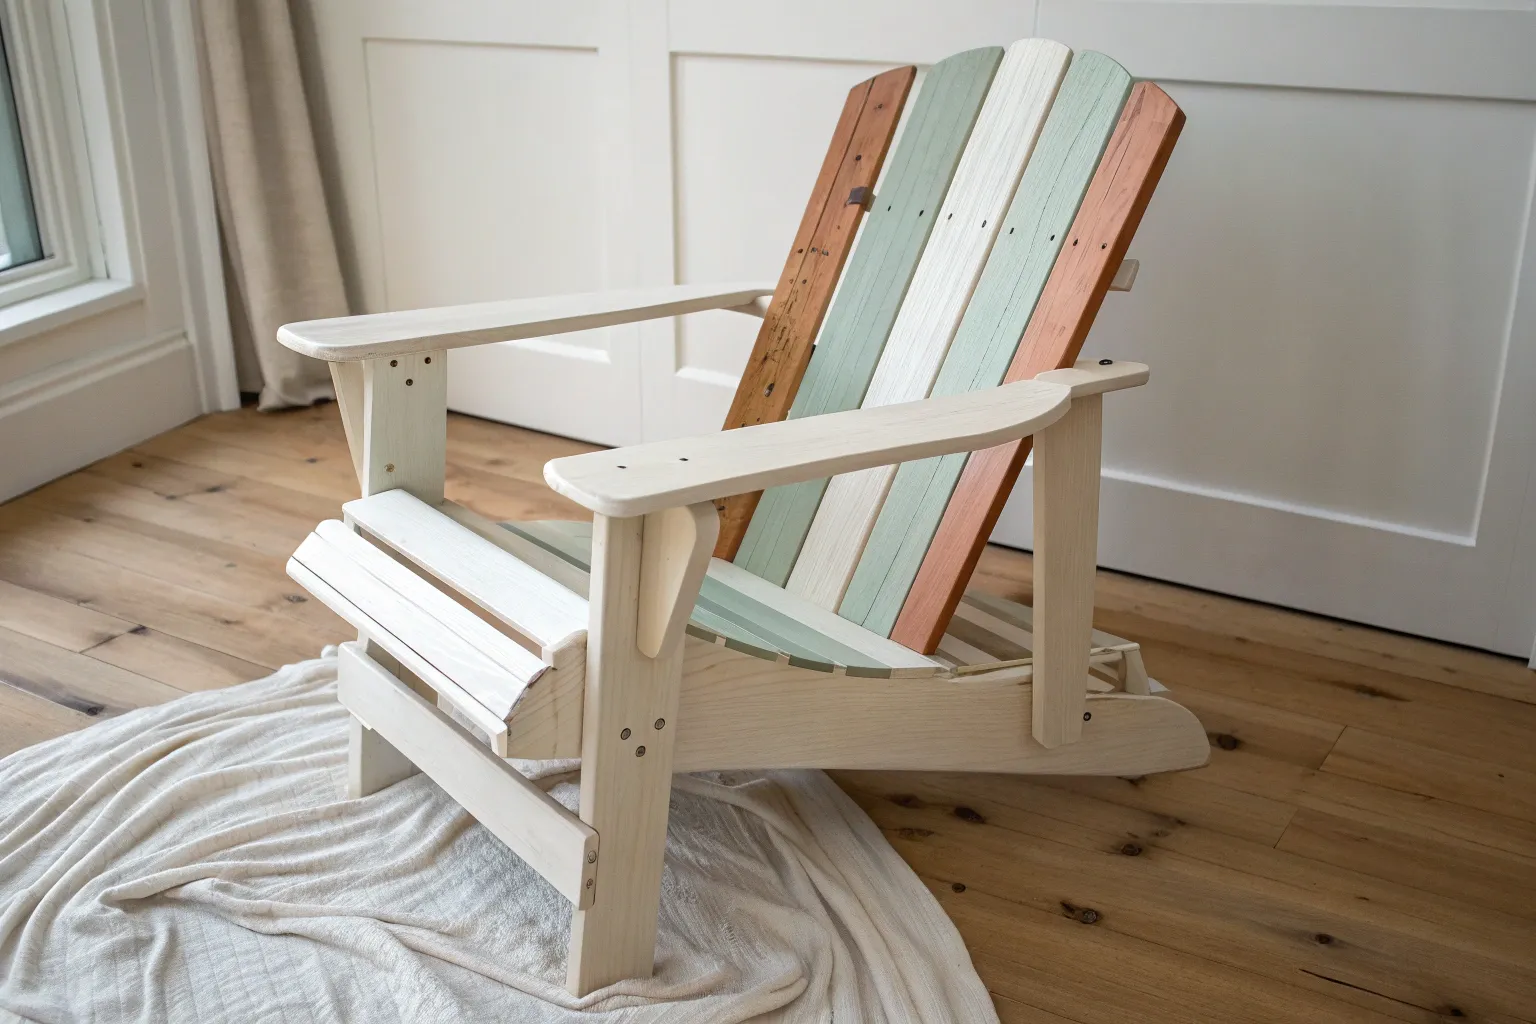
A plain Adirondack chair is basically a giant, lovable canvas just waiting for color. Here are my favorite painted Adirondack chairs ideas—starting with the classics and drifting into the more artsy, “how did you do that?” territory.
Classic Solid-Color Refresh
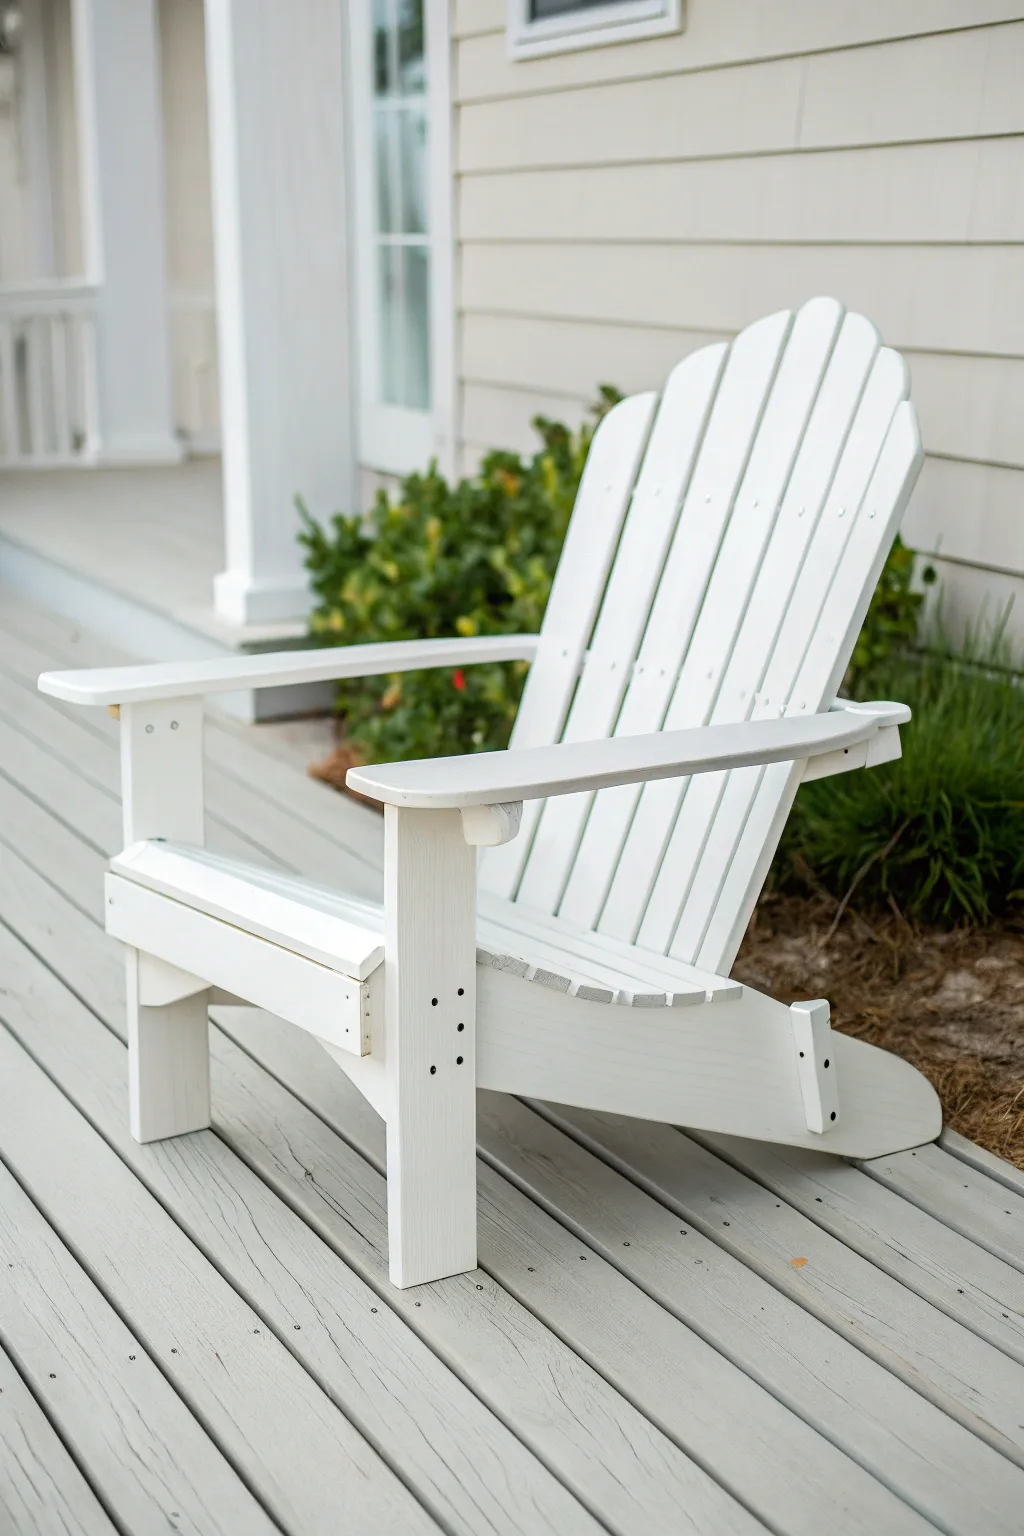
Transform a weathered or unfinished Adirondack chair into a beacon of summer relaxation with this clean, solid-white finish. This project revitalizes classic outdoor furniture with a durable, weather-assistant coating that looks right at home on any porch or deck.
Step-by-Step Guide
Materials
- Unfinished or old Adirondack chair
- Exterior-grade wood primer (white)
- High-quality exterior latex or enamel paint (Bright White)
- Course sandpaper (80-grit)
- Medium sandpaper (120-grit)
- Fine sandpaper (220-grit)
- Tack cloths
- Wood filler (exterior grade)
- Putty knife
- 2-inch angled sash brush
- 4-inch foam roller and tray
- Drop cloth
- Painter’s tape (optional for hardware)
- Mild detergent and scrub brush
Step 1: Preparation & Repairs
-
Clean the surface:
Start by thoroughly washing your chair with mild detergent and a stiff scrub brush to remove dirt, mildew, or algae. Rinse it completely and let the wood dry for at least 24 hours before moving on. -
Inspect and fill:
Check the chair for any deep gouges, cracks, or recessed screw holes that need attention. Use a flexible exterior wood filler to patch these imperfections, overfilling slightly to account for shrinkage. -
Initial sanding:
Once the filler is dry, begin sanding the entire chair with 80-grit sandpaper to remove any old, peeling finish or rough wood fibers. This aggressive sand helps level out the patches you just made. -
Smooth the surface:
Switch to 120-grit sandpaper and go over the whole chair again. This step is crucial for smoothing out the scratches left by the coarse paper and prepares the wood grain for a uniform finish. -
Remove dust:
Use a vacuum with a brush attachment to pull dust out of the slats and crevice. Follow up by wiping everything down with a tack cloth to ensure the surface is perfectly clean.
Paint Pyramids
Prop the chair legs up on painter’s pyramids or scrap wood blocks. This lets you paint the very bottom of the legs without the brush picking up dirt from the ground.
Step 2: Priming the Wood
-
Protect your workspace:
Lay down a drop cloth underneath the chair. If you can’t remove the hardware, apply painter’s tape carefully over any metal bolts or screws you want to keep unpainted. -
Cut in the corners:
Open your exterior primer. Using the 2-inch angled brush, dab primer into the tight corners, between the back slats, and around the armrest supports where a roller won’t reach. -
Roll the flat surfaces:
I prefer using a small 4-inch foam roller for the broad areas like the seat slats, backrest front, and wide armrests. It applies the primer smoothly without leaving heavy brush marks. -
Let it cure:
Allow the primer to dry completely according to the manufacturer’s instructions. Exterior primers can be thick, so give it plenty of time to bond. -
Sand the primer:
Once dry, lightly scuff the primed surface with 220-grit sandpaper. This knocks down any raised wood grain or dust nibs, leaving a buttery smooth base for your topcoat.
Nautical Stripe Add-on
For a beachy twist, tape off a single vertical stripe down the center of the backrest slats and paint it navy blue or soft gray after the white base is fully dry.
Step 3: Painting & Finishing
-
First coat application:
Stir your bright white exterior paint thoroughly. Just like with the primer, start by brushing the paint into the nooks, crannies, and edges before moving to flat surfaces. -
Roll the main areas:
Use a fresh foam roller to apply paint to the seat, back, and arms. Apply thin, even coats rather than one thick one to prevent drips and sagging. -
Check for drips:
While the paint is still wet, inspect the undersides of the slats and armrests. Use your brush to catch and smooth out any drips that may be gathering. -
Dry and recoat:
Let the first coat dry for the recommended time (usually 4-6 hours). If the surface feels rough, a very light pass with fine sandpaper can help, but wipe away the dust afterward. -
Apply final coat:
Apply a second full coat of paint, ensuring solid white coverage over any areas that look thin. This second layer provides the real weather protection. -
Final cure:
Leave the chair to cure undisturbed for at least 24 to 48 hours before sitting on it or placing cushions. This hardening period prevents the paint from feeling tacky.
Now your professionally finished chair is ready to serve as the perfect spot for morning coffee or sunset watching

Two-Tone Frame and Slats
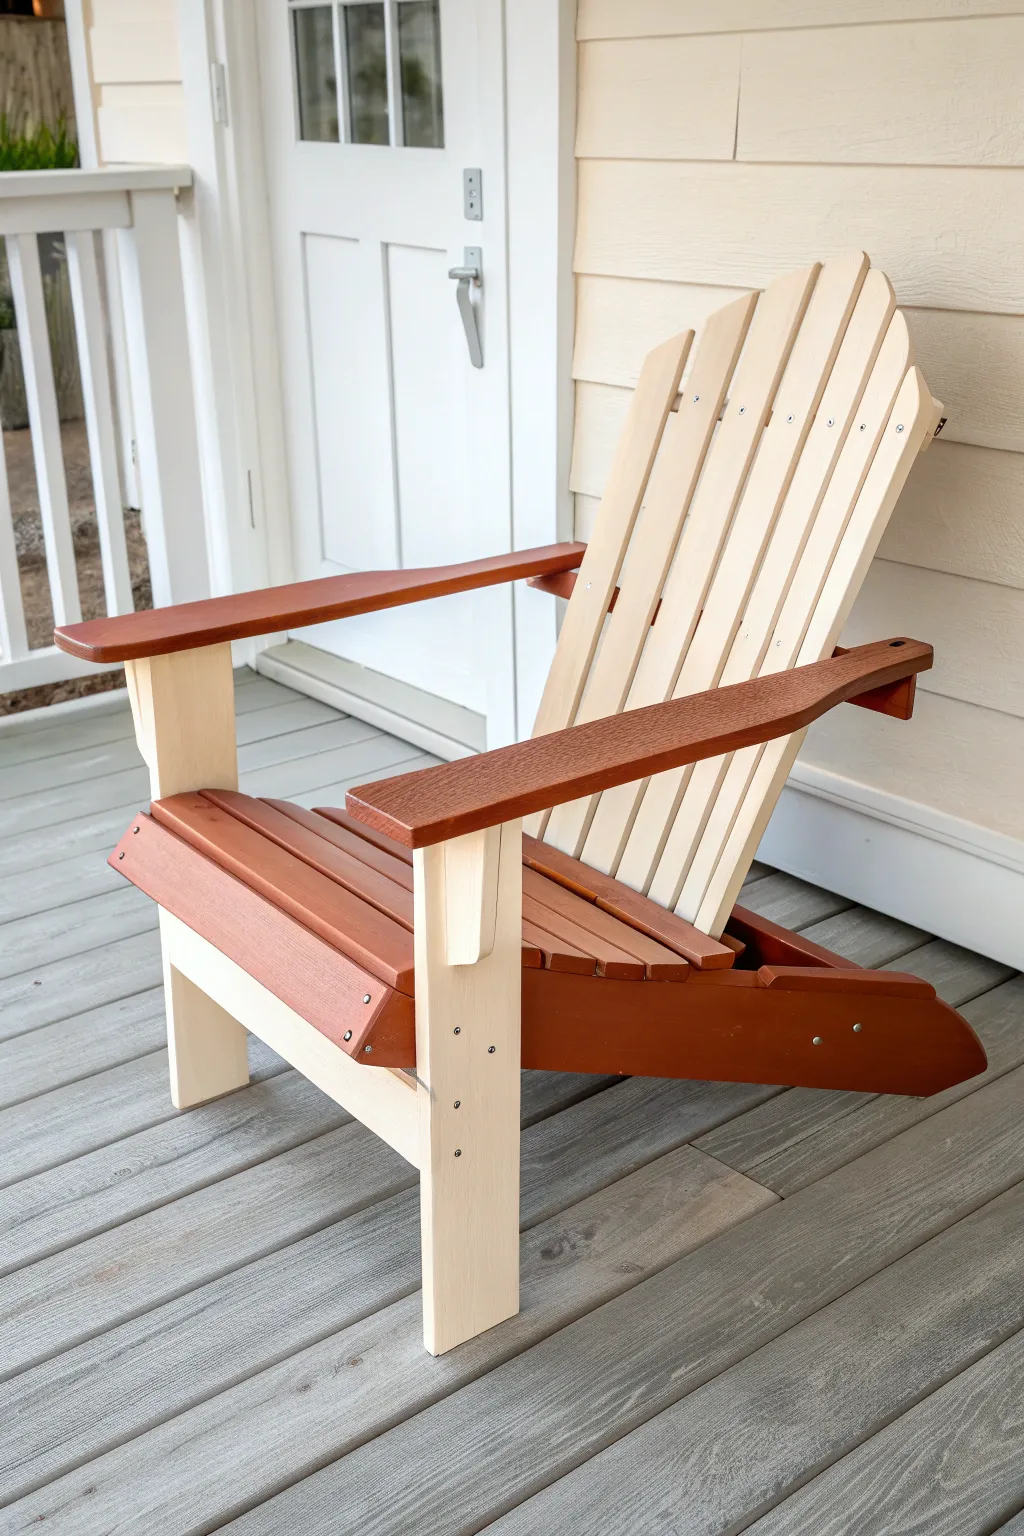
Give your classic Adirondack chair a modern refresh by pairing creamy beige uprights with rich, terracotta-toned accents. This two-tone approach highlights the architectural lines of the chair while keeping the overall look warm and inviting.
How-To Guide
Materials
- Unfinished wooden Adirondack chair
- Medium-grit sandpaper (120-grit)
- Fine-grit sandpaper (220-grit)
- Clean tack cloths
- Exterior wood primer (oil-based recommended for durability)
- Exterior latex or acrylic paint (Creamy Beige color)
- Exterior semi-transparent stain or paint (Reddish-Brown/Terracotta color)
- Small angled sash brush (1.5 inch)
- Flat paint brush (2-3 inch)
- Painter’s tape (high adhesion for wood)
- Drop cloth
- Screwdriver or chill driver (if disassembling)
Step 1: Preparation First
-
Assess the Surface:
Begin by inspecting your wooden chair for any rough spots, splinters, or previous finishes. If it’s a new unfinished kit, you are ahead of the game. -
Initial Sanding:
Sand the entire chair with 120-grit paper to open up the wood grain and smooth out rough edges. Follow the direction of the wood grain to avoid scratches. -
Finish Polish:
Go over the surfaces one more time with 220-grit sandpaper for an ultra-smooth finish that will accept paint readily. -
Clean Up:
Wipe down every nook and cranny with a tack cloth to remove all sawdust. Dust is the enemy of a smooth paint job. -
Strategic Disassembly:
If possible, I prefer to disassemble the backrest and arms from the base frame. Painting the slats and arms separately makes achieving crisp lines much easier than taping everything off later.
Sticky Situation
Place the chair legs on small blocks of scrap wood or painter’s pyramids while working. This prevents the bottoms of the legs from sticking to your drop cloth as they dry.
Step 2: Painting the Lighter Elements
-
Prime the Frame:
Apply a coat of exterior wood primer to the backrest slats, the front legs, and the main vertical supports. These are the parts that will be the creamy beige. -
Sand the Primer:
Once the primer is fully dry, give it a very light scuff with the fine-grit sandpaper to knock down any raised grain, then wipe clean. -
First Coat of Cream:
Using your flat brush, apply the first coat of creamy beige paint to the primed areas. Use long, smooth strokes along the length of the slats. -
Second Coat:
Allow the first coat to dry completely according to the can’s instructions, then apply a second coat for full, opaque coverage.
Color Harmony
Match the darker tone to your deck’s floorboards or your house’s front door color. This ties the furniture into the architecture for a custom-designed look.
Step 3: Applying the Contrast Tone
-
Prep the Darker Parts:
Identify the seat slats, armrests, and lower side rails. If you are using a semi-transparent stain, ensure these parts are raw wood; if using paint, prime them now. -
Stain or Paint Application:
Apply your reddish-brown finish to these specific sections. If using stain, brush it on and wipe off excess with a rag after a few minutes to control the depth of color. -
Detailing the Arms:
Pay special attention to the armrests, as these are high-touch areas. Ensure the finish is smooth and even, coating the underside of the overhang as well. -
Drying Time:
Let these darker contrasting pieces dry thoroughly. Stain often takes longer to cure than latex paint, so patience is key here.
Step 4: Assembly and Touch-ups
-
Reassembly:
Once all parts are dry to the touch and cured, carefully reassemble the chair. Hand-tighten screws initially to avoid stripping the wood or cracking the new finish. -
Taping Off (If Assembled):
If you didn’t disassemble the chair, use high-quality painter’s tape to mask off the dry beige sections where they meet the seat slats before painting the dark tone. -
Inspect Junctions:
Check the joints where the beige frame meets the dark rails. Use a small artist’s brush to touch up any spots where the colors might have missed or overlapped. -
Sealing (Optional):
For extra longevity, especially if the chair will be fully exposed to rain, apply a clear outdoor polyurethane topcoat over the entire piece.
Now you have a stunning, custom-finished chair ready for seasons of relaxation

Coastal Stripes on the Back Slats
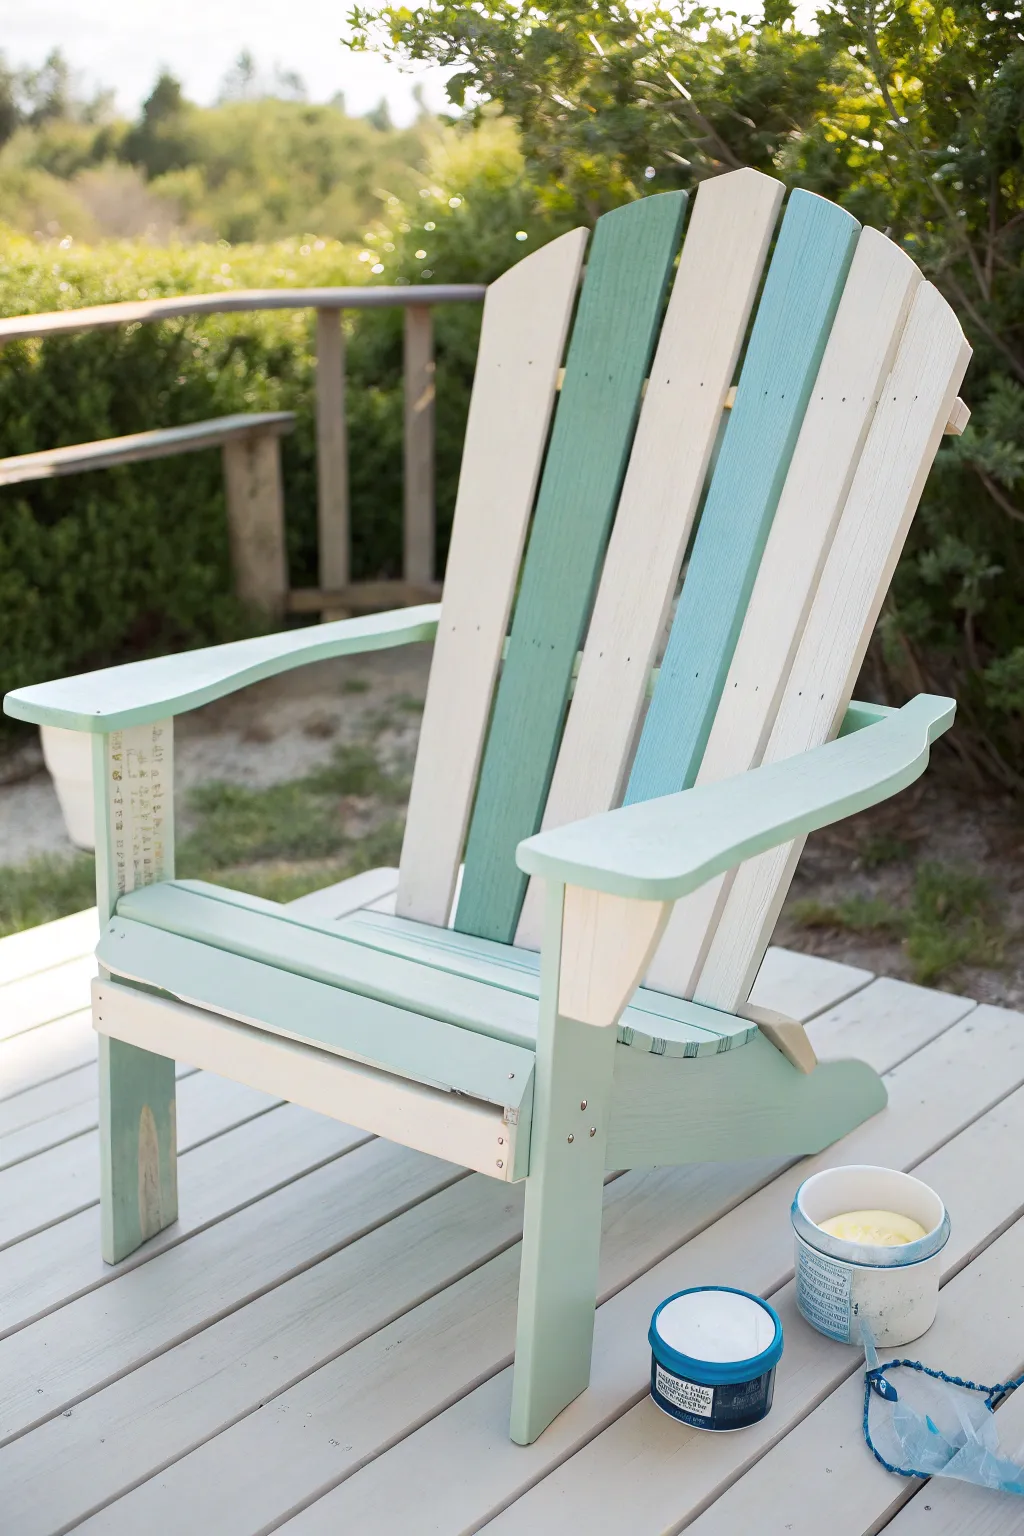
Bring the breezy charm of the coast to your backyard with this refreshing Adirondack chair update. By alternating soft creams with muted teal and seafoam stripes on the back slats, you create a sophisticated yet relaxed look perfect for summer lounging.
Step-by-Step Tutorial
Materials
- Unfinished or sanded Adirondack chair
- Medium-grit sandpaper (120-150 grit)
- Painter’s tape
- Exterior primer
- Exterior semi-gloss paint (Cream/Off-White)
- Exterior semi-gloss paint (Seafoam Green)
- Exterior semi-gloss paint (Muted Teal/Blue)
- Exterior semi-gloss paint (Pale Sage Green)
- 2-inch angled paintbrush
- Small foam roller
- Drop cloth
- Clean rag
Step 1: Preparation and Priming
-
Clean the surface:
Begin by wiping down the entire chair with a damp rag to remove any dust, dirt, or cobwebs. If the chair is older, you might need a mild detergent solution to cut through any grime. -
Sand for adhesion:
Lightly scuff the entire wood surface using medium-grit sandpaper. You aren’t trying to remove all previous finishes necessarily, just creating a ‘tooth’ for the new paint to grip. -
Wipe away dust:
After sanding, it’s crucial to remove all the sawdust. Use a tack cloth or a slightly damp rag to ensure the surface is perfectly clean before painting. -
Apply primer:
Coat the entire chair with a layer of quality exterior primer. This step ensures your coastal colors pop and provides weather resistance. Let the primer cure completely according to the can’s instructions.
Step 2: Painting the Base and Solids
-
Paint the cream slats:
Identify the back slats that will remain cream-colored (the alternating ones). Paint these slats, covering both the front and sides thoroughly. I like to do two thin coats rather than one thick one for durability. -
Paint the legs and seat frame:
Using the pale sage green paint, coat the front vertical legs. This color acts as a grounding shade for the lower section of the chair. -
Coat the armrests:
Continue using the pale sage green on the armrests and the support brackets underneath them. Use long, smooth strokes along the grain to minimize brush marks on these highly visible surfaces. -
Paint the front seat edge:
Apply the same pale sage green to the front-most slat of the seat and the apron piece directly below it to tie the lower structure together. -
Let the solids dry:
Allow these sections to dry completely. If you paint adjacent areas too soon, you risk smudging the colors.
Pro Tip: Smooth Finish
Between coats of colored paint, lightly sand with fine 220-grit sandpaper. This knocks down raised grain and brush strokes, giving the chair a professional, furniture-grade feel.
Step 3: Creating the Coastal Stripes
-
Tape off adjacent areas:
Once the cream slats are fully dry, carefully apply painter’s tape along their edges to protect them while you paint the colorful stripes next door. -
Apply the seafoam green:
Select specific back slats for the lighter seafoam green shade. Paint these slats carefully, using an angled brush to get into the crevices between the wood pieces without bleeding onto the seat. -
Apply the teal blue:
Paint the remaining unpainted back slats with the darker muted teal or turquoise color. This creates that lovely alternating rhythm of cream, green, and blue. -
Paint the seat slats:
For the seat area (excluding the front pale green slat), apply a unifying coat of the pale sage green or, for more contrast, continue the alternating stripe pattern from the back down onto the seat. -
Double check coverage:
Inspect the sides of each slat. It’s easy to miss the edges where the wood is thickest. Dab paint into these areas to ensure the wood is sealed against moisture. -
Remove tape:
Carefully peel away the painter’s tape while the paint is still slightly tacky—this helps prevent the dried paint film from ripping. -
Touch up edges:
Use a small artist’s brush to fix any little bleeds or spots where the paint lines aren’t crisp. -
Seal (Optional):
For extra longevity, especially near the ocean, you can apply a clear exterior polyurethane topcoat over the entire project once the paint has cured for at least 24 hours.
Level Up: Distressed Look
Once dry, lightly sand the edges of the armrests and slat corners to reveal a bit of the wood or primer underneath. This adds an authentic weathered, beach-cottage vibe to the piece.
Place your newly painted chair on the deck and enjoy the beautifully coordinated coastal vibe you have created


Bright Primary Pop Pairing

Transform unfinished wooden Adirondack chairs into a vibrant summer statement with this glossy, primary-color pairing. The bold cobalt blue and classic fire engine red create a striking contrast against green grass and water, making them the perfect cheerful accent for any outdoor seating area.
Detailed Instructions
Materials
- Unfinished wooden Adirondack chairs (2)
- Small wooden side table (unfinished)
- Exterior wood primer (white or gray)
- High-gloss exterior latex paint (Cobalt Blue)
- High-gloss exterior latex paint (Fire Engine Red)
- Clear exterior spar urethane (satin finish for table)
- Medium-grit sandpaper (120-grit)
- Fine-grit sandpaper (220-grit)
- Tack cloths
- 2-inch synthetic angled sash brush
- 4-inch foam roller and tray
- Drop cloths or plastic sheeting
- Painter’s tape (optional)
- Wood filler (if needed for repairs)
- Stir sticks
Step 1: Preparation & Priming
-
Surface Inspection:
Begin by inspecting your unfinished chairs and table for any rough patches, splinters, or knots. If you find any holes or deep gouges, fill them with a dab of wood filler and let it dry completely according to package instructions. -
Initial Sanding:
Sand all surfaces of the chairs and the table with 120-grit medium sandpaper. You want to smooth out the grain and ensure the wood pores are open to accept the primer. Always sand in the direction of the wood grain to avoid scratches. -
Dust Removal:
Wipe down every slat, armrest, and leg with a tack cloth. It is crucial to remove all the sawdust so your paint finish will be smooth. -
Priming the Chairs:
Apply a coat of exterior wood primer to both chairs. I prefer to use a brush for the slats and crevices first, ensuring full coverage in the hard-to-reach spots, before coating larger flat areas. -
Drying and Sanding:
Allow the primer to dry fully, usually about 2-4 hours depending on humidity. Once dry, lightly scuff the primed surface with 220-grit fine sandpaper to knock down any raised grain. -
Second Dusting:
Run a clean tack cloth over the primed chairs again to remove the fine white dust generated by sanding.
Paint Drips?
Work in the shade. Direct sun dries paint too fast, causing lap marks. If you spot a dried drip, slice it off carefully with a razor blade, lightly sand the spot, and touch it up.
Step 2: Painting the Blue Chair
-
First Blue Coat:
Stir your High-gloss Cobalt Blue paint thoroughly. Dip your 2-inch angled brush into the paint and begin coating the underside and slats of the first chair. Use long, even strokes. -
Rolling Flat Surfaces:
For the broad back slats and the wide armrests, switch to the 4-inch foam roller. This helps eliminate brush marks and gives that smooth, factory-like finish seen in the photo. -
Drying Time:
Let the first coat dry for at least 4-6 hours. Don’t rush this step; tacky paint will ruin your finish if you recoat too soon. -
Second Blue Coat:
Apply a second coat of blue, repeating the brush-then-roll method. Two coats usually provide that deep, saturated color, but inspect it once dry to see if a third light coat is needed for depth.
Level Up
Add a coat of clear UV-resistant polyurethane over the painted chairs for extra gloss and protection against fading.
Step 3: Painting the Red Chair
-
Switching Colors:
While the blue chair dries, clean your tools or use a fresh set for the red paint to avoid color contamination. Stir the Fire Engine Red gloss paint well. -
Applying Red Paint:
Follow the same method as the blue chair: use the angled brush for the vertical slats and gaps between boards, then smooth out the seat, back, and arms with the roller. Red pigment can be tricky, so ensure you aren’t spreading it too thin. -
Final Red Coat:
Once the first coat is perfectly dry, apply your second coat of red. Watch for drips along the edges of the armrests and underneath the seat slats, smoothing them out immediately.
Step 4: Finishing the Table
-
Natural Finish Prep:
For the small side table, the goal is a natural wood look to balance the bright colors. Ensure it is sanded very smooth with the 220-grit paper. -
Sealing the Table:
Apply a coat of clear exterior spar urethane using a clean high-quality brush. Brushing inside the small structure can be fiddly, so work from the inside out. -
Final Cure:
Allow all three pieces—the blue chair, the red chair, and the natural table—to cure for at least 24-48 hours before placing them outdoors or sitting on them to ensure the finish has hardened.
Once fully cured, these vibrant chairs will be ready to withstand the elements and brightness to your waterfront view
BRUSH GUIDE
The Right Brush for Every Stroke
From clean lines to bold texture — master brush choice, stroke control, and essential techniques.
Explore the Full Guide
Soft Pastel Cottage Look
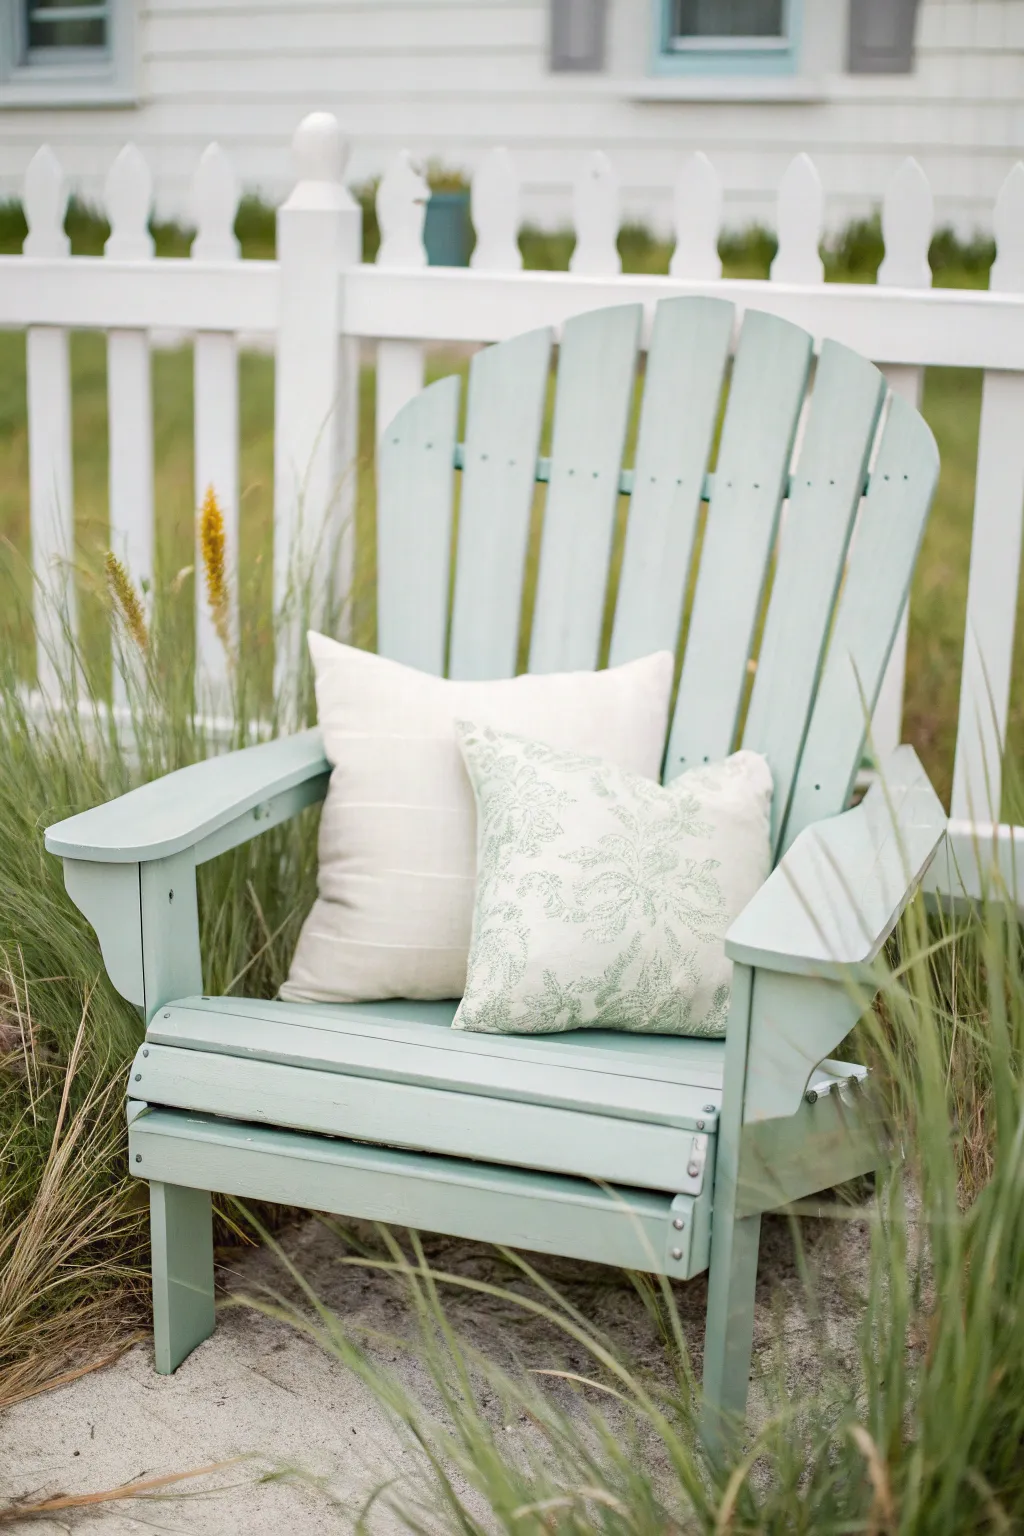
Capture the breezy essence of a seaside cottage with this soft pastel Adirondack chair makeover. This project transforms raw wood or a worn-out chair into a serene, beachy focal point using a muted seafoam green paint and comfortable styling accessories.
How-To Guide
Materials
- Unfinished or old wooden Adirondack chair
- Medium-grit sandpaper (120-150 grit)
- Fine-grit sandpaper (220 grit)
- Tack cloth or clean rags
- Exterior wood primer
- Exterior latex or acrylic paint (Soft Seafoam/Pastel Teal semi-gloss finish)
- Synthetic bristle paintbrush (2-inch)
- Small angled sash brush (1.5-inch for crevices)
- Drop cloth
- Stir stick
Step 1: Preparation & Priming
-
Assess and clean the surface:
Begin by thoroughly cleaning your chair to remove any dirt, mildew, or old flaking paint. If you are working with a previously painted chair, scrape off any loose chips. For raw wood, simply wipe it down to ensure it is dust-free. -
Initial sanding:
Using medium-grit sandpaper, go over the entire chair. If it’s old paint, you want to scuff the surface to help adhesion; if it’s raw wood, smooth out any rough patches or splinters. -
Smooth the finish:
Switch to fine-grit sandpaper for a second pass. This extra step ensures a professional, furniture-grade feel. Pay special attention to the armrests where people’s hands will rest. -
Remove dust:
Wipe away all sanding residue using a tack cloth. It is critical to get every bit of dust out of the slats so your primer goes on smoothly. -
Apply primer:
Brush on a coat of high-quality exterior wood primer. Start from the underside and work your way up to the visible surfaces. This seals the wood and prevents tannins from bleeding through your beautiful pastel color. -
Let primer cure:
Allow the primer to dry completely according to the manufacturer’s instructions, usually about 2-4 hours.
Sticky Situation
If painted surfaces feel tacky even after drying (blocking), dust a tiny bit of talcum powder on contact points before stacking or folding furniture.
Step 2: Painting the Pastel Finish
-
First coat application:
Stir your soft seafoam paint thoroughly. Begin applying the first coat using the synthetic bristle brush. I find it easiest to paint the slats of the backrest first, then move to the seat, and finish with the arms and legs. -
Focus on the gaps:
Use the smaller angled sash brush to get inside the narrow gaps between the slats. Don’t overload the brush here, as drips can easily form in these crevices. -
Check for drips:
While the paint is wet, inspect the underside of the slats and the edges of the armrests for any running paint and smooth it out immediately. -
Dry time:
Let the first coat dry for at least 4-6 hours. If the grain raised slightly, you can do a very light sanding with high-grit paper, but wipe it clean again if you do. -
Second coat coverage:
Apply a second coat of paint. This layer builds the true color depth and provides the durability needed for outdoor furniture. Use long, even strokes to minimize brush marks. -
Final inspection:
Look over the chair for any missed spots, particularly under the front edge of the seat or the back legs. -
Extended curing:
Allow the chair to cure for at least 24 hours before use. Exterior paint needs time to harden properly against the elements.
Step 3: Styling the Look
-
Select your textiles:
To achieve the look in the photo, choose two pillows. One should be a solid cream or oatmeal color with a subtle texture. -
Add a pattern:
Layer a second, slightly smaller pillow with a delicate botanical or floral print in a matching sage or seafoam green tone. -
Placement:
Arrange the solid pillow in the back and the patterned one in front for a cozy, layered cottage aesthetic.
Distressed Charm
For a vintage vibe, lightly sand the edges of the arms and seat slats after the final coat dries to reveal a peek of the wood underneath.
Now you have a refreshing spot to relax that perfectly captures the gentle colors of the coast
Ombre Fade From Seat to Back
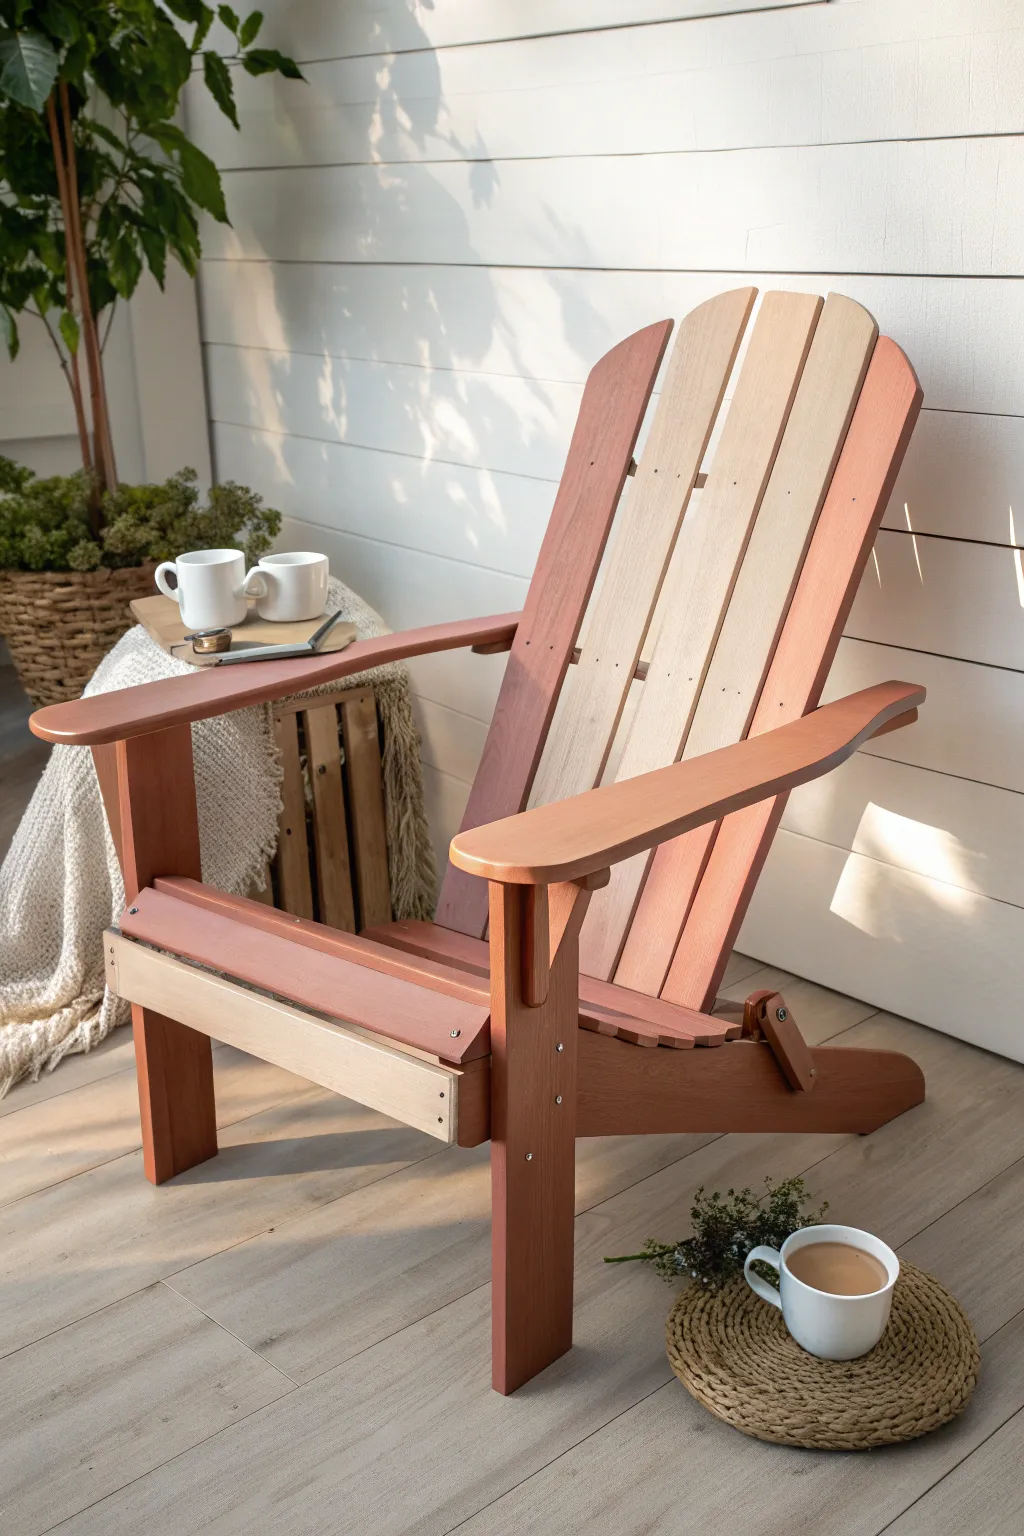
Transform a standard wooden Adirondack chair into a modern statement piece with this elegant block-color design. By pairing deep, warm terracotta tones with soft cream accents on specific slats, you create a sophisticated look that feels both grounded and airy.
How-To Guide
Materials
- Unfinished wooden Adirondack chair
- Sandpaper (120 and 220 grit)
- Tack cloth
- Exterior wood primer
- Exterior latex or acrylic paint: Terracotta/Rust
- Exterior latex or acrylic paint: Cream or Natural Wood opacity
- Painter’s tape (1.5 inch width)
- 2 inch angled sash brush
- Small foam roller (optional for flat areas)
- Clear matte exterior polyurethane sealer
- Drop cloth
Step 1: Preparation & Mapping
-
Disassemble if necessary:
If your chair is brand new and assembly is required, paint the pieces *before* putting it together for the cleanest lines. If it’s already built, check all screws and tighten them. -
Sand the surface:
Give the entire chair a thorough sanding with 120-grit paper to remove any rough spots or old finish. Follow up with 220-grit for a smooth touch. -
Clean dust:
Wipe every nook and cranny with a tack cloth. Any leftover sawdust will ruin your crisp paint lines. -
Plan your color zones:
Identify which parts will be the accent color. In this design, the three central back slats and the front-most apron board under the seat are cream; everything else is terracotta. -
Prime the wood:
Apply a coat of high-quality exterior wood primer over the entire chair. This ensures your colors will be true and durable against the elements.
Clean Lines Secret
Use a credit card or putty knife to firmly burnish the edge of your painter’s tape. This prevents paint bleed on rough wood grain.
Step 2: Painting the Light Accents
-
Start with cream:
It is generally easier to paint the lighter colors first. Apply the cream paint to the three central back slats and the front apron piece. -
Coat and dry:
Apply two to three thin coats of cream, allowing the manufacturer’s recommended drying time between each. I prefer nice thin layers to avoid drips. -
Tape off the accents:
Once the cream paint is fully cured (give it at least 24 hours just to be safe), carefully apply painter’s tape to the edges where the cream meets the areas destined for the dark color. -
Seal the tape edge:
Press the tape down firmly. You can even lightly brush a tiny bit of cream paint over the tape edge to lock it and prevent the dark paint from bleeding under.
Folding Mechanism
If your chair folds (like the one in the photo), verify the moving parts aren’t gummed up with paint. Wax the pivot points after drying.
Step 3: Applying the Terracotta
-
Paint the main body:
Using your sash brush or a small foam roller, apply the terracotta paint to the arms, legs, seat slats, and the outer back slats. -
Methodical coverage:
Work in sections—do the underside and legs first, then flip the chair (on a drop cloth) to do the top surfaces. -
Get between the slats:
Use the tip of your angled brush to carefully paint the sides of the slats. This is tedious, but essential for a professional finish. -
Second coat:
Apply a second coat of terracotta to ensure deep, opaque coverage. Watch for drips along the edges of the armrests. -
Remove tape:
While the final coat of terracotta is still slightly tacky (not soaking wet, but not fully dry), carefully peel back the painter’s tape at a 45-degree angle to reveal crisp lines.
Step 4: Finishing Touches
-
Touch ups:
Inspect your lines. If any terracotta bled onto the cream, use a tiny artist’s brush to correct it once the paint is bone dry. -
Apply sealer:
To protect your hard work from sun and rain, apply two coats of clear matte exterior polyurethane over the entire chair. -
Final cure:
Let the chair sit in a dry, dust-free area for several days to let the finish fully cure before placing it outside.
Now you have a custom piece of patio furniture ready for morning coffee or evening relaxation

PENCIL GUIDE
Understanding Pencil Grades from H to B
From first sketch to finished drawing — learn pencil grades, line control, and shading techniques.
Explore the Full Guide
Sunset Gradient Backrest
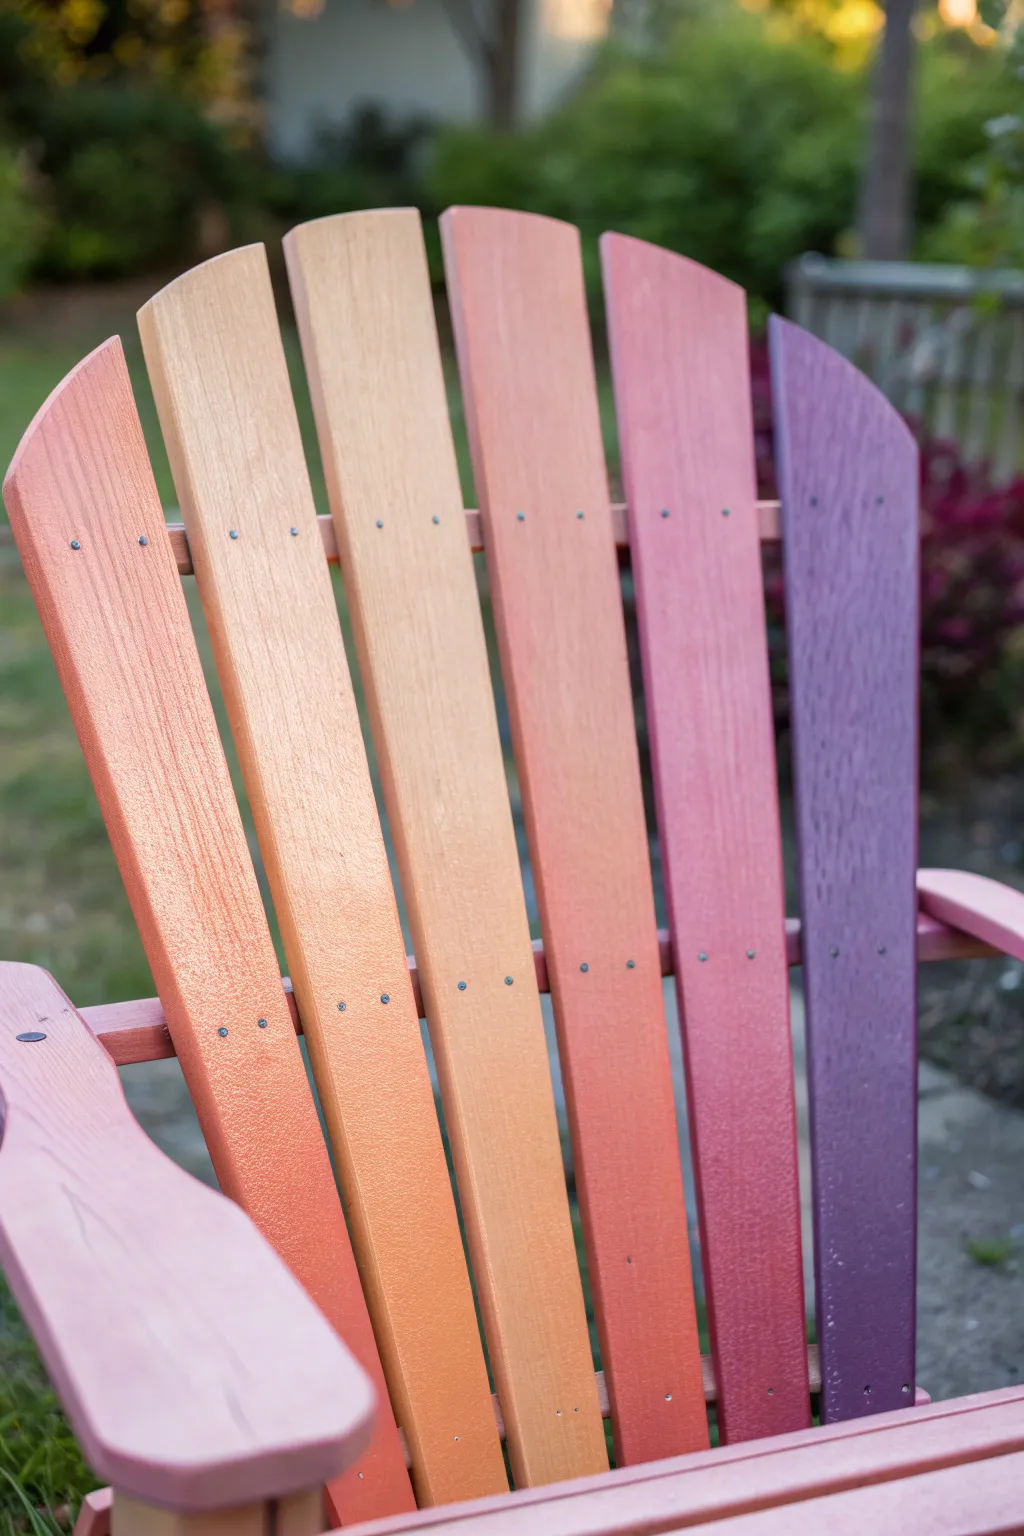
Transform a standard wooden Adirondack chair into a stunning piece of functional art featuring a warm sunset gradient. By painting each slat of the backrest a distinct shade ranging from coral to purple, you create a seamless transition of color perfect for relaxing evenings outdoors.
Detailed Instructions
Materials
- Unfinished wooden Adirondack chair
- Sandpaper (120 and 220 grit)
- Clean cloth or tack cloth
- Exterior primer (white or gray)
- Exterior latex or acrylic paint in 5 shades: soft coral, light peach, warm orange, deep rose, and violet
- 2-inch synthetic bristle brush
- 1-inch angle sash brush
- Painter’s tape
- Clear exterior polyacrylic sealer (satin or semi-gloss)
- Drop cloth
- Stir sticks
- Small paint trays
Step 1: Preparation
-
Sand the surface:
Begin by sanding the entire chair with 120-grit sandpaper to remove any rough patches or splinters. Follow up with 220-grit sandpaper for a smooth finish that feels great to the touch. -
Clean the wood:
Wipe down every slat, armrest, and leg with a damp cloth or tack cloth to remove all sawdust. A clean surface is crucial for paint adhesion. -
Prime the chair:
Apply a coat of high-quality exterior primer to the entire chair. This ensures your colors will pop and protects the wood from underlying tannins bleeding through. -
Let the primer cure:
Allow the primer to dry completely according to the manufacturer’s instructions before moving on to the color coats.
Sticky Situation?
If slats are sticking together due to paint drips, slide a piece of waxed paper between them while they dry to keep them separated and clean.
Step 2: Painting the Base
-
Select a base color:
Choose one of your lighter gradient colors, like the soft coral or a neutral tone, to paint the frame, legs, seat, and armrests of the chair. This anchors the design without distracting from the backrest. -
Paint the frame:
Using a 2-inch brush, apply two coats of your chosen base color to everything except the back vertical slats. Let the first coat dry fully before applying the second.
Step 3: Creating the Gradient
-
Plan the color order:
Arrange your paint pots in the order of the gradient shown in the photo: soft coral (left), light peach, warm orange/tan, deep rose, and finally violet (right). Visualizing this beforehand saves frustration later. -
Tape off edges:
Use painter’s tape at the base of the slats where they meet the horizontal support to ensure crisp lines between the slats and the chair frame. -
Paint the first slat:
Start on the far left with your soft coral shade. Use the 1-inch angle brush to carefully paint the front, sides, and edges of the first vertical slat. -
Move to the second slat:
Dip a clean brush into the light peach paint for the second slat. I find it helpful to keep a separate brush for each color to avoid muddiness, though washing thoroughly between colors works too. -
Apply the middle tones:
Paint the central slats with your warm orange and tan shades. Be careful not to let the brush touch the neighboring wet slats; you want distinct blocks of color, not a blend. -
Paint the deep tones:
Proceed to the next slat with the deep rose color, ensuring full coverage on the sides of the wood. -
Finish with violet:
Paint the final slat on the far right with the violet shade to complete the sunset spectrum. -
Check for drips:
While the paint is still wet, quickly scan for any drips along the edges or back of the slats and smooth them out lightly with your brush. -
Apply a second coat:
Once the first layer is dry to the touch, apply a second coat to each slat in the same order. This deepens the color saturation and ensures durability against the elements.
Level Up: Ombré Effect
Instead of solid colors, use a dry brush to slightly blend the edges where the slats meet visually, creating a softer, more continuous sunset fade.
Step 4: Sealing and Finishing
-
Remove the tape:
Carefully peel away the painter’s tape while the final coat is still slightly tacky to prevent peeling up any dry paint chips. -
Inspect and touch up:
Look closely at the crevices between slats. Use a small artist’s brush to touch up any spots where the primer might still be peeking through. -
Apply clear sealer:
Using a clean 2-inch brush, apply a coat of clear exterior polyacrylic over the entire chair. This protects your hard work from UV rays and moisture. -
Final cure:
Let the chair cure for at least 24 to 48 hours in a dry, dust-free area before moving it to its permanent spot in your garden.
Enjoy the warmth and vibrancy this custom chair brings to your patio space every time you sit down
Simple Stencil Pattern Panels
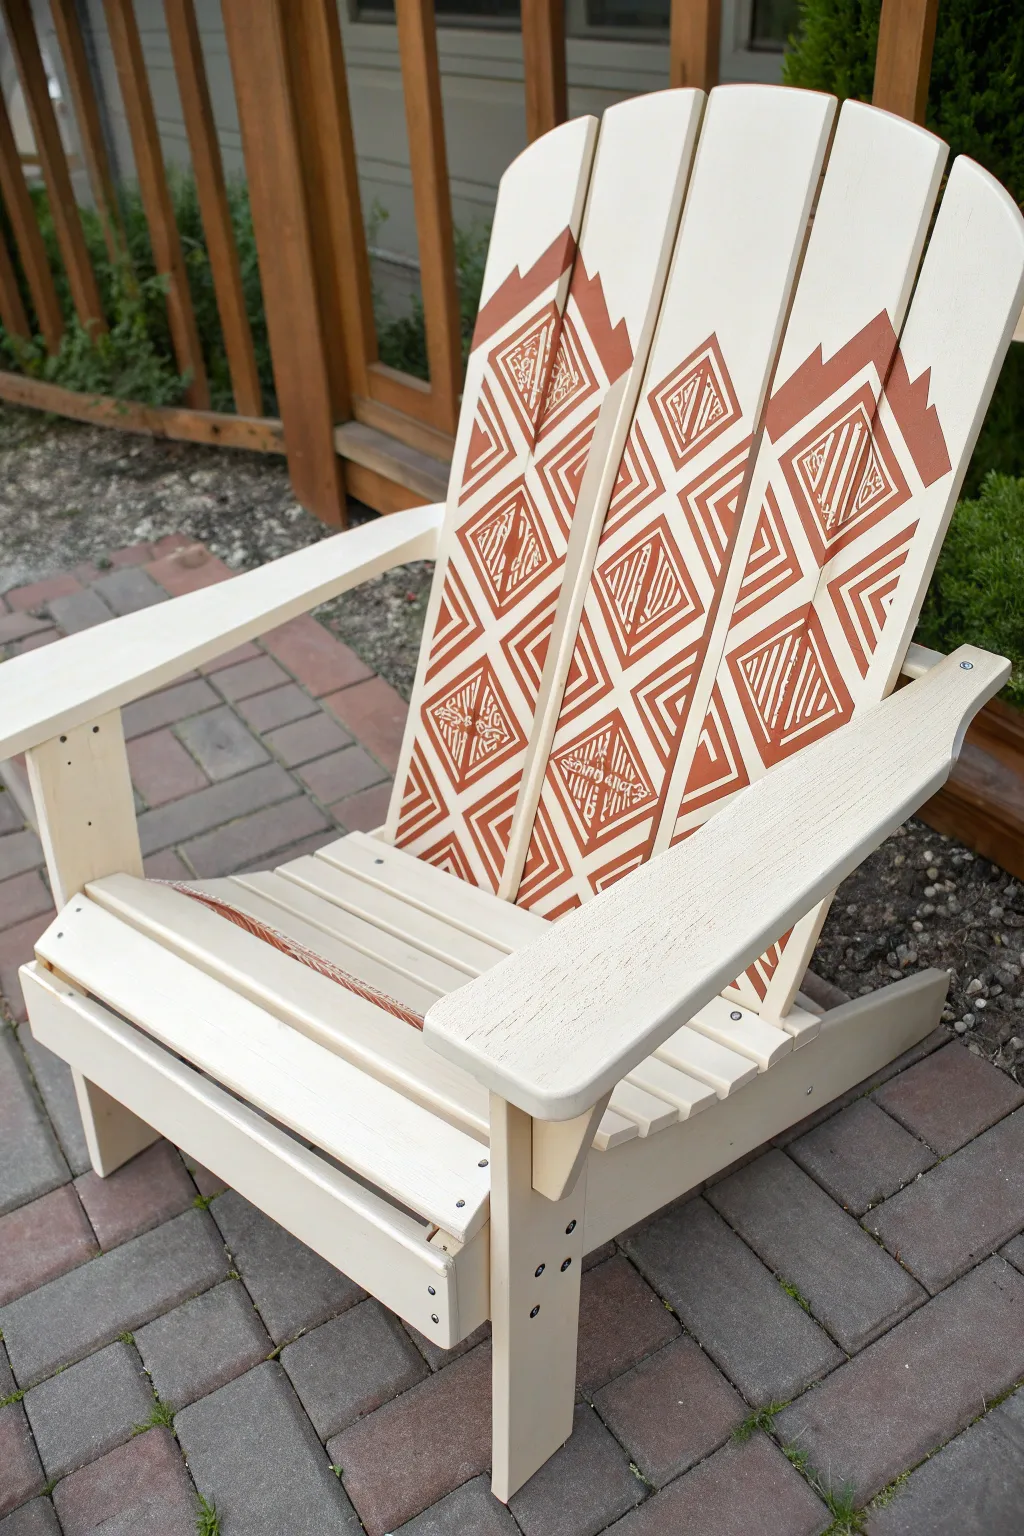
Transform a plain Adirondack chair into a piece of modern art with this geometric mountain-inspired design. The contrast of warm terra cotta against a creamy base creates a sophisticated, earthy look that’s perfect for any patio.
Step-by-Step Guide
Materials
- Unfinished or primed Adirondack chair
- Exterior wood paint (Cream/Off-White)
- Exterior wood paint (Terra Cotta/Rust Brown)
- Wide paintbrush or paint sprayer
- Adhesive stencil (diamond/geometric pattern)
- Painter’s tape
- Stencil brush or foam pouncer
- Small artist’s brush
- Sandpaper (220 grit)
- Tack cloth
- Clear exterior sealer (matte or satin)
Step 1: Preparation and Base Coat
-
Prepare the surface:
Start by lightly sanding the entire chair with 220-grit sandpaper to smooth out any rough patches or previous finish. This ensures your new paint adheres properly. -
Clean deeply:
Wipe down every slat and crevice with a tack cloth or damp rag to remove all sanding dust. A clean surface is crucial for a smooth finish. -
Apply the base color:
Using a wide brush or sprayer, apply your first coat of the cream exterior paint. Work with the grain of the wood, paying special attention to the gaps between slats. -
Let it dry completely:
Allow the first coat to dry according to the manufacturer’s instructions, usually 2-4 hours. Do not rush this step, as tacky paint can ruin your stencil work later. -
Add a second coat:
Apply a second layer of cream paint for full, opaque coverage. Let this base layer cure overnight to ensure it is hard enough to handle tape and stencils.
Clean Lines Secret
Before painting the stencil color, paint a thin layer of the *base* color (cream) over the stencil. This seals the edges so no dark paint bleeds under.
Step 2: Creating the Mountain Peaks
-
Mark the peak lines:
Visualize the ‘mountain’ shapes on the backrest. Use painter’s tape to create angled lines across the back slats, simulating peaks and valleys. Press the tape edges down firmly. -
Block out the solid shapes:
I prefer to paint the solid triangular ‘caps’ of the mountains first. Use the terra cotta paint and a small brush to fill in the areas above your tape lines on the upper parts of the slats. -
Remove tape carefully:
Peel back the tape while the paint is still slightly wet to get the crispest lines. Let these solid geometric peaks dry fully before moving to stenciling.
Step 3: Stenciling the Geometric Pattern
-
Position the stencil:
Place your diamond geometric stencil below the solid peaks you just painted. Align it so the pattern flows naturally from the solid areas. -
Secure the stencil:
Use painter’s tape or a light mist of spray adhesive to hold the stencil firmly against the wood slats. Movement here causes blurry edges. -
Load the brush correctly:
Dip your stencil brush or foam pouncer into the terra cotta paint, then offload most of it onto a paper towel. You want an almost dry brush. -
Apply the pattern:
Dab the paint gently over the stencil using a vertical up-and-down motion. Do not brush side-to-side, as this pushes paint under the stencil. -
Navigate the slats:
When stenciling across the gaps between slats, be careful not to overload the edges. You want the pattern to look like it continues across the empty space. -
Repeat and extend:
Lift the stencil and reposition it to continue the pattern down the backrest. Align the design with the previously painted section for continuity. -
Detail the bottom edge:
For the bottom part of the design, use tape to create a clean, angled ‘V’ shape where the pattern ends, matching the inverted shape of the mountain peaks above.
Paint Peeling Up?
If tape pulls up base paint, the bottom layer wasn’t fully cured. Sand the spot, repaint, and wait 24-48 hours before applying tape again.
Step 4: Finishing Touches
-
Touch up imperfections:
Once the stencil paint is dry, use a tiny artist’s brush and the cream base paint to correct any bleed-through or messy edges. -
Add subtle accents:
If desired, paint a thin terra cotta line along the front edge of the seat slats for a cohesive detail that ties the chair together. -
Seal the project:
Apply two coats of clear exterior sealer over the entire chair. This protects your hard work from UV rays and moisture.
Now you have a custom, designer-style chair ready for relaxing afternoons.


Botanical Vines Climbing the Arms
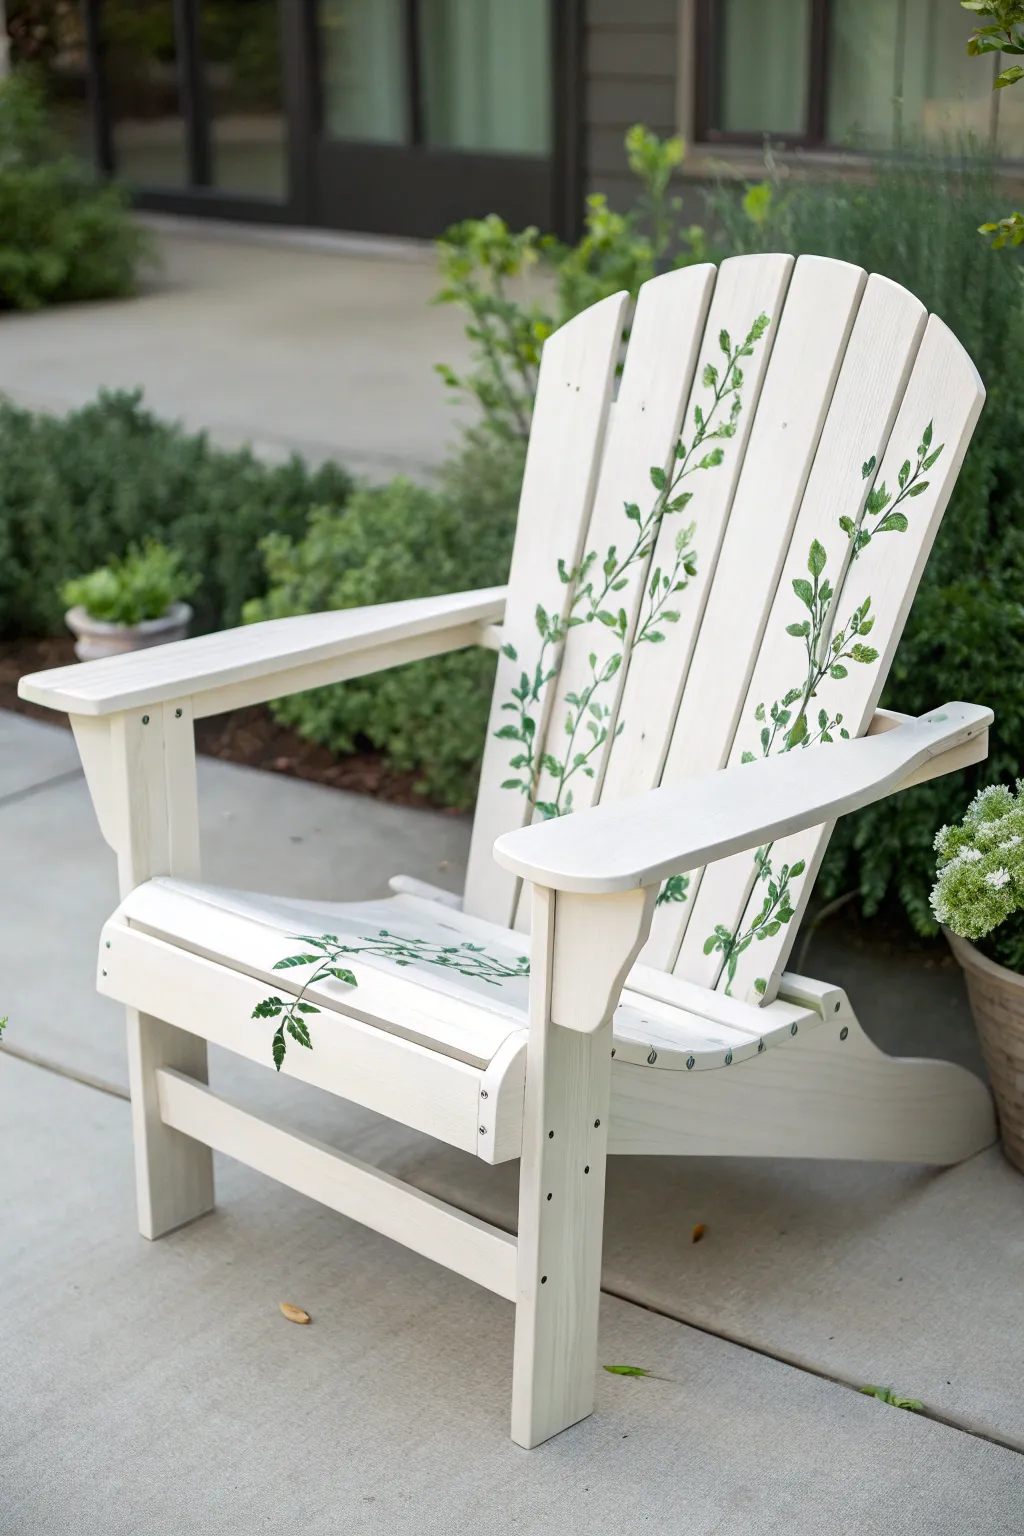
Transform a plain wooden chair into a whimsical garden feature with this delicate botanical design. The hand-painted green vines appear to naturally climb up the back slats and spill over the seat, creating an organic connection between your furniture and the outdoors.
Step-by-Step Tutorial
Materials
- White or cream outdoor acrylic latex paint (base coat)
- Wide paintbrush (2-3 inch) for base coat
- Sandpaper (120 and 220 grit)
- Clean tack cloth
- Acrylic craft paints in deep forest green, sap green, and sage green
- Round synthetic brushes (sizes 2, 4, and 6)
- Fine liner brush (size 0 or 00)
- Pencil for sketching
- Outdoor matte or satin clear sealant (spray or brush-on)
- Palette or paper plate
Step 1: Preparation and Base Coating
-
Prepare the surface:
Start by lightly sanding the entire Adirondack chair with 120-grit sandpaper to remove any rough spots or old varnish. Wipe it down thoroughly with a tack cloth to remove all dust. -
Apply the first base coat:
Using the wide paintbrush, apply a smooth, even coat of your white or cream outdoor latex paint. Work with the grain of the wood, ensuring coverage in the gaps between slats. -
Sand and re-coat:
Allow the first coat to dry completely (usually 2-4 hours). Lightly sand with 220-grit paper for an ultra-smooth finish, wipe away dust, and apply a second coat of the base color for solid opacity.
Natural Flow Tip
Don’t make the vines perfectly symmetrical. Vary the height slightly between the left and right sides to mimic how plants naturally grow at different rates.
Step 2: Drafting the Design
-
Plan the vine placement:
Visualize two main climbing vines. One should travel up the second slat from the left, and another up the second slat from the right. Plan for a smaller vine to drape across the front seat slat. -
Sketch the main stems:
Using a pencil very lightly, draw the central winding stems. Let them meander naturally, crossing back and forth over the gaps between the wood slats periodically to create continuity. -
Mark leaf positions:
Lightly sketch small oval shapes along the stems where your leaves will go. Group them in alternating pairs for a natural Ivy or Vinca look.
Uneven Wood Texture?
If the brush skips over wood grain, thin your paint slightly with water. This improves flow into the crevices without needing to press the bristles too hard.
Step 3: Painting the Foliage
-
Mix your green palette:
On your palette, squeeze out your three shades of green. Mixing the deep forest green with a touch of sage creates a nice mid-tone for the main stems. -
Paint the main stems:
Dip a size 4 round brush into your mid-tone green mixture. With a steady hand, trace over your pencil lines for the stems, varying the pressure to make the lines slightly thicker at the bottom and thinner toward the top. -
Paint the darker base leaves:
Using the dark forest green and a size 6 brush, paint the base layer of the leaves. Use a simple ‘press and lift’ stroke: press the belly of the brush down to create the leaf width, then lift as you pull back to create a point. -
Add dimension with lighter greens:
While the dark green is tacky but not fully wet, stroke the sap green onto the upper half of select leaves. This creates the illusion of sunlight hitting the foliage. -
Extend the design on the seat:
Repeat the leaf painting process on the front edge of the seat. I find it looks best if this vine appears to be ‘spilling’ over the edge, so ensure some leaves wrap around the front curve. -
Refine the stem connections:
Use the size 2 brush and your darkest green to ensure all leaves are firmly connected to the main vine with tiny, thin stems.
Step 4: Detailing and Sealing
-
Add fine tendrils:
Switch to your liner brush (size 0). Mix a little water into your sage green to make it inky. Paint tiny, curling tendrils spiraling off the main vine for a delicate, realistic look. -
Highlight the veins:
Using the liner brush and the lightest sage green, paint a very fine central vein line on the largest leaves to give them texture and direction. -
Check continuity:
Stand back and look at the chair from a distance. Ensure the vines visual flow across the gaps in the wood slats makes sense to the eye. -
Cure the paint:
Allow the painted design to dry for at least 24 hours. Acrylics need to cure fully before being sealed to prevent cloudiness. -
Apply protection:
Apply two coats of outdoor clear sealant. A matte finish keeps the look natural, while satin adds a slight sheen. Ensure you seal the entire chair, not just the painted vines, for uniform weathering.
Now you have a stunning, custom piece of furniture that brings a touch of eternal greenery to your patio.
Big, Loose Florals on the Back
Transform a plain wooden Adirondack chair into a romantic garden statement piece with this soft, painterly design. Using a technique that mimics watercolor on wood, you’ll create large, loose floral blooms that seem to grow right up the back of the chair.
Step-by-Step
Materials
- Unfinished wooden Adirondack chair
- Sandpaper (120 and 220 grit)
- Clean tack cloth
- Primer (white, water-based for wood)
- Chalk paint or matte acrylic paint: Sage Green (base), Cream/Off-White (back slats), Peach/Coral, Deep Rose, Olive Green, various lighter greens
- Assorted brushes: 2-inch flat brush, Filbert brushes (sizes 6-10), Round brushes (sizes 2-4)
- Textile medium or glazing medium (to extend drying time)
- Clean water jar and paper towels
- Clear matte or satin spar urethane (outdoor rated)
Step 1: Preparation and Base Coat
-
Sand the surface:
Begin by sanding the entire chair thoroughly. Start with 120-grit sandpaper to remove any rough spots or splinters, then finish with 220-grit for a smooth painting surface. Wipe away all dust with a tack cloth. -
Prime the wood:
Apply a coat of high-quality wood primer. Since we are painting flowers, a white primer is best to ensure the colors pop later. -
Paint the chair frame:
Paint the arms, legs, and seat of the chair with your Sage Green chalk paint. Leave the back slats unpainted for now, or paint a rough border where they meet the frame. -
Paint the back slats:
Apply a creamy Off-White or very pale wood-tone paint to the vertical back slats. This mimics the look of raw, bleached wood and provides a neutral canvas for the flowers. Let this dry completely. -
Add a distressed seat detail:
If you want to match the reference image exactly, dry-brush a small streak of the peach or rose color across the front seat slats for a worn, artistic touch.
Paint looking too opaque?
If your flowers look too solid and heavy, dip your brush in water before loading paint. The water acts as a thinner, creating that sheer, dreamy watercolor wash on the wood.
Step 2: Blocking in the Florals
-
Plan your composition:
Lightly sketch the placement of three large main blooms on the back slats using a pencil. Aim for an asymmetrical arrangement: one near the top right, one middle left, and one lower center. -
Mix your floral colors:
Mix your Peach/Coral paint with a little glazing medium. The medium makes the paint more translucent, giving you that watercolor effect. -
Paint the first petals:
Using a large filbert brush, lay down wide, sweeping strokes for the outer petals of the large flowers. Keep your hand loose; these shouldn’t be perfect circles. -
Layer in darker tones:
While the first layer is still slightly tacky, mix a Deep Rose color. Add this to the centers of the flowers and blend outward slightly into the peach petals. -
Create depth:
I like to add a touch of white to the peach mix and highlight the very edges of the petals to make them look like they are catching the light. -
Add secondary buds:
paint smaller, closed buds floating above the main flowers on the upper slats using the same peach and rose mixtures.
Pro Tip: The Slats Trick
Don’t try to paint “around” the cracks between the back slats. Paint right over the gaps as if it were a solid canvas, then use a razor blade to gently clear the gap if paint bridges across.
Step 3: Greenery and Details
-
Paint main stems:
Mix an Olive Green with the glazing medium. Using a medium round brush, paint thin, curving stems connecting your flowers and buds. -
Add broad leaves:
Paint large leaves around the base of the blooms using a mix of Sage Green and Olive. Use a flat brush and twist it as you pull to create organic leaf shapes. -
Add filler foliage:
Using a fine liner brush and a diluted teal-green or blue-green shade, paint delicate sprays of fern-like foliage. These should look airy and light, filling the empty spaces between the heavy blooms. -
Detail the flower centers:
Once the flower petals are dry, use a small round brush to tap in the reproductive parts (stamens) using yellow, dark brown, or black dots in the center of the blooms. -
Paint tiny accent flowers:
Add sprigs of tiny berries or small filler flowers in contrasting colors like mustard yellow or soft pink on the outer edges of the composition. -
Refine and touch up:
Step back from the chair to look at the overall balance. If a spot looks too empty, add a floating petal or a wispy vine.
Step 4: Sealing and Finishing
-
Cure time:
Allow the artwork to cure for at least 24 hours. Because we used glazing medium, it may take longer to dry than standard acrylics. -
Apply the first topcoat:
Apply a coat of outdoor-rated spar urethane. Use a high-quality synthetic brush and long strokes to avoid bubbles. -
Sand between coats:
Once the first coat is dry, lightly sand with very fine 220 or 300 grit paper to knock down any raised grain or dust nibs. Wipe clean. -
Final seal:
Apply two more coats of sealer, allowing proper drying time between each. This is crucial for protecting your hand-painted art from sun and rain.
Place your newly adorned chair in a favorite garden spot and enjoy the perpetual bloom all season long.
Nautical Icons and Rope Lines
Transform a standard Adirondack chair into a seaside statement piece using a rich navy base and delicate golden details. This project combines classic nautical paint colors with scattered metallic icons for a look that feels both curated and relaxed.
Step-by-Step Tutorial
Materials
- Unfinished wood Adirondack chair
- Navy blue exterior latex paint (satin or semi-gloss)
- Metallic gold paint or gold leafing pen
- Nautical-themed stencils (anchors, rope, coral, shells)
- Wide paintbrush or paint sprayer
- Small stencil brushes or sponge pouncers
- Fine-grit sandpaper (220 grit)
- Painter’s tape
- Drop cloth
- Clear outdoor sealant (spray or brush-on)
- Thick decorative rope (optional, for styling)
Step 1: Preparation & Base Coat
-
Surface prep:
Begin by inspecting your chair for any rough patches or splinters. Lightly sand the entire surface with 220-grit sandpaper to ensure the wood accepts the paint evenly. -
Clean down:
Wipe away all sawdust with a damp tack cloth. It is crucial the surface is completely dust-free before you open a paint can. -
First coat application:
Stir your navy blue exterior paint thoroughly. Using a wide brush, apply the first coat, working with the grain of the wood to minimize brush strokes. -
Getting in the crevices:
Don’t forget the spaces between the slats. I find a smaller angled brush helps get into those tight gaps where the back slats meet the support beams. -
Drying time:
Allow the first coat to dry completely according to the manufacturer’s instructions, typically 2-4 hours for latex paint. -
Second coat:
Apply a second coat of navy paint to ensure a deep, opaque finish. This dark background is essential for making the gold details pop later. -
Final cure:
Let the chair dry overnight. The paint needs to be fully cured and hard so the stencil adhesive doesn’t peel it up in the next phase.
Step 2: Adding Nautical Details
-
Planning the layout:
Before painting, lay your stencil sheets against the chair back to visualize spacing. Aim for a random, scattered pattern rather than perfect rows. -
Securing the first stencil:
Choose a small motif like a shell or coral branch. Tape the stencil firmly to one of the upper back slats using painter’s tape. -
Loading the brush:
Dip your stencil brush into the metallic gold paint, then offload most of the paint onto a paper towel until the brush is almost dry. This prevents bleeding. -
Stenciling technique:
Use a straight up-and-down dabbing motion (pouncing) to apply the gold paint. Do not brush side-to-side, as this pushes paint under the stencil edges. -
Peeling and repeating:
Carefully lift the stencil straight up while the paint is still slightly wet. Move to a lower section on a different slat and repeat the process. -
Mixing motifs:
Rotate through your different designs—anchors, knots, and sea life. Vary the height and orientation slightly to keep the look organic. -
The centerpiece anchor:
Designate a specific spot for a focal point. On the front horizontal slat below the seat, place a prominent anchor stencil right in the center. -
Hand-painted touches:
If your stencils have very fine lines that didn’t transfer perfectly, use a gold leafing pen or a liner brush to sharpen the edges or add tiny details. -
Sealing the work:
Once the gold paint is fully dry (give it at least 24 hours), apply a coat of clear outdoor sealant over the entire chair to protect your artwork from the elements.
Less is More
When stenciling on a dark base, multiple thin layers of gold paint provide better coverage and sharper edges than one thick, gloppy layer.
Smudged Edges?
If gold paint bleeds under the stencil, wait for it to dry completely, then use a small artist brush and the navy base paint to touch up and erase mistakes.
Now you have a custom piece of coastal decor ready for relaxing afternoons on the porch
Lake-Life Fish Across the Slats
Bring the serene feeling of the lake right onto your deck with this hand-painted Adirondack chair featuring a classic striped bass spanning the back slats. The segmented canvas creates a unique, rustic effect that turns standard outdoor furniture into a custom piece of art.
Step-by-Step Guide
Materials
- White or light-colored wooden Adirondack chair
- Sandpaper (220-grit)
- Pencil and large eraser
- Acrylic craft paints (olive green, warm yellow, burnt sienna, teal blue, white, black, silver/grey)
- Assorted brushes (1-inch flat, medium round, fine liner)
- Outdoor varnish or polyurethane sealer
- Painter’s tape or stencil film (optional)
- Paper towels and water cup
Step 1: Preparation & Sketching
-
Surface Prep:
Before anything else, ensure the back slats of your chair are clean and dry. If the chair has a glossy finish, lightly scuff the area where the fish will go with 220-grit sandpaper to help the paint adhere propertly. -
Map the Shape:
Using a pencil, lightly sketch the large oval outline of the fish body directly across the middle three or four slats. Don’t worry about the gaps between the wood just yet; simply draw as if the surface was solid. -
Refine the Outline:
Add the specific details to your outline: the forked tail swimming off to the right, the dorsal fins on top, and the mouth and gill plate on the left side. I find it helpful to look at a reference photo of a striped bass to get the proportions right. -
Clear Guidelines:
Once you are happy with the shape, darken your final lines slightly and erase any stray sketch marks. It is easier to clean up the wood now than after paint is applied.
Fixing Gap Distortion
If the image looks disjointed across wide gaps, hold a piece of paper behind the slats while sketching. This bridges the gap visually so your lines connect accurately on the wood faces.
Step 2: Blocking Colors
-
Base Coat – Top:
Start painting the top third of the fish body with an olive green mixed with a touch of silver. Use a medium round brush and stroke horizontally, following the direction of the fish. -
Base Coat – Middle:
While the green is still slightly wet, transition into a silvery-white stripe through the center of the body. Blend the edges where the green meets the silver to create a soft gradient. -
Base Coat – Bottom:
Paint the belly of the fish with a solid white, blending it upward into the silver section. This creates the foundational three-tone look typical of fish. -
Filling the Fins:
Use a teal blue mixed with a little grey to fill in the dorsal, pectoral, and tail fins. Keep this layer fairly thin and translucent if possible. -
Gap Check:
Inspect the edges of the slats. You can either wrap the paint slightly around the curve of the wood or keep a sharp edge on the face; wrapping it slightly makes the image readable from side angles.
Step 3: Detailing & Texture
-
Adding Stripes:
Striped bass are defined by their horizontal lines. Mix a diluted black or dark grey and, using a steady hand or a guide stick, paint thin, broken horizontal lines across the silver and white sections of the body. -
Warming the Tones:
To give the fish life, dry-brush a small amount of warm yellow or burnt sienna near the gill plate and along the lateral line. This subtle warmth prevents the fish from looking too flat and cold. -
The Eye:
Paint the eye using a solid black circle with a gold rim. Add a tiny dot of pure white in the upper corner of the black circle to create a reflection highlight—this instantly wakes up the character. -
Gill Definition:
Use your fine liner brush and dark grey paint to outline the curved gill cover behind the eye. Adding a shadow line behind it gives the head dimension. -
Fin Rays:
With the finest brush or a black paint pen, draw thin lines radiating through the teal fins to mimic the spine structures. -
Final Outlines:
Go over the external perimeter of the entire fish with a shaky, illustrative black line. This ‘sketchy’ style outline ties the whole image together across the separate wooden slats.
Make It A School
Paint two smaller fish swimming in the opposite direction on the lower slats or the seat itself to create a dynamic sense of movement and depth.
Step 4: Sealing
-
Cure Time:
Let the paint dry completely for at least 24 hours. Acrylic needs to be fully cured before sealing to prevent cloudiness. -
Varnishing:
Apply two to three thin coats of outdoor-rated clear varnish or polyurethane over the painted area and the surrounding wood. This ensures your catch of the day won’t fade in the sun.
Once the varnish is dry, your lakeside seat is ready for relaxing afternoons by the water
Black-and-White Doodle Linework
Transform a plain white chair into a statement piece using high-contrast black and white linework. This project mimics the relaxation of sketchbook doodling but on a grander scale, featuring flowing vines, geometric fills, and bold floral motifs.
How-To Guide
Materials
- Unfinished or primed Adirondack chair
- High-quality white exterior paint (satin or semi-gloss)
- Black oil-based paint markers (various tip sizes: fine, medium, broad)
- Black exterior acrylic paint
- Small detail paintbrushes
- Clear exterior polycrylic sealer (spray or brush-on)
- Pencil and eraser
- Sandpaper (220 grit)
- Tack cloth
Step 1: Preparation & Base Coat
-
Sand the Surface:
Begin by lightly sanding the entire chair with 220-grit sandpaper to smooth out any rough patches or splinters. Focus on the back slats and seat where your detailed drawing will go. -
Clean Thoroughly:
Wipe down the entire chair with a tack cloth to remove all sanding dust. A clean surface is crucial for the paint markers to glide smoothly without snagging. -
Apply White Base:
Paint the entire chair with two to three coats of white exterior paint. Allow ample drying time between coats according to the manufacturer’s instructions to ensure a solid, opaque background. -
Cure the Paint:
Let the final coat of white paint cure for at least 24 to 48 hours. The surface needs to be completely hard so the pencil and marker tips don’t dig into the paint.
Marker Mastery
Work from top to bottom and left to right (if you are right-handed) to avoid smudging wet ink with your hand as you draw.
Step 2: Drafting the Design
-
Plan the Vertical Panels:
Lightly sketch your design with a pencil. On the topmost back slats, designate the left two slats for floral motifs and the right slats for abstract swirls and geometric fills, using the gap between slats as a natural border. -
Sketch the Focal Swirls:
Draw large, sweeping S-curves on the right-hand side of the backrest. These will serve as the ‘spine’ for your zentangle patterns. -
Add Floral Details:
On the left slats, sketch a vertical vine climbing up. Add simple 5-petal flower shapes spaced evenly, interspersed with leaf shapes. -
Mark Geometric Zones:
On the seat slats and armrest supports, pencil in guidelines for simpler geometric patterns like straight lines, dots, or small triangles.
Step 3: Inking the Patterns
-
Outline Main Shapes:
Using a broad-tip black paint marker, trace over your main structural pencil lines—the big swirls and the primary flower outlines. Keep your hand steady and pull the marker towards you. -
Fill the Swirls:
Switch to a medium-tip marker. Inside your large S-curves, draw repetitive parallel lines or ‘hatching’ that follows the curve of the shape. -
Create Scalloped Scales:
In the lower right section of the backrest, draw stacked semi-circles or ‘scales.’ Fill every other layer with solid black or stripes to create visual weight. -
Detail the Flowers:
Use a fine-tip marker to add centers to your flowers on the left slats. Draw small rings or dots inside the petals for texture. -
Add the Dot Work:
Scatter different sizes of black dots around the floral vine. I find that varying the dot size creates a magical, ‘floating’ movement in the design. -
Paint Solid Leaves:
Use a small brush and liquid black acrylic paint to fill in larger solid areas, like the leaves on the left slat. Markers can streak on large fills, so paint is better here for solid coverage. -
Decorate the Seat:
On the front edge of the seat slats, add a distinct pattern band. Use large, bold polka dots on the left side and flowing abstract leaf shapes on the right side. -
Accent the Legs:
Don’t forget the legs! Draw a vertical line down the front leg and add small alternating motifs, like tiny flowers or geometric diamonds, to tie the whole piece together.
Make it Pop
Choose one accent color, like teal or yellow, and fill in just the centers of the flowers to break up the monochrome look.
Step 4: Finishing Touches
-
Erase Guidelines:
Once the black ink is completely dry (give it at least an hour), very gently erase any visible pencil marks. -
Seal the Artwork:
Apply a clear exterior polycrylic sealer. Use a spray for the first light coat to avoid smearing the ink, then follow up with a brush-on coat for durability if desired.
Now you have a stunning, hand-illustrated chair that serves as both furniture and art.
Rainbow Slats With a Neutral Frame
Transform a standard Adirondack chair into a cheerful statement piece with this easy-to-create rainbow effect. By painting individual back slats in a graduated spectrum while keeping the frame neutral, you achieve a balanced, sophisticated look that adds a perfect pop of color to any lawn.
Detailed Instructions
Materials
- Unfinished wooden Adirondack chair (partially unassembled)
- Exterior wood primer
- Exterior semi-gloss paint (White)
- Exterior paint or wood stain samples (Red, Orange, Yellow, Green, Blue, Purple)
- Medium-grit sandpaper (120-150 grit)
- Fine-grit sandpaper (220 grit)
- Tack cloth or slightly damp rag
- 2-inch synthetic bristle brush
- Small foam brushes or 1-inch detail brushes
- Drop cloth or tarp
- Screwdriver or drill (if disassembly is needed)
- Painter’s tape
Step 1: Preparation and Priming
-
Assess the assembly:
If your chair is already fully assembled, use a screwdriver or drill to carefully remove the back slats and the seat slats if possible. Working on detached pieces ensures cleaner lines and prevents colors from bleeding onto the frame. -
Sand the surfaces:
Go over every wooden piece with medium-grit sandpaper to smooth out any rough patches or splinters. Follow up with fine-grit sandpaper to create a velvety surface ready for paint. -
Clean the dust:
Wipe down all the wood pieces thoroughly with a tack cloth or a damp rag to remove every speck of sawdust. This is crucial for paint adhesion. -
Prime the frame pieces:
Lay out the armrests, legs, and support pieces on your drop cloth. Apply a coat of exterior wood primer to all sides, ensuring you get into the joints and crevices. -
Prime the slats:
Prime the back slats and seat slats separately. Make sure to coat the edges and ends well, as end grain soaks up moisture more easily. -
Allow to dry:
Why rush perfection? I like to let the primer dry completely according to the manufacturer’s instructions before checking if a second coat is needed for full coverage.
Step 2: Painting the Components
-
Coat the frame white:
Using your 2-inch brush, apply the white exterior semi-gloss paint to the main frame components (legs, arms, supports). Use long, smooth strokes to minimize brush marks. -
Paint the neutral slats:
Identify which seat slats will remain white. Typically, this is all of them except for perhaps one accent slat at the front or back. Paint these white as well. -
Second coat for the white:
Once the first coat is dry, lightly sand with fine paper if bumps appeared, wipe clean, and apply a second coat of white for a durable, opaque finish. -
Sort the rainbow slats:
Arrange your back slats in order on the ground. Assign a color to each: Red, Orange, Yellow, Green, Blue, Purple. This visualization helps prevent mixing up the gradient. -
Paint the first rainbow layer:
Working one color at a time, use a clean foam brush for each hue. Apply the paint to the front, back, and importantly, the side edges of the slat. The side edges will be visible when the chair is assembled. -
Paint the accent seat slat:
If you are replicating the specific look in the photo, select the second-to-last seat slat and paint it with a gradient or a single bold stripe (like red or purple) to tie the seat into the back design. -
Dry and recoat colors:
Allow the colored slats to dry fully. Apply a second coat to ensure the colors are vibrant and rich, especially for the lighter shades like yellow and orange which sometimes can look streaky. -
Seal the deal (optional):
If your exterior paint doesn’t have a built-in sealer, apply a clear exterior polyurethane topcoat to all colored pieces for extra UV and rain protection.
Gradient Guide
To soften transitions, mix a drop of the extensive neighbor color into the current color. E.g., mix a little orange into your yellow paint for a smoother spectral flow.
Step 3: Assembly and Touch-ups
-
Gather hardware:
Ensure all your screws and bolts are clean. If the old hardware looks rusty, this is the perfect moment to swap them for stainless steel screws that won’t stain the white wood. -
Reassemble the seat:
Construct the seat base first, attaching the white slats and your special accent slat. Keep a small brush handy for accidental scratches during assembly. -
Install the rainbow back:
Carefully screw the rainbow slats onto the back support rails. Start from one side (e.g., Red) and work your way across to Purple to ensure even spacing. -
Attach arms and legs:
Connect the assembled seat and back to the arm and leg assembly. Tighten screws firmly but be careful not to crack the wood or strip the paint around the holes. -
Inspect the screw heads:
If the screws are sunken, you can dab a tiny bit of paint over the heads to hide them, though exposed stainless steel also looks nice and industrial. -
Final cure time:
Let the fully assembled chair sit for at least 24 to 48 hours before sitting on it. This allows the paint to cure and harden, preventing tackiness.
Ombré Variation
Instead of a full rainbow, pick one color (like blue) and buy a sample pot. Mix it with increasing amounts of white for each slat to create a stunning monochromatic fade.
Place your vibrant chair in a sunny spot on the lawn and enjoy the cheerful welcome it brings to your outdoor space
Trompe L’Oeil Tile Mosaic Illusion
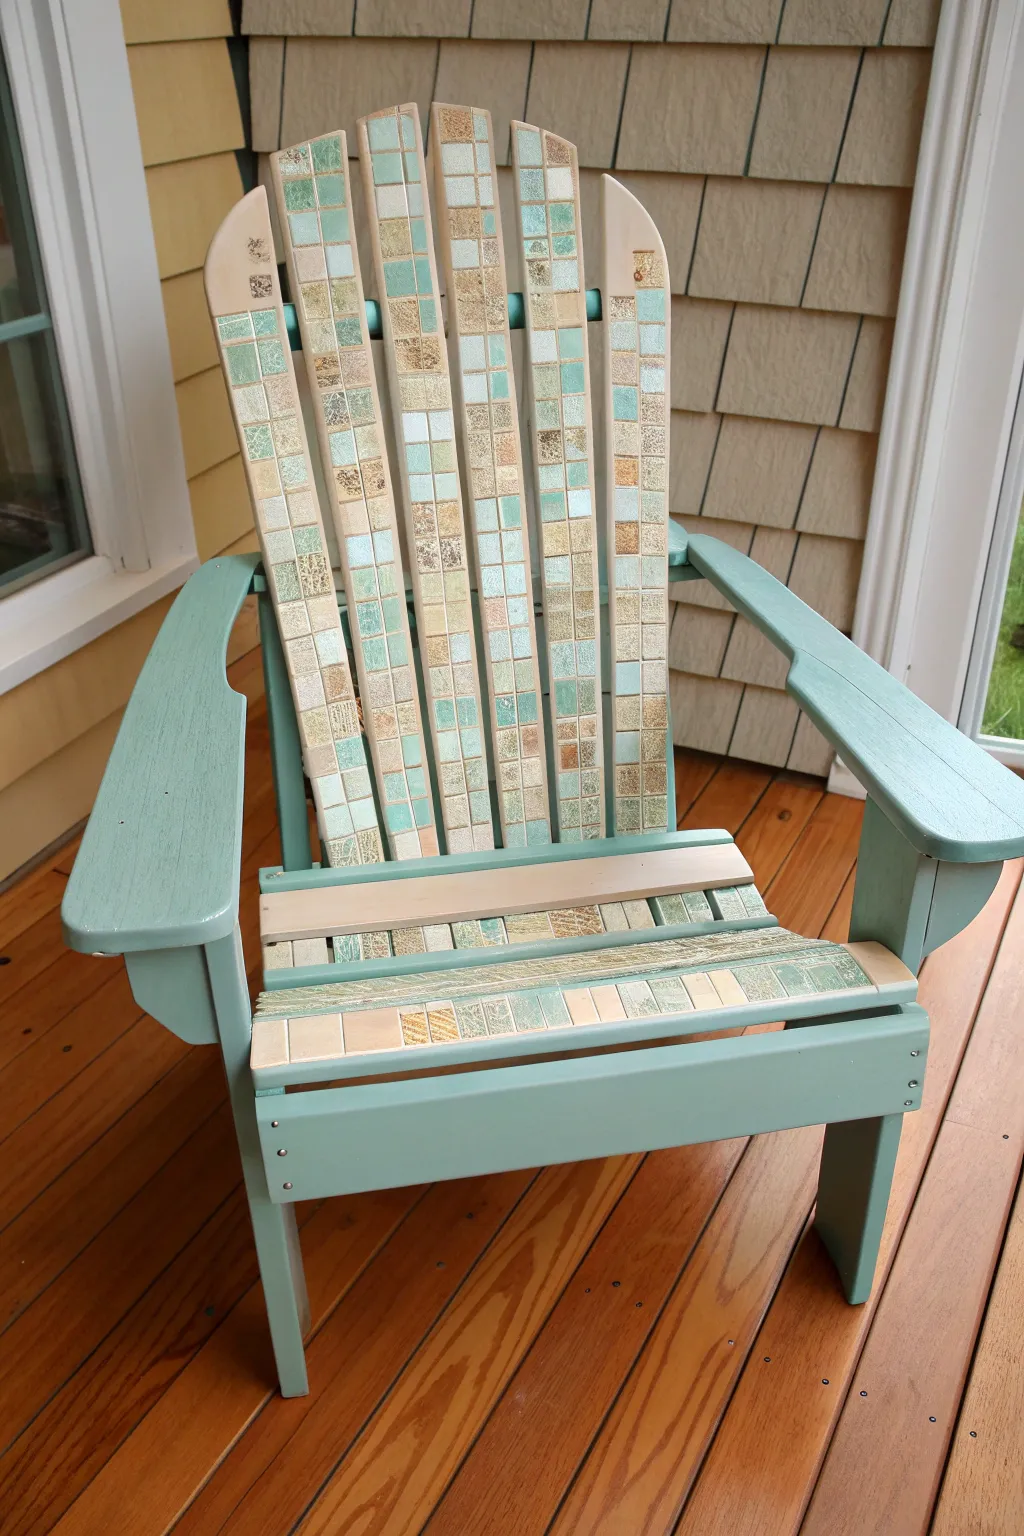
Transform a standard wooden Adirondack chair into a stunning piece of faux-mosaic art using nothing but paint and patience. This trompe l’oeil technique creates the convincing illusion of individual ceramic tiles without the heavy weight or jagged edges of real stonework.
Step-by-Step
Materials
- Unfinished or primed Adirondack chair
- Aqua/Teal exterior latex paint (base color)
- Cream/Off-white exterior latex paint (grout lines)
- Assorted acrylic craft paints (sage green, tan, terracotta, beige)
- Painter’s tape (1/4 inch width)
- Painter’s tape (1 inch width)
- Pencil and ruler
- Small flat artist brushes
- Sea sponge or crumpled plastic wrap
- Exterior water-based polyurethane sealer
- Sandpaper (medium grit)
Step 1: Preparation and Base Coat
-
Sand and prep:
Begin by giving the entire chair a light sanding to ensure a smooth bonding surface, paying special attention to the slats where you’ll be painting the details. -
Apply the base color:
Paint the entire chair—legs, arms, and back—with your chosen aqua or teal base color. This will serve as the color for the sides and back, and will eventually peek through as the ‘grout’ color if you were doing a reverse method, but here we want a uniform structural color first. -
Define the mosaic area:
Once the base coat is fully dry, identify which slats on the seat and backrest will feature the tile design. Tape off the sides of these slats if you want to keep the edges clean and solid-colored. -
Paint the grout layer:
On the front faces of the backrest and seat slats, paint a solid coat of cream or off-white. This color will ultimately represent the grout lines between your faux tiles.
Step 2: Creating the Grid
-
Measure the tiles:
Determine the size of your square tiles—1.5 to 2 inches is usually a good scale for these chairs. Use a ruler to make light pencil ticks up the vertical slats to mark your horizontal lines. -
Tape horizontal lines:
Apply strips of 1/4-inch painter’s tape horizontally across all the slats at your pencil marks. Press the edges down firmly to prevent bleed-under. -
Create vertical divisions:
If your slats are wide enough to accommodate two columns of tiles, run a vertical strip of 1/4-inch tape down the center of the slat. The natural gap between the wooden slats already acts as a vertical grout line for most of the design.
Sticky Situation
Burnish the edges of your painter’s tape with a credit card or spoon back before painting. This ensures a tight seal and crisp faux grout lines.
Step 3: Painting the Tiles
-
Plan your palette:
Pour small amounts of your acrylic colors (sage, tan, beige, and the original aqua) onto a palette. The goal is a natural, stone-like variety. -
Paint individual squares:
Using a small flat brush, paint each exposed square a solid color. I find it helpful to work randomly, painting five or six non-adjacent squares with one color before switching to the next to ensure a balanced distribution. -
Add stone texture:
While the paint is still tacky, lightly dab a sea sponge or a wad of crumpled plastic wrap over the tiles. This lifts a tiny bit of paint and adds that mottled, organic look of tumbled stone. -
Add color variation:
Dip a nearly dry brush into a contrasting color (like putting a bit of tan on a sage tile) and dry-brush the center or corners of a few random tiles to create depth. -
Peel the tape:
This is the satisfying part—carefully peel away all the painter’s tape while the paint is still slightly soft to reveal your crisp cream-colored ‘grout’ lines.
Variation Station
Mix a little fine sand or grout powder into the paint for the ’tiles’ to give them genuine gritty texture that feels real to the touch.
Step 4: Finishing Touches
-
Touch up edges:
Check for any paint bleed on your grout lines. Use a tiny detail brush and your cream paint to tidy up any messy intersections. -
Highlight the tiles:
To make the tiles pop, add a very thin line of white paint to the top and left edge of each square, simulating a light source hitting the tile edge. -
Shadow the tiles:
Similarly, add a thin line of watered-down dark gray or brown on the bottom and right edges of the squares to create a drop-shadow effect. -
Seal the artwork:
Since this chair lives outside, apply at least three coats of exterior water-based polyurethane. Let each coat dry completely before applying the next.
Now you have a durable, comfortable seat that offers all the charm of a mosaic masterpiece without the risk of cracking in the frost


Have a question or want to share your own experience? I'd love to hear from you in the comments below!