If you’ve got an old antique vanity with good bones but a tired finish, paint can turn it into the prettiest little statement piece in the room. Here are my favorite painted antique vanity ideas—from classic makeovers to artsy, unexpected finishes that feel like pure studio play.
Soft White Antique Vanity Refresh

Transform a tired wooden dresser or cabinet into a serene bathroom vanity using soft white paint and subtle texturing. This project focuses on achieving a gentle, matte finish with unique stenciled or fabric-inlaid door panels for a touch of vintage elegance.
Step-by-Step Guide
Materials
- Antique wooden cabinet or vanity base
- Sandpaper (120, 220, and 320 grit)
- Wood filler
- Krud Kutter or TSP cleaner
- Soft white chalk-style paint (e.g., Cream or Linen)
- Clear furniture wax
- Dark antique wax (optional for depth)
- Synthetic oval brush for painting
- Lint-free rags or wax brush
- Textured wallpaper, lace, or stencil for door panels
- Mod Podge or spray adhesive (if using paper/fabric)
- Vessel sink and faucet hardware
- Drill with hole saw attachment (for plumbing)
- New dark bronze knobs and pulls
Step 1: Prep and Plumbing
-
Remove Hardware:
Begin by removing all old knobs, pulls, and hinges. Keep the screws in a labeled bag if you plan to reuse the hinges, though we’ll be replacing the pulls. -
Clean Thoroughly:
Scrub the entire piece with a degreaser like Krud Kutter to remove years of grime, oil, and furniture polish. Rinse with a damp cloth and let it dry completely. -
Modify for Plumbing:
If converting a dresser, remove the back panel or cut a section out to accommodate wall plumbing. Measure your vessel sink’s drain location and use a hole saw to cut the appropriate opening in the vanity top. -
Sand the Surface:
Scuff sand the entire exterior with 120-grit sandpaper. You don’t need to strip it to bare wood, but you need to break the existing finish so the paint adheres properly. -
Fill Imperfections:
Fill any deep scratches or old hardware holes (if changing pull spacing) with wood filler. Once dry, sand these spots flush with 220-grit paper.
Sticky Drawers?
If drawers stick after painting, sand the sides down to bare wood and rub a bar of paraffin wax or soap along the runners for smooth gliding.
Step 2: Painting and Panel Detailing
-
First Coat:
Apply your first coat of soft white chalk paint using a synthetic oval brush. Paint in long, smooth strokes with the grain. Don’t worry if coverage isn’t perfect yet; thin coats are better. -
Second Coat:
After the first coat dries (usually 1-2 hours), apply a second coat for full opacity. Watch for drips around corners and recessed panel areas. -
Detail the Panels:
For the inset panels on the doors, cut your textured wallpaper or lace fabric to exact size. Adhere it carefully using Mod Podge or spray adhesive, smoothing out bubbles from the center outward. -
Paint the Inserts:
Once the panel adhesive is set, lightly paint over the textured insert with your brush. Use a stippling motion to push paint into the crevices of the texture without flooding it. -
Smooth Sanding:
Once the paint is fully cured (overnight is best), lightly sand the flat surfaces with 320-grit sandpaper. This knocks down brush strokes and creates that buttery smooth professional feel.
Step 3: Finishing Touches
-
Apply Clear Wax:
Dip a wax brush into clear furniture wax and massage it into the paint. Work in small sections, wiping away excess with a lint-free rag. -
Buff to Sheen:
After the wax has hazed up (about 15-20 minutes), buff the surface vigorously with a clean cloth to create a soft, protective satin sheen. -
Install Sink:
Place your vessel sink over the cut hole. Apply a bead of clear silicone adhesive around the base to seal it to the vanity top. -
Add Hardware:
Install the new dark bronze knobs and drawer pulls. The contrast of dark metal against the soft white paint really grounds the piece. -
Final Inspection:
Check all doors and drawers for smooth operation. If paint build-up makes them stick, sand the edges lightly and apply a touch of candle wax to the runners.
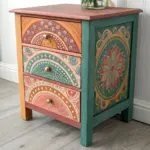
Two-Tone Twist
Leave the top wood surface natural and only paint the base. Seal the wood top with multiple coats of marine varnish for water resistance.
Enjoy the calm, spa-like atmosphere your beautiful custom vanity brings to the room


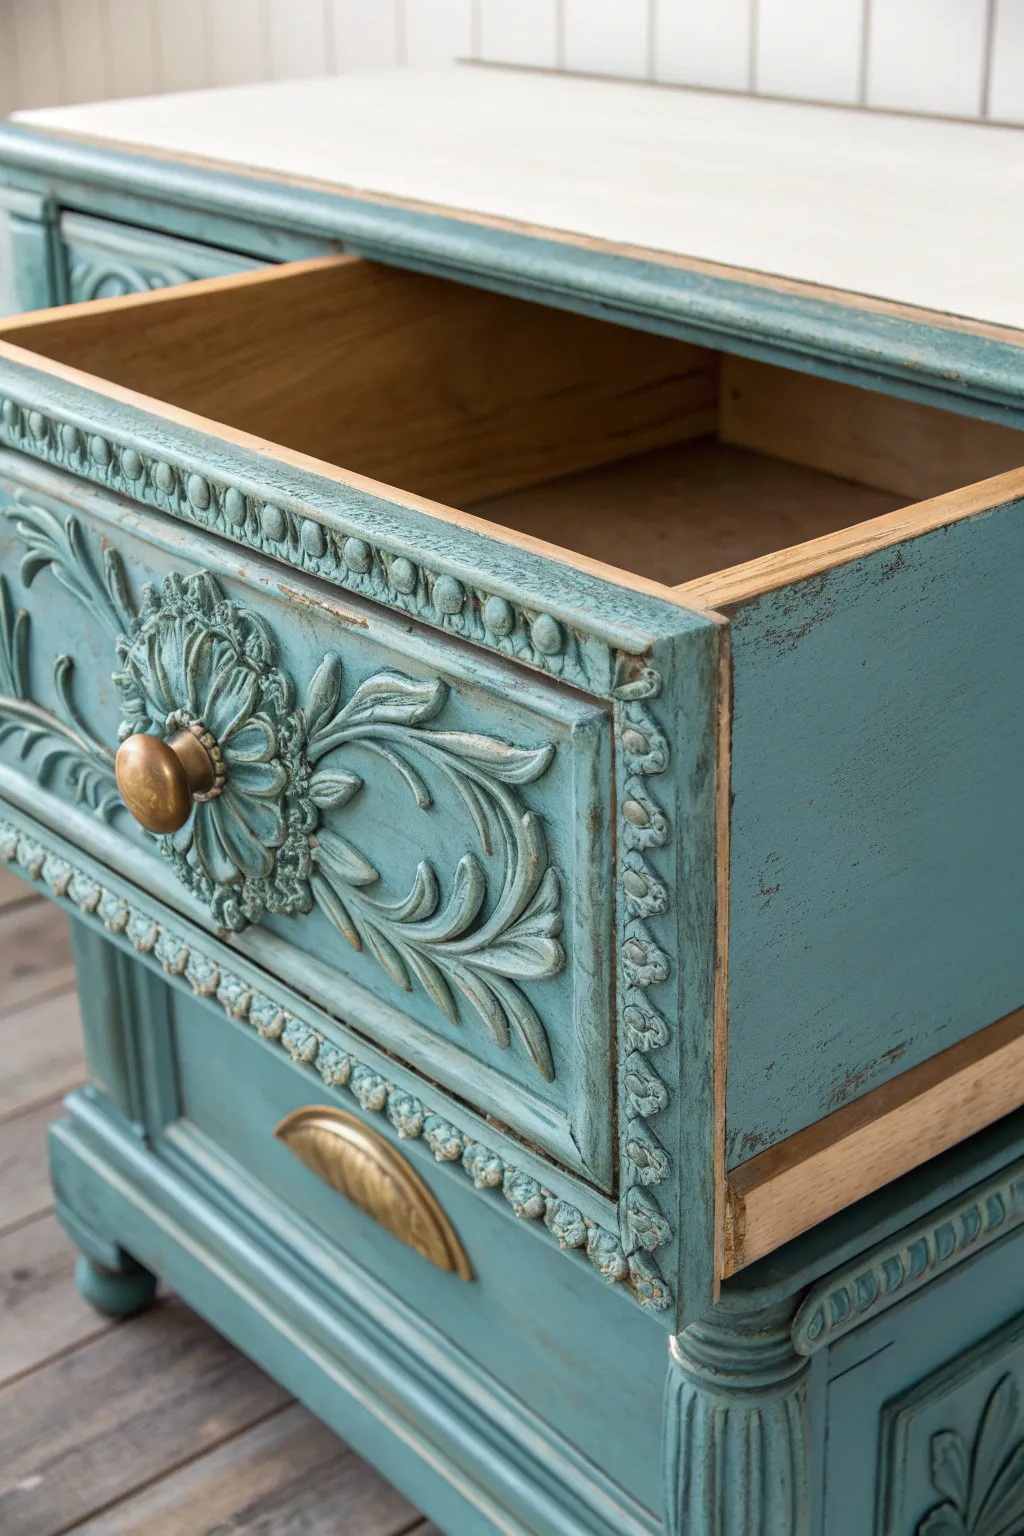
Matte Black Antique Vanity Makeover
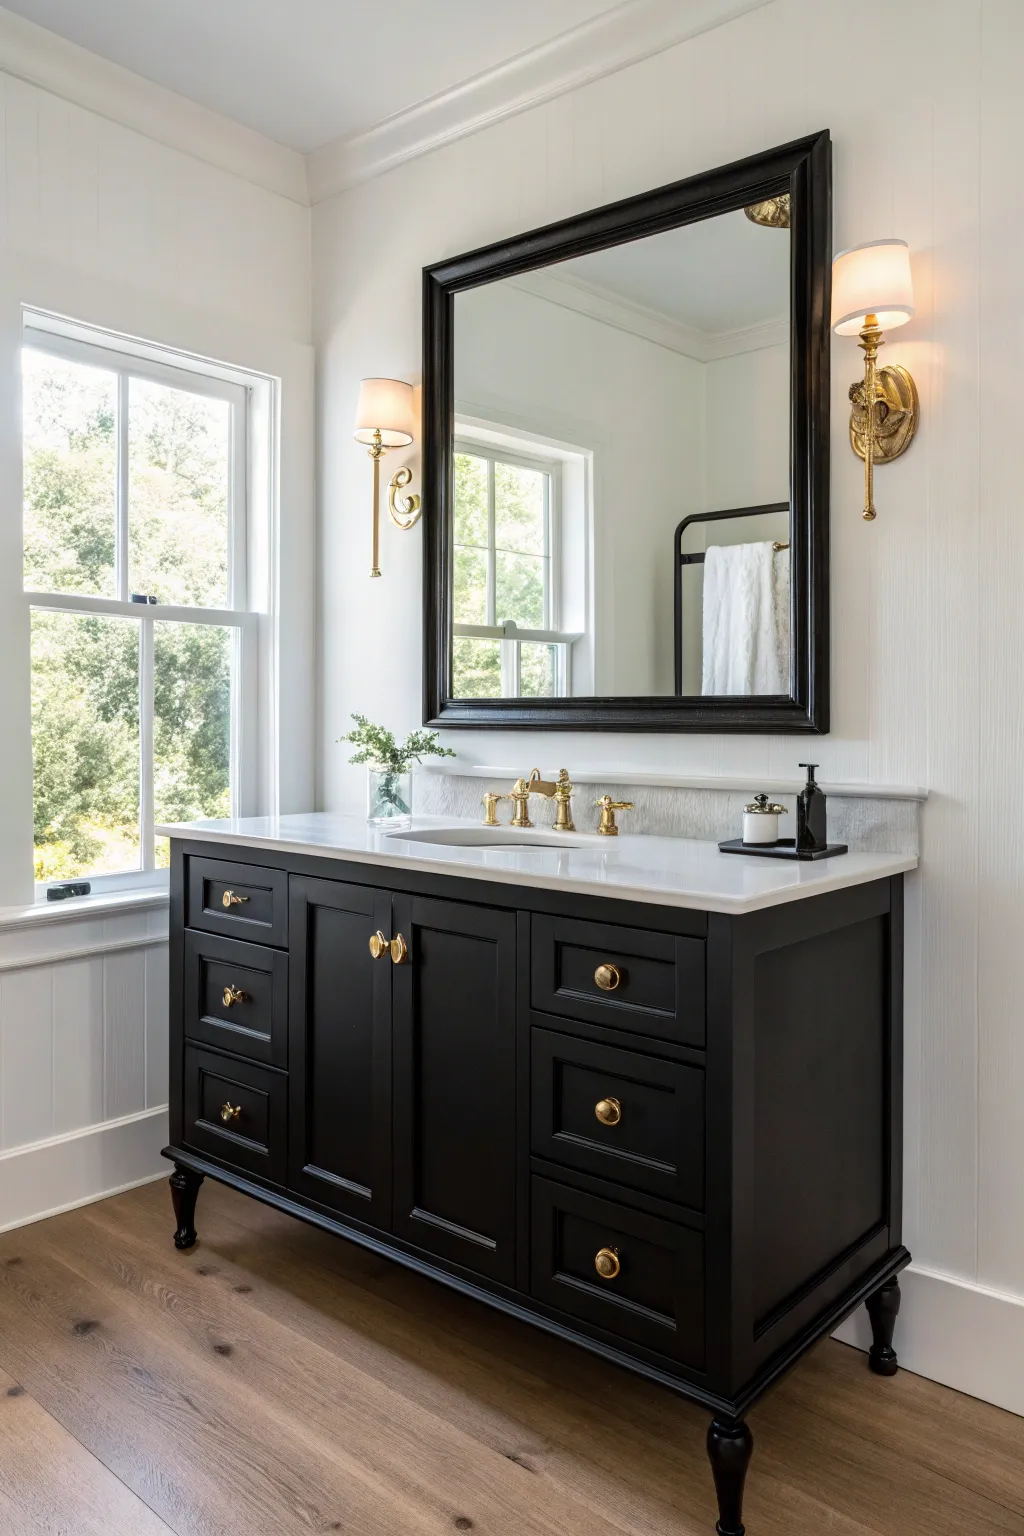
Transform a dated wooden dresser or vanity into a sophisticated, modern-classic masterpiece with a deep matte black finish. This project balances the moody drama of black paint with the warmth of gold hardware for a high-end, custom look.
Step-by-Step
Materials
- Solid wood vanity or antique dresser
- Deglosser or liquid sandpaper
- 120 and 220-grit sandpaper
- Tack cloths
- High-quality bonding primer (oil-based recommended for tannins)
- Matte black furniture paint (acrylic or enamel)
- Polycrylic topcoat (matte finish)
- Synthetic angled sash brush (2-inch)
- High-density foam roller and tray
- Gold or brass drawer pulls and knobs
- Gold or brass faucet set
Step 1: Preparation & Sanding
-
Remove Hardware:
Begin by removing all drawers from the vanity carcass. Unscrew and remove all existing knobs, pulls, and hinges, placing them in labeled bags if you plan to reuse them. -
Clean Surfaces:
Scrub the entire piece down with a degreaser or TSP alternative to remove years of bathroom grime, oils, and residue. Let it dry completely. -
Scuff Sanding:
Use 120-grit sandpaper to thoroughly scuff all surfaces. You don’t need to strip it to bare wood, but you must remove the sheen of the old finish to help the new paint adhere. -
Smooth the Details:
Fold a small piece of sandpaper to get into any crevices or decorative routing on the drawer fronts and legs. -
Dust Removal:
Vacuum up the sanding dust, then wipe everything down with a tack cloth to ensure a perfectly clean surface.
Sticky Drawers?
If painted drawers stick, rub a plain candle or beeswax along the wooden runners and tracks. This lubricates the friction points without damaging your fresh paint job.
Step 2: Priming the Wood
-
Apply Primer:
Apply a coat of high-quality bonding primer. I prefer an oil-based primer here to prevent any old wood tannins from bleeding through the paint later. -
Smooth with Roller:
Use a foam roller for the large flat sides and drawer fronts to avoid brush strokes, using the brush only for corners and legs. -
Light Sanding:
Once the primer is fully cured, lightly create a smooth base by sanding with 220-grit paper. Wipe away the dust with a tack cloth.
Pro Tip: Isolate the Legs
Wrap the bottom inch of the vanity legs in painter’s tape before you start painting. This prevents floor dust from dragging into your brush and ruining the smooth finish.
Step 3: Painting the Matte Finish
-
Cut In Edges:
Using your angled sash brush, paint the difficult areas first: the legs, inside corners, and any detailed molding on the drawer fronts. -
Roll the Flat Surfaces:
Immediately follow up with the foam roller on the flat panels while the brushed edges are still wet to blend the textures seamlessly. -
First Coat Drying:
Allow the first coat of matte black paint to dry according to the manufacturer’s instructions, usually 2-4 hours. -
Second Coat Application:
Apply a second coat using the same technique. Matte black can sometimes show streakiness, so ensure you maintain a ‘wet edge’ and don’t overwork the paint. -
Check Coverage:
Inspect the piece in good lighting. If the underlying primer is visible or the finish looks uneven, a third light coat may be necessary for deep opacity.
Step 4: Finishing & Assembly
-
Topcoat Protection:
Since this is a bathroom vanity, seal the paint with a matte water-based polycrylic. Apply two thin coats to protect against moisture without adding unwanted shine. -
Reinstall Hinges:
Once the sealer has cured for at least 24 hours, carefully reattach the cabinet doors using the original hinges. -
Install New Hardware:
Measure and drill holes if your new hardware centers are different, then install glowing gold or brass pulls to contrast beautifully against the matte black. -
Final Touchups:
Place the drawers back into their tracks and check for any scuffs that might have happened during reassembly, touching up with a small artist’s brush if needed.
Now step back and admire how a simple can of black paint has completely elevated the character of your bathroom


Moody Navy Antique Vanity With Warm Hardware
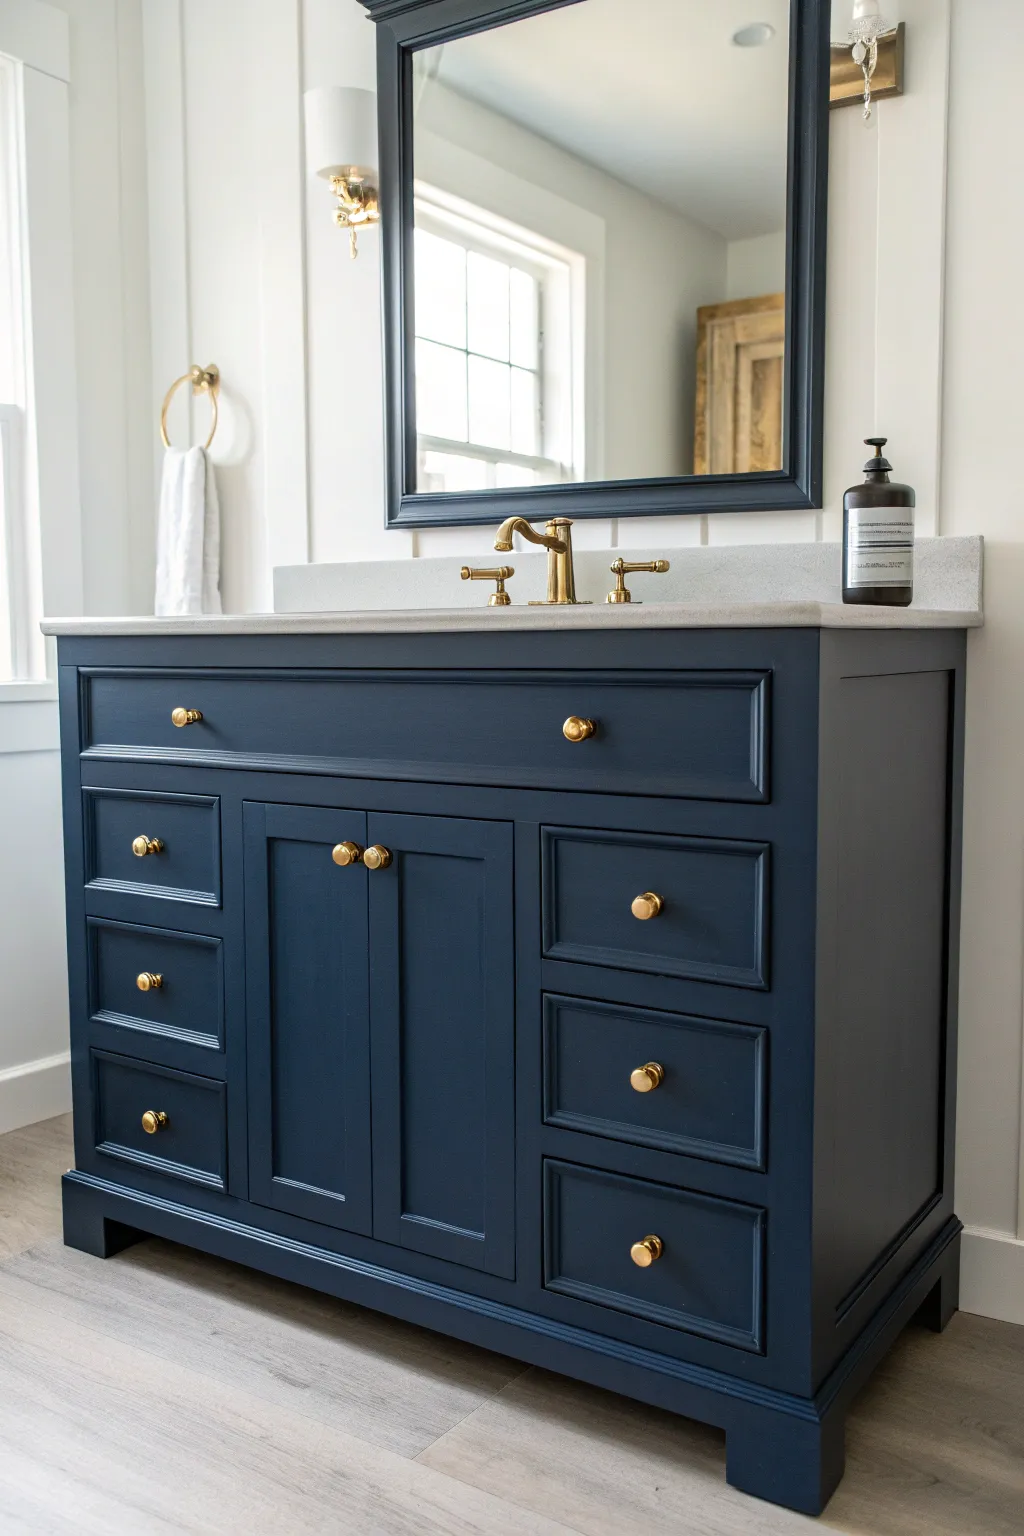
Transform an ordinary wooden vanity into a statement piece with a rich navy finish and contrasting warm gold accents. This renovation balances modern crispness with antique charm, creating a sophisticated focal point for any bathroom renovation.
Step-by-Step Tutorial
Materials
- Solid wood bathroom vanity (vintage or new)
- TSP substitute or degreaser
- Medium (120-grit) and fine (220-grit) sandpaper
- Tack cloth
- Wood filler
- High-quality bonding primer (shellac-based recommended)
- Semi-gloss or satin enamel paint (color matched to ‘Hale Navy’ or similar)
- High-density foam roller and tray
- Angled sash brush (1.5 – 2 inch)
- New brushed brass or gold hardware (knobs and pulls)
- Screwdriver or drill
- Painters tape
- Drop cloth
Step 1: Preparation & Repairs
-
Clear and clean:
Begin by removing all drawers and doors from the vanity frame. Unscrew the old hardware and set it aside or discard if replacing. Thoroughly clean all surfaces with a TSP substitute to remove decades of grime, grease, or hairspray residue. -
Fill imperfections:
Inspect the wood for deep scratches, gouges, or old hardware holes that don’t match your new pulls. Fill these spots with wood filler, slightly overfilling to account for shrinkage. -
Sand the surface:
Once the filler is dry, sand the entire vanity—frame, doors, and drawer fronts—with 120-grit sandpaper. You don’t need to strip it to bare wood, but you must scuff the glossy finish to ensure the new paint adheres. -
Detail sanding:
Switch to 220-grit sandpaper to smooth out the wood filler patches until they are perfectly flush with the surrounding surface. Feather the edges so they disappear under paint. -
Remove dust:
Vacuum up the bulk of the sanding dust. Finally, wipe every nook and cranny with a tack cloth to ensure a perfectly debris-free surface. -
Masking:
If your vanity top is attached, apply painter’s tape meticulously along the edges where the wood meets the countertop and the wall.
Smooth Finish Secret
Add a paint conditioner like Floetrol to your latex enamel. It slows drying time, allowing brush and roller marks to level out for a sprayed-on look.
Step 2: Priming & Painting
-
Apply primer:
Coat the vanity with a high-quality bonding primer. Using a shellac-based primer is smart here to prevent tannins from the old wood bleeding through your dark finish. -
Sand the primer:
After the primer has cured completely, lightly sand it with 220-grit sandpaper. This knocks down any brush strokes or texture, creating a glass-like base for your color. -
Wipe down:
Run the tack cloth over the surfaces one more time to catch that fine primer dust. -
Cut in edges:
Open your navy enamel paint. Use an angled sash brush to paint the recessed panels, corners, and detailed molding first. Go light on the paint to prevent pooling in the corners. -
Roll flat surfaces:
While the brushed edges are still wet, use a high-density foam roller to paint the flat drawer fronts, door panels, and cabinet sides. This technique eliminates brush marks. -
Dry and repeat:
Allow the first coat to dry according to the manufacturer’s instructions. Dark colors often look streaky after one coat, so don’t panic. Apply a second coat using the same brush-then-roll method for full opacity. -
Optional third coat:
For deep navy blues, I sometimes find a third, very thin coat is necessary to get that deep, velvet-like richness, especially on the frame.
Step 3: Finishing Touches
-
Curing time:
Let the paint cure undisturbed for at least 24 to 48 hours before reattaching anything. This hardens the enamel so it won’t chip when you install the doors. -
Drill for hardware:
If your new hardware requires different hole spacing, measure precisely and mark the new locations. Drill fresh pilot holes carefully to avoid splintering the new paint. -
Install hardware:
Attach your brushed brass knobs and pulls. Hand-tighten the screws with a screwdriver rather than a drill to prevent stripping the threads or cracking the finish. -
Reassembly:
Reattach the doors and slide the drawers back into place. Adjust the hinges as needed to ensure the gaps around the doors are even.
Sticky Drawers?
If painted drawers stick, rub a plain candle or beeswax along the wood runners. Avoid painting the actual sliding tracks to keep them moving freely.
Enjoy the dramatic elegance your newly finished vanity brings to the space


Dusty Blue Antique Vanity Cottage Look
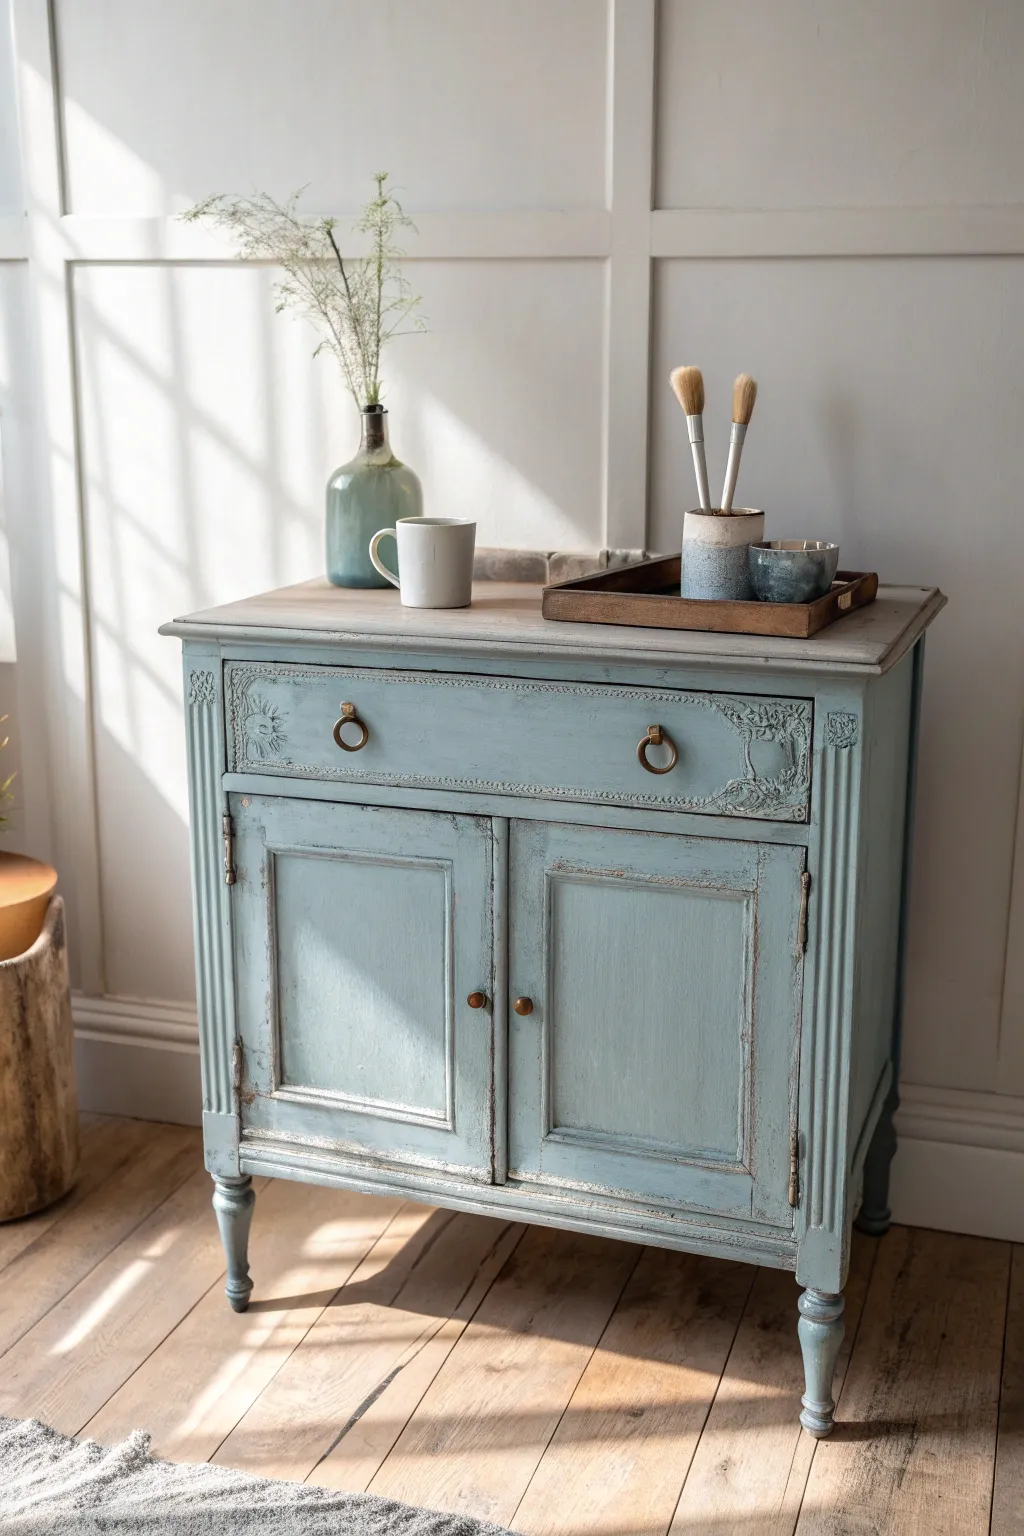
Transform a tired wooden cabinet into a serene cottage masterpiece with this dusty blue finish. The look combines soft, matte textures with subtle distressing to create a piece that feels both timeless and lovingly worn.
Step-by-Step
Materials
- Wooden vanity or small buffet cabinet
- Sander (orbital) and sandpaper (120, 220 grit)
- Wood filler
- Primer (stain-blocking)
- Chalk paint in ‘Dusty Blue’ or ‘Duck Egg’
- Chalk paint in ‘Cream’ or ‘Latte’ (for undercoat)
- Clear furniture wax
- Dark antique wax
- Wax brushes
- Synthetic paint brushes
- Clean lint-free rags
- Screwdriver (for hardware removal)
- Drop cloths
Step 1: Preparation
-
Remove Hardware:
Begin by taking off all knobs, pulls, and hinges using a screwdriver. Keep these screws and pieces in a labeled bag so nothing gets lost during the process. -
Clean the Surface:
Wipe down the entire piece with a degreasing cleaner or a mix of warm water and vinegar to remove years of dust, oil, and furniture polish. Let it dry completely. -
Sand the Top:
For that natural wood top look, sand the top surface down to bare wood using an orbital sander. Start with 120-grit paper to remove old varnish and finish with 220-grit for a smooth touch. -
Scuff Sand the Body:
Lightly hand-sand the body of the vanity with 220-grit sandpaper. You aren’t trying to remove all the old finish here, just giving the primer something to grip onto. -
Repair Imperfections:
Fill any deep gouges or unwanted holes with wood filler. Once dry, sand these spots flush with the surface.
Waxing Wisdom
Always apply a layer of clear wax BEFORE dark wax. The clear wax acts as an eraser, allowing you to control and wipe back the dark wax easily.
Step 2: Painting & Distressing
-
Prime the Body:
Apply a coat of stain-blocking primer to the body of the cabinet. This prevents old wood tannins from bleeding through your beautiful blue paint later. -
Apply Base Color:
Paint a thin coat of your creamy ‘Latte’ or off-white color on the areas where you plan to distress heavily—like edges, corners, and carved details. This ensures that when we sandpaper later, a nice contrasting color shows through instead of just bare wood. -
First Coat of Blue:
Once the undercoat is dry, apply your ‘Dusty Blue’ chalk paint liberally. Use long, smooth strokes, following the grain of the wood. Don’t worry about complete opacity yet. -
Second Coat of Blue:
Apply a second coat of blue paint for full coverage. I like to use a slightly drier brush here to avoid drips in the fluted columns and detailed carvings. -
Wet Distressing:
Before the paint fully cures but is dry to the touch, take a damp heavy-duty sponge or cloth. Gently rub the high points—edges of the doors, the ornate drawer carvings, and the fluting—to reveal the cream paint or wood underneath. -
Sandpaper Distressing:
For sharper distressed lines, use a folded piece of 220-grit sandpaper on the corners and feet. This mimics natural wear and tear where the furniture would be touched most often.
Carving Pop
Highlight ornate carvings by dry-brushing a tiny amount of metallic gold or bronze wax on the highest points for a hint of elegance.
Step 3: Sealing & Finishing
-
Whitewash the Top:
Create a wash by mixing 1 part white or cream paint with 1 part water. Brush this quickly onto the bare wood top and wipe it back almost immediately with a rag. This gives that soft, bleached-wood look without hiding the grain. -
Seal the Top:
Once the wash is dry, apply three coats of a matte, water-based polyurethane to the top for durability. Sand lightly between coats with fine sandpaper. -
Wax the Body:
Using a wax brush, work clear furniture wax into the painted body in sections. Massage it into the paint like lotion into dry skin, then buff off the excess with a clean rag. -
Apply Dark Wax:
To age the piece, dip a small brush into dark antique wax. Apply it sparingly into crevices, corners, and carvings. Immediately wipe it back with a clear-waxed rag if it gets too dark; this creates depth and shadow. -
Reattach Hardware:
Clean your original hardware or source new brass ring pulls. Screw them back onto the drawers and doors to complete the transformation.
Now step back and admire how a splash of dusty blue has given your old furniture a soulful new identity
BRUSH GUIDE
The Right Brush for Every Stroke
From clean lines to bold texture — master brush choice, stroke control, and essential techniques.
Explore the Full Guide
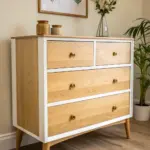
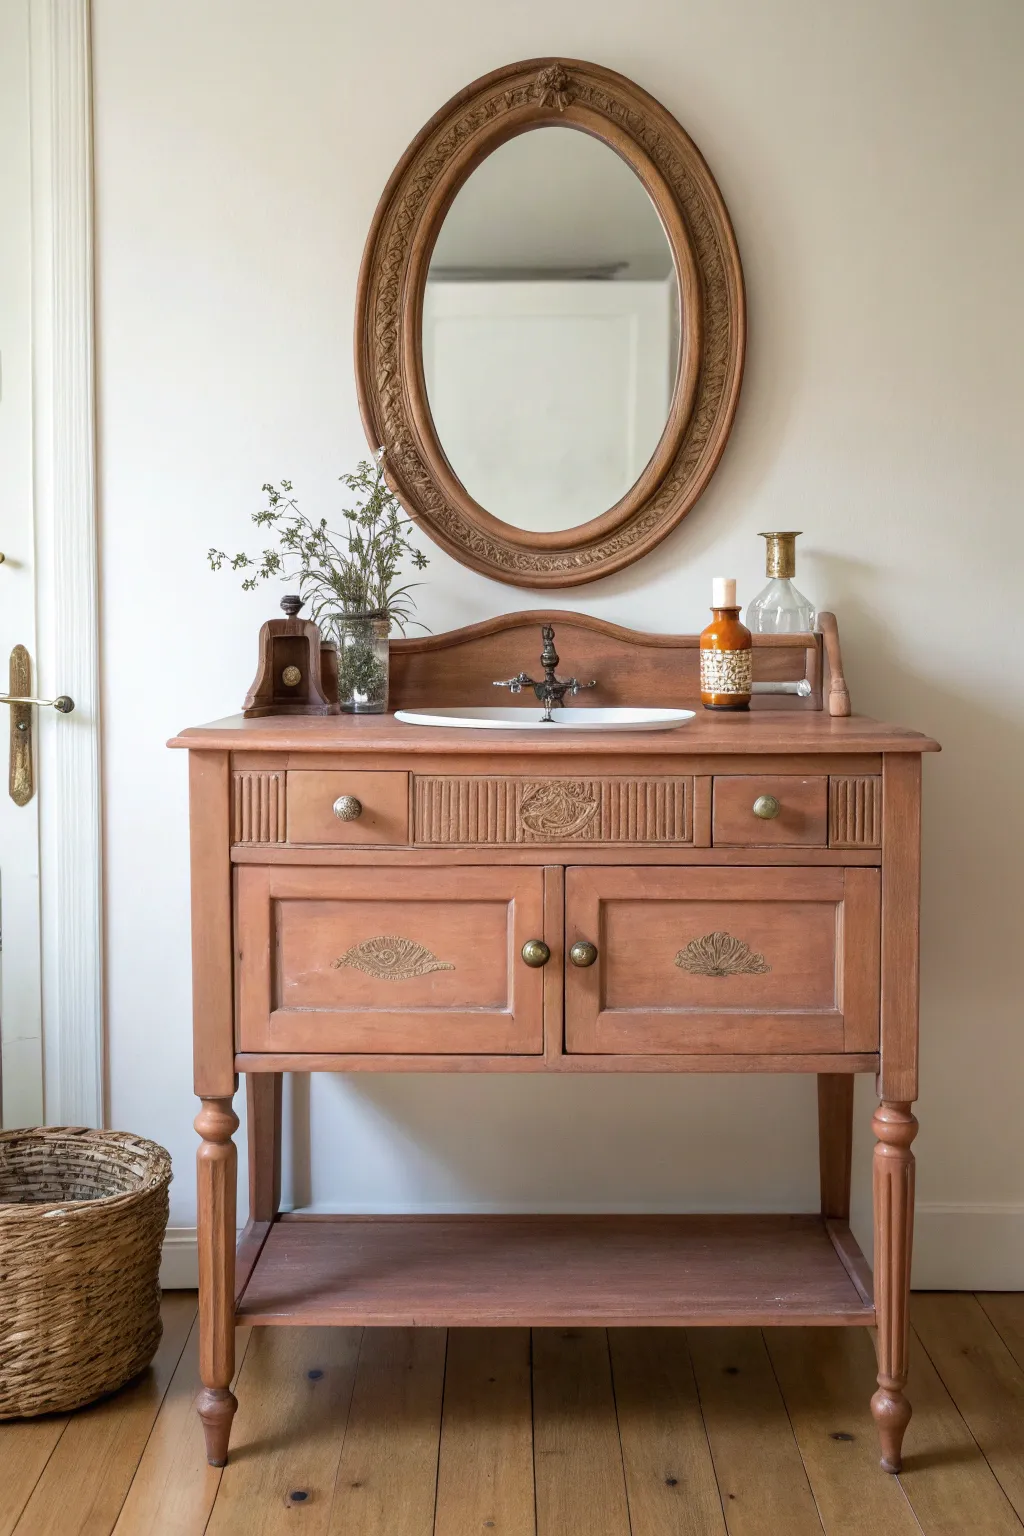
Two-Tone Antique Vanity With Natural Wood Top
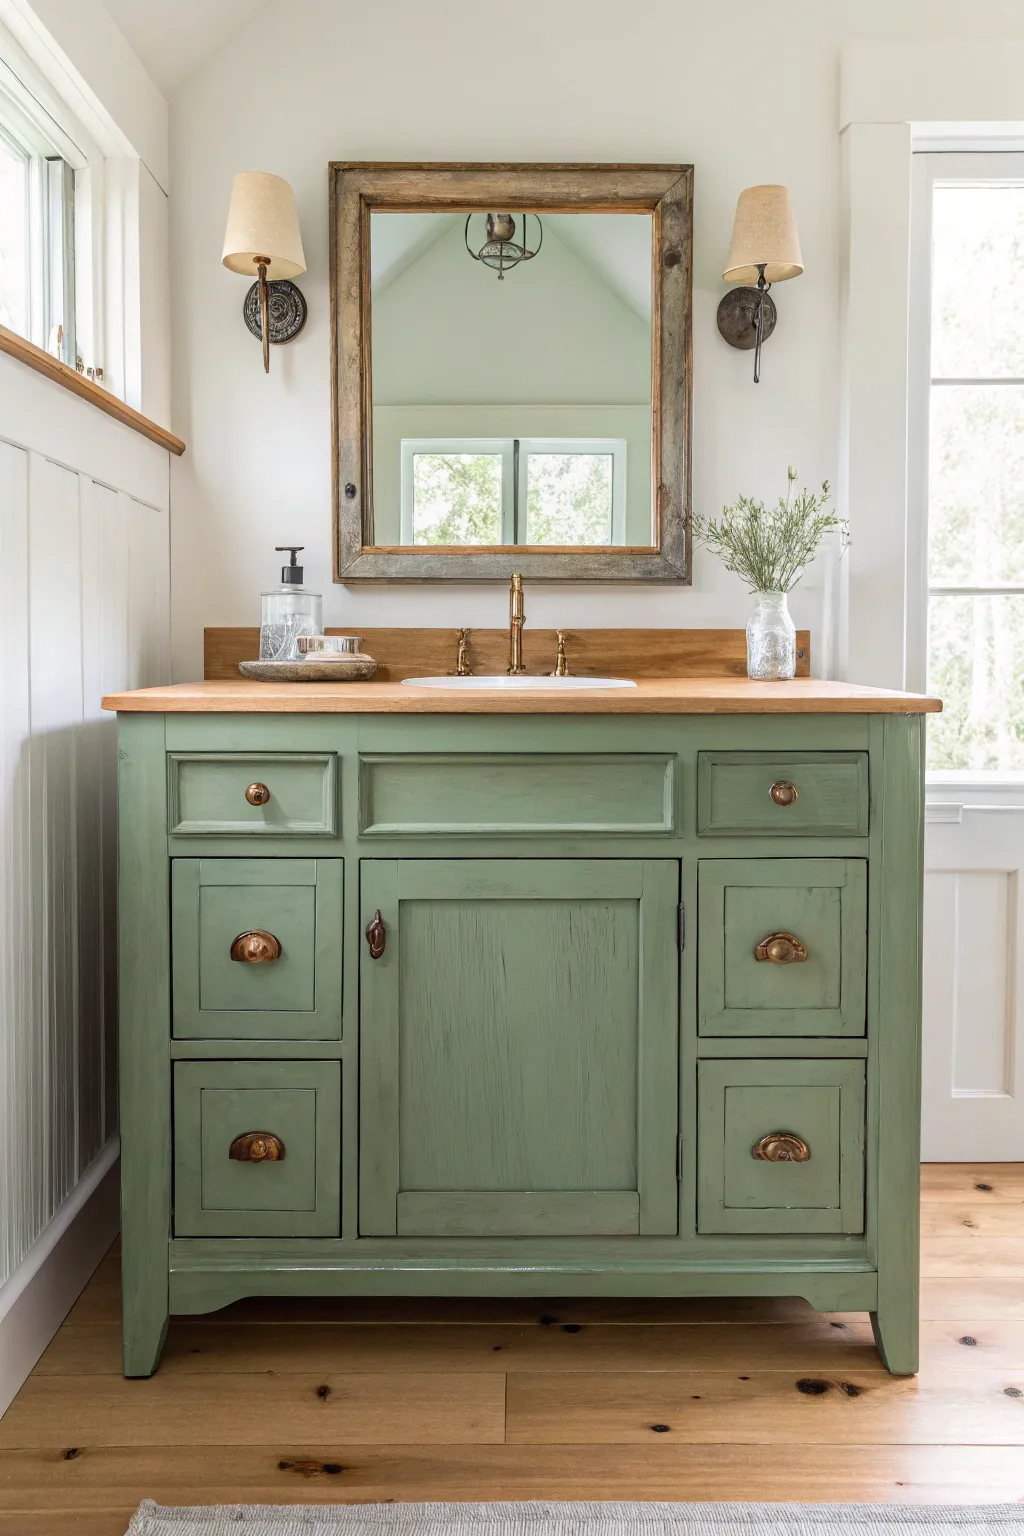
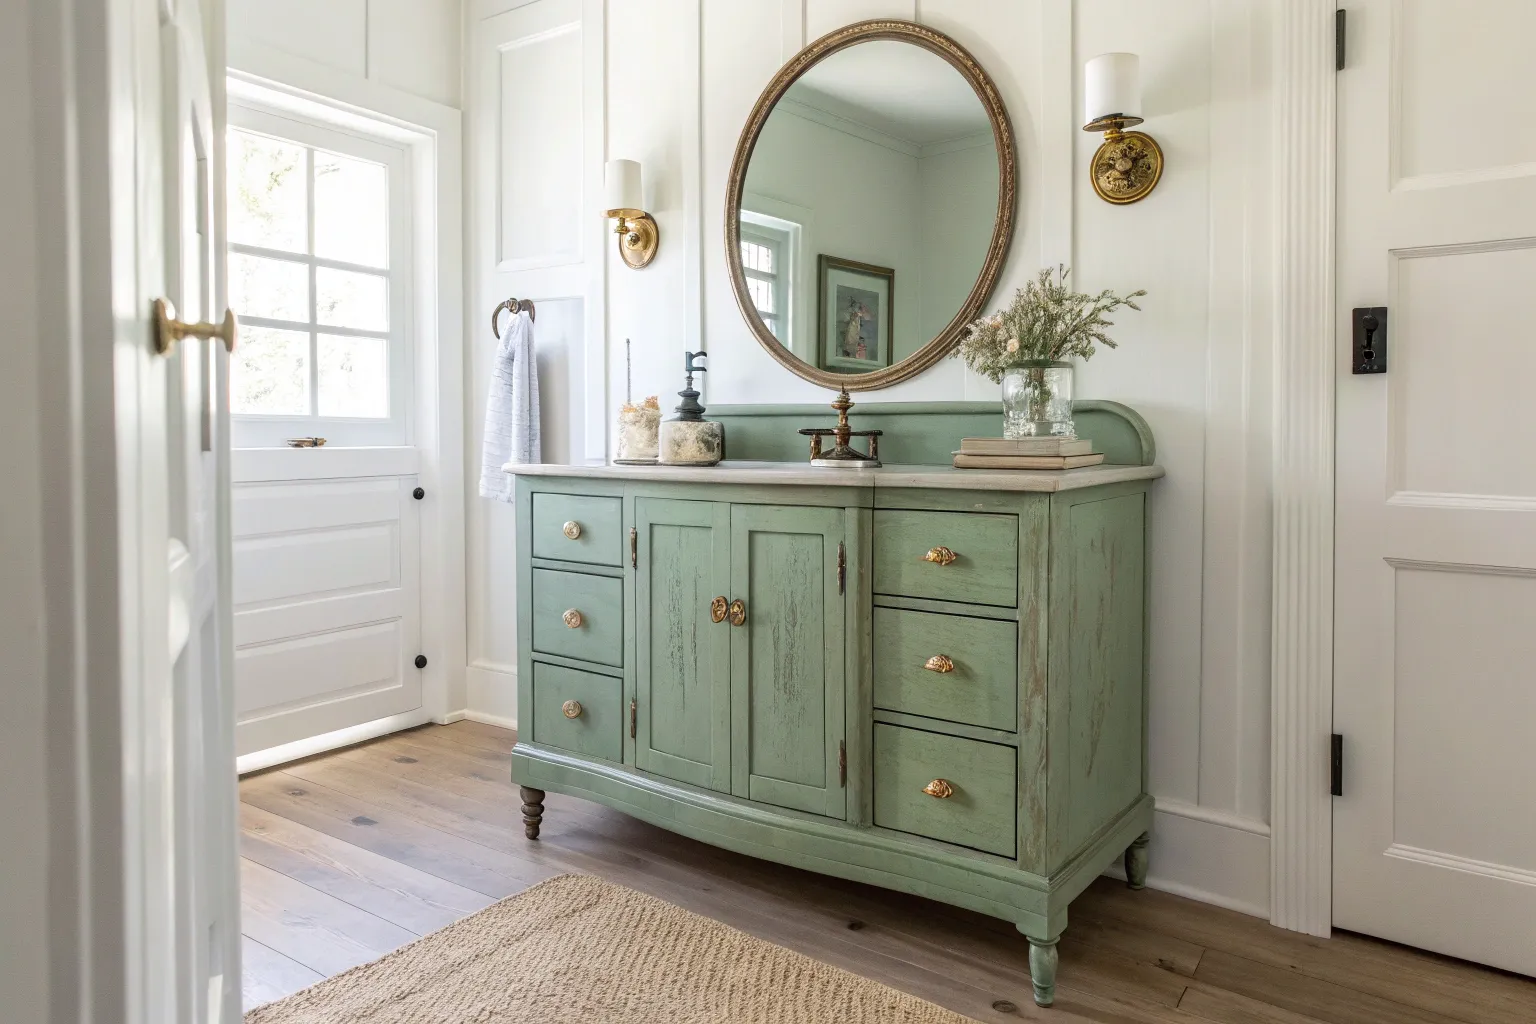
Transform a tired antique dresser into a charming bathroom vanity featuring a soft sage green body and a warm, exposed wood top. This two-tone finish balances rustic warmth with cottage elegance, perfect for a cozy bathroom update.
Detailed Instructions
Materials
- Antique wooden dresser or vanity
- Orbital sander with varying grits (80, 120, 220)
- Chemical paint stripper (optional, for heavy varnish)
- Wood filler
- Painter’s tape
- Stain-blocking primer (shellac-based recommended)
- Sage green furniture paint (chalk or mineral paint)
- Matte polyurethane topcoat (water-based)
- Natural wood stain (optional)
- Tung oil or marine varnish (for water resistance)
- Antique brass cup pulls and knobs
- Plumbing kit (sink basin and faucet)
- Jigsaw (for plumbing cutouts)
- Paintbrushes and foam rollers
- Tack cloths
Step 1: Preparation & Stripping
-
Remove hardware and doors:
Begin by taking off all old knobs, pulls, and hinges. Remove the drawers and the cabinet door. Number the drawers on the underside so you know exactly where they go back later. -
Assess the top surface:
Since we want a natural wood top, inspect the existing surface. If it has thick varnish or paint, apply a chemical stripper according to the manufacturer’s instructions to lift the bulk of the old finish. -
Sand the top to bare wood:
Using an orbital sander, start with 80-grit paper to remove any remaining finish on the top. Progress to 120-grit, and finally 220-grit for a silky smooth feel. Wipe away dust frequently with a tack cloth. -
Prepare the body:
Scuff sand the painted or stained body of the vanity with 120-grit sandpaper. You don’t need to strip this to bare wood, just create enough ‘tooth’ for the new primer to adhere. -
Accommodate plumbing:
If converting a dresser, use a jigsaw to cut openings in the back panel and the top surface for your sink and faucet pipes. You may also need to modify the top drawer to wrap around the plumbing.
Bleed-Through Blues?
If pink or yellow stains appear through the primer, stop painting. Apply another coat of shellac-based primer specifically to the spots. It seals tannins better than water-based primers.
Step 2: Painting the Body
-
Clean and tape:
Thoroughly clean the entire piece with a degreaser to remove oils and sanding dust. Once dry, use high-quality painter’s tape to protect the newly sanded wood top edges from paint splatter. -
Apply primer:
Brush on a coat of stain-blocking shellac-based primer. This step is crucial with antique furniture to prevent old tannins from bleeding through your light green paint. -
First coat of color:
Stir your sage green mineral or chalk paint well. Apply the first coat using a synthetic brush for corners and detailed moldings, and a small foam roller for flat side panels to minimize brush strokes. -
Sand between coats:
Once the first coat is completely dry, lightly sand it by hand with 400-grit sandpaper to knock down any nibs. Wipe clean with a tack cloth. -
Second coat of color:
Apply a second coat of green paint for full, opaque coverage. I find two coats are usually sufficient, but check for any thin spots in bright light. -
Paint the drawers and door:
Repeat the priming and painting process for the drawer fronts and the cabinet door. Don’t paint the sides of the drawers, or they may stick when sliding.
Step 3: Sealing & Assembly
-
Seal the painted areas:
Protect your green paint by applying two coats of a clear, water-based matte polyurethane. This ensures the bathroom humidity won’t damage the finish. -
Stain the wood top:
If you want a richer tone, apply a wood stain to the sanded top now. Wipe off excess stain and let it dry completely. If you prefer the raw look, skip straight to sealing. -
Waterproof the top:
The top needs heavy-duty protection against water splashes. Apply 3-4 coats of marine varnish or pure tung oil, allowing ample drying time between layers. Pay special attention to the rim of the sink cutout. -
Install the sink:
Once the top is fully cured, install your sink basin according to product instructions, sealing the edges with clear silicone caulk to prevent water ingress. -
Add hardware:
Install the antique brass cup pulls on the drawers and the knobs on the smaller top drawers. Reattach the cabinet door with its hinges. -
Final touches:
Slide the drawers back into their designated slots. Place the vanity in your bathroom and connect the plumbing.
Level Up: Wood Backsplash
Use leftover wood from a matching species to create a short 3-inch backsplash. Attach it to the back edge and seal it heavily to protect the wall from water damage.
Enjoy the serene, custom look of your new vanity every time you walk into the bathroom
Two-Tone Antique Vanity With Unpainted Drawers
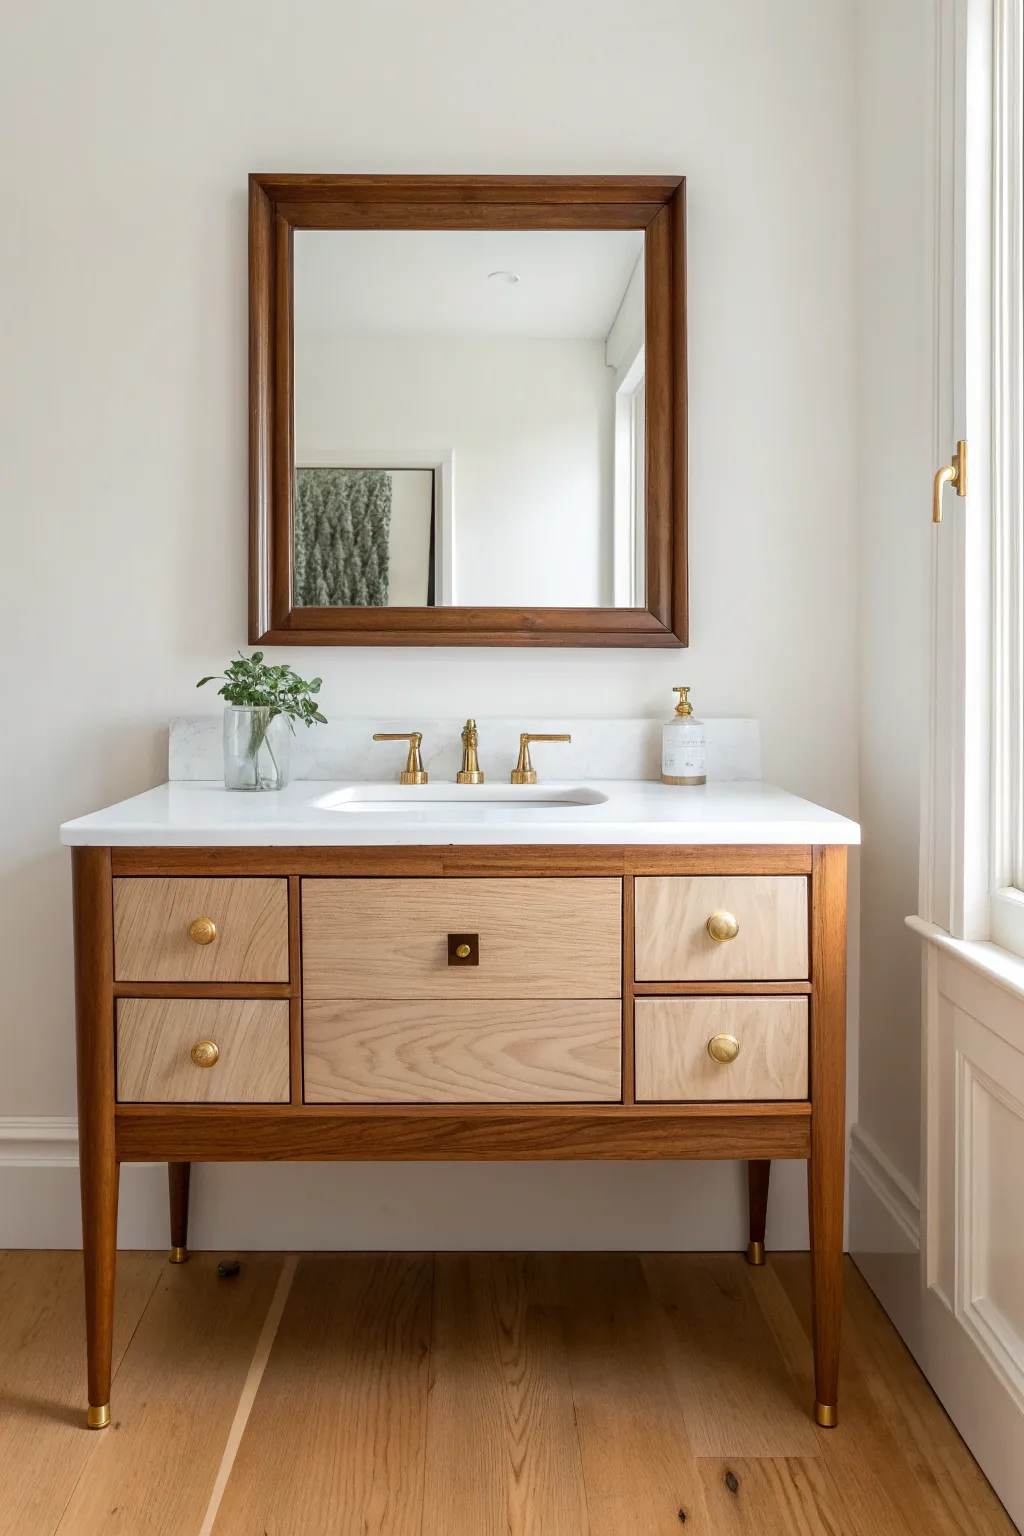
This project breathes new life into a vintage vanity by contrasting rich, stained structural elements with raw, bleached wood drawers for a sophisticated contemporary look. The result is a bespoke piece that feels both grounded and airy, perfect for a modern bathroom update.
Step-by-Step
Materials
- Solid wood vanity with drawers
- Orbital sander
- Sandpaper (80, 120, 220 grit)
- Chemical paint stripper (optional)
- Household bleach or 2-part wood bleach
- Mineral spirits
- Pre-stain wood conditioner
- Medium walnut or teak gel stain
- Water-based matte polyurethane
- Brass or gold geometric knobs
- Screwdriver
- Clean lint-free rags
- Foam brushes and high-quality bristle brushes
- Painter’s tape
Step 1: Preparation & Disassembly
-
Remove hardware and drawers:
Begin by removing all existing knobs, pulls, and hinges using a screwdriver. Pull out all the drawers and set them aside on a drop cloth. Remove the old countertop carefully if you plan to replace it. -
Clean surfaces:
Wipe down the entire vanity frame and drawer fronts with a mixture of mild soap and water or a degreaser to remove years of grime and oils. -
Strip the finish:
If the existing finish is very thick, apply a chemical stripper according to the manufacturer’s instructions to scrape off the bulk of the varnish. If the finish is thin, you can skip straight to sanding.
Step 2: Sanding & Bleaching
-
Sand the drawer fronts:
Using an orbital sander, sand the drawer fronts down to bare wood. Start with 80-grit to remove the old finish, progress to 120-grit, and finish with 220-grit for a smooth surface. Be extra thorough here; any remaining varnish will prevent the bleaching process from working evenly. -
Sand the frame:
Sand the main body and legs of the vanity. Since you will be staining this darker, you don’t need to get it as raw as the drawers, but you must remove the glossy topcoat and scuff the surface well so the new stain adheres. -
Bleach the drawers:
To achieve that pale, raw oak look, apply household bleach (or a 2-part wood bleach kit for stronger results) to the bare wood drawers using a sponge. Let it dry completely in the sun. I usually repeat this process 2-3 times until the red/orange undertones are gone. -
Neutralize and dry:
Once you’re happy with the lightness, wipe the bleached wood with a rag dampened with a 50/50 water and white vinegar mix to stop the chemical reaction. Let the wood dry for at least 24 hours.
Bleach Not Lifting Color?
If regular household bleach isn’t lifting the red tones, switch to a 2-part A/B wood bleach (sodium hydroxide and hydrogen peroxide). It’s much stronger and chemically alters the wood color.
Step 3: Staining & Sealing
-
Condition the frame:
Apply a pre-stain wood conditioner to the vanity frame and legs. This is crucial for preventing blotchiness, especially on older wood species. -
Stain the frame:
Using a lint-free rag or foam brush, apply a gel stain in a medium walnut or teak tone to the frame and legs. Gel stain sits on top of the surface better than penetrating stain, making it easier to control the color depth. -
Wipe and dry:
Wipe away excess stain after a few minutes, always moving with the grain. Let the stain dry according to the can’s directions, usually overnight. -
Seal the drawers:
Apply a water-based matte polyurethane to the bleached drawers. Water-based is essential here because oil-based sealers will amber over time and ruin the pale, raw look you worked hard to achieve. -
Seal the frame:
Apply two to three coats of the same matte polyurethane to the stained frame for durability against bathroom moisture. -
Sand between coats:
Between each coat of sealer (on both drawers and frame), lightly hand-sand with 320-grit paper or a brown paper bag to knock down any raised grain for a professional, buttery finish.
Pro Tip: Grain Direction
When bleaching the drawers, wipe the solution on following the wood grain. Circular motions can leave swirl marks that become visible once the final clear coat is applied.
Step 4: Reassembly
-
Install the countertop:
Once the vanity base is fully cured, install your countertop (white quartz or marble works beautifully here) and secure it with silicone adhesive. -
Attach new hardware:
Drill new holes if your new hardware has different spacing. Install the brass knobs on the side drawers and a square latch or unique pull on the center drawer for visual interest. -
Add feet details:
For the finishing touch seen in the photo, add brass ferrules (caps) to the bottom of the legs, or simply paint the bottom inch with liquid gold leaf if you can’t find metal caps that fit.
Enjoy the custom, high-end look of your newly refreshed vanity every time you step into your bathroom

PENCIL GUIDE
Understanding Pencil Grades from H to B
From first sketch to finished drawing — learn pencil grades, line control, and shading techniques.
Explore the Full Guide
Gently Distressed Antique Vanity Edges
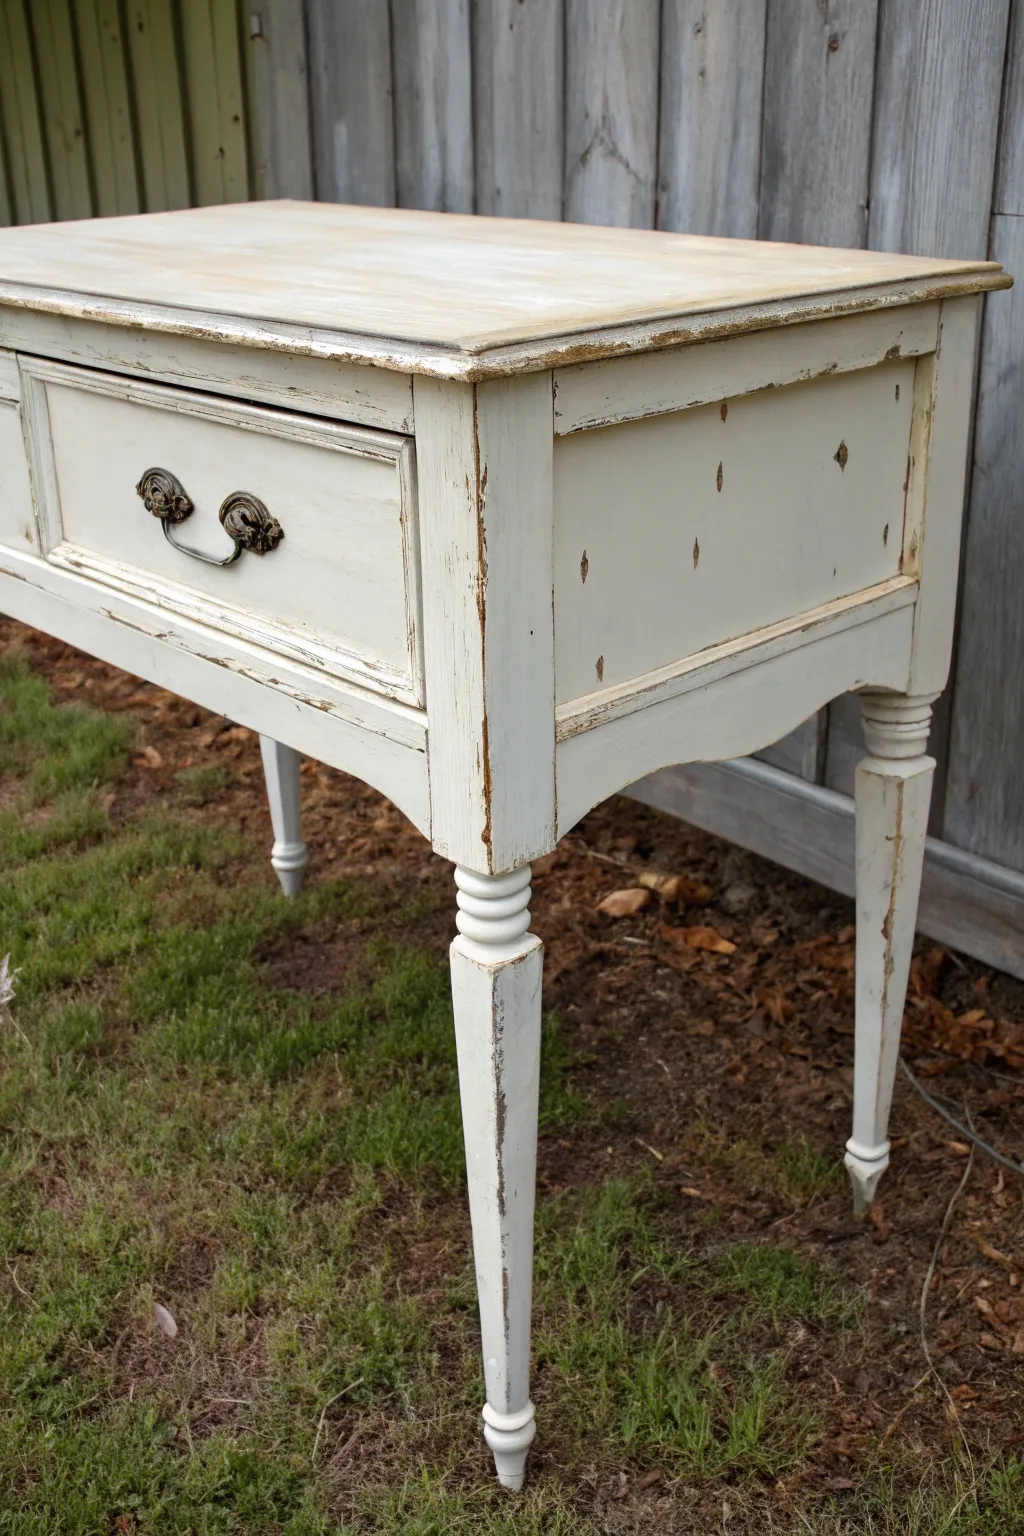
Transform a tired wooden piece into a charming rustic vanity with this heavy distressing technique. The bright white finish contrasts beautifully with peek-a-boo natural wood edges, giving it that authentic, time-worn farmhouse appeal.
How-To Guide
Materials
- Antique wooden vanity or desk
- Medium-grit sandpaper (100-120 grit)
- Fine-grit sandpaper (220 grit)
- Chalk-style paint (Creamy White)
- Paintbrush (synthetic bristle)
- Clean lint-free rags
- Water (for diluting)
- Clear furniture wax
- Wax brush or soft cloth
- Screwdriver (for hardware removal)
Step 1: Preparation and Base
-
Remove hardware:
Start by unscrewing all pulls, handles, and knobs. Keep them safe in a baggie; for this look, the original antique hardware is usually perfectly tarnished, so no cleaning is needed. -
Clean surface:
Wipe down the entire piece with a mild cleaner or a damp cloth to remove years of dust and grime. Let it dry completely. -
Sand the top:
Using your medium-grit sandpaper, sanding the top surface down to raw wood. You want to remove most of the old glossy varnish so the wood grain is exposed. -
Scuff the body:
Lightly scuff sand the legs, sides, and drawers just enough to give the surface ‘tooth’ for the paint to grab onto. -
Create a wash:
In the small container, mix your white chalk paint with water. Aim for a 1:1 ratio—you want a milky consistency, not a thick paint. -
Apply the top wash:
Brush the watery mixture over the sanded wood top. Work in sections, applying the paint and then immediately wiping most of it back with a rag. This allows the grain to show through while tinting it white.
Natural Wear Patterns
Focus sanding heavily on corners, feet, and raised trim. These are the spots that naturally get bumped over 100 years, making the distressing look authentic rather than manufactured.
Step 2: Painting and Distressing
-
Paint the body:
Using your undiluted chalk paint, apply a coat to the rest of the vanity—legs, sides, and drawer fronts. Don’t worry about perfect coverage; brush strokes add character here. -
Second coat:
Once the first coat is dry to the touch (usually 30-60 minutes), apply a second coat for a more solid white finish. -
Dry completely:
Allow the paint to cure for at least a few hours or overnight. Distressing wet paint results in a muddy mess, so patience is key. -
Distress the edges:
Take your 100-grit sandpaper and firmly sand along the sharp edges of the legs, drawer frames, and corners. Apply pressure until you break through the white paint to reveal the dark wood underneath. -
Add random wear:
Identify high-traffic spots. I like to hit the areas around where the handles will go and random spots on the flat panels to simulate accidental bumps over time. -
Soften the sanding:
Switch to fine-grit (220) sandpaper and lightly go over the entire painted surface. This smooths out any rough brush strokes and feathers the edges of your heavy distress marks.
Step 3: Finishing Touches
-
Dust off:
Use a tack cloth or a clean, dry rag to carefully wipe away all the sanding dust. Any leftover dust will get trapped in the wax. -
Apply wax:
Using a wax brush or lint-free cloth, massage clear furniture wax into the paint and the exposed raw wood areas. This seals the piece and enriches the color of the revealed wood. -
Buff the finish:
Let the wax sit for about 15-20 minutes, then buff it vigorously with a clean cotton cloth to create a soft, satin sheen. -
Reinstall hardware:
Screw the original handles back onto the drawers to complete the vintage look.
Paint Peeling Too Much?
If paint peels off in large chunks while sanding, it hasn’t bonded well. Let it cure longer (24 hrs) before sanding again, or use a finer grit paper with a lighter touch.
Step back and admire how perfectly imperfect your new antique piece looks in the light
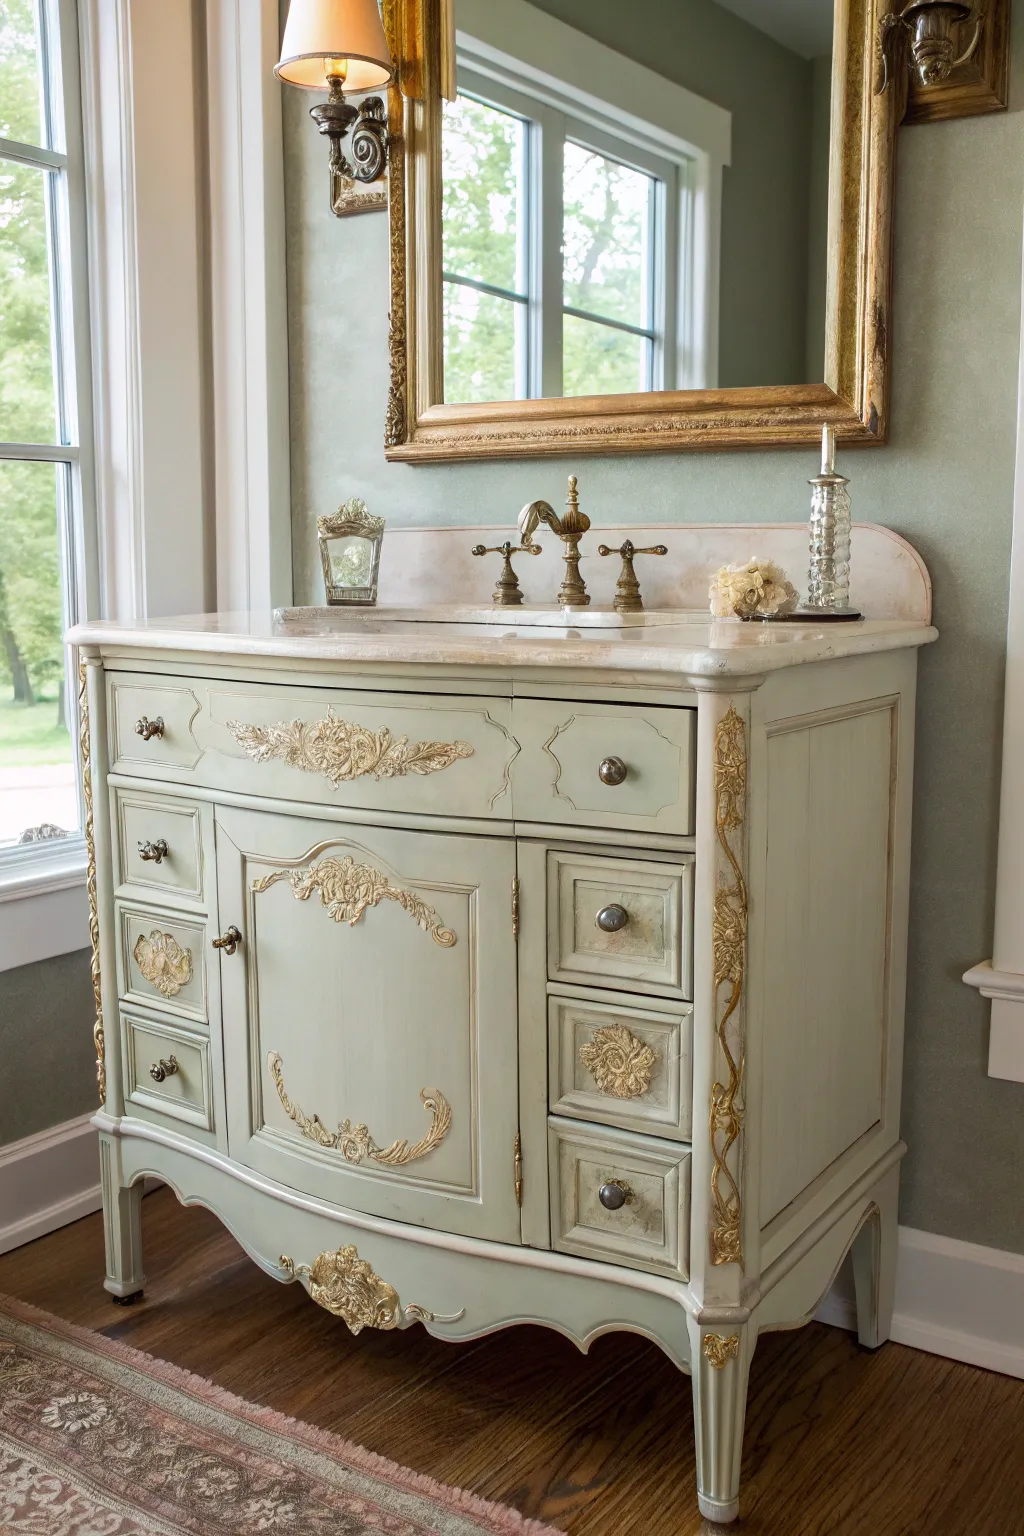
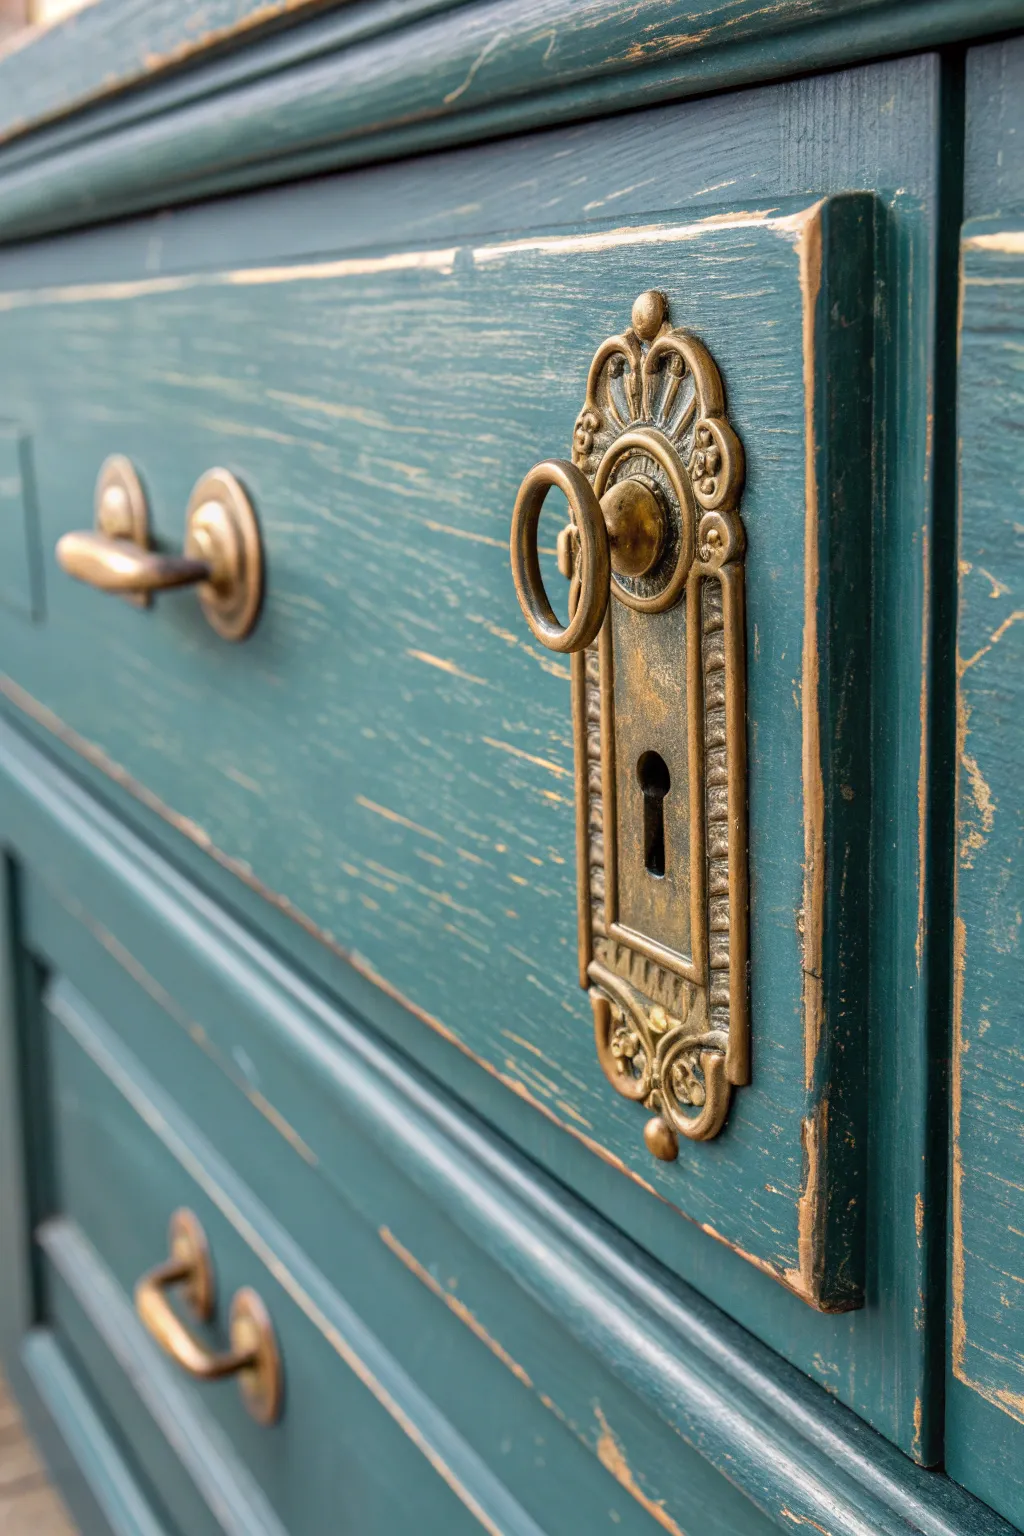
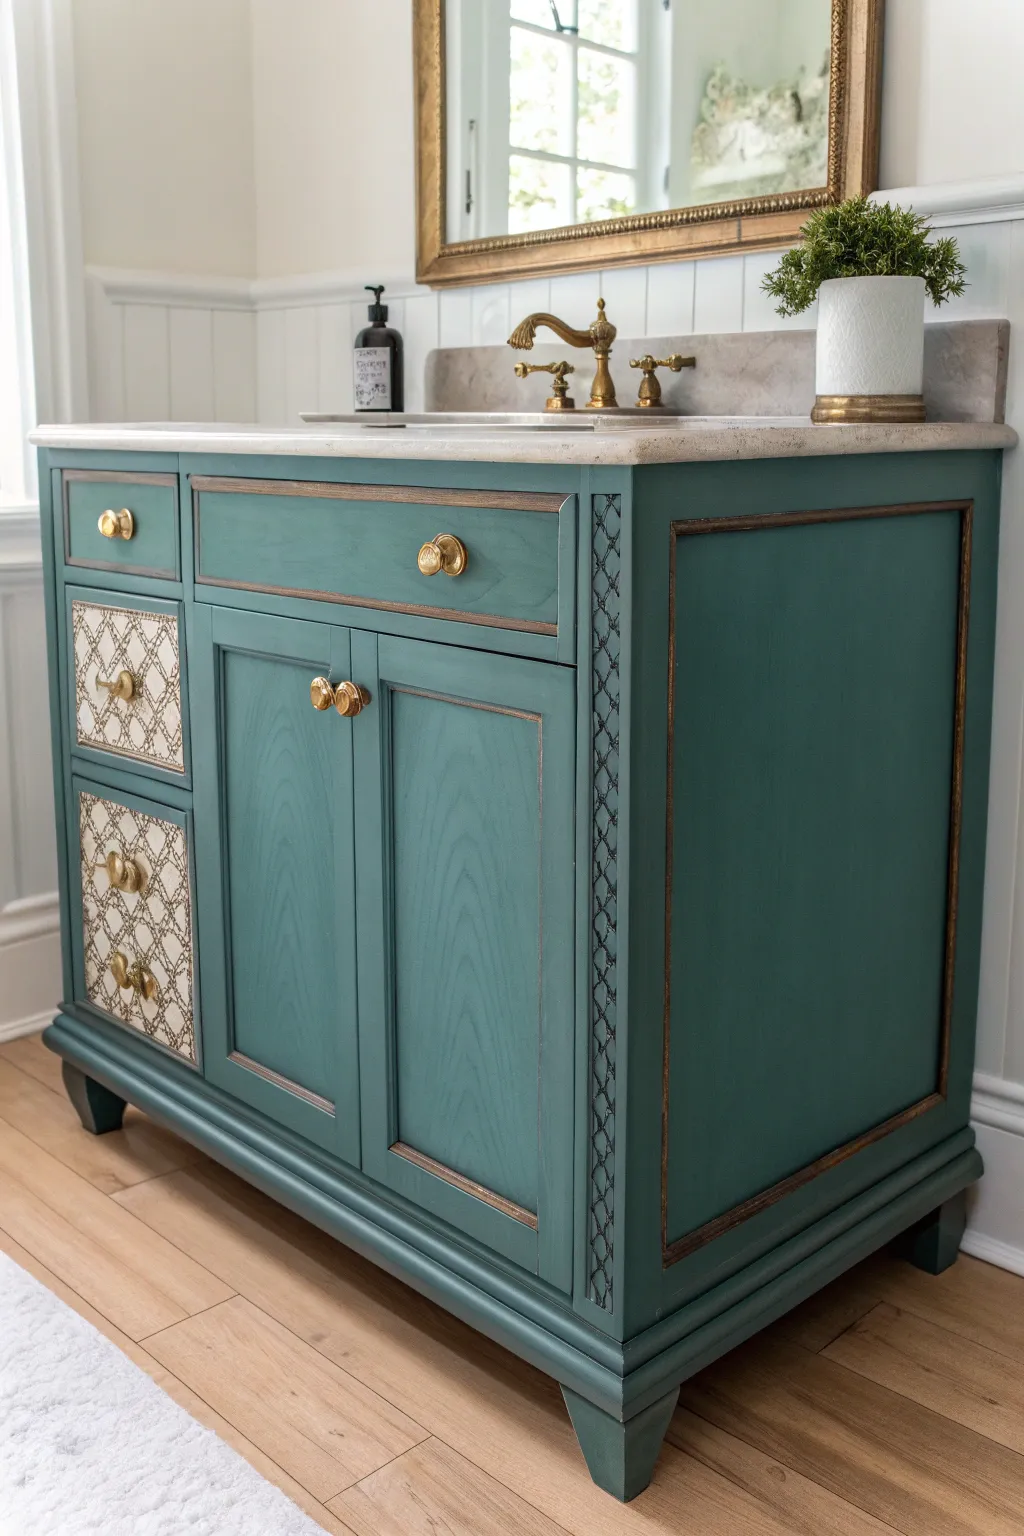
Antiquing Glaze for an Aged Antique Vanity
Transform a dated wooden piece into a stunning, vintage-inspired focal point with a custom teal finish and antiquing glaze. This technique highlights intricate carvings and adds centuries of character in just a weekend.
Step-by-Step Guide
Materials
- Ornate wooden vanity or nightstand
- Degreasing cleaner (TSP substitute)
- Medium and fine grit sandpaper (120 and 220 grit)
- Teal chalk-style paint
- Dark brown antiquing wax or glaze
- Clear furniture wax
- High-quality synthetic bristle brush
- Wax brush or round natural bristle brush
- Lint-free cotton rags
- Painter’s tape
- Screwdriver (for hardware removal)
- Clean water for misting
Step 1: Preparation & Base Coat
-
Remove Hardware:
Begin by removing all drawer pulls, knobs, and hinges. Store them in a marked bag so you don’t lose any screws. If the drawers are removable, take them out to make painting the frame easier. -
Clean Thoroughly:
Scrub the entire piece with a degreasing cleaner to remove oils, old polish, and dirt. A TSP substitute works well here. This step is crucial for paint adhesion, so don’t skip it. -
Light Sanding:
Once dry, lightly scuff sand the brilliant surface with 120-grit sandpaper. You aren’t stripping the finish, just giving the paint something to grip. Wipe away all dust with a damp rag. -
Tape Off Interiors:
Use painter’s tape to protect the inside edges of the drawers and the drawer runners. We want to keep that beautiful natural wood interior pristine, just like in the example photo. -
First Coat Application:
Apply your first coat of teal chalk-style paint using a synthetic bristle brush. Don’t worry about complete opacity yet; thorough coverage is better than thick, gloopy layers. -
Focus on Crevices:
When painting the ornate carvings, use a stabbing or stippling motion to push the paint deep into the recesses. Ensure no bare wood shows through the details. -
Second Coat:
After the first coat is fully dry (usually 1-2 hours), apply a second coat. This layer provides the rich, solid color foundation needed for the antiquing process.
Step 2: Distressing & Glazing
-
Distress Edges:
Using 220-grit sandpaper, gently sand high points, corners, and raised details on the carvings. The goal is to reveal a bit of the original wood underneath, mimicking natural wear. -
Clean Dust:
Thoroughly remove all sanding dust with a tack cloth or vacuum. Dust trapped under wax will make the finish look muddy. -
Apply Clear Wax:
Brush on a thin layer of clear furniture wax over the entire painted surface. This acts as a barrier so the dark glaze doesn’t stain the paint too heavily or permanently. -
Apply Dark Glaze:
Working in small sections, brush the dark antiquing glaze or dark wax generously over the carvings and flat surfaces. Make sure it gets into all the deep grooves of the rosette and leaf details. -
Wipe Back Glaze:
Immediately wipe away the excess glaze with a clean, lint-free cloth. I like to wipe gently so the dark color stays trapped in the recesses while cleaning up the high points. -
Blend & Buff:
Keep wiping until you achieve your desired level of ‘grunge.’ If a spot is too dark, apply a little more clear wax to your rag and use it like an eraser to lift the dark pigment. -
Curing Time:
Allow the wax works to cure and harden. This usually takes 24 hours to feel dry to the touch, and up to 30 days for a full cure. -
Reattach Hardware:
Once the surface isn’t tacky, reattach your original hardware or add new antique brass knobs to complement the teal.
Glaze Control
Work in small sections (like one drawer front at a time). If the glaze dries before you wipe it back, it becomes very difficult to manipulate.
Too Dark?
If the dark wax looks too heavy or muddy, don’t scrub! Apply a dollop of clear wax to a clean cloth and gently buff the area to lift the excess pigment.
Now you have a beautifully aged piece that adds a touch of history to your room


Dry-Brushed Metallic Highlights on an Antique Vanity
Transform a tired wooden vanity into a regal powder room centerpiece with this sophisticated painting technique. By layering a soft sage green base with strategic gold dry-brushing, you’ll achieve a finish that feels both historically grounded and freshly elegant.
Step-by-Step Tutorial
Materials
- Antique wooden vanity with detailed carvings
- Degreaser or TSP substitute
- Medium and fine-grit sandpaper (120 and 220 grit)
- High-quality adhesion primer
- Chalk-style or mineral paint in soft sage/celadon green
- Metallic gold paint or gilding wax
- Small artist brushes and chip brushes
- Clear protective topcoat (matte or satin finish)
- Painter’s tape
- Lint-free rags
- Screwdriver for hardware removal
Step 1: Preparation & Priming
-
Remove Hardware:
Carefully unscrew and remove all drawer pulls, knobs, and hinges. Place them in labeled bags so you don’t lose any tiny vintage screws. If the faucet is installed, tape it off meticulously with painter’s tape. -
Clean Thoroughly:
Scrub the entire vanity with a degreaser or TSP substitute. Vintage pieces often have years of built-up oil and wax that will repel paint, so don’t rush this step. Wipe away any residue with a damp cloth. -
Scuff Sanding:
Lightly sand the existing finish with 120-grit sandpaper. You aren’t trying to strip it to bare wood, just creating ‘tooth’ for the primer to grip. Wipe away all dust with a tack cloth or damp rag. -
Priming:
Apply a coat of high-quality adhesion primer. Use a brush to get into the ornate carvings first, then roll the flat surfaces for a smooth finish. Let this dry completely according to the can’s instructions.
Less Is More
When dry-brushing the gold, hold your brush perpendicular to the surface and use a feather-light touch. You only want to kiss the raised texture, not paint stripes.
Step 2: Painting the Base
-
First Coat:
Apply your first coat of sage green chalk or mineral paint. I find that using a synthetic oval brush helps distribute paint evenly over curves and intricate details without leaving heavy brush marks. -
Check for Drips:
While the paint is still wet, inspect the crevices of the carvings. Paint loves to pool there; gently wick away excess with your dry brush tip to prevent globs from drying. -
Second Coat:
Once the first coat is dry to the touch (usually 1-2 hours for chalk paint), apply a second coat for full opacity. This color tone relies on a solid, opaque background to make the gold pop later. -
Smooth Sanding:
After the final coat dries overnight, very lightly run 220-grit sandpaper over the flat surfaces. This knocks down any tiny fibers or brush strokes, making the finish feel like factory satin.
Step 3: The Gilded Details
-
Prepare the Palette:
Squeeze a small amount of metallic gold paint onto a paper plate or cardboard scrap. You want a bright, true gold rather than a dark bronze for this specific look. -
Load the Brush:
Dip a small, stiff-bristled artist brush or a dedicated dry-brush into the gold paint. Immediately wipe 90% of the paint off onto a paper towel until the brush looks almost dry. -
Highlighting Edges:
Lightly drag the brush over the raised edges of the carvings, trims, and appliques. The goal is to catch only the highest points, leaving the green visible in the recesses. -
Building Intensity:
Work in light layers. It is much easier to add more gold than to remove it. Focus extra attention on the center applique and the floral motifs on the legs. -
Hardware Touch-up:
If your original hardware is mismatched or tarnished, you can now clean it or rub a tiny bit of matching gilding wax over it to coordinate with your new gold accents. -
Reattach Hardware:
Once all paint effects are dry, screw the hardware back into place. Having the hardware on helps you visualize if you need to add any more gold highlights near the knobs.
Glaze It Up
For an aged look, apply a diluted brown glaze over the green base before adding the gold. Wipe it back immediately so it only stays in the deep crevices.
Step 4: Protection
-
Application:
Stir your clear topcoat gently (never shake, as this creates bubbles). Apply a thin, even layer over the entire piece using a high-quality synthetic brush or sponge applicator. -
Final Coat:
For a bathroom vanity, humidity protection is key. Apply two to three thin coats of sealer, allowing proper dry time between each, to ensure water resistance.
Step back and admire how the gold highlights catch the light on your reinvented vanity
Monochrome Antique Vanity With Matching Mirror Frame
Transform a mismatched dresser and mirror into a cohesive, primitive-style statement piece with a monochrome terracotta finish. This project relies on the unique, porous texture of milk paint to create a soft, muted look that feels both historic and beautifully modern.
Step-by-Step
Materials
- Antique wooden washstand or vanity (unsealed or stripped)
- Matching antique oval mirror
- Old Barn Milk Paint (in a warm terracotta or salmon-clay shade)
- Warm water
- Whisk or fork
- Medium-grit sandpaper (120-150 grit)
- Fine-grit sandpaper (220 grit)
- Natural bristle brush
- Clear furniture wax (or hemp oil)
- Clean lint-free rags
- Tack cloth
- Painter’s tape
- Drop cloth
Step 1: Preparation & Stripping
-
Assess the surface:
Examine your vanity and mirror frame. Milk paint bonds best to raw, porous wood. If your piece has a shiny varnish or polyurethane seal, you will need to sand it down to bare wood using medium-grit sandpaper. -
Clean thoroughly:
Once sanded, or if the wood was already raw, wipe down the entire piece with a damp cloth to remove oil, dust, and grime. Residue can prevent the paint from soaking in properly. -
Protect the glass:
Carefully apply painter’s tape around the inside edge of the mirror frame to protect the glass. If you can remove the mirror glass entirely, that is even better. -
Mask the hardware:
If the knobs and pulls are difficult to remove, cover them with tape. However, for a professional finish, unscrew them and set them aside. Cover the sink basin edges with tape if the sink is already installed.
Milk Paint Mastery
Milk paint spoils quickly once mixed. Mix only enough for one coat at a time. If you must save it, cover and refrigerate for up to 24 hours, but stir well before reusing.
Step 2: Mixing & Painting
-
Mix the milk paint:
Combine equal parts milk paint powder and warm water. Whisk vigorously for several minutes until the powder is fully dissolved and there are no lumps. Let the mixture sit for about 10-15 minutes to thicken slightly. -
Apply the first coat:
Using a natural bristle brush, apply the paint to the vanity. Work in long, even strokes with the grain of the wood. Don’t worry if it looks streaky or translucent; the first coat acts as a stain layer. -
Paint the mirror frame:
While the vanity dries, apply the first coat to the mirror frame. Use a smaller brush to dab paint into the deep grooves of the carved rosette and floral details. -
Dry completely:
Allow the first coat to dry for at least 1-2 hours. The color will lighten significantly as it dries, turning chalky and matte. -
Light sanding:
Once dry, run a piece of fine-grit sandpaper lightly over the flat surfaces to knock down any raised grain. Wipe away the dust with a tack cloth. -
Apply the second coat:
Paint a second layer on both the vanity and the mirror. This coat provides the opaque, rich terracotta color. Pay special attention to the turned legs and the fluted details on the drawer fronts. -
Detail check:
Inspect the fan carvings on the doors and the central crest on the backsplash. Ensure paint has covered the recessed areas without glopping. Use a dry brush to feather out any drips.
Step 3: Finishing & Distressing
-
Final sanding:
When the second coat is bone dry, use high-grit sandpaper (220 or higher) to smooth the entire piece. I like to focus on the edges and raised carvings, sanding just enough to let a tiny bit of the wood tone peek through for depth. -
Dust removal:
Vacuum the piece thoroughly and wipe with a tack cloth. Any remaining dust will get trapped in the wax and can create a muddy finish. -
Wax application:
Scoop a small amount of clear furniture wax onto a clean rag or wax brush. Massage it into the paint in circular motions. The wax will instantly deepen the color and remove the chalky haze. -
Buffing:
Let the wax cure for about 20 minutes, then buff vigorously with a clean, soft cloth to achieve a soft satin sheen. This seals the porous milk paint and protects it from water splashes. -
Reassembly:
Remove all painter’s tape from the mirror and sink. Reattach your hardware knobs. Place a clear glass vase or Amber apothecary bottles on top to complement the warm tones.
Gold Highlights
To elevate the fan carvings on the doors, lightly rub a tiny bit of Gilding Wax (in gold or bronze) over just the raised ridges after you have sealed the piece.
Step back and admire how the warm, monochromatic finish brings a cohesive, timeless elegance to your bathroom space
Contrasting Mirror Frame for a Painted Antique Vanity
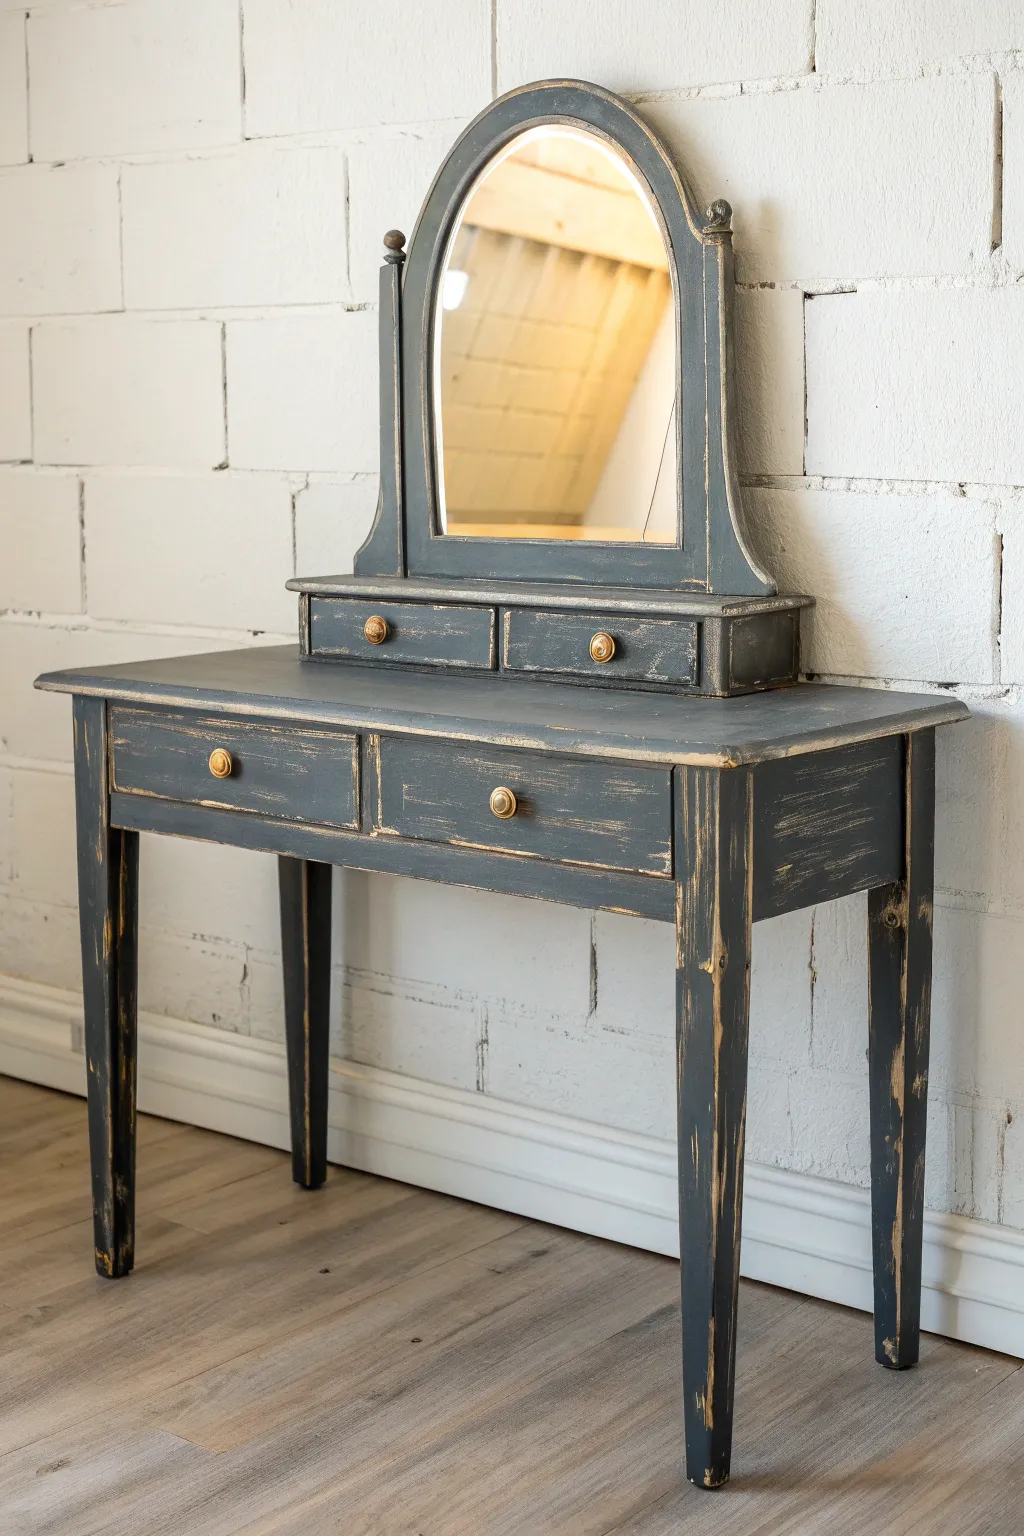
Transform a dated wooden vanity into a striking statement piece with this heavy-distressing technique that reveals warm wood tones beneath a cool charcoal finish. The result is a moody, lived-in look that perfectly balances rustic charm with modern elegance.
Step-by-Step Guide
Materials
- Antique wooden vanity with mirror
- Medium-grit sandpaper (120-150 grit)
- Fine-grit sandpaper (220 grit)
- Clean rags or tack cloth
- Chalk-style paint (Charcoal or Graphite color)
- High-quality synthetic bristle brush (2-inch)
- Small round paint brush (for detail work)
- Clear furniture wax
- Dark furniture wax (optional, for enhancing corners)
- Wax brush or lint-free cotton cloth
- Screwdriver (for hardware removal)
- Painter’s tape
- Drop cloth
Step 1: Preparation and Cleaning
-
Remove hardware:
Begin by carefully unscrewing and removing all knobs, pulls, and hinges. Place them in a labeled bag so no small pieces get lost. If the mirror is detachable, remove it from the frame or tape off the glass entirely with painter’s tape to protect it from stray brushstrokes. -
Clean surface thoroughly:
Scrub the entire vanity with a mixture of warm water and mild degreasing soap. Old furniture often has layers of wax or polish that prevent paint adhesion, so ensure every nook is clean and let it dry completely. -
Sand for adhesion:
Lightly scuff sand the entire piece with 150-grit sandpaper. You aren’t trying to remove the old finish entirely, just creating a ‘tooth’ for the new paint to grab onto. Wipe away all dust with a tack cloth.
Waxing Pro-Tip
Always apply a layer of clear wax before using dark wax. This acts as an ‘eraser’ layer, allowing you to wipe away excess dark wax if you apply too much.
Step 2: Painting the Base
-
First coat application:
Dip your synthetic brush into the charcoal chalk paint. Apply a thin, even coat over the vanity, working in the direction of the wood grain. Don’t worry if the coverage isn’t perfectly opaque yet; thin layers are key. -
Tackle the details:
Use the small round brush to get paint into the ornate curves of the mirror frame and the recessed areas of the drawers. Watch out for drips pooling in the corners and smooth them out immediately. -
Dry and repeat:
Allow the first coat to dry for at least one hour (or as recommended by your specific paint brand). Apply a second coat to ensure rich, solid coverage. I usually find two coats are sufficient for dark chalk paint.
Step 3: Creating the Distressed Look
-
Identify high points:
Once the paint is completely dry (wait at least 4 hours so it cures slightly), identify the natural wear points: edges of the drawers, corners of the legs, the rim of the mirror frame, and the top lip of the desk surface. -
Wet distress technique:
Dampen a lint-free rag with water. Gently rub over the identified high points. Chalk paint reactivates with water, allowing you to wipe away layers to reveal the wood underneath naturally without harsh scratch marks. -
Dry distress for texture:
For more aggressive weathering, take your 120-grit sandpaper and sand heavily along the sharp edges of the legs and the tabletop. This mimics years of friction and creates the stark contrast seen in the inspiration image. -
Refine the surface:
Switch to 220-grit sandpaper and lightly sand the flat painted surfaces. This polishes the chalk paint to a buttery smooth finish and removes any brush marks, leaving a professional feel. -
Clean up dust:
The sanding process creates significant fine dust. Vacuum the piece thoroughly and wipe it down with a fresh tack cloth to ensure no particles are trapped under the wax.
Level Up: Hardware
For a luxe touch, apply a small dab of ‘Rub ‘n Buff’ in Antique Gold to the raised details of the knobs to make them pop against the dark paint.
Step 4: Sealing and Finishing
-
Apply clear wax:
Load your wax brush with a small amount of clear furniture wax. Massage it into the paint using circular motions, working in small sections. The wax will darken the charcoal color slightly and seal the porous paint. -
Buff to sheen:
Let the wax sit for about 15-20 minutes, then buff it vigorously with a clean cotton cloth. The more you buff, the glossier the finish will become. Aim for a soft satin sheen. -
Add dimension (optional):
To enhance the antique feel, you can apply a tiny amount of dark wax into the deep crevices or corners. Wipe back the excess immediately so it only remains in the recesses as a shadow. -
Reinstall hardware:
Once the waxing is complete, reattach your original hardware. If the original knobs look too new, consider rubbing a little dark wax on them to matce the aged aesthetic. -
Clean the mirror:
Remove the painter’s tape from the mirror glass and clean it with glass cleaner to remove any paint splatters or unintentional smudges.
Now step back and admire how a simple paint job has given this piece a completely new, sophisticated soul
Preserved Original Hardware on a Painted Antique Vanity
This project transforms a standard wooden furniture piece into a stunning, time-worn treasure featuring a rich teal finish with authentic distressing. By carefully layering paint and revealing the natural wood beneath, you achieve a look that perfectly bridges the gap between antique charm and modern color.
Step-by-Step
Materials
- Wooden vanity or dresser (antique or reproduction)
- Medium-grit sandpaper (120-150 grit)
- Fine-grit sandpaper (220 grit)
- Tack cloth or microfiber rags
- Chalk-style paint (Deep Teal or Peacock Green)
- High-quality synthetic bristle brush (2-inch)
- Small artist brush
- Dark antique wax
- Clear furniture wax
- clean lint-free cloths (for waxing)
- Screwdriver
- Plastic baggies (for hardware)
Step 1: Preparation & Hardware Removal
-
Remove Hardware:
Begin by carefully unscrewing all knobs, pulls, and escutcheons (keyplates). Place all screws and pieces into labeled plastic baggies so nothing gets lost during the painting process. -
Clean Surfaces:
Wipe down the entire piece with a mild degreaser or a mix of vinegar and water to remove decades of oil, dust, and furniture polish. Let it dry completely. -
Scuff Sanding:
Give the existing finish a light scuff sand using 150-grit sandpaper. You aren’t trying to strip it to bare wood yet, just creating a ‘tooth’ for the new paint to grip. -
Dust Removal:
Use a tack cloth or damp microfiber rag to remove every speck of sanding dust. Any leftover dust will create a bumpy texture in your final finish.
Paint Peeling?
If paint lifts off entirely while distressing, the surface wasn’t cleaned well enough. Sand the spot, clean with alcohol, and repaint just that patch before blending.
Step 2: Painting
-
First Coat Application:
Dip your synthetic brush into the deep teal chalk paint. Apply a smooth, even base coat, brushing in the direction of the wood grain. Don’t worry if it looks slightly streaky; chalk paint typically requires two coats. -
Dry Time:
Allow the first coat to dry fully, usually about 1-2 hours depending on humidity. It should feel chalky and dry to the touch. -
Second Coat Application:
Apply a second coat of paint for full, opaque coverage. Pay special attention to recessed areas on drawer fronts or moldings, ensuring the color is rich and solid. -
Smooth the Finish:
Once the second coat is bone dry, strictly take a piece of 220-grit sandpaper and very lightly run it over flat surfaces to smooth out brush strokes without removing the paint.
Step 3: Distressing & Finishing
-
Targeted Distressing:
Fold a piece of 150-grit sandpaper. Focus on the high points, edges of drawers, and corners where natural wear would occur. Sand firmly until the raw wood peeks through the teal paint. -
Refining the Wear:
Vary the pressure. On some edges, strip a long line of paint; on others, just expose a spot here and there. I like to stand back occasionally to ensure the wear pattern looks organic, not polka-dotted. -
Hardware Polish:
While the paint cures, clean your original hardware. If it’s too tarnished, a little Bar Keepers Friend works wonders, but leaving some patina matches the distressed look perfectly. -
Sealing with Wax:
Apply a thin layer of clear furniture wax over the entire painted surface using a wax brush or lint-free cloth. This protects the paint and deepens the color. -
Adding Dimension:
Dip a small brush into dark antique wax. Work it slightly into corners, crevices, and lightly over the distressed wood areas to give them an aged, oxidized appearance. -
Buffing:
After the wax has sat for about 15-20 minutes, buff the surface vigorously with a clean cotton cloth to create a soft, satin sheen. -
Reassembly:
Reattach your hardware. Be careful not to overtighten screws, which could crack the freshly waxed finish.
Gilding the Lily
For extra elegance, rub a tiny amount of ‘Rub ‘n Buff’ in Antique Gold along the raised edges of the drawer molding to highlight the architectural details.
Enjoy the rich character and history inherent in your newly refreshed antique piece
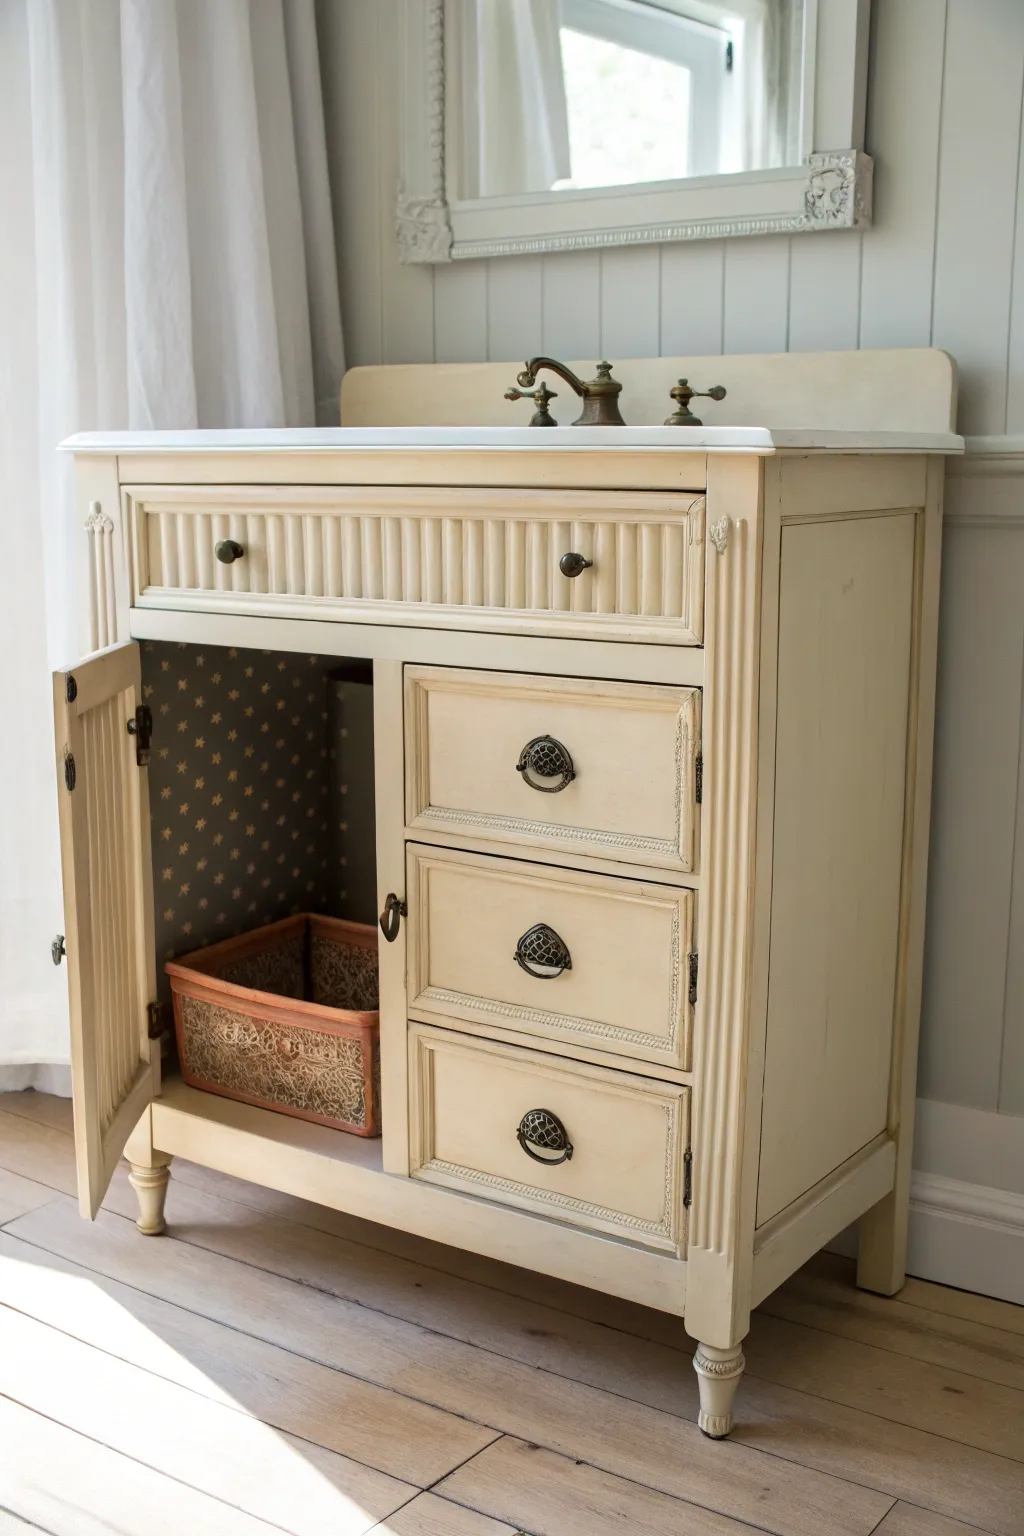
Updated Hardware That Complements an Antique Vanity
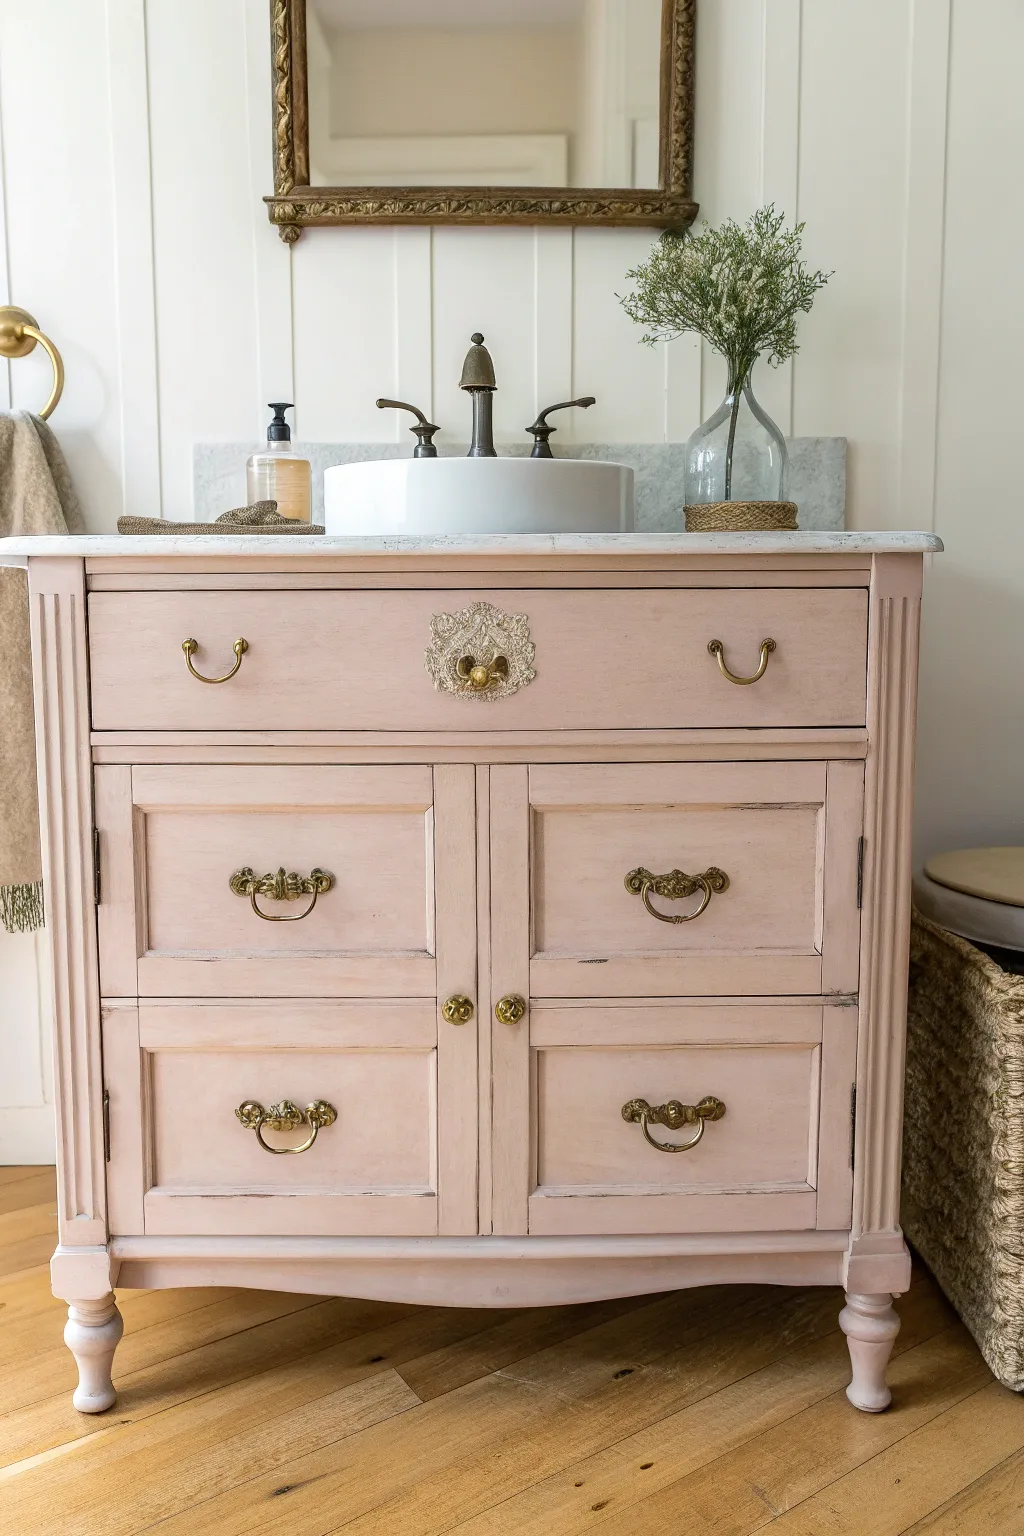
Transform a tired antique dresser into a charming bathroom vanity with this soft blush pink finish and elegant hardware update. The distressed edges and warm brass accents create a perfect balance of vintage character and modern utility.
How-To Guide
Materials
- Antique wooden chest of drawers or dresser
- Chalk-style paint (soft blush pink)
- Clear furniture wax
- Dark antique wax (optional for aging)
- Sandpaper (120 and 220 grit)
- Tack cloth
- Painters tape
- Paintbrushes (good quality synthetic oval brush)
- Wax brush or lint-free rags
- Screwdriver and drill
- Replacement brass hardware (drop pulls and knobs)
- Vessel sink and faucet
- Jigsaw (if modifying drawers for plumbing)
- Clear matte polyurethane (for top protection)
Step 1: Prep & Prime
-
Clean thoroughly:
Begin by removing all old hardware and scrubbing the piece down with a degreaser or TSP alternative. Old furniture often hides decades of oil and wax, so be meticulous here to ensure adhesion. -
Scuff sand:
Use 120-grit sandpaper to scuff the entire surface. You don’t need to strip it to bare wood, just create enough ‘tooth’ for the paint to grab. -
Fill old holes:
If your new hardware has different spacing than the original pulls, fill the old holes with wood filler. Let it dry completely, then sand smooth with 220-grit paper. -
Drill new holes:
Measure and mark the placement for your new hardware carefully. Drill the new pilot holes now, before painting, so you don’t damage your finish later. -
Tape off edges:
If you are keeping the original top or installing a new stone top later, tape off any areas you want to protect from the paintbrush.
Step 2: Drill & Modify plumbing
-
Cut for sink drain:
Measure the center point for your vessel sink. Use a hole saw attachment on your drill to cut the appropriate size hole for the drain pipe through the top surface. -
Modify top drawers:
The plumbing trap will likely interfere with the top drawers. You may need to use a jigsaw to cut out a U-shape in the back of the drawers or permanently seal the top drawer front to the frame.
Pro Tip: Waxing
Apply a tiny bit of dark wax just into the crevices of the carved details after the clear wax. This adds instant depth without darkening the whole piece.
Step 3: Painting & Distressing
-
First coat:
Apply your first coat of blush chalk paint. Don’t worry about perfect coverage here; thin coats are better than thick ones. Let it dry for at least 2-4 hours. -
Second coat:
Apply the second coat for full opacity. I like to keep my brush strokes long and fluid to minimize texture. -
Touch-up:
Once fully dry, inspect for any missed spots or drips. Lightly sand away drips with 220-grit paper and touch up paint as needed. -
Distress the edges:
Take your 120-grit sandpaper and gently sand along the high points—edges, corners, and detail carvings—to reveal the dark wood underneath. This mimics natural wear. -
Clean dust:
Wipe the entire piece down with a tack cloth to remove all sanding dust before sealing.
Level Up: Hardware
For a truly bespoke look, use Rub ‘n Buff in ‘Antique Gold’ on the hardware to match the faucet exactly if the metal tones aren’t quite aligned.
Step 4: Sealing & Hardware
-
Apply clear wax:
Work the clear wax into the paint using a wax brush in circular motions. Work in small sections, wiping away excess wax with a lint-free cloth as you go. -
Waterproof the top:
Since this is a bathroom vanity, wax may not be enough for the top surface. Apply 2-3 coats of flat matte polyurethane to the top surface for water resistance. -
Buff finish:
Once the wax has cured overnight, buff the surface vigorously with a clean cotton cloth to create a soft, eggshell sheen. -
Install hardware:
Screw in your new brass drop pulls and central knob. The gold tones will pop beautifully against the matte pink. -
Install plumbing:
Place the vessel sink over the hole, seal with silicone, and connect your faucet and drain assembly.
Step back and admire how a simple coat of paint and thoughtful hardware choices have completely reinvented this piece for a fresh new life
Hand-Painted Florals on Antique Vanity Drawers
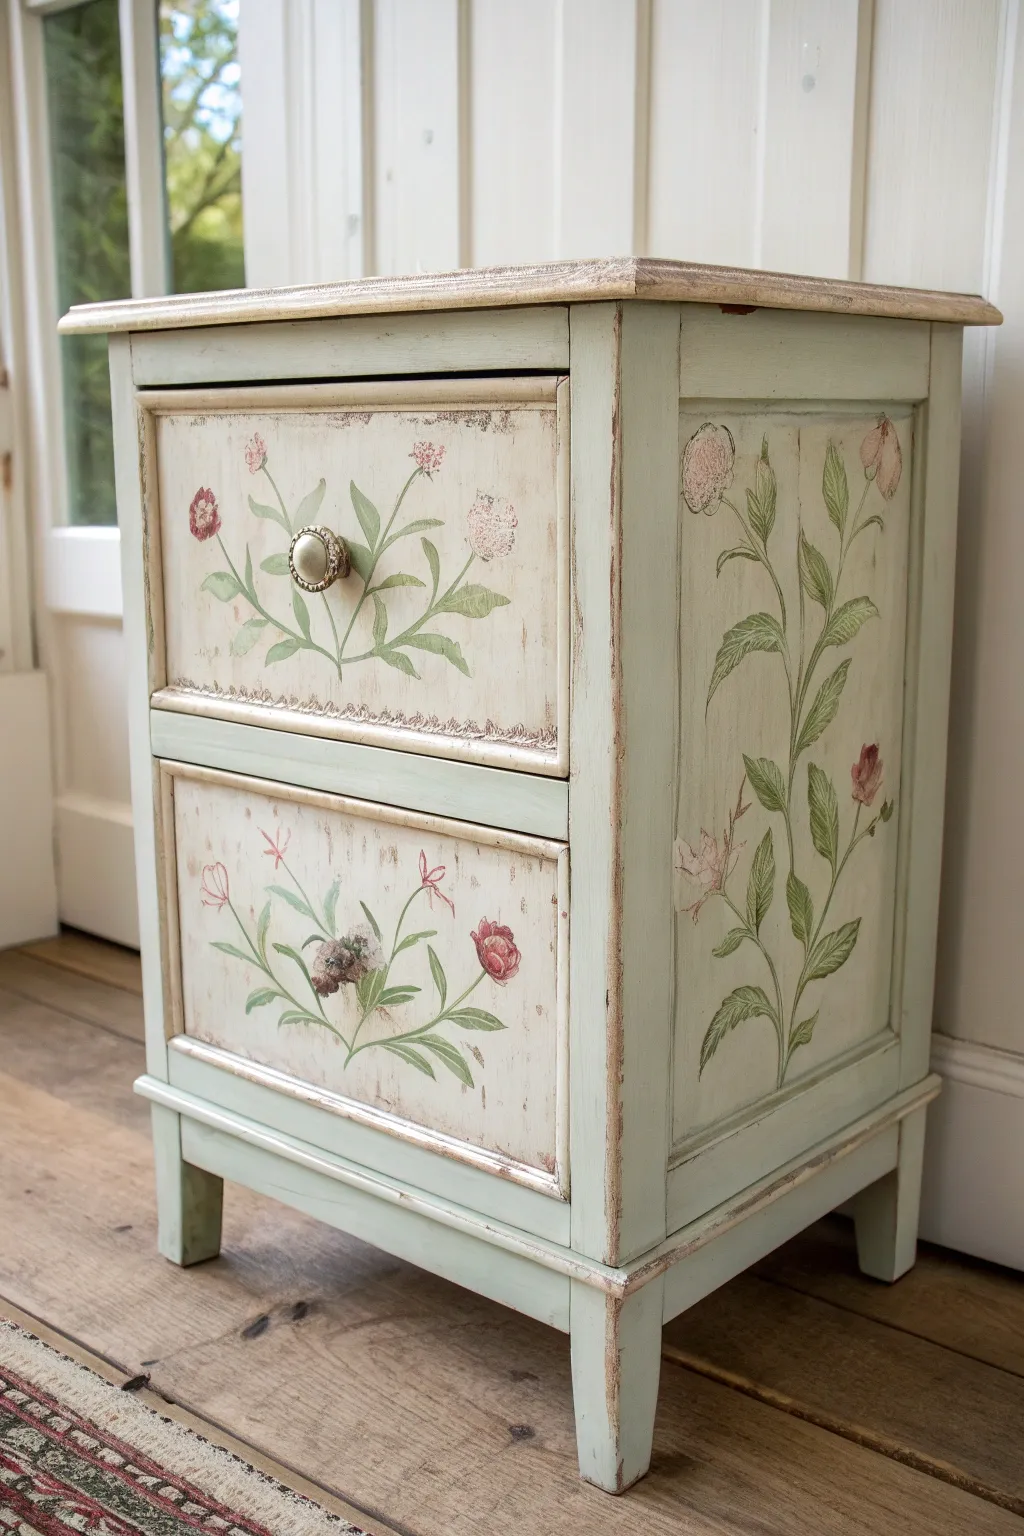
Transform a plain wooden nightstand into a vintage-inspired masterpiece featuring delicate floral motifs and a distressed finish. This project combines soft sage greens with hand-painted botanical art for a charming, aged aesthetic perfect for a cozy bedroom corner.
Step-by-Step Tutorial
Materials
- Small wooden nightstand or side table (unfinished or sanded)
- Chalk paint (Sage Green)
- Chalk paint (Cream or Antique White)
- Acrylic paints (Vintage Pink, Rose, Olive Green, Forest Green, Burnt Umber)
- Gold or Bronze gilding wax
- Clear furniture wax
- Dark antique wax
- Assorted paintbrushes (medium flat brush, small round detail brush, liner brush)
- Sandpaper (120 and 220 grit)
- Pencil
- Carbon transfer paper (optional)
- Clean lint-free cloths
Step 1: Preparation and Base Coats
-
Surface Prep:
Begin by removing all hardware, including the knob. Give the entire piece a light sanding with 120-grit paper to scuff up the surface, ensuring the paint will adhere properly. Wipe away all dust with a damp cloth. -
Painting the Body:
Apply a coat of Sage Green chalk paint to the frame, legs, and sides of the nightstand. Use a medium flat brush and paint with the grain. Don’t worry about perfect coverage yet; a slightly uneven look adds to the vintage charm. -
Painting the Drawer Fronts:
Paint the inset panels of the drawer fronts with your Cream or Antique White chalk paint. Paint the surrounding raised trim on the drawer fronts in the same Sage Green as the body. Let everything dry completely. -
Second Coat:
Apply a second coat to both the green body and the cream drawer centers. This ensures solid color depth before we start distressing. Allow this to dry for at least 2-3 hours.
Step 2: Creating the Floral Art
-
Sketching the Design:
Lightly sketch your floral design onto the cream drawer fronts using a pencil. I like to start with a central stem that branches outward symmetrically for a balanced look. If you aren’t confident drawing freehand, place carbon paper under a printed floral design and trace it onto the wood. -
Painting Stems and Leaves:
Mix Olive Green with a touch of Forest Green. Using a small round brush, paint the main stems and leaf shapes. Keep your strokes fluid and slightly sheer to mimic a watercolor effect. -
Adding Leaf Details:
Once the base green is tacky but not fully dry, use a liner brush with darker Forest Green to add veins and shadows to the leaves. This wet-on-wet technique helps blend the colors naturally. -
Painting the Blooms:
Using Vintage Pink and Rose acrylics, paint the flower heads. Dab the paint on loosely for the petals rather than painting solid circles; this creates texture. Add tiny dots of Burnt Umber in the centers for depth. -
Side Panel Art:
Repeat a similar, perhaps larger, vertical climbing vine pattern on the flat side panels of the nightstand to tie the whole piece together. Let all artwork dry overnight.
Wet Sanding Trick
For ultra-smooth distressing without dust, use a damp sanding sponge instead of dry paper. It removes paint gently and leaves a polished feel.
Step 3: Distressing and Finishing
-
Distressing Edges:
Take 220-grit sandpaper and gently sand the edges of the nightstand, the corners of the legs, and the raised trim on the drawers. Apply slightly more pressure in areas that would naturally wear over time until the raw wood peeks through. -
Scuffing the Art:
Very lightly sand over your painted floral designs. You want to scratch them just enough so they look faded and aged, not brand new. -
Applying Clear Wax:
Brush a layer of clear furniture wax over the entire piece to seal the chalk paint. Buff it gently with a lint-free cloth. -
Antiquing with Dark Wax:
Dip a brush sparingly into dark antique wax. Focus on the corners, the recessed areas of the drawer trim, and over the distressed edges. Wipe away excess immediately, leaving the dark pigment only in the crevices to simulate age. -
Gilding the Trim:
Use your finger or a small cloth to rub a small amount of Gold or Bronze gilding wax along the very top edge of the nightstand and the inner edges of the drawer trim. This adds a subtle, elegant shimmer. -
Reassembly:
Once the wax has cured (usually 24 hours), reattach your hardware. A vintage brass or ceramic knob works beautifully with this style.
Crackled Texture
Apply a crackle medium between the wood and the cream paint on the drawer fronts to create dramatic, authentic-looking age cracks in the background.
Now you have a beautifully aged, custom piece of furniture that feels like a family heirloom
Painted Pattern Drawer Interiors for an Antique Vanity
Transform the inside of your vintage vanity from a forgotten space into a delightful surprise with this interior lining technique. By adding a patterned fabric or wallpaper to the cabinet walls, you create a boutique furniture feel that contrasts beautifully with a creamy exterior finish.
Step-by-Step Guide
Materials
- Antique wood vanity
- Creamy chalk or mineral paint (for exterior)
- Patterned wallpaper or fabric (dark blue/charcoal with gold stars)
- Mod Podge or wallpaper paste (if using paper)
- Spray adhesive (if using fabric)
- Measuring tape
- Straight edge ruler
- X-Acto knife or sharp scissors
- Smoothing tool or brayer
- Sanding block (medium grit)
- Painter’s tape
- Damp cloth
- Interior basket (optional, for styling)
Step 1: Preparation and Cleaning
-
Clean the Interior:
Begin by thoroughly cleaning the inside of the cabinet area. Vacuum out any old dust or debris, then wipe down the walls with a damp cloth and a mild degreaser to ensure your adhesive will stick properly. -
Sand Rough Spots:
If the interior wood is rough or splintery, give it a quick pass with a medium-grit sanding block. You don’t need it perfectly smooth, just consistent enough that it won’t tear your liner. -
Remove Hardware:
Take off the cabinet door by unscrewing the hinges. This makes reaching the back corners much easier and prevents accidental paint or glue spills on your hardware.
Step 2: Painting the Exterior
-
Base Coat Application:
Apply your creamy chalk or mineral paint to the exterior of the vanity. Use a high-quality synthetic brush to minimize brush strokes, working with the grain of the wood. -
Second Coat and Distress:
Once the first coat is fully dry, apply a second coat for opaque coverage. If you want that aged look shown in the image, gently sand the edges and raised details once the paint is dry to reveal a bit of the dark wood underneath. -
Paint the Door Interior:
Don’t forget the inside of the cabinet door. Paint the frame of the door interior to match the exterior, but leave the center panel unpainted if you plan to line that as well, or paint it solid if you prefer the contrast.
Bubble Trouble?
If a stubborn air bubble appears under wallpaper after smoothing, prick it with a tiny pin and press the air out. For fabric, try ironing it on low heat before gluing.
Step 3: Measuring and Cutting the Liner
-
Measure the Cavity:
Measure the height and width of the interior walls (back, left, right, and potentially the floor). I always measure twice here because vintage pieces are rarely perfectly square. -
Create Templates:
For tricky corners or non-square edges, cut a piece of scrap paper or newspaper to size first. Press it into the space and crease the edges to create an exact template. -
Cut the Material:
Lay your starred fabric or wallpaper face down on a cutting mat. Place your template on top and cut around it using a sharp X-Acto knife and a straight edge. Leave about 1/4 inch of excess on all sides for adjustments.
Level Up: Scented Surprise
Before lining the back wall, adhere a flat sachet of dried lavender behind the fabric or paper. Every time you open the door, you’ll get a faint, relaxing scent.
Step 4: Installing the Interior Lining
-
Apply Adhesive:
If using wallpaper, apply your paste to the back of the paper. If using fabric, spray a generous coat of heavy-duty spray adhesive onto the back of the fabric piece. Let it get ‘tacky’ for about 30 seconds before installing. -
Position the Back Panel First:
Carefully insert the back panel piece. Start pressing it from the top center, working your way down and out toward the sides. This helps prevent large bubbles from getting trapped in the middle. -
Smooth it Out:
Use a smoothing tool or a brayer to firmly press the material against the wood. Push any air bubbles toward the edges. If using fabric, use your hand to ensure the weave stays straight and doesn’t warp. -
Trim Excess:
Take your X-Acto knife and carefully trim the 1/4 inch excess right into the corners for a perfectly flush fit against the adjacent walls. -
Install Side Panels:
Repeat the process for the side walls. When lining adjacent walls, make sure to butt the edges tightly against the back panel so no wood shows through the seam. -
Seal Edges (Optional):
For fabric, I sometimes dab a very small amount of Mod Podge along the cut edges with a small detail brush to prevent fraying over time.
Step 5: Final Assembly
-
Reattach Door:
Once the adhesive has fully cured and the paint is dry, screw the cabinet door back onto its hinges. -
Add Storage:
Slide a decorative basket into the bottom of the cabinet. This not only adds storage but protects your new liner from heavy items scratching the bottom.
Enjoy the secret pop of pattern every time you reach for your belongings
Stenciled Side Panels on a Painted Antique Vanity
Transform a tired antique vanity into a stunning statement piece featuring a deep teal finish and delicate stenciled detailing. The combination of rich color, gold accents, and patterned side panels creates a perfect balance of vintage charm and modern sophistication.
How-To Guide
Materials
- Antique wood vanity
- Sandpaper (120, 220, and 320 grit)
- Wood filler
- Degreasing cleaner (like TSP substitute)
- High-quality bonding primer
- Deep teal chalk or mineral paint
- Cream or off-white chalk paint (for stencil base)
- Metallic gold paint or gilding wax
- Geometric lattice stencil (sized for drawer fronts)
- Stencil brush or foam pouncer
- Synthetic bristle paint brush (2-inch angled)
- Small artist brush
- Clear matte polyacrylic topcoat
- Painter’s tape
- Gold hardware (knobs and pulls)
Step 1: Preparation & Cleaning
-
Remove hardware:
Begin by removing all existing knobs, pulls, and hinges. Place them in a labeled bag if you intend to reuse them, though upgrading to new gold hardware really elevates this look. -
Clean thoroughly:
Scrub the entire vanity with a degreasing cleaner to remove years of oil, wax, and grime. A clean surface is crucial for paint adhesion. -
Fill imperfections:
Inspect the wood for deep scratches or dents. Fill these areas with wood filler and allow it to dry completely according to the manufacturer’s instructions. -
Sand the surface:
Scuff sand the entire piece with 120-grit sandpaper to remove the old glossy finish. Smooth out your wood filler spots with 220-grit paper. Wipe away all sanding dust with a tack cloth or damp rag.
Step 2: Painting the Base
-
Prime the vanity:
Apply a coat of bonding primer to the entire cabinet, including the drawer fronts. This prevents bleed-through and ensures the teal paint sticks perfectly. -
Apply the first teal coat:
Using your angled synthetic brush, apply the first coat of deep teal paint. Work in the direction of the wood grain, careful to catch drips in corners. -
Sand between coats:
Once dry, very lightly sand the surface with 320-grit paper. This knocks down brush strokes for a professional, factory-smooth feel. -
Apply the second teal coat:
Apply a second, full coat of teal paint for rich, opaque coverage. Let this cure fully, preferably overnight.
Clean Lines Only
Is paint bleeding under your stencil? Your brush is too wet! Offload onto a paper towel until it feels dry to the touch before stippling.
Step 3: Stenciling the Drawers
-
Prep the stencil area:
For the side drawers receiving the design, paint the inset rectangular panels with your cream or off-white base color. You may need two coats for solid coverage. -
Position the stencil:
Align your geometric lattice stencil over the dry cream panel. Secure it firmly with painter’s tape to prevent shifting. -
Apply the pattern:
Dip your stencil brush into the gold paint (or a dark bronze for contrast), then offload almost all the paint onto a paper towel until the brush is nearly dry. This ‘dry brush’ technique prevents bleed-under. -
Stipple the design:
Lightly stipple or swirl the brush over the stencil openings. Build the color gradually rather than applying one thick coat. -
Reveal the pattern:
Carefully lift the stencil straight up while the paint is still slightly tacky. Allow the design to dry completely.
Gilding Tip
For the gold trim lines, use your pinky finger as a stabilizer against the drawer front while you pull the brush along the edge for a steadier hand.
Step 4: Detaling & Sealing
-
Highlight the trim:
Using a small artist brush and your gold metallic paint or gilding wax, carefully trace the routed edges of the drawer fronts and the door molding. This gold pinstripe frames the teal beautifully. -
Detail the side carving:
If your vanity has carved details on the corners like this one, lightly dust the raised areas with gold wax to accentuate the texture. -
Seal the piece:
Apply two to three coats of clear matte polyacrylic topcoat over the entire vanity, including the stenciled drawers, to protect your hard work from moisture and wear. -
Install hardware:
Once the topcoat is fully cured, install your gold knobs and pulls to complete the transformation.
Step back and admire how a little paint and patience brought a timeless new life to your vintage find
Art Deco Linework on an Antique Vanity Makeover
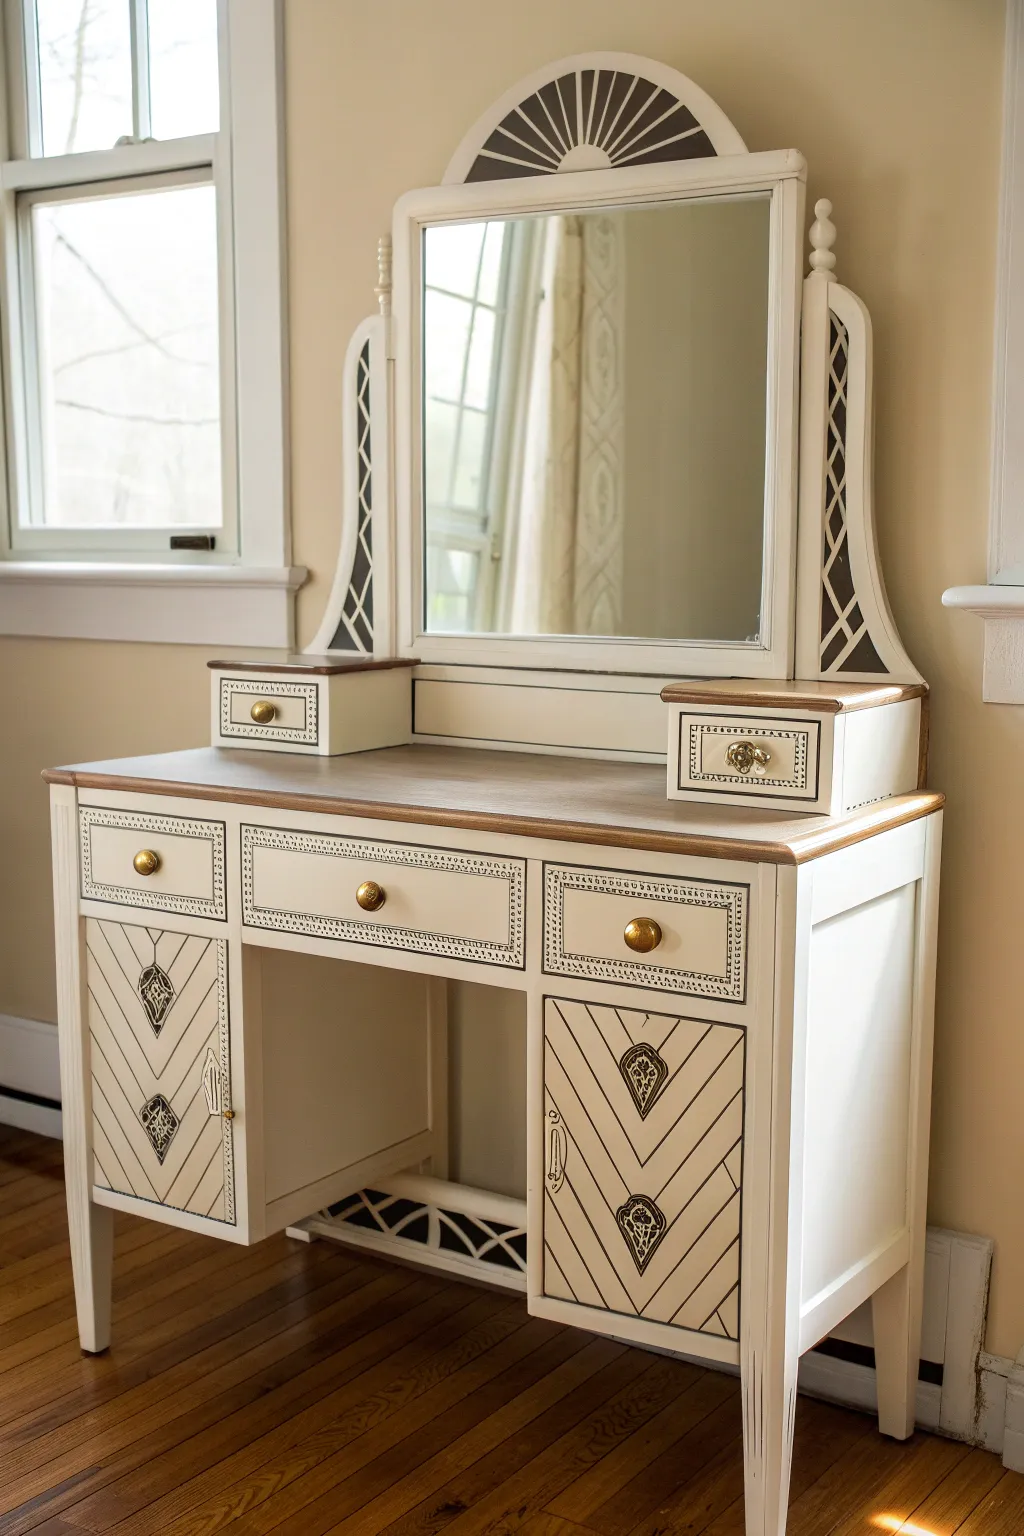
Transform a tired antique dressing table into a stunning Gatsby-era statement piece with crisp geometric linework and a two-tone finish. This project balances the warmth of natural wood with a sleek, modern painted design that highlights the furniture’s original structural beauty.
Step-by-Step Tutorial
Materials
- Antique vanity with mirror
- Orbital sander with 120 and 220-grit discs
- Wood stain (walnut or espresso)
- White chalk paint or satin enamel
- Black acrylic paint or paint pen (fine tip)
- Painter’s tape (various widths)
- Polycrylic topcoat or furniture wax
- Gold spray paint (for hardware)
- Ruler or straight edge
- Pencil
- Fine detail artist brush
- Screwdriver
Step 1: Preparation & Stripping
-
Remove Hardware:
Begin by removing all drawer pulls, knobs, and hinges. Place them in a labeled bag so no screws go missing. If the mirror is detachable, carefully remove it from the frame to prevent accidental breakage. -
Initial Sanding:
Using an orbital sander with 120-grit sandpaper, strip the old finish off the vanity top and the tops of the two small jewelry drawers. You want to expose the raw wood grain here for staining. -
Scuff Sanding the Body:
For the rest of the vanity (legs, drawers, mirror frame), use 220-grit sandpaper to lightly scuff the existing finish. You don’t need to strip it to bare wood, just create enough ‘tooth’ for the new paint to adhere. -
Clean Surfaces:
Wipe down the entire piece with a tack cloth or a damp rag with mild degreaser to remove all sanding dust and oils.
Step 2: Painting & Staining
-
Stain the Top:
Apply your chosen wood stain to the freshly sanded vanity top and jewelry box tops using a lint-free cloth. Wipe away excess after a few minutes and let it dry completely according to the can’s instructions. -
Base Coat Painting:
Apply the first coat of white chalk paint or satin enamel to the body, drawer fronts, and mirror frame. Use a high-quality synthetic brush to minimize stroke marks. -
Second Coat Applications:
Once the first coat is dry, lightly sand with a fine-grit sponge for a smooth finish, then apply a second coat of white paint for solid, opaque coverage. -
Refinish Hardware:
While the paint dries, clean the original hardware. If it’s tarnished or the wrong color, give the knobs and pulls a fresh coat of metallic gold spray paint.
Steady Hands
For the long chevron lines, use a long ruler as a guide for your paint pen, but wipe the ruler’s edge after every single line to prevent smearing ink.
Step 3: The Art Deco Details
-
Map the Chevron Pattern:
On the cabinet doors, lightly draw a center vertical line with a pencil. Use a ruler to mark diagonal lines extending downward from the center to create a chevron V-shape. Space them evenly, about 1-2 inches apart. -
Paint the Chevrons:
Using a fine-tip paintbrush and black acrylic paint, or a high-quality black paint pen for better control, carefully trace over your pencil lines. I prefer a paint pen here for crisp, consistent thickness. -
Detail the Drawers:
Add a framed border to the drawer fronts. Create a double line of dots or small dashes around the perimeter of each drawer face to mimic inlaid detailing. -
Mirror Sunburst:
For the arched top of the mirror, use painter’s tape to mark off a sunburst pattern. Paint the alternating sections dark grey or black to create a fan effect. -
Side Wing Accents:
If your vanity has side supports for the mirror, paint a latticework or diamond pattern in black inside the recessed areas to accentuate the height. -
Add Decorative Motifs:
Freehand or stencil a teardrop or classic Art Deco stylized floral motif in the center of the chevron patterns on the cabinet doors for a focal point.
Go Geometric
Swap the teardrop motif for a simple bold diamond or fan shape if you aren’t confident with freehand painting organic curves.
Step 4: Assembly & Protection
-
Seal the Wood Top:
Protect the stained wood surfaces with three coats of Polycrylic, sanding lightly with a high-grit sponge between coats for a glass-smooth finish. -
Wax or Seal the Body:
Seal the painted white sections with furniture wax (buffed to a sheen) or a clear matte topcoat to protect your hand-painted designs from chips and scratches. -
Reassemble:
Once everything is fully cured, reattach the mirror to the base and screw the gold hardware back onto the drawers and doors to complete the look.
This sophisticated refresh proves that a little black paint and steady geometry can give even the simplest antique a luxurious new life
Ombre Antique Vanity in Two to Three Tones
Transform a classic antique lingerie chest into a stunning statement piece with this elegant ombre technique. The subtle gradient moves from a rich, metallic-infused copper at the top down to a soft, creamy white, creating a warm and sophisticated cascade of color.
Detailed Instructions
Materials
- Antique highboy or lingerie chest
- Sandpaper (120, 180, and 220 grit)
- Clean tack cloths and rags
- Painter’s tape
- Primer suitable for furniture (optional depending on finish)
- Chalk or mineral paint: Creamy White (base)
- Chalk or mineral paint: Dusty Rose
- Chalk or mineral paint: Deep Copper/Rust
- Metallic glaze or wax: Gold/Copper tone
- Various paint brushes (synthetic flat and round)
- Small spray bottle with water (mister)
- Clear furniture wax or polyurethane topcoat
- Screwdriver for hardware removal
- Gold spray paint (optional for hardware)
Step 1: Preparation and Base Coat
-
Remove hardware:
Begin by removing all drawers from the chest. Unscrew all pulls and knobs, placing them in a labeled bag to keep them safe. If the original hardware needs refreshing, clean them thoroughly or set them aside for a quick spray of gold paint later. -
Clean the surface:
Scrub the entire piece with a degreasing cleaner to remove years of furniture polish, oil, and dust. Wipe it down with clean water and let it dry completely. -
Scuff sand:
Lightly sand the entire body and drawer fronts with 120-grit sandpaper to break the existing finish and give the paint something to grip. Wipe away all dust with a tack cloth. -
Paint the frame:
Apply your creamy white base paint to the main body (the frame and legs) of the dresser. Use a high-quality synthetic brush to minimize strokes. I like to let this dry and apply a second coat for full opacity, ensuring a crisp, clean border for the colorful drawers.
Step 2: Creating the Ombre Drawers
-
Organize your gradient:
Line up your drawers in their correct order on a workbench or drop cloth. This is crucial for visualizing the color flow. The top drawers will be the darkest, transitioning to the lightest at the bottom. -
Paint the bottom drawer:
Start with the bottom-most drawer. Paint it entirely in your Creamy White color. This anchors the gradient and matches the frame. -
Mix the mid-tone:
For the drawer above the bottom one, mix 2 parts Creamy White with 1 part Dusty Rose. Paint the entire drawer front with this custom pale peach mixture. -
Apply the rose tone:
Move to the middle drawer. Paint this one with pure Dusty Rose paint. Ensure even coverage, working with the grain of the wood. -
Create the darkest shade:
For the top drawers, apply your Deep Copper or Rust color. This should be the boldest hue in your palette. -
Blend the transitions:
Now, refine the ombre effect on each drawer individually. While the paint is still damp, use a mister bottle to lightly spray the surface. On the ‘peach’ drawer, dip a brush lightly into the pure Rose color and feather it near the top edge, blending downwards. Similarly, add a touch of the lighter mix to the bottom edge of the Rose drawer. -
Add metallic depth:
Once the base coats on the top drawers are dry, dry-brush a small amount of metallic gold or copper glaze over the Rust paint. This adds that shimmering, burnished look seen in the inspiration image.
Seamless Blending Tip
Keep a spray mister handy! A gentle mist of water keeps chalk-style paint workable longer, allowing you to blend the colors directly on the drawer front for a softer transition.
Step 3: Finishing Touches
-
Distress edges:
After all paint is fully dry (preferably overnight), take 220-grit sandpaper and gently distress the edges of the drawers and the detailed molding on the frame. This reveals a bit of the wood underneath, highlighting the antique lines. -
Paint the top surface:
Paint the top wooden surface of the dresser to match the top drawers—a deep copper/rust tone. You can add a wash of the Rose color over it while wet to tie the colors together. -
Seal the piece:
Apply a clear furniture wax or a matte polycrylic topcoat over the entire piece. If using wax, buff it with a lint-free cloth to a soft sheen. -
Reinstall hardware:
Reattach your clean or freshly painted gold hardware. The gold tones will pop beautifully against both the rust and the cream sections. -
Final assembly:
Slide the drawers back into their tracks. Step back and check the gradient flow; if any drawer looks too stark, you can add a very thin colored wax to adjust the tone slightly.
Sticky Drawers?
If drawers stick after painting, sand the sides (where they slide) down to raw wood. Apply a clear wax or rub a plain candle along the tracks for smooth gliding.
Enjoy the warm, romantic glow this restored piece brings to your bedroom decor
Faux Marble Top on a Painted Antique Vanity
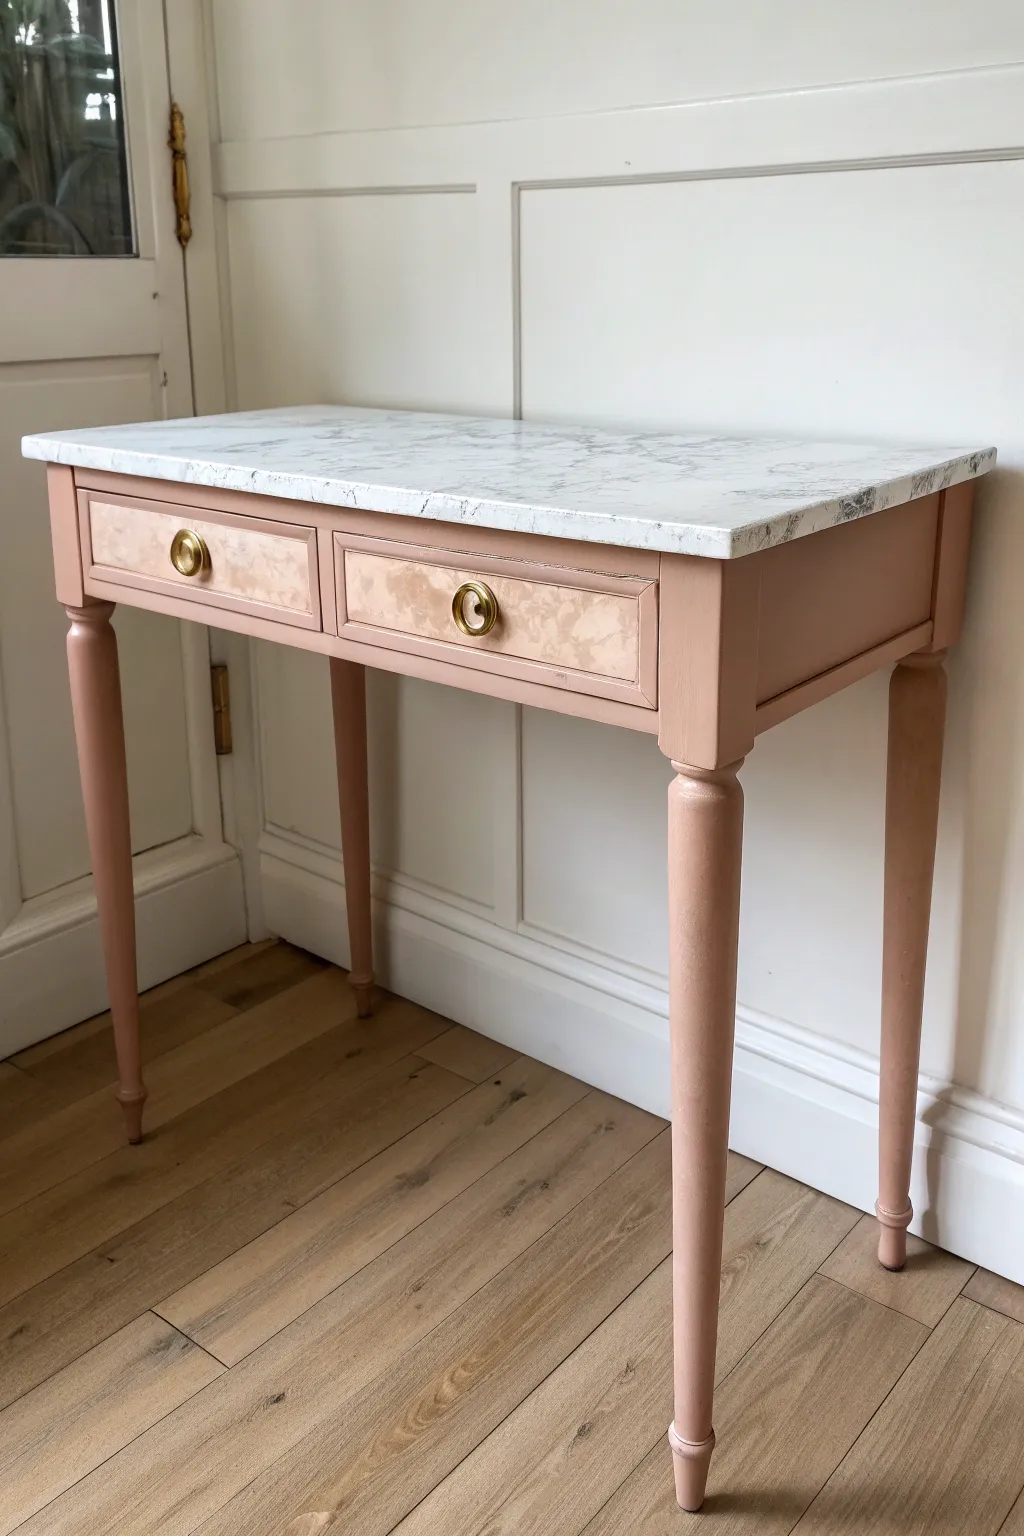
Transform a simple wooden console into a sophisticated statement piece with a soft blush finish and a luxurious faux marble surface. This project combines classic painting techniques with a clever marble contact paper hack for a high-end look without the heavy lifting.
Step-by-Step Guide
Materials
- Antique wooden vanity or console table (2-drawer)
- Sandpaper (120 and 220 grit)
- Tack cloth
- Primer (bonding primer recommended)
- Blush pink chalk-style or mineral paint
- High-quality synthetic bristle brush
- Self-adhesive marble contact paper or vinyl wrap
- Squeegee or credit card
- X-Acto knife or sharp razor blade
- Gold drawer pulls (ring style)
- Screwdriver
- Clear matte or satin topcoat sealer
- Optional: Wallpaper remnants or burl wood veneer for drawer fronts
Step 1: Prep and Paint
-
Remove hardware:
Begin by removing all existing knobs and drawer pulls using a screwdriver. Keep the screws in a labeled baggie so they aren’t lost during the makeover process. -
Clean and sand:
Wipe down the entire piece with a degreaser to remove old polish and grime. Once dry, scuff sand the base, legs, and drawer fronts with 120-grit sandpaper to give the primer something to grip. -
Clean dust:
Thoroughly remove all sanding dust using a vacuum and a sticky tack cloth. Any remaining dust will create a bumpy texture in your final paint job. -
Prime the surface:
Apply a coat of high-quality bonding primer to the legs, apron, and drawer frames. This step is crucial for preventing bleed-through and ensuring durability, especially on older furniture. -
First coat of color:
Stir your blush pink paint well. Using a synthetic brush, apply the first coat in long, smooth strokes, following the grain of the wood. Don’t worry if coverage isn’t perfect yet. -
Second coat:
Allow the first coat to dry completely according to the can’s instructions. Apply a second coat for full, opaque coverage, watching closely for drips around the legs. -
Seal the paint:
Once the paint has cured (usually 24 hours), apply two thin coats of clear matte or satin topcoat to protect the finish from daily wear.
Bubble Trouble?
If you get a stubborn air bubble in the contact paper, don’t peel it up. Poke a tiny hole with a sewing needle and press the air out for a flat finish.
Step 2: Detailing the Drawers
-
Address drawer fronts:
For the drawer insets, you can either paint them to match or create the contrast shown in the image. If recreating the burl/floral look, cut a piece of decorative paper or veneer to fit inside the drawer trim. -
Apply the inset:
Adhere your chosen paper or veneer to the drawer front using decoupage medium or strong adhesive. Smooth it out carefully to remove air bubbles.
Step 3: Creating the Marble Top
-
Clean the top:
Ensure the top surface of the vanity is perfectly smooth and clean. If there are deep gouges, fill them with wood filler and sand flat first. -
Measure and cut:
Roll out your marble contact paper over the vanity top. Cut a piece that is slightly larger than the surface, allowing about 2 inches of overhang on all sides. -
Peel and stick:
Peel back just a few inches of the backing paper. Align the sticky edge with the back edge of the vanity top. Press down firmly. -
Smooth it out:
Slowly peel away the backing paper with one hand while using a squeegee with the other to smooth the vinyl onto the surface. Work from the center outward to push out air bubbles. -
Wrap edges:
At the edges, pull the vinyl taut and wrap it underneath the lip of the table top. If your table has sharp corners, you may need to make small relief cuts for a clean fold. -
Trim excess:
Use a sharp X-Acto knife to trim away any excess vinyl underneath the table edge for a professional, seamless finish. -
Reinstall hardware:
Last but not least, install your gold ring pulls. If the original holes don’t match your new hardware, fill them and drill new ones before painting.
Upgrade the Look
For a more authentic look, use gold Rub ‘n Buff on the trim around the drawer insets to highlight the shape and tie in with the brass hardware.
Step back and admire how fresh and elegant your new vanity looks in its spot
Whimsical Mural Details on an Antique Vanity
Transform a tired antique dresser into a stunning bathroom focal point with a rich, jewel-toned finish. This project combines classic furniture restoration with a bold color choice to create a piece that feels both historic and fresh.
Step-by-Step
Materials
- Antique wooden dresser or vanity
- Sandpaper (120, 180, and 220 grit)
- Mouse sander (optional but helpful)
- Wood filler
- High-quality primer (oil-based or shellac-based)
- Deep teal interior paint (satin or semi-gloss finish)
- High-density foam roller and tray
- Angled sash brush (2-inch)
- Polycrylic topcoat or furniture wax
- Brass cup pulls and knobs
- Vessel sink and faucet
- Plumber’s putty and silicone sealant
- Jigsaw (for sink installation)
Step 1: Preparation and Top Restoration
-
Hardware removal:
Begin by removing all drawers from the vanity. Unscrew and remove all old hardware, including knobs and pulls. Store the screws in a baggy if you plan to reuse them, though new brass hardware really makes the color pop. -
Clean the surface:
Thoroughly clean the entire piece with a degreaser or TSP substitute to remove decades of furniture wax, oils, and dirt. This step is crucial for paint adhesion. -
Sand the base:
Scuff sand the entire painted body of the vanity with 120-grit sandpaper. You don’t need to strip it to bare wood, just remove the shine to give the primer something to grip. -
Strip the top:
Since we are keeping the wood top natural, you need to sand it completely down to bare wood. Start with 80-grit if the old finish is thick, then move to 120-grit, and finish with 180-grit for a smooth surface. An orbital sander is your best friend here. -
Seal the wooden top:
Apply several coats of a waterproof sealer to the wooden top. Since this is for a bathroom, a marine-grade varnish or high-quality polyurethane is essential to protect against splashing water.
Sticky Drawers?
If painted drawers stick, rub a candle or a bar of soap along the wooden runners and the bottom edges of the drawer sides to help them glide smoothly.
Step 2: Painting the Body
-
Prime the surface:
Apply a coat of high-quality primer. I prefer an oil-based or shellac-based primer for antique furniture to prevent old wood tannins from bleeding through your beautiful teal paint. -
First coat of color:
Once the primer is dry and lightly sanded smooth, apply your first coat of deep teal paint. Use an angled brush to get into the crevices, molding, and corners first. -
Roll the flat surfaces:
While the brushed areas are still wet, use a high-density foam roller or a fine-finish roller to paint the flat sides and drawer fronts. This minimizes brush strokes for a professional look. -
Apply second coat:
Allow the first coat to dry completely according to the can’s instructions. Lightly sand with 220-grit paper if there are any bumps, wipe away dust, and apply a second coat for full, rich coverage. -
Seal the paint (optional):
If you used a chalk-style paint, seal it with furniture wax or a matte polycrylic. If you used a high-quality enamel or cabinet paint, this step might not be necessary, but it adds durability.
Pro Tip: Sink Height
antique dressers are often lower than modern vanities (30″ vs 36″). Adding a vessel sink adds height, making it more comfortable for daily use.
Step 3: Installation and Finishing
-
Cut sink opening:
Measure your vessel sink drain placement carefully. Mark the center on the wooden countertop and use a jigsaw to cut the appropriate hole for the drain and faucet lines. -
Install hardware:
Install the brass cup pulls on the drawers and knobs on the cabinet doors. Creating a template out of cardboard helps ensure your drill holes are perfectly centered and aligned. -
Mount the sink:
Apply a bead of silicone to the bottom of the vessel sink and position it over the drain hole. Tighten the drain assembly to secure the sink to the counter. -
Reassemble:
Slide the drawers back into their tracks. Make any necessary adjustments to the drawer glides so they sit flush with the frame. -
Plumbing hookup:
If the vanity back is solid, you’ll need to cut holes for your wall plumbing with a hole saw. Connect your P-trap and supply lines to finish the conversion.
Now you have a bespoke vanity piece that adds historic character to your bathroom renovation


Have a question or want to share your own experience? I'd love to hear from you in the comments below!