
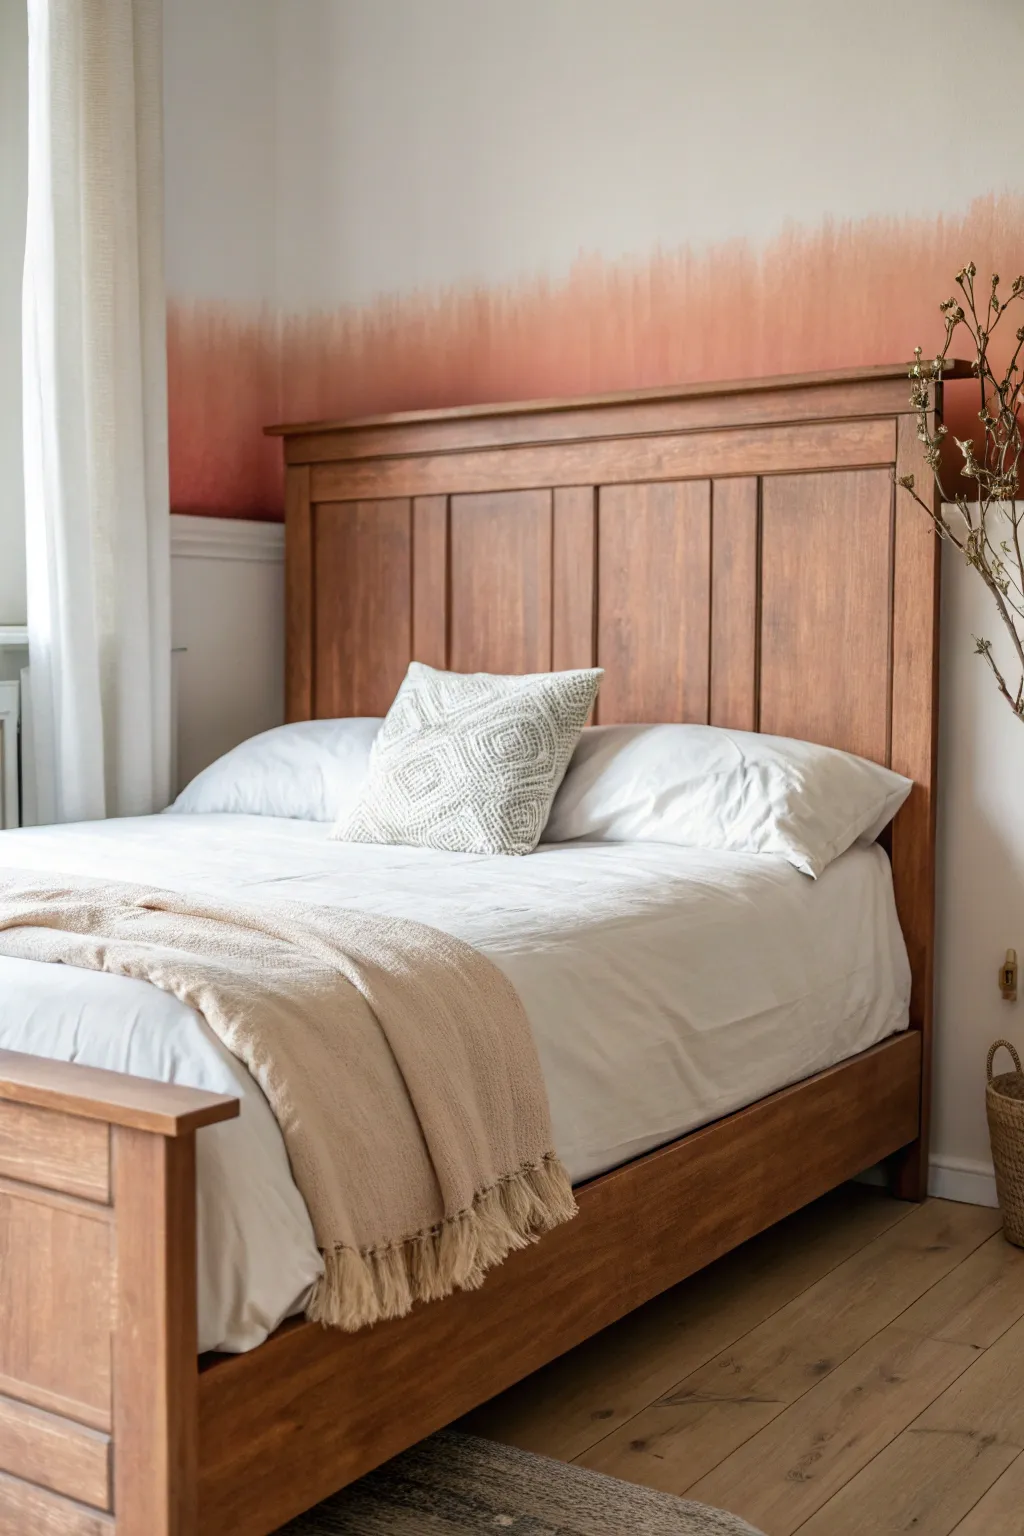
If you’ve got a bed frame that feels a little dated, paint is the quickest way to make it look intentional and fresh again. I love how a painted bed can anchor the whole room—like you built the entire color story around one confident, creative choice.
Crisp White Classic
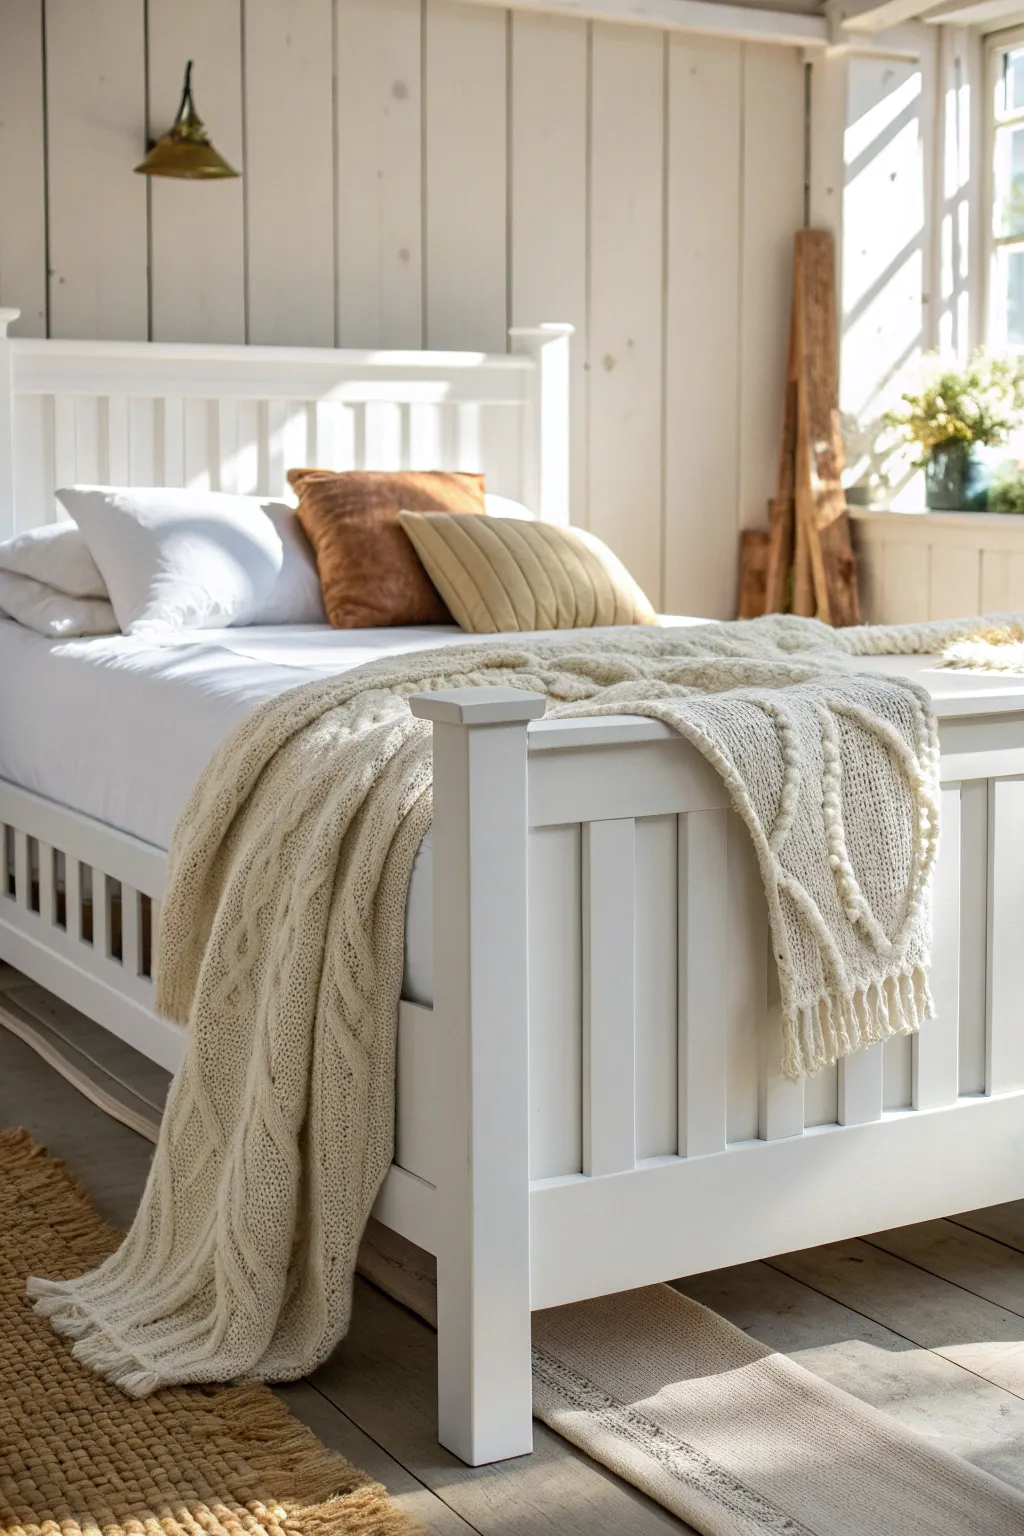
Transform a tired wooden bed frame into a serene sanctuary centerpiece with a coat of crisp, clean white paint. This classic finish brightens any bedroom, creating a peaceful and airy atmosphere that pairs beautifully with natural textures.
Step-by-Step
Materials
- Wooden bed frame (headboard, footboard, and rails)
- Medium grit sandpaper (120-grit)
- Fine grit sandpaper (220-grit)
- Tack cloth or microfiber rags
- High-quality wood primer (stain-blocking recommended)
- Semi-gloss or satin white interior paint (acrylic latex or alkyd)
- 2-inch angled sash brush
- 4-inch foam roller or mini roller with flocked cover
- Painter’s tape
- Drop cloths
- Screwdriver or drill (for disassembly)
- Mild degreasing cleaner (like TSP substitute)
- Sanding block
Step 1: Preparation & Sanding
-
Clear and Clean:
Begin by removing the mattress and bedding, then disassemble the bed frame completely. Lay down drop cloths to protect your floor and wipe down every piece of the frame with a mild degreasing cleaner to remove oils and dust. -
Initial Scuff Sanding:
Once dry, use the medium 120-grit sandpaper to thoroughly scuff the existing finish. You don’t need to remove all the old paint or varnish, but you must degloss the surface to give the new paint something to grip. -
Detail Work:
Fold your sandpaper or use a sanding sponge to get into the crevices of the headboard slats and any detailed trim on the footboard. Often, I like to wrap the sandpaper around a small dowel to reach tight corners effectively. -
Dust Removal:
Vacuum up the bulk of the sanding dust. Follow up by wiping the entire frame with a tack cloth to capture every last microscopic particle, ensuring a smooth final finish. -
Tape Hardware:
If there are any metal brackets or connection points you can’t remove, cover them carefully with painter’s tape to keep them paint-free.
Pro Tip: Elevate it
Add Floetrol or a similar paint conditioner to your latex paint. It slows drying time, allowing brush and roller marks to level out perfectly for a sprayed-on appearance.
Step 2: Priming
-
Apply Primer to Slats:
Start priming the difficult areas first, such as the vertical slats on the headboard and footboard. Use your 2-inch angled brush to apply a thin, even coat of stain-blocking primer, watching for drips in the corners. -
Roll the Flat Surfaces:
Switch to your mini foam roller for the wide, flat panels of the headboard and the side rails. Rolling provides a smoother finish without brush marks. Let the primer cure according to the can’s instructions, usually 2-4 hours. -
Light Sanding:
Once the primer is fully dry, deeply inspect the surface. Run 220-grit sandpaper lightly over the primed wood to knock down any raised grain or bubbles. Wipe distinctively with a tack cloth again.
Step 3: Painting
-
First Coat on Details:
Stir your white paint thoroughly. Like with the primer, begin with the brush work. Paint the interior edges of the slats and the decorative trim on the footboard first, feathering out the edges to avoid ridges. -
Rolling the Main Surfaces:
Immediately follow the brush work by rolling the flat surfaces while the brushed edges are still wet (maintaining a ‘wet edge’). Apply the paint in long, smooth strokes. Don’t preserve paint here; a semi-generous coat often levels better. -
Dry Time:
Allow the first coat to dry completely, ideally overnight or at least 6-8 hours. Patience here prevents the paint from pulling up when you apply the next layer. -
Assess and Sand:
Check for any unevenness or dust nibs. Very lightly sand with the fine 220-grit paper if needed, and wipe clean. This step is the secret to that professional, factory-smooth look. -
Second Coat Application:
Apply the second coat of paint using the same method: brush details first, then roll the flats. This second coat ensures true opacity and that brilliant, crisp white color. -
Final Inspection:
While wet, check immediately for drips, especially on the vertical slats of the footboard. Smooth them out gently with the tip of your brush. -
Curing:
Let the paint cure for at least 24 to 48 hours before reassembling the bed. Paint may feel dry to the touch sooner, but it needs time to harden so the mattress and bedding don’t leave indentations. -
Reassembly:
Carefully remove any painter’s tape and reassemble the frame. Place felt pads under the legs if you want to protect your floors, then make the bed with soft linens to complete the look.
Level Up: Distress It
After the final white coat dries, lightly sand the edges and corners with coarse sandpaper to reveal the wood or primer underneath for a charming farmhouse chic vibe.
Enjoy the fresh, calming atmosphere your newly brightened bed frame brings to the room


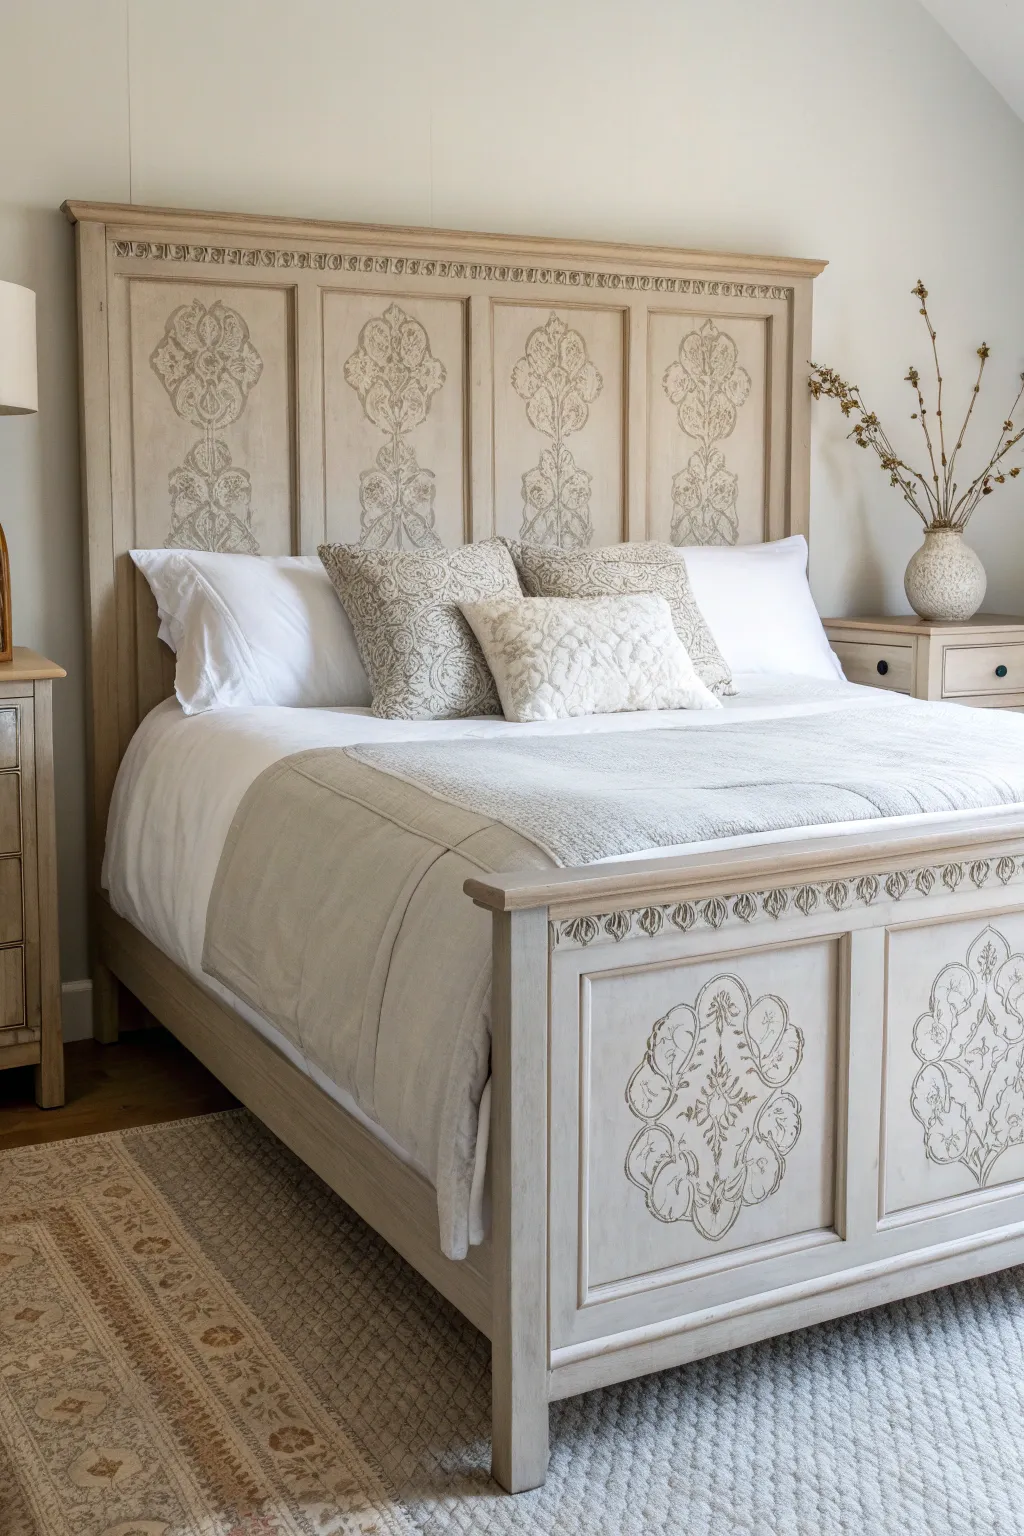
Soft Greige Modern Neutral
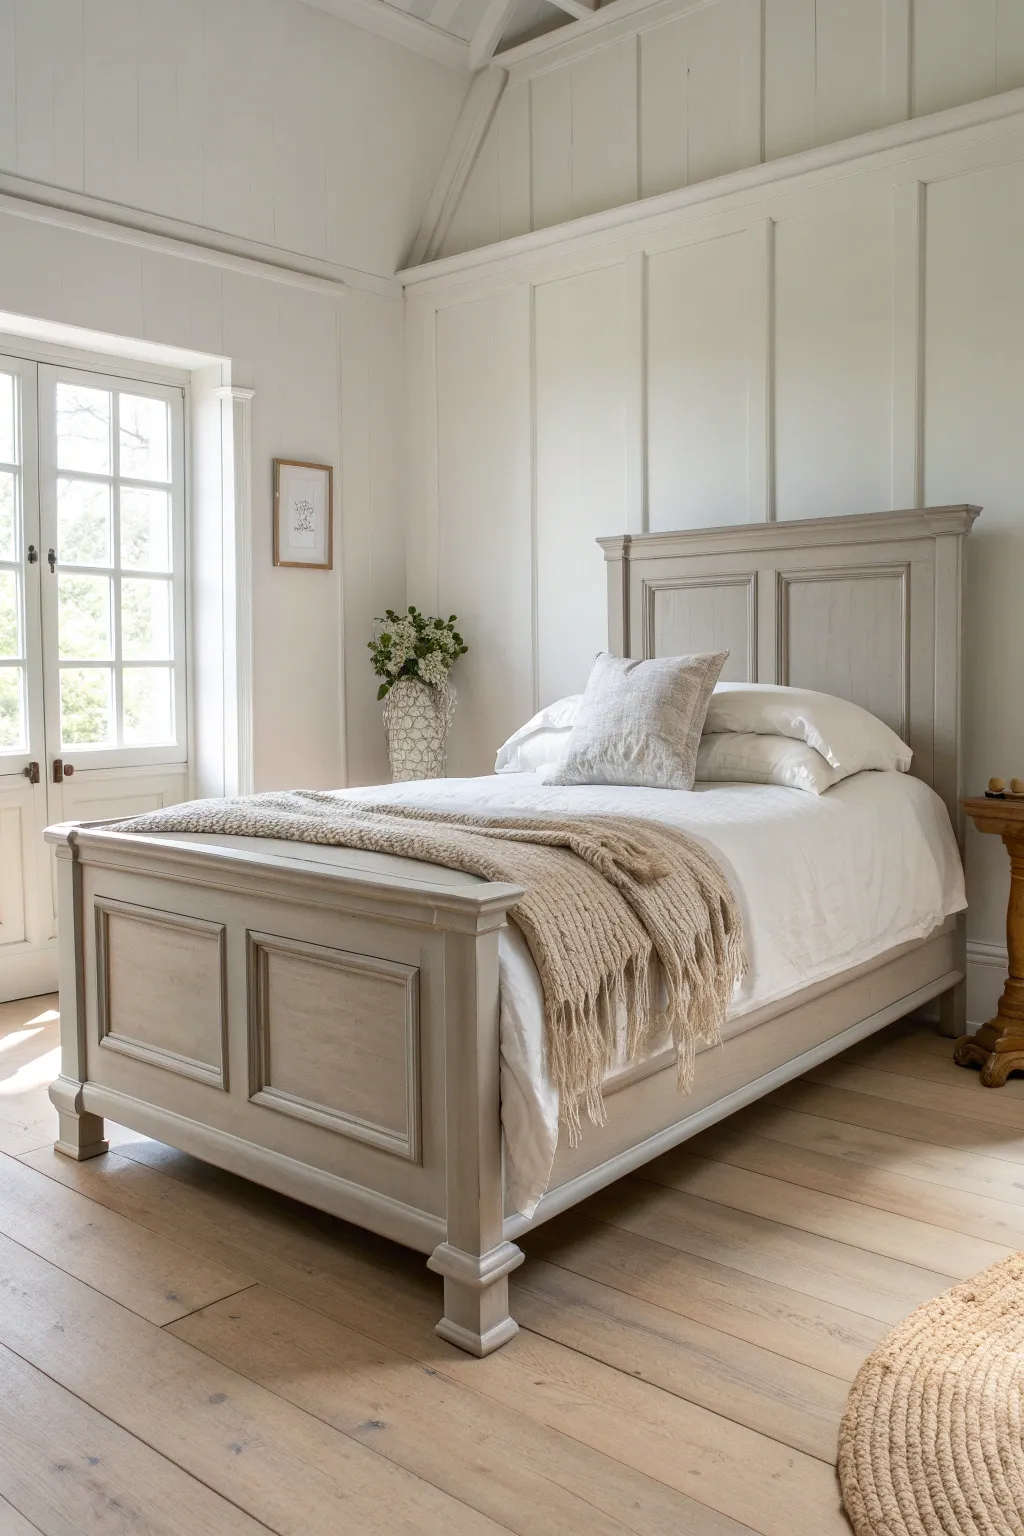
Transform a plain wooden bed frame into a serene sanctuary centerpiece with this soft greige finish. The subtle warm grey tones and distressed detailing create a perfect modern neutral look that feels both grounded and airy.
Step-by-Step Tutorial
Materials
- Wooden bed frame (raw or previously finished)
- Medium-grit sandpaper (120-grit)
- Fine-grit sandpaper (220-grit)
- Tack cloth
- High-quality bonding primer
- Chalk-style paint or matte furniture paint (Greige color)
- Clear furniture wax or matte polyurethane
- Dark antique wax (optional for distressing)
- 2-inch angled sash brush
- Lint-free cotton rags
- Drop cloths
- Painters tape
- Screwdriver (for hardware removal)
Step 1: Preparation Phase
-
Create a workspace:
Lay down your drop cloths in a well-ventilated area. If possible, dismantle the bed frame to make painting the headboard, footboard, and rails much easier and to ensure you reach every corner. -
Clean the surface:
Wipe down the entire frame with a mild degreaser or soapy water to remove years of oils and dust. Let it dry completely before moving on. -
Initial sanding:
Using the 120-grit sandpaper, scuff sand all surfaces. You aren’t trying to strip the wood bare, just creating a ‘tooth’ for the primer to grip onto. Pay attention to the inset panels on the headboard and footboard. -
Remove dust:
Thoroughly wipe away all sanding dust. I like to use a vacuum first, followed by a tack cloth to pick up the finest particles. -
Prime the wood:
Apply a coat of high-quality bonding primer. Use long, even strokes with your angled brush to get into the panel corners. -
Primer sanding:
Once the primer is fully dry (check the can for times), lightly sand with 220-grit paper to smooth out any brush marks or raised grain.
Step 2: Painting & Distressing
-
First coat application:
Stir your Greige chalk paint well. Apply the first thin coat, brushing in the direction of the wood grain. Don’t worry if it looks patchy; thin coats are better than thick ones. -
Dry time:
Allow the first coat to dry completely, usually about 2-4 hours depending on humidity. -
Second coat application:
Apply a second coat of paint for full opaque coverage. Ensure you get full coverage inside the recessed panel molding. -
Soft sanding:
For that ultra-smooth modern finish, lightly sand the dried second coat with very fine 220-grit sandpaper. It should feel buttery soft to the touch. -
Distressing edges (Optional):
To mimic the look in the image, lightly distress the raised edges using the 220-grit paper. Focus on corners and panel frames where natural wear would occur.
Brush Technique
Keep a wet edge while painting the large flat panels. If drag marks appear, your brush might be too dry—mist it lightly with water.
Step 3: Finishing & Assembly
-
Clear wax application:
Dip a lint-free rag or wax brush into clear furniture wax. Massage it into the paint in small circular sections, then wipe away excess in the direction of the grain. -
Antique detailing:
If you want more depth, mix a tiny amount of dark wax with your clear wax. Apply it sparingly into the crevices of the molding to create subtle shadows, then buff it back immediately. -
Buffing:
Once the wax has hazed over (usually 15-20 minutes), buff the entire bed vigoriously with a clean cotton cloth to achieve a soft sheen. -
Curing time:
Let the finish cure for at least 24 hours before reassembling the bed. Full curing can take up to 30 days, so be gentle with the finish initially. -
Reassembly:
Carefully reassemble your bed frame, taking care not to scratch your fresh paint job against the metal hardware.
Custom Color
Mix 3 parts light grey with 1 part beige to create a custom ‘Greige’ that perfectly matches your room’s lighting warmth.
Enjoy the calm and sophisticated atmosphere your new bed brings to the bedroom


Charcoal Matte Makeover

Transform a dated or plain wooden bed frame into a modern farmhouse focal point with a rich charcoal finish. This project relies on the sophisticated look of matte paint to bring out the subtle texture of the wood paneling while adding a bold, grounding element to your bedroom.
Step-by-Step Guide
Materials
- Wooden bed frame (headboard, footboard, and rails)
- Course grit sandpaper (80-100 grit)
- Medium grit sandpaper (150-220 grit)
- Tack cloth or microfiber rags
- Liquid deglosser or TSP substitute
- Stain-blocking primer
- Matte or eggshell finish charcoal paint (e.g., ‘Iron Ore’ or ‘Wrought Iron’)
- 2-inch angled sash brush
- 4-inch foam roller
- Small roller tray
- Painter’s tape
- Drop cloths
- Screwdriver or drill (for disassembly)
Step 1: Prep & Prime
-
Disassemble the frame:
Begin by taking the bed apart. Remove the mattress, box spring, and slats. Unscrew the side rails from the headboard and footboard to make every angle accessible. -
Clean surfaces thoroughly:
Wipe down every inch of the wood with a TSP substitute or degreaser. This removes oils and furniture polish that could repel your paint. -
Sand the existing finish:
Use the coarse grit sandpaper to scuff up the glossy topcoat. You don’t need to strip it to bare wood, just create enough ‘tooth’ for the primer to grip. -
Smooth it out:
Follow up with a pass of medium grit sandpaper to smooth out any deep scratches from the coarse sanding. -
Remove dust:
Vacuum up the sanding dust, then wipe everything down with a tack cloth. Even a tiny bit of dust can ruin that smooth matte finish. -
Tape off hardware:
If there are metal brackets or bolts you can’t remove, cover them carefully with painter’s tape. -
Apply primer:
Brush a coat of stain-blocking primer into the crevices and panel grooves first, then roll the flat surfaces. Let this dry completely according to the can’s instructions.
Mastering the Matte
For that ultra-flat look without chalkiness, add a splash of water conditioner (like Floetrol) to your paint. It levels out brush strokes and keeps the matte finish velvety smooth.
Step 2: Painting the Charcoal Layers
-
Cut in the edges:
Stir your charcoal paint well. Using the angled sash brush, paint the recessed areas of the paneling, corners, and tight spots on the headboard and footboard. -
Roll the first coat:
While the brushed areas are still wet, use the foam roller to apply paint to the large, flat areas. This helps blend the brush marks for a seamless look. -
Watch for drips:
Inspect the vertical grooves in the paneling immediately. I always keep a dry brush handy to catch any drips that pool in the corners before they dry. -
Allow to dry:
Let the first coat dry for at least 4-6 hours. Dark pigments often take a bit longer to cure than lighter colors. -
Light sanding:
Very lightly sand the first coat with high-grit sandpaper (300+) to knock down any bumps. Wipe away the dust with a clean rag. -
Apply second coat:
Repeat the cut-in and rolling process for a second coat. This layer will provide the true depth and richness of the charcoal color. -
Check coverage:
Inspect the finish in good lighting. Deep colors sometimes require a third thin coat to get fully opaque coverage without streaks. -
Let it cure:
Allow the paint to cure for at least 24-48 hours before reassembling. The paint needs to harden so it doesn’t chip when you tighten the bolts. -
Reassemble:
Carefully put the bed frame back together, tightening all hardware securely. Remove any painter’s tape you applied earlier.
Sticky Situation?
If the paint feels tacky days later, humidity is likely the culprit. Run a dehumidifier in the room or point a fan away from the bed to circulate air without blowing dust on it.
Enjoy the deep, cozy atmosphere your new charcoal bed frame brings to the bedroom


Deep Navy Statement Bed
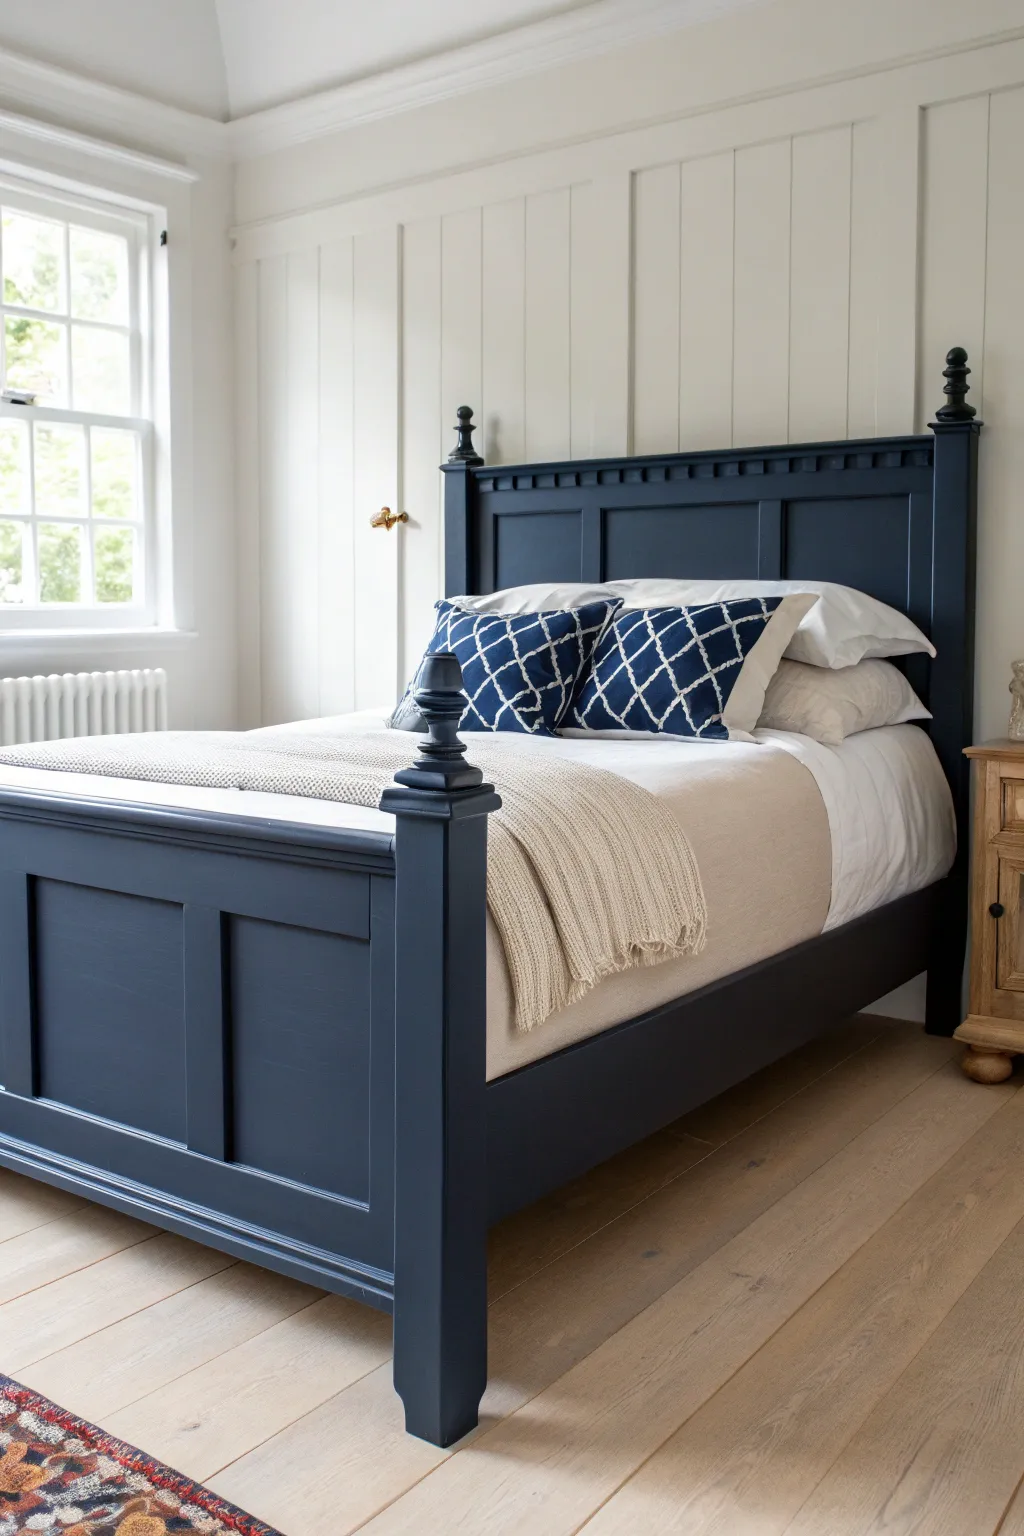
Transform a standard wooden bed frame into a striking centerpiece with this deep navy finish. The rich, matte indigo hue brings a sophisticated depth to the room, perfectly complementing crisp linens and natural wood tones.
Detailed Instructions
Materials
- Wooden bed frame (pre-existing or unfinished)
- Medium grit sandpaper (120-150 grit)
- Fine grit sandpaper (220 grit)
- Tack cloth
- High-quality interior wood primer (tinted gray recommended)
- Deep Navy Blue furniture paint (satin or eggshell finish)
- 2-inch angled sash brush (synthetic bristles)
- 4-inch foam roller or short-nap microfiber roller
- Paint tray
- Painter’s tape
- Drop cloths
- Degreasing cleaner (like TSP substitute)
- Clean rags
Step 1: Preparation & Cleaning
-
Clear and clean:
Begin by removing the mattress and bedding, moving the frame to a well-ventilated workspace if possible. Use a degreasing cleaner and a rag to wipe down every surface of the wood to remove oils, dust, and old furniture polish. -
Protect the area:
Lay down drop cloths under the bed legs and surrounding floor space to catch any paint drips or sanding dust. -
Initial scuff sand:
Using the medium grit (120-150) sandpaper, thoroughly sand the entire bed frame. You don’t need to strip it to bare wood, but you must tough up the existing finish so the primer adheres properly. -
Wipe away dust:
Vacuum up the loose sanding dust, then wipe the entire frame with a tack cloth to ensure the surface is completely pristine before priming. -
Tape off hardware:
If there are any metal brackets or connecting bolts you can’t remove, cover them carefully with painter’s tape.
Use a Drying Rack
Prop the side rails up on blocks or scrap wood while painting. This lets you paint the bottom edges without the brush picking up dust from the drop cloth.
Step 2: Priming the Wood
-
Choose the right primer:
Since we are going for a very dark navy, I strongly recommend asking the paint store to tint your primer gray. This helps the dark topcoat achieve better coverage with fewer layers. -
Cut in edges:
Use your angled brush to apply primer to the detailed areas first—specifically the turned grooves on the bedposts and the recessed corners of the panels. -
Roll the flat surfaces:
Switch to your roller for the flat panels and side rails to create a smooth, even base. -
Let it cure:
Allow the primer to dry completely according to the manufacturer’s instructions, usually about 2-4 hours. -
Light sanding:
Once the primer is dry, lightly graze the surface with fine grit (220) sandpaper to smooth out any brush strokes, then wipe clean with a tack cloth.
Add Metallic Accents
For a regal touch, lightly brush a gold or antique brass wax over the turned ridges of the bedposts once the navy paint is fully cured to highlight the details.
Step 3: Painting the Navy Coat
-
Mix the paint:
Stir your navy paint thoroughly, ensuring the pigments at the bottom of the can are fully incorporated for true color richness. -
Detail work first:
Just like with priming, start with the angled brush. Paint the finials, the turned posts, and the interior corners of the headboard panels. Apply thin coats to prevent drips in the grooves. -
Rolling large areas:
Use the foam or short-nap roller to apply paint to the flat panel sections and the main horizontal rails. Work in long, unified strokes to minimize texture. -
Check for drips:
While the paint is wet, inspect the corners and turned legs. Smooth out any pooled paint immediately with your brush. -
Dry and recoat:
Allow the first coat to dry for at least 4-6 hours. A dark color like this almost always needs a second coat to eliminate streaking and achieve full opacity. -
Apply second coat:
Repeat the painting process for the second layer. If you feel the finish isn’t smooth enough between coats, a very light sanding with 220 grit paper can help before this final layer. -
Final cure:
Let the bed frame cure for at least 24-48 hours before subjecting it to wear or putting the mattress back on. This waiting period prevents the paint from denting or sticking to bedding.
Enjoy the deep, restful atmosphere your new statement bed brings to the bedroom
BRUSH GUIDE
The Right Brush for Every Stroke
From clean lines to bold texture — master brush choice, stroke control, and essential techniques.
Explore the Full Guide
Sage Green Calm Retreat
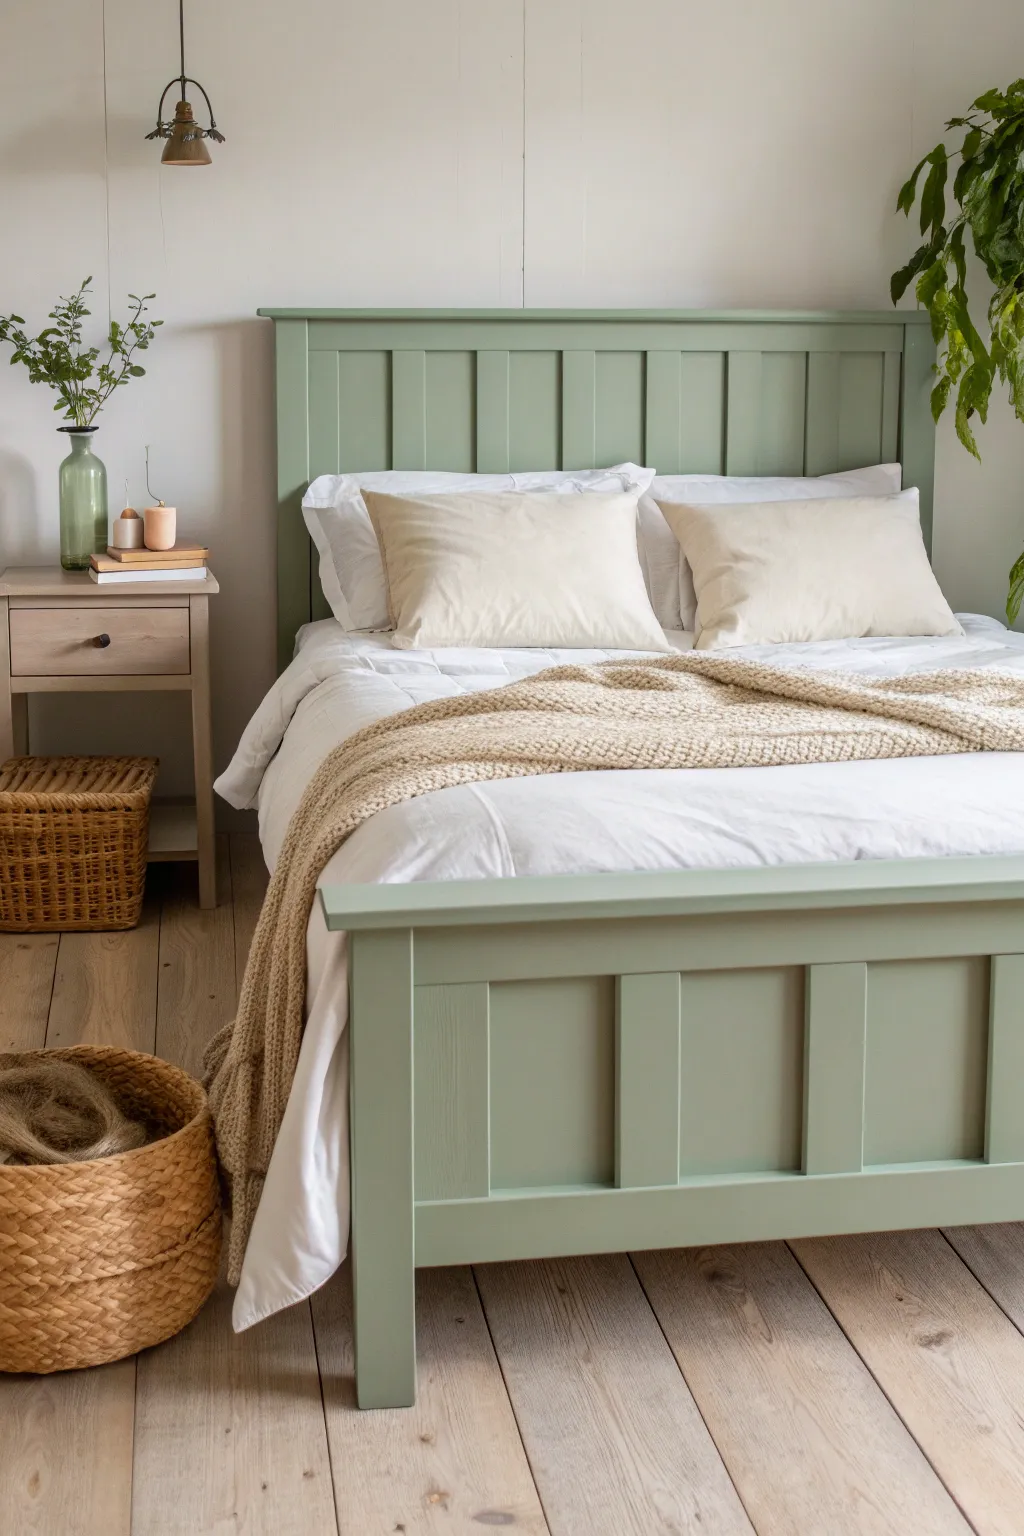
Transform a standard wooden bed frame into a serene focal point with this soothing sage green finish. The soft, muted tone brings an immediate sense of nature and tranquility to your bedroom, perfectly complementing natural wood floors and neutral bedding.
Step-by-Step
Materials
- Unfinished or previously painted wooden bed frame (headboard and footboard)
- Sandpaper (120-grit and 220-grit)
- Tack cloths or microfiber rags
- Painter’s tape
- Wood filler (if repairing old dents)
- High-quality bonding primer suitable for wood
- Sage Green furniture paint (satin or eggshell finish)
- 2-inch angled synthetic paintbrush
- 4-inch foam roller or short-nap microfiber roller
- Drop cloths
- Clear matte or satin polyurethane topcoat (optional)
Step 1: Preparation
-
Protect your workspace:
Begin by laying down drop cloths to protect your flooring. If the bed is currently assembled, it is much easier to disassemble the headboard, footboard, and side rails to paint them lying flat or propped against a stable wall. -
Clean surface thoroughly:
Wipe down the entire frame with a damp cloth and a mild degreaser to remove any oils, dust, or old furniture polish. Let it dry completely. -
Fill imperfections:
Inspect the wood for deep scratches or dents. Apply a small amount of wood filler with a putty knife, smoothing it flush with the surface. Allow the filler to dry according to the package instructions. -
Sand the frame:
Using 120-grit sandpaper, sand the entire bed frame. You don’t need to strip it to bare wood, but you must scuff up the glossy finish to create ‘tooth’ for the primer. I find moving in the direction of the wood grain prevents unsightly scratches. -
Remove dust:
Vacuum up the sanding dust, then wipe the entire piece with a tack cloth. Any remaining dust will create a gritty texture in your final paint job. -
Tape off areas:
If there are parts of the bed you wish to keep unpainted, such as metal hardware or specific joinery, apply painter’s tape carefully over these areas now.
Fixing Brush Strokes
Seeing visible brush marks? Sand lightly with 220-grit paper between coats. Switching to a high-density foam roller for flat areas also helps achieve that factory-smooth finish.
Step 2: Priming
-
Apply the primer:
Stir your bonding primer well. Use the angled brush to cut in around corners, crevices, and the vertical slats of the headboard. Immediately follow up with the small roller on the flat, broad surfaces to smooth out brush marks. -
Inspect and smooth:
Once the primer is fully dry, run your hand over the surface. If it feels rough, lightly sand with 220-grit sandpaper and wipe away the dust with a tack cloth.
Step 3: Painting
-
Mix your paint:
Open your sage green paint and stir it thoroughly to ensure the pigments are evenly distributed, especially if it has been sitting for a while. -
Paint the detailed areas:
Start by painting the recessed panels and corners of the headboard and footboard using your angled brush. Work in small sections to keep a wet edge. -
Roll the flat surfaces:
Use the foam or microfiber roller to paint the flat rails and posts. For the headboard slats, carefully brush or roll vertically, watching for drips pooling at the bottom. -
Dry and assess:
Allow the first coat to dry for the recommended time (usually 2-4 hours). Don’t worry if it looks patchy; the second coat brings the magic. -
Apply second coat:
Repeat the painting process for a second coat. This layer will provide the true depth and solid coverage characteristic of this sage green look. -
Check for drips:
While the paint is still wet, do a final visual sweep for any drips or runs, particularly on the vertical posts, and gently brush them out.
Add Rustic Charm
Technically, you can gently sand the edges and corners after the paint dries to distress the piece slightly. This reveals a bit of wood underneath for a modern farmhouse vibe.
Step 4: Finishing Touches
-
Optional topcoat:
For high-traffic beds (like in a kid’s room), apply a clear matte polyurethane topcoat after the paint has cured for 24 hours. This adds extra durability against scratches. -
Reassemble:
Wait until the paint is fully cured—ideally 48 hours—before reassembling the bed to prevent the paint from sticking or peeling at the joints. -
Style the bed:
Once assembled, dress the bed with plush, neutral bedding in creams or whites to let the sage green frame stand out as the calming centerpiece.
Enjoy the peaceful atmosphere your newly painted bed brings to the room
Blush Pink Sweet and Subtle
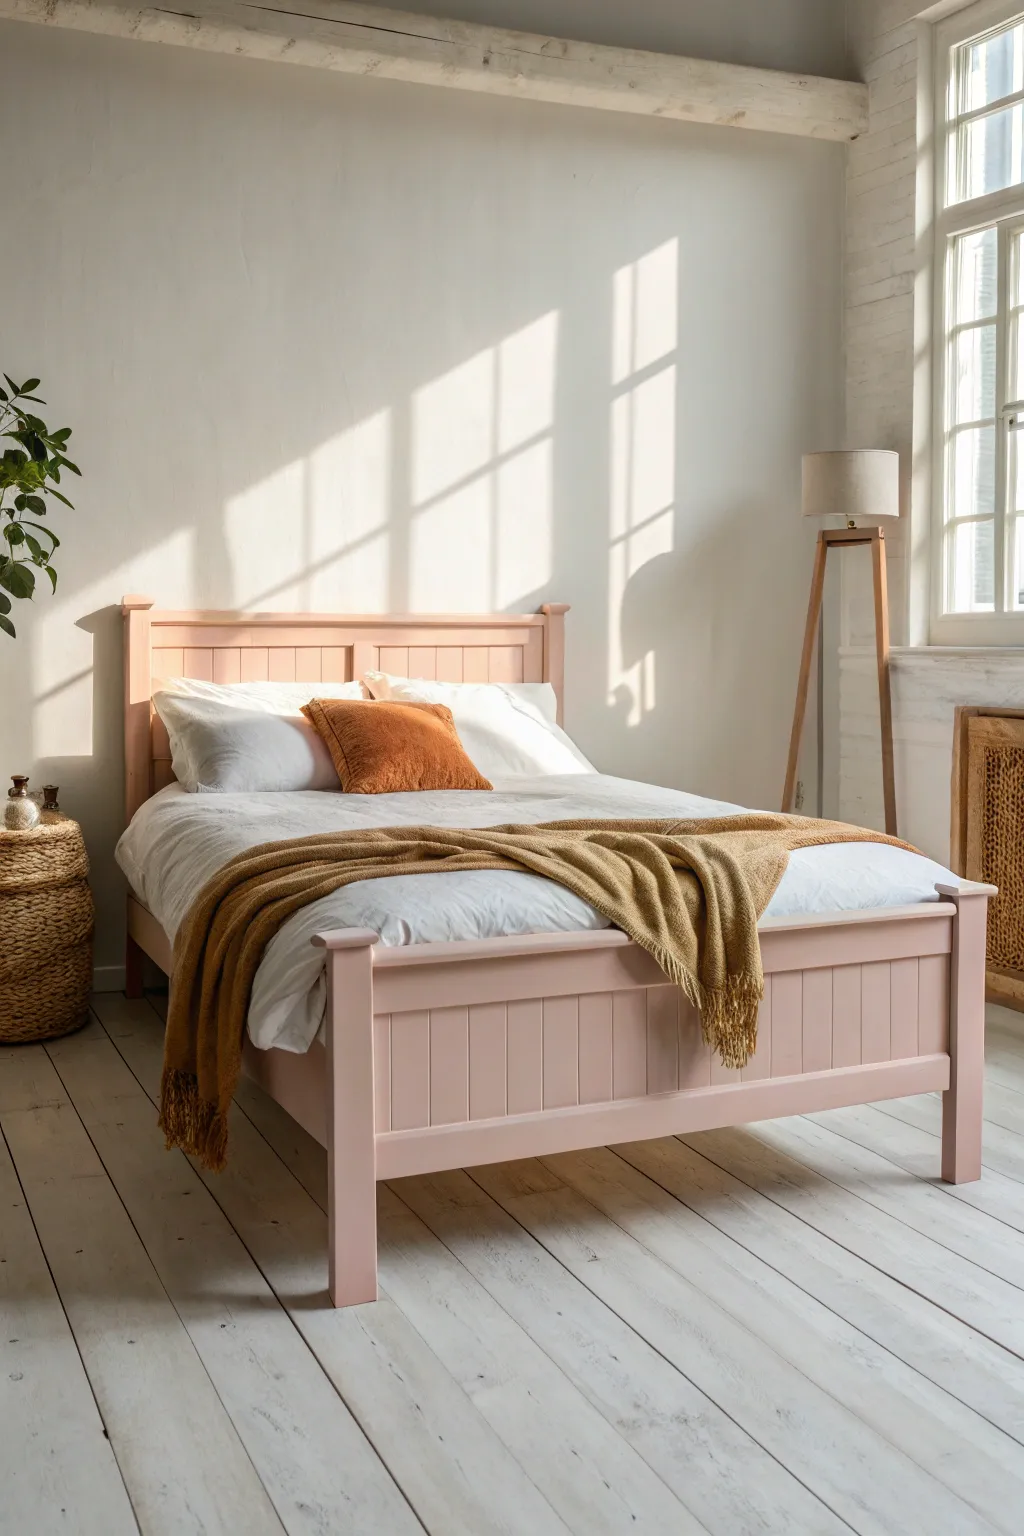
Transform a standard wooden bed frame into a dreamy focal point with this soft blush pink makeover. The matte finish enhances the subtle vertical paneling, creating a warm and inviting atmosphere perfect for a restful sanctuary.
How-To Guide
Materials
- Wooden bed frame (headboard, footboard, and rails)
- Sander or sanding block
- 120-grit and 220-grit sandpaper
- Degreasing cleaner (like TSP) and rags
- Wood filler and putty knife
- Painter’s tape
- High-quality bonding primer (stain-blocking)
- Matte or eggshell interior paint in blush pink
- 2-inch angled sash brush
- 4-inch foam roller or short-nap microfiber roller
- Drop cloths
- Screwdriver or drill (for disassembly)
Step 1: Preparation & Cleaning
-
Clear and Disassemble:
Start by removing the mattress and bedding. Disassemble the bed frame using your screwdriver or drill, separating the headboard, footboard, and side rails to make every surface accessible. -
Initial Cleaning:
Wipe down all wooden pieces with a damp cloth to remove loose dust and cobwebs before you begin the rough work. -
Repair Imperfections:
Inspect the wood for deep scratches or dents. Fill these with wood filler using a putty knife, overfilling slightly to account for shrinkage, and let it dry completely. -
Sanding Surfaces:
Sand all surfaces with 120-grit sandpaper to remove any glossy old finish and smooth out the dried wood filler. This mechanical adhesion is crucial for paint durability. -
Deep Clean:
Wash the sanded frame thoroughly with a degreasing cleaner like TSP substitute. This removes oils and sanding dust that could prevent the primer from sticking.
Sticky Paint Fix
If paint feels tacky after drying, humidity might be high. Run a fan or dehumidifier in the room. Dusting a tiny bit of talcum powder in joints can prevent sticking.
Step 2: Priming the Wood
-
Tape Off Hardware:
Use painter’s tape to cover any metal brackets or screw holes that you don’t want painted. -
First Coat of Primer:
Apply a coat of high-quality bonding primer. Use the brush to get into the grooves of the paneling first, then smooth out the flat areas with the roller. -
Check for Bleed-Through:
Once dry, check for any stains or tannins bleeding through the primer. If you see discoloration, spot-prime those areas again to seal them. -
Light Sanding:
I always lightly sand the primed surface with 220-grit sandpaper once it’s fully cured. This knocks down any brush strokes and creates a buttery smooth base for your pink paint. -
Dust Removal:
Wipe away the fine dust from this sanding step with a tack cloth or a slightly damp rag.
Distressed Upgrade
For a vintage cottage look, gently sand the edges and raised details with 150-grit sandpaper after the pink paint dries to reveal a bit of the wood underneath.
Step 3: Painting the Blush Finish
-
Cut In the Details:
Stir your blush pink paint thoroughly. Using your 2-inch angled brush, paint the recessed areas, corners, and vertical grooves of the headboard and footboard panels first. -
Roll the Flat Surfaces:
Immediately follow up with your foam or microfiber roller on the flat panels and rails while the brushed paint is still wet to blend the textures seamlessly. -
Dry Time:
Allow the first coat to dry according to the manufacturer’s instructions, usually 2-4 hours. Don’t rush this, as painting over tacky paint can ruin the finish. -
Second Coat Application:
Apply a second coat using the same method—brushing grooves then rolling flats. This ensures full opacity and a rich, true color. -
Inspect and Touch Up:
Once the second coat is dry, look closely for any drips or thin spots. Gently sand drips with 220-grit paper and touch up with a small amount of paint if needed. -
Curing Period:
Let the paint cure for at least 24 to 48 hours before reassembling. While dry to the touch, the paint needs time to harden against scratches. -
Reassembly:
Carefully reassemble your bed frame, being mindful not to scrape the fresh paint against metal tools.
Now you can dress your new bed with cozy linens and enjoy the peaceful vibe of your bedroom refresh

PENCIL GUIDE
Understanding Pencil Grades from H to B
From first sketch to finished drawing — learn pencil grades, line control, and shading techniques.
Explore the Full Guide
Black Satin Drama
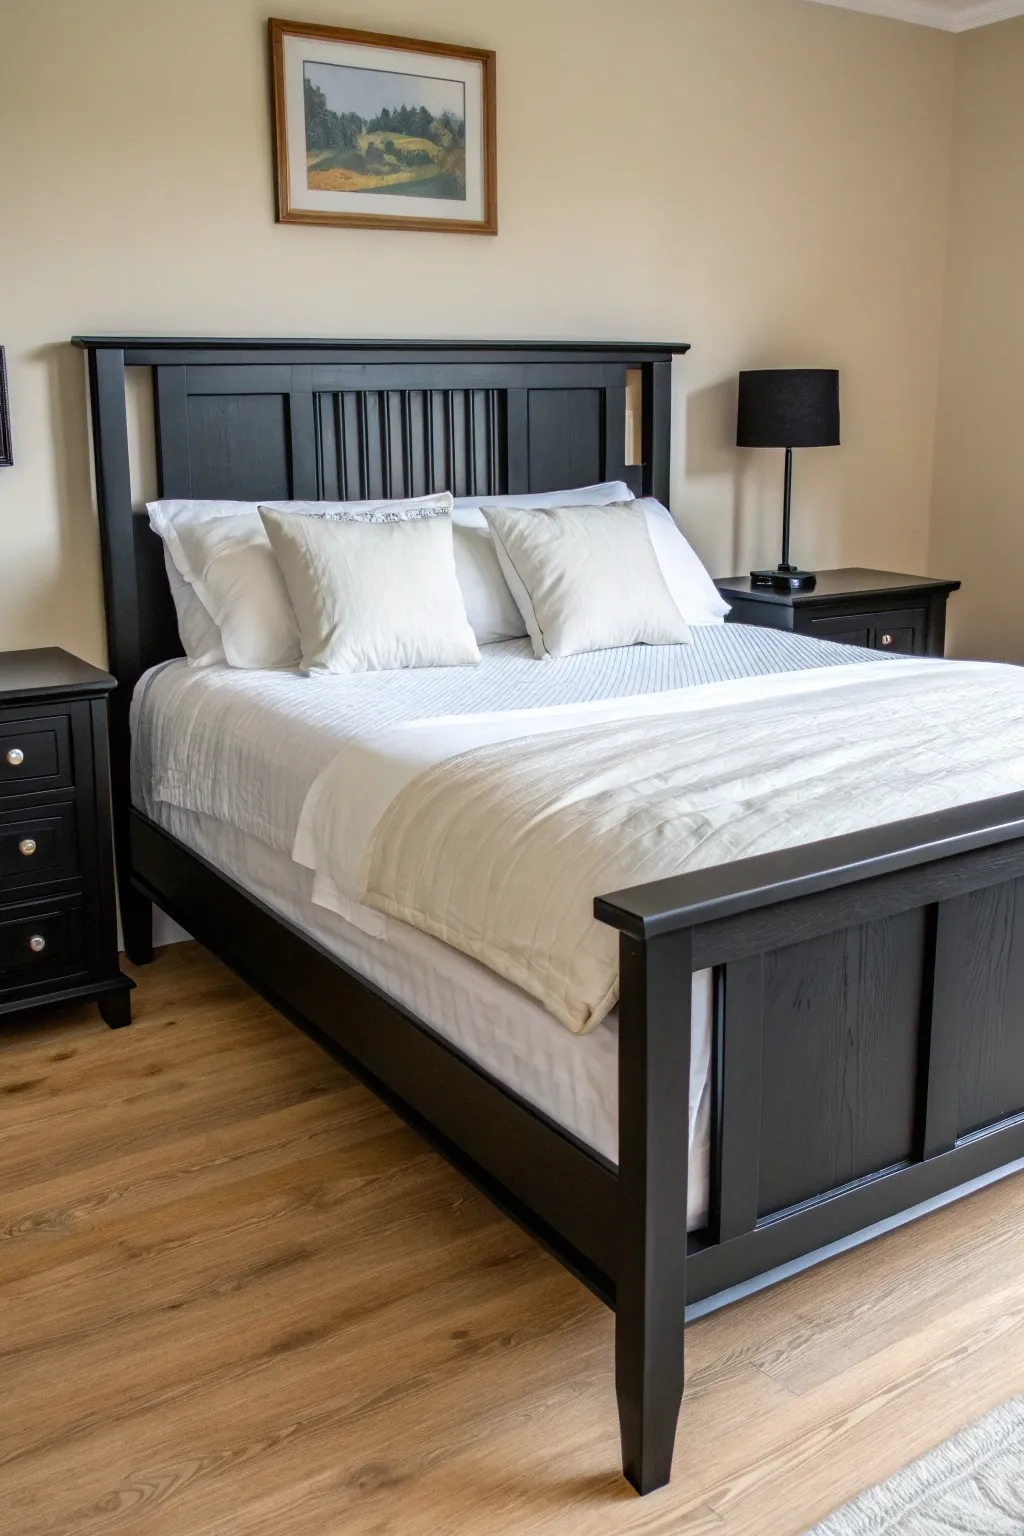
Transform a dated or basic wooden bed frame into a sophisticated centerpiece with a rich satin black finish. This project proves that a few coats of paint can add incredible modern elegance and drama to any bedroom.
Detailed Instructions
Materials
- Wooden bed frame (headboard, footboard, and rails)
- Course grit sandpaper (80-100 grit)
- Medium grit sandpaper (150-180 grit)
- Fine grit sandpaper (220 grit)
- Liquid deglosser or TSP substitute
- Clean lint-free rags
- Stain-blocking primer (high-quality, oil-based or bonding water-based)
- Satin finish black interior paint (enamel or furniture paint recommended)
- 2-inch angled sash brush (synthetic bristles)
- 4-inch foam roller or short nap microfiber roller
- Small roller tray
- Drop cloths
- Painter’s tape
- Tack cloth
- Screwdriver or wrench (for disassembly)
- Wood filler (optional)
Step 1: Preparation & Disassembly
-
Clear and Clean:
Begin by removing all bedding and the mattress from the frame. Move the bed to a well-ventilated workspace like a garage or open room with drop cloths laid out to protect your floors. -
Disassemble the Frame:
Using your screwdriver or wrench, carefully take apart the headboard, footboard, and side rails. Labeling hardware in small bags is something I always do so reassembly isn’t a puzzle later. -
Clean Surfaces:
Wipe down every piece with a TSP substitute or similar degreaser to remove oils, dust, and old furniture polish. Let the wood dry completely before moving on. -
Fill Imperfections:
Inspect the wood for deep scratches or gouges. Apply wood filler to these areas, slightly overfilling them. Once dry, sand the filler flush with the surface.
Sticky Situation?
If the paint feels tacky after drying, humidity is likely too high. Run a dehumidifier or fan in the room and wait an extra 24 hours before handling to prevent fingerprints.
Step 2: Sanding & Priming
-
Initial Sanding:
Scuff sand the entire surface using 150-180 grit sandpaper. You aren’t trying to strip all the old finish, just creating a ‘tooth’ for the new paint to grab onto. -
Detail Sanding:
Pay special attention to the slats on the headboard and the recessed panels on the footboard. Fold your sandpaper to get into these tight corners and grooves. -
Remove Dust:
Vacuum up the sanding dust, then wipe everything down thoroughly with a tack cloth to ensure a perfectly smooth base. -
Apply Primer:
Apply a coat of high-quality stain-blocking primer. Use the angled brush for the corners, slats, and recessed areas first, then use the foam roller for the wide, flat surfaces to avoid brush marks. -
Check for Bleed-Through:
Let the primer dry according to the manufacturer’s instructions. If you see any old stain bleeding through, apply a second coat of primer to seal it completely. -
Light Sanding:
Once the primer is fully cured, lightly sand it with 220-grit sandpaper to knock down any raised grain or texture. Wipe away dust with a fresh tack cloth.
Level Up: Hardware Pop
Swap standard dark hardware for brushed gold or brass bolts if they are visible. The metallic contrast against the black satin looks distinctively high-end.
Step 3: Painting the Black Finish
-
First Coat – Edges:
Open your satin black paint and stir well. Start by cutting in with your angled brush. Paint the inside edges of the headboard slats, the corners of the raised panels, and any detailed molding. -
First Coat – Flats:
Immediately follow up with your roller on the flat surfaces of the headboard and footboard. Maintain a ‘wet edge’ by rolling into the brushed areas while they are still wet to blend the textures. -
Watch for Drips:
Inspect the vertical slats closely for drips or pooling paint in the corners. Smooth these out with your brush immediately before they tack up. -
Dry Time:
Allow the first coat to dry overnight. Black paint is unforgiving with texture, so patience here ensures a hard, durable finish. -
Sand Between Coats:
Very lightly hand-sand the first coat with 220-grit sandpaper. You barely want to apply pressure—just enough to smooth out tiny dust nibs. Remove dust with a tack cloth. -
Second Coat:
Apply the second coat using the same method: brush the details first, then roll the flats. This coat should provide full, opaque coverage and that deep satin luster. -
Final Inspection:
Check for any missed spots or uneven sheen. If necessary, a third light coat can be applied after drying, but two coats are usually sufficient for black. -
Curing:
Let the painted pieces cure for at least 48 to 72 hours before reassembling. The paint needs to harden fully so the mattress/box spring doesn’t stick to the rails. -
Reassembly:
Carefully reassemble the bed frame in your room, watching out not to scratch your fresh finish against doorways or tools. Place felt pads under the legs if you have hard floors.
Now step back and admire how a simple color change has anchored your room with boldness and style
Distressed Cottage Finish
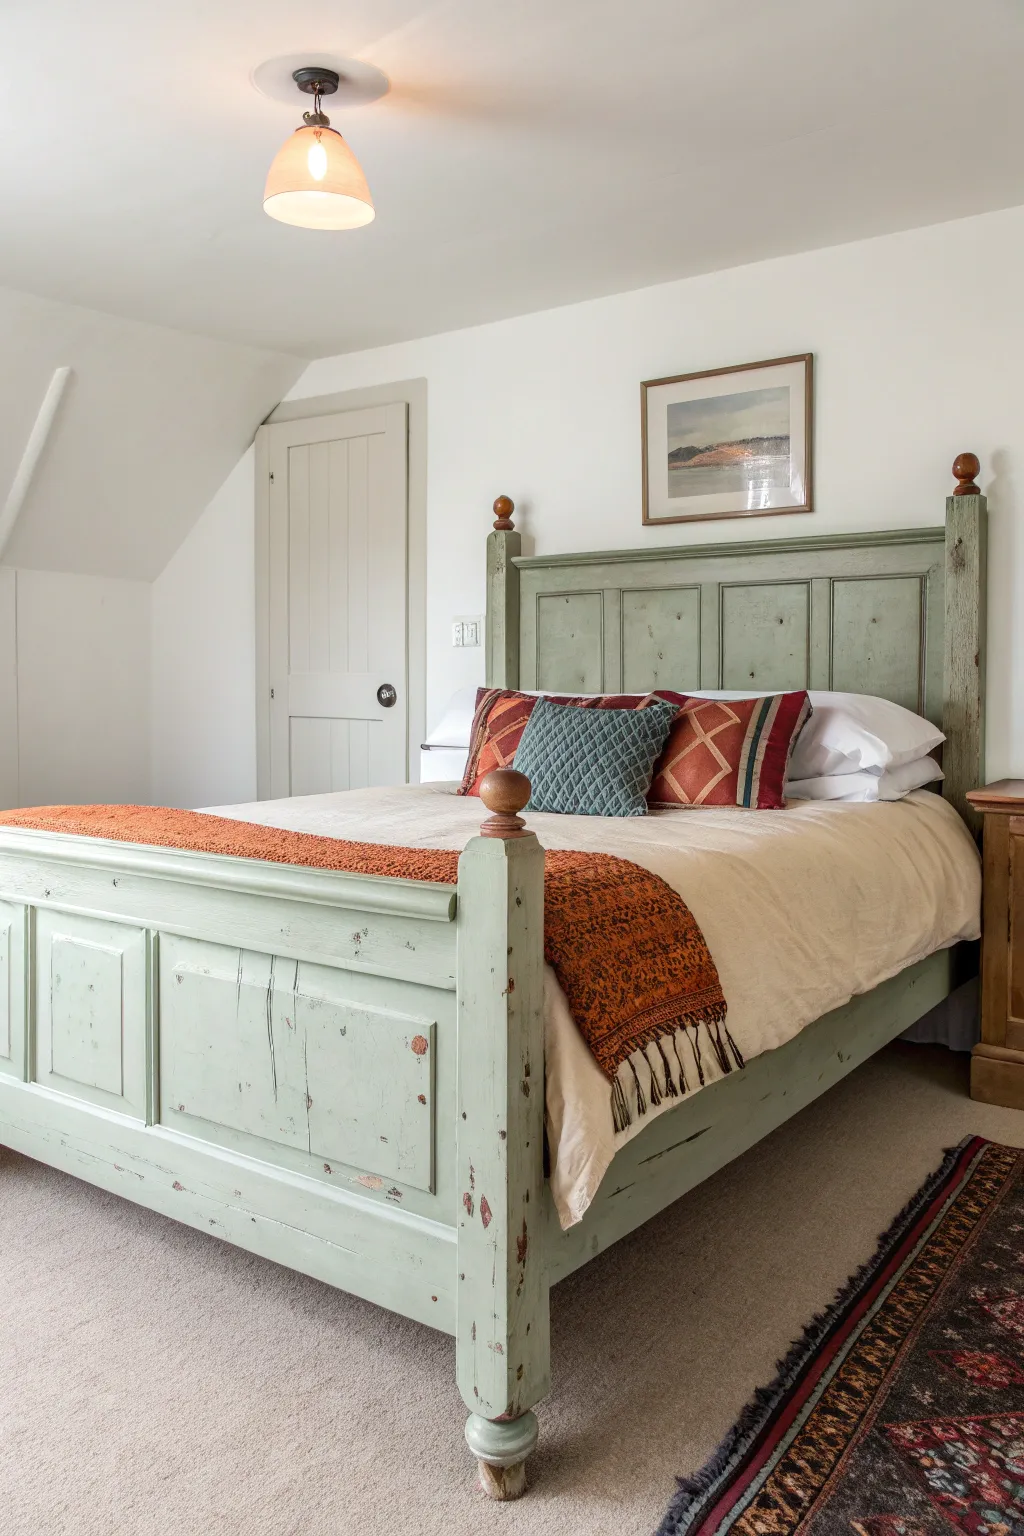
Transform a plain wooden bed frame into a charming, time-worn centerpiece with this weathered paint technique. Using a soft sage green over exposed wood, you’ll achieve that authentic cottage look where history seems to peek through every corner and edge.
Step-by-Step Guide
Materials
- Solid wood bed frame (cleaned and prepped)
- Medium-grit sandpaper (120-grit)
- Fine-grit sandpaper (220-grit)
- Orbital sander (optional, for larger areas)
- Tack cloth
- Primer (stain-blocking)
- Chalk-style paint or matte latex paint in Sage Green
- Warm brown wood stain (optional, for under-layer)
- Dark antique wax
- Clear furniture wax
- High-quality synthetic angular sash brush
- Wax brush or lint-free cotton rags
- Steel wool (0000 grade)
Step 1: Preparation & Base
-
Clean surface:
Begin by thoroughly cleaning the entire bed frame with a degreaser or mild soap solution to remove any oils, dust, or old furniture polish. -
Initial sand:
Scuff sand the entire surface using 120-grit sandpaper. You aren’t trying to remove all previous finish, just giving the new paint something to grip. -
Wipe down:
Remove all sanding dust meticulously using a tack cloth or a damp rag, ensuring a perfectly clean surface. -
Stain underlying wood:
If your bed frame is light pine or MDF and you want that rich dark wood to show through the distress marks like in the photo, apply a coat of warm brown wood stain to the edges and corners now. Let this dry completely according to the can’s instructions. -
Wax resist method:
For easier distressing later, rub a small amount of beeswax or a candle stick along the sharp edges, raised panels, and finials—anywhere natural wear would occur. This prevents the paint from adhering strongly in those specific spots.
Step 2: Painting
-
First coat application:
Stir your sage green chalk-style paint well. Apply the first coat using a synthetic brush, painting with the grain of the wood. Don’t worry about perfect opacity yet; thin, even coverage is key. -
Dry time:
Allow the first coat to dry fully. Chalk paint dries quickly, usually within 30-60 minutes, but check for tackiness before proceeding. -
Second coat:
Apply a second coat of sage green. This should provide full coverage. Pay attention to the recesses in the paneling to ensure no unintentional gaps in color. -
Final dry:
Let the final coat cure for at least 2 to 4 hours. You want the paint hard enough to sand without peeling, but fresh enough to distress easily.
Natural Wear Patterns
Look at where you grab the bedpost or kick the footboard. Distress heavily there. Random distressing looks fake; logical placement looks authentic.
Step 3: Distressing & Finishing
-
Begin distressing:
Take a 220-grit sanding block or sandpaper. Start rubbing gently over the areas where you applied the wax resist earlier. The paint should flake away to reveal the wood or stain underneath. -
Focus on high points:
Focus your sanding efforts on the high points: the finials, the corners of the posts, and the raised edges of the recessed panels. I like to close my eyes and run my hand over it to feel where it would naturally be touched. -
Create variation:
Vary your pressure. Use heavier pressure on corners to expose more wood, and lighter scuffing on flat surfaces to just simulate age without exposing raw wood. -
Clean up dust:
Once you are happy with the level of distressing, use a tack cloth again to remove all fine paint dust. -
Apply clear wax:
Using a wax brush or lint-free cloth, apply a thin layer of clear furniture wax over the entire bed. This seals the paint and provides a workable base for the dark wax. -
Antique with dark wax:
Dip your brush lightly into dark antique wax. Offload excess onto a paper towel, then lightly brush it into grooves, corners, and recessed areas to add instant age and depth. -
Blend and buff:
Immediately wipe back the dark wax with a clean cloth. If it’s too dark, use a dab of clear wax on your cloth to erase it. Finally, once the wax has set for a bit, buff the entire piece with a soft cotton cloth for a subtle sheen.
Paint Not Stick?
If paint peels off easily in sheets rather than sanding away dusty, the underlying finish was too glossy. Sand deeper and use a grip primer first.
Step back and admire how this simple finish adds layers of history and cozy character to your bedroom


Two-Tone Frame and Headboard
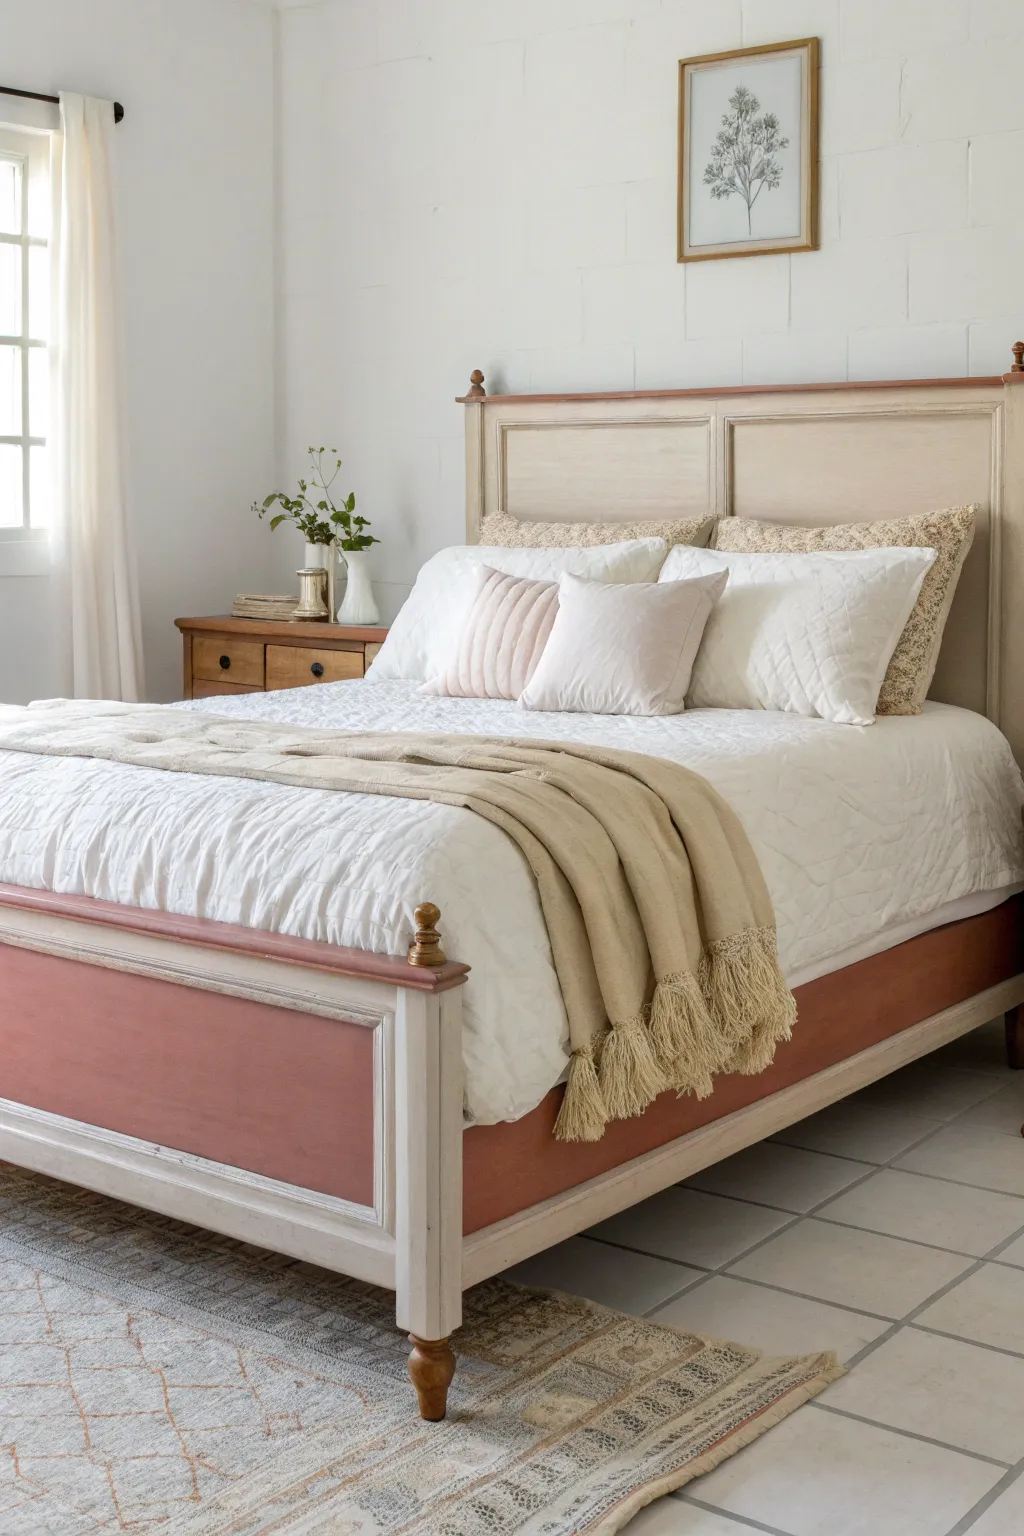
Give a standard wooden bed frame a sophisticated, custom look by combining distressed cream with warm, earthy terra cotta panels. This two-tone approach highlights the architectural details of the furniture while adding a soft pop of color that anchors the room.
Step-by-Step
Materials
- Wooden bed frame with inset panels
- Sandpaper (120 and 220 grit)
- Tack cloth
- Painter’s tape
- Primer (oil-based or stain-blocking)
- Chalk-style paint (Cream/Off-White)
- Chalk-style paint (Terra Cotta/Dusty Pink)
- Clear furniture wax
- Dark antique wax (optional for aging)
- High-quality synthetic paint brushes (2 inch angled)
- Small artist brush for corners
- Wax brush or lint-free rags
- Drop cloth
Step 1: Preparation & Priming
-
Clean the frame:
Begin by thoroughly cleaning the entire bed frame with a degreasing cleaner to remove oils and dirt. Let it dry completely. -
Scuff sanding:
Lightly sand all surfaces with 120-grit sandpaper. You aren’t trying to remove the old finish entirely, just creating ‘tooth’ for the primer to grip. -
Remove dust:
Wipe away every speck of sanding dust using a sticky tack cloth. Any leftover dust will create a gritty finish. -
Tape off edges:
If you are worried about steady hands, apply painter’s tape around the inner edges of the panels where the flat center meets the raised molding. This separates your two colors. -
Apply primer:
Coat the entire piece in a stain-blocking primer. This is crucial for preventing wood tannins from bleeding through your light cream paint later on.
Step 2: Applying the Cream Base
-
Paint the moldings:
Using your angled brush, apply the cream chalk paint to the main structure of the bed: the legs, the top rails, and the raised molding frames. -
Second coat:
Allow the first coat to dry according to the can’s instructions, then apply a second coat for full opacity. I like to sand very lightly with fine-grit paper between coats for a smooth feel. -
Distress edges:
Once the cream paint is dry, use 220-grit sandpaper to gently distress high points, corners, and carved details. This reveals a bit of the wood or primer underneath, adding character.
Clean Lines
For the crispest line between molding and panel, lightly score the corner with a dull blade before taping. This stops paint from bleeding under the tape edge.
Step 3: Adding the Terra Cotta Panels
-
Cut in the color:
Dip a smaller brush into your terra cotta paint. Carefully paint the flat, recessed panels on the footboard, side rails, and headboard. -
Watch the edges:
Use a steady hand or a small artist brush to get crisp lines right up against the cream molding. If you taped earlier, ensure the tape is pressed down firmly before painting. -
Build coverage:
Apply 2-3 thin coats of the terra cotta color rather than one thick one. This prevents brush strokes and drips. -
Remove tape:
If you used painter’s tape, peel it off slowly while the last coat is still slightly tacky to prevent peeling the paint film.
Level Up: Texture
Mix a small amount of texture powder or baking soda into the terra cotta paint for the panels. This creates a plaster-like, old-world finish.
Step 4: Sealing & Finishing
-
Apply clear wax:
Using a wax brush or lint-free rag, massage a layer of clear furniture wax over the entire bed frame to seal the porous chalk paint. -
Buff to sheen:
Wait about 20 minutes for the wax to set up, then buff it vigorously with a clean cloth until you achieve a soft, satin sheen. -
Antique the details (optional):
To enhance the vintage look, apply a tiny amount of dark antique wax into the crevasses of the molding. Wipe it back almost immediately so it only remains in the deep corners.
Step back and admire how this elegant two-tone finish completely refreshes the bedroom atmosphere
Natural Wood Plus Painted Rails

Achieve the serene, sun-drenched look of Scandinavian minimalist design by refreshing a standard wooden bed frame. This project focuses on stripping away heavy finishes to reveal the natural grain, creating a light, airy centerpiece that feels both modern and timeless.
Detailed Instructions
Materials
- Solid wood bed frame (oak or pine works best)
- Chemical varnish stripper (citrus-based is safer)
- Plastic scraper
- Orbital sander with dust bag
- Sandpaper discs (80, 120, and 220 grit)
- Sanding sponges (medium and fine)
- Wood bleach (two-part kit or oxalic acid)
- Synthetic bristle brush for bleach
- Vinegar and water solution (for neutralizing)
- Matte polyacrylic sealer or furniture wax
- Clean lint-free rags
- Drop cloths and painter’s tape
Step 1: Preparation and Stripping
-
Clear and clean:
Begin by removing the mattress and bedding, then thoroughly wipe down the entire frame with a damp cloth to remove surface dust and grime. -
Protect the area:
Lay down heavy-duty drop cloths underneath the bed legs and surrounding floor to catch the mess of stripping and sanding. -
Apply stripper:
If your bed has a thick, glossy varnish, brush on a generous layer of citrus-based stripper. Let it sit for the time recommended on the bottle, usually until it starts bubbling. -
Scrape away finish:
Use a plastic scraper to gently push off the goopy old varnish. I prefer plastic over metal here to avoid accidentally gouging the soft wood underneath. -
Clean residue:
Wipe the wood down with mineral spirits and steel wool to remove any remaining sticky stripper residue before moving on to sanding.
Uneven Bleaching?
If the wood looks blotchy after the first bleach application, apply a second coat specifically to the darker areas to even out the tone.
Step 2: Sanding to Raw Wood
-
Initial coarse sanding:
Load your orbital sander with 80-grit paper. Sand the flat surfaces of the headboard, footboard, and rails to remove the remaining finish and stain. -
Tackle the details:
For the legs, corners, or any routed edges on the headboard paneling, switch to a medium-grit sanding sponge to get into crevices the machine can’t reach. -
Step up the grit:
Switch to 120-grit paper on your sander. Go over the entire piece again to smooth out the scratches left by the coarse paper. -
Final smooth sanding:
Finish with 220-grit sandpaper. The wood should feel incredibly smooth to the touch and look uniform in color. -
Dust removal:
Vacuum the wood thoroughly and wipe with a tack cloth. Any leftover sawdust will create a muddy look when you apply a finish.
White Wax Wonder
Skip the clear sealer and use a white-tinted furniture wax instead. It settles into the grain, enhancing that pale, coastal texture even more.
Step 3: Bleaching and Finishing
-
Mix the bleach:
If you want that ultra-light, sun-faded look shown in the photo, mix your two-part wood bleach according to the package instructions in a glass container. -
Apply bleach solution:
Using a synthetic brush, apply the bleach evenly across the wood. Work quickly to ensure the wood stays wet for a consistent chemical reaction. -
Let it dry:
Allow the wood to dry completely. You will see the color lighten significantly as the moisture evaporates. -
Neutralize the wood:
Wipe the bleached wood down with a mixture of 50/50 white vinegar and water. This stops the chemical reaction so your final sealer will adhere properly. -
Knock down the grain:
Bleaching often raises the wood grain, making it feel fuzzy. Lightly hand-sand with 220-grit paper one last time to smooth it back down. -
Apply sealer:
To keep the look natural, apply a dead-flat matte polyacrylic. Brush it on in thin coats, following the direction of the wood grain. -
Buff between coats:
Once the first coat is dry, lightly sand with a fine sponge, wipe clean, and apply a second coat for durability without high shine.
Now you have a stunning, salon-worthy bed frame that brings a breath of fresh air to your sleeping space
Highlight Carved Details With Color
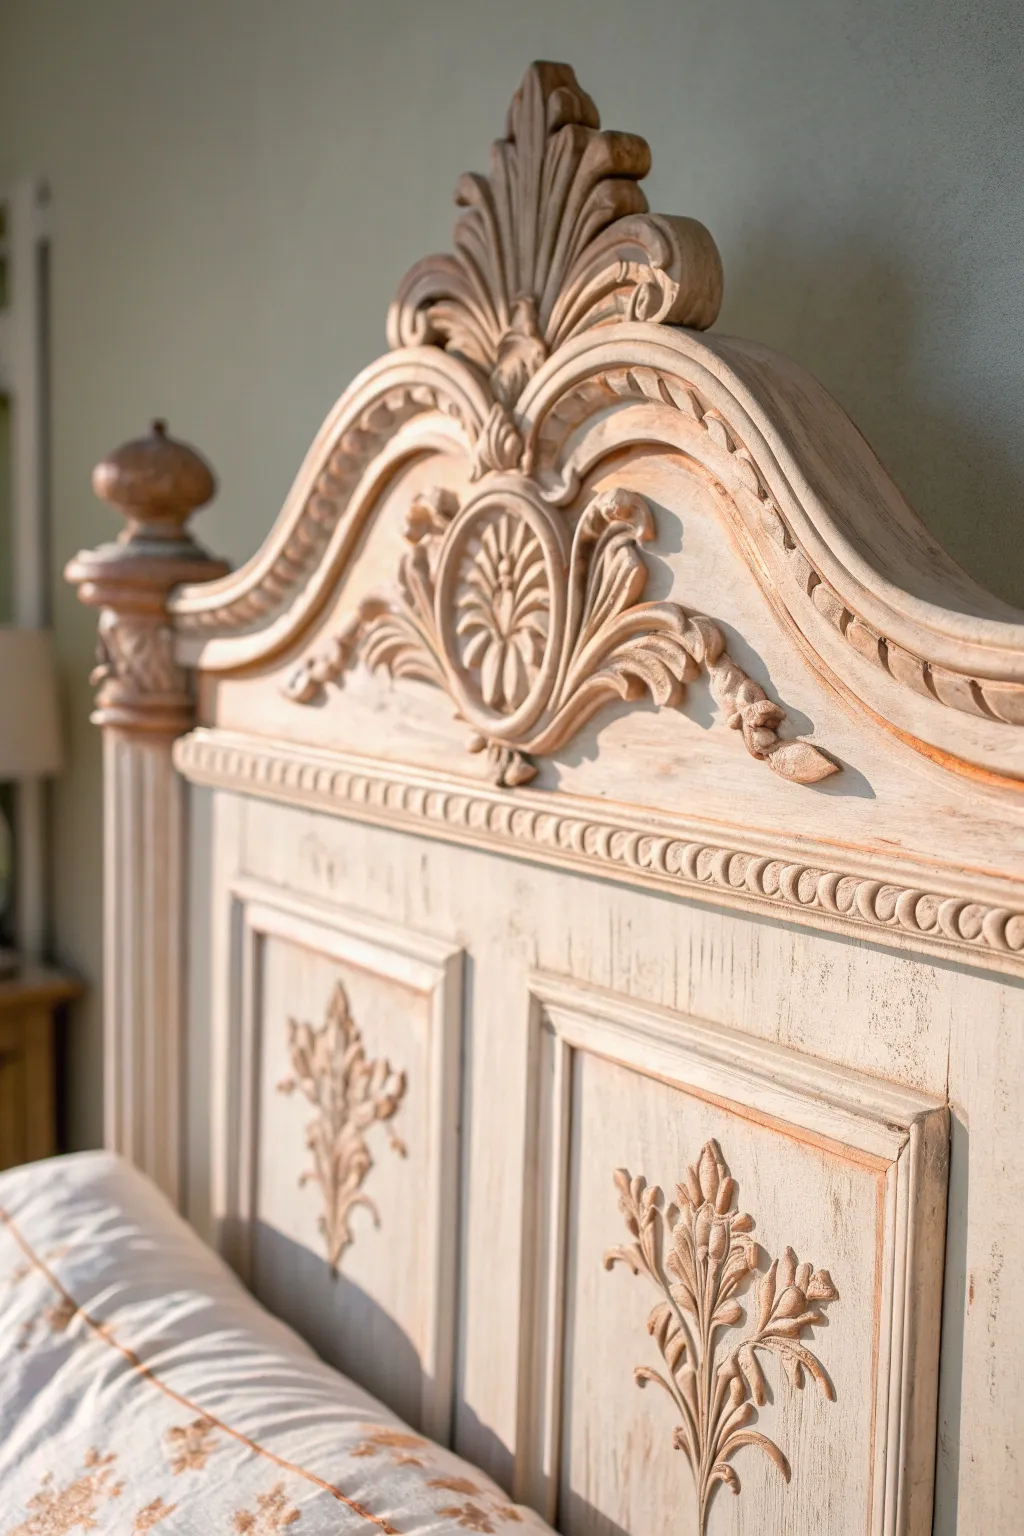
Transform a heavily carved headboard into a piece that feels like it belongs in a bright, sun-drenched villa. This technique uses layers of cream paint, distressing, and dark wax to make every carved leaf and scroll pop with dimension.
Step-by-Step Guide
Materials
- Ornate wooden headboard (pre-cleaned)
- Medium-grit sandpaper (120-150 grit)
- Chalk paint in a warm cream or off-white color
- 2-inch synthetic bristle paint brush
- Small round artist brush (for crevices)
- Clean, lint-free cotton rags
- Dark antique wax (brown tone)
- Clear finishing wax
- Wax brush or clean cloth for application
- Water spray bottle
Step 1: Preparation & Base Coat
-
Clean surface:
Before you begin, wipe down the entire headboard with a degreaser or mild soap and water to remove oils and dust that could repel the paint. -
Light scuffing:
Run medium-grit sandpaper over the glossy areas just enough to create ‘tooth’ for the paint to adhere, then wipe away the dust with a tack cloth. -
Dilutes the paint:
Pour your cream chalk paint into a container and mix in a very small amount of water—about 10%—to slightly thin the consistency, which helps it settle into the carvings without clogging them. -
Apply first coat:
Brush the paint over the entire headboard, working it well into the deep recesses of the finials and central medallions. -
Watch for drips:
Check the vertical grooves on the posts frequently for drips while the paint is wet and brush them out immediately. -
Let it dry completely:
Allow this initial coat to dry for at least 2-4 hours, or until it is no longer cool to the touch. -
Assess coverage:
If the original wood color is still showing through too much for your taste, apply a second thin coat, focusing on flat panels but keeping the paint lighter on high points.
Natural Hues
If the underlying wood is red or unfinished, apply a coat of shellac first to prevent tannins from bleeding through and pinking your cream paint.
Step 2: Distressing & Highlighting
-
Wet distress technique:
Before the paint cures fully (usually within 24 hours of painting), take a damp, lint-free rag and gently rub the high points of the carvings excessively. -
Reveal the wood:
Focus your rubbing on the edges of the curved molding, the tips of the leaf carvings, and the rounded finials to reveal the raw wood underneath. -
Sand for texture:
For a more rustic texture, I prefer to use 150-grit sandpaper on the flat panel edges to create genuine wear patterns where a pillow might naturally rub. -
Clean up dust:
Vacuum or wipe away all sanding dust thoroughly; any remaining dust will muddy your wax finish.
Step 3: Waxing & Finishing
-
Apply clear wax:
Brush a layer of clear furniture wax over the entire piece first; this acts as a barrier so the dark wax doesn’t stain the paint too heavily. -
Apply dark wax:
Dip a small round brush into the dark antique wax and dab it specifically into the deepest crevices, corners, and the centers of the carved motifs. -
Blend the shadows:
Use a clean cloth to wipe back the excess dark wax from the high points, leaving the dark pigment only in the low points to create shadow and depth. -
Buff to sheen:
Wait about 15-20 minutes for the wax to haze over, then buff the entire headboard briskly with a clean, soft cloth to create a subtle, durable sheen. -
Final cure:
Let the piece cure in a well-ventilated area for at least 24 hours before moving bedding back against it.
Too Heavy?
If the dark wax looks too muddy or intense, apply more clear wax strictly over the dark area. It acts like an eraser, lifting the pigment.
Step back and admire how the layers of paint and wax have given your furniture a timeless, architectural quality
Painted Spindles That Pop
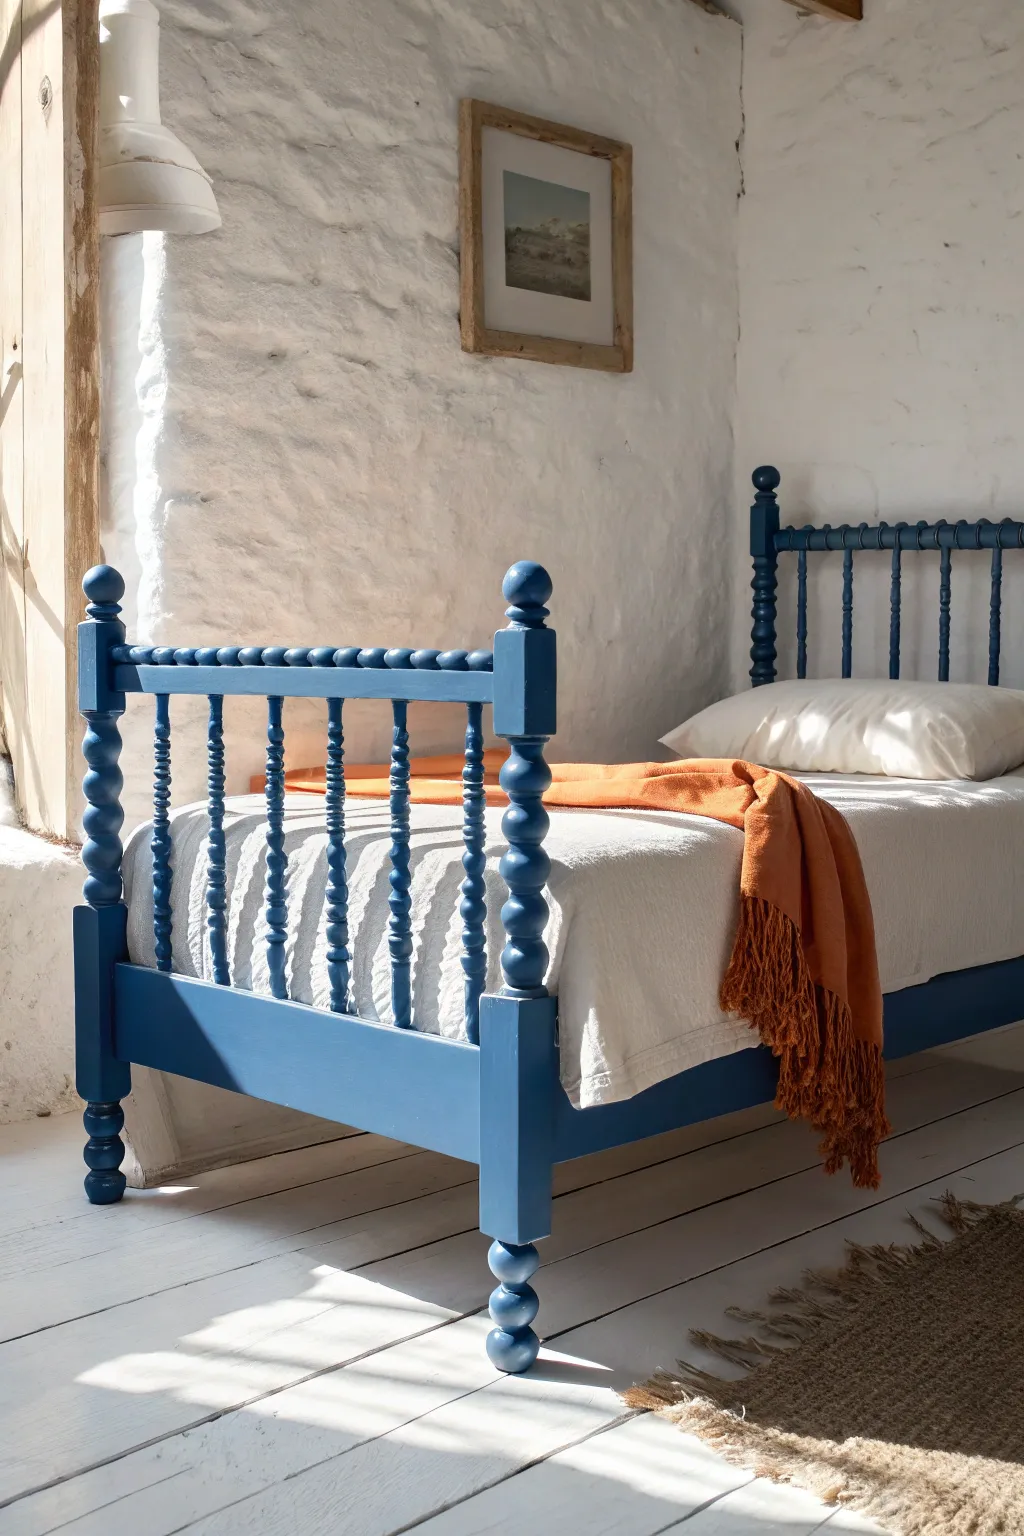
Transform a classic spindle bed into a striking focal point with a bold coat of denim-blue paint. This project highlights the beautiful turned wood details while adding a modern pop of color to a rustic, whitewashed room.
Step-by-Step Tutorial
Materials
- Wooden spindle bed frame (headboard, footboard, and rails)
- Degreasing cleaner (like TSP) and sponge
- Medium-grit sandpaper (120-grit)
- Fine-grit sandpaper (220-grit)
- Tack cloths
- High-quality stain-blocking primer
- Satin or semi-gloss furniture paint in a denim blue shade
- 2-inch angled sash brush (synthetic bristles)
- Small round artist’s brush for tight crevices
- Drop cloth
- Screwdriver or wrench for disassembly
Step 1: Preparation First
-
Disassemble the frame:
Begin by taking the bed apart completely. Remove the side rails from the headboard and footboard to ensure you can reach every angle of those tricky spindles without obstruction. -
Create a workspace:
Lay down a large drop cloth in a well-ventilated area. If possible, prop the headboard and footboard up against a wall or sawhorse so they are vertical, which makes painting easier. -
Clean thoroughly:
Scrub the entire frame with a degreasing cleaner like TSP to remove oils, furniture polish, and dust. This step is crucial for paint adhesion, so don’t rush it. -
Sand the surfaces:
Using 120-grit sandpaper, go over the entire bed frame. Focus on scuffing up the existing finish rather than stripping it bare. Gently hand-sand around the turned spindles. -
Remove dust:
Vacuum up the sanding dust, then wipe every nook and cranny with a tack cloth. Even a tiny bit of dust can ruin the smoothness of your final coat.
Drip Patrol
Check your work 10 minutes after painting each section. Spindle turnings are notorious for ‘gravity drips’ that appear slowly. Brush them out lightly before they tack up.
Step 2: Priming the Spindles
-
Apply primer:
Using your angled sash brush, apply a coat of stain-blocking primer. The primer is essential to prevent old wood tannins from bleeding through your blue paint. -
Watch for drips:
Pay special attention to the turned sections of the spindles. Paint tends to pool in the crevices, so keep your coats thin and brush out any drips immediately. -
Sand the primer:
Once the primer is fully dry (check the can for times), lightly sand the surfaces with 220-grit sandpaper to knock down any roughness. -
Wipe down again:
Run a tack cloth over the piece one more time to ensure a perfectly clean surface for your color coats.
Step 3: Applying the Blue Finish
-
Start with the difficult parts:
Begin painting the intricate turned spindles first. It’s easier to smooth out brush marks on the flat rails later than trying to fix the spindles after the flat parts are drying. -
Use the right technique:
Load your brush lightly. I usually tap off excess paint before touching the wood. Use long, smooth strokes along the length of the spindles where possible. -
Detail work:
Switch to a small round artist’s brush if you’re struggling to get paint deep into the crevices where the spindles meet the rails without flooding the area. -
Paint the flat sections:
Move on to the top rails, side posts, and mattress rails. Use your angled brush to create smooth, long strokes following the wood grain. -
Dry and assess:
Let the first coat dry completely, usually overnight or at least 4-6 hours depending on your paint type. -
Apply second coat:
Apply a second thin coat of blue paint, following the same order: spindles first, then flat areas. This second coat deepens the color and hides any primer streaks. -
Final cure:
Allow the paint to cure for at least 48 hours before reassembling the bed. This prevents the paint from chipping or sticking when you tighten the hardware.
Two-Tone Twist
For a subtle custom look, dry-brush a slightly lighter shade of blue just on the highest raised rings of the spindles to accentuate the 3D shape.
Enjoy the fresh, coastal energy your newly painted bed brings to the bedroom
Color-Dipped Legs and Feet
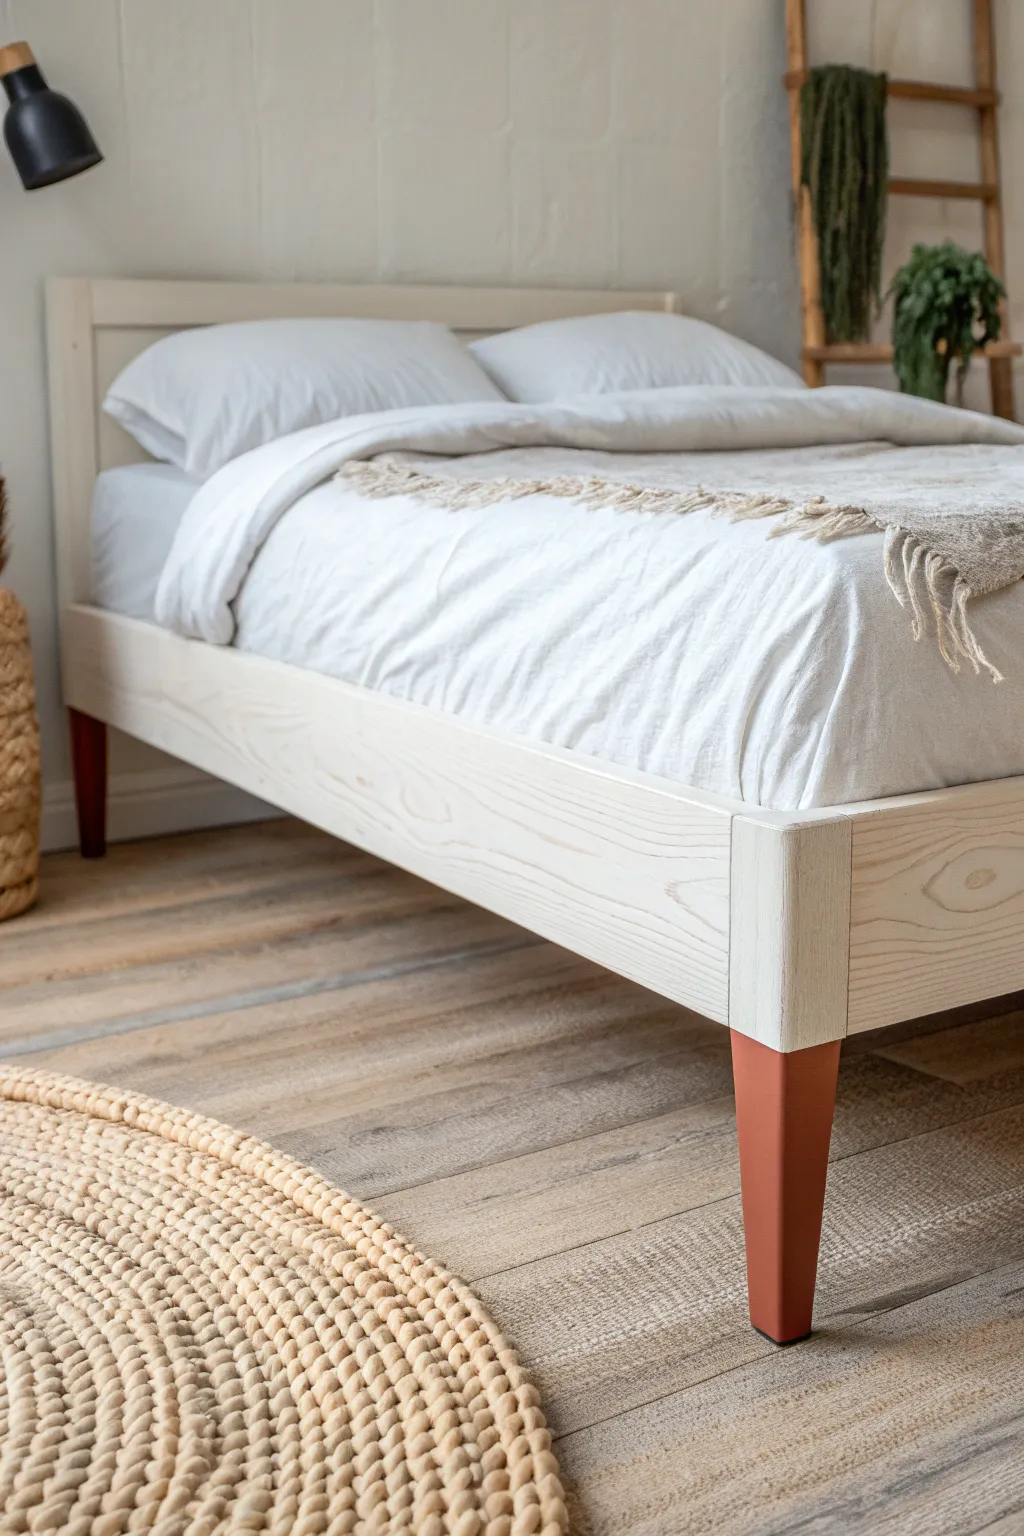
Give your bedroom a subtle yet stylish update with this trendy color-dipped furniture technique. This project combines the airy feel of whitewashed wood with a grounding pop of terracotta on the legs for a modern, custom look.
Step-by-Step Guide
Materials
- Wooden bed frame (unfinished or previously finished)
- Sandpaper (120 and 220 grit)
- Painter’s tape (high quality)
- Tape measure
- Pencil
- Whitewash stain or white paint diluted with water
- Terracotta or reddish-brown latex paint
- Paintbrushes (one wide for the frame, one angled sash brush for the legs)
- Clean lint-free rags
- Drop cloth
- Clear matte polyurethane (optional)
Step 1: Preparation
-
Prepare the workspace:
Lay down your drop cloth in a well-ventilated area to protect your flooring. If possible, dismantle the bed frame or elevate the legs on small blocks of wood to make painting easier. -
Sand the surfaces:
Using 120-grit sandpaper, thoroughly sand the entire bed frame to remove any old glossy varnish or rough patches. If the wood is already raw, give it a quick pass to open the grain. -
Smooth the finish:
Switch to 220-grit sandpaper for a final pass. This ensures the wood is incredibly smooth to the touch, which will help your whitewash apply evenly without grabbing too much pigment in rough spots. -
Clean the dust:
Wipe down the entire frame with a tack cloth or a slightly damp rag to remove every speck of sanding dust. A clean surface is crucial for a professional finish.
Step 2: Whitewashing the Frame
-
Mix your whitewash:
If you aren’t using a pre-mixed stain, create your own by mixing white latex paint with water. I usually start with a 1:1 ratio, but you can add more water for a more translucent look that shows more wood grain. -
Apply the wash:
Dip a rag or wide brush into the mixture and apply it to the wood in long, even strokes following the direction of the wood grain. Work in manageable sections, like one rail at a time. -
Wipe back excess:
Before the wash dries, gently wipe over the painted area with a clean, dry lint-free rag. This removes excess paint and reveals the beautiful wood grain underneath. Apply more pressure to remove more white, or use a light hand for a more opaque look. -
Let it cure:
Allow the whitewash to dry completely according to your product’s instructions. This usually takes at least 2-4 hours, but humidity can affect drying times.
Bleeding Lines?
If paint bled under the tape, don’t panic. Gently scrape the excess dried paint away with an X-Acto knife or razor blade held at a low angle, then touch up with a tiny bit of whitewash.
Step 3: The Dipping Technique
-
Measure the height:
Decide how high you want your ‘dipped’ effect to go. Using your tape measure, mark a height of about 8 to 10 inches from the floor on all four legs. Ensure the height is identical on every leg for a symmetrical look. -
Apply the tape:
Wrap painter’s tape around each leg precisely at your pencil marks. Press the edge of the tape down firmly with your fingernail or a credit card to prevent paint from bleeding under specifically at the dip line. -
Seal the tape edge:
For a razor-sharp line, lightly brush a tiny amount of your clear matte finish or even a bit of the base whitewash over the tape edge. This seals any microscopic gaps. -
Paint the first coat:
Using your angled sash brush and the terracotta paint, paint the bottom section of the legs. Brush from the tape downward towards the floor to avoid forcing paint up under the tape. -
Repeat for coverage:
Allow the first coat to dry to the touch, then apply a second coat for rich, opaque color coverage. Darker colors like terracotta often need two coats to look solid against the light wood. -
Remove tape:
Here is the critical moment: peel off the painter’s tape while the final coat is still slightly wet. Pull the tape away from the painted area at a 45-degree angle to get the cleanest line possible.
Metallic Accent
Add a luxe touch by painting a thin gold or copper stripe right over the transition line where the terracotta meets the whitewash. Use 1/4 inch masking tape to guide you.
Step 4: Finishing Touches
-
Inspect and touch up:
Once the leg paint is dry, check your lines. If any paint bled through, use a small detail brush with the whitewash mixture to carefully correct it, or scrape it gently with a craft knife. -
Seal the project:
To protect your handiwork, apply a coat of clear matte polyurethane over the entire frame, paying special attention to the painted legs which might scuff against vacuums or shoes. -
Final cure:
Let the clear coat cure for at least 24 hours before reassembling the bed or placing a heavy mattress back onto the frame.
Enjoy the fresh, contemporary look your custom-dipped bed frame brings to your bedroom sanctuary
Ombré Fade Headboard
Bring the warmth of a desert sunset into your bedroom with this soft, brushed ombré wall treatment. This technique creates a dreamy, jagged transition between earthy terracotta and crisp white, adding texture and height to your space without needing a full mural.
Detailed Instructions
Materials
- Interior latex paint (terracotta/rust color)
- Interior latex paint (white or existing wall color)
- Glaze medium (clear)
- Wide dry paintbrush (4-inch chip brush or类似)
- Standard paint roller and tray
- Painter’s tape
- Drop cloths
- Mixing bucket
- Stir sticks
Step 1: Preparation and Base Coat
-
Clear and Protect:
Begin by moving your bed and furniture away from the target wall. Lay down drop cloths to protect your flooring from any drips or splatters. -
Tape the Edges:
Apply painter’s tape along the baseboards, adjacent walls, and ceiling line to ensure crisp edges where the fade won’t be applied. -
Refresh the Base:
If your wall isn’t already a fresh white, roll on a coat of white interior latex paint. This acts as the ‘sky’ for your sunset fade and ensures the colors pop correctly. -
Dry Time:
Allow this base coat to dry completely according to the manufacturer’s instructions before starting the color application.
Paint drying too fast?
If the paint drags and won’t blend, lightly mist the wall with water from a spray bottle. This reactivates the latex slightly, giving you more work time for the fade.
Step 2: The Color Application
-
Mix the Glaze:
In a mixing bucket, combine your terracotta paint with clear glaze medium. A 4:1 ratio of paint to glaze usually works well to extend the drying time and make the paint more translucent for blending. -
Establish the Horizon:
Using a roller or large brush, paint a solid band of the terracotta mix along the bottom third of the wall. This doesn’t need to be perfect at the top edge. -
Create the Mid-Tone:
While the bottom band is still wet, stroke upward with your brush to drag the paint higher. As the brush runs out of paint, the color will naturally lighten. -
Feather the Edge:
Dip a dry 4-inch chip brush very lightly into the original paint mix. Start at the wet edge of your color band and use upward, vertical strokes to feather the color into the white space. -
The Dry Brush Technique:
Wipe most of the paint off your brush onto a rag. With this ‘dry’ brush, rapidly stroke upward from the colored section into the white, creating uneven, jagged peaks that mimic distant rain or heat waves. -
Vary the Height:
I like to intentionally vary the height of these vertical strokes. Some should reach higher than others to avoid a uniform line, which keeps the look organic and relaxed.
Step 3: Blending and Refining
-
Soften Transitions:
Take a clean, dry brush and lightly sweep over the area where the color fades into white. This helps blur harsh lines while keeping the vertical texture intact. -
Add Depth:
If the bottom section looks too sheer, go back and add a second layer of the solid terracotta color near the baseboards to anchor the gradient. -
Spot Check:
Step back to the other side of the room. Look for areas that seem too heavy or too bare and make small adjustments with your dry brush. -
Let it Set:
Allow the wall to dry undisturbed for at least 24 hours. The glaze extends drying time significantly, so be patient. -
Clean Up:
Once fully dry, slowly peel away the painter’s tape at a 45-degree angle to reveal your clean edges. -
Style the Bed:
Move your wooden headboard back into place. The natural wood tones will beautifully complement the warm, rusty gradient you’ve just created.
Add a Setting Sun
Before the fade dries, use a circular stencil to gently sponge a pale yellow or soft peach circle partially hidden behind the headboard area for a stunning sunset detail.
Now you have a serene, custom backdrop that brings warmth to your bedroom every single day
Painted Bed With Stenciled Panels
Transform a plain wooden bed frame into a sophisticated, French-country inspired masterpiece using paint and stencils. This project achieves a high-end, custom furniture look by combining a soft, washed base coat with delicate, ornate stenciling on the recessed panels.
Step-by-Step
Materials
- Wooden bed frame with recessed panels (headboard and footboard)
- Sandpaper (120 and 220 grit)
- Tack cloth
- Chalk paint in a light greige or warm ivory (Base Color)
- Chalk paint in a taupe or light grey (Stencil Color)
- Large damask or ornate floral wall stencil
- Painter’s tape
- Stencil brush (stiff bristle)
- High-quality synthetic paint brush (2-inch)
- Water-based clear matte polycrylic sealer
- Paper towels
- Measuring tape
- Spray adhesive (repositionable)
Step 1: Preparation and Base Coat
-
Clean the Surface:
Begin by thoroughly cleaning the entire bed frame with a degreasing cleaner to remove oils, dust, and old wax. Let it dry completely. -
Light Sanding:
Scuff sand the wood surfaces using 120-grit sandpaper. You aren’t trying to strip it bare, just creating ‘tooth’ for the paint to adhere to. -
Remove Dust:
Wipe away all sanding dust with a tack cloth to ensure a perfectly smooth finish. -
Apply First Base Coat:
Using your 2-inch synthetic brush, apply the first coat of your light greige chalk paint. Work with the grain of the wood, covering the main rails, posts, and the recessed panels. -
Dry and Assess:
Allow the first coat to dry for at least 2-4 hours. Chalk paint dries quickly, but patience helps durability. -
Apply Second Coat:
Apply a second coat of the base color to ensure full, opaque coverage. Pay special attention to the corners of the recessed panels. -
smooth Finish:
Once fully dry, lightly run a piece of 220-grit sandpaper over the flat surfaces to knock down any brush strokes, creating a buttery smooth feel.
Step 2: Stenciling the Panels
-
Measure and Center:
Measure the width of one recessed panel to find the exact vertical center. Mark this lightly with a pencil or a piece of painter’s tape. -
Prepare the Stencil:
Lightly mist the back of your damask stencil with repositionable spray adhesive. Let it sit for a moment until tacky, not wet. -
Position the Stencil:
Align the center of the stencil pattern with your center mark on the panel. Press the stencil firmly against the surface, ensuring the intricate bridges are stuck down. -
Load the Brush:
Dip just the tips of your stencil brush into the taupe paint. Offload almost all the paint onto a paper towel until the brush feels nearly dry. This is crucial to prevent bleeding. -
Apply Stencil Paint:
Using a vertical dabbing motion or a light swirling motion, apply the paint over the stencil design. Build the color slowly rather than applying one thick coat. -
Repeat the Pattern:
If your panel is tall, you may need to lift and reposition the stencil to continue the pattern downwards. Ensure you align the registration marks carefully perfectly. -
Detail the Footboard:
Repeat this process for all panels on the headboard and the footboard, ensuring the central motif is placed at the same height on each panel. -
Touch Ups:
Once the stenciling is dry, use a small artist’s brush and your base color to tidy up any areas where paint might have slipped under the stencil.
Bleeding Lines?
If paint seeps under the stencil, your brush was too wet. Wait for it to dry, paint over the error with the base color, and try again with an extremely dry brush.
Step 3: Finishing and Distressing
-
Optional Distressing:
For an aged look, lightly sand the raised edges and corners of the bed frame with 220-grit sandpaper to reveal a bit of the wood underneath. -
Seal the Work:
Apply a thin, even coat of water-based matte polycrylic sealer over the entire bed. This protects your handiwork from scratches and wear. -
Final Cure:
Let the sealer cure for at least 24 hours before putting the mattress back or styling the bed with linens.
Antique Wash Effect
Mix 1 part dark wax with clear wax before applying. This settles into the stencil crevices and corners, giving the piece instant age and depth.
Now you have a stunning focal point for your bedroom that looks like an expensive antique find
Stripes on the Headboard Only
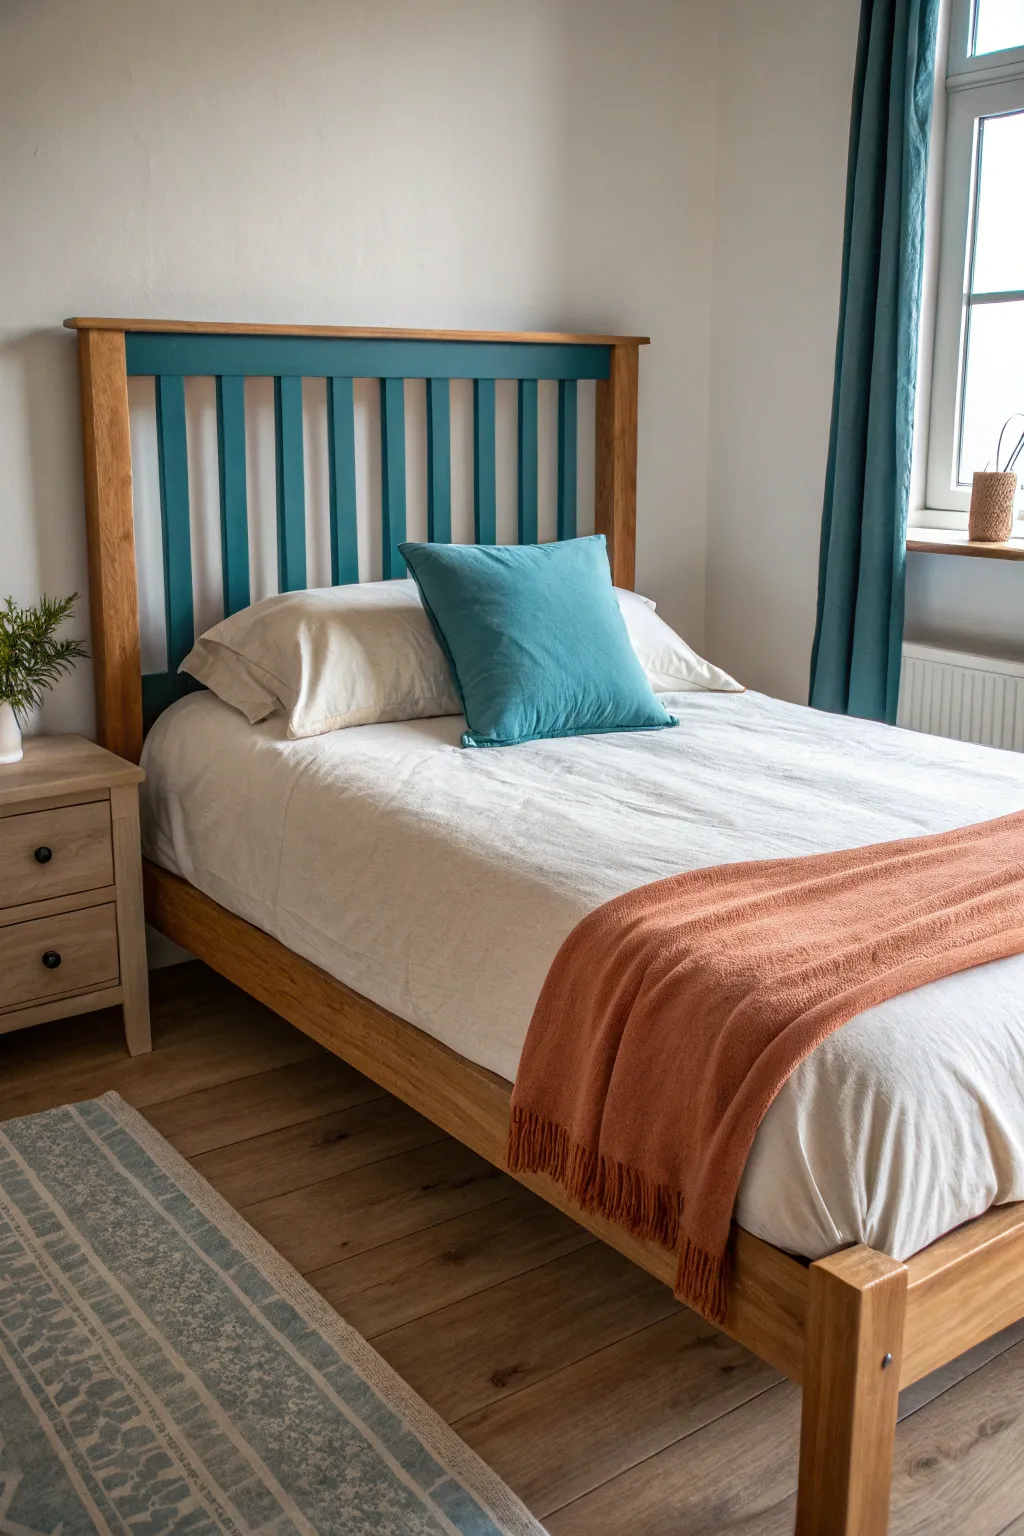
Transform a plain wooden bed frame into a striking focal point by adding a pop of color exclusively to the headboard slats. This project contrasts the warmth of natural oak with a cool, deep teal for a modern, customized look.
Step-by-Step Guide
Materials
- Wooden bed frame with vertical slats
- Sandpaper (120 and 220 grit)
- Painter’s tape (high quality)
- Wood primer (bonding primer geared towards furniture)
- Satin or eggshell finish furniture paint (Teal/Blue-Green)
- Small angled sash brush (1.5 inch)
- Mini foam roller (optional for smoother finish)
- Drop cloth
- Mild degreasing cleaner
- Clean lint-free rags
- Clear matte polycrylic sealer (optional)
Step 1: Cleaning and Preparation
-
Protect the surrounding area:
Before you begin, lay down a drop cloth underneath the headboard to catch any sanding dust or paint drips. If the bed is already assembled in the room, pull it away from the wall slightly to give yourself room to work from both sides. -
Clean the surface:
Wipe down the entire headboard with a mild degreasing cleaner to remove oils, dust, and furniture polish. Let it dry completely. -
Sand the slats:
Using 120-grit sandpaper, lightly scuff just the vertical slats you intend to paint. You don’t need to strip the wood entirely, but you do need to rough up the existing varnish so the new paint adheres. -
Remove dust:
Vacuum up the sanding dust, then wipe the slats down with a damp, lint-free rag. Follow with a dry rag to ensure no moisture remains.
Clean Lines Secret
To stop paint bleeding, paint a thin layer of clear matte medium or the existing wood varnish over the tape edge first. This seals the gap before you apply the teal.
Step 2: Masking the Frame
-
Apply painter’s tape:
This is the most critical step for a crisp look. Carefully apply painter’s tape to the top rail and the bottom rail where the slats meet the horizontal wood. -
Seal the edges:
Press the tape down firmly with your fingertip or a credit card edge. I like to run the edge of my fingernail right along the seam to prevent any paint from bleeding under the tape onto the natural wood.
Try an Ombre Effect
Instead of a single color, paint the slats in a gradient. Start with dark teal on the outer slats and gradually mix in white for the inner slats for a fading effect.
Step 3: Priming
-
Apply the primer:
Using your small angled sash brush, apply a thin coat of bonding primer to the slats. Focus on getting into the vertical corners without letting paint pool there. -
Check for drips:
Immediately inspect the slats for drips, especially near the bottom tape line, and smooth them out. -
Let it dry:
Allow the primer to dry according to the manufacturer’s instructions, usually about 1-2 hours. -
Light sanding:
Once dry, very lightly run 220-grit sandpaper over the primed slats to smooth out any brush strokes. Wipe away the dust.
Step 4: Painting the Color
-
First coat of teal:
Stir your teal paint thoroughly. Apply the first coat using long, vertical strokes with the brush to mimic the grain direction. If you prefer a sprayer-like finish, you can use a mini foam roller for the flat faces of the slats. -
Watch the edges:
Be careful not to overload your brush near the taped edges. It’s better to do multiple thin coats than one thick coat that bleeds. -
Dry time:
Let this coat dry completely, usually 2-4 hours depending on humidity. -
Second coat:
Apply a second coat for full opacity and depth of color. The teal should now look rich and solid. -
Remove tape while wet:
Here is a trick to get perfect lines: carefully peel off the painter’s tape while the second coat is still slightly wet. Pull the tape away from the painted edge at a 45-degree angle.
Step 5: Finishing Up
-
Final cure:
Let the paint cure fully for at least 24 hours before touching it heavily or restyling the bed. -
Optional top coat:
If you want extra durability, apply a clear matte polycrylic sealer over the painted slats once the paint is fully cured, though high-quality furniture paint often doesn’t require this.
Now step back and admire how a simple touch of paint completely redefined your bedroom furniture.
Metal Bed Frame in a Fresh Color
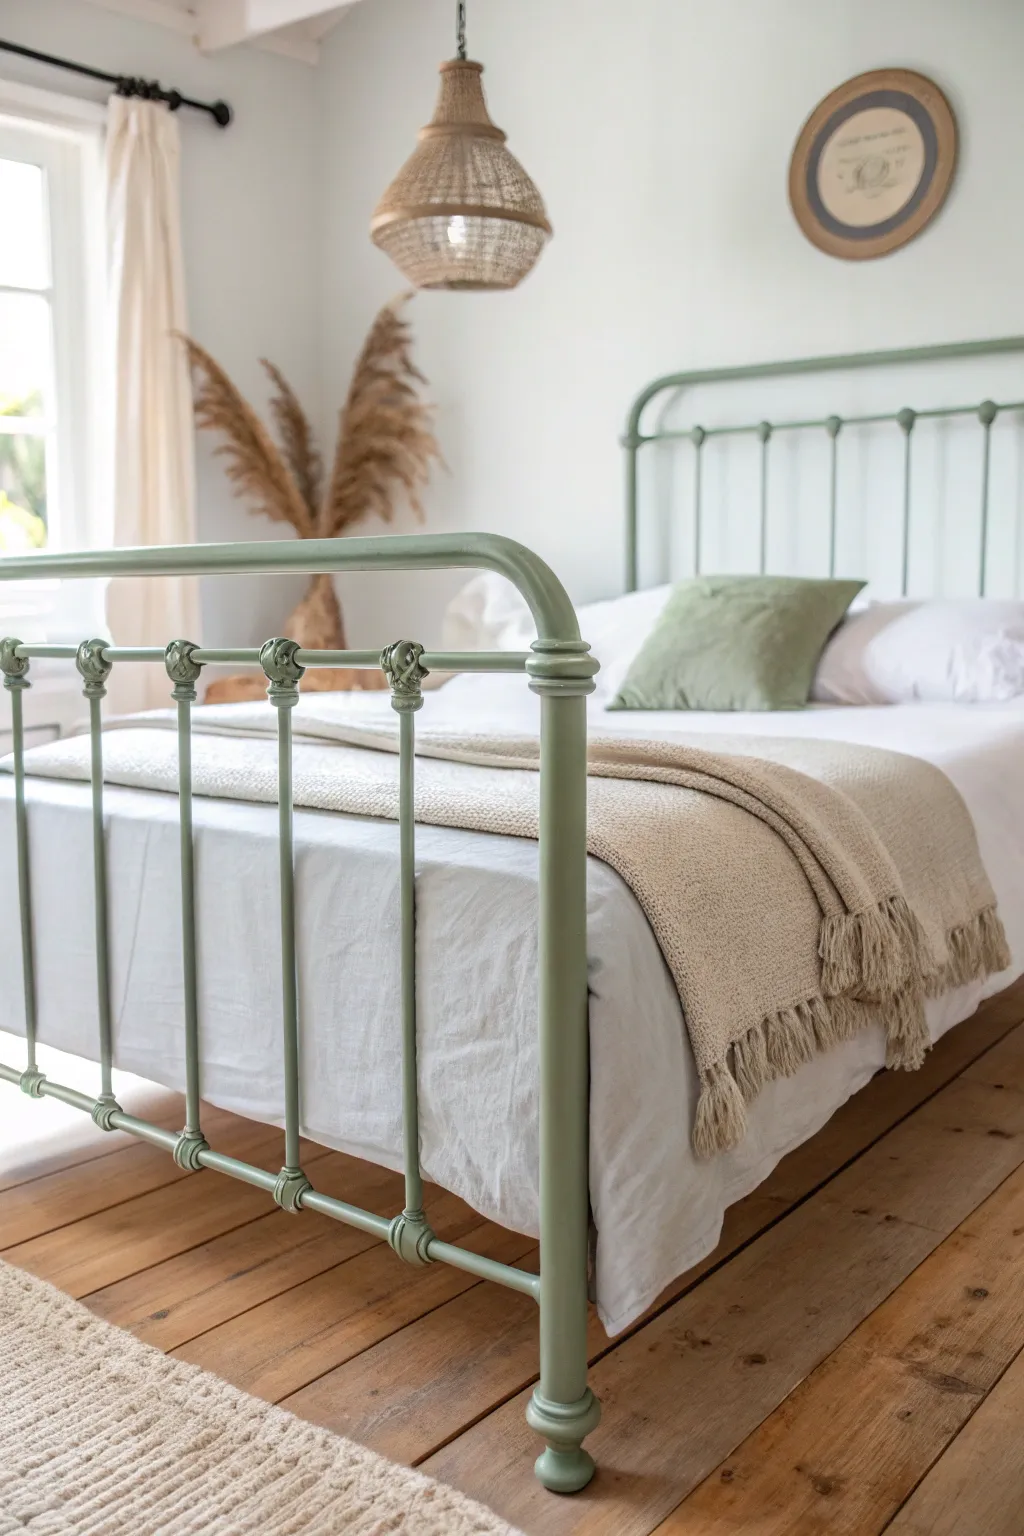
Transform a tired or dated metal bed frame into a serene focal point with a fresh coat of sage green paint. This project modernizes a classic silhouette with a soft, matte finish that perfectly complements natural wood tones and airy textiles.
Step-by-Step Tutorial
Materials
- Metal bed frame (vintage or new)
- Mild degreaser or TSP alternative
- Sanding sponges (medium and fine grit)
- Wire brush
- Painter’s tape
- Drop cloths
- Metal bonding primer (spray can recommended)
- Sage green spray paint (satin or matte finish)
- Microfiber tack cloths
- Respirator mask
- Protective gloves
Step 1: Preparation
-
Disassemble the Frame:
Begin by taking the bed apart completely. It is much easier to paint individual rails, the headboard, and the footboard when they are separated and laying flat or propped up individually. -
Clean Thoroughly:
Wipe down every inch of the metal using a mild degreaser or TSP substitute. Years of hand oils, dust, and furniture polish can ruin your paint adhesion, so be meticulous here. -
Scrub the Details:
Use a stiff brush or an old toothbrush to get into the crevices of the decorative castings and joints where the degreaser might not reach easily. -
Tackle Rust:
If your frame is vintage, inspect it for rust spots. Attack any flaking areas with a wire brush until you reach bare metal to prevent future corrosion. -
Sand the Surface:
Scuff sand the entire frame using a medium-grit sanding sponge. You aren’t trying to remove all previous paint, just creating a rough texture for the new primer to grip. -
Final Wipe:
Remove all sanding dust using a tack cloth. This step is crucial for a smooth finish, as even tiny specks of dust will show up in the final spray. -
Protect the Area:
Lay down large drop cloths in a well-ventilated area, preferably outdoors. Mask off any parts you don’t want painted, such as screw threads or casters, with painter’s tape.
Trigger Happy?
To save your finger from fatigue and ensure a more even coat, purchase a cheap snap-on spray can trigger handle. It makes controlling the spray pattern much easier.
Step 2: Priming and Painting
-
Apply Primer:
Shake your metal bonding primer vigorously for at least a minute. Apply a light, even coat to the entire frame, keeping the can moving to avoid drips. -
Check the Castings:
Pay special attention to the ornate joints and rounded feet. Spray from multiple angles to ensure the primer coats the recessed areas of the detailed metalwork. -
Let Primer Cure:
Allow the primer to dry according to the manufacturer’s instructions. I like to give it an extra hour just to be safe before moving on to the color. -
First Coat of Color:
Begin applying your sage green spray paint. Hold the can about 8-10 inches away and use sweeping, overlapping motions. Keep this coat thin; full coverage isn’t the goal yet. -
Dry and Inspect:
Wait about 15-20 minutes for the first coat to become tacky-dry. Look for any spots you missed, particularly under the horizontal rails. -
Second Coat:
Apply a second slightly heavier coat, focusing on getting solid color coverage. Watch carefully for runs on the vertical spindles. -
Rotate and Repeat:
If possible, safely flip the pieces over once they are dry to the touch to ensure the undersides and backs of the spindles are fully coated. -
Final Touch-ups:
Inspect the frame one last time in good lighting. Use short bursts of spray to hit any remaining shadows or thin spots. -
Extended Cure Time:
Let the paint cure for at least 24 to 48 hours before reassembling the bed. Metal paint can feel dry but still be soft enough to scratch easily during assembly.
Fixing Drips
If you get a paint run, wait for it to dry completely (don’t wipe it wet!). Lightly sand the drip flush with fine-grit sandpaper, wipe clean, and respray that specific area.
Once fully cured and reassembled, your new sage green bed frame will bring a calm, restorative energy to your bedroom space
Mural-Style Headboard on the Bed
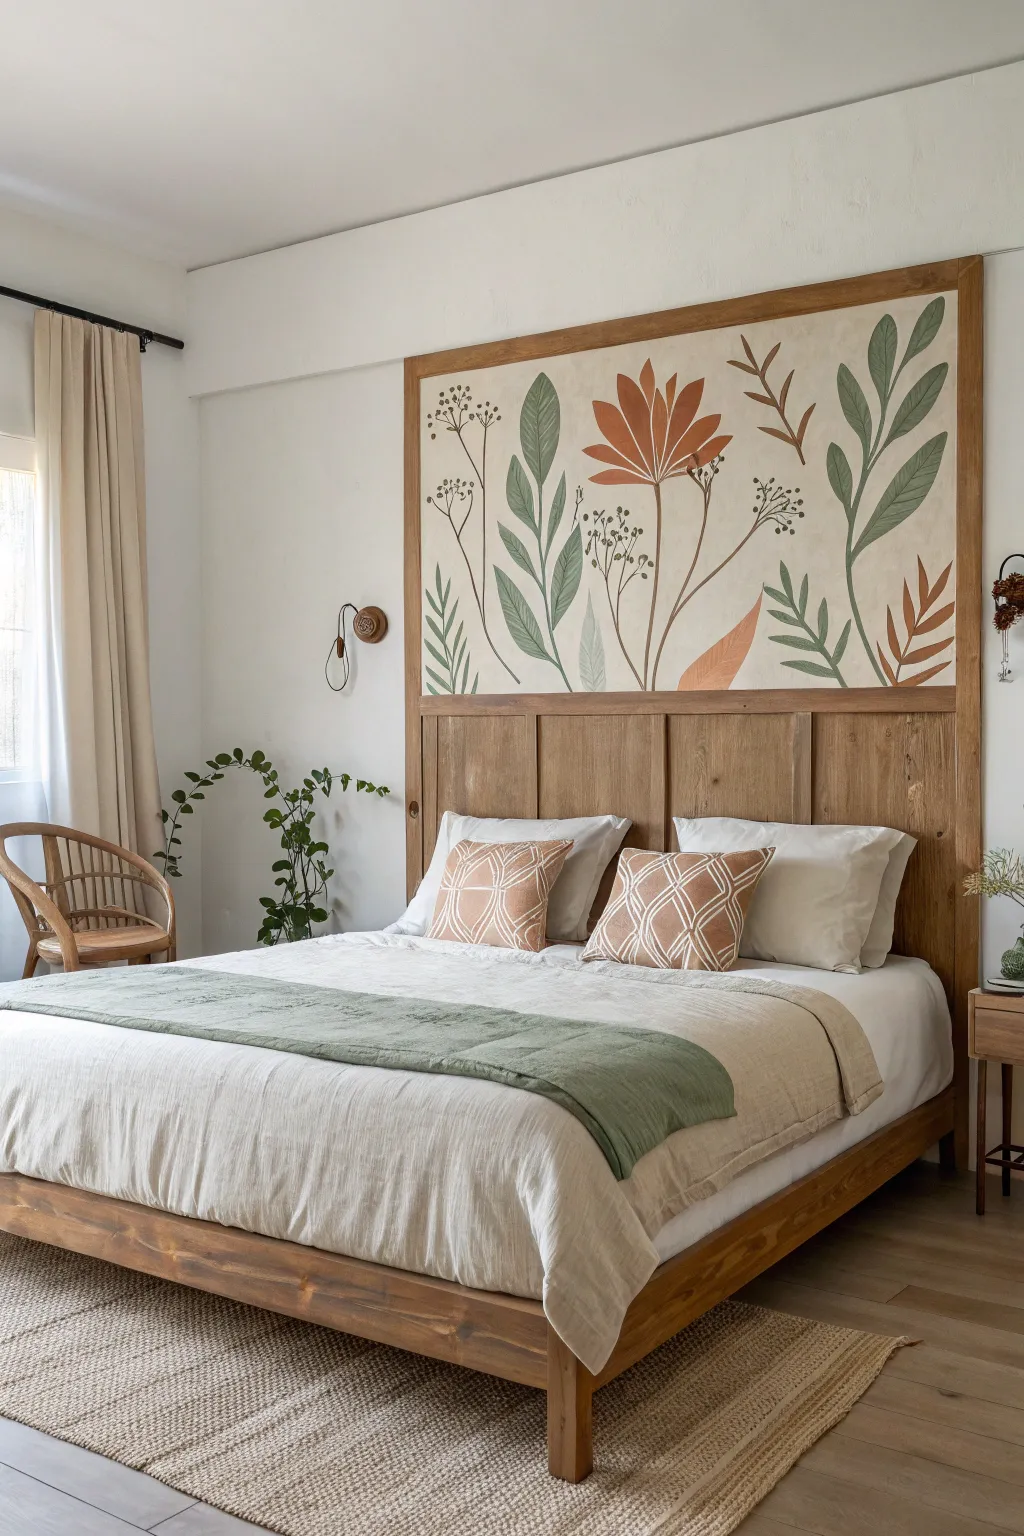
Transform a plain wooden headboard into a stunning focal point with this large-scale botanical mural. By painting directly onto a panel framed by natural wood, you create an art piece that feels both organic and structured, bringing the restorative power of nature right into your bedroom.
Step-by-Step Tutorial
Materials
- Large plywood sheet or MDF panel (sized to your bed width)
- Wooden trim boards (for the frame)
- Wood stain (medium oak or walnut tone)
- Sanding block (medium grid)
- Primer (white, suitable for wood)
- Acrylic latex wall paints (Cream/Off-white, Sage Green, Deep Forest Green, Terracotta/Rust, Brown)
- Pencil and eraser
- Various paintbrushes (2-inch flat brush, ½-inch angle brush, fine liner brush)
- Painter’s tape
- Clear matte polycrylic sealer
- Wood glue and finishing nails
Step 1: Preparing the Canvas
-
Frame construction and sizing:
Measure the width of your bed frame to determine the size of your mural panel. Cut your plywood or MDF sheet to this width and a height of approximately 3-4 feet. Ideally, this panel will sit atop a wainscoting-style lower section, but it can also be a standalone piece. -
Staining the frame:
Before attaching anything, cut your wooden trim boards to frame the plywood panel. Sand these pieces smooth and apply your chosen wood stain with a rag or brush. Wipe away excess and let them dry completely so you don’t accidentally smudge stain onto your future artwork. -
Priming the panel:
Create a smooth, neutral base by applying two coats of white primer to the main plywood panel. Let the first coat dry for at least an hour before sanding lightly and adding the second coat. -
Applying the background color:
Mix a warm, creamy off-white paint to serve as the background ‘canvas.’ Use a roller or wide flat brush to apply this color evenly across the primed surface. I like to do two thin coats rather than one thick one for the smoothest finish.
Loose Wrists for Leaves
When painting leaves, don’t just use your fingers. Move your whole arm and wrist in a sweeping motion. This creates fluid, organic curves rather than stiff, geometric shapes.
Step 2: Sketching the Design
-
Visualizing the layout:
Look at the composition: there is a central large rust-colored flower, flanked by tall vertical leafy stems on the left and curving, organic branches on the right. Notice how the negative space is balanced. -
Drafting the main stems:
Using a pencil with a light hand, sketch the primary vertical lines first. Draw the central stem for the large flower, then the curving lines for the surrounding large leaves. Keep the lines loose and flowing. -
Adding leaf details:
Flesh out your stems by sketching the leaf shapes. Vary the sizes—some leaves should be large and broad (like the ones on the far right), while others are smaller and more delicate. -
Refining the floral shapes:
Sketch the large, star-burst style flower near the top center. Add the smaller, delicate sprigs with berry-like ends on the left and right sides to fill the gaps without overcrowding.
Step 3: Painting the Foliage
-
Mixing the greens:
Prepare a palette with two distinct greens: a muted sage for the lighter leaves and a deep forest green for contrast. You may want to mix in a tiny drop of the background cream color to the sage to harmonize the tones. -
Blocking in large leaves:
Using a ½-inch angle brush, fill in the large leaf shapes. Use long, confident strokes starting from the stem and pulling outward toward the leaf tip to mimic the natural vein structure. -
Painting the rust elements:
Switch to your terracotta or rust-colored paint. Fill in the large central flower petals and any accent leaves. This warm tone provides a critical pop of color against the cool greens. -
Drawing the delicate stems:
For the thin, spindly stems and the tiny berry sprigs, switch to a fine liner brush and brown paint mixed with a little water for flow. Carefully trace your pencil lines, keeping the pressure light. -
Adding the berries:
Dip the tip of a small round brush or even the back of your paintbrush handle into the brown or dark green paint. Dot these onto the ends of your fine sprigs to create the berry clusters.
Add Fabric Texture
For a textile-art look, paint the mural on primed artist canvas cloth instead of wood. Stretch and staple the canvas over the plywood panel before framing it.
Step 4: Finishing Touches
-
Clean up:
Once the paint is fully dry to the touch, gently erase any visible pencil marks that weren’t covered by paint. -
Sealing the mural:
Protect your artwork from dust and fading by applying a clear matte polycrylic sealer over the entire painted panel. Use a sponge brush to avoid brush marks. -
Final assembly:
Attach your pre-stained wooden trim around the painted panel using wood glue and finishing nails. If you built a lower wainscoting section, attach that now as well to complete the full headboard look.
Step back and admire how your new botanical mural anchors the room with a peaceful, artistic atmosphere


Have a question or want to share your own experience? I'd love to hear from you in the comments below!