
A painted bookcase is one of my favorite “big impact, totally doable” makeovers—it turns plain shelving into a real design moment. Let’s play with color, contrast, and a few painterly tricks so your shelves feel custom and full of personality.
Classic Crisp White Refresh
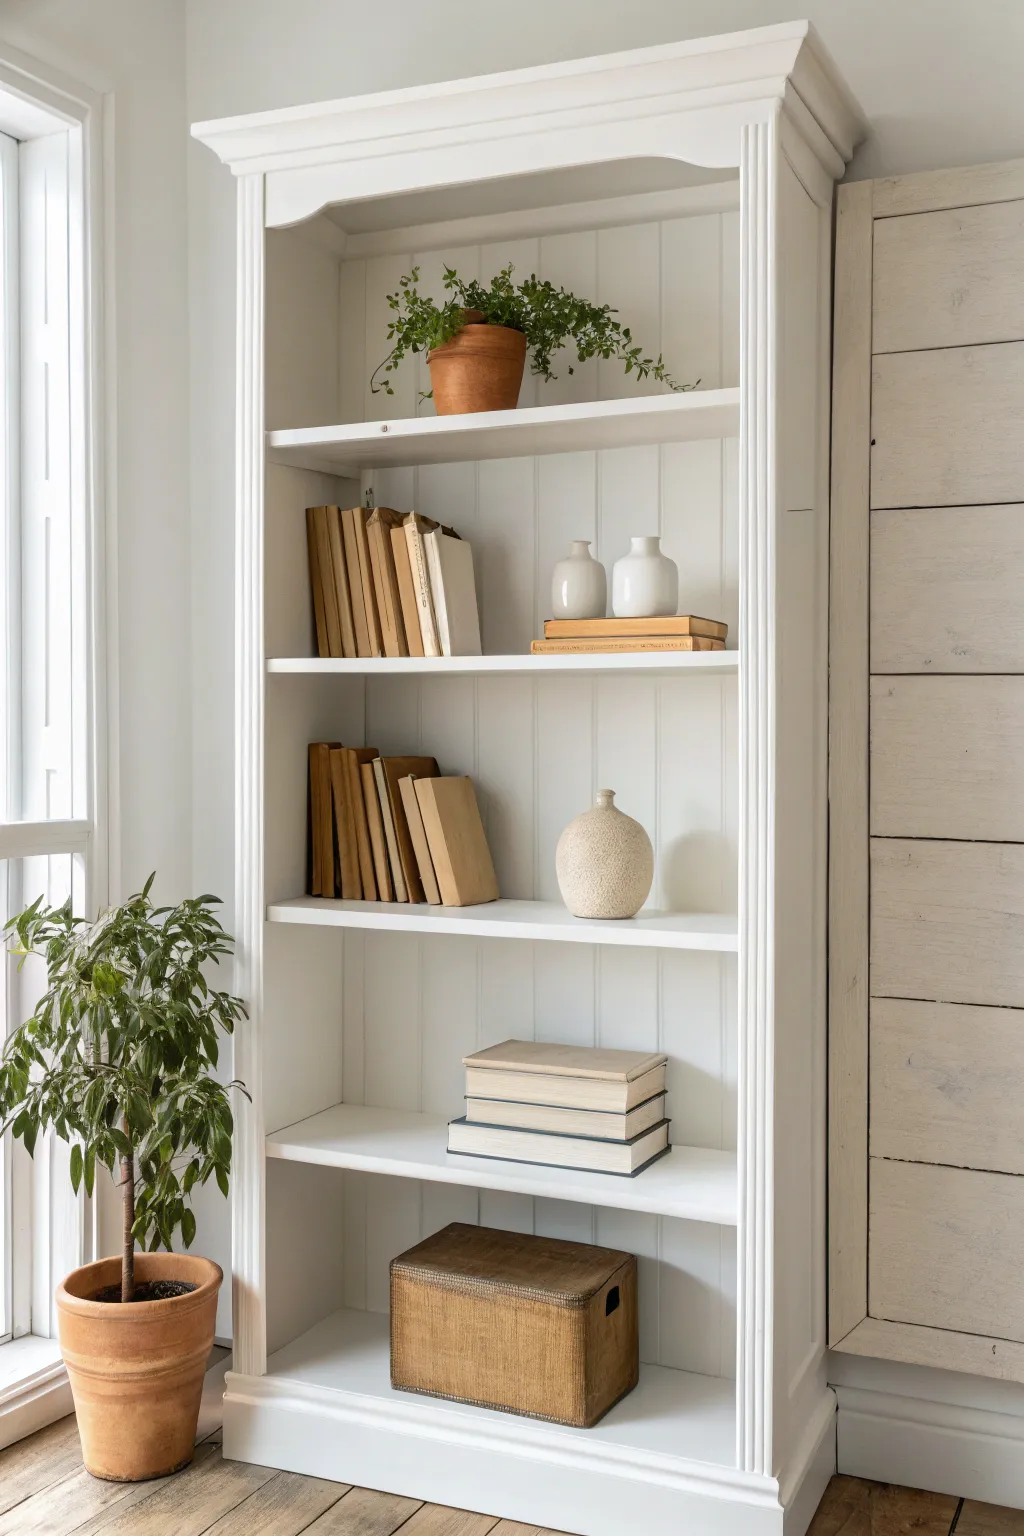
Transform a dark or outdated wooden bookcase into a bright, airy focal point with this classic white refresh. By adding beadboard backing and crisp molding details, you can achieve a custom built-in look that perfectly suits cottage and farmhouse interiors.
Step-by-Step Tutorial
Materials
- Tall wooden bookcase (thrifted or existing)
- Beadboard paneling sheets
- Crown molding (sized to bookcase width)
- Fluted casing or trim molding
- Medium-grit sandpaper (120-150 grit)
- Fine-grit sandpaper (220 grit)
- Primer (high-adhesion, stain-blocking)
- Interior semi-gloss or satin paint (pure white)
- Wood glue
- brads or finishing nails
- Wood filler
- Paint rollers (foam and medium nap)
- Angled sash brush (2 inch)
- Circular saw or table saw
- Miter box or miter saw
- Tack cloth
Step 1: Prep and Demolition
-
Remove shelves and hardware:
Begin by taking out all adjustable shelves and shelf pins. If there is any existing hardware or doors you don’t plan to keep, remove those now. Store the pins in a safe place for later. -
Detach the old backing:
Carefully pry off the original backing of the bookcase. Many factory-made cases have flimsy cardboard or thin particle board backs; removing this is essential to replace it with the sturdy beadboard. -
Sand the surfaces:
Scuff sand the entire bookcase using 120-grit sandpaper. You don’t need to strip it to bare wood, but you must degloss the finish so your primer sticks. Don’t forget to sand the loose shelves as well. -
Clean thoroughly:
Wipe away every speck of dust with a tracking cloth or a damp rag. Dust is the enemy of a smooth painted finish.
Step 2: Adding Architectural Details
-
Measure and cut beadboard:
Measure the opening of the back of your bookcase. Cut your beadboard sheet to fit this dimension precisely. I find it easiest to have the hardware store rip these large sheets if possible. -
Install the beadboard:
Apply wood glue to the back edge of the bookcase frame. Position the beadboard piece, ensuring the lines run vertically. Secure it with finishing nails or brads every 6 inches along the perimeter. -
Cut side trim:
Measure the vertical height of the bookcase face frame. Cut your fluted casing or decorative trim to fit these vertical stiles. This adds that substantial, custom-furniture look shown in the image. -
Attach the side trim:
Glue and nail the fluted trim onto the face frame. If the trim is slightly wider than the frame, align it flush with the outside edge. -
Add the crown molding:
Measure the top width and depth of the bookcase. Using a miter box or saw, cut the crown molding at 45-degree angles to wrap around the front and sides. Secure these pieces with glue and nails at the very top. -
Fill gaps:
Use wood filler to cover all nail holes and any gaps where the molding meets the case. Let it dry completely, then sand smooth with fine-grit sandpaper.
Groove Control
When painting beadboard, paint tends to pool in the vertical grooves. Run your brush tip gently down each groove immediately after rolling to catch unexpected drips.
Step 3: Painting and Finishing
-
Apply primer:
Coat the entire piece, including the new beadboard and molding, with a stain-blocking primer. This is crucial for preventing wood knots or old stains from bleeding through the white paint. -
Sand the primer:
Once the primer is fully dry, lightly sand it with 220-grit paper to knock down any raised grain or brush marks. Wipe away the dust. -
Paint the corners and grooves:
Using your angled sash brush to cut in the corners, the grooves of the beadboard, and the details of the fluted trim. Watch for drips in the beadboard grooves. -
Paint the flat surfaces:
Use a foam roller for the shelves and flat sides to achieve a smooth, sprayer-like finish. Apply the first coat of your pure white semi-gloss paint. -
Apply second coat:
Allow the first coat to dry according to the can’s instructions. Apply a second coat for full opacity and durability. -
Reassemble and style:
Once the paint has cured (give it at least 24 hours), replace the shelf pins and slide the shelves back in. Style with neutral decor, plants, and books placed spine-in for that monochromatic aesthetic.
Sticky Shelves?
If painted shelves feel tacky or stick to books days later, the paint hasn’t fully cured. This can take up to 30 days. Place wax paper under objects temporarily.
Enjoy your beautifully refreshed bookcase that brings brightness and structure to your room


Monochrome Built-In Look
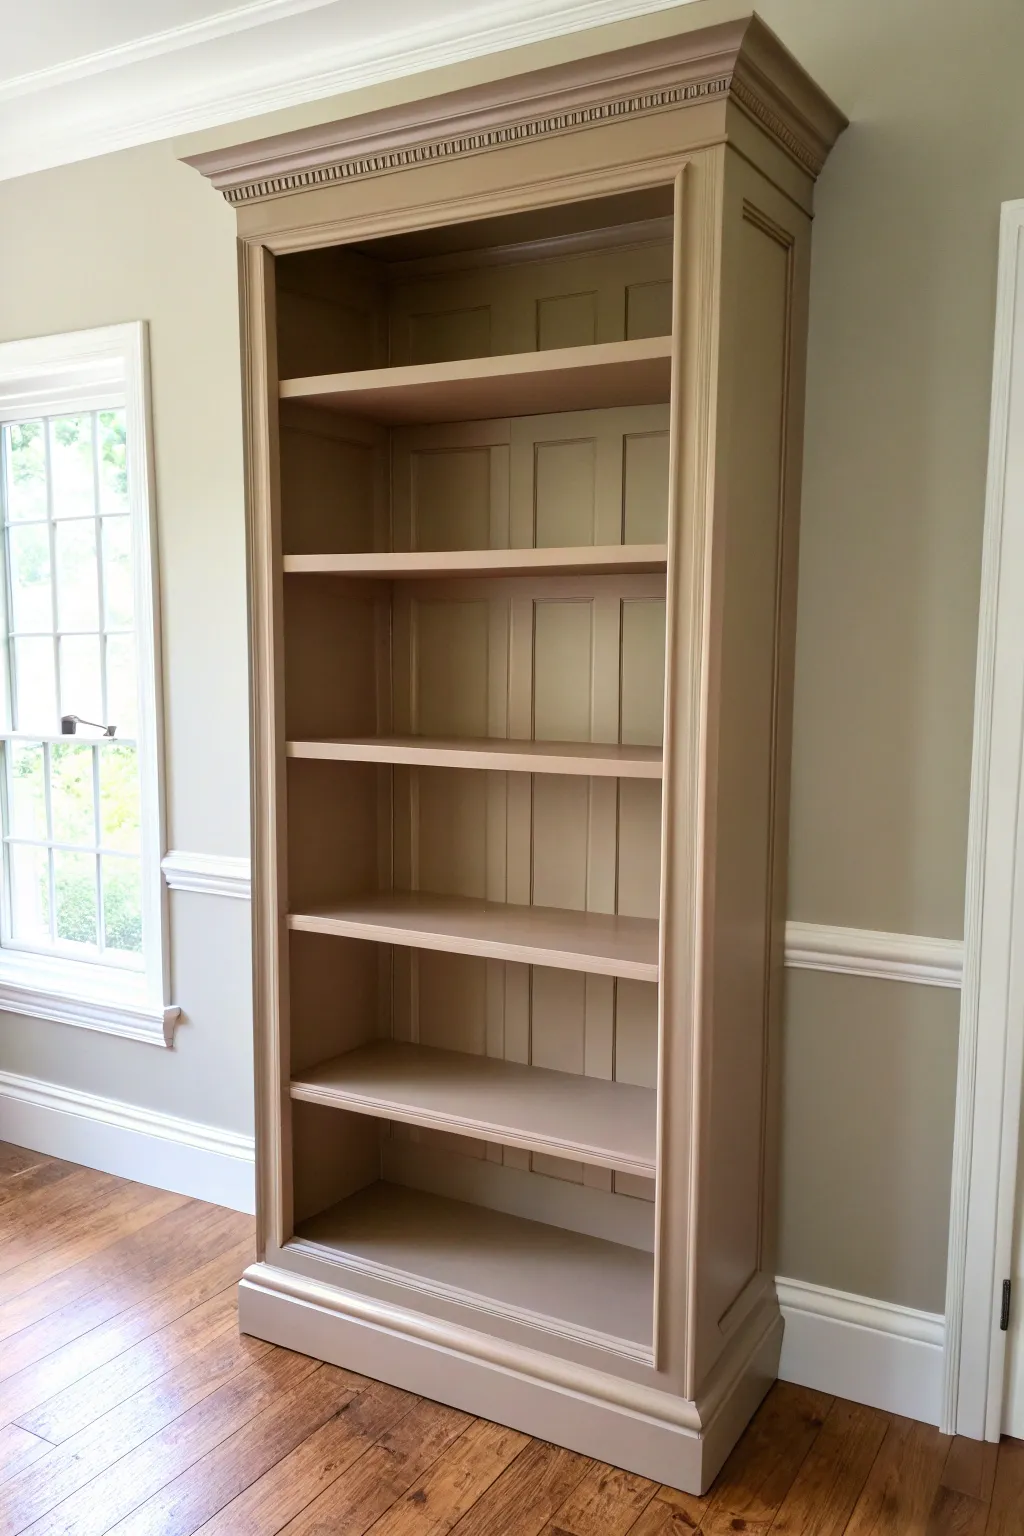
Transform a standard wooden bookcase into an architectural statement piece with this monochrome painting technique. By matching the cabinet color closely to your walls, you achieve a sophisticated built-in look that feels custom-made and high-end.
How-To Guide
Materials
- Tall wooden bookcase (with adjustable shelves)
- High-quality interior latex paint (satin finish, taupe/greige)
- bonding primer
- Sandpaper (120 and 220 grit)
- Tack cloth
- High-density foam roller
- 2-inch angled distinct sash brush
- Painter’s tape
- Wood filler
- Screwdriver
- Drop cloth
- Degreaser or mild soap
Step 1: Preparation & Disassembly
-
Clear and clean:
Begin by removing all books and items from the shelves. Wipe down the entire unit with a degreaser or mild soap and warm water to remove dust, oils, and grime, which can prevent paint adhesion. -
Remove hardware:
Take out all adjustable shelves and set them aside. Locate the hardware supporting the shelves (metal pins or clips) and remove them, placing everything in a labeled bag so nothing gets lost. -
Address imperfections:
Inspect the wood for any deep scratches, old screw holes, or dents. Fill these spots with wood filler, slightly overfilling to account for shrinkage. -
Sanding basics:
Once the filler is dry, sand the filled areas flush. Then, scuff-sand the entire bookcase—including the shelves—with 120-grit sandpaper. You aren’t trying to strip the finish, just creating a rough surface for the primer to grab. -
Dust removal:
Vacuum up the sanding dust thoroughly. Follow up by wiping every surface with a tack cloth to capture even the finest particles.
Smooth Finish Secret
Add a paint conditioner like Floetrol to your latex paint. It slows drying time just enough to let brush strokes level out, giving you a sprayed-on look with hand tools.
Step 2: Priming the Surface
-
Tape off edges:
If your bookcase is already in position against the wall (or you are painting the trim/crown molding attached to it), carefully tape off the wall and floor edges to protect them. -
Cut in the corners:
Open your bonding primer. using your 2-inch angled brush, paint into the deep corners, along the paneling grooves on the back wall, and around the detailed fluting on the crown molding. -
Roll the flat surfaces:
Use a small foam roller to apply primer to the larger flat areas like the side panels and shelf surfaces. This helps avoid visible brush strokes. I like to let this dry briefly before checking for drips. -
Sand between coats:
Once the primer is fully dry (check the can for specific times), lightly sand everything with 220-grit paper for a buttery smooth base. Wipe away dust with a fresh tack cloth.
Two-Tone Surprise
For a subtle twist, paint the back panel one shade darker than the frame. It adds immense depth while maintaining the monochromatic vibe.
Step 3: Painting & Reassembly
-
First coat application:
Stir your satin finish taupe paint thoroughly. Start painting from the top down, beginning with the intricate crown molding using your brush. Work into the recesses of the fluted trim carefully. -
Tackle the back panel:
Move to the interior back panel. Use the brush for the recessed squares of the paneling and the roller for the raised flat sections. Maintain a ‘wet edge’ to prevent lap marks. -
Paint the shelves separately:
While the main body dries, paint the removed shelves on a flat surface. Don’t forget to paint the front-facing edge, as this is the most visible part. -
Apply the second coat:
Allow the first coat to dry completely. Apply a second coat using the same top-down method. The second coat provides the true depth of color and ensures uniform coverage. -
Paint the hidden edges:
Double-check the underside of the shelves and the interior top of the bookcase frame. Even if mostly hidden, painting these ensures a professional look when viewed from a lower angle. -
Cure time:
This is crucial: let the paint cure for at least 48 to 72 hours before putting anything back on the shelves. Paint might feel dry to the touch but can still be soft and tacky. -
Reinstall hardware:
Once fully cured, carefully re-insert the shelf pins. If the paint added thickness to the holes, you might need to gently twist a drill bit by hand to clear them out. -
Final arrangement:
Slide the shelves back into place. Step back and inspect your work to ensure the lines between the bookcase and the wall look seamless.
Enjoy the calm sophistication your new monochrome bookcase brings to the room


Dark Interior, Light Exterior Contrast
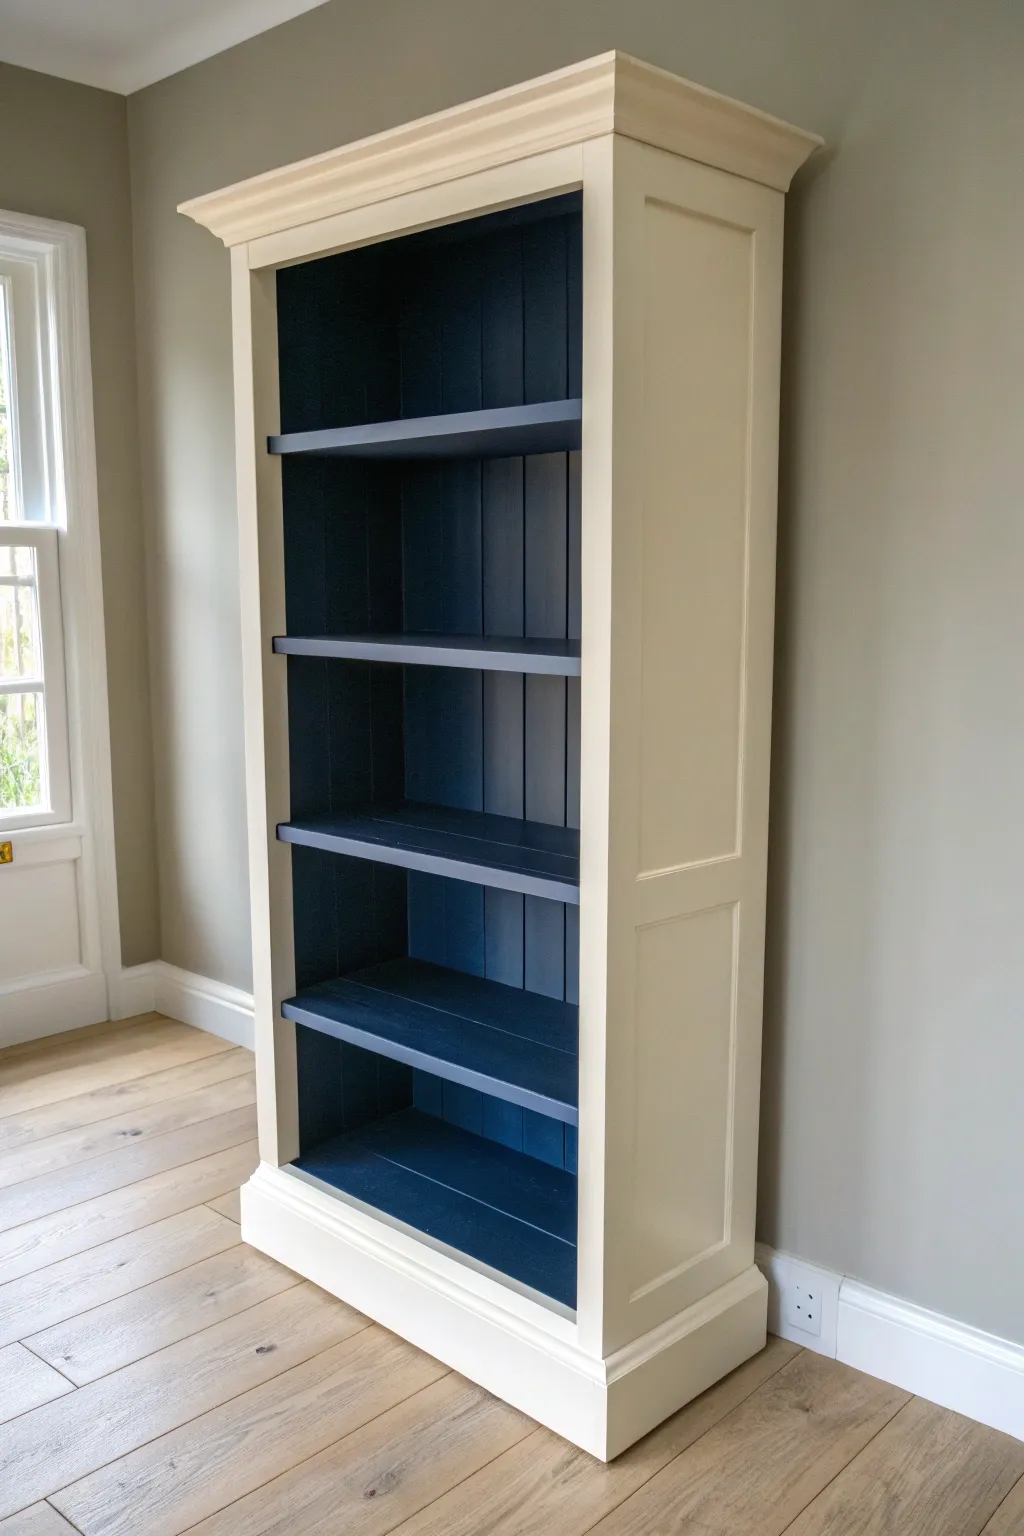
Transform a plain bookcase into a sophisticated statement piece by combining a soothing cream exterior with a deep, dramatic navy blue interior. This two-tone approach adds instant depth and allows your displayed items to pop against the dark background.
How-To Guide
Materials
- Bookcase (wooden or laminate)
- Sandpaper (120 and 220 grit)
- Degreaser or TSP alternative
- High-quality bonding primer (oil-based or shellac-based recommended for slick surfaces)
- Deep Navy Blue furniture paint (Satin or Eggshell finish)
- Cream/Off-White furniture paint (Satin or Eggshell finish)
- 1.5 to 2-inch angled synthetic brush
- 4-inch foam roller or short-nap microfiber roller
- Painter’s tape (delicate surface)
- Drop cloths
- Tack cloths
- Polycrylic topcoat (optional, for extra durability)
Step 1: Prep Work
-
Clear and Clean:
Remove all shelves if they are adjustable. If they are fixed, you’ll be painting them in place. Wipe down the entire piece with a degreaser or TSP alternative to remove any oils, wax, or dust. -
Scuff Sanding:
Using 120-grit sandpaper, thoroughly scuff sand every surface you intend to paint. You aren’t trying to remove the old finish entirely, just creating a ‘tooth’ for the primer to grip. -
Dust Removal:
Vacuum up the sanding dust, then wipe everything down with a tack cloth to ensure a perfectly smooth surface. -
Prime the Surface:
Apply a coat of high-quality bonding primer to both the interior and exterior. I highly recommend using a shellac-based primer if you are painting over laminate or previously stained wood to prevent bleed-through. -
Sand the Primer:
Once the primer is fully dry, lightly sand it with 220-grit sandpaper to knock down any brush strokes or texture, then wipe clean with a tack cloth.
Step 2: Painting the Interior
-
Tape the Front Edge:
Apply painter’s tape along the front-facing edges of the shelves and the inner rim of the frame. This protects the area where the cream paint will eventually go. -
Cut In the Corners:
Using your angled brush, ‘cut in’ the navy blue paint into the back corners and around the shelf supports. Do this one section at a time so the paint doesn’t dry before you can roll it. -
Roll the Back and Sides:
Immediately after cutting in, use the small foam or microfiber roller to apply the navy paint to the large flat areas of the back panel and side walls. This ensures a smooth, stroke-free finish. -
Paint the Shelves:
If your shelves are fixed, paint the tops and bottoms now. If removable, paint them separately on a drop cloth. Apply thin, even coats. -
Second Interior Coat:
Allow the first coat to dry according to the can’s instructions (usually 2-4 hours). Apply a second coat of navy following the same process for full opacity.
Bleed-Through Blues?
If paint seeps under your tape, don’t panic. Wait for it to dry completely, then re-tape the opposite side and touch up with the original color using a small artist brush.
Step 3: Painting the Exterior
-
Remove Tape:
Carefully peel off the painter’s tape while the navy paint is arguably still slightly tacky or fully dry, depending on your tape brand’s instructions. -
Tape the Interior:
Once the navy interior is fully cured (give it at least 24 hours to be safe), tape off the very edge of the blue sections to protect them from the cream paint. -
Paint the Face Frames:
Using the angled brush, apply the cream paint to the front face frame. Work in long, smooth strokes. Watch out for drips gathering in the corners of any decorative molding. -
Roll the Exterior Sides:
Use a clean roller to paint the large exterior side panels and the top header. Rolling provides that factory-sprayed look that brushing can’t always achieve. -
Repeat Exterior Coats:
Let the first coat dry, lightly sand with high-grit paper if you feel any bumps, and apply a second coat of cream. Light colors often require a third coat for perfect coverage.
Add Beadboard Detail
For extra texture, glue and nail a beadboard panel over the existing back panel before painting. It adds a classic cottage feel that looks amazing in navy.
Step 4: Finishing Touches
-
Final Inspection:
Remove the final tape. Use a tiny artist’s brush to touch up any spots where the blue and cream meeting line isn’t perfectly crisp. -
Protection (Optional):
If the bookcase will see heavy use, apply a clear, water-based polycrylic topcoat over the shelves to prevent books from scratching the paint. -
Cure Time:
Let the piece cure for several days before placing heavy books back on the shelves to prevent the paint from sticking.
Enjoy styling your renewed shelves with bright accessories that will truly shine against the dark backdrop


Trim Highlight in a Second Color
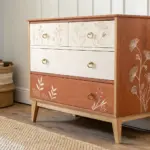
Transform a plain wooden bookcase into a stunning statement piece by contrasting rich, jewel-toned teal interiors with a soft, natural wood exterior. This high-contrast look draws the eye inward, making your displayed treasures pop while keeping the outer silhouette elegant and light.
Detailed Instructions
Materials
- Unfinished wooden bookcase
- Deep teal chalk or mineral paint
- Light wood stain or matte clear sealant
- Painter’s tape (high quality)
- Sandpaper (120 and 220 grit)
- Tack cloth
- Angled sash brush (2 inch)
- Small artist brush
- Mini foam roller
- Drop cloth
- Screwdriver (if removing hardware/shelves)
Step 1: Preparation & Sanding
-
Disassemble shelving:
Begin by removing any adjustable shelves and hardware supports. If the backing is removable, unscrew it now to make painting significantly easier later. -
Sand surfaces:
Lightly sand the entire piece with 120-grit sandpaper to remove any rough spots or existing finish. Follow up with 220-grit for a smooth touch, ensuring you get into the grooves of the beadboard backing. -
Clean thoroughly:
Remove all dust using a vacuum with a brush attachment, then wipe everything down with a tack cloth. A dust-free surface is crucial for a smooth paint finish.
Crisp Lines Secret
Before painting your teal color, seal the edge of your painter’s tape with a thin layer of clear matte medium or sealer. This blocks paint from seeping under.
Step 2: Painting the Interior
-
Tape off trim:
Carefully apply painter’s tape along the inside edges of the face frame where the interior meets the exterior trim. Press the tape edges down firmly to prevent bleed-through. -
Cut in corners:
Using your angled sash brush, dip into the deep teal paint and ‘cut in’ the corners and edges of the interior cabinet box. I like to work from the top down to catch any drips immediately. -
Paint the beadboard:
If your backing has beadboard grooves, use the brush to get paint deep into those vertical lines first. Don’t let the paint pool; spread it evenly. -
Roll the flat surfaces:
Switch to a mini foam roller for the larger flat sections of the backing and side walls. This ensures a smooth, brush-stroke-free finish. -
Paint the shelves:
Paint the removed shelves separately on a drop cloth. Don’t forget the front edges and the undersides if they will be visible. -
Apply second coat:
Allow the first coat to dry according to the paint can’s instructions. Apply a second coat to ensure full, opaque coverage, especially for this dark jewel tone.
Step 3: Finishing the Exterior
-
Remove tape:
While the interior paint is slightly tacky but mostly dry, carefully peel away the painter’s tape at a 45-degree angle. -
Touch up lines:
Inspect the line between the painted interior and the raw wood face frame. Use a tiny artist brush to correct any small mistakes for a crisp division. -
Seal the exterior trim:
To keep the light wood look shown in the image, apply a matte clear sealant or a very light whitewash stain to the exterior molding and face frame. -
Seal the crown molding:
Pay special attention to the decorative crown molding at the top. Use a clean brush to work the sealant into the curves without letting it drip. -
Protect the paint:
Once the teal paint is fully cured (usually 24 hours), apply a clear protective topcoat over the painted surfaces if you used a chalk paint that requires sealing. -
Reassemble:
Carefully slide the shelves back into place once everything is completely dry to the touch and cured to prevent sticking.
Luxurious Depth
For an antique library feel, apply a dark wax over the dried teal paint, focusing on the corners and beadboard grooves to add instant age and shadow.
Now step back and admire how the dark interior adds incredible depth to your room without weighing it down
BRUSH GUIDE
The Right Brush for Every Stroke
From clean lines to bold texture — master brush choice, stroke control, and essential techniques.
Explore the Full Guide
Stenciled Back Panel Pattern
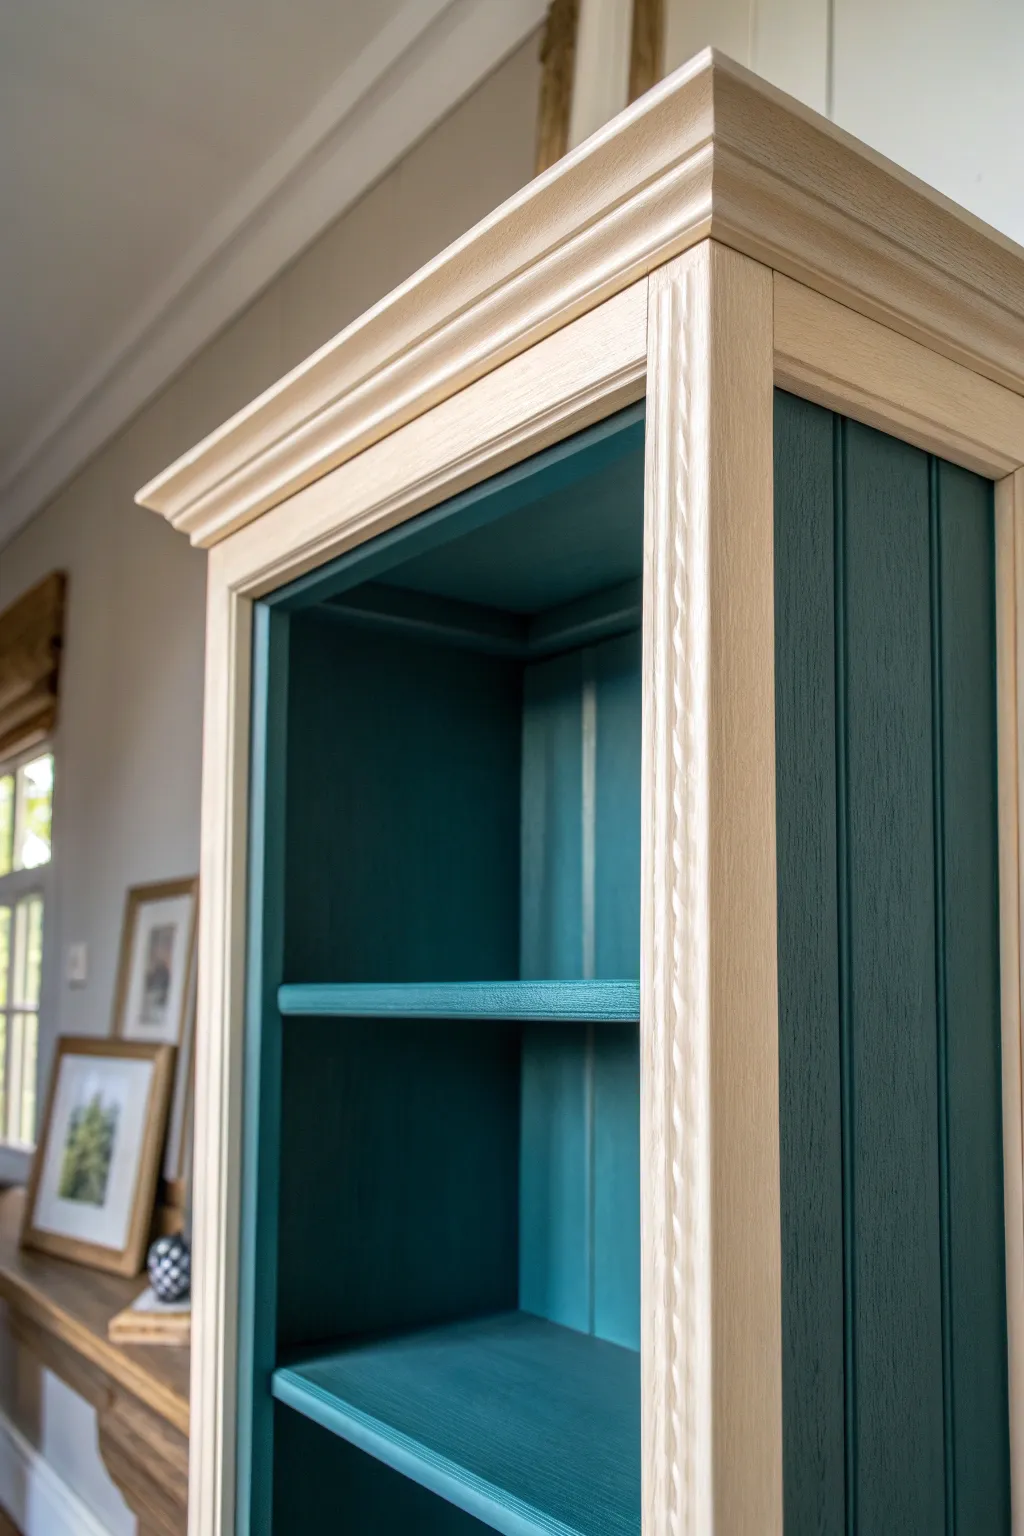
Transform a standard bookcase into a custom piece by adding a hidden pop of pattern to just one section of the back panel. This project combines a classic creamy white finish with a vibrant geometric accent that draws the eye downward.
Step-by-Step Tutorial
Materials
- Wooden bookcase (with beadboard backing preferred)
- Sanding block (medium and fine grit)
- Tack cloth
- Primer suitable for wood
- Creamy white chalk or mineral paint
- Geometric stencil (diamond/tile pattern)
- Terracotta or warm orange stencil paint
- Teal or sage green stencil paint
- Stencil brushes or foam pouncers
- Painter’s tape
- Clear matte topcoat or wax
- Small paintbrush for touch-ups
- Paper towels
Step 1: Preparation & Base Coat
-
Clean everything thoroughly:
Before you begin, wipe down the entire bookcase with a degreasing cleaner to remove dust, oils, or furniture polish. A clean surface is critical for paint adhesion. -
Light scaffolding:
Use a medium-grit sanding block to lightly scuff the entire surface. You don’t need to strip it to bare wood, just create a ‘tooth’ for the primer to grab onto. -
Remove dust:
Clear away all sanding dust. I find a tack cloth works best here to pick up even the finest particles that a regular rag might miss. -
Apply primer:
Brush or roll on a coat of high-quality primer. If your bookcase has knots or dark wood, use a stain-blocking primer to prevent bleed-through later. -
Paint the main color:
Once the primer is dry, apply your creamy white base paint. Use a high-quality synthetic brush for the grooves and corners, and a small foam roller for the flat shelves and sides to ensure a smooth finish. -
Second coat:
Let the first coat dry completely according to the can’s instructions. Apply a second coat for full, opaque coverage. Don’t forget the underside of the shelves.
Less is More
The #1 mistake in stenciling is using too much paint. Your brush should be almost dry to the touch to get crisp, sharp lines without bleed.
Step 2: Creating the Stenciled Accent
-
Isolate the bottom panel:
Apply painter’s tape around the edges of the bottom shelf section’s back panel. This protects the side walls and the shelf surface from accidental stencil smudges. -
Position the stencil:
Start your stencil in the center of the panel to ensure the pattern is symmetrical. Use painter’s tape or spray adhesive to hold the stencil firmly in place against the beadboard. -
Load the brush lightly:
Dip your stencil brush into the terracotta paint, then offload almost all the paint onto a paper towel until the brush feels dry. This ‘dry brush’ technique prevents paint from bleeding under the stencil edges. -
Apply the first color:
Gently pounce or swirl the brush over the specific areas of the stencil design meant for the orange tone. Build up the color in light layers rather than one heavy coat. -
Switch colors:
Using a fresh brush, repeat the process with the teal/green paint for the contrasting elements of the pattern. Be careful near the edges where colors might meet. -
Move and repeat:
Carefully lift the stencil and reposition it to continue the pattern across the panel. Line up the registration marks on the stencil with your previously painted design to keep everything straight. -
Touch up beadboard grooves:
Beadboard can be tricky because stencils don’t always reach into the deep grooves. Use a small artist’s brush to hand-paint the pattern into the recesses of the beadboard lines for a cohesive look.
Step 3: Finishing Touches
-
Clean up edges:
Once the stenciling is fully dry, remove the painter’s tape. If any paint seeped under the tape, use your small brush and base white paint to tidy up the lines. -
Seal the piece:
Apply a clear matte topcoat over the entire bookcase. Pay special attention to the shelf surfaces where items will slide, and the stenciled area to protect your artwork from scratches. -
Final cure:
Let the topcoat cure for at least 24 hours before placing any vases or books on the shelves to prevent them from sticking to the fresh finish.
Bleeding Edges?
If paint bleeds, let it dry completely. Then, use a small artist brush and your base wall color to ‘erase’ the mistake by painting over it carefully.
Now you have a charming display piece that hides a delightful artistic surprise on the bottom shelf
Geometric Color-Block Shelves
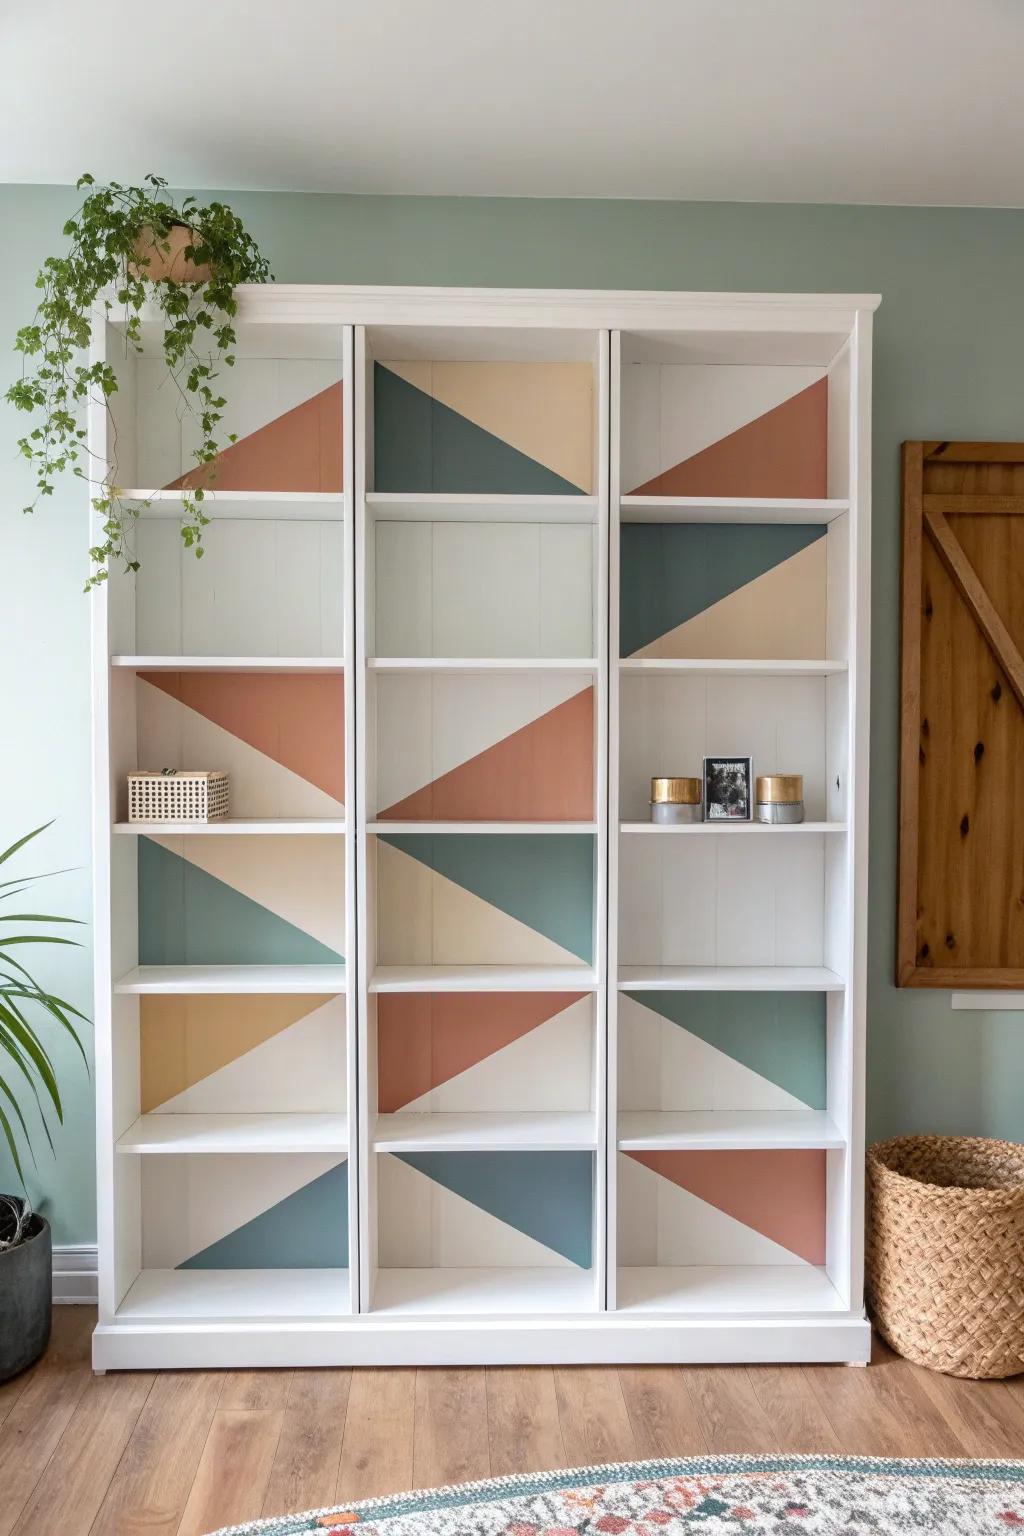
Transform a basic white laminate bookcase into a custom statement piece with this trendy geometric paint effect. By treating the back panel as a canvas for bold triangles in muted earth tones, you create a dynamic backdrop that makes your shelves pop.
Detailed Instructions
Materials
- White bookcase with removable back panel (e.g., IKEA Billy)
- Sandpaper (120 and 220 grit)
- Zinsser BIN or similar shellac-based primer
- Painter’s tape (high-quality, like FrogTape)
- Paint rollers (small foam variety)
- Small angled paintbrush
- Latex or chalk paint in 4-5 colors (terracotta, teal, mustard, beige)
- Clear sealer (polycrylic)
- Straight edge or ruler
- Pencil
Step 1: Prep Work
-
Disassemble the backing:
If your bookcase is already built, carefully remove the back panel. If it’s new in the box, simply set the back panel aside on a flat work surface. Working on the panel flat is essential for clean lines. -
Light scuffing:
Even though IKEA furniture is smooth, paint needs something to grab onto. Lightly scuff the shiny side of the back panel with 120-grit sandpaper just enough to dull the sheen. -
Wipe it down:
Clean the panel thoroughly with a damp cloth to remove all dust, then let it dry completely. -
Prime the surface:
Apply a coat of shellac-based primer like Zinsser BIN. This is crucial for laminate surfaces to prevent peeling later. Let it cure according to the can instructions.
Step 2: Mapping the Design
-
Define the shelf lines:
Assemble the main frame of your bookcase and measure exactly where the shelves will sit. Transfer these measurements to your back panel by drawing light horizontal lines. This ensures your geometric shapes align perfectly with the shelves. -
Plan your triangles:
Use a straight edge to draw diagonal lines within the shelf sections you just marked. Vary the direction of the diagonals—some sloping up, some down—to keep the eye moving. -
Color coding:
To avoid confusion once you start painting, mark each resulting triangle with a tiny letter or dot corresponding to your chosen paint colors. I find this prevents accidentally painting two identical colors next to each other.
Bleeding Edges?
If paint bled under the tape, don’t panic. Wait for it to dry fully, then use a small, stiff angled brush and the background white paint to carefully touch up and straighten the line.
Step 3: Painting
-
Tape the first batch:
Apply painter’s tape along the pencil lines for your first set of triangles. You can’t paint adjacent shapes at the same time, so choose non-touching sections first. -
Seal the tape edge:
Press the tape down firmly. For super crisp lines, brush a tiny amount of the white base paint (or clear matte medium) over the tape edge first to seal it. -
Apply color:
Using a small foam roller or brush, fill in the exposed triangle sections. Apply thin coats rather than one thick one to avoid drips. -
Peel while damp:
Carefully peel back the tape while the paint is still slightly tacky. This helps render that perfect, razor-sharp edge. -
Repeat the process:
Once the first set of triangles is totally dry, tape off the next sections. Continue this process until the entire pattern is filled in.
Pro Tip
For the pattern shown, leave some triangles white! Using the negative space balances the bold colors and keeps the shelf looking airy rather than heavy.
Step 4: Assembly
-
Let it cure:
Give the panel at least 24 hours to cure fully. If you put the shelves back too soon, they might scratch your fresh work. -
Protective coat (optional):
If you plan to slide books in and out frequently, roll on a layer of water-based polycrylic to protect the design from scuffs. -
Reattach the back:
Nail or slide the back panel onto the bookcase frame. -
Insert shelves:
Place your adjustable shelves. It is incredibly satisfying to see those horizontal shelf lines match up perfectly with the breaks in your geometric pattern.
Step back and admire how a simple weekend project completely elevated your room’s focal point

PENCIL GUIDE
Understanding Pencil Grades from H to B
From first sketch to finished drawing — learn pencil grades, line control, and shading techniques.
Explore the Full Guide
Rainbow Shelves for a Playful Corner
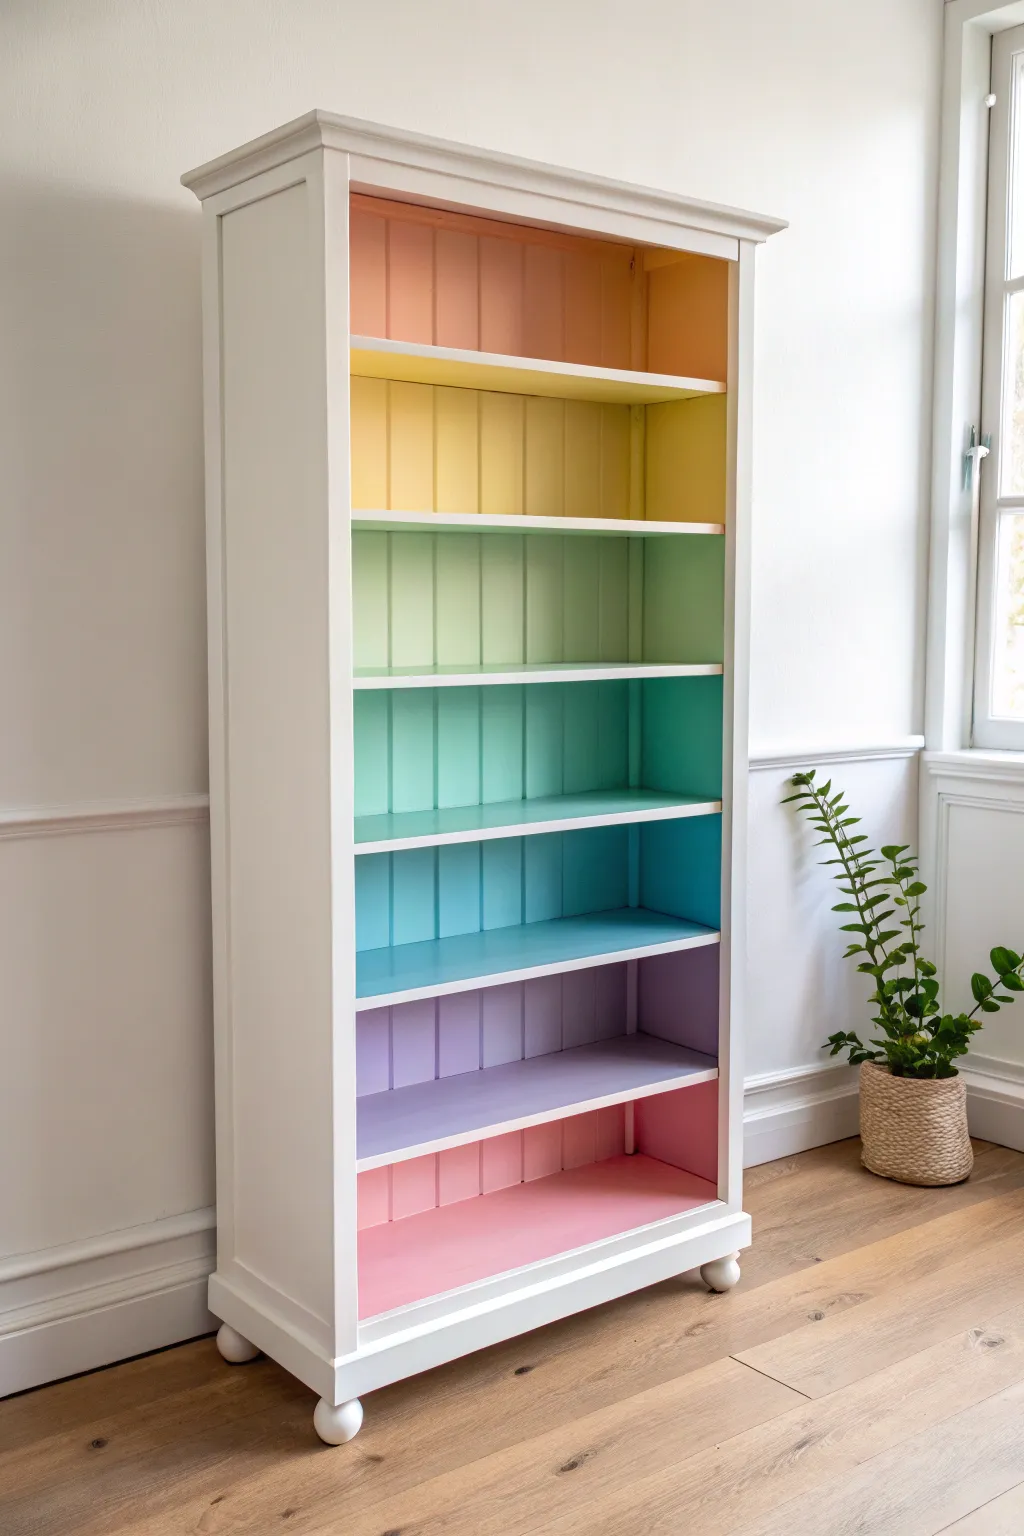
Transform a plain white bookcase into a vibrant focal point by bringing a spectrum of color to its interior. This project uses soft pastel shades painted onto the back panel and shelves to create a stunning, orderly rainbow effect that brightens any room.
Detailed Instructions
Materials
- Tall wooden bookcase with adjustable or removable shelves (like an IKEA Billy or similar)
- Sanding sponge or sandpaper (120-grit and 180-grit)
- Primer suitable for furniture (bonding primer recommended)
- White semi-gloss or satin furniture paint (for exterior)
- 7 shades of acrylic or latex paint (peach/coral, soft yellow, sage green, teal, sky blue, lavender, pink)
- Painter’s tape (high quality)
- Small foam roller and tray
- 2-inch angled paintbrush
- Small craft brushes (for corners)
- Screwdriver (to remove backing)
- Mild cleaner and rag
Step 1: Preparation & Disassembly
-
Disassemble the unit:
Begin by removing all loose shelves from the bookcase. If your bookcase has a removable back panel attached with nails or screws, carefully remove it now—it makes painting the crisp lines significantly easier. -
Clean surfaces:
Wipe down the entire unit, including the separate shelves and back panel, with a mild cleaner to remove dust and oils. -
Sand for adhesion:
Lightly scuff all surfaces with 120-grit sandpaper. You don’t need to strip the old finish completely, just remove the sheen to help the primer stick. -
Prime the frame:
Apply a coat of bonding primer to the exterior frame and the tops/bottoms of the loose shelves. Let this dry according to the manufacturer’s instructions.
Clean Lines Pro Tip
Before painting a color section, seal the edge of your painter’s tape with a tiny amount of the *base* color (white) first. This prevents the colored paint from bleeding under the tape.
Step 2: Painting the Exterior
-
Apply the white base:
Using a small foam roller for a smooth finish, paint the exterior of the bookcase frame in your chosen white semi-gloss. I find two thin coats are always better than one thick one. -
Detail work:
Use the angled brush to get into any moldings or corners on the exterior frame, specifically around the top cornice if your bookshelf has one. -
Allow to cure:
Let the white paint fully cure for at least 24 hours before you attempt to reassemble anything, as tacky paint can ruin your finish.
Level Up: Ombré Effect
Instead of distinct bands, blend the colors while wet where they meet on the back panel using a dry brush technique for a seamless, dreamy gradient transition.
Step 3: Creating the Rainbow Interior
-
Map out the zones:
Lay your back panel flat on the floor. Measure the height of the space between each shelf placement and mark horizontal lines lightly with a pencil where each color transition will happen. -
Tape the transitions:
Apply painter’s tape along your pencil lines. To get perfect edges, you’ll need to paint alternating sections first (e.g., sections 1, 3, 5, 7), let them dry, remove tape, and then tape off the dry sections to paint the remaining ones (2, 4, 6). -
Paint the top section (Peach):
Apply the peach/coral paint to the top section of the back panel. Also, paint the *underside* of the very top shelf piece in this same color. -
Paint the second section (Yellow):
Paint the second section of the back panel yellow. Paint the top and bottom of the first removable shelf entirely yellow to match this zone. -
Continue the gradient:
Work your way down: green, teal, blue, lavender, and finally pink at the bottom. For every corresponding loose shelf, paint the entire board in that specific hue. -
Detailing the grooves:
If your back panel has beadboard grooves like the one in the photo, use a small craft brush to ensure the paint gets deep into the crevices without pooling. -
Second coats:
Apply a second coat to all colored sections for opaque, vibrant coverage. The lighter yellow and peach shades often need a little extra attention. -
Remove tape:
Peel off the painter’s tape while the final coat is still slightly damp to ensure a crisp, clean line between colors.
Step 4: Assembly
-
Reattach backing:
Once everything is bone dry, carefully reattach the rainbow back panel to the white frame, ensuring your colors are oriented correctly from top to bottom. -
Insert shelves:
Place the painted shelves into their corresponding color slots. The yellow shelf goes in the yellow zone, the green in the green zone, and so on. -
Touch-ups:
Check for any scrapes that occurred during assembly. Use a small artist’s brush to dab paint onto any imperfections.
Now you have a cheerful, customized display piece ready to hold your favorite books and treasures
Whitewash Plank-Style Painted Backing
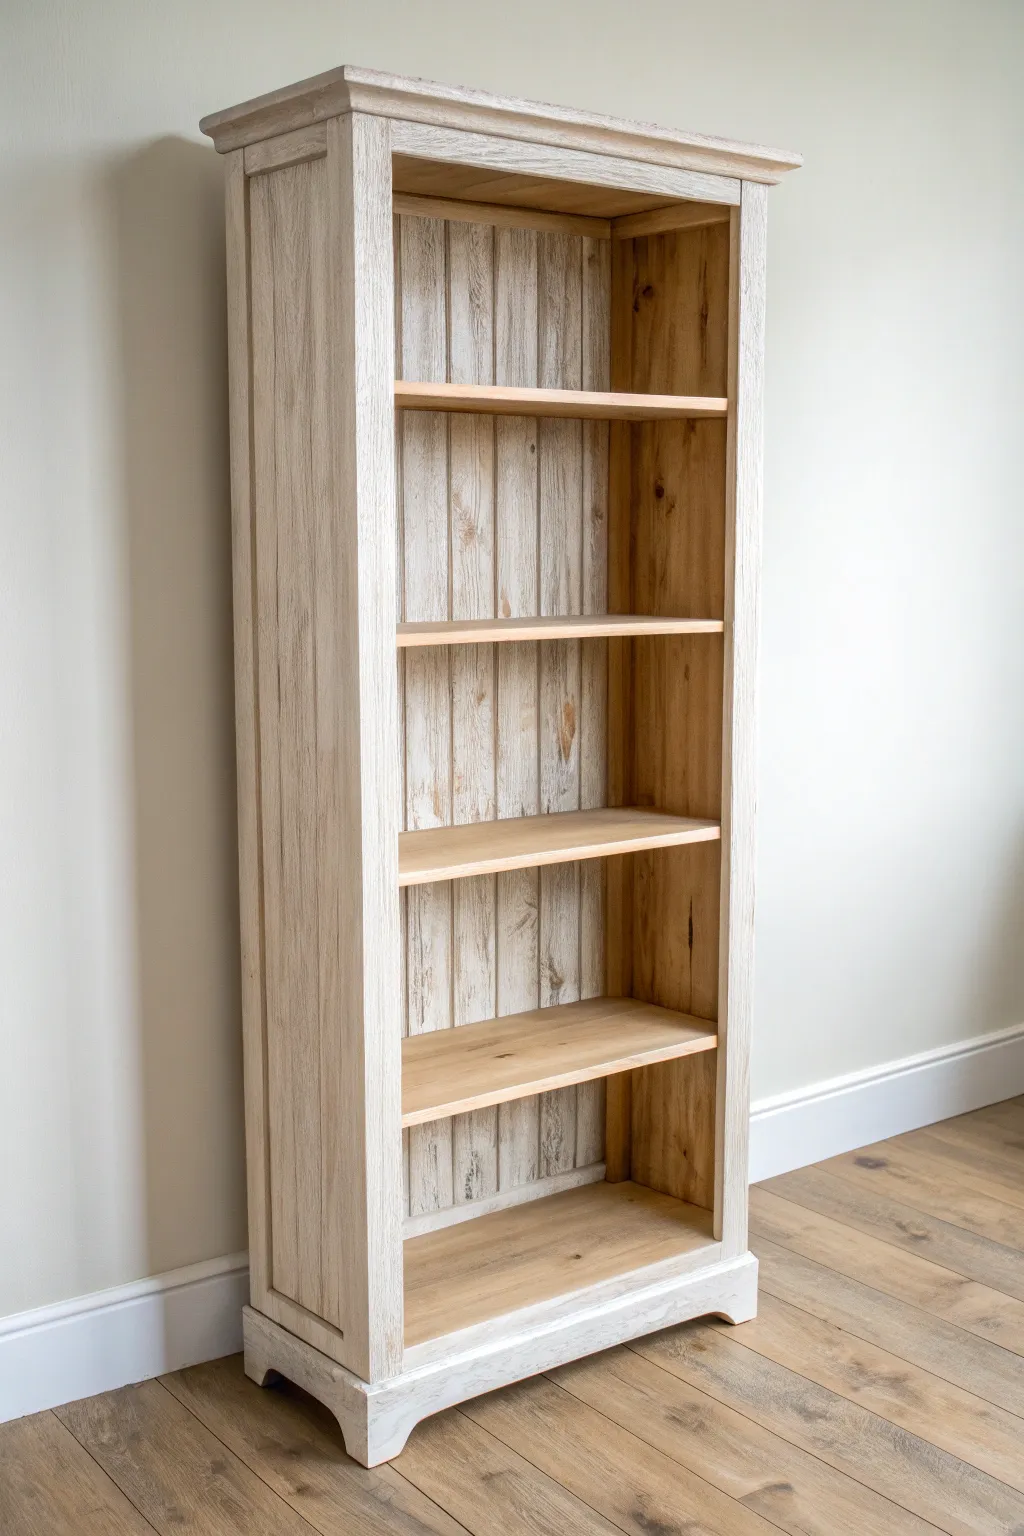
Transform a plain bookcase into a farmhouse-style feature piece by adding a planked back and a layered finish. This project balances the warmth of natural wood shelves with a distressed, creamy whitewash exterior for a timeless, rustic look.
Step-by-Step Guide
Materials
- Tall wooden bookcase (with removable shelves)
- Plywood paneling or tongue-and-groove planks (for backing)
- Chalk paint (cream or off-white)
- White latex paint (flat or eggshell)
- Natural wood stain (light oak or pine)
- Clear matte polyurethane
- Medium-grit sandpaper (120-150 grit)
- Fine-grit sandpaper (220 grit)
- Paintbrushes (natural bristle and synthetic)
- Lint-free rags
- Panel adhesive or finishing nails
- Tack cloth
Step 1: Preparation and Frame
-
Remove hardware and shelves:
Start by taking out all removable shelves and unscrewing any metal shelf pins or hardware. If the bookcase has a flimsy cardboard back, carefully remove it and discard it, as we will be replacing it with planks. -
Sand the surfaces:
Give the entire exterior frame and the empty interior sides a good scuff sanding with medium-grit sandpaper. You want to remove the sheen of the old finish so your new paint adheres well. -
Clean the dust:
Wipe away all sanding residue using a tack cloth or a damp rag. A clean surface is crucial for a smooth finish. -
Apply the base coat:
Paint the exterior frame and the interior side walls with your cream-colored chalk paint. I find that chalk paint sticks wonderfully without a heavy primer coat. Don’t worry about perfect coverage yet. -
Add a second coat:
Once the first coat is dry to the touch, apply a second coat for full opacity. Let this cure completely, ideally overnight. -
Distress the edges:
Using medium-grit sandpaper, gently sand the edges, corners, and raised moldings of the frame. The goal is to reveal a bit of the wood underneath to mimic natural wear.
Dry Brushing Tip
When whitewashing the back planks, keep your brush extremely dry. Dip just the tips in paint, offload most onto a paper towel, then lightly drag over the wood texture.
Step 2: Create the Planked Backing
-
Measure and cut planks:
Measure the height and width of the back opening. Cut your tongue-and-groove planks or beadboard paneling to fit this space vertically. -
Base coat the planks:
Before installing, paint the planks with a thin coat of white latex paint. If you want the wood grain to show through slightly, dilute the paint with a little water. -
Create the whitewash effect:
Once the base white is dry, take a diluted mixture of gray or brown paint (or dark wax) and brush it over the planks. Immediately wipe it back with a rag, leaving the darker color settled into the grooves and wood grain. -
Heavy sanding for texture:
Take your coarse sandpaper to the painted planks. Sand aggressively in random patches to expose the raw wood beneath the white paint, creating that heavy, rustic texture seen in the photo. -
Install the backing:
Attach the finished planks to the back of the bookcase using panel adhesive and finishing nails. Ensure the vertical lines are straight.
Step 3: Shelves and Finishing
-
Sand the shelves:
Sand the removable shelves down to bare wood if they are painted, or scuff them heavily if they are already stained. Clean them thoroughly. -
Stain the shelves:
Apply a light wood stain (like a natural pine or light oak) to the shelf tops and fronts using a lint-free rag. Wipe off excess stain and let dry. -
Seal the shelves:
Apply two coats of clear matte polyurethane to the shelves to protect them from sliding books and decor. Sand lightly with 220-grit paper between coats. -
Seal the frame:
Apply a coat of clear matte wax or polyurethane over the painted exterior frame to seal the chalk paint and stop the distressing process. -
Reassemble:
Once everything is fully cured, reinsert the shelf pins and slide your newly stained shelves back into place.
Add Crown Moulding
To make a basic IKEA-style bookcase look high-end, glue and nail wooden crown moulding to the top edge before you start painting the exterior frame.
Now you have a stunning, heavy-duty display piece that brings architectural interest to any room.


Hand-Painted Mini Mural Inside the Back

Transform a plain bookcase into a stunning statement piece by turning the back panel into a canvas for a modern, abstract landscape mural. Featuring grounding earth tones and playful textures like terrazzo speckling, this project brings artistic flair to functional storage.
Step-by-Step Tutorial
Materials
- Bookcase (wooden frame, removable shelves)
- Sandpaper (120-grit and 220-grit)
- Primer (bonding primer recommended)
- White furniture paint (satin or eggshell finish)
- Acrylic paints (Terra cotta, sage green, mustard yellow, deep teal, navy)
- Painter’s tape (frog tape for crisp lines)
- Fine-grit sanding block
- Paint rollers (foam for smooth finish)
- Assorted paintbrushes (angled sash brush, fine detail brush)
- Ruler and pencil
- Clear matte or satin varnish
- Old toothbrush (for splatter effect)
Step 1: Preparation & Base Coat
-
Disassemble the shelving:
Begin by removing all adjustable shelves from the bookcase. If the back panel is removable, take it off to make painting easier; if not, you’ll just paint it in place. -
Sand the surfaces:
Scuff sand the entire unit lightly with 120-grit sandpaper to help the paint adhere. Wipe away all dust with a damp cloth or tack cloth. -
Prime the frame and back:
Apply a coat of bonding primer to the entire bookcase, excluding the drawer fronts if you plan to leave them natural wood like the example. -
Paint the exterior frame:
Once primed, apply your main white paint to the exterior frame, sides, and shelf edges. Use a foam roller for the large flat areas to minimize brush strokes. -
Base coat the back panel:
Paint the back panel (or the inside back of the bookcase) with a solid coat of a creamy off-white or light beige. This will serve as the background ‘sky’ and the negative space between your shapes.
Step 2: Designing the Mural
-
Sketch the composition:
On a piece of paper, plan out your abstract shapes. The design relies on large, sweeping arcs and hill-like mounds. Aim for asymmetry, allowing shapes to flow behind where the shelves will sit. -
Draft lightly on the wood:
Using a pencil, lightly transfer your design onto the back panel. Draw large semi-circles and rolling hills. Don’t worry about perfection; the organic look is part of the charm. -
Tape off the sun shapes:
For the crisp, graphic lines seen in the terra cotta arches, use painter’s tape to mask off the edges of your first shape.
Clean Lines Hack
To prevent paint bleeding under your tape on the back panel, seal the tape edge with a thin layer of your base wall color first before applying the colored paint.
Step 3: Painting the Abstract Shapes
-
Paint the terra cotta arches:
Fill in your first masked shape with terra cotta paint. Once dry, you can add detail lines. For the rainbow arch effect, use a steady hand and a medium brush to paint curved black or dark navy lines over the orange base. -
Create the sage green hills:
Move to the next section and paint the rolling hill shapes in sage green. I find that two thin coats provide much better coverage than one thick coat here. -
Add the deep teal elements:
Paint the lower semi-circles in deep teal or navy blue. To mimic the example, add concentric curved stripes in a contrasting color, like terra cotta or soft pink, over the dark base once it is fully dry. -
Create the textured yellow section:
Paint a section in mustard yellow. To achieve the textured look shown in the middle shelf area, dry brush a lighter cream color quickly over the yellow while it’s tacky, or sponge it slightly.
Metallic Accent
Use gold leaf foil or metallic gold paint for the thin stripes on the navy blue arches. It catches the light beautifully and adds a touch of glam to the earthy palette.
Step 4: Adding Details & Finish
-
Apply the terrazzo effect:
For the speckled ‘terrazzo’ hill shape, paint a base color first (like grey or cream). Once dry, dip an old toothbrush into diluted paint, point it at the shape, and run your thumb across the bristles to splatter tiny specks. Mask surrounding areas to prevent stray splatter. -
Detail the drawers:
Sand the drawer fronts down to raw wood if they were previously painted or varnished. Seal them with a clear matte varnish to keep that natural timber look that contrasts beautifully with the white frame. -
Install hardware:
Attach simple wooden or brass knobs to the drawers for a minimalist finish. -
Seal the mural:
Once the mural is completely cured (give it at least 24 hours), apply a protective topcoat of clear matte varnish over the artwork to prevent scratching when sliding books in and out. -
Reassemble:
Put the shelves back into position. Notice how the mural interacts with the horizontal lines of the shelves, creating framed vignettes of your artwork.
Step back and admire how a simple storage unit has become a sophisticated piece of art for your room
Chalky Matte With Soft Distressed Edges
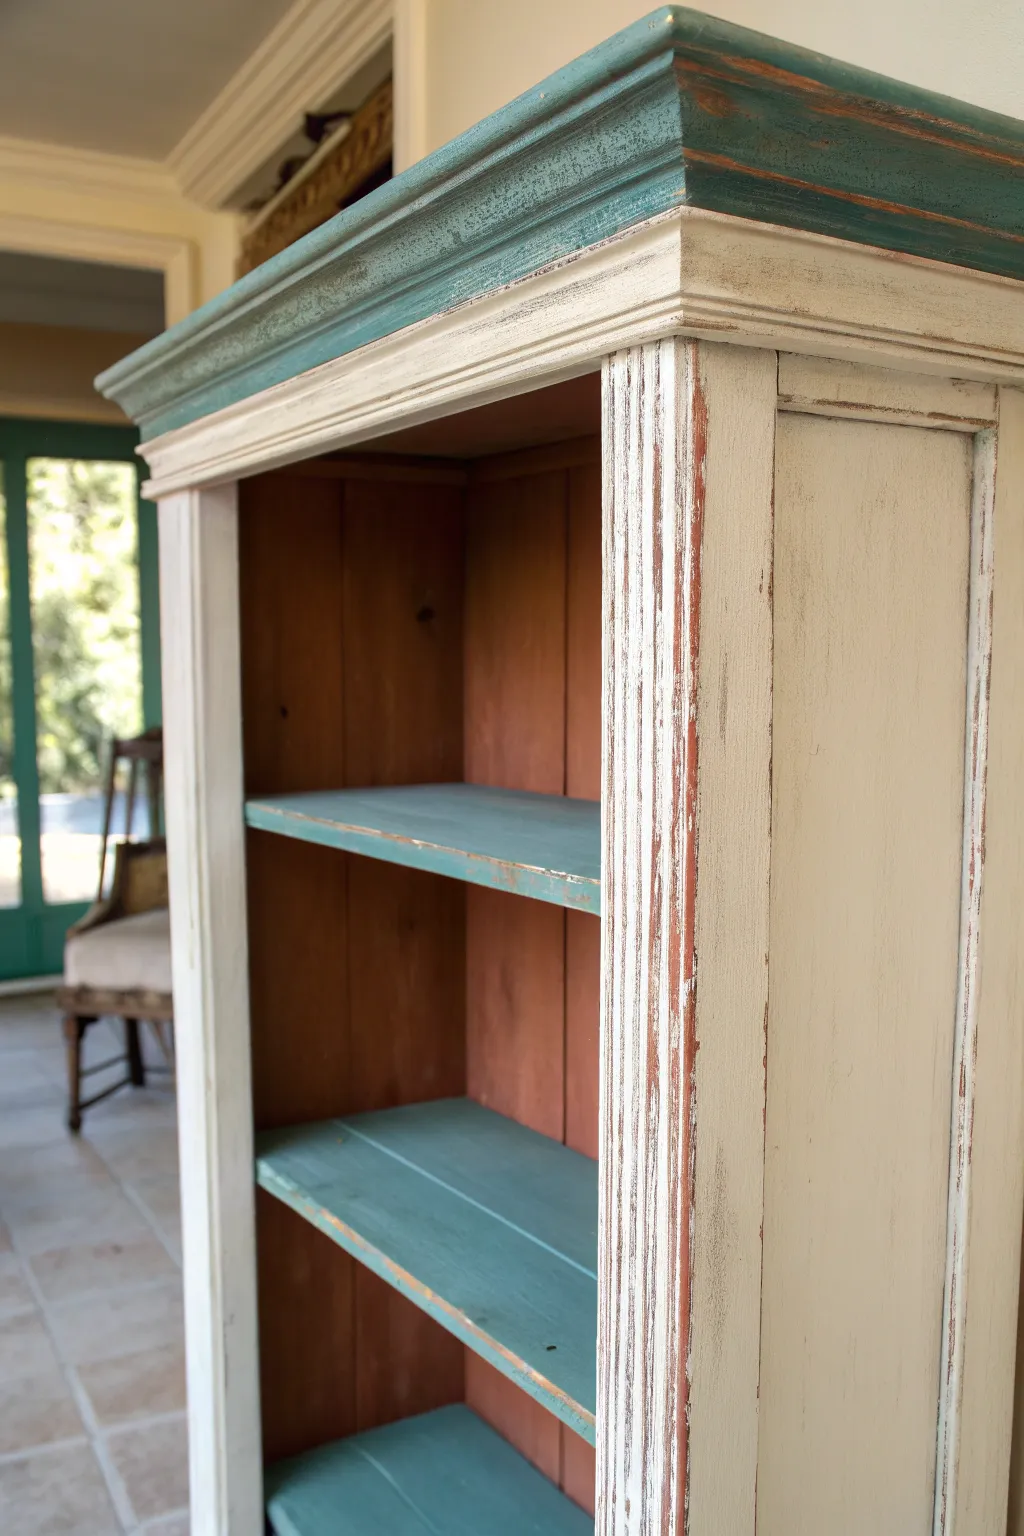
Transform a standard wooden bookcase into a character-filled statement piece with this two-toned, heavily distressed technique. By combining a creamy off-white exterior with unexpected pops of teal on the shelves and molding, you create a look that feels both vintage and refreshingly breezy.
Step-by-Step
Materials
- Wooden bookcase (unfinished or stripped)
- Chalk-style paint (Creamy Off-White)
- Chalk-style paint (Teal/Turquoise)
- Medium-grit sandpaper (120-150 grit)
- Coarse-grit sandpaper (80 grit)
- 2-inch synthetic bristle brush
- 1-inch angled sash brush
- Clear furniture wax
- Dark antique wax (optional)
- Wax brush or lint-free cloth
- Painter’s tape
- Drop cloth
Step 1: Preparation & Foundation
-
Clean the surface:
Begin by thoroughly cleaning your bookcase to remove any dust, grease, or old wax. A mixture of water and mild dish soap works well, but let it dry completely before moving on. -
Protect the interior:
Since the interior back and side walls will remain unpainted wood (or stained wood), carefully apply painter’s tape along the interior edges where the shelves meet the sides. Cover the back panel if you’re worried about drips. -
Address the wood tone:
If your bookcase is raw pale wood, you’ll need to stain the interior and the areas that will be distressed first. Apply a reddish-brown stain to the back panel, interior sides, and the exterior edges where you plan to distress later. Let this cure fully.
Wet Distressing Alternative
To avoid dust, wipe a damp kitchen sponge over the paint just as it begins to dry. This removes paint gently from high points without scratching the wood underneath.
Step 2: Adding Color
-
Paint the shelves:
Using your teal chalk paint and the angled brush, carefully paint the tops and front edges of the shelves. You can leave the undersides natural if desired, or paint them for a finished look. -
Apply teal to the crown molding:
Paint the heavy top molding of the bookcase with the same teal color. Don’t worry about perfect coverage here; a little bit of the wood showing through adds to the charm giving it a sun-bleached effect. -
Paint the exterior body:
Dip your 2-inch brush into the creamy off-white paint. Apply this to the sides, the front face frame, and the vertical fluting details. Apply a solid, thick coat, as chalk paint covers well. -
Second coat application:
Once the first coat is dry to the touch (usually 30-60 minutes), evaluate coverage. If the wood grain is showing through too much for your taste, apply a second coat of white to the exterior. -
Drying time:
Allow all paint layers to dry completely, ideally overnight. Chalk paint distresses best when it has hardened slightly but isn’t fully cured.
Patterned Back Panel
Instead of leaving the back panel plain wood, line it with a vintage floral wallpaper or paint it a contrasting soft yellow to brighten the items displayed on the shelves.
Step 3: The Art of Distressing
-
Distress the edges:
Take your medium-grit sandpaper and run it along the sharp edges of the face frame. Apply uneven pressure to reveal the reddish wood beneath the white paint. -
Highlight the fluting:
For the grooved vertical side columns (fluting), fold a piece of coarse 80-grit sandpaper. Sand vigorously up and down the raised ridges to expose significant amounts of wood, creating that worn, structural look shown in the photo. -
Work the teal molding:
Switch back to medium sandpaper for the teal crown molding. Sand the high points and corners to reveal the wood, making the molding look like it has been handled for decades. -
Scuff the shelf fronts:
Lightly sand the front edges of the teal shelves. This high-traffic area would naturally wear over time, so distressing here adds authenticity. -
Clean up dust:
Vacuum or wipe down the entire piece with a tack cloth to remove the significant amount of dust created by the distressing process.
Step 4: Sealing & Finishing
-
Apply clear wax:
Using a wax brush, massage a thin layer of clear furniture wax over all painted surfaces. Work in small sections, rubbing the wax into the porous chalk paint. -
Buff to sheen:
After the wax has sat for about 10-15 minutes, buff it briskly with a clean, lint-free cloth. This creates a soft, hand-rubbed luster rather than a high gloss. -
Optional aging:
If I want a dustier, more antique look, I sometimes apply a tiny amount of dark aesthetic wax into the deepest crevices of the fluting and wipe it back immediately. -
Final inspection:
Check the interior wood sections. If the finish looks dry, revive it with a quick wipe of hemp oil or clear wax to nourish the wood and match the sheen of the painted parts.
Enjoy styling your new shelves with books and treasures that complement the lovely worn texture you have created
Metallic Accents on the Details
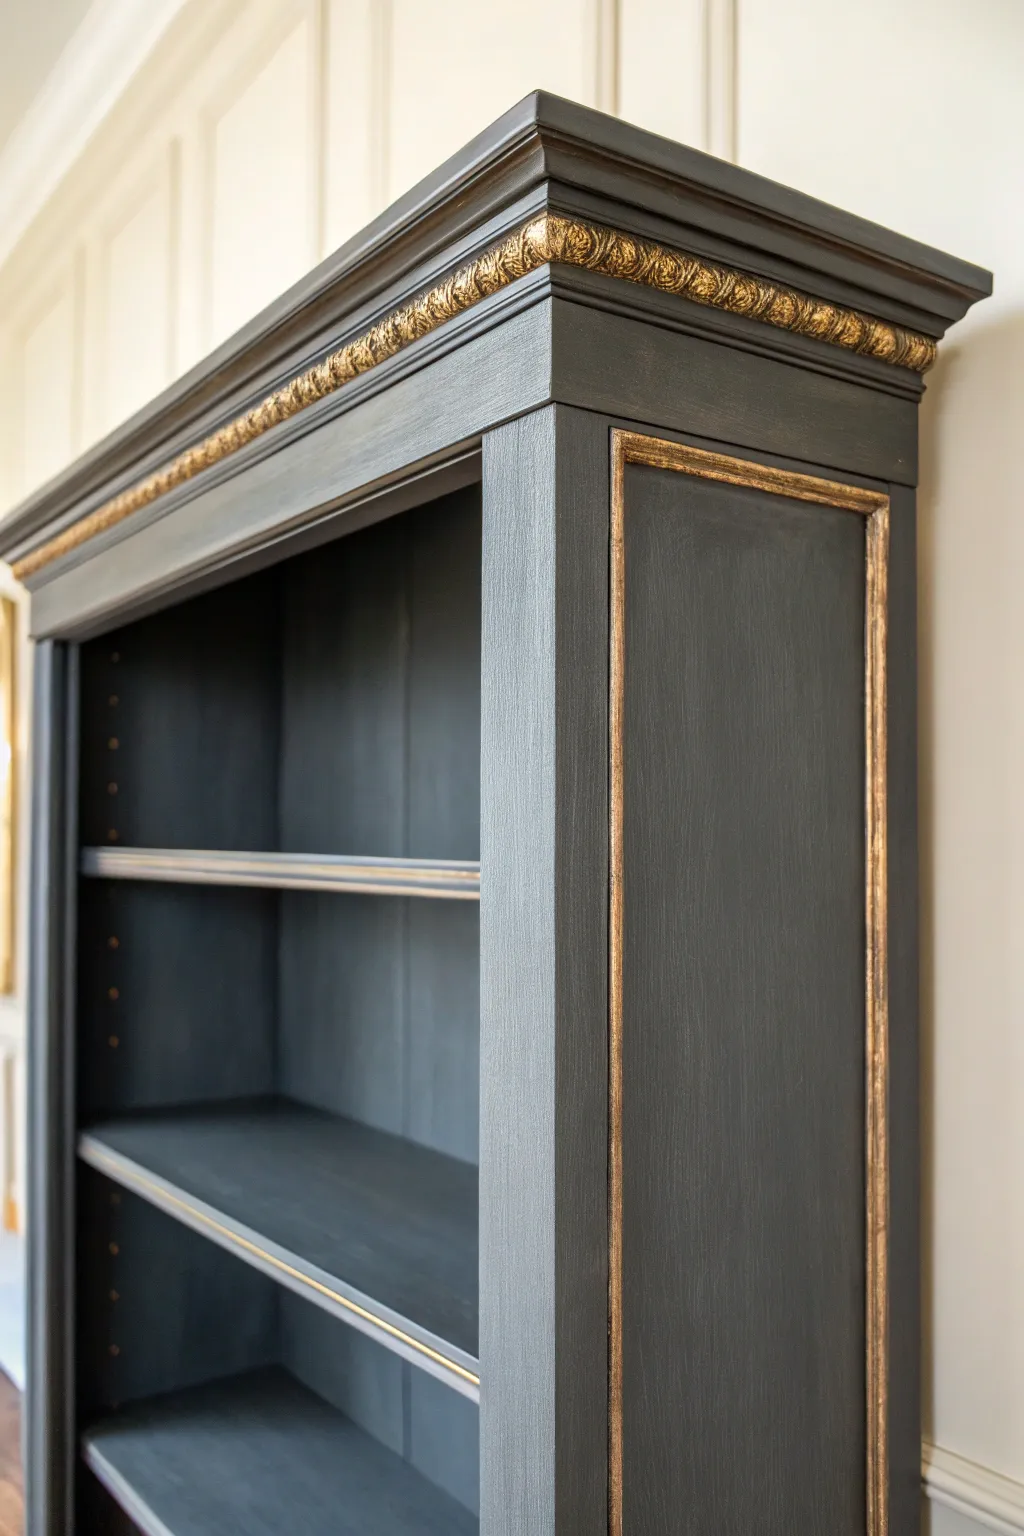
Transform a standard bookcase into a regal statement piece by pairing deep charcoal paint with luxurious metallic accents. This project focuses on highlighting architectural details like cornices and side panels to create a sophisticated, high-end look.
Step-by-Step Tutorial
Materials
- Wooden bookcase
- Charcoal grey chalk-style paint
- Gold gliding wax or metallic gold paint
- Clear matte wax or polycrylic topcoat
- Medium grit sandpaper (120-150)
- Fine grit sandpaper (220)
- Small artist brushes (round and flat)
- 2-inch synthetic angled sash brush
- Lint-free rags or tack cloth
- Painter’s tape
- Degreaser cleaner
Step 1: Preparation
-
Clean and Degrease:
Thoroughly wipe down the entire bookcase with a degreasing cleaner to remove dust, oils, and furniture polish residue. This step is critical for ensuring your paint adheres properly. -
Light Sanding:
Scuff sand the existing finish using medium grit sandpaper (120-150). You don’t need to strip it to bare wood; just create enough ‘tooth’ for the new paint to grip. -
Remove Dust:
Vacuum up the sanding dust and wipe the surface down with a tack cloth or a damp lint-free rag to ensure a pristine canvas. -
Tape Off Shelves:
If your shelves are fixed, apply painter’s tape to the back wall if you want a contrasting color, though for this monochromatic look, you can skip this unless protecting specific hardware.
Less is More Impact
Work with a ‘dry brush’ technique for the gold. Offload most of the paint/wax on a paper towel first so you only highlight the topmost ridges.
Step 2: Painting the Base
-
First Coat Application:
Using your 2-inch synthetic brush, apply the first coat of charcoal grey chalk-style paint. Work in long, smooth strokes following the grain of the wood. Don’t worry if coverage isn’t perfect yet. -
Let it Dry:
Allow the first coat to dry completely according to the manufacturer’s instructions, typically 2-4 hours for chalk paint. -
Sand Between Coats:
Lightly run fine-grit sandpaper (220) over the dried paint to knock down any brush strokes or raised grain. Wipe away dust immediately. -
Second Coat Application:
Apply the second coat of grey paint. This layer should provide full, opaque coverage. Pay special attention to corners and the crevices of any molding. -
Final Dry Time:
Let this final coat cure overnight if possible, or at least 4-6 hours, to ensure the surface is hard enough to accept the metallic detailing without lifting.
Antique the Gold
For a vintage vibe, lightly dab dark wax or a diluted bit of black paint over the gold trim, then wipe it back to make the metal look aged.
Step 3: Adding Metallic Accents
-
Select Your Accent Areas:
Identify the raised details you want to highlight. In this project, focus on the intricate carving of the crown molding and the rectangular trim on the side panel. -
Apply Gold Wax – Finger Method:
For the upper carved molding (the ‘egg and dart’ or floral style), dip your index finger lightly into the gold gilding wax. I find using a finger offers the best control for hitting just the raised high points. -
Rub and Buff:
Gently rub the wax over the raised textures. The goal is to catch the top ridges while leaving the deep crevices dark grey for contrast. -
Apply Gold Wax – Brush Method:
For the straight lines on the side panel molding, switch to a small flat artist brush. Load a tiny amount of wax or metallic paint and carefully drag it along the trim. -
Refine the Lines:
If the gold strays onto the flat panel, quickly wipe it away with a clean cloth before it sets, or touch it up with a distinct dab of charcoal paint later. -
Detail Shelf Edges:
For a cohesive look, run a very thin line of gold along the front-facing edge of the visible shelves using your small brush.
Step 4: Sealing and Finishing
-
Cure the Wax:
Allow the metallic wax to cure for at least 30 minutes to an hour (or per package instructions) before applying any topcoat. -
Apply Clear Wax:
If using chalk paint, apply a clear furniture wax over the charcoal areas to seal the paint. Use a round wax brush and work in sections. -
Avoid Smearing:
Be extremely careful working around your gold accents. If you rub too hard, you might smear the metal into the dark grey background. -
Buff to Sheen:
Once the clear wax has hazed over, buff the charcoal surfaces with a clean lint-free cloth to achieve a soft, satin sheen.
Step back and admire how a few simple gold highlights have completely elevated the character of your furniture


Have a question or want to share your own experience? I'd love to hear from you in the comments below!