A painted chest is one of my favorite ways to turn plain storage into a real piece of art you get to live with every day. Here are my go-to painted chest ideas—from classic, foolproof finishes to bold, artsy transformations that make a chest of drawers feel totally one-of-a-kind.
Classic Solid-Color Painted Chest
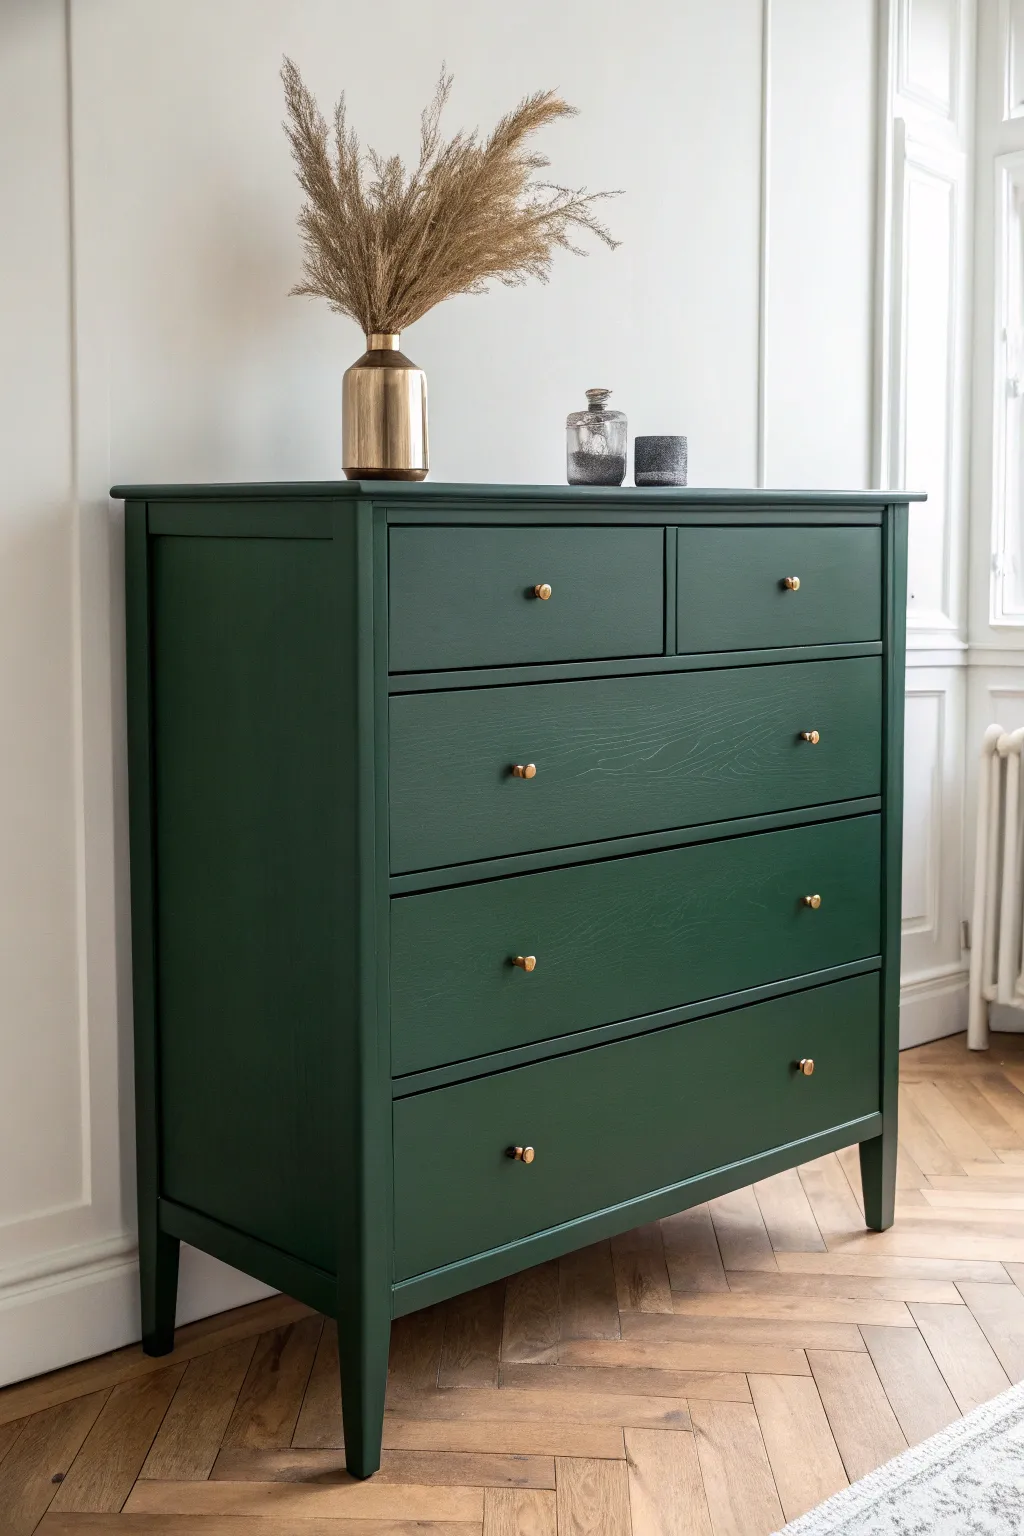
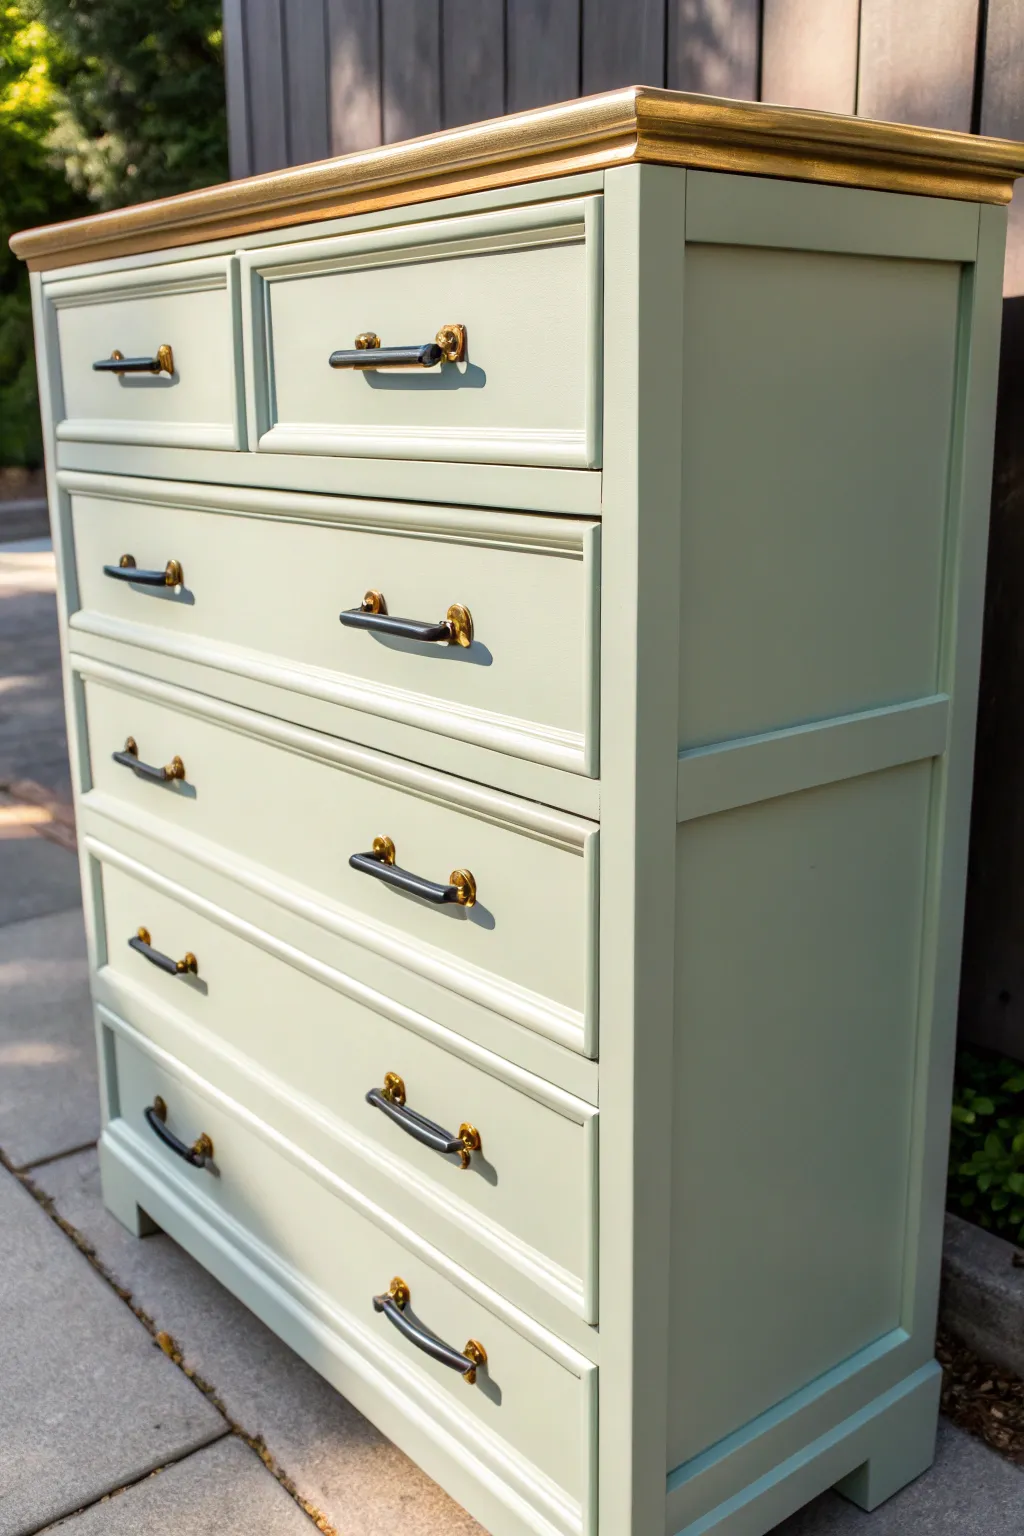
Transform a basic wooden dresser into a sophisticated statement piece with a rich, matte forest green finish. This project proves that a solid, bold color choice paired with simple gold hardware can completely elevate standard furniture.
Step-by-Step Tutorial
Materials
- Wooden chest of drawers (e.g., IKEA Hemnes or similar)
- TSP substitute or degreaser
- Medium (120-grit) and fine (220-grit) sandpaper
- Tack cloth
- High-quality bonding primer (oil-based or shellac-based recommended)
- High-density foam roller and tray
- 2-inch angled synthetic sash brush
- Deep forest green paint (satin or eggshell finish)
- Water-based polyurethane topcoat (matte)
- Gold or brass round knobs
- Screwdriver
- Wood filler (optional)
- Painter’s tape
Step 1: Preparation
-
Remove hardware and drawers:
Start by pulling out all the drawers and setting them on a drop cloth. Unscrew and remove all old knobs or handles. If you plan to change the hole spacing for new hardware, fill the old holes with wood filler now and let it dry. -
Clean thoroughly:
Furniture accumulates oils and wax over time. Scrub the entire casing and drawer fronts with a TSP substitute or intense degreaser to ensure a clean surface. Wipe away any residue with a damp cloth. -
Scuff sand the surface:
Using the 120-grit sandpaper, sand the existing finish. You don’t need to strip it to bare wood, but you must tough up the surface enough that it feels dull to the touch so the primer can grip. -
Remove dust:
Vacuum up the sanding dust, then wipe everything down with a tack cloth to catch the fine particles. Dust is the enemy of a smooth finish. -
Protect the interior:
Use painter’s tape to mask off the drawer glides and the interior edges of the frame if you want to keep the inside unpainted. This keeps the drawers sliding smoothly later.
Sticky Drawers?
If paint builds up on the drawer edges causing them to stick, rub clear candle wax or a dedicated furniture wax along the wooden runners and sides to restore a smooth glide.
Step 2: Priming
-
Apply bonding primer:
Pour your bonding primer into a tray. Use the angled sash brush to cut in the corners and detailed edges first. -
Roll the flat surfaces:
Switch to your high-density foam roller for the large flat areas of the frame and drawer fronts. This roller type minimizes texture. Apply a thin, even coat. -
Sand the primer:
Once the primer is fully dry (check the can’s instructions), lightly hand-sand with 220-grit paper to knock down any brush strokes or bumps. Wipe clean with a tack cloth.
Luxe Drawer Liners
Line the interior drawer bottoms with a botanical or geometric patterned wallpaper in gold and white tones. It adds a hidden pop of design every time you open the chest.
Step 3: Painting
-
First coat of green:
Stir your deep forest green paint thoroughly. Begin by brushing the recessed areas, corners, and legs where a roller can’t reach. -
Roll for a smooth finish:
Immediately follow up with the foam roller on the flat surfaces while the brushed edges are still wet to blend them seamlessly. I find working in long, light strokes from one edge to the other helps avoid roller marks. -
Dry and assess:
Let this first coat dry completely. Dark colors often look streaky after one coat, but don’t panic; the next layer will deepen the coverage. -
Second coat application:
Apply the second coat exactly like the first. If the coverage still looks slightly translucent, a third light coat may be necessary for that rich, opaque deep green.
Step 4: Finishing Touches
-
Apply protective topcoat:
Once the paint has cured for at least 24 hours, apply two thin coats of water-based matte polyurethane using a clean foam roller or high-quality synthetic brush. This protects the dark paint from scuffs. -
Reassemble the piece:
Remove the painter’s tape carefully. Reinsert the drawers into their tracks. -
Install new hardware:
Screw the brass or gold knobs into the drawer fronts. The contrast between the warm metal and cool dark green is what really defines this look.
Step back and admire purely elegant results that look professionally manufactured.


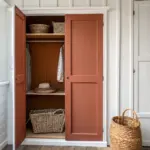
Crisp White Chest With Subtle Aging
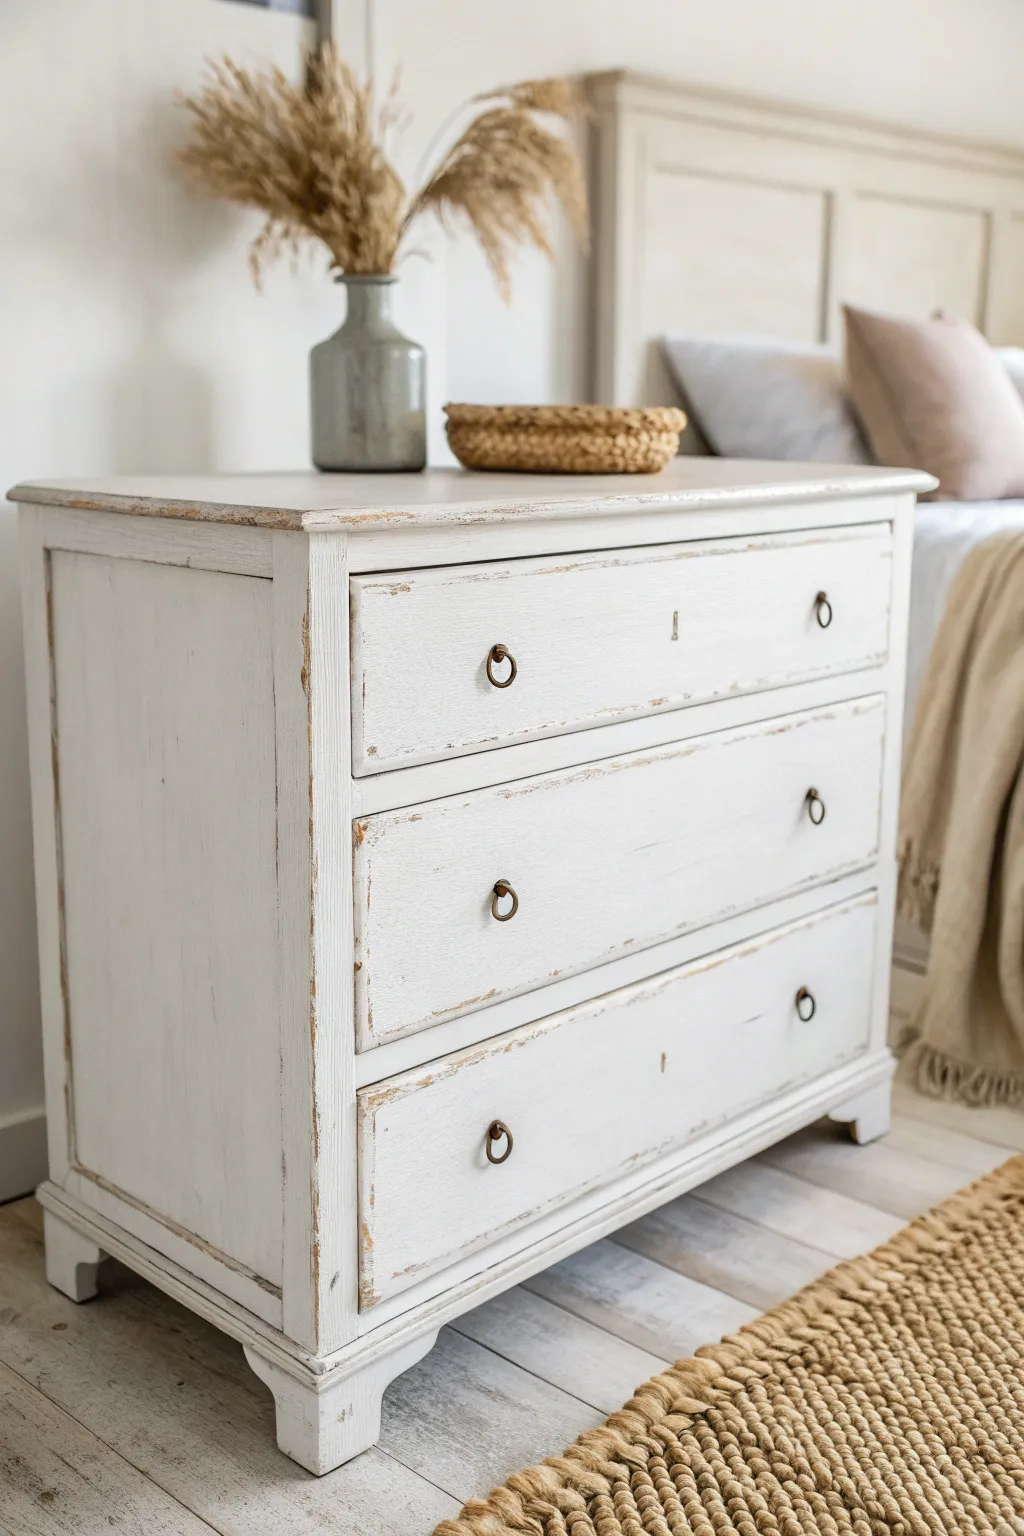
Transform an outdated wooden chest into this serene bedroom centerpiece featuring a crisp white finish and authentic, subtle distressing. The gentle wear along the edges reveals the natural wood beneath, adding character without overwhelming the clean, airy aesthetic.
How-To Guide
Materials
- Wooden chest of drawers (cleaned and hardware removed)
- Medium grit sandpaper (120-150 grit)
- Fine grit sandpaper (220 grit)
- Tack cloth
- Primer (stain-blocking, water-based)
- Chalk-style paint or matte finish latex paint (Warm White)
- Small foam roller
- Quality angled paintbrush
- Clear matte furniture wax or polycrylic topcoat
- Wax brush or lint-free rags
- Antique bronze ring pulls (optional replacement hardware)
Step 1: Preparation
-
Clean the Surface:
Begin by removing all drawers and unscrewing the old hardware. Give the entire piece a thorough cleaning with a degreaser or mild soap and water to remove oils and dust that could interfere with adhesion. -
Scuff Sanding:
Lightly sand the entire exterior surface using 120-grit sandpaper. You aren’t trying to strip the old finish completely, just scuffing it enough to give the new primer something to grip. -
Address Imperfections:
Inspect the wood for deep gouges you might want to fill, but remember that for this aged look, existing dings add to the charm. Wipe away all sanding dust with a tack cloth.
Bleed-Through Blues?
If pink or yellow stains appear through the white paint, stop. Apply a coat of shellac-based primer over the stain to seal it, let dry, then repaint.
Step 2: Priming and Base Coat
-
Apply Primer:
Roll or brush on a coat of stain-blocking primer. This is crucial if you are painting over dark wood like mahogany or cherry to prevent bleed-through. -
Light Sanding Between Coats:
Once the primer is fully dry, run your 220-grit sandpaper very lightly over the surface to knock down any bumps, then wipe clean again. -
First Coat of Paint:
Using your foam roller for flat surfaces and the angled brush for corners, apply the first coat of warm white paint. Don’t worry if it looks slightly streaky; thin, even coats are key. -
Let it Cure:
Allow the first coat to dry according to the manufacturer’s instructions. Chalk paints dry quickly, but latex may need a few hours. -
Second Coat:
Apply a second, full coat of white paint. Watch for drips along the edges of the drawers and smooth them out immediately. -
Inspect Coverage:
Check if a third coat is needed. You want a solid, opaque white base before you start the distressing process.
Wet Distressing Trick
For a smoother distressed look without dust, wipe a damp kitchen sponge over the paint just before it fully dries to lift the color off the edges gently.
Step 3: Distressing and Finishing
-
Targeted Distressing:
Take a folded piece of 150-grit sandpaper and gently rub the edges where natural wear would occur: the corners of the top, the edges of the drawer fronts, and the feet. -
Vary the Pressure:
I like to vary my pressure here—rub harder in some spots to reveal the raw wood, and lighter in others just to thin the paint, creating a realistic time-worn effect. -
Clean Up Dust:
This step creates significant dust. Vacuum the piece thoroughly and follow up with a fresh tack cloth to ensure no particles are trapped in the final seal. -
Apply Clear Wax:
If using chalk paint, load a wax brush with clear furniture wax. Massage it into the paint in circular motions, working in small sections. -
Buff the Finish:
After the wax has sat for about 10-15 minutes, buff it briskly with a clean, lint-free rag to create a soft, durable sheen. -
Alternative: Polycrylic:
If you chose latex paint, skip the wax and apply a clear matte polycrylic topcoat for durability, using a synthetic brush to avoid brush strokes. -
Reinstall Hardware:
Once the topcoat is fully cured, reinstall your hardware. Antique bronze or iron ring pulls contrast beautifully with the white finish. -
Re-insert Drawers:
Slide the drawers back into the frame. If paint on the sides makes them stick, rub a little candle wax on the wooden runners.
Step back and appreciate how this simple technique has given the piece a fresh, timeless new life


Moody Black Chest With Texture
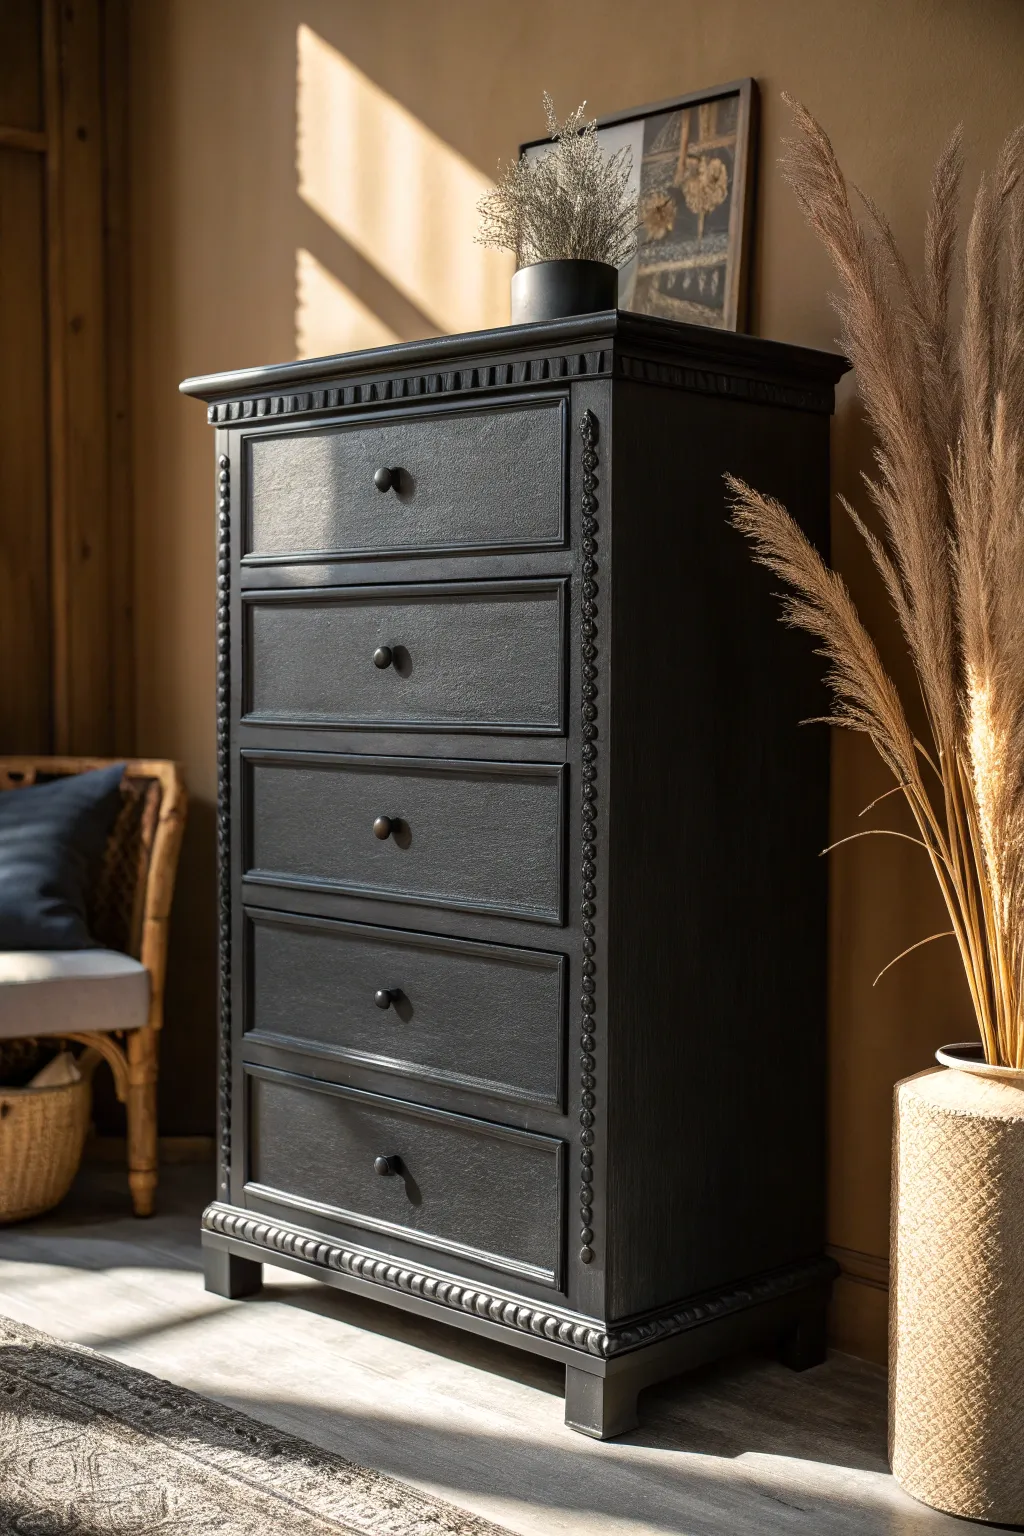
Transform a plain or dated wooden dresser into a moody, modern masterpiece using a unique stone-like texture technique. This project combines deep matte black paint with tactile additives to create a finish that feels as rich as it looks, catching the light in warm, subtle ways.
Step-by-Step
Materials
- Tall wooden 5-drawer chest (thrifted or existing)
- Medium grit sandpaper (120-150 grit)
- Clean rags and tack cloth
- Degreasing cleaner (like TSP or simple green)
- Bonding primer (if laminating or previously sealed)
- Matte black chalk or mineral paint
- Texture additive (powder) or baking soda
- Round wax brush or textured roller
- Small artist brush
- Matte black drawer knobs (round)
- Protective matte topcoat or black wax
- Painter’s tape
- Screwdriver
Step 1: Prep and Prime
-
Hardware Removal:
Begin by removing all the old knobs and hardware. Keep the screws in a labeled baggie so they don’t get lost, even though we will likely be replacing the knobs. -
Initial Cleaning:
Give the entire piece a thorough scrub with a degreasing cleaner. Years of furniture polish and oils can ruin your paint adhesion, so don’t skip this. -
Scuff Sanding:
Using your medium grit sandpaper, scuff sand the entire surface. You don’t need to strip it to bare wood, just create enough ‘tooth’ for the new finish to grab onto. -
Dust Removal:
Wipe away all the sanding dust with a damp rag, followed by a tack cloth to ensure the surface is perfectly clean. -
Priming:
Apply a coat of bonding primer, especially if your piece has a shiny finish or is made of laminate. Let this cure fully according to the can’s instructions.
Too Clumpy?
If your paint texture feels too gritty or chunky, dip your brush in a tiny bit of water and work it over the wet paint to smooth the lumps out.
Step 2: Creating the Textured Base
-
Mixing the Texture:
Pour your matte black paint into a separate container. Slowly mix in your texture powder (or baking soda) until the paint reaches a consistency similar to heavy cream or brownie batter. -
First Coat Application:
Apply the first coat of thickened paint using a round brush. Instead of smooth, long strokes, use a stippling or cross-hatch motion to start building up that stone-like surface. -
Detail Work:
Pay special attention to the decorative trim, like the beaded molding along the sides and the fluting at the top. Use a smaller artist brush to dab the textured paint into these crevices without flooding them. -
Drying Time:
Allow this first textured layer to dry completely. It will take longer than standard paint due to the thickness. -
Second Coat Strategy:
For the second coat, I prefer to use slightly less texture additive. Apply this coat to ensure full coverage, smoothing out any overly aggressive peaks while keeping the visual roughness.
Step 3: The Finisher
-
Light Sanding:
Once the paint is bone dry, run a high-grit sanding block very lightly over the flat surfaces. The goal isn’t to remove paint, but to knock down any sharp points that might snag clothing. -
Cleaning Again:
Use a vacuum with a brush attachment to remove any dust from the light sanding, paying close attention to the crevices in the molding. -
Sealing the Piece:
Apply a matte protective topcoat. Alternatively, using a black wax here adds incredible depth and a soft, velvety sheen that enhances the ‘moody’ vibe. -
Buffing (If Waxing):
If you chose wax, wait for it to haze over and then buff it gently with a lint-free cloth to achieve a subtle, satin glow. -
Interior Check:
If paint got inside the drawer glides, sand it away or apply a little beeswax to ensure the drawers still slide smoothly. -
Hardware Installation:
Install the new simple, round matte black knobs. The monochrome look is key to this style, letting the texture be the star rather than the hardware. -
Final Styling:
Place the drawers back into their slots and let the piece cure for at least 24 hours before setting anything heavy on top.
Pro Tip: Depth of Color
Use a dark grey primer under black paint. If you distress the edges later, grey looks like natural aging slate, whereas white primer looks cheap.
Now you have a striking, architectural furniture piece that adds immediate character to your room


Two-Tone Dipped Chest Finish
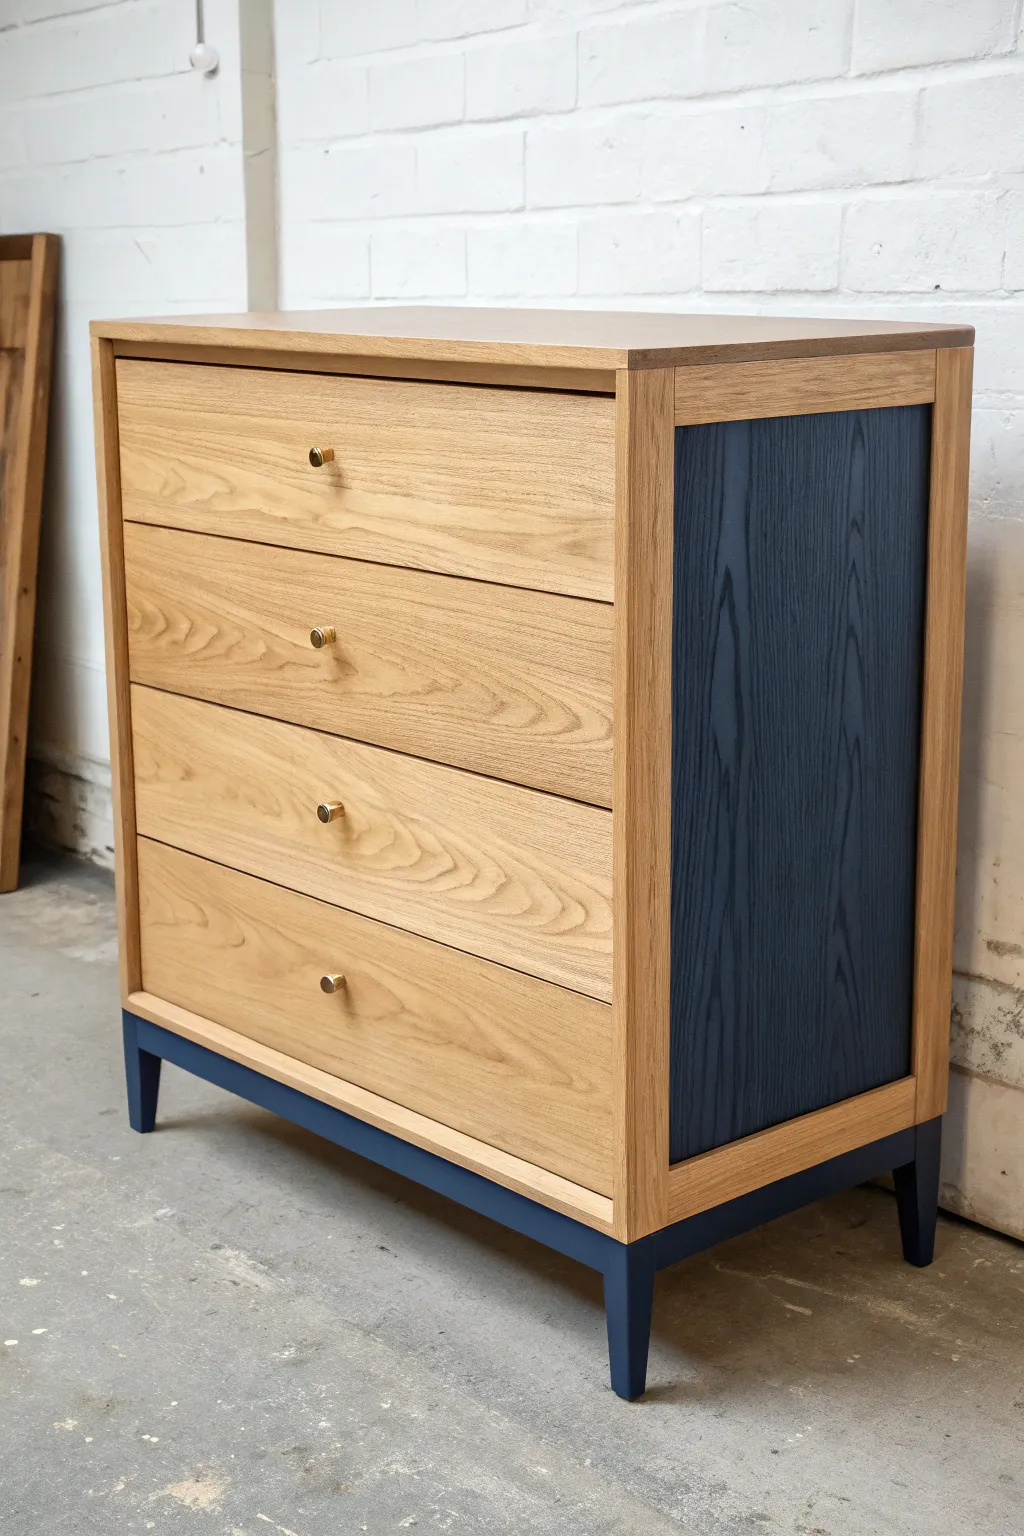
This project combines the warmth of natural wood grain with a bold, moody accent color for a striking two-tone effect. The result is a modern ‘dipped’ look that highlights the furniture’s structure while giving it a fresh, custom feel.
Step-by-Step Tutorial
Materials
- Unfinished oak or similar light wood chest of drawers
- Sandpaper (120, 180, and 220 grit)
- Painter’s tape (high-quality edging tape)
- Tack cloth
- Deep blue-gray wood stain or opaque furniture paint
- Matte or satin polyurethane topcoat
- Small foam rollers
- Angled sash brush (1.5 or 2 inch)
- Brass cylinder knobs
- Drill and bits (for hardware)
- Drop cloths
- Screwdriver
Step 1: Preparation & Sanding
-
Disassembly:
Begin by removing all the drawers from the chest casing. Unscrew any existing hardware or knobs and set them aside if you plan to reuse them, though new brass ones work best for this look. -
Initial Sanding:
Sand the entire piece using 120-grit sandpaper to remove any existing finish or rough spots. An orbital sander works efficiently for the flat tops and drawer fronts, but switch to hand sanding for the corners. -
Smoothing the Grain:
Progress to 180-grit sandpaper to smooth out the wood grain. This step is crucial for the natural wood sections, as any scratches will show through the clear coat. -
Clean Up:
Vacuum away all the sawdust from the cracks and corners. Wipe the entire piece down firmly with a tack cloth to ensure a completely dust-free surface.
Seal Tape Edges
After applying painter’s tape, brush a tiny amount of your clear sealer over the tape edge first. This creates a barrier so no dark paint can bleed underneath.
Step 2: Applying the Dark Finish
-
Tape Off Boundaries:
This is the most critical step. Carefully apply painter’s tape along the inside edges of the side frames where the side panel meets the front legs and top rail. You want crisp, sharp lines here. -
Tape the Base:
Flip the chest onto its back or side if possible. Tape off the bottom edge of the wooden casing exactly where it meets the leg structure, ensuring the tape line is straight and firmly sealed. -
Paint the Side Panels:
Apply your deep blue-gray paint or opaque stain to the inset side panels. I usually prefer a brush for the edges and a small foam roller for the center to keep the texture smooth. -
Paint the Base and Legs:
Apply the same dark color to the entire base structure and legs. Ensure you get full coverage on the inside angles of the legs. -
Second Coat:
Allow the first coat to dry according to the manufacturer’s instructions. Lightly scuff sand with 220-grit paper if needed, wipe clean, and apply a second coat for full opacity. -
Revealing the Lines:
Remove the painter’s tape while the final coat is still slightly tacky. Pull the tape away slowly at a 45-degree angle to prevent peeling the paint and ensure a razor-sharp edge.
Wire Brush Texture
Before painting the blue side panels, run a wire brush firmly with the grain. The paint will settle into the grooves, highlighting the wood texture even when opaque.
Step 3: Sealing & Assembly
-
Sealing the Natural Wood:
Stir your matte or satin polyurethane gently to avoid bubbles. Apply a thin, even coat over the unpainted oak sections: the top, the front frame, and the drawer fronts. -
Sealing the Painted Sections:
Once the dark paint is fully cured, apply the same clear topcoat over the blue areas to protect the color and unify the sheen across the piece. -
Sanding Between Coats:
After the first layer of poly dries, hand-sand strictly with 220-grit sandpaper to knock down any raised grain. Wipe clean with a tack cloth before applying a second coat. -
Hardware Holes:
If your new hardware has a different screw size or placement, fill old holes with wood filler prior to finishing, or drill new holes now centered on the drawer fronts. -
Attach Hardware:
Screw in the brass cylinder knobs. Ensure they are tightened securely but be careful not to over-torque and damage the wood finish. -
Reassembly:
Slide the drawers back into their tracks. Step back and check that the reveals (the gaps between drawers) look even.
Enjoy the sophisticated contrast of your new custom furniture piece
BRUSH GUIDE
The Right Brush for Every Stroke
From clean lines to bold texture — master brush choice, stroke control, and essential techniques.
Explore the Full Guide
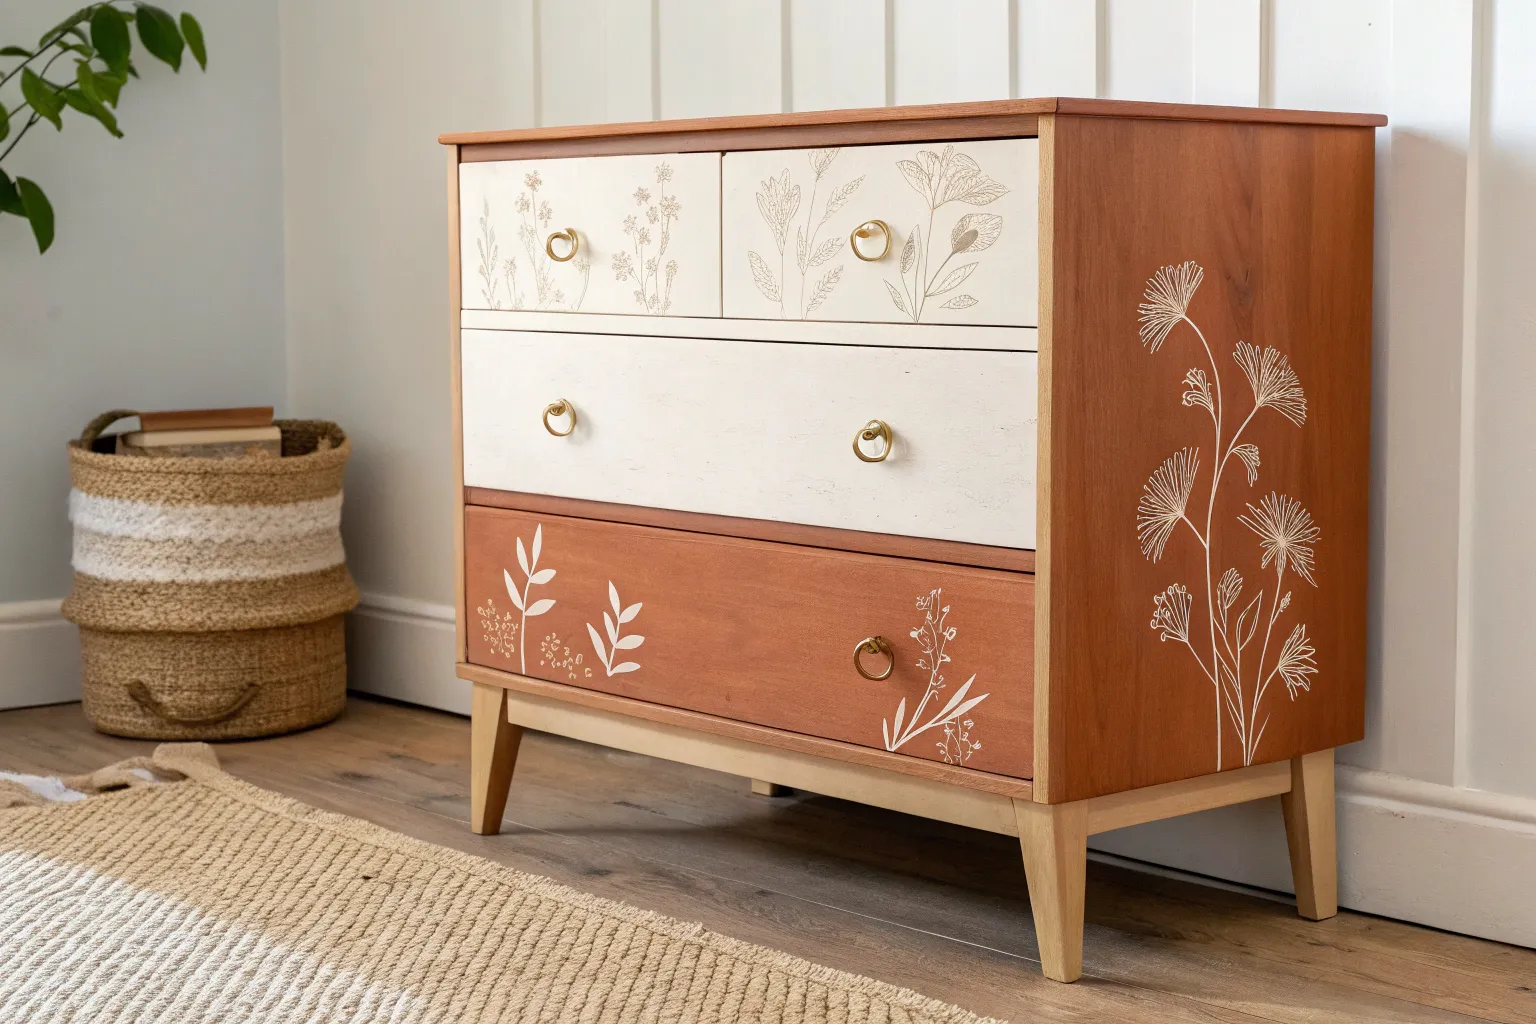
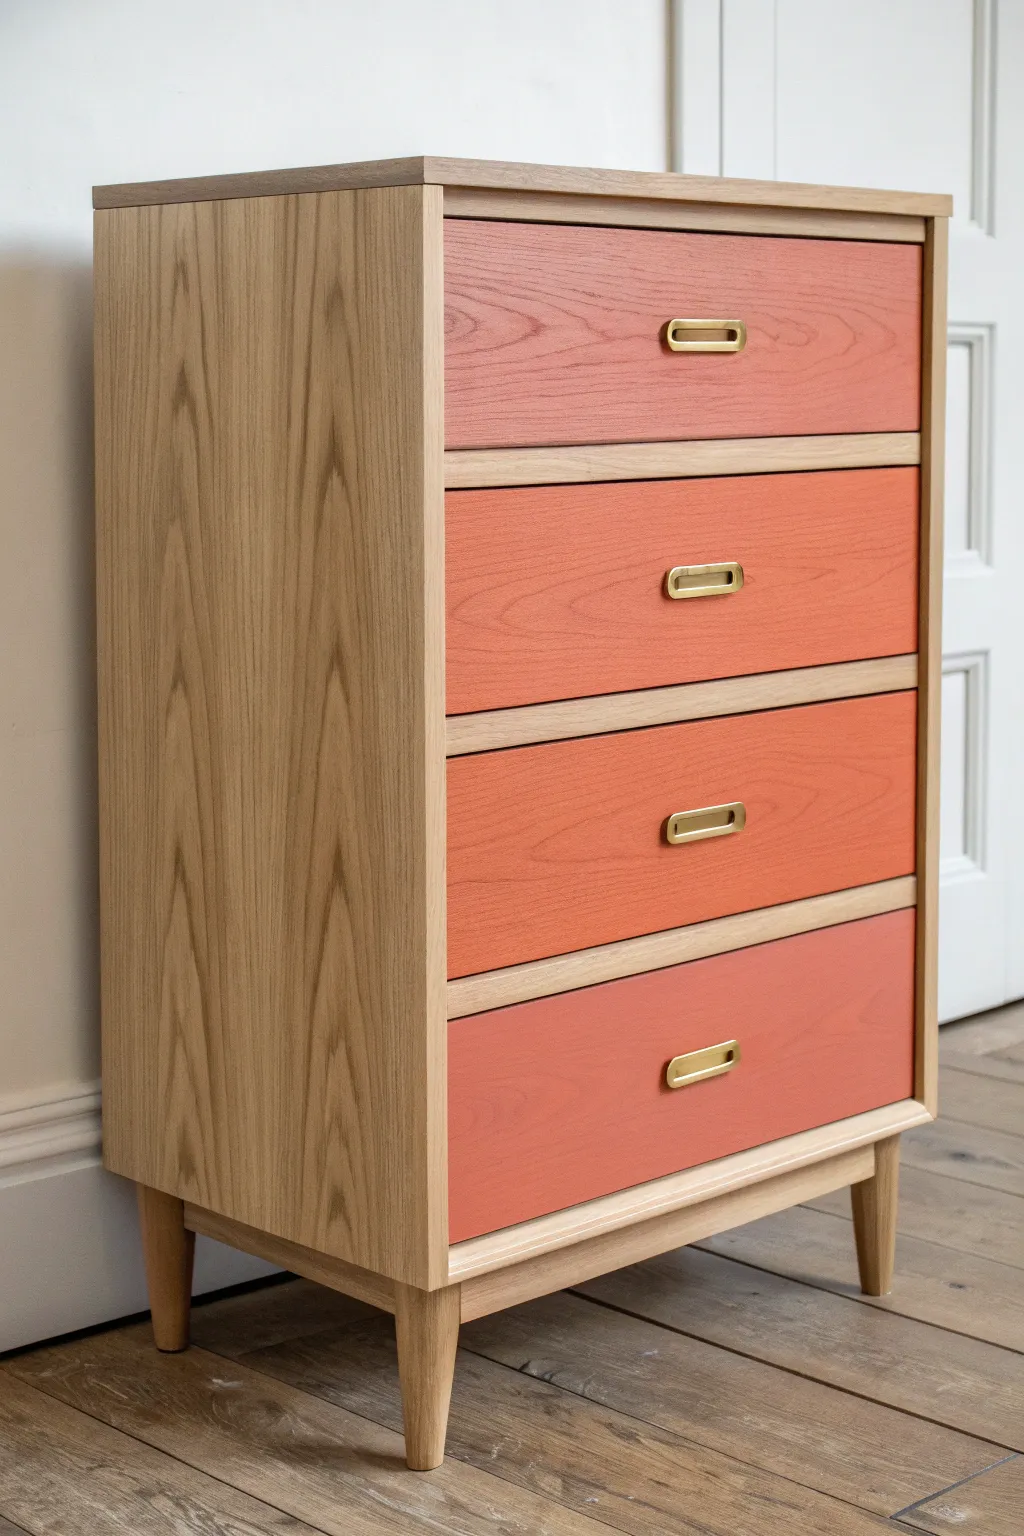
Ombre Drawers From Dark to Light
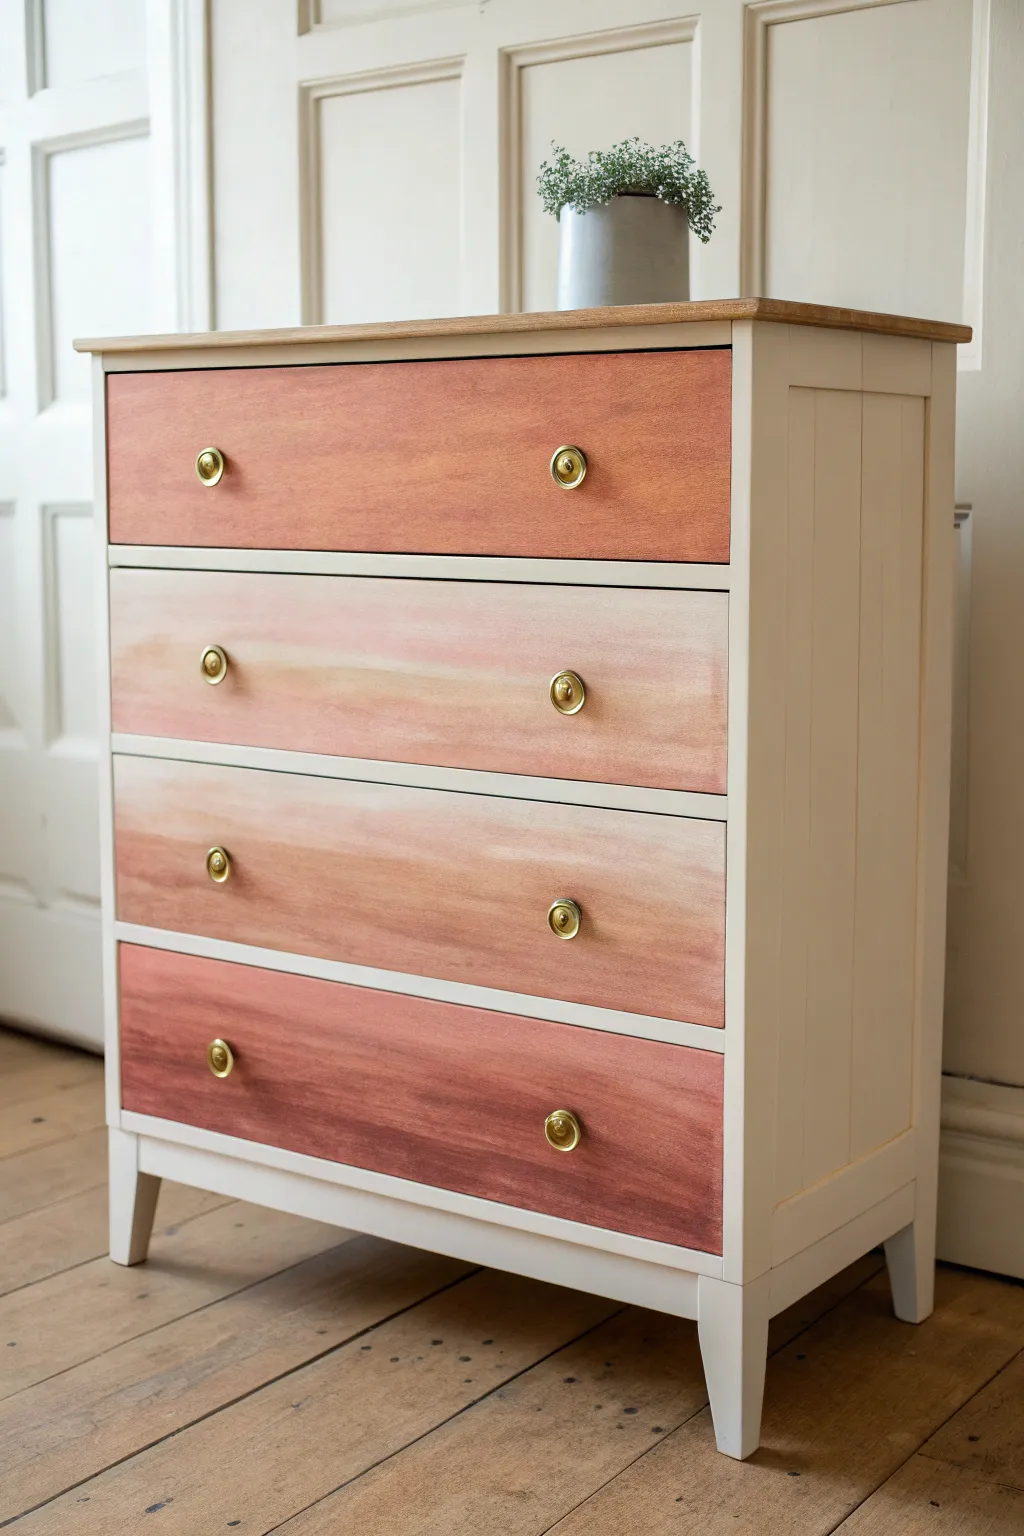
Transform a plain wooden dresser into a warm, sun-drenched statement piece with this sophisticated ombre technique. By blending earthy terracotta tones with soft creams, you’ll create a wash of color that feels organic and beautifully weathered.
Step-by-Step
Materials
- Wooden 4-drawer chest (unfinished or stripped)
- Sandpaper (120 and 220 grit)
- Tack cloth
- Primer (optional, for the frame)
- Cream or off-white chalk paint
- Terracotta or dusty rose chalk paint
- Water-based matte topcoat
- Synthetic angled brush (2-inch)
- Wide flat artist brush or chip brush (for blending)
- Gold drawer knobs
- Spray bottle with water
- Clean lint-free rags
- Painter’s tape
Step 1: Preparation
-
Remove hardware:
Unscrew the existing knobs or pulls from all drawer fronts and set them aside. If the new gold knobs require different hole spacing, fill the old holes with wood filler now. -
Clean and sand:
Give the entire piece a light sanding with 120-grit paper to scuff the surface. If the wood has a glossy varnish, you’ll need to remove it thoroughly. Wipe away all dust using a tack cloth. -
Protect the top:
Since we are keeping the top natural wood, carefully apply painter’s tape along the edges where the top meets the side frame.
Step 2: Painting the Frame
-
Apply base color:
Remove the drawers from the unit. Paint the main carcass, legs, and dividers with your cream or off-white chalk paint. Use long, smooth strokes with your angled brush. -
Second coat:
Allow the first coat to dry completely according to the can’s instructions. Apply a second coat for full, opaque coverage, checking for drips in corners. -
Prep the drawers:
While the frame dries, lightly sand the drawer fronts with 220-grit paper to ensure they are ultra-smooth for the gradient effect.
Uneven Blotches?
If the wash looks blotchy, the wood might be absorbing unevenly. Wiping the wood with a damp cloth before painting helps the watery paint glide smoothly.
Step 3: Creating the Ombre Effect
-
Mix your gradients:
This is where the magic happens. You need four distinct shades. Pour your base terracotta paint into a container for the bottom (darkest) drawer. For the next drawer up, mix 75% terracotta with 25% cream in a separate cup. -
Continue mixing:
For the third drawer up (the second lightest), mix 50% terracotta with 50% cream. For the top drawer, mix 25% terracotta with 75% cream. I like to test these swatches on a scrap piece of wood to ensure the transition looks seamless. -
Paint the bottom drawer:
Apply the pure terracotta paint to the bottom drawer front. To get that cloudy, washed look seen in the photo, dip your brush in a little water before painting, or mist the wood lightly with your spray bottle. -
Paint the middle drawers:
Move to the next drawer up with your 75/25 mix. Use horizontal strokes, keeping the paint somewhat sheer and watery rather than thick and opaque. Repeat for the next drawer with the 50/50 mix. -
Paint the top drawer:
Apply the lightest 25/75 mix to the top drawer. Keep the application consistent with the others so the wood grain shows through slightly. -
Blend the transitions (Optional):
If you want the ‘washed’ look within each individual drawer (lighter in the center, darker at edges), take a damp rag and gently wipe away a bit of paint from the center of the drawer fronts while they are still tacky. -
Review and refine:
Stand back and look at the gradient. If one step feels too abrupt, dilute a bit of the darker shade with water and wash called a ‘glaze’ over the lighter drawer to bridge the gap.
Level Up: Textile Texture
Line the interior of the drawers with a patterned floral wallpaper or fabric that matches the terracotta tones for a hidden surprise when opened.
Step 4: Finishing Touches
-
Seal the paint:
Once everything is bone dry (wait at least 24 hours for best results), apply a water-based matte topcoat over the frame and drawer fronts to protect your work. -
Treat the top:
Remove the tape from the natural wood top. Apply a clear wax or the same matte topcoat to seal the raw wood, enhancing its grain without changing the color too drastically. -
Install hardware:
Attach the new gold knobs to the center of each drawer front. The metallic finish adds a lovely pop against the matte terracotta tones. -
Reassemble:
Slide the drawers back into their tracks, ensuring they are in the correct order from Darkest (bottom) to Lightest (top).
Now you have a stunning custom piece that brings a warm, artisanal glow to your room
Only the Drawer Fronts Painted
Bring a warm, sunset glow to your bedroom with this elegant dresser makeover that celebrates natural wood grain. By using semi-transparent washes in a subtle gradient, you preserve the stunning oak texture while adding a modern pop of color to the drawer fronts.
Step-by-Step Tutorial
Materials
- Unfinished oak or ash chest of 4 drawers
- Sanding block (120 and 220 grit)
- Tack cloth
- Painter’s tape
- Water-based wood stain or furniture paint (three shades: deep terracotta, medium coral, soft salmon)
- Water (for thinning if using paint)
- Clean lint-free rags
- Synthetic bristle paintbrush (2-inch)
- Clear matte polycrylic topcoat
- Gold recessed pull handles
- Drill and bits (for hardware)
- Drop cloth
Step 1: Preparation & Disassembly
-
Remove drawers:
Start by pulling all drawers out of the chest casing and setting them on a covered work surface. If there is existing hardware, unscrew and remove it now. -
Sand the surfaces:
Lightly sand both the chest frame and the drawer fronts. If the wood is raw, use 220-grit just to smooth raised grain. If it has an old finish, use 120-grit to strip it back to raw wood, followed by 220-grit. -
Clean dust:
Wipe every surface down thoroughly with a tack cloth to remove fine sawdust, ensuring a pristine base for your finish. -
Tape off edges:
Apply painter’s tape carefully along the side edges of the drawer fronts. We only want the stain on the face, not dripping down the sides or onto the dovetails.
Step 2: Creating the Ombré Wash
-
Mix your washes:
If you couldn’t find pre-tinted stains in the exact gradient, create your own washes. Mix your latex or chalk paint with water in a 1:1 ratio. You want a consistency that stains the wood rather than coating it. -
Test the opacity:
On a scrap piece of wood or the back of a drawer, test your wash colors. The goal is to see the wood grain clearly through the color. Add more water if it’s too opaque. -
Bottom drawer application:
Start with the bottom drawer and the darkest shade (terra cotta). Dip your rag or brush into the wash and wipe it across the drawer front in long, horizontal strokes following the grain. -
Wipe back excess:
Immediately use a clean, dry lint-free rag to wipe off excess wash. This pushes the pigment into the grain and reveals the wood texture. -
Middle drawers application:
Move to the next drawer up using your medium tone (coral). Repeat the brush-on, wipe-off technique. For the third drawer up, mix a little of your lightest shade into the medium tone for a custom bridge color. -
Top drawer application:
Apply the lightest shade (salmon/pale pink) to the top drawer front. Ensure the transition of color from bottom to top feels gradual and cohesive. -
Seal the frame:
While the drawers dry, apply a clear matte polycrylic to the main body and legs of the chest to protect the raw oak color without darkening it too much.
Too Opaque?
If you applied paint too heavily and lost the grain, don’t panic. Gently sand the surface while the paint is still tacky to distress it, or wipe aggressively with a damp sponge.
Step 3: Assembly & Details
-
Seal the drawers:
Once the colored wash is fully dry (check manufacturer times), apply two thin coats of matte polycrylic over the painted fronts. Sand lightly with high-grit sandpaper between coats for a professional feel. -
Drill for hardware:
Measure the center point of each drawer front. I typically use a template here to ensure the recessed pulls align perfectly vertically. -
Route or chisel:
If using flush recessed pulls like the image, you’ll need to use a router or chisel to create the cavity for the handle to sit in. If using standard surface-mount handles, simply drill through-holes. -
Install pulls:
Secure the brass hardware into the drawers. The contrast of the gold against the warm pink wood tones really makes the piece sing. -
Reassemble:
Slide the drawers back into the casing, stepping back to admire how the gradient flows from bottom to top.
Level Up: Grain Pop
Before applying color, use a wire brush very lightly on the raw oak to open the pores. This allows the colored wash to settle deeper into the grain lines for more texture.
The result is a piece of furniture that feels both modern and organically grounded, perfectly suited for a tailored bedroom update

PENCIL GUIDE
Understanding Pencil Grades from H to B
From first sketch to finished drawing — learn pencil grades, line control, and shading techniques.
Explore the Full Guide
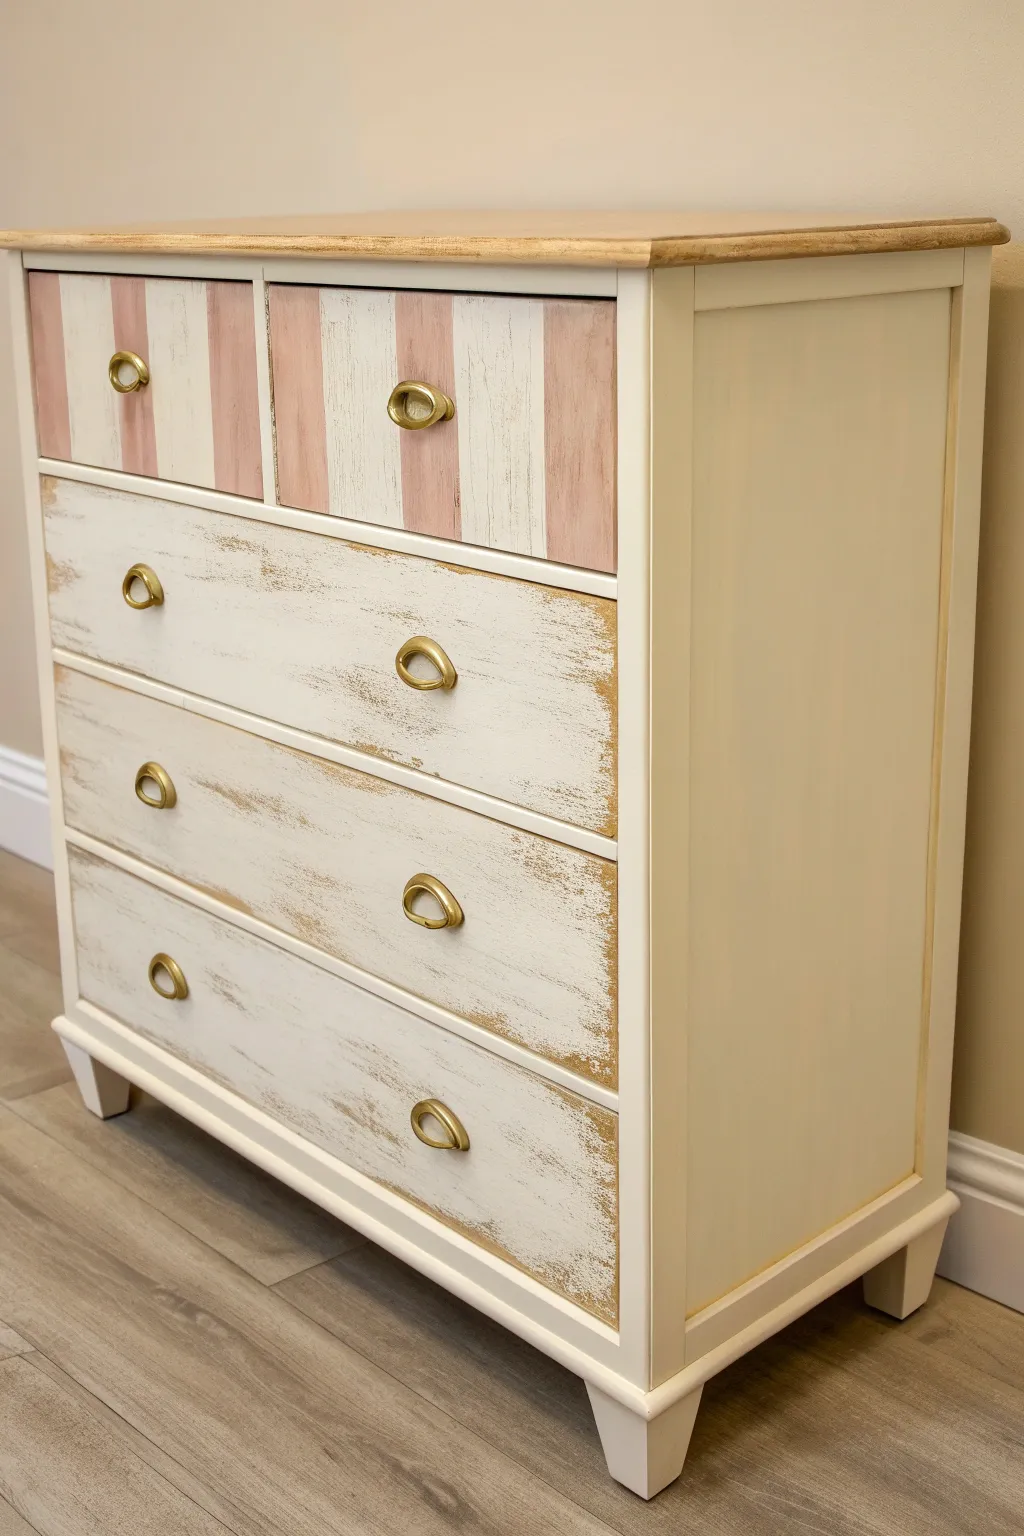
Vertical Stripes for a Taller Look
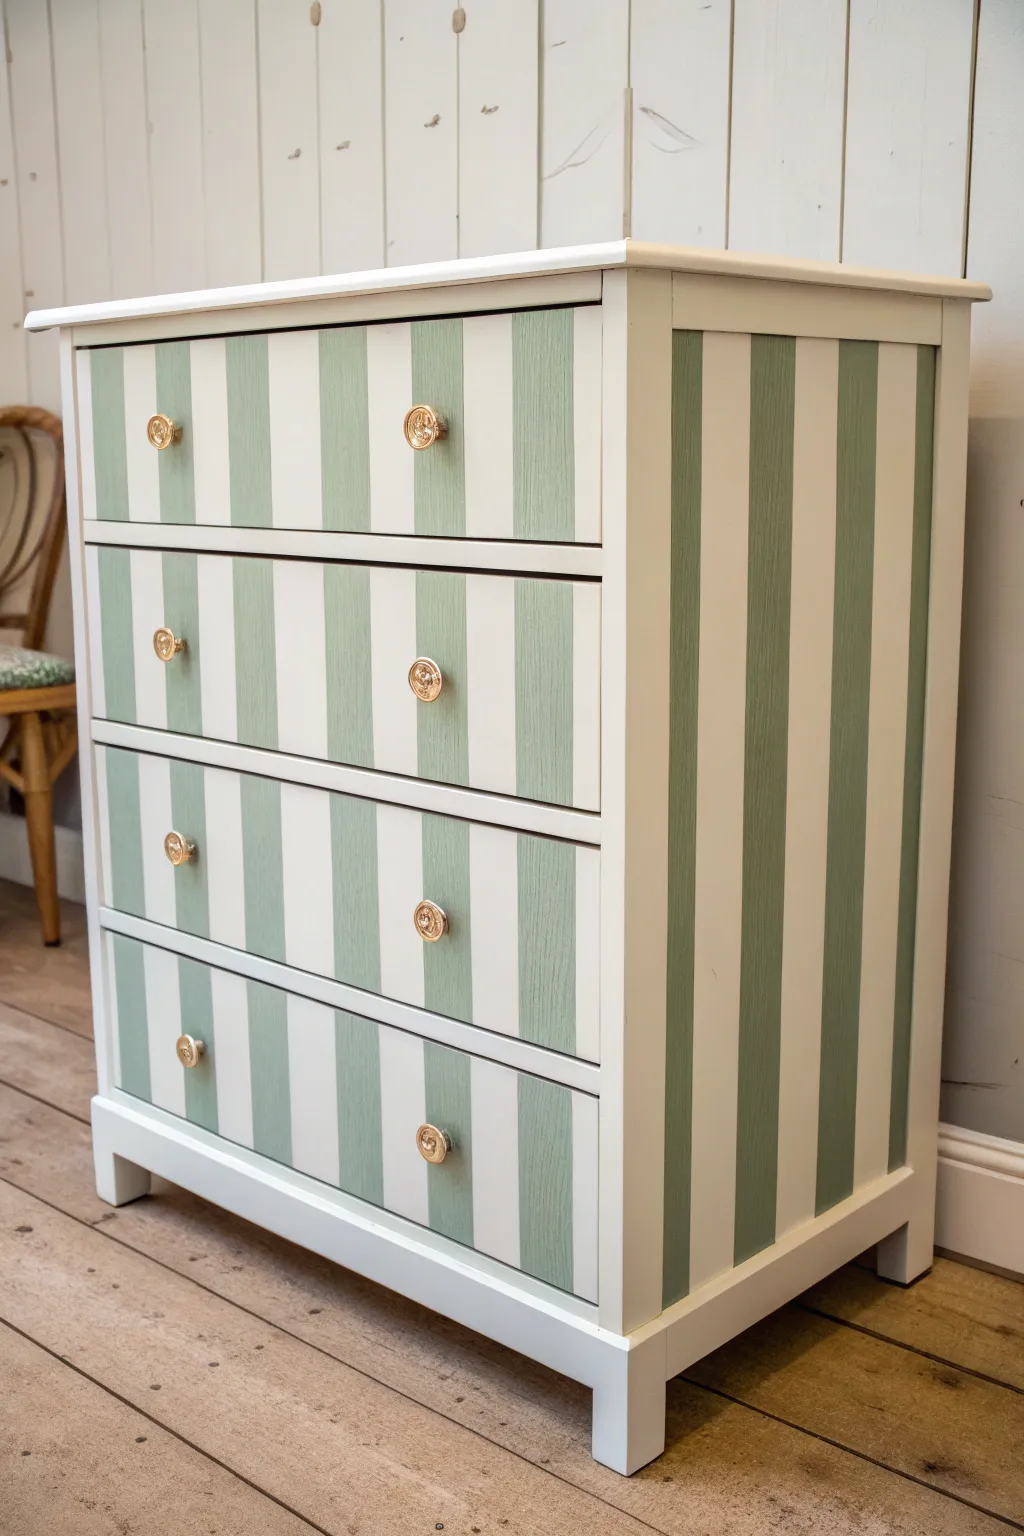
Transform a plain chest of drawers into a chic statement piece using this tailored vertical stripe technique. The combination of crisp white and soft sage green elongates the furniture’s profile while the gold hardware adds a touch of classic elegance.
How-To Guide
Materials
- Wooden chest of drawers
- Sander and 120-grit/220-grit sandpaper
- Primer (stain-blocking)
- White or cream chalk/mineral paint (base color)
- Sage green chalk/mineral paint (stripe color)
- Painter’s tape (high quality like FrogTape)
- Gold drawer knobs (8)
- Tape measure and pencil
- Paint rollers (foam or microfiber)
- Small angled paintbrush
- Poly-acrylic topcoat (satte or matte)
- Level (optional but helpful)
Step 1: Preparation
-
Remove Hardware:
Begin by unscrewing all existing knobs or handles from the drawers. Store the screws in a labelled baggie so they don’t get lost, though we will be replacing the knobs later. -
Clean and Sand:
Thoroughly clean the piece with a degreaser or sugar soap to remove oils. Once dry, scuff sand the entire surface—including the sides and drawer fronts—with 120-grit sandpaper to help the paint adhere. -
Prime the Surface:
Apply a coat of stain-blocking primer to the entire chest. This is crucial if you are painting over dark wood or a glossy finish. Let the primer dry completely according to the can’s instructions.
Bleed-Through Blues
If paint bleeds under the tape, wait for it to dry completely. Then, place a piece of tape over the ‘good’ stripe and use a tiny artist’s brush to touch up the error with the opposing color.
Step 2: Base Coat
-
Apply the Base Layer:
Paint the entire piece, including the frame and drawer fronts, with your white or cream base color. I prefer using a foam roller here for a smooth, brush-stroke-free finish. -
Second Coat:
Allow the first coat to dry fully, then lightly sand with 220-grit paper for smoothness. Apply a second coat of white paint to ensure solid, opaque coverage. -
Replace Drawers:
Once the base coat is perfectly dry, slide the drawers back into the chest. It is much easier to tape the pattern accurately when the drawers are sitting in their final positions.
Step 3: Creating the Stripes
-
Measure the Width:
Measure the total width of the chest top. Decide on your stripe width (e.g., 3 inches). Divide the total width by your desired stripe size to ensure they fit evenly. -
Mark the Guidelines:
Using a pencil and a long ruler or level, lightly mark the vertical lines down the face of the chest. Ensure these lines run continuously from the top edge, down across each drawer front, to the bottom skirting. -
Mark the Sides:
Don’t forget the sides of the cabinet. Repeat the measuring and marking process on both side panels so the pattern wraps around the furniture cohesively. -
Apply Tape:
Apply your painter’s tape along the OUTSIDE of the areas that will remain white. Press the edges of the tape down firmly with a credit card or fingernail to prevent bleed-under. -
Seal the Tape:
Here is a vital trick: lightly paint over the edge of the tape with your BASE (white) color. This seals the gap; if any paint bleeds under, it will be white on white, keeping your future green lines crisp. -
Paint the Sage Stripes:
Once the sealing layer is dry, use a small roller or brush to fill in the exposed stripes with your sage green paint. Two thin coats are better than one thick one to avoid ridges. -
Refine the Edges:
Ensure you paint the top and bottom edges of the drawer fronts where the stripe continues, so the pattern doesn’t break when the drawers are opened slightly.
Pattern Play
Make the stripes varied widths (e.g., one thick, two thin) for a ‘ticking stripe’ fabric look, or carry the pattern over the top surface for a fully enveloped design.
Step 4: Fishing Touches
-
The Reveal:
Remove the tape while the final coat of green paint is still slightly tacky—don’t wait for it to dry completely, or it might peel. Pull the tape away slowly at a 45-degree angle. -
Protect the Finish:
After the paint has cured for at least 24 hours, apply a clear poly-acrylic topcoat. A matte or satin finish looks best for this style. Apply two coats for durability. -
Install New Hardware:
Once the topcoat is dry, attach the new gold knobs. Center them carefully within the stripes or use the existing holes if they align with your pattern.
Enjoy the fresh, elevated look this striped masterpiece brings to your room
Color-Blocked Geometric Chest Front
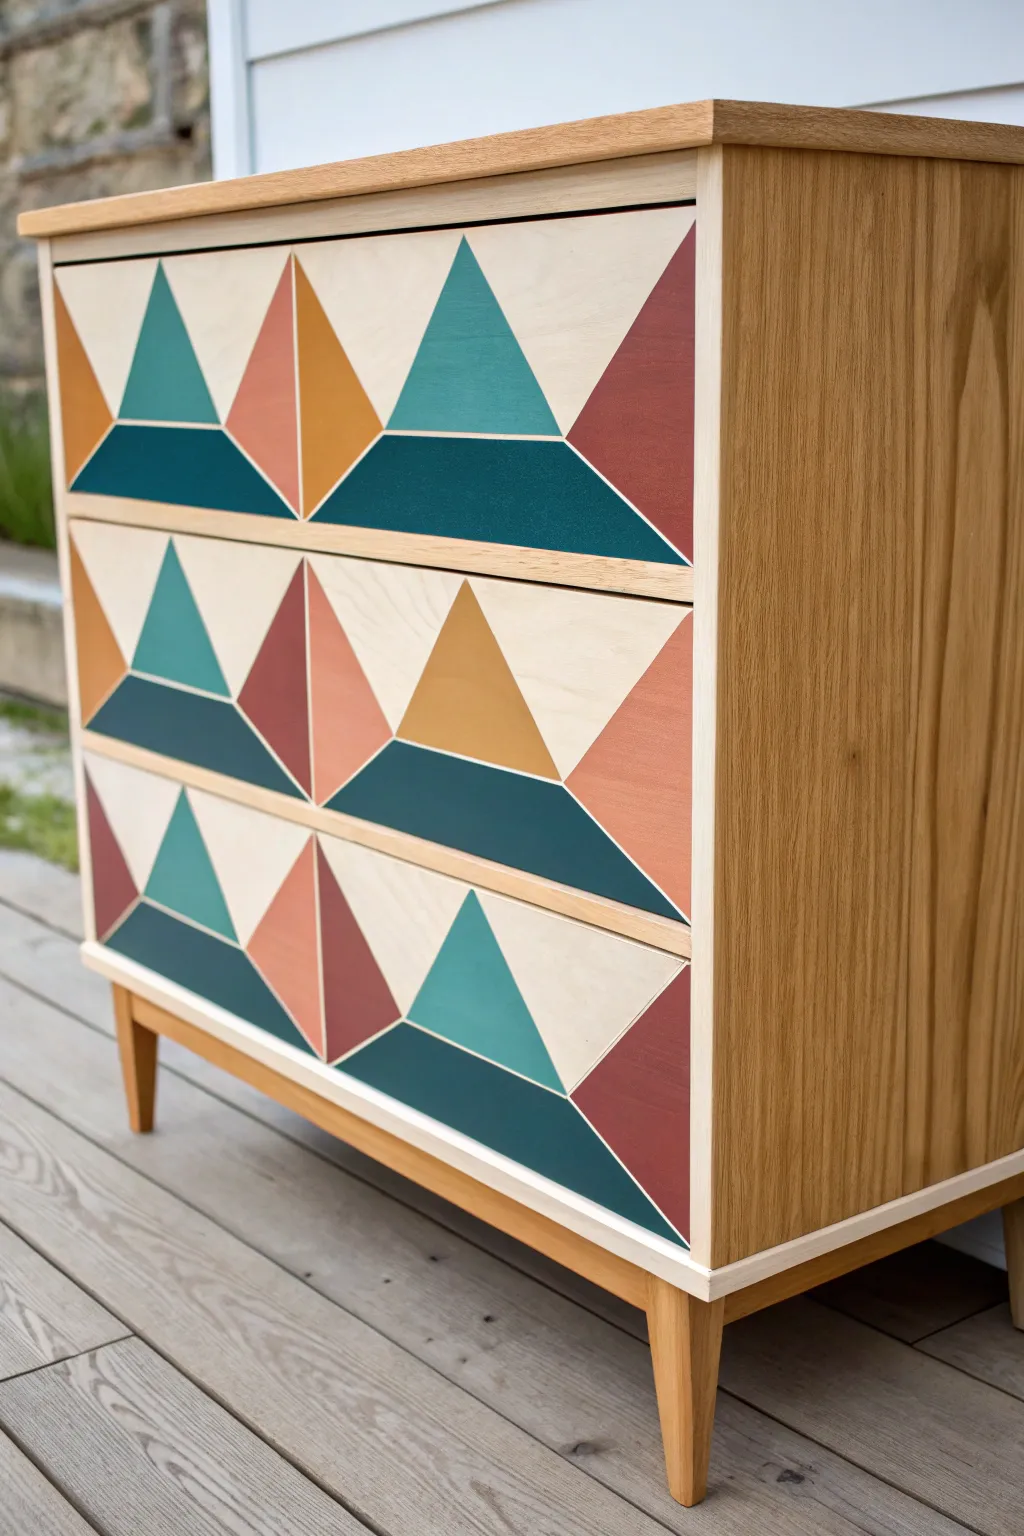
Transform a plain wooden chest into a mid-century modern statement piece with this striking geometric design. By combining exposed wood grain with crisp, mountain-like peaks in earthy tones, you create a look that feels both retro and refreshingly contemporary.
Step-by-Step Guide
Materials
- Unfinished wooden 3-drawer chest (or existing chest stripped to raw wood)
- Painter’s tape (high quality, meant for delicate surfaces)
- Pencil
- Ruler or straight edge
- Protractor (optional, for precision angles)
- Acrylic latex paint sample pots (Deep Teal, Sage Green, Terracotta, Rust, Mustard Yellow)
- Clear matte or satin polycrylic sealer
- Small angled sash brush (1.5 inch)
- Small flat artist brushes
- Sandpaper (220-grit)
- Tack cloth
- X-Acto knife or utility blade
Step 1: Preparation & Planning
-
Prepare the surface:
Remove the drawers from the frame and take off any existing hardware. If your dresser is previously finished, sand the drawer fronts down to raw wood using an orbital sander, starting with 120-grit and finishing with 220-grit for a smooth base. -
Clean the wood:
Wipe away all sanding dust thoroughly with a tack cloth. Any remaining dust will prevent your tape from sticking properly and ruin your crisp lines. -
Map out the grid:
Lightly draw a horizontal line across the center of each drawer front with your pencil. Then, measuring from the left edge, mark vertical points every 6-8 inches (depending on drawer width) to establish where the peaks of your triangles will sit.
Bleed-Proof Lines
Before painting your color, brush a clear matte medium or the base wood sealer over the tape edge first. This fills any tiny voids, ensuring your colored paint lines remain razor-sharp.
Step 2: Masking the Design
-
Tape the first layer:
Begin taping your main large triangles. Based on the reference image, create a series of large triangles that span the full height of the drawer, and some that are split. Press the tape down firmly along the edges. -
Seal the tape edges:
This is the most critical step for crisp lines: take a small amount of clear matte sealer and brush it lightly over the edges of your tape. This seals the gap so paint can’t bleed underneath. -
Create the split lines:
To achieve the ‘mountain cap’ look where colors change halfway down a triangle, run horizontal strips of tape across your triangle shapes. Use a sharp X-Acto knife to carefully trim excess tape without scoring the wood deep enough to damage it. -
Mask for negative space:
Remember that some parts of the design are just the raw wood. Ensure these areas are fully covered by tape or paper to protect them from accidental drips.
Step 3: Painting the Geometry
-
Paint the darkest tones:
Start with your darkest color (the deep teal/forest green). Apply this to the bottom sections of your large triangles. Use a small angled brush, painting inward from the tape to avoid forcing paint under the edge. -
Apply the mid-tones:
Move on to your terracotta and rust shades. These often appear on the side triangles or the ‘shadow’ sides of the peaks. Apply two thin coats rather than one thick one for the smoothest finish. -
Add the highlights:
Paint the top peaks in your lighter shades like sage green or mustard yellow. I find it helpful to look at the reference photo frequently to ensure the color balance feels random yet cohesive. -
Let it dry:
Allow the paint to set for about an hour. It should be dry to the touch but not fully cured.
Elevate with Hardware
Keep the drawers handle-free for a sleek look, or add minimalist brass finger pulls to the top edge of each drawer to add a touch of metallic luxury without disrupting the pattern.
Step 4: Refining & Finishing
-
Remove tape carefully:
Peel the tape off slowly at a 45-degree angle while the paint is still slightly pliable. If the paint has fully hardened, you risk pulling up chips of color. -
Touch up edges:
Inspect your lines. If there was any minor bleed, use a small artist brush to touch up the paint or carefully scrape away excess paint on the raw wood sections with your X-Acto blade. -
Erase guidelines:
Once the paint is completely dry (give it overnight if possible), gently erase any visible pencil marks from the unpainted wood sections. -
Seal the drawers:
Apply a clear satin or matte polycrylic over the entire drawer front, including the painted and unpainted areas. This unifies the sheen and protects the raw wood from yellowing or staining. -
Reassemble:
Once the sealer has cured according to the can’s instructions, slide the drawers back into the chest frame.
Step back and admire how a few simple geometric shapes have completely revitalized your furniture piece


Diagonal Drawer Color Sweep
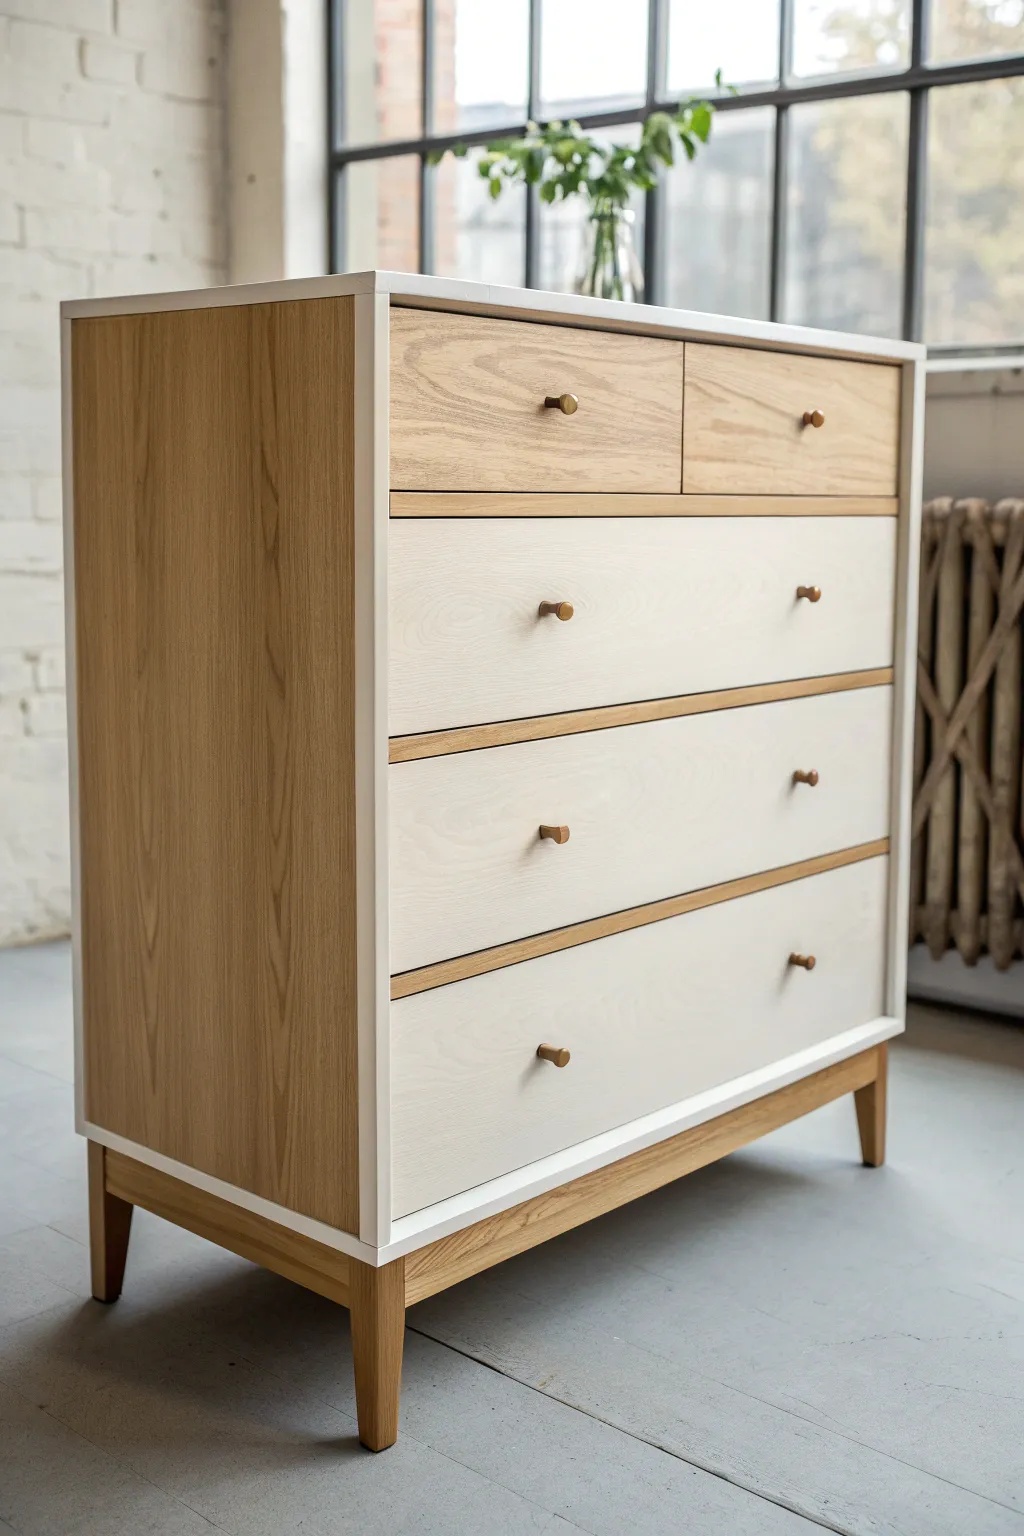
This project transforms a standard dresser into a sleek, Scandinavian-inspired statement piece by pairing crisp white framing with the warmth of natural oak. The design highlights the wood grain on the top drawers and structural lines while softening the look with creamy, matte-painted lower fronts.
Step-by-Step Tutorial
Materials
- Unfinished wooden chest (oak veneer preferred)
- Sandpaper (120, 220, and 320 grit)
- Painter’s tape (high quality)
- Water-based primer
- Cream or off-white furniture paint (eggshell finish)
- White furniture paint (satin finish)
- Clear matte polyurethane or polydip sealer
- Small foam roller and tray
- Synthetic angled sash brush
- Brass or gold cylindrical knobs
- Tack cloth
- Screwdriver
Step 1: Preparation & Sanding
-
Dissasemble the piece:
Begin by removing all drawers from the chest casing. Unscrew any existing hardware and set it aside if you plan to reuse it, though modern gold knobs really elevate this look. -
Initial frame sanding:
Since the sides and legs will remain natural wood, sand these areas carefully with 120-grit sandpaper to remove any existing finish, following up with 220-grit for a smooth touch. -
Prep the paint zones:
Lightly scuff sand the areas intended for paint—specifically the thin front edges of the outer casing and the faces of the bottom three large drawers. -
Clean the surface:
Wipe down the entire piece with a tack cloth to remove every speck of dust. Dust is the enemy of a smooth finish, so I always take my time here.
Seal Before You Tape
Apply a thin layer of clear matte sealer over your tape edges before painting. This blocks paint bleed and ensures your lines are razor-sharp.
Step 2: Painting the Framework
-
Tape the side panels:
Apply painter’s tape precisely along the side edge where the wood panel meets the front face. You want to preserve the beautiful wood grain on the tall side panels. -
Tape the horizontal dividers:
This is a key detail: tape over the horizontal wooden strips *between* the drawer openings. These will stay natural wood to create that distinctive striped effect. -
Prime the front frame:
Apply a thin coat of primer to the untaped front edges of the chest casing. Let it dry completely according to the can’s instructions. -
Paint the white border:
Using a small brush for precision, paint the front edges of the casing in your bright white satin paint. You may need two coats for full opacity.
Mix Up The Grain
For a custom look, use iron-on wood veneer banding on the drawer dividers. Install it vertically to contrast against the horizontal grain of the drawers.
Step 3: Finishing the Drawers
-
Tape the drawer edges:
For the bottom three drawers, run tape along the top and bottom thickness of the drawer fronts if you want to keep those edges natural, or prepare to paint the entire front face. -
Prime the lower drawers:
Apply primer to the faces of the three large bottom drawers. Use a foam roller to ensure a texture-free, flat surface. -
Apply the cream topcoat:
Roll on your cream/off-white paint onto the primed drawer fronts. Two thin coats are better than one thick one to avoid drips. -
Refine the top drawers:
For the top two smaller drawers, simply ensure they are sanded to 320-grit smoothness. These remain unpainted to anchor the natural theme.
Step 4: Sealing & Assembly
-
Seal the natural wood:
Apply a clear matte polyurethane to all exposed wood areas: the side panels, the legs, the horizontal dividers, and the top two drawer fronts. -
Sand between coats:
After the first coat of poly dries, lightly sand with 320-grit paper to knock down any raised grain, then apply a second coat for durability. -
Seal the painted areas:
Give the painted drawer fronts a coat of the same matte sealer to protect against scuffs and fingerprints. -
Remove tape:
Carefully peel away all painter’s tape. Pulling the tape at a 45-degree angle while the final paint coat is semi-dry often yields the crispest lines. -
Install hardware:
Attach your new cylindrical brass knobs to the center of each drawer front. -
Reassemble:
Slide the drawers back into their tracks, stepping back to admire how the white frame pops against the natural wood tones.
Now you have a stunning, bespoke storage piece that perfectly balances modern lines with organic warmth.
Floral Painted Chest for Soft Vintage Charm
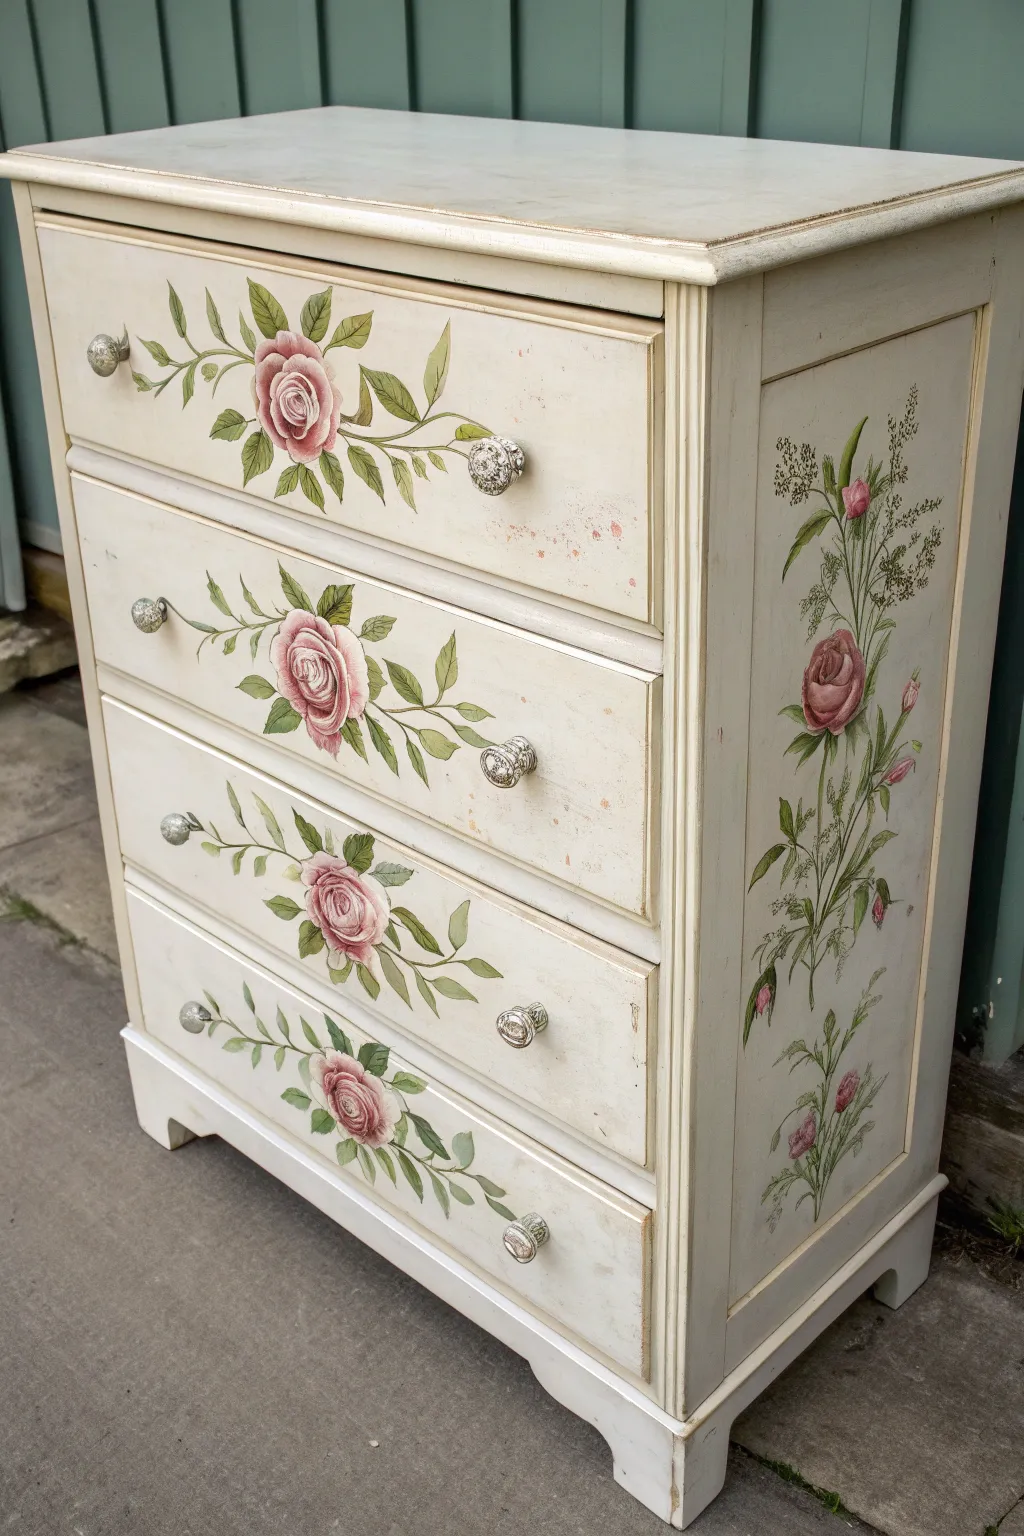
Transform a plain chest of drawers into a shabby chic centerpiece featuring delicate hand-painted roses and climbing vines. This project combines soft, creamy hues with loose botanical brushwork to achieve a timeless, lived-in cottage aesthetic.
How-To Guide
Materials
- Wooden chest of drawers
- Sandpaper (120 and 220 grit)
- Primer (stain-blocking)
- Creamy off-white chalk paint
- Acrylic craft paints (dusty pink, deep rose, sage green, olive green, cream)
- Paintbrushes (2-inch flat synthetic, round #4 and #6, fine liner brush)
- Decorative crystal or glass knobs
- Clear matte polyurethane topcoat
- Dark antique wax (optional for aging)
- Clean lint-free rags
- Water cup and palette
Step 1: Preparation & Base Coat
-
Remove Hardware:
Unscrew and remove all existing knobs or handles from the drawers. Store the screws in a safe place or set aside if you plan to replace them with dainty glass knobs like in the photo. -
Clean the Surface:
Scrub the entire piece with a degreasing cleaner (like TSP or a mild dish soap solution) to remove years of furniture polish, oil, and dust. -
Scuff Sanding:
Lightly sand the existing finish with 120-grit sandpaper. You don’t need to strip it to bare wood, just scuff it enough to give the primer something to grip. -
Prime the Piece:
Apply a coat of stain-blocking primer. This is crucial for vintage furniture to prevent old wood tannins from bleeding through your beautiful white finish later. -
Apply the Base:
Using a 2-inch flat brush, paint the entire chest with your creamy off-white chalk paint. Paint in the direction of the wood grain for a smooth look. -
Second Coat:
Once the first coat is fully dry (usually about 2 hours), apply a second coat for solid, opaque coverage. Let this cure overnight.
Paint Not Sticking?
If your paint separates or ‘crawls’ on the wood, there is likely oil residue. Stop painting, let it dry, sand that spot back, and clean thoroughly with TSP before re-priming.
Step 2: Painting the Floral Motifs
-
Plan the Composition:
Lightly sketch your design with a pencil directly onto the paint. For the drawers, center a single large rose with horizontal vines. For the side panel, plan a vertical vine climbing upward. -
Base the Roses:
Mix a dusty pink shade. Using a #6 round brush, paint a rough, irregular circle where each rose blossom will be. Don’t worry about petals yet; just create the color base. -
Add Rose Definitions:
Load your brush with a deeper rose color. While the base is tacky, paint ‘C’ shaped strokes starting from the center of the pink circle and working outward to suggest unfolding petals. -
Highlight the Petals:
Wipe your brush and pick up some cream paint. Add highlights to the top edges of the ‘C’ strokes to make the petals look three-dimensional and caught in the light. -
Paint the Leaves:
Using sage green and olive green on a #4 round brush, paint double-stroke leaves. Press the brush down to widen the leaf and lift as you pull to create a sharp tip. -
Connect with Vines:
Switch to a fine liner brush and thinned olive green paint. Draw delicate, winding stems that connect your leaves to the main rose. Keep these lines fluid and varying in thickness. -
Detail the Side Panels:
For the tall side panel art, vary your flowers. Paint large roses mixed with smaller buds and tall, wispy filler flowers (like baby’s breath) using stippling motions with the tip of your brush. -
Add Spatter Texture:
I like to add a hint of age here. Dilute a tiny bit of brown or deep pink paint with water, load an old toothbrush, and gently flick varied specks across the painted areas for a speckled, vintage effect.
Softer Petals
To get that ethereal, dreamy rose look, mix a glazing medium into your pink acrylics. This increases transparency and makes blending the petal shades much smoother and more forgiving.
Step 3: Finishing Touches
-
Distress Edges:
Take 220-grit sandpaper and gently rub the edges and corners of the drawers and top rim. Reveal a bit of the wood underneath to mimic years of wear. -
Protect the Art:
Apply two coats of clear matte polyurethane. Use a light hand over the painted flowers so you don’t smudge your work. -
Optional Aging:
If you want a grungier look, work a small amount of dark antique wax into the corners and crevices with a lint-free rag, buffing away the excess immediately. -
Hardware Installation:
Once the topcoat is fully cured (give it 24 hours), screw in your new crystal or decorative glass knobs to complete the elegant look.
Step back and admire how a simple coat of paint and some flowers have given this piece a brand new soul
Nature Scene Painted Across the Drawers
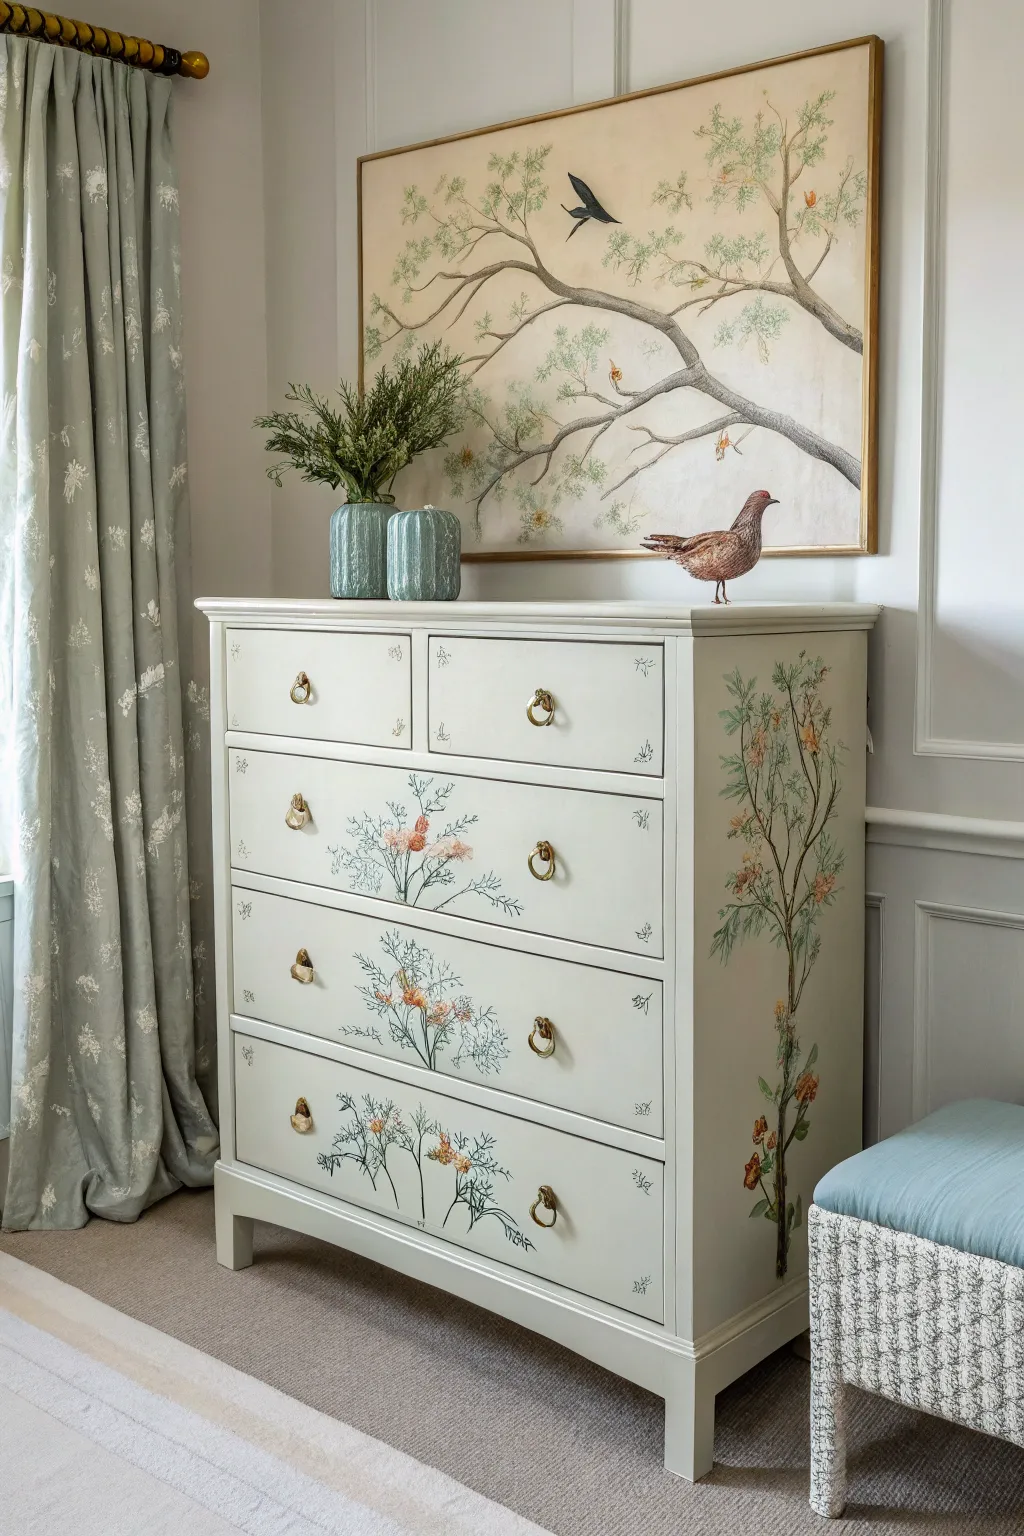
Transform a plain dresser into a romantic botanical statement piece with delicate, hand-painted florals that seem to grow right across the drawers. This project uses soft, airy brushwork to create a vintage herbarium aesthetic, perfect for adding a touch of nature to a bedroom or hallway.
Step-by-Step
Materials
- Wooden chest of drawers (pre-finished or raw)
- Sandpaper (120 and 220 grit)
- Primer (bonding primer highly recommended)
- Cream or off-white chalk or mineral paint (base color)
- Acrylic craft paints (sage green, forest green, muted orange, soft pink, yellow ochre)
- Assorted small paintbrushes (fine liner, round #2 and #4)
- Pencil and eraser
- Clear matte or satin polycrylic topcoat
- Painter’s tape
- Brass ring pulls (optional replacement hardware)
Step 1: Preparation and Base Coat
-
Remove hardware:
Begin by unscrewing and removing all existing knobs or pulls. Store them in a baggie inside a drawer so they don’t get lost, or set them aside if you plan to replace them with brass rings like in the example. -
Clean and scuff:
Wipe down the entire piece with a degreaser or mild soap solution to remove oils and dust. Once dry, lightly scuff sand all surfaces with 120-grit sandpaper to give the new paint something to grip. -
Prime the surface:
Apply a coat of high-quality bonding primer. This is crucial if your dresser has a slick or factory finish. Let the primer cure according to the can’s instructions, usually overnight. -
Apply base color:
Paint the entire dresser in your chosen cream or off-white shade. Use a high-quality synthetic brush or a foam roller for a smooth finish without heavy brushstrokes. I usually apply two to three thin coats rather than one thick one, sanding lightly with 220-grit paper between coats for a buttery smooth surface.
Uneven Drawer Gaps?
If the design looks disjointed across drawer gaps, open the drawer slightly and paint the edges of the drawer front (top and bottom lips) to continue the stem line visually when closed.
Step 2: Drafting the Design
-
Plan the layout:
Ideally, you want the floral design to flow across the drawer gaps. Place the drawers back into the chest to visualize the full canvas. Lightly sketch your design directly onto the paint with a pencil. -
Sketch the side tree:
For the side panel, draw a tall, slender tree or climbing vine. Start with a main trunk that meanders upward, adding side branches that reach out naturally. Don’t worry about perfection; organic shapes are more forgiving. -
Sketch drawer motifs:
On the front, sketch individual wildflower clusters. Position them so the stems start at the bottom of a drawer and the blooms reach upward, creating a rhythmic pattern. Leave plenty of negative space to keep the look airy.
Step 3: Painting the Botanicals
-
Mix your greens:
Prepare a palette with a few variations of green—mix sage with a little white for highlights, and forest green with a touch of brown for shadows. This variety adds depth to otherwise flat stems. -
Paint stems and branches:
Using a fine liner brush and your darkest green mixture, trace over your pencil lines for the main stems and tree trunk. Keep your hand loose and vary the pressure on the brush to create lines that taper naturally. -
Add delicate leaves:
Switch to a #2 round brush. Load it with sage green and press down gently at the base of the leaf, lifting as you pull away to create a pointed tip. Add leaves sparsely along the branches. -
Create foliage clusters:
For the feathery foliage seen on the lower floral clusters, use a dry-brush technique. Dip an old, splayed brush into a lighter green, wipe most of it off, and stipple gently to create a soft, airy texture resembling dill or fennel. -
Paint the blooms:
Using your floral colors (muted orange and soft pink), add small blossoms. Simple shapes work best here—small clusters of dots for berries or buds, and loose, four-petal shapes for open flowers. -
Add corner details:
Notice the tiny sprigs in the corners of the top drawers? replicate these by painting tiny, singular sprigs or simple geometric flourishes in a pale grey or green to frame the upper section. -
Refine the details:
Once the main colors are dry, go back in with your finest brush. Add tiny stems connecting the flowers to the branches and put little dots of yellow ochre in the flower centers.
Level Up: Aged Effect
Mix a tiny amount of raw umber glaze and lightly brush it over the edges and corners of the drawers. Wipe back immediately with a cloth to leave a subtle antique patina.
Step 4: Finishing Touches
-
Erase guidelines:
After ensuring the paint is bone dry (give it at least 24 hours to be safe), gently erase any visible pencil marks. Be extremely gentle to avoid burnishing the matte base paint. -
Seal the artwork:
Protect your handiwork with a clear, water-based polycrylic topcoat. Apply it in long, even strokes across the entire piece, not just the painted areas, to ensure a uniform sheen. -
Install hardware:
Once the topcoat has fully cured, install your brass ring pulls. The metallic gold adds a lovely contrast to the soft, natural painting style.
This charming piece will bring a breath of fresh air to your room, blooming beautifully year-round.
Stencil Pattern for a Repeat Design Chest
Transform a plain wooden dresser into a statement piece with this elegant stenciling project. By combining the natural warmth of wood with a crisp, repeating geometric floral pattern, you’ll achieve a high-end, custom look that feels both modern and timeless.
Step-by-Step Guide
Materials
- Wooden chest of drawers preferably with flat fronts
- Sandpaper (120 and 220 grit)
- Tack cloth
- Cream or off-white chalk paint or latex paint
- High-density foam roller
- Stencil brush (small)
- Geometric floral diamond stencil (approx. 6-8 inches wide)
- Painter’s tape or stencil adhesive spray
- Measuring tape
- Pencil
- Clear matte polyurethane or wax for sealing
- Small paint tray
- Paper towels
Step 1: Preparation
-
Deconstruct:
Remove all the drawers from the chest frame. If the existing knobs or pulls are in the way of your design, unscrew and remove them, keeping the hardware in a safe place. -
Clean surfaces:
Wipe down the entire piece, focusing on the drawer fronts, with a degreaser or mild soapy water to remove oils, dust, and grime. Let the wood dry completely. -
Sand for adhesion:
Lightly scuff the drawer fronts with 220-grit sandpaper. You aren’t trying to strip the finish entirely, just creating a ‘tooth’ for the paint to grab onto. Wipe away all dust with a tack cloth. -
Plan the layout:
Measure the width of your drawer front and the width of your stencil. mark the exact center point of the drawer with a pencil. This ensures your pattern is symmetrical and doesn’t cut off awkwardly at the edges.
Bleeding Lines?
If paint seeps under the edges, your roller was too wet. Let the paint dry completely, then gently scrape the excess away with the edge of a credit card or sand it off before sealing.
Step 2: Stenciling
-
Secure the stencil:
Apply a light mist of stencil adhesive to the back of your stencil pattern. Wait a few seconds for it to become tacky, then press it firmly onto the center mark of the first drawer. Use painter’s tape on the edges for extra security. -
Load the roller:
Pour a small amount of cream paint into your tray. Load your foam roller, then roll it off onto a paper towel until it feels almost dry. This ‘offloading’ step is critical to prevent paint from bleeding under the stencil. -
Apply the first pass:
Roll over the stencil with light to medium pressure. Use a pouncing motion (up and down) if you are struggling to get coverage in tight corners, but avoid pushing paint sideways. -
Detail work:
If your stencil has very fine floral details like the ones in the image, use a small stencil brush for those areas. Dip the brush, offload it on a paper towel, and gently dab vertically over the delicate cutouts. -
Peel and reveal:
Carefully lift one corner of the stencil to check your coverage. If it looks solid, peel the stencil straight up and off the wood. Let this section dry to the touch before moving adjacent to it. -
Repeat the pattern:
Align the stencil for the next section. Many stencils have ‘registration marks’ (parts that overlap with the previous design) to help you keep the spacing consistent. Continue stenciling across the entire drawer front. -
Clean between drawers:
After finishing a drawer, or if you notice paint buildup on the plastic, wipe the stencil clean. Wet paint on the back of the stencil is the number one cause of smudges. -
Finish all drawers:
Repeat the process for the remaining three drawers. I find it helpful to line the drawers up on the floor to ensure the vertical alignment of the diamonds matches from top to bottom.
Step 3: Finishing Touches
-
Touch ups:
Once dry, inspect your work. Use a tiny artist’s brush and your base paint (or wood stain marker if you kept the wood background) to correct any small bleeds or fuzzy lines. -
Sanding for distress (Optional):
For a slightly worn, vintage look like the example, take a piece of very fine 320-grit sandpaper and lightly swipe it over the painted design once or twice. This integrates the paint into the wood grain. -
Seal the work:
Apply a coat of clear matte polyurethane or furniture wax over the drawer fronts. This protects your hard work from scratches and makes the surface wipeable. -
Reassemble:
Reattach your hardware. If you painted over the knob holes, you can poke through the paint with an awl before screwing the knobs back in. Slide the drawers back into the frame.
Registration Trick
Use a small piece of painter’s tape on the wood to mark exactly where the edge of the stencil frame sits. This helps you realign perfectly without guessing if you can’t see the design well.
Step back and admire how a simple repeated pattern has given your furniture piece a completely new rhythm and life
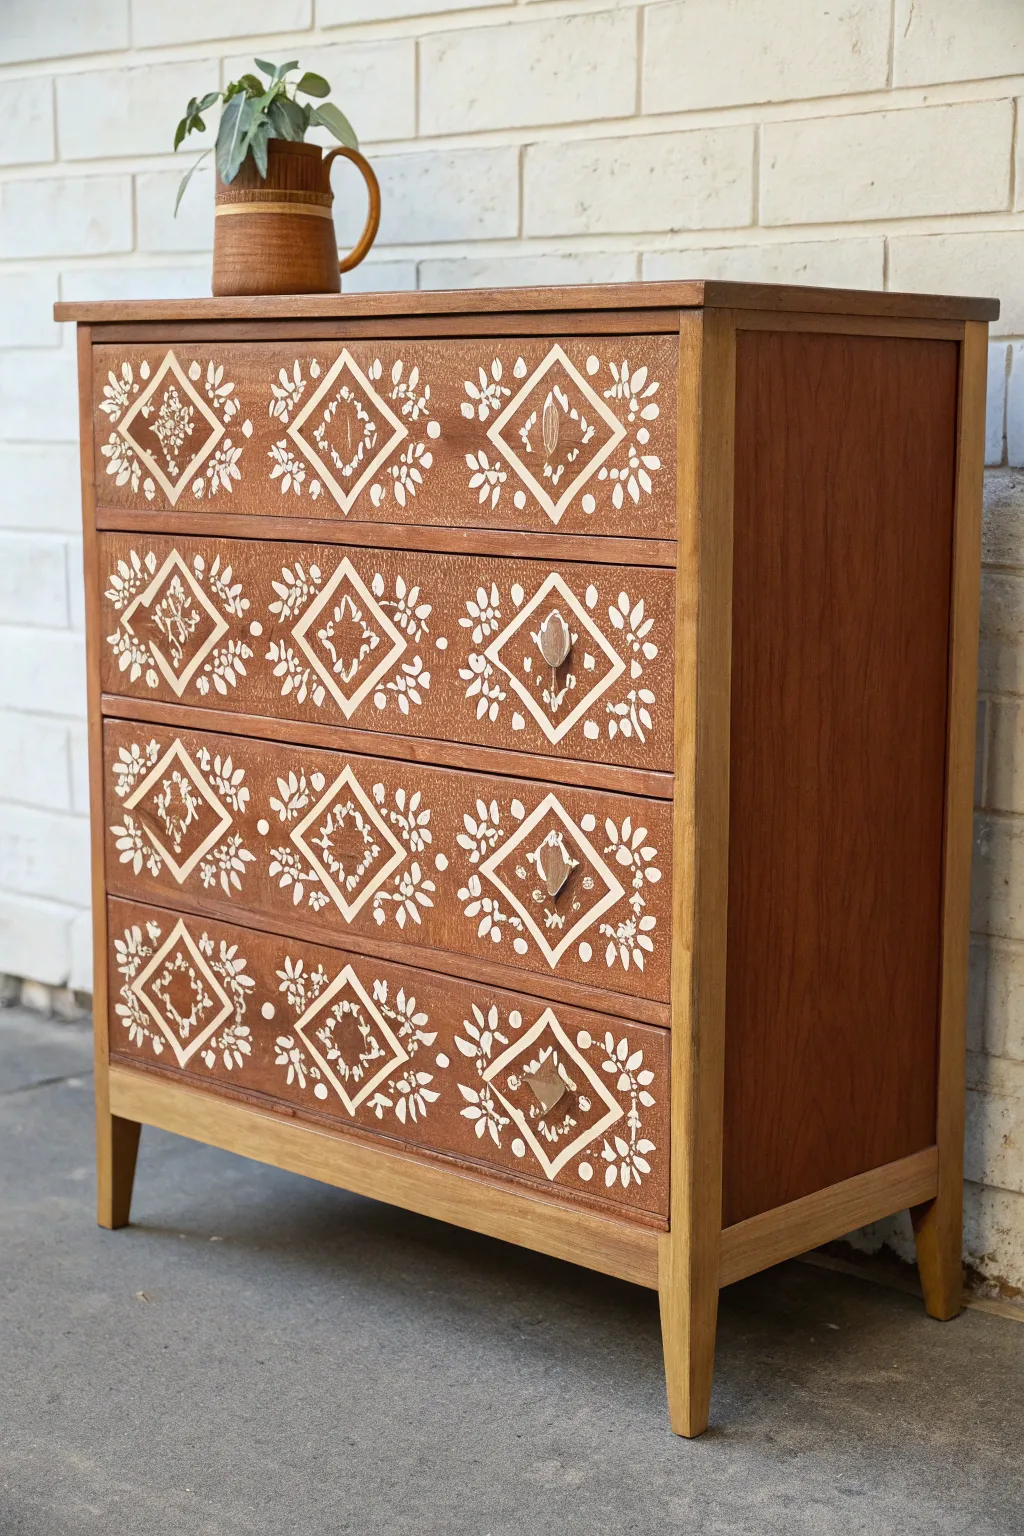
Faux Inlay Look on a Painted Chest
Transform a plain wooden chest into a high-end statement piece with this clever faux inlay technique. By combining decorative beading trim with a soft, neutral paint color and striking gold accents, you can achieve a sophisticated, custom furniture look without advanced woodworking skills.
Step-by-Step Tutorial
Materials
- Wooden chest of drawers
- Self-adhesive decorative wood trim or molding (beaded or rope style)
- Measuring tape and pencil
- Miter shears or sharp utility knife
- High-quality furniture paint (Pale Sage or Light Greige)
- Gold gilding wax or metallic gold paint
- Small artist brushes
- Medium-grit sandpaper
- Tack cloth
- Painter’s tape
- Wood glue (optional, for extra hold)
- Gold cup pull hardware
- Clear topcoat (matte or satin)
- Wood stain (for the top surface)
Step 1: Preparation and base painting
-
Remove hardware and prep:
Start by removing all existing knobs, handles, and drawers from the chest. Give the entire piece a thorough cleaning to remove grease and dust, then lightly sand all surfaces with medium-grit sandpaper to help the primer and paint adhere properly. -
Sand the top surface:
If you plan to have a natural wood top like the example, sand the top surface completely down to raw wood. Remove all old varnish or paint, wipe away the dust with a tack cloth, and tape off the edges where the top meets the base to protect it during painting. -
Prime the body:
Apply a coat of high-quality primer to the body of the chest and the drawer fronts. Let it dry completely according to the manufacturer’s instructions. -
Apply base color:
Paint the body and drawer fronts with your chosen pale sage or greige color. Use a high-quality synthetic brush or a foam roller for a smooth finish. I find that two to three thin coats usually provide the best coverage, letting each coat dry fully before adding the next. -
Stain and seal the top:
While the paint dries, apply your chosen wood stain to the sanded top surface. Once the stain is dry, seal the top with a durable polyurethane topcoat to protect it from wear and tear.
Sticky Situation
If your mitered corners have small gaps, don’t restart! Fill the gap with a tiny amount of wood filler or spackle, sand it smooth once dry, and paint over it perfectly.
Step 2: Creating the faux inlay
-
Measure the trim placement:
Decide on the inset distance for your faux inlay frames. Measure about 1.5 to 2 inches in from the edge of each drawer front and the side panels. Use a pencil and a ruler to lightly mark faint guide lines where your trim will sit. -
Cut the decorative trim:
Using miter shears (which make this much easier than a saw), cut your decorative beading trim to fit your measured rectangles. Cut the ends at 45-degree angles so they join seamlessly at the corners. -
Dry fit the frame:
Before gluing, lay the cut trim pieces onto the drawer fronts to ensure the corners meet perfectly. Make tiny adjustments with sandpaper if any pieces are slightly too long. -
Attach the trim:
Apply a thin bead of wood glue to the back of the trim pieces. If you are using self-adhesive trim, peel the backing but add a dot of glue for longevity. Press them firmly onto your pencil guide lines. -
Secure the corners:
Use painter’s tape to hold the trim corners tightly in place while the glue dries. This ensures your mitered joints stay tight and don’t slide around.
Double Detail
Add a second, smaller rectangle of trim inside the first one on the larger bottom drawers to create a more intricate, double-framed ‘museum’ look.
Step 3: Gilding and finishing touches
-
Touch up the paint:
Once the glue is dry and tape is removed, inspect the trim. If the trim came unpainted, paint it now to match the chest body. If you want the ‘inlay’ to look seamless, paint over the trim and the area inside it one more time. -
Apply gold accents:
This is the transformational step. Using a small artist brush or your finger, carefully apply gold gilding wax or metallic gold paint to the top of the decorative trim. For a vintage look, don’t aim for perfect coverage; let some texture show through. -
Detail the side panels:
Don’t forget the large side panels. Repeat the gold application on the large rectangular trim frames on the sides of the chest to carry the design around the piece. -
Install new hardware:
Locate the center of your drawers (or use existing holes if they align). Install the gold cup pulls. The cup style complements the classic feel of the beaded trim perfectly. -
Final protective coat:
Apply a clear wax or a polycrylic topcoat over the painted areas to seal the paint and the gilding wax. This prevents the gold from rubbing off over time and makes the furniture wipeable.
Step back and admire how a simple addition of texture and gold has turned a basic storage piece into a stunning focal point.
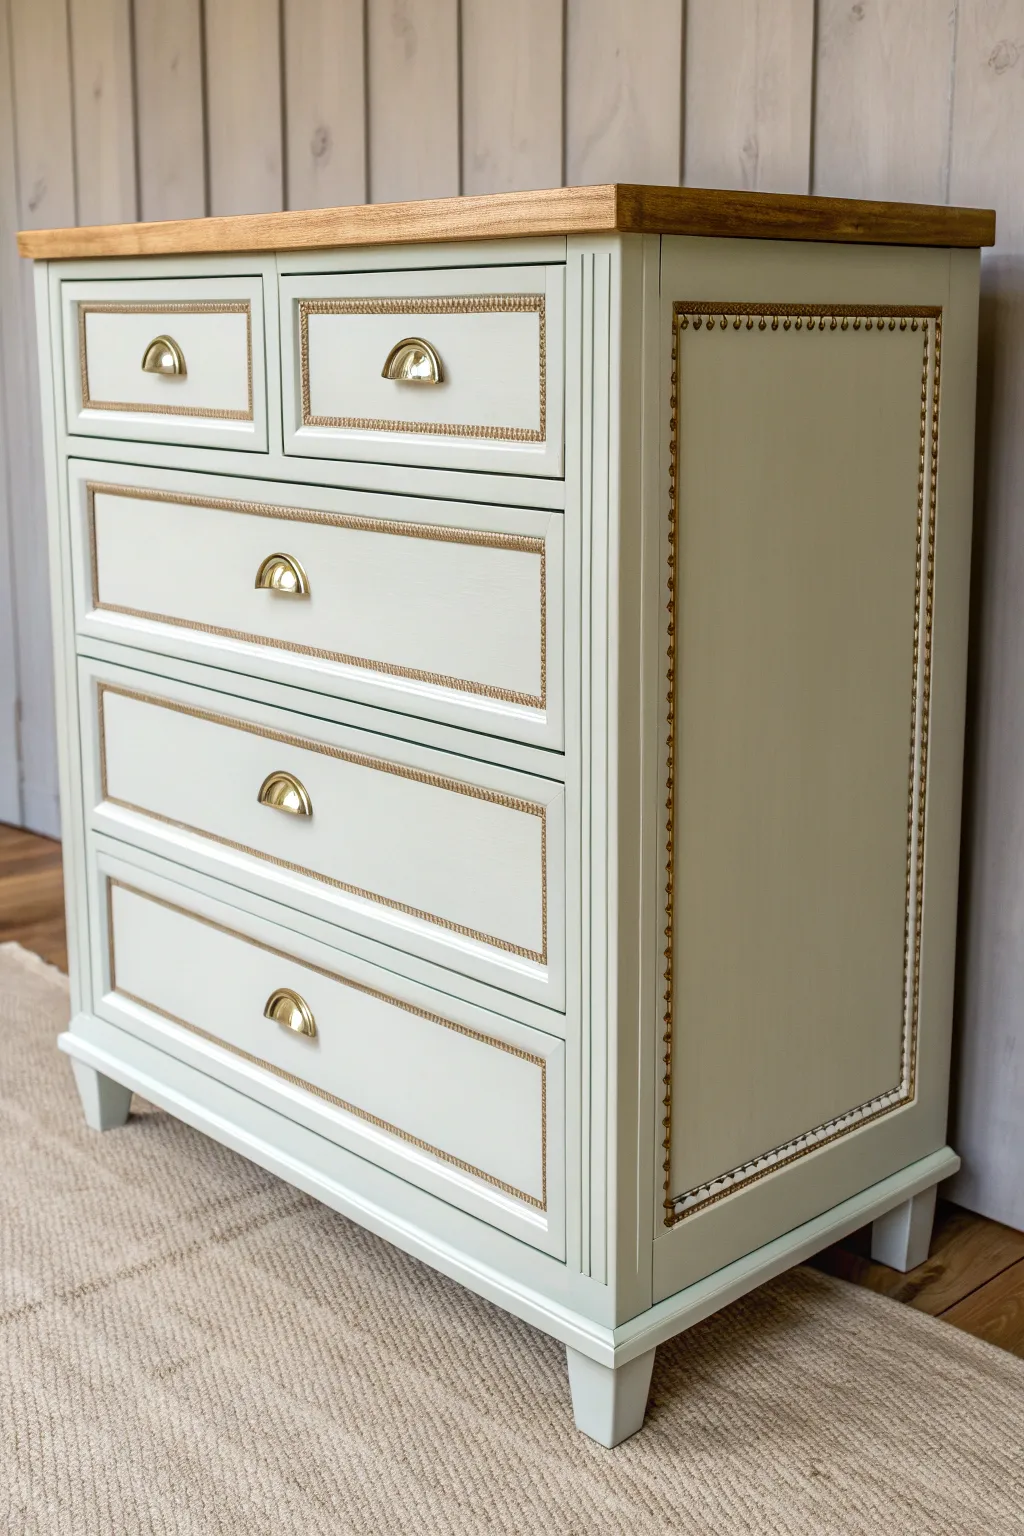
Hardware as the Star of the Painted Chest
Transform a dated wooden chest into a modern statement piece by pairing a soft, calming sage green with bold, high-contrast hardware. This project emphasizes clean lines and a touch of luxury with a metallic gold edge detail.
Step-by-Step Guide
Materials
- Tall wooden chest of drawers (cleaned and sanded)
- High-quality furniture paint (Sage Green or Soft Mint, Satin finish)
- Stain-blocking primer (shellac-based recommended)
- Metallic Gold furniture paint or liquid gold leaf
- Modern T-bar pulls (Matte black with gold accents)
- Sandpaper (120, 220, and 320 grit)
- Tack cloths
- Synthetic bristle paint brush (2-inch)
- Foam roller (4-inch) and tray
- Painter’s tape
- Screwdriver or drill
- Wood filler (if filling old hardware holes)
- Clear topcoat (Polycrylic or wax)
Step 1: Preparation & Repairs
-
Remove Hardware:
Begin by removing all existing knobs, pulls, and hinges using a screwdriver. Keep the screws in a labeled baggie if you plan to reuse them later, though for this look, new hardware is key. -
Clean Thoroughly:
Scrub the entire piece with a degreaser or a TSP alternative to remove years of furniture polish, oil, and grime. A clean surface is critical for paint adhesion. -
Fill Holes:
If your new hardware has different spacing than the old, fill the old screw holes with wood filler. Overfill slightly, as it shrinks when drying. -
Sand the Surface:
Once the filler is dry, sand the filled areas flush. Then, scuff sand the entire chest with 120-grit sandpaper to remove the old glossy finish. You don’t need to strip it to bare wood, just create a dull surface. -
Remove Dust:
Vacuum up the sanding dust and wipe the piece down completely with a tack cloth to ensure no particles remain.
Step 2: Priming & Painting
-
Apply Primer:
Apply a coat of stain-blocking primer. I prefer using a shellac-based primer here because it prevents tannins from the wood bleeding through light paint colors. -
Light Sanding:
Once the primer is fully dry, give it a quick pass with 220-grit sandpaper to knock down any brush strokes or texture, then wipe clean. -
First Coat of Green:
Using a high-density foam roller for flat surfaces and a brush for corners, apply the first coat of sage green paint. Keep layers thin to avoid drips. -
Sand Between Coats:
After the first coat dries (check manufacturer times), lightly sand with 320-grit sandpaper for an ultra-smooth professional finish. Wipe away the dust. -
Second Coat:
Apply the second coat of green paint, ensuring full coverage. Check for any missed spots or streaks and smooth them out while the paint is wet. -
Paint the Top Band:
Tape off the top edge of the dresser where the molding sits. Apply your metallic gold paint or liquid gold leaf to this top trim to create that luxurious crown effect.
Hardware Jig Hack
Make a drilling template using a piece of cardboard. Punch holes where the hardware goes, then use this guide on every drawer to ensure identical spacing without measuring every time.
Step 3: Finishing Touches
-
Drill New Holes:
Measure carefully and mark the locations for your new hardware. Use a template or jig to ensure perfect alignment, then drill the new holes. -
Apply Topcoat:
Protect your paint job with a water-based polyurethane topcoat. Apply at least two coats, sanding lightly in between for durability. -
Install Hardware:
Once the topcoat has cured for at least 24 hours, attach the new black and gold pulls. Tighten them securely. -
Final Polish:
Wipe down the piece one last time and let it cure fully before placing heavy objects on top.
Add Drawer Liners
Line the inside of the drawers with a patterned paper that includes gold or sage green tones. It’s a hidden pop of design that makes opening the drawers a delight.
Step back and admire how fresh hardware and a coat of paint totally completely reinvented your furniture.
Painted Chest With Mixed Sheen Accents
Transform a plain wooden dresser into a charming statement piece character by blending soft pastels with rustic textures. This project combines distressing techniques with precise taping to create a finish that feels both vintage and playfully modern.
Step-by-Step Tutorial
Materials
- Wooden dresser (raw or sanded to bare wood)
- Creamy off-white chalk paint
- Soft blush pink chalk paint
- Clear furniture wax
- Dark antique wax
- Painter’s tape (1-inch width)
- Sanding block (medium grit)
- Clean lint-free rags
- High-quality synthetic paint brushes
- Brass finish drawer pulls
- Screwdriver
- Palm sander (optional, for prep)
Step 1: Preparation & Base Work
-
Remove hardware:
Begin by removing all old drawer pulls or knobs using a screwdriver. Place the screws and hardware in a labeled baggie so nothing gets lost during the painting process. -
Sand the surface:
For the top surface that will remain natural wood, sand it thoroughly down to the bare grain to remove any old varnish or stain. Lightly scuff-sand the rest of the dresser body and drawer fronts to help the paint adhere. -
Clean thoroughly:
Wipe down the entire piece with a damp cloth or a degreaser to remove all sanding dust and oils. A clean surface is crucial for a smooth finish. -
Protect the top:
Since the top will remain natural wood, apply painter’s tape along the very top edge of the base cabinet to protect the wood grain from stray paint strokes.
Step 2: Painting the Body & Lower Drawers
-
Paint the frame:
Using your creamy off-white chalk paint, cover the main body and side panels of the dresser. Apply long, smooth strokes in the direction of the grain. -
Paint the lower drawers:
Apply the same off-white color to the fronts of the three large bottom drawers. Don’t worry about perfect full coverage; a slightly thinner coat allows for easier distressing later. -
Apply a second coat:
Once the first layer is dry to the touch (usually about 30-60 minutes for chalk paint), apply a second coat to the frame for solid coverage. Keep the drawer coverage slightly lighter if you want heavy distressing. -
Distress the drawers:
After the lower drawers are fully dry, take a medium-grit sanding block and vigorously sand the edges and raised areas. I like to focus heavily on the corners where wear would naturally occur, revealing the wood underneath. -
Dry brush texture:
To enhance the weathered look on the white drawers, take a mostly dry brush with a tiny amount of darker wax or tan paint and whisk it horizontally across the white paint to simulate age.
Tape Trick
Paint a thin layer of your base white color over the tape edges first. This seals the gap, so if any paint bleeds under, it’s the white base, keeping your pink lines perfect.
Step 3: Creating the Striped Top Drawers
-
Base coat the top drawers:
Paint the entire face of the two small top drawers with your off-white base color. Let this dry completely—overnight is best to prevent tape from peeling it up. -
Mark the center:
Find the vertical center of each drawer front and lightly mark it with a pencil. This ensures your stripe pattern remains symmetrical. -
Apply painter’s tape:
Place strips of 1-inch painter’s tape vertically across the drawer fronts. Use a spacer (like a piece of scrap wood of the same width) to ensure the gaps between tape strips are perfectly even. -
Seal the tape edges:
Run your finger or a credit card firmly along the edges of the tape to ensure a tight seal. This prevents the pink paint from bleeding under the tape. -
Paint the stripes:
Using the soft blush pink paint, fill in the exposed alternating stripes. Apply two light coats rather than one heavy one for the crispest lines. -
Remove tape immediately:
Peel the tape off carefully while the pink paint is still slightly wet. Pull the tape away at a 45-degree angle to keep lines sharp. -
Distress the stripes:
Once fully cured, lightly sand over the entire drawer front. This softens the contrast between the pink and white stripes and gives them that unifying vintage, worn-in appearance.
Change the Vibe
Swap the blush pink for a soft sage green or a nautical navy blue for a completely different style, or use crystal knobs instead of brass cups for a glam finish.
Step 4: Sealing & Assembly
-
Wax the body:
Apply a coat of clear furniture wax over all painted surfaces using a wax brush or lint-free cloth. Buff it gently to a soft sheen. -
Seal the wood top:
For the natural wood top, apply either a clear wax or a matte polycrylic sealer to protect the raw wood while maintaining its natural color. -
Install hardware:
Attach the brass cup pulls to the drawers. The gold tone complements the blush pink beautifully. -
Reinsert drawers:
Slide the drawers back into their tracks, placing the striped ones at the top for that custom accent look.
Step back and admire how a little paint and distressing have given your furniture a warm, storied new life
Abstract Brushstroke Painted Chest
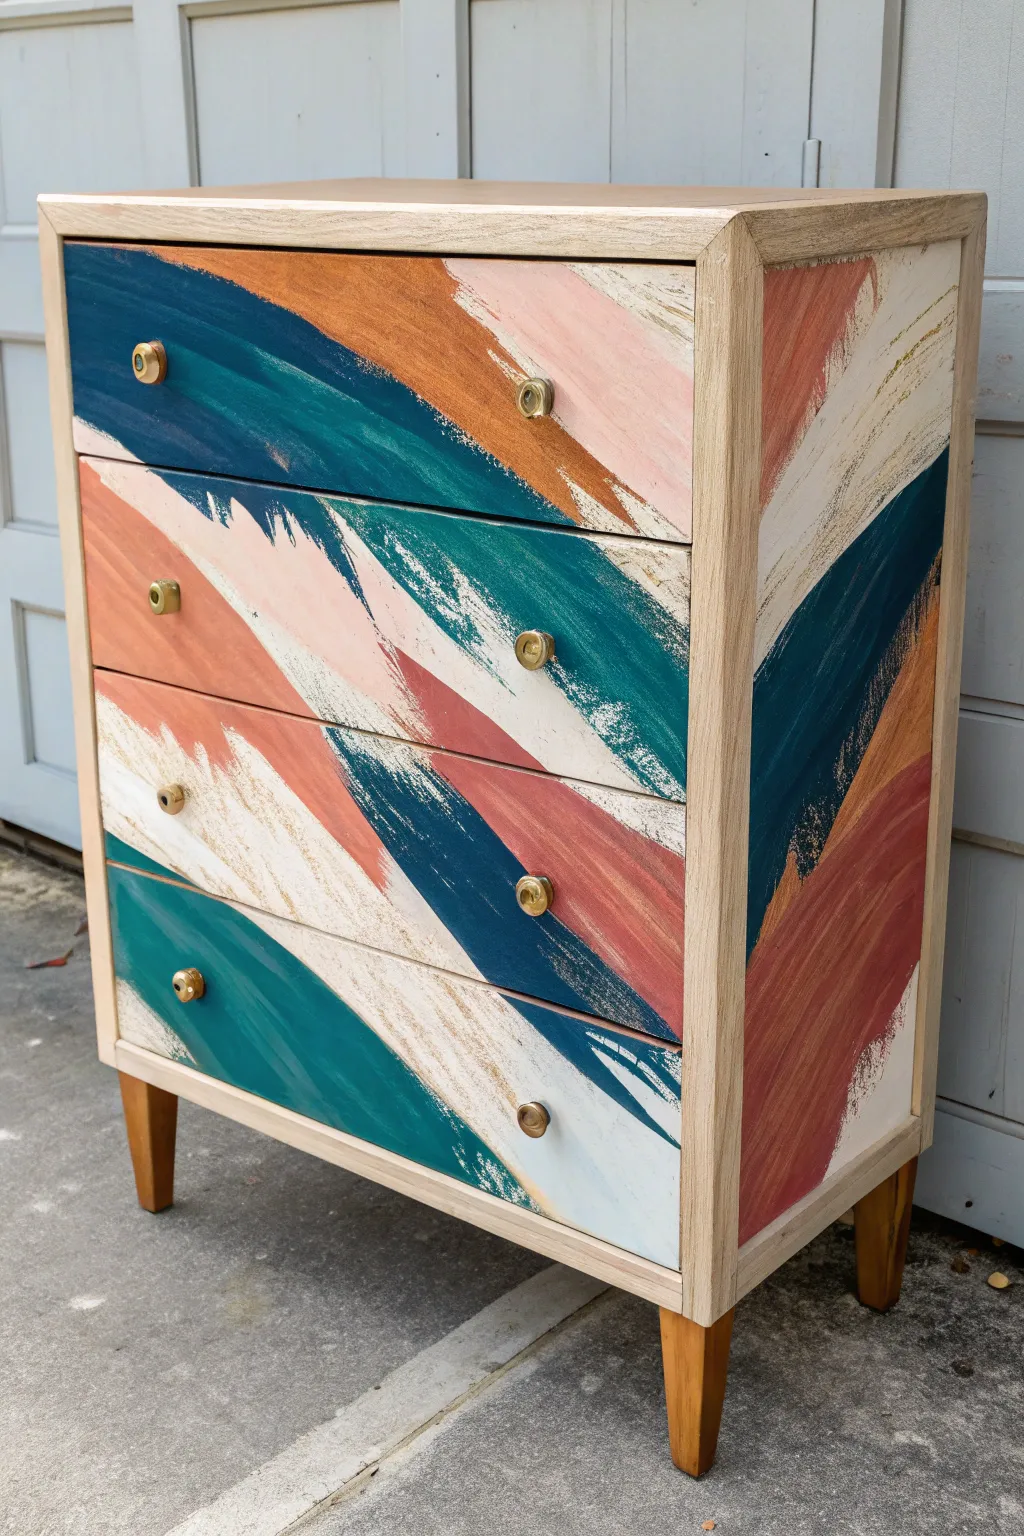
Transform a plain chest of drawers into a striking statement piece with this bold, abstract design. By using deliberate, sweeping brushstrokes that ignore drawer boundaries, you create a cohesive and modern artwork that feels both organic and high-end.
Step-by-Step
Materials
- Wooden dresser (preferably mid-century or clean-lined)
- Sander or sandpaper (120 and 220 grit)
- Tack cloth
- Painter’s tape
- Chalk paint or acrylic furniture paint (Teal/Deep Green)
- Chalk paint or acrylic furniture paint (Navy/Dark Blue)
- Chalk paint or acrylic furniture paint (Rust/Terracotta)
- Chalk paint or acrylic furniture paint (Blush Pink)
- Chalk paint or acrylic furniture paint (Cream/White)
- Wide flat synthetic paintbrushes (2-3 inches)
- Gold spray paint (optional for hardware)
- Clear matte polycrylic topcoat
- Small artist brush (for touch-ups)
- Screwdriver
Step 1: Preparation and Base
-
Remove Hardware:
Begin by removing all drawer pulls or knobs using a screwdriver. Keep the screws and hardware together in a baggie so nothing gets lost. -
Clean and Sand:
Wipe down the entire dresser to remove dust and grime. Sand the surfaces you intend to paint—specifically the drawer fronts and sides—with 120-grit sandpaper to scuff the finish. Follow with 220-grit for smoothness. -
Protect the Frame:
Since this design features a raw wood frame contrasting with painted drawers, carefully apply painter’s tape to the inner edges of the frame where it meets the drawers. Tape off the legs as well. -
Prime (Optional):
If your original wood is very dark or has a slick varnish, apply a coat of white primer to the drawer fronts and sides to ensure your colors pop.
Step 2: Creating the Abstract Design
-
Plan Your Palette:
Pour small amounts of your five colors (teal, navy, rust, blush, cream) onto a paper plate or palette. -
The White Base Layer:
Start by painting broad, diagonal strokes of the Cream/White paint. Don’t cover everything; leave large gaps for other colors, but establish the diagonal movement now. -
Apply the Deepest Tone:
Dip a wide dry brush into the Navy/Dark Blue paint. Apply a confident, sweeping stroke diagonally across the drawers. Let the brush run out of paint naturally at the ends of the stroke to create that textured, ‘dry brush’ look. -
Add Intermediate Colors:
Next, load a clean brush with the Teal/Deep Green. Apply this adjacent to or slightly overlapping the navy strokes. The goal is to have the colors interact but not muddy together completely. -
Layering Warm Tones:
Introduce the Rust/Terracotta color. I find that placing this warm tone next to the cool blues creates the most dynamic contrast. Use quick, confident wrist movements. -
Softening with Blush:
Add the Blush Pink strokes intermingled with the cream and rust areas. This softens the transition between the stark white and the darker colors. -
Bridge the Gaps:
Ensure the design flows continuously across the drawer gaps. You may need to open the drawers slightly to paint the top and bottom edges of the drawer fronts so no bare wood peeks through when closed. -
Continue to the Sides:
Don’t stop at the front! Wrap the design around to the side panels of the dresser, maintaining the same diagonal angle and brushstroke energy. -
Refine the Texture:
Once the first layer is touch-dry, go back in with a very dry brush and feather the edges of your strokes. Add a second coat only where opacity is lacking, preserving the brushy texture.
Muddy Colors?
If colors are blending into brown sludge, let each color layer dry for 10-15 minutes before applying the next overlapping stroke.
Step 3: Finishing Touches
-
Seal the Surface:
Once the paint is fully cured (check your paint can for times), apply 2-3 coats of clear matte polycrylic. Use a high-quality synthetic brush to avoid stroke marks in the clear coat. -
Update Hardware:
While the sealer dries, give your old hardware a fresh look with gold spray paint, or clean them up if you prefer the original vintage brass. -
Reassemble:
Remove all painter’s tape carefully. Reattach the hardware to the drawer fronts. -
Slide Back In:
Place the drawers back into the frame. Step back and admire how the abstract lines connect seamlessly across the piece.
Dry Brushing Pro-Tip
Don’t wet your brush with water! A bone-dry brush creates those beautiful scratchy, textured tails at the end of every stroke.
Now you have a custom piece of modern art that doubles as functional storage
Checkerboard Chest for Maximalist Energy
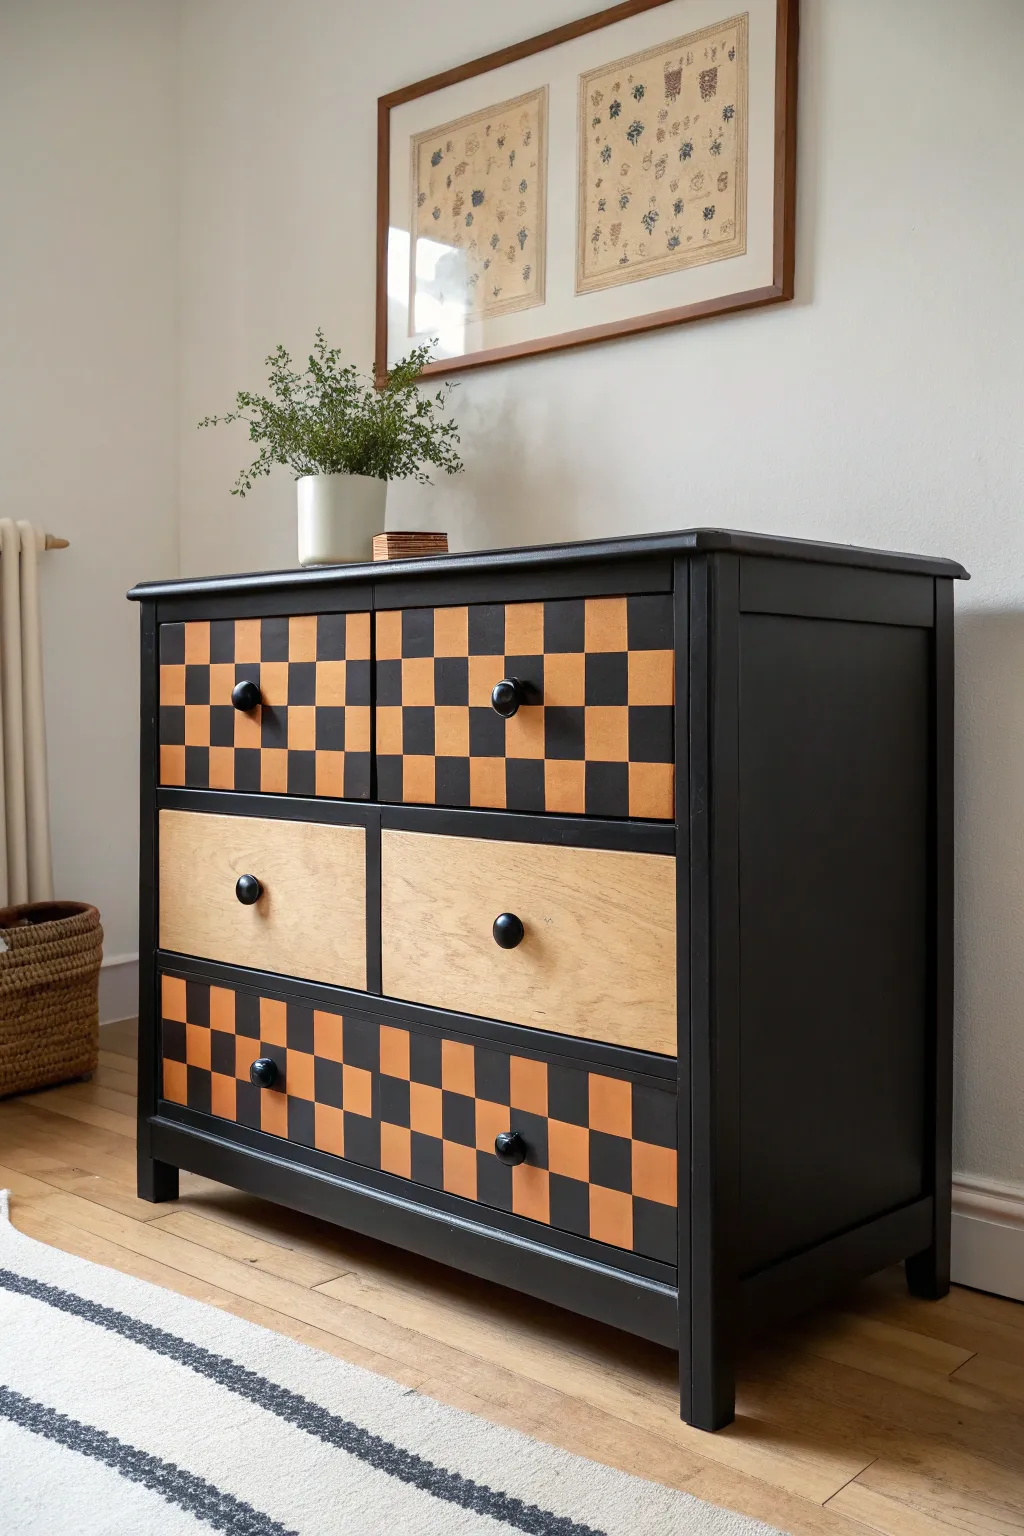
Transform a plain dresser into a striking statement piece by combining sleek matte black paint with the warmth of natural wood in a playful checkerboard pattern. This project balances maximalist energy with classic design, resulting in a unique focal point for any bedroom or living space.
Step-by-Step Tutorial
Materials
- Wooden dresser (raw or previously finished)
- Orbital sander
- Sandpaper (80, 120, and 220 grit)
- Painter’s tape (high quality, specific for delicate surfaces)
- Ruler or framing square
- Pencil
- Matte black furniture paint (chalk or mineral paint works well)
- Paintbrush (synthetic bristle for smooth finish)
- Small foam roller
- Small artist brush or detail brush
- Clear matte polyurethane topcoat
- Black knobs or drawer pulls
- Wood filler (if repairing old hardware holes)
- Tack cloth
- X-Acto knife or utility blade
Step 1: Preparation & Sanding
-
Remove hardware:
Begin by removing all existing knobs, handles, and hinges. Place them in a labeled bag if you plan to reuse them, though for this look, simple black mushroom knobs are best. -
Clean surface:
Wipe down the entire dresser with a degreaser or a mix of vinegar and water to remove oils, dust, and grime that could interfere with sanding. -
Sand to raw wood:
Using an orbital sander with 80-grit paper, sand the drawer fronts completely down to bare wood. This is crucial for the checkerboard sections and the middle row. Switch to 120 and then 220 grit for a smooth finish. -
Scuff sand the body:
For the main body of the dresser (top, sides, and frame), you don’t need to go down to bare wood if you are painting it black. Just scuff sand with 120-grit paper to give the paint something to grip. -
Dust removal:
Vacuum up all the sawdust and wipe every surface thoroughly with a tack cloth to ensure no particles remain.
Bleeding Lines?
If paint bleeds under the tape, don’t panic. Once dry, gently scrape the excess off the raw wood grain with a sharp craft knife or razor blade for a crisp edge.
Step 2: Mapping the Checkerboard
-
Measure the drawers:
Take precise measurements of the height and width of the drawer fronts designated for the checkerboard pattern (top and bottom rows). -
Calculate grid size:
Divide the width and height to create square sections. For a standard dresser, 2-inch or 3-inch squares usually look proportional. Adjust your math so you don’t end up with slivers of squares on the edges. -
Mark horizontal lines:
Using a long ruler or straight edge, lightly draw horizontal pencil lines across the drawer front at your determined intervals. -
Mark vertical lines:
Draw corresponding vertical lines to complete the grid. I find it helpful to put a tiny piece of tape or a light ‘X’ in the squares that will remain unpainted (wood) so I don’t get confused later. -
Tape the grid:
Apply painter’s tape along the OUTSIDE of the lines for the squares you intend to paint black. You will have to do this in two passes (painting every other square) to avoid tape overlap issues. -
Seal the tape edges:
Press the tape down firmly. A great trick is to run a credit card over the tape edges to ensure a tight seal and prevent paint bleed.
Seal Before You Paint
Apply a thin layer of clear matte varnish over your tape edges *before* the black paint. This seals the tape line, ensuring that if anything bleeds, it’s just clear coat.
Step 3: Painting & Finishing
-
Paint the body:
While you prep the drawers, paint the main body of the dresser matte black. Apply two thin coats rather than one thick one, sanding lightly between coats with fine-grit paper for smoothness. -
Paint the first set of squares:
Using a small brush or foam pouncer, dab black paint onto the exposed squares on the drawer fronts. Apply light layers to minimize bleeding under the tape. -
Remove tape and dry:
Ideally, peel the tape off while the paint is still slightly wet to keep lines crisp. Let this first set of squares dry completely—preferably overnight—before taping for the second set. -
Paint remaining squares:
Tape off the already painted squares (be very gentle and ensure paint is cured) to expose the alternate squares. Paint these black, remove tape, and let dry. -
Touch up:
Inspect your lines. If there’s minor bleeding, use an X-Acto knife to carefully scrape away excess paint or a tiny artist brush to crisp up the corners. -
Seal the drawers:
Apply a clear matte polyurethane topcoat over the entire drawer fronts (including the raw wood middle row). This seals the raw wood and protects the paint. Two to three coats are recommended. -
Install hardware:
Once fully cured, attach the black knobs. Center them perfectly on the drawer fronts for a balanced look. -
Reassemble:
Slide the drawers back into their tracks and admire your stark, graphic masterpiece.
Step back and enjoy the satisfaction of seeing how a simple geometric pattern completely reinvented your furniture piece


Have a question or want to share your own experience? I'd love to hear from you in the comments below!