A door is basically a ready-made canvas, and it’s one of the fastest ways to shift the whole mood of a room. If you’ve been craving a change, these painted door ideas will give you everything from classic color swaps to full-on hand-painted art moments.
Classic Solid-Color Statement Door
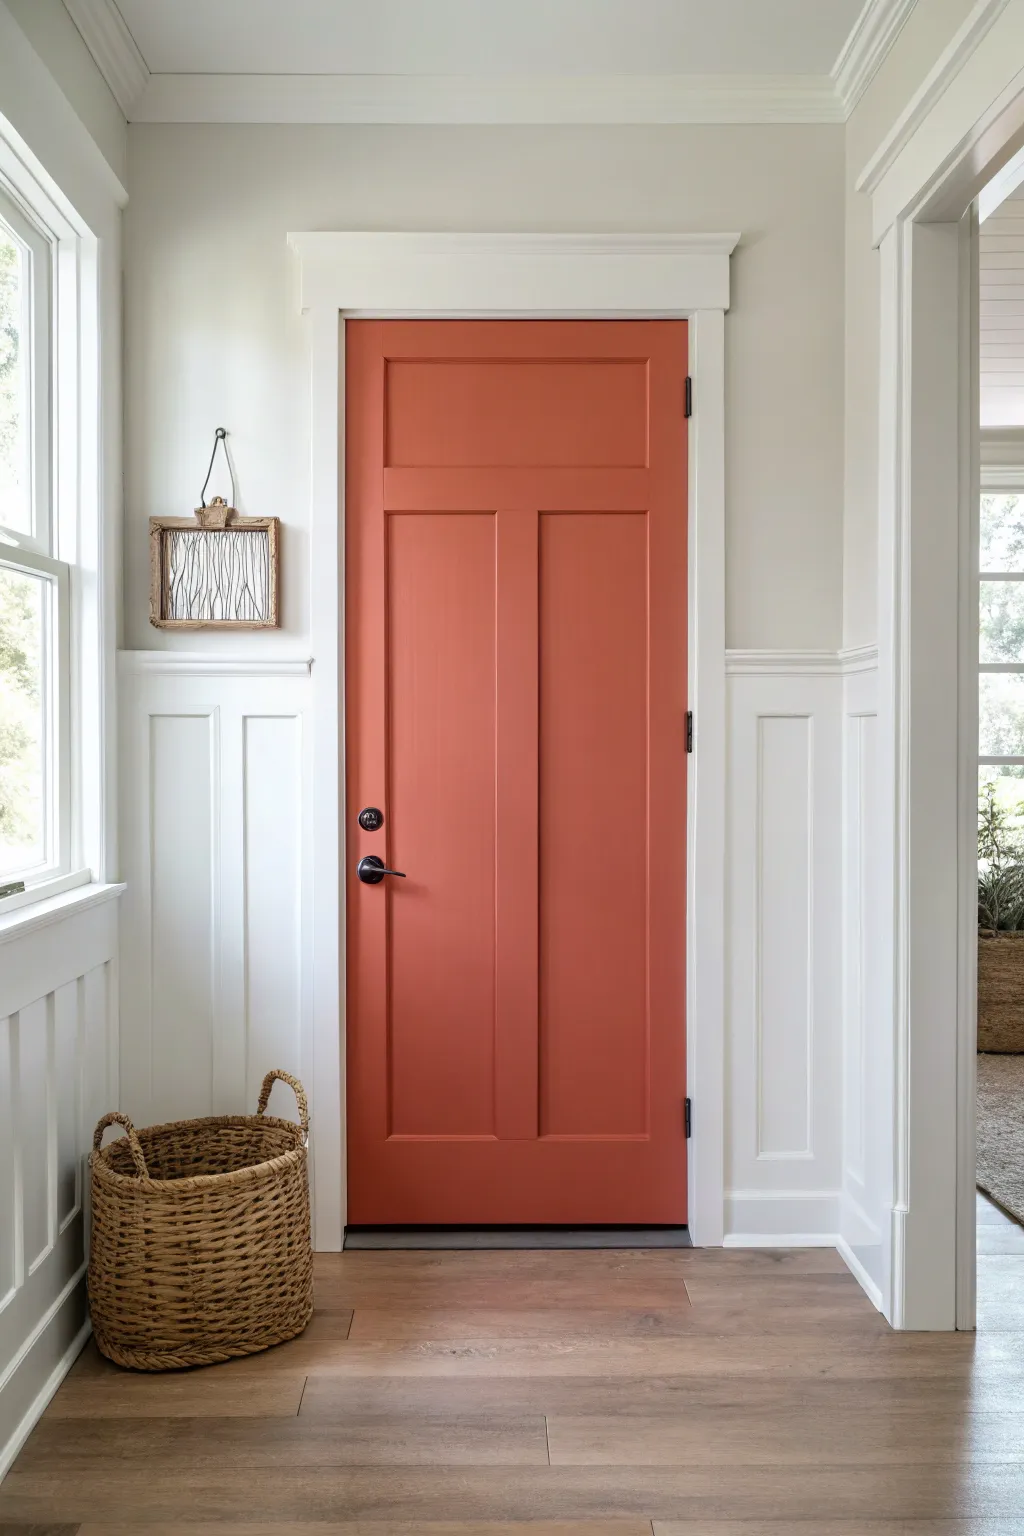

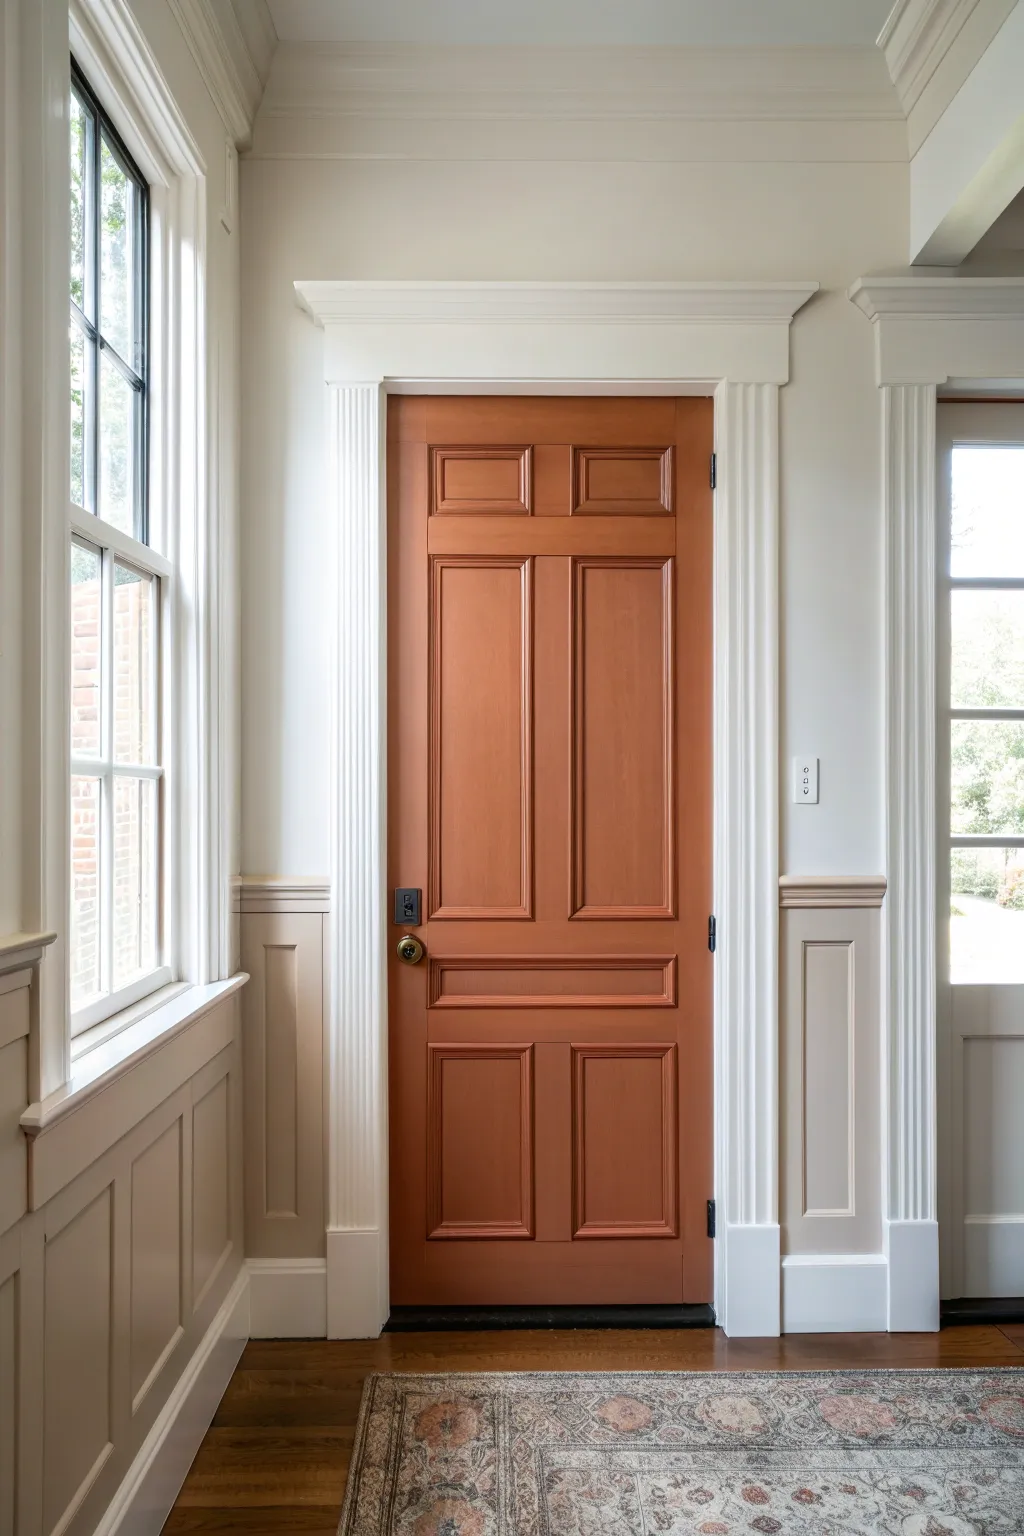
Transform a standard entryway into a warm focal point by embracing the earthy, inviting charm of a classic solid-color statement door. This project captures the sophisticated yet cozy look of a burnt terra cotta finish against crisp white wainscoting.
Detailed Instructions
Materials
- Interior wood door (Craftsman 3-panel style)
- High-quality interior paint (Terra Cotta/Burnt Orange shade, e.g., similar to ‘Cavern Clay’)
- Interior semi-gloss paint (White)
- Small foam roller
- 2-inch angled sash brush
- Painter’s tape
- Sandpaper (120 and 220 grit)
- Tack cloth
- Primer (bonding primer highly recommended)
- Screwdriver
- Drop cloths
- Wood filler (optional)
Step 1: Preparation
-
Clear the area:
Begin by removing all hardware from the door using a screwdriver. This includes the handle set, locks, and hinges if you plan to paint the door flat (which is easier for avoiding drips). -
Clean surfaces:
Wipe down the entire door with a mild degreaser or soapy water to remove oils and fingerprints. Let it dry completely. -
Fill imperfections:
Inspect the woodwork for any dings or deep scratches. Fill these with wood filler, allow it to dry, and sand flush for a pristine final look. -
Initial sanding:
Scuff sand the entire door using 120-grit sandpaper. You aren’t trying to remove all previous paint, just roughening the surface so the new primer adheres well. -
Remove dust:
Wipe away sanding dust carefully with a tack cloth to ensure no particles get trapped in your paint layers. -
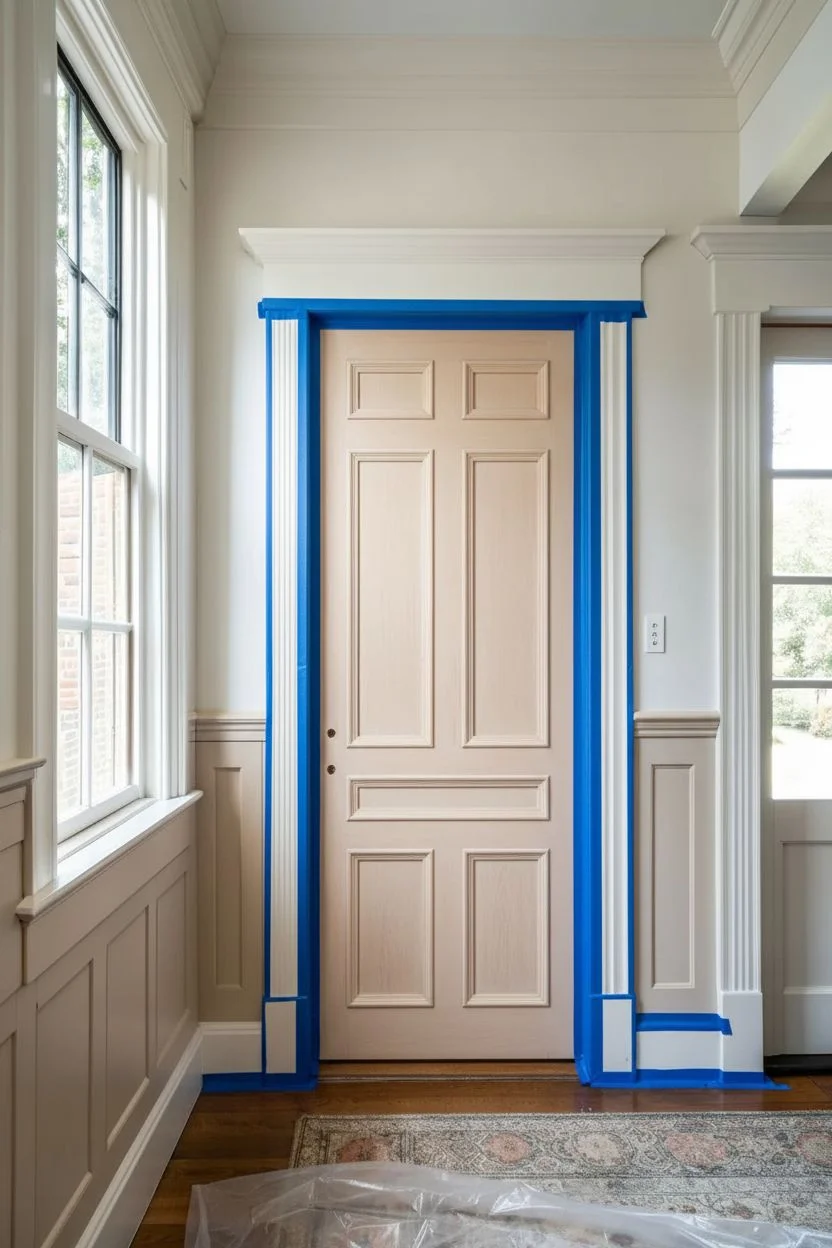
Masking:
If painting the door while it hangs, apply painter’s tape to the hinges (if not removed) and around the door jamb to protect the white trim.
Sticky Situation
Is the door sticking to the frame? It hasn’t cured enough. dusting the edges with baby powder can prevent sticking until the paint fully hardens over the next week.
Step 2: Priming and Painting
-
Apply primer:
Using your brush for corners and the roller for flat areas, apply a coat of high-bonding primer. This is crucial for rich colors like terra cotta to show true and adhere properly. -
Light sanding:
Once the primer is fully dry, do a very light pass with 220-grit sandpaper to knock down any raised grain or brush marks. -
First coat: Panels:
Start painting with the recessed panels first. Use the angled brush to cut into the corners and edges of the recessed squares. -
First coat: Center stiles:
Move to the vertical center stiles (the wood between the panels). Paint with the grain using long, smooth strokes. -
First coat: Rails:
Paint the horizontal rails next. Keep a wet edge to avoid lap marks. -
First coat: Outer stiles:
Finish the first coat by painting the long vertical stiles on the far left and right edges of the door. Allow this coat to dry for at least 4-6 hours. -
Inspect and smooth:
Check for any drips or heavy brush marks. I like to do a quick check here and gently sand any imperfections before the final coat. -
Second coat:
Apply the second coat of burnt orange paint in the exact same order: panels, center stiles, rails, then outer stiles. -
Curing time:
Let the door dry for at least 24 hours before reinstalling hardware. The paint may feel dry to the touch sooner, but it remains soft and prone to scratching.
Pro Tip: Floetrol
Add a paint conditioner like Floetrol to your latex paint. It slows drying time, allowing brush marks to level out for a factory-smooth finish.
Step 3: Finishing Touches
-
Hardware reinstallation:
Screw the handle and lockset back into place carefully. A matte black finish, as seen in the photo, contrasts beautifully with the warm orange tone. -
Trim maintenance:
While the door cures, inspect the surrounding white wainscoting. Touch up any scuffs with semi-gloss white paint to ensure the contrast remains crisp. -
Styling:
Add natural elements like a woven basket or a simple hanging frame nearby to echo the earthy vibes of your new statement door.
Enjoy the sophisticated warmth your new entryway brings to the entire home


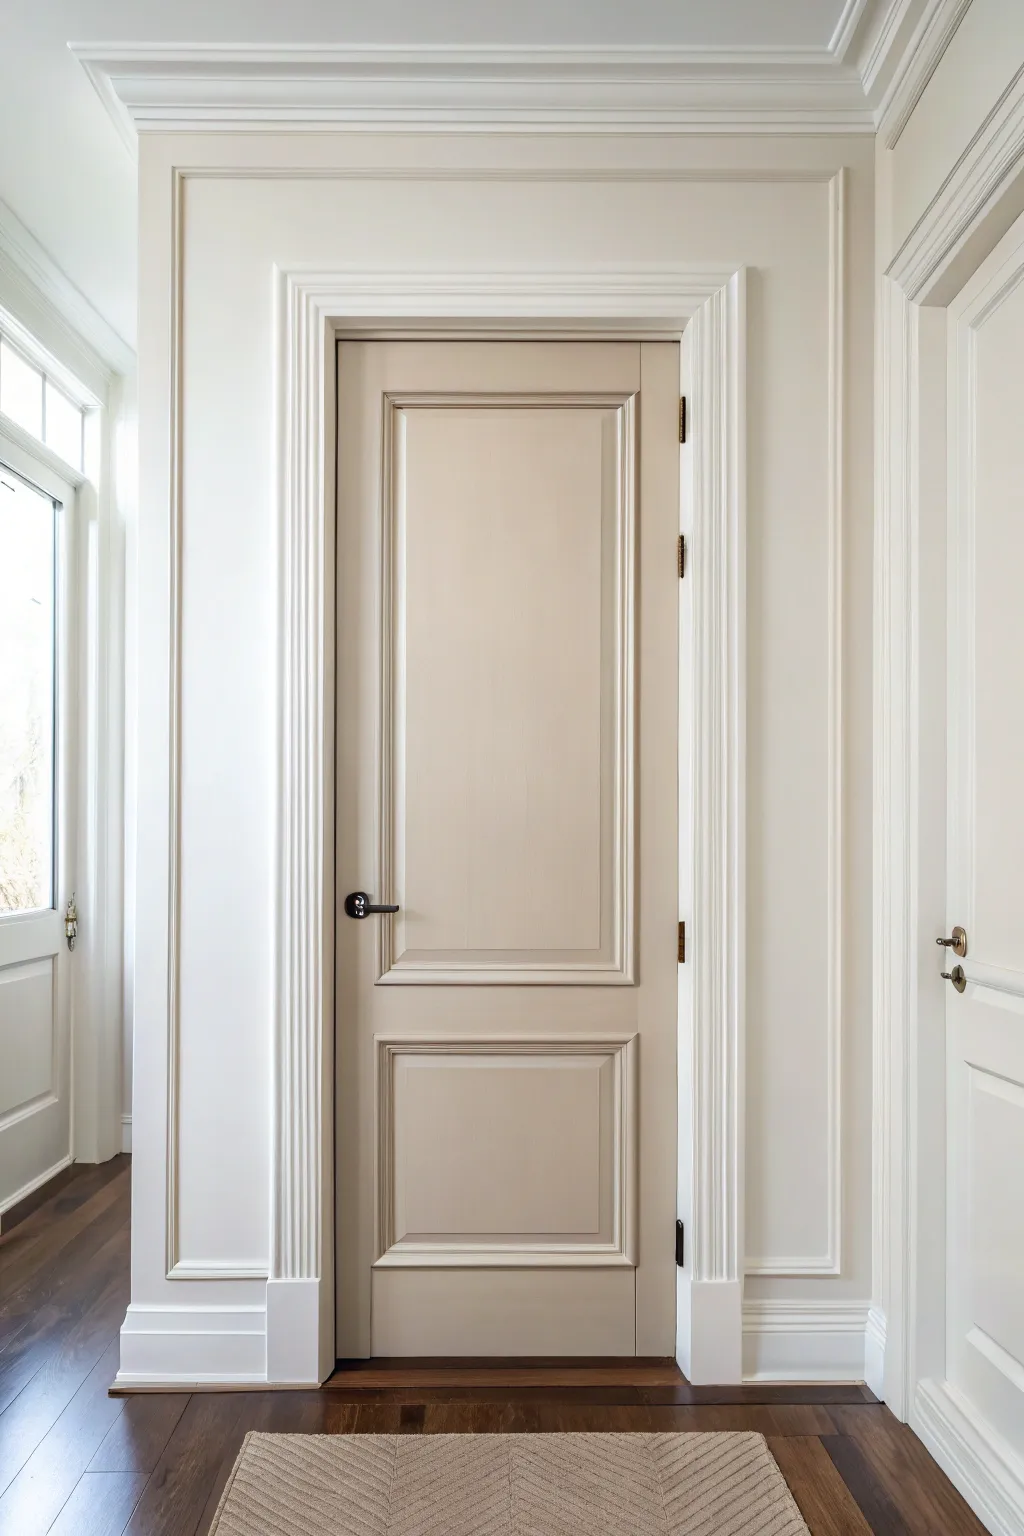
Moody Black or Charcoal Painted Door
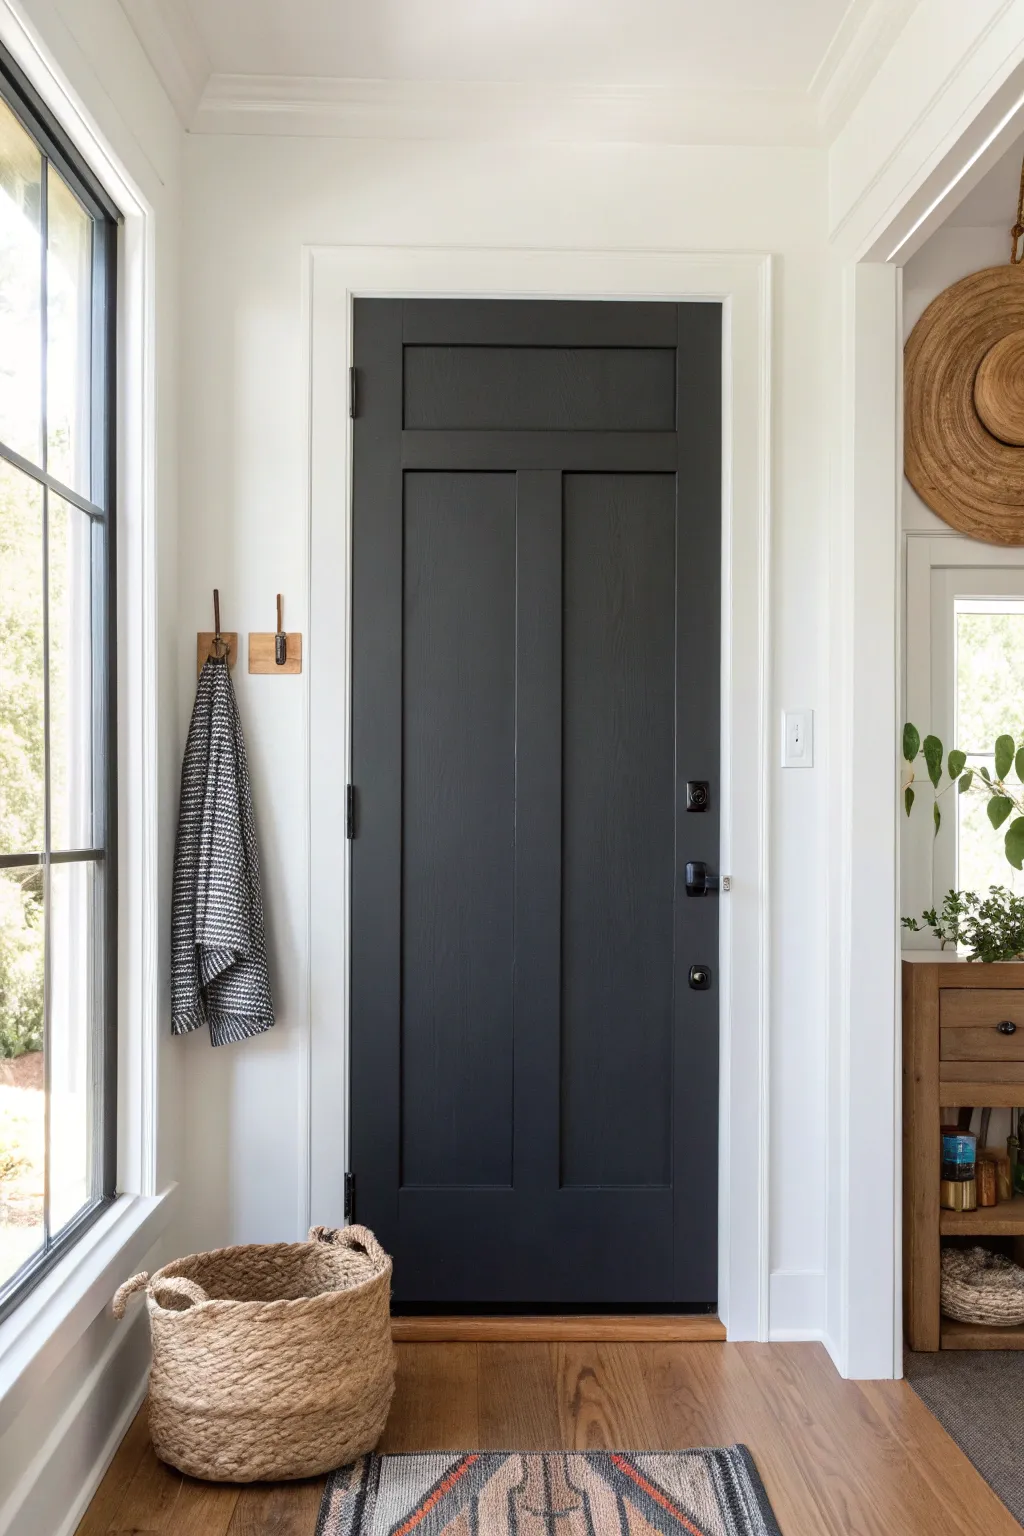

Transform a standard interior door into a modern farmhouse statement piece with a rich charcoal finish. This project creates a stunning focal point that adds depth and architectural interest to your entryway without replacing any hardware.
Step-by-Step Guide
Materials
- Interior door paint (Satin or Semi-Gloss finish)
- Bonding primer (if painting over slick surfaces)
- High-grit sandpaper (220-grit)
- Medium-grit sandpaper (120-grit)
- Tack cloths
- Painter’s tape (high quality)
- Degreezer or TSP substitute
- 2-inch angled sash brush (synthetic bristles)
- 4-inch foam roller or velour roller
- Small roller tray
- Drop cloth
- Screwdriver
- Wood filler (if repairing dents)
Step 1: Preparation
-
Clear the area:
Prop the door open so you can access all edges easily. Place a drop cloth beneath the door to catch any drips or dust. If possible, removing the door from its hinges and laying it flat on sawhorses is ideal for preventing drips, but painting it in place works too if you are careful. -
Remove hardware:
Using a screwdriver, take off the doorknobs, locksets, and strike plates. It is much easier to get a professional finish by removing these rather than taping around them. Place all screws and parts in a labeled bag so nothing gets lost. -
Clean thoroughly:
Wipe down the entire door with a degreaser or a TSP substitute. Doors collect a surprising amount of hand oils and grime, which can prevent paint from adhering properly. Let it dry completely. -
Fill imperfections:
Inspect the surface for any deep scratches or dents. Fill these with a small amount of wood filler, smoothing it with a putty knife. Allow the filler to dry according to the package instructions. -
Sand the surface:
Scuff sand the entire door using 120-grit sandpaper. You don’t need to strip the old paint entirely; just roughen the surface enough to give the new paint ‘teeth’ to grab onto. Pay special attention to the recessed corners around the panels. -
Remove dust:
Vacuum up the sanding dust, then wipe the door down with a tack cloth to remove every last speck of debris. Any dust left behind will create a gritty texture in your finish. -
Tape hinges:
If you left the door hanging, carefully apply painter’s tape to the hinges. Press the edges of the tape down firmly with a fingernail or putty knife to prevent paint bleed.
Step 2: Painting
-
Prime the surface:
If your door was previously painted with gloss paint or is a slick laminate, apply a coat of high-quality bonding primer. Use your brush for the recessed areas and the roller for the flat surfaces. Let the primer cure fully. -
Light sanding:
Once dry, lightly run a 220-grit sandpaper over the primed surface to knock down any raised grain or brush marks. Wipe away dust with a fresh tack cloth. -
Paint the panels first:
Stir your charcoal paint well. Start by painting the recessed panels. Use the angled brush to get into the corners and moldings first, then smooth out the center of the panels. Watch carefully for drips pooling in the corners. -
Paint the center stiles:
Move to the vertical center stile (the strip between the panels). I like to brush or roll this vertically, feathering the edges slightly so they will blend when you paint the horizontal rails. -
Paint horizontal rails:
Paint the horizontal rails (top, middle, and bottom sections). Use long, even strokes with the grain. If using a roller, follow immediately with a brush (a technique called back-brushing) if you want a hand-painted wood look, or just stick to the velour roller for a sprayed-look finish. -
Paint outer stiles:
Finish by painting the long vertical stiles on the far left and right of the door. Run your stroke from top to bottom in one continuous motion if possible to minimize lap marks. -
Paint the edges:
Don’t forget the edges of the door. The edge that opens into the room should be painted the same color as the side facing that room. -
Dry and recoat:
Allow the first coat to dry for at least 4-6 hours (or as recommended by your paint brand). Lightly sand with 220-grit paper if needed, wipe clean, and apply a second coat following the exact same order: panels, center stile, rails, outer stiles.
Sticky Situation?
If the door sticks to the frame after painting, rub a plain candle or clear paraffin wax along the edges where they touch. This creates an invisible barrier that prevents sticking.
Step 3: Finishing Touches
-
Remove tape:
Ideally, remove the painter’s tape while the final coat is still slightly tacky, or score along the edge with a utility knife once dry to ensure crisp lines. -
Reinstall hardware:
Wait at least 24 hours for the paint to harden before reinstalling your doorknobs and locks. This prevents the hardware from sticking to or denting the fresh soft paint.
Pro Tip: Floetrol
Add a paint conditioner like Floetrol to your latex paint. It slows drying time, allowing brush and roller marks to level out completely for that factory-smooth finish.
Enjoy the dramatic, modernized entry that your newly painted door brings to the space


Soft Sage or Muted Green Calm-Door Look
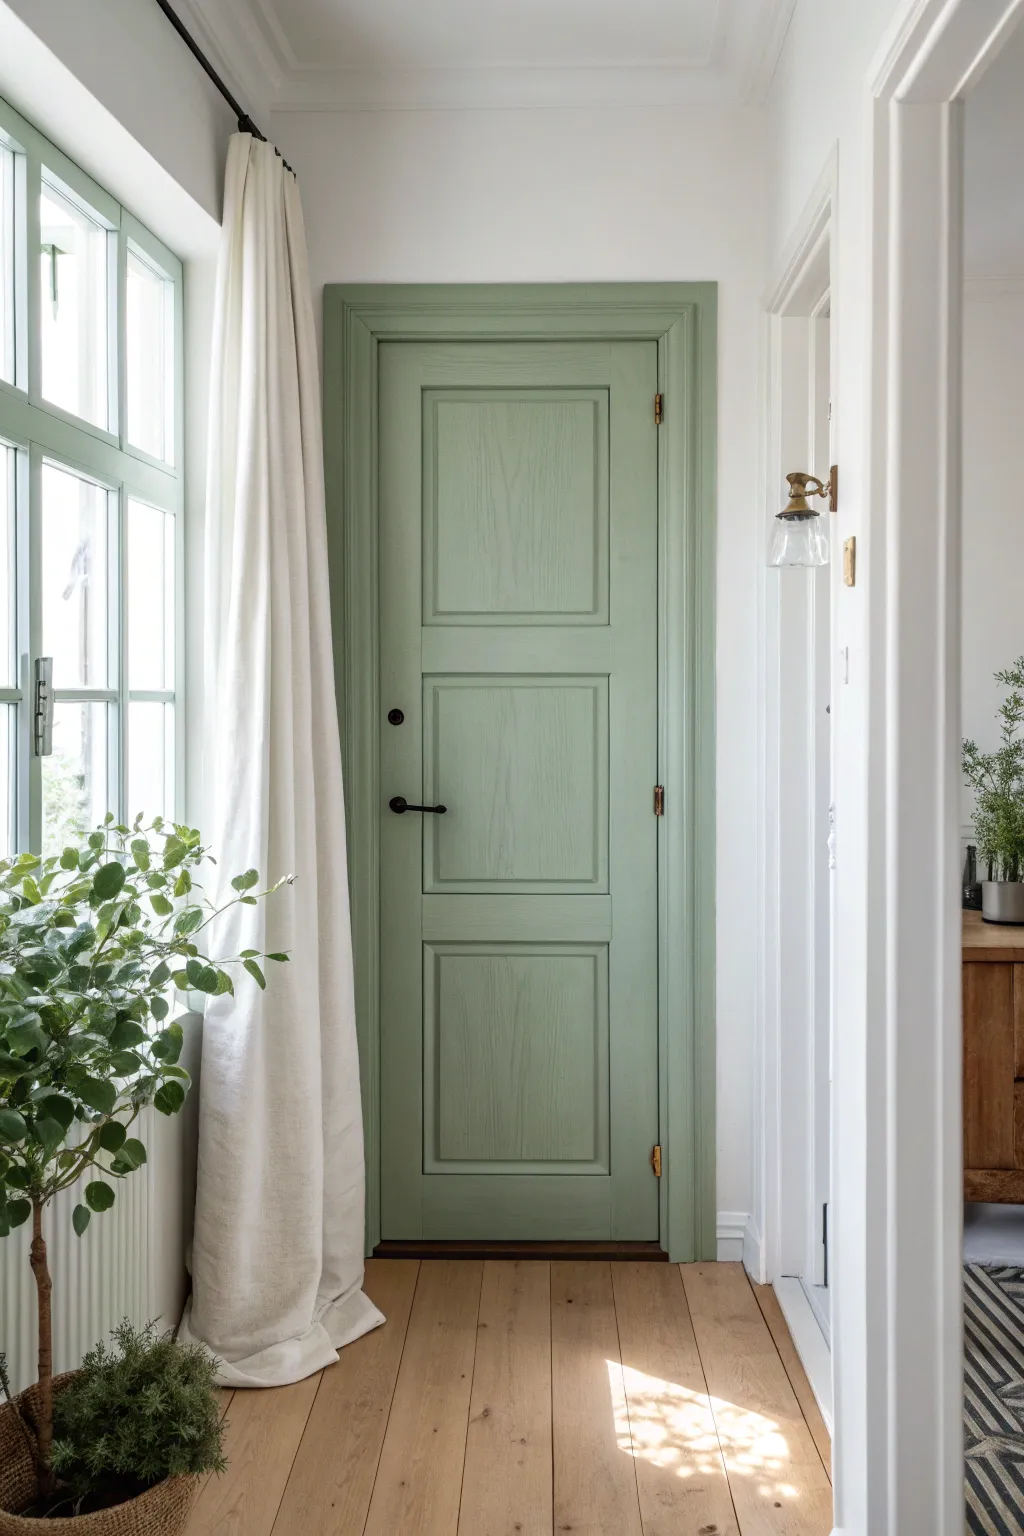
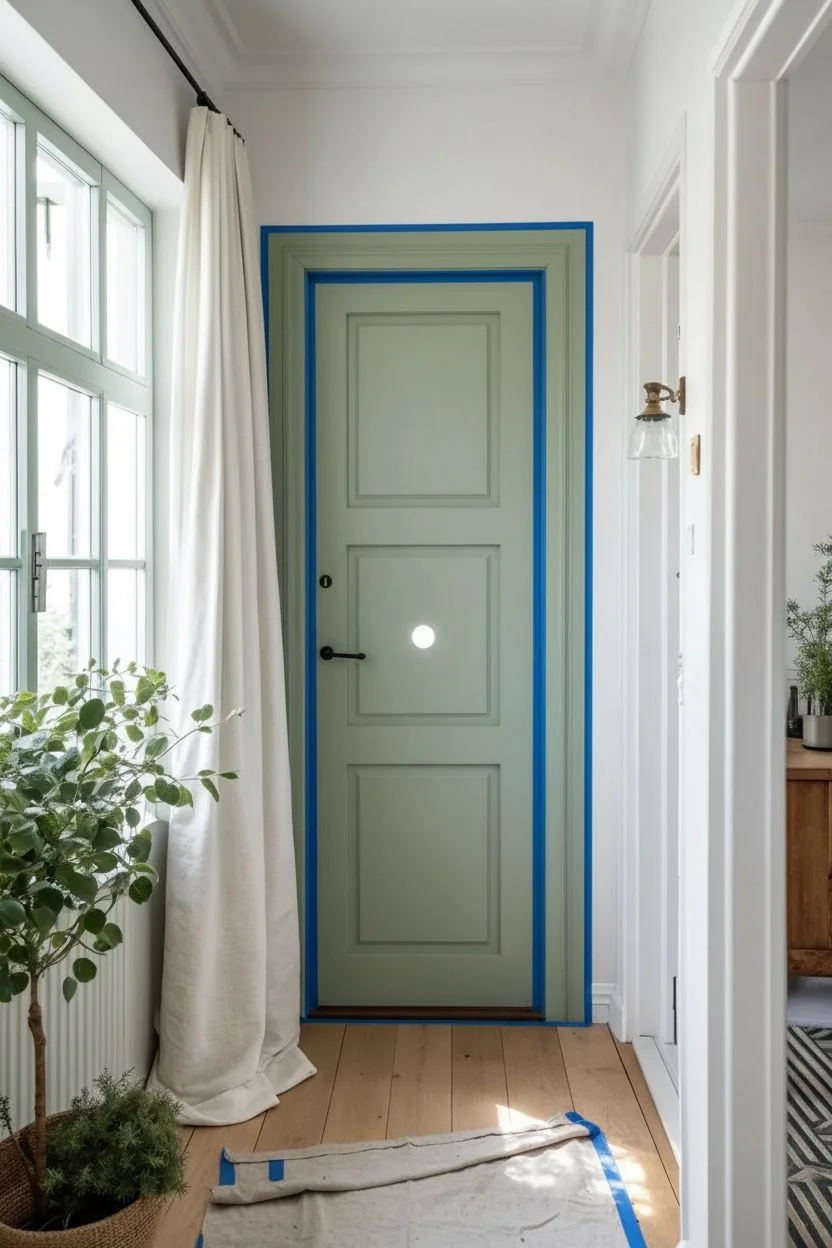
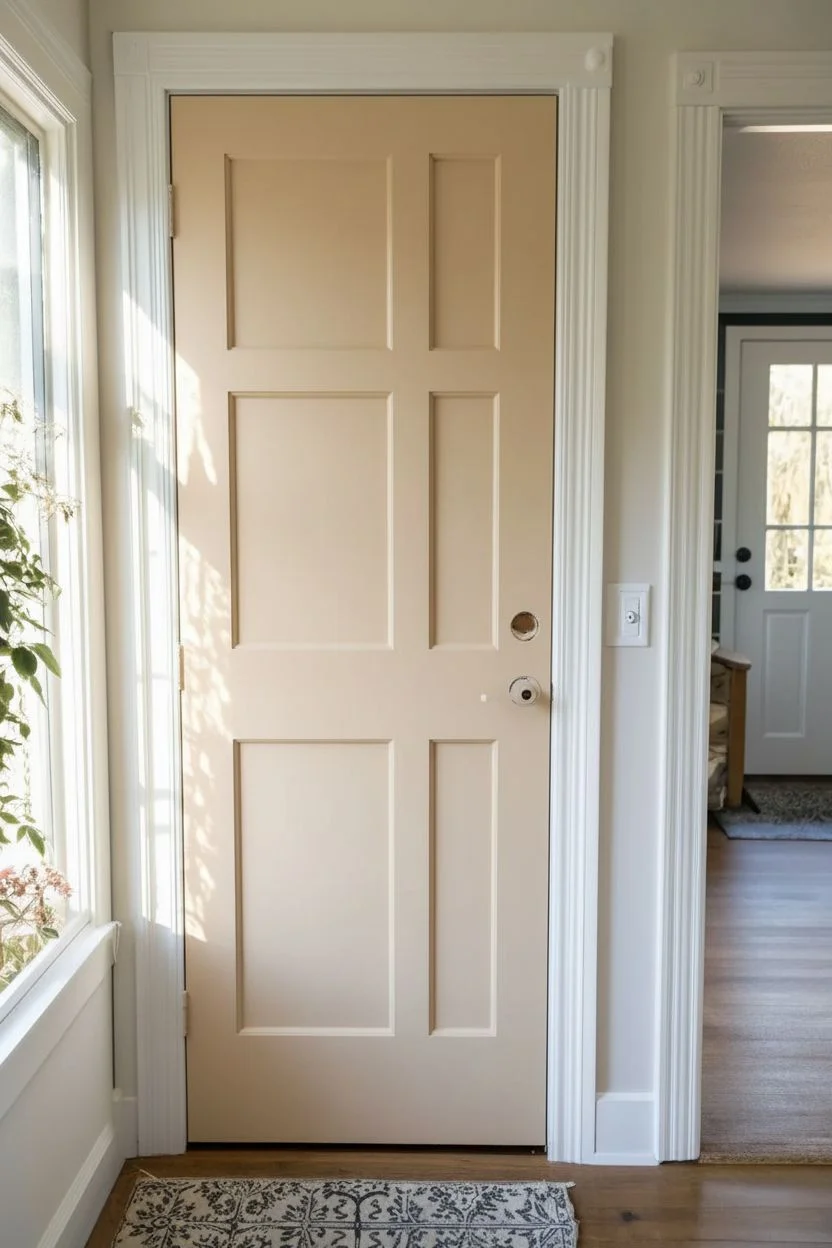
Bring the calming essence of nature indoors by transforming a standard interior door into a design statement with a coat of muted sage green. This project elevates a simple three-panel door into a sophisticated architectural feature that pairs beautifully with bright whites and natural wood tones.
Detailed Instructions
Materials
- Interior wood door (3-panel style preferred)
- Sandpaper (120 and 220 grit)
- Sanding block or orbital sander
- Bonding primer (high-quality)
- Sage green satin or semi-gloss interior paint
- 2-inch angled sash brush (synthetic bristles)
- 4-inch foam roller or short-nap microfiber roller
- Paint tray and liners
- Painter’s tape
- Drop cloths
- Screwdriver (for hardware removal)
- Clean tack cloths
- Matte black door handle hardware
Step 1: Preparation and Removal
-
Clear the area:
Begin by removing any items near the door, including rugs or plants, and lay down a heavy-duty drop cloth to protect your flooring. -
Remove hardware:
Using a screwdriver, carefully remove the existing door handle, lock mechanisms, and strike plates. Place all screws and parts in a labeled bag so nothing gets lost. -
Clean the surface:
Wipe the entire door down with a mild degreaser or soapy water to remove hand oils and dust. Let it dry completely before proceeding. -
Protect the perimeter:
Apply painter’s tape meticulously along the door hinges (if not removing the door) and the surrounding trim to ensure a crisp edge.
Sticky Door Fix
If the door feels sticky after drying, apply a tiny amount of clear wax or talcum powder along the jamb where the door touches the frame to stop paint blocking.
Step 2: Sanding and Priming
-
Initial sand:
Scuff sand the entire door using 120-grit sandpaper. You aren’t trying to strip the old finish entirely, just creating enough ‘tooth’ for the new primer to adhere. -
Dust removal:
Vacuum up the sanding dust, then wipe the door with a tack cloth to ensure the surface is perfectly clean. -
Prime the details:
Use your angled sash brush to apply a bonding primer into the recessed corners of the panels first. Smooth out any drips immediately. -
Roll the flat surfaces:
Use the 4-inch roller to apply primer to the flat vertical and horizontal stiles and rails. Let the primer cure according to the manufacturer’s instructions.
Step 3: Painting the Sage Layers
-
Sand between coats:
Once the primer is dry, lightly run 220-grit sandpaper over the surface to knock down any texture. Wipe clean with a tack cloth. -
Cut in the panels:
Dip your angled brush into the sage green paint and carefully paint the recessed molding of the three panels. I usually feather out the edges onto the flat surfaces to avoid hard ridge lines. -
Paint the panels:
Use the roller to fill in the flat center of each panel, ensuring the texture looks consistent. -
Paint the center rail:
Roll the vertical strip running down the center of the door. -
Paint the horizontal rails:
Paint the horizontal cross-pieces next. Use light pressure to ensure the roller marks blend seamlessly with the vertical sections. -
Finish the outer stiles:
Finally, paint the long vertical sides (stiles) of the door last. This order—panels, rails, stiles—helps minimize slightly visible overlap marks. -
Dry and repeat:
Allow the first coat to dry for at least 4-6 hours. lightly sand with high-grit paper if needed, tack cloth it off, and apply a second coat following the exact same order.
Pro Tip: Floetrol
Add a conditioner like Floetrol to your latex paint. It slows drying time, allowing brush strokes to level out for a factory-smooth, sprayed-on finish.
Step 4: Finishing Touches
-
Remove tape:
While the final coat is still slightly tacky (not fully cured), carefully peel away the painter’s tape at a 45-degree angle to prevent peeling the new paint. -
Cure time:
Let the door cure for at least 24 hours before reattaching hardware to prevent the fresh paint from sticking to the metal plates. -
Install hardware:
Install the new matte black handle set. The dark contrast against the sage green creates that modern, sophisticated look shown in the inspiration.
Step back and admire how this soothing pop of color completely completely changes the atmosphere of your hallway


Navy Painted Door for Classic Polish
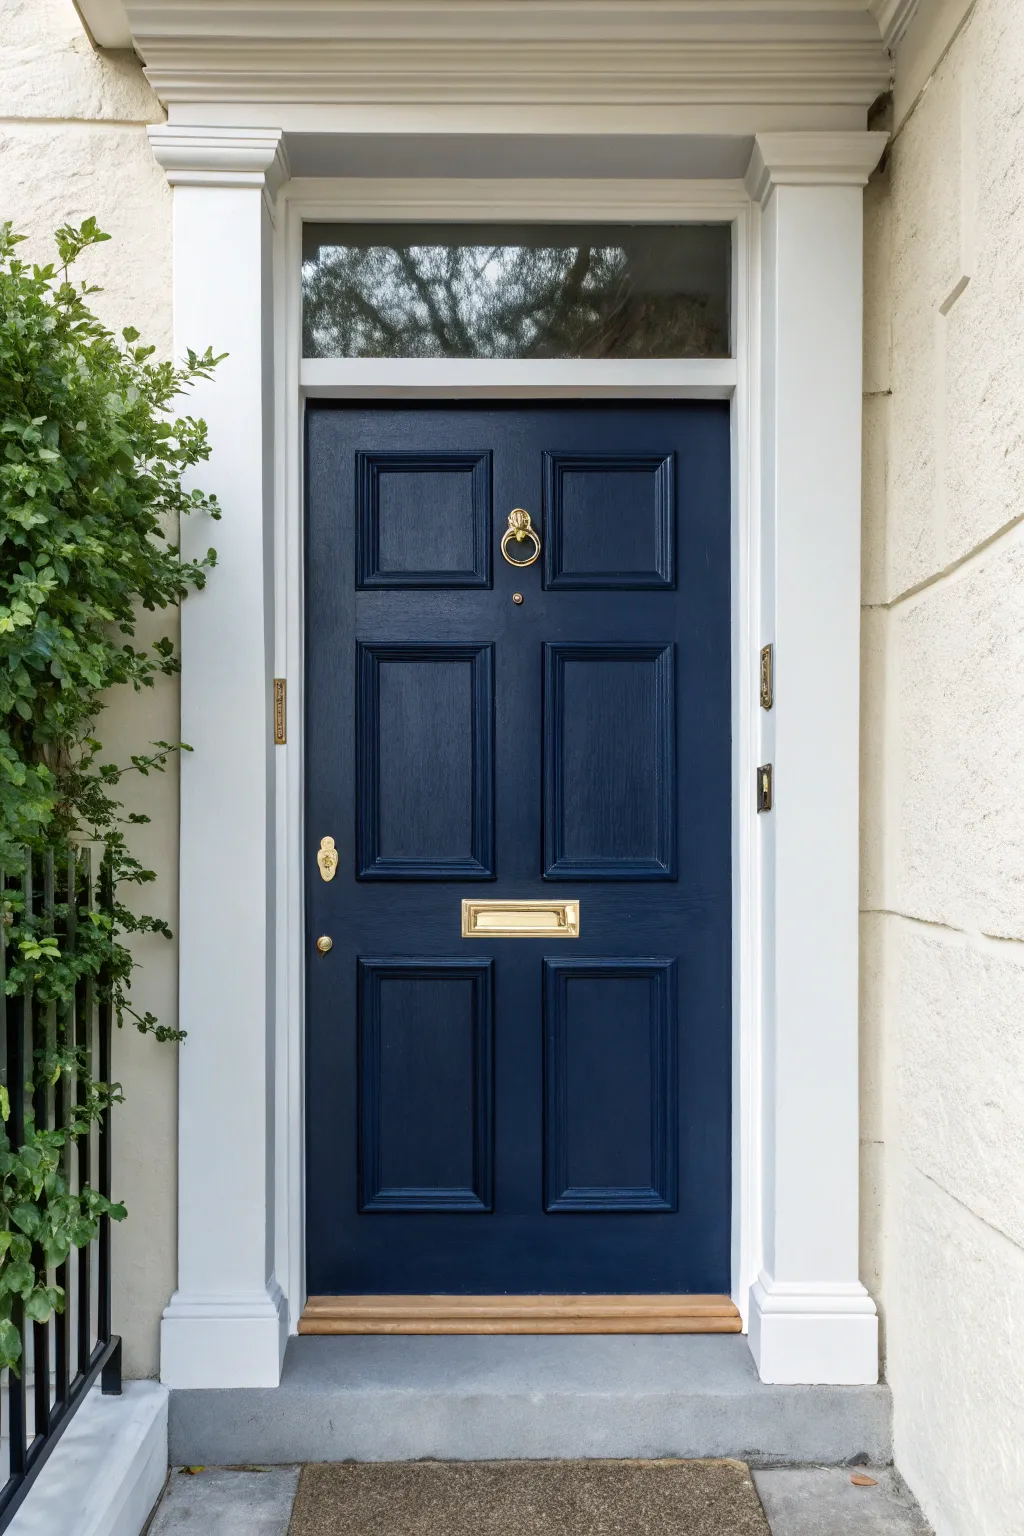

Transform your front entrance into a statement of timeless elegance with this deep navy finish. This project balances rich, dark tones with brass accents and crisp white trim for a look that feels both historic and impeccably polished.
Step-by-Step Tutorial
Materials
- Exterior satin or semi-gloss paint (Navy Blue)
- Exterior semi-gloss paint (Crisp White)
- Bonding primer (exterior grade)
- Sandpaper (120 and 220 grit)
- Liquid deglosser or TSP substitute
- Painter’s tape (exterior grade)
- Small foam roller
- 2-inch angled distinct sash brush
- Drop cloths
- Screwdriver or drill (for hardware removal)
- Wood filler (if repairs are needed)
- Gold or brass door hardware (knob, knocker, letterbox)
Step 1: Preparation & Hardware Removal
-
Check the weather:
Before starting, ensure you have a stretch of 2-3 days with no rain and moderate temperatures (between 50°F and 80°F) for optimal curing. -
Remove hardware:
Using your screwdriver, take off the knocker, letterbox, spyhole, and lock covers. If the lock mechanism is tricky, tape it off precisely later, but removing it offers the cleanest finish. -
Clean the surface:
Scrub the entire door and the surrounding white frame with TSP or a degreaser to remove dirt, grime, and oils from hands. -
Sand the surface:
Lightly sand the existing finish with 120-grit sandpaper to create tooth for the new paint. Wipe away dust with a tack cloth or damp rag.
Step 2: Priming & Framing
-
Tape the edges:
Apply painter’s tape to the glass transom above the door and along the floor threshold to protect them from drips. -
Prime the door:
Apply a coat of bonding primer to the door panels and stiles. This is crucial if you are painting over a dark color or a glossy surface. -
Refresh the frame:
While the door primer dries, turn your attention to the surrounding casing. Paint the frame, pediment, and columns with your crisp white exterior semi-gloss, using the angled brush for the corners. -
Second white coat:
Once the first coat on the trim is dry to the touch, apply a second coat of white to ensure distinct, solid coverage against the masonry.
Pro Tip: Weather Stripping
Don’t close the door tightly until the paint is fully cured (often 1-2 days). Weather stripping can stick to fresh paint and rip it right off upon reopening.
Step 3: Painting the Navy Door
-
Start with panels:
Begin painting the navy color on the recessed panels first. Use the angled brush to get into the corners and molding profiles of the six inset rectangles. -
Paint the center stiles:
Next, paint the vertical strip running down the center of the door. Use the small foam roller here for a smooth finish, keeping strokes vertical. -
Paint the rails:
Move to the horizontal rails (the cross-pieces). Paint these horizontally, feathering the edges where they meet the vertical stiles. -
Finish the outer stiles:
Paint the long vertical strips on the far left and right edges of the door last. This sequence helps manage drying lines and keeps the grain direction logical. -
Wait and sand:
Allow the first coat to dry completely (usually 4-6 hours). I like to lightly hand-sand with 220-grit paper between coats to knock down any bumps. -
Apply second coat:
Repeat the painting process (panels, center vertical, horizontal rails, outer verticals) with a second coat for true depth of color. -
Check the edges:
Don’t forget to paint the edge of the door that is visible when it opens. Check the color of your interior side to decide where the paint line should stop.
Troubleshooting: Brush Marks
If brush strokes are visible after drying, you likely overworked the paint. Add a paint conditioner like Floetrol to your mix to improve leveling and buy you more working time.
Step 4: Finishing Touches
-
Remove tape:
Carefully score the edge of the painter’s tape with a utility knife before pulling it off to prevent peeling any fresh paint. -
Reinstall hardware:
Once the paint has cured for at least 24 hours to avoid tackiness, screw your gold knocker, letterbox, and handle back into place. -
Clean the glass:
Clean the transom window above to sparkling clarity so the reflection complements the gloss of the new paint. -
Style the entrance:
Add a simple coir mat and ensure any adjacent greenery, like ivy or potted plants, is trimmed neatly away from the fresh paint.
Enjoy the commanding presence your new entrance brings to the entire facade of your home
BRUSH GUIDE
The Right Brush for Every Stroke
From clean lines to bold texture — master brush choice, stroke control, and essential techniques.
Explore the Full Guide
Sunny Painted Door in Warm Yellow Tones
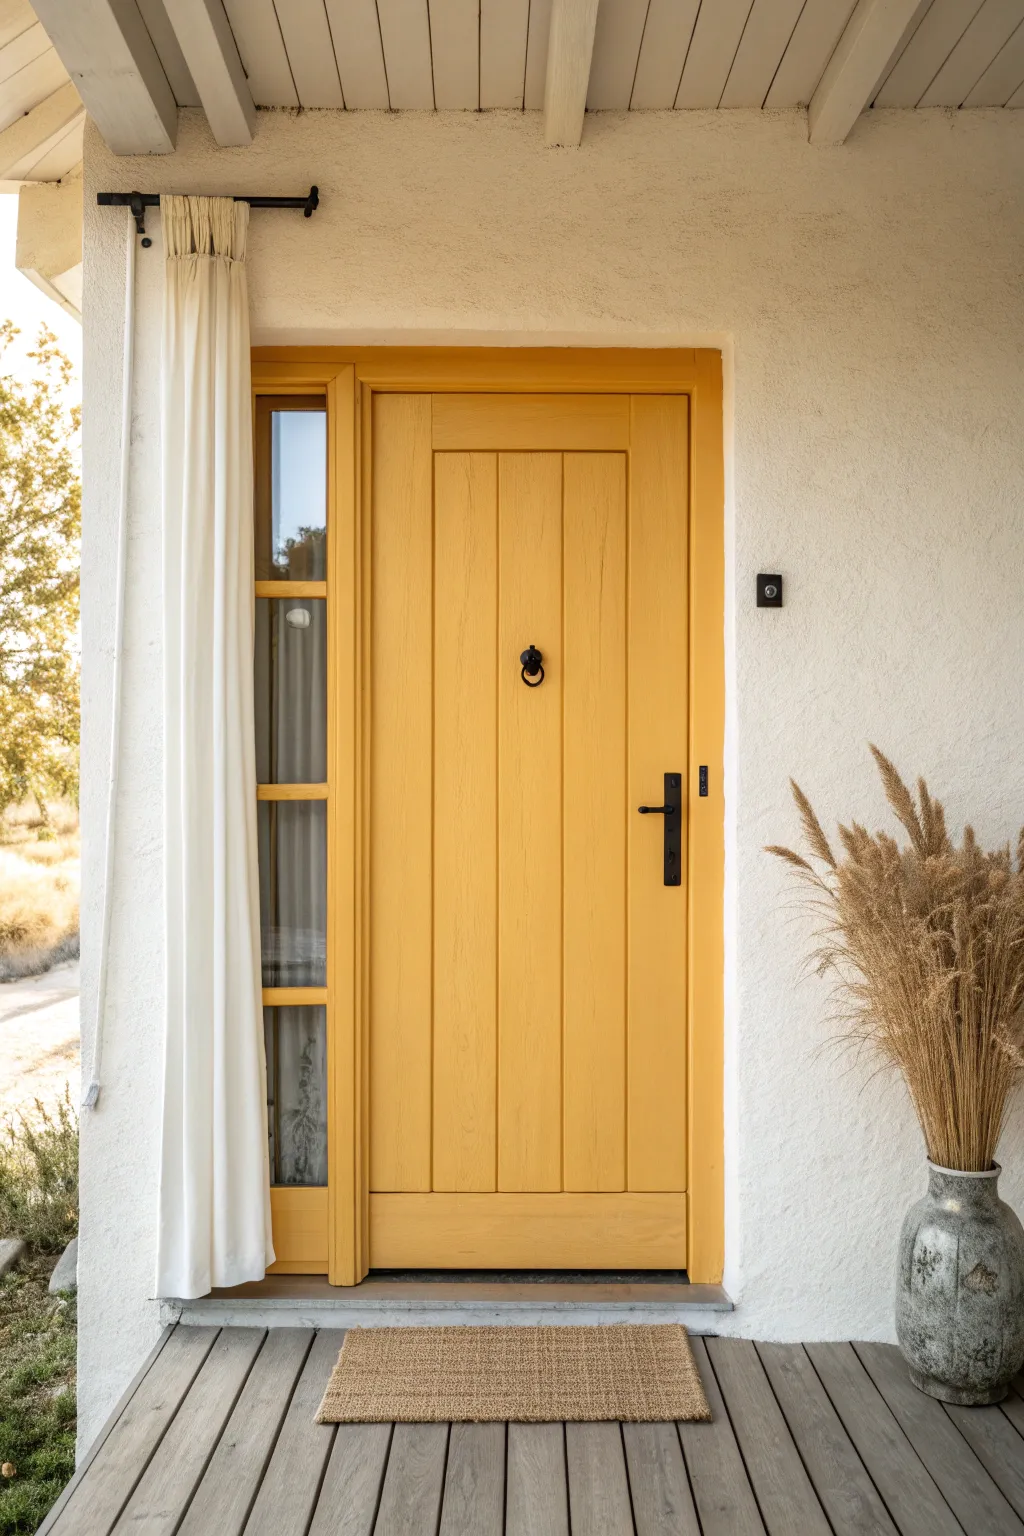
Transform your entryway into a welcoming burst of sunshine by painting your front door in a warm, inviting yellow tone. This project not only boosts curb appeal but also creates a cheerful focal point that hints at the warmth inside your home.
Step-by-Step
Materials
- Exterior-grade wood primer
- Exterior satin or semi-gloss paint in warm yellow (e.g., ‘Sunflower’ or ‘Dijon’)
- Painter’s tape (multi-surface)
- Drop cloths or plastic sheeting
- Sandpaper (120 and 220 grit)
- Tack cloth
- Screwdriver or drill
- 2-inch angled sash brush
- 4-inch foam roller
- Small roller tray
Step 1: Preparation First
-
Assess the weather:
Before you begin, check the forecast. You need a window of dry weather with temperatures between 50°F and 85°F to ensure proper drying without blistering. -
Remove hardware:
Using your screwdriver or drill, carefully remove all door hardware, including the handle, lockset, and that charming center knocker. Store screws in a labeled bag so nothing gets lost. -
Clear the area:
Pull back any curtains, move doormats, and relocate adjacent decor like vases. Lay down your drop cloth to protect the decking from drips. -
Clean surface:
Wash the entire door with a mild detergent and water solution to remove dirt, grime, and grease. Let it dry completely. -
Sand the wood:
Scuff sand the existing finish with 120-grit sandpaper. You don’t need to strip it bare, but you do need to remove any gloss so the new paint adheres. -
Dust off:
Wipe away the sanding dust with a microfiber rag, followed by a tack cloth to pick up the finest particles.
Step 2: Protect and Prime
-
Tape the glass:
If your door has side lites or glass panels like this one, carefully apply painter’s tape to the glass edges. Press down firmly with a credit card to prevent bleed-under. -
Tape the frame:
Run tape along the adjacent stucco or trim to ensure you get a crisp line where the door meets the wall. -
Apply primer:
If you are painting over a dark color or raw wood, apply a coat of exterior primer. Use the brush for corners and the roller for flat areas. -
Light sand:
Once the primer is fully dry, give it a very light pass with 220-grit sandpaper and wipe clean again. This makes the topcoat ultra-smooth.
Sticky Situation?
If the door sticks to the weatherstripping after painting, rub a little paraffin wax or a white candle along the edges where they meet to create a non-stick barrier.
Step 3: Painting the Details
-
Cutting in:
Open your yellow paint can and stir well. I like to start by using the angled sash brush to paint the recessed grooves of the vertical panels first. -
Edges and corners:
While you have the brush out, paint the bevels around the window panes and the outer edges of the door itself. -
Rolling flat areas:
Switch to your 4-inch foam roller. Apply the yellow paint to the flat vertical panels and the horizontal rails, working in the direction of the wood grain. -
Smooth it out:
If you see any roller texture, lightly drag a dry brush over the wet paint (tipping off) to smooth it out. -
Dry and repeat:
Allow the first coat to dry according to the manufacturer’s instructions. Apply a second coat for full opacity and rich color depth.
Color Depth
For an antique look, apply a very subtle dark glaze into the vertical grooves before the final clear coat. It emphasizes the wood grain texture.
Step 4: Finishing Touches
-
Remove tape:
Score the edge of the tape with a utility knife before the paint fully cures to prevent peeling, then pull the tape away slowly at a 45-degree angle. -
Reinstall hardware:
Once the door is dry to the touch (usually 24 hours for heavy use), reattach your black hardware. The contrast against the yellow will look stunning. -
Style the entrance:
Place your doormat back down and bring in natural elements, like a tall vase of dried grasses, to complement the sunny tones.
Step back and enjoy the warm, vibrant welcome your home now offers to everyone who visits
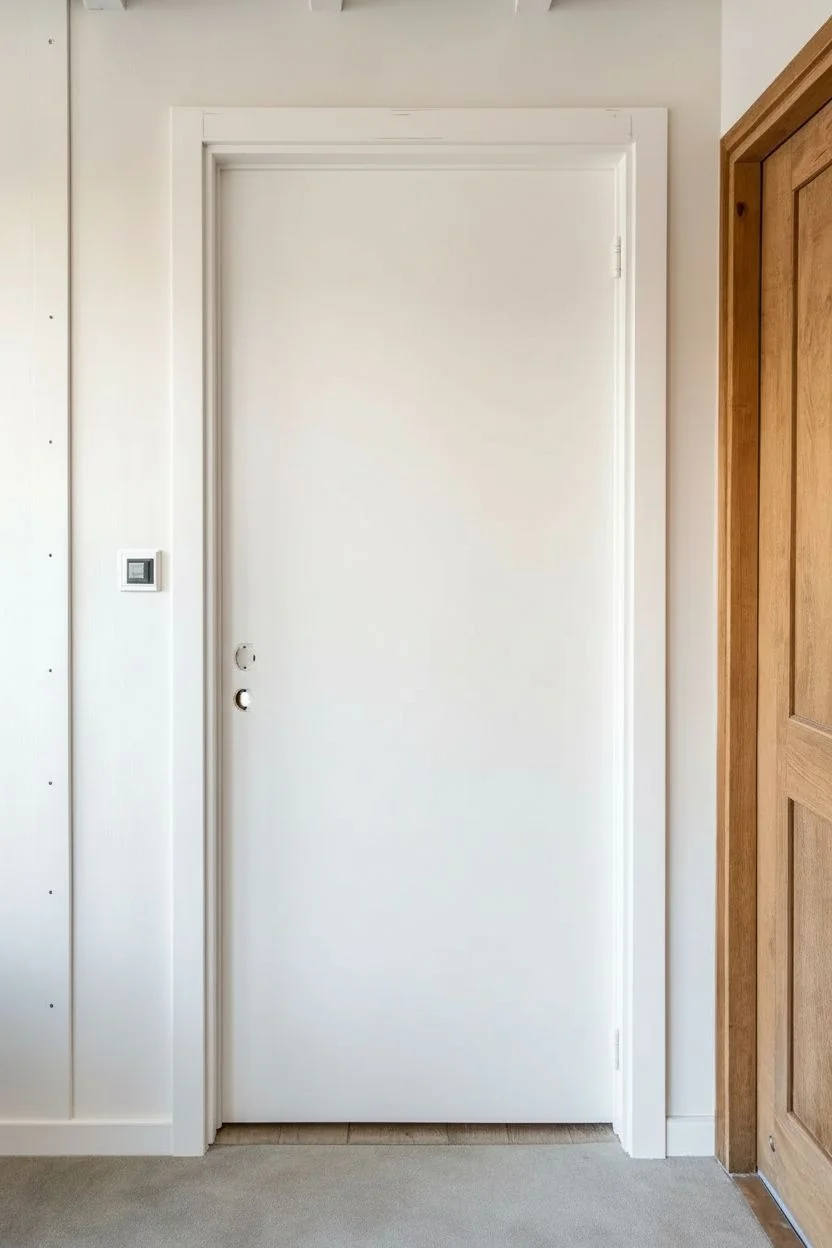
Barely-There Blush or Dusty Pink Painted Door
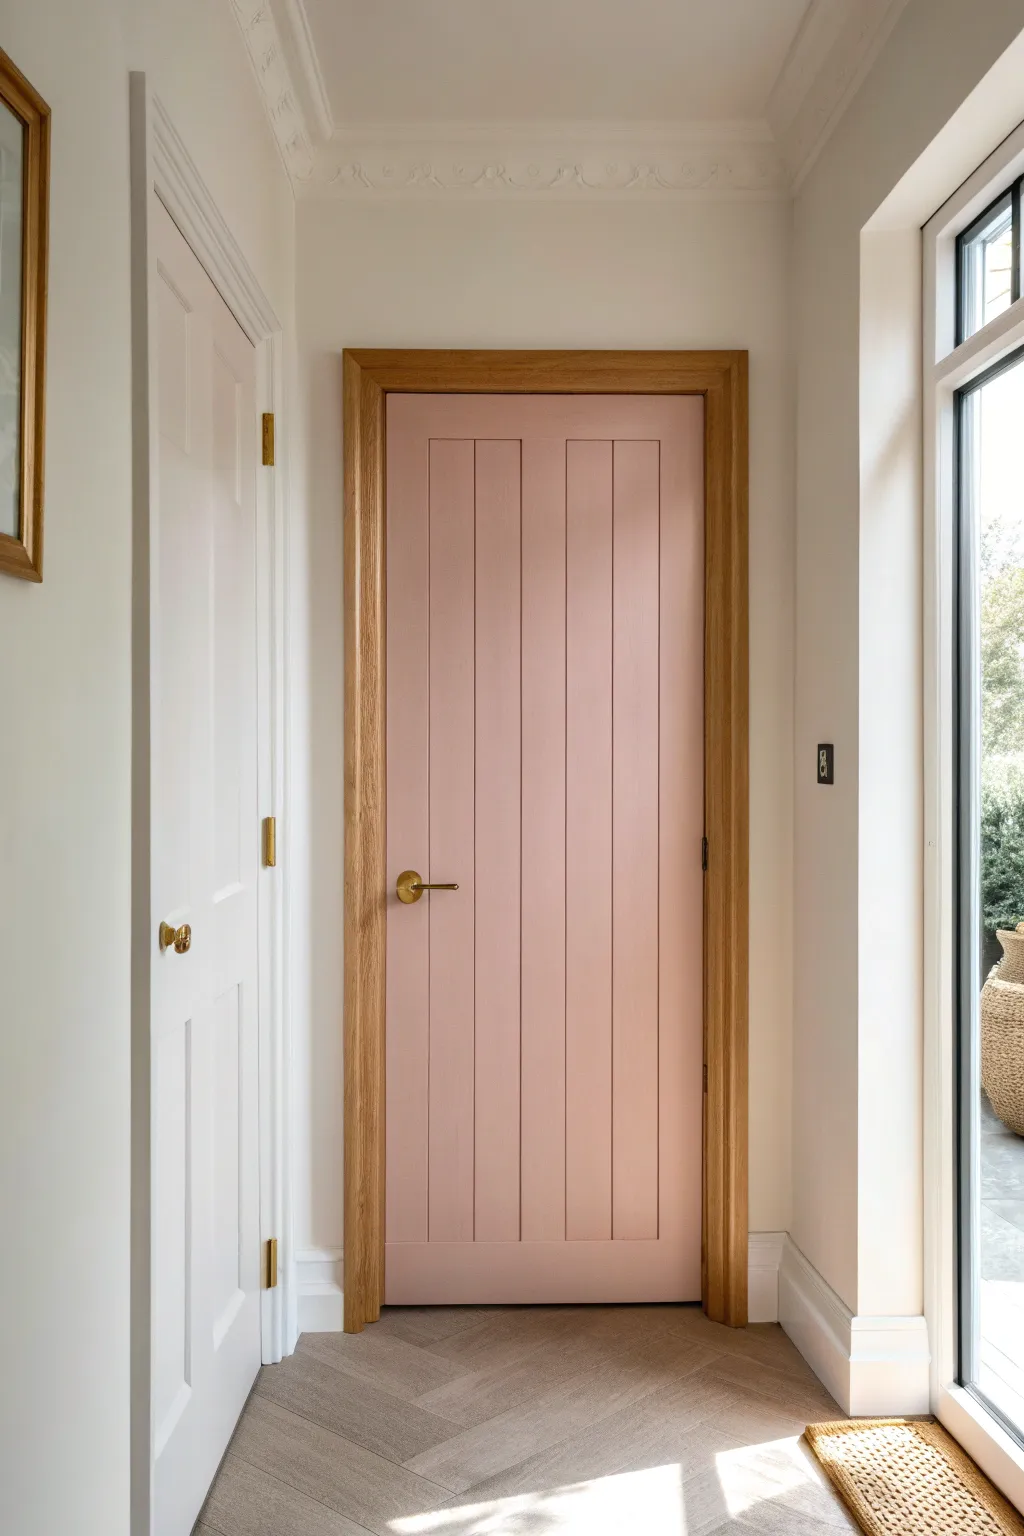
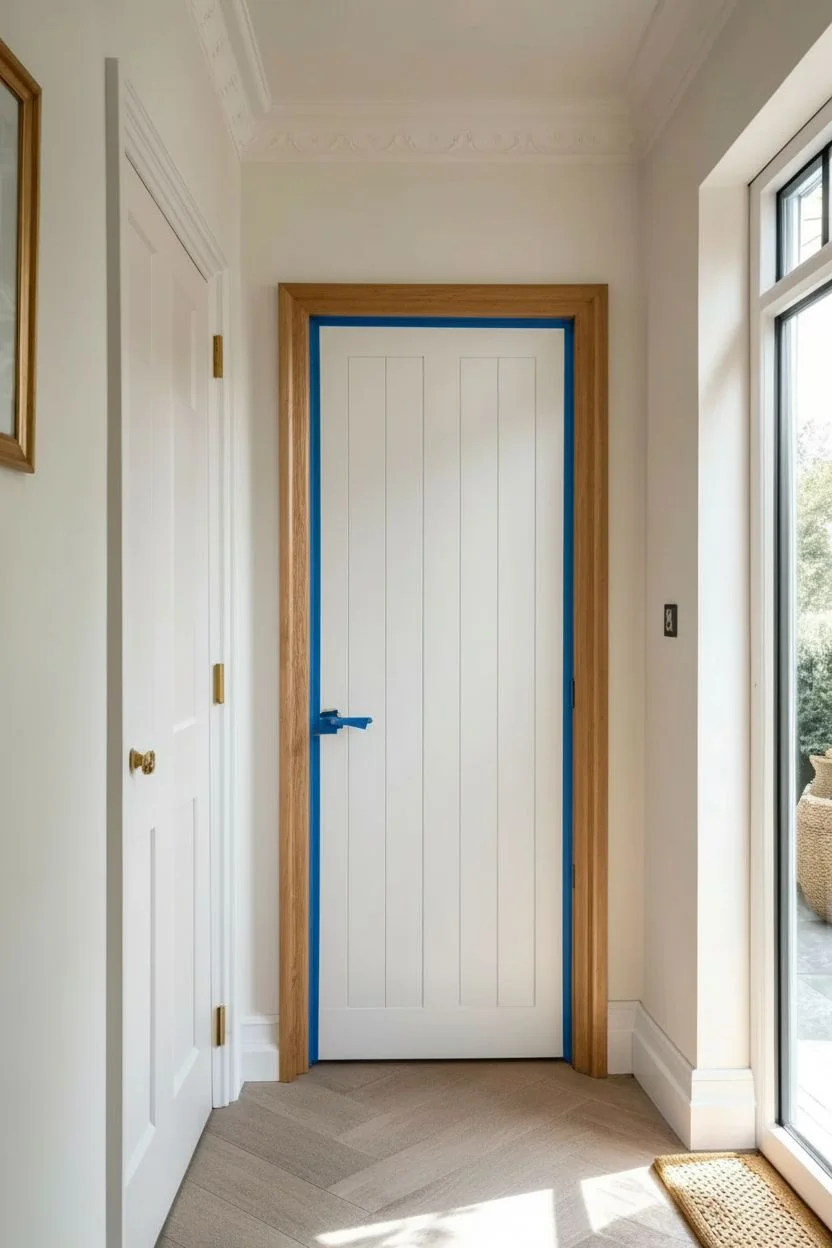
Transform a standard internal door into a soft, inviting focal point with this subtle blush pink renovation. By pairing a gentle, dusty rose hue with natural timber architraves, you create a sophisticated entrance that feels both modern and timeless.
How-To Guide
Materials
- Unfinished solid wood or primed internal door (vertical paneled style)
- Oak architrave set (frame)
- Dusty pink or blush interior wood paint (satin or eggshell finish)
- Clear matte or satin wood varnish (for the frame)
- Fine-grit sandpaper (120 and 240 grit)
- Wood primer (if door is bare wood)
- 2-inch synthetic angled brush
- 4-inch foam roller and tray
- Painter’s tape
- Brass door handle mechanism
- Drop cloth
- Screwdriver and drill
Step 1: Preparation & Framing
-
Clear the area:
Remove the door from its hinges if possible, as painting flat prevents drips. Lay it across sawhorses or a protected flat surface. If painting in situ, wedge the door open securely. -
Prep the door surface:
Lightly sand the entire door surface using 120-grit sandpaper to key the surface. Wipe away all dust with a tack cloth or slightly damp rag to ensure a perfectly smooth base. -
Prime the door:
If your door is bare wood, apply a high-quality wood primer to prevent tannins from bleeding through. For pre-primed doors, a quick spot-prime on any scuffs is sufficient. -
Install the architrave:
While the primer dries on the door, focus on the frame. If you are replacing painted trim with natural wood, carefully remove the old molding and install your new oak architrave kit, cutting corners at 45-degree angles for a crisp miter joint. -
Protect the frame:
Once the oak frame is installed, use low-tack painter’s tape to mask off the edges where the wood meets the wall, and where the hinges will sit.
Paint Dragging?
If the paint feels sticky or drags while rolling, add a tiny splash of paint conditioner (like Floetrol) to your tray. It improves flow and leveling for a smoother finish.
Step 2: Painting the Blush Finish
-
Cut in the details first:
Using your 2-inch angled brush, paint the recessed vertical grooves of the door first. I usually work from the top down to catch any drips immediately. -
Roll the flat panels:
Switch to a 4-inch foam roller for the flat vertical panels. This ensures a smooth, stroke-free finish that looks professionally sprayed. -
Let it cure:
Allow the first coat of blush pink to dry completely according to the manufacturer’s instructions. Do not rush this step, as tacky paint will drag. -
Sand between coats:
Just give the dry surface a very gentle scuff with 240-grit sandpaper. This knocks back any raised grain or dust nibs for a buttery smooth final feel. -
Apply the second coat:
Repeat the painting process—grooves first, then flat panels. A second coat deepens the dusty pink color and ensures solid opacity.
Step 3: Finishing Touches
-
Seal the oak frame:
To keep that beautiful raw wood look without the risk of staining, apply a coat of clear matte varnish to your oak architrave. It protects the wood while keeping it looking natural. -
Install hardware:
Once the door paint has cured for at least 24 hours (harder paint prevents scratching during installation), attach your brass door handle. The gold tone complements the blush pink perfectly. -
Rehang the door:
With the help of a friend, lift the door back onto its hinges. Check that it swings freely without catching on your newly installed oak frame. -
Final inspection:
Remove the painter’s tape carefully at a 45-degree angle. Touch up any tiny areas near the hinges with a small artist’s brush if needed.
Level Up: Hardware Match
Swap standard hinges for brass ones to match your handle. Even though they are small, consistent metal finishes make the project look fully custom and high-end.
Enjoy the gentle warmth and sophisticated pop of color this beautiful door adds to your hallway

PENCIL GUIDE
Understanding Pencil Grades from H to B
From first sketch to finished drawing — learn pencil grades, line control, and shading techniques.
Explore the Full Guide
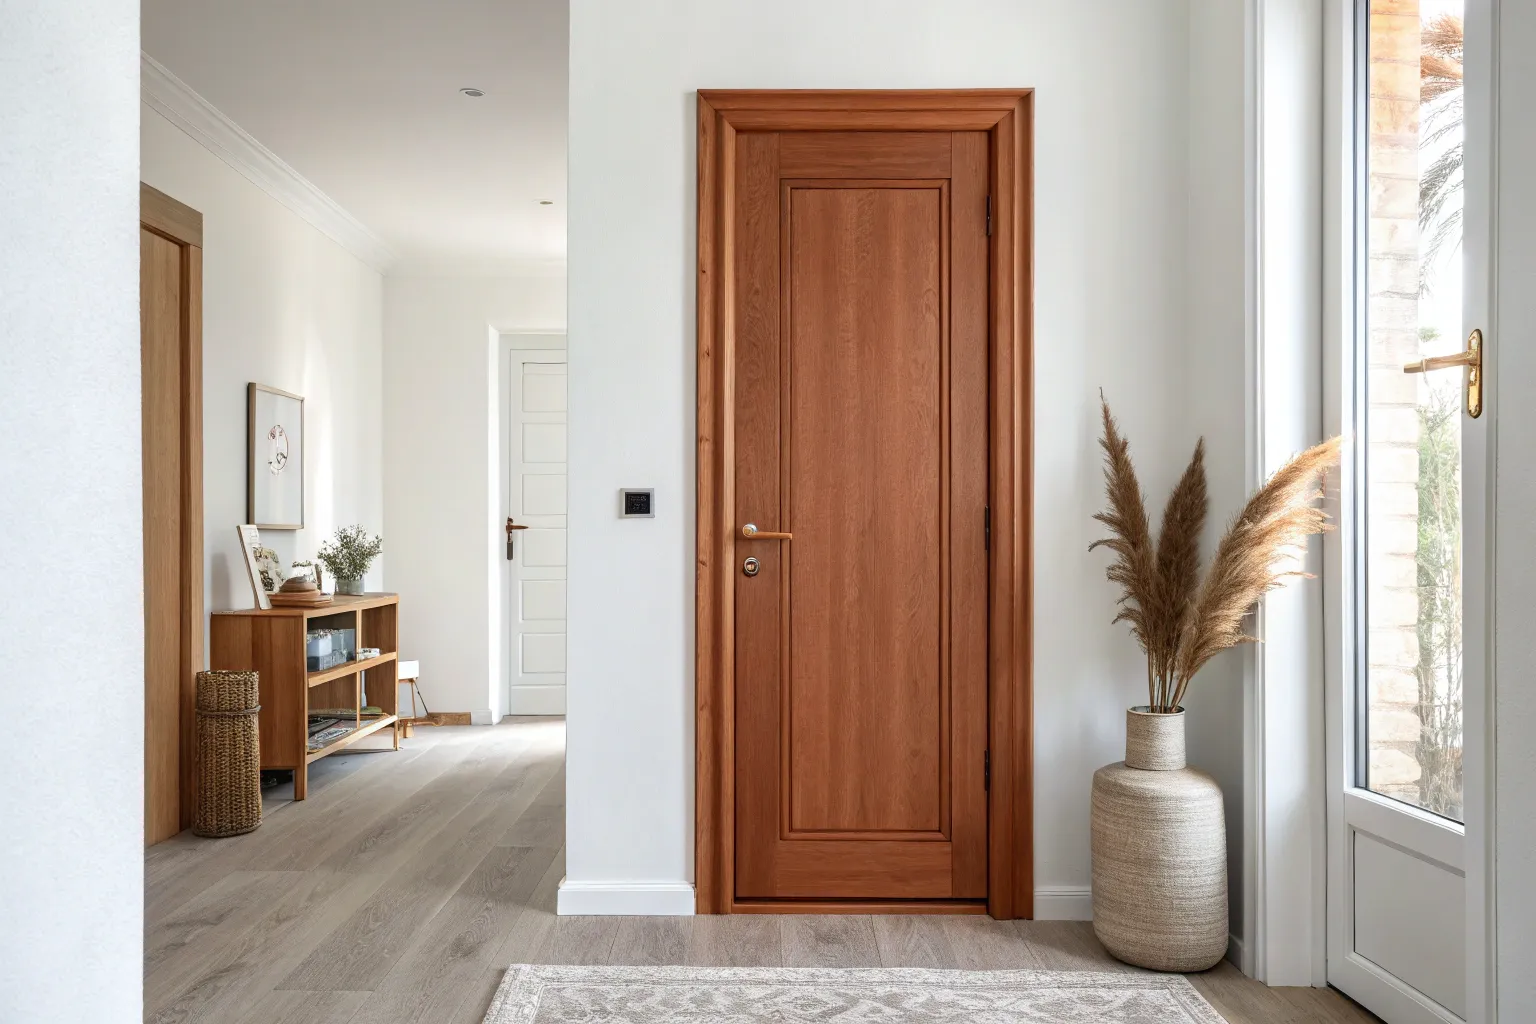
Color-Drenched Door and Trim in One Shade
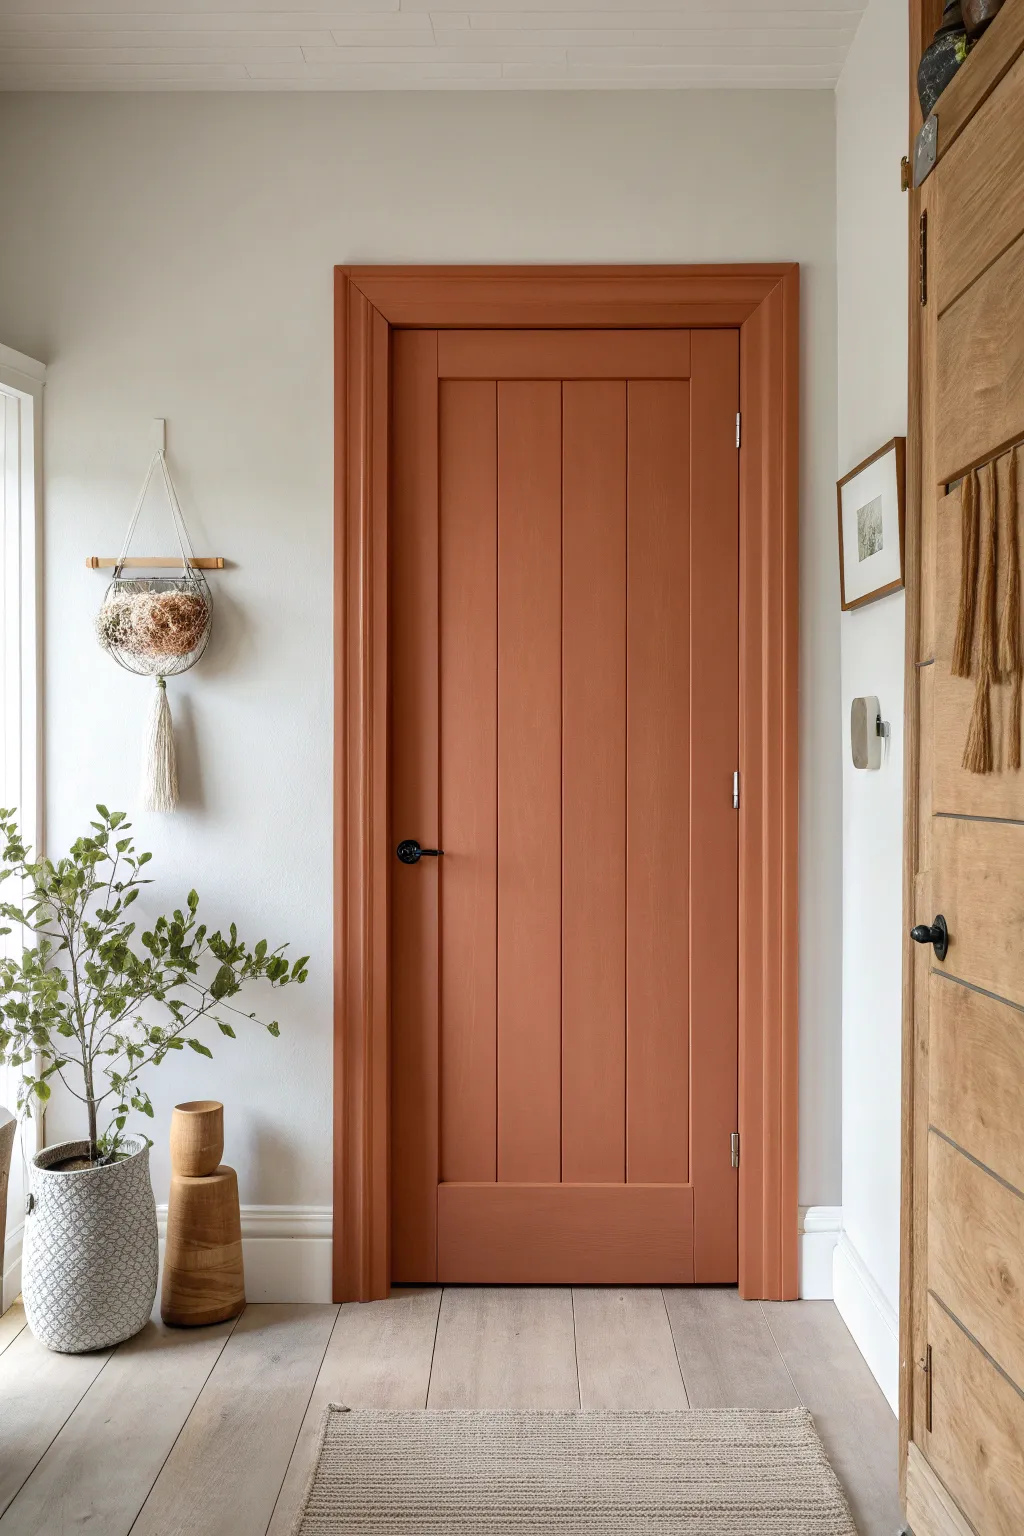
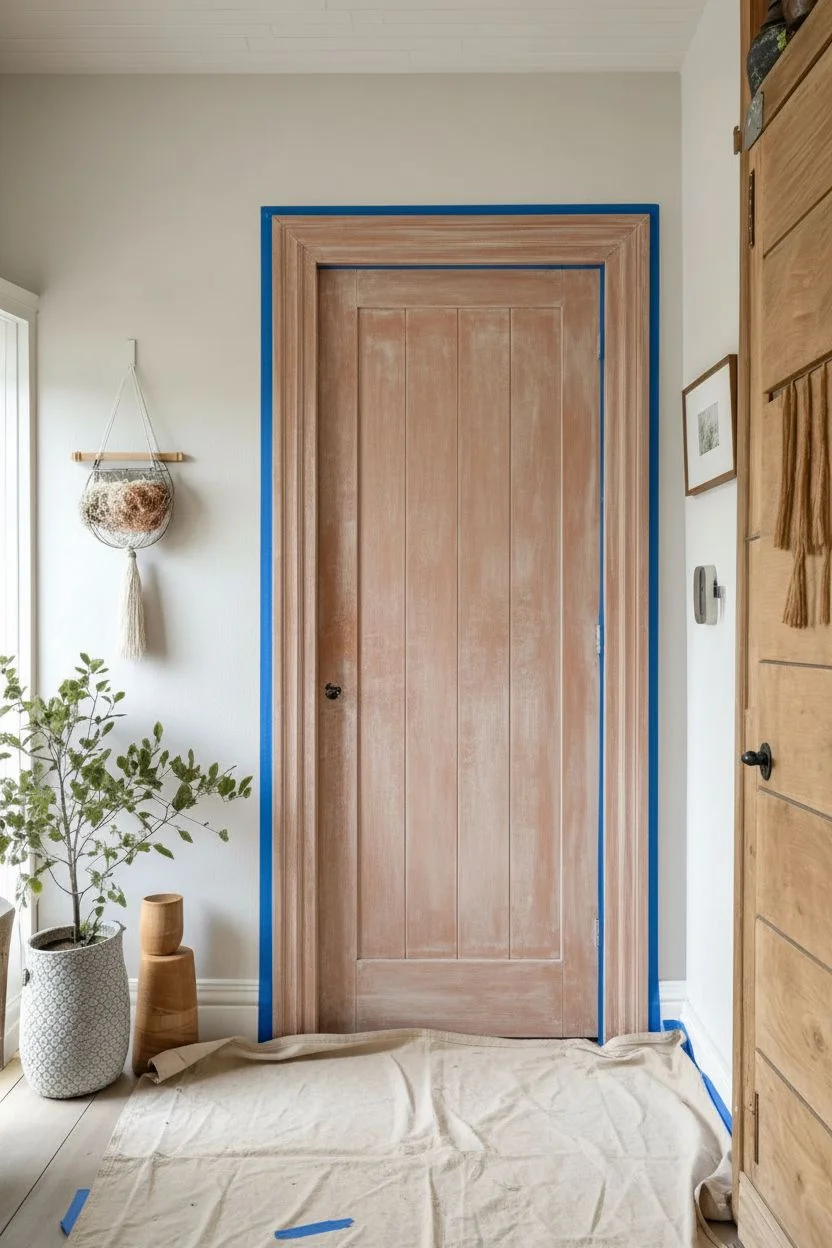
Embrace the warmth of the earth with this cohesive painting project that unifies your door and woodwork in a single, rich hue. By extending the color from the door slab onto the surrounding frame, you create a modern, color-drenched focal point that adds architectural interest to any neutral hallway.
Step-by-Step Guide
Materials
- Interior wood paint (Terracotta/Burnt Orange, satin or eggshell finish)
- Wood primer/undercoat (tinted grey or orange if possible)
- Medium-grit sandpaper (120 grit)
- Fine-grit sandpaper (220 grit)
- High-quality synthetic angled sash brush (2 inch)
- Small foam roller and tray
- Painter’s tape (frog tape recommended)
- Drop cloth or masking paper
- Screwdriver (for hardware removal)
- Sugar soap or degreaser
- Clean rags
- Wood filler (optional)
Step 1: Preparation
-
Clear and protect:
Begin by laying down a drop cloth or heavy masking paper to protect your flooring completely. Slide it right up to the threshold to catch any errant drips. -
Hardware removal:
Using your screwdriver, carefully remove the door handle, latch plate, and any other hardware. Store these screws in a small bag so they don’t get lost—it saves so much hassle later. -
Clean the surface:
Wash the entire door and the surrounding architrave thoroughly with sugar soap and warm water. This removes unseen grease from hands that can prevent paint adhesion. -
Initial sanding:
Sand the door faces and the trim with medium-grit (120) sandpaper. You don’t need to take it back to bare wood; just scuff the slick surface enough to create a ‘key’ for the new paint. -
Dust control:
Vacuum up the sanding dust, paying close attention to the grooves between panels. Wipe everything down with a tack cloth or a damp rag to ensure a pristine surface. -
Masking up:
Apply painter’s tape carefully along the wall where it meets the door trim. Press the edge of the tape down firmly with your thumb or a putty knife to prevent paint bleed.
Step 2: Priming
-
Spot fill and sand:
If there are any deep dings or scratches, fill them with wood filler now. Once dry, sand those spots smooth with the fine-grit paper. -
Cut in the primer:
Using your angled brush, apply primer to the recessed grooves of the door panels and the detailed edges of the architrave first. -
Roll the flats:
Use the foam roller to apply primer to the flat vertical panels and horizontal rails. This ensures a smooth, texture-free base. -
Let it cure:
Consult your primer tin for drying times and allow it to dry completely. A light sand with fine grit (220) here often makes the final finish much smoother.
Sticky Situation?
If the door sticks after painting, rub a clear candle or a bar of soap along the edge that is catching. This lubricates the surface without damaging your new paint job.
Step 3: Painting
-
First coat: Details:
Stir your terracotta paint thoroughly. Dip your brush about an inch into the paint and tackle the complex areas first: the molding profiles on the trim and the vertical grooves on the door. -
Painting the rails:
Paint the horizontal rails (the top and bottom blocks of the door). Brush in the direction of the wood grain for the most natural look. -
Rolling the panels:
Switch to your foam roller for the long vertical panels. Load the roller lightly to avoid orange-peel texture and roll from top to bottom. -
Check for drips:
Scan the corners of the panels and the bottom of the frame immediately. Smooth out any gathering drips with a dry brush before they set. -
Dry and recoat:
Allow the first coat to dry for the time recommended by the manufacturer. I usually wait an extra hour just to be safe before starting the second coat. -
Second coat:
Repeat the painting process exactly: details first, then flats. The color depth will truly emerge with this second layer. -
Remove tape:
While the final coat is still slightly tacky (not wet, but not fully cured), carefully peel off the painter’s tape at a 45-degree angle to ensure a crisp line. -
Reinstall hardware:
Once the door is fully cured—ideally after 24 hours to prevent scratching—screw your handles and plates back into place.
Two-Tone Twist
For a surprise pop of contrast, paint the thin edge of the door (the latch side) in a neon pink or bright yellow. It’s a hidden detail only visible when the door is open.
Step back and enjoy the warmth this bold block of color brings to your space
High-Contrast Door and Trim for Instant Pop
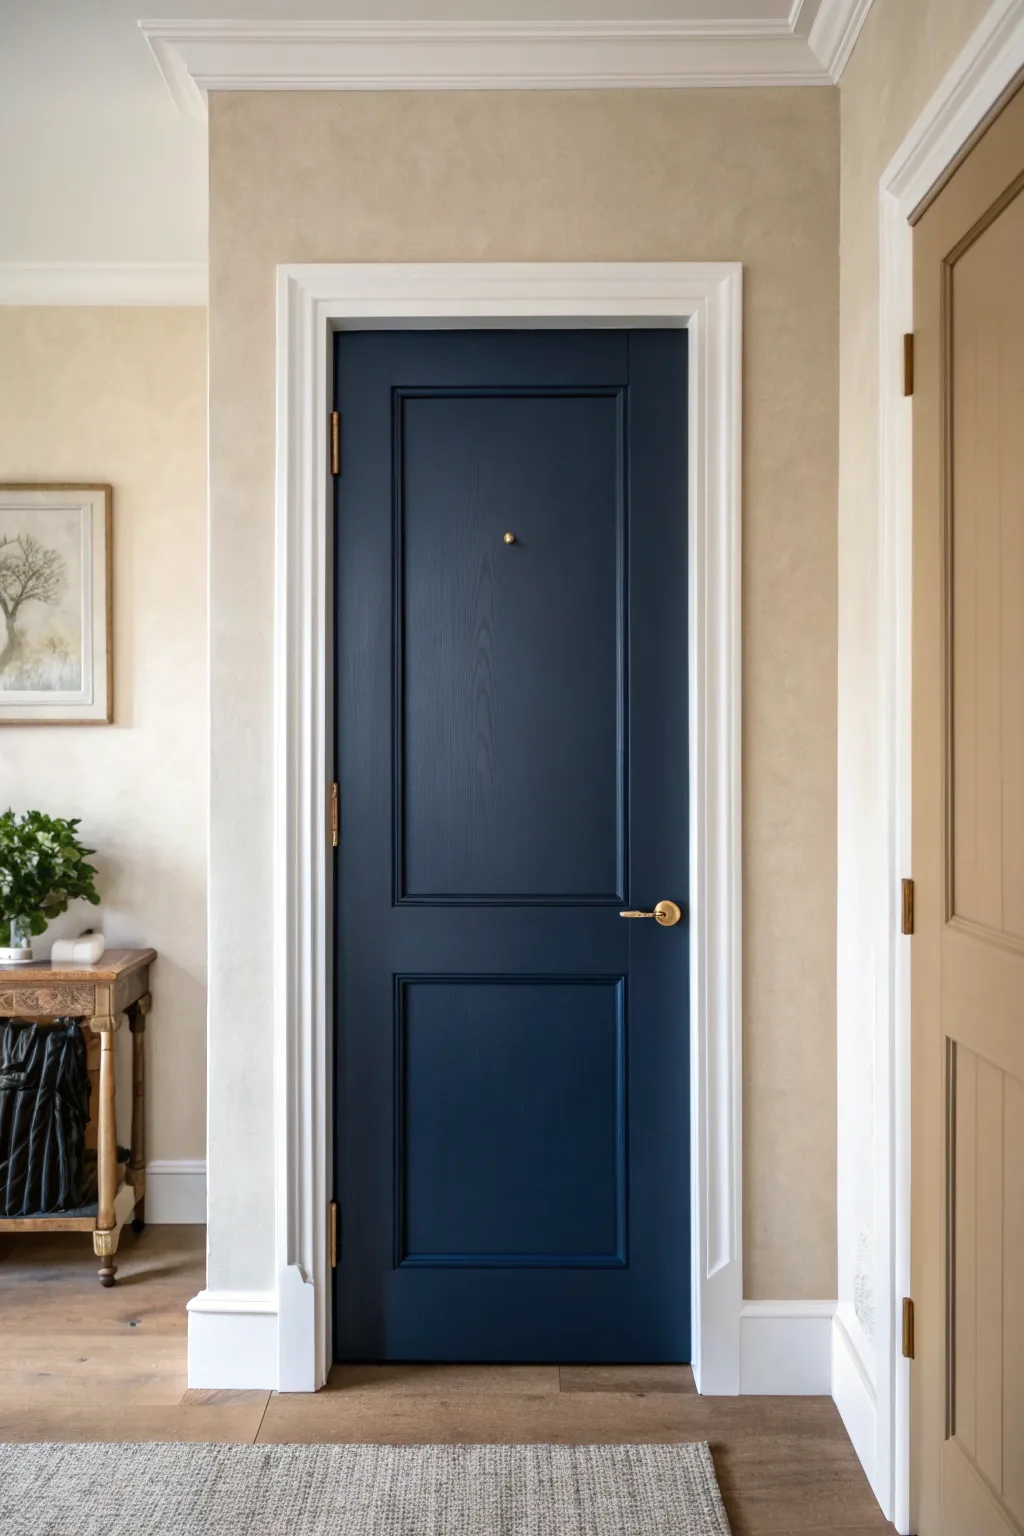
Transform a standard interior door into a sophisticated focal point by pairing a deep, moody navy blue simply known as ‘Hale Navy’ with crisp white trim. This high-contrast look adds instant architectural interest and modern classic charm to any hallway or entryway.
Step-by-Step Tutorial
Materials
- Interior semi-gloss or satin paint (Deep Navy Blue)
- Interior semi-gloss paint (Crisp White)
- High-quality angled sash brush (2.5 inch)
- Small foam roller and tray
- Painter’s tape (delicate surface)
- Sandpaper (120 and 220 grit)
- Tack cloth
- Screwdriver
- Drop cloth
- Wood filler (optional)
- Mild degreaser or TSP substitute
Step 1: Preparation & Hardware Removal
-
Clear the area:
Begin by propping the door open and laying down a drop cloth underneath to protect your flooring from drips. Ensure you have good lighting and ventilation in the workspace. -
Remove hardware:
Using a screwdriver, carefully remove the door handle, lock mechanism, and any other accessories like peepholes or knockers. It is much easier to paint a flat surface than to cut in around intricate metalwork. -
Bag the parts:
Place all screws and hardware pieces into a labeled sandwich bag immediately so nothing gets lost during the project. -
Clean the surface:
Wipe down the entire door and the surrounding trim with a mild degreaser or TSP substitute to remove oils, fingerprints, and dust. This ensures the best possible paint adhesion. -
Sand for grip:
Lightly sand the door and trim with 120-grit sandpaper to remove any glossy sheen. You aren’t trying to strip the paint, just scuffing it up to create a ‘tooth’ for the new coat. -
Dust off:
Wipe away all sanding dust thoroughly using a tack cloth. Even small dust particles can mar a smooth finish, especially with dark colors.
Sticky Situation?
If the door sticks to the frame after painting, rub a plain candle or some paraffin wax distinctively along the edges where they meet to reduce friction.
Step 2: Painting the Trim
-
Tape the walls:
Apply painter’s tape to the wall right along the edge of the door casing to protect your beige wall paint. Press the edges down firmly. -
Cut in the trim:
Using your angled sash brush and the crisp white paint, carefully paint the detailed edges and contours of the door casing. -
Fill the flat trim:
Paint the flat faces of the trim. I like to do long, continuous strokes here to minimize brush marks. Apply two coats if necessary, letting the first dry completely before the second.
Step 3: Applying the Navy Finish
-
Tape the hinges:
If you didn’t remove the door from the hinges (which is often easier), cover the hinge plates entirely with painter’s tape to keep them gold and gleaming. -
Paint the panels:
Start with the recessed panels of the door. Use the angled brush to paint the molded edges first, then use a small roller or brush to fill in the flat center of the panel. -
Paint the rails and stiles:
Move on to the vertical and horizontal pieces (stiles and rails). Paint the vertical center stile, then the horizontal rails, and finally the two long vertical outer stiles. -
Check for drips:
Dark paint shows imperfections easily, so inspect corners for pooling paint or drips immediately and smooth them out with a dry brush. -
Allow to dry:
Let the first coat dry according to the manufacturer’s instructions. Dark colors often require a longer drying time to cure properly. -
Sand lightly between coats:
Once dry, very lightly run 220-grit sandpaper over the surface to smooth out any raised grain or bubbles, then wipe with a tack cloth. -
Apply second coat:
Apply the second coat of navy paint using the same order: panels, center stile, rails, outer stiles. This builds that rich, opaque color depth. -
Remove tape:
While the final coat is still slightly tacky (not fully cured), carefully peel away the painter’s tape at a 45-degree angle to ensure a sharp line. -
Reinstall hardware:
Once the door is fully cured—ideally waiting 24 hours to prevent sticking—screw the gold handle and accessories back into place.
Pro Tip: The Order Matters
Always paint the molding/recesses within the panels first. If paint spills onto the flat surfaces, you can roll over it later for a smoother finish.
Step back and admire how a simple color change has completely redefined the character of your space


Two-Tone Painted Door Split Top and Bottom
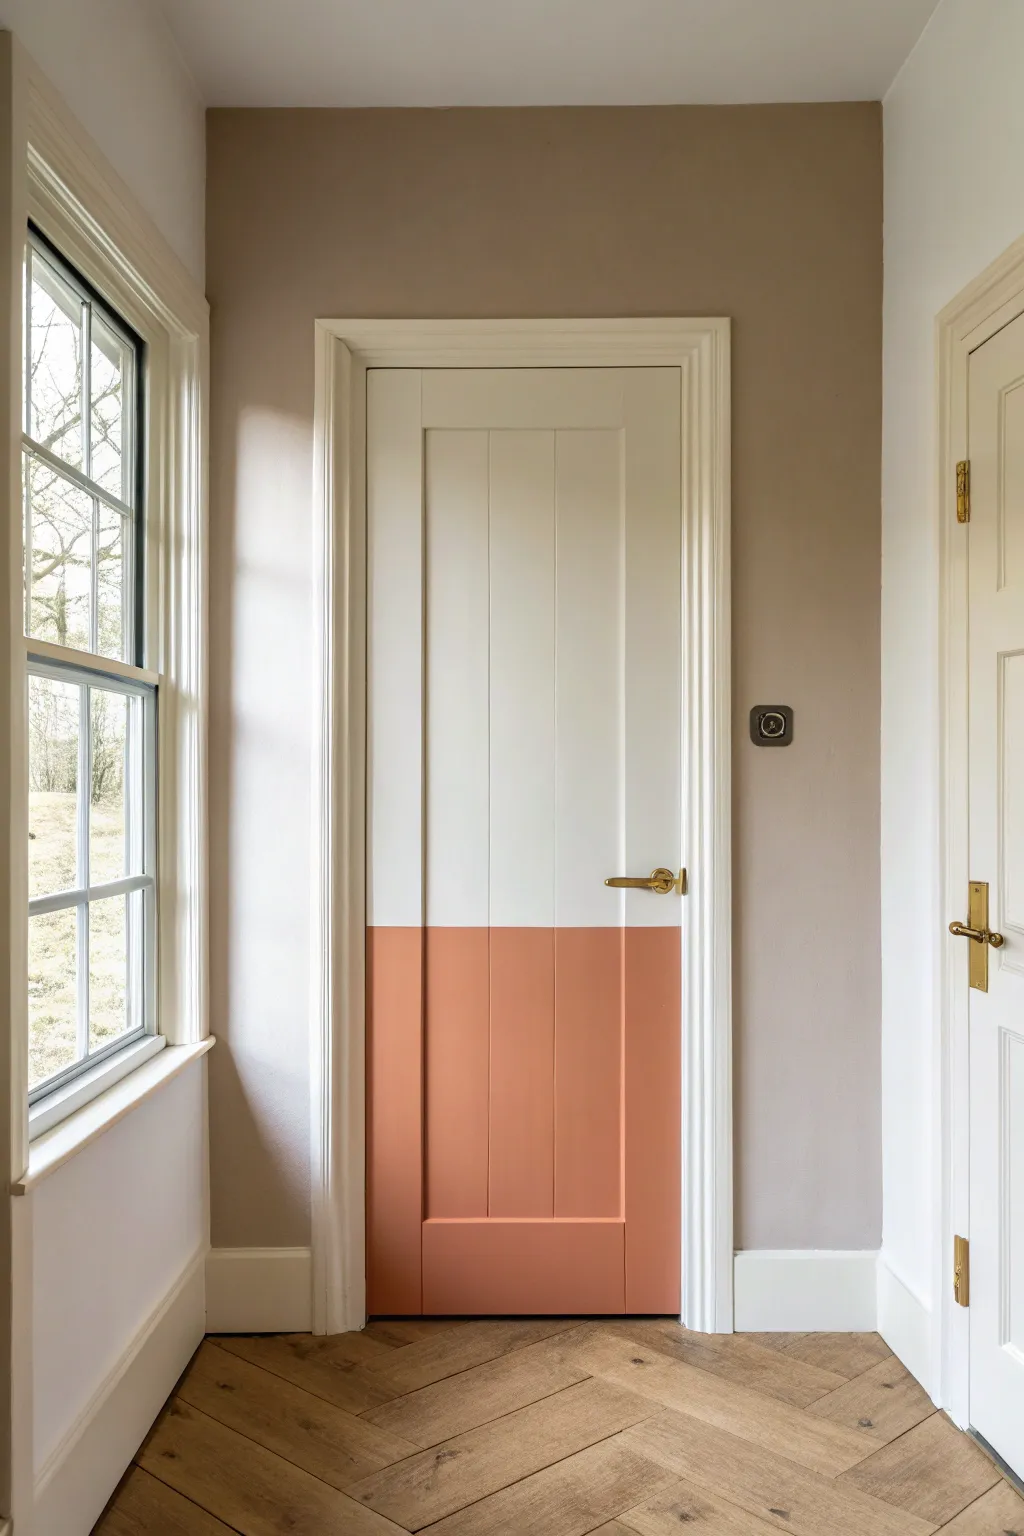
Transform a standard interior door into a modern statement piece with this clever two-tone technique. By splitting the colors horizontally rather than following the panel lines, you create a playful, dipped effect that adds architectural interest to any hallway.
Detailed Instructions
Materials
- Interior wood door to serve as your canvas
- Semi-gloss or satin interior trim paint (Off-white/Cream)
- Semi-gloss or satin interior trim paint (Terracotta/Soft Peach)
- Small foam roller and tray
- 2-inch angled sash brush
- High-quality painter’s tape (like FrogTape)
- Sandpaper (120 and 220 grit)
- Tack cloth
- Measuring tape and pencil
- Laser level or long spirit level
- Screwdriver (for removing hardware)
- Primer (bonding primer recommended)
Step 1: Preparation & Base Coat
-
Remove hardware:
Begin by removing the door handle, lock, and strike plates using your screwdriver. Store all screws and parts in a labeled bag so nothing gets lost during the process. -
Clean surface:
Thoroughly wipe down the entire door with a degreasing cleaner to remove fingerprints, oil, and dust that could prevent paint adhesion. -
Sand lightly:
Scuff sand the entire door using 120-grit sandpaper. You aren’t trying to strip it bare, just roughening the surface to give the new paint ‘teeth’ to grip onto. -
Remove dust:
Wipe away all sanding residue with a tack cloth. This step is crucial for a smooth finish, as even tiny dust particles can mar the final look. -
Prime the door:
Apply a coat of high-quality bonding primer to the entire door using your roller for the flat areas and the brush for the recessed panels. Let this dry completely according to the can’s instructions. -
Sand primer:
Once the primer is dry, give it a very light pass with 220-grit sandpaper to knock down any bumps, then wipe clean with the tack cloth again.
Seal the Crevices
The trickiest part is where the tape crosses the panel molding. Burnish the tape firmly into those dips with a credit card edge so paint can’t sneak underneath.
Step 2: The Upper Color application
-
Paint the top section:
Start with your lighter, upper color (the off-white). Paint the top two-thirds of the door, extending slightly lower than where you want your final split line to be. This ensures no unpainted gaps later. -
Methodology:
I prefer to use the brush first to get into the corners of the panels, then smooth out the flat surfaces with the foam roller for a factory-like finish. Watch for drips in the panel corners. -
Apply second coat:
Allow the first coat to dry fully (usually 4-6 hours), then lightly sand with 220-grit paper, wipe clean, and apply a second coat of the off-white paint for solid coverage. -
Cure time:
Let this top color dry for at least 24 hours. Because you will be putting tape over this fresh paint, it needs to be harder than just ‘touch dry’ to avoid peeling.
Level Up: The Edge Wrap
Don’t stop at the front face! Continue your horizontal line and color split onto the vertical edge of the door (the part with the latch) for a truly continuous, 3D dipped effect.
Step 3: Creating the Split Line
-
Measure the split:
Decide on your line height. In the example, the line sits just below the door handle, creating a grounded look. Measure up from the floor on both sides of the door and mark with a pencil. -
Draw the line:
Use a laser level or a long spirit level to connect your marks, lightly drawing a straight horizontal line across the entire width of the door, ignoring the panel indentations. -
Apply tape:
Run your painter’s tape along this line. Place the tape *above* the pencil line so the bottom color will cover your marks. Press the tape edge down firmly. -
Tape the molding:
Pay special attention where the tape crosses the recessed panel molding. Use your fingernail or a putty knife to press the tape tightly into those crevices to prevent paint bleed. -
Seal the tape edge:
Here is a pro secret: brush a tiny amount of the *top* color (off-white) over the bottom edge of the tape. This seals the tape line and ensures any bleed is just the top color, keeping the final line crisp.
Step 4: The Bottom Dip
-
Paint the bottom section:
Apply your darker terracotta color to the bottom section of the door. Use the brush for the moldings and edges, and the roller for the flat stiles and rails. -
Second coat:
Let the first coat dry, lightly sand if needed, and apply a second coat of terracotta. Ensure you have full, rich opacity. -
Remove tape:
While the final coat is still slightly tacky (not fully dry), slowly peel off the painter’s tape at a 45-degree angle. Pulling while wet helps prevent the paint from bridging and chipping. -
Hardware reinstallation:
Allow the door to fully cure for 24 to 48 hours before reinstalling the handle and heavy manufacturing use, ensuring your hard work doesn’t get scratched.
Step back and admire how this simple color-blocking technique has completely redefined the architectural character of your space
Painted Door Panels Only (Leave Rails and Stiles Solid)
Bring warmth and character to your entryway by painting your interior door a rich, earthy terracotta hue. This project transforms a standard paneled door into a sophisticated focal point that complements neutral wainscoting and crisp white trim.
Step-by-Step
Materials
- Sandin block or sandpaper (120 and 220 grit)
- Tack cloth
- Painter’s tape
- High-quality interior primer (stain-blocking)
- Interior acrylic-latex paint (satin or semi-gloss finish)
- Terracotta color match (e.g., Farrow & Ball Red Earth or Benjamin Moore Spiced Pumpkin)
- 2-inch angled sash brush
- 4-inch foam or mohair roller
- Roller tray
- Screwdriver
- Drop cloth
- Wood filler (optional)
Step 1: Preparation
-
Clear the area:
Begin by propping the door open or removing it from its hinges if you have the space to work flat. Lay down a drop cloth to protect your floors and rugs. -
Remove hardware:
Using a screwdriver, carefully remove the doorknob, lock mechanism, and strike plates. Store screws in a small bag so they don’t get lost. -
Clean surface:
Wipe down the entire door with a mild degreaser or soapy water to remove oils and dirt, which is crucial for paint adhesion. -
Address imperfections:
Inspect the wood for dents or scratches. Apply wood filler to any damage, let it dry, and sand it flush. -
Sand the door:
Lightly sand the entire surface with 120-grit sandpaper to remove the previous sheen. I find this step essential for a durable finish. -
Remove dust:
Vacuum up the sanding dust and wipe the door thoroughly with a tack cloth to ensure a perfectly clean surface. -
Protect trim:
Apply painter’s tape carefully along the door hinges (if left hanging) and the surrounding trim if you are painting within the frame.
Brushwork Master
For the smoothest finish, always drag your brush in the direction of the wood grain for the final pass on every section.
Step 2: Priming
-
Cut in panels:
Start applying primer with your angled sash brush. Work the primer into the recessed corners and edges of the panels first. -
Roll flat surfaces:
Switch to your 4-inch roller to apply primer to the larger flat panels, stiles (vertical pieces), and rails (horizontal pieces). -
Smooth it out:
While the primer is wet, use the brush to lightly smooth out any bubbles or texture left by the roller, following the wood grain. -
Light sanding:
Once the primer is fully dry, give it a very light pass with 220-grit sandpaper and wipe clean again with a tack cloth.
Step 3: Painting
-
Paint the panels:
Dip your angled brush into the terracotta paint. Start by painting the recessed molding and corners of the top panels. -
Fill the center:
Use the brush or a mini roller to paint the flat center of each panel. Keep a wet edge to avoid lap marks. -
Paint vertical stiles:
Move onto the vertical center stile (the strip between panels). Paint vertically with distinct strokes. -
Paint horizontal rails:
Paint the horizontal rails, starting from the top and working down. Be careful to catch any drips collecting in the panel corners. -
Paint outer stiles:
Finish by painting the long vertical stiles on the far left and right edges on the door. -
Apply second coat:
Allow the first coat to dry according to the manufacturer’s instructions (usually 4-6 hours). Apply a second coat following the exact same order. -
Reassemble:
Once the final coat has cured for at least 24 hours, carefully remove the painter’s tape and reinstall your hardware.
Sheen Selection
Swap the satin finish for a high-gloss enamel lacquer. It is more durable and adds a luxurious, glassy look to the rich color.
Enjoy the welcoming glow your newly painted door brings to your hallway
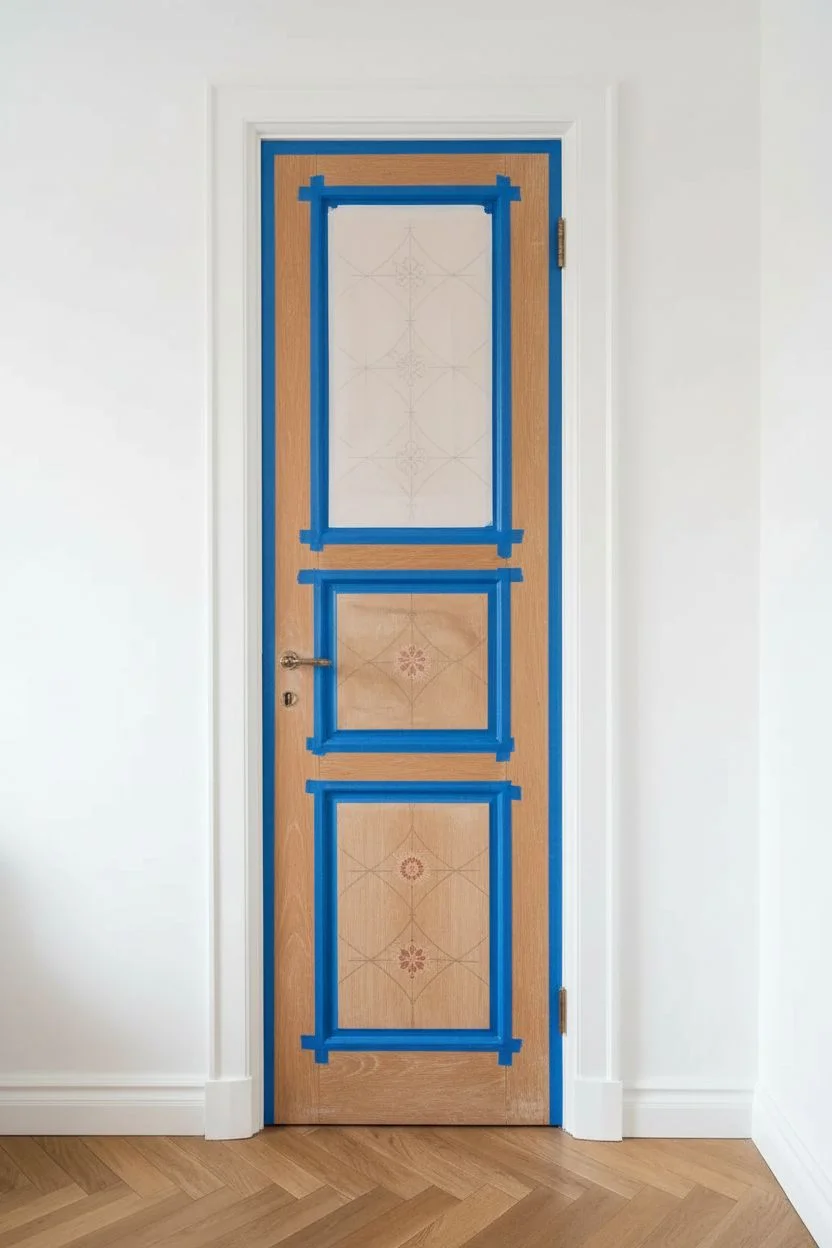
Stencil Pattern Painted Door for Easy Detail

Transform a plain interior door into a statement piece with the warmth of terra cotta and intricate geometric patterns. This project uses stencils to mimic the look of inlaid tiles within the door’s recessed panels, adding incredible depth and character to your entryway.
Step-by-Step Guide
Materials
- Interior door (6-panel style works best)
- Sanding block (120-grit)
- Painter’s tape
- Primer suitable for interior woodwork
- Base coat paint (soft peach or beige)
- Pattern stencils (geometric or floral motif)
- Terra cotta colored acrylic or chalk paint
- White or cream acrylic paint (for the second pattern)
- Small high-density foam rollers
- Stencil brushes
- Spray adhesive for stencils
- Paper towels
- Small artist brush (for touch-ups)
- Clear protective sealer (polyurethane, matte or satin)
Step 1: Preparation & Base Coat
-
Remove hardware:
Begin by unscrewing the doorknobs, lock mechanisms, and hinges if you are taking the door down. While you can paint the door while it’s hanging, laying it flat on sawhorses prevents drips and makes stenciling significantly easier. -
Clean and sand:
Wipe down the entire door with a degreaser or mild soap and water to remove oils. Once dry, lightly scuff the surface with your 120-grit sanding block to give the new paint distinct ‘teeth’ to grip onto. -
Tape off edges:
If you are painting the door while it is still hung, carefully apply painter’s tape to the hinges and the latch plate. Tape off the edges of the door frame if necessary. -
Prime the surface:
Apply a coat of high-quality primer. This is crucial if you are painting over a dark color or a glossy finish. Allow the primer to dry completely according to the manufacturer’s instructions. -
Apply base color:
Roll on your chosen soft beige or peach base color. Use a brush to get into the corners of the recessed panels first, then use a foam roller for the flat surfaces to ensure a smooth finish. I find two thin coats are always better than one thick coat.
Step 2: Stenciling the Details
-
Select your panels:
Identify the recessed panels where the design will go. In the inspiration image, the top and middle panels feature a terra-cotta ‘positive’ pattern, while the bottom panel uses an inverted or different geometric tile pattern. -
Prepare the stencil:
Spray the back of your first stencil with a light mist of spray adhesive. Let it get tacky for a moment before placing it. This prevents the stencil from shifting and keeps paint from bleeding underneath. -
Position the first stencil:
Center your stencil in one of the top recessed panels. Press it down firmly, paying special attention to the delicate bridges of the design. -
Load the roller:
Pour a small amount of terra cotta paint onto a paper plate. Load your foam roller, then offload most of the paint onto a paper towel until the roller feels almost dry. This ‘dry rolling’ technique is the secret to crisp lines. -
Apply the pattern:
Gently roll over the stencil using light pressure. Build up the color in layers rather than trying to get full opacity in one pass. Repeat this process for the top four panels. -
Switch patterns:
For the bottom panels, as seen in the photo, you might want to switch to a different geometric design. Clean your tools or grab a fresh roller. -
Apply the bottom pattern:
Position your second stencil pattern in the bottom recessed rectangle. Using the same terra cotta color (or switching to white if you want the inverted look shown), apply the paint using the dry-roll method. -
Check corners:
Use a small stencil brush to tap paint into the tricky corners of the recessed panel where the roller might not reach perfectly.
Bleed-Through Blues?
If paint bleeds under the stencil, you likely have too much paint on your roller. Let it dry, sand the spot lightly, paint over it with the base color, and try again with a drier roller.
Step 3: Finishing Touches
-
Touch up imperfections:
Once the paint is dry, remove the stencils. Use a tiny artist brush and your base coat color to clean up any spots where the stencil paint might have bled under the plastic. -
Seal the work:
To protect your intricate work from fingerprints and scratches, apply a clear matte or satin polyurethane topcoat over the entire door. Do not skip this step in high-traffic areas. -
Reinstall hardware:
Once the sealer has cured fully (usually 24 hours), screw the doorknob and lockset back into place. Consider upgrading to matte black hardware for a modern contrast against the warm paint tones.
Level Up: Aged Look
For an antique terracotta vibe, lightly sand the stenciled areas after they dry to distress them, then apply a subtle dark wax over the panels to highlight the texture.
Step back and admire how a simple can of paint and a stencil transformed a standard door into a custom architectural feature.
Wallpaper-Inset Panels Framed by Paint
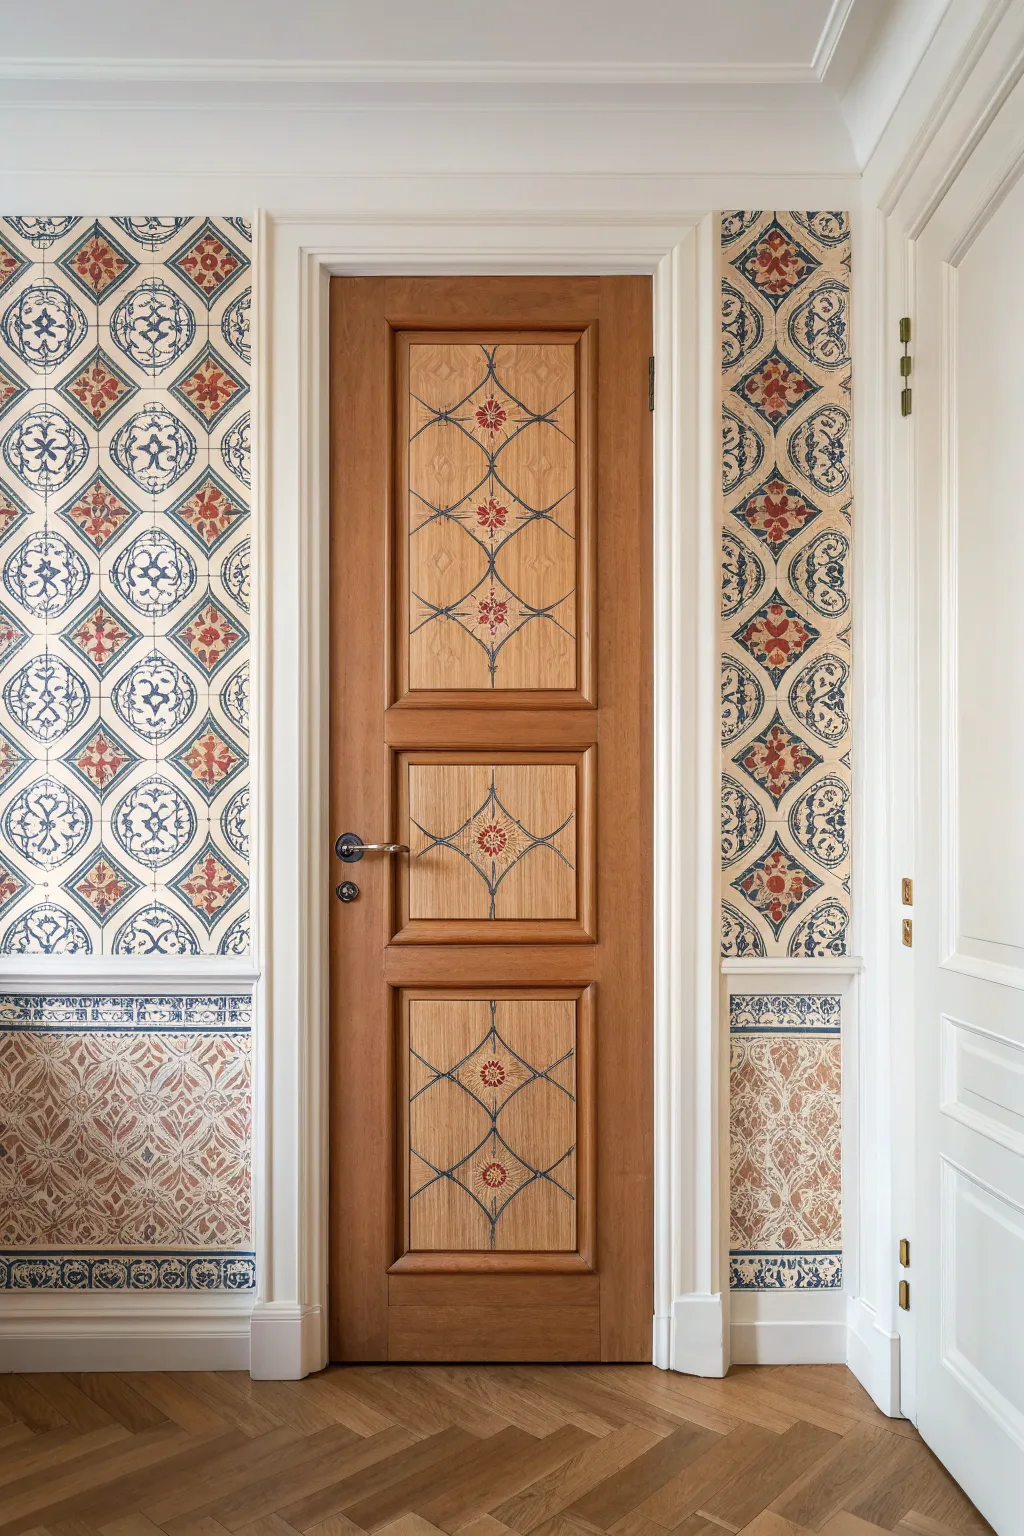
Transform a standard paneled door into a custom architectural feature by adding intricate, wallpaper-inspired designs directly onto the wood. This technique mimics the look of textile inlays while preserving the durability and warmth of the natural timber grain.
Step-by-Step
Materials
- Solid wood or wood-veneer paneled door
- Fine-grit sandpaper (220-grit)
- Tack cloth
- Painter’s tape (low-tack)
- Pencil and ruler
- Large sheet of tracing paper or stencil film
- Acrylic paints (Red, Blue, Cream/White)
- Fine liner brushes (size 0 and 00)
- Example wallpaper pattern (for reference)
- Matte or satin clear polyurethane sealer
Step 1: Preparation and Design
-
Clean and prep the surface:
Begin by thoroughly cleaning the door panels to remove any oils or furniture polish. Lightly sand the interior recessed panels with 220-grit sandpaper to give the paint some tooth without removing the existing wood finish entirely. -
Wipe away dust:
Use a tack cloth to remove every speck of sanding dust. This ensures your delicate paint lines won’t snag on debris. -
Mask the edges:
Apply low-tack painter’s tape around the inner edges of the stiles and rails where they meet the panel. This protects the frame of the door while you work on the inset area. -
Create your template:
Measure the dimensions of one panel. On a large sheet of tracing paper, draw a grid of diamonds to match the scale of your reference wallpaper. In this design, the diamonds are roughly 4-6 inches tall. -
Sketch the motifs:
I prefer to sketch the floral centerpieces and corner flourishes onto the tracing paper first. Draw a central flower inside each diamond and curved, scrolling lines connecting the diamond points.
Uneven Lines?
If your hand shakes, use a ‘mahl stick’ (or a simple ruler) to bridge across the panel. Rest your hand on the stick rather than the door surface to stabilize your painting stroke.
Step 2: Transferring the Pattern
-
Align the template:
Tape your tracing paper template onto the top door panel, ensuring the design is perfectly centered. The diamond points should align vertically. -
Transfer the design:
Using a transfer method (like carbon paper suitable for wood or distinct pressure marks), trace over your design lines so they appear faintly on the wood. -
Repeat for all panels:
Move the template to the middle and bottom panels. Double-check your alignment before transferring to ensure all three panels look cohesive.
Level Up: Texture
Instead of tracing, use a custom-cut vinyl stencil for the repeating diamond grid. Then, hand-paint the floral centers. This gives you crisp geometric lines with a hand-touched finish.
Step 3: Painting the Details
-
Outline the geometric grid:
Dip a size 0 liner brush into thinned blue acrylic paint. Carefully paint the thin diagonal lines that form the main diamond grid structure. Keep your hand steady and reload the brush often. -
Add the connecting flourishes:
Using the same blue paint, create the curved, bracket-like shapes that sit at the intersections of the diamonds. These should look like elegant architectural ironwork. -
Paint the central florals:
Switch to a red or terracotta acrylic. Paint the small flower bursts in the center of each diamond. Use tiny dotting motions for the petals to mimic a block-printed look. -
Add secondary details:
Go back in with darker blue or black to add center dots to the flowers and small accent leaves on the curved lines. These tiny details bring the ‘wallpaper’ pattern to life. -
Let the paint cure:
Allow the paint to dry completely for at least 24 hours. Acrylics need to bond fully to the wood surface before sealing.
Step 4: Sealing and Finishing
-
Remove the tape:
Carefully peel away the painter’s tape. Pull it at a 45-degree angle away from the paint to avoid lifting any design edges. -
Seal the panels:
Apply a thin coat of matte or satin clear polyurethane over the painted panels. This protects your artwork from scratches and cleaning moisture without making the wood look plastic. -
Final inspection:
Once the sealer is dry, inspect the edges. If any paint bled under the tape, carefully scrape it away with a fingernail or a damp toothpick.
This technique brings a bespoke, historic charm to your entryway that mere hardware changes can’t compete with
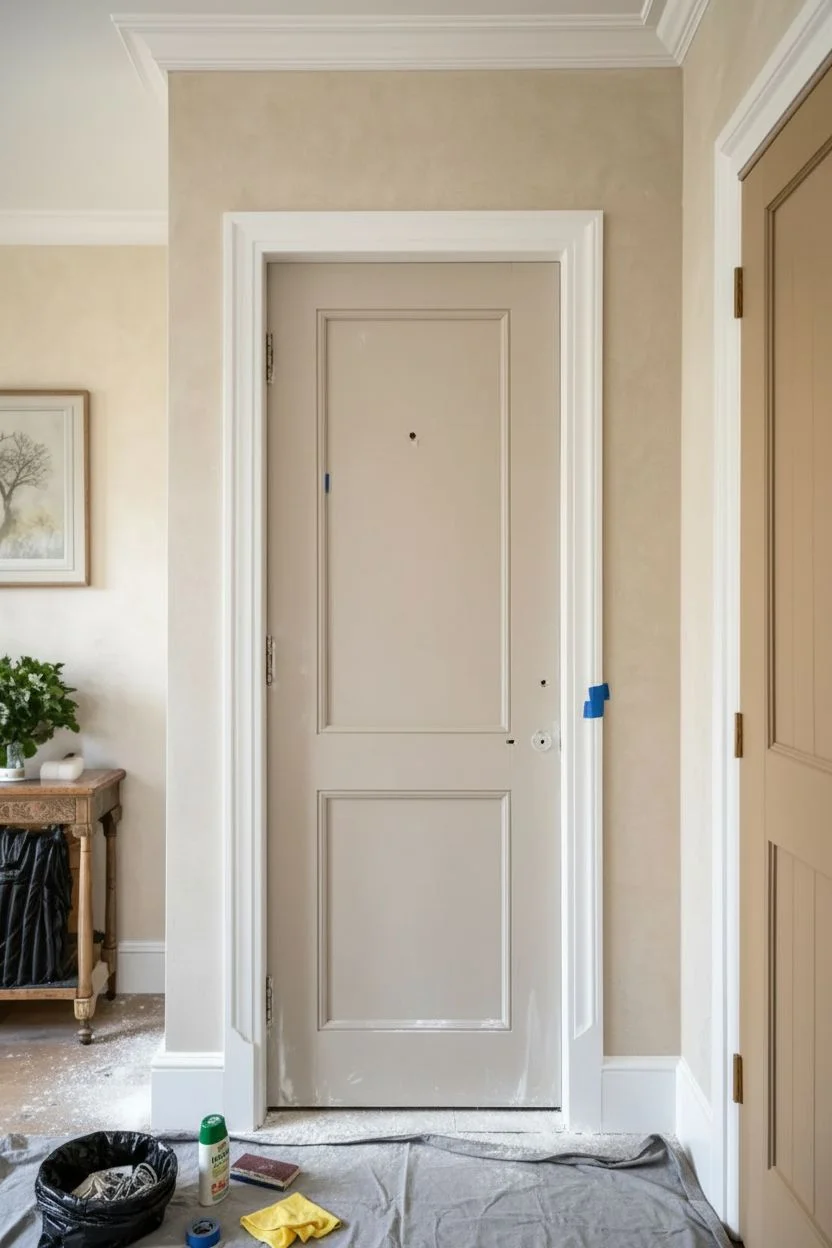
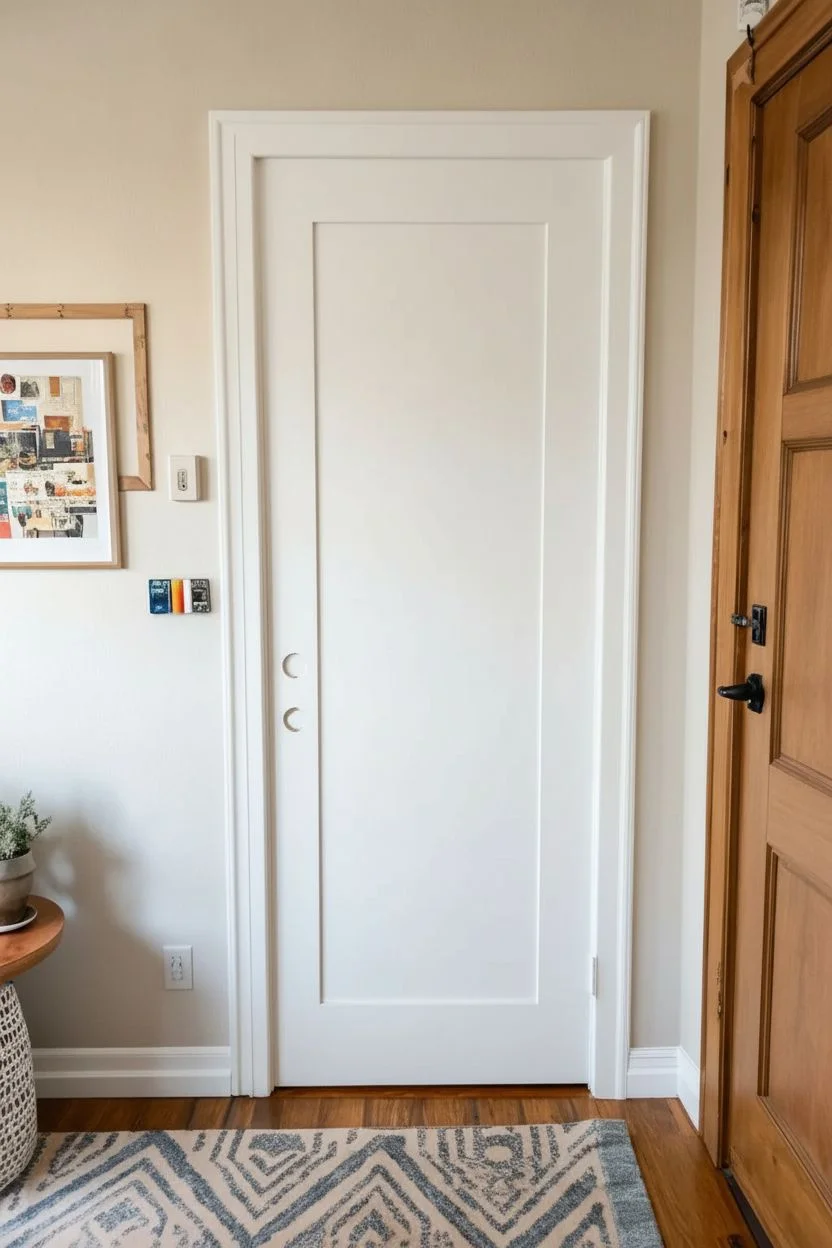
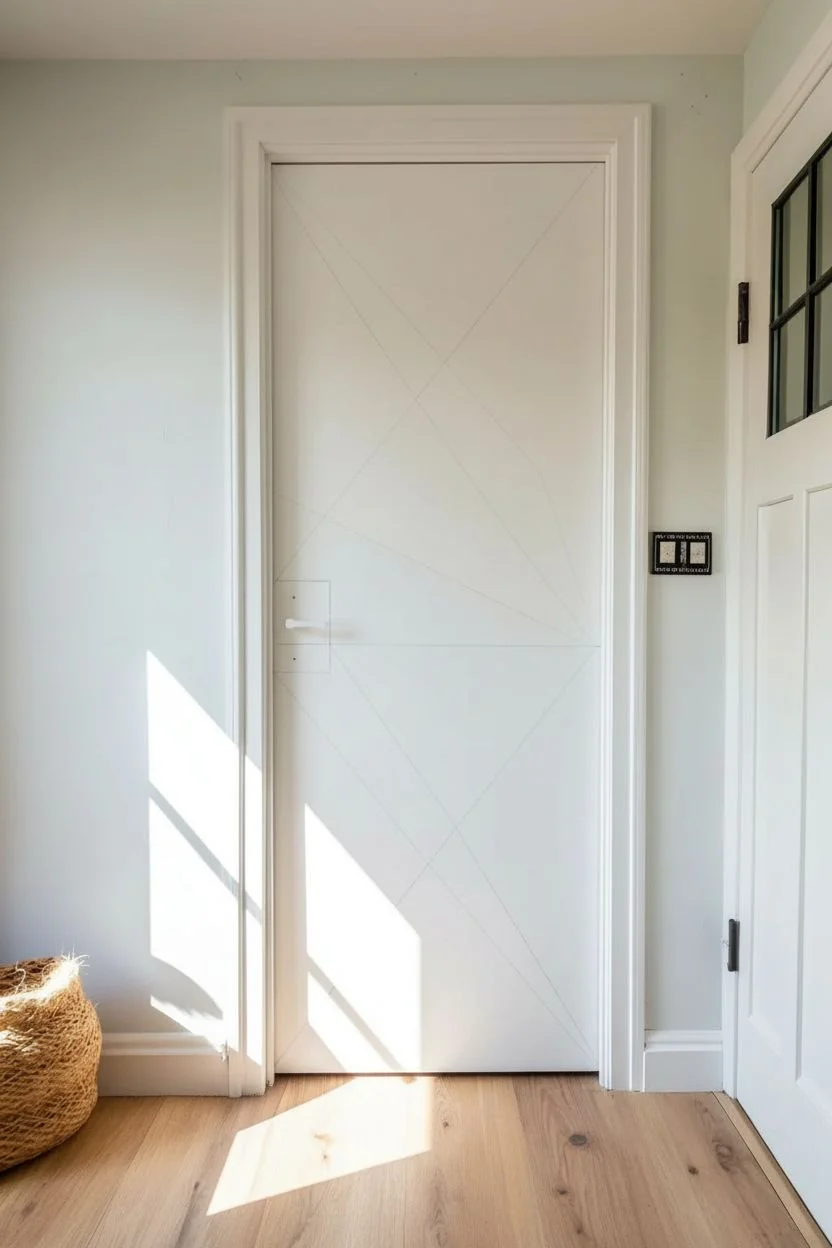
Faux Raised Panel Effect with Painted Lines
Transform a plain, flat door into a sophisticated architectural feature with just paint and painter’s tape. By carefully marking out geometric panels and using different sheen levels or subtle shading, you can create the illusion of raised molding and depth.
Detailed Instructions
Materials
- Interior flat door paint (base color)
- Painter’s tape (various widths)
- Measuring tape
- Pencil
- Level
- Angle sash brush (2 inch)
- Small foam roller
- Glaze medium (optional)
- Darker paint shade (for shadow lines)
- Lighter paint shade (for highlight lines)
- Fine grit sandpaper
Step 1: Preparation & Base Coat
-
Clean and Sand:
Start by thoroughly cleaning the door surface to remove any grease or oils. Once dry, lightly sand the entire door with fine-grit sandpaper to ensure the paint adheres properly. -
Apply Base Color:
Using your foam roller, apply a smooth coat of your chosen base color—here, a warm, creamy beige. Let it dry completely, then apply a second coat for full, even coverage. -
Cure Time:
Allow the base coat to cure for at least 24 hours. This is crucial because you’ll be applying tape over it, and you don’t want to peel up fresh paint.
Don’t Rush the Tape
Use high-quality painter’s tape specifically for delicate surfaces. Press the edges down firmly with a credit card to prevent paint bleed, which ruins the illusion.
Step 2: Mapping the Panels
-
Measure the Door:
Measure the width and height of your door to determine the scale of your faux panels. A classic design usually features a larger rectangle on top and a smaller, squarish one on the bottom. -
Mark the Layout:
Using a pencil and a level, lightly draw the outer boundaries of your two rectangular panels. Ensure the spacing is symmetrical on both sides—typically 4-5 inches from the door edge looks balanced. -
Create Inner Borders:
Inside your first rectangle, measure inward about 2-3 inches and draw a second, smaller rectangle. These two lines will represent the ‘molding’ width.
Add Hardware
Replace standard shiny brass knobs with matte black or oil-rubbed bronze levers. The modern hardware contrasts beautifully with the classic panel design.
Step 3: Creating Dimension
-
Tape the Shadow Lines:
To create the illusion of depth, you need shadows. Apply painter’s tape along the *outside* of the top and left lines of your drawn rectangles. This exposes the lines where shadows would naturally fall if light were coming from the top left. -
Paint Shadows:
Mix a small amount of your base paint with a drop of darker grey or brown, or use a glaze. With a small artist brush, paint a thin, crisp line along the exposed area next to the tape. I like to keep this very subtle so it doesn’t look cartoonish. -
Remove Tape:
Carefully peel back the tape while the paint is still slightly tacky to keep the edge sharp. -
Tape the Highlight Lines:
Once the shadow lines are dry, tape off the *bottom* and *right* sides of your rectangles. These areas would catch the light on real molding. -
Paint Highlights:
Using a paint shade slightly lighter than your base (or white mixed with the base), paint these lines. This contrast creates the 3D ‘lift’ effect. -
Clean Up Edges:
Remove the second set of tape. If any lines look shaky or too bold, use a small brush with the original base color to tidy them up.
Step 4: Finishing Touches
-
Enhance corners:
For extra realism, you can add 45-degree miter lines at the corners where your shadow and highlight lines meet. Use a straight edge to guide your brush for these tiny diagonal connectors. -
Final Inspection:
Step back about five feet to view the door. The effect should look like genuine carpentry from this distance. Touch up any smudges with the base wall color. -
Protective Coat:
If this is a high-traffic door, apply a clear, matte polycrylic sealer over the painted artwork to protect your faux finish from scratches.
Now you have a door with architectural character that cost only a fraction of replacing it
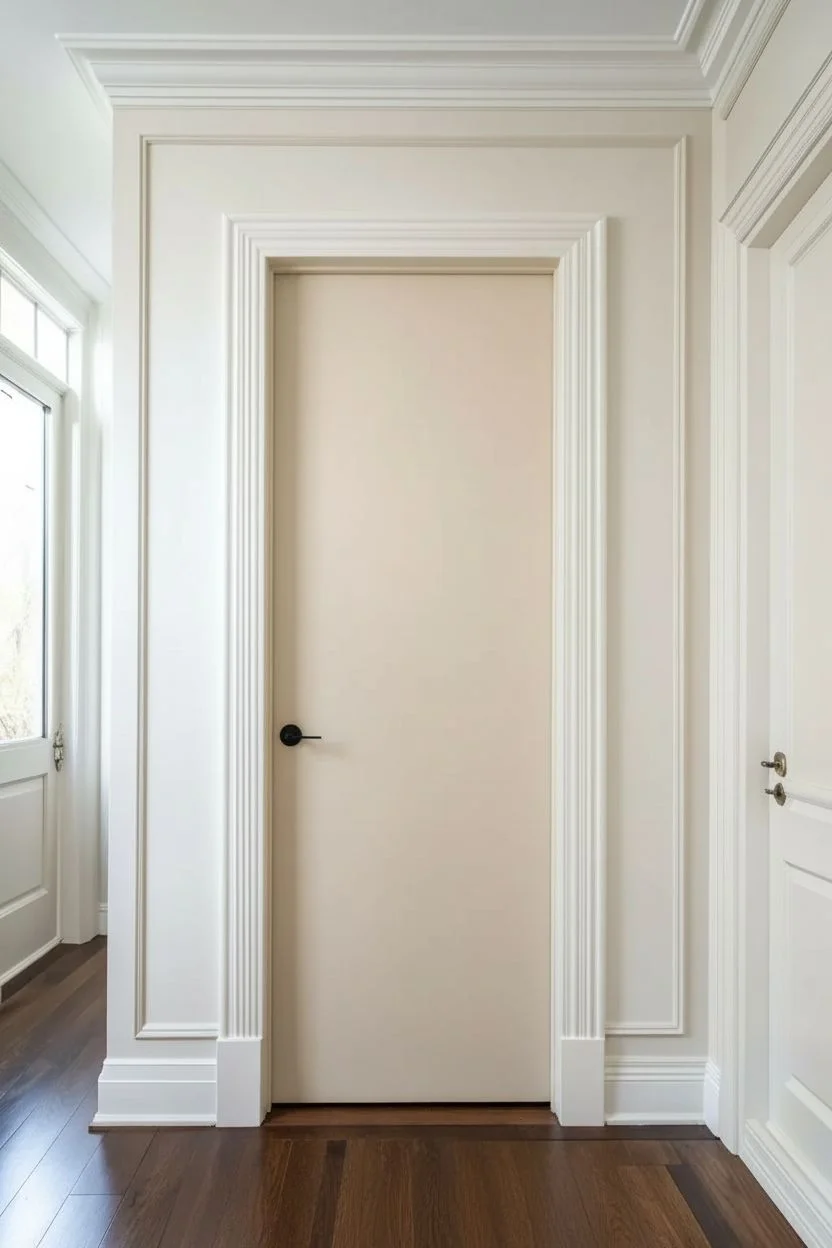
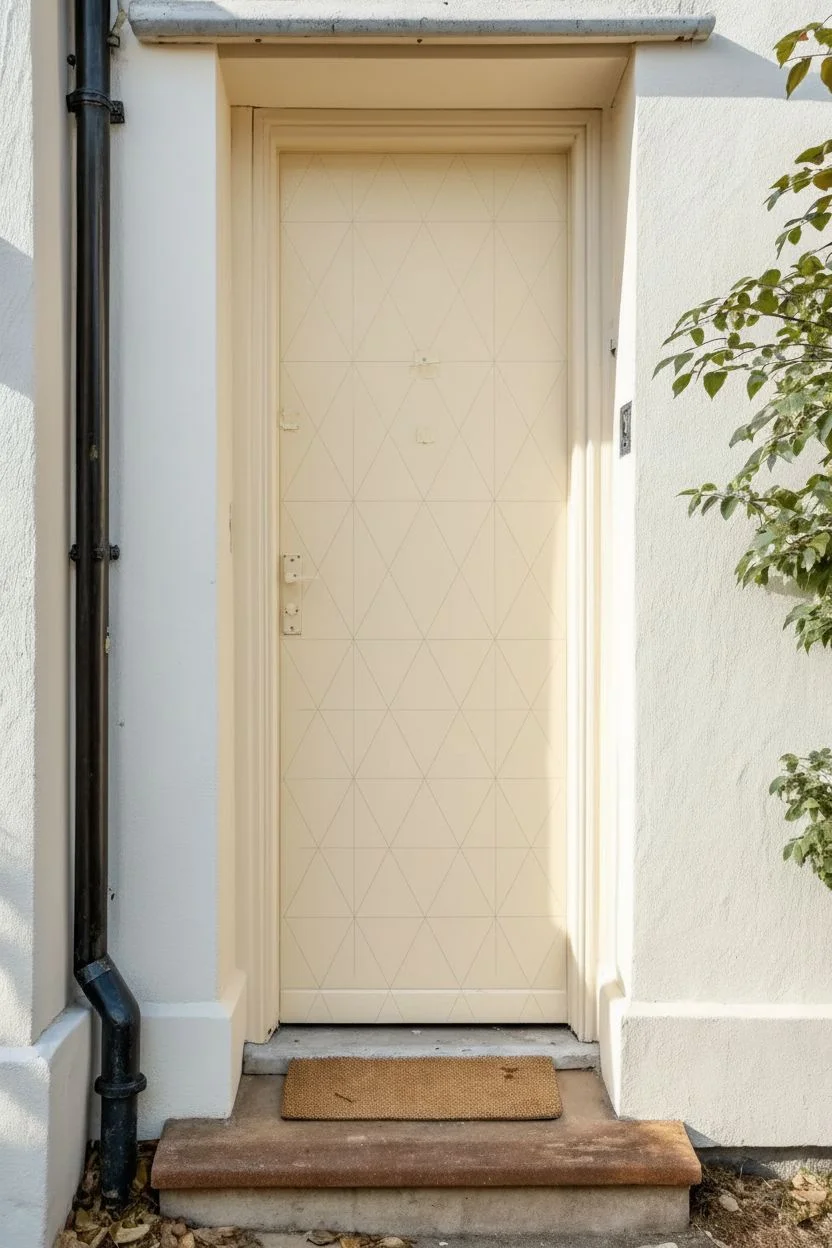
Painted Arch or Halo Shape Centered on the Door

Transform a plain white door into a statement architectural feature with this clever paint technique. By combining warm terracotta tones with precise geometric lines, you creates the illusion of a custom-carved door that adds instant warmth and character to your entryway.
Step-by-Step
Materials
- Interior semi-gloss door paint (white)
- Interior semi-gloss paint (terracotta/rust orange)
- High-quality painter’s tape (multi-surface)
- Flexible curving tape (for arches)
- Small foam roller
- Small angled sash brush (1.5 – 2 inch)
- Fine detail brush
- Pencil
- Tape measure
- Large string and thumb tack (for compass)
- Sandpaper (220 grit)
- Tack cloth
- Drop cloth
Step 1: Preparation & Base Coat
-
Clean and protect:
Begin by removing the door handle and lock hardware, or taping them off meticulously if removal isn’t possible. Lay down a drop cloth to protect your flooring. -
Prep the surface:
Lightly sand the entire door surface with 220-grit sandpaper to scuff the existing finish and ensure good adhesion. Wipe away all dust with a tack cloth. -
Apply the white base:
If your door isn’t already a crisp, clean white, apply two coats of white semi-gloss paint using a foam roller for the flat areas and a sash brush for any molding or edges. Let this dry completely—I usually wait a full 24 hours to ensure the tape won’t peel it up later.
Seal for Sharp Lines
Always paint over your tape edge with the *base* color first. This seals the gap, so if any paint seeps under, it’s just the background color, keeping your final color line razor sharp.
Step 2: Designing the Arches
-
Measure the center:
Find the exact horizontal center of your door and mark it lightly with a pencil at the height where you want the main arch to peak. -
Create a string compass:
Tie a string to a pencil. Determine the radius of your large top arch (it should span almost the full width of the door panel). Pin the string at the center point lower down on the door so the pencil hits your peak mark. -
Draw the top arch:
Holding the string taut, swing the pencil to draw a smooth semi-circle at the top of the door panels. -
Draw the inner detail:
Shorten your string by about 3-4 inches and draw a second, smaller semi-circle inside the first one to create the thick band shape. -
Mark the bottom details:
Repeat the compass process near the bottom of the door to draw the smaller inverted quarter-circles on the left and right panels. -
Connect vertical lines:
Use a long straightedge or level to draw straight vertical lines connecting your top arch design down the length of the door panels where the paint lines will continue.
Metallic Accent Upgrade
Instead of terracotta for the thin outline stripes, swap in a metallic gold or copper paint. It catches the light and adds a glamorous Art Deco vibe to the finished door.
Step 3: Taping and Painting
-
Apply curving tape:
Apply flexible curving tape along your pencil lines for all the arched sections. This specialized tape stretches to follow the curve without buckling. -
Tape straight lines:
Use standard painter’s tape for the straight vertical sections, slightly overlapping the ends with the curving tape to ensure a seamless connection. -
Seal the tape edges:
Press the tape edges down firmly with a credit card or your fingernail. Paint a very thin layer of the *base* white paint over the tape edges to seal them; this prevents the colored paint from bleeding under. -
Paint the terracotta arch:
Using a small brush or mini roller, fill in the large top arch semi-circle with your terracotta paint. Apply 2-3 thin coats for solid coverage. -
Paint thin outlines:
With a fine detail brush or a very steady hand with the sash brush, paint the thin accent lines: the inner arch, the long vertical stripes, and the bottom quarter-circles. Take your time here. -
Remove tape while damp:
Carefully pull off the tape while the final coat of paint is still slightly tacky, pulling at a 45-degree angle away from the paint line. This ensures a crisp edge. -
Touch up:
Use a tiny artist’s brush to fix any small bleeds or uneven spots once the main paint is dry. -
Reinstall hardware:
Once the paint has cured for at least 24 hours, reinstall your door knob and lock hardware to complete the look.
Enjoy the custom look of your new architectural statement door every time you walk into the room
Geometric Color-Block Painted Door
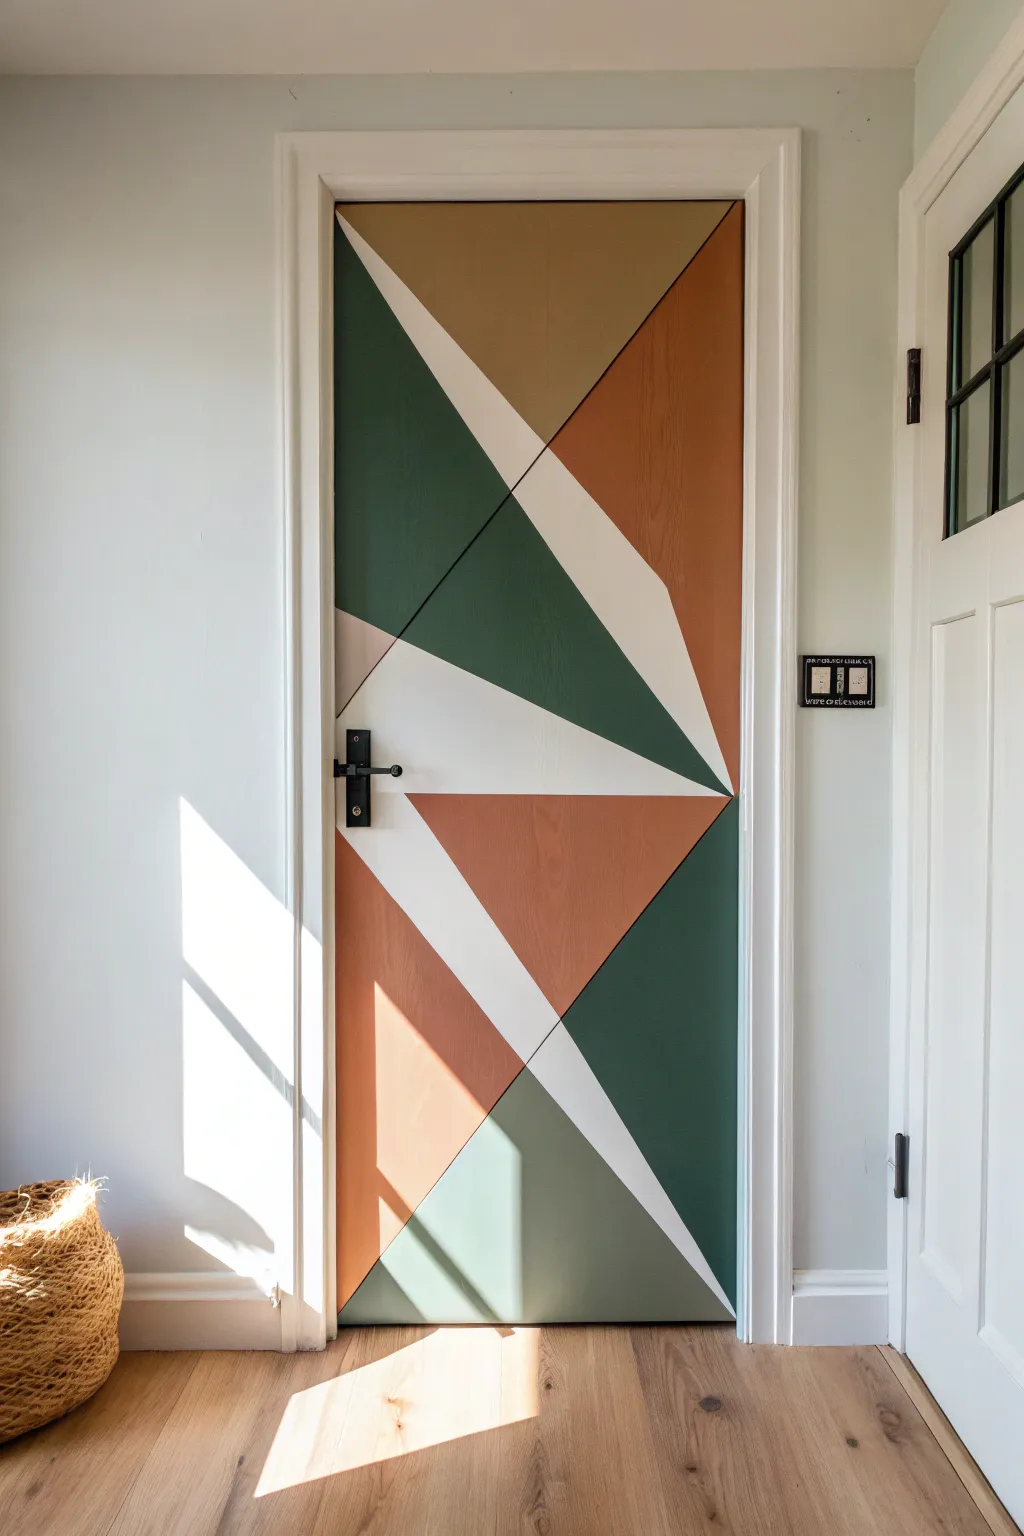
Transform a plain flat-panel door into a striking piece of modern art with this bold geometric design. Using a palette of earth tones including sage, terracotta, mustard, and forest green layered over bright white, this project adds instant architectural interest to any entryway.
Step-by-Step Tutorial
Materials
- Flat-panel interior door
- Sandpaper (120-grit and 220-grit)
- Tack cloth
- Painter’s tape (high-quality delicate surface tape recommended)
- Small foam rollers (4-inch) and handle
- Angled sash brush (1.5-inch)
- Primer (bonding primer if door is pre-finished)
- Paint colors: White (base), Forest Green, Terracotta, Mustard Yellow, Sage Green, and Blush Pink
- Pencil
- Long straight edge or level
- Utility knife or box cutter
Step 1: Preparation and Base Coat
-
Remove Hardware:
Begin by unscrewing the door handle and lock mechanism. It is much easier to paint a crisp design without navigating around hardware. Place all screws and parts in a labeled bag so nothing gets lost. -
Clean and Sand:
Wipe the door down with a degreaser to remove hand oils and dirt. Once dry, scuff the entire surface with 120-grit sandpaper to help the paint adhere. Wipe away dust thoroughly with a tack cloth. -
Prime the Surface:
Apply a coat of high-quality bonding primer using a foam roller for the large areas and a brush for the edges. Let this dry completely according to the manufacturer’s instructions. -
Apply the Base Color:
Paint the entire door with your chosen white base color. This will serve as the white lines between your shapes later. Apply two coats for full opacity, allowing proper drying time between each layer. -
Cure for Taping:
Allow the white base coat to cure for at least 24 to 48 hours. This is crucial; if the paint is even slightly soft, the tape you apply in the next phase will peel it right off.
Step 2: Designing and Taping
-
Sketch the Design:
Using a pencil and a long straight edge, lightly draw your radiating geometric pattern directly onto the dried white door. Start from a focal point on the right side (middle-height) and draw lines extending outward to the top, bottom, and left edges. -
Tape the Lines:
Apply painter’s tape along your pencil lines. Remember that the area *under* the tape will remain white. Press the edges of the tape down firmly with your fingernail or a credit card to prevent bleed-through. -
Seal the Tape Edges:
Here I prefer to brush a very light layer of the *base white paint* over the edges of the tape. This seals the gap; if any paint bleeds under, it will be white and invisible, keeping your colored lines razor sharp.
Pro Tip: Sheen Choice
Use a satin or semi-gloss finish for this project. Not only does it make the geometric shapes pop, but it’s much more durable and easier to clean than matte paint.
Step 3: Painting the Color Blocks
-
Plan Your Palette:
Assign your colors to specific triangles. The design features a large forest green section, a terracotta triangle, a mustard top section, and smaller accents of blush and sage. Mark each section lightly with a small piece of tape or pencil notation so you don’t mix them up. -
Paint First Sections:
Paint the sections that do not touch each other first. For example, paint the top mustard triangle and the bottom sage triangle. Use a small roller for the middle of the shape and an angled brush near the tape lines. -
Layering Coats:
Apply 2-3 thin coats for each color rather than one thick coat, which helps minimize ridge lines. Let the paint dry to the touch between coats. -
Let Dry and Re-Tape (If Necessary):
If intricate sections touch and share a tape line, wait for the first color to dry fully, then carefully tape over the fresh paint (using delicate surface tape) to define the edge for the adjacent color. -
Remove Tape While Damp:
Once your final coat of paint is applied but still slightly wet, slowly peel back the painter’s tape at a 45-degree angle. Pulling while the paint is damp prevents the dried paint film from ripping.
Troubleshooting: Peeling Paint
If paint peels up with the tape, your base coat wasn’t cured enough or you pulled too fast. Score the edge of the tape very lightly with a utility knife before pulling to cut the paint film.
Step 4: Finishing Touches
-
Touch Ups:
Inspect your lines. If any paint bled through, use a tiny artist’s brush and your base white paint to carefully correct the line work once the colored paint is fully hard. -
Reinstall Hardware:
Wait at least 24 hours for the paint to harden before reinstalling the handle and lockset to avoid scratching your new finish.
Step back and admire how a simple can of paint turned a standard door into a custom focal point for your home
Harlequin Diamond Painted Door Pattern

Transform a plain front door into a grand entrance with this classic harlequin diamond pattern. The alternating rust-red and cream tones create a bold, geometric statement that feels both vintage and playfully modern.
Step-by-Step
Materials
- Exterior door paint (cream/off-white, satin or semi-gloss)
- Exterior door paint (rust-red/terracotta, satin or semi-gloss)
- Painter’s tape (high quality, delicate surface)
- Measuring tape
- Long spirit level or laser level
- Pencil
- Calculator
- Small foam roller
- Angled sash brush (1.5 – 2 inch)
- Craft knife or box cutter
- Sandpaper (fine grit)
- Clean rag and degreaser
Step 1: Preparation & Base Coat
-
Clean and sand:
Begin by thoroughly cleaning the door with a degreaser to remove dirt and oils. Once dry, lightly sand the surface to ensure the new paint adheres well, then wipe away all dust with a damp rag. -
Remove hardware:
For the cleanest lines, unscrew and remove the doorknob, letterbox, and knocker. If removal isn’t possible, mask them off tightly with painter’s tape. -
Apply the base color:
Paint the entire door with your lighter cream color. This will serve as the background for the diamonds. Use a foam roller for the flat areas and a brush for any molding or edges. -
Apply a second coat:
Allow the first coat to dry completely according to the manufacturer’s instructions, then apply a second coat for solid, opaque coverage. Let this cure for at least 24 hours before taping.
Step 2: Measuring & Marking
-
Calculate diamond dimensions:
Measure the width of your door panel. Decide how many diamonds you want across (usually 3 or 4 wide looks best). Divide the width by that number to get your diamond width. For height, a ratio of 1:2 (width to height) often creates an elegant elongated diamond shape. -
Mark the vertical grid:
Using your calculated width, mark vertical points along the top and bottom of the door panel. Use a long level to draw faint vertical pencil lines connecting these points from top to bottom. -
Mark the horizontal grid:
Using your calculated height, mark horizontal intervals down the side of the door. Use your level to draw faint horizontal lines across the door, creating a grid of rectangles. -
Connect the diagonals:
To form the diamonds, draw diagonal lines connecting the corners of your rectangles. You create a zigzag pattern. Start from the top center of a rectangle and draw lines to the side midpoints. I find visualizing an ‘X’ inside a 2×2 grid of rectangles helps clarify the pattern. -
Mark the ‘paint’ zones:
Lightly place a small piece of tape or an ‘X’ in every other diamond. This simple step prevents the heartbreaking mistake of painting the wrong diamond later on.
Bleed-Through Blues?
If paint seeped under the tape, wait for it to fully dry. Then, use a small, stiff artist brush and the base color to carefully ‘erase’ the jagged edge with a steady hand.
Step 3: Taping & Painting
-
Tape the first set:
Apply painter’s tape along the outside edges of the diamonds marked with an ‘X’. Important: You cannot tape all diamonds at once because the corners touch. Tape every other painted diamond first. -
Seal the tape edges:
Press the tape down firmly. To ensure razor-sharp lines, verify the edges are sealed by running a credit card or your fingernail along the tape edge. -
Prevent bleed-through:
A pro trick is to brush a tiny amount of your base cream color over the tape edge first. This seals any microscopic gaps; if paint bleeds, it will match the base coat. -
Paint the first diamonds:
Using the rust-red paint and a small roller or brush, fill in the taped diamonds. Apply thin coats to avoid drips and ridges. -
Add a second coat:
Once the first coat is dry to the touch, apply a second coat of rust-red for rich, deep color. -
Remove tape carefully:
While the final coat is still slightly tacky (not fully dry), slowly peel off the tape at a 45-degree angle. This prevents the paint from peeling up with the tape. -
Tape the remaining diamonds:
Allow the painted diamonds to dry completely (often overnight). Then, tape off the remaining diamonds that need color. The tape will now go over your dried red diamonds, so ensure they are fully cured. -
Paint remaining sections:
Repeat the painting process: edge seal with base color, apply two coats of red, and remove tape carefully. -
Touch up and reinstall:
Use a small artist’s brush to tidy up any tiny imperfections or corners. Once fully cured, reinstall your hardware to complete the look.
Hardware Harmony
Swap standard hardware for brass or polished chrome fixtures. A central bee or lion head knocker adds serious character to the center of a diamond.
Step back and admire how this bold pattern gives your entryway a completely new personality.
Striped Painted Door Inspired by Slats and Planks
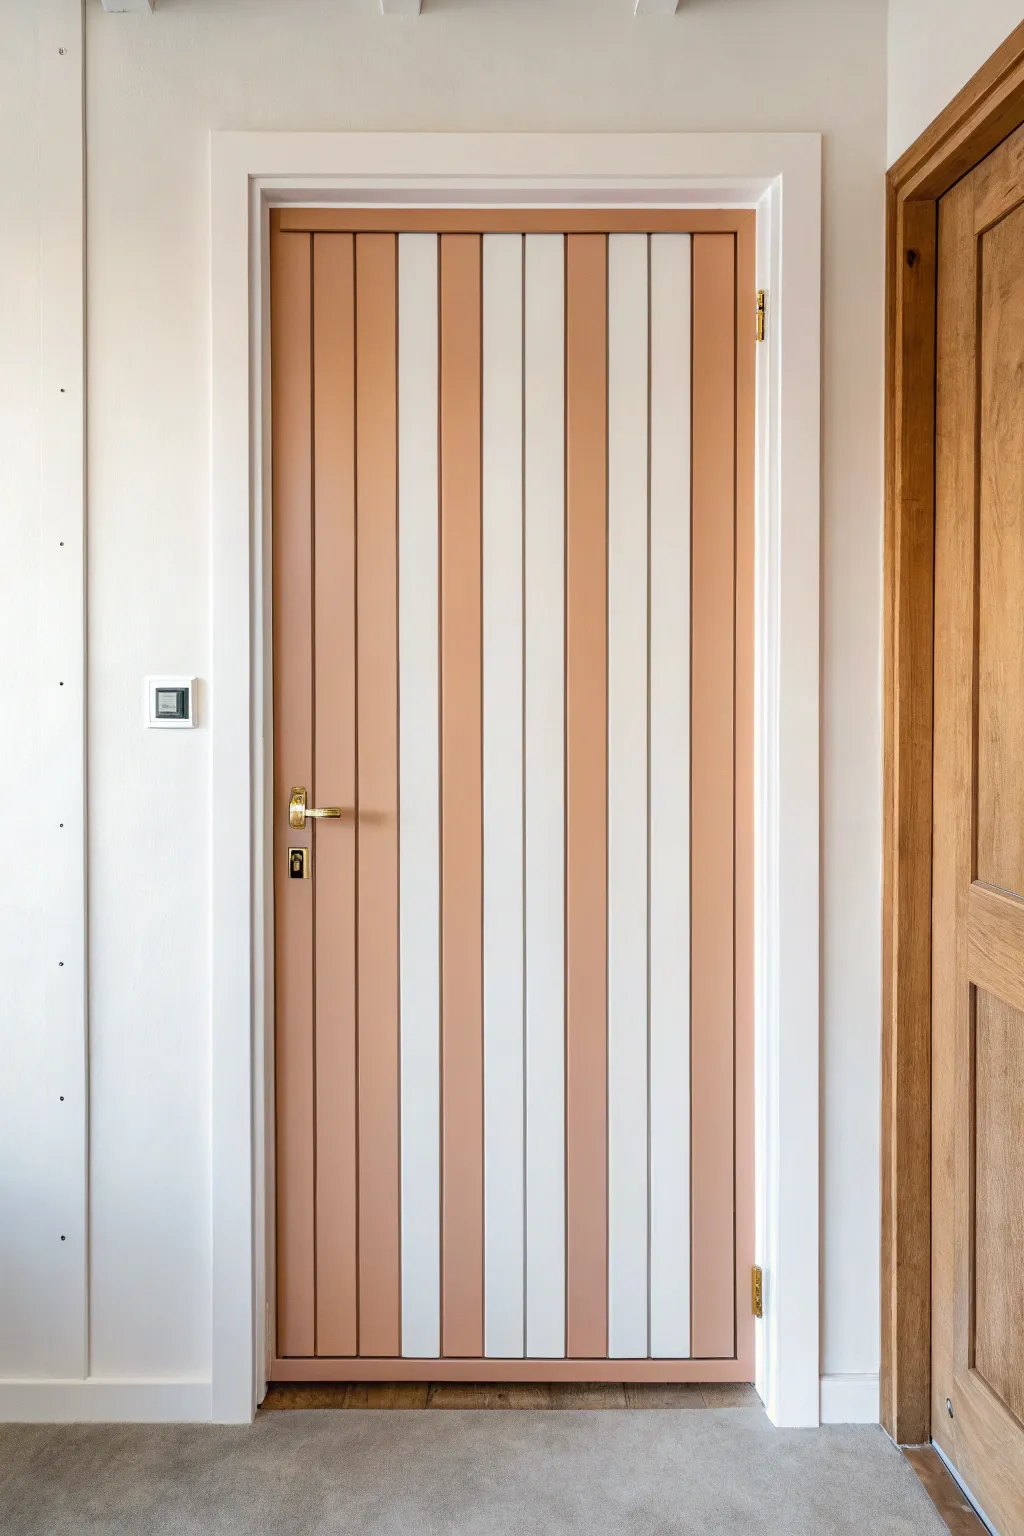
Transform a standard flat-paneled door into a charming architectural feature using nothing but paint and clever taping. This project mimics the look of tongue-and-groove planks by alternating soft terracotta and crisp white stripes, giving any room an instant dose of texture and warmth.
Step-by-Step Tutorial
Materials
- Interior wood door (pre-primed or existing)
- Sandpaper (120 and 220 grit)
- Painter’s tape (1-inch width works best)
- Measuring tape
- Pencil
- Long straight edge or level
- High-quality angled sash brush (2 inch)
- Small foam roller and tray
- Primer (bonding primer if painting over gloss)
- Base paint: Crisp white satin or semi-gloss enamel
- Accent paint: Terracotta or salmon pink satin or semi-gloss enamel
- Utility knife
- Damp cloth
- Screwdriver (for removing hardware)
Step 1: Preparation
-
Remove Hardware:
Begin by removing the door handles, lock plates, and hinges if you plan to paint the door off the frame. Taking the hardware off ensures a much cleaner finish than taping around it. -
Clean the Surface:
Wipe down the entire door with a damp cloth and mild detergent to remove oils and dust. Let it dry completely. -
Sand for Adhesion:
Lightly scuff the entire surface with 120-grit sandpaper. You aren’t trying to strip the old paint, just giving the new coats something to grip. -
Prime the Door:
Apply a coat of high-quality primer. If your door was previously painted with oil-based paint or is very glossy, use a bonding primer to prevent peeling later.
Step 2: Base Coat Application
-
Paint the Base Color:
Apply your crisp white base color using a foam roller for the smooth areas and a brush for edges. This white will eventually become the white stripes. -
Apply Second Coat:
Once dry to the touch, apply a second coat of white to ensure full, opaque coverage. Let this cure for at least 24 hours—this is crucial so the tape doesn’t peel up your fresh base coat.
Pro Tip: Avoid Peeling
Use “delicate surface” painter’s tape (usually yellow or purple) since you are taping over fresh base paint. Press the edges down firmly with a credit card for a tight seal.
Step 3: Mapping the Stripes
-
Calculate Stripe Width:
Measure the width of your door inside the frame. Divide this number by the number of desired stripes to get an even width. In the reference image, the stripes appear to be roughly 3-4 inches wide. -
Mark the Intervals:
Use your measuring tape and pencil to make small tick marks along the very top and bottom edges of the door panel corresponding to your calculated stripe widths. -
Draw Guidelines:
Using a long level or straight edge, lightly draw vertical pencil lines connecting your top and bottom marks. These lines will guide your tape placement.
Level Up: Faux Texture
To make the planks look even more realistic, run a very fine graining tool or a stiff bristle brush vertically through the wet terracotta paint to simulate wood grain.
Step 4: Taping and Sealing
-
Apply Tape:
Apply painter’s tape along your pencil lines. Important: Place the tape on the *outside* of the stripes that will remain white. You are masking off the white areas to expose the areas that will turn terracotta. -
Plan the Pattern:
Double-check your work. You should have alternating sections: tape (white), exposed door (paint), tape (white), exposed door (paint). The reference photo shows a wider solid terracotta block on the left, so adjust your taping if you want that specific asymmetrical look. -
Seal the Tape Edges:
I always take a moment to seal the tape edges by brushing a very thin layer of the *base white paint* over the edge of the tape. This fills any tiny gaps and ensures the next color won’t bleed underneath, giving you laser-sharp lines.
Step 5: Adding the Color
-
Paint the Terracotta Stripes:
Using a small roller or brush, paint the terracotta color onto the exposed striped sections. Don’t overload the roller to avoid ridges. -
Apply Second Color Coat:
Allow the first coat to dry according to the can’s instructions, then apply a second coat for a rich, solid finish. -
Remove Tape:
Pull the tape off while the final coat is still slightly tacky, not bone dry. Pull slowly at a 45-degree angle away from the fresh paint to cleanly slice through the film.
Step 6: Finishing Touches
-
Touch Ups:
Inspect your stripes. If any paint bled through, use a tiny artist’s brush and the base white paint to correct it once everything is dry. -
Reinstall Hardware:
Once the paint has cured fully (give it a day or two to harden so it doesn’t chip), screw your handles and hinges back into place.
Step back and admire how a simple pattern has completely redefined your entryway


Have a question or want to share your own experience? I'd love to hear from you in the comments below!