Paint can take a beat-up, brown piece of furniture from “why do I still own this?” to “I can’t believe I made that.” Here are my favorite painted furniture before and after ideas that show real, dramatic transformation—because you deserve proof that the glow-up is possible.
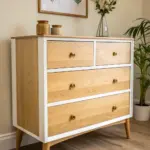
Brown Wood Dresser to Crisp White Classic
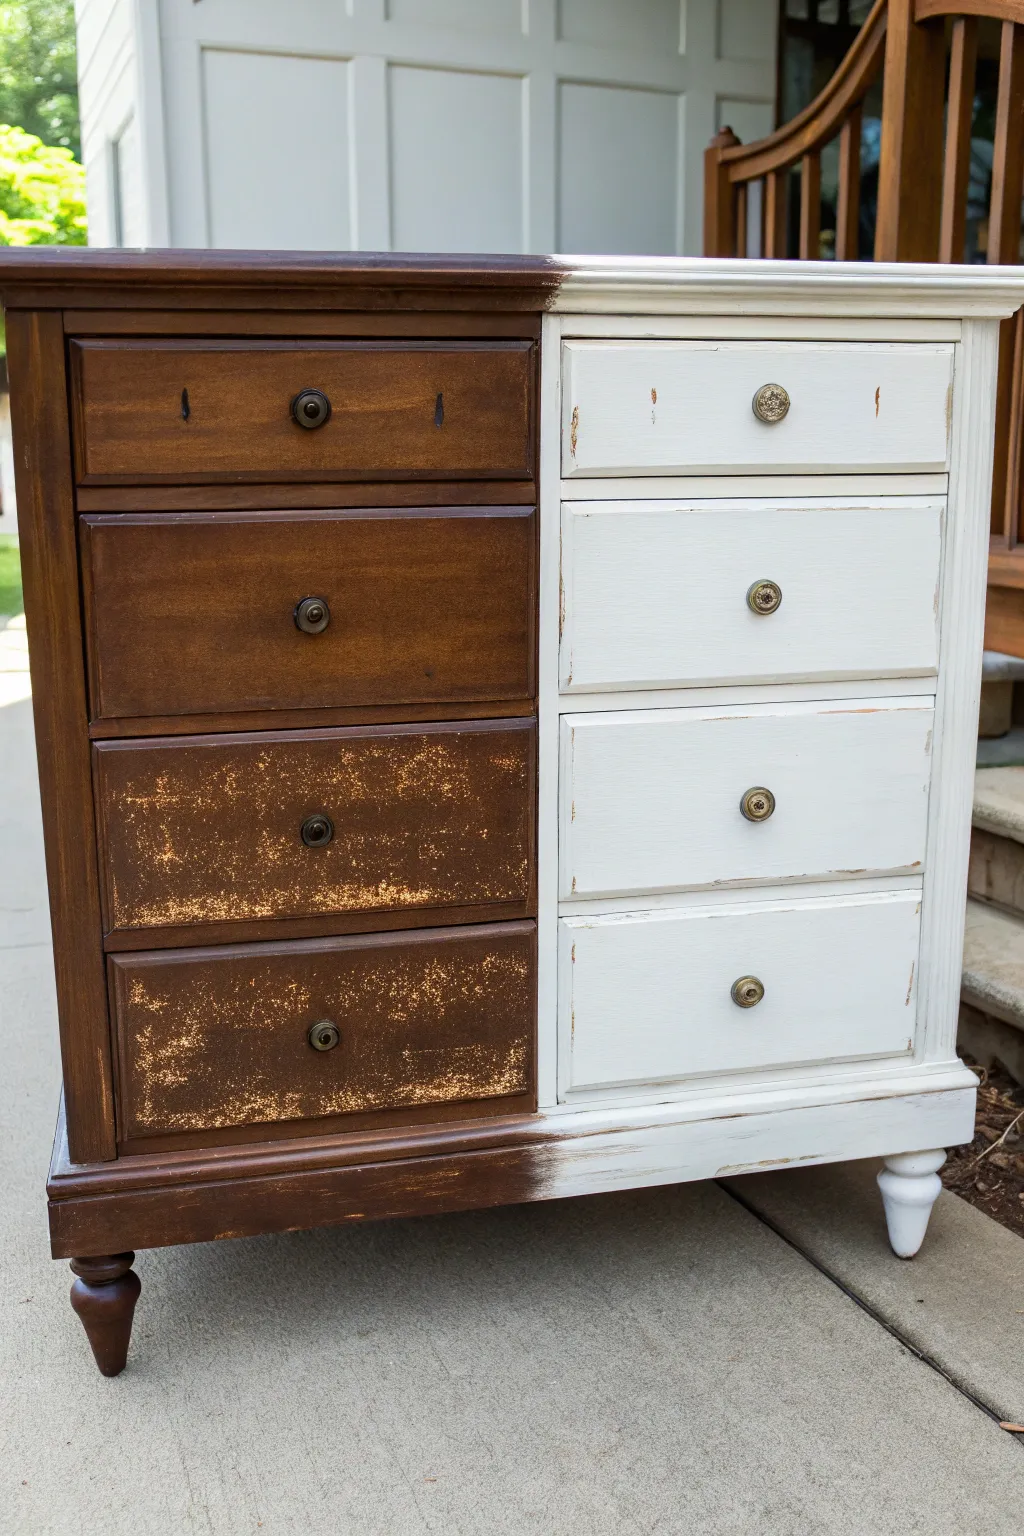
Transform a tired, dated brown dresser into a bright farmhouse-style statement piece with a classic white finish. This project demonstrates the power of paint to cover damage while maintaining vintage charm through subtle distressing.
How-To Guide
Materials
- Wooden dresser
- Medium-grit sandpaper (120-150 grit)
- Fine-grit sandpaper (220 grit) or sanding block
- Tack cloth or microfiber rags
- TSP (Trisodium Phosphate) or degreasing cleaner
- Wood filler (if repairing deep gouges)
- Stain-blocking primer (oil-based or shellac-based recommended for dark wood)
- Quality chalk-style or mineral paint in crisp white
- Angled sash brush (2-inch)
- Small foam roller (optional for flat surfaces)
- Matte or satin clear coat polycrylic
- Painters tape
- Screwdriver
Step 1: Preparation & Cleaning
-
Hardware removal:
Start by removing all drawers from the dresser body. Use your screwdriver to take off all knobs, handles, and pulls. Store these in a labeled bag so no screws get lost during the refinishing process. -
Initial sand:
Using medium-grit sandpaper, give the entire piece a thorough scuff sanding. You don’t need to strip it to bare wood, but you do need to rough up the old glossy finish so the new paint adheres. -
Address heavy damage:
If your lower drawers have significant flaking or textured damage like the ones in the ‘before’ photo, sand these areas more aggressively until the surface feels smooth to the touch. -
Deep clean:
Wash the entire dresser with TSP or a strong degreaser to remove years of furniture polish, oil, and dust. This is crucial for durability. Wipe everything down with a clean, damp cloth afterwards to remove residue.
Step 2: Priming
-
Stain blocking:
Because the original wood is dark and reddish, use a stain-blocking primer. Apply a consistent coat over the entire body and drawer fronts. This prevents the old wood tannins from bleeding through and pinking your white paint later. -
Smooth the primer:
Once the primer is completely dry, run a fine-grit sanding sponge lightly over the surface. This knocks down any brush strokes or raised grain. -
Dust removal:
Wipe away the fine sanding dust with a tack cloth before moving on to your paint. Even tiny specks can ruin the final finish.
Prevent Bleed-Through
Don’t skip the shellac-based primer! Dark vintage stains (like mahogany or cherry) are notorious for leaching pink or yellow stains through white paint weeks later if not sealed.
Step 3: Painting & Distressing
-
First coat:
Dip your angled brush into your white chalk-style paint. Apply the first coat with long, smooth strokes following the grain of the wood. Don’t worry if it looks slightly streaky; thin coats are better than thick ones. -
Drying time:
Allow the first coat to dry according to the manufacturer’s instructions, usually about 2-4 hours depending on humidity. -
Second coat:
Apply a second coat of white paint for solid, opaque coverage. If you are covering very dark wood, I sometimes find a third thin coat is necessary for that perfect crisp look. -
Distressing the edges:
Once the paint is fully dry, take a 220-grit sanding block to the edges and raised details. Gently sand until the dark wood peeks through the white paint. Focus on areas where natural wear would occur, like corners and drawer lips. -
Customizing the look:
Vary your pressure while distressing. You can replicate the look in the photo by creating small ‘chips’ on the flat drawer fronts and heavier wear on the routed edges.
Wax On, Wax Off
For a softer, velvety feel instead of a poly finish, use clear furniture wax. Apply with a round brush, let it haze over, then buff vigorously with a lint-free cloth.
Step 4: Finishing Touches
-
Sealing the piece:
Protect your hard work with a clear topcoat. Apply a water-based polycrylic using a synthetic brush or foam sponge. This seals the chalk paint and makes the surface wipeable. -
Hardware refresh:
While the sealer dries, clean your original hardware. If the dirty brass look doesn’t suit the new style, you can spray paint them or polish them up. The hardware in the photo creates a nice contrast against the white. -
Reassembly:
Once everything has cured for at least 24 hours, reattach the knobs and slide the drawers back into their tracks.
Enjoy your renewed space with this fresh and classic furniture update


Shiny Traditional Table to Matte Modern Finish
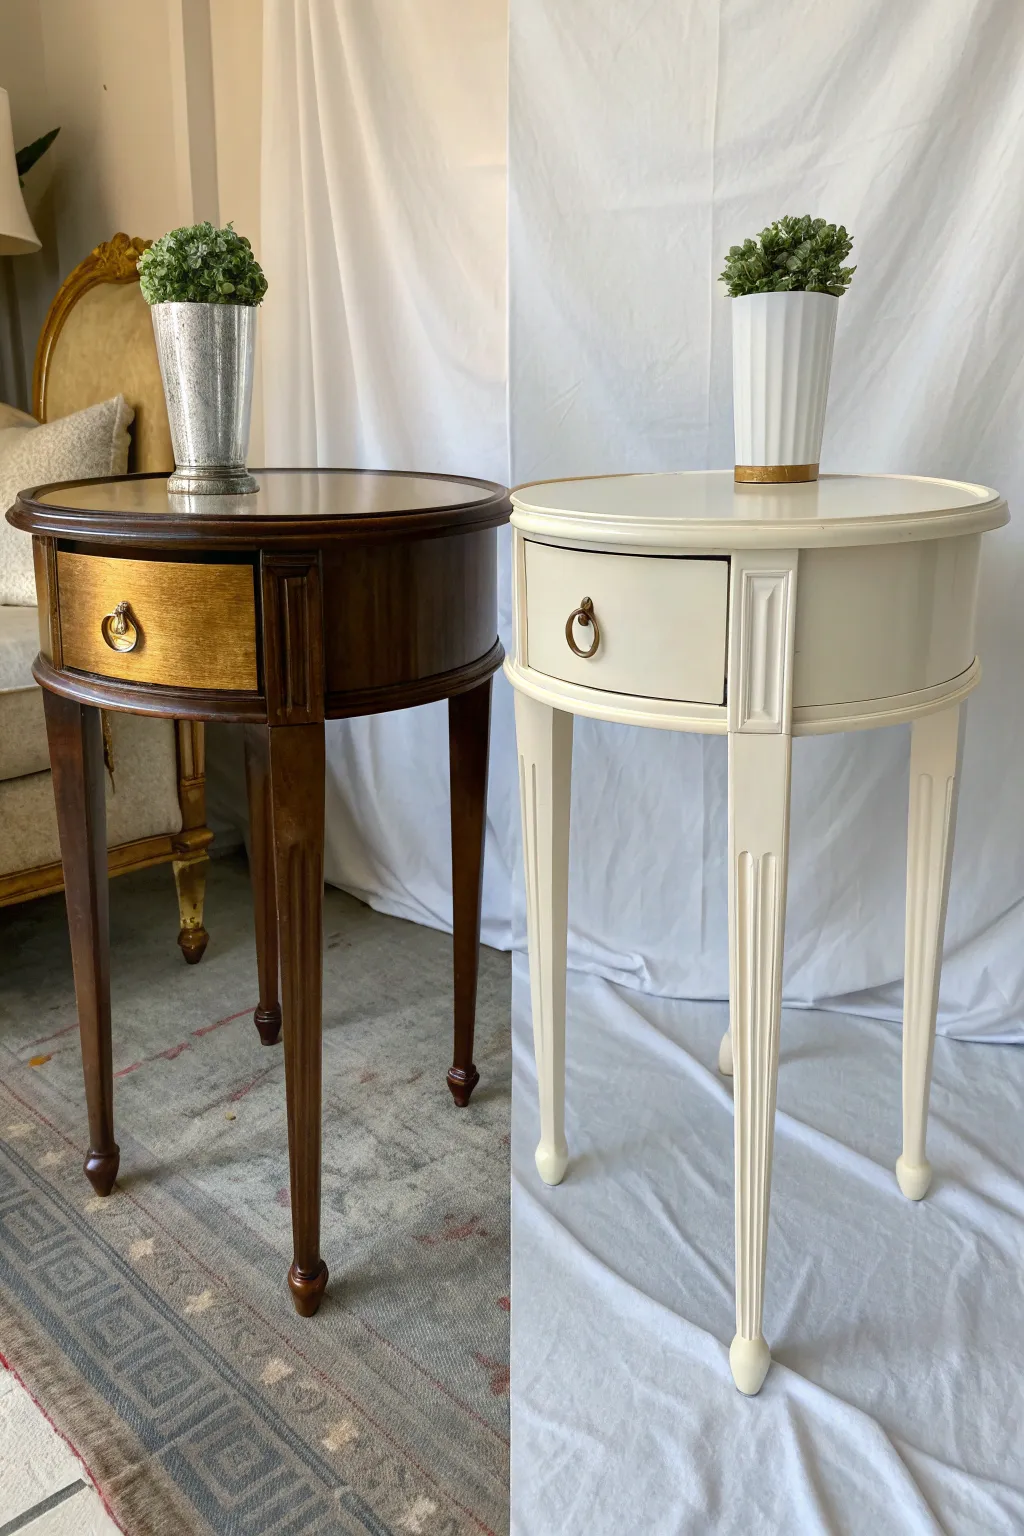
Transform a dated, high-gloss traditional side table into a fresh, modern piece with a soft matte finish. This makeover proves how a simple coat of creamy white paint can completely change the personality of sturdy, classic furniture.
Step-by-Step
Materials
- Round side table (wood)
- Medium-grit sandpaper (120-150 grit)
- Fine-grit sandpaper (220 grit)
- Tack cloth or lint-free rags
- Mild degreasing cleaner (like TSP substitute)
- High-quality adhesion primer
- Matte or eggshell finish furniture paint (Cream/Off-White)
- 2-inch angled synthetic sash brush
- Small foam roller (optional for top)
- Screwdriver (for hardware removal)
- Wood filler (if needed)
- Painter’s tape
Step 1: Preparation & Cleaning
-
Remove Hardware:
Begin by removing the drawer from the table. Using your screwdriver, carefully unscrew the brass ring pull from the drawer front and set it aside in a safe place or a labeled baggie so you don’t lose the screws. -
Clean Thoroughly:
Scrub the entire piece down with a mild degreasing cleaner. Vintage furniture often has years of furniture polish or wax buildup that can repel paint, so don’t skip this step. Wipe it completely dry. -
Scuff Sanding:
Using medium-grit sandpaper (around 120-150), sand the entire surface. You don’t need to strip the dark finish back to bare wood; the goal is simply to dull the glossy sheen so the primer has something to grip. -
Dust Removal:
Vacuum up the sanding dust, then wipe every nook and cranny with a tack cloth. Any leftover dust will create a gritty texture in your final finish. -
Protect the Drawer Sides:
If you want maintain clean, unpainted wood on the sides of the drawer (where it slides in), apply painter’s tape along the edges of the drawer front to create a sharp line.
Step 2: Priming
-
Apply Primer:
Brush on a coat of high-quality adhesion primer. Since we are going from dark mahogany to a light cream, stain-blocking primer is essential to prevent the wood tannins from bleeding through later. -
Focus on Details:
Use the tip of your angled brush to work the primer into the fluted grooves on the legs and the decorative squares on the apron. -
Check for Drips:
While the primer is wet, constantly check the undersides of the table rim and the legs for drips and smooth them out immediately. -
Light Sanding:
Once the primer is fully dry, run your fine-grit (220) sandpaper lightly over the flat surfaces to knock down any brush strokes. Wipe away the dust.
Don’t Rush the Cure
Even if dry to the touch, paint takes up to 30 days to fully cure and harden. Avoid placing heavy vases or sharp objects on the tabletop for the first few weeks to prevent chipping.
Step 3: Painting
-
First Coat Application:
Stir your cream matte paint thoroughly. Apply the first coat using long, smooth strokes. Paint with the grain of the wood, starting with the legs and working your way up to the tabletop. -
Painting the Tabletop:
For the flat top surface, I prefer to use a brush for the edges and then feather inward, but a small foam roller can also provide a very smooth finish here. -
Dry Time:
Allow the first coat to dry completely according to the manufacturer’s instructions. Patience here prevents the paint from dragging or peeling. -
Second Coat Application:
Apply a second coat to ensure opaque, solid coverage. The dark wood underneath should be completely hidden by now. If you still see shadows of the dark finish, a third thin coat may be necessary. -
Detail Work:
Pay special attention to the fluted legs during this coat; paint can pool at the bottom of the grooves. Use a dryer brush to pull excess paint out of those crevices.
Level Up: Drawer Surprise
Line the inside of the drawer or the sides with a patterned wallpaper or a pop of contrasting color for a fun, hidden design element every time you open it.
Step 4: Finishing Touches
-
Final Smooth:
If you want an ultra-smooth factory feel, you can do a very gentle pass with high-grit sandpaper or a brown paper bag over the dried paint, but be careful not to distress the edges. -
Hardware Update:
Clean the original brass hardware if you want to keep the vintage look, or give it a quick spray of metallic paint if it’s tarnished beyond repair. -
Reassembly:
Remove the painter’s tape from the drawer sides. Reattach the pull to the drawer front and slide the drawer back into the table.
Now your heavy, dark antique has been refreshed into a light, airy accent piece ready for a modern living space


China Cabinet to Airy Lightened-Up Hutch
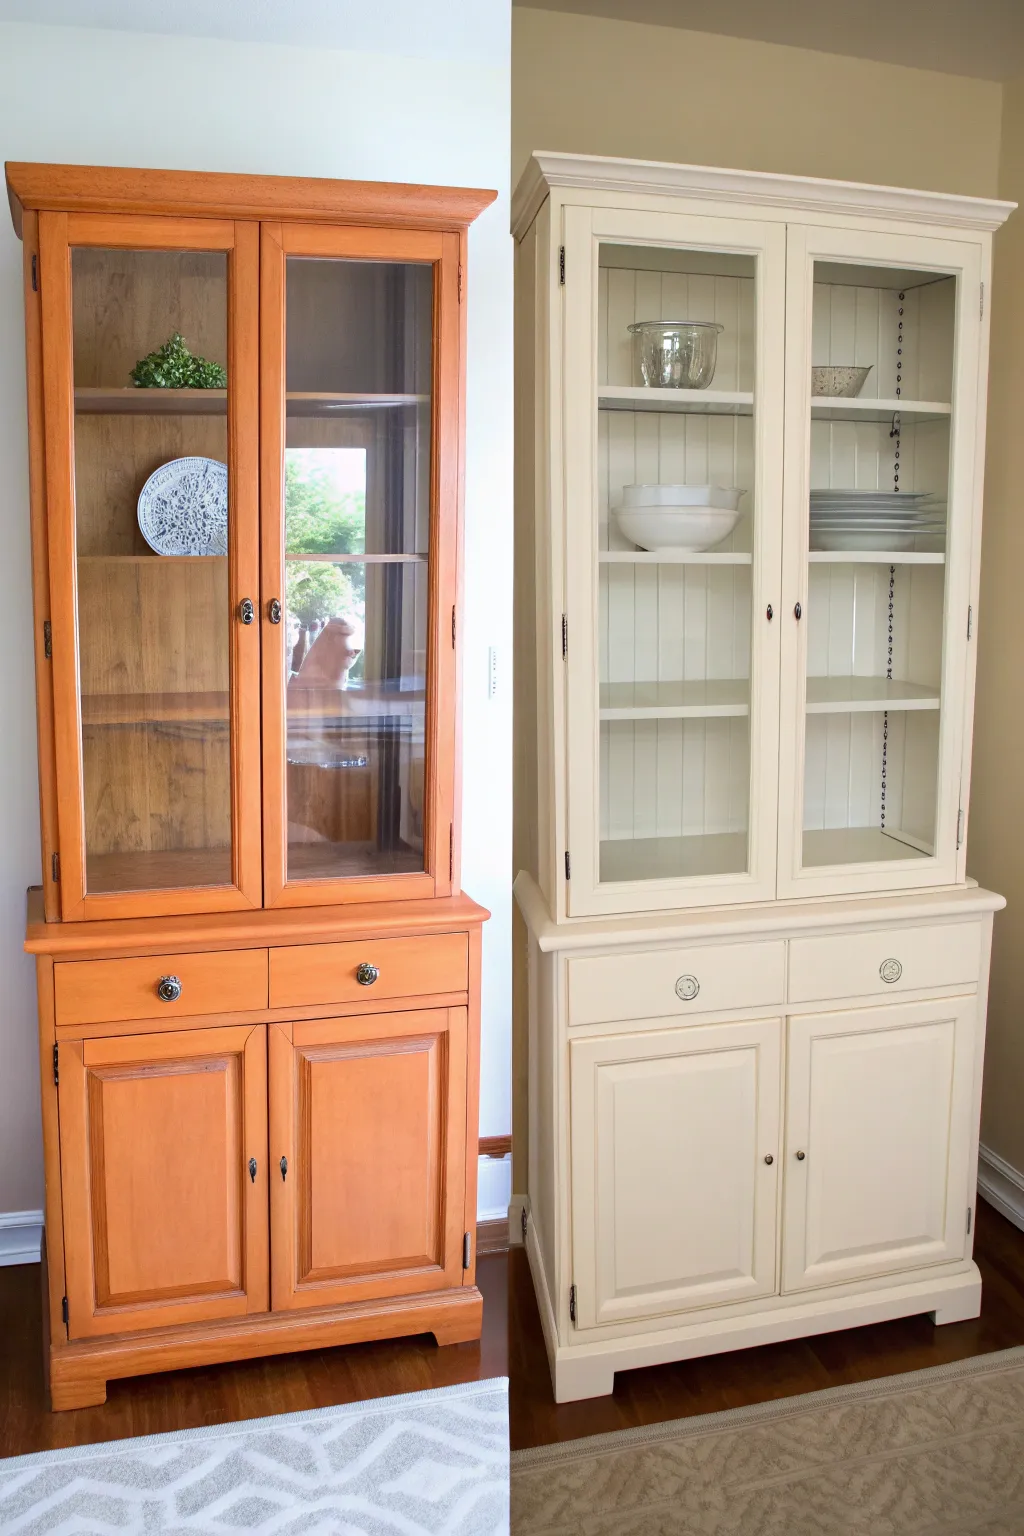
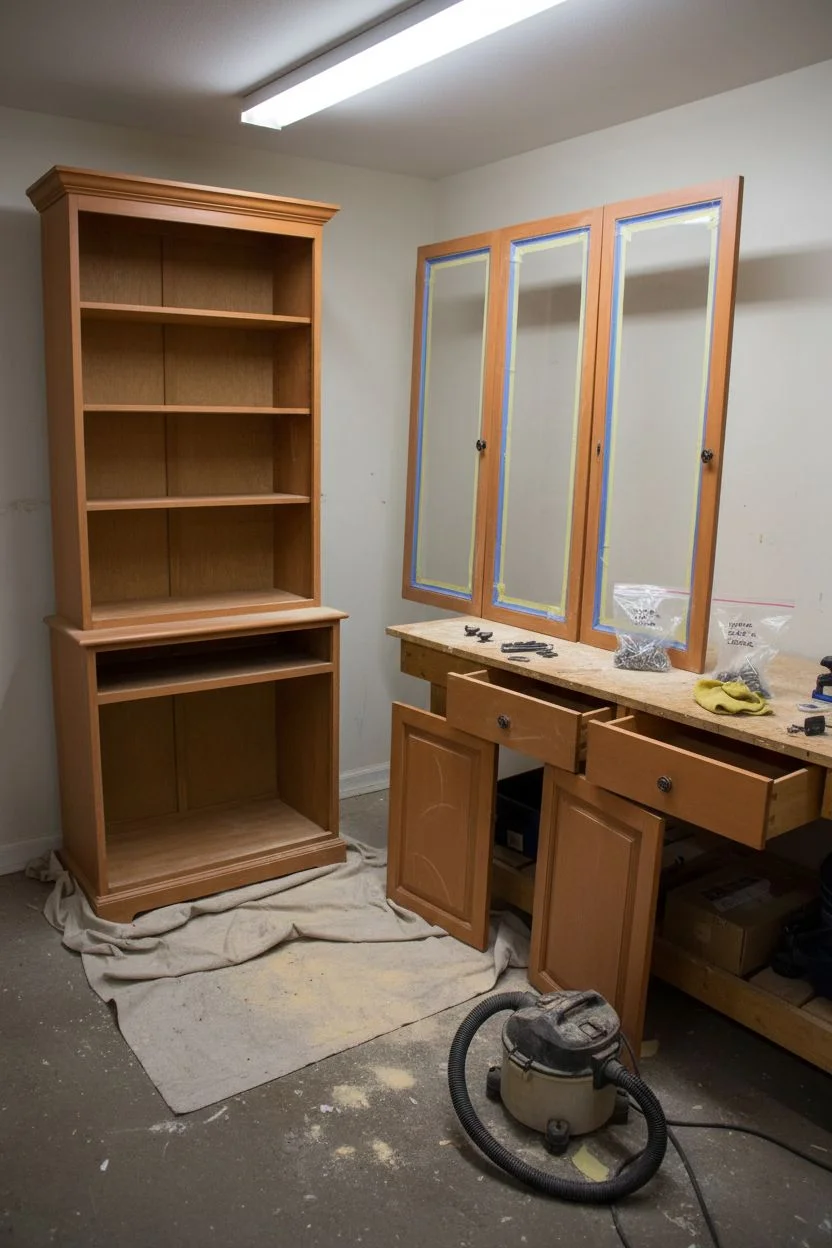
This project takes a dated, orange-toned china cabinet and breathes new life into it with a fresh coat of creamy ivory paint. The transformation lightens the visual weight of the piece, turning it into an airy focal point suitable for a modern farmhouse or cottage-style dining room.
Detailed Instructions
Materials
- China cabinet or hutch
- Screwdriver (for hardware removal)
- TSP substitute (degreaser)
- Medium grit sandpaper (120-150 grit)
- Fine grit sandpaper (220 grit)
- Tack cloth
- Painter’s tape
- High-quality bonding primer (stain-blocking)
- Creamy white furniture paint (satin or semi-gloss finish)
- Beadboard wallpaper or thin beadboard paneling (optional for backing)
- Construction adhesive (if using beadboard)
- Synthetic angled sash brush (2 inch)
- Small foam roller and tray
- New hardware (knobs and pulls)
- Clear furniture wax or polychrylic topcoat
Step 1: Preparation
-
Disassemble the cabinet:
Begin by removing all doors, drawers, and shelves from the hutch. Carefully unscrew the old hardware and hinges. Place screws in labeled bags so you don’t lose them, especially if you plan to reuse the hinges. -
Clean thoroughly:
Wipe down every inch of the wood with a TSP substitute or a strong degreaser. Older furniture often holds onto years of wax, polish, and oils that will prevent paint from sticking. -
Scuff sand:
Use 120-150 grit sandpaper to scuff the entire surface. You don’t need to strip it to bare wood; you just want to remove the shine and create ‘tooth’ for the primer to grab onto. -
Remove dust:
Vacuum up the sanding dust, then wipe everything down with a tack cloth to ensure a perfectly clean surface. -
Tape off glass:
Apply painter’s tape carefully around the edges of the glass panes on the doors to protect them from primer and paint drips.
Bleed-Through Blues?
If pink or yellow stains appear through your white primer, stop immediately. Switch to a shellac-based primer (like BIN) which seals in tannins that water-based primers can’t block.
Step 2: Priming and Backing
-
Apply bonding primer:
Using your angled brush for corners and the foam roller for flat areas, apply a coat of high-quality, stain-blocking primer. This is crucial for covering the orange wood tones and preventing bleed-through. -
Sand the primer:
Once the primer is fully dry, lightly sand it with 220-grit sandpaper to smooth out any brush strokes or bumps. Wipe away the dust. -
Evaluate coverage:
If the original dark wood is still showing through significantly, apply a second coat of primer. I usually find two thin coats work better than one thick one. -
Optional beadboard install:
If you want the textured back look shown in the ‘after’ photo, cut beadboard wallpaper or thin panels to fit the back of the upper hutch. Secure panels with construction adhesive or apply the wallpaper now before painting.
Add Interior Contrast
To make your white dishes pop, try painting the back panel of the hutch a soft contrasting color like pale blue or greige instead of matching the exterior ivory.
Step 3: Painting
-
First coat of paint:
Stir your creamy ivory paint well. Start painting the frame, using the brush to work paint into crevices and detail work first, then smoothing it out. -
Roll the flat surfaces:
Use the small foam roller on the larger flat sides and the drawer fronts to achieve a smooth, factory-like finish without brush marks. -
Paint the doors:
Paint the detached doors on a flat surface. Do the backs first, let them dry, and then flip them over to paint the fronts. -
Dry and light sand:
Allow the first coat to dry according to the manufacturer’s instructions. A very light pass with fine sandpaper here ensures a professional feel. -
Second coat:
Apply your second coat of paint to all surfaces, ensuring full, opaque coverage. Watch for drips in the corners of the window panes. -
Paint the interior shelving:
Don’t forget to paint the shelves! If they are wood, paint them to match. If they are glass, clean them thoroughly.
Step 4: Finishing Touches
-
Seal the piece:
Once the paint has cured (wait at least 24 hours), apply a clear wax or a water-based polycrylic topcoat to protect the finish from scratches. -
Remove tape and clean glass:
Carefully peel off the painter’s tape. Use a razor blade to gently scrape off any paint that might have seeped onto the glass. -
Install hardware:
Attach your new knobs and pulls. The example uses vintage-style metal pulls on the drawers and small knobs on the doors for a classic look. -
Reassemble:
Reattach the doors to the hinges and slide the drawers back into place.
Now step back and admire how this bright, clean piece completely refreshes the energy of your room


Laminate Desk Glow-Up With Smooth Painted Coverage
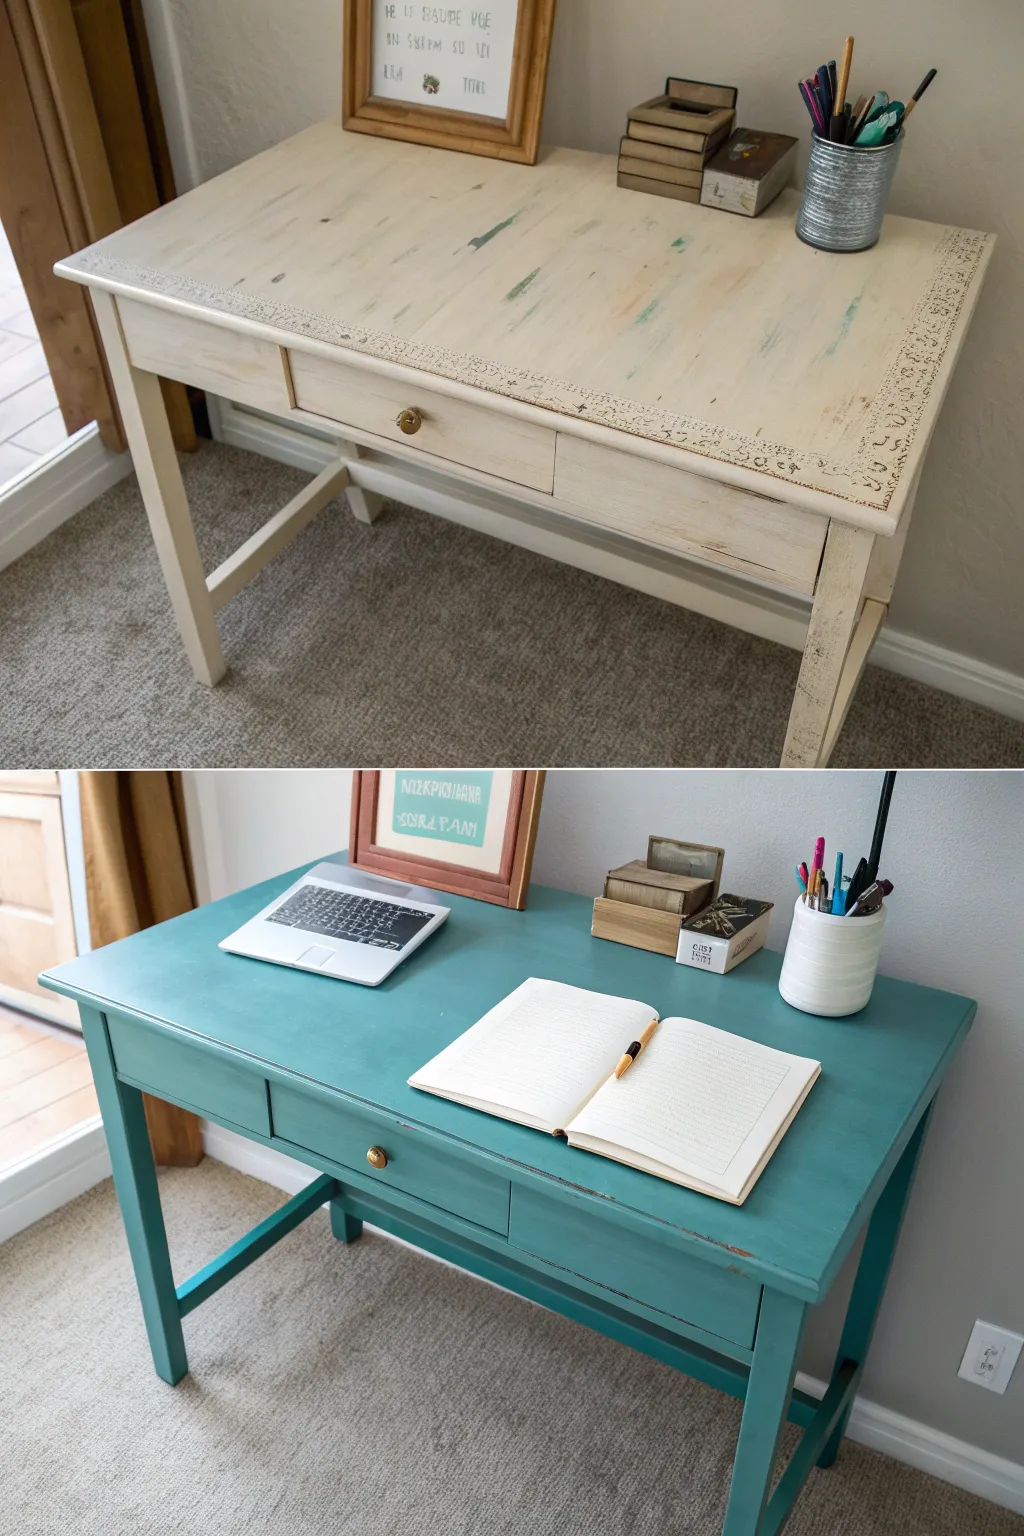
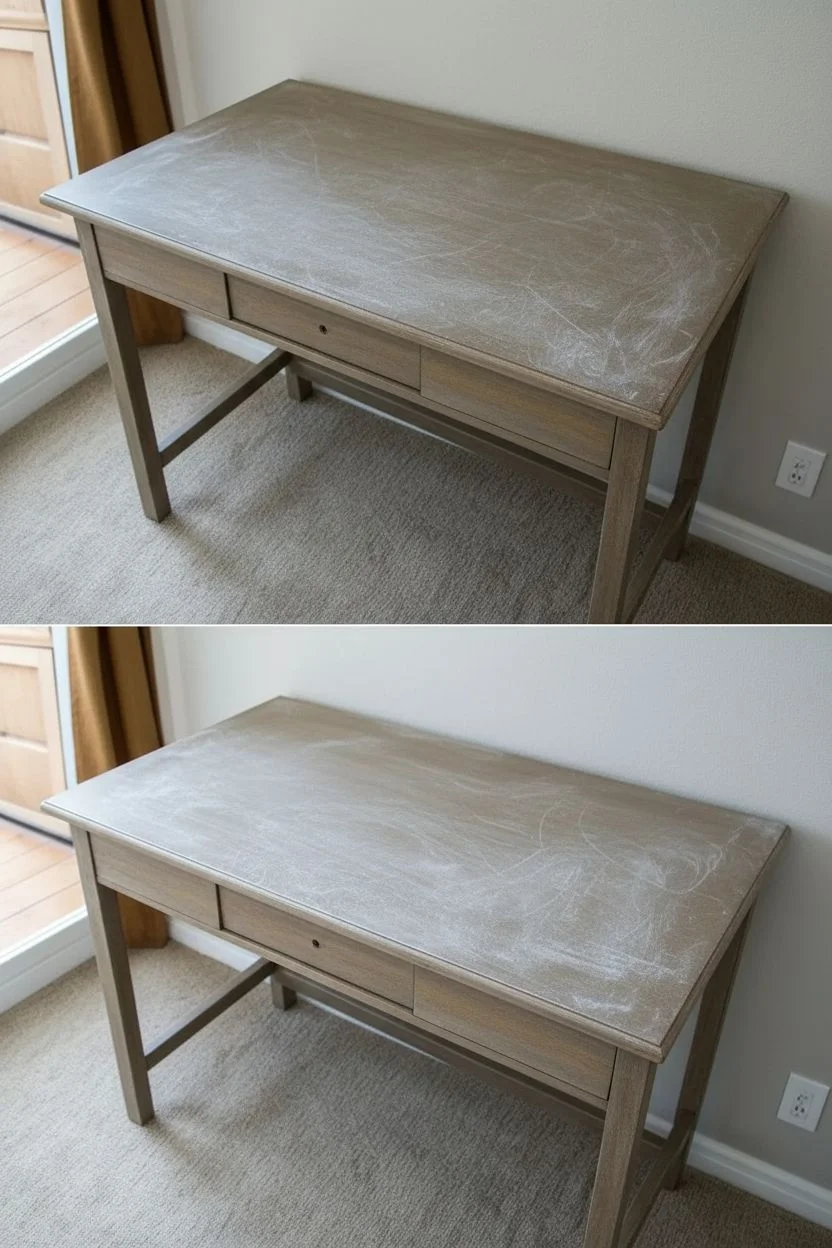
Transform a tired, faux-distressed laminate desk into a modern statement piece with a bold coat of teal paint. This project proves that even slick, manufactured surfaces can be given a high-end, smooth finish with the correct preparation and products.
Step-by-Step
Materials
- Laminate desk to be refinished
- Sander or sanding block (medium and fine grit)
- TSP substitute or degreaser
- High-adhesion primer (specifically for laminate/slick surfaces)
- Teal chalk-style or acrylic furniture paint
- Polycrylic topcoat or furniture wax
- Synthetic bristle paint brush
- Small foam roller (optional for top)
- Painter’s tape
- Screwdriver (for hardware removal)
- Clean lint-free cloths
Step 1: Preparation
-
Set up your workspace:
Lay down a drop cloth or old cardboard in a well-ventilated area to protect your floors from sanding dust and paint drips. -
Remove hardware:
Using a screwdriver, unscrew and remove the knob or handle from the drawer. Keep these parts in a small bag so they don’t get lost. -
Clean thoroughly:
Wipe down the entire desk with a TSP substitute or a strong degreaser. Laminate often has oily residues that repel paint, so scrubbing well here is crucial for adhesion. -
Scuff sand the surface:
Use a medium-grit sanding block to scuff the entire surface of the desk. You aren’t trying to strip the finish off, just scratching up the glossy laminate to give the primer something to grip. -
Remove sanding dust:
Vacuum up the loose dust and follow up with a damp lint-free cloth or a tack cloth to ensure the surface is perfectly clean.
Paint Peeling Off?
If paint scrapes off easily during the process, your laminate wasn’t sanded enough or was dirty. Stop, sand the peeling spot down to the base, re-clean, and re-prime that specific area.
Step 2: Priming and Painting
-
Tape off edges:
If there are areas (like inside the drawer) that you don’t want painted, apply painter’s tape carefully to those dividing lines. -
Apply primer:
Brush or roll on a coat of high-adhesion primer designed for slick surfaces. This is the most critical step for laminate; don’t skip it or the paint may peel later. -
Let primer cure:
Allow the primer to dry completely according to the manufacturer’s instructions. I usually let it sit overnight just to be safe. -
First coat of color:
Stir your teal furniture paint well. Apply the first coat using long, smooth strokes. Don’t worry if it looks a bit patchy or streaky; thin coats are better than thick ones. -
Dry and lightly sand:
Wait for the first coat to dry fully. Run a fine-grit sanding sponge very lightly over the surface to knock down any brush marks. -
Second coat of color:
Apply a second coat of teal paint. This should provide full, opaque coverage. If using a brush, finish with long, continuous strokes from one end to the other to minimize texture. -
Check coverage:
Inspect the desk for any light spots. If the original white is peeking through, apply a third thin coat.
Pro Tip: Roller vs. Brush
For the flattest finish on the large desk top, use a dense foam roller instead of a brush. It eliminates brush strokes and creates an almost factory-sprayed look.
Step 3: Finishing Touches
-
Seal the surface:
Once the paint is cured, apply a clear topcoat like Polycrylic or a clear furniture wax. For a desk surface that sees a lot of wear, a water-based poly is usually more durable. -
Create a smooth finish:
If using poly, apply 2-3 coats, lightly sanding with high-grit sandpaper between coats for a professionally smooth feel. -
Reinstall hardware:
Screw the knob or handle back onto the drawer front. If the old hardware looks dated, this is a great time to spray paint it gold or replace it entirely. -
Final cure time:
Let the desk sit without placing heavy objects on it for a few days to gloss over fully.
Now you have a vibrant, custom desk that looks brand new and adds a pop of personality to your workspace
BRUSH GUIDE
The Right Brush for Every Stroke
From clean lines to bold texture — master brush choice, stroke control, and essential techniques.
Explore the Full Guide
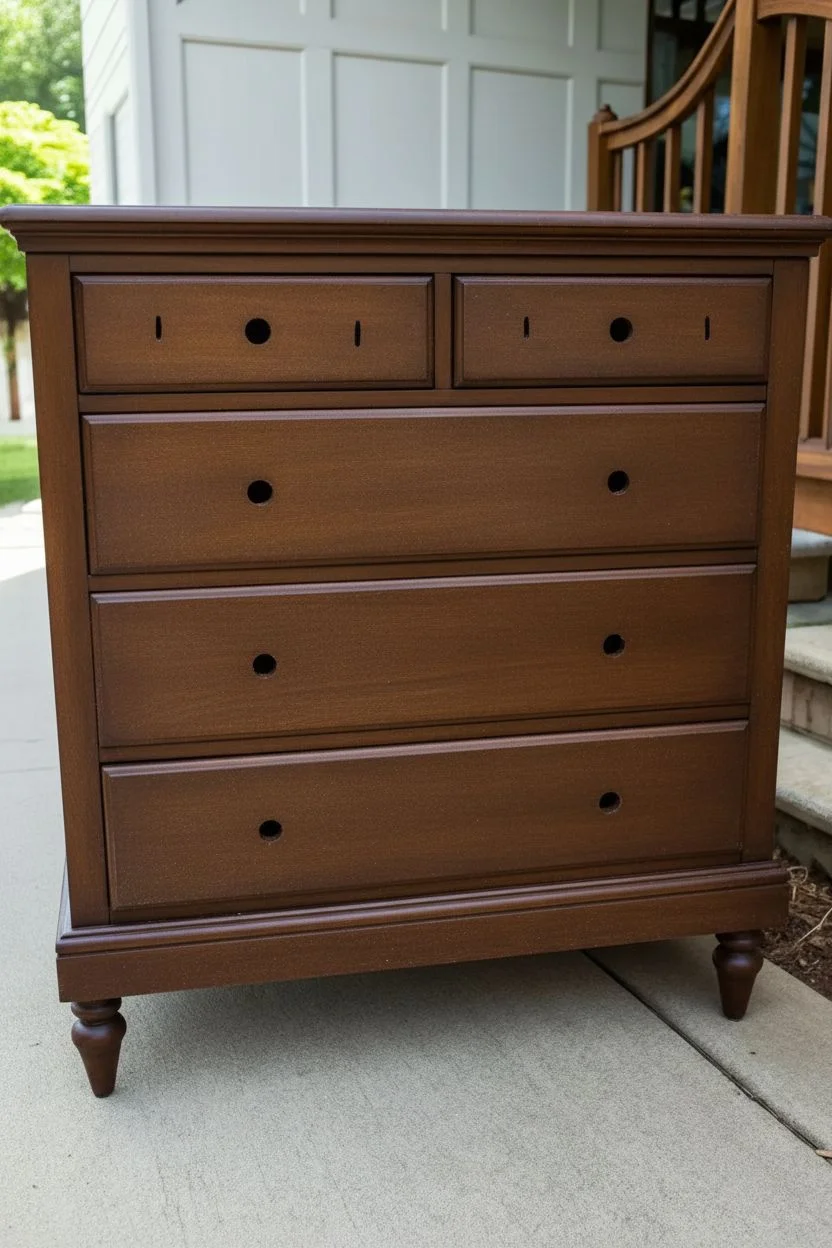
Hardware Swap That Changes Everything
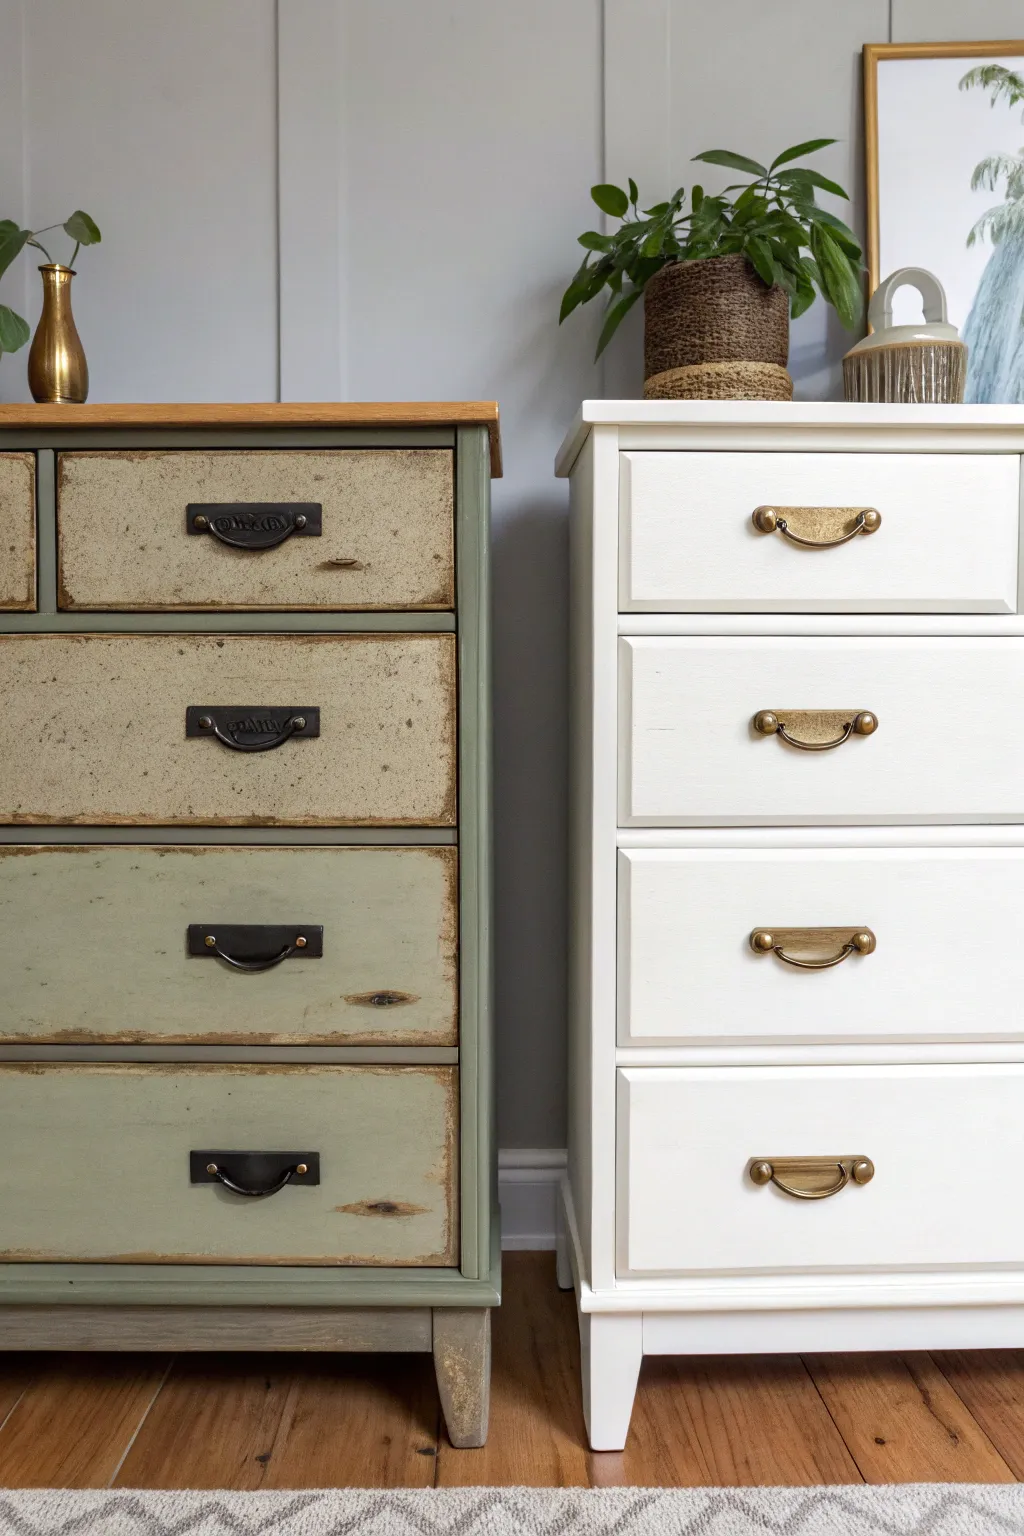
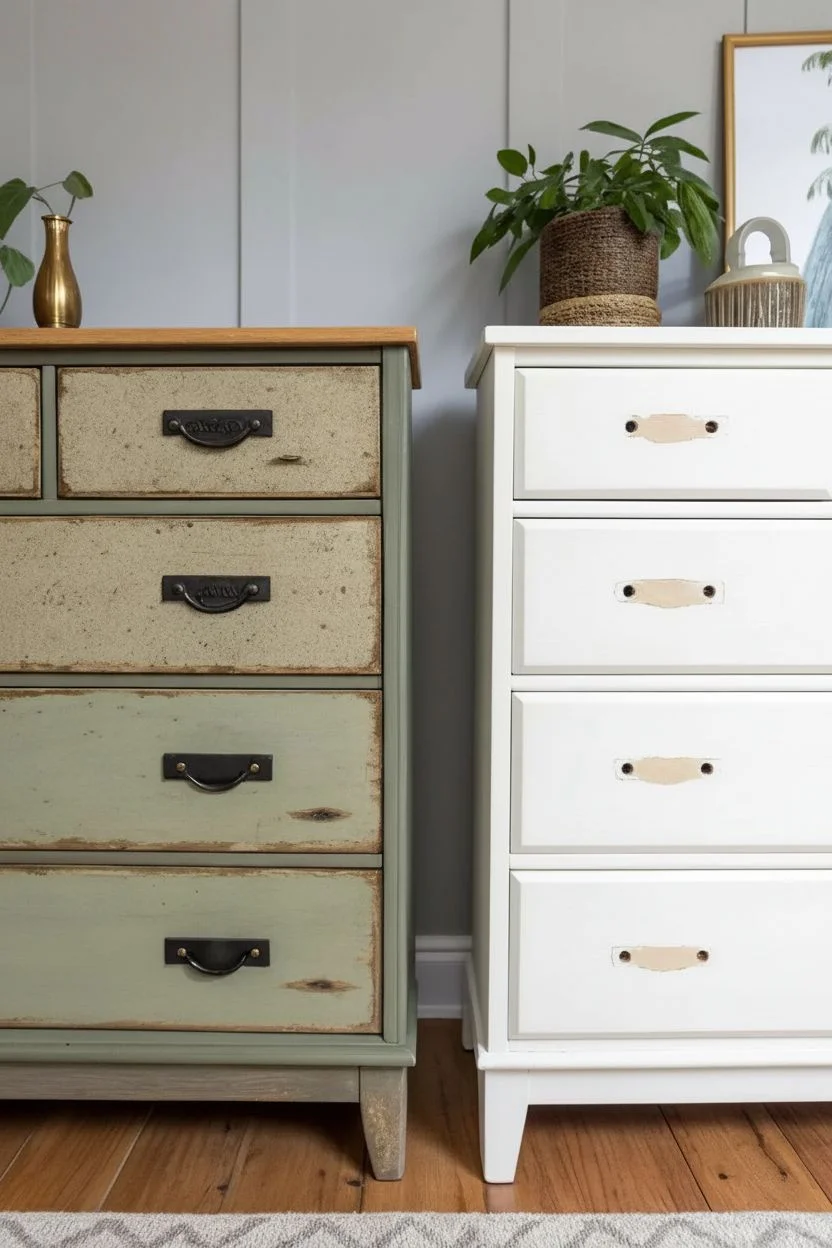
This transformation proves that sometimes the biggest impact comes from the smallest details. By trading mismatched, dark industrial pulls for uniform, elegant brass cup handles, you can completely reimagine the personality of a piece from rustic farmhouse to modern classic.
How-To Guide
Materials
- Old dresser (for refinishing)
- Screwdriver or power drill
- Wood filler
- Sandpaper (120 and 220 grit)
- Clean white semi-gloss furniture paint
- High-quality angled sash brush
- Foam mini roller
- Brass or gold cup handles (set of 4)
- Measuring tape
- Pencil
- Drill bits (sized for new hardware screws)
Step 1: Preparation & Repairs
-
Remove old hardware:
Start by unscrewing all the existing handles from the drawer fronts. Keep the screws in a baggie just in case you ever want to revert the style. -
Assess the holes:
Check if your new brass cup pulls align with the existing holes. Since we are switching from wide bar pulls to cup pulls, the holes likely won’t match perfectly. -
Fill the gaps:
Apply wood filler generously into the old screw holes that won’t be used. Overfill them slightly, as the filler tends to shrink as it dries. -
Sand smooth:
Once the filler is completely dry, sand the area flat with 120-grit sandpaper until it’s flush with the drawer surface. Finish with 220-grit for a super smooth base. -
Clean surface:
Wipe down the entire dresser with a tack cloth or a damp rag to remove all sanding dust. Paint won’t stick well to a dusty surface.
Hardware Jig Helper
Make a drilling template from a piece of cardboard. Mark your holes once on the card, punch them out, and use it to instantly align every drawer perfectly.
Step 2: Painting for Perfection
-
Prime the wood:
If your original dresser is dark wood or heavily stained like the ‘before’ image, apply a coat of stain-blocking primer first to prevent bleed-through. -
First coat application:
Use your angled brush to cut in around the edges and detailed molding of the drawer fronts. This ensures coverage in the tricky spots. -
Roll the flat surfaces:
While the brushed edges are still wet, use a foam mini roller to cover the flat drawer fronts. This technique eliminates brush strokes for a factory-finish look. -
Let it cure:
Allow the first coat to dry according to the paint manufacturer’s instructions. Rush this step, and you risk engaging tacky paint. -
Sand between coats:
I always do a very light sanding with 220-grit paper between coats. It knocks down any rough spots or dust nibs. -
Second coat:
Apply the second coat using the same brush-then-roll method. Inspect for any thin areas and touch up as needed.
Step 3: Hardware Installation
-
Measure twice:
Find the absolute center of each drawer front. Measure the distance between the screw holes on your new cup pulls. -
Mark the spots:
Using your center point as a guide, mark the two new drill locations with a pencil. Double-check that they are level. -
Drill pilot holes:
Drill through your pencil marks using a bit that is the same size as your screws. Keep the drill perpendicular to the drawer face. -
Attach the pulls:
Insert the screws from the inside of the drawer and thread them into the brass cup pulls on the front. -
Tighten securely:
Hand-tighten the screws with a screwdriver rather than a power drill to avoid stripping the threads or cracking the finish.
Antiqued Effect
If the bright brass feels too new, rub a tiny bit of dark wax onto the handle crevices and buff it off. It adds instant age and depth to the metal.
Step 4: Finishing Touches
-
Reassemble:
Slide the drawers back into the dresser casing, ensuring they glide smoothly over the painted rails. -
Final polish:
Give the new brass handles a quick wipe with a clean cloth to remove fingerprints and make them shine against the crisp white background.
Enjoy the fresh, cohesive look your new hardware brings to the room
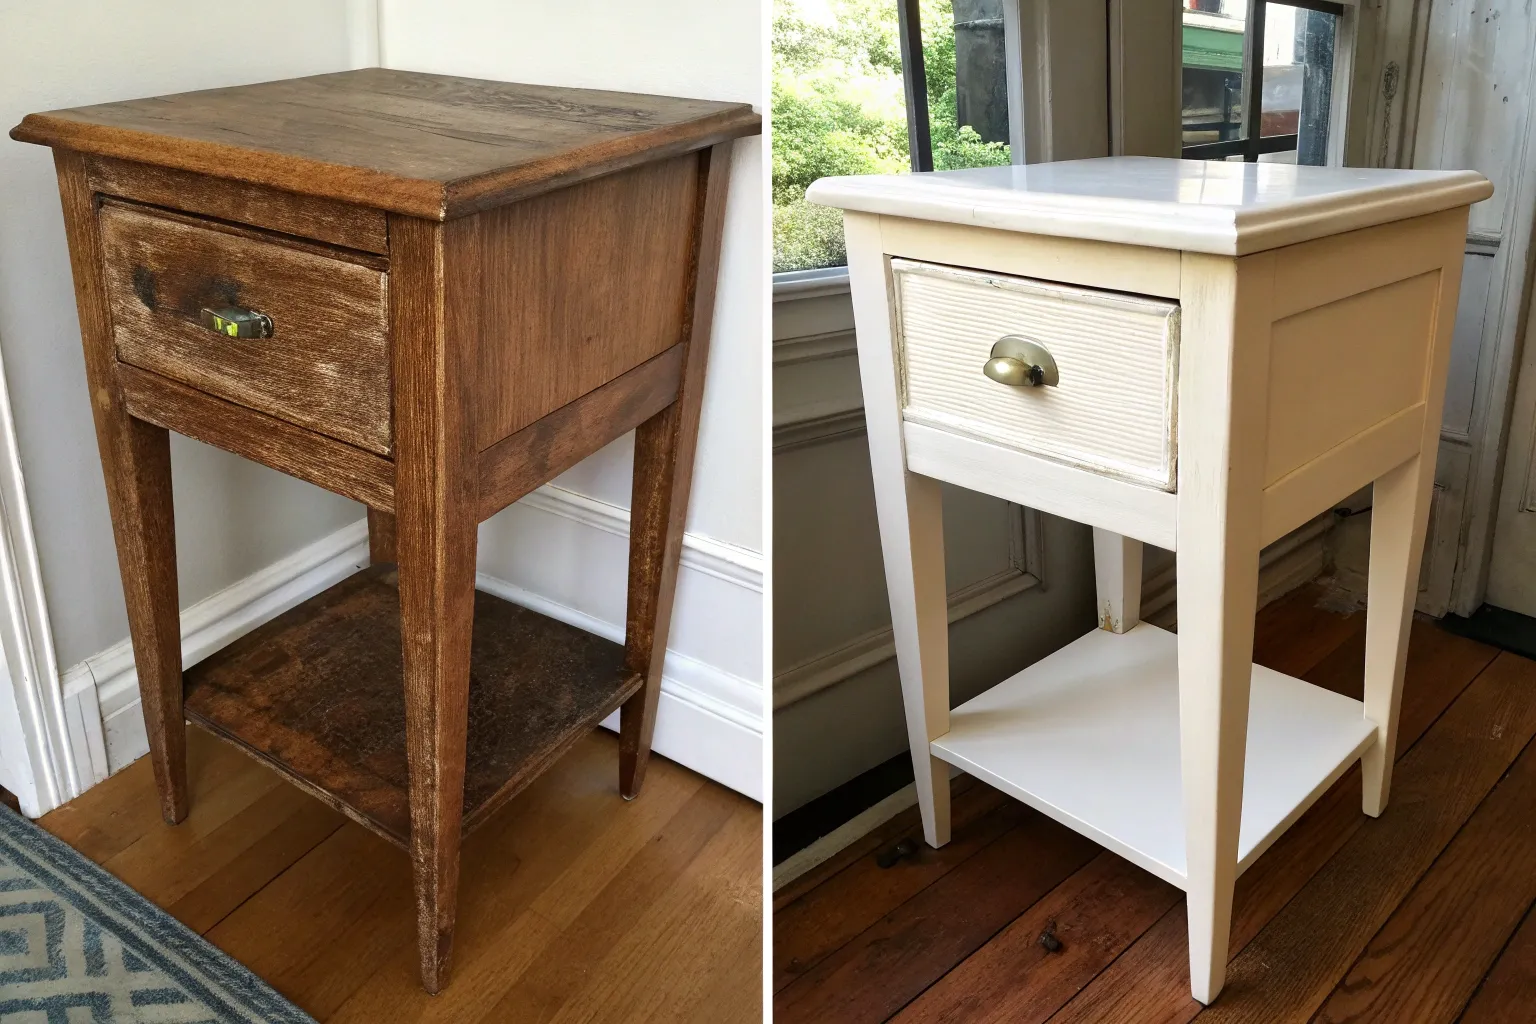
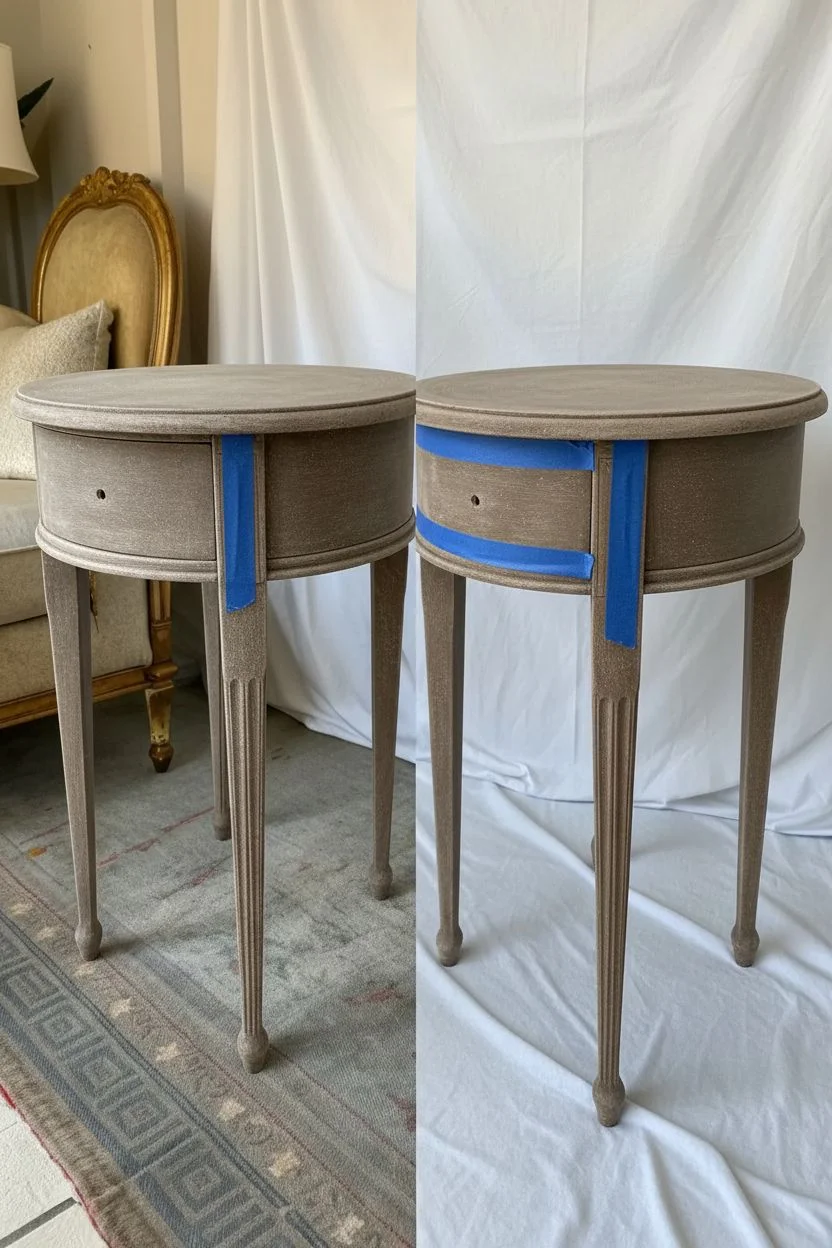
Washstand to Painted Nightstand With Hidden Charging Spot
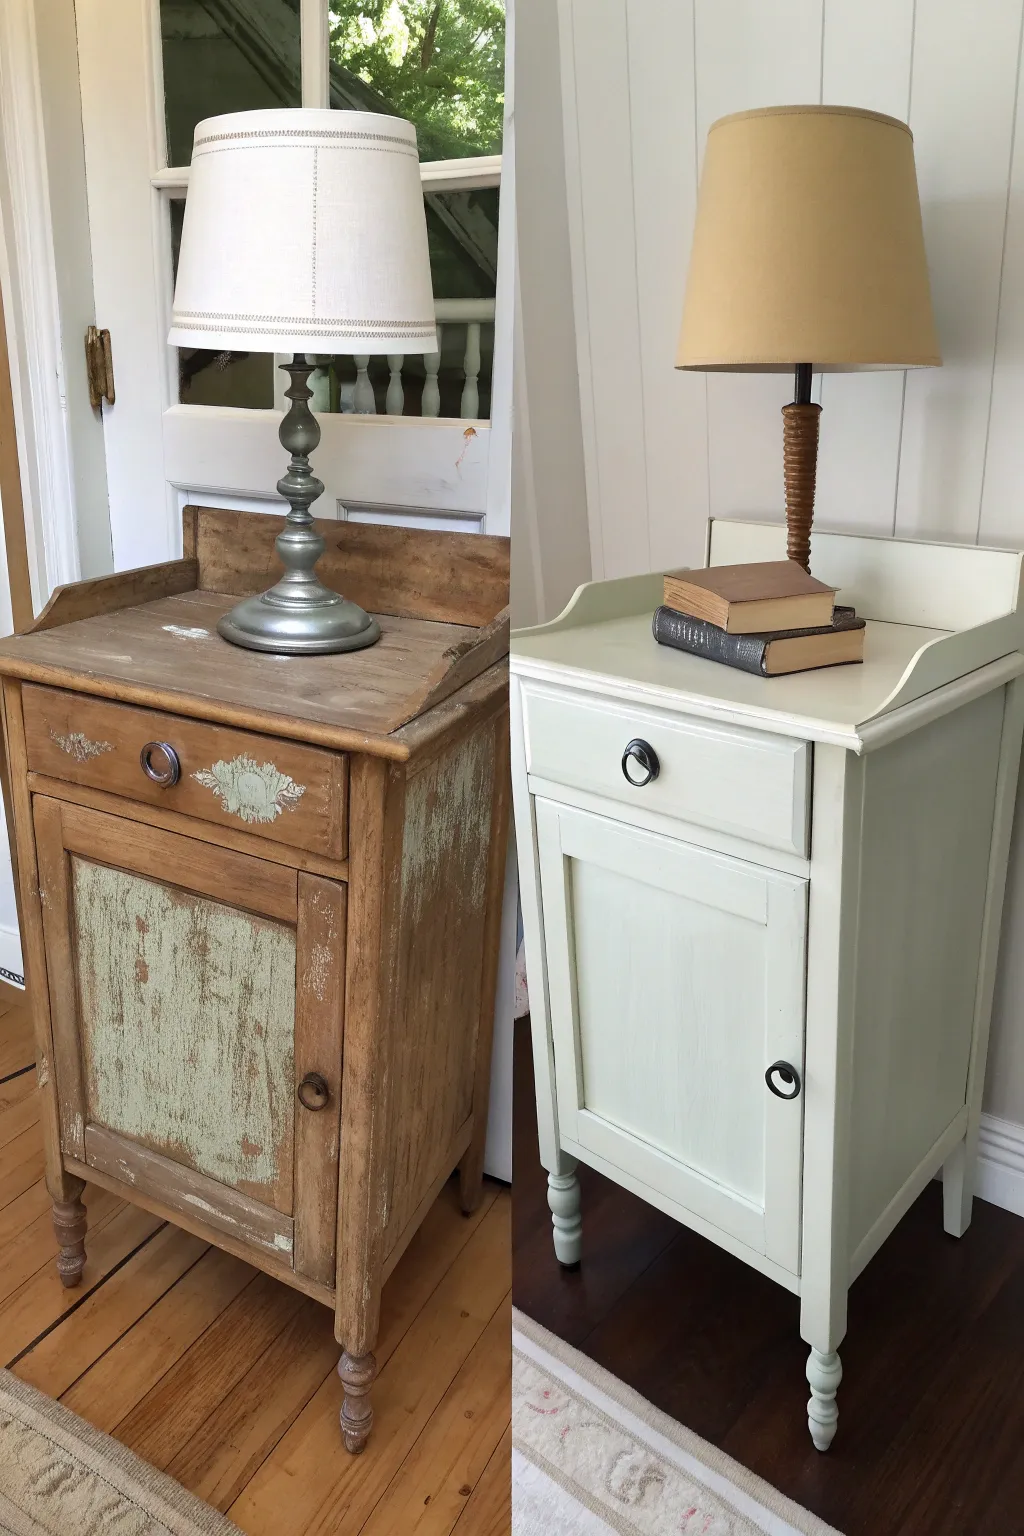
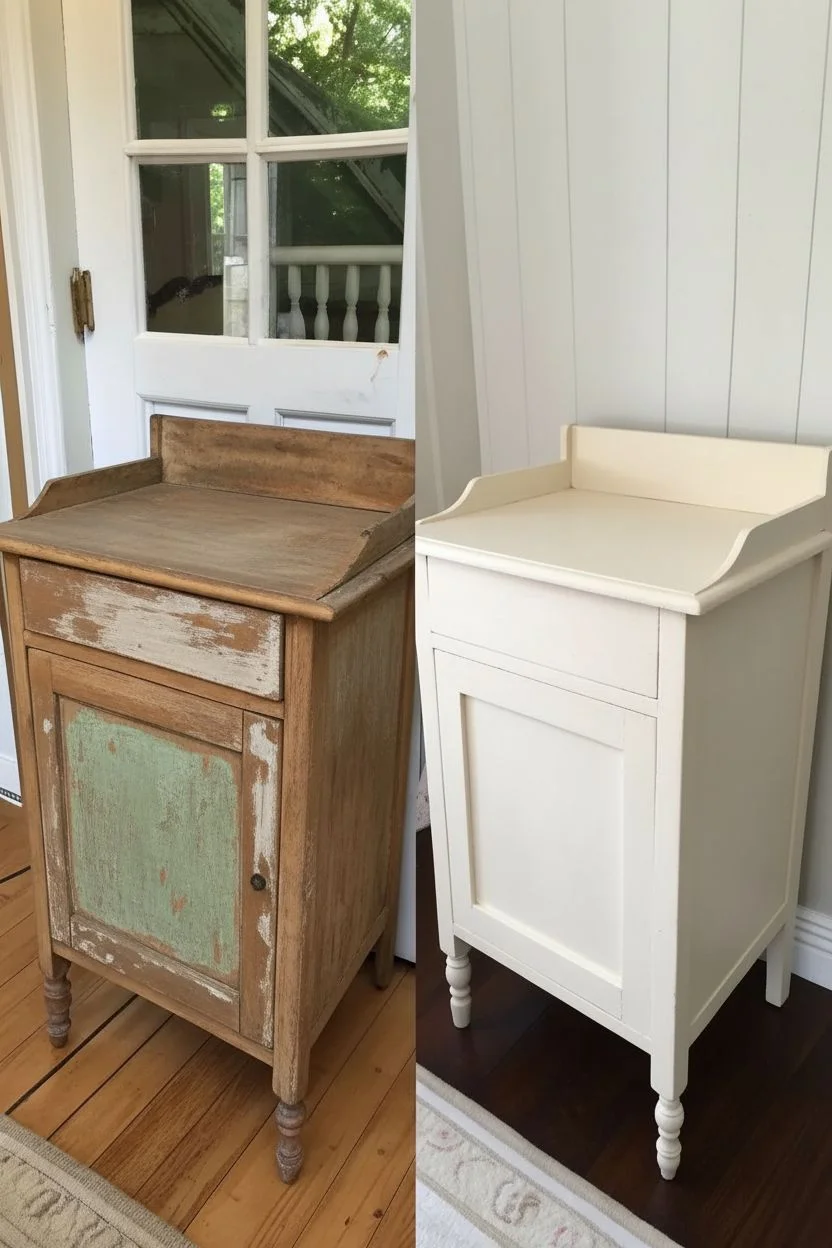
Transform a weathered, chipped washstand into a sleek and functional bedside table with a fresh coat of pale sage paint. This makeover takes a tired piece with peeling veneer and gives it a smooth, modern finish while preserving its classic charm.
How-To Guide
Materials
- Vintage wooden washstand
- Medium-grit sandpaper (120-grit)
- Fine-grit sandpaper (220-grit)
- Wood filler or Bondo (for deep gouges)
- Putty knife
- Tack Cloths
- Stain-blocking primer (oil-based or shellac-based)
- Pale sage or mint green furniture paint (satin or semi-gloss)
- 2-inch angled sash brush
- 4-inch foam roller
- Black ring pull hardware
- Drill and bits
- Screwdriver
- Multi-outlet power strip (for hidden charging)
Step 1: Prep and Repair
-
Remove hardware:
Begin by unscrewing the old knobs and pulls. Remove the drawer completely and take the door off its hinges to make painting easier. -
Clean thoroughly:
Scrub the entire piece with a degreasing cleaner to remove years of dust, wax, and grime. Let it dry completely. -
Address loose finish:
Using a scraper or 120-grit sandpaper, aggressively sand any areas where old paint or veneer is chipping or peeling, especially on the door panel. -
Fill imperfections:
Apply wood filler to deep scratches, gouges, or old hardware holes if you plan to change the handle spacing. Smooth it out with a putty knife. -
Sand everything smooth:
Once the filler is dry, sand the entire piece with 120-grit sandpaper to scuff the shiny surfaces and smooth out the filler. Follow up with 220-grit for a velvety finish. -
Dust off:
Vacuum up the sanding dust, then wipe every nook and cranny with a tack cloth to ensure a debris-free surface for painting.
Bleed-Through Blues?
If pink or yellow stains appear through your primer, the wood tannins are bleeding. Stop and apply a shellac-based primer specifically, which seals wood knots and stains better than water-based ones.
Step 2: Prime and Drill
-
Create cable access:
Drill a hole through the back panel of the cabinet section large enough to feed a power strip cord through. This creates your hidden charging station. -
Apply primer:
Since this is an old piece with potential bleed-through (tannins), roll or brush on a coat of stain-blocking primer. Don’t skip this step, or stains will yellow your new paint later. -
Sand the primer:
After the primer cures, lightly sand with fine 220-grit paper to knock down any brush strokes or raised grain. Wipe clean with a tack cloth.
Add a Pattern Pop
Line the bottom of the drawer or the interior shelf with a vintage floral wallpaper or contact paper. It adds a lovely hidden surprise every time you open the nightstand.
Step 3: Painting and Finishing
-
Paint the first coat:
Using your angled brush for corners and the foam roller for flat surfaces, apply a thin, even layer of sage green paint. I always start with the legs and work my way up. -
Let it dry:
Allow the first coat to dry according to the manufacturer’s instructions. Patience here prevents tacky finishes. -
Apply the second coat:
Roll on a second coat for full, opaque coverage. Watch for drips along the edges of the recessed door panel and drawer front. -
Seal (Optional):
If your paint doesn’t have a built-in topcoat, apply a clear polycrylic sealer for extra durability against water glasses and scratches. -
Install new hardware:
Once the paint is fully cured, attach the new black ring pulls to the drawer and door. Drill new holes first if the spacing differs from the original. -
Set up the charging station:
Feed the power strip cord through the back hole and mount the strip inside the cabinet using double-sided mounting tape or screws. -
Reassemble:
Slide the drawer back in and reattach the cabinet door to complete the transformation.
Now you have a charming, customized nightstand ready to keep your devices charged and out of sight


Have a question or want to share your own experience? I'd love to hear from you in the comments below!