
If you’ve got a plain boundary staring you down, a painted garden wall can turn it into the most charming part of your yard. Here are my favorite painted garden wall ideas—from classic backdrops that make plants pop to artsy illusions that feel like you added a whole new outdoor “room.”
Crisp White Garden Wall Glow-Up
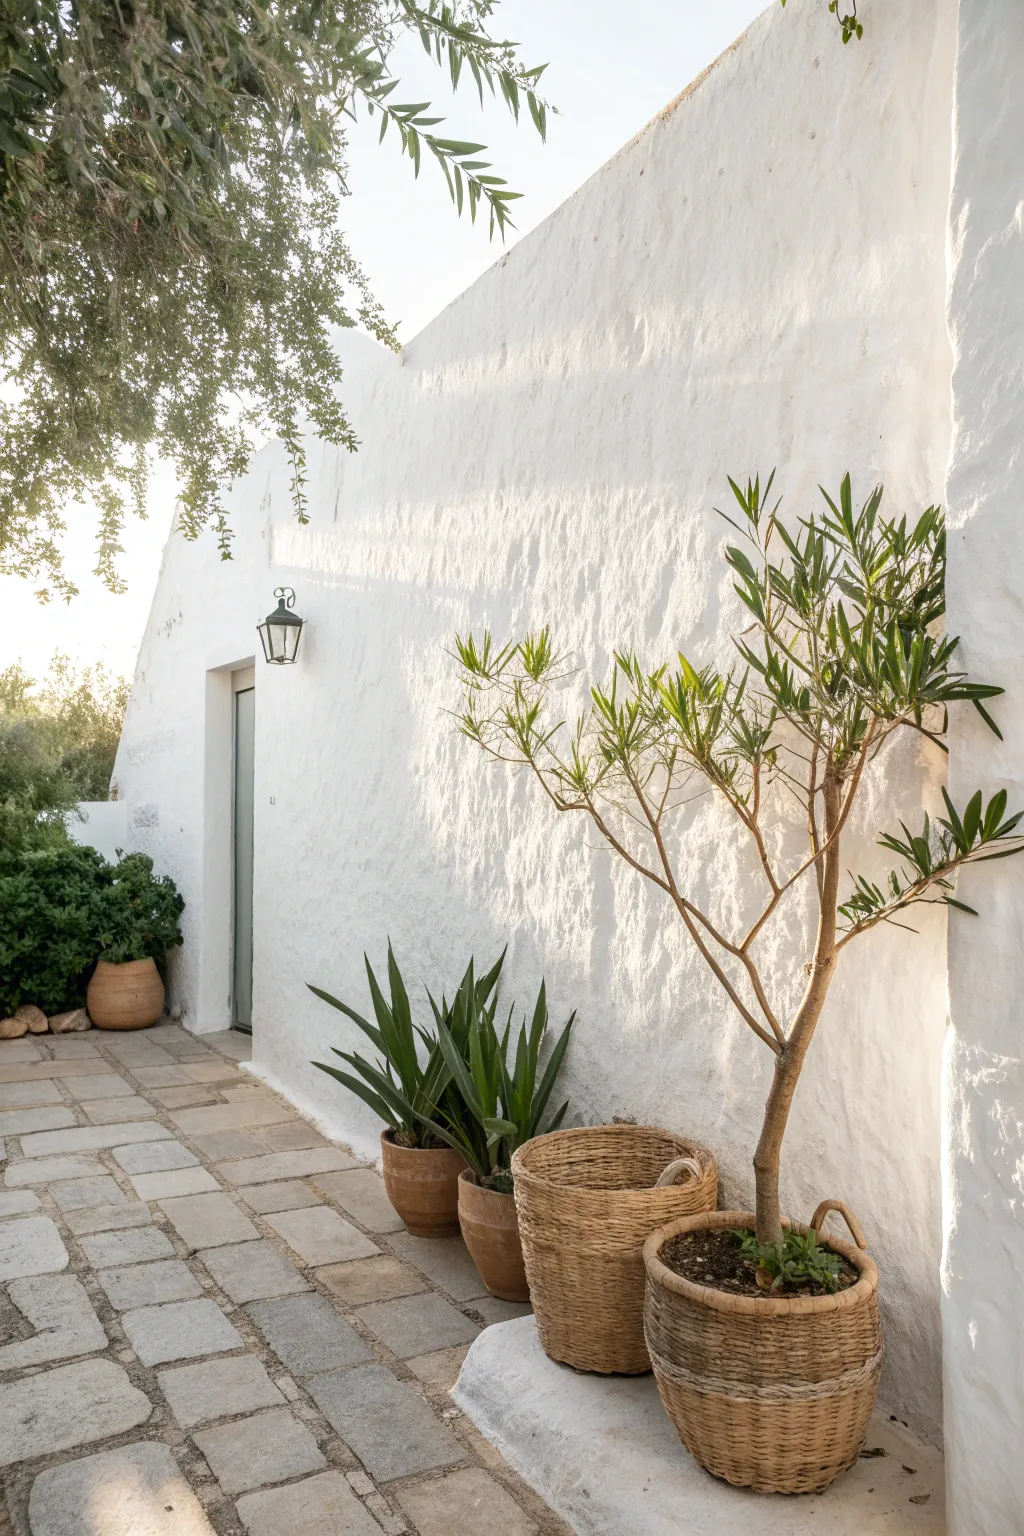
Transform a plain or dated masonry wall into a stunning, sun-drenched feature reminiscent of a Greek island villa. This project uses textured masonry paint to create a beautifully imperfect, rustic finish that brightens your entire garden space.
Step-by-Step Tutorial
Materials
- Wire brush and stiff bristle broom
- Pressure washer (optional but recommended)
- Exterior masonry filler
- Fungicidal wash (if moss/algae is present)
- Exterior masonry paint (White)
- Masonry roller with extension pole
- Wide masonry brush (4-6 inch)
- Small detailing brush
- Drop cloths or plastic sheeting
- Masking tape
Step 1: Preparation
-
Clear the area:
Move all potted plants, furniture, and loose items away from the wall. You will need roughly 3-4 feet of clear working space along the entire length. -
Protect the ground:
Lay down drop cloths or heavy-duty plastic sheeting over your paving stones. Secure the edges with tape or weights so they don’t shift while you work, as masonry paint is notoriously hard to remove from stone. -
Scrub the surface:
Using a stiff broom or wire brush, vigorously scrub the wall to remove any loose paint, dirt, or flaking plaster. If you have access to a pressure washer, give the wall a thorough blast, but allow it to dry completely for at least 24 hours before proceeding. -
Treat organic growth:
If you notice green algae or moss patches, apply a fungicidal wash according to the manufacturer’s instructions. This prevents the growth from bleeding through your beautiful new white finish later. -
Fill cracks and holes:
Inspect the wall for deep cracks or missing chunks of render. Apply exterior masonry filler with a putty knife, smoothing it out as best as possible. Don’t worry about perfection; a bit of texture adds to the rustic charm. -
Mask fixtures:
Carefully apply masking tape around any wall sconces, door frames, or electrical outlets attached to the wall. This ensures crisp lines and protects your hardware from accidental splatters.
Paint Flaking Off?
Flaking usually happens if the wall wasn’t dry or clean. Scrape the loose area, sand it back to a sound surface, clean thoroughly, and re-prime before touching up with fresh paint.
Step 2: Painting
-
Cut in the edges:
Start by using a smaller masonry brush to paint the perimeter of the wall, around the light fixtures, and along the ground line. This ‘cutting in’ creates a frame for the rest of your painting. -
Load the roller:
Pour your masonry paint into a tray. Load your high-pile masonry roller generously. These rollers hold a lot of paint, which is necessary to get into the deep crevices of a textured wall. -
Apply the first coat:
Roll the paint onto the wall using firm pressure. Work in small sections, roughly 3×3 feet, rolling in a ‘W’ or ‘M’ pattern to distribute the paint evenly. Don’t stretch the paint too thin; the goal is saturation. -
Stipple for texture:
For heavily textured areas where the roller misses spots, I find it helpful to use a wide masonry brush to jab or ‘stipple’ the paint into the pitted surface. This ensures complete coverage and mimics that classic whitewashed look. -
Let it dry:
Allow the first coat to dry completely. Consult your paint can for specific times, but usually, masonry paint needs about 4-6 hours depending on humidity and temperature. -
Apply the second coat:
Repeat the rolling process for a second coat. This layer provides the true opacity and that brilliant, blinding white finish seen in the photo. Two coats also significantly improve weather resistance. -
Detail checks:
Walk along the wall and inspect it from different angles. Use a small detail brush to touch up any pinholes or missed crevices that might be visible now that the paint is drying.
Step 3: Styling
-
Clean up:
While the paint is still slightly tacky but not wet, carefully peel off the masking tape. Folding the tape in on itself as you pull helps keep paint off your hands. Remove the drop cloths once the wall is fully dry. -
Position large planters:
Place your warm-toned terracotta or woven basket planters against the wall. The texture of wicker and clay pops beautifully against the smooth white backdrop. -
Final arrangement:
Arrange your plants, featuring tall, sculptural greenery like olive trees or oleanders to complete the Mediterranean garden aesthetic.
Pro Tip: Rustic Texture
To get that thick, plaster-like Mediterranean look, don’t use smooth masonry paint. Look for ‘Fine Textured’ masonry paint, which contains small aggregates to hide hairline cracks.
Now step back and enjoy the incredible brightness this simple update brings to your outdoor sanctuary


Soft Sage Garden Wall Backdrop
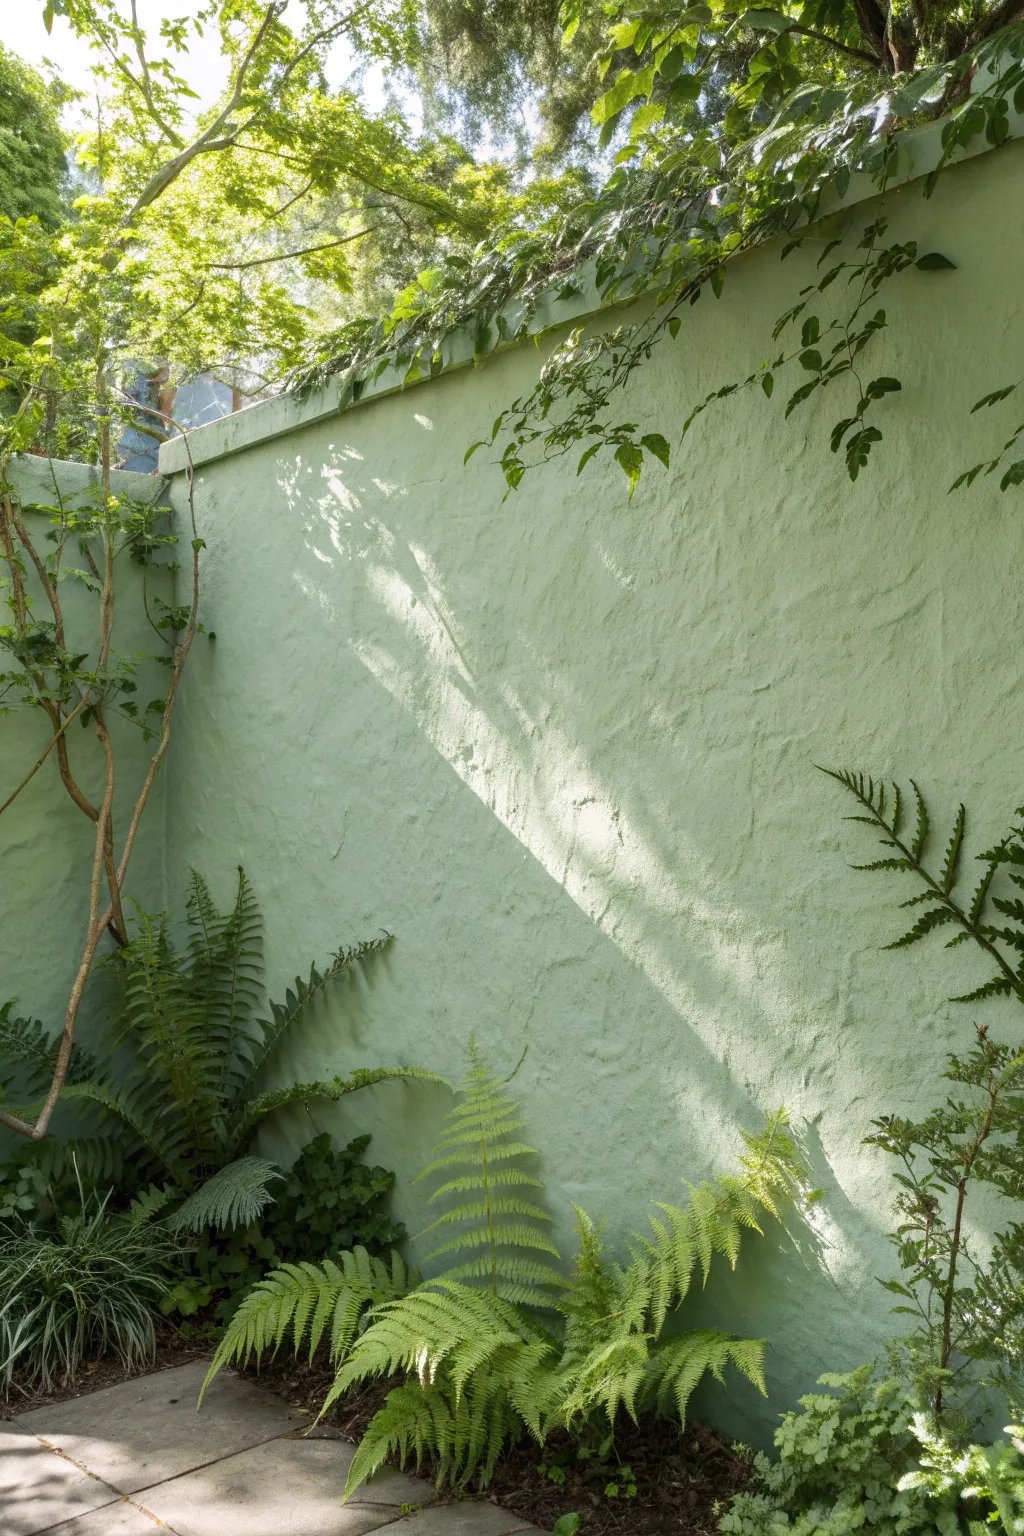
Transform a plain garden wall into an ethereal woodland backdrop with a textured finish and a coat of soft sage green. This project combines rustic masonry techniques with a monochromatic palette to create a serene, sun-dappled canvas that mimics the feeling of an old walled garden.
Step-by-Step Guide
Materials
- Exterior masonry primer
- Exterior masonry paint (sage green tint)
- Ready-mixed exterior stucco/texture coat
- Large trowel or masonry hawk
- Wide paintbrush (4-inch)
- Medium-nap paint roller and extension pole
- Pressure washer or stiff scrub brush
- Painter’s tape and plastic sheeting
- Clear matte masonry sealer (optional)
Step 1: Preparation & Cleaning
-
Assess the surface:
Begin by inspecting your existing wall for deep cracks or structural damage. Fill any large fissures with exterior filler and let it cure fully before proceeding. -
Deep clean:
Use a pressure washer on a medium setting to strip away moss, dirt, and peeling old paint. If you don’t have one, a stiff bristle brush and a bucket of soapy water will work just as well, though it requires a bit more elbow grease. -
Wait for drying:
Allow the masonry to dry completely for at least 24 to 48 hours. Trapping moisture under your new layers can lead to bubbling later. -
Protect surroundings:
Lay down plastic sheeting over any bedding plants or paving stones at the base of the wall. Use painter’s tape to mask off any adjacent fencing or trim you want to keep clean.
Uneven Texture?
If the stucco dries too fast while working, mist the wall lightly with water from a spray bottle. This rehydrates the edge, allowing you to blend the new section seamlessly without visible seams.
Step 2: Adding Texture
-
Prime the surface:
Roll on a coat of high-quality exterior masonry primer. This ensures your texture coat adheres properly and doesn’t flake off after the first freeze. -
Prepare the stucco:
Mix your exterior stucco or texture coat according to the manufacturer’s instructions until it reaches the consistency of thick peanut butter. -
Apply the base layer:
Using a trowel, spread a thin layer of the texture mix onto the wall, working in sections of about 1 meter square. -
Create the rustic texture:
Go back over the wet mix with your trowel using sweeping, irregular motions. I like to twist the wrist slightly at the end of each stroke to create those organic ridges and dips that catch the sunlight. -
Soften edges:
If any ridges look too sharp or manufactured, lightly brush over them with a damp wide paintbrush to soften the texture while it’s still pliable. -
Cure the texture:
Let the textured coat cure fully. This usually takes 24 hours, but check your product specific guidelines as humidity affects drying time significantly.
Age It Instantly
Dilute a darker mossy green paint with water (1:10 ratio) and sponge it randomly into the texture’s crevices. Wipe the high points clean immediately for an instant, weathered antique look.
Step 3: Painting the Sage Finish
-
Cut in the edges:
Take your sage green masonry paint and use a brush to cut in around the corners, the ground line, and the top edge of the wall. -
Roll the main areas:
Use a medium-to-high nap roller to apply the sage paint to the main surfaces. The thicker nap is essential for getting paint into all the little crevices of the texture you created. -
Stipple missed spots:
Inspect the wall for pinholes or deep texture pockets the roller missed. Use a brush to stipple paint into these recesses to ensure full coverage. -
Apply a second coat:
Once the first coat is dry to the touch, apply a second coat. This deepens the color and provides a robust weather-resistant barrier. -
Seal the top:
For extra longevity, especially on the horizontal top edge of the wall where water pools, apply a clear matte masonry sealer once the paint has cured for a few days. -
Landscape integration:
Remove your protective plastic and tape. Gently brush any soil back against the base of the wall to ground your new backdrop instantly.
Enjoy the calming atmosphere your new sage garden sanctuary brings to your outdoor space


Deep Blue Garden Wall for Depth
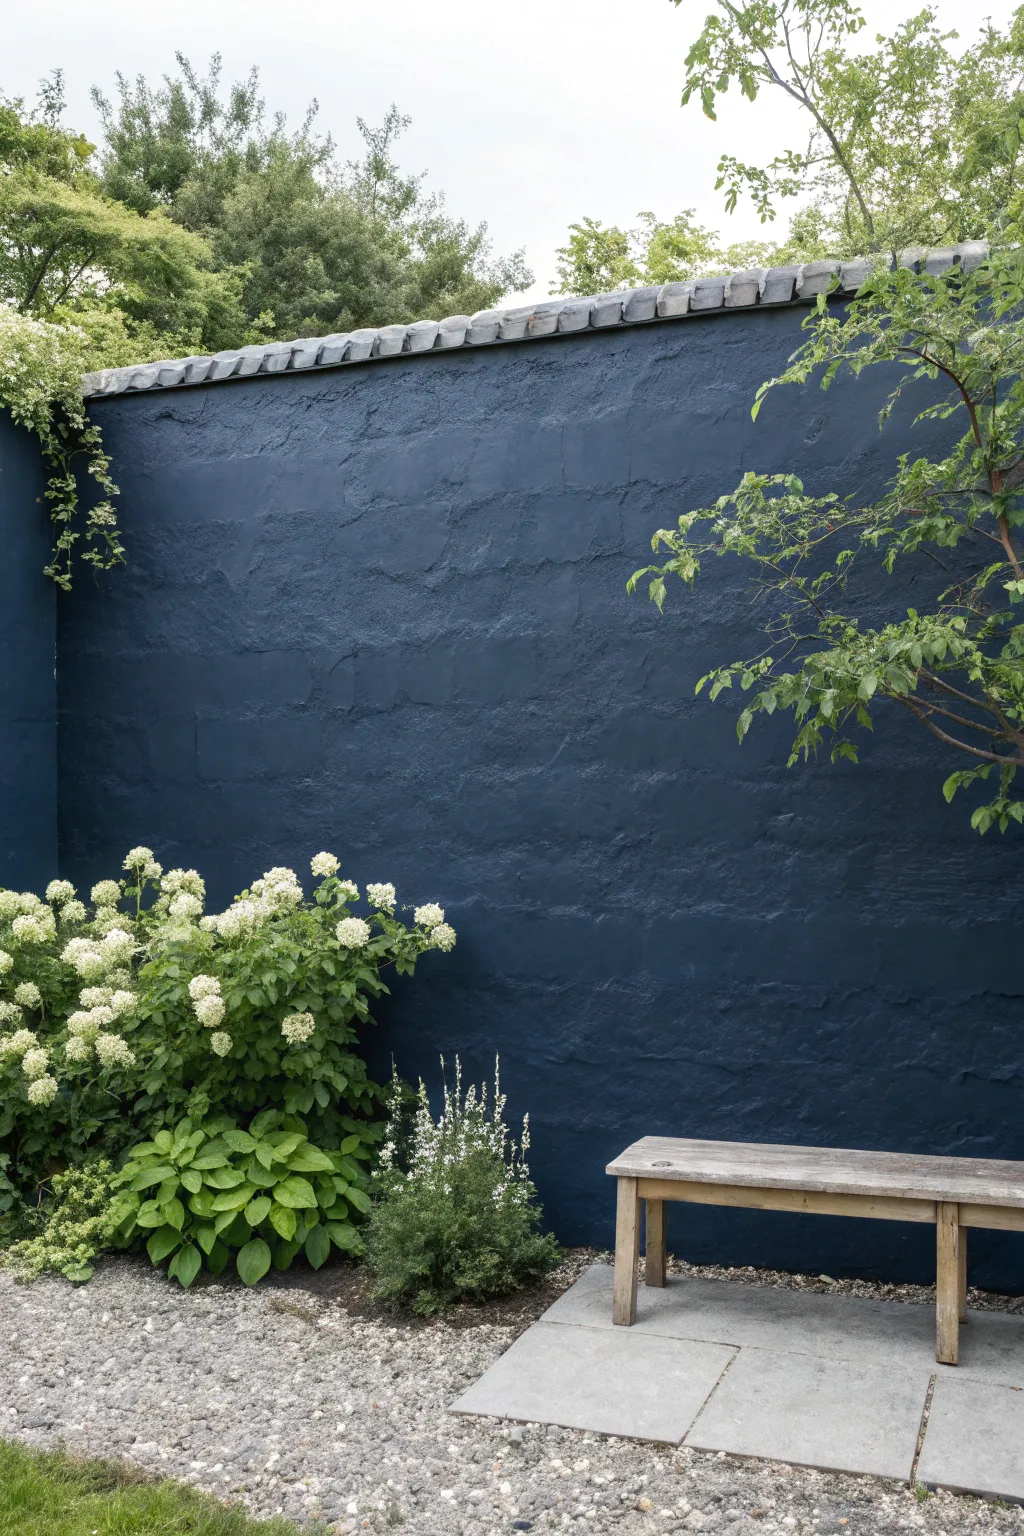
Transform a plain masonry wall into a moody, dramatic backdrop that makes greenery pop using deep blue masonry paint. This project creates instant depth and sophistication, turning a standard boundary into a stunning feature wall with a textured, matte finish.
How-To Guide
Materials
- Exterior masonry paint (Deep Navy or Midnight Blue)
- Stabilizing primer (for masonry)
- Masonry roller (long pile)
- Extension pole for roller
- Large masonry brush (4-inch)
- Stiff wire brush
- Pressure washer or garden hose
- Fungicidal wash (if moss is present)
- Drop cloths or plastic sheeting
- Masking tape (heavy-duty outdoor grade)
- Ladder
Step 1: Preparation
-
Clear the area:
Move any portable furniture, like benches or pots, well away from the wall. For planted shrubs like the hydrangeas seen here, gently tie branches back or cover them with lightweight drop cloths to protect foliage from splatter. -
Clean the surface:
Scrub the entire wall vigorously with a stiff wire brush to remove any loose paint, flaking mortar, or dirt. This manual scraping is crucial for a lasting finish. -
Wash down:
Use a pressure washer on a medium setting or a hose with a spray attachment to rinse away the dust you just scrubbed off. Let the wall dry completely; masonry paint generally shouldn’t be applied to damp surfaces. -
Treat organic growth:
If you notice green algae or moss patches, apply a fungicidal wash according to the manufacturer’s instructions. Rinse thoroughly and allow the wall to dry for at least 24 hours. -
Protect the perimeter:
Lay down heavy-duty drop cloths on the gravel or grass at the base of the wall. Secure them with stones or weights so they don’t blow away. -
Mask edges:
Apply outdoor masking tape carefully along any adjoining fences, gates, or the top capping stones (the grey tiles on top) to ensure a crisp, professional line.
Patchy Coverage?
Rough walls soak up paint unevenly. If the second coat still looks blotchy, dab paint into the deepest pits with a brush rather than rolling again.
Step 2: Priming and Painting
-
Apply stabilizer:
If your wall is old, chalky, or particularly porous, roll on a coat of stabilizing primer. This binds the loose surface and ensures your expensive topcoat adheres properly. -
Cut in the edges:
Using your 4-inch masonry brush, paint a border around all the edges where the roller won’t reach—along the ground, corners, and just under the capping stones. Work the paint into the mortar joints. -
Load the roller:
Pour your deep blue masonry paint into a tray. Load a long-pile masonry roller generously; these rollers hold a lot of paint, which is necessary to get into the nooks and crannies of rough stone. -
First coat application:
Roll the paint onto the wall using upward and downward strokes, working in manageable sections (about 1 meter wide). Apply firm pressure to push the paint into the texture of the blocks. -
Check for gaps:
Masonry surfaces are uneven. Step back and look for ‘holidays’—tiny spots where the old wall color peeks through. Use your brush to dab paint into deep crevices the roller missed. -
Dry time:
Allow the first coat to dry according to the can’s instructions, typically 2-4 hours. It might look patchy at this stage, but don’t worry, the second coat will unify it. -
Second coat application:
Apply the second coat just like the first. I find rolling in a ‘W’ pattern helps distribute the paint more evenly for this final layer. This is where that rich, deep color really solidifies. -
Touch up details:
Do a final walk-around with a small brush to catch any drips or missed spots before clean-up. -
Remove tape:
Peel off the masking tape while the paint is still slightly tacky to prevent it from pulling up dried chips of paint. Reveal your clean lines against the grey roof tiles.
Make it Moody
Install solar up-lights at the base of the wall. At night, the textured surface will cast dramatic shadows against the dark blue for a magical effect.
Once dry, move your bench back into place and enjoy how the dark backdrop makes your white flowers glow


Warm Terracotta Garden Wall Heat
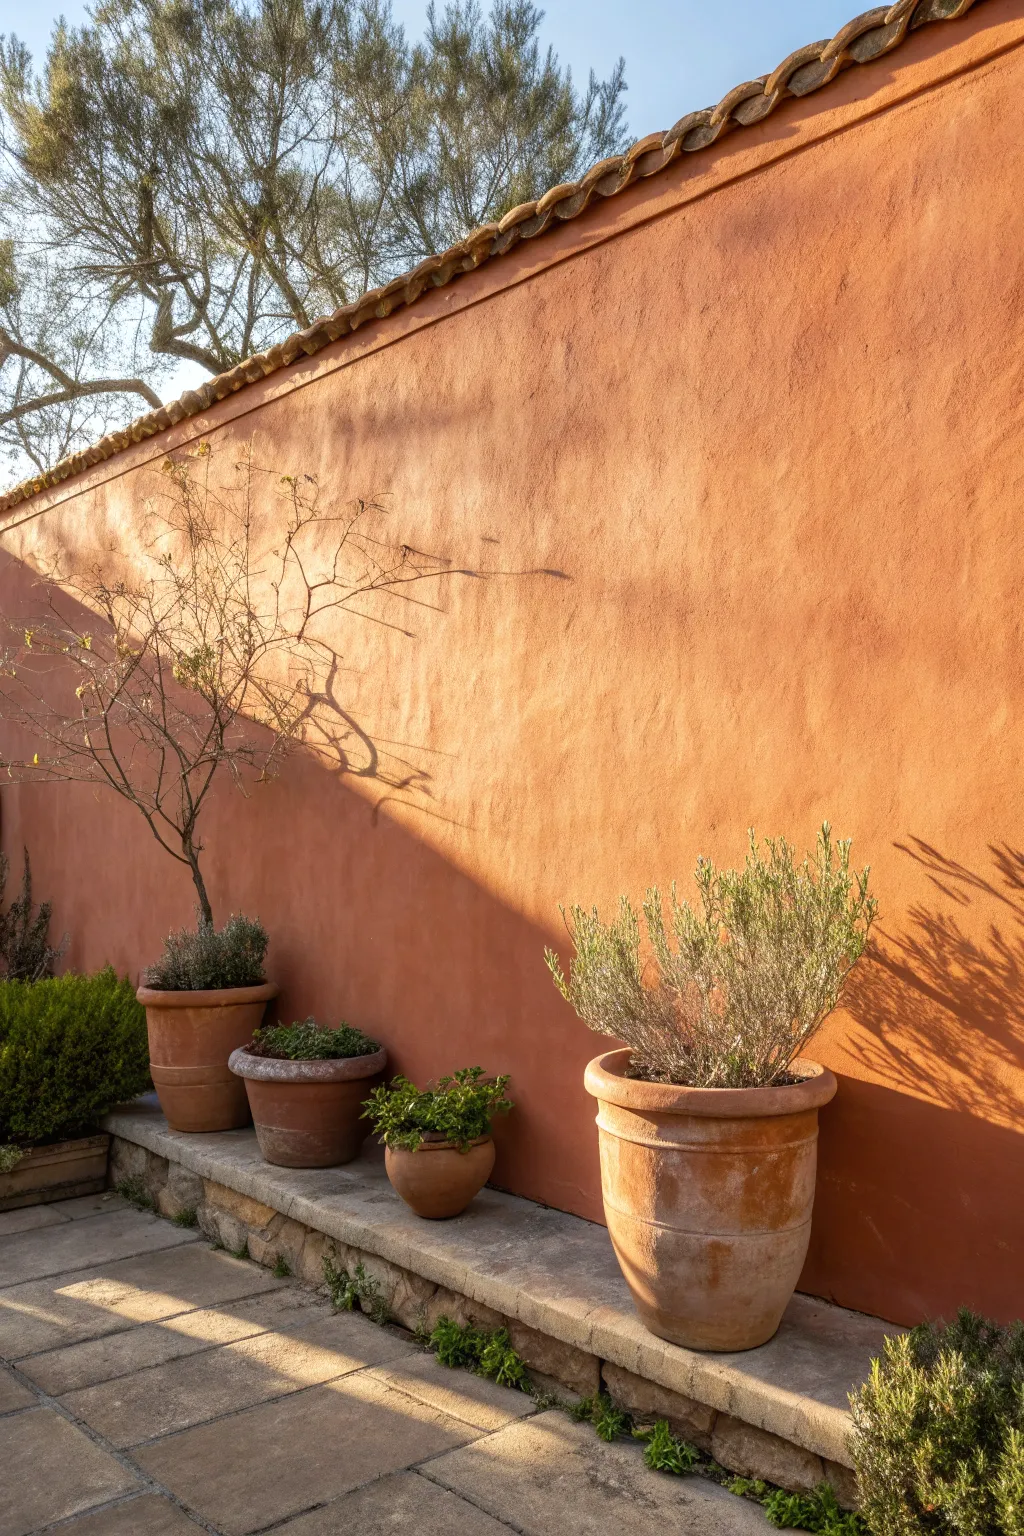
Transform a plain garden wall into a sun-soaked Mediterranean retreat with this textured terracotta finish. The rich, earthy orange tones and subtle stucco texture create a warm backdrop that instantly makes your outdoor space feel like a Tuscan villa.
Step-by-Step Tutorial
Materials
- Exterior masonry paint (Terracotta/Burnt Orange)
- Textured masonry paint or stucco add-in medium
- Masonry primer/stabilizer
- Wide masonry brush (4-6 inch)
- Long-pile roller and tray
- Wire brush
- Pressure washer (optional)
- Masking tape and drop cloths
- Terracotta pots (various sizes)
- Mediterranean herbs (Rosemary, Lavender)
- Natural stone coping or pavers
Step 1: Preparation & Cleaning
-
Assess the wall:
Begin by inspecting your garden wall for any loose debris, flaking old paint, or moss. If the wall is currently painted but peeling, use a stiff wire brush to scrape away any loose material until you have a solid surface. -
Deep clean:
Wash the wall thoroughly. A pressure washer is ideal for getting into the pores of existing brick or render, but a stiff scrubbing brush and soapy water work well too. Allow the wall to dry completely for at least 24 hours. -
Prime the surface:
Apply a coat of masonry stabilizing solution or primer. This is crucial for porous surfaces like brick or old stucco, ensuring your new terracotta paint adheres properly and lasts longer against the elements.
Sun-Bleached Effect
For an older look, sponge a very watered-down white paint sporadically over high points of the dry texture to mimic sun-fading.
Step 2: Creating the Texture
-
Mix the texture:
To achieve that authentic, hand-plastered look seen in the image, mix a texturing additive into your base coat of terracotta paint. Follow the manufacturer’s ratio carefully to ensure the paint remains spreadable. -
Apply the base coat:
Using a long-pile roller, apply the textured paint to the wall. Work in small sections (about 1 meter square) to keep a wet edge. -
Enhance the texture:
While the paint is still wet, go over it with a varied, multi-directional motion using a wide masonry brush. This breaks up the uniform roller pattern and creates those subtle ridges and valleys that catch the sunlight. -
Let it cure:
Allow this textured base layer to dry completely according to the paint can instructions, usually overnight.
Roof Detail
Top the wall with curved terracotta roof tiles (Monk and Nun style) to protect the top edge and complete the authentic Spanish look.
Step 3: Applying the Colour
-
First color pass:
Apply your main terracotta exterior paint. I find using a wide brush rather than a roller for this stage helps maintain the rustic aesthetic, as brush marks add clearer definition to the wall’s character. -
Add depth:
Create a subtle wash by diluting a small amount of a slightly darker brown-orange paint with water (about 3:1 water to paint). -
Apply the wash:
Brush this wash randomly over the wall, focusing on areas where shadows naturally fall or near the bottom. Rag it off gently with an old cloth to soften the edges, giving the wall an aged, weathered appearance rather than a flat, solid color. -
Final coat:
If the coverage looks patchy, apply a final standard coat of your terracotta paint, allowing the texture beneath to remain the star feature.
Step 4: Styling the Scene
-
Install the ledge:
If you don’t have an existing ledge, lay a low course of natural stone pavers or concrete caps at the base of the wall to create a stage for your plants. -
Select your pots:
Gather a collection of traditional unglazed terracotta pots. Aim for variety in size—one large feature pot and several medium ones create a balanced composition. -
Planting:
Fill the pots with Mediterranean staples like rosemary, lavender, or bushy thyme. These plants thrive in sun and their silvery-green foliage perfectly complements the warm orange wall. -
Arrangement:
Space the pots along the stone ledge. Leave enough room between them so the wall color remains visible, casting lovely shadows when the sun hits the scene.
Enjoy the glowing warmth this feature wall brings to your garden, especially during the magic hour of sunset
BRUSH GUIDE
The Right Brush for Every Stroke
From clean lines to bold texture — master brush choice, stroke control, and essential techniques.
Explore the Full Guide
Dusty Pink Garden Wall Softness
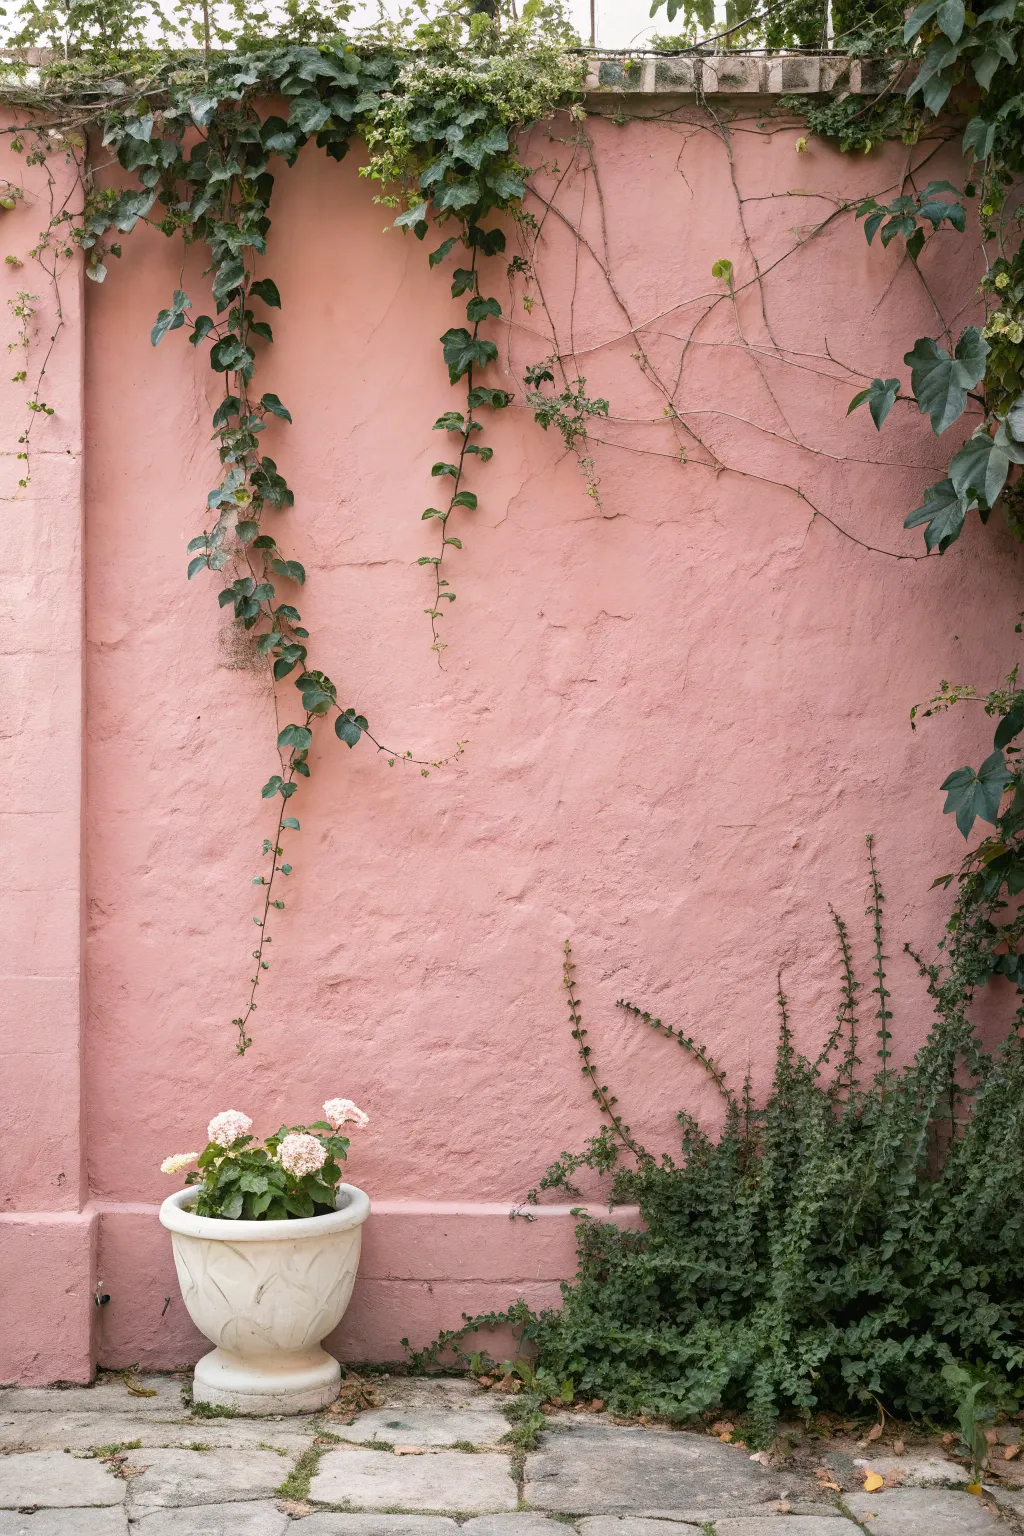
Transform a plain garden wall into a scene of bygone romance with this textured, dusty pink finish. Using simple masonry paints and textural techniques, you’ll recreate the look of aged, sun-baked plaster that serves as the perfect backdrop for climbing ivy.
How-To Guide
Materials
- Exterior masonry paint (White)
- Exterior masonry paint (Terracotta or Deep Red)
- Exterior masonry paint (Ochre or Yellow Oxide)
- Textured masonry paint or sand additive
- Large masonry brush (4-5 inch)
- Medium stiff-bristle brush (2-3 inch)
- Clean rags or sponge
- Paint roller and tray
- Garden sprayer or misting bottle with water
- Bucket for mixing
- Drop cloths
- Masking tape
Step 1: Preparation and Base Coat
-
Clean the Surface:
Begin by thoroughly cleaning your garden wall. Remove any loose dirt, moss, or flaking old paint with a stiff brush or a pressure washer. Let the wall dry completely before starting. -
Protect the Area:
Lay down drop cloths at the base of the wall to catch drips. If you have existing plants you can’t move, gently tie them back and cover them with lightweight plastic sheeting. -
Mix the Base Color:
In your bucket, create a soft, dusty pink. Start with a large amount of white masonry paint. Slowly add small amounts of Terracotta/Deep Red until you get a pale pink. Then, add a touch of Ochre to warm it up and kill the ‘candy’ pink vibe, giving it that dusty, historic feel. -
Apply Texture (Optional):
If your wall is smooth concrete or brick and you want that stucco look, mix a sand additive into your base color now, or use a pre-textured masonry paint. Stir thoroughly. -
Roll the Base Layer:
Using a roller, apply this base pink color over the entire wall. It doesn’t need to be perfectly opaque; a little variation is actually desirable for this look. Allow this coat to dry for at least 4-6 hours.
Wet-on-Wet Magic
For better blending, keep the wall slightly damp with your sprayer before applying the darker glazes. This prevents harsh brush lines.
Step 2: Creating the Aged Patina
-
Mix a Glaze:
Create a wash by diluting some of your original pink mixture with water (about 1 part paint to 3 parts water). Add a tiny bit more Terracotta to make it slightly darker than the base. -
Apply the Wash:
Dip your large masonry brush into the watery wash. Apply it loosely over the wall in random, cross-hatch motions. The goal is uneven coverage. -
Drip and Run:
While the wash is still wet, spritz areas with water from your garden sprayer. Let the paint run down slightly to mimic years of rain weathering. -
Soften with Rags:
Take a clean, damp rag or sponge and blot areas where the paint looks too heavy or uniform. This lifts pigment and reveals the lighter base coat underneath, adding depth. -
Darken the Cracks:
If your wall has actual cracks or heavy texture, use a smaller brush to dab a slightly darker version of your pink (less water) into these recesses. This emphasizes the rugged nature of the surface. -
Add Sun-Bleached Spots:
Mix a very watery white wash. Lightly brush this onto the upper sections of the wall or protruding areas where the sun would naturally hit. I find this really sells the ‘aged in the sun’ effect.
Step 3: Finishing and Styling
-
Dry and Assess:
Step back and view the wall from a distance. If it looks too uniform, go back in with your sponge and remove more glaze, or add more dark wash to corners and edges. -
Final Cure:
Allow the wall to dry for a full 24 hours before moving any pots back or untying plants. Masonry paint needs time to harden against the elements. -
Reintroduce Greenery:
Train ivy or vines back onto the wall. The green leaves will pop beautifully against the dusty pink backdrop. -
Style with Planters:
Place a classic stone or white planter at the base with soft blooming flowers like hydrangeas or roses to complete the romantic garden vignette.
Faux Cracks
Use a fine liner brush and dark grey-brown paint to paint thin, wandering ‘cracks’ on the surface for extra character.
Now you have a charming, Mediterranean-style backdrop that will age gracefully along with your garden
Warm Gray or Taupe Garden Wall Neutral
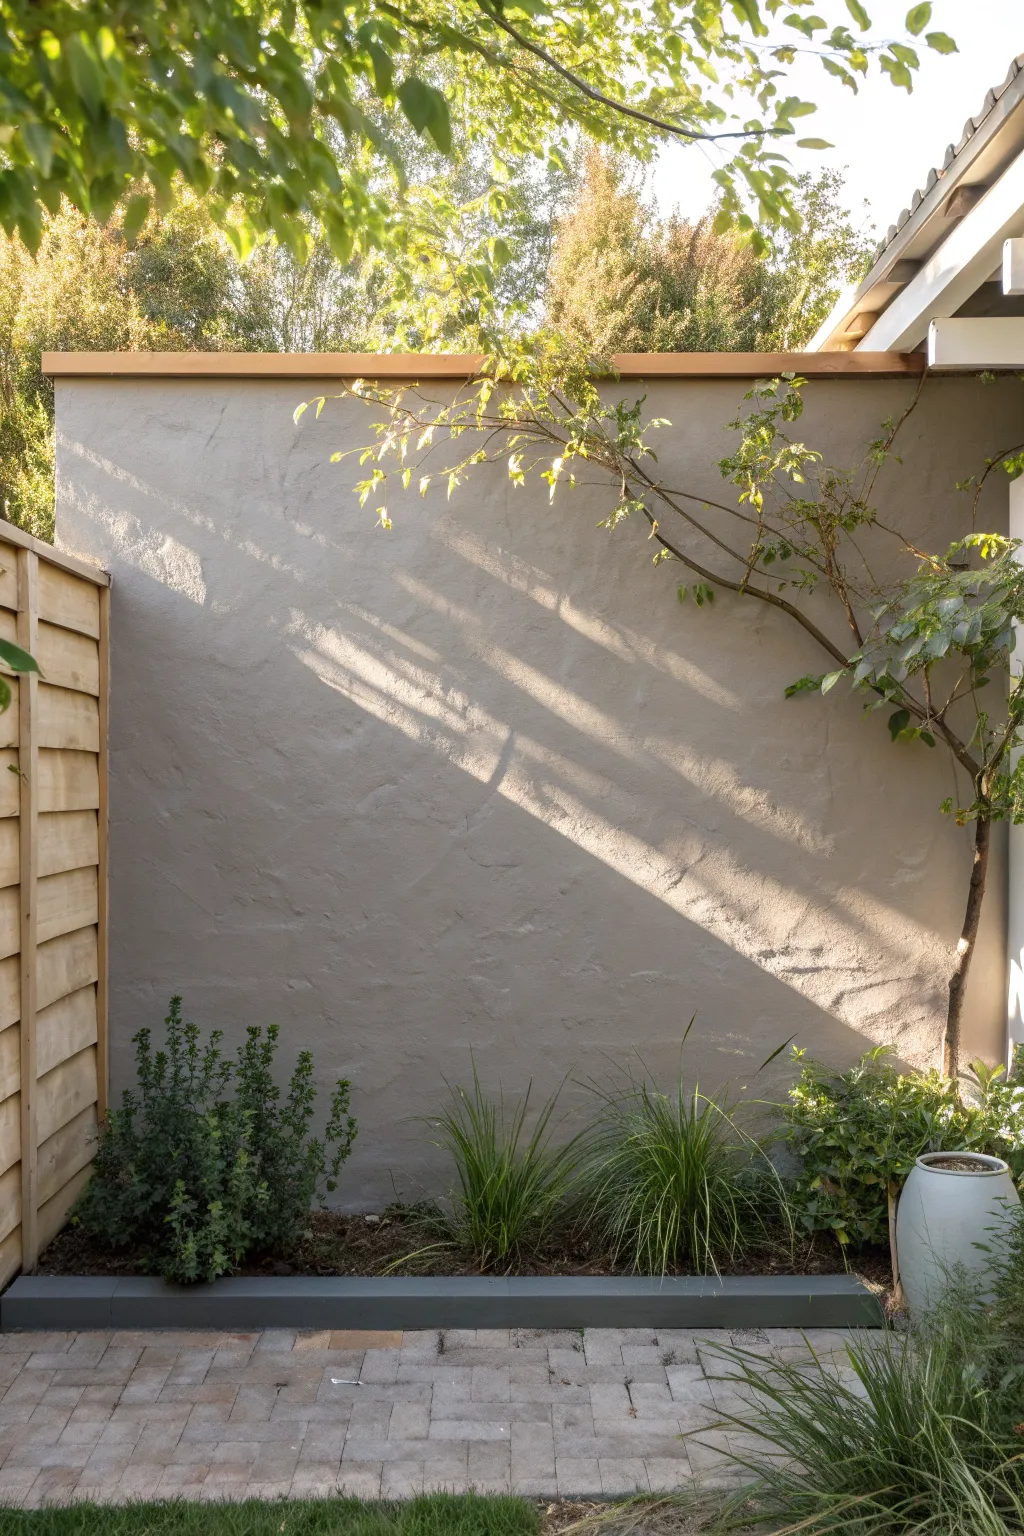
Transform a plain garden wall into a sophisticated backdrop with this warm gray taupe finish. The subtle texture catches sunlight beautifully, creating a serene canvas for casting tree shadows and highlighting your favorite greenery.
Detailed Instructions
Materials
- Exterior masonry primer
- Exterior masonry paint (warm taupe/greige color)
- Texture additive (sand or fine aggregate) or pre-textured masonry paint
- Pressure washer or stiff scrub brush
- TSP (Trisodium Phosphate) cleaner
- Masonry crack filler (if needed)
- Wide masking tape (painter’s tape)
- Drop cloths
- Large masonry brush (4-6 inch)
- Deep pile roller (3/4 inch nap) and extension pole
- Paint tray with liner
- Stir stick
- Ladder (optional, depending on wall height)
Step 1: Preparation & Cleaning
-
Clear the area:
Begin by removing any existing plants, pots, or debris from the base of the wall. Pull back any soil or mulch about six inches to ensure you can paint below the visible ground line. -
Clean the surface:
Use a pressure washer or a stiff brush with TSP solution to thoroughly clean the wall. You need to remove all dirt, moss, algae, and loose paint to ensure a permanent bond. -
Rinse and dry:
Rinse the wall completely with clean water and let it dry for at least 24 hours. Masonry holds moisture, and painting over damp stone can trap water inside. -
Repair imperfections:
Check for deep cracks or crumbling mortar. Apply exterior masonry filler with a putty knife, smoothing it out to match the surrounding surface level. -
Protect surroundings:
Lay down drop cloths over the patio pavers and soil. Use wide painter’s tape to mask off adjacent wooden fences, the roofline trim, or any areas you want to keep paint-free.
Uneven Texture?
If the texture looks patchy, try cross-rolling. Roll the final coat horizontally, then immediately go over it lightly vertically to distribute aggregates evenly.
Step 2: Creating Texture & Priming
-
Mix the texture:
If you are using a standard masonry paint but want that stucco look, mix in your texture additive now. Stir thoroughly to distribute the sand or aggregate evenly. Skip this if using pre-textured paint. -
Apply primer:
Roll on a coat of high-quality masonry primer. This step is crucial for neutralizing the surface pH and preventing efflorescence (white salty deposits) from bleeding through later. -
Cut in edges:
Once the primer is dry, use a large masonry brush to ‘cut in’ the colored paint around the edges, corners, and along the ground line where a roller can’t reach. -
First coat application:
Dip your deep pile roller into the taupe paint. Apply the first coat using an ‘M’ or ‘W’ pattern to distribute the paint, then roll vertically to smooth it out. -
Work into crevices:
For heavily textured walls, I like to use the brush to jab paint into deep pores that the roller might bridge over. This ensures no pinholes of the old color show through.
Limewash Effect
For an old-world look, dilute the final coat with 20% water. Apply it unevenly with a large block brush instead of a roller to create subtle, cloudy variations.
Step 3: Finishing Touches
-
Dry time:
Allow the first coat to dry according to the manufacturer’s instructions, usually 4-6 hours depending on humidity. -
Apply second coat:
Roll on a second coat for full opacity and true color depth. This coat usually goes on much faster than the first since the surface is now sealed. -
Check for holidays:
Inspect the wall from different angles to spot any missed patches, known as ‘holidays.’ Touch these up with your brush while the paint is still workable. -
Remove tape:
Carefully peel off the painter’s tape while the final coat is still slightly tacky to prevent the dried paint from pulling up or chipping at the edge. -
Clean up borders:
Push the soil or mulch back against the base of the wall once the paint is fully cured (usually 24 hours) to create a neat, finished edge.
Enjoy the calming atmosphere your new warm gray wall brings to your outdoor space

PENCIL GUIDE
Understanding Pencil Grades from H to B
From first sketch to finished drawing — learn pencil grades, line control, and shading techniques.
Explore the Full Guide
Bold Chartreuse Garden Wall Pop
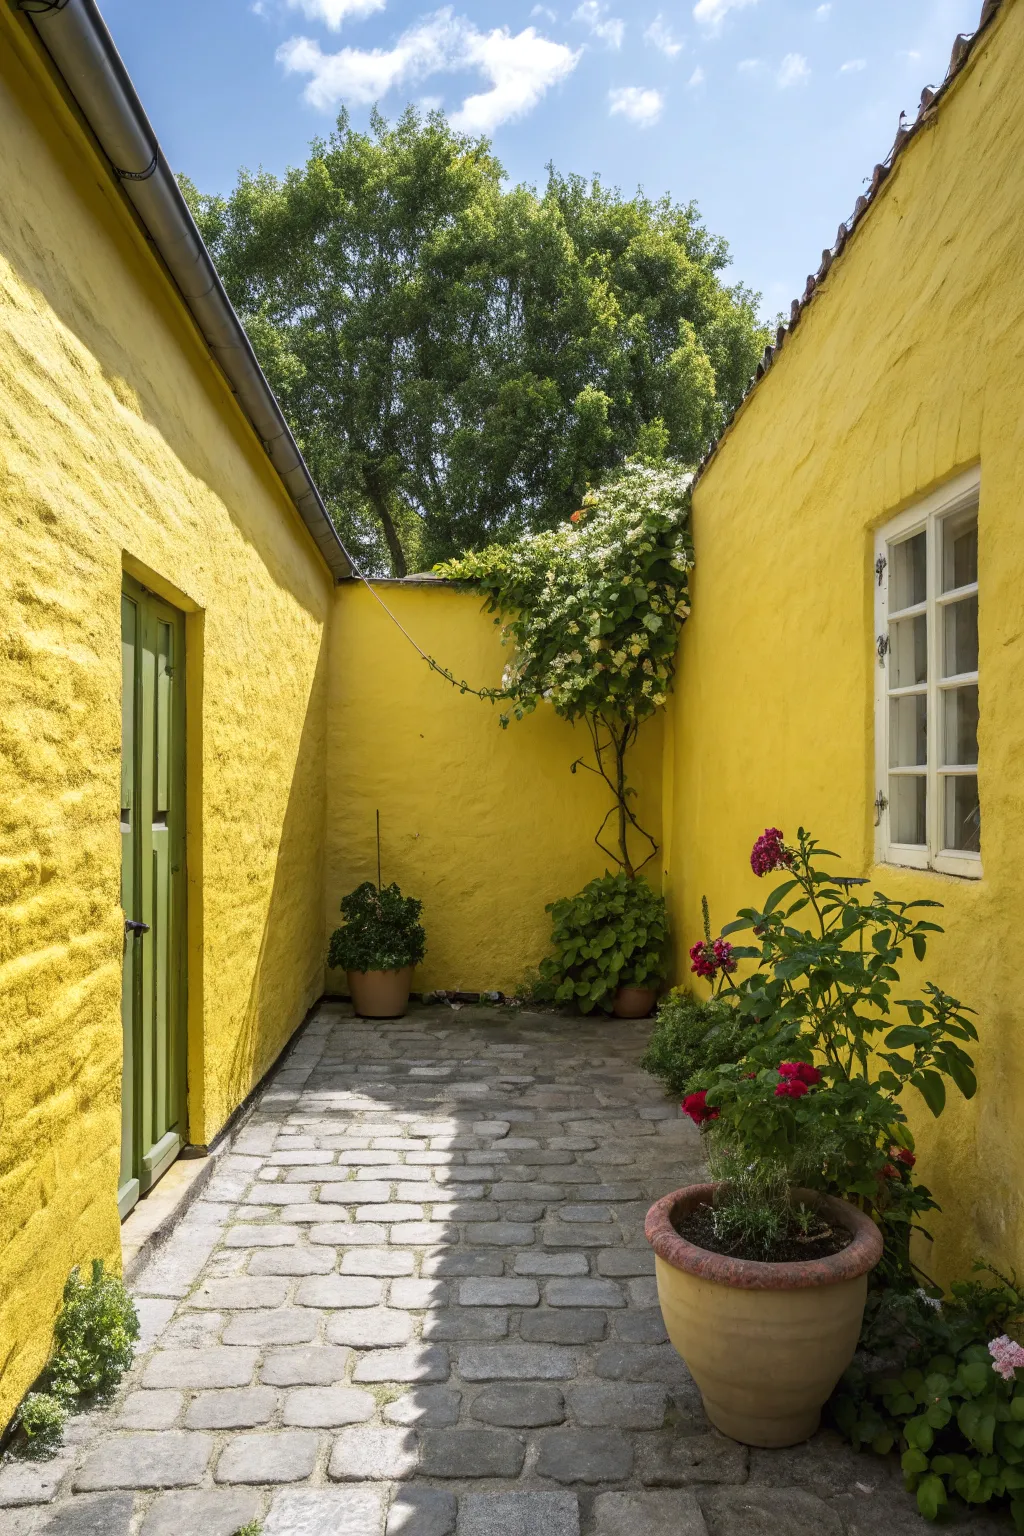
Transform a dull, enclosed outdoor nook into a sun-drenched Mediterranean escape with this bold painting project. By applying a textured, vibrant yellow wash to masonry walls, you can mimic the warmth of Italian stucco even on cloudy days.
Step-by-Step Guide
Materials
- High-quality exterior masonry paint (Chartreuse or Sunny Yellow)
- Masonry primer or stabilizer
- Wire brush or stiff scrub brush
- Pressure washer (optional but recommended)
- Wide masonry brush (4-6 inch)
- Deep-pile paint roller and extension pole
- Roller tray with liner
- Drop cloths
- Painter’s tape
- Spackle or exterior filler (for cracks)
- Ladder
Step 1: Preparation & Cleaning
-
Clear the area:
Remove all potted plants, trellises, and loose items from the courtyard to give yourself a clear workspace. -
Scrub the walls:
Using a stiff wire brush, vigorously scrub the brick or stone walls to remove loose mortar, dirt, moss, and flaky old paint. -
Wash down surfaces:
Ideally, use a pressure washer on a low setting to thoroughly clean the masonry. If you don’t have one, a garden hose and a scrub brush with soapy water work well too. -
Let it dry:
Allow the walls to dry completely for at least 24-48 hours. Painting on damp masonry can trap moisture and cause bubbling later. -
Repair imperfections:
Inspect the mortar joints and brick faces. Fill any significant cracks or holes with exterior filler and let it cure according to the package instructions.
Don’t Skimp on Pile
Use a roller sleeve with a very long nap or pile (at least 3/4 inch). A standard roller won’t reach into the deep texture of rough masonry.
Step 2: Priming & Protection
-
Mask off edges:
Apply painter’s tape carefully around door frames, window sills, and any drainage pipes you want to keep paint-free. -
Protect the ground:
Lay down heavy-duty drop cloths over the cobblestones or paving. Tape them down at the edges so they don’t slide as you move the ladder. -
Apply stabilizer:
If your wall surface is chalky or very porous, brush on a coat of masonry stabilizer. This creates a solid base for the topcoat to adhere to.
Step 3: Painting the Sunlight
-
Cut in the edges:
Start with your masonry brush. Paint a 3-inch border around all edges, corners, and taped-off areas like the green door frame and window. -
Work into the texture:
When cutting in, use a dabbing motion with the brush to force paint into the deep crevices and rough texture of the brick or stone. -
Roll the first coat:
Load your deep-pile roller generously. I find working in small 3×3 foot sections helps maintain a wet edge and prevents lap marks. -
Apply vertical passes:
Roll vertically first to cover the surface, applying steady pressure to push paint into the uneven masonry texture. -
Cross-roll for coverage:
Follow up with horizontal strokes over the same area to ensure no pinholes or unpainted mortar joints remain. -
Dry and inspect:
Let the first coat dry for the manufacturer’s recommended time (usually 4-6 hours). Step back and look for ‘holidays’—spots you missed. -
Apply the second coat:
Roll on a second coat for full opacity and that rich, saturated chartreuse color. This layer brings the true vibrancy to life. -
Detail checks:
Do a final walk-around with a small brush to touch up any deep recessed areas the roller might have skipped.
Add Weathered Charm
For an aged Tuscan feel, dry-brush a slightly lighter shade of yellow over the highest points of the texture once the base coat is dry.
Step 4: Finishing Touches
-
Remove tape:
Peel off the painter’s tape slowly while the paint is still slightly tacky to ensure a crisp, clean line. -
Reintroduce greenery:
Once fully cured, move your potted geraniums and climbing plants back into position. The contrast between the foliage and the yellow wall is key to the look. -
Clean up:
Wash your brushes and rollers immediately with water (if using water-based masonry paint) to save them for future projects.
Enjoy your new sunlit sanctuary, where every coffee break feels like a small European holiday
Two-Tone Color Block Garden Wall
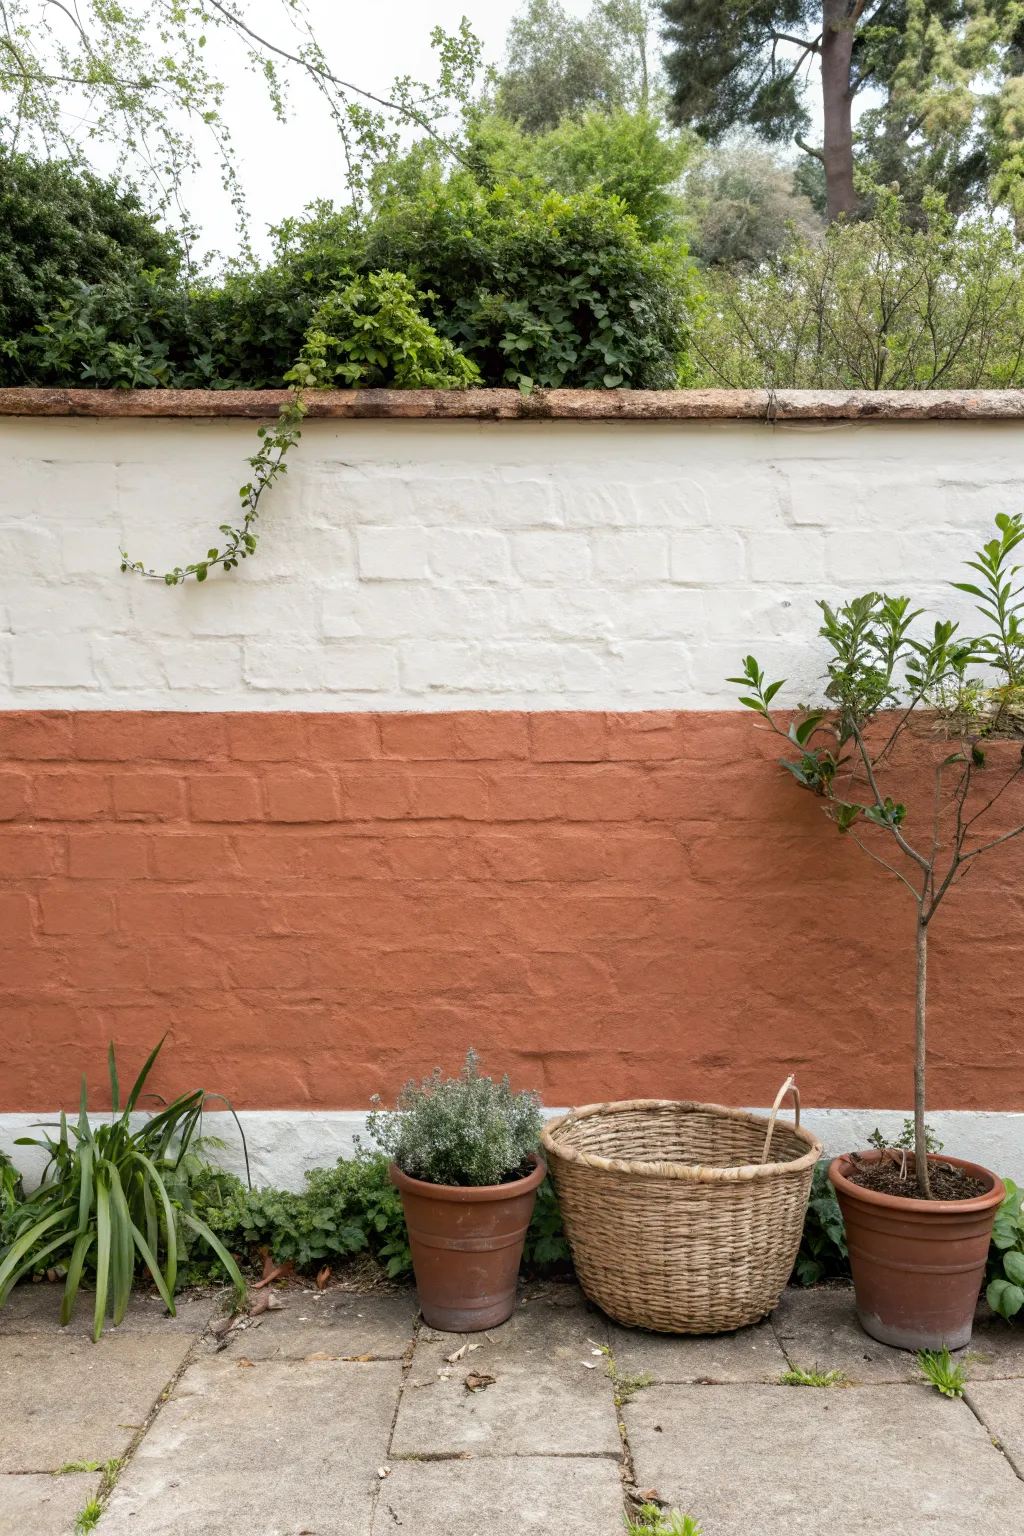
Transform a plain garden boundary into a Mediterranean-inspired feature with this simple yet striking color-block technique. The combination of crisp white and warm, earthy terracotta creates a modern backdrop that highlights your potted plants beautifully.
Step-by-Step Tutorial
Materials
- External masonry paint (White)
- External masonry paint (Terracotta or Burnt Orange)
- Wire brush or stiff broom
- Pressure washer (optional)
- Sugar soap or masonry cleaner
- Stabilizing solution (for old or chalky walls)
- Large masonry paintbrush (4-inch)
- Medium sash brush or angled brush
- Painter’s masking tape (exterior grade)
- Spirit level or laser level
- Chalk line or pencil
- Groundsheet or plastic sheeting
- Stirring stick
Step 1: Preparation
-
Clear vegetation:
Begin by gently pulling back any climbing plants, like the ivy shown near the top edge, and temporarily moving potted plants away from the work zone. You need full access to the wall surface. -
Scrub the surface:
Use a stiff wire brush or broom to knock off any loose flakes of old paint, moss, or dried dirt. This step is crucial for adhesion. -
Wash down:
Dilute your sugar soap or masonry cleaner in a bucket of water. Scrub the bricks thoroughly to remove grease and grime, or blast it with a pressure washer if the wall is particularly dirty. -
Rinse and dry:
Rinse the wall with clean water to remove any soapy residue. Allow the bricks to dry completely; masonry paint won’t adhere well to damp surfaces. -
Prime if necessary:
Run your hand over the dry wall. If it leaves a dusty residue, apply a coat of stabilizing solution to seal the surface before painting.
Clean Lines Pro-Tip
Before painting the second color, paint over the tape edge with the FIRST color again. This seals gaps in the tape with the base color, ensuring the second color can’t bleed under.
Step 2: Mapping the Line
-
Determining height:
Decide where you want your color split to be. The image shows a split roughly at waist height, which grounds the space while keeping the top airy. -
Mark the level:
Use a spirit level and a pencil to mark a straight horizontal line across the bricks. If the wall is long, a chalk line creates a perfect guide in seconds. -
Apply tape:
Apply a strip of high-quality exterior masking tape along your pencil line. Press the edges down firmly, especially into the grout lines, to prevent paint bleed.
Step 3: Painting the Top Section
-
Cut in the edges:
Open your white masonry paint and stir well. Using a smaller brush, carefully paint along the top edge of the wall and around any tricky crevices. -
Paint the bricks:
Switch to your large masonry brush. Apply the white paint to the upper section, working it well into the rough texture of the bricks and mortar. -
Paint over the tape:
Paint slightly over the top edge of your masking tape. This seals the tape edge with the base color and ensures a crisp line later. -
Second coat:
Allow the first coat to dry according to the tin’s instructions. Apply a second coat of white for a solid, opaque finish.
Level Up: Texture
For an aged Tuscan look, mix a little sand into the terracotta paint before applying, or dry-brush a lighter peach shade over the finished brickwork to highlight texture.
Step 4: Painting the Bottom Section
-
Wait and re-tape:
Ensure the white paint is fully dry. Remove the old tape and apply a fresh line of tape precisely over the bottom edge of the white paint to protect it. -
Mix the terracotta:
Stir your terracotta or burnt orange masonry paint thoroughly to ensure the pigments are evenly distributed. -
Apply the warm tone:
Start painting the bottom section. I find stippling—jabbing the brush tip into the surface—helps get this darker color deep into the brick pores. -
Watch the ground:
Be careful near the ground level. Use a piece of card or a shield to prevent picking up dirt on your brush or getting paint on the paving stones. -
Finish the color:
Apply a second coat of the terracotta paint once the first is dry to achieve that rich, deep hue seen in the reference. -
The reveal:
While the paint is still slightly tacky (not fully hard), gently peel away the masking tape at a 45-degree angle to reveal your sharp line. -
Touch ups:
Inspect the line for any bleed-through. Use a small artist’s brush and the appropriate paint color to correct any tiny imperfections.
Once dry, reintroduce your potted plants and enjoy the warm, structured background you have created for your garden


Half-Height Band on a Garden Wall
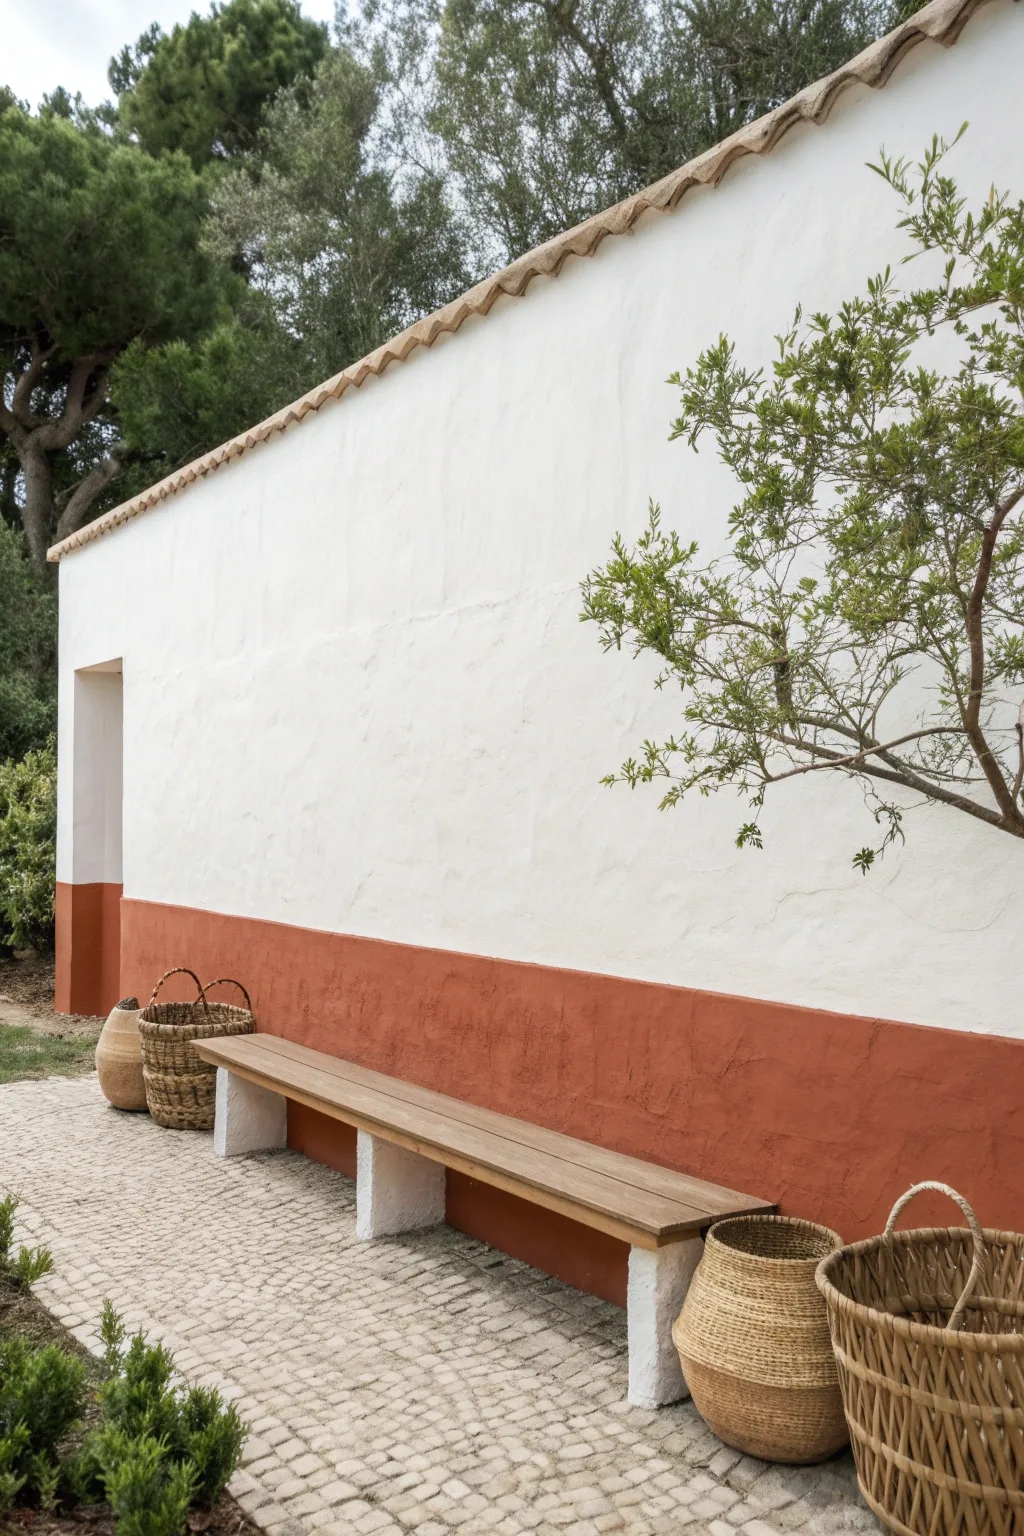
Bring the warmth of the Mediterranean to your outdoor space with this simple yet striking two-tone wall treatment. The earthy terracotta band grounds the pristine white plaster, creating a beautiful backdrop for wooden furniture and woven accents.
Step-by-Step
Materials
- Exterior masonry paint (white)
- Exterior masonry paint (terracotta/burnt orange)
- Wire brush
- Pressure washer (optional)
- Masonry filler
- Wide masking tape or painter’s tape for rough surfaces
- Spirit level
- Chalk line or pencil
- Large masonry roller and extension pole
- Medium sash brush (synthetic bristles)
- Small detail brush
- Drop cloths
- Paint tray and liners
Step 1: Wall Preparation
-
Assess the surface:
Begin by inspecting your garden wall for any loose plaster, flaking paint, or moss growth. Use a wire brush to vigorously scrub away any debris or loose material to ensure a solid base. -
Clean thoroughly:
Wash the wall down completely. If you have access to a pressure washer, use it on a low setting to remove deep-seated dirt, but be careful not to damage the stucco texture. Let the wall dry completely for at least 24 hours. -
Patch imperfections:
Fill any cracks or deep divots with exterior masonry filler. Smooth it out with a filling knife, aiming to match the existing texture of the wall where possible. -
Protect the area:
Lay down heavy-duty drop cloths over your paving or garden bed. Secure them with heavy stones or tape to prevent them from blowing away while you work.
Clean Lines on Stucco
On heavy texture, paint bleed is common. ‘Caulking’ your tape edge with a thin layer of clear acrylic medium before painting your color ensures a razor-sharp line every time.
Step 2: Applying the Base Coat
-
Cut in the edges:
Starting with your white exterior masonry paint, use a sash brush to cut in along the roofline, corners, and around any architectural features like the door frame. -
Roll the main surface:
Load a commercial masonry roller generously with white paint. Apply it to the entire wall, working from top to bottom. The textured surface will require you to press firmly to get paint into all the crevices. -
Apply a second coat:
Once the first coat is dry (check your paint can for times, usually 4-6 hours), apply a second coat of white to ensure full, opaque coverage. This bright white base is crucial for the high-contrast look. -
Let it cure:
Allow the white base coats to dry thoroughly, preferably overnight. The surface must be completely dry before you apply tape, or you risk peeling off your fresh work.
Step 3: Creating the Colour Band
-
Measure the height:
Decide on the height of your colored band. In the project image, the band sits at roughly knee-height, aligning well with the bench seat. Mark this height with a pencil at several points along the wall. -
Establish a level line:
Use a long spirit level to connect your marks, drawing a light pencil line. For very long walls, a chalk line is invaluable here to snap a perfectly straight guide across the entire span. -
Apply the tape:
Apply your masking tape exactly along the top edge of your pencil line. Press the tape down firmly. I like to run a fingernail or a putty knife along the tape edge to seal it tight against the textured stucco. -
Seal the tape edge:
To get a truly crisp line on textured walls, lightly brush a tiny amount of the *white* base paint over the edge of the tape first. This fills any small gaps under the tape with white paint, so the terracotta color won’t bleed underneath. -
Paint the corners and edges:
Using a clean brush and your terracotta paint, cut in along the floor, corners, and door frame within the lower section area. -
Roll only the bottom section:
Roll the terracotta paint onto the lower section of the wall. Be careful near the tape line; don’t overload the roller here to avoid thick paint ridges. -
Double check coverage:
Inspect the terracotta section for pinholes or missed spots caused by the rough texture. Use a brush to dab paint into deep pits if the roller missed them. -
Second coat application:
Apply a second coat of the terracotta color once the first is dry to the touch. This deepens the color and ensures a rich, uniform finish. -
Remove the tape:
While the second coat is still slightly tacky (not fully dried), carefully peel off the masking tape at a 45-degree angle. Pulling it while slightly wet helps prevent the paint film from tearing. -
Touch ups:
Inspect your crisp line. If any terracotta paint bled through, use a small artist’s brush and a bit of white paint to carefully touch up the imperfections once completely dry.
Level Up: Aged Patina
For an authentic aged look, dilute your terracotta paint slightly with water (10%) for the final coat. Apply it unevenly with a sponge or rag to create subtle tonal variations.
Now you have a stunning, sun-drenched feature wall that transforms your garden into a relaxing retreat
Wide Stripes to Stretch a Garden Wall
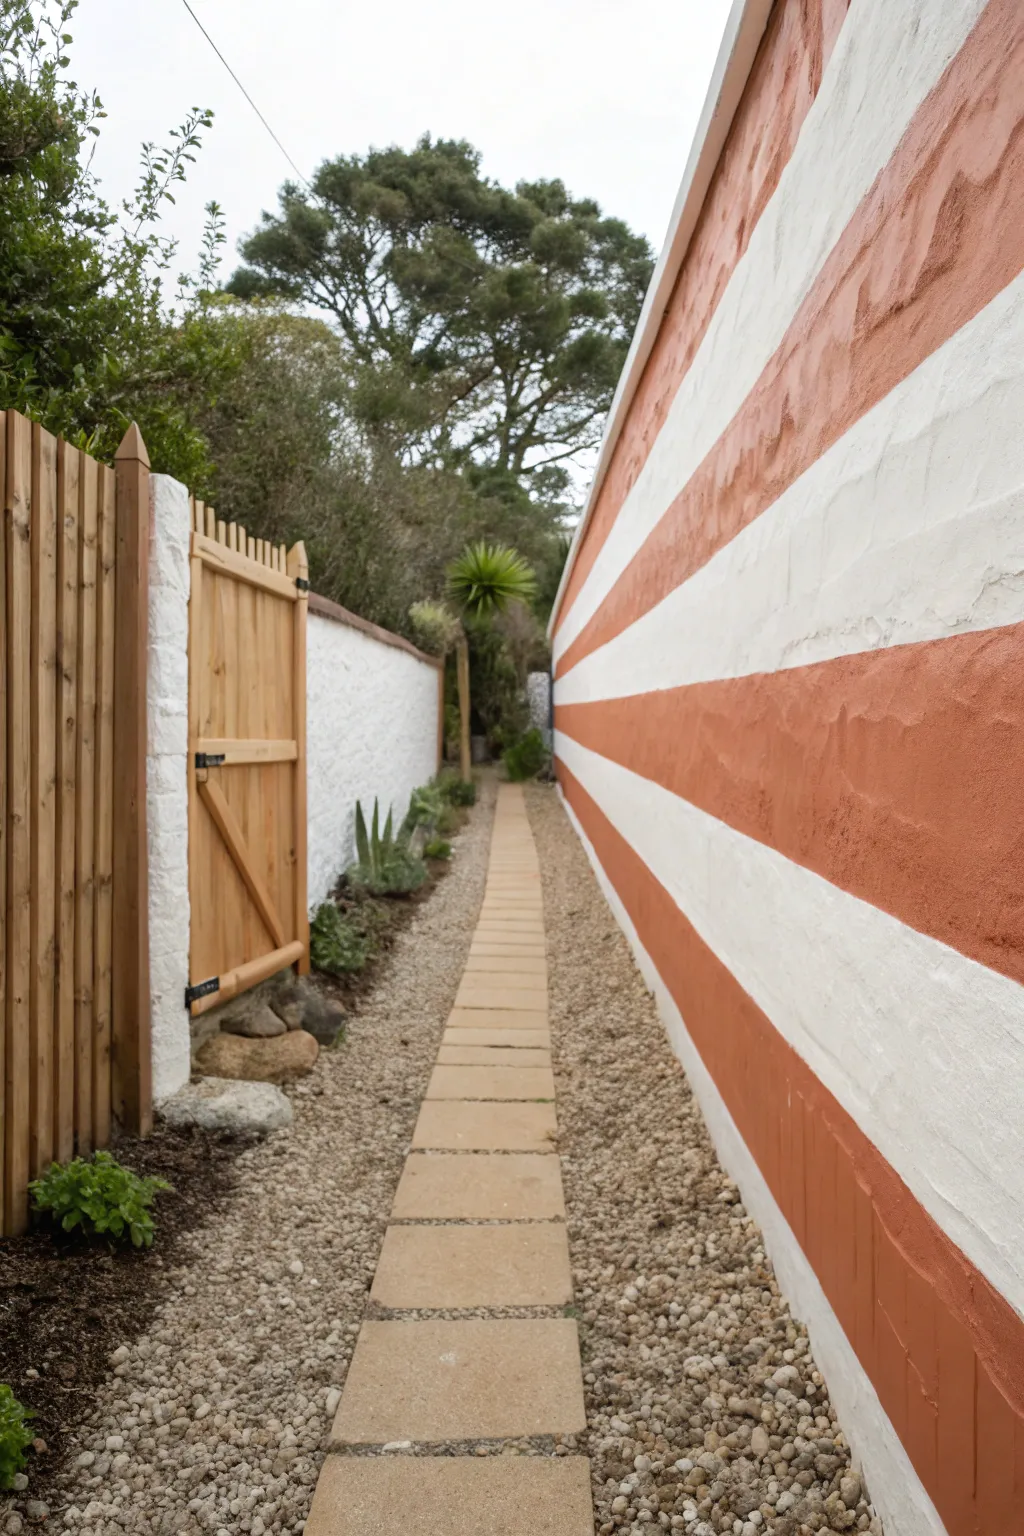
Transform a long, plain garden wall into a vibrant feature with these crisp, wide horizontal stripes. The warm terracotta and bright white bands create an elongating effect that draws the eye down the path, adding distinctive Mediterranean character to your outdoor space.
Step-by-Step Tutorial
Materials
- Exterior masonry paint (White)
- Exterior masonry paint (Terracotta/Burnt Orange)
- Pressure washer or stiff scrub brush
- Masonry filler & putty knife (if needed)
- High-quality painter’s tape (wide width, meant for rough surfaces)
- Laser level or chalk line
- Spirit level
- Long tape measure
- Pencil
- Large masonry paint brush (4-5 inch)
- Medium pile roller with extension pole
- Small detail brush for edges
- Paint tray and liners
- Drop cloths
Step 1: Preparation
-
Clean the surface:
Before any paint touches the wall, ensure the surface is pristine. Use a pressure washer to remove dirt, moss, and loose flaking paint. If you don’t have a pressure washer, a stiff brush and soapy water will work, but require more elbow grease. Let the wall dry completely for at least 24-48 hours. -
Repair imperfections:
Inspect the masonry for deep cracks or holes. Apply exterior masonry filler with a putty knife to smooth these areas out. Allow the filler to cure according to the manufacturer’s instructions before sandling lightly if necessary. -
Protect the area:
Lay down drop cloths along the base of the wall. This is crucial as masonry paint can be difficult to remove from gravel or paving stones once dried. Tape off any adjacent fences or perpendicular walls to ensure crisp edges.
Bleeding Lines?
If paint bleeds under tape on rough stone, don’t panic. Wait for it to dry fully, then use a small, stiff flat brush and your base white paint to carefully ‘erase’ the error by overpainting the bleed.
Step 2: Base Coat
-
Cutting in:
Start with your white masonry paint. Use a brush to cut in along the top edge, bottom edge, and corners of the wall. Work the paint well into the textured surface so no crevices remain unpainted. -
Roll the base:
Load your roller with white paint and cover the entire wall. Masonry surfaces often drink up the first coat, so be generous. You want a solid, opaque white background because this will serve as one set of your stripes. -
Second coat:
Once the first layer is dry (check the can for recoat times, usually 4-6 hours), apply a second coat of white. This ensures a bright, clean contrast for your coloured stripes later. Let this base cure fully—I recommend waiting overnight to ensure the tape won’t peel it up.
Step 3: Measuring and Taping
-
Calculate stripe width:
Measure the total height of your wall. Divide this number by how many stripes you want (odd numbers often look best, starting and ending with the same color). For the look in the photo, aim for wide bands, roughly 30-40cm each. -
Mark vertical guides:
Using a pencil and measuring tape, make small marks at your calculated intervals up the wall at both ends and in the middle. This ensures your lines stay straight over a long distance. -
Snap lines:
Use a chalk line or a laser level to connect your marks horizontally. If using a chalk line, have a friend hold one end while you snap the string to leave a faint guide line on the white paint. -
Apply the tape:
Run your painter’s tape along the OUTSIDE of the stripes that will remain white. This is the crucial part: you want the tape to cover the ‘white’ zone, leaving the ‘terracotta’ zone exposed. Press the tape firmly into the texture of the wall to prevent bleed. -
Seal the tape edge:
Here is a professional secret: quickly brush a very thin layer of the WHITE base paint over the edge of the tape that faces the area you will paint terracotta. This seals any gaps in the textured masonry with white paint, so if anything bleeds under, it matches the base.
Soften the Contrast
For a more aged, rustic look, lightly dry-brush a little white paint over the terracotta stripes once dry. This highlights the stone texture and makes the wall feel weathered rather than freshly painted.
Step 4: Painting the Stripes
-
Cut in the stripes:
Open your terracotta paint. Carefully brush along the edge of the tape (the side you just sealed). Don’t overload the brush here; you just want to define the boundaries. -
Fill the bands:
Use a roller or a large block brush to fill in the exposed bands with terracotta paint. A brush often works better on very rough stone walls to get into the deep pits. -
Assess coverage:
Let the first coat dry. Depending on the depth of the colour, you may need a second coat to achieve that rich, sun-baked opacity. Work carefully to avoid splattering onto the taped white sections. -
Remove tape:
This is the satisfying part. Remove the tape while the final coat of terracotta paint is still slightly tacky—don’t let it dry rock hard or it might pull paint chips with it. Pull the tape slowly at a 45-degree angle away from the painted edge. -
Touch ups:
Inspect your lines. Masonry is tricky, and you might have a tiny bit of bleed or a missed spot in a deep crevice. Use a small artist’s brush to tidy up any uneven edges for a crisp finish.
Step back and admire how the bold linear pattern makes your garden feel wider and wonderfully structured
Simple Geometric Shapes on a Garden Wall
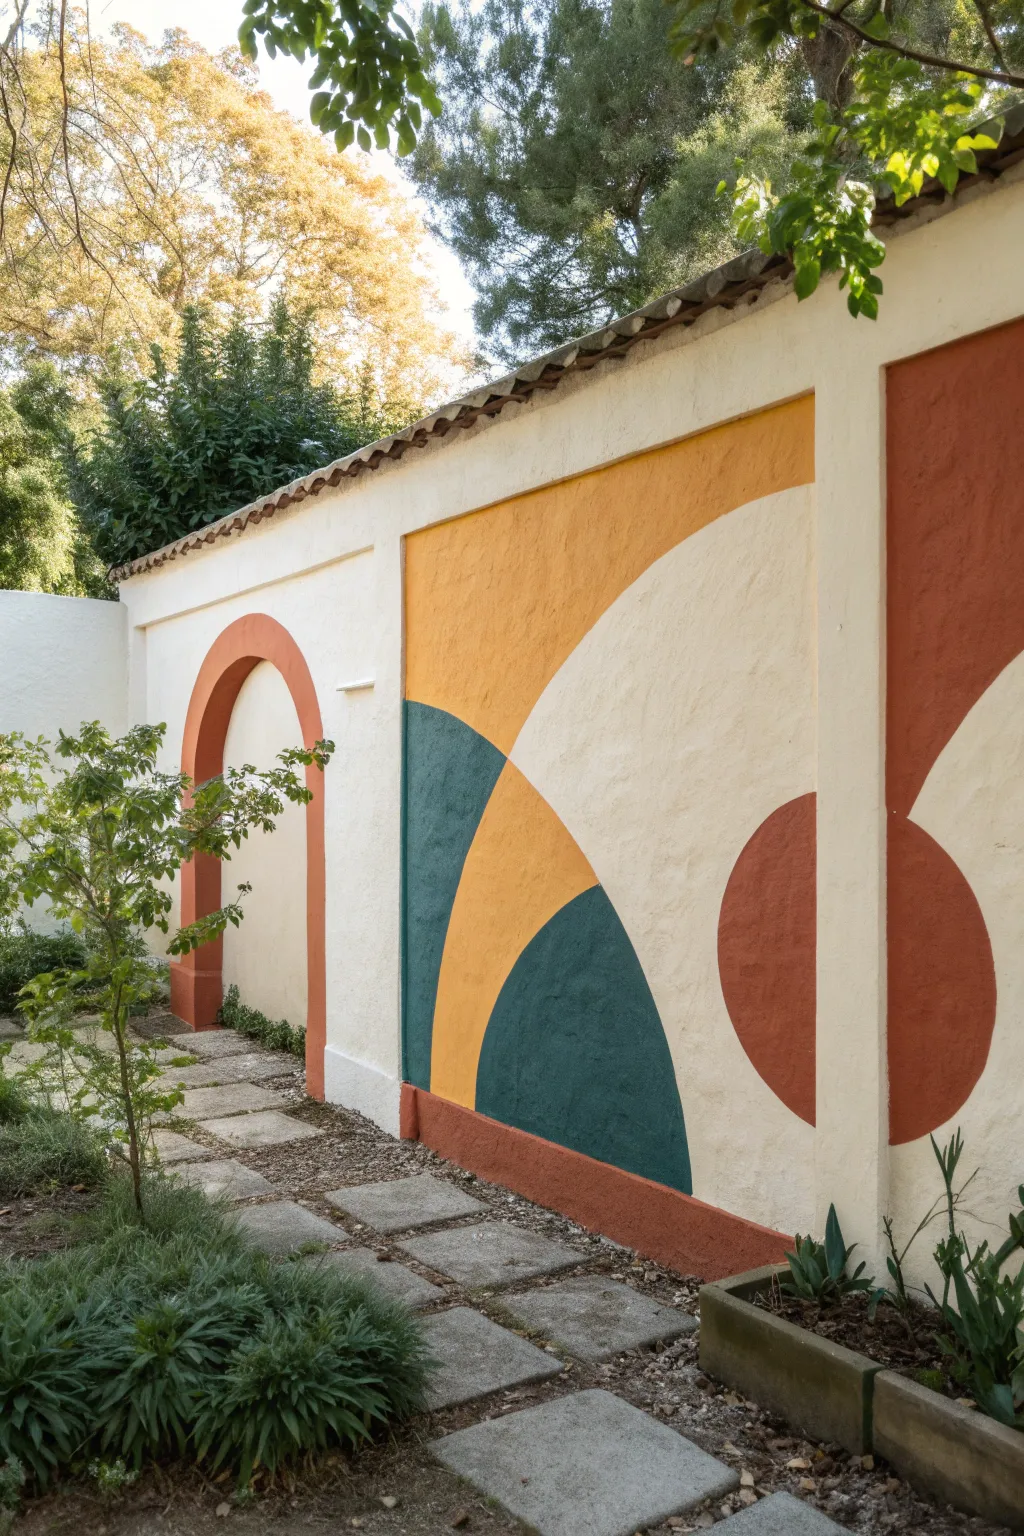
Transform a plain exterior stucco wall into a stunning focal point with this bold, abstract mural featuring warm earth tones and crisp geometric curves. This design uses color blocking in terracotta, mustard, and teal to create depth and architectural interest, perfectly complementing outdoor greenery.
Detailed Instructions
Materials
- Exterior masonry paint (Cream/Off-White base)
- Exterior masonry paint (Terracotta/Brick Red)
- Exterior masonry paint (Mustard Yellow)
- Exterior masonry paint (Deep Teal/Green)
- Paint rollers (medium nap for textured walls) and tray
- Angled sash brushes (various sizes)
- Painter’s tape (exterior grade)
- Chalk line or long level
- String and pencil (for drawing circles)
- Measuring tape
- Pressure washer or stiff scrub brush
- TSP substitute cleaner
- Ladder (if necessary)
Step 1: Preparation & Base Coat
-
Clean the surface:
Begin by thoroughly cleaning your garden wall. Use a pressure washer or a stiff brush with a TSP substitute solution to remove dirt, moss, or loose paint. Let the wall dry completely for at least 24 hours before proceeding. -
Clear the area:
Pull back any plants or vines growing near the wall. Tie back shrubs like the ones in the foreground to give yourself ample working space and prevent foliage from brushing against wet paint. -
Apply the base color:
Roll on a coat of exterior masonry paint in a creamy off-white shade across the entire wall surface. This neutralizes the canvas and ensures your colors will pop. Depending on the wall’s texture, a second coat might be necessary for full coverage.
Rough Texture Troubles?
If paint gleeds under tape on bumpy stucco, seal the tape edge first with a thin layer of the base color. This fills the gaps, ensuring the top color creates a crisp line.
Step 2: Drafting the Design
-
Define the panels:
Before drawing curves, establish the rectangular boundaries. The design works best within recessed panels or defined sections. Use your measuring tape to find the center lines and boundaries of each panel. -
Create a compass:
To draw the large curves, create a makeshift compass. Tie a string to a pencil. Generally, you’ll pin or hold the string end at a fixed point (like the bottom corner of a panel) to swing the pencil and mark perfect arcs. -
Draft the large yellow curve:
For the prominent yellow section, anchor your string at the bottom left corner of the main panel. Extend the string to the top right corner and swing it downwards to create that sweeping quarter-circle shape. -
Draft the inner curves:
Shorten your string length to create the smaller concentric arcs. Using the same anchor point at the bottom left, draw the boundary for the teal section inside the yellow shape. -
Mark the circle elements:
For the red circular element on the right, locate the center point on the vertical edge of the pillar. Use your string compass to draw a semi-circle that aligns seamlessly with the adjacent panel’s design. -
Outline the archway:
If your wall has an actual archway like the one on the left, use painter’s tape to outline a border around it. If it’s a flat wall, you can paint a faux arch by drawing a U-shape with vertical sides and a semi-circle top.
Step 3: Painting the Colors
-
Tape the straight edges:
Apply exterior painter’s tape along all straight vertical and horizontal boundaries. Press the edges of the tape down firmly to prevent bleed, especially on textured stucco. -
Hand-paint the curves:
Tape often struggles on curves. I find it best to use a high-quality angled sash brush to carefully ‘cut in’ the curved lines by hand. Paint slowly along your pencil marks to get a crisp edge. -
Fill the mustard section:
Using a roller or large brush, fill in the large top section with your mustard yellow paint. Be careful not to cross the line where the teal section will begin. -
Paint the teal accent:
Once the yellow boundary is touch-dry (or if you left a small gap), fill in the bottom quarter-circle with the deep teal paint. This dark color grounds the design and mimics the nearby foliage. -
Add the terracotta details:
Paint the circular element on the right and the archway boarder on the left with the terracotta/brick red paint. This warm tone balances the cool teal and bright yellow. -
Paint the base border:
Finish the color application by painting a consistent horizontal band along the very bottom of the wall in the terracotta color. This acts as a visual footer preventing dirt splashes from staining the white base.
Clean Curve Secret
For steadier hand-painted curves, hold your breath slightly while dragging the brush and use your pinky finger against the dry wall for stability.
Step 4: Finishing Touches
-
Remove tape:
Peel off the painter’s tape while the paint is still slightly tacky. Pull at a 45-degree angle away from the painted edge to ensure a clean line without chipping. -
Touch up edges:
On rough exterior walls, some bleed is inevitable. Go back with a small artist’s brush and your base cream color to tidy up any fuzzy lines or drips. -
Review and refine:
Step back to view the mural from a distance. Check for uneven coverage in the large color blocks and apply a second coat if the stucco texture is showing through too much.
Now you have a vibrant, modern backdrop that brings year-round color to your garden space.
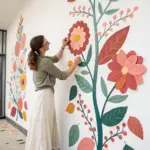
Hand-Painted Flower-and-Vine Garden Wall Mural
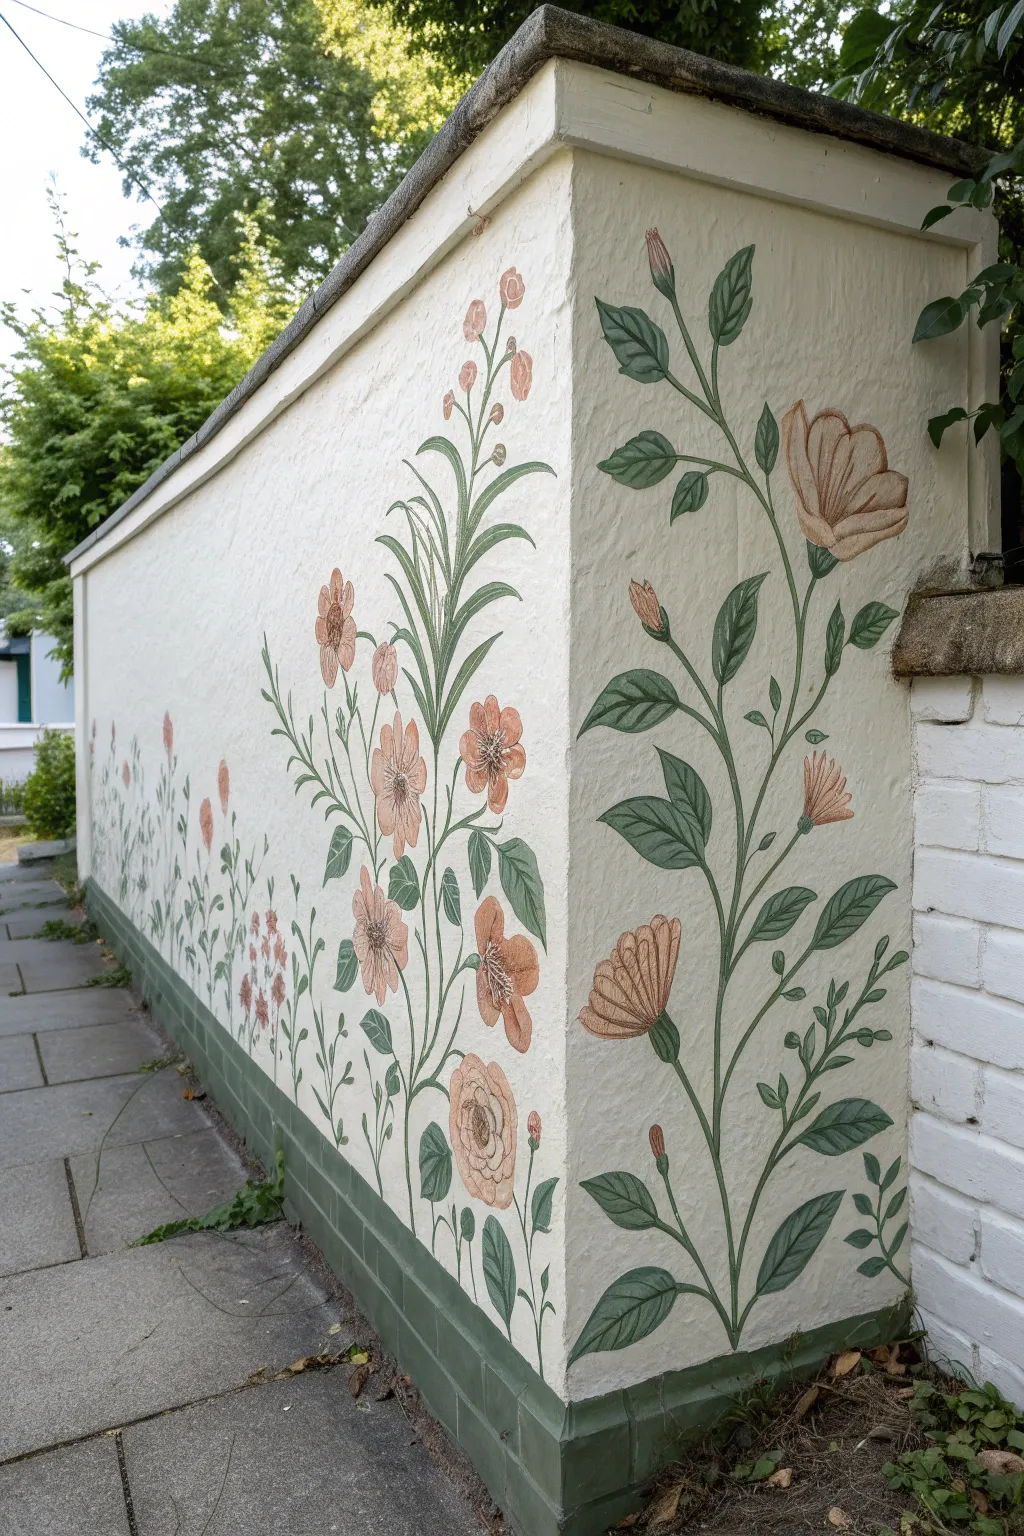
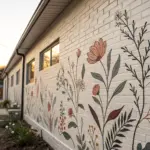
Transform a plain exterior corner into a charming storybook scene with this hand-painted botanical mural. Featuring trailing vines and soft, peach-toned blooms against a creamy textured background, this project brings a touch of timeless, illustrative beauty to your outdoor space.
Step-by-Step
Materials
- Exterior masonry paint (Cream/Off-white for base)
- Exterior acrylic paints (Peach, Terracotta, Sage Green, Forest Green, Deep Olive)
- Set of artist brushes (various sizes: fine liner, medium round, large flat)
- Chalk or soft pastel for sketching
- Small roller and tray
- Painter’s tape
- Clear outdoor sealant (matte or satin finish)
- Mixing palettes or plastic containers
- Rag or paper towels
Step 1: Preparing the Canvas
-
Clean and mask:
Start by thoroughly cleaning the wall surface to remove any moss, dirt, or loose debris, ensuring a solid bond for the paint. Use painter’s tape to mask off the green glazed brick base and any adjacent brickwork to keep your edges crisp. -
Apply base coat:
Roll on a coat of high-quality exterior masonry paint in a warm cream or off-white shade. Because the wall is textured, use a thick-nap roller to get into all the crevices. Let this dry completely, usually for about 4–6 hours. -
Sketch the layout:
Using a light-colored chalk or soft pastel, loosely sketch the main flow of your vines. Start from the bottom corner and draw sweeping curves upward and outward. Don’t worry about perfect details yet; just establish the ‘spine’ of your plants to ensure balanced placement.
Brushwork Tip
For natural-looking leaves, press down on the brush belly at the base of the leaf and lift gradually as you pull outward, creating a sharp tapered point.
Step 2: Painting the Greenery
-
Mix your greens:
Create three distinct green mixtures: a pale sage for highlights, a standard forest green for mid-tones, and a deep olive for shadows. I find that pre-mixing these pots saves time and keeps the color palette consistent. -
Paint main stems:
Using a medium round brush and the forest green shade, follow your chalk lines to paint the main stems. Keep your hand loose to create natural, organic curves rather than stiff lines. -
Add primary leaves:
Paint the larger leaves attached to the main stems. Use the forest green to block in the shapes, which should be pointed ovals with slightly serrated or wavy edges. -
Layer with shadows:
While the green is still slightly tacky or just dry, take the deep olive paint and add shading to the underside of the leaves and the bottom of the stems. This adds dimension and prevents the mural from looking flat. -
Highlight leaf veins:
Switch to a fine liner brush and your pale sage mix. Carefully paint the central veins and smaller branching veins on each leaf. This illustrative detail gives the mural its vintage botanical print look. -
Add thinner tendrils:
Using the liner brush and the mid-tone green, add delicate, swirling tendrils branching off the main stems. Let these wander into the empty white spaces to create movement.
Vintage Patina
Mix a tiny amount of raw umber with water to create a translucent glaze. Lightly wash over the dried flowers to tone down bright colors for an aged look.
Step 3: Blooming Flowers
-
Block in flower shapes:
Mix a soft peach color and determine where your main blooms will sit. Paint the basic silhouette of cup-shaped flowers and open rosettes. Vary the sizes, placing slightly smaller buds near the top of the vines. -
Define petals:
Using a terracotta or deeper orange shade, paint lines radiating from the center of each flower to define individual petals. For side-facing flowers, focus the darker color at the base of the bloom. -
Add flower centers:
Dab a small cluster of dark brown or deep red dots in the center of the open flowers to represent stamens. You can add tiny yellow highlights on top of these dots for extra contrast. -
Refine with highlights:
Mix a very pale pink or white into your peach color. highlight the top edges of the petals where the sunlight would naturally hit. This simple step instantly adds volume to the blooms. -
Connect blooms to stems:
Go back to your green paint and add the calyx (the green cup at the base of the flower) and small stems to connect every floating flower head firmly to the main vine system.
Step 4: Finishing Touches
-
add textural details:
Look for empty spots that feel unbalanced. Add small floating leaves or tiny distinct buds in these gaps. On the grassy-style leaves at the bottom, add quick upward strokes of lighter green to suggest growth. -
Clean up:
Once the paint is dry, gently wipe away any remaining chalk lines with a damp cloth. Check for any drip marks or smudges and touch them up with your base wall color. -
Seal the artwork:
To protect your hard work from the elements, apply a clear, non-yellowing exterior masonry sealer over the mural. A matte finish is best to maintain the hand-painted, fresco style.
Step back and admire how your new botanical corner breathes life and whimsy into the garden path
Ombre Wash Across the Garden Wall
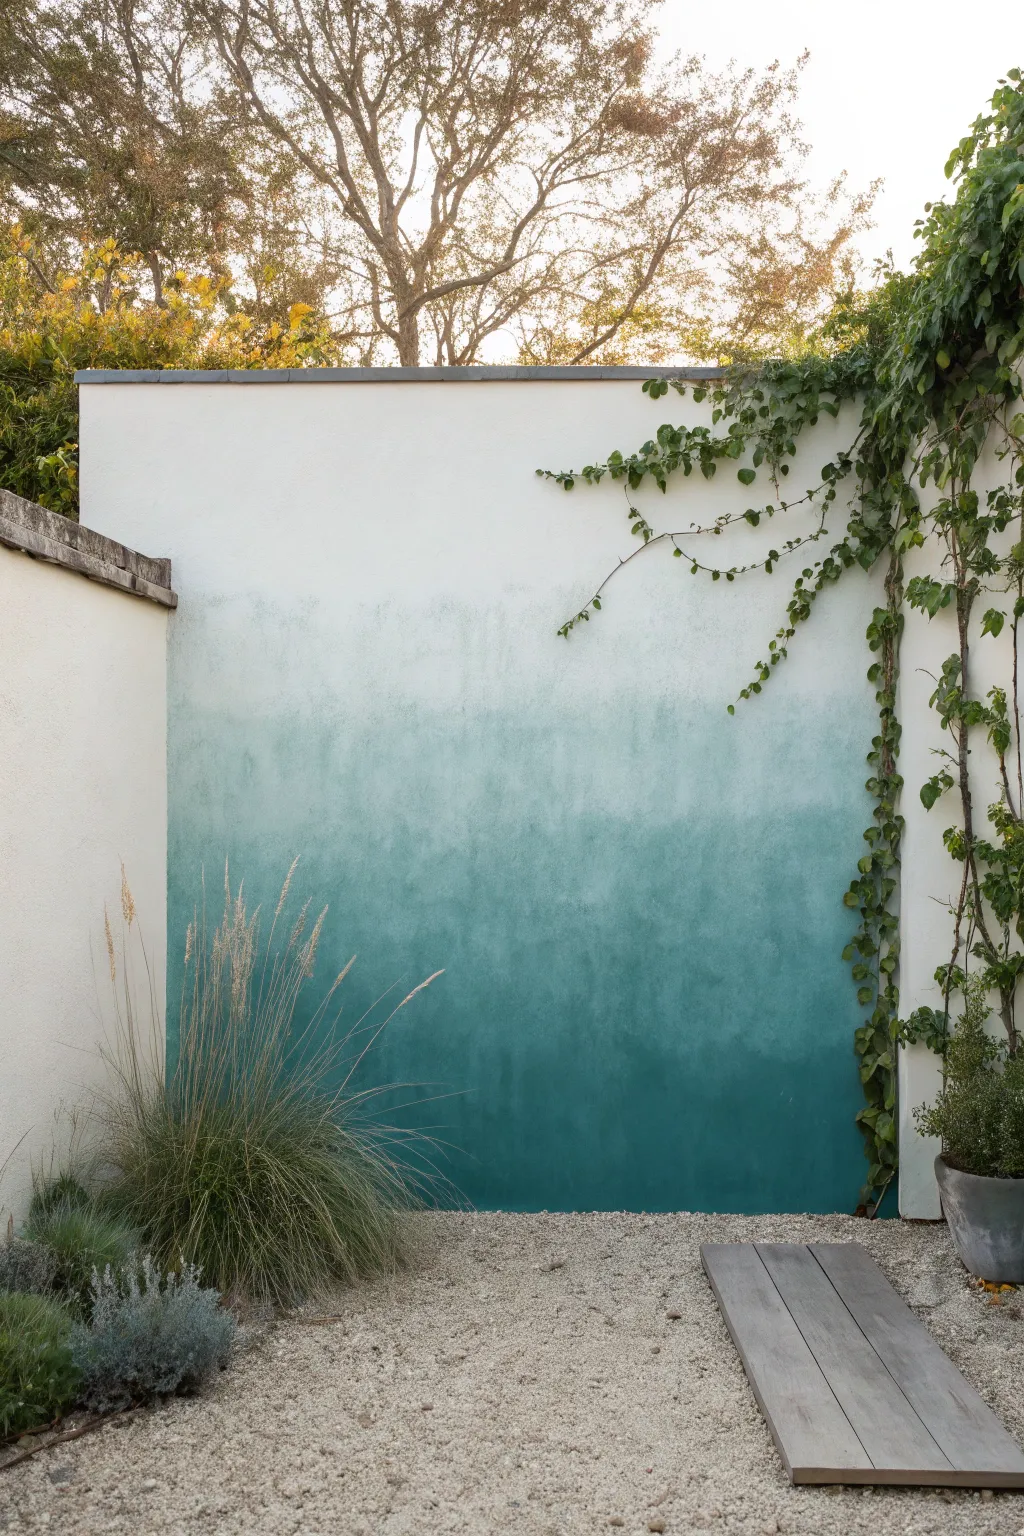
Transform a plain outdoor stucco or concrete wall into a stunning watercolor-style backdrop with this ombre technique. By blending a deep teal base upward into pure white, you create a softening effect that makes garden boundaries feel airy and artistic.
How-To Guide
Materials
- Exterior masonry paint (White)
- Exterior masonry paint (Deep Teal/Turquoise)
- Large paint roller and tray
- Extension pole for roller
- Wide masonry brush (4-6 inch)
- Garden hose lightly set to mist (optional)
- Clean bucket with water
- Large sponge or blending rag
- Painter’s tape
- Drop cloths or plastic sheeting
- Stiff bristle brush for cleaning
Step 1: Preparation & Base Coat
-
Clean surface:
Begin by thoroughly cleaning your stucco or concrete wall. Use a stiff bristle brush to remove loose dirt, moss, or cobwebs. If there is significant grime, wash it down and let it dry completely before starting. -
Protect the area:
Lay down heavy-duty drop cloths over the gravel or ground at the base of the wall. Secure them with rocks or weights so they don’t shift while you work. Tape off any adjacent walls or fixtures you want to keep clean. -
Prime the surface:
If the wall hasn’t been painted recently, apply a coat of white exterior masonry primer to ensure good adhesion and color trueness. -
Apply the white base:
Using your roller and extension pole, paint the entire upper two-thirds of the wall with the white masonry paint. Ensure expansive coverage, bringing the white down lower than you think you need it—roughly to the midpoint or slightly below.
Wet-on-Wet is Key
For the smoothest gradient, don’t let the paint dry between bands. Work in manageable vertical sections (about 3-4 feet wide) so all colors remain wet enough to blend together seamlessly.
Step 2: Applying color
-
Mix mid-tone:
In a separate bucket, mix roughly two parts white paint with one part teal paint. This will be your transition color. -
Paint the bottom:
While the white section is still slightly tacky (but not wet), use a clean roller to apply the pure deep teal paint to the bottom third of the wall. Ensure solid, opaque coverage right down to the ground. -
Apply the middle band:
Directly above the deep teal section, roll on your mixed mid-tone color. Overlap it slightly with the top edge of the deep teal and the bottom edge of the white section above.
Step 3: Creating the Ombre Blend
-
Wet the brush:
Here is the critical part: dampen your wide masonry brush in clean water. It should be moist but not dripping. -
Blur the lower transition:
Working quickly while the paint is wet, use the damp brush to vigorously cross-hatch back and forth where the deep teal meets the mid-tone. Use upward sweeping strokes to pull the dark color slightly up. -
Blur the upper transition:
Rinse your brush or grab a fresh damp sponge. Move to the line where the mid-tone meets the white. Use lighter, multidirectional strokes to feather the color upward until the hard line disappears. -
Mist for smoothness:
If the paint is drying too fast outdoors, I sometimes use a spray bottle or a hose on a very fine mist setting to lightly dampen the wall. This reactivates the paint just enough to extend your blending time. -
Check from a distance:
Step back about 10 feet. Look for any distinct horizontal stripes. If you see them, go back with a damp sponge and a tiny bit of diluted paint to soften those specific areas. -
Final softening:
For that cloudy, wash-like effect seen in the photo, take a mostly dry brush with a tiny amount of white paint and dry-brush downwards from the white section into the fade, breaking up any heavy saturation.
Natural Texture
Use a natural sea sponge instead of a brush for the transition zones. Dab and twist the sponge to create an organic, cloud-like texture rather than visible brush strokes.
Step 4: Finishing Touches
-
Dry completely:
Allow the wall to dry undisturbed for at least 24 hours. The colors may lighten slightly as the moisture evaporates. -
Remove tape:
Carefully peel away your painter’s tape and lift the drop cloths. -
Add greenery:
Once fully cured, you can reintroduce your planters or train vines along the wall to contrast against the new color gradient.
Now you have a serene, custom backdrop that brings the colors of the ocean right into your garden


Have a question or want to share your own experience? I'd love to hear from you in the comments below!