If you’ve been daydreaming about a fresh look, painted house updates are one of the quickest ways to change the whole vibe from the curb. I pulled together my favorite painted houses ideas—from classic, foolproof palettes to artsy twists that still feel totally livable.
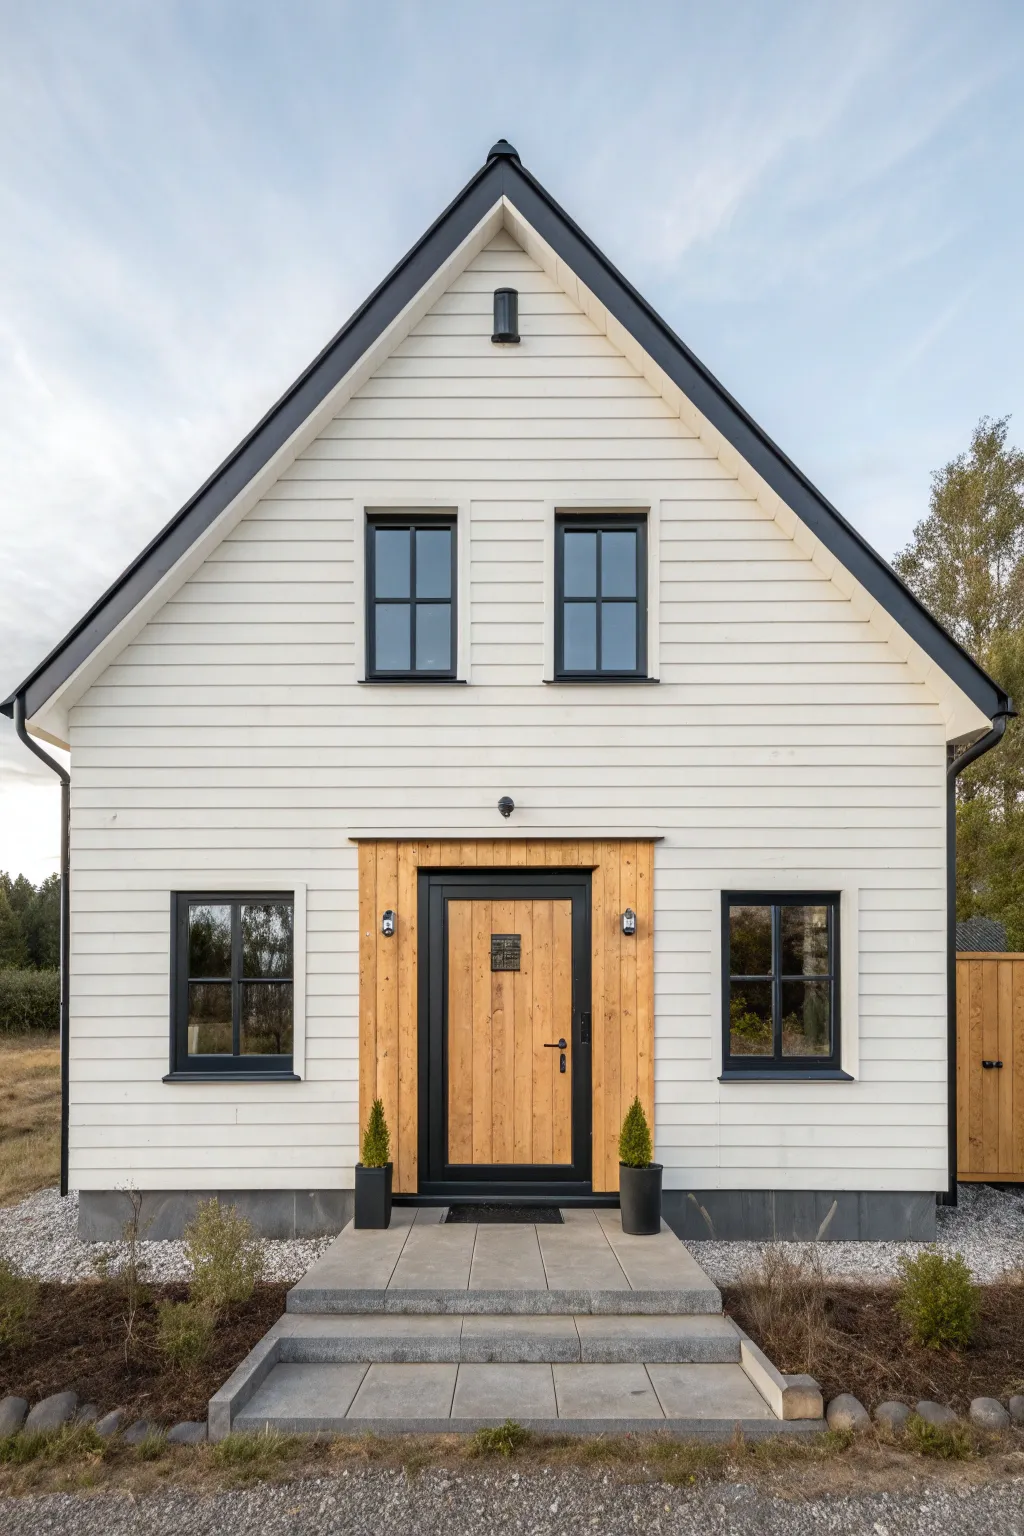
Classic White Siding With Black Trim
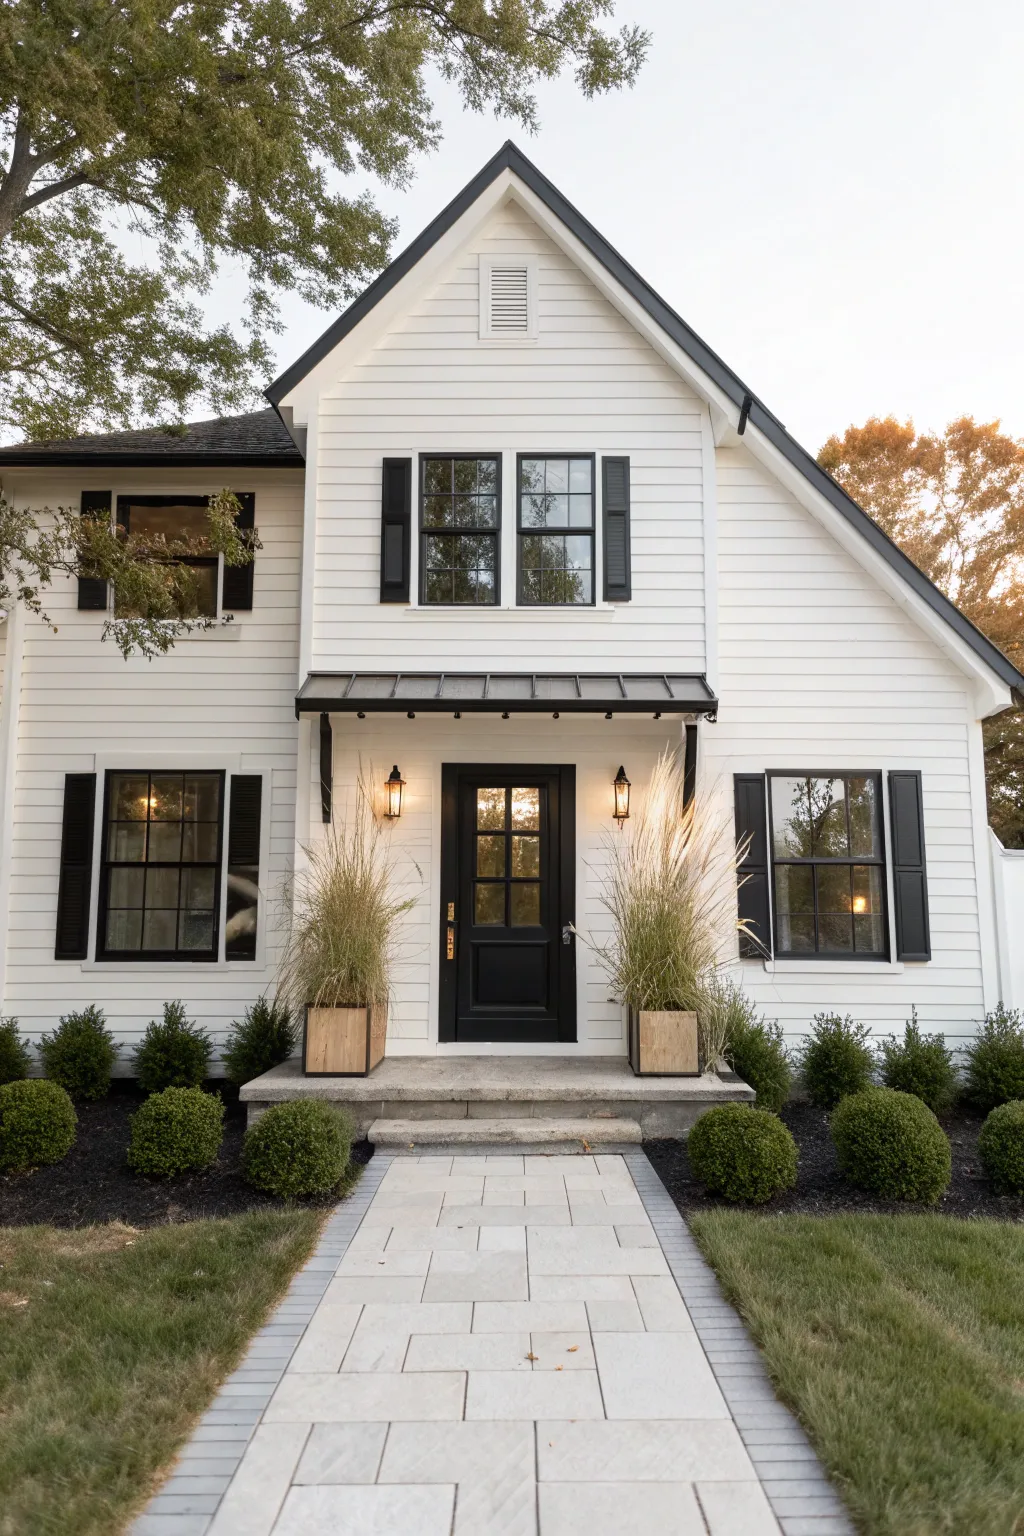
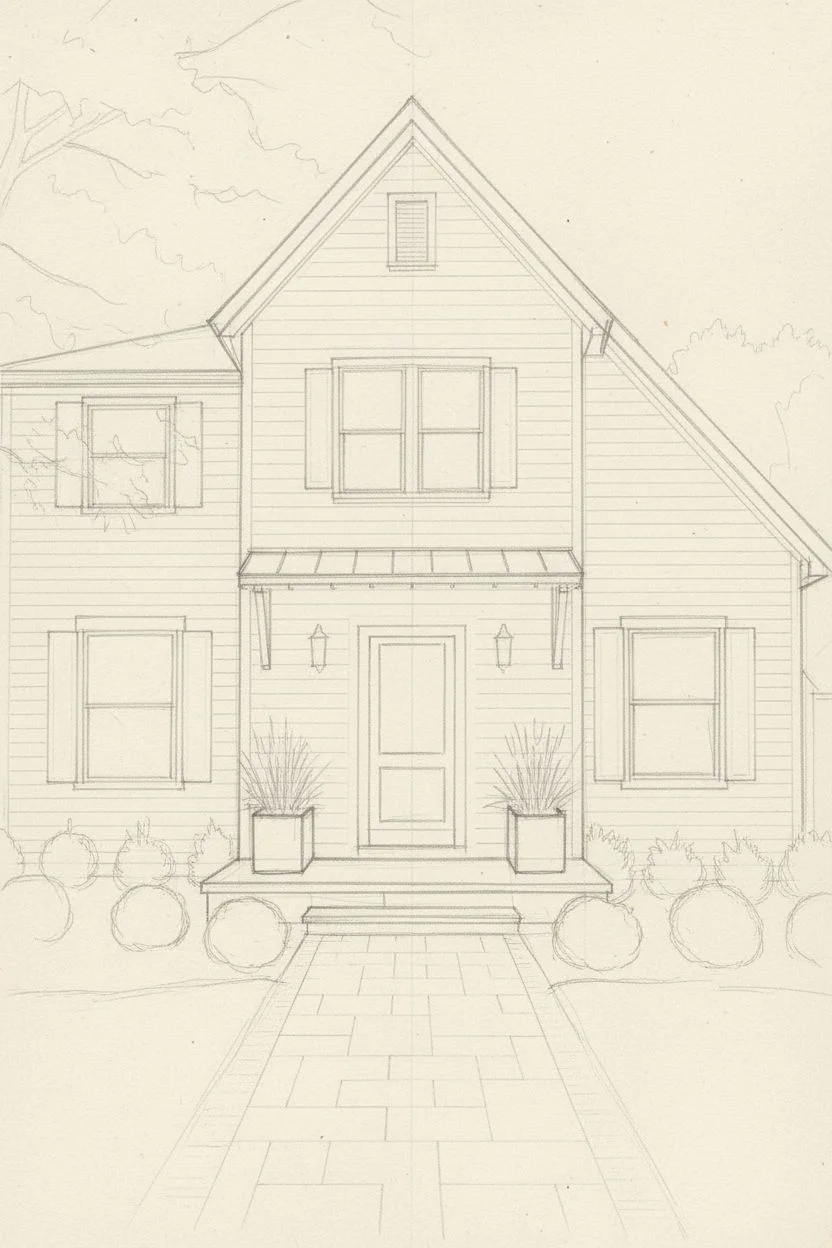
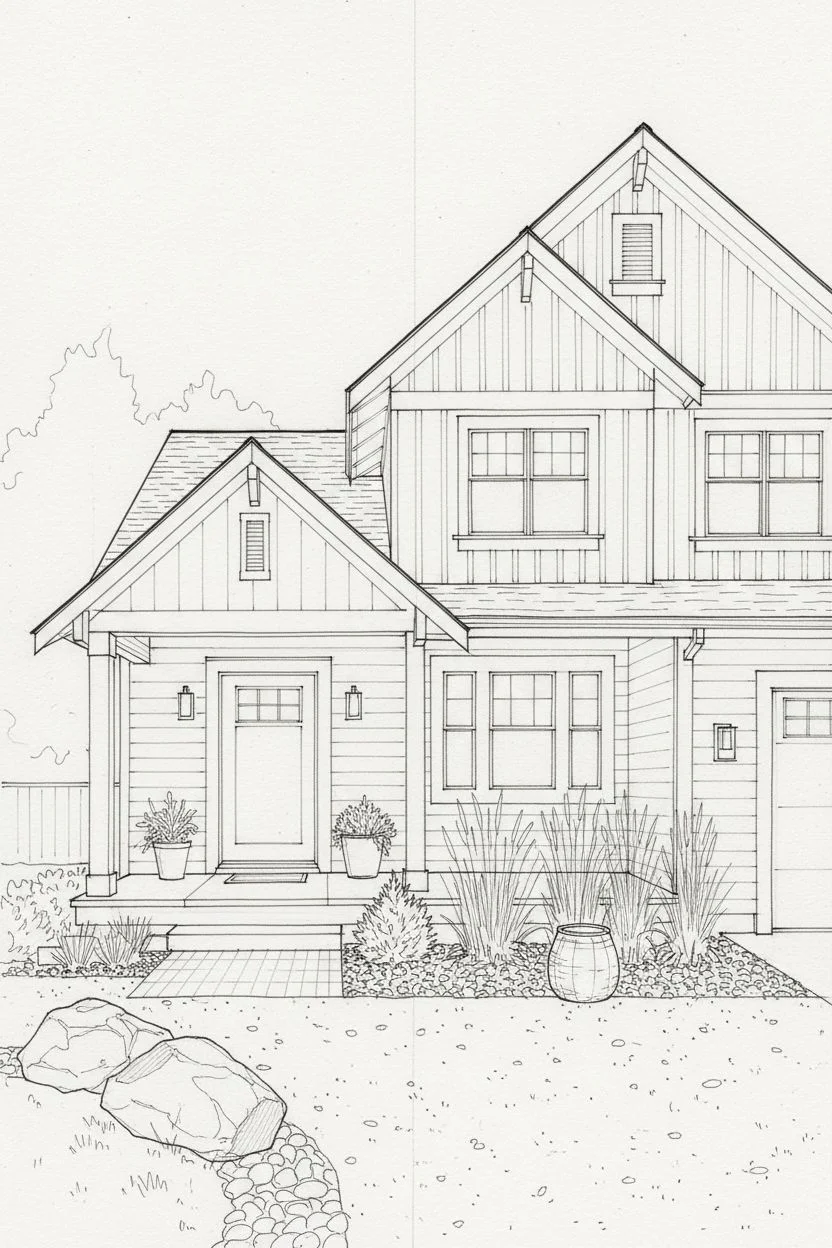
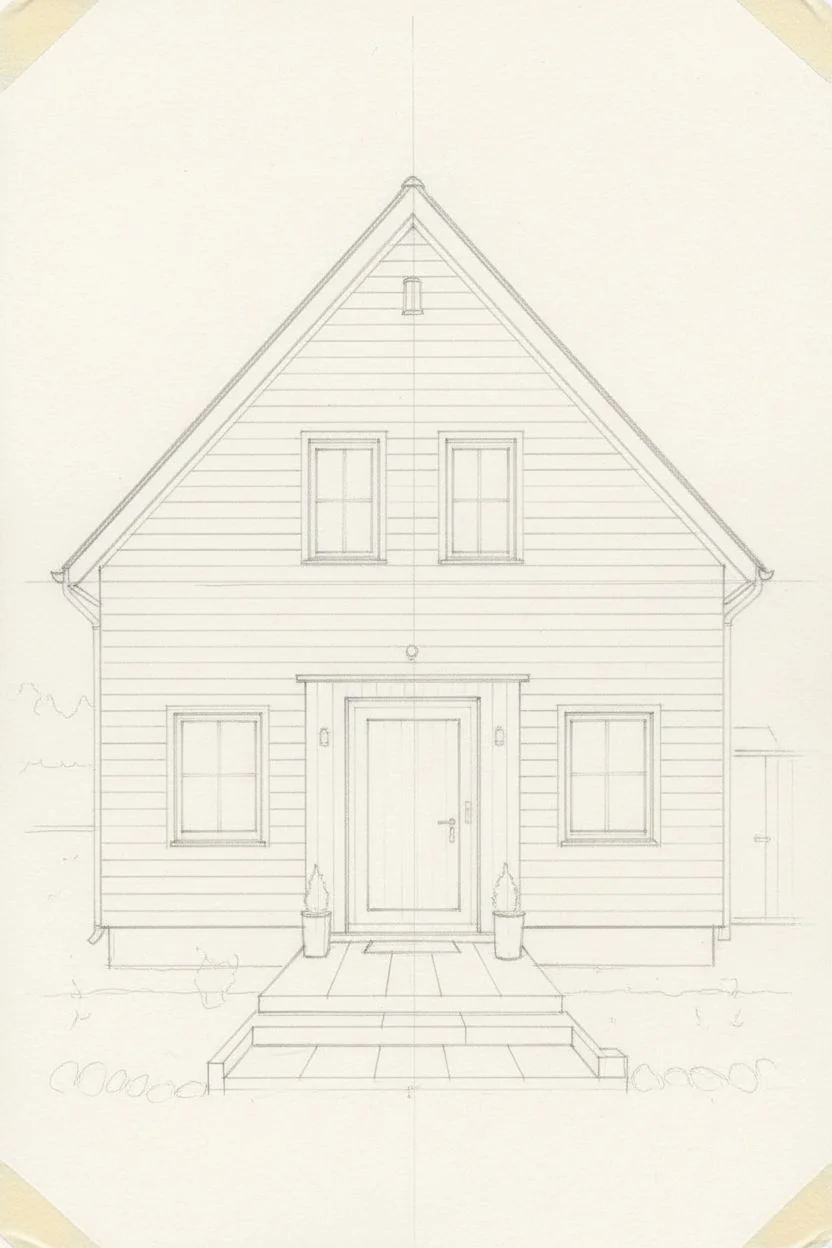
Capture the crisp elegance of a modern farmhouse exterior with this architectural illustration tutorial. You will learn to balance the stark contrast between bright white siding and deep black accents while rendering realistic textures like stone, grass, and foliage.
Step-by-Step Guide
Materials
- Heavyweight watercolor paper or mixed media board (hot press)
- Pencil (HB or H)
- Fine liner pens (0.1mm, 0.3mm, 0.5mm, 0.8mm) in black
- Ruler or T-square
- Kneaded eraser
- Alcohol-based markers (Cool Greys C1-C5, Warm Greys W1-W3, Black, Olive Green, Forest Green)
- White gel pen or opaque white gouache
- Colored pencils (optional, for texture)
Step 1: Drafting the Structure
-
Establish the horizon:
Begin by lightly drawing a horizon line near the bottom third of your paper. This will serve as the ground level for your walkway and landscaping. -
Block in the main shapes:
Using your ruler, sketch the large central gable shape first. It should be the dominant vertical element. To the left, draw the rectangular extension for the second section of the house. -
Add architectural details:
Draft the smaller details within your main shapes. Sketch the front porch overhang, the front door frame, the window placements, and the pitched rooflines. Keep your lines light so they can be erased later. -
Define the siding lines:
Lightly rule horizontal lines across the white sections of the house to represent the lap siding. Ensure these lines are parallel and evenly spaced to maintain perspective. -
Sketch the landscape:
Loosely outline the shapes of the boxwood shrubs in the front, the taller ornamental grasses in the planters, and the surrounding trees. Draw the perspective lines for the stone walkway leading to the door.
Shadow Precision
When shading white siding, cast shadows directly under the horizontal laps using your lightest grey marker. This subtle effect creates incredible realism.
Step 2: Inking the Lines
-
Outline the main structure:
Use a 0.5mm pen to ink the main structural lines of the house, like the roof edges and corners. Use a ruler for straight edges to keep the architectural feel sharp. -
Ink the dark features:
Switch to a 0.8mm pen for the elements that will be solid black later, such as the window frames, shutters, and the front door casing. This thicker line helps contain the dark ink. -
Detail the siding:
For the siding, I prefer using a very fine 0.1mm pen. Don’t draw solid lines all the way across; instead, use broken, delicate lines to suggest the shadow of the siding without overwhelming the white space. -
Add organic textures:
Use a 0.3mm pen to create loose, scribbly textures for the shrubbery and trees. For the ornamental grasses, use quick, upward flicking motions. -
Clean up:
Once the ink is completely dry, gently erase all your pencil guides with a kneaded eraser.
Step 3: Adding Value and Color
-
Fill the black accents:
Use a black marker to fill in the shutters, the front door, the roof fascia, and the metal porch awning. Leave tiny slivers of white paper for highlights on the metal surfaces. -
Shade the white siding:
The house is white, but it needs dimension. Use a C1 (very light cool grey) marker to add shadows under the eaves, beneath the window sills, and under the porch roof. -
Deepen the shadows:
Layer a C3 marker into the deepest shadow areas, particularly around the entryway and under the metal awning, to create contrast and depth. -
Render the windows:
Color the glass panes with a dark grey or black, but leave distinct rectangular reflections to suggest the glass surface reflecting the sky or trees. -
Color the walkway:
Use Warm Grey markers (W1 and W3) for the stone pavers. vary the shades slightly between individual stones to create a natural, unpolished look. -
Paint the greenery:
Apply your Olive Green and Forest Green markers to the shrubs and grass. Use the darker green at the bottom of the bushes and lighter green at the tips where the sun hits. -
Warm up the planters:
Use a light tan or warm grey marker to color the wooden planters flanking the door, adding vertical strokes to simulate wood grain. -
Final highlights:
Take your white gel pen and add crisp highlights to the top edges of the black shutters, the door handle, and the lantern lights to make them pop.
Warm Lighting
Add a touch of pale yellow or orange pencil inside the lanterns and the door windows to suggest warm interior lighting welcoming guests home.
Step back and admire the stark, beautiful contrast of your modern farmhouse illustration.


Navy Body With Crisp White Trim
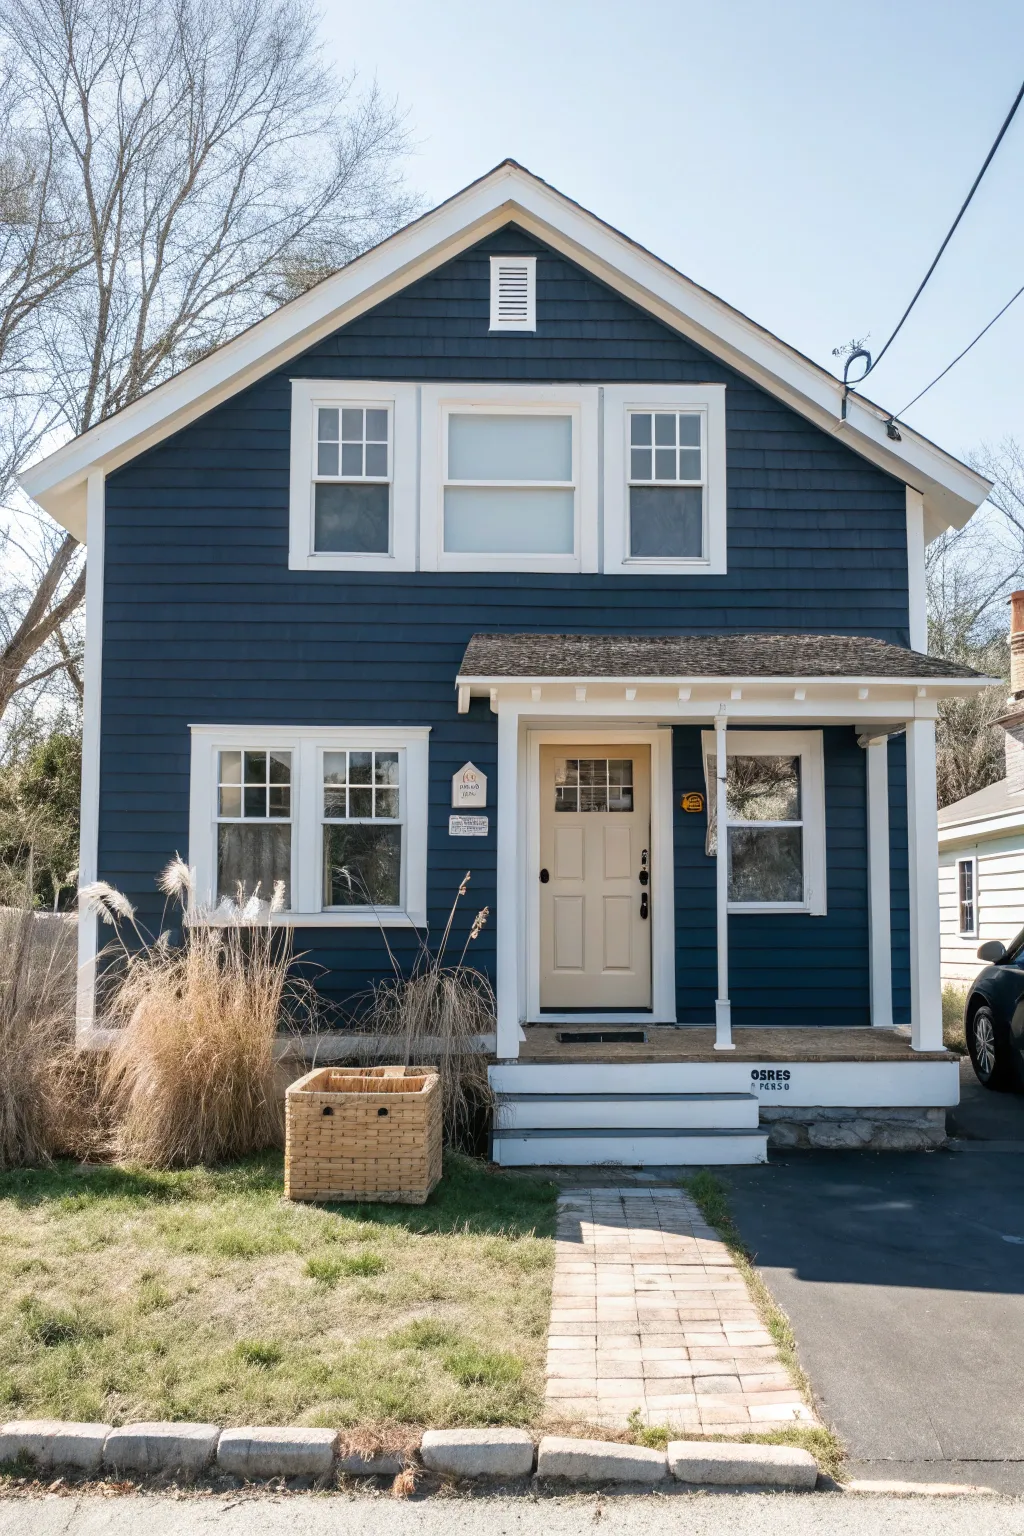

Transform your home’s exterior with this classic, maritime-inspired combination of deep navy blue siding and stark, crisp white trim. This timeless look creates striking curb appeal that feels both modern and historically grounded.
Step-by-Step Tutorial
Materials
- High-quality exterior latex paint (Navy Blue – e.g., ‘Hale Navy’ or similar)
- High-quality exterior latex paint (Crisp White)
- Exterior primer compatible with your siding type
- Pressure washer
- Painter’s tape and plastic sheeting
- Caulk and caulking gun
- Scrapers and sanding blocks
- Paint sprayer (optional but recommended for siding)
- Assorted paintbrushes (angled sash brushes, 3-inch flat brushes)
- Paint rollers and extension poles
- Ladder or scaffolding
- Drop cloths
Step 1: Preparation & Cleaning
-
Wash the exterior:
Begin by thoroughly pressure washing the entire house to remove dirt, mildew, and chalky residue. Allow the siding to dry completely for at least 24-48 hours before proceeding. -
Scrape and sand:
Walk the perimeter and scrape away any loose or peeling paint. Sand the edges of scraped areas to feather them out, ensuring a smooth surface for the new paint to adhere to. -
Repair and caulk:
Inspect the siding and trim for any gaps or cracks. Fill nail holes with exterior wood filler and seal gaps around windows, doors, and trim with a high-quality exterior caulk. -
Protect surroundings:
Cover landscaping, walkways, and non-painted fixtures like light sconces with drop cloths and plastic sheeting. Mask off window glass carefully with painter’s tape.
Paint Selection Tip
Test your navy blue on a large board first. Dark colors can shift dramatically in full sun versus shade, sometimes looking purple or black.
Step 2: Prime & Paint Siding
-
Prime bare spots:
Spot-prime any areas of bare wood or significant repairs. If you are making a drastic color change or the old paint is very worn, apply a full coat of primer to the entire house. -
Paint the first coat:
Stir your navy blue paint thoroughly. Using a sprayer or roller, apply the first coat of navy to the siding, working from the top down. Keep a wet edge to avoid lap marks. -
Back-brushing technique:
If using a sprayer, have a helper follow immediately behind with a brush to work the paint into the texture of the siding or shingles. I find this creates a much more durable bond. -
Apply second coat:
Once the first coat is fully dry according to the manufacturer’s instructions, apply a second coat of navy for rich, true color coverage.
Uneven Coverage?
If the navy looks streaky after drying, it likely wasn’t mixed enough or was applied too thin. A third thin coat usually evens out deep pigments.
Step 3: Trim & Details
-
Paint the trim:
Switch to your crisp white paint. Carefully paint the fascia boards, window frames, corner boards, and door casings. Use an angled sash brush for precise lines against the dark siding. -
Columns and porch:
Paint the porch columns and beams in the same bright white. Ensure you get into any decorative grooves or detailing. -
Front door accent:
For the front door, choose a contrasting warm tone like the creamy beige shown. Paint the door separately, possibly removing hardware first for the cleanest look. -
Final touches:
Paint the stair risers white to match the trim, while staining or painting the treads a durable deck color that complements the navy house. -
Clean up:
Remove all painter’s tape slowly before the paint fully cures to prevent peeling. Clean brushes and dispose of masking materials responsibly.
Step back and admire how the dark navy makes the architectural details pop against the landscape


Warm Greige With Soft White Trim

Recreating this modern farmhouse aesthetic involves balancing warm, earthy tones with crisp architectural details. You’ll learn how to capture the inviting look of warm greige siding paired with soft white trim, perfect for an architectural rendering or a detailed house portrait.
How-To Guide
Materials
- Heavyweight watercolor paper or mixed media board (minimum 140lb)
- Pencil (HB for sketching)
- Kneaded eraser
- Waterproof fine liner pens (black, sizes 01 and 05)
- Watercolor paints (Yellow Ochre, Burnt Umber, Paynes Grey, White Gouache or Chinese White)
- Round brushes (sizes 2, 6, and 12)
- Flat brush (1/2 inch) for large washes
- Ruler or T-square
- Masking tape
- Two jars of water
Step 1: Drafting the Structure
-
Establish the Horizon:
Begin by lightly drawing a horizon line about one-third of the way up your paper. This will ground your house and provide a base for the gravel driveway. -
Block in Main Shapes:
Using your ruler, sketch the large geometric forms of the house. Start with the two main gabled peaks—the smaller one over the porch and the larger, taller one for the main roofline. -
Detail the Siding:
Lightly delineate the vertical board-and-batten siding on the upper gables and the horizontal lap siding on the lower sections. Keep these lines faint as they will guide your painting later. -
Add Architectural Features:
Sketch the prominent white trim around the windows and the thick columns supporting the porch roof. Don’t forget the outlines of the front door and the garage door. -
Ink the Outlines:
Go over your final pencil lines with a waterproof 01 fine liner. Use the ruler for long architectural lines like the roof and columns, but freehand the plants and stone textures for a more organic feel.
Step 2: Washing with Warm Tones
-
Mix the Perfect Greige:
Create the signature siding color by mixing a diluted wash of Yellow Ochre with a tiny touch of Burnt Umber and a drop of Paynes Grey. Test it on a scrap paper; it should be a warm, sandy beige, not too grey. -
Apply the Siding Wash:
Using a size 6 or flat brush, apply this wash to the siding areas. Work carefully around the white trim areas—we want to leave those the white of the paper for maximum brightness. -
Deepen Shadows:
While the first layer is still slightly damp, drop a slightly more concentrated mix of the greige under the eaves and rooflines to create soft, cast shadows. I find this helps add immediate depth. -
Paint the Roof:
Mix Paynes Grey with a little Burnt Umber for a dark charcoal color. Paint the roof shingles, leaving tiny slivers of white paper occasionally to suggest texture and light reflection.
Keep the light source consistent
Decide on a light direction (e.g., top-left) right at the start. Ensure all cast shadows under eaves and plants fall in the same opposite direction.
Step 3: Bringing in Warmth and Texture
-
Wood Elements:
For the front door and garage door, mix Burnt Umber with Yellow Ochre for a rich, golden-brown hue. Apply this with vertical strokes to mimic wood grain. -
The Gravel Driveway:
Wet the entire driveway area with clean water first. Drop in very diluted grey and beige washes, letting them bleed together. While wet, sprinkle coarse salt on the area and let it dry completely to create a speckled stone texture. -
Landscaping Greens:
Mix various greens using Hooker’s Green and Yellow Ochre. Paint the ornamental grasses with quick, upward flicking motions using your smallest brush to simulate thin blades.
Add life with imperfections
Don’t make your lines too perfect. Slight wobbles in the siding lines or varied opacity in the roof wash make the house look lived-in and hand-painted rather than computer-generated.
Step 4: Final Details and Highlights
-
Define the Windows:
Paint the window panes with a very pale, watery wash of Paynes Grey to suggest glass. Leave a small rectangle of white paper in each pane to represent a reflection. -
Crisp Up the White Trim:
If you accidentally painted over any white trim, use opaque White Gouache to reclaim those crisp lines on the columns and window frames. -
Add Deepest Darks:
Use your 05 pen or a dark paint mix to deepen the darkest shadows: inside the porch, under the darkest eaves, and the base of the plants. -
The Woven Basket:
Paint the planter basket with horizontal curved strokes using the wood tone mix. Add a darker shadow on one side to give it roundness. -
Texture the Foreground:
Once the driveway is totally dry and salt is brushed off, use a small brush to stipple dots of grey and brown to suggest larger river stones along the grass edge.
Step back and admire how the warm tones interplay with the crisp white trim to create a truly welcoming piece of art


Sage Green House With Warm Wood Details
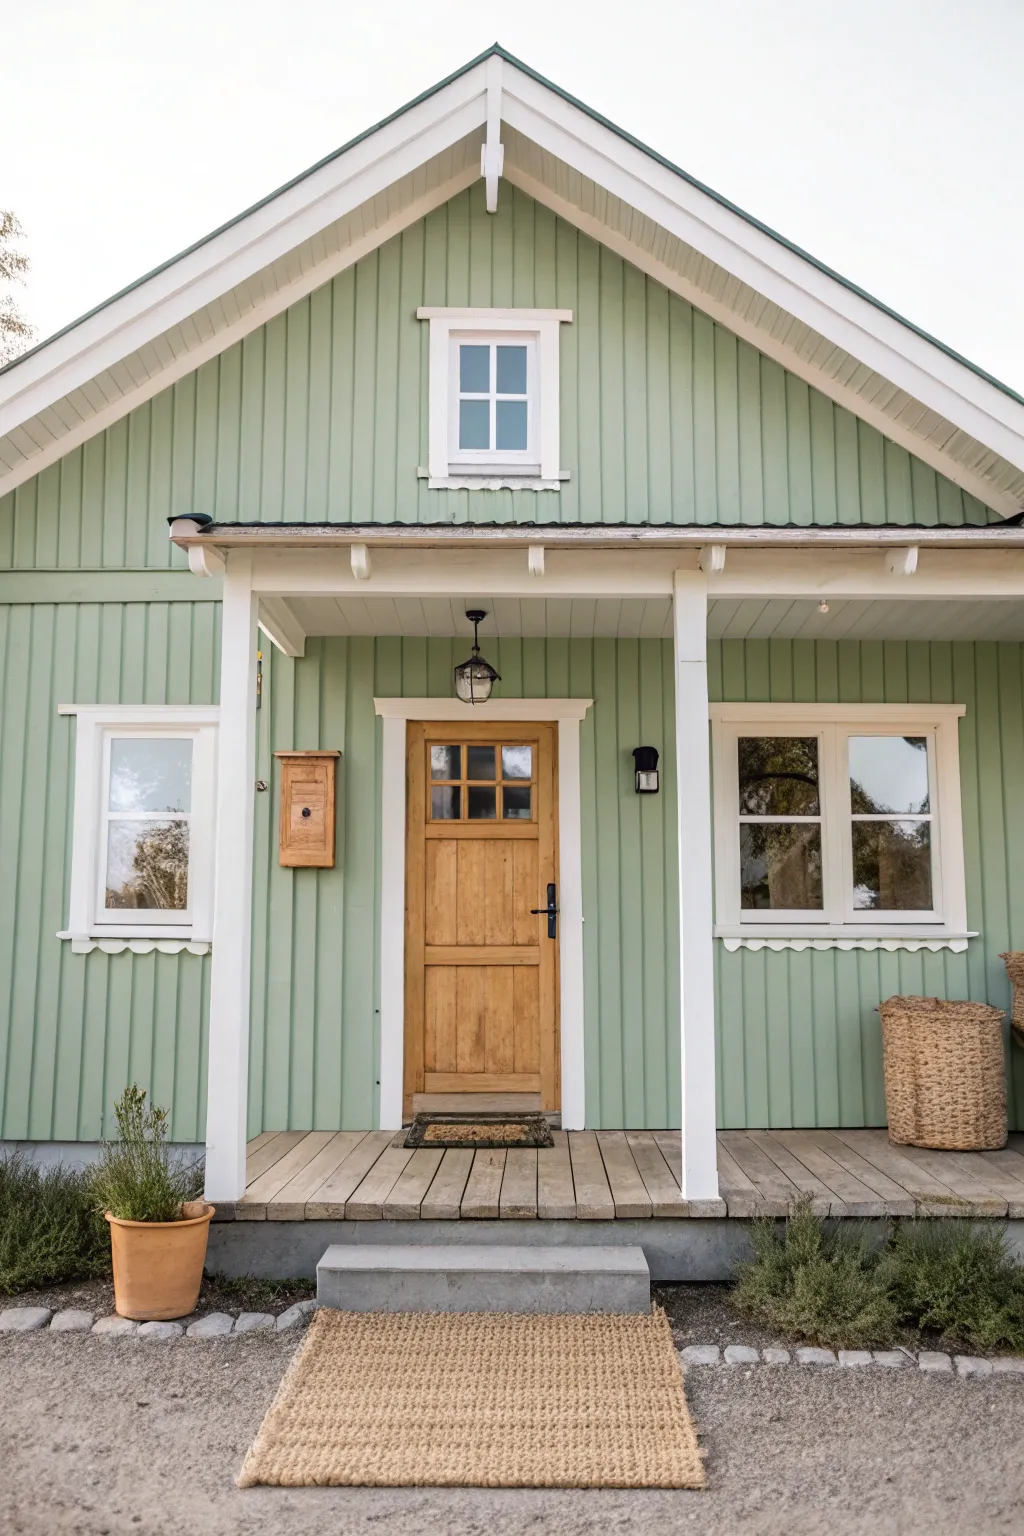
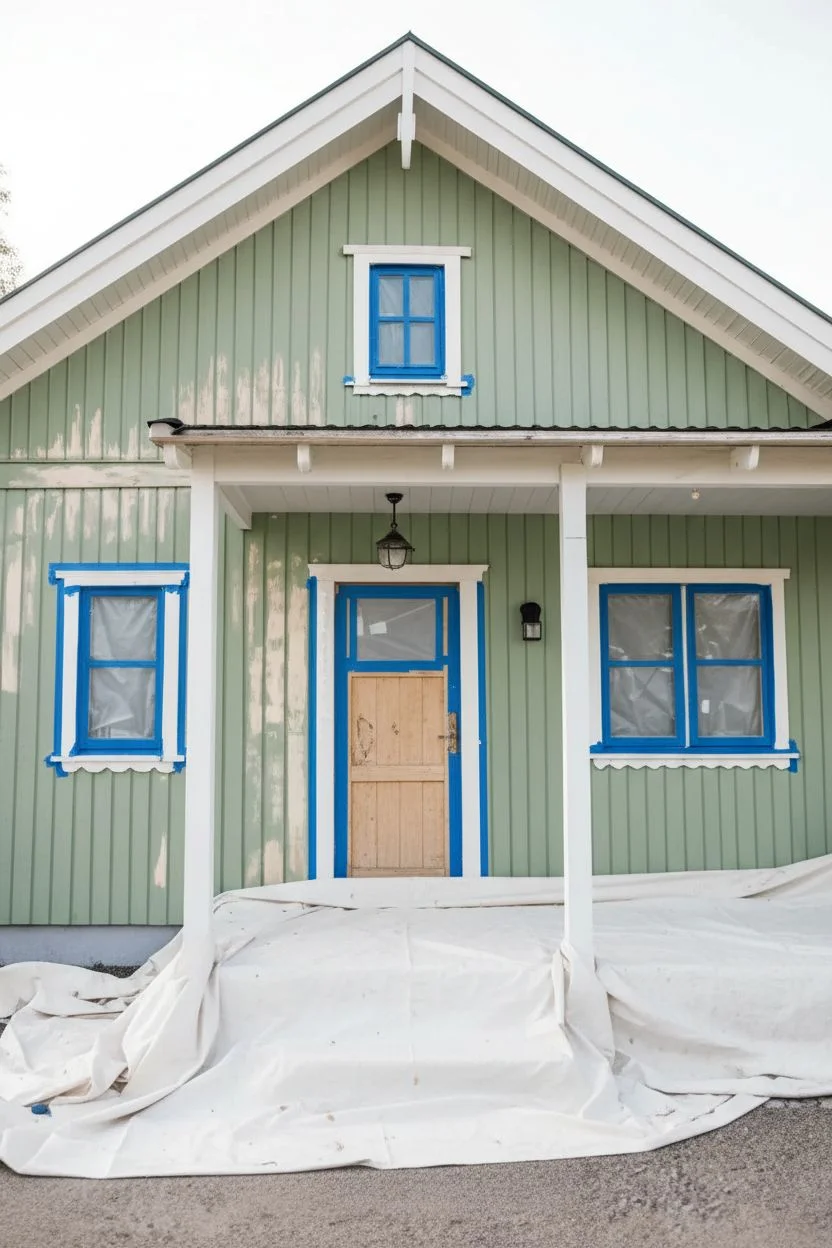
Transform your home’s exterior into this serene retreat using a calming sage green palette paired with crisp white trim and natural wood textures. This project combines careful color application with staining techniques to achieve a modern farmhouse aesthetic that feels both fresh and timeless.
Step-by-Step Guide
Materials
- High-quality exterior primer
- Exterior paint (Sage green, satin finish)
- Exterior paint (Pure white, semi-gloss finish)
- Exterior wood stain (Warm oak or Cedar tone)
- Painter’s tape (exterior grade)
- Pressure washer
- Wood filler and putty knife
- Paint rollers (medium nap for siding)
- Angled sash brushes (2.5 inch)
- Drop cloths
- Sandpaper (80, 120, and 220 grit)
- Scrapers
- Ladder or scaffolding
Step 1: Preparation
-
Inspect and Clean:
Begin by thoroughly pressure washing the entire exterior, including the porch decking and siding. Let it dry for at least 24 hours. While cleaning, inspect the wood for rot or loose boards. -
Scrape and Repair:
Use a scraper to remove any peeling or flaking paint. Fill holes or cracks in the siding with exterior wood filler, smoothing it out with a putty knife. -
Sand Surfaces:
Once the filler is dry, sand the repaired areas flush. Lightly sand the rest of the siding to create a ‘tooth’ for the new paint to adhere to. -
Masking Off:
Protect your windows, door hardware, and light fixtures. Apply painter’s tape carefully around window glass and cover the floor deck with drop cloths to catch drips.
Step 2: Painting the Siding & Trim
-
Prime Bare Wood:
Spot-prime any areas where you scraped down to bare wood or applied filler. If you are making a drastic color change, consider priming the entire house. -
Cut In the Siding:
Starting at the top of the house (the peak), use an angled sash brush to cut in the sage green paint along the edges where the siding meets the trim or roofline. -
Roll the Siding:
Use a roller to apply the sage green paint to the broad surfaces of the vertical siding. Work in small sections, maintaining a wet edge to avoid lap marks. -
Second Coat Application:
Allow the first coat to dry according to the manufacturer’s instructions (usually 4 hours). Apply a second coat of sage green for full, rich coverage. -
Paint the Trim:
Once the siding is dry, switch to the pure white semi-gloss paint. Carefully paint the window frames, fascia boards, and porch columns. Use a steady hand or fresh tape for crisp lines. -
Detailing the Gable:
Don’t forget the decorative trim at the peak of the roof. Paint these white to highlight the architectural shape against the green background.
Sticky Situation?
If paint peels when removing tape, score the edge first with a sharp utility knife. This breaks the paint seal and ensures a perfect, crisp line.
Step 3: Refinishing the Wood Elements
-
Strip the Door:
If your front door is painted, strip it down to the raw wood. If it’s already stained, sand it thoroughly with 120-grit followed by 220-grit paper to remove the old finish. -
Clean the Door:
Wipe the door down with a tack cloth or mineral spirits to remove all sanding dust. This ensures the stain absorbs evenly. -
Stain Application:
Apply your warm oak stain using a clean rag or brush. I find working in the direction of the grain gives the most natural look. Wipe off excess stain after a few minutes. -
Protect the Door:
After the stain dries completely, apply an exterior-grade spar urethane to seal the door against moisture and UV rays. -
Refresh the Deck:
If the porch floor looks weathered, give it a light sanding and apply a transparent or semi-transparent wood sealer that complements the door’s warm tones.
Go The Extra Mile
Install matching wooden flower boxes under the windows, stained in the same warm oak tone as the front door, to tie the whole look together beautifully.
Step 4: Finishing Touches
-
Reinstall Fixtures:
Remove all painter’s tape. Reinstall or replace your exterior light fixtures—lantern styles work beautifully here—and put the house numbers back up. -
Style the Porch:
Add a natural fiber doormat and a woven basket for texture. Place terracotta pots with greenery near the edges to bridge the gap between the house and the garden.
Step back and admire how this revitalized color scheme brings a welcoming calm to your home’s facade
BRUSH GUIDE
The Right Brush for Every Stroke
From clean lines to bold texture — master brush choice, stroke control, and essential techniques.
Explore the Full Guide
Dark Charcoal Exterior With Creamy Trim
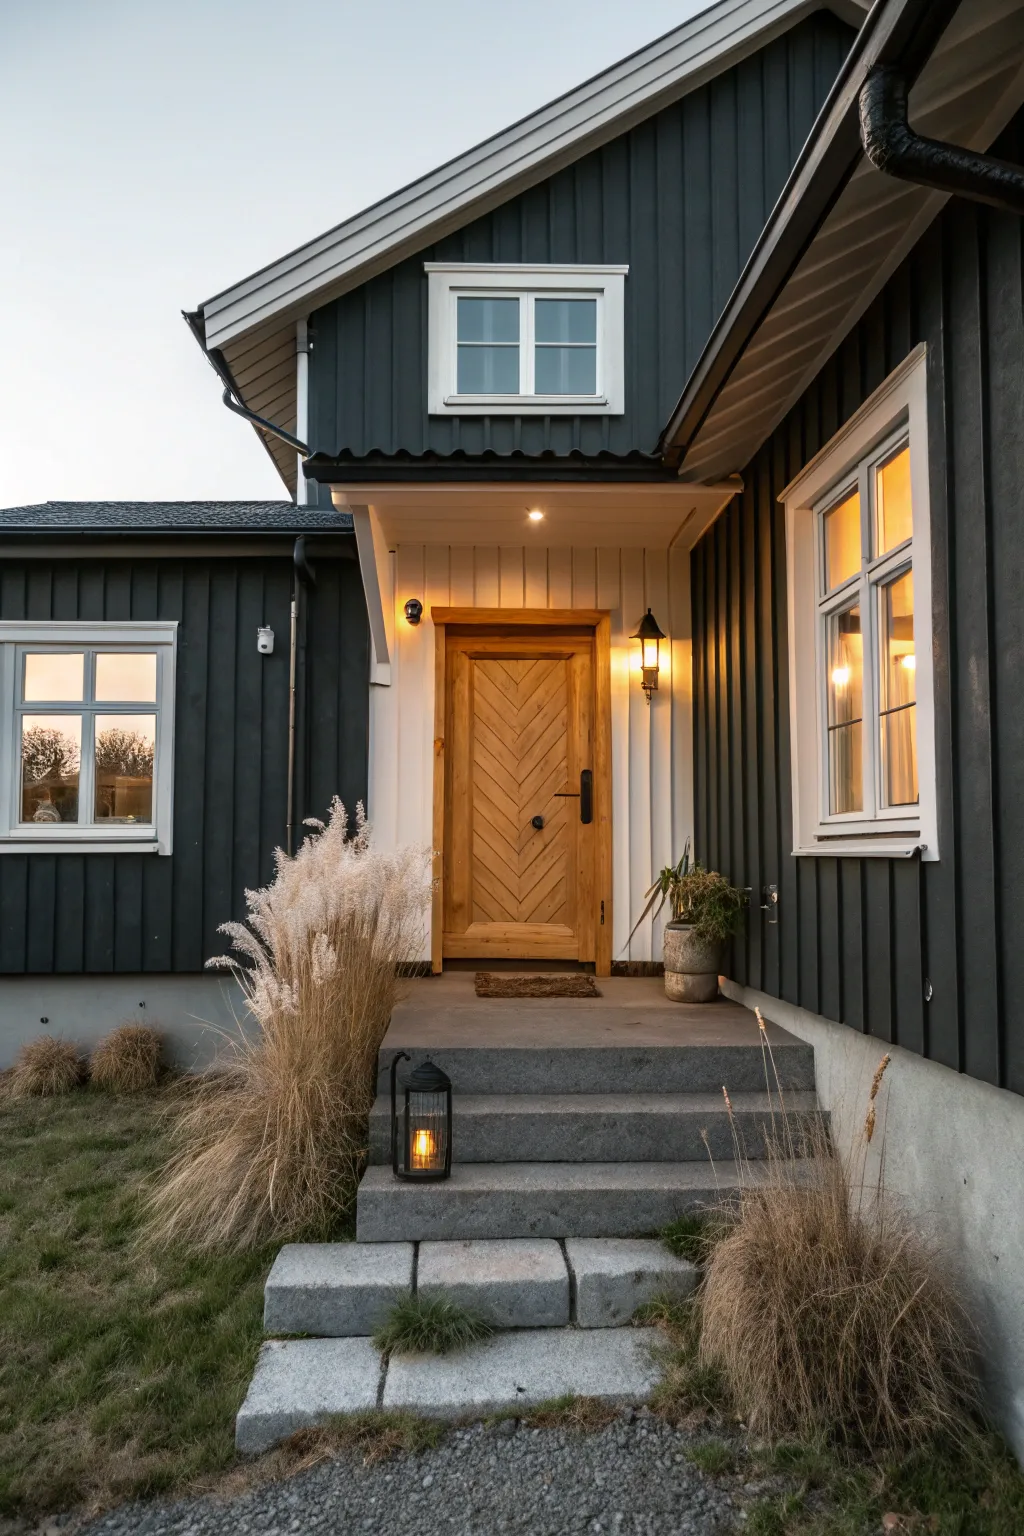
Transform your home’s exterior into a striking modern farmhouse statement piece with this high-contrast palette. By combining moody charcoal vertical siding with crisp creamy trim and natural wood accents, you’ll create an entryway that feels welcoming, sophisticated, and undeniably stylish.
Step-by-Step Guide
Materials
- High-quality exterior latex paint (Dark Charcoal/Soft Black)
- High-quality exterior latex paint (Creamy White)
- Exterior wood stain (Warm Honey or similar)
- Exterior spar urethane (Satin finish)
- Painter’s tape (multi-surface)
- Drop cloths and plastic sheeting
- Pressure washer
- Exterior caulk and caulking gun
- Sandpaper (80, 120, and 220 grit) and sanding block
- Paint sprayer (highly recommended for siding)
- Angled sash brushes (2-3 inch)
- Mini foam rollers and tray
- Ladder or scaffolding
- Wire brush or scraper
Step 1: Preparation & Cleaning
-
Deep Clean Surfaces:
Begin by thoroughly pressure washing the entire exterior, focusing on removing dirt, mold, and cobwebs from the siding grooves. Allow the wood to dry completely for at least 24-48 hours before proceeding. -
Repair and Prep Wood:
Inspect all siding boards forrot or damage. Scrape away any loose or peeling paint with a wire brush or scraper to ensure a smooth base. -
Caulk Gaps:
Apply exterior-grade caulk to cracks around window frames, door jambs, and where siding boards meet trim to seal out moisture and create seamless lines. -
Protect Surroundings:
Cover the stone steps, porch floor, lights, and landscaping with heavy-duty drop cloths. Use plastic sheeting and painter’s tape to mask off windows, the door hardware, and the roofline soffits.
Pro Tip: Crisp Lines
To get razor-sharp lines between the charcoal and white paint, press the tape down firmly with a putty knife, then paint a thin layer of the base color over the tape edge to seal it before switching colors.
Step 2: The Dark Exterior
-
Prime Bare Spots:
If you exposed any bare wood during scraping, spot-prime those areas with a high-adhesion exterior primer. -
Choosing the Charcoal:
Select a dark charcoal with slight blue or neutral undertones rather than brown. Test a swatch on the shady and sunny sides of the house first. -
Applying the Dark Coat:
Using a paint sprayer for best coverage, apply the charcoal paint to the main siding. I suggest starting from the top and working your way down to manage drips easily. -
Back-Brushing:
Immediately after spraying a section, use a wide brush to back-brush the paint into the wood grain and vertical grooves. This ensures deep penetration and a consistent finish. -
Second Coat:
Allow the first coat to dry according to the manufacturer’s instructions, then apply a second coat for true opacity and richness.
Troubleshooting: Flashing
If you see uneven shiny spots (flashing) in your dark paint, it likely dried too fast. Avoid painting in direct, hot sunlight; aim for an overcast day or chase the shade around the house.
Step 3: Creamy Accents & Entryway
-
Masking for Contrast:
Once the dark siding is fully cured, carefully tape off the edges where the dark siding meets the trim. -
Painting the Window Trim:
Use an angled sash brush to paint the window casings in a creamy white. Two coats are usually necessary to cover dark edges cleanly. -
Brightening the Alcove:
Paint the recessed entryway siding white. This reflects light and creates a warm ‘landing zone’ that contrasts beautifully with the dark exterior shell. -
Painting the Soffits:
Don’t forget the underside of the roof overhangs. Painting these white helps bounce light downward, illuminating the architectural details.
Step 4: The Statement Door
-
Sanding the Door:
If your door is previously finished, sand it down carefully. Start with 80 grit to remove old varnish, then move to 120 and 220 for a smooth, stain-ready surface. -
Applying Stain:
Apply the warm honey stain with a lint-free rag or foam brush. Work in the direction of the chevron pattern to avoid cross-grain streaks. -
Sealing the Wood:
Once dry, apply three coats of exterior spar urethane. Lightly sand with 220 grit between coats for a professional, furniture-grade finish. -
Finishing Touches:
Remove all tape and plastic. Clean window glass carefully with a razor blade if any paint seeped through. Reinstall light fixtures and style with lanterns or pampas grass.
Step back and admire how the bold contrast perfectly frames your warm, inviting entrance.
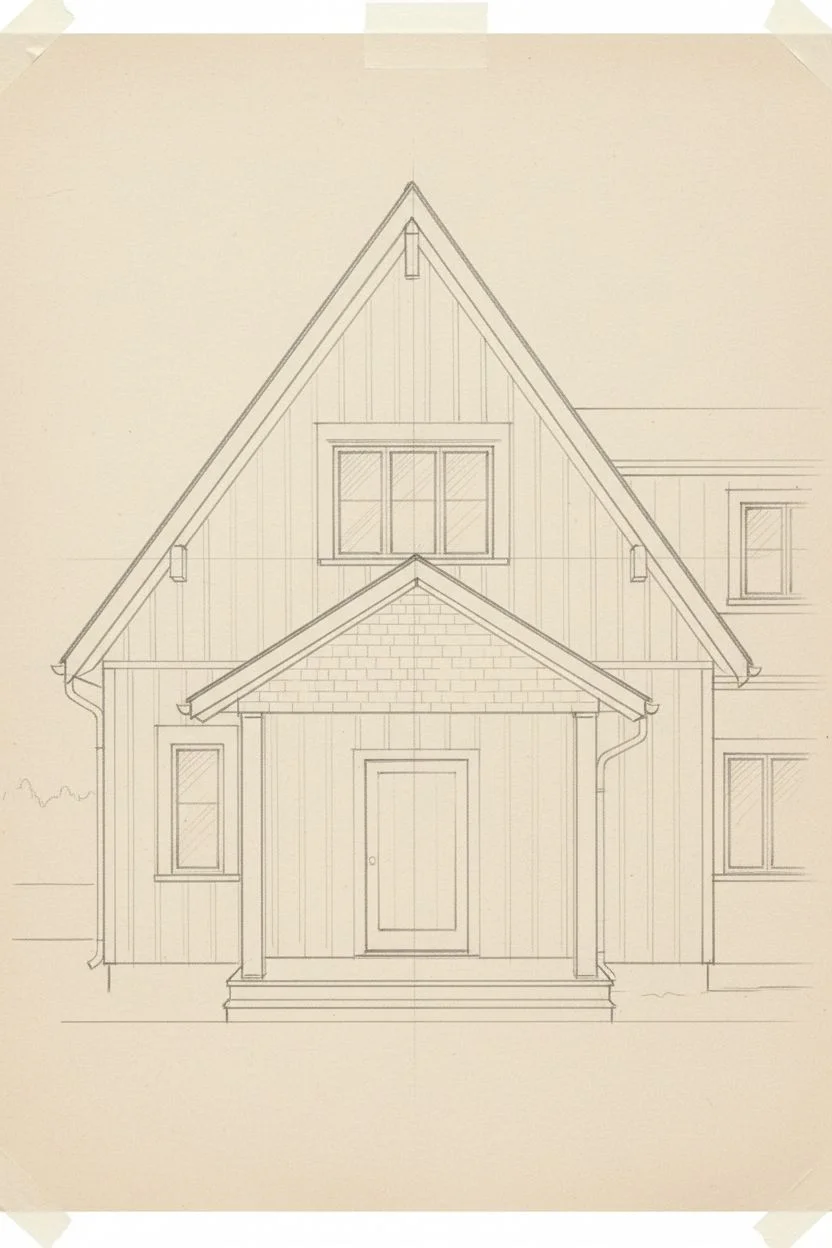
Two-Tone Siding With a Darker Bottom Band
Capture the clean lines and striking contrast of a modern farmhouse façade with this mixed-media architectural illustration. Using precise ink lines and warm wood tones, you’ll recreate the inviting symmetry of this home, perfect for a housewarming gift or portfolio piece.
Step-by-Step
Materials
- Heavyweight watercolor paper (hot press)
- Pencil (HB or 2H)
- Ruler and T-square
- Fine liner pens (0.1, 0.3, 0.5, 0.8mm, black waterproof)
- Watercolor paints (Payne’s Grey, Burnt Sienna, Yellow Ochre, Sap Green)
- Small round brushes (size 2 and 4)
- White gouache or gel pen
- Eraser (kneaded)
- Masking tape
Step 1: Drafting the Structure
-
Set the Horizon:
Tape your paper down to a flat surface. Use your ruler to draw a very faint horizon line about one-third up from the bottom of the page to ground your drawing. -
Outline the Main A-Frame:
Finding the center of your page, draw a vertical centerline. Measure equal distances out to the left and right for the house width, then draw the steep triangular roof peak, ensuring both sides are perfectly symmetrical. -
Position Windows and Door:
Lightly sketch the rectangular shapes for the upper two windows, lower two windows, and the central door frame. Use your centerline to ensure the spacing is even and balanced. -
Define the Siding:
Using a ruler, lightly draw horizontal lines across the entire façade to represent the siding boards. Keep them evenly spaced, about 3-4mm apart depending on your drawing scale. -
Add Landscaping Details:
Sketch the outline of the front walkway steps leading up to the door and rough in the shapes of the potted plants and side bushes.
Wobbly Lines?
If your hand shakes while inking long siding lines, don’t worry. Embrace the imperfection or use a ruler with a beveled edge upside down to prevent ink smearing.
Step 2: Inking the Lines
-
Main Outlines:
Switch to a 0.5mm pen to ink the main triangular roofline and the vertical corner limits of the house. Use a straightedge for a crisp, architectural look. -
Window and Door Frames:
Use a 0.3mm pen for the window frames and the black door surround. Be careful to leave the glass panes empty for now. -
Detailing the Siding:
With a steady hand and a 0.1mm pen, freehand ink the horizontal siding lines. I prefer to freehand these rather than use a ruler here; the slight wobble makes the texture look more like painted wood than a technical diagram. -
Thickening the Roof:
Go back over the roof edges with an 0.8mm pen to mimic the heavy fascia board and gutter line shown in the reference, giving the roof visual weight. -
Erase Pencil Marks:
Once the ink is completely dry (wait at least 15 minutes), gently erase all your pencil guidelines with a kneaded eraser.
Add Seasonal Flair
Customize your drawing by changing the potted plants to pumpkins for autumn or adding a holiday wreath to the door for a winter version.
Step 3: Adding Color and Texture
-
Wood Grain Wash:
Mix Burnt Sienna with a touch of Yellow Ochre and lots of water. Apply a flat wash to the vertical wooden planks surrounding the door. -
Deepening the Wood:
Once the first wash is dry, use a drier brush with slightly darker brown to add vertical streaks, simulating the wood grain texture on the door area. -
Painting the Trim:
Use a concentrated Payne’s Grey (almost black) to paint the front door frame, window sashes, and the roof trim. Keep the edges sharp. -
Window Reflection:
Dilute Payne’s Grey to a very watery consistency. Paint the window panes, leaving small irregular white shapes unpainted to represent reflections of the sky. -
Foundation and Steps:
Mix a light grey wash and apply it to the concrete foundation strip at the bottom and the walkway steps. Add a second layer to the vertical faces of the steps to show shadow and dimension. -
Greenery Accents:
Stipple Sap Green mixed with a little dark grey onto the potted plants and side bushes. Vary the pressure to create leafy textures.
Step 4: Final Touches
-
Shadows:
Mix a transparent cool grey. Paint a thin shadow line under the roof overhang and under each horizontal siding boad to give the wall depth. -
Highlights:
Use a white gel pen to add tiny highlights to the black light fixtures and door hardware to make them pop. -
Sky Wash:
Clean your brush thoroughly. Wet the sky area around the roof with clean water, then drop in a very faint blue, fading it out as you go higher.
Frame your architectural portrait with a sleek black mat to echo the modern trim

PENCIL GUIDE
Understanding Pencil Grades from H to B
From first sketch to finished drawing — learn pencil grades, line control, and shading techniques.
Explore the Full Guide
Garage Door Painted to Blend With the Siding
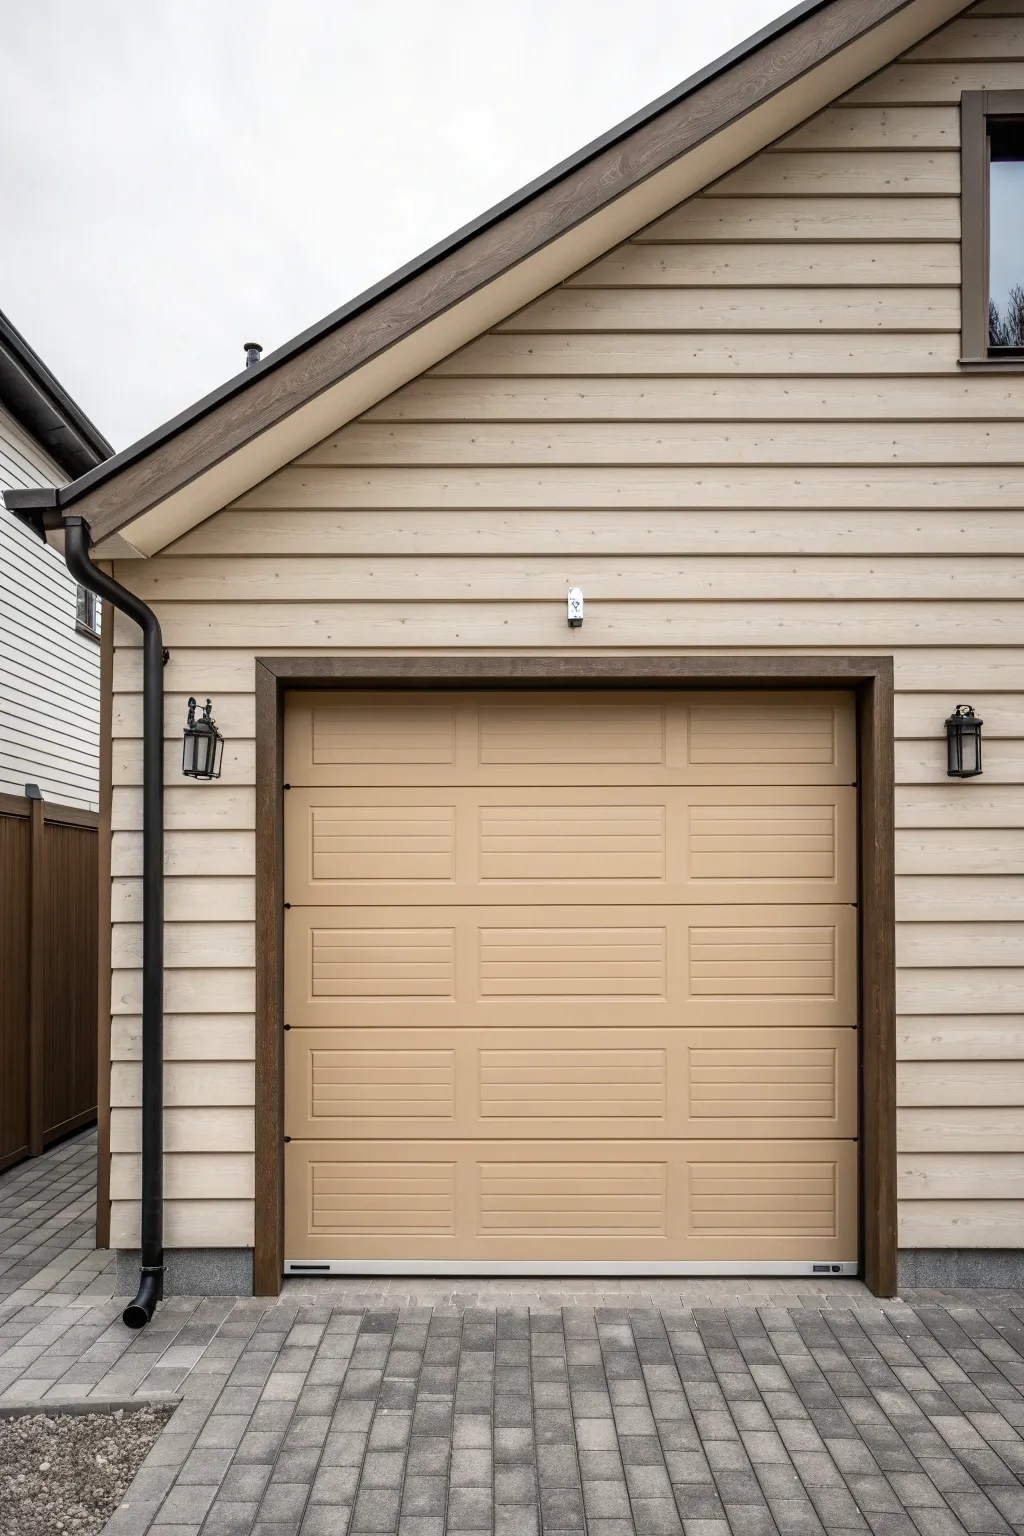
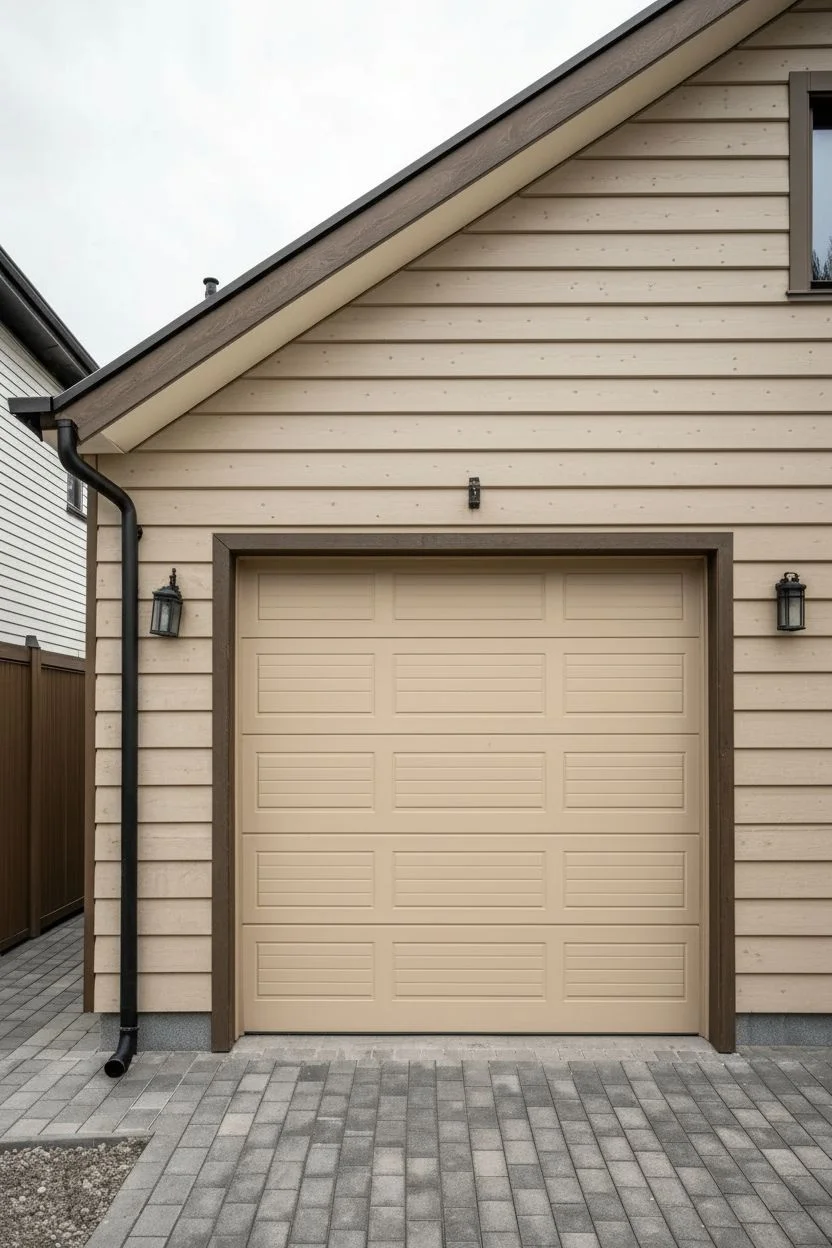
Transform your home’s exterior with this clever approach where the garage door is painted to create a seamless extension of your siding. This project uses a warm, neutral beige to unify the facade while contrasting dark trim adds refined architectural definition.
Step-by-Step
Materials
- Exterior acrylic latex paint (beige/tan color match)
- Exterior trim paint (dark espresso brown)
- Power washer or garden hose with high-pressure nozzle
- Degreaser or TSP substitute
- Sanding sponges (medium and fine grit)
- Clean rags and tack cloth
- Painter’s tape (exterior grade)
- Drop cloths or plastic sheeting
- High-quality 2-inch angled sash brush
- 4-inch mini roller with microfiber cover
- Extension pole (optional)
- Primer (if bare metal or severe peeling exists)
Step 1: Preparation & Cleaning
-
Assess the surface:
Begin by inspecting the current state of your garage door finishes. Check for any peeling paint, rust spots on metal doors, or rot on wooden ones that need addressing before painting. -
Wash thoroughly:
Use a power washer or a hose with a strong nozzle to remove loose dirt and cobwebs. Scrub stubborn grime with a degreaser or TSP substitute mixed with water. -
Rinse and dry:
Rinse the entire door and surrounding trim completely to ensuring no soapy residue remains. Allow the surfaces to dry fully, which usually takes a few hours on a sunny day. -
Scuff sand:
Using a medium-grit sanding sponge, lightly scuff the entire surface of the garage door and the trim. This isn’t about removing old paint, but creating microscopic grooves for the new coat to grip. -
Remove dust:
Wipe down the sanded areas with a damp rag or a tack cloth to capture all the fine dust particles that could ruin your smooth finish.
Weather Watch
Avoid painting in direct, hot sunlight. The paint will dry too fast, causing brush marks. An overcast day with temps around 70°F is ideal for smoothness.
Step 2: Masking & Trim Work
-
Protect the perimeter:
Lay down drop cloths underneath the door area to catch drips. Apply painter’s tape to the siding where it meets the trim to ensure a crisp line. -
Cut in the trim:
Open your dark espresso trim paint. Use the 2-inch angled brush to carefully paint the trim surrounding the garage opening. I prefer starting at the top header and working my way down the sides. -
Paint the weatherstripping:
If your weatherstripping is paintable, brush a coat of the dark trim color onto it now. If it’s flexible vinyl that can’t be painted, mask it off carefully before proceeding. -
Double check trim coverage:
Once the first coat on the trim is dry to the touch, inspect for thin spots. Apply a second coat if the wood grain or old color is showing through.
Hardware Upgrade
Install magnetic or screw-in decorative hardware like faux hinges and handles to give your freshly painted door a custom carriage-house look instantly.
Step 3: Painting the Door Panels
-
Isolate the mechanism:
If possible, disengage the electric opener so you can manually move the door up or down to reach different panels comfortably without the motor engaging unexpectedly. -
Paint the recessed grooves:
Dip your angled brush into the beige paint. Start painting the deep grooves and recessed borders of the panels first. Do this row by row or section by section. -
Roll the flat surfaces:
Switch to your 4-inch mini roller. While the paint in the grooves is still wet, roll the flat center of each panel and the stiles (vertical spaces) between them to smooth out brush marks. -
Feather the edges:
As you move from one section to another, maintain a wet edge. Lightly feather the roller over overlapping areas to prevent visible ridge lines when it dries. -
Check between the slats:
Lift the garage door slightly to expose the hidden edges between the horizontal panels. Paint these thin strips so no old color shows when the door begins to open. -
Apply second coat:
Allow the first coat to dry according to the manufacturer’s instructions (usually 2-4 hours). Apply a second coat using the same groove-then-flat technique for a rich, durable finish. -
Clean up:
Before the paint fully cures, carefully peel away the painter’s tape at a 45-degree angle to avoid pulling up any paint film. Reattach the opener mechanism once completely dry.
Enjoy the sleek, unified appearance your new garage finish brings to the entire front of your home
Softwash Look for a Gentle, Cloudy Finish
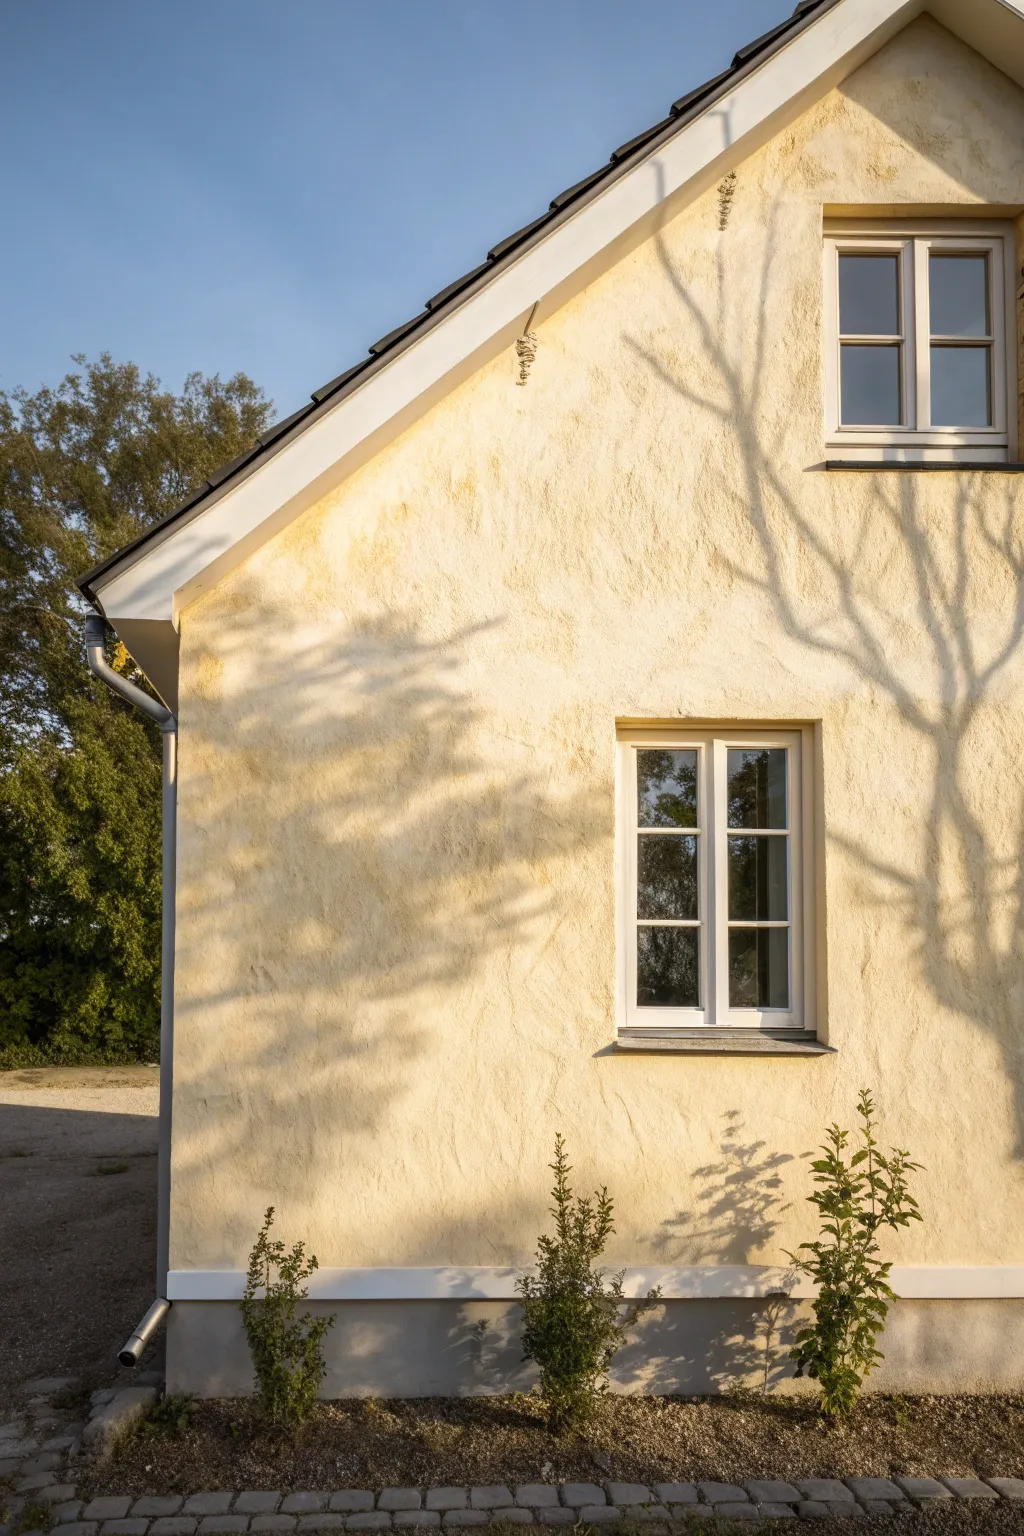
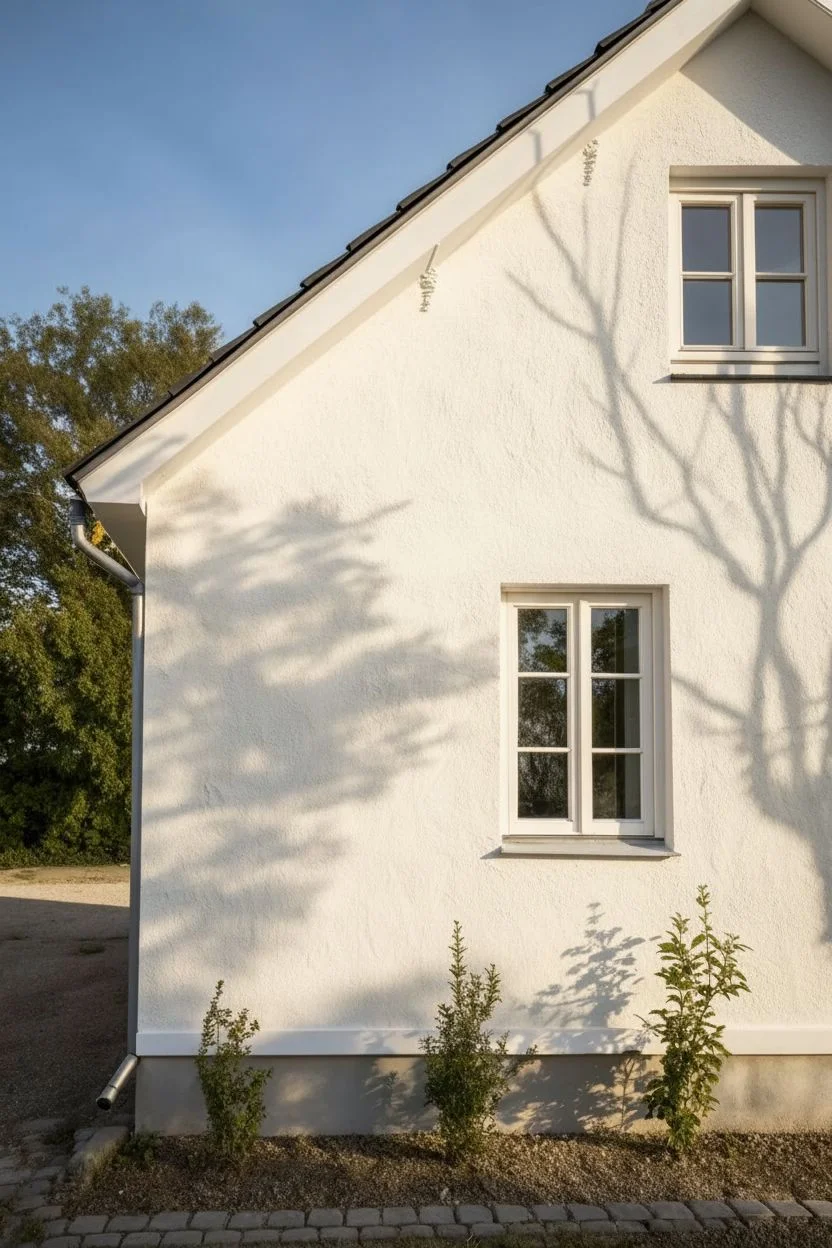
This technique transforms a plain stucco or masonry exterior into a warm, gently textured surface reminiscent of classic European cottages. By layering translucent washes over a solid base, you create a depth and luminosity that flat paint simply cannot achieve.
Step-by-Step
Materials
- High-quality mineral-based exterior masonry paint (cream/off-white base)
- Mineral glaze or dilution medium
- Tinting concentrate (yellow ochre or raw sienna)
- Wide masonry brush (flat, 4-6 inch)
- Large block brush or calcamine brush
- Clean buckets for mixing washes
- Painter’s tape and drop cloths
- Sponge or rag (for texture control)
- Garden hose or sprayer (optional for pre-wetting)
Step 1: Preparation and Base Coat
-
Assess the surface:
Ensure your existing stucco or masonry is clean, dry, and free of loose debris. If there is existing moss or algae, treat it first to prevent it from bleeding through your new finish. -
Masking up:
Carefully tape off window frames, gutters, and the foundation line. This technique can be splatter-prone due to the thinner consistency of the paint washes. -
Apply the primer:
Roll or brush on a high-adhesion masonry primer suitable for mineral paints. This ensures an even absorption rate for the subsequent layers. -
The base layer:
Apply your solid base color, typically an off-white or very pale cream mineral paint. Use a roller for efficiency, but back-brush immediately to work it into the nooks and crannies of the stucco texture. -
Let it cure:
Allow this base coat to dry completely, ideally overnight. A completely dry surface is crucial so the subsequent semi-transparent layers don’t re-activate or muddy the base.
Fixing Spotty Areas
If you create a dark spot where pigment pooled too heavily, don’t panic. Gently scrub the area with a wet sponge while it’s damp, or lightly dry-brush some base coat over it once dry to blend it back.
Step 2: Mixing and Applying the Softwash
-
Create the wash solution:
In a clean bucket, mix your mineral glaze medium with a small amount of the tinting concentrate (yellow ochre). You want a ratio of roughly 1 part paint/pigment to 3-4 parts glaze/water. It should look like colored milk. -
Test the transparency:
Find an inconspicuous area or a piece of spare board to test your mixture. Depending on the absorbency of your wall, I often adjust the water content here to ensure it flows easily without dripping uncontrollably. -
Begin the wash application:
Using a large block brush, apply the wash in random, crisscross strokes (an ‘X’ pattern). Work in roughly 3-foot square sections to maintain a wet edge. -
Clouding the texture:
While the wash is still wet, use a clean, slightly damp sponge or a dry brush to soften the edges of your brushstrokes. Gently dab areas where pigment has pooled too heavily in the texture. -
Building subtle variation:
Intentionally leave some areas slightly lighter than others. The goal is a cloudy, natural variance rather than a uniform color field. -
Checking for distinct lines:
Step back frequently to ensure you aren’t creating visible vertical or horizontal lines between your working sections. Feather the edges out thinly so the next section blends seamlessly.
Sun-Kissed corners
Add a tiny drop of raw umber to your final wash mix and apply it extremely sparingly only near rooflines or corners. This subtle shadowing mimics decades of natural aging.
Step 3: Refining and Sealing
-
Optional second layer:
Once the first wash is dry to the touch, assess the depth. If you want more warmth, apply a second, slightly more diluted wash, perhaps focusing on the upper portions or corners for a weathered look. -
Handling the trim:
Remove the tape from around the windows while the final layer is still slightly tacky to prevent peeling. Clean up any drips on the window sills immediately with a damp detailing cloth. -
Finishing the plinth:
If your house has a foundation plinth (the grey strip at the bottom), paint this last with a solid, durable grey masonry paint to ground the lighter, textured wall above. -
Addressing the ground:
Re-gravel or clean the landscape border. The sharp contrast between fresh landscaping and the soft, organic wall texture really sells the final look.
Enjoy the way the shifting sunlight plays across the subtle, cloudy texture of your newly refreshed exterior


Gable and Eave Accents to Highlight Architecture
Capture the crisp lines and warm textures of this modern farmhouse facade using watercolor and ink. This project focuses on balancing architectural precision with organic details like wood grain and landscaping for a professional architectural rendering feel.
Step-by-Step
Materials
- Hot press watercolor paper (140lb/300gsm)
- Pencil (HB or 2H)
- Ruler and T-square
- Waterproof fine liner pens (0.05mm, 0.1mm, 0.3mm)
- Watercolor paints (Payne’s Grey, Burnt Sienna, Yellow Ochre, Sap Green, Sepia)
- White gouache
- Round brushes (sizes 2, 4, 8)
- Masking tape
Step 1: Planning and Sketching
-
Establish the horizon:
Tape your paper down securely. Draw a light horizon line near the bottom third of the page to ground your structure. -
Map the main gable:
Using your ruler, draw a large isosceles triangle centrally to represent the main roofline. Ensure the peak is centered. -
Draft the porch gable:
Below the main triangle, draw a smaller, nested triangle for the porch roof. This should be wider and flatter than the main peak. -
Outline the siding:
Lightly sketch vertical lines for the board-and-batten siding. Keep uniform spacing, stopping where the porch roof begins. -
Add windows and door:
Draw the rectangular frame for the front door centered under the porch gable. Sketch the upper window directly above the porch peak, ensuring symmetry.
Straight Edge Secret
Flip your ruler over so the beveled edge faces down when inking. This lifts the metal off the paper slightly preventing ink bleed underneath.
Step 2: Inking the Structure
-
Define the rooflines:
Use a 0.3mm pen to ink the strong outer lines of the main roof and porch roof. Use a ruler for crisp, confident lines. -
Ink the windows:
Switch to a 0.1mm pen for the window muntins (grids). Be careful not to smudge; I usually work from left to right to keep my hand clear. -
Detail the siding:
Use the 0.05mm pen for the vertical siding lines. Keep these very thin to suggest texture without overpowering the main form. -
Add decorative elements:
Ink the lantern sconces and the exposed wooden corbels under the eaves. Sketch the potted plants loosely with broken lines. -
Erase pencil marks:
Wait until the ink is completely dry, then gently erase all graphite guidelines.
Perspective Check
If the house looks flat, your shadows are too light. Deepen the cool grey cast shadows right under the eaves to pop the roof forward.
Step 3: Watercolor Application
-
Paint the wood elements:
Mix Burnt Sienna with a touch of Yellow Ochre. Paint the front door, the porch gable shake area, and the corbels. Keep the wash slightly uneven to mimic wood grain. -
Add wood texture:
While the wood wash is still damp, drop in tiny amounts of Sepia at the edges for shadow and depth. -
Color the windows:
Dilute Payne’s Grey to a translucent wash. Fill the window panes, leaving small white rectangles for reflections. -
Shadow the white house:
Mix a very watery grey using Payne’s Grey and plenty of water. Paint shadows under the eaves and roof overhangs to detach the white siding from the background. -
Paint the pots:
Use pure Payne’s Grey or Black for the tall planters flanking the door.
Step 4: Finishing Touches
-
Landscape greenery:
Mix Sap Green with a little Sepia. Paint the grass area loosely at the bottom, using upward flicks for blades. -
Dry brush the plants:
Use a taller, drier brush with a mix of Ochre and Brown to create the wispy texture of the ornamental grasses in the pots. -
Define the walkway:
Use a very faint grey wash to suggest pavers leading to the steps. Don’t fill it in completely; let the white paper show through. -
Highlight with gouache:
Use opaque white gouache to add crisp highlights to the black planters and the lantern glass. -
Final shadows:
Enhance the deepest shadows under the porch roof and door frame with a more concentrated mix of Payne’s Grey and Sepia.
Now you have a stunning architectural portrait that celebrates clean lines and rustic warmth
Modern Color Blocking on a Flat-Front Facade
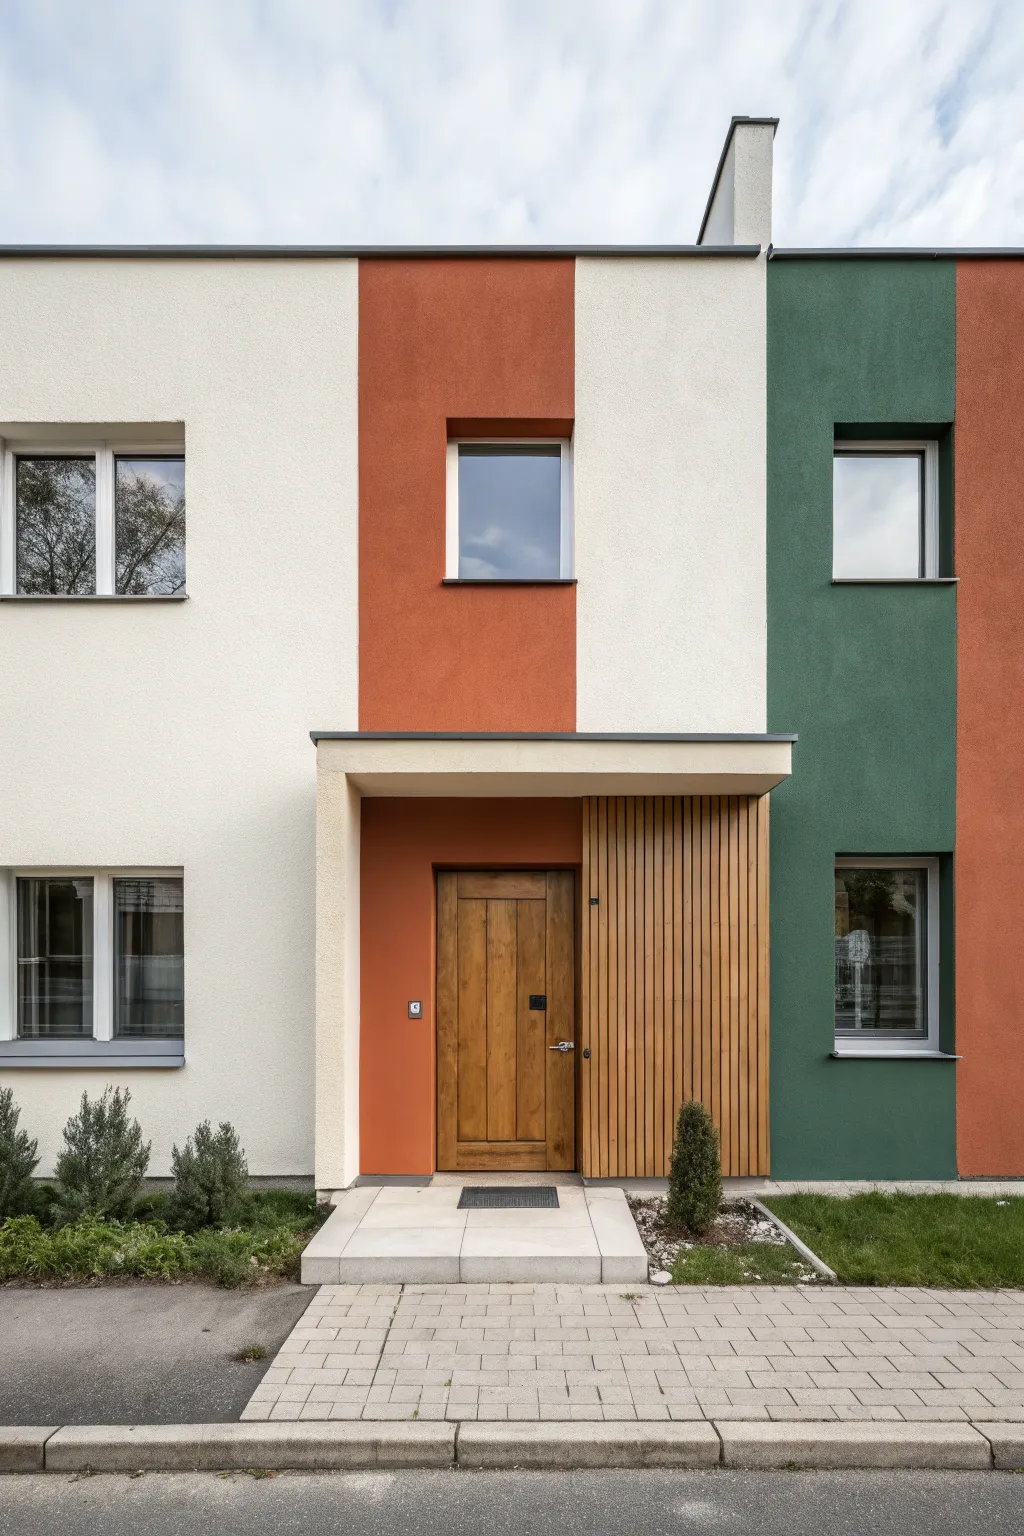
This tutorial guides you through creating a miniature architectural painting that captures the clean lines and bold color blocking of a modern home exterior on canvas. You will learn to mask precise geometric shapes and mix custom acrylic shades to replicate the striking terracotta, cream, and forest green palette shown in the reference.
Step-by-Step Tutorial
Materials
- Square canvas (10×10 or 12×12 inches)
- Acrylic paints (Titanium White, Burnt Sienna, Yellow Ochre, Phthalo Green, Burnt Umber, Mars Black)
- Painters tape (low tack, varying widths)
- Ruler and pencil
- Flat shader brushes (sizes 4, 8, and 12)
- Small round detail brush (size 0 or 1)
- Palette knife for mixing
- Matte varnish (optional)
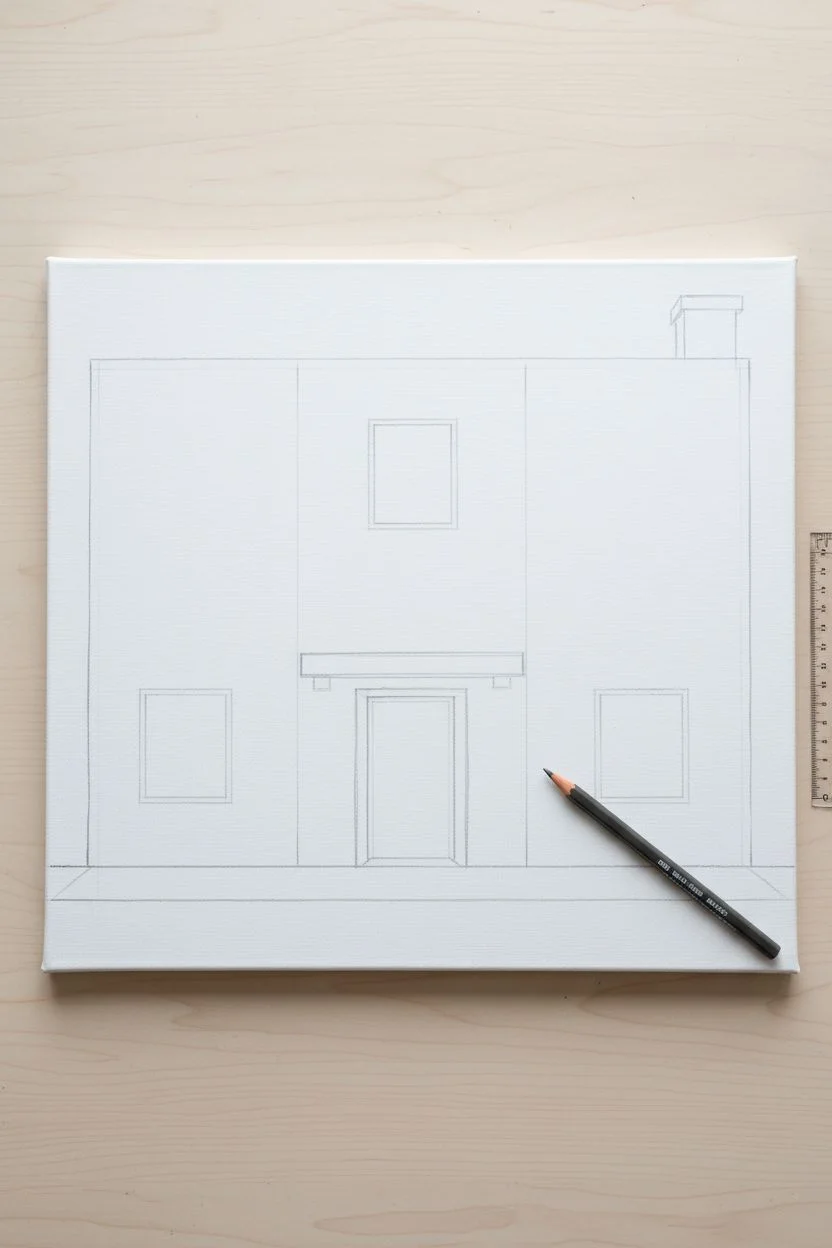
Step 1: Planning and Sketching
-
Prime the Surface:
Ensure your canvas is clean and primed. If the canvas texture is too rough, apply a coat of gesso and sand it lightly once dry to create a smoother surface for straight architectural lines. -
Set the Horizon:
Using your ruler and pencil, lightly draw a horizontal line near the bottom of the canvas to represent the curb and sidewalk level. This grounds your composition. -
Draft the Vertical Blocks:
Divide the main facade area vertically. Draw light vertical lines to designate the cream section on the left, the terracotta central strip, and the green section on the right. Keep these lines perfectly perpendicular to your curb line. -
Outline Architectural Elements:
Sketch the rectangular windows within their respective color zones. Mark out the entrance overhang, the recessed door area, and the chimney structure at the top right.
Tape Bleeding?
If paint bleeds under tape, seal the tape edge first with a clear matte medium or the base color underneath. This creates a barrier, ensuring the next color layer stays perfectly crisp.
Step 2: Color Blocking the Facade
-
Mix the Cream Tone:
On your palette, mix a large amount of Titanium White with a tiny touch of Yellow Ochre and a speck of Burnt Umber. You want a warm, off-white plaster color. -
Paint the Left Section:
Apply the cream mixture to the left wall section and the central white strip above the door overhang. Use a large flat brush for smooth, even coverage. Let this dry completely. -
Tape for Color Separation:
Once the cream paint is fully cured, apply masking tape over the edge of the cream section where it meets the future terracotta strip. This ensures a razor-sharp line. -
Mix and Apply Terracotta:
Combine Burnt Sienna with a little Yellow Ochre and a touch of Red if needed. Paint the central vertical stripe and the recessed wall next to the door. I find applying two thin coats gives a more solid, stucco-like finish than one thick coat. -
Mix and Apply Forest Green:
Mix Phthalo Green with a bit of Mars Black and a touch of Burnt Umber to desaturate it. Paint the right-hand vertical section. Remove the tape carefully while the paint is still slightly tacky to avoid peeling.
Step 3: Adding Details and Windows
-
Paint the Windows:
Darken your original cream mix with grey or blue to create a reflection color for the glass. Paint the rectangles of the windows. While wet, blend in subtle white streaks to suggest cloud reflections. -
Frame the Openings:
Using a small flat brush and a dark grey mix, paint the thin frames around the windows and the door casing. Steady hands are key here, or re-mask if necessary. -
Create the Wooden Door:
Mix Yellow Ochre and Burnt Sienna for a warm wood tone. Paint the door rectangle. Once dry, use a detail brush with diluted Burnt Umber to draw vertical plank lines and subtle wood grain texture. -
Detail the Slat Wall:
For the wooden slats next to the door, paint the background dark brown first. Once dry, paint thin, vertical strips of your lighter wood color over it, leaving gaps to create depth. -
Paint the Walkway:
Mix a light cool grey for the paved walkway and applying it to the bottom section. Use a pencil or very thinned dark paint to grid out the paving stones.
Texture It Up
To mimic real stucco, mix a pinch of fine sand or modeling paste into your acrylics for the main wall sections. This adds tactile realism to the flat facade.
Step 4: Finishing Touches
-
Add Greenery:
Stipple dark green paint at the bottom edge of the building to create the small bushes. Layer lighter greens on top for highlights on the leaves. -
Shadows and Highlights:
Add a thin line of dark grey under the roof overhang and inside the window recesses to create three-dimensional depth. -
Final Cleanup:
touch up any bleeding edges with the appropriate background color. Once everything is fully dry, apply a matte varnish to unify the sheen and protect the painting.
Hang your modernist architectural piece in a simple floating frame to complete the contemporary look
Playful Pastel House With Multicolor Trim Details
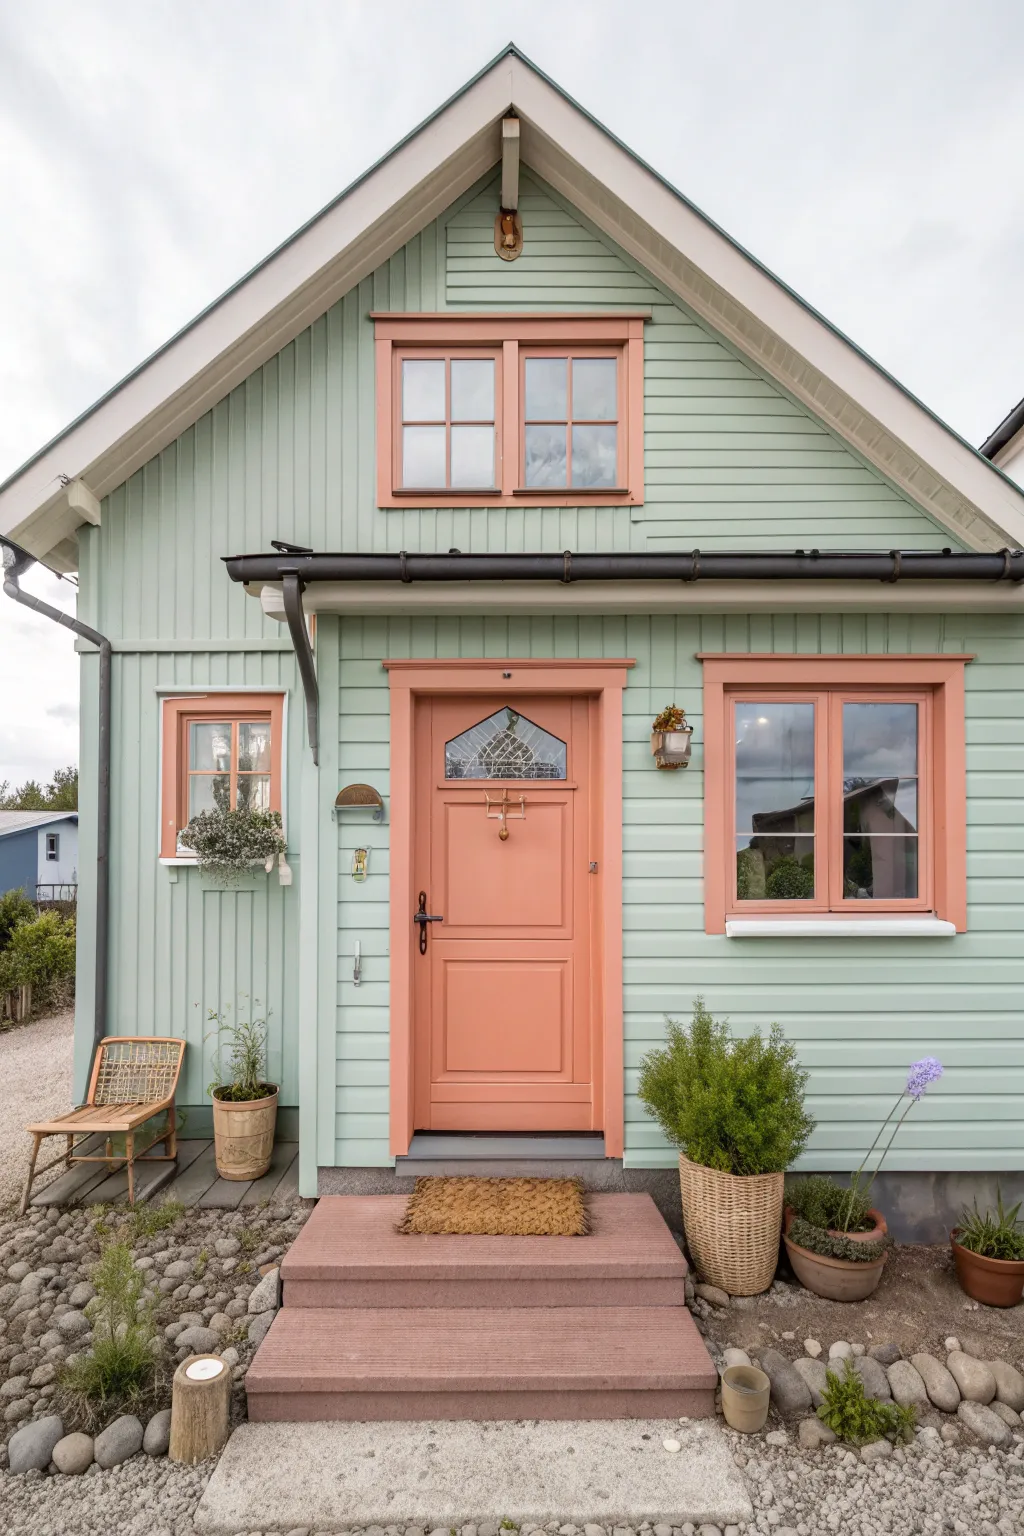
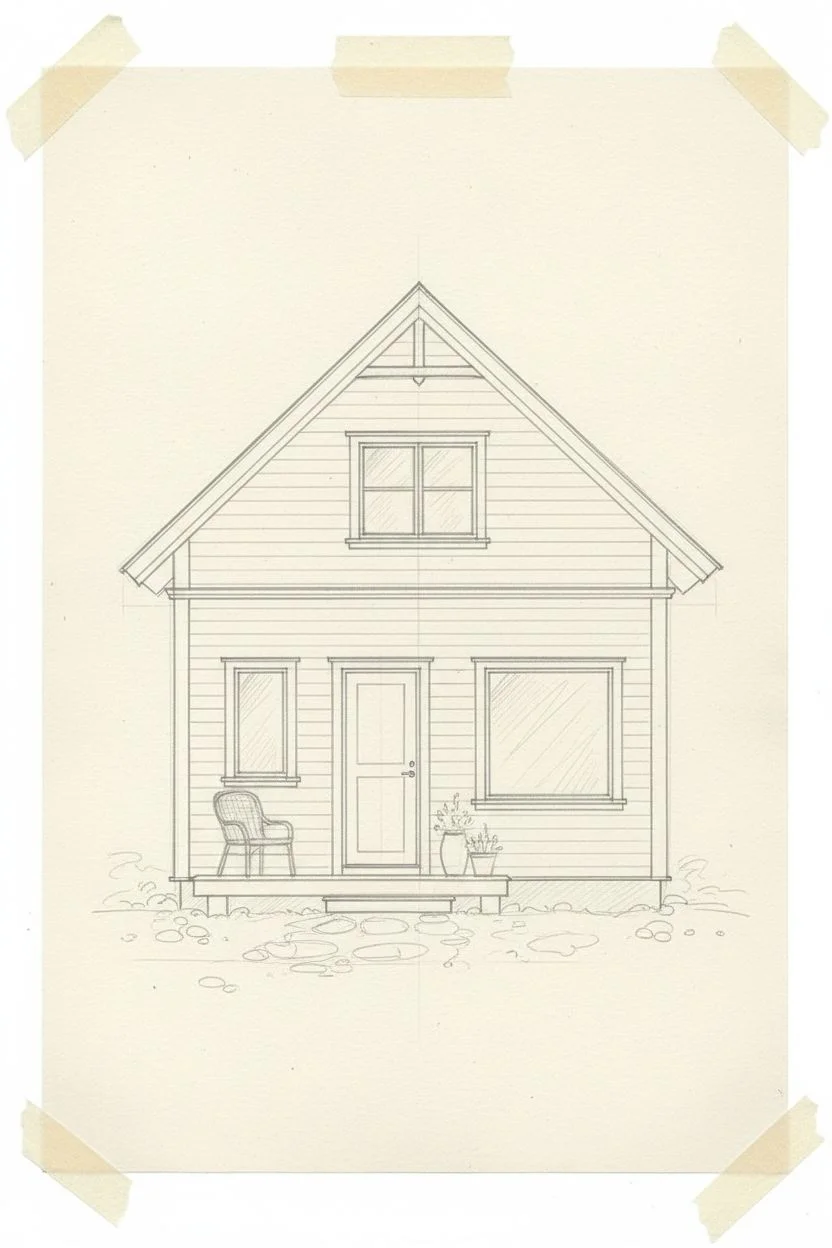
Capture the whimsical charm of Scandinavian architecture with this detailed architectural painting. Using a soothing palette of mint green and warm coral, you’ll learn to render precise siding textures and inviting window details for a cozy finished piece.
Detailed Instructions
Materials
- Heavyweight watercolor paper (300gsm, cold press)
- Pencil (HB) and eraser
- Ruler or T-square
- Waterproof fine liner pens (0.1mm, 0.3mm, 0.5mm, black)
- Watercolor paints (Mint/Seafoam Green, Coral/Peach, Burnt Sienna, Payne’s Grey, White Gouache)
- Round brushes (sizes 2, 4, and 6)
- Fine detail brush (size 0 or 00)
- Masking tape
Step 1: Drafting the Structure
-
Establish the Foundation:
Tape down your paper to prevent buckling. Using a ruler and pencil, lightly draw a large triangle for the roof pitch, centering the peak near the top of the page. Draw vertical lines down from the eaves to form the main body of the house. -
Place Architectural Features:
Sketch a central rectangle for the door, ensuring it sits on a slightly raised platform for the stairs. Add rectangles for the windows: one large one to the right, a smaller one to the left, and a double window centered in the gable (the triangle part) above. -
Detail the Trim:
Thicken your window and door outlines to create frames. Draw the horizontal fascia boards along the roofline and add the decorative corbel detail at the very peak of the gable. -
Sketch the Siding:
With a ruler, draw light horizontal lines across the entire house facade to represent the clapboard siding. Keep the spacing consistent, leaving gaps where the windows and door are located. -
Add Elements of Life:
Lightly sketch the potted plants on the porch, the woven chair on the left, and the stone texture for the ground in the foreground.
Step 2: Inking the Lines
-
Outline the Structure:
Use a 0.5mm pen to trace the main structural lines—the roof edges, the foundation line, and the main corners of the house. Don’t worry if the lines aren’t perfectly mechanical; a slight wobble adds character. -
Define the Siding:
Switch to a 0.1mm pen for the siding. Instead of drawing one continuous line, lift your pen occasionally or vary the pressure to create a natural, weathered look for the wood planks. -
Ink the Details:
Use a 0.3mm pen for the window frames, door panels, and rain gutter. For the plants, use short, scribbly strokes to suggest texture without drawing every individual leaf. Erase all pencil marks once the ink is completely dry.
Straight Lines Secret
Don’t press hard against the ruler when inking. Let the pen glide lightly. Pressing too hard can cause ink bleed under the ruler’s edge.
Step 3: Watercolor Application
-
Apply the Base Siding Color:
Mix a diluted wash of Mint Green. Using a size 6 brush, paint the siding area. I like to work wet-on-dry here so I can control the edges around the trim. -
Paint the Trim:
Mix a warm Coral or Peach tone. carefully paint the window frames and the door frame. Let this dry, then paint the actual door with a slightly more saturated version of the same color to make it pop. -
Add Shadow and Depth:
Once the mint layer is dry, mix a tiny bit of Payne’s Grey into your green. Paint thin lines directly under each clapboard overlap to create a drop shadow effect, giving the wall dimension. -
Render the Roof and Gutter:
Use a mix of White Gouache and a touch of brown for the roof fascia to keep it bright but natural. Paint the rain gutter a dark charcoal using Payne’s Grey.
Level Up: Seasonal Twist
Change the accessories! Add pumpkins on the steps for autumn, or paint a dusting of white gouache on the roof and window sills for a winter vibe.
Step 4: Finishing Touches
-
Paint the Accessories:
Use Burnt Sienna mixed with yellow for the woven chair and the plant pots. Paint the greenery with a mix of sap green and olive tones, stippling the color for texture. -
Create the Glass Effect:
dilute Payne’s Grey heavily with water. Paint the window panes, leaving small diagonal strips unpainted (white paper) to represent reflections on the glass. -
Steps and Ground:
Paint the stairs with a dusty reddish-brown wash. For the stone ground, dap spots of grey and brown, leaving plenty of white space between them to suggest gravel. -
Final Highlights:
Use a white gel pen or opaque white gouache to add tiny highlights on the door handle, the edges of the pots, and the top of the gutter pipe to simulate sunlight hitting the surfaces.
Step back and admire your charming architectural portrait, ready to be framed or scanned for a greeting card design


Have a question or want to share your own experience? I'd love to hear from you in the comments below!