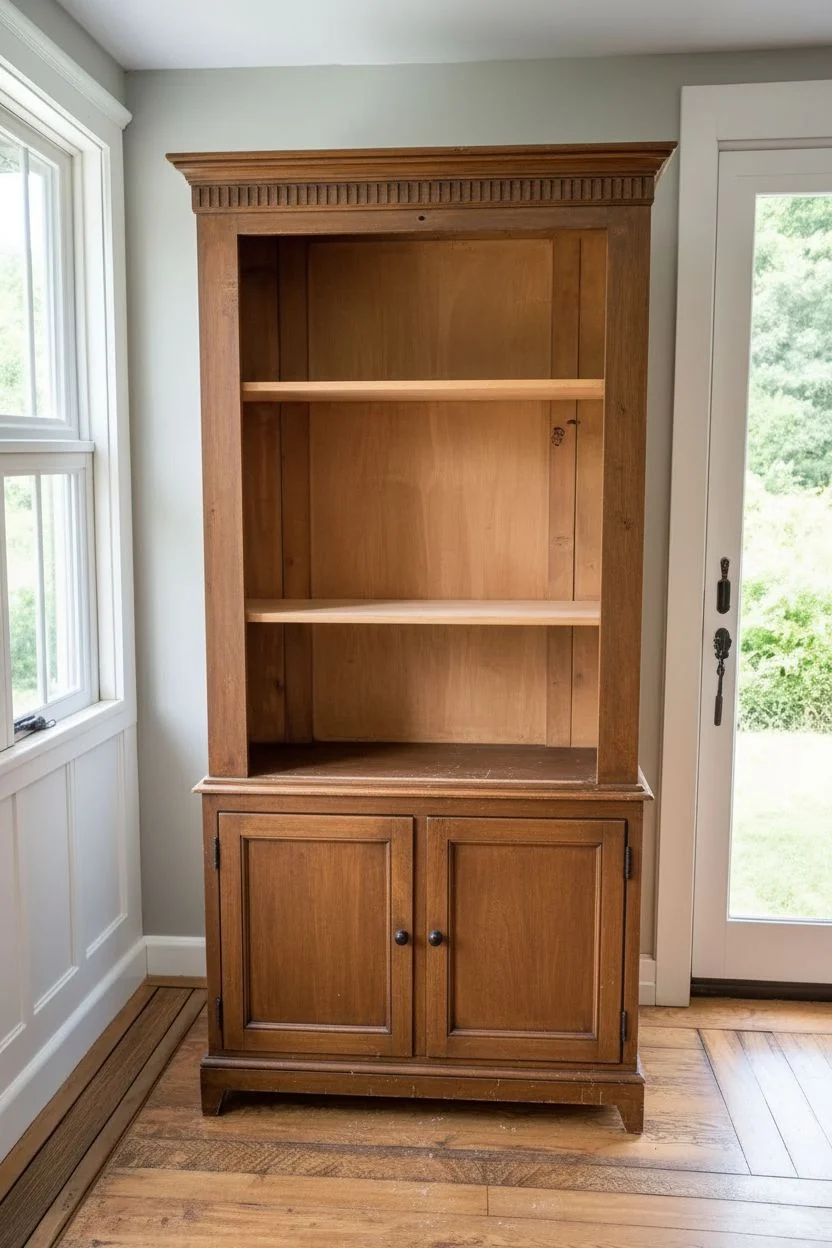
A painted hutch is one of my favorite “big impact” projects because the transformation is instantly obvious and totally mood-shifting. Whether your hutch is vintage, builder-basic, or thrifted and a little sad, paint can turn it into a piece you actually want to style and show off.
Classic Crisp White Hutch Refresh
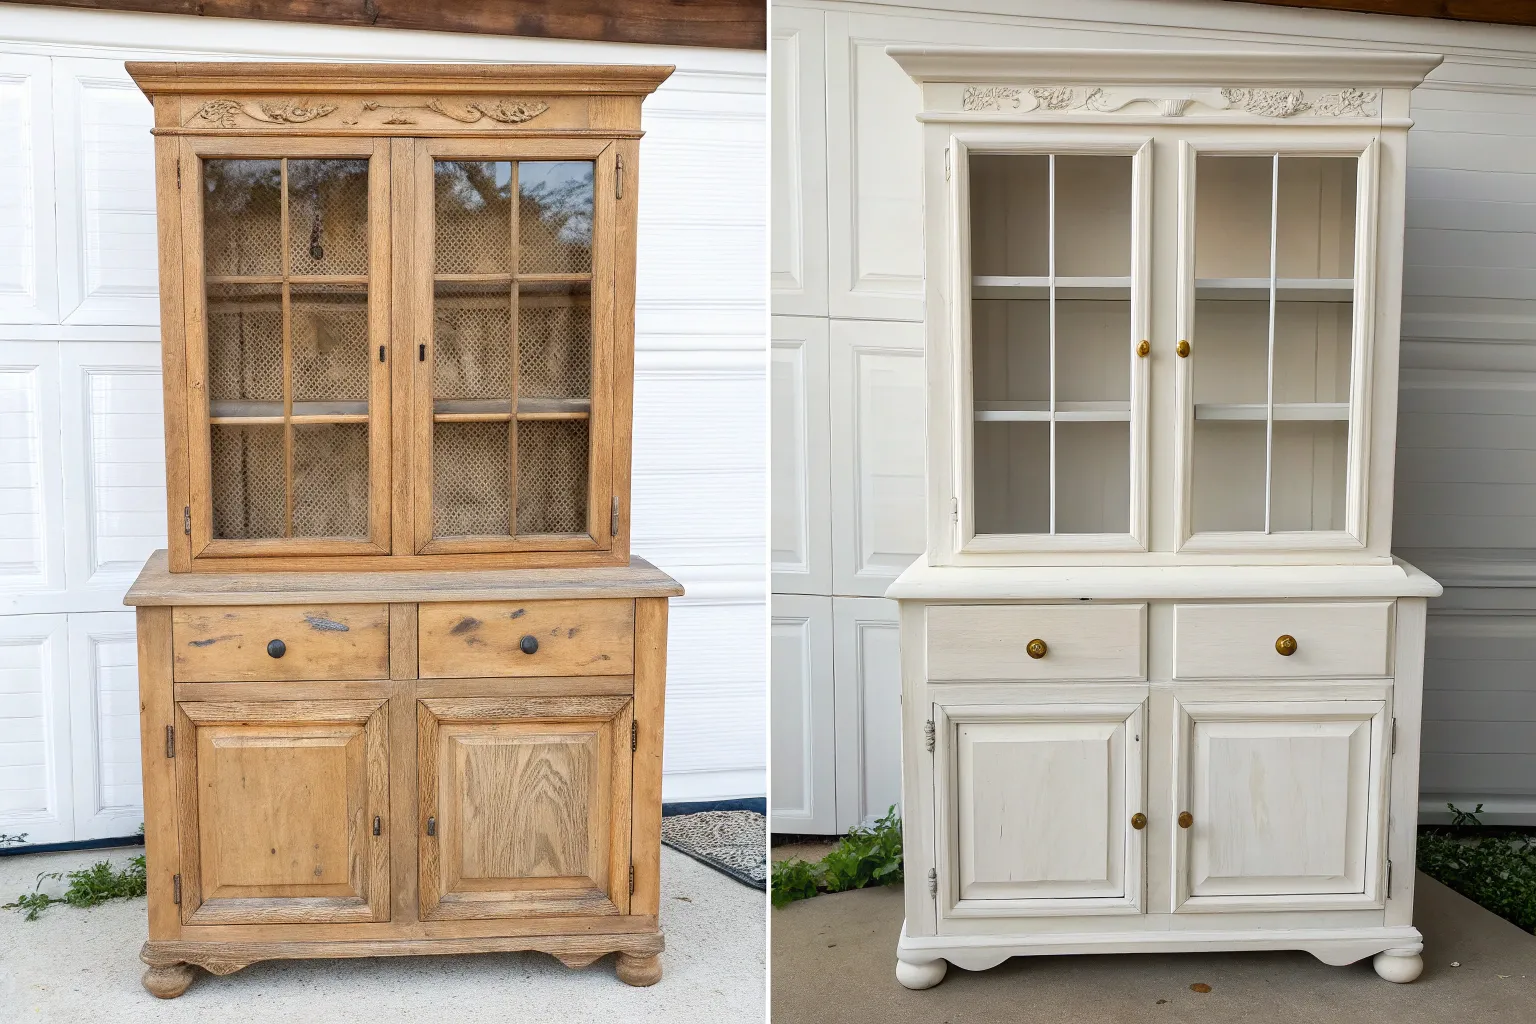
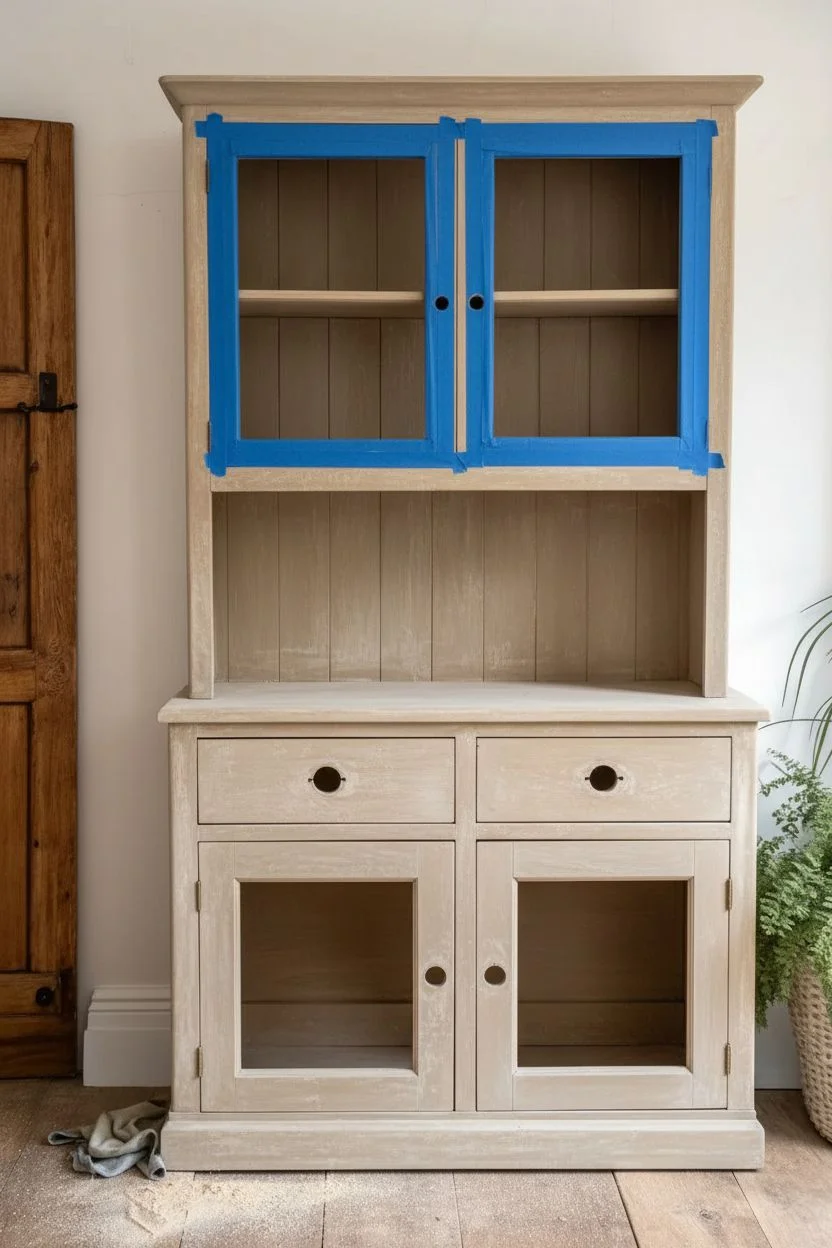
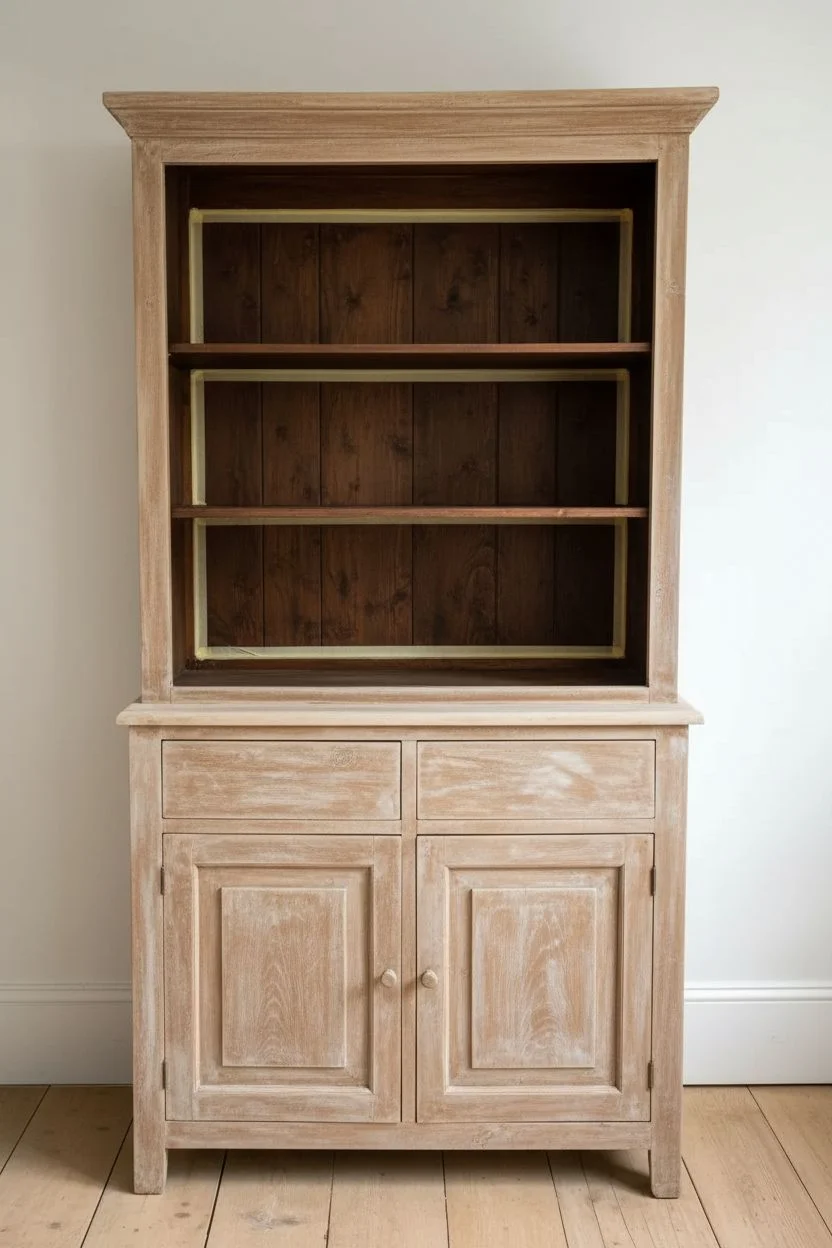
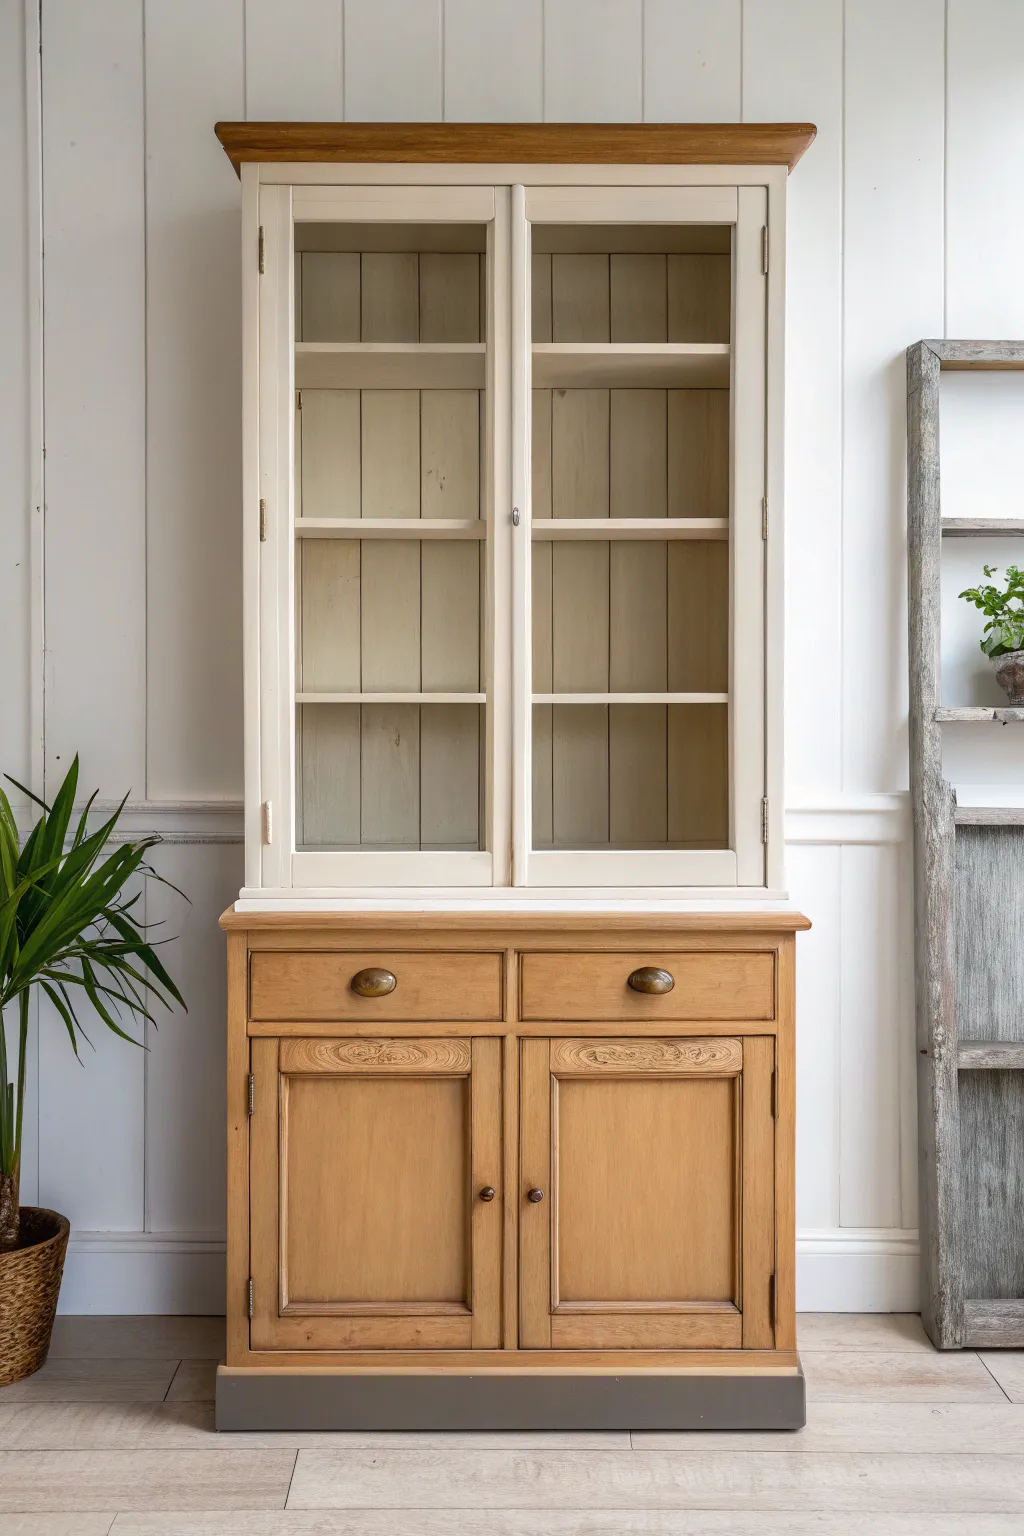
Transform a dated or darkened piece of furniture into a bright focal point with this classic white refresh. By keeping the interior and countertop natural, you create a beautiful sense of depth and warmth that prevents the piece from feeling too stark.
Detailed Instructions
Materials
- Large wooden hutch (two-piece preferred)
- TSP substitute or degreaser
- Medium and fine grit sandpaper (120 and 220)
- Painter’s tape
- Stain-blocking primer (shellac-based recommended)
- Creamy white chalk or mineral paint
- Dark walnut wood stain
- Matte spray sealer or furniture wax
- Synthetic angled sash brush
- Small foam roller
- Lint-free rags
- Screwdriver for hardware removal
- Drop cloths
Step 1: Preparation & Disassembly
-
Separate and clear:
Begin by removing all items from the hutch and, if possible, separate the top shelving unit from the bottom buffet base to make moving and painting easier. -
Remove hardware:
Unscrew all pulls, knobs, and hinges. Place them in labeled bags so you know exactly where they go later. -
Remove doors:
Take off the cabinet doors from both the top and bottom sections. This ensures you can paint all edges cleanly without obstruction. -
Clean thoroughly:
Wipe down the entire piece with a TSP substitute or strong degreaser to remove years of furniture polish, oil, and dust. This is crucial for paint adhesion. -
Scuff sand:
Lightly sand all surfaces you intend to paint using 120-grit sandpaper. You don’t need to strip it to bare wood, just scuff the glossy finish.
Clean Lines Secret
Running a putty knife over the edge of your painter’s tape presses it down firmly, preventing paint bleed onto the natural wood interior.
Step 2: Addressing the Natural Wood Areas
-
Sand the countertop:
For the buffet top that will remain stained, you need to sanding more aggressively to remove the old finish. Start with 120-grit and finish with 220-grit for a smooth surface. -
Apply stain:
Apply a dark walnut stain to the countertop using a lint-free rag. Wipe with the grain, let it penetrate for about 5-10 minutes, and wipe away the excess. -
Tape interior edges:
Since the back panel inside the hutch remains natural wood, carefully apply painter’s tape to the inside edges where the wood backing meets the frame.
Add Subtle Age
Mix a tiny amount of dark wax into your clear furniture wax. Apply it into the crevices of the molding to simulate decades of patina.
Step 3: Painting & Distressing
-
Prime the surface:
Apply a coat of stain-blocking primer to the exterior frame, doors, and drawers. This prevents tannins from the old wood bleeding through your fresh white paint. -
Check for bleed-through:
Once the primer is dry, look for yellow or pink spots. If you see them, apply a second spot-coat of shellac-based primer to those areas. -
First coat of paint:
Using a high-quality synthetic brush for corners and a foam roller for flat areas, apply your first coat of creamy white paint. I prefer to work in long, continuous strokes to minimize texture. -
Second coat:
After the proper drying time, apply a second coat for full opaque coverage. Don’t forget the edges of the doors and the drawer fronts. -
Distress the edges:
Once the paint is fully dry, take a 220-grit sandpaper block and gently rub the high points, corners, and edges of the molding to reveal a bit of the dark wood underneath.
Step 4: Finishing Touches
-
Seal the paint:
Apply a clear matte wax or a matte poly-acrylic topcoat over the painted surfaces to protect them from fingerprints and dust. -
Seal the stained wood:
Apply multiple coats of polyurethane to the stained countertop, as this area sees the most wear and tear. Sand lightly between coats. -
Refinish hardware:
If your original hardware looks tired, give it a quick cleaning or a light spray of oil-rubbed bronze paint to match the vintage aesthetic. -
Reassemble:
Carefully screw the hinges back onto the doors and reattach them to the frame. Install the drawer pulls and knobs. -
Final wipe down:
Remove any remaining painter’s tape from the interior and give the glass panels a good clean with vinegar and water.
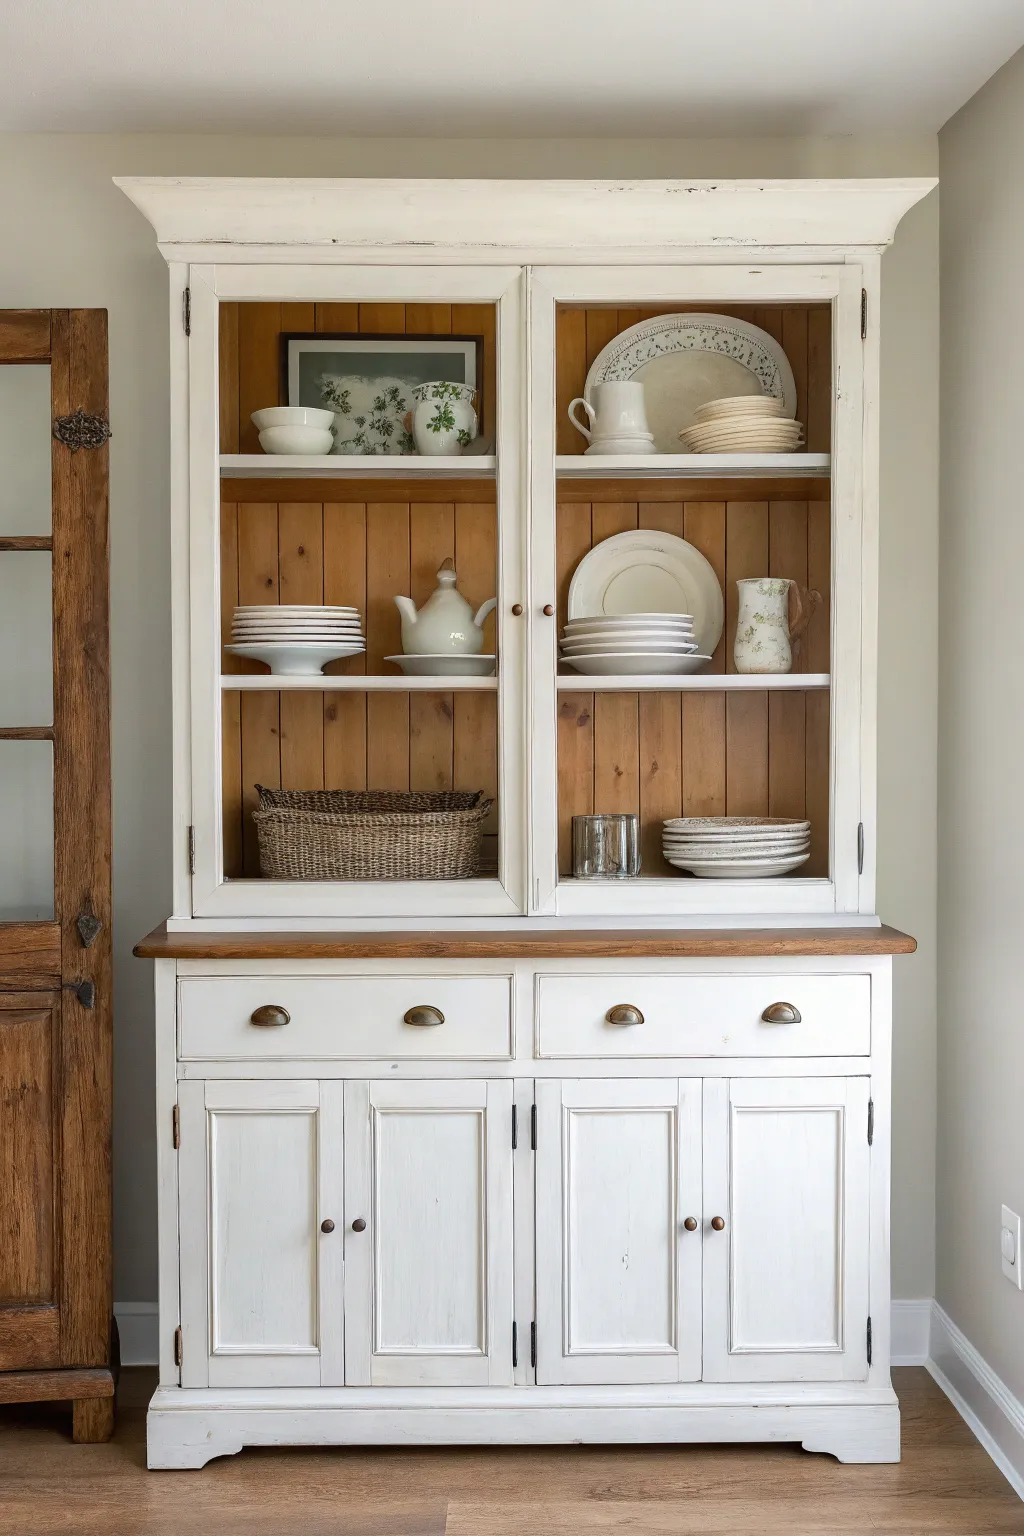
Now you have a stunning, timeless piece that brightens your room while maintaining its rustic character


Two-Tone Hutch With a Contrasting Back Panel
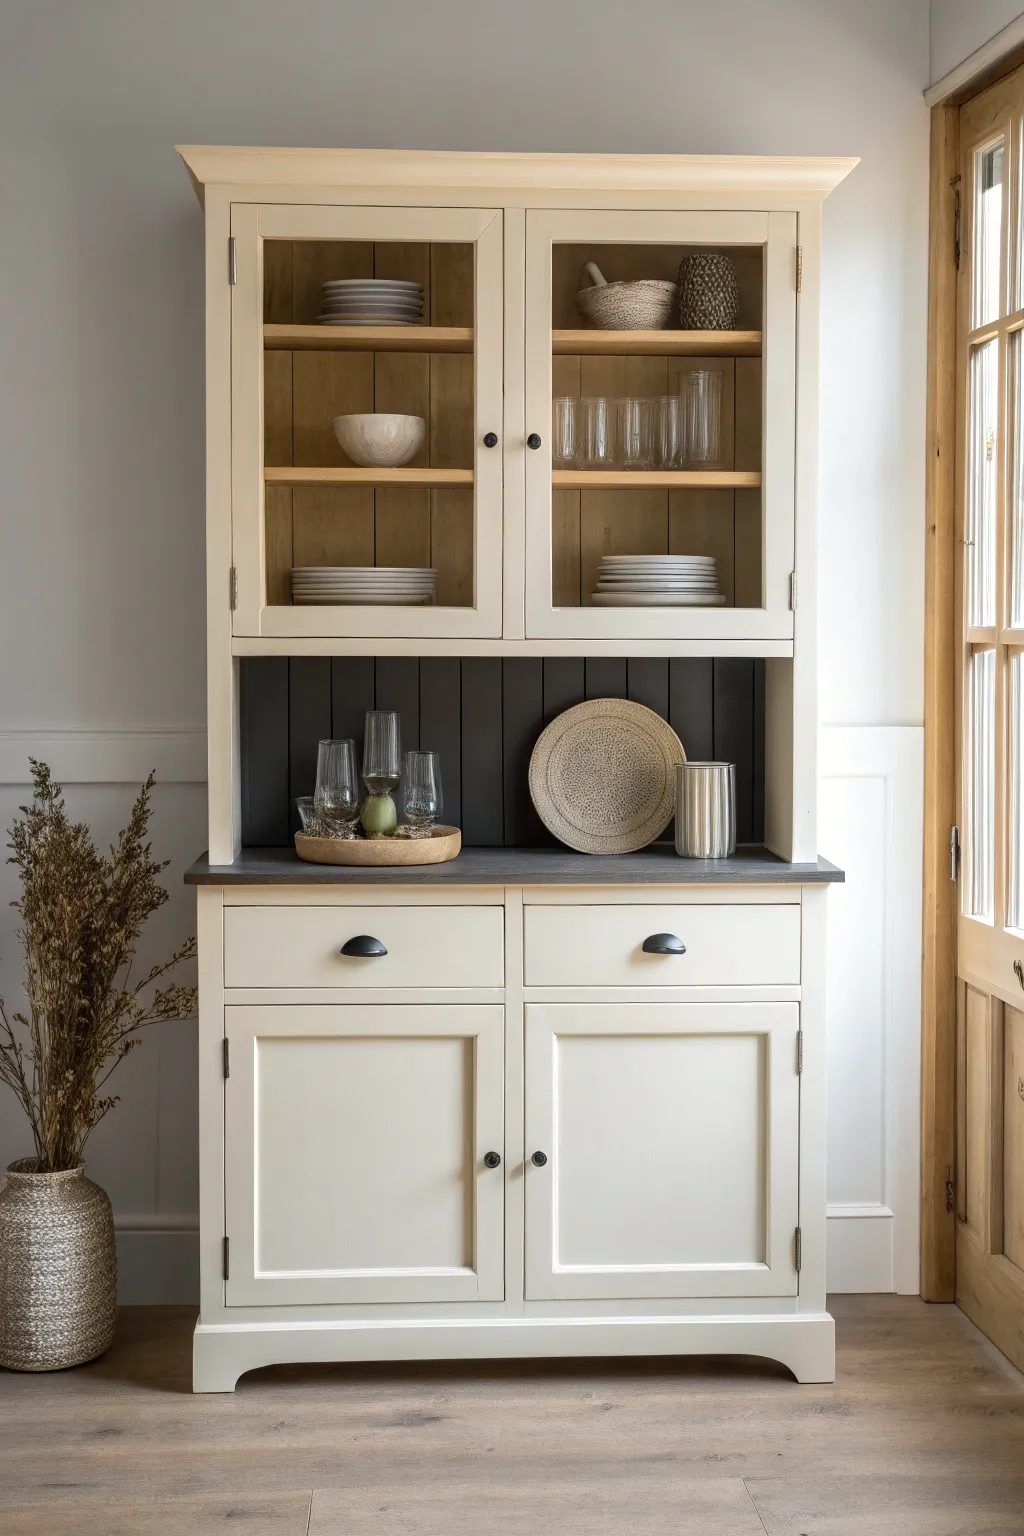
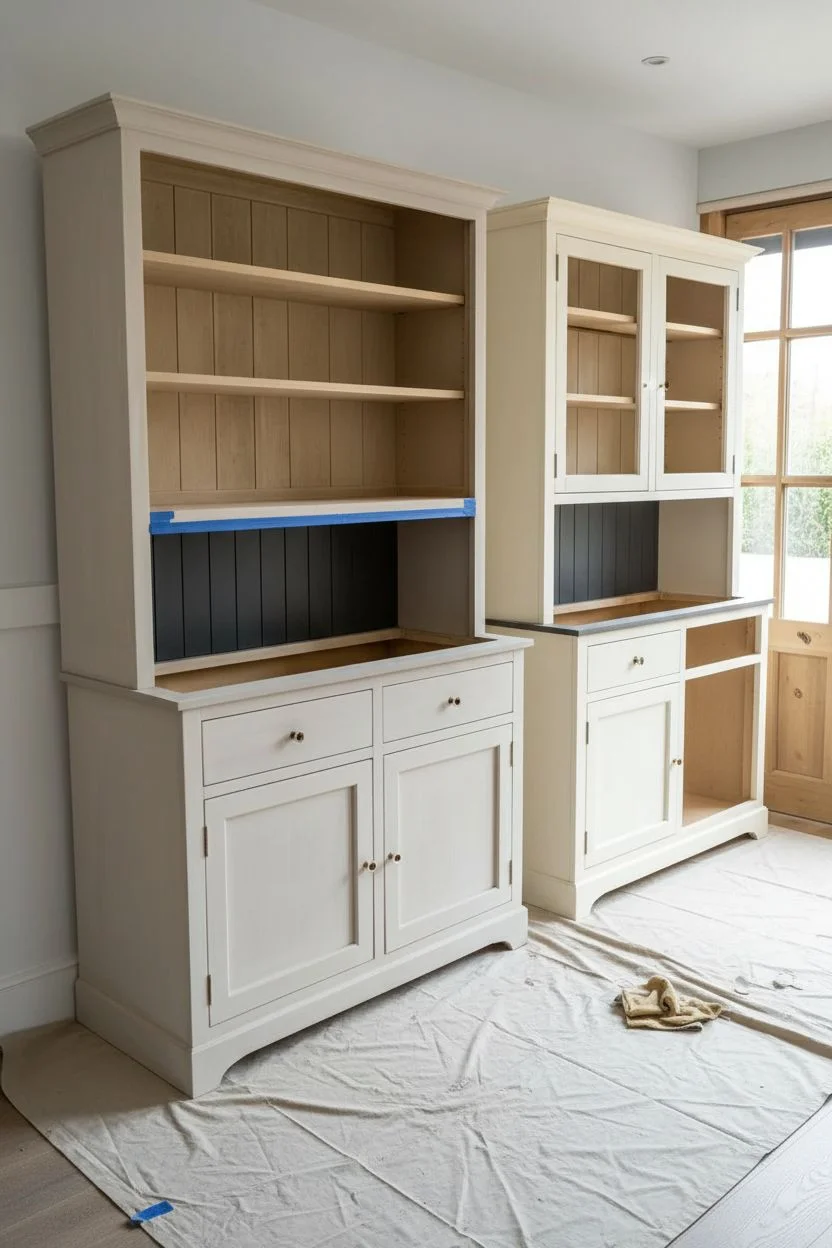
Transform a dated wooden hutch into a modern farmhouse focal point with this elegant two-tone finish. By pairing creamy off-white cabinetry with a striking charcoal shiplap backsplash, you create depth and drama that highlights your favorite dishware.
Step-by-Step
Materials
- Wooden hutch (two-piece unit preferred)
- Medium and fine grit sandpaper (120 and 220 grit)
- TSP substitute cleaner or degreaser
- High-quality adhesion primer
- Cream/Off-White furniture paint (satin finish)
- Charcoal or Soft Black furniture paint (matte or eggshell finish)
- Dark wood stain (for interior shelving)
- Polyurethane topcoat (matte)
- 2-inch synthetic angled brush
- 4-inch foam roller and tray
- Painter’s tape
- Screwdriver (for hardware removal)
- Tack cloth
Step 1: Preparation & Disassembly
-
Remove hardware and doors:
Begin by removing all knobs, pulls, and hinges. Place them in labeled bags so you don’t lose any screws. Take the doors off the hinges and remove any adjustable shelves from the interior. -
Clean thoroughly:
Scrub the entire piece with a TSP substitute or degreaser to remove years of furniture polish, oil, and dust. This step is crucial for paint adhesion, so be thorough. -
Sand the surfaces:
Scuff sand the entire exterior and the back panel using 120-grit paper to remove the old glossy finish. You don’t need to strip it to bare wood, just de-gloss it so the primer sticks. -
Smooth the surface:
Follow up with a quick pass of 220-grit sandpaper for a buttery smooth base. Wipe away all sanding dust with a tack cloth or a damp rag. -
Tape off zones:
If you are keeping the interior shelves natural or stained wood like in the example, carefully apply painter’s tape to the inner edges of the glass cabinet frame to protect those areas from paint.
Bleed-Through Blues
If you see pink or yellow stains seeping through your primer, stop! You have tannin bleed. Switch to a shellac-based primer (like BIN) immediately to seal those stains before painting.
Step 2: Staining & Priming
-
Stain the interior:
If your hutch’s interior wood needs refreshing, apply a coat of dark wood stain to the back panel behind the glass and the shelves. Wipe away excess stain and let it dry completely before moving on. -
Prime the exterior:
Apply a coat of high-quality adhesion primer to the entire exterior frame, the doors, and the open middle section backboard. I find a foam roller works best for the large flat areas. -
Sand the primer:
Once the prime coat is fully dry, lightly sand it with fine-grit paper to knock down any raised grain or brush strokes, ensuring a professional finish.
Step 3: Painting the Two-Tone Look
-
Paint the dark accent panel:
Start with the open middle section’s back panel (the shiplap area). Use your dark charcoal or soft black paint. Use a small brush to get into the grooves of the shiplap first. -
Roll the dark panel:
While the grooves are wet, use a small foam roller to paint the flat surfaces of the back panel. Apply two thin coats for full coverage, letting it dry between coats. -
Paint the main body:
Now move to the cream color. Paint the exterior frame, the drawers, and the door frames. Use an angled sash brush for corners and details, and a roller for the flat sides. -
Paint the doors:
Paint the separated doors lying flat to avoid drips. Be careful around the glass panes; either tape them off precisely or use a scraping razor later to clean up errant paint. -
Paint the counter surface:
For the flat surface where the top meets the bottom unit, paint this a dark charcoal to match the back panel, creating a cohesive visual separation. Use a roller for a smooth, stone-like appearance. -
Wait and repeat:
Allow the first coat of cream paint to dry for at least 4-6 hours. Apply a second coat to ensure the color is rich and solid.
Pro Tip: Seamless Shiplap
When painting the vertical grooves of the back panel, check for drips pooling at the bottom immediately. Run a dry brush vertically through the groove to maximize definition.
Step 4: Assembly & Finishing
-
Seal the piece:
Protect your work by applying a matte polyurethane topcoat. Focus especially on the dark ‘countertop’ area which will see the most wear and tear. -
Reinstall glass (if removed):
If you removed glass panes for painting, clean them thoroughly and reinstall them now. Otherwise, use a razor blade to gently scrape any paint splatters off the glass. -
Attach hardware:
Reattach your knobs and pulls. The example features dark, cup-style pulls on drawers and simple round knobs on doors which contrast beautifully with the cream paint. -
Reassemble the unit:
Carefully re-hang the doors and place the top unit back onto the base if they were separated. Step back and admire the fresh contrast.
Style your refreshed hutch with simple ceramics and greenery to complete the modern rustic aesthetic.


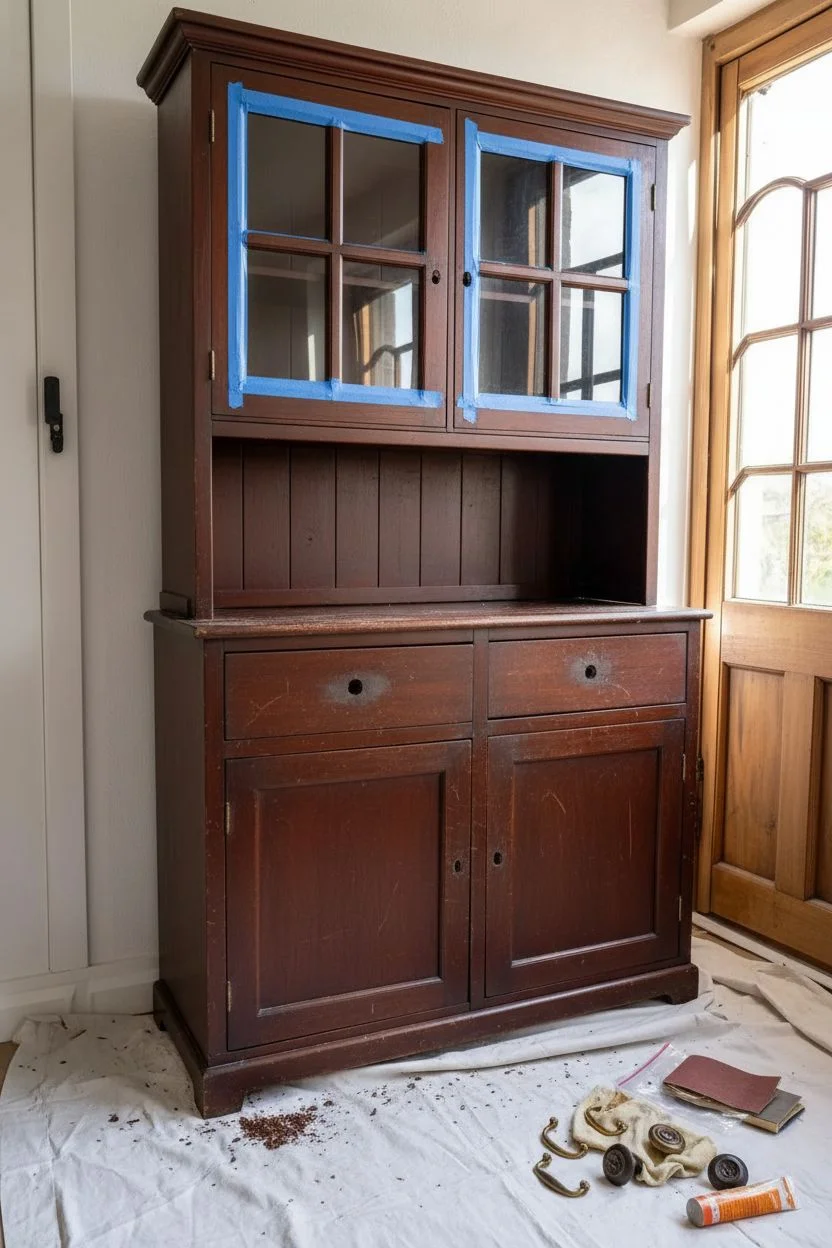
Deep Navy Painted Hutch as a Statement Piece
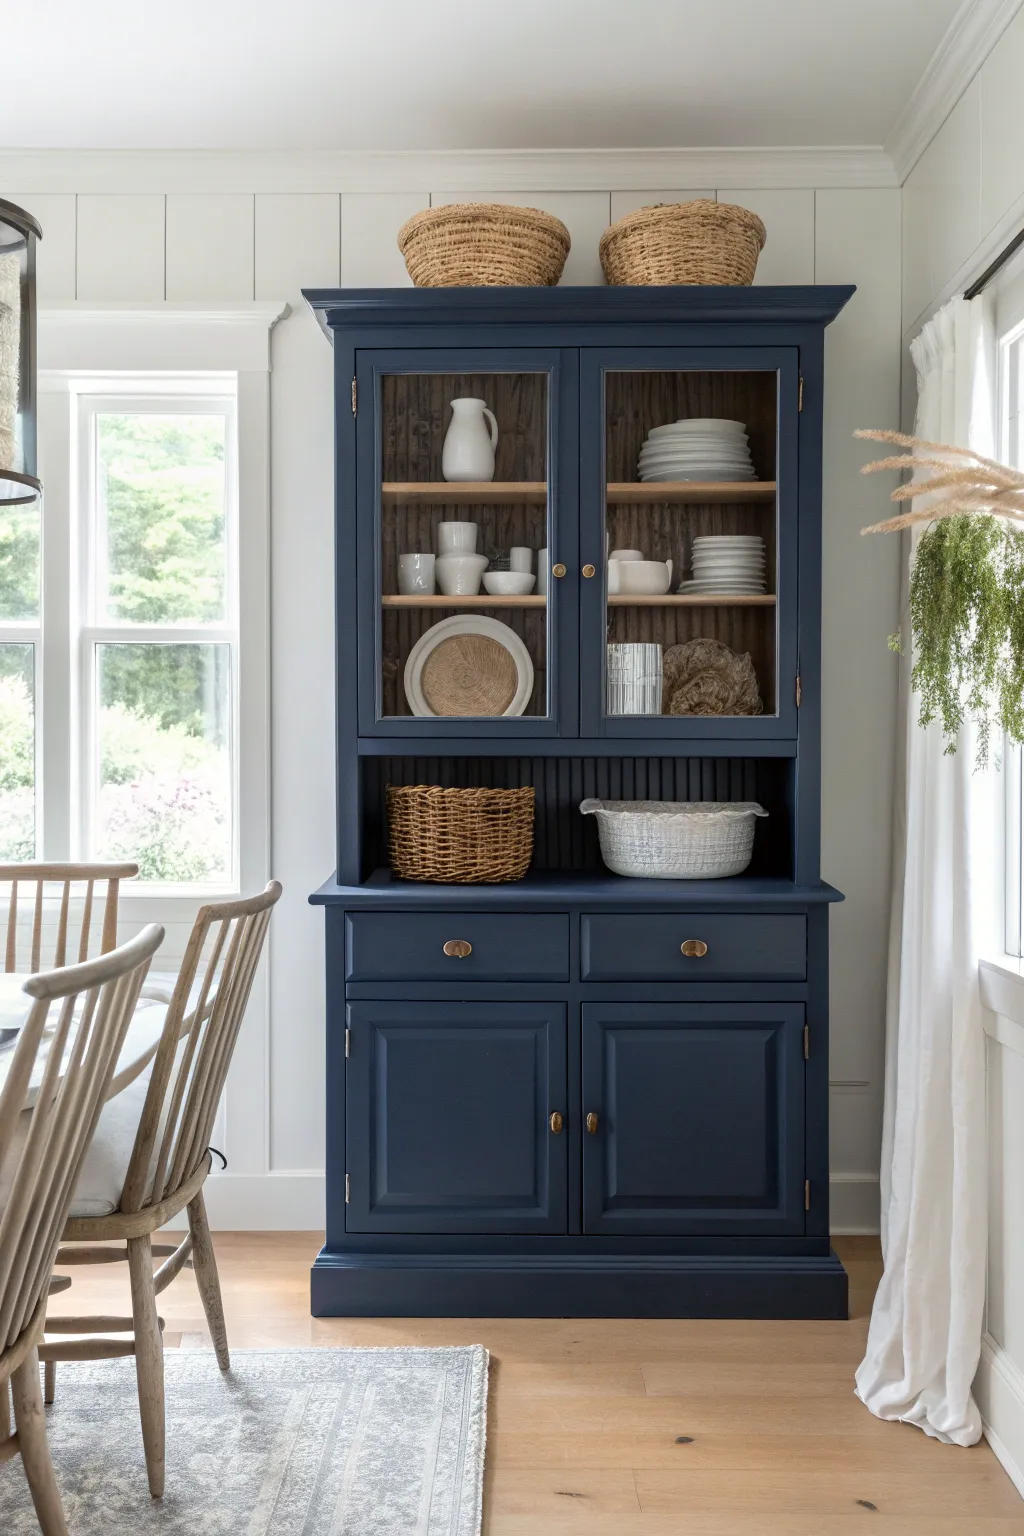
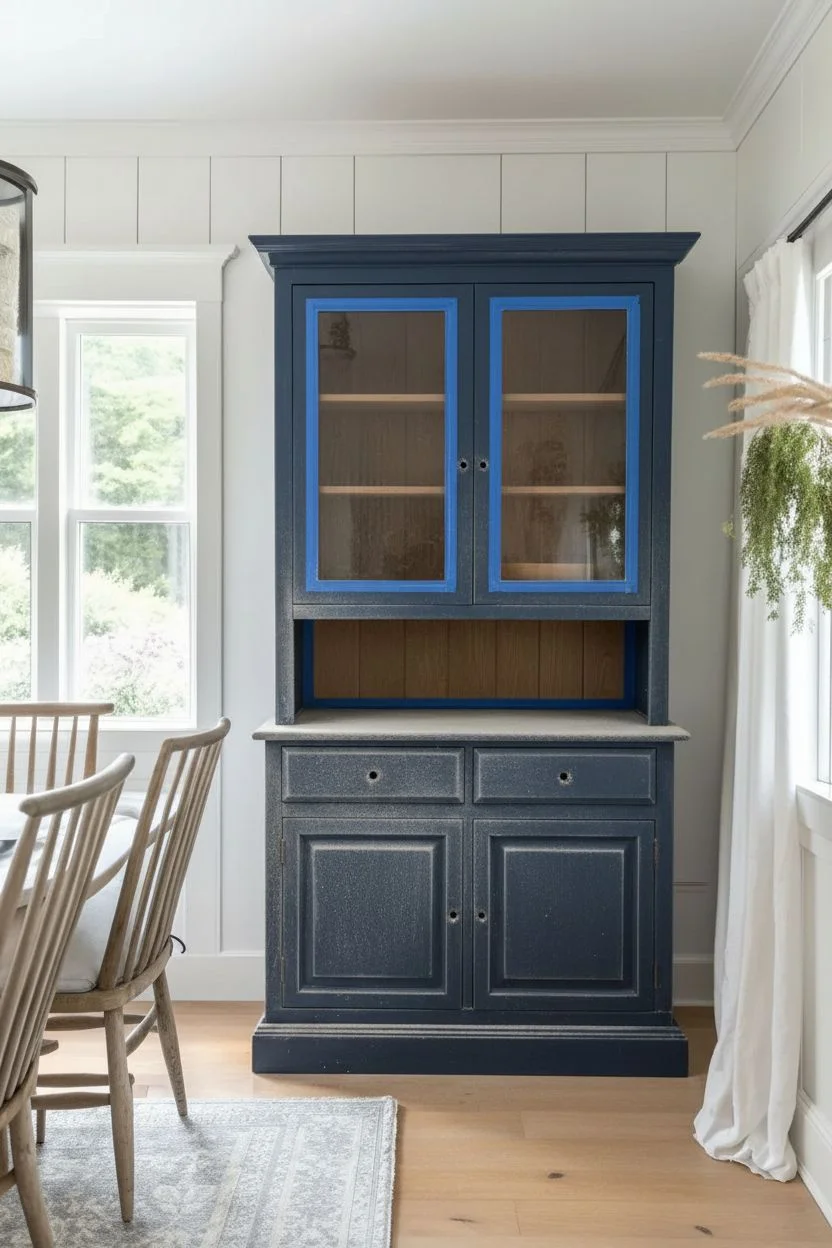
Transform a tired piece of furniture into a sophisticated focal point with this deep navy hutch makeover. The rich, matte finish contrasts beautifully with natural wood shelving and brass hardware, creating a timeless look that anchors any dining room.
How-To Guide
Materials
- Old wooden hutch (two-piece preferred)
- Deep navy mineral or chalk paint (e.g., Midnight Blue or Navy)
- Clear matte topcoat or furniture wax
- Medium-grit sandpaper (120-150 grit)
- Fine-grit sandpaper (220 grit)
- Tack cloth
- Screwdriver
- Painter’s tape
- Synthetic bristle angled paintbrush
- Small foam roller
- Wood filler (if needed)
- Brass knobs and pulls
- Degreasing cleaner (like TSP substitute)
Step 1: Preparation & Disassembly
-
Remove hardware:
Begin by removing all existing knobs, pulls, and hinges. Place them in labeled bags so you don’t lose any screws. If the hutch comes in two pieces, separate the top shelving unit from the bottom buffet for easier maneuvering. -
Clean thoroughly:
Scrub the entire piece with a degreasing cleaner to remove years of furniture polish, oil, and dust. This step is critical for paint adhesion; a dirty surface will eventually cause the paint to peel. -
Scuff sand:
Using medium-grit sandpaper, give the entire exterior a good scuff sand. You don’t need to strip it to bare wood, but you do need to remove the glossy sheen of the old varnish. -
Tape interior edges:
If you plan to keep the interior shelves natural wood like the inspiration photo, carefully tape off the inside edges of the door frames and the back panel where it meets the sides.
Paint Insider Tip
For dark colors like navy, use a tinted primer (grey) underneath. It helps achieve rich, true color depth faster and typically requires fewer topcoats.
Step 2: Painting the Exterior
-
First coat application:
Stir your navy mineral paint thoroughly. Using an angled brush, cut in around corners, detailed molding, and the beadboard backing of the open middle shelf. Keep a wet edge. -
Roll the flat surfaces:
Immediately after cutting in a section, use the small foam roller to cover the larger flat areas like the sides and cabinet doors. This minimizes brush strokes for a professional finish. -
Dry and sand:
Allow the first coat to dry completely, usually about two hours depending on humidity. Once dry, lightly run fine-grit sandpaper over the surface to smooth out any raised wood grain or imperfections. -
Clean dust:
Wipe away all sanding dust with a tack cloth before proceeding. I find any lingering dust can create a gritty texture in the final coat. -
Second coat:
Apply the second coat of navy paint using the same brush-then-roll technique. This darker color often requires a second coat to achieve full, opaque coverage without streaks. -
Inspect coverage:
Check for any light spots, especially in the grooves of the beadboard or corners of the door molding. Touch up with a small artist’s brush if necessary.
Level Up: Interior Glow
Install hidden LED strip lighting under the interior shelves. It illuminates your display items and adds warmth to the dark moody paint color.
Step 3: Finishing Touches
-
Detail the interior:
If surface scratches are visible on the interior wood shelves, lightly sand them and apply a fresh coat of clear wood oil or conditioner to make the grain pop against the navy exterior. -
Seal the paint:
Once the paint has cured for 24 hours, apply two coats of clear matte sealer or furniture wax. Focus extra attention on the buffet top where dishes will be placed, as this area sees the most wear. -
Clean the glass:
Remove any painter’s tape from the glass panes. Use a razor blade scraper to carefully remove any paint that might have seeped under the tape, then clean the glass with vinegar and water. -
Install hardware:
Attach your new brass knobs and pulls. The gold tone of the brass provides a striking, elegant contrast against the deep navy blue. -
Reassemble:
Carefully lift the top hutch unit back onto the base. Ensure it is secure; you may need to drive a few screws into the back to lock the two pieces together for safety. -
Style the shelves:
Fill your newly painted hutch with white ironstone, baskets, and clear glassware to highlight the color contrast and complete the look.
Enjoy styling your stunning new statement piece for seasons to come


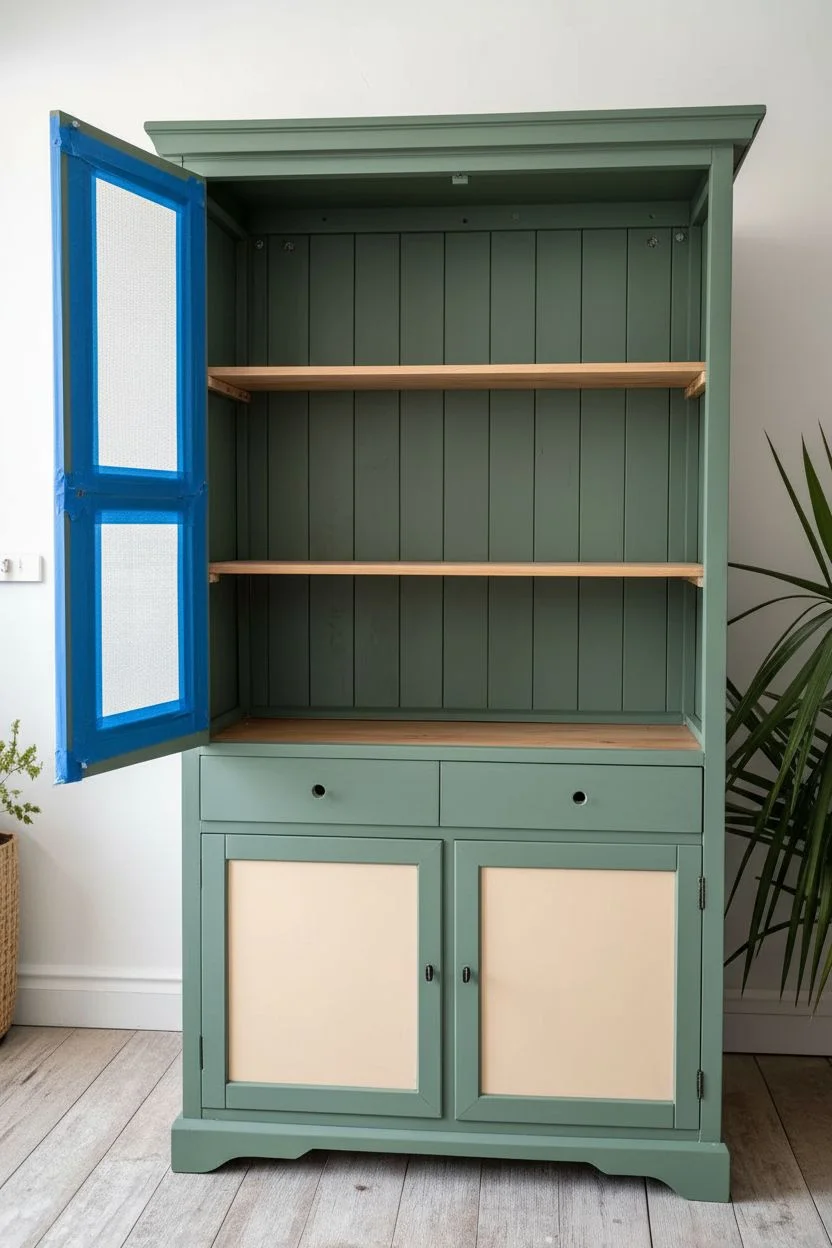
Soft Sage Green Hutch for Cottage Calm
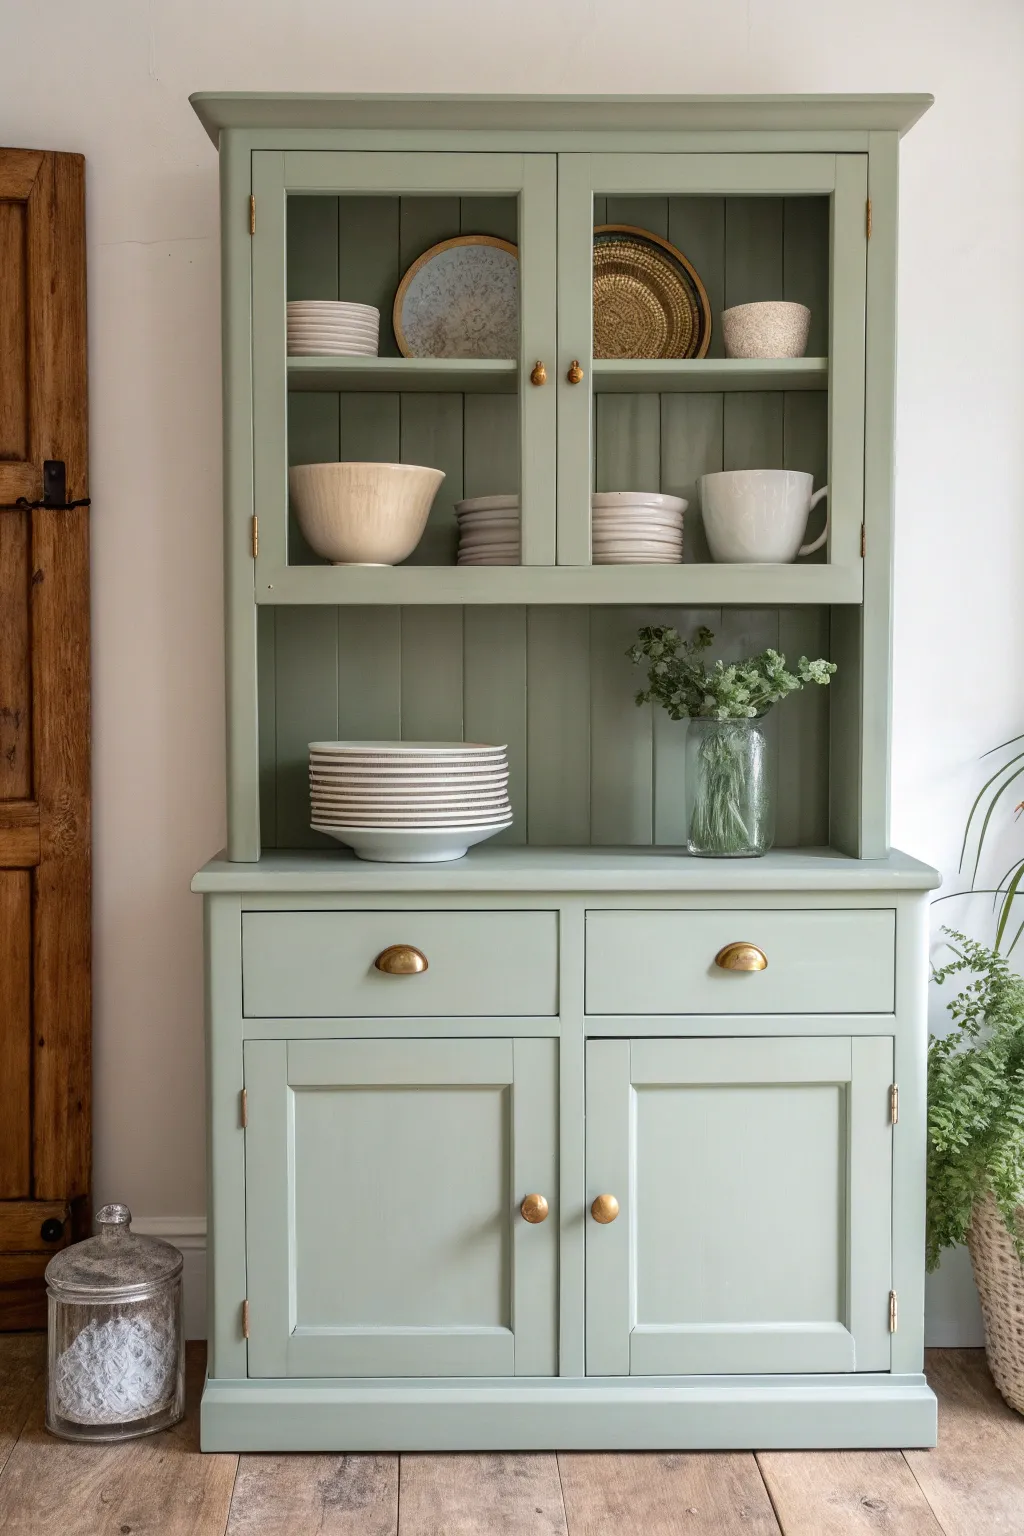
Transform a dated or plain wooden hutch into a serene focal point with this soft sage green finish. The result is a clean, modern-farmhouse look that brings a breath of fresh air to any dining room or kitchen.
Step-by-Step Guide
Materials
- Solid wood hutch (preferably with glass upper doors)
- Sandpaper (120, 220, and 320 grit)
- High-quality wood primer (stain-blocking)
- Soft sage green furniture paint (eggshell or satin finish)
- Clear matte polycrylic topcoat
- Brass half-moon cup pulls (2)
- Round brass knobs (4)
- Small brass knobs for upper doors (2)
- High-density foam roller and tray
- Angled synthetic paintbrush (2-inch)
- Screwdriver or drill
- Painter’s tape
- Tack cloth
- Wood filler (if filling old hardware holes)
Step 1: Preparation
-
Clean and disassemble:
Begin by removing all doors, drawers, and removable shelves. Take off the old hardware and set it aside in labeled bags if you plan to reuse any hinges. -
Deep cleaning:
Scrub the entire piece with a degreasing cleaner like TSP or a TSP substitute to remove years of kitchen grease, wax, or furniture polish. Let it dry completely. -
Address hardware holes:
If your new hardware has different spacing than the old handles, fill the existing holes with wood filler. Overfill slightly, as it shrinks when drying, and let it cure according to package instructions. -
Sanding:
Scuff sand the entire surface using 120-grit sandpaper. You don’t need to strip it to bare wood, but you must remove the glossy sheen so the new paint adheres. -
Dust removal:
Vacuum up the sanding dust, then wipe everything down with a tack cloth to ensure a perfectly smooth surface. -
Protect glass panes:
Carefully apply painter’s tape to the glass edges on the upper doors. Use a razor blade to trim the tape perfectly into the corners for crisp lines later.
Paint Choice Tip
Look for a paint with ‘self-leveling’ properties. This style minimizes visible brush strokes significantly, making hand-painting look like a factory spray finish.
Step 2: Priming and Painting
-
Prime the surface:
Apply a coat of stain-blocking primer. This step is crucial for preventing old wood tannins from bleeding through your light sage color. -
Sand the primer:
Once the primer is fully dry, lightly sand it with 220-grit sandpaper to knock down any brush strokes or texture. Wipe away dust. -
First coat of colour:
Stir your sage green paint thoroughly. Use an angled brush to cut in corners, grooves, and detailed molding first. -
Rolling flat surfaces:
While the brushed edges are still wet, use the high-density foam roller on the larger flat areas like the sides, shelves, and door fronts for a flawless, spray-like finish. -
Painting the interior back:
Don’t forget the back panel behind the shelves. Painting this the same sage colour creates a cohesive look, though some prefer a contrasting white here. -
Dry and repeat:
Allow the first coat to dry for at least 4-6 hours (or as per can instructions). Apply a second coat using the same method: brush details first, then roll. -
Final smoothing:
I like to do a very gentle pass with 320-grit sandpaper between the second and third coats if needed, just to get that professional buttery smoothness. -
Touch-ups:
Inspect the piece in good lighting. If coverage looks solid, you are done painting; otherwise, add a thin third coat.
Tannin Bleed-Through?
If yellow or pink stains appear through the primer, stop. Apply a coat of shellac-based primer specifically over those spots before continuing with paint.
Step 3: Finishing Touches
-
Seal the finish:
Apply two coats of clear matte polycrylic to high-traffic areas, specifically the shelf where dishes will sit and the main countertop area. -
Remove tape:
Ideally, score the edge of the painter’s tape with a craft knife before peeling it off the glass to prevent pulling up dried paint. -
Clean glass:
Use a glass cleaner to remove any smudges or sticky residue from the panes. -
Install drawers:
Slide the drawers back into their slots. If they feel sticky due to paint buildup, rub a little candle wax on the runners. -
Attach hardware:
Install your new brass cup pulls on the drawers and knobs on the doors, adjusting the hinges so the doors hang straight. -
Style the shelves:
Load your hutch with neutral crockery, white serving bowls, and textured baskets to complement the calming green hue.
Enjoy the peaceful atmosphere this beautifully refreshed piece brings to your home
BRUSH GUIDE
The Right Brush for Every Stroke
From clean lines to bold texture — master brush choice, stroke control, and essential techniques.
Explore the Full Guide
Chalky Matte Painted Hutch for a Vintage Look
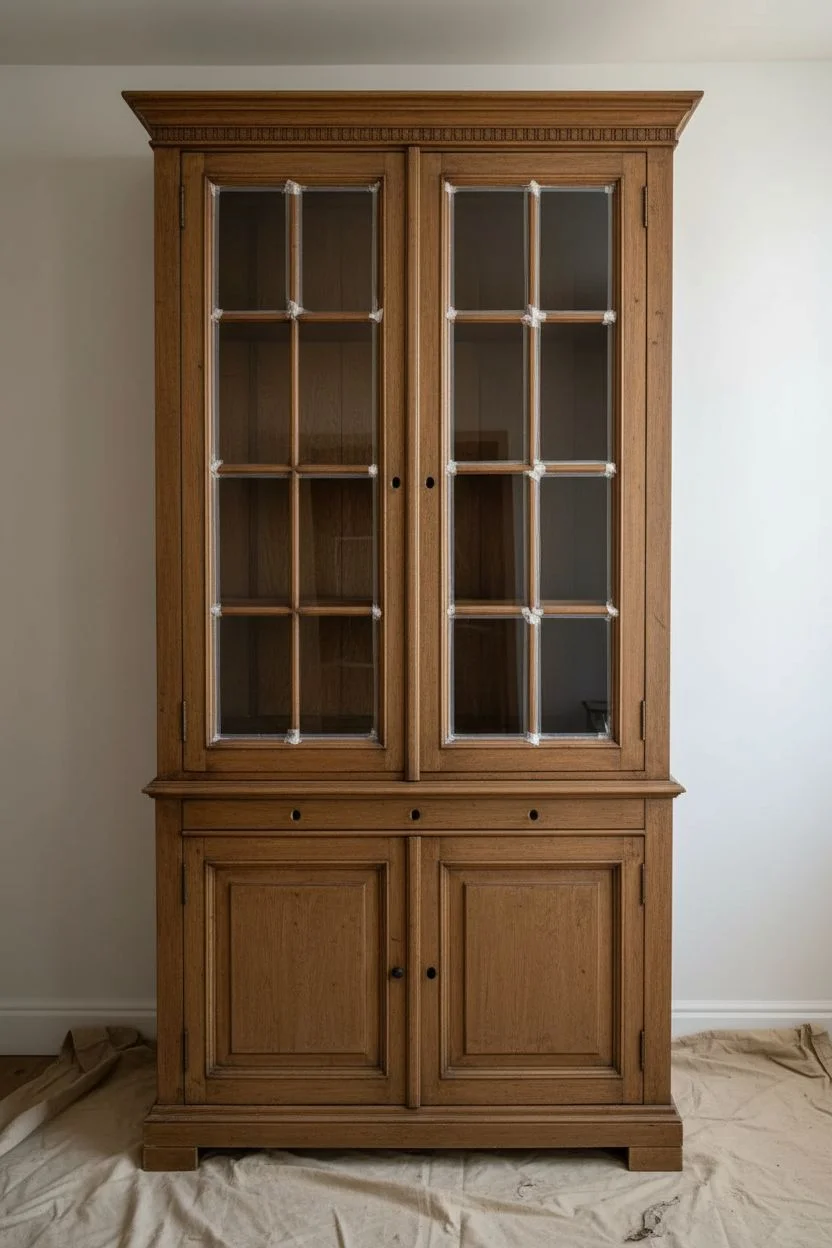
Transform a standard wooden hutch into a stunning heirloom piece with this vintage-inspired finish. Using chalk-style paint and strategic distressing creates a soft, weathered texture that perfectly mimics aged European cabinetry.
How-To Guide
Materials
- Wooden hutch (cleaned and prepped)
- Chalk-style paint (warm cream or antique white)
- Dark wax or antiquing glaze (brown/taupe)
- Clear furniture wax
- Medium-grit sanding block (120-150 grit)
- Fine-grit sanding sponge (220 grit)
- Round natural bristle chalk paint brush
- Lint-free rags or cheesecloth
- Small artist brush for corners
- Painter’s tape
- Drop cloths
- Screwdriver (for hardware removal)
Step 1: Preparation
-
Clear the area:
Move your hutch to a well-ventilated workspace and lay down drop cloths to protect your flooring. -
Remove hardware:
Using a screwdriver, carefully take off all knobs, handles, and hinges. Store them in labeled bags so you don’t lose any small screws. -
Clean deeply:
Scrub the entire piece with a degreasing cleaner to remove years of furniture polish, oil, and dust. This step is crucial for paint adhesion. -
Protect glass panes:
If your hutch has glass doors, carefully apply painter’s tape to the edges of the glass where it meets the wood trim.
Uneven Glaze?
If the dark wax looks too heavy or blotchy, apply a dollop of clear wax onto a rag and rub it over the dark spot. The clear wax acts as an eraser to lift the excess pigment.
Step 2: Painting the Base Layer
-
First coat application:
Stir your cream-colored chalk paint thoroughly. Dip your round brush in and apply the first coat using long, smooth strokes in the direction of the wood grain. -
Handle the details:
Use a smaller artist brush to get paint into tight corners, mullions on the glass doors, and any carved details along the top cornice. -
Dry time:
Allow this first coat to dry completely, which typically takes about 1-2 hours depending on humidity. -
Second coat coverage:
Apply a second coat of paint. I prefer to apply this coat slightly thicker to ensure solid coverage, but keep an eye out for drips. -
Final dry:
Let the piece cure overnight or for at least 4-6 hours until it is bone dry to the touch.
Interior Contrast
Make your dishes pop by painting the interior back panel of the hutch a contrasting color, like a soft sage green or a muted charcoal gray, before reassembling.
Step 3: Distressing and Aging
-
Initial distressing:
Take your medium-grit sanding block and gently sand areas where natural wear would occur: edges, corners, raised moldings, and around handle holes. -
Create texture:
Sand the flat panels more lightly to reveal just a hint of the wood grain underneath, creating a sense of depth rather than stripping the paint entirely. -
Smooth the surface:
Go over the entire painted surface with a fine-grit sanding sponge to knock down any brush strokes and create that buttery smooth matte feel. -
Clean dust:
Wipe away all sanding dust with a tack cloth or a damp rag. Any leftover dust will muddy your waxing finish.
Step 4: Sealing and Glazing
-
Apply clear wax:
Working in small sections, massage a thin layer of clear furniture wax into the paint using a wax brush or lint-free cloth. -
Buff the clear wax:
Wipe off excess wax with a clean rag immediately. This clear layer acts as a barrier so the dark wax doesn’t stain the paint too heavily. -
Add the antique look:
Apply a small amount of dark wax or antiquing glaze into the crevices, corners, and carved details where dust and age would naturally accumulate. -
Feather the darkness:
Use a clean cloth to wipe back the dark wax from the high points, leaving it darker in the recesses. Blend it outward gently for a subtle, smoky effect. -
Final buffing:
Once the wax has hardened slightly (usually after an hour), buff the entire piece with a soft cloth to achieve a soft matte sheen. -
Reassembly:
Remove the painter’s tape from the glass and reinstall your hardware to complete the transformation.
Enjoy styling your newly refreshed hutch with your favorite linens and china knowing you created this finish yourself
Distressed Gray Hutch With Timeworn Edges
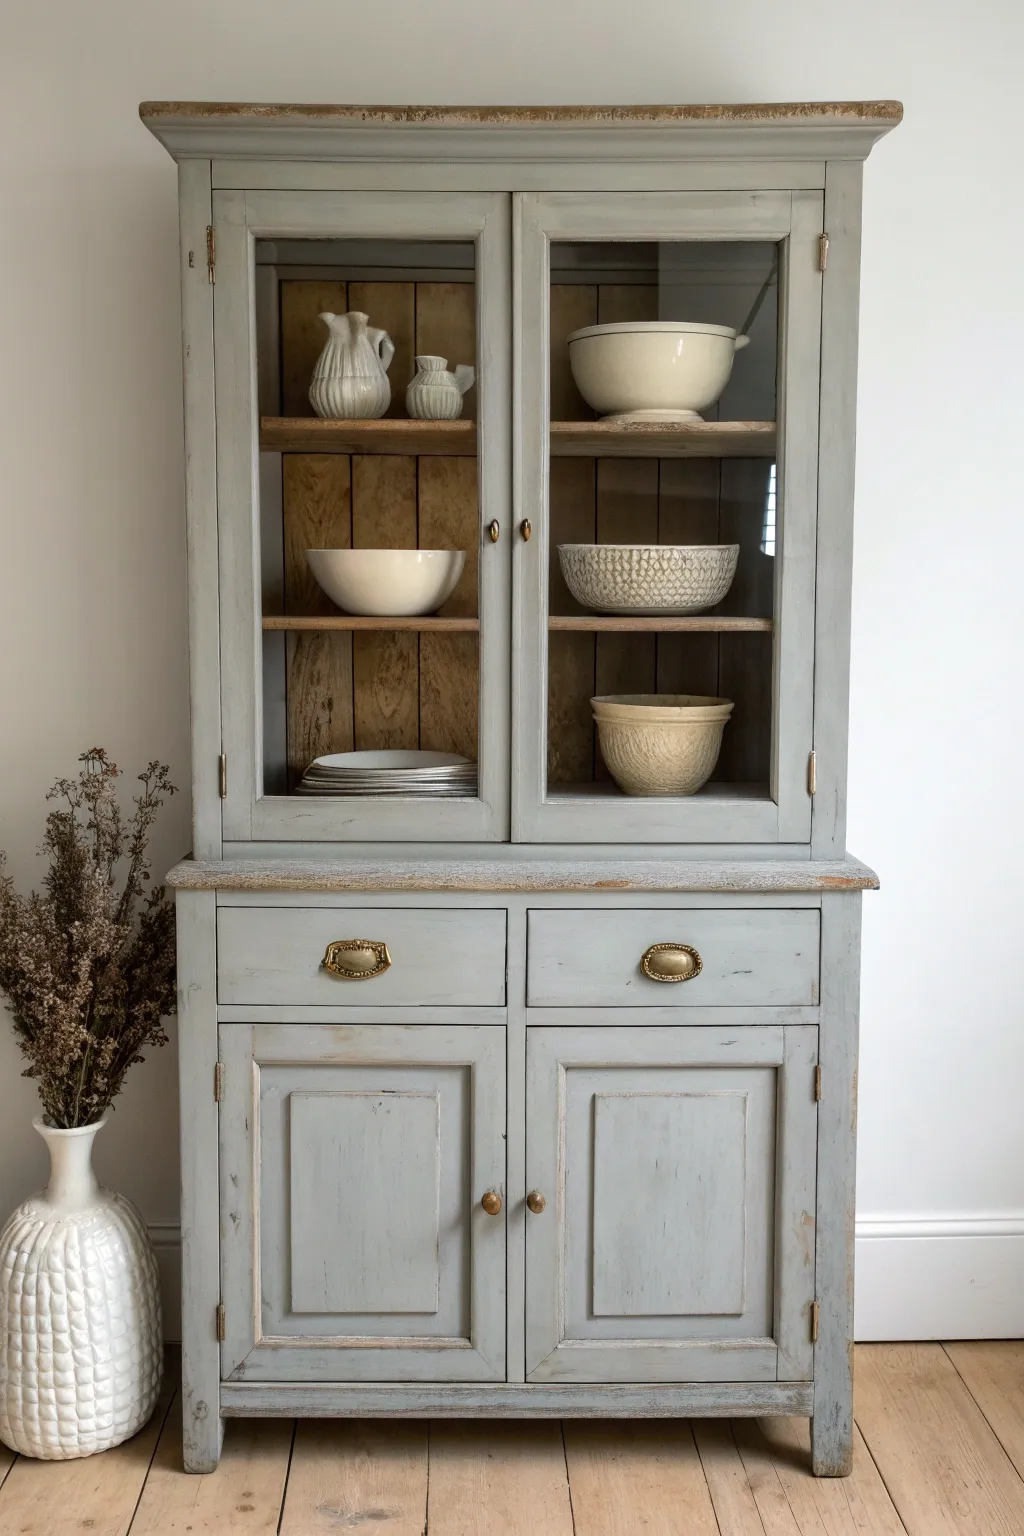
Transform a dated wooden cabinet into a charming focal point with this distressed gray finish that perfectly balances rustic warmth and cool elegance. By carefully layering paint and strategically sanding back to the original wood, you’ll achieve an authentic aged look that feels like a family heirloom.
Step-by-Step
Materials
- Solid wood hutch (top and bottom separate or one piece)
- Sandpaper (100, 150, and 220 grit)
- Orbital sander
- Degreasing cleaner (like TSP substitute)
- Painter’s tape
- Chalk-style paint (light gray-blue)
- High-quality synthetic bristle brush (2-inch)
- Small artist brush
- Clear matte wax or polycrylic topcoat
- Wax brush or lint-free cloths
- Screwdriver
- Wood filler (optional)
Step 1: Preparation & Cleaning
-
Remove hardware and doors:
Begin by removing all drawers, shelves, and doors. Unscrew all hinges, knobs, and drawer pulls. Place the hardware in labeled bags so you don’t lose any screws. -
Clean thoroughly:
Scrub the entire piece with a degreasing cleaner to remove years of furniture polish, oil, and dust. This step is crucial for paint adhesion. -
Identify finish areas:
Decide which parts will remain natural wood. In this look, the interior back panel and shelves remain unpainted. Tape off the interior edges carefully if you aren’t removing the back panel. -
Scuff sand the exterior:
Use 150-grit sandpaper to scuff the exterior surfaces that will be painted. You don’t need to strip it completely, just roughen the surface to give the paint grip. -
Strip the top edge (optional but relevant):
Notice the crown molding and the countertop surface have exposed wood. Sand these areas down to raw wood using 100-grit paper if they have a dark stain you want to lighten.
Uneven Distressing?
If you sanded off too much paint, simply dry-brush a tiny amount of original paint back over the spot, let it dry, and distress again more gently with a damp cloth instead of sandpaper.
Step 2: Painting the Exterior
-
Tape the glass:
If your hutch has glass panels, apply painter’s tape to the glass edges precisely. Press the tape down firmly with a credit card to prevent seepage. -
Apply the first coat:
Using your synthetic brush, apply a coat of light gray-blue chalk paint. Brush in the direction of the wood grain. Don’t worry if it looks streaky; chalk paint often needs two coats. -
Allow to dry:
Let the first coat dry completely, usually about 1-2 hours depending on humidity. -
Apply the second coat:
Apply a second coat for full, opaque coverage. Pay special attention to the recessed areas on the door panels and drawer fronts. -
Touch up edges:
Use a small artist brush to get paint into any tricky corners or around hinges if you couldn’t remove them.
Add Hidden Texture
For a subtle surprise, line the back of the drawers with vintage floral wallpaper or paint the interior back panel a soft contrasting cream color to make your dishware pop.
Step 3: Distressing & Finishing
-
Wet distress technique:
For a smoother worn look, I like to use a damp scouring sponge before the paint fully cures. Gently rub edges where hands would naturally touch—corners, knobs, and raised trim. -
Sand for heavy wear:
For the distinct ‘timeworn’ heavy distressing seen on the crown molding and corners, use 150-grit sandpaper. Sand aggressively until the raw wood shows through clearly. -
Expose the countertop edge:
Run your sandpaper along the protruding edge of the buffet top (the waist of the hutch) to reveal a solid line of wood, separating the top and bottom sections visually. -
Smooth the surfaces:
Go over the flat painted areas lightly with 220-grit sandpaper. This polishes the chalk paint to a buttery smooth feel without removing the color. -
Clean dust:
Vacuum or wipe away all sanding dust with a tack cloth. Any remaining dust will muddy your wax. -
Apply clear wax:
Brush or wipe on a clear matte furniture wax. This seals the porous chalk paint and protects the raw wood areas exposed during distressing. -
Buff to a sheen:
Once the wax has dried (usually 15-20 minutes), buff it vigorously with a clean, lint-free cloth to achieve a soft satin glow. -
Reattach hardware:
Clean your original brass hardware (or install new vintage-style pulls). Screw everything back into place. -
Curate the interior:
If the interior wood looks dry, condition it with hemp oil or clear wax before putting your shelves back in.
Now step back and admire how a little paint and sandpaper have revealed a piece full of history and character.

PENCIL GUIDE
Understanding Pencil Grades from H to B
From first sketch to finished drawing — learn pencil grades, line control, and shading techniques.
Explore the Full Guide
Painted Hutch With Updated Hardware for Instant Modern
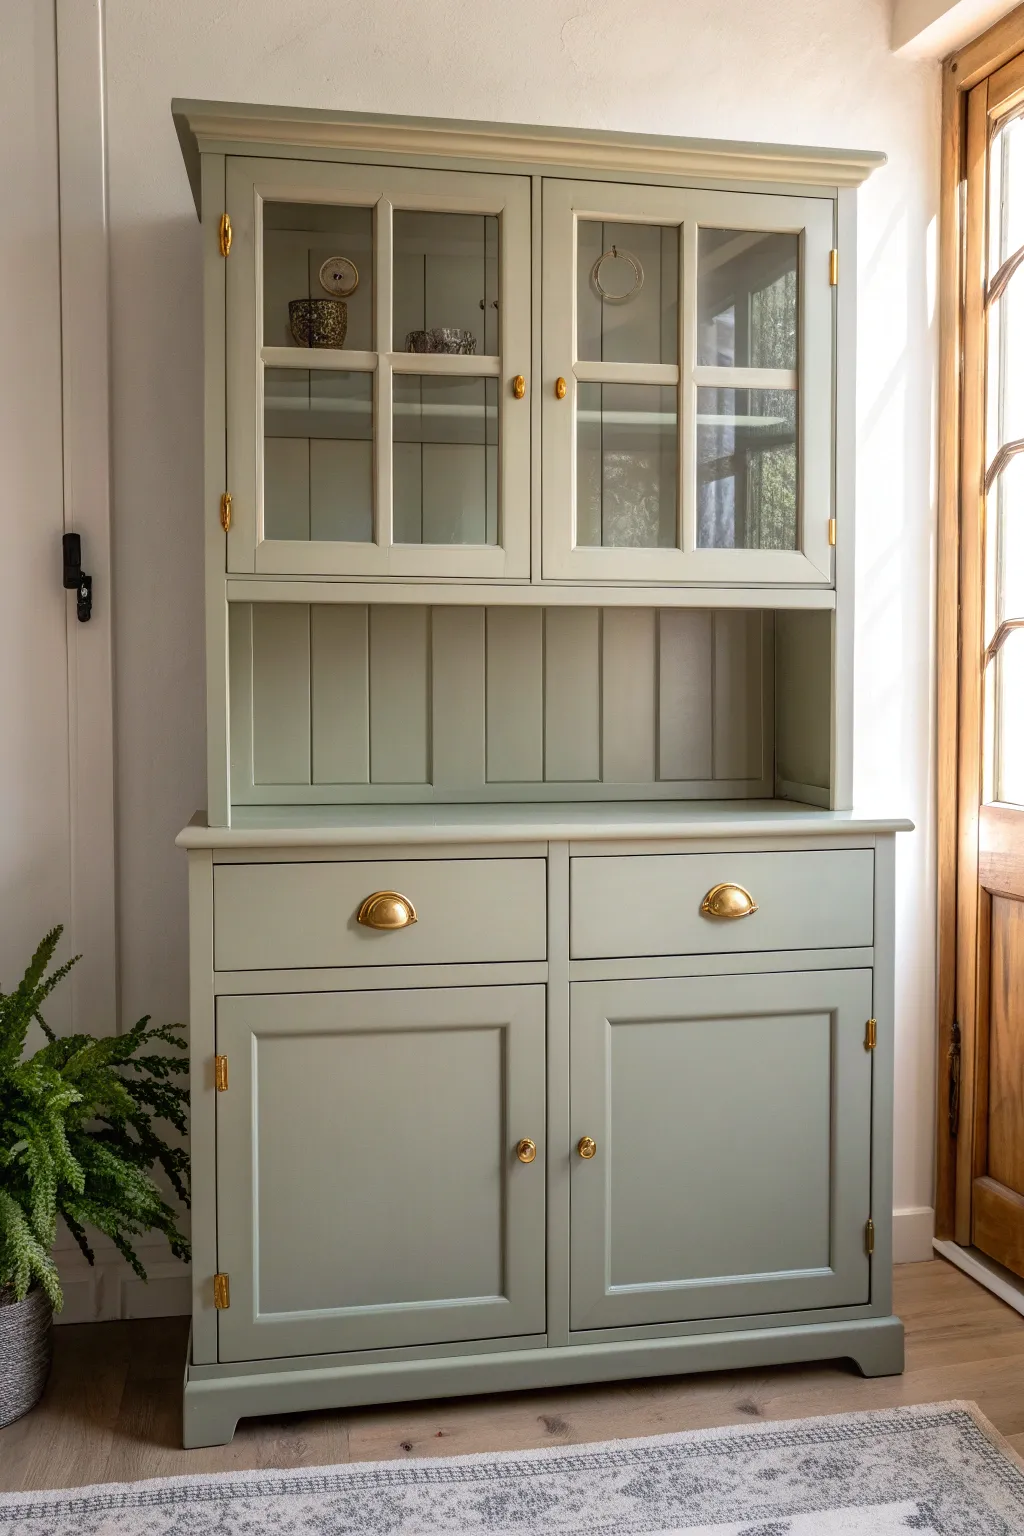
Transform a dated wooden hutch into a modern farmhouse focal point with a fresh coat of soft sage paint and gleaming gold hardware. This project proves that simple updates, like swapping out old handles and lightening the color, can completely revitalize a heavy piece of furniture.
Step-by-Step Guide
Materials
- Wooden hutch (two-piece preferred)
- Mineral or chalk paint (Sage Green)
- Clear protective topcoat (wax or polycrylic)
- TSP or degreasing cleaner
- Medium and fine grit sandpaper (120 & 220)
- Wood filler
- Painter’s tape
- Gold cup pulls (2)
- Gold round knobs (4)
- Gold exposed hinges (optional)
- High-quality synthetic brush (2-inch)
- Small foam roller
- Screwdriver
- Clean lint-free rags
Step 1: Preparation & Dismantling
-
Clean everything:
Begin by thoroughly cleaning the entire hutch with a TSP substitute or degreaser to remove years of furniture polish, dust, and grime. This step is crucial for paint adhesion. -
Remove hardware:
Unscrew and remove all existing knobs, pulls, and hinges. If you are reusing the hinges, place them in a labeled bag; otherwise, discard the old hardware. -
Separate sections:
If your hutch comes in two pieces, carefully lift the top shelving unit off the bottom base to make painting easier and more accessible. -
Fill imperfections:
inspect the wood for deep scratches or old hardware holes that won’t match your new pulls. Fill these with wood filler and let it dry completely. -
Scuff sand:
Lightly sand all surfaces with 120-grit sandpaper to break the existing finish. You don’t need to strip it to bare wood, just create a ‘tooth’ for the new paint to grab onto. -
Protect glass:
Use painter’s tape to carefully mask off the edges of the glass panes on the upper doors. Run a credit card along the tape edge to ensure a tight seal against seepage.
Step 2: Painting & Finishing
-
First coat application:
Apply your sage green mineral paint. I find using a brush for corners and details, followed immediately by a small foam roller for flat surfaces, gives the smoothest finish. -
Tackle the beadboard:
For the vertical slats on the back panel, use a smaller brush to get deep into the grooves first, then smooth out the flat faces to avoid drips pooling in the cracks. -
Shelving strategy:
If the shelves are removable, paint them separately. If fixed, paint the underside first, then the top, working from the back of the cabinet to the front. -
Allow to dry:
Let the first coat dry according to the manufacturer’s instructions, usually 2-4 hours depending on humidity. -
Sand between coats:
Very lightly run a 220-grit sandpaper sponge over the painted surface to knock down any raised grain or brush strokes, then wipe away the dust with a tack cloth. -
Second coat:
Apply a second coat of paint for full opacity. Pay special attention to the door frames and drawer fronts. -
Seal the finish:
Once the paint is fully cured (give it 24 hours), apply a clear protective topcoat. Two thin coats are better than one thick one to prevent yellowing or cloudiness.
Sticky Drawers?
If drawers stick after painting, run a bar of clear paraffin wax or a candle along the wooden runners and the sides of the drawer box to help them glide smoothly.
Step 3: Reassembly
-
Drill for new hardware:
If your new cup pulls require different hole spacing than the old handles, measure precisely and drill new holes in the drawer fronts. -
Install glass door knobs:
Screw the round gold knobs onto the upper glass doors. Ensure they are aligned perfectly with the latches on the inside. -
Attach cup pulls:
Secure the gold cup pulls to the lower drawers, tightening them firmly from the inside. -
Rehang doors:
Attach the doors using your hinges. If you painted over the hinge mortises, you might need to gently scrape away excess paint so the hinges sit flush. -
Final assembly:
Carefully lift the top section back onto the base section. Remove the painter’s tape from the glass and clean any stray specks with a razor blade.
Add Wallpaper
Instead of painting the back beadboard, line the back of the open shelf area with a botanical or vintage-style peel-and-stick wallpaper for a patterned surprise.
Step back and enjoy the calm, modern presence your newly refreshed hutch brings to the room.
Painted Hutch With Mirror Back Removed or Covered
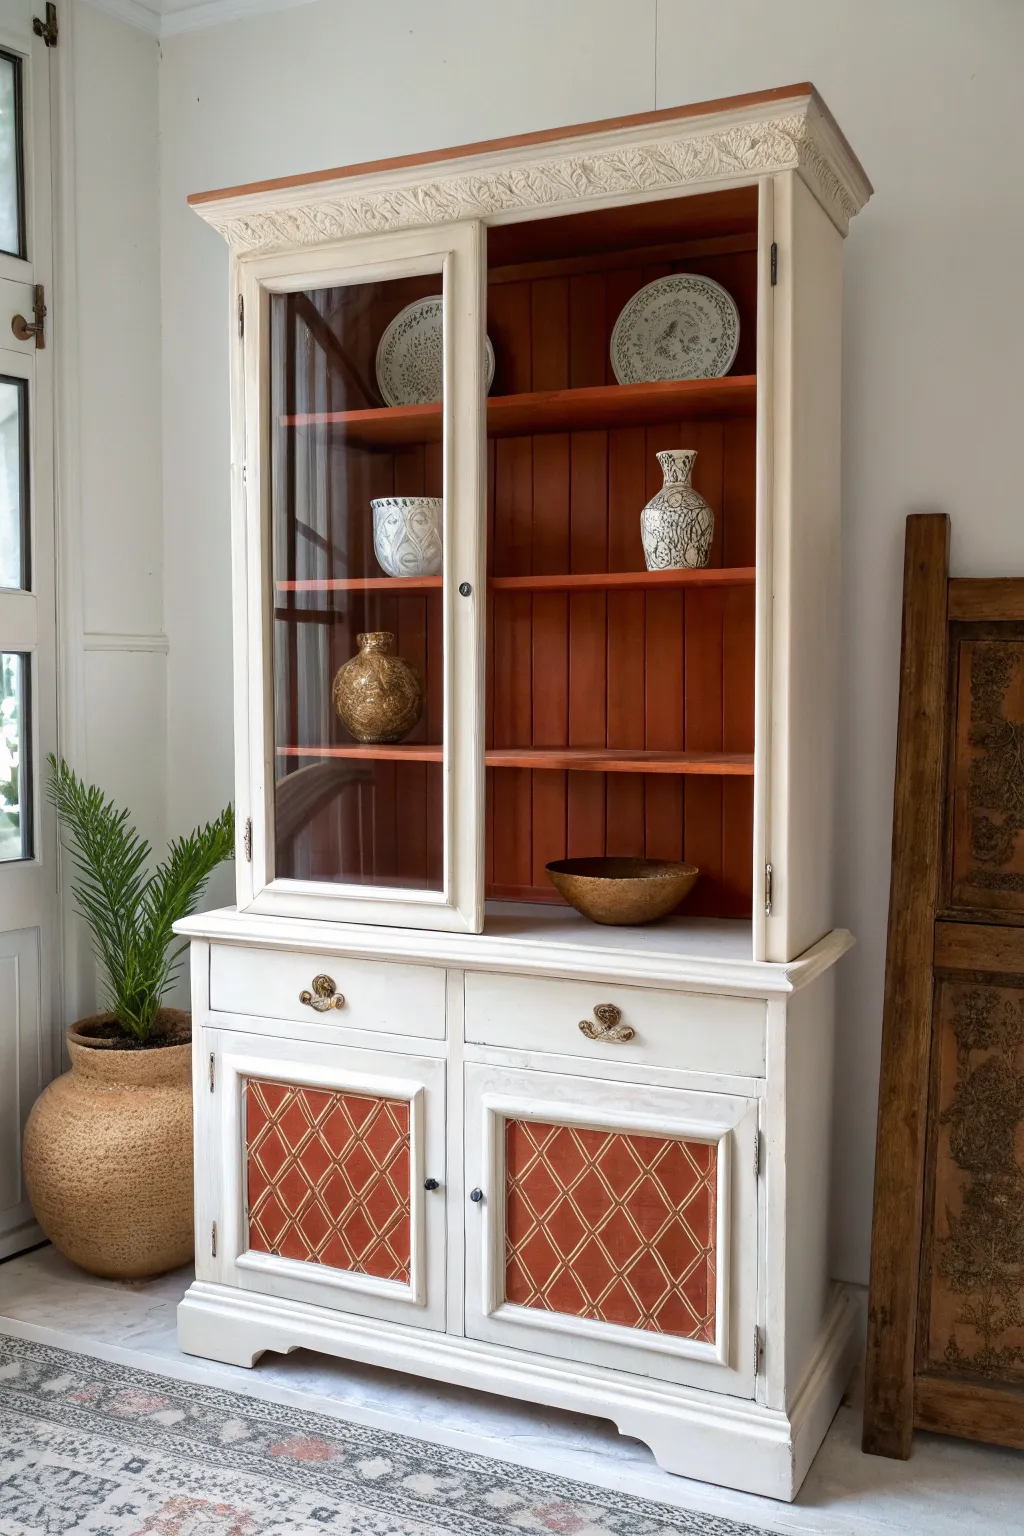

This project transforms a standard wooden hutch into a striking statement piece by combining a crisp, creamy white exterior with a warm, earthy terracotta interior. The standout feature is the diamond lattice pattern on the lower doors, adding a touch of rustic elegance that mimics expensive inlay work.
How-To Guide
Materials
- Wooden hutch (with glass or mirror back removed)
- Sandpaper (120 and 220 grit)
- Tack cloth
- Primer (high-adhesion bonding primer)
- Creamy white chalk or mineral paint
- Terracotta/Rust orange chalk or mineral paint
- Painter’s tape (various widths)
- Gold or metallic paint pen (fine tip)
- Clear wax or matte topcoat
- Screwdriver
- Paintbrushes (synthetic bristle for smooth finish)
- Small foam roller
- Ruler or straight edge
- Pencil
Step 1: Preparation & Disassembly
-
Remove Hardware:
Begin by removing all handles, knobs, and hinges using a screwdriver. Place these in a labeled bag so you don’t lose any screws. If the glass shelves are removable, take those out as well for safekeeping. -
Clean Thoroughly:
Scrub the entire piece with a degreasing cleaner (like TSP or a specialist furniture cleaner) to remove years of dust, oil, and furniture polish. This step is crucial for paint adhesion. -
Sand Surfaces:
Scuff sand the entire exterior and interior using 120-grit sandpaper. You don’t need to strip it to bare wood, just rough up the shiny finish so the primer sticks. Wipe away all dust with a tack cloth. -
Prime the Piece:
Apply a coat of high-quality bonding primer to both the interior and exterior. If your wood is dark and you are painting the outside white, a second coat of primer on the exterior will save you painting time later.
Clean Lines Secret
When painting the lattice lines, don’t aim for factory perfection. Slight variations in line thickness actually add to the hand-crafted, artisan aesthetic.
Step 2: Painting the Interior
-
Cut In Corners:
Using a brush, paint the interior corners and edges with your terracotta color first. This ensures you get full coverage in the hard-to-reach spots. -
Roll the Back Panel:
Use a small foam roller to apply the terracotta paint to the large back panel and the interior shelves. This prevents brush strokes and gives a smooth, modern look. -
Apply Second Coat:
Once the first coat is dry (usually 2-4 hours depending on the brand), apply a second coat of terracotta to ensure a rich, opaque color depth. -
Tape Off:
Once the interior is completely dry (I like to wait overnight to be safe), tape off the inner edges to protect your fresh terracotta paint from the white exterior paint.
Step 3: Exterior & Detail Work
-
Paint Exterior:
Apply your creamy white paint to the exterior of the hutch, including the frame, legs, and drawers. Use long, smooth strokes. Two to three thin coats are better than one thick one. -
Detail the Cornice:
For the decorative carving at the top, use a smaller brush to work the white paint into the crevices. Don’t let paint pool in the details; keep it light to preserve the texture. -
Paint Door Frames:
Carefully paint the frames of the lower cabinet doors white, leaving the center inset panel for the next step.
Texture Shift
Use a textured wallpaper or beadboard panel on the back of the hutch before painting it terracotta to add physical depth behind your display items.
Step 4: Creating the Diamond Lattice
-
Base Color for Panels:
Paint the inset panels of the lower doors with the same terracotta color used for the interior. Apply two coats for solid coverage. -
Mark the Grid:
Once the panel is fully dry, use a ruler to lightly mark a diamond grid pattern with a pencil. Measure carefully to ensure your diamonds are symmetrical. -
Hand-Paint the Lattice:
Using a fine-tip artist brush and the cream paint (or a metallic gold paint pen for easier control), trace over your pencil lines to create the lattice effect. -
Distress the Detail:
After the lattice lines are dry, lightly sand over the pattern with 220-grit sandpaper. This softens the lines and makes them look woven or inlaid rather than just painted on.
Step 5: Finishing Touches
-
Seal the Project:
Apply a clear wax or matte polychrylic topcoat over the entire piece. Create a smooth finish by buffing the wax with a lint-free cloth after it hazes over. -
Highlight Hardware:
If reusing old hardware, clean it up or give it a quick rub with -
Reassemble:
Reattach the doors, drawers, and glass shelves. Remove any remaining painter’s tape carefully. -
Style the Interior:
Arrange white ceramics or contrasting pottery on the shelves to make that terracotta background pop.
This vibrant two-tone hutch will now serve as a stunning focal point that beautifully showcases your favorite treasures


Beadboard-Back Painted Hutch for Subtle Texture
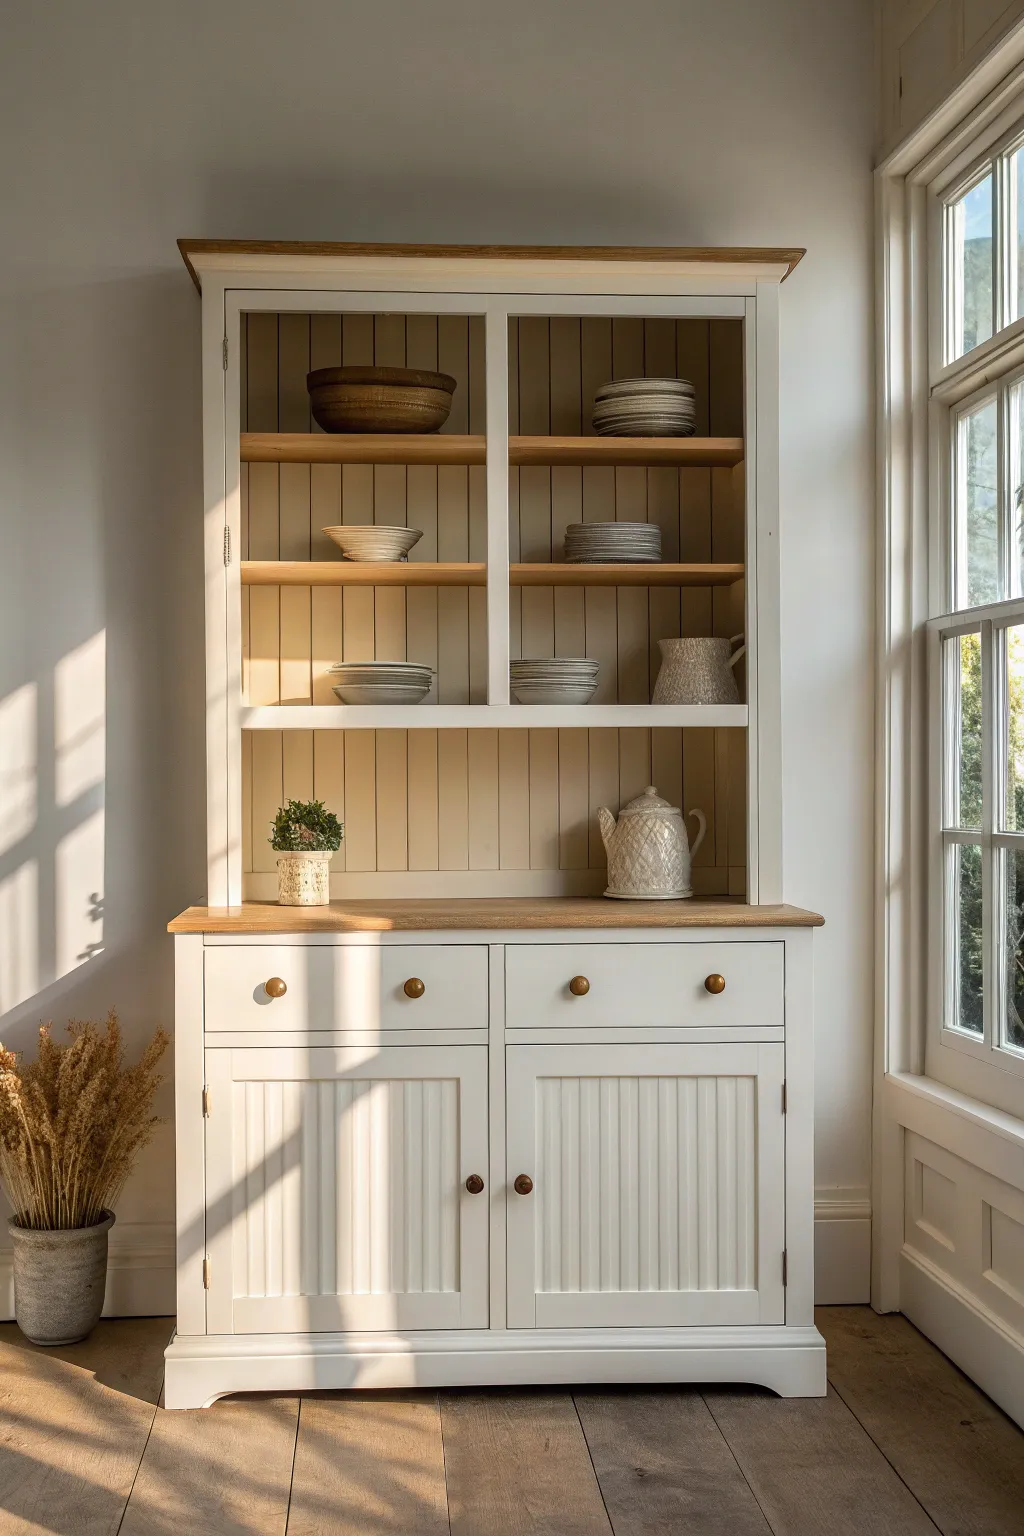
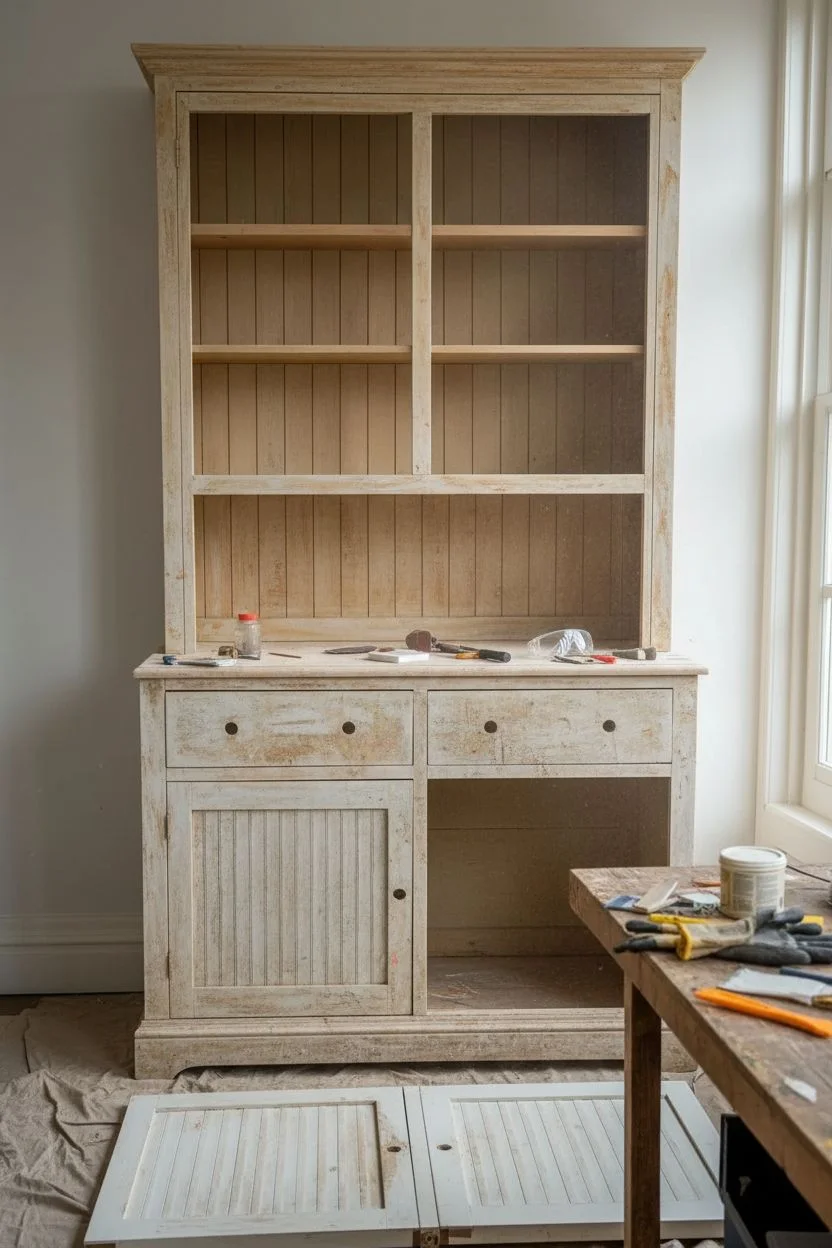
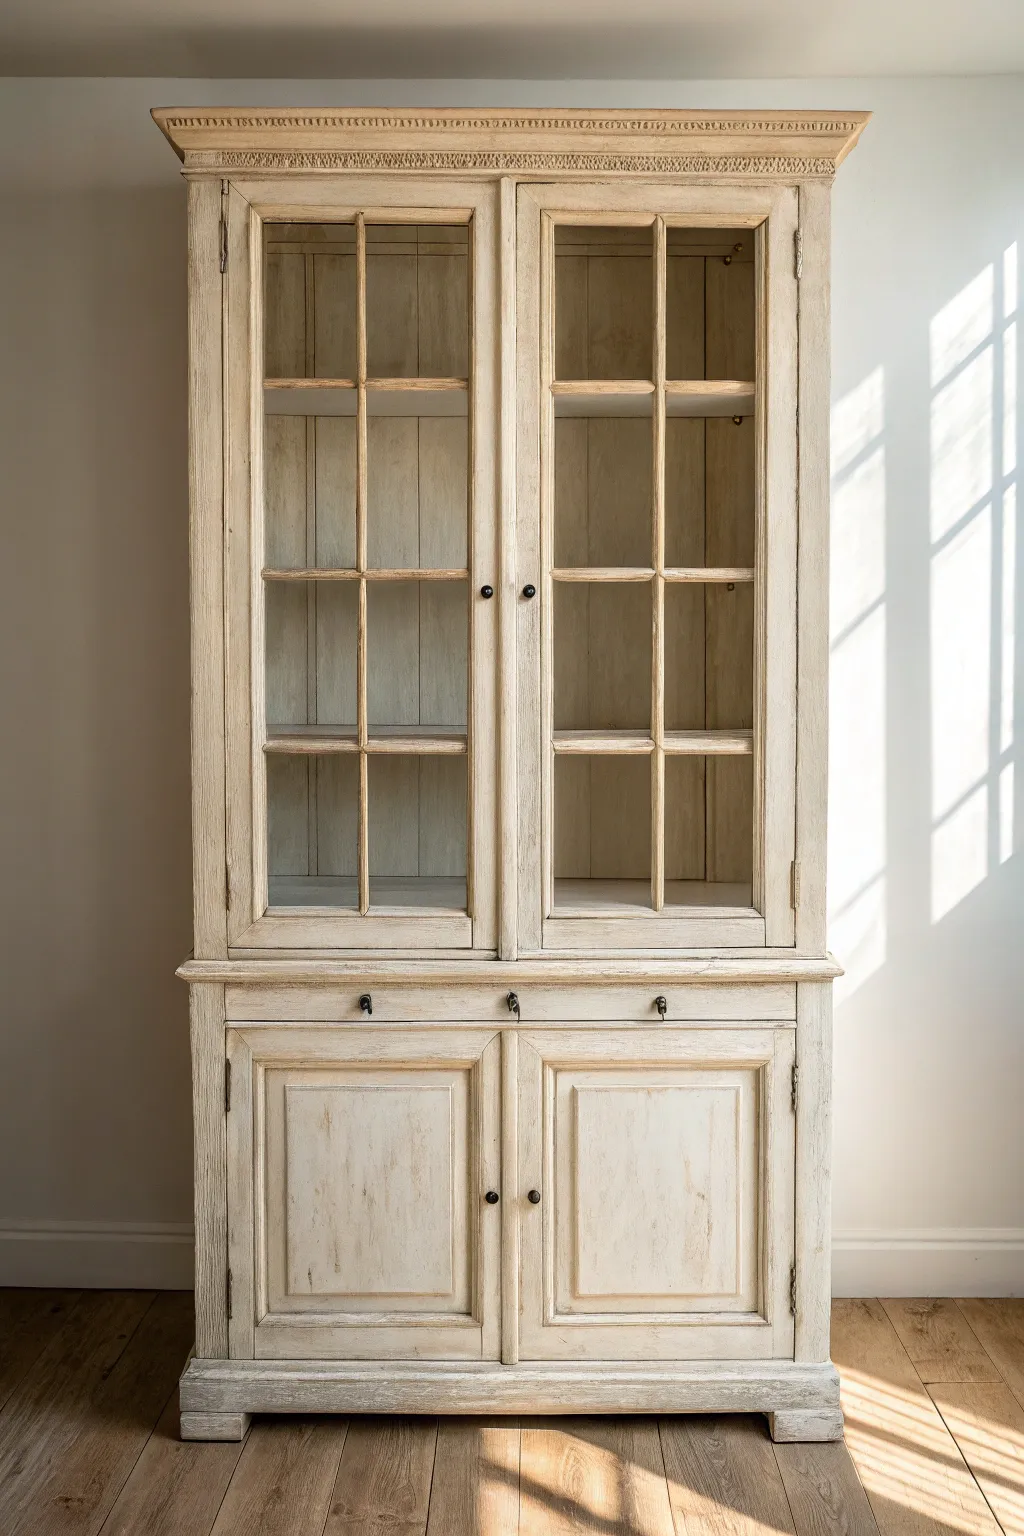
Transform a tired piece of furniture into a light and airy focal point with this classic white and natural wood makeover. By combining crisp white paint with warm, stripped wood tones and a charming beadboard backing, you’ll create a timeless storage piece that brightens any room.
Step-by-Step Guide
Materials
- Solid wood hutch (preferably with existing beadboard or backing to replace)
- Chemical paint stripper (Citristrip or similar)
- Plastic looped scraper and putty knife
- Orbital sander with 80, 120, and 220-grit sandpaper
- High-quality wood primer (stain-blocking)
- Creamy white furniture paint (satin or eggshell finish)
- Matte water-based polyurethane topcoat
- Natural wood stain (optional, light oak tone)
- Beadboard paneling (if hutch doesn’t have it)
- Paintbrushes (good quality angled sash brush)
- Foam roller for larger flat areas
- Wood filler
- Tack cloth
- Painter’s tape
- Screwdriver and hardware cleaner or new knobs
Step 1: Preparation & Stripping
-
Deconstruct the Hutch:
Begin by removing all doors, drawers, and hardware. Store the screws and knobs in a labeled bag so nothing gets lost. If the top hutch section detaches from the bottom buffet, separate them now to make moving and working on them much easier. -
Assess the Finish:
Determine which parts will remain natural wood. For this look, we are keeping the very top cornice, the buffet countertop, and the interior shelves natural. Apply a thick layer of chemical stripper to these specific areas. -
Scrape the Old Finish:
Let the stripper sit for the manufacturer’s recommended time (usually 30-60 minutes). Once the finish bubbles up, gently scrape it away with a plastic scraper to avoid gouging the wood. Wipe down the residue with mineral spirits. -
Clean the Body:
While the stripped wood dries, thoroughly clean the rest of the hutch frame, doors, and drawers with a degreaser or TSP substitute to remove decades of wax and furniture polish.
Clean Lines
For crisp lines between the paint and natural wood top, run a credit card firmly over the edge of your painter’s tape before priming to stop any bleed-under.
Step 2: Sanding & Repairs
-
Sanding the Natural Areas:
Using an orbital sander, sand the stripped surfaces (top, counter, shelves) starting with 80-grit to remove stubborn stain, moving to 120-grit, and finishing with 220-grit for a silky smooth feel. -
Scuff Sanding the Paint Surfaces:
For the areas you plan to paint white, you don’t need to strip to bare wood. simply scuff sand the existing finish with 120-grit sandpaper to give the primer something to grip. -
Installing Beadboard (If Needed):
If your hutch has a plain flat back, measure the opening and cut a sheet of beadboard paneling to fit. Do not install it yet; it is much easier to paint while it is separate from the hutch. -
Patching Imperfections:
Fill any deep scratches or old hardware holes (if you plan to change handle spacing) with wood filler. Let it dry completely, then sand flush. -
Dust Removal:
Vacuum up all the sanding dust from every crevice. Wipe the entire piece down with a tack cloth to ensure a debris-free surface for painting.
Step 3: Painting & Sealing
-
Masking Off:
Use high-quality painter’s tape to protect the freshly sanded natural wood areas (the counter and top edge) where they meet the frame you intend to paint. -
Priming:
Apply a coat of stain-blocking primer to the body, doors, drawer fronts, and the beadboard sheet. I find this crucial for preventing old wood tannins from bleeding through your white topcoat. -
Painting the Body:
Once the primer is dry and lightly sanded, apply your first coat of creamy white paint. Use a foam roller for the large flat sides and a high-quality angled brush for corners and details. -
Painting the Beadboard:
Paint the beadboard panel separately. Be careful not to let paint pool in the decorative grooves; use a fairly dry brush to gently feather paint into those vertical lines. -
Second Coat:
Apply a second (and potentially third) coat of white paint, allowing ample drying time between layers. Lightly sanding with very fine sandpaper between coats gives you that professional factory finish. -
Sealing the Natural Wood:
If you like the raw wood tone, simply seal the natural areas with three coats of matte water-based polyurethane. If you prefer a darker tone, apply your stain first, wipe away excess, let dry, then seal.
Sticky Drawers?
If painted drawers stick, rub a clear candle or a bar of soap along the wooden runners and the sides of the drawer box to help them glide smoothly.
Step 4: Assembly & styling
-
Reattaching the Back:
Nail or screw the painted beadboard panel onto the back of the hutch frame. -
Reassembling Doors:
Reattach the hinges and hang the doors. Ensure they hang straight; you may need to adjust the hinge screws slightly if the paint layers have changed the fit. -
Hardware Update:
Install simple wooden knobs or antique brass pulls. If using wooden knobs as shown, stain them to match the shelves for a cohesive look. -
Final Cure:
Let the piece cure for at least 48 hours before placing heavy pottery on the shelves to prevent the fresh finish from denting or sticking.
Step back and admire how this fresh combination of white and wood completely revitalizes your space.
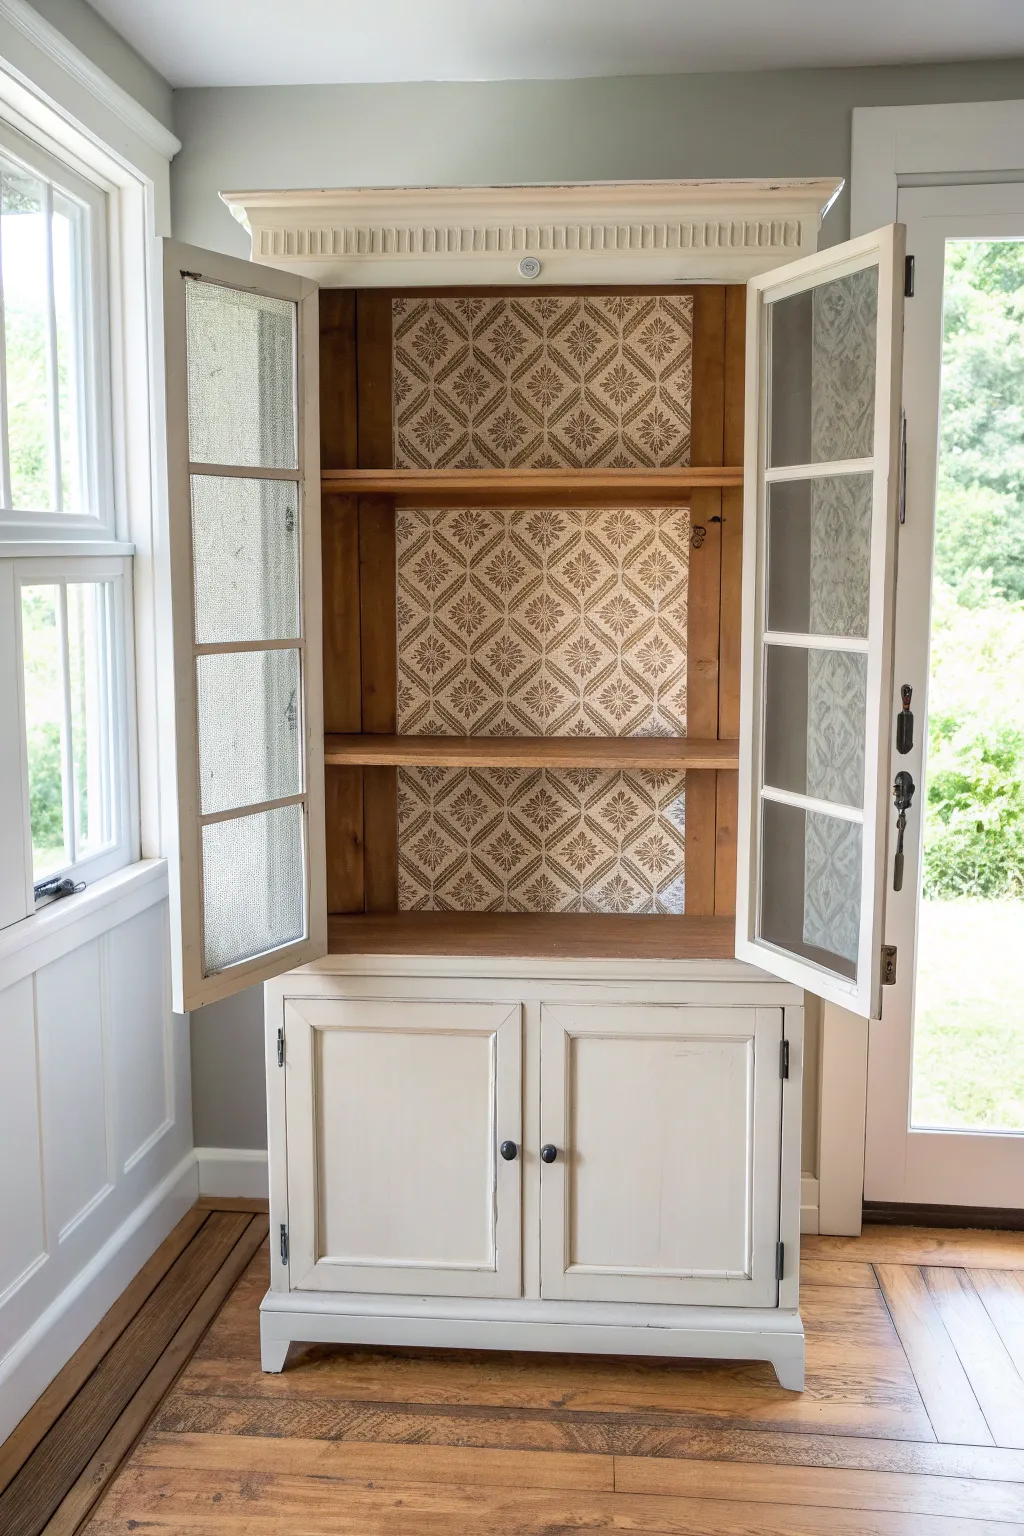
Wallpaper-Back Painted Hutch for Pattern Pop
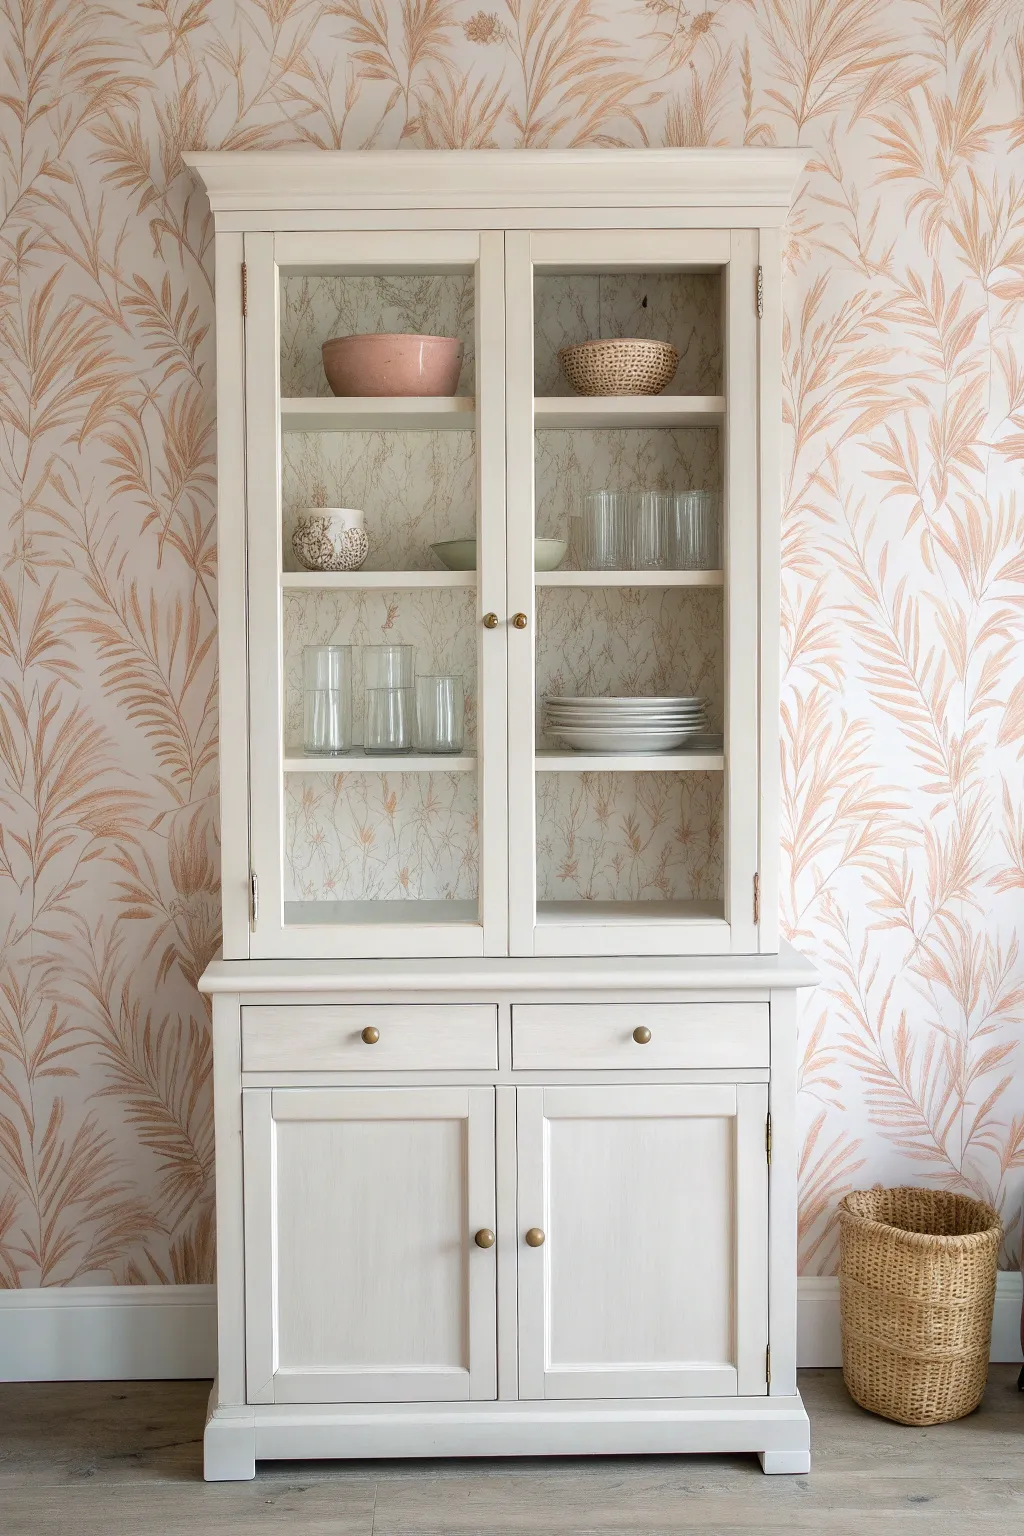
Transform a dated or plain china cabinet into a luminous focal point by pairing creamy neutral paint with a delicate, nature-inspired wallpaper backing. This project perfectly balances modern simplicity with a touch of organic warmth, making your display pieces truly pop against the patterned interior.
Step-by-Step
Materials
- Solid wood or wood veneer hutch
- Sander (orbital or palm) and sandpaper (120 and 220 grit)
- Painter’s tape
- High-quality primer (bonding primer recommended)
- Creamy off-white chalk or satin finish paint
- Peel-and-stick or traditional wallpaper (botanical print)
- Wallpaper smoothing tool
- X-Acto knife with fresh blades
- Screwdriver tailored to your hardware
- Paintbrushes (angled sash brush) and foam rollers
- Clean tack cloths
- Measuring tape
Step 1: Preparation & Disassembly
-
Clear and Clean:
Empty the hutch completely. Give the entire piece a thorough wipe down with a degreaser or mild soap and water to remove dust, oils, and old furniture polish. -
Remove Hardware:
Using your screwdriver, carefully remove all knobs, pulls, and hinges. Place these small parts in labeled bags so you don’t lose them. -
Separate Sections:
If your hutch comes in two pieces (a top display unit and a bottom buffet), carefully separate them. This makes moving and painting significantly easier. -
Shelving Removal:
Take out any adjustable shelves. If the back panel is easily removable (sometimes held on by small nails or screws), remove it now. This is a game-changer for applying wallpaper later. -
Sanding Surfaces:
Scuff sand the entire exterior and the interior shelving with 120-grit sandpaper. You don’t need to strip it to bare wood, just create a grippy surface for the primer. -
Dust Clean-up:
After sanding, vacuum up the dust and wipe everything down with a tack cloth to ensure a perfectly smooth base.
Wallpaper Bubble Trouble?
If you spot a stubborn air bubble after smoothing, prick it gently with a sewing needle to release the air, then press flat with your smoothing tool.
Step 2: Painting the Structure
-
Tape and Protect:
Use painter’s tape to mask off any glass panels on the doors. Press the tape edges down firmly to prevent paint bleed. -
Prime the Piece:
Apply a coat of bonding primer to the entire unit, including shelves and doors. Use a brush for corners and detailed moldings, and a roller for flat surfaces. -
First Paint Coat:
Once the primer is dry and lightly sanded with 220-grit paper, apply your first coat of creamy off-white paint. I find that long, even strokes with the grain give the best finish. -
Dry and Recoat:
Allow the first coat to dry completely according to the can’s instructions. Apply a second coat for full, opaque coverage. -
Seal (Optional):
If you used chalk paint, apply a clear wax or matte polycrylic topcoat to protect the finish from scratches and wear.
Level Up: Shelf Lighting
Install small, battery-operated puck lights under each shelf or at the top of the cabinet to illuminate your display and highlight the wallpaper pattern.
Step 3: Wallpaper Application
-
Measure the Back:
Measure the height and width of the back panel area. If you left the back attached, you’ll be working inside the cabinet; if you removed it, lay it flat on a table. -
Cut the First Strip:
Cut your first length of wallpaper, leaving about two inches of excess on both the top and bottom to allow for adjustments. -
Apply Center Strip:
Start applying the paper at the top edge. If working on a wide back, I prefer starting in the center to ensure the pattern is symmetrical, then working outward. -
Smooth it Out:
Use your smoothing tool to press the paper against the backing, working from the center toward the edges to push out air bubbles. -
Match the Pattern:
Line up the second strip carefully so the botanical pattern flows seamlessly. Overlap slightly if the manufacturer instructions suggest it, otherwise butt the edges tightly together. -
Trim Excess:
Once all paper is applied, use a sharp X-Acto knife and a straight edge to trim the excess paper at the top, bottom, and corners for a crisp line.
Step 4: Reassembly
-
Reattach Backing:
If you removed the back panel, nail or screw it back onto the top hutch unit securely. -
Hardware Installation:
Reattach the doors and drawers. Install your knobs and pulls. If the old hardware looks dated, consider spray painting them gold or buying new brass knobs to match the warm tones. -
Shelf Placement:
Slide your painted shelves back into place. Be careful not to scuff your fresh wallpaper as you inset them. -
Clean Glass:
Remove the painter’s tape from the glass and clean the panes with glass cleaner to remove any smudges.
Enjoy styling your refreshed hutch with favorite ceramics and glassware to complete the look
Painted Hutch With Glass Doors Framed in Color
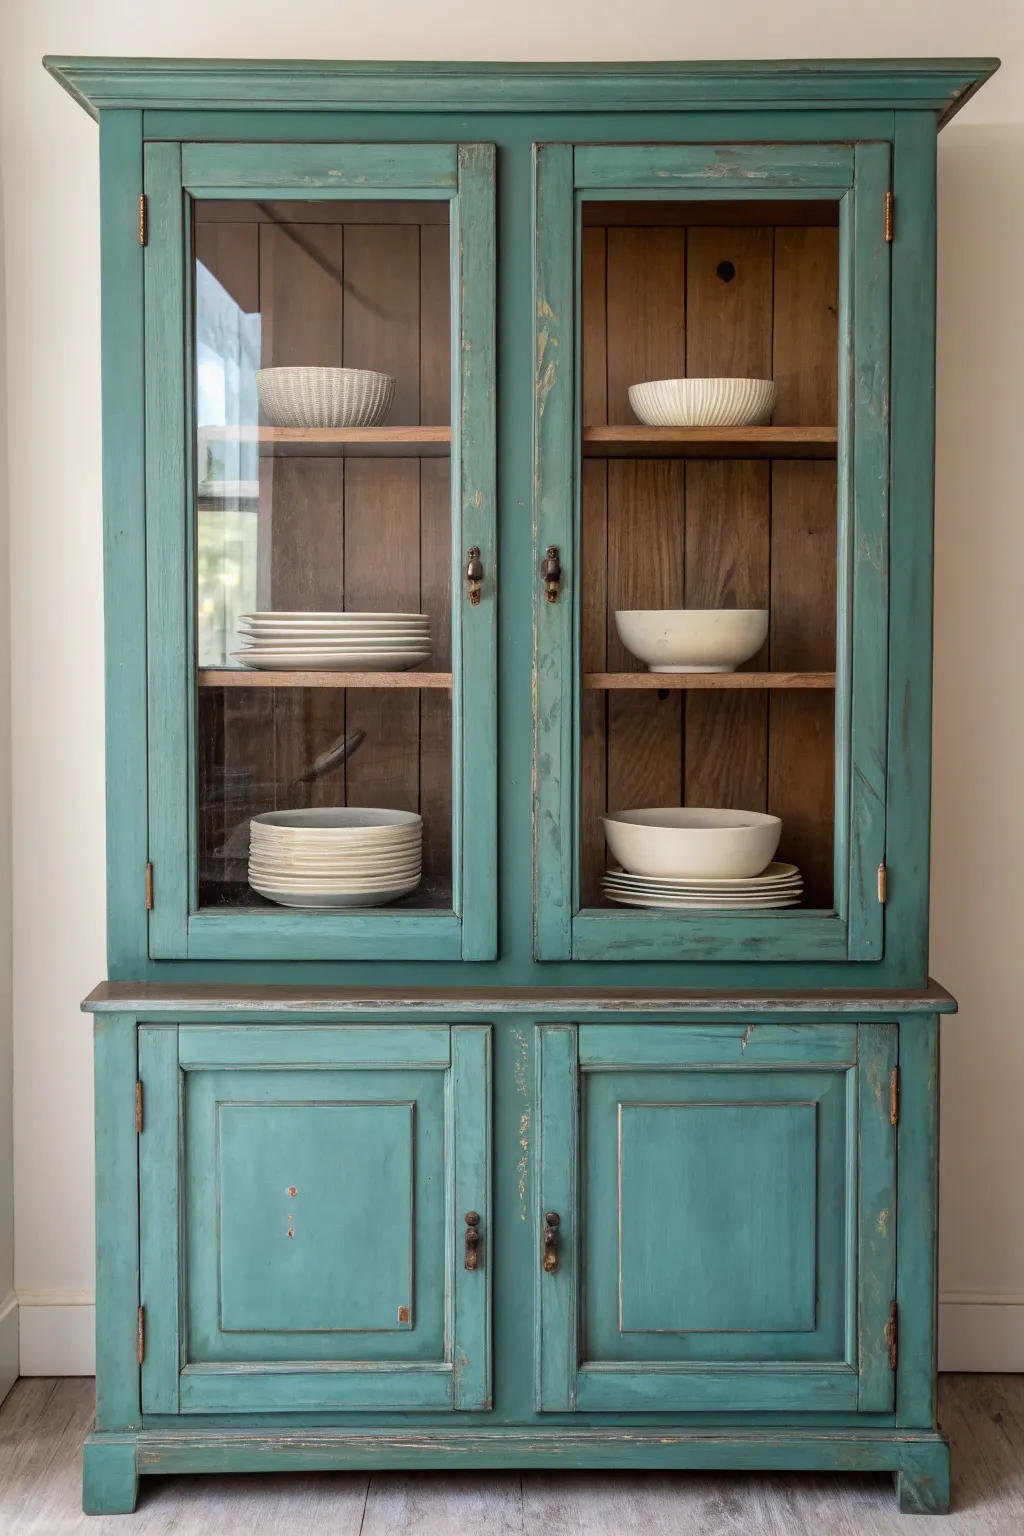
This project transforms a standard hutch into a stunning rustic focal point featuring a vibrant teal finish heavy with character. By combining milk paint with strategic distressing, you will achieve that authentic, time-worn look that perfectly frames the warm wood interior.
How-To Guide
Materials
- Wooden hutch (with glass upper doors)
- Teal or turquoise milk paint (or chalk paint)
- Dark wood stain (walnut or espresso)
- Clear furniture wax
- Dark antiquing wax
- Medium-grit sandpaper (120-150 grit)
- Fine-grit sandpaper (220 grit)
- Painter’s tape
- Paintbrushes (natural bristle recommended)
- Lint-free rags
- Screwdriver
- Drop cloth
- Mild degreaser or TSP substitute
Step 1: Preparation and Cleaning
-
Hardware Removal:
Begin by removing all doors, drawers, hinges, and handles using your screwdriver. Keep all screws and hardware organized in labeled bags so reassembly is easy later. -
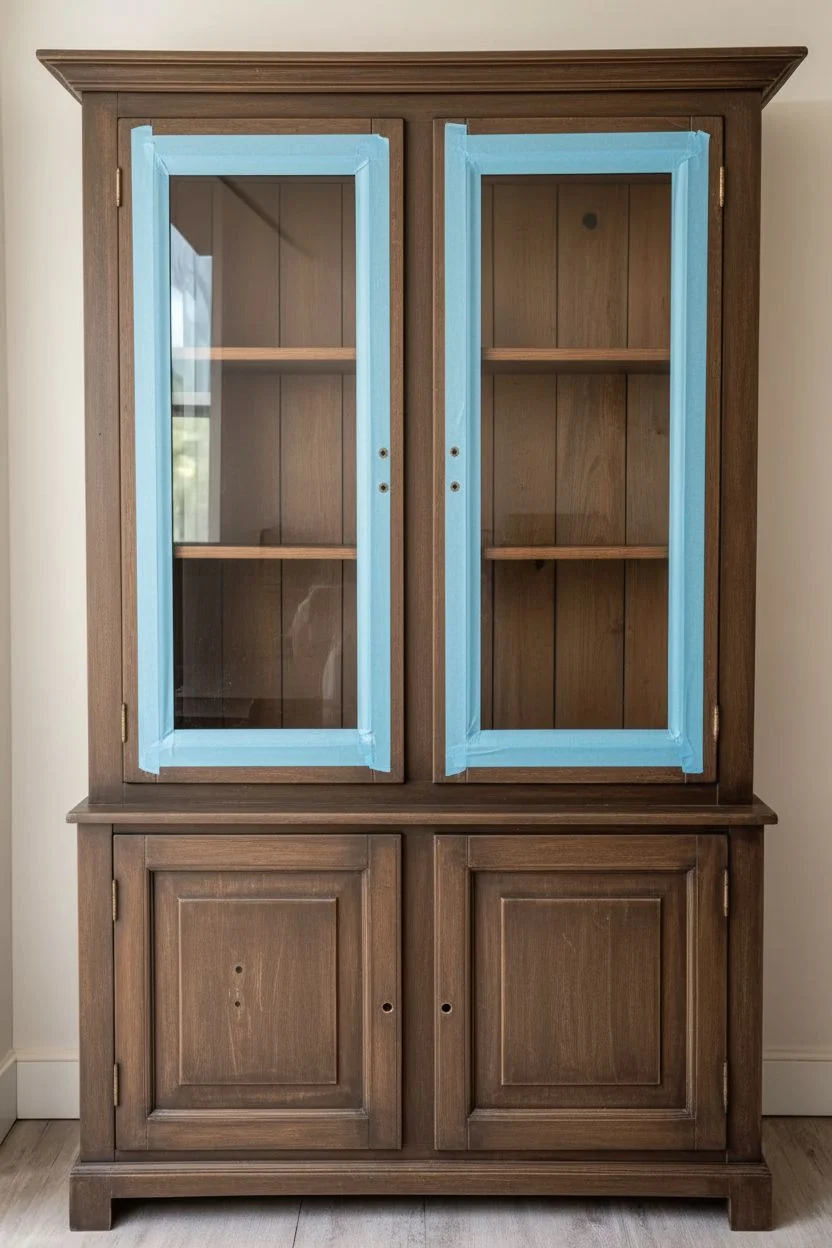
Glass Protection:
Carefully tape off both sides of the glass panels on the upper doors with painter’s tape. Press the edges down firmly with a credit card or fingernail to prevent any paint from seeping underneath. -
Surface Cleaning:
Wipe down the entire exterior of the hutch with a mild degreaser or TSP substitute. This removes years of furniture polish, oil, and dust that could prevent your new finish from adhering properly. -
Scuff Sanding:
Use medium-grit sandpaper to lightly scuff the exterior surfaces. You don’t need to strip it to bare wood, but you do need to rough up the existing shiny finish to give the new paint distinct ‘teeth’ to grab onto.
Step 2: Staining and Painting
-
Dark Base Coat (Optional):
If your hutch is currently a light color, apply a coat of dark wood stain to the exterior areas you plan to distress. This ensures that when you sand later, a rich dark wood shows through rather than pale pine or white primer. Let this dry completely according to the can’s instructions. -
First Paint Coat:
Mix your teal milk paint. Apply the first coat using a natural bristle brush. Don’t worry about perfect opacity here; milk paint often looks streaky on the first pass, which adds to the vintage charm. -
Drying Time:
Allow the first coat to dry fully. Milk paint dries fairly quickly, usually within 1-2 hours depending on humidity, but ensure it is dry to the touch before proceeding. -
Second Paint Coat:
Apply a second coat of teal paint for better coverage. Pay special attention to the door frames and detailed molding, but keep the application somewhat loose to maintain a hand-painted feel. -
Interior Consideration:
Leave the interior of the cabinet unpainted to maintain the warm wood contrast. If the interior needs refreshing, simply wipe it down with a little hemp oil or clear wax to revitalize the existing wood.
Milk Paint Magic
For authentic chipping, skip the primer. Milk paint naturally flakes off pre-finished surfaces. Just lightly sand loose flakes away before waxing to seal the ‘chippy’ look.
Step 3: Distressing and Sealing
-
Targeted Sanding:
Once the paint is bone dry, take your medium-grit sandpaper to the high points. Focus on edges, corners, handle areas, and raised molding—places where standard wear and tear would naturally occur over decades. -
Heavy Distressing:
For the look in the photo, be aggressive in a few spots. Sand firmly until you break through the teal paint to reveal the dark wood underneath. Dust off the piece thoroughly with a clean rag or tack cloth. -
Clear Wax Application:
Apply a layer of clear furniture wax over the entire painted exterior using a wax brush or lint-free rag. This seals the porous milk paint and deepens the teal color. -
Adding Age with Dark Wax:
While the clear wax is still tacky, use a small brush to apply dark antiquing wax into the crevices, corners, and recessed panels. I find this step adds immediate dimension and historical weight to the piece. -
Buffing the Finish:
Wipe away excess dark wax with a clean cloth, feathering it out so it doesn’t look like smudge marks. Once the wax has cured for a few hours, buff the entire piece with a soft cloth to create a subtle, satin sheen. -
Reassembly:
Carefully remove the painter’s tape from the glass. Reattach the doors and hardware. If the original hardware looks too new, consider rubbing a little dark wax on the handles to match the aged aesthetic.
Patterned Backing
Add visual surprise by lining the back interior panel with peel-and-stick wallpaper in a subtle cream floral or geometric print before putting the shelves back in.
Now you have a centerpiece that balances vibrant color with rustic history, ready to display your favorite dishware
Open-Shelf Painted Hutch With Doors Removed
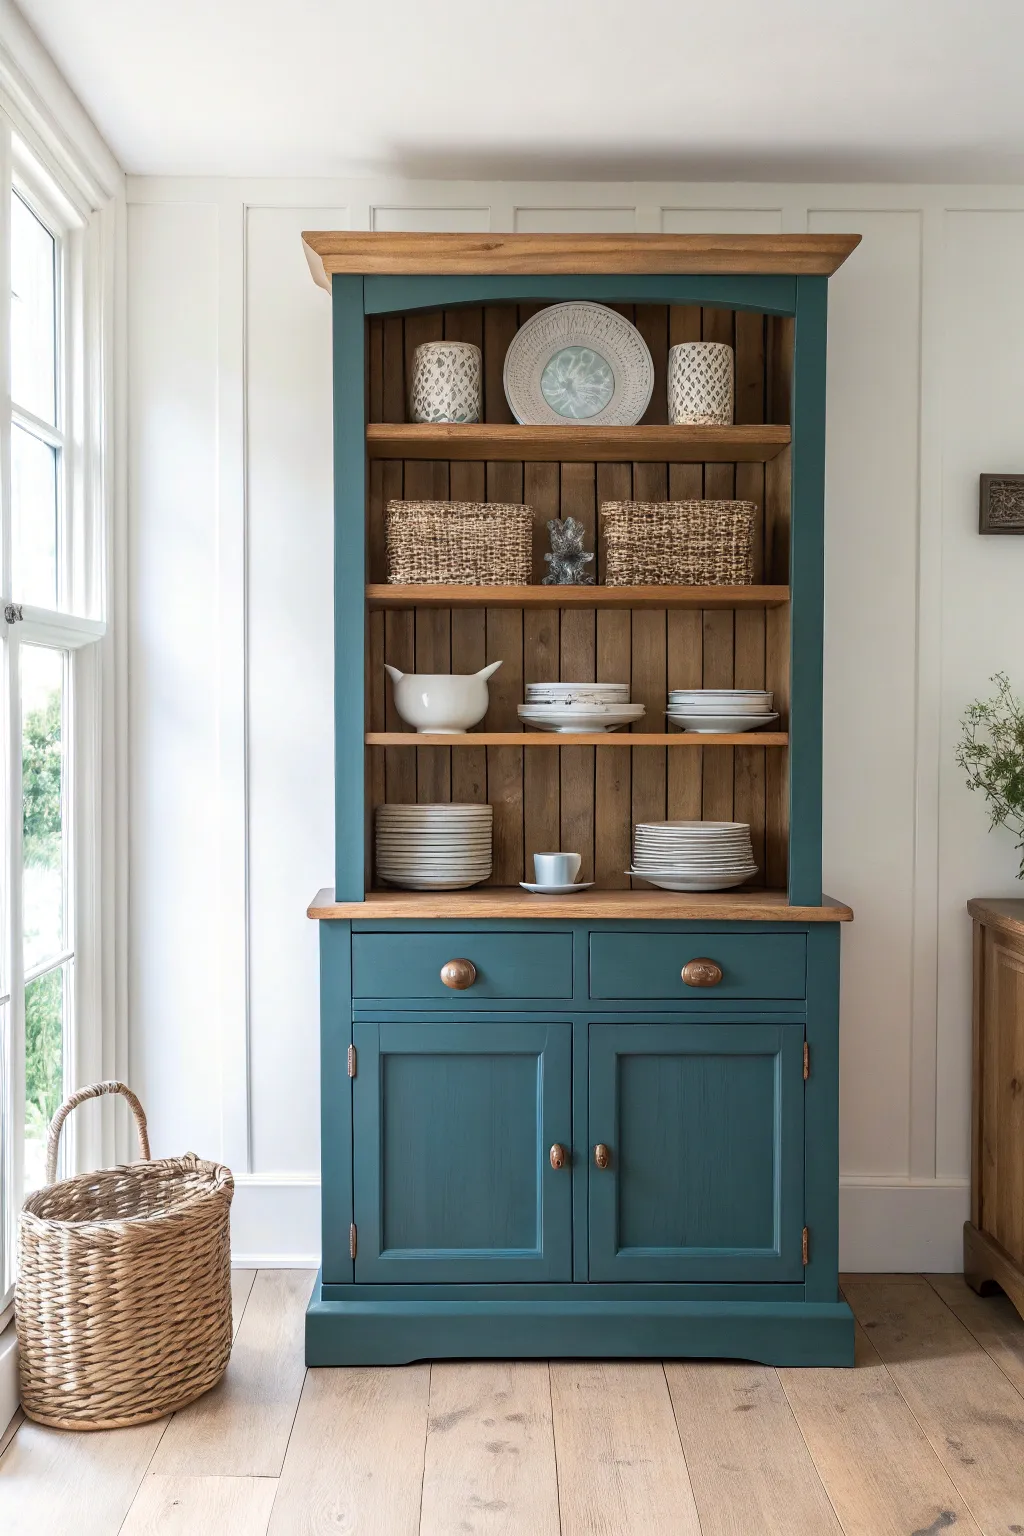
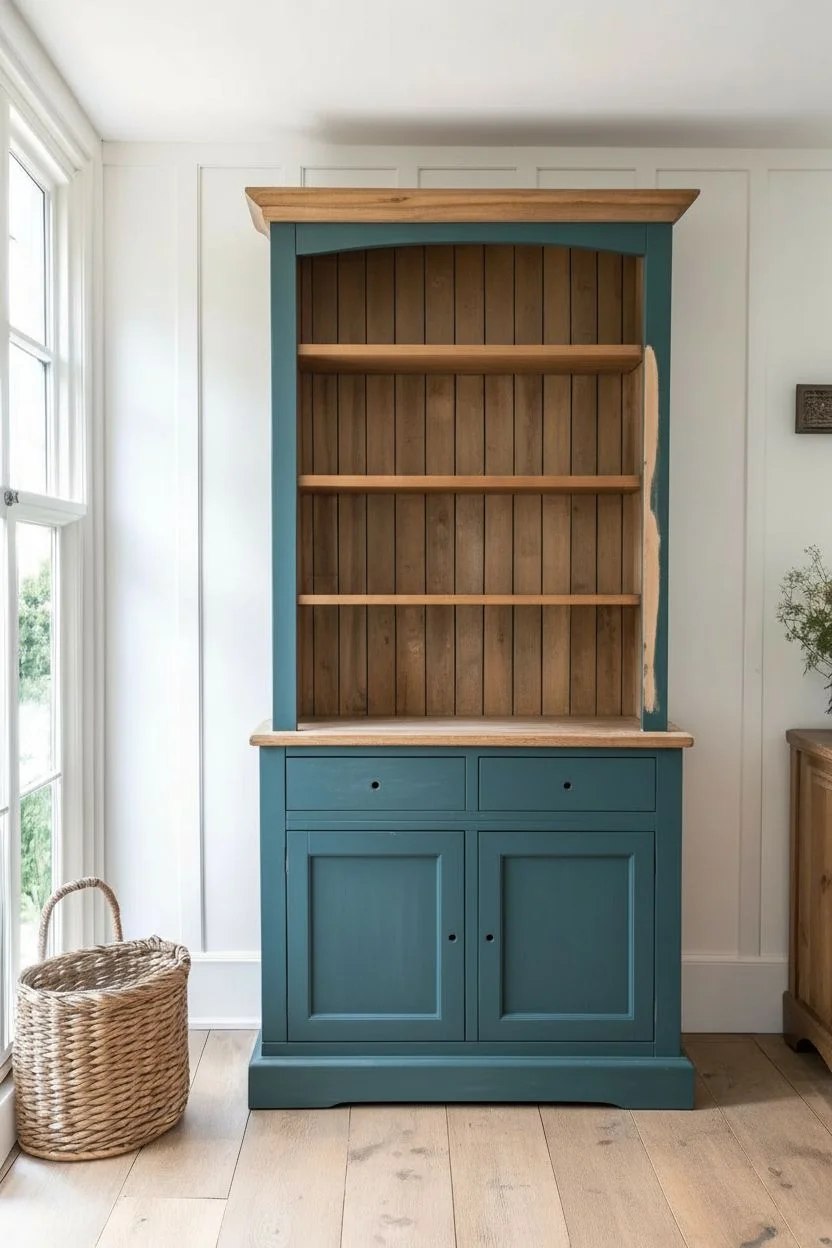
Transform a dated dining room staple into a modern farmhouse focal point with this elegant two-tone makeover. By removing upper doors and pairing a rich teal exterior with warm, natural wood tones, you’ll create a piece that feels both grounded and airy.
Step-by-Step Guide
Materials
- Solid wood hutch (preferably with removable upper doors)
- Screwdriver or drill
- Wood filler
- Sandpaper (80, 120, and 220 grit)
- Orbital sander
- Painter’s tape
- Primer (stain-blocking)
- Deep teal chalk or mineral paint
- Matte clear topcoat (polyurethane or wax)
- Wood stain (warm oak or walnut tone)
- Clean lint-free rags
- Synthetic bristle paintbrushes (angled and flat)
- Small foam roller
- Antique bronze or copper hardware (knobs and pulls)
Step 1: Disassembly and Prep
-
Clear the decks:
Begin by removing all contents, shelves, and hardware from the hutch. Take off the upper cabinet doors completely—we won’t be putting these back on to achieve that open-shelf look. -
Remove hardware:
Unscrew all existing knobs, handles, and hinges. Keep the screws in a labeled baggie just in case, even if you plan to replace the hardware. -
Fill the voids:
Since we are permanently removing the upper doors, fill the old hinge holes on the face frame with wood filler. Use a putty knife to overfill slightly, as the filler will shrink when dry. -
Sand it smooth:
Once dry, sand the filled areas flush with the surface using 120-grit sandpaper. This step is crucial for making those old holes invisible under the paint. -
Clean deeply:
Scrub the entire piece with a degreaser or a TSP substitute to remove years of furniture polish, oils, and dust. A clean surface ensures your new finish won’t peel later.
Tape Trick
To prevent paint bleed on the textured back panel, run a credit card firmly over the edge of your painter’s tape to seal it tight before painting.
Step 2: Refinishing the Wood Accents
-
Strip the natural areas:
Identify the parts you want to keep as raw wood: the top crown, the flat buffet surface, the shelves, and the vertical back paneling. Use an orbital sander with 80-grit paper to strip away the old finish, working your way up to 220-grit for a smooth feel. -
Hand sanding details:
For the grooves in the beadboard backing or tight corners on the shelves, fold a piece of sandpaper and sand by hand to remove the old finish without damaging the profile. -
Apply stain:
Apply your chosen warm oak wood stain to these stripped areas using a clean rag. Wipe on, let it penetrate for a few minutes, then wipe off the excess in the direction of the grain. -
Seal the wood:
Once the stain is fully dry, protect these natural wood sections with two thin coats of matte clear polyurethane. Sand lightly with high-grit paper between coats for a professional touch.
Step 3: Painting the Structure
-
Masking up:
Use quality painter’s tape to carefully mask off the freshly stained wood areas (the back paneling, shelves, and buffet top). Take your time here; crisp lines make the project. -
Scuff sand the rest:
Lightly scuff sand the remaining exterior surfaces that will be painted. You don’t need to strip it bare, just roughen the surface so the primer grabs hold. -
Prime time:
Apply a stain-blocking primer to the exterior frame, drawers, and lower doors. This prevents old wood tannins from bleeding through your beautiful teal paint. -
First coat of color:
Stir your deep teal paint thoroughly. Use an angled brush to cut in around corners and edges, then use a small foam roller on the flat surfaces of the sides and doors for a smooth, brush-stroke-free finish. -
Build coverage:
Allow the first coat to dry completely. Apply a second coat, watching for drips around the edges. I find that darker colors often benefit from a thin third coat just on the high-traffic areas for depth. -
Seal the paint:
Protect your paint job with a matte clear topcoat. If using wax, buff it to a soft sheen; if using poly, apply with a soft brush to avoid bubbles.
Add Lighting
Install discreet, battery-operated puck lights under the top lip or shelves to illuminate your display items and highlight the wood backing.
Step 4: Assembly and Styling
-
Remove tape:
Carefully peel away the painter’s tape. Pulling the tape at a 45-degree angle while the topcoat is distinctively tacky but not fully cured can help ensure a razor-sharp line. -
Hardware installation:
Install the new antique bronze knobs on the drawers and pulls on the lower doors. The warm metal tones will pop beautifully against the cool teal. -
Reinsert shelves:
Carefully slide the wooden shelves back into place. If they are adjustable, decide on your spacing now based on the baskets or decor you plan to display. -
Final wipe down:
Give the entire piece a final wipe with a microfiber cloth to remove any lingering dust or fingerprints from installation.
Step back and admire how the balance of rich color and natural texture completely revitalizes the room.
Color-Blocked Painted Hutch With Geometric Panels
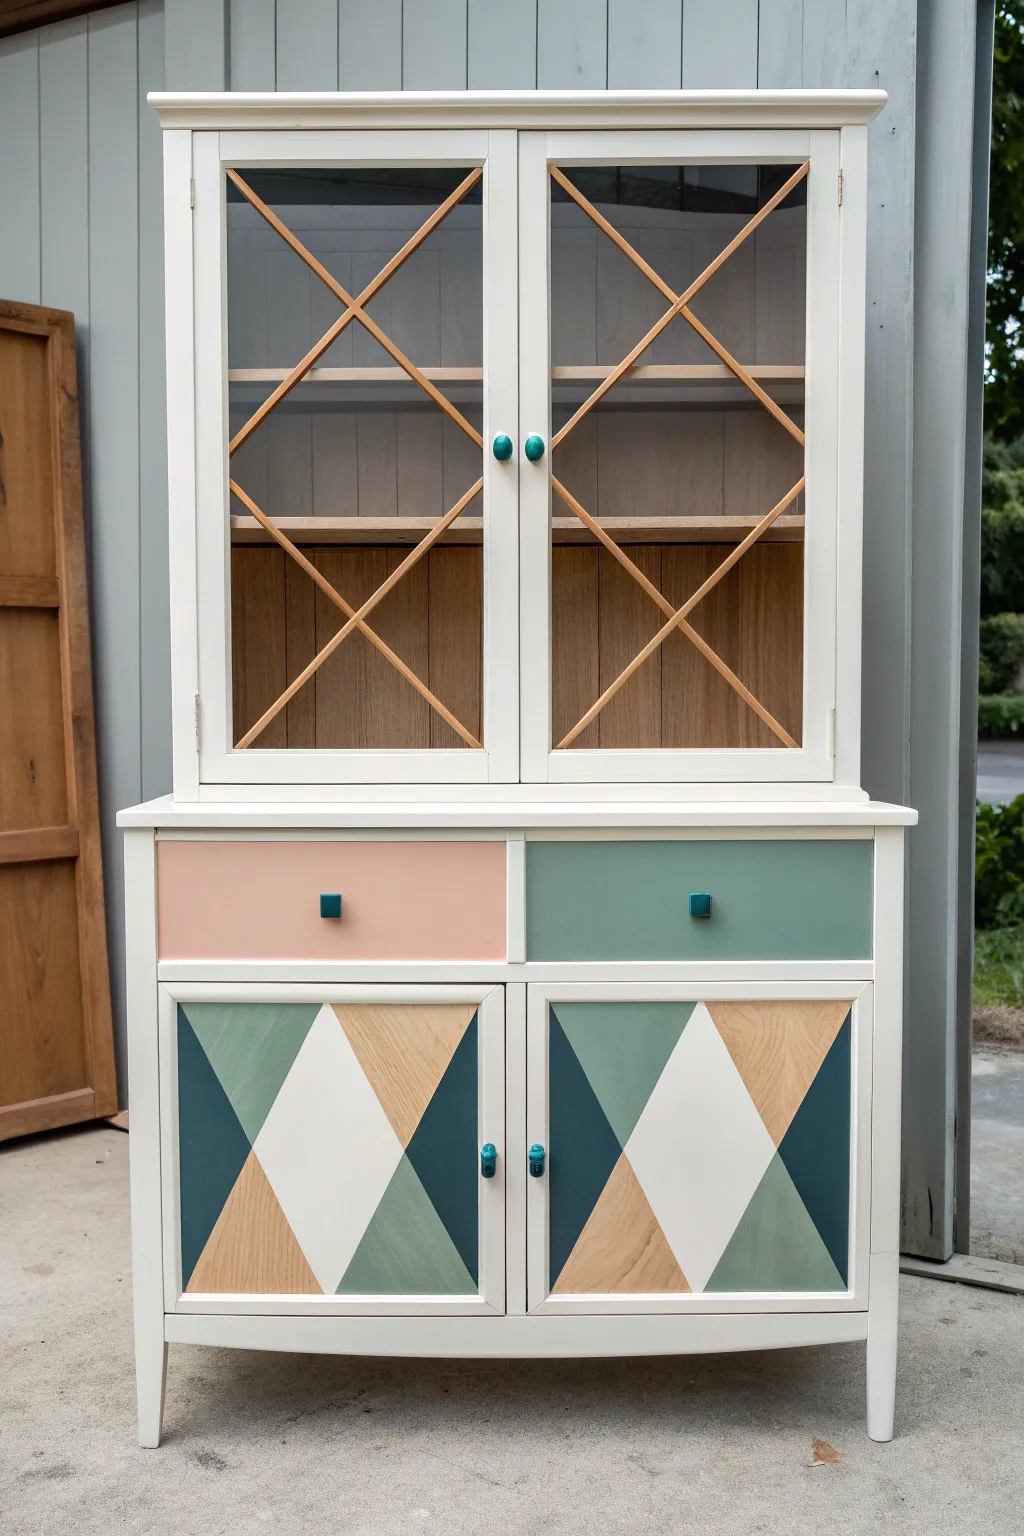

Transform a dated hutch into a modern statement piece with this playful, geometric makeover. By combining crisp white trim, soft pastels, and a striking diamond pattern on the lower doors, you’ll create a custom furniture piece that feels both retro and freshly contemporary.
Detailed Instructions
Materials
- Solid wood hutch (preferably with glass upper doors and flat lower panels)
- Sandpaper (120, 180, and 220 grit)
- Orbital sander
- Painter’s tape (high-quality delicate surface tape recommended)
- Primer (stain-blocking)
- White semi-gloss furniture paint (base color)
- Pale pink chalk or acrylic paint
- Sage green chalk or acrylic paint
- Dark teal chalk or acrylic paint
- Small foam roller and tray
- High-quality angled brush (1.5 – 2 inch)
- Clear matte or satin polycrylic topcoat
- Measuring tape and pencil
- Square ruler
- Four decorative knobs (square knobs for drawers)
- Two round knobs (for upper doors)
- Wood filler (if changing hardware hole locations)
Step 1: Preparation & Base Coat
-
Hardware removal:
Begin by removing all existing hardware, including knobs, pulls, and hinges if possible. If you plan to change the hardware style like in our example, fill the old holes with wood filler now and let dry. -
Surface sanding:
Scuff sand the entire piece with 120-grit sandpaper to remove the old glossy finish. For the lower door panels specifically, sand down to bare wood if you want to expose natural wood grain in the geometric pattern later. -
Cleaning:
Wipe the entire unit down thoroughly with a damp cloth or tack cloth to remove all dust. A clean surface is crucial for smooth paint adhesion. -
Glass protection:
Carefully tape off the glass panes on the upper doors. Take your time here—getting paint on the glass is a pain to clean later. -
Priming:
Apply a coat of stain-blocking primer to the entire piece, *except* the areas on the lower doors where you want natural wood to show. Lightly sand with 220-grit paper once dry. -
Painting the frame:
Using your foam roller for flat areas and the angled brush for corners, paint the main body, upper doors, and door frames in a crisp white semi-gloss. You will likely need 2-3 coats for full coverage.
Bleeding Lines?
If paint bleeds under the tape, don’t panic. Wait for it to fully dry, then use a small, stiff artist’s brush and your base color to touch up the edges for a razor-sharp line.
Step 2: Drawers & X-Detailing
-
Color blocking the drawers:
Paint one drawer front in pale pink and the other in sage green. Use the foam roller for a smooth, brush-stroke-free finish. -
Detailing the upper glass:
If your hutch has wooden mullions (the X pattern) over the glass, leave them natural wood for contrast, or stain them lightly to match the lower door accents. If they are already painted, strip a small section to check the wood quality before deciding.
Step 3: The Geometric Patterns
-
Planning the geometry:
On the lower doors, locate the vertical centerizing point. Draw a light pencil line down the center. Use a square ruler to map out a large diamond shape that spans the width of the panel. This central diamond will be white. -
Mapping the triangles:
From the corners of your central diamond, draw lines connecting to the outer corners of the door panel. This creates four surrounding triangles. -
Taping stage one:
Tape off the central diamond first. Press the tape edges down firmly with a credit card to prevent bleed-through. -
Painting the center:
Paint the central diamond white. Also, choose two opposite triangles (e.g., top right and bottom left) to leave as exposed natural wood. Tape off the remaining triangles. -
Painting the dark teal:
Paint the outer triangles on the far left and far right edges in dark teal. I prefer to do two thin coats rather than one thick one to avoid ridges at the tape line. -
Painting the sage green:
Paint the remaining triangles (neighboring the central diamond) in sage green. -
The reveal:
Peel off the tape while the final coat is still slightly tacky. This helps ensure a crisp, sharp line.
Natural Wood Look
If the wood under the paint is damaged, you can cheat the look! Use a realistic wood-grain contact paper for those specific triangular sections instead of stripping and sanding.
Step 4: Assembly & Finishing
-
Sealing:
Apply two coats of clear polycrylic over the drawers and lower doors, paying special attention to the raw wood sections to protect them from moisture and oils. -
Hardware installation:
Drill new holes if necessary and install the small square knobs (teal on pink, green on green for a fun mix-match) on the drawers. Install coordinating teardrop or simple round pulls on the doors. -
Reassembly:
Reattach the doors to the hinges carefully, ensuring they hang straight.
Step back and admire how a little bit of geometry and color has completely revitalized your furniture piece.
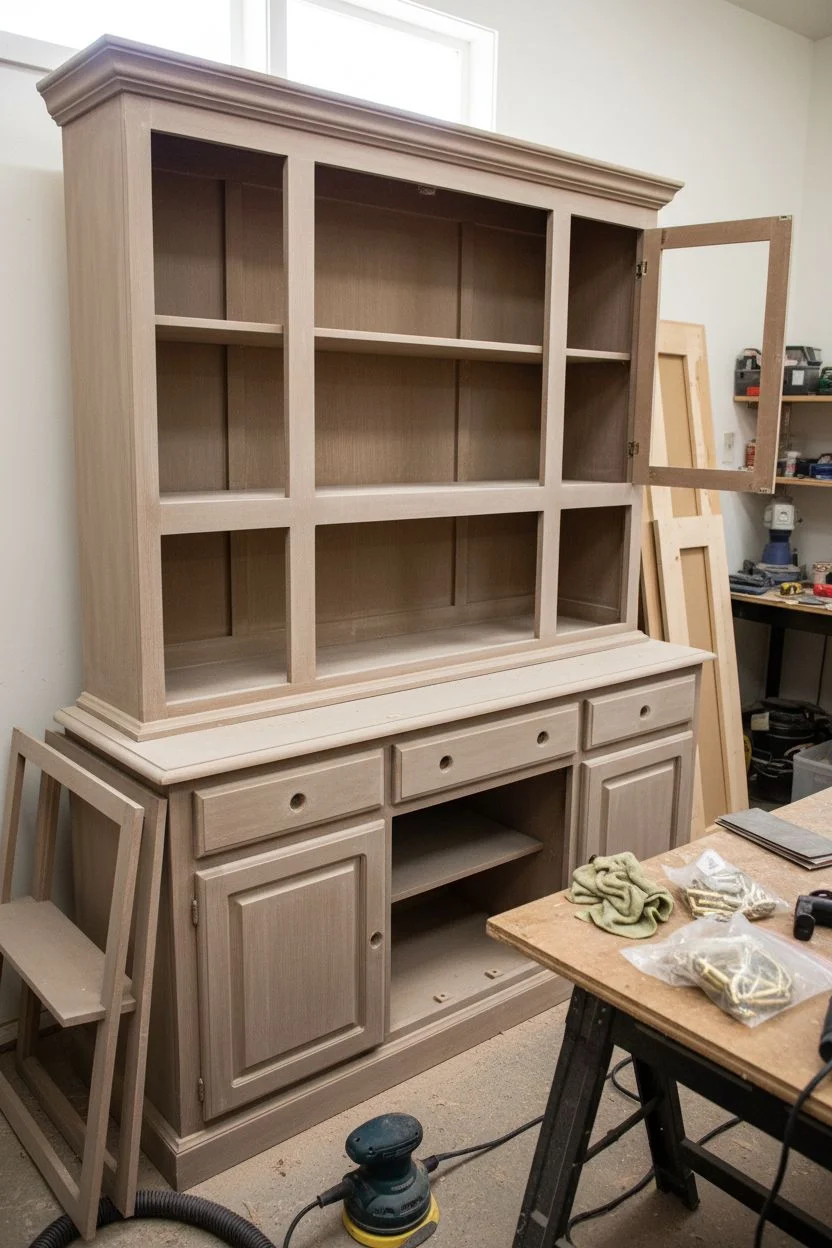
Painted Hutch With Ombre or Gradient Shelves
Transform a standard pine dresser into a statement piece with this elegant two-toned design featuring a surprise inside. The exterior boasts a creamy, neutral finish, while the interior shelves showcase a soft, barely-there gradient that adds depth and sophistication to your display.
Step-by-Step
Materials
- Solid wood hutch with glass doors
- Sandpaper (120, 220, and 320 grit)
- Orbital sander (optional but recommended)
- Wood filler
- High-quality primer (oil-based recommended for raw wood)
- Cream/Off-white chalk or mineral paint
- Three shades of interior paint (grading from light to slightly darker taupe/grey)
- Clear matte wax or polycrylic topcoat
- Dark grey/charcoal furniture paint (for the plinth)
- Paintbrushes (synthetic angled brush and flat brush)
- Small foam rollers
- Painter’s tape
- Screwdriver
- Tack cloth
Step 1: Preparation and Disassembly
-
Remove hardware:
Begin by removing all handles, knobs, and hinges. Place them in labeled bags so you don’t lose any screws. If the glass panels are removable, take them out now; otherwise, tape them off meticulously later. -
Separate the pieces:
If your hutch comes in two parts (top and bottom), separate them to make moving and painting easier. Place the top section on a stable work table. -
Clean thoroughly:
Scrub the entire piece with a degreaser or a TSP alternative to remove years of furniture polish, oil, and dust. This is crucial for paint adhesion. -
Fill imperfections:
Inspect the wood for deep scratches or dents. Apply wood filler, let it dry completely, and sand it flush. -
Sand the surfaces:
Scuff sand the entire piece with 120-grit paper to break the existing finish. You don’t need to strip it to bare wood, just create a ‘tooth’ for the primer. Wipe away all dust with a tack cloth.
Tape Trick
When painting window mullions (the wood strips on glass), don’t stress about perfection. Let paint get on the glass, then scrape it off later with a fresh razor blade for crisp lines.
Step 2: The Base and Exterior
-
Prime the top unit:
Apply a coat of primer to the entire top unit (where the paint will go). I prefer an oil-based primer here to prevent wood knots from bleeding through your light paint later. -
Paint the upper exterior:
Once primed and lightly sanded (220-grit), apply your cream or off-white paint to the exterior frame and doors of the top hutch. Use a synthetic brush for corners and a foam roller for flat areas to minimize brush strokes. -
Second coat:
Allow the first coat to dry according to the can’s instructions, then apply a second coat for full opacity. Sand lightly with 320-grit paper between coats for a professional smooth finish. -
Refinish the base unit:
For the bottom sideboard, you have a choice. If the wood is good quality, sand it down to raw wood (starting with 80 grit, moving to 220). If painting, apply a clear matte sealer to keep that natural pine look shown in the inspiration. -
Paint the plinth:
Tape off the bottom edge of the base unit. Paint the plinth (the very bottom strip) in a contrasting dark grey or charcoal to ground the piece and add a modern touch.
Pattern Play
Instead of a solid color gradient, line the back of the hutch with wallpaper. Choose a pattern that fades from dense at the bottom to sparse at the top for a similar visual effect.
Step 3: Creating the Gradient Interior
-
Map your gradient:
The goal is an ombre effect where the shelves get slightly darker as they go down (or up, depending on preference). Organize your three taupe/grey paint sample pots from lightest to darkest. -
Paint the top backboard:
Paint the back panel of the top shelf section with your lightest shade. Use a brush to cut in the corners first. -
Paint the middle section:
Paint the back panel behind the middle shelves with the medium shade. If there is no physical divider, blend the wet paints slightly where they meet for a soft transition, or use a shelf as a definitive break line. -
Paint the bottom section:
Apply the darkest shade to the lowest section of the backboard. This creates a subtle shadow effect that makes the cabinet look deeper. -
Paint the shelves:
Remove the shelves if possible. Paint them to match the section they belong to. If using the ombre technique, the top shelf gets the lightest distinctive color, and the bottom shelf gets the darkest. -
Seal everything:
Once all paint is fully cured (give it at least 24 hours), apply a clear matte wax or polycrylic over painted surfaces and the natural wood base. This protects against scratches from dishes.
Step 4: Assembly and Styling
-
Reattach hardware:
Screw the hinges and knobs back into place. If you want an upgrade, consider spray painting the old hardware antique brass before reattaching. -
Reconnect units:
Carefully lift the top hutch back onto the base. Secure them together at the back with metal mending plates for safety. -
Final clean:
Clean the glass inside and out with vinegar and water to remove any paint splatters or dust.
Step back and admire how the gradient interior draws the eye inward, making your favorite dishes pop against the subtle background.
Stenciled Painted Hutch Details for Handcrafted Charm
Transform a dated hutch into a farmhouse centerpiece by combining a soft, creamy exterior finish with a surprising pop of pattern inside. This project balances the warmth of natural wood with crisp, stenciled details for a look that feels both vintage and fresh.
How-To Guide
Materials
- Wooden hutch with glass doors
- Sander (orbital) and sandpaper (80, 120, 220 grit)
- Creamy off-white chalk or mineral paint
- Clear wax or matte polycrylic topcoat
- Large geometric stencil (diamond/floral motif)
- Stencil brush or high-density foam roller
- Painter’s tape
- Spray adhesive (repositionable)
- Paper towels
- Screwdriver (for hardware removal)
- Wood stain (optional, if shelves need refreshing)
- Tack cloth
Step 1: Preparation & Sanding
-
Remove Hardware and Doors:
Start by taking off all knobs, hinges, and latches. Label them in small bags so you know exactly where they go later. Carefully remove the glass doors and the lower cabinet doors to make painting easier. -
Clean Thoroughly:
Wipe down the entire piece with a degreaser or a mixture of vinegar and water to remove years of furniture polish, dust, and grime. Let it dry completely. -
Sand the Exterior:
Scuff sand the exterior surfaces that you intend to paint using 120-grit sandpaper. You don’t need to strip it to bare wood, just create enough ‘tooth’ for the paint to grip. -
Expose the Interior Wood:
This is the most labor-intensive part, but worth it. Sand the interior back panel and shelves down to raw wood using your orbital sander, starting with 80-grit and working up to 220-grit for a smooth finish. Remove all sanding dust with a tack cloth.
Dry Brush Secret
The #1 mistake is a wet brush. Offload 90% of your paint onto a paper towel before touching the stencil. The brush should feel almost dry to the touch to prevent bleeding.
Step 2: Painting the Exterior
-
First Coat:
Apply your creamy white chalk paint to the exterior frame, sides, and door frames. Use a high-quality synthetic brush for the detailed molding and a small roller for flat sides to minimize brush strokes. -
Dry and Repeat:
Allow the first coat to dry according to the manufacturer’s instructions. Apply a second coat for full, opaque coverage. I find two coats are usually sufficient for this vintage look. -
Distress Edges (Optional):
Once the paint is fully dry, take a fine-grit sandpaper block and gently rub the edges, corners, and raised details of the molding to reveal a bit of wood underneath. This adds that authentic aged character. -
Seal the Paint:
Apply a coat of clear furniture wax or a matte polycrylic to the painted exterior to protect the finish. Buff the wax with a lint-free cloth once dry to achieve a soft sheen.
Step 3: Stenciling the Interior
-
Prep the Back Panel:
Ensure the raw wood back panel is perfectly clean. If you want to stain the wood first to deepen the contrast, do so now and let it cure fully before stenciling. -
Position the Stencil:
Spray the back of your geometric stencil with a light mist of repositionable spray adhesive. Wait a moment for it to get tacky, then press it firmly onto the top center of the cabinet back panel. Use painter’s tape to secure the edges. -
Load the Brush:
Dip your stencil brush into the same cream paint used on the exterior. Offload almost all the paint onto a paper towel until the brush feels dry. Too much paint causes bleeding under the stencil edges. -
Apply the Pattern:
Use a pouncing motion (tapping up and down) or a light swirling motion to apply the paint through the stencil design. Light layers are better than one heavy one. -
Move and Repeat:
Carefully peel back the stencil and reposition it to continue the pattern based on the registration marks. Continue until the entire back panel is covered. Let the paint dry completely.
Uneven Stencil Edges?
If paint bleeds under the stencil, don’t panic. Once dry, lightly sand the area with fine-grit sandpaper to distress the design. It blends the mistake right into the vintage look.
Step 4: Reassembly
-
Clean the Glass:
While the paint cures, clean the glass panes on the doors thoroughly on both sides to remove any sanding dust or errant paint splatters. -
Reattach Doors:
Screw the hinges back onto the cabinet frame and reattach the doors. It helps to have a second pair of hands here to hold the doors level. -
Install Hardware:
Reattach your knobs and latches. If the old hardware looks too tarnished, you can spray paint them matte black or oil-rubbed bronze before reinstalling. -
Final Polish:
Give the entire piece one final wipe down and slide your wooden shelves back into place. Step back and admire the contrast between the rustic wood and the elegant stencil work.
Enjoy styling your newly refreshed hutch with your favorite china or books, knowing the backdrop is a custom work of art
Artistic Painted Hutch With Mural-Style Interior
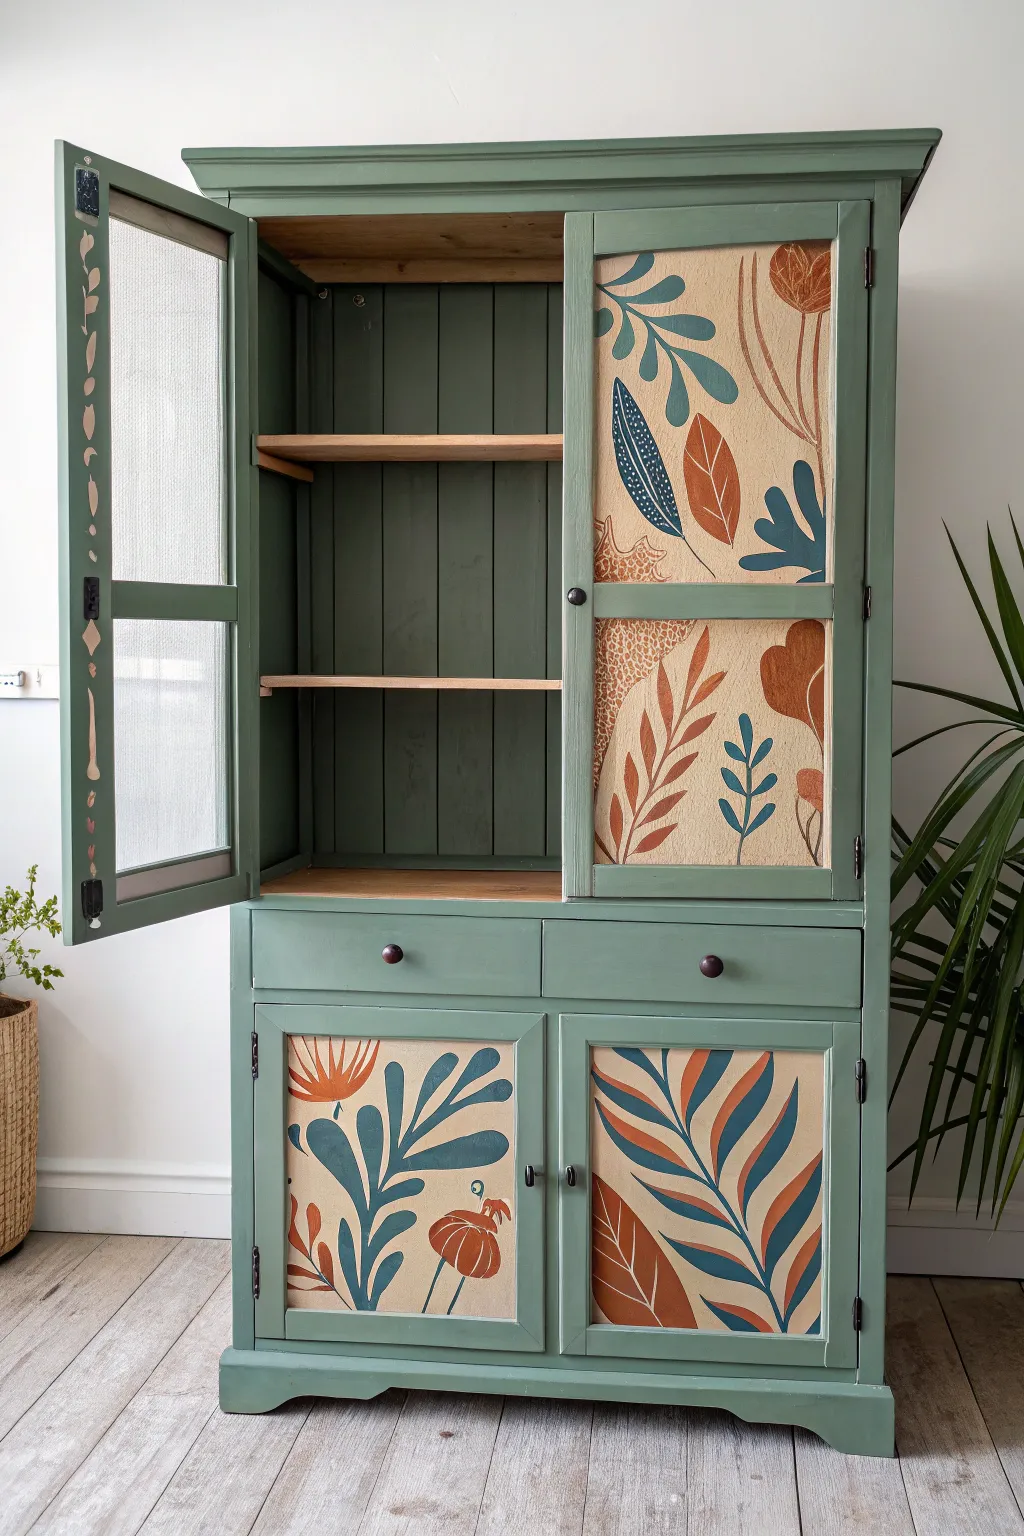
Transform a tired wooden cabinet into a stunning statement piece featuring earthy tones and freehand botanical art. This project combines a soothing sage green body with warm, mural-style door panels for a look that feels both vintage and fresh.
Step-by-Step
Materials
- Wooden hutch or cabinet
- Sage green chalk or mineral paint
- Cream or beige background paint
- Acrylic craft paints (burnt orange, navy blue, terra cotta, white)
- Sandpaper (120 and 220 grit)
- Primer (stain-blocking)
- Assorted paintbrushes (medium angled sash brush, fine detail brushes)
- Painter’s tape
- Clear matte or satin topcoat sealer
- Pencil and eraser
- Wood filler (optional)
Step 1: Preparation & Base Painting
-
Clean and prep the surface:
Begin by removing all hardware, including handles and hinges. If the glass panes are removable, take them out carefully; otherwise, cover them thoroughly with painter’s tape. Clean the entire piece with a degreaser to remove oils and dirt. -
Sand for adhesion:
Scuff sand the entire cabinet with 120-grit sandpaper. You aren’t trying to strip it bare, just creating a ‘tooth’ for the paint to grab onto. Wipe away all dust with a damp cloth or tack cloth. -
Prime the wood:
Apply a coat of stain-blocking primer. This is especially important for vintage furniture to prevent tannins from bleeding through your beautiful green finish. -
Paint the main body:
Apply your sage green paint to the exterior frame, drawers, legs, and the interior back panel. Use a high-quality angled brush to get into corners and grooves. Let the first coat dry completely before adding a second coat for full coverage. -
Prep the mural panels:
Identify which panels will feature the artwork. Paint these specific panel insets with your cream or beige base color. Depending on the darkness of the primer, you may need 2-3 thin coats to get a solid, opaque background.
Mural Mistakes?
If a painted leaf shape goes rogue, don’t panic. Let the mistake dry completely, lightly sand the raised paint edge, and paint over it with the cream background color to start fresh.
Step 2: Creating the Botanical Mural
-
Draft the design:
Once the cream base is fully dry (I like to wait at least 24 hours here to prevent pencil indentations), lightly sketch your botanical shapes directly onto the panels. Focus on large, flowing leaf shapes and organic curves rather than perfect realism. -
Paint the large leaves:
Start with your darkest color, the navy blue. Using a medium filbert or round brush, fill in the large, sweeping leaf shapes. Keep your strokes smooth and confident to mimic the illustrative style shown in the image. -
Add warm tones:
Switch to your burnt orange and terra cotta paints. Fill in the secondary leaf shapes and any floral elements. Distribute these warm colors evenly across the panels to balance the cool blue tones. -
Detail work:
Use a fine liner brush and white or light cream paint to add veins and details on top of the dried blue and orange leaves. This layering adds depth and visual interest to the flat shapes. -
Refine edges:
Step back and look at the composition. If any edges look shaky, use a small angle brush and your cream background color to crisp up the lines around the leaves.
Step 3: Assembly & Finishing
-
Paint interior accents:
While the mural dries, check the interior shelves. You can leave them natural wood for contrast (simply sanding and sealing them) or paint them sage green to match the interior walls. -
Detail the door trim:
Don’t forget the inside edge of the glass door frame. The reference image shows a delicate vine pattern painted in white on the green frame; use a small round brush to add these simple stylistic flourishes. -
Seal the artwork:
Once all paint is perfectly dry, apply a clear matte or satin topcoat over the entire piece. Pay extra attention to the mural panels, applying at least two thin coats to protect the hand-painted art from scratches. -
Reassemble:
Remove all painter’s tape carefully. Reattach the hinges and hang the doors. Install the drawer pulls and knobs. If the hardware is old, consider spray painting it matte black or oil-rubbed bronze before reinstalling. -
Final touch-ups:
Inspect the piece for any nicks or missed spots. Use a small artist brush to touch up the sage green paint where needed, particularly around the hinge areas where installation might have scratched the finish.
Pro Tip: Visual Balance
When sketching your mural, step back frequently. Ensure the heavy blue elements are balanced by the lighter orange ones so one door doesn’t look ‘heavier’ than the other.
Now you have a completely custom furniture piece that brings nature indoors with a whimsical, artistic touch


Have a question or want to share your own experience? I'd love to hear from you in the comments below!