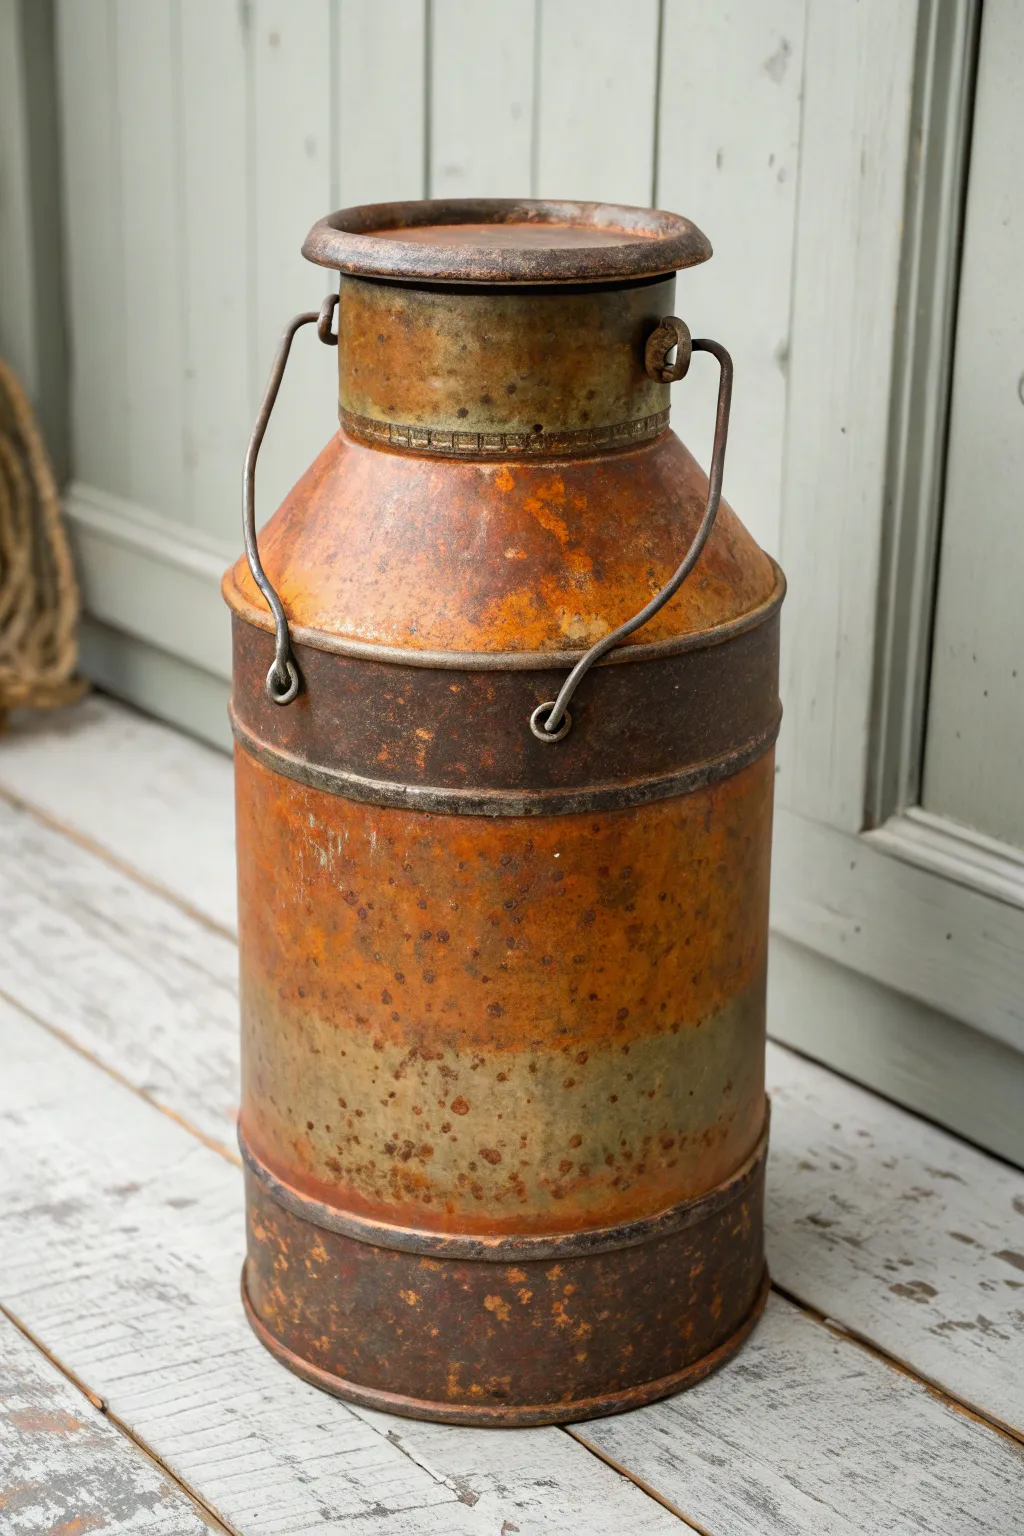
Painted milk cans are one of my favorite ways to turn a chunky, old-school workhorse into a piece of art that actually sets the tone of a space. If you’re craving upcycled decor with personality, these painted milk can ideas will give you plenty to riff on in your own style.
Classic Farmhouse “Milk” Lettering
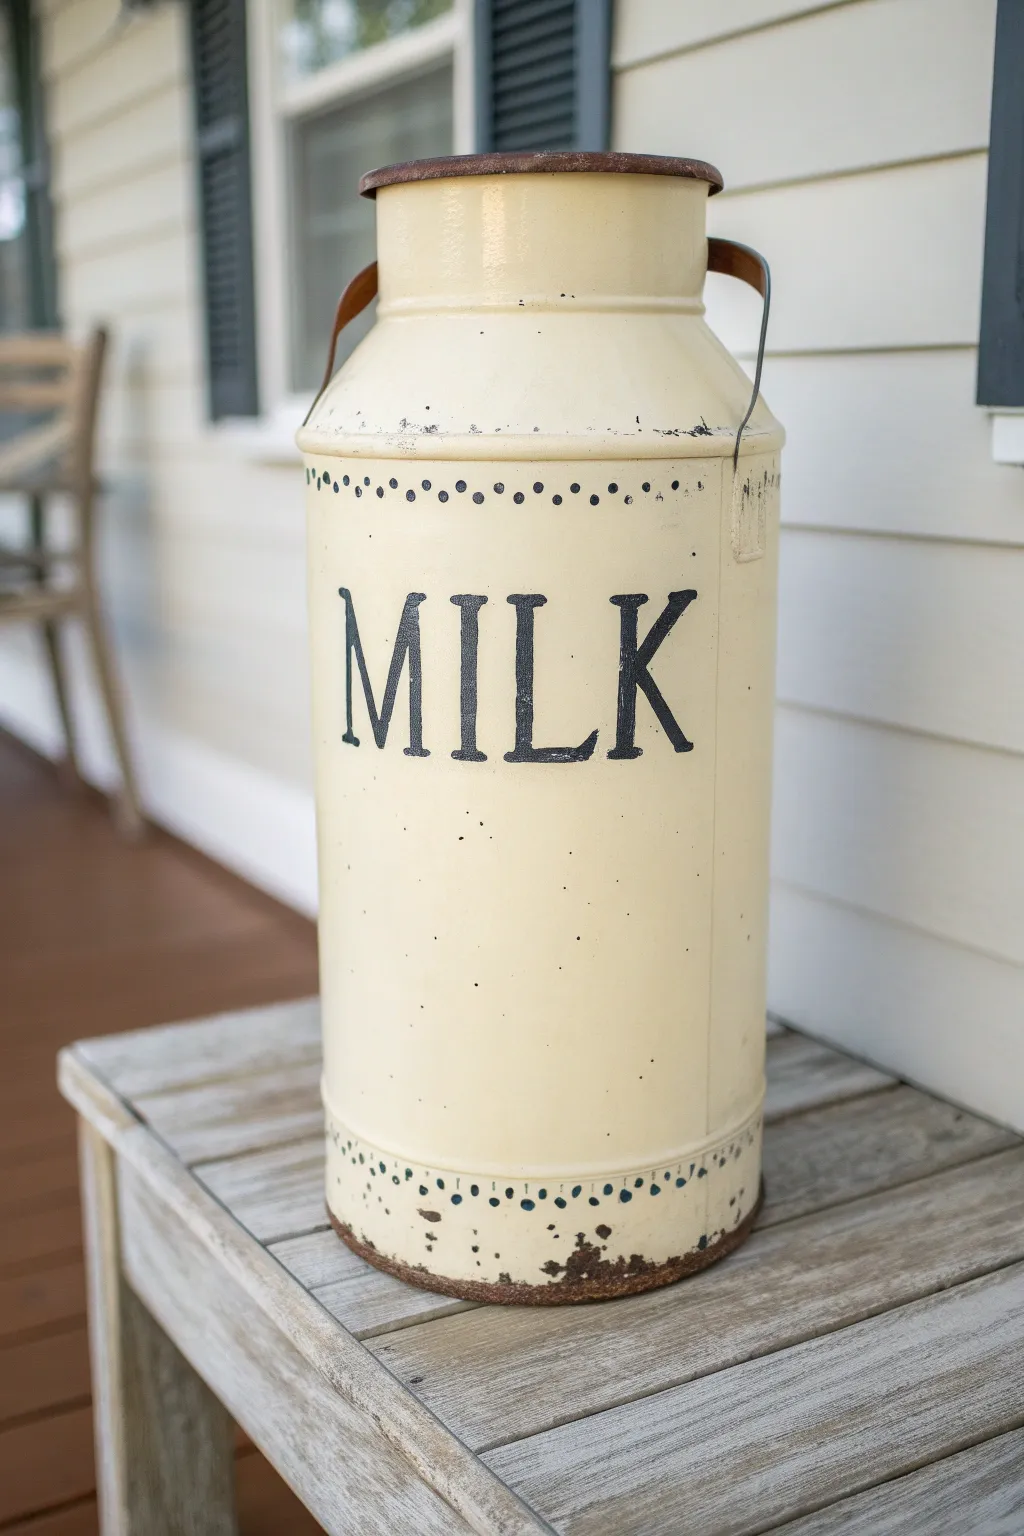
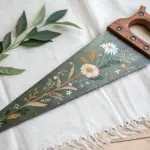
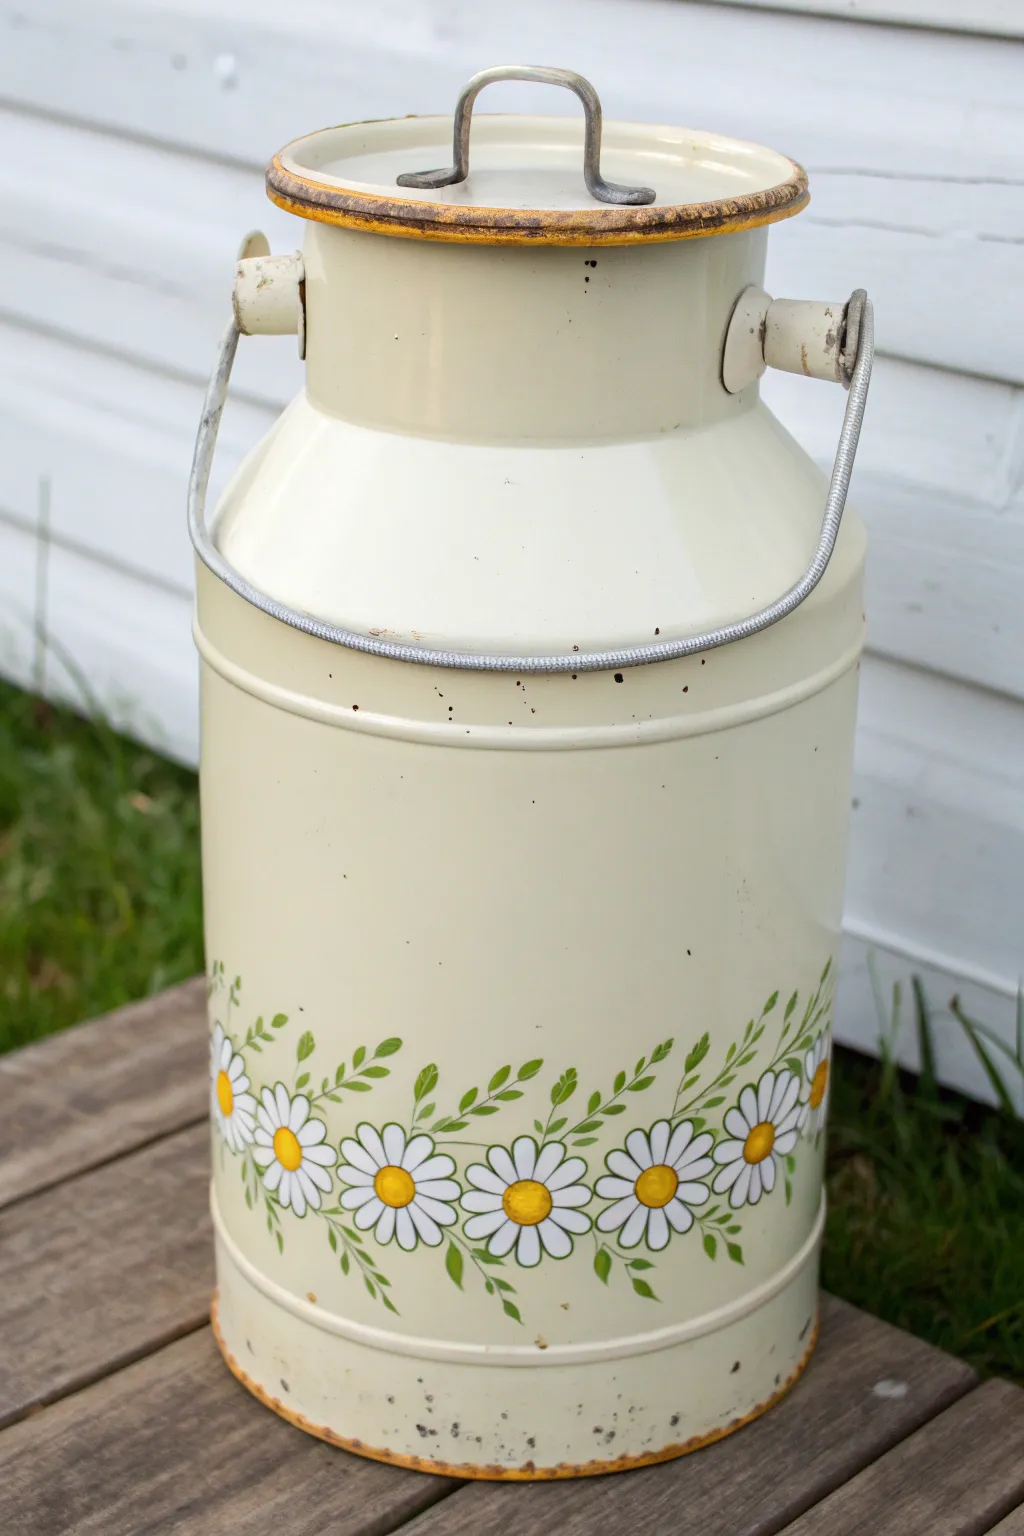
Capture the essence of vintage dairy farms with this charmingly distressed milk can project. The creamy finish, bold serif lettering, and intentionally weathered edges make it a perfect porch accent or rustic umbrella stand.
Step-by-Step
Materials
- Vintage or reproduction metal milk can
- Sandpaper (medium and fine grit)
- Cream or antique white chalk paint
- Black acrylic craft paint
- Rust-colored texture paint (or brown and orange acrylics mixed)
- Medium flat synthetic brush
- Small round detail brush
- Letter stencils (large serif font)
- Painter’s tape
- Stencil brush or foam pouncer
- Matte clear sealer spray
- Pencil
- Clean rag
Step 1: Preparation & Base Coat
-
Clean surface:
Begin by thoroughly cleaning the metal milk can with warm soapy water to remove any grease, dirt, or loose rust. Let it dry completely. -
Scuff sand:
Lightly sand the entire exterior surface with medium-grit sandpaper. This gives the metal ‘tooth’ so your paint adheres properly rather than sliding right off. -
Apply base color:
Using a medium flat brush, apply your first coat of cream chalk paint. Don’t worry about perfect opacity yet; thin, even layers are best. -
Second coat:
Once the first coat is dry to the touch (usually 30–60 minutes), apply a second coat of cream paint for solid coverage. Let this cure for at least two hours.
Bleeding Lines?
If paint bleeds under the stencil, wait for it to dry completely. Then, use a small brush and your cream base paint to carefully touch up the edges and crisp up the lines.
Step 2: Lettering & Details
-
Position stencils:
Arrangement is key. Secure your large serif letter stencils to the front center of the can using painter’s tape, ensuring they are level and evenly spaced. -
Paint letters:
Dip a stencil brush or foam pouncer into black acrylic paint, offloading most of it onto a paper towel until the brush is almost dry. -
Stippling technique:
Lightly dab (stipple) the paint over the stencil openings. This ‘dry brush’ method prevents paint from bleeding underneath the stencil edges. -
Remove stencils:
Carefully peel away the stencils while the paint is still slightly tacky to avoid pulling up any dried edges. -
Connect bridges:
If your stencil font had ‘bridges’ (small gaps in letters like ‘O’ or ‘D’), use a small detail brush and black paint to fill them in for a solid, hand-painted look. -
Add dot borders:
Dip the handle end of a paintbrush into black paint to create the decorative dots. Stamp a row around the top rim and a row slightly above the bottom rim.
Step 3: Distressing & Finishing
-
Corner distressing:
Once all paint is dry, take coarse sandpaper to the high points—the rim, the handle attachments, and the bottom edge. Sand aggressively enough to reveal the metal underneath. -
Faux rust application:
I like to dab a mix of brown and orange paint (or specialty rust texture paint) onto the exposed metal areas and random spots on the body to mimic natural corrosion. -
Enhance the bottom:
Heavily apply your rust color or dark brown wax along the very bottom base of the can to simulate years of sitting on a porch floor. -
Weather the letters:
Lightly sand over your black ‘MILK’ letters with fine-grit sandpaper. This fades the black slightly so it looks worn and integrated rather than freshly decal-ed. -
Seal the work:
Protect your finish with two light coats of matte clear sealer spray. This is especially important if the can will live outdoors.
Add Dimension
Mix a little baking soda into your rust-colored paint before applying it. This adds a gritty, raised texture that makes the rust effect look incredibly realistic.
Place your finished piece by the front door filled with dried hydrangeas or tall grasses for a welcoming farmhouse vibe


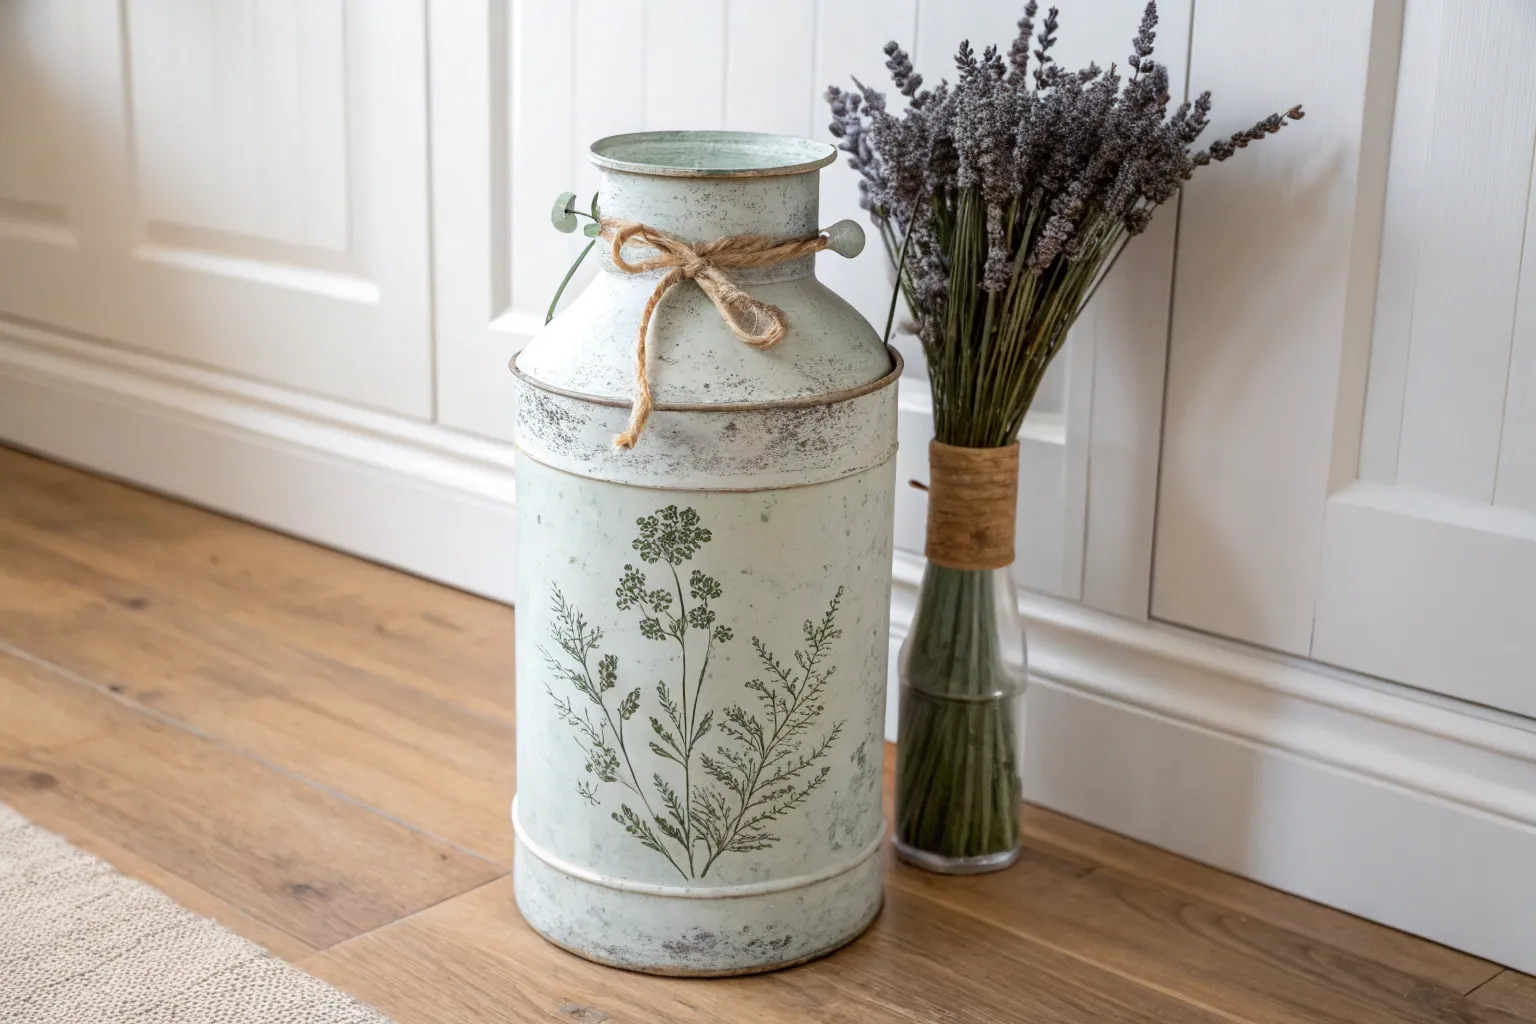
Monogram With a Leaf Wreath
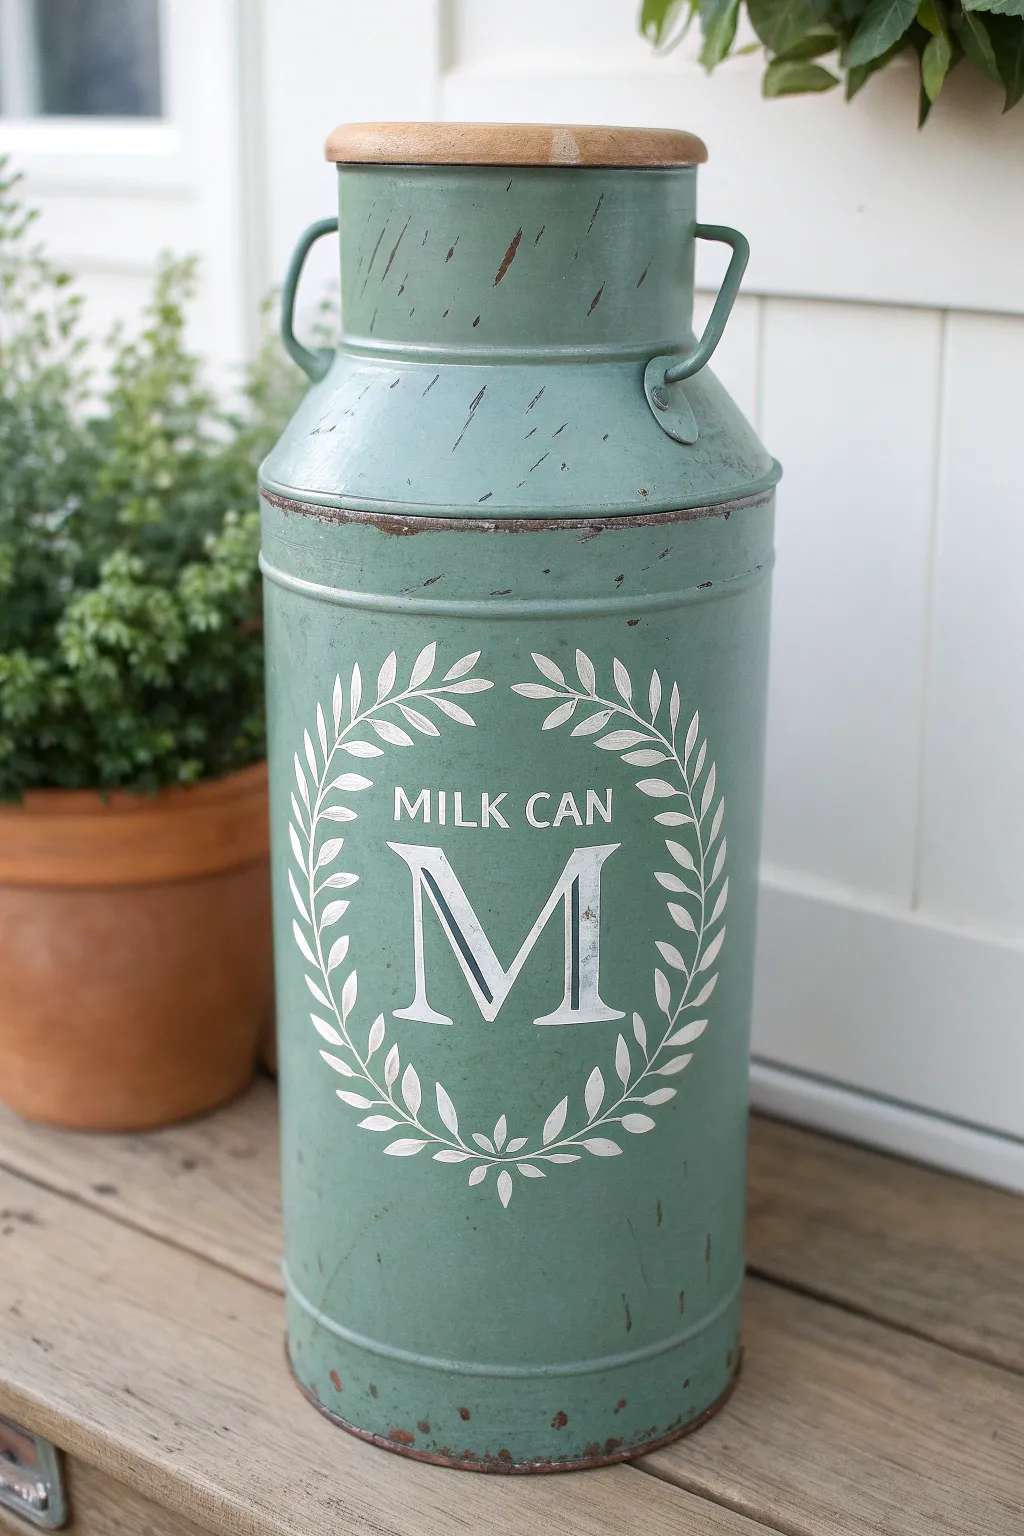
Transform an ordinary metal milk can into a charming farmhouse statement piece with a sage green finish and custom monogram. This project combines distressing techniques with precise stenciling to replicate an authentic, aged vintage look perfect for a front porch or entryway.
Step-by-Step Guide
Materials
- Galvanized metal milk can (vintage or reproduction)
- Round wooden lid (sized to fit the can opening)
- Sandpaper (medium and fine grit)
- Sage green chalk paint (matte finish)
- White acrylic craft paint or chalk paint
- Adhesive vinyl or stencil film
- Transfer tape
- Cricut or Silhouette machine (optional, or craft knife)
- Foam pouncer or stencil brush
- Small detail paintbrush
- Dark antique wax or brown acrylic paint
- Clean lint-free rags
- Matte clear sealer spray
Step 1: Preparation and Base Coat
-
Clean the Surface:
Begin by thoroughly cleaning the metal milk can to remove any grease, dust, or factory oils. Warm soapy water usually does the trick, but wipe it down with vinegar afterward to ensure a clean bond for the paint. -
Initial Sanding:
Lightly scuff the entire metal surface with medium-grit sandpaper. This gives the paint something to grab onto so it doesn’t peel off later. -
Apply the Green Base:
using a wide brush, apply your sage green chalk paint. Cover the entire can, including the handle loops. Don’t worry about perfect coverage on the first go; chalk paint is forgiving. -
Layering Up:
Allow the first coat to dry completely, then apply a second coat for solid opacity. Let this cure for at least 2-3 hours before handling.
Bleed Prevention
Paint a thin layer of the green base color over the stencil edges first. This seals the gaps, so if any paint bleeds under, it matches the background.
Step 2: Creating the Stencil Design
-
Design Layout:
On your computer, create a design featuring a laurel wreath circle. Place the words ‘MILK CAN’ in a classic serif font at the top inside curve, and a large serif ‘M’ in the center. -
Cut the Stencil:
Cut your design out of adhesive vinyl using a cutting machine. If you don’t have one, print the design on paper, tape it to stencil film, and carefully cut it out with a craft knife. -
Weeding:
Remove the negative space pieces—the letters and the leaf shapes—so you are left with a stencil that masks the background. -
Transfer:
Apply transfer tape over your vinyl stencil. Peel the backing off and carefully center the entire design on the front of the milk can. -
Secure the Stencil:
Burnish the stencil firmly onto the curved surface, paying special attention to the edges of the tiny leaves to prevent paint bleed.
Add Functionality
Drill drainage holes in the bottom before painting if you plan to use this as a real planter for live greenery, or weigh it down with rocks for faux stems.
Step 3: Painting and Distressing
-
Stenciling:
Dip a foam pouncer into white paint and offload most of it onto a paper towel until the sponge is almost dry. Lightly dab over the stencil openings using an up-and-down motion. -
Second Pass:
Apply a second light coat of white paint if needed to brighten the letters. Peel off the vinyl stencil while the paint is still slightly tacky to keep edges crisp. -
Distressing the Paint:
Once everything is fully dry, take your sandpaper to the raised edges, rims, and handles. Sand until the raw metal underneath peeks through, mimicking natural wear patterns. -
Adding Age:
Dip a rag into a small amount of dark antique wax. Rub it sporadically over the green paint, focusing on the sanded areas and crevices to dirty it up a bit. -
Faux Rust Details:
I like to use a small detail brush with brown paint to add tiny ‘rust’ specks near the rims and scattered across the body for extra realism. -
Finishing Touches:
Place the wooden lid on top. If the wood looks too new, give it a quick stain with a walnut color or rub it with the antique wax to match the can’s vibe. -
Seal:
Spray the entire project with a matte clear sealer to protect your paint job from scratches and weather.
Enjoy styling your new vintage-inspired milk can with fresh greenery or seasonal blooms


House Number Porch Marker
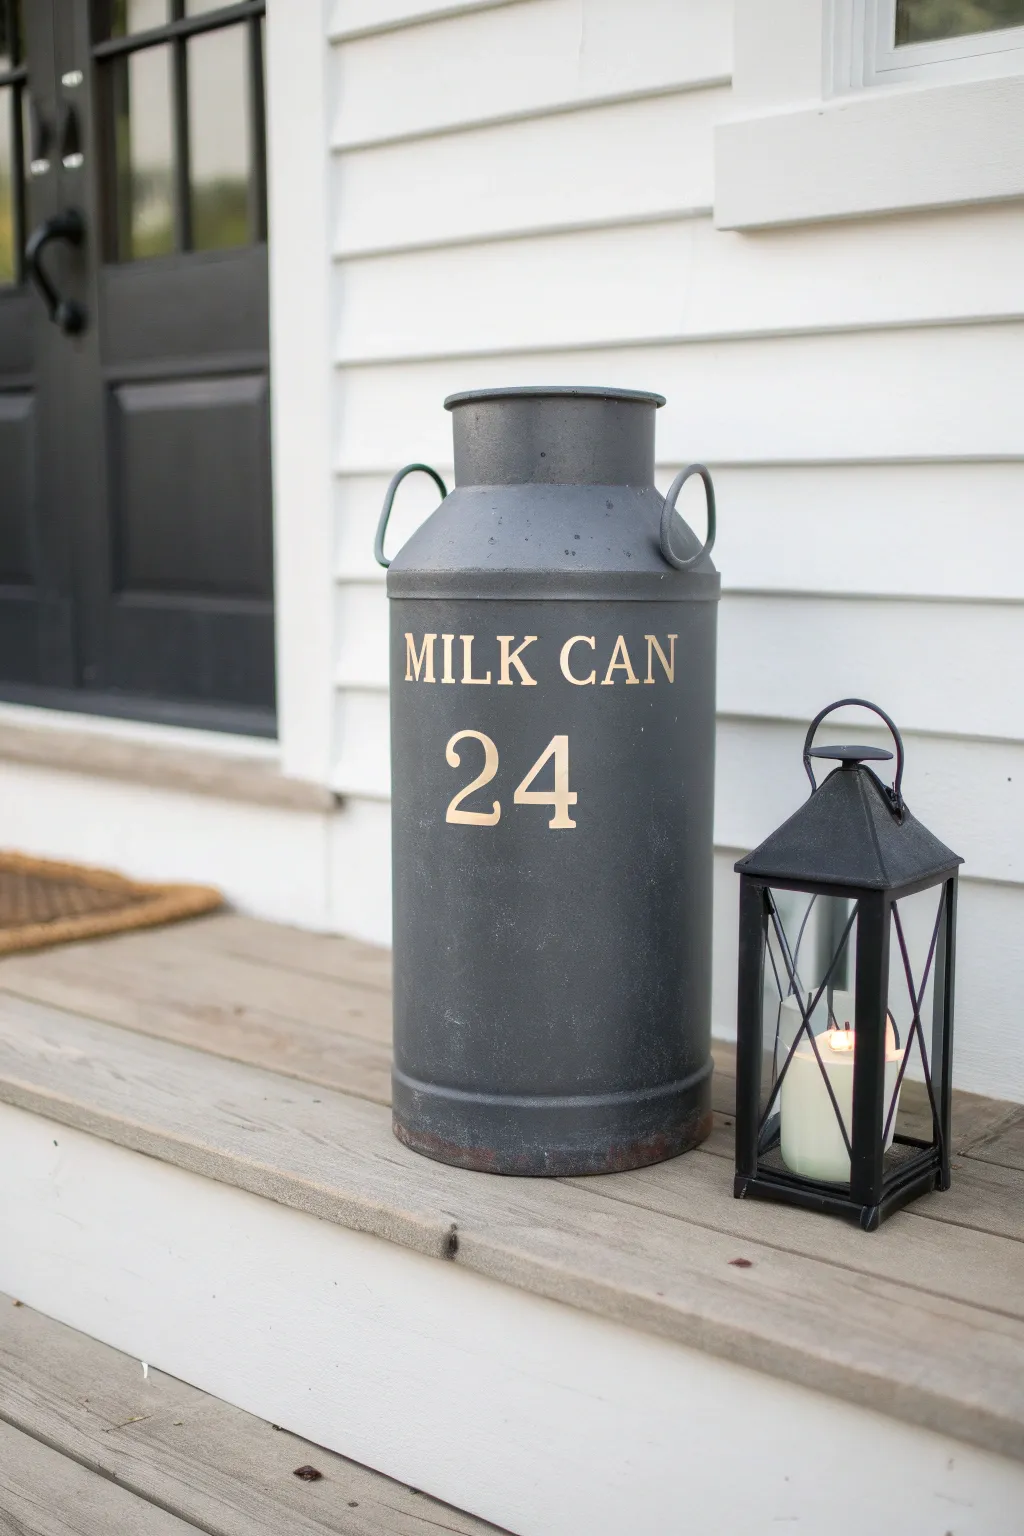
Transform a vintage or reproduction milk can into a striking porch statement with this simple yet elegant project. By combining a matte charcoal finish with crisp stenciling, you’ll create a functional piece of decor that adds instant curb appeal to your entryway.
Step-by-Step Tutorial
Materials
- Large metal milk can (vintage or reproduction)
- Medium-grit sandpaper (120-150 grit)
- Clean rags and mild degreaser (like TSP or dish soap water)
- Painter’s tape
- Matte charcoal or dark slate spray paint (or chalk paint)
- Cream or antique gold acrylic craft paint
- Adhesive vinyl or painter’s tape for stenciling
- Letter and number stencils (or a die-cutting machine)
- Small foam pouncer or stencil brush
- Clear matte sealer spray
- Fine-point craft knife (optional)
- Drop cloth or newspapers
Step 1: Preparation & Base Coat
-
Clean the surface:
Begin by thoroughly cleaning the milk can with warm water and a mild degreaser. If you are using a vintage can, pay special attention to scrubbing away any loose rust, dirt, or oily residue. -
Sand for adhesion:
Once dry, scuff the entire exterior surface with medium-grit sandpaper. You don’t need to strip it to bare metal, but you do need to remove any flaky paint and create a rough texture for the new paint to grip. -
Wipe down:
Use a damp, lint-free rag to wipe away all sanding dust. Let the metal dry completely before moving on to painting. -
Set up your workspace:
Lay down your drop cloth or newspapers in a well-ventilated area, preferably outdoors or in an open garage. -
Apply the first coat:
Spray the milk can with your matte charcoal paint, holding the can about 8-10 inches away. Use steady, sweeping motions to apply a light, even coat. -
Layer up the color:
Allow the first coat to dry according to the manufacturer’s instructions (usually 15-30 minutes). Apply a second and third coat as needed until you have full, opaque coverage without any drips. -
Full cure time:
Let the base coat cure fully. I recommend waiting at least 24 hours before applying any stencils to ensure the tape doesn’t peel up your fresh paint.
Clean Lines Pro Tip
Before applying your cream paint, dab a tiny layer of the base charcoal paint over the stencil first. This seals the edges so any bleed is invisible, resulting in perfect lines.
Step 2: Stenciling the Design
-
Create the stencil:
Prepare your stencil text. For the look in the photo, create one line that says “MILK CAN” in a serif font and a larger stencil underneath for your house number (e.g., “24”). A die-cutting machine works best for custom vinyl stencils, but pre-cut stencils work too. -
Measure and mark:
Locate the center of the milk can’s front face. Use painter’s tape to mark a straight horizontal line where the bottom of your text often rests to keep everything level. -
Apply the stencil:
Adhere your vinyl stencil or tape your plastic stencil firmly onto the can. Press down firmly on all the edges of the letters to prevent paint bleed. -
Prepare the paint:
Pour a small amount of cream or antique gold acrylic paint onto a paper plate. You want the paint to be slightly thick, not watery. -
Load the tool:
Dip your foam pouncer or stencil brush into the paint, then dab almost all of it off onto a paper towel. The tool should feel almost dry. -
Apply the text color:
Using a straight up-and-down dabbing motion, lightly pounce the paint over the stencil openings. Do not brush back and forth, as this pushes paint under the edges. -
Build opacity:
Apply several very thin layers of paint rather than one thick one. Let each layer dry to the touch (about 5-10 minutes) before adding the next. -
Remove the stencil:
While the final coat of paint is still slightly tacky (but not wet), carefully peel away the stencil and tape. Pulling while slightly damp helps keep the edges crisp. -
Clean up edges:
If there are any minor bleeds, use a fine-point craft knife to gently scrape them away once the paint is fully hard, or touch up with a tiny brush and your base charcoal color.
Level Up: Seasonal Swap
Don’t adhere the house numbers permanently. Attach them to a magnetic strip or painted wood plaque that hangs from the handles, letting you swap decor for holidays.
Step 3: Sealing & Styling
-
Protect the finish:
Once the lettering is completely dry (give it another few hours), spray the entire can with a clear matte sealer. This protects the finish from rain and UV fading. -
Final dry:
Allow the clear coat to dry overnight before placing the milk can out on your porch.
Now your entryway has a charming, personalized touch that combines history with modern farmhouse style


Sunflowers on a Dark Background

Transform a vintage milk can into a stunning piece of porch decor with this rich, hand-painted sunflower design. The deep forest green background makes the sunny yellow petals pop, creating a welcoming and classic country aesthetic.
How-To Guide
Materials
- Large metal milk can (vintage or reproduction)
- Sandpaper (medium and fine grit)
- Metal primer spray paint
- Acrylic craft paints (Deep Forest Green, Golden Yellow, Cream/Light Yellow, Burnt Umber, Raw Sienna, Sage Green, Olive Green)
- Large flat brush (for base coat)
- Assorted painting brushes (filbert, round, and liner brushes)
- Chalk or transfer paper
- Clear outdoor acrylic sealer (spray or brush-on)
- Painters tape
- Damp cloth
Step 1: Preparation & Base Coat
-
Clean the surface:
Scrub the milk can thoroughly with warm soapy water to remove any dirt, grease, or rust. If you are using a true vintage can, ensure all rust is treated or sanded down smooth. -
Sand for adhesion:
Lightly sand the entire exterior surface with medium-grit sandpaper to rough it up slightly, which helps the paint stick better. Wipe away all dust with a damp cloth. -
Prime the metal:
Apply a coat of metal primer. This is crucial for preventing future rust and ensuring your green base coat lasts. Let it cure completely according to the can’s instructions. -
Apply the background color:
Using a large flat brush, apply the deep forest green acrylic paint. Use long, smooth vertical strokes. You will likely need two to three coats to get that solid, opaque matte finish shown in the photo, allowing dry time between each.
Double Loading Technique
Load one corner of your brush with dark yellow and the other with cream. Blend slightly on your palette before painting petals for an instant two-tone effect.
Step 2: Blocking in the Sunflowers
-
Plan your composition:
Visualize where your three main flowers will go. A good composition usually has odd numbers: place one large bloom lower center, another slightly higher to the right, and a smaller bud or bloom higher up. -
Sketch the outlines:
Use a piece of chalk to lightly sketch circles for the flower heads and sweeping lines for the stems. Chalk is great because it wipes right off the dark green paint if you make a mistake. -
Paint the centers:
Mix Burnt Umber with a touch of black. Paint the round centers of your sunflowers first. Don’t make them perfect circles; give them slightly irregular edges for a natural look. -
Layer the petals:
Load a filbert brush with Golden Yellow. Start from the outer edge of the seed center and pull strokes outward to form the first layer of petals. Keep the paint somewhat thin here so the green background subtly influences the tone. -
Add highlights:
Without cleaning your brush fully, pick up some Cream or Light Yellow. Paint a second layer of petals on top of the first, focusing on the tips and upper edges where the light would hit. This creates dimension.
Rust-Oleum Level Up
Mask off the handles and rim with painter’s tape and spray them with a metallic bronze or copper paint for a polished, high-end finished look.
Step 3: Leaves & Details
-
Paint the stems and leaves:
Mix Olive Green with a little white to get a soft Sage tone. I like to use a round brush here to swoop in the sturdy stems and large, heart-shaped leaves at the base of the flowers. -
Detail the leaf veins:
Once the leaves are dry, use a liner brush with a lighter green mixture to paint thin veins. This adds realism and breaks up the large green shapes. -
Texture the centers:
Go back to the brown centers. Use an old, stiff brush to stipple (tap repeatedly) lighter brown (Raw Sienna) and black dots to mimic the texture of sunflower seeds. -
Add wispy accents:
Using your thinnest liner brush and a watered-down brown or dark orange paint, add delicate sprigs, small fern-like shapes, and thin scrolling lines around the flowers to fill empty space elegantly. -
Paint the bud:
For the unopened bud near the top, paint a tight teardrop shape in yellow and orange, then wrap the base with green sepals (leafy structures) hugging the petals. -
Final touches:
Step back and look at the can. Add tiny touches of white highlights to the wettest looking parts of the leaves or petals to make them shine.
Step 4: Sealing
-
Let it cure:
Allow the painted design to dry for at least 24 hours to ensure all layers are hardened. -
Protect your work:
Apply two coats of clear outdoor acrylic sealer. A matte or satin finish looks best for this rustic style. This protects against UV fading and weather damage.
Place your finished milk can on your front step and enjoy the sunny vibes it brings to your entrance
BRUSH GUIDE
The Right Brush for Every Stroke
From clean lines to bold texture — master brush choice, stroke control, and essential techniques.
Explore the Full Guide
Wildflower Meadow Wraparound
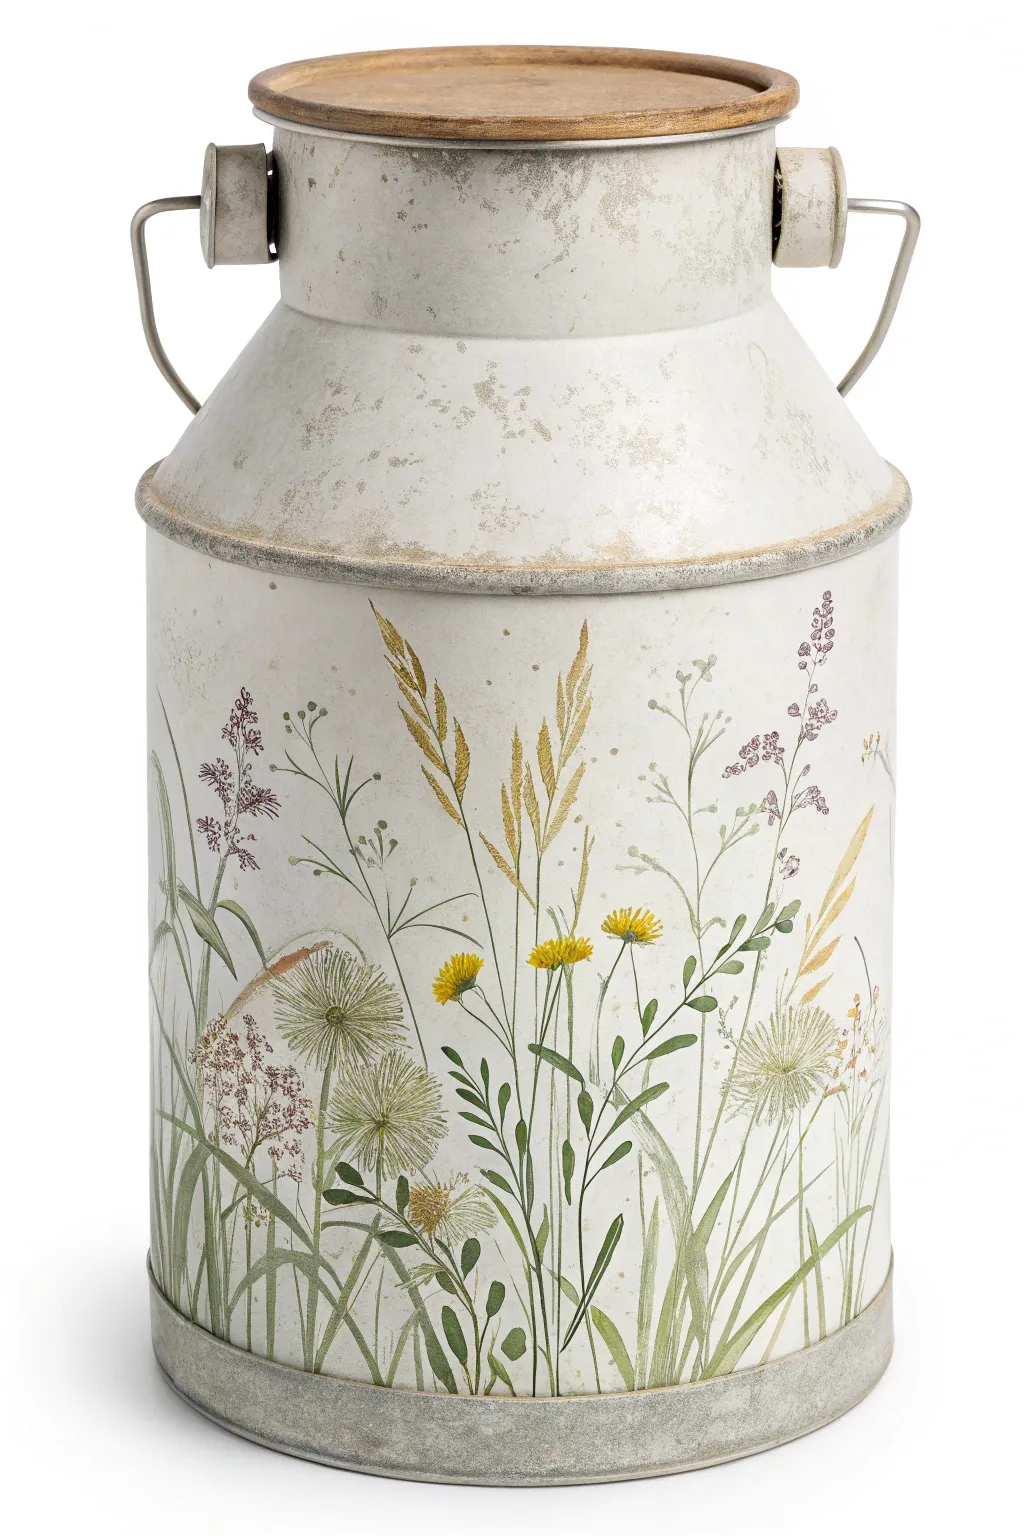
Transform a plain metal milk can into a piece of charming farmhouse decor featuring a gentle wildflower meadow. The distressed white finish and delicate botanical stems capture the airy feeling of a summer field.
Detailed Instructions
Materials
- Metal milk can (cleaned and degreased)
- Chalk paint (warm white/cream)
- Chalk paint (light grey or taupe for distressing)
- Acrylic paints (olive green, sap green, golden yellow, soft lavender, white, brown)
- Fine grit sandpaper (220 grit)
- Set of paintbrushes (1-inch flat, script liner, fine round)
- Matte finish sealer spray or brush-on varnish
- Wooden lid (optional, if your can doesn’t have one)
- Paper towels and water cup
Step 1: Base Preparation
-
Clean surface:
Begin by thoroughly cleaning the metal milk can with warm soapy water or a vinegar solution to remove any oils or dust. Let it dry completely. -
Apply base coat:
Using a 1-inch flat brush, apply a coat of warm white chalk paint over the entire can. Don’t worry about perfect coverage on the first pass; chalk paint builds up nicely. -
Second layer:
Once dry, add a second coat of white. For a vintage look, I like to sponge a tiny bit of light grey paint randomly while the white is still wet to create subtle textural shadows. -
Distressing:
When the base is fully dry, lightly sand the raised ridges, the rim, and random spots on the body using 220-grit sandpaper to reveal the metal underneath. -
Antiquing rim:
Mix a watery wash of brown paint and brush it lightly around the bottom rim and the neck seam, then immediately wipe most of it back with a paper towel to simulate aged grime.
Step 2: Painting the Meadow
-
Draft layout:
Lightly sketch the taller grasses and main flower placements with a pencil directly onto the painted surface, varying heights for a natural look. -
Paint tall grasses:
Using a script liner brush and thinned olive green acrylic, paint long, sweeping strokes from the bottom upward. Release pressure at the tip to make the blades taper naturally. -
Layer foliage:
Mix sap green with a touch of white for variety. Add shorter leaves and stems, crossing over the first layer of grass to create depth. -
Golden stalks:
With a fine round brush, paint wheat-like stalks using golden yellow mixed with brown. Create small V-shapes stacked loosely along the stem. -
Purple accents:
For the lavender-style sprigs, dot small clusters of soft lavender paint along thin stems. Concentrate the color at the top and spacing them out lower down. -
Yellow blooms:
Paint small, flat-topped yellow flowers. Use short, outward strokes from a center point, like painting a tiny sun. Add a dot of brown in the center for contrast. -
Seed heads:
To create the fluffy dandelion seed heads, mix white with a tiny drop of brown (off-white). Use a dry brush to stamp a circular, airy puff shape, keeping the edges soft. -
Seed head details:
Once the puff shape is dry, use your finest liner brush to add tiny, radiating lines from the center outward in a darker taupe color to define the seeds. -
Bottom grounding:
Add a few more dense, grassy strokes near the very bottom rim to ‘ground’ the plants so they don’t look like they are floating in mid-air.
Paint Not Sticking?
If paint slides off the metal, your surface might be too slick. Lightly sand the bare metal or use a bonding primer spray before applying your chalk paint base.
Step 3: Finishing Touches
-
Softening touches:
Step back and assess. If any flower looks too bold, lightly dry brush a little of the base white color over it to embrace the faded, shabby-chic aesthetic. -
Sealing:
Protect your artwork with a clear matte sealer. Two light coats are better than one heavy one to prevent drips. -
Lid treatment:
If you have a wooden lid, stain it a warm medium oak color. If metal, paint it to match the rim details.
Add Texture
Mix a pinch of baking soda into your white base paint. This creates a grainy, stone-like texture that makes the distressing look even more authentic and aged.
Place your finished milk can in an entryway with dried flowers to complete the look
Daisy Border With Soft Distressing
Bring rustic farmhouse charm to your porch or entryway with this beautifully aged milk can project. The soft cream base provides the perfect canvas for a cheerful ring of hand-painted daisies, while subtle distressing adds authentic vintage character.
How-To Guide
Materials
- Clean metal milk can (vintage or reproduction)
- Sandpaper (medium and fine grit)
- Metal primer spray
- Cream or off-white outdoor acrylic paint
- White, yellow, and green acrylic craft paints
- Burnt umber or rust-colored acrylic paint
- Paintbrushes: 1-inch flat brush, round detail brush, fine liner brush
- Pencil
- Clear matte outdoor sealer spray
- Old rag or sponge
Step 1: Preparation and Base Coat
-
Clean the surface:
Begin by thoroughly cleaning your milk can with warm soapy water to remove any dirt, grease, or existing rust flakes. Let it dry completely. -
Sand for adhesion:
Lightly sand the entire exterior surface with medium-grit sandpaper. This creates a ‘tooth’ for the primer to grab onto, ensuring your paint job lasts longer. -
Apply primer:
Spray the can with a metal primer. Use steady back-and-forth motions to get an even coat without drips. Allow the primer to dry according to the manufacturer’s instructions. -
Paint the base color:
Using your 1-inch flat brush, apply the cream or off-white acrylic paint. You’ll likely need two to three coats for full, opaque coverage. Let each coat dry fully before adding the next.
Step 2: Painting the Daisy Border
-
Guide lines:
Lightly sketch a horizontal line with a pencil about 4-5 inches from the bottom of the can to serve as a guide for your flower centers. -
Paint flower centers:
Using the yellow paint and a round brush, paint small circles spaced evenly along your guide line. These don’t need to be perfect circles; slight organic variance looks better. -
Add petals:
Switch to white paint. With a round brush, press down near the yellow center and pull outward to create teardrop-shaped petals. I find it easiest to paint ’12, 6, 3, and 9 o’clock’ petals first, then fill in the gaps. -
Second layer of white:
Once the first layer of white petals is dry, add a second coat to make the white pop against the cream background. -
Paint leaves and stems:
Using a fine liner brush and green paint, create thin, curved vines connecting the flowers. Add small, leaf-like strokes coming off the vines. -
Detail the centers:
Add a tiny dot of darker orange or brown to the bottom edge of your yellow centers to give them dimension and a slightly domed appearance. -
Outline the petals:
For a stylized look like the photo, use a very fine liner brush and thinned dark grey or black paint to loosely outline the petals and define the leaves.
Natural Texture
When painting the faux rust, mix a tiny pinch of baking soda into your rust-colored paint. This adds gritty texture that feels like real corrosion.
Step 3: Distressing and Finishing
-
Create faux rust:
Dip a sponge or stiff brush into burnt umber or rust-colored paint. Dab most of it off onto a paper towel until the brush is almost dry. -
Distress the rims:
Gently stipple the rust color along the top rim edge and the bottom rim of the can. Concentrate the color on the edges where wear would naturally occur. -
Weather the lid:
If your can has a lid, repeat the rust stippling around the outer edge of the lid and lightly on the handle. -
Add random wear:
Flick tiny specks of the rust paint onto the main body of the can using an old toothbrush or stiff brush to simulate age spots and weathering. -
Seal the project:
Once all paint is completely dry (wait at least 24 hours), spray the entire can with two coats of clear matte outdoor sealer to protect your artwork from the elements.
Add a Handle Wrap
Wrap the metal handle in thick jute twine or hemp rope before sealing. This adds a nice tactile contrast to the smooth painted metal.
Now you have a charming piece of decor that looks like it has been in the family for generations

PENCIL GUIDE
Understanding Pencil Grades from H to B
From first sketch to finished drawing — learn pencil grades, line control, and shading techniques.
Explore the Full Guide
Black-and-White Buffalo Check Accent
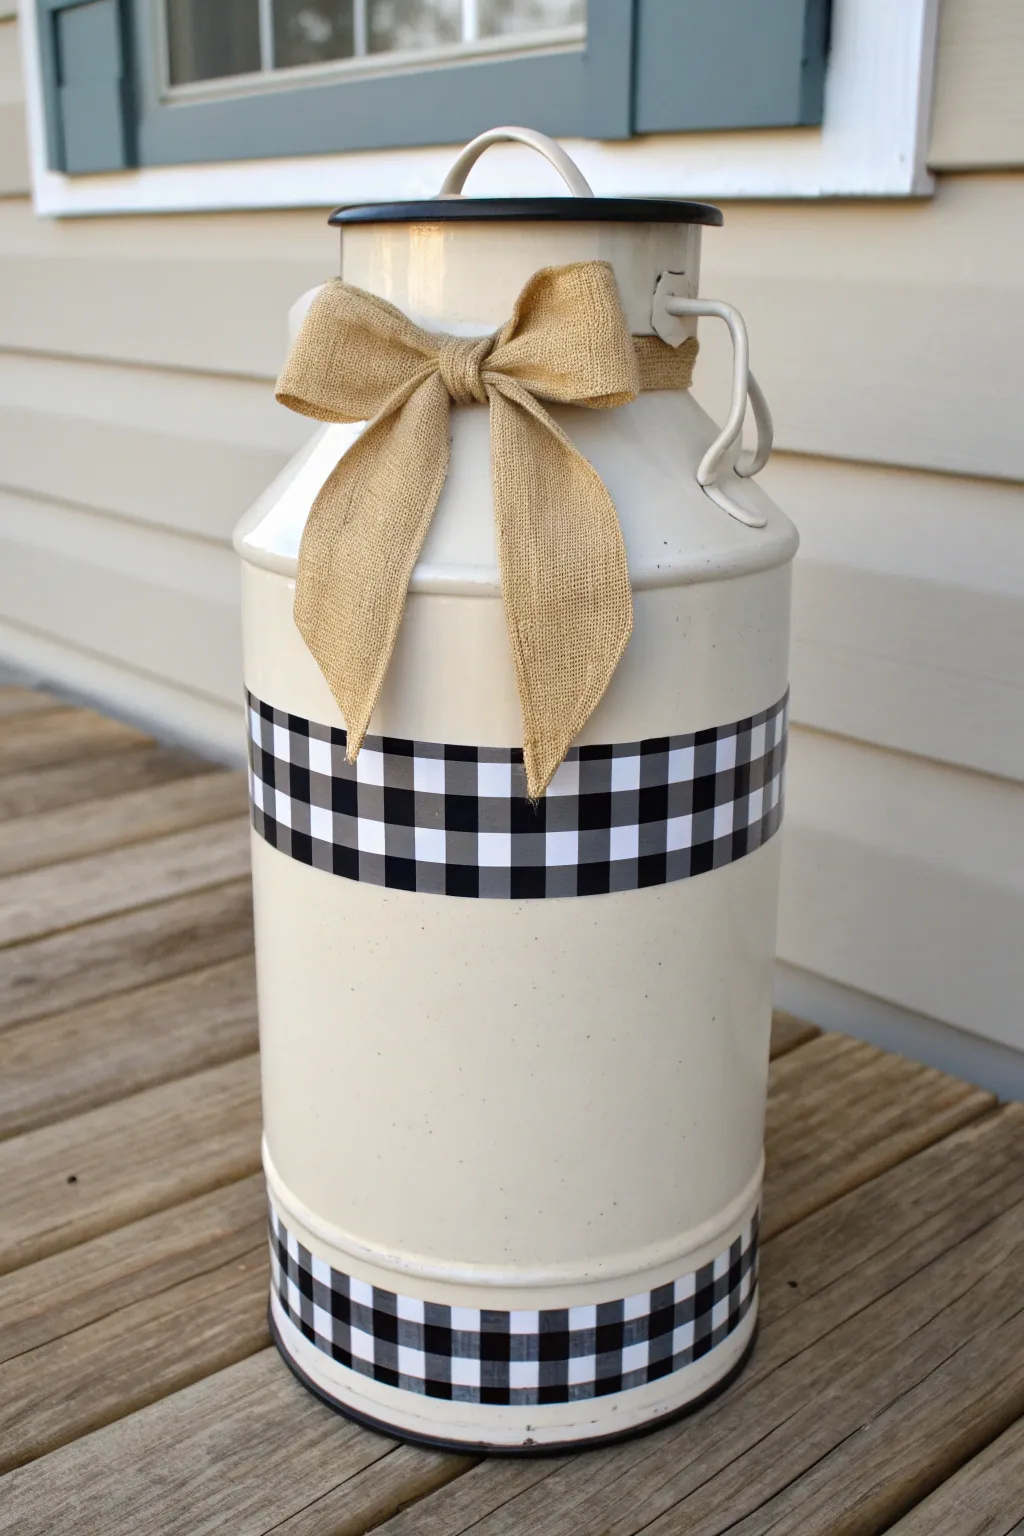
Transform a rustic metal milk can into a farmhouse-style statement piece with clean lines and classic patterns. This project combines a creamy white base with bold black-and-white buffalo check accents and a simple burlap bow for a cozy, welcoming look.
Step-by-Step Guide
Materials
- Metal milk can (vintage or reproduction)
- Cream or off-white spray paint (satin finish)
- Black and white buffalo check ribbon (2-3 inches wide)
- Burlap ribbon (wired edge works best)
- Hot glue gun and glue sticks
- Scissors
- Measuring tape
- Painter’s tape (optional for marking lines)
- Sandpaper (medium grit)
- Damp cloth
- Clear sealant spray (matte or satin, optional)
Step 1: Preparation & Base Coat
-
Clean the can:
Begin by thoroughly cleaning your milk can. Use warm soapy water to remove any dirt, grease, or grime. If it’s a true vintage can, you might need a scrub brush to get into the crevices. -
Sand the surface:
Once dry, lightly sand the entire exterior surface with medium-grit sandpaper. This scuffs up the metal (or previous finish) to help the new paint adhere better. -
Wipe away dust:
Take a damp cloth and wipe down the can to remove all the sanding dust. The surface must be completely clean and dry before painting. -
Apply the first coat:
In a well-ventilated area, spray the first coat of cream paint. Hold the can about 8-10 inches away and use sweeping motions to avoid drips. Don’t worry about full coverage yet. -
Let it dry:
Allow the paint to dry according to the manufacturer’s instructions, usually about 15-20 minutes for spray paint. -
Apply subsequent coats:
Apply 2-3 additional thin coats until you have a solid, opaque cream finish. I like to let the can cure overnight to ensure the paint is hard enough to handle without scratching.
Ribbon Slipping?
If the ribbon slides while gluing, use small pieces of double-sided tape or painter’s tape to hold the starting end in place. This acts as a ‘third hand’ while you work your way around with the glue gun.
Step 2: Adding the Buffalo Check Accents
-
Measure the middle band:
Determine where you want the central band to sit. On most milk cans, there is a natural ridge or indented section around the middle; wrapping the ribbon just below this ridge often looks best. -
Cut the ribbon:
Wrap your buffalo check ribbon around the circumference of the can to measure the length needed, adding an extra inch for overlap. Cut the ribbon cleanly. -
Attach the middle band:
Apply a line of hot glue to the back of the ribbon. Carefully press it onto the can, keeping it level. Work in small sections—apply a few inches of glue, press, and smooth it out as you go. -
Secure the overlap:
When you reach the starting point, fold the raw edge of the ribbon under slightly for a neat finish, add a dab of glue, and press it down to close the loop. -
Measure the bottom band:
Repeat the measuring process for the bottom of the can. This band should sit flush against the bottom rim to ground the design. -
Attach the bottom band:
Glue the second strip of buffalo check ribbon around the base, using the same section-by-section gluing method to ensure it stays straight and tight against the can.
Seasonal Switch-Up
Make the decor interchangeable by using heavy-duty velcro dots instead of hot glue for the ribbons. This allows you to swap the buffalo check for floral patterns in spring or red plaid during the holidays.
Step 3: Finishing Touches
-
Create the burlap bow:
Take your burlap ribbon and tie a simple, large bow. Adjust the loops so they are symmetrical and fluff them out nicely. Ensure the tails hang down long enough to overlap the middle band slightly. -
Attach the bow:
Apply a generous amount of hot glue to the back of the bow’s knot. Press it firmly onto the neck of the milk can. -
Wrap the neck (optional):
For a fuller look, you can wrap a piece of burlap ribbon around the neck first and glue the bow on top of that band, rather than gluing the bow directly to the metal. -
Trim the tails:
Trim the ends of the burlap bow tails into a ‘V’ shape (dovetail) or an angled cut to prevent excessive fraying and give it a polished appearance. -
Seal the project (optional):
If this can will be sitting on an exposed porch, you may want to mist the painted areas (avoiding the ribbon) with a clear matte sealer to protect against weather.
Place your finished can on the front porch or in your entryway to enjoy that classic farmhouse feel every time you walk by
Simple “Hello” or “Stay Awhile” Greeting
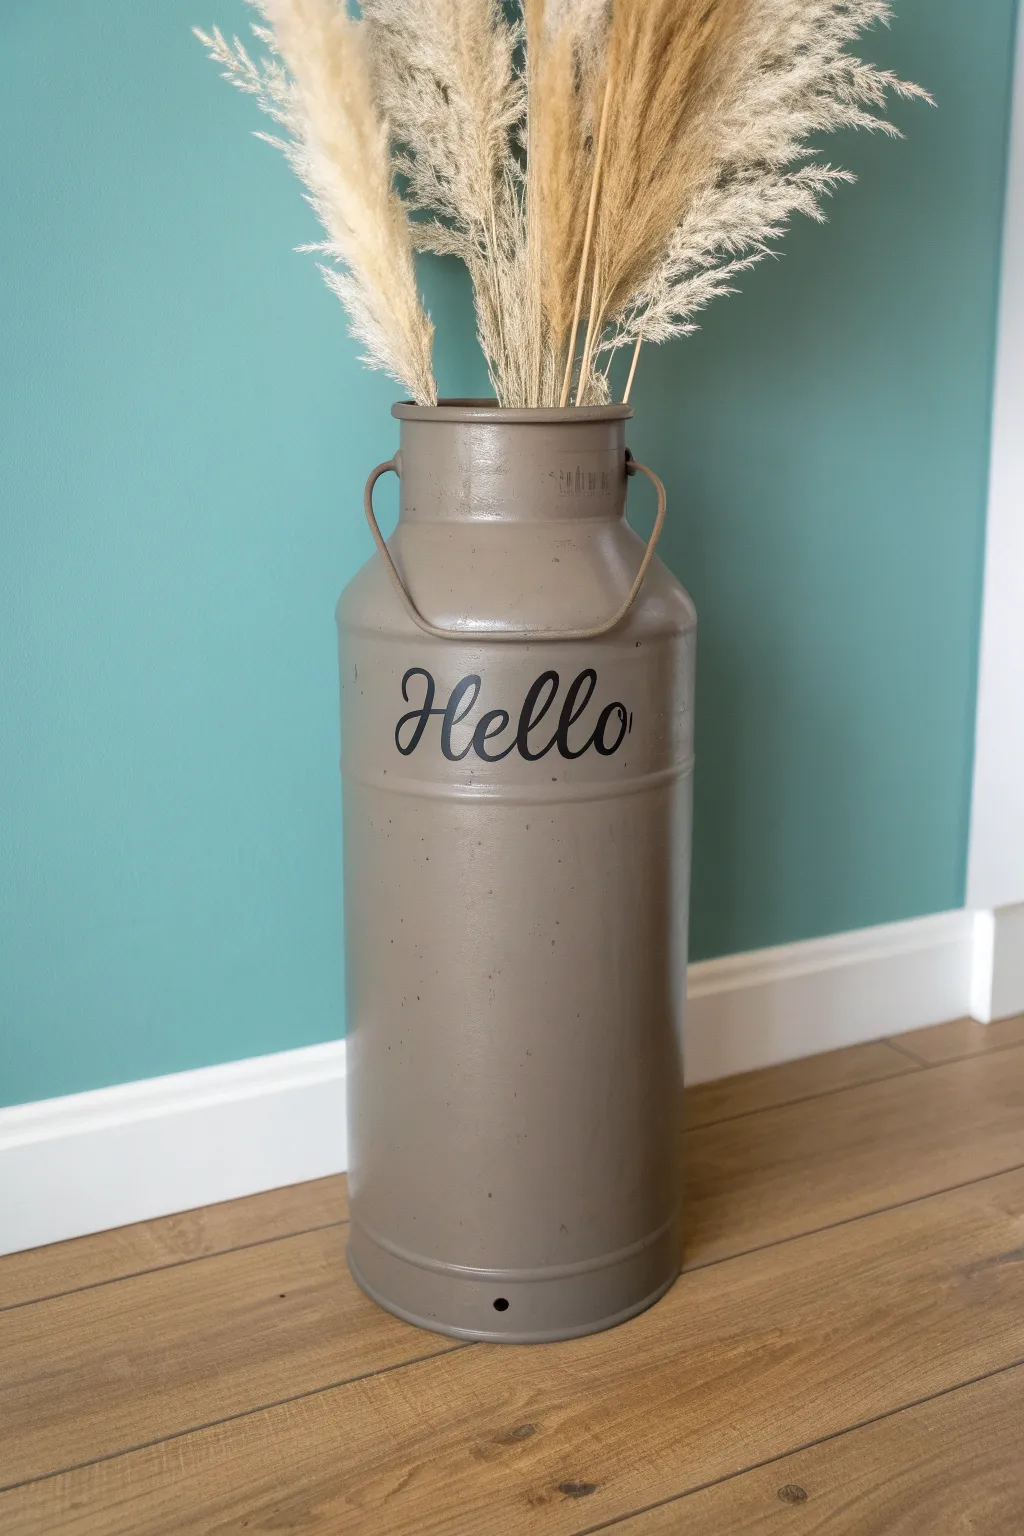
Transform a rustic metal milk can into a chic, modern farmhouse entryway piece with a sleek coat of taupe paint and a simple greeting. This project balances vintage charm with contemporary minimalism, making it the perfect vessel for tall, feathery pampas grass.
Step-by-Step Tutorial
Materials
- Vintage milk can (metal)
- Sandpaper (medium and fine grit)
- Spray primer (metal-bonding)
- Taupe or greige spray paint (matte or satin finish)
- Black adhesive vinyl or stencil film
- Cricut or Silhouette machine (optional)
- Transfer tape
- Black acrylic paint and stencil brush (if stenciling)
- Clear matte sealer spray
- Cleaning cloth and mild degreaser
Step 1: Preparation
-
Clean the Surface:
Start by thoroughly cleaning your milk can. Use a mild degreaser or soapy water to remove years of dust, grime, and oils. A clean surface is critical for paint adhesion, so scrub well and let it dry completely. -
Sand for Texture:
Once dry, scuff the entire exterior surface with medium-grit sandpaper. You aren’t trying to remove all the old finish, just creating a rough ‘tooth’ for the new paint to grip onto. -
Smooth Imperfections:
Switch to fine-grit sandpaper to smooth out any rusty patches or rough spots. Wipe down the can with a damp cloth or tack cloth to remove all sanding dust. -
Apply Primer:
Spray a coat of metal-bonding primer over the entire can. Hold the can about 8-10 inches away and use sweeping motions to avoid drips. Let this base layer dry according to the manufacturer’s instructions.
Vinyl Not Sticking?
If the vinyl lifts with the transfer tape, the paint may still be off-gassing. wait another 24 hours for the paint to fully cure, then try burnishing again.
Step 2: Painting
-
First Coat of Color:
Select a warm taupe or greige spray paint in a matte or satin finish. Apply the first coat lightly. Don’t worry about full coverage yet; thin layers act better than one thick, drippy one. -
Drying Time:
Allow the first coat to dry for at least 15-20 minutes, or until it’s tack-free. This patience prevents the paint from wrinkling later. -
Second Coat:
Apply a second coat of taupe paint, moving around the can to ensure even coverage. Make sure to get into the crevices near the handles and the rim. -
Final Touch-ups:
Inspect the can for any light spots. If needed, I usually do a very light third dusting to ensure the color is solid and opaque. Let the can cure for at least 24 hours before applying any decals.
Pro Tip: Curved Surface
On a round can, cut small slits in the transfer tape (not the vinyl) around the design. This allows the tape to flex and conform to the curve without wrinkling.
Step 3: Adding the Greeting
-
Design the Graphic:
Create your “Hello” design using design software. Choose a flowing, legible script font. Size it to fit comfortably on the upper third of the milk can’s body. -
Cut the Vinyl:
Cut the design out of black matte adhesive vinyl using a cutting machine. If you don’t have a machine, you can buy a pre-made decal or hand-cut a stencil. -
Weed the Design:
Carefully remove the excess vinyl around the letters, leaving only the word “Hello” on the backing paper. Be gentle with the thin loops of the cursive letters. -
Apply Transfer Tape:
Place a piece of transfer tape over your vinyl design. Burnish it firmly with a scraper tool or credit card to ensure the vinyl sticks to the tape. -
Position the Decal:
Hold the design up to the milk can to find the perfect placement. It usually looks best centered on the flattest part of the upper section, just below the neck curve. -
Adhere to the Can:
Peel the backing paper away and press the transfer tape onto the can. Start from the center of the word and smooth outward to prevent air bubbles. -
Burnish and Peel:
Rub the letters firmly through the transfer tape to bond the adhesive to the painted metal. Slowly peel back the transfer tape at a sharp angle, leaving the black vinyl letters behind. -
Seal (Optional):
For extra durability, especially if this will sit on a porch, spray a light coat of clear matte sealer over the decal area or the entire can.
Step 4: Styling
-
Arrange Foliage:
Finish the look by inserting a large bunch of dried pampas grass or wheat stems into the can. The fan-like arrangement adds height and texture that complements the smooth taupe finish perfectly.
Place your new statement piece by the front door to give every guest a warm welcome


Family Name and Established Date
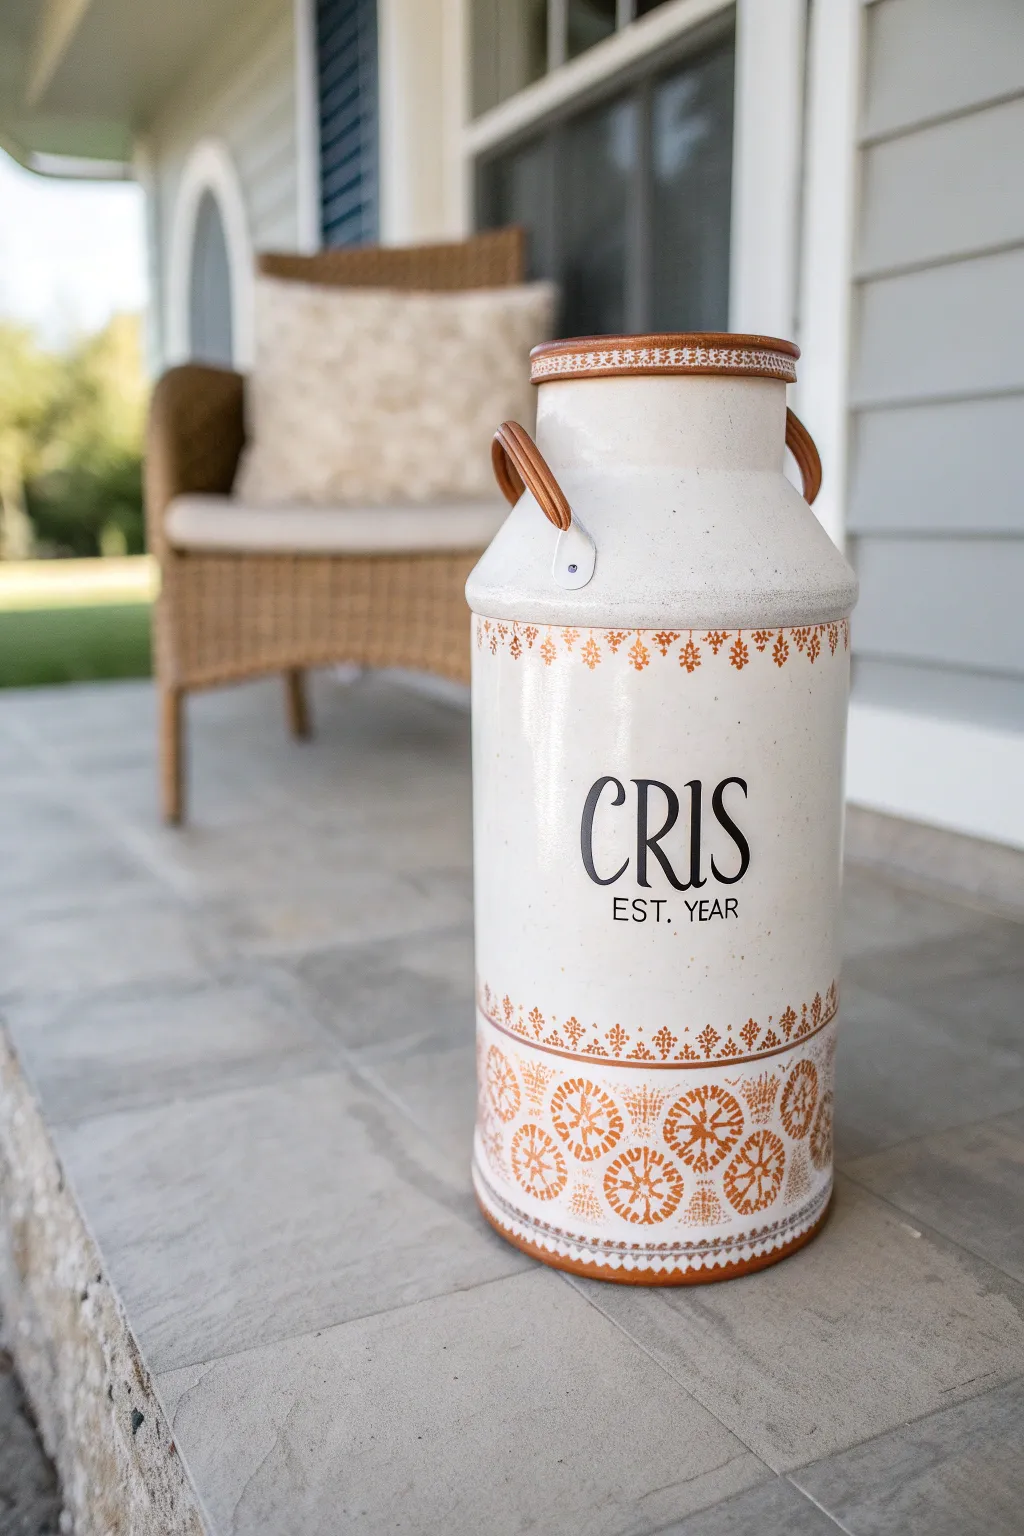
Transform a rustic metal milk can into a sophisticated porch display with this elegant cream and copper design. Featuring crisp typography and intricate geometric details, this project perfectly blends farmhouse charm with modern personalization.
Detailed Instructions
Materials
- Vintage or reproduction metal milk can
- Sandpaper (120 and 220 grit)
- Primer (spray or brush-on for metal)
- Cream or off-white chalk paint or enamel
- Metallic copper or rust-colored acrylic paint
- Black acrylic paint or paint pen
- Detailed geometric or Mandala-style stencil tape (approx. 2-3 inches wide)
- Circular geometric stencil (for the bottom motif)
- Stencil brushes or high-density foam pouncers
- Painter’s tape
- Vinyl cutting machine (like Cricut) or letter stencils
- Matte or satin clear sealant spray
- Leather cord or thin leather strips (optional for handles)
Step 1: Preparation & Base Coat
-
Clean surface:
Begin by thoroughly cleaning the milk can with warm soapy water to remove any dirt or grease. If the can is a vintage find, you may need a degreaser to ensure a clean slate. -
Sand and smooth:
Once dry, scuff the entire surface with 120-grit sandpaper to help the paint adhere. If there are rusty spots, sand them down until smooth, then wipe away all dust with a damp tack cloth. -
Apply primer:
Spray or brush on a coat of metal primer. This is crucial for preventing future rust and ensuring your topcoat lasts, especially for outdoor decor. -
Paint the base:
Apply your cream or off-white base paint. I usually do two to three thin, even coats rather than one thick one to avoid drips. Let the paint dry completely between layers according to the manufacturer’s timeframe.
Bleeding Lines?
If paint bleeds under the stencil, wait for it to dry completely. Then, use a small angled craft brush with the cream base color to carefully ‘erase’ the error.
Step 2: Adding the Geometric Details
-
Position top stencil:
Measure about 2 inches down from the neck of the can. Wrap your geometric border stencil around the circumference, securing it firmly with painter’s tape to prevent slipping. -
Stipple the top border:
Dip your stencil brush into the copper paint, offloading almost all the paint onto a paper towel until the brush feels dry. Lightly stipple over the stencil design to create the upper decorative band. -
Create the lower border:
Move to the bottom of the can. Repeat the process with a similar or identical border stencil just above the bottom rim, ensuring the color saturation matches the top. -
Add the main pattern:
For the large geometric circles at the base (as seen in the photo), position your circular mandala stencil just above the bottom border. Stencil these shapes in copper, spacing them evenly around the can. -
Rim detailing:
Use a small brush or a sponge to dab copper paint onto the very top lip of the can and the bottom metal rim to frame the piece beautifully.
Get the Vintage Look
After the copper paint dries, lightly sand the stenciled areas with fine-grit sandpaper. This distresses the pattern slightly for an authentic, aged appearance.
Step 3: Personalization & Finishing
-
Prepare the text:
Create a stencil for your family name (using a serif font) and the ‘EST. YEAR’ (in a clean sans-serif font). If you don’t have a cutting machine, store-bought adhesive letter stencils work perfectly. -
Center the design:
Find the visual center of the can between the two copper bands. Apply your text stencil, making sure it is level and pressed down firmly at the edges. -
Paint the name:
Using black acrylic paint and a different stencil brush or sponge, dab the paint over the letters. Use a straight up-and-down motion to prevent paint from bleeding under the stencil. -
Remove and touch up:
Carefully peel away the text stencil while the paint is still slightly tacky. Use a fine-tip paintbrush and your cream base color to tidy up any blurry edges. -
Seal the project:
Once all paint is cured (usually 24 hours), spray the entire can with two coats of clear matte sealant to protect it from the elements. -
Wrap the handles:
For the final touch shown in the image, wrap thin leather strips around the metal handles. Secure the ends with a dab of strong adhesive like E6000.
Now you have a stunning, personalized statement piece ready to welcome guests to your home
Vintage Dairy Label Look

Transform a plain metal milk can into a piece of farmhouse history with this painted finish that mimics the look of an aged dairy container. This project layers subtle weathering techniques with elegant scrollwork to create a sophisticated, time-worn aesthetic perfect for rustic porches.
Step-by-Step Tutorial
Materials
- Large metal milk can (galvanized or steel)
- Sandpaper (120 and 220 grit)
- Metal primer (spray preferred)
- Chalk-style paint: Pale Duck Egg Blue or Robin’s Egg Blue
- Chalk-style paint: Warm Cream or Antique White
- Acrylic craft paint: Burnt Umber or Raw Sienna (for rust)
- Acrylic craft paint: Metallic Antique Gold
- Acrylic craft paint: Black or Dark Grey (for details)
- Medium flat synthetic brush
- Small round detail brush (size 1 or 2)
- Stencil (oval frame with scrollwork) or painter’s tape
- Sea sponge or stippling brush
- Matte clear sealer (spray or brush-on)
- Pencil
- Clean rags
Step 1: Preparation and Base Coat
-
Clean and Scuff:
Begin by thoroughly cleaning your milk can with soapy water to remove any grease or oils. Once dry, scuff the entire surface with 120-grit sandpaper to give the metal some ‘tooth’ for the paint to adhere to. -
Apply Primer:
Spray a coat of metal primer over the entire can, ensuring you get into the crevices of the handles and the rim. Let this dry completely according to the manufacturer’s instructions. -
Initial Blue Coat:
Using your medium flat brush, apply the first coat of Pale Blue chalk paint. Don’t worry about perfect coverage here; a little unevenness adds to the vintage charm later on. -
Second Coat and Dry:
Apply a second coat of blue paint for better opacity. Allow this to dry fully—usually about 2-4 hours depending on humidity—before moving on to the detailed work.
A Golden Touch
For a true metallic sheen on the scrollwork, use ‘liquid leaf’ instead of standard acrylic gold paint. It reflects light beautifully.
Step 2: Creating the Label Area
-
Mark the Oval:
Decide where your central label will go. Lightly draw a large oval shape with a pencil. You can trace an oval platter or make a paper template to ensure it’s symmetrical. -
Fill the Oval:
Paint inside your pencil line with the Warm Cream paint. This may take 2-3 thin coats to completely cover the blue background without leaving heavy brushstrokes. -
Outline the Label:
Using a small detail brush or a fine paint marker, carefully trace the edge of the cream oval with a very thin line of Metallic Gold or dark grey to define the boundary.
Uneven Lines?
If your hand shakes while painting scrolls, clear the mistake quickly with a damp Q-tip, or distress that area later to hide wobbles.
Step 3: Adding the Scrollwork
-
Sketch Designs:
Lightly sketch scrollwork, leaves, and flourishes around the top and bottom of your cream oval using a pencil. If you aren’t confident freehanding, use a stencil or transfer paper. -
Paint Gold Details:
Load a size 2 round brush with Metallic Antique Gold paint. Carefully paint over your pencil lines, creating the elegant curlicues and the diamond shape at the top center. I find thinning the paint slightly effectively helps it flow smoother for these lines. -
Add Dark Accents:
Once the gold is dry, add tiny dots or thin shadow lines with Black or Dark Grey paint to give the scrollwork dimension and make it pop against the blue. -
Detail the Neck:
Use a liner brush to paint thin, vertical decorative stripes on the slanted neck of the can in dark grey or gold, mirroring the style in the photo.
Step 4: Weathering and Aging
-
Create Faux Rust:
Dip a sea sponge into Burnt Umber paint and dab most of it off onto a paper towel until almost dry. Lightly stipple this ‘rust’ color onto the handles, the bottom rim, and along the seams where natural corrosion would occur. -
Age the Label:
using a very dry stiff brush and a tiny amount of Burnt Umber, gently smudge dirty spots onto the cream oval label to make it look stained and old. -
Distress Edges:
Take your 220-grit sandpaper and gently sand the raised ridges of the can and the handles, revealing a bit of the metal or primer underneath for a worn effect. -
Seal the Project:
Finish by applying two coats of matte clear sealer to protect your artwork from the elements, especially if this will sit on a porch.
Place your newly aged milk can by the front door filled with sunflowers or dried wheat for an instant farmhouse welcome
Faux Rust and Patina Layers
Transform a clean, galvanized, or plain metal milk can into a weathered antique using layered paint techniques. This project captures the charm of deep oxidation, flaking patina, and decades of farm use without waiting for time to do the work.
Step-by-Step
Materials
- Metal milk can (primed if necessary)
- Dark brown acrylic paint (burnt umber/espresso)
- Black acrylic paint
- Rust-orange acrylic paint (burnt sienna/terra cotta)
- Yellow ochre or mustard acrylic paint
- Metallic copper or bronze paint (optional)
- Sea sponge or coarse texture sponge
- Chip brushes (various sizes)
- Texture medium (like sand or a texture paste)
- Matte clear sealer spray
- Paper towels
- Water spray bottle
Step 1: Building the Base Grime
-
Prepare the Surface:
Clean your milk can thoroughly to remove any oils or dust. If the surface is very shiny metal, scuff it lightly with sandpaper and apply a metal primer to help your acrylics stick. -
Apply the Base Coat:
Mix a dark brown paint with a small drop of black to create a deep, grimy base color. Use a chip brush to cover the entire can, but don’t worry about perfect coverage; uneven streaks add character. -
Add Texture:
While the base coat is still wet, sprinkle a little texture sand or mix texture medium into a small batch of brown paint. Dab this onto areas where rust typically accumulates, like the seams, the bottom rim, and around the handles. -
Initial Drying:
Let this dark, textured base coat dry completely. This creates the ‘old metal’ foundation beneath the rust.
Rust looks fake?
If your rust looks too flat, you’re likely using too much paint. Sponge in very sheer, dry layers. Build up 3-4 thin layers rather than one thick glob.
Step 2: Layering the Rust Effect
-
Create the Deep Rust:
Load a slightly damp sea sponge with burnt sienna (the dark reddish-brown rust color). Blot off most of the paint onto a paper towel until the sponge is almost dry. -
Stipple the Surface:
Firmly blot the sponge over the dark base, concentrating heavily on the middle section and the neck. Use a pouncing motion rather than wiping to create an organic, pitted look. -
Blend the Transitions:
While the burnt sienna is tacky, take a dry chip brush and very lightly feather the edges of your sponged areas. This softens the look so it doesn’t appear like polka dots. -
Introduce Bright Oxidation:
Mix a bright orange paint with a touch of yellow ochre. Using a smaller piece of sponge or a stiff stencil brush, dab this brighter color specifically into the center of your darkest rust patches. -
Simulate Paint Flaking:
To mimic old paint wearing off, I like to apply patches of the original ‘metal’ color or a dull grey-green in horizontal bands, then immediately wipe parts of it away with a damp rag, letting the ‘rust’ show through.
Add Instant Age
Dust cinnamon or cocoa powder over wet brown paint patches. It adds granular texture and smells great while creating a hyper-realistic gritty rust finish.
Step 3: Adding Depth and Detail
-
Darken the Recesses:
Mix a watered-down wash of black and dark brown paint. Brush this liquid generously into the crevices, specifically around the welded horizontal seams and under the lip of the lid. -
Drip Effect:
Before the wash dries, mist it lightly with water from a spray bottle. Let gravity pull the dark wash down the sides in subtle streaks to mimic years of rain runoff. -
Highlighting Edges:
Take a very small amount of metallic copper or bronze on your finger or a dry brush. Lightly rub it on the raised metal handles and the very top rim of the lid where handling would have rubbed the rust away to bare metal. -
Mustard Patina Accents:
For that specific yellowish corrosion look seen in the reference, dilute some yellow ochre paint. Stipple it very sparsely in the transition zones between the dark iron and bright rust. -
Final Spatter:
Dip an old toothbrush into thinned dark brown paint. Pull your thumb across the bristles to flick tiny speckles across the surface, unifying the different layers of paint. -
Seal the Work:
Once you are completely satisfied and the paint is bone dry, spray the entire can with a matte clear sealer. This protects the finish and knocks back any unnatural shine from the acrylics.
Display your new antique-style milk can on the porch or entryway for an authentic rustic touch
Chippy Paint Cottage Finish

Transform a plain metal milk can into a piece of vintage cottage decor with this convincing chippy paint technique. The layered finish combines creamy white and soft teal with intentional distressing to mimic decades of authentic weathering.
Step-by-Step Tutorial
Materials
- Metal milk can (vintage or reproduction)
- Chalk-style paint: Creamy White
- Chalk-style paint: Seafoam Green or Teal
- Dark brown or rust-colored acrylic paint (if can isn’t naturally rusted)
- Vaseline (petroleum jelly)
- Paint scraper or putty knife
- Fine-grit sandpaper (220 grit)
- Medium-grit sandpaper (120 grit)
- Clear matte sealer spray
- Small paintbrush
- Medium paintbrush
- Lint-free rags
Step 1: Base Preparation
-
Clean surface:
Begin by thoroughly cleaning your milk can with warm soapy water to remove any grease or dust. Dry it completely with a lint-free towel. -
Assess the base:
If your can is shiny new galvanized metal, you’ll need to fake the age first. Sponge on layers of dark brown and rust-colored acrylic paint in random patches, focusing on the rims, handles, and dents. Let this fully dry. -
Apply resist medium:
Dip your finger or a small brush into Vaseline. Apply generous smudges of Vaseline over the areas where you want the final paint to chip off—think about high-wear areas like ridges, rims, and handles.
Step 2: Layering Colors
-
Paint the teal bands:
Using the seafoam green chalk paint, paint a horizontal band around the middle ‘waist’ of the can and another band around the bottom base rim. -
Masking (optional):
You can use painter’s tape to get straight lines, but for this rustic look, free-handing often produces a more authentic, charming result. -
Paint the main body:
Once the teal bands are dry, paint the rest of the body and the neck with the creamy white chalk paint. Don’t worry about perfect coverage; a little texture is good. -
Blend the edges:
Carefully paint up to the teal lines. It’s okay if they overlap slightly, as this adds to the hand-painted vintage feel. -
Second coat:
Apply a second coat of white paint if the first is too translucent, but remember we are going for an aged look, so it doesn’t need to be flawless. -
Dry time:
Allow the paint to dry until it is tacky but not fully cured—usually about 30 to 45 minutes depending on humidity.
Problem: Paint Won’t Chip
If the paint sticks too well over the Vaseline, the paint may have cured too long. Use rougher sandpaper to break the surface, then scrape again aggressively.
Step 3: Distressing & Finishing
-
The scrape test:
Take your paint scraper or putty knife and gently scrape over the areas where you applied Vaseline earlier. The paint should peel or chip away easily, revealing the dark rusted base beneath. -
Enhance the chipping:
If the paint isn’t chipping enough, apply a little more pressure or use the corner of the scraper to create random chips and scratches throughout the white and teal sections. -
Sanding for smoothness:
Once you are happy with the major chips, take 220-grit sandpaper and lightly sand the entire surface. This smoothens the brush strokes and feathers the edges of your chipped paint for a realistic worn effect. -
Heavy distressing:
Switch to 120-grit sandpaper to aggressively hit the raised ridges and the lip of the can, exposing more of the underlying metal. -
Faux rust details:
I like to mix a tiny amount of water with rust-colored paint and flick it onto the can with an old toothbrush to create tiny oxidized speckles. -
Clean off dust:
Wipe the entire can down with a dry or slightly damp cloth to remove all sanding dust and loose paint chips. -
Seal the finish:
Spray the entire piece with a clear matte sealer. This locks in the chipping paint so it doesn’t continue to flake off over time.
Pro Tip: Authentic Age
Follow the ‘story’ of the object. Distressing shouldn’t be random; focus peeling on raised rings and handles where hands would naturally wear down the paint.
Now you have a stunning, time-worn vessel perfect for holding dried floral stems or standing alone as a statement piece
Botanical Transfer-Inspired Collage
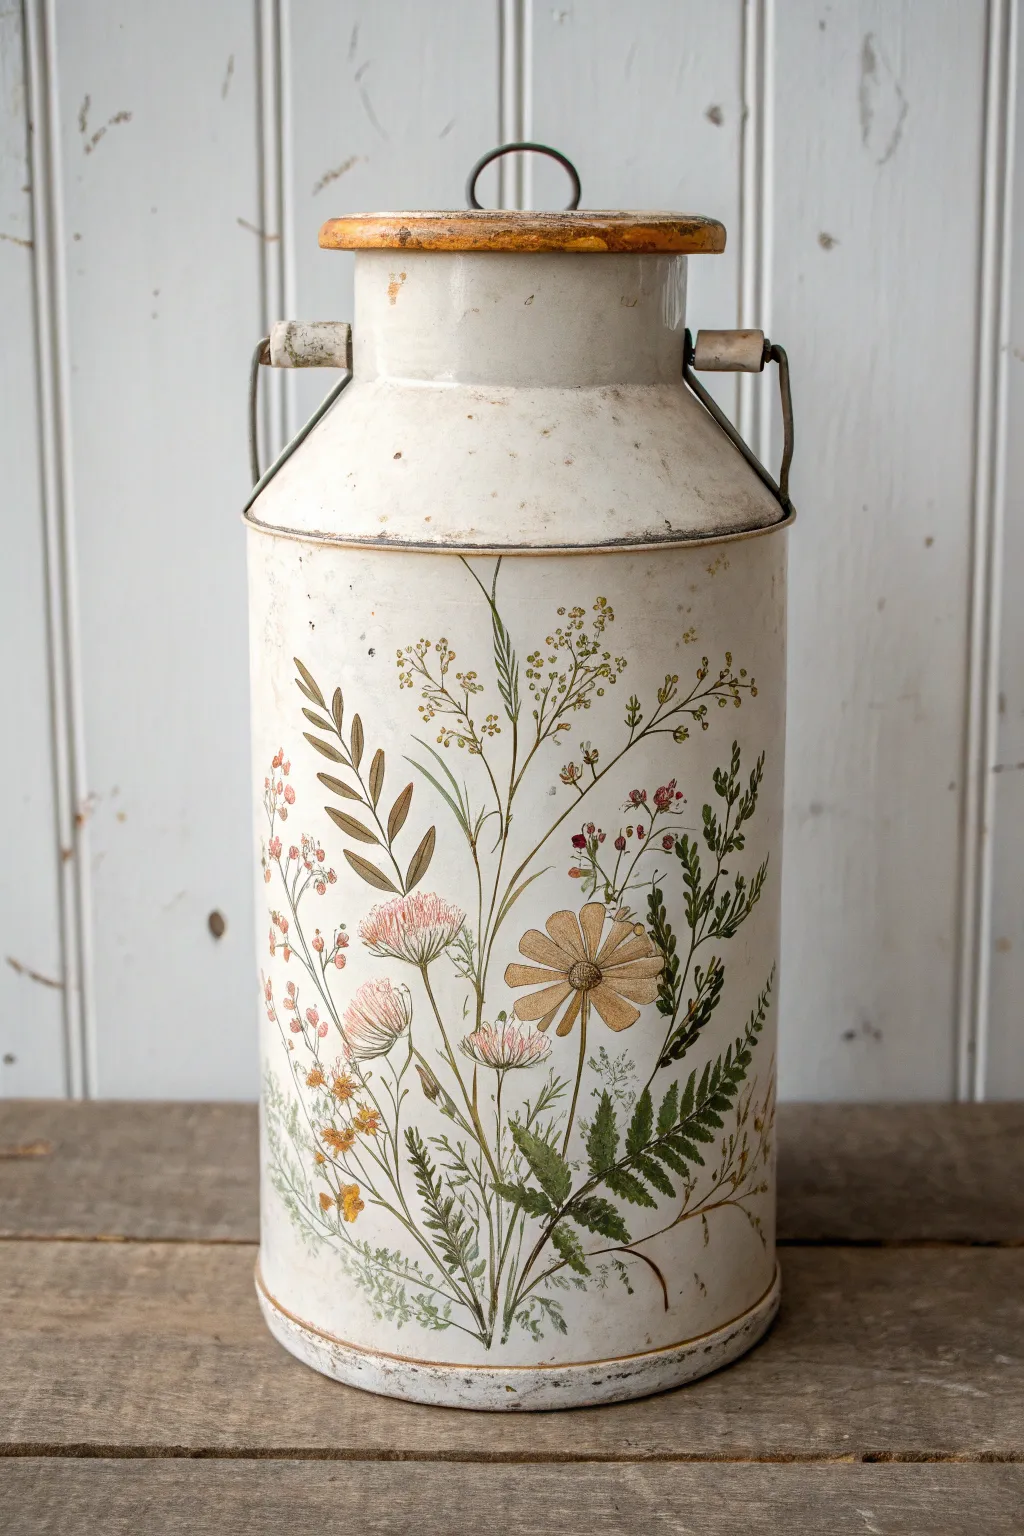
Transform a plain metal milk can into a piece of rustic art using a botanical transfer method that mimics the look of vintage field guides. The result is a beautifully aged vessel featuring delicate wildflowers and ferns against a distressed creamy white background.
How-To Guide
Materials
- Old metal milk can (vintage or reproduction)
- Sandpaper (medium and fine grit)
- Metal primer spray
- Creamy off-white chalk paint
- Large flat paintbrush
- Botanical waterslide decal paper OR image transfer medium
- High-resolution botanical prints (wildflowers, ferns, daisies)
- Clear matte acrylic sealer (spray)
- Burnt umber acrylic paint (for aging)
- Water and lint-free cloths
- Small sponges
- Scissors
Step 1: Preparation & Base Coat
-
Clean the surface:
Begin by thoroughly cleaning your milk can with warm soapy water to remove any grease, dirt, or old rust residue. Let it dry completely. -
Sand for adhesion:
Scuff the entire metal surface with medium-grit sandpaper. This creates a specialized texture that helps the primer grip the metal, especially if the can is galvanized or glossy. -
Prime the metal:
Apply a coat of metal primer spray. Use short, even bursts to avoid drips. Let this layer cure according to the manufacturer’s instructions. -
Apply base color:
Using a large flat brush, paint the entire can with your creamy off-white chalk paint. Don’t worry about perfect smoothness; brushstrokes add to the vintage character. -
Add a second coat:
Once dry, apply a second coat of chalk paint for opaque coverage. Allow this to dry for at least 4-6 hours.
Seamless edges
If decal edges are visible after drying, mist them very lightly with matte varnish spray to blend the glossy film line into the matte chalk paint background.
Step 2: Designing the Meadow
-
Select your botanicals:
Curate a selection of botanical images. Look for a mix of ferns, tall grasses, pink wildflowers, and a focal daisy. I like to print these on standard paper first to test the arrangement against the can’s curve. -
Prepare the transfers:
Print your chosen designs onto waterslide decal paper or image transfer paper. If using transfer paper, remember to mirror your images before printing. -
Cut out the stems:
Carefully cut around each plant stem and flower head. The closer you cut to the design, the less visible the film edges will be later. -
Apply the central focal point:
Start by applying the largest flowers or the tall fern leaves near the bottom center. Follow the instructions for your specific transfer paper (usually soaking in water or applying medium face-down). -
Build the layers:
Work outward and upward, layering smaller wildflowers and grasses behind or beside the main stems. Vary the heights to simulate a natural field. -
Smooth air bubbles:
Gently smooth out each decal or transfer with a damp cloth or squeegee tool to ensure there are no trapped air bubbles, which can ruin the painted effect.
Step 3: Distressing & Sealing
-
Initial sealing:
Once the transfers are completely dry, lightly spray the entire can with a clear matte sealer to lock the designs in place before weathering. -
Mix an aging wash:
Dilute a small amount of burnt umber acrylic paint with water until it has the consistency of tea. -
Apply the wash:
Brush the wash casually over the can, focusing on the rim, handle attachments, and the bottom edge. While it’s wet, wipe most of it back with a lint-free cloth, leaving dirt trapped in crevices and brushstrokes. -
Distress the edges:
Use fine-grit sandpaper to gently rub away paint on the raised rims, handles, and occasional spots on the body to reveal the metal underneath. -
Enhance the lid:
If your can has a wooden lid, stain it a warm golden oak tone. If metal, paint it to match or leave it rusted for contrast. -
Final protection:
Give the entire project two coats of matte acrylic sealer. This protects the transfers from peeling and seals the distressed finish.
Add 3D texture
Mix baking soda into your base paint for a gritty, stoneware texture, or glue dried pressed flowers among the transfers for mixed-media realism.
Now you have a stunning, time-worn vessel perfect for holding dried lavender or standing proudly on its own
Seasonal Swap: Spring Florals
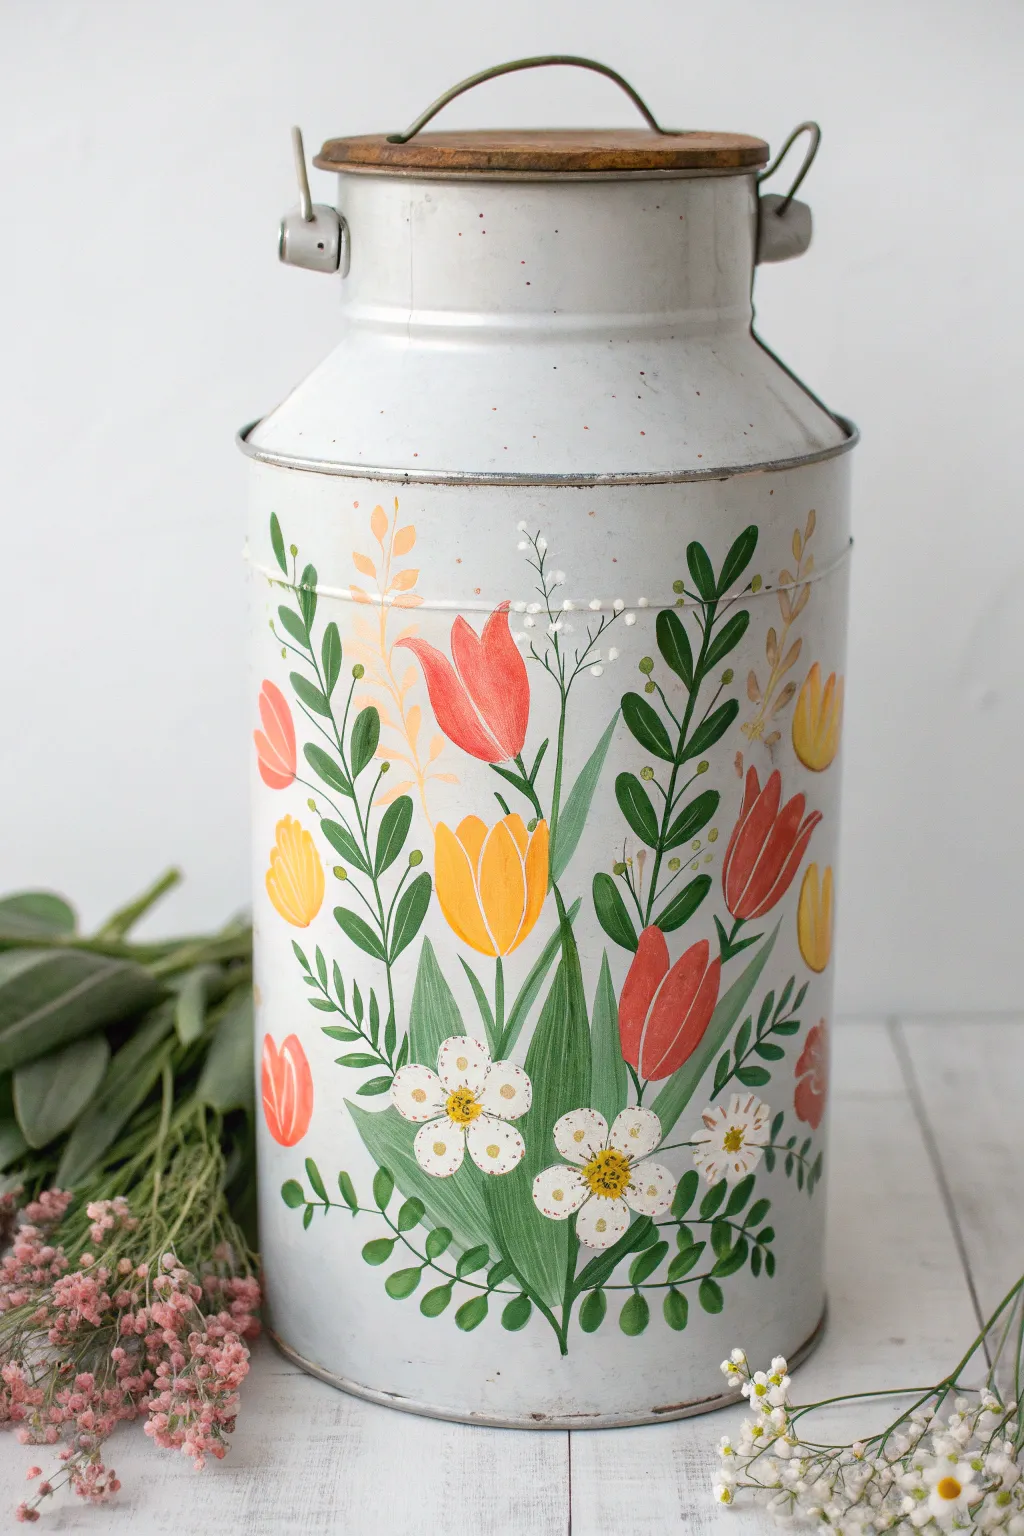
Transform a vintage metal milk can into a celebration of spring with this vibrant, folk-art inspired floral design. The clean white background makes the cheerful tulips, daisies, and delicate leafy sprigs pop with traditional charm.
Detailed Instructions
Materials
- Vintage or reproduction metal milk can (cleaned and primed)
- White chalk paint or matte acrylic paint (base coat)
- Acrylic paints: Coral red, deep red, marigold yellow, mustard yellow, bright white, forest green, sage green, and olive green
- Round synthetic brushes (sizes 2, 4, and 6)
- Fine liner brush (size 0 or 00 for details)
- Pencil (optional for sketching)
- Matte spray sealer
- Small sponge or foam pouncer (optional for centers)
Step 1: Preparation & Base Coat
-
Clean surface:
Begin by thoroughly cleaning the milk can with warm soapy water to remove any grease or dust. If the can is truly vintage and rusty, give it a quick sanding with fine-grit sandpaper to smooth out the roughest spots. -
Apply base color:
Paint the entire exterior of the can with a white chalk paint or matte acrylic. I find that using a large flat brush gives nice coverage, but don’t worry about faint brushstrokes—they add to the vintage character. -
Dry and repeat:
Allow the first coat to dry completely for about an hour. Apply a second coat if the metal is still showing through, ensuring you have a solid, opaque canvas for your florals.
Step 2: Painting the Foliage
-
Anchor the design:
Start by painting the large, central leaves at the bottom center. Mix forest green with a touch of sage. Using a size 6 round brush, press down and lift up to create broad, tapered leaves that fan outward. -
Stem structure:
Switch to a size 4 brush and paint long, slender stems rising from the central leaf cluster. Keep these lines loose and slightly curved; nature is rarely perfectly straight. -
Leafy sprigs:
Add the darker, symmetrical branch details. Using forest green, paint pairs of small oval leaves climbing up the taller stems on the left and right sides of the composition. -
Fern-like details:
Towards the bottom, add curved, drooping branches with tiny rounded leaves using olive green. These should frame the bottom of your bouquet, almost hugging the curve of the can.
Uneven Coverage?
If your red paint looks streaky over the white base, stop painting. Let it dry fully, then apply a second thin coat rather than overworking wet paint.
Step 3: Adding the Blooms
-
Tulip shapes:
Load a size 6 brush with coral red. Paint the main tulip bell shapes by creating a ‘U’ shape and filling it in, tapering the top edges slightly inward. -
Tulip shading:
While the red is still slightly damp, blend in a darker red on one side or at the base of the tulips for dimension. Add a bright yellow tulip in the center using marigold paint. -
Yellow buds:
Paint smaller, tighter yellow buds on the outer edges using mustard yellow. These are simple oval shapes that sit atop the thinner stems. -
Daisy placement:
Using bright white and a size 4 brush, paint the three prominent daisies near the bottom center. Create five rounded petals for each flower, leaving a small open space in the middle. -
Delicate fillers:
With a fine liner brush and thinned white paint, add tiny sprigs of baby’s breath or wildflowers rising high above the main bouquet. Use quick, small dots to represent the tiny buds. -
Whispy ferns:
Paint faint, golden-yellow fern fronds in the background using a very watered-down mustard paint. These should look soft and translucent compared to the bold green leaves.
Rustic Speckle
Before sealing, flick an old toothbrush loaded with diluted brown paint over the can to create tiny speckles that mimic aged enamelware.
Step 4: Refining Details
-
Daisy centers:
Once the white petals are dry, use a small brush or the back end of a paintbrush handle to dot a yellow center into each daisy. -
Detailing centers:
Add tiny brown or black specks around the yellow daisy centers to give them texture and depth. -
Highlighting leaves:
Use a lighter sage green to add a simple central vein line to the large bottom leaves. This separates them visually and adds a touch of realism. -
Petal definition:
Take a fine liner brush with white paint and add very subtle highlight strokes to the edges of the red and yellow tulips to define the individual petals. -
Protective coat:
After letting the artwork cure for at least 24 hours, spray the entire can with a clear matte sealer to protect your painting from scratches and moisture.
Now you have a charming piece of rustic decor ready to hold dried flowers or stand proudly on your porch
Seasonal Swap: Summer Garden Theme
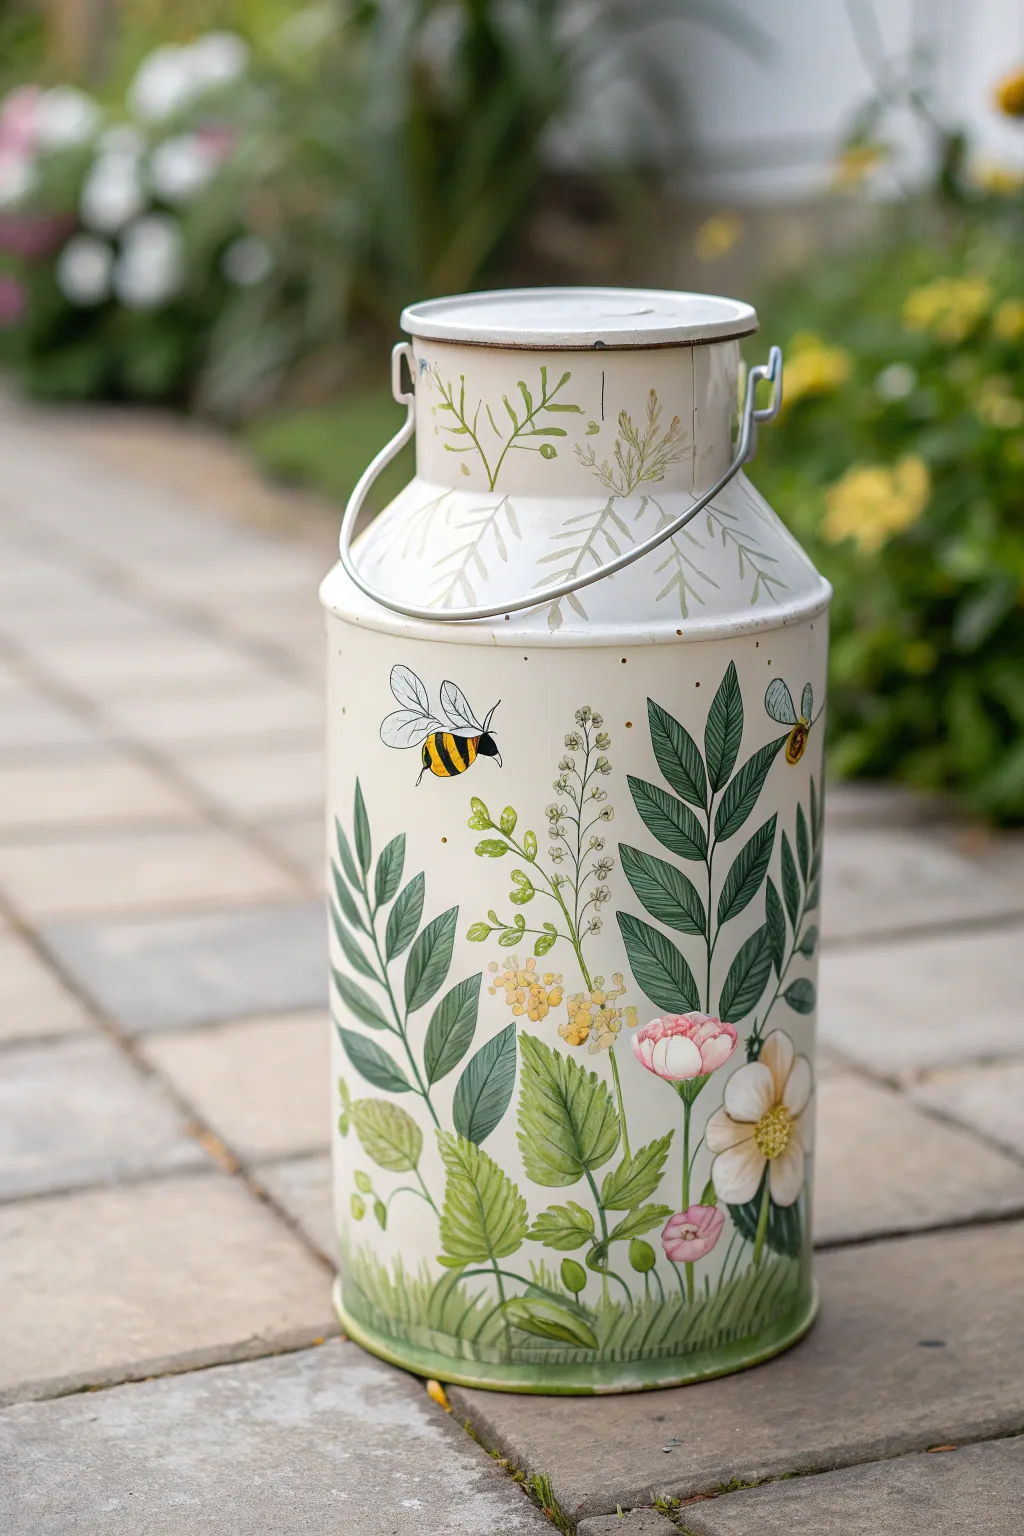
Transform a plain metal milk can into a buzzing summer garden scene with this light and airy design. Featuring delicate botanical illustrations and playful bumblebees against a creamy white background, this project is perfect for bringing a touch of nature to your porch or entryway.
How-To Guide
Materials
- Clean metal milk can (vintage or new reproduction)
- Sandpaper (medium and fine grit)
- Metal primer spray paint (white)
- Creamy white acrylic craft paint or chalk paint (for base coat)
- Acrylic paints: sage green, dark forest green, yellow ochre, black, white, pale pink, dusty rose, light brown
- Paintbrushes: 1-inch flat brush, small round brush (size 1-2), liner brush (size 00)
- Clear acrylic sealer (matte or satin finish)
- Pencil
- Carbon transfer paper (optional)
Step 1: Preparation & Base Coat
-
Clean surface:
Thoroughly wash the milk can with warm bubbly water to remove any grease or dirt. If it’s vintage, scrub away loose rust with a wire brush. -
Sand for adhesion:
Scuff the entire exterior surface with medium-grit sandpaper to give the paint something to grip. Wipe away the dust with a damp cloth. -
Prime the metal:
In a well-ventilated area, spray the can with a metal primer. Apply thin, even coats to prevent drips and let it dry according to the manufacturer’s instructions. -
Apply base color:
Using the 1-inch flat brush, paint the entire can with your creamy white acrylic or chalk paint. You will likely need 2-3 coats for solid, opaque coverage; let each layer dry completely before adding the next.
Brushwork Tip
For natural-looking leaves, vary the pressure on your brush. Press down for the wide part of the leaf and lift up as you reach the tip.
Step 2: Drafting the Design
-
Sketch basic placement:
Lightly sketch your design directly onto the dry base coat with a pencil. Focus on tall vertical stems for the prominent leaves and small clusters for the flowers. -
Plan the neck details:
Don’t forget the slanted neck area. Sketch simple, fern-like sprigs radiating upward toward the rim to create a delicate border effect. -
Position the bees:
Draw the outline for two large bees: one hovering mid-air near the top left and perhaps another tucking into the foliage on the right.
Step 3: Painting the Botanicals
-
Paint main stems:
Mix a medium sage green with a touch of water to improve flow. Using a small round brush, paint long, fluid lines for the main stems, starting from the bottom and extending upward. -
Create large leaves:
For the prominent, fern-like leaves, use a darker forest green. Paint pairs of pointed oval leaves extending from the main stems. I find it helps to drag the brush from the stem outward, lifting pressure at the tip to create a sharp point. -
Add leafy texture:
Once the dark green leaves are dry, mix a lighter green tone and add delicate central veins using your liner brush for added dimension. -
Paint textured foliage:
For the lower, broader leaves (resembling mint or strawberries), use a yellow-green mix. Paint the jagged edges carefully and fill them in. -
Add the grass base:
At the very bottom rim, use short, upward flickering strokes with various shades of green to create a grassy foundation.
Level Up
Use a toothbrush to splatter faint specks of watered-down brown paint across the background before sealing. This creates a vintage, aged enamelware look.
Step 4: Flowers and Bees
-
Paint flower bases:
Using pale pink and white, paint the round flower heads. Layer the petals by starting with the darker dusty rose near the center and highlighting the edges with white. -
Add floral centers:
Dot the centers of the flowers with yellow ochre. Once dry, add tiny speckles of light brown around the yellow for a realistic stamen effect. -
Paint yellow sprigs:
Create the delicate filler flowers by dabbing small clusters of yellow and cream dots on thin, wispy stems. -
Color the bee bodies:
Fill in the bee bodies with bright yellow sections. Once dry, paint the bold black stripes over the top, following the curve of the insect’s body. -
Create transparent wings:
Paint the wings with a very watered-down white or light grey wash so the background color shows through slightly. Outline them delicately with black using your finest liner brush. -
Detail the neck:
Go back to the neck of the can and paint the simple olive-green fern sprigs you sketched earlier, keeping them light and airy. -
Seal the artwork:
Allow the paint to cure for at least 24 hours. Apply two coats of clear acrylic sealer (matte is best for this rustic look) to protect your artwork from the elements.
Place your finished milk can in the garden or fill it with dried flowers for a charming indoor display
Seasonal Swap: Autumn Pathway Scene
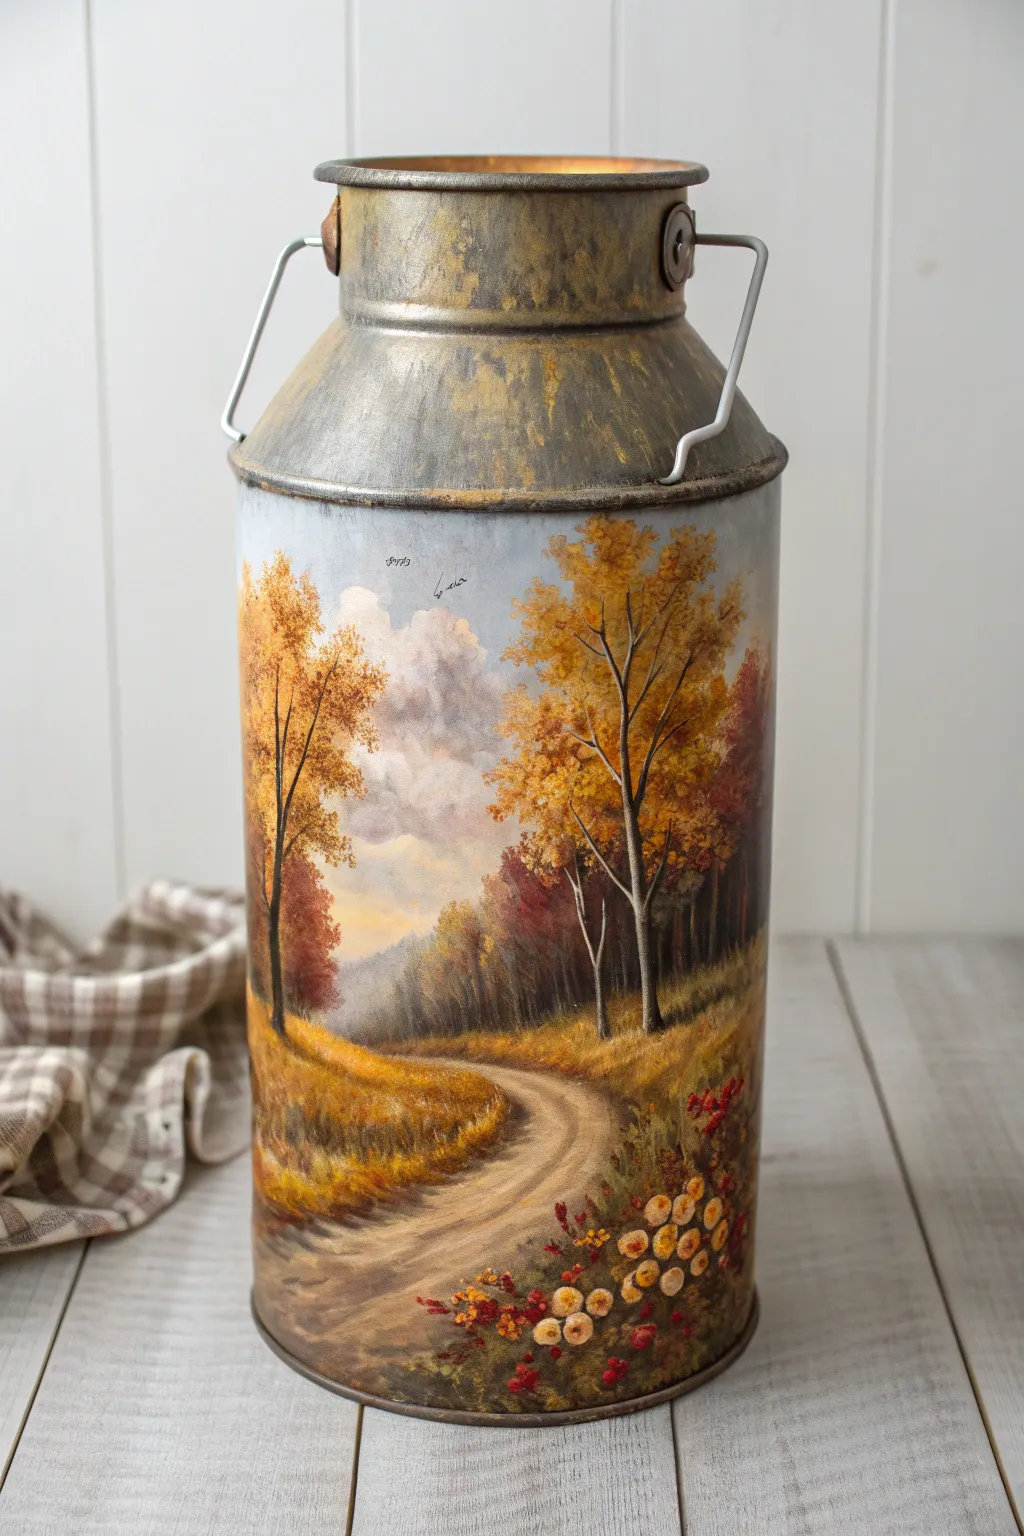
Transform a plain metal milk can into a centerpiece of rustic charm with this warm, inviting autumn landscape. The scene captures the golden glow of fall foliage and a winding path, painted directly onto distressed metal for an authentic farmhouse feel.
Step-by-Step Guide
Materials
- Vintage or reproduction metal milk can
- Sandpaper (medium and fine grit)
- Metal primer spray (grey or white)
- Acrylic craft paints (burnt umber, raw sienna, yellow ochre, cadmium yellow, titanium white, burnt sienna, crimson, olive green, phthalo blue)
- Metallic acrylic paint (aged bronze or antique gold)
- Assorted brushes: 1-inch flat, medium filbert, lush fan brush, fine liner
- Sea sponge for texturing
- Matte spray sealer
Step 1: Preparation and Base Coat
-
Prep the Surface:
Begin by thoroughly cleaning the milk can to remove any grease or oils. Sand the entire surface lightly to create a ‘tooth’ for the paint to adhere to, then wipe away all dust with a damp cloth. -
Prime the Canvas:
Mask off the top neck and handles if you wish to keep them metallic, or plan to paint over them later. Apply an even coat of metal primer to the main body of the can. Let this cure completely according to the manufacturer’s instructions. -
Create the Sky Gradient:
Mix titanium white with a tiny touch of phthalo blue and a hint of grey. Using the 1-inch flat brush, paint the upper third of the can, blending downward into a warmer, creamy white near the horizon line to simulate an atmospheric distance.
Paint Slipping?
If acrylics bead up on the metal, the surface is too slick. Lightly sand again and wipe with rubbing alcohol before re-priming.
Step 2: Painting the Landscape
-
Block in Background Trees:
Using a mix of olive green, raw sienna, and burnt umber, lightly tap in a distant tree line across the middle of the can. Keep these shapes soft and fuzzy to push them into the background. -
Establish the Pathway:
Sketch the winding road shape with thinned burnt sienna. Start wide at the bottom center and narrow it significantly as it curves toward the left and disappears into the horizon. -
Underpaint the Fields:
Fill the grassy areas on either side of the path with a base of yellow ochre. While wet, streak in burnt sienna and raw umber to suggest the modulation of the terrain. -
Add Cloud Formations:
With a scruffy brush or sea sponge, dab thick titanium white mixed with a touch of purple-grey into the sky area. Soften the edges with a dry brush to create fluffy, rolling cumulus clouds.
Glow Up
Mix a tiny amount of gold mica powder into your yellow ochre paint for the leaves. It will make the autumn foliage shimmer in the light.
Step 3: Adding Detail and Foliage
-
Paint the Main Trees:
Use a liner brush and dark burnt umber to paint the skeletal structures of the foreground trees. Let the trunks be slightly crooked and natural, branching out finer as they reach the top. -
Stipple the Leaves:
Load a fan brush or stippling brush with cadmium yellow and raw sienna. Gently tap foliage onto the tree branches. I like to layer lighter yellows on top of darker oranges to mimic sunlight hitting the canopy. -
Refine the Dirt Road:
Add texture to the road using horizontal strokes of beige and white to create ‘ruts’ and light reflection. Keep the center slightly lighter than the edges. -
Texturize the Grass:
Using a fan brush turned vertically, flick upward strokes of yellow ochre and burnt sienna along the road edges to create tall, dry autumn grasses. -
Deepen the Shadows:
Glaze a thin wash of burnt umber along the tree line and the shadowed side of the road curve to add dramatic contrast and depth.
Step 4: Finishing Touches
-
Paint Foreground Wildflowers:
In the bottom right corner, use the handle end of a brush or a Q-tip to dot on small round flower heads in white and yellow. Add tiny red accents for berries or darker blooms. -
Add Flying Birds:
With your finest liner brush and thinned black paint, add two or three tiny ‘V’ shapes in the distance to represent birds flying over the valley. -
Distress the Metal:
For the top neck and handles, simulate aged metal by sponging on layers of grey, followed by the metallic bronze paint. Once dry, lightly sand high points to reveal the dark base. -
Seal the Artwork:
Once the entire painting is bone dry—wait at least 24 hours—sray the can with a clear matte sealer to protect the acrylics from scratching and fading.
Place your finished milk can on a porch or entryway to welcome guests with the warmth of the harvest season.
Seasonal Swap: Winter Barn or Evergreen Scene
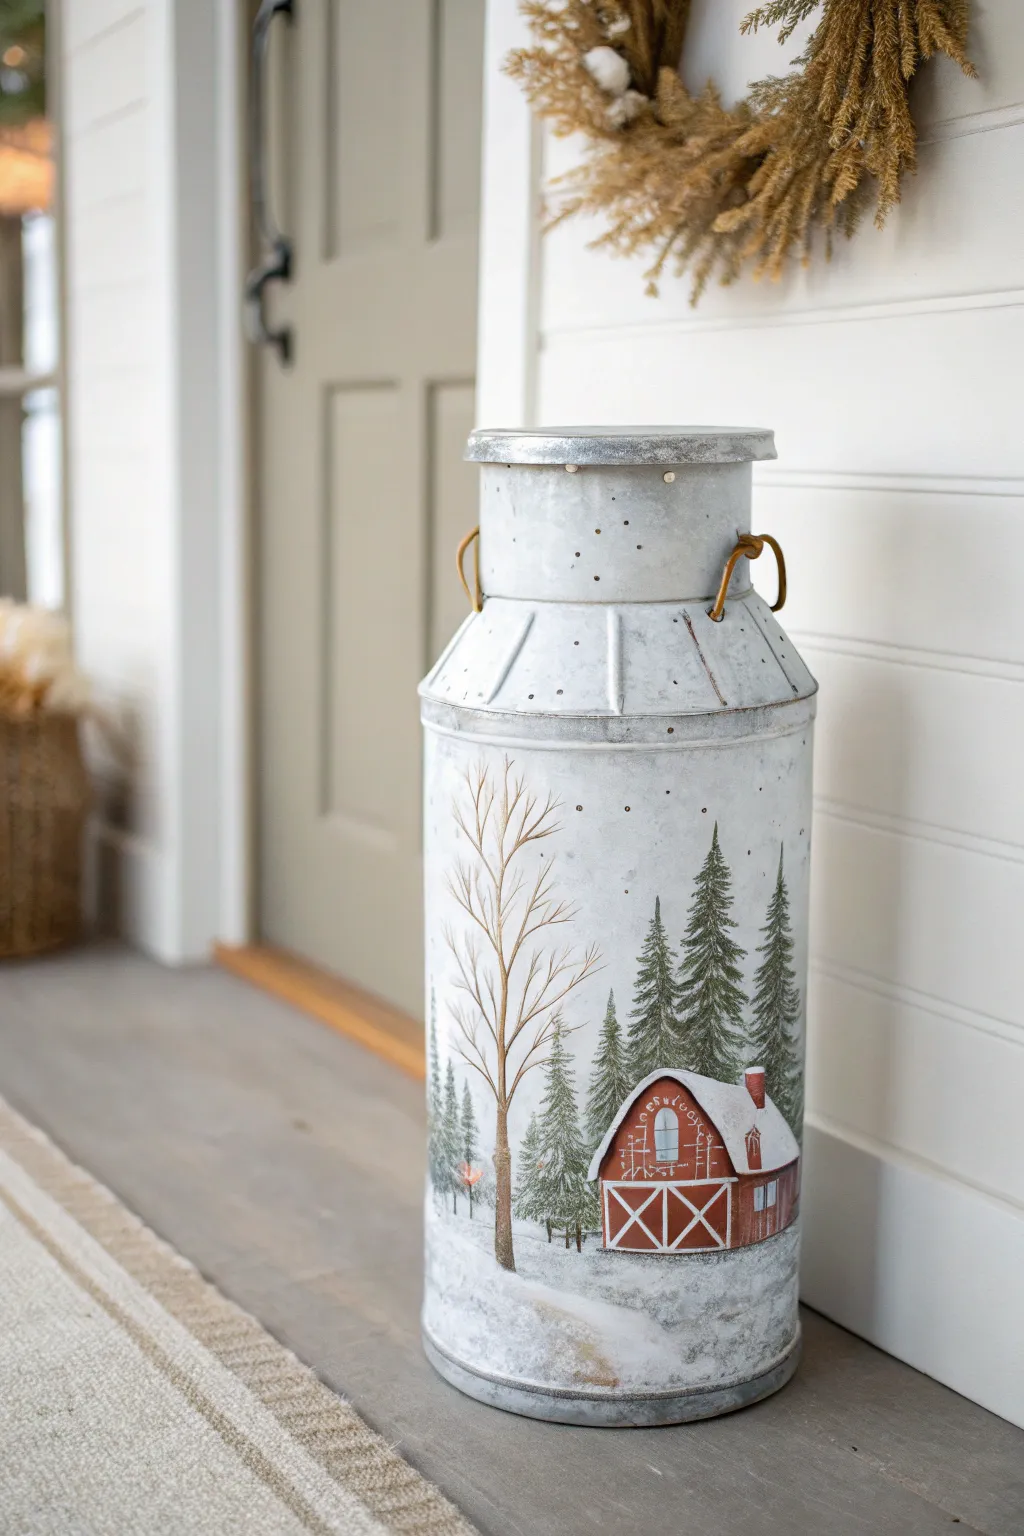
Transform a galvanized milk can into a cozy winter scene featuring a classic red barn nestled among snowy evergreens. This rustic project uses simple painting techniques to create a frosted, vintage look perfect for seasonal porch decor.
Step-by-Step Tutorial
Materials
- Large galvanized metal milk can (vintage or reproduction)
- Sandpaper (medium grit)
- Rubbing alcohol
- White chalk paint or matte acrylic paint
- Acrylic craft paints: Barn Red, Pine Green, Dark Green, Burnt Umber, Slate Grey, Warm White
- Assorted brushes: 1″ flat brush, medium round brush, liner brush, fan brush
- Old toothbrush (optional for splatter)
- Clear matte sealer spray
- Paper towels
- Pencil
Step 1: Prepping the Canvas
-
Clean the surface:
Wipe down the entire exterior of the milk can with rubbing alcohol. This removes any oils or manufacturing residue that could prevent the paint from sticking properly. -
Rough it up:
Lightly sand the smooth galvanized surface, especially where you plan to paint the main scene. You don’t need to strip it, just give it enough ‘tooth’ for the paint to grip. -
Create a snowy base:
Dip a dry 1″ flat brush into white chalk paint and wipe most of it off on a paper towel. Use a pouncing or stippling motion to apply a cloudy, uneven layer of white all over the can, concentrating heavier coverage near the bottom to simulate a snowbank. -
Add falling snow texture:
While the base is drying, you can flick tiny droplets of watered-down white paint using an old toothbrush for a subtle falling snow effect in the ‘sky’ area.
Snowy Texture Trick
Mix baking soda into your white acrylic paint before applying it to the roof and ground. It creates a gritty, fluffy texture that looks like real piled snow when it dries.
Step 2: Planning and Blocking
-
Sketch the layout:
Lightly sketch your design with a pencil directly onto the dry white base. Mark where the barn will sit, the rolling hills of snow, and the vertical lines for the tree trunks. -
Paint the barn base:
Fill in the basic shape of the barn structure using Barn Red and a medium round brush. Don’t worry about details yet; just get a solid coat of color down. You may need two coats for opacity. -
Add the snowy roof:
Using your Warm White, paint the roof of the barn. Make the edges slightly irregular and fluffy to look like piled-up fresh snow.
Step 3: Painting the Landscape
-
Start the pine trees:
Mix Pine Green with a tiny drop of black or Dark Green. Using a fan brush or a rough flat brush turned vertically, tap in the evergreen trees. Start at the top point and tap wider as you go down to create the conical shape. -
Layering the forest:
Once the dark green layer dries, come back with a lighter green mixed with a little white. Tap this highlight color onto the tips of the branches to add dimension and make them look dusted with frost. -
The bare winter tree:
Mix Burnt Umber with water to make it inky. Use a liner brush to paint the large deciduous tree in the foreground. Start with the trunk, pulling upward, and let your hand shake slightly to create natural-looking, jagged branches. -
Highlighting the bare tree:
Add a very thin line of white or light grey along the left side of the trunk and main branches to suggest a light source and frost.
Light Up the Barn
Drill small holes through the freshly painted barn windows before sealing. Place a battery-operated puck light inside the can to make the windows glow at night.
Step 4: Refining Details
-
Barn details:
Use the liner brush and bright white paint to add the ‘X’ details on the barn doors and outline the windows. Add a touch of Slate Grey to create shadows under the roof eaves. -
Grounding the scene:
Using a dry brush with white paint, feather the area where the trees and barn meet the ‘ground.’ This softens the hard edges and makes them look like they are sitting in deep snow. -
Adding depth to the snow:
Mix a very watery Slate Grey wash. Lightly brush this into the low points of the snowdrifts to create subtle shadows, giving the ground some rolling topography. -
Final heavy snowfall:
I prefer to add one last layer of ‘snow’ by dabbing thick white paint onto the tops of the fence posts (if you added any), the barn roof, and the very tops of the evergreen trees.
Step 5: Sealing
-
Checking your work:
Step back and look at the can from a distance. If the sky looks too empty, add a few larger snowflakes using the tip of a stylus or the handle end of a paintbrush. -
Protect the art:
Allow the paint to cure for at least 24 hours. Once fully dry, spray the entire can with two light coats of clear matte sealer to protect it from moisture and chipping.
This charming scene captures the quiet beauty of winter and will greet your guests warmly all season long
Milk Can Side Table With Painted Top Rim
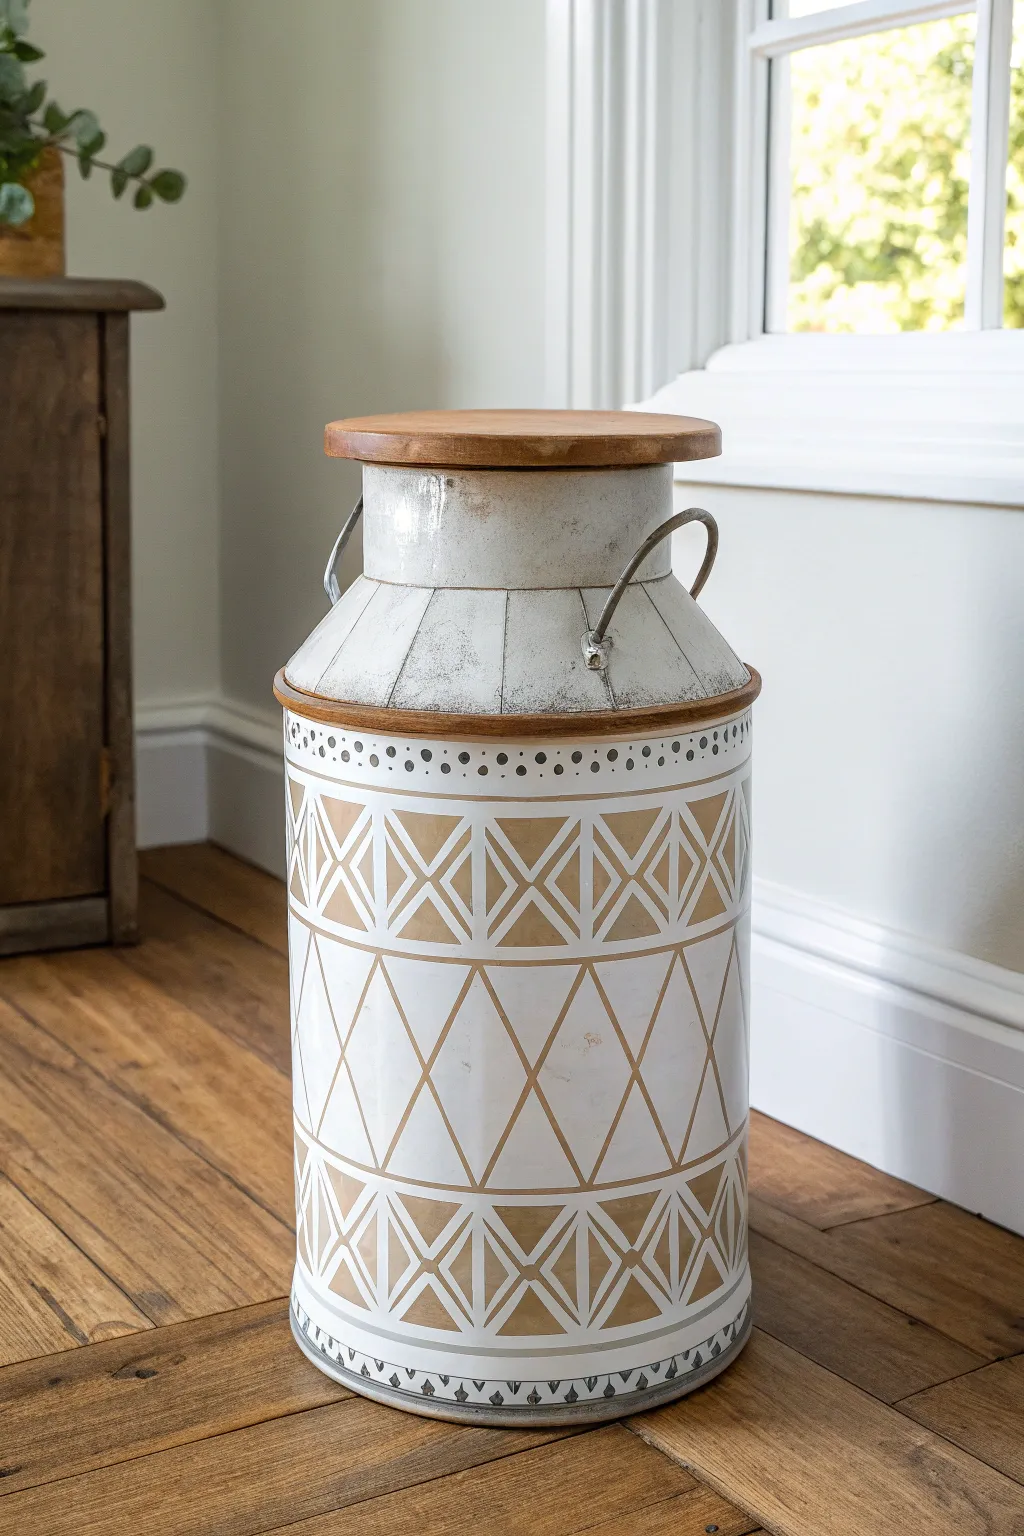
Transform a rustic metal milk can into a stunning side table featuring crisp white and gold geometric patterns. This project blends farmhouse charm with modern bohemian aesthetics, topped with a warm wood finish lid.
Step-by-Step Guide
Materials
- Vintage or reproduction metal milk can
- Pre-cut round wooden plaque (sized to fit can opening)
- Wooden ring or flexible wood trim (optional for shoulder)
- White chalk paint or spray paint (matte finish)
- Gold or tan metallic craft paint
- Grey craft paint
- Painter’s tape (various widths)
- Detail paint brushes
- Medium flat brush
- Sandpaper (120 and 220 grit)
- Wood stain (medium oak or walnut)
- Strong adhesive (E6000 or construction adhesive)
- Clear matte sealer spray
- Pencil and flexible ruler
Step 1: Preparation & Base Coat
-
Clean the Can:
Begin by thoroughly cleaning the milk can with warm soapy water to remove any grease, dirt, or loose rust. Let it dry completely. -
Sand Metal Surfaces:
Lightly sand the entire exterior of the can with 120-grit sandpaper to rough up the surface, providing a better grip for your paint. -
Apply Base White:
Paint the entire body and neck of the can with white matte chalk paint. Apply 2-3 coats as needed for full coverage, allowing ample drying time between layers. -
Distress the Neck (Optional):
If you want the rustic look shown in the inspiration, lightly sand the neck area to reveal bits of the metal underneath, or use a dry-brush technique with grey paint to simulate age.
Uneven Lines?
If paint bleeds under tape, wait for it to dry fully. Then, use a craft knife to gently scrape excess paint away or touch up with the base white color.
Step 2: Creating the Wooden Elements
-
Stain the Lid:
Take your round wooden plaque and sand it smooth. Apply your chosen wood stain with a cloth, wiping away excess depending on how dark you want the finish. Let it dry fully. -
Create the Shoulder Rim:
If your can doesn’t have a distinct rim, you can glue a wooden ring or a strip of flexible wood veneer around the ‘shoulder’ where the neck meets the body. Stain this to match your lid.
Level Up: Hidden Storage
Instead of gluing the wooden top down permanently, add small wooden blocks to the underside of the lid so it fits snugly but remains removable for storage.
Step 3: Painting the Geometric Pattern
-
Mark Horizontal Bands:
Use a pencil and ruler to measure and lightly mark three horizontal bands around the main body of the can. These will define your pattern sections. -
Apply Tape for Grid:
Tape off the horizontal lines. For the complex diamond patterns, I find it easiest to use thin painter’s tape to create the ‘X’ and diamond shapes within the top and bottom bands. -
Paint Gold Accents:
Using your gold or tan metallic paint, carefully fill in the negative spaces left by your tape. Use a small flat brush for clean edges. -
Freehand the Middle Section:
For the large central diamonds, use a ruler to draw the large triangles lightly. Paint the outlines carefully with a fine liner brush in gold to create the open geometric look. -
Add Decorative Dots:
Along the very top edge of the main body (just below the wooden rim), use the back of a paintbrush dipped in grey paint to stamp a row of uniform dots. -
Paint Bottom Border:
Create a finishing border at the bottom edge. Paint small grey triangles or a jagged line to mimic the detail seen in the photo. -
Remove Tape:
Carefully peel away all painter’s tape while the paint is still slightly tacky to ensure crisp, clean lines.
Step 4: Assembly & Finishing
-
Clean Up Lines:
Inspect your geometric patterns. Use a small brush with white paint to touch up any bleeds or messy edges. -
Seal the Project:
Spray the entire painted can and the stained wooden lid with a clear matte sealer. This protects the paint from chipping and makes the table durable for daily use. -
Attach the Handles:
If you removed the wire handles for painting, reattach them now. Leaving them in their original metal finish adds authentic character. -
Fix the Lid:
Apply a strong adhesive to the top rim of the milk can and center the stained wooden plaque on top. Weigh it down with heavy books while the glue cures.
Now you have a unique, custom piece of furniture that adds instant character to any room
Unexpected Modern Gradient Color Block
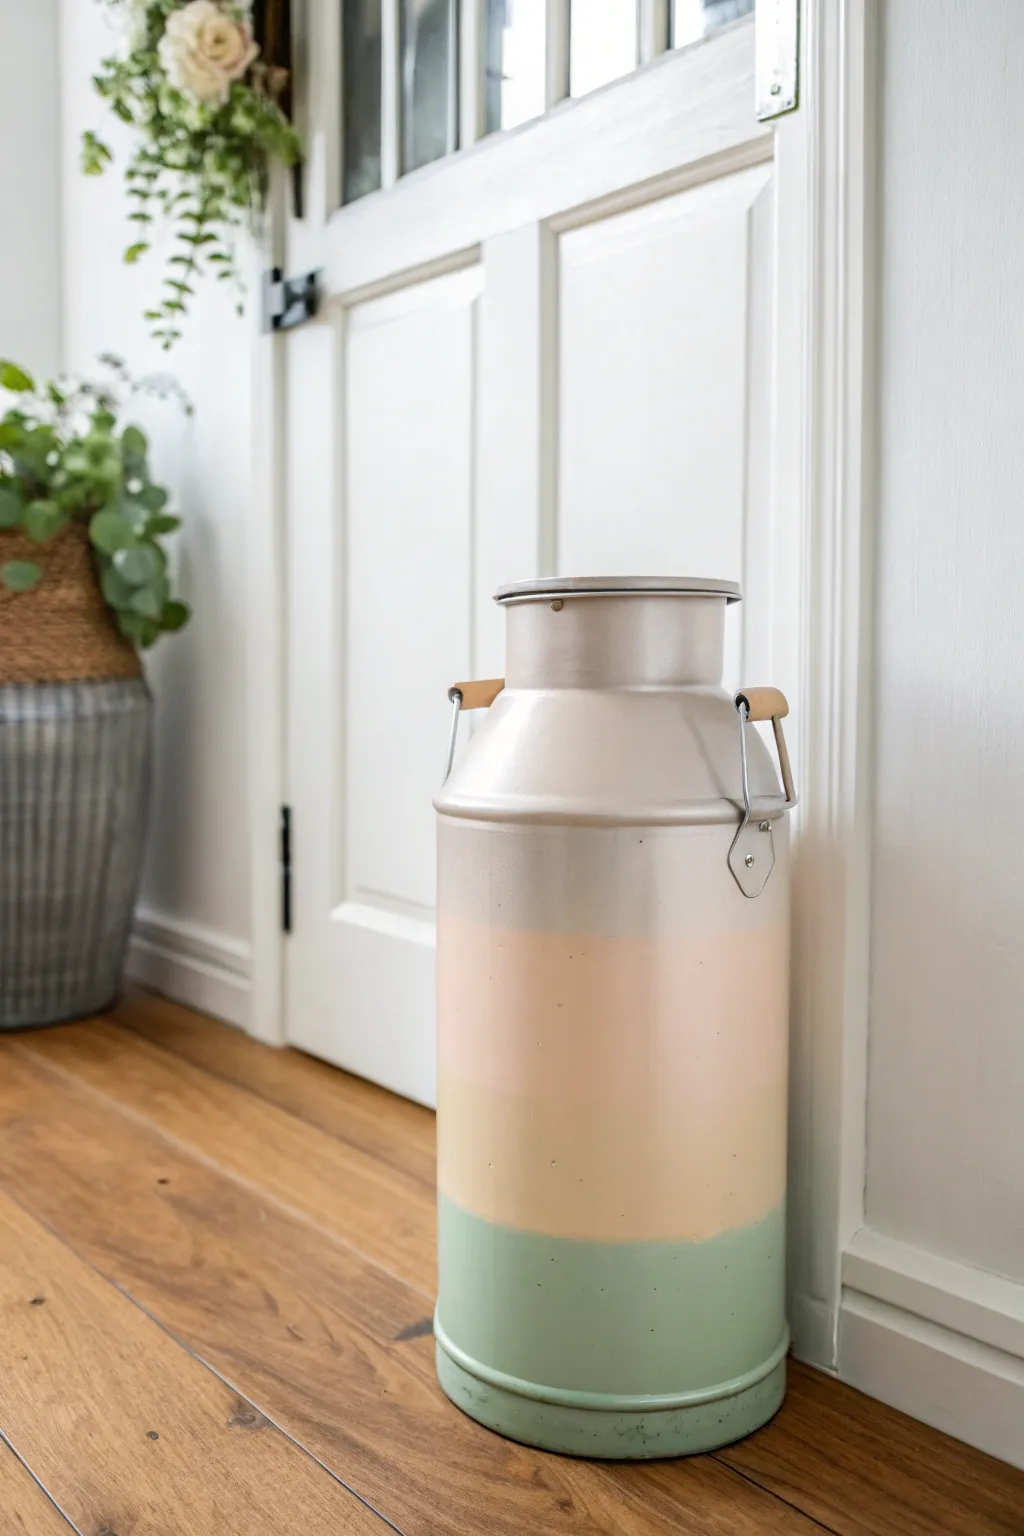
Transform a rustic metal milk can into a chic, modern decor piece with this soft, gradient-style color block technique. The combination of metallic champagne, warm peach, and muted sage green creates a sophisticated palette that feels fresh yet timeless.
Step-by-Step Tutorial
Materials
- Large metal milk can (vintage or reproduction)
- Spray paint primer (bonding primer for metal)
- Metallic champagne or soft gold spray paint
- Flat or satin spray paint in soft peach/blush
- Flat or satin spray paint in sage green
- Painter’s tape (wide width)
- Plastic drop cloth or old newspapers
- Clean rag and mild degreaser (like TSP substitute) or rubbing alcohol
- Fine-grit sandpaper (220-grit)
- Cardboard or poster board (for masking)
- Gloves and respirator mask
Step 1: Preparation & Priming
-
Clean surface:
Begin by thoroughly cleaning the milk can to remove any dirt, oil, or sticker residue. Use a mild degreaser or rubbing alcohol on a clean rag, ensuring the metal is completely free of contaminants. -
Light sanding:
If your can has a glossy finish or rough rust spots, scuff it gently with fine-grit sandpaper. This helps the paint adhere better to the smooth metal surface. -
Wipe down:
Wipe away all sanding dust with a damp cloth and let the metal dry completely before moving on to painting. -
Protect handles:
If your milk can has wooden handles like the one shown, carefully wrap them in painter’s tape to keep them free of overspray. -
Prime the can:
Apply a coat of bonding primer over the entire can. Use steady, sweeping motions to avoid drips, holding the can about 8-10 inches away. -
Dry primer:
Allow the primer to dry fully according to the manufacturer’s instructions, usually about an hour or two.
Fixing Bleeds
If paint bled under the tape, spray a small amount of the correct paint color into a cup and use a small artist’s brush to carefully touch up the line by hand.
Step 2: Painting the Base & Top
-
Apply metallic top color:
Start by spraying the top third of the can—including the neck, lid, and upper handles—with the metallic champagne paint. Don’t worry about a crisp line at the bottom yet; just ensure good coverage at the top. -
Layering coat:
Apply a second light coat of metallic paint to ensure an opaque, even finish. Let this dry completely, preferably overnight, so the tape won’t peel it off later. -
Mask the top section:
Once fully cured, apply painter’s tape horizontally around the can where you want the metallic section to end. Press the edge of the tape down firmly to prevent bleed-through. -
Paper protection:
Tape paper or plastic over the top metallic section (above your tape line) to protect it from the next colors.
Add Weathering
For a vintage twist on this modern look, lightly run fine-grit sandpaper over the painted raised ridges or edges to reveal a hint of the metal underneath.
Step 3: Creating the Color Blocks
-
Spray the middle section:
Spray the exposed middle and bottom sections with your peach/blush paint. You want this color to cover the area just below the metallic line down to where the green will start. -
Feather the edges:
I like to spray a little lower than needed for the peach section, feathering it out towards the bottom, to ensure there are no unpainted gaps later. -
Dry the middle:
Let the peach paint dry to the touch. It doesn’t need a full cure like the base layer, but it should be dry enough to accept tape without tackiness. -
Mask the middle:
Apply a new line of painter’s tape to define the bottom edge of the peach stripe. Ensure it is parallel to your first tape line for a clean look. -
Protect the middle:
Cover the freshly painted peach section with paper or plastic, taping it securely to your masking line. -
Spray the bottom section:
Apply the sage green paint to the remaining bottom section of the can. Use two light coats rather than one heavy one to prevent drips near the base. -
Remove tape:
Carefully peel off all tape and masking paper while the final coat is still slightly tacky (not wet, but not rock hard). Pull the tape away at a 45-degree angle for the sharpest lines. -
Handle reveal:
Unwrap the painter’s tape from the wooden handles to reveal the natural wood contrast. -
Final cure:
Let the entire project cure for at least 24 hours before moving it into place to prevent scuffs.
Now you have a stunning, customized statement piece ready to welcome guests in your entryway or add charm to a corner.

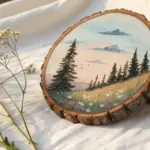


Have a question or want to share your own experience? I'd love to hear from you in the comments below!