
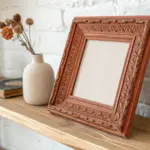
A painted mirror frame is one of my favorite quick transformations because it instantly shifts the whole vibe of a room. If you’ve got a mirror that feels dated or bland, these painted mirror frame ideas will help you turn it into a piece you actually want to style around.
Classic Matte White Painted Mirror Frame
Transform a tired or dated mirror frame into a crisp, clean statement piece with a simple coat of matte white paint. This classic finish brightens up any corner and pairs perfectly with both minimalist and farmhouse decor.
Step-by-Step
Materials
- Full-length mirror with existing wood or composite frame
- Medium-grit sandpaper (120-150 grit)
- Painter’s tape (blue or green)
- Newspapers or masking paper
- High-quality adhesion primer
- Matte white finish paint (latex or chalk paint)
- Angled synthetic brush (1.5 – 2 inch)
- Small foam roller (optional for flat surfaces)
- Clean lint-free cloths
- Mild degreaser or soapy water
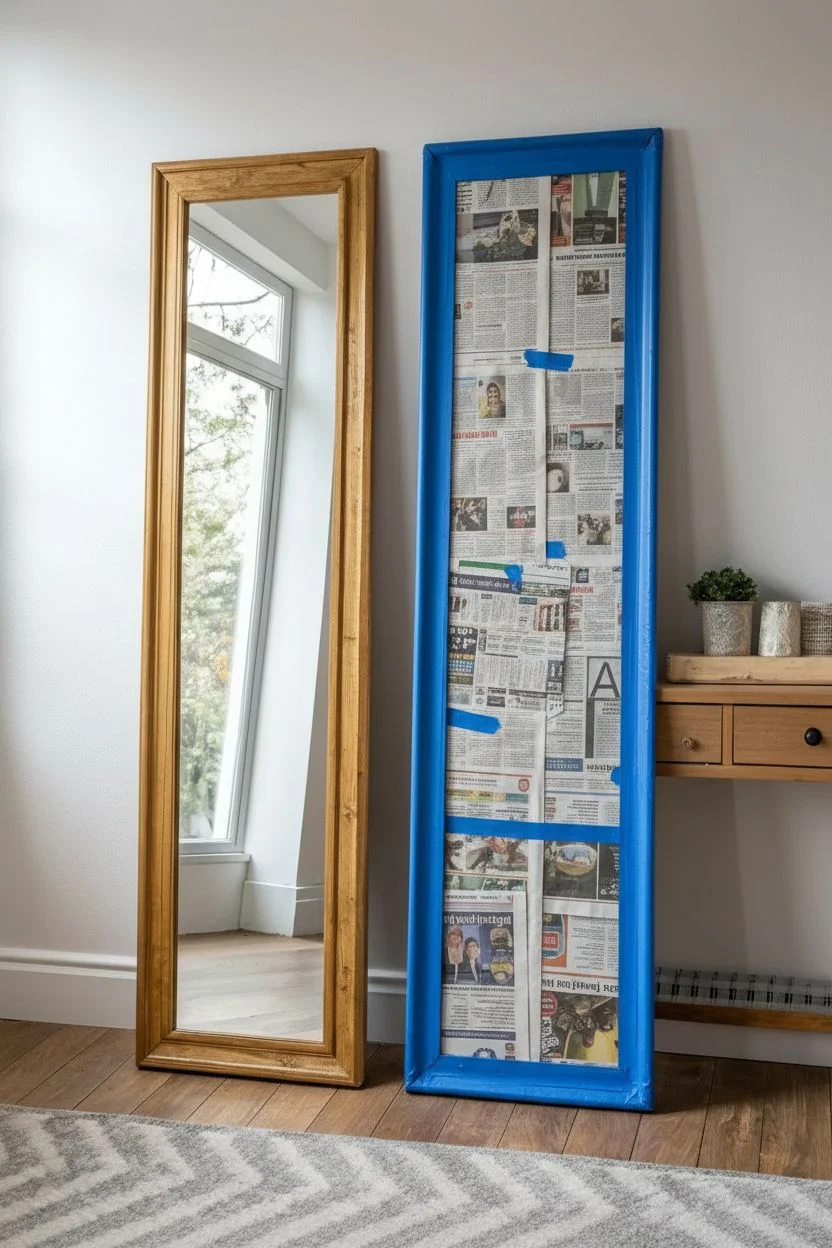
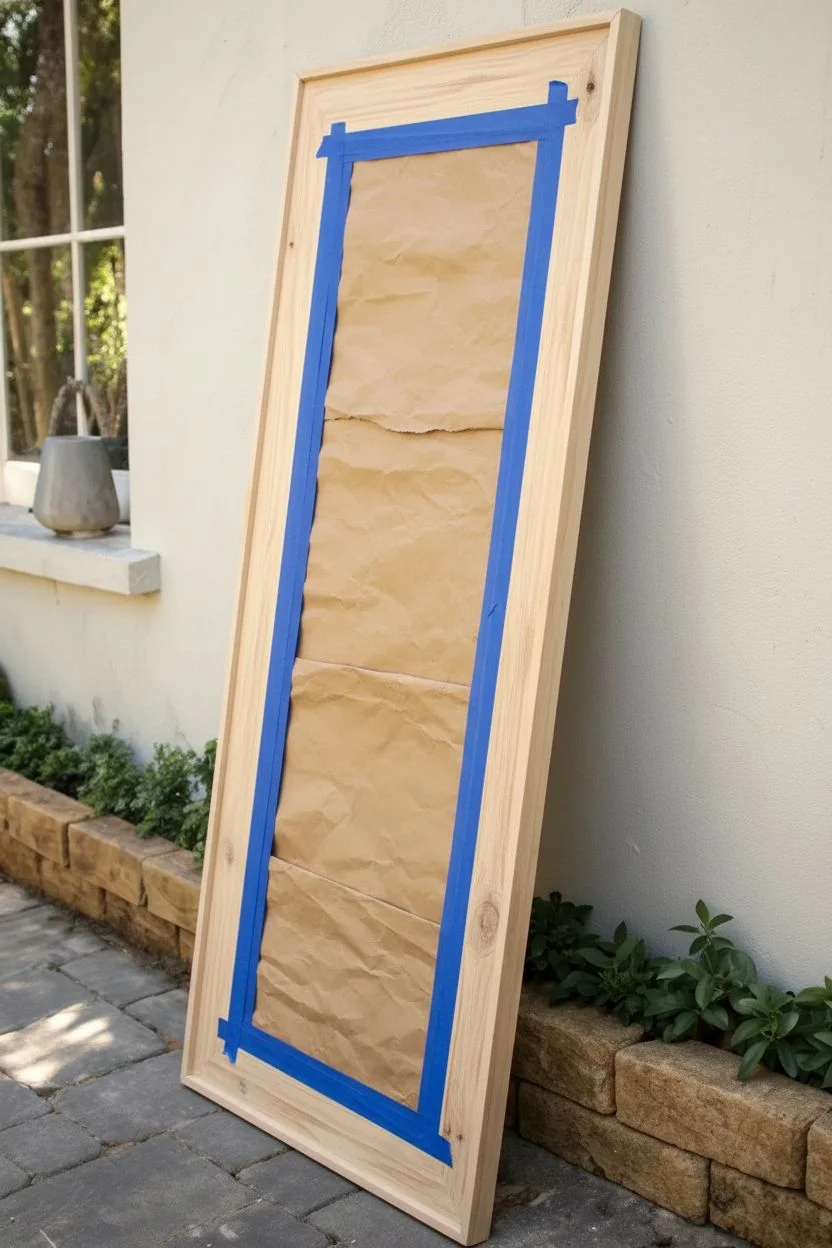
Step 1: Preparation & Masking
-
Clean the surface:
Before doing anything else, wipe down the entire mirror frame with a mild degreaser or warm soapy water. You need to remove years of dust, oils, or furniture polish to ensure the paint sticks. -
Scuff sand the frame:
Using your medium-grit sandpaper, lightly sand every inch of the frame’s surface. You aren’t trying to strip the old finish completely; just rough it up enough to create ‘tooth’ for the primer. -
Remove sanding dust:
Vacuum up the loose dust, then go over the frame one last time with a tack cloth or a slightly damp rag to ensure it is pristine. -
Protect the glass:
Carefully run painter’s tape along the inner edge of the frame where it meets the glass. Take your time here—slid a credit card along the tape edge to seal it tightly and prevent paint bleed. -
Cover the mirror center:
Tape sheets of newspaper or masking paper over the main area of the glass. It might feel overkill, but scraping dried paint splatters off a mirror later is tedious work.
Use Conditioner
If using latex paint, add a splash of paint conditioner (like Floetrol) to your mix. Is slows drying time, allowing brush strokes to level out and disappear.
Step 2: Priming
-
Apply the first coat of primer:
Dip your angled brush into the adhesion primer and begin cutting in the inner corners and detailed molding edges first. -
Roll or brush the flat areas:
If your frame has wide, flat sides, you can use a small foam roller for a smoother finish, or continue with the brush using long, even strokes. -
Check for drips:
While the primer is wet, keep an eye out for potential drips gathering in the corners of the molding and smooth them out immediately. -
Let it dry fully:
Follow the manufacturer’s instructions for drying time. I usually wait a bit longer than suggested just to be safe, ensuring the base is rock solid.
Step 3: Painting the Finish
-
Stir the matte paint:
Thoroughly stir your matte white paint. Matte finishes can sometimes settle, and you want that pigment perfectly distributed for consistent coverage. -
Apply the first topcoat:
Start applying the white paint, working in sections. Paint with the grain of the wood (or the length of the frame) to minimize brush marks. -
Watch the edges:
Be careful not to overload your brush near the taped glass edge, as a thick ridge of paint can peel away when you remove the tape later. -
Allow to cure:
Let this first coat dry completely. Matte paint dries fairly quickly to the touch, but give it at least 2-4 hours before recoating. -
Assess coverage:
Check if the primer or old wood color is showing through. Lighter colors like white almost always require a second coat for true opacity. -
Apply final coat:
Repeat the painting process for a second coat, ensuring smooth, long strokes for a flawless professional look.
Paint Peeling?
If paint peels off easily after drying, the frame likely wasn’t cleaned or sanded enough. Sand that spot down to bare material and re-prime before painting.
Step 4: Finishing Touches
-
Score the tape edge:
Before the paint is 100% cured hard, gently run a utility knife very lightly along the edge where the tape meets the frame to break the paint seal. -
Remove tape:
Peel the tape away slowly at a 45-degree angle, pulling away from the fresh paint. -
Clean any seepage:
If any tiny spots of paint got onto the glass, use a razor blade scraper to gently lift them off once fully dry.
Place your newly refreshed mirror against the wall and enjoy the instant brightness it brings to your room


Soft Gray Painted Mirror Frame for a Calm, Modern Look
Transform a plain wooden mirror into a serene focal point with this soft gray washed finish. This technique highlights the natural wood grain while adding a cool, modern tone that strikes the perfect balance between rustic and refined.
How-To Guide
Materials
- Unfinished wood mirror frame (or stripped vintage frame)
- Sandpaper (120-grit and 220-grit)
- Tack cloth or microfiber rag
- Gray chalk-style paint or latex paint (a cool, medium gray)
- White chalk-style paint or white wax
- Water for thinning paint
- Mixing cups
- 2-inch synthetic bristle brush
- Clean, lint-free cotton rags
- Clear matte polyurethane or clear furniture wax
- Painter’s tape
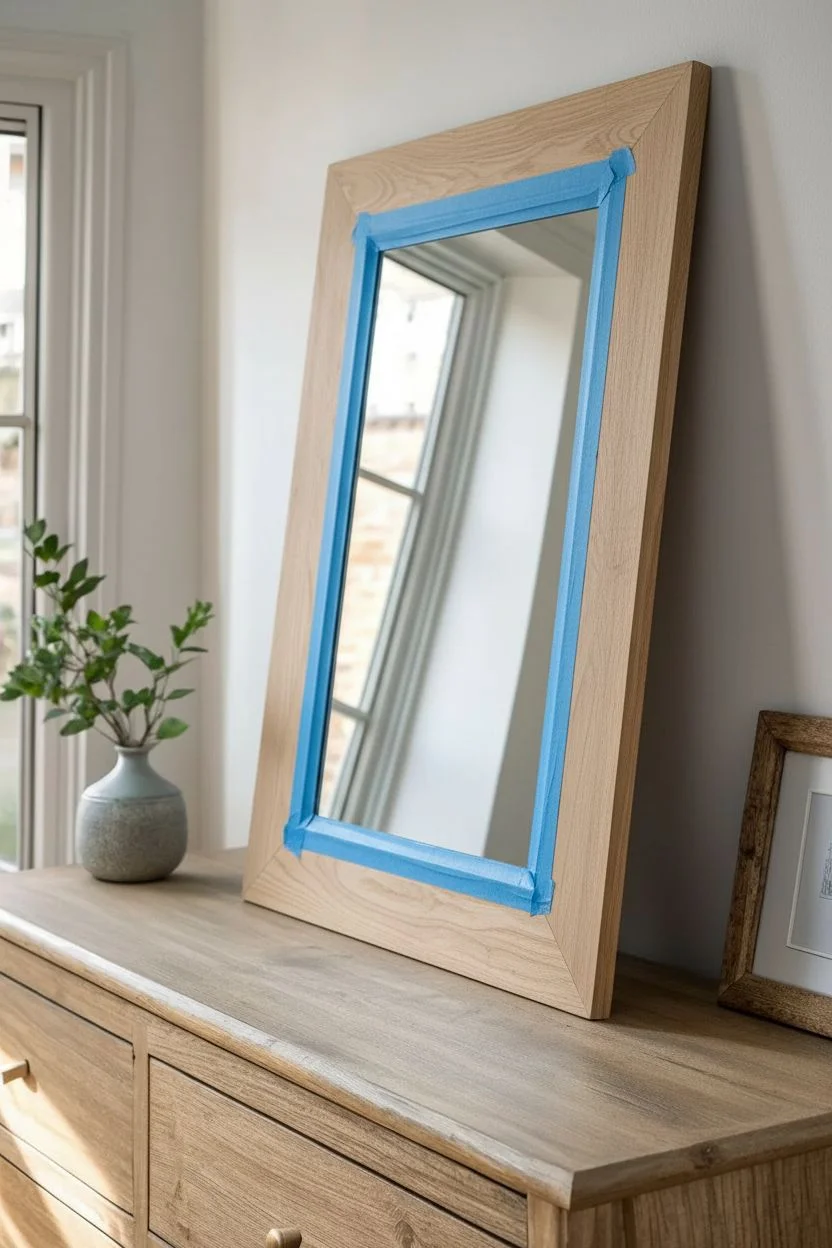
Step 1: Preparation
-
Protect the glass:
Before doing anything else, carefully apply painter’s tape to the mirror glass, sliding the edge of the tape slightly under the frame lip if possible to ensure full coverage. -
Initial scuffing:
If your frame has an existing shiny finish, sand it thoroughly with 120-grit sandpaper to break the seal. For raw wood, a light pass with 220-grit is sufficient to smooth any rough fibers. -
Clean surface:
Wipe the entire frame down with a tack cloth or a slightly damp microfiber rag to remove every speck of dust. Debris left behind will get trapped in the wash.
Step 2: Applying the Gray Wash
-
Mix the wash:
In a mixing cup, combine your gray paint with water. I generally aim for a 1:1 ratio—equal parts paint and water—to create a semi-transparent consistency that resembles thin milk. -
Test the opacity:
Test your gray wash on the back of the frame or a scrap piece of wood. If it’s too solid, add more water; if it’s too transparent, add a touch more paint. -
Apply first section:
Dip your brush into the wash and apply it to one side of the frame. Work in long, even strokes following the direction of the wood grain. -
Wipe back:
Immediately take a clean cotton rag and wipe over the wet paint gently. This removes excess pigment and allows the wood grain to show through the gray tint. -
Continue painting:
Repeat the paint-and-wipe process for the remaining three sides of the frame. Try to work quickly so you don’t get harsh lap marks where sections join. -
Check for consistency:
Stand back and look at the frame. If some areas look too light, apply a second coat of the wash using the same technique, but let the first coat dry for about 20 minutes first.
Wire Brush Trick
Before painting, scrub the raw wood vigorously with a wire brush in the direction of the grain. This opens the pores and allows the gray wash to settle deeper for more texture.
Step 3: Adding Depth and Texture
-
Dry burshing highlight (Optional):
To mimic the subtle texture seen in the photo, dip the very tip of a dry brush into a tiny amount of undiluted white paint. Offload most of it onto a paper towel until the brush is almost empty. -
Apply texture:
Lightly drag the dry brush over the raised areas of the grain. This catches the texture and creates that dusty, ‘limed’ look without covering the gray. -
Alternative: White wax:
Alternatively, you can use a white furniture wax. Rub it on with a cloth and buff it off, leaving the white pigment in the deepest crevices of the wood grain. -
Distress edges:
Once the paint is fully dry, take a fresh piece of 220-grit sandpaper and gently sand the sharp edges and corners of the frame to expose a tiny bit of raw wood for a natural wear patterns.
Coastal Vibe
Mix a drop of seafoam blue into your gray wash for a subtle coastal tint, or use a dark charcoal wax at the very end to define the corners for a more industrial look.
Step 4: Sealing and Finishing
-
Clean again:
Wipe away any sanding dust or loose wax crumbs with a clean, dry cloth. -
Apply topcoat:
If you used wax, you are done. If you used paint only, apply a clear matte polyurethane to seal the finish. Matte is crucial here to maintain that soft, chalky appearance. -
Remove tape:
Score the edge of the painter’s tape with a utility knife to ensure the paint doesn’t peel, then slowly remove the tape from the mirror glass. -
Final polish:
Clean the mirror glass with glass cleaner to remove any smudges from the project, making sure not to spray the cleaner directly onto your fresh frame.
This sophisticated yet simple update gives your mirror a timeless quality that works beautifully in brightly lit entryways or bedrooms


Sage Green Painted Mirror Frame That Feels Fresh and Cozy
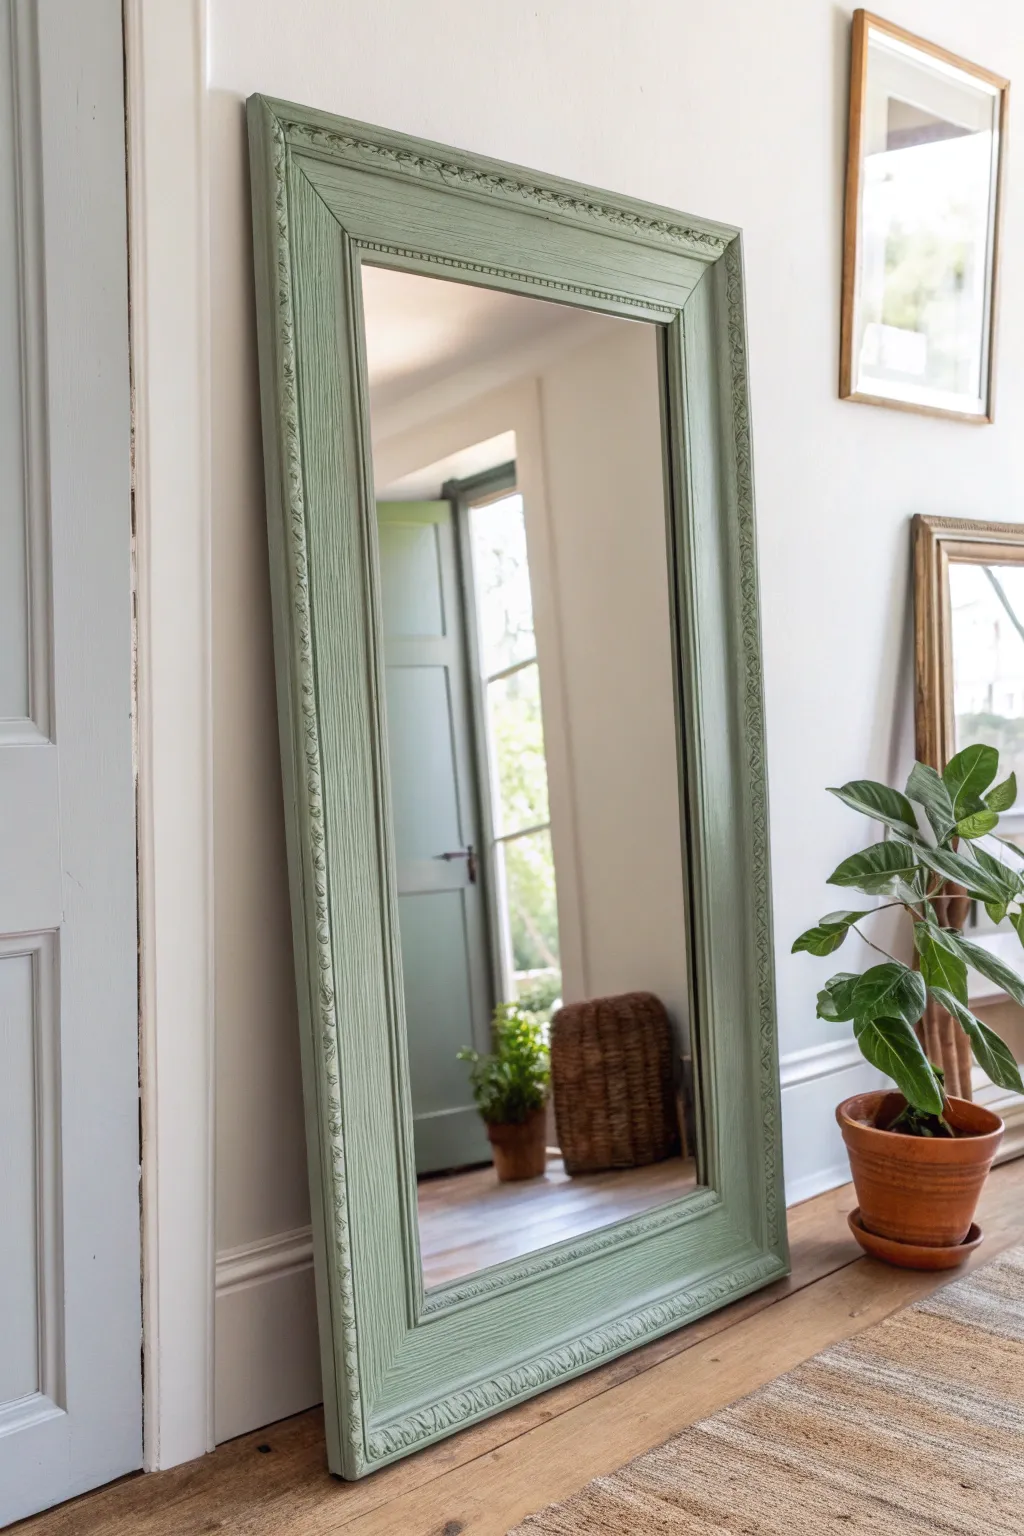
Transform a dated or basic mirror into a calm, earthy focal point with this sage green makeover. The soft, herbal hue coupled with the frame’s detailed molding creates a piece that feels both grounded and refreshingly modern.
Step-by-Step Guide
Materials
- Large wooden framed floor mirror (thrifted or new)
- Sandpaper (120-grit and 1220-grit)
- Tack cloth or microfiber rag
- Painter’s tape
- Adhesion primer
- Sage green chalk finish paint or matte acrylic paint
- Clear furniture wax or matte polyurethane topcoat
- 2-inch angled distinct brush (synthetic bristles)
- Small round craft brush (for detailing)
- Drop cloth
- Wood filler (optional)
Step 1: Preparation
-
Clean surface:
Begin by thoroughly cleaning the mirror frame with a mild degreaser or TSP substitute to remove any oils, dust, or old furniture polish that might repel the paint. -
Protect glass:
Carefully slide painter’s tape under the inside edge of the frame where it meets the glass. Press it down firmly with your thumbnail or a credit card to seal the edge perfectly. -
Sand the frame:
Scuff sand the entire frame using 120-grit sandpaper. You aren’t trying to remove all the old finish, just creating a rough surface for the new paint to grip. -
Refine details:
For the ornate molding along the inner and outer edges, fold your sandpaper or use a sanding sponge to get into the crevices without flattening the details. -
Dust off:
Wipe away all sanding residue with a tack cloth. This step is crucial because leftover dust will create a gritty texture in your final finish.
Paint Peeling?
If paint peels when removing tape, the paint bonded to the tape. Next time, peel the tape while the last coat is still slightly wet, or score the edge with a razor blade first.
Step 2: Painting
-
Apply primer:
Apply a thin, even coat of adhesion primer. This is especially important if your original frame has a shiny varnish or is made of laminate. -
Wait for dry:
Allow the primer to dry completely according to the manufacturer’s instructions, usually about one hour. -
First coat of sage:
Stir your sage green paint thoroughly. Using your angled brush, apply the first coat, brushing in the direction of the wood grain on the flat sections. -
Detail work:
Switch to a small round craft brush to dab paint into the deep recesses of the decorative molding on the edges, ensuring no bare spots remain. -
Dry and assess:
Let this first coat dry for at least 2-4 hours. It may look streaky or patchy at this stage, but don’t worry, the second coat will fix it. -
Second coat:
Apply a second coat of sage green paint. This time, use long, smooth strokes to minimize brush marks and achieve full opacity. -
Touch-ups:
Inspect the frame from different angles, looking for any missed spots in the carved details, and touch them up lightly while the paint is still workable.
Step 3: Finishing
-
Distress (optional):
If you want the details to pop more, lightly sand the raised edges of the molding with 220-grit sandpaper to reveal a tiny bit of the wood underneath. -
Seal the paint:
Once the paint is fully cured (usually overnight), apply a coat of clear furniture wax with a lint-free cloth or a matte polyurethane with a clean brush. -
Buffing:
If using wax, let it sit for about 10 minutes, then buff it briskly with a clean cloth to create a subtle, durable sheen. -
Remove tape:
Ideally, score the edge of the tape with a craft knife before peeling it away to ensure you don’t pull up any dried paint from the frame. -
Clean glass:
Using glass cleaner, remove any smudges or stray paint specks from the mirror surface to get it sparkling clean.
Pro Tip: Better Brushwork
To barely see brush strokes, dip your brush in water (acrylics) or mineral spirits (oil-based) before loading paint. It thins the flow slightly for a self-leveling finish.
Place your newly refreshed mirror against a wall and enjoy the calm, organic vibe it brings to your space


Coastal Powder Blue Painted Mirror Frame
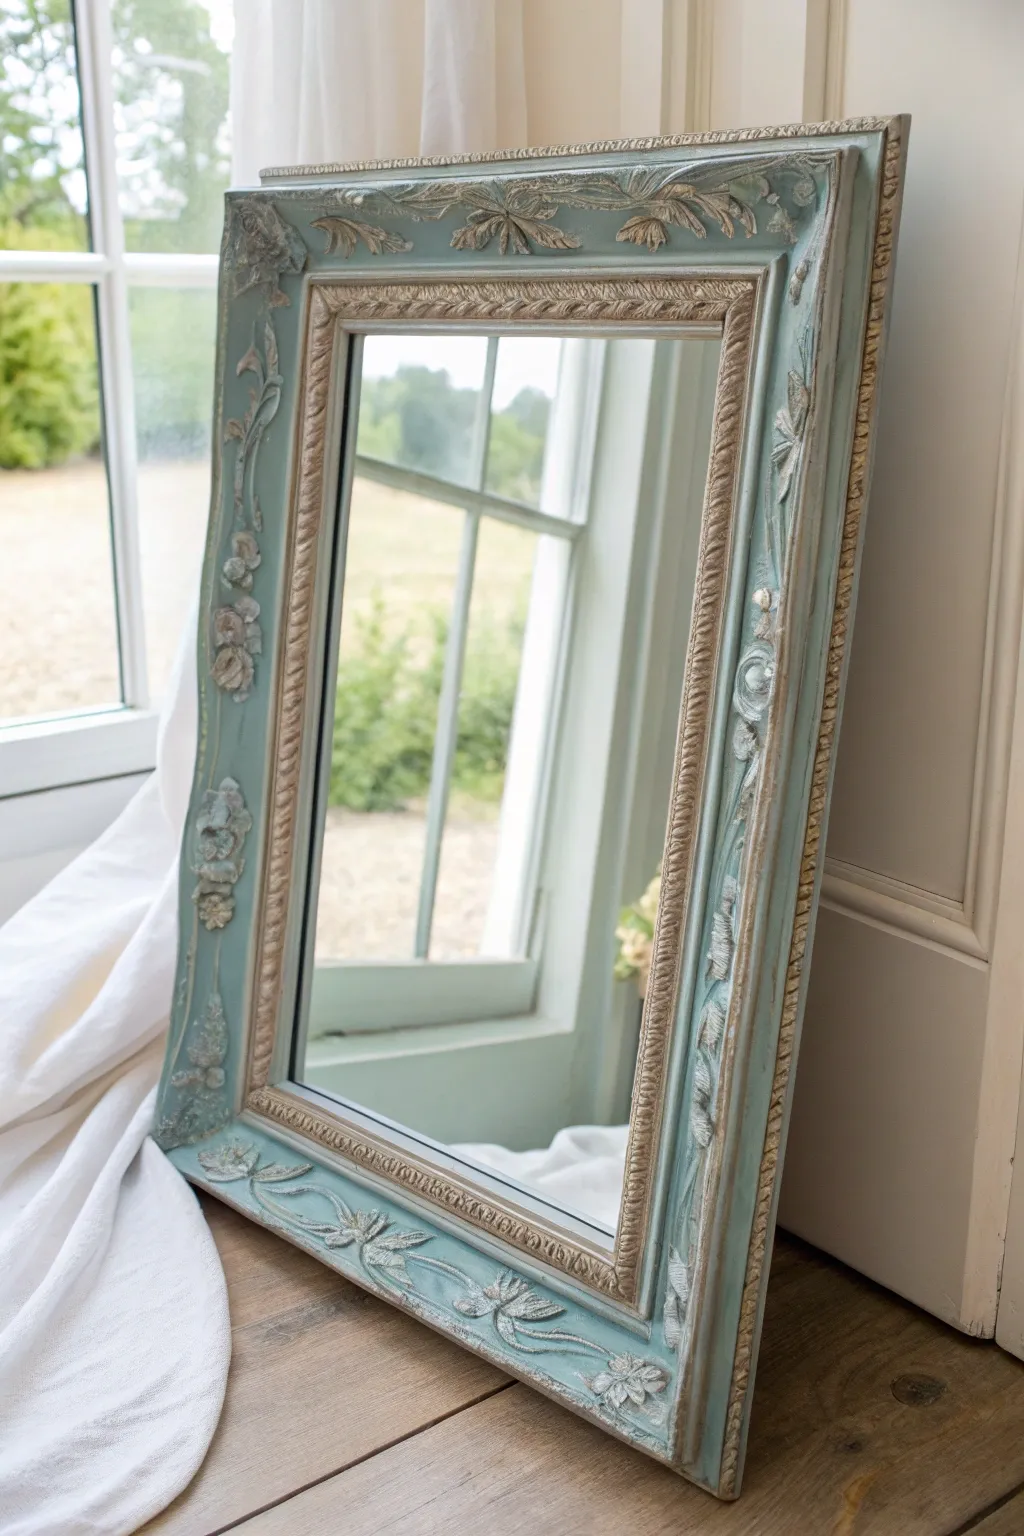
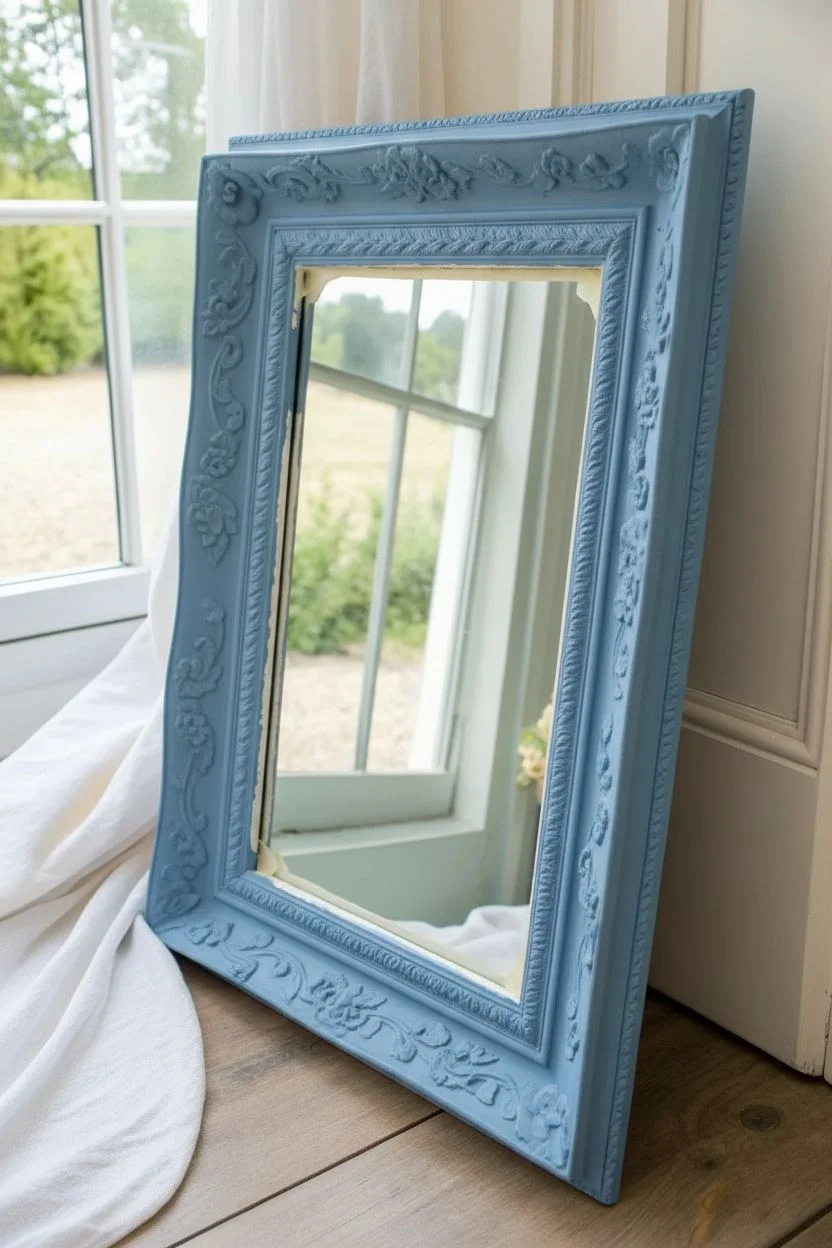
Transform a standard ornate mirror into a breezy, coastal statement piece with this sophisticated paint and wax technique. The soft powder blue finish, accented with white wax and distressed edges, highlights intricate carvings beautifully while adding a relaxed, airy vibe to any room.
Step-by-Step
Materials
- Ornate wood or resin mirror frame (rectangular)
- Chalk paint (Powder Blue or Duck Egg Blue)
- Chalk paint (Cream or Antique White)
- White decorative wax or liming wax
- Clear furniture wax
- Medium-grit sandpaper (120-150 grit)
- Fine-grit sandpaper (220 grit)
- Round chalk paint brush
- Small detail brush
- Lint-free cotton rags
- Painter’s tape
- Glass cleaner
Step 1: Preparation and Base Coat
-
Prepare the mirror:
Begin by thoroughly cleaning the mirror glass and the frame to remove any dust or grease. Once clean, carefully apply painter’s tape around the inside edge of the mirror glass to protect it from stray paint strokes. -
Scuff the surface:
If your frame has a glossy varnish, lightly scuff the entire surface with medium-grit sandpaper. You don’t need to remove the finish, just create a little “tooth” so the paint adheres better. -
Apply the first coat:
Load your round brush with the powder blue chalk paint. Apply a generous first coat, working the bristles into all the deep crevices and ornate carvings. Don’t worry about brush strokes; texture is good here. -
Touch up missed spots:
Inspect the frame from different angles to ensure you haven’t missed any hidden nooks in the floral molding. Use a small detail brush to dab paint into any stubborn recesses. -
Layering the color:
Once the first coat is completely dry to the touch (usually about an hour), apply a second coat of blue. This ensures rich, solid coverage before we start the decorative finishes.
Too much white wax?
If you applied too much white wax and it looks heavy, act fast! Apply a little clear wax on a rag and rub over the area. The clear wax acts as an eraser, lifting the excess pigment.
Step 2: Creating the Weathered Look
-
Dry brush highlights:
Dip just the tips of a clean, dry brush into a small amount of cream or antique white paint. Offload almost all the paint onto a paper towel until the brush is nearly dry. -
Highlight the details:
Lightly drag the dry brush over the raised floral motifs and the braided inner trim. The goal is to catch only the highest points to create dimension, not to continually paint the surface. -
Distress the edges:
After the paint has fully cured (wait at least 4-6 hours), take your fine-grit sandpaper and gently sand the high points, corners, and edges of the frame. Reveal the underlying wood or base material to simulate natural wear. -
Clean dust:
Wipe the entire frame down with a damp cloth to remove all sanding dust. This step is crucial before waxing to prevent a muddy finish.
Pro Tip: Depth Control
For more drama, paint a dark grey or brown base coat first. When you distress the blue top layer, the dark color will show through instead of raw wood, adding instant age.
Step 3: Sealing and Finishing
-
Apply clear wax:
Using a wax brush or a lint-free cloth, apply a thin layer of clear furniture wax over the entire frame. This seals the paint and provides a smooth surface for the white wax to glide over. -
Apply white wax:
While the clear wax is still fresh, brush on the white or liming wax. Work in sections, pushing the white wax deep into the carvings and textured areas where dust would naturally gather. -
Wipe back excess:
Immediately wipe away the excess white wax from the flat, high surfaces using a clean cloth. I like to leave heavier deposits of white in the grooves to enhance that dusty, coastal feel. -
Buff to a sheen:
Allow the wax to cure for about 24 hours. Then, use a clean, soft cloth to buff the frame vigorously. This will harden the wax and bring out a subtle, professional satin sheen. -
Clean the glass:
Remove the painter’s tape carefully. Use glass cleaner to polish the mirror, removing any potential seep-through spots with a razor blade if necessary.
Hang your new coastal mirror in a hallway or bedroom to instantly brighten the space with its airy, time-worn charm
BRUSH GUIDE
The Right Brush for Every Stroke
From clean lines to bold texture — master brush choice, stroke control, and essential techniques.
Explore the Full Guide
High-Gloss Black Painted Mirror Frame for Instant Drama
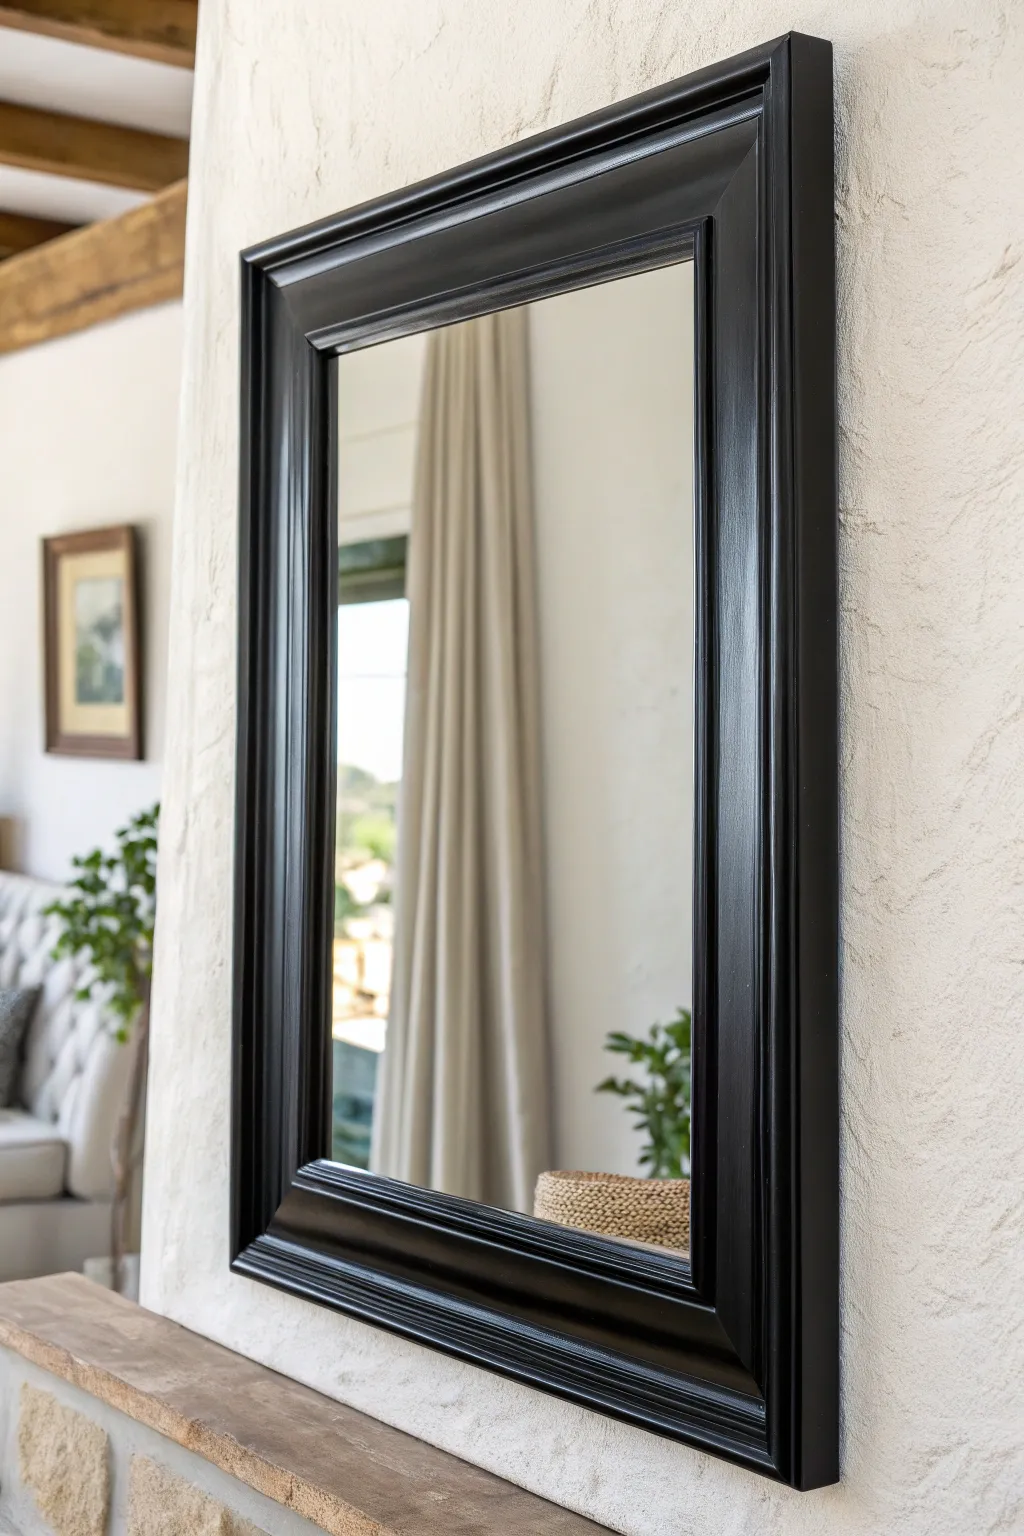

Transform a dated or basic mirror into a sophisticated statement piece with this high-gloss black finish. The result is a sleek, modern frame that adds instant drama and depth to any room by reflecting light beautifully.
Detailed Instructions
Materials
- Mirror with a thick, molded frame (wood or composite)
- Painter’s tape (blue or green)
- Newsprint or kraft paper
- Degreasing cleaner (like TSP) and rags
- Fine-grit sandpaper (220-grit)
- Tack cloth
- High-quality bonding primer (spray or brush-on)
- High-gloss black enamel paint (spray paint or brush-on)
- High-quality synthetic angular brush (if brushing)
- Drop cloth
- Cardboard scraps
Step 1: Preparation
-
Create a Workspace:
Set up a well-ventilated area, preferably outdoors or in a garage if you are spray painting. Lay down a drop cloth to protect the floor. -
Clean the Surface:
Wipe down the entire frame thoroughly with a degreasing cleaner like TSP substitute. Remove all dust, oils, and old furniture polish to ensure the paint adheres properly. -
Position the Mirror:
Prop the mirror up on cardboard scraps or blocks so the edges are lifted slightly off the ground. This helps you paint the underside of the frame edges without sticking to the drop cloth. -
Protect the Glass:
Carefully apply painter’s tape around the inner edge of the mirror glass where it meets the frame. Take your time to get a clean line, pressing the tape down firmly with your fingernail. -
Cover the Reflection:
Tape newsprint or kraft paper over the rest of the exposed glass, securing it to the perimeter tape you just applied. Ensure no glass is visible to protect it from overspray or drips.
Pro Tip: Spray vs. Brush
For the absolute smoothest, factory-like finish without brush strokes, use high-quality spray enamel. If brushing, use a conditioner like Floetrol to help leveling.
Step 2: Sanding and Priming
-
Scuff Sanding:
Lightly sand the frame with 220-grit sandpaper. You aren’t trying to remove the old finish entirely, just creating a ‘tooth’ for the new paint to grip. Get into the crevices of the molding. -
Dust Removal:
Vacuum up the loose dust, then wipe the frame with a tack cloth. This step is crucial for a high-gloss finish, as any speck of dust will show in the final reflection. -
Apply Primer:
Apply a thin, even coat of bonding primer. If spraying, hold the can 8-10 inches away and use sweeping motions. If brushing, watch for drips in the corners. -
Let Dry:
Allow the primer to dry completely according to the manufacturer’s instructions. Usually, this takes about an hour depending on humidity. -
Smooth the Primer:
Once dry, run a piece of very fine sandpaper extremely lightly over the primed surface to knock down any fuzz or texture. Wipe again with a tack cloth.
Troubleshooting: Orange Peel
If your finish looks bumpy like an orange peel, you may be spraying too far away or it’s too hot. Sand smooth with wet/dry paper and recoat closer.
Step 3: Painting
-
First Coat:
Apply the first coat of high-gloss black enamel. I find that multiple thin coats are much better than one thick one. Keep your spray strokes steady and overlapping slightly. -
Check Angles:
Walk around the mirror to check the complex molding profiles from different angles. It’s easy to miss the underside of a curve or a deep groove. -
Dry Time:
Let the first coat dry until it is tacky but no longer wet. Check the can for specific recoat windows to avoid wrinkling the paint. -
Inspect for Imperfections:
Look closely for any dust nibs or hairs that may have fallen into the wet paint. If you find any, let the paint dry fully, sand that spot lightly, and clean before proceeding. -
Second Coat:
Apply a second coat of high-gloss black. This coat should bring out the deep, wet look of the finish. Focus on achieving full, opaque coverage. -
Third Coat (Optional):
If the finish looks uneven or lacks depth, a third light coat can add that extra level of glass-like shine. Let dry for at least 24 hours to cure.
Step 4: Revealing
-
Score the Tape:
Before removing the tape, lightly score the edge where the paint meets the tape with a craft knife. This prevents the paint from peeling up along with the tape. -
Remove Tape:
Slowly peel the painter’s tape away at a 45-degree angle. Do this carefully to reveal your crisp, clean paint line against the mirror glass. -
Clean Glass:
Use glass cleaner to remove any smudge marks or adhesive residue from the center of the mirror.
Hang your stunning new mirror proudly and enjoy the elegant reflection it brings to your space
Antique White Painted Mirror Frame With Light Distressing
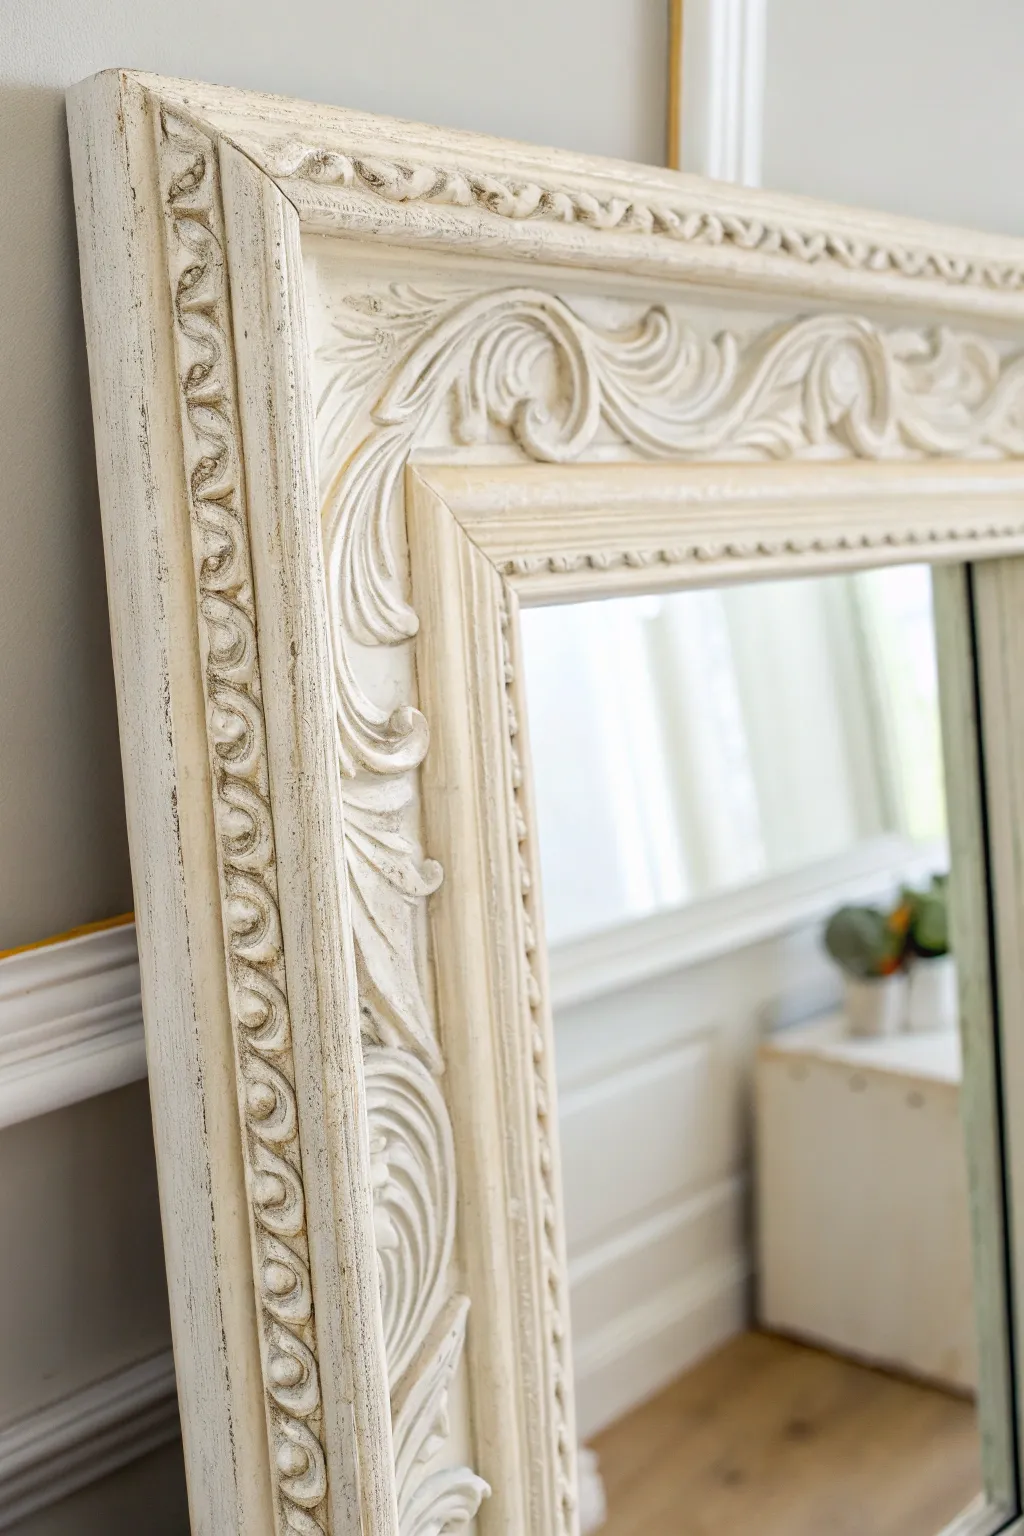
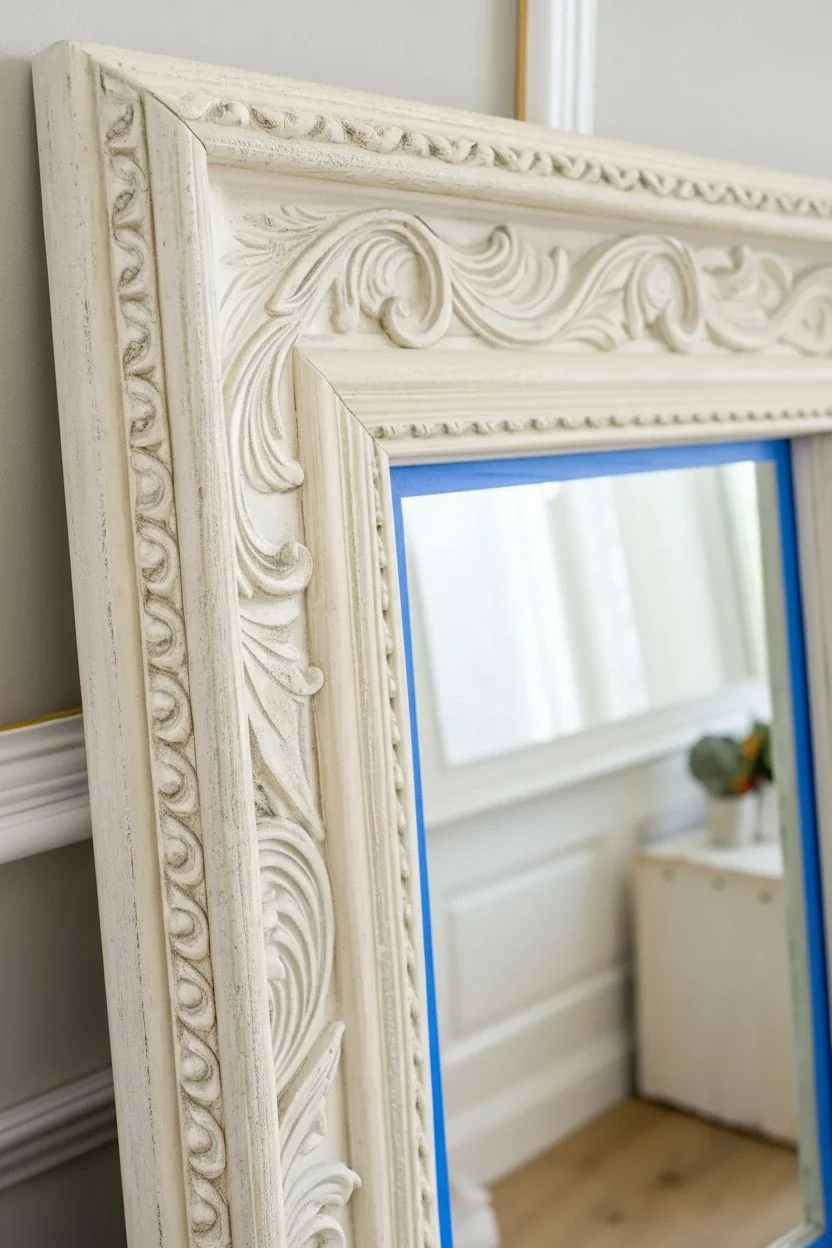
Transform a basic ornate frame into a stunning vintage-style statement piece with softness and historical charm. This finish uses layers of cream paint and strategic dark waxing to highlight intricate scrollwork and bead details, creating an authentic aged look.
Step-by-Step Guide
Materials
- Ornate mirror frame (wood or plastic resin)
- Chalk-style paint in Cream or Antique White
- Clear furniture wax
- Dark antiquing wax (brown or espresso)
- Round wax brush
- Clean, lint-free cotton rags
- Medium-grit sandpaper (150-220 grit)
- Fine-grit sandpaper (320-400 grit)
- Painter’s tape
- Paper towels
- Mild degreaser or TSP substitute
Step 1: Preparation and Base Coat
-
Clean the Surface:
Begin by thoroughly cleaning your frame with a mild degreaser or TSP substitute. Dust and grime love to hide in ornate crevices, and getting them out now ensures your paint adheres properly. -
Protect the Mirror:
Carefully apply painter’s tape around the inner edge of the frame where it meets the glass. Press down firmly with your fingernail to seal the edge so paint doesn’t seep underneath. -
Apply First Coat:
Stir your cream chalk-style paint well. Using a round brush, apply a generous coat over the entire frame. The round brush shape helps jam the bristles into all those deep carvings and scrolls. -
Check Coverage:
Don’t worry if the first coat looks a bit streaky or if the original color peeks through slightly; this adds depth later. Let this coat dry completely, usually about an hour depending on humidity. -
Apply Second Coat:
Brush on a second coat of the cream paint. This time, focus on getting solid coverage on the high points and flat edges. Let this layer dry fully, preferably overnight to ensure it is hard enough for distressing.
Wax Control Secret
Always apply a layer of clear wax BEFORE dark wax. This ‘lubricant’ prevents the dark pigment from staining the paint permanently and allows you to wipe it back easily.
Step 2: Distressing and Aging
-
Smooth the Surface:
Lightly run a fine-grit sandpaper (320-400) over the flat areas of the frame. You aren’t trying to remove paint here, just knocking down any rough brush strokes to create a silky finish. -
Distress High Points:
Switch to medium-grit sandpaper (150-220). Gently sand the raised details—the tops of the scrolls, the beads, and the sharp corners. Your goal is to reveal a little bit of the base material or wood underneath, mimicking natural wear. -
Dust Off:
Wipe the entire frame down with a dry, lint-free cloth or a tack cloth to remove all sanding dust. Any leftover dust will make your wax look muddy. -
Seal with Clear Wax:
Load a round wax brush with clear furniture wax. Apply a thin, even layer over a small section of the frame. Work the wax into the pores of the paint. -
Wipe Back Clear Wax:
Immediately wipe off the excess clear wax with a clean rag. The paint should feel smooth but not sticky. This clear layer is crucial because it acts as a barrier, allowing you to control the dark wax in the next step.
Texture Boost
Before waxing, use a dry brush with a tiny amount of pure white or light grey paint to highlight just the highest tips of the carving for extra dimension.
Step 3: Antiquing Details
-
Apply Dark Wax:
Dip just the tip of your wax brush into the dark antiquing wax. Offload some excess onto a paper towel or cardboard palette first—a little goes a very long way. -
Work into Crevices:
Stipple the dark wax specifically into the deep recesses, corners, and intricate carvings. You want the darkness to settle in the valleys of the design patterns. -
Feather Out:
Lightly brush the dark wax over the rest of the section, but keep it lighter on the high points. -
Erase and Blend:
I like to take a clean rag with a small dab of *clear* wax on it to wipe back the dark wax. The clear wax acts like an eraser, lifting the dark color off the high points while leaving it in the cracks. -
Check Consistency:
Continue this process section by section around the frame. Step back occasionally to ensure the level of ‘aging’ is consistent across the whole piece. -
Buff to Sheen:
Allow the wax to cure for about 24 hours. Once it feels dry to the touch, take a soft, clean cloth and buff the sun-facing surfaces vigorously to create a subtle, professional satin sheen. -
Clean Up:
Remove the painter’s tape carefully. Use a razor blade to gently scrape any stray paint droplets off the glass for a crisp reflection.
Hang your newly antiqued mirror in a bright spot to let the light play off those beautifully highlighted details

PENCIL GUIDE
Understanding Pencil Grades from H to B
From first sketch to finished drawing — learn pencil grades, line control, and shading techniques.
Explore the Full Guide
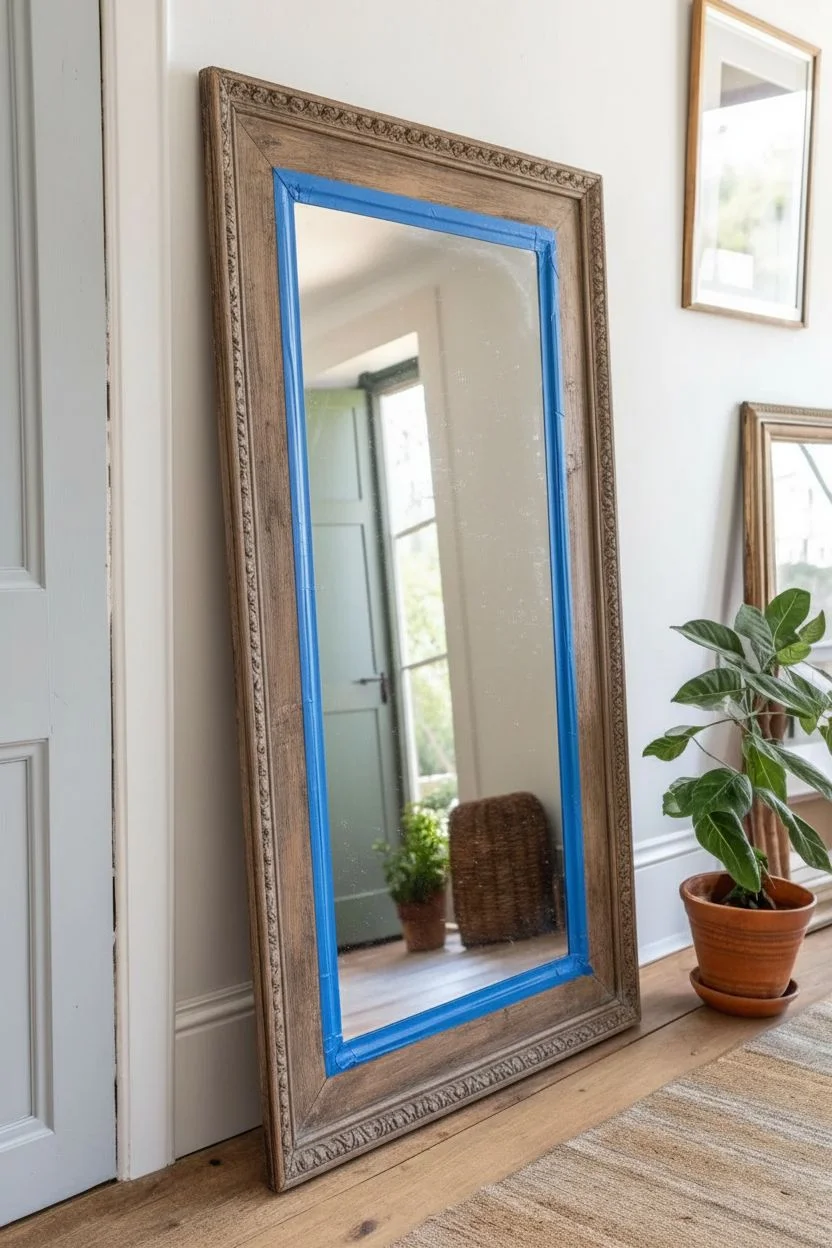
Two-Tone Painted Mirror Frame With a Contrasting Inner Edge
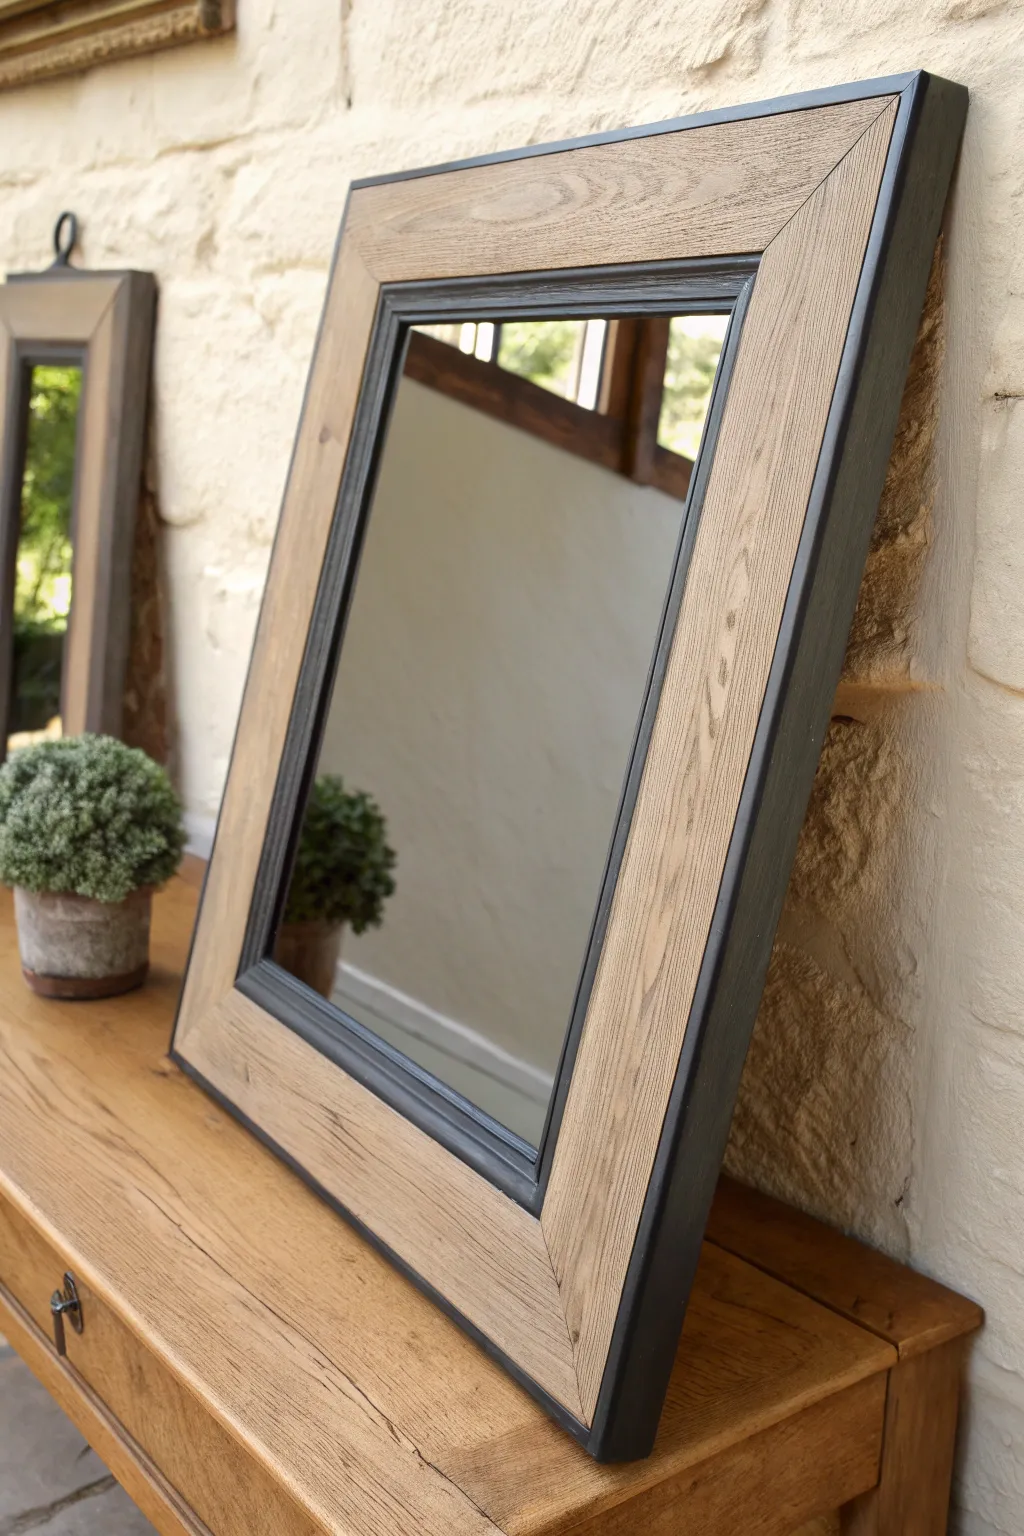

Achieve a sophisticated balance of rustic warmth and modern industrial style with this transformed mirror frame. By combining a light, weathered wood finish on the face with a deep charcoal or matte black on the inner and outer edges, you create depth and a striking architectural outline.
Step-by-Step
Materials
- Wide-framed wooden mirror (unfinished or sanded)
- Matte black or charcoal chalk paint
- Light oak or weathered gray wood stain
- Painter’s tape (high-quality, low-tack)
- Medium and fine-grit sandpaper (120 and 220 grit)
- Tack cloth
- Small angled paintbrush
- Flat paintbrush or foam brush for staining
- Lint-free rags
- Clear matte polyurethane or wax topcoat
- Newsprint or kraft paper
Step 1: Preparation & Sanding
-
Prepare your workspace:
Lay down a drop cloth or kraft paper on a sturdy table or flat floor area. Ensure the room has good ventilation, especially since you will be working with wood stain. -
Protect the glass:
Carefully slide pieces of paper or cardstock between the mirror glass and the frame edge if possible. If the gap is too tight, apply painter’s tape thoroughly over the entire glass surface, ensuring the edges are perfectly sealed against paint seep. -
Sand the frame:
Sand the entire wooden frame using 120-grit sandpaper to remove any existing finish or varnish. You need to get down to raw wood for the stain to penetrate properly. -
Refine the surface:
Switch to 220-grit sandpaper for a final pass. This smooths out any scratches from the coarser paper and prepares the wood fibers for a uniform stain application. -
Clean the dust:
Wipe away all sawdust using a tack cloth or a slightly damp rag. Any remaining dust will get trapped in your paint or stain, ruining the smooth finish.
Paint Bleeding?
If paint bleeds under the tape onto the stained wood, gently scrape it away with a razor blade once dry, or lightly sand the spot and dab a tiny bit of stain to blend it back in.
Step 2: Staining the Face
-
Tape the edges:
Apply painter’s tape along the outer side edge of the frame and the inner bevel (the part closest to the glass). You want to isolate the wide front face of the frame for staining. -
Apply the stain:
Stir your light oak or weathered gray stain well. Using a foam brush or rag, apply the stain to the front face of the frame, following the direction of the wood grain. -
Wipe excess stain:
Let the stain sit for a minute or two—I tend to check the color intensity frequently here—then wipe away the excess with a clean, lint-free rag. Wiping reveals the beautiful grain pattern. -
Dry completely:
Allow the stained section to dry according to the manufacturer’s instructions. This usually takes a few hours, but overnight is safer to prevent smudging.
Step 3: Painting the Contrast Edges
-
Reverse the masking:
Once the stain is 100% dry, remove the old tape. Now, carefully apply new tape over the stained wood face to protect it from the black paint. Press the tape edges down firmly to prevent bleeding. -
Paint the inner bevel:
Using a small angled brush, paint the inner ‘step’ or bevel of the frame next to the glass with your matte black or charcoal chalk paint. Use long, smooth strokes. -
Paint the outer edge:
Paint the outer thickness of the frame (the sides) with the same dark color. This framing technique is what gives the mirror its sharp, defined look. -
Add a second coat:
Allow the first coat of paint to dry to the touch, then apply a second coat if necessary to ensure solid, opaque coverage without brushstrokes showing. -
Remove tape immediately:
While the final coat of paint is still slightly wet, carefully peel back the painter’s tape at a 45-degree angle. This helps ensure a crisp line without pulling up dried paint.
Add Metallic Flair
Swap the matte black paint for an iron or bronze metallic paint to give the inner and outer edges a subtle glimmer that mimics a metal industrial frame.
Step 4: Finishing Touches
-
Seal the wood:
Apply a clear matte polyurethane or furniture wax over the stained wood sections to protect them from moisture and dust. You can also seal the painted sections if you prefer a uniform sheen. -
Clean the glass:
Remove the protection from the mirror glass. Use a glass cleaner to remove any smudges or dust that accumulated during the project.
Place your newly finished mirror on a console table or lean it against a wall to instantly anchor the space with its custom look
Dry-Brushed Painted Mirror Frame to Highlight Carved Details

Transform a plain or outdated carved mirror into a stunning focal point with this two-tone paint technique. By layering a deep charcoal base with creamy dry-brushed highlights, you will instantly reveal and accentuate every intricate detail of the woodwork.
How-To Guide
Materials
- Carved wooden mirror frame
- Degreasing cleaner (like TSP or dish soap solution)
- Medium-grit sandpaper (120-150 grit)
- Painter’s tape
- Cardboard or drop cloth
- Chalk-style paint or matte acrylic (Deep Charcoal/Black)
- Chalk-style paint or matte acrylic (Cream or Off-White)
- Medium-sized synthetic brush (for base coat)
- Chip brush or old stiff-bristled brush (for dry brushing)
- Paper towels
- Clear matte wax or polycrylic sealer (optional)
- Lint-free cloth (if using wax)
Step 1: Preparation & Cleaning
-
Clean the surface:
Begin by thoroughly cleaning the mirror frame to remove dust, oils, and grime, especially deep within the carved crevices. A degreaser works best here. Let it dry completely. -
Protect the glass:
Carefully apply painter’s tape around the inner edge of the frame where it meets the mirror glass. Press the tape down firmly to prevent paint seepage. -
Light sanding:
Scuff the existing finish lightly with medium-grit sandpaper to give the new paint distinct ‘teeth’ to adhere to. Wipe away all sanding dust with a damp cloth.
Too much highlight?
Did you apply too much cream paint? Don’t panic. Simply dip a rag into your dark base paint and lightly wipe it over the heavy spot to knock back the brightness.
Step 2: The Dark Base Coat
-
Load your brush:
Dip your medium synthetic brush into the deep charcoal or black paint. You want full coverage, so load the brush generously. -
Apply the first coat:
Paint the entire frame, working the bristles into every deep groove, scroll, and leaf. Don’t worry about brush strokes, but ensure no original wood color peeks through. -
Check angles:
View the frame from different angles to catch any missed spots in the intricate carving. Fill those in while the paint is still wet. -
Allow to dry:
Let this base coat dry completely. Depending on your paint type, this could take 1-2 hours. If the coverage looks thin, apply a second coat and let it dry again.
Step 3: Dry Brushing Highlights
-
Prepare the highlight color:
Pour a small amount of your cream or off-white paint onto a paper plate or piece of cardboard. -
Load the chip brush:
Dip just the tips of your dry chip brush into the cream paint. A stiff, old brush works best for this technique. -
Offload excess paint:
This is crucial: wipe almost all the paint off the brush onto a paper towel. The brush should feel almost dry to the touch—hence the name. -
Begin dry brushing:
Lightly drag the brush across the raised surfaces of the carving. Keep your hand flat and use virtually no pressure so the paint catches only the highest points. -
Focus on texture:
Sweep the brush against the grain of the carving (perpendicular to the ridges) to maximize the contrast. I like to start creating the effect on a less visible corner to test the intensity. -
Build up slowly:
Apply the highlight in layers. It is much easier to add more lightness than to cover it up, so work conservatively until you reach the desired brightness. -
Detailing the inner rim:
Use a smaller brush or precise strokes to dry brush the inner detail strip closest to the glass, ensuring the pattern matches the outer frame.
Try an aged look
For a warmer, antique vibe, use a dark brown wax as your final sealer. It will settle into the texture and tint the cream highlights slightly tan.
Step 4: Finishing Touches
-
Initial inspection:
Step back a few feet to look at the overall balance. Add tiny touches of cream to any dark areas that look too heavy or undefined. -
Clean up paint mistakes:
If you accidentally got a glob of heavy cream paint in a crevice, use a small brush with a bit of the dark base color to touch it up. -
Seal the finish:
Once fully dry, apply a clear matte wax with a lint-free cloth or brush on a matte polycrylic to protect the finish without adding unwanted shine. -
Buff the wax:
If you used wax, let it cure for about 20 minutes, then buff gently with a clean cloth to harden the surface. -
Reveal the glass:
Carefully peel away the painter’s tape. If any paint seeped under, scrape it gently off the glass with a razor blade.
Place your newly refreshed mirror where it can catch natural light to really show off that dimensional texture


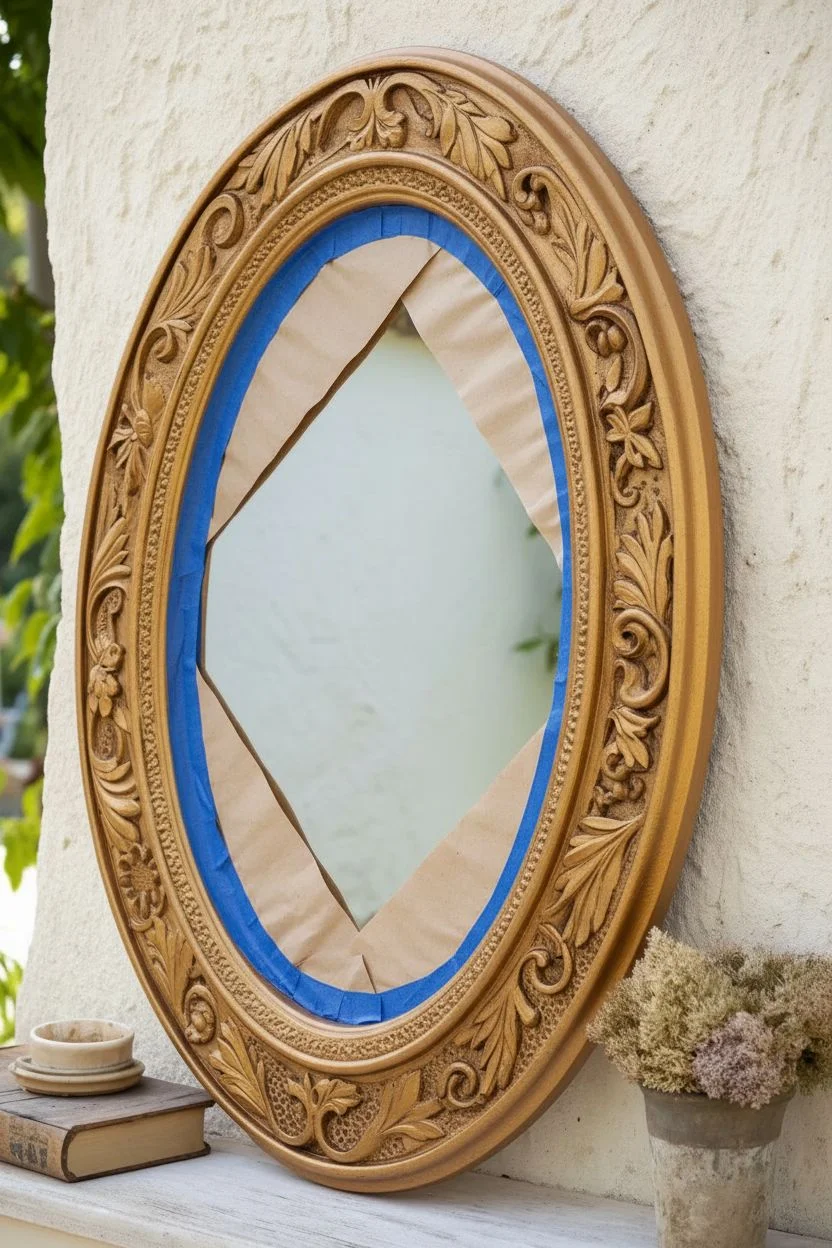
Painted Mirror Frame With a Faux Aged Patina Look
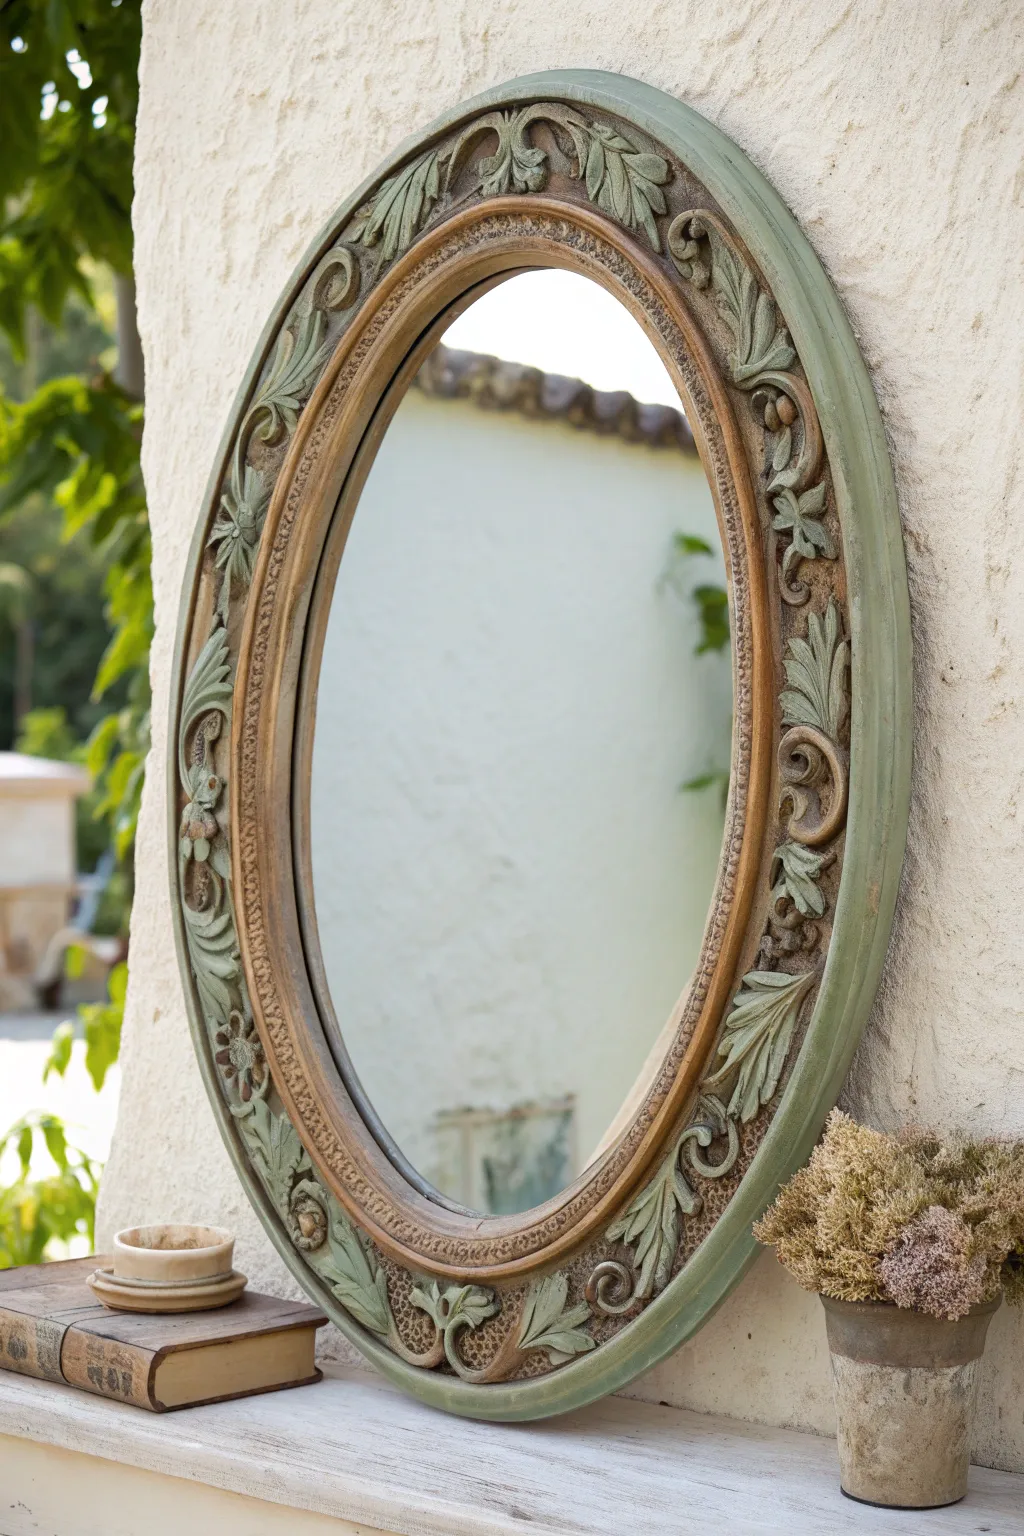
Transform a standard ornate mirror into a timeless French country treasure with this faux aged patina technique. By layering sage green paint over rich gold tones and heavily distressing the high points, you’ll create a finish that looks authentically weathered by time rather than freshly painted.
How-To Guide
Materials
- Ornate oval mirror frame (wood, resin, or plastic)
- Chalk-style paint (Sage Green or Muted Teal)
- Metallic acrylic paint (Antique Gold or Bronze)
- Dark wax or antiquing glaze
- Clear wax (optional, for sealing)
- Medium-grit sandpaper (120-150 grit)
- Fine-grit sandpaper (220 grit)
- Clean lint-free rags
- Small synthetic paintbrushes
- Chip brush or dry brush
- Blue painter’s tape
- Kraft paper or newspaper
Step 1: Preparation & Base Coat
-
Protect the glass:
Before opening any paint cans, carefully tape off the mirror glass using blue painter’s tape. Slip pieces of kraft paper or newspaper under the tape edges to cover the center of the glass entirely, protecting it from splatters. -
Clean the frame:
Wipe down the entire frame with a damp cloth and a mild degreaser to remove dust and oils. If your mirror is shiny plastic or previously varnished, give it a light scuff sanding with fine-grit sandpaper to help the paint adhere. -
Apply the metallic base:
Apply a liberal coat of Antique Gold or Bronze metallic paint to the entire frame. This layer will act as the ‘sub-layer’ that peeks through later. Ideally, use a brush to get into all the deep crevasses of the scrollwork. -
Dry and repeat:
Let the metallic coat dry completely according to the bottle instructions. If the original frame color is still showing through, apply a second coat of gold for solid coverage.
Paint Stripping Too Fast?
If wet distressing removes too much green, stop and let the paint cure longer. If you remove too much by mistake, simply dab a little green back on with a dry brush and blend.
Step 2: Creating the Patina Layer
-
Apply the sage green:
Once the gold base is fully cured, paint over the entire frame with your Sage Green chalk-style paint. Chalk paint is preferred here because it distresses beautifully and has a matte, vintage finish. -
Work into crevices:
Don’t be afraid to be generous with the paint in the detailed areas. You want the green to settle into the low points of the leaves and scrolls. -
Let it dry… mostly:
Allow the green paint to dry until it is dry to the touch but not fully cured (usually about 30-45 minutes). This makes the distressing step significantly easier.
Step 3: Distressing & Aging
-
Wet distress technique:
Dampen a clean rag with water. Gently rub the high points of the ornate details—the tips of the leaves and the raised scrolls. The water will reactivate the uncured chalk paint, wiping it away to reveal the gold base underneath. -
Strategic sanding:
Once the paint is fully dry, take your medium-grit sandpaper to areas that need more aggressive distressing. Focus on the outer rim and the most protruding details where natural wear would occur over decades. -
Create variation:
Start with light pressure and increase as needed. I like to leave some areas heavier with green and strip others almost bare to the gold to create a random, organic look. -
Clean up dust:
Use a dry, soft brush or a vacuum attachment to remove all sanding dust from the intricate carvings. This remains crucial before sealing.
Add Rustic Texture
Before painting the gold base, dab a little texture paste or even baking soda mixed with glue onto random spots of the frame for a crusty, truly ancient chipped effect.
Step 4: Antiquing & Sealing
-
Apply dark wax:
Using a round wax brush or a lint-free cloth, work a small amount of dark antiquing wax into the recessed areas and corners of the frame. This mimics accumulated dust and age. -
Wipe back excess:
Immediately wipe away the excess dark wax from the high points with a clean cloth. The dark color should remain only in the deep grooves to accentuate the texture. -
Add a wash (optional):
If the gold looks too bright, you can dilute a tiny drop of brown acrylic paint with water and brush it over the gold areas, wiping it back quickly to tone down the metallic shine. -
Final seal:
To protect your finish, apply a thin layer of clear wax over the entire frame. Buff it gently with a soft cloth once dry to achieve a subtle, eggshell sheen. -
Reveal:
Carefully peel away the painter’s tape and remove the paper masking to reveal your transformed mirror.
Hang your newly aged masterpiece in an entryway or over a mantelpiece to add instant history and charm to your room
Whitewashed Painted Mirror Frame That Lets Wood Grain Peek Through

Achieve a breezy coastal or farmhouse look with this whitewashed mirror frame that beautifully highlights natural wood grain. This technique uses diluted paint and dry brushing to create a textured, time-worn finish without hiding the wood’s inherent character.
Step-by-Step Tutorial
Materials
- Unfinished wooden mirror frame (pine or oak works best)
- White or off-white chalk paint
- Water for dilution
- Medium-grit sandpaper (120-150 grit)
- Fine-grit sandpaper (220 grit)
- Small plastic container for mixing
- Cheap chip brush or stiff-bristled synthetic brush
- Lint-free cotton rags
- Clear matte wax or polyurethane sealer
- Drop cloth
- Painter’s tape
Step 1: Preparation and Sanding
-
Protect the Mirror:
Before doing anything else, carefully apply painter’s tape along the inside edge of the mirror glass where it meets the frame to prevent scratches or paint splatters. -
Initial Sanding:
Sand the entire wooden surface with medium-grit sandpaper (120-150 grit). You want to open up the pores of the wood and remove any existing glossy varnish if you are upcycling a frame. -
Enhance the Grain:
If your wood is very smooth, use a coarser grit paper and sand firmly in the direction of the grain to create tiny grooves; these will catch the white paint later and mimic the deep texture seen in the photo. -
Clean the Surface:
Wipe down the entire frame with a tack cloth or a slightly damp rag to remove all sawdust. A clean surface ensures the wash absorbs evenly.
Wire Brush Trick
Before painting, run a wire grill brush firmly along with the grain. This digs out soft wood fibers, creating deeper valleys for the white paint to settle into.
Step 2: Creating the Whitewash
-
Mix the Wash:
In your small container, mix the white chalk paint with water. I usually aim for a 1:1 ratio—equal parts paint and water—to create a milky consistency. -
Test the Consistency:
Test your mixture on the back of the frame or a scrap piece of wood. It should be opaque enough to see the white color, but transparent enough that the wood tone shows through immediately.
Layered Depth
For a driftwood effect, apply a very dilute wash of gray paint first, let dry, and then apply your white wash over top to create complex, aged tones.
Step 3: Applying the Finish
-
Dip the Brush:
Dip just the tips of your chip brush into the paint wash. You don’t want the brush fully saturated. -
First Pass Application:
Brush the wash onto one section of the frame, moving strictly in the direction of the wood grain. Work in sections of about 12 inches at a time so the paint doesn’t dry before you can manipulate it. -
Wipe Back:
Immediately after brushing, take a lint-free rag and gently wipe the wet paint *with* the grain. This removes the excess and pushes the white pigment into the wood’s crevices. -
Assess Coverage:
Step back and look at the opacity. If you want a whiter look, let it dry for a few minutes and repeat the brush-and-wipe process. For the look in the photo, one generous pass is usually sufficient.
Step 4: Dry Brushing for Texture
-
Prepare Dry Brush:
Once the base wash is fully dry to the touch (about 30 minutes), put a tiny amount of undiluted white paint on a paper plate or cardboard. -
Offload Excess Paint:
Tap your brush into the paint, then rub it vigorously on a paper towel until almost no paint comes off. It should feel ‘dry’. -
Highlighting Edges:
Lightly drag the dry brush over the raised edges and corners of the miter cuts. This mimics the wear pattern seen in the example image where the white is more opaque on the high points. -
Add Surface Streaks:
Feather the dry brush lightly over the flat surfaces using long, quick strokes. This adds those distinct streaks of brighter white on top of the softer wash background.
Step 5: Finishing Touches
-
Distress (Optional):
If the white looks too perfect, take fine-grit sandpaper (220) and gently scuff high-traffic areas to reveal raw wood underneath. -
Seal the Frame:
Apply a thin coat of clear matte wax with a clean cloth. This seals the chalk paint without adding an artificial shine, keeping that raw, rustic aesthetic. -
Buff and Clean:
After the wax cures according to the package instructions, buff it gently. Finally, remove the painter’s tape and clean the mirror glass.
Enjoy the airy and welcoming atmosphere your new custom mirror brings to the room
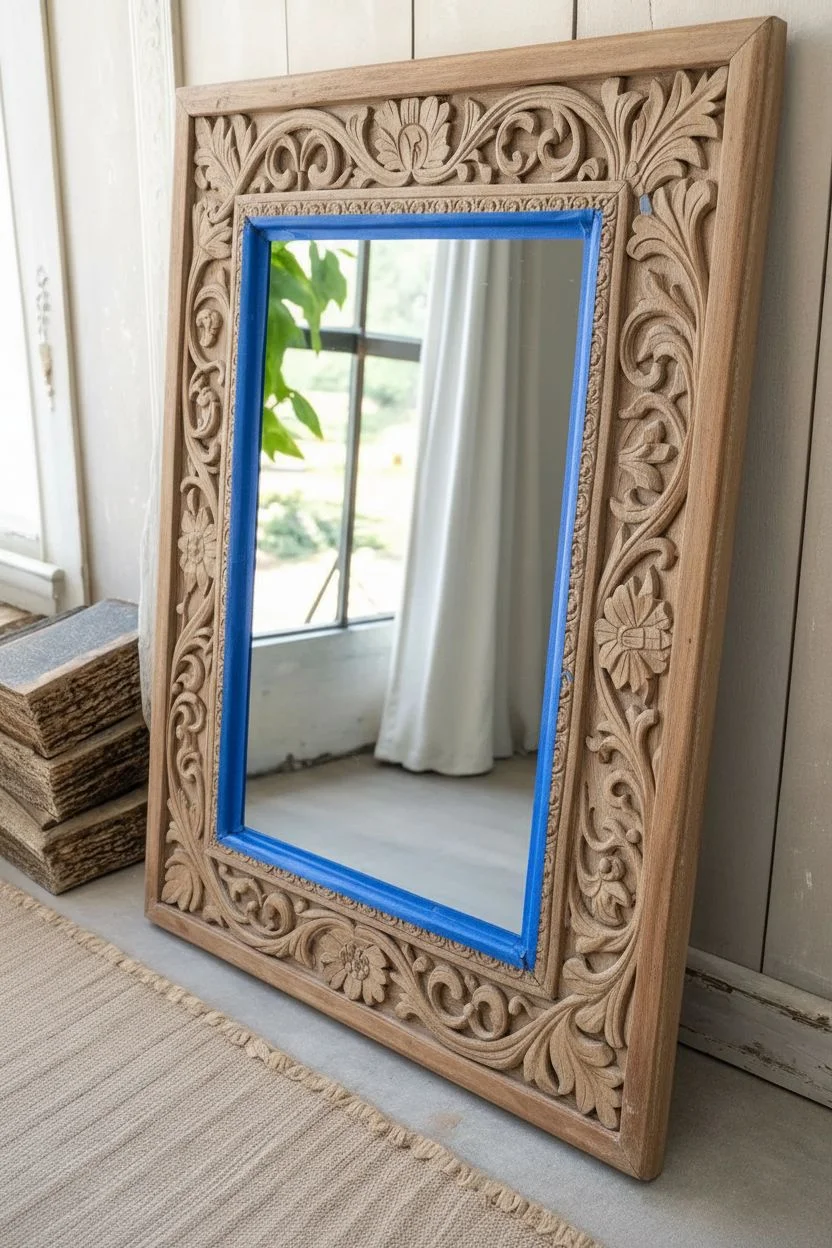
Painted Mirror Frame With a Subtle Stenciled Border
Transform a plain or dated mirror into a stunning focal point with this beaded blue makeover. By adding beaded trim and a rich, distressed paint finish, you’ll create a piece that feels both vintage and sophisticated.
Step-by-Step
Materials
- Oval mirror with a wide, flat wooden frame
- Flexible half-round wood bead trim (roll or individual)
- Wood glue or heavy-duty construction adhesive
- Navy blue chalk-style paint
- Dark antique wax
- Clear finishing wax
- Medium-grit sandpaper (120-150 grit)
- Painter’s tape
- Small artist brush
- Round wax brush or lint-free rags
- Measuring tape
- Scissors or wire cutters (for trim)
Step 1: Preparation and Assembly
-
Clean surface:
Begin by thoroughly cleaning the existing mirror frame to remove any dust, grease, or old polish. A simple mixture of vinegar and water works well. -
Protect the glass:
Carefully apply painter’s tape along the inner edge of the mirror glass where it meets the frame. Press it down firmly with your fingernail or a credit card to prevent paint seepage. -
Measure the inner rim:
Measure the circumference of the inner edge of the frame where you intend to place the beaded trim. If your mirror is a perfect oval like this one, precision is key. -
Cut the trim:
Cut your flexible wood bead trim to length. If using individual split wood beads, lay them out first to ensure spacing is correct before gluing. -
Adhere the beads:
Apply a thin, steady bead of wood glue along the inner rim. Press the flexible trim firmly into place. If using individual beads, glue them one by one, keeping them tight against each other. -
Secure and dry:
Use small pieces of painter’s tape to hold the trim in place while the glue sets. Let this dry completely according to the adhesive’s instructions, usually a few hours.
Use Flexible Trim
For oval or round frames, buy ‘bendable’ wood moulding or pre-strung wood bead garland rather than rigid trim. It conforms effortlessly to curves.
Step 2: Painting and Distressing
-
First coat:
Dip your brush into the navy blue chalk paint. Apply the first coat over the entire frame, including the newly added beads. Don’t worry about perfect coverage yet; thin coats are better. -
Get into the crevices:
I like to use a smaller artist brush here to really work the paint into the gaps between the beads so no raw wood shows through. -
Second coat:
Once dry to the touch, apply a second coat of navy blue for full, opaque coverage. Let this layer dry completely, preferably overnight. -
Distress the edges:
Take your medium-grit sandpaper and gently sand the raised areas. Focus on the tops of the beads and the outer rim of the frame to reveal the wood or base layer underneath. -
Clean up dust:
Wipe away all sanding dust with a tack cloth or a slightly damp rag. The surface needs to be dust-free for the wax.
Step 3: Finishing Touches
-
Apply clear wax:
Brush on a thin layer of clear wax over the entire painted surface. This seals the paint and provides a workable base for the dark wax. -
Add dark wax:
While the clear wax is still ‘open’ or wet, sparingly apply dark antique wax. Concentrate it in the recessed areas around the beads and frame grooves to create depth. -
Buff and blend:
Use a clean, lint-free cloth to wipe back the excess dark wax. The dark color will stay in the crevices while the high points remain brighter. -
Final buffing:
Once the wax has cured for a bit (usually 15-20 minutes), buff the entire frame vigorously with a clean cloth to achieve a subtle, satin sheen. -
Remove tape:
Peel away the painter’s tape from the mirror glass. If any paint seeped through, gently scrape it off with a razor blade or glass scraper.
Try Dry Brushing
Instead of sanding to distress, lightly dry-brush a metallic gold or copper paint over the high points of the beads for a gilded, elegant look.
Now hang your beautifully finished mirror and enjoy the depth and character it adds to your wall
Ombre Painted Mirror Frame That Fades From Dark to Light
Transform a plain wooden mirror into a modern statement piece with this subtle ombre effect. By blending a dark charcoal wash into natural wood, you create a striking gradient that feels both rustic and contemporary.
How-To Guide
Materials
- Unfinished wood mirror frame (or stripped wooden frame)
- Painter’s tape
- Kraft paper or newspaper
- Matte charcoal or black chalk paint
- Water for diluting paint
- Two plastic cups (for mixing)
- Medium-sized flat paintbrush
- Small chip brush (dry bristles)
- Clean rag or lint-free cloth
- Fine-grit sandpaper (220 grit)
- Matte polyurethane sealer (optional)
Step 1: Preparation
-
Protect the glass:
Begin by thoroughly cleaning the mirror glass to remove any dust or fingerprints. Once dry, carefully apply painter’s tape around the inside edge of the frame where it meets the glass. -
Cover the surface:
Tape sheets of kraft paper or newspaper over the entire glass surface, securing it to your initial tape border. This ensures absolutely no wash gets onto the reflective surface. -
Prep the wood:
If your frame is raw wood, give it a light sanding with fine-grit sandpaper to open the grain. If it was previously finished, you must sand it down to bare wood to allow the wash to soak in properly. -
Wipe down:
Use a damp cloth to remove every speck of sanding dust from the wood grain. Dust left behind will create muddy spots in your finish.
Step 2: Creating the Wash
-
Mix the dark wash:
In a plastic cup, mix your charcoal chalk paint with water. Aim for a ratio of about 1 part paint to 2 parts water. You want a consistency that looks like ink—thin enough to show the wood grain but pigmented enough to be dark. -
Create a lighter wash:
In a second cup, create an even more diluted version—roughly 1 part paint to 4 or 5 parts water. This will be crucial for the transition zone. -
Test the color:
Flip the mirror over or use a piece of scrap wood to test your dark wash. It should soak in like a stain rather than sit on top like paint. Adjust water levels if needed.
Uneven Blotches?
If the wood absorbs the wash unevenly, wipe the wood with a damp cloth first. The moisture opens the pores and helps the pigment spread more consistently.
Step 3: Applying the Ombre
-
Paint the bottom section:
Start applying the darkest wash to the bottom third of the frame using your flat paintbrush. Work in long, vertical strokes following the grain of the wood. -
Saturate the end:
Apply a second coat immediately to the very bottom few inches to ensure it is the darkest point of the frame. Wipe away any drips with a rag. -
Begin the transition:
Switch to your lighter (more diluted) wash mixture. Apply this to the middle section of the frame, slightly overlapping the dark bottom section while the paint is still wet. -
Blend the line:
This is the trickiest part. Take a damp rag and gently rub the area where the dark and light washes meet. Use an upward motion to pull the dark pigment slightly into the lighter area, blurring the distinct line. -
Dry brush the fade:
Dip just the tips of your dry chip brush into the light wash, dab most of it off on a paper towel, and lightly flick upward from the painted area into the raw wood section. This creates that feathery, uneven fade seen in the photo. -
Evaluate the height:
Stand back and check both sides of the mirror frame. Make sure the fade starts and ends at roughly the same height on both vertical rails. -
Feather the edges:
If the transition looks too harsh, use a barely-damp clean rag to lift some pigment off the wood at the highest point of the fade, softening the look.
Level Up: Metallic Dip
Add a touch of glam by adding a subtle gold or copper leaf stripe right at the transition line where the wash fades away for a modern mixed-media look.
Step 4: Finishing Touches
-
Let it dry completely:
Allow the frame to dry for at least 2-4 hours. The colors will often lighten slightly as the water evaporates. -
Light sanding:
Once dry, run a piece of fine-grit sandpaper very lightly over the painted areas. This knocks down the raised grain caused by the water and enhances the distressed, washed look. -
Seal the deal (Optional):
If this mirror will be in a bathroom or high-humidity area, apply a clear matte polyurethane sealer over the entire frame (including the raw wood top) to protect it. -
Reveal the glass:
Carefully peel away the painter’s tape and paper. Clean the glass one last time to remove any smudge marks from handling.
Lean your newly transformed mirror against a bright wall to let that dramatic gradient really shine
Hand-Painted Botanical Painted Mirror Frame With Delicate Vines
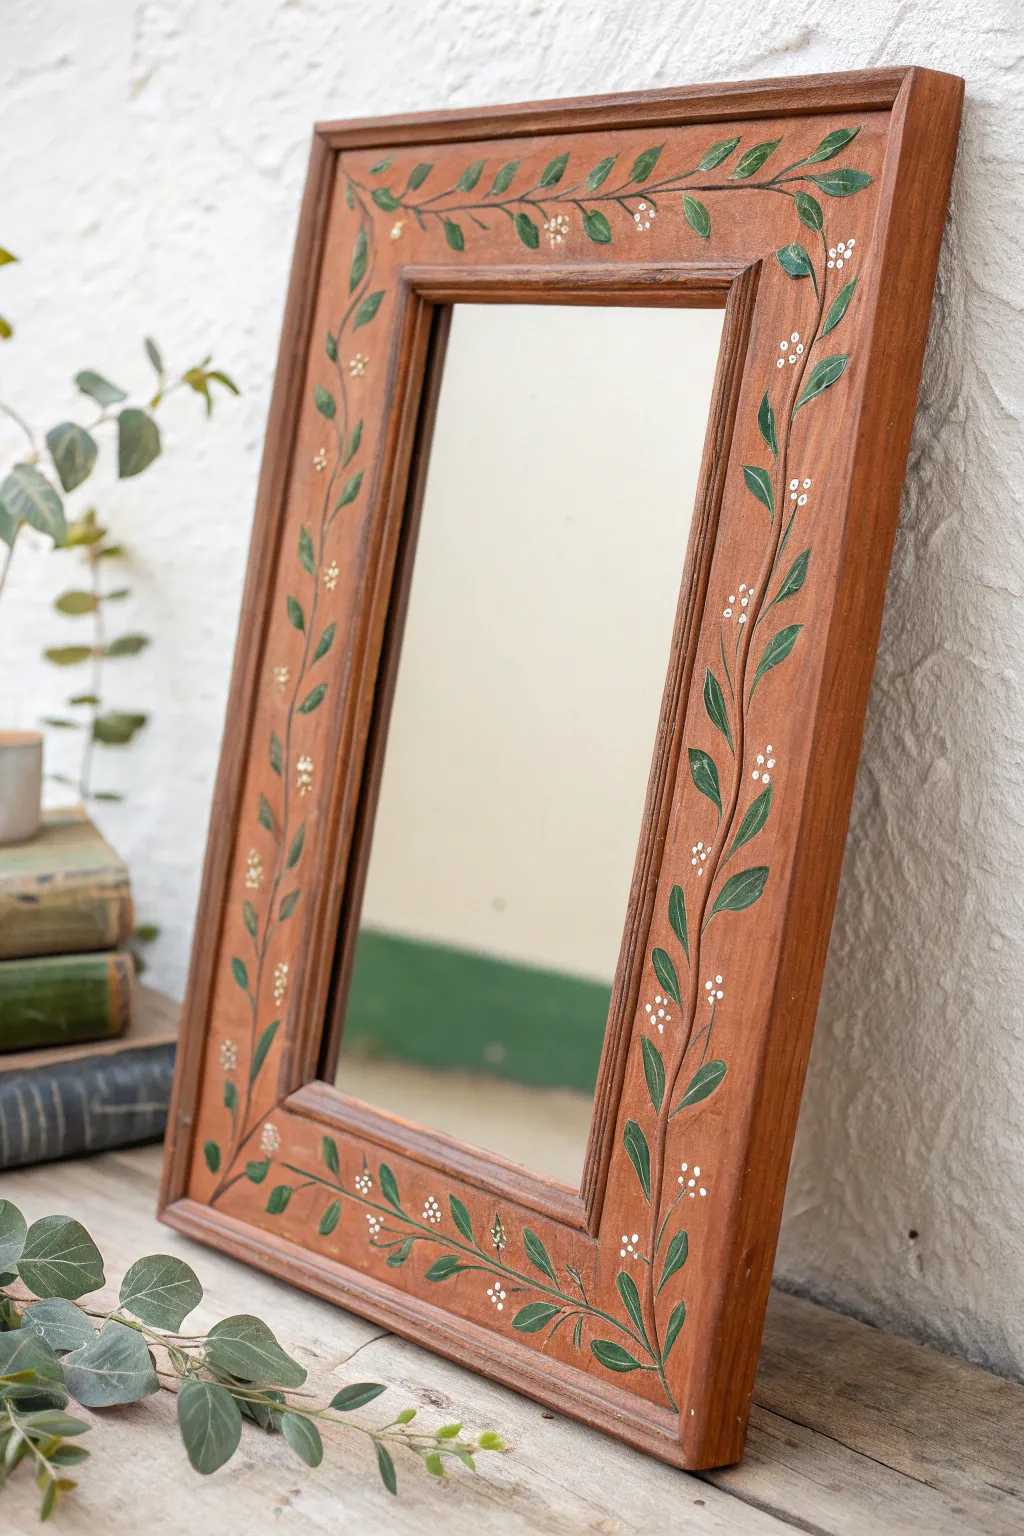
Transform a plain wooden mirror into a charming piece of folk art with delicate hand-painted vines. This project embraces the natural warmth of the wood, using it as a canvas for trailing greenery and dainty white blossoms that frame your reflection perfectly.
Step-by-Step
Materials
- Unfinished or matte-finished wooden mirror frame (wide/flat profile)
- Acrylic paints: Sap Green, Dark Green (like Hooker’s Green), Warm White
- Fine liner brush (size 0 or 00)
- Small round brush (size 2)
- Pencil (H or HB for light lines)
- Painter’s tape
- Paper plate or palette
- Water cup and paper towels
- Clear matte acrylic sealer (spray or brush-on)
- Sandpaper (220 grit)
- Clean cloth
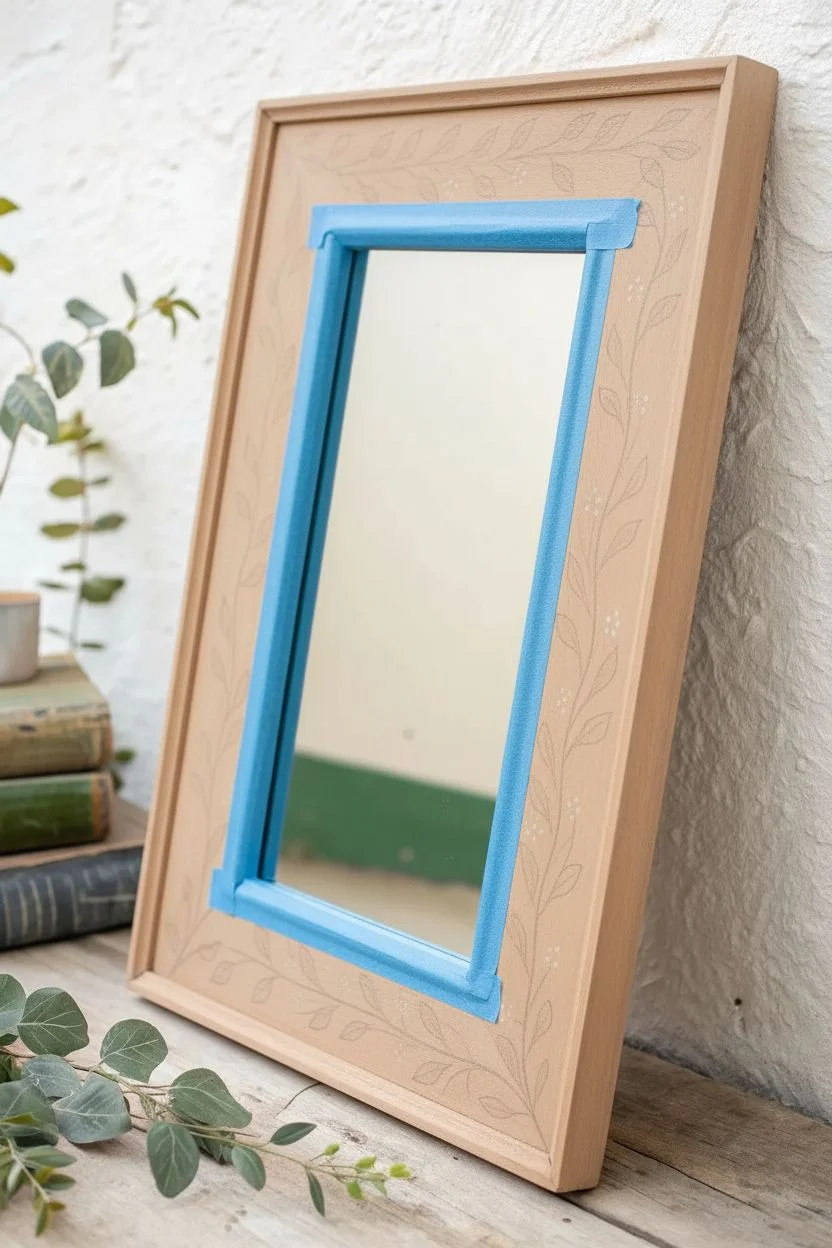
Step 1: Preparation & Planning
-
Prepare the surface:
Before painting, ensure the wood is smooth and receptive. Lightly sand the entire frame with 220-grit sandpaper to remove any rough spots or existing glossy varnish. Wipe it down thoroughly with a damp cloth to remove all dust. -
Protect the glass:
Carefully apply painter’s tape to the mirror glass, sliding the edge of the tape right under the inner lip of the frame if possible. This ensures you can paint freely without scraping paint off the glass later. -
Sketch the vine structure:
Using a pencil very lightly, draw a continuous S-curve line that wanders around the frame. Start at the bottom center and work your way up each side. Aim for a flowing, organic movement rather than perfect symmetry.
Fixing Shaky Lines
If your vine stems look wobbly, don’t worry. Simply thicken the line slightly in that area or paint a leaf directly over the mistake to hide it perfectly.
Step 2: Painting the Greenery
-
Mix your main vine color:
Squeeze a small amount of dark green paint onto your palette. If it feels too stiff, add a tiny drop of water to improve flow—you want an inky consistency for smooth lines. -
Paint the central stem:
Load your fine liner brush with the dark green paint. Slowly trace over your pencil line, keeping the pressure light to maintain a thin, delicate stem. If the paint skips, reload your brush. -
Add leaf placement markers:
While the stem dries, visualize where your leaves will go. I like to mark tiny dots with a pencil along the vine, spacing them out so the leaves will alternate left and right. -
Paint the first layer of leaves:
Switch to the small round brush (size 2). Using the dark green, paint almond-shaped leaves attached to the stem. Press the belly of the brush down to widen the leaf and lift up to create a pointed tip. -
Add dimension with a second green:
Mix a little Sap Green (a lighter, yellowish green) with your dark green. While the first leaves are still tacky or just dry, paint a few smaller leaves or add highlights to the existing ones to create depth. -
Connect the leaves:
Use the liner brush again to ensure every leaf is firmly connected to the main vine with a tiny, thin stem. Floating leaves can ruin the realistic effect. -
Let the greenery set:
Allow the green paint to dry completely for about 20 minutes before moving on to the flowers to prevent smudging.
Step 3: Adding Floral Details
-
Prepare the white paint:
Load the tip of your smallest liner brush (or even a toothpick) with Warm White acrylic paint. Ensure the paint is opaque enough to stand out against the wood. -
Dot the flowers:
Group 3 to 5 tiny dots together to form small flower clusters. Place these sporadically along the vine, focusing on empty spaces between leaves. -
Add single buds:
Scatter singular white dots near the tips of the vines to represent unopened buds. This helps the design taper off naturally at the ends. -
Clean up sketch lines:
Once the paint is bone dry (give it a good hour), gently erase any visible pencil marks. Be careful not to rub the paint itself too vigorously. -
Seal the artwork:
Apply a coat of clear matte acrylic sealer over the wood. This protects your handiwork from dust and moisture without adding an artificial shine. -
Reveal the mirror:
Slowly peel away the painter’s tape from the glass. If any paint seeped under, scrape it away gently with a fingernail or razor blade.
Natural Leaf Texture
Don’t overmix your greens on the palette. Letting the two shades swirl slightly on the brush creates natural variegation in every single leaf stroke.
Now hang your mirror in a well-lit spot and enjoy the touch of nature you’ve added to your room


Have a question or want to share your own experience? I'd love to hear from you in the comments below!