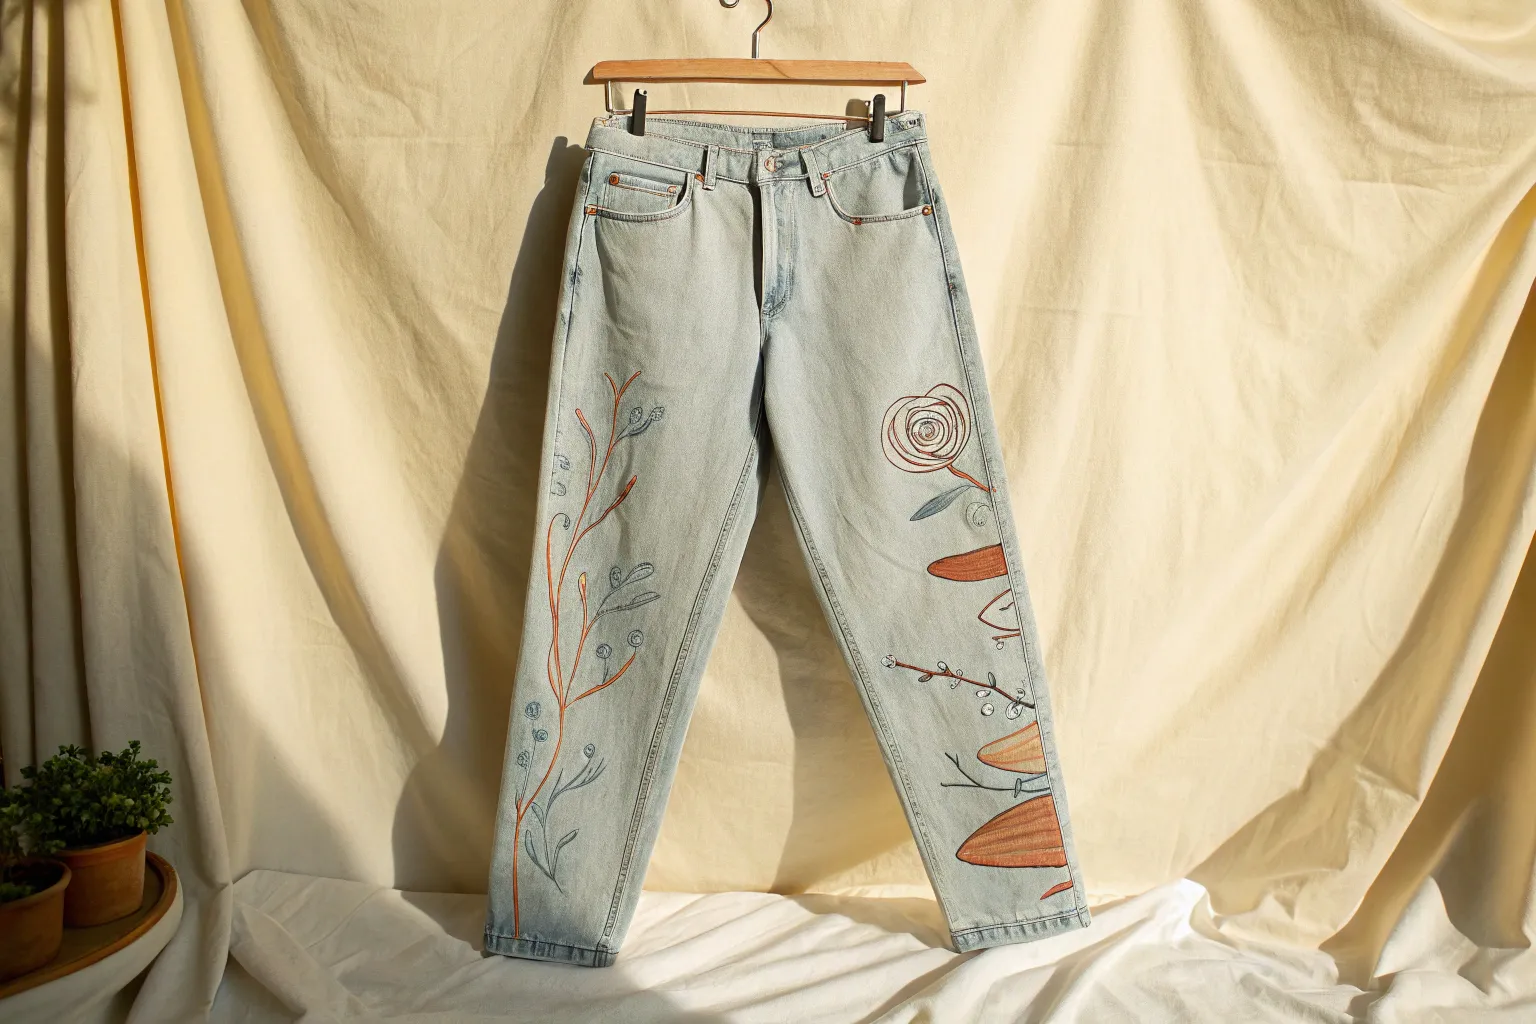
Painted pants are my favorite way to turn everyday denim into a walking canvas that feels totally you. Below are my go-to painted pants ideas, starting with classic crowd-pleasers and ending with a few studio-style experiments for when you want something extra bold.
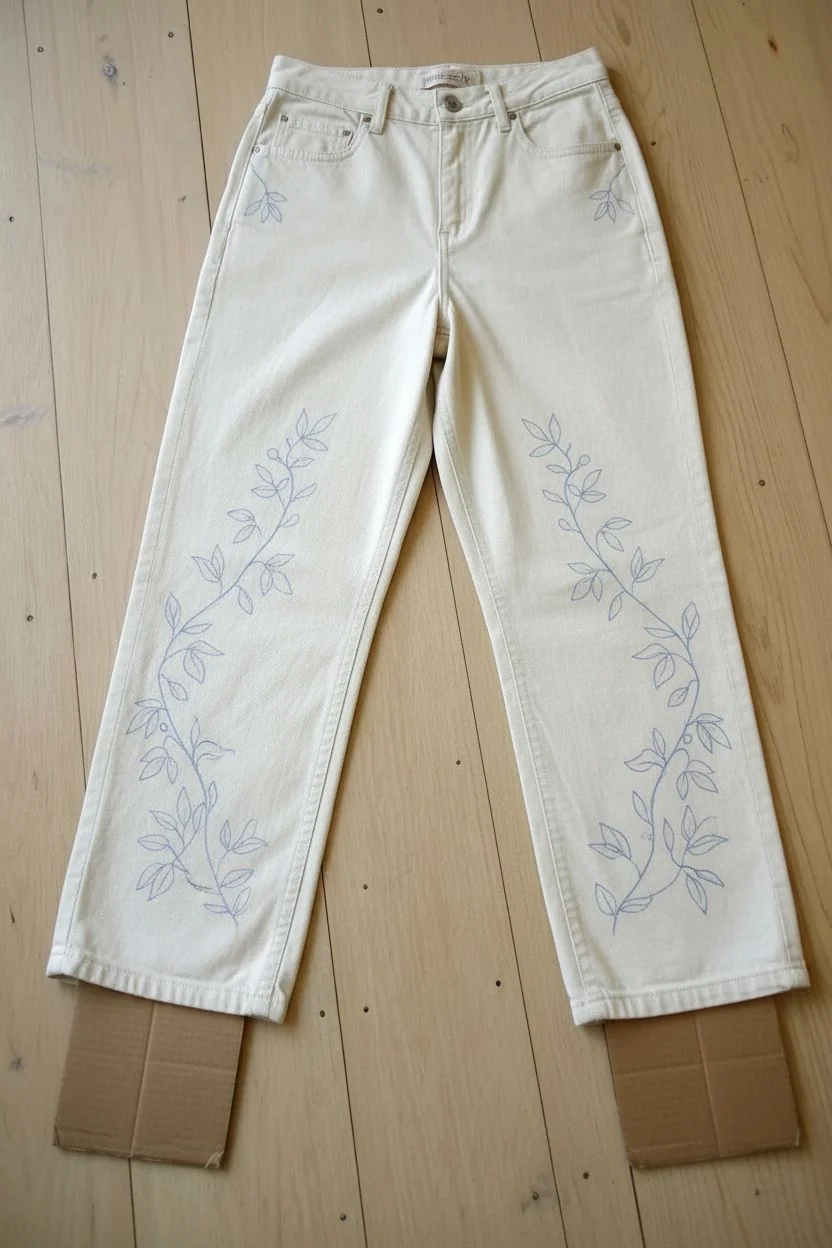
Big Florals Up the Leg
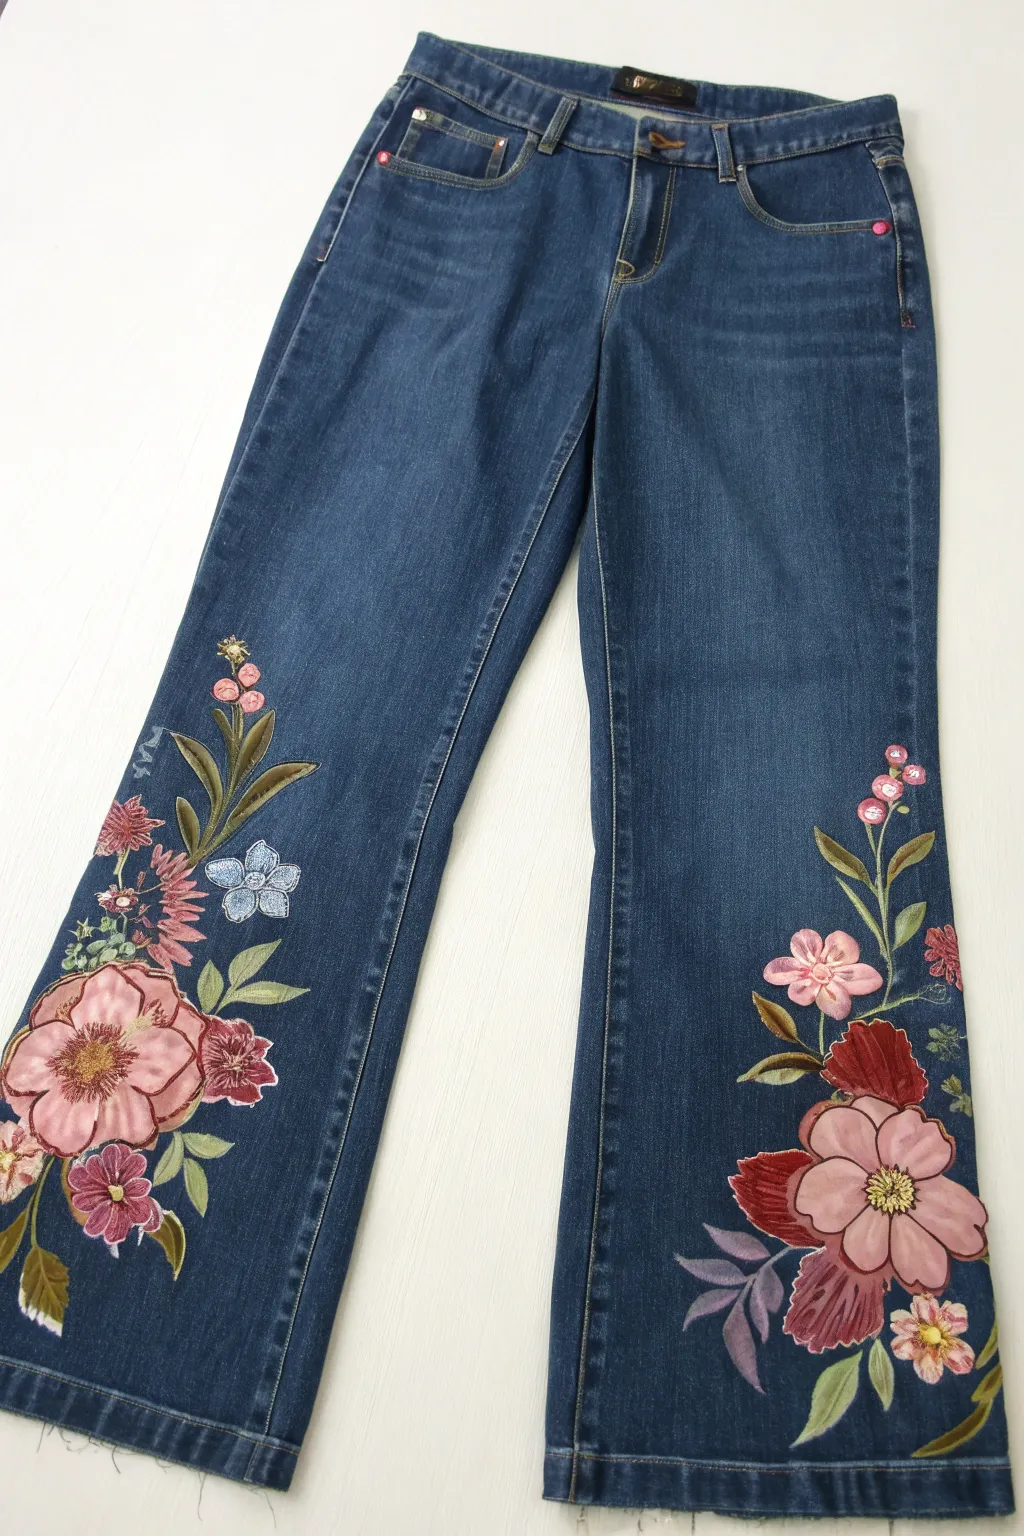
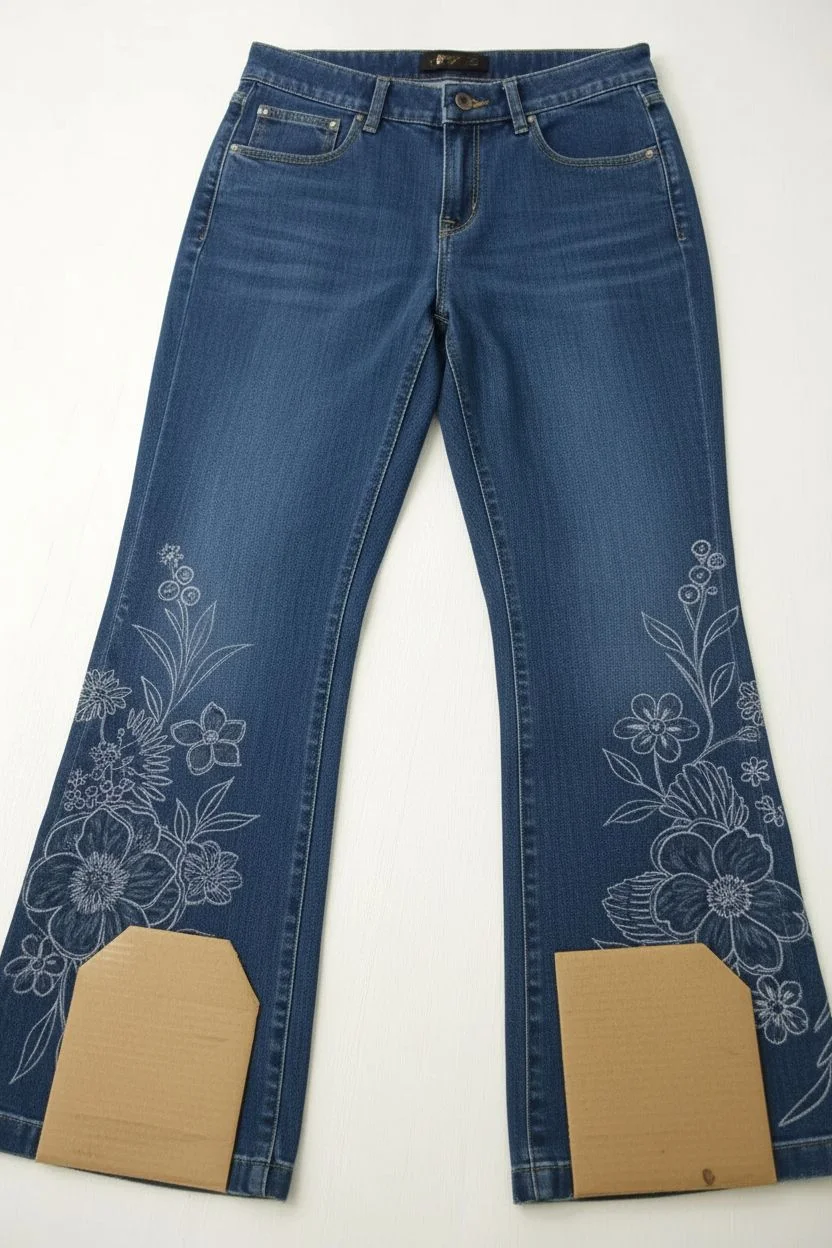
Transform a simple pair of denim jeans into a wearable garden with these lush, hand-painted floral designs. The look features oversized blooms climbing up the calves, blending soft pinks and deep burgundies with varied greenery for a romantic, vintage-inspired finish.
Step-by-Step
Materials
- Pair of denim jeans (bootcut or flare works best)
- White fabric paint or gesso (for priming)
- Fabric medium
- Acrylic paints (Titanium White, Alizarin Crimson, Cadmium Red, Hooker’s Green, Sap Green, Yellow Ochre, Burnt Umber, Ultramarine Blue, Violet)
- Assorted brushes (flat brush for base coats, angled shader brush, fine liner brush)
- Fabric marker or chalk pencil
- Cardboard insert or separation board
- Palette or paper plate
- Iron (for heat setting)
Step 1: Preparation & Sketching
-
Prepare the surface:
Wash and dry your jeans without fabric softener to remove sizing, which helps the paint adhere better. Once dry, slip a piece of cardboard inside each pant leg. This is crucial to prevent paint from bleeding through to the back of the leg. -
Rough layout:
Using a white chalk pencil or disappearing fabric marker, lightly sketch your composition. On the left leg, plan a large focal bloom near the hem with vines reaching upward. On the right leg, place the main flower slightly higher or lower for an asymmetrical, organic look. -
Map the vines:
Draw long, curving stems extending from your focal flowers. Add leaf shapes along the stems, varying their sizes—some large at the bottom, tapering to smaller buds at the top.
Step 2: Base Coating
-
Mixing the primer:
Denim absorbs paint quickly, so you need a base. If you don’t have opaque white fabric paint, mix equal parts white acrylic paint with fabric medium. I like to keep this mixture slightly thin so it penetrates the denim fibers without getting clumpy. -
Priming the shapes:
Fill in all your sketched flower and leaf shapes with this white mixture. Don’t worry about perfect coverage; you just need to block out the blue denim color so your top colors pop. Let this layer dry completely.
Priming Pro-Tip
Don’t skip the white base layer! Without it, your pinks and yellows will look dull and muddy against the dark indigo denim.
Step 3: Painting the Foliage
-
Mixing greens:
Prepare a few shades of green. Mix Sap Green with a touch of Yellow Ochre for a warm, olive tone. For darker shadows, mix Hooker’s Green with a tiny bit of Burnt Umber or red. -
Base green layer:
Paint the leaves and stems with your mid-tone olive green. Ensure you mix fabric medium into your acrylics at a 1:2 ratio (medium to paint) if you aren’t using specific fabric paints. -
Adding dimension to leaves:
While the green is still slightly wet, blend a darker green near the base of the leaves and stems. Use a lighter, yellowish green on the tips and upper edges to suggest sunlight hitting the foliage. -
Veining details:
Once the green base is dry, use your fine liner brush with a very light green or off-white mixture to draw delicate veins on the larger leaves.
Level Up: Texture
Mix a tiny pinch of fine glitter into the fabric medium for the flower centers to add a subtle sparkle that catches the light as you walk.
Step 4: Painting the Blooms
-
Base flower color:
For the large pink blooms, mix Titanium White with a small amount of Alizarin Crimson to create a soft, dusty pink. Paint the entire flower shape over your white primer. -
Defining petals:
Mix a deeper shade using more Alizarin Crimson and a touch of violet. shadow the areas where petals overlap and the centers of the flowers. Use an angled brush to sweep this darker color from the center outwards, lifting the brush as you go to feather the edges. -
Adding highlights:
Mix a very pale pink, almost white. Apply this to the outer edges of the petals to make them look curled and dimensional. This contrast between the dark centers and light edges creates the 3D effect. -
Secondary flowers:
Paint the smaller accent flowers (like the reddish-brown ones) using a mix of Burnt Sienna or Oxide Red. Highlight these with a touch of orange or yellow to give them warmth. -
Flower centers:
Using a small round brush, dab yellow paint into the absolute center of your open blooms. Once dry, add tiny dots of brown or black over the yellow to create texture resembling stamen.
Step 5: Finishing Touches
-
Fine details:
Look for empty spaces in your composition. Add small buds using pink or red dots at the end of thin stems. In the image, there are tiny blue forget-me-notch style flowers; add these using a light blue mixed with white for variety. -
Outline optional:
If you want a sharper look, you can very lightly outline some petals with a thinned-down darker color, though keeping it painterly often looks softer. -
Heat setting:
Allow the jeans to dry for at least 24 hours. After they are fully dry, turn the leg inside out (or place a cloth over the design) and iron on a medium-high setting (no steam) for 3-5 minutes per section to permanently set the paint.
Now you have a custom piece of wearable art that brings a touch of spring to any outfit


Daisy Pocket Accents
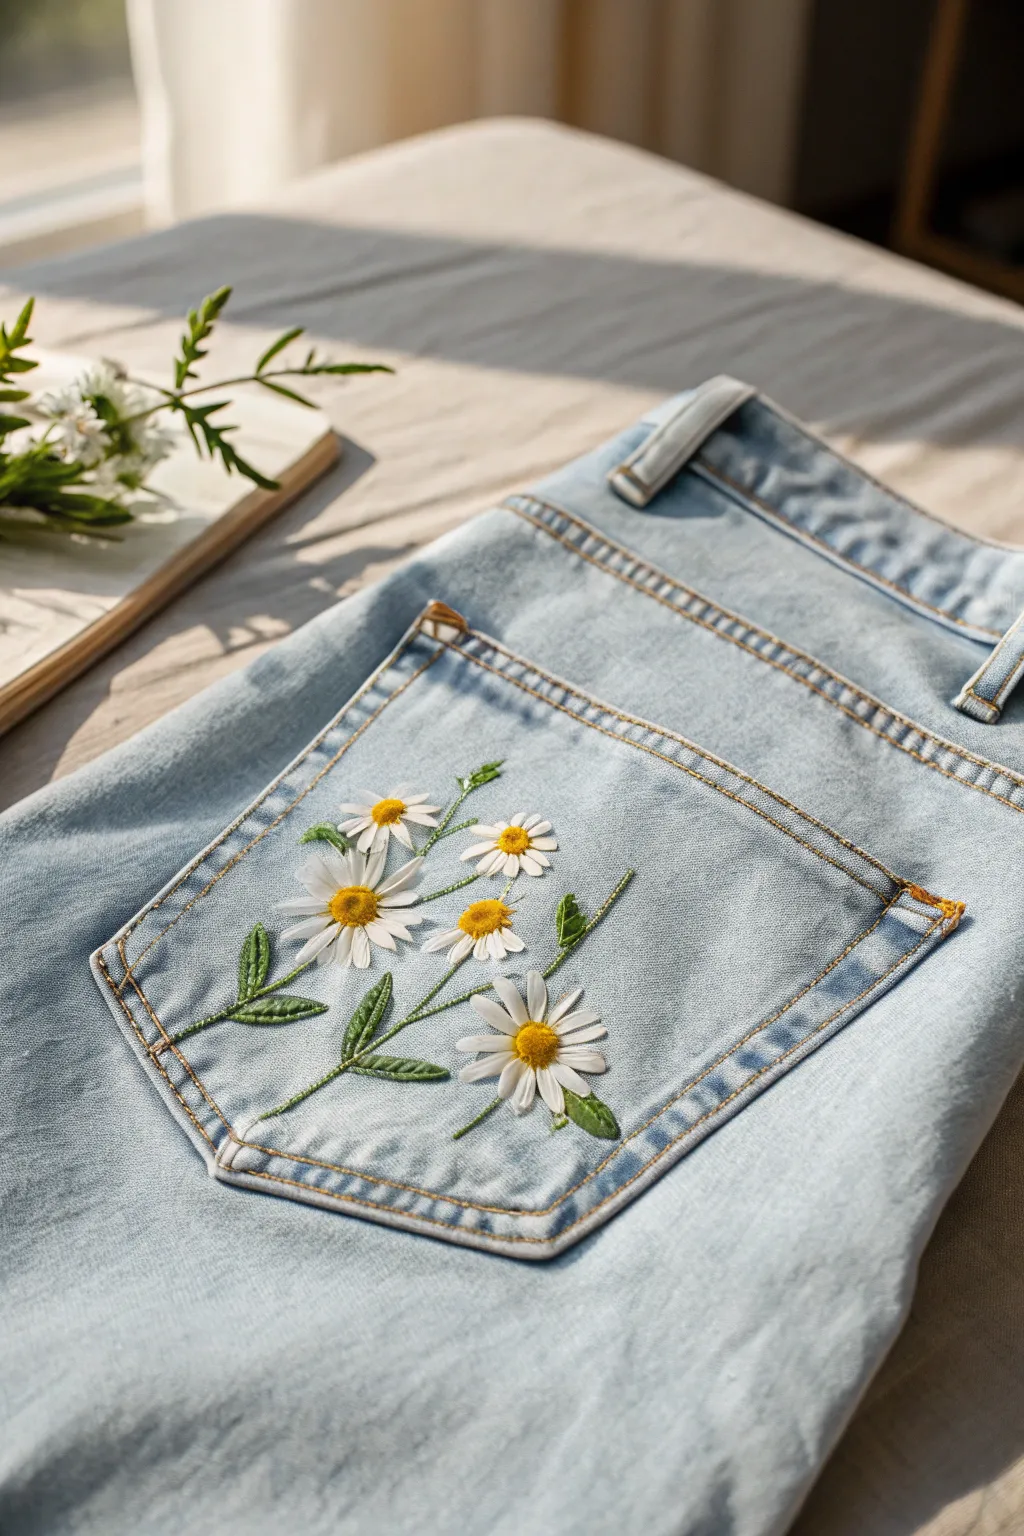
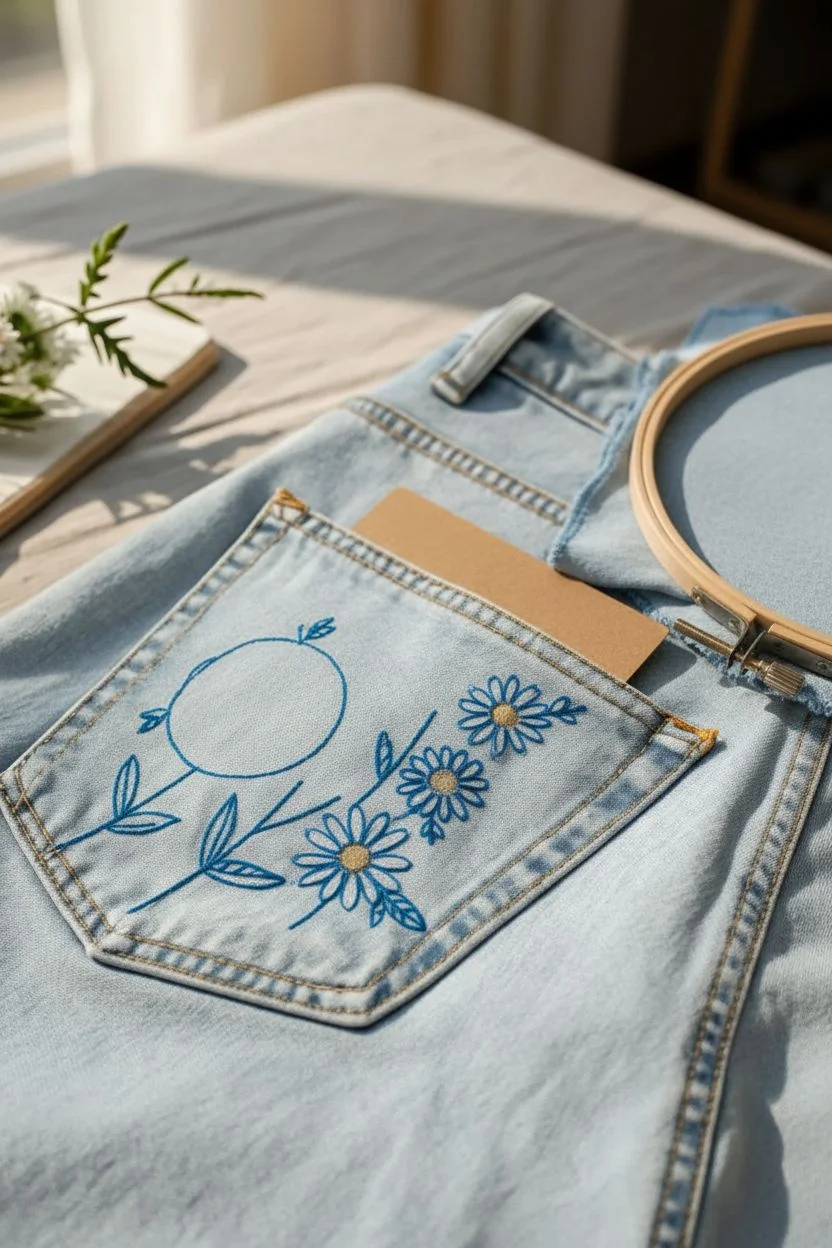
Transform a plain pair of light-wash jeans into a charming meadow with these delicate daisy accents. The textured stitching brings the flowers to life, adding a sweet, dimensional touch to the back pocket that feels both vintage and fresh.
How-To Guide
Materials
- Light wash denim jeans
- Embroidery hoop (small enough to fit inside or around the pocket area)
- White embroidery floss
- Yellow embroidery floss (goldenrod shade)
- Green embroidery floss (medium forest green)
- Embroidery needle (size 5-7)
- Water-soluble fabric marker or chalk pencil
- Small scissors
Step 1: Preparation & Sketching
-
Prepare the pocket:
Ensure your denim pocket is clean and dry. Since you are stitching on a pocket, you need to be extremely careful not to sew the pocket shut. Place a piece of thick cardstock or a small cutting mat inside the pocket to act as a barrier. -
Map out the design:
Using your water-soluble marker, lightly draw five daisy positions. Place the largest one centrally on the left, a smaller one slightly below it, one near the top right, another tucked in the middle, and a final one near the bottom center. -
Draw stems and leaves:
Sketch thin, slightly curved lines connecting the flower heads downwards to create stems. Add small, leaf-like shapes branching off the stems—aim for a mix of small singular leaves and slightly larger ones near the base. -
Hoop the fabric:
If possible, separate the pocket fabric from the pant leg and place it in a small embroidery hoop. If the pocket is too tight, you may need to stitch without a hoop, keeping the fabric taut with your non-dominant hand. I find using a 4-inch hoop usually works best here.
Pocket Protector
Keep a piece of cardboard inside the pocket while stitching. It prevents you from accidentally sewing the pocket shut to the leg of the jeans!
Step 2: Stitching the Greenery
-
Thread the needle:
Cut a length of green embroidery floss about 18 inches long. Separate the strands and use 3 strands for a delicate but visible line. Knot one end. -
Stitch the stems:
Use a stem stitch or a simple backstitch to follow the lines of your flower stems. Keep your stitches short (about 3-4mm) to handle the slight curves gracefully. -
Outline the leaves:
Move to the leaf shapes. Outline each leaf using a backstitch. The leaves in the image have a distinct, slightly filled texture, often achieved with a satin stitch or a fishbone stitch. -
Fill the leaves:
For the larger leaves, use a fishbone stitch to create a spine down the center, giving them a realistic leaf texture. For tiny leaves, a simple satin stitch (stitching side-to-side) will fill them in quickly.
Step 3: Creating the Daisies
-
Prepare white thread:
Switch to your white embroidery floss. Use all 6 strands if you want the petals to look puffy and substantial, or 3-4 for a flatter look. The image shows fairly textured petals. -
Stitch the first petals:
Start with the main central flower. Bring your needle up at the outer edge of the center circle (leave the center empty for now) and stitch outward to the tip of a petal. Use a lazy daisy stitch (detached chain stitch) for a looped look, or long straight stitches for a flatter petal. -
Layering petals:
Continue stitching petals around the circle. To make them look natural, vary the length slightly. Some petals can overlap their neighbors just a tiny bit. -
Complete all flowers:
Repeat the petal process for the remaining four daisies. As you move to the smaller buds, make the petals shorter and fewer in number to simulate different stages of bloom. -
Check density:
Look over your white petals. If any flower looks too sparse, add a single straight stitch between existing petals to fill gaps.
Upgrade the Texture
Mix two shades of yellow thread in the French knots for a more realistic, sun-dappled look on the flower centers.
Step 4: Adding the Centers & Finishing
-
Thread yellow floss:
Thread your needle with the goldenrod yellow floss. Use 4-6 strands to create a dense, textured center. -
French knots:
Fill the center of each daisy with French knots. Wrap the thread around the needle twice for each knot. Pack them tightly together to create a bumpy, pollen-rich center. -
Varying the centers:
For the largest flower, you might need 6-8 knots. For the smaller flowers, 3-4 knots might be sufficient. Arrange them so they form a nice, rounded mound. -
Secure the back:
Once all flowers are complete, bring your needle to the inside of the pocket (make sure you don’t catch the pant leg!). Tie off your threads securely and trim the excess. -
Remove markings:
If any blue marker lines are still visible, dab them gently with a damp cloth or a wet Q-tip to dissolve the ink.
Wear your new customized denim with pride, knowing roughly two hours of stitching created this lovely botanical detail


One-Leg Statement Panel
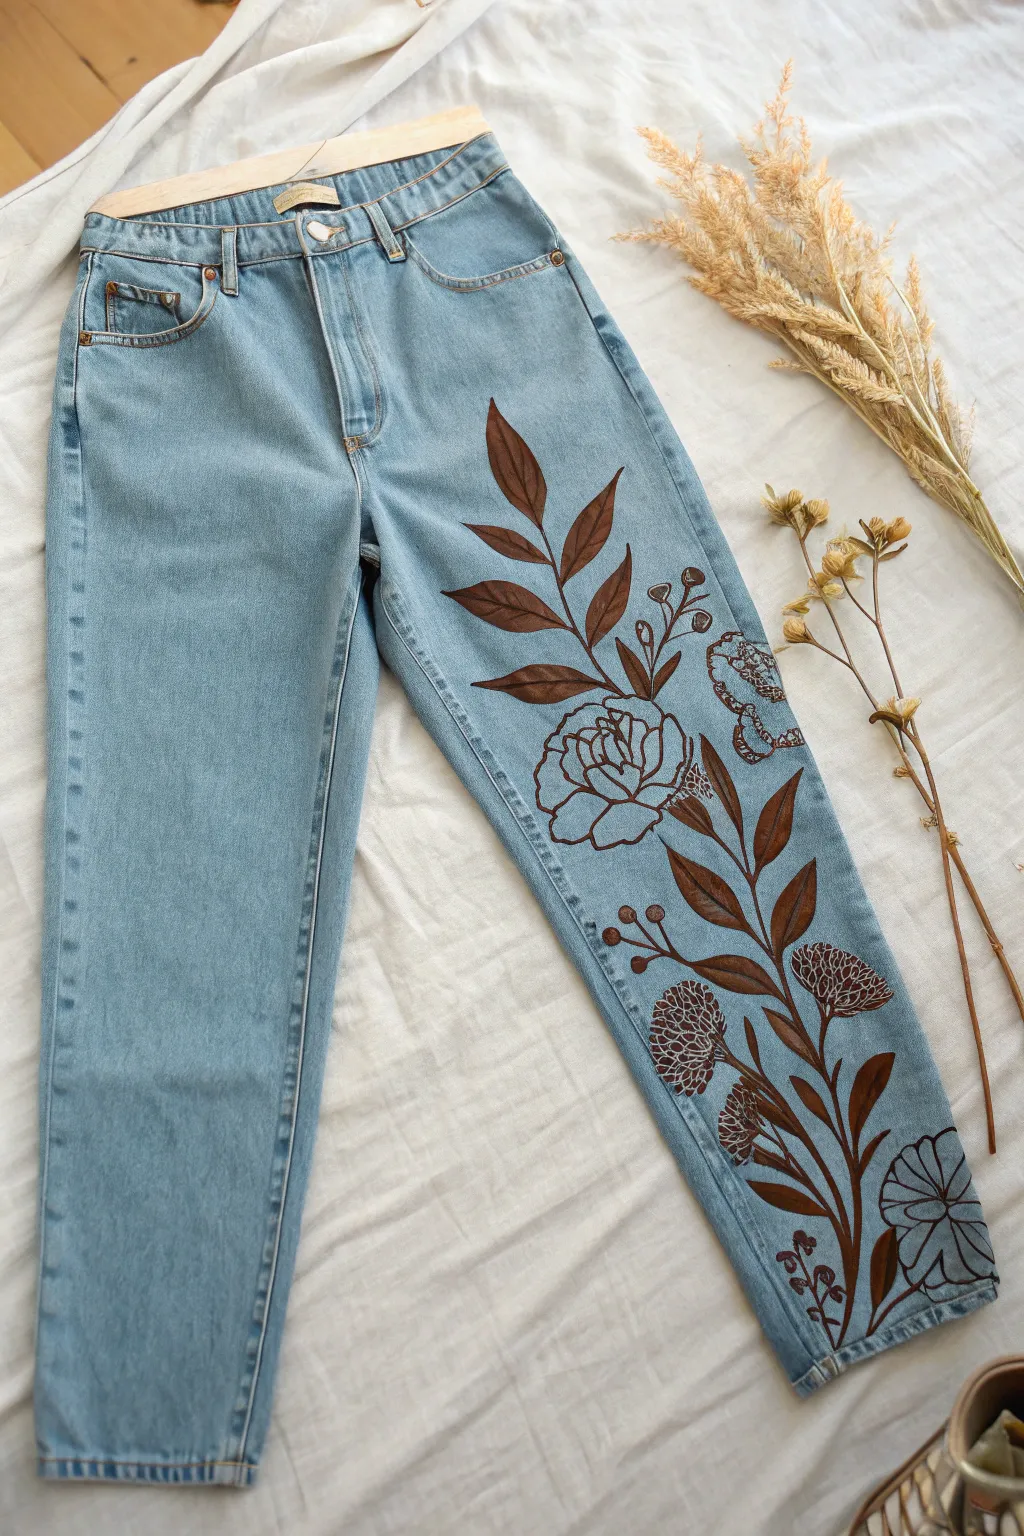
Transform a simple pair of light-wash jeans into a statement piece with this elegant, nature-inspired design. Featuring a mix of solid-filled leaves and delicate floral line work in rich brown tones, this one-leg panel adds an organic, artistic touch to your wardrobe.
Detailed Instructions
Materials
- Light wash denim jeans
- Fabric medium
- Acrylic paint (Burnt Umber, Raw Sienna, and a dark Reddish-Brown)
- Round synthetic brushes (sizes 2, 4, and a 00 liner brush)
- White or light chalk pencil for sketching
- Piece of cardboard or thick plastic
- Iron and cloth for heat setting
- Palette for mixing
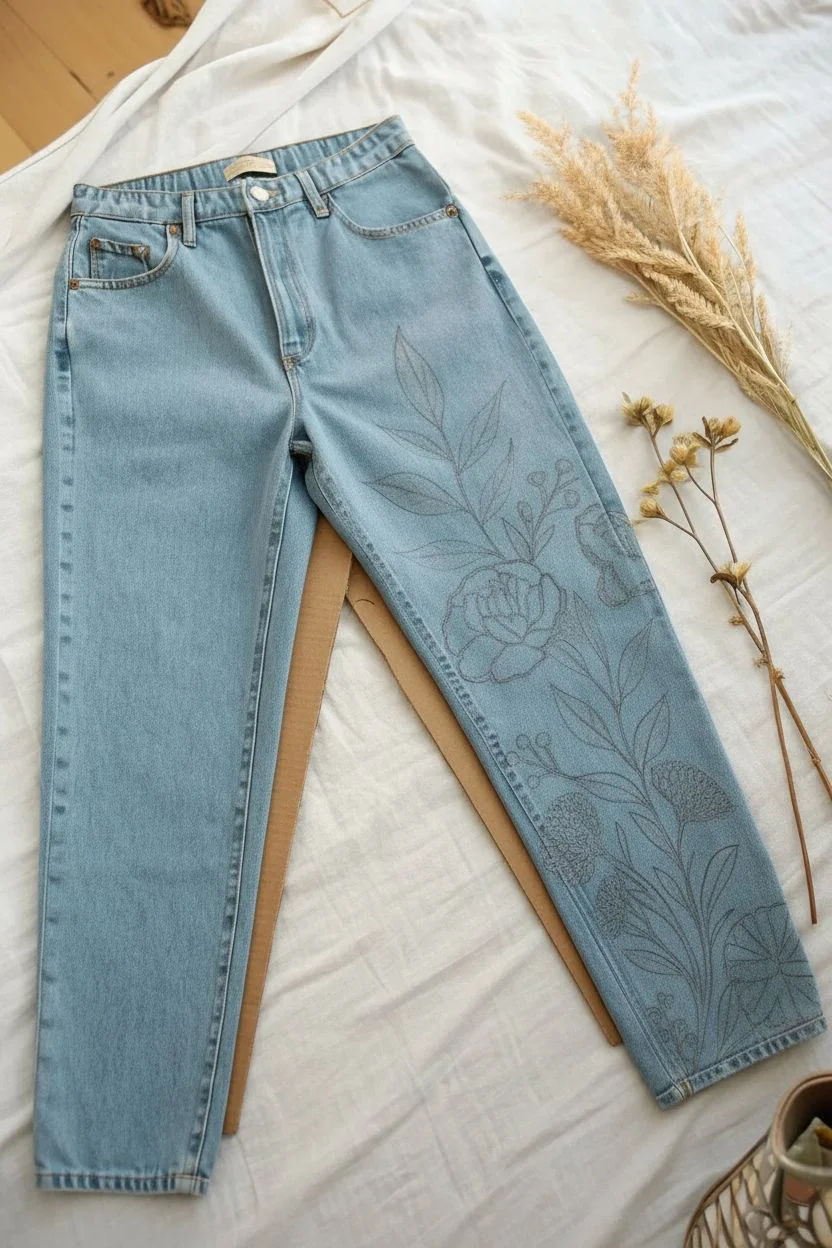
Step 1: Preparation and Sketching
-
Prepare your workspace:
Lay your jeans flat on a smooth surface. It is crucial to insert a piece of thick cardboard or protective plastic inside the leg you intend to paint. This prevents the paint from bleeding through to the back of the leg. -
Map out the main stem:
Using your chalk pencil, lightly draw a long, curving line starting near the bottom hem and extending up towards the knee. This will be the central spine for the lower floral cluster. -
Outline the upper leaves:
Sketch a second grouping higher up on the thigh. Draw simple, elongated leaf shapes branching out. Don’t worry about perfection; organic shapes look more natural. -
Draft the floral elements:
Roughly sketch the circles where your flower heads will go—one large bloom near the knee and several smaller, thistle-like shapes further down. Keep the pressure light so the chalk wipes away easily later.
Stiff Paint Fix
If the painted areas feel like cardboard after drying, you likely used too little fabric medium. After heat setting, a gentle wash with fabric softener usually helps soften the texture.
Step 2: Painting the Solid Leaves
-
Mix the base leaf color:
Combine your Burnt Umber acrylic paint with fabric medium according to the bottle’s instructions (usually 1:1 or 2:1). This ensures the paint moves with the fabric rather than cracking. -
Paint the first layer:
Using a size 4 round brush, fill in the large, smooth leaves on the upper thigh. Apply the paint in smooth strokes following the direction of the leaf vein. -
Build opacity:
Denim is thirsty and often absorbs the first layer. Let this base coat dry for about 15-20 minutes, then apply a second coat to get that rich, solid brown coverage seen in the photo. -
Add dimension:
While the second coat is still slightly wet, I like to mix a tiny bit of Raw Sienna into the brown on my palette and streak it into the tips of the leaves for subtle highlights.
Step 3: Detailed Line Work
-
Mix the liner color:
Create a darker shade for the outlines. Mix Burnt Umber with a touch of the dark Reddish-Brown. Ensure you add enough fabric medium or a drop of water to make the paint inky and fluid. -
Outline the main bloom:
Switch to your size 0 or 00 liner brush. Carefully trace the petals of the large flower near the knee. Use varied pressure: press down for thicker lines and lift up for tapering tips. -
Create the thistle textures:
For the smaller, round flowers lower on the leg, use a stippling motion or small hatching lines to create that textured, seed-head appearance. Keep the stems thin and flowing. -
Connect the design:
Paint the stems connecting your solid leaves to the floral outlines. Ensure the stems flow naturally between the heavy, filled shapes and the airy line drawings. -
Add detail to solid leaves:
Once the solid brown leaves are fully dry, use the dark liner mixture to paint a central vein down the middle of each leaf for definition. -
Incorporate small fillers:
Look for empty spaces in your composition. Add tiny twigs with berries or small buds using just the tip of your liner brush to balance the visual weight.
Pro Tip: Hand Stability
For steady line work on the uneven denim texture, rest your pinky finger on a dry part of the jeans to anchor your hand while painting delicate stems.
Step 4: Refining and Sealing
-
Clean up edges:
Check your solid leaves for any fuzzy edges. Use the liner brush to smooth them out with a final pass of paint if needed. -
Remove sketch lines:
Once the paint is completely dry to the touch (wait at least an hour), use a clean, slightly damp cloth to gently wipe away any visible chalk marks. -
Let it cure:
Allow the painted jeans to sit undisturbed for 24 hours. This curing time is essential for the paint to bond with the cotton fibers. -
Heat set the design:
Turn the jeans inside out (or place a scrap cloth over the painted side). Iron on a medium-high setting without steam for 3-5 minutes over the painted area to make the design permanent.
Wear your new custom denim with pride knowing you have created a piece of wearable art entirely from scratch


All-Over Swirls and Doodles
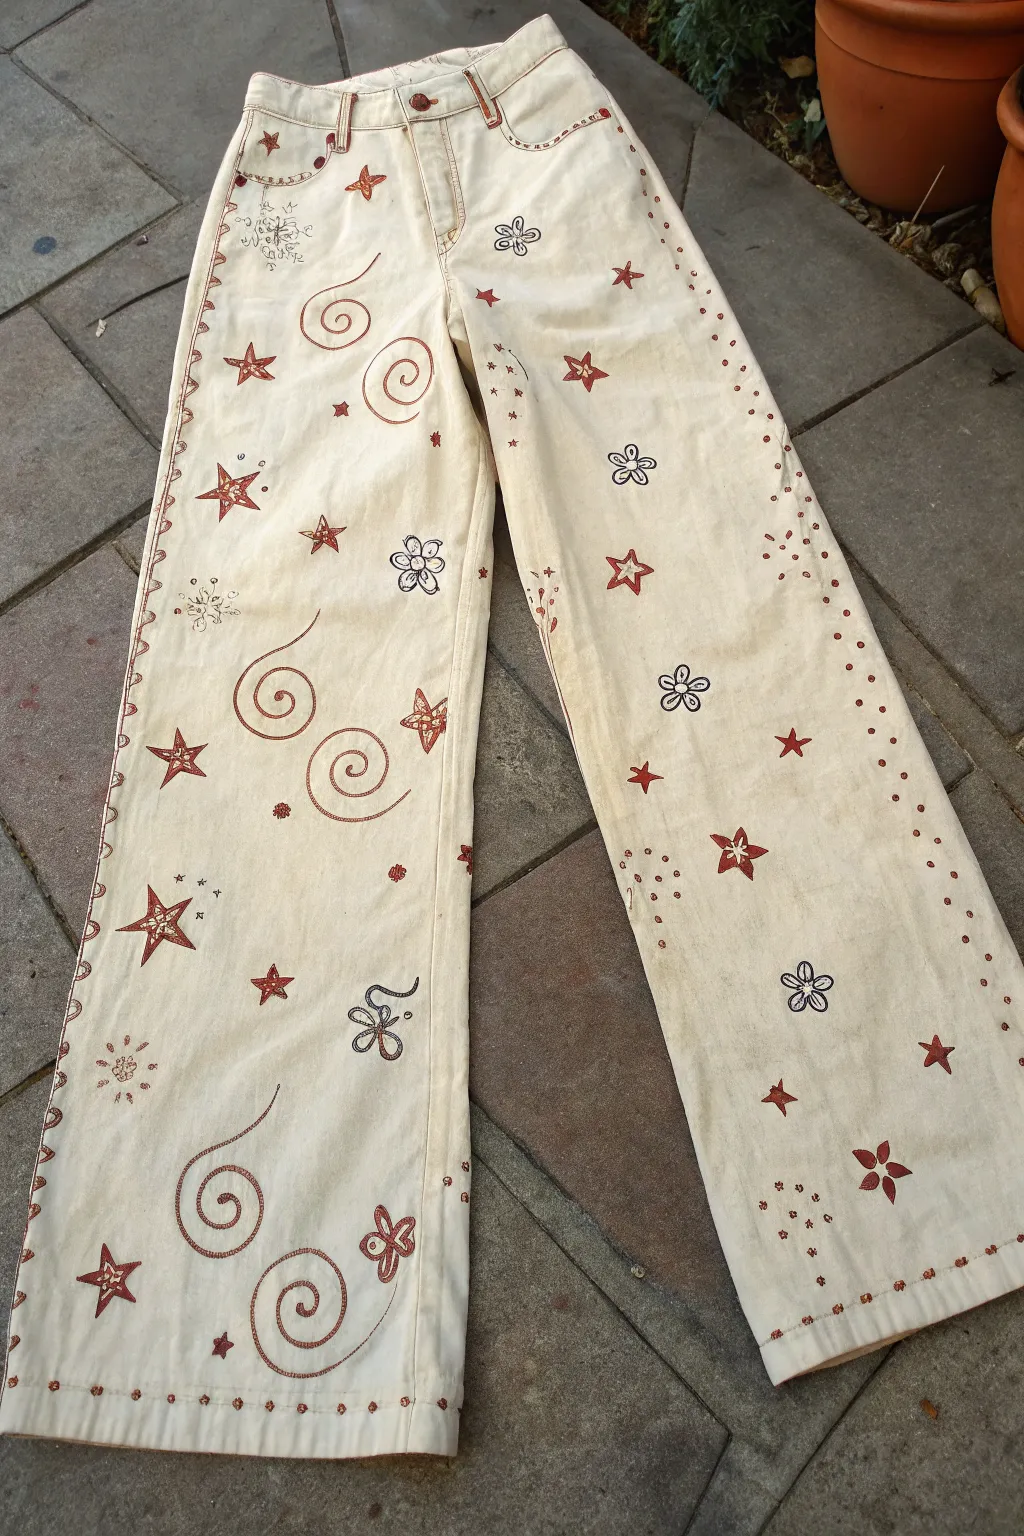
Transform a plain pair of cream jeans into a whimsical statement piece with rusty red and deep brown motifs. This all-over design features scattered stars, hypnotic swirls, and simple floral doodles for a hand-drawn, boho look.
Step-by-Step
Materials
- Cream or off-white denim jeans
- Fabric paint or fabric markers (Rust Red/Terracotta)
- Fabric paint or fabric markers (Dark Brown/Espresso)
- Fine-tip paintbrush (if using liquid paint)
- Iron (for heat setting)
- Pressing cloth or parchment paper
- Cardboard insert for legs
- Pencil or disappearing fabric ink pen
Step 1: Preparation & Planning
-
Pre-wash the denim:
Before you begin, wash and dry your jeans without fabric softener. This removes factory sizing and ensures the paint adheres properly to the fibers. -
Insert barriers:
Cut pieces of cardboard to fit inside the legs of the pants. Slide them in to provide a smooth drawing surface and prevent ink from bleeding through to the back side. -
Sketch the layout:
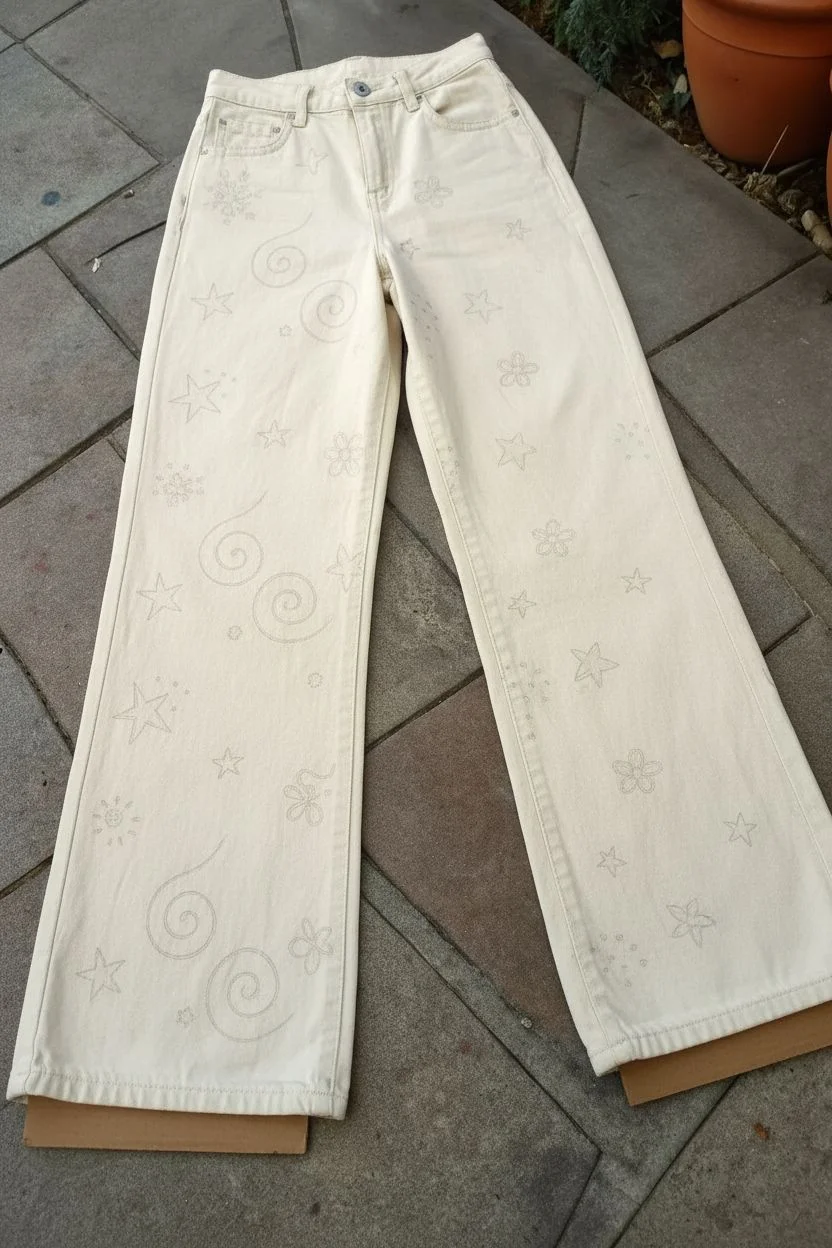
Using a pencil or disappearing ink pen, lightly sketch out your main motifs. Don’t worry about perfection; the charm of this style is its freehand feel.
Oops! Blotchy Lines?
If a fabric marker bleeds, turn the mistake into a solid shape. A messy star outline can easily become a bold, filled-in star with just a bit more ink.
Step 2: Drawing the Motifs
-
Create the side seams:
Start by defining the outer structure. Draw a dotted line running vertically down the outer side seam of both legs using the rust-red color. -
Outline the stars:
Draw various sizes of five-pointed stars scattered across the legs. Use the rust-red shade for the outlines. -
Fill the stars:
Inside the larger stars, add a smaller star shape or simple hatching lines to give them dimension. -
Add the swirls:
Draw large, loose spirals in open spaces. Keep the line weight consistent with the stars, using the same rust-red tone. -
Draw flower outlines:
Switch to your dark brown color. Draw simple five-petal flower outlines scattered between the red motifs. -
Detail the flowers:
Add a small center dot to each brown flower. For variety, you can color in some petals or leave them open. -
Add solid stars:
Using the rust-red paint, fill in a few small solid stars completely. This adds visual weight and contrast to the line drawings.
Step 3: Finer Details
-
Draw star clusters:
Create clusters of tiny dots or mini-stars near the larger motifs. Think of these as ‘sparkles’ or constellation dust. -
Embellish the pockets:
Continue the dotted line pattern along the curve of the front pockets. Add a small star or swirl near the pocket rivet. -
Create doodles:
In large empty spaces, add small, scribbly doodle clusters or abstract floral shapes using a very fine tip or pen. -
Add hem details:
Finish the bottom edge by adding a row of dots or small dashes just above the hem stitching. -
Check for balance:
Step back and look at the jeans from a distance. If any area looks too empty, add a small spiral or a tiny star to balance the composition.
Pro Tip: Vary the Scale
To keep the design dynamic, ensure you have three distinct sizes of motifs: large focal points (swirls), medium fillers (stars), and tiny details (dots).
Step 4: Finishing Up
-
Let it dry completely:
Allow the paint to air dry for at least 24 hours. I usually leave mine overnight just to be safe. -
Heat set the design:
Turn the jeans inside out or place a pressing cloth over the painted areas. Iron on a cotton setting (no steam) for 3-5 minutes per section to lock in the color.
Now you have a custom pair of doodle denim ready for your next casual outing
BRUSH GUIDE
The Right Brush for Every Stroke
From clean lines to bold texture — master brush choice, stroke control, and essential techniques.
Explore the Full Guide
Butterfly Trail Across the Calf
Transform a plain pair of white trousers into a fluttering garden scene with this delicate butterfly trail design. The artwork features a vertical vine climbing down the leg, adorned with butterflies in varying sizes and shades of blue, orange, and red.
Step-by-Step
Materials
- White or light-colored linen/cotton pants
- Fabric medium
- Acrylic craft paints (Deep Blue, Sky Blue, Orange, Red, White, Black, Green)
- Fine liner paintbrush (size 0 or 00)
- Small flat shader brush (size 2 or 4)
- Fabric marking pen or pencil (washable)
- Cardboard insert
- Reference images of butterflies
- Iron (for heat setting)
Step 1: Preparation & Sketching
-
Prep the fabric:
Begin by washing and drying your pants without fabric softener to ensure the paint adheres properly. Iron them smooth to create a flat canvas. -
Protect the layers:
Insert a piece of cardboard or thick cardstock inside the pant leg. This is crucial to prevent paint from bleeding through to the back side of the leg. -
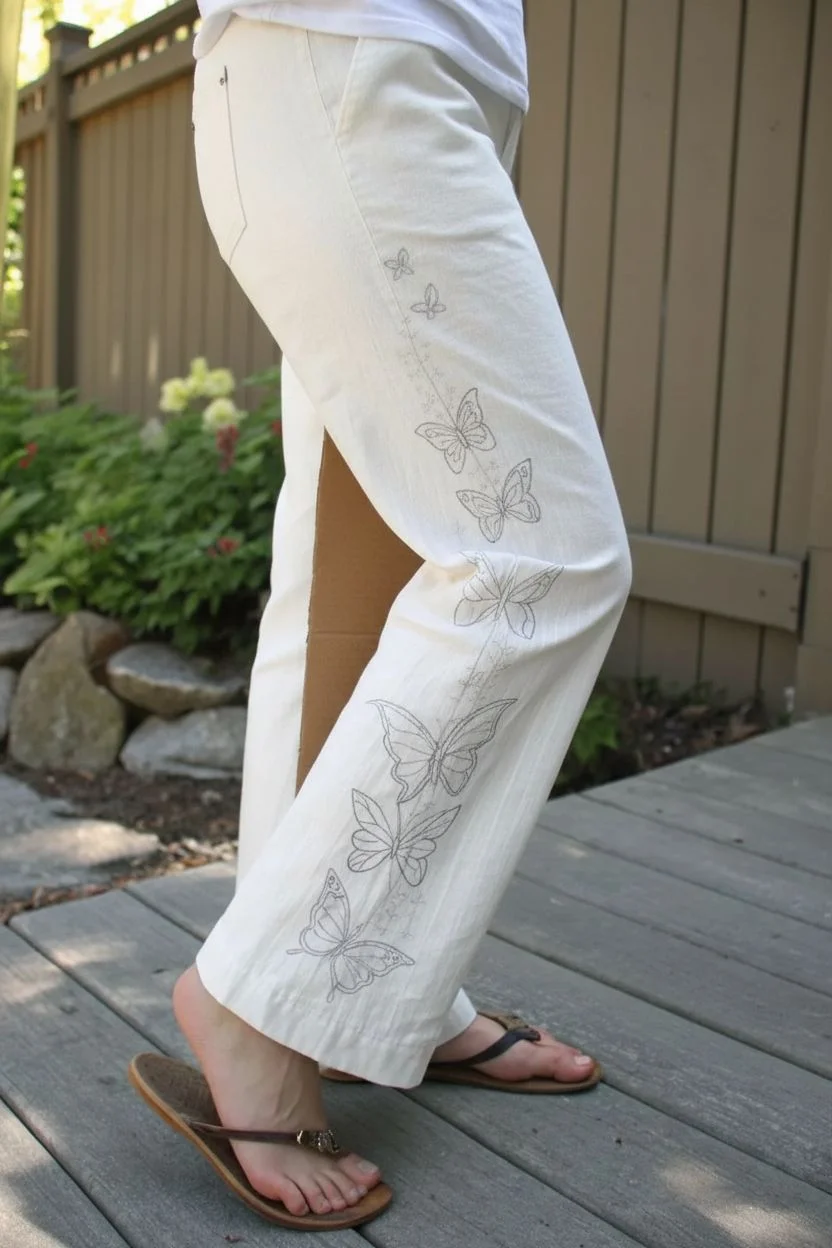
Draft the vine:
Using your washable fabric pen, lightly sketch a meandering vertical line starting from just below the hip pocket down towards the hem. Add small branching offshoots where the butterflies will rest. -
Map out butterflies:
Sketch the outlines of about 6-8 butterflies along your vine. Vary their sizes and orientation—have some facing upwards and others angling down to create movement.
Step 2: Painting the Butterflies
-
Mix your medium:
Mix your acrylic paints with fabric medium according to the bottle instructions (usually a 2:1 ratio of paint to medium). This keeps the design soft and flexible. -
Base coat the wings:
Starting with the large butterfly near the knee, use your small flat brush to fill in the wings with solid colors. Use orange for the Monarch-style ones and deep blue for the others. -
Create gradients:
While the base coat is still slightly wet, blend a tiny bit of white into the center of the blue wings or yellow into the orange wings to create a subtle highlight effect. -
Paint smaller motifs:
Move up and down the leg, filling in the smaller butterflies. I like to use a solid red for the medium-sized ones and a lighter sky blue for the tiny ones near the top and bottom. -
Let it set:
Allow these base colors to dry completely before adding any details. This prevents the black outline from turning muddy.
Smooth Moves
If your brush drags on the fabric texture, dampen the fabric slightly with a spray mist bottle. This helps the paint glide into the weave better.
Step 3: Detailing & Vine Work
-
Outline wings:
Switch to your fine liner brush and black paint mixed with medium. Carefully outline the wings of each butterfly. -
Add wing veins:
Paint delicate internal lines within the wings to represent veins. For the Monarchs, create the classic stained-glass webbing pattern. -
Dotted details:
Dip the very tip of your brush handle or a toothpick into white paint. Add tiny dots along the black edges of the butterfly wings for a realistic touch. -
Trace the vine:
Using a very thinned-down green or teal paint and your liner brush, trace over your initial vine sketch. Keep the line extremely thin and delicate. -
Add floral buds:
Paint tiny ticks and small buds along the vine using blue or green. These shouldn’t be full leaves, but rather suggestive botanical textures. -
Final dry:
Let the pants dry for at least 24 hours. Once fully dry, heat set the design by ironing on the reverse side (or use a pressing cloth) for 3-5 minutes to make it permanent.
Metallic Magic
Mix a drop of metallic gold or silver fabric paint into your wing colors for a subtle shimmer that catches the sunlight as you walk.
Wear your new fluttering masterpiece with pride and enjoy the artistic flair it adds to your outfit
Galaxy Gradient Wash


Transform standard light-wash jeans into a dreamy night sky with this stunning three-tone gradient effect. By blending purple and deep blue fabric dyes, you’ll create a seamless sunset fade on the legs, finished with hand-painted twinkling stars.
Step-by-Step Guide
Materials
- Light wash denim jeans (100% cotton preferred)
- Purple fabric dye (liquid or powder)
- Navy or Midnight Blue fabric dye
- Large plastic tub or bucket
- Rubber gloves
- White fabric paint
- Fine detail paintbrush (size 0 or great for dots)
- Flat paintbrush (size 2-4 for stars)
- Sponge brush or scrap fabric (for blending)
- Plastic drop cloth or garbage bags
- Salt and dish soap (if required by your dye brand)
Step 1: Preparing the Gradient Base
-
Pre-wash preparation:
Begin by washing your jeans without fabric softener to remove any sizing or finishes that might repel the dye. Leave them damp, as this helps the color wick upwards for a smoother gradient. -
Setup your workspace:
Cover your work area with plastic drop cloths. This project can get messy, and you’ll want plenty of space to lay the pants flat during the painting phase. -
Mix the purple dye:
In your bucket or tub, mix the purple fabric dye with hot water according to the package instructions. Add salt or dish soap if the manufacturer recommends it for cotton. -
The first dip:
Holding the jeans by the waistband, lower them into the purple dye bath. Stop when the dye level reaches just below the crotch area. Hold them there for about 5-10 minutes to saturate the fabric. -
Create the fade:
Slowly lift the jeans out of the dye bath about an inch every few minutes. This gradual removal prevents harsh lines and creates a soft transition where the purple meets the light blue denim. -
Rinse the purple:
Carefully rinse the bottom half of the jeans with cool water until it runs mostly clear, being careful not to splash purple dye onto the upper light blue section.
Soften The Blend
Keep a spray bottle of water handy during the dyeing process. Lightly misting the fabric just above the dye line encourages the color to bleed upward naturally, creating a buttery smooth fade.
Step 2: Deepening the Night Sky
-
Mix the dark blue dye:
Prepare a fresh dye bath with the Navy or Midnight Blue color. Make this solution concentrated for a rich, deep color. -
The second dip:
Lower the jeans into the dark blue dye, but only submerge the bottom third of the legs (from the calf down). You want to leave the purple section visible above this new dark layer. -
Blend the transition:
While the bottoms are soaking, use a sponge brush or a piece of scrap fabric dipped in the dark dye to gently dab the area where the blue meets the purple. I find this manual blending helps merge the two colors more naturally than dipping alone. -
Soak for depth:
Leave the bottom hem submerged for at least 15-20 minutes. The hems should look almost black when wet to achieve that deep midnight blue when dry. -
Final rinse and dry:
Rinse the bottoms with cool water until clear. Wash the entire pair of pants on a gentle cycle with mild detergent to set the gradient, then dry them completely.
Dye Not Taking?
If your denim has a high synthetic content (polyester blends), standard dyes won’t work well. Check the label first and use a synthetic-specific dye formula if cotton is less than 60%.
Step 3: Painting the Stars
-
Prepare the painting surface:
Lay the dried jeans flat on a hard surface. Insert a piece of cardboard inside the pant legs to prevent paint from bleeding through to the back side. -
Map out the constellations:
Dip your fine detail brush into white fabric paint. Start by placing random tiny dots concentrated at the very bottom hem, scattering them more sparsely as you move up into the purple section. -
Create main stars:
choose 3-5 spots on each leg to paint larger ‘hero’ stars. Using the flat brush, paint a simple cross shape first: a vertical line intersected by a horizontal line of equal length. -
Add star flare:
To make the stars twinkle, curve the inner corners of your cross inward, creating a four-pointed diamond shape. Extend the tips into sharp, thin points. -
Vary the sizes:
Paint a few smaller, four-pointed stars using just the detail brush. Varying the size of your stars creates depth and makes the galaxy look more realistic. -
Set the paint:
Allow the white paint to dry for at least 4 hours. Once dry, follow your fabric paint’s instructions for heat setting—usually ironing on the reverse side for a few minutes.
Wear your new galaxy jeans with pride and enjoy the starry compliments coming your way

PENCIL GUIDE
Understanding Pencil Grades from H to B
From first sketch to finished drawing — learn pencil grades, line control, and shading techniques.
Explore the Full Guide
Fruit and Garden Vines

Transform a plain pair of cream or white jeans into a wearable garden with this delicate vine design. The climbing foliage and scattered marigold blooms create an elegant, organic look that feels custom-made for sunny days.
Step-by-Step Tutorial
Materials
- Pair of light-colored denim jeans (cream, white, or light wash)
- Fabric medium
- Acrylic paints (Forest Green, Leaf Green, Golden Yellow, Orange, Burnt Sienna)
- Small round paintbrushes (sizes 0, 1, and 3)
- Fine liner brush (size 00 or 000)
- Air-erasable fabric pen or tailor’s chalk
- Cardboard or stiff paper (to insert into legs)
- Iron and pressing cloth
Step 1: Preparation & Sketching
-
Prep the canvas:
Begin by washing and drying your jeans without fabric softener to remove any sizing chemicals. This ensures the paint adheres properly to the fibers. -
Create a barrier:
Cut strips of cardboard to fit inside the pant legs. Slide them in carefully; this is crucial to prevent paint from bleeding through to the back of the leg. -
Plan the vine path:
Using your air-erasable pen, lightly sketch a meandering S-curve starting from the bottom hem of each leg. Let the line wander naturally up to about knee-height. -
Add pocket details:
Don’t forget the top! Sketch tiny sprigs or single berries peeking out from the front pocket seams for a cohesive look. -
Leaf placement:
Along your main vine lines, sketch small almond shapes for leaves. Vary their direction and grouping—sometimes single leaves, sometimes pairs—to keep it organic.
Pro Tip: Layering Greens
Don’t use just one shade of green! Mixing a dark ‘shadow’ green and a light ‘sun-hit’ green brings the flat drawing to life.
Step 2: Painting the Greenery
-
Mix your medium:
Mix your acrylic paints with fabric medium according to the bottle’s ratio (usually 2:1 paint to medium). This makes the paint flexible so it won’t crack when you walk. -
Outline the stems:
With your fine liner brush and Forest Green paint, carefully trace over your vine sketches. Keep the pressure light to maintain thin, delicate stems. -
Base coat the leaves:
Switch to a size 1 round brush. Fill in the leaf shapes with a mix of Forest Green and a touch of Leaf Green. I find painting from the stem outward creates a naturally tapered leaf tip. -
Add dimension:
While the green is still slightly wet, dip the very tip of your brush in lighter Leaf Green or even a dot of yellow. Blend this into one side of select leaves to create a highlight. -
Tiny tendrils:
Using the liner brush again, add tiny, curling tendrils coming off the main vine. These corkscrew shapes add movement and fill empty spaces nicely.
Step 3: Adding the Blooms
-
Base the flowers:
Identify spots near the bottom hem and scattered along the vine for your flowers. Paint small circles using Golden Yellow mixed with medium. -
Create texture:
Once the yellow base is dry, use a size 0 brush with Orange paint. Dab small stippling motions or tiny C-curves over the yellow to mimic the texture of marigolds. -
Detail the center:
Add a tiny dot of Burnt Sienna or dark orange in the very center of the flowers to give them depth. -
Pocket posies:
Paint the small details on the pockets using same techniques. You can add tiny orange dots to represent berries or buds near the waistline. -
Final leaf check:
Examine your work. Add a few extra leaves near the flowers to ground them to the stems.
Troubleshooting: Shaky Lines?
If your vine lines are shaky, widen the stem slightly in those areas or add a leaf directly over the wobble to hide it creatively.
Step 4: Finishing Touches
-
Let it cure:
Allow the pants to dry flat for at least 24 hours. Do not move the cardboard until the paint is dry to the touch. -
Set the paint:
Once fully dry, turn the jeans inside out. Place a pressing cloth over the painted areas and iron on a medium-high setting (no steam) for 3-5 minutes to heat-set the design.
Wear your new garden-inspired denim with pride, knowing you have a truly one-of-a-kind piece
Paint Around Rips and Tears
Transform a pair of light-wash denim into a vintage-inspired masterpiece by painting climbing floral vines that frame and accentuate the fabric’s natural distressing. This project features soft peach roses and reddish-orange buds winding elegantly around the legs, turning casual rips into intentional design elements.
How-To Guide
Materials
- Light wash denim jeans (vintage or mom-jean cut works best)
- Fabric medium
- Acrylic craft paints (Peach, Terracotta/Burnt Orange, Deep Green, Sage Green, Navy Blue, White, Cream)
- Small flat shader brush (size 4 or 6)
- Fine liner brush (size 0 or 00)
- Chalk or disappearing fabric pen
- Piece of cardboard or thick plastic barrier
Step 1: Preparation & Sketching
-
Prepare the surface:
Wash and dry your jeans without fabric softener to ensure the paint adheres properly to the fibers. Lay them flat on a hard surface and smooth out any deep wrinkles. -
Insert barriers:
Slip a piece of thick cardboard or a plastic sheet inside each pant leg. This is crucial to prevent paint from seeping through to the back of the leg. -
Plan the composition:
Using your chalk or fabric pen, lightly sketch the main S-curve of the stems. On the left leg, start low near the shin and curve upward toward the thigh. On the right leg, focus the design around the knee rip, letting the vine peek out from beneath the distressed area. -
Mark the blooms:
Sketch circles where the main rose blossoms will sit—one large one on the left thigh and a couple near the right ankle. Add smaller ovals for the buds and quick lines for leaf placement.
Smooth Strokes Tip
If your paint feels sticky or drags on the denim, dip your brush tip in water before picking up paint. The denim texture is rough, so slightly thinner paint flows much better.
Step 2: Painting the Base Layers
-
Mix the paint:
Mix your acrylic paints with fabric medium according to the bottle’s ratio (usually 2 parts paint to 1 part medium). This makes the paint flexible so it won’t crack when you wear the jeans. -
Base coat the roses:
Starting with the large blooms, fill in the circular shapes with a mix of Cream and a tiny drop of Peach. Don’t worry about petals yet; just create a solid, opaque silhouette. -
Paint the leaves:
Use your flat brush to paint the leaves. Mix Deep Green with a touch of Navy Blue for the darker, shadowed leaves, and use Sage Green for the lighter ones. Use a single stroke, pressing down and lifting up to create a tapered leaf shape. -
Add the stems:
Switch to your liner brush. Using a brownish-green mix, trace over your initial stem lines. Keep the pressure light to maintain a thin, elegant vine, especially where it interacts with the rip on the right leg. -
Block in the buds:
Paint small, teardrop shapes using the Terracotta or Burnt Orange shade for the smaller scattered flowers. I like to group these in threes for a natural look.
Level Up: Faux Embroidery
To mimic the look of real embroidery, use short, directional brushstrokes for the fills instead of smooth blending. It creates a texture that looks like thread from a distance.
Step 3: Adding Detail & Dimension
-
Define the rose petals:
Once the cream base is dry, use a slightly darker Peach tone. Paint curved, C-shaped strokes inside the rose silhouettes to suggest overlapping petals. Start from the center and work outward. -
Deepen the shadows:
Mix a little Burnt Orange into your Peach. Reinforce the bottom edges of the petals to create depth, making the flower look three-dimensional rather than flat. -
Highlight the leaves:
Mix White with Sage Green. Add thin lines down the center of some leaves or along one edge to simulate light hitting the foliage. -
Outline for clarity:
Using your finest liner brush and a very dark Navy or thin Black, carefully outline the major elements. Use broken, organic lines rather than thick, continuous cartoons outlines to keep the vintage embroidery aesthetic. -
Add intricate veins:
With that same dark liner color, draw delicate veins inside the larger leaves and add tiny thorns or texture to the main stems. -
Detail the buds:
Add tiny sepals (the green leaves at the base of a flower bud) using your green mix at the bottom of the orange teardrop shapes.
Step 4: Finishing Touches
-
Check the rips:
Examine the area around the knee tear on the right leg. If the paint looks too disconnected, extend a small vine or leaf slightly ‘into’ the rip area (painting on the threads) so the design feels integrated. -
Final highlights:
Add tiny dots of pure White to the centers of the flowers and the tips of the brightest leaves for a glistening effect. -
Heat set:
Allow the design to dry for at least 24 hours. Once fully dry, place a thin cloth over the artwork and iron it on a medium-high setting (no steam) for 3-5 minutes to permanently set the paint.
Once heat-set, these custom painted jeans are ready to become your new favorite wardrobe staple, merging artistic flair with casual comfort.


Senior-Year Celebration Jeans
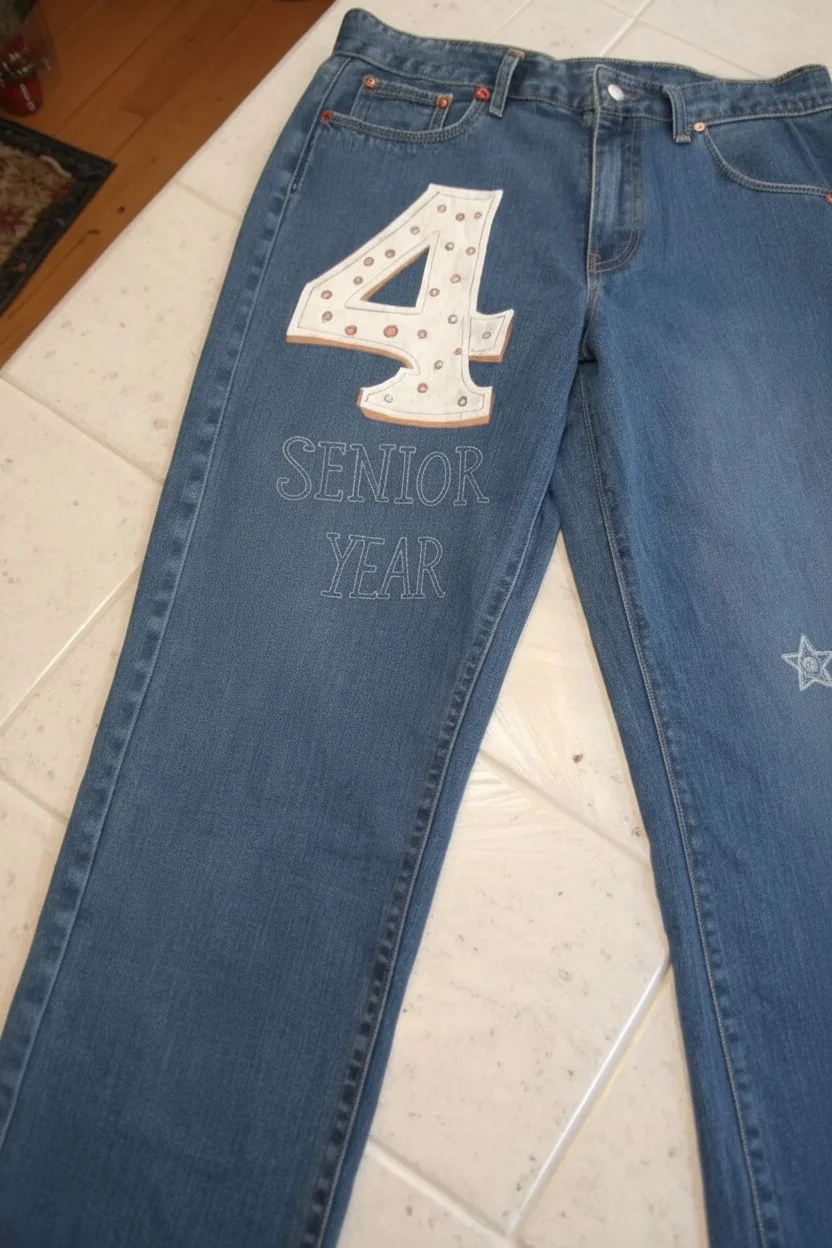
Capture the excitement of graduating with these custom-painted jeans featuring bold typography and whimsical botanical doodles. The design combines a classic collegiate font with playful hand-drawn elements for a personal keepsake you can wear.
Step-by-Step
Materials
- A pair of blue denim jeans
- Fabric paint (White, Red, Light Blue, Deep Yellow, Sage Green)
- Pencil or white chalk pencil
- Fine detail paintbrushes (sizes 0 and 00)
- Flat shader brush (size 4 or 6)
- Cardboard or cardstock insert
- Painter’s tape or stencil (optional)
- Iron and ironing cloth (for heat setting)
Step 1: Preparation and Base Design
-
Prep the surface:
Begin by washing and drying your jeans without fabric softener to ensure the paint adheres properly. Lay them flat on a table and insert a piece of thick cardboard inside the leg you will be painting to prevent bleed-through to the back. -
Sketch the layout:
Using a pencil or white chalk pencil, lightly sketch the large number ‘4’ on the upper thigh area. Below that, sketch out the words ‘SENIOR’ and ‘YEAR’ in a serif font. Don’t press too hard; you just need a faint guide. -
Outline the number:
Load a flat shader brush with white fabric paint. Carefully paint final outline of the ‘4’, creating a block-letter style. Fill in the center of the number with an even coat of white paint. You will likely need two or three coats for full opacity, letting each layer dry for about 15 minutes in between. -
Add dimension:
Once the white base is fully dry, use a fine detail brush and a mix of white with a tiny drop of brown or orange (to make a tan color) to paint a ‘shadow’ line along the bottom and left edges of the number, giving it a 3D effect. -
Detail the number:
Dip the handle end of a paintbrush into red or pink paint and dot it onto the white number to create a polka-dot pattern.
Clean Lines Hack
Mix your acrylics with a dedicated fabric medium rather than using straight paint. This helps the paint flow smoother for crisp lettering and prevents it from cracking later.
Step 2: Lettering and Main Elements
-
Paint the text:
Using your smallest detail brush (size 0 or 00) and white paint, carefully trace over your ‘SENIOR YEAR’ sketch. Keep the brush strokes vertical on the downstrokes to mimic the serif typeface shown in the photo. Take your time here to keep lines crisp. -
Add the heart:
Paint a small, solid red heart just below the text, slightly off-center to the right. Apply a second coat if the denim blue shows through. -
Create the large vine:
To the left of the text, paint a long, curving stem using a dull red or coral color. Add thin, pointed leaves branching off the stem, curving upward.
Make It 3D
Use ‘Puffy Paint’ or dimensional fabric paint for the dots on the number ‘4’ or the center of the flowers to add actual texture that pops off the denim.
Step 3: Floral Accents and Doodles
-
Draft lower doodles:
Moving down the leg, lightly sketch the positions for the remaining flowers, vines, and stars to ensure balanced spacing. -
Paint a white geometric flower:
Below the red heart, paint a five-petaled flower outline in white. Draw a line down the center of each petal. Add a small green dot in the center. -
Add the spiral:
Further down, use a golden-yellow or tan paint to create a loose spiral shape. Circle it with a thin outline in the same color. -
Create whimsical white vines:
Use your fine liner brush with white paint to draw free-flowing, squiggly vines near the bottom cuff. Add small loops or leaves along the vine for a playful look. -
Detailed branch work:
Paint a vertical branch with small leaves using a light blue or sage green paint. Keep these leaves simple and small. -
Add finishing stars:
Near the top pocket and the bottom hem, paint five-pointed stars. I like to paint the outline in white and sketch a smaller star inside it for a doodle effect. -
Small filler details:
Fill any large empty gaps with tiny design elements: small white teardrops, little red dots, or small circles to balance the composition.
Step 4: Finishing Touches
-
Clean up lines:
Look over the entire design. If any edges on the letters or the number ‘4’ look rough, use your smallest brush with a little bit of fresh paint to sharpen them up. -
Dry completely:
Let the pants sit undisturbed for at least 24 hours to allow the paint to cure completely. -
Heat set:
Turn the jeans inside out (or place a cloth over the design). Run a hot iron (no steam) over the painted areas for 3-5 minutes to permanently set the design into the fabric.
Now you have a unique pair of custom denim ready to wear for senior portraits or graduation week
Neon Pop on Dark Denim
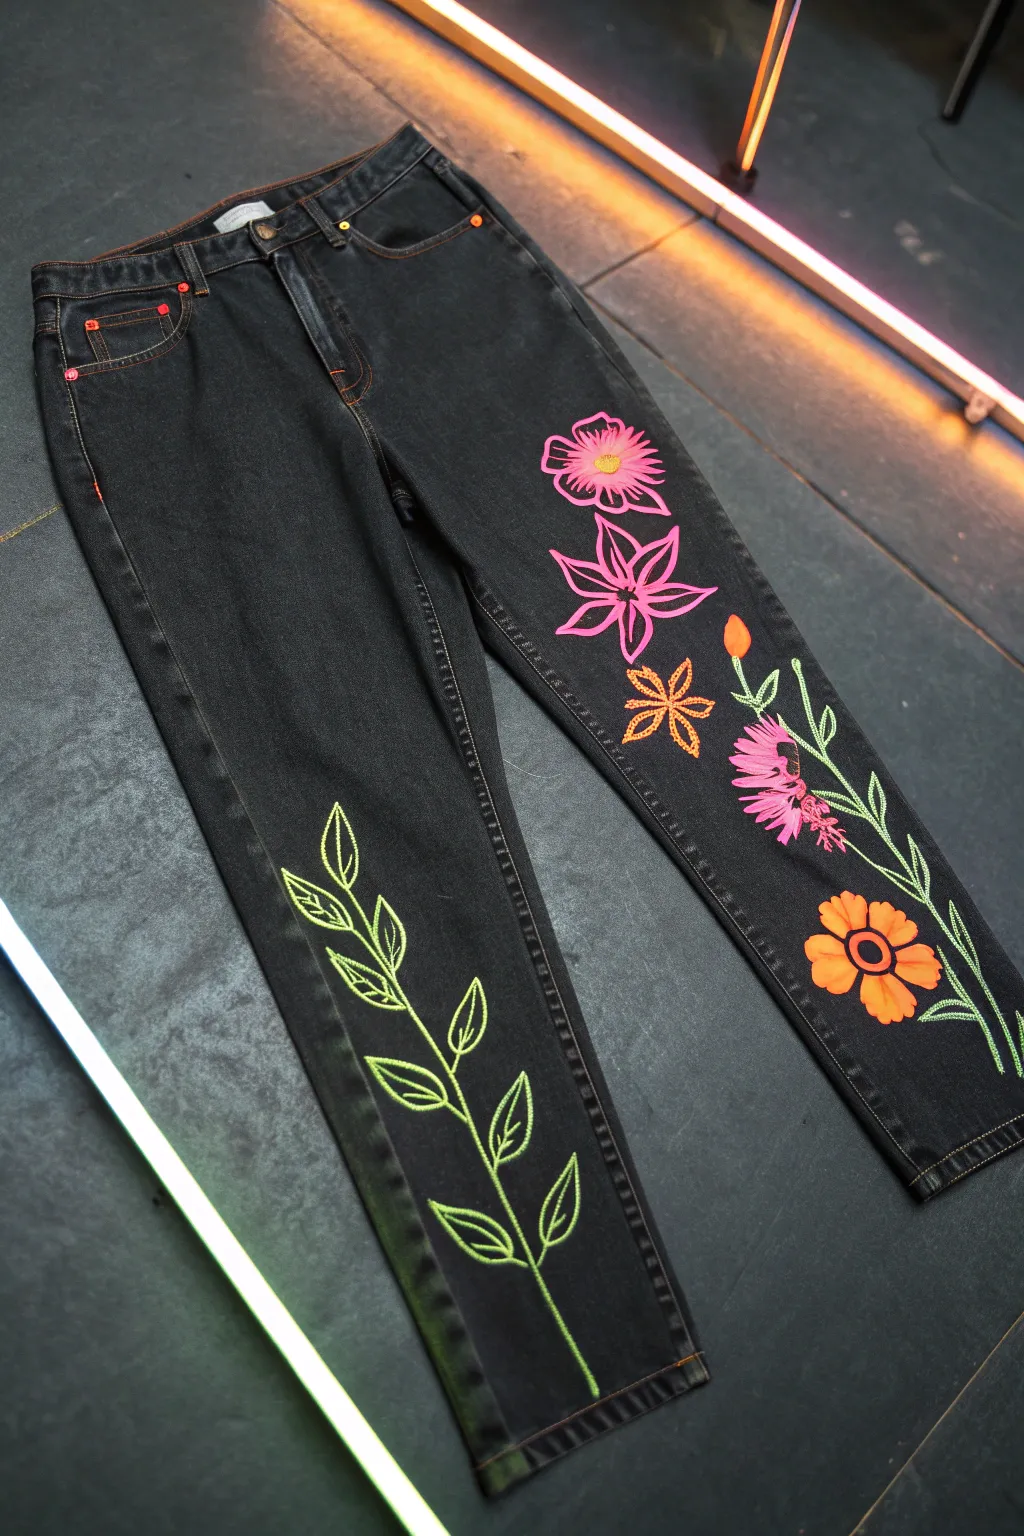
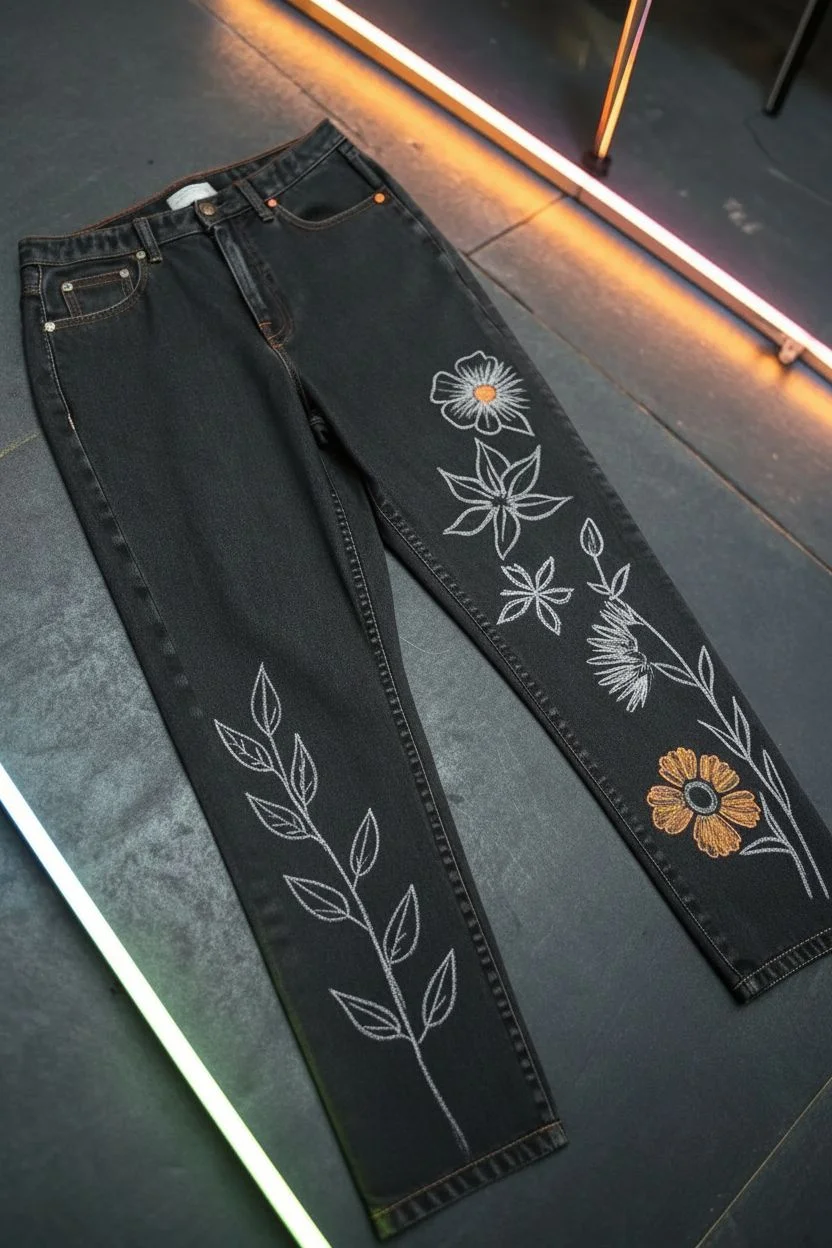
Transform a plain pair of black jeans into a wearable garden with this vibrant neon painting project. The contrast of electric pinks, oranges, and greens against the dark denim creates a striking, modern look perfect for festival season or casual wear.
Step-by-Step Guide
Materials
- Pair of black denim jeans (washed and dried)
- White fabric paint or gesso (for priming)
- Neon fabric paints (pink, orange, lime green)
- Fine liner brush (size 0 or 00)
- Small flat brush (size 2 or 4)
- Round brush (size 2)
- Chalk or white fabric pencil
- Cardboard or plastic barriers (for inside the legs)
- Iron (for heat setting)
Step 1: Preparation and Sketching
-
Prepare the workspace:
Lay your jeans flat on a solid surface. Insert pieces of cardboard or thick plastic inside each pant leg, positioning them directly under the thigh and shin areas where you plan to paint. This prevents paint from bleeding through to the back of the leg. -
Plan the composition:
Visualize the layout shown in the image: a climbing vine of leaves designated for the bottom half of the left leg, and a cascading floral arrangement starting from the upper thigh down to the shin on the right leg. -
Sketch the vine:
Using your chalk or white fabric pencil, lightly draw a long, slightly curved central stem up the left shin. Add pairs of leaf shapes extending outward, keeping the lines simple and botanical. -
Sketch the flowers:
On the right leg, sketch your floral cluster. Start high with a large, open-petaled flower, then drop down to a star-shaped lily, a small six-petaled blossom, and finally a large daisy-like bloom near the bottom. Connect them loosely with stems.
Paint Cracking?
If your paint feels too thick or stiff, mix a tiny drop of water or fabric medium into your acrylics. Thin layers are flexible; thick blobs will crack.
Step 2: Priming and Base Layers
-
Prime the shapes:
Because the denim is black, neon colors won’t pop without help. Use a small flat brush to paint a thin, solid layer of white fabric paint or gesso inside all your sketched flower and leaf shapes. Do not paint the stems yet. -
Let the primer set:
Allow this white base layer to dry completely. It should be dry to the touch before you add color, or else the neon will turn into a pastel mess. -
Review coverage:
If the black denim is still showing through the white significantly, I usually add a quick second coat of white to ensure the final colors are truly electric.
Step 3: Applying Neon Colors
-
Paint the green vine:
Load a round brush with neon lime green paint. Carefully trace over the white-primed leaves on the left leg. For the stems that you didn’t prime, go ahead and paint them directly with green now—the slightly darker green result adds nice depth. -
Add leaf details:
Once the green fill is dry, use a fine liner brush and the same green paint (or a slightly lighter shade) to draw the central vein and outline of each leaf to crisp up the edges. -
Color the top flowers:
On the right leg, paint the top two flowers using a bright neon pink. Use the flat brush to fill the petals smoothly, following the direction of the petal growth. -
Paint the accents:
Switch to neon orange for the small six-petaled flower in the middle and the large daisy at the bottom. Fill a small bud near the middle with orange as well. -
Add floral greenery:
Using your green paint and a liner brush, connect the flowers with thin stems and add the small leaves interspersed between the blooms.
Add UV Magic
Use specifically labeled UV-reactive acrylics for the top coat. Your design will look bright in daylight but will literally glow under blacklights at parties.
Step 4: Detailing and Finishing
-
Outline the petals:
To make the design graphic and bold, use a very fine liner brush to outline the pink and orange petals. You can use a slightly darker shade of their respective colors or a very thin black line if you want a cartoon effect, though self-colored outlines look best here. -
Add flower centers:
Paint the centers of the flowers. Use yellow or orange for the pink flowers, and a dark contrasting circle (like black or dark brown) for the orange daisy at the bottom. -
Refine the lines:
Check for any uneven edges. If you went outside the lines, you can carefully touch up with a tiny bit of black paint to blend it back into the denim. -
Dry completely:
Let the pants sit undisturbed for at least 24 hours to ensure the paint has cured fully. -
Heat set the design:
Turn the jeans inside out. Place a scrap cloth over the painted area (on the inside) and iron on a medium-high setting (no steam) for 3-5 minutes per section to seal the paint permanently.
Now you are ready to wear your custom denim art with pride


Have a question or want to share your own experience? I'd love to hear from you in the comments below!