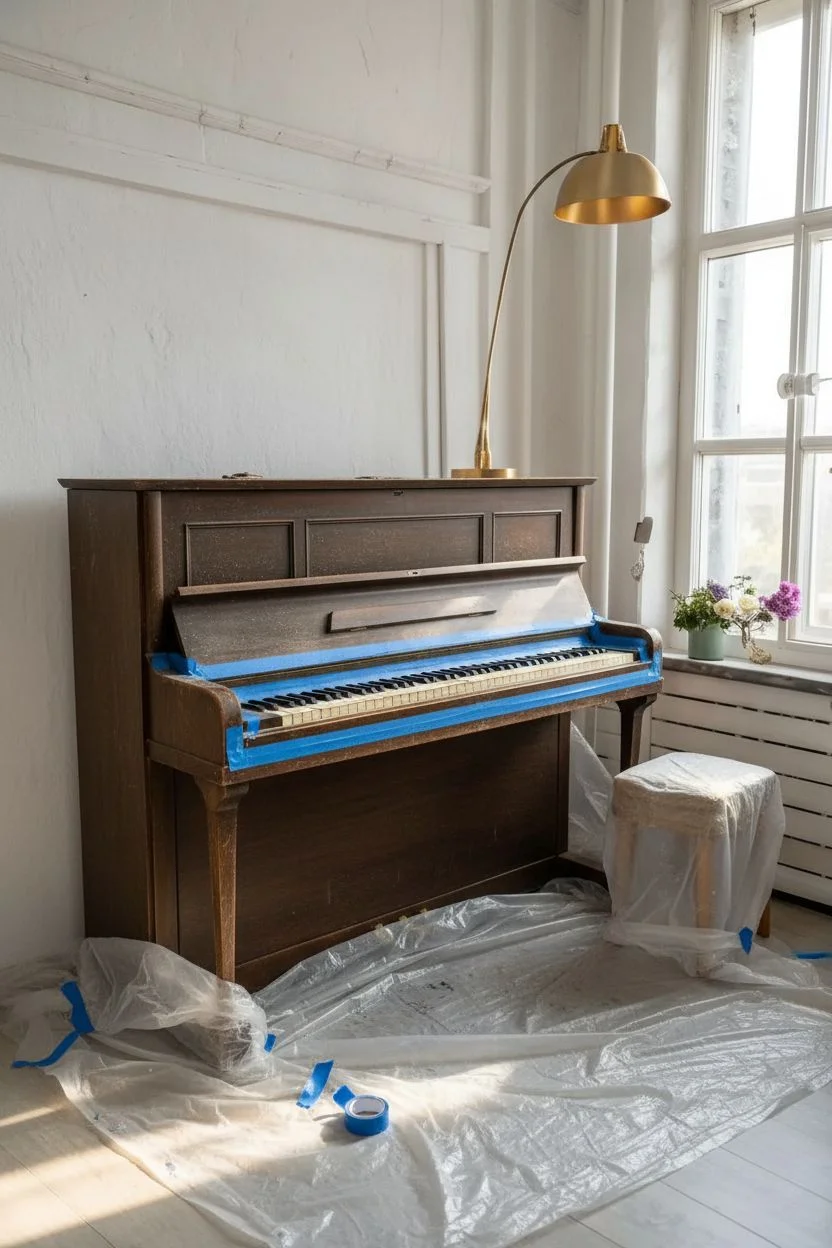
A painted piano can turn a heavy, dated instrument into a true statement piece that feels like it belongs in your space. Here are my favorite painted piano ideas—from classic, crowd-pleasing finishes to artsy, unexpected treatments that make your piano feel like functional artwork.
Classic Matte Black Makeover
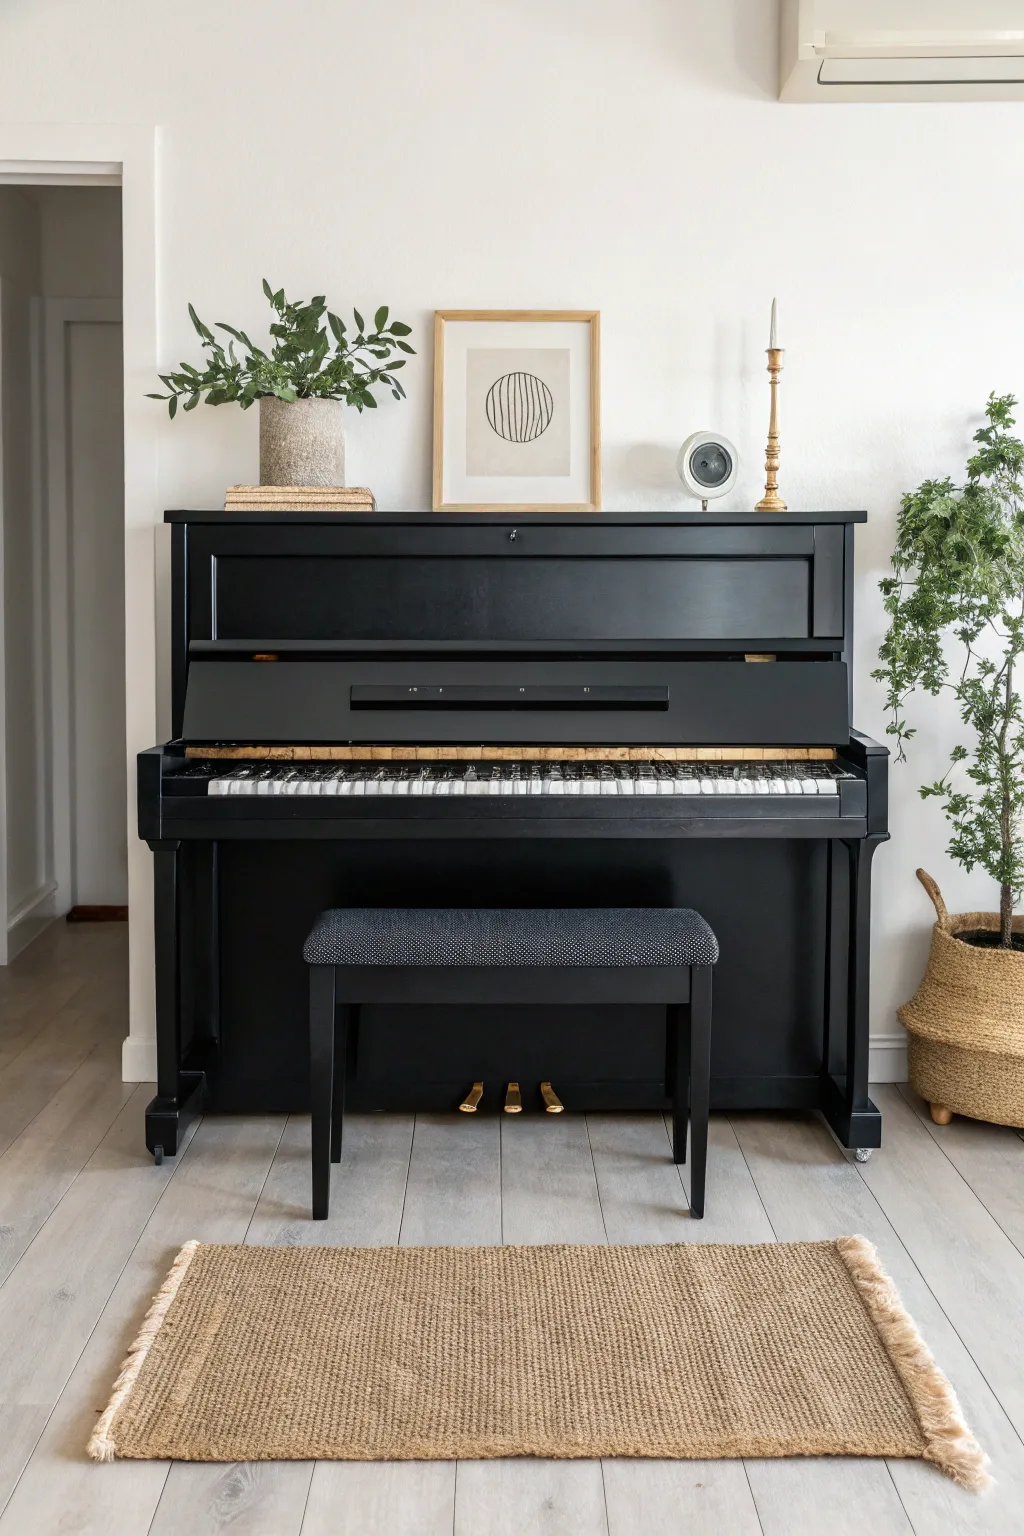
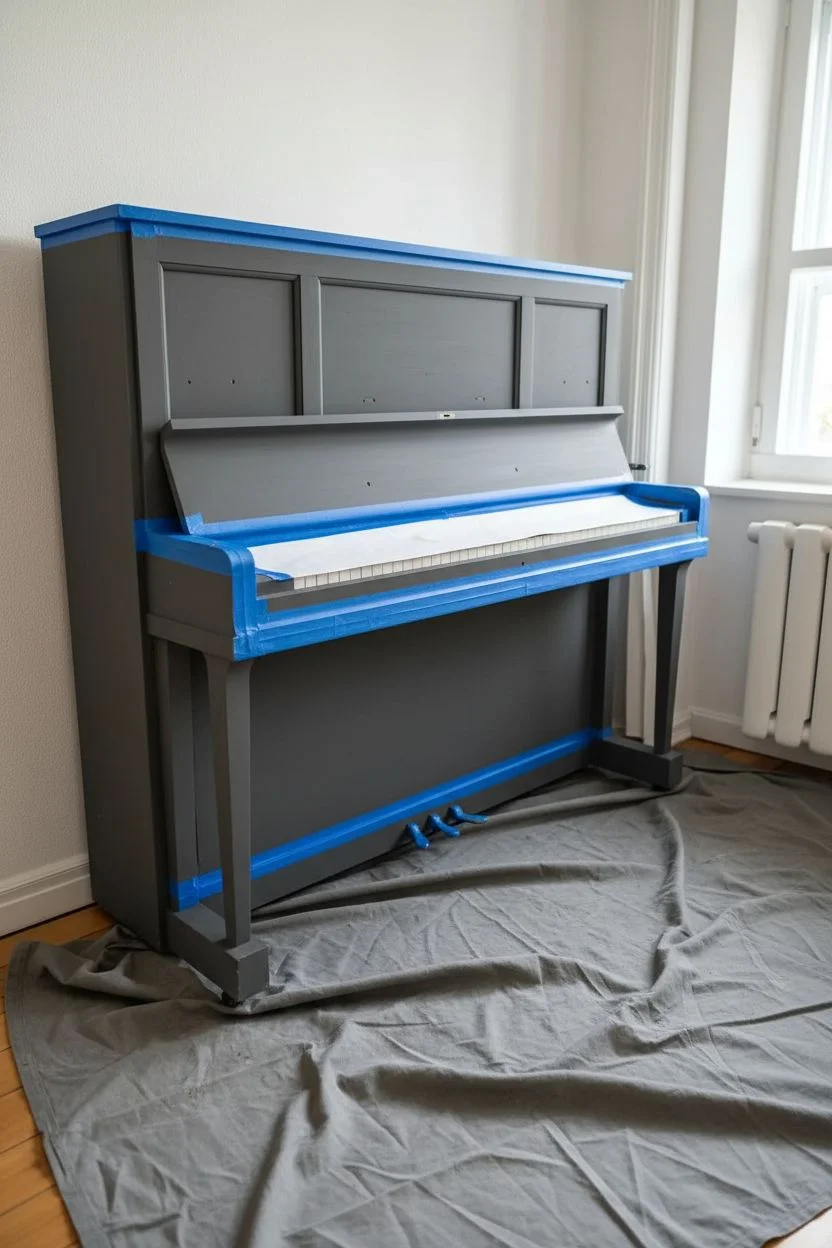
Give an old, dated piano a sophisticated new life with a sleek matte black finish that instantly modernizes any room. This classic makeover technique focuses on achieving a smooth, professional-looking surface that feels timeless rather than trendy.
Step-by-Step Guide
Materials
- TSP cleaner or degreaser
- Medium (120-grit) and fine (220-grit) sandpaper
- Tack cloth
- Painter’s tape
- Masking paper or plastic drop cloths
- High-quality bonding primer (oil-based recommended)
- Matte or satin black furniture paint (chalk paint or mineral paint works well)
- Polycrylic top coat (matte finish)
- 2-inch angled sash brush
- 4-inch foam roller or velour roller
- Screwdriver (for hardware removal)
- Wood filler (optional)
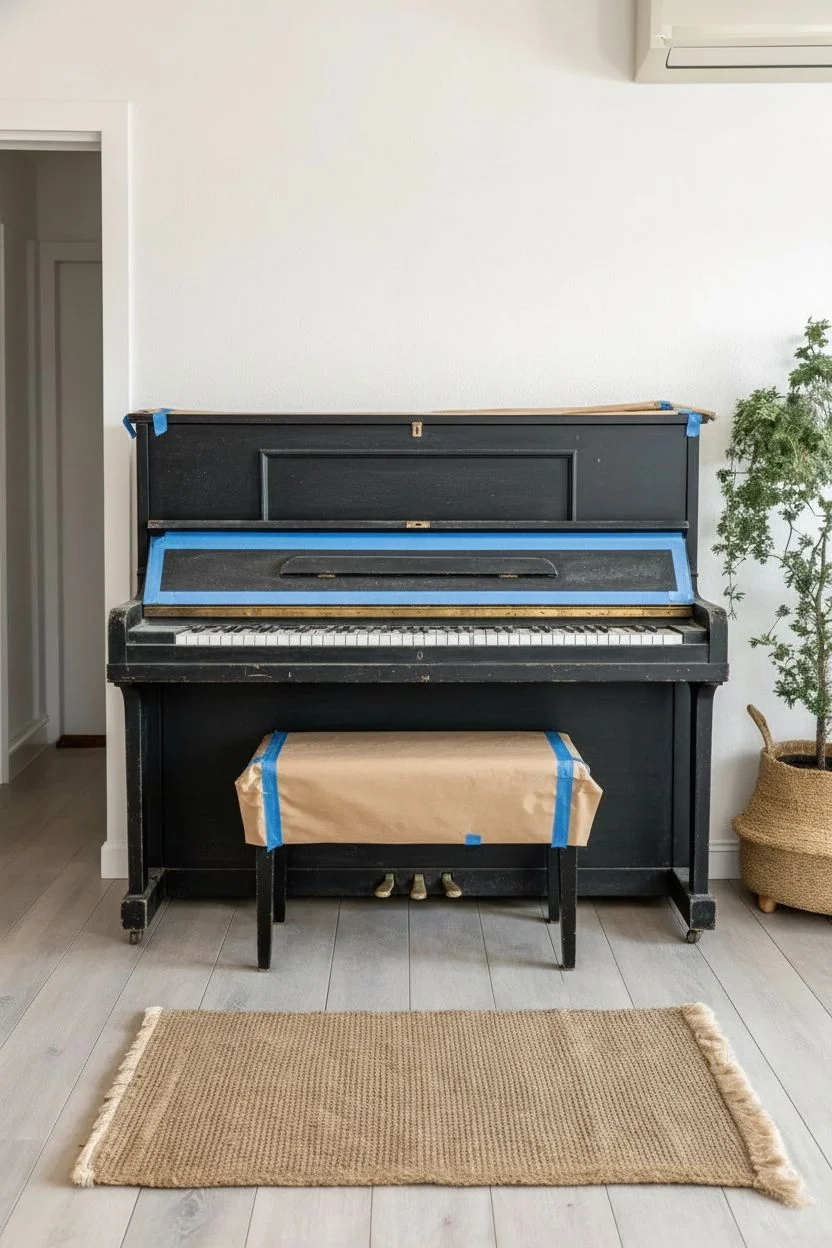
Step 1: Preparation
-
Clear and clean:
Begin by removing any music books or decor from the piano. Wipe down the entire surface with TSP cleaner or a strong degreaser to remove years of built-up oils, wax, and dust. Let it dry completely. -
Remove hardware:
Carefully unscrew and remove any accessible hardware, such as music stands or hinges if possible. If the pedals can be removed, take them off; otherwise, we’ll mask them later. -
Scuff sanding:
Using 120-grit sandpaper, lightly scuff sand the entire piano. You aren’t trying to strip the old finish, just creating ‘tooth’ for the primer to grip. Wipe away dust with a damp cloth. -
Fill imperfections:
Inspect the wood for deep scratches or gouges. Fill these with wood filler, let dry, and sand smooth with fine sandpaper. -
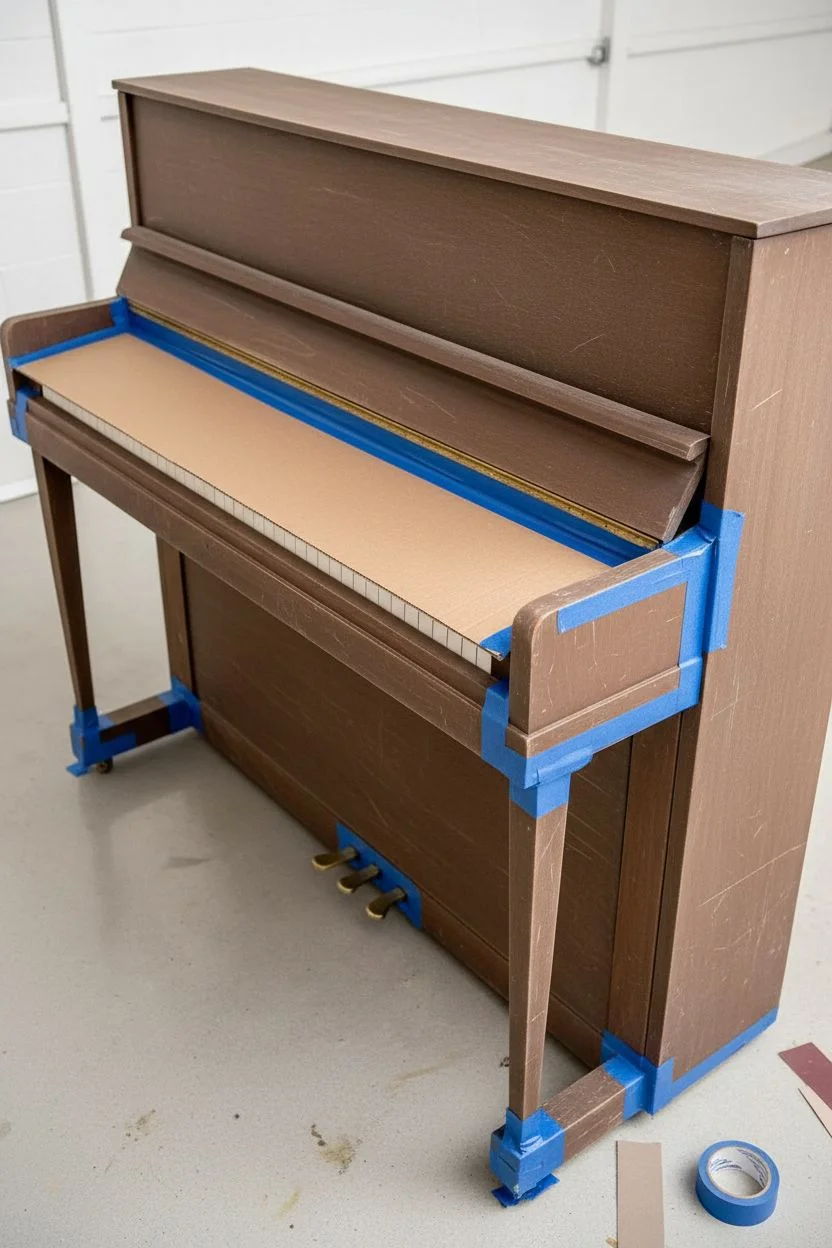
Masking off:
This is crucial: cover the keys completely with masking paper and painter’s tape. Don’t let tape touch the ivory surfaces directly if they are antique; instead, tape paper over them. Mask off the pedals and the brand logo if you wish to preserve it.
Sticky Keys?
If paint accidentally gets between keys, gently slide a razor blade or thin piece of cardstock between them to break the seal once dried.
Step 2: Priming
-
Apply primer:
Stir your bonding primer thoroughly. Using a roller for flat areas and a brush for corners, apply a thin coat of primer. I like to work from the top down to catch drips easily. -
Detail work:
Use your angled brush to get into the crevices around the keyboard and legs. Ensure no primer pools in these corners. -
Sand the primer:
Once the primer is fully dry (check the can’s instructions), lightly sand it with 220-grit paper. This ensures your final black coat will be incredibly smooth. Remove all dust with a tack cloth.
Step 3: Painting
-
First coat of black:
Pour your matte black paint into a tray. Load your foam roller and apply the first coat to the large, flat panels. Use long, even strokes to avoid start-and-stop marks. -
Brushing edges:
Immediately smooth out any roller texture with your brush if necessary, and paint the detailed areas like legs and trim. Keep a ‘wet edge’ to blend brush and roller marks seamlessly. -
Evaluating coverage:
Let this coat dry completely. Don’t panic if it looks streaky; black paint often needs multiple thin layers for true depth. -
Second coat:
Apply a second coat using the same method. A third coat might be necessary depending on the paint’s opacity. Lightly sanding with very fine paper between coats can help achieve a factory-like finish. -
The bench:
Don’t forget the bench! Repeat the cleaning, priming, and painting steps on the wooden legs of the piano bench to match.
Modern Styling
Swap out the original fabric on the bench seat for a textured charcoal or dark patterned upholstery to complement the matte black vibe.
Step 4: Finishing Touches
-
Sealing the paint:
Once the black paint has cured for at least 24 hours, apply a matte polycrylic topcoat. This protects the finish from fingerprints and scratches without adding unwanted shine. Use a clean brush and apply very thin layers. -
Hardware refresh:
While the sealer dries, polish the brass pedals using a metal polish like Brasso to make them shine against the dark paint. -
Reassembly:
Carefully remove all masking tape and paper. Reattach any hardware you removed. Wait a few days before placing heavy objects back on top.
Enjoy the dramatic elegance your newly painted piano brings to your space.


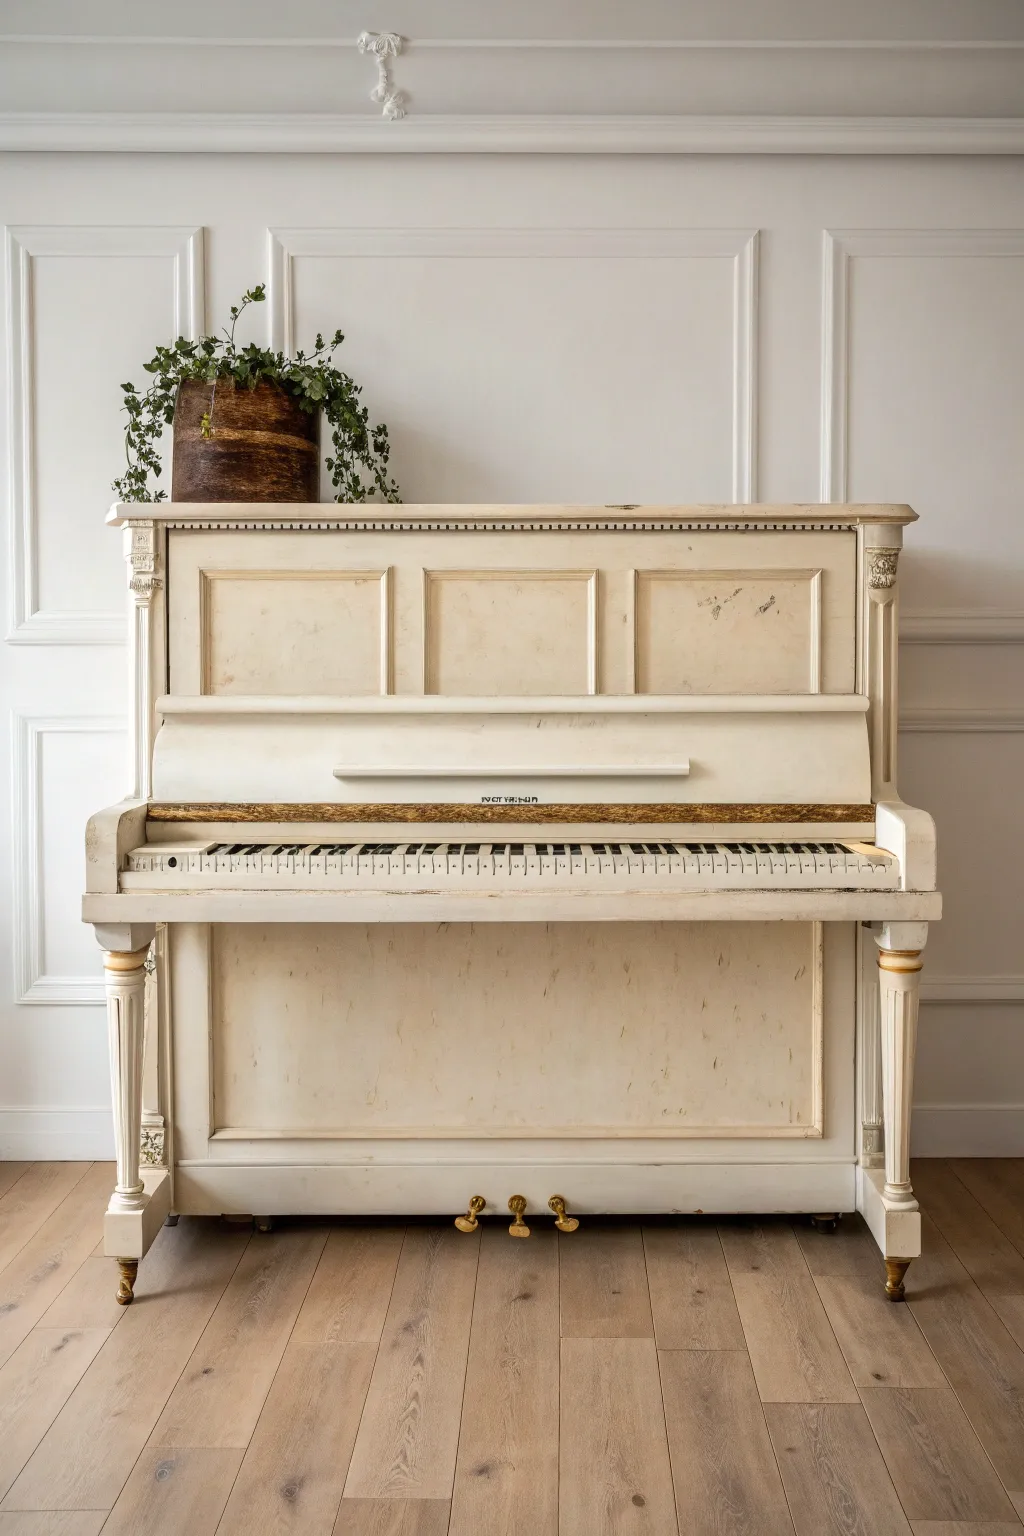
Soft White for an Airy Look
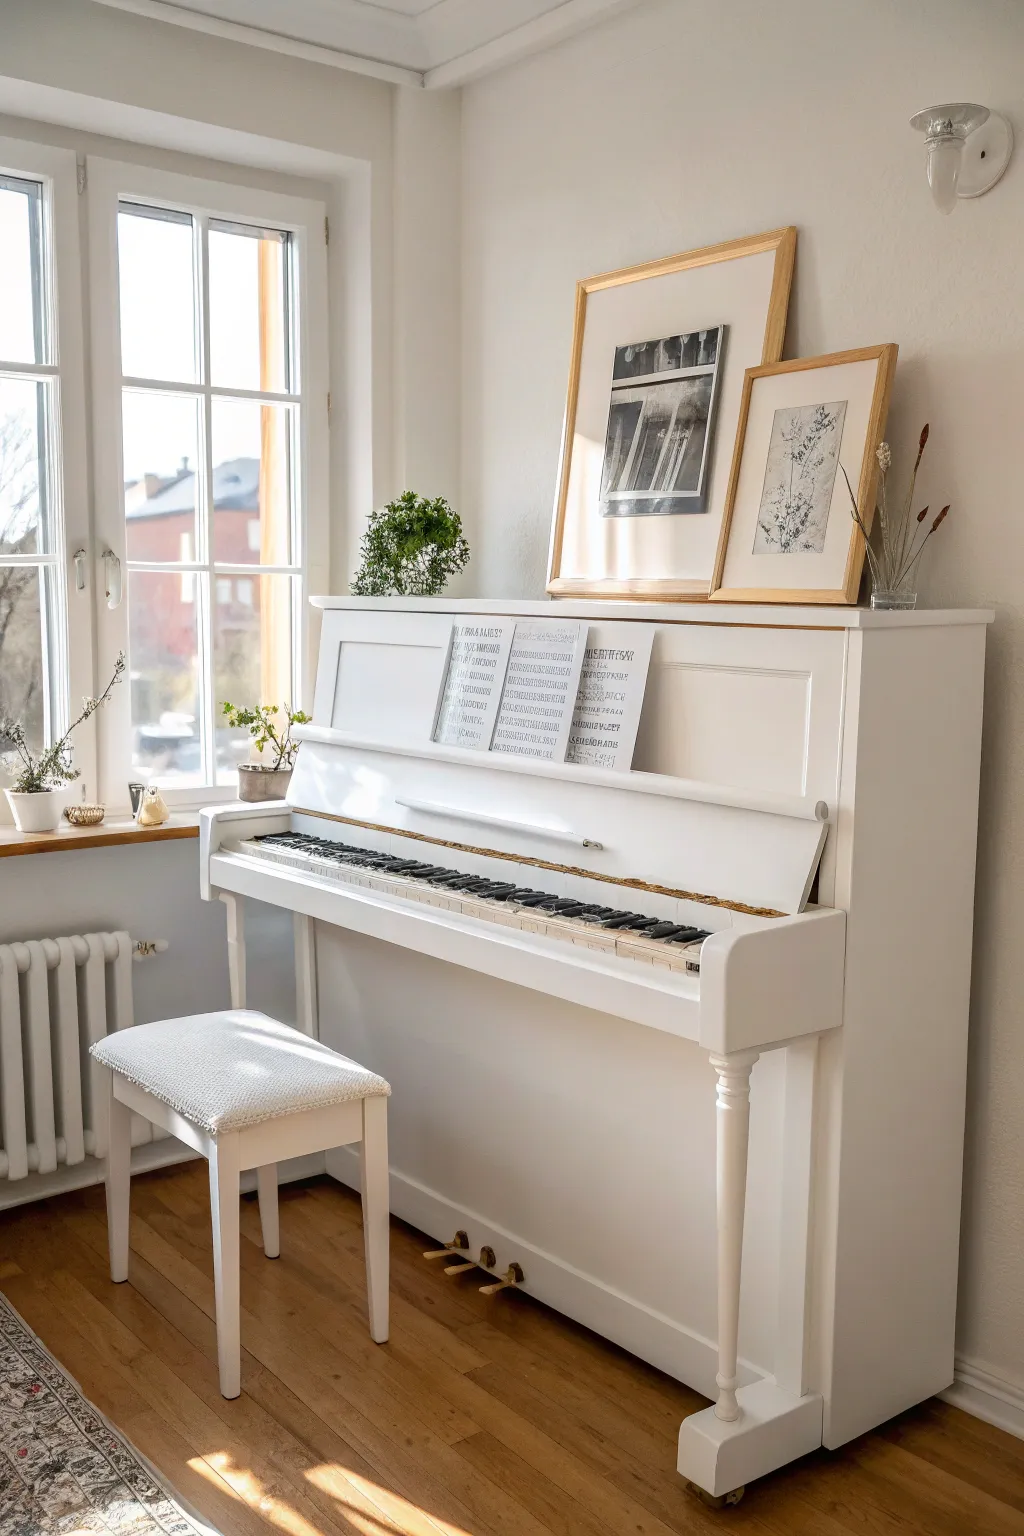
Transform a dark, heavy piano into a light and airy centerpiece with this soft white finish. This project creates a clean, matte look that brightens up any room while maintaining the instrument’s classic charm.
Step-by-Step Tutorial
Materials
- Upright piano (clean and functional)
- TSP substitute cleaner or degreaser
- Medium grit sandpaper (120-150 grit)
- Fine grit sandpaper (220 grit)
- Painter’s tape (high quality)
- Plastic drop cloths
- Bonding primer (e.g., Zinsser BIN or similar shellac-based)
- Chalk paint or Mineral paint in Soft White
- Clear furniture wax or matte polycrylic topcoat
- High-quality synthetic bristle brush (2-inch)
- Small artist brush or angled sash brush
- Lint-free rags
- Screwdriver set
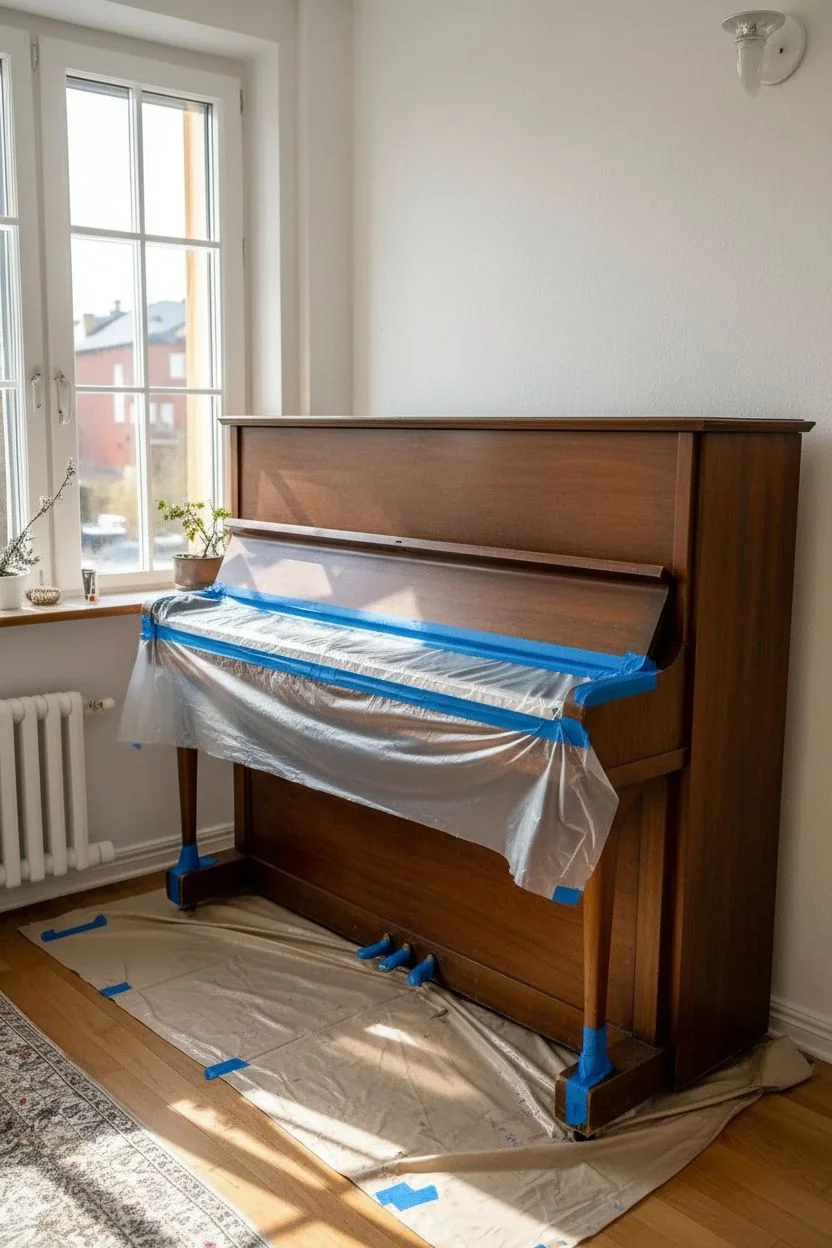
Step 1: Preparation and Cleaning
-
Clear the area:
Move the piano away from the wall if possible and lay down plastic drop cloths to protect your flooring. It’s best to have access to the back, though not strictly necessary if you aren’t painting it. -
Remove hardware:
Using a screwdriver, carefully remove any removable parts such as the music desk, the fallboard (the cover over the keys), and the lower front panel. Bag the screws and hardware so they don’t get lost. -
protect the keys:
This is crucial. Press down on the keys and run a strip of painter’s tape along the very back edge where the keys disappear into the piano body. Then, tape plastic over the entire keyboard to completely seal it off from dust and paint drips. -
Tape the pedals:
Wrap the brass pedals completely in painter’s tape to keep them shiny and paint-free. -
Clean thoroughly:
Wipe down the entire wood surface with a TSP substitute or strong degreaser. Old pianos often have layers of furniture polish or wax that will prevent paint from sticking.
Step 2: Sanding and Priming
-
Scuff sand:
Lightly sand all surfaces with medium-grit sandpaper. You aren’t trying to strip the finish, just roughening the glossy varnish to give the primer something to grip. Wipe away all dust with a damp rag. -
Apply primer – coat one:
Brush on a coat of high-quality bonding primer. Shellac-based primers are excellent here because they block wood tannins from bleeding through the white paint later. -
Check for bleed-through:
Allow the primer to dry completely. If you see pink or yellow spots appearing, apply a second coat of primer to those specific areas until the stain is blocked. -
Light sanding:
Once the primer is fully cured, run fine-grit sandpaper over the surface to smooth out any brush strokes, then wipe away the dust.
Bleed-through Blues?
If reddish stains persist after priming, switch to a spray shellac just for those spots. It creates a harder seal than brush-on primer and stops stubborn tannins.
Step 3: Painting and Sealing
-
First coat of white:
Stir your soft white chalk or mineral paint thoroughly. Apply a thin, even coat using a synthetic brush. Paint in the direction of the wood grain. -
Watch the edges:
Use a smaller angled brush or an artist brush to get into tricky corners, like around the key bed and decorative moulding, ensuring you don’t glob paint in the crevices. -
Dry and repeat:
Let the first coat dry according to the manufacturer’s instructions. Apply a second coat for full opacity. I find that white often needs a light third coat to look truly solid and rich. -
Distressing (optional):
If you want a slightly aged look, gently sand the edges and raised details with fine sandpaper to reveal a bit of the wood underneath. For the pristine look in the photo, skip this step. -
Apply wax or topcoat:
To seal chalk paint, massage clear furniture wax into the surface with a lint-free cloth or a wax brush. Work in small sections, wiping off excess as you go. -
Buff the finish:
Once the wax has hazed over (usually 15-20 minutes), buff it vigorously with a clean cloth to create a soft, durable sheen. -
Reassemble:
Carefully remove the tape from the keys and pedals. Reattach the music desk, fallboard, and any other panels you removed giving your new bright piano its final form.
Matching Bench Upgrade
Don’t forget the bench! Paint the legs to match the piano, but recover the seat cushion in a textured linen or boucle fabric to mirror the cozy, airy vibe.
Enjoy the fresh, modern energy your newly painted piano brings to your home


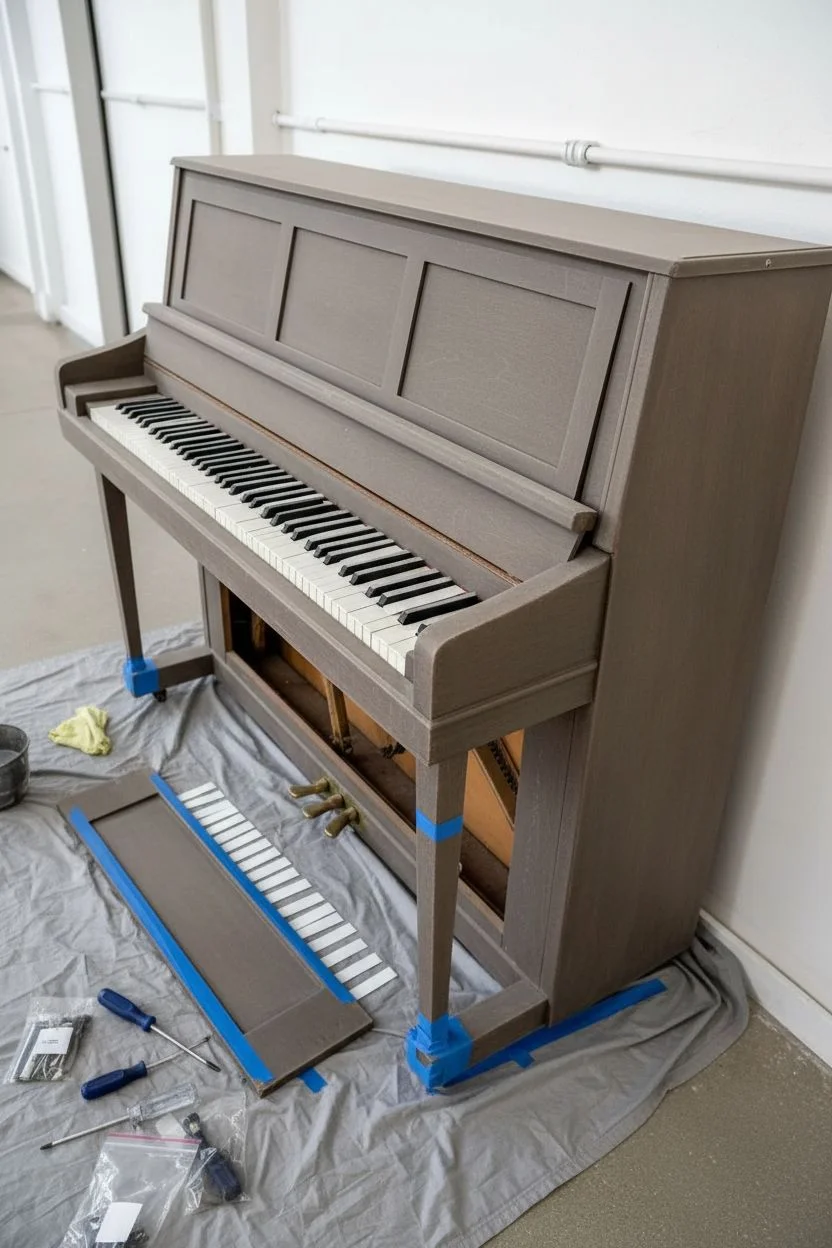
Warm Greige to Blend Into Decor
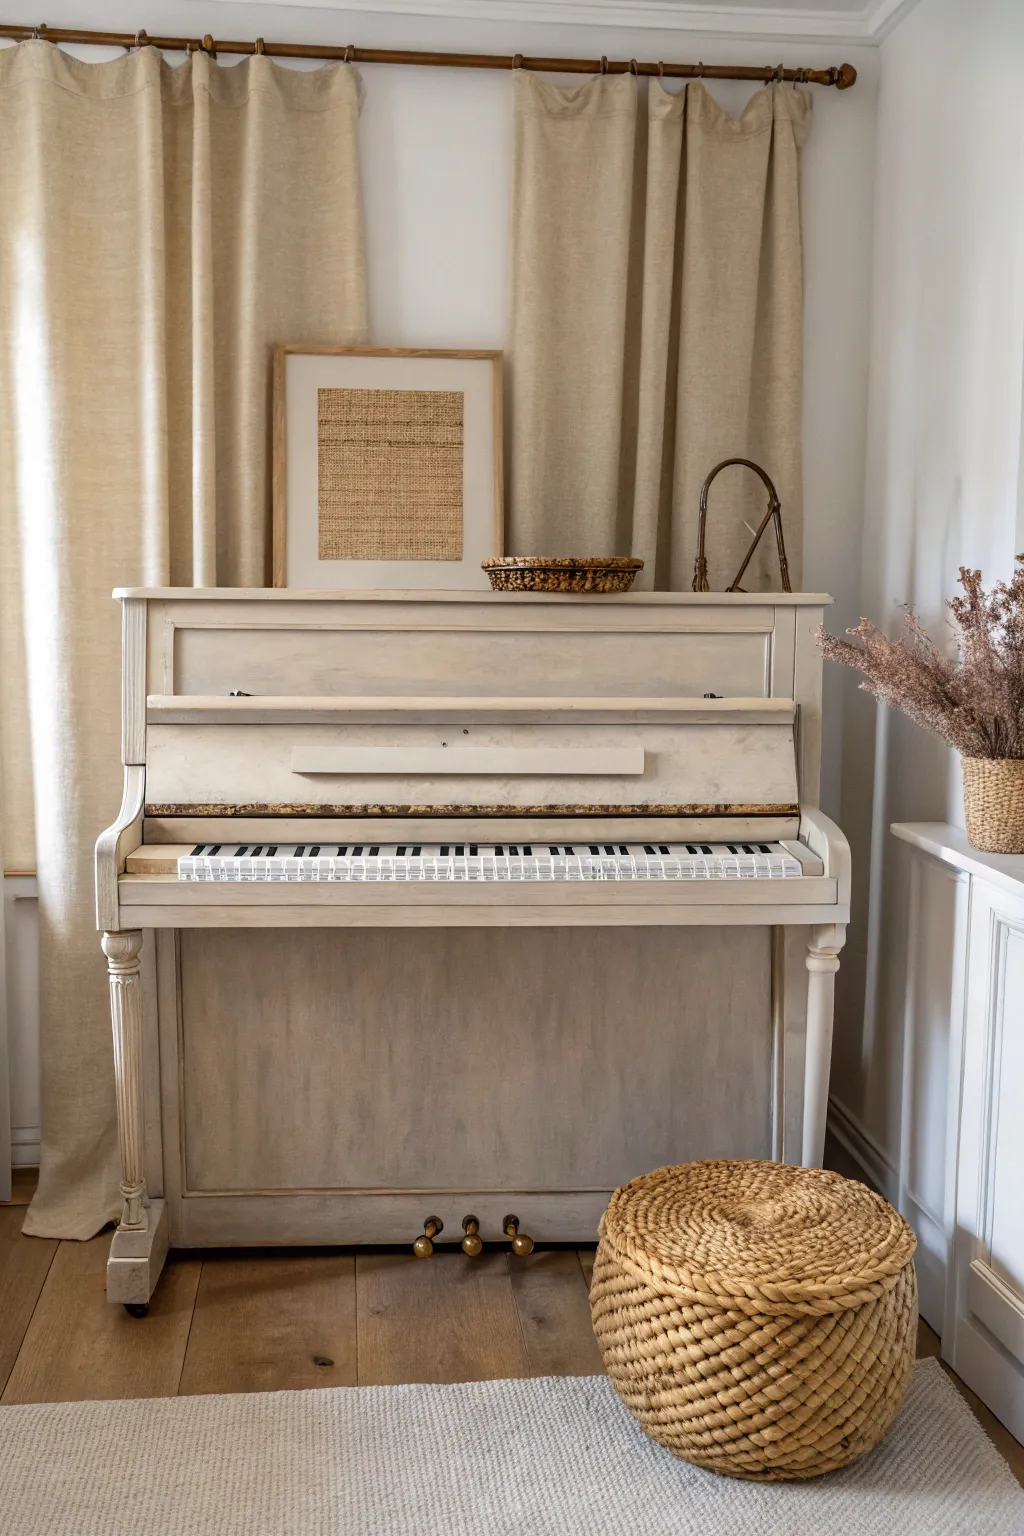
Give your upright piano a calming, modern makeover with this warm greige finish that feels both contemporary and timeless. By layering subtle washes of paint, you can achieve a textured, chalky look that breaks away from the heaviness of traditional dark wood finishes.
How-To Guide
Materials
- Upright piano (clean and prepped)
- Chalk-style paint in a warm greige color
- Chalk-style paint in a creamy white (for mixing)
- Clear furniture wax
- Dark antique wax (optional for depth)
- Painter’s tape
- Sanding sponges (medium and fine grit)
- Round chalk paint brush
- Small artist brush for edges
- Lint-free rags or wax brush
- Drop cloths
- Screwdriver (for hardware removal)
- TSP substitute or degreaser
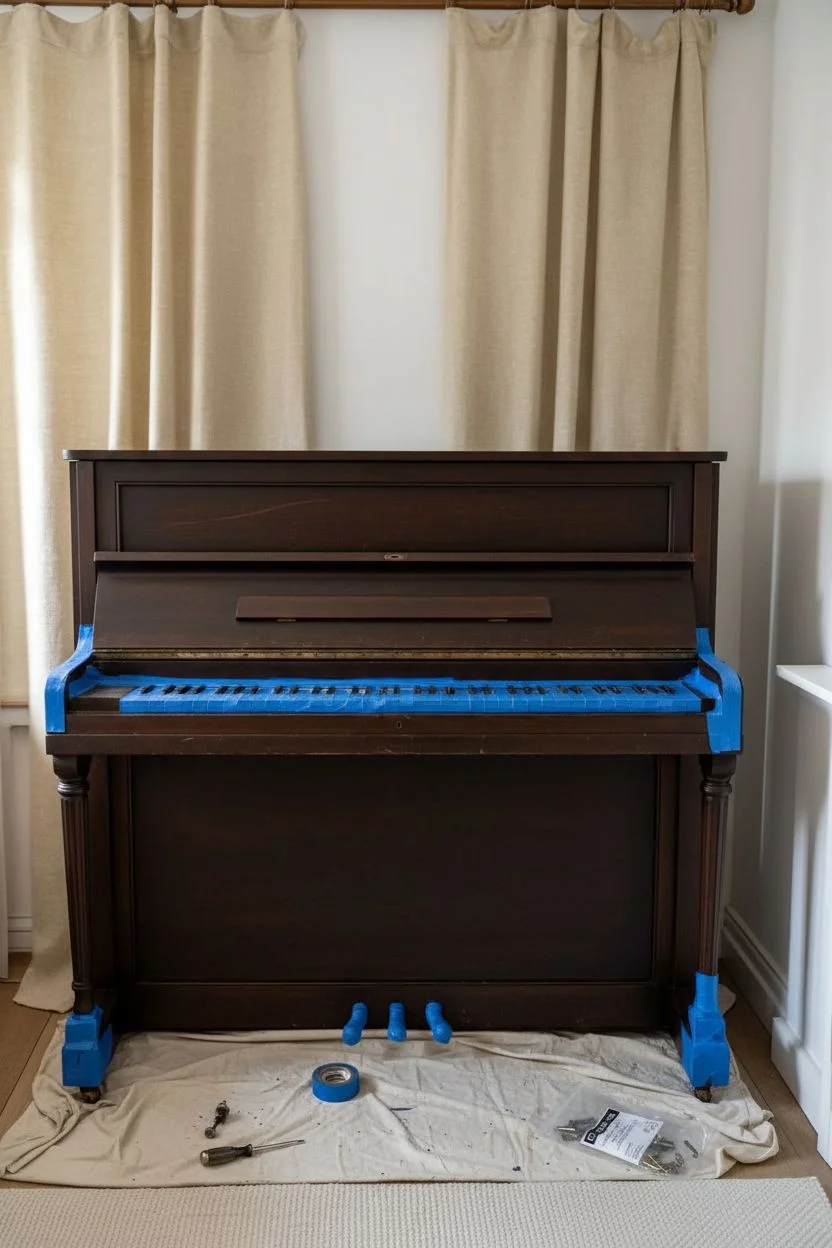
Step 1: Preparation & Cleaning
-
Clear the area:
Move the piano away from the wall if possible and lay down drop cloths to protect your flooring. This messy work is easier when you have 360-degree access. -
Remove hardware:
Take off any removable parts like the music desk, the fallboard (key cover), and the lower panel. Use your screwdriver to remove hinges or knobs, storing them safely in a labeled bag. -
Clean thoroughly:
Wipe down the entire wood surface with a TSP substitute or a strong degreaser. Pianos accumulate oils over decades, and paint won’t stick to oily residue. -
Scuff sand:
Use a medium-grit sanding sponge to lightly scuff the glossy finish. You aren’t stripping the wood to bare grain; you just need to create some ‘tooth’ for the paint to grab onto. -
Mask the keys:
This is crucial: carefully apply painter’s tape to the back of the keys and the inner sides of the key bed. You want to ensure no paint touches the actual instrument mechanism. -
Protect the pedals:
Wrap the brass pedals entirely in painter’s tape to keep them shiny and paint-free.
Bleed-Through Blues?
If you see pink or yellow stains appearing through your wet paint, stop. Apply a coat of shellac-based primer to seal the tannins, let dry, then resume painting.
Step 2: Painting the Base
-
Apply the first coat:
Using your round chalk paint brush, apply the greige color in long, even strokes. Don’t worry if it looks streaky or if the wood shows through; coverage improves with the second layer. -
Work in sections:
Paint the main body, the legs, and the detached panels separately. Keep a wet edge to avoid overlapping marks drying noticeably. -
Refine the edges:
Switch to a small artist brush to carefully cut in around the key bed and near the pedals where the large brush might be too clumsy. -
Let it dry:
Allow this first coat to dry completely, usually about 2-4 hours depending on humidity. -
Second coat application:
Apply a second coat of the greige paint. This layer should provide full opacity. If the paint feels too thick, I sometimes mist the brush with a little water to help it glide.
Fabric Panel Hack
For a textural upgrade, replace the solid front panel with a wooden frame wrapped in a linen or burlap fabric to match the rustic, natural vibe of the room.
Step 3: Creating Texture & Finishing
-
Dry brush highlights:
Dip just the tips of your dry brush into the creamy white paint, offload most of it onto a paper towel, and lightly drag it over raised details or the edges of the piano legs to create subtle dimension. -
Smooth sanding:
Once fully dry, take a fine-grit sanding sponge and very lightly run it over the flat surfaces. This knocks down brush strokes and makes the finish feel buttery smooth. -
Apply clear wax:
Using a wax brush or lint-free rag, massage clear furniture wax into the paint. Work in small circular motions, then wipe away any excess. -
Add antique depth (optional):
If you want the finish to look aged like the photo, mix a tiny amount of dark aesthetic wax with clear wax, and apply it sparingly into crevices and corners, wiping it back immediately. -
Buff to a sheen:
Wait 24 hours for the wax to cure slightly, then buff the entire piano vigorously with a clean, soft cloth to achieve a soft satin glow. -
Reassemble:
Remove all tape from the keys and pedals, screw the hardware back on, and reattach the panels and music desk.
Step back and admire how this soft, neutral color completely changes the atmosphere of your room


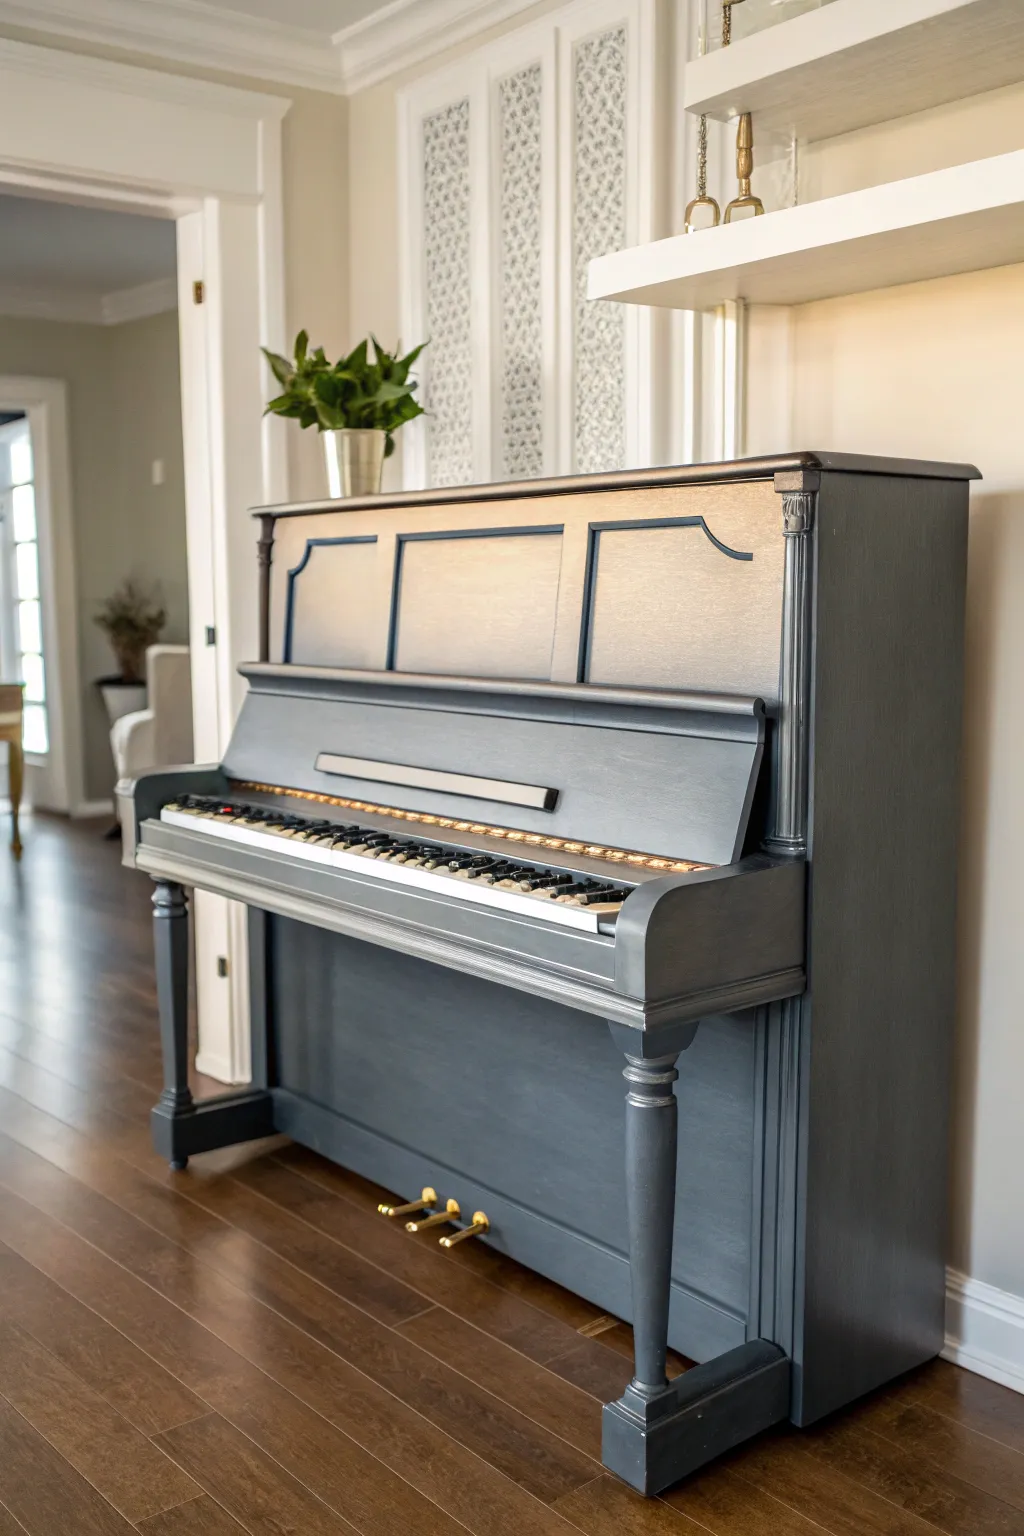
Moody Navy Statement Piano
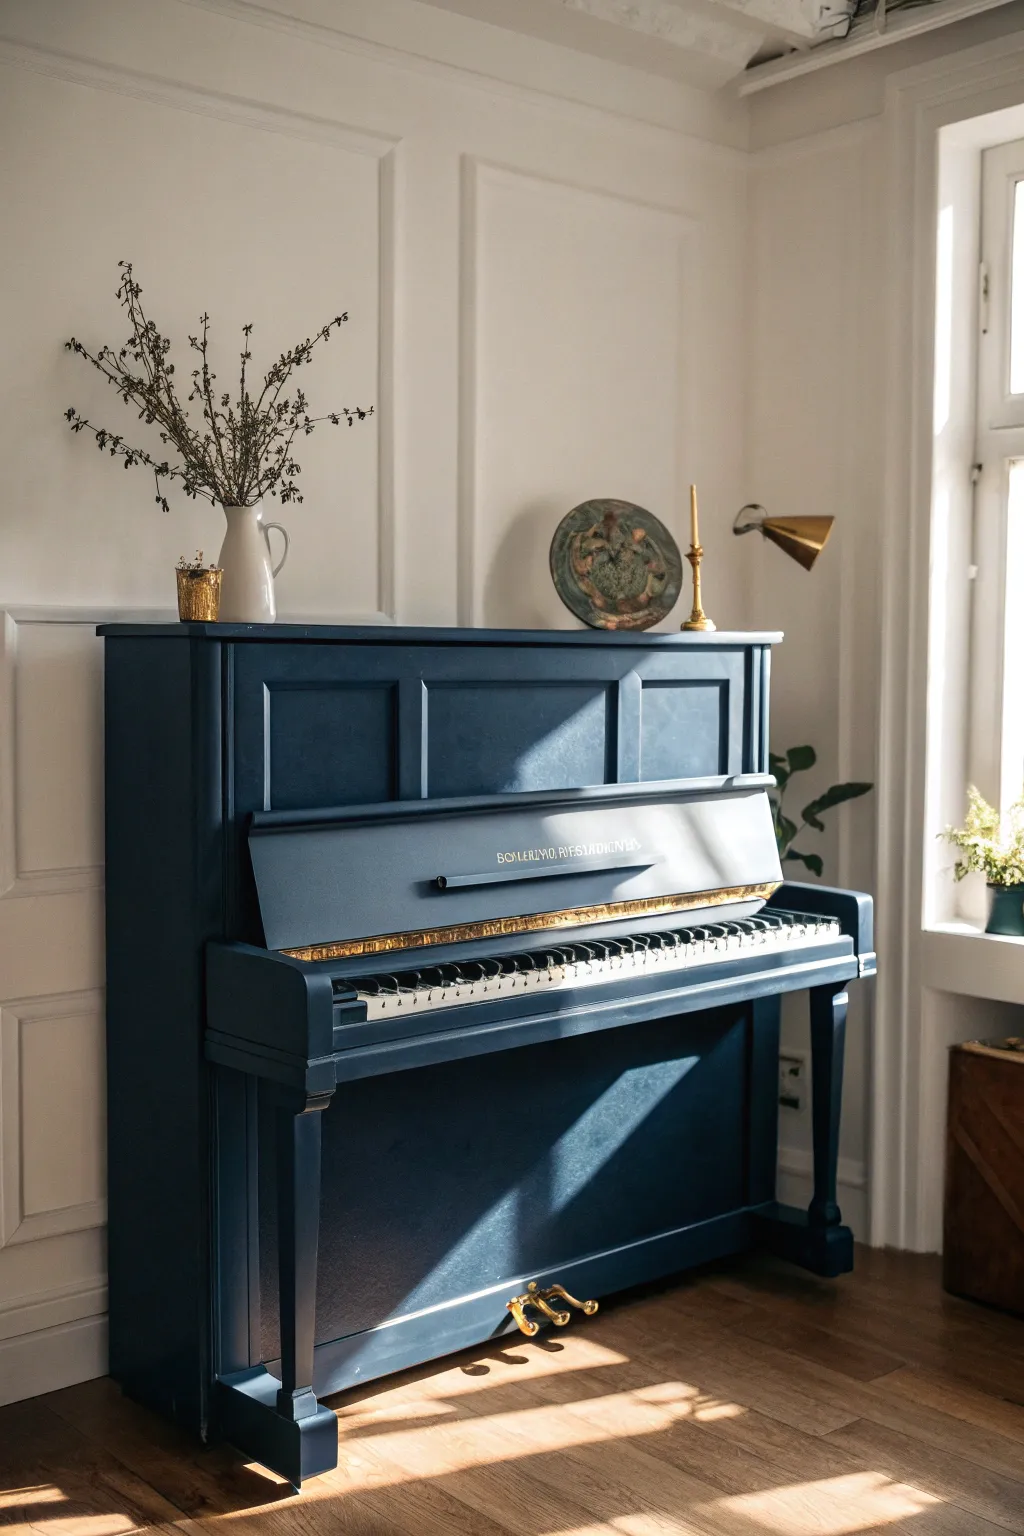
Give your upright piano a sophisticated new life with this deep, moody navy blue finish that feels instantly timeless. The matte sheen absorbs light beautifuly, creating a dramatic focal point that elevates the entire room.
Step-by-Step
Materials
- High-quality chalk or mineral paint (Deep Navy/Midnight Blue)
- Bonding primer (specifically for glossy surfaces)
- Clear matte or satin furniture wax/polyurethane
- Gold Rub ‘n Buff or metallic leaf paint
- Painter’s tape (multi-width)
- Sanding block (medium grit and fine grit)
- Tack cloth
- High-density foam roller (4-inch)
- Angled synthetic paint brush (1.5 – 2 inch)
- TSP substitute (De-greaser)
- Drop cloths
- Screwdriver set (for hardware removal)
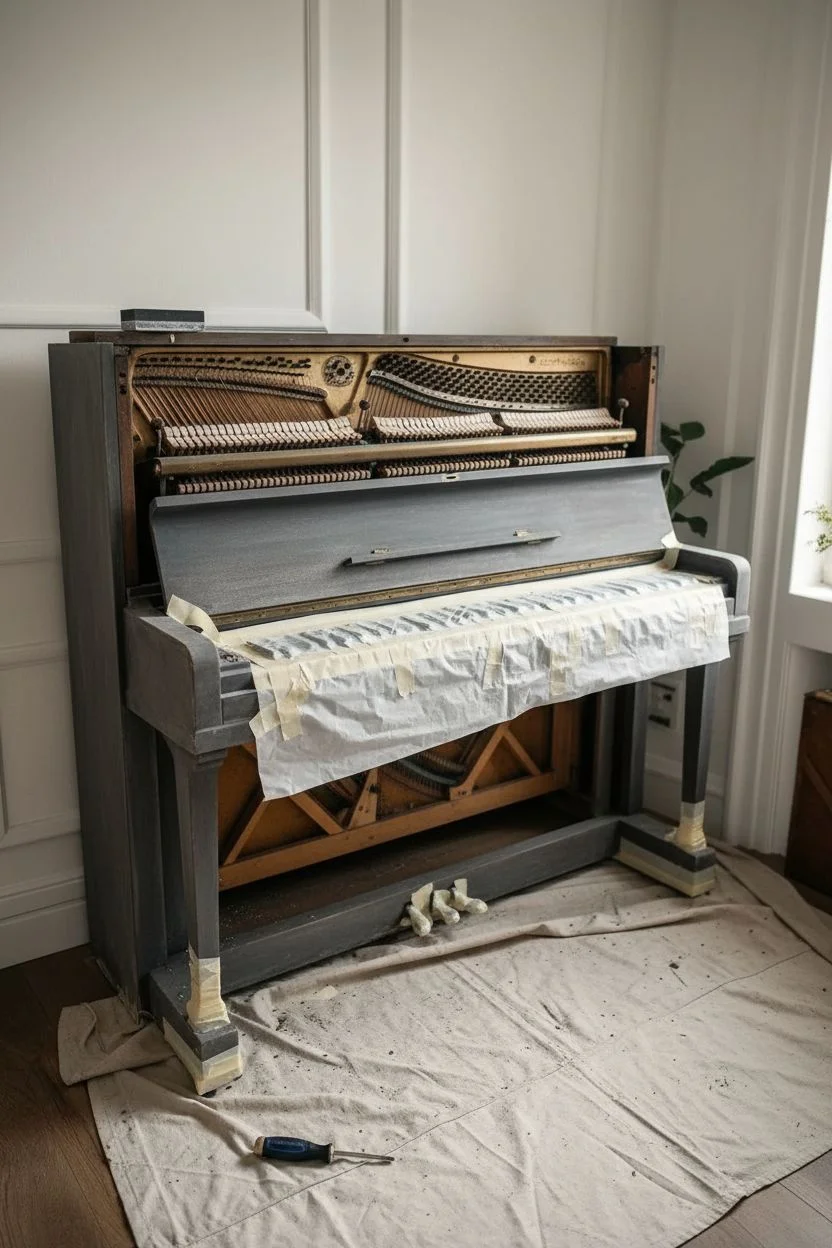
Step 1: Preparation
-
Clear the area:
Begin by moving the piano slightly away from the wall if possible to protect your baseboards, and lay down drop cloths to catch plenty of sanding dust and drips. -
Disassemble the case:
Carefully remove the front upper panel, the fallboard (the part covering the keys), and the lower panel. Usually, these lift out or unclip, though you may need a screwdriver for hinges. -
Mask the keys:
This is crucial: Spend extra time taping off the keys. Slide the tape slightly under the lip of the keys if possible, and cover the entire keyboard with plastic or paper to prevent any accidental splashes. -
Mask the pedals:
Wrap the foot pedals completely in painter’s tape to keep their original brass shine protected from the navy paint. -
Scuff sanding:
Using a medium-grit sanding block, scuff all the wood surfaces you plan to paint. You aren’t trying to remove the old finish, just creating ‘teeth’ for the new paint to grip. -
Deep clean:
Wipe down the entire piano with a TSP substitute and a rag. Old pianos often have layers of furniture polish that will repel paint, so be thorough here.
Step 2: Painting
-
Apply bonding primer:
Apply a coat of high-quality bonding primer. This ensures your hard work lasts, especially on slick original varnishes. Let this cure according to the can’s instructions. -
First coat of navy:
Stir your deep midnight blue chalk or mineral paint well. Use an angled brush to cut in around the edges, corners, and detailed molding first. -
Roll the flat surfaces:
Immediately after cutting in, use a high-density foam roller to paint the large flat panels. This technique helps eliminate brush strokes for a factory-smooth finish. -
Paint the disassembled parts:
Don’t forget the panels you removed in step 2. Paint them separately on a workbench or sawhorses to prevent drips from pooling. -
Light sanding:
Once the first coat is completely dry, very lightly run a fine-grit sanding block over the surfaces to knock down any raised grain or fuzz. Wipe away the dust with a tack cloth. -
Second coat:
Apply your second coat of navy blue using the same brush-then-roll method. This color relies on depth, so a second coat is essential for that rich, moody look. -
Touch-ups:
Inspect the piano under good lighting. I find that dark colors sometimes show missed spots easily, so spot-paint any areas where the primer is peeking through.
Sticky Keys?
Avoid painting the inside edges of the ‘cheeks’ (side panels) where keys might rub. If keys stick, sand the paint down slightly on those inner contact points.
Step 3: Detaling & Sealing
-
Seal the finish:
Since this is a high-traffic instrument, apply two coats of clear matte wax or a matte polychrylic topcoat. The matte finish is key to achieving the modern, velvety look in the photo. -
Highlight the branding:
If your piano has an engraved brand name on the fallboard, use a tiny artist’s brush and gold metallic paint or Rub ‘n Buff to carefully fill in the letters. -
Hardware accent:
For the hinges and pedal hardware, you can either polish the original brass or apply a small amount of gold wax to make them pop against the navy blue. -
Reassembly:
Once everything is fully cured (give it at least 24 hours), carefully reattach the panels and remove the tape from the keys and pedals. -
Style and settle:
Place the piano back against the wall. Add a few styling elements like a ceramic pitcher with dried botanicals or a simple brass candlestick to complement the new color.
Brass Revival
Before removing the tape on the pedals, utilize a metal polish like Brasso to shine the brass pedals. Detailed shiny hardware creates a stunning contrast.
Enjoy the dramatic elegance your newly painted instrument brings to your home
BRUSH GUIDE
The Right Brush for Every Stroke
From clean lines to bold texture — master brush choice, stroke control, and essential techniques.
Explore the Full Guide
Sage Green for a Calm Vintage Vibe
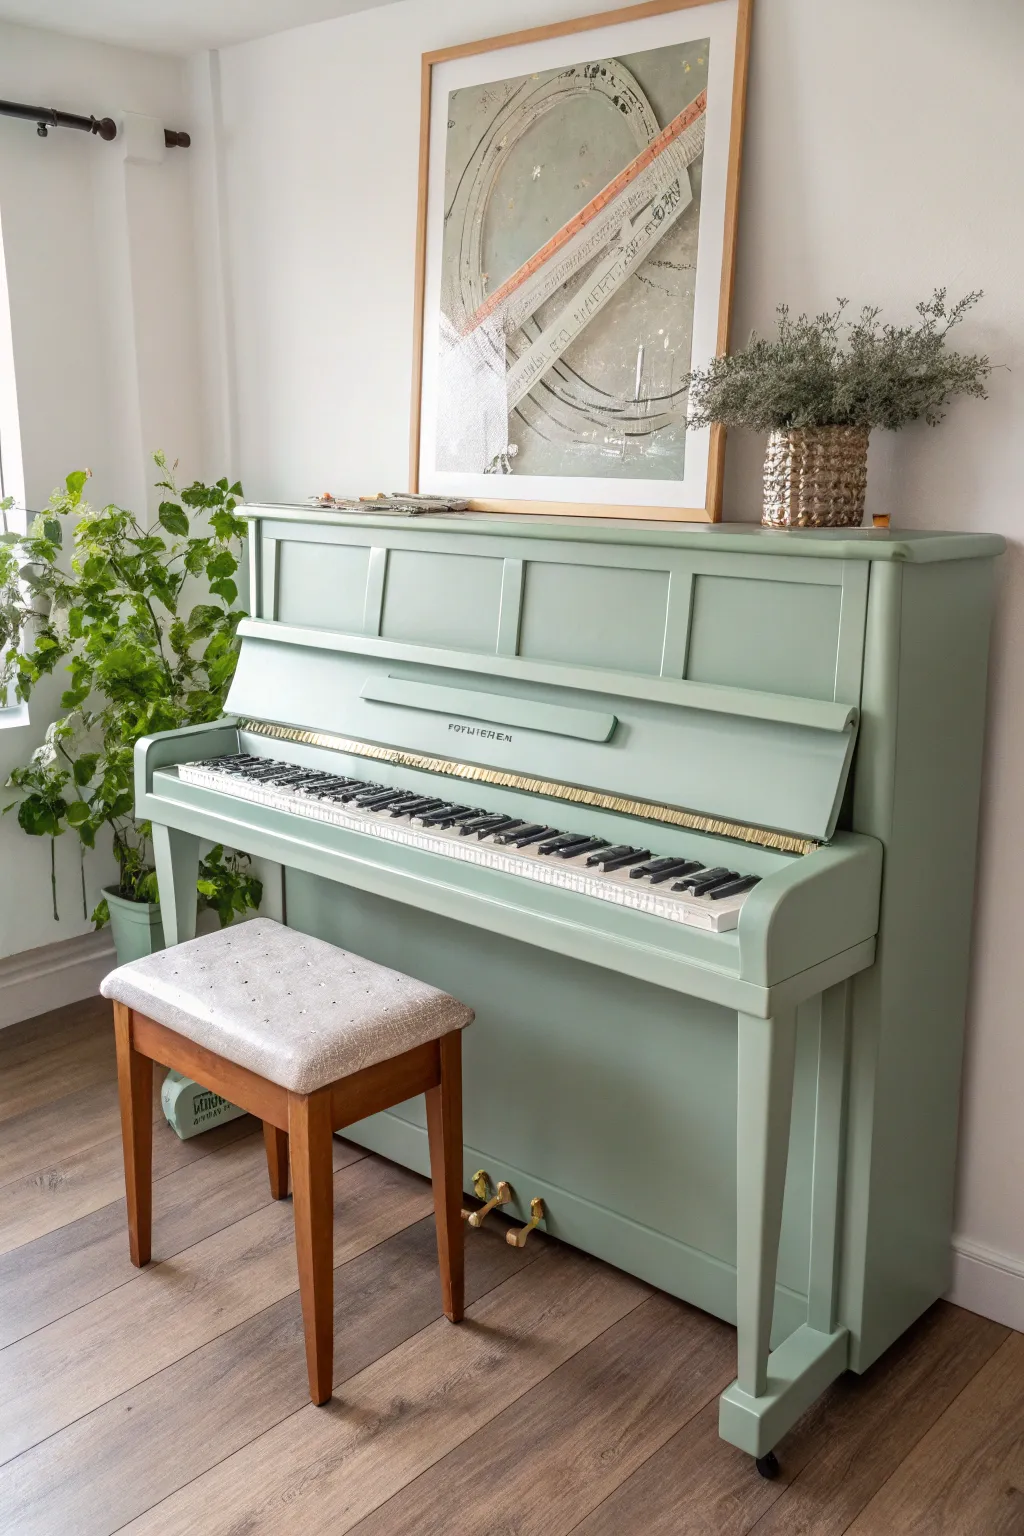
Transform an outdated or worn upright piano into a stunning focal point with a coat of soft sage green paint. This calming, vintage-inspired finish breathes new life into the instrument while maintaining a sophisticated, timeless appeal that blends beautifully with natural wood and greenery.
Detailed Instructions
Materials
- Upright piano (clean and dry)
- Mineral paint or chalk-style paint in Sage Green
- High-quality angled synthetic brush (2 inch)
- High-density foam roller and tray
- Painter’s tape (delicate surface)
- Sandpaper (120 and 220 grit)
- Clean tack cloths
- TSP cleaner or degreaser
- Drop cloths
- Screwdriver set
- Clear furniture wax or matte polychrylic topcoat
- Wax brush or lint-free rags
- Gold Rub ‘n Buff (optional for hardware)
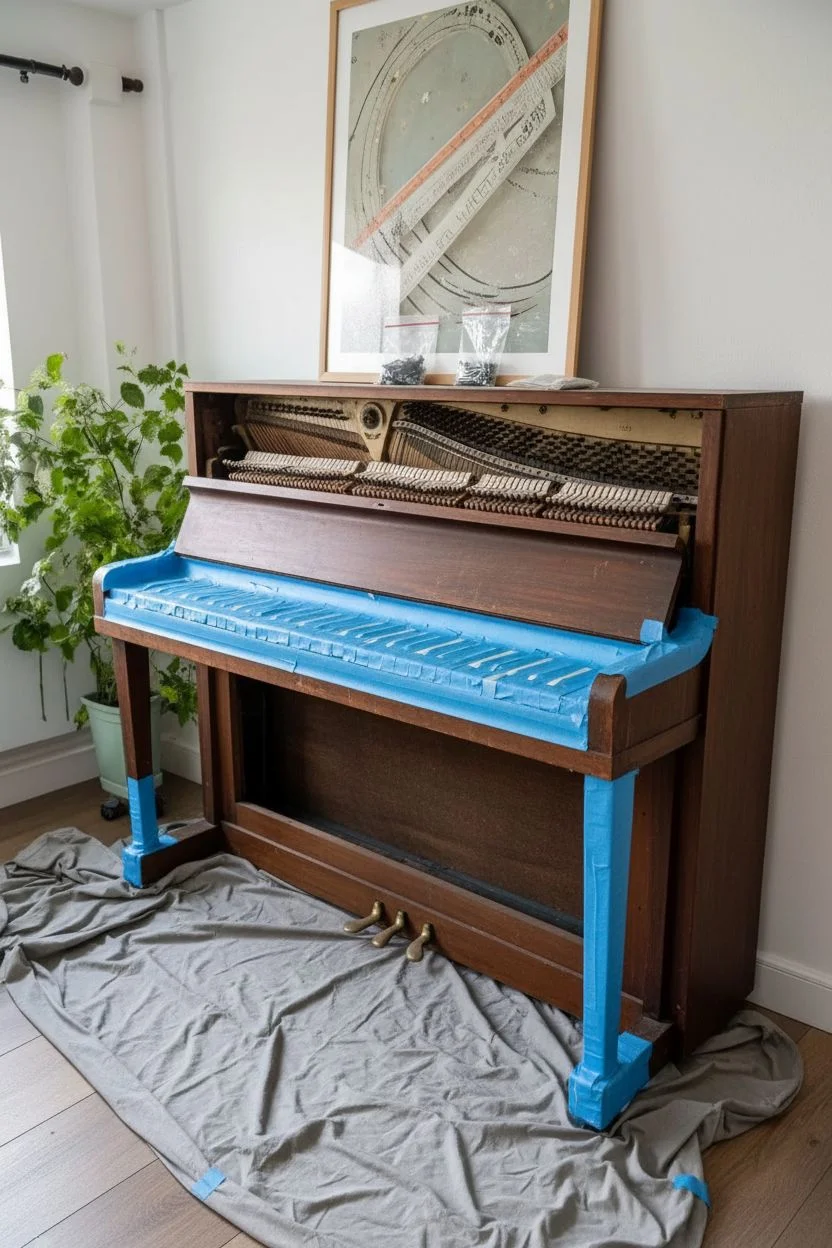
Step 1: Preparation & Disassembly
-
Initial Setup:
Begin by moving the piano away from the wall and placing drop cloths underneath to protect your flooring. Ensure the room has good ventilation before you start working. -
Remove Hardware:
Using a screwdriver, carefully remove the music desk, the front board, and the key cover if possible. Label the screws in small bags so reassembly is easy later. -
Tape the Keys:
Run a strip of delicate surface painter’s tape along the very back edge of the white and black keys. Press it down firmly to prevent paint from dripping between or onto the keys. You can also cover the entire keyboard with plastic wrap for extra safety. -
Protect Pedals:
Wrap the foot pedals completely in painter’s tape to keep them free of paint drips and dust during the sanding process.
Smooth Operator
To avoid ‘blocking’ (where the key cover sticks to the piano body), apply a thin layer of wax to the touching painted edges. This prevents peeling when opening and closing the lid.
Step 2: Cleaning & Sanding
-
Deep Clean:
Wipe down the entire piano with a TSP cleaner or strong degreaser to remove years of oils, wax, and furniture polish. This step is crucial for good paint adhesion. -
Scuff Sanding:
Use 120-grit sandpaper to scuff the existing finish. You don’t need to strip it to bare wood; just create a rough surface for the paint to grip. Focus on flat areas and detail grooves alike. -
Dust Removal:
Vacuum up the sanding dust thoroughly from all crevices. Follow up by wiping everything down with a tack cloth to ensure a perfectly smooth surface.
Step 3: Painting Process
-
Cut In Edges:
Dip your angled synthetic brush into the sage green paint and start by ‘cutting in’ the corners, recessed panels, and areas around the keyboard. Apply thin, even strokes to avoid buildup. -
Roll the Flat Surfaces:
For the large flat panels, switch to a high-density foam roller. This helps achieve that smooth, factory-like finish without visible brush strokes. Apply the paint in long, vertical sections. -
Dry and Sand:
Allow the first coat to dry completely according to the manufacturer’s instructions. Once dry, lightly sand flat surfaces with 220-grit sandpaper to knock down any bumps. Wipe away the dust. -
Second Coat:
Apply a second coat using the same method—brushing the details and rolling the flats. I generally find two coats are sufficient for good coverage with mineral paint, but a third thin coat may be needed for lighter greens. -
Check for Drips:
While the paint is still wet, inspect the edges and corners for any drips or runs and smooth them out immediately with your brush.
Creative Contrast
Paint the inside of the music desk area in a cream or soft gold color. When you open the desk to play, you’ll reveal a delightful hidden pop of contrasting color.
Step 4: Finishing Touches
-
Seal the Paint:
Once the final coat has cured for at least 24 hours, apply a clear furniture wax using a wax brush for a soft, hand-rubbed sheen. Alternatively, for higher durability, brush on a matte polychrylic topcoat. -
Update Hardware:
If your hinges or pedals look tarnished, apply a small amount of Gold Rub ‘n Buff with your finger or a cloth to restore their shine without removing them. -
Reassembly:
Carefully remove all painter’s tape from the keys and pedals. Reattach the music desk, front board, and other removed parts using the saved screws. -
Final Polish:
Give the newly painted surfaces a final buff with a clean lint-free cloth to bring out the luster of the wax.
Enjoy the serene atmosphere your beautifully updated instrument brings to the room
Sunny Yellow for Instant Cheer
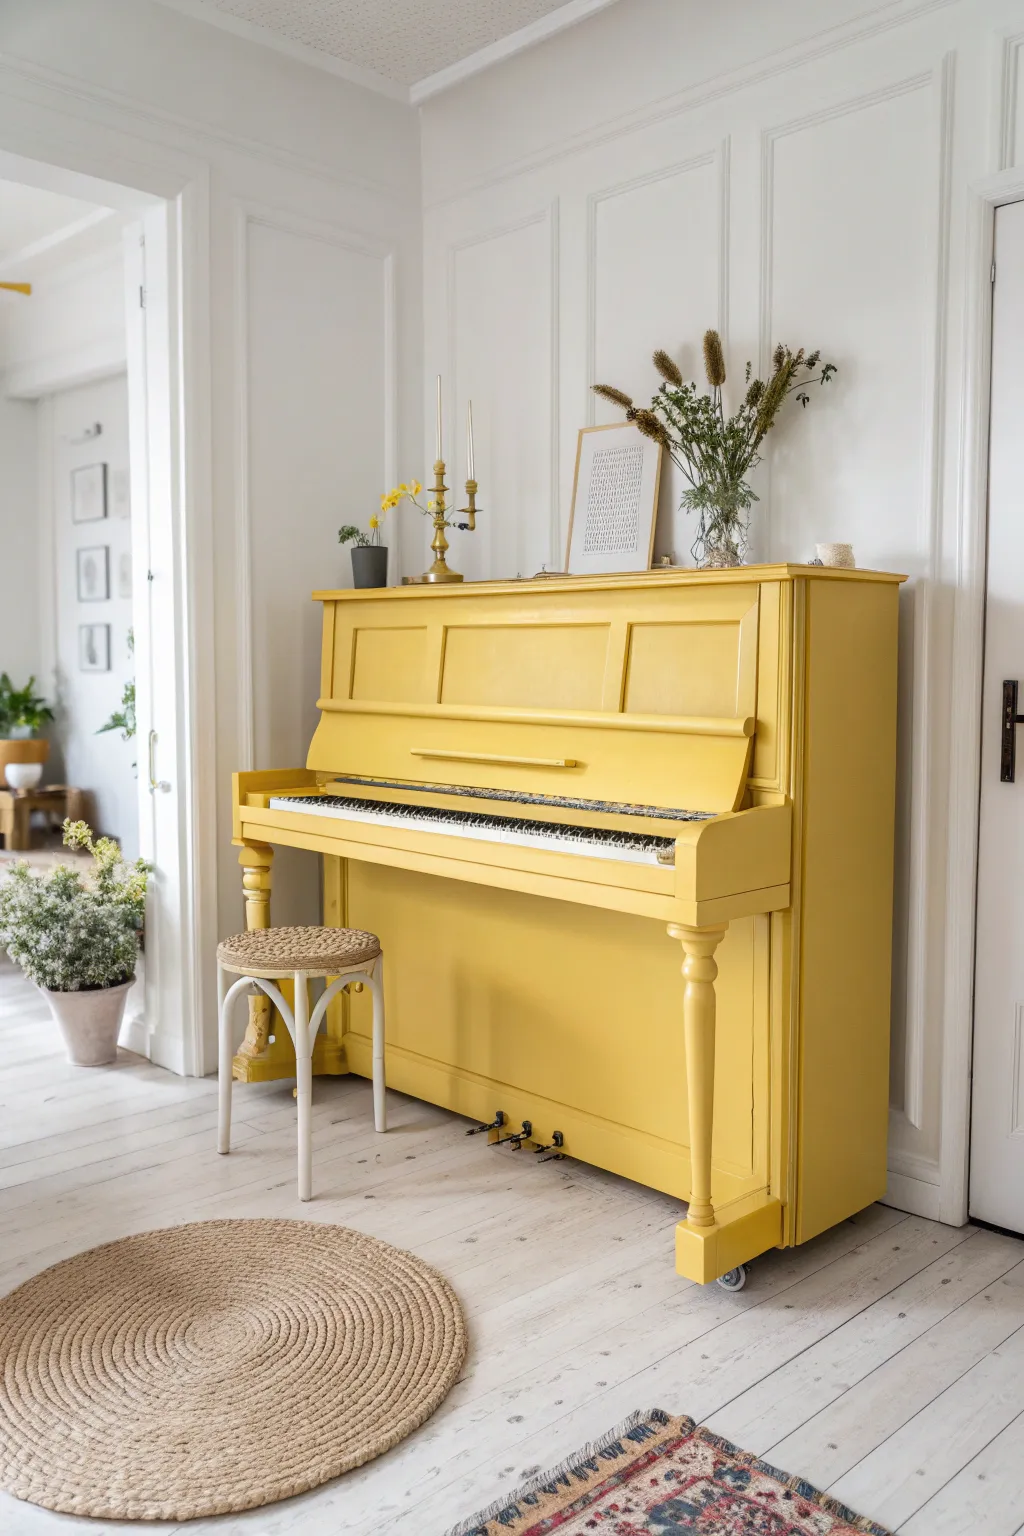

Transform a dark, heavy instrument into a beaming source of joy with this bold yellow makeover. This project uses a matte, warm yellow finish to turn a standard upright piano into a statement piece that instantly brightens any room.
Step-by-Step Guide
Materials
- Upright piano (clean and dusted)
- High-quality chalk paint or mineral paint (Warm Sun/Mustard Yellow color)
- Clear furniture wax (sealer)
- Painter’s tape (1-inch width)
- Sanding block (medium grit)
- TSP (Tri-Sodium Phosphate) or heavy-duty degreaser
- Clean lint-free rags
- Synthetic oval brush
- Small artist brush (for tight corners)
- Drop cloths
- Screwdriver (for removing hardware)
Step 1: Preparation
-
Prepare the Workspace:
Lay down drop cloths around the piano to protect your flooring. Open windows for ventilation, even though chalk-style paints generally have low VOCs. -
Remove Hardware:
Using a screwdriver, carefully remove the music stand (if detachable) and any other decorative hardware. Place screws in a labeled bag so they don’t get lost. -
Mask the Keys:
This is the most crucial step. Carefully apply painter’s tape to the very back of the keys where they meet the fallboard. Run a long strip of tape across the top of the keys and secure with plastic or paper to cover the entire keyboard. -
Mask the Pedals:
Wrap each foot pedal individually with painter’s tape to protect the metal from drips. -
Clean Thoroughly:
Wipe down the entire exterior wood surface with TSP or a degreaser. Old pianos maximize oil buildup from fingers, which repels paint. -
Scuff Sanding:
Lightly run a medium-grit sanding block over the glossy surfaces to create a ‘tooth’ for the paint. You aren’t stripping the finish, just dulling the shine. -
Final Wipe:
Remove all sanding dust with a damp lint-free rag and let the wood dry completely.
Sticky Keys?
If paint drips between keys, don’t panic. Wait for it to dry completely, then gently scrape it off with a razor blade or craft knife. Never wipe wet paint into the key gaps.
Step 2: Painting
-
First Coat Application:
Stir your yellow chalk paint thoroughly. Dip your oval brush and apply the first coat in long, smooth strokes following the grain of the wood. Don’t worry if it looks streaky; yellow is notorious for needing layers. -
Tackle the Details:
While the main panels dry, use a small artist brush to work the paint into the scrollwork on the legs and the tight corners around the keyboard housing. -
Let Dry:
Allow the first coat to dry for at least 2-4 hours, or until it is dry to the touch and no longer cool. -
Second Coat:
Apply a second coat. I like to paint thinner on this layer to avoid drips. The color will start to deepen and become opaque. -
Assess Coverage:
Yellow pigment often requires a third coat for true richness. If you see any wood grain peeking through, apply a third thin layer after the second has dried. -
Paint the Stool:
If you have a matching stool, paint the legs now to match the piano body, leaving the seat natural or upholstered.
Step 3: Sealing and Finishing
-
Check for Smoothness:
Once the final coat is fully dry (overnight is best), run your hand over the surface. Use a high-grit sanding sponge lightly to knock down any brush ridges. -
Apply Wax:
Using a wax brush or a lint-free cloth, massage clear furniture wax into the paint. Work in small sections. -
Buff to Sheen:
Wait about 30 minutes for the wax to haze over, then buff vigorously with a clean cotton cloth to achieve a soft satin sheen. -
Reassemble:
Remove all painter’s tape carefully. Reattach the music rack and any hardware you removed earlier.
Distress for Depth
Before waxing, lightly sand the curved edges of the legs and keyboard cover to reveal a peek of the original dark wood. This adds vintage character.
Enjoy the warm glow your new statement piece brings to your home practice sessions

PENCIL GUIDE
Understanding Pencil Grades from H to B
From first sketch to finished drawing — learn pencil grades, line control, and shading techniques.
Explore the Full Guide
Blush Pink for a Sweet, Modern Pop
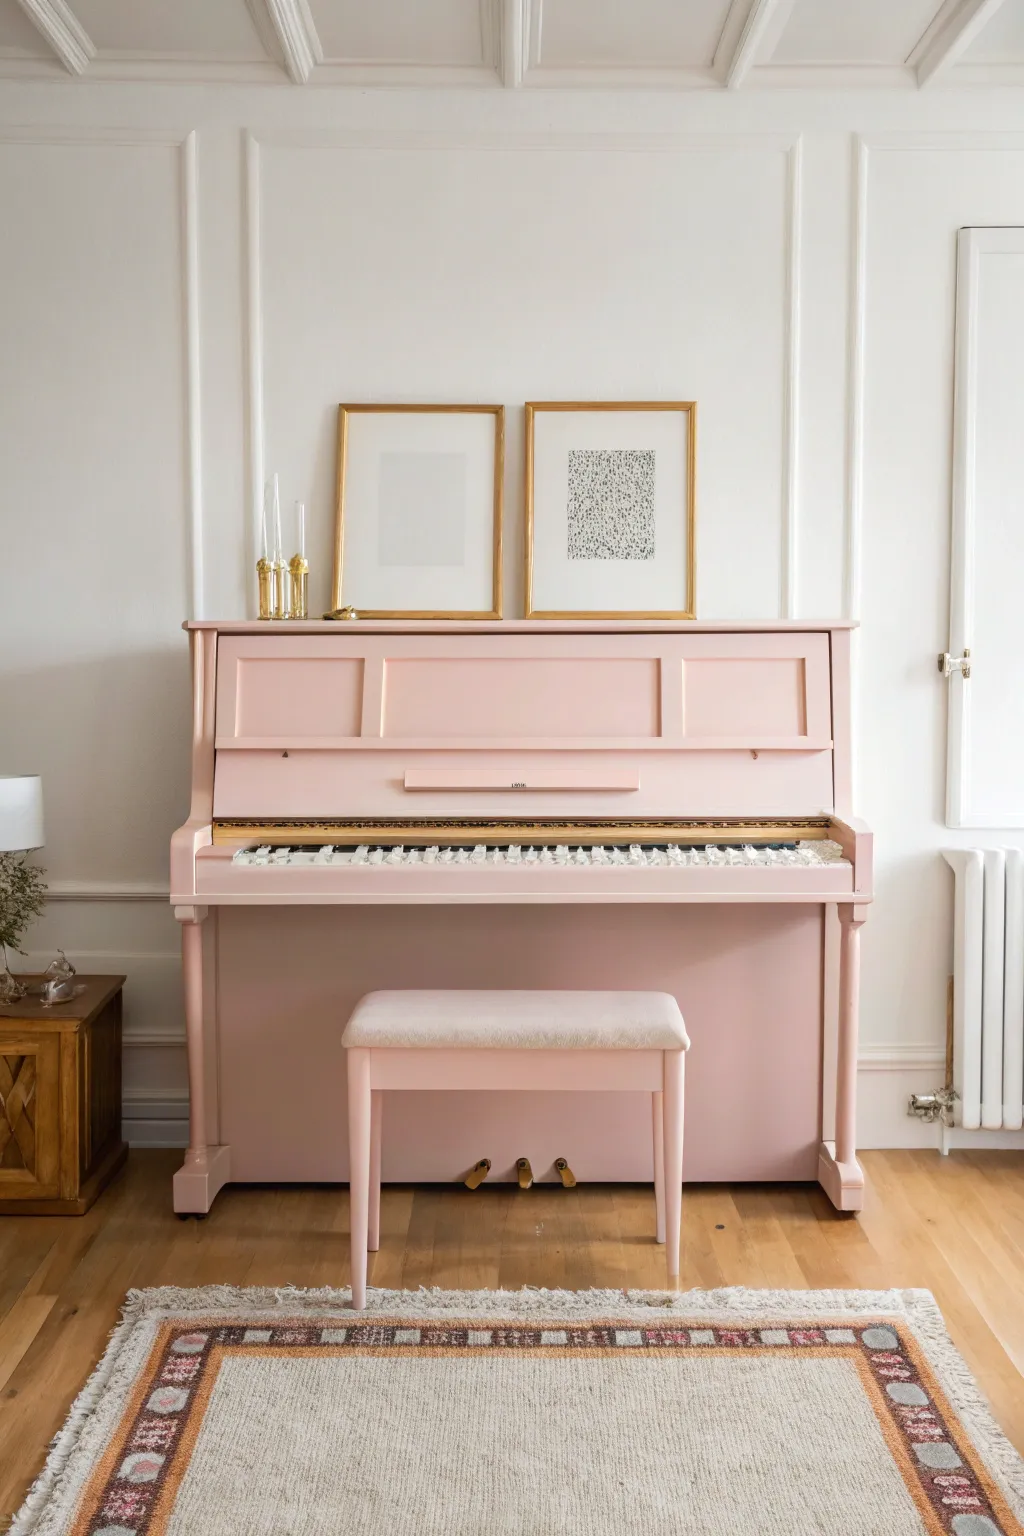
Transform a traditional upright piano into a soft, modern statement piece with this lovely blush pink finish. The gentle hue adds warmth and a contemporary touch without overwhelming the room, making it a perfect update for an older instrument.
Step-by-Step
Materials
- Upright piano (wooden)
- Piano bench (wooden)
- Sanding block (medium grit)
- Fine-grit sandpaper (220 grit)
- TSP (Trisodium Phosphate) cleaner
- Painter’s tape (high quality)
- Plastic drop cloths or old sheets
- High-quality primer (oil-based or shellac-based for bleed-through blocking)
- Chalk paint or satin finish furniture paint in blush pink
- Clear furniture wax or water-based polycrylic topcoat
- Synthetic bristle brushes (2-inch angled sash)
- Small foam roller and tray
- Screwdriver set
- Clean lint-free rags
- Key leveling tool (optional, if removing keys)
Step 1: Preparation & Disassembly
-
Clear the area:
Move the piano away from the wall to give yourself ample workspace. Lay down plastic drop cloths or old sheets underneath the piano and bench to protect your flooring from dust and drips. -
Remove hardware:
Using your screwdriver, carefully remove any removable parts. This typically includes the music desk (the shelf for sheet music), the fallboard (the lid covering the keys), and sometimes the lower board near the pedals. Label screws in small bags so reassembly is easy later. -
Protect the keys:
If you aren’t comfortable removing the keys entirely, it’s crucial to cover them. Place plastic wrap over the keys and secure the edges meticulously with painter’s tape. Press the tape firmly into the crevices where the keys meet the wood to prevent any paint seepage. -
Deep clean:
Mix TSP cleaner with warm water according to the package instructions. Scrub the entire wood surface thoroughly with a sponge or rag to remove decades of furniture wax, oils from fingers, and dust. This step is vital for paint adhesion. -
Wipe down:
Once scrubbed, wipe the piano down with a clean, damp cloth to remove any chemical residue. Let the wood dry completely for at least a few hours.
Sticky Keys?
If paint drips between keys, they might stick. Slide a thin razor blade or piece of thick paper between keys to break the paint seal gently without chipping the wood.
Step 2: Sanding & Priming
-
Scuff sanding:
Lightly sand all surfaces you intend to paint with a medium-grit sanding block. You aren’t trying to strip the old finish entirely, just creating a ‘tooth’ for the primer to grab onto. Don’t forget the bench legs and frame. -
Remove dust:
Vacuum up the sanding dust, paying special attention to corners and molding details. Follow up with a tack cloth or a damp rag to get every last particle. -
Tape off pedals:
Wrap the brass pedals completely in painter’s tape to keep them shiny and paint-free. Tape off any other brass hinges or logos you couldn’t remove. -
Apply primer:
Using a brush for corners and a foam roller for flat areas, apply a coat of high-quality stain-blocking primer. Oil-based or shellac-based primers are best here to prevent old wood tannins from bleeding through your light pink paint later. -
Light sand:
Once the primer is fully dry (check the can for times), lightly sand the surfaces with fine-grit sandpaper (220 grit) to smooth out any brush strokes or texture. Wipe away the dust.
Create Dimension
Mix a tiny amount of white wax with clear wax for the final coat. This adds a subtle, milky depth to the pink and highlights any carved details on the legs or molding.
Step 3: Painting & Finishing
-
First coat of pink:
Stir your blush pink paint thoroughly. Start by cutting in corners, molding, and detailed areas with your angled brush. Aim for a thin layer; thick paint leads to drips. -
Roll the flat surfaces:
While the brushed edges are still wet, use the foam roller to paint the large, flat panels of the piano and bench. This helps achieve a smooth, factory-like finish without brush marks. -
Dry and repeat:
Allow the first coat to dry completely. Apply a second coat using the same method—brushing details first, then rolling flats. I find that light pinks often need a third thin coat for full, opaque coverage. -
Seal the finish:
Once the final coat of paint has cured for 24-48 hours, apply your topcoat. A clear furniture wax buffs to a soft sheen and feels lovely, but a water-based polycrylic is more durable against scratches. Apply two thin coats. -
Reassemble:
When everything is dry to the touch and no longer tacky, carefully remove the painter’s tape from the keys and pedals. Reattach the music desk, fallboard, and any other hardware you removed. -
Upholster the bench (optional):
To match the bench top perfectly, you might want to recover the seat pad. Stretch a neutral or soft pink fabric over the cushion, stapling extensively on the underside, before screwing the cushion back onto the painted frame.
Enjoy your beautifully modernized instrument that now serves as a stunning focal point in your home
Dusty Lavender for a Creative Corner
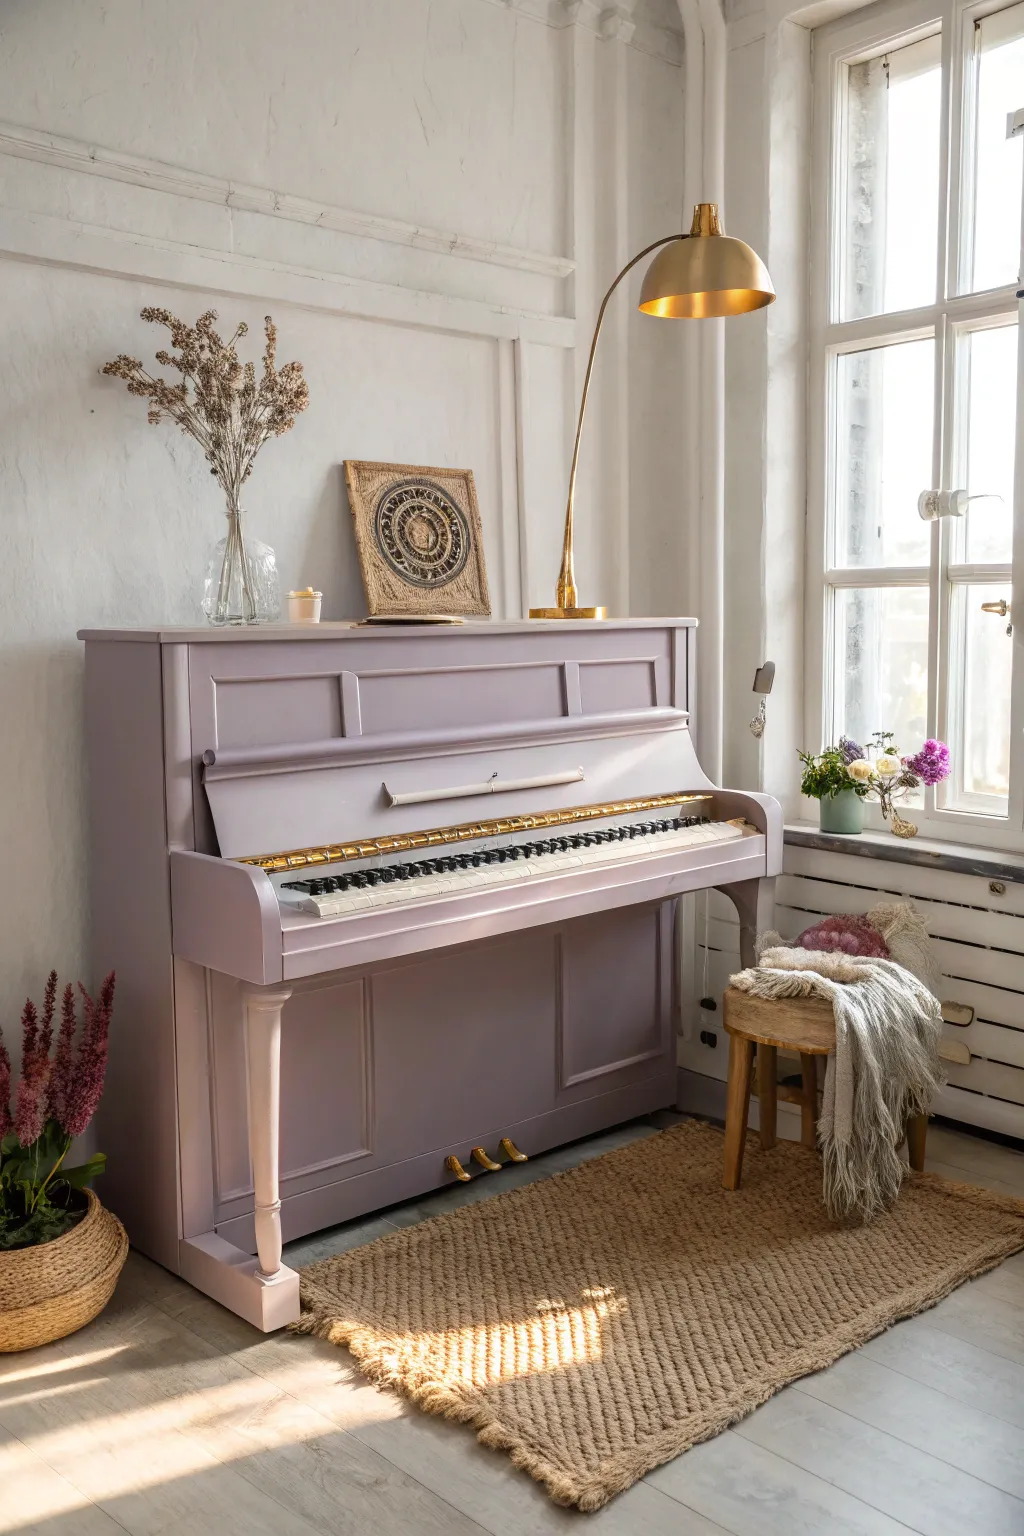
Breathing new life into an old instrument, this project transforms a standard upright piano into a statement piece with a soft, muted dusty lavender finish. The matte texture and warm undertaking create a cozy, creative atmosphere that feels both modern and vintage.
How-To Guide
Materials
- Upright piano (cleaned and dusted)
- Sanding block (medium grit)
- Fine grit sandpaper (220 grit)
- Painter’s tape (high quality)
- Plastic drop cloths
- Bonding primer (stain-blocking)
- Chalk-style or mineral paint in ‘Dusty Lavender’
- Clear furniture wax or matte polyurethane topcoat
- Gold metallic wax or paint (for pedals and accents)
- High-quality synthetic bristle brush (2-inch)
- Small artist brushes
- Lint-free rags
- Screwdriver set
- Mild degreaser solution
Step 1: Preparation
-
Clear and clean:
Begin by removing any decor, sheet music, or items from the piano. Wipe down the entire surface with a mild degreaser solution to remove years of oils, dust, and furniture polish residues. -
Remove hardware:
Carefully remove any easily detachable hardware if possible. If you can’t remove the pedals or hinges, don’t worry—we will protect them later. -
Scuff sanding:
Using a medium-grit sanding block, lightly scuff the entire exterior surface. You aren’t trying to strip the old finish completely, just creating a ‘tooth’ for the primer to grip. -
Dust control:
Thoroughly vacuum up all sanding dust, getting into crevices. Follow up by wiping the piano with a damp, lint-free rag to ensure a perfectly clean surface. -
Masking off:
Apply painter’s tape meticulously around the keys. This is the most critical step; press the tape edges down firmly to prevent bleed. Cover the pedals and any gold hinges you want to preserve.
Step 2: Painting
-
Prime the surface:
Apply a coat of high-quality bonding primer. This ensures your lavender paint adheres properly and prevents wood tannins from bleeding through the light color. Let this dry specifically according to the can’s instructions. -
First coat application:
Open your dusty lavender chalk or mineral paint and stir well. Using a synthetic bristle brush, apply the first coat in long, smooth strokes following the grain of the wood. It may look streaky initially, but resist the urge to overwork it. -
Drying time:
Allow the first coat to dry completely. Chalk-style paints dry quickly, but giving it a few hours ensures durability. -
Light sanding:
Once dry, lightly run a fine 220-grit sandpaper over the flat surfaces to knock down any brush strokes or raised grain. Wipe away the dust. -
Second coat:
Apply the second coat of lavender paint. You should see full, opaque coverage now. If the color still looks sheer, a thin third coat may be necessary after another drying period. -
Detail work:
Use a small artist brush to get paint into any intricate carvings or corners that the larger brush missed, ensuring no original wood color shows through.
Sticky Keys?
If paint drips between keys, don’t force them. Wait for it to dry, then carefully slice the paint with a razor blade or craft knife to free the key without chipping.
Step 3: Finishing Touches
-
Remove tape:
Carefully peel away the painter’s tape while the final coat is barely tacky or fully dry. Pull the tape at a 45-degree angle away from the wet edge to ensure a crisp line. -
Seal the finish:
For a velvety feel like the photo, apply clear furniture wax with a lint-free cloth or wax brush. Work in small sections, wiping away excess. Alternatively, use a matte polyurethane for higher durability. -
Buffing:
If using wax, let it cure for a short while, then buff gently with a clean cloth to achieve a soft sheen. -
Pedal refresh:
Clean the pedals. If they are tarnished beyond repair, apply a small amount of gold metallic wax with your finger or a cloth to bring back their luster. -
Final cure:
Allow the piano to cure fully before placing heavy decor back on top. This usually takes a few days to harden completely.
Level Up: Gold Accents
Use gold leaf or gold gliding wax on the carved edges or the music stand ledge for a subtle, elegant highlight that complements the pedals.
Enjoy the serene and artistic vibe your newly painted piano brings to your creative corner


Two-Tone Body and Key Cover Contrast
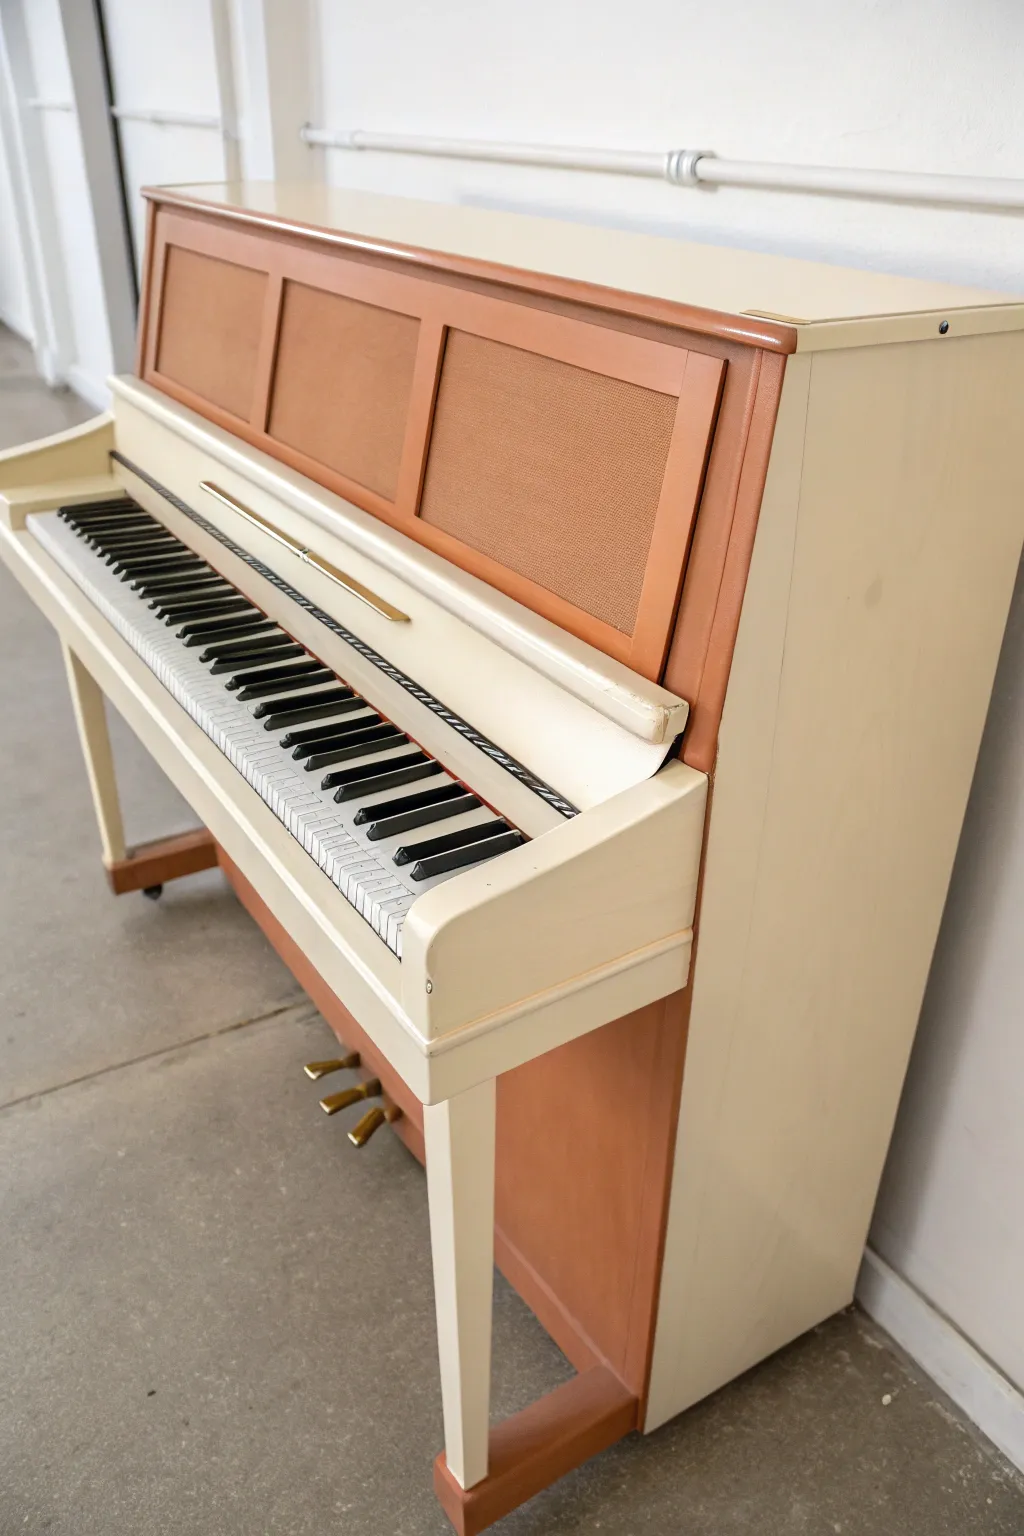
Breathe new life into an outdated spinet piano with this fresh, dual-tone transformation. By contrasting a crisp, creamy off-white with warm, earthy terracotta accents, you can turn a heavy, dark instrument into a light and modern statement piece.
Detailed Instructions
Materials
- High-quality chalk paint in Cream/Off-White
- High-quality chalk paint in Terracotta/Warm Brown
- Clear furniture wax or polyurethane topcoat
- Painter’s tape (multiple widths)
- Sandpaper (120 and 220 grit)
- Electric orbital sander (optional)
- TSP cleaner or degreaser
- Clean lint-free rags
- Screwdriver set
- Synthetic oval brush (for large areas)
- Small angled sash brush (for trim)
- Drop cloths
- Wood filler (if repairs are needed)
- Primer (stain-blocking)
Step 1: Preparation & Disassembly
-
Clear the area:
Begin by moving the piano away from the wall and placing drop cloths underneath to protect your flooring. -
Remove hardware:
Using your screwdriver, carefully remove the music rack, top lid, and the lower front board if it detaches easily. Store screws in labeled bags so you don’t lose them. -
Clean thoroughly:
Wipe down the entire piano with TSP or a strong degreaser to remove years of furniture polish, oil, and dust. This step is crucial for paint adhesion. -
Scuff sand:
Lightly sand all surfaces with 120-grit sandpaper to rough up the old glossy finish. You aren’t trying to strip it to bare wood, just creating ‘tooth’ for the primer. -
Protect the keys:
Depress the keys and slide cardstock or painter’s tape between the keys and the fallboard. Tape over the pedals completely to keep them brassy and clean.
Tape Like a Pro
To prevent paint bleed, press tape down firmly and paint a thin layer of the *base* color (cream) over the tape edge first to seal it.
Step 2: Priming & Base Coat
-
Apply primer:
Old pianos often bleed tannins, so apply a coat of stain-blocking primer over the entire surface. Let this dry according to the manufacturer’s instructions. -
Section off the design:
Study the reference image. Identify which parts will be terracotta—specifically the recessed panels on the upper front board, the main lower board, and the base supports. -
Paint the cream sections:
Using your oval brush, apply the first coat of cream paint to the sides, the legs, the key bed, and the outer frame of the top panel. Don’t worry about full coverage yet. -
Sand between coats:
Once dry, lightly run 220-grit sandpaper over the painted areas to smooth out brush strokes, then wipe away the dust. -
Apply second cream coat:
Apply a second, slightly thicker coat of cream paint. I usually find two coats are sufficient with high-quality chalk paint, but add a third if the old finish shows through.
Textured Panels?
If the upper panels are plain wood, consider gluing on rattan webbing or textured wallpaper before painting for a boho-chic upgrade.
Step 3: Adding the Contrast
-
Tape the edges:
Once the cream paint is fully cured (give it at least 24 hours), carefully tape off the borders around the upper recessed panels to ensure crisp lines. -
Paint the terracotta panels:
Use the small angled sash brush to paint the recessed rectangles on the upper front board and the large lower panel in your terracotta shade. -
Paint the lower supports:
Don’t forget the bottom wooden rails that the legs sit on—paint these terracotta as well to ground the design visually. -
Detail work:
Check for any drips or messy edges. Use a small artist’s brush for touch-ups where the two colors meet. -
Remove tape:
Peel off the painter’s tape while the final coat is still slightly tacky to prevent the paint from lifting.
Step 4: Sealing & Finishing
-
Apply wax or poly:
To protect your work, brush on a clear furniture wax or a matte polyurethane topcoat. Wax offers a softer, hand-rubbed feel. -
Buff the wax:
If using wax, let it dry for about 15 minutes, then buff it vigorously with a clean, lint-free cloth to achieve a subtle sheen. -
Clean the pedals:
Remove the tape from the brass pedals. If they look tarnished, use a little brass polish and steel wool to brighten them up. -
Reassemble:
Screw the music rack and lids back into place carefully, ensuring you don’t scratch your fresh paint job. -
Final inspection:
Do a final walk-around to ensure all surfaces feel smooth and look uniform before sliding the piano back into position.
Enjoy the renewed energy this bright, custom instrument brings to your living space
Distressed Finish to Highlight Details
Transform a tired old upright piano into a stunning shabby-chic centerpiece using layers of warmth and strategic distressing. This technique highlights intricate woodwork and molding details while giving the piece a beloved, time-worn appearance that feels authentic rather than manufactured.
Step-by-Step
Materials
- TSP cleaner or degreaser
- Medium-grit sanding sponge (120-grit)
- Fine-grit sandpaper (220-grit)
- Painter’s tape
- Chalk-style paint (warm cream or off-white)
- Chalk-style paint (light beige/tan for undercoat – optional)
- Clear furniture wax
- Dark antique wax
- Wax brush (large round)
- Lint-free rags
- Screwdriver (for removing hardware)
- Cardboard or drop cloths
Step 1: Preparation
-
Clear and Clean:
Begin by removing all loose items from the piano. Wipe down the entire surface thoroughly with TSP cleaner or a strong degreaser to remove years of furniture polish, oil, and dust that will prevent paint adhesion. -
Mask the Keys:
Carefully apply painter’s tape to the back of the keys and the foot pedals. Press the tape down firmly to ensure no paint sneaks underneath, as cleaning keys later is tedious work. -
Disassemble What You Can:
If your piano allows, remove the front music desk and the bottom kickboard. Taking these off makes it significantly easier to paint the edges and corners without missing spots. -
Scuff Sanding:
Use a medium-grit sanding sponge to lightly scuff the entire glossy surface. You aren’t trying to strip the finish, just create enough ‘tooth’ for the chalk paint to grip effectively. -
Dust Removal:
Vacuum up all the sanding dust, paying special attention to crevices in the molding. Wipe everything down one last time with a damp rag to ensure a pristine surface.
Step 2: Painting
-
First Coat Application:
Apply your first coat of warm cream chalk paint using a high-quality brush. Don’t worry about perfect coverage here; chalk paint often looks streaky on the first pass. -
Dry Time:
Allow this initial layer to dry completely according to the can’s instructions, usually about 2-4 hours depending on humidity. -
Second Coat:
Apply a second, thicker coat of the cream paint. I find that painting in the direction of the wood grain (usually vertical on uprights) gives the most professional-looking finish. -
Check for coverage:
Inspect the piano for any spots where the original dark wood is showing through too much. Apply a third touch-up coat only where necessary to ensure a solid base. -
Smooth the Surface:
Once fully dry (let it cure overnight if possible), simulate a worn feel by lightly sanding the entire painted surface with 220-grit fine sandpaper. This makes the finish feel buttery soft.
Waxing Wisdom
Always apply clear wax BEFORE dark wax. The clear layer acts as a barrier, allowing you to control and wipe back the dark pigment so it doesn’t stain the paint permanently.
Step 3: Distressing & Detailed Finishing
-
Strategic Distressing:
Take your sanding sponge and firmly rub the edges, corners, and raised molding details. The goal is to reveal the dark wood underneath in areas max natural wear would occur. -
Enhance the Carvings:
Focus extra attention on the decorative legs and the lip of the keyboard cover. Sanding these areas heavily creates the lovely contrast seen in the inspiration image. -
Clean Up Dust:
Wipe away all the fine chalk dust created by the distressing process using a tacky cloth or slightly damp rag. -
Seal with Clear Wax:
Use a round wax brush to apply a layer of clear furniture wax over the entire piano. Work in sections, massaging the wax into the porous paint. -
Buff the Wax:
After the wax sits for about 10-15 minutes, buff it vigorously with a clean, lint-free rag to create a subtle sheen. -
Apply Dark Wax:
To get that aged, yellowed look, sparingly apply dark antique wax into the recesses of the panels and corners. Brush it on, then immediately wipe most of it back off. -
Feather the Aging:
If the dark wax looks too harsh, use a dollop of clear wax on a rag to ‘erase’ and blend the dark sections until you achieve a soft, smoky gradient. -
Final Buff:
Give the entire piece one final polish with a clean cloth to harden the wax surface and bring out the details. -
Reassemble:
Remove the painter’s tape carefully and reattach the music desk and kickboard to complete your masterpiece.
Bleed-Through Blues
If pink or yellow stains appear through the white paint, the underlying wood tannins are bleeding. Seal solely that spot with clear shellac, let dry, and repaint.
Now you have a beautifully weathered instrument that looks like a cherished family heirloom ready for its next concerto
High-Gloss Lacquer-Like Drama
Achieve a stunningly sophisticated, mirror-like finish on an upright piano that mimics the depth and drama of expensive factory lacquer. This transformation uses high-gloss enamel to turn a tired instrument into a sleek, modern statement piece that reflects light beautifully.
Detailed Instructions
Materials
- High-quality oil-based high-gloss enamel paint (black)
- Oil-based primer (tinted gray if possible)
- Liquid deglosser or TSP substitute
- High-grit sandpaper (220, 320, 400 grit)
- Tack cloths
- Painter’s tape (automotive grade preferred)
- High-density foam rollers
- High-quality angled sash brush (synthetic blend for oil)
- Metal polish (for pedals and hinges)
- Canvas drop cloths
- Respirator mask
- Mineral spirits (for cleanup)
Step 1: Preparation & Dismantling
-
Clear the area:
Move the piano away from the wall and place canvas drop cloths underneath. Ensure the room has excellent ventilation due to the fumes from oil-based products. -
Remove hardware:
Carefully remove any detachable parts. Take off the music desk, the front board (both upper and lower), and the fallboard (key cover) if your model allows. Label all screws in small bags. -
Clean thoroughly:
Scrub the entire surface with a TSP substitute or degreaser to remove years of furniture polish, oil from fingers, and dust. This step is critical to prevent fisheyes in the glossy finish. -
Degloss the surface:
Apply a liquid deglosser according to the package instructions. This chemical sander helps the new paint bite into the old varnish without stripping it completely. -
Protect the keys:
Depress the keys and slide cardstock or playing cards between the keys and the wood frame. Tape over the keys meticulously with painter’s tape to seal them off completely from drips.
Step 2: Priming for Smoothness
-
Scuff sand:
Once dry, lightly scuff the entire piano with 220-grit sandpaper. You aren’t removing the finish, just creating microscopic scratches for adhesion. -
Remove dust:
Vacuum the dust away and wipe the entire surface with a tack cloth. Any speck of dust will show in a high-gloss finish, so be extremely thorough. -
Apply primer:
Roll on a thin coat of oil-based primer using a high-density foam roller. Use the brush to get into corners and detailed carving. Let this cure for a full 24 hours. -
Sand the primer:
Smooth out the primer coat with 320-grit sandpaper. It should feel as smooth as glass to the touch. Wipe down again with a fresh tack cloth.
Uneven Sheen?
If you see dull spots after drying, it usually means the paint was applied too thinly or soaked into the wood unevenly. Lightly sand that area and apply one more uniform topcoat.
Step 3: Creating the Glassy Finish
-
First coat of gloss:
Stir your high-gloss enamel gently to avoid introducing air bubbles. Pour a small amount into a tray. -
Application technique:
Apply the paint with a foam roller in small sections. Immediately ‘tip off’ the wet paint by lightly dragging the tip of your high-quality brush over it in one continuous, long stroke to smooth out roller texture. -
Dry and assess:
Allow this coat to dry for at least 24-48 hours. Oil-based enamels have longer open times, which allows them to self-level, but they take patience to cure. -
Wet sanding:
Very lightly wet sand the surface with 400-grit sandpaper to knock down any nibs or brush marks. Clean thoroughly with a damp cloth followed by a tack cloth. -
Second coat:
Apply the second coat using the same roll-and-tip method. Work quickly to keep a wet edge and avoid overworking the paint, which causes drag marks. -
Optional third coat:
I find that for a true ‘dipped in lacquer’ look, a third thin coat often adds that final depth. Repeat the sanding and painting process if you desire deeper gloss.
Mirror Shine Level-Up
For a true showroom finish, once the paint is fully cured (30 days), use automotive polishing compound and a buffer to bring the gloss to a literal mirror reflection.
Step 4: Final Details
-
Polish hardware:
While the paint cures, polish the brass pedals and hinges with metal polish until they gleam gold against the new black finish. -
Reassemble:
Wait at least 5-7 days for the paint to harden significantly before reattaching the music desk and boards. Tighten screws carefully to avoid cracking the new paint. -
Reveal the keys:
Peel back the tape from the keys slowly. Clean the keys with a slightly damp microfiber cloth to remove any residue.
Now step back and admire how the light dances across your revitalized instrument as you play your first song
Chalkboard Paint for Interactive Art
Transform an old, weary upright piano into a playable canvas for creativity with this bold chalkboard paint makeover. This project turns the instrument’s surface into an interactive space for musical notation, doodles, and ever-changing art, all while giving it a sleek, matte black finish.
How-To Guide
Materials
- Upright piano (in need of a cosmetic refresh)
- Black chalkboard paint (quart)
- High-quality angled sash brush (1.5 – 2 inch)
- Small foam roller and tray
- Sandpaper (100-grit and 220-grit)
- Painter’s tape (blue or green)
- Drop cloths
- Tack cloth
- Screwdriver (for hardware removal)
- Primer suitable for wood/laminate (dark tinted preferred)
- Chalk (white and colored)
- Damp cloth for cleaning
- Gold metallic paint (optional for pedals)
Step 1: Preparation & Dismantling
-
Assess the piano:
Begin by inspecting your piano. Decide which parts are easily removable; typically, the music desk, the fallboard (key cover), and sometimes the front panels can be taken off for easier painting. -
Protect the surroundings:
Lay down heavy-duty drop cloths underneath and around the piano to catch any sanding dust or paint drips. This is a messy job, so be thorough. -
Remove hardware:
Use a screwdriver to carefully remove hinges, knobs, and pedals covers if possible. Bag and label these screws immediately so you don’t lose them during the process. -
Protect the keys:
This is crucial: depress the keys slightly to slide a sheet of paper or plastic between the keys and the fallboard area, then meticulously mask off the entire keyboard with painter’s tape. Seal the edges tightly so no dust gets inside.
Season to Flavor
Don’t skip the seasoning step! Rubbing chalk over the whole surface fills the paint’s pores. If you skip this, your first drawing will leave a permanent faint image.
Step 2: Surface Prep
-
Initial sanding:
Scuff sand the entire surface using 100-grit sandpaper. You aren’t trying to strip it to bare wood, but you must remove the glossy varnish so the new paint adheres. -
Clean the dust:
Vacuum up the loose dust from the sanding process, then wipe down the entire piece with a damp cloth followed by a tack cloth to catch fine particles. -
Prime the surface:
Apply a coat of primer. If your piano is dark wood, a dark-tinted primer helps achieve coverage faster. Use a brush for corners and a foam roller for the large flat panels. -
Light sanding:
Once the primer is fully dry, lightly sand the surfaces with 220-grit sandpaper to knock down any texture. Wipe clean with a tack cloth again.
Color Me Musical
Don’t limit yourself to white chalk. Use neon chalk markers for temporary ‘permanent’ art that pops, or pastel chalks to softy shade musical notation.
Step 3: Painting & Finishing
-
Cut in edges:
Open your chalkboard paint and stir thoroughly. Use the angled sash brush to ‘cut in’ the paint around the complicated edges, molding, and corners where a roller won’t reach. -
Roll the first coat:
Using the small foam roller, apply the first coat of chalkboard paint to the large, flat areas like the front board and sides. Work in long, smooth strokes to avoid roller marks. -
Dry and repeat:
Allow the first coat to dry according to the can’s instructions (usually 4-24 hours). I prefer to wait a full day to ensure a hard base before adding the second coat. -
Apply second coat:
Apply a second (and potentially third) coat of chalkboard paint using the same method. Multiple thin coats are better than one thick, gloopy one. -
Refresh the pedals:
If your pedals look tarnished, carefully mask around them and use a small detail brush to apply a touch of gold metallic paint for a classic contrast. -
Remove tape:
While the final coat is still slightly tacky (not fully cured), carefully peel away the painter’s tape. pulling it away at a 45-degree angle ensures clean lines.
Step 4: Setting the Stage
-
Curing time:
Let the paint cure for at least 3 days before writing on it. Chalkboard paint needs time to harden completely to withstand the abrasion of chalk. -
Seasoning the board:
Before drawing your first masterpiece, ‘season’ the chalkboard by rubbing the side of a piece of white chalk over the entire painted surface, then erasing it. This prevents ‘ghosting’ from your first drawings. -
Add musical motifs:
Draw some initial artwork to inspire the player. Sketch large musical notes on the bottom panel and perhaps a treble clef or some practice scales on the upper panels. -
Create a focal point:
On the fallboard or central panel, sketch a whimsical drawing or write a favorite quote. In the reference image, abstract faces and loose doodles add a relaxed, artistic vibe. -
Side panel art:
Don’t forget the sides! These tall vertical spaces are perfect for elongated sketches, like a standing bass, a scrolling vine, or abstract shapes.
Enjoy your customized instrument that now serves as both a musical center and an ever-evolving gallery for your home
Painted Florals on the Front Panels
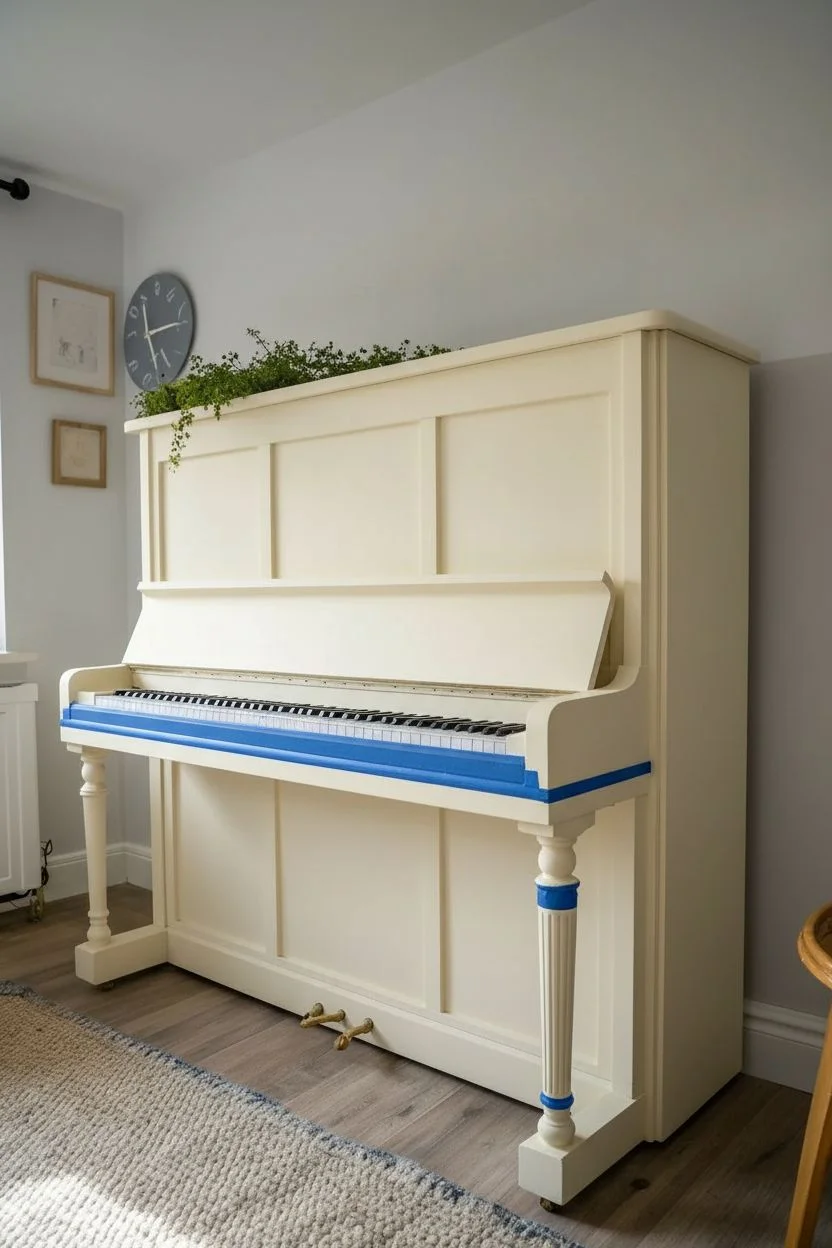
Breathe new life into a tired instrument with this charming update that brings the garden indoors. By combining a creamy, soft white base with delicate botanical illustrations on the inset panels, you can create a centerpiece that feels both vintage and fresh.
Step-by-Step Tutorial
Materials
- Upright piano (cleaned and prepped)
- Sander and sandpaper (120 and 220 grit)
- Painter’s tape
- Chalk paint or mineral paint (Cream/Off-White)
- Small foam roller and tray
- High-quality synthetic angled brush (2-inch)
- Fine detail brushes (sizes 0, 1, and 3)
- Acrylic paints (olive green, muted pinks, mustard yellow, browns)
- Clear matte or satin polycrylic topcoat
- Pencil and eraser
- Optional: Botanical transfer decals or stencils
Step 1: Preparation and Base Coat
-
Clean surface:
Begin by removing any dust, grime, or oils from the piano surface using a degreasing cleaner. A clean surface is crucial for paint adhesion. -
Scuff sand:
Lightly sand the entire exterior of the piano with 120-grit sandpaper. You aren’t trying to remove the old finish entirely, just creating a ‘tooth’ for the new paint to grab onto. -
Protect keys:
Carefully apply painter’s tape to the edges of the keys and the pedals to protect them from paint splatters. -
Apply first coat:
Using the synthetic angled brush for corners and the foam roller for flat areas, apply your first coat of cream chalk paint. Don’t worry if it looks streaky; coverage will improve with the next layer. -
Sand and recoat:
Once dry, lightly smooth any bumps with 220-grit sandpaper, wipe away dust, and apply a second coat. Depending on the original wood color, a third coat might be necessary for full opacity.
Step 2: Painting the Botanicals
-
Plan composition:
Focus your attention on the recessed panels above and below the keyboard, as well as the tall side panels. Sketch your wildflower designs lightly with a pencil directly onto the dry paint, varying the heights of the stems for a natural look. -
Paint stems:
Mix a muted olive green allowing for slight variations in tone. Using a size 1 liner brush, paint the long, slender stems following your pencil lines. Keep your hand loose to avoid stiff-looking plants. -
Add leaves:
With a size 3 brush, add small, fern-like leaves and grassy blades near the bottom of the stems. I find it helps to start the brush stroke with pressure and lift off quickly to create a tapered leaf point. -
Create blooms:
Dip into your pinks, yellows, and browns. Dab small clusters of dots to create seed heads or lavender-style flowers. For poppy-like flowers, use broad, loose strokes with a bit of water to make the petals look translucent. -
Add side details:
Move to the side of the piano and replicate a taller, climbing floral vine design. Since this surface is larger, you can scale up your flowers slightly to fill the vertical space effectively. -
Detail work:
Use your smallest zero-point brush to add tiny darker centers to the flowers or fine veins on larger leaves. These small contrasts bring the flat shapes to life. -
Clean up:
Once the artwork is fully dry, gently erase any visible pencil marks that weren’t covered by paint.
Uneven Paint?
If your white base coat looks brush-stroked, lightly sand with a damp sanding sponge between coats. Adding a splash of water to chalk paint can also help it self-level better.
Step 3: Sealing and Finishing
-
Apply topcoat:
Stir your clear polycrylic gently (do not shake, to avoid bubbles). Apply a thin layer over the entire piano using a clean brush or foam applicator. -
Seal artwork:
Pay special attention to the areas with your hand-painted flowers, ensuring the clear coat completely covers the acrylic work to prevent chipping. -
Final dry:
Let the first coat of sealer dry for at least 2 hours, then apply a second coat for durability. Remove the painter’s tape carefully before the final coat is 100% hard to ensure a crisp line.
Try Transfers
Not confident in your painting skills? Use furniture transfer rub-ons instead of hand-painting. Botanical transfers offer the same detailed look with zero drawing required.
Enjoy the gentle, artistic presence your newly painted piano brings to the room
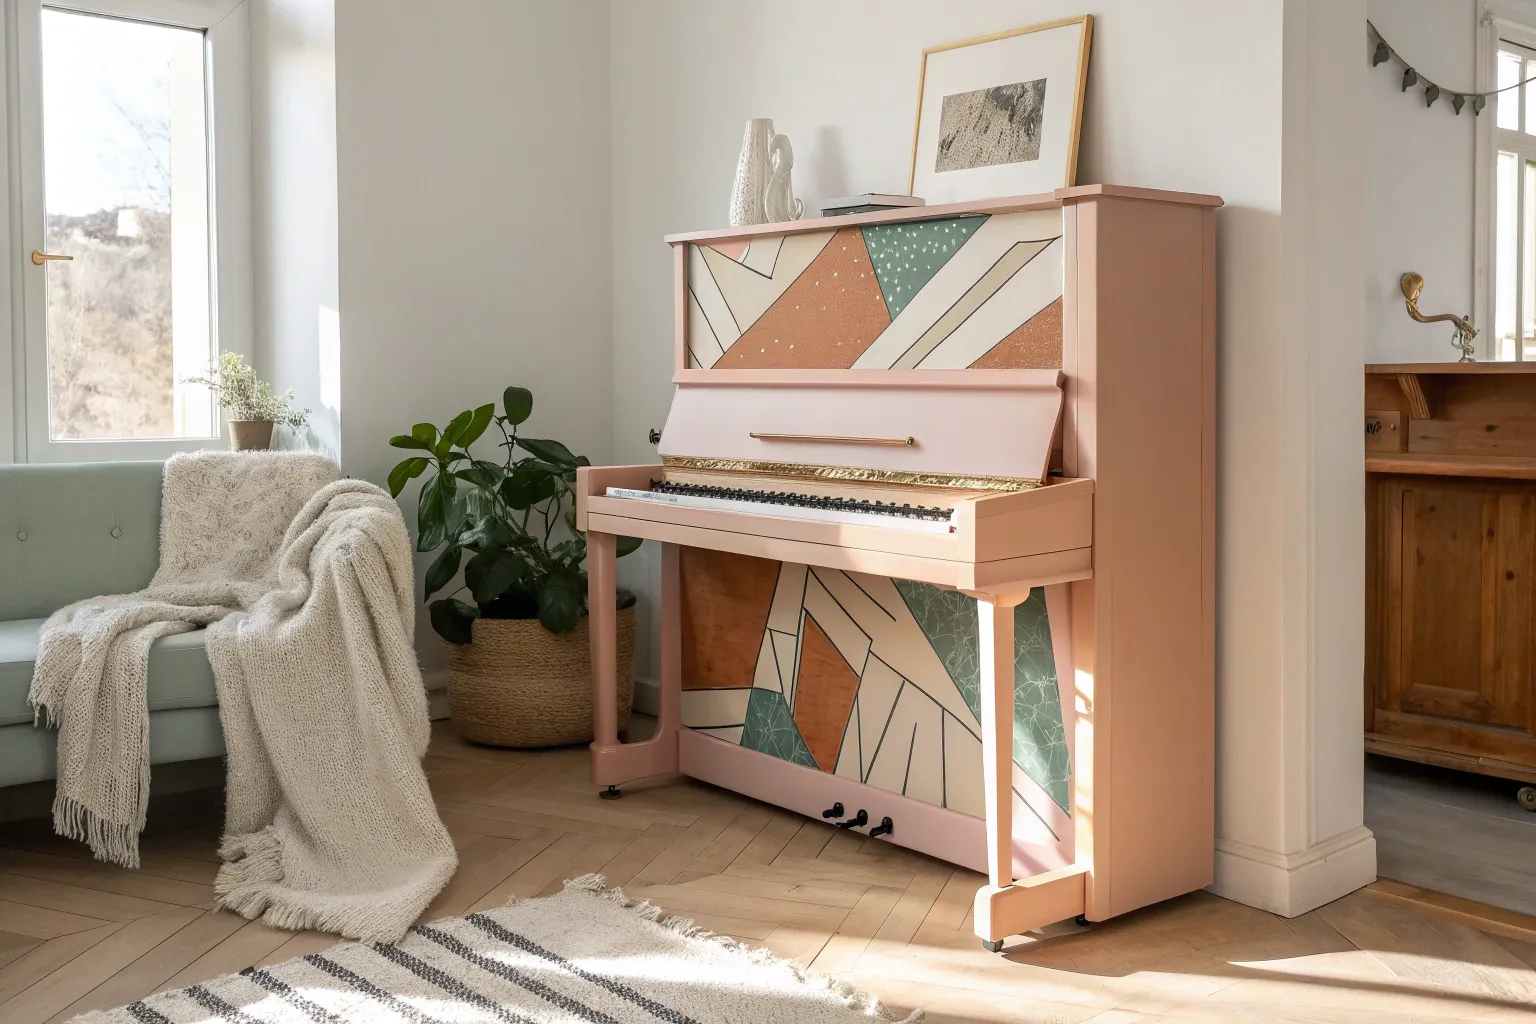
Geometric Color Blocks for Modern Style
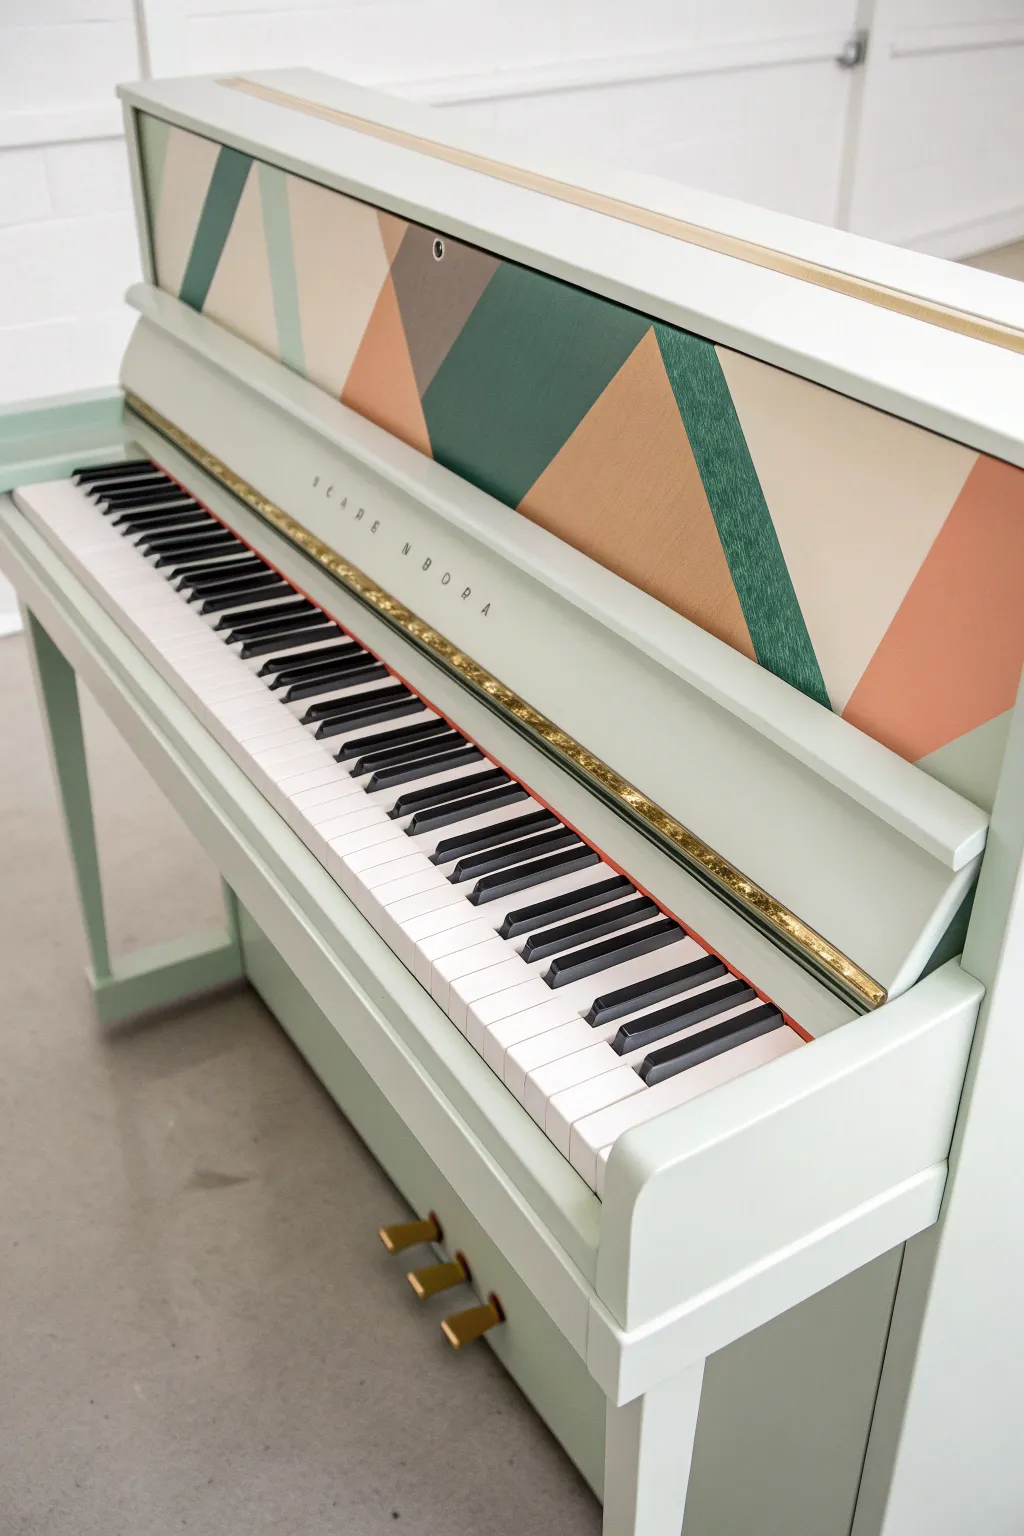
Transform an outdated upright piano into a modern statement piece with soft mint paint and bold geometric color blocking. This project balances a calm, uniform base color with a playful, abstract design on the front panel for a truly unique look.
Step-by-Step Guide
Materials
- Upright piano (cleaned and prepped)
- Painter’s tape (various widths)
- Mint green chalk paint or furniture paint
- Acrylic paints (beige, terracotta, dark teal, grey)
- Gold leaf or metallic gold paint
- Clear wax or matte polyurethane topcoat
- Fine-grit sandpaper (220-grit)
- Small foam roller
- Angled sash brush
- Small detail brushes
- Screwdriver (for hardware removal)
- Drop cloths
Step 1: Cleaning & Prep
-
Surface Prep:
Begin by thoroughly cleaning the entire piano exterior with a degreaser or TSP alternative to remove oils and old wax. Wipe it down with a damp cloth afterward to remove any residue. -
Hardware Removal:
Carefully unscrew and remove any removable parts like the music desk or front panel if possible. If you can’t remove the pedals, tape them off securely with painter’s tape. -
Light Sanding:
Scuff sand the entire glossy surface with 220-grit sandpaper. You don’t need to strip it to bare wood, just create enough ‘tooth’ for the primer and paint to adhere. -
Protecting the Keys:
This is crucial: cover the piano keys completely. I like to lay a rigid piece of cardboard over them and then seal the edges with painter’s tape so no drips can sneak through.
Step 2: Base Coat Application
-
First Coat of Mint:
Using a small foam roller for large flat areas and an angled brush for corners, apply your first coat of mint green paint. Keep layers thin to avoid drips. -
Drying Time:
Allow the first coat to dry completely according to the manufacturer’s instructions, usually 2-4 hours. -
Second Coat:
Apply a second coat of mint paint for opaque, even coverage. Check for any brush strokes and smooth them out lightly while the paint is still wet. -
Gold Accents:
Once the green body is dry, use a small brush to carefully paint the decorative trim strip above the keys with metallic gold paint or apply gold leaf size and leafing for extra shine.
Bleeding Lines?
If paint bleeds under tape, seal tape edges first with the base color (mint) before painting the color block. This blocks gaps!
Step 3: Geometric Design
-
Planning the Shapes:
On the upper front panel, use painter’s tape to map out your geometric design. Create large intersecting triangles and trapezoids. Press the tape edges down firmly to prevent bleed. -
Painting First Colors:
Select non-adjacent shapes to paint first—start with the beige and terracotta sections. Apply paint within the taped off areas using a small flat brush. -
Tape Removal Trick:
Remove the tape while the paint is still slightly tacky, not fully dry. This helps keep the lines crisp and prevents the paint from peeling up with the tape. -
Painting Second Colors:
Once the first set of shapes is fully dry, re-tape to define the remaining shapes for the dark teal and grey colors. Paint these sections carefully. -
Touch Ups:
After all tape is removed and paint is dry, use a tiny artist’s brush to tidy up any lines that aren’t perfectly straight or where colors might have bled slightly.
Level Up: Texture
Mix a little baking soda into the paint for the geometric shapes to create a raised, velvety texture that contrasts with the smooth body
Step 4: Finishing Touches
-
Applying Topcoat:
Protect your work with a clear matte wax or water-based polyurethane. Apply it gently over the geometric design first to ensure colors don’t smear, then seal the rest of the body. -
Revealing the Pedals:
Remove the tape from the pedals. If they look tarnished, you can buff them with metal polish or paint them with the same gold metallic paint used on the trim. -
Reassembly:
Screw any removed hardware back into place and remove the protective cardboard from the keys.
Enjoy the fresh, modern melody your newly painted piano brings to the room
Ombre Fade from Dark to Light

Transform an ordinary upright piano into a stunning statement piece with this sophisticated ombre finish. The design starts with a deep, slate blue base that gradually fades upward into a shimmering metallic champagne, creating a sense of height and elegance.
Step-by-Step
Materials
- Interior/Furniture Cleaner or TSP substitute
- Sanding sponge (medium grit)
- Painter’s tape
- Bonding primer (stain-blocking)
- Chalk or Mineral paint (Dark Slate Blue)
- Chalk or Mineral paint (Metallic Champagne/Silver)
- High-quality synthetic paint brushes (oval and flat)
- Blending brush or soft bristle brush
- Water spray bottle (mister)
- Clear wax or polycrylic topcoat
- Lint-free rags
- Drop cloths
Step 1: Preparation & Priming
-
Clean Thoroughly:
Begin by removing any dust and grime. Scrub the entire surface with a TSP substitute or furniture cleaner to ensure the paint adheres properly. -
Light Scuff Sanding:
Using a medium grit sanding sponge, lightly scuff all surfaces you intend to paint. You aren’t trying to strip the old finish, just creating ‘tooth’ for the primer. -
Protect the Keys:
This is crucial: carefully tape off the piano keys and pedals. Slide stiff paper or cardstock between the keys and the fallboard to ensure no drips get inside the mechanism. -
Apply Primer:
Paint a coat of specific stain-blocking bonding primer over the entire wood surface. This prevents old wood tannins from bleeding through your new finish.
Mist for Magic
A fine mist spray bottle is your best friend during blending. Use it to keep acrylic paints wet longer, allowing for a seamless, smoky transition without brush/drag marks.
Step 2: Painting the Base Color
-
Paint the Bottom Half:
Start with your Dark Slate Blue paint. Apply a solid coat to the bottom panel, the legs, and the sides, working your way up to just below the keyboard area. -
Paint the Middle Section:
Continue painting the blue up the sides and onto the fallboard (the part that covers the keys). Keep your strokes long and even. -
Continue Upward:
Bring the blue paint up to the top panel, but stop about halfway up or leave the coverage thinner near the top where the blend will happen. -
Second Coat:
Once dry, apply a second coat of the dark blue to the bottom and middle sections to ensure rich, opaque coverage.
Step 3: Creating the Ombre Blend
-
Apply Metallic Top:
Now, take your Metallic Champagne paint. Start at the very top of the piano and paint downward on the upper front panel. -
Meet the Colors:
Bring the metallic paint down until it meets the blue edge on the upper panel. Do not let the paint dry yet; work while both edges are slightly wet if possible. -
Mist and Blend:
Lightly mist the transition area where the blue meets the metallic with your water bottle. Take a clean, dry blending brush and feather the two colors together horizontally. -
Layering the Blend:
I usually find blending takes patience. If the blue is too strong, feather more metallic down. If it’s too light, feather a tiny bit of blue up. The goal is a soft, smoky transition. -
Highlighting Details:
Use a small brush to apply the metallic paint specifically to the raised molding frames on the upper panel, creating a crisp, bright accent against the blended background. -
Dry and Assess:
Let the blended section dry completely. Check if you need to intensify the metallic top with a second coat, being careful not to ruin your fade.
Hardware Upgrade
For a truly custom look, replace old caster wheels with new brass ones, or use ‘Rub ‘n Buff’ in Gold Leaf on the existing pedals and hinges to match the champagne top.
Step 4: Finishing and Sealing
-
Seal the Paint:
Once everything is fully dry (wait at least 24 hours), apply a clear wax or a polycrylic topcoat. Wax offers a softer sheen, while liquid topcoat is more durable for high-traffic areas. -
Buffing (If Using Wax):
If you chose wax, wait for it to haze over and then buff it gently with a lint-free cloth to bring out a subtle satin glow. -
Polish the Pedals:
Remove the tape from the pedals. If they are brass, use a little metal polish to make them shine and complement the metallic paint.
Now you have a centerpiece instrument that looks as beautiful as the music it plays


Have a question or want to share your own experience? I'd love to hear from you in the comments below!