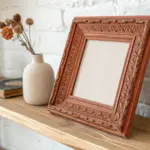
A painted picture frame can turn even the simplest photo or sketch into something that feels truly yours. I love how a little paint, a few clever techniques, and a thrifted frame can become custom home decor in an afternoon.
Classic Solid-Color Frame Refresh
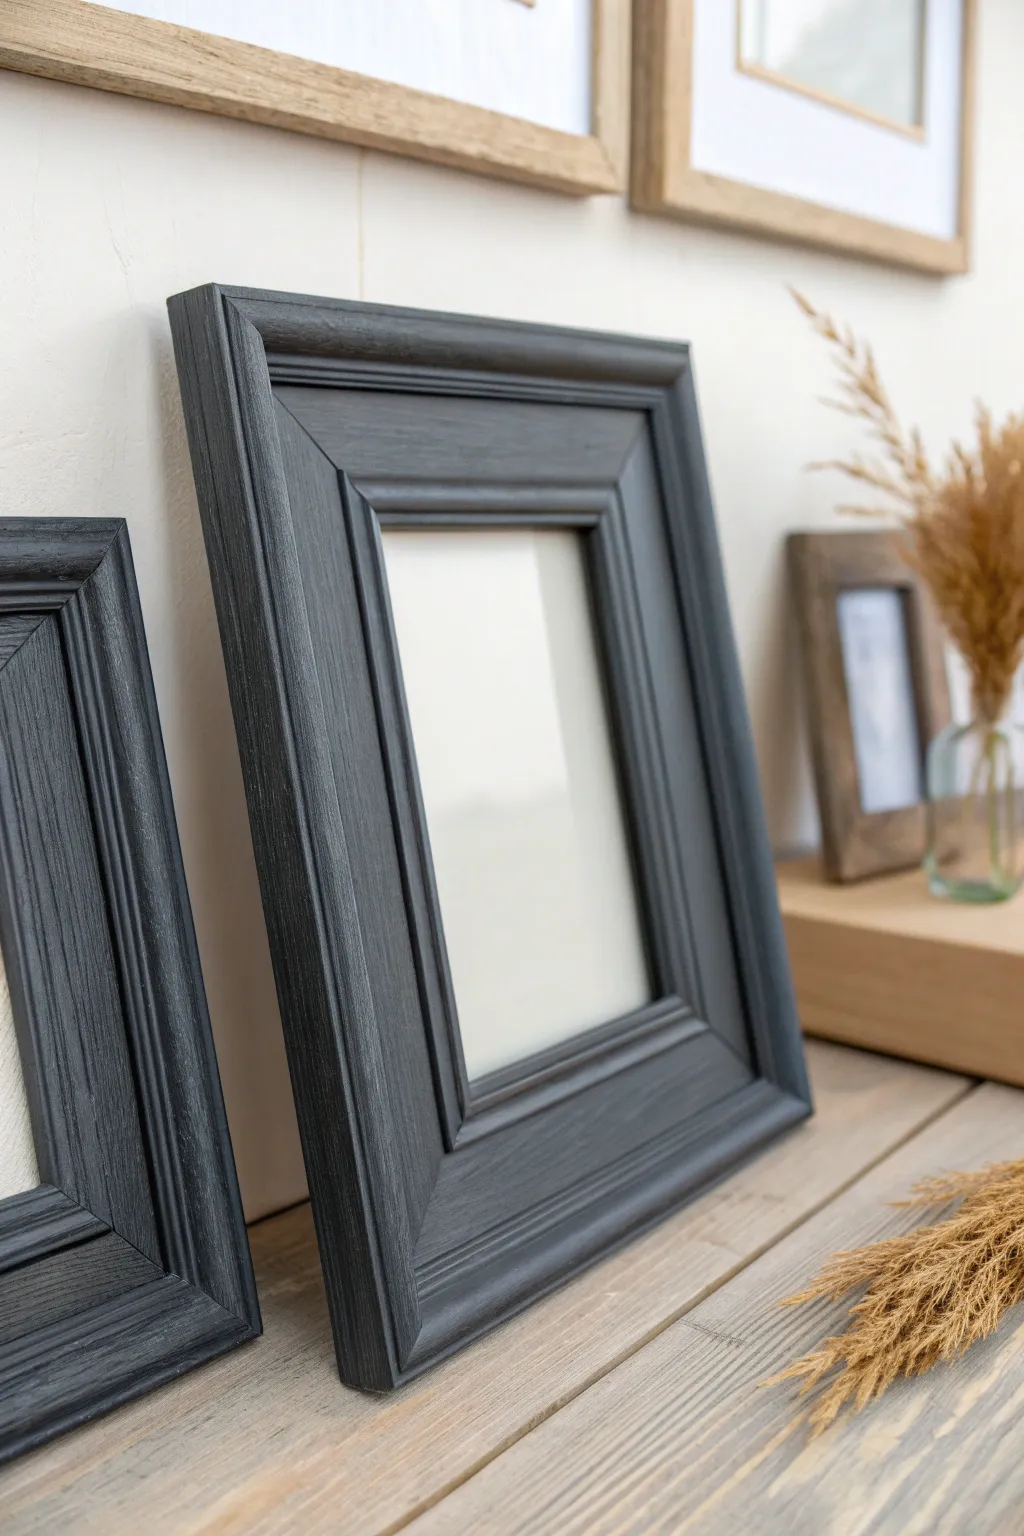
Give outdated wooden frames a modern, sophisticated edge with this deep charcoal matte finish. The result highlights the natural wood grain while adding a sleek, architectural element to your shelf decor.
Detailed Instructions
Materials
- Old wooden picture frames (molded profiles work best)
- Sandpaper (150-grit and 220-grit)
- Tack cloth or microfiber rag
- Painter’s tape
- Matte charcoal or graphite gray chalk-style paint
- Small angled sash brush (1.5 inch)
- Small round synthetic brush
- Clear matte wax or polycrylic sealer
- Lint-free wax cloth (if using wax)
- Drop cloth or old newspaper
Step 1: Cleaning and Prep
-
Disassemble the frame:
Begin by removing the backing, the glass, and any artwork from your frames. Store these components safely aside; you only want to work with the bare wooden frame itself. -
Clean surface grime:
Wipe down the frames thoroughly with a damp cloth and a mild soap solution to remove years of dust or oils. Let the wood dry completely before moving forward. -
Sand the finish:
Using 150-grit sandpaper, scuff the entire surface of the frame. You don’t need to strip it to bare wood, but you do need to rough up any existing varnish so the new paint adheres properly. -
Detail sanding:
Fold a small piece of sandpaper to get into the deep crevices of the molding. These detailed areas are crucial for achieving a professional look. -
Remove dust:
Wipe away all sanding dust using a tack cloth. Even tiny specks of dust can create an undesirable texture under your smooth matte paint.
Step 2: Painting the Frames
-
First coat application:
Dip your angled sash brush into the charcoal chalk paint. Apply a thin, even coat, following the direction of the wood grain as much as possible. -
Tackle the corners:
Use the small round brush to dab paint into the mitered corners and deep recesses of the molding where the larger brush might miss. -
Check for drips:
Inspect the inner and outer edges of the frame specifically for paint drips and smooth them out immediately before they begin to set. -
Allow to dry:
Let the first coat dry completely. Chalk-style paints usually dry quickly, but I like to give it at least an hour to be safe. -
Light sanding:
Once dry, very lightly run 220-grit sandpaper over the flat surfaces. This knocks down any brush strokes and creates a buttery smooth base for the next layer. -
Clean again:
Quickly wipe away the fine dust from your intermediate sanding with the tack cloth. -
Second coat application:
Apply a second thin coat of the charcoal paint. This layer should provide full, opaque coverage over the original wood color. -
Final dry time:
Allow the second coat to dry fully, preferably overnight, to ensure the paint hardens sufficienty before sealing.
Visible Brushstrokes?
If brush marks are too visible, your paint might be too thick. Dip your brush in a tiny bit of water before loading paint to help it self-level.
Step 3: Sealing and Assembly
-
Apply wax or sealer:
To keep that ultra-matte look, apply a clear matte furniture wax with a lint-free cloth. Work it into the wood in circular motions, then wipe away excess in the direction of the grain. -
Buff the finish:
After the wax has hazed over (usually 10-15 minutes), buff it gently with a clean cloth. This strengthens the finish without adding high shine. -
Clean the glass:
While the frame cures, clean both sides of the picture frame glass with glass cleaner to ensure your artwork shines through clearly. -
Reassemble:
Place the glass, your chosen artwork, and the backing board back into the frame. Secure the clips or points on the back. -
Final check:
Inspect the front one last time for any smudges on the glass or dust on the frame before displaying it on your shelf.
Pro Tip: Depth Control
For added dimension, use a black wax instead of clear in the deep crevices. It subtly highlights the molding profile.
Enjoy the refined, gallery-style aesthetic these updated frames bring to your space


Matte Black for Crisp Contrast
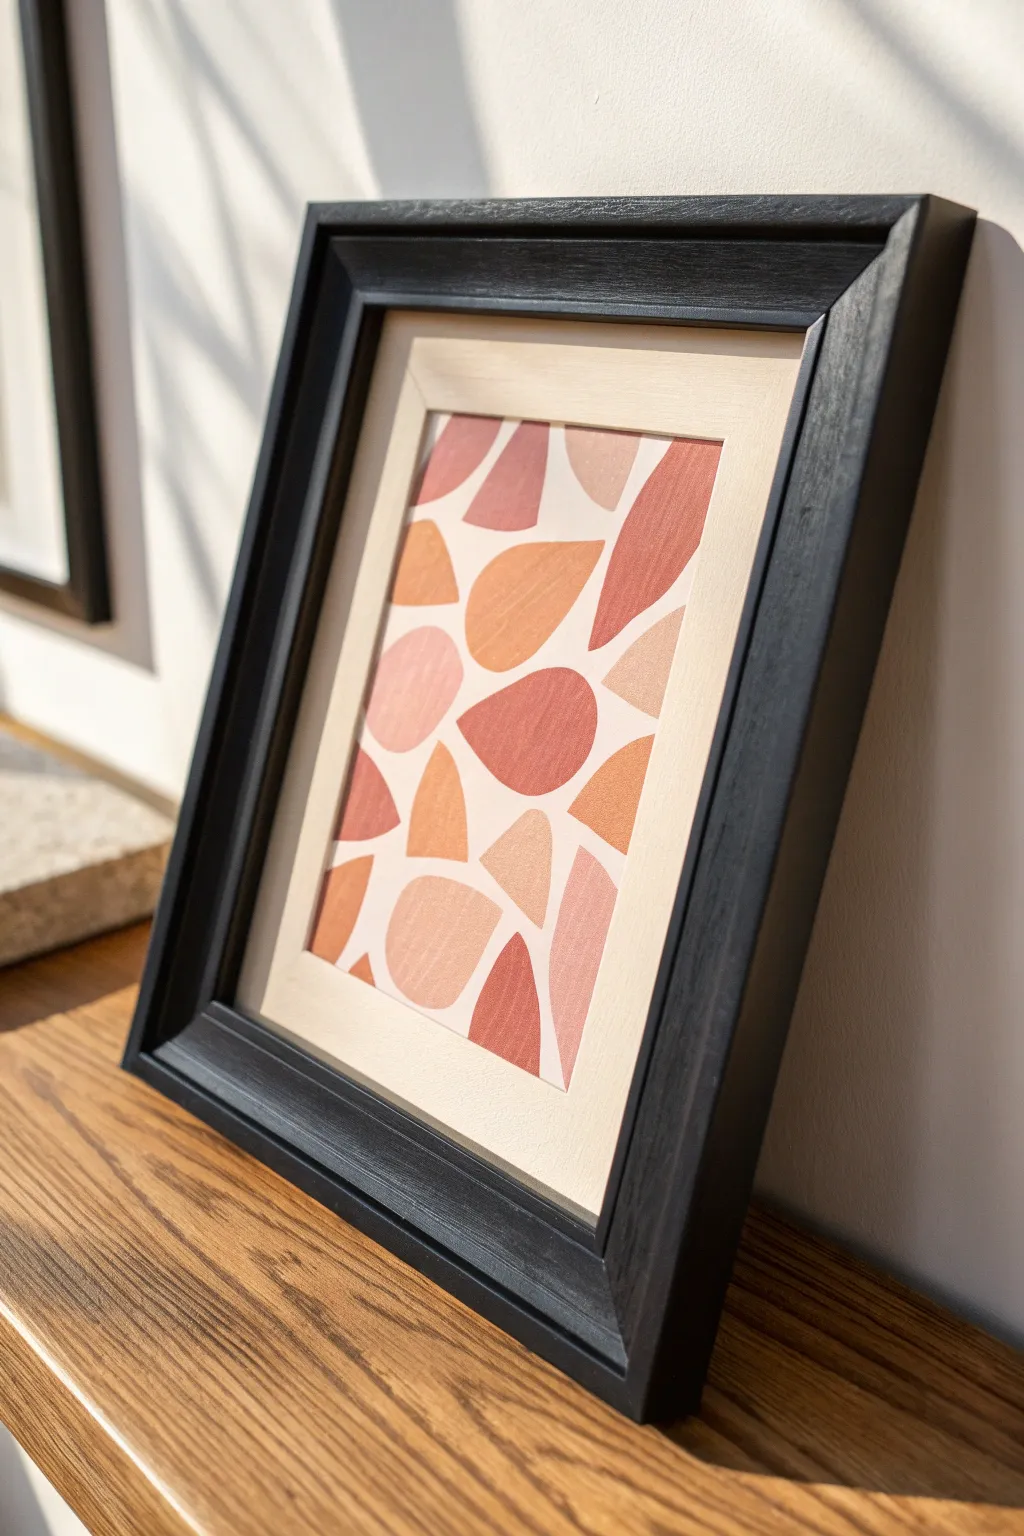
Transform a plain wooden frame into a bold statement piece with a coat of rich matte black paint, providing the perfect crisp border for warm-toned abstract art. This project combines a simple frame makeover with an approachable gouache painting technique to create a modern, gallery-worthy display.
Step-by-Step
Materials
- Unfinished or old wooden picture frame (chunky profile works best)
- Matte black acrylic paint or chalk paint
- Wide flat paintbrush (1-inch width)
- Small angled paintbrush for corners
- Fine grit sandpaper (220 grit)
- Heavyweight watercolor paper or mixed media paper (cut to frame size)
- Gouache paints (burnt sienna, terracotta, ochre, soft pink, cream)
- Round synthetic paintbrushes (sizes 4 and 6)
- Pencil
- Palette for mixing
- Mat board (cream or off-white)
Step 1: The Frame Makeover
-
Prepare the surface:
Remove the glass and backing from your wooden frame. Give the wood a light sanding with fine-grit sandpaper to rough up the surface, ensuring the paint adheres properly to any existing varnish or smooth spots. -
Clean the dust:
Wipe the entire frame down with a slightly damp cloth to remove all sanding dust. Let the wood dry completely before moving on to painting. -
Apply the first coat:
Using your wide flat brush, apply an even coat of matte black paint. Follow the direction of the wood grain to keep the finish looking natural and deliberate. -
Detail the corners:
Switch to the small angled brush to get paint into the recessed mitered corners and the inner bevel of the frame without pooling. I find this prevents those annoying drips that ruin a clean edge. -
Dry and assess:
Allow the first layer to dry for at least 30-60 minutes. If the wood grain is still showing through more than you’d like, or if the coverage looks patchy, prepare for a second coat. -
Finish the frame:
Apply a second coat of black paint if necessary for full opacity. The goal is a deep, light-absorbing matte finish that contrasts sharply with the artwork.
Visible Grain Pro Tip
For the look in the photo, don’t use a heavy primer. Let the wood grain texture show through the black paint slightly for a more organic feel.
Step 2: Creating the Abstract Art
-
Plan the composition:
Cut your paper to fit the mat opening. Using a pencil, lightly sketch a pattern of organic, rounded shapes resembling river stones or petals. Keep the shapes loose and varied in size. -
Mix your palette:
Prepare your gouache paints. You want a warm, earthy palette. Mix burnt sienna with a little white for a terracotta tone, and create a few variations of peach and soft pink by mixing ochre and red with plenty of white. -
Outline the shapes:
Starting with your darkest terracotta color, use the size 4 round brush to carefully outline a few of your sketched shapes. This creates a clean edge to fill in later. -
Fill with color:
Immediately fill in the outlined shapes with the same color using the slightly larger size 6 brush. Gouache dries visually flat and opaque, which is key for this illustrative look. -
Add lighter tones:
Switch to your peach or ochre mixture. Paint a few adjacent shapes, ensuring the wet paint doesn’t touch the previous shapes if they are still wet, to keep the edges crisp and distinct. -
Balance the layout:
Continue filling in shapes, alternating between your pink, cream, and terracotta mixes. Step back occasionally to ensure the distribution of dark and light colors feels balanced across the paper. -
Add texture:
For a bit of visual interest, I like to create subtle streaks in some shapes by dragging a slightly drier brush with a lighter shade over a base color that is just barely damp. -
Let it cure:
Allow the painting to dry flat for at least an hour. Gouache can smudge if handled too early, so patience is key here. -
Final Assembly:
Once the frame and artwork are fully dry, clean the glass thoroughly. Place the mat board over your painting, secure it in the frame, and close up the backing clips.
Level Up: Texture
Instead of standard smooth paper, use cold-press watercolor paper. The rough texture will catch the paint differently, adding depth to your simple shapes.
Now you have a striking, high-contrast art piece that brings a sophisticated warmth to any shelf or wall


Metallic Look for a Faux Gilded Finish
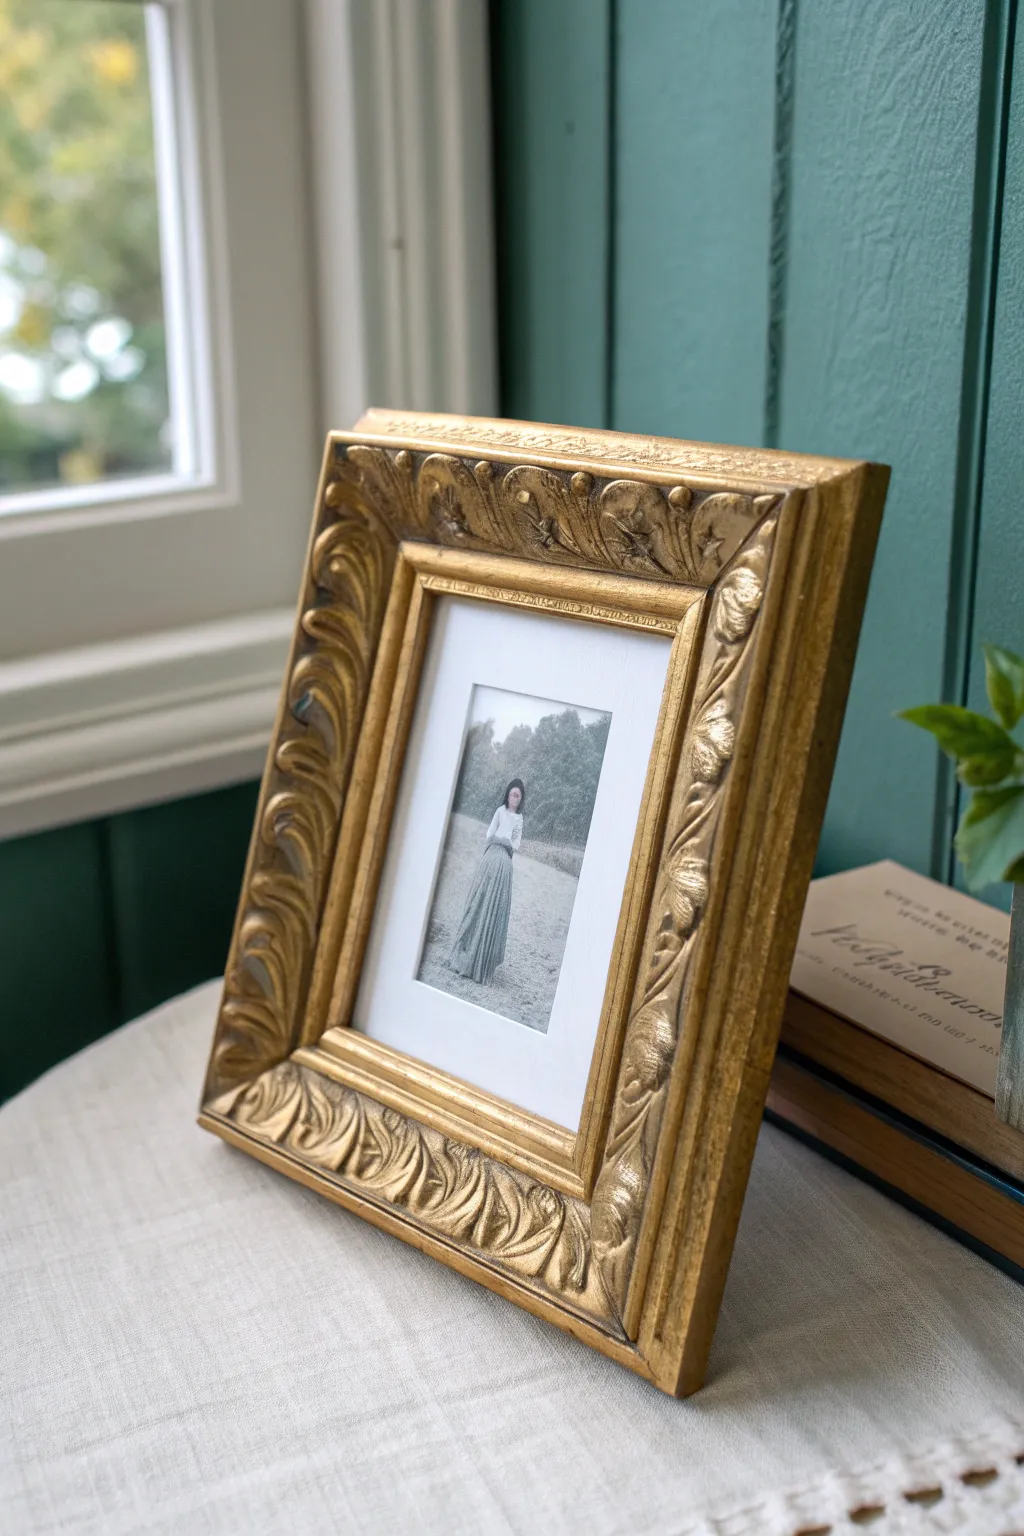
Transform a basic thrift store find or plain wooden frame into a luxurious, gold-leaf inspired masterpiece. This project uses metallic paint and waxes to achieve that high-end, heavy antique look without the hefty price tag of real gold leaf.
Step-by-Step
Materials
- Ornate wooden or resin picture frame (thrifted works best)
- Sandpaper (medium and fine grit)
- Primer spray paint (red or dark brown)
- Metallic gold spray paint (bright gold)
- Gold gilding wax or Rub ‘n Buff (antique gold)
- Dark antiquing wax or brown acrylic paint
- Soft lint-free cloths
- Small stiff paintbrush
- Clear sealant spray (satin or matte)
- Glass cleaner
- Black and white photo print
- White mat board
Step 1: Preparation and Base Coat
-
Clean the Frame:
Remove the backing, glass, and existing artwork from your chosen frame. Thoroughly wipe down the frame with a damp cloth to remove centuries of dust or thrift store grime. Let it dry completely. -
Light Sanding:
Scuff sand the entire surface of the frame using medium-grit sandpaper. You don’t need to remove the old finish entirely, just roughen it up so the new paint adheres well. -
Dust Removal:
Wipe away all sanding dust with a tack cloth or a slightly damp rag. Any leftover dust will create bumps in your metallic finish. -
Applying the Primer:
Spray the frame with a dark primer—I prefer a reddish-brown or terracotta color. This mimics the ‘bole’ clay layer found under traditional gold leafing and adds warmth to the final gold tone. -
Let it Cure:
Allow the primer to dry fully according to the can’s instructions. Usually, this takes about an hour, but patience here prevents peeling later.
Color Depth Secret
Use a red oxide primer instead of grey. The red undertone showing through slightly makes the gold topcoat look richer and more like antique gold leaf.
Step 2: Creating the Gold Finish
-
Gold Base Layer:
Apply your metallic gold spray paint in short, sweeping bursts. Keep the can about 8-10 inches away to avoid drips. -
Check Coverage:
Don’t worry about complete opacity on the first pass. It is better to do two or three thin coats than one heavy one that might run. -
Second Coat:
Once the first coat is tacky or dry, apply a second coat of gold spray paint. Ensure you get into all the deep crevices of the ornate molding. -
Adding Dimension:
Take a small amount of gold gilding wax (or Rub ‘n Buff) on your finger or a soft cloth. Lightly rub it over the highest points of the frame’s relief pattern. -
Highlighting Edges:
Continue applying the gilding wax to the outer and inner edges of the frame. This different gold tone adds depth and makes it look like solid metal rather than painted wood.
Too Much Gold?
If the gold looks too bright or ‘new,’ apply a very thin wash of burnt umber paint over the whole frame, let sit for 30 seconds, then wipe heavily.
Step 3: Antiquing and Assembly
-
Applying Antiquing Wax:
Using a small, stiff brush, dab dark antiquing wax (or watered-down brown acrylic paint) into the deep recesses and carvings of the frame. -
Wipe Back:
Immediately wipe away the excess dark wax from the raised surfaces using a clean cloth. You want the darkness to remain only in the cracks to simulate age and shadow. -
Buff to Shine:
Once the waxes have set for a few minutes, use a soft, clean cloth to buff the high points. The friction will heat the wax slightly and bring out a beautiful, authentic sheen. -
Seal the Finish:
Protect your work with a light coat of clear sealant spray. A satin finish works best to maintain a realistic luster without looking like plastic. -
Clean the Glass:
While the frame dries, clean both sides of the glass thoroughly with glass cleaner to ensure your photo shines through clearly. -
Mount the Photo:
Insert your photo into the white mat board. A wide white border helps draw the eye to the image and contrasts beautifully with the heavy gold frame. -
Final Assembly:
Place the glass, matted photo, and backing into the frame. Secure the backing clips or points firmly.
Place your newly gilded frame near a window or lamp to catch the light and show off those rich metallic textures


Distressed Edges for Vintage Charm
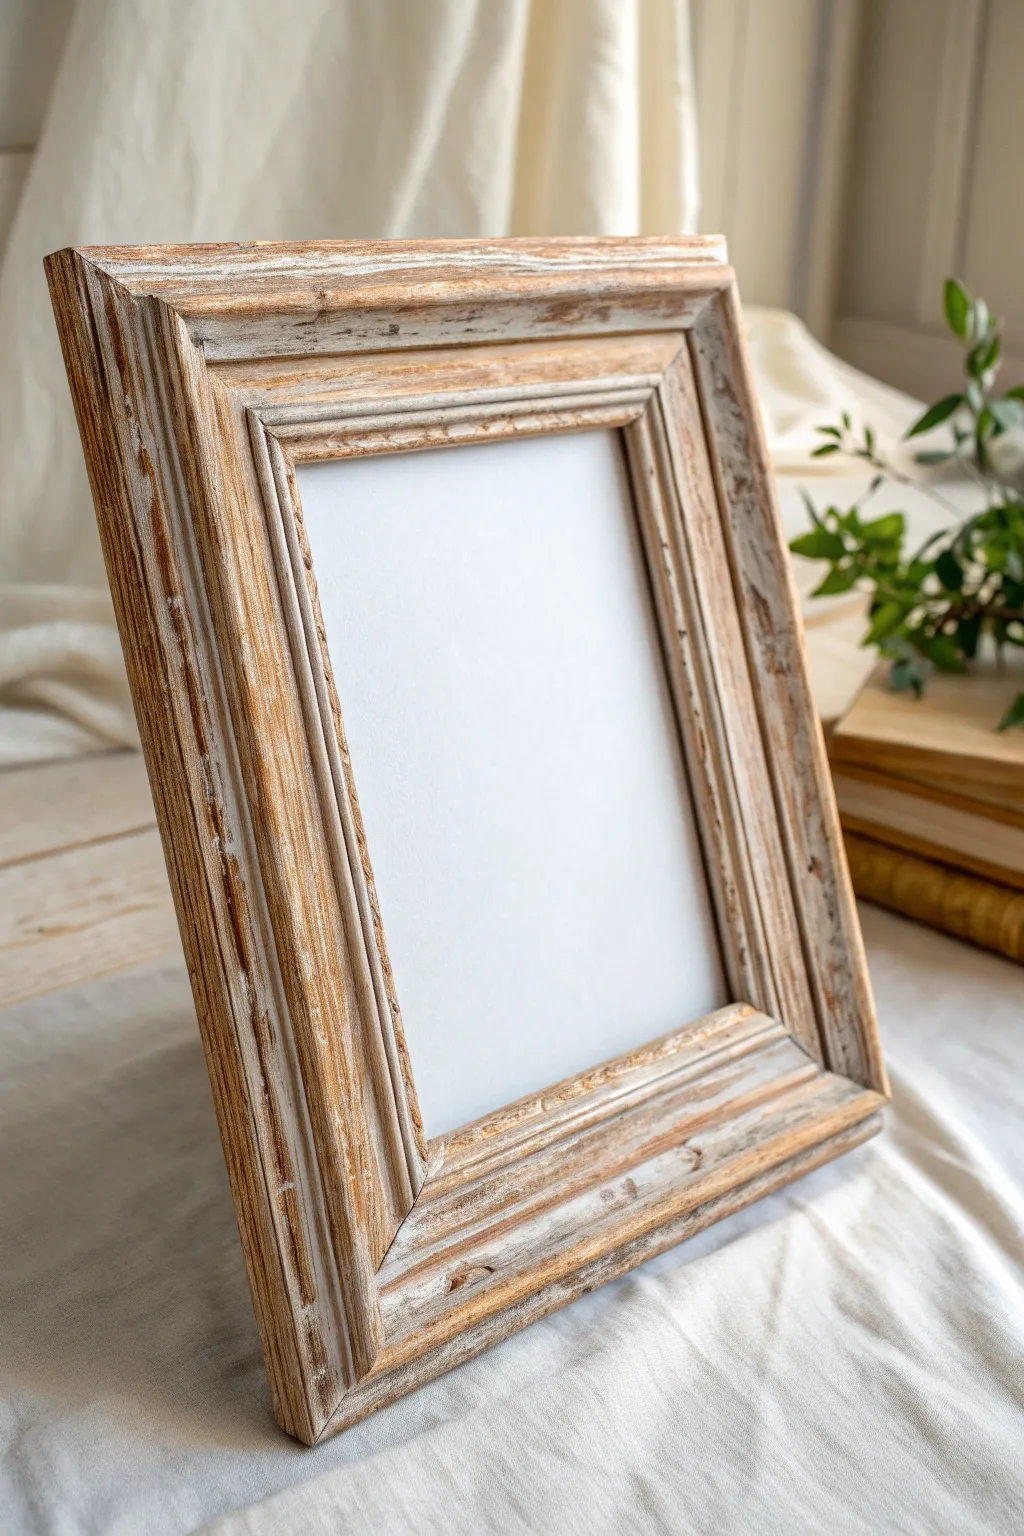
Achieve the timeless elegance of flea market finds with this simple distressed wood technique. By layering paint and strategically removing it, you can turn a plain, inexpensive frame into a piece that looks like it has stories to tell.
Step-by-Step Tutorial
Materials
- Unfinished wooden picture frame with molding details
- Medium-grit sandpaper (120-150 grit)
- Fine-grit sandpaper (220 grit)
- White or cream chalk paint
- Paintbrush (synthetic bristle)
- Dark antique wax (brown)
- Clear furniture wax
- Lint-free rags or cheesecloth
- Clean dry paintbrush for waxing
- Vacuum or tack cloth
Step 1: Preparation and Base
-
Prepare the workspace:
Lay down a drop cloth or old newspaper to catch the sanding dust. Ensure your wooden frame is clean and free of any stickers or residue. -
Initial roughing:
If your frame has a smooth or varnished finish, lightly scuff the entire surface with medium-grit sandpaper. This helps the paint adhere better to the wood grain. -
Remove the dust:
Wipe the frame down thoroughly with a tack cloth or vacuum it. You want a perfectly clean surface before any paint touches the wood. -
Dilute the paint:
Pour a small amount of white chalk paint into a container. I like to add just a splash of water—about a 10% dilution—to make the paint drag more easily over the ridges. -
Apply the first coat:
Brush the paint onto the frame in long, even strokes following the direction of the wood grain. Don’t worry about perfect coverage; a little transparency is good here. -
Let it dry completely:
Allow the paint to dry for at least 30-45 minutes. It should feel dry to the touch and chalky before you proceed.
Step 2: Creating the Distressed Look
-
Identify high points:
Look at the frame’s profile. Identify the raised ridges, corners, and edges where wear and tear would naturally occur over time. -
Sand the ridges:
Take your medium-grit sandpaper and firmly sand along those raised edges. You want to remove the white paint completely in these areas to reveal the raw wood underneath. -
Spot distress flat areas:
Lightly graze the flat sections of the frame with the sandpaper. Create random patches where the paint looks worn thin, varying your pressure for a natural look. -
Smooth the finish:
Switch to fine-grit sandpaper and go over the entire frame very lightly. This softens the transition between the paint and the exposed wood so it doesn’t look scratched. -
Clean up again:
It is crucial to remove all sanding dust at this stage. Use a vacuum brush attachment or a fresh tack cloth to get every particle out of the crevices.
Natural Wood Tone Tip
If your raw wood is very pale, stain it with a walnut stain before painting. This ensures that when you distress it, the exposed wood has a rich, aged contrast.
Step 3: Antiquing and Sealing
-
Apply clear wax:
Brush a thin coat of clear furniture wax over the entire frame. This seals the paint and provides a workable base for the dark wax so it doesn’t stain the paint too heavily. -
Add the dark wax:
Dip a clean brush sparingly into the dark antique wax. Work it into the recessed grooves and corners of the molding where dust would naturally settle. -
Wipe back excess:
Immediately use a clean lint-free rag to wipe away the dark wax from the high points. You want the dark color to remain only in the crevices and texture of the wood. -
Buff to a sheen:
Let the wax cure for about 15-20 minutes, then buff the entire frame briskly with a soft cloth. This creates a subtle, professional satin sheen. -
Final inspection:
Check for any large clumps of wax in the corners and gently remove them with a cotton swab if necessary.
Paint Stripping too Fast?
If paint peels off in sheets while sanding, it didn’t bond well. Next time, ensure the base is fully scuffed, or use a primer designed for slick surfaces.
Place your favorite photo inside to complete the charming vintage aesthetic
BRUSH GUIDE
The Right Brush for Every Stroke
From clean lines to bold texture — master brush choice, stroke control, and essential techniques.
Explore the Full Guide
Two-Tone Frame With a Painted Inner Lip
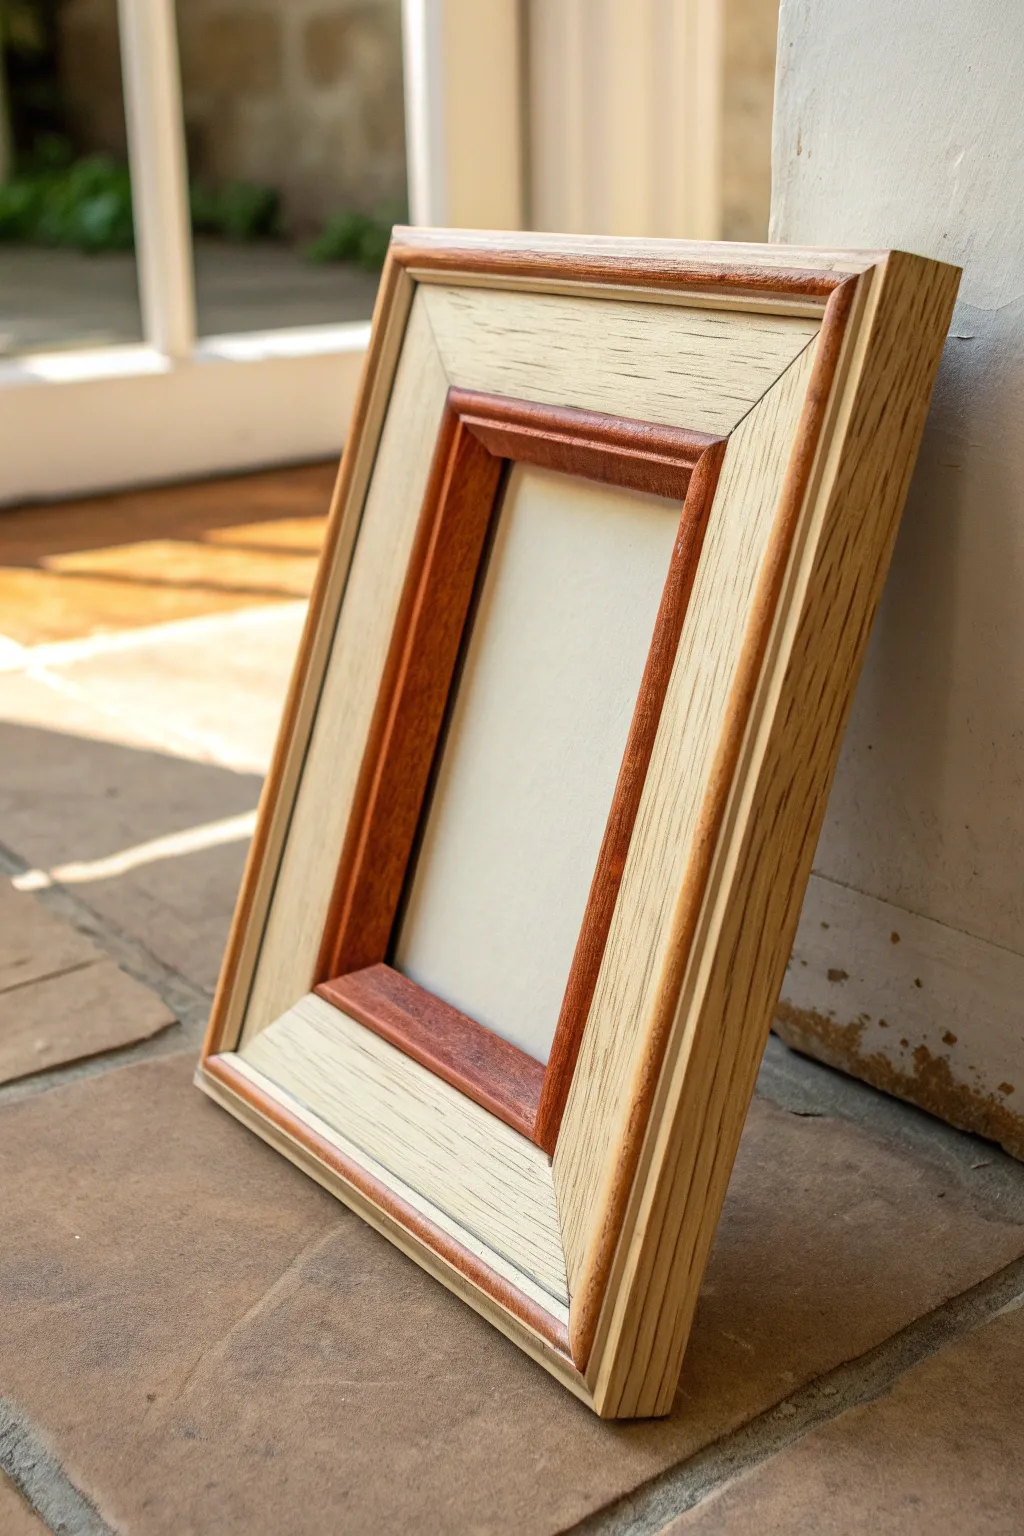
Elevate a simple wooden frame by highlighting its architectural details with a sophisticated two-tone finish. Using a combination of natural wood grain and a rich, reddish accent on the inner lip adds depth and a custom, high-end gallery feel to any photo.
Step-by-Step
Materials
- Unfinished wood picture frame (choose one with a distinct inner lip)
- White or light beige chalk paint (or stain)
- Reddish-brown wood stain or acrylic paint (e.g., mahogany or cherry)
- Painter’s tape (frog tape works best for crisp lines)
- Small angled detail brush
- Medium flat paintbrush
- Fine-grit sandpaper (220 grit)
- Clean rag or lint-free cloth
- Clear matte varnish or wax
Step 1: Preparation & First Tone
-
Disassemble the Frame:
Begin by removing the backing board, glass, and any existing artwork from the frame. Set these aside in a safe place to prevent scratching or breakage. -
Sand the Surface:
Lightly sand the entire unfinished wood frame with 220-grit sandpaper. This opens up the pores of the wood and ensures a smooth base. Wipe away all dust with a tack cloth or slightly damp rag. -
Identify the Zones:
Look closely at your frame’s profile. You want to identify the broad, flat face which will remain light, and the inner lip (the part closest to the photo) which will be the darker accent color. -
Apply the Accents:
Using your small angled detail brush, carefully apply the reddish-brown stain or paint to the inner lip. If your frame has a small outer edge detail, paint that as well to create a balanced border. -
Wipe for Consistency:
If you are using stain, let it sit for a minute or two, then wipe off the excess with a clean rag. This allows the grain to show through. If using paint, aim for a thin, semi-transparent wash rather than a thick coat. -
Dry Completely:
Allow the accent color to dry fully. This is crucial before moving to the next step to prevent bleeding. Depending on your material, this could take 1-2 hours.
Bleeding Lines?
If paint bleeds under tape inspite of your best efforts, use a craft knife to gently scrape the excess paint away once dry, or use a fine-tip marker to redefine the dark edge.
Step 2: Creating the Contrast
-
Protect the Accents:
Once the accent color is bone dry, carefully apply painter’s tape over the areas you just painted. Press the edges of the tape down firmly with your fingernail to prevent the light color from seeping under. -
Prepare the Light Wash:
For the main body of the frame, dilute a white or cream paint with a little water (about a 1:1 ratio) to create a color wash. This technique keeps the wood grain visible while changing the tone. -
Apply the Light Wash:
Using the medium flat brush, paint the broad, flat face of the frame with your light wash. Brush in the direction of the wood grain for the most natural look. -
Remove Excess Wash:
immediately after applying, wipe the surface gently with a lint-free rag. I find this helps drive the pigment into the grain lines while keeping the texture visible. -
Second Coat (Optional):
If you want a more opaque look, wait for the first coat to dry and apply a second layer of the light wash, wiping it back again for a subtle finish. -
Remove Tape:
While the light paint is still slightly tacky (but mostly dry), slowly peel back the painter’s tape at a 45-degree angle to reveal the crisp line between the two tones. -
Touch Up:
Inspect the transition lines. If any paint seeped through, use a tiny artist’s brush or a sanding block to correct the edge.
Step 3: Finishing
-
Seal the Wood:
Apply a clear matte varnish or a finishing wax over the entire frame. This unifies the sheen of the two different colors and protects the wood from dust. -
Reassembly:
Once the sealer is fully cured, clean the glass on both sides and reinsert it into the frame along with your artwork and the backing board.
Grain Enhancement
Before sealing, dry-brush a tiny amount of the dark accent color into the deep grain of the light wood sections to make the texture pop even more.
Now you have a custom gallery-style frame ready to display your favorite memory on a mantel or wall
Paint-Dipped Corners for a Modern Pop
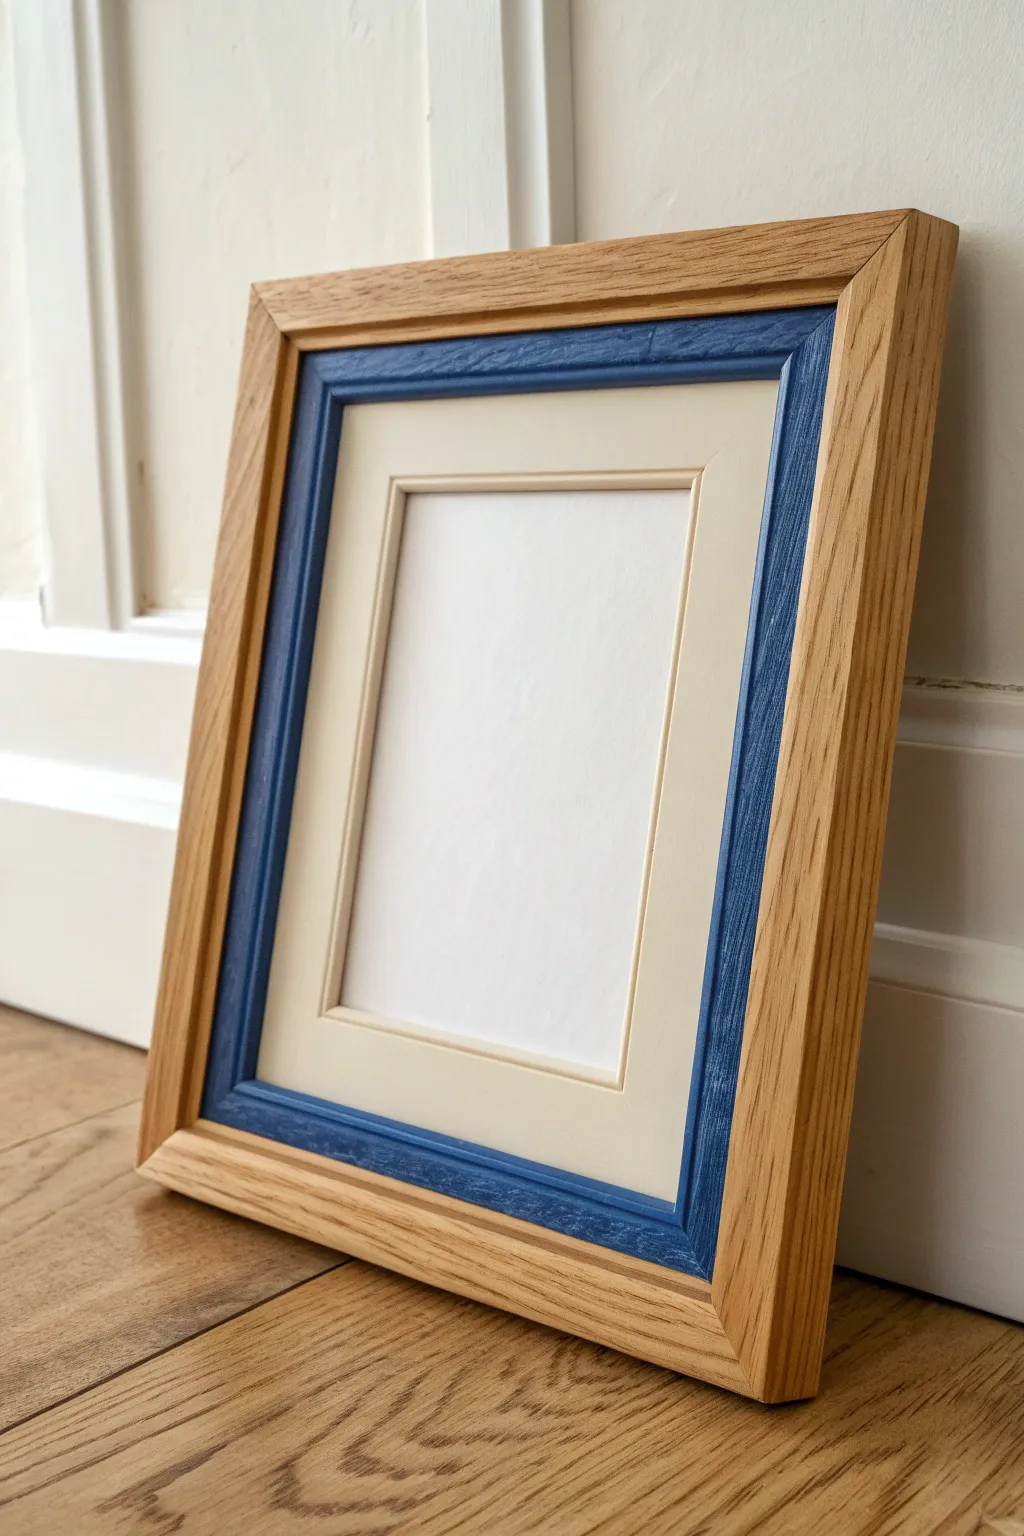
Transform a standard wooden frame into a sophisticated, multi-textural piece by introducing a painted inner liner. This project combines the warmth of natural oak with a striking band of textured slate blue, creating depth that draws the eye straight to your artwork.
Step-by-Step Guide
Materials
- Unfinished oak picture frame with flat profile
- Secondary inner wooden frame liner (slightly smaller dimension)
- Cream or off-white bevel-cut mat board
- Slate blue chalk-style or mineral paint
- Fine-grit sandpaper (220-grit)
- Painter’s tape
- Small flat synthetic paintbrush
- Matte clear wax or polycrylic sealer
- Wood glue or pin nails
- Lint-free cloth
Step 1: Preparation & Disassembly
-
Assess the components:
Begin by separating your frame components. For this look, you are essentially working with a ‘stacked’ frame design: an outer oak frame and an inner liner frame that fits snugly inside it. -
Sand the surfaces:
Lightly sand both wooden frame pieces with 220-grit sandpaper. Even though the outer frame will stay natural, a quick sanding opens the grain. Wipe away all dust with a lint-free cloth. -
Tape for protection:
If your frames are already joined or you are painting a specific routed groove on a single frame, use painter’s tape to mask off the areas you want to keep as raw wood. Press the edges of the tape down firmly.
Uneven Paint Lines?
If paint bled under your tape onto the natural oak, wrap a small piece of sandpaper around a credit card edge. Gently sand just the bleed-over away for a crisp line.
Step 2: Creating the Blue Accent
-
Select the paint:
Choose a slate blue chalk-style paint. Chalk paint is ideal here because it adheres well to wood without priming and creates that lovely matte, slightly textured finish seen in the reference. -
First coat application:
Using a small flat synthetic brush, apply the first coat of blue to the inner liner frame. Work the paint into the grain, brushing in the same direction as the wood fibers. -
Let it dry:
Allow this initial coat to dry completely, which typically takes about 30 to 60 minutes depending on humidity. Don’t rush this step or the texture might get gummy. -
Apply the second coat:
Paint a second layer for full opacity. I find that stippling the paint slightly (dabbing up and down) on this final coat enhances the wood grain texture rather than smoothing it out perfectly. -
Clean the edges:
If any paint dripped onto the back or sides that will be hidden, wipe it away now to ensure the pieces fit together flush later. -
Seal the color:
Once the blue paint is fully cured, apply a very thin layer of matte clear wax or polycrylic. This protects the color without adding unwanted shine.
Dry Brushing Depth
To highlight the wood grain on the blue section, lightly drag a dry brush with a tiny amount of lighter blue or white paint over the texture before sealing.
Step 3: Assembly & Finishing
-
Treat the outer oak:
For the outer frame, keep it natural. Apply a clear furniture wax or hemp oil to nourish the wood and bring out the golden oak tones without staining it darker. -
Stack the frames:
Insert the blue-painted liner into the larger oak frame. It should friction fit, but if it’s loose, you may need a few drops of wood glue or a pin nail from the back to secure them together. -
Prepare the backing:
Clean the glass thoroughly on both sides to remove fingerprints and dust specs. -
Add the mat board:
Place your cream bevel-cut mat board into the frame stack. The cream color provides a soft transition between the bold blue and your artwork. -
Final assembly:
Insert your artwork behind the mat, followed by the backing board. Secure the entire sandwich with glazing points or the flexible tabs on the back of the frame. -
Final inspection:
Check the corners where the blue liner meets the oak frame. If there’s any gap, a tiny dab of colored wax or filler can hide the transition seamlessly.
Place your newly layered frame on a shelf or mount it to the wall to enjoy that pop of unexpected color

PENCIL GUIDE
Understanding Pencil Grades from H to B
From first sketch to finished drawing — learn pencil grades, line control, and shading techniques.
Explore the Full Guide
Loose Botanical Vines Hand-Painted on the Frame
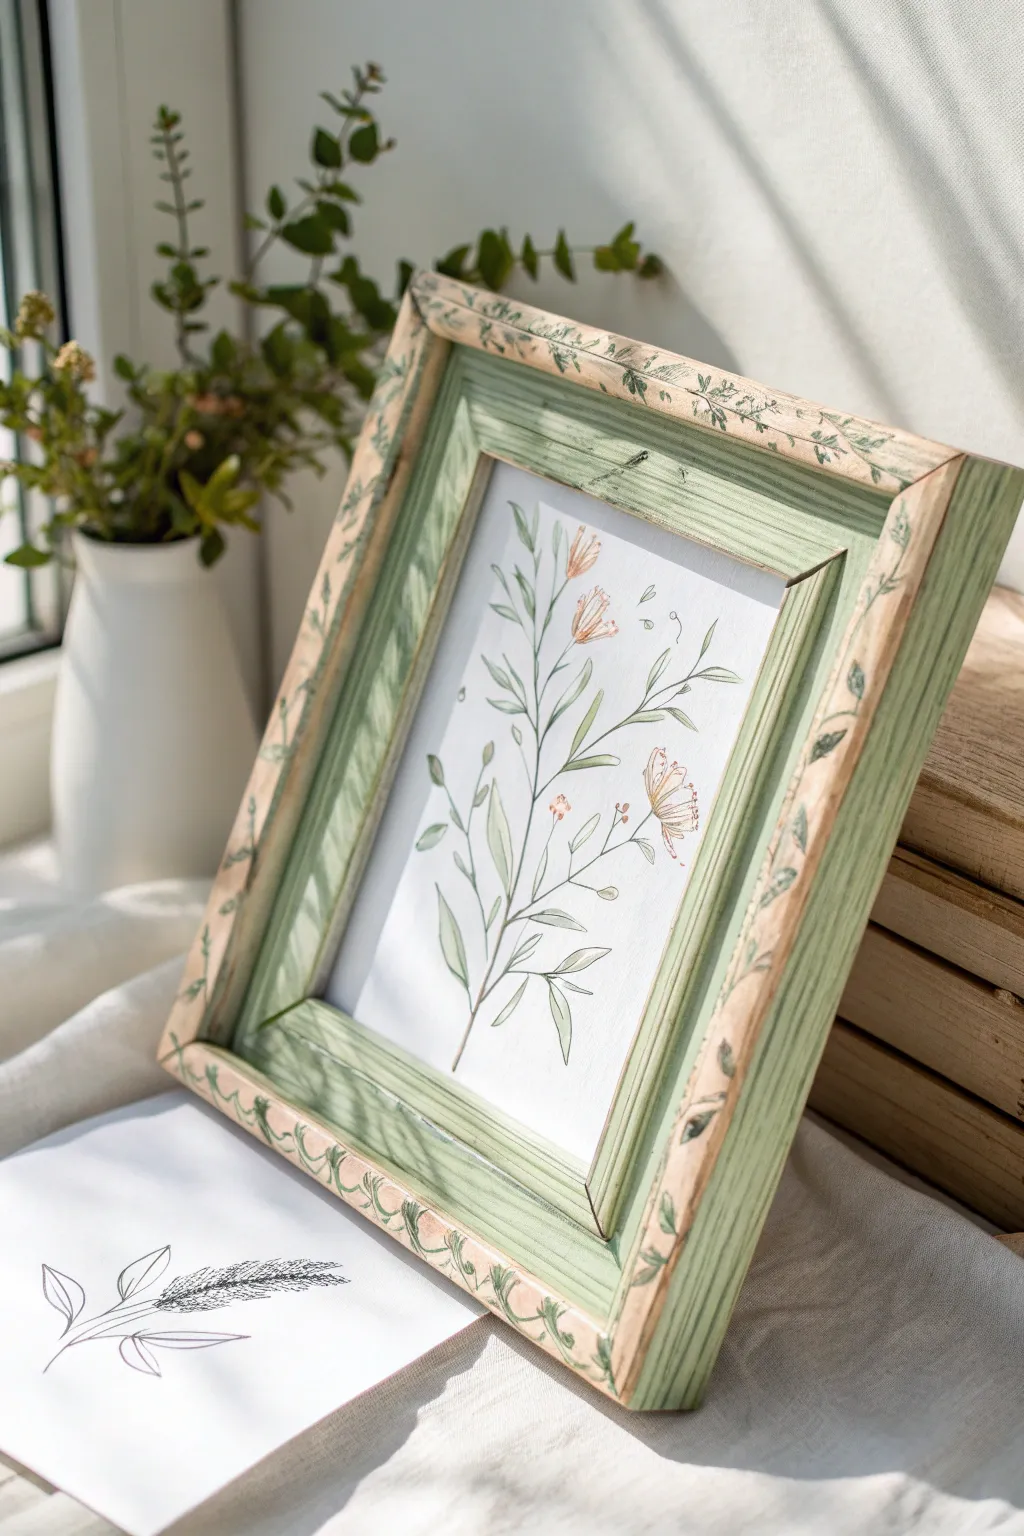
Transform a plain wooden frame into a charming piece of botanical décor with delicate, hand-painted vines. The soft sage green base and intricate leaf details give this project a fresh, organic feel that perfectly complements floral artwork.
Step-by-Step
Materials
- Unfinished wide wood picture frame
- Sandpaper (medium and fine grit)
- White tonal spray primer or gesso
- Acrylic paints: Sage green, cream, deep forest green, and soft pink/terracotta
- Small angled brush
- Fine liner brush (size 00 or 0)
- Matte spray varnish
- Watercolor paper
- Watercolor sketching set
- Pencil and eraser
Step 1: Preparing the Frame Base
-
Sand the frame:
Begin by removing the glass and backing from your frame. Gently sand the entire wooden surface, focusing on smoothing out any rough edges or splinters that might snag your brush later. -
Apply the base coat:
Mix a watery wash using your sage green acrylic paint and a touch of water. Brush this wash over the inner and outer areas of the frame, allowing the natural wood grain to show through slightly for a rustic look. -
Paint the inner bevel:
For the inner beveled edge (the part closest to the picture), apply a slightly more opaque layer of the sage green to create depth and definition. -
Create the cream border:
Paint the outermost raised border—where the vines will go—with a solid coat of cream or light beige paint. You may need two coats here to ensure a clean, bright canvas for your detail work. -
Distress (Optional):
Once the paint is fully dry, lightly scuff the edges with fine-grit sandpaper if you want to enhance the vintage, worn-in aesthetic seen in the example.
Shaky Hands?
If you struggle with fine lines, use a green fine-tip permanent marker for the vines instead of a paint brush. It offers much more control.
Step 2: Painting the Vine Details
-
Practice your strokes:
Before touching the frame, practice painting tiny leaves on a scrap piece of paper. The key is to press down at the base of the leaf and lift up quickly to create a fine point. -
Sketch the vine path:
Using a very light pencil touch, draw a meandering, wavy line along the cream-colored border. This will act as the spine for your vine pattern. -
Paint the vine stem:
Load your fine liner brush with deep forest green paint, thinned slightly with water for better flow. Trace over your pencil line with a steady hand to create the main stem. -
Add the leaves:
Using the same green, paint small, delicate leaves branching off the stem. Vary the direction and spacing to keep it looking organic rather than perfectly symmetrical. -
Incorporate subtle buds:
Mix a tiny amount of soft pink or terracotta paint. Add minuscule dots or tiny teardrop shapes near some of the leaves to represent small flower buds. -
Double-check the corners:
Ensure the vine pattern wraps naturally around the corners of the frame. You might need to extend a leaf or curve a stem to bridge the gap seamlessly. -
Seal the frame:
Allow the vine work to dry for several hours. Once cured, spray the entire frame with a matte varnish to protect the paint from chipping and dust.
Step 3: Creating the Insert Art
-
Draft the botanical sketch:
Cut your watercolor paper to fit the frame. Lightly sketch a tall, central plant stem with branching leaves and a few distinct blooms, similar to the frame’s motif but larger. -
Outline in ink:
Go over your pencil sketch with a fine-tip waterproof pen or a very thin brush with dark green watercolor. Keep the lines loose and sketchy rather than rigid. -
Add color washes:
Using diluted watercolors, fill in the leaves with a soft green and the flowers with a pale peach or orange. Don’t worry about staying perfectly inside the lines; the looseness adds charm. -
Assemble the project:
Once the painting is completely dry, place it behind the glass in your newly decorated frame and secure the backing.
Pattern flow
Don’t let the vine pattern stop abruptly at the corners. Curve the stem so it appears to grow continuously around the 90-degree bend.
Place your finished artwork near a window where natural light can highlight the delicate brushwork and soft colors
Tiny Floral Border for Cottage Style
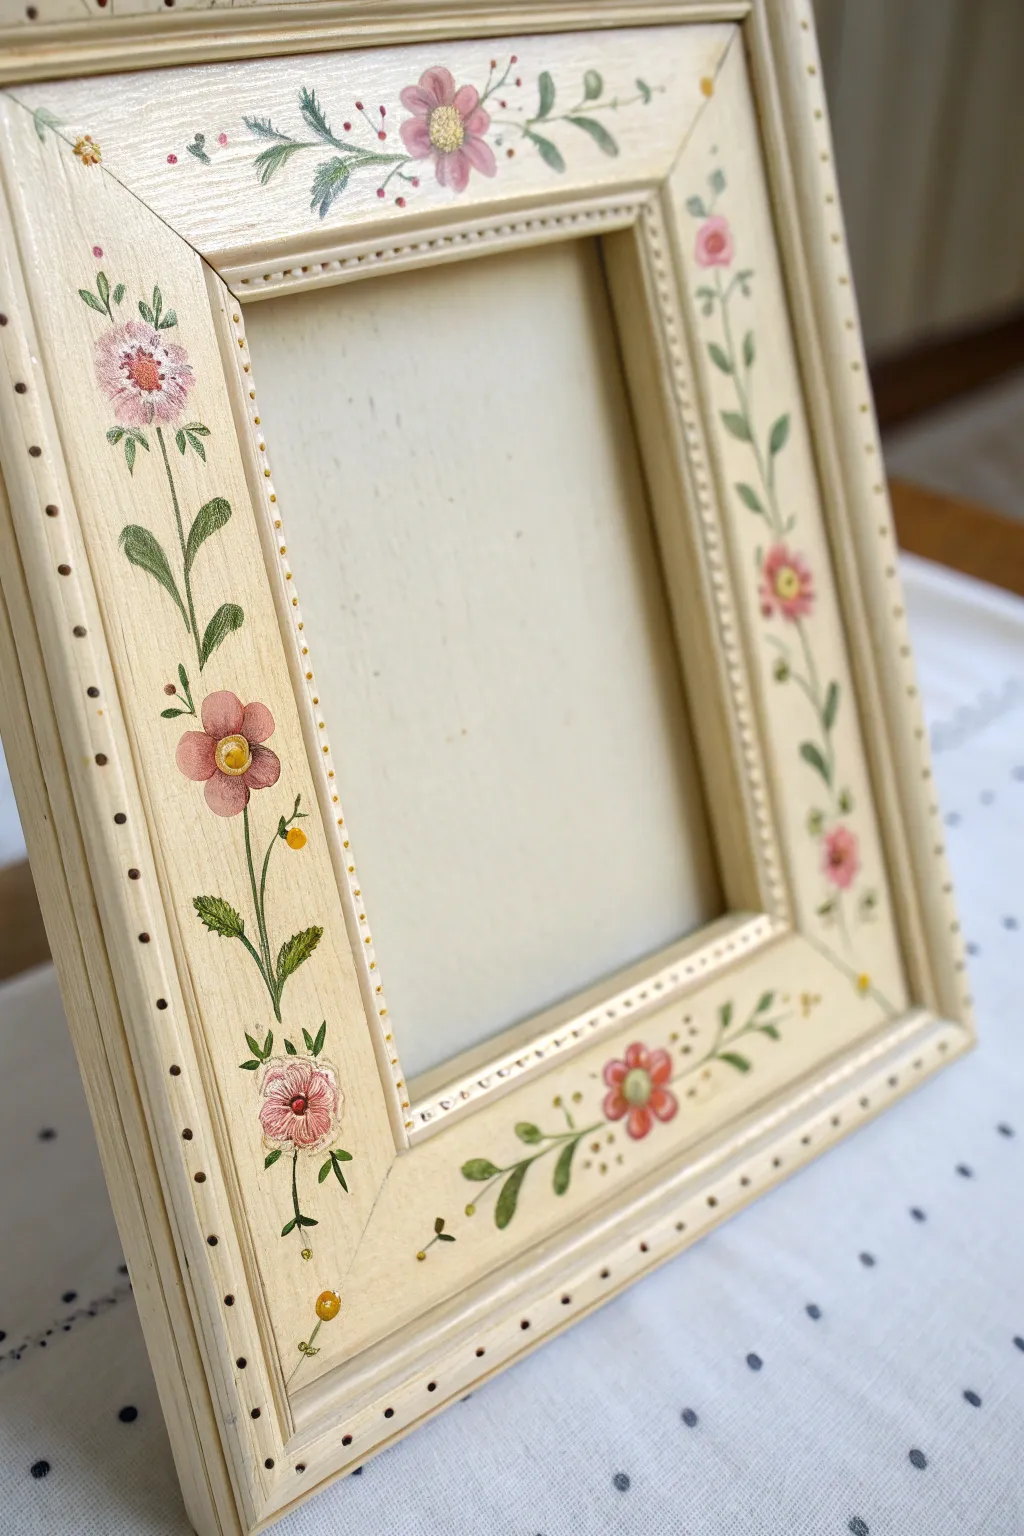
Bring a touch of old-world charm to your photos with this delicate hand-painted frame. The creamy base and soft pink and green florals create an inviting, romantic border that perfectly suits the cottage aesthetic.
How-To Guide
Materials
- Unfinished wooden picture frame (flat, wide borders work best)
- Cream or off-white acrylic paint (base coat)
- Acrylic paints: Blush Pink, Rose Red, Olive Green, Forest Green, Golden Yellow, White
- Medium flat brush (for base coating)
- Small round brush (size 2 or 3)
- Fine liner brush (size 0 or 00)
- Dotting tool or toothpick
- Fine-grit sandpaper
- Matte or satin clear sealant
Step 1: Preparation & Base Coat
-
Prepare the surface:
Begin by lightly sanding your wooden frame to ensure a smooth painting surface. Wipe away all sawdust with a damp tack cloth or paper towel. -
Apply the base color:
Using your medium flat brush, apply a coat of creamy off-white acrylic paint to the entire front and visible sides of the frame. Let this dry completely. -
Check for opacity:
If the wood grain is still showing through too much, apply a second coat of the cream paint. I always prefer two thin coats over one thick globby one for a professional finish. -
Create the texture (Optional):
For that slightly weathered look seen in the photo, you can take a dry brush with a tiny amount of slightly darker beige paint and lightly streak it vertically to simulate wood grain.
Keep it Fluid
Mix a tiny drop of water into your green stem paint. Inky consistency paint flows much better for long lines, preventing choppy, broken stems.
Step 2: Painting the Vertical Florals
-
Map out the stems:
Start on the left vertical side. Using a small round brush and Olive Green paint diluted slightly with water, paint a thin, waving stem line starting from the bottom third and reaching upward. -
Add primary leaves:
Along the main stem, add elongated leaves. Press down with the belly of the brush and lift up quickly to create pointed tips. Use Forest Green for some leaves to add depth. -
Paint the main blooms:
Mix Blush Pink with a touch of White. Paint simple five-petal flower shapes near the top and middle of your stem. Don’t worry about perfection; rustic is the goal. -
Add floral details:
Once the pink base is dry, use Rose Red on your fine liner brush to add small strokes radiating from the center of the flowers. This creates the petal definition. -
Paint the center pollen:
use Golden Yellow to paint a small circle in the flower centers. Once tacky, dot tiny specks of white or brown on top for texture. -
Repeat on the right:
Mirror this process on the right side of the frame, perhaps changing the flower placement slightly so it doesn’t look like a carbon copy.
Add Antique Age
After sealing, wipe a watered-down brown glaze over the corners and recessed ridges, then wipe it back immediately for an aged, vintage patina.
Step 3: Horizontal Accents & Finishing Touches
-
Paint the corners:
In the corners, paint small vines that curve inward. Add tiny buds using just a single press of your pink-loaded brush. -
Add floating elements:
Fill empty negative spaces with tiny floating leaves or small red berries. These small details make the design feel cohesive. -
Create the dotted border:
Use a dotting tool or the back of a paintbrush dipped in dark brown or bronze paint. Carefully place evenly spaced dots along the very outer raised edge of the frame. -
Inner border dots:
Repeat the dotting process on the inner recessed ridge near the photo opening, using a smaller tool or toothpick for finer dots. -
Seal the artwork:
Allow the paint to cure for at least 24 hours. Apply a layer of matte or satin sealant to protect your handiwork from dust and fading.
Place a treasured memory inside and enjoy the gentle warmth this custom frame brings to your room


Polka Dots for a Playful Painted Frame
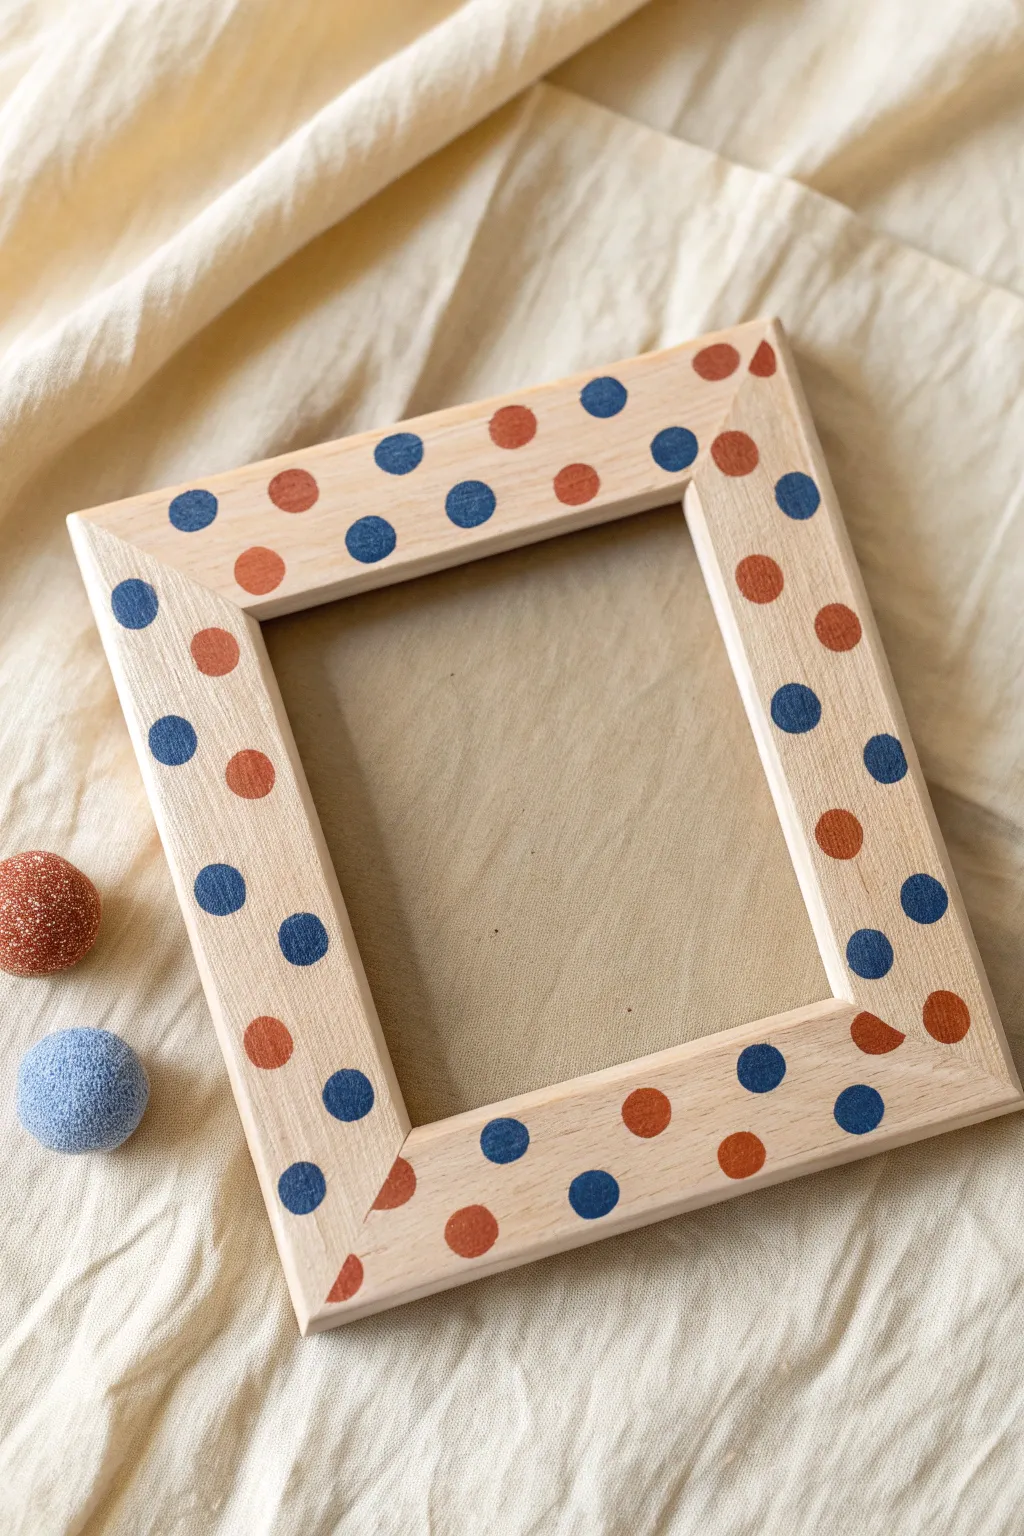
Transform a plain, unfinished wooden frame into a charming piece of decor using nothing more than simple dots. This minimalist yet cheerful design uses earthy terracotta and deep blue tones to create a balanced, modern look perfect for a nursery or living room shelf.
Step-by-Step Guide
Materials
- Unfinished wooden picture frame (flat profile work best)
- Acrylic craft paint in terracotta/rust orange
- Acrylic craft paint in deep denim blue
- Round foam pouncers (small size, approx. 1/2 inch)
- Small paintbrush (for touch-ups)
- Paper plate or paint palette
- Fine-grit sandpaper (optional)
- Clean cloth
- Clear matte acrylic sealer (spray or brush-on)
Step 1: Preparation
-
Prep the surface:
Begin by removing the glass and backing from your wooden frame. If the wood feels rough to the touch, give it a quick sanding with fine-grit sandpaper to ensure a smooth surface for painting. -
Clean the wood:
Wipe the frame down thoroughly with a dry, clean cloth to remove any sawdust or oils. A clean surface is crucial for crisp paint edges. -
Set up your palette:
Squeeze a generous dot of the terracotta paint onto one side of your paper plate and a dot of the deep blue paint on the other side. Make sure the puddles are wide enough to accommodate your foam pouncer.
Bleeding Paint?
If paint seeps under the pouncer, your paint is too thin or overloaded. Wring out the foam slightly or use stiffer paint for cleaner edges.
Step 2: Painting the Dots
-
Load the pouncer:
Take your round foam pouncer and dip it straight down into the terracotta paint. Tap it gently on a clean part of the palette a few times to offload excess paint; you want an even coat, not a gloppy mess. -
Start with the orange dots:
Press the pouncer firmly onto the frame to create your first dot. Lift straight up to avoid smearing. -
Create a pattern:
Continue adding terracotta dots randomly around the frame. Aim for a scattered look rather than a perfect grid, leaving plenty of empty space for the blue dots later. -
Mind the edges:
Don’t be afraid to let some dots go off the edge of the frame. I like to place a few half-dots on the corners or rims to make the pattern feel continuous and organic. -
Let the first color dry:
Allow the terracotta dots to dry completely. This usually takes about 15-20 minutes depending on how thick your paint application was. -
Switch to blue:
Clean your pouncer thoroughly and dry it, or grab a fresh one. Load it with the deep blue acrylic paint just as you did before. -
Fill the gaps:
Stamp blue dots into the empty spaces between the orange ones. Try to maintain consistent spacing between all dots so the design looks cohesive. -
Check the balance:
Step back and look at the frame from a distance. If you see any large empty wood areas, add another blue dot to balance the composition. -
Clean up edges:
If any paint bled incorrectly or created a ridge, use a damp Q-tip to tidy it up while wet, or wait for it to dry and gently scrape the excess away.
Step 3: Finishing Touches
-
Dry completely:
Let the entire frame sit for at least an hour to ensure the paint is fully cured. -
Seal the deal:
Apply a coat of clear matte acrylic sealer. This protects the unfinished wood from yellowing and keeps the dots from chipping over time. -
Reassemble:
Once the sealer is dry and no longer tacky, place the glass and backing back into the frame. It’s now ready to display your favorite photo.
Make It Pop
Paint the background wood white first for a high-contrast look, or use metallic gold paint for the dots to add a touch of glamour.
Enjoy your custom-patterned frame that adds a spot of joy to any room
Thin Stripes for a Clean Graphic Look
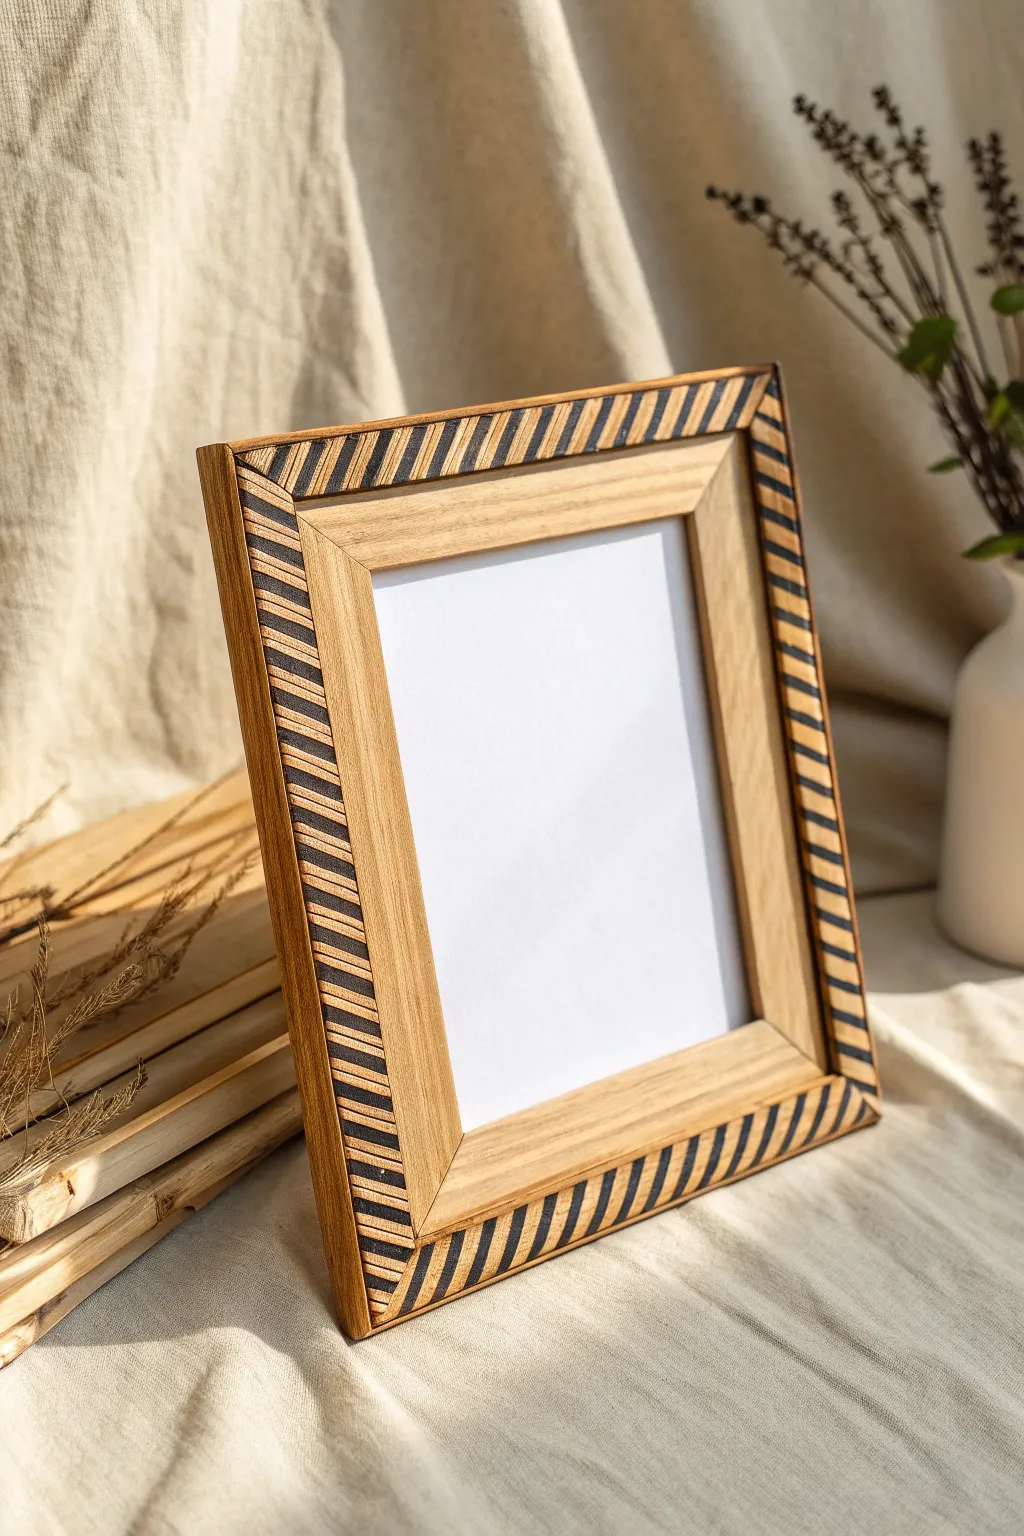
Elevate a plain wooden frame with crisp, high-contrast detailing that brings a touch of modern art to your decor. This tutorial shows you how to achieve perfectly sharp diagonal stripes using just a little patience and the right masking technique.
Step-by-Step
Materials
- Unfinished wide-profile wooden picture frame
- Black acrylic paint
- Painter’s tape (various widths, or cut to size)
- Fine-grit sandpaper (220 grit)
- Small flat paintbrush
- Matte clear sealant or varnish
- Ruler
- Pencil
- Craft knife or scissors
- Damp cloth
Step 1: Preparation
-
Remove hardware:
Begin by removing the backing board, glass, and any metal tabs or hardware from your wooden frame. Set these aside in a safe spot so you have just the raw wood frame to work with. -
Sand the surface:
Using 220-grit sandpaper, lightly sand the entire surface of the frame. Pay special attention to the outer edges where the stripes will go, ensuring the wood is smooth. -
Clean dust:
Wipe away all sanding dust thoroughly using a slightly damp cloth. Let the wood dry completely before moving on to taping. -
Mark the inner boundary:
Decide how much of the frame you want to remain plain wood. In the image, the inner bevel is left natural. If your frame is flat, lightly mark a pencil line about 1 inch from the inner opening to serve as your boundary.
Bleeding Lines?
If paint bleeds under the tape, wait for it to dry fully. Then, use a fine-grit sanding block to gently abrade the unwanted paint away, revealing clean wood underneath.
Step 2: Creating the Pattern
-
Tape the inner border:
Apply a strip of painter’s tape along the inner boundary line you created. This will protect the section of wood closest to the photo that should remain unpainted. -
Start the diagonal tape:
Cut several short strips of painter’s tape. Begin at one corner and place your first strip of tape diagonally across the outer rim of the frame. -
Use a spacer:
To keep spacing consistent, I like to use a small scrap of wood or a specific width of tape as a spacer guide between each stripe. Place your spacer next to the first piece of tape. -
Continue taping:
Place the next strip of tape against your spacer. Remove the spacer and repeat this process all the way around the frame perimeter. -
Check the corners:
When you reach the corners, the pattern may get tricky. Try to align the stripes so they meet neatly at the mitred edge, or wrap the tape continuously if preferred. Press every edge of the tape down firmly with your thumbnail. -
Seal edges (optional):
For razor-sharp lines, brush a very thin layer of clear matte medium or sealant over the tape edges. This prevents black paint from bleeding under the tape.
Add Color
Swap the black paint for navy blue or dark forest green for a subtle twist. You can also stain the plain wood section with a light oak stain for more contrast.
Step 3: Painting and Finishing
-
Apply black paint:
Using a small flat brush, apply black acrylic paint to the exposed wood sections between your tape strips. Use confident strokes parallel to the tape lines. -
Second coat:
Allow the first coat to dry for about 15-20 minutes. Apply a second coat of black paint to ensure opaque, solid coverage. -
Remove tape:
While the paint is still slightly tacky (not fully cured), carefully peel off the painter’s tape. Pulling at a 45-degree angle usually gives the cleanest line. -
Touch ups:
Once the tape is removed, inspect your lines. If any paint bled through, use a craft knife to gently scrape it away or a tiny brush with wood-colored paint to cover it. -
Sand the edges:
Once the paint is 100% dry, very lightly run your fine sandpaper over the painted edges to distress them slightly if you want a lived-in look, or leave them crisp. -
Seal the wood:
Apply a coat of clear matte varnish over the entire frame—both the painted stripes and the raw wood sections. This protects your work and unifies the sheen. -
Reassemble:
After the varnish has fully cured (check bottle instructions), place the glass, artwork, and backing board back into the frame.
Now you have a striking, custom-designed frame ready to showcase your favorite memories
Stenciled Pattern That Looks Hand-Drawn
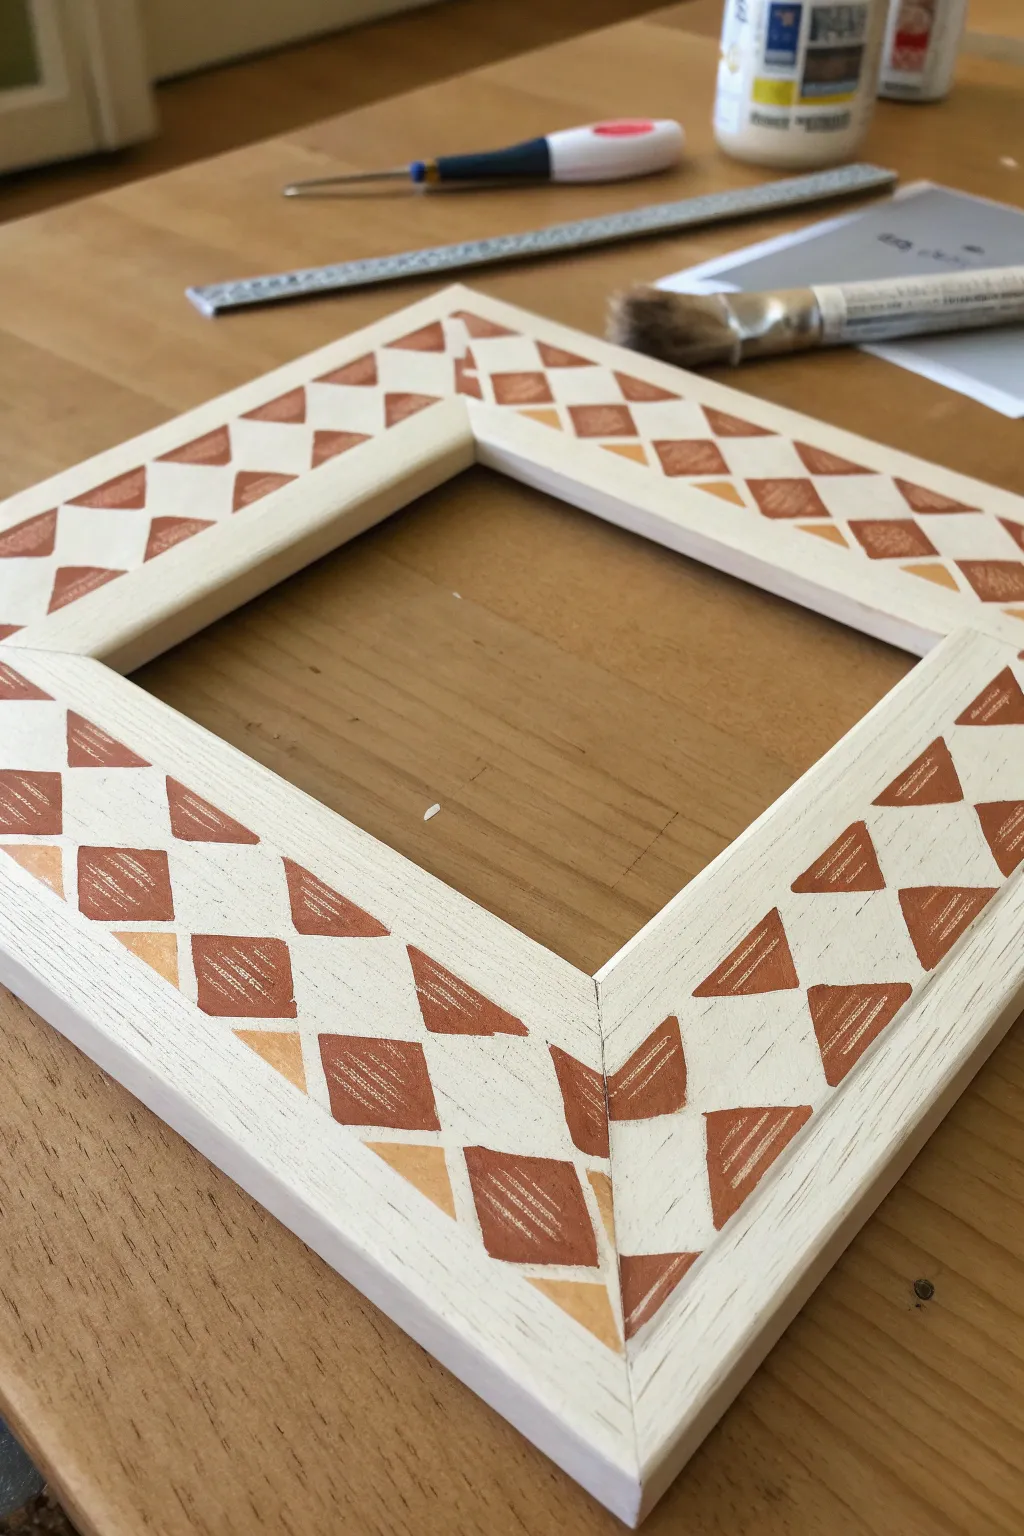
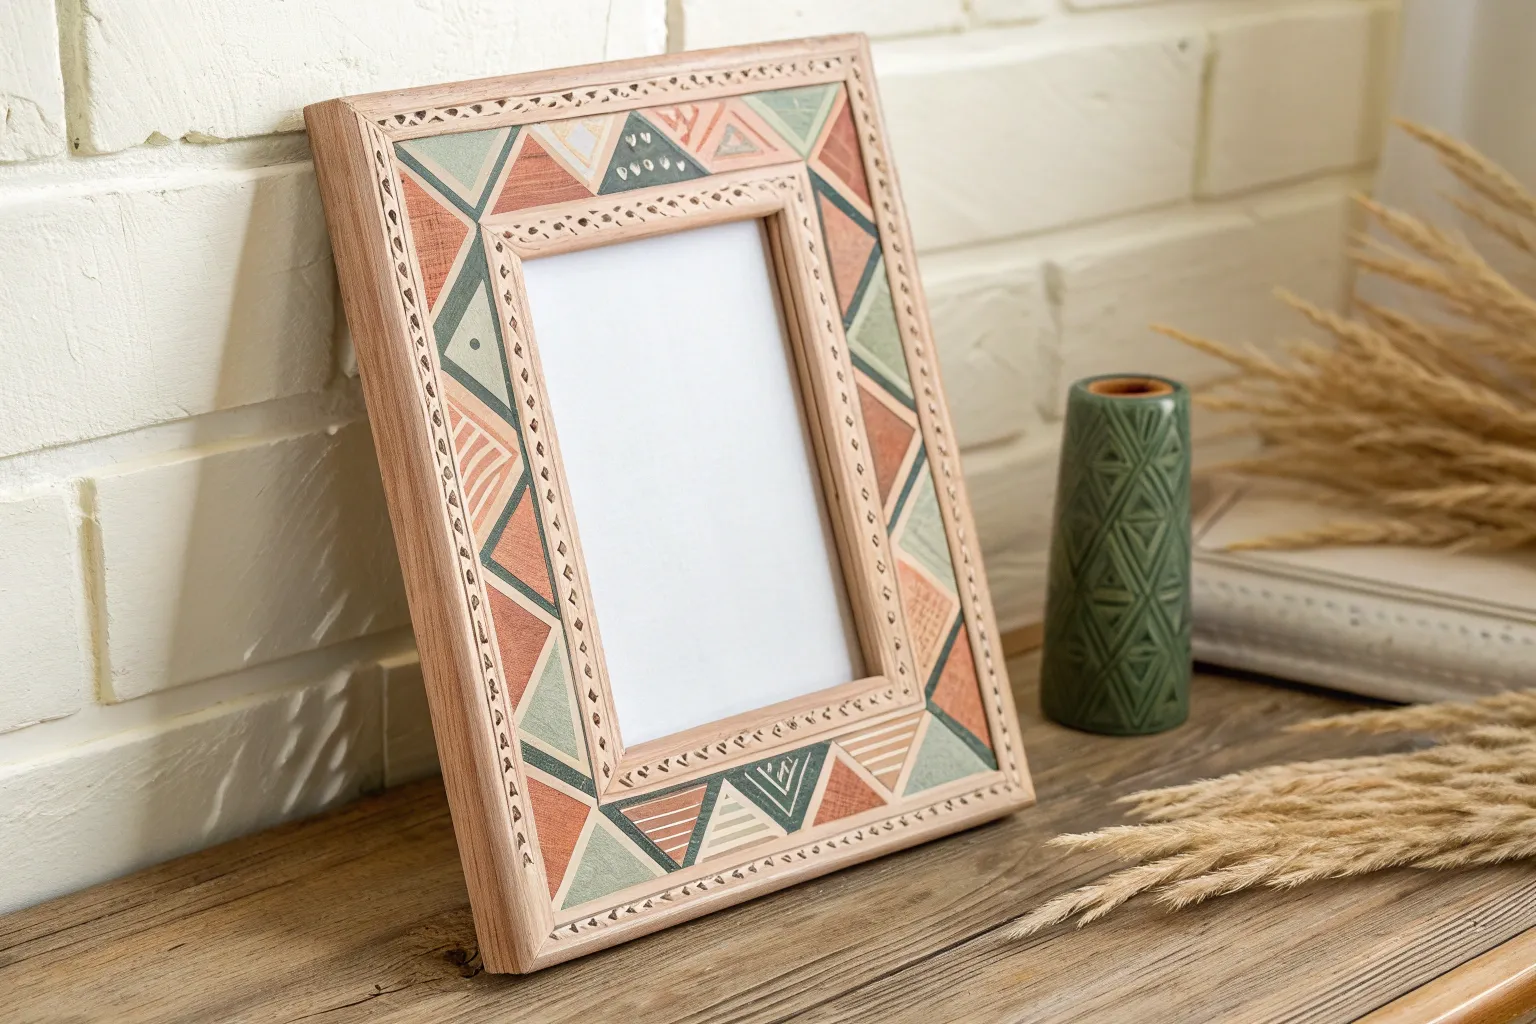
Transform a plain wooden frame into a charming piece of folk art with this simple geometric design. The stenciled diamond pattern, applied with a light touch, gives the finish a lovely hand-drawn, textural quality that feels both modern and traditional.
Detailed Instructions
Materials
- Unfinished wide wooden picture frame (square)
- White or cream chalk paint (base coat)
- Terracotta or warm brown acrylic paint (diamonds)
- Light mustard or ochre acrylic paint (accents)
- Diamond pattern stencil (or painter’s tape)
- Stencil brush (stiff bristles)
- Small flat brush
- Fine-grit sandpaper (220 grit)
- Ruler and pencil
- Paper plate or palette
- Matte clear sealant (optional)
Step 1: Preparing the Base
-
Sand the frame:
Begin by lightly sanding your raw wooden frame to ensure a smooth surface. Wipe away any dust with a tack cloth or slightly damp rag. -
Apply the base coat:
Paint the entire front and sides of the frame with a white or cream chalk paint. Chalk paint is ideal here because its matte finish creates a perfect, slightly porous surface for the stencil design. -
Check coverage:
Let the first coat dry completely. If the wood grain shows through too much for your liking, apply a second thin coat and let dry. -
Distress lightly:
Once dry, run your sandpaper very gently over the white paint. We want to expose a tiny bit of wood texture to help the paint adhere better and add character.
Bleeding Lines?
If paint bleeds under the stencil, your brush was too wet. Let it dry, sand the error off, and repaint with the base color before trying again with a drier brush.
Step 2: Creating the Layout
-
Plan your spacing:
Measure the width of your frame edges. You want your diamond pattern to sit centered within the visible face of the frame. -
Mark the corners:
Pay special attention to the mitered corners. It looks best if a full diamond or two half-diamonds meet neatly at the 45-degree angle line. -
Position the stencil:
Lay your diamond stencil over one side of the frame. If you are using tape instead, mark a grid and tape off diamond shapes now.
Level Up: Faux Fabric
After painting the diamonds, use a fine-tip white paint pen to draw tiny diagonal dashes inside the shapes to mimic the weave of woven fabric.
Step 3: Painting the Pattern
-
Load the brush:
Dip just the tip of your stiff stencil brush into the terracotta paint. Offload almost all the paint onto a paper towel until the brush is nearly dry. -
Stipple the main diamonds:
Apply the paint through the stencil using an up-and-down pouncing motion. Keep the application somewhat uneven and scratchy to achieve that ‘hand-drawn’ sketchy look seen in the photo. -
Add color variation:
While stenciling, intentionally leave some diamonds lighter than others. This variation adds depth and prevents the frame from looking factory-made. -
Paint the accent diamonds:
Identify the smaller filler diamonds in your pattern. Switch to a small brush and the ochre/mustard paint for these specific shapes. -
Hand-paint the corners:
Stencils rarely fit corners perfectly. Remove the stencil and use a small flat brush to hand-paint the partial diamonds right at the mitered seams to connect the pattern seamlessly. -
Let the pattern set:
Allow the design to dry fully. The acrylics should dry relatively quickly compared to the base coat.
Step 4: Finishing Touches
-
Create texture:
Take your fine sandpaper again and gently scuff the painted diamonds. This is key to making the stencil look integrated rather than just sitting on top of the surface. -
Clean the edges:
If any paint bled under the stencil, I usually just sand it away aggressively or touch it up with a tiny bit of the white base paint. -
Seal the work:
To protect the design without adding shine, apply a clear matte wax or polycrylic sealant over the entire frame.
Once the sealant cures, your custom art frame is ready to add a cozy touch to any wall
Speckled Splash Texture for Artsy Energy
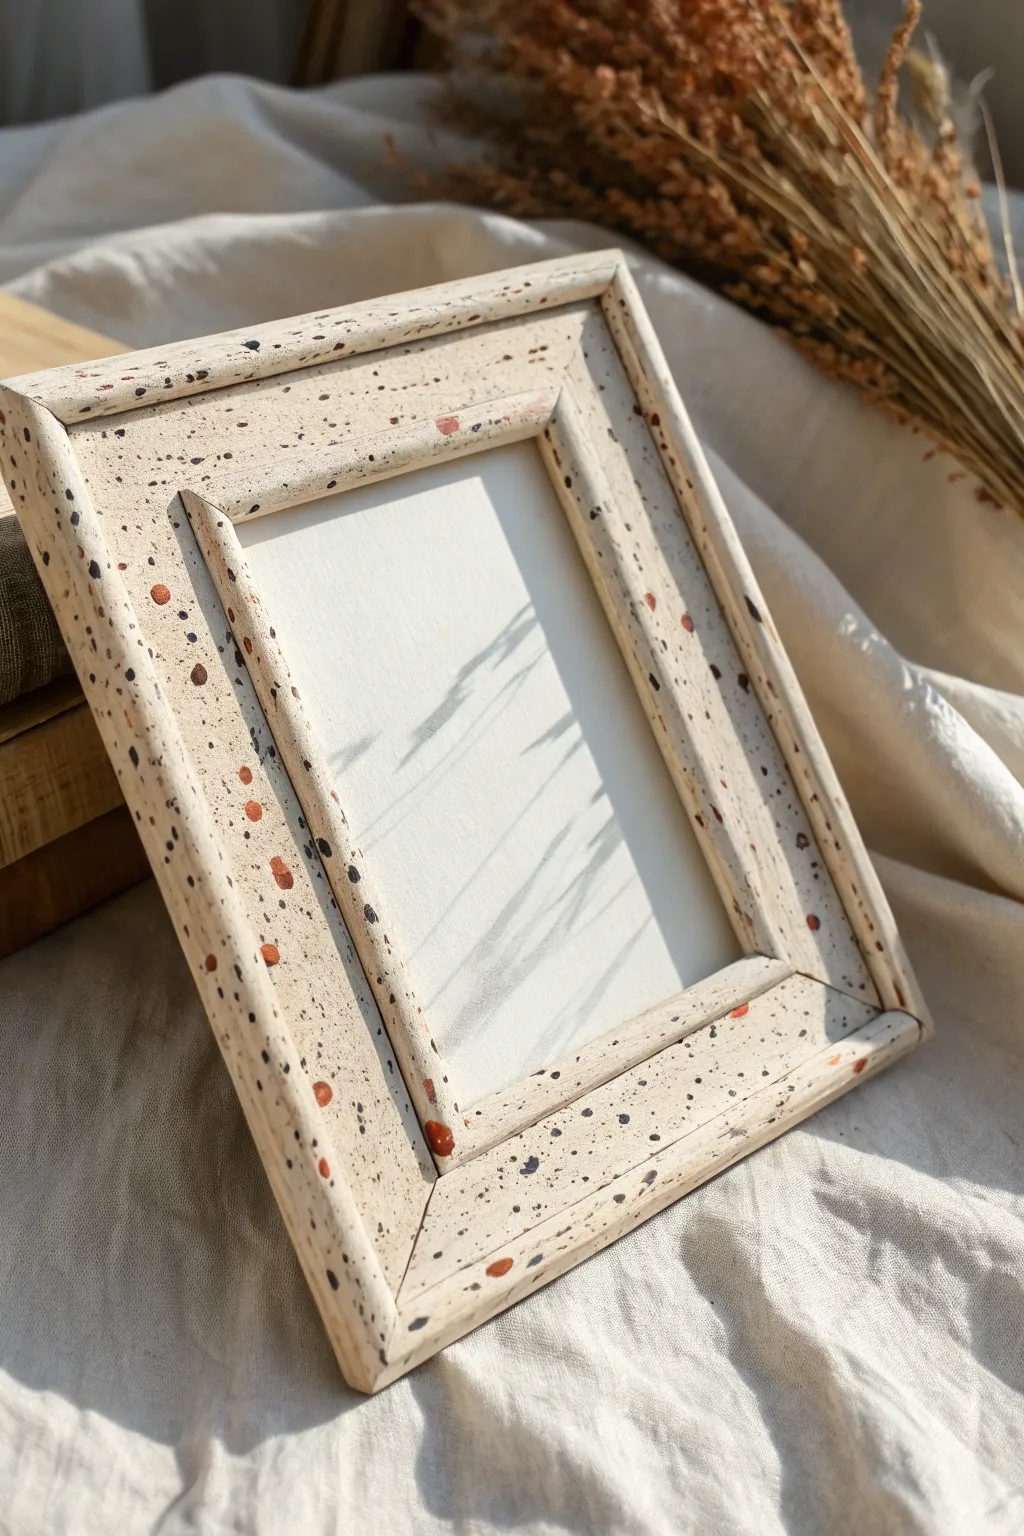
Transform a plain wooden frame into a trendy piece of décor with this easy paint splatter technique. By layering fine black mist with bolder terracotta drops, you can achieve a sophisticated faux-terrazzo look that adds artsy energy to any room.
Step-by-Step
Materials
- Unfinished wooden picture frame with wide molding
- Sandpaper (220 grit)
- White or cream spray primer
- Cream or off-white acrylic paint (matte finish)
- Black acrylic paint
- Terracotta or burnt orange acrylic paint
- Small flat paintbrush
- Old stiff-bristle toothbrush
- Small round paintbrush (size 2 or 4)
- Palette or small dishes
- Drop cloth or large cardboard box
- Matte clear sealant spray
Step 1: Preparation & Base Coat
-
Disassemble the frame:
Begin by removing the backing, glass, and any hardware from your wooden frame. Store these safely aside so they don’t get covered in paint during the process. -
Sand the surface:
Lightly sand the entire surface of the frame using 220-grit sandpaper. Focus on smoothing out any rough patches or sharp edges on the molding to ensure a professional finish. -
Wipe it down:
Use a tack cloth or a slightly damp paper towel to remove all the sanding dust. The surface needs to be completely clean for the primer to adhere properly. -
Apply primer:
In a well-ventilated area, spray the frame with a light coat of white primer. This seals the wood and prevents the final paint colors from soaking in too much. -
Paint the base color:
Once the primer is dry, apply two coats of your cream or off-white acrylic paint using a flat brush. I like to let the first coat dry for about 20 minutes before applying the second to ensure solid, opaque coverage. -
Cover the workspace:
This project gets messy. Set up a splatter station by placing the frame inside a large cardboard box or laying out a wide drop cloth to protect your table and floors.
Practice Makes Perfect
Before splattering your frame, practice the toothbrush flicking technique on a piece of scrap cardboard to get a feel for how much pressure creates the perfect mist.
Step 2: Creating the Speckle Effect
-
Prepare the black paint:
Mix a small amount of black acrylic paint with a few drops of water. You want a fluid, ink-like consistency that flows easily but isn’t transparent. -
Load the toothbrush:
Dip just the tips of the stiff-bristle toothbrush into the thinned black paint. Tap off any excess onto a paper towel to avoid huge, unintentional blobs. -
Flick the fine mist:
Hold the toothbrush about 6-8 inches above the frame. Run your thumb firmly across the bristles to flick a spray of fine black dots across the surface. -
Add variance:
Move your hand around the frame to ensure even coverage, but allow some areas to have slightly denser clusters for a natural, organic stone look. -
Dry the first layer:
Let the black speckles dry completely for roughly 10-15 minutes. This prevents the colors from muddying if they overlap in the next step. -
Mix the terracotta color:
Prepare your terracotta or burnt orange paint. You can use it straight from the tube for more texture, or thin it slightly if you prefer flatter spots. -
Apply larger spots:
Dip a small round paintbrush into the terracotta paint. Instead of flicking, you will manually tap the handle against a second brush or your finger to shake larger droplets onto the frame. -
Control the placement:
For specific large spots visible in the inspiration photo, lightly touch the loaded brush tip directly to the frame in random areas. Vary the pressure to create different sized dots. -
Review and refine:
Step back and look at the frame from a distance. If an area looks too empty, add a few more flickers of black or a manual dot of orange to balance the composition.
Color Pop Upgrade
Swap the terracotta for a metallic gold or a bright teal paint to give the frame a more modern, eclectic vibe that matches your specific room decor.
Step 3: Finishing Touches
-
Let it cure:
Allow the speckled paint to dry fully. Since some of the larger orange drops might be thick, give it at least an hour or two to be safe. -
Seal the artwork:
Spray the entire frame with a matte clear sealant. This protects the splatter work from chipping and gives the frame a cohesive, non-glossy finish that mimics ceramic or stone. -
Reassemble:
Once the sealant is dry to the touch, place the glass, artwork, and backing board back into the frame.
Now you have a custom, gallery-worthy frame ready to highlight your favorite memories
Raised Details Highlighted With Dry Brushing
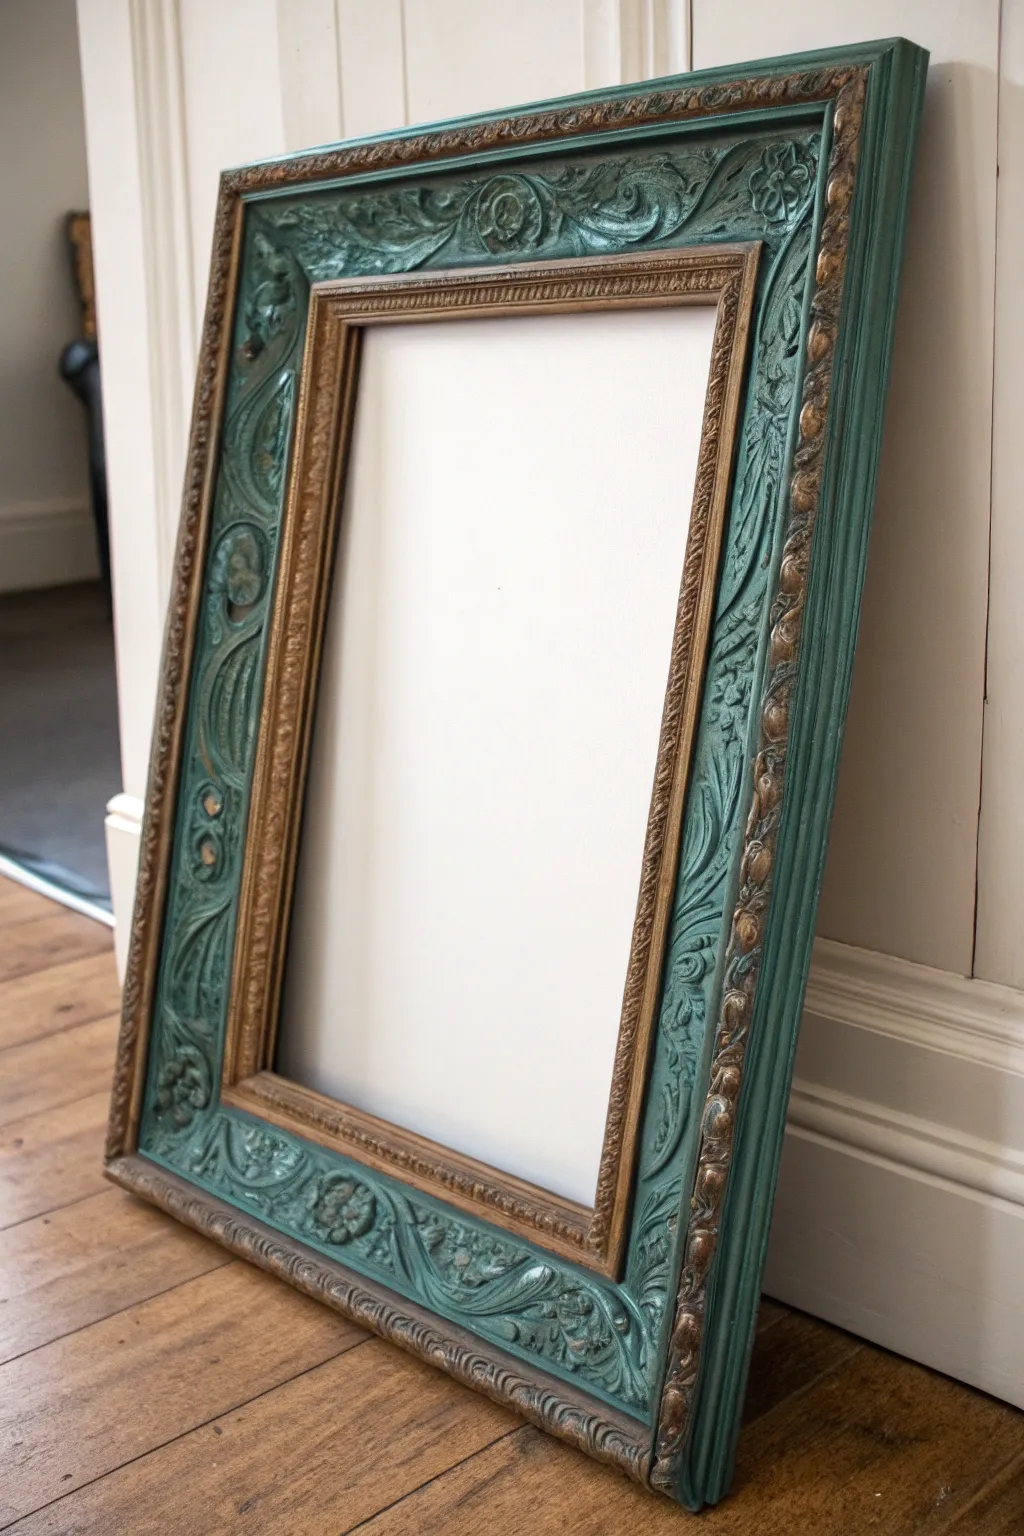
Transform an ordinary ornate frame into a vintage-style treasure using layers of teal paint and metallic accents. This technique highlights intricate raised details, giving the piece a weathered, antique charm that looks like it came straight from a French chateau.
Detailed Instructions
Materials
- Ornate wooden or composite picture frame (with deep relief)
- Medium-grit sandpaper (120-150 grit)
- Tack cloth
- Deep teal chalk-style paint
- Rub-n-Buff or metallic heavy body acrylic paint (Antique Gold)
- Dark furniture wax (optional, for aging)
- Clear matte sealer spray
- 2-inch synthetic paintbrush
- Small stiff-bristled brush (for dry brushing)
- Soft lint-free rags
- Painter’s tape
Step 1: Preparation & Base Coat
-
Clean and prep the surface:
Start by thoroughly cleaning your frame to remove dust and oils. If the frame has a shiny varnish, lightly scuff it with medium-grit sandpaper to give the paint something to grip. -
Wipe away debris:
Use a tack cloth to remove every speck of sanding dust from the crevices. This is crucial for a smooth finish later. -
Mask off areas:
If your frame has an inner liner or sections you want to keep original (like the inner gold rim in the photo), carefully apply painter’s tape to protect them. -
Apply the first coat of teal:
Using a 2-inch synthetic brush, apply your deep teal chalk paint. Push the bristles into the carved details to ensure full coverage in the deep recesses. -
Check for missed spots:
Look at the frame from different angles to catch any hidden holidays in the intricate scrollwork before the paint dries. -
Let it dry completely:
Allow the first coat to dry for at least 1-2 hours. Chalk paint dries fast, but you want a solid foundation. -
Apply a second coat:
Add a second coat of teal paint for rich, opaque color. This ensures the base is solid before we start adding dimension.
Step 2: Distressing & Highlighting
-
Prepare for wet distressing:
While the paint is fully dry, dampen a lint-free rag slightly. We are going to gently rub away some paint to reveal the underlying wood. -
Distress the high points:
Gently rub the damp flowing rag over the highest raised details of the carvings. The goal is to let the original wood or base color peek through naturally. -
Load the dry brush:
Take a small, stiff-bristled brush and dip just the very tip into your Antique Gold metallic wax or heavy body paint. Wipe almost all of it off onto a paper towel until the brush feels dry. -
Dry brush the details:
Lightly sweep the brush over the raised floral patterns and edges. Use a feather-light touch; you want the gold to catch only the textures, not paint the flat surfaces. -
Add gold to the edges:
Turn the brush sideways and run it along the outer and inner rims of the frame to create a defined, metallic border. -
Enhance with dark wax (optional):
If you want a moodier look, apply a small amount of dark furniture wax into the deepest crevices with a small brush, then wipe back the excess from the high points. -
Seal the finish:
Once you are happy with the level of distressing and gold highlights, spray the entire frame with a clear matte sealer to protect the paint. -
Remove tape and reassemble:
Carefully peel off the painter’s tape. Once the sealer is cured, reinsert your glass, artwork, and backing board.
Less is More Impact
When dry brushing gold, start with barely any product. It’s much easier to add another layer of shimmer than to try and remove a heavy globs of metallic paint.
Fixing Heavy Handedness
Painted too much gold? Don’t panic. Let it dry completely, then lightly dry brush your original teal paint back over the gold to push it into the background.
Now step back and admire how a dash of gold and some strategic distressing turned a plain frame into a centerpiece of vintage elegance
Textured Frame Base Painted One Unified Color
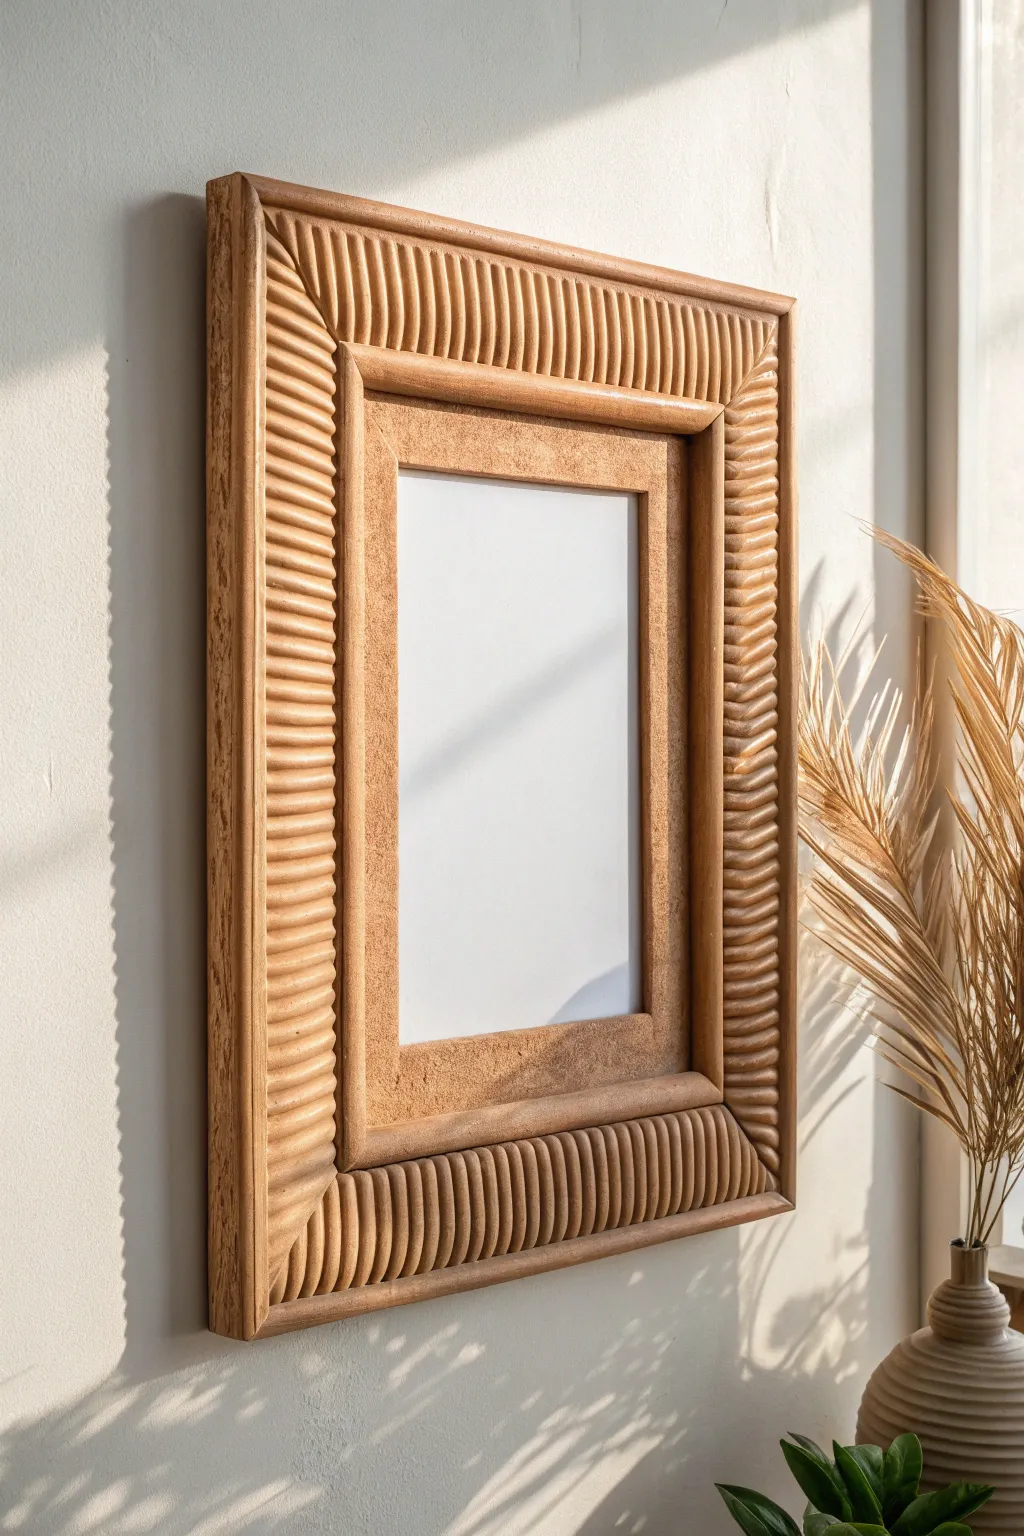
This project transforms a standard flat frame into a piece of dimensional art using half-round dowels and textural mediums. The finished look mimics high-end, hand-carved wood with a distinctive fluted design that draws the eye inward.
How-To Guide
Materials
- Wide, flat wooden picture frame (unfinished or sanded)
- Half-round wood dowels (approx. 1/2 inch width)
- Miter box and saw
- Wood glue
- Sandpaper (medium and fine grit)
- Wood filler
- Textural paste (like sand texture gel or pumice gel)
- Palette knife
- Painter’s tape
- Matte finish wood stain (light oak or pecan)
- Foam brush
- Clear matte polyurethane spray
Step 1: Preparing the Frame Structure
-
Prepare the base:
Begin with a wide, flat wooden frame. If it has a finish, sand it down roughly so the glue will adhere properly. Wipe away any dust with a damp cloth. -
Measure the dowels:
Measure the length of the outer edges of your frame. You will need enough half-round dowels to cover the entire outer perimeter and the inner perimeter near the photo opening. -
Cut the miters:
Using a miter saw and box, cut the ends of your half-round dowels at 45-degree angles so they meet cleanly at the corners of the frame. I like to double-check the fit dry before gluing anything down. -
Create the outer fluting:
Apply a line of wood glue to the flat side of the dowels and press them onto the outer edge of the frame face. The rounded side should face up, creating a ribbed border. -
Clamping stage:
Use clamps or painter’s tape to hold the dowels firmly in place while the glue sets. Let this dry for at least one hour. -
Create the inner fluting:
Repeat the cutting and gluing process for the inner edge of the frame, right next to where the glass would sit. This creates a double-border effect. -
Fill the gaps:
Once the glue is fully cured, use wood filler to smooth out the mitered corners where the dowels meet. You want the corner joints to look seamless. -
Sand smooth:
After the wood filler dries, sand the corners and any rough edges of the dowels. Start with medium grit and finish with fine grit for a professional touch.
Uneven Texture?
If the texture gel looks too peaked or spiky, lightly sand the surface with fine-grit sandpaper after it dries to knock down the sharpest points before staining.
Step 2: Adding Texture and Unified Color
-
Tape off sections:
Use painter’s tape to mask off the newly attached dowels. You want to expose only the flat, middle section of the frame between the two fluted borders. -
Apply texture medium:
Using a palette knife, spread a thin, even layer of sand texture gel or pumice gel onto the flat middle section. This mimics the look of the rough, cork-like inlay seen in the inspiration photo. -
Creating the surface:
Dab the surface gently with the flat of the knife or a dry sponge to create a uniform, stippled texture. Allow the texture paste to dry completely, usually overnight. -
Remove tape:
Carefully peel away the painter’s tape once the texture is dry. -
Initial staining:
Stir your light oak or pecan stain well. Using a foam brush, apply the stain over the entire frame—both the wooden dowels and the textured middle section. -
Wiping back:
Let the stain sit for a minute or two, then wipe off the excess with a lint-free rag. The textured center will grab more pigment, appearing slightly darker and richer than the smooth wood. -
Check for consistency:
Inspect the crevices of the fluted dowels. Use a dry brush to ensure stain hasn’t pooled in the grooves, which can look messy when dry. -
Seal the piece:
To protect that raw wood look, spray the entire frame with a clear matte polyurethane. This seals the texture without adding unwanted shine. -
Final assembly:
Once the sealer is dry and no longer smells of fumes, insert your glass, backing, and artwork.
Go Monochromatic
Instead of wood stain, spray paint the entire finished frame in a matte terracotta or sage green for a modern, sculptural look that highlights the shadows.
Hang your new textured masterpiece in a spot where the light will catch those beautiful ridges.


Have a question or want to share your own experience? I'd love to hear from you in the comments below!