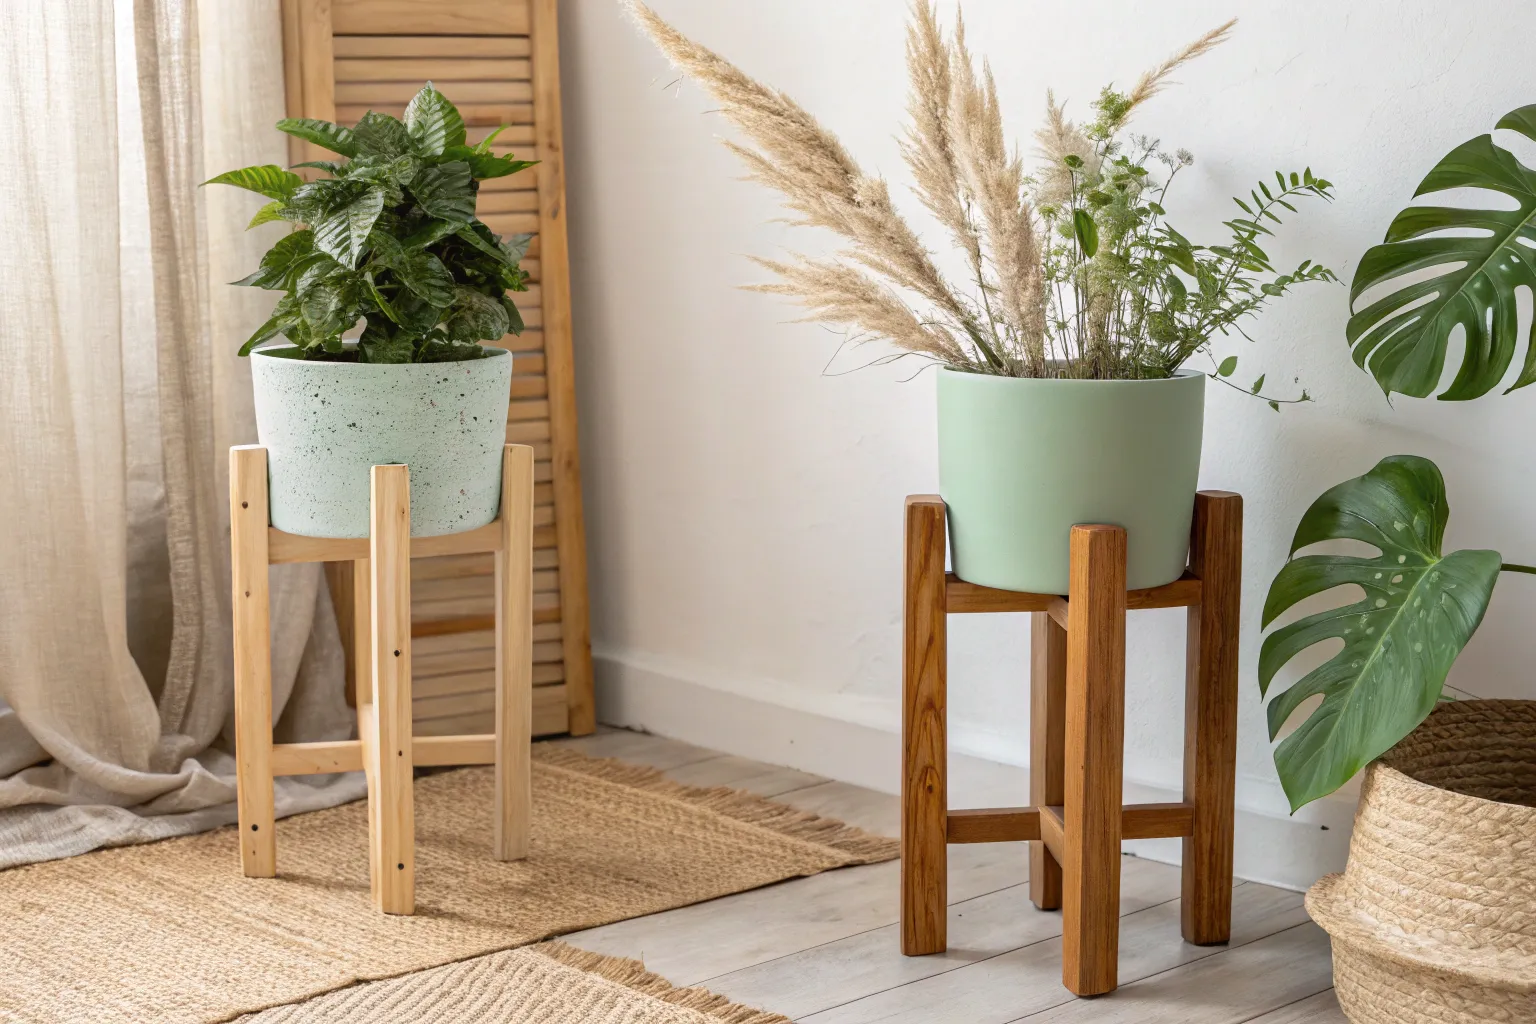
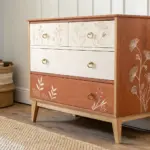
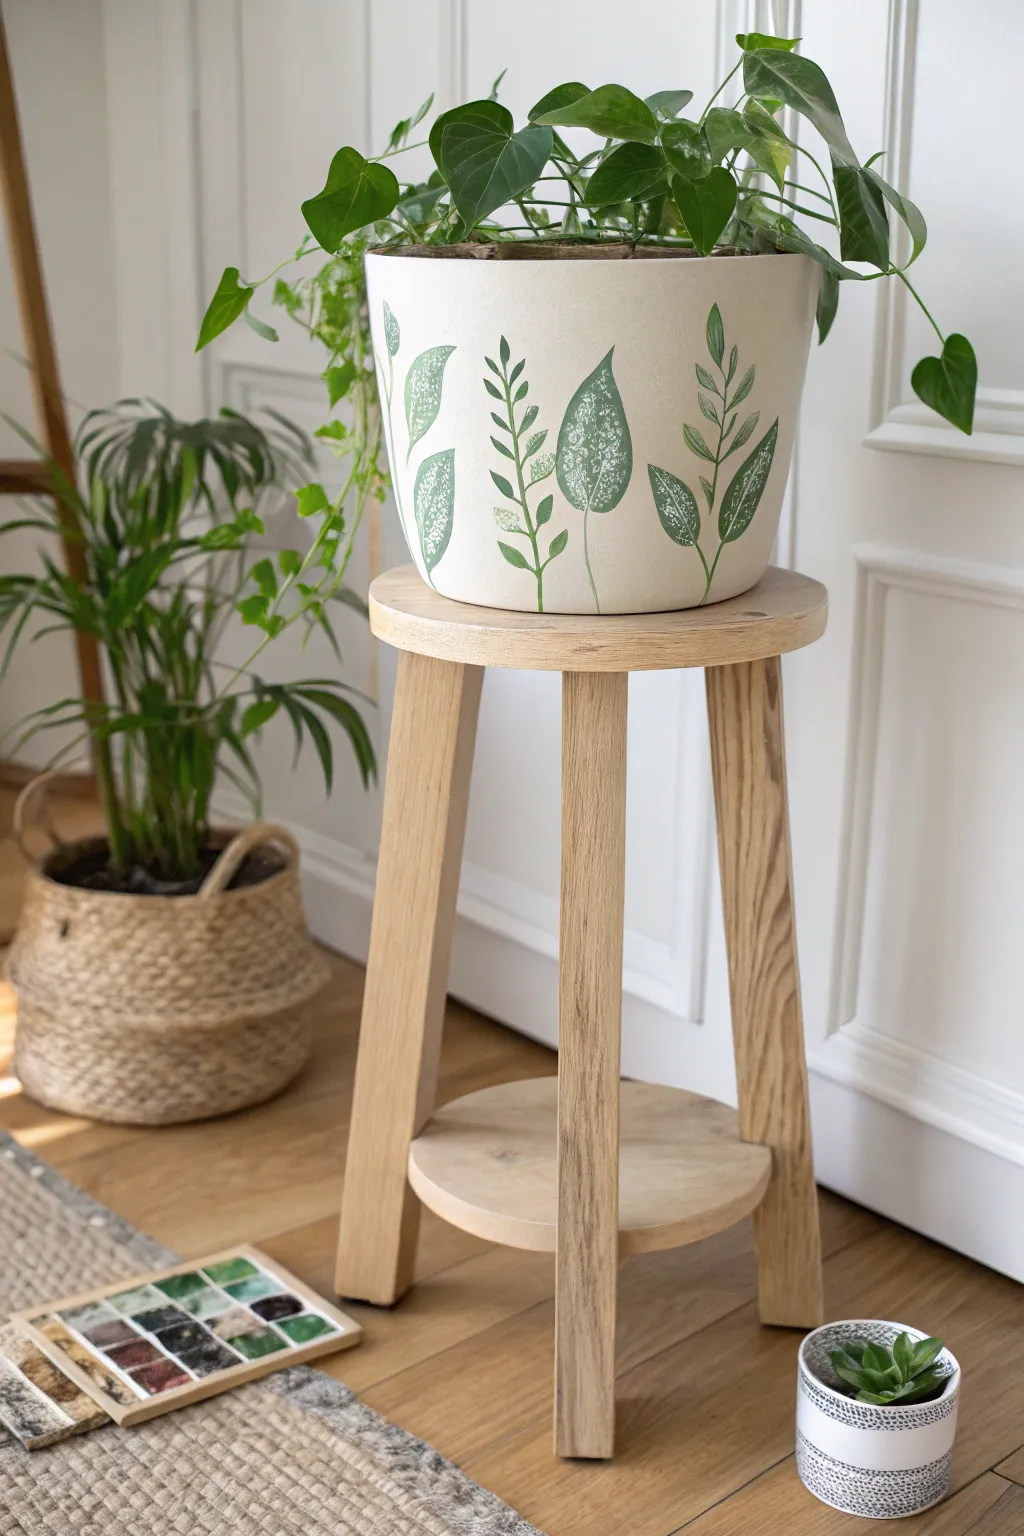
A little paint can turn a plain plant stand into a piece that feels totally you—more like decor you made on purpose than furniture you settled for. Here are my favorite painted plant stand ideas that range from classic makeovers to artsy, wow-factor finishes.
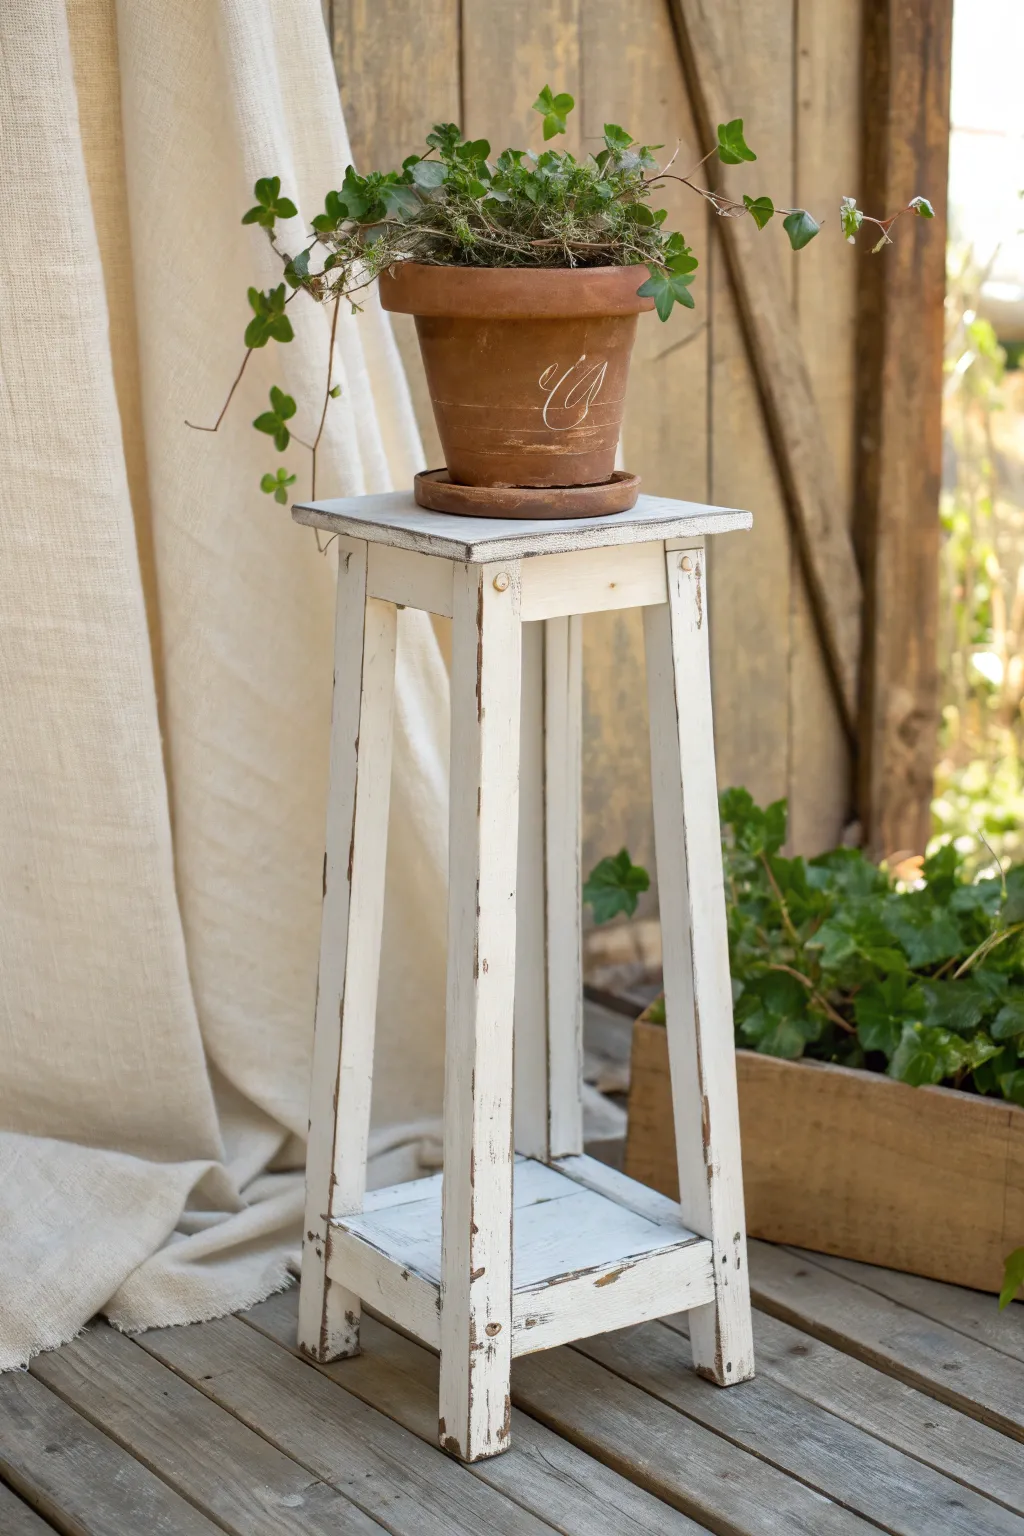
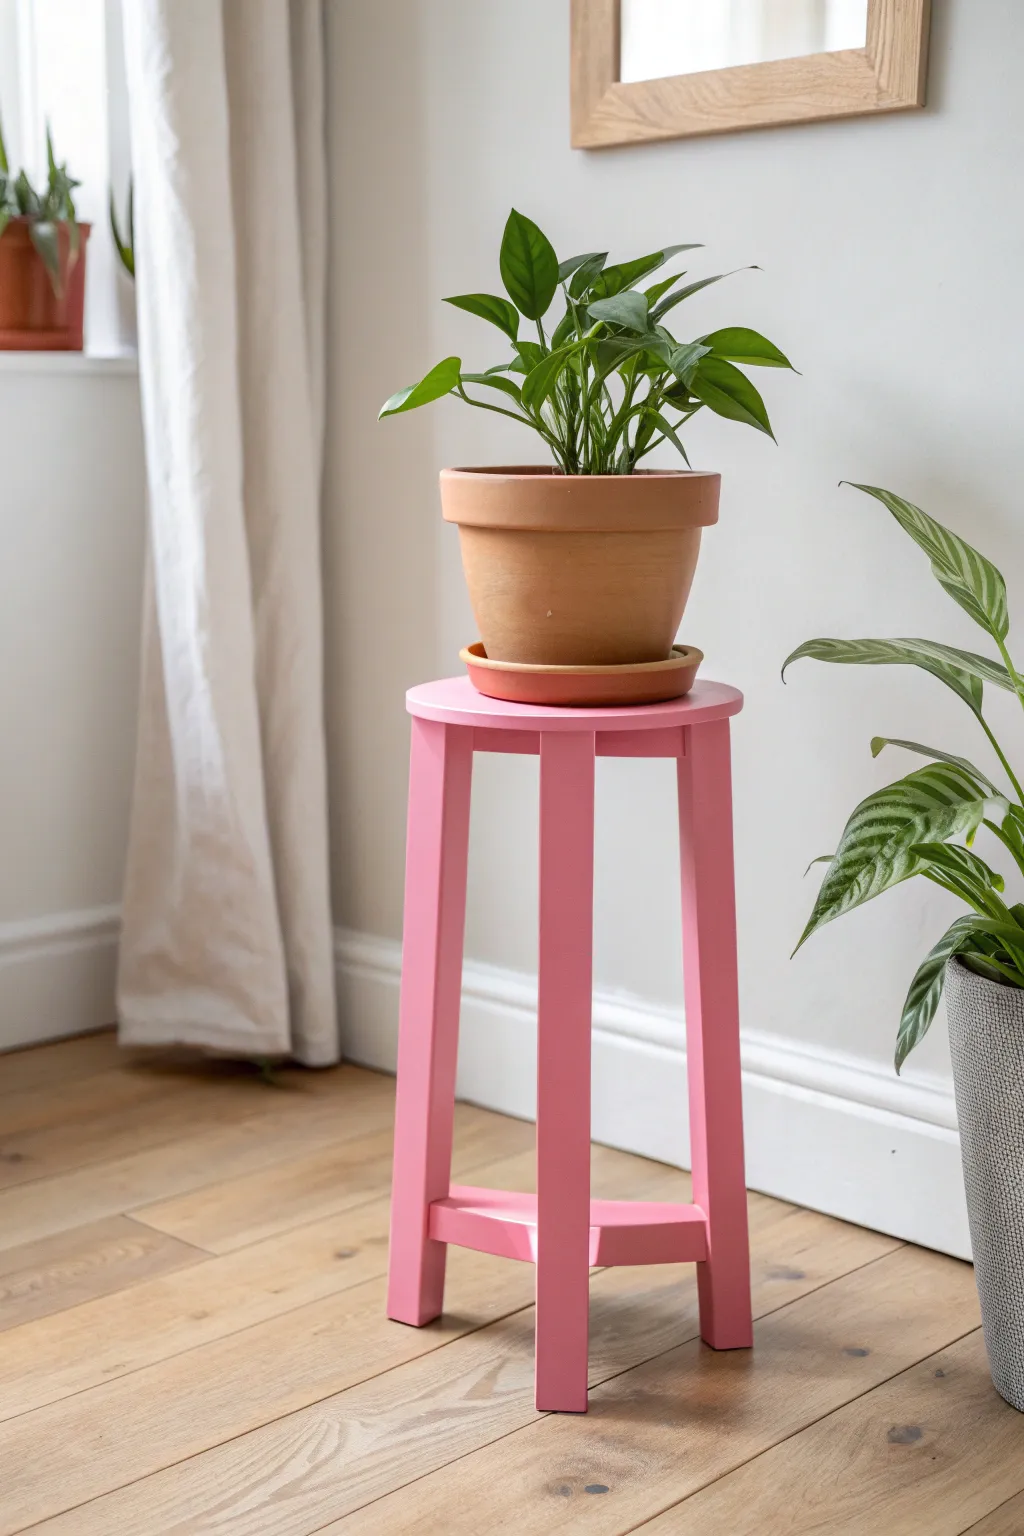
Classic Soft White Makeover
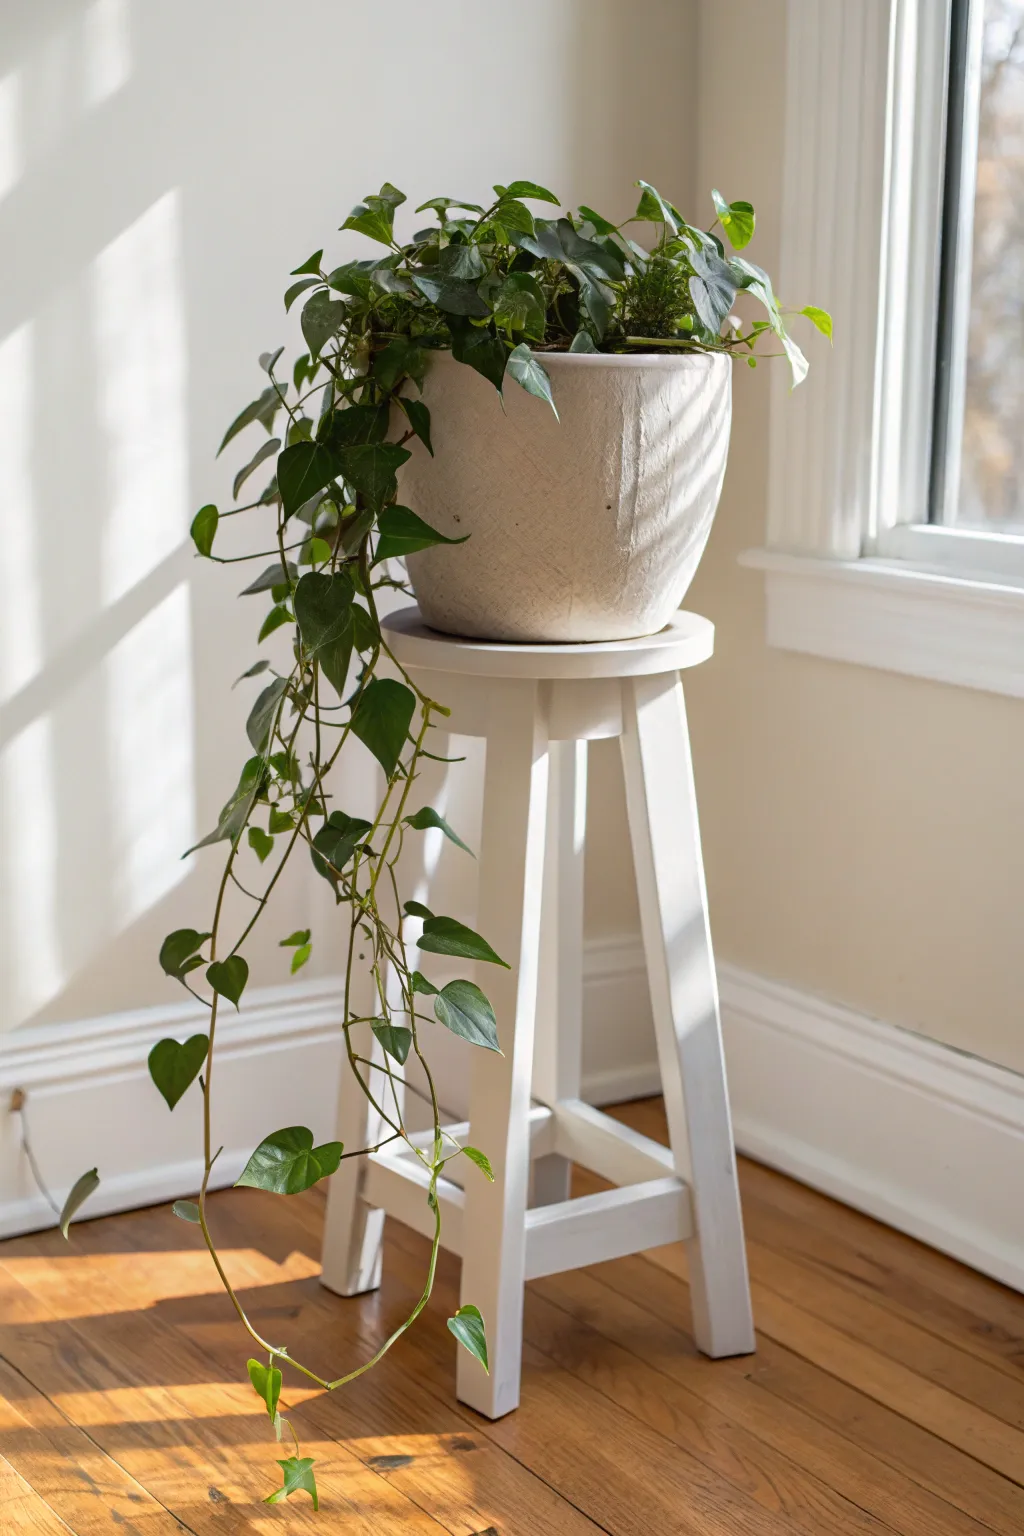
Transform a tired or dark wooden stool into a bright, airy plant stand with this classic makeover. The soft white finish reflects natural light beautifully, making it the perfect understated pedestal for cascading houseplants like ivy or pothos.
Step-by-Step
Materials
- Wooden stool (thrifted or unfinished)
- Medium-grit sandpaper (120-150 grit)
- Fine-grit sandpaper (220 grit)
- Tack cloth or damp microfibre rag
- High-quality stain-blocking primer
- Soft white chalk paint or satin-finish furniture paint
- angled sash brush (2-inch)
- Small foam roller (optional for top)
- Clear matte polycrylic or furniture wax
- Drop cloth
- Painter’s tape (optional)
Step 1: Preparation & Cleaning
-
Clean the surface:
Begin by thoroughly wiping down your stool with a damp cloth and a mild degreaser to remove any old polish, dust, or grime. Let it dry completely. -
Assess the finish:
If your stool has a glossy varnish, you’ll need to scuff it up. Using the medium-grit sandpaper, sand the entire piece, focusing on flat surfaces and legs. -
Sand the details:
Don’t forget the tricky spots like the cross-braces or under the seat. Flexible sanding sponges work wonders here for getting into curves without flattening them. -
Remove the dust:
Wipe away all sanding dust using a tack cloth. This step is crucial because any leftover dust will create a gritty texture in your final paint job.
Step 2: Priming for Durability
-
Apply the primer:
Using your angled brush, apply a coat of stain-blocking primer. This is especially important for vintage wood to prevent tannins from bleeding through the white paint later. -
Watch for drips:
Keep an eye on the underside of the legs and crossbars while priming; smooth out any drips immediately before they tack up. -
Let it cure:
For the best adhesion, allow the primer to dry according to the can’s instructions, often at least 4-6 hours. -
Light sanding:
Once the primer is dry, I like to run a fine-grit sandpaper lightly over the surfaces to knock down any raised grain or brush strokes.
Flip It Over
Make painting easier by flipping the stool upside down to paint the legs and undersides first. Flip it right-side up only to paint the top seat last.
Step 3: Painting the Finish
-
First coat application:
Dip your brush into the soft white paint. Start by painting the legs and the complex joinery underneath first. This prevents you from leaning against wet paint later. -
Painting the legs:
Use long, smooth strokes down the length of the legs. If you are using chalk paint, work somewhat quickly as it dries fast. -
Painting the seat:
Finish with the top seat surface. You can use a small foam roller here for a super smooth finish, or lighter brush strokes for a hand-painted look. -
Dry time:
Allow the first coat to dry fully. It might look streaky or patchy at this stage—that is totally normal. -
Second coat:
Apply a second coat of white paint. This coat typically provides full coverage and creates that solid, creamy opacity seen in the photo. -
Final inspection:
Check for any missed spots, specifically underneath the seat lip or inside the leg joints, and touch them up delicately.
Dip-Dyed Effect
For a modern twist, tape off the bottom 3 inches of the legs and leave them natural wood or paint them a contrasting color like gold or navy.
Step 4: Sealing & Protection
-
Choose your sealer:
Since plants involve water, a polycrylic sealer is often more durable than wax. Stir your matte polycrylic gently—never shake it, as bubbles are the enemy here. -
Apply protection:
Brush on a thin, even coat of the sealer. Pay extra attention to the top surface where the pot will sit to prevent water rings. -
Cure time:
Let the sealer cure for at least 24-48 hours before placing any heavy pots on top to ensure the finish doesn’t dent or stick.
Enjoy the fresh, clean look your new plant stand brings to your sunny corner


Matte Black Modern Stand

Achieve a sleek, industrial look with this tall, open-frame plant stand tutorial. The matte black finish transforms simple square dowels or metal tubing into a high-end, modern accent piece perfect for showcasing your favorite succulents.
How-To Guide
Materials
- 4 lengths of 3/4-inch square wood dowels or aluminum square tubing (30-36 inches long for legs)
- 8 shorter lengths of matching square material (8 inches long for crossbars)
- Strong wood glue or construction adhesive (like E6000 for metal)
- Corner clamps (optional but recommended)
- Sandpaper (120 and 220 grit)
- Wood filler (if using wood)
- High-quality spray primer (gray or black)
- Matte black spray paint suitable for your material
- Measuring tape
- Pencil
- Saw (miter box saw or hacksaw depending on material)
- Clean tack cloth
Step 1: Planning and Cutting
-
Determine dimensions:
Decide on the final height of your stand. The example shown is quite tall, likely between 30 to 36 inches. Measure the pot you intend to use to determine the width of the top square; an 8-inch square is a versatile standard size. -
Measure the legs:
Mark four identical lengths on your square dowels for the vertical uprights. Check your measurements twice to ensure perfectly level legs later. -
Measure the crossbars:
Mark eight identical shorter pieces for the horizontal supports. These will form the top and bottom squares that hold the structure together. -
Make the cuts:
Using a miter saw for wood or a hacksaw for metal, cut your pieces carefully. Aim for straight, 90-degree cuts to ensure the frame sits square. -
Sand the raw edges:
Smooth out the cut ends with 120-grit sandpaper to remove splinters or burrs before assembly.
Step 2: Assembling the Frame
-
Build the side panels first:
Lay two long leg pieces and two short crossbar pieces on a flat surface to form a ladder shape. Position the crossbars at the very top and very bottom, sandwiched between the legs. -
Glue the first panel:
Apply your adhesive to the ends of the crossbars. Press them firmly against the inside of the leg pieces. I like to use corner clamps here to ensure everything dries at a perfect right angle. -
Repeat for the second panel:
While the first panel dries, construct an identical second panel with the remaining two legs and two crossbars. -
Connect the panels:
Once the two side panels are stable, stand them up parallel to each other. Use the remaining four short crossbars to connect the two panels, creating a 3D rectangular box. -
Check for squareness:
Before the glue sets, use a framing square or measure diagonally across the corners to ensure the stand isn’t twisting. Adjust slightly if needed. -
Let it cure:
Allow the adhesive to cure completely according to the manufacturer’s instructions. This is crucial for structural integrity.
Wobbly Stand?
If the stand rocks on a flat floor, adhere small felt furniture pads to the bottom of the shorter legs, or carefully sand the longer legs down until level.
Step 3: Finishing Touches
-
Fill the gaps:
If you are using wood, apply wood filler to the seams where the pieces join to create the illusion of a seamless metal weld. Let it dry. -
Sand for smoothness:
Sand the entire structure, paying special attention to the filled joints. Start with 120-grit and finish with 220-grit for a super smooth surface. -
Clean the surface:
Wipe the stand down thoroughly with a tack cloth to remove every speck of dust. Any debris left behind will show up in the final paint job. -
Apply primer:
Spray a light, even coat of primer over the entire stand. This helps the black finish adhere evenly and hides wood grain texture. -
Sand the primer:
Once the primer is dry, give it a very light scuff with fine sandpaper to knock down any fuzz. -
Paint it black:
Apply the matte black spray paint in long, sweeping motions. Keep the can moving to avoid drips. -
Second coat:
After the first coat is dry to the touch, apply a second coat to ensure deep, opaque coverage. Inspect the stand from all angles to catch any missed spots inside the frame. -
Final cure:
Let the stand dry for at least 24 hours before placing any weight on it.
Level Up: Stone Top
Add a custom-cut piece of slate or marble tile to the top square opening. This creates a solid shelf for smaller pots and adds a luxury texture contrast.
Now you have a striking, architectural display piece ready for your favorite greenery


Warm Neutral Greige Blend
Transform a plain wooden plant stand into a cozy, sophisticated focal point with a custom greige finish. This project layers warm gray and beige tones to create a soft, weathered look that blends seamlessly with neutral farmhouse or cottage decor.
Detailed Instructions
Materials
- Unfinished wooden plant stand or thrifted find
- Sandpaper (120 and 220 grit)
- Tack cloth
- Beige chalk paint (warm undertone)
- Light gray chalk paint (cool undertone)
- Clean lint-free rags
- Small paintbrush (synthetic bristles)
- Water spray bottle
- Clear matte polycrylic or furniture wax
- Drop cloth
Step 1: Prep Work
-
Clean the surface:
Begin by thoroughly cleaning your plant stand. If it’s a thrifted piece, remove any dirt or oily residue with a mild degreaser and let it dry completely. -
Initial sanding:
Scuff sand the entire piece using 120-grit sandpaper. You don’t need to strip it to bare wood if it was previously finished, but you need to create a ‘tooth’ for the paint to grip. If the wood is raw, just smooth out any rough patches. -
Dust removal:
Wipe away all sanding dust with a tack cloth. It is crucial to have a dust-free surface so your washed finish doesn’t look grainy.
Uneven Color Fix
If the wash looks blotchy, lightly dampen the area with a wet sponge and buff it out. The water reactivates the chalk paint slightly, allowing you to smooth the transition.
Step 2: Creating the Greige Wash
-
Mix the base color:
In a plastic container, dilute your warm beige chalk paint with water. Aim for a ratio of about 1 part paint to 1 part water. You want a consistency similar to heavy cream or milk. -
Apply the first wash:
Dip your rag or brush into the diluted beige paint. Wipe it onto the wood in long, vertical strokes following the grain. Working in sections prevents the wash from drying too quickly. -
Wipe back excess:
Immediately after applying, use a clean, dry rag to wipe off the excess paint. This allows the wood grain to peek through slightly, establishing that warm base tone. -
Let it dry:
Allow this first layer to dry completely, which typically takes about 30 to 45 minutes depending on humidity.
Step 3: Layering Dimensions
-
Prepare the gray wash:
Create a second wash using your light gray chalk paint, using the same 1:1 water-to-paint ratio. This cool tone will balance the beige. -
Dry brush technique:
Dip just the tips of your brush into the gray wash and offload most of it onto a paper towel until the brush is almost dry. -
Apply the gray highlight:
Lightly drag the dry brush over the edges, corners, and flat surfaces of the stand. I find this technique highlights the texture best without covering the beige base completely. -
Blend the tones:
If the gray looks too stark in spots, lightly mist it with your water bottle and wipe it gently with a rag to blend it into the beige layer. -
Smooth the finish:
Once the paint is fully dry, very lightly run 220-grit sandpaper over the entire piece. This distresses the finish slightly and makes the surface buttery smooth.
Level Up: Stone Effect
Mix a tiny amount of baking soda into your gray wash layer. This adds grit and texture, making the wooden stand look like aged limestone or concrete.
Step 4: Sealing and Protecting
-
Dust again:
Run your tack cloth over the stand one final time to remove the fine dust from the smoothing step. -
Apply sealer:
Brush on a thin coat of clear matte polycrylic. Matte is essential here to keep that natural, earthy look rather than a shiny, manufactured appearance. -
Protect the top:
Since this will hold a plant pot that might leak or sweat, apply a second or even third coat of sealer to the top square surface for extra water resistance. -
Final cure:
Let the stand cure for at least 24 hours before placing any heavy pots on it to prevent the finish from denting or sticking.
Now you have a beautifully neutral pedestal ready to showcase your favorite fern or trailing vine without distracting from the greenery


Painted Top, Natural Legs
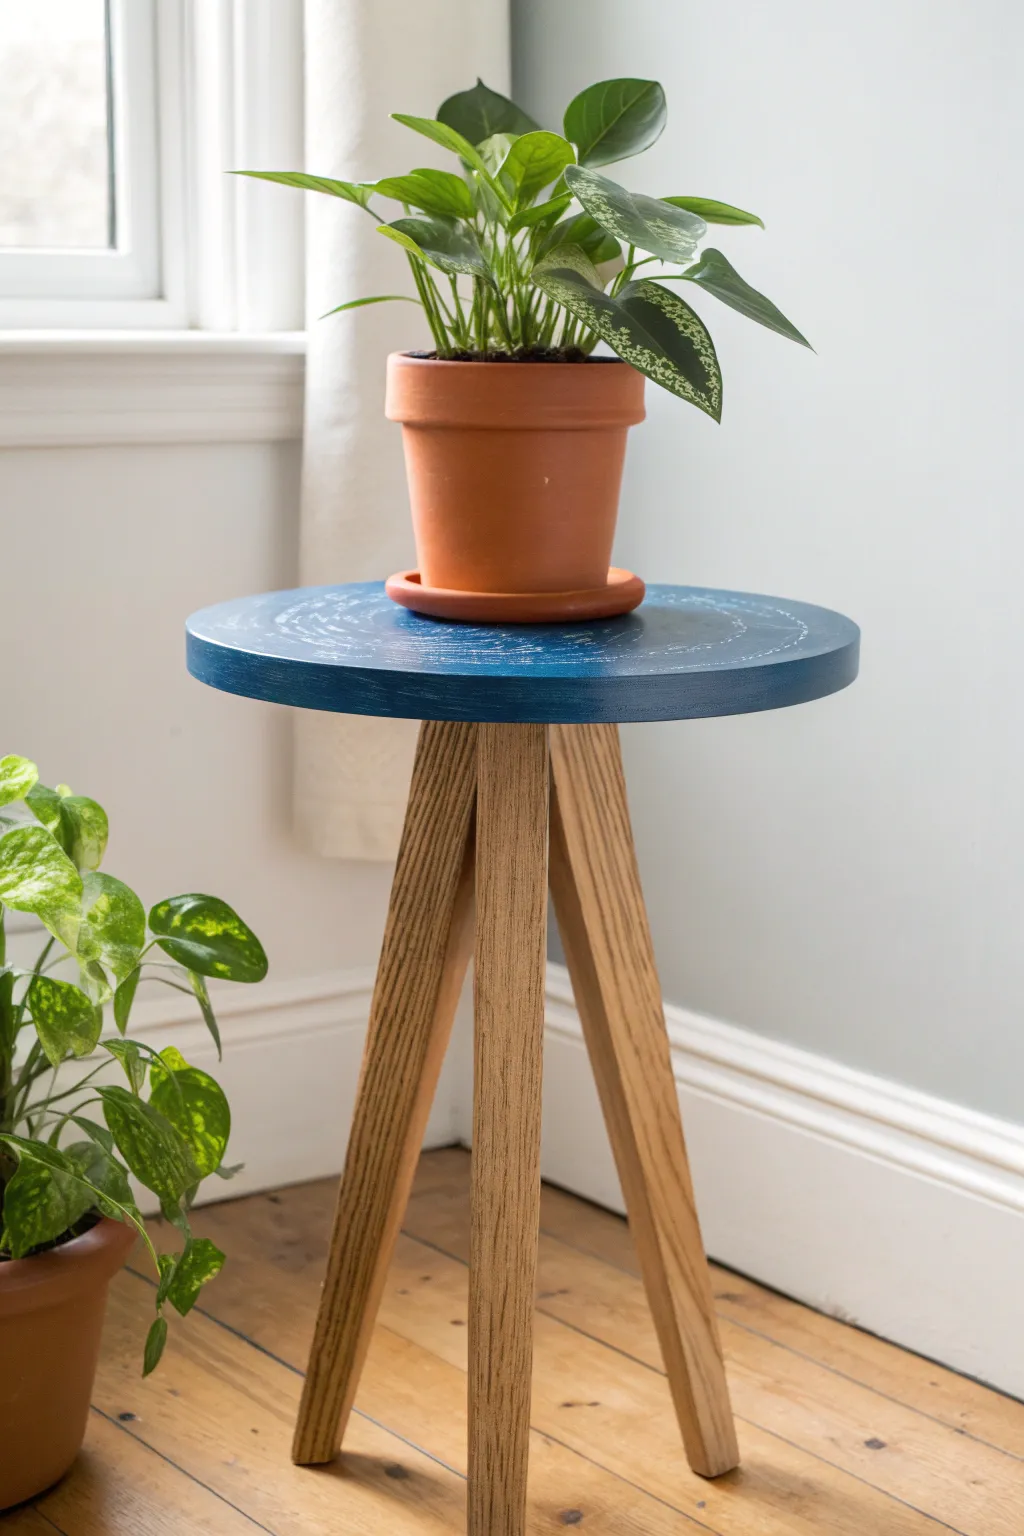
This project transforms a basic wooden stool or plant stand by highlighting the contrast between raw wood grain and a saturated, ocean-blue top. With a subtle, weathered finish on the surface, it brings a fresh and modern handcrafted touch to your indoor garden display.
How-To Guide
Materials
- Unfinished wooden plant stand (round top, 3 legs)
- Sandpaper (120 and 220 grit)
- Painter’s tape
- Deep teal or navy blue acrylic or chalk paint
- White or light grey craft paint (for dry brushing)
- Medium flat paintbrush
- Small chip brush or stencil brush
- Clean lint-free rags
- Clear matte polyurethane or wax sealant
- Tack cloth
- Drop cloth
Step 1: Preparation
-
Prepare your workspace:
Lay down a drop cloth in a well-ventilated area to catch any dust or drips. -
Sand the surface:
Using 120-grit sandpaper, go over the entire plant stand to remove any existing clear coats or rough patches. Pay special attention to the top disc. -
Smooth the finish:
Switch to 220-grit sandpaper for a final pass. This ensures the wood is super smooth and ready to accept the paint and sealer evenly. -
Clean the dust:
Wipe the entire piece down with a tack cloth or a slightly damp rag to remove every speck of sawdust. Any leftover dust can ruin your paint finish. -
Tape off the legs:
Flip the stand over. Apply painter’s tape carefully around the top of each leg where it meets the underside of the seat. This creates a crisp line so the legs stay natural.
Crisp Lines Pro-Tip
After applying painter’s tape to the legs, brush a tiny bit of clear matte medium over the tape edge first. This seals the gap and prevents the blue paint from bleeding under.
Step 2: Painting the Top
-
Apply the base coat:
Using your medium flat brush, paint the top surface and the side edges of the round disc with your deep blue paint. -
Check the underside:
Don’t forget to paint the underside of the rim (about an inch in) so no raw wood peeks through from the side view. -
Let it dry completely:
Allow this first coat to dry according to the paint manufacturer’s instructions, usually about 1-2 hours. -
Apply a second coat:
Add a second layer of blue paint to ensure solid, opaque coverage without brush strokes showing through. -
Create texture (optional):
Once the blue is barely tacky or fully dry, dip a dry chip brush lightly into a tiny amount of white paint. Offload most of it onto a paper towel. -
Dry brush the surface:
I like to lightly sweep the brush in a circular motion or following a faint geometric pattern on top to create that weathered, white-washed look shown in the image.
Step 3: Finishing Touches
-
Remove the tape:
While the paint is still slightly soft (not fully cured), carefully peel away the painter’s tape from the legs to avoid pulling up any dried paint chips. -
Seal the legs:
Apply a clear matte polyurethane or wax to the natural wood legs to protect them from moisture and dirt without darkening them too much. -
Seal the painted top:
Apply two coats of the same clear sealant to the blue top. Since this will hold a plant pot, waterproofing is essential to prevent water rings. -
Let it cure:
Allow the entire piece to cure for at least 24 hours before placing any heavy pots on top. -
Style your stand:
Place a terracotta pot with a lush green plant on top to complete the look.
Troubleshooting Blotches
If your white dry-brushing looks too heavy or blotchy, immediately wipe it back with a damp rag before it dries, or paint a thin wash of the blue over it to push it back.
Now you have a stylish, custom perch ready to elevate your favorite greenery
BRUSH GUIDE
The Right Brush for Every Stroke
From clean lines to bold texture — master brush choice, stroke control, and essential techniques.
Explore the Full Guide
Color-Blocked Bands
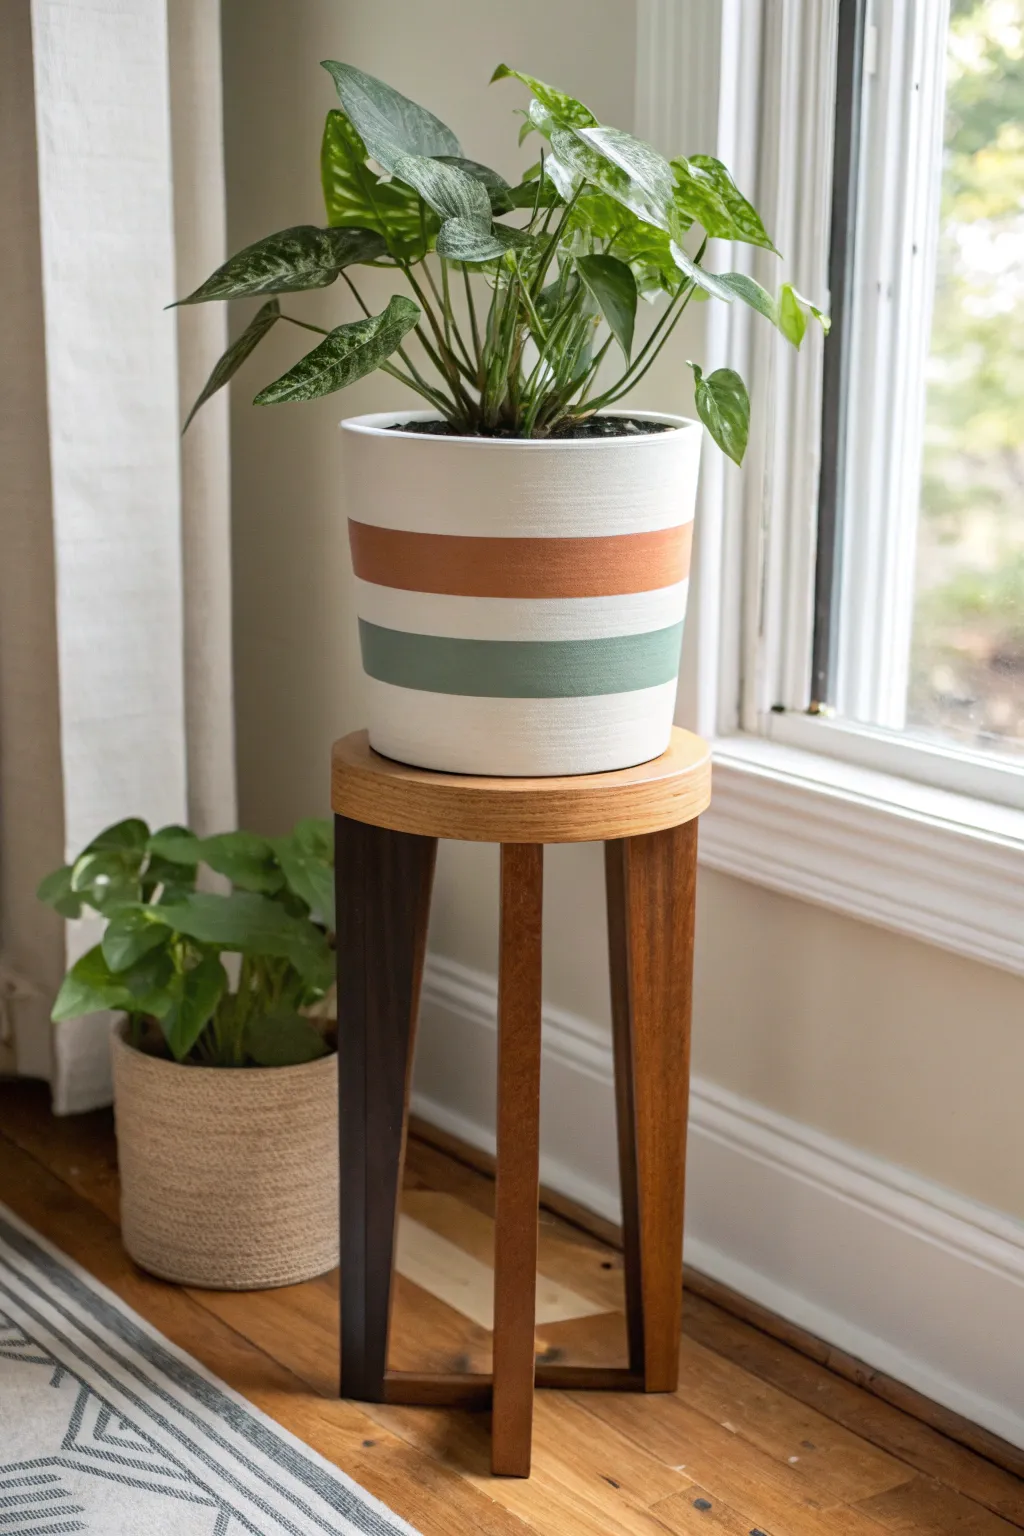
Give your greenery a stylish geometric upgrade with this dual-tone project that balances clean lines with natural textures. By color-blocking horizontal bands on a ceramic pot and playing with contrasting leg stains on the stand, you create a cohesive, mid-century inspired display piece.
Detailed Instructions
Materials
- Cylindrical ceramic planter (white or primed terra cotta)
- Wooden tripod plant stand (unfinished)
- Painter’s tape (frog tape recommended for crisp lines)
- Acrylic craft paint (Terracotta/Rust Orange)
- Acrylic craft paint (Sage Green)
- Foam brushes or flat synthetic brushes
- Wood stain (Medium Walnut/Oak)
- Wood stain (Ebony or Dark Walnut)
- Clean rags for staining
- Clear matte sealer spray
- Ruler or measuring tape
- Pencil
Step 1: Painting the Pot
-
Prepare the surface:
Start with a clean, dry planter. If you are using a standard terra cotta pot, apply a base coat of white primer and white acrylic paint first to create the blank canvas seen in the photo. Allow this base to dry completely—at least 2 hours—before proceeding. -
Measure the bands:
Decide on the placement of your stripes. For the look in the photo, the terracotta band sits just above the midpoint, and the green band sits just below it. Use a ruler to mark small pencil dots around the circumference of the pot to guide your tape. -
Tape the first stripe:
Apply painter’s tape horizontally around the pot to mask off the area for the top orange band. You will need two strips of tape: one defining the top edge of the band and one defining the bottom. Press the edges of the tape down firmly with your thumbnail to prevent bleed-through. -
Tape the second stripe:
Repeat the taping process for the lower green band, leaving a white gap of about an inch between the two stripe areas. Ensure your tape lines are parallel to the rim of the pot. -
Paint the top band:
Using a flat brush or foam brush, apply the Terracotta/Rust Orange paint between the top set of tape lines. Use smooth, horizontal strokes. I find that applying two thin coats gives a much smoother finish than one thick gloppy coat. -
Paint the bottom band:
Apply the Sage Green paint to the lower masked-off section. Again, aim for two coats for full opacity, allowing about 20 minutes of drying time between coats. -
Remove the tape:
The secret to crisp lines is removing the tape while the final coat of paint is still slightly tacky, not fully dry. Peel the tape away slowly at a 45-degree angle. -
Seal the pot:
Once the paint is fully cured (give it overnight to be safe), spray the entire exterior with a clear matte sealer to protect the finish from water drips.
Step 2: Staining the Stand
-
disassemble or prep:
If your plant stand came disassembled, it’s easier to stain the pieces before putting them together. If it is already assembled, tape off the connections where the legs meet the top circle to keep the stain distinct. -
Stain the top and two legs:
Using a clean rag, apply the Medium Walnut stain to the round top piece and exactly two of the three legs. Wipe away any excess stain after a few minutes to reveal the wood grain. -
Apply the darker accent:
For that unique asymmetrical look shown in the image, apply the Ebony or Dark Walnut stain to the third leg only. This high-contrast leg adds a custom, designer touch to an otherwise simple piece. -
Dry and assemble:
Allow all wood parts to dry according to the stain manufacturer’s instructions in a well-ventilated area. Once dry, assemble the stand, ensuring the dark leg is securely attached. -
Final setup:
Place your color-blocked pot onto the two-tone stand. Adjust the pot so the best side of your painted stripes faces outward.
Bleeding Lines?
If paint seeps under the tape, wait for it to dry completely, then use a small detail brush and the white base paint to touch up the edges.
Style Shift
Swap the stripes for gradient shades of blue for a coastal look, or leave one leg unfinished pine for a lighter, Scandi-style contrast.
Now you have a custom statement piece that perfectly highlights your favorite houseplant
Ombre Fade From Top to Feet
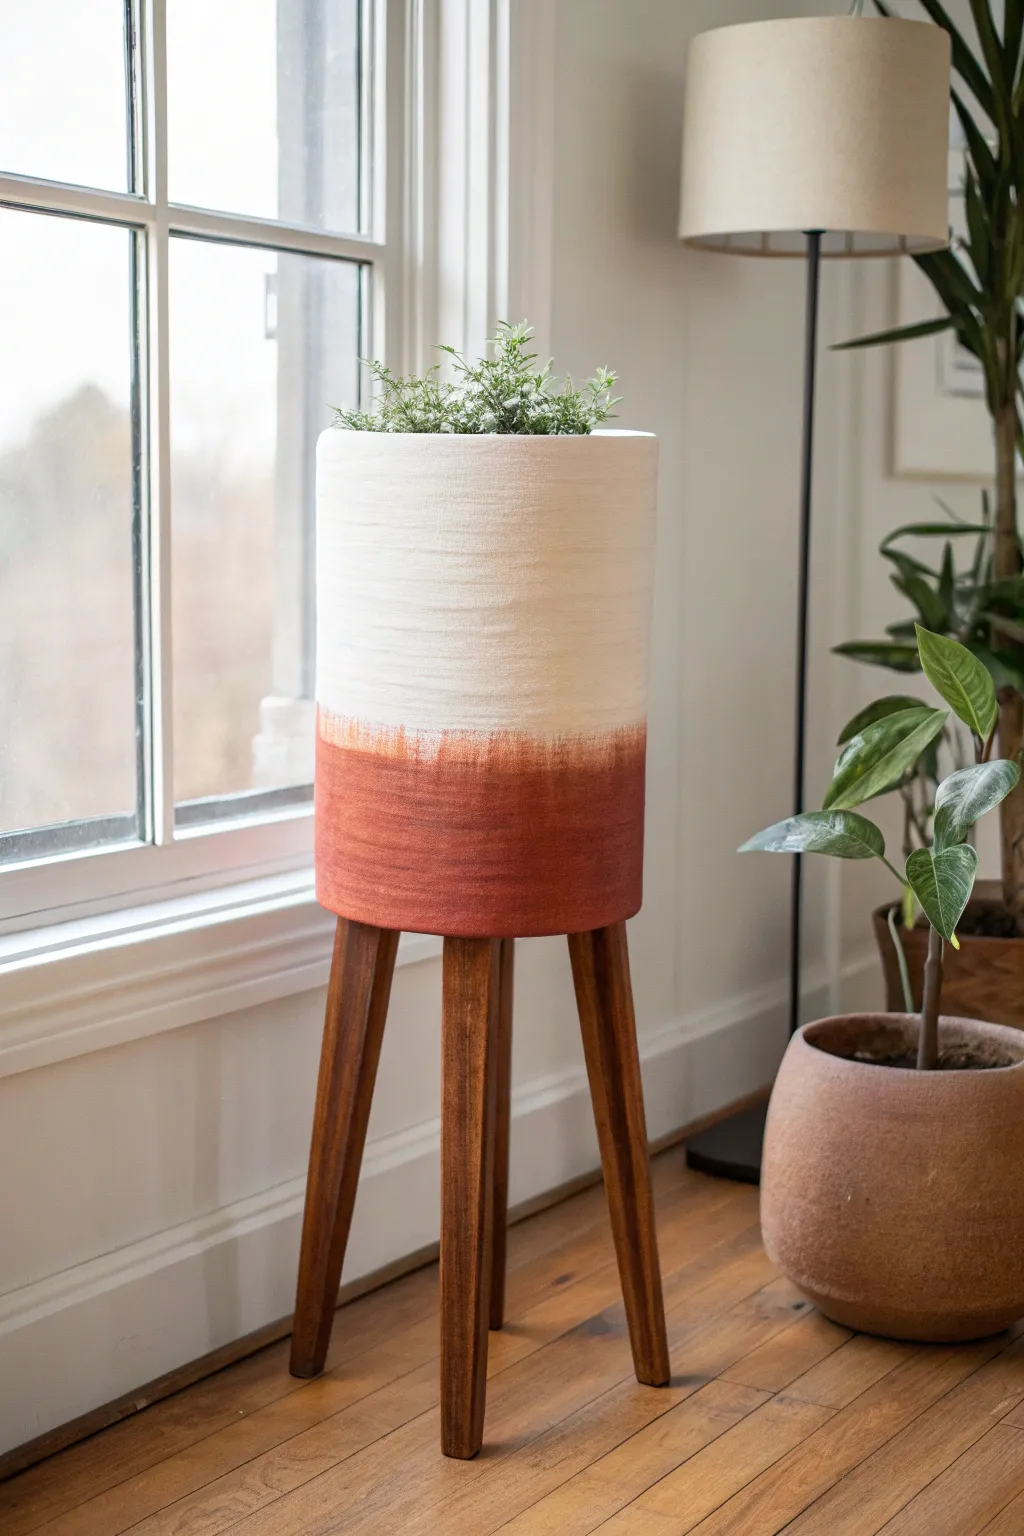
Elevate a simple standing planter with this warm, textural ombre design that mimics the look of dipped clay. This project transforms a basic cylinder pot into a modern statement piece by blending crisp white with earthy terracotta tones in a soft, upward fade.
Step-by-Step
Materials
- Cylindrical standing planter with wooden legs
- Sanding block (medium grit)
- Painter’s tape
- White chalk paint or matte acrylic paint
- Terracotta or warm rust chalk paint
- Large flat paintbrush (2-3 inch)
- Medium chip brush or bristly paintbrush (for blending)
- Clear matte sealer (spray or brush-on)
- Drop cloth or newspapers
- Damp cloth
Step 1: Preparation & Base Coat
-
Clean surface:
Begin by removing the planter from its stand if possible. Wipe the surface down thoroughly with a damp cloth to remove any dust or oils that might prevent paint adhesion. -
Protect legs:
If the legs are attached or you can’t remove them, carefully wrap the top section of the wooden legs with painter’s tape to protect the stained wood finish. -
Light scuffing:
Take your medium-grit sanding block and gently scuff the shiny surface of the planter. You don’t need to strip it, just create enough ‘tooth’ for the paint to grab onto. -
Apply white base:
Using your large flat brush, apply a generous coat of white chalk paint to the entire exterior of the cylinder. Chalk paint works best here for its matte, textured finish. -
Dry and repeat:
Let the first coat dry completely (usually 30-45 minutes). Apply a second coat of white to ensure full, opaque coverage where no original container color shows through. -
Smooth the texture:
Once fully dry, run your hand over the surface. If there are heavy brush ridges, give it a very light pass with fine sandpaper to smooth it out while keeping the matte look.
Step 2: Creating the Ombre Fade
-
Mark the horizon:
Visualise where you want the terracotta color to stop. In the example, it occupies the bottom third. You can lightly mark a guide line with a pencil, but keep it faint. -
Paint the bottom block:
Load your large flat brush with the terracotta paint. Paint the bottom section solid, ensuring you cover the very bottom edge and work your way up to about two inches below your fade line. -
Feather the edge:
Without reloading your brush, continue painting upward towards your guide line. As the paint runs out on the brush, the coverage will naturally become streakier and lighter. -
Dry brush technique:
Switch to your dry chip brush. Dip just the very tips into a small amount of terracotta paint, then dab most of it off onto a paper towel until the brush is almost dry. -
Blend the transition:
Using quick, vertical flicking motions, brush from the wet terracotta section up into the white section. The goal is to create a scratchy, uneven transition rather than a perfect gradient. -
Soften the white:
If the transition looks too harsh, take a clean dry brush with a tiny amount of white paint and flick it downward from the white section into the rust section to soften the blend. -
Add texture layers:
I find that adding a second, very light layer of ‘dry brushing’ once the first pass is tacky helps create that authentic textured pottery look seen in the photo. -
Check from a distance:
Step back from the planter to view the fade relative to the legs. Make sure the ‘horizon line’ of the fade feels level overall, even if the brushstrokes are irregular.
Pro Tip: Texture Trick
Mix a teaspoon of baking soda into your terracotta paint before applying. This adds a grainy, ceramic-like texture that makes the faux-clay effect look surprisingly realistic.
Step 3: Finishing Touches
-
Remove tape:
Carefully peel away any painter’s tape from the wooden legs while the paint is still slightly fresh to avoid peeling up any dried edges. -
Let it cure:
Allow the planter to dry completely overnight. This is crucial for chalk paint to harden properly before sealing. -
Apply sealer:
Coat the painted surface with a clear matte sealer. This will protect your paint job from water drips when you water your plants. -
Reassemble:
If you removed the pot from the stand, place it back onto the wooden legs once the sealer is dry to the touch.
Level Up: Metallic Rim
Add a thin line of gold leaf or metallic copper paint to the very top rim of the planter. This adds a tiny spark of luxury that contrasts beautifully with the matte, rustic body.
Now you have a stunning, custom planter that brings a touch of warmth to any corner of your home

PENCIL GUIDE
Understanding Pencil Grades from H to B
From first sketch to finished drawing — learn pencil grades, line control, and shading techniques.
Explore the Full Guide
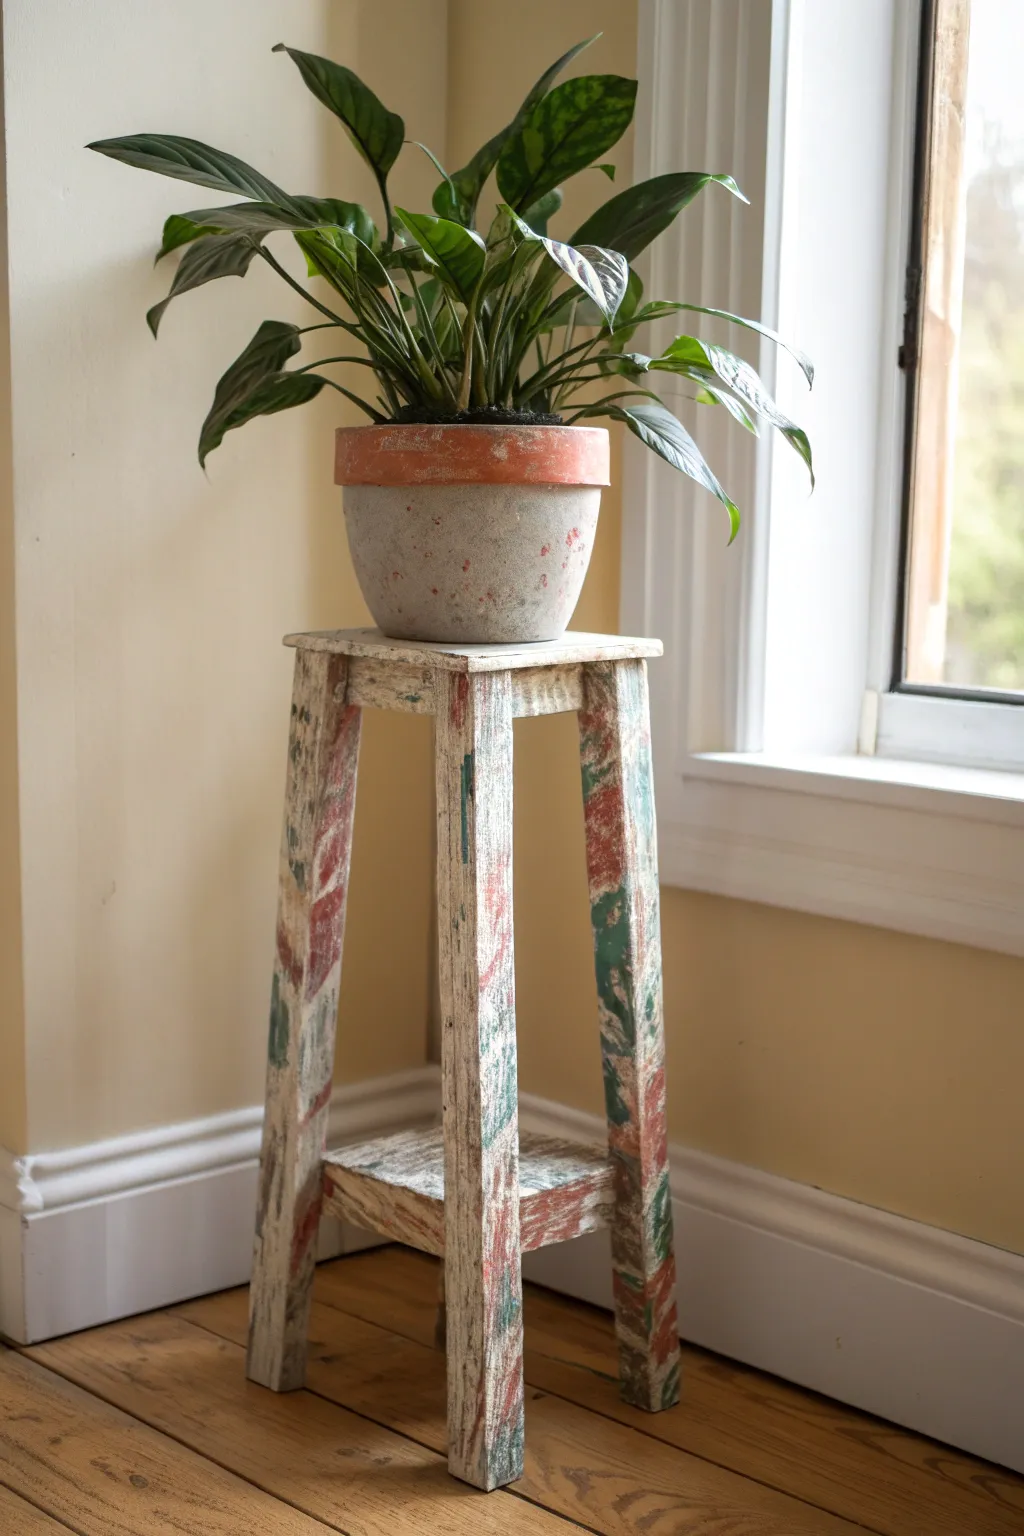
Distressed Vintage Farmhouse Look
Transform a plain wooden plant stand into a stunning piece of vintage farmhouse decor with this heavy distressing technique. By layering wax and paint, you can achieve that perfectly aged, time-worn look that usually takes decades to develop naturally.
How-To Guide
Materials
- Unfinished wooden plant stand (tall, square design)
- White or antique white chalk-style paint
- Dark wood stain (walnut or espresso)
- Fine-grit sandpaper (220-grit)
- Medium-grit sandpaper (120-grit or 150-grit)
- Paintbrushes (bristle brush and chip brush)
- Beeswax puck or candle wax
- Lint-free rags
- Clear matte sealer or wax
- Drop cloth
Step 1: Preparation & Staining
-
Sand the surfaces:
Begin by lightly sanding the entire plant stand with fine-grit sandpaper to remove any rough spots or potential splinters. Wipe it down thoroughly with a tack cloth to ensure it’s free of dust. -
Apply the stain:
Using a lint-free rag or staining sponge, apply a coat of dark wood stain to the entire piece. Focus especially on the corners, edges, and anywhere you want the wood to eventually show through the white paint. -
Wipe away excess:
After letting the stain penetrate for about 5-10 minutes, wipe away any excess liquid. You want a rich, dark base color since this will be the contrast layer under your paint. -
Let it cure:
Allow the stain to dry completely, preferably overnight. If the stain is still tacky or wet, it will bleed into your white paint and turn it pink or beige.
Paint Not Chipping?
If the paint isn’t flaking off the waxed areas easily, your paint layer might be too thick. Use a metal scraper or a putty knife to gently scrape the edges for a more aggressive chip.
Step 2: The Wax Resist Technique
-
Apply the wax resist:
Take your beeswax puck or an ordinary white candle and rub it vigorously along the sharp edges of the legs, the corners of the top platform, and random spots on the flat surfaces. This wax creates a barrier that paint won’t stick to. -
Focus on wear points:
Think about where furniture naturally gets bumped or scuffed—the feet and the top edges are prime locations. Be generous with the wax in these areas. -
Mix your paint:
Stir your white chalk-style paint thoroughly. Chalk paint is ideal here because it sands beautifully and has a matte finish that suits the farmhouse aesthetic perfectly. -
Paint the first coat:
Apply a coat of white paint over the entire stand, painting right over the waxed areas. Don’t worry if the paint separates slightly over the wax; that is exactly what should happen. -
Dry and assess:
Let this first coat dry completely. If the wood stain is showing through too much in non-waxed areas, you may want to apply a second light coat for better coverage, but keep it seemingly imperfect.
Level Up: Antique Glaze
For a grungier look, brush a brown antique glaze into the crevices after sanding. Wipe it back immediately with a damp cloth, leaving the darkness only in the deep textures.
Step 3: Distressing & Finishing
-
Start the distressing:
Once the paint is bone dry, take your medium-grit sandpaper and begin sanding the edges where you applied the wax. I find that applying firm pressure makes the paint flake off in satisfying, realistic chips. -
Refine the look:
Continue sanding along the long vertical lines of the legs to simulate years of wear. The paint over the wax should come off effortlessly, revealing the dark stain underneath. -
Sand the flat surfaces:
Lightly scuff the flat panels and the center of the shelves with fine-grit sandpaper. You aren’t trying to remove all the paint here, just smoothing out brush strokes and adding a soft patina. -
Clean up dust:
Vacuum or wipe away all the significant amount of sanding dust created during the distressing process. A clean surface is crucial for the final sealing step. -
Seal the piece:
To protect your finish without adding unwanted shine, apply a clear matte wax or a flat polyacrylic sealer. Use a clean rag or wax brush to work it into the wood. -
Buff to finish:
If using wax, let it set for about 15 minutes, then buff it briskly with a soft cloth to create a silky, durable surface that feels great to the touch.
Place your favorite terracotta pot on top and enjoy the charm this rustic piece adds to your corner
Stenciled Medallion on the Top
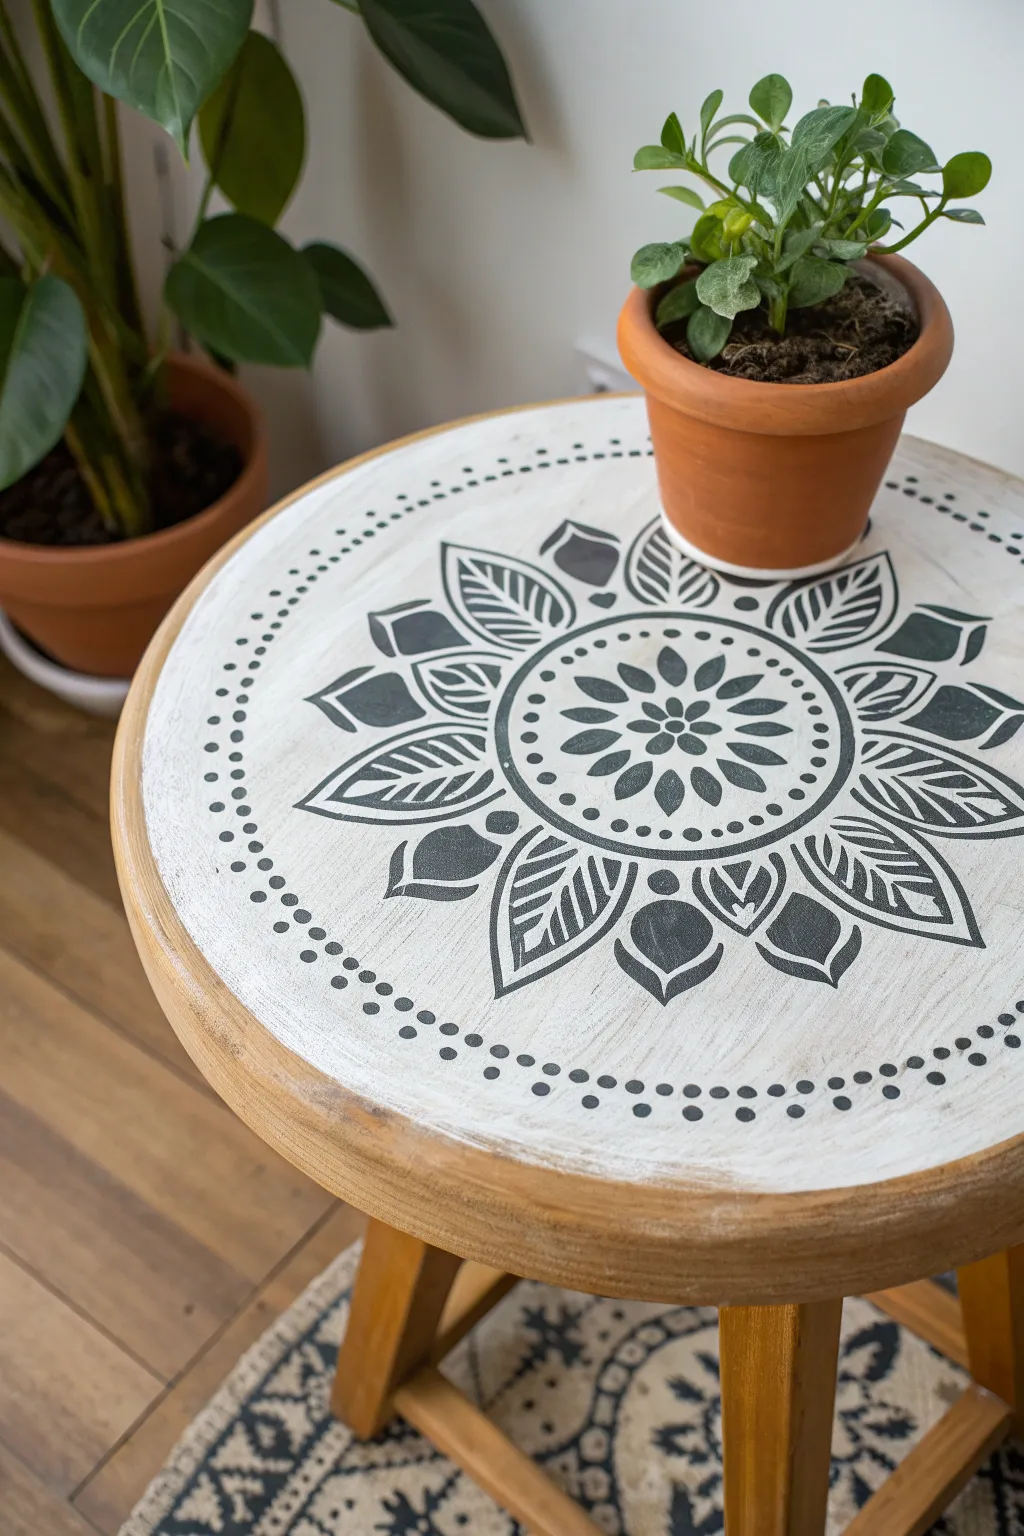
Transform a plain wooden stool into a piece of functional art with a high-contrast mandala design. This weathered white and slate-grey motif adds a touch of bohemian charm to your plant corner, perfectly balancing rustic texture with crisp geometric patterns.
Step-by-Step Guide
Materials
- Round wooden stool or plant stand (unfinished or sanded)
- Chalk paint (white or cream)
- Chalk paint or acrylic paint (charcoal grey or black)
- Large mandala stencil (sized to fit the stool top)
- Stencil brush or high-density foam roller
- Painter’s tape
- Sandpaper (120 and 220 grit)
- Large synthetic bristle brush
- Paper towels
- Matte clear coat sealer (spray or brush-on)
- Damp cloth
Step 1: Preparing the Base
-
Clean the Surface:
Begin by wiping down your wooden stool with a damp cloth to remove any dust or oils. If the wood has a glossy finish, scuff it lightly with 120-grit sandpaper so the paint adheres properly. -
Define the Border:
To achieve the look in the image where the natural wood wraps around the edge, apply painter’s tape just below the top rim of the stool. Press down firmly to prevent paint from bleeding onto the sides. -
Apply the Base Coat:
Using a large synthetic brush, apply a coat of white chalk paint to the entire top surface. Don’t worry about perfect coverage on the first pass; a slightly uneven texture adds to the rustic feel. -
Add a Second Layer:
Once the first coat is dry to the touch (usually about 30 minutes for chalk paint), apply a second coat for better opacity. Let this layer dry completely for at least two hours. -
Distress the Background:
For that weathered look seen in the photo, take your 220-grit sandpaper and lightly sand the white paint. Focus on the edges or where the wood might naturally wear down to let some grain peek through.
Dry Brush Success
The number one mistake is too much paint. Your brush should feel dry to the touch before it hits the stencil. It’s better to do two light translucent coats than one goopy one.
Step 2: Stenciling the Design
-
Position the Mandala:
Place your mandala stencil on the center of the painted top. Measure from the outer rim to the stencil edge at four points (north, south, east, west) to ensure it is perfectly centered. -
Secure the Template:
Use small pieces of painter’s tape to secure the stencil firmly in place. It is crucial that the stencil lays completely flat against the wood surface. -
Load the Brush:
Dip just the very tip of your stencil brush into the charcoal or black paint. I insist on offloading almost all the paint onto a paper towel until the brush feels nearly dry—this is the secret to crisp lines. -
Start Stenciling:
Begin applying the paint using a vertical up-and-down dabbing motion (or a light swirling motion if your brush is dry enough). Start from the center of the design and work your way outward. -
Check for Bleeding:
Carefully lift one small corner of the stencil to peek underneath. If the lines look crisp, continue. If paint is bleeding, your brush is too wet. -
Complete the Pattern:
Continue dabbing until the entire design is filled. You want solid coverage on the black elements to create a sharp contrast against the white background. -
Remove the Stencil:
While the paint is still slightly tacky (but not wet), peel the stencil straight up. Do not slide it across the surface. This helps keep the edges sharp. -
Add Dotted Accents:
The design in the image features a ring of dots around the outer edge. If your main stencil didn’t include this, use the end of a paintbrush handle or a small round foam pouncer dipped in black paint to stamp a border of dots manually.
Fixing Smudges
If paint bleeds under the stencil, don’t panic. Wait for it to dry completely, then use a tiny artist’s brush and your base white paint to ‘erase’ the blurry edges.
Step 3: Finishing Touches
-
Dry Time:
Allow the stenciled design to cure for at least four to six hours. Chalk paint dries fast, but thick stencil paint takes a little longer to harden. -
Light Distressing (Optional):
If the black pattern looks too ‘new,’ lightly run the 220-grit sandpaper over the whole top one final time. This knocks back the contrast slightly and unifies the texture. -
Remove Tape:
Peel off the painter’s tape from the rim to reveal the clean line between the painted top and the natural wood sides. -
Seal the Surface:
Since this will hold a plant pot (and potential water drips), seal the top with two coats of matte clear sealer. Let the first coat dry for an hour before applying the second.
Now you have a stunning, custom plant stand ready to showcase your favorite greenery


Hand-Painted Botanical Vines
Transform a plain ceramic pot into a lush, botanical statement piece perfect for displaying atop a simple wooden stand. The delicate green vine motif brings an organic, hand-crafted feel that beautifully bridges the gap between your indoor greenery and modern decor.
How-To Guide
Materials
- Large cylindrical ceramic pot (matte off-white/cream)
- Acrylic paints (Olive Green, Sap Green, White)
- Small flat shader brush (size 4 or 6)
- Fine liner brush (size 0 or 1)
- Pencil
- Eraser
- Paper plate or palette
- Clear matte acrylic sealer spray
- Water cup and paper towels
Step 1: Preparation & Planning
-
Clean the surface:
Before painting, ensure your ceramic pot is completely clean and dry. Wipe it down with a damp cloth to remove any dust or oils that might prevent the paint from adhering properly. -
Establish the height:
Decide how high you want your vines to reach. I find it helpful to lightly mark a few ‘top points’ around the rim with a pencil to keep the overall design balanced without looking too uniform. -
Sketch the main stems:
Using your pencil, lightly draw vertical, slightly curving lines rising from the bottom of the pot. Vary the lengths and curves; make some stand straight and others lean gently for a natural look.
Uneven Coverage?
If your leaf paint looks streakier than intended, apply a second thin coat of the base green. Let the first layer dry fully before adding the second to avoid lifting the paint.
Step 2: Painting the Foliage
-
Mix your base green:
On your palette, mix a small amount of Olive Green with a tiny touch of White to create a soft, muted sage color. This will be the base for your leaves. -
Paint the stems:
Load your fine liner brush with the mixed green paint. Carefully trace over your pencil lines, starting from the base and lifting pressure as you reach the tip to create a tapering effect. -
Block in leaf shapes:
Switch to your small flat brush. Along the stems, paint simple almond or teardrop shapes for the leaves. Don’t worry about texture yet; just get the solid green silhouettes down. -
Vary leaf orientation:
Paint leaves in pairs on some stems (like ferns) and alternating on others. Angling them slightly upward mimics how real plants grow toward light. -
Let the base layer dry:
Allow the green silhouettes to dry completely to the touch. This usually takes about 15-20 minutes depending on the thickness of your paint.
Step 3: Adding Texture & Detail
-
Create a texture mix:
Mix a lighter shade of green by adding more White to your original mix. You want a color that contrasts enough to show up against the base leaves but isn’t stark white. -
Technique: Dry brushing:
Dip your flat brush into the lighter mix, then wipe most of it off on a paper towel. The bristles should be almost dry. -
Add veining texture:
Gently drag the dry brush over the painted leaves. This creates a scratchy, organic texture that mimics veins and variegation without needing precise line work. -
Define the edges:
If the dry brushing made the edges messy, use your liner brush and the original darker green to crisp up the outline of any leaves that lost their shape. -
Painting the central vein:
For the larger leaves, use the liner brush and the lighter green mix to paint a single thin line down the center of each leaf for definition. -
Review and refine:
Step back and look at the pot from a distance. Fill in any sparse areas with small, budding leaves near the top of the stems to balance the composition.
Level Up: 3D Dimension
Use a sponge to dab a tiny amount of dark green at the very base of each leaf where it meets the stem. This shadow effect adds surprising depth to the flat design.
Step 4: Finishing Touches
-
Clean up guidelines:
Once the paint is 100% dry (give it an hour to be safe), use your eraser to gently remove any visible pencil marks from the initial sketching phase. -
Seal the artwork:
Take the pot to a well-ventilated area. Apply a light, even coat of clear matte acrylic sealer. This protects your design from moisture when watering your plants. -
Stage your stand:
Place your finished pot onto a simple wooden stool or plant stand. The elevated height will help showcase the vertical movement of your painted vines.
Now you have a custom botanical planter that brings artful greenery into your home before you’ve even planted a seed
Speckled Terrazzo Sprinkle Finish
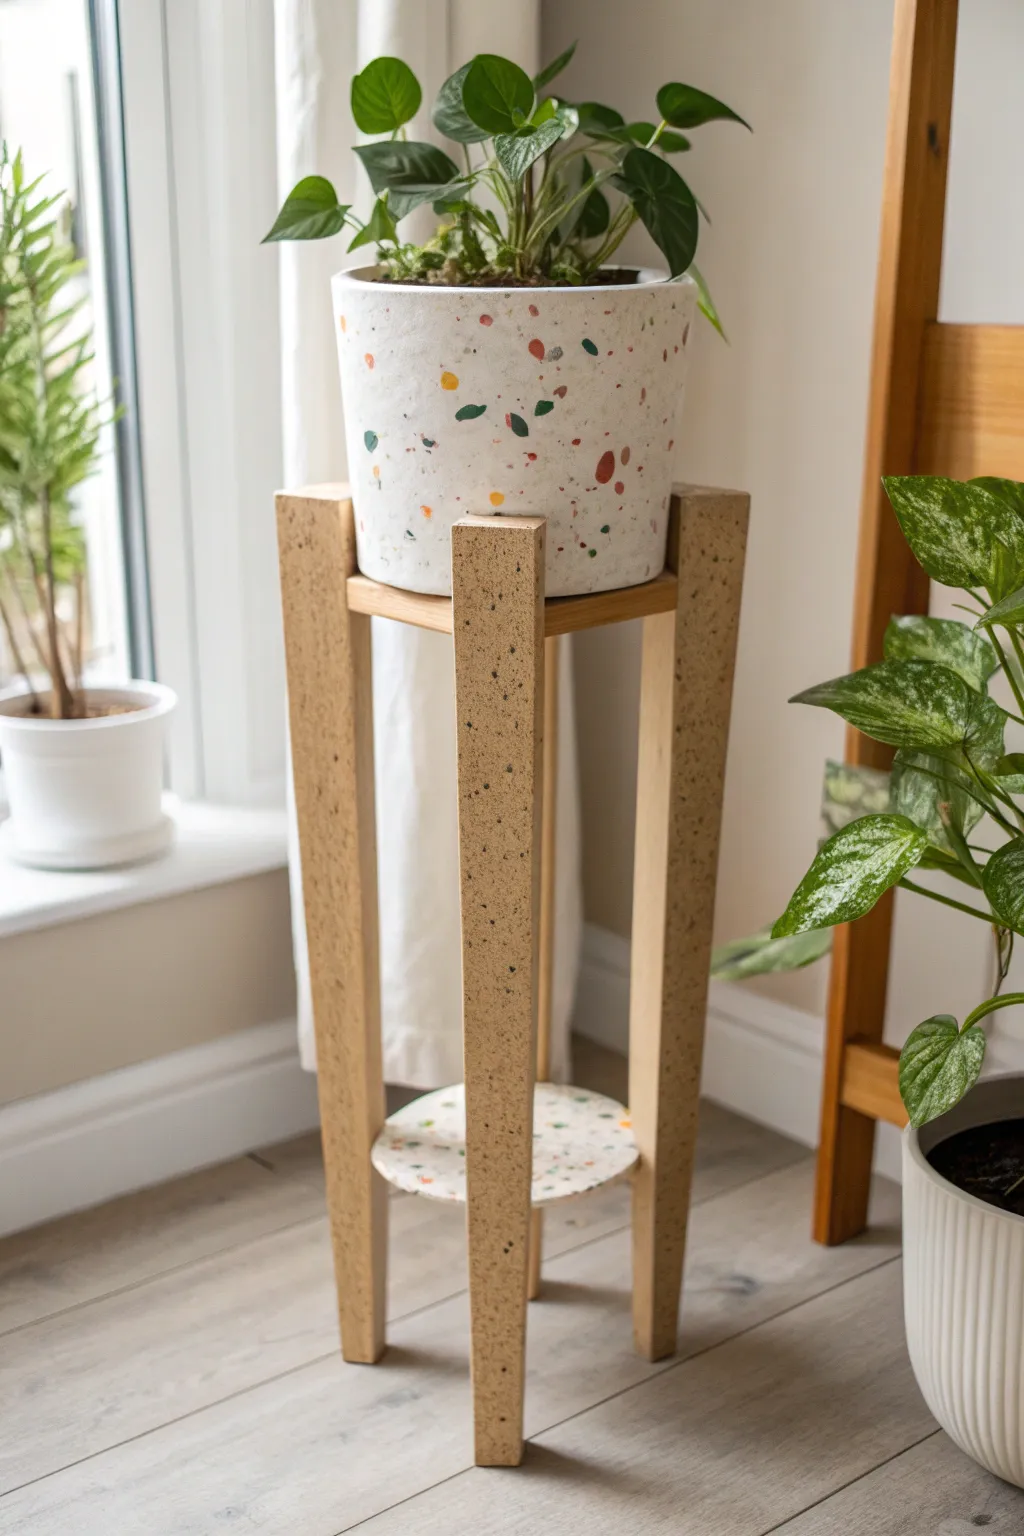
Give a simple wooden plant stand a playful, modern update with this faux terrazzo finish. By layering subtle speckles over a warm base, you can mimic the look of expensive stone or composite material for a fraction of the cost.
Detailed Instructions
Materials
- Wooden plant stand (unfinished or sanded)
- Sandpaper (120 and 220 grit)
- Primer spray paint or brush-on primer
- Base coat paint (warm beige or sandy cream)
- Acrylic paints (black, dark green, terracotta orange, white)
- Old toothbrushes or stiff bristle brushes
- Protective drop cloth or cardboard
- Painter’s tape
- Clear matte or satin polyurethane sealant
- Gloves
Step 1: Preparation & Base
-
Prep the surface:
Begin by giving your plant stand a thorough sanding with 120-grit sandpaper to remove any old varnish or rough spots, then smooth it out with 220-grit. -
Wipe it clean:
Use a tack cloth or a slightly damp rag to remove all sawdust. Any dust left behind will create a gritty texture under your paint. -
Prime the wood:
Apply a coat of primer to the entire stand. This prevents the wood tannins from bleeding through your light base color and ensures the paint adheres properly. -
Apply the base color:
Once the primer is dry, apply your warm beige or sandy cream base coat. Paint in smooth, even strokes following the grain of the wood. -
Second coat:
Let the first coat dry completely according to the manufacturer’s instructions, then apply a second coat for full, opaque coverage.
Flick Control
Test your flicking technique on a piece of cardboard first. The consistency of the paint determines droplet size—more water equals bigger splatters.
Step 2: Creating the Terrazzo Effect
-
Set up your station:
Move the stand to a well-ventilated area covered with a large drop cloth or cardboard box. This part gets messy. -
Protect surrounding areas:
If you want to keep the inner cross-bars plain wood (as seen in some designs), tape them off now with painter’s tape. Otherwise, proceed with the whole stand. -
Prepare the black paint:
Dilute a small value of black acrylic paint with a few drops of water. It should be fluid like ink but not overly watery. -
Flick the first layer:
Dip an old toothbrush into the diluted black paint. Hold the brush near the wood and run your thumb across the bristles to flick tiny specks onto the surface. -
Vary the finish:
I find it helpful to vary the distance of your hand from the wood; closer creates denser clusters, while further away creates a sparse dust look. -
Add larger spots:
For the darker specks, you can also use a small detail brush to manually dot a few slightly larger ‘stones’ here and there to break up the toothbrush texture. -
Let it set:
Allow the black speckles to dry for about 15-20 minutes so they don’t smear when you apply the next color. -
Apply secondary colors:
Repeat the flicking process with your dark green paint. Aim to fill in the empty spaces rather than overlapping the black too much. -
Add warmth:
Using the same technique, add the terracotta orange speckles. These should be sparse accents rather than the dominant color. -
Add depth:
Finally, add a very light flicking of white or a lighter cream paint. This adds dimension and makes the ‘stone’ look more realistic.
Two-Tone Look
For extra style, leave the horizontal support bars natural wood or stain them a dark walnut to contrast with the painted legs.
Step 3: Finishing Touches
-
Inspect and touch up:
Check for any large globs of paint that may have dripped. You can carefully dab them up with a paper towel corner while wet, or sand them lightly once dry. -
Dry thoroughly:
Wait at least 24 hours for the paint to fully cure. This is crucial before sealing. -
Seal the stand:
Apply a coat of clear matte or satin polyurethane. This protects the finish from water drips when you water your plants. -
Final coat:
Lightly sand with very fine grit sandpaper if the first clear coat feels rough, wipe clean, and apply a final layer of sealant.
Place your favorite potted pothos on top and enjoy the organic, artistic vibe this piece adds to your corner
High-Gloss Candy Color Pop
Transform a plain wooden stool into a statement piece with a vibrant, high-gloss candy finish. This project uses a striking bubblegum pink shade that pops beautifully against green foliage and neutral walls.
Step-by-Step Guide
Materials
- Unfinished wooden plant stand or bar stool
- High-gloss enamel paint (Pink/Bubblegum shade)
- White primer (suitable for wood)
- Medium-grit sandpaper (120-grit)
- Fine-grit sandpaper (220-grit)
- Tack cloth or microfiber rag
- High-quality synthetic bristle brush (2-inch)
- Small angled sash brush
- Drop cloth or masking paper
- Painter’s tape (optional)
- Wood filler (if repairing an old stool)
- Stir stick
Step 1: Preparation & Surface Work
-
Assess the surface:
Begin by inspecting your wooden stand. If it’s a new, unfinished piece, simply wipe it down. If you are upcycling an older stool, check for deep scratches or dents. -
Fill imperfections:
Use wood filler to patch any holes or significant divots. Press the filler firmly into the gap with a putty knife and leave it slightly overfilled to account for shrinkage as it dries. -
Initial sanding:
Once any filler is dry, sand the entire piece with 120-grit sandpaper. Even if the wood is new, this step opens up the grain and ensures the primer adheres properly. -
Clean the dust:
Thoroughly remove all sanding dust. A tack cloth is ideal here, as it grabs the fine particles that a regular rag might miss, ensuring a smooth foundation for that glossy finish. -
Setup the workspace:
Lay down your drop cloth in a well-ventilated area. If you can, prop the stool up on small blocks or scrap wood to reach the very bottom of the legs without picking up dust from the floor.
Step 2: Priming for Pop
-
Stir the primer:
Open your white primer and give it a good stir. Using a white base is crucial for this look because it makes the translucent pigments in bright pink paint appear much more vibrant. -
Apply primer to legs:
Start applying the primer to the legs, working from top to bottom. Use long strokes to avoid drips. -
Prime the intricate areas:
Switch to your smaller angled sash brush to get into the corners where the cross-braces meet the legs. This ensures you don’t get globs of paint pooling in the joints. -
Prime the top:
Finish the priming phase by coating the round seat. Don’t worry if the coverage looks slightly streaky; the goal is adhesion, not perfection. -
Let it cure:
Allow the primer to dry completely according to the manufacturer’s instructions, typically 1 to 2 hours. -
Sand the primer:
Lightly buff the dry primer with 220-grit sandpaper. This is the secret to a professional finish—knock down any raised grain or brush marks now. -
Wipe down again:
Use the tack cloth one more time to remove the white dust. The surface should feel silky smooth to the touch.
Smooth Operator
For the smoothest finish, dip your brush in a tiny bit of water (for water-based) or mineral spirits (for oil-based) before loading paint. It helps the paint self-level.
Step 3: Applying the Gloss Color
-
Prepare the gloss paint:
Stir your high-gloss pink enamel slowly but thoroughly. Avoid shaking the can, as this introduces air bubbles that ruin the glass-like finish. -
First coat application:
Apply the first coat of pink paint. I prefer to start upside down, painting the undersides and inside legs first, then flipping it over to do the outsides and top. -
Watch for drips:
Keep a close eye on vertical edges. High-gloss paint tends to be slightly thinner and runnier, so brush out any drips immediately before they tack up. -
Dry time is key:
Let this first coat dry fully. High-gloss enamels can feel dry to the touch but remain soft underneath, so give it at least 24 hours or whatever the can specifies. -
Very light sanding:
If you notice any dust nibs in the finish, extremely lightly sand them out with 220-grit paper. Wipe clean carefully. -
Second coat for depth:
Apply the second coat. This layer builds the deep, saturated ‘candy’ color. Move efficiently to keep a wet edge, blending your brush strokes into the previous ones. -
Final inspection:
Check the round top specifically, as light hits it directly. Ensure the paint is leveled out smoothly. If transparency issues remain, a third thin coat may be necessary. -
Extended curing:
Allow the stand to cure in a dust-free area for at least 3-5 days before placing a heavy pot on it. This prevents the pot from sticking to or indenting the fresh paint.
Two-Tone Twist
Create a ‘dipped’ look by taping off the bottom 3 inches of the legs and painting them gold or bright red for a contrasting sock effect.
Once fully cured, top your glossy pink creation with a lush green plant and enjoy the cheerful splash of color it brings to your room
Geometric Line Art Legs
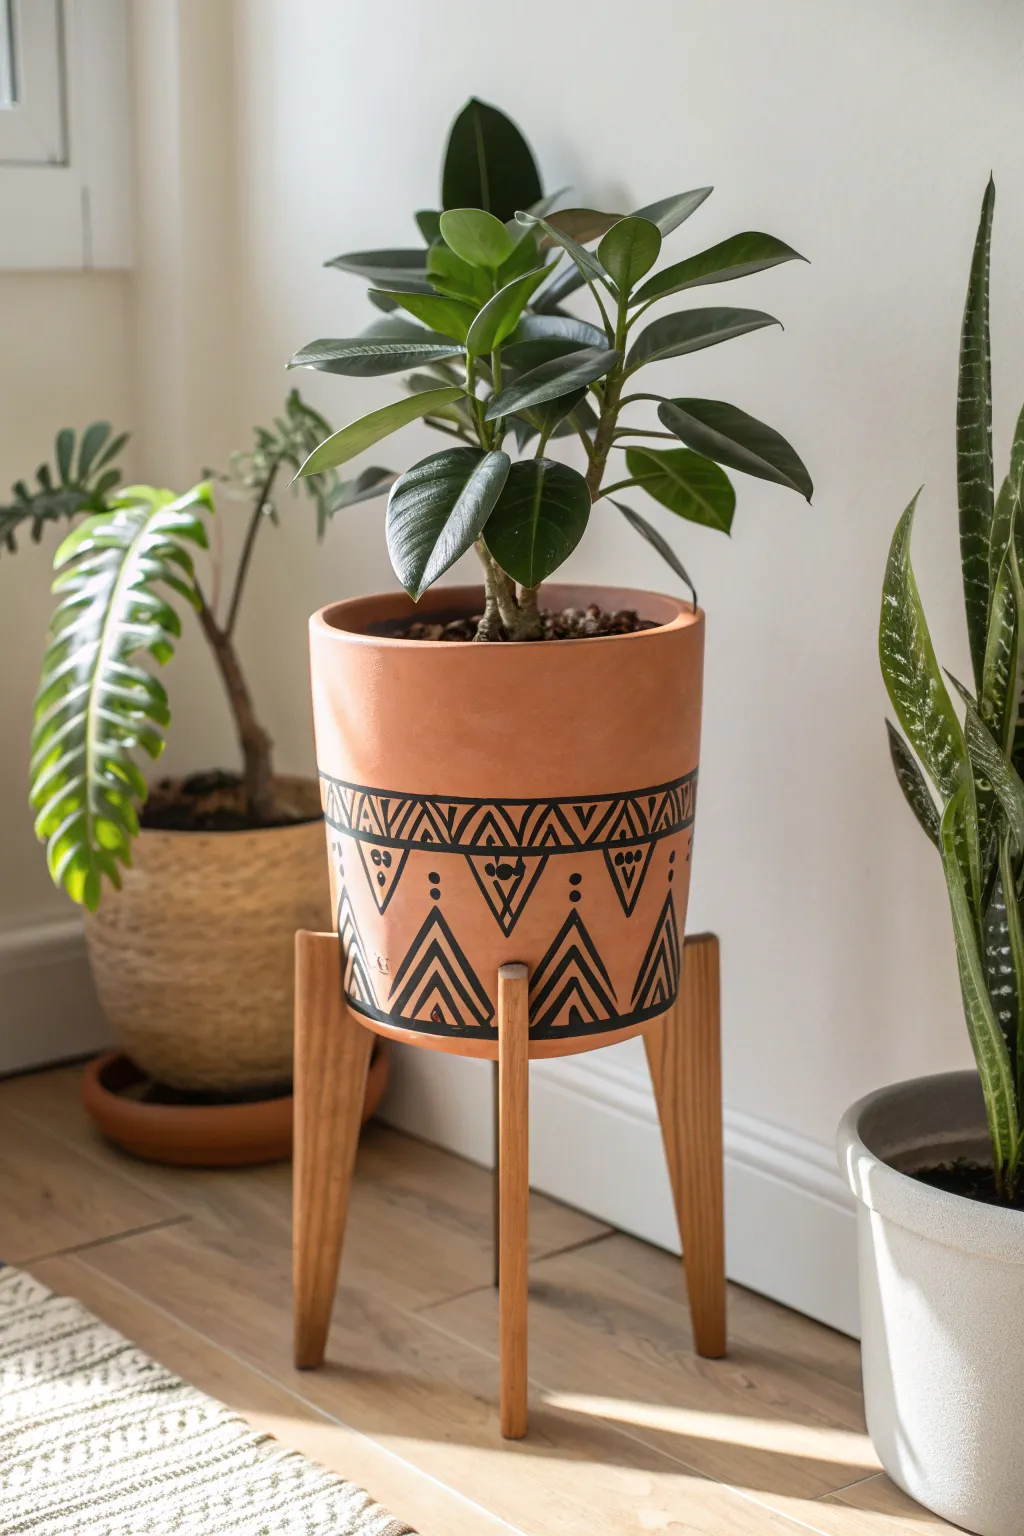
Elevate a simple terracotta pot with striking geometric patterns inspired by tribal line art. This project turns a standard planter into a bold statement piece that perfectly complements the warmth of natural wood stands.
Step-by-Step
Materials
- Terracotta pot (clean and dry)
- Black acrylic paint (outdoor rated if for patio)
- Fine liner brush (size 0 or 00)
- Medium round brush (size 4 or 6)
- Pencil
- Flexible sewing tape measure
- Clear matte sealer spray
- Paper towels
- Water cup
Step 1: Planning & Prepping
-
Clean surface:
Ensure your terracotta pot is completely clean and dry. Any dust or moisture will prevent the paint from adhering properly. -
Measure the circumference:
Use a flexible sewing tape measure to find the circumference of the pot near the middle where your main design band will sit. -
Calculate pattern spacing:
Divide that circumference number by how many large triangles you want. Mark these intervals lightly with a pencil around the pot to ensure your pattern meets up evenly at the back. -
Draft the top band:
Draw two parallel horizontal lines around the pot’s midsection, spaced about 1.5 inches apart. This will house the upper geometric border.
Wobbly Lines?
If your hands are shaky, wrap a rubber band around the pot to act as a physical guide for painting straight horizontal lines.
Step 2: Drawing the Base Design
-
Sketch the main triangles:
Below your bottom horizontal line, lightly sketch large downward-pointing triangles. These act as the ‘anchors’ for the lower pattern. -
Add internal details:
Inside each large triangle, pencil in nested V-shapes. Draw a central vertical line splitting each triangle if you want perfect symmetry. -
Fill the band:
Within the top horizontal band you created earlier, sketch a repeating zigzag or ‘mountain range’ pattern. -
Add accent motifs:
Between the large hanging triangles, sketch smaller inverted triangles or diamond shapes. Don’t forget the three small dots vertically aligned above them for that tribal look.
Step 3: Painting the Lines
-
Load your liner brush:
Dip your fine liner brush into black acrylic paint. You want a consistency like heavy cream—add a tiny drop of water if the paint feels too sticky. -
Outline the top band:
Carefully trace the two horizontal parallel lines first. I find rotating the pot on a lazy susan or a towel helps keep my hand steady. -
Paint the zigzags:
Fill in the zigzag pattern within the band using the liner brush. Keep your pressure consistent for even line width. -
Define the big triangles:
Switch to your medium round brush if needed for thicker lines, and outline the large downward-pointing triangles. -
Create nested lines:
Paint the V-shapes inside the large triangles. Leave even spacing of raw terracotta showing between the black lines.
Level Up
Paint the saucers of the plant stand in solid black or matching geometric patterns to create a cohesive, custom set.
Step 4: Finishing Details
-
Add the dots:
Use the back end of your paintbrush handle to stamp perfect circles for the three vertical dots above each smaller triangle. -
Fill accent shapes:
Paint the smaller inverted triangles between the main ones. You can leave the centers open or add a single dot inside them. -
Clean up edges:
If you made any smudges, let the paint dry completely, then gently scrape the excess away with a craft knife or touch up with a mix of orange and white paint. -
Let it cure:
Allow the paint to dry for at least 24 hours to ensure it bonds well with the porous clay. -
Seal the deal:
Spray the entire exterior with a clear matte sealer. This protects your design from water damage when you water your plants.
Place your newly decorated pot into its stand and enjoy the custom bohemian vibe you’ve created
Checkerboard Top With Clean Corners
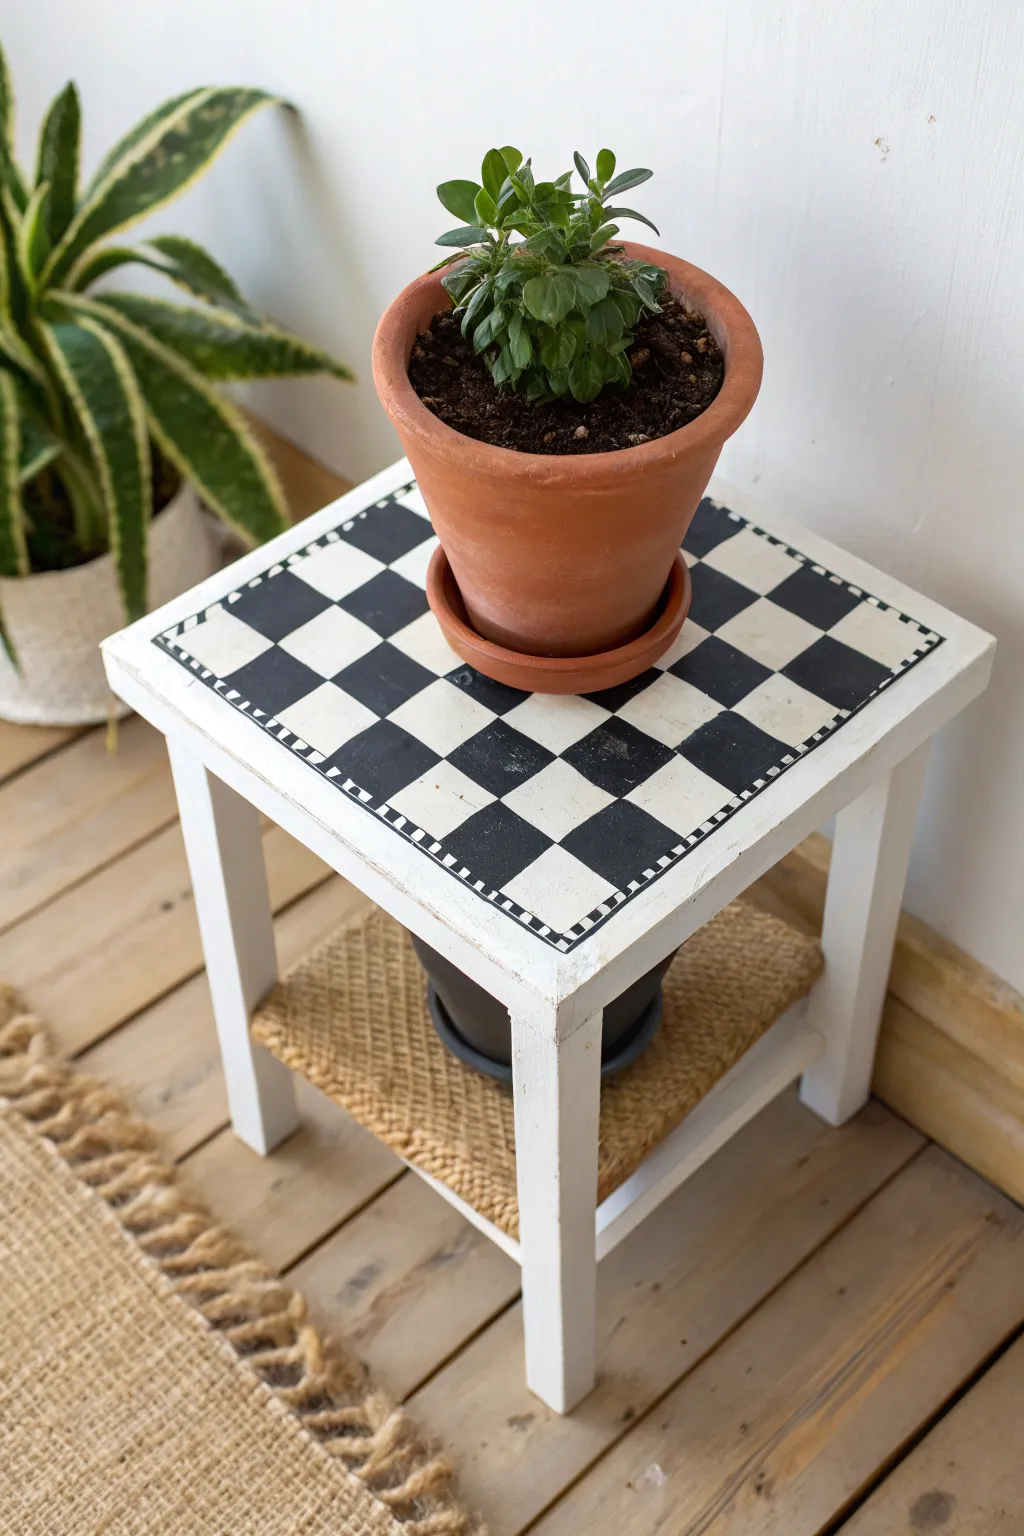
Transform a basic wooden plant stand into a striking statement piece with this classic black and white checkerboard design. The crisp geometric pattern is softened by a hand-painted dashed border, giving it a playful yet sophisticated look perfect for displaying your favorite greenery.
Step-by-Step Tutorial
Materials
- Small wooden side table or plant stand (unfinished or pre-primed)
- Sandpaper (120 and 220 grit)
- Painter’s tape (preferably high-quality for crisp lines)
- White chalk paint or acrylic paint
- Black acrylic paint
- Ruler or framing square
- Pencil
- Small flat paintbrush (about 1/2 inch)
- Fine detail brush (for the border)
- Matte or satin clear sealant (spray or brush-on)
- Damp cloth
Step 1: Preparation & Base Coat
-
Sand the surface:
Begin by giving your entire stand a light sanding. If it’s an old piece, focus on smoothing out any scratches or bumps on the top surface where you’ll be painting the detail. Wipe away all dust with a damp cloth. -
Prime the wood:
If your wood is raw or dark, apply a coat of primer to ensure the white paint pops. Let this dry completely before moving on. -
Apply the white base:
Paint the entire stand, including the top surface, legs, and shelves, with your white paint. I like to do two thin coats rather than one thick one to avoid drips. -
Dry thoroughly:
Ensure the white base coat is fully cured—ideally overnight—before applying any tape. If the paint is tacky, the tape will peel it off later.
Clean Lines Hack
Burnish your painter’s tape edges with a credit card or spoon back. Painting a thin layer of your base color (white) over the tape edge before the black guarantees zero bleed-through.
Step 2: Drafting the Design
-
Measure the top:
Measure the width and length of your table top. Decide on the size of your squares; for a small stand like this, 2-inch squares usually work well. -
Mark the center:
Find the exact center of the table and mark it lightly with a pencil. It’s often easier to start the pattern from the center and work outward to ensure symmetry. -
Draw the border lines:
Before drawing the grid, lightly draw a square perimeter about 1 inch inward from the edge of the table. This will be the boundary for your checkerboard, leaving a clean white margin. -
Grid the interior:
Use your ruler to draw a light grid inside your border marking. Ensure your lines are straight and the squares are even. -
Mark the black squares:
Place a tiny ‘x’ in every other square with your pencil. This visual guide is a lifesaver so you don’t accidentally paint two adjacent squares the same color.
Wobbly Dashing?
If your hand shakes while painting the border dashes, use a black fine-point paint pen or permanent marker instead of a brush. It gives you much more control for straight lines.
Step 3: Painting the Pattern
-
Tape the first set:
Apply painter’s tape along the outside edges of your ‘x’ marked squares for the first round. You won’t be able to tape every square at once, so work in alternating rows or columns. -
Seal the edges:
Press the tape down firmly. A quick trick is to brush a tiny bit of white paint over the tape edge first; this seals the tape and prevents black paint from bleeding under. -
Paint the black squares:
Using your flat brush, fill in the exposed ‘x’ squares with black paint. Apply thin layers to keep the surface smooth. -
Remove tape and wait:
Carefully peel back the tape while the paint is still slightly damp to avoid chipping. Let these squares dry completely to the touch. -
Tape the remaining squares:
Once the first batch is dry, tape off the remaining squares. Be gentle placing tape over your freshly painted black areas. -
Finish the checkerboard:
Paint the remaining squares black, remove the tape, and check your work. Use a small detail brush to touch up any fuzzy lines or corners.
Step 4: The Detail Border
-
Paint the inner line:
Using your fine detail brush and black paint, carefully paint a thin, continuous line right along the outer perimeter of your checkerboard grid. -
Add the dashed outer line:
Paint a second line parallel to the first, spaced about 1/4 inch away. Instead of a solid line, create small dashes all the way around toward the edge of the table. -
Connect with cross-hatches:
Draw tiny perpendicular lines connecting the solid inner line to the dashed outer line, creating a ‘ladder’ or ‘stitch’ effect similar to the reference photo. -
Clean up corners:
Pay special attention to the corners where the border lines meet. A steady hand is key here, but remember this is hand-painted, so minor imperfections add charm.
Step 5: Finishing
-
Let it cure:
Allow the entire piece to dry for at least 24 hours to ensure the black paint is fully set. -
Erase pencil marks:
Gently erase any visible pencil guidelines that weren’t covered by paint. -
Apply sealant:
Protect your hard work with a clear polyacrylic or wax sealant. Since pots can leave water rings, aim for 2-3 coats on the top surface.
Now you have a stylish spot to showcase your favorite plant
Rainbow Spray Gradient on Metal
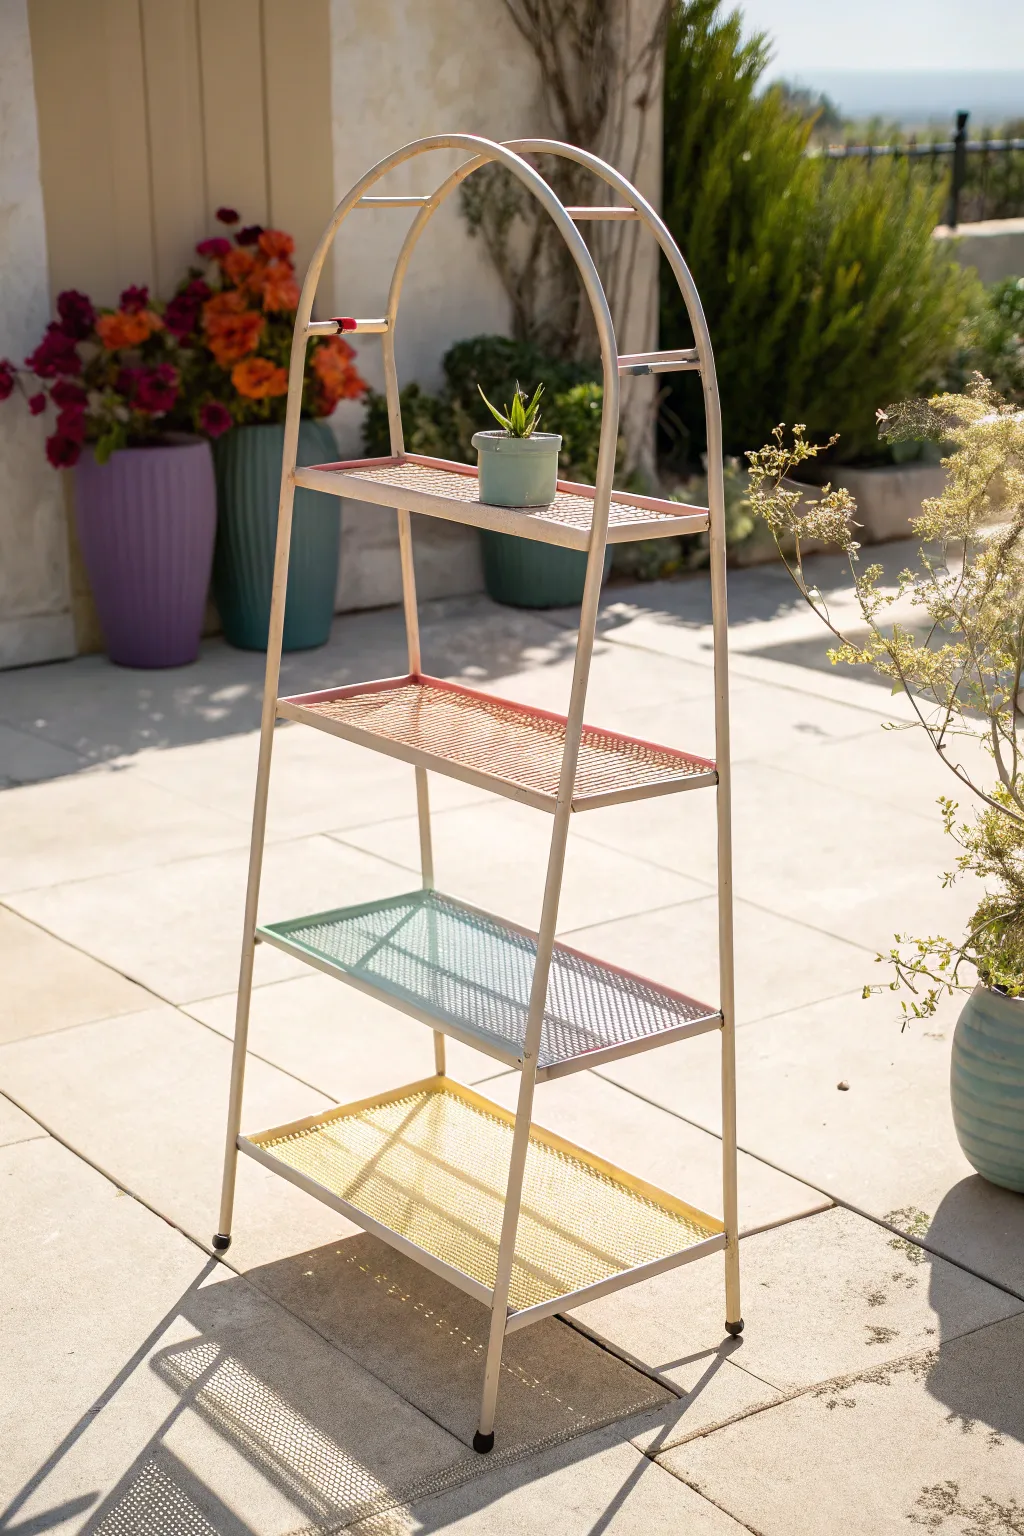
Transform a basic metal shelving unit into a whimsical garden feature with a soft, summery gradient. This project uses spray paint to create a seamless transition of pastel hues across mesh shelves, perfect for highlighting your favorite potted succulents.
Detailed Instructions
Materials
- Four-tier metal plant stand (with mesh shelves)
- Sandpaper (medium grit and fine grit)
- Clean rags or tack cloth
- Painter’s tape
- Heavy-duty drop cloth or cardboard
- Metal primer spray paint (white or light gray)
- Spray paint in Pastel Pink
- Spray paint in Peach or Soft Coral
- Spray paint in Mint or Aqua
- Spray paint in Pale Yellow
- Spray paint in Cream or Off-White (for the frame)
- Clear matte sealer spray (outdoor rated)
Step 1: Prep and Prime
-
Clean the surface:
Begin by thoroughly wiping down the entire plant stand to remove any dust, grease, or garden grime. If the stand is old, use a degreaser to ensure a clean base. -
Sand for adhesion:
Lightly scuff all metal surfaces with medium-grit sandpaper. This helps the new paint stick better, especially if the original finish is glossy. Focus on the arches and the flat mesh surfaces. -
Remove dust:
Wipe away all sanding residue with a tack cloth or a damp rag, letting the metal dry completely before moving on. -
Apply primer:
Spray a coat of metal primer over the entire stand. Use steady, sweeping motions to avoid drips. A white primer is best here, as it will make the pastel colors pop more vibrantly later. -
Let it cure:
Allow the primer to dry fully according to the can’s instructions. If you notice any rough spots, give them a quick pass with fine-grit sandpaper.
Blocked Nozzle?
If your spray can starts sputtering, turn it upside down and spray until clear gas comes out. Wipe the nozzle tip with mineral spirits to dissolve any dried paint clogs.
Step 2: Painting the Frame
-
Spray the main structure:
Using your Cream or Off-White spray paint, coat the arched frame legs and the side supports. Don’t worry too much if some cream gets onto the mesh shelves, as those will be painted over shortly. -
Inspect coverage:
Apply a second light coat to the frame if needed to ensure solid opacity. Let this base coat dry to the touch, usually about 30 to 60 minutes. -
Mask the frame (optional):
If you want extremely crisp lines where the shelves meet the frame, tape off the vertical legs carefully. However, for a softer look like the reference photo, you can skip this and just spray carefully.
Step 3: Creating the Rainbow Gradient
-
Start at the top:
Take your Pastel Pink spray paint and apply it to the top shelf. Hold the can about 8-10 inches away and spray the mesh thoroughly. I like to angle the can slightly to get inside the mesh holes. -
Paint the second tier:
Move to the second shelf down and apply the Peach or Soft Coral paint. Spray the top and underside of the mesh to ensure full coverage. -
Paint the third tier:
Apply the Mint or Aqua paint to the third shelf. Be mindful of overspray onto the shelf above or below; you can use a piece of cardboard as a handheld shield while you spray. -
Paint the bottom tier:
Finish the color application by spraying the bottom shelf with Pale Yellow paint. -
Blend the edges:
To achieve the subtle gradient look on the shelf rims, lightly mist the color of the shelf onto the immediate edge of the frame next to it. This softens the transition between the vibrant shelf and the cream frame. -
Check for missed spots:
Walk around the stand and check the shelves from different angles. Metal mesh is tricky and often hides unpainted spots inside the weave. Touch up with short bursts of spray where needed.
Mesh Mastery
For metal mesh shelves, always spray the underside first. This ensures the mesh holes are coated inside without creating heavy paint buildup on the top visible surface.
Step 4: Finishing Up
-
Remove tape:
If you used painter’s tape on the frame, carefully peel it off now while the paint is still slightly tacky to prevent chipping. -
Apply sealer:
Once the colored paints are completely dry (wait at least 24 hours), spray the entire unit with a clear matte outdoor sealer. This protects the finish from sun fading and moisture. -
Final cure:
Let the stand cure in a dry, ventilated area for a few days before placing heavy pots on it to prevent the paint from sticking to the planters.
Once fully cured, style your new rainbow stand with lush greenery to create a beautiful contrast against the soft pastel steps
Mismatched Colors for Tiered Stands
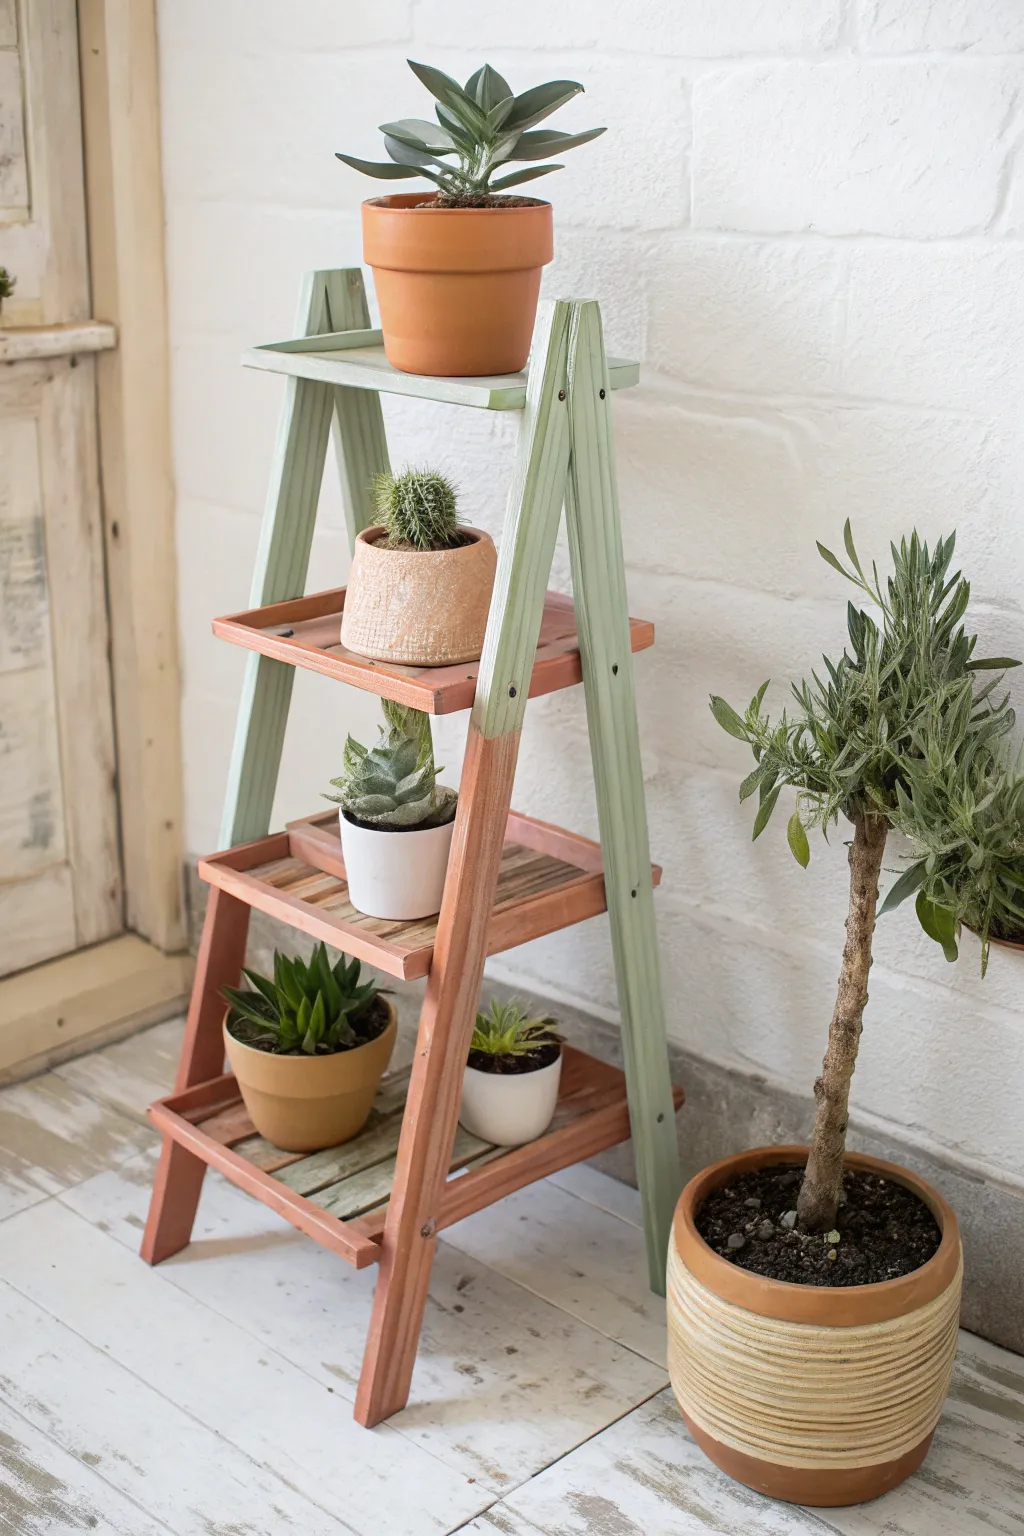
Give a simple wooden ladder stand a modern facelift with this two-tone paint effect that mimics the trendy “dipped” look. The combination of soft sage green and warm terracotta creates a playful yet grounded aesthetic perfect for displaying your favorite succulents.
Step-by-Step Guide
Materials
- Wooden tiered plant stand (unfinished or sanded)
- Sandpaper (120 and 220 grit)
- Painter’s tape (high quality)
- Sage green chalk or acrylic paint
- Terracotta or salmon pink chalk or acrylic paint
- Paintbrushes (medium flat brush and small angled sash brush)
- Satin polyurethane sealer (optional)
- Drop cloth
- Ruler or measuring tape
- Pencil
Step 1: Prep Work
-
Assess the Surface:
Examine your wooden stand for rough spots. If the wood is raw, give it a quick sanding with 120-grit paper to remove splinters. If it has an old finish, scuff sand the entire piece to help the new paint adhere. -
Clean Thoroughly:
Wipe down the entire stand with a damp cloth or tack cloth to remove every speck of dust. Paint applied over dust will result in a bumpy, unprofessional finish. -
Plan the Color Line:
Decide where you want the color transition to happen. In this project, the transition occurs diagonally across the second shelf support legs. Measure about halfway down the middle tier’s side supports. -
Mark the Line:
Using a pencil and ruler, lightly mark the level line on all four legs. Ensure the height is consistent so your dipped effect looks intentional. -
Apply Tape:
Wrap painter’s tape firmly around the legs at your pencil marks. Press the edges of the tape down firmly with your fingernail or a credit card to prevent paint bleed. Tape the area that will be painted *second* to protect it.
Bleed Patrol
Paint bled under the tape? Don’t panic. Wait for it to dry fully, then lightly scrape the excess away with a craft knife or touch up closely with a fine liner brush.
Step 2: Painting the Base
-
Start with Terracotta:
Dip your medium brush into the terracotta paint. Begin painting the bottom portion of the stand, including the lower shelves and the bottom half of the legs up to the tape line. -
Paint With the Grain:
Apply the paint in long, smooth strokes following the direction of the wood grain. This minimizes brush marks and ensures even coverage. -
Handle the Corners:
Use the smaller angled sash brush to get into the tight corners where the shelves meet the legs. Do not overload the brush to avoid drips pooling in the crevices. -
Dry and Recoat:
Allow the first coat of terracotta to dry completely (usually 1 hour for chalk paint). Apply a second coat if the wood grain is still showing through too much for your taste. -
Remove Lower Tape:
Once the terracotta paint is touch-dry but not fully cured, carefully peel off the tape. Pulling it away at a 45-degree angle helps keep the line crisp.
Step 3: Painting the Top
-
Protect the Bottom:
Once the terracotta section is fully dry (I like to wait overnight to be safe), apply fresh painter’s tape directly over the new paint, precisely aligning it with the edge of the color line. -
Seal the Tape Edge:
Lightly brush a tiny amount of the *terracotta* paint over the edge of the new tape. This seals the gap; if any paint bleeds under, it matches the bottom color, keeping the final line perfect. -
Apply Sage Green:
Using a clean brush, apply the sage green paint to the top portion of the stand, coating the upper legs and top shelf. -
Focus on the Transition:
Paint carefully around the taped area. Brush away from the tape edge rather than into it to avoid forcing paint underneath. -
Second Coat Green:
Let the first coat dry, then apply a second coat of green for a solid, opaque finish. -
The Reveal:
While the green paint is still slightly damp, slowly peel away the painter’s tape to reveal your sharp transition line.
Distressed Upgrade
For a vintage cottage vibe, lightly sand the edges of the painted areas with 220-grit sandpaper after drying to reveal hints of raw wood beneath.
Step 4: Finishing Up
-
Touch Ups:
Inspect your lines. If there’s any small bleed, use a tiny artist’s brush to correct it with the appropriate color. -
Sealing (Optional):
If your stand will be used outdoors or held damp terracotta pots directly, apply two thin coats of satin polyurethane sealer over the entire piece to protect the paint from moisture damage. -
Final Cure:
Let the stand cure for at least 24 hours before placing any heavy pots on the shelves to prevent the paint from sticking or peeling.
Now you have a custom, geometric accent piece that brings a subtle pop of color to your indoor garden
Abstract Brushwork Like a Mini Canvas
Turn a basic wooden stand into a piece of functional art with this layered, abstract painting technique. The finished look mimics the texture of an old canvas, featuring distinct, visible brushstrokes in earthy reds, greens, and whites that create a beautifully distressed patina.
Detailed Instructions
Materials
- Tall wooden plant stand (unfinished or sanded)
- Chalk paint in White (or heavy body acrylic)
- Acrylic paint in Deep Red/Terra Cotta
- Acrylic paint in Forest Green
- Acrylic paint in Beige/Taupe
- Medium coarse sandpaper (80-100 grit)
- Fine grit sandpaper (220 grit)
- Clear matte polyurethane topcoat
- Stiff bristle chip brushes (1-inch and 2-inch)
- Palette or paper plate
- Clean lint-free rags
- Drop cloth
Step 1: Preparation & Base Layer
-
Prepare the surface:
Begin by sanding your wooden plant stand thoroughly. If it has an existing shiny finish, you’ll need to rough it up significantly with 80-grit sandpaper so the paint adheres properly. Wipe away all dust with a damp rag. -
Apply the neutral ground:
Mix a small amount of beige or taupe paint with white to create a warm, creamy base color. Paint the entire stand with this mixture using a 2-inch brush. Don’t worry about perfect coverage; a little wood showing through adds character. -
Let it cure:
Allow this base coat to dry completely. Since we will be layering colors wet-on-dry for the most part, a solid foundation is key. I usually give this about an hour.
Muddied Colors?
If your red and green are turning brown where they overlap, let the first color dry completely before applying the second. Use separate brushes for each distinct color to keep tones pure.
Step 2: Creating the Abstract Pattern
-
Load the brush creatively:
Squeeze out your deep red and forest green paints onto the palette. Do not mix them. Dip a stiff 1-inch chip brush into the red, but don’t overload it—we want a ‘dry brush’ effect. -
Apply red strokes:
Starting on the legs, apply the red paint in short, downward diagonal strokes. Think of these as dashes rather than continuous lines. Leave plenty of the base color visible between the marks. -
Add the green layer:
Using a clean brush (or the same one wiped thoroughly), repeat the process with the forest green paint. Place these green strokes near and overlapping the red ones, focusing on the edges and corners of the legs for a weathered look. -
Create textural randomness:
Vary the pressure of your brush. Press hard for opaque spots and light for wispy, scratchy textures. Avoid uniform patterns; the goal is random, organic patches of color. -
Dry thoroughly:
Let these colored layers dry completely to the touch before moving to the next step to prevent muddied colors.
Step 3: The Whitewash Integration
-
Prepare the white overcoat:
Load a clean, dry chip brush with a small amount of white chalk paint. Offload most of the paint onto a paper towel until the brush is almost dry. -
Apply the white layer:
Lightly drag the white paint over the colored strokes. Go in the direction of the wood grain (vertical on the legs). This step ‘pushes’ the red and green back, making them look like they are emerging from beneath. -
Heavier coverage areas:
Apply the white paint a bit more heavily on the flat surfaces of the legs, leaving the corners and edges more exposed to show the color. This mimics natural wear patterns. -
Initial distressing:
While the white paint is still slightly tacky, use a damp rag to wipe back specific spots where you want the red and green to pop through more vividly.
Add a Pot Accent
Use the leftover red and white paint on a terracotta pot. Sponge white paint unevenly over the rim and body of the pot to tie it visually to the distressed finish of the stand.
Step 4: Finishing Touches
-
Rough sanding:
Once everything is bone dry, take your 80-grit sandpaper and aggressively sand the corners, edges, and the tops of the legs. The goal is to reveal the raw wood and the deep colors underneath the white. -
Fine tuning:
Switch to 220-grit sandpaper and lightly go over the flat surfaces to smooth out the brush ridges without removing too much paint. -
Dust off:
Vacuum or wipe down the stand carefully to remove all sanding dust. -
Seal the work:
Stir your clear matte polyurethane. Apply a thin coat over the entire piece to protect the paint and seal the exposed wood. -
Final cure:
Let the sealer dry according to the can’s instructions before placing any plants on top.
Place your favorite fern or peace lily on top to complete this charming corner vignette


Have a question or want to share your own experience? I'd love to hear from you in the comments below!