A painted wall border is one of my favorite ways to make a room feel finished without adding anything bulky or permanent. With just paint (and a little patience), you can create clean transitions, playful patterns, and custom details that feel totally you.
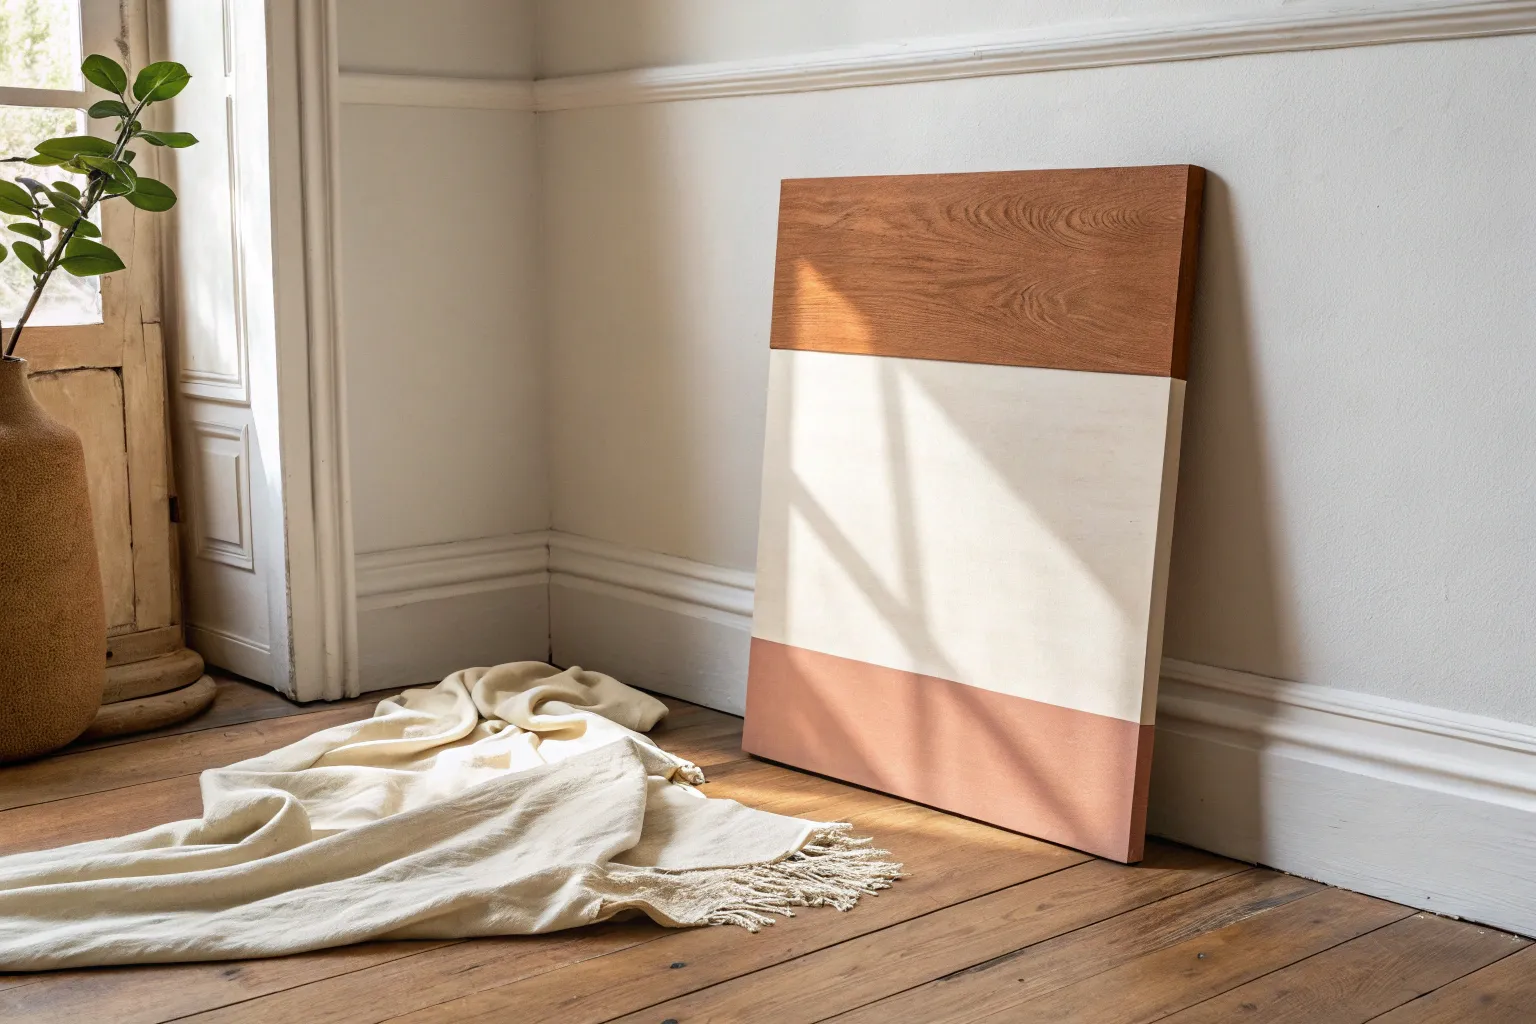
Classic Ceiling-Line Border

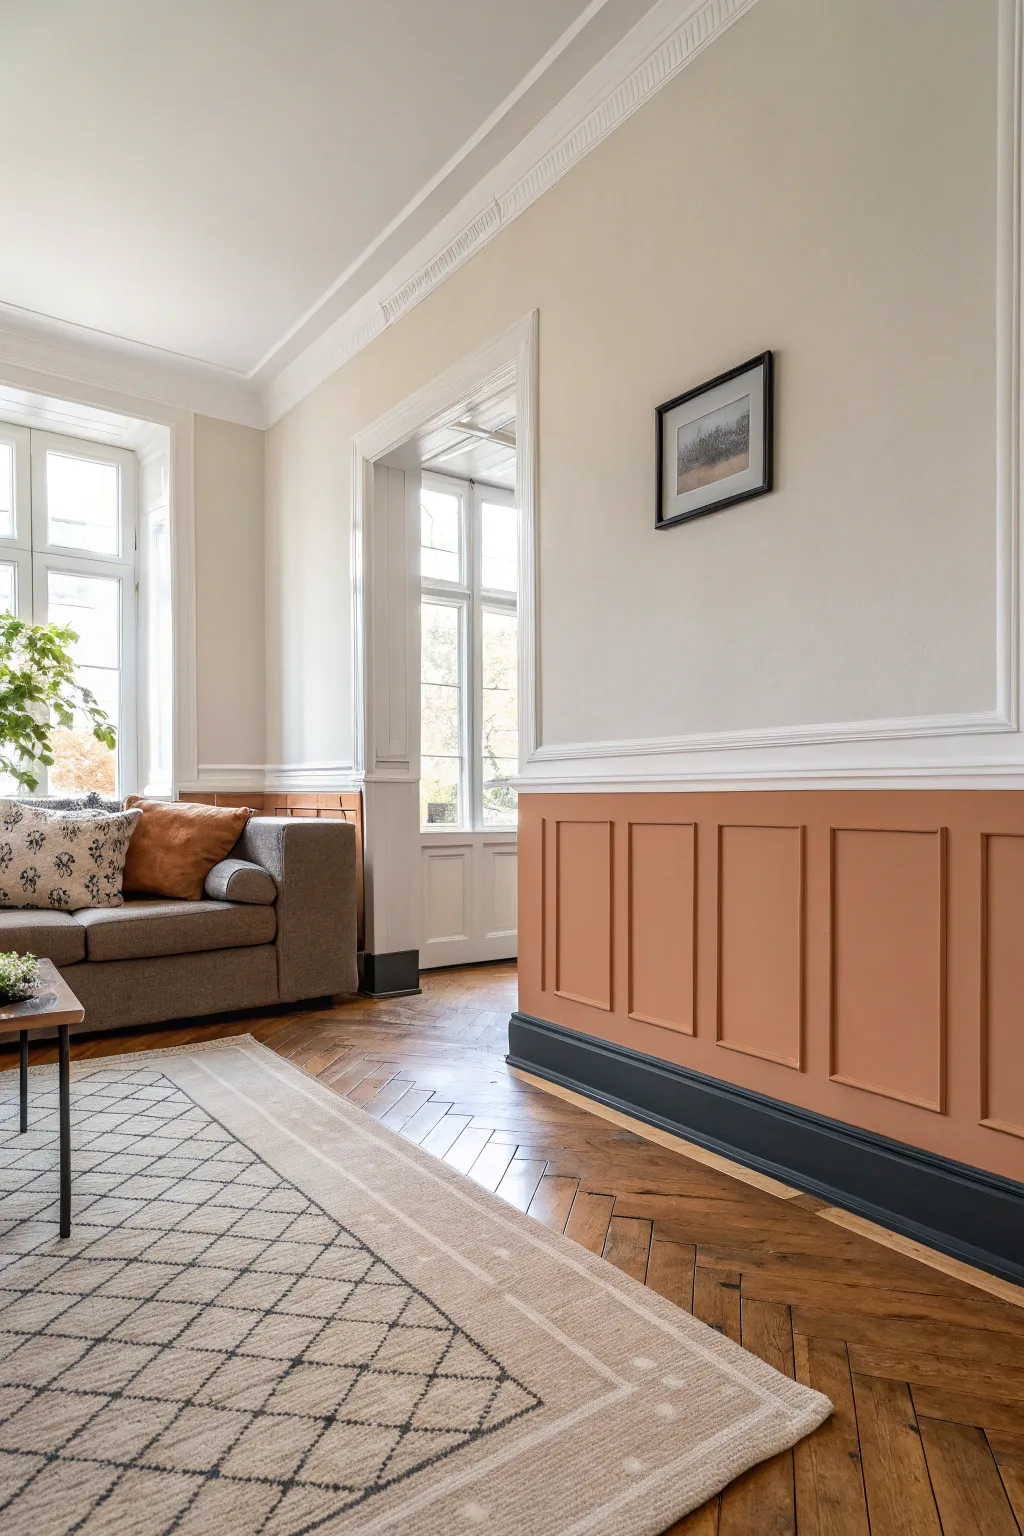
Bring classic elegance to your space by accentuating your molding with a warm, earthy terracotta hue and a precise painted stripe. This technique draws the eye upward and adds architectural depth to plain white walls without the need for complex construction.
Step-by-Step Guide
Materials
- High-quality painter’s tape (multi-surface)
- Painter’s tape for delicate surfaces (optional)
- Terracotta semi-gloss interior paint
- Pristine white ceiling paint (matte or eggshell)
- 2-inch angled sash brush
- 1-inch angled art or trim brush
- Laser level or bubble level
- Pencil
- Straight edge or ruler
- Damp cloth for clean-up
- Small roller and tray (for the molding, if preferred)
Step 1: Preparation and Base Coat
-
Clean the surfaces:
Begin by thoroughly dusting and wiping down the crown molding and the wall section immediately below it. Dust prevents tape from sticking and paint from adhering smoothly. -
Mask the ceiling:
Apply painter’s tape to the ceiling right where it meets the top edge of the crown molding. Press the tape edge firmly with your fingernail or a putty knife to prevent bleed-through. -
Tape the lower wall:
Apply a strip of tape to the wall directly beneath the bottom edge of the crown molding. This protects the wall while you paint the molding itself. -
Prime the molding:
If your molding is raw wood or a dark color, apply a coat of primer. If it’s already white, you can likely skip this, but a quick scuff sand helps adhesion.
Step 2: Painting the Crown Molding
-
Cut in the edges:
Using your 2-inch angled sash brush, carefully paint the top and bottom edges of the molding where it meets the tape. I like to keep the brush fairly dry here to avoid pooling. -
Fill in the dentil details:
The molding in the image features ‘dentil’ style blocks. Use the 1-inch brush to dab paint into the recesses and corners of these small blocks to ensure full coverage. -
Smooth out the face:
Once the details are filled, use long, horizontal strokes across the main curved face of the molding to smooth out any brush marks. -
Apply a second coat:
Allow the first coat to dry according to the paint can’s instructions (usually 2-4 hours). Apply a second coat to ensure a rich, opaque terracotta color. -
Remove molding tape:
While the second coat is still slightly tacky, carefully peel away the tape from the ceiling and the wall. Pulling at a 45-degree angle helps keep the line crisp.
Seal the Deal
For textured walls, run a thin bead of clear paintable caulk along the tape edge before painting. Wipe off excess immediately. This prevents paint from creeping under the tape into the texture.
Step 3: Creating the Lower Stripe
-
Measure the gap:
Decide on the spacing for the thin stripe below the molding. In the image, this looks to be about 2-3 inches below the main molding. Measure down from the molding and create pencil tick marks every few feet. -
Draw the guide line:
Use a laser level to project a straight line connecting your marks, or use a long straight edge and level to lightly draw the path for your stripe around the room. -
Tape the top stripe edge:
Place a long strip of painter’s tape just *above* your pencil line. This defines the top edge of your painted stripe. -
Tape the bottom stripe edge:
Place a second strip of tape parallel to the first, leaving a gap of about 1/2 inch to 3/4 inch exposed. This gap will become your painted stripe. -
Seal the tape edges:
Take a tiny amount of your *wall color* (white) and brush it over the edges of the tape where the stripe will be. This seals the tape and ensures that any bleed is white, keeping your terracotta line razor-sharp. -
Paint the stripe:
Using the 1-inch brush, paint the exposed gap with your terracotta paint. You don’t need much paint here; thin layers are better. -
Second pass:
Apply a second coat to the stripe once the first is dry to the touch, ensuring the color saturation matches the crown molding above. -
Reveal the line:
Slowly peel off both strips of tape while the paint is still slightly damp. Step back and admire the sophisticated double-border effect.
Level Up: Metallic Accent
For a glamorous twist, use a metallic gold or copper paint for the thin lower stripe while keeping the main molding matte. It catches the light beautifully near a window.
This refined architectural detail instantly adds height and custom charm to your room.

Framed Accent Wall Border
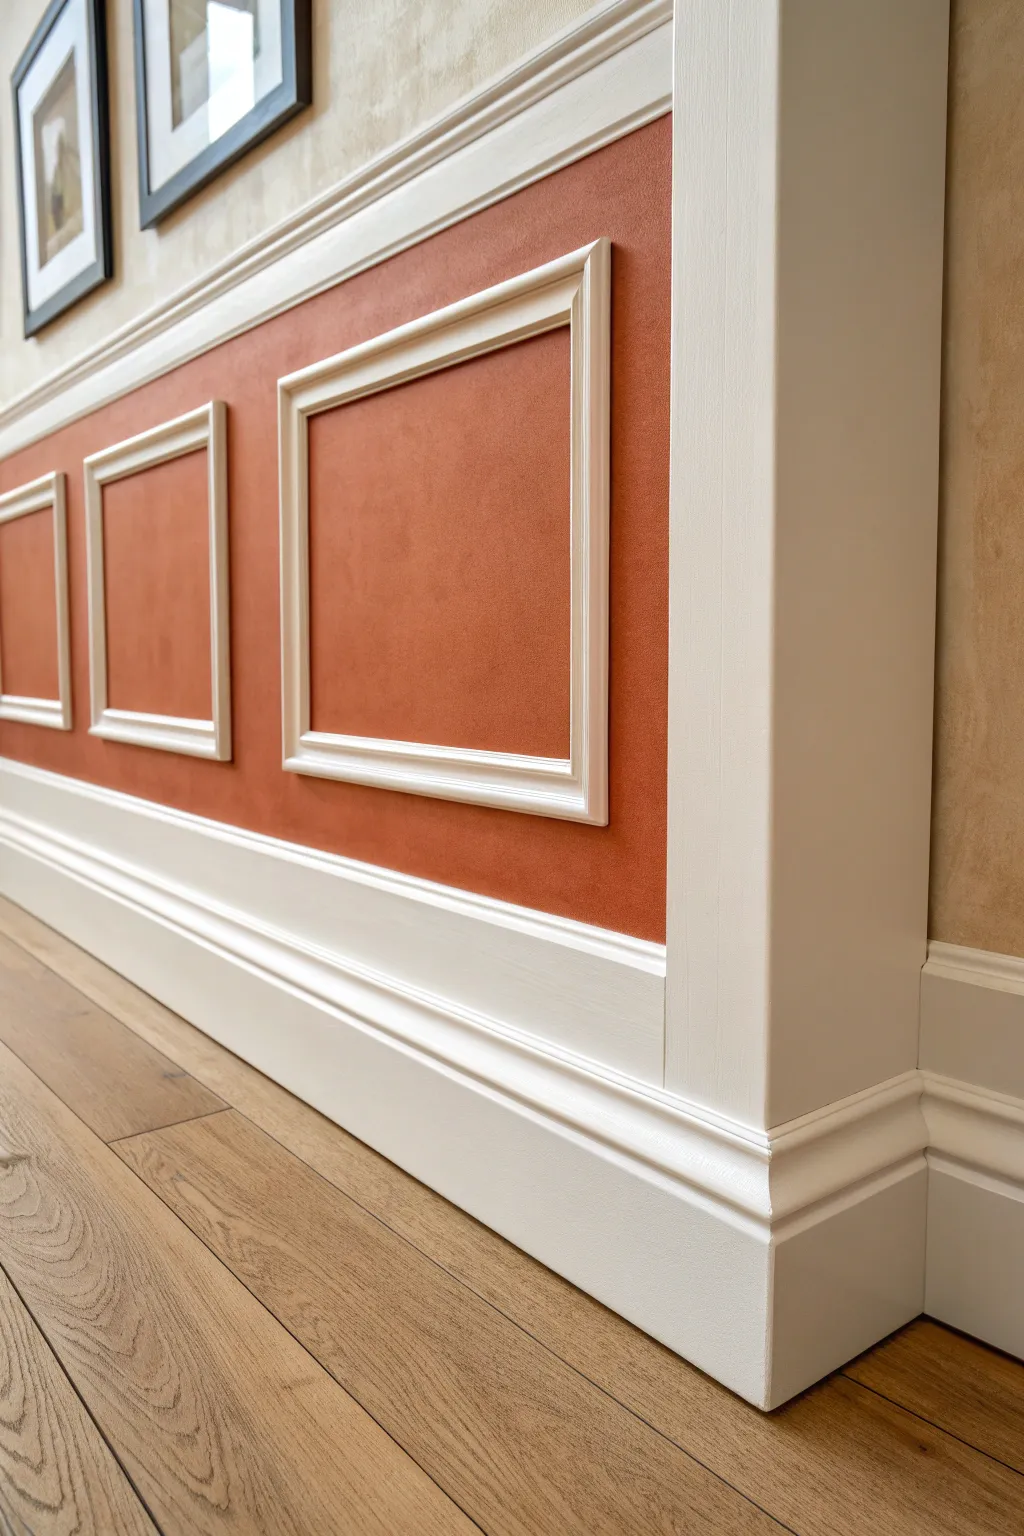
Elevate a plain hallway or dining room wall with this sophisticated take on traditional wainscoting that blends architectural depth with warm color. By combining crisp white moldings with a rich, textured terracotta paint, you create a striking accent border that adds immediate character and value.
Detailed Instructions
Materials
- 1×4 or 1×6 MDF or wood boards (for baseboard)
- Chair rail molding profile
- Base cap molding (optional, for top of baseboard)
- Panel molding trim (picture frame molding)
- Miter saw
- Laser level (or standard level and chalk line)
- Brad nailer and 1-inch to 2-inch finish nails
- Paintable latex caulk and caulk gun
- Wood filler
- Sandpaper (120 and 220 grit)
- Painter’s tape
- Terracotta or burnt orange interior paint (matte or suede finish recommended)
- Semi-gloss white trim paint
- Paint rollers (microfiber) and angled sash brushes
- Tape measure
Step 1: Planning and Foundation
-
Measure and Mark:
Begin by determining the total height of your wainscoting border. A standard height is often around 32 to 36 inches from the floor, but you can adjust based on your ceiling height. Use your measuring tape to mark this top line along the wall. -
Determine Box Spacing:
Measure the total length of the wall to calculate your frame spacing. Aim for an equal distance between each box (stiles) and between the boxes and the trim (rails), typically 3 to 4 inches. I find sketching this out on paper first prevents headaches later. -
Level the Lines:
Using a laser level or a long straight edge with a spirit level, draw horizontal lines indicating where the chair rail and baseboard will sit to ensure everything stays perfectly parallel with the floor.
Uneven gaps?
Walls are rarely perfectly straight. If gaps appear behind the trim, don’t force the wood back. Use caulk to fill gaps under 1/4 inch; it disappears once painted.
Step 2: Installing Base and Rails
-
Install the Baseboard:
Cut your primary baseboard material to length. If you are retrofitting existing walls, you may need to remove old baseboards first. Attach the new board to the studs using a brad nailer, ensuring it sits flush against the floor. -
Add Base Detail:
To achieve the chunky look in the photo, install a piece of base cap molding directly on top of your flat baseboard piece, or use a decorative shoe molding at the bottom. This builds visual weight. -
Install the Chair Rail:
Cut the chair rail molding to fit the length of your wall. Align the bottom of the molding with your previously marked top height line. Check for level one last time, then nail it securely into the wall studs.
Step 3: Creating the Frames
-
Paint the Field Color:
Before attaching the intricate picture frame molding, paint the wall section between the baseboard and chair rail with your terracotta color. It is much easier to roll this large area now than to cut in around the frames later. Apply two coats for full saturation. -
Cut Frame Pieces:
Set your miter saw to a 45-degree angle. Cut the four sides for your first box based on your layout plan. Measure the long point of the miter to ensure accuracy. -
Assemble Frames (Optional):
You can nail pieces individually to the wall, but gluing the corners together on a flat surface first often results in tighter joints. Let the glue set briefly before installation. -
Mount the Frames:
Position your first frame on the wall using spacers (scrap wood cut to your gap size) to guarantee consistent spacing. Nail the frame to the wall using shorter brad nails so you don’t hit plumbing or wires. -
Repeat Installation:
Continue installing the remaining frames along the wall, checking spacing frequently to ensure they remain centered and level.
Level Up: Texture
For the exact look in the photo, use a suede-effect paint or a color-wash technique (sponge painting) for the terracotta sections to mimic fabric or plaster.
Step 4: Finishing and Painting
-
Fill Nail Holes:
Go over every piece of trim and fill the small nail holes with wood filler. Don’t forget the miter-joint corners of your frames if there are any small gaps. -
Sand Smooth:
Once the filler is completely dry, sand the patched areas with 220-grit sandpaper until completely flush with the wood surface. Wipe away dust with a tack cloth. -
Caulk the Seams:
Run a thin bead of paintable caulk along every edge where the trim meets the wall, and where trim pieces meet each other (like the chair rail to the wall). Smooth it with a wet finger for a seamless look. -
Prime the Trim:
If your molding is unprimed wood, apply a high-quality primer. If you used pre-primed MDF, just spot-prime the filled and sanded areas. -
Paint the Trim:
Carefully paint the baseboard, chair rail, and picture frame molding with semi-gloss white paint. Use an angled sash brush for control. -
Touch Up:
Inspect your edges. If white paint strayed onto the terracotta section, use a small artist’s brush to touch up the wall color for a razor-sharp transition.
Step back and admire how this elegant architectural detail completely transforms the scale and warmth of your room.


Two-Tone Divider Stripe
Transform a plain wall into a character-rich feature by combining warm, earthy tones with crisp architectural details. This two-tone divider project uses a classic chair rail and vertical groove effects to create depth, warmth, and timeless elegance.
How-To Guide
Materials
- High-quality painter’s tape (multi-surface)
- Cream or beige interior latex paint (eggshell or matte finish)
- Terra cotta or rust interior latex paint (satin or eggshell finish)
- White trim paint (semi-gloss)
- Wood chair rail molding
- Miter box and saw
- Construction adhesive or finishing nails
- Caulk and caulk gun
- Sanding block (medium grit)
- Drop cloths
- Paint rollers and tray
- 2-inch angled sash brush
- Level or laser level
- Tape measure
- Pencil
Step 1: Preparation and Base Coat
-
Clear and clean:
Begin by removing any existing nails or screws from the wall and filling small holes with spackling paste. Once dry, sand the patched areas smooth and wipe down the entire wall surface with a damp cloth to remove dust and grease. -
Measure the height:
Decide on the height of your two-tone divider. A classic wainscoting height is roughly 32 to 36 inches from the floor, but you can adjust this based on your window sills or ceiling height. Mark this height at several points along the wall. -
Draw the level line:
Using a laser level or a long spirit level, connect your marks to draw a faint, continuous horizontal pencil line across the entire room. This will be the guide for the bottom of your chair rail molding. -
Paint the upper wall:
Apply the cream or beige paint to the upper portion of the wall. Using a roller, extend the paint slightly below your pencil line to ensure full coverage behind where the molding will sit later. -
Apply a second coat:
Allow the first coat to dry completely according to the manufacturer’s instructions, then apply a second coat for a rich, opaque finish. Let this cure fully before moving on.
Bleed-Through Blues?
If paint bleeds under the tape, don’t panic. Wait for it to dry completely, then use a small, stiff artist brush and the original base color to carefully touch up the line.
Step 2: Creating the Lower Section
-
Tape the boundary:
Once the top paint is fully cured (I usually wait 24 hours just to be safe), apply painter’s tape horizontally along the wall, positioning the bottom edge of the tape exactly on your pencil line. -
Seal the tape edge:
lightly brush a small amount of the *top* wall color over the bottom edge of the tape. This seals the tape and prevents the darker bottom color from bleeding underneath, ensuring a razor-sharp line. -
Cut in the edges:
Using your angled sash brush and the terra cotta paint, carefully cut in along the baseboards, corners, and just below the tape line. If you are painting over existing baseboards, ensure they are taped off as well. -
Roll the bottom section:
Use a roller to fill in the large areas of the lower wall with the terra cotta paint. Apply in ‘W’ shapes to distribute paint evenly, then smooth it out with vertical strokes. -
Second coat coverage:
Apply a second coat of the rust color once the first is dry. Darker, earthy tones often need two or even three coats to achieve true depth and richness. -
Remove tape:
Carefully peel away the painter’s tape while the final coat is still slightly tacky. Pull the tape at a 45-degree angle away from the paint edge to prevent peeling.
Step 3: Installing the Chair Rail
-
Measure and cut molding:
Measure the length of your walls for the chair rail. Use a miter box to cut 45-degree angles for any corners where walls meet. Dry fit the pieces to ensure they align perfectly. -
Paint the trim:
It is much easier to paint the molding before installation. Apply two coats of white semi-gloss paint to your cut molding pieces and let them dry on a drop cloth. -
Attach the rail:
Apply a bead of construction adhesive to the back of the molding and press it onto the wall, aligning the bottom edge with your color transition line. Secure with finishing nails into the wall studs for extra hold. -
Fill and finish:
Use a nail set to sink the nail heads slightly below the wood surface. Fill the holes with wood filler, let dry, and lightly sand. Run a thin bead of caulk along the top edge of the rail where it meets the wall to fill any gaps. -
Final touch-ups:
Once the caulk is dry, use a small artist’s brush to touch up the nail holes and the top caulk line with your white trim paint for a seamless, professional look.
Pro Tip: Seamless Corners
When coping corners for the chair rail, cut the first piece square against the wall, then cope the profile of the second piece to fit over it for a tighter joint than a miter.
Step back and admire how this simple division adds architectural weight and warmth to your room


Chair-Rail Illusion Border
Transform a plain wall into a sophisticated architectural feature by combining applied molding with a bold color-blocking technique. This project creates the illusion of high-end chair-rail wainscoting using simple trim and a warm terracotta hue to ground the space.
Step-by-Step Guide
Materials
- Baseboard molding (6-8 inches high)
- Panel molding trim (thin profile)
- Chair rail molding
- Miter saw or miter box
- Construction adhesive (e.g., Liquid Nails)
- Finishing nails and nail gun (or hammer and nail set)
- Caulk and caulking gun
- Wood filler
- Sandpaper (120 and 220 grit)
- Painter’s tape
- Level and measuring tape
- Primer
- Paint: Terracotta/burnt orange (satin or semi-gloss)
- Paint: Dark charcoal/black (satin or semi-gloss for trim)
- Paint: Off-white/beige (eggshell)
- Paintbrushes and rollers
Step 1: Planning and Layout
-
Determine The Height:
Decide on the height of your wainscoting. A standard chair rail height is usually between 30 to 36 inches from the floor, but going a bit higher can add drama. -
Mark The Box Layout:
Measure the total length of your wall and divide it into equal sections for the rectangular boxes. Aim for boxes that are visually balanced; leaving about 3-4 inches of space between each box and the chair rail usually looks best. -
Sketch On The Wall:
Use a pencil and a long level to lightly draw the exact placement of your baseboard, the chair rail line, and the rectangular boxes directly onto the wall to serve as your guide.
Spacer Block Trick
Cut a piece of scrap wood to the exact width needed between your boxes. Use this as a spacer guide rather than measuring every single gap to ensure perfect uniformity.
Step 2: Installing The Trim
-
Install Baseboards:
Cut your thick baseboard molding to length. Apply construction adhesive to the back, press it into place at the floor, and secure it with finishing nails into the studs. -
Cut The Panel Molding:
Using your miter saw, cut the thinner panel molding pieces at 45-degree angles to form the frames for your rectangular boxes. -
Assemble The Frames:
I find it easier to glue the mitered corners of the boxes together on the floor first, letting them set briefly, before attaching the whole frame to the wall. -
Attach Frames To Wall:
Apply adhesive to the back of your assembled frames and press them onto your pencil guidelines. Use a level to ensure they are perfectly straight before nailing them secure. -
Install The Chair Rail:
Measure and cut the chair rail molding to fit the length of the wall. Install this just above your boxes, creating the top border of your wainscoting section.
Uneven Walls?
If your walls are wavy, the trim might pull away, leaving gaps. Don’t force the wood; nail it where it touches the wall and use extra caulk to fill the visible gaps behind it.
Step 3: Prep and Prime
-
Fill Nail Holes:
Go over every piece of trim with wood filler, filling in all nail holes. A dab on your finger is usually enough for each hole. -
Caulk The Gaps:
Run a bead of paintable caulk along every edge where the wood meets the wall, and inside the corners of your box frames. Smooth it out with a damp finger for a seamless look. -
Sand Smooth:
Once the filler dries, gently sand the wood filler flush with the trim using 220-grit sandpaper. Wipe away all dust with a tack cloth. -
Prime The Wood:
Apply a coat of primer to all the new raw wood trim and any patched areas to ensure your topcoat adheres evenly.
Step 4: Painting
-
Paint The Upper Wall:
Start by painting the wall area above the chair rail with your off-white or beige color. Cut in carefully along the top edge of the chair rail. -
Paint The Wainscout Section:
Apply your terracotta/burnt orange paint to the lower wall section, including the chair rail, the wall space inside the boxes, and the panel molding itself. Use a brush for the intricate trim and a small roller for the flat spaces. -
Apply Second Coat:
Let the orange paint dry completely, then apply a second coat to ensure rich, opaque coverage without brush strokes. -
Paint The Baseboard:
Tape off the floor and the wall just above the baseboard with high-quality painter’s tape to protect your new orange paint. -
Dark Accent:
Paint the chunky baseboard in the dark charcoal or black color. This provides a grounding contrast to the warm wall above. -
Remove Tape:
Carefully peel away the painter’s tape while the black paint is still slightly tacky to prevent peeling. -
Final Touch-ups:
Inspect your edges. If any paint bled, use a small artist’s brush to tidy up the lines where colors meet.
Enjoy the refined, custom look this architectural detail adds to your room
BRUSH GUIDE
The Right Brush for Every Stroke
From clean lines to bold texture — master brush choice, stroke control, and essential techniques.
Explore the Full Guide
Crisp Double-Line Border

Elevate your standard baseboards with this sophisticated, architectural detail that mimics the look of custom millwork. By combining simple wooden molding with precise painted stripes, you can create a high-end, structured border that wraps beautifully around corners.
How-To Guide
Materials
- Wooden dado rail or trim molding (approx. 1-1.5 inch wide)
- Construction adhesive or wood glue
- Finishing nails and nail gun (or hammer and nail set)
- Wood filler
- Sandpaper (120 and 220 grit)
- Painter’s tape (high quality, for delicate surfaces)
- Laser level or long spirit level
- Pencil
- White semi-gloss trim paint
- Grey satin or semi-gloss paint (for stripes)
- Small angled sash brush
- Artist’s liner brush (optional, for touch-ups)
- Caulk and caulk gun
Step 1: Preparation and Molding Installation
-
Measure and mark height:
Begin by determining the height for your molding. This design sits just above the existing baseboard. Use a laser level to project a straight line around the room at your desired height to ensure continuity. -
Cut the molding:
Measure your wall lengths carefully. When dealing with corners like the one shown, cut your wooden molding at 45-degree angles (miters) to ensure a seamless wrap-around connection. -
Attach the molding:
Apply a bead of construction adhesive to the back of the trim. Press it firmly against the wall along your marked line, then secure it with finishing nails into the studs for a permanent hold. -
Fill and sand:
Cover the nail holes and the corner miter joint with wood filler. Once dry, sand the filler smooth so it’s flush with the wood surface, then wipe away any dust. -
Caulk the gaps:
Run a thin bead of paintable caulk along the top edge of the molding where it meets the wall, and the bottom edge. Smooth it with a wet finger for a seamless transition.
Step 2: Base Coat and Taping
-
Paint the base color:
Paint the entire area—the new wooden molding, the wall space between the molding and the baseboard, and the baseboard itself—with your white semi-gloss trim paint. Apply two coats for solid coverage. -
Let it cure:
Allow the white paint to cure fully, preferably for 24 to 48 hours. This is crucial because fresh paint can peel off when you remove the tape in the next steps. -
Map out the stripes:
Using your level, lightly mark the positions for the grey stripes with a pencil. The design features a thicker stripe just below the wood molding and thinner parallel lines near the floor. -
Apply tape for the top stripe:
Apply painter’s tape to define the first grey stripe immediately beneath the wooden molding. Press the edges of the tape down firmly with a credit card or putty knife to prevent bleed. -
Tape the lower stripes:
Tape off the thin parallel lines near the bottom. I find using different widths of tape as spacers helps keep the distance between lines perfectly consistent without constant measuring. -
Seal the tape edges:
Paint a very thin layer of the *white* base paint over the tape edges. This seals any tiny gaps; if paint bleeds, it will be white-on-white, keeping your final grey lines razor-sharp.
Bleed-Through Fix
If paint bleeds under the tape, wait for it to fully dry. Then, place a fresh piece of tape over the ‘good’ line and lightly touch up the bleed with your original base color.
Step 3: Painting the Accents
-
Paint the grey stripes:
Using a small angled brush or a mini foam roller, fill in the exposed striped areas with your grey paint. Use a ‘dry brush’ technique—applying thin layers rather than one thick gloopy one. -
Apply the wood accent (optional):
If you want the top molding to have the natural wood tone shown in the reference (rather than painted white), carefully stain the wood molding now, using a small brush to avoid getting stain on the white wall. -
Remove tape precisely:
Remove the painter’s tape while the grey paint is still slightly tacky to the touch. Pull the tape away slowly at a 45-degree angle to cut a clean edge. -
Check the corners:
Corners can be tricky for tape adhesion. Use a fine artist’s brush to manually sharpen the grey stripes right at the corner point if the tape lifted slightly.
Metallic Upgrade
Swap the grey paint for a metallic gold or silver leaf paint on the thinnest bottom stripes. This adds a subtle shimmer that catches light near the floor.
Step back and admire how this simple addition of lines and molding completely transforms the architectural weight of the room
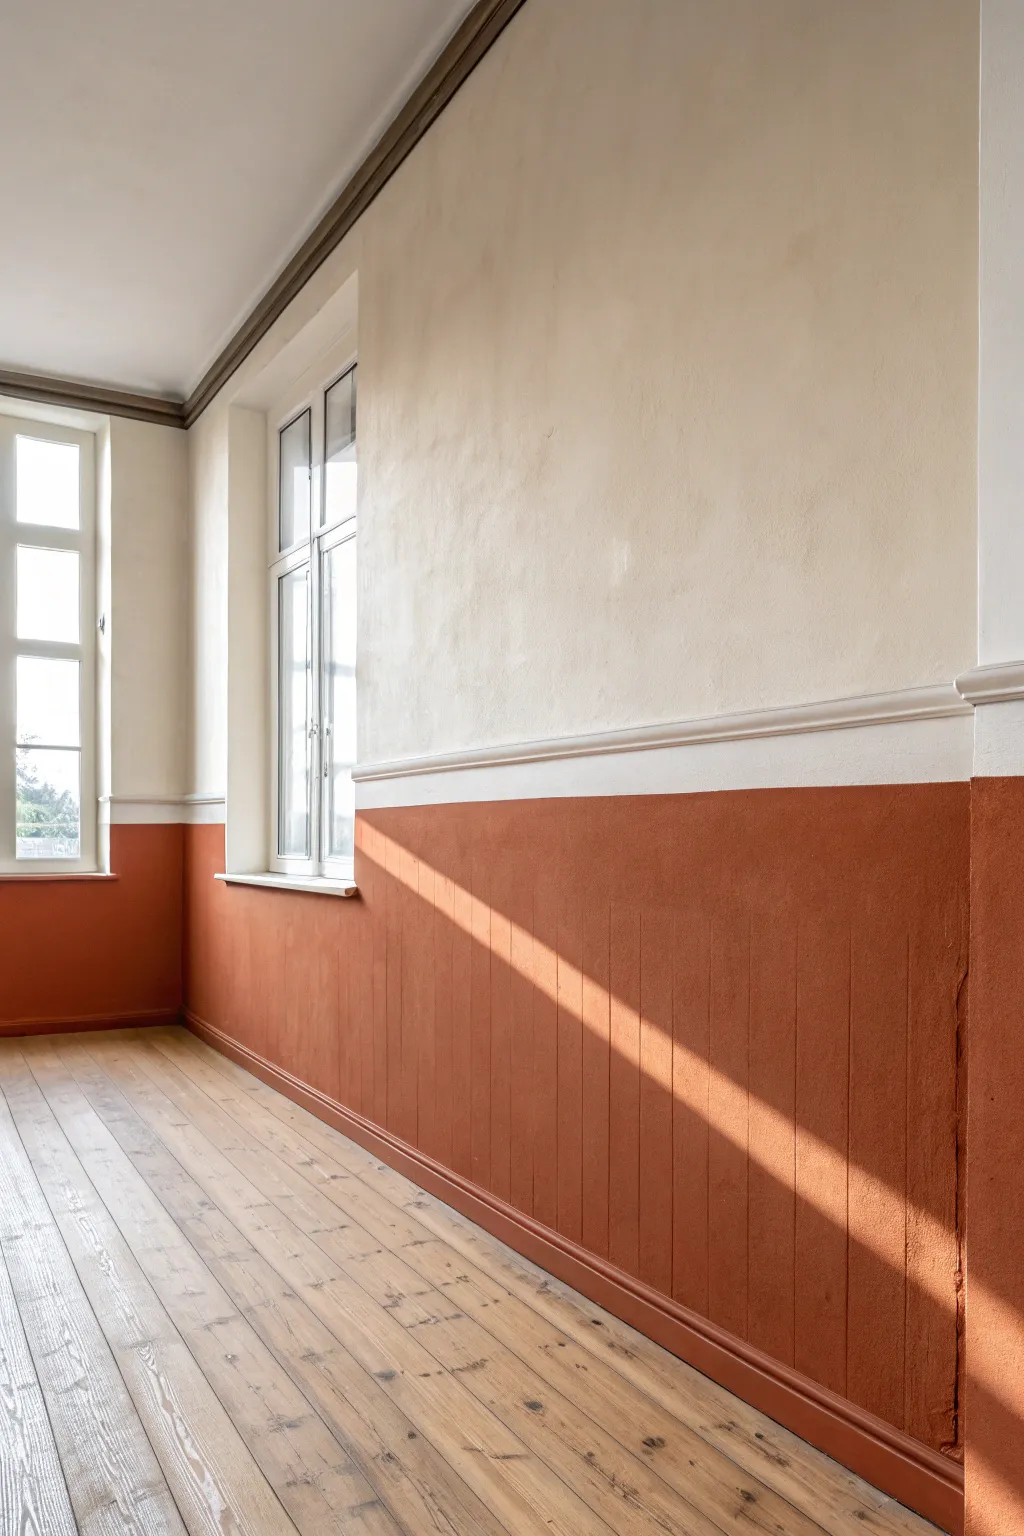
Thick Band With Skinny Pinstripe
Bring the warmth of a Mediterranean villa into your hallway with this elegant two-tone wall treatment. The rich terracotta base grounds the space while bright white upper walls and structured molding add height and architectural interest.
Detailed Instructions
Materials
- High-quality painter’s tape (multi-surface)
- White interior paint (eggshell or satin finish)
- Terracotta or burnt orange interior paint (matte or flat finish)
- Polyurethane decorative wall molding (chair rail profile)
- Construction adhesive (specifically for foam or polyurethane)
- Caulk gun
- Paintable latex caulk
- Fine-grit sandpaper (220 grit)
- Drop cloths
- Extension pole for rollers
- 9-inch paint roller frame
- Microfiber roller covers (3/8 inch nap)
- 2-inch angled sash brush
- Measuring tape
- Level or laser level
- Miter box and saw
- Clean rags
Step 1: Preparation and Base Coat
-
Prepare the space:
Clear the hallway of furniture and lay down drop cloths to protect your flooring, especially if you have beautiful tiles like the ones shown here. -
Clean the walls:
Wipe down the entire wall surface with a damp rag to remove dust and cobwebs, ensuring a clean surface for adhesion. -
Paint the upper wall:
Starting from the ceiling line down, paint the entire upper portion of the wall with your white paint. It’s better to paint a little lower than where your chair rail will sit to ensure full coverage. -
Let it cure:
Allow the white paint to dry completely according to the manufacturer’s instructions before proceeding to the next steps.
Pro Tip: Crisp Lines
To prevent paint bleed, paint over the edge of your tape with the base wall color (white) first. This seals the tape edge so your terracotta line stays razor sharp.
Step 2: Installing the Molding
-
Mark your height:
Determine the height for your chair rail. A standard height is usually around 32 to 36 inches from the floor. Use a measuring tape and mark this height at several points along the wall. -
Draw a level line:
Using a long level or a laser level, connect your marks to create a continuous, straight guideline around the room. -
Measure and cut molding:
Measure the lengths of wall you need to cover. Use a miter box to cut 45-degree angles for any corners where walls meet, ensuring the molding pieces fit together snugly. -
Apply adhesive:
Apply a zigzag bead of construction adhesive to the back of your first piece of molding. -
Mount the molding:
Press the molding firmly against the wall, aligning the top edge with your level pencil line. hold it in place for a moment to let the adhesive grab. -
Secure and continue:
Continue installing molding strips around the room, matching up your corner cuts carefully. -
Caulk the gaps:
Once the adhesive dries, run a thin bead of latex caulk along the top and bottom edges of the molding, as well as any corner joints. Smooth it out with a wet finger.
Step 3: Painting the Lower Section
-
Tape off the molding:
Carefully apply painter’s tape along the bottom edge of your newly installed molding to protect it from the darker paint color. -
Cut in the edges:
Using your angled sash brush and the terracotta paint, carefully ‘cut in’ along the floor trim, corners, and right up against the tape line under the molding. -
Roll the color:
Use the roller to fill in the rest of the lower wall section with the terracotta paint. I like to work in small ‘W’ shaped sections to keep a wet edge. -
Apply second coat:
Let the first coat dry, then apply a second coat for a rich, opaque finish that hides any patchiness. -
Paint the molding:
Remove the tape while the terracotta paint is still slightly tacky to prevent peeling. Then, using a small brush, carefully paint the molding white to match the upper wall. -
Final touch-ups:
Inspect your lines. If any dark paint bled onto the white molding, use a small artist’s brush and white paint to correct it for a crisp, professional finish.
Level Up: Texture
For an authentic old-world feel, add a texture additive to your terracotta paint or use a lime wash paint to give the lower section a subtle, plastered movement.
Step back and admire how this simple division transforms a plain hallway into a sophisticated architectural feature

PENCIL GUIDE
Understanding Pencil Grades from H to B
From first sketch to finished drawing — learn pencil grades, line control, and shading techniques.
Explore the Full Guide
High-Contrast White Edge Frame
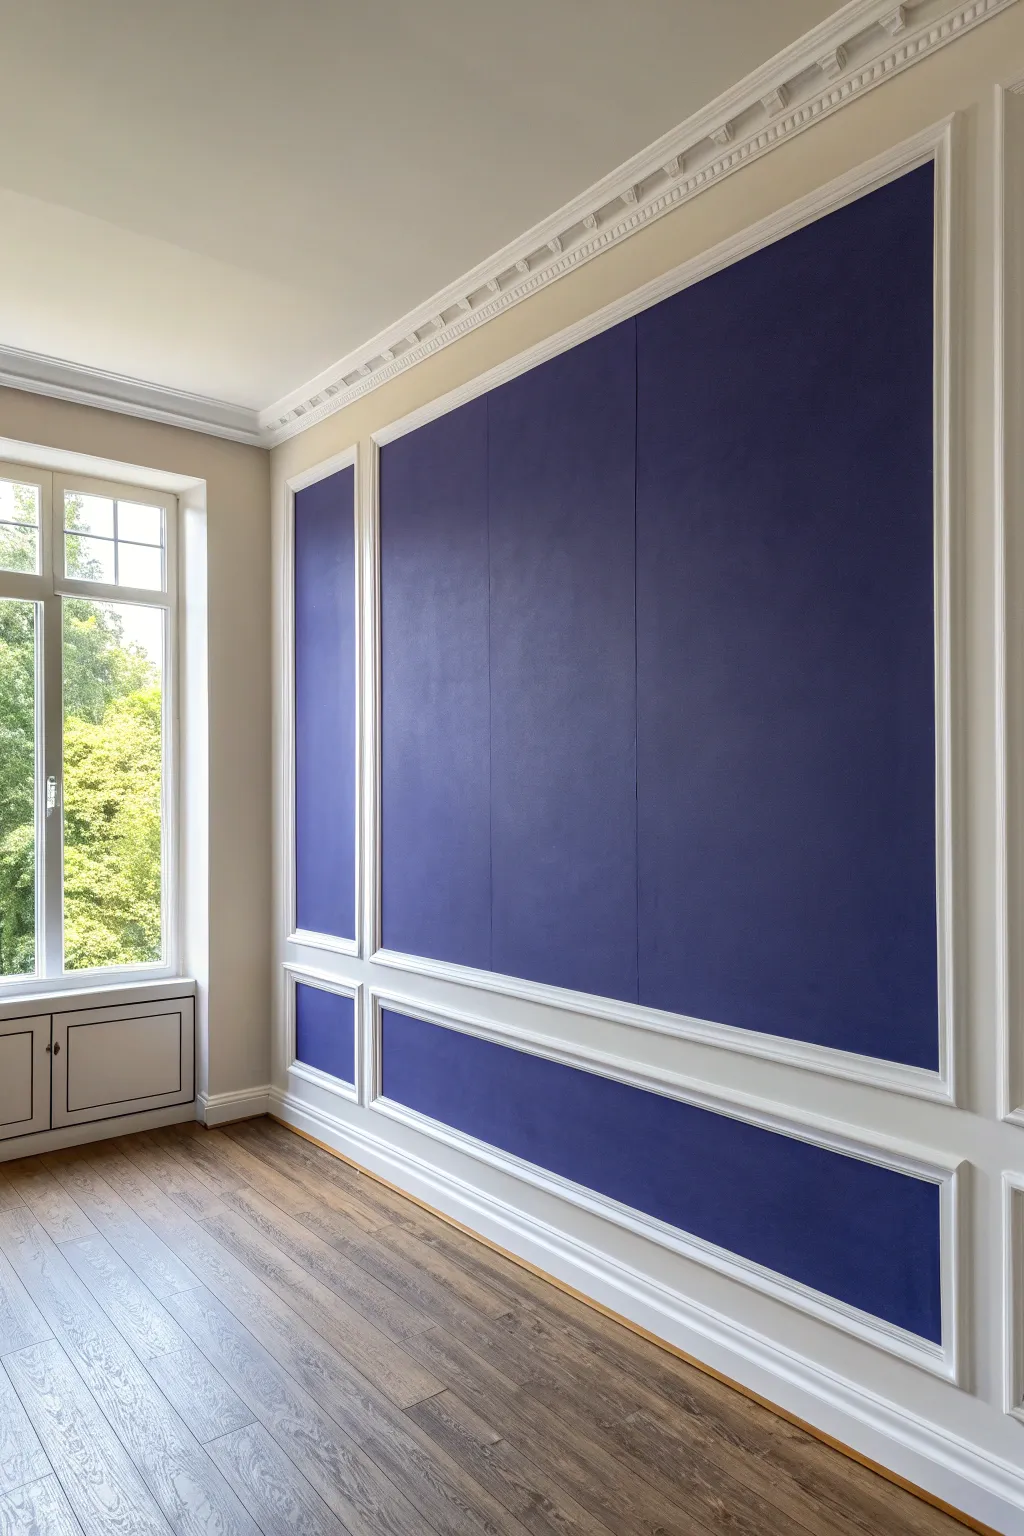
Transform a plain wall into elegant architectural wainscoting using nothing but paint and tape. This high-contrast technique mimics the depth of real wood trim by framing deep violet-blue panels with crisp, bright white borders.
Step-by-Step Tutorial
Materials
- Deep violet-blue interior latex paint (matte or eggshell)
- Bright white interior trim paint (semi-gloss or satin)
- Painters tape (delicate surface and standard multi-surface)
- Laser level or long spirit level
- Measuring tape
- Pencil
- 2-inch angled sash brush
- 4-inch foam roller or small nap roller
- Drop cloths
- Sanding sponge (fine grit)
- Paint tray and liners
Step 1: Planning and Preparation
-
Measure and Map:
Begin by measuring your wall’s total width and height. Sketch a layout on paper that mimics wainscoting: a large upper section and a shorter lower section (chair rail height), divided into vertical panels. Aim for a 2-3 inch gap between all ‘panels’ to serve as your white frame. -
Prep the Surface:
Clean the wall thoroughly with mild soapy water to remove dust and oils. If the wall has existing sheen, lightly scuff it with a sanding sponge to ensure strong paint adhesion. -
Draw the Grid:
Using a laser level for precision, lightly mark your grid on the wall with a pencil. You need to draw the outer boundaries of every blue box, leaving the ‘frame’ space empty between them.
Clean Lines Pro Tip
Press the tape down firmly with a putty knife or credit card before sealing. The heat from the friction helps activate the adhesive for a tighter seal.
Step 2: Painting the Base Frames
-
Base Coat Application:
Before worrying about the blue panels, paint the areas that will become the white frames. You don’t need to be precise here; simply roll or brush your bright white paint over the pencil lines, extending a few inches into where the blue panels will eventually be. This ensures the edges underneath the tape will be the correct color. -
Second White Coat:
Apply a second coat of white paint to these grid lines to ensure solid, opaque coverage. Let this dry completely for at least 24 hours so the tape won’t peel it up later.
Step 3: Taping the Design
-
Apply the Tape:
Now, tape off the boxes. You are applying the tape *over* the white paint you just applied. The tape should cover the area you want to remain white. Use your original pencil marks (if visible) or re-measure to ensure straight lines. -
Create Sharp Corners:
Be meticulous with your corners. I like to cut the tape ends at straight 90-degree angles or carefully overlap them to ensure the inner corners of the ‘frames’ are perfectly sharp. -
Seal the Edges:
Crucial step: Take a small amount of your white paint and brush it lightly over the edge of the tape that faces the inside of the panel. This seals the tape edge; if any paint bleeds under, it will be white on white, keeping your future blue line crisp.
Level Up: 3D Effect
Add actual thin wood trim over the center of your white painted stripes. This creates a true architectural shadow line that blends seamlessly with the painted border.
Step 4: Painting the Panels
-
Cutting In:
Once the sealing layer is dry, open your deep violet-blue paint. Use an angled sash brush to carefully cut in around the inside edges of the taped boxes. -
Rolling the Panels:
Switch to a small roller to fill in the large centers of the blue panels. Keep the texture smooth and consistent. -
Second Blue Coat:
Allow the first coat to dry to the touch, then apply a second coat of blue. Dark colors often require two or even three coats for true depth and richness. -
Quality Check:
Inspect the finish while wet. Look for any light spots or roller marks and gently smooth them out before the paint begins to set.
Step 5: The Reveal
-
Remove Tape:
Remove the tape while the final coat of blue paint is still slightly tacky (not fully dry) to prevent the paint film from pulling up. Pull the tape away from the painted edge at a 45-degree angle. -
Touch Ups:
Inspect your white lines. If any blue bled through, use a tiny artist’s brush and white paint to correct it once the blue is fully cured.
Step back and admire how flat paint has created the sophisticated illusion of three-dimensional millwork
Stenciled Repeat Pattern Border
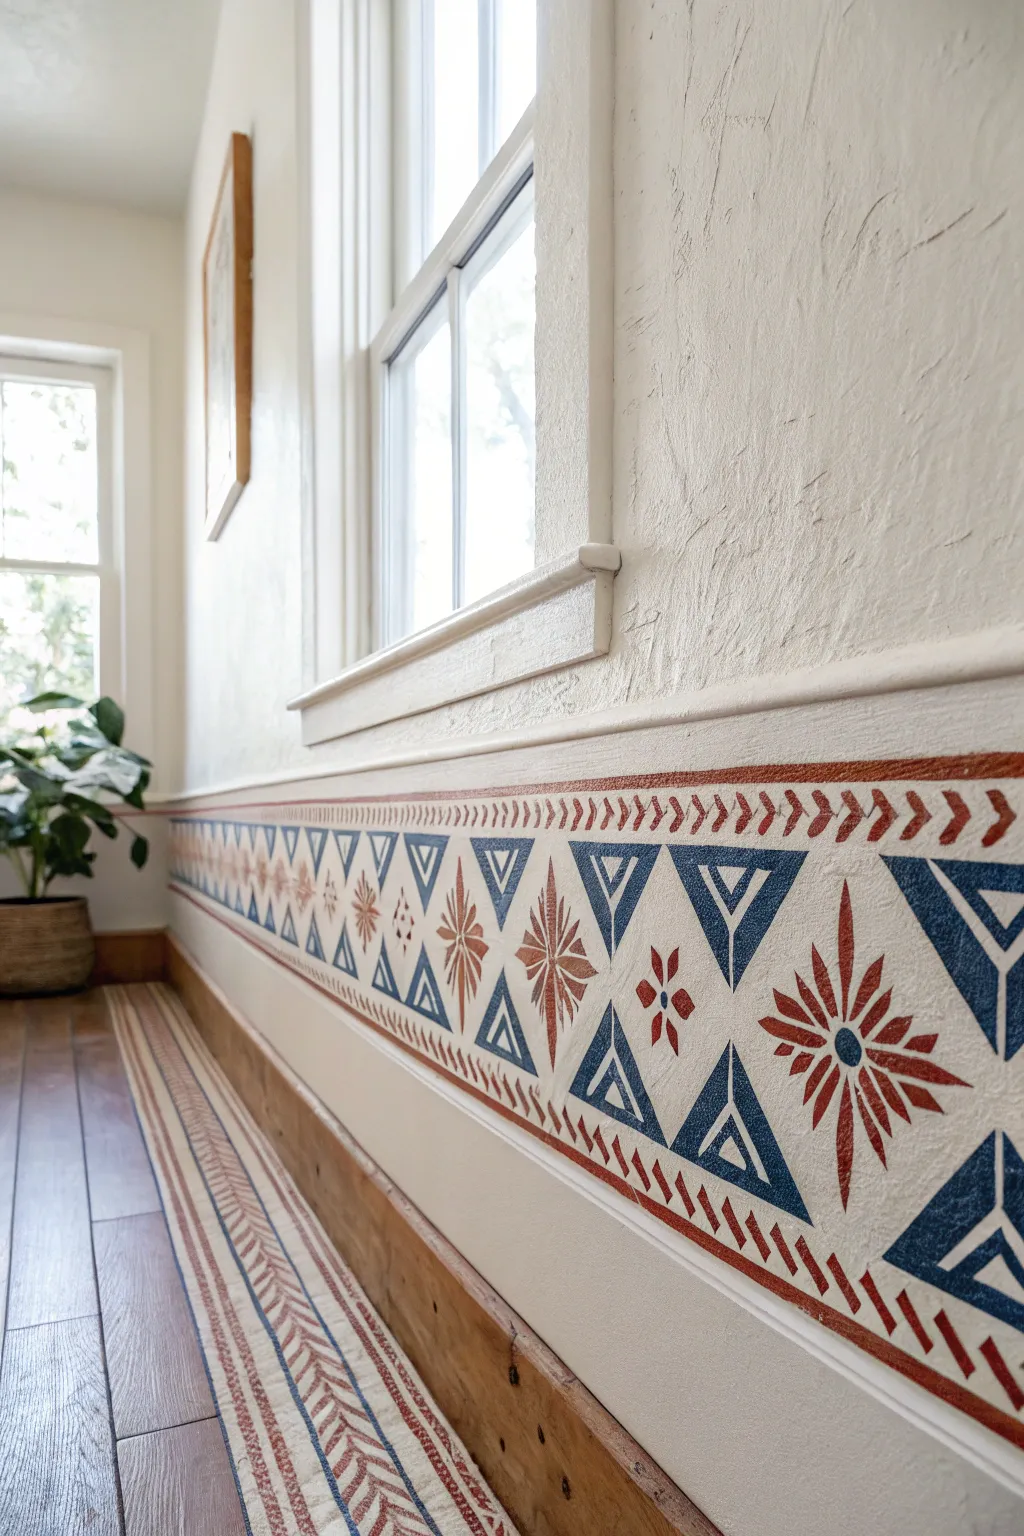
Add timeless architectural interest to any room with this custom stenciled border that mimics the look of hand-painted tiles. Featuring a striking geometric pattern of diamonds, triangles, and sunbursts in classic rust and denim hues, this project transforms plain walls into a statement feature.
Step-by-Step Guide
Materials
- Custom geometric wall stencil (featuring diamonds, triangles, floral stars)
- Painter’s tape (low tack for freshly painted walls)
- Stencil adhesive spray
- Measuring tape
- Bubble level or laser level
- Chalk line (optional)
- Small stencil brushes (two separate brushes for different colors)
- Acrylic or latex paint (Deep Terracotta/Rust)
- Acrylic or latex paint (Denim/Navy Blue)
- Paper towels or rags
- Small artist’s brush for touch-ups
Step 1: Preparation and Alignment
-
Clean the surface:
Begin by wiping down the wall area where the border will go with a damp cloth to remove dust or oils. Let it dry completely. -
Determine height:
Decide on the height of your border. In the example, the border runs just above the baseboard, creating a wainscoting effect. Measure upwards from the floor or baseboard to mark your starting height. -
Mark level lines:
Using a laser level or a bubble level and a straight edge, lightly mark a horizontal guideline for the top edge of your border. A chalk line works well for long hallways, but keep the line faint. -
Tape boundaries:
Apply strips of painter’s tape just above your top guideline and just below where the bottom of the pattern will sit. This protects the wall from accidental brush slips.
Clean Edges on Texture
On textured plaster, paint bleeding is common. To prevent this, seal the stencil edges first by painting a thin layer of the base wall color over the stencil before applying your colors.
Step 2: Stenciling the Pattern
-
Prepare the stencil:
Turn your stencil over and spray the back lightly with stencil adhesive. Let it get tacky for a few seconds before positioning it on the wall. This prevents paint bleed-under. -
Align the first repeat:
Place the stencil at the start of your wall, aligning the top edge perfectly with your marked guideline or tape. Press firmly, especially around the intricate cutout areas. -
Load the blue brush:
Dip just the tip of your stencil brush into the denim blue paint. Offload most of the paint onto a paper towel until the brush feels almost dry. This dry-brush technique is crucial for crisp lines on textured walls. -
Paint the blue elements:
Stipple or swirl the brush over the large triangle sections and the smaller diamond outlines intended for blue. Use a vertical dabbing motion to push paint into the wall texture without forcing it under the stencil. -
Switch to rust:
Using a fresh brush, load the deep terracotta paint and offload as before. Apply this color to the central sunburst/star motifs and the upper and lower chevron border tracks. -
Check coverage:
You can lift a corner of the stencil gently to check your color density. The look should be slightly weathered, so opaque coverage isn’t strictly necessary. -
Move the stencil:
Peel the stencil off carefully. Align the registration marks (usually parts of the pattern you just painted) with the corresponding cutouts on the stencil to start the next section. -
Repeat the process:
Continue moving down the wall, re-applying a light mist of adhesive if the stencil stops sticking. I find it helpful to wipe off excess paint buildup on the front of the stencil every few repeats.
Step 3: Finishing Touches
-
Corner handling:
When you reach a corner, bend the flexible stencil into the crease and tape it securely. Paint the first wall side, then carefully paint into the corner without shifting the sheet. -
Remove tape:
Once the entire border is stenciled and dry to the touch, slowly peel away your top and bottom painter’s tape pulling at a 45-degree angle. -
Inspect and touch up:
Examine the border for any significant bleeds. Use a tiny artist’s brush and your original wall color to clean up messy edges. -
Add hand-painted details:
The example shows small dots within the sunbursts. If your stencil didn’t capture these well, use the small artist brush and blue paint to add a dot to the center of each rust flower manually. -
Final cure:
Allow the paint to cure fully for at least 24 hours before placing any furniture back against the wall.
Layered Dimension
Add depth by stenciling a faint grey ‘shadow’ version of the pattern first, shifting the stencil just 1/8th inch to the right and up, before applying the main colors.
Step back and admire how this simple painted detail adds custom architectural character to your space


Geometric Tape Pattern Border
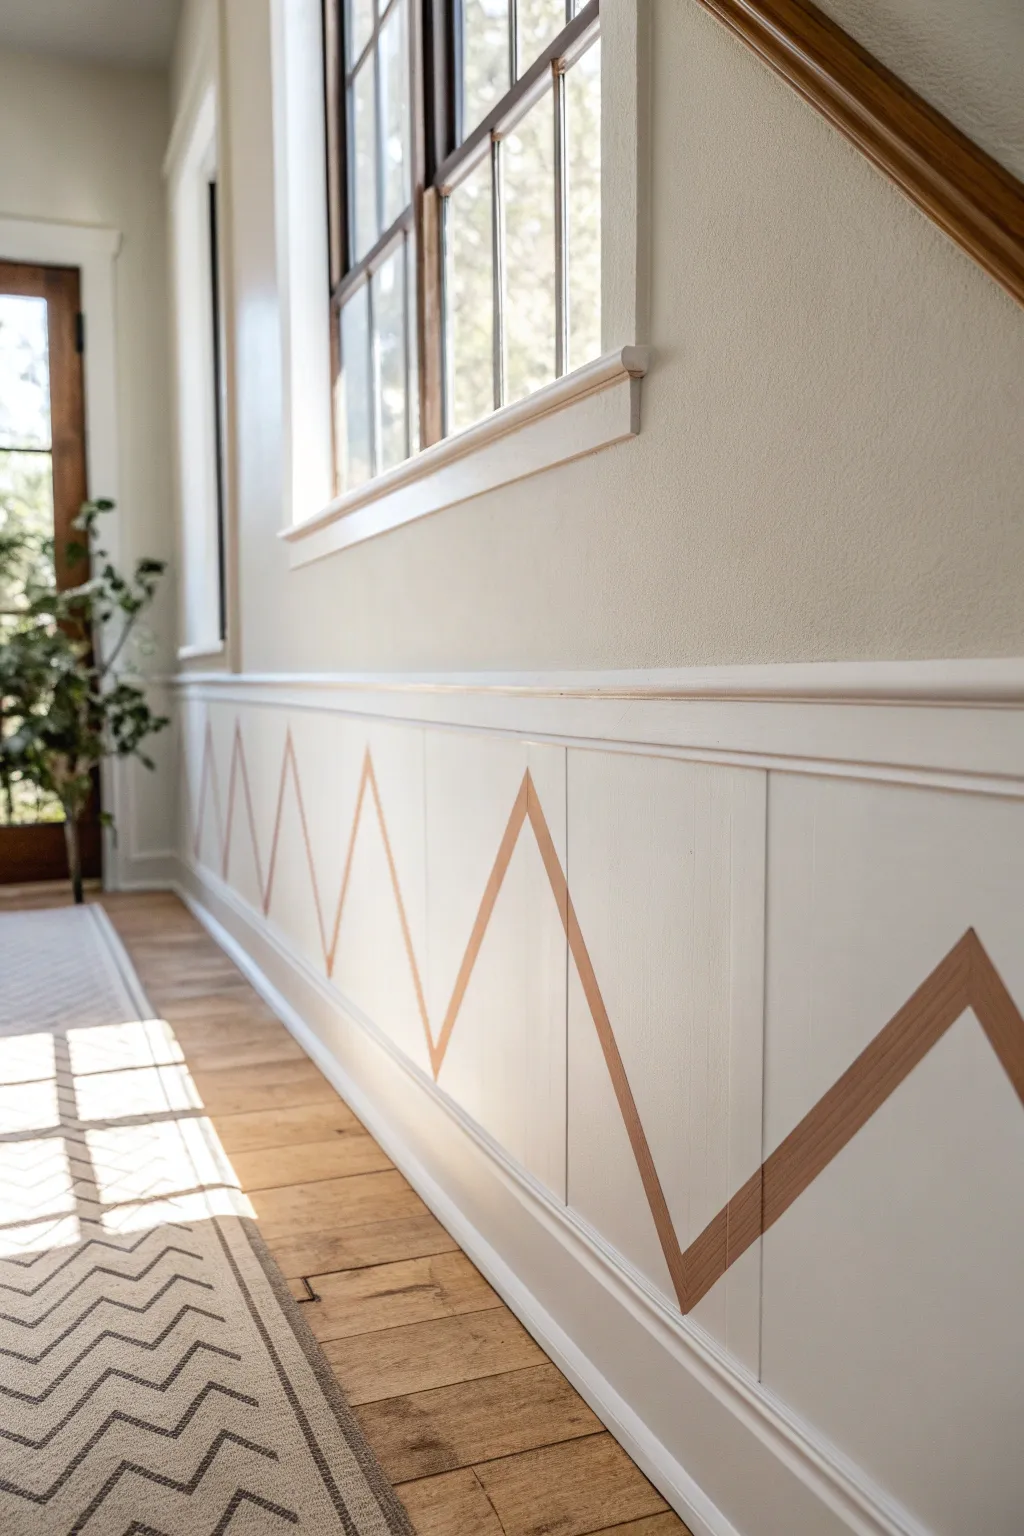
Elevate a simple hallway or room with this striking geometric border that mimics the look of high-end inlaid wood. By combining crisp white wainscoting with a metallic copper zigzag pattern, you create a modern yet warm architectural detail that guides the eye through the space.
Step-by-Step
Materials
- Interior semi-gloss paint (white or cream for base)
- Metallic copper or bronze acrylic paint
- High-quality painter’s tape (1-inch width)
- Measuring tape
- Pencil
- Straight edge or level
- Small foam roller
- Angled sash brush (1.5 to 2 inch)
- Small artist’s brush (for touch-ups)
- Drop cloth
Step 1: Preparation and Base Coat
-
Clean surface:
Begin by thoroughly cleaning the wainscoting or lower wall area to remove dust and grease, which ensures proper tape adhesion. -
Protect floors:
Lay down your drop cloth along the baseboard to protect your flooring from any potential drips or splatters. -
Apply base color:
If your wainscoting isn’t already the desired white, roll on two coats of semi-gloss interior paint, allowing ample drying time between coats. -
Wait for cure:
Let the base coat cure completely—I recommend waiting at least 24 hours—before applying any tape to prevent peeling the fresh paint.
Bleeding Lines?
If paint bled under the tape, wait for it to fully dry. Then, place a piece of tape over the metallic line and use the base white paint on a small brush to touch up the edge perfectly.
Step 2: Measuring and Taping
-
Mark vertical guides:
Measure the total length of your wall and decide on the width of your chevrons. Mark light pencil ticks along the top rail and baseboard at equal intervals to define the peaks and valleys. -
Connect the dots:
Using a straight edge, lightly draw diagonal lines connecting your top and bottom marks to visualize the zigzag pattern before taping. -
Apply first tape line:
Apply strips of painter’s tape along the *outside* of your pencil lines. This gap between tape strips will become your painted copper line. -
Apply parallel tape line:
Place a second strip of tape parallel to the first, using a spacer block or careful measurement to ensure a consistent 1-inch (or desired width) gap for the stripe. -
Manage corners:
At the peaks and valleys where the lines change direction, carefully cut the tape with a utility knife or overlap it cleanly to create sharp, pointed mitered joints. -
Seal the edges:
Firmly press down all tape edges with a credit card or huge putty knife to prevent paint bleed.
Add Dimension
For a 3D effect, paint a very thin, darker grey line along just one side of the copper chevron. This creates a faux shadow, making the metallic stripe look inlaid or raised.
Step 3: Painting the Pattern
-
Seal with base color:
To ensure perfectly crisp lines, lightly brush a tiny amount of your *white base paint* over the tape edges first. This seals any microscopic gaps. -
See the seal dry:
Allow this sealing layer to dry to the touch, usually about 20-30 minutes. -
Apply metallic paint:
Using a small foam roller or brush, apply the metallic copper paint into the taped-off area. Use light coats to maximize the metallic shimmer without drips. -
Second coat:
Apply a second coat of copper paint once the first is tacky but dry, ensuring full opacity and rich color depth. -
Remove tape:
While the final coat is still slightly damp (don’t let it fully dry!), strictly pull the tape away slowly at a 45-degree angle.
Step 4: Finishing Touches
-
Inspect points:
Check the sharp points of your zigzags. If any tape lifted paint, use a small artist’s brush to tidy up the white base or the copper edges. -
Erase guidelines:
Gently erase any visible pencil marks that weren’t covered by the paint. -
Final cure:
Allow the metallic paint to cure fully for a few days before scrubbing or cleaning the area.
Now step back and admire how a simple roll of tape and some metallic paint completely transformed the character of your hallway
Simple Stripe Border Stack
Transform a plain hallway or corner into a stylish focal point with this comforting, earth-toned stripe design. Featuring a stack of soft sage green, terracotta, and beige bands separated by crisp white lines, this project adds visual height and modern charm to any textured wall.
Step-by-Step Tutorial
Materials
- Interior latex paint (Eggshell finish)
- Small roller with 3/8-inch nap
- Painter’s tape (high quality)
- Laser level or long bubble level
- Measuring tape
- Pencil
- 1.5-inch angled sash brush
- Damp rag
Step 1: Preparation & Base Coat
-
Clean surface:
Begin by wiping down the wall area between the chair rail and baseboard with a damp rag to remove dust and grime, which ensures better tape adhesion. -
Paint base color:
Paint the entire area white (or your chosen stripe-separator color). This acts as the background for those thin crisp lines, so you won’t have to paint them individually later. -
Dry completely:
Allow this white base coat to cure fully for at least 24 hours. If the paint is even slightly tacky, the tape you apply next might peel it off.
Step 2: Measuring & Taping
-
Determine stripe widths:
Plan your pattern on paper first. This design alternates between wide bands (approx. 4-6 inches) and medium bands (approx. 2-3 inches), separated by thin 1/2-inch gaps. -
Mark reference points:
Starting from the bottom baseboard, use a tape measure and pencil to lightly mark the height of each line at several points along the wall. -
Set laser level:
Position your laser level to align with your first pencil mark. This is crucial for keeping stripes straight, especially when wrapping around a corner like I did here. -
Apply tape for white lines:
Place strips of painter’s tape over the areas that should remain white. The tape defines the ‘gaps’ between your colored stripes. -
Seal the tape edges:
Press the tape edges down firmly with a credit card or putty knife. On textured walls, this step is vital to prevent paint bleed. -
The bleed-prevention trick:
Lightly brush a tiny amount of your *white base paint* over the edges of the tape. This seals the gap; if any paint seeps under, it will be white and invisible.
Textured Wall Pro Tip
On heavy orange-peel texture, use ‘FrogTape for Textured Surfaces’ or run a thin bead of clear paintable caulk along the tape edge to minimize bleed under the tape.
Step 3: Painting the Stripes
-
Mix your palette:
Prepare your colors: a warm beige, a muted terracotta/peach, and a soft sage green. Pour small amounts into a tray. -
Paint lower green stripe:
Using the angled brush for edges and a small roller for the middle, paint the bottom-most stripe in sage green. -
Apply terracotta stripe:
Move upward to the next exposed section and paint it the warm terracotta color. Be careful not to cross onto neighboring taped sections. -
Paint thin green accent:
Apply sage green to the thinner band directly above the terracotta. -
Fill the large beige void:
Paint the widest middle section in the neutral beige tone. Use the roller here to get a consistent texture that matches the rest of the wall. -
Finish top sections:
Continue the pattern upward: a thin green stripe, followed by a medium terracotta band at the very top under the chair rail. -
Apply second coat:
Once dry to the touch, apply a second coat to all colored stripes to ensure solid, opaque coverage.
Troubleshooting Bleeds
If paint bleeds under the tape, don’t panic. Wait for it to dry fully, re-tape the line slightly wider or narrower, and touch up with the correct color for a crisp edge.
Step 4: The Reveal
-
Remove tape:
While the second coat is still slightly damp (not soaking wet, but not fully cured), slowly peel the tape away at a 45-degree angle. -
Touch up:
Inspect the white lines. If any color managed to sneak through, use a tiny artist’s brush and white paint to correct the irregularities.
Step back and enjoy the structural elegance and warmth your new striped border brings to the space
Dotted Dash Border Line
Bring warmth and architectural interest to a plain white wall with this rustic, geometric border that mimics the look of inlaid tiles or clay. The rhythmic triangle pattern creates a stunning visual break, perfectly complementing natural materials like brick and stone.
Step-by-Step Guide
Materials
- Sienna or terracotta colored acrylic paint (matte finish)
- Painter’s tape (1-inch width)
- Painter’s tape (low tack/delicate surface)
- Ruler or tape measure
- Pencil
- Stiff stencil brush
- Small angled shader brush
- Cardstock or thin plastic sheet (for stencil)
- Craft knife
- Cutting mat
- Spirit level
Step 1: Preparation & Layout
-
Clean the surface:
Begin by wiping down your wall area with a slightly damp cloth to remove dust. If you have textured stucco walls like the example, ensure there are no loose crumbs that might interfere with paint adhesion. -
Determine the height:
Decide on the placement of your border. A good rule of thumb is ‘chair rail height,’ approximately 30-36 inches from the floor, or directly above existing wainscoting. -
Mark the guidelines:
Using your spirit level and pencil, lightly draw two parallel horizontal lines around the room. The distance between them should be about 3 to 4 inches, defining the total width of your border. -
Tape the boundaries:
Apply painter’s tape along the outside edges of your two pencil lines. Press the tape edges down firmly with your fingertip to prevent paint bleed.
Bleed Prevention
On textured walls, paint bleed is common. Seal your tape edges with a thin layer of matte medium or the base wall color before applying the red paint to ensure crisp lines.
Step 2: Creating the Stencil
-
Measure your repeat:
Decide on the size of your triangles. A 2-inch wide base usually works well. Mark these intervals on your cardstock or plastic sheet. -
Draw the triangles:
Draw a row of equilateral triangles side-by-side. Leave a small gap (about 1/4 inch) between them to create the negative space ‘grout’ line seen in the image. -
Cut the stencil:
carefully cut out the triangle shapes using a sharp craft knife on a cutting mat. Keep the bridges between the triangles intact. -
Define the outer stripes:
To mimic the solid bands above and below the triangles, you can either cut slits in your stencil or simply rely on taping off additional lines on the wall itself. I find taping directly on the wall gives a crisper line.
Step 3: Painting the Design
-
Tape the inner bands:
Inside your main boundary tape, place two more strips of tape, leaving a thin 1/2-inch gap at the very top and bottom. These gaps will become the solid terracotta stripes that frame the triangles. -
Paint the border stripes:
Load your brush with sienna paint and fill in these narrow top and bottom gaps. Use a ‘stippling’ or dabbing motion if the wall is textured to get into the crevices. -
Position the stencil:
Once the stripes are dry to the touch, align your triangle stencil in the center open space between your painted stripes. -
Secure the stencil:
Use small pieces of low-tack tape to holding the stencil in place so it doesn’t shift while you work. -
Stipple the triangles:
Using a stiff stencil brush with very little paint (dry brush technique), dab the paint into the triangle cutouts. Build opacity slowly rather than flooding it with paint. -
Move and repeat:
Carefully lift the stencil and move it to the right, aligning the first cutout with the last painted triangle to ensure consistent spacing. Repeat this around the room.
Add Dimension
Mix a slightly darker brown shade and paint a very thin shadow line on the bottom right edge of each triangle to create a faux-relief, 3D effect.
Step 4: Finishing Touches
-
Remove tape:
While the paint is still slightly tacky, slowly peel back all the painter’s tape at a 45-degree angle. This helps ensure clean edges without peeling off dried paint. -
Touch up edges:
Use a small angled shader brush to carefully fix any areas where paint might have bled under the tape or where the texture of the wall caused a gap. -
Connect the corners:
Corners can be tricky with stencils. Use your small brush to hand-paint the triangles that wrap around inner or outer corners to ensure the pattern flows continuously. -
Soften the look (optional):
If the paint looks too new or uniform, lightly sand the dried design with fine-grit sandpaper to give it a weathered, old-world fresco appearance.
Step back and admire how a simple geometric repetition transforms the character of your entire room
Scalloped Border Transition
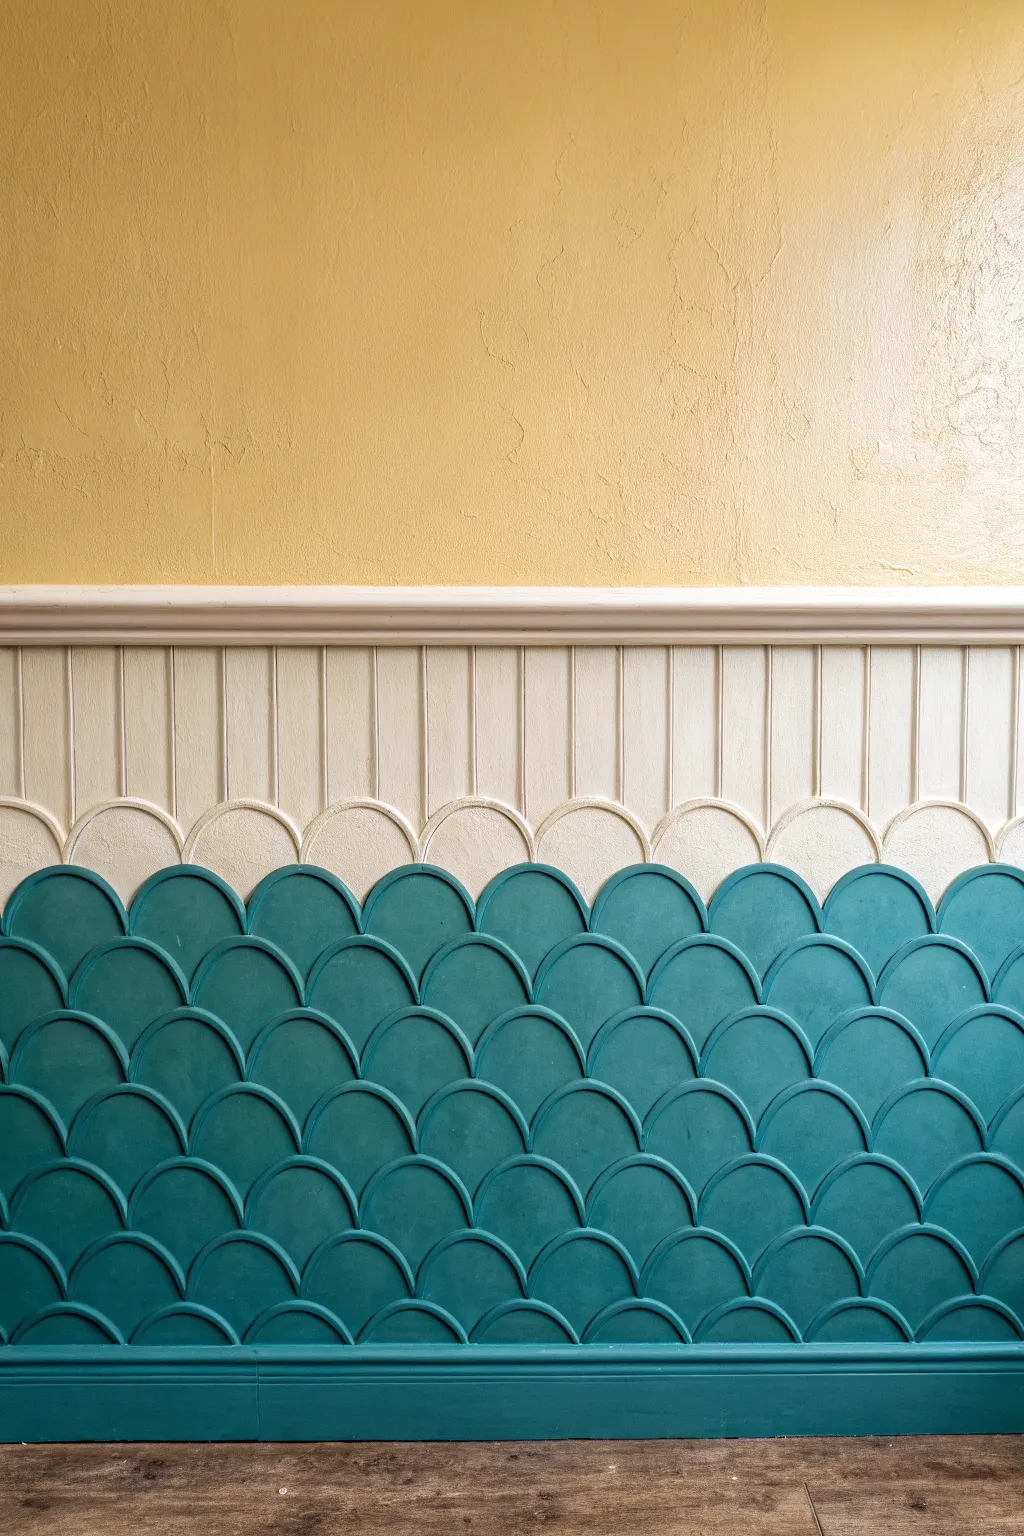
This striking wall treatment combines classic vertical paneling with a playful, mermaid-inspired scalloped bottom. The dimensional fish-scale effect creates incredible texture, providing a whimsical transition between the creamy wainscoting and the deep teal base.
Step-by-Step
Materials
- MDF sheets (1/4 inch thick)
- Jigsaw with fine-tooth scroll blade
- Vertical shiplap or beadboard paneling
- Chair rail molding (trim)
- Baseboard molding
- Construction adhesive (Liquid Nails)
- Brad nailer and 1-inch nails
- Wood filler and putty knife
- Sandpaper (120 and 220 grit)
- Painter’s tape
- Primer
- Yellow latex paint (upper wall)
- Cream latex paint (middle paneling)
- Teal latex paint (lower scallops)
- Cardboard or heavy cardstock (for template)
- Pencil and compass
- Level
- Caulk gun and paintable caulk
Step 1: Preparation & Upper Wall
-
Measure and mark:
Determine the height of your transition. For this look, the chair rail sits at roughly 48 inches from the floor, with the scalloped section taking up the bottom 24 inches. Mark these horizontal lines across your wall with a level and pencil. -
Paint the upper wall:
Before installing any wood, paint the top portion of the wall with your chosen sunny yellow hue. It’s much easier to roll this area now without having to cut in around new trim later.
Fixing Rough Curves
If your jigsaw cuts look jagged, wrap sandpaper around a large soup can or round object. Use this improvised sanding block to smooth the curves into perfect arcs before installing.
Step 2: Middle Paneling Installation
-
Cut paneling to size:
Cut your vertical beadboard or shiplap panels to fit the middle section. They should reach from your top marked line down to where the scallops will begin, overlapping slightly behind where the scallops will adhere. -
Install the vertical boards:
Apply construction adhesive to the back of the panels and press them onto the wall. Secure them with a brad nailer, ensuring they remain plumb using your level as you work across the room. -
Add the chair rail:
Cut and install the chair rail molding along the top edge of the paneling to cap it off. This creates a clean separation between the yellow paint and the cream woodwork.
Add Dimension
To make the scales pop, use a router with a round-over bit on the edges of each MDF scallop before installation. This softens the sharp cut edge and adds professional depth.
Step 3: Creating the Scallops
-
Draft the template:
On a piece of stiff cardboard, draw your scallop shape using a compass. Aim for a semi-circle about 6-8 inches wide. Cut this out carefully, as this master template dictates the quality of every wooden piece. -
Trace onto MDF:
Lay your MDF sheet flat and trace the template repeatedly. You will need enough individual scallops to create multiple horizontal rows. Nest them close together to minimize waste. -
Cut the shapes:
Using a jigsaw with a scroll blade, carefully cut out each semi-circle. Take your time on the curves to keep the edges smooth; inconsistent curves will show in the final grid. -
Sand the edges:
Give the curved edges of every cut piece a quick sanding with 120-grit paper to remove any fuzzy fibers or sharp ridges left by the saw.
Step 4: Installation & Finish
-
Install the first row:
Start at the bottom, just above where your baseboard will go. Apply adhesive to the back of a scallop and nail it in place. Continue horizontally, spacing them so they touch edge-to-edge. -
Layer subsequent rows:
Start the second row offset by half a scallop width (centered above the seam of the two below it). Continue building upward, row by row, until you reach the beadboard. I find using a spacer block helps keep vertical spacing consistent. -
Install baseboard:
Attach your baseboard molding at the very bottom, covering the straight bottom edges of your first row of scallops for a polished look. -
Fill and caulk:
Fill all nail holes with wood filler. Run a thin bead of printable caulk along the top edge and sides of the scallops where they meet the wall or each other to seal gaps. -
Prime the woodwork:
Apply a coat of primer to the entire lower section (scallops and baseboard) and the middle beadboard section to seal the MDF and raw wood. -
Paint the cream section:
Paint the middle beadboard paneling and the chair rail in your chosen cream color. Let this dry completely before moving to the teal. -
Paint the teal section:
Paint the scalloped section and baseboard in deep teal. Use an angled sash brush to get into the curves and distinct edges of the scallops, watching out for drips pooling on the rims. -
Detail curved top:
For the very top row of scallops that overlaps the cream paneling, use a small artist’s brush to ensure a crisp line where the teal curve meets the cream vertical board.
Step back and admire how this textural masterpiece transforms a flat wall into an architectural feature
Circle Chain Stamp Border
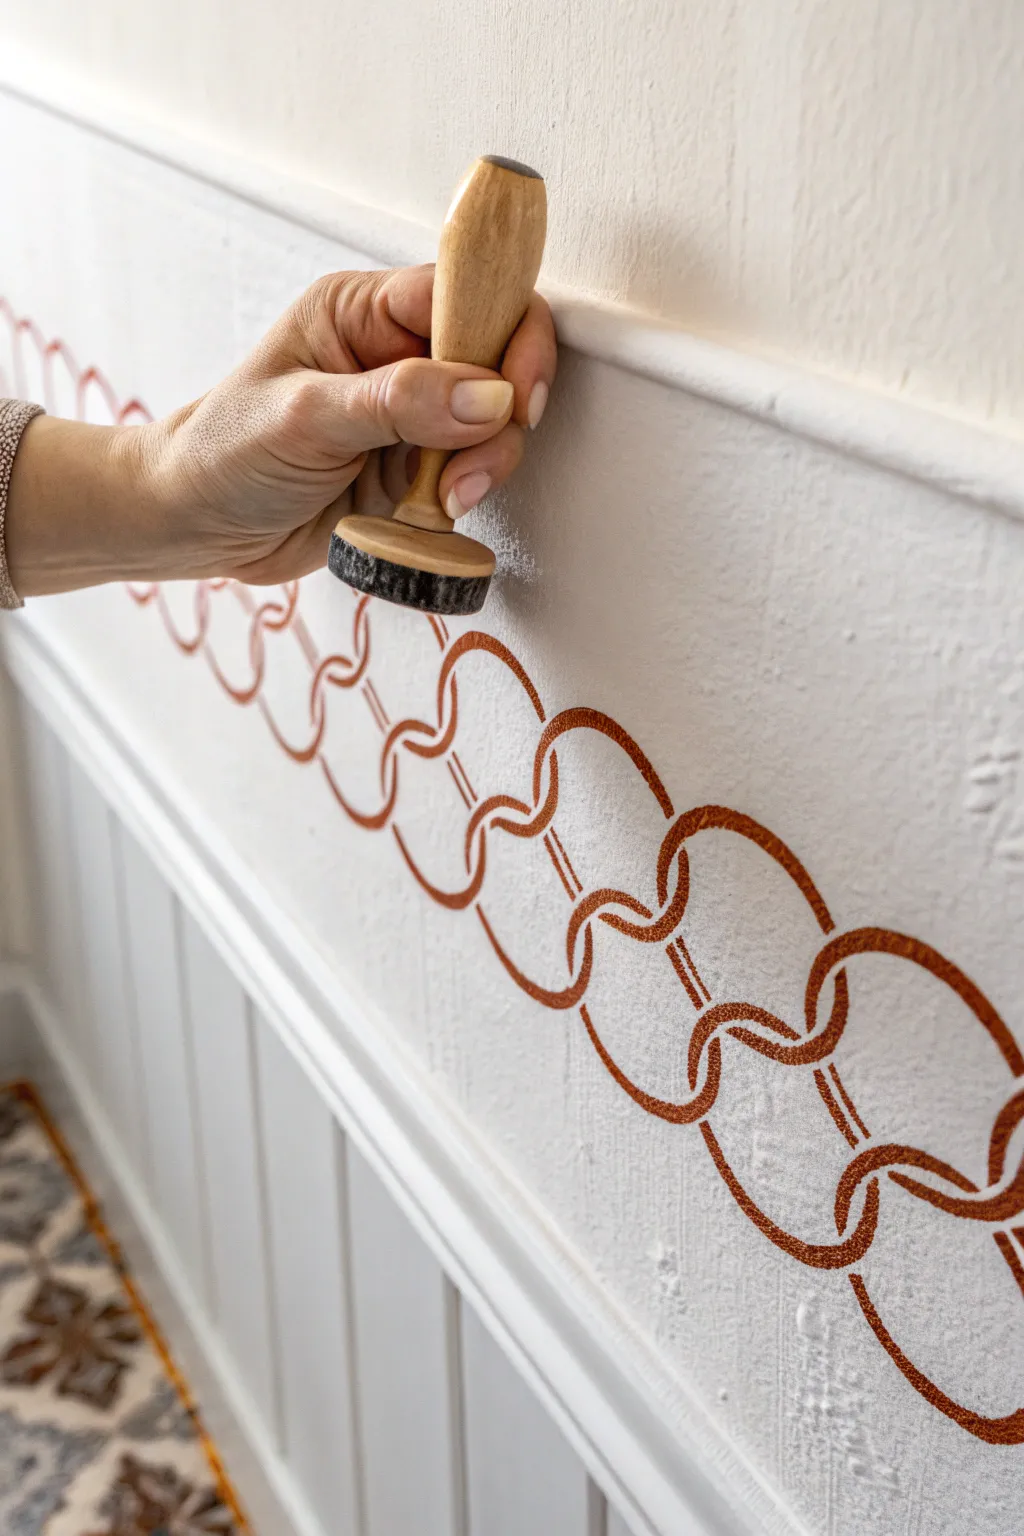
Add a touch of timeless elegance to your walls with this deceptively simple interlocking chain design. Using a custom stamp and a rich terracotta hue, you can transform plain wall space above wainscoting into a sophisticated architectural detail.
Step-by-Step Tutorial
Materials
- White wall paint (eggshell or satin finish)
- Terra cotta or rust-colored acrylic paint (or latex wall paint)
- Round foam stamp tool (approx. 2-inch diameter)
- Painter’s tape
- Level (laser or bubble)
- Pencil
- Paper plate or paint tray
- Cardboard or poster board for practice
- Damp rag for cleanup
Step 1: Preparation and Planning
-
Prepare the surface:
Ensure your wall is clean and dry. If you are painting over existing wainscoting or chair rail molding, wipe down the ledge to remove any dust that might interfere with your stamping. -
Establish a guideline:
Using a level and a pencil, lightly draw a horizontal line across the wall where you want the center of your border to sit. Alternatively, you can use the top of your chair rail as a guide if it is level. -
Prepare the paint:
Pour a small amount of your terra cotta paint onto a paper plate. You want a shallow puddle, not a deep pool, to prevent overloading the stamp. -
Test your technique:
Practice stamping on a piece of cardboard first. Dip the foam stamp into the paint, blot off the excess, and practice making clean, consistent circle impressions.
Stamp Slipping?
If the stamp slides on the wall, you have too much paint. Blot the foam excessively on paper towels until it feels almost dry before touching the wall.
Step 2: Creating the First Layer
-
Stamp the primary circles:
Begin at one end of the wall. Press the stamp firmly against the wall to create your first circle, ensuring the bottom of the circle hovers just above your guideline or chair rail. -
Spacing the pattern:
Place your next stamp to the right of the first one. You want a gap between them that is slightly smaller than the width of the stamp itself, leaving room for the connecting links. -
Continue the row:
Repeat this process along the entire length of the wall, keeping the spacing as consistent as possible. I find stepping back every few feet helps ensure the line stays straight. -
Let it dry:
Allow these primary circles to dry to the touch. This usually takes about 15-20 minutes depending on the thickness of your paint application.
Step 3: Interlocking the Design
-
Visualize the links:
To create the chain effect, you will be stamping connecting arcs that appear to loop through the first set of circles. -
Stamp the top connection:
Position your stamp so that it overlaps the upper right quadrant of the first circle and the upper left quadrant of the second circle. -
Apply pressure carefully:
Press the stamp down. Because you are stamping over dry paint, the new layer will sit on top, creating the illusion of the link passing ‘over’ the previous circles. -
Stamp the bottom connection:
Now, stamp the lower connection. Position the stamp to overlap the bottom right of the first circle and the bottom left of the second circle. -
Create the woven look:
For a true interlocking look, you can wipe away tiny sections of the wet paint where the lins should go ‘under,’ but the simple overlapping method shown often provides enough depth on its own.
Add Depth
Mix a tiny drop of dark brown or black into your paint for a second pass. lightly stamp slightly offset from the original to create a 3D shadow effect.
Step 4: Finishing Touches
-
Complete the chain:
Work your way down the wall, adding these top and bottom connecting stamps between every pair of primary circles. -
Check for consistency:
Inspect the pattern for any faint spots. If a stamp didn’t transfer fully, carefully realign the tool and press again to fill in the color. -
Clean edges:
If any paint smudged onto the wall outside the pattern or onto the trim, wipe it away immediately with a damp rag. -
Erase guidelines:
Once the paint is completely dry (wait at least an hour), use a clean eraser to gently remove any visible pencil guidelines.
Step back and admire how a simple repeated shape has created a custom architectural feature for your room
Moroccan-Inspired Tile Border Band
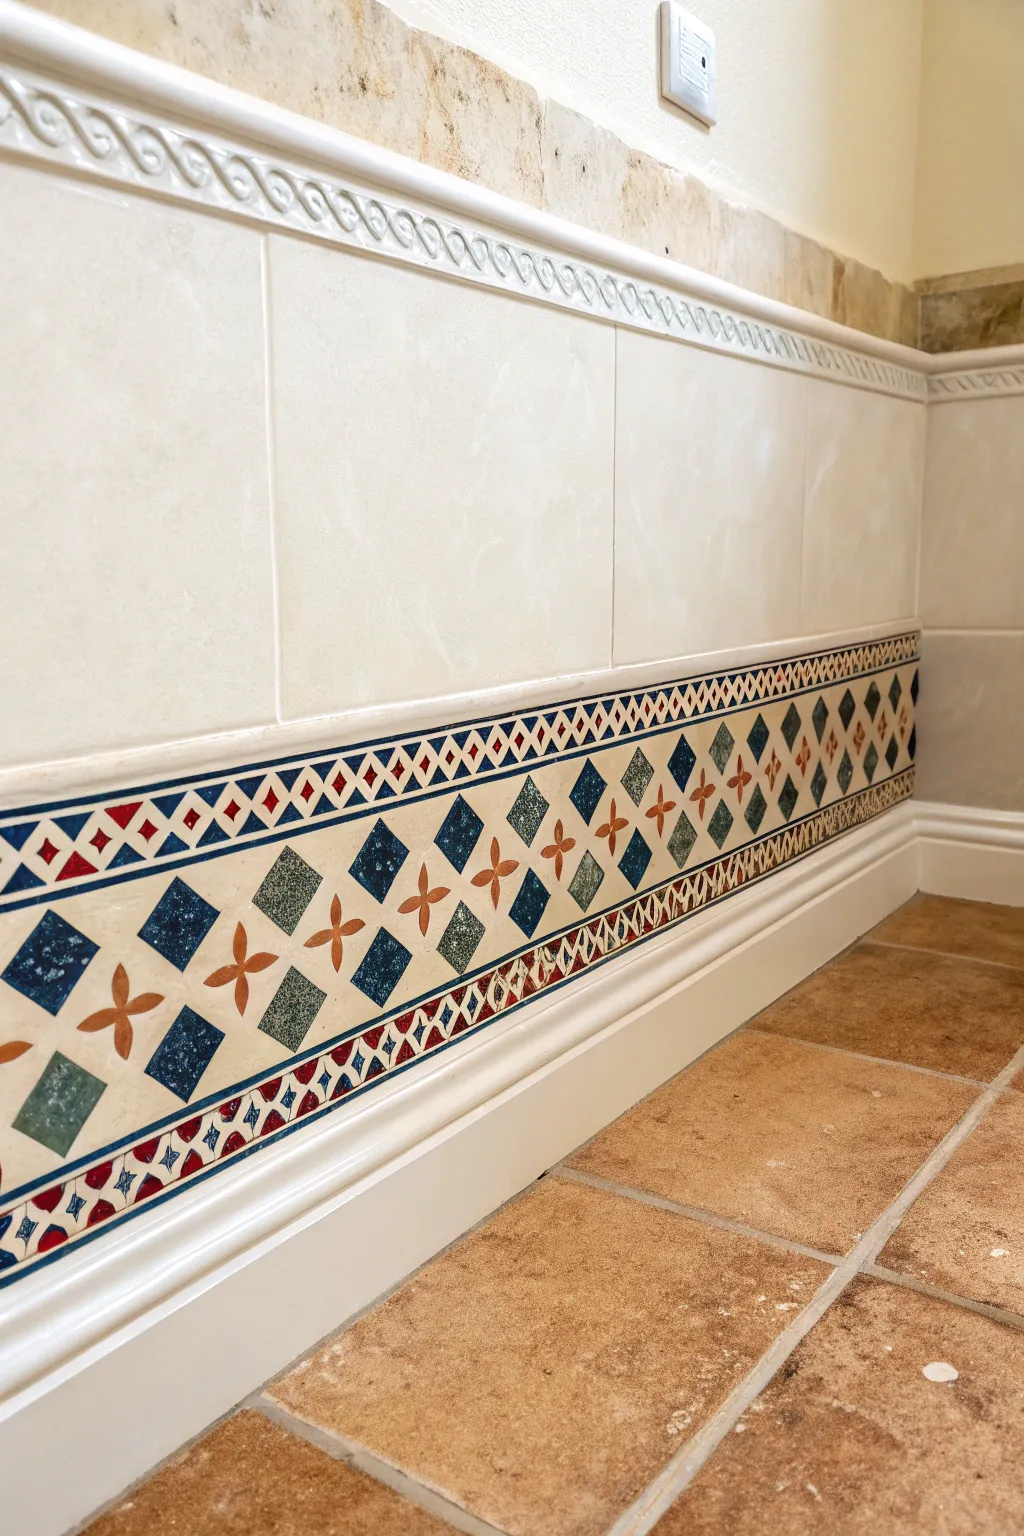
Transform a plain strip of wall space into a stunning architectural feature with this hand-painted border that realistically mimics ceramic tilework. Using careful geometric stenciling and texture techniques, you can achieve the look of high-end Moroccan tile borders without the mess of grout or spacers.
Step-by-Step
Materials
- High-quality painter’s tape (various widths including 1/4 inch)
- Pencil and long straight edge/ruler
- Base coat paint (cream or off-white latex)
- Acrylic craft paints: Deep Navy Blue, Olive Green, Terracotta/Rust, Burgundy, Gold
- White paint pen or fine detail brush
- Small flat artist brushes (synthetic)
- Small round detail brush
- Stipple sponge or sea sponge
- Gloss or semi-gloss clear polycrylic sealer
- Cardstock or stencil film (optional for repetitive shapes)
Step 1: Preparation & Base Layout
-
Clean surface:
Begin by cleaning the wall area thoroughly with a mild degreaser or TSP substitute to ensure perfect paint adhesion, especially if you are working near a floor or baseboard where dust collects. -
Define the borders:
Use painter’s tape to mask off the top and bottom boundaries of your border area. Measure the vertical space carefully; the design shown is approximately 4-6 inches tall. -
Apply the base coat:
Roll or brush on two coats of your cream or off-white latex paint to create the ‘grout’ and background color. Let this dry completely, preferably overnight, as you’ll be applying a lot of tape over it. -
Grid the main section:
Lightly draw two horizontal lines to divide the band into three horizontal sections: a wide central band for the diamonds and two narrow strips (top and bottom) for the detailed border pattern. -
Mark the diamonds:
In the wide central band, use your ruler to measure and mark equal intervals. Connect these marks diagonally to create a series of diamond shapes. Aim for shapes that are about 2-3 inches tall.
Pro Tip: Faux Texture
Add a few drops of glazing medium to the blue paint. It creates slightly transparent areas that look exactly like hand-glazed ceramic variations.
Step 2: Painting the Main Pattern
-
Block in solid diamonds:
Using a small flat brush and the Deep Navy Blue acrylic, paint every other diamond in the sequence. Keep your edges sharp; paint consistency is key here, so thin it slightly if it drags. -
Create textured diamonds:
For the alternate diamonds, mix a bit of white into your Olive Green paint. Apply this with a sponge or a dry brush using a stippling motion to create a mottled, stone-like texture rather than flat color. -
Stencil the floral crosses:
Between the diamonds, there are cross-shaped floral motifs. Cut a simple template from cardstock for this ‘X’ shape with petal ends. Position it in the negative spaces between the diamonds. -
Paint the floral motifs:
Stipple the Terracotta/Rust orange paint into these floral stencils. I like to keep the center of the ‘X’ slightly lighter to give it dimension. -
Clean up edges:
Once the main motifs are dry, use your cream base color and a tiny brush to touch up any messy edges, re-establishing the ‘grout lines’ between the shapes.
Step 3: Painting the Detail Borders
-
Tape the narrow bands:
Moving to the thin strips previously marked at the top and bottom, apply tape to create a crisp separation from the main diamond band. -
Establish the pattern:
These strips feature a repeating ‘X’ and diamond pattern. Use a pencil to mark small, regular intervals—about 1 inch apart—all the way across the strip. -
Paint the small diamonds:
Using a fine round brush, paint tiny blue diamonds at alternating intervals within this narrow strip. -
Paint the cross-hatching:
With the Burgundy paint, carefully draw the ‘X’ lines connecting the diamonds. If your hand is unsteady, a red fine-tip paint marker works wonders here. -
Add corner accents:
Dot tiny triangles of red or blue in the corners created by the zig-zag pattern to mimic mosaic chips.
Troubleshooting: Bleeding Tape
If paint bleeds under your tape, don’t panic. Let it dry fully, then scrape the excess gently with an X-Acto knife or touch up with the base wall color.
Step 4: Effects & Sealing
-
Add highlights:
To make the ’tiles’ look glazed and three-dimensional, apply a tiny, translucent stroke of white paint to the top-left corner of each blue diamond. -
Weather the background:
Mix a very watery glaze of light brown paint. Lightly brush this over the cream ‘grout’ areas and immediately wipe it back with a rag. This ages the ‘grout’ so it doesn’t look like staring white paint. -
Remove tape:
Carefully peel away all remaining painter’s tape. Pull the tape slowly at a 45-degree angle to ensure clean lines. -
Apply the glaze coat:
The final magic trick is gloss. Apply two coats of high-gloss polycrylic sealer over the entire painted band. This mimics the shine of fired ceramic and protects your work from scuffs.
Step back and admire how realistic your new faux-finished border looks against the floor tiles
Botanical Vine Border
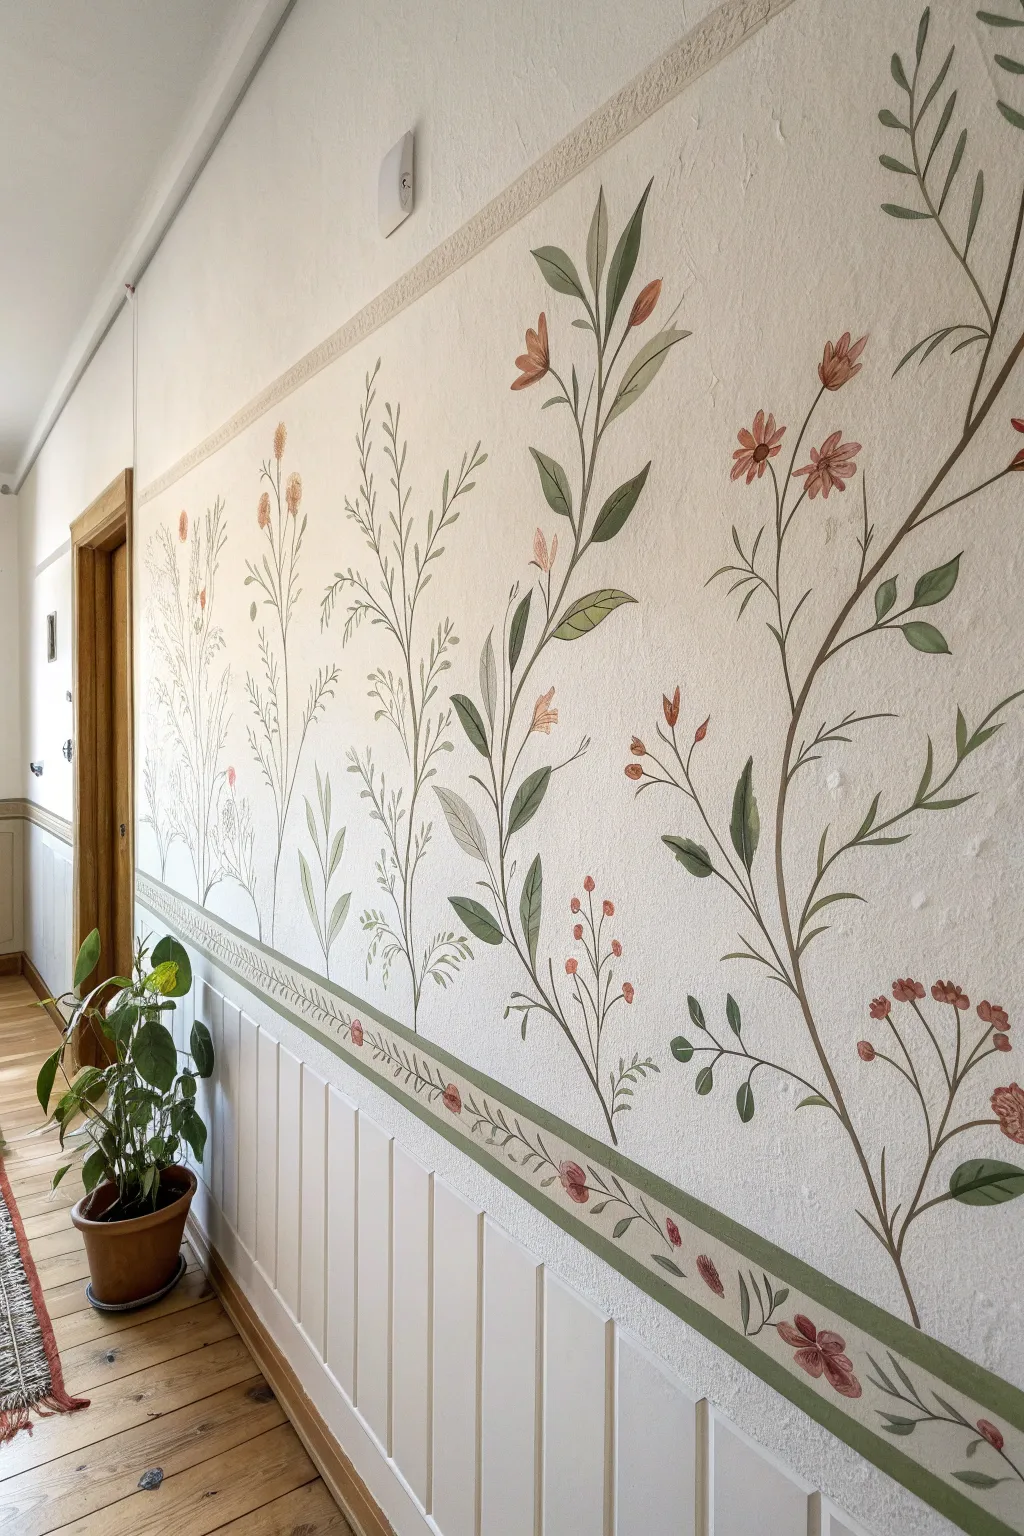
Transform a plain hallway into a serene garden walk with this delicate botanical mural technique. Using simple brushstrokes and a muted, natural color palette, you will create an airy composition of wildflowers and vines that climbs elegantly above your wainscoting.
Detailed Instructions
Materials
- Interior latex wall paint (matte or eggshell base in white/cream)
- Acrylic craft paints (sage green, olive green, warm ochre, dusty rose, terracotta)
- Glazing medium (optional, for translucency)
- Assorted round brushes (sizes #2, #4, and #6)
- Liner brush (size #0 or #00 for fine stems)
- Painter’s tape
- Pencil and eraser
- Level and ruler
- Palette or paper plate
- Step ladder
- Water cup and paper towels
Step 1: Preparation and Border
-
Prep the surface:
Begin by ensuring your wall surface is clean and dry. If the wall is textured like the one in the example, gently dust it with a microfiber cloth to remove any debris from the crevices. -
Outline the border area:
Using a level and a ruler, measure about 2-3 inches above your existing wainscoting or chair rail. Lightly mark a horizontal line with a pencil across the entire length of the wall to define the top of the decorative green band. -
Tape the border:
Apply painter’s tape directly above your pencil line and directly along the top edge of the wainscoting. Press the edges of the tape down firmly to prevent paint bleed. -
Paint the base border stripe:
Fill in the taped area with a muted sage green acrylic or wall paint. You may need two coats for solid coverage. Peel the tape off carefully while the paint is still slightly tacky to get a crisp edge. -
Add border details:
Once the green stripe is dry, hand-paint a delicate running vine pattern inside it using a darker olive green and a #2 round brush. Add tiny terracotta-colored buds periodically along this vine for a cohesive look.
Step 2: Drafting the Botanicals
-
Plan the composition:
Before painting, visualize the flow. You want tall, sweeping stems that reach upward. Lightly sketch the main ‘spines’ of the tallest plants with a pencil, varying their heights and curvature so they don’t look like soldiers in a row. -
Sketch secondary stems:
Draw shorter, branching stems coming off your main lines. Keep the distinct plant varieties separated—some should be leafy ferns, others thin wildflowers, and some berry branches.
Textured Wall Trouble?
On bumpy walls, dilute paint slightly with water. This helps it flow into crevices without requiring heavy pressure that might distort your brush bristles.
Step 3: Painting the Foliage
-
Mix your greens:
Prepare a palette with at least three shades of green: a light sage, a medium olive, and a dark forest green. I like to mix a little glazing medium into the paint here to give the leaves a watercolor-like transparency. -
Paint the main stems:
Using your liner brush and the medium olive green, trace over your pencil lines for the main stems. Keep your hand loose and lift pressure at the tips of branches for a tapered effect. -
Create large leaves:
Switch to a #6 round brush for the larger leaves. Press the belly of the brush against the wall and pull outward, lifting as you reach the leaf tip to create a natural almond shape. -
Add fern details:
For the feathery, fern-like plants, use a #2 brush and quick, short strokes. Paint these in a lighter sage green to push them visually into the background. -
Layer depth:
Go back and add darker green leaves or stems near the base of the plants. This darker value anchors the mural and simulates the density of a garden bed at ground level.
Pro Tip: Variance is Key
Avoid using the exact same green for every stem. Mixing slight variations of your green on the palette for each plant adds realistic depth and prevents a flat look.
Step 4: Adding Blooms and Details
-
Paint the feature flowers:
Identify where your ‘hero’ blooms will go. Using dusty rose and terracotta paint, create the petals. For daisy-like shapes, start from the center and pull strokes outward; for tulip shapes, paint cupped strokes. -
Add smaller buds:
Using the tip of a #4 brush, dab small circles of warm ochre or pink along the thinner stems to represent berries or budding flowers. -
Detail the centers:
Once the flower petals are dry, use a contrasting color (like dark brown or deep red) to dot the centers of the open blooms. -
Refine edges:
Inspect your work from a distance. If any leaves look too transparent or stems look broken, touch them up now. You can also lightly erase any visible pencil marks once the paint is fully cured.
Step back and enjoy the peaceful, organic atmosphere your new botanical border brings to the space
Doorway Frame Painted Border
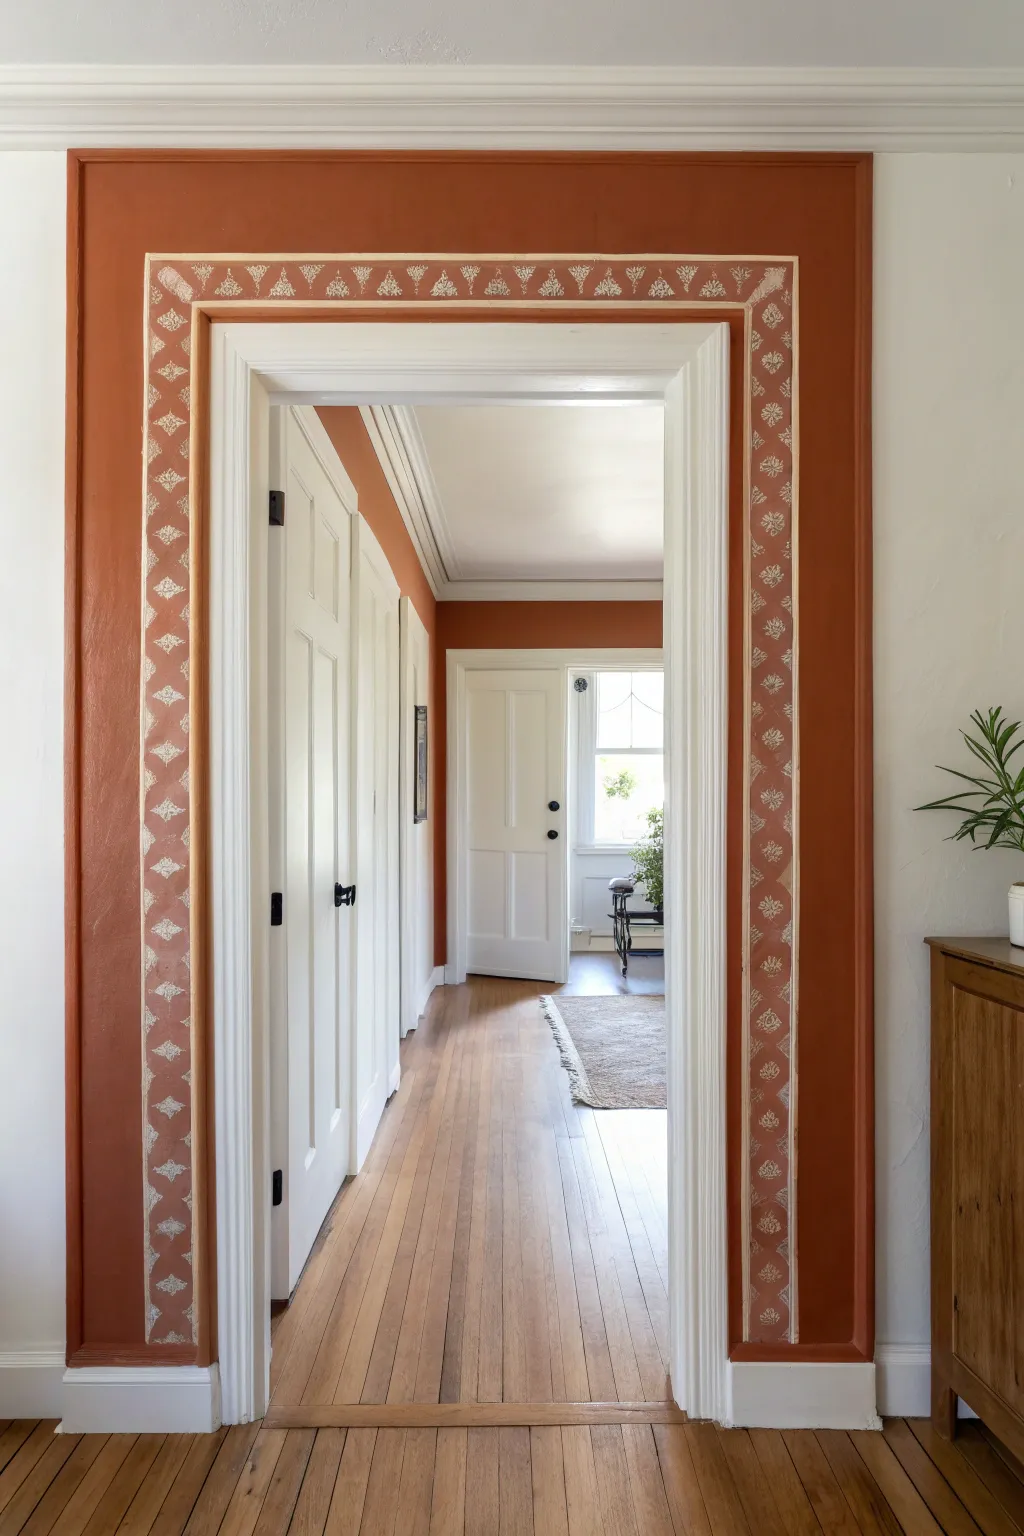
Transform a plain white doorway into a warm, architectural focal point with this clever paint trick. By framing the opening with a rich terracotta color and adding a delicate, stenciled inner border, you create depth and character without installing expensive trim.
Step-by-Step Tutorial
Materials
- Terracotta colored latex wall paint (e.g., burnt orange or sienna)
- Cream or off-white detail paint (for stenciling)
- High-quality painter’s tape (1-inch and 2-inch widths)
- Small foam roller and tray
- Stiff stencil brush
- Diamond or fleur-de-lis pattern stencil (sized for a 3-4 inch border)
- Measuring tape
- Spirit level or laser level
- Pencil
- Damp rag for clean-up
Step 1: Planning and Taping
-
Clean the surface:
Before you begin, wipe down the wall area around the door frame with a damp cloth to remove any dust or oils, ensuring the tape sticks perfectly. -
Measure the outer width:
Decide on the total width of your painted frame. Looking at the example, the total width is about 8-10 inches from the existing white door trim. -
Mark the outer boundary:
Using a measuring tape, make light pencil marks at your desired width around the top and both sides of the door frame. -
Create the outer line:
Use a long level or laser level to connect your pencil marks, creating straight vertical and horizontal lines. -
Apply outer tape:
Apply painter’s tape along the *outside* edge of your pencil lines. Press the edge down firmly with a credit card or your thumbnail to prevent bleed-through. -
Protect the trim:
Apply a second line of painter’s tape directly onto the side of the existing white door casing to protect it from the terracotta paint.
Bleeding Lines?
If paint seeps under the stencil, you likely have too much paint on your brush. Wait for it to dry, paint over the error with the terracotta base, and try again with a much drier brush.
Step 2: Base Coat Application
-
Seal the tape edges:
For razor-sharp lines, I like to brush a very thin layer of the existing wall color (white) over the tape edge first; this seals any gaps so the colored paint won’t seep under. -
Cut in the edges:
Once the seal is dry, use an angled brush to carefully paint the terracotta color along the tape edges and next to the door casing. -
Roll the fill:
Use a small foam roller to fill in the rest of the designated border area with the terracotta paint for a smooth, brush-stroke-free finish. -
Apply a second coat:
Allow the first coat to dry completely according to the can’s instructions, then apply a second coat for rich, opaque coverage. -
Let it cure:
Let this base color dry thoroughly—preferably overnight—before moving on to the taping for the inner detail, as fresh tape can pull up uncured paint.
Step 3: Creating the Inner Detail
-
Mark the inner border:
Measure inward about 1.5 inches from the outer painted edge and mark a line all the way around. This defines the space for your stencil. -
Tape the inner rectangle:
Apply painter’s tape along this new line to mask off the solid outer band of color. -
Tape the casing gap:
Measure about 1 inch from the door casing and apply another strip of tape. You now have an exposed channel in the middle of your painted area where the stencil will go. -
Position the stencil:
Place your stencil in the exposed channel. Secure it with small pieces of painter’s tape so it doesn’t shift while you work. -
Load the stencil brush:
Dip your stencil brush into the cream paint, then offload almost all of it onto a paper towel until the brush feels nearly dry. -
Apply the pattern:
Use a light, vertical pouncing motion (tapping up and down) to apply the cream paint through the stencil. Avoid brushing side-to-side to prevent seepage. -
Repeat the pattern:
Carefully lift the stencil and align it with the previous section to continue the pattern around the frame. Use a corner piece if your stencil kit has one, or carefully mask off the corner to miter the design.
Pro Tip: Custom Corners
Stenciling corners is tricky. Instead of bending the stencil, stop the pattern a few inches short on both sides and hand-paint a simple square or dot in the corner to connect them cleanly.
Step 4: Finishing Touches
-
Remove tape carefully:
While the stencil paint is still slightly tacky, slowly peel away the tape at a 45-degree angle. This prevents the dried paint from cracking along the edge. -
Perform touch-ups:
Inspect your lines. If any paint bled through, use a tiny artist’s brush and the background wall color to erase the mistake.
Step back and admire how a simple border completely redefines the architectural feel of your room
Arched Opening Border Detail
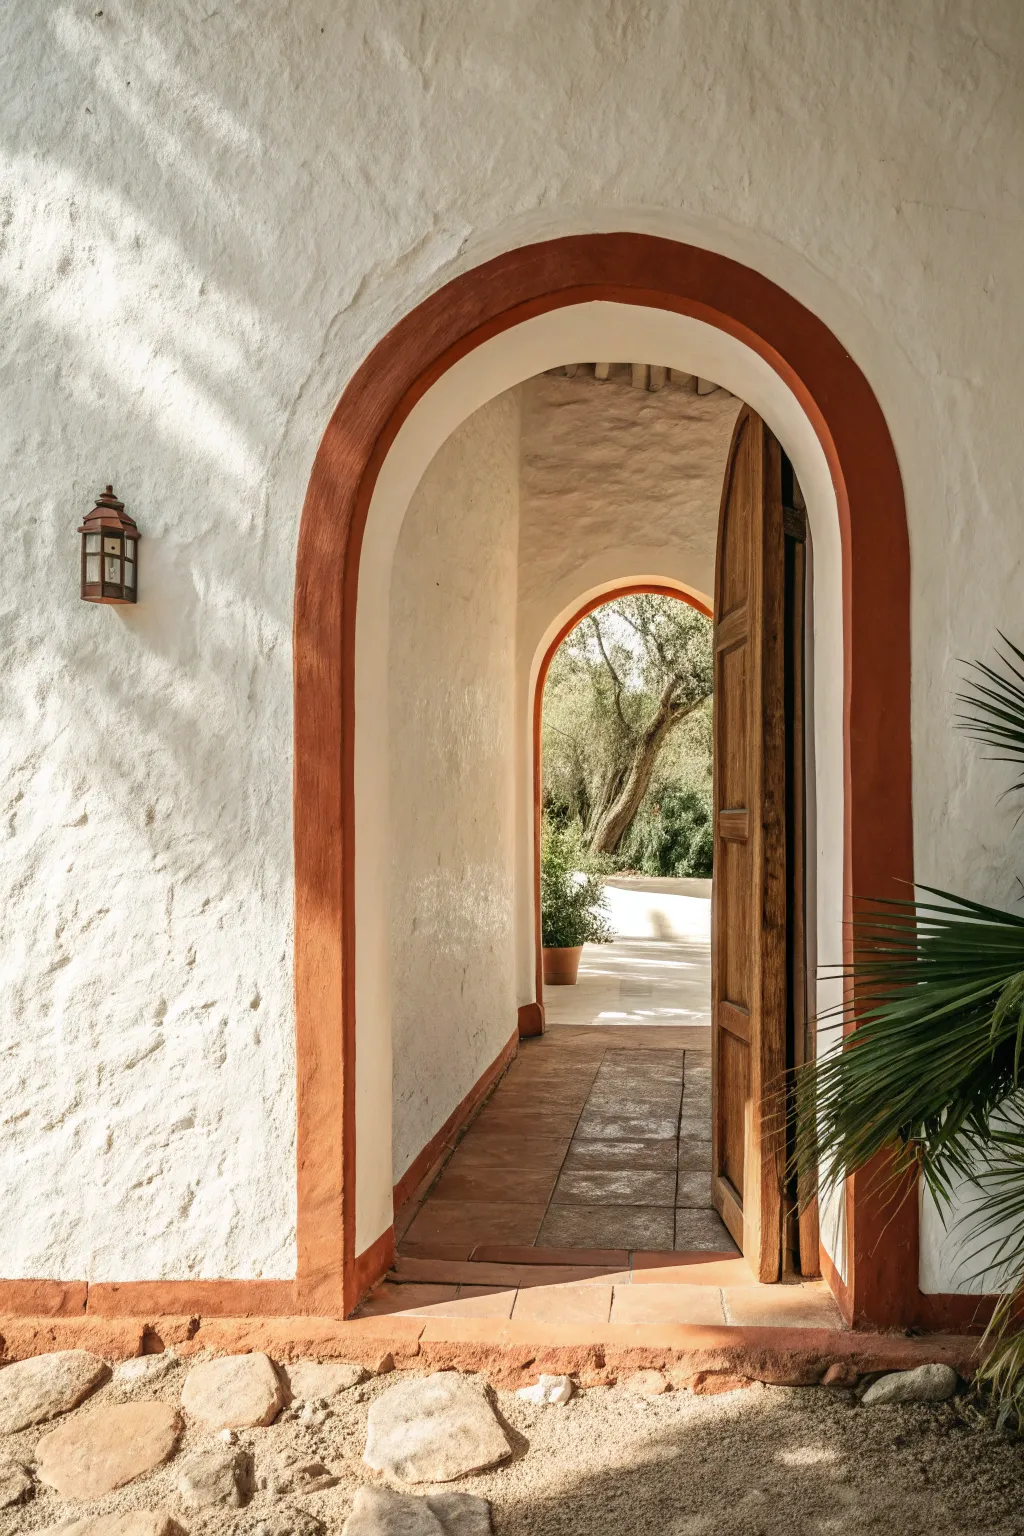
This project adds a warm, rustic touch to a simple arched doorway by framing it with a bold band of earthy terracotta paint. The hand-painted quality evokes Mediterranean charm, creating a welcoming transition between spaces.
Detailed Instructions
Materials
- High-quality masonry or exterior paint (terracotta/burnt orange)
- Small angled sash brush (1.5 – 2 inch)
- Medium flat paintbrush (2 – 3 inch)
- Painter’s tape (multi-surface)
- Drop cloth
- Measuring tape
- Pencil
- Damp rag
- Ladder or step stool
Step 1: Preparation and Mapping
-
Clean the surface:
Before painting, ensure the stucco or plaster surface is free of dust and cobwebs. A quick wipe with a damp rag or a stiff brush will help the paint adhere properly to the textured wall. -
Measure the border width:
Decide on the thickness of your border. For the look in the image, a width of about 4 to 6 inches works well. Measure out from the edge of the archway at several points to keep it consistent. -
Mark the guide:
Using your pencil, lightly mark small dashes along the wall corresponding to your measurements. These will serve as the outer boundary for your painted arch. -
Tape the floor line:
Apply painter’s tape along the floor where the wall meets the ground or paving. This ensures a crisp line for the bottom border that connects to the arch. -
Tape the inner jamb (optional):
If you want a very sharp line where the face of the wall meets the inner curve of the arch, apply tape there. However, for a rustic look, you can often cut this in freehand.
Textured Wall Tip
On heavy stucco, don’t use tape for the outer curved edge. Paint bleeds under tape on rough walls anyway. Freehanding with a high-quality angled brush yields a cleaner result.
Step 2: Painting the Outline
-
Load the angled brush:
Dip your angled sash brush about halfway into the terracotta paint. Scrape off the excess to prevent drips, especially since you will be working vertically. -
Cut in the inner edge:
Start painting along the immediate edge of the archway opening. Keep a steady hand to follow the curve of the architecture. I find it easier to work from the top center down to the sides. -
Connect to the base:
Continue that inner line all the way down to the floor on both sides of the doorway. -
Establish the outer curve:
Using your pencil marks as a guide, carefully paint the outer edge of the border. Don’t worry if the line isn’t machine-perfect; a slight wobble adds to the hand-applied stucco aesthetic. -
Paint the baseboard area:
Extend the paint horizontally along the bottom of the wall to create the matching base border shown in the image, connecting it seamlessly to the arch legs.
Step 3: Filling and Finishing
-
Switch to the flat brush:
Now that the edges are defined, switch to your larger flat brush to fill in the center of the border more quickly. -
Work paint into the texture:
Because stucco has a heavy texture, use a stippling (dabbing) motion or firm brush strokes to ensure the paint gets into all the little crevices and pits. -
Feather the strokes:
Brush in the direction of the arch curve to smooth out any stippling marks and create a uniform finish. -
Check for holidays:
Step back and look for ‘holidays’—missed spots where the white wall still peeks through—and touch them up immediately. -
Allow the first coat to dry:
Let the paint dry according to the can’s instructions. Masonry paint often dries quickly, but ensure it’s dry to the touch before re-coating. -
Apply a second coat:
Apply a second layer to deepen the color opacity. This is crucial for getting that rich, saturated terracotta tone. -
Remove tape:
Carefully peel away the tape while the paint is still slightly tacky to prevent peeling up dried chips of paint.
Old World Patina
Mix a tiny bit of water into your paint for the final coat. A slightly thinner consistency creates a wash-like effect, making the finish look aged and sun-baked rather than plastic.
Step back and admire how this simple band of color completely transforms the character of your doorway
Corner Wrap Border With Mitered Look
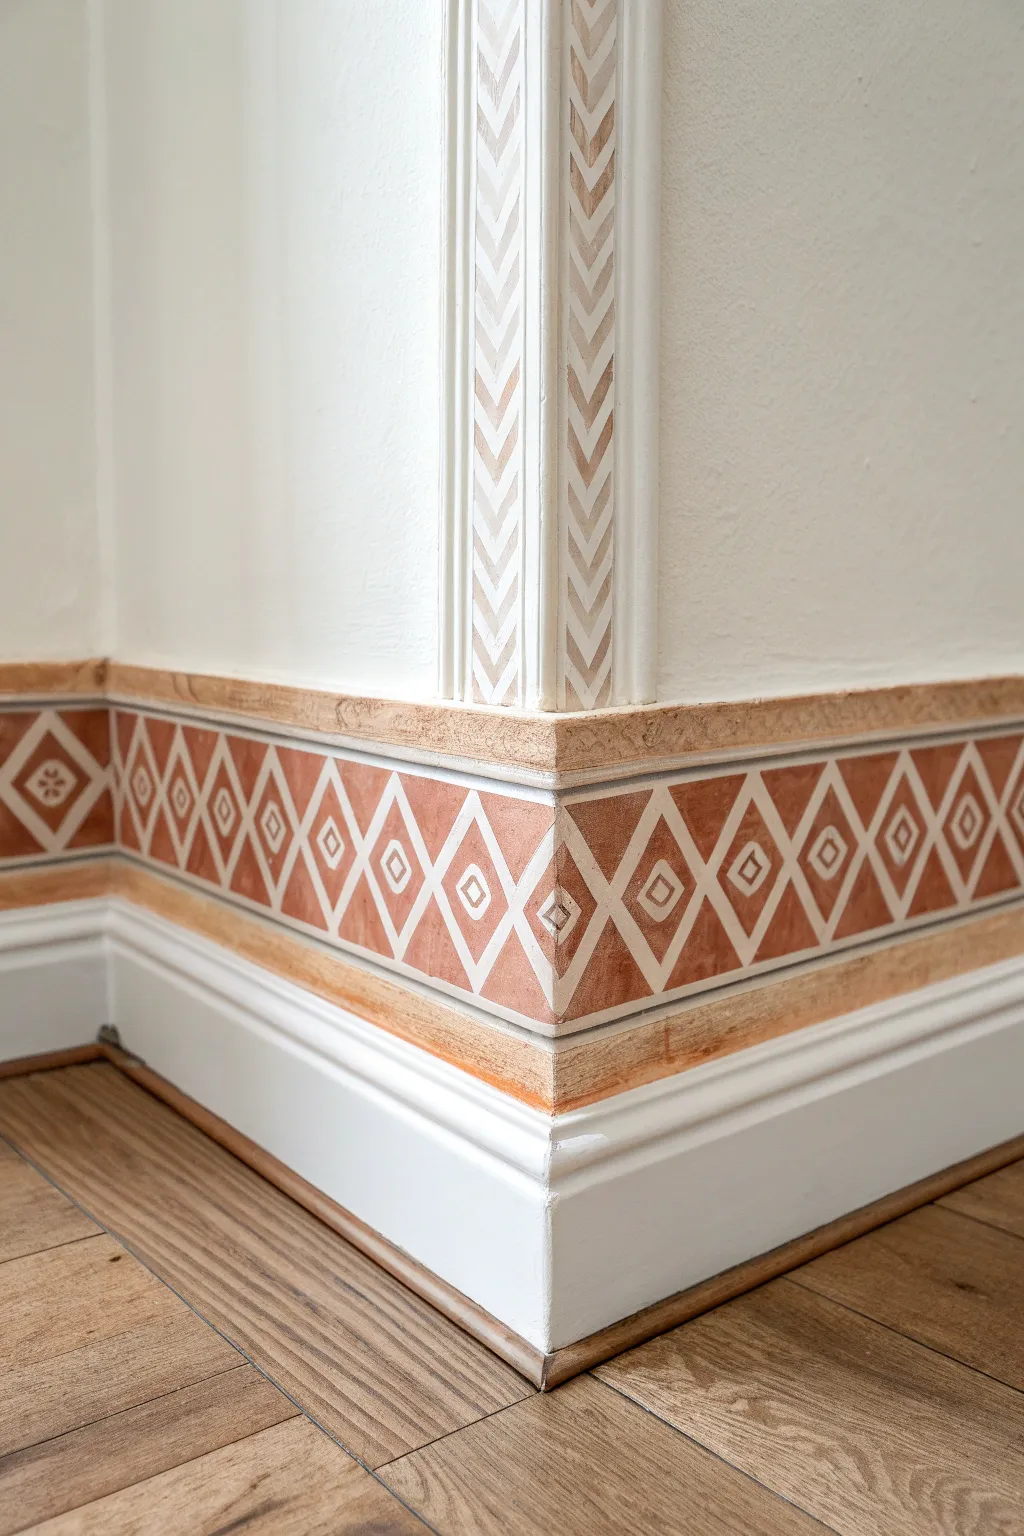
Transform a plain wall corner into an architectural feature with this precise, painted border that mimics the look of inlaid wood or encaustic tile. By using clever taping and soft, earthy tones, you can achieve a custom finish that wraps seamlessly around corners for a high-end, built-in effect.
Step-by-Step Guide
Materials
- High-quality painter’s tape (various widths: 1 inch, 1/4 inch fine line)
- Laser level or spirit level
- Measuring tape and pencil
- Terracotta or rust-colored latex paint (satin finish)
- Beige or warm sandstone latex paint (satin finish)
- Small angled sash brush (1.5 inch)
- Artist’s liner brush
- Small foam roller
- Utility knife with fresh blades
- Damp cloth for corrections
Step 1: Preparation and Base Lines
-
Clean and prep:
Start by ensuring the wall surface above the baseboard is perfectly clean, dry, and free of dust. If your current wall color isn’t the desired background white/cream, paint that base coat now and let it cure for at least 24 hours. -
Establish the horizontal band:
Using a laser level to ensure accuracy, mark the top and bottom lines of your horizontal border. It should sit directly above the baseboard, likely about 4-6 inches wide depending on your preference. -
Tape the horizontal borders:
Apply 1-inch painter’s tape along the outside of your top and bottom pencil lines. Press the edges down firmly with a credit card or putty knife to prevent bleed-under. This defines the main workspace. -
Paint the background borders:
Within your taped area, paint two thin strips of the beige/sandstone color along the very top and very bottom edges. These will serve as the thin framing rails for the main pattern. -
Mask the inner rail:
Once the beige paint is dry to the touch, apply a thin strip of tape (or carefully positioned 1-inch tape) over those beige lines to protect them while you work on the central block.
Burnishing is Key
Before painting, seal your painter’s tape by running a fingernail or credit card firmly along every edge. This ‘burnishing’ prevents the paint from creeping underneath and ruining your sharp lines.
Step 2: Creating the Diamond Lattice
-
Measure the diamonds:
Measure the height of the remaining central space. To get perfect diamonds, mark intervals equal to half that height along the top and bottom edges. Stagger the bottom marks so they sit exactly between the top marks. -
Tape the diagonal grid:
Connect your marks using 1/4 inch fine-line tape to create a crisscross diamond pattern. Make sure the tape lines intersect cleanly. I find it helpful to do all diagonals in one direction first, then the opposite direction. -
Add the inner detail:
To create the smaller diamond ‘eye’ inside each large diamond, place a small square of tape in the exact center of each diamond shape. You can cut these specifically from wider tape on a clean cutting mat. -
Seal the tape edges:
Lightly brush a tiny amount of your base wall color (white/cream) over the edges of all your tape. This seals the tape and ensures crisp lines later.
Bleed-Through Fix
If paint bleeds under the tape, don’t panic. Wait for it to dry completely, then place a piece of tape precisely along the intended line and lightly paint over the mistake with the background color.
Step 3: Painting and Vertical Detail
-
Apply the main color:
Using a small foam roller or brush, apply the terracotta/rust paint over the taped diamond grid. Use thin coats to avoid buildup against the tape edges. Two coats usually give the best solid coverage. -
Peel to reveal:
While the second coat is still slightly damp, carefully peel away the diagonal tape and the center squares. Pull the tape at a 45-degree angle, slow and steady. -
Vertical molding preparation:
Move to the vertical corner molding. If your wall doesn’t have existing molding, you can paint this effect directly on the wall. Mark a vertical column about 3 inches wide ending at the horizontal border. -
Create the chevron guide:
Tape off the vertical column. Mark a centerline running vertically. Using a protractor or set square, mark 45-degree angles branching up from the centerline to create V-shapes. -
Tape the chevrons:
Apply fine-line tape along your markings. Since you want painted chevrons, you are taping the ‘negative’ space (the white parts) and the borders. -
Paint the vertical pattern:
Using the beige/sandstone paint, fill in the exposed V-shapes. Use a small artist brush for control near the edges. -
Final touch-ups:
Once all tape is removed and paint is fully dry, inspect the corners. Use an artist’s liner brush and the white base color to sharpen any diamond points that might have bled slightly.
Step back and admire how this elegant border adds immediate historical charm and sophistication to your room.
Shadow Border With Faux Depth
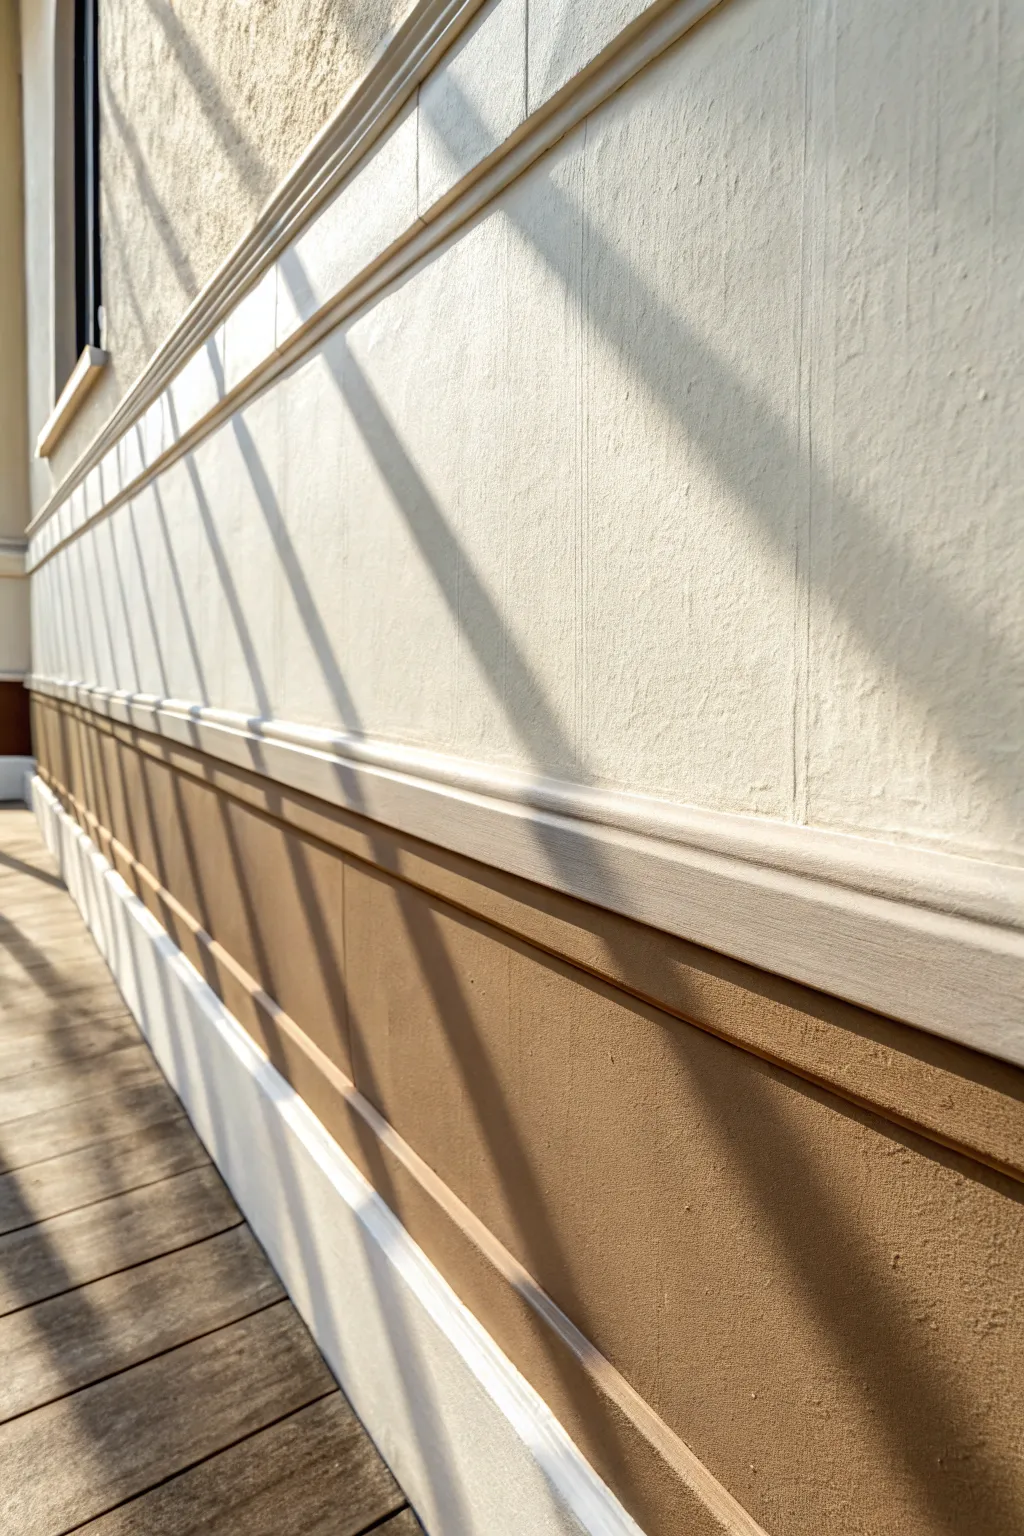
Transform a flat wall into a dimensional masterpiece by painting a faux architectural border that plays with light and shadow. This technique mimics the look of high-end moulding and deep recesses using only paint and clever taping.
Step-by-Step
Materials
- Exterior or interior latex paint (Cream/Off-White base color)
- Exterior or interior latex paint (Medium Tan/Camel)
- Exterior or interior latex paint (Dark Brown for depth lines)
- Painter’s tape (various widths: 1-inch and 2-inch)
- Laser level or long straight edge
- Pencil
- High-quality angled sash brush (2-inch)
- Small artist’s angular brush (for fine lines)
- Mini roller and tray
- Drop cloth
Step 1: Preparation and Base Layer
-
Clean surface:
Begin by thoroughly cleaning the wall surface to remove dust, cobwebs, or grime. If this is an exterior wall like the one shown, a light pressure wash or scrub with a stiff brush is essential for adhesion. -
Apply base color:
Roll on two coats of your main cream or off-white base color across the entire wall section, including where the border will eventually go. Allow this to dry completely for at least 24 hours to ensure tape won’t peel it up later. -
Mark horizontal guides:
Use a laser level to project a straight horizontal line where you want the top of your wainscoting-style border to begin. Lightly mark this line with a pencil across the length of the wall.
Bleed-Through Blues?
On heavy stucco textures, tape alone often fails. Paint a thin layer of clear acrylic caulk along the tape edge before painting your color to perfectly seal the rough dips.
Step 2: Creating the Faux Moulding
-
Tape the upper moulding:
Apply a strip of 2-inch painter’s tape just *above* your pencil line. Press the edges down firmly with a putty knife or your fingernail to seal them against the wall texture. -
Tape the lower definition:
Place a second strip of tape parallel to the first, leaving a narrow gap of about 3/4 inch exposed between the two tape strips. This gap will become the ‘highlight’ ridge of your moulding. -
Seal the tape:
Brush a very light coat of your base cream paint over the tape edges. This bleeds the base color under the tape instead of the contrast color, creating a razor-sharp final line. -
Paint the border body:
Once the seal is dry, apply your Medium Tan/Camel paint to the entire lower section of the wall, starting from the bottom tape line and working downwards to the floor or deck. -
Double coat the border:
Apply a second coat of the tan paint to ensure solid coverage, especially if the wall has a rough stucco texture.
Step 3: Adding Dimensional Details
-
Remove tape carefully:
While the second coat is still slightly tacky, slowly peel back the painter’s tape at a 45-degree angle to reveal your clean lines. -
Tape for shadow lines:
To create the illusion of a recessed groove, apply a new line of tape right along the top edge of your freshly painted tan border section. -
Paint the deep recess:
Using the dark brown paint and an artist’s brush or very small sash brush, paint a thin, consistent line (about 1/4 inch) right above the tan border. I find steadying my hand against a mahl stick or passing ruler helps here. -
Soften the shadow:
For a more realistic look, you can immediately feather the top edge of this dark brown line with a slightly damp brush to blur it into the cream wall, mimicking a soft cast shadow. -
Add the highlight:
Using a mix of your base cream and a touch of white, paint a very thin, crisp line along the top edge of your ‘moulding’ strip to simulate light hitting the top architectural ridge.
Level Up: Texture
Add fine sand or texture additive to the tan paint for the lower border. This physical texture difference enhances the illusion that the bottom section is a separate material.
Step 4: The Shadow Overlay Effect
-
Plan the diagonal shadows:
To recreate the specific lighting effect in the image, use long strips of tape to mask off diagonal ‘beams’ of light. The angle should be steep, roughly 60 degrees. -
Tape the shadow negatives:
Place tape where the ‘light’ would hit. The exposed areas between the tape strips will become the shadows. -
Mix a glaze:
Mix a small amount of black or dark gray paint with a clear glazing medium (4 parts glaze to 1 part paint). You want this to be very transparent. -
Apply the shadow glaze:
Lightly brush the glaze into the exposed areas between the tape. Do not saturate the wall; you want to tint the existing colors (both the cream top and tan bottom) darker, not cover them up. -
Final reveal:
Remove all remaining tape immediately. The glaze creates a continuous shadow that passes convincingly over both your ‘moulding’ and the wall colors.
With these precise lines and shadows, you have created a sophisticated architectural illusion that adds permanent depth to your space
Freehand Sketchy Border Line

Transform plain wainscoting into a piece of architectural art with this charming, freehand-style painted finish. By mimicking the look of classic Azulejo tiles or Delftware with sketchy, brushy lines, you add instant history and character to a simple paneled wall.
Step-by-Step Guide
Materials
- White or cream interior wall paint (satin or eggshell finish)
- Deep cobalt blue acrylic or latex craft paint
- Flat shader brush (size 6 or 8)
- Fine liner brush (size 0 or 1)
- Pencil
- Ruler or straight edge
- Measuring tape
- Paper palette or heavy cardstock
- Painters tape
- Damp cloth (for quick corrections)
- Clear matte polycrylic sealer (optional)
Step 1: Preparation and Base
-
Prepare the surface:
Ensure your wainscoting or wall panels are clean, dry, and free of dust. If the current paint is glossy, give it a light sanding to help the new paint adhere. -
Apply base coat:
Paint the entire panel area with a fresh coat of white or cream paint. This provides a crisp canvas for the blue details and mimics the ceramic background of tiles. Let this dry completely, preferably overnight. -
Define the borders:
Using a ruler and pencil, lightly mark the top and bottom boundaries where your decorative borders will go. For the top strip, measure about 2-3 inches down from the ledge; for the bottom, define a wider band if desired above the baseboard.
Step 2: Painting the Top Geometric Border
-
Mark the grid:
Lightly sketch vertical guide lines every 1.5 to 2 inches along the top border area to keep your pattern spacing consistent. -
Sketch the X pattern:
Inside every other marked square, pencil in a large ‘X’ shape connecting the corners. In the alternate squares, draw a diamond shape. -
Load your brush:
Dilute your deep blue paint slightly with a drop of water to improve flow. Load a small flat brush, ensuring the bristles are coated but not dripping. -
Paint vertical dividers:
Paint the vertical lines separating each design block first. Don’t worry about using a ruler here; a steady hand and slight line variation add to the ‘sketchy’ hand-painted charm. -
Fill the star motifs:
Using the flat brush, paint the ‘X’ shapes, pressing down slightly to widen the stroke at the ends. Add small triangles in the empty spaces around the X to create a starburst effect. -
Add bordering lines:
Finish the top section by painting a continuous horizontal line above and below the pattern using the flat shader brush. I find it easiest to work in short 6-inch sections to maintain control.
Wobbly Lines?
Don’t panic! If a line goes astray, quickly wipe it with a damp cloth. Also, painting a slightly thicker line over a mistake often corrects it while enhancing the hand-painted style.
Step 3: Painting the Bottom Floral Border
-
Sketch the floral flow:
The bottom border is more organic. Lightly pencil a waving vine line running horizontally through the center of your bottom band. -
Add floral elements:
Sketch rough circles for flower heads and leaf shapes branching off the main vine. These don’t need to be perfect botanical drawings; think simplified folk art shapes. -
Paint the solid blue background:
Unlike the top border, the bottom design often looks best as a negative space effect or heavy line work. Use your larger brush to block in areas of heavy blue around the bottom edge if you want a visual anchor. -
Outline the vine:
Switch to your fine liner brush for the delicate work. Trace your pencil vine line with the blue paint, allowing the line thickness to vary naturally. -
Fill flower petals:
Paint the flower petals using simple, C-shaped strokes. Leave the center of the flowers white or fill them in, depending on the visual weight you prefer. -
Add leaf details:
Paint the leaves with a single stroke: press the brush down to widen the belly of the leaf and lift up as you reach the tip. -
Incorporate framing lines:
Just like the top border, paint a strong horizontal blue line above this floral section to separate it from the central white panels.
Antique Effect
Once dry, lightly sand the painted blue areas with fine-grit sandpaper (220-grit). This distresses the paint slightly, making the design look aged and lived-in.
Step 4: Finishing Touches
-
Check for balance:
Step back and look at the wall as a whole. If some blue areas look too faint, apply a second coat to deepen the color and match the intensity across the wall. -
Clean up stray marks:
Once the paint is fully dry, gently erase any visible pencil lines with a clean white eraser. -
Protect the artwork:
Especially in high-traffic areas like hallways, apply a clear matte water-based sealer over the painted borders to prevent scuffs and make cleaning easier.
Now you have a custom architectural feature that feels both timeless and wonderfully personal.


Have a question or want to share your own experience? I'd love to hear from you in the comments below!