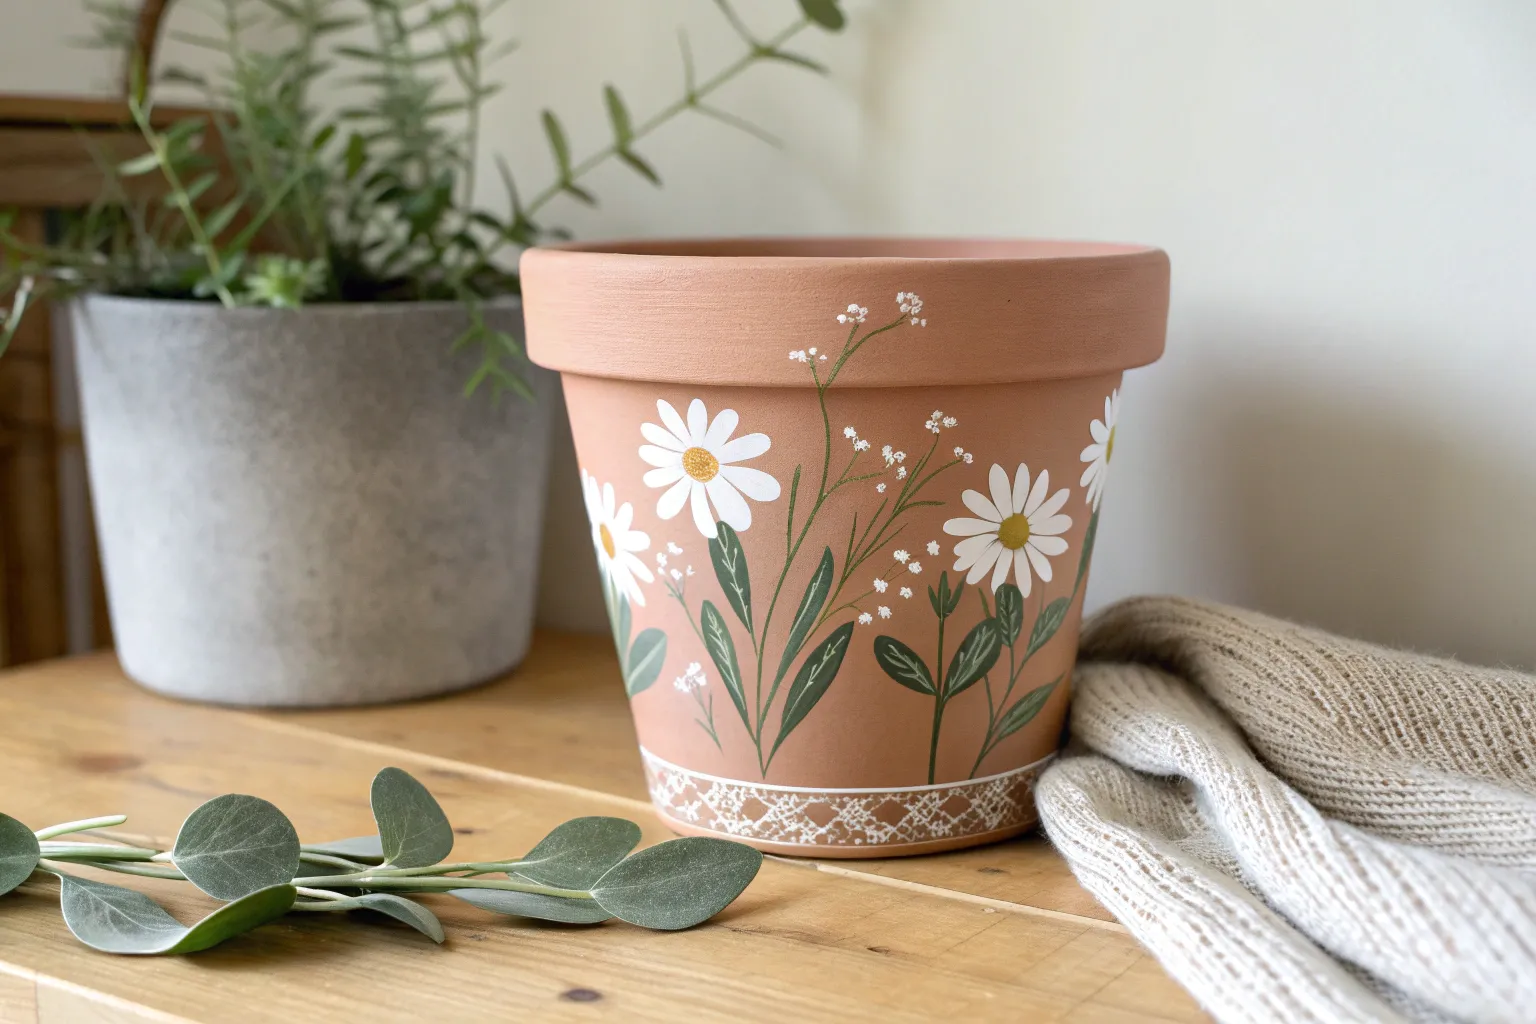
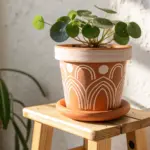
If you’ve got a plain pot sitting around, you’ve basically got a tiny blank canvas waiting for you. I’m sharing my favorite painting flower pots ideas—starting with the classics you can knock out in an afternoon and ending with a few playful designs that always make people stop and stare.
Solid-Color Terracotta Flower Pot Refresh
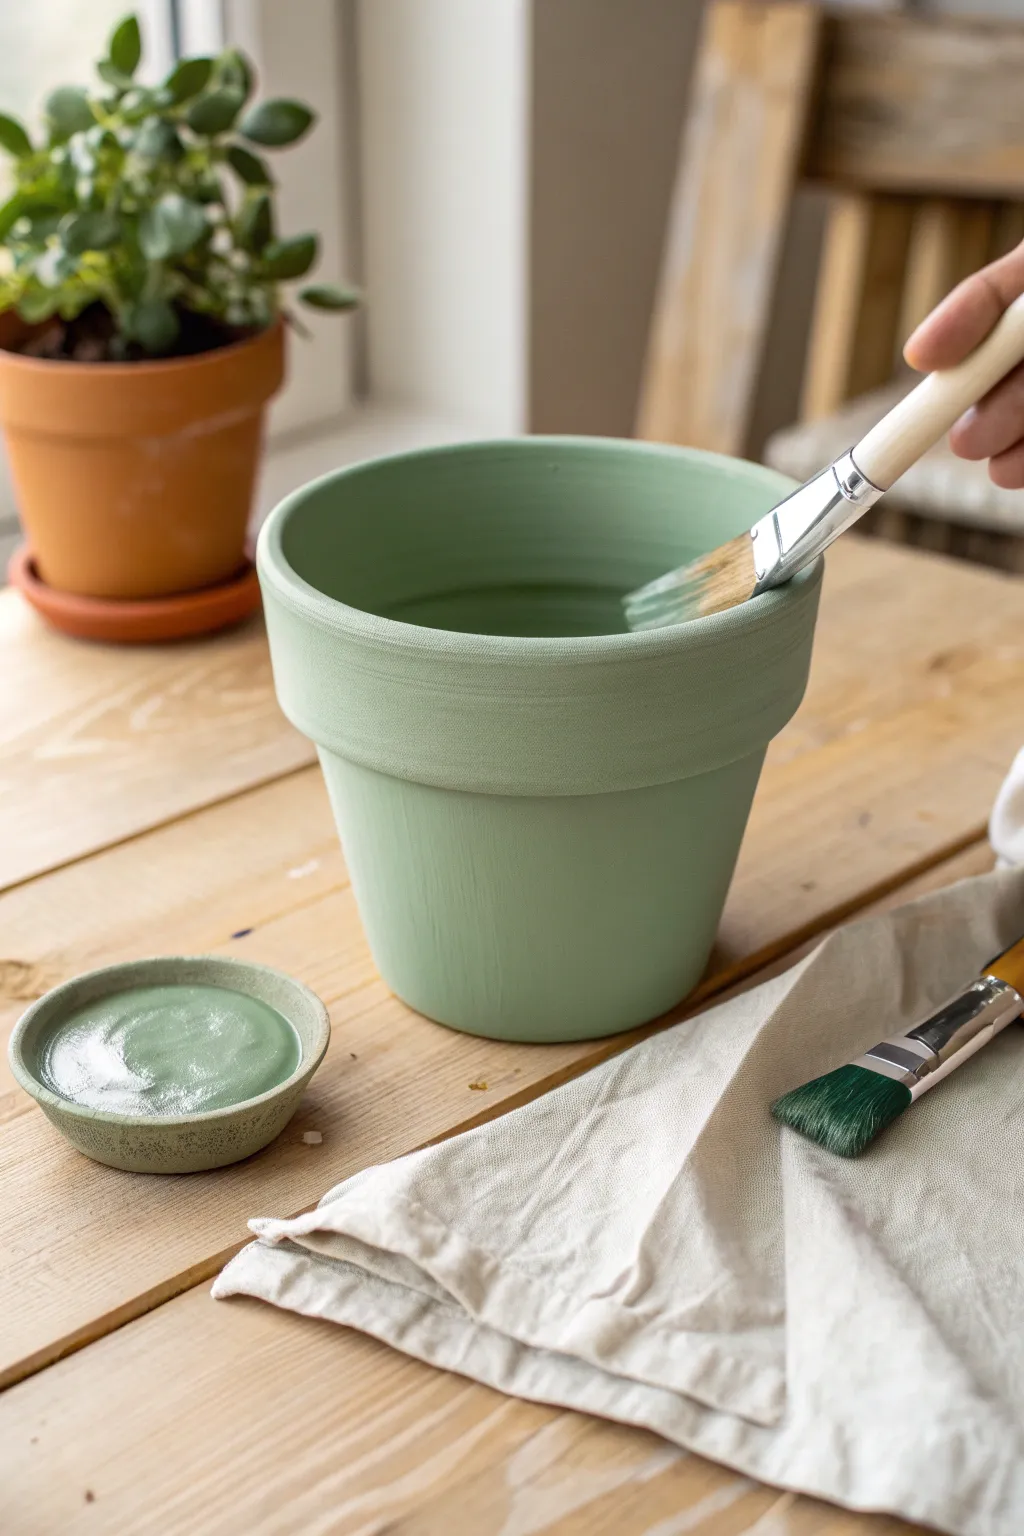
Transform a standard terracotta planter into a sleek, modern decor piece with a simple coat of matte sage green paint. This monochromatic refresh proves that sometimes the most stunning transformations come from a single, well-chosen hue that brings a calm, earthy vibe to your plant collection.
Step-by-Step Tutorial
Materials
- Terracotta flower pot (clean and dry)
- Small ceramic dish or saucer for paint
- Soft synthetic flat paintbrush (around 1 inch wide)
- Matte acrylic craft paint (Sage green or similar earthy tone)
- Drop cloth or old newspapers
- Water cup for rinsing brushes
- Soft rag or paper towel
- Clear matte sealer spray (optional)
Step 1: Preparation
-
Clean the Surface:
Before you even open the paint, make sure your terracotta pot is completely clean. Scrub off any dirt, dust, or sticker residue with warm water and let it dry fully, as terracotta absorbs moisture easily. -
Set Up Your Station:
Lay down your drop cloth or newspaper on a flat work surface like a wooden table. Having everything within reach prevents scrambling later when your hands are covered in paint. -
Pour the Paint:
Pour a generous amount of your sage green acrylic paint into your small ceramic dish. It’s helpful to have a shallow pool of paint so you can easily load your brush without globs forming.
Uneven Coverage?
Terracotta is thirsty! If the first coat looks patchy, don’t press harder. Let it dry completely, then apply a second or third thin coat for opacity.
Step 2: Painting the Exterior
-
Load the Brush:
Dip your flat synthetic brush into the paint, ensuring the bristles are coated about halfway up. Wipe any excess on the rim of your dish to prevent drips. -
Start at the Rim:
Begin painting just under the rim of the pot. Use long, horizontal strokes to follow the curve of the pot’s lip. The flat brush helps create a sharp line even without painter’s tape. -
Paint the Top Band:
Fill in the thick band at the top of the pot. I like to paint horizontally here so the brushstrokes align with the pot’s natural structure. -
Move Down to the Body:
Transition to the main body of the pot. Apply the paint in smooth, vertical strokes from the bottom of the rim down to the base. This vertical motion helps elongate the look of the pot. -
Feather the Strokes:
If you see thick ridges of paint where strokes overlap, lightly gently feather your brush over them while the paint is still wet to smooth out the texture. -
Check for Coverage:
Terracotta is very porous and will drink up the first layer quickly. Don’t worry if it looks streaky at first; just ensure the entire surface is covered. -
Paint the Inside Rim:
Don’t forget the inside! Paint the top 1-2 inches of the inner rim. This ensures that once the soil is in, the terracotta color won’t peek through at the top. -
Let the First Coat Dry:
Allow the pot to dry for about 20-30 minutes. It will dry to a matte finish and feel chalky to the touch when it’s ready for the next layer.
Add Texture
Mix a teaspoon of baking soda into your acrylic paint before applying. This creates a trendy, gritty, ceramic-like texture for a faux-stone effect.
Step 3: Finishing Up
-
Apply a Second Coat:
Repeat the painting process with a second coat. This layer will provide that solid, opaque sage color shown in the image. Use a lighter touch here to avoid lifting the previous layer. -
Inspect the Bottom Edge:
Flip the pot upside down gently (if the rim is dry) to ensure you’ve painted all the way to the very bottom edge where it sits on the table. -
Smooth the Final Texture:
Look for any final brush marks or heavy spots. A very light final pass with a barely damp brush can help smooth these out for a professional finish. -
Dry Completely:
Let the pot cure for at least 24 hours before adding soil or plants. This ensures the paint hardens sufficiently. -
Seal (Optional):
If you plan to use this outdoors, spray the entire painted surface with a clear matte sealer to protect your pigment from water damage.
Now you have a beautifully refreshed pot ready to house your favorite greenery.

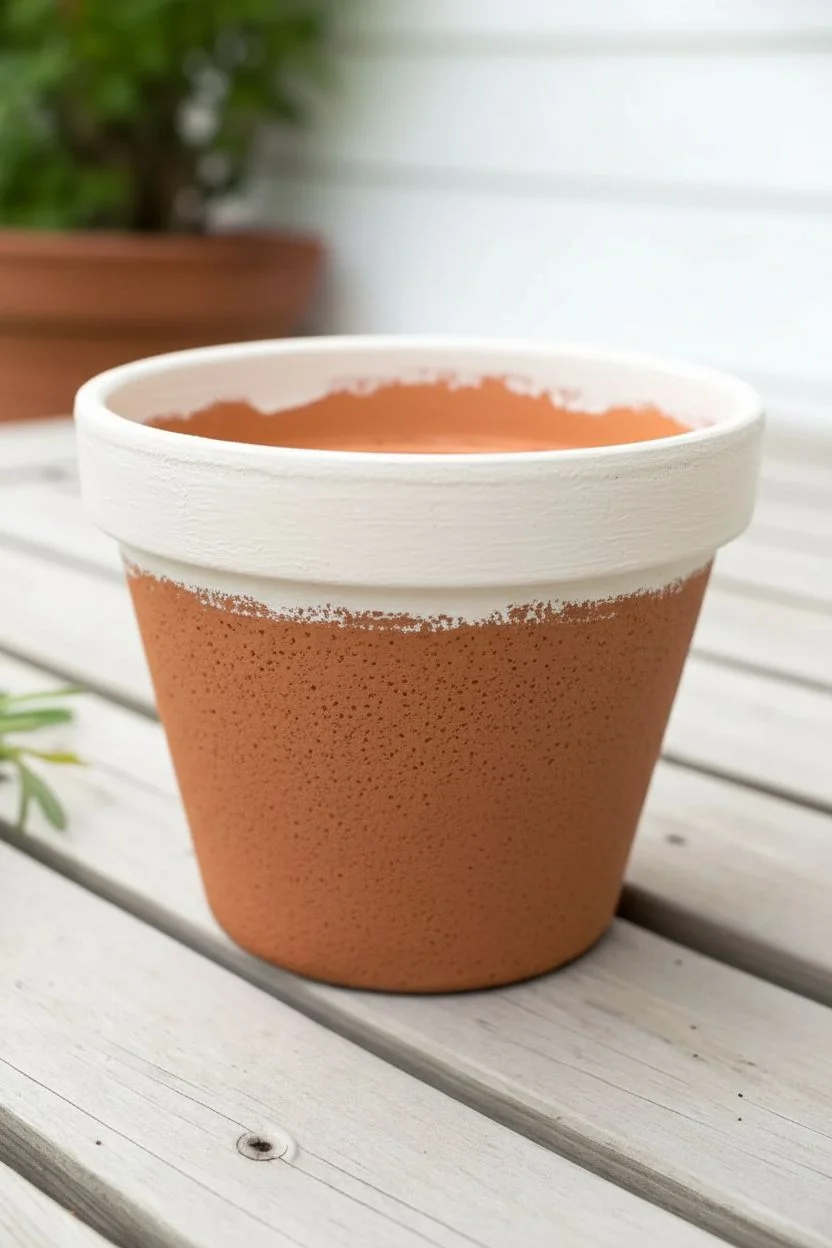
Two-Tone Dipped Flower Pots With A Clean Line

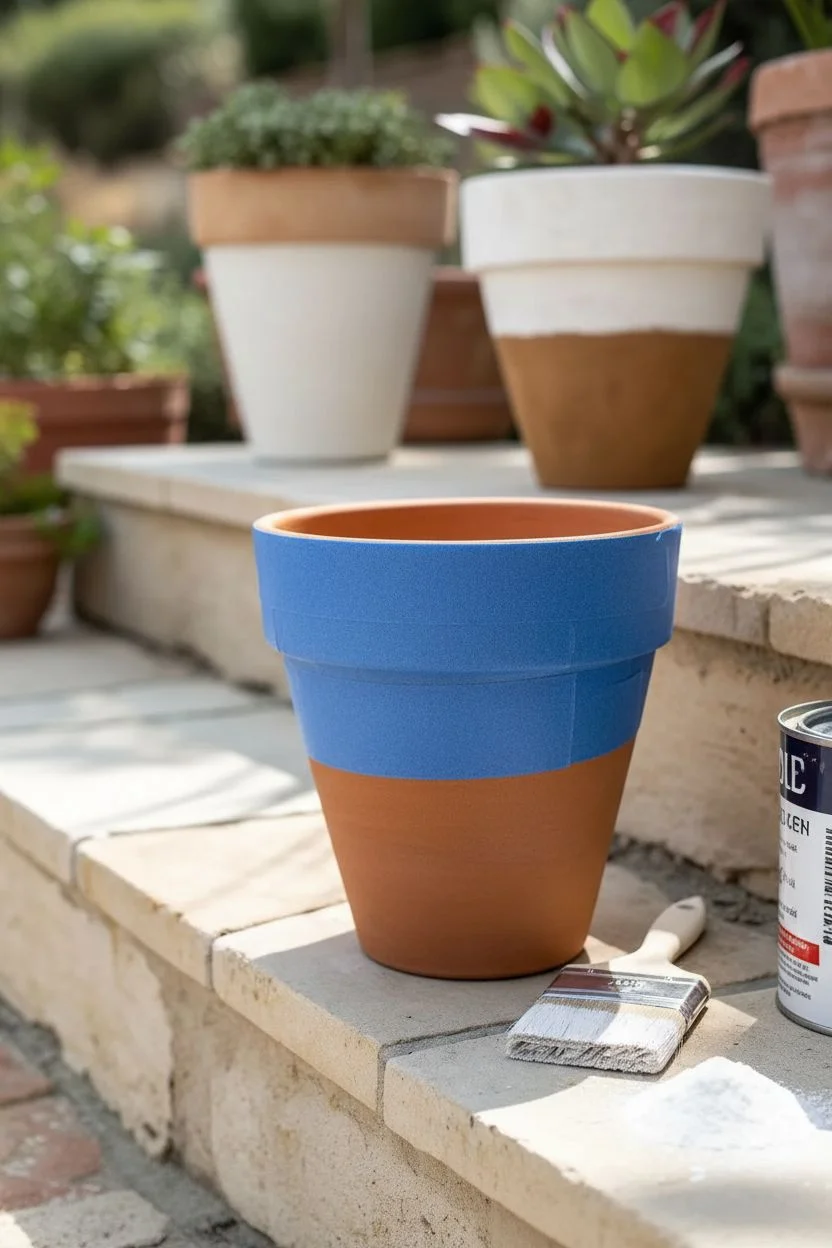
Achieve a sophisticated, modern minimalist look for your garden with this deceptively simple two-tone painting technique. By combining raw terracotta warmth with a crisp, textured white upper, these pots bring instant style to any porch or patio.
How-To Guide
Materials
- Terracotta pots (new or thoroughly engaged)
- White or cream acrylic exterior paint (chalk paint works well for texture)
- Baking soda (optional, for added texture)
- Painter’s tape (wide width recommended)
- Flat paintbrush (1-2 inch)
- Small foam brush
- Sealant spray (clear matte)
- Drop cloth or newspapers
- Damp rag
Step 1: Preparation First
-
Clean the surface:
If you are using old pots, scrub them thoroughly with water and a stiff brush to remove dirt and salts. Even new pots need a quick wipe with a damp rag to remove pottery dust. -
Dry completely:
Allow the clay to dry fully in the sun. Painting on damp terracotta can trap moisture and cause the paint to bubble or peel later. -
Determine the line:
Decide how much of the raw terracotta base you want to show. The example image uses a dip line that sits about one-third of the way up from the bottom, leaving a substantial clay base. -
Apply the tape:
Apply your painter’s tape carefully around the circumference of the pot at your chosen height. Press down firmly on the edges of the tape with your thumbnail to perform a ‘burnish’, ensuring a tight seal that prevents paint bleed. -
Check level:
Step back and look at the tape line from a distance. Adjust it slightly if it looks crooked; getting this line straight is the key to the professional ‘dipped’ illusion.
Seal the edge first
Before painting white, brush a tiny amount of clear matte medium or sealer over the tape edge. This fills gaps and ensures your white paint line is perfect.
Step 2: Painting the Dip
-
Mix your paint:
Pour your white or cream paint into a container. If you want to replicate the slightly gritty, stone-like texture visible in the photo, I like to mix in a tablespoon of baking soda to the paint now. -
Paint the rim first:
Start applying paint to the top rim and the inside lip (about 2 inches down). This ensures the soil line won’t show raw clay at the top. -
Paint the body:
Using your flat brush, paint the body of the pot above the tape line. Use vertical strokes initially to cover the surface. -
Stroke direction:
Finish each section with horizontal strokes around the pot to minimize brush marks and create a uniform texture. -
Let dry:
Allow the first coat to dry to the touch, usually about 30 minutes depending on humidity. -
Apply second coat:
Apply a second layer of paint for solid opacity. Terracotta is porous and drinks up paint, so a second (or even third) coat is often necessary for that bright, crisp white. -
Remove tape promptly:
Peel off the painter’s tape while the final coat is still slightly tacky, not fully dry. Pull the tape away from the painted area at a 45-degree angle to ensure a razor-sharp line.
Speckled Stone Effect
Flick a stiff toothbrush dipped in diluted black or grey paint over the dried white section to create a trendy splatter or terrazzo stone effect.
Step 3: Finishing and Sealing
-
Touch up:
Inspect your crisp line. If any paint bled under the tape, carefully scrape it away gently with a craft knife or use a damp cotton swab to clean it up. -
Cure time:
Let the pot sit for at least 24 hours to let the paint fully cure and harden. -
Seal the inside:
Spray the *interior* of the pot with a clear sealant. This helps prevent water from seeping through the clay walls and pushing the exterior paint off over time. -
Seal the exterior (optional):
For extra longevity, especially outdoors, give the painted exterior a light coat of matte clear sealer. Avoid effective glossy sealers if you want to maintain that natural, chalky aesthetic.
Place your favorite succulents or herbs inside and enjoy the modern contrast of your new planters


Crisp Striped Flower Pots Using Tape
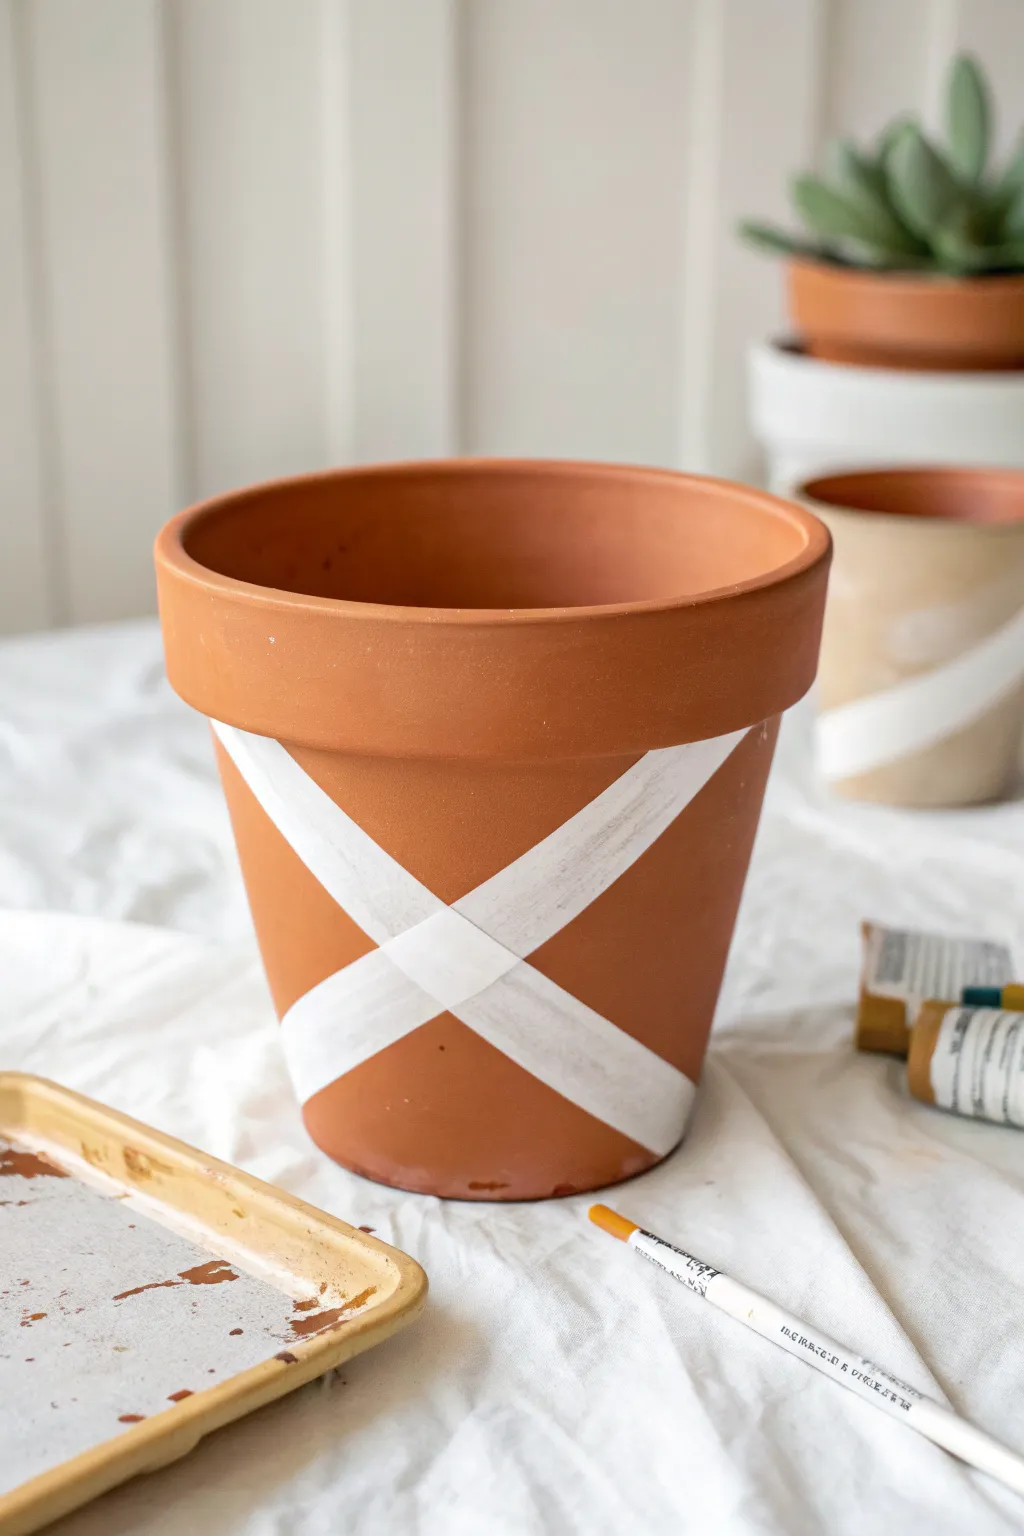
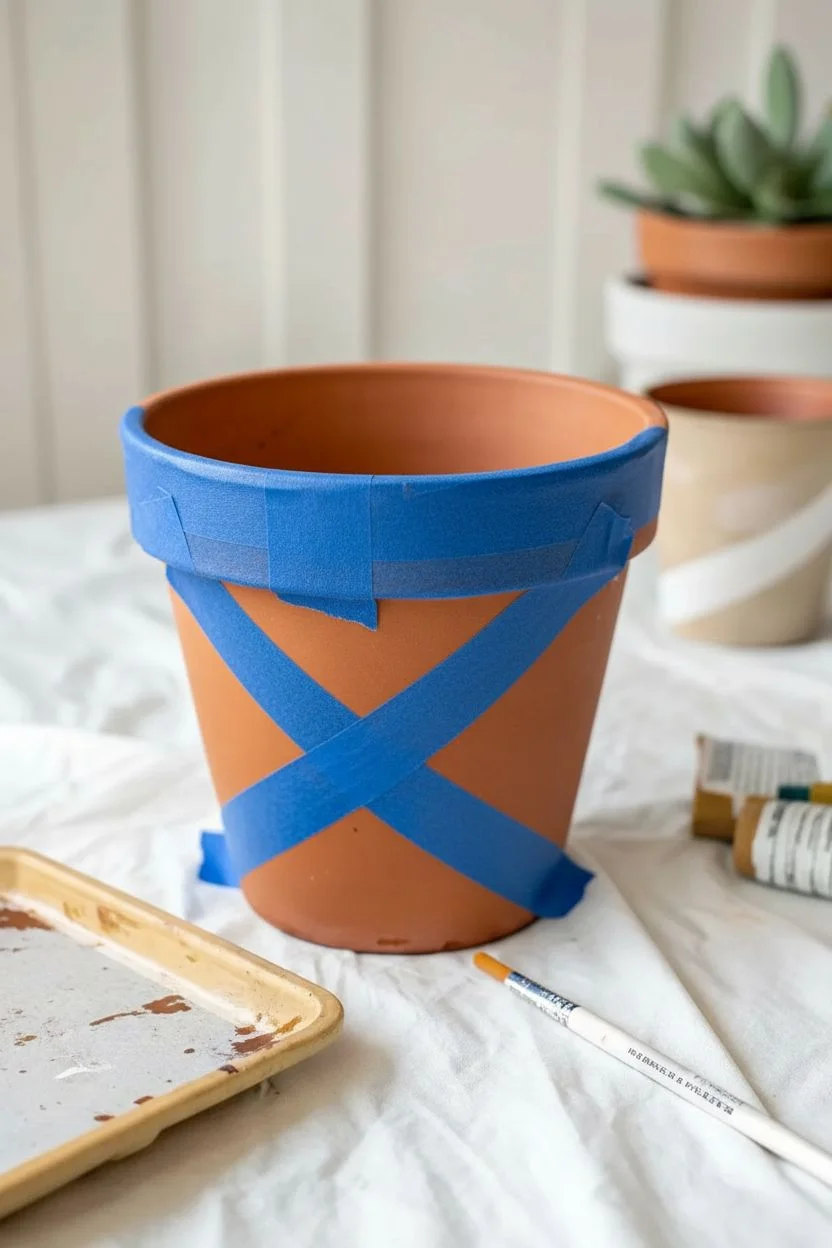
Transform a plain terracotta pot into a modern statement piece with this simple yet striking geometric design. The clean white lines create a bold contrast against the natural clay, resulting in a planter that feels both rustic and contemporary.
Step-by-Step Guide
Materials
- Clean terracotta pot
- Painter’s tape or masking tape (approx. 1 inch width)
- White acrylic craft paint
- Small flat paint brush
- Paper plate or paint tray
- Damp cloth or sponge
Step 1: Preparation and Taping
-
Clean surface:
Begin by wiping down your terracotta pot with a damp cloth to remove any dust or debris from the store shelves. Let it dry completely before moving on. -
Cut first tape strip:
Pull a strip of painter’s tape long enough to stretch diagonally from just under the rim to the bottom edge of the pot. -
Apply first diagonal:
Place this strip diagonally across the front of the pot. Press it down firmly, ensuring it runs smoothly without any wrinkles or air bubbles. -
Cut second tape strip:
Cut a second piece of tape of similar length to create the other half of your cross shape. -
Apply second diagonal:
Position this second strip diagonally in the opposite direction, crossing over the first piece to form a large ‘X’ shape on the pot’s face. -
Check symmetry:
Step back and look at your taped ‘X’ to ensure the angles look balanced and the intersection point is centered where you want it. -
Seal the edges:
Run your fingernail or a credit card firmly along the edges of both tape strips. This is crucial to prevent paint from bleeding underneath and ruining your crisp lines.
Bleeding Paint?
If you struggle with blurry lines, try painting a thin layer of clear matte sealer over the tape edges first. This seals the gap so your white paint won’t seep through later.
Step 2: Painting the Design
-
Load the brush:
Squeeze a small amount of white acrylic paint onto your tray. Dip your flat brush in, ensuring it’s evenly coated but not dripping. -
Paint the first segment:
Begin painting inside the taped area of one arm of the ‘X’. I like to stroke away from the tape edge toward the center of the stripe to minimize bleed-through. -
Fill the cross:
Continue painting the remaining sections of the ‘X’, applying a thin, even layer of white paint over the terracotta surface enclosed by your tape lines. -
Check for coverage:
Terracotta is porous and soaks up paint quickly. Let the first coat dry for about 10-15 minutes. -
Apply second coat:
Go over the white sections with a second coat of paint. This will ensure the white looks solid and opaque rather than streaky. -
Touch up:
Inspect the paint for any thin spots. If necessary, add a third light coat for a truly bright white finish.
Step 3: Finishing Up
-
Partial dry:
Allow the final coat of paint to dry until it is tacky to the touch, but not completely hardened. This usually takes about 15-20 minutes. -
Remove tape:
Carefully peel back the painter’s tape slowly at a 45-degree angle. Pulling while the paint is slightly tacky helps ensure a clean edge without chipping. -
Correcting mistakes:
If any paint seeped under the tape, use a damp Q-tip or a small craft knife to gently scrape away the excess while it’s still relatively fresh. -
Final cure:
Let the pot sit for at least an hour to fully cure before planting anything inside.
Reverse Effect
Instead of painting the stripe, cover the stripe area with tape and paint the rest of the pot a solid color. Peel the tape to reveal a natural terracotta ‘stripe’ design.
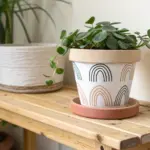
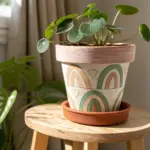
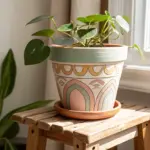
Now you have a stylish new home for your favorite succulent or houseplant


Playful Polka Dot Flower Pots In Mixed Sizes
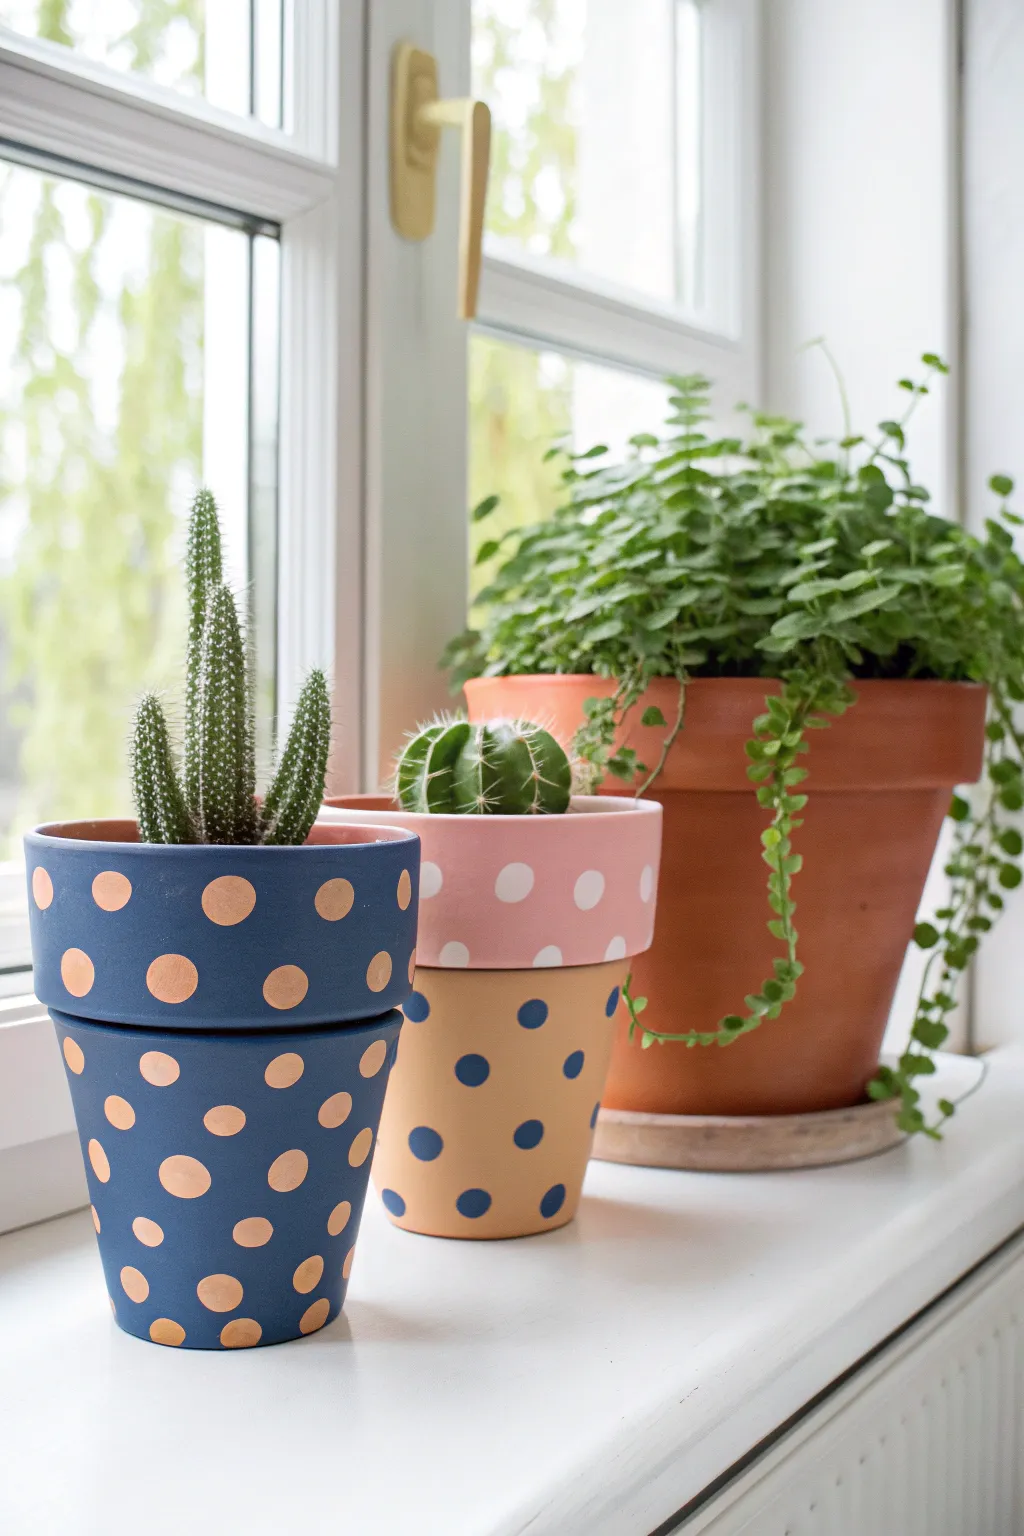
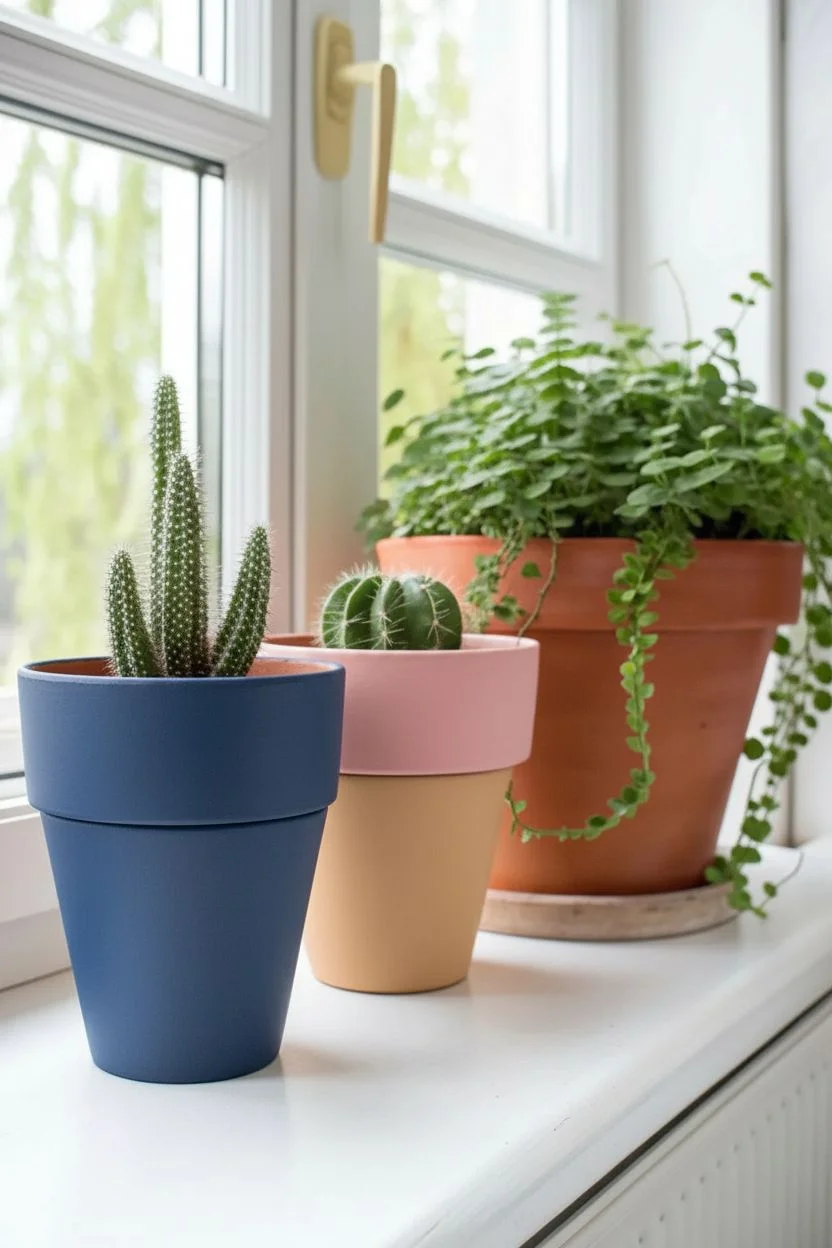
Transform plain terracotta into stylish home decor with this playful yet elegant polka dot project. Featuring a mix of matte backgrounds and metallic accents, these pots bring a modern pop of color to any windowsill garden.
Step-by-Step Tutorial
Materials
- Terracotta pots (various sizes)
- Acrylic craft paint (Navy Blue, Matte Pink, Light Camel/Mustard, Metallic Copper)
- Foam circular pouncers or daunting tools (various sizes)
- Flat paintbrushes (medium and large)
- Small detail brush
- Paper plate or paint palette
- Clear acrylic sealer spray (matte or satin finish)
- Newspaper or drop cloth
Step 1: Base Coat Preparation
-
Clean the surface:
Start by wiping down your terracotta pots with a damp cloth to remove any dust or debris. Let them dry completely before applying any paint. -
Apply the first base coat:
Squeeze your navy blue acrylic paint onto your palette. Using a large flat brush, apply a smooth, even coat over the entire exterior of the first pot, including the rim. For the second pot, paint the rim a soft pink and the body a light camel or mustard yellow. -
Let it dry:
Allow the first coat to dry for about 20–30 minutes. Terracotta is porous and soaks up paint quickly, so don’t be surprised if the first layer looks a bit streaky. -
Add a second coat:
Apply a second layer of your base colors to ensure solid, opaque coverage. I find that two coats are usually sufficient, but add a third if you can still see the clay color peeking through. -
Paint the inner rim:
Don’t forget to paint the top 1-2 inches inside the pot. This ensures that once the soil and plant are inside, you only see the beautiful painted finish, not bare clay.
Slippery Sponge?
If your foam pouncer slides when you press it down, use less paint. Offload excess paint onto paper first. Pressing straight down and lifting straight up prevents smearing.
Step 2: Creating the Polka Dots
-
Prepare your dotting tools:
Select foam pouncers or daubers that match the size of dots you want. For the blue pot, choose a medium-sized pouncer for the metallic copper dots. -
Load the pouncer:
Dip your foam pouncer into the metallic copper paint. Dab it a few times on a spare section of your paper plate to ensure the sponge is evenly loaded but not dripping with excess paint. -
Stamp the first row:
Press the pouncer firmly onto the blue pot’s surface. Start with a row around the rim or just under it. Lift the pouncer straight off to keep the circle crisp. -
Create a pattern:
Continue stamping dots around the pot. For a balanced look, stagger the dots in the next row down so they sit in the spaces between the dots above, creating a diamond-like grid pattern. -
Switch colors for the second pot:
For the pink and yellow pot, use a clean pouncer. Dip it into white paint for the pink rim and navy blue paint for the yellow body. -
Apply dots to the second pot:
Stamp white polka dots onto the pink rim. Then, switch to the navy blue paint and stamp dots onto the lower yellow section, maintaining that staggered spacing for a cohesive look. -
Touch up edges:
If any of your dots have uneven edges or thin spots, use a small detail brush to carefully fill them in or smooth out the circumference once the initial stamp is dry.
Step 3: Finishing Touches
-
Allow full drying time:
Let the pots sit undisturbed for at least an hour or two until the thick dots are completely dry to the touch. -
Seal the pots:
Take your pots outside or to a well-ventilated area. Spray them with a clear acrylic sealer. This protects the paint from water damage when you water your plants and prevents chipping. -
Add your plants:
Once the sealer is fully cured (check the can instructions), you can pot your cacti or succulents directly into your new stylish containers.
Pro Tip: Sticker Guide
For perfectly uniform spacing without measuring, use round garage sale stickers as a stencil or visual guide before you start painting your final permanent dots.
Enjoy styling your new custom planters in a sunny spot in your home
BRUSH GUIDE
The Right Brush for Every Stroke
From clean lines to bold texture — master brush choice, stroke control, and essential techniques.
Explore the Full Guide
Geometric Color-Block Flower Pots For A Modern Look
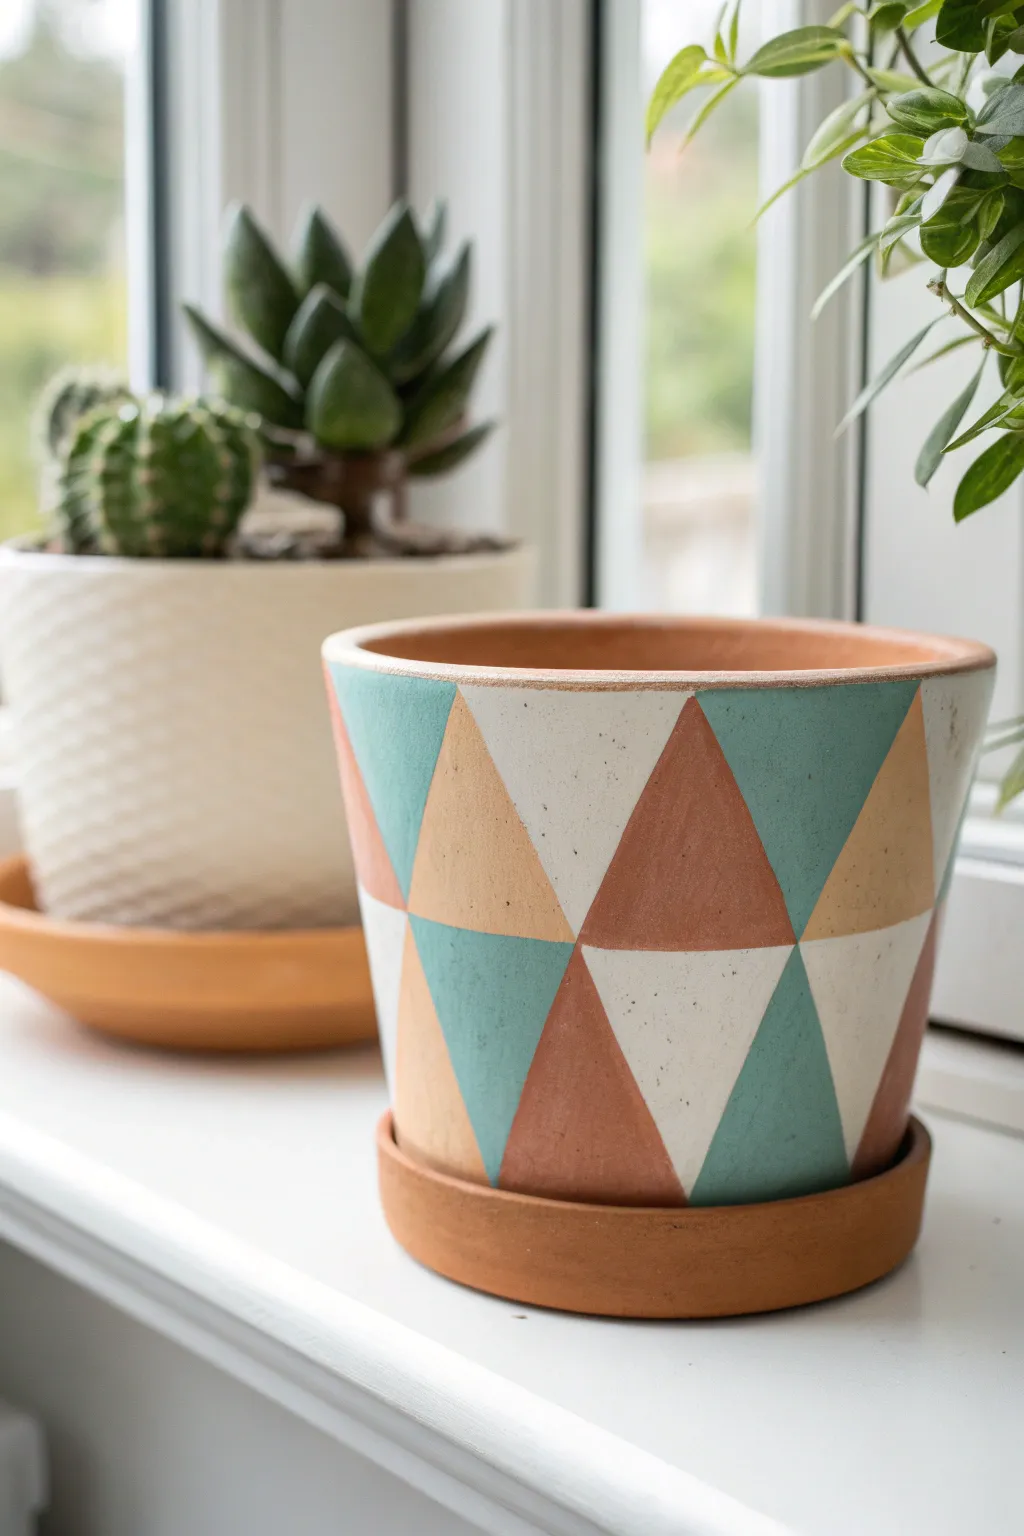
Transform a plain terracotta planter into a stylish geometric statement piece with this easy-to-follow triangle design. The soft, earthy palette of teal, rust, beige, and white creates a modern yet warm look perfect for housing your favorite succulents or houseplants.
Detailed Instructions
Materials
- Terracotta pot with saucer (clean and dry)
- Acrylic craft paints: White (or cream), Teal/Sage Green, Burnt Orange/Rust, Beige/Mustard
- Painter’s tape (washi tape works great for delicate lines)
- Flat shader brush (medium size)
- Detail round brush (small size)
- Pencil
- Ruler or straight edge
- Paper plate or palette
- Clear acrylic sealer spray (matte finish)
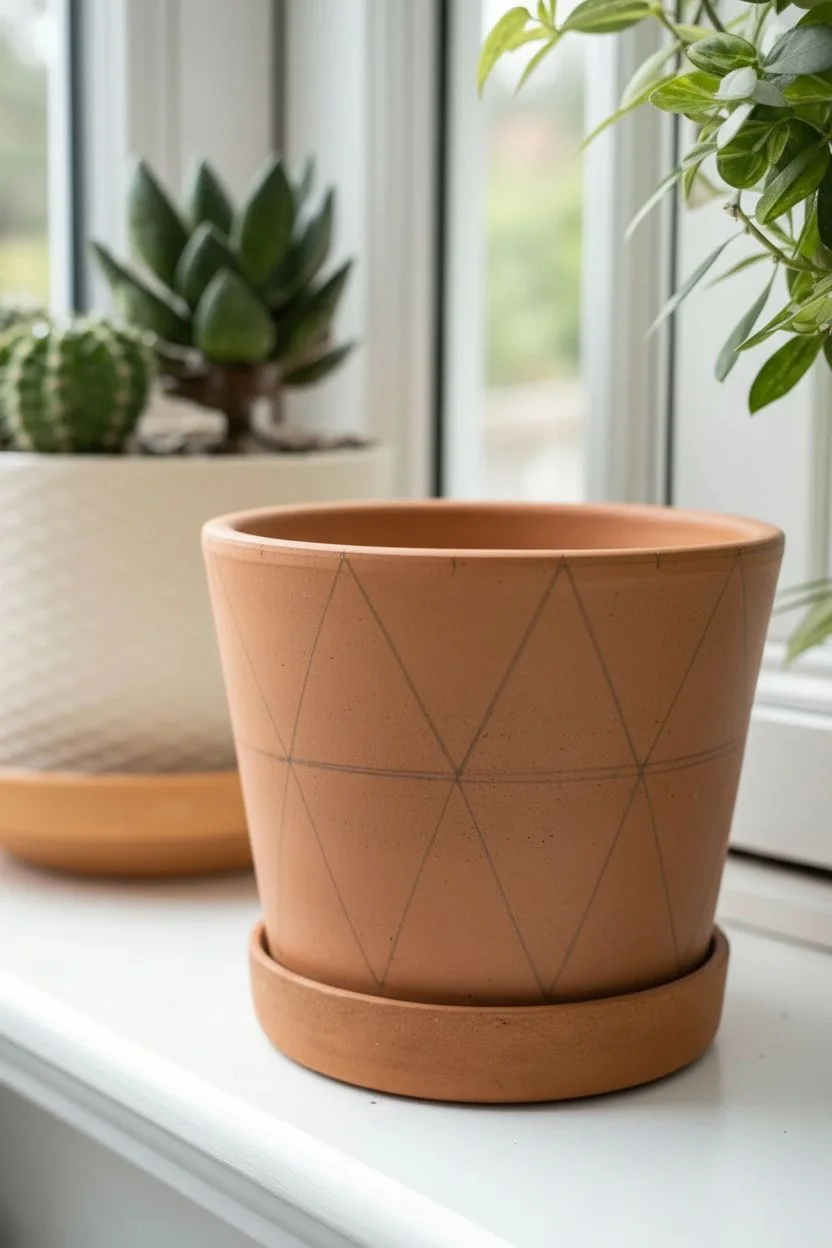
Step 1: Preparation & Base Design
-
Clean the Surface:
Ensure your terracotta pot is completely clean and free of dust or price sticker residue. If you washed it, let it dry for at least 24 hours so moisture doesn’t get trapped under the paint. -
Plan the Grid:
To keep your triangles uniform, lightly measure and mark a horizontal line around the center of the pot with a pencil. This will serve as the meeting point for the top and bottom rows of triangles. -
Mark Vertical Guides:
Make small tick marks along the top rim and the bottom edge of the pot at equal intervals. These marks will determine the width of your triangle bases. -
Sketch the Zig-Zag:
Using a flexible ruler or straight edge, lightly connect your tick marks to create a zig-zag pattern around the pot. You want to form a series of diamonds that are split in half by that center horizontal line you drew earlier. -
Refine the Triangles:
Double-check that your lines intersect cleanly. You should end up with a row of upward-pointing triangles on the bottom and downward-pointing triangles on the top.
Step 2: Painting the Colors
-
Tape the First Set:
Apply painter’s tape along the outlines of specific non-adjacent triangles. It’s best to paint one color group at a time to keep edges crisp. -
Seal the Tape Edges:
I like to press the tape down firmly with a fingernail or credit card to prevent paint bleed. This extra second of effort makes a huge difference in the sharpness of your lines. -
Apply the White Base:
Start with the white/cream triangles. Using your flat brush, apply a thin, even coat. Let it dry to the touch, then add a second coat for full opacity. -
Remove Tape & Dry:
Carefully peel off the tape while the paint is still slightly tacky to avoid pulling up dried flakes. Allow these sections to dry completely before taping over them. -
Tape for Teal:
Tape off the next set of scattered triangles intended for the teal color. Ensure you are taping over fully dry paint where the shapes touch. -
Paint Teal Sections:
Fill in the taped areas with your teal or sage green acrylic paint. Use the same technique of two thin coats rather than one thick gloppy one. -
Add the Warm Tones:
Repeat the taping and painting process for the burnt orange/rust triangles. These warm tones anchor the design beautifully against the terracotta background. -
Finish with Beige:
Finally, tape off and paint the remaining triangles with your beige or mustard yellow. This completes the color blocking effect.
Crisp Line Hack
Before applying your color, paint a thin layer of clear matte medium (or the base pot color) over the tape edge. This seals the gap so your colored paint won’t bleed under.
Step 3: Finishing Touches
-
Clean Up Lines:
Once all tape is removed, inspect your work. Use a small detail brush to carefully touch up any jagged edges where colors might have bled or gaps appeared. -
Paint the Rim (Optional):
Decide if you want to paint the top rim or leave it natural terracotta. The reference image leaves it natural, which frames the artwork nicely. -
Let it Cure:
Allow the entire pot to dry for at least 24 hours. Acrylic paint needs time to fully bond to the porous clay surface. -
Apply Sealer:
Take the pot outdoors and spray it with a matte clear acrylic sealer. Apply 2-3 light coats, waiting 15 minutes between each, to protect your design from water and fading. -
Don’t Forget the Saucer:
While sealing, give the saucer a quick coat too, even if you didn’t paint it. This prevents the terracotta from wicking moisture onto your windowsill.
Wobbly Lines?
If your taped lines look crooked, don’t panic. Use a white paint pen or a gold metallic marker to outline the triangles at the end to cover mistakes and add flair.
Pop in your favorite plant and admire the clean, modern lines of your new custom planter
Soft Ombre Flower Pots That Fade Like A Sunset
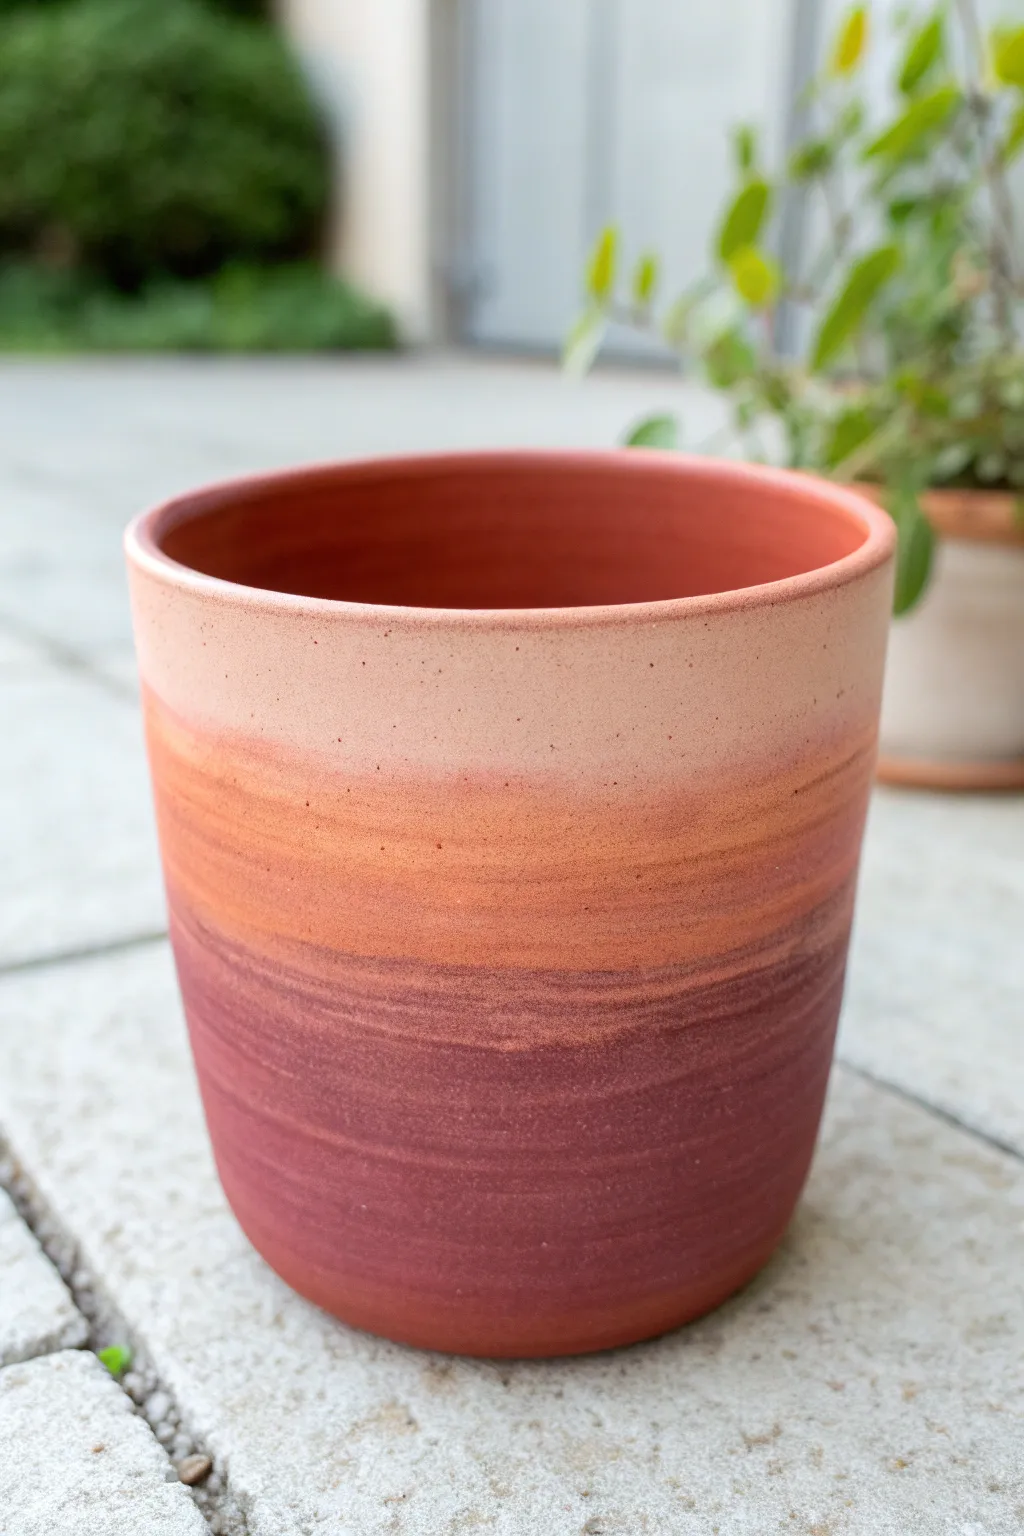
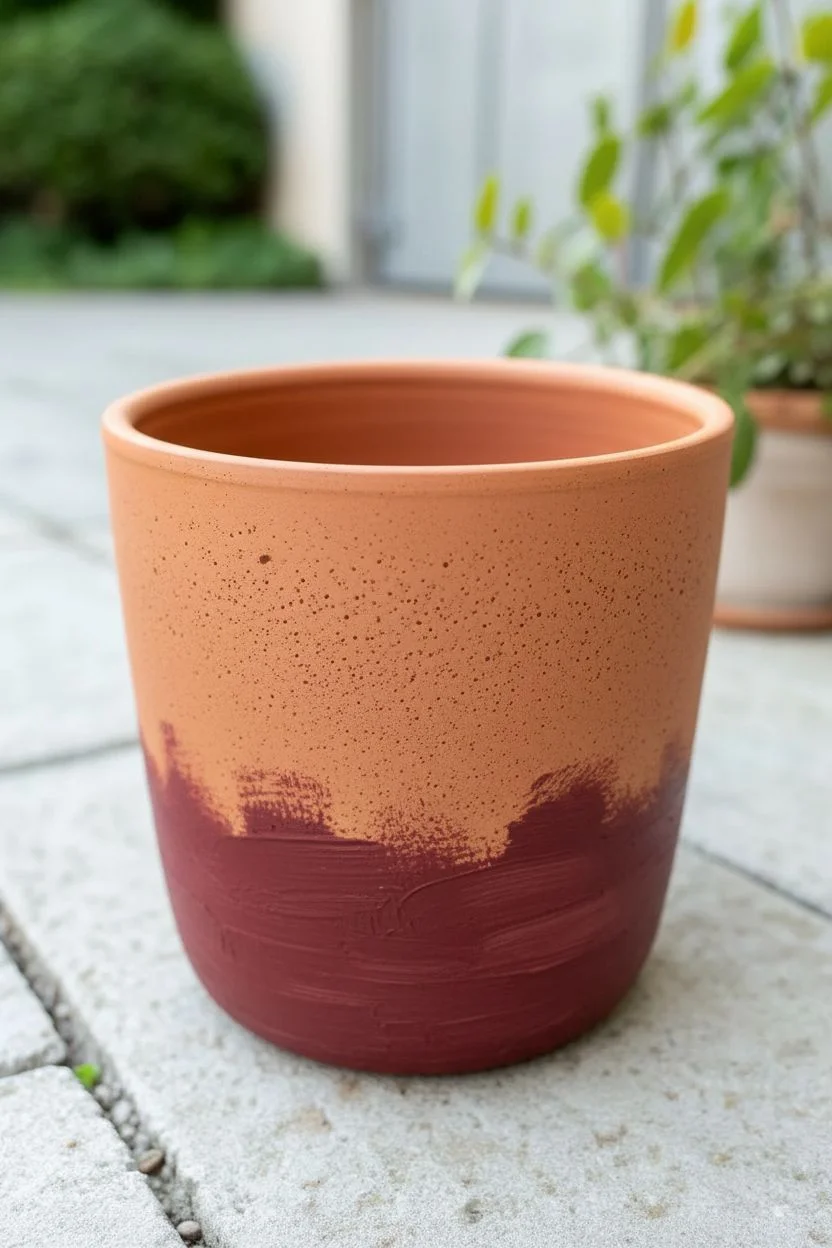
Capture the magic of twilight with this beautiful gradient planter that seamlessly transitions from deep maroon to light peach. The soft, horizontally brushed texture gives it an organic, earthen feel perfect for succulents or herbs.
Step-by-Step Tutorial
Materials
- Terracotta pot (clean and dry)
- Acrylic paints: Deep Maroon/Burgundy, Burnt Orange, Peach/Light Pink, White
- Medium-sized flat paintbrush (synthetic bristles work best)
- Palette or paper plate for mixing
- Cup of water and paper towels
- Matte spray sealer (optional but recommended)
Step 1: Preparation and Base
-
Clean surface:
Ensure your terracotta pot is completely free of dust or dirt. Give it a quick wipe with a damp cloth and let it dry fully before starting. -
Mix the darkest shade:
Squeeze out your deep maroon acrylic paint onto the palette. Determine how high up the pot you want this darkest color to go—usually the bottom third works best for grounding the design. -
Apply the bottom layer:
Paint the bottom section of the pot with the maroon paint. Use horizontal brush strokes that wrap around the circumference. -
Create a ragged edge:
As you paint upwards toward the middle, don’t make a straight line. Let the brush strokes be slightly uneven and feathery at the top edge of the maroon section to help with blending later.
Pro Tip: Keep It Wet
Acrylis dry fast on clay! Keep a spray bottle of water handy to lightly mist the pot as you work. This keeps the paint workable for longer, making those smooth gradient blends much easier to achieve.
Step 2: Building the Transition
-
Mix the transition color:
Take your burnt orange paint and mix a tiny amount of the maroon into it. This creates a bridge between the two distinct zones. -
Paint the middle band:
Apply this orange mixture directly above the wet maroon section. I like to work quickly here so the paints remain wet enough to blend. -
Blend the boundary:
While both paint bands are still slightly wet, run your brush horizontally back and forth right where the maroon meets the orange. The colors should physically mix on the clay surface. -
Dry brush technique:
If the paint is drying too fast, dampen your brush slightly (blot off excess water) and drag the lighter orange color downwards into the maroon with light, sweeping strokes. -
Refine the middle:
Add pure burnt orange to the upper part of the middle section, again leaving a feathery, uneven edge at the top for the next transition.
Level Up: speckled finish
Dip an old toothbrush in watered-down white or dark brown paint. Run your thumb over the bristles to flick tiny specks onto the dry gradient for a trendy ceramic glaze effect.
Step 3: The Lightest Tones
-
Prepare the top color:
Mix your peach or light pink paint. If you want an even softer look, mix in a little white to desaturate it. -
Apply the top band:
Paint the top third of the pot, including the rim, with this lightest shade. -
Blend downward:
Just like before, use horizontal strokes to pull this light peach color down into the wet orange layer below. -
Checking the gradient:
Step back and look at the pot. If the transition lines look too harsh, take a mostly dry brush with a tiny bit of the intermediate color and lightly sweep it across the line. -
Paint the inner rim:
Don’t forget to paint the inside top inch of the pot with the peach color so the soil line looks finished.
Step 4: Finishing Touches
-
Let it cure:
Allow the pot to dry completely. Terracotta is porous, so give it at least an hour. -
Inspect textures:
The charm of this specific look is the visible brush texture. If it looks too smooth, you can dry-brush a very light layer of the lighter colors over the darker sections to enhance that dusty texture. -
Seal the work:
Once fully dry, take the pot to a ventilated area and apply a clear matte spray sealer. This protects the gradient from water damage when you water your plants.
Now you have a stunning custom planter that brings a warm, calming glow to your any room

PENCIL GUIDE
Understanding Pencil Grades from H to B
From first sketch to finished drawing — learn pencil grades, line control, and shading techniques.
Explore the Full Guide
Hand-Painted Leaves and Vines Wrapping Around Flower Pots
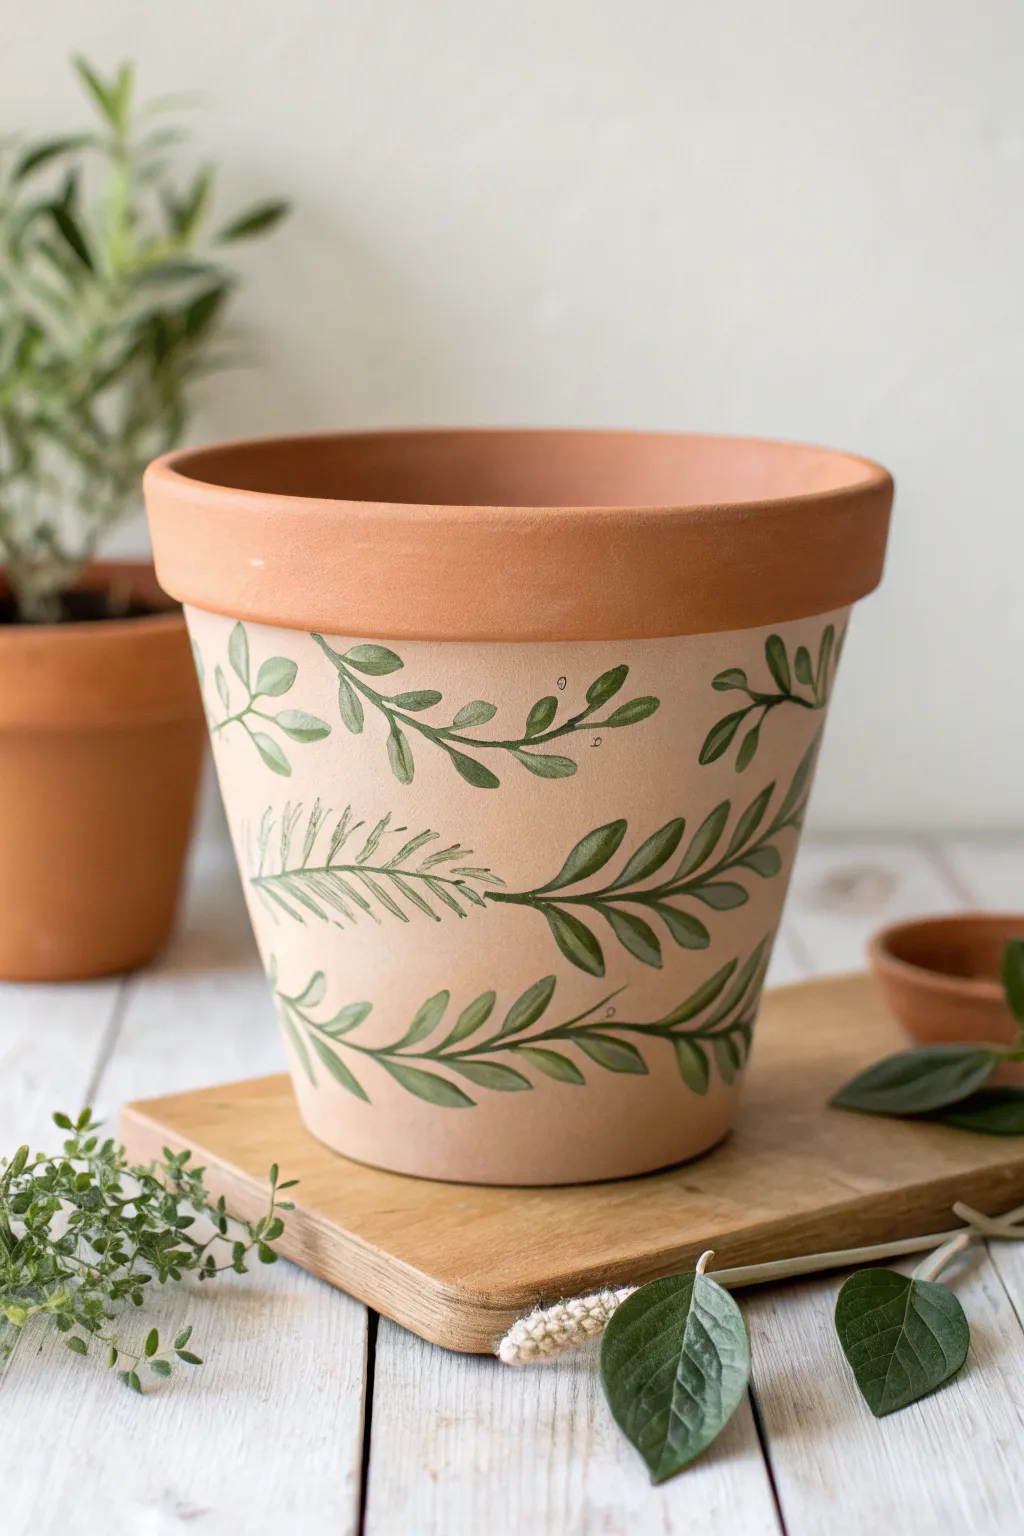
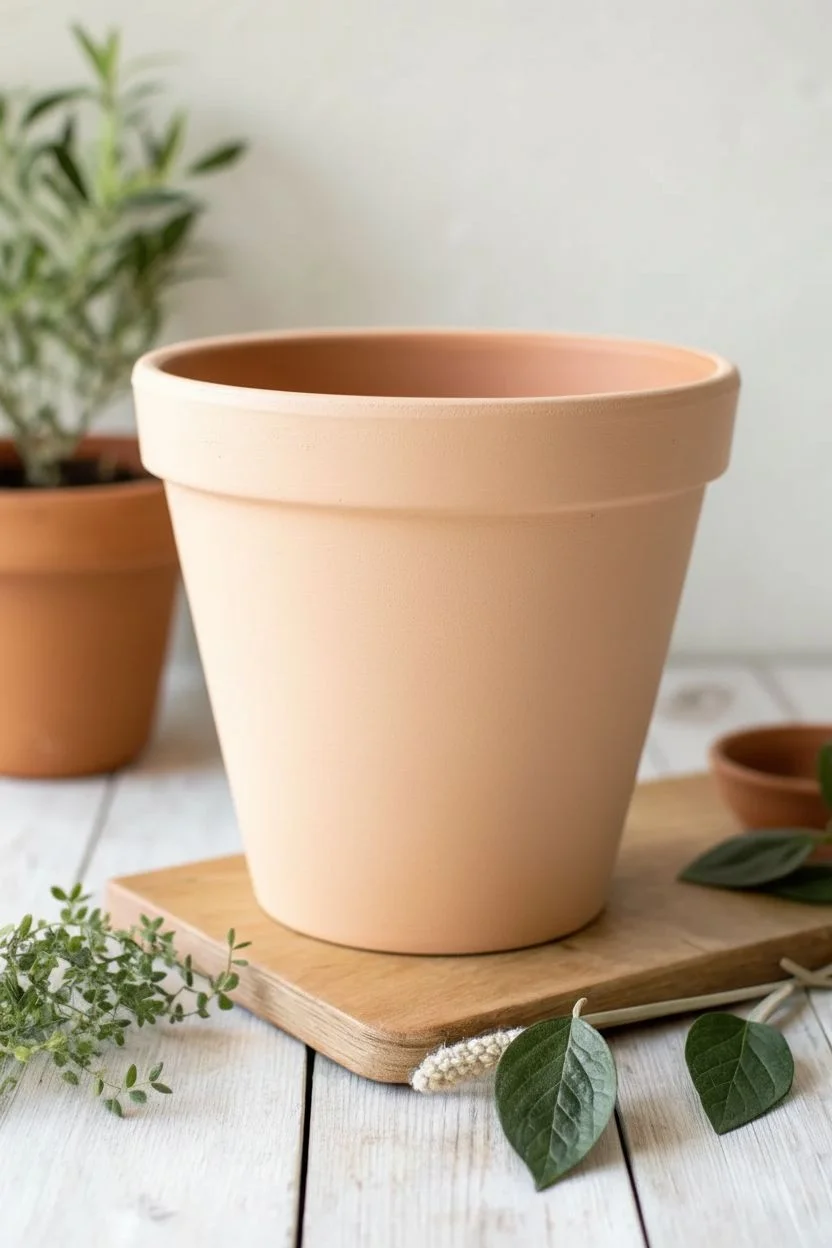
Transform a simple terracotta pot into a botanical beauty with this delicate leaf and vine design. The soft peach base creates a warm, modern backdrop for the organic green foliage wrapping around the surface.
Step-by-Step Guide
Materials
- Terracotta pot (standard size)
- Acrylic craft paint (pale peach/cream, dark olive green, sage green, forest green)
- Fine liner brush (size 0 or 00)
- Small round brush (size 2)
- Medium flat brush (for base coat)
- Pencil (optional)
- Paper plate or palette
- Water cup
- Paper towels
- Matte spray sealant
Step 1: Preparing the Canvas
-
Clean the surface:
Before you begin, wipe down your terracotta pot with a damp cloth to remove any dust or manufacturing residue. Let it dry completely. -
Apply the base color:
Using your medium flat brush, mix a pale peach or cream color. Apply this to the main body of the pot, just below the rim. -
Refine the edge:
Carefully paint up to the underside of the rim, keeping the rim itself raw terracotta for that rustic, two-toned look. -
Add a second coat:
Terracotta is porous and soaks up paint quickly. Once the first layer is dry, apply a second coat to ensure an opaque, smooth finish.
Brushwork Secret
For sharper leaf tips, press the belly of the round brush down near the stem, then slowly lift the brush as you pull outward to a point.
Step 2: Top Vine Border
-
Plan the placement:
Visually divide your pot into three horizontal sections. You can lightly mark these with a pencil if you need guidance. -
Paint the first vine stem:
For the top band, use your fine liner brush and dark olive green paint to create a thin, wavy line that travels horizontally around the upper part of the painted section. -
Add small leaves:
Along this vine, paint small, teardrop-shaped leaves using the same dark olive shade. Keep them simple and somewhat spaced out. -
Vary direction:
Alternate the direction of the leaves—some pointing up, some down—to mimic natural growth.
Level Up: Texture
Use a fine-tip waterproof black pen to outline some of the leaves loosely after the paint dries for a stylish ‘sketched’ illustration look.
Step 3: Middle Foliage Layer
-
Create the central stems:
In the middle section, paint disjointed, slightly thicker stems flowing horizontally. Use a forest green shade here for contrast. -
Paint fern-style leaves:
I like to vary the texture here. For some leaves, use a dry-brush technique with a sage green to create feathery, fern-like strokes. -
Add solid leaves:
Next to the feathery leaves, paint solid, elongated almond-shaped leaves in forest green to anchor the design visually. -
Layer the greens:
Don’t be afraid to overlap a few leaves slightly using different shades of green to add depth and dimension.
Step 4: Bottom Vine & Finish
-
Paint the bottom vine:
For the lowest band, create another undulating vine near the base of the pot. Make the waves slightly deeper than the top border. -
Add larger leaves:
Attach larger, darker green leaves to this bottom vine. Use your round brush to press and lift, creating a distinct leaf shape in one stroke. -
Add highlights:
Once the green leaves are dry, mix a tiny bit of white into your sage green and add very subtle highlight lines to the centers of a few leaves. -
Check for gaps:
Rotate the pot and look for any large empty spaces. Fill them with tiny stray leaves or small dots for a whimsical touch. -
Let it cure:
Allow the paint to dry completely, ideally overnight, to ensure the moisture has evaporated from the clay. -
Seal the work:
Finish by spraying the painted area with a clear matte sealant. This protects your artwork from water damage when watering your plant.
Your new custom planter is ready to add a fresh, distinctive touch to your indoor garden
Black-and-White Mud Cloth Pattern Flower Pots

Transform a plain planter into a stunning piece of decor with this high-contrast mud cloth design. The striking black-and-white geometric patterns bring a modern yet earthy vibe to your indoor jungle.
Step-by-Step Guide
Materials
- Terra cotta flower pot (cleaned and dried)
- White acrylic paint or chalk paint
- Black acrylic paint or paint pen
- Wide flat paintbrush (approx 1 inch)
- Fine liner brush or detail brush
- Water cup and paper towels
- Pencil (optional for sketching)
- Matte spray sealer (optional)
Step 1: Preparing the Base
-
Clean the surface:
Before you begin, ensure your terra cotta pot is free of dust and debris. Wipe it down with a damp cloth and let it dry completely so the paint adheres properly. -
Apply the first coat:
Using your wide flat paintbrush, apply a generous layer of white paint to the entire exterior of the pot. Don’t forget to paint the inner rim down to the soil line. -
Let it dry:
Allow the first coat to dry fully. Terra cotta is porous and absorbs moisture quickly, so this shouldn’t take too long. -
Apply additional coats:
To get that solid, opaque white background, apply a second and possibly third coat of white paint. I like to let each layer dry for at least 30 minutes to ensure a smooth finish.
Paint Pen Trick
Struggling with brush control? Swap the fine brush for a water-based acrylic paint marker. It gives you the precision of drawing with the permanence of paint.
Step 2: Designing the Rim
-
Paint scattered dashes:
Start with the thick band at the top of the pot. Using black paint and a fine brush (or a black paint pen), create small, somewhat random dashes or ‘seeds’ all around the rim. -
Vary the direction:
Keep these dashes loose and organic. Angle them slightly differently rather than making them uniform, mimicking the hand-dyed nature of authentic mud cloth fabric.
Make It Antique
Lightly sand the finished, dry pot with fine-grit sandpaper before sealing. This distresses the paint slightly for an authentic, aged textile look.
Step 3: Creating the Mid-Section Bands
-
Dotted line border:
Just under the rim where the pot body begins, paint a horizontal row of evenly spaced black dots. This acts as a separator for your design sections. -
Triangle row:
Below the dots, paint a continuous line of small triangles. The bases of the triangles should form a straight horizontal line. -
Add inner details:
Inside each small triangle, paint a slightly smaller triangle, leaving a thin white border between the two shapes. -
Thick horizontal lines:
Paint a bold, thick black line underneath your row of triangles. Leave a small gap and paint another parallel thick black line below it to create a ‘track’. -
Diagonal fills:
Fill the space between these two thick lines with slanted diagonal dashes. Keep the spacing relatively tight to create a textured look.
Step 4: Painting the Bottom Zig-Zags
-
Prepare the bottom section:
Move to the lower half of the pot. Visualize or lightly sketch a large zig-zag pattern that wraps around the entire base. -
Inner chevron lines:
Paint the first zig-zag line. Then, paint a second parallel line inside the first one, mirroring its peaks and valleys closely. -
Outer detail lines:
Paint vertical lines extending downward from the outer points of your zig-zags. Add a small dot inside the ‘v’ of the upper valleys for extra detail. -
Refine the lines:
Go over any black lines that look too faint. The charm of this style is in the hand-painted imperfection, so don’t worry if lines aren’t ruler-straight.
Step 5: Finishing Touches
-
Final drying:
Allow the black paint to cure completely, preferably overnight, to prevent smudging. -
Seal the pot:
Spray the entire exterior with a matte clear sealer. This protects your hard work from water damage when you water your plants.
Now your custom planter is ready to be the stylish new home for your favorite greenery


Boho Sun, Moon, and Desert Icon Flower Pots
Bring the mystery of the high desert to your patio with this sun-baked, boho-style planter. Featuring stylized cacti, celestial bodies, and warm earth tones, this project transforms a plain terracotta pot into a charming piece of functional art.
Step-by-Step Tutorial
Materials
- Terracotta pot and matching saucer
- Acrylic craft paints: Cream/Off-white, Mustard/Ochre Yellow, Deep Teal/Cactus Green, Rust/Terracotta Orange, White
- Flat paintbrush (medium size)
- Round detail brush (small/fine tip)
- Pencil
- Water cup and paper towels
- Clear acrylic sealer (matte or satin finish)
- Painter’s tape (optional)
Step 1: Preparation and Base Coat
-
Clean surface:
Begin by wiping down your terracotta pot with a damp cloth to remove any dust or debris. Let it dry completely so the paint adheres properly. -
Tape the rim:
If you want a crisp line between the rim and the body, apply painter’s tape just under the lip of the pot. Otherwise, you can carefully freehand the edge later. -
Paint the background:
Using a flat medium brush, paint the main body of the pot below the rim with your cream or off-white acrylic paint. This creates that soft, canvas-like background for your icons. -
Build opacity:
Allow the first coat of cream paint to dry for about 15-20 minutes. Apply a second or third coat until the terracotta color no longer shows through, achieving a solid, opaque finish.
Uneven Lines?
If your fine lines are shaky, try thinning your acrylic paint with a single drop of water. This improves the flow, making it easier to drag the brush smoothly.
Step 2: Drafting the Design
-
Sketch lightly:
Once the cream background is thoroughly dry, use a pencil to lightly sketch your design. Draw a large sun, a crescent moon, and various cactus shapes spaced evenly around the pot. -
Add floating elements:
In the empty spaces between your main icons, sketch small stars, dots, or small stylized bursts to fill out the celestial theme.
Step 3: Painting the Icons
-
Paint the sun:
Dip your round detail brush into the mustard or ochre yellow paint. Fill in the circle of the sun and carefully pull the brush outward to create the triangular rays. -
Paint the moon:
Using the same yellow hue (or mixing in a tiny bit of rust for variation), fill in your crescent moon shape. -
Paint the cacti:
Switch to your deep teal or cactus green paint. Fill in the cactus shapes using steady vertical strokes to mimic the plant’s structure. -
Add cactus pots:
At the base of your green cacti, use rust or terracotta orange paint to draw small, simple pot shapes. This grounds the plants nicely. -
Refine edges:
If any edges look messy, wait for the paint to dry and use your cream background color to touch up the outline.
Add Dimension
Mix baking soda into your cream base coat paint before applying. This creates a textured, plaster-like finish that makes the pot look like vintage pottery.
Step 4: Details and Rim
-
Detail the sun:
Once the yellow sun is dry, use white paint and a very fine brush to add a thin highlight ring inside the sun’s center. -
Detail the moon:
Add an intricate pattern inside the crescent moon using a darker orange or fine white lines to give it texture. -
Detail the cacti:
Using white or a very pale green, paint thin vertical lines or tiny dashes on the cactus bodies to represent spines. -
Patterns on pots:
Add tiny zig-zag or line patterns in white on the small painted pots holding your cacti. -
Rim motifs:
Moving up to the natural terracotta rim (remove tape if used), paint simple white stars and dots freehand. I like to alternate between six-pointed stars and simple five-point stars for variety.
Step 5: Sealing and Finishing
-
Dry time:
Allow the entire painted design to dry for at least 3-4 hours, or ideally overnight, to ensure the acrylic is fully set. -
Apply sealer:
Spray or brush on a clear matte acrylic sealer over the entire outside of the pot and inner rim. This protects your artwork from water damage and fading. -
Saucer check:
Ensure the saucer is left unpainted or just sealed with clear coat to maintain the cohesive look and allow for proper drainage.
Place your favorite succulent inside and enjoy the warm, creative vibe this pot adds to your space
Minimal Line-Art Face Flower Pots
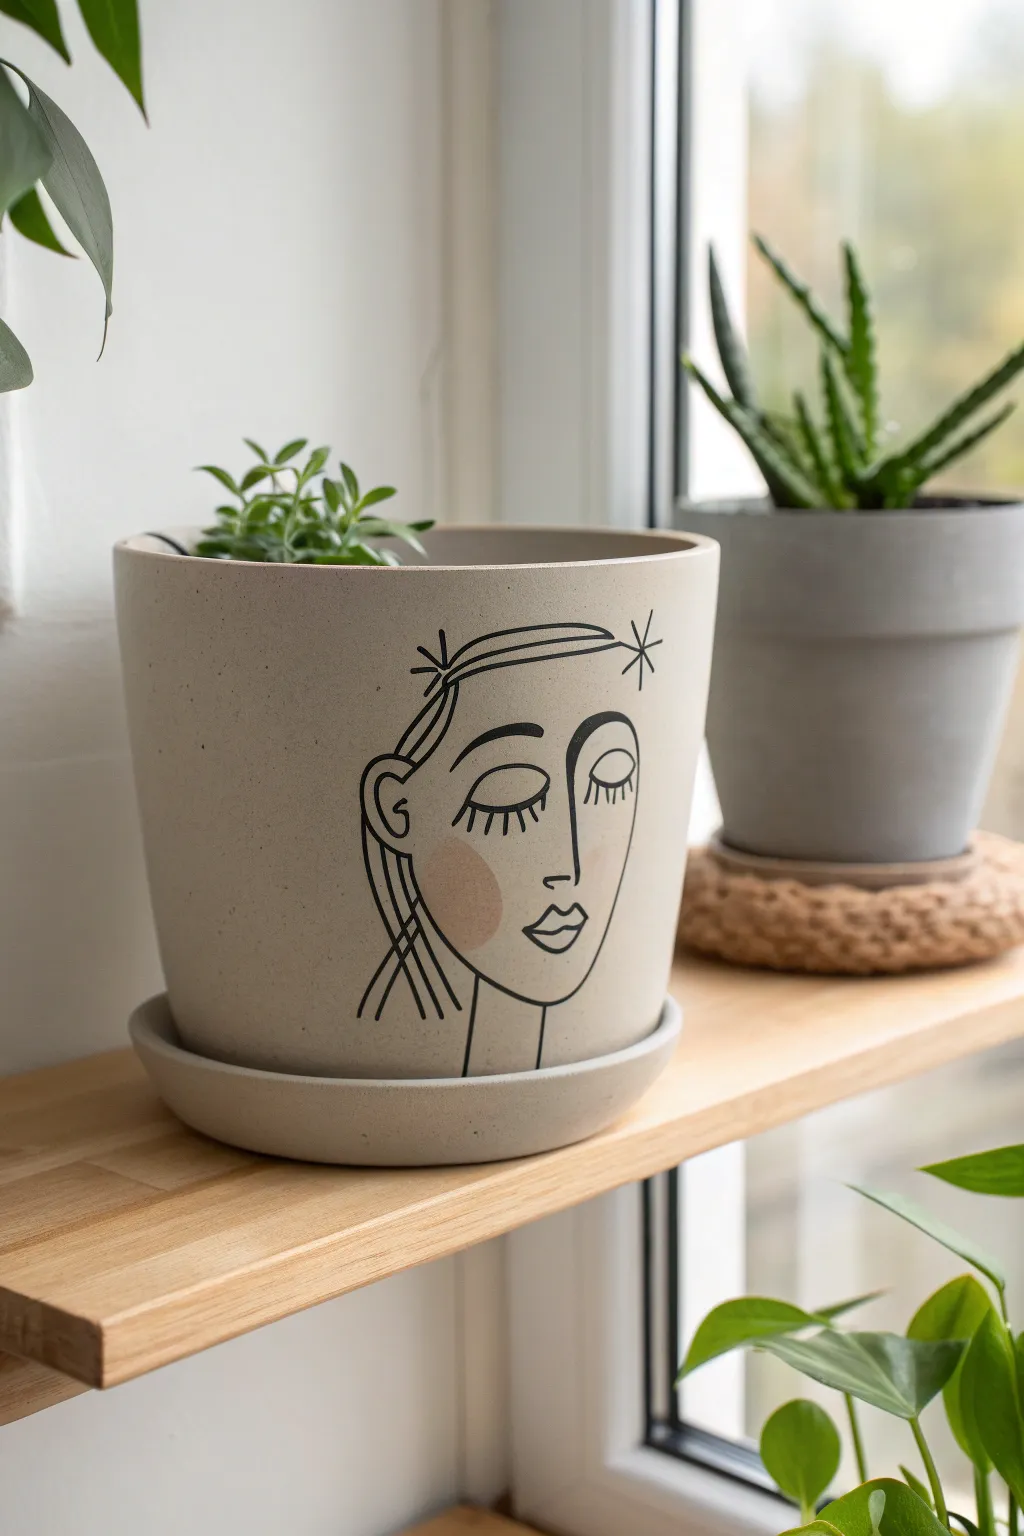
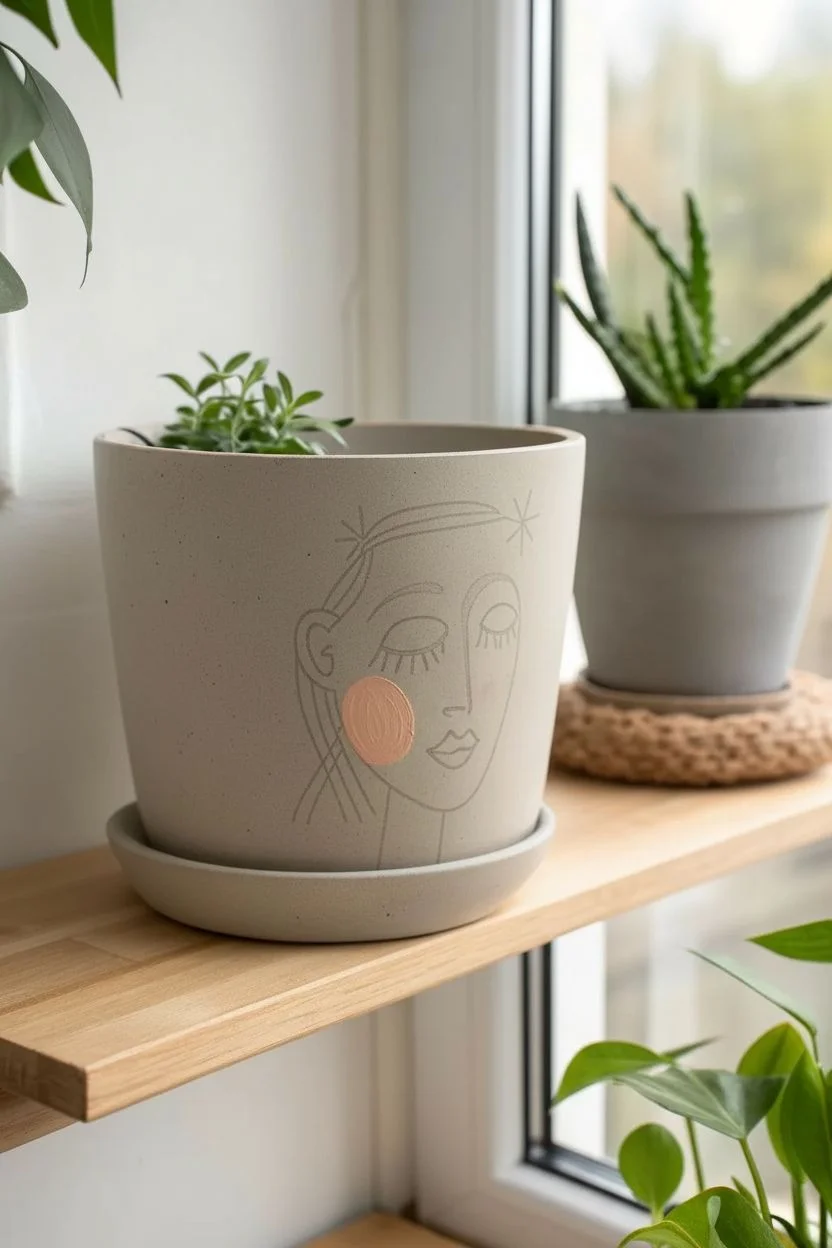
Transform a plain ceramic planter into a piece of modern art with this simple yet striking line drawing design. The serene, closed-eye expression and subtle blush accents create a calm, bohemian vibe perfect for your windowsill jungle.
Step-by-Step Guide
Materials
- Matte beige or off-white ceramic planter with saucer
- Black oil-based paint marker (medium tip)
- Black oil-based paint marker (fine tip)
- Acrylic paint (soft peach or terracotta)
- Round paintbrush (size 4 or 6)
- Pencil (HB or lighter)
- Eraser
- Paper towels
- Sealant spray (matte finish)
Step 1: Preparation & Sketching
-
Clean surface:
Begin by wiping down your planter with a damp cloth to remove any dust or oils. Let it dry completely so the marker adheres properly. -
Locate center:
Ideally, find the ‘front’ of your pot. Lightly mark a vertical centerline with your pencil to help keep the face symmetrical. -
Sketch the nose:
Start your sketch with the nose. Draw an L-shaped line slightly to the right of your centerline. This anchors the face. -
Add the lips:
Below the nose, sketch a simple mouth. Draw a distinct upper lip and a smaller curved line for the bottom lip, keeping it slightly open. -
Draft the eyes:
Draw two U-shapes for the closed eyelids. Ensure they are level with each other. Add vertical lashes extending downward. -
Outline the face shape:
Sketch a long, smooth curve starting from the forehead, down the left side (cheek), and curbing in for the chin. Do not draw the right side of the face; let the features imply the edge. -
Sketch hair details:
Add sweeping lines for hair on the left side. Include a distinct ear shape within the hair strands. Top the head with a headband line and two star-burst shapes.
Step 2: Adding Color & Lines
-
Paint the blush:
Before doing the final black lines, apply the cheek color. Dip your brush into the peach acrylic paint and dab off excess. -
Apply the spot:
Paint a soft, organic circle on the left cheek area, right where the cheekbone would be. It doesn’t need to be perfect; clearer edges look more graphic. -
Let paint dry:
Wait for the blush spot to dry completely. If you draw over wet paint, the marker will snag and bleed. -
Trace main lines:
Shake your medium-tip black paint marker well. Ideally, I test the flow on a scrap paper first. Carefully trace over your pencil lines for the face profile and hair. -
Detail the features:
Switch to the fine-tip marker if you have one, or use a very light touch with the medium tip for the eyelashes and star details on the headband. -
Refine the lines:
Go back over the main profile line (the side of the face and chin) to thicken it slightly, giving it more visual weight than the internal features. -
Clean up:
Once the black ink is fully dry (give it at least 20 minutes), gently erase any visible pencil marks.
Curve Control
Drawing on a curved surface is tricky. Rest your wrist on a stack of books equal to the pot’s height to stabilize your hand while drawing.
Step 3: Finishing Touches
-
Protect the art:
Take the pot to a well-ventilated area. Apply a light coat of matte sealant spray to protect your design from water drips when watering the plant. -
Pot your plant:
Once the sealant is cured, place your plant inside. A trailing succulent or leafy varied plant looks excellent as ‘hair’ for the pot.
Smudge Alert
If you smudge wet marker, dampen a Q-tip with a tiny bit of rubbing alcohol and quickly wipe it away before it sets into the ceramic.
Now you have a serene, custom planter that adds a touch of artistic calm to your home decor
Cute Bee and Wildflower Flower Pots
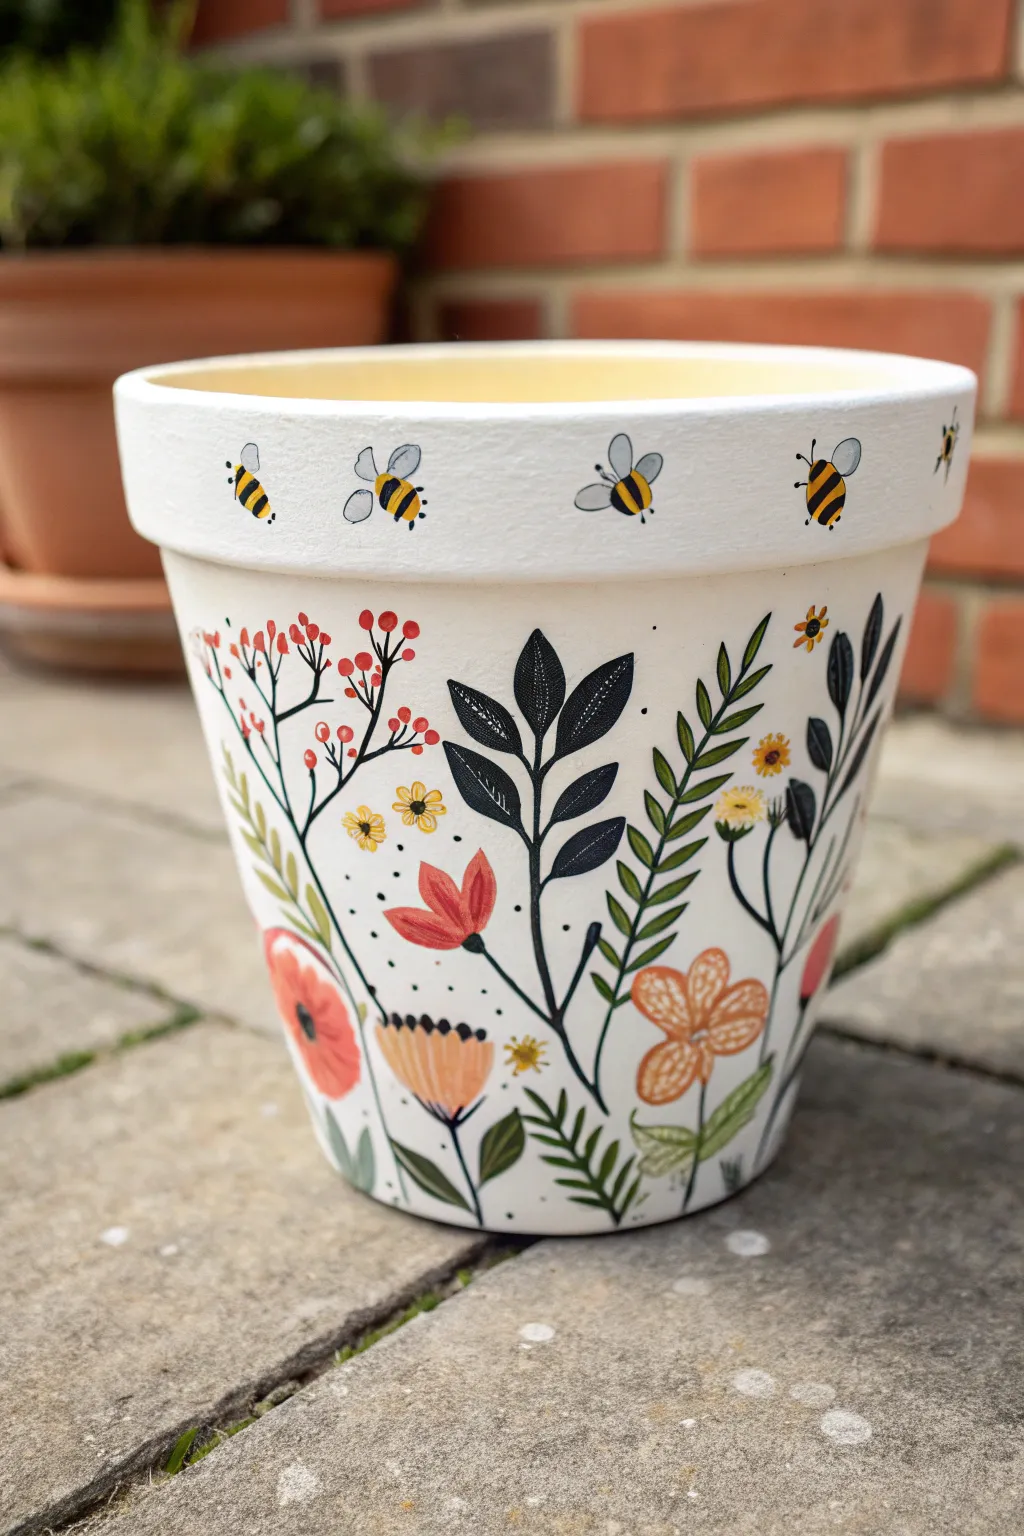
Transform a plain terracotta vessel into a buzzing meadow scene with this delightful painting project. The contrast of the crisp white background against the warm, earthy tones of the wildflowers makes a perfect home for your favorite indoor plant.
How-To Guide
Materials
- Terracotta pot (medium size)
- White acrylic paint (matte or satin)
- Cream or pale yellow acrylic paint
- Acrylic paints: black, sage green, forest green, burnt orange, bright red, mustard yellow
- Wide flat brush for base coating
- Medium round brush for leaves and petals
- Fine liner brush (size 0 or 00) for details
- Pencil
- Matte spray sealer
Step 1: Base Coat & Preparation
-
Clean and Dry:
Ensure your terracotta pot is completely clean and dry. Wipe it down with a damp cloth to remove any dust or debris, which ensures the paint adheres properly. -
Prime the Exterior:
Using your wide flat brush, apply a coat of white acrylic paint to the entire exterior of the pot, including the rim. Let it dry completely. -
Apply Second Coat:
Apply a second or even third coat of white paint until you have a solid, opaque finish where no terracotta orange shows through. Allow full drying time between layers. -
Paint the Interior Rim:
Paint the inside of the rim and about two inches down into the pot with the cream or pale yellow paint. This adds a warm, finished look that complements the upcoming bee design.
Smooth Operator
Sand the terracotta pot lightly with fine-grit sandpaper before painting. This creates a smoother surface for intricate details.
Step 2: Designing the Meadow
-
Sketch the Layout:
Lightly sketch your flower stems and large leaves with a pencil directly onto the white paint. Focus on creating vertical flow from the bottom up, varying the heights of the plants. -
Paint Black Leaves:
Start with the boldest elements first. Mix a touch of water into your black paint for flow, and paint the large, central stems and their solid, pointed oval leaves. Keep the edges sharp. -
Add Green Ferns:
Using a forest green shade, paint the fern-like fronds. Use short, quick strokes pulling away from the stem to create the textured leaves. -
Create Berry Sprigs:
Paint thin black branching stems for the berry plants. At the end of each tiny branch, dap a small circle of bright red paint. -
Paint Main Blooms:
Using burnt orange and red, paint the larger flower heads. For the cup-shaped flowers, use broad strokes that curve upwards. Add smaller yellow buds scattered throughout for variety.
Go 3D
Use tiny dabs of puffy paint for the bee bodies or flower centers to add tactile texture that literally stands out.
Step 3: Adding Details & Bees
-
Detail the Leaves:
Once the black leaves are dry, use your fine liner brush and white paint to add delicate veins or dots inside them for contrast. -
Enhance Flowers:
Add centers to your flowers using black or contrasting dots. For the orange blooms, you might add a little white highlight to give the petals dimension. -
Rim Bumblebees:
On the rim, paint small yellow ovals spaced evenly around the circumference. These will be the bodies of your bees. -
Bee Details:
Using the fine liner and black paint, add stripes to the yellow ovals. Paint small black antennas and tiny legs. For the wings, I find outlining a tear-drop shape in diluted grey or white creates a lovely translucent effect. -
Final Patterns:
Fill in any large empty white spaces on the pot body with tiny black dots or drifting petals to connect the design elements. -
Seal the Work:
Once the entire pot is bone dry (wait at least 24 hours), spray it with a clear matte sealer. This protects your artwork from water damage and fading.
Now your painted pot is ready to bring a touch of eternal spring to your windowsill
Watermelon Slice Flower Pots With Seeds and Rind Stripes
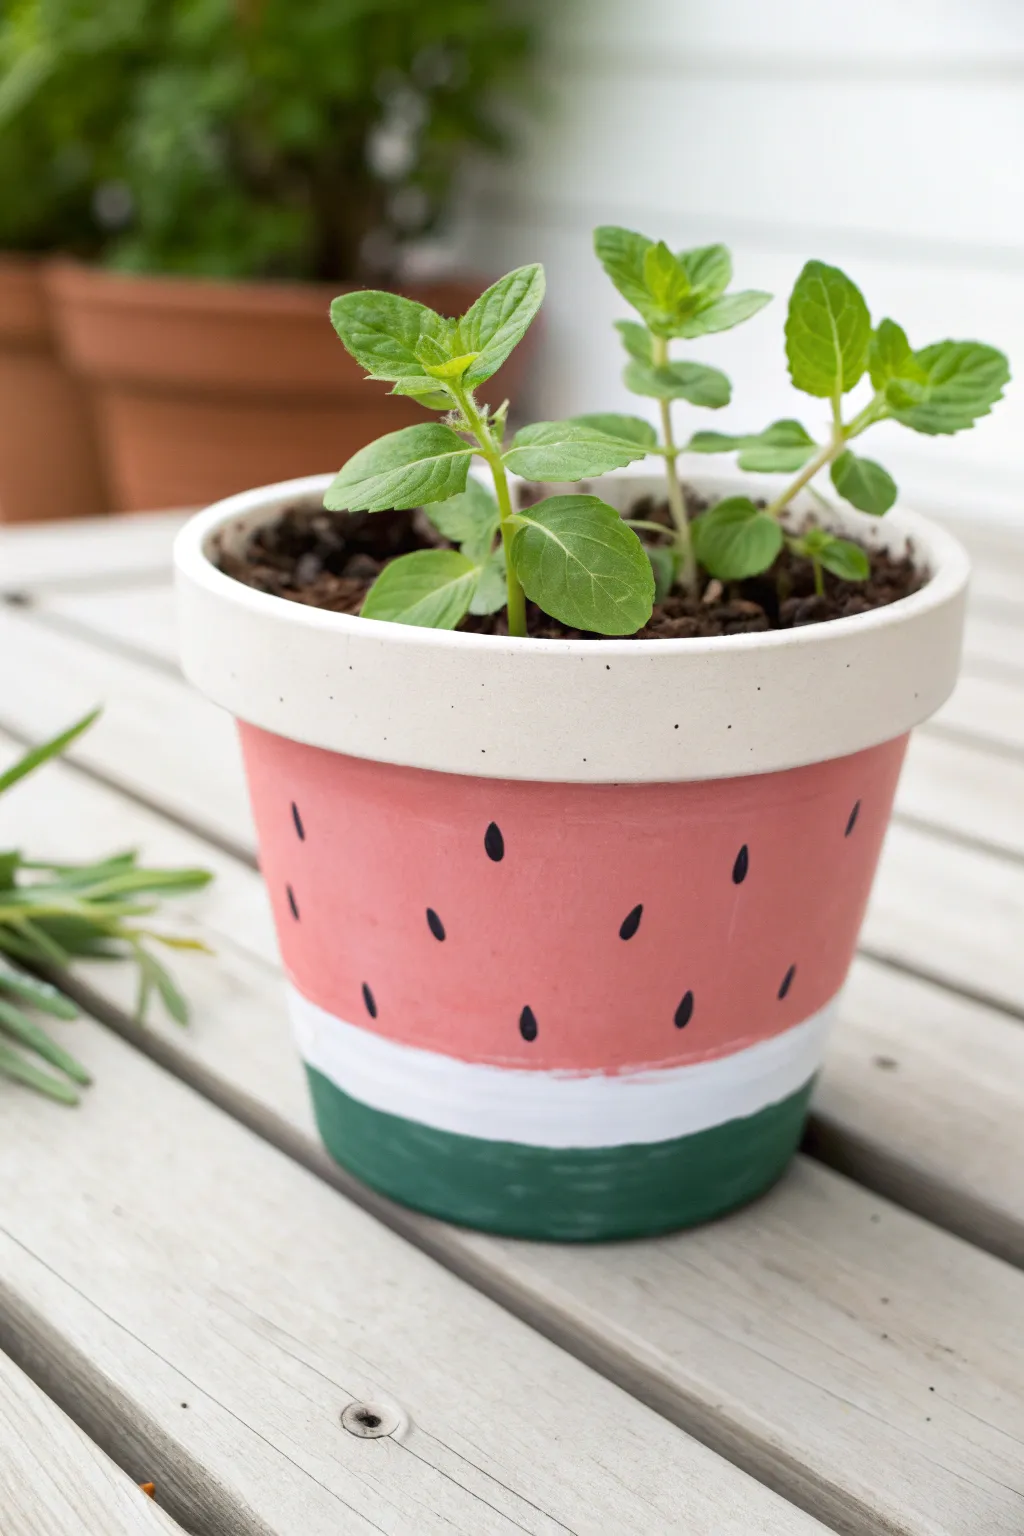
Transform a plain terracotta pot into a refreshing slice of summer with this charming watermelon design. The layered stripes of pink, white, and green mimic the fruit perfectly, while little black seeds add a playful, graphic touch.
Step-by-Step Tutorial
Materials
- Terracotta pot (4-6 inch diameter)
- Acrylic craft paints: Matte White (or warm cream), Watermelon Pink (or coral red), Forest Green, Black
- Medium flat paintbrush (1 inch)
- Small round detail brush
- Water cup and paper towels
- Palette or paper plate
- Clear acrylic sealer spray (matte or satin finish)
Step 1: Preparation and Base
-
Clean surface:
Begin by wiping down your terracotta pot with a damp cloth to remove any dust or debris. Since terracotta is porous, ensure it is completely dry before applying any paint. -
Define the rim:
Decide on the look for your rim. In the reference image, the textured rim is painted a soft, creamy white. Use your medium flat brush to apply an even coat of white or cream paint specifically to this top band. -
Rim coverage:
Terracotta absorbs paint quickly, so you will likely need a second coat on the rim to get a solid, opaque finish. Let the first coat dry for about 15 minutes before applying the second.
Uneven Lines?
If you struggle painting straight stripes freehand, wrap a rubber band around the pot to act as a guide, or lightly mark your sections with a pencil first.
Step 2: Painting the Fruit Body
-
Apply the pink:
Using a clean flat brush, paint the main body of the pot below the rim with your watermelon pink or coral red shade. Leave the bottom one-inch of the pot unpainted for now. -
Build opaque color:
Just like the rim, the pink section will need multiple layers for vibrancy. I usually find that two or three thin coats work better than one thick, gloppy coat. Allow drying time between layers. -
Create the heavy white rind:
Once the pink is dry, paint a thick white band directly below the pink section. This represents the inner rind. Use your flat brush held horizontally to create a band about 1/2 inch wide. -
Smooth transition:
Don’t worry if the line between the pink and white isn’t perfectly straight; organic lines make it look more like real fruit. Ensure the white paint meets the pink cleanly without leaving a gap of bare clay.
Go for texture
Mix a tiny bit of baking soda into the green paint for the bottom stripe. This creates a slightly rough texture that actually feels like a real melon rind.
Step 3: Adding the Rind and Seeds
-
Paint the green skin:
Fill in the remaining bottom section of the pot with forest green paint. This should cover everything from the white rind stripe down to the very bottom edge of the pot. -
Refine the green edge:
Carefully run your brush along the edge where the green meets the white stripe to distinctively separate the outer skin from the inner rind. -
Practice seeds:
While the background colors dry completely, practice painting teardrop shapes on a scrap piece of paper. The goal is a rounded bottom that tapers to a small point at the top. -
Paint the seeds:
Dip your small detail brush into black paint. Paint small teardrop seeds randomly scattered across the pink section of the pot. -
Seed placement:
Keep the scattered pattern somewhat loose, but avoid placing seeds too close to the white rim or the white rind stripe. Staggering them creates a balanced look. -
Add highlights (optional):
If you want extra dimension, add a tiny speck of white paint to the top corner of each black seed once they are dry to mimic light reflection.
Step 4: Finishing Up
-
Final drying:
Allow the entire pot to sit for at least 24 hours to ensure all layers of paint have fully cured and hardened. -
Seal the project:
Take the pot to a well-ventilated area and spray it with a clear acrylic sealer. This is crucial for protecting the paint from moisture when you eventually water your plant. -
Plant:
Once the sealer is dry, fill your pot with potting soil and your favorite herb, like the mint shown in the example, to complete the fresh look.
Place your new creation on a sunny porch table and enjoy the permanent summer vibes
Pineapple Flower Pots That Pair With Spiky Plants
Transform a standard terra cotta pot into a fun, fruity home for your succulents. With its golden yellow base and geometric white lattice pattern, this pot perfectly mimics a pineapple’s texture, especially when topped with a spiky green aloe plant.
Step-by-Step Guide
Materials
- Terra cotta pot (standard shape with rim)
- White acrylic paint or primer
- Mustard yellow or golden ochre acrylic paint
- Small flat paintbrush
- Fine detail paintbrush (round size 1 or 2)
- Pencil
- Clear matte or satin sealant spray
- Water cup and palette
Step 1: Base Coat Prep
-
Clean the pot:
Start with a clean, dry terra cotta pot. Wipe away any dust with a damp cloth and let it dry completely to ensure the paint adheres well. -
Prime the bottom:
Using your white paint, paint a clean strip around the very bottom edge of the pot, creating a small white footer about half an inch wide. -
Apply the yellow base:
With the flat brush, cover the rest of the pot exterior—including the main body and the rim—in your mustard yellow paint. You want a warm, earthy yellow rather than a neon shade. -
Second coat:
Terra cotta is thirsty and absorbs paint quickly. Apply a second coat of yellow to get a solid, opaque finish. I like to let the first coat dry for about 20 minutes before adding the second. -
Paint the inner rim:
Don’t forget to paint the top inch of the inside of the pot yellow, as this will show once the soil is added.
Steady Hands
Rest your pinky finger against the pot while painting fine lines. This anchors your hand and gives you much better control over the detail brush.
Step 2: Creating the Grid
-
Sketch the lattice:
Once the base coat is fully dry, lightly use a pencil to draw a crisscross diamond pattern on the main body of the pot. Start with diagonal lines going one way, then cross them in the opposite direction. -
Paint the first diagonals:
Load your fine detail brush with white paint. Carefully trace over your pencil lines in one direction. Keep your hand steady and try to keep the line thickness consistent. -
Complete the diamonds:
Paint the diagonal lines in the opposite direction to close the diamond shapes. The lines don’t have to be perfectly straight; a little wobble adds to the organic texture. -
Add vertical dashes:
Look closely at the design: within the vertical stack of diamonds, paint a small vertical line connecting the top and bottom points of specific diamonds to create a more intricate lattice look.
Step 3: Rim Details & Finish
-
Design the leaves:
On the yellow rim of the pot, you’ll paint abstract pineapple leaves. Use your fine brush to paint groups of three white lines fanning out from a central point. -
Space them out:
Repeat these three-pronged fan shapes all around the rim. Aim for equal spacing, leaving about an inch between each cluster. -
Refine the footer:
Check the white stripe at the bottom. If yellow paint dripped onto it, touch it up with fresh white paint for a crisp edge. -
Erase guidelines:
If any heavy pencil marks show through the white lattice lines after the paint is dry, gently erase them. -
Seal the work:
To protect your paint from water damage, spray the entire exterior with a matte or satin clear sealant. This prevents the paint from bubbling when you water your plant.
Texture Pop
Mix a tiny bit of baking soda into your white paint for the lattice lines. It will add a gritty, raised texture that makes the pineapple skin look even more realistic.
Pop in an aloe or haworthia plant to serve as the pineapple’s crown and enjoy your new tropical decor piece
Wraparound Underwater Scene Flower Pots With Bubbles and Fish
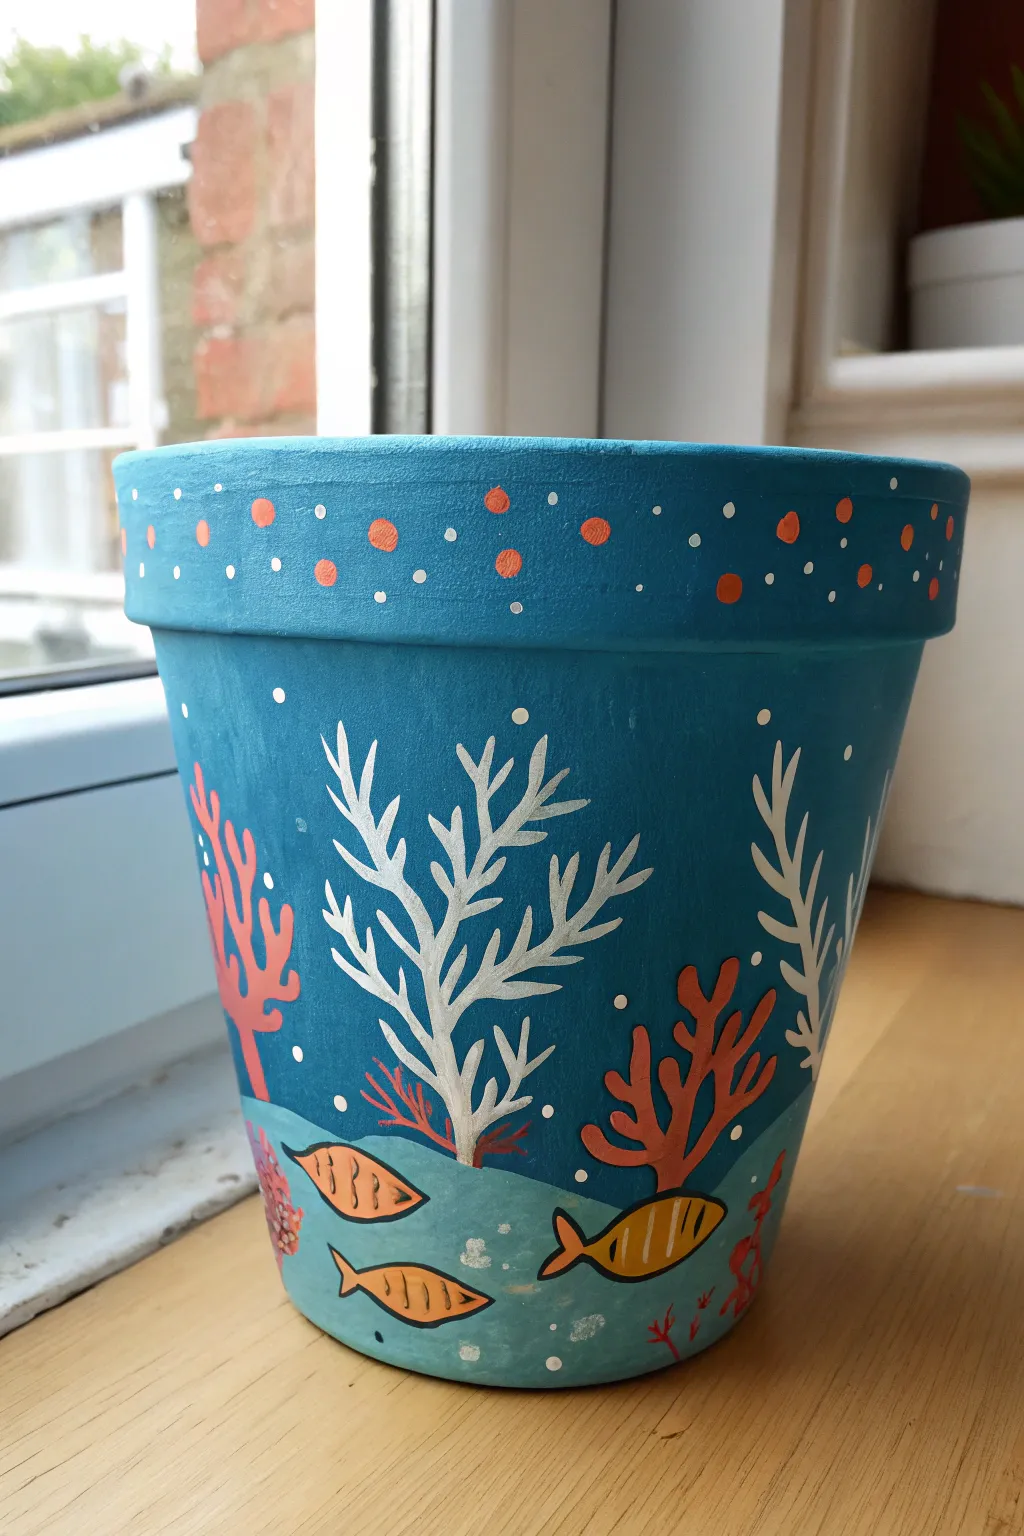

Transform a plain terracotta pot into a vibrant underwater world with this charming painting project. The deep teal background sets the stage for whimsical coral reefs and friendly orange fish, making a perfect home for your favorite houseplant.
Detailed Instructions
Materials
- Terracotta pot (clean and dry)
- Acrylic paints (deep teal/ocean blue, white, bright orange/coral, light blue, black)
- Flat paintbrushes (large for base coat, medium for coral)
- Fine detail brush or liner brush
- Dotting tool or toothpick
- Palette or paper plate
- Clear acrylic sealer spray (optional but recommended)
Step 1: Setting the Scene
-
Clean and prep:
Before you begin painting, ensure your terracotta pot is completely clean and dry. Wipe away any dust with a damp cloth and let it air dry so the paint adheres properly. -
Base coat blues:
Squeeze out a generous amount of deep teal or ocean blue acrylic paint. Using a large flat brush, cover the entire exterior of the pot, including the top rim and a few inches inside the top edge. -
Second coat:
Allow the first layer to dry completely to the touch, which usually takes about 15-20 minutes. Apply a second coat to ensure solid, opaque coverage without any brushstrokes showing through. -
Paint the seabed:
Mix a lighter shade of blue by adding a touch of white to your base teal. With a medium brush, paint a wavy, uneven strip around the very bottom of the pot to represent the sandy ocean floor.
Paint Peeling?
If paint lifts off the terracotta, the pot might have been too dusty or damp. Sand the spot lightly, wipe clean with a dry cloth, and spot-paint the area again.
Step 2: Planting the Coral
-
White coral structure:
Using a thin round brush and white paint, create the large central coral structures. Start with a central vertical line and branch out with Y-shaped strokes, keeping lines organic and slightly curved. -
Orange coral accents:
Switch to a coral or bright orange paint. Paint smaller coral bushes on the sides of the white ones, using shorter, thicker strokes that branch out like small trees from the seabed. -
Pinkish-red details:
If you want variety, mix a little red or pink with your orange to create a slightly different coral tone. Add a few small, shrub-like shapes near the bottom edge for depth. -
Layering up:
I like to go back over the white coral with a second layer once the first is dry; this makes the white pop brightly against the dark blue background.
Glow Up
Mix a tiny amount of iridescent medium into your teal base coat or use metallic silver paint for the bubbles to give the water a shimmering, magical quality.
Step 3: Adding Life
-
Fish bodies:
Using bright orange or yellow-orange paint, paint simple almond or leaf shapes swimming near the bottom. Make them varying sizes to create interest. -
Adding tails:
Add small triangles or V-shapes at the back of each almond shape to create the tail fins. -
Fish outlines:
Once the orange paint is fully dry, take your finest detail brush and black paint. Carefully outline each fish body and tail with a thin line. -
Fish details:
Paint vertical stripes or small lines inside the fish bodies for texture, and add a tiny dot for the eye near the front.
Step 4: Finishing Touches
-
Rim decoration:
Move to the top rim of the pot. Dip the handle end of a paintbrush or a large dotting tool into your orange paint and stamp varying sizes of dots all around the rim. -
Bubble magic:
Using a smaller dotting tool or the tip of a toothpick, dip into white paint. Add tiny white dots around the orange ones on the rim to look like sea foam. -
Underwater bubbles:
Scatter small white dots throughout the blue water section of the pot, concentrating them near the fish and coral to mimic rising bubbles. -
Sealing the deal:
Once your masterpiece is completely dry (give it a few hours or overnight), spray it with a clear acrylic sealer. This protects the paint from water damage when you water your plant.
Now you have a cheerful aquarium scene that requires zero maintenance


Have a question or want to share your own experience? I'd love to hear from you in the comments below!