
When you’re painting for your girlfriend, it’s not about being “perfect”—it’s about making something that feels like the two of you. These ideas are all designed to look special and personal, even if you’re keeping the techniques simple and beginner-friendly.
Sunset Silhouette of You Two Holding Hands

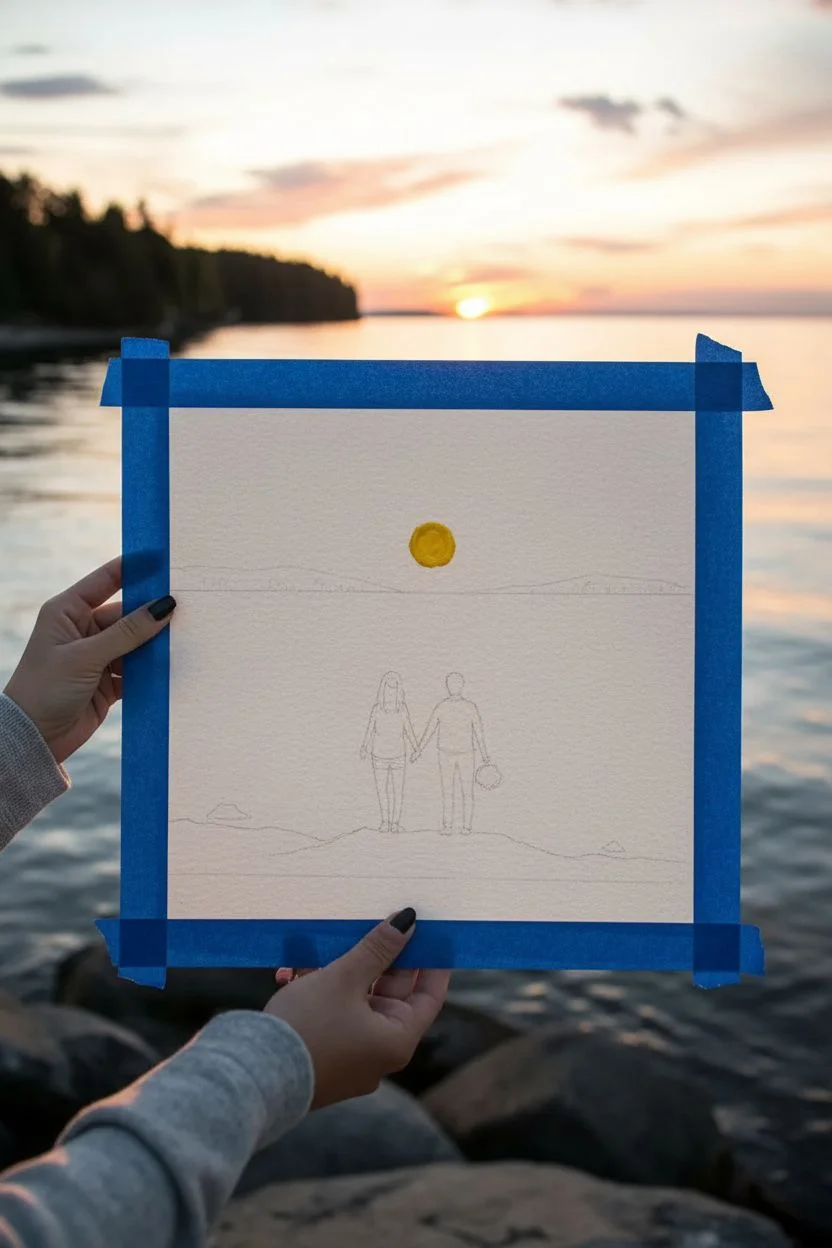
Capture a romantic moment forever with this glowing sunset silhouette painting that mirrors the beauty of nature. Using warm washes and crisp details, you’ll recreate the feeling of standing together by the water as the day turns to dusk, making it a perfect heartfelt gift.
Step-by-Step Guide
Materials
- Cold-press watercolor paper (300 gsm)
- Watercolor paints (Alizarin Crimson, Cadmium Yellow, Ultramarine Blue, Burnt Umber, Lamp Black)
- Masking fluid or white watercolor pencil
- Painter’s tape
- Flat wash brush (1 inch)
- Round brushes (sizes 4 and 8)
- Small detail brush (size 0 or linear)
- Two jars of water
- Paper towels
- Palette for mixing
- Reference photo of you two (optional)
Step 1: Preparation and Sketching
-
Secure the paper:
Begin by taping down all four edges of your watercolor paper to a board or table. This creates that clean, crisp white border you see in the example and prevents the paper from buckling when it gets wet. -
Sketch the horizon:
Lightly draw a horizon line about one-third of the way up from the bottom of the page. Don’t press too hard; you want this line to be barely visible through the paint later. -
Outline the land and figures:
Sketch the rocky foreground at the bottom and the distant hills along the horizon. Then, in the center foreground, lightly outline the two figures holding hands. Focus on the general shapes of the bodies rather than tiny details. -
Mask the sun:
To keep the sun perfectly bright, apply a small circle of masking fluid just above the horizon in the center. If you don’t have masking fluid, you can carefully paint around this circular area, but fluid makes it much easier.
Fixing “Cauliflowers”
If water blooms or “cauliflowers” appear in the sky, don’t panic. Wait for it to dry, then gently scrub the area with a damp stiff brush and re-glaze with a light wash of color to smooth it out.
Step 2: Painting the Sky and Water
-
Wet the sky area:
Using your large flat brush, apply clean water to the entire sky area above the horizon line. The paper should be glisten but not have puddles. -
Apply the sunset base:
While the paper is wet, drop in Cadmium Yellow around the sun area. As you move outward and upward, blend in orange (mix yellow and a touch of red) and then Alizarin Crimson for pinker tones. -
Add darker clouds:
Towards the top edge of the paper, mix a purple-grey using crimson and a tiny bit of blue. Dab this onto the upper sky while it’s still damp to create soft, fluffy cloud textures. -
Paint the water reflection:
Load your brush with the same yellow and orange mix. Paint horizontal strokes below the horizon line to mirror the sunset colors on the water, leaving a vertical path of lighter value directly under the sun. -
Deepen the water edges:
Switch to a purple-pink mix and add horizontal strokes to the sides of the water area, leaving the center warm and bright. Let the watercolor layers dry completely.
Personalize the Silhouette
Make the figures yours by adding specific details: a baseball cap, a ponytail, holding a guitar (like in the photo), or even a small pet silhouette sitting beside you.
Step 3: Adding the Landscape
-
Paint the distant hills:
Mix a dark purple-brown color using Alizarin Crimson, Ultramarine Blue, and Burnt Umber. With a round brush, paint the distant land strip across the horizon. Keep the bottom edge flat against the water line and the top edge irregular to look like trees or hills. -
Create the foreground rocks:
Mix a very dark, near-black tone using Burnt Umber and Lamp Black. Use the size 8 round brush to fill in the rocky foreground area at the very bottom. Dab the brush to create a rough, stony texture. -
Dry completely:
It is crucial ensuring the background is bone-dry before moving to the figures to prevent bleeding. I usually use a hairdryer on a low setting here to speed things up.
Step 4: Detailing the Figures
-
Base layer for figures:
Using your small detail brush and a slightly diluted grey-black mix, carefully fill in the silhouettes of the two figures. This first pass defines the shapes. -
Add clothing texture:
Once the base silhouette is dry, use a slightly darker, thicker black paint to add subtle details like the folds in jeans or the shape of a jacket. Use dry-brushing techniques to suggest texture without fully painting it out. -
Define the connection:
Pay special attention to the clasped hands. Use the finest point of your brush to ensure the fingers look interlaced and delicate against the bright water background. -
Paint the reflection:
Dilute your dark paint significantly with water. Paint wavy, broken horizontal lines directly below the figures on the water to simulate their reflection.
Step 5: Finishing Touches
-
Remove the mask:
Gently rub away the masking fluid to reveal the white paper sun. If the edges are too sharp, soften them slightly with a clean, damp brush. -
Tint the sun:
Apply a very pale wash of yellow over the white sun so it glows rather than looking stark white. -
Add sparkles:
If desired, use white gouache or a white gel pen to add tiny sparkles on the water crests near the sun’s reflection path. -
Peel the tape:
Slowly peel the painter’s tape away from the paper at a 45-degree angle to reveal your clean edges and frame-ready masterpiece.
Frame this romantic scene simply to let the glowing colors speak for themselves.


Couple Under an Umbrella in the Rain
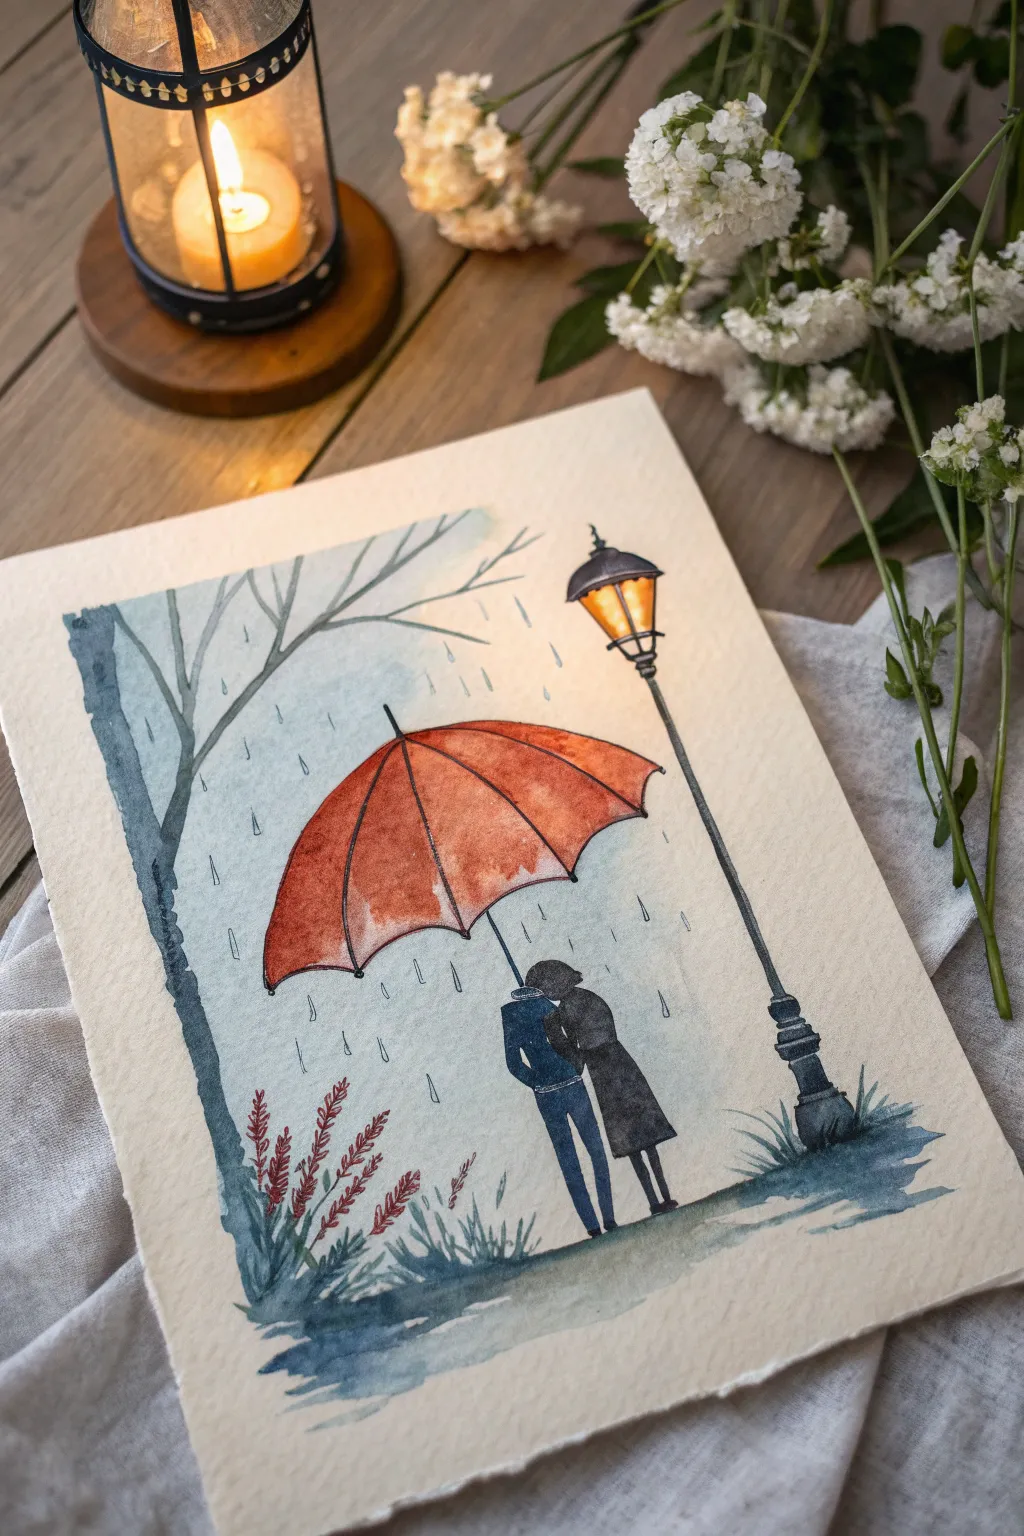
Create a cozy and atmospheric scene featuring a couple sheltered under a vibrant orange umbrella amidst a gentle rain. This watercolor tutorial guides you through capturing the glow of the streetlamp and the moody blues of a wet evening walk.
Step-by-Step
Materials
- Cold press watercolor paper (A5 or similar size)
- Watercolor paints (Indigo, Burnt Sienna, Orange, Paynes Grey, warm Yellow)
- Round brushes (sizes 4, 8, and a fine liner)
- Pencil (HB) and eraser
- Jars of clean water
- Paper towels
- Waterproof fine liner pen (optional, for lamp details)
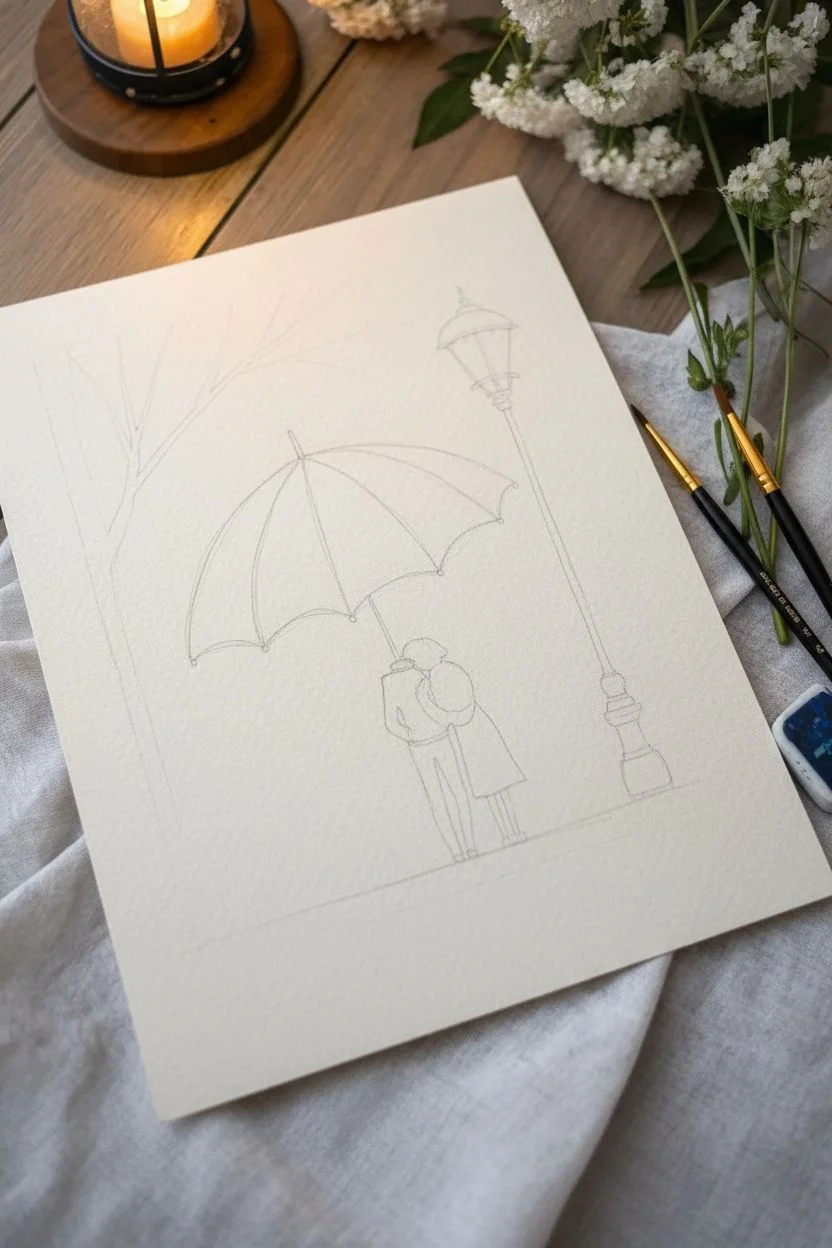
Step 1: Sketching the Scene
-
Draft the main elements:
Begin with a very light pencil sketch. Draw a tall, slightly curved vertical line on the right for the lamp post. On the left, sketch the trunk and main branches of a bare tree reaching inwards. -
Outline the umbrella:
In the center, draw a large, sweeping semi-circle for the umbrella. Add subtle scallops to the bottom edge to suggest the umbrella’s ribs. -
Place the couple:
Beneath the umbrella, sketch two simple silhouettes. They should be standing close together; one figure slightly taller than the other, legs disappearing into the ground shadow.
Fixing Blooms
If your background wash dries with uneven ‘cauliflower’ blooms, don’t panic. Wet a clean brush and gently soften the edges, blending them into the rainy texture.
Step 2: Painting the Atmosphere
-
Wash the background:
Dilute a mix of Indigo and a touch of Paynes Grey to create a very pale, watery blue. Using your size 8 brush, apply a loose wash over the entire paper, carefully painting *around* the umbrella, the lamp’s glass, and the couple. -
Add rain streaks:
While the background is still slightly damp but not soaking, use a smaller brush with a slightly more concentrated blue-grey mix to flick or draw vertical, dashed lines to represent falling rain. -
Create the glowing lamp:
Paint the glass panes of the streetlamp with a bright, warm Yellow. Let the yellow bleed slightly into the surrounding damp blue wash to create a glowing halo effect. -
Paint the ground:
Mix a darker, muddy blue-grey for the ground. Apply horizontal strokes at the bottom of the page, letting the paint pool slightly to create puddles and reflections.
Step 3: The Vibrant Umbrella
-
First layer of orange:
Mix a vibrant Orange with a hint of Burnt Sienna. Paint the segments of the umbrella, leaving tiny slivers of white paper between the ribs to show highlight and separation. -
Adding depth:
While the orange is still wet, drop a darker mix of Burnt Sienna or Red into the bottom edges of the umbrella segments to create a rounded, 3D form. -
Defining the ribs:
Once the umbrella is completely dry, use a fine brush with a dark brown or black mix to paint thin lines over the rib separations you left earlier.
Make it Personal
Customize the couple’s clothes to match the recipient’s favorite outfits, or change the umbrella color to her favorite shade for an extra personal touch.
Step 4: Details & Figures
-
Paint the figures:
Using a concentrated mix of Indigo and Paynes Grey (almost black), carefully paint the couple. Keep the shapes simple—a coat and trousers for one, a coat for the other. Leave a tiny white gap or lighter wash where their heads meet to define them. -
Detail the lamp post:
Switch to your fine liner brush or a small round brush. With dark grey or black paint, fill in the ironwork of the lamp post, the cap on top, and the decorative base. -
Tree silhouette:
Paint the tree on the left using a watery grey-blue mix. It should look like a shadow in the mist, so keep the edges soft and the color less intense than the couple. -
Botanical accents:
At the base of the tree and near the lamp post, paint loose, upward strokes to suggest grass or reeds. Add a few dots of reddish-brown on the left to hint at dried winter plants.
Step 5: Final Touches
-
Reinforce shadows:
Add a darker wash of blue-grey underneath the couple’s feet to ground them to the pavement. -
Highlights:
If you lost the highlights on the umbrella, you can use a tiny bit of white gouache or a white gel pen to add a crisp line along the top curve. -
Final drying:
Allow the entire painting to dry completely before erasing any stray pencil marks that might still be visible.
This charming scene captures a quiet moment of connection perfectly tailored for a thoughtful gift


“Our Song” Soundwave as a Romantic Abstract for Her
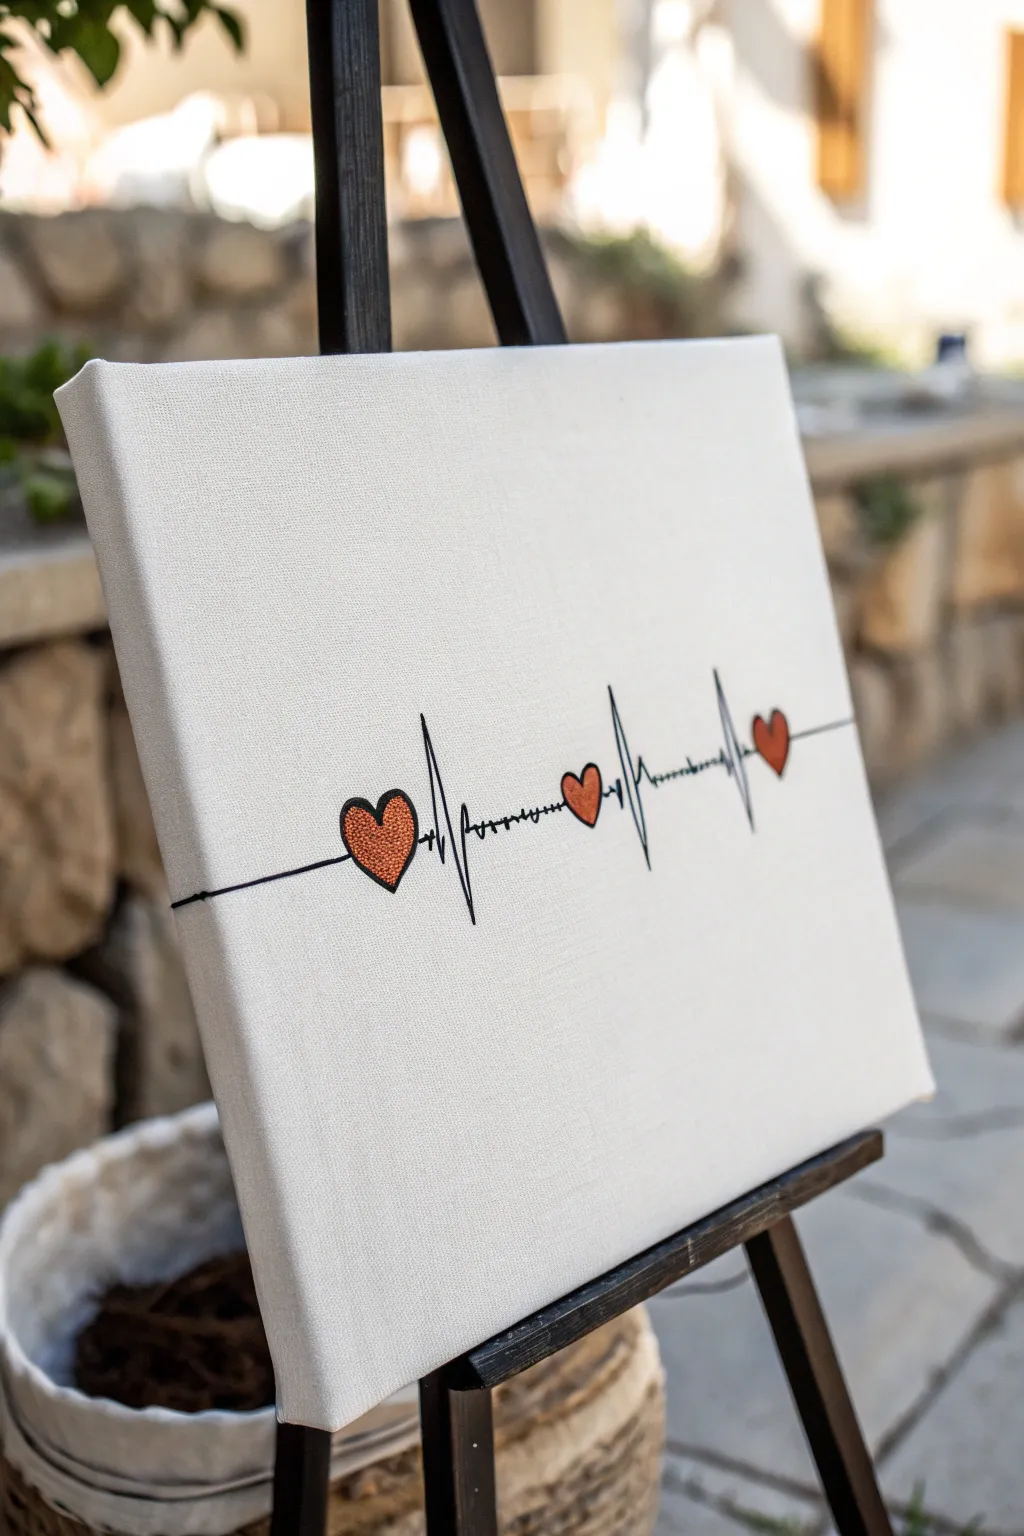
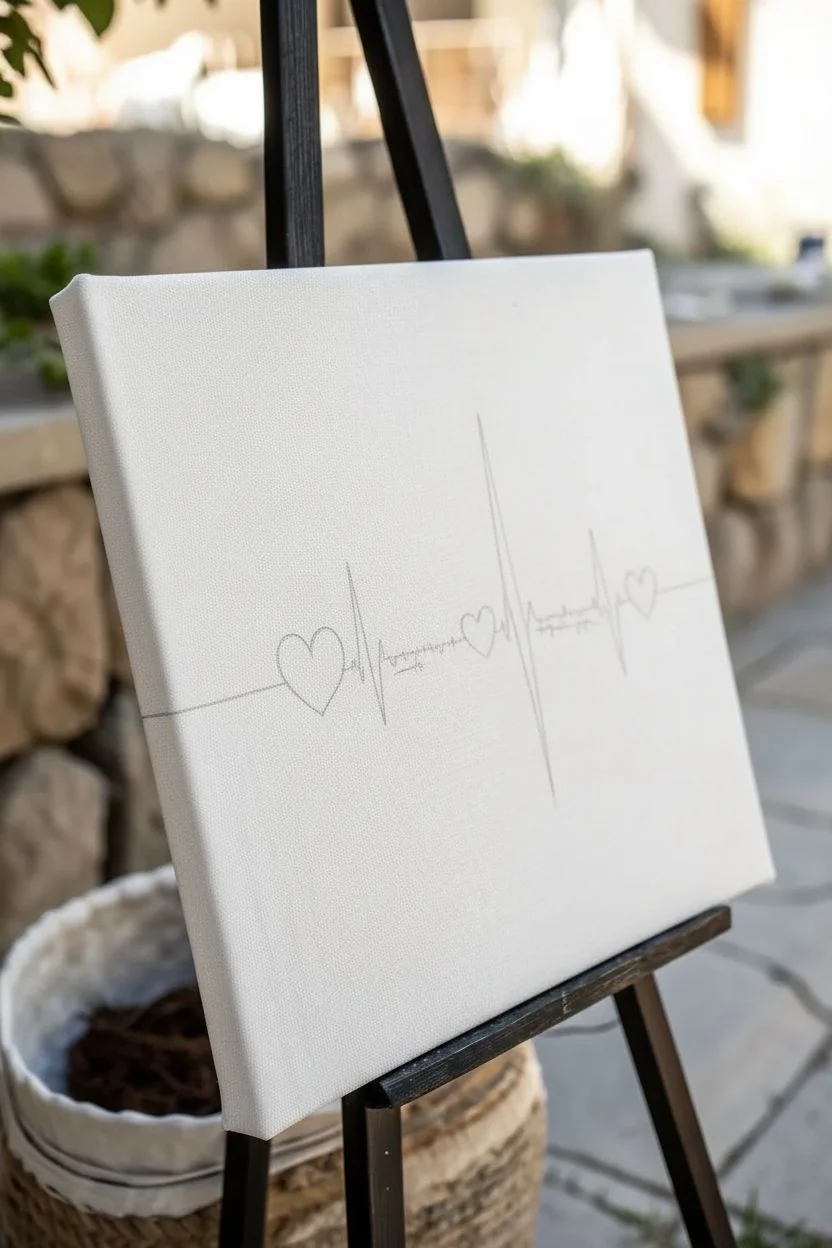
Transform a simple EKG rhythm into a meaningful declaration of love with this minimalist and striking canvas art. The clean black heartbeat line is punctuated by shimmering, textured red hearts, creating a modern piece that symbolizes how your heart beats just for her.
Step-by-Step Tutorial
Materials
- 12×12 inch square stretched canvas
- Pencil and eraser
- Ruler
- Fine-point black permanent marker or paint pen (Posca)
- Black acrylic paint
- Fine liner brush (size 0 or 00)
- Red glitter paint or metallic red acrylic paint
- Standard red acrylic paint (as base)
- Small round brush (size 2 or 3)
- Clear acrylic sealer (spray or brush-on)
- Computer or phone (for reference)
Step 1: Planning & Sketching
-
Establish the baseline:
Begin by finding the horizontal center of your canvas. Use a ruler to lightly pencil a straight horizontal line across the entire width, about one-third of the way up from the bottom edge. This acts as the resting line for your heartbeat. -
Map out the hearts:
Decide on the placement of the three hearts. Sketch them lightly in pencil along the baseline. Place the largest one on the left, a slightly smaller one in the middle, and the smallest on the right to create visual interest. -
Draft the rhythm:
Lightly sketch the EKG ‘spikes’ connecting the hearts. You want sharp, jagged peaks and valleys. Make the spike between the first and second heart the tallest to serve as the focal point. -
Add detail to the line:
Between the spikes, don’t just draw a straight line. Add tiny, scribbly, almost illegible writing or small hash marks along the horizontal spaces to mimic the ‘noise’ found on real heart monitor printouts.
Clean Lines Hack
If you struggle with shaky hands, use a ruler for the vertical spikes too, but soften the top and bottom points slightly so they don’t look like rigid triangles.
Step 2: Creating the Hearts
-
Apply the red base coat:
Using your small round brush and standard red acrylic paint, fill in the three heart shapes. This solid base ensures the glitter or metallic topcoat pops vividly. Let this layer dry completely. -
Add the shimmer:
Once the red base is dry, apply your red glitter paint or metallic textured paint over the hearts. Dab the paint on rather than brushing it to build up a nice, thick texture that catches the light. -
Outline the hearts:
Carefully outline each heart with the fine-point black marker or paint pen. The outline should be crisp and help define the shape against the white background.
Make It Personal
Hide a secret date or initials within the ‘scribble’ noise on the line. It will look like abstract texture from afar but be meaningful up close.
Step 3: Defining the Pulse
-
Trace the main line:
Using your fine-point marker or a very steady hand with the liner brush and black paint, trace over your penciled EKG line. Keep the pressure consistent for a clean look. -
Refine the spikes:
Go over the tall vertical spikes again to make them slightly bolder than the rest of the horizontal line. This variation in line weight adds depth to the graphic. -
Create the ‘noise’ texture:
For the scribbly sections between the spikes, use quick, short strokes with your finest pen. These shouldn’t look perfect; the jagged, almost handwritten quality is what makes it look authentic. -
Extend to the edges:
Ensure the black line extends all the way to the very left and right edges of the canvas face, suggesting an ongoing timeline. -
Wrap the sides (optional):
For a polished gallery look, continue the black line around the sides of the canvas onto the wrapped edges.
Step 4: Finishing Touches
-
Erase guidelines:
Wait until the black ink or paint is absolutely fully dry—I usually give it at least an hour to be safe. Then, gently erase any visible pencil marks from your initial sketch. -
Check for gaps:
Inspect where the black line meets the red hearts. If there are small white gaps, carefully touch them up with your black marker to ensure a seamless connection. -
Seal the artwork:
Apply a coat of clear acrylic sealer over the entire canvas. A gloss finish works beautifully here to amplify the shine of the glitter hearts.
This heartfelt piece is ready to hang as a daily reminder of your rhythm together

A Simple Portrait of Your Girlfriend in Soft, Dreamy Colors
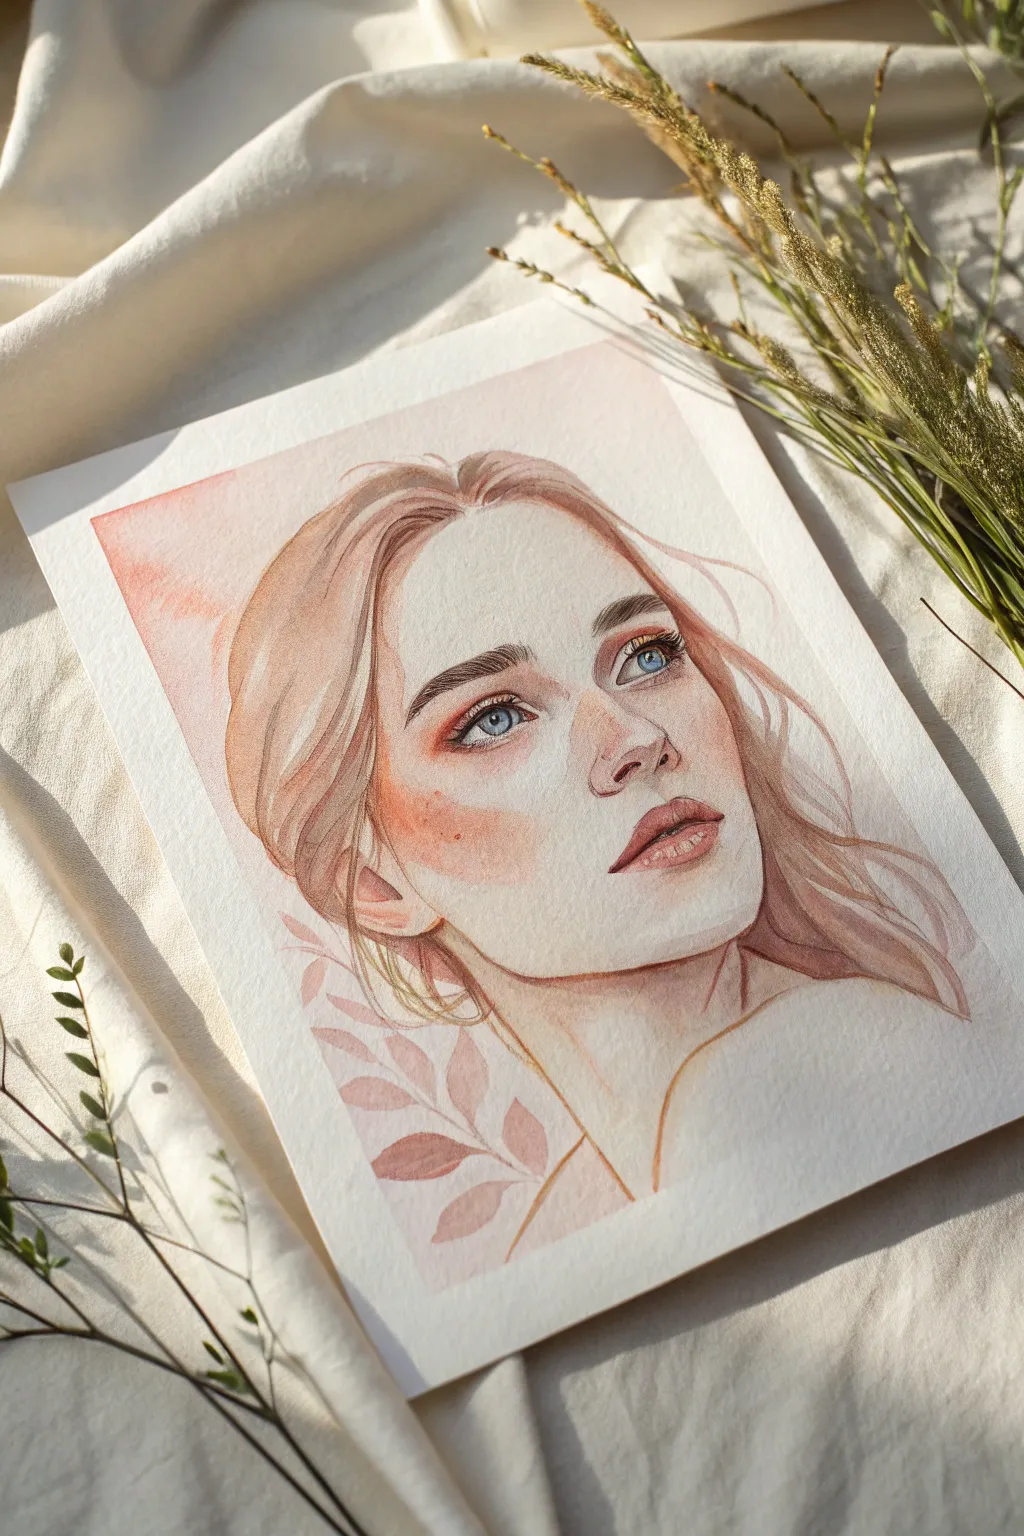
Capture the delicate beauty of your girlfriend with this soft, dreamy watercolor portrait that emphasizes gentle lighting and pastel tones. This project uses loose wash techniques and precise detailing to create a romantic, timeless keepsake.
Step-by-Step Tutorial
Materials
- Cold press watercolor paper (300 gsm)
- Watercolor paints (Alizarin Crimson, Yellow Ochre, Burnt Sienna, Cobalt Blue, Paynes Gray)
- Round watercolor brushes (Size 8 for washes, Size 2 for details)
- Pencil (HB or H)
- Kneaded eraser
- Masking tape
- Two jars of water
- Paper towels
- White gouache or white gel pen
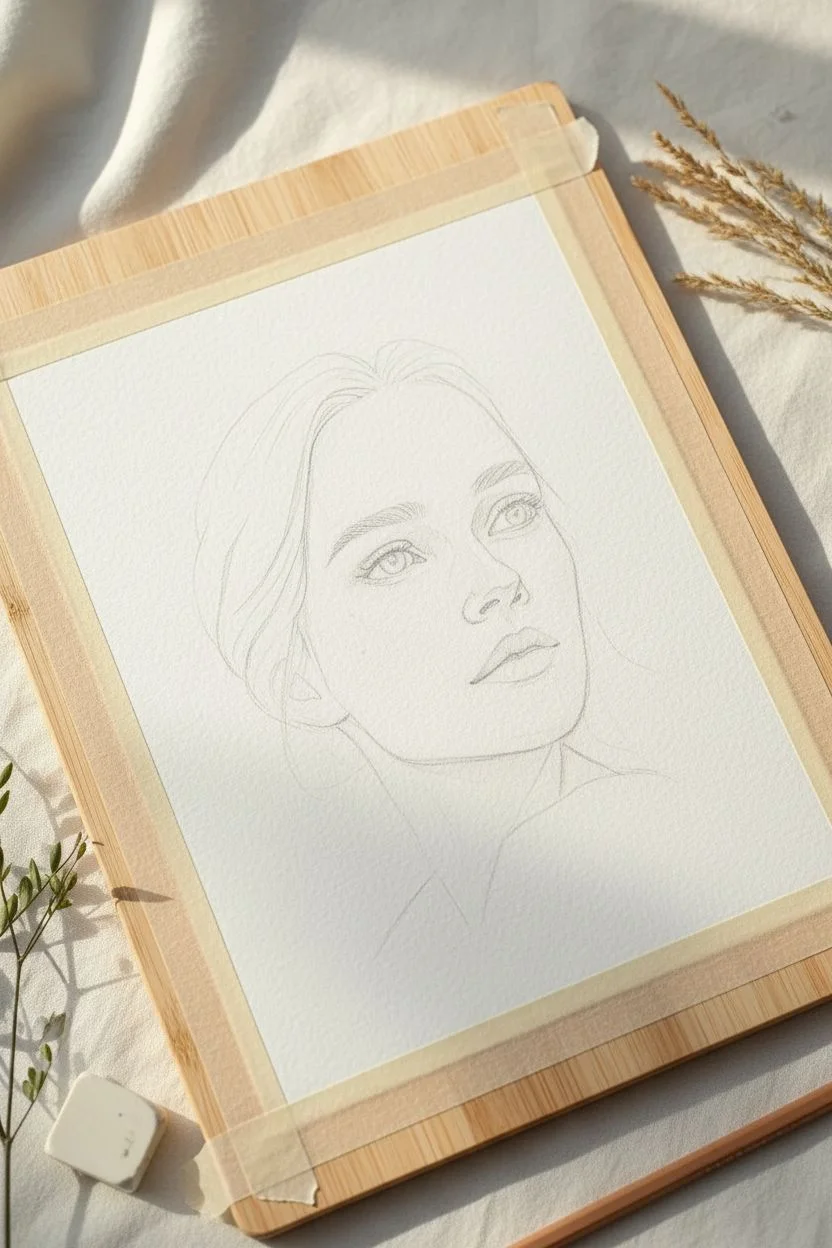
Step 1: Sketching the Foundation
-
Tape the Edges:
Secure your paper to a board using masking tape on all four sides. This creates a clean white border and prevents the paper from buckling when wet. -
Light Outline:
Using an HB pencil, very lightly sketch the contours of the face, hair, and neck. Focus on the tilt of the head and the placement of the eyes, nose, and mouth. -
Refining Features:
Add subtle details to the eyes and lips, but keep the lines faint. Watercolor is transparent, so heavy graphite marks will show through; use a kneaded eraser to lift excess graphite until the drawing is barely visible.
Step 2: First Washes and Skin Tones
-
Mixing the Bloom:
Create a pale skin tone wash using a lot of water mixed with Yellow Ochre and a tiny touch of Alizarin Crimson. I like to keep this mixture very dilute to start. -
Base Layer Application:
Apply this pale wash over the face and neck area, avoiding the whites of the eyes. Work quickly to ensure an even tone without hard edges. -
Adding the Blush:
While the base layer is still slightly damp, drop in a slightly more saturated mix of Alizarin Crimson and Burnt Sienna on the cheeks, nose, and lips to create a soft, natural flush. -
Shadow Mapping:
Mix a cool shadow tone using the skin mix and a minuscule amount of Cobalt Blue. Apply this to the eye sockets, under the nose, and beneath the jawline to build dimension. -
Let it Dry:
Allow these initial layers to dry completely before moving on. Rushing this step can result in muddy colors.
Muddy Skin Tones?
If skin looks dirty, you likely overmixed colors on the paper. Let layers dry completely between glazes. Use two water jars: one for dirty rinse water, one for clean mixing water.
Step 3: Hair and Background
-
Warm Hair Wash:
Mix Burnt Sienna and Yellow Ochre for the hair. Paint the main masses of hair using large, fluid strokes with your size 8 brush, following the direction of growth. -
Deepening Values:
While the hair wash is wet, drop in concentrated Burnt Sienna near the roots and behind the ear to create depth and volume. -
The Pink Atmosphere:
Create a very watery wash of Alizarin Crimson. Paint the background, letting some of this pink dreamy color bleed into the damp edges of the hair for a soft-focus effect. -
Leaf Accents:
Using a similar dilute reddish-brown mix, paint simple leaf silhouettes in the lower left corner. Keep these loose and abstract to frame the face without distracting from it.
Pro Tip: Softening Edges
For that dreamy look, soften hard paint edges immediately. Paint a stroke of color, rinse your brush, wipe it slightly, and run the damp brush along the edge to feather it out.
Step 4: Defining the Features
-
Eye Detail:
Switch to your size 2 brush. Paint the irises with Cobalt Blue, leaving a tiny spot of white paper for the catchlight. Use a mix of Burnt Sienna and Paynes Gray for the pupils and upper lash line. -
Eyebrows:
Use the brown hair mixture to paint the eyebrows. Instead of a solid block, use drying, flicking strokes to mimic individual hairs. -
Lip Definition:
Deepen the color of the lips with Alizarin Crimson. Add a darker line between the lips for separation, but soften the edges with a clean, damp brush. -
Refining Shadows:
Go back in with your cool shadow mix to deepen the contrast around the nose, the corner of the eyes, and the neck cast shadow.
Step 5: Final Touches
-
Hair Strands:
With the small brush and a darker brown mix, add a few stray hairs sweeping across the face or background to add movement and realism. -
Highlights:
Use white gouache or a white gel pen to accentuate the highlight in the eyes if you accidentally painted over them, and add a tiny dot on the tip of the nose or lower lip. -
Reveal:
Once the painting is bone dry, carefully peel off the masking tape at a 45-degree angle to reveal the crisp white border.
Frame this gentle portrait in a natural wood frame for a heartfelt gift she will cherish forever
BRUSH GUIDE
The Right Brush for Every Stroke
From clean lines to bold texture — master brush choice, stroke control, and essential techniques.
Explore the Full Guide
Her Birth Month Flower With a Tiny Couple Detail
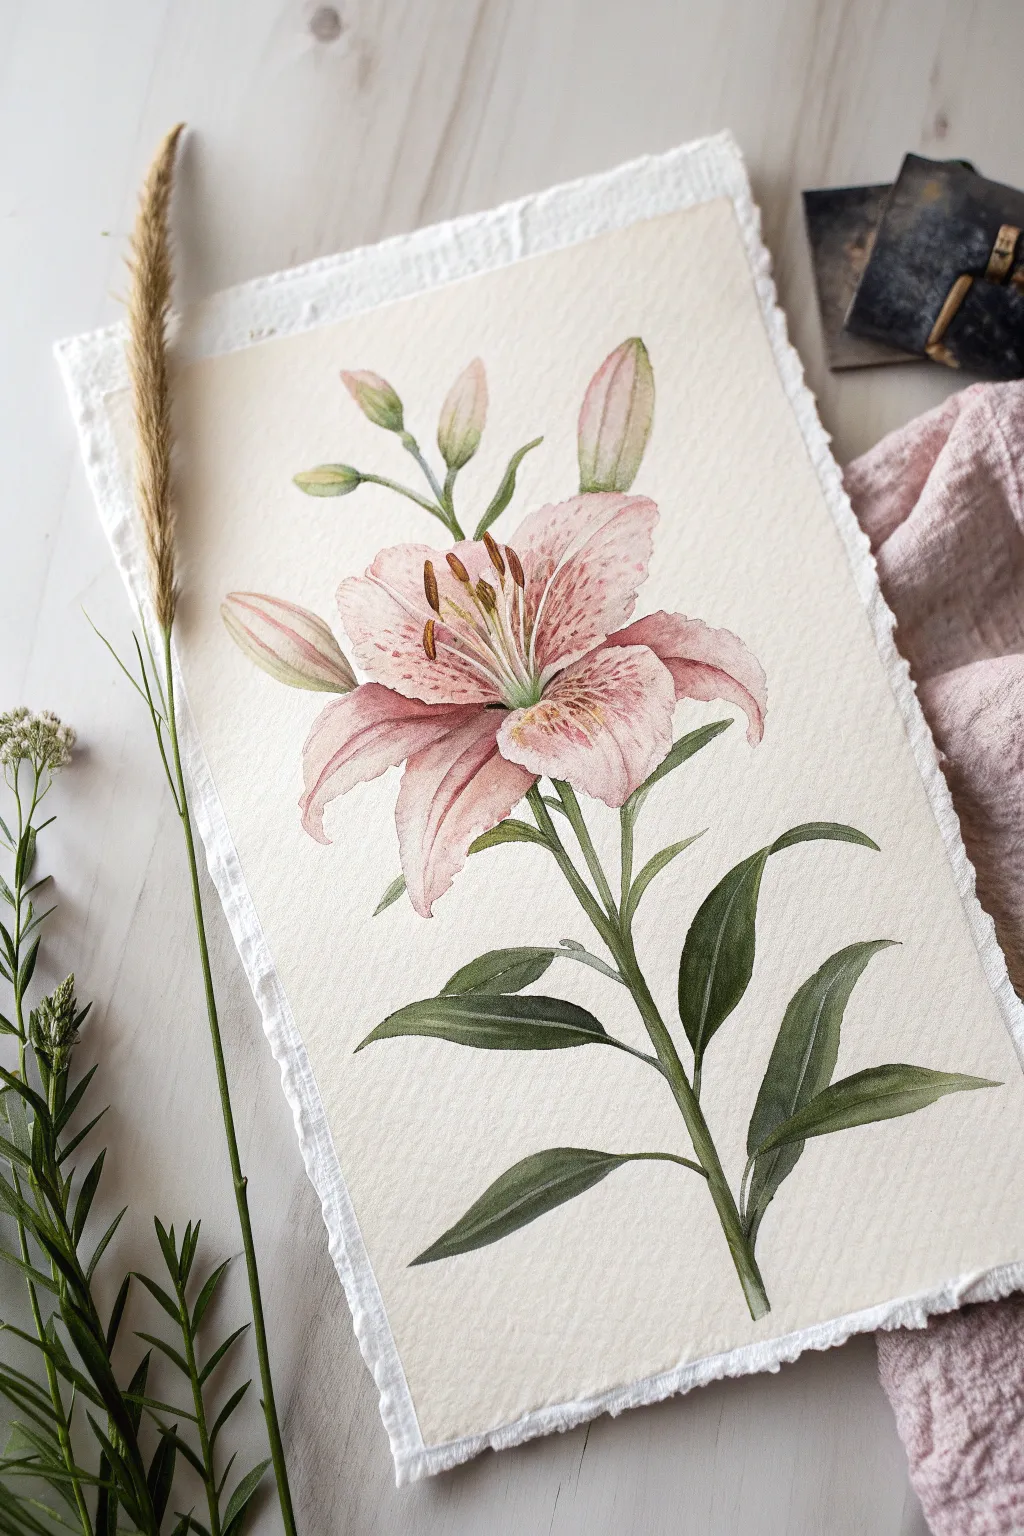
Capture the delicate beauty of a blooming lily with this soft watercolor project on handmade paper. This painting balances detailed botanical accuracy with a loose, romantic feel, making it a perfect heartfelt gift.
How-To Guide
Materials
- Cold press watercolor paper (deckle-edge preferred or tearing ruler)
- Watercolor paints (Alizarin Crimson, Sap Green, Burnt Umber, Lemon Yellow, Hooker’s Green)
- Round brushes (sizes 2, 4, and 6)
- Rigger or liner brush (size 0 or 00)
- Pencil (HB or H for light lines)
- Kneaded eraser
- Two jars of water
- Paper towel
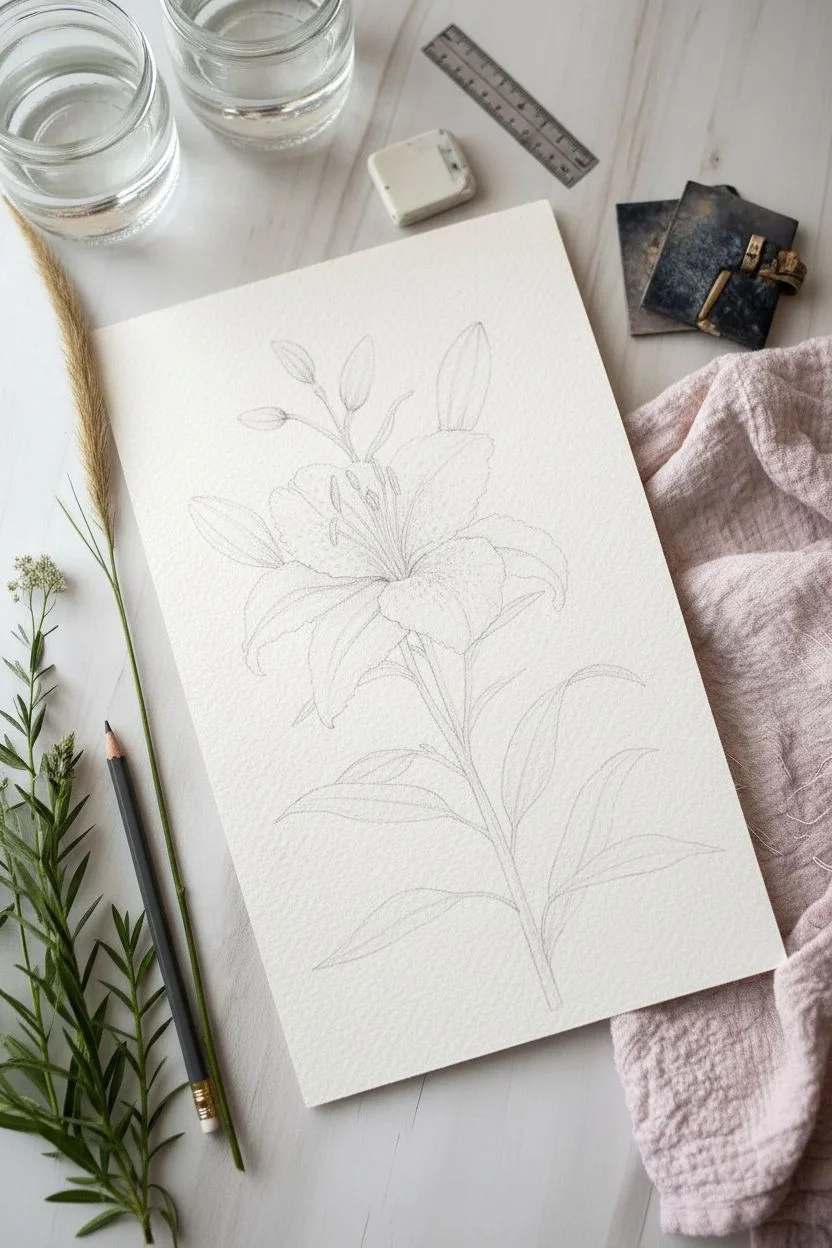
Step 1: Sketching and Preparation
-
Prepare the paper:
If your paper doesn’t have a deckled edge, you can create one by folding the paper back and forth along a ruler and carefully tearing it. This gives the vintage, handmade look seen in the photo. -
Map the stem:
Start with a very light curved line going up the center of the page. This is your main stem line. It should have a gentle ‘S’ curve rather than being stick-straight. -
Outline the flower head:
Draw the central open lily roughly in the upper third of the paper. Focus on the star shape of the six petals: three wider inner petals and three slightly narrower outer petals. -
Add buds and leaves:
Sketch three closed buds branching off the top left and right. Then, draw the long, lance-shaped leaves alternating down the stem, ensuring they curve naturally. -
Lighten the sketch:
Roll your kneaded eraser gently over the entire drawing. You want the graphite lines to be barely visible so they don’t show through the transparent watercolor.
Step 2: Painting the Blooms
-
First wash on petals:
Mix a very watery, pale wash of Alizarin Crimson. Using your size 6 brush, paint the petals one by one. Leave the very center of the flower almost white or pale yellow/green. -
Wet-on-wet shading:
While the first wash is still damp, drop in a slightly more saturated pink near the tips of the petals and along the central veins. Let the paint bloom naturally. -
Painting the buds:
For the closed buds, use a mix of Sap Green and your pink mix. Paint the base green, blending upward into a soft pink tip. -
Deepening the pinks:
Once the first layer is dry, mix a stronger crimson. With a size 4 brush, glaze over the mid-sections of the petals to create depth, leaving the edges soft. -
Adding the speckles:
This is crucial for that realistic lily look. Mix a concentrated reddish-brown. Using only the tip of your smallest brush, dot tiny speckles near the center of the petals. -
Stamens and pistil:
Paint the long filaments curving out from the center using a mix of palest green and yellow. Top them with dark Burnt Umber anthers using your size 2 brush.
Pro Tip: Clean Colors
Wait for the pink flower head to completely dry before painting any green parts that touch it. This prevents the red and green from blending into a muddy brown mess.
Step 3: Greenery and Finishing Touches
-
Base green layer:
Mix Sap Green with a touch of Lemon Yellow for a fresh look. Paint the entire stem and fill in the leaves with a flat wash using the size 6 brush. -
Adding leaf dimension:
While the leaves are drying but not fully set, drop a darker mix (Hooker’s Green with a tiny bit of red to neutralize it) into the shadowed areas where the leaves attach to the stem. -
Defining the veins:
Use your size 2 brush to paint the central vein on the leaves. I prefer lifting color out with a damp brush for a highlight, or painting a thin dark line for a shadow. -
Connecting the buds:
Carefully paint the thinner stems connecting the buds to the main stalk. Ensure the transition from green stem to pink bud is smooth. -
Building contrast:
Look at the overall piece. The leaves at the bottom might need a second layer of dark green to anchor the painting visually. -
Final assessment:
Check for any hard edges that need softening with a clean, damp brush. Make sure the stamen details are crisp against the softer petals.
Level Up: Hidden Figures
Since this is for a romantic gift, hide a tiny, microscopic silhouette of a couple holding hands inside one of the bottom leaves or camouflaged in the speckles.
Once dry, frame this delicate botanical piece floating in a larger frame to show off those beautiful deckled edges
Two-Panel Painting That Connects When She Puts Them Together
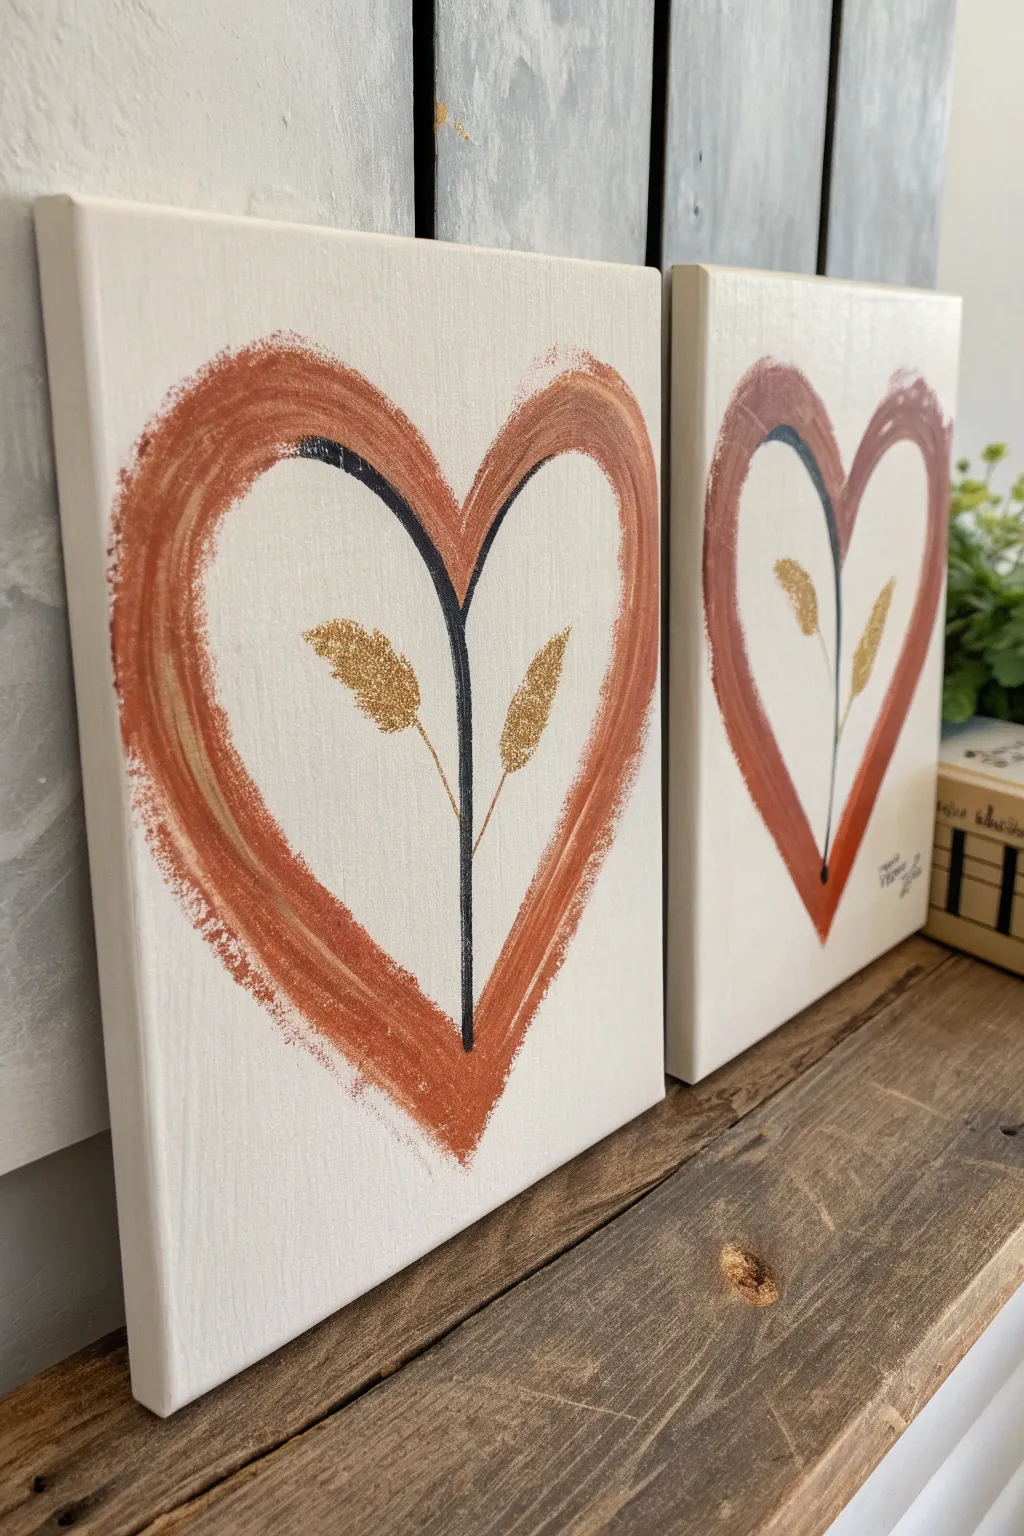
This charming two-piece set features a stylized heart painted across separate canvases, united by metallic gold wheat stalks and a dark central stem. The warm terracotta tones and simple brushwork create a cozy, boho-chic aesthetic that symbolizes connection.
Step-by-Step Tutorial
Materials
- Two small stretched canvases (e.g., 5×7 or 8×10 inches)
- Acrylic paint: Terracotta/Rust Orange
- Acrylic paint: Black or Dark Navy
- Acrylic paint: Metallic Gold
- Acrylic paint: White (optional for mixing)
- Wide flat brush (approx. 1 inch)
- Small round detail brush
- Pencil for sketching
- Palette for mixing paint
- Cup of water and paper towels
Step 1: Setting the Composition
-
Align the canvases:
Place your two blank canvases on a flat surface, pushing them right up against each other so their edges touch. You want them to act like one single sheet of paper for the initial sketch. -
Sketch the heart shape:
Using a pencil very lightly, draw a large heart shape that spans across both canvases. The dip of the heart and the point should fall roughly near the seam between the two canvases, but it doesn’t have to be perfectly symmetrical. -
Mark the stems:
Draw a central line starting from the bottom point of the heart, moving upward. About halfway up, split this line into a ‘Y’ shape, with one branch curving into the left lobe and one into the right. -
Add leaf details:
Sketch simple oval or teardrop shapes at the ends of your ‘Y’ branches to represent the wheat or leaf clusters. Keep these outlines faint so they don’t show through the final paint.
Step 2: Painting the Heart
-
Separate the canvases:
Pull the canvases apart slightly, giving yourself about an inch of space between them so you can paint the edges without sticking them together. -
Load the wide brush:
Dip your wide flat brush into the terracotta or rust-colored acrylic paint. You want a decent amount of paint on the bristles for a rich, textured stroke. -
Paint the first curve:
Starting on the left canvas, follow your pencil guide to paint the left side of the heart. Use a single, continuous sweeping motion if possible to get that nice brushstroke texture visible in the reference. -
Create the dry-brush effect:
As you come to the end of the stroke near the bottom or top, let the brush run naturally out of paint. This creates the ragged, dry edges that give the piece its rustic character. -
Paint the second curve:
Repeat the process on the right canvas. Start from the top curve and sweep down to meet the imaginary point at the bottom center. -
Paint the wrapped edges:
Don’t stop the paint at the front face of the canvas. Carry the rust color over the sides of the canvas where the heart shape runs off the edge, so the image looks continuous when viewed from an angle. -
Dry completely:
Let this layer dry fully before moving on. Since the application is thick, give it at least 20-30 minutes.
Dry Brush Technique
To get those rough, artistic edges on the heart, don’t add water to your brush. Use thick paint and let the bristles naturally run dry as you finish the stroke.
Step 3: Adding the Botanical Details
-
Paint the central stem:
Switch to your small round detail brush and load it with black or dark navy paint. Paint the vertical line starting from the bottom of the heart, moving upward. -
Branch out:
Where your sketch lines split, paint the branches curving outward into the center of each heart lobe. Taper your strokes at the end so they look delicate. -
Ensure continuity:
I like to briefly push the canvases back together to check that the black line connects perfectly across the gap, then separate them again to finish detail work. -
Prepare the gold paint:
Clean your detail brush thoroughly or grab a fresh one. Load it with metallic gold paint. If the paint is too transparent, mix in a tiny dot of yellow ochre to boost opacity. -
Paint the wheat heads:
At the tip of each black branch, paint a cluster of small dabs or short strokes to form the wheat shape. Start overlapping the black stem slightly. -
Add texture to the gold:
Instead of a solid gold oval, use stippling (dotting the brush up and down) to give the wheat texture and sparkle. -
Final touches:
If desired, verify your edges are neat. Sign your name lightly in the corner of one canvas using the small brush and black paint.
Uneven Heart Shape?
Don’t stress about perfect symmetry! The charm of this piece relies on the organic, hand-painted look. Imperfections make it feel more authentic and warm.
Once dry, these canvases are ready to be gifted or hung together to symbolize your bond


Have a question or want to share your own experience? I'd love to hear from you in the comments below!