
If you’re staring at orange-toned knotty pine and dreaming of something brighter, you’re not alone—I’ve painted a lot of it, and the transformation can be wild. Here are my favorite painting knotty pine ideas, starting with the classics and ending with the fun, unexpected twists.
Classic Bright White Painted Knotty Pine
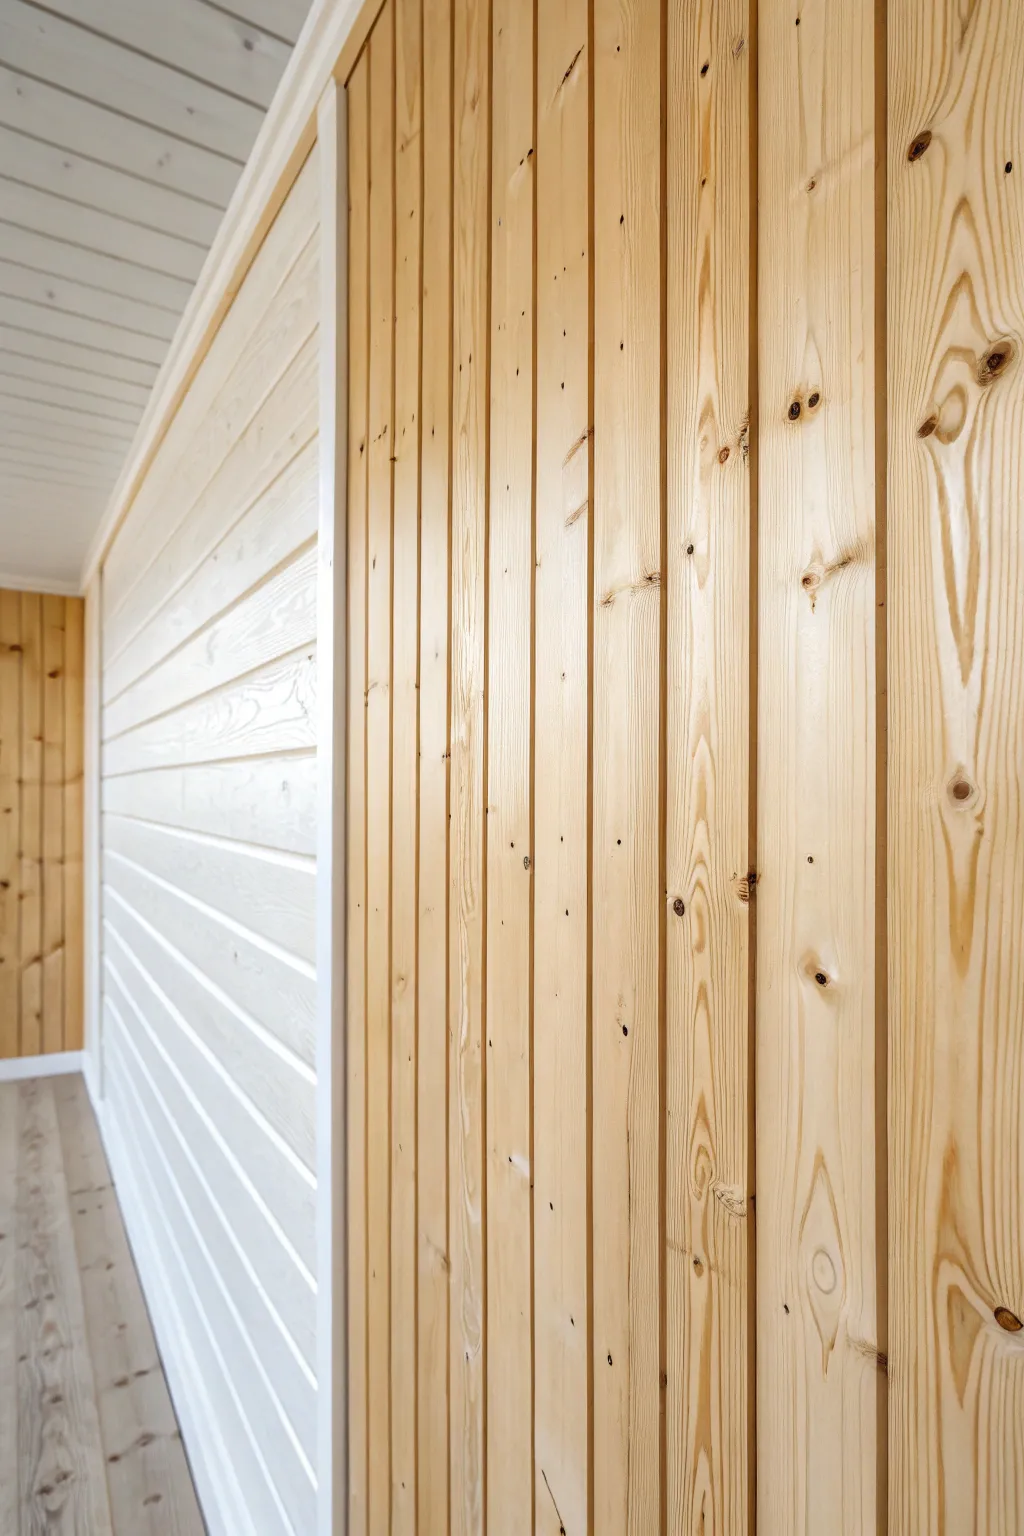
This project transforms a standard knotty pine wall into a striking visual feature by contrasting the natural warmth of wood against crisp, bright white paint. The result is a clean, modern aesthetic that preserves the rustic charm of the original grain while brightening the overall space.
How-To Guide
Materials
- Knotty pine paneling (existing or new)
- High-quality stain-blocking primer (oil-based or shellac-based)
- White semi-gloss or satin interior trim paint
- Clear water-based polycrylic sealer
- Painter’s tape (high adhesion)
- Sanding block (medium and fine grit)
- Tack cloth
- Wood filler (stainable for the natural side, standard for painted side)
- Angled sash brush (2-inch)
- Mini foam roller and tray
- Drop cloths
Step 1: Preparation and Cleaning
-
Clean the surface:
Begin by thoroughly cleaning the entire wood wall with a degreasing cleaner or TSP substitute. Old knotty pine often holds years of dust or wax, which will prevent paint adhesion. Scrub well and let it dry completely. -
Sand the wood:
Lightly scuff sand the entire surface using a medium-grit sanding block. You aren’t trying to remove all the finish, just creating a rough ‘tooth’ for the new coatings to grip. Wipe away all dust with a tack cloth. -
Inspect knot condition:
Check all the knots on the boards. If any feel loose or have deep voids you want to fill, apply wood filler now. Use stainable filler on the section you plan to keep natural, and standard filler on the side to be painted.
Knot Bleed Blocker
Never skip shellac-based primer on knots. Pine resin is persistent and will bleed yellow circles through water-based latex paint in months if not sealed properly.
Step 2: Sealing the Natural Wood
-
Choose your natural section:
Decide which portion of the wall will remain natural wood. In the example, a vertical divider trim piece separates the two zones. If you don’t have a trim piece, measure and mark a crisp vertical line. -
Apply clear sealer:
On the natural wood section (the vertical planks on the right), apply a coat of clear water-based polycrylic. This protects the wood without yellowing over time like oil-based polyurethane might. Use a quality synthetic brush to follow the grain. -
Sand and recoat:
Once the first coat is dry, lightly sand with fine-grit paper to knock down any raised grain. Wipe clean, then apply a second coat for a smooth, furniture-grade finish. -
Protect the finished wood:
After the clear coat has fully cured (check the can instructions, usually 24 hours), run a strip of painter’s tape exactly along the edge where the painted section will begin to protect your fresh natural finish.
Trim Transition
Install a thin, vertical slat of wood (painted white) exactly over the transition line. It hides any paint bleed and creates a deliberate architectural separation.
Step 3: Painting the White Section
-
Prime the knots:
This is the most critical step for the painted side. Spot-prime every single knot with a shellac-based or oil-based stain-blocking primer. I find that water-based primers just won’t stop the pine resin from bleeding through eventually. -
Prime the full surface:
Now apply a full coat of your stain-blocking primer over the entire section to be painted. Ensure you work the primer into the grooves between boards using an angled brush. -
Sand the primer:
Once dry, give the primed surface a quick sand with fine-grit paper to smooth out any brush marks or raised fibers. The smoother the base, the more professional the final look. -
Cut in the edges:
Using your angled sash brush and the bright white paint, carefully ‘cut in’ the paint along the taped edge, corners, ceiling line, and baseboards. Applying paint into the vertical grooves between planks first is usually helpful. -
Roll the flat surfaces:
Use a mini foam roller to apply paint to the flat faces of the boards. This helps achieve a smooth, spray-like finish without heavy brush strokes. Work in small sections to maintain a wet edge. -
Apply second coat:
Allow the first coat to dry according to the manufacturer’s time frame. Apply a second coat using the same method: brush the grooves, then roll the faces. This ensures solid, opaque coverage over the dark wood. -
Remove tape:
While the final coat of paint is still slightly tacky (not fully dry), carefully peel away the painter’s tape at a 45-degree angle. This prevents the dried paint from peeling up with the tape.
Step back and admire how the crisp white paint brings a fresh, airy feel while the preserved natural wood keeps the room grounded and cozy


Greige Painted Knotty Pine for Modern Neutral
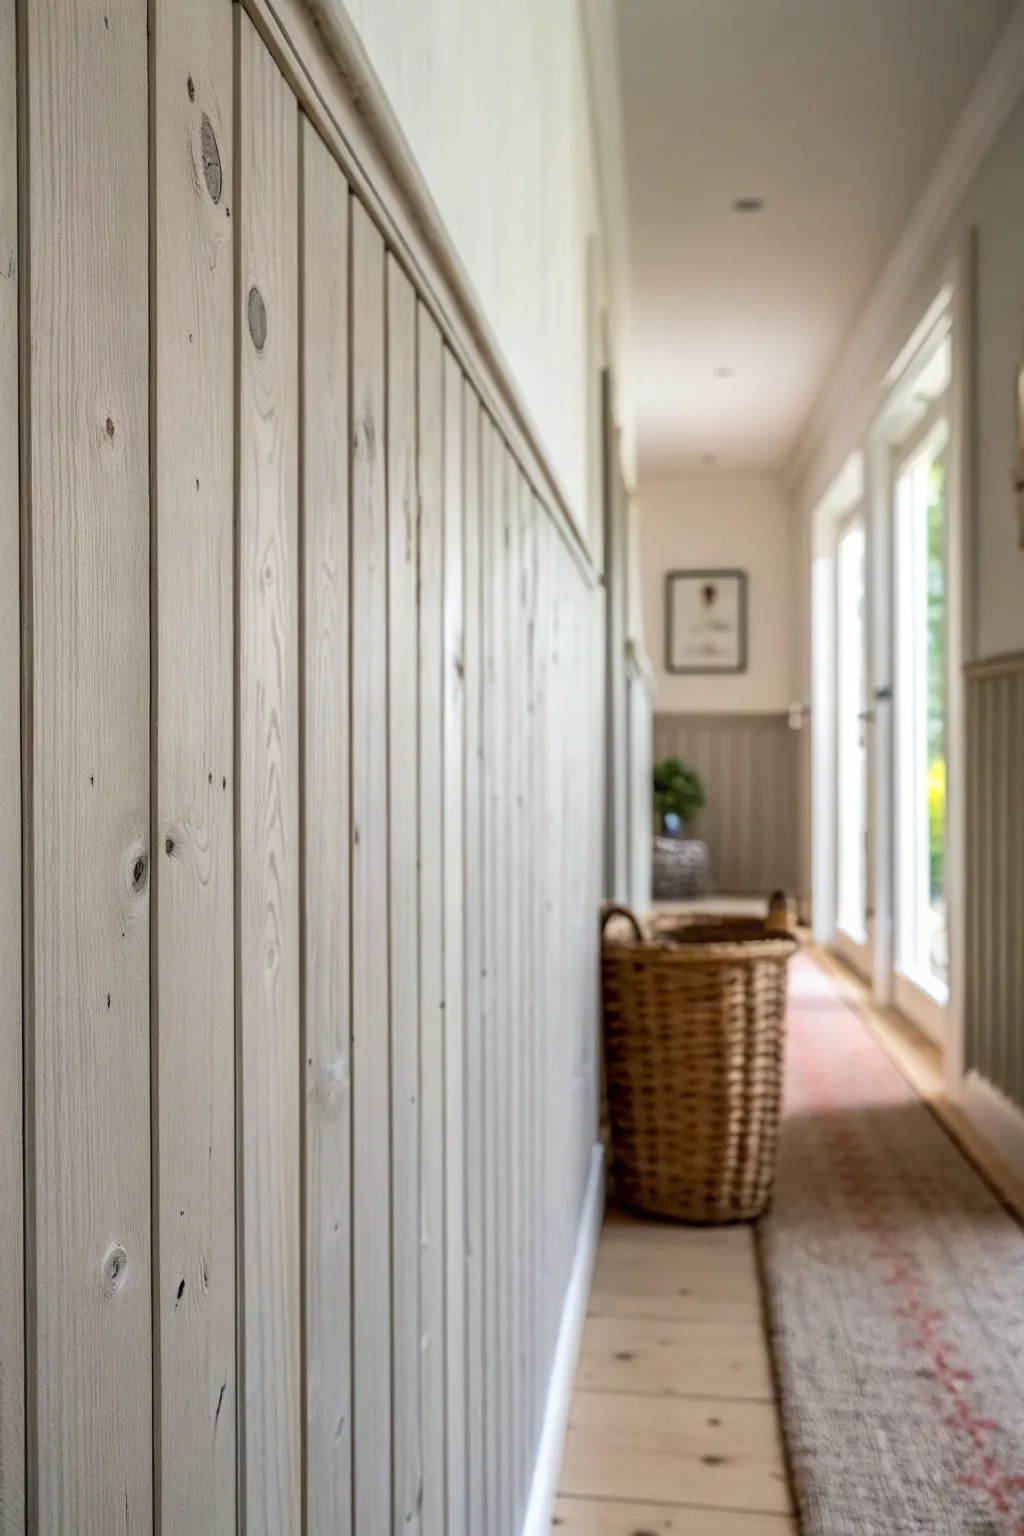
Transform dated yellow pine into a sophisticated architectural feature with this subtle greige wash technique. This finish modernizes the space while allowing the natural texture and knots to peek through, adding depth and character to a hallway or room.
Step-by-Step Tutorial
Materials
- TSP substitute or heavy-duty cleaner
- Sanding sponges (120 and 220 grit)
- Clean tack cloths
- Shellac-based primer (spot treatment only)
- High-quality latex paint (Greige color)
- Water for dilution
- Mixing bucket
- Stir stick
- 2-inch angled sash brush
- Lint-free rags
- Painters tape
- Drop cloths
Step 1: Preparation
-
Clear the area:
Remove any furniture, artwork, or obstacles from the wall. Lay down drop cloths to protect your floor and secure them with painter’s tape along the baseboards if necessary. -
Clean the wood thoroughly:
Scrub the paneling with a TSP substitute or a heavy-duty degreaser. Knotty pine often accumulates oils over time, and paint won’t adhere well to dirty wood. -
Rinse and dry:
Wipe down the walls with clean water to remove any cleaner residue, then let the wood dry completely before moving forward. -
Light scuff sanding:
Use a 120-grit sanding sponge to lightly scuff the surface. You aren’t trying to remove the old finish entirely, just giving it ‘tooth’ for the new paint to grip. Sand with the grain. -
Address only the darkest knots:
If you have open knots that might bleed sap, dab them lightly with a clear shellac-based primer. For this semi-transparent look, apply it sparingly only on the knot center so it doesn’t create a solid white patch. -
Dust removal:
Vacuum the walls with a brush attachment and follow up with a tack cloth to catch every last speck of dust.
Bleed-Through Blues
If stubborn knots turn yellow after painting, spot-prime them with clear shellac spray, then dab a bit of your undiluted paint over just that spot before blending.
Step 2: Mixing the Wash
-
Select your paint:
Choose a greige (gray-beige) latex paint with a matte or eggshell finish. A satin finish can look too shiny on textured wood. -
Create the ratio:
In a mixing bucket, combine 1 part water to 2 parts paint. This ratio provides coverage while keeping the wood grain visible. If I want it more transparent, I adjust to a 1:1 ratio. -
Test the mixture:
Find an inconspicuous spot or a scrap piece of pine to test your wash. Let it dry to see the true opacity before committing to the whole wall.
Step 3: Application
-
Work in small sections:
Plan to work on 3-4 boards at a time. This prevents the paint from drying before you can work it into the wood. -
Brush on the wash:
Dip your angled sash brush into the mixture and apply it along the length of the boards. Be generous enough to get paint into the grooves. -
Work coating into grooves:
Use the tip of the brush to push paint specifically into the vertical tongue-and-groove gaps. These areas are hard to reach if you just skim the surface. -
Wipe back excess:
Immediately after brushing a section, take a lint-free rag and gently wipe down the boards in the direction of the grain. This removes brush marks and reveals the wood texture. -
Check for drips:
Inspect the grooves for pooling paint or drips. Smooth them out with your brush or rag before moving to the next section. -
Maintain a wet edge:
Move immediately to next adjacent boards while the previous edge is still wet to avoid lap marks where layers overlap. -
Assess coverage after drying:
Allow the first coat to dry for at least 4 hours. The greige will lighten as it dries. -
Optional second coat:
If the knots are too prominent for your taste, repeat the process with a second light wash. Wipe it back more heavily this time to layer the color without blocking the grain. -
Final light sand:
Once fully cured (wait 24 hours), lightly run a clean 220-grit sanding sponge over the surface to knock down any raised grain fibers for a smooth touch.
Pro Tip: The Rag Trick
Keep your wipe-off rags slightly damp with water. A bone-dry rag absorbs too much paint too quickly, making the finish look streaky rather than washed.
Now enjoy your beautifully refreshed hallway that perfectly balances rustic charm with modern elegance


Pale Blue Painted Knotty Pine for Airy Calm
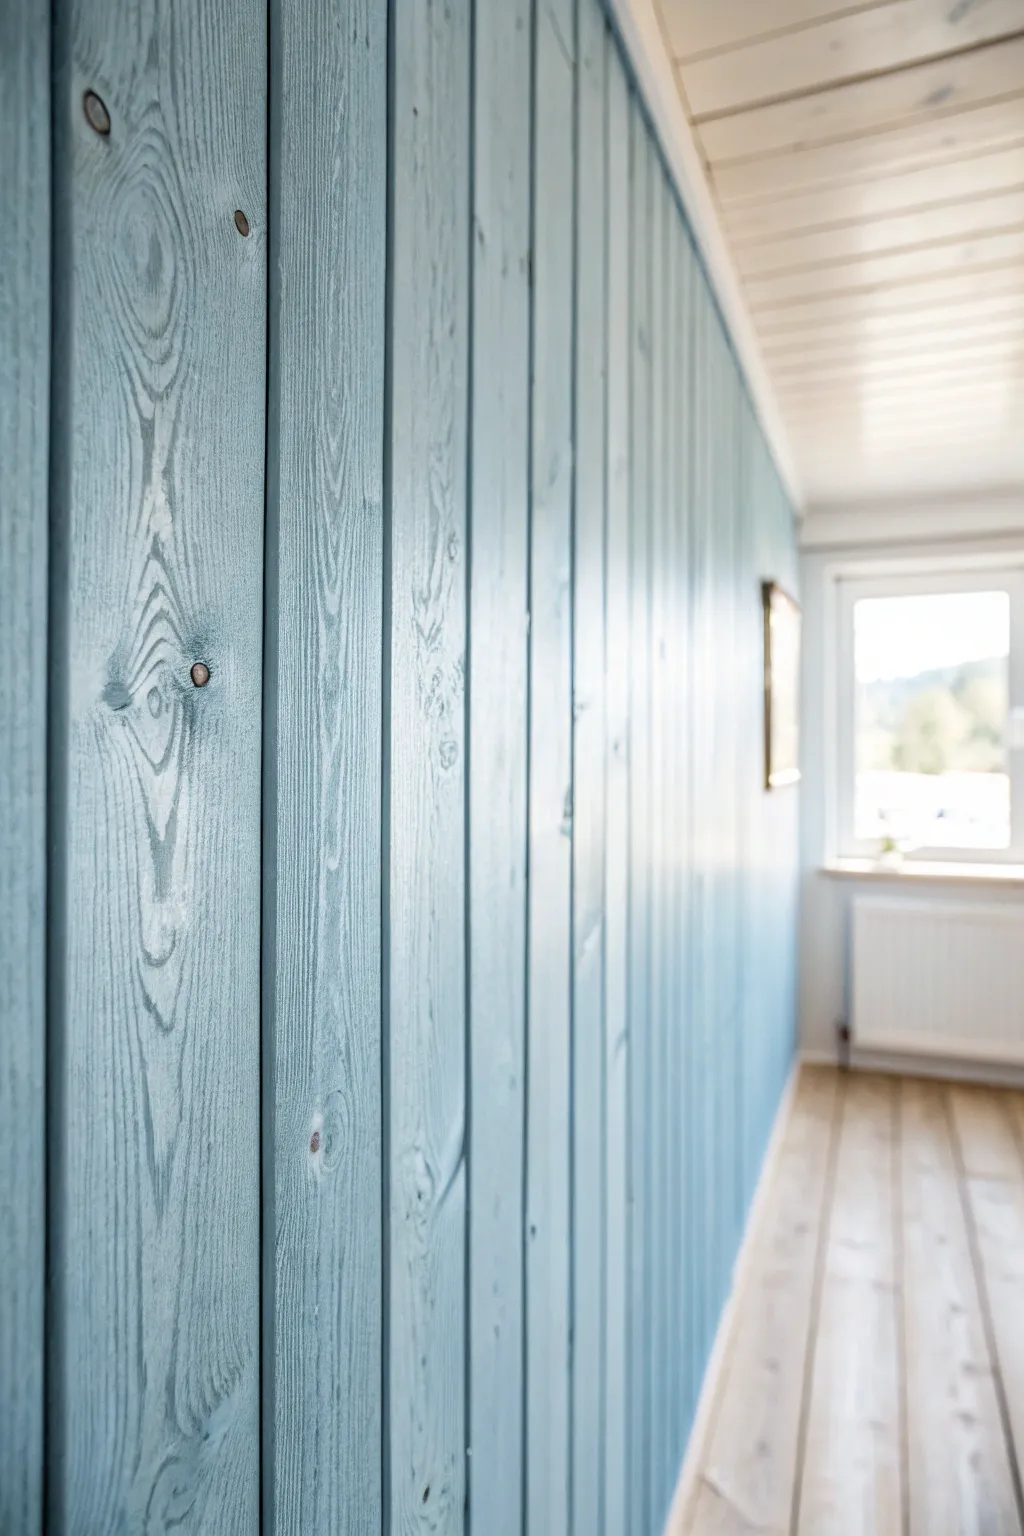
Transform dated, yellowing knotty pine into a coastal retreat with this soft, semi-transparent blue finish. By using a wash technique rather than solid paint, you allow the natural beauty of the wood grain and knots to remain a subtle, textured feature.
Detailed Instructions
Materials
- TSP (Trisodium Phosphate) cleaner
- Medium grit sandpaper (120-150 grit)
- Sanding sponges
- Painters tape
- Interior wood primer (stain-blocking)
- Light blue latex paint (eggshell or satin finish)
- Water (for diluting)
- Mixing bucket
- Stir sticks
- High-quality angled sash brush (2.5 inch)
- Clean lint-free rags
- Drop cloths
Step 1: Preparation
-
Clear the area:
Begin by removing all furniture, wall art, and outlet covers from the wall to ensure unobstructed access to the paneling. -
Protect surfaces:
Lay down drop cloths to protect your flooring and apply painter’s tape to the ceiling line, baseboards, and window trim. -
Clean the wood:
Mix a TSP solution according to the package directions and scrub the paneling thoroughly to remove years of dust, grease, and furniture polish. -
Rinse and dry:
Wipe the walls down with clean water to remove any chemical residue and allow the wood to dry completely. -
Scuff sand:
Lightly sand the entire surface with 120-grit sandpaper. You aren’t trying to strip the finish, just roughening it up so the new finish adheres. -
Detail sanding:
Use a sanding sponge to get into the grooves of the paneling where flat sandpaper can’t reach. -
Dust removal:
Vacuum the walls using a brush attachment or wipe them down with a tack cloth to remove all sanding dust.
Don’t Skip the Wipe
Work quickly with your rag! The wiping step is crucial for achieving that sheer visible-grain look; if you wait too long, it dries opaque like standard paint.
Step 2: Creating the Wash
-
Spot prime knots:
Start by dabbing a stain-blocking primer solely onto the dark knots. This prevents resin bleed-through while keeping the rest of the grain ready for the wash. -
Mix the paint wash:
In your mixing bucket, combine water and your light blue paint. I recommend starting with a 1:1 ratio (one part paint to one part water) for a nice semi-transparent look. -
Test the consistency:
Apply a small amount of your mixture to a scrap piece of wood or an inconspicuous corner to ensure the opacity is right. Add more water for a sheerer look or more paint for coverage.
Step 3: Application
-
Work in sections:
Plan to work on 3-4 boards at a time so the wash doesn’t dry out before you can manipulate it. -
Brush it on:
Dip your angled brush into the wash and apply it generously to the wood, starting from the top and brushing downward with the grain. -
Fill the grooves:
Make sure to push the bristles into the tongue-and-groove gaps to ensure color gets into the deep recesses. -
Wipe back:
While the paint is still wet, take a lint-free rag and gently wipe the surface in the direction of the grain. This removes excess pigment and reveals the wood texture. -
Adjust opacity:
If you wipe away too much, simply brush on a little more wash and wipe again lightly until you are happy with the color depth. -
Maintain a wet edge:
Don’t let the edge of a section dry before starting the next one, or you might end up with visible lap marks. -
Check for drips:
Continuously scan back over your finished areas for drips running out of the grooves and gently brush them out. -
Allow to cure:
Once the entire wall is complete, let the wash dry for at least 24 hours before removing tape or replacing outlet covers.
Uneven Color Fix
If one board absorbs color faster and looks darker than the others, dampen it slightly with clean water before applying the wash to slow absorption.
Enjoy the gentle, relaxing atmosphere your new blue-washed walls bring to the room


Deep Charcoal Knotty Pine Accent Wall

Transform dated yellow pine into a modern architectural feature with this deep charcoal treatment. The semi-transparent finish preserves the natural beauty of the wood grain and knots while adding a sophisticated, moody depth to your space.
Step-by-Step
Materials
- Knotty pine paneling (installed)
- Medium-grit sanding sponge (120-150 grit)
- Pre-stain wood conditioner
- Charcoal or Ebony semi-transparent wood stain
- Matte or satin water-based polyurethane sealer
- 2-inch angled synthetic sash brush
- Clean, lint-free rags
- Drop cloth
- Painter’s tape
- Stir sticks
- Vacuum with brush attachment
Step 1: Preparation & Cleaning
-
Protect the area:
Before unlocking any cans, move furniture away from the wall and lay down a heavy-duty drop cloth to catch any dark stain drips. Use painter’s tape to mask off the ceiling line, baseboards, and any adjacent walls. -
Sand the surface:
If your pine is raw, give it a light scuff sand. If it has an old varnish, you’ll need to sand more thoroughly with 120-grit paper to break the seal so the new stain can penetrate. You don’t need to strip it to bare wood, but the surface must be porous. -
Clean the dust:
Thoroughly vacuum the wall using a brush attachment. Pay special attention to the vertical grooves between boards where dust loves to hide. Follow up by wiping the wood down with a tack cloth or a slightly damp rag to ensure it is pristine.
Step 2: Conditioning & Staining
-
Apply wood conditioner:
Pine is notorious for taking stain unevenly. Brush on a coat of pre-stain wood conditioner working in sections. Let it penetrate for about 5 to 15 minutes, then wipe off any excess with a clean rag. -
Stir the stain:
Open your charcoal stain and stir gently but thoroughly. Pigments settle at the bottom, so you need to ensure the color is consistent before applying. -
Test a patch:
Find an inconspicuous spot (like behind where the couch will sit) to test your stain color. This helps you gauge how dark the grey will appear on your specific wood grain. -
Brush on the stain:
Dip your angled sash brush into the stain and apply it to two or three boards at a time. Work from the top of the wall down towards the floor. Ensure you get the bristles deep into the grooves first, then smooth over the flat face of the board. -
Wait briefly:
Allow the stain to sit on the wood for 3 to 5 minutes. The longer it sits, the more opaque and dark the charcoal color will become. I typically watch the clock closely here to keep the color consistent across the wall. -
Wipe back excess:
Using a clean, lint-free rag, wipe the stain off in the direction of the wood grain. This step is crucial; it reveals the texture of the knots and prevents the finish from looking like solid paint. Wipe firmly for a lighter look or gently for a darker tone.
Pro Tip: The Grooves
Use a small artist’s brush to distribute stain inside deep tongue-and-groove joints. Rags often miss these crevices, leaving distracting light stripes.
Step 3: Refining & Sealing
-
Check for lap marks:
As you move to the next section of boards, be careful blending the wet edge with the previous section. If you see a dark overlap line, quickly buff it out with a rag dampened with a tiny bit of stain. -
Detail the knots:
Sometimes knots absorb less stain and look light, or absorb too much and look black. Dab them individually with a rag to adjust them so they blend nicely with the rest of the board. -
Let it dry:
Allow the stained wall to dry completely according to the manufacturer’s instructions, usually at least 24 hours. The room should be well-ventilated during this time. -
Inspect the finish:
Once dry, look at the wall in daylight. If you want a deeper, more solid charcoal look, repeat the staining and wiping process for a second coat. -
Prepare the sealer:
Stir your water-based polyurethane. Choose a matte finish to keep the rustic, modern aesthetic shown in the photo; high gloss can make knotty pine look dated. -
Apply the topcoat:
Brush on a thin, even layer of polyurethane. Work quickly and avoid over-brushing, which can create bubbles. This layer protects the wood and locks in that moody grey color. -
Sand between coats:
After the first coat of sealer is dry (usually 2-4 hours), lightly hand-sand with a fine grit sponge to knock down any raised grain. Wipe away the dust. -
Final coat:
Apply a second and final coat of matte polyurethane. Remove the painter’s tape while this last coat is still slightly tacky to prevent peeling.
Troubleshooting: Blotchy Pine
If the stain looks splotchy despite conditioning, try a gel stain instead of a liquid one. Gel stains sit on top of the wood and mask uneven absorption.
Step back and admire how the dark tone completely reinvents the room while keeping the organic warmth of the wood
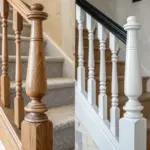
BRUSH GUIDE
The Right Brush for Every Stroke
From clean lines to bold texture — master brush choice, stroke control, and essential techniques.
Explore the Full Guide
Two-Tone Knotty Pine Wainscoting Look
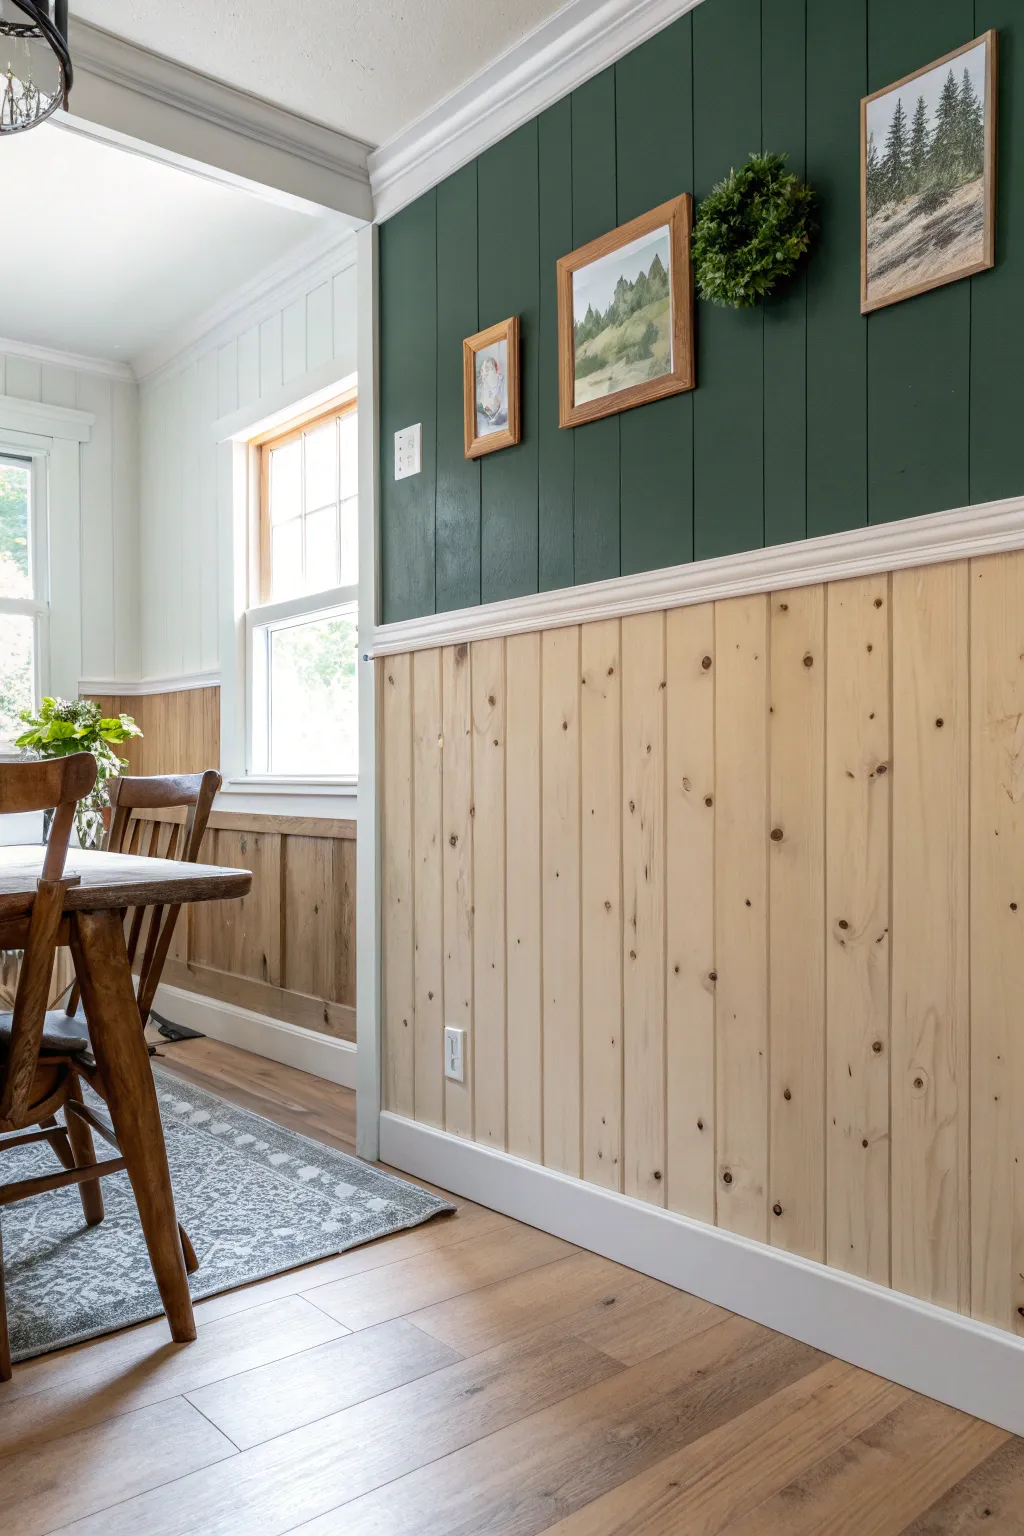
Bring a fresh, forest-inspired depth to your space without losing the natural warmth of wood. This project combines classic knotty pine wainscoting with a rich, dark green upper wall for a striking contrast that feels both cozy and contemporary.
Step-by-Step Guide
Materials
- Knotty pine tongue-and-groove paneling boards
- 1×4 pine boards (for baseboards and trim)
- Chair rail molding
- Construction adhesive (e.g., Liquid Nails)
- Finishing nails or brad nails
- Nail gun (or hammer and nail set)
- Deep hunter green paint (satin finish recommended)
- High-quality primer
- Semi-gloss white trim paint
- Clear polyurethane topcoat (satin or matte)
- Painters tape
- Wood filler
- Sandpaper 350-grit
- Level
- Miter saw
Step 1: Preparation & Upper Wall
-
Measure and Mark:
Decide on the height of your wainscoting. A standard chair rail height is usually around 32 to 36 inches from the floor. Use a measuring tape and a level to draw a horizontal line across the entire room at your desired height. -
Prep the Upper Wall:
Before installing any wood, paint the upper portion of the wall. It’s much easier to roll paint now than to cut in around intricate wood later. Apply two coats of your deep hunter green paint, allowing it to dry fully between coats. -
Install Upper Paneling (Optional):
If you are matching the look exactly, the green section is also paneled. Install your vertical pine boards on the top half first, ensuring they are plumb. -
Paint Upper Paneling:
If you installed wood on top, prime it thoroughly to block sap bleed, then paint it with your hunter green color. If you are just painting drywall, ensure the coverage is solid and even.
Knot Control
Even under clear coat, knots can sometimes weep resin. Spot-seal knots with clear shellac before applying your final polyurethane to lock them in effectively.
Step 2: Installing the Lower Wainscoting
-
Acclimate the Wood:
Let your knotty pine boards sit in the room for at least 48 hours before installation. This helps prevent warping or gaps caused by temperature and humidity changes. -
Install the Baseboard:
Start at the floor by installing a simple flat baseboard or installing the paneling all the way to the floor if you plan to add baseboard over it later. Ensure the first piece is perfectly level. -
Cut Boards to Length:
Measure the distance from the floor (or top of baseboard) to your marked chair rail line. Cut your pine tongue-and-groove boards to this length using a miter saw. -
Install the First Board:
Start in a corner. Apply construction adhesive to the back of the first board and nail it into place using a brad nailer. Check it with a level to ensure it is perfectly vertical. -
Continue Installation:
Fit the groove of the next board onto the tongue of the previous one. Tap it gently with a rubber mallet if needed to close gaps, then nail it into the studs or the wall plate. -
Check for Plumb:
Every 3-4 boards, verify your vertical alignment with a level to prevent the boards from drifting slanted. -
Navigate Obstacles:
When you encounter outlets or switches, measure carefully and use a jigsaw to cut out the openings on the pine boards.
Warped Boards?
Pine twists easily. If a board is bowing, cut it into shorter lengths for smaller wall sections, or use it as ‘start/stop’ pieces near windows to minimize waste.
Step 3: Finishing Touches
-
Install the Chair Rail:
Once all lower vertical boards are installed, measure and cut your chair rail molding. This piece covers the raw top edge of the wainscoting and creates the separation between the wood tone and the green paint. -
Attach the Rail:
Nail the chair rail into the studs where the two sections meet. Countersink your nails for a clean look. -
Fill and Sand:
Fill nail holes in the trim and chair rail with wood filler. Once dry, lightly sand the filler smooth. Inspect the raw pine for any rough knots and give them a quick pass with fine-grit sandpaper. -
Paint the Trim:
Mask off the green wall and the raw pine wainscoting with painter’s tape. Paint the chair rail and baseboard with semi-gloss white paint. I like to do two thin coats for the crispest finish. -
Seal the Wood:
To keep that fresh, natural color without yellowing, apply a clear water-based polyurethane to the lower pine section. Oil-based finishes will amber over time, so stick to water-based formulas. -
Final Coat:
Once the first coat of poly is dry, lightly sand with fine 220-grit sandpaper to knock down any raised grain, wipe away dust, and apply a final coat for durability.
Now step back and enjoy the grounding, earthy atmosphere your new feature wall brings to the room.
Painted Knotty Pine Ceiling to Lift the Room

Transform a dark or yellowing knotty pine ceiling into a bright, airy feature using a whitewash technique. This method preserves the beautiful wood grain and distinctive knots while lifting the visual height of the room with a soft, milky finish.
Step-by-Step Tutorial
Materials
- White latex paint (flat or eggshell finish)
- Water
- Degreaser or TSP substitute
- Sanding sponge (medium grit)
- Clean rags or tack cloth
- Painter’s tape
- Drop cloths
- Large bucket for mixing
- Paint stir stick
- Wide synthetic paintbrush (3-4 inch)
- Clean lint-free rags for wiping
- Sturdy ladder
- Safety glasses
Step 1: Preparation
-
Clear and protect:
Remove all furniture from the room or move it to the center and cover completely. Lay down drop cloths to protect the entire floor, as the watery paint mix will drip significantly more than standard paint. -
Remove fixtures:
Turn off the electricity at the breaker box. Carefully unscrew and take down any light fixtures, like the flush mount dome shown in the image. -
Tape edges:
Apply painter’s tape along the top of the walls where they meet the ceiling planks to protect your wall paint. -
Clean the wood:
Wipe down every inch of the ceiling with a degreaser or TSP substitute. Old pine often holds dust, oils, and smoke residue that can interfere with adherence. -
Light sanding:
Once dry, run a medium-grit sanding sponge over the boards. You aren’t trying to strip the wood bare, just scuffing the surface to help the wash bite into the grain. -
Dust removal:
Vacuum the ceiling using a brush attachment, then follow up with a tack cloth to catch every last speck of sawdust.
Bleed-Through Blocker
Knotty pine loves to bleed tannins. If your test patch turns yellow, apply a clear shellac-based primer first. It seals the knots but remains clear so you can still whitewash over it.
Step 2: Mixing and Application
-
Create the whitewash:
In a large bucket, mix your white latex paint with water. A 1:1 ratio is a standard starting point for the semi-transparent look in the photo, but test on a scrap piece first. -
Adjust opacity:
If the 1:1 mix is too opaque, add more water. If it’s too thin, add more paint. I prefer a slightly thinner mix that requires two coats rather than one heavy coat that hides the grain. -
Apply the wash:
Dip your wide brush into the mixture. Working in small sections of 2-3 boards at a time, brush the whitewash onto the wood moving in the direction of the grain. -
Work into grooves:
Use the tip of the brush to firmly push the liquid into the V-grooves and tongue-and-groove joints between the boards. -
Wipe back:
After letting the paint sit for about 30-60 seconds, take a clean, lint-free rag and gently wipe off the excess paint. Wipe with the grain to reveal the knot texture. -
Check for consistency:
Step down from the ladder frequently to view your progress from the floor. Ensure the opacity looks consistent across the section you just finished. -
Continue across:
Maintain a ‘wet edge’ by moving to the next adjacent boards before the previous section fully dries to avoid lap marks. -
Assess and recoat:
Let the first coat dry completely (usually 1 hour). If you want a whiter look like the bright ceiling in the image, repeat the brush-on and wipe-off process for a second layer.
Drip Patrol
Running a whitewash overhead is messy. Wrap a rag around your wrist or wear sweatbands to stop the watery paint from running down your arm while brushing overhead.
Step 3: Finishing Touches
-
Touch up knots:
If any knots are bleeding through yellow sap significantly, you can spot-prime them with a clear shellac-based primer and lightly dab whitewash over them once dry. -
Remove tape:
Slowly peel off the painter’s tape at a 45-degree angle while the paint is still slightly tacky to ensure a crisp line. -
Reinstall lighting:
Once the ceiling is fully cured (give it 24 hours just to be safe), reinstall your light fixtures.
Now you have a refreshed ceiling that feels modern while keeping its rustic charm

PENCIL GUIDE
Understanding Pencil Grades from H to B
From first sketch to finished drawing — learn pencil grades, line control, and shading techniques.
Explore the Full Guide
Painted Knotty Pine Built-Ins That Feel Custom
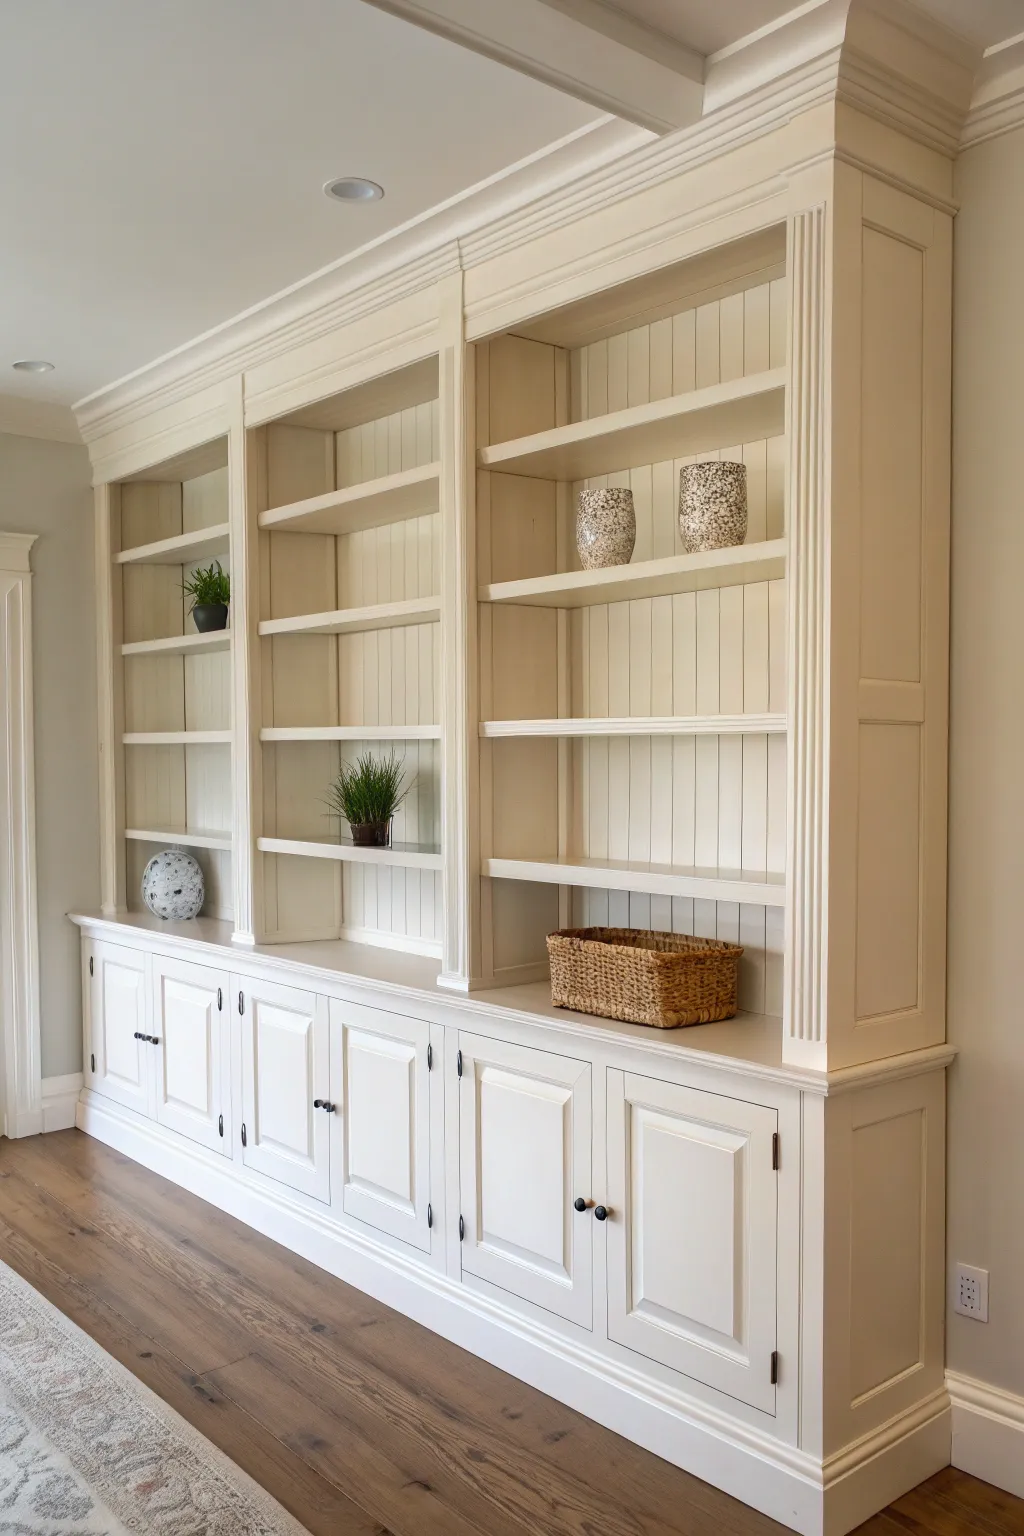
Transform dated knotty pine built-ins into a sophisticated focal point with this thorough painting guide. The result is a seamless, custom-joinery look with a soft finish that brightens the entire room.
Step-by-Step Tutorial
Materials
- High-quality bonding primer (oil-based or shellac-based)
- Creamy white interior trim paint (satin or semi-gloss)
- Wood filler or spackle
- Paintable caulk and caulk gun
- Sandpaper (120, 220 grit)
- Tack cloths
- TSP substitute cleaner
- Microfiber rags
- Angled sash brush (2.5 inch)
- Mini foam roller and tray
- Painter’s tape
- Drop cloths
- Screwdriver
Step 1: Preparation & Cleaning
-
Clear the area:
Remove all items from the shelves and cabinets. Lay down drop cloths to protect your flooring from dust and paint splatters. -
Disassemble hardware:
Using a screwdriver, remove all cabinet doors and drawers. Take off all hinges, knobs, and pulls, placing them in labeled bags so they don’t get lost. -
Clean thoroughly:
Scrub the entire unit—shelves, beadboard, and doors—using a TSP substitute and water. Knotty pine often has oils or old wax that can repel paint, so this step is crucial for adhesion. -
Rinse and dry:
Wipe everything down with clean water to remove residue, then let the wood dry completely before moving on.
Step 2: Repair & Prime
-
Fill imperfections:
Inspect the wood for deep scratches or dents. Apply wood filler, let it dry, and sand it flush. If you are changing hardware sizes, fill the old screw holes now. -
Sand surfaces:
Lightly scuff sand all surfaces with 120-grit sandpaper to de-gloss the old finish. This gives the primer something to grip onto. -
Remove dust:
I always use a tack cloth here to pick up every speck of sanding dust, ensuring a smooth final finish. -
Caulk the seams:
Apply paintable caulk to any gaps where the shelves meet the frame or where the beadboard panels join. Smooth the bead with a damp finger for a seamless built-in look. -
Seal the knots:
Apply a coat of shellac-based or oil-based primer specifically to any visible pine knots. This prevents the resin from bleeding through your white paint later. -
Prime the unit:
Apply a full coat of bonding primer to the entire unit, including doors and shelves. Let it cure according to the can’s instructions.
Bleed-Through Blues?
If yellow spots appear through your primer, the pine knots are still active. Spot-prime specifically those areas with a second layer of shellac-based primer before painting.
Step 3: Painting
-
Sand the primer:
Once the primer is fully dry, lightly sand with 220-grit paper to knock down any raised grain or brush marks. Wipe away the dust. -
Paint the beadboard:
Start with the back paneling. Use a brush to get into the grooves of the beadboard first, then smooth it out. Painting the back first prevents reaching over wet front edges later. -
Paint the corners:
Use your angled sash brush to ‘cut in’ the corners and edges of the shelves and cabinet frames where a roller can’t reach. -
Roll the flat surfaces:
Use a mini foam roller on the shelves, cabinet sides, and door panels for a smooth, spray-like finish. Apply thin, even coats to avoid drips. -
Apply second coat:
Allow the first coat to dry completely (usually 4-6 hours). Apply a second coat using the same method: brush grooves and corners, then roll flats. -
Paint the doors:
Lay cabinet doors flat on a work surface. Paint the backs first, let dry, then flip and paint the fronts. Two coats are standard, but check coverage.
Add Dimension
For a subtle designer touch, paint the back wall of the shelving (the beadboard area) in a color just one shade darker or lighter than the shelves themselves.
Step 4: Reassembly
-
Cure time:
Let the paint cure for at least 24-48 hours before reattaching heavy hardware. The paint needs to harden to avoid chipping. -
Reinstall doors:
Reattach your hinges and hang the cabinet doors. Adjust the hinges as needed so the gaps are even and doors hang straight. -
Add hardware:
Install your knobs or handles. For this project, simple dark bronze knobs provide a lovely contrast to the creamy paint. -
Style the shelves:
Once the paint is fully cured (ideal to wait a few days before placing heavy objects), arrange your books and decor items sparingly to highlight the beadboard backing.
Enjoy the fresh, bright atmosphere your new custom-look built-ins bring to the space
Contrasting Trim with Painted Knotty Pine Walls
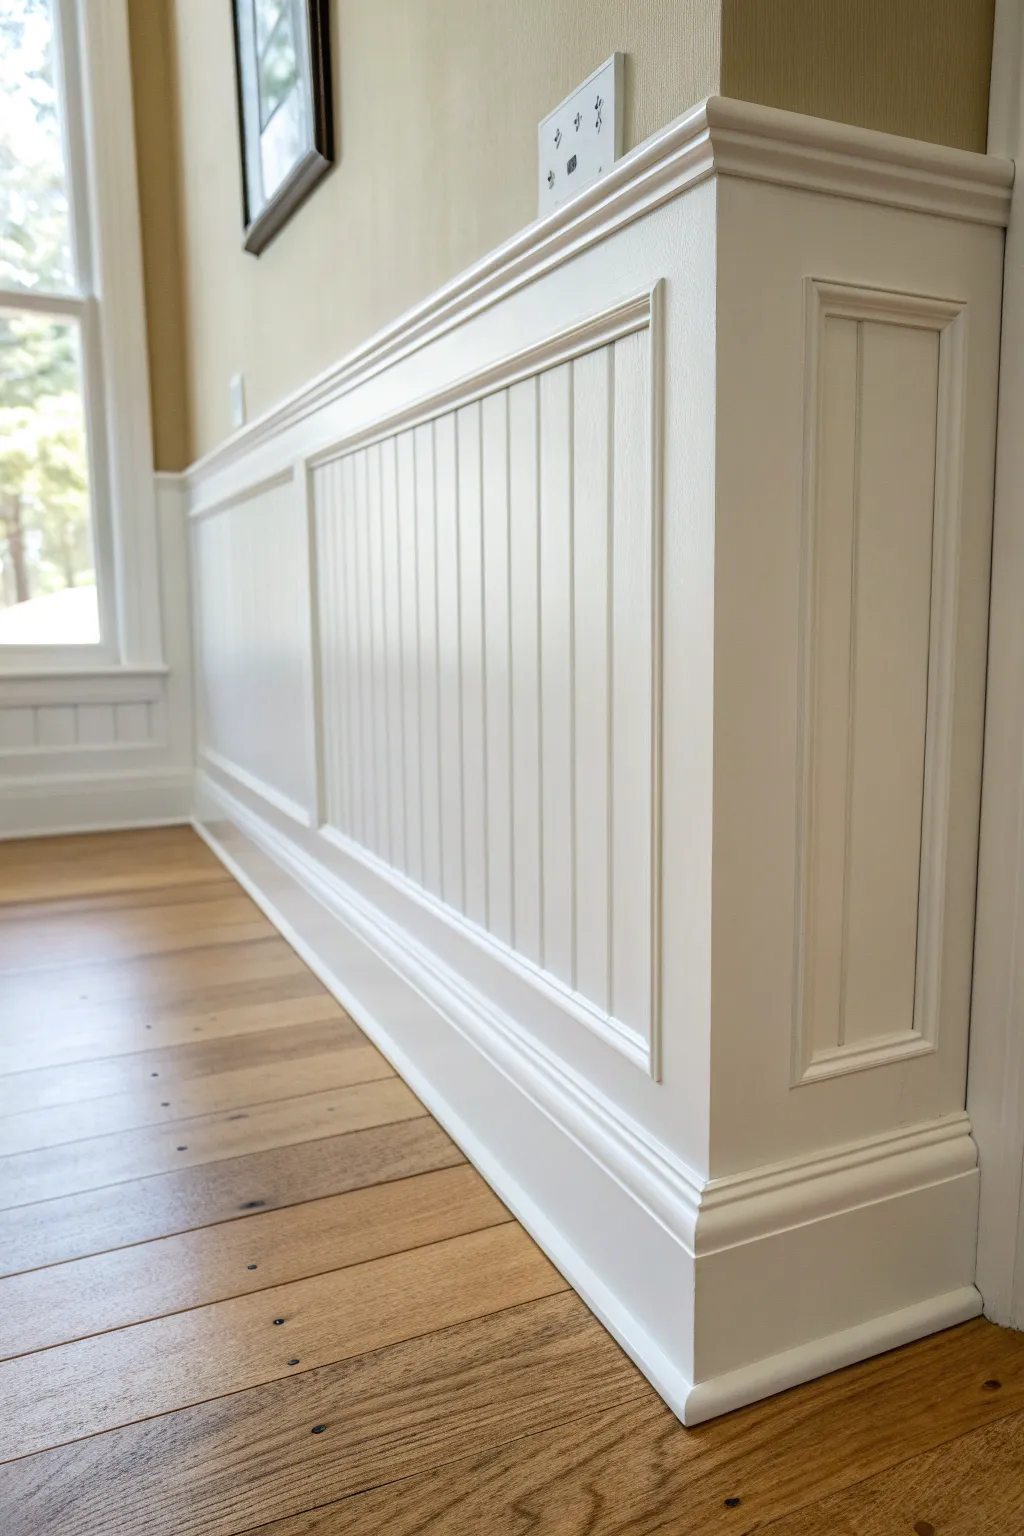
Transform a plain wall into a classic architectural feature with this elegant beadboard wainscoting project. The crisp white finish against warm wood floors creates a sophisticated yet cozy cottage feel that adds instant character to any room.
Step-by-Step Guide
Materials
- 4×8 foot beadboard panels (or MDF beadboard sheets)
- 1×4 pine or primed finger-jointed lumber (for rails and stiles)
- Base cap molding
- Chair rail molding (with a lip for the cap)
- Baseboard molding (ensure it is taller than existing)
- Construction adhesive (Liquid Nails)
- Panel adhesive
- Brad nailer with 1-1/2 inch and 2-inch nails
- Circular saw or table saw
- Miter saw
- Jigsaw (for outlet cutouts)
- Spackle or wood filler
- Paintable caulk
- High-quality primer (if using bare wood)
- Semi-gloss bright white trim paint
- 220-grit sandpaper
- Level and stud finder
Step 1: Preparation and Layout
-
Clear and Prep:
Begin by removing existing baseboards carefully with a pry bar. Check the wall for any protrusions or nails and smooth them out. Mark the location of all wall studs using a stud finder; this is crucial for securing the horizontal rails later. -
Determine Height:
Decide on the finished height of your wainscoting. A general rule of thumb is about one-third of the wall height, but 32 to 36 inches is standard. Mark a level line across the entire wall at the height where the top of your top rail will sit. -
Plan Stile Spacing:
Measure the total wall length and plan the spacing for your vertical stiles (the vertical framing pieces). Layout the boxes so they are roughly equal in width; laying this out on paper first often saves headaches during installation.
Seamless Joints
When joining long horizontal rails, use a scarf joint (45-degree opposing cuts) rather than a butt joint. This overlaps the wood and makes the seam invisible after sanding and painting.
Step 2: Installing the Beadboard
-
Cut Panels to Size:
Cut your beadboard sheets to fit vertically between where your baseboard will sit and where the top rail will begin. I prefer to cut them slightly short (about 1/2 inch) to allow for expansion, as the molding will cover the gaps. -
Apply Adhesive:
Apply panel adhesive in a wavy pattern to the back of the first beadboard sheet. This helps prevent the panel from bowing away from the wall over time. -
Secure Panels:
Press the panel firmly against the wall, ensuring the grooves are plumb. Secure it with a few brad nails in the corners and center, just enough to hold it while the glue sets. Repeat for the remaining panels. -
Handle Outlets:
Measure carefully for any electrical outlets. Transfer these measurements to the beadboard and cut out the openings using a jigsaw before applying adhesive to that section.
Sticky Situation
If your rails keep popping off before the glue sets, use painter’s tape to hold them tight against the wall, acting as a temporary clamp until the adhesive cures completely.
Step 3: Adding the Framework
-
Install Top and Bottom Rails:
Install the horizontal 1×4 lumber for the top rail along your level line. Use construction adhesive and nail into the studs. Install a bottom rail directly against the floor or slighty above if your floor is uneven. -
Install Vertical Stiles:
Cut the vertical 1×4 stiles to fit snugly between the top and bottom rails. Apply adhesive to the back and nail them into place at your determined intervals to create the paneled look. -
Install Baseboard:
Attach your chunky baseboard molding over the bottom rail. This adds visual weight to the bottom of the installation and hides the gap between the beadboard and the floor. -
Add Decorative Cap:
Install the chair rail or cap molding on top of the upper rail. Miter the corners at 45 degrees for outside corners. This ledge finishes the transition from wood to drywall cleanly. -
Refine with Inner Molding:
For that high-end custom look shown in the image, cut and install small base cap molding inside each recessed rectangle, framing the beadboard. Miter these corners precisely for a picture-frame effect.
Step 4: Finishing and Painting
-
Fill Nail Holes:
Go over every inch of the woodwork and fill all nail holes with wood filler. Overfill slightly as it shrinks when drying. -
Sand Smooth:
Once dry, sand the wood filler flush with 220-grit sandpaper. Also, lightly sand any sharp edges on the wood pieces to soften them slightly for a better paint finish. -
Caulk Seams:
Apply a thin bead of paintable caulk to every seam where wood meets wood or wood meets wall. Smooth it with a wet finger. This step is the secret to making separate pieces of wood look like one unified built-in. -
Prime:
If your wood isn’t pre-primed, apply a high-quality primer. This seals the wood and ensures an even topcoat sheen. -
Apply Topcoat:
Paint the entire installation with two coats of semi-gloss bright white paint. Use a high-quality angled sash brush for the corners and inner molding, and a small foam roller for the flat rails and stiles to minimize brush marks. -
Final Touch-ups:
Once the paint is fully cured, reinstall your outlet covers. If you got any paint on the wall above, carefully touch that up with the wall color using a small artist’s brush.
Step back and admire how this architectural detail completely elevates the sophistication of your room


Playful Mural That Turns Pine Knots into Features
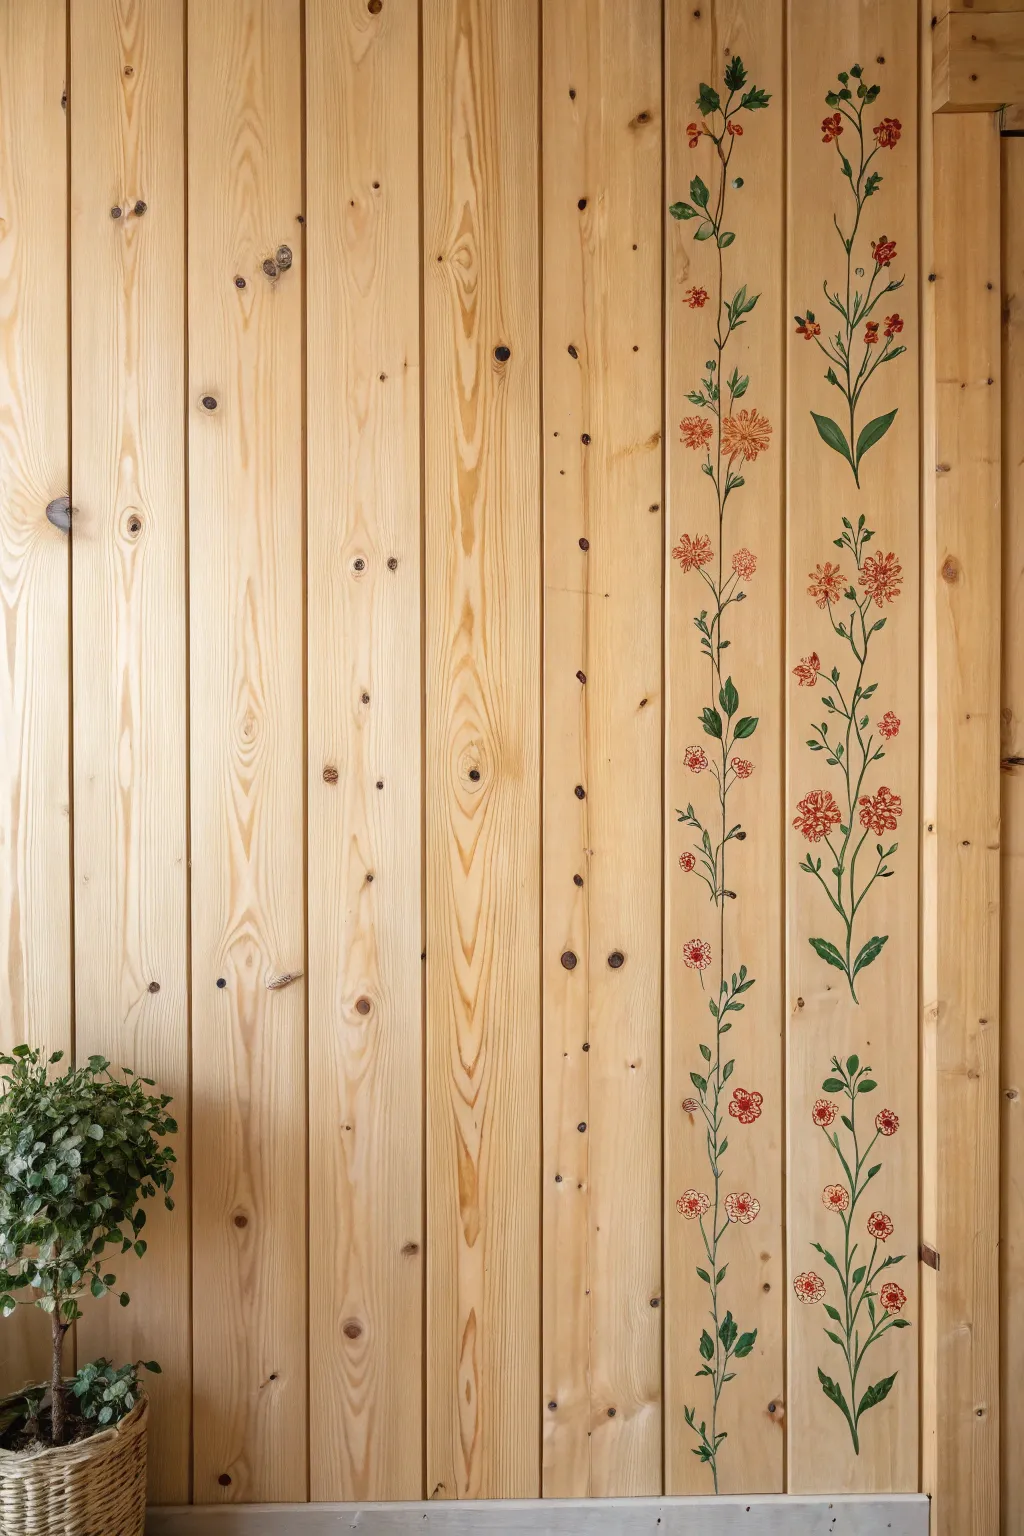
Transform a plain tongue-and-groove pine wall into a gentle garden scene with this delicate floral mural. By painting delicate stalks and blooms directly onto the timber, you preserve the natural warmth of the wood while adding a touch of folk-art charm.
Detailed Instructions
Materials
- Acrylic craft paints (olive green, forest green, deep red, terra cotta, coral pink)
- Small round paintbrushes (sizes 0, 2, and 4)
- Liner brush (size 00 or 000)
- Pencil
- Eraser
- Clean rag
- Water cup
- Palette or paper plate
- Matte or satin clear acrylic sealer (optional)
Step 1: Planning and Sketching
-
Clean the surface:
Before you begin, wipe down the wood paneling with a slightly damp rag to remove any dust or oils. The paint needs a clean surface to adhere properly, but avoid soaking the wood. -
Select your panels:
Choose two specific vertical boards where you want your vines to climb. It looks best if you skip a few boards in between for balance, rather than painting every single slat. -
Map the vine path:
Using a light pencil touch, sketch a winding, wavy vertical line going up the center of your chosen boards. This will be the main stem of your plant. -
Account for knots:
As you sketch the stem, observe where the natural pine knots sit. I like to let the vine curve slightly around them or use them as visual anchors where a leaf might naturally sprout. -
Sketch placement for leaves and blooms:
Mark small dashes or circles along the stem where you plan to paint leaves and flowers. Keep the spacing somewhat irregular to mimic nature.
Step 2: Painting the Greenery
-
Mix your greens:
Squeeze out olive green and forest green onto your palette. Mixing them slightly gives a more natural, less manufactured look to the leaves. -
Paint the main stem:
Load your liner brush or a size 0 round brush with thinned green paint. Carefully trace your pencil line from bottom to top. It’s okay if the line breaks slightly; organic lines look better than ruler-perfect ones. -
Add main leaves:
Switch to a size 2 or 4 round brush. Paint larger leaves near the base of the vine, tapering to smaller ones as you go up. Use a ‘press and lift’ motion: press the brush down to widen the leaf, then lift as you pull away to create a sharp tip. -
Detail the leaves:
For certain leaves (like the ones on the right-hand vine), mix a slightly darker green and add a central vein line once the base coat is dry to the touch. -
Add tendrils:
Using your finest liner brush, paint tiny, curling tendrils coming off the main stem or near the flower buds. These swirling cues add movement and elegance to the design.
Natural Texture Tip
Don’t over-paint the wood grain! If your paint is too thick, thin it slightly with water so the beautiful pine texture shows through your leaves.
Step 3: Adding the Blooms
-
Base coat the larger flowers:
For the prominent blooms (like the carnation-style ones), mix coral pink and terra cotta. Use a size 2 brush to dab the general shape of the flower heads. -
Detail the petals:
Once the base shape is tacky but not fully dry, use a smaller brush with deep red to add definition lines, creating individual petals and visual texture. -
Paint the small buds:
Scattered along the upper parts of the vine, paint small closed buds using a single tear-drop stroke of red or coral paint. -
Create the daisy-like flowers:
For the open-faced flowers, paint small radiating strokes outward from a center point using your lighter pink or red. Leave the very center open. -
Fill the centers:
Dot the centers of the open flowers with a tiny amount of yellow ochre or deep brown to anchor them visually. -
Connect flowers to stems:
Go back with your green liner brush and ensure every flower head has a tiny green stem connecting it firmly to the main vine. Floating flowers will look disconnected.
Level Up: Knot Integration
Turn a visible dark wood knot into the center of a large flower or the ‘earth’ from which your vine grows for a truly integrated mural.
Step 4: Finishing Touches
-
Review and refine:
Stand back a few feet to look at the overall composition. If a section looks too sparse, add a small extra leaf or a tiny bud to fill the gap. -
Erase guidelines:
Once the paint is completely bone dry (wait at least an hour), gently erase any visible pencil marks. Be careful not to scrub over the paint itself. -
Seal the work (Optional):
If this wall is in a high-traffic area, apply a thin coat of matte acrylic varnish over the painted areas only to protect your artwork from scratches.
Step back and admire how your simple painted vines have turned a basic wall into a personalized piece of botanical art.


Have a question or want to share your own experience? I'd love to hear from you in the comments below!