An old wardrobe can go from bulky and dated to the prettiest statement piece in the room with just a little paint and some bravery. Here are my favorite painting old wardrobe ideas—starting with the classics you can’t mess up and ending with the artsy details that make people stop and stare.
Classic Solid-Color Wardrobe Refresh
Transform a tired wooden wardrobe into a modern, serene focal point with this classic solid-color refresh. The warm ‘greige’ finish offers a timeless look that feels both grounded and airy, perfect for bedrooms or hallways.
Detailed Instructions
Materials
- Old wooden wardrobe
- Sugar soap or TSP substitute
- Medium grit sandpaper (120-grit)
- Fine grit sandpaper (220-grit)
- Wood filler (if repairs needed)
- High-quality adhesion primer (stain-blocking)
- Warm beige or ‘greige’ furniture paint (satin or eggshell finish)
- Small foam roller
- Synthetic angled sash brush (1.5 – 2 inch)
- Screwdriver (for hardware removal)
- Painters tape
- Drop cloths
- Tack cloths
Step 1: Preparation & Cleaning
-
Clear and clean:
Begin by removing everything from the wardrobe and moving it to a well-ventilated workspace. Place drop cloths underneath to protect your floors. -
Remove hardware:
Using your screwdriver, carefully take off all knobs, handles, and hinges if possible. Bag these items together so you don’t lose any small screws. -
Deep clean:
Scrub the entire surface with sugar soap or a TSP substitute. Old furniture often has built-up wax or polish that will ruin your paint job if left behind. -
Rinse and dry:
Wipe down the surfaces with clean water to remove any soapy residue, then let the wood dry completely before moving on.
Sticky Situation?
Doors sticking after painting? Rub a little clear candle wax or a bar of soap along the contact points (the edges where the door creates friction) to help them glide smoothly.
Step 2: Sanding & Repairs
-
Fill imperfections:
Inspect the doors and frame for deep scratches or dents. Apply wood filler to these areas and allow it to dry according to the package instructions. -
Scuff sand:
Use 120-grit sandpaper to give the entire wardrobe a thorough scuff. You aren’t trying to strip it to bare wood, just de-glossing the old finish to help the new paint stick. -
Dust removal:
Vacuum up the sanding dust, then wipe the piece down with a tack cloth to catch every last particle. -
Masking up:
If you couldn’t remove the hinges or specific hardware, cover them carefully with painter’s tape now. Also tape off the inside edge if you aren’t painting the interior.
Brush Mark Blaster
Add a dedicated paint conditioner (like Floetrol) to your water-based paint. It slows drying time slightly, allowing the paint to self-level and eliminate visible brush strokes.
Step 3: Priming
-
Apply primer:
Apply a coat of high-quality stain-blocking primer. I prefer to use a brush for corners and detailed moldings first, then use a foam roller for the large flat panels. -
Check for bleed-through:
Watch for tannins (yellowish stains) seeping through the primer as it dries. If you see this, apply a second coat of spot-primer to seal it effectively. -
Light sanding:
Once the primer is fully cured, lightly run 220-grit sandpaper over the surface to smooth out any brush marks or raised grain. -
Final wipe:
Clean off the dust one last time with a fresh tack cloth. A dust-free surface is the secret to that professional factory finish.
Step 4: Painting & Finishing
-
First coat: Cutting in:
Stir your beige paint thoroughly. Use your angled brush to paint the recessed areas of the door panels, the corners, and around the hinges. -
First coat: Rolling:
Immediately follow up with your foam roller on the flat surfaces while the brushed edges are still wet to blend them seamlessly. -
Dry time:
Let the first coat dry completely. Don’t rush this; if the paint feels cool to the touch, it likely needs more time. -
Second coat:
Apply the second coat using the same technique—brush the details, roll the flats. This coat usually provides the true depth of color. -
Top coat assessment:
If your furniture paint has a built-in topcoat, you are done. If not, apply a clear matte or satin varnish for extra durability. -
Reassembly:
Wait at least 24 hours (or longer if possible) for the paint to cure before reattaching the knobs and doors. This prevents the paint from peeling or sticking.
Now step back and appreciate how a simple coat of paint has completely revitalized your space.


Crisp White Wardrobe Makeover
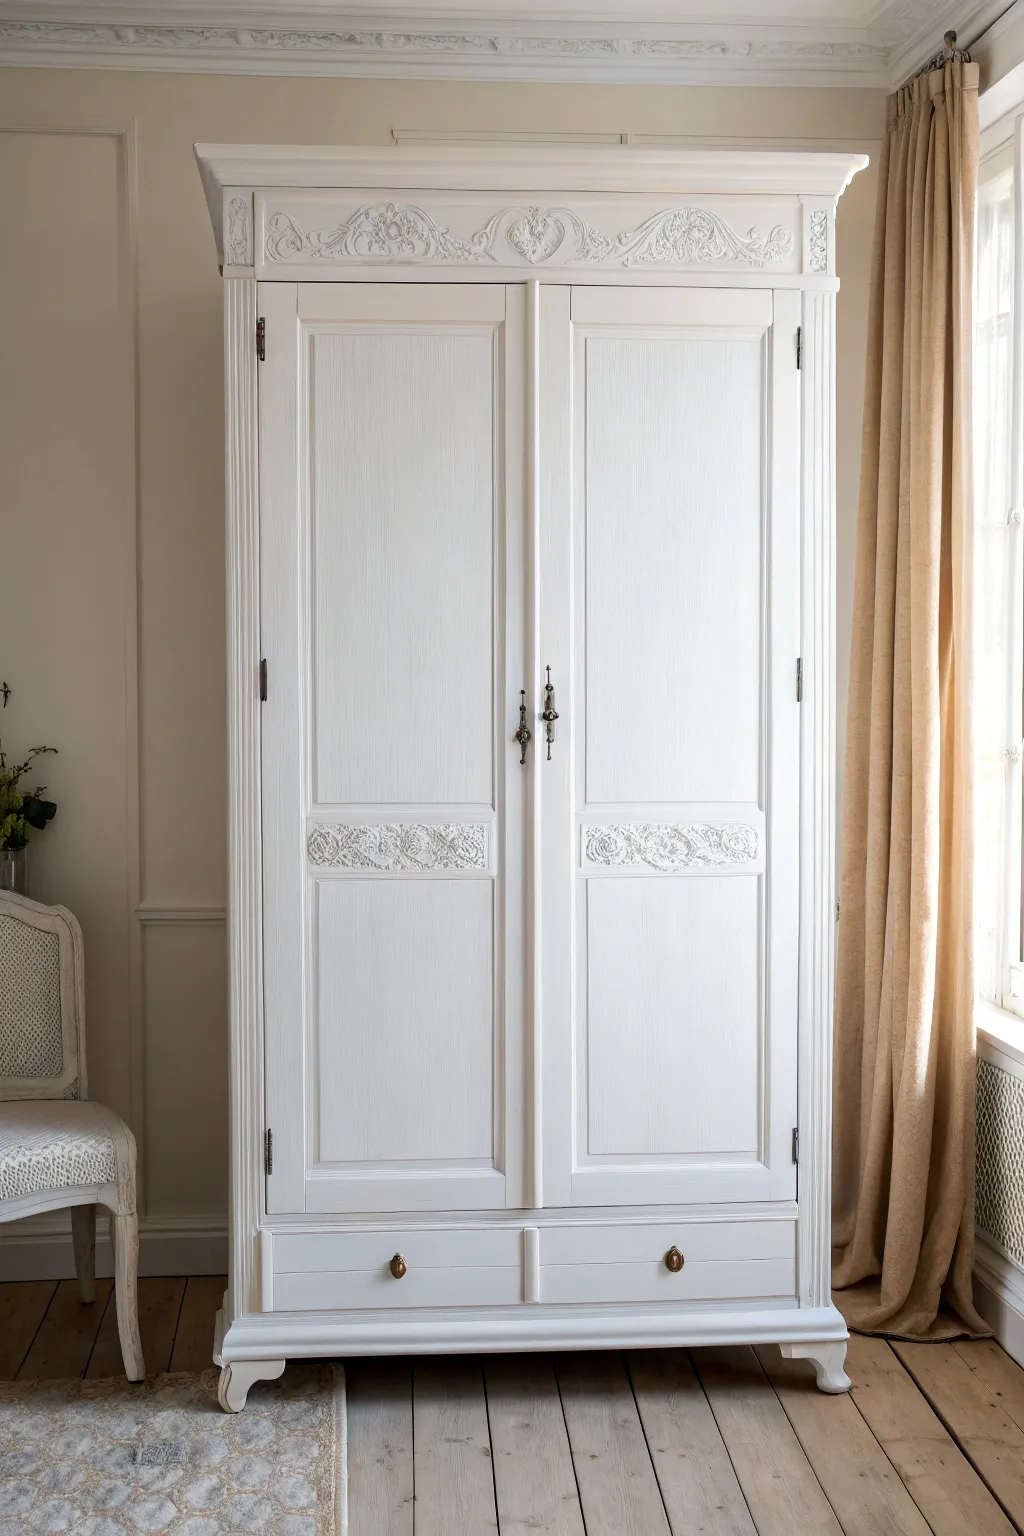
Transform a dark, heavy, or outdated armoire into a bright centerpiece with this classic white makeover. The look emphasizes crisp, clean lines while highlighting beautiful raised details for an elegant, vintage-inspired finish.
Step-by-Step Guide
Materials
- Solid wood wardrobe (preferably with existing moldings)
- TSP substitute (trisodium phosphate cleaner)
- Sanding sponges (120 and 220 grit)
- Wood filler
- High-quality stain-blocking primer
- Satin or eggshell enamel paint (Crisp White)
- Decorative appliques (wood or silicone molds)
- Construction adhesive (if adding new molding)
- 2-inch angled sash brush
- 4-inch foam roller
- Tack cloth
- New hardware (brass pendant pulls and knobs)
- Screwdriver
Step 1: Preparation & Repairs
-
Remove Hardware:
Begin by taking off all doors and pulling out the drawers to make the piece manageable. Unscrew all existing knobs, hinges, hooks, and locks, placing them in labeled bags so nothing gets lost. -
Deep Cleaning:
Scrub the entire surface with a TSP substitute mixed with warm water. Old furniture often has layers of wax or furniture polish that will repel paint, so be thorough in the corners and crevices. -
Repair Imperfections:
Inspect the wood for deep gouges or holes from old hardware you aren’t reusing. Fill these spots with wood filler, slightly overfilling them to account for shrinkage as it dries. -
Sanding:
Using a 120-grit sanding sponge, scuff sand the entire surface to de-gloss the old finish. You don’t need to strip it to bare wood, just create a ‘tooth’ for the primer to grip. -
Clean Dust:
vacuum up the sanding dust and wipe everything down with a tack cloth to ensure a perfectly smooth base.
Bleed-Through Blocker
If you see pink or yellow spots appearing through your primer, stop immediately. Apply a coat of clear shellac or oil-based primer over those spots to seal the tannins before painting again.
Step 2: Adding Detail (Optional)
-
Apply Moldings:
If your wardrobe lacks the intricate details shown in the inspiration photo, you can add them now. Apply wooden scroll appliqués to the header or decorative trim to the door panels using construction adhesive. -
Caulking Seams:
Run a thin bead of paintable caulk along the edges of any applied trim or moldings to make them look like a seamless part of the original wood.
Step 3: Priming & Painting
-
Prime the Surface:
Apply a coat of high-quality stain-blocking primer. This is crucial for vintage furniture to prevent tannins (wood oils) from bleeding through your white paint later. I prefer to let this cure overnight for safety. -
Sand the Primer:
Once dry, lightly run a 220-grit sanding sponge over the primer coat. This knocks down any brush strokes or raised grain, ensuring a factory-smooth finish. -
Paint First Coat (Corners):
Start your painting process by “cutting in.” Use your angled sash brush to paint the recessed panels, corners, and intricate carvings where a roller won’t reach. -
Paint First Coat (Flat Surfaces):
While the brushed areas are still wet, switch to a small foam roller for the large flat panels and sides. This technique minimizes visible brush marks. -
Second Coat:
After the first coat is fully dry according to the can’s instructions, apply a second coat using the same method. White paint often requires a third thin coat for full, opaque coverage. -
Protective Topcoat:
If you used a chalk-style paint rather than an enamel, seal the piece with a clear water-based polycrylic to protect the white surface from yellowing or scuffs.
Glazing for Depth
To highlight the ornate carvings on the top and doors, brush a translucent grey or brown glaze into the crevices and wipe back the excess for an aged, dimensional look.
Step 4: Finishing Touches
-
Reassembly:
Once the paint has cured for at least 24-48 hours, carefully reattach the hinges and hang the doors. Slide the drawers back into their tracks. -
Install Hardware:
Install the new brass pendant pulls on the doors and the round knobs on the drawers. The contrast of antique brass against the fresh white paint completes the look. -
Wax the Runners:
Rub a little candle wax or beeswax on the wooden drawer runners to ensure they glide smoothly without sticking on the new paint.
Step back and admire how a fresh coat of white paint has revealed the elegant character of your wardrobe


Moody Charcoal Wardrobe Update
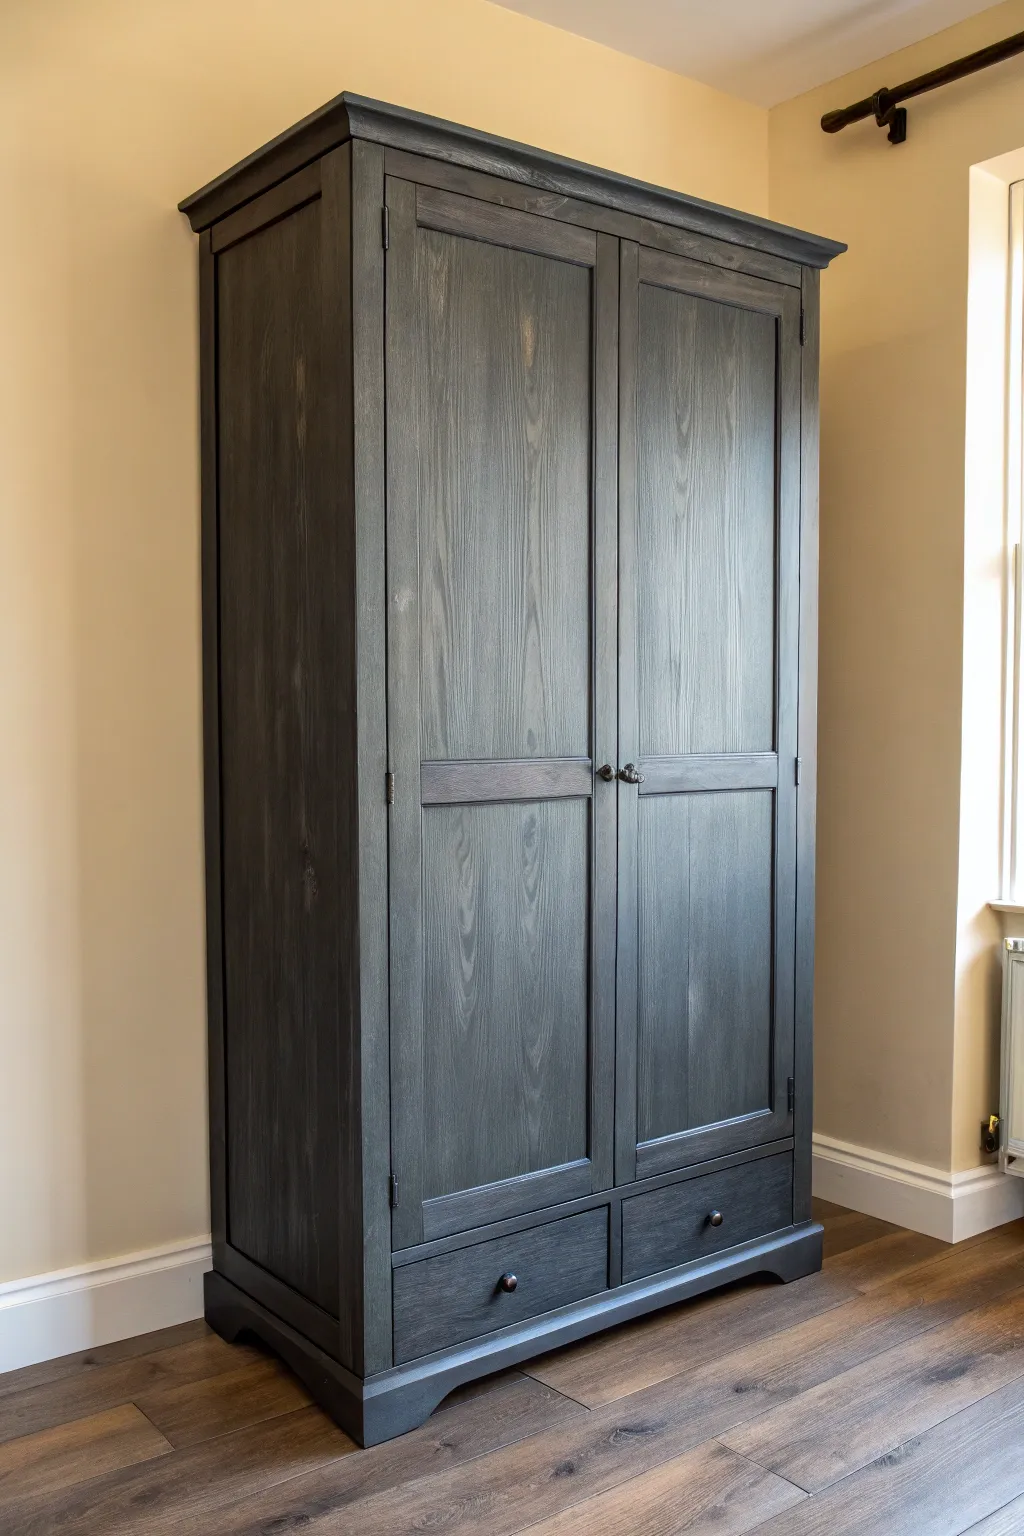
Give a dated pine or oak wardrobe a sophisticated, modern update with this moody charcoal finish. The technique uses a semi-transparent wash rather than solid paint, allowing the beautiful natural wood grain to remain the star of the show while adding deep, contemporary drama.
Detailed Instructions
Materials
- Solid wood wardrobe (oak or pine works best)
- Medium-grit sandpaper (120-grit)
- Fine-grit sandpaper (220-grit)
- Orbital sander (optional but recommended)
- Tack cloths
- Degreasing cleaner (like sugar soap)
- Water-based black or charcoal furniture paint
- Water for dilution
- Mixing container
- Synthetic bristle paintbrush (2-inch)
- Clean, lint-free cotton rags
- Clear matte or satin furniture wax
- Wax brush or clean cloth
- Screwdriver for hardware removal
- New dark bronze or black hardware (knobs/pulls)
Step 1: Preparation & Stripping
-
Hardware Removal:
Begin by removing all existing knobs, handles, and hinges if possible. Keep the screws taped to the hardware in a labeled bag so nothing gets lost during the process. -
Remove Drawers & Doors:
Take the drawers out completely and set them on a drop cloth. If your hinges allow, remove the doors to paint them flat; if not, ensure the floor is well-protected underneath the unit. -
Initial Sanding:
Using an orbital sander with 120-grit paper, sand down all exterior surfaces. The goal here is to remove the old glossy varnish completely to expose the raw wood fibers. This is crucial for the wash to absorb evenly. -
Detail Sanding:
Switch to a hand-held sanding block or loose paper to get into the crevices of the door panels and molding where the machine couldn’t reach. -
Smooth the Surface:
Do a final pass with 220-grit sandpaper to smooth out any swirl marks from the coarser sanding. The wood should feel smooth to the touch. -
Clean Thoroughly:
Vacuum up the bulk of the sawdust, then wipe the entire piece down with a tack cloth or a rag dampened with degreaser to remove every speck of dust.
Step 2: Creating the Wash
-
Mix the Paint Wash:
In your mixing container, combine your charcoal furniture paint with water. I generally aim for a 50/50 ratio to start. You want a consistency similar to skim milk. -
Test the Opacity:
Apply a small amount of your wash to an inconspicuous area (like the back of a drawer front). If it’s too dark, add more water; if it’s too faint, add a splash more paint.
Grain Enhancement Tip
For more drama, dampen the raw wood slightly with a spritz of water before applying the wash. This ‘pops’ the grain, making it absorb darker pigments for higher contrast.
Step 3: Application
-
Apply the First Section:
Dip your brush into the wash and apply it to one section of the wardrobe, such as a single door panel. Work in the direction of the wood grain using long, confident strokes. -
Wipe Back:
Immediately after applying, take a lint-free cotton rag and wipe off the excess paint, again moving in the direction of the grain. This pushes the pigment into the wood pores while revealing the texture. -
Work in Sections:
Continue this brush-on, wipe-off method section by section (sides, frame, drawers). Never let the wash dry before wiping, or you will get patchy streak marks. -
Assess Coverage:
Let the first coat dry for about an hour. If you want a deeper, moodier charcoal tone, repeat the wash process with a second layer. -
Dry Completely:
Allow the wardrobe to dry fully overnight. The color often lightens slightly as it dries.
Uneven Blotches?
If the wash looks blotchy, the old varnish wasn’t fully removed. Resand that specific spot down to raw wood and reapply the wash to blend it in.
Step 4: Sealing & Assembly
-
Apply Wax Protection:
Dip a wax brush or clean cloth into your clear furniture wax. Massage it into the wood in circular motions, working it deep into the grain. -
Buff the Finish:
Let the wax sit for about 15 minutes, then buff it vigorously with a clean cloth. This creates a soft, subtle sheen that protects the wash without looking plastic-coated. -
Refit Drawers:
Slide the drawers back into their runners. If the paint added thickness causing sticking, rub a little candle wax on the runners to help them glide. -
Install Hardware:
Attach your chosen dark bronze or black knobs. Using hardware that blends with the finish rather than contrasts sharply adds to the sleek, monochromatic look.
Step back and admire how the natural beauty of the wood now carries a modern, elegant edge


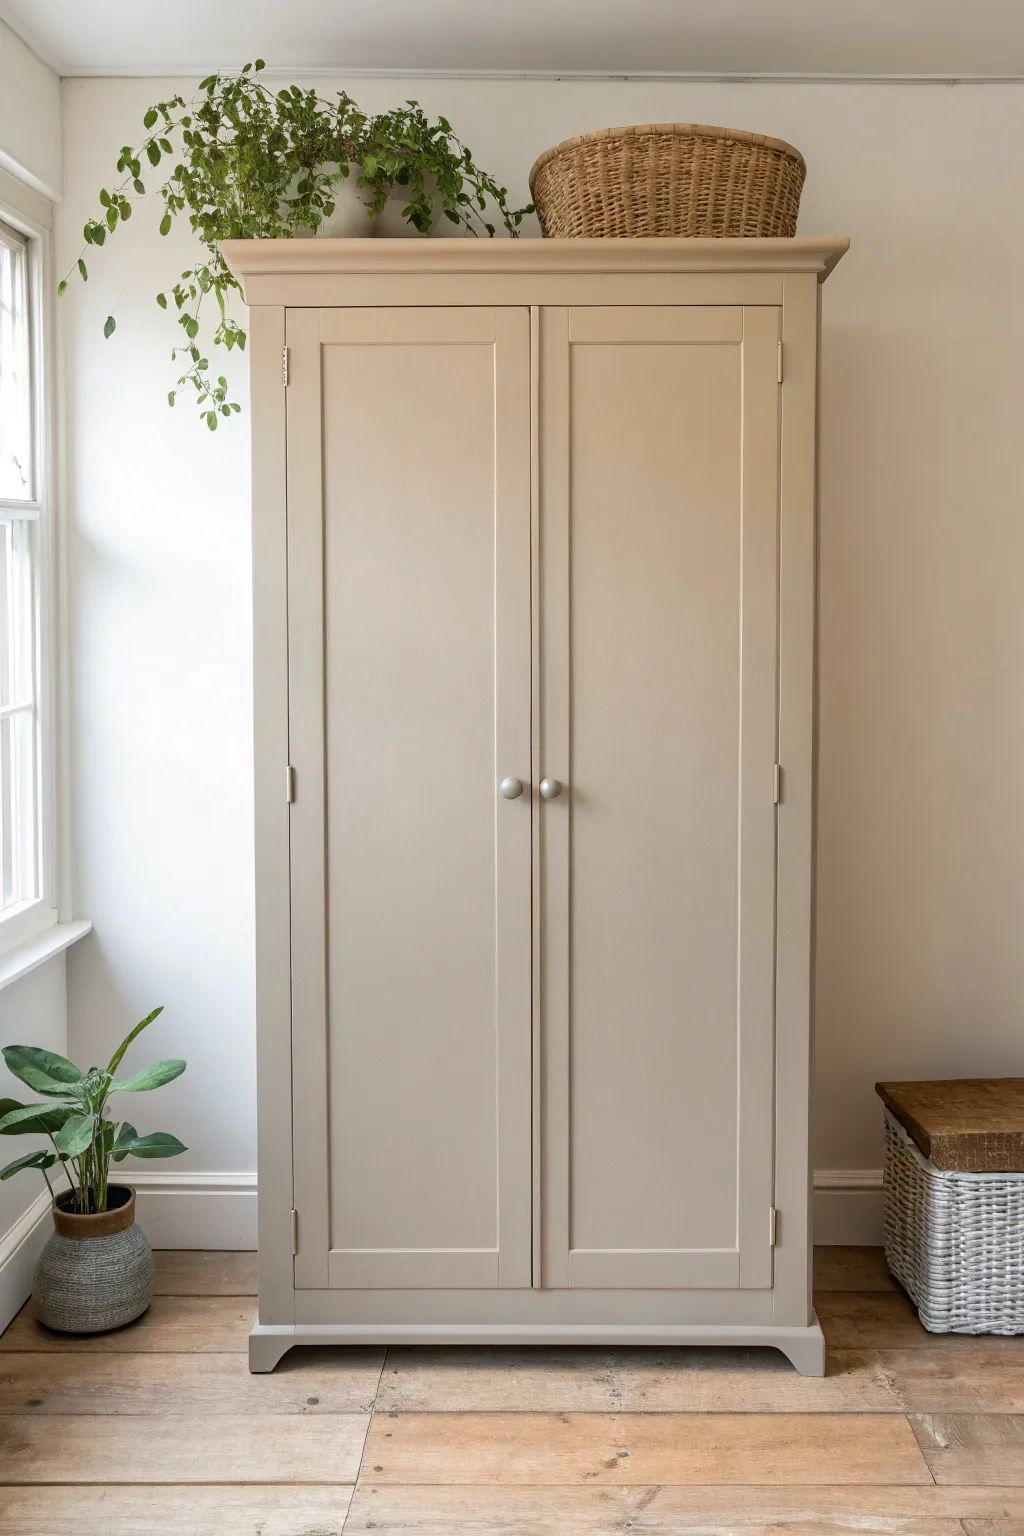
Soft Greige Wardrobe for a Calm Look

Transform a tired wooden wardrobe into a serene sanctuary piece with this soft, textured greige finish that mimics the look of naturally aged French furniture. The technique focuses on subtlety, using a layered wash effect to keep the wood grain visible while adding a creamy, calming hue.
Step-by-Step
Materials
- Old wooden wardrobe (sanded clean)
- Chalk paint (Greige/Warm Grey color, e.g., French Linen)
- Chalk paint (Creamy White)
- Clear furniture wax
- Dark antique wax (optional for depth)
- Round chalk paint brush
- Fine grit sandpaper (180-220 grit)
- Clean lint-free rags
- Water for dilution
- Painter’s tape
- Screwdriver (for hardware removal)
- Tack cloth
Step 1: Preparation & Cleaning
-
Remove Hardware:
Before you begin, use a screwdriver to carefully remove all handles, knobs, and hinges. Store them in a marked bag so nothing gets lost. -
Clean Thoroughly:
Wipe down the entire wardrobe with a degreaser or mild soap and water solution to remove years of dust, oils, or furniture polish. Let it dry completely. -
Light Sanding:
Scuff sand the surface with 180-grit sandpaper. You aren’t trying to strip it to bare wood, just creating enough ‘tooth’ for the paint to adhere. Wipe away dust with a tack cloth.
Uneven Coverage?
If the watered-down paint beads up, the surface might be too oily. Scuff sand that area again and wipe with mineral spirits before repainting.
Step 2: Creating the Greige Base
-
Mix the Base Wash:
Dilute your greige (grey-beige) chalk paint with water. Aim for a 70% paint to 30% water ratio. This creates a semi-transparent wash rather than a solid block of color. -
First Coat Application:
Using your round brush, apply the paint in long, even strokes following the direction of the wood grain. The watered-down consistency helps it soak into the wood texture. -
Dry and Assess:
Allow this first coat to dry for about an hour. It will likely look streaky or uneven at this stage—don’t worry, that’s normal and part of the process. -
Second Coat:
Apply a second coat of the greige wash. This builds opacity while still keeping a soft, handmade feel. Let this dry fully for 2-3 hours.
Step 3: Adding Depth & Texture
-
Dry Brushing Highlights:
Dip just the tips of a dry brush into your creamy white paint. Offload most of the paint onto a paper towel until the brush is almost devoid of color. -
Feathering the White:
Lightly drag the dry brush over the raised areas, moldings, and edges of the wardrobe. This catches the texture and creates that sun-bleached look seen in the photo. -
Distressing:
Take fine 220-grit sandpaper and gently rub the edges, corners, and areas around the handle holes. I find this step crucial for revealing a tiny bit of the original wood underneath. -
Blend the Distress:
Wipe away any sanding dust immediately with a clean, dry cloth to prevent it from muddying your final wax coat.
Fabric Insert
Replace the inner door panels with linen fabric or chicken wire for a true French farmhouse aesthetic that adds even more texture.
Step 4: Sealing and Finishing
-
Apply Clear Wax:
Using a wax brush or lint-free rag, massage a thin layer of clear furniture wax into the paint. Work in small sections, rubbing it in circular motions. -
Buffing:
After the wax has sat for about 15 minutes, buff it briskly with a clean cloth. This creates a soft, satiny sheen rather than a high gloss. -
Optional Antique Detail:
If you want more definition in the crevices (like the door molding grooves), apply a tiny amount of dark antique wax with a small artist brush, then wipe back the excess immediately with clear wax. -
Hardware Refresh:
Clean your original hardware. If it’s too shiny, dab it with a bit of dark wax or black paint to matte it down before reattaching. -
Reassembly:
Screw the hardware back into place. Ensure the doors close properly without scraping against the freshly painted frame. -
Final Cure:
Let the wardrobe sit for 24 hours before filling it with clothes to allow the wax to harden sufficiently.
Enjoy the peaceful atmosphere your new custom furniture brings to the room
BRUSH GUIDE
The Right Brush for Every Stroke
From clean lines to bold texture — master brush choice, stroke control, and essential techniques.
Explore the Full Guide
Two-Tone Wardrobe: Light Outside, Dark Inside
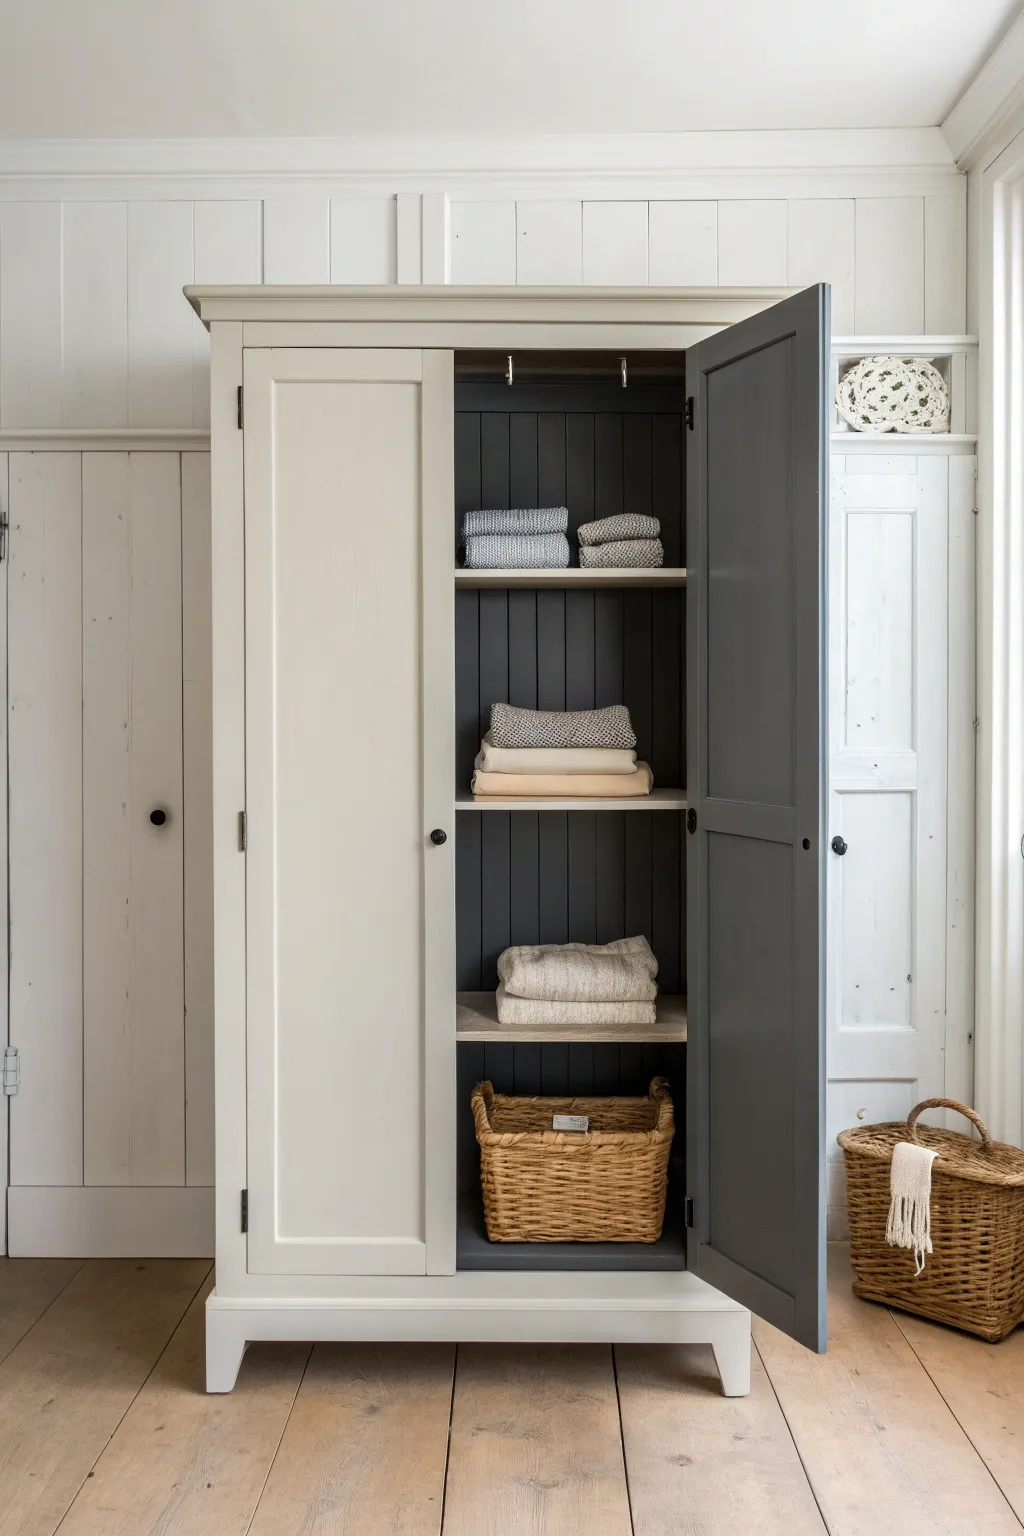
Transform a plain wooden wardrobe into a statement piece by playing with contrasting interior and exterior shades. This project features a soft, neutral cream on the outside that opens to reveal a striking, deep charcoal grey interior.
How-To Guide
Materials
- Solid wood wardrobe
- Sanding block or electric sander (120 and 220 grit)
- Wood filler and putty knife
- Sugar soap or TSP cleaner
- Painter’s tape (high quality)
- Primer suitable for wood
- Cream/Off-white furniture paint (Eggshell or Satin finish)
- Dark Charcoal Grey furniture paint (Matte or Eggshell finish)
- Synthetic bristle brushes (angled for cutting in)
- Small foam roller and tray
- Screwdriver (for hardware removal)
- Drop cloths
Step 1: Preparation
-
Clear and Disassemble:
Begin by removing all contents from the wardrobe. Take out any removable shelves and the hanging rail. Using your screwdriver, carefully remove all hinges, knobs, latches, and hooks. Place these in a labeled bag so you don’t lose any screws. -
Take off Doors:
It is much easier to paint if the doors are removed, so lift them off their hinges if possible. Lay them flat on saw horses or drop cloths in your workspace. -
Clean Thoroughly:
Scrub the entire wardrobe, inside and out, using sugar soap or a TSP cleaner. This removes years of grease, dust, and furniture polish that could prevent the new paint from adhering properly. -
Fill Imperfections:
Inspect the wood for deep scratches or dents. Apply wood filler with a putty knife, smoothing it out. Let it dry completely according to the package instructions. -
Sand Everything:
Scuff sand all surfaces using 120-grit sandpaper. You aren’t trying to strip it to bare wood, just removing the old glossy finish to give the new paint ‘teeth’ to grip onto. Follow up with 220-grit for a smooth finish, then wipe away all dust with a tack cloth.
Crisp Lines Pro Tip
To stop the dark paint from bleeding under the tape, paint over the tape edge first with your CREAM base color. This seals the gap, meaning any bleed is invisible.
Step 2: Exterior First
-
Prime the Exterior:
Apply a coat of primer to the exterior surfaces and the front faces of the doors. Use a brush for corners and detailed moldings, and a small foam roller for the flat panels to ensure a smooth finish. Allow it to dry fully. -
First Coat of Cream:
Once the primer is dry, apply your first coat of the cream/off-white paint. I like to start with the tricky recessed areas of the door panels using an angled brush, then roll the flat areas while the paint is still wet to blend the brush strokes. -
Second Coat for Coverage:
After the first coat has cured (check your paint tin for recoat times), apply a second coat for full opacity. This builds a rich, solid color that looks professional.
Level Up: Shelf Contrast
Instead of painting the removable shelves grey, sand them down to raw wood and apply a clear matte wax. The natural wood grain creates a beautiful third texture.
Step 3: The Dark Interior
-
Masking Off:
This is crucial for the two-tone look. Apply painter’s tape precisely along the front edge where the interior meets the exterior frame. Press the tape down firmly to prevent bleed-through. -
Prime the Inside:
Apply primer to the entire interior, including the back panel, side walls, shelves, and the inside face of the doors. If the original wood is dark, one coat is usually enough; if it’s varnished, ensure it’s well-covered. -
Cutting In the Dark Grey:
Open your charcoal grey paint. Use a high-quality angled sash brush to carefully paint the corners, edges against the tape, and the grooves of any tongue-and-groove paneling on the back wall. -
Rolling the Interior:
Use a fresh foam roller to apply the grey paint to the larger flat surfaces of the interior walls and interior door faces. The roller helps avoid visible brush strokes in the dark pigment. -
Second Interior Coat:
Dark colors can sometimes look patchy after one coat. Apply a second coat to ensure a deep, velvety finish. Don’t forget to paint the shelves separately while waiting for the cabinet to dry. -
Remove Tape:
While the final coat is still slightly tacky (not fully dry), carefully peel back the painter’s tape at a 45-degree angle. This creates the crispest line between the cream exterior and grey interior.
Step 4: Reassembly
-
Hardware Update:
Clean your old hardware or consider spray painting the hinges and hooks black or pewter to match the dark interior vibe. Reattach the hinges to the doors first. -
Hang Doors:
Get someone to help you hold the doors while you screw them back onto the main frame. Ensure they swing freely without scraping your new paint job. -
Install Knobs and Shelves:
Screw the knobs back onto the doors. Carefully slide the painted shelves back into position on their supports. -
Final Touchups:
Inspect the piece for any tiny nicks caused during reassembly. Use a small artist’s brush to dab a tiny bit of paint on any imperfections.
Enjoy styling your newly transformed wardrobe with neutral linens and woven baskets to complete the look
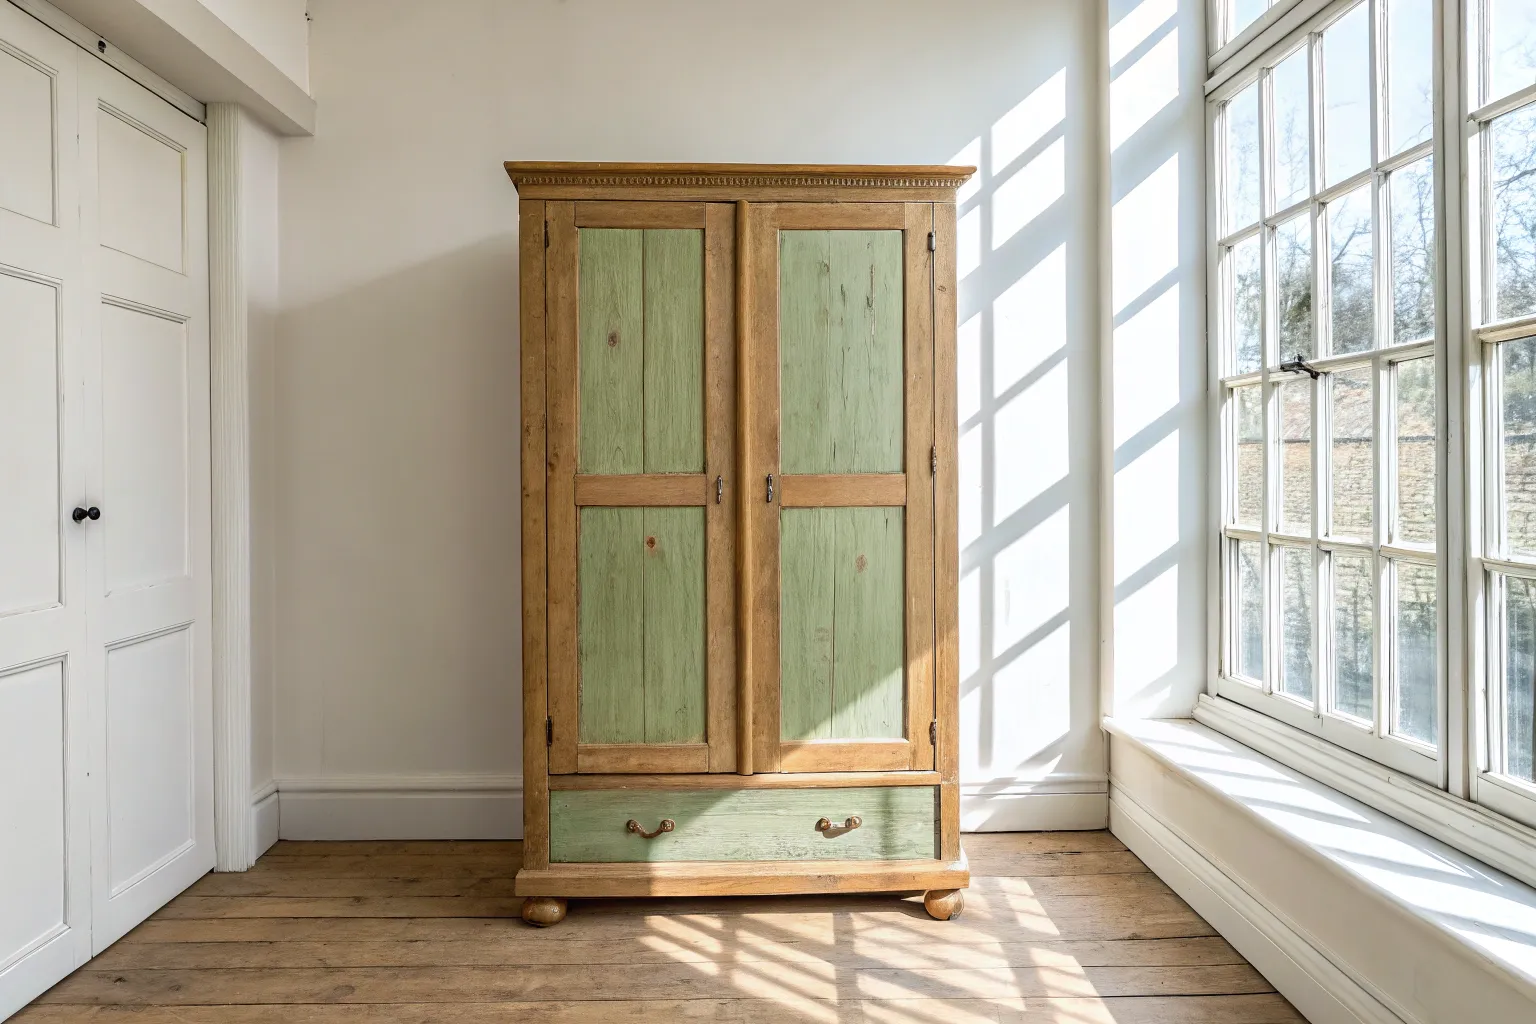
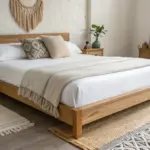
Natural Wood and Painted Wardrobe Contrast
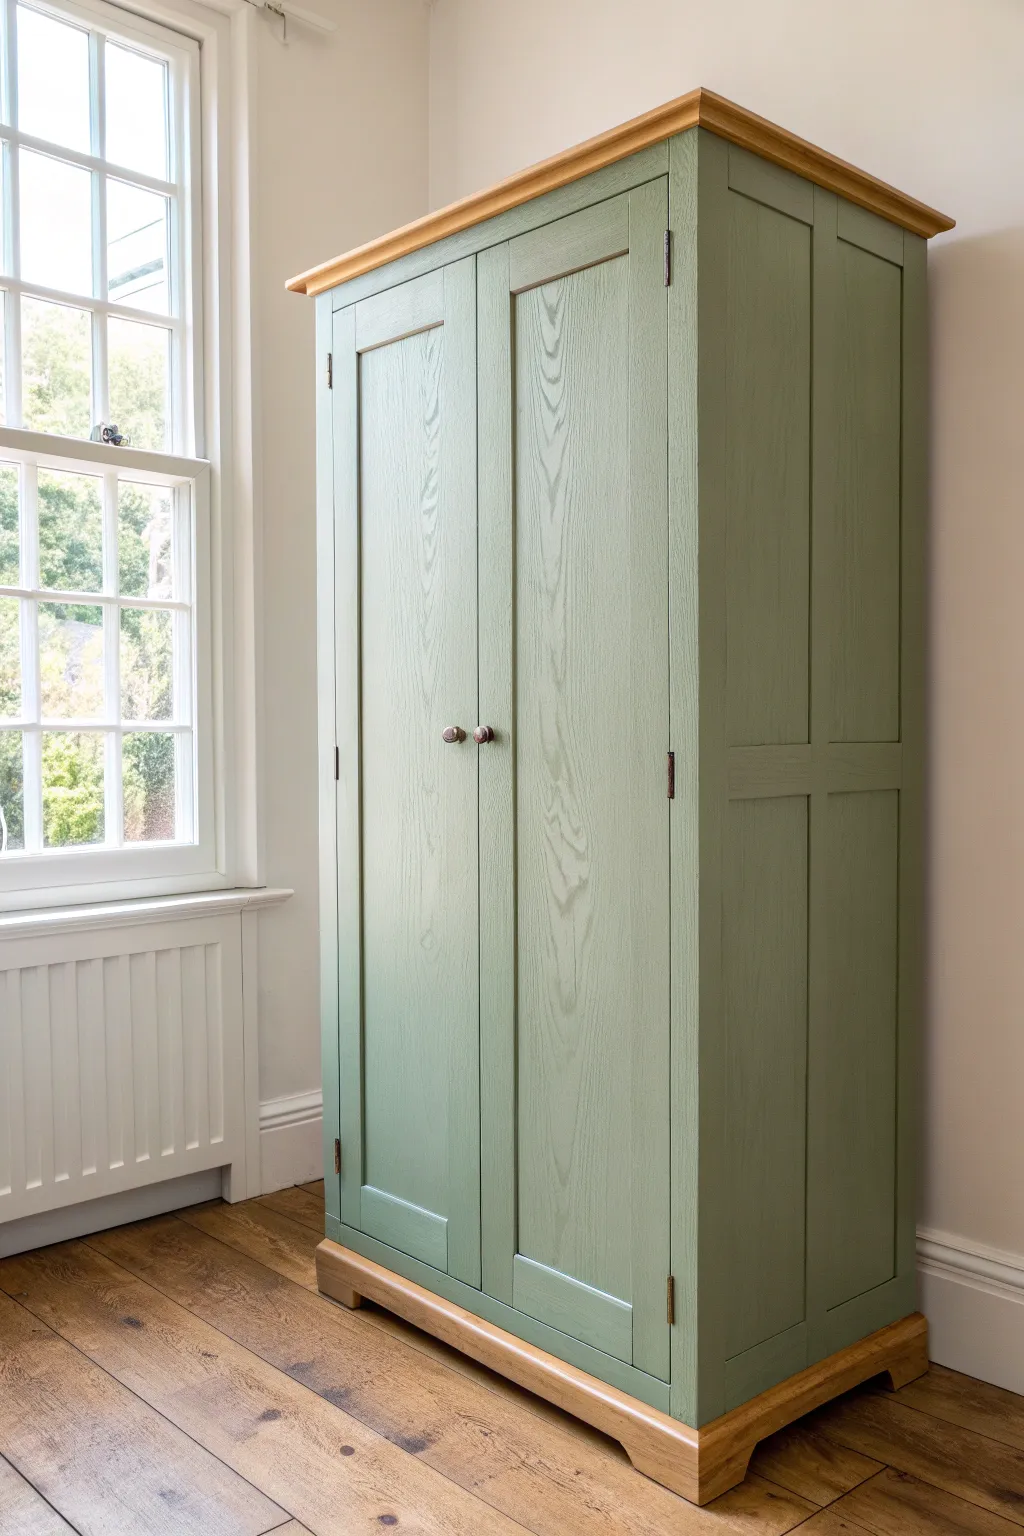
This project creates a beautiful balance between rustic warmth and modern color by preserving the natural wood grain while updating the main body with a calming sage green. The contrast between the timber top and base against the soft, painted panels adds instant sophistication to any bedroom.
Step-by-Step Tutorial
Materials
- Solid wood wardrobe (oak or pine)
- Sage green furniture paint (satin or eggshell finish)
- Clear matte or satin polyurethane topcoat
- Medium and fine grit sandpaper (120 and 220 grit)
- Wood filler (if repairing old holes)
- Painter’s tape (high quality)
- Sugar soap or TSP cleaner
- Lint-free cloths
- Small foam roller
- Angled synthetic paint brush (2-inch)
- Screwdriver for hardware removal
- Tack cloth
Step 1: Preparation & Sanding
-
Dismantle hardware:
Start by removing all door handles, hinges, and internal rails. Keep these screws and pieces in a labeled bag so nothing gets lost during the process. -
Clean thoroughly:
Scrub the entire wardrobe down with sugar soap or a TSP cleaner to remove years of polish, grease, and dust. This step is crucial for paint adhesion. -
Assess the grain:
Look closely at your wood. Since we want the grain texture to remain visible through the paint (as seen in the photo), you don’t need to sand overly smooth, but you do need to remove any existing shiny varnish. -
Sand the body:
Use 120-grit sandpaper to scuff sand all areas you intend to paint. The goal is to create a ‘key’ for the paint to stick to, not to strip it back to raw wood entirely. -
Sand the accents:
For the top cornice and bottom plinth/base that will remain natural, sand these more aggressively. Start with 120-grit to strip old orange varnish, then finish with 220-grit for a silky smooth raw wood feel. -
Dust extraction:
Vacuum up all the dust, paying attention to corners and crevices. Finish by wiping everything down with a tack cloth to ensure a perfectly clean surface.
Bleed-Through Blues?
If paint bleeds under the tape onto the natural wood, don’t panic. Wrap a putty knife in a damp cloth and gently scrape it while wet, or lightly sand it off once dry.
Step 2: Masking & Painting
-
Apply painter’s tape:
Carefully tape off the edges where the paint meets the natural wood sections (the top crown and the bottom base). Press the tape edges down firmly to prevent bleed-through. -
Cutting in:
Using your angled synthetic brush, paint the difficult areas first: inside panel molding, corners, and around hinge recesses. Keep coats thin to avoid gloopy buildup. -
Roll the flat surfaces:
Switch to a small foam roller for the large flat panels and sides. This helps achieve a smooth, consistent finish without prominent brush strokes. -
First coat drying:
Let the first coat dry completely according to your paint can’s instructions. Lighter sanding with fine grit paper between coats can help knock back any raised grain. -
Apply second coat:
Repeat the painting process. A second coat will deepen the sage color and ensure solid coverage. Depending on your paint’s opacity, a third thin coat might be necessary. -
Remove tape:
Carefully peel away the painter’s tape while the final coat is still slightly tacky—this helps prevent the paint from peeling off in jagged chunks.
Step 3: Sealing & Finishing
-
Seal natural wood:
Apply a clear matte or satin polyurethane topcoat to the exposed raw wood at the top and bottom. This protects the timber without darkening it too much, maintaining that soft, raw look. -
Light sanding for sealer:
Once the first coat of sealer dries on the wood accents, give it a very light hand sand with 220-grit paper to remove any fuzziness, then apply a second coat. -
Reattach hardware:
Screw the hinges and handles back into place. Since the original hardware in the image is simple and dark, you might consider spray painting your old handles oil-rubbed bronze if they don’t match. -
Final cure time:
Allow the wardrobe to cure for a few days before filling it with heavy clothes or closing the doors tightly, as fresh paint can stick to itself until fully hardened.
Upgrade the Interior
Line the back panel or drawers with a botanical wallpaper that complements the sage green exterior for a hidden pop of pattern when you open the doors.
Step back and admire how the natural wood accents warm up the cool green tones for a perfectly balanced piece

PENCIL GUIDE
Understanding Pencil Grades from H to B
From first sketch to finished drawing — learn pencil grades, line control, and shading techniques.
Explore the Full Guide
Matte Painted Wardrobe With Hardware Glow-Up
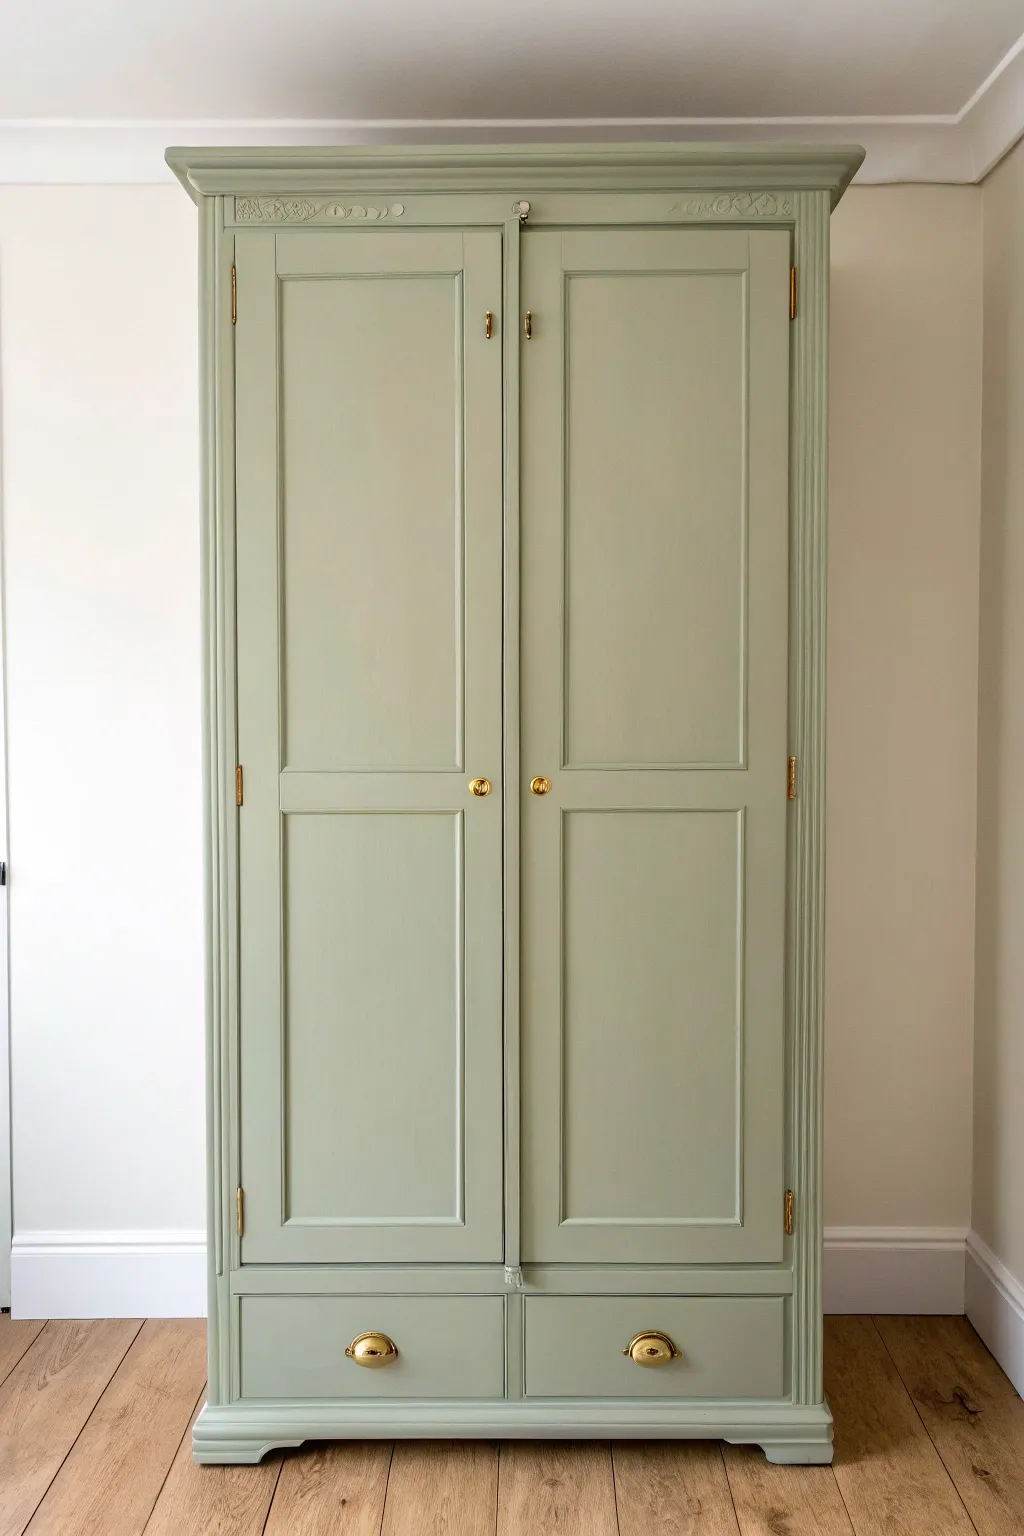
Transform a tired, dated wardrobe into a sophisticated statement piece with a soft matte sage finish and gleaming gold accents. This project breathes new life into classic furniture, proving that a simple color change and hardware update can completely modernize a room.
Step-by-Step Guide
Materials
- Solid wood wardrobe (vintage or secondhand)
- Sugar soap or TSP cleaner
- Sanding block (medium grit, 120-180)
- Wood filler (if repairs are needed)
- Painter’s tape
- Zinsser B-I-N Primer (or similar stain-blocking primer)
- Matte finish furniture paint (Sage Green or Eucalyptus shade)
- Synthetic angled sash brush (2-inch)
- Mini foam roller and tray
- Gold spray paint (Metallic finish)
- Crystal-clear topcoat (optional for high-traffic areas)
- Screwdriver
- Clean lint-free cloths
Step 1: Preparation & Cleaning
-
Remove Hardware:
Begin by removing all handles, knobs, and exterior hinges using a screwdriver. Keep these screws safe in a labeled baggie so you don’t lose them during the process. -
Clean Thoroughly:
Wash the entire wardrobe down with sugar soap or a TSP solution. Vintage furniture often has years of wax or polish build-up that will repel paint, so really scrub into the corners and carved details. -
Scuff Sanding:
Once dry, use a medium-grit sanding block to lightly scuff the entire surface. You aren’t trying to strip it to bare wood; just create a ‘key’ or rough surface for the primer to grip. -
Dust Removal:
Vacuum up the sanding dust, then wipe the piece down with a damp lint-free cloth or a tack cloth to ensure a perfectly clean surface. -
Tape Edges:
Apply painter’s tape to the inside edges of the drawers and doors if you want to keep the interior wood natural, or to protect any glass panes if your wardrobe has them.
Sticky Drawers?
If painted drawers stick, rub a plain candle or block of beeswax along the runners. The wax creates a slick surface, helping the wood slide smoothly without scraping your new paint job.
Step 2: Priming & Painting
-
Apply Primer:
Brush a coat of stain-blocking primer over the entire piece. This is crucial for vintage wood to stop tannins from bleeding through your green paint later. -
Smooth the Primer:
After the primer is fully dry, I like to do a very light sanding with high-grit paper to knock back any brush strokes, creating a glass-smooth base. -
Cut In Edges:
Using your angled sash brush, start applying the matte green paint to the intricate details, corners, and moldings where a roller won’t reach. -
Roll Flat Surfaces:
Immediately follow up with a mini foam roller on the large flat panels (doors and sides) to smooth out the brush marks and achieve that flawless, sprayed-on look. -
Second Coat:
Allow the first coat to dry according to the can’s instructions, then apply a second coat using the same method to ensure rich, opaque coverage. -
Check Coverage:
Inspect the wardrobe in good lighting. If the original wood was very dark, you might need a third thin coat for true depth of color.
Luxe Interior
Line the back panel or drawers with a floral or geometric wallpaper. It adds a secret pop of pattern that creates a high-end, boutique feel every time you open the doors.
Step 3: Hardware Glow-Up & Assembly
-
Clean Hardware:
While the paint cures, clean your old metal handles and keyhole covers with soapy water and steel wool to remove grime and rust. -
Spray Painting:
Set up a cardboard station in a ventilated area. lay out your hardware and apply thin, even coats of metallic gold spray paint. Don’t forget to spray the screw heads if they will be visible. -
Flip & Spray:
Once the top side is dry, flip the handles over and spray the undersides to ensure no old metal shows through from different angles. -
Reinstall Hardware:
Wait at least 24 hours for the paint on the wardrobe to cure slightly before reattaching the newly gold hardware. Tighten screws carefully to avoid chipping the fresh paint.
Step back and admire how a splash of color and gold detailing has completely redefined your space
Chalky Wardrobe Finish That Hides Imperfections
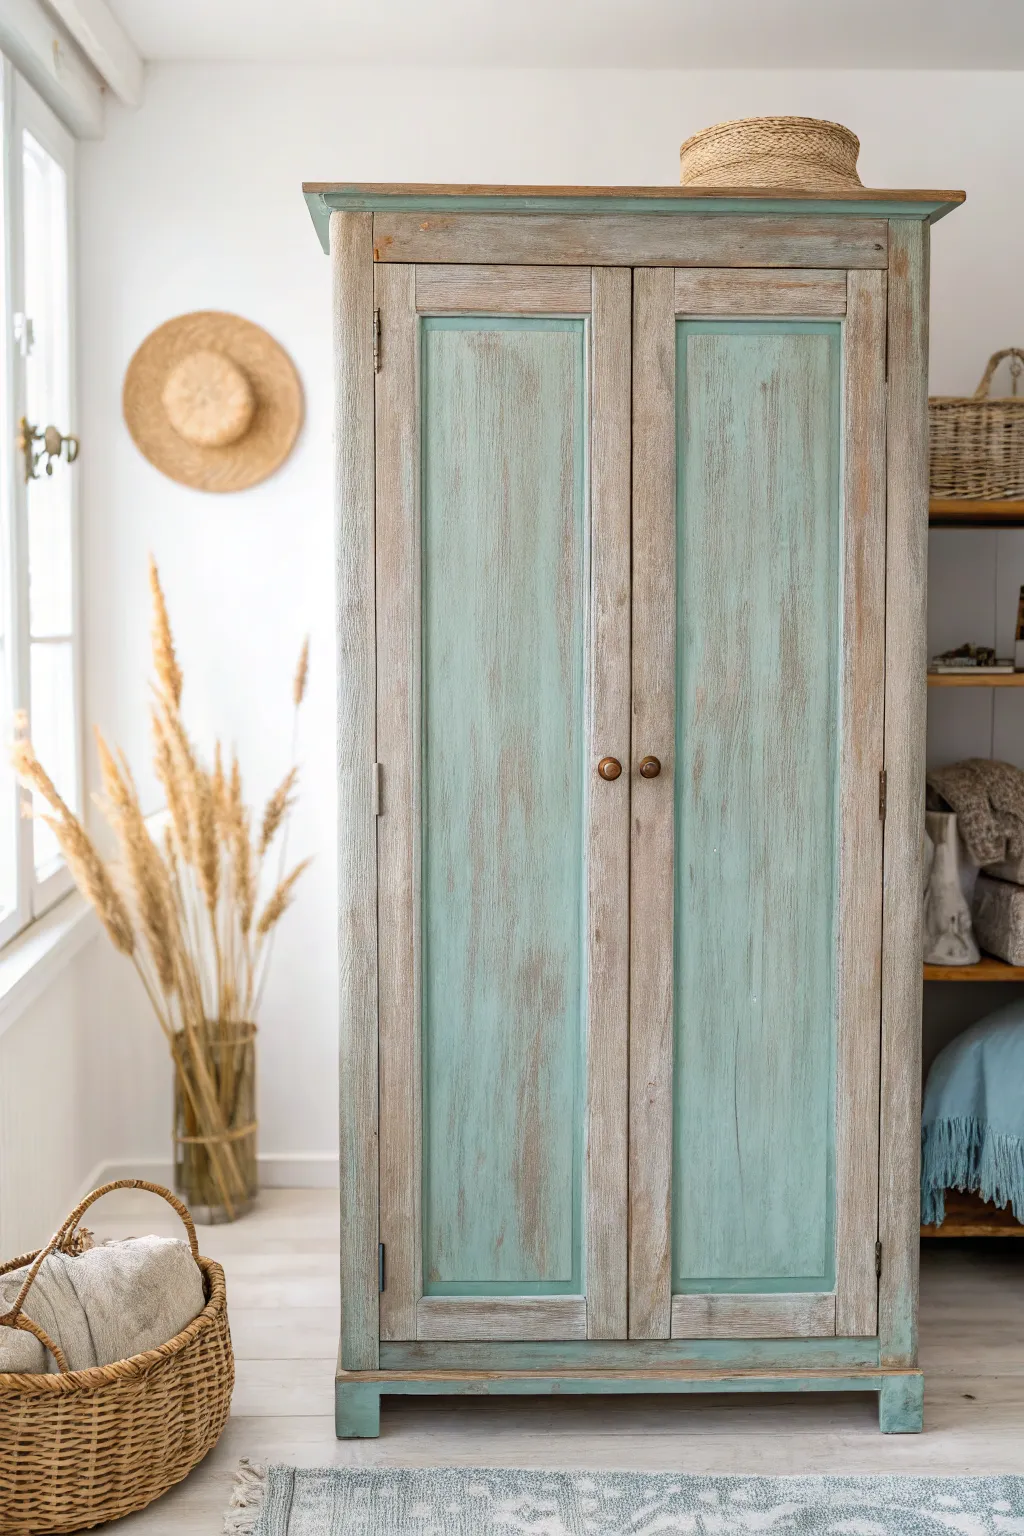
Give a tired wooden armoire a breezy, seaside update with this textured finish that brilliantly mimics weathered driftwood. By layering chalk paints and distressing strategically, you’ll create a piece that feels both vintage and refreshingly modern, perfect for hiding any existing surface imperfections.
Step-by-Step
Materials
- Old wooden wardrobe
- Sandpaper (120 and 220 grit)
- Clean rags or tack cloth
- Chalk paint (Aqua or Mint Green shade)
- Chalk paint (Cream or Warm Grey shade)
- Clear furniture wax
- Dark antique wax (optional)
- Paintbrushes (natural bristle)
- Wax brush or lint-free cloth
- Painter’s tape
- Screwdriver (for hardware removal)
- Drop cloth
Step 1: Preparation & Cleaning
-
Clear and clean:
Begin by removing all contents from the wardrobe. Wipe down the entire surface with a damp cloth and mild detergent to remove years of dust, grime, or oils, then let it dry completely. -
Remove hardware:
Using a screwdriver, carefully take off all knobs, handles, and hinges if possible. Store them in a labeled bag so you don’t lose any screws during the painting process. -
Scuff sanding:
Lightly sand the entire exterior with 120-grit sandpaper. You aren’t trying to strip the wood bare, just creating a tooth for the paint to grip. Wipe away all sanding dust with a tack cloth. -
Masking off:
If there are areas you wish to keep original or protect, such as internal shelves or specific metal fixtures you couldn’t remove, apply painter’s tape carefully over them.
Bleed-Through Blues
If old wood tannins bleed pinkish stains through your light paint, stop. Seal the affected area with a clearer shellac or stain-blocking primer, let dry, and then repaint that spot.
Step 2: Painting the Base & Accents
-
First coat application:
Apply a base coat of your Cream or Warm Grey chalk paint to the entire frame and door frames, avoiding the recessed inner panels for now. Brush in the direction of the wood grain for a natural look. -
Painting the panels:
Switch to your Aqua or Mint Green chalk paint for the recessed door panels. Paint right up to the edges of the molding. Don’t worry about perfect coverage; a slightly uneven coat adds to the aged effect. -
Adding color to trim:
Continue using the Aqua/Green paint on the top cornice molding and the bottom plinth or feet of the wardrobe to tie the look together. Let all paint dry for at least 2-3 hours. -
Second coat (optional):
If the coverage looks too patchy, apply a second light coat. However, for this rustic look, one solid coat often provides a better base for distressing later. -
Dry brush technique:
Dip just the tips of a dry brush into the Cream/Grey paint. Offload most of it onto a paper towel, then lightly drag the brush over the Aqua panels. This adds depth and creates that sun-bleached driftwood vibe.
Step 3: Distressing & Finishing
-
Distressing edges:
Once the paint is fully dry, take 220-grit sandpaper to the edges, corners, and raised moldings. Sand firmly to reveal the wood underneath, focusing on areas that would naturally weather over time. -
Panel distressing:
Lightly sand large flat areas of the green panels in varying directions. This breaks up the solid color and allows some of the wood grain or base tones to peek through. -
Clean up dust:
Vacuum or wipe the wardrobe thoroughly to remove all fine chalk dust created by the distressing. This is crucial for the wax to adhere properly. -
Apply clear wax:
Using a wax brush or lint-free cloth, massage a layer of clear furniture wax over the entire piece. Work in small sections, rubbing it into the paint to seal and protect the finish. -
Adding age with dark wax:
To enhance the antique look, apply a tiny amount of dark antique wax into deep crevices, corners, or detailed carvings. I like to immediately wipe back the excess with clear wax to soften the effect. -
Buffing:
Allow the wax to cure for about 24 hours, then buff the surface briskly with a clean, soft cloth. This will create a subtle, silky sheen rather than a high gloss. -
Reattach hardware:
Screw the handles and knobs back into place. If the original hardware looks too shiny, consider rubbing a little dark wax on them to match the aged aesthetic.
Interior Surprise
Line the back panel or drawers with a vintage floral wallpaper or fabric. It adds a delightful pop of pattern every time you open the doors to grab a sweater.
Enjoy the relaxed and airy atmosphere your new statement piece brings to the room


Distressed Wardrobe Edges for Vintage Charm
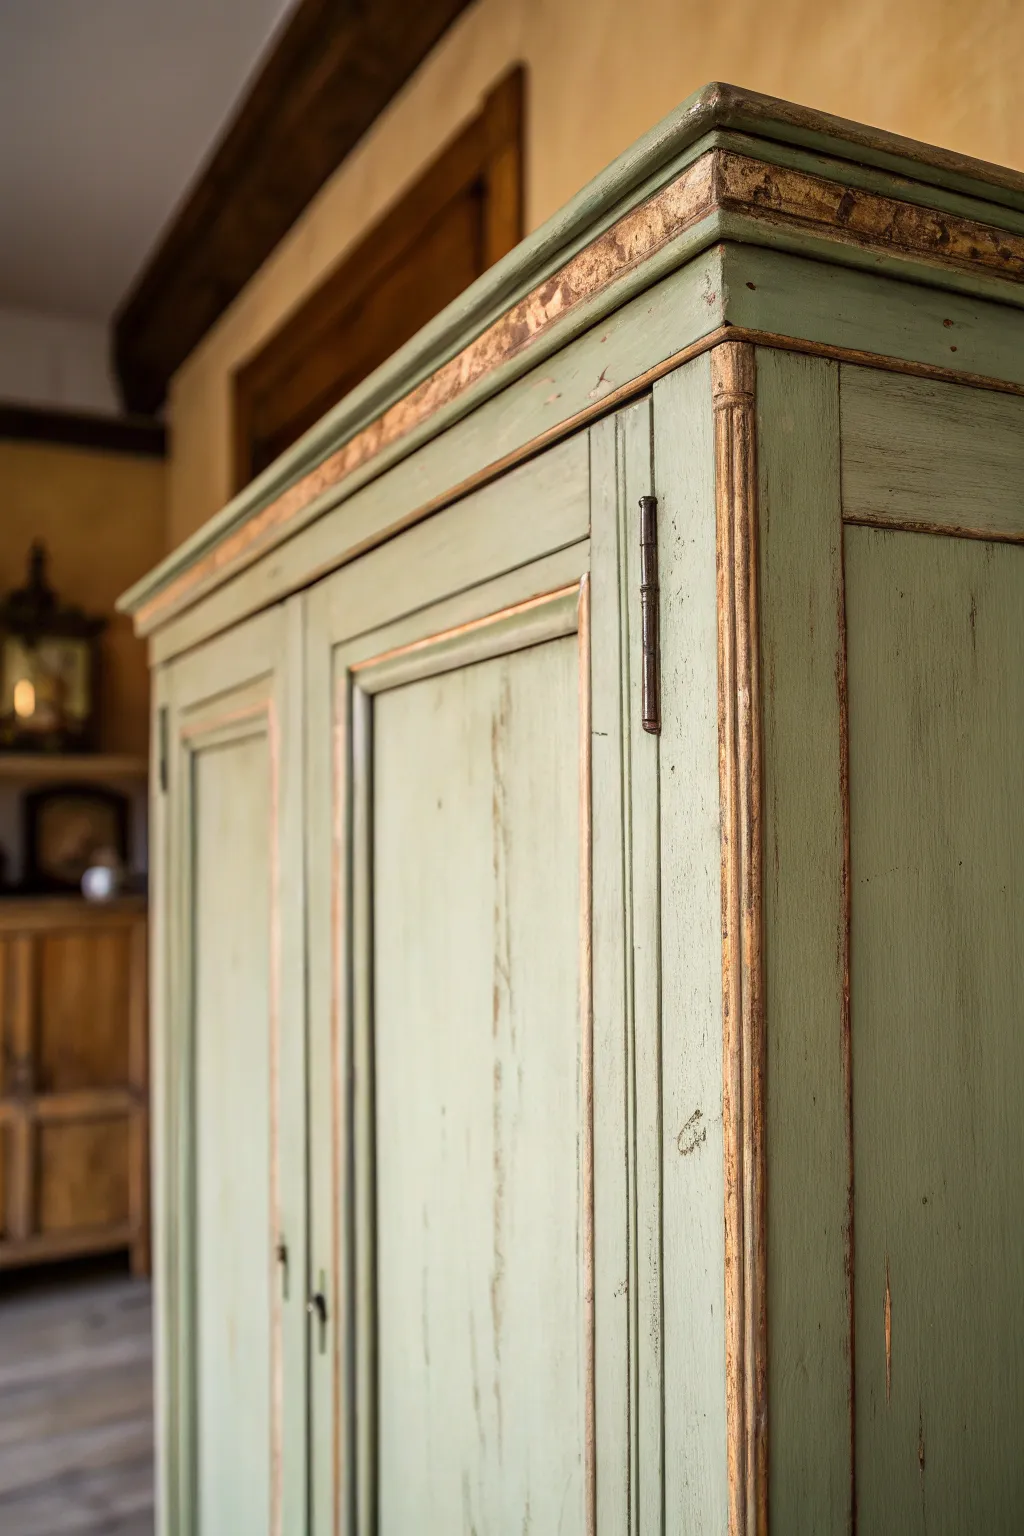
Transform a plain wooden wardrobe into a vintage masterpiece with this elegant faux-aged finish. The soft sage green paint, intentionally distressed along the edges to reveal warm wood and hints of gold underneath, creates a timeless, heirloom aesthetic.
Step-by-Step Tutorial
Materials
- Wooden wardrobe (solid wood veneer preferred)
- Medium-grit sandpaper (120-150 grit)
- Fine-grit sandpaper (220 grit)
- Tack cloths
- Primer (stain-blocking)
- Chalk-style paint (Sage Green)
- Dark wax or antiquing glaze
- Gold gilding wax or metallic paint (optional but recommended)
- Clear matte polyurethane or furniture wax
- Paintbrushes (high-quality synthetic)
- Wax brush or lint-free rags
- Painter’s tape
- Screwdriver (for hardware removal)
Step 1: Preparation & Base Work
-
Hardware removal:
Begin by removing all handles, hinges, and decorative hardware from the wardrobe. Place these screws and pieces in a labeled bag so nothing gets lost during the transformation. -
Surface cleaning:
Scrub the entire piece with a degreaser or a mixture of warm water and mild dish soap. Removing old oils and furniture polish is crucial for paint adhesion. -
Initial sanding:
Scuff sand the entire surface using 120-grit sandpaper. You don’t need to strip it to bare wood, just rough up the existing finish to give the primer something to grip. -
Dust check:
Wipe away every speck of sanding dust using a tack cloth. Any leftover dust will create tiny bumps in your paint finish. -
Protecting the interior:
Use painter’s tape to mask off the interior edges if you plan to leave the inside unpainted. This ensures a crisp, professional line when the doors are open. -
Applying primer:
Apply a coat of stain-blocking primer. This is especially important for vintage furniture to prevent old wood tannins from bleeding through your beautiful green paint later. -
Smoothing the base:
Once the primer is fully dry, lightly sand it with 220-grit paper to smooth out any brush strokes, then wipe clean again.
Natural Wear Patterns
Close your eyes and run your hands over the piece. Where do your hands naturally grab or bump? Distress mostly in these tangible areas for the most authentic vintage look.
Step 2: Painting & Distressing
-
First coat of color:
Apply your first coat of sage green chalk-style paint. Brush in the direction of the wood grain for the most natural look. Don’t worry if coverage isn’t perfect yet. -
Drying time:
Allow the first coat to dry completely according to the manufacturer’s instructions, usually about 2-4 hours depending on humidity. -
Second coat application:
Apply a second coat of green paint for full opacity. Pay special attention to the recessed areas of the door panels and molding. -
Strategic sanding:
Once the paint is bone dry, use the 150-grit sandpaper to distress the edges. Focus on high points like corners, molding ridges, and door frames where natural wear would occur over time. -
Exposing the layers:
Sand aggressively enough in select spots to reveal the raw wood beneath. Vary the pressure so some areas show just primer, while others show deep wood tones. -
Adding metallic warmth:
For the look in the photo, apply a small amount of gold gilding wax to the exposed raw wood edges using your fingertip or a small brush. Smudge it slightly so it looks integrated, not painted on. -
Creating depth:
Apply a thin layer of dark wax or antiquing glaze into the crevices of the molding. Wipe back the excess immediately with a clean rag, leaving darkness only in the shadows to accentuate the relief.
Hardware Harmony
For a cohesive look, brush a tiny amount of your sage paint onto the metal hinges, then wipe most of it off immediately. It leaves a patina that ties the metal to the wood.
Step 3: Sealing & Reassembly
-
Sealing the finish:
Protect your work by applying a clear matte wax or polyurethane topcoat. This seals the chalk paint and the distressed areas, making the piece durable for daily use. -
Buffing the finish:
If using wax, let it cure for about 24 hours, then buff it vigorously with a clean, lint-free cloth to create a soft, satin sheen. -
Hardware reinstallation:
Reattach your hinges and handles. If the original hardware looks too new, you might consider rubbing a little dark wax on them to match the wardrobe’s aged vibe. -
Final inspection:
Do a final walk-around. If any distress marks look too ‘perfect’ or manufactured, blend them slightly with a tiny bit more sanding or a touch of dark wax.
Step back and admire how this technique brings a soulful, time-worn character to your furniture.
Antiqued Wardrobe Details With Tinted Glaze
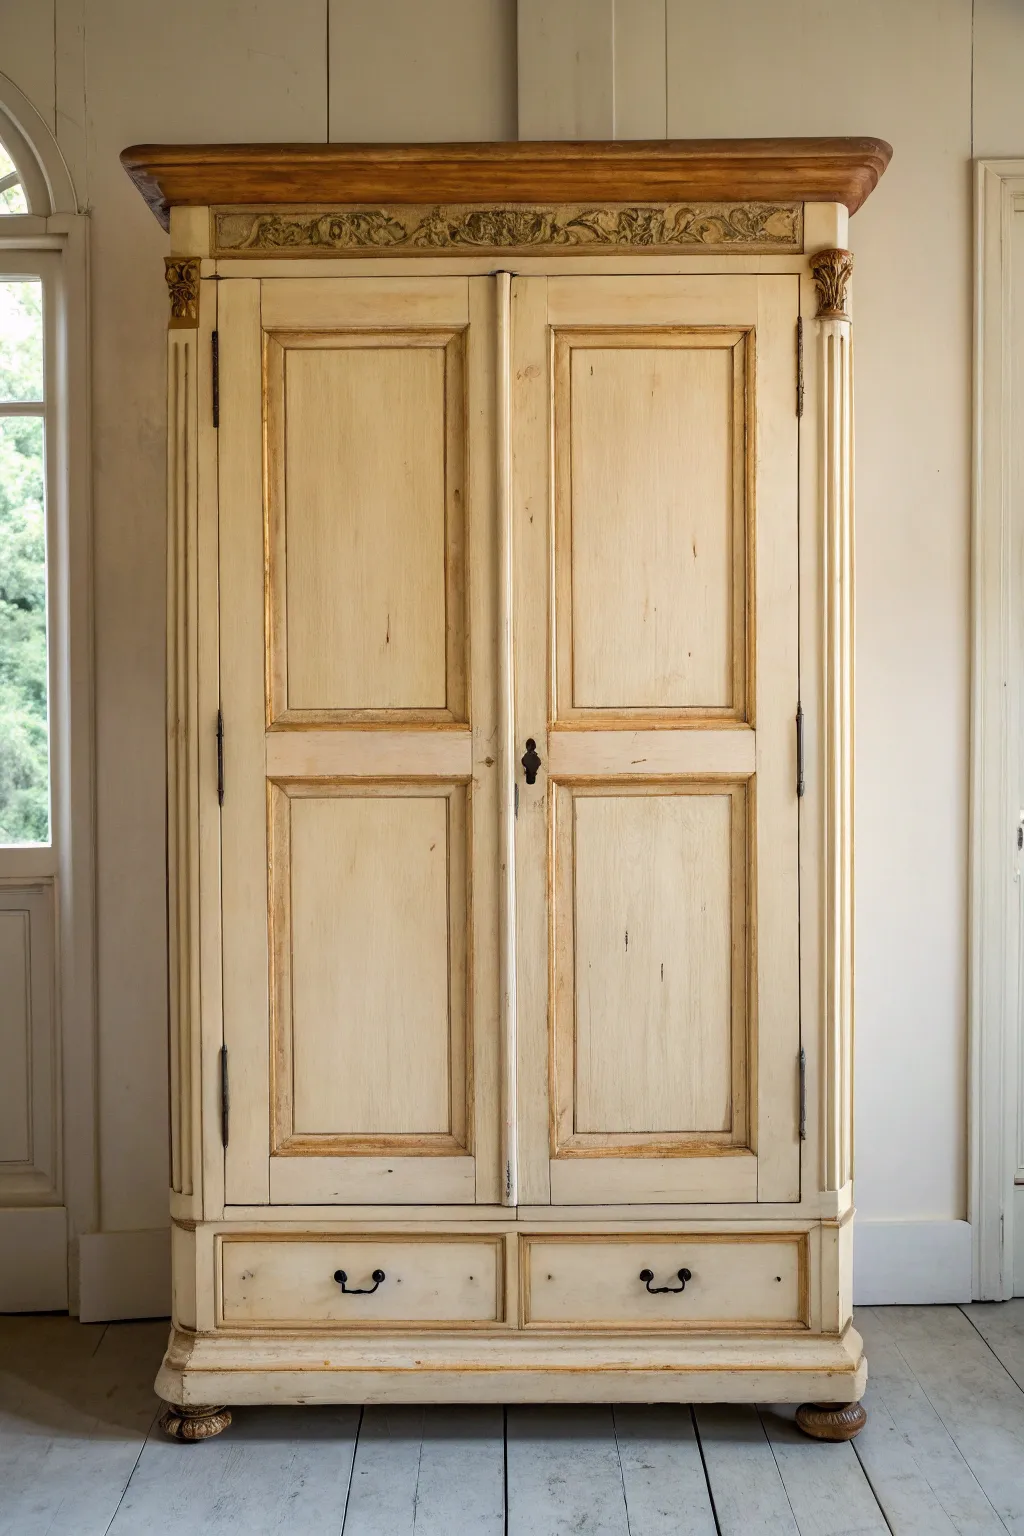
Transform a plain wooden wardrobe into a stunning heirloom piece using soft antique white paint and masterful glazing techniques. This finish mimics years of gentle aging, highlighting carved details and panel edges with warmth and depth.
Step-by-Step
Materials
- Large wooden wardrobe or armoire
- Sandpaper (120 and 220 grit)
- Tack cloth
- Primer suitable for wood furniture
- Creamy antique white chalk or mineral paint
- Clear furniture wax or matte sealer
- Dark antique glaze (brown/burnt umber tone)
- Small paintbrush or artist brush for crevices
- Synthetic angled sash brush
- Clean, lint-free cotton rags
- Gold gilding wax (optional)
Step 1: Preparation & Base Coat
-
Clean and Sand:
Begin by removing all hardware, including handles and hinges if possible. Give the entire piece a thorough cleaning with degreaser. Once dry, scuff sand the existing finish with 120-grit sandpaper to create a gripping surface. -
Dust Clean-up:
Wipe away all sanding dust using a tack cloth or a slightly damp rag. A clean surface is crucial for a smooth paint application. -
Apply Primer:
Paint a coat of high-quality primer over the wood, especially if you are covering a dark stain which might bleed through. Allow this to dry completely according to the manufacturer’s instructions. -
First Coat of Paint:
Apply your creamy antique white paint using an angled sash brush. Work in the direction of the wood grain, ensuring long, smooth strokes to minimize brush marks. -
Sand and Repeat:
Once the first coat is dry, lightly sand with 220-grit paper for a buttery smooth finish. Remove dust, then apply a second coat of paint for full, opaque coverage.
Control Your Glaze
Keep a stack of damp and dry rags nearby. A wet rag removes more glaze, while a dry rag smudges it. Mixing the two techniques gives the most natural, accumulated-dust look.
Step 2: Glazing & Antiquing
-
Seal Before Glazing:
Here I prefer to apply a thin layer of clear matte sealer or clear wax before glazing. This acts as a barrier so the dark glaze doesn’t soak straight into the porous paint, giving you more control. -
Apply Glaze to Crevices:
Using a small artist brush, paint the dark antique glaze liberally into the recessed corners of the door panels, around the molding, and into the carved details at the top cornice. -
Wipe Back:
Immediately take a damp, lint-free rag and wipe away the excess glaze from the flat surfaces. Leave the dark color settled deep in the grooves and corners to create shadow and dimension. -
Feather the Edges:
For the flat panels, lightly feather the remaining glaze residue inward from the corners to create a subtle, aged gradient rather than a stark line. -
Highlight the Fluting:
Run the glaze brush lightly down the vertical fluted columns on the sides. Wipe gently so the glaze remains in the vertical grooves but cleans up the raised ridges. -
Address the Top Crown:
For the detailed carving on the frieze (the decorative band at the top), dab the glaze into the intricate patterns and wipe firmly across the top to make the design pop. -
Optional Gilding:
If you want that extra touch of luxury seen on the column capitals, apply a tiny amount of gold gilding wax to the raised leaf details using your finger or a dry brush.
Glaze Drying Too Fast?
If the glaze is drying before you can blend it, mist the surface lightly with water (if water-based) or use a clear glaze medium to extend the working time.
Step 3: Finishing Touches
-
Dry Time:
Allow the glaze to cure fully. This usually takes longer than paint; waiting overnight is often the safest bet to avoid smudging your work. -
Top Coat Protection:
Apply a final coat of clear furniture wax or protective polycrylic over the entire piece to seal in your beautiful glaze work. -
Reattach Hardware:
Secure the original handles and hinges back onto the wardrobe. If the hardware looks too new, you can paint them matte black or bronze to match the aged aesthetic.
Enjoy the refined, storied character this updated piece brings to your bedroom or hallway
Ombre Wardrobe Fade From Light to Deep
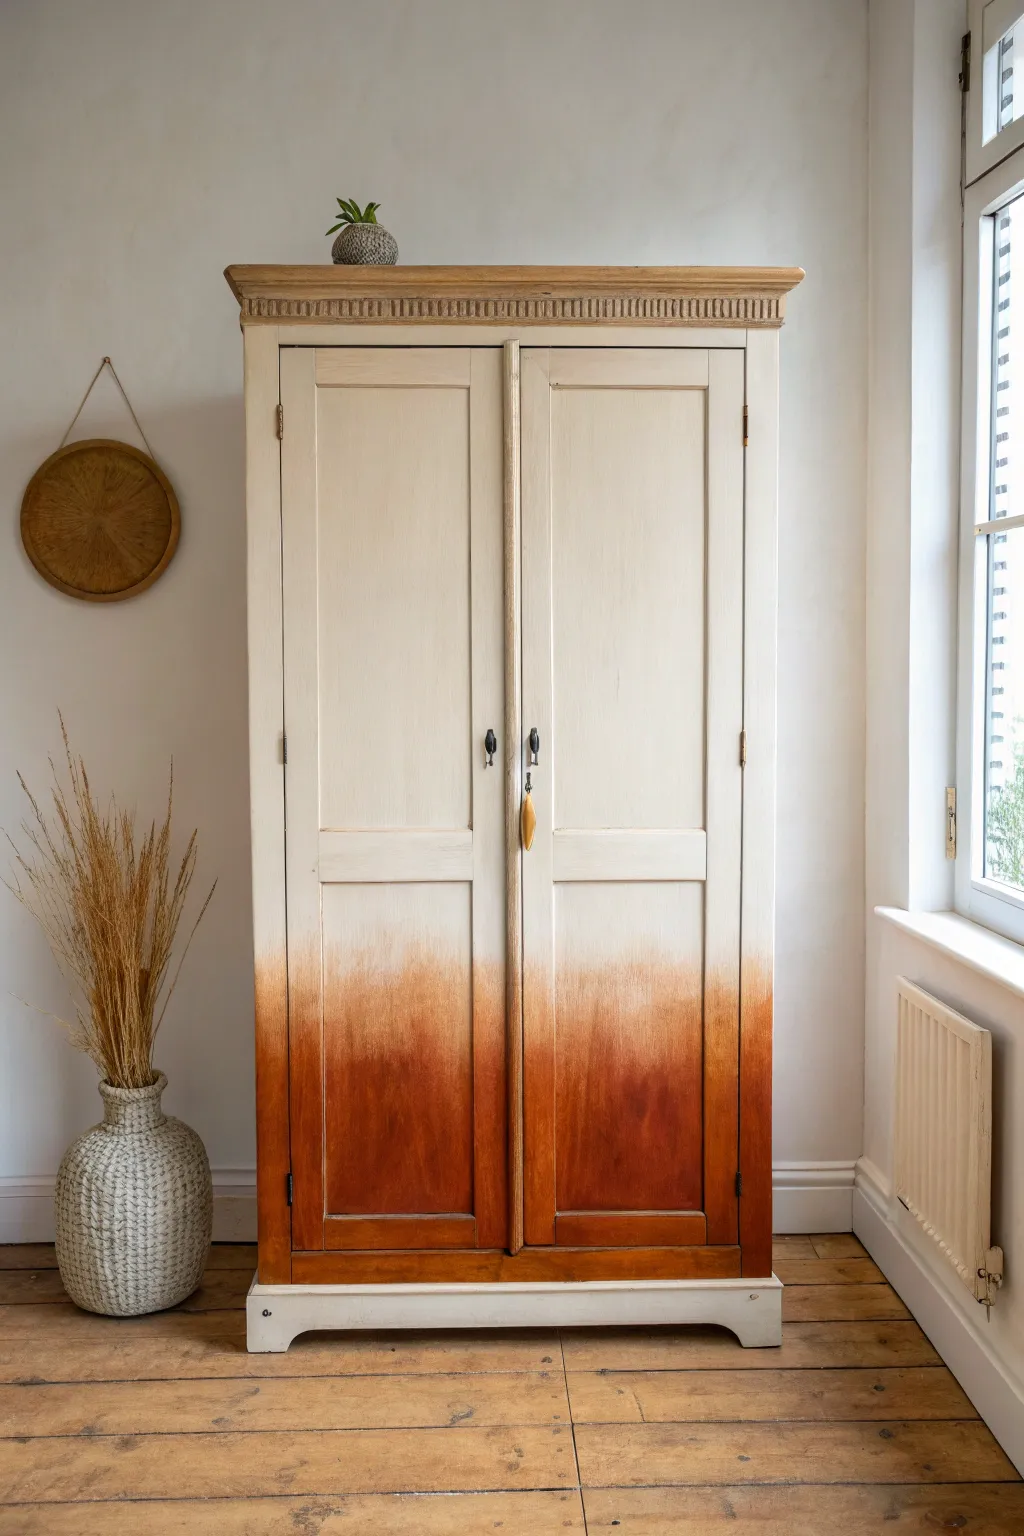
Transform a dated wooden wardrobe into a stunning focal point using a textured ombre technique reminiscent of a hazy sunrise. This finish blends a crisp, creamy upper half into a warm, grounding terracotta base, creating a look that feels both vintage and strikingly modern.
How-To Guide
Materials
- Old wooden wardrobe
- Sandpaper (120 and 220 grit)
- Electric sander (optional but recommended)
- Wood primer (water-based)
- Chalk paint or matte furniture paint: Creamy White
- Chalk paint or matte furniture paint: Terracotta/Russet Orange
- Large flat synthetic brush
- Round wax brush or blending brush
- Spray mister bottle with water
- Clear furniture wax
- Dark furniture wax (optional for aging)
- Lint-free rags
- Painter’s tape
- Drop cloths
Step 1: Preparation & Priming
-
Hardware removal:
Begin by removing all handles, hinges, and internal fixtures. Keep the screws taped to the hardware in a bag so nothing gets lost during the project. -
Clean the surface:
Scrub the entire wardrobe down with a degreaser or sugar soap to remove years of built-up oil, polish, and grime. A clean surface ensures the paint adheres properly. -
Scuff sanding:
Using 120-grit sandpaper, give the entire piece a thorough scuff sand. You don’t need to strip it to bare wood, just de-gloss the old finish so the primer has something to grip. -
Wipe away dust:
Vacuum up the sanding dust and wipe the piece down with a damp lint-free cloth or tack cloth. Any remaining dust will create a rough texture in your final paint. -
Masking:
Use painter’s tape to protect any mirrors, glass panels, or internal areas you don’t want painted. Lay down drop cloths to protect your floor. -
Apply primer:
Apply a coat of high-quality wood primer. Since we are using a light color on top, this prevents tannins from the old wood bleeding through and discoloring your cream finish.
Step 2: Painting the Base Colors
-
The cream foundation:
Using your large flat brush, paint the top 2/3 of the wardrobe with your Creamy White paint. Don’t worry about a perfect line at the bottom; a ragged edge helps with blending later. -
The terracotta base:
While the cream is still slightly tacky or just dry, paint the bottom 1/3 of the wardrobe with your Terracotta/Russet Orange paint. Bring the color up to meet the cream section. -
Second coat coverage:
Allow the first coats to dry completely according to the can instructions. Apply a second coat of Creamy White to the top section to ensure solid, opaque coverage. -
Building the dark tone:
Apply a second coat of Terracotta to the bottom section. This depth of color is crucial for the final dramatic fade effect.
Paint drying too fast?
If the paint drags and won’t blend, your room might be too warm. Mist slightly more water or mix a slowing medium into your paint to extend the open working time.
Step 3: Creating the Ombre Blend
-
Preparing the blend zone:
This is the critical step. Apply a fresh, thin layer of Creamy White just above the meeting line, and a fresh layer of Terracotta just below it. You need wet paint to blend. -
Mist and mix:
Lightly mist the transition area with your water spray bottle. You don’t want drips, just enough moisture to keep the acrylic or chalk paint from setting up too fast. -
The cross-hatch technique:
Take a designated blending brush (or a clean dry brush). Start at the line where colors meet and use rapid cross-hatch (X-shaped) strokes to pull the dark paint up into the light and the light paint down into the dark. -
Refining the fade:
Work horizontally across the wardrobe. If the blend looks too stark, dip just the tip of your brush into the Terracotta, wipe most of it off, and dry-brush upwards into the cream to soften the transition. -
Feathering out:
Use a clean, dry soft brush to lightly feather over the blended area while it’s still damp. This removes brush marks and creates that soft, hazy, airbrushed appearance seen in the photo. -
Assessment:
Step back and look at the gradient from a distance. If the transition line is too straight or obvious, mist again and rework the feathering until it looks organic and cloudy.
Pro Tip: The Third Color
For a truly seamless professional fade, mix a 50/50 cup of your cream and orange paints. Apply this ‘mid-tone’ right at the seam before blending for an easier transition.
Step 4: Finishing Touches
-
Distressing (optional):
Once fully dry, take a 220-grit sanding block and lightly sand the edges of the doors and the transition area if you want an ultra-smooth, time-worn feel. -
Waxing for protection:
Apply a layer of clear furniture wax over the entire piece with a lint-free cloth or wax brush. This seals the chalk paint and adds durability. -
Adding depth:
To enhance the ‘burnt’ look at the very bottom, I sometimes apply a tiny amount of dark wax over the Terracotta section, buffing it well to deepen the orange tone. -
Reassembly:
Once the wax has cured (usually 24 hours to be handle-safe), remove the tape and reattach your hardware to complete the transformation.
With a little patience and blending, you now have a custom piece that brings the warmth of a sunset into your bedroom
Blended Blue Wardrobe for a Boho Vibe
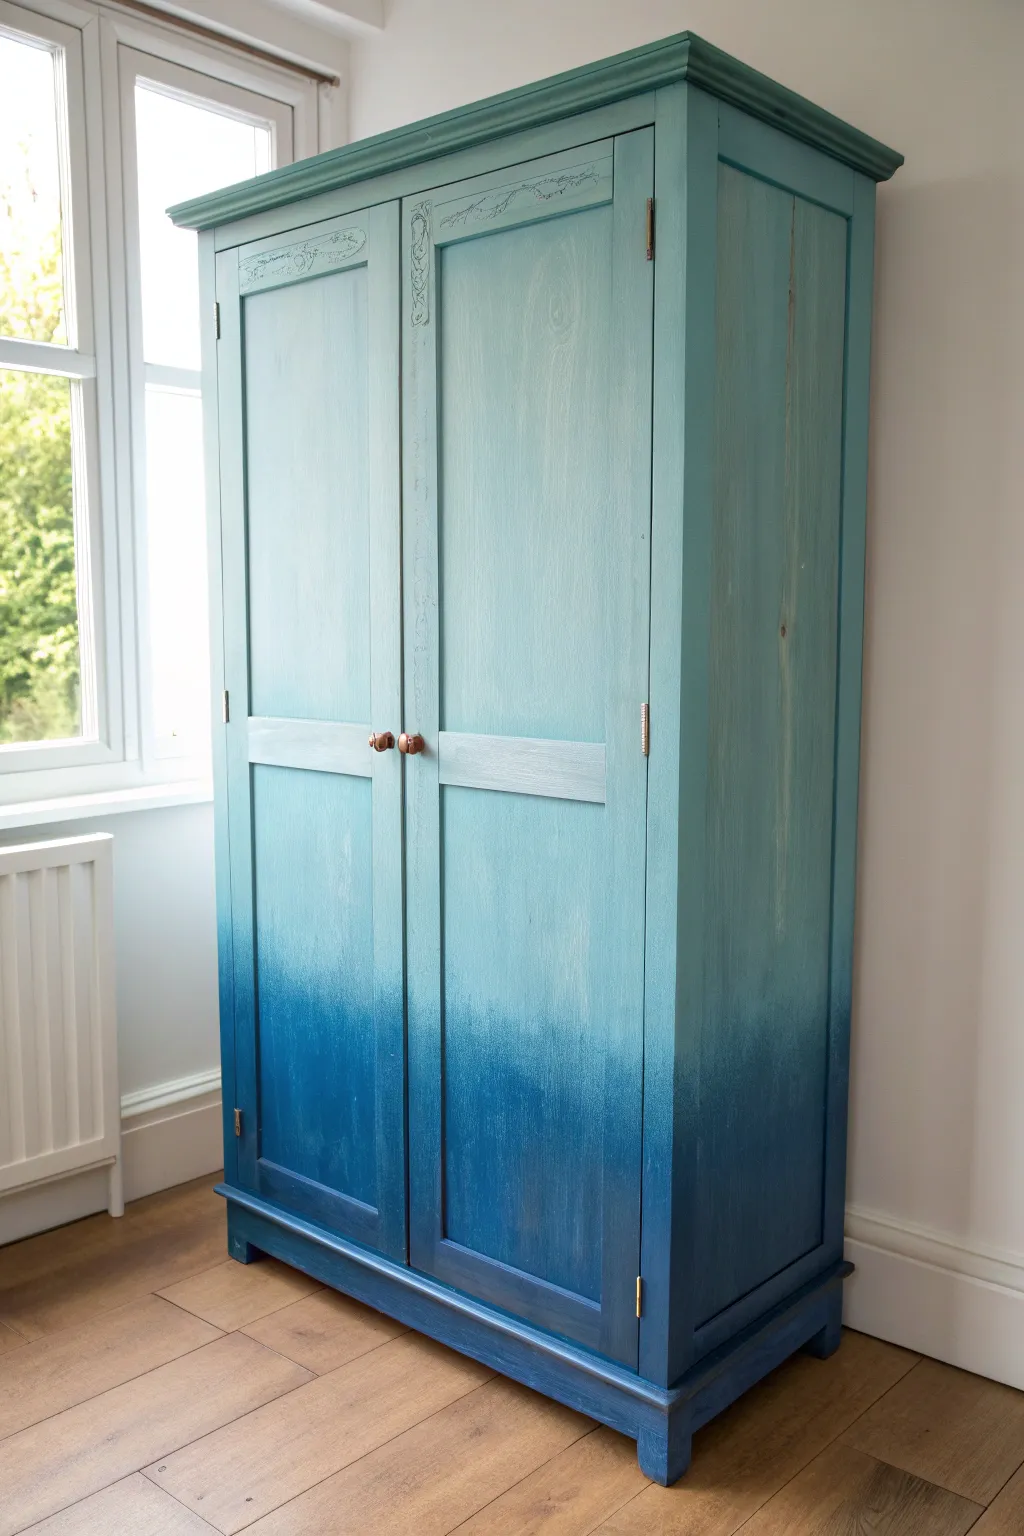
Transform a tired wooden wardrobe into a calming coastal statement piece with this stunning blended blue finish. The gradual fade from soft aqua to deep navy creates a sophisticated ombré effect that adds instant character to any bedroom.
Step-by-Step Tutorial
Materials
- Old wooden wardrobe
- Sandpaper (120 and 220 grit)
- Sugar soap or TSP cleaner
- Painter’s tape
- Chalk paint or Mineral paint (Light Aqua/Teal color)
- Chalk paint or Mineral paint (Deep Navy Blue color)
- Two large synthetic paint brushes (oval or flat)
- One medium blending brush or misting bottle
- Clear furniture wax or matte topcoat
- Lint-free rags
- Screw driver
- Drop cloth
Step 1: Preparation
-
Clear and clean:
Begin by removing all hardware, including handles, hinges, and any loose internal shelves. Wipe down the entire piece with sugar soap or a TSP cleaner to remove years of grease and grime, ensuring a clean surface for adhesion. -
Sand the surface:
Give the entire wardrobe a thorough scuff sanding using 120-grit sandpaper. You aren’t trying to strip it back to bare wood, but rather to create a ‘key’ or rough surface for the paint to grab onto. -
Remove dust:
Vacuum up the sanding dust and follow up with a tack cloth or a damp lint-free rag to ensure not a speck of dust remains. -
Masking up:
Apply painter’s tape to anything you can’t remove but don’t want painted, such as glass panes or specific internal edges.
Mist for Magic
Keep a misting spray bottle of water handy during the blending phase. A light mist keeps acrylic chalk paints workable longer, allowing for a much smoother, smokier gradient.
Step 2: Creating the Base Layers
-
Paint the top section:
Using a clean brush, apply your Light Aqua paint to the top two-thirds of the wardrobe. Don’t worry about a perfect bottom edge yet; keep the strokes long and flowing with the grain of the wood. -
Paint the bottom section:
While the top is still drying, switch to a fresh brush and apply the Deep Navy Blue to the bottom third of the wardrobe. Bring the dark color up to meet the light color, leaving a small gap between them initially. -
Initial blend:
Quickly, while both paints are still wet, brush the navy paint upward into the aqua area. Use light, feathery strokes to start crossing the colors over each other. -
Let it dry:
Allow this first coat to dry completely. Chalk paint usually dries quickly, but give it at least an hour or two. The coverage might look patchy, but that’s normal for the first coat.
Muddy Middle?
If your blended area starts looking gray or muddy, stop. Let it dry completely, then re-apply fresh bands of pure blue and pure aqua before attempting the blend again.
Step 3: Perfecting the Fade
-
Apply the second lighter coat:
Apply a second coat of the Light Aqua to the top section. When you reach the transition zone, stop and keep the edge wet. -
Apply the second darker coat:
Apply the second coat of Deep Navy to the bottom, bringing it up to meet the wet light paint. -
Create the transition mix:
Dip a separate blending brush lightly into both paint cans—a little aqua on one side, a little navy on the other—or mix a small amount on a paper plate to create a mid-tone. -
Wet blending:
Work this mid-tone into the space where the two colors meet. I like to use a misting bottle here to lightly spray water on the transition area; the moisture helps the paints move and blur together seamlessly without brush marks. -
Feather the edges:
Use dry, sweeping up-and-down strokes to pull the dark color slightly higher and the light color slightly lower until the line disappears into a soft fog. -
Detail work:
Don’t forget to address molding, sides, and the thin edges of the doors using a smaller brush to ensure the gradient wraps around consistently.
Step 4: Finishing Touches
-
Smooth sanding:
Once the blended layer is totally dry (overnight is best), use a fine 220-grit sandpaper to lightly smooth out any rough textures or stray brush hairs. Wipe away the dust. -
Seal the piece:
Apply a clear furniture wax or a matte polycrylic topcoat. Wax offers a classic, hand-rubbed feel: apply with a rag, let it haze, then buff. A polycrylic provides more durability for high-traffic pieces. -
Reassemble:
Reattach your handles and hardware. If the old hardware doesn’t match the new look, consider spray painting the knobs gold or copper for a warm contrast against the blue. -
Curing time:
Let the piece cure for a few days before placing heavy items inside or on top to ensure the finish has hardened fully.
Enjoy the serene atmosphere your new custom-painted wardrobe brings to the room
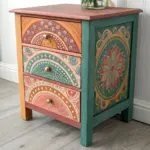
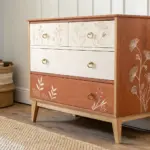
Floral Folk-Art Wardrobe Panels
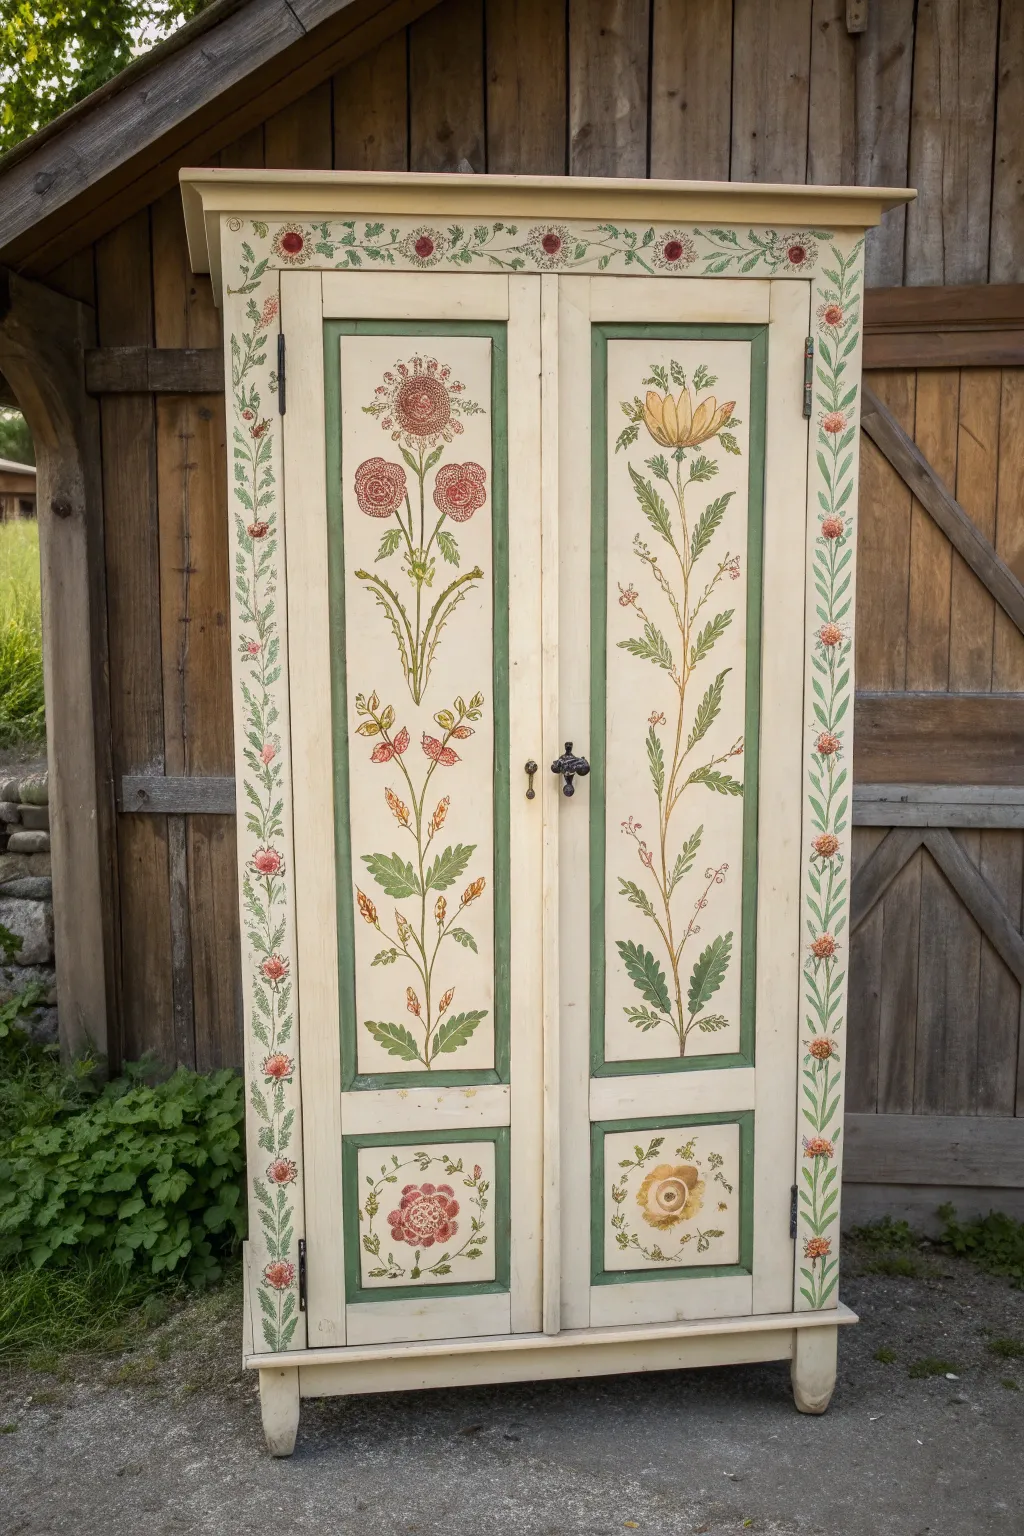
Transform a plain wooden wardrobe into a charming heirloom piece with this detailed folk art painting tutorial. The design features symmetrical floral motifs framed in sage green borders, capturing the essence of traditional European peasant furniture.
Step-by-Step
Materials
- Wooden wardrobe (unfinished or sanded)
- Cream or off-white chalk paint (base)
- Sage green acrylic paint
- Deep red acrylic paint
- Mustard yellow acrylic paint
- Burnt orange acrylic paint
- Various shades of leaf green acrylic paints
- Painter’s tape (1-inch width)
- Fine detail brushes (sizes 0, 2)
- Flat shader brushes (sizes 4, 8)
- Sandpaper (220 grit)
- Clear matte varnish or wax
- Pencil and eraser
- Ruler or straight edge
- Transfer paper (optional)
Step 1: Preparation and Base Coat
-
Surface Prep:
Begin by removing all hardware, including handles and hinges. Clean the surface thoroughly with a degreaser to ensure good adhesion. If the wood is glossy, give it a light sanding with 220-grit sandpaper to create some tooth. -
Base Painting:
Apply two to three coats of cream or off-white chalk paint to the entire exterior. Allow each coat to dry completely before applying the next. I like to sand very lightly between coats for a super smooth finish. -
Marking the Panels:
Once the base is cured, use a ruler and pencil to lightly measure and mark the recessed panels on the doors. You want to define the rectangular areas where the main floral designs will live.
Step 2: Creating the Framework
-
Taping Borders:
Apply painter’s tape around the inner edges of the door panels and the small lower panels. This will help you create crisp, straight lines for the sage green borders. -
Painting Frames:
Load a flat brush with sage green paint. Carefully paint a border about 1/2-inch wide inside your taped areas. Don’t forget the horizontal division separating the tall upper panel from the smaller lower square. -
Removing Tape:
Peel off the tape while the paint is still slightly tacky to prevent chipping. Tidy up any bleed-through with a small brush and your base cream color. -
Outer Vine Border:
For the decorative vine running along the outer edges of the doors and top header, lightly sketch a simplified undulating vine pattern in pencil first to ensure symmetry.
Stealing Symmetry
Draw your design on tracing paper first. Flip the paper over and rub chalk on the lines, then tape it to the door and trace over it to transfer a perfectly mirrored design.
Step 3: The Main Floral Motifs
-
Sketching Central Stems:
In the center of each large panel, lightly sketch a tall, vertical main stem. Make the left door mirror the right door slightly, though they don’t need to be perfect copies. -
Painting the Stems:
Using a size 2 round brush and a mix of olive and leafy greens, paint the long central stems. Use a lighter touch at the top for thinner lines. -
Adding Base Leaves:
Paint large, acanthus-style leaves at the bottom of the stems using a darker green. Use a ‘comma stroke’ technique where you press down and lift up to create the leaf shape. -
Primary Blooms (Left Panel):
On the left door, paint the large circular sunflower-like bloom at the top in muted red and pink. Add two smaller red rose-style circles below it. -
Primary Blooms (Right Panel):
On the right door, paint a large, tulip-shaped yellow flower at the top. Shade the bottom of the petals with a touch of burnt orange for depth. -
Filling the Vines:
Go back to the outer border vine. Paint small red buds and green leaves along the undulating line you sketched earlier, keeping the strokes loose and repetitive.
Make It Yours
Personalize the design by hiding meaningful symbols in the border vines, such as tiny initials, ladybugs, or bees painted amidst the leaves for a whimsical touch.
Step 4: Detailing and Antiquing
-
Adding Veins and Thorns:
Switch to your size 0 detailing brush. Mix a dark green (almost black) to paint tiny veins inside the leaves and small distinct thorns or jagged edges on the stems. -
Flower Centers:
Dot the centers of your red and yellow flowers. Use tiny dots of yellow on the red flowers and brown dots on the yellow flowers to create texture. -
Lower Panel Wreaths:
In the bottom square panels, paint a simplified circular wreath. Place a single large flower in the center—a red rose on the left, a yellow rose on the right—surrounded by small green sprays. -
Creating Patina:
Once all paint is perfectly dry, mix a small amount of dark brown paint with glaze or water (1:10 ratio). Brush this over the painted areas and immediately wipe it back with a rag. This ‘antiquing’ settles into brushstrokes and makes the piece look aged. -
Sealing:
Apply a clear matte wax or varnish over the entire piece to protect your artwork. Wax offers a more authentic, hand-rubbed feel suitable for folk art. -
Reassembly:
Reattach your hinges and handles. If the original hardware was shiny, consider darkening it with metal paint or rub ‘n buff to match the aged aesthetic.
Step back and admire how this traditional painting technique brings warmth and history to your space
Raised Stencil Texture on a Painted Wardrobe
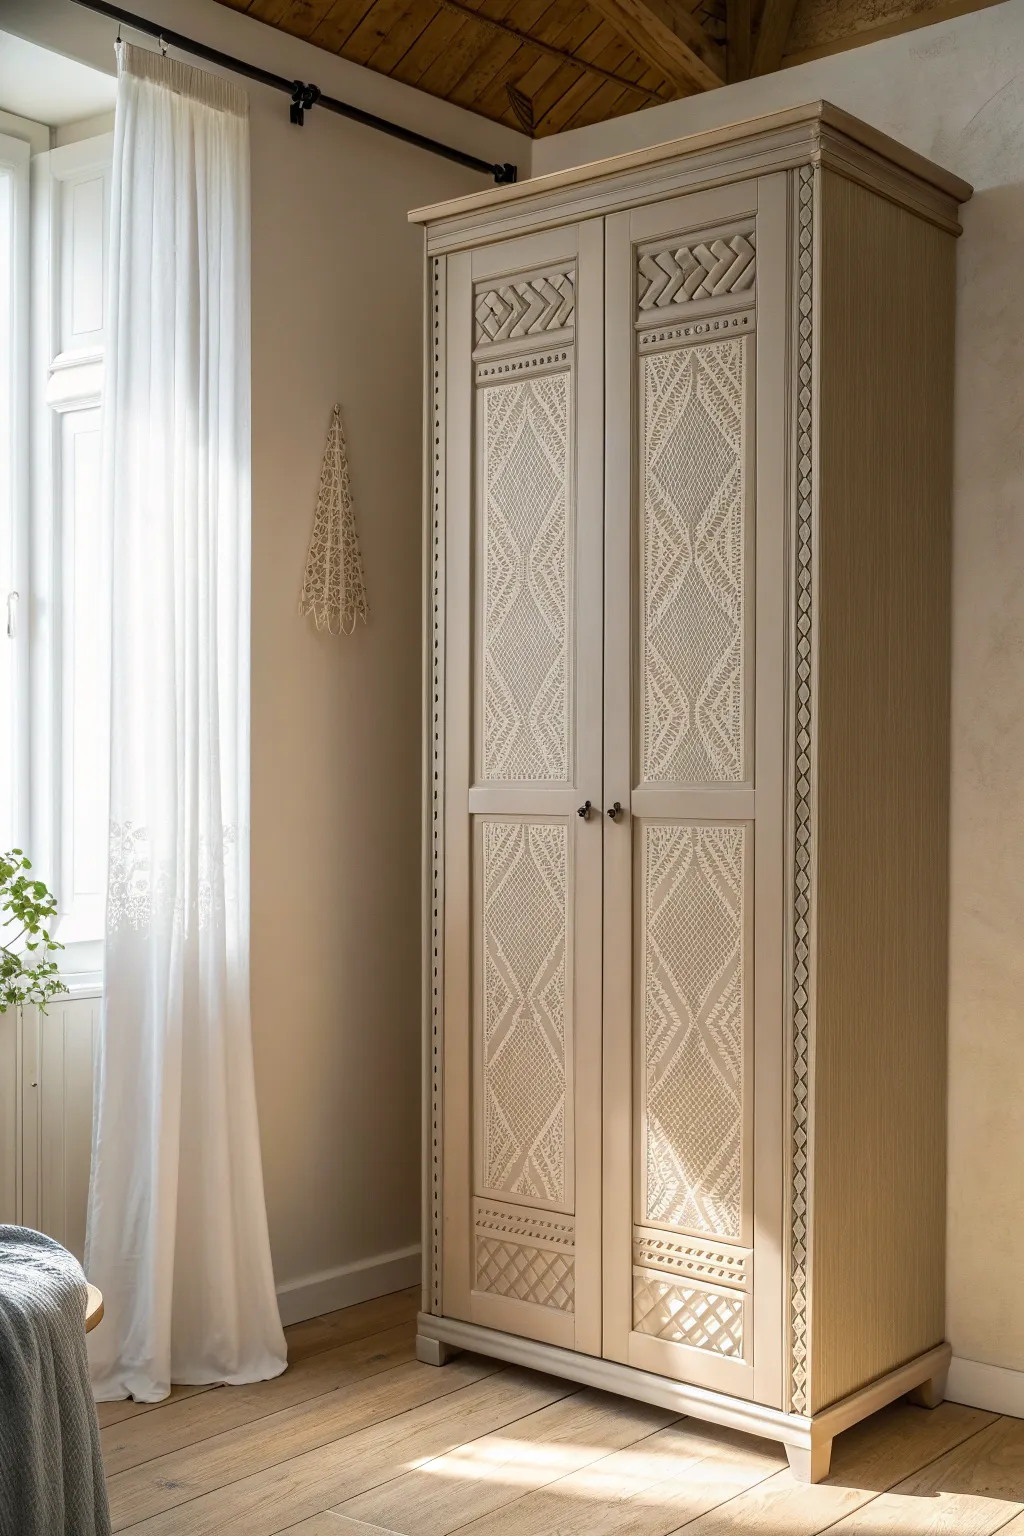
Transform a plain wardrobe into a stunning, textured statement piece with a subtle boho vibe. This project combines soft neutral tones with intricate raised patterns and carved wood appliques to create a high-end, custom look for a fraction of the cost.
Step-by-Step Guide
Materials
- Wooden wardrobe (sanded and cleaned)
- Chalk paint (soft beige/taupe color)
- Wood filler or embossing paste
- Large geometric or lace stencil
- Palette knife or scraper tool
- Painter’s tape
- Wooden lattice or carved trim pieces (for top/bottom panels)
- Wood glue
- High-grit sandpaper (220-320 grit)
- Wax or clear sealant
- Paint rollers and synthetic brushes
- New hardware (optional)
Step 1: Preparation & Base Coat
-
Remove hardware:
Begin by taking off all handles, knobs, and hinges if possible. Store them in a marked bag so nothing gets lost during the process. -
Clean surfaces:
Wipe down the entire wardrobe with a degreaser or a mix of water and vinegar to remove dust, oils, and old furniture polish. -
Light scuff sanding:
Use medium-grit sandpaper to scuff the existing finish. This helps your new primer and paint adhere properly without peeling later. -
Prime the wood:
Apply a coat of stain-blocking primer, especially if your wardrobe is made of dark wood or pine that might bleed tannins. -
Apply base color:
Roll on your first coat of soft beige or taupe chalk paint. Use a brush to get into corners and recessed panel areas. -
Second coat:
Once the first coat is completely dry, apply a second coat for full, opaque coverage. Chalk paint dries quickly, but I like to give it a few hours just to be safe.
Crisp Lines Only
Spray the back of your stencil with a temporary spray adhesive. This keeps intricate lace patterns tight against the wood to prevent the paste from bleeding underneath.
Step 2: Adding Texture & Detail
-
Attach wood trim:
Measure the top and bottom recessed panels of your doors. Cut your decorative wooden lattice or carved trim to fit these spaces perfectly. -
Glue the trim:
Apply a quality wood glue to the back of your trim pieces and press them firmly into place. Use clamps or painter’s tape to hold them while the glue sets. -
Position the stencil:
Place your large geometric or lace stencil over the main central panel of the door. Secure it tightly with painter’s tape to prevent slipping. -
Apply texture medium:
Using a palette knife or scraper, scoop up your wood filler or embossing paste. Spread it over the stencil like you are frosting a cake—smooth and even, but not too thick. -
Reveal the pattern:
Carefully lift the stencil straight up. Do not drag it. This reveals the raised, 3D pattern. If you mess up a spot, quickly wipe it off with a wet rag and try again. -
Repeat the process:
Allow the first stenciled section to dry before moving the stencil to adjacent areas. Align the pattern carefully to ensure a seamless look. -
Sand for smoothness:
Once the raised texture is hard and dry, run a high-grit sandpaper very lightly over the peaks to knock down any sharp edges or burrs.
Step 3: Finishing Touches
-
Paint the details:
Paint over the newly attached wood trim and the raised stencil areas with your base paint color. This unifies the textures for a monochromatic, carved-wood effect. -
Distress (optional):
If you want a more aged look, lightly sand the edges of the trim and the high points of the stencil to reveal a tiny bit of the wood or primer underneath. -
Seal the piece:
Apply a clear furniture wax or a matte polyacrylic sealant. This protects the raised texture from chipping and makes the wardrobe easier to clean. -
Buff the wax:
If using wax, let it cure for a short while, then buff it with a lint-free cloth to achieve a soft, professional sheen. -
Reattach hardware:
Screw your handles or knobs back on. This is the moment the whole look really comes together.
Metallic Glaze
After painting, lightly dry-brush a champagne gold or pearl metallic glaze over the raised stencil texture to make the pattern catch the light beautifully.
Step back and admire how a simple technique has given your furniture such sophisticated character
Geometric Color-Blocked Wardrobe Shapes
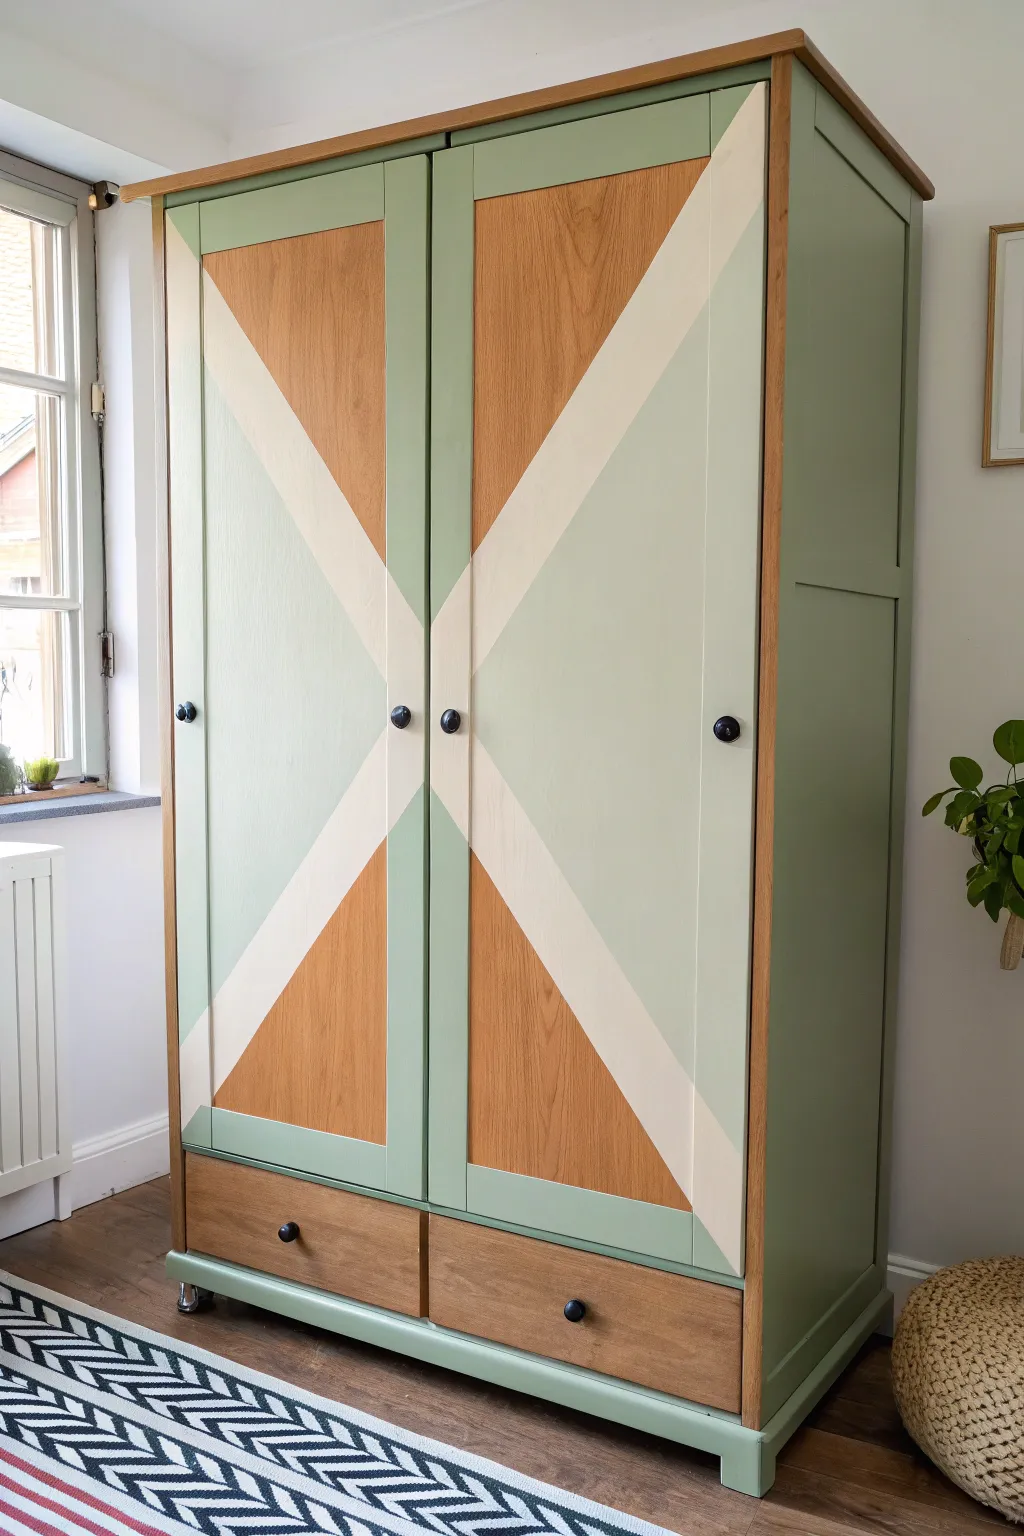
Transform a plain wooden wardrobe into a striking statement piece with this clever color-blocking technique. By combining the natural wood grain with soft sage green and crisp white diagonal lines, you’ll create a modern design that feels both playful and sophisticated.
How-To Guide
Materials
- Wooden wardrobe (unfinished or sanded back)
- Painter’s tape (high-quality, delicate surface specific)
- Sage green furniture paint (satin or eggshell finish)
- Off-white or cream furniture paint
- Clear matte varnish or wax
- Electric sander and sandpaper pads (80, 120, and 240 grit)
- Wood filler (if repairing old holes)
- Foam rollers and small synthetic paintbrushes
- Measuring tape and pencil
- Long ruler or straight edge
- Screwdriver (for hardware removal)
Step 1: Preparation
-
Remove Hardware:
Start by taking off all knobs, handles, and hinges. Remove the doors and drawers entirely to make them easier to work on flat surfaces, which helps avoid drips. -
Sand the surfaces:
If your wardrobe has an existing finish, you need to sand it back completely to reveal the raw wood, especially for the areas that will remain unpainted. Start with 80 grit, move to 120, and finish with 240 for a smooth touch. -
Clean and dust:
Vacuum up all the sanding dust and wipe the entire piece down with a slightly damp microfiber cloth. The surface must be perfectly dust-free for the tape to stick properly.
Step 2: Mapping the Design
-
Find the center points:
On each door face, measure to find the exact horizontal and vertical center. Mark these lightly with a pencil. -
Draw the diagonal cross:
Using a long straight edge, draw lines from the top left corner to the bottom right corner, and top right to bottom left. Do this for both doors so the ‘X’ pattern meets perfectly in the middle when the doors are closed. -
Plan the stripes:
Decide on the width of your white diagonal stripe (approx. 2-3 inches). Measure and mark this width outward from your initial diagonal lines to create the boundaries for the masking tape.
Bleeding Lines?
If paint seeps under the tape onto the raw wood, gently scrape it away with a sharp razor blade or sand that specific spot very lightly with high-grit sandpaper.
Step 3: Painting
-
Tape the wood sections:
Apply painter’s tape firmly over the areas that will remain natural wood (the top and bottom triangles). Run your fingernail or a credit card along the edge of the tape to ensure a tight seal. -
Seal the tape edges:
I like to brush a tiny amount of clear matte varnish along the tape edge first. This blocks the pores and prevents the colored paint from bleeding under the tape. -
Paint the white stripes:
Once the varnish seal is dry, paint the diagonal stripe area with your off-white color. Use a small foam roller for a smooth finish. You will likely need 2-3 coats, letting each dry fully. -
Tape for the green sections:
After the white paint has cured for at least 24 hours, carefully tape over the white lines you just painted to protect them. Now, tape off the natural wood sections again if the previous tape was removed. -
Apply the sage green:
Paint the side triangles and the frame of the wardrobe in your sage green color. Use a brush for corners and detailed molding, and a roller for the flat panels. -
Paint the frame and drawers:
Don’t forget the main carcass of the wardrobe. Paint the sides and front frame green. For the drawers, you can choose to paint them solid wood, solid green, or continue the geometric line if they sit flush.
Tape Sealing Trick
Paint the base color (or clear varnish for raw wood) over the tape edge first. This seals the gap so your accent color sits perfectly on top with zero bleed.
Step 4: Finishing Touches
-
The reveal:
Carefully peel away all the painter’s tape at a 45-degree angle while the final coat of paint is still slightly tacky to effectively prevent peeling. -
Touch ups:
Inspect your lines. If there’s any small bleed, use a detail brush or carefully scrape away excess paint from the wood grain with a craft knife. -
Seal the wood:
Apply a clear matte varnish or furniture wax over the entire piece—including the painted and unpainted sections. This protects the raw wood from yellowing and fingerprints. -
Reassemble:
Once everything is fully cured, reattach the hinges and hang the doors. Screw the knobs back on or replace them with new hardware for a fresh look.
Enjoy the satisfaction of seeing those crisp lines every time you get dressed in the morning
Playful Line-Art Squiggles on a Painted Wardrobe
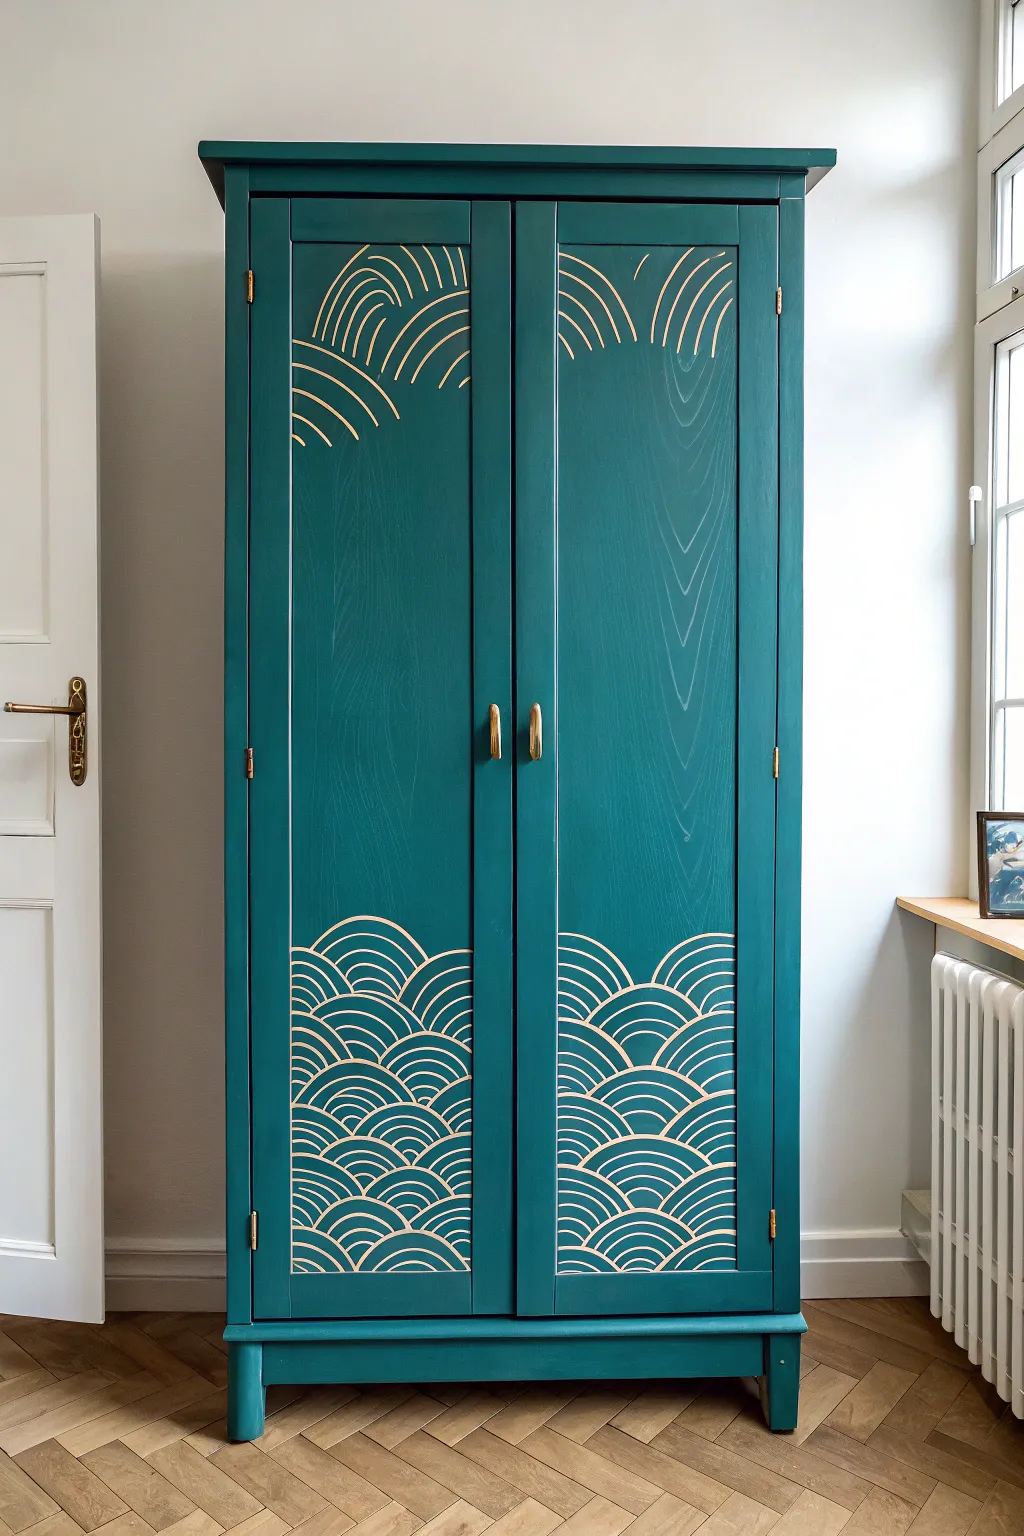
Transform a tired, standard wardrobe into a statement piece of furniture with this deep teal makeover featuring elegant, Japanese-inspired gold line art. The contrast between the moody background and the metallic wave pattern creates a sophisticated, modern look that completely refreshes any room.
Step-by-Step Tutorial
Materials
- Old wooden wardrobe
- Sandpaper (120 and 220 grit)
- Wood filler (if repairs are needed)
- Adhesion primer
- Deep teal chalk or mineral paint
- Gold paint marker or fine-tip brush with liquid gold leaf
- Pencil and eraser
- Large compass or circular object for tracing
- Ruler or straight edge
- Painters tape
- Clear protective topcoat (wax or poly)
- Gold hardware (knobs or pulls)
- Clean lint-free cloths
- Synthetic paint brushes (medium and large)
- Small foam roller
Step 1: Preparation & Base Coat
-
Remove hardware:
Begin by unscrewing and removing all existing handles, knobs, and hinges if possible. Store these safely in a bag so you don’t lose any screws. If you plan to reuse them, give them a good clean now; otherwise, set them aside for disposal. -
Clean the surface:
Wipe down the entire wardrobe with a degreasing cleaner to remove years of dust, oils, and furniture polish. Let it dry completely. -
Sand and repair:
Lightly scuff sand the entire piece with 120-grit sandpaper to give the primer something to grip. If there are deep scratches or holes from old hardware, fill them with wood filler, let dry, and sand smooth with 220-grit paper. -
Prime the surface:
Apply a coat of high-quality adhesion primer. This step is crucial for ensuring your dark paint sticks well and doesn’t chip later. Use a roller for large flat areas and a brush for corners. -
Apply the first coat of paint:
Once the primer is dry, stir your deep teal paint thoroughly. Apply the first coat using a brush to cut in the corners and details, then follow immediately with a foam roller on the flat panels for a smooth, brush-stroke-free finish. -
Apply the second coat:
Allow the first coat to dry according to the manufacturer’s instructions (usually 2-4 hours). Apply a second coat to ensure full, opaque coverage. The deep teal color needs to be rich and solid.
Smudged Lines?
If you accidentally smudge the gold marker, let it dry completely rather than wiping it wet. Once dry, touch up the teal background paint over the mistake with a small detail brush.
Step 2: Creating the Wave Pattern
-
Plan the layout:
Decide where you want your pattern. In this design, the waves are dense at the bottom and sparse at the top right/left corners. Use a ruler to lightly mark a horizontal baseline near the bottom of the doors where the pattern will start. -
Draft the bottom waves:
You’ll create the ‘seigaiha’ (Japanese wave) pattern. If you don’t have a steady hand, create a stencil or use a compass. Set your compass to a width of about 2-3 inches. Draw a series of semicircles along your baseline using a pencil. -
Layer the waves:
For the next row up, place the point of your compass at the intersection of the two waves below. Draw the next semicircle. Repeat this upward to create the overlapping scale effect. I usually sketch the entire bottom section lightly in pencil first. -
Sketch the inner lines:
Each ‘wave’ consists of concentric arches. Adjust your compass to a slightly smaller radius and draw an inner arch, then repeat 3-4 times until the wave is filled with parallel curved lines. -
Draft the top accents:
For the upper corners, draw incomplete or ‘floating’ wave sections that look like they are drifting down or sunbursts peeking out. Keep these asymmetrical for a more artistic feel. -
Trace with gold:
Shake your gold paint marker vigorously. Test the flow on a scrap piece of paper. Carefully trace over your pencil lines. Start from the top-most lines and work your way down so your hand doesn’t smudge the wet gold ink. -
Refine the lines:
If using a brush and liquid gold leaf instead of a marker, load your fine liner brush sparingly. Use smooth, confident strokes. Don’t worry if lines aren’t perfectly uniform; the hand-painted variations add charm. -
Clean up:
Allow the gold paint to cure for at least 24 hours. Once fully dry, gently erase any visible pencil marks with a soft eraser, being careful not to rub off the gold.
Level Up: Texture
Make the waves tactile! Use a gold relief paste or puff paint with a fine nozzle instead of a flat marker. This creates a raised, embossed effect for the pattern.
Step 3: Finishing Touches
-
Seal the piece:
To protect your handiwork, apply a clear topcoat. A spray-on polycrylic or clear wax works best over paint markers to prevent smearing. Apply thin, even coats. -
Install new hardware:
Once the topcoat is dry, install your new gold handles. The metallic hardware ties the whole look together and complements the gold line art perfectly. -
Reassemble:
Reattach the doors to the wardrobe frame. Step back and admire your custom art piece.
Now you have a stunning, one-of-a-kind wardrobe that serves as both functional storage and a striking piece of art for your home
Surprise Painted Wardrobe Interior With Pattern Pop
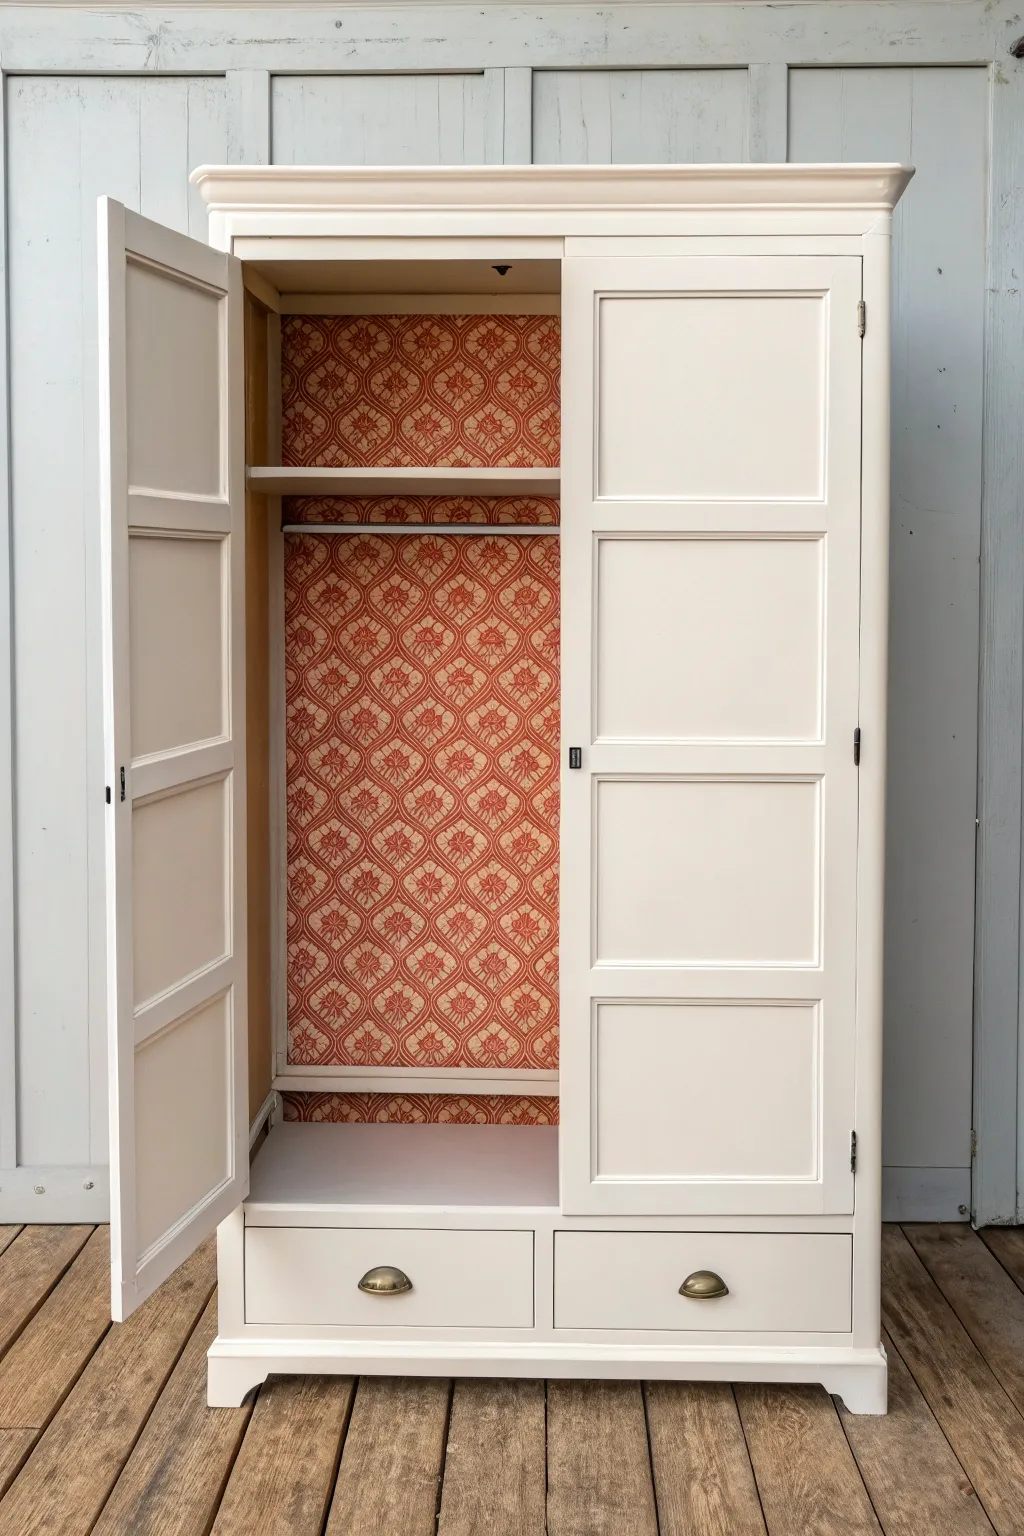
Transform a standard wardrobe into a delightful surprise by contrasting a serene, creamy exterior with a vibrant, patterned interior. This project breathes new life into tired furniture, offering a hidden pop of personality every time you open the doors.
Step-by-Step
Materials
- Solid wood wardrobe (vintage or secondhand)
- Sanding block and sandpaper (120 and 220 grit)
- Wood filler
- High-adhesion primer (zinsser BIN or similar)
- Creamy off-white furniture paint (eggshell or satin finish)
- Patterned wallpaper (geometric or floral motif in warm tones)
- Wallpaper paste
- Smoothing brush or squeegee
- Craft knife with fresh blades
- Painter’s tape
- Small foam roller and tray
- Synthetic angled brush (2 inch)
- Cup handles (antique brass finish)
- Screwdriver
- Cleaning cloths and sugar soap
Step 1: Preparation
-
Remove hardware:
Start by unscrewing all existing handles, hinges, and the hanging rail. Store these safely in a labeled bag so nothing gets lost during the painting process. -
Clean thoroughly:
Scrub the entire wardrobe, inside and out, using sugar soap and a damp cloth to remove years of grime, grease, or furniture wax. Let it dry completely. -
Fill imperfections:
Inspect the surfaces for deep scratches or dents. Apply wood filler to these areas and allow it to dry according to the package instructions. -
Sand surfaces:
Scuff sand the entire exterior and interior frame with 120-grit sandpaper to give the paint something to grip. Follow up with 220-grit for a smooth finish, then wipe away all dust with a tack cloth.
Seamless Seams
Paint the back panel in a color similar to your wallpaper’s background before papering. If seams shrink slightly, the gap won’t show.
Step 2: Painting the Structure
-
Tape edges:
If you plan to keep the very back panel unpainted (since you are wallpapering it), tape off the edges where the side walls meet the back panel to keep your lines clean. -
Prime the wood:
Apply a coat of high-adhesion primer to the entire wardrobe, including the doors and drawer fronts. Use a brush for corners and a foam roller for flat surfaces to avoid brush marks. -
Assess and sand:
Once the primer is dry, lightly sand any raised grain with fine sandpaper and wipe clean. This step is crucial for that professional, silky feel. -
First coat of paint:
Stir your creamy off-white paint well. Apply the first coat using long, even strokes with your synthetic brush on the molding details, following immediately with the roller on the large flat panels. -
Dry and repeat:
Allow the first coat to dry fully—usually 2-4 hours depending on your paint brand. I like to let this dry overnight if possible to ensure hardness. -
Apply topcoat:
Apply a second (and potentially third) coat of paint until you achieve a solid, opaque finish with no wood showing through. -
Paint the drawers:
Don’t forget the drawer fronts! Paint these separately to ensure no drips pool in the crevices.
Step 3: The Patterned Interior
-
Measure the back panel:
Measure the height and width of the interior back panel precisely. If shelves are fixed, measure the spaces between them individually. -
Cut wallpaper:
Cut your wallpaper strips, leaving an extra 2 inches of overhang on the top and bottom to allow for adjustments during placement. -
Apply paste:
Depending on your paper type, either apply paste directly to the back wood panel or to the paper itself. Ensure even coverage right to the corners. -
Hang the first strip:
Align your first strip of wallpaper against the top edge and one side corner. Use your smoothing tool to push out air bubbles, working from the center outwards. -
Match the pattern:
For subsequent strips, carefully line up the pattern so the motif continues seamlessly. Slide the paper into place gently before smoothing it down. -
Trim excess:
Use a sharp craft knife and a straight edge (like a metal ruler) to trim the excess paper at the top, bottom, and corners for a crisp finish. -
Clean adhesive:
Wipe away any excess paste from the painted side walls immediately with a damp sponge so it doesn’t leave a shiny residue.
Scented Surprise
Line the drawer bottoms with scented drawer liners or attach a small sachet to the inside wall for a fresh fragrance upon opening.
Step 4: Finishing Touches
-
Reassemble hardware:
Once the paint has cured for at least 24 hours, screw the hinges and hanging rail back into place. -
Install new handles:
Attach the antique brass cup handles to the drawer fronts. If the holes from old handles don’t match, you may need to drill new pilot holes before this step.
Now step back and admire how a simple roll of paper turned a plain piece of furniture into a statement piece


Have a question or want to share your own experience? I'd love to hear from you in the comments below!