If you’re staring down dark wood paneling and dreaming of a brighter, fresher room, paint can seriously work magic. I’ve pulled together my favorite painting paneling ideas—from the classics everyone loves to a few artsy twists that make the grooves feel intentional.
Classic Crisp White Painted Paneling
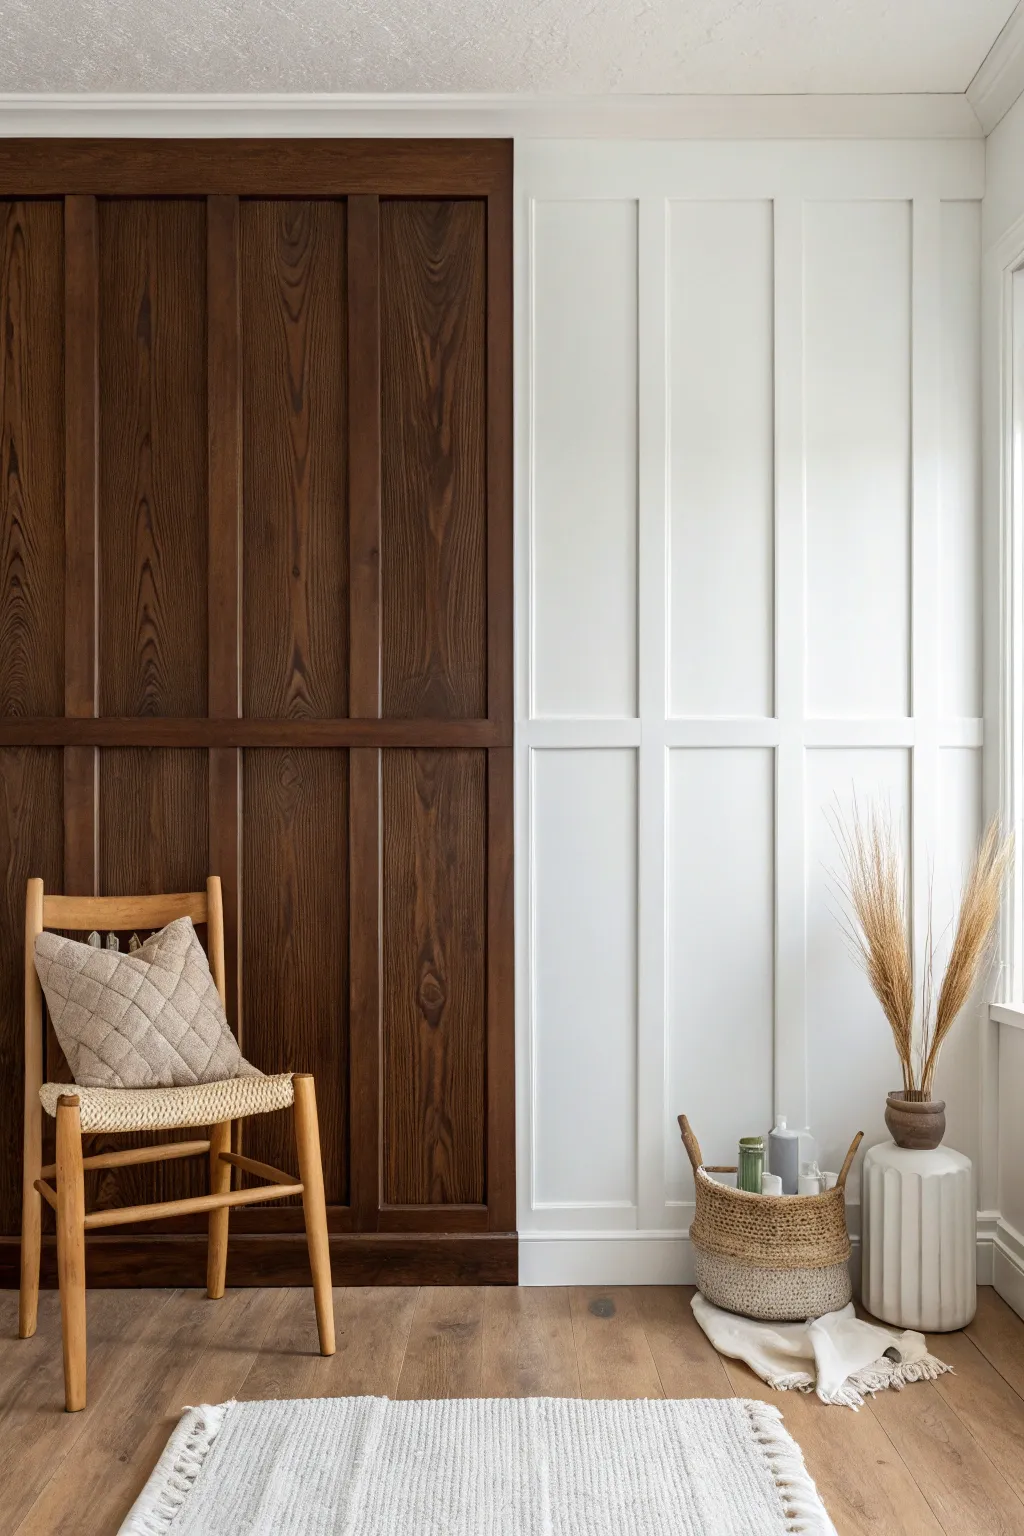
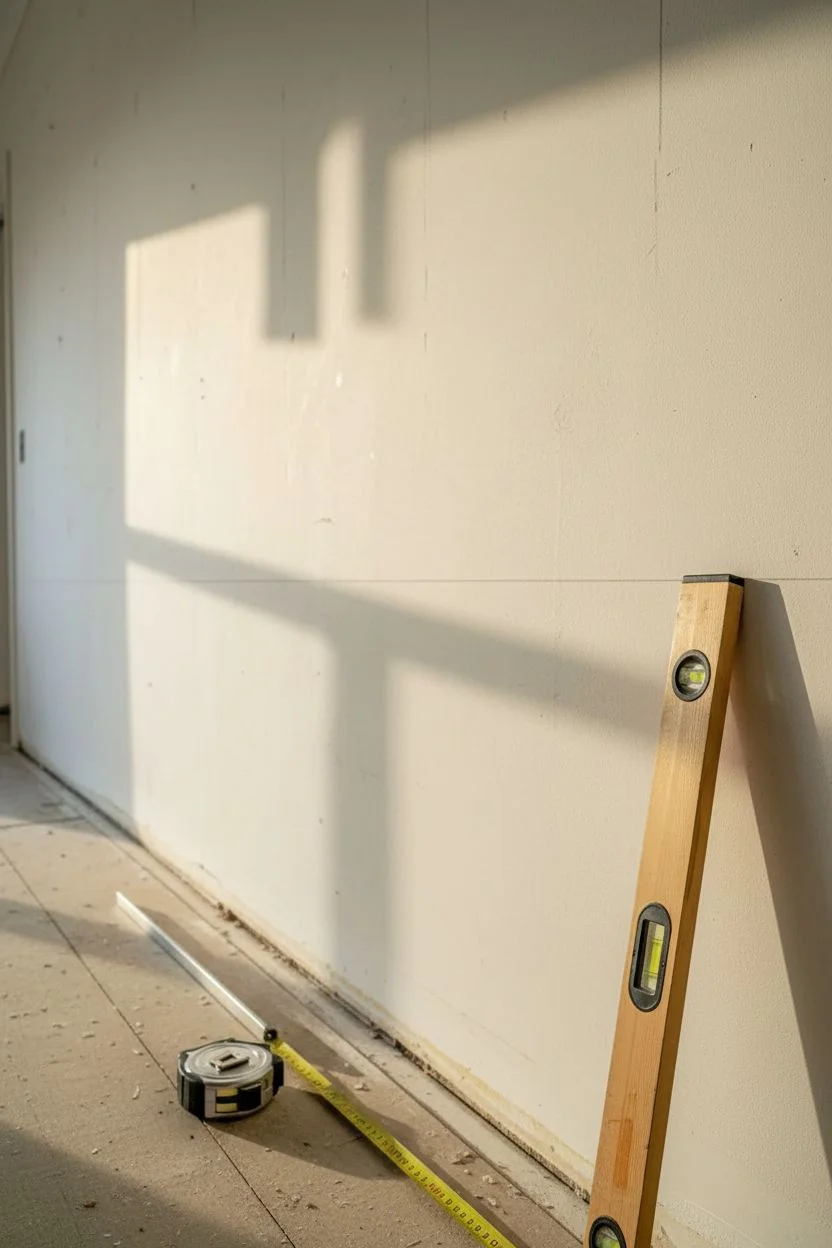
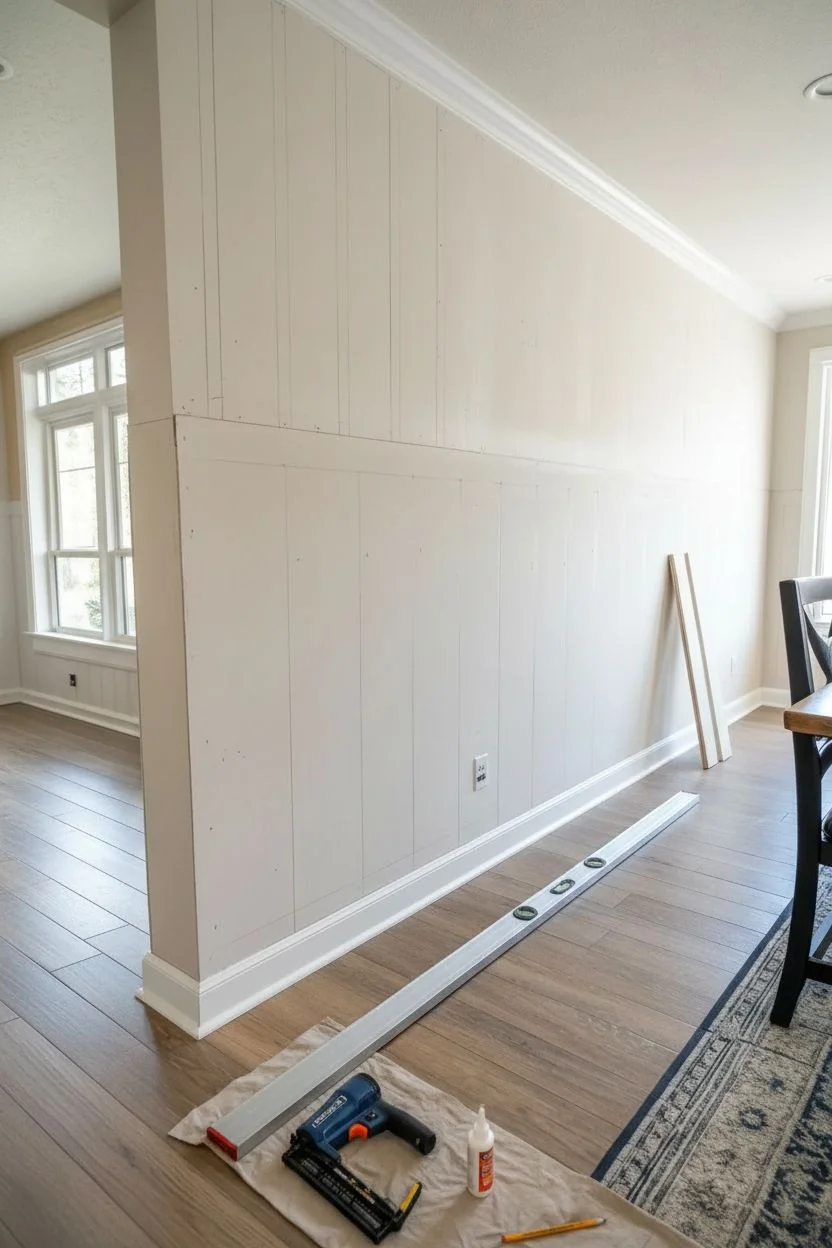
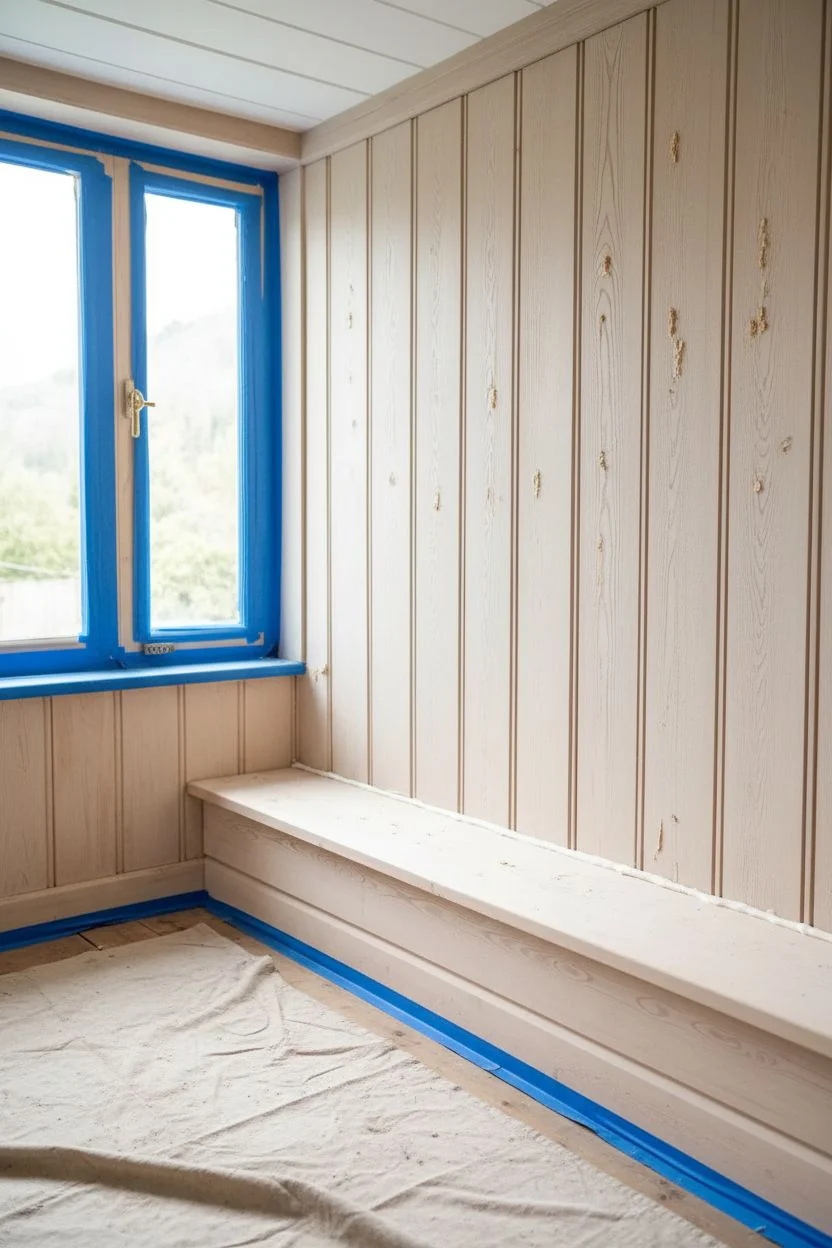
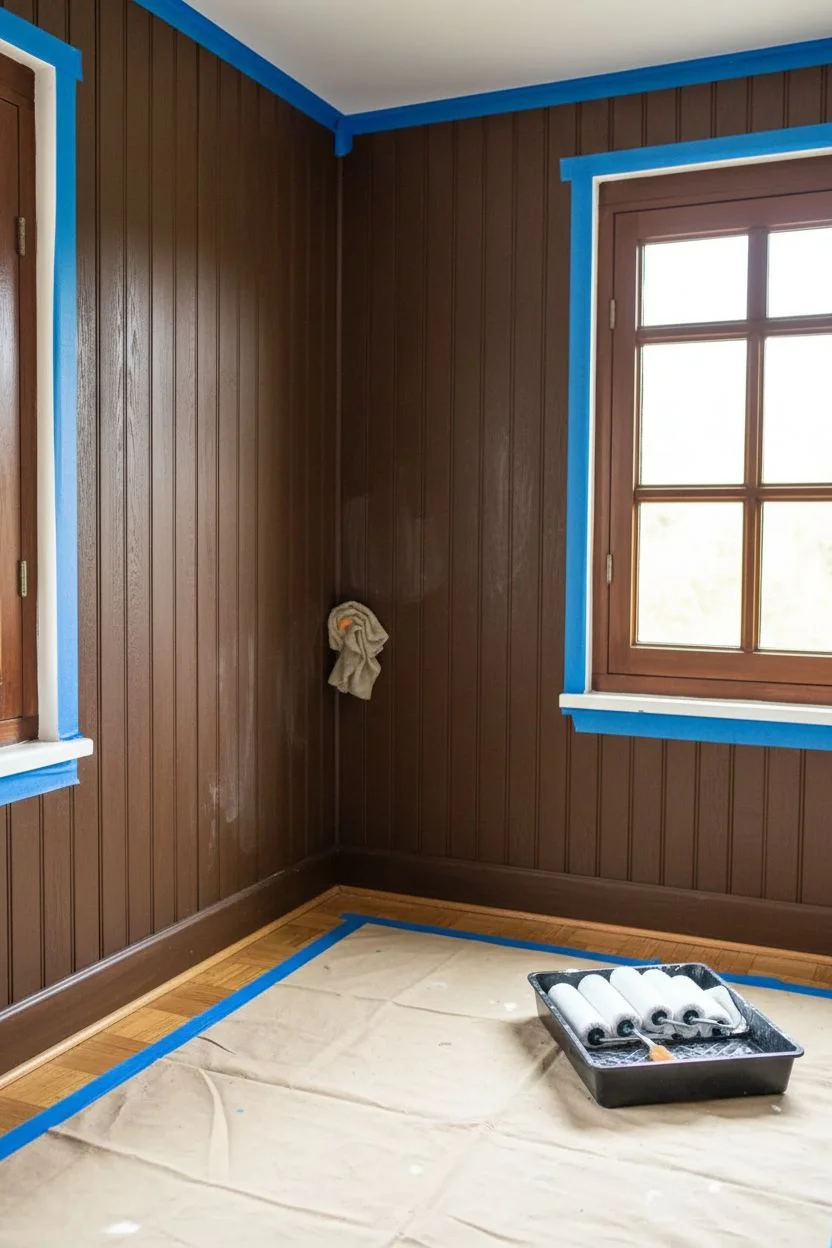
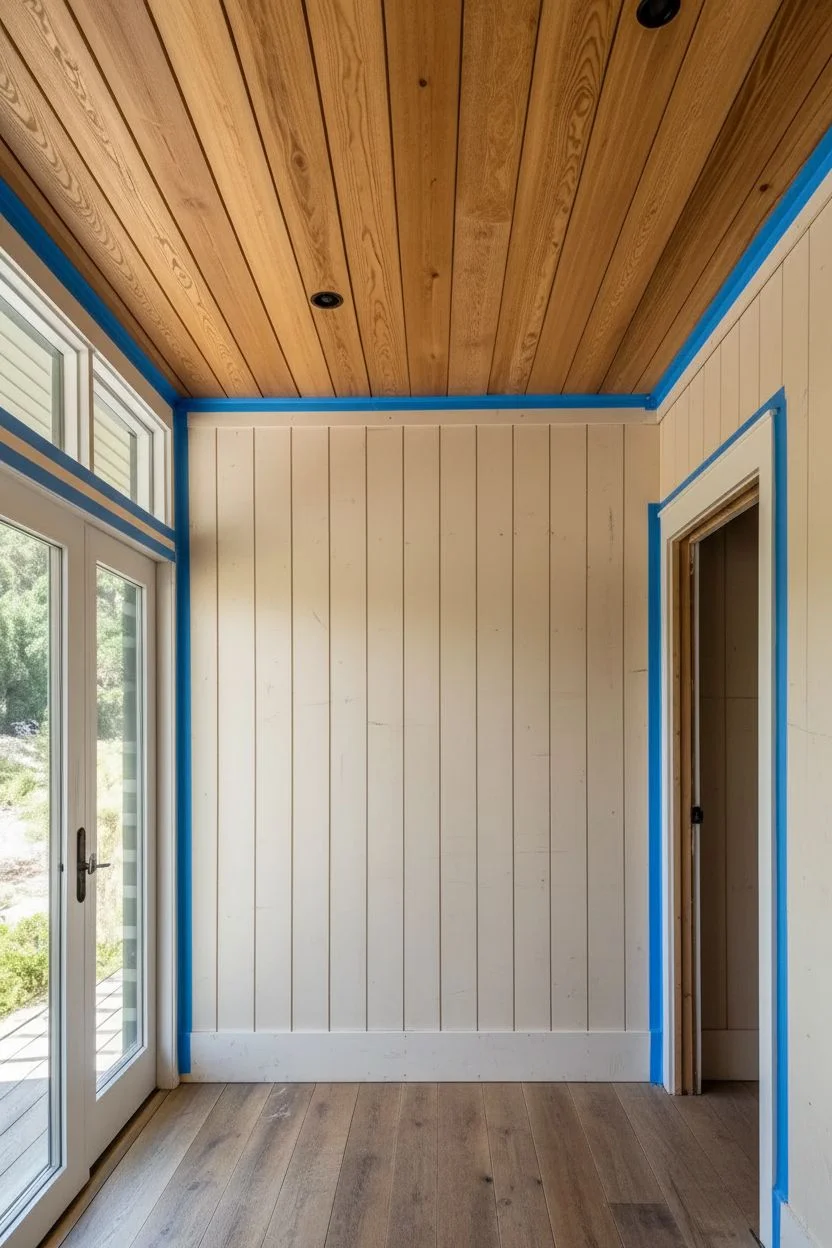
Transform a plain wall into a sophisticated architectural feature with this two-tone paneling project. By combining rich, dark wood tones on one side with crisp, bright white on the other, you create a stunning visual contrast that adds depth and character to any room.
Step-by-Step Guide
Materials
- 1×3 or 1×4 MDF or primed pine boards (for battens)
- Panel molding or trim (optional cap rail)
- Construction adhesive (e.g., Liquid Nails)
- Brad nailer and 2-inch brad nails
- Wood filler or spackle
- High-grit sandpaper (220-grit)
- Caulk and caulk gun
- Primer (if using bare wood)
- Bright white interior paint (semi-gloss or satin)
- Dark wood stain (e.g., walnut or espresso) and polyurethane
- Paint rollers and angled sash brushes
- Laser level or long spirit level
- Tape measure
- Painter’s tape
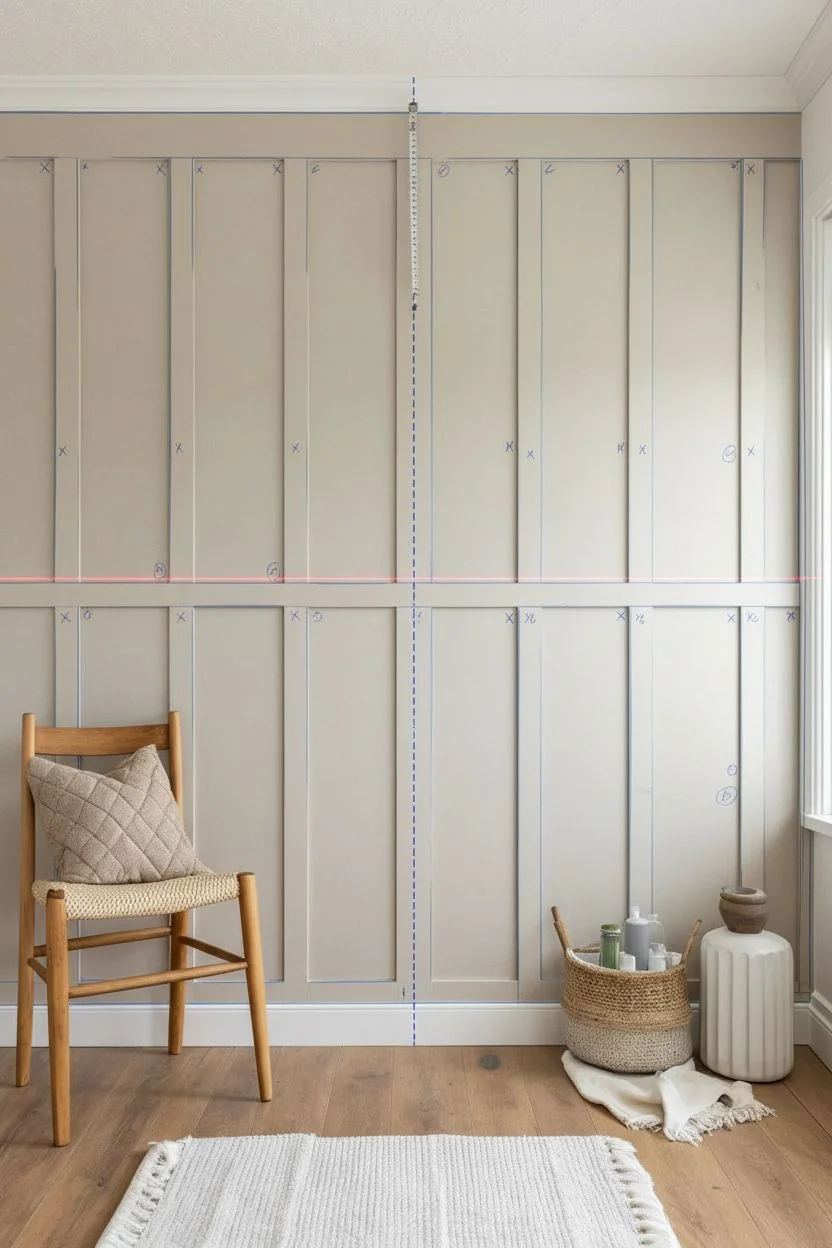
Step 1: Planning and Layout
-
Measure the wall:
Start by measuring the total width and height of your wall space. Decide where the transition between the dark wood and white paint will occur—in this design, it’s roughly a 50/50 split. -
Calculate batten spacing:
Determine the spacing for your vertical battens. A common spacing is between 12 to 16 inches apart. Divide your wall width by the number of spaces to ensure even placement. -
Mark the studs:
Use a stud finder to locate and mark the wall studs. While adhesive helps, nailing into studs provides the most secure hold for your horizontal rails.
Gap Troubleshooting
If your wall is wavy and boards don’t sit flush, don’t force them. Nail the board where it touches, then fill the gaps behind it with caulk later. Forcing it can bow the wood.
Step 2: Installation
-
Install horizontal rails:
Begin by installing the top and bottom horizontal boards. Use a level to ensure they are perfectly straight, applying construction adhesive to the back before nailing them into the studs. -
Add the middle rail:
Install the horizontal middle rail that runs across the center of the wall. This rail breaks up the height and adds visual interest. Check for level frequently. -
Cut vertical battens:
Measure the distance between your horizontal rails for each vertical section individually, as floors and ceilings are rarely perfectly even. Cut your vertical battens to size. -
Attach vertical battens:
Apply adhesive to the back of each vertical batten and nail them into place according to your spacing marks. I like to use a scrap piece of wood cut to the exact spacing width as a spacer to make this faster.
Level-Up: Texture
To mimic the image exactly, use wood with a strong grain for the dark side and smooth MDF for the painted side. The texture contrast makes the design pop.
Step 3: Prep for Finish
-
Fill nail holes:
Go over every nail hole with wood filler. Overfill slightly to account for shrinkage as it dries. -
Sand smooth:
Once the filler is dry, sand all filled areas and joints smooth with 220-grit sandpaper until they are flush with the board surface. -
Caulk the seams:
Run a thin bead of printable caulk along every edge where the boards meet the wall and where boards meet each other. Smooth it out with a damp finger for a seamless look.
Step 4: Painting and Staining
-
Stain the dark side:
For the dark wood section (if building from scratch with stain-grade wood), apply your chosen deep walnut stain with a rag or brush. Wipe away excess after a few minutes. -
Seal the dark wood:
After the stain has fully dried, protect the finish with a clear coat of matte or satin polyurethane. -
Taping off:
Once the stained side is fully cured (give it at least 24 hours), apply painter’s tape precisely down the vertical center line to protect the wood from the white paint. -
Prime the paint side:
Apply a coat of high-quality primer to the ‘white’ side of the paneling, covering both the MDF/wood and the drywall in between. -
Paint edges first:
Use an angled brush to cut in the white paint along the corners, edges, and around the battens where a roller can’t reach. -
Roll the flat surfaces:
Use a small foam roller or low-nap roller for the flat surfaces of the boards and the wall sections between them. This helps avoid brush strokes. -
Second coat:
Allow the first coat to dry according to the can’s instructions, then apply a second coat for a truly opaque, crisp white finish. Remove the tape while the paint is still slightly tacky to avoid peeling.
Step back and admire how this sharp contrast completely redefines the atmosphere of your space


Soft Warm White Paneling for a Cozy Glow
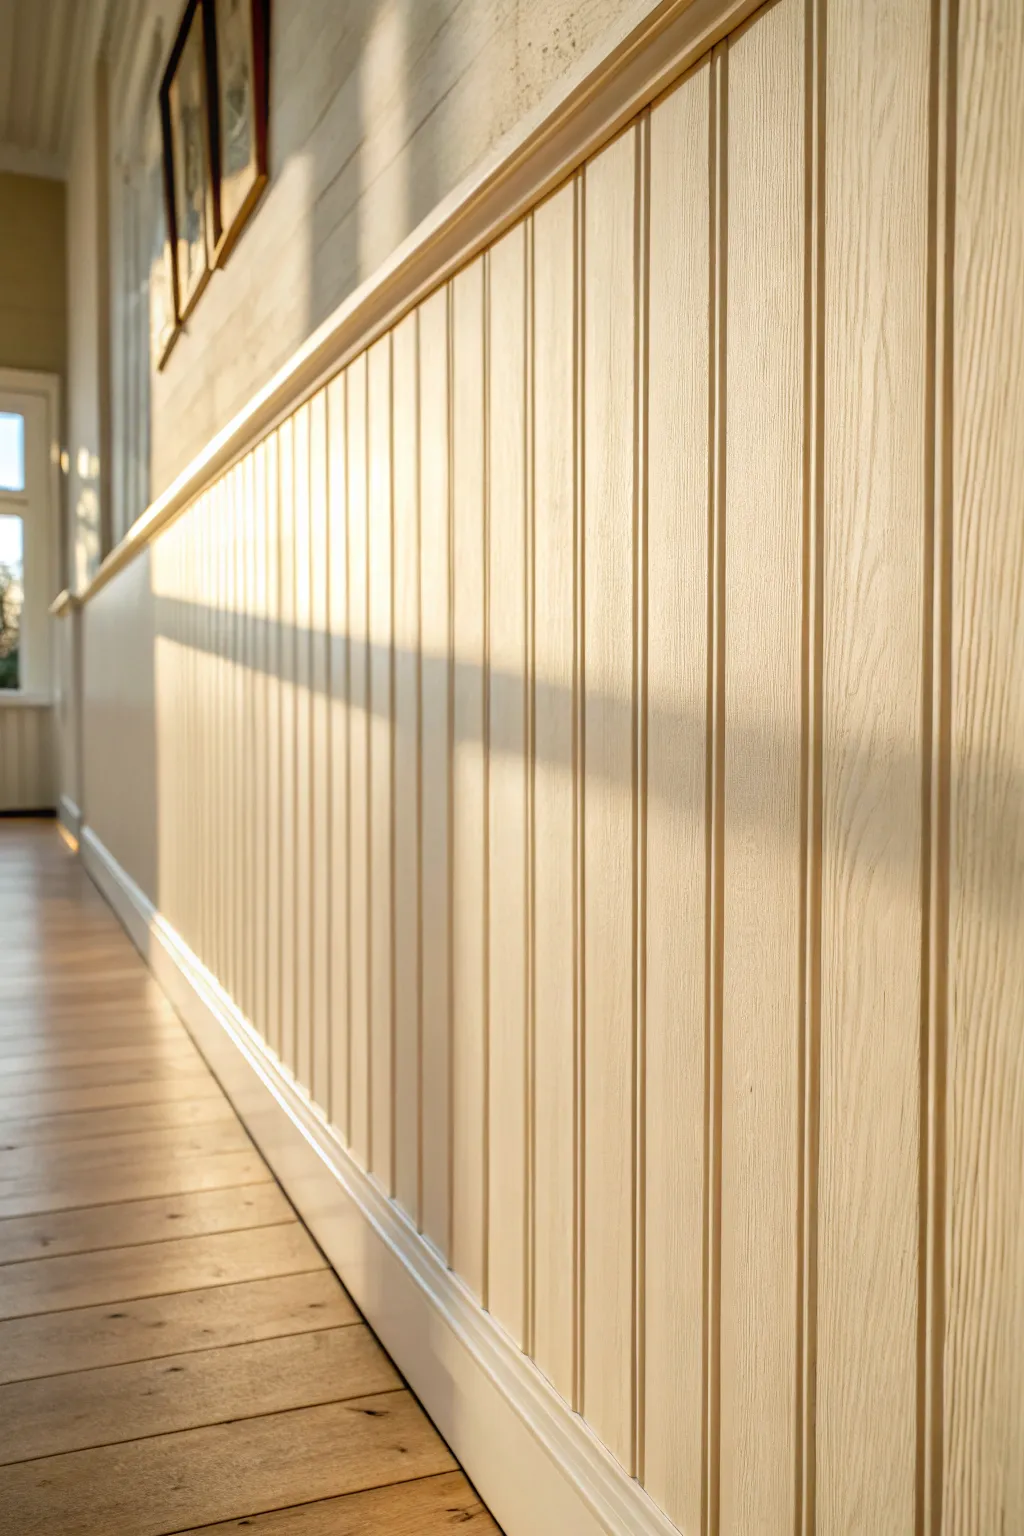
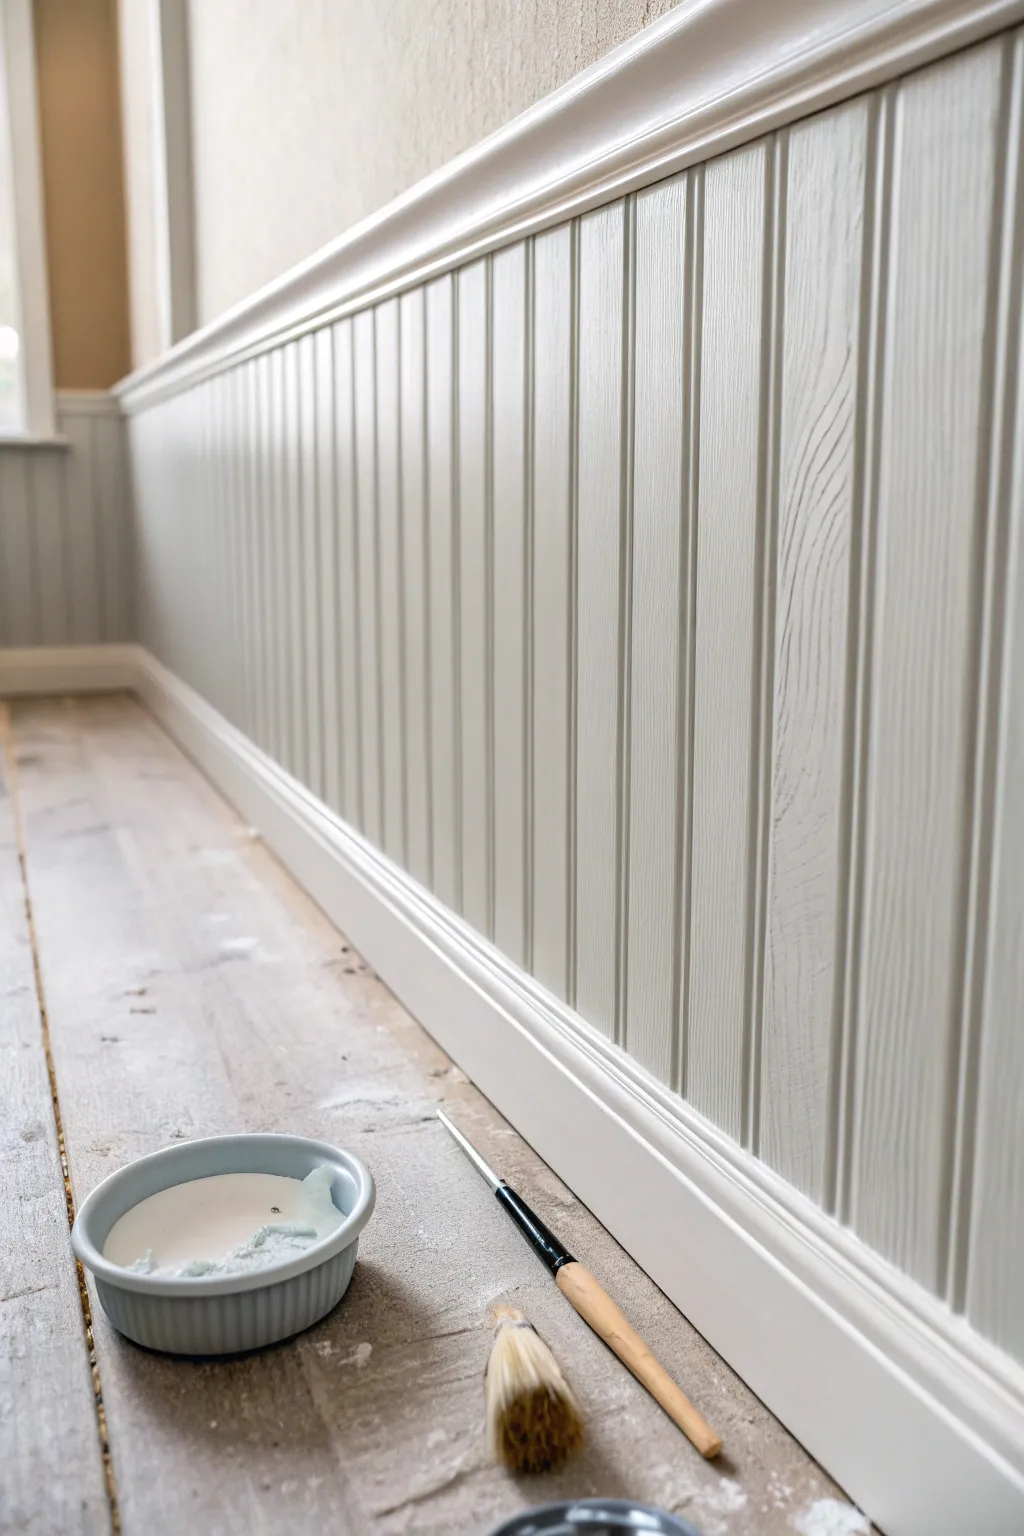
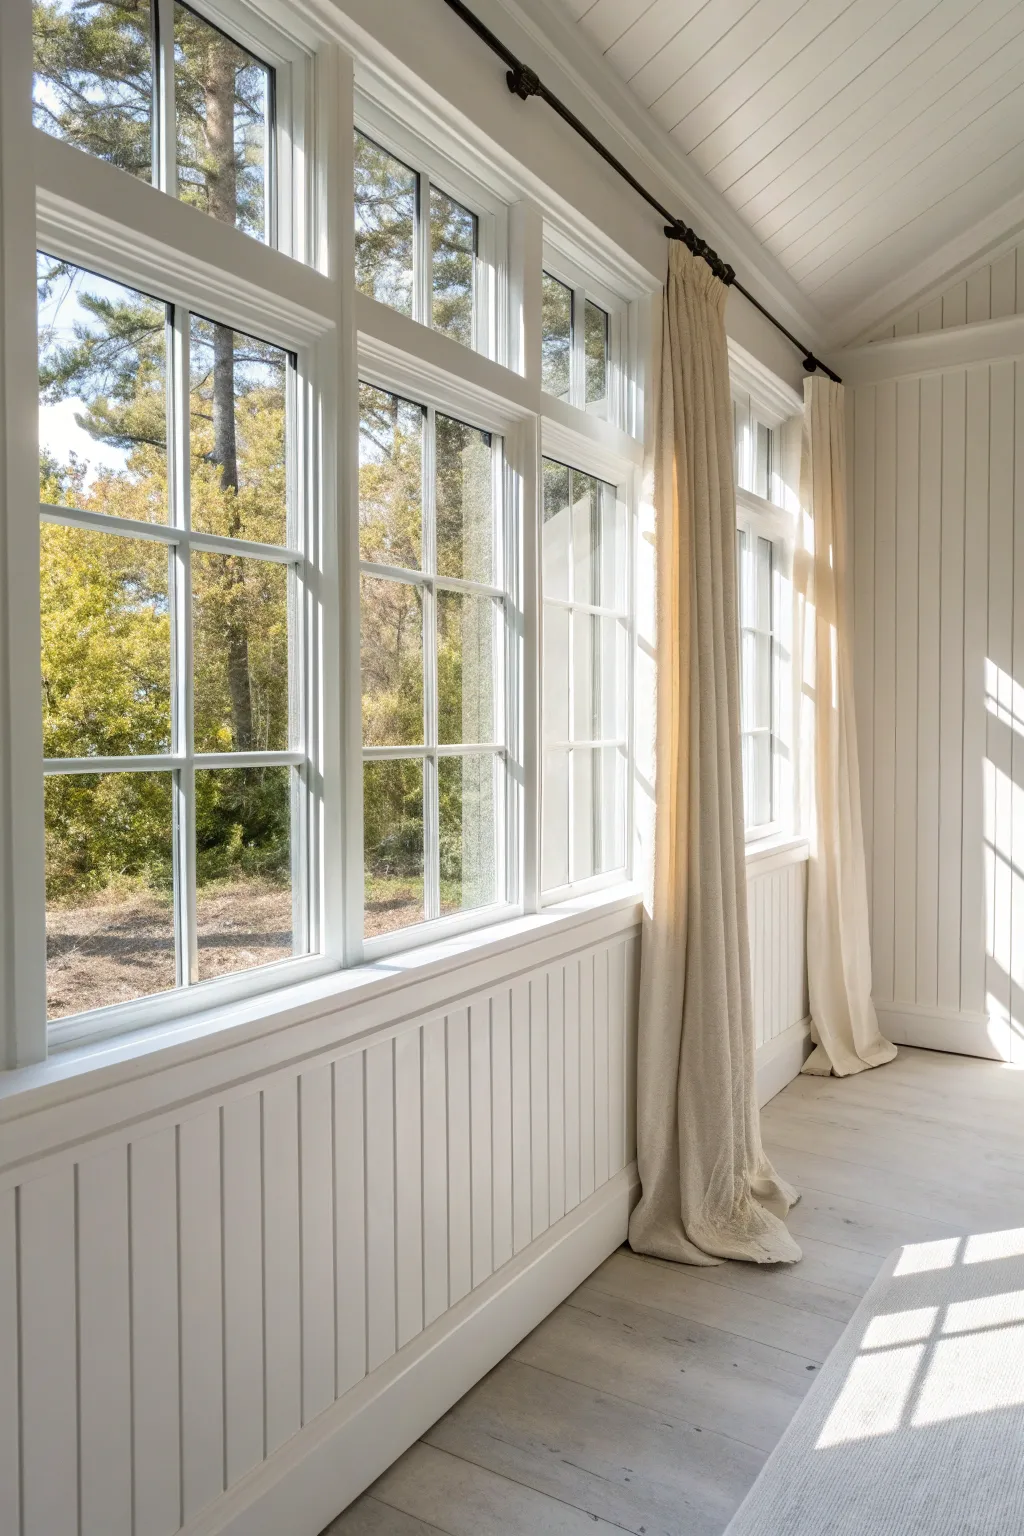
Transform a plain wall into a feature of timeless elegance with this beadboard wainscoting project. The soft, warm white paint captures the sunlight beautifully, creating vertical lines that draw the eye up and add architectural interest to any hallway or room.
Detailed Instructions
Materials
- Pre-primed MDF or wood beadboard sheets (4×8 ft)
- Chair rail molding (wood or MDF)
- Baseboard molding (matching style)
- Construction adhesive (Liquid Nails or similar)
- Finishing nails (1.5 inch and 2 inch)
- Wood filler or spackle
- Paintable caulk
- High-quality interior trim paint (Warm White, Semi-Gloss)
- Circular saw
- Jigsaw (for outlet cutouts)
- Level (4ft or longer)
- Caulk gun
- Hammer and nail set OR nail gun
- Looking glass sandpaper (220 grit)
- Tack cloth
- Angled sash paintbrush (2 inch)
- Mini foam roller and tray
- Painter’s tape
Step 1: Preparation and Planning
-
Measure twice, cut once:
Begin by measuring the total length of the wall you intend to cover. Decide on the height of your wainscoting; a standard height is around 32-36 inches, or simply one-third of the wall’s height, but measuring from the floor up allows you to visualize the final look. -
Remove existing trim:
Carefully pry off the existing baseboards using a pry bar. Save them if you plan to reuse them, though new baseboards often provide a cleaner finish with beadboard. Check the wall for any major bumps and sand them down so the panels will sit flat. -
Locate studs:
Use a stud finder to mark the location of every wall stud. I like to mark these just above where the top of the beadboard will sit so the marks remain visible during installation. -
Establish a level line:
Draw a level horizontal line across the entire wall at your desired finished height. Do not rely on the floor being level; this line will guide the top edge of your panels.
Step 2: Installation
-
Cut panels to size:
Using a circular saw, cut your beadboard sheets to the determined height. If cutting multiple sheets, ensure they are identical. -
Dry fit the first panel:
Place your first panel in the corner. Check for plumb using your level. If the corner isn’t perfectly square, you may need to scribe and trim the edge for a tight fit. -
Apply adhesive:
Apply a zigzag pattern of construction adhesive to the back of the panel. This helps reduce the number of nails needed and prevents the panel from rattling. -
Secure the panel:
Press the panel firmly against the wall. Nail it into the studs you marked earlier, placing nails near the top, middle, and bottom edges. The top edge will be covered by the chair rail, and the bottom by baseboard, but nailing into the grooves hides the heads best in the field. -
Continue installation:
Butt the next panel tightly against the first. Most beadboard sheets have a lap joint on the edges to overlapping seamlessly. Continue this process along the wall, measuring and cutting out spaces for electrical outlets with a jigsaw as needed.
Seamless Joints
When joining two pieces of chair rail on a long wall, cut both ends at a 45-degree angle (scarf joint) rather than butt them together. This hides the seam much better.
Step 3: Trim and Finishing Details
-
Install the chair rail:
Cut your chair rail molding to length. Place it on top of the beadboard, covering the exposed edge. Nail it into the studs using 2-inch nails, sinking the heads slightly below the surface. -
Install baseboards:
Attach the baseboard molding along the bottom of the beadboard. This anchors the look and hides any gaps between the panel and the floor. -
Fill nail holes:
Go over every nail hole in the molding and panels with wood filler. Use a putty knife or your finger to smooth it out. Let it dry completely. -
Caulk the seams:
Run a thin bead of paintable caulk along the top of the chair rail (where it meets the wall) and all internal corners. Smooth it with a wet finger for a seamless transition. -
Sand for smoothness:
Once the filler is dry, lightly sand the filled areas and any rough spots on the molding with 220-grit sandpaper. Wipe away all dust with a tack cloth.
Add a Picture Ledge
For extra utility, use a deeper piece of molding for the chair rail cap. This creates a narrow shelf perfect for displaying small framed photos or art.
Step 4: Painting
-
Masking:
Apply painter’s tape to the wall immediately above the chair rail and to the floor to protect surfaces from drips. -
Prime (if needed):
If your beadboard is not pre-primed, or if you are using bare wood molding, apply a coat of high-quality primer. -
Brush the grooves:
Start by using an angled sash brush to paint inside the vertical grooves of the beadboard and the detailed profiles of the molding. These areas are hard for a roller to reach effectively. -
Roll the flats:
Immediately follow up with a mini foam roller on the flat surfaces of the panels. This smooths out brush marks and provides that factory-finish look. I generally work in 2-foot sections to keep a wet edge. -
Second coat:
Allow the first coat to dry according to the paint manufacturer’s instructions. Apply a second coat using the same brush-then-roll technique for full, rich coverage in your warm white tone.
Enjoy the instant character and brightness this classic architectural detail brings to your home.


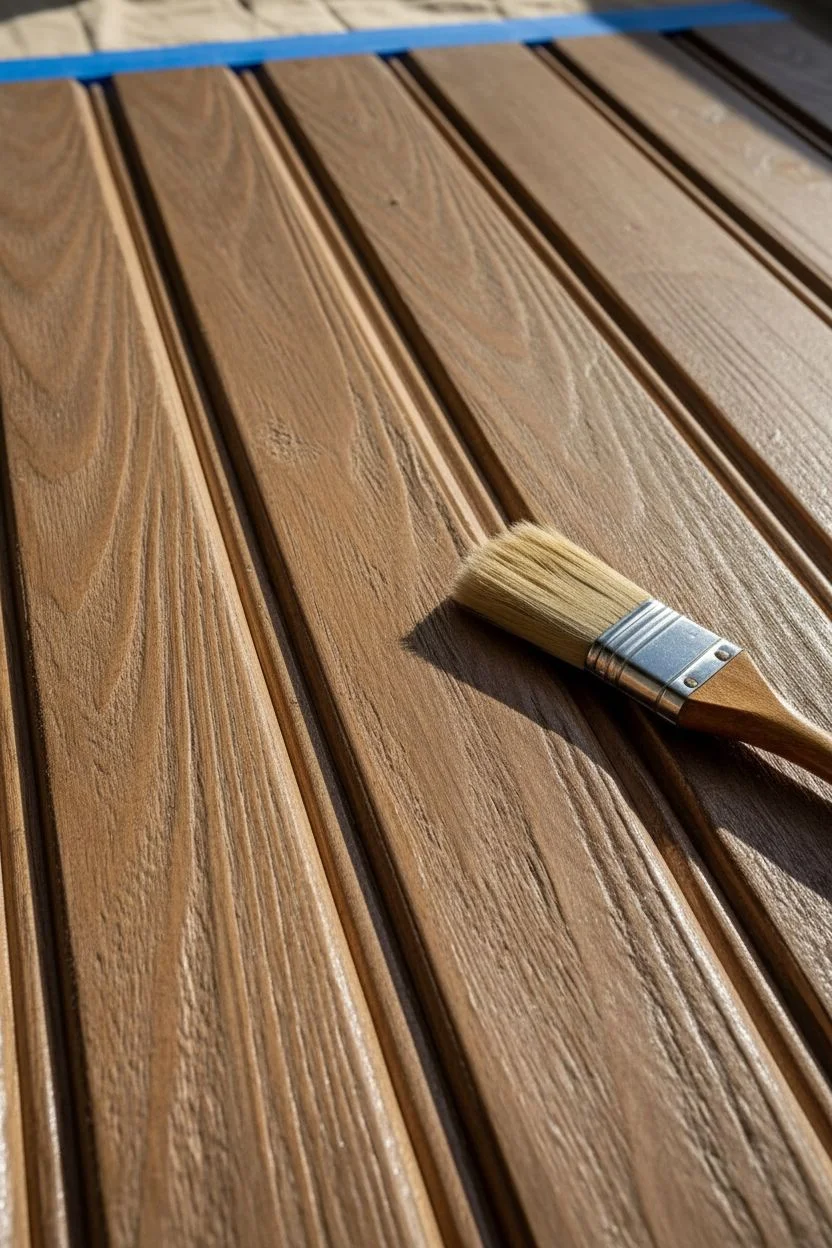
Light Greige Paneling for a Modern Neutral Update
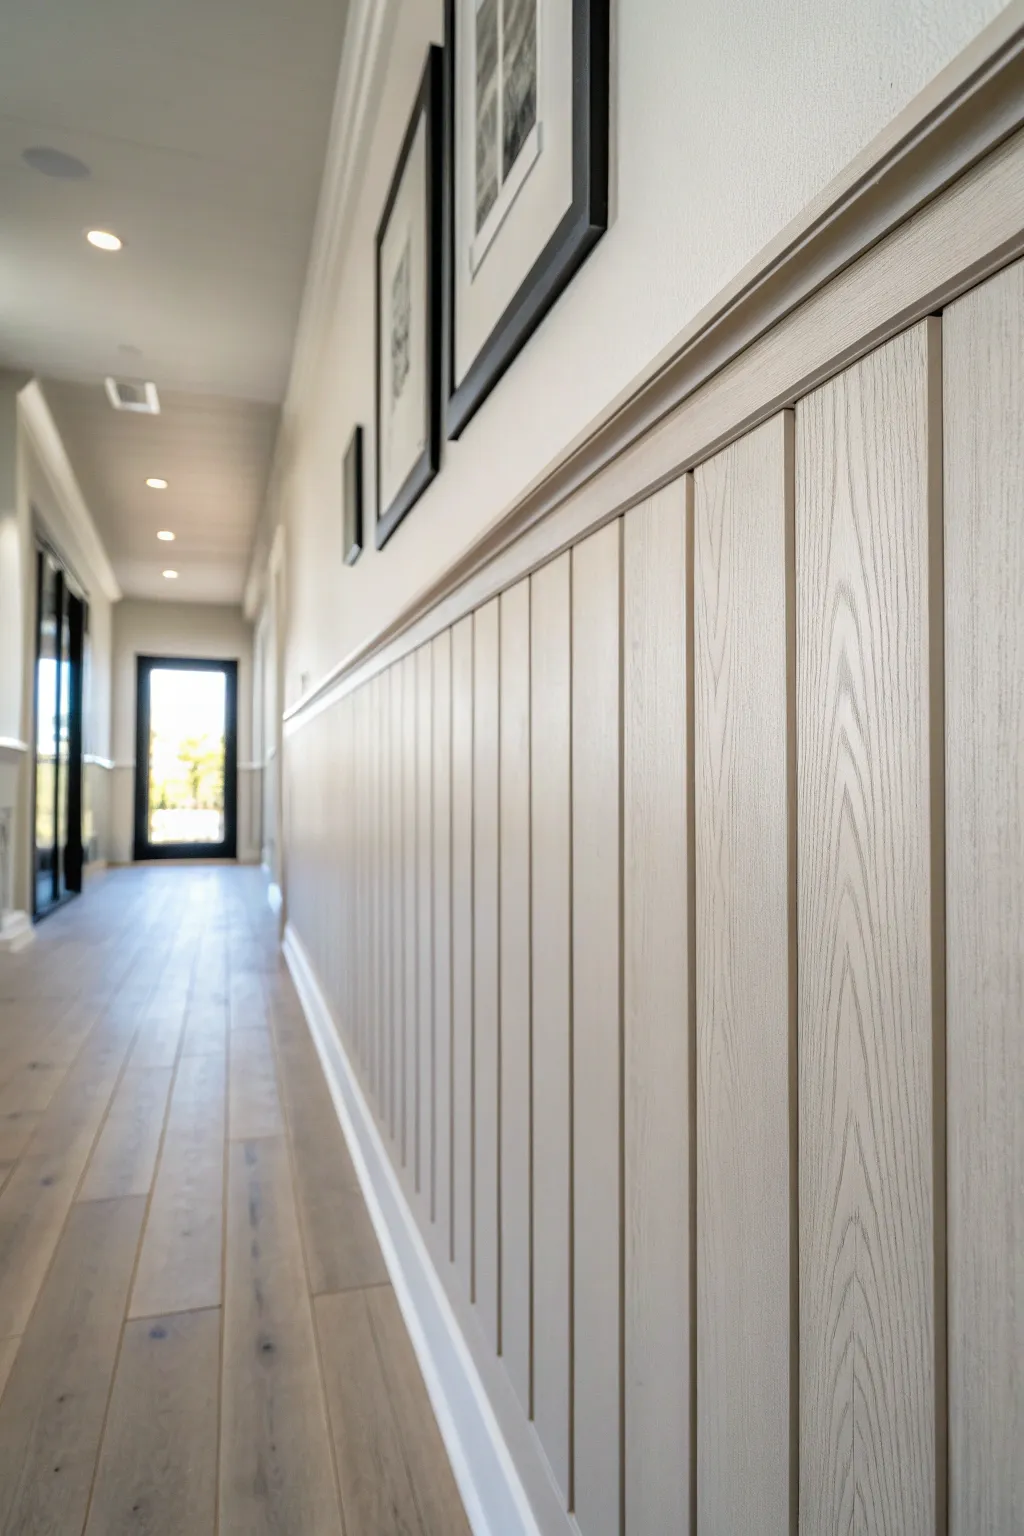
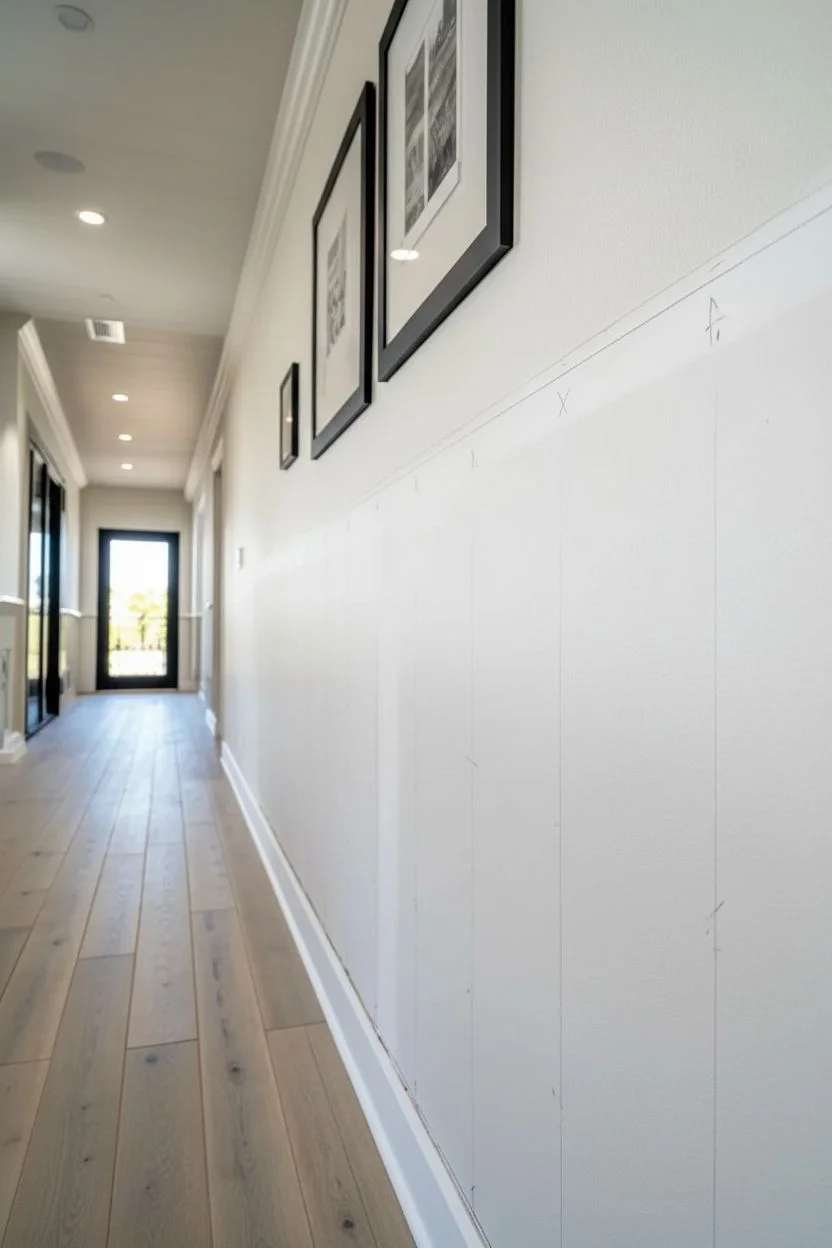
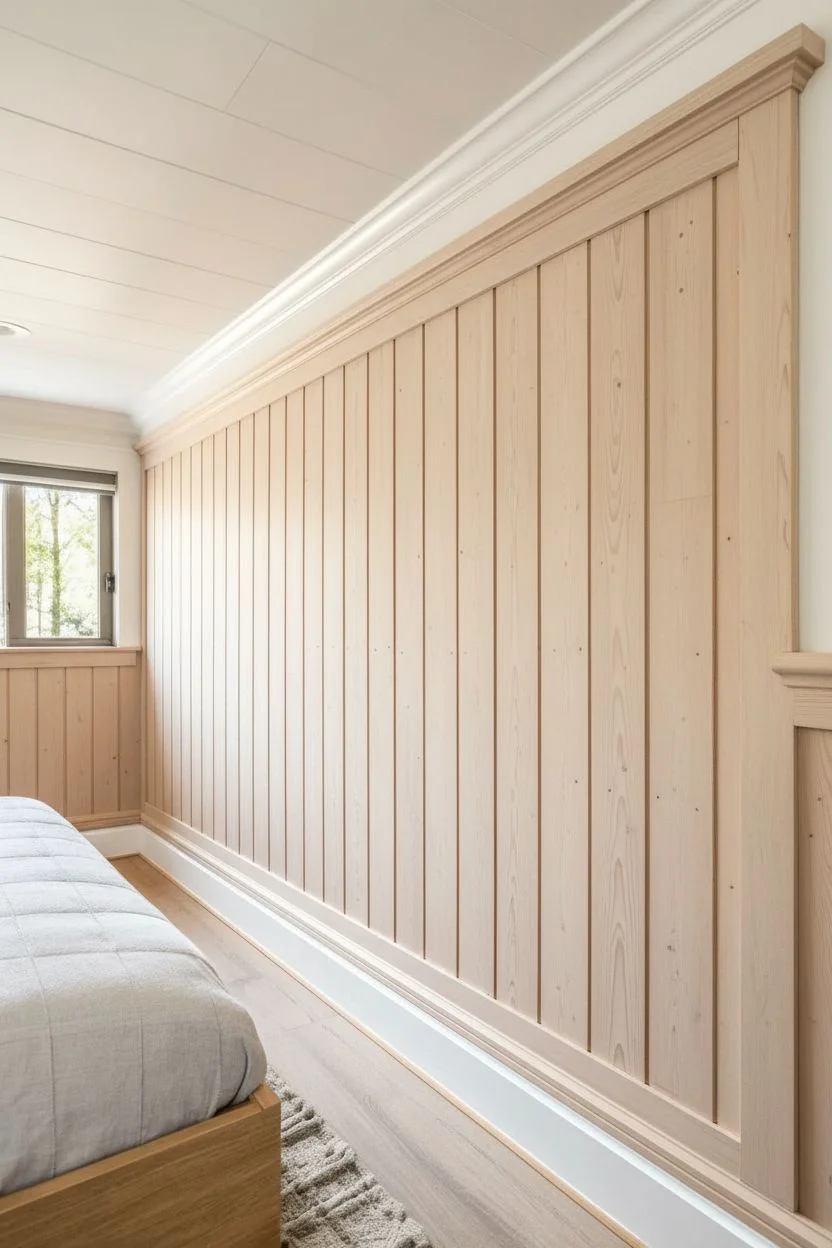
Transform a plain hallway into a sophisticated corridor with this modern take on traditional wainscoting. The vertical tongue-and-groove boards, finished in a soft light greige, add elegant texture while maintaining an airy, neutral palette.
Step-by-Step Guide
Materials
- Tongue-and-groove paneling boards (MDF or wood)
- Chair rail molding (flat profile with reveal)
- Baseboard molding (simple profile)
- Construction adhesive
- Brad nailer and 1.5-inch nails
- Wood filler
- Paintable caulk
- Fine-grit sanding sponge (220-grit)
- Primer (high-adhesion)
- Light greige paint (satin finish)
- Angled sash brush (2.5 inch)
- Small foam roller
- Level
- Miter saw
Step 1: Planning and Preparation
-
Determine Height:
Decide on your wainscoting height. For this modern look, aim for roughly 36 to 42 inches from the floor, including baseboard and top rail. Mark a level line across the entire length of your hallway wall. -
Remove Old Trim:
Carefully pry off existing baseboards using a trim puller. If you plan to reuse them, label the back of each piece; otherwise, prep the wall surface by scraping away any old caulk or bumps. -
Locate Studs:
Finding steady anchor points is crucial. Use a stud finder to mark the stud locations along your horizontal level line and near the floor to ensure your nailing is secure later.
Seamless Grooves
Don’t let paint pool in the vertical grooves. After brushing a section of grooves, immediately do a dry pass with your brush to pull out excess paint before rolling the face.
Step 2: Installing the Boards
-
Cut Vertical Boards:
Measure the distance from the floor to your level line, subtracting the height of your new baseboard if you are installing it on top of the paneling. Cut all tongue-and-groove boards to length. -
Start the First Board:
Apply construction adhesive to the back of your first board in a zigzag pattern. Place it in the corner, ensuring it is perfectly plumb with your level. Nail it into place through the tongue. -
Continue Installation:
Slot the next board’s groove into the previous tongue. Keep the fit snug but not forced to allow for slight expansion. Nail through the tongue into the studs where possible, or angle nail into drywall if using adhesive. -
Handle Obstacles:
When you encounter outlets or switches, measure carefully and use a jigsaw to cut out the openings on the specific board before installation. -
Install Baseboards:
Once all vertical boards are up, install the baseboard along the bottom. This covers any uneven gaps at the floor level and locks the bottom of the panels in place. -
Attach the Top Rail:
Install the chair rail molding directly on top of the vertical boards. For the look in the photo, use a flat, stepped molding that slightly overhangs the paneling to create a clean shadow line.
Step 3: Painting and Finishing
-
Fill Nail Holes:
Go over every board and trim piece, filling nail holes with wood filler. I like to slightly overfill them, as the filler shrinks when it dries. -
Sand Smooth:
Once the filler is dry, sand the filled spots flush with the wood using a fine-grit sanding sponge. Lightly scuff the surface of the boards to help the primer adhere. -
Caulk Seams:
Run a thin bead of paintable caulk along the top of the baseboard, the bottom of the chair rail, and any inside corners. Smooth it with a damp finger for a seamless transition. -
Prime the Surface:
Apply a coat of high-quality primer to the raw wood or MDF. This ensures your greige color will look true and consistent. Let it dry completely according to the can’s instructions. -
Cut In Edges:
Using your angled sash brush, paint the ‘grooves’ between the boards first, as well as the edges near the trim. Brushing the grooves first prevents drippy buildup later. -
Roll the Flat Surfaces:
While the brushed paint in the grooves is still wet, use a small foam roller to paint the flat faces of the boards. This smooths out brush marks and creates a uniform finish. -
Apply Second Coat:
After the first coat has dried, assess the coverage. Apply a second coat using the same method—brush the grooves, then roll the faces—for a rich, durable finish. -
Contrast Baseboard:
For the crisp look in the image, paint the baseboard in a pure white satin or semi-gloss to create a subtle separation from the greige paneling above.
Level Up: Grain Reveal
Use white oak veneer paneling instead of MDF. Rub a white-tinted wax into the grain after painting to highlight the wood texture for a high-end, organic modern feel.
Step back and admire how the vertical lines elongate your hallway while the warm tone adds a cozy welcome


Two-Tone Paneling With a Dark Lower Half
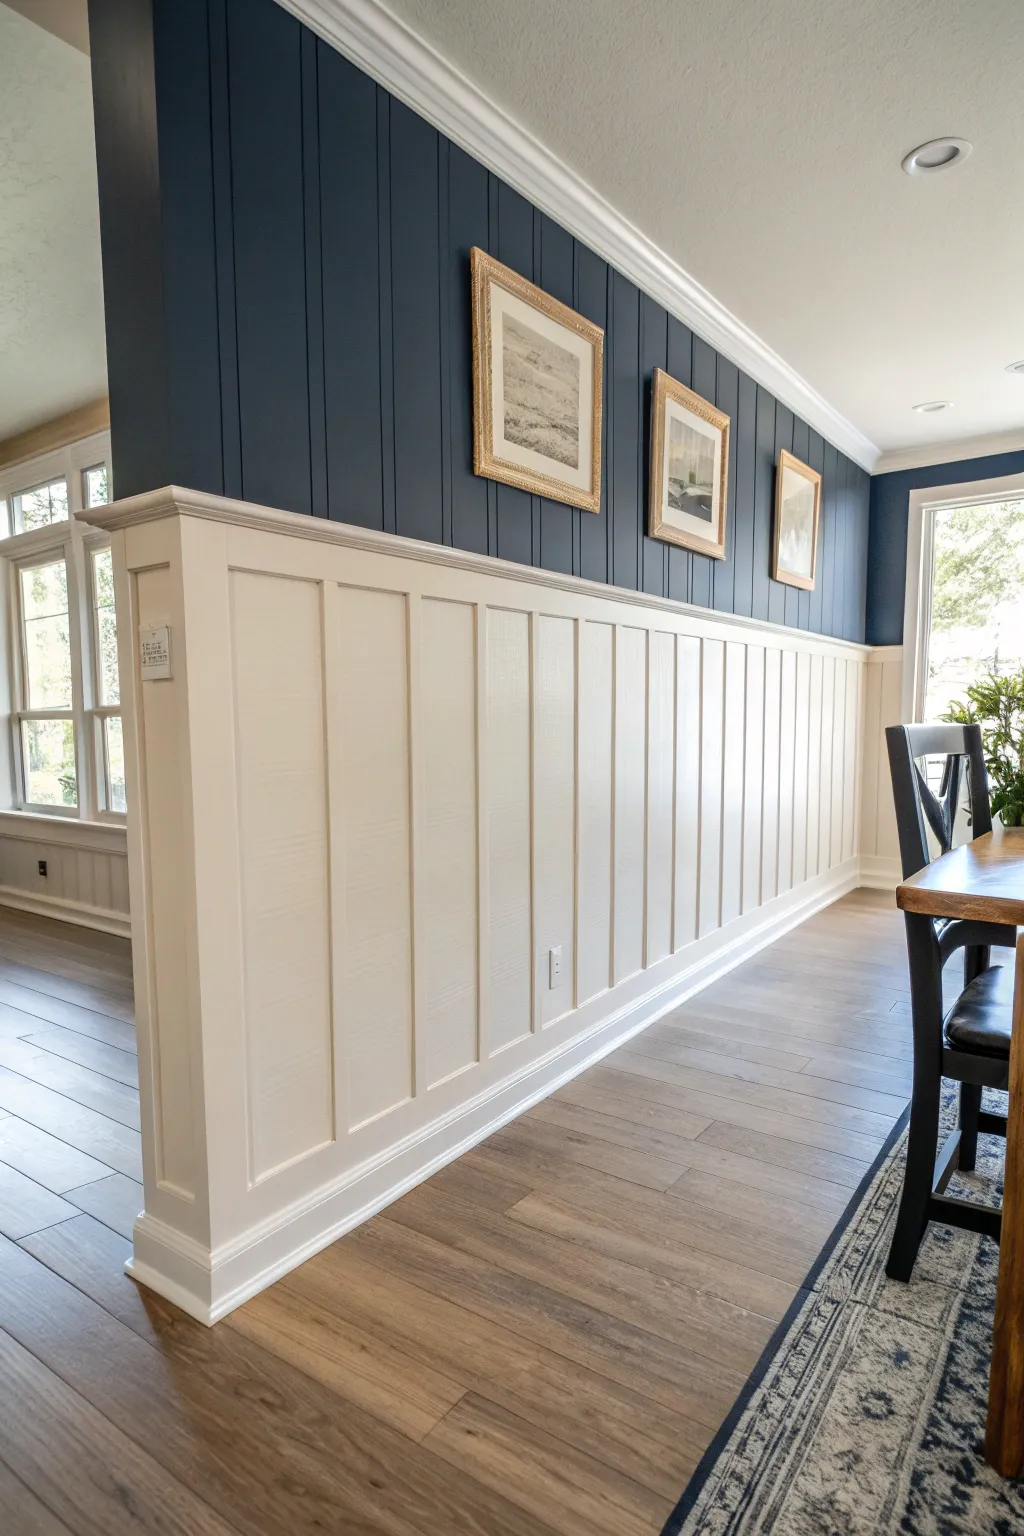
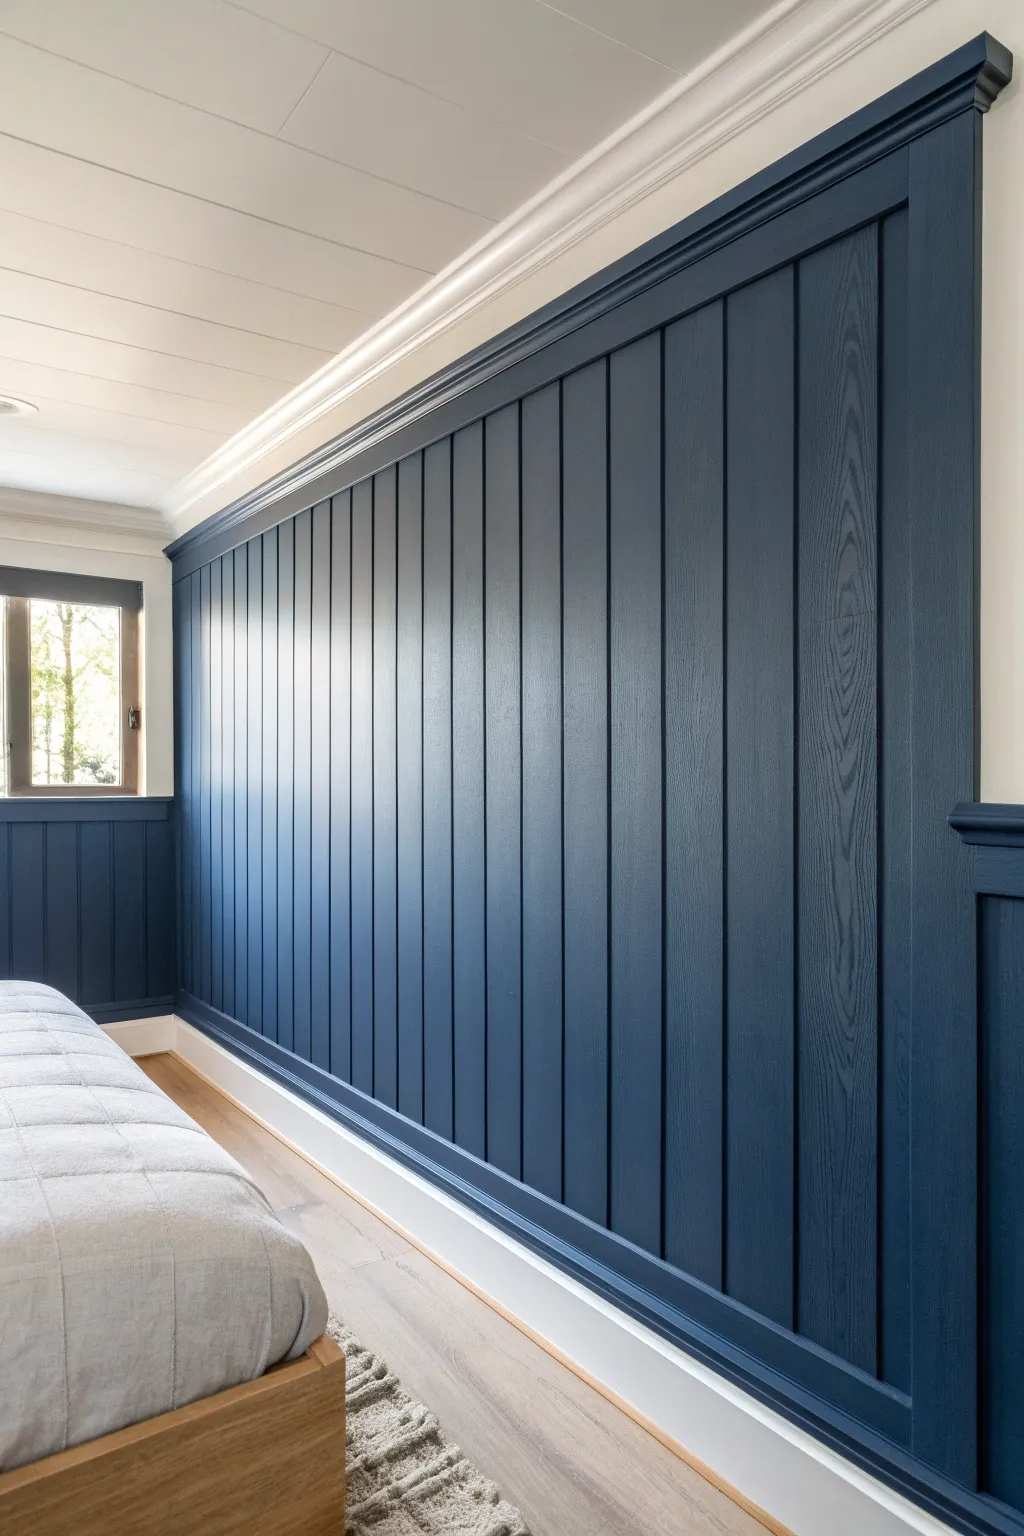
Transform a plain wall into a sophisticated focal point by combining two distinct paneling styles. This project pairs a moody, deep navy upper section featuring vertical v-grooves with a crisp, creamy board-and-batten wainscoting below for a timeless, high-contrast look.
Detailed Instructions
Materials
- 1×4 pine boards or MDF strips (for battens)
- 1×6 pine board (for top rail/ledge)
- Baseboard molding
- Crown molding
- Quarter round molding (optional)
- V-groove paneling sheets or shiplap boards
- Construction adhesive
- Brad nailer and 2-inch nails
- Miter saw
- Level (4-foot or longer)
- Spackle or wood filler
- Caulk and caulk gun
- Sandpaper (120 and 220 grit)
- Primer (oil-based recommended for raw wood)
- Latex paint: Deep Navy (e.g., Hale Navy) in satin finish
- Latex paint: Cream/Off-White in semi-gloss finish
- Paint rollers (foam and medium nap)
- Angle sash brush
- Painter’s tape
Step 1: Setting the Lower Foundation
-
Measure and mark the height:
Decide on the height of your lower wainscoting. A good visual rule is about one-third or two-thirds of the wall height. For this project, mark a level line roughly 40-48 inches from the floor across the entire wall. -
Install the baseboard:
If you removed existing baseboards, install your new flat-stock baseboard first. Use a level to ensure it sits straight, shimming any dips in the floor if necessary, and secure it with your brad nailer. -
Install the top horizontal rail:
Align the top edge of a 1×4 horizontal board with your marked level line. Apply construction adhesive to the back, press it to the wall, and nail it into the studs. This creates the upper boundary for your board-and-batten section. -
Calculate batten spacing:
Measure the horizontal distance between walls. Design your layout so the vertical battens (the 1×3 or 1×4 strips) are spaced evenly, typically 12 to 16 inches apart. Mark these vertical center lines on the wall.
Spacer Block Trick
Cut a scrap piece of wood to the exact width of your desired gap between battens. Use this as a spacer guide as you move along the wall to ensure perfect spacing without measuring every time.
Step 2: Installing Upper Paneling & Lower Battens
-
Install the upper v-groove paneling:
Cut your vertical v-groove paneling sheets or boards to fit the space between the top rail of the wainscoting and the ceiling. I find it easiest to dry-fit the first piece to check for plumb before gluing and nailing it into place. -
Cut vertical battens:
Measure the distance between the top of your baseboard and the bottom of your top horizontal rail for each section. Cut your 1×4 vertical batten strips to fit these measurements. -
Attach the battens:
Apply adhesive to the back of each batten strip. Place them over your marked lines, check for plumb with your level, and nail them securely to the wall. -
Add the chair rail cap:
Install a 1×2 or slightly deeper ledge piece on top of the horizontal rail. This creates a finished shelf that separates the lower wainscoting from the upper navy paneling. Miter any corners carefully. -
Install crown molding:
Finish the transition between the dark blue paneling and the ceiling by installing crown molding. This adds a necessary traditional touch that unifies the deep color with the white ceiling.
Step 3: Prep and Paint
-
Fill nail holes:
Go over every inch of the wall with wood filler or spackle, filling every nail hole. Overfill slightly as the filler will shrink when drying. -
Caulk the seams:
Run a bead of paintable caulk along every seam where wood meets wood or wood meets wall. This includes the sides of the battens, the top rails, and the baseboards. Smooth the bead with a damp finger for a seamless look. -
Sand smooth:
Once the filler is dry, sand all updated surfaces with 220-grit sandpaper until completely smooth. Wipe away all dust with a tack cloth or damp rag. -
Prime the surface:
Apply a coat of high-quality primer. If you are using raw wood or MDF, this is crucial to prevent paint absorption complications. Let the primer cure fully according to the can’s instructions. -
Paint the upper section first:
Cut in the edges of the upper v-groove section with the deep Navy paint using an angled brush. Carefully paint along the ceiling line and just above the chair rail. -
Roll the dark color:
Use a medium nap roller to paint the rest of the upper section. The nap ensures paint gets into the v-grooves. Check for drips in the grooves and smooth them out immediately. -
Paint the lower wainscoting:
Switch to your Cream or Off-White paint. Use the brush to cut in around the intricate corners of the battens and the chair rail. Take your time here to ensure a sharp line where the cream ledge meets the navy wall. -
Roll the flat surfaces:
Use a small foam roller or smooth nap roller for the flat panels and battens of the lower section. Apply 2-3 coats as needed for full coverage, lightly sanding between coats if you want a furniture-like finish.
Gaps at the Wall?
Walls are rarely perfectly straight. If your end batten has a gap against the adjacent wall, don’t force it. Scribble the wall contour onto the batten and plane or sand it down for a flush fit.
Step back and admire how the contrast between the moody navy and crisp cream completely reshapes the character of your room
BRUSH GUIDE
The Right Brush for Every Stroke
From clean lines to bold texture — master brush choice, stroke control, and essential techniques.
Explore the Full Guide
Moody Navy Paneling Feature Wall
Transform a plain wall into a sophisticated focal point with this moody navy paneling project. The deep, rich color highlights the vertical texture of beadboard or shiplap, creating immediate architectural interest and a cozy atmosphere.
Step-by-Step Guide
Materials
- Vertical wood paneling sheets or tongue-and-groove planks
- 1×4 MDF or wood trim boards (for top rail)
- Baseboard molding
- Construction adhesive (Liquid Nails)
- Brad nailer and 1.5-inch brad nails
- Wood filler or spackle
- Paintable caulk and caulk gun
- Primer (high-quality bonding primer)
- Navy blue interior paint (e.g., Hale Navy or Naval) in Satin or Eggshell finish
- 2-inch angled sash brush
- Microfiber paint roller (3/8 inch nap)
- Fine-grit sandpaper (220-grit)
- Tack cloth
- Painter’s tape
Step 1: Preparation and Installation
-
Measure and Plan:
Begin by measuring your wall width and deciding on the height of your paneling. For this dramatic look, the paneling goes nearly to the ceiling, leaving just enough space for a crown molding or a small gap if you have a sloped ceiling. -
Prepare the Surface:
Remove existing baseboards carefully if you plan to reuse them, though new, taller baseboards generally look better with this style. Ensure the wall is clean and relatively smooth. -
Install Baseboards:
Install the bottom baseboard first, nailing it into the studs. This gives your vertical paneling a solid foundation to rest on. -
Adhere the Paneling:
Apply construction adhesive to the back of your first paneling sheet or plank. Press it firmly against the wall, ensuring it sits flush on top of the baseboard. Use a level to confirm it is perfectly vertical before nailing. -
Secure with Nails:
Using your brad nailer, secure the panel to the wall. Shoot nails into the grooves where possible to make them less visible later, aiming for wall studs for maximum hold. -
Continue Installation:
Repeat the process across the wall. If you encounter an outlet, carefully measure and cut the opening with a jigsaw before installing that specific panel. -
Add the Top Rail:
Once all vertical panels are up, install the horizontal top rail (the 1×4 board) to cap the exposed top edge of the paneling. Nail this securely into the studs.
Uneven Color Fix
If the navy looks streaky after drying, your roller nap might be too thin. Switch to a 1/2-inch nap for better paint loading, or lightly sand between coats to help the next layer grip more evenly.
Step 2: Filling and Priming
-
Fill Nail Holes:
Go over every nail hole with wood filler. Overfill them slightly to account for shrinkage as it dries. -
Caulk the Seams:
For a professional, seamless look, run a bead of paintable caulk along every joint where wood meets wood or wood meets wall. Pay special attention to the gap between the paneling and the top rail. -
Sand Smooth:
Once the filler is completely dry, sand the filled areas and any rough wood patches with 220-grit sandpaper until they are smooth to the touch. -
Clean Up Dust:
Wipe down the entire wall with a tack cloth or damp rag to remove all sanding dust. -
Apply Primer:
Roll on a coat of high-quality bonding primer. If you are painting raw wood, this step is non-negotiable to prevent bleed-through and ensure an even finish. Let the primer dry according to the can’s instructions.
Level Up: Hidden Door
Make the paneling continuous! If there’s a closet door on this wall, use the paneling material on the door itself and install hidden hinges for a seamless ‘secret door’ effect.
Step 3: Painting the Finish
-
Cut In the Edges:
Using your angled sash brush and the navy paint, carefully ‘cut in’ around the perimeter, corners, and inside the vertical grooves of the paneling where a roller might not reach. -
Roll the First Coat:
Use a microfiber roller to apply the navy paint to the flat surfaces. Maintain a ‘wet edge’ to avoid lap marks, working in small sections from top to bottom. -
Dry and Assess:
Allow the first coat to dry fully (usually 4-6 hours). Dark colors often look patchy after one coat, so don’t worry if coverage isn’t perfect yet. -
Apply Second Coat:
Apply a second coat using the same method: brush the grooves first, then roll the flats. I usually find that deep hues like this benefit significantly from a third light coat to get that velvety depth. -
Remove Tape:
If you used painter’s tape on adjacent walls or ceilings, peel it off slowly while the final coat is still slightly tacky to prevent the paint from peeling.
Step back and admire how the rich color adds instant sophistication to your space
Dusty Blue-Green Paneling for a Calm Cottage Feel
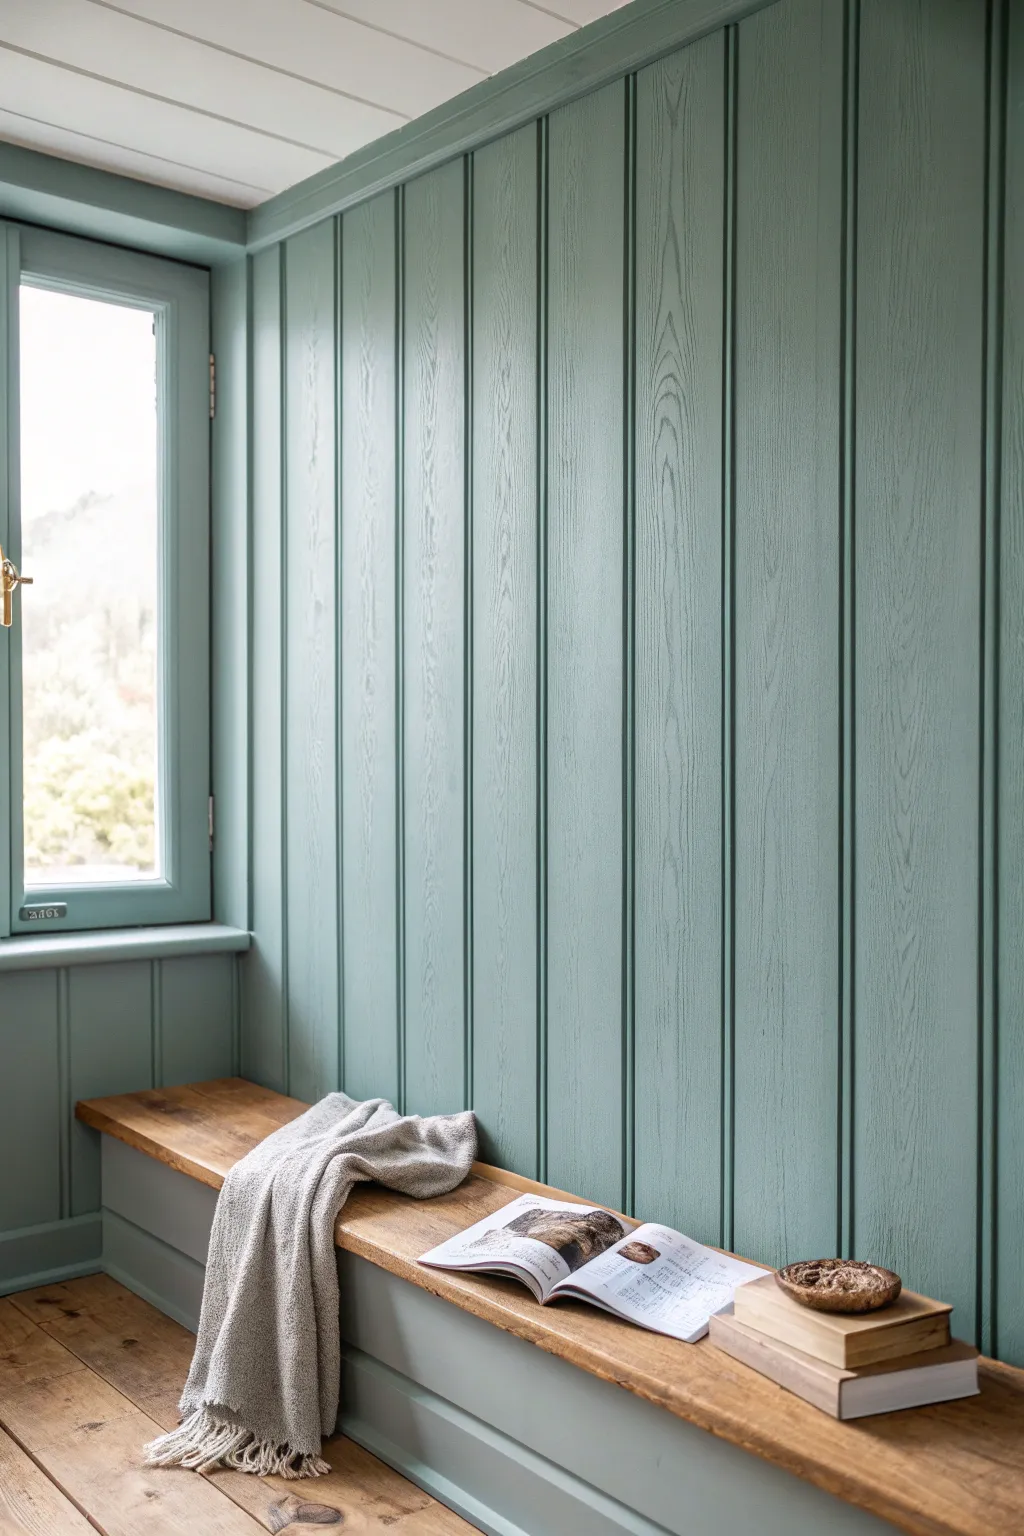
Transform ordinary wood paneling into a serene retreat with this dusty blue-green finish that evokes a calm, countryside cottage. The visible wood grain adds texture and depth, making the color feel lived-in and organic rather than flat.
Detailed Instructions
Materials
- Vertical tongue-and-groove or beadboard paneling sheets
- Sanding block (medium and fine grit)
- Painter’s tape
- High-quality angled sash brush (2 inch)
- Microfiber roller (4 inch) and tray
- Dusty blue-green satin or eggshell paint
- Primer (stain-blocking)
- Wood filler
- Caulk gun and paintable caulk
- Drop cloths
- Tack cloth
Step 1: Preparation & Setup
-
Clear and clean:
Remove any furniture, outlet covers, or window treatments from the area. Wipe down the existing walls or raw paneling with a damp cloth to remove dust and cobwebs. -
Protect surfaces:
Lay down drop cloths to cover the floor. Apply painter’s tape carefully along the edges of the window glass and the floor trim to ensure crisp lines later. -
Inspect the wood:
Check the paneling for any knots, holes, or rough patches. If you are installing new paneling, ensure all boards are securely nailed completely flush. -
Fill imperfections:
Use a small amount of wood filler for nail holes or deep gouges. Overfill slightly, as the filler will shrink when drying, and let it cure according to package instructions. -
Sand smooth:
Once the filler is dry, sand the filled areas flush with the surface. Give the entire paneled area a light sanding with medium-grit sandpaper to help the paint adhere, especially if the wood was previously sealed. -
Caulk the seams:
Run a bead of paintable caulk along corners, baseboards, and where the paneling meets the window frame. Smooth the caulk with a wet finger for a seamless transition.
Step 2: Priming the Base
-
Remove dust:
Vacuum the walls and floor area thoroughly. Wipe the paneling down with a tack cloth to pick up every last speck of sanding dust. -
Cut in primer:
Using your angled sash brush, apply a stain-blocking primer into the vertical grooves of the paneling first. This ensures the recessed areas get full coverage. -
Roll the flat surfaces:
Switch to a small microfiber roller to prime the flat faces of the boards. Roll vertically with the grain to minimize texture marks. -
Check for bleed-through:
Allow the primer to dry completely. If you see knot holes bleeding through (yellowing), spot-prime those specific areas with a second coat.
Brush Maintenance Tip
Wrap your brush and roller in plastic wrap or a plastic bag between coats. This keeps the paint wet so you don’t have to wash your tools until the job is totally done.
Step 3: Painting the Finish
-
Mix your color:
Stir your dusty blue-green paint thoroughly. I like to pour a manageable amount into a small handheld creative bucket for easier cutting in. -
Paint the grooves:
Just like with the primer, use the angled brush to paint inside the vertical grooves first. Work in sections of 3-4 boards at a time to maintain a ‘wet edge’. -
Feather the edges:
While the paint in the grooves is still wet, lightly feather it out onto the flat surface of the board to prevent thick ridges of paint from drying. -
Roll the flats:
Immediately follow up with your roller on the flat sections. Roll from top to bottom in long, even strokes to mimic the direction of the wood grain. -
Watch for drips:
Check the bottom of the grooves and corners frequently. Gravity tends to pull excess paint down, creating pools that are hard to fix once dry. -
Apply second coat:
Wait for the first coat to dry fully (usually 2-4 hours). Repeat the process—brushing grooves then rolling flats—for a rich, solid color that still lets the texture show. -
Remove tape:
While the final coat is still slightly tacky (not wet, but not fully cured), carefully peel away the painter’s tape at a 45-degree angle to keep the lines sharp. -
Final touch-ups:
Inspect the walls in good lighting. Use a small artist’s brush to correct any tiny spots missed near the floor or window latch.
Level Up: Distressed Look
For an aged cottage vibe, lightly sand the edges and raised grain of the paneling with fine-grit sandpaper after the final coat dries to reveal hints of wood underneath.
Enjoy the peaceful atmosphere your new cottage-style nook brings to the room

PENCIL GUIDE
Understanding Pencil Grades from H to B
From first sketch to finished drawing — learn pencil grades, line control, and shading techniques.
Explore the Full Guide
Sage Green Paneling That Plays Nice With Plants
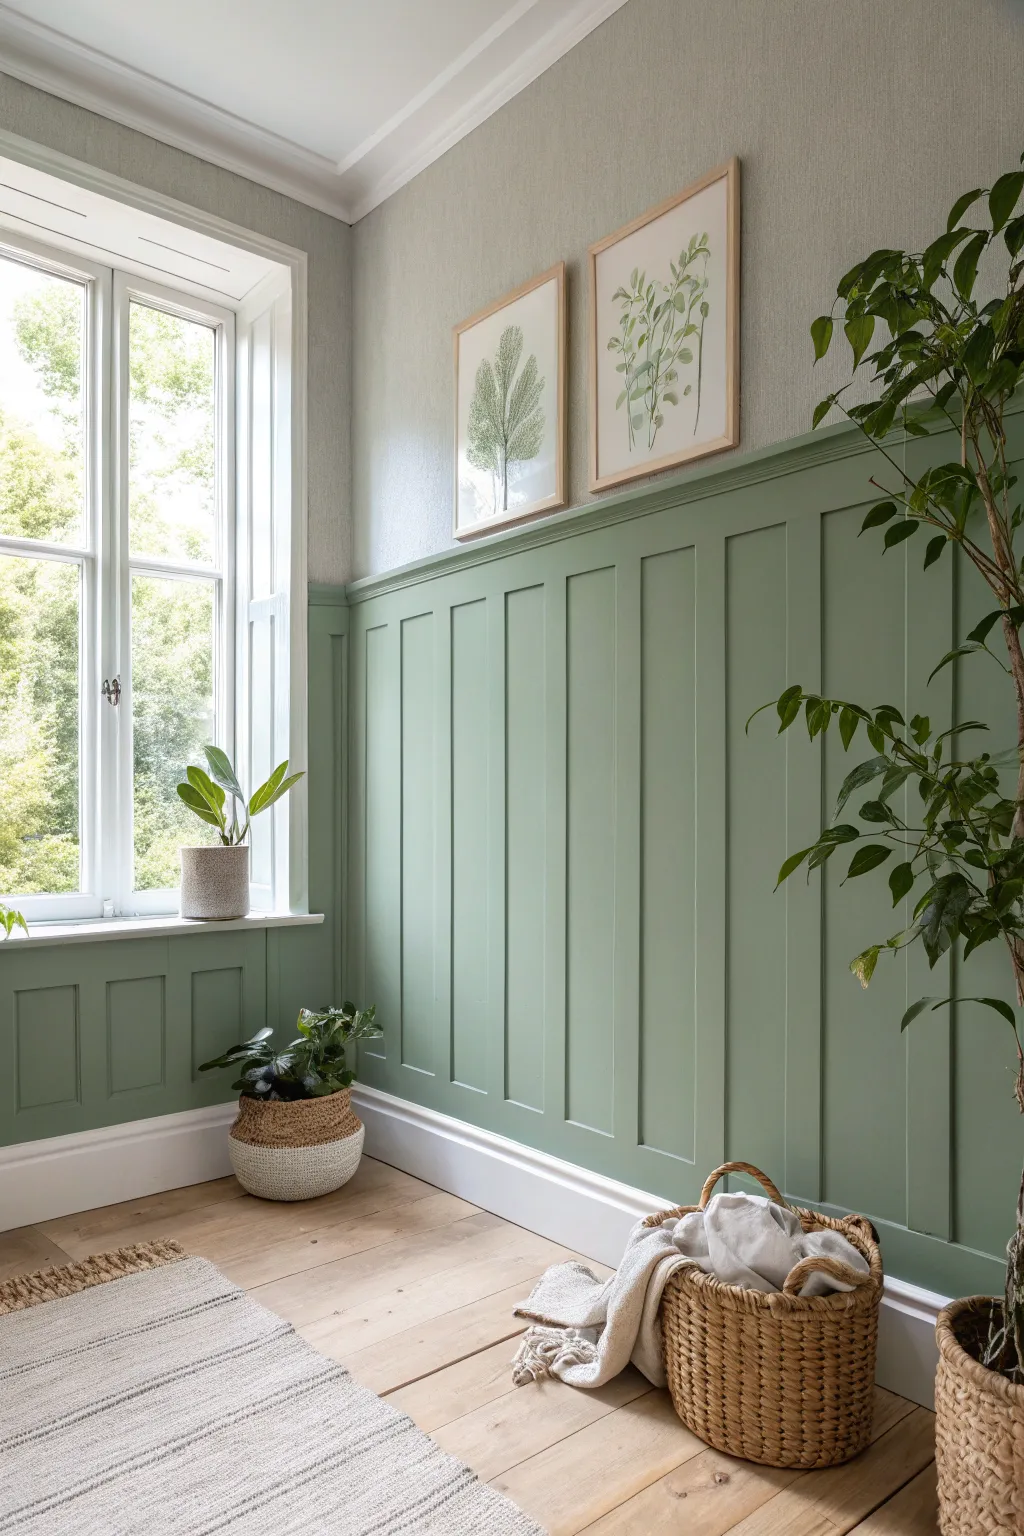
Bring the calming influence of nature indoors with this DIY board and batten wainscoting project. The soothing sage green finish pairs perfectly with light woods and leafy houseplants, creating a grounded, organic atmosphere in any room.
How-To Guide
Materials
- MDF or pine lattice strips (2.5 inches wide, 1/4 inch thick)
- Top cap moulding (dado rail)
- Sage green interior paint (eggshell or satin finish)
- Neutral greige wall paint
- Construction adhesive (e.g., Liquid Nails)
- Brad nailer and 1-inch brad nails
- Spackle or wood filler
- Paintable caulk and caulk gun
- Fine-grit sandpaper (220 grit)
- Level (2-foot and 4-foot recommended)
- Tape measure
- Painter’s tape
- Roller with smooth nap cover
- Angled sash brush (2 inch)
Step 1: Preparation and Planning
-
Measure and mark:
Begin by determining the height of your paneling. A good rule of thumb is to go about two-thirds up the wall, roughly 60 inches from the floor for standard ceilings. Use your tape measure and level to draw a horizontal reference line around the room. -
Plan vertical spacing:
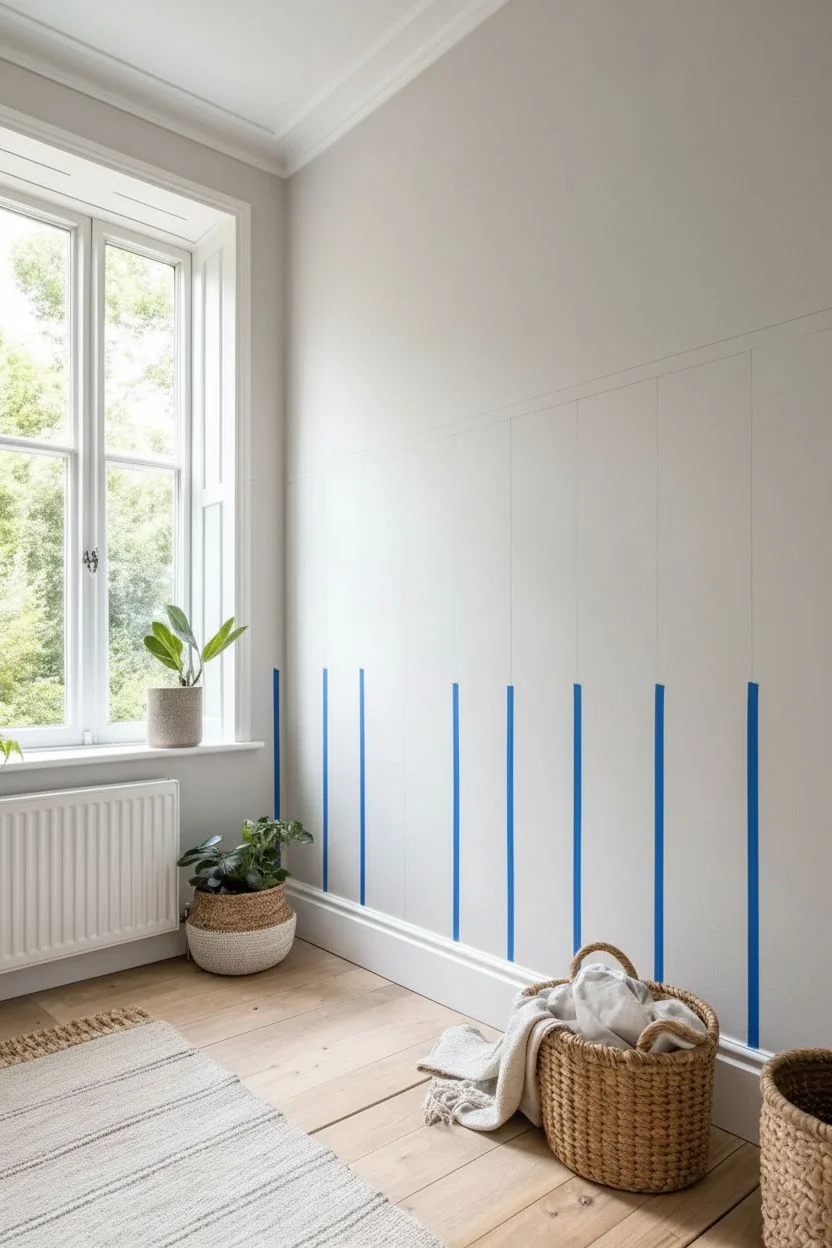
Measure the total length of the wall and divide it to find equal spacing for your vertical battens. Aim for a gap of about 12 to 16 inches between each strip for that classic look shown in the photo. -
Prep the surface:
Ensure the wall is clean and smooth. If your existing baseboards are thick enough, you can rest the battens on top; otherwise, you may need to remove them and install a flat 1×4 baseboard to match the system.
Spacer Block Trick
Cut a scrap piece of wood to the exact width of your desired gap between vertical battens. Use this as a physical spacer instead of measuring every time to ensure perfectly even spacing.
Step 2: Installation
-
Install the top horizontal rail:
Cut your horizontal MDF strips to length. Apply a bead of construction adhesive to the back and align the top edge with your level line. Secure it to the wall using the brad nailer. -
Add the top cap:
Place your decorative dado rail moulding on top of the horizontal rail you just installed. This creates a finished ledge. Glue and nail this piece into studs where possible for extra stability. -
Cut vertical battens:
Measure the distance between your baseboard and the bottom of the horizontal top rail. Cut your vertical strips to this precise length. -
Install vertical battens:
Starting from the center or corners based on your layout plan, attach the vertical battens using adhesive and nails. Use a level on every single piece to ensure it is perfectly plumb before nailing.
Step 3: Finishing and Painting
-
Fill nail holes:
Go over every brad nail hole with spackle or wood filler. I find using a fingertip is often easier than a putty knife for these small holes. Overfill slightly to account for shrinkage. -
Sand smooth:
Once the filler is dry, sand the patched areas down with 220-grit sandpaper until they are flush with the wood. Wipe away all dust with a tack cloth. -
Caulk the seams:
Run a thin bead of finish caulk along every edge where the wood meets the wall and where the battens meet the rails. Must smooth this out specifically with a wet finger for a seamless look. -
Prime the woodwork:
If you are using raw wood or MDF, apply a coat of high-quality primer. If your materials came pre-primed, you can skip to the paint, but a quick spot-prime on cut edges helps. -
Cut in edges:
Using your angled sash brush and the sage green paint, carefully paint the corners, the top cap ledge, and along the baseboards. -
Roll the panels:
Use a small roller with a smooth nap to paint the flat wall sections between the battens and the faces of the battens themselves. This ensures a consistent texture across the wall and wood. -
Apply second coat:
Allow the first coat to dry completely according to the can’s instructions. Apply a second coat for rich, true color coverage. -
Remove tape:
If you used painter’s tape along the floor or adjacent walls, remove it while the paint is still slightly tacky to prevent peeling.
Uneven Walls?
If your walls are wavy and the wood doesn’t sit flush, don’t force it with nails. Use more construction adhesive and use painter’s tape to hold the board flat against the wall until the glue cures.
Step 4: Styling
-
Paint upper walls:
Paint the wall space above the paneling in a soft, textured greige or neutral stone color to complement the green without competing with it. -
Hang artwork:
Center botanical prints in light wood frames within the upper wall space, aligning them generally with the vertical lines of the paneling below.
Step back and admire how this elegant architectural detail transforms your space into a peaceful retreat
Charcoal Paneling for Instant Drama Without Darkness
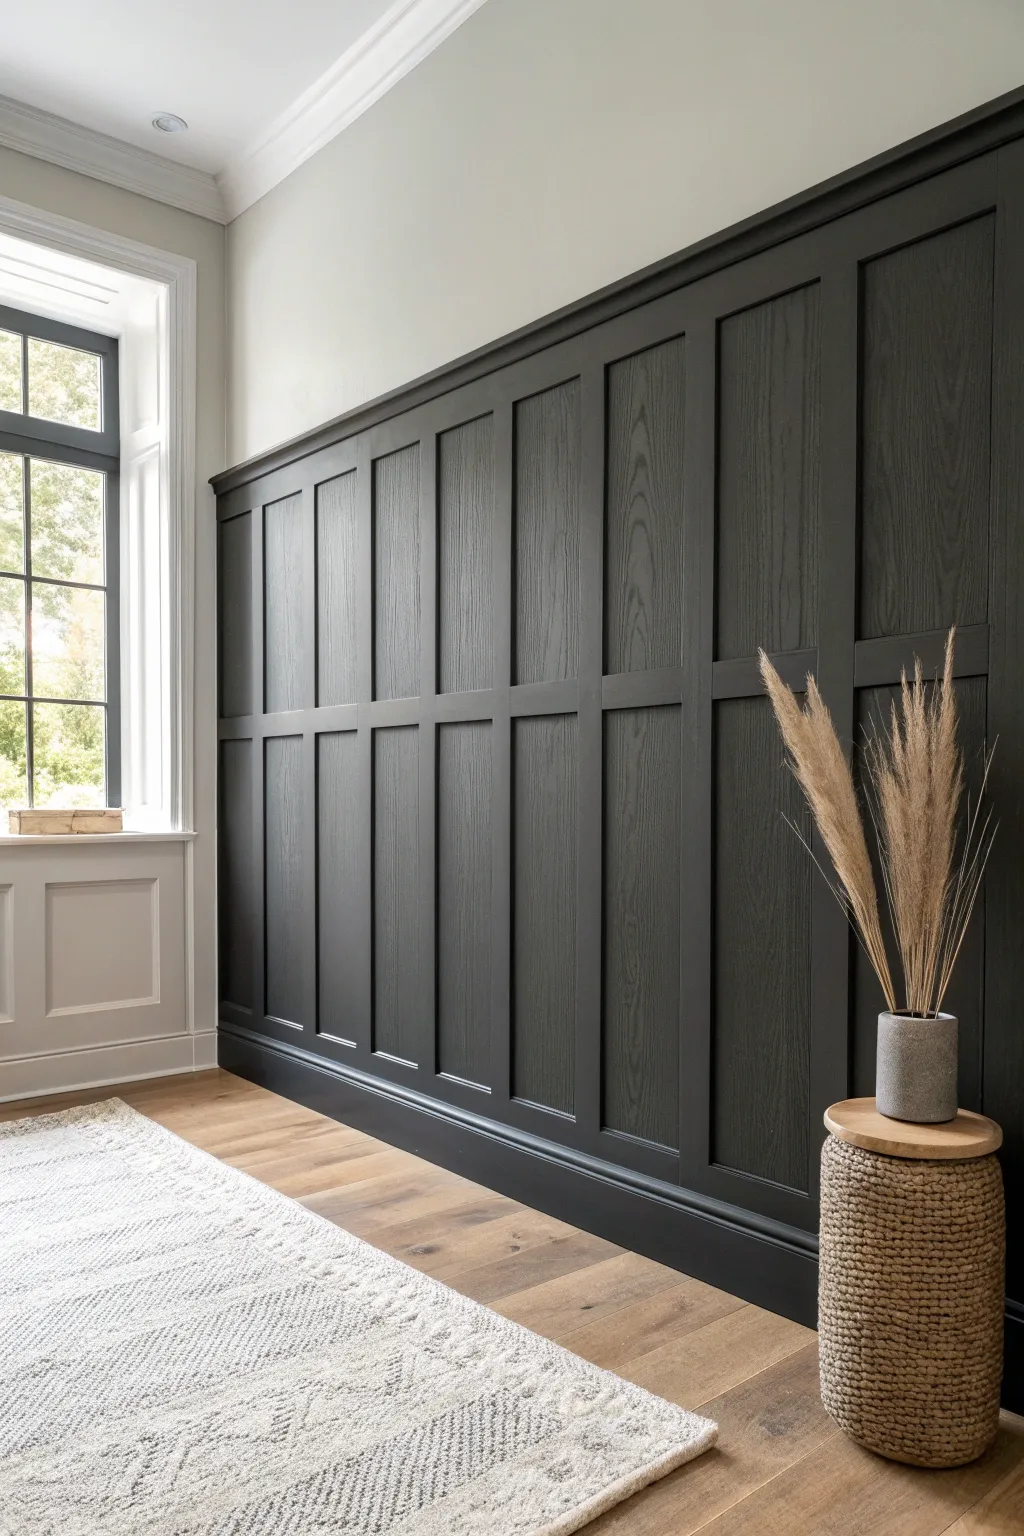

Transform a plain wall into a sophisticated focal point with this floor-to-ceiling board and batten wainscoting painted in a deep, moody charcoal shade. The visible wood grain texture adds organic warmth, ensuring the drama never feels too stark or cold.
Step-by-Step
Materials
- 4×8 sheets of plywood or hardboard (for backing, if needed)
- 1×3 or 1×4 MDF or primed pine boards (for battens)
- Baseboard molding (to match room style)
- Top cap moulding
- Construction adhesive (Liquid Nails)
- Pneumatic finish nailer
- 2-inch brad nails
- Wood filler
- Paintable caulk and caulk gun
- 120-grit and 220-grit sandpaper
- High-quality primer (if using bare wood)
- Satin or eggshell finish charcoal paint (e.g., Benjamin Moore Wrought Iron or similar)
- 2-inch angled sash brush
- High-density foam roller and tray
- Laser level (or standard level and chalk line)
- Tape measure
- Stud finder
Step 1: Planning and Layout
-
Measure and calculate:
Begin by measuring the total width of your wall. Subtract the width of your stiles (the vertical boards) to find the remaining ’empty’ space, then divide that by your desired number of panels to determine even spacing. -
Mark the stud locations:
Use a stud finder to locate and mark all studs along the wall. While we will use adhesive, nailing into studs provides the most secure hold for your horizontal rails and vertical battens. -
Draw the grid:
Using a laser level or a long level and pencil, draw your layout directly onto the wall. This visual guide prevents mistakes before you cut a single piece of wood.
Seamless Seams
For invisible joints on long horizontal runs, cut the ends of touching boards at a 45-degree bevel (scarf joint) rather than a blunt butt joint.
Step 2: Installation
-
Install the baseboard:
Remove existing baseboards first, then install your new, flat-profile baseboard. Shoot nails into the studs and check for level. -
Attach the top rail:
Install the uppermost horizontal board at your desired height (or ceiling height). Apply construction adhesive to the back, press it to the wall, and nail it securely into place. -
Install vertical battens:
Cut your vertical 1×3 or 1×4 boards to fit snugly between the baseboard and top rail. Apply adhesive, align them with your pencil marks, and nail them in. I find using a ‘spacer block’ cut to the exact panel width helps keep everything perfectly consistent. -
Add horizontal rails:
Measure and cut the shorter horizontal pieces to fit between the vertical battens. Install them using the same glue-and-nail method to create the grid effect. -
Cap it off:
If your paneling doesn’t go to the ceiling, add a finish piece or small molded cap on top of the highest rail for a clean edge.
Texture Play
To replicate the visible grain in the photo, use oak plywood for the backing and solid oak boards, then use a semi-transparent charcoal stain instead of paint.
Step 3: Prep Work
-
Fill the holes:
Generously apply wood filler to all nail holes and joints where boards meet. Overfill slightly, as the filler will shrink when it dries. -
Sand smooth:
Once the filler is dry, sand everything flush with 120-grit sandpaper. Follow up with 220-grit for a furniture-smooth finish. -
Caulk the seams:
Run a thin bead of paintable caulk along every edge where the wood meets the wall or other wood pieces. Smooth it with a wet finger to eliminate gaps. -
Clean the surface:
Wipe down the entire wall with a tack cloth or damp rag to remove all dust, ensuring a flawless paint finish.
Step 4: Painting
-
Prime the wood:
If you aren’t using pre-primed finger-jointed pine or MDF, apply a coat of high-quality primer to seal the wood and ensure even absorption of the dark color. -
Paint the edges first:
Using your angled sash brush, ‘cut in’ the charcoal paint along all the corners, recessed edges, and detailed areas where a roller can’t reach. -
Roll the flats:
Immediately after brushwork, use a foam roller or a short-nap roller to paint the flat surfaces of the battens and the wall panels. This creates a smooth, spray-like texture. -
Inspect and recoat:
Allow the first coat to dry completely according to the can’s instructions. Dark colors often require two or even three coats for full opacity and depth. -
Final touch-ups:
Check the wall under good lighting for any missed spots or drips. Lightly sanding with very fine sandpaper between coats can knock down any stray nubs for a professional feel.
Step back and admire how the dark, structured lines instantly add architectural weight and elegance to your room


Color-Drenched Paneling and Trim in One Shade
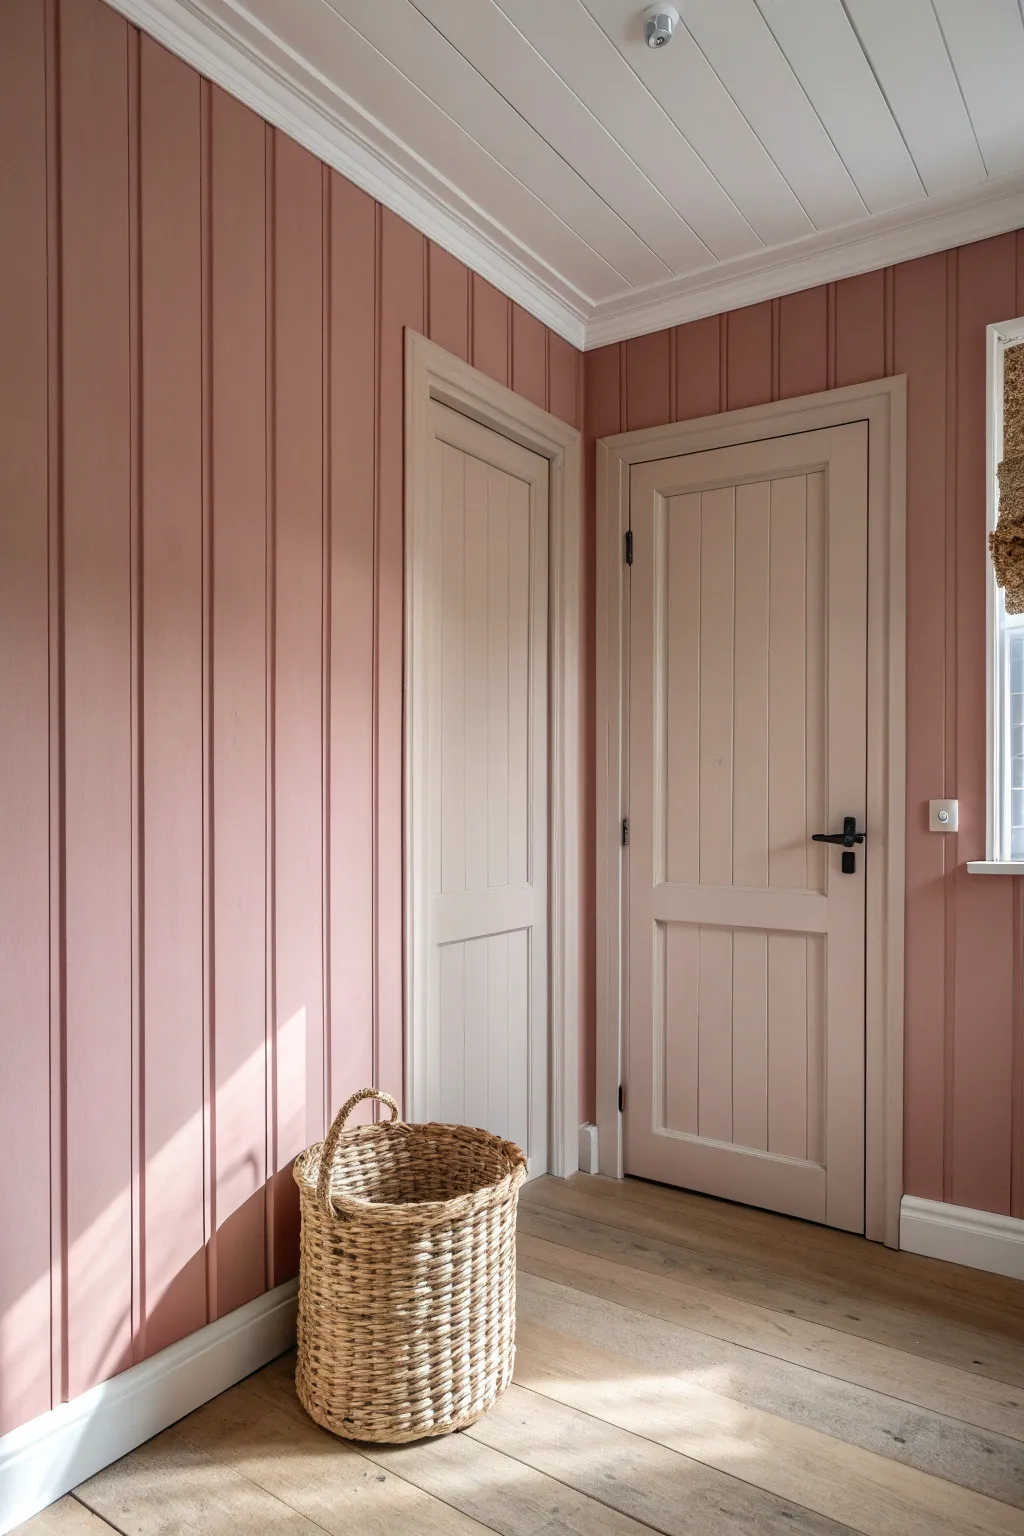
Transform a plain hallway into a cozy, textured retreat by combining vertical wooden paneling with a warm, dusty rose color palette. This project balances the rustic charm of tongue-and-groove boards with a sophisticated, color-drenched paint application that creates depth and character.
How-To Guide
Materials
- Tongue-and-groove wall paneling boards (MDF or solid wood)
- Construction adhesive (e.g., Liquid Nails)
- Finishing nails or brad nails
- Bubble level
- Miter saw or hand saw
- Jigsaw (for cutting around outlets/switches)
- Wood filler and putty knife
- Caulk and caulk gun
- Fine-grit sandpaper (120 and 220 grit)
- Primer (stain-blocking)
- Dusty rose satin or eggshell interior paint
- Cream or pale beige satin enamel paint (for doors/trim)
- 2-inch angled sash brush
- Microfiber paint roller (3/8 inch nap)
- Painter’s tape
- Baseboard molding and chair rail (optional cap molding)
Step 1: Preparing the Walls and Boards
-
Measure and calculate:
Begin by measuring the total linear footage of the walls you intend to panel. Calculate how many tongue-and-groove boards you will need based on their width, adding about 10% extra for waste and cuts. -
Acclimate the wood:
Bring your paneling boards into the room where they will be installed at least 48 hours prior. This allows the wood to adjust to the room’s humidity, preventing warping or gaps later. -
Clear and prep walls:
Remove existing baseboards carefully if you plan to reuse them, or discard them if replacing. Remove all outlet covers and switch plates, taping over the electrical components for safety. -
Locate studs:
Use a stud finder to mark the location of wall studs. Snap a chalk line or use a pencil to mark these lines vertically down the wall, which will guide your nailing pattern.
Sticky Situation?
If boards bow away from the wall despite adhesive, use painter’s tape to hold them tight against the previous board while the glue sets, or add a face nail that you can fill later.
Step 2: Installing the Paneling
-
Cut to length:
Measure the height from floor to ceiling (or to your desired rail height). Cut your first batch of boards. I usually measure each spot before cutting since floors are rarely perfectly level. -
Install the first board:
Start at an inside corner. Apply construction adhesive to the back of the board in a zigzag pattern. Place it in the corner, checking with a level to ensure it is perfectly plumb before nailing. -
Secure the board:
Nail through the tongue of the board into the studs using a brad nailer. Nailing through the tongue at a 45-degree angle hides the nail head when the next board is slotted in. -
Continue the run:
Slot the groove of the next board onto the tongue of the first. Tap it gently with a rubber mallet or a scrap block of wood to ensure a tight fit, then nail it into place. -
Handle obstacles:
When you reach outlets or switches, measure their position carefully on the board and use a jigsaw to cut out the necessary opening before installing the board. -
Corner transitions:
For corners or end walls, you may need to rip the final board lengthwise on a table saw to fit the remaining gap perfectly.
Seamless Finish
Use a flexible, paintable caulk for the long vertical corner seams. Standard wood filler can crack with seasonal expansion, but caulk will flex and keep that corner looking sharp.
Step 3: Finishing and Painting
-
Install trim:
Once all vertical boards are up, install your baseboards at the bottom and crown molding or trim at the top to conceal any uneven cut edges. -
Fill and sand:
Fill any visible nail holes on the face of the boards or trim with wood filler. Once dry, sand these spots smooth with fine-grit sandpaper. Also lightly sand the surface of the boards to help paint adhesion. -
Caulk gaps:
Run a bead of caulk along the seams where the paneling meets the ceiling, baseboards, and inside corners. Smoothing this out creates a professional, seamless look. -
Prime the surface:
Apply a coat of stain-blocking primer to the entire paneled surface. This is especially crucial for knotty wood to prevent resin bleeding through your pink paint. -
Cut in edges:
Using an angled sash brush, ‘cut in’ the dusty rose paint along the ceiling line, corners, and along the grooves between the paneling boards where a roller might miss. -
Roll the walls:
Use a microfiber roller to apply the dusty rose paint to the flat surfaces of the paneling. Work in small sections, maintaining a wet edge to avoid lap marks. -
Second coat:
Allow the first coat to dry completely according to the can’s instructions. Apply a second coat for rich, full coverage and true color depth. -
Paint doors and trim:
Tape off the pink walls once dry. Paint the door frames, doors, and baseboards in a contrasting creamy beige satin enamel. I prefer doing this last to ensure crisp lines against the dark color.
Step back and enjoy the warm, enveloping atmosphere your new paneled hallway brings to your home
Painted Paneling With Bright White Trim for Clean Contrast
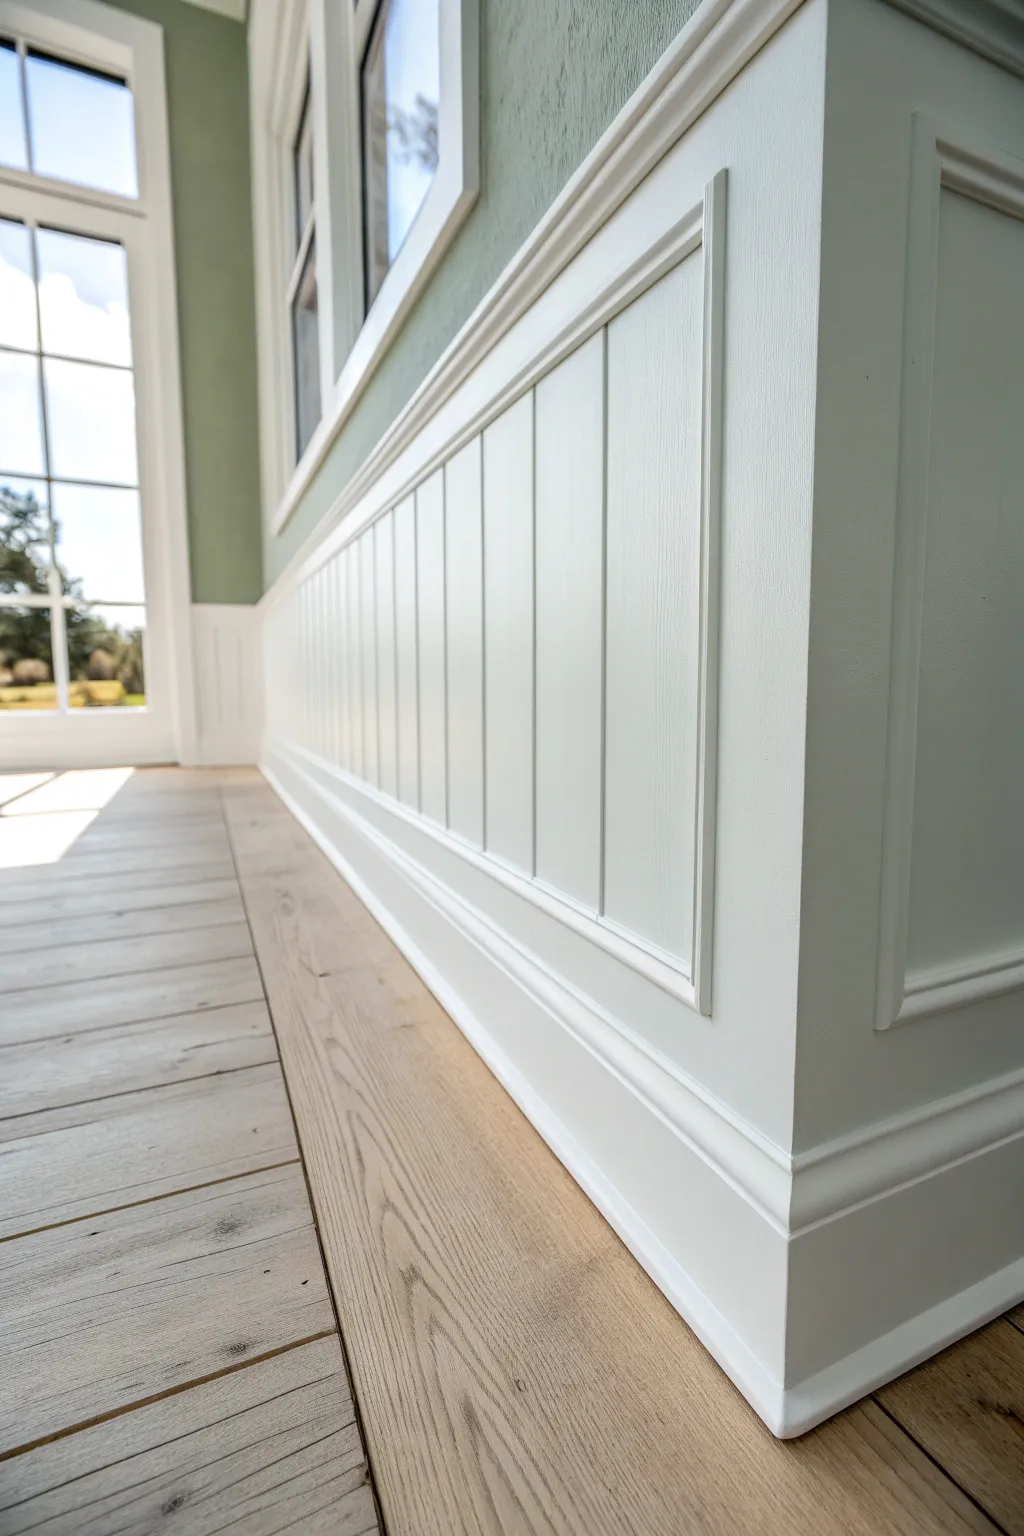
Achieve a sophisticated, airy atmosphere with this timeless wainscoting project, featuring vertical grooves and elegant trim work. The stark white finish creates a stunning contrast against softer wall colors and natural wood flooring, giving any room a polished and expansive feel.
Step-by-Step Tutorial
Materials
- V-groove or beadboard paneling sheets
- 1×4 MDF or primed wood boards (for rails and stiles)
- Baseboard molding
- Panel molding trim (small profile)
- Chair rail molding
- Construction adhesive
- Finishing nails
- Wood filler
- Caulk and caulk gun
- Primer (oil-based recommended for raw wood)
- Semi-gloss or satin interior paint (Bright White)
- Roller with smooth nap cover
- Angled sash brush (2-inch)
- Fine-grit sandpaper (220-grit)
- Painter’s tape
- Drop cloth
Step 1: Preparation and Planning
-
Measure and Map:
Begin by determining the height of your wainscoting. A common standard is about one-third of the wall height, or around 32-36 inches. Mark a level line across the room to represent the top of your installation. -
Prep the Surface:
Remove existing baseboards carefully if you plan to reuse them, though new baseboards often yield a cleaner look. Ensure the wall surface is clean, dry, and relatively smooth. Fill any large holes that might interfere with adhesion. -
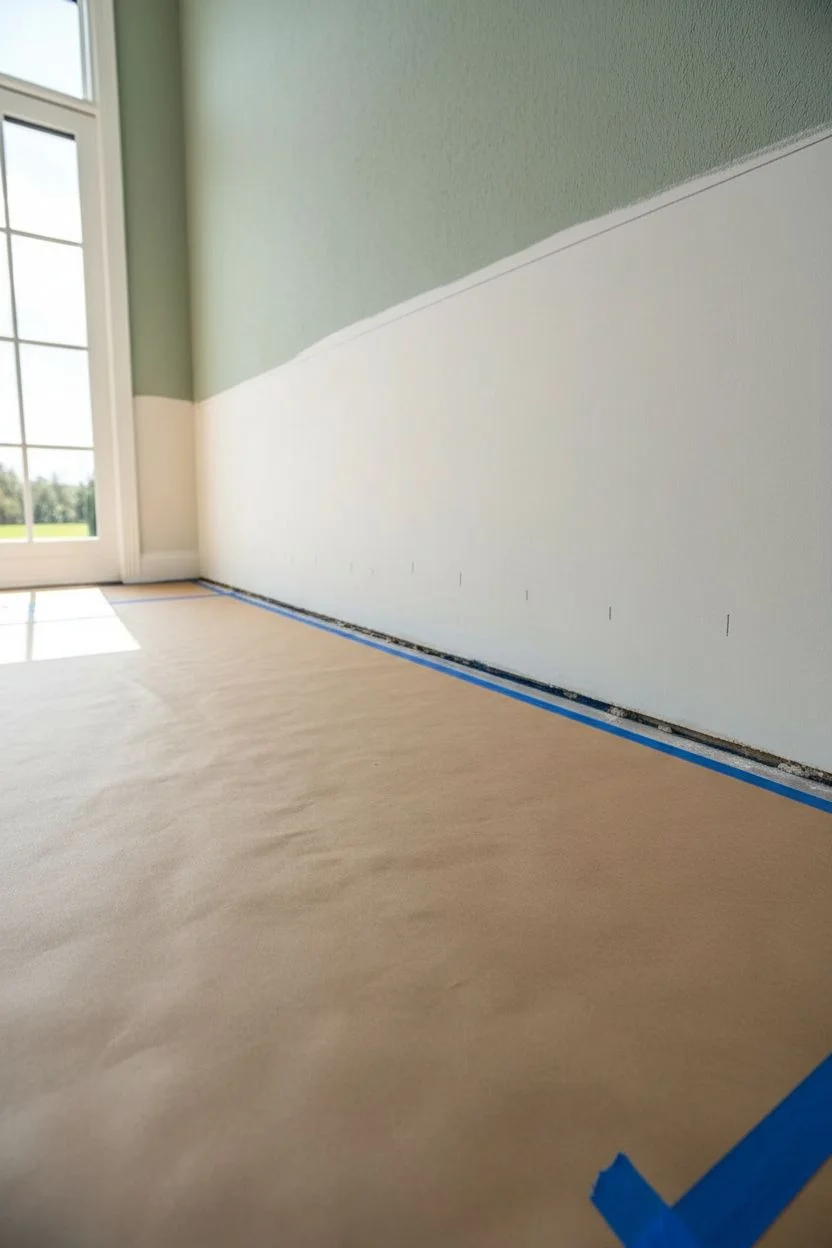
Protect the Floors:
Lay down heavy-duty paper or a drop cloth to protect your beautiful wood flooring. I always like to tape the edges down so the paper doesn’t shift while I’m working.
Clean Caulk Lines
Keep a damp rag handy while caulking. Wipe your finger frequently to keep the caulk bead consistent and prevent messy buildup on the molding profiles.
Step 2: Installation
-
Dry Fit the Panels:
Cut your v-groove or beadboard panels to the desired height minus the thickness of your baseboard. Dry fit them against the wall to check for fit, especially around corners or outlets. -
Install Vertical Panels:
Apply construction adhesive to the back of the first panel. Press it firmly onto the wall. Secure it with finishing nails, aiming for the studs whenever possible for maximum hold. -
Add Baseboard and Rails:
Install the bottom baseboard first, nailing it through the paneling into the wall plate. Then, install the top horizontal rail (the 1×4 board) along your level line, capping the top edge of the vertical panels. -
Install Stiles (Vertical Trim):
If your design calls for boxed detailing like the image, measure and cut vertical 1×4 stiles to fit snugly between the baseboard and the top rail. Space them evenly along the wall and secure with adhesive and nails. -
Apply Inner Molding:
To get that elevated, custom look, cut small profile panel molding with 45-degree miter joints. detailed step. Fit these inside the ‘boxes’ created by your rails and stiles to add depth and shadow lines. -
Cap it Off:
Finish the carpentry by installing a chair rail or cap molding on top of the upper horizontal rail. This creates a small shelf-like transition to the painted drywall above.
Step 3: Finishing Touches
-
Fill and Sand:
Using a putty knife, fill all nail holes with wood filler. Once dry, sand them flush with the surface. Sand any rough edges on the cut wood to ensure a professional finish. -
Caulk the Seams:
Run a bead of paintable caulk along every seam: where the panels meet the trim, inside the molding corners, and along the top edge near the wall. Smooth it with a wet finger for a seamless transition. -
Lightly Sand Surface:
Give the entire wainscoting assembly a quick, light sanding with 220-grit sandpaper. This helps knock down any raised grain and prepares the surface for primer. -
Prime the Work:
Apply a coat of high-quality primer. If you are using MDF or raw wood, this step is crucial to prevent paint absorption. Let it dry completely according to the manufacturer’s instructions.
Level Up: Color Drenching
Instead of white, paint the wainscoting, trim, and baseboards in a moody charcoal or navy for a dramatic, modern Victorian vibe.
Step 4: Painting
-
Cut In Edges:
Using your angled sash brush and bright white paint, carefully cut in around the intricate details of the molding and corners where a roller won’t reach effectively. -
Roll the Flat Surfaces:
Use a small foam or short-nap roller to paint the flat panels and rails. Keep a ‘wet edge’ to avoid lap marks. The roller provides a smoother finish than brushing large areas. -
Check for Drips:
Immediately scan for drips, especially in the grooves of the paneling or corners of the molding. Brush them out lightly before the paint begins to tack up. -
Apply Second Coat:
Allow the first coat to dry fully. A second coat is almost always necessary for a true bright white finish that hides the underlying material completely. Apply just like the first coat. -
Remove Tape:
If you taped off the upper wall, remove the tape carefully while the paint is still slightly tacky to prevent peeling. Pull the tape away from the fresh paint at a 45-degree angle.
Step back and admire how this architectural detail instantly adds value and classic charm to your space
Keep the Grooves: Let Painted Paneling Stay Textured
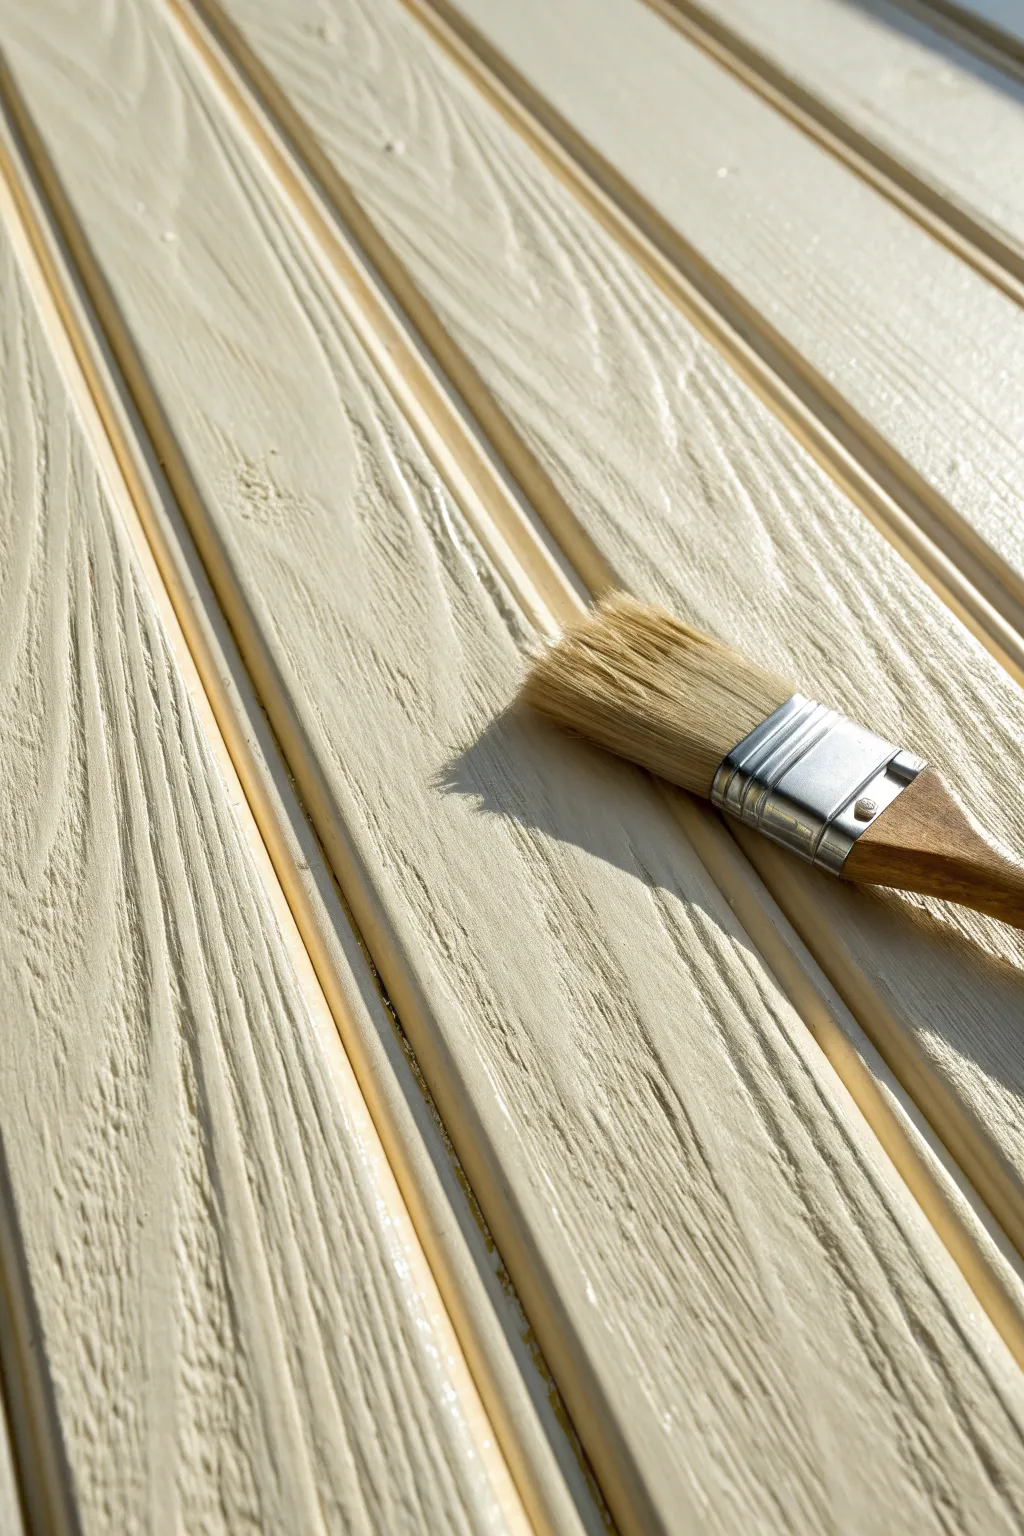
Achieve a sophisticated, tactile finish on your wooden paneling with this technique that specifically highlights the natural grain rather than hiding it. By choosing the right paint consistency and application method, you create a bright, creamy surface where every unique groove and wood pattern remains beautifully visible.
Detailed Instructions
Materials
- Wood paneling wall or surface
- High-quality angled sash brush (2-2.5 inch)
- Natural bristle stain brush (for dry brushing)
- TSP substitute cleaner
- Sanding sponge (medium grit)
- Tack cloth
- High-adhesion primer (oil-based or shellac-based recommended for wood)
- Satin or eggshell finish interior paint (Cream/Off-white)
- Paint tray and liner
- Painter’s tape
- Drop cloths
Step 1: Preparation & Cleaning
-
Assess the Surface:
Examine your paneling closely. If there is a very thick, glossy varnish, you will need to spend extra time scuffing it up. The goal is to keep the texture, so avoid filling small non-structural dents if they add character. -
Clean Thoroughly:
Mix your TSP substitute according to the package directions. Scrub the wood vigorously to remove decades of oil, grime, or furniture polish. This step is non-negotiable for lasting adhesion. -
Rinse and Dry:
Wipe down the wall with a clean, damp rag to remove any cleaning residue. Allow the wood to dry completely before moving on to sanding. -
Scuff Sanding:
Use a medium-grit sanding sponge to lightly scuff the entire surface. Press into the grooves, but don’t sand so hard that you flatten the wood grain texture. You just want to dull the shine. -
Dust Removal:
Vacuum the grooves with a brush attachment to pull out sawdust. Follow up by wiping everything down with a tack cloth to ensure a pristine surface.
Bleed-Through Blues
If yellow stains appear through the primer, stop! You have tannin bleed. Switch to a shellac-based primer specifically for spot-treating those areas before continuing.
Step 2: Prime & Base
-
Tape Off Edges:
Apply painter’s tape to baseboards, ceilings, and adjacent walls to protect them from stray brushstrokes. -
Apply Primer:
Using your angled sash brush, apply a thin coat of high-adhesion primer. Work vertically with the grain. Don’t worry about full opacity here; the focus is on gripping the surface. -
Check the Grooves:
As you prime, keep an eye on the vertical grooves. If primer pools in them, use the dry tip of your brush to feather it out immediately so you don’t lose definition. -
Dry and Assess:
Let the primer cure according to the manufacturer’s instructions. If any grain raised significantly, give it a very light pass with fine sandpaper.
Enhance the Grain
For extra texture visibility, dilute your final paint coat very slightly (5-10%) with water. A thinner paint settles tighter into the wood grain, revealing more natural detail.
Step 3: Painting for Texture
-
Load the Brush Lightly:
Dip your angled brush into your cream paint, tapping off the excess. You want less paint on the brush than you would for smooth drywall to prevent filling the wood pores. -
First Coat Application:
Apply the paint in long, vertical strokes following the direction of the paneling. Press firmly enough to push paint into the low spots of the grain, but not so hard that it drips. -
Work in Sections:
Paint 3-4 boards at a time. Maintain a ‘wet edge’ by never letting the paint line dry in the middle of a board. -
Feather the Grooves:
After covering a section, run your brush vertically down the deep grooves one last time to ensure no paint bridges across them. This keeps that distinct shadow line sharp. -
Dry Time:
Allow the first coat to dry fully. It might look streaky or uneven at this stage, but resist the urge to touch it up while it’s tacky. -
Second Coat Strategy:
For the second coat, I prefer to use even less pressure. Glide the brush over the surface. This highlights the high points of the grain texture while ensuring full color coverage. -
Final Inspection:
Look at the wall from an angle with good light. Check for any drips in the grooves or missed spots in the deep texture. -
Remove Tape:
Pull your painter’s tape while the final coat is still slightly damp to prevent peeling any paint film along with it.
Step back and enjoy the fresh, airy look of your paneling that still retains its authentic wooden charm
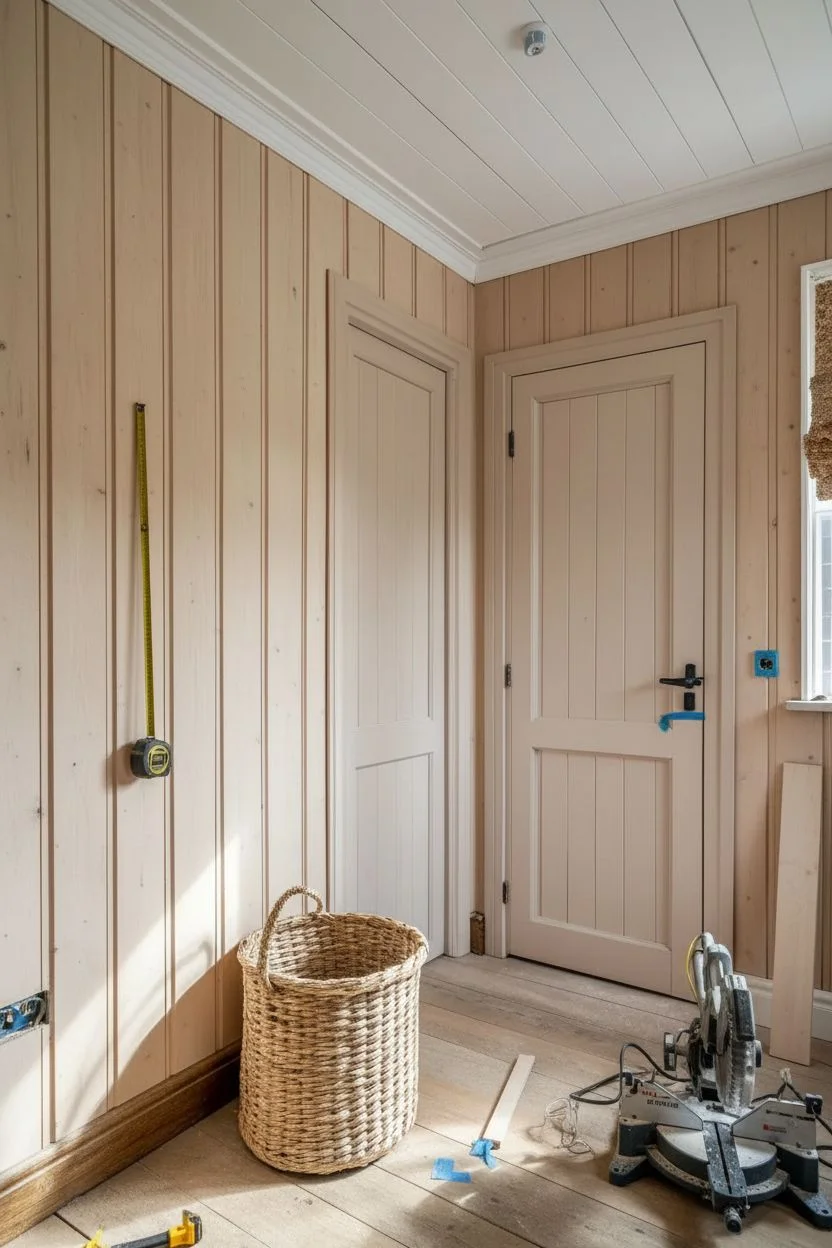
Fill the Grooves for a Smooth Wall Look
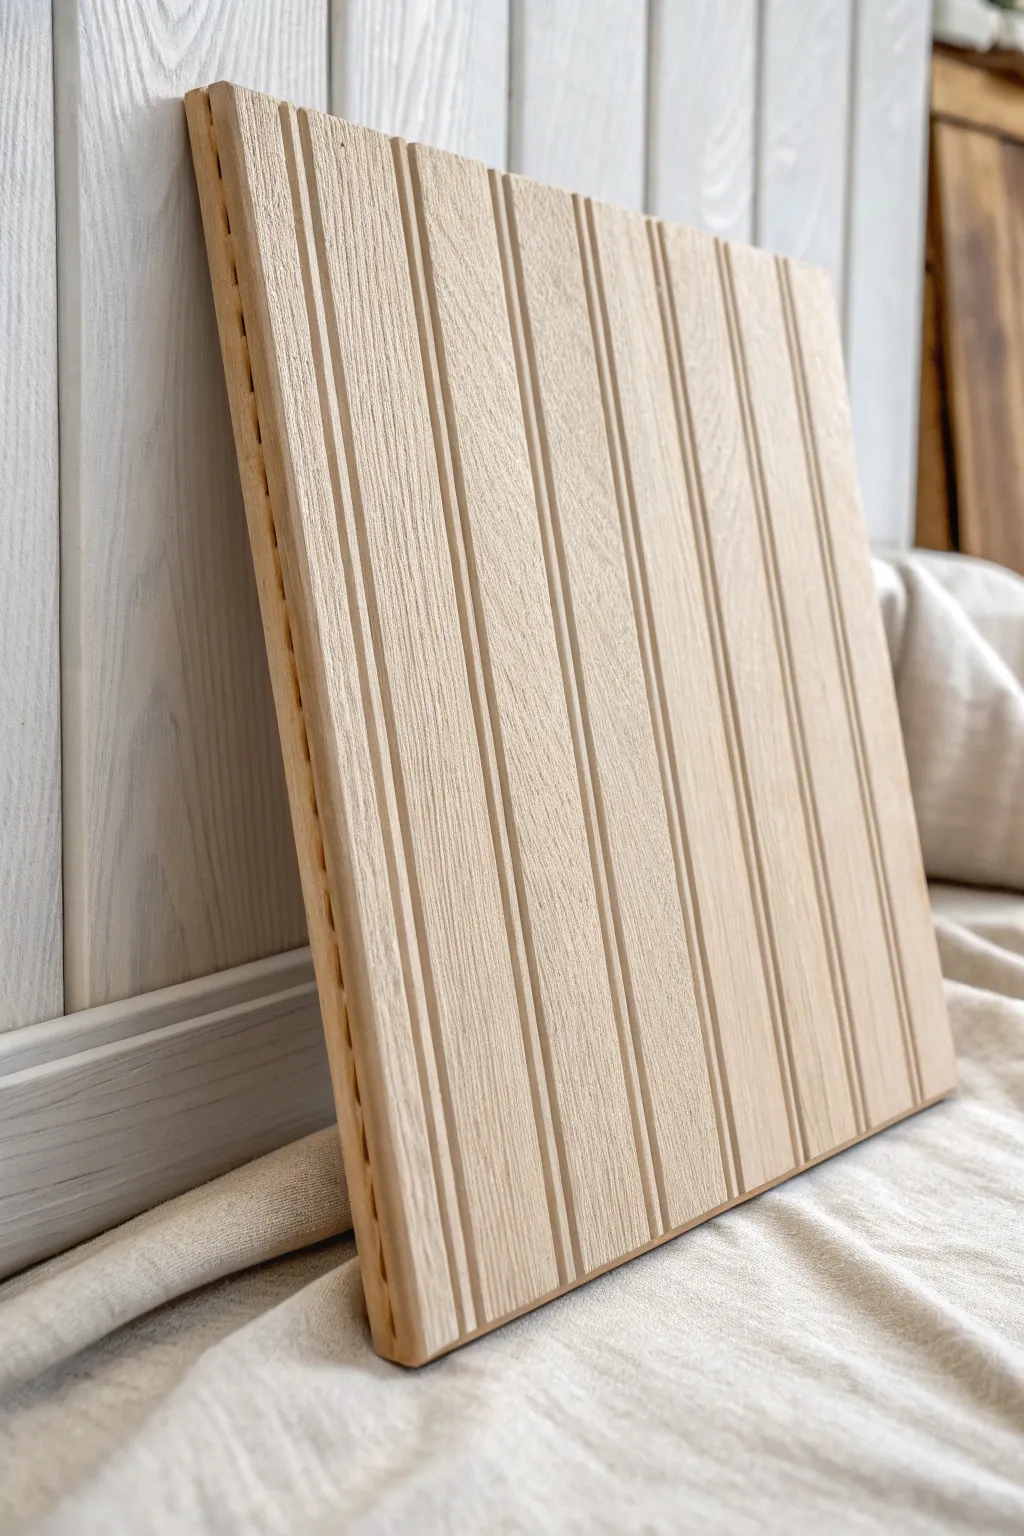

Before filling any grooves to achieve that modern smooth look, you need to understand the raw material itself. This project focuses on preparing a sample section of classic beadboard paneling, showcasing the beautiful natural grain before it gets hidden away under filler and paint.
Step-by-Step
Materials
- Unfinished beadboard paneling sheet (pine or MDF)
- Circular saw or jigsaw
- Measuring tape
- Pencil
- Fine-grit sandpaper (220-grit)
- Tack cloth or microfiber rag
- Workbench or stable cutting surface
Step 1: Sizing and Cutting
-
Measure your sample area:
Determine the size of the panel you need. Since this is likely a test piece to practice your filling technique, a manageable square around 24×24 inches works perfectly. -
Mark cut lines:
Using a pencil and a straight edge, mark your cut lines clearly on the backside of the paneling to prevent tear-out on the face. -
Secure the panel:
Clamp your beadboard sheet to your workbench. Ensure the grooved side is facing down if you are using a circular saw to keep the front surface crisp. -
Make the cut:
Carefully cut along your marked lines. Move the saw steadily to avoid burning the wood edges.
Clean Grooves Matter
Wrap sandpaper around a pencil or dowel to sand curved grooves evenly. This maintains the profile shape while smoothing out rough spots inside the channel.
Step 2: Surface Preparation
-
Inspect the grooves:
Look closely at the routed grooves (the ‘beads’). Manufacturing often leaves small splinters or rough patches inside these channels. -
Fold your sandpaper:
Take a sheet of 220-grit sandpaper and fold it into thirds. This creates a sharp, stiff edge that fits perfectly into the narrow grooves. -
Sand the channels:
Run the folded sandpaper edge up and down each vertical groove. You aren’t trying to remove material, just knock down any loose fibers. -
Sand the flat surfaces:
Lightly sand the flat raised portions of the paneling. Use long, even strokes following the direction of the wood grain. -
Check the edges:
Don’t forget the cut outer edges. Give them a quick pass with the sandpaper to remove any sharpness or splinters from the sawing process.
Step 3: Cleaning and Final Inspection
-
Remove heavy dust:
Brush off the bulk of the sawdust with a dry bristle brush or use a shop vac with a brush attachment. -
Wipe with tack cloth:
I usually do a final pass with a sticky tack cloth. Gently wipe the entire surface, ensuring you get deep into the grooves to pull out hidden dust. -
Inspect for sap:
Check for any sticky sap pockets if using real pine. If found, seal these specific spots with a dab of shellac-based primer now, or they will bleed through your future paint. -
Condition the wood (optional):
If the wood feels exceedingly dry or fuzzy, wipe it down with a barely damp cloth to raise the grain slightly, then do one final very light sanding once dry. -
Prop for acclimation:
Lean your prepared panel in the room where it will eventually be installed. Let it sit for 24-48 hours to adjust to the room’s humidity before you start applying any filler.
Two-Tone Test
Before filling it all, tape off half the panel diagonally. Fill and paint one side smooth, but stain the other side to keep the wood look. It creates a stunning art piece.
Now your beadboard is perfectly prepped and ready for the smoothing process to begin
High-Adhesion Primer Moment: The True Before-and-After Step
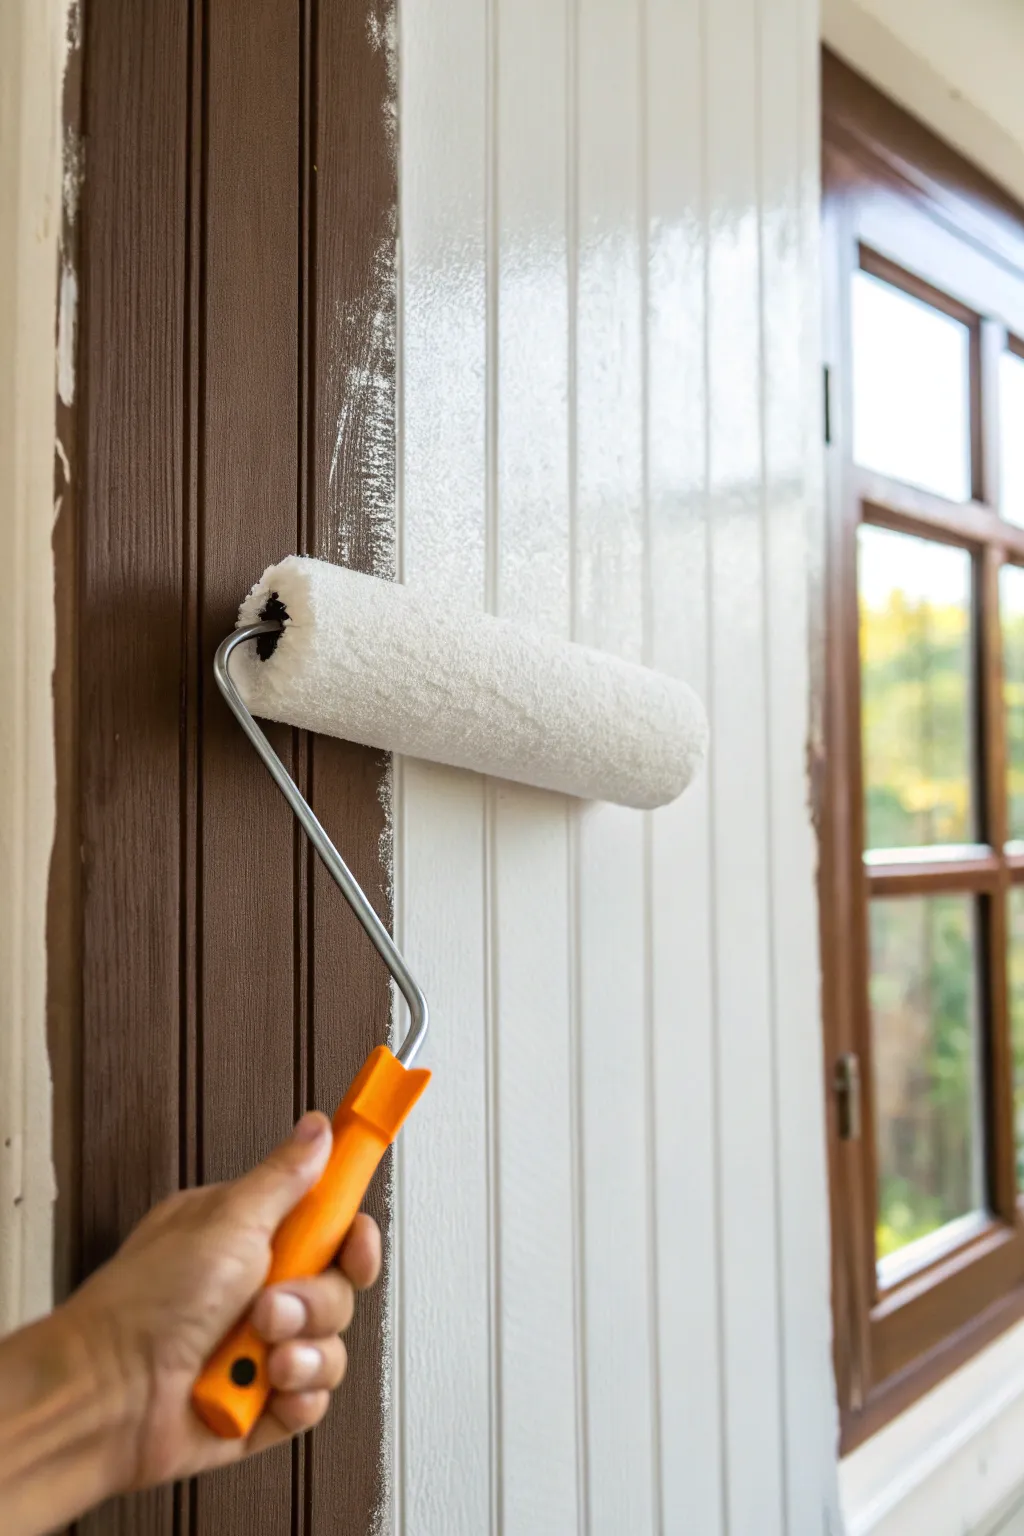
This project tackles the transformative moment of covering dark, dated wood paneling with a fresh coat of high-adhesion primer. You’ll master the technique of rolling smooth, opaque coverage over grooved surfaces, capturing the satisfying contrast between old and new.
Detailed Instructions
Materials
- High-adhesion interior primer (e.g., KILZ or Zinsser)
- 9-inch paint roller frame
- 3/8 inch nap microfiber roller cover
- Orange handled roller (for visual accuracy)
- Painter’s tape
- Sanding sponge (medium grit)
- TSP substitute or degreaser
- Drop cloths
- Paint tray and liner
- Angle sash brush (2 inch)
Step 1: Preparation & Cleaning
-
Clear the area:
Move furniture away from the wall you intend to paint. Lay down drop cloths to protect your flooring from splatter. -
Clean the surface:
Paneling often holds years of oils and dust. Scrub the wood thoroughly with a TSP substitute or a strong degreaser to ensure the primer will bond properly. -
Light scuff sanding:
Once the wall is dry, run a medium-grit sanding sponge over the surface. The goal isn’t to strip the finish, but to dull the glossy sheen so the primer grips better. -
Remove dust:
Wipe away all sanding residue with a tack cloth or a damp rag. Any leftover dust will create a gritty texture in your final finish. -
Tape edges:
Apply painter’s tape along the ceiling line, baseboards, and adjacent walls. If you have a window like in the image, tape off the trim carefully.
Bleed-Through Blues?
If stubborn brown stains seep through your water-based primer, switch to an oil-based or shellac-based spot primer for those specific areas to seal the tannins permanently.
Step 2: The Rolling Technique
-
Load the roller:
Pour your high-adhesion primer into the tray. Load your roller fully, but roll off the excess on the tray ridges so it isn’t dripping. -
Cut in first:
Before rolling the main sections, use your angle sash brush to paint the grooves and edges where the roller might not reach fully. -
Start the main pass:
Place the roller on the wall about mid-height. In the image, we see a vertical strip being applied; mimic this by rolling straight up toward the ceiling. -
Apply downward pressure:
Roll back down the same path. Apply enough pressure to push the primer into the subtle texture of the wood grain, but not so much that paint squeezes out the sides. -
Work in small sections:
Don’t try to prime the whole wall at once. Focus on a 3-foot wide section at a time to maintain a wet edge. -
Overlap your strokes:
Overlap each vertical stroke by about 50% to ensure even coverage and prevent vertical streaking. -
Check groove coverage:
I like to inspect the vertical beadboard grooves immediately after rolling. If the roller missed deep spots, dab them lightly with a brush or run the roller vertically again before it dries. -
Smooth out ridges:
If you see thick lines of paint form on the edges of your roller path, lightly roll over them without adding more paint to feather them out.
Embrace the Texture
Instead of hiding the grooves completely, use a slightly thinner nap roller (1/4 inch) to keep the definition crisp, highlighting the paneling’s architectural lines.
Step 3: Refining the Finish
-
Wait for dry time:
High-adhesion primers can be sticky. Allow the full recommended drying time (usually 1-2 hours) before touching or recoating. -
Assess bleed-through:
Look for tannins or wood knots bleeding through the white. If you see yellow or brown spots, you will need a second coat of stain-blocking primer. -
Light sand between coats:
For an ultra-smooth finish, quickly run a fine-grit sponge over the dried primer to knock down any raised grain fibers. -
Final clean:
Wipe away the sanding dust one last time. You now have a perfect, bright white canvas ready for your topcoat paint.
Your dark wall is now a bright, clean slate ready for any color you choose to apply
Paint Paneling and the Ceiling Different to Change the Room’s Shape
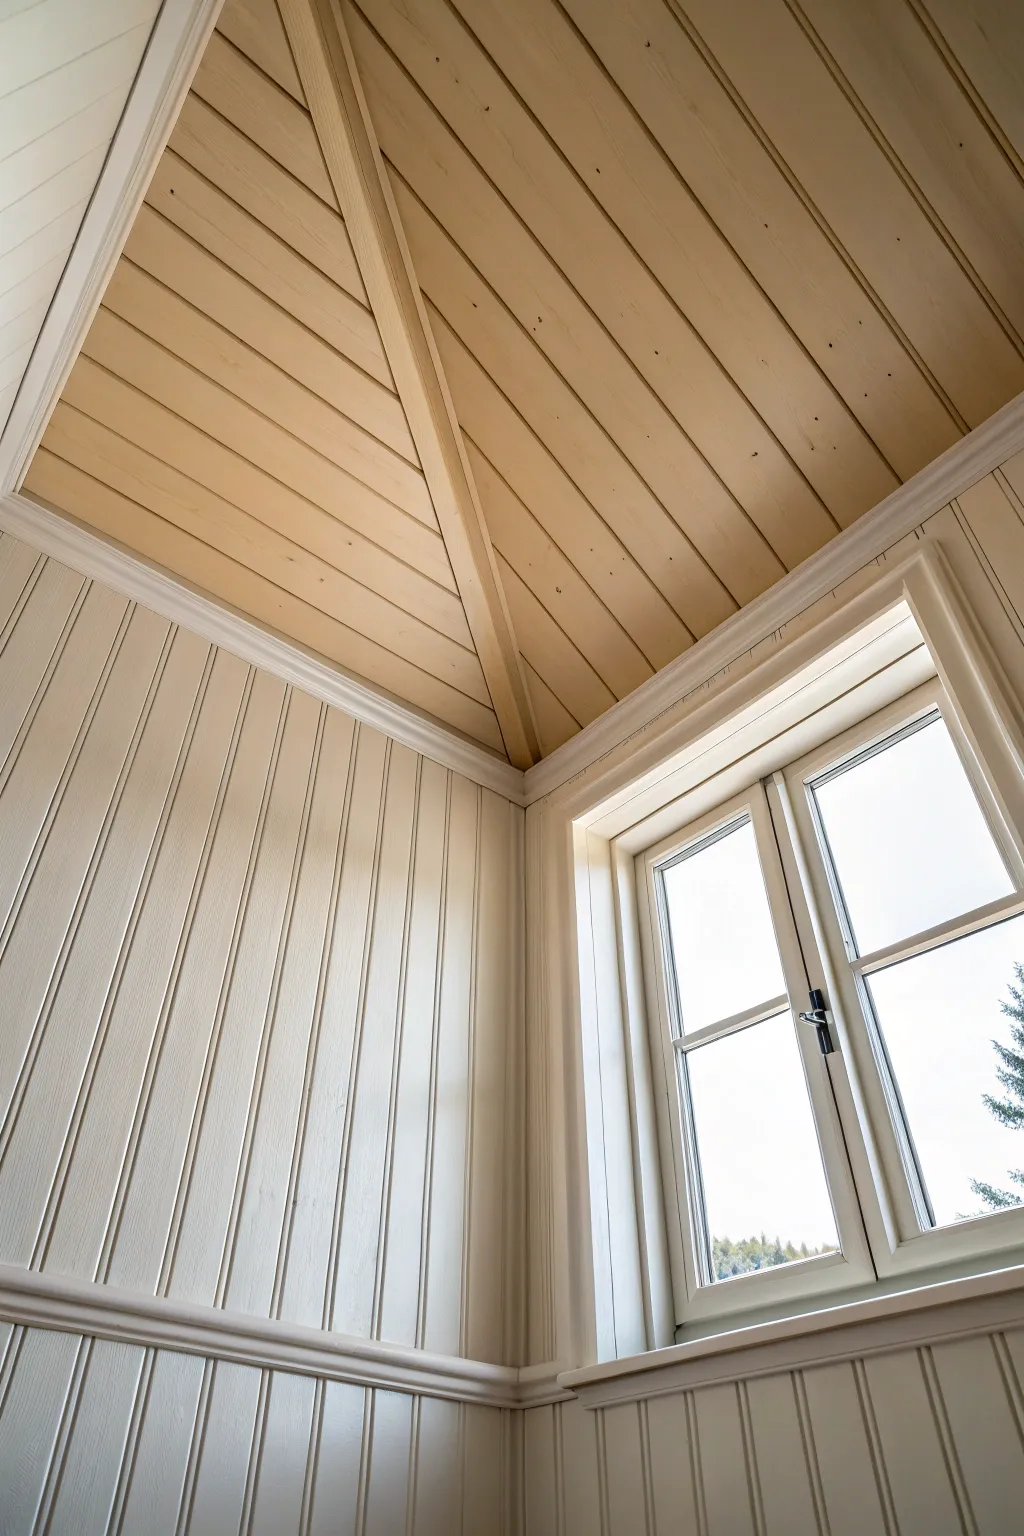
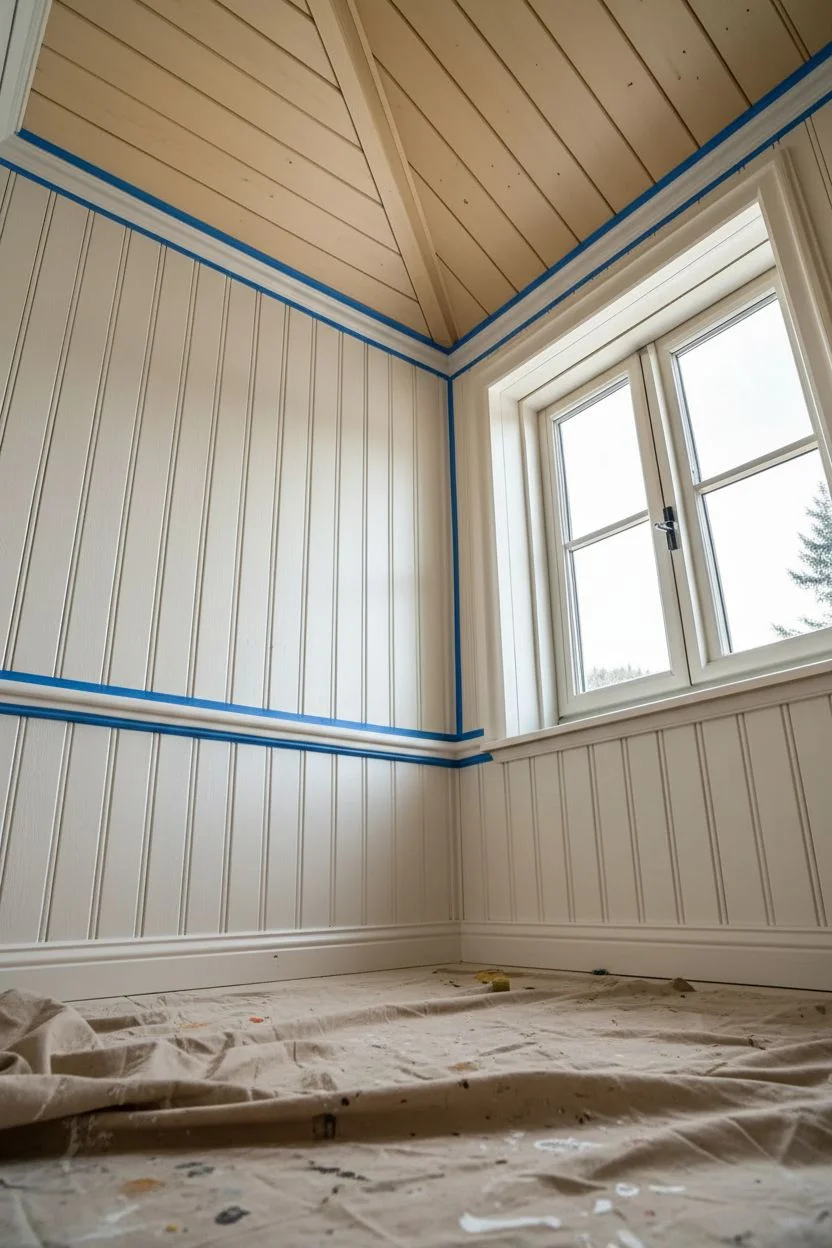
Transform a standard room shape by highlighting its angles with a thoughtful paint treatment. This project preserves the natural warmth of ceiling wood while refreshing the walls with a creamy, structured finish, creating an illusion of height and airy spaciousness.
How-To Guide
Materials
- High-quality interior primer (shellac-based recommended)
- Cream or off-white interior latex paint (satin or eggshell finish)
- Clear matte or satin polyurethane (water-based)
- Painter’s tape (delicate surface)
- Sandpaper (120 and 220 grit)
- Tack cloth
- Angled sash brush (2.5 inch)
- Small foam roller and tray
- Paint stir sticks
- Drop cloths
- Caulk and caulk gun (paintable acrylic latex)
- Wood filler (stainable if ceiling needs patching)
- Ladder
Step 1: Preparation and Protection
-
Clear and clean:
Begin by removing any furniture or obstacles from the corner you are working on. Lay down drop cloths to protect the floor, as drips are inevitable when painting overhead. -
Inspect the surfaces:
Check both the ceiling planks and the wall beadboard for any protruding nails or rough splinters. Tap nails in with a nail set and lightly sand down any rough spots with 120-grit sandpaper. -
Caulk the gaps:
For a professional finish, run a thin bead of paintable caulk along the seams where the trim meets the beadboard on the walls. Do not caulk the ceiling joints if you intend to keep the natural wood look there. -
Create the divide:
Apply painter’s tape exactly where the wall molding meets the ceiling beam structure. This line needs to be crisp, as it defines the separation between the natural wood ceiling and the painted walls.
Step 2: Treating the Ceiling
-
Clean the wood:
Before applying any finish, wipe down the ceiling planks with a tack cloth to remove everyday dust or sanding residue. The wood needs to be pristine. -
First coat of clear finish:
Using your angled brush for the grooves and a roller for the flat planks, apply a thin coat of clear water-based polyurethane. I prefer water-based here because it doesn’t yellow over time like oil-based formulas. -
Light sanding:
Once the first coat is completely dry (check the can for times, usually 2-4 hours), lightly scuff the surface with 220-grit sandpaper. This knocks down any raised wood grain. -
Final ceiling seal:
Wipe away the sanding dust again and apply a second coat of clear finish. This seals the knots and ensures the wood retains that warm, honey-toned glow without darkening too much.
Bleeding Lines?
If paint bleeds under the tape onto the wood, don’t panic. Wrap a fine damp cloth around a putty knife and gently rub the wet paint away. If dried, scrape very gently with a plastic razor blade.
Step 3: Painting the Walls
-
Prime the paneling:
If your beadboard is unpainted wood or has knots, spot-prime the knots with a shellac-based primer to prevent bleed-through. Then, apply a full coat of primer over the entire wall surface. -
Cut in the edges:
Once the primer is dry, dip your angled sash brush into your cream-colored wall paint. Carefully paint along the taped edge where the wall meets the ceiling, and around the window casing. -
Paint the grooves:
This is crucial for beadboard: use the tip of your brush to get paint deep into the vertical grooves first. Don’t rely on the roller for this, or you’ll get dripping gaps later. -
Roll the flats:
Immediately after brushing the grooves (working in sections so the paint stays wet), use a small foam roller to smooth out the paint on the flat surfaces of the panels. This removes brush marks and creates a unified texture. -
Second coat application:
Allow the first coat to dry for at least 4 hours. Repeat the cutting-in, groove brushing, and rolling process for a second coat to ensure rich, opaque coverage. -
Handle the trim:
Paint the baseboards, chair rails, or crown molding in the same color as the walls for a modern monochromatic look, or a slightly glossier finish if you want subtle definition.
Pro Tip: The “Lock-In” Method
To get a perfect line between wall and ceiling, apply a little clear matte medium or the *ceiling* finish over the tape edge first. This seals the gap so the wall paint can’t seep under.
Step 4: Finishing Touches
-
Remove tape:
Ideally, peel off the painter’s tape while the final coat of wall paint is still slightly tacky. Pull the tape slowly at a 45-degree angle away from the paint line to ensure a razor-sharp edge. -
Touch ups:
Inspect your edges. If any cream paint bled onto the natural ceiling wood, carefully scrape it away with a fingernail or use a damp cloth wrapped around a putty knife immediately. -
Window hardware clean-up:
If you got any paint on the black window latches or hinges, wipe it off now before it cures completely.
Step back and admire how the contrast between the painted walls and natural ceiling opens up the vertical space in your room
Two-Tone: Painted Paneling With a Natural Wood Ceiling Left Unpainted
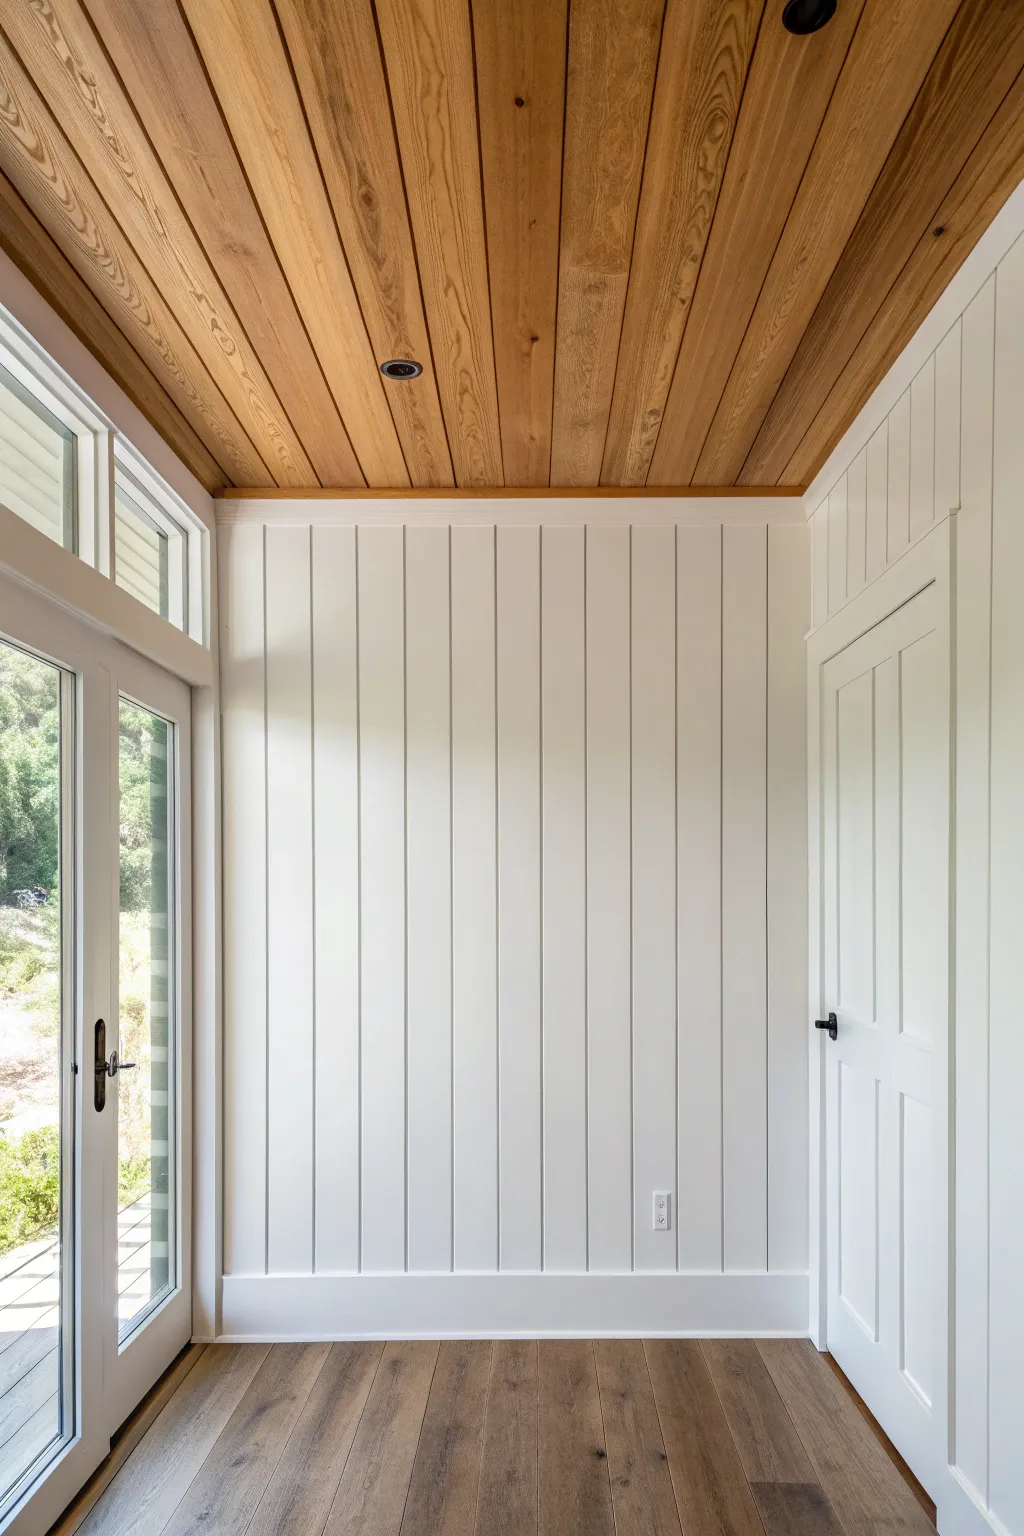
This project creates a stunning contrast by pairing crisp, white vertical shiplap walls with the warmth of a natural wood ceiling. The result is a bright, airy space that feels grounded by earthy textures and modern lines.
Step-by-Step
Materials
- Vertical shiplap or beadboard panels (primed)
- Tongue-and-groove ceiling planks (white oak or pine)
- 1×4 trim boards for baseboards and casings
- High-quality interior paint (Satin or Semi-Gloss White)
- Clear polyurethane or matte wood sealer
- Construction adhesive
- Brad nailer and 1.5-inch brad nails
- Caulk gun and paintable caulk
- Wood filler
- Sanding block (220 grit)
- Paint roller (foam or short nap)
- Angled sash brush
- Painter’s tape
- Stain (optional, if darkening the ceiling wood)
Step 1: Ceiling Installation & Finishing
-
Acclimate the wood:
Before you begin installation, bring your ceiling planks into the room. Let them sit for at least 48 to 72 hours to adjust to the humidity, which prevents warping later. -
Prep the ceiling surface:
Ensure your ceiling joists or drywall surface are clean and level. Mark the joist locations with a pencil or chalk line so you know exactly where to nail. -
Install the first plank:
Start against the wall that is most visible. Apply construction adhesive to the back of the plank and nail it through the tongue into the joists using your brad nailer. -
Continue the ceiling pattern:
Slot the next board’s groove into the previous tongue. Tap it gently with a rubber mallet and scrap wood block to close the gap tight, then nail into place. -
Cut holes for lighting:
Measure carefully for any recessed lighting cans. Use a jigsaw or hole saw to cut openings in the planks before installing those specific pieces. -
Seal the wood:
Once the ceiling is fully installed, lightly sand any rough spots. Apply a clear matte sealer to preserve the natural color. I find using a rag to wipe on the sealer gives more control than a brush overhead. -
Protect the ceiling:
After the sealer is fully dry, apply a strip of painter’s tape along the perimeter where the ceiling meets the wall to protect that beautiful wood during the painting phase.
Seamless Seams
For invisible joints, don’t just butt the ends of ceiling planks together. Cut them at a 45-degree bevel (scarf joint) where they meet, gluing the angled faces for a seamless transition.
Step 2: Wall Paneling Installation
-
Establish a level line:
Walls are rarely perfectly straight. Snap a vertical chalk line or use a laser level to guide your first panel ensuring it is perfectly plumb. -
Install vertical shiplap:
Apply adhesive to the back of your first panel and align it with your level line. Nail it into the studs. Continue across the wall, checking for plumb every few boards. -
Add baseboards:
Install a simple 1×4 flat stock baseboard along the floor. This grounds the vertical lines and protects the bottom edge of the paneling. -
Fill the nail holes:
Using a finger or putty knife, fill every nail hole with wood filler. Don’t forget the holes in the baseboard trim as well. -
Sand smooth:
Once the filler is dry, sand the patched areas flush with the surface using 220-grit sandpaper. Wipe away all dust with a tack cloth or damp rag. -
Caulk the seams:
Run a thin bead of finish caulk along the corners, where the paneling meets the trim, and where it meets the ceiling/door frames. Smooth it with a wet finger for a seamless look.
Bleed-Through Blues
If knots in the wood (especially pine) are bleeding through your white paint, spot-prime them with a shellac-based primer before applying your topcoat to seal the resin permanently.
Step 3: Painting & Finishing Touches
-
Cut in the edges:
Dip your angled sash brush into the white paint and carefully cut in along the ceiling line (against the tape), corners, and baseboards. -
Roll the first coat:
Use a foam roller or short nap roller to apply the paint to the flat surfaces of the paneling. Work in vertical sections to follow the grain direction. -
Check groove coverage:
Sometimes the roller misses the deep grooves of shiplap. Use your brush to feather paint into those vertical gaps before the surface paint dries to avoid drips. -
Apply the second coat:
Allow the first coat to dry completely according to the can’s instructions. Apply a second coat for full, opaque coverage and a durable finish. -
Remove tape:
While the final coat is still slightly tacky, carefully peel away the painter’s tape from the ceiling line at a 45-degree angle to get a crisp, clean edge.
Taking the time to preserve the natural ceiling creates a sophisticated contrast that elevates the entire room
Sunroom Paneling Painted Bright to Bounce Natural Light
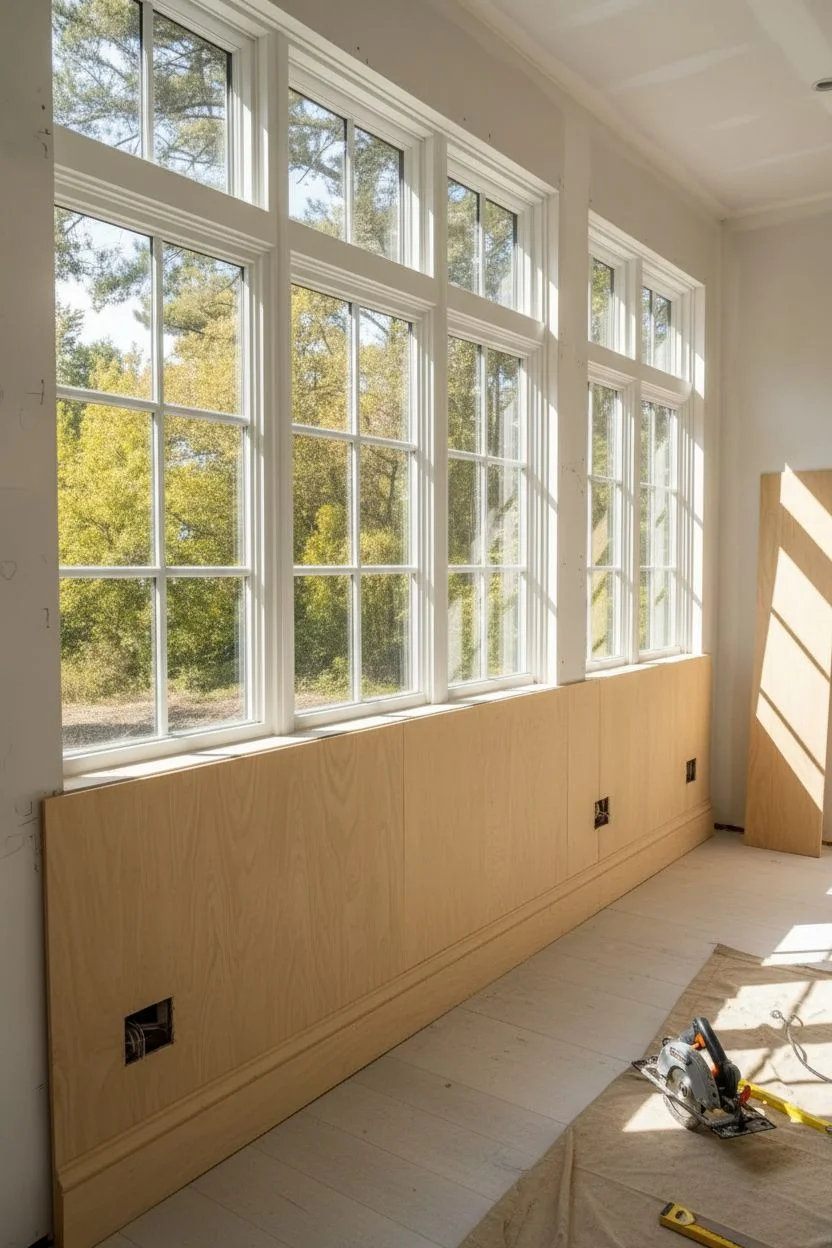
Transform a dark or outdated sunroom into an airy sanctuary by installing and painting beadboard wainscoting. This project layers crisp white paneling beneath large windows to maximize natural light reflection, creating a timeless, cottage-inspired look.
How-To Guide
Materials
- 4×8 sheets of beadboard paneling (or tongue-and-groove planks)
- Top cap molding (chair rail)
- Baseboard molding
- Construction adhesive (Liquid Nails)
- Finishing nails
- Hammer or nail gun
- Circular saw
- Jigsaw (for outlet cutouts)
- Caulk and caulk gun
- Spackle or wood filler
- Fine-grit sandpaper (220-grit)
- High-quality primer (stain-blocking)
- Interior semi-gloss or satin paint (pure white)
- Paint rollers (foam or short nap)
- Angled sash brush (2-inch)
- Painter’s tape
- Drop cloths
- Level
- Stud finder
Step 1: Preparation and Cutting
-
Clear and Prep:
Remove any existing baseboards using a pry bar, being careful not to damage the drywall. Fill any large holes and ensure the wall surface is relatively clean and flat. -
Measure the Height:
Decide on the height of your wainscoting. In this sunroom, the paneling aligns perfectly with the bottom sill of the window frame. Measure from the floor to just under the window sill to get your cut height. -
Cut Panels to Size:
Using a circular saw, cut your beadboard sheets to the determined height. I like to cut them face-down to minimize splintering on the visible side. -
Mark Studs:
Use a stud finder to locate the studs along the wall. Mark their positions on the floor or slightly above where the paneling will sit so you don’t lose the reference marks. -
Cut Outlets:
Measure exactly where any electrical outlets are located. Transfer these measurements to your panel and carefully cut the openings with a jigsaw.
Gaps at the Floor?
If your floor is uneven, you might see gaps under the baseboard. Install a thin shoe molding or quarter-round flexible trim at the bottom, nailing it into the baseboard (not the floor) to hide variations.
Step 2: Installation
-
Apply Adhesive:
Apply a zigzag bead of construction adhesive to the back of your first panel. This helps prevent the paneling from bowing away from the wall over time. -
Position and Level:
Place the first panel against the wall, starting at a corner. Use a level to ensure the vertical edge is perfectly plumb. This first piece sets the tone for the rest of the room. -
Nail in Place:
Secure the panel by nailing into the studs you marked earlier. Enhance the hold by adding nails along the top and bottom edges where the molding will eventually cover them. -
Continue Installation:
Repeat the process for the remaining panels, butt-joining them tightly. If you encounter a corner, measure and rip the final piece to fit snugly.
Level Up: Hidden Storage
Create a secret compartment! Before installing a section of paneling, frame out a small void between studs. Hinges on one panel allow it to open, perfect for hiding valuables or spare keys.
Step 3: Adding Trim
-
Install Baseboards:
Measure and cut your new baseboard molding. Nail it directly over the bottom edge of the beadboard to anchor the look and hide any uneven floor gaps. -
Add the Top Cap:
Install the chair rail or top cap molding along the upper edge of the wainscoting. This creates a finished transition between the paneling and the window sill or upper wall.
Step 4: Finishing and Painting
-
Fill Nail Holes:
Go over every nail hole with spackle or wood filler. Don’t forget to check the trim pieces too. -
Caulk Seams:
Apply a thin bead of paintable caulk to all seams—corners, where the molding meets the paneling, and where panels join. Smooth it with a wet finger for a seamless look. -
Sand Smooth:
Once the filler is dry, lightly sand the patched areas with fine-grit sandpaper. This step is crucial for that professional, glass-smooth finish. -
Prime the Surface:
Apply a coat of high-quality stain-blocking primer. Even if the beadboard came pre-primed, I find this step helps cover filler spots and ensures the final white coat is truly brilliant. -
Paint Grooves First:
Using an angled sash brush, paint inside the vertical grooves of the beadboard first. Rollers often miss these deep spots. -
Roll the Flat Surfaces:
Immediately after brushing the grooves, use a foam or short-nap roller to paint the flat surfaces. Maintain a ‘wet edge’ to avoid lap marks. -
Apply Final Coat:
Allow the first coat to dry completely according to the can’s instructions. Apply a second coat for full, opaque coverage that bounces light beautifully.
Step back and enjoy the incredible brightness your new paneling brings to the space
Entryway Paneling Painted Mid-Tone for Scuff-Friendly Style
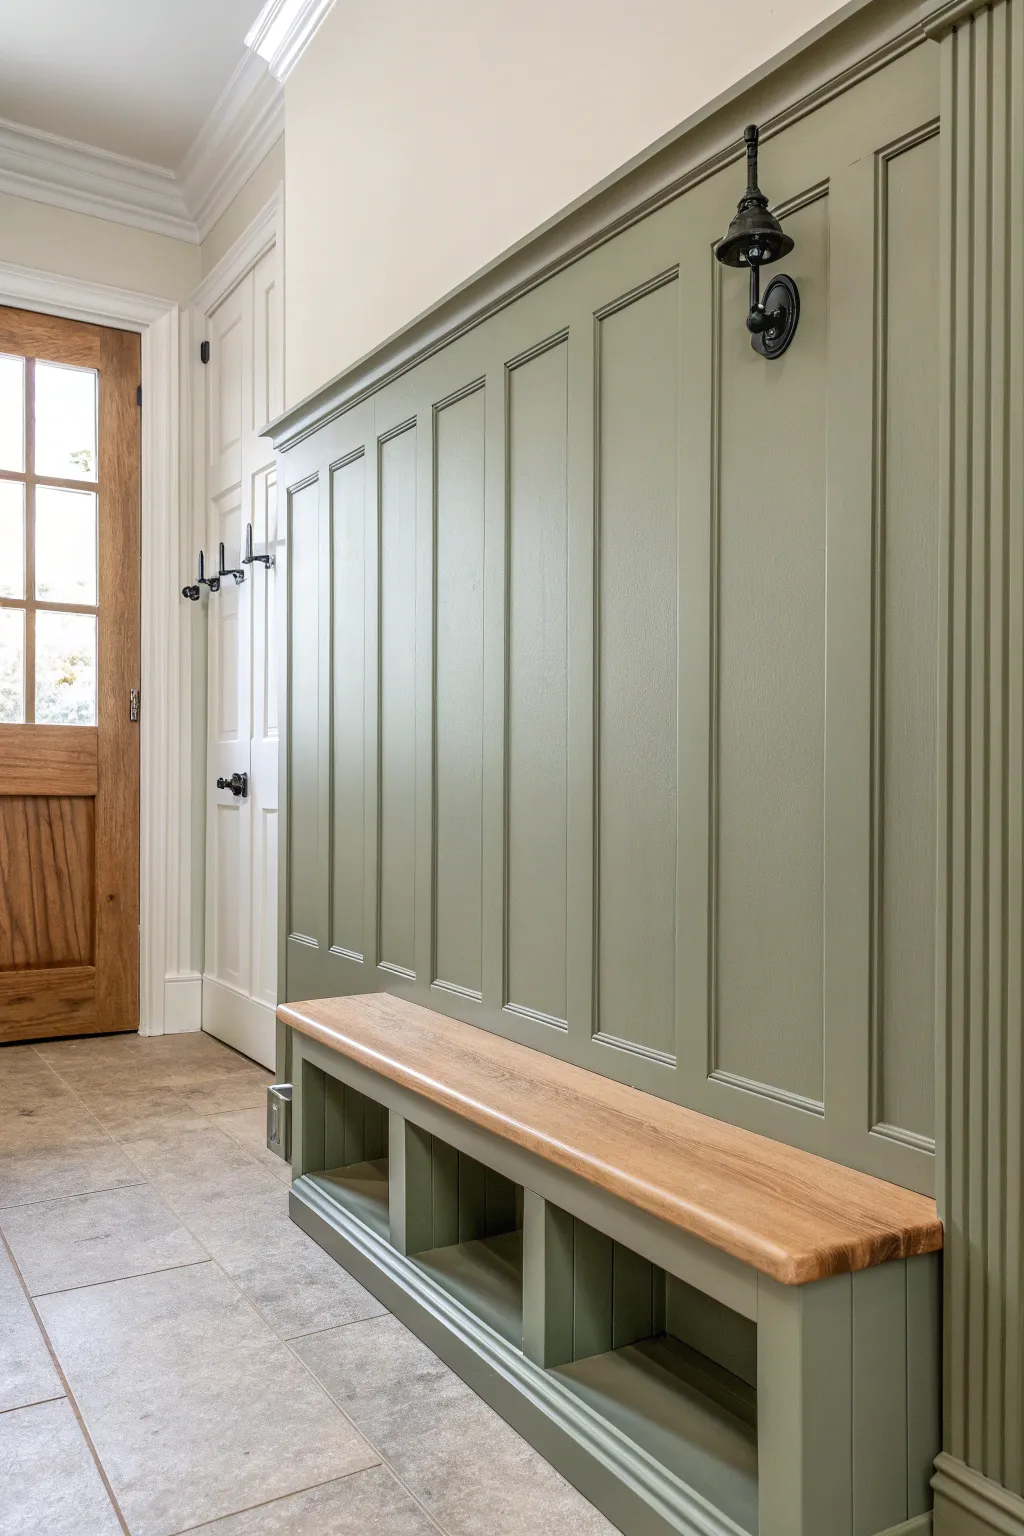
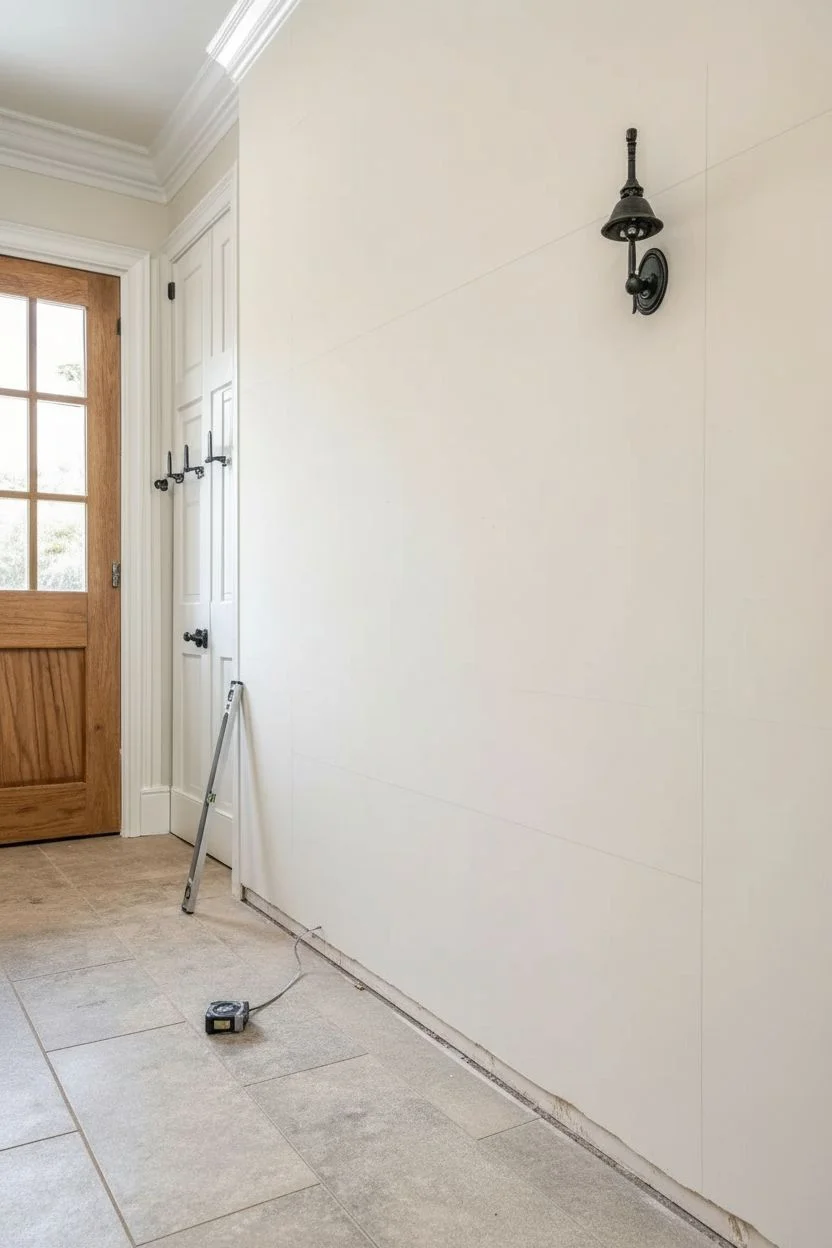
Transform a chaotic entryway into a sophisticated drop zone with this custom board-and-batten paneling and built-in bench project. The mid-tone sage green paint not only looks timeless but also cleverly hides the inevitable scuffs of high-traffic family life.
Step-by-Step Guide
Materials
- 1×4 MDF or Poplar boards (stiles/rails)
- 1×6 MDF or Poplar boards (top rail)
- Panel molding trim
- Crown molding (for top cap)
- 3/4-inch Cabinet-grade Plywood (for bench)
- 1.5-inch Solid Oak or Ash Butcher Block (bench seat)
- Construction adhesive
- Brad nailer & 2-inch nails
- Wood filler & caulk
- Primer (oil-based if knotty wood)
- Satin Enamel Paint (Sage Green – e.g., SW 6207 Retreat)
- Polycrylic or Polyurethane Sealer (for wood seat)
- Orbital sander & sandpaper (120-220 grit)
- Level, tape measure, jigsaw or circular saw
Step 1: Planning & Wall Prep
-
Measure and Map:
Begin by measuring the full height and width of your wall. Determine the desired height for your wainscoting—this example sits at about 6 feet high for dramatic impact. Mark the stud locations with a pencil, as you’ll want to anchor your horizontal rails into these. -
Remove Baseboards:
Carefully pry off existing baseboards. If you plan to reuse them, label the back; however, for a seamless built-in look like this, installing a new chunky baseboard integrated into the paneling is best. -
Sketch the Grid:
Decide on the spacing for your vertical stiles. Divide the wall length by your desired number of panels to ensure even spacing. Mark these vertical lines on the wall lightly with a pencil.
Miter Saws & Modeling
Gaps in your mitered molding corners? Don’t panic. Rub the round shaft of a screwdriver over the joint to burnish fibers together, then fill with painter’s putty for a flawless intersection.
Step 2: Building the Bench Framework
-
Construct the Base Box:
Build a rectangular box using 3/4-inch plywood to serve as the bench base. The dimensions should match your intended depth (usually 16-18 inches). Secure this box directly to the wall studs and the subfloor. -
Add Cubby Dividers:
Cut vertical plywood dividers to create the three storage cubbies shown. Screw them into the top and bottom of your base box frame, ensuring they are perfectly square so your baskets or shoes will slide in easily. -
Face the Frame:
Apply a 1×2 or similar trim onto the raw plywood edges of the bench face using wood glue and brad nails. This face frame gives the bench a solid, furniture-grade appearance.
Pro Tip: Hidden Strength
When framing the bench, don’t just rely on screws. Use generous amounts of construction adhesive on all joints. It prevents squeaking later when someone sits down to tie their shoes.
Step 3: Installing the Paneling
-
Install Horizontal Rails:
Attach the top horizontal rail (1×6) and the bottom baseboard at your predetermined height. Use a long level to ensure they are perfectly straight, regardless of whether your floor has a slight slope. -
Attach Vertical Stiles:
Cut your 1×4 vertical boards (stiles) to fit snugly between the top rail and the bench (or baseboard on side walls). Apply construction adhesive to the back and nail them into place according to your marked grid lines. -
Add Inner Panel Trim:
For that recessed shaker look seen in the image, measure the inner rectangles created by your grid. Cut small decorative molding to frame inside each rectangle, mitering the corners at 45 degrees. -
Cap the Top:
Finish the very top of the paneling with a projecting piece of crown molding or a flat 1×2 ledge. This creates a finished visual break and a small shelf for dust to settle rather than on the rail face.
Step 4: Finishing & Painting
-
Fill and Sand:
Fill every nail hole with wood filler and caulk all seams where boards meet the wall or each other. I find that taking extra time here makes the difference between a DIY look and a professional finish. Once dry, sand everything smooth with 220-grit sandpaper. -
Prime the Surface:
Apply a high-quality primer to the entire wall structure and the bench base. If you used raw wood, this seals the grain; if you used MDF, it prevents paint absorption. -
Cut In Edges:
Using an angled sash brush, ‘cut in’ the sage green paint along the corners, inside the molding details, and along the floor. These areas are tricky for rollers to reach. -
Roll the Flat Zones:
Use a foam roller or a short nap roller to paint the flat stile and rail surfaces and the wall sections inside the panels. Apply two to three coats of Satin Enamel, allowing full drying time between coats.
Step 5: The Wooden Seat & Hardware
-
Cut and Stain the Seat:
Cut your solid wood butcher block to overhang the bench base slightly (about 1 inch) on the front and sides. Sand completely smooth. If you want a warmer tone, apply a light oak stain now; otherwise, keep it natural. -
Seal the Seat:
Apply 3 coats of polyurethane or polycrylic to the wood seat. Sand lightly between coats. This provides the durability needed for people sitting down to remove muddy boots. -
Attach the Seat:
Once the paint and sealer are cured, attach the wooden seat from underneath, driving screws through the plywood top of your base box up into the butcher block. -
Install Hooks:
Finally, mount your chosen matte black hardware. Locate the studs or the solid vertical stiles you installed to ensure the hooks can hold the weight of heavy winter coats.
Now step back and admire how this elegant, functional build completely redefines the entrance to your home.
Basement Rec Room Paneling Painted Light to Lose the “Cave” Vibe
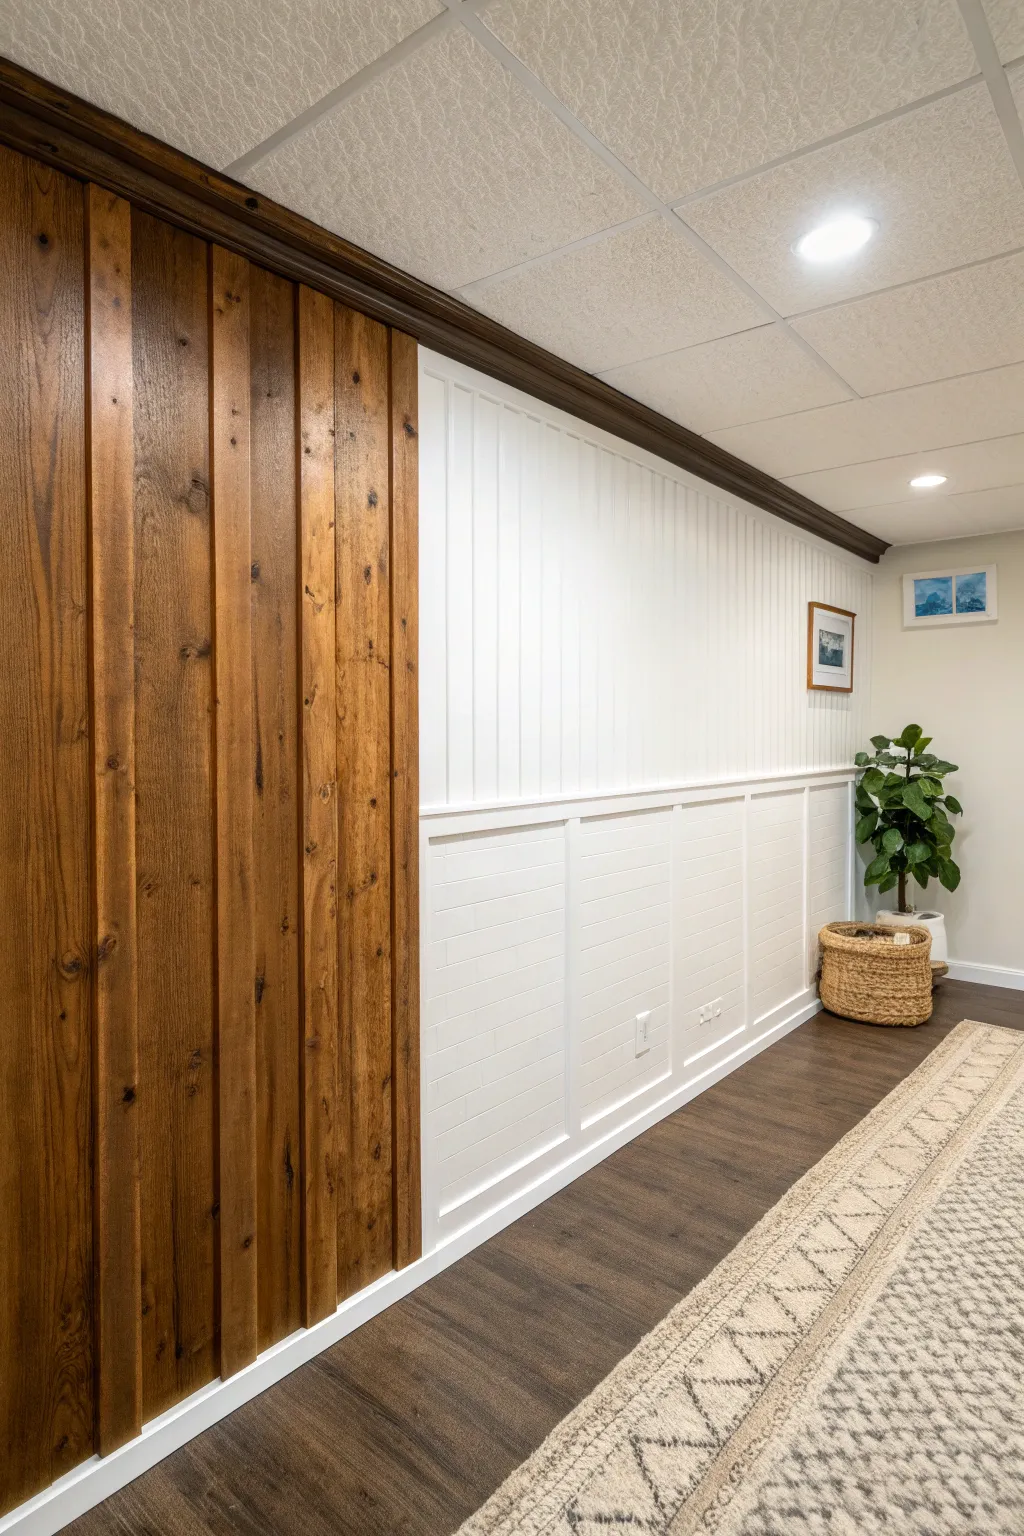
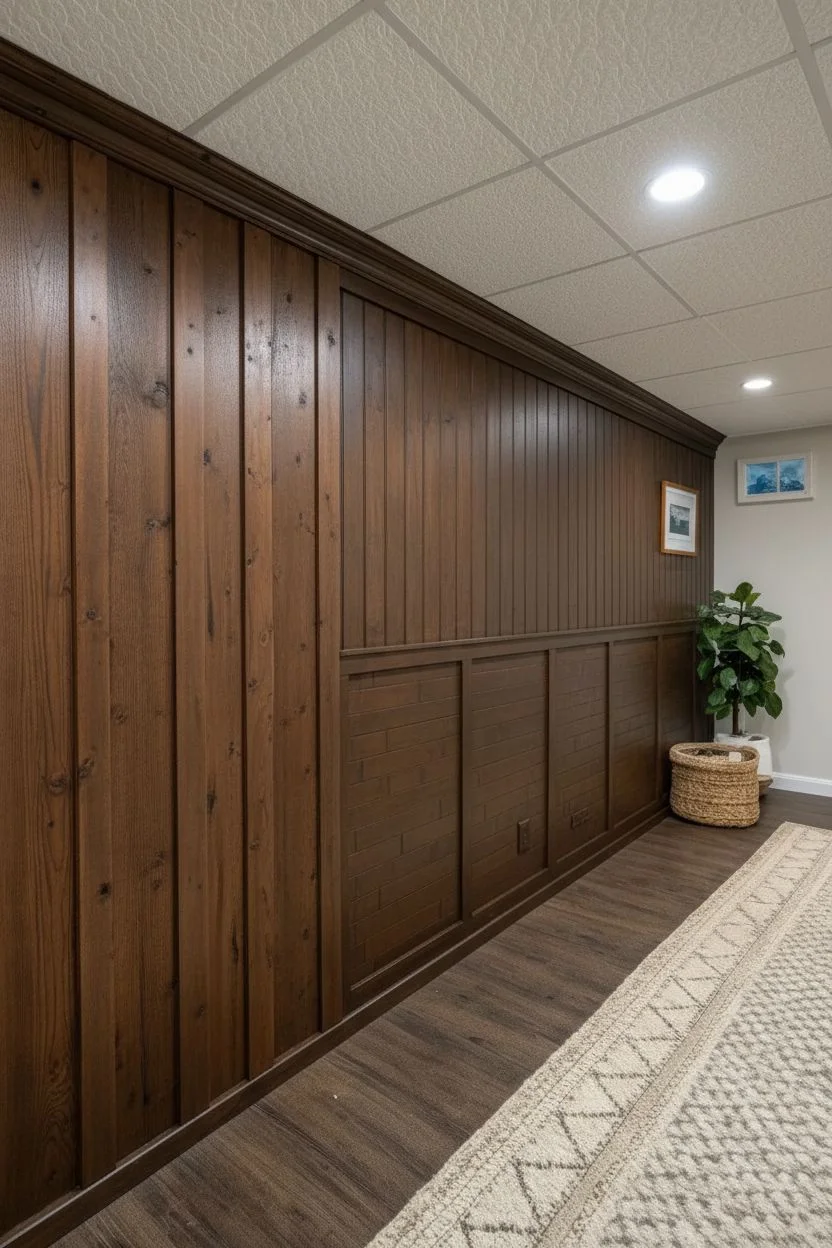
Transform a dark, dated basement into a modern retreat by combining warm wood textures with crisp white paint. This project creates a stunning visual break by leaving one section of paneling natural while brightening the rest with fresh wainscoting and beadboard.
Detailed Instructions
Materials
- Pre-primed beadboard paneling sheets
- 1×4 primed MDF or pine boards (for battens and trim)
- Vertical wood slat paneling (or dark stain for existing wood)
- Interior latex paint (Satin or Eggshell finish, Bright White)
- Dark wood stain (Walnut or Espresso)
- High-quality angled sash brush
- Foam paint roller and tray
- Construction adhesive (Liquid Nails)
- Brad nailer and 1.5-inch brad nails
- Wood filler and putty knife
- Caulk and caulk gun
- Painter’s tape
- Fine-grit sandpaper (220 grit)
- Level and measuring tape
Step 1: Preparation & Wood Feature
-
Assess the wall surface:
Begin by cleaning your existing wall thoroughly. If you are applying over drywall, locating studs is crucial. If you are working over existing retro paneling, ensure it is secure. Decide where the transition point between the dark wood and white section will be. -
Install the wood slats:
Measure and cut your vertical wood slats to span from floor to ceiling. Install them on the left side of the wall using construction adhesive and a brad nailer, leaving slight gaps between boards for that modern slat look if desired, or butt them tight against each other. -
Stain the wood section:
Apply your chosen dark stain (like a rich Walnut) to the slat section. Use a lint-free rag to wipe onto the wood grain, working in small sections. I like to let the stain penetrate for about 5 minutes before wiping off excess to get deep color saturation. -
Seal the wood:
Once the stain is fully dry (usually 24 hours), apply a clear matte polyurethane topcoat to protect the finish without adding too much shine.
Uneven Seams?
If the beadboard seams are visible after painting, run a thin line of spackle over the joint, sand lightly, and repaint. The texture should blend right in.
Step 2: Installing the White Paneling
-
Install vertical beadboard:
On the remaining right side of the wall, measure and cut beadboard sheets to cover the upper two-thirds of the wall height. Secure them to the wall using adhesive and nails, ensuring the vertical grooves are level. -
Create the lower wainscoting:
For the bottom third, install horizontal shiplap or smooth paneling as a base. Then, install a horizontal 1×4 board at the top of this section to serve as the chair rail, separating the bottom wainscoting from the top beadboard. -
Add vertical battens:
Cut vertical 1×4 pieces to fit between the baseboard and your new chair rail. Space them evenly—about 18 to 24 inches apart—to create the board-and-batten grid pattern. Nail these into place securely. -
Fill and sand:
Fill all nail holes with wood filler. Once dry, sand the filler smooth. This is the step that makes the woodwork look professional rather than DIY. -
Caulk the seams:
Run a bead of paintable caulk along every edge where the boards meet the wall or each other. Smooth with a damp finger. Don’t skip this; gaps will show up instantly once painted.
Step 3: Painting & Finishing
-
Protect the dark wood:
Carefully apply painter’s tape along the vertical edge where your new white paneling meets the dark stained wood slats. Press the tape edge firmly to prevent white paint bleed. -
Prime the surface:
If your materials weren’t pre-primed, apply a coat of high-quality bonding primer to the beadboard and battens. Let it dry completely. -
Cut in the edges:
Using your angled sash brush, paint the corners, the intricate grooves of the beadboard, and around the battens with your Bright White paint. -
Roll the smooth areas:
Switch to a foam roller for the flat surfaces of the wainscoting and the face of the battens. The foam roller helps achieve a spray-smooth finish without brush marks. -
Apply a second coat:
After the first coat is dry to the touch, apply a second coat for full opacity and durability. -
Remove tape and style:
Peel off the painter’s tape while the paint is still slightly tacky to get a crisp line. Replace any outlet covers, push your furniture back in place, and enjoy the contrast.
Add a Picture Ledge
Top the wainscoting chair rail with a slightly deeper 1×2 board to create a functional ledge for leaning framed art or small photos without nails.
This clever mix of textures brightens your space while keeping just enough rustic charm to feel cozy
Sloped Ceiling Paneling Painted One Color to Lift the Space
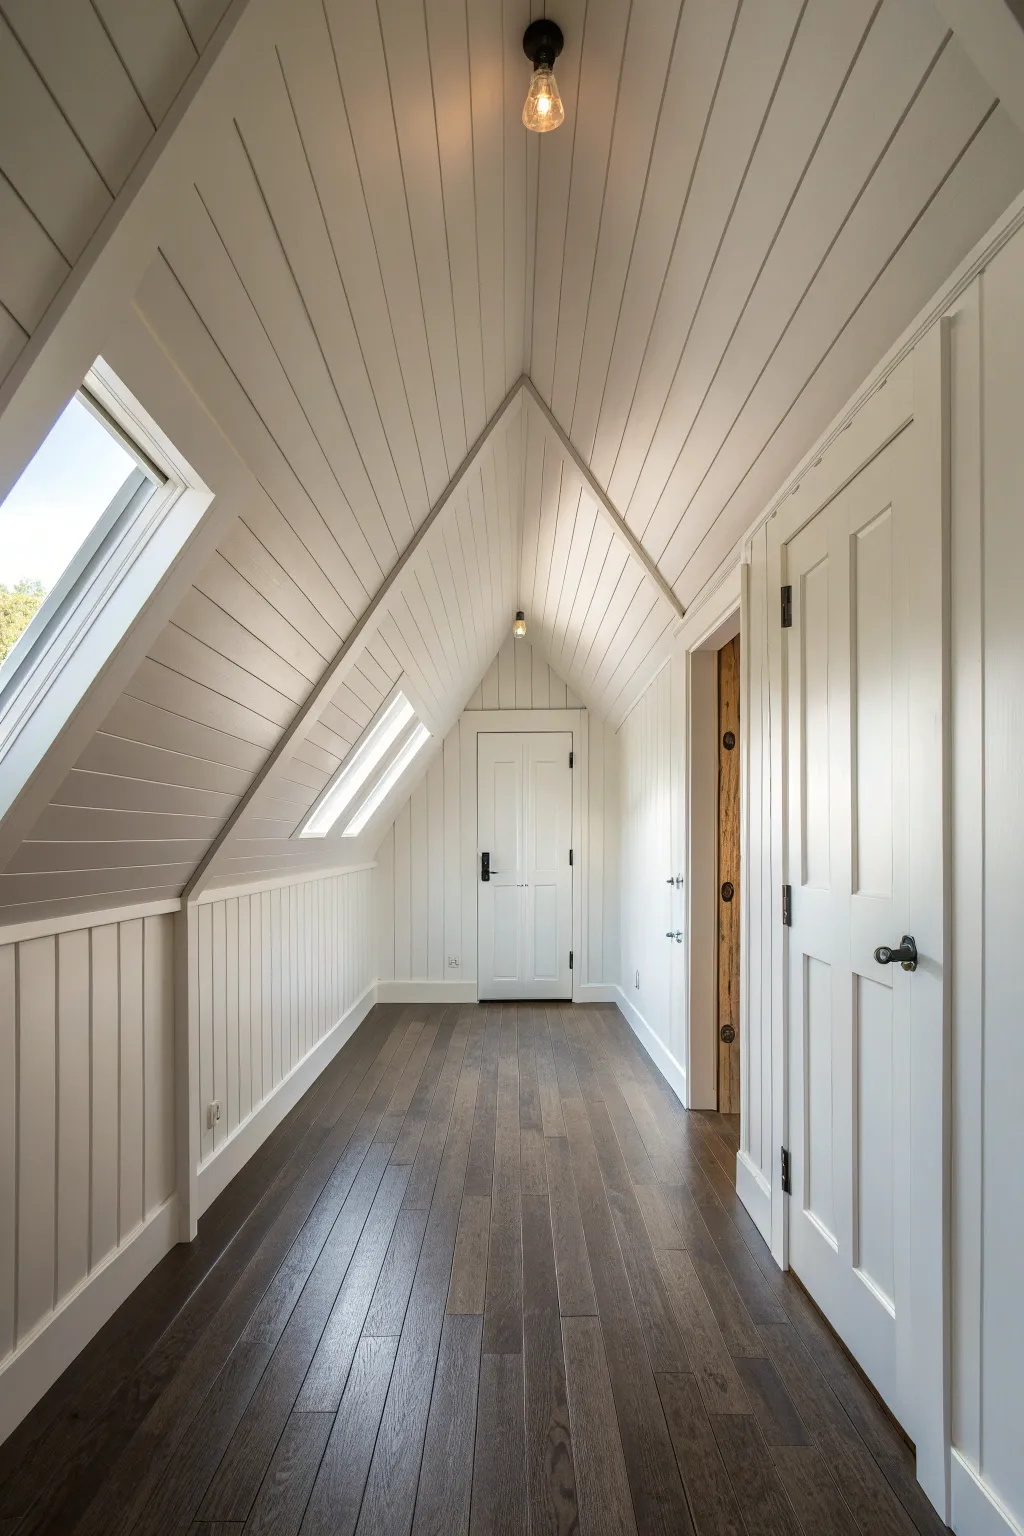
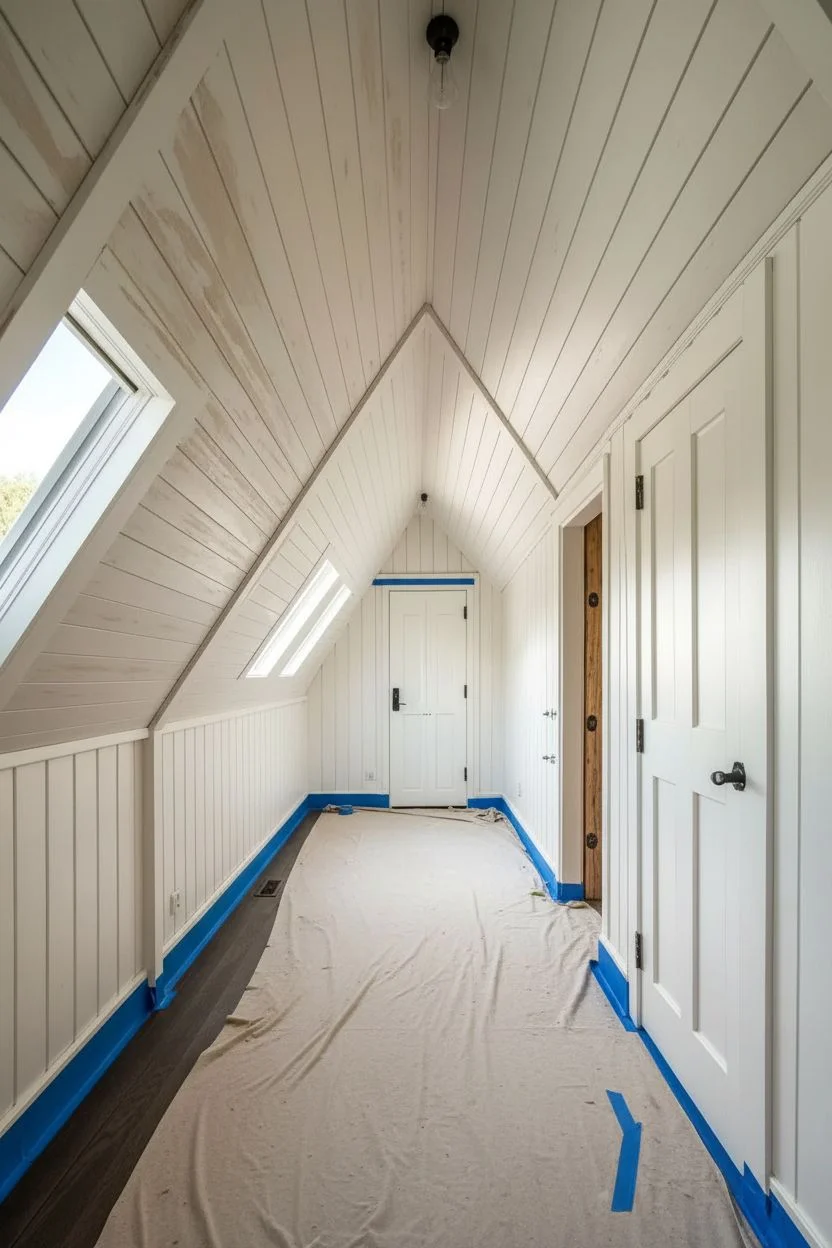
Transform an attic hallway into a bright, cohesive sanctuary by painting sloped shiplap paneling in a unified, crisp white. This technique visually lifts the ceiling and expands the space, creating a seamless flow from the walls to the apex.
Step-by-Step
Materials
- High-quality interior primer (stain-blocking)
- Satin or semi-gloss interior paint (bright white)
- Angled sash brush (2.5 inch)
- Roller frame and extension pole
- Microfiber roller covers (3/8 inch nap)
- Painter’s tape
- Drop cloths
- Sanding sponge (220 grit)
- Spackle or wood filler
- Caulk and caulk gun
- Tack cloth
- Ladder
Step 1: Preparation & Repairs
-
Protect the surround:
Begin by laying down drop cloths to protect that beautiful dark hardwood flooring. Use painter’s tape to meticulously mask off any areas you don’t want painted, such as door hardware or specific trim transitions if you are keeping them natural. -
Inspect the paneling:
Walk through the hallway and inspect the shiplap or beadboard for any nail holes, dents, or gaps. I like to run my hand over the boards to find imperfections that light might catch later. -
Fill imperfections:
Fill nail holes with spackle or a suitable wood filler. For the gaps between the trim and the walls, or seams where boards meet corners, apply a thin bead of paintable caulk to ensure a seamless look. -
Sand for adhesion:
Once the filler is dry, lightly sand the paneling with a 220-grit sanding sponge. You aren’t trying to remove old paint entirely, just scuffing the surface to help the new coat stick better. -
Clean the surface:
Remove all sanding dust using a tack cloth or a damp rag. Dust is the enemy of a smooth finish, especially in the grooves of paneling.
Sticky Situation
If paint bridges the gaps between boards, run a putty knife or a specialized gap-cleaning tool through the grooves while the paint is still wet to redefine the lines.
Step 2: Priming the Slopes
-
Cut in the edges:
Using your angled sash brush, apply primer to the edges, corners, and importantly, inside the vertical or horizontal grooves of the paneling where a roller might not reach fully. -
Roll the flats:
Use a microfiber roller to apply primer to the flat surfaces of the boards. An extension pole is a lifesaver here for reaching the peak of the sloped ceiling without constantly moving the ladder. -
Check for bleed-through:
If you are painting over raw wood or knotted pine, observe the primer as it dries. If knots bleed through, spot prime them with a shellac-based primer to seal them permanently. -
Light sanding:
After the primer has dried completely (check the can for times), do a very quick, light pass with the sanding sponge to knock down any raised grain or brush marks.
Step 3: Painting for Perfection
-
Brush the grooves first:
Start your topcoat application by brushing paint into the shiplap gaps or beadboard grooves. It’s best to work in sections of about 3-4 feet so the paint doesn’t dry before you can roll it. -
Roll the section:
Immediately after brushing the grooves in a section, roll the flat surfaces with your satin or semi-gloss paint. This technique, called ‘back-rolling,’ smooths out brush marks for a factory-like finish. -
Maintain a wet edge:
Keep moving steadily across the wall and ceiling. Maintaining a wet edge prevents lap marks, which are especially visible on long, uninterrupted ceiling slopes. -
Respect the skylights:
When painting around the skylight wells, be extra careful to cut in cleanly. The light coming through will highlight any messy edges, so take your time here. -
Dry and assess:
Let the first coat dry completely. Interior latex paints usually need 4 hours before recoating. Check for thin spots or missed grooves. -
Apply second coat:
Repeat the brushing and rolling process for a second coat. This ensures true color depth and durability. -
Remove tape:
Carefully remove the painter’s tape while the final coat is still slightly tacky (or score the edge with a utility knife if dry) to prevent peeling up your fresh paint.
Sheen Selection
Use a satin finish for the walls and ceiling to minimize glare from the skylights while still offering washability. Semi-gloss is great for trim and doors for contrast.
Step back and admire how the continuous color draws the eye upward and floods the hallway with light
Wallpaper and Painted Paneling: Texture-on-Texture Done Right
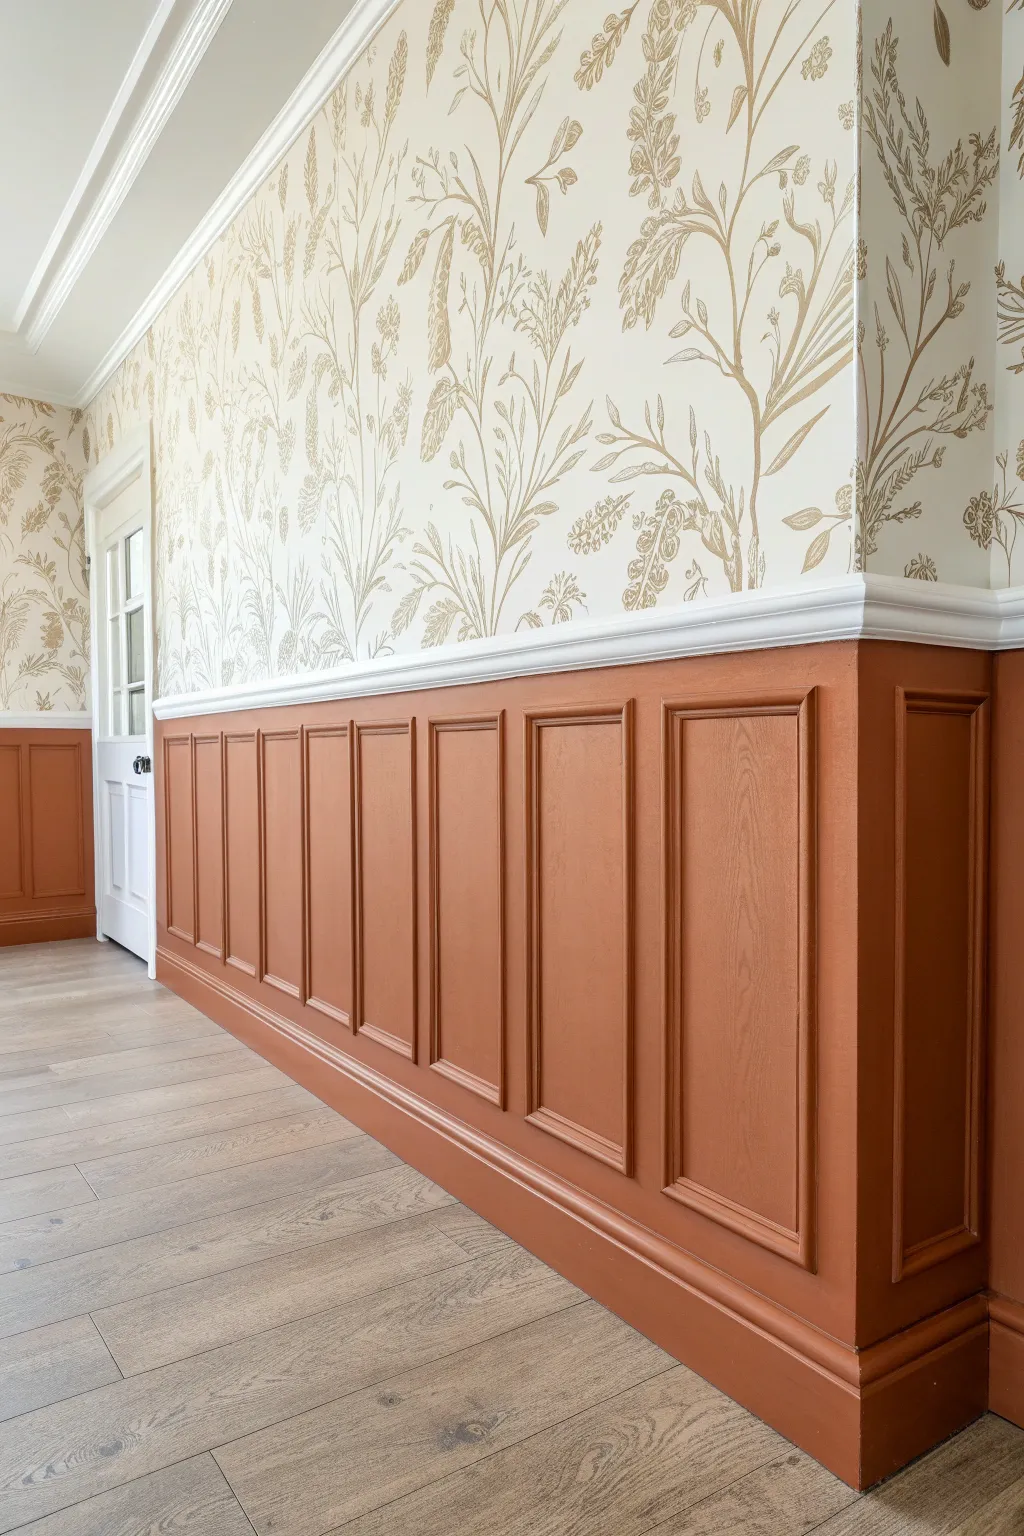
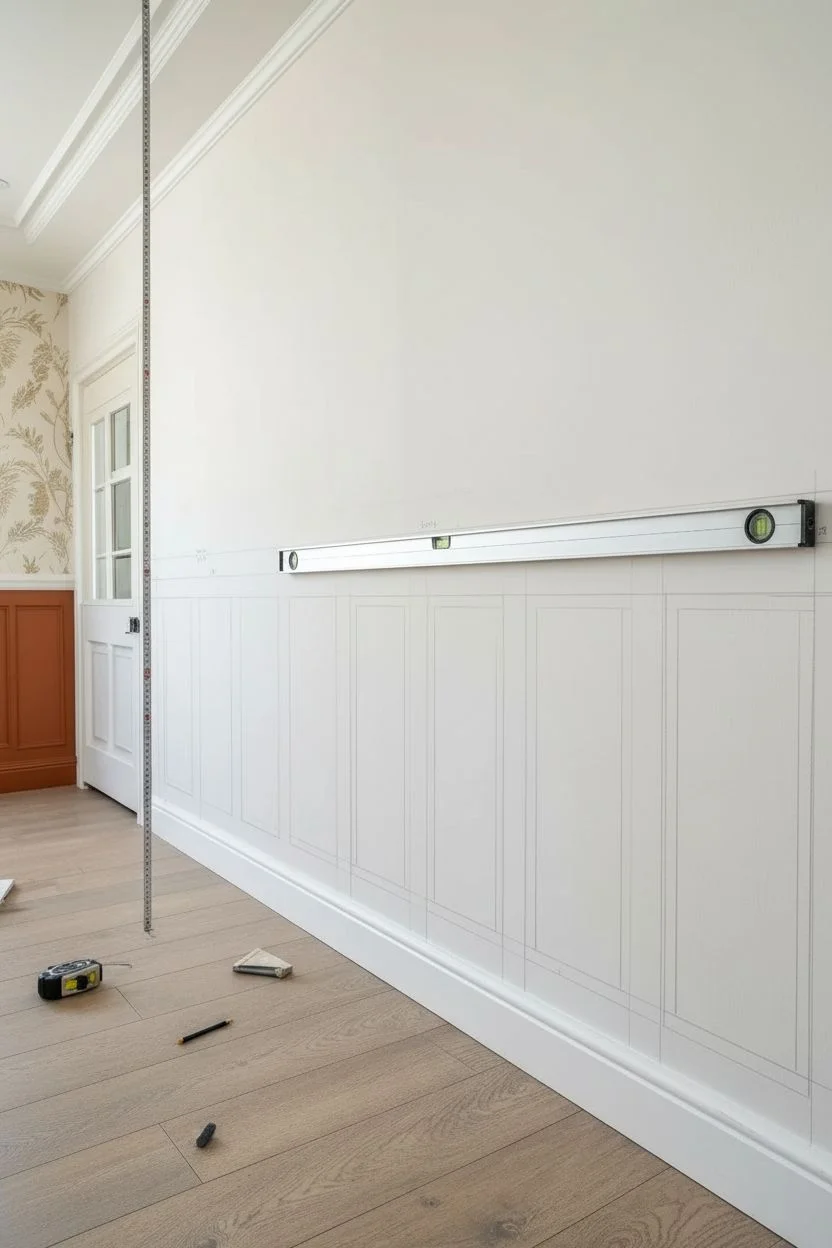
This project combines the grounded warmth of rust-colored wainscoting with the airy elegance of botanical wallpaper for a sophisticated, layered look. It transforms a plain hallway or room into a textural masterpiece by balancing bold paint with intricate patterns.
Step-by-Step Guide
Materials
- MDF or wood panel molding strips
- Chair rail molding
- Baseboard molding
- Construction adhesive (e.g., Liquid Nails)
- Painter’s tape
- Botanical wallpaper (pre-pasted or paste-the-wall)
- Terra cotta or rust-colored interior paint (satin or semi-gloss finish)
- White trim paint (semi-gloss)
- Wood filler
- Caulk and caulk gun
- Sandpaper (120 and 220 grit)
- Paint roller (microfiber) and sash brush
- Level and measuring tape
- Miter saw
- Brad nailer (optional but recommended)
Step 1: Planning and Layout
-
Define the height:
Decide on the height of your wainscoting. A classic rule of thumb is roughly one-third of the wall height, but for a modern look, consider going a bit higher, around 36 to 42 inches from the floor. -
Calculate panel spacing:
Measure the total length of your wall. Subtract the width of your vertical styles (the spaces between the boxes) to determine how many panel boxes will fit evenly. Sketch this directly on the wall with a pencil to visualize the rhythm. -
Mark level lines:
Using a long level, draw a horizontal line across the entire wall where the bottom of the chair rail will sit. This is your critical reference line to ensure everything stays straight.
Step 2: Installing the Framework
-
Install baseboards:
If you are replacing old baseboards, install the new, taller baseboard first. Secure it to the studs using a brad nailer. -
Attach the top rail:
Install a horizontal board or the chair rail backing just below your level line. This acts as the cap for your paneling section. -
Cut and place vertical styles:
Cut your vertical molding strips to fit snugly between the baseboard and the top rail. Use construction adhesive on the back and nail them into place at your pre-determined spacing intervals. -
Create the inner boxes:
For the picture-frame look shown in the image, cut four pieces of thinner molding for each panel section. Miter the corners at 45 degrees so they form a perfect rectangle inside each vertical section. -
Secure the picture frames:
Glue and pin-nail these inner frames to the wall. I find using a scrap block of wood cut to the desired spacing helps position every frame perfectly centered without constant measuring. -
Add the chair rail cap:
Install the decorative chair rail molding on top of your horizontal top rail. This creates the ledge that separates the paint from the wallpaper.
Spacer Block Tip
Cut a scrap piece of wood to the exact width needed between your molding frames. Use it as a jig to space every box identically without measuring tape.
Step 3: Prep and Paint
-
Fill and sand:
Fill all nail holes with wood filler and let dry. Sand the filler flush. Run a bead of caulk along every seam where wood meets wall or wood meets wood to create a seamless, built-in look. -
Prime the paneling:
Apply a high-quality primer to the entire lower paneling section, especially raw wood or MDF edges which tend to soak up paint. -
Paint the paneling color:
Using a sash brush, cut in the corners and intricate molding edges with your terra cotta paint first. Watch for drips pooling in the corners of the molding. -
Roll the flat surfaces:
Use a small microfiber roller to paint the flat panels and vertical styles. This ensures a smooth finish without brush strokes. Apply two to three coats for full depth of color. -
Paint the chair rail:
Carefully paint the chair rail white (or your chosen trim color). Use painter’s tape to protect your freshly painted terra cotta wall if you don’t have a steady hand.
Level Up: Pattern Play
Paint the ceiling in the same terracotta hue as the paneling to draw the eye upward and envelope the room in warm, cozy color.
Step 4: Wallpaper Application
-
Prepare the upper wall:
Ensure the wall above the chair rail is clean and smooth. If darker paint was there before, prime it white so it doesn’t show through the light background of the botanical paper. -
Cut the first strip:
Measure the height from ceiling to chair rail and add 4 inches for trimming. Cut your first strip of wallpaper. -
hang the first drop:
Draw a plumb vertical line to guide your first strip. Apply paste (or wet the baking) and hang the strip, leaving roughly 2 inches of overhang at both the ceiling and the chair rail. -
Match the pattern:
Cut the next strip, paying close attention to the pattern repeat. Align it next to the first strip, butting the seams tightly together without overlapping. -
Trim the excess:
Use a fresh blade in your utility knife and a straight edge to trim the excess paper at the ceiling line and right along the top of the chair rail. -
Smooth it out:
Use a wallpaper smoothing tool to push out any air bubbles, working from the center toward the edges. Wipe away any excess paste immediately with a damp sponge.
Step back and admire how the crisp lines of your paneling anchor the whimsical movement of the wallpaper above
Hand-Painted Details That Turn Paneling Grooves Into an Art Feature

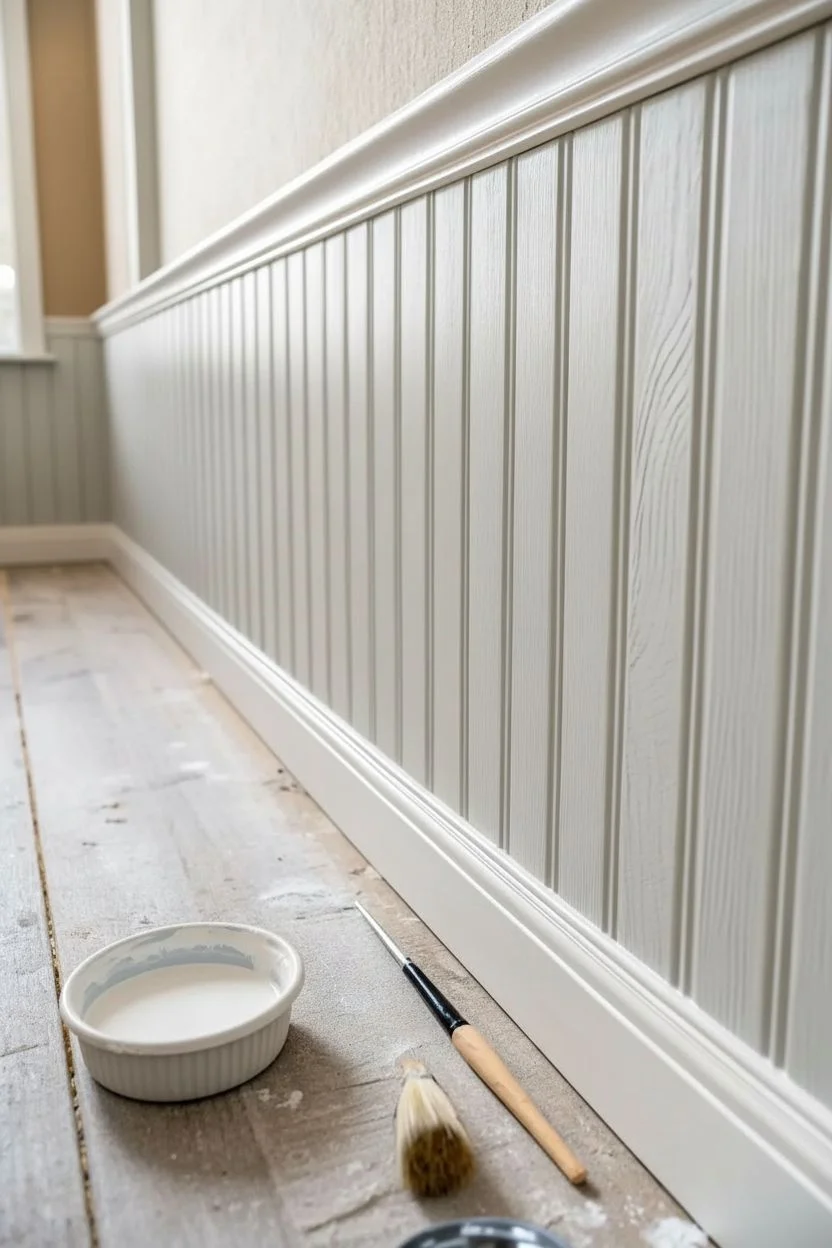
Elevate standard beadboard wainscoting by turning the grooves themselves into a subtle, custom art feature. By carefully hand-painting the vertical recesses with a contrasting color, you create a sophisticated pinstripe effect that adds incredible depth and dimension to your walls.
How-To Guide
Materials
- Existing beadboard wainscoting (cleaned and prepped)
- High-quality trim paint (base color, semi-gloss or satin)
- Acrylic paint or latex sample pot (accent color for grooves)
- Fine-point artist brush (round or liner style, size 2 or 4)
- Small mixing bowl or ramekin
- Painter’s tape (optional, primarily for baseboards)
- Damp rag for immediate clean-up
- Sanding sponge (fine grit)
- Canvas drop cloth
Step 1: Base Coat Preparation
-
Assess the surface:
Begin by inspecting your wainscoting for any scuffs or old drips. If necessary, use a fine-grit sanding sponge to smooth out the flat panels and the interior of the grooves to ensure a professional finish. -
Clean thoroughly:
Wipe down the entire surface with a damp cloth or a mild TSP substitute. Dust and grime love to hide in beadboard crevices, and they will ruin your fine line work later. -
Apply the main color:
Roll or brush on your main white or cream base color across the entire wainscoting. Don’t worry about the grooves being perfect yet since we will be highlighting them, but aim for solid, even coverage on the raised flats. -
Let it cure:
Allow this base coat to dry completely, ideally overnight. The paint needs to be hard enough to withstand a steady hand and a damp rag wiping across it without tacky drag.
Wobbly Lines?
If your hand is shaking, rest your pinky finger against the flat part of the panel as a stabilizer while you pull the brush down the groove.
Step 2: The Pinstripe Technique
-
Prepare your accent paint:
Pour a small amount of your chosen accent color into a shallow bowl or ramekin. I find that thinning the paint slightly with a few drops of water (if using latex/acrylic) helps it flow down the long vertical channels more smoothly. -
Load the artist brush:
Dip your fine-point artist brush into the paint. You want the bristles saturated but not dripping; tap the excess off against the side of the bowl. -
Start at the top:
Position your brush at the very top of a groove, right under the chair rail molding. Place the tip firmly into the center of the recess. -
Pull downward:
With a steady hand, pull the brush straight down the groove. Use the physical shape of the beadboard recess to guide your bristles—let the wood do the work of keeping you straight. -
Work in sections:
Don’t try to paint the entire floor-to-ceiling length in one go if you can’t reach it comfortably. Paint down roughly 12-18 inches, then reload your brush. -
Correct mistakes immediately:
If paint spills onto the flat raised surface, immediately wipe it away with your damp rag. Because the base coat is fully cured, the wet accent paint will wipe off easily without damaging the layer underneath. -
Connect the lines:
When continuing a line from where you left off, start slightly above the stopping point and feather the stroke downward to blend the two sections seamlessly. -
Finish at the baseboard:
Carry the line all the way down to where the panel meets the baseboard. Use the very tip of your brush to manipulate paint into that tight bottom corner for a crisp termination.
Step 3: Refining and Sealing
-
Check for consistency:
Step back and look at the wall as a whole. Ensure the color density is consistent across all grooves; some might need a second pass if the paint was too thin. -
Clean up edges:
Go back with a clean, damp cloth wrapped tightly around your finger to sharpen up any edges where the groove paint might have feathered out too widely. -
Touch up the base:
If any stubborn accent paint dried on the white flats, use a small angled brush and your original base color to carefully touch up those spots once the grooves are dry. -
Final dry:
Let the accent lines dry undisturbed for at least 4-6 hours before moving furniture back against the wall.
Color Choice Tip
For a subtle, historic look, use a grey only two shades darker than your white. For modern drama, go with charcoal or navy in the grooves.
Now you have a custom architectural feature that adds depth and craftsmanship to your room.


Have a question or want to share your own experience? I'd love to hear from you in the comments below!