
A plain brown paper bag is basically a tiny canvas that’s already shaped into something useful. Here are my favorite paper bag drawing ideas to turn everyday kraft bags into gifts, decor, and playful crafts you’ll actually want to make.
Simple Floral Bouquet Front Panel
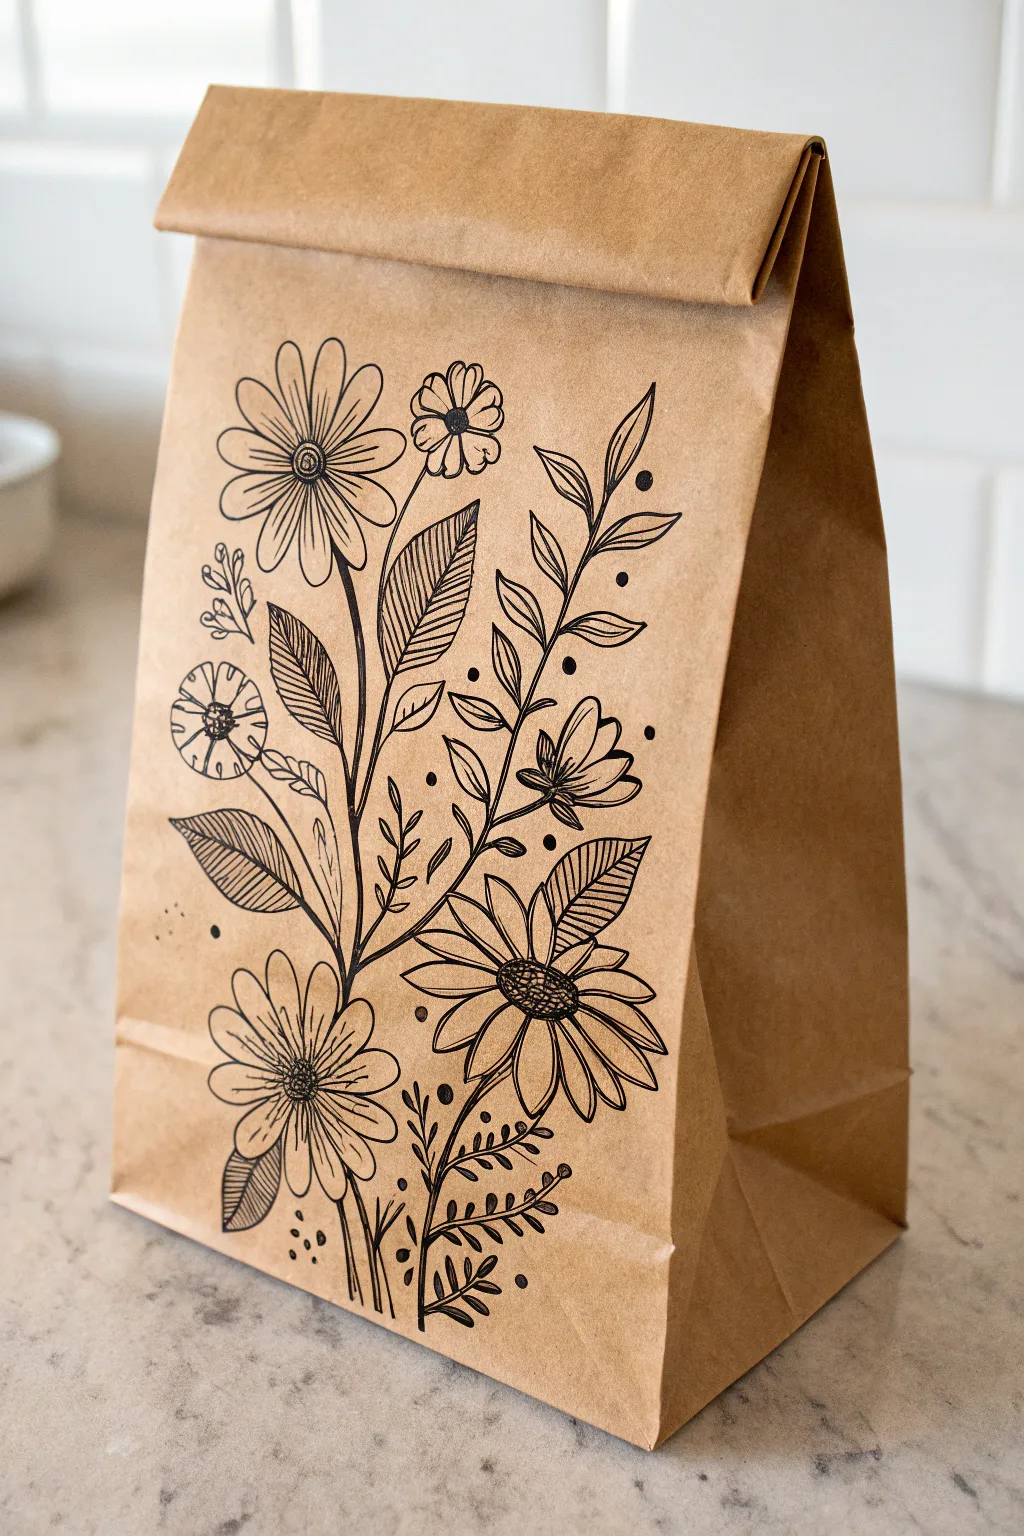
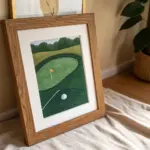
Transform a plain brown lunch bag into a charming piece of functional art with this simple floral line drawing. The contrast of crisp black ink against the kraft paper creates a rustic, organic look perfect for gift giving or special lunches.
Step-by-Step Guide
Materials
- Standard brown kraft paper lunch bag
- Pencil (HB or 2B)
- Soft eraser
- Fine liner pen (0.3mm or 0.5mm, black)
- Medium marker pen (0.8mm or 1.0mm, black)
- Scrap cardboard (to fit inside the bag)
Step 1: Preparation and Sketching
-
Prepare the surface:
Before you begin, slide a piece of scrap cardboard or thick cardstock inside the paper bag. This provides a stable drawing surface and prevents any ink from bleeding through to the back panel. -
Flatten the workspace:
Smooth out the bag on a flat table, ensuring the bottom gusset is folded flat so you have a clear, uninterrupted area on the front panel. -
Draft the main stems:
Using a pencil with very light pressure, draw two main vertical curves starting near the bottom center. Let them sway slightly apart as they move upward to establish the bouquet’s flow. -
Position the main blooms:
Sketch circles lightly to mark the placement involving the three large daisy-like flowers: one near the top left, one at the bottom left slightly overlapping the stem, and one angled on the bottom right. -
Add secondary elements:
Roughly sketch in the smaller floral shapes, like the cosmos flower at the top center and the tulip-like bloom on the right side. Don’t worry about petals yet, just get the placement right.
Smudge Alert
Kraft paper is porous but some inks sit on top. If your hand drags through wet ink, place a clean scrap paper under your drawing hand to act as a shield while you work.
Step 2: In line Work: Flowers
-
Outline the flower centers:
Switch to your medium marker (0.8mm). Draw the circular centers of your main daisies first. I like to add a tiny grid or stippling pattern inside them for texture. -
Draw primary petals:
Draw long, oval-shaped petals radiating from the centers. Make sure they aren’t perfect; let some overlap slightly or curve naturally. -
Detail the side blooms:
Ink the smaller side flowers. For the tulip-shape on the right, use cup-like strokes. For the small posy on the left, draw tiny circular shapes with simple radiating lines.
Step 3: Inking Leaves and Stems
-
Solidify the stems:
Trace over your pencil stem lines with the medium marker. Where the stems meet leaves, thicken the line slightly to mimic a natural joint. -
Outline the leaves:
Draw the leaf shapes using a pointed oval form. Include a variety of leaf types: some solid and simple, others serrated or with multiple leaflets like the branch on the far right. -
Add leaf veins:
Switch to the finer pen (0.3mm or 0.5mm). Inside the larger leaves, draw a central vein and diagonal lines for a striped shading effect. This creates visual interest without overpowering the flowers. -
Create fern fronds:
Using the fine pen, add the delicate, fern-like branch at the very bottom center. Use short, quick strokes for the tiny leaflets.
Add a Pop of White
Use a white gel pen or white paint marker to add highlights on the leaf tips or flower centers. The opacity creates a stunning contrast against the brown paper.
Step 4: Finishing Touches
-
Add decorative berries:
Scattered around the upper stems, draw small solid black circles. These act as berries or pollen and help balance the open space. -
Incorporate playful dots:
Add tiny stippling dots loosely around the bouquet, particularly near the bottom and top edges, to give the illustration a whimsical, airy feeling. -
Erase guidelines:
Allow the ink to dry completely for at least 5-10 minutes. Gently erase all remaining pencil marks, holding the paper taut so it doesn’t crinkle. -
Fold the top:
Remove the cardboard insert. Fold the top of the bag over twice to complete the classic lunch-sack look, ensuring the fold sits just above your highest flower.
Now your custom-illustrated bag is ready to make someone’s lunch extra special


Cute Smiley Face Gift Bag

Transform a plain kraft paper bag into a cheerful gift wrap with just a few simple strokes. This adorable smiley face design adds a personal, heartwarming touch to any present, turning standard packaging into a keepsake.
Step-by-Step Tutorial
Materials
- Plain brown kraft paper bag (with handles)
- Black permanent marker or paint pen (medium tip)
- Pink acrylic paint or pink paint pen
- White acrylic paint or white gel pen
- Pencil (HB or lighter)
- Eraser
- Small round paintbrush (if using paint)
- Circular stencil or small bottle cap (optional)
Step 1: Planning and Sketching
-
Flatten the surface:
Lay your paper bag flat on a hard table. Smooth out any wrinkles gently with your hand to ensure you have an even surface for drawing. -
Position the face:
Visualize where the face will go. You want it centered horizontally and positioned slightly above the middle vertical point, leaving room for the smile below. -
Sketch the eyes:
Using your pencil very lightly, draw two circles for the eyes. They should be spaced about two inches apart. If you aren’t confident drawing freehand circles, trace around a small bottle cap or coin. -
Mark the cheeks:
Sketch two smaller circles slightly lower than the eyes and further out to the sides for the rosy cheeks. -
Draft the smile:
Lightly draw a wide, shallow ‘U’ shape connecting the space between the cheeks. Keep the curve smooth and simple.
Ink bleeding?
If your black marker feathers into the paper grain, switch to a Posca paint pen or acrylic paint. These sit on top of the absorbent paper fibers rather than soaking in
Step 2: Adding Color and Details
-
Fill in the eyes:
Take your black marker or paint pen. Carefully outline the pencil circles for the eyes first, then fill them in completely solid black. Let this ink set for a moment so it doesn’t smear. -
Add the eyelashes:
Draw three distinct lashes on top of each eye. Start from the top edge of the black circle and flick your wrist upward to create a tapered, natural lash look. The middle lash should go straight up, while the side ones angle outward. -
Trace the smile:
Go over your penciled smile line with the black marker. Use a confident, steady motion to keep the line smooth rather than jagged. Add a tiny perpendicular tick mark at each end of the smile for extra cuteness. -
Paint the cheeks:
Using pink acrylic paint or a pink paint pen, fill in the cheek circles. I find a dabbing motion works better than brushing on paper bags to prevent the paper from pilling. -
Clean up sketch lines:
Once the black ink is fully dry, gently erase any visible pencil marks around the eyes or mouth. Be careful not to erase over the wet pink paint.
Step 3: Finishing Touches
-
Create eye highlights:
This is the most important step for bringing the character to life. Dip the handle end of a paintbrush into white paint (or use a white gel pen) to add reflections. -
Place the large reflection:
Add a medium-sized white dot in the upper right quadrant of the left eye. Repeat this in the exact same spot on the right eye. -
Add the secondary highlight:
Place a much smaller white dot diagonally opposite the large one, in the lower left of each eye. This adds depth. -
Dry completely:
Allow the bag to sit undisturbed for at least 30 minutes. The white paint needs to be thick to be opaque, so it will take longer to dry than the rest.
Level Up
Glue real yarn or ribbon to the top of the bag for 3D hair, or add a tiny fabric bow tie below the smile for a dapper gentleman gift bag
Now your gift is ready to bring a smile to someone’s face before they even open it


Hand Lettered Tag Lines and Messages
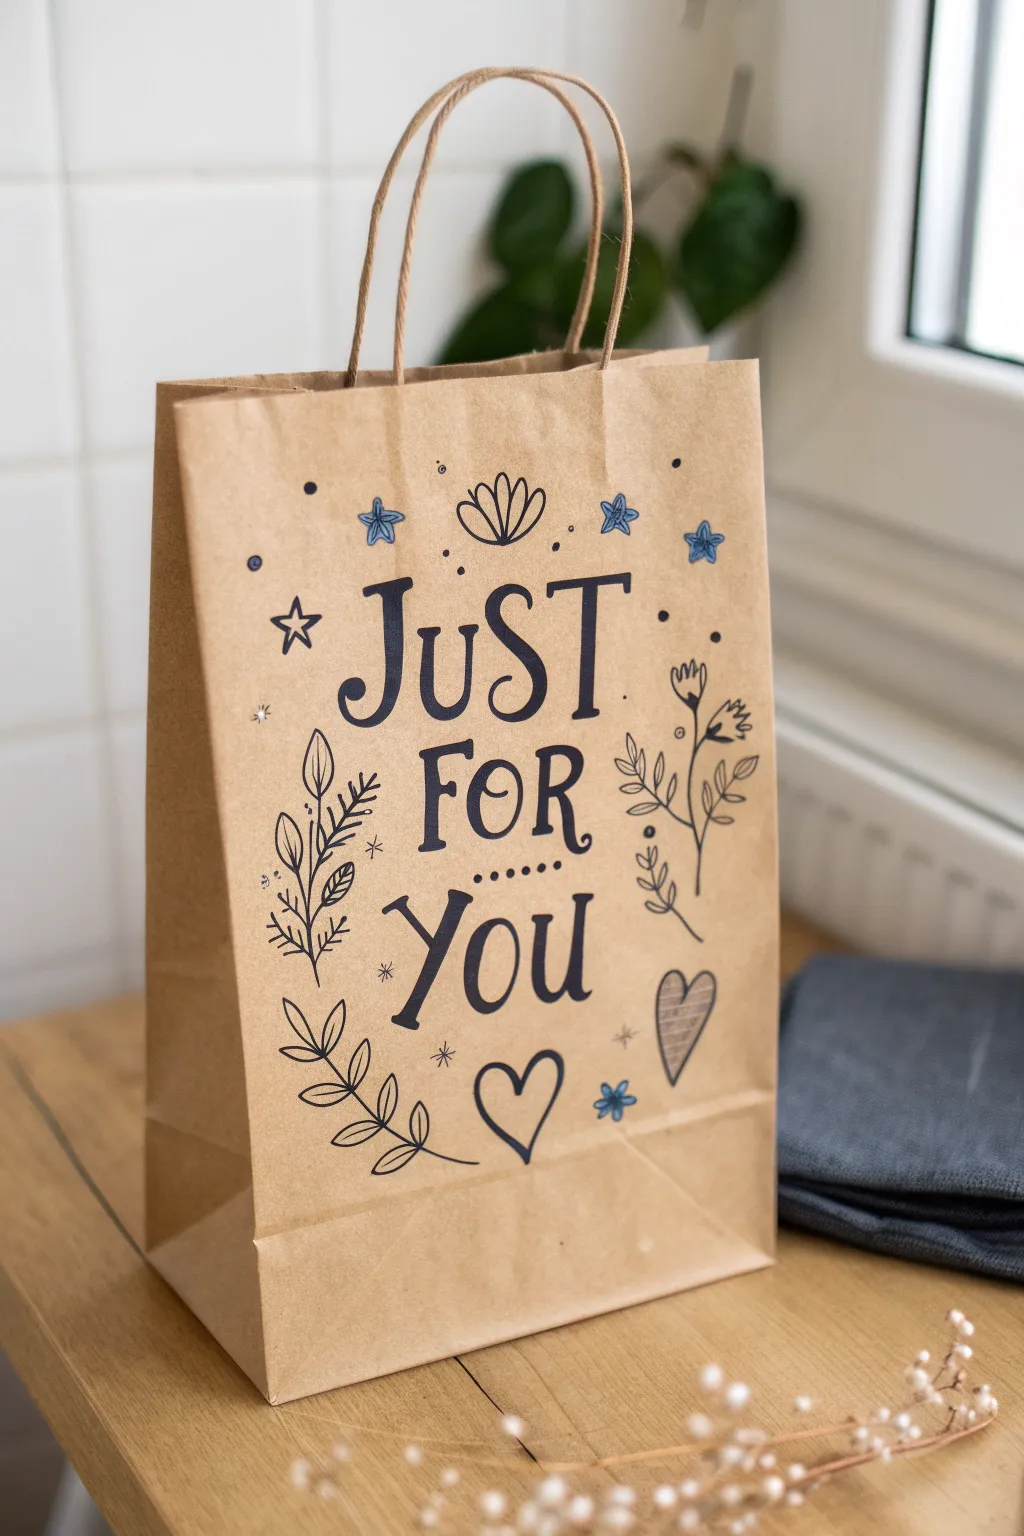
Transform a plain brown kraft bag into a personalized gift wrap with just a few permanent markers and some charming doodles. This project features a bold, whimsical serif font surrounded by delicate botanical and celestial accents.
How-To Guide
Materials
- Small or medium brown kraft paper bag with handles
- Pencil (HB or lighter)
- Eraser
- Fine-point permanent marker (black or dark navy blue)
- Medium-point permanent marker (black or dark navy blue)
- Blue gel pen or fine marker (for star accents)
- White gel pen (optional, for highlights)
Step 1: Drafting the Design
-
Define the layout area:
Lay your paper bag flat on a hard surface. Visualize a central rectangle on the front face of the bag where your text will go, leaving about two inches of margin on all sides. -
Sketch guidelines:
Using a very light pencil touch, draw three horizontal lines to guide your text. The top line is for ‘JUST’, the middle for ‘FOR’, and the bottom for ‘YOU’. Leave a little breathing room between each line. -
Draft the lettering:
Lightly sketch the words ‘JUST FOR YOU’ in a tall, serif style. Make the vertical strokes slightly thicker than the horizontal ones to mimic calligraphy. The ‘J’ and ‘Y’ can have gentle, curving tails. -
Plan the doodles:
Around the text, lightly pencil in your placement for the decorative elements. Sketch a leafy branch on the left, a stemmed flower on the right, and various hearts and stars scattered in the empty spaces.
Step 2: Inking the Lettering
-
Outline the text:
Take your fine-point dark marker and carefully trace the outline of your pencil letters. Focus on clean, confident lines rather than sketchy strokes. -
Thicken the downstrokes:
Identify the ‘downstrokes’ of each letter (the parts where your pen would naturally move downward). Use the medium-point marker to thicken only these lines, creating a faux-calligraphy look. -
Fill and refine:
If you just outlined the thick parts, now fill them in completely with the medium marker. Smooth out any shaky edges to make the letters look crisp. -
Add the connecting dots:
Between the words ‘FOR’ and ‘YOU’, draw a horizontal row of six small, evenly spaced dots using the medium marker.
Don’t Smudge the Ink
Place a scrap piece of cardboard inside the bag before drawing. This provides a smooth surface and prevents permanent marker ink from bleeding through to the back of the bag
Step 3: Drawing the Decorative Elements
-
Draw the left branch:
Using the fine-point marker, ink the leafy branch on the left side. Start with the central stem curving upward, then add oval-shaped leaves branching off. Draw a center vein in the larger leaves for detail. -
Ink the right flowers:
On the right side, draw the tall, thin stems first. Top them with simple tulip-shaped or wild-flower blooms. Keep the lines delicate. -
Add the bottom branch:
Sketch the horizontal branch at the bottom left, curving slightly under the word ‘YOU’. Use simple oval leaves here as well. -
Create the main heart:
Draw the large outline of the heart centered below the text. Keep the lines somewhat loose and organic rather than perfectly geometric. -
Detail the shaded heart:
To the right of the main heart, draw a slightly smaller heart. Fill this one with horizontal hatch marks to give it a textured, sketched appearance.
Add a Pop of White
Use a white gel pen or paint marker to add tiny highlight lines inside the thickest parts of your black letters. It makes the text look dimensional and pop off the brown paper
Step 4: Finishing Touches
-
Add the stars:
Draw outline stars (five points) scattered around the top left and right. I like to vary the sizes slightly to make it feel more magical. -
Incorporate color accents:
Switch to your blue pen. Draw solid blue stars (some five-pointed, some six-pointed asterisks) in the gaps near the top corners and bottom right. -
Add tiny details:
Using the fine black marker again, sprinkle tiny dots and small asterisks (*) throughout the empty background space to fill gaps without cluttering the design. -
Erase pencil lines:
Wait at least 15 minutes to ensure the ink is completely dry. Gently erase all visible pencil guidelines, being careful not to crumple the bag. -
Final check:
Step back and look at the composition. If a specific area looks too empty, add a tiny blue dot or a small black star to balance it out.
Now your custom gift bag is ready to be filled with something special for ease gift-giving


Holiday Lights Wrapped Around the Bag
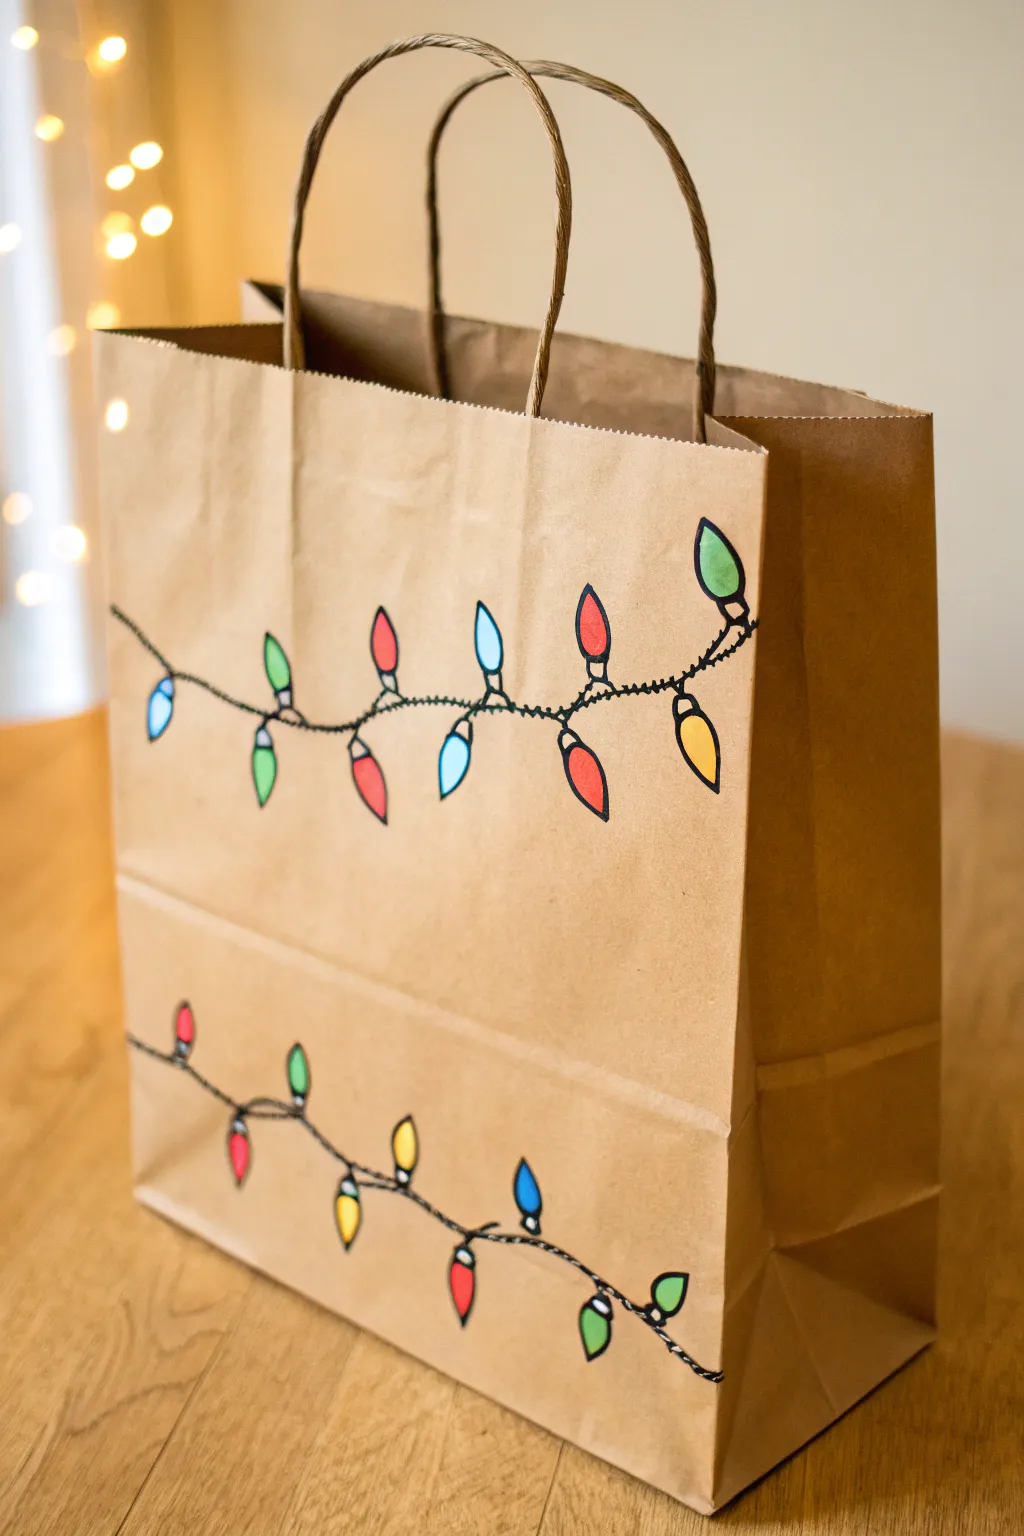
Turn a simple kraft paper bag into festive gift wrap with this charming hand-drawn design. This project features two strings of classic Christmas bulbs, winding playfully across the bag for a touch of handmade holiday warmth.
Step-by-Step Guide
Materials
- Plain brown kraft paper bag with handles
- Black fine-tip permanent marker or drawing pen
- Colored markers or paint pens (red, blue, green, yellow)
- Pencil
- Eraser
- Ruler (optional)
Step 1: Planning and Sketching
-
Lay the bag flat:
Start by setting your paper bag on a flat, hard surface. Press it down smoothly so the front panel is wrinkle-free and easy to draw on. -
Sketch the first wire:
Using a pencil, lightly draw a wavy line across the upper half of the bag. Let it dip and curve naturally, starting from the left edge and reaching to the right. -
Sketch the second wire:
Draw a second wavy line on the lower third of the bag. Try to make the curves different from the top line for visual variety. -
Mark bulb positions:
Along both pencil lines, make small tick marks where you want each light bulb to go. Space them out somewhat evenly, but keep it organic.
Step 2: Drawing the Outlines
-
Draw the main wire:
Take your black fine-tip marker and trace over your pencil wire lines. Instead of a single straight line, draw two very thin lines twisted together or small loops to mimic a twisted electrical cord. -
Add the sockets:
At each tick mark you made earlier, draw a small rectangle or cylinder shape attached to the wire. This forms the base or socket for each bulb. -
Draw the bulbs:
Attached to each socket, draw a teardrop shape for the glass bulb. Vary the angles slightly so they look like they are hanging naturally from the cord. -
Wait for ink to dry:
Give the black ink a moment to set completely so it doesn’t smudge during the next step. -
Erase pencil guides:
Gently erase any visible pencil lines underneath your ink drawing to keep the design clean.
Bleeding Lines?
If your markers bleed into the paper grain, switch to colored pencils for the bulbs. They offer vibrant color without the risk of ink spreading on porous kraft paper.
Step 3: Adding Color
-
Select your palette:
Choose a classic holiday color scheme of red, blue, green, and yellow markers or paint pens. -
Color the first bulb:
Fill in the first teardrop shape on the top string. If using paint pens, I find a single smooth coat works best to avoid warping the paper. -
Work in a pattern:
Continue along the string, alternating colors in a pattern (e.g., blue, green, red, blue, red, yellow) until the top string is full. -
Color the bottom string:
Repeat the coloring process for the lower string of lights. You can use the same color pattern or mix it up for a more random look. -
Let the color set:
Allow the markers or paint to dry fully before touching the bag again. -
Add highlights (optional):
For extra dimension, add a tiny white dot or line on one side of each colored bulb using a white gel pen to look like a reflection and make them shine.
Make It Glow
Use metallic silver or gold pens for the bulb sockets instead of black. This small detail adds a festive shimmer that catches the light wonderfully.
Now your custom gift bag is ready to be filled with holiday cheer
BRUSH GUIDE
The Right Brush for Every Stroke
From clean lines to bold texture — master brush choice, stroke control, and essential techniques.
Explore the Full Guide
Owl Puppet With Big Patterned Eyes
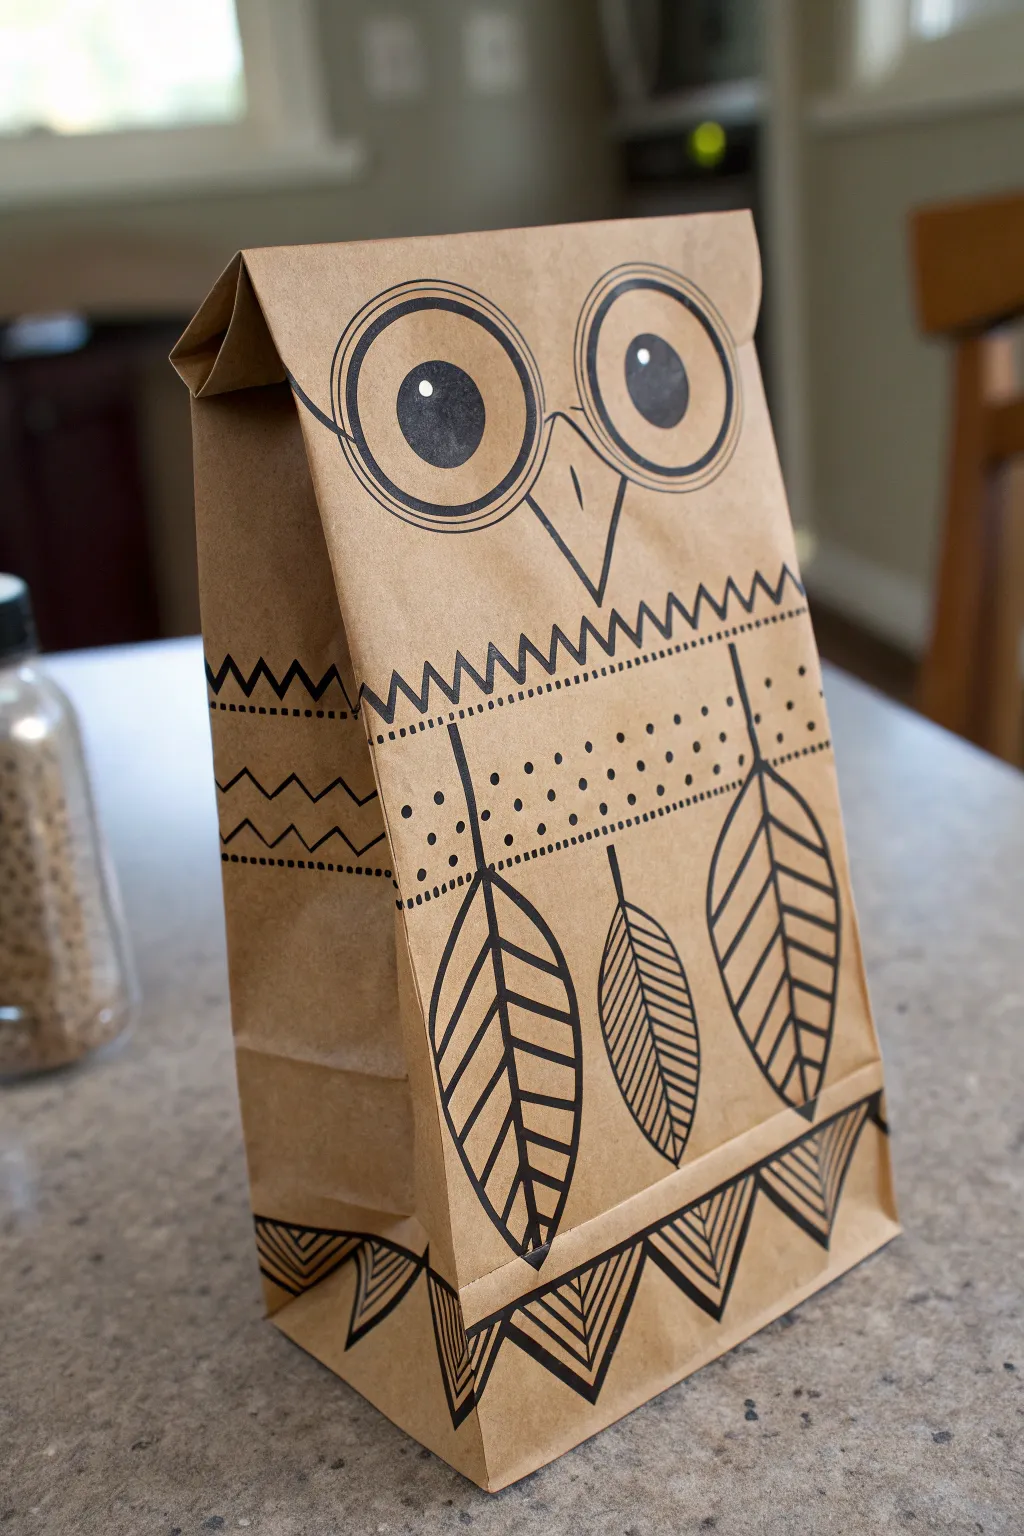
Transform a humble brown paper lunch sack into a charming owl character with bold, black line art. This project relies on geometric shapes and repetitive patterns to create a folk-art style puppet that’s perfect for play or decoration.
How-To Guide
Materials
- Standard brown paper lunch bag
- Thick black permanent marker (e.g., Sharpie Fine Point)
- Pencil (optional, for sketching)
- Eraser
- Ruler (optional)
Step 1: Setting the Face
-
Prepare the bag:
Start with the paper bag folded flat, just as it comes out of the package. The bottom flap of the bag (which is currently folded up) will serve as the owl’s face area. -
Draw the outer eyes:
On the top flap, draw two large circles side-by-side. They should take up most of the vertical space on the flap. Leave a small gap between them for the beak. -
Add detail rings:
Draw slightly smaller circles inside the first ones to create the frames for the owl’s glasses-like eyes. -
Create the pupils:
Inside each eye, draw a large filled-in black circle for the pupil. Leave a tiny white dot uncolored near the top-left of each pupil to add a glint of life. -
Connect the spectacles:
Draw small curved lines connecting the eye circles to the outer edges of the bag flap, making them look like glasses sitting on a face. -
Draw the beak:
In the space between the eyes, draw a downward-pointing triangle. The top of the triangle should start just below the center of the eyes, and the point should extend down to the bottom edge of the flap.
Steady Your Hand
Place a piece of cardstock inside the bag before drawing. This prevents the ink from bleeding through to the back side and gives you a smoother surface for crisp lines.
Step 2: Patterning the Body
-
Create the neck ruffle:
Move to the main body of the bag, directly under the flap. distinct zig-zag line all the way across the width of the bag deeply under the flap’s shadow. -
Add the dotted band:
Below your zig-zags, draw two straight horizontal lines about an inch apart. Fill the space between them with rows of small, evenly spaced dots. -
Anchor the feathers:
From the bottom line of your dotted band, draw three long vertical lines extending downward. These will be the stems for the chest feathers. -
Outline the feathers:
Draw a large leaf shape around each vertical stem. The center feather should point straight down, while the two side feathers can curve slightly outward. -
stripe the feathers:
Fill the feathers with diagonal stripes. I find it looks best if the stripes on the left side of the stem slant up, and the right side slant down, creating a chevron effect. -
Decorate the sides:
On the side gussets of the bag (the folded parts), add a horizontal band matching the neck pattern: two straight lines filled with zig-zags.
Ink Smudging?
Paper bags absorb ink differently than sketchbook paper. If your lines look fuzzy, switch to a pigment liner pen instead of a standard alcohol-based permanent marker.
Step 3: Finishing Touches
-
Draw the bottom border:
Near the very bottom edge of the bag, draw a horizontal line across the width. -
Add geometric feet:
Draw upside-down triangles hanging from the line you just made. These represent the owl’s patterned feathers or feet. -
Detail the bottom triangles:
Fill these bottom triangles with nested ‘V’ shapes to mimic the texture of the chest feathers. -
Clean up:
If you used a pencil for sketching, gently erase any visible guidelines once the ink is completely dry to keep the kraft paper looking crisp.
Now your wide-eyed owl is ready to perch on a shelf or host a puppet show
Grocery-Style Handled Bag Cityscape Sketch
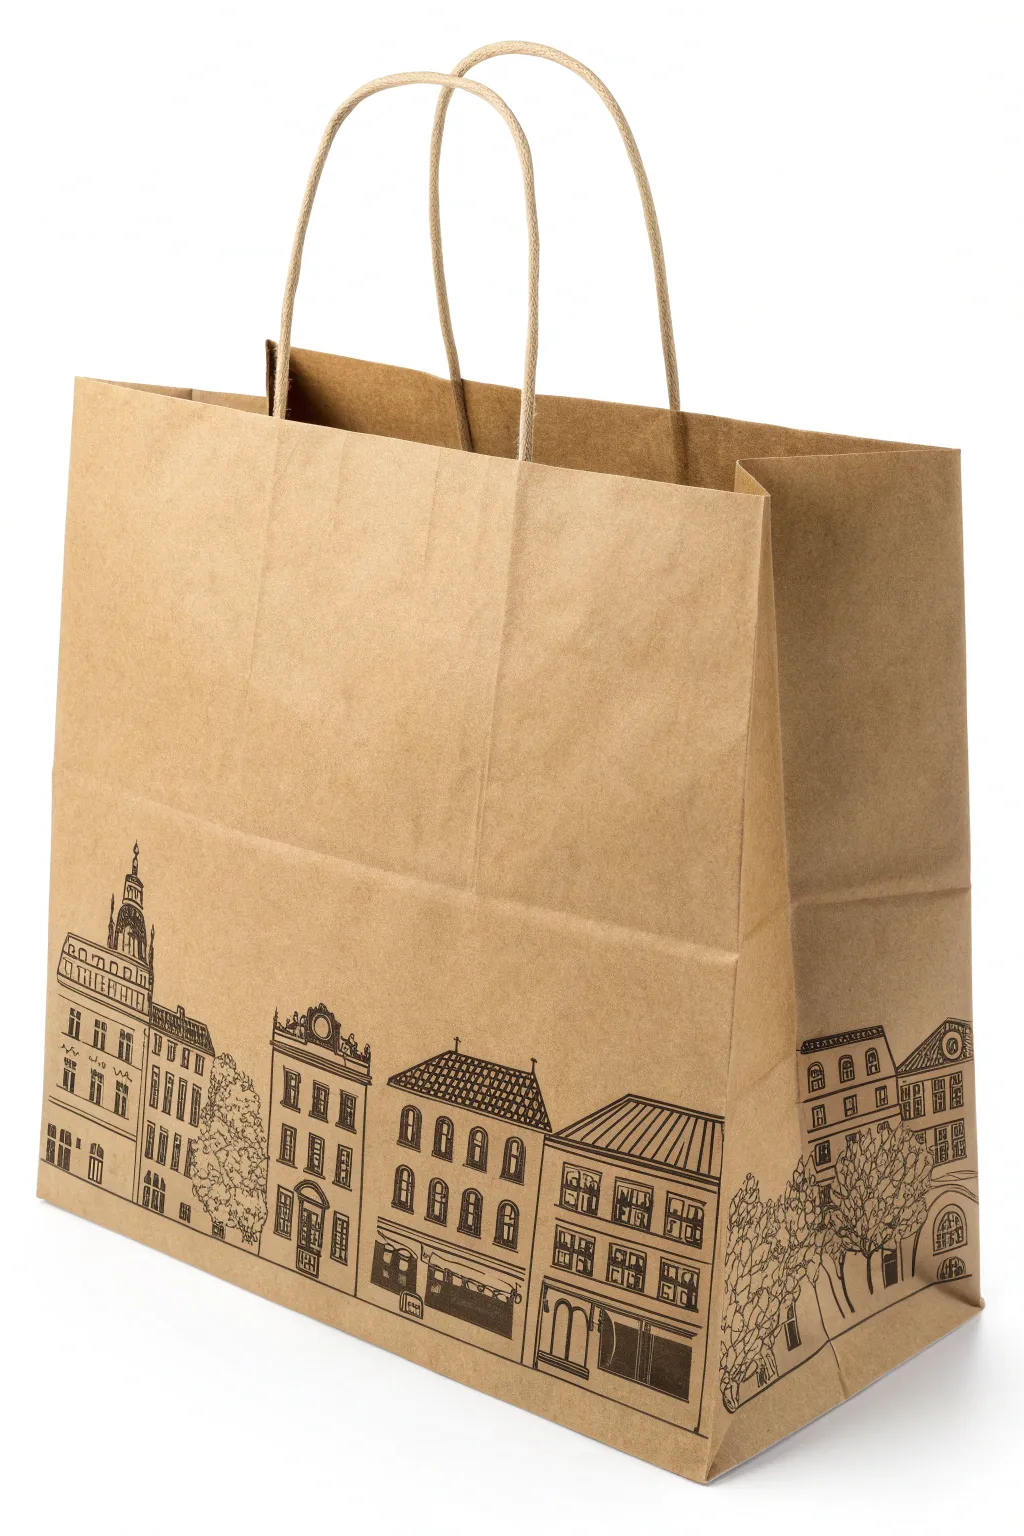
Transform a plain brown paper grocery bag into a piece of functional art with this charming cityscape illustration. Using simple black ink lines, you’ll create a stylized row of European-inspired buildings that wraps around the base of the bag.
Step-by-Step Tutorial
Materials
- Standard brown kraft paper shopping bag with handles
- Pencil (HB or lighter)
- Eraser
- Fine-point black permanent marker or drawing pen (0.5mm)
- Medium-point black permanent marker (0.8mm or 1.0mm)
- Ruler or straight edge
- Scrap paper for sketching
Step 1: Planning the Layout
-
Flatten the surface:
Before you begin, open the bag slightly to ensure it stands, or lay it completely flat if that’s easier for you to draw on. If working flat, insert a piece of stiff cardboard inside the bag to provide a smooth, hard surface and prevent ink from bleeding through to the other side. -
Mark the horizon:
Using your ruler and a light pencil, draw a faint horizontal guideline about 2-3 inches from the bottom edge of the bag. This doesn’t have to be perfectly straight, as street levels vary, but it helps ground your buildings. -
Rough out the shapes:
Lightly sketch the basic rectangles and squares for your building facades along the guideline. Vary the heights and widths to create visual interest. I like to leave small gaps between some buildings for trees or alleyways. -
Add roof details:
Top your rectangles with different roof shapes. Try a mix of triangles for pitched roofs, flat tops with decorative cornices, and perhaps a spire or dome on the far left to anchor the composition.
Step 2: Inking the Architecture
-
Outline the structures:
Switch to your medium-point black marker. Carefully trace over your pencil outlines for the main building shapes and roofs. Keep your hand steady, but don’t worry if lines are slightly wobbly—it adds to the hand-drawn charm. -
Draw the windows:
Using the fine-point pen, draw rows of small rectangles or arches for windows. Group them in pairs or threes to mimic classic architecture. Ensure they align vertically on each building facade. -
Detail the doors:
At the street level of each building, ink in larger rectangular or arched doorways. You can add details like double doors or shop windows with simple display lines. -
Add roof textures:
On the pitched roofs, use the fine-point pen to draw cross-hatching or parallel lines to suggest shingles or tiles. For flat roofs, draw small vertical dashes along the top edge to simulate railings or decorative molding. -
Create the spire:
For the tower on the left, draw a detailed spire with a small globe or cross at the top. Use tiny curves to suggest architectural flourishes.
Ink Bleed Prevention
Brown paper fiber can be thirsty. Always test your pen on the bottom of the bag first to see how much the ink spreads.
Step 3: Adding Life and Depth
-
Sketch the trees:
In the gaps between buildings and on the far right edge (wrapping onto the side gusset), draw scribbly, organic shapes for tree canopies. Use quick, loopy motions with the fine pen to create a leafy texture. -
Connect trunks to ground:
Draw thin, dark lines extending from your tree canopies down to the ‘street’ level to form trunks and branches. -
Fill in dark areas:
Use the medium marker to color in the shop windows or doorways solidly black. This high contrast anchors the building to the ground and gives the illusion of depth. -
Refine the lines:
Go back over any main structural lines that look too thin, thickening them slightly to make the buildings pop against the brown paper. -
Clean up:
Once the ink is completely dry (give it at least 10 minutes to avoid smudging), gently erase all your pencil guidelines. Brush away the eraser crumbs carefully. -
Wrap around:
If you’re feeling adventurous, extend the drawing onto the side gusset of the bag, adding another building or continuing the tree line for a 3D effect.
Level Up: White Highlights
Use a white gel pen to add accents to the windows and roof tiles. The white ink looks fantastic against kraft paper.
Now step back and admire your custom-illustrated bag, ready for gift-giving or stylish storage

PENCIL GUIDE
Understanding Pencil Grades from H to B
From first sketch to finished drawing — learn pencil grades, line control, and shading techniques.
Explore the Full Guide
Snack Bag With Doodle Food Characters
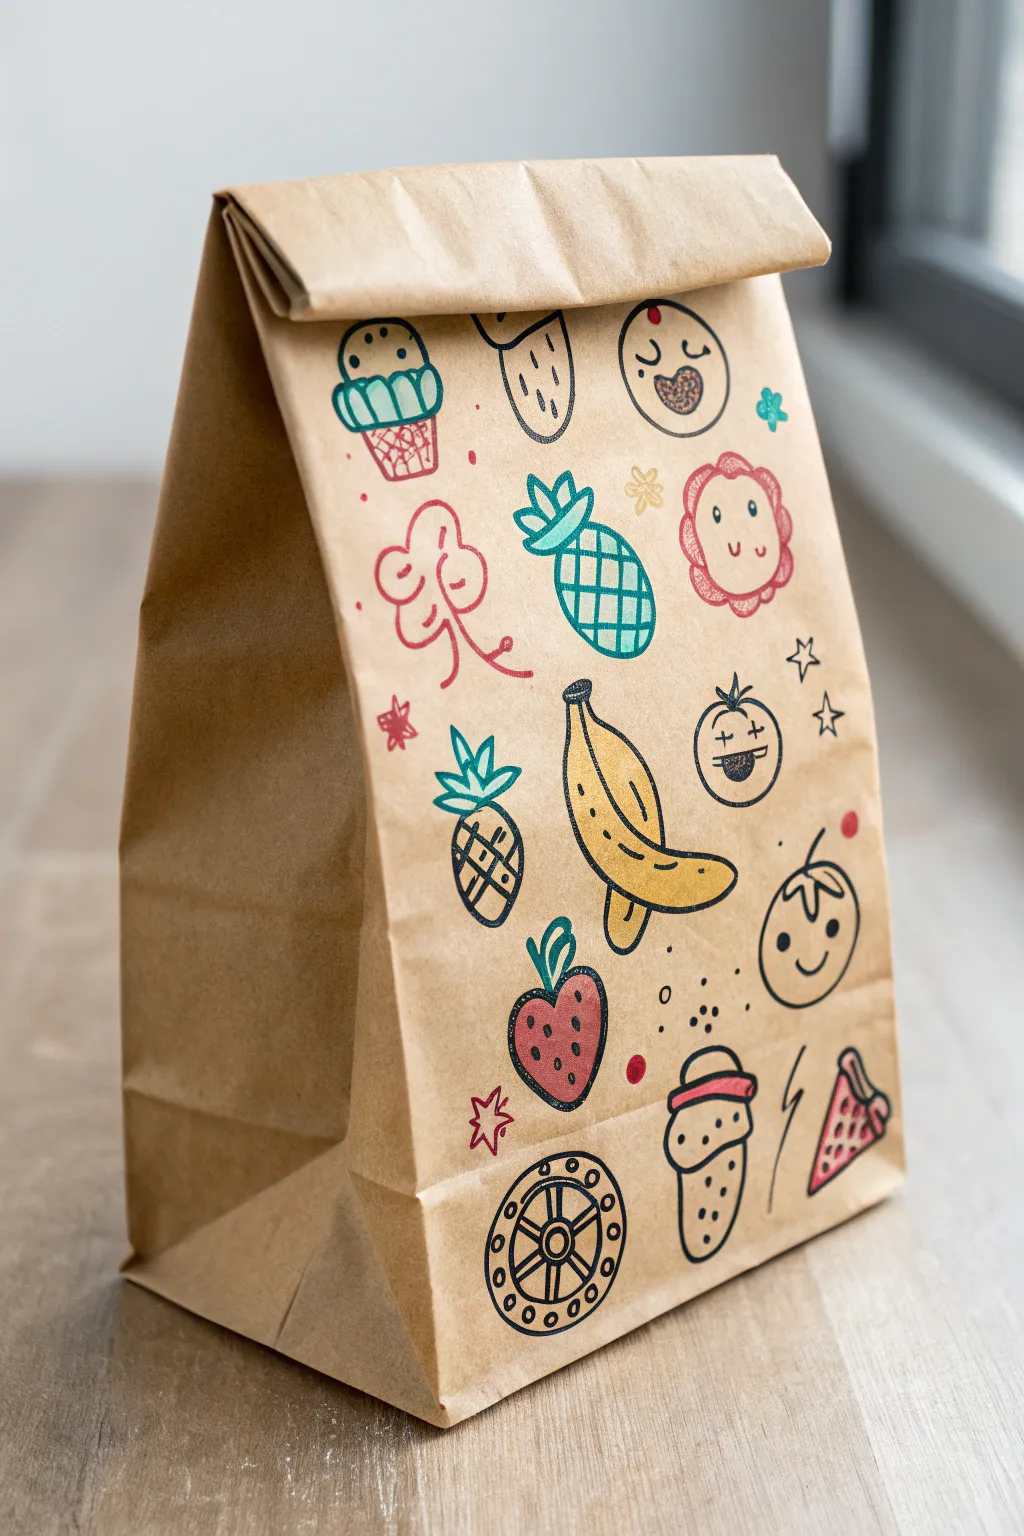
Transform a plain brown paper lunch sack into a charming canvas filled with personality. This project uses bold outlines and simple pops of color to create a playful pattern of smiling fruits, treats, and cute characters.
How-To Guide
Materials
- Standard brown paper lunch bag
- Pencil (HB or lighter)
- Eraser
- Black fine-liner or gel pen (0.5mm to 0.8mm)
- Colored markers or felt-tip pens (teal, red, yellow, pink)
- Scrap paper or cardstock (to insert inside the bag)
Step 1: Preparation and Planning
-
Prepare the canvas:
Start by flattening your brown paper bag on a smooth, hard surface. Fold the top edge down about an inch to simulate how it will look when closed, so you know not to draw past that fold line. -
Insert a barrier:
Slide a piece of scrap paper or thin cardstock inside the bag. This is crucial because standard lunch bags are porous, and ink will almost certainly bleed through to the other side without protection. -
Sketch the layout:
Using a pencil very lightly, sketch the placement of your largest icons first. Aim for a scattered pattern rather than a grid. Place the banana, the cupcake, and the pineapples first to anchor the composition.
Ink Bleed Prevention
Paper bags absorb ink quickly. Work fast with markers and avoid layering wet ink on wet ink to prevent the paper from pilling or tearing.
Step 2: Drawing the Icons
-
Draw the banana:
Near the center, draw a curved banana shape with your black pen. Add a second peel hanging down and dots on the skin for texture. Leave the inside blank for coloring later. -
Add the pineapples:
Sketch two pineapples. For the top one, draw a simple oval with a crisscross grid pattern inside. Give it a spiky crown of leaves. For the lower pineapple, make it smaller and similar in style. -
Create the cupcake:
In the upper left, draw a cupcake wrapper shape (a trapezoid with vertical lines). Top it with a fluffy cloud shape for frosting and add a cherry on top. -
Doodle the happy faces:
Draw several circular characters. One should be a simple smiling face. Another can be a tomato with a leafy top and a cheeky grin. Try doing a flower with a face in the center, drawing petals around a circular head. -
Add sweet treats:
Near the bottom right, draw a triangular slice of pizza or pie with small circles for pepperoni. In the bottom center, draw an ice cream cone with a scoop on top. -
Draw the strawberry:
Add a heart-shaped strawberry near the bottom left. Give it a leafy top and tiny teardrop shapes for seeds. -
Fill the gaps:
Look for empty spaces between your main drawings. Fill these with small stars, asterisks, dots, and squiggly lines to make the pattern feel cohesive and full.
Step 3: Coloring and Details
-
Color the banana:
Use a yellow marker to fill in the banana. Be careful to stay within the black outlines. -
Add teal accents:
Switch to your teal or blue-green marker. Color the frosting of the cupcake and the body of the top pineapple. I typically leave the grid lines visible by checking the transparency of the marker first. -
Pop in the reds:
Use a red marker for the strawberry, the pizza slice, and the floral elements. Add rosy cheeks to your smiling face characters for extra cuteness. -
Incorporate pinks:
Use a pink marker for softer details, like the flower petals or the wrapper of the cupcake. -
Create texture with black ink:
Go back in with your black fine-liner. Add texture details over the dried color, such as the grid on the teal pineapple or the seeds on the red strawberry. -
Draw the wagon wheel:
At the very bottom, draw a decorative wheel or geometric circle pattern using black ink outlines and small circular details. -
Final check:
Erase any visible pencil lines gently. If needed, re-thicken any black outlines that might have been faded by the colored markers.
Make It a Gift
Use a decorative wooden clothespin or colorful washi tape to seal the folded top of the bag for an elevated presentation.
Now you have a custom-designed snack bag ready to brighten someone’s lunch hour


Have a question or want to share your own experience? I'd love to hear from you in the comments below!