If you’re craving fresh paper dragon inspiration, you’re in the right place—these ideas are all about making a dragon that looks awesome and actually moves. I’m focusing on designs that work beautifully with the classic split-jaw puppet build, so you can decorate with confidence and play with it right away.
Fire-Breathing Dragon With Flame Tongue and Ember Scales

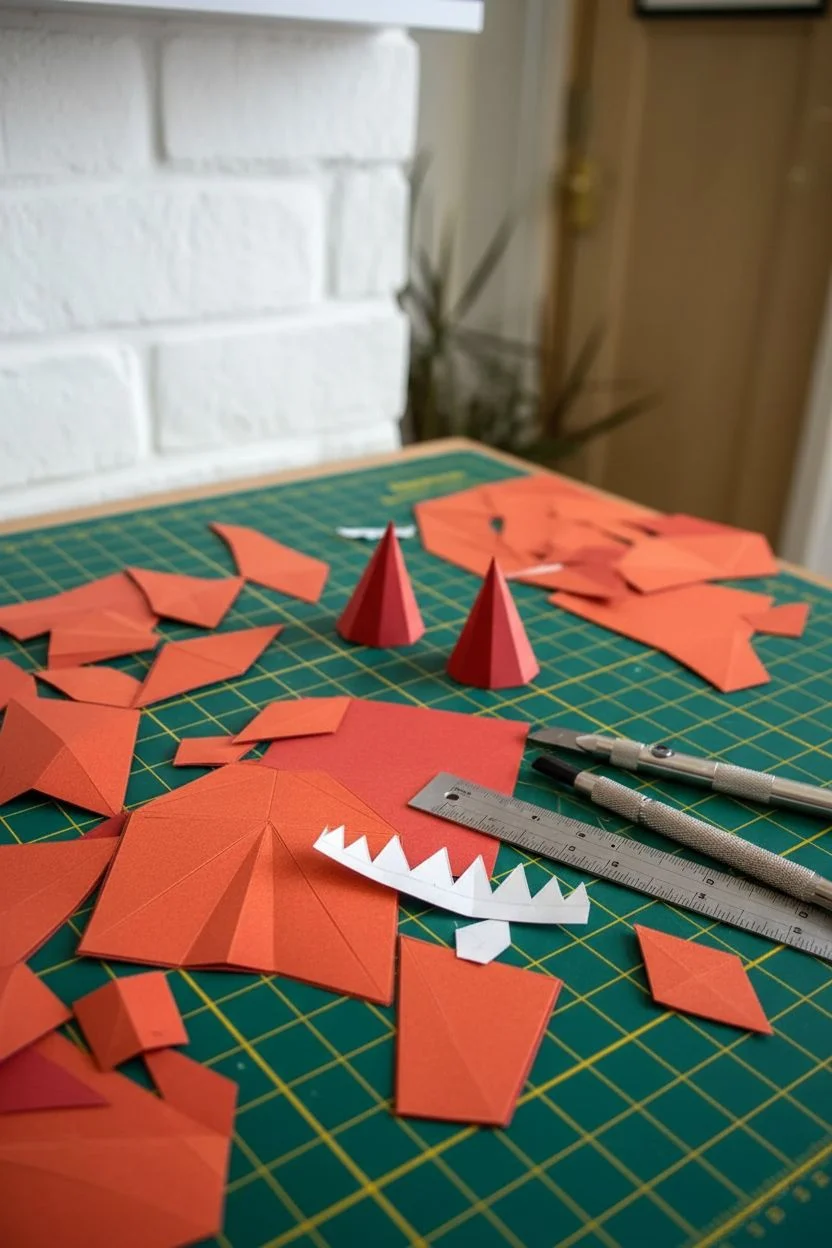
Transform flat sheets of paper into a fierce, three-dimensional dragon head that bursts from your wall with geometric precision. This low-poly trophy features faceted scales, menacing horns, and a vibrant orange palette that mimics the glow of embers.
How-To Guide
Materials
- Digital template (PDF or SVG for cutting machines)
- Heavy cardstock (160-300gsm) in three shades of orange/red, plus yellow for eyes and white for teeth
- Precision craft knife (X-Acto)
- Self-healing cutting mat
- Metal ruler
- Scoring tool (bone folder or dull knife back)
- PVA glue or high-tack mounting tape
- Tweezers
- Double-sided tape (optional for initial hold)
Step 1: Preparation & Cutting
-
Acquire the template:
Since this is a complex geometric structure, you cannot freehand it effectively. You will need to purchase or download a ‘low-poly dragon mask’ or ‘trophy’ pattern online. Ensure the pattern matches the scale you want for your wall. -
Print directly or transfer:
Print the template lines directly onto your colored cardstock. If you don’t want lines showing at all, print a mirror image on the back of the cardstock, so the fold lines remain hidden inside the model. -
Color coding:
Use the darkest red-orange for the horn tips and spines, a medium textured orange for the main face and scales, and a lighter orange for the jaw underside. Keep the yellow separate for the eyes and white for the teeth. -
Score the fold lines:
Before cutting anything out, use your ruler and scoring tool to trace every dashed and dotted line. This is the secret to crisp, professional-looking facets; apply enough pressure to dent the paper but not cut it. -
Cut the components:
Using a sharp craft knife, cut along the solid exterior lines of each piece. Change blades frequently, as dull blades will tear the cardstock fibers and ruin the clean edges we need.
Crisp Creases
Use a dried-out ballpoint pen as a scoring tool if you don’t have a bone folder. It creates perfectly smooth indentations for folding without tearing the fiber.
Step 2: Folding & Assembly
-
Pre-fold everything:
Fold along your scored lines. Identify ‘mountain folds’ (folding away from you) and ‘valley folds’ (folding towards you) based on the pattern key. Sharp creases are essential for the geometric look. -
Start with small details:
Begin assembling the trickiest parts first, such as the horns and the teeth. These small cones and pyramids can be fiddly, and tweezers are a lifesaver here for holding flaps while the glue sets. -
Construct the snout:
Using the tab-and-number system common in these patterns, glue the snout pieces together. I like to use a toothpick to apply a thin layer of PVA glue to the tabs to prevent oozing. -
Assemble the jaw:
Build the lower jaw separately, ensuring the tongue curvature is smooth. Insert the pre-assembled teeth strips into the gum lines before closing up the jaw structure. -
Build the eyes:
Construct the yellow eye sockets. Be careful here; the expression of the dragon relies on the angle of these eyebrows, so ensure the alignment is perfectly symmetrical. -
Connect head sections:
Attach the snout, eyes, and brow ridge to the larger cheek plates. Work slowly, allowing each major seam to dry completely before moving to the next to avoid warping.
Step 3: Completing the Neck & Mounting
-
Form the neck scales:
Assemble the large neck cylinder. This section often supports the weight of the head, so use slightly more generous glue amounts on these structural tabs. -
Attach the spines:
Glue the dark red triangular spines down the center back of the neck. Align them carefully so they create a straight, aggressive line down the spine. -
Final union:
Join the completed head to the neck base. This is usually a large, circular connection point; ensure the head is looking straight forward and not tilting before the glue locks. -
Reinforce the back plate:
The flat back piece that touches the wall needs reinforcement. Glue a piece of thick cardboard inside this back plate to give the mounting hole extra strength. -
Mount and admire:
Hang your dragon using a nail or strong command hook. The lightweight structure means it doesn’t need heavy-duty hardware.
Smoke Effect
Place a small, battery-operated LED light inside the nose or throat. Use red tissue paper behind the nostrils to diffuse the light for a glowing ‘fire’ effect.
Now you have a mythical guardian watching over your room with fiery intensity


Ocean Dragon With Wave Patterns and Fin Ears
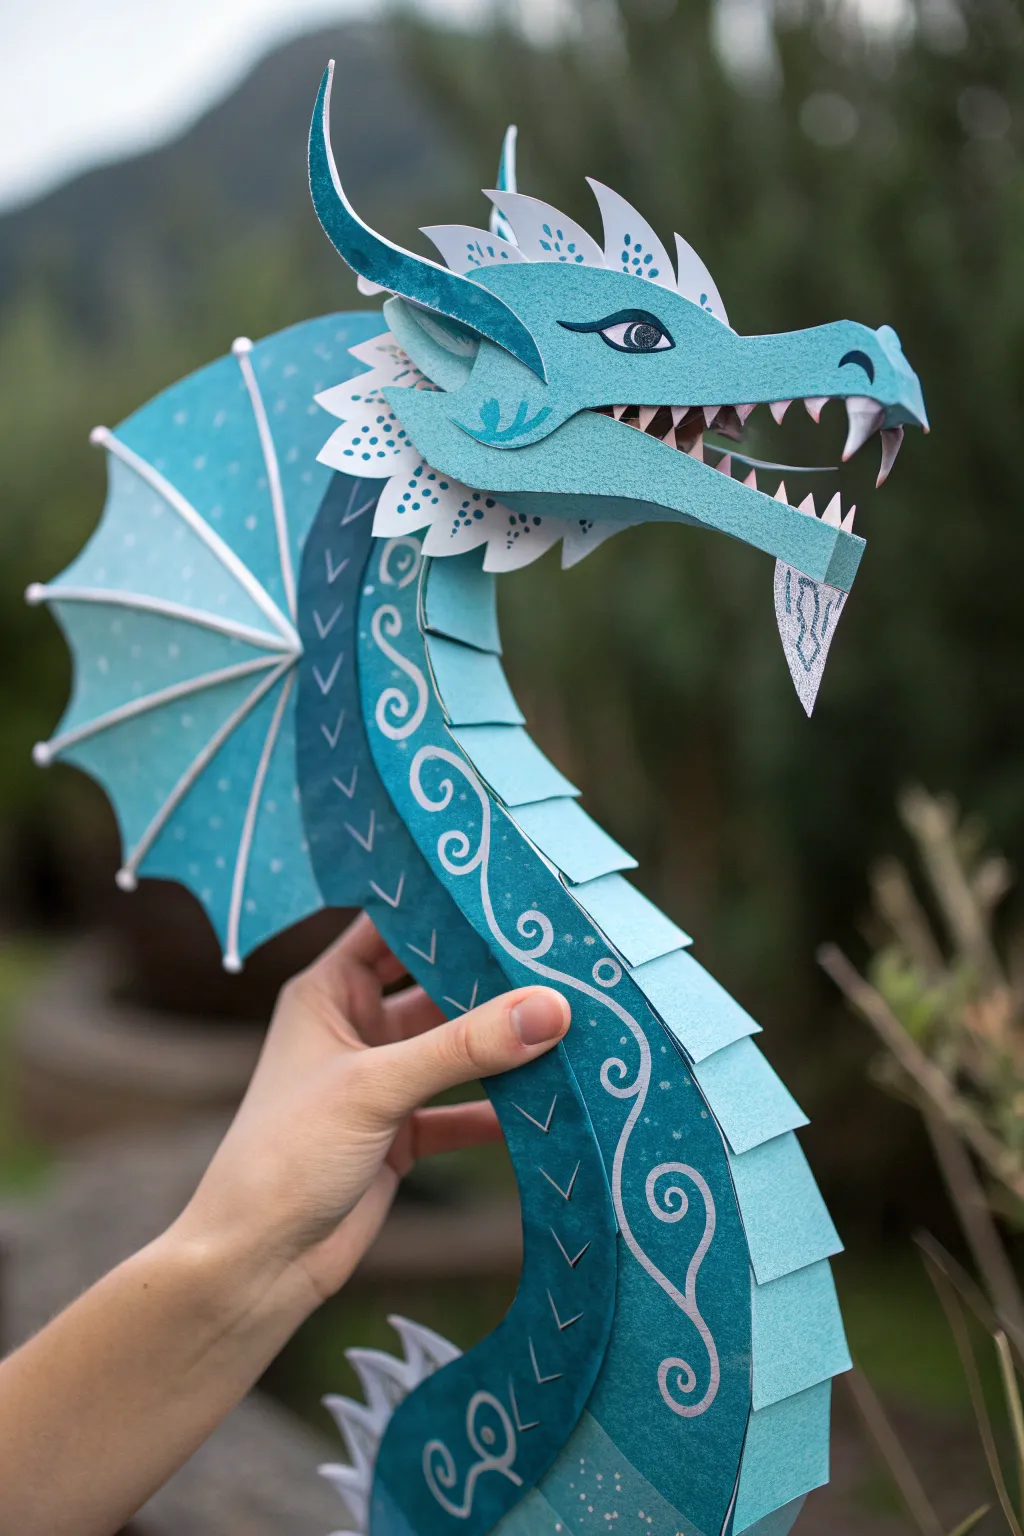
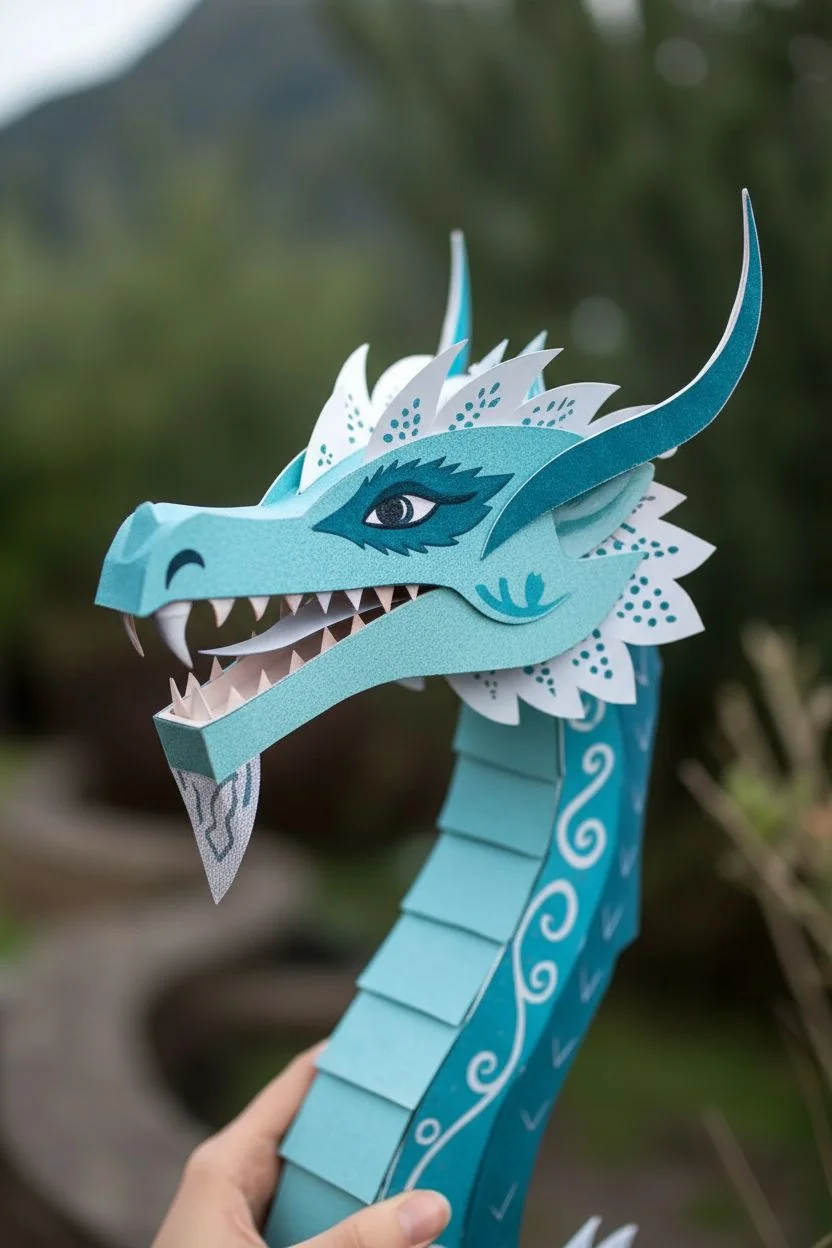
Bring the sea to life with this intricate paper sculpture featuring a serene palette of teals and silvers. This segmented dragon boasts fin-like ears, wave-patterned scales, and a wonderfully articulated neck that creates a sense of movement.
Step-by-Step Tutorial
Materials
- Teal cardstock (two shades: dark and light)
- White or pearlescent cardstock
- Silver gel pen or metallic paint marker
- Craft knife and self-healing cutting mat
- Small hole punch or awl
- Paper glue or tacky glue
- Bone folder
- Pencil and eraser
- Brads or paper fasteners (optional for movement)
- Small adhesive gems or black paper (for the eye)
Step 1: Shaping the Head
-
Draft the profile:
Begin by sketching the dragon’s head profile on the lighter teal cardstock. Create a long snout, a structured jawline, and space for the eye. Cut two identical pieces for the left and right sides. -
Construct the snout bridge:
Cut a rectangular strip of the same cardstock to connect the two head profile pieces. Score the edges to create tabs, then glue this strip between the top edges of the snout to give the head 3D volume. -
Add facial details:
Cut accents from darker teal paper, specifically the curved shapes around the eye socket and the cheek swirls. Use a silver gel pen to draw wave motifs on these accent pieces before gluing them in place. -
Create the eyes:
Assemble the eye using a white almond-shaped base, a black circle for the pupil, and a tiny white speck for the reflection. Glue this onto the dark teal eye socket created in the previous step. -
Assemble the teeth:
Cut a jagged strip of small triangles from white cardstock. Adhere this strip to the inside of the upper jaw so the teeth peek out menacingly but neatly. -
Craft the horns and fin ears:
From dark teal cardstock, cut two curved horn shapes. For the ears, use white paper to create spiky, fin-like ruffs. Decorate these with dots using your teal marker or silver pen and attach them behind the jawline.
Sticky Situations
If the neck scales keep popping up while drying, use paper clips or bobby pins to hold them flat against the curve until the glue sets completely.
Step 2: Building the Neck and Body
-
Plan the segmented neck:
The neck relies on a series of overlapping plates. Sketch a curved neck shape on a base piece of cardstock to act as your spine or guide. -
Cut the dorsal scales:
Using the lighter teal cardstock, cut 10-12 rectangular pieces. Gently curl each one around a pencil or bone folder to give them a slight arch. -
Layer the dorsal scales:
Starting from the bottom of your neck base and working upward, glue these curled rectangles so they overlap like shingles. This creates the armored back look. -
Create the side panels:
Cut large, curved side panels from the dark teal cardstock. These should follow the S-curve of the neck. I often lay the paper against the neck base to trace the exact curve needed. -
Decorate with silver waves:
Before attaching the side panels, use your silver gel pen to draw elaborate scrolling wave patterns and small dots along the length of the dark teal strip. -
Add underside segments:
For the dragon’s belly/throat, cut smaller crescent moon shapes or ‘V’ shapes from dark teal paper. Glue these running down the front of the throat area for texture. -
Attach the head:
Secure the finished head to the top of the neck assembly using strong glue. Ensure the angle looks natural, as if the dragon is looking slightly forward.
Step 3: The Fin Wings and Final Touches
-
Structure the wing spine:
Cut long, thin strips of white cardstock to act as the ‘bones’ of the fin. Arrange them in a fan shape radiating from a central point. -
Fill the wing membrane:
Cut a webbed shape from the light teal cardstock that fits between your white spine strips. Glue the spines on top of this teal base. -
Decorate the fin:
Add texture to the wing membrane with white paint dots or by poking tiny pinholes for a porous look. Glue the finished fin to the back of the neck. -
Add the beard:
Cut a small triangular hanging piece from white or light blue paper. Draw a filigree pattern on it in silver or blue and attach it to the tip of the chin. -
Final assembly:
Check all joints and glue points. If you want extra stability where the head meets the neck, reinforce the back with a scrap strip of heavy cardstock.
Shimmer Effect
Lightly brush the edges of the dark teal scales with a metallic silver ink pad or eyeshadow to make the dragon look like it’s glistening with sea water.
Take a step back and admire how the different shades of teal come together to create a creature of the deep


Forest Dragon With Vines, Leaves, and Flower Horns
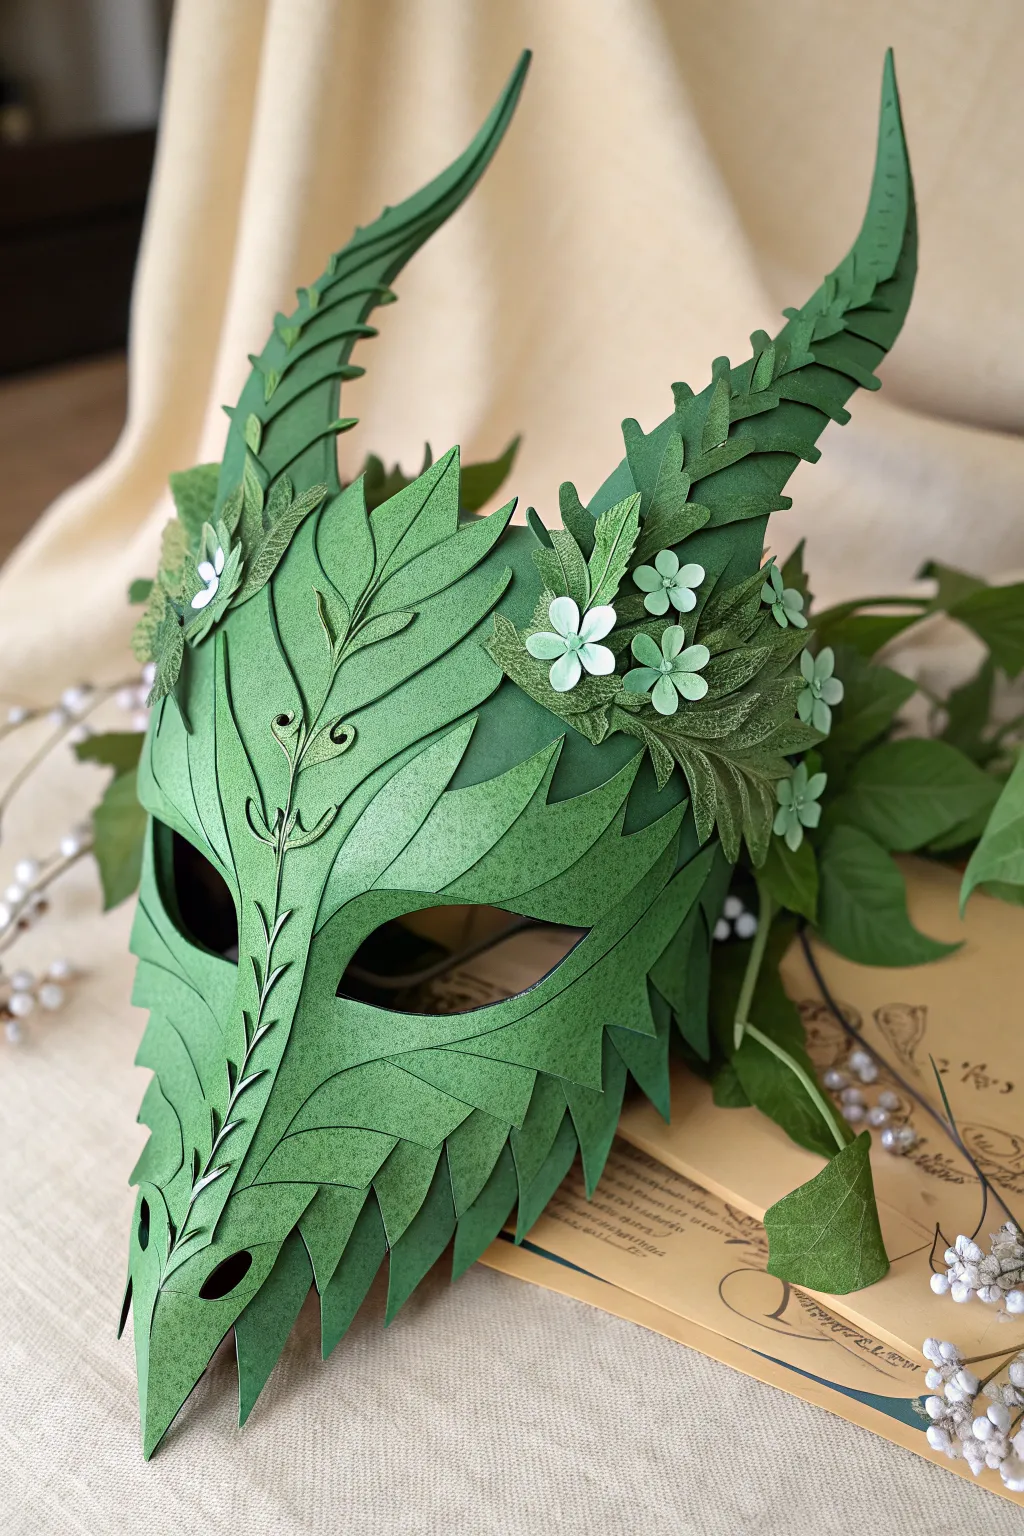
Embody the spirit of the ancient woods with this intricate paper dragon mask, designed to look like living foliage. Featuring elongated leaf-like scales, curling horns, and delicate floral accents, this project transforms simpler cardstock into a mythical forest creature.
Detailed Instructions
Materials
- Green cardstock (3 shades: hunter, olive, and pale green)
- Thick white craft foam or EVA foam (for structural base)
- Precision craft knife (X-Acto)
- Self-healing cutting mat
- Ballpoint stylus or bone folder (for scoring)
- PVA glue or tacky craft glue
- Hot glue gun (optional, for speed)
- Green floral wire
- Small craft pearls or adhesive gems
- Vintage paper/book pages (for displaying, optional)
- Elastic cord or ribbon
Step 1: Forming the Base Structure
-
Create the base template:
Sketch a basic dragon face shape onto thick cardstock or thin EVA foam to act as your foundation. It needs large eye holes and a snout that extends downward. -
Shape the muzzle:
Cut a long triangular piece for the nose bridge and score it down the center to create a ridge. Glue this vertically down the center of your base to give the mask a distinct 3D profile. -
Attach the horn supports:
Cut two curved horn shapes from your stiffer base material. Glue these firmly to the top corners of the mask frame, ensuring they curve inward slightly for that classic dragon silhouette.
Step 2: Layering the Leaf Scales
-
Cut the primary scales:
Using your hunter green cardstock, cut dozens of elongated, pointed leaf shapes. They should look like dragon scales but with a botanical twist—sharp and jagged. -
Add texture to scales:
With your stylus or the back of your knife, score a central vein down the middle of each paper leaf. Gently fold along this score line so the leaves have dimension and aren’t flat. -
Begin the layering process:
Start gluing the scales at the very bottom of the snout (the nose tip), overlapping them as you move upward. The tip of each new leaf should cover the base of the previous one. -
Fan out the cheeks:
As you reach the cheek area, angle the leaf-scales outward. Use larger cutouts here to mimic the flared gills or ruffs seen on forest dragons. -
Cover the horns:
Switch to slightly smaller, narrower leaf strips for the horns. Wrap them horizontally around the horn structure, overlapping upward like shingles to create a segmented, organic look. -
Refine the eye sockets:
Carefully trim and glue smaller, curved pieces around the eye holes to create a smooth, clean rim. This hides the structural base underneath.
Texturizing Tip
Before cutting your leaves, lightly crumple the paper and smooth it back out. Ideally use textured cardstock to mimic real plant veins.
Step 3: Detailing with Vines and Flora
-
Create the central vine:
Cut a very thin, continuous strip of lighter green paper that tapers at the ends. Ideally, cut this with tiny off-shoot curves or use a die-cutter if available. -
Apply the nose ridge detail:
Glue this vine strip directly down the center ridge of the nose. I like to let the tiny tendrils curl up freely rather than gluing them flat for extra texture. -
Make the flowers:
Using the palest green paper, punch or cut small 5-petal flower shapes. Cupping the petals slightly with a ball tool on a soft mousepad gives them a natural cup shape. -
Assemble the floral crown:
Arrange clusters of these small flowers near the base of the horns and the temples. Glue them in trio clusters for a balanced aesthetic. -
Add varied foliage:
Intersperse darker, textured die-cut leaves (like fern patterns) amongst the flowers to create depth and shadow in your floral clusters. -
Final embellishments:
Place tiny white pearl beads or drops of white dimensional paint into the center of each flower to serve as stamen. -
Attach the strap:
Punch small holes on the sides of the mask (hidden under the cheek leaves) and thread your elastic or ribbon through to finish the wearable piece.
Level Up: Color Gradient
Use ink pads or soft pastels to darken the edges of every green scale before gluing. This adds immense depth and a realistic aged look.
Now your mask is ready for a display shelf or your next fantasy costume event


Cloudy Sky Dragon With Sun and Cloud Cheek Markings
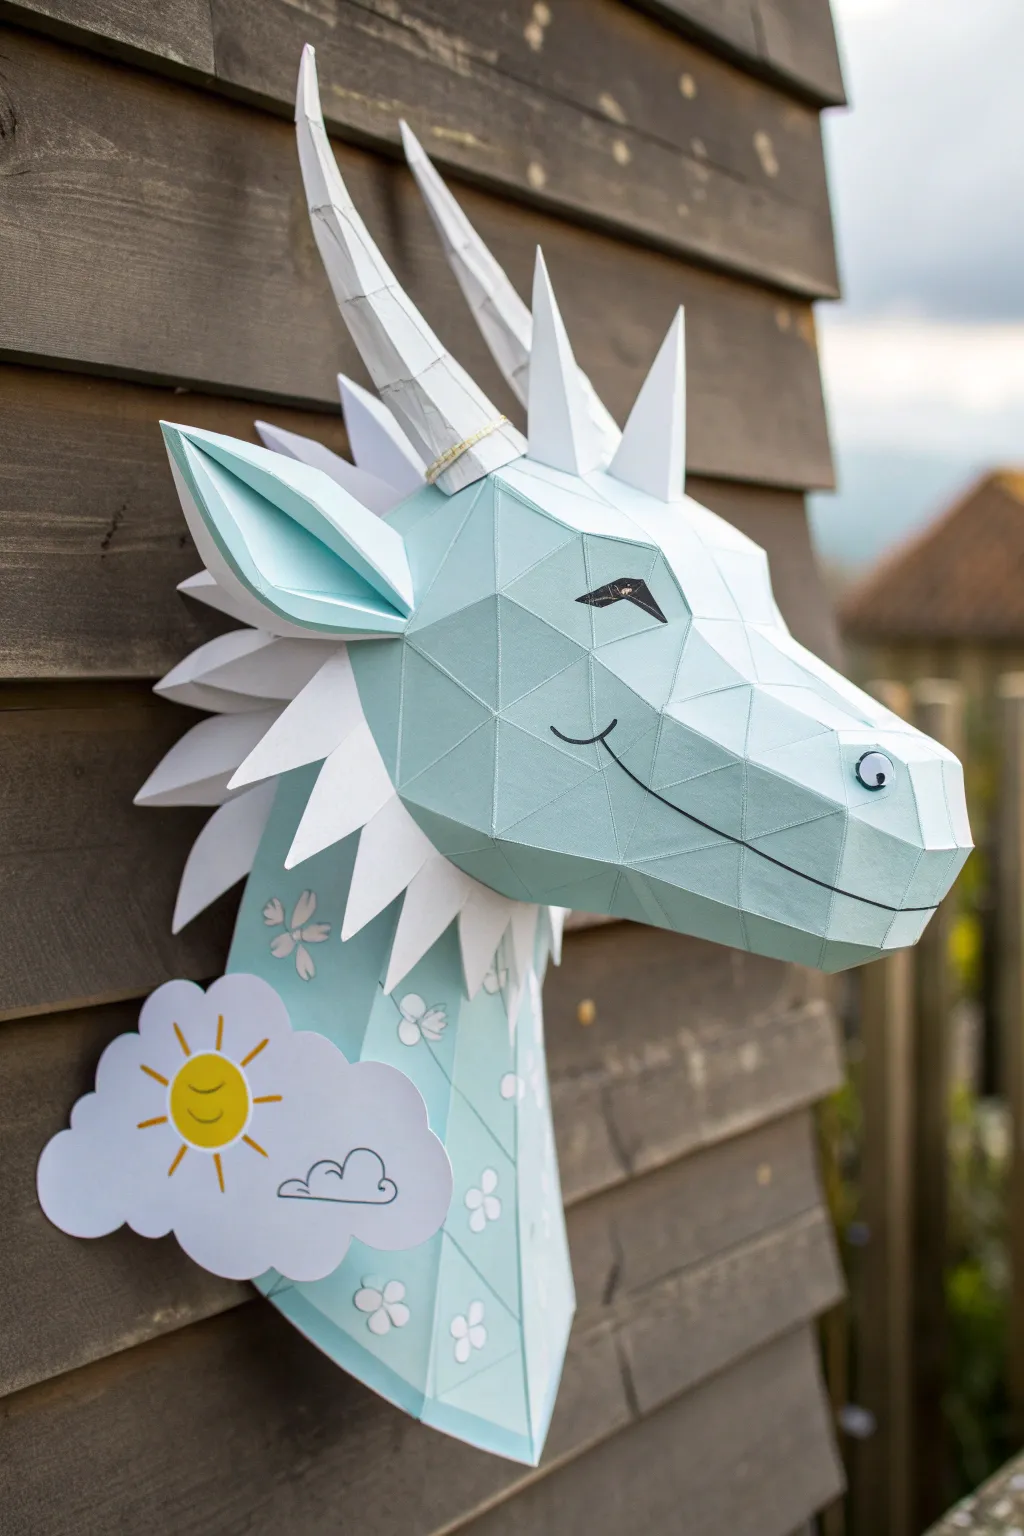
Bring a touch of magic to your wall with this charming 3D papercraft dragon head. Featuring a soft sky-blue palette, geometric facets, and adorable weather-themed decorations, this low-poly sculpture makes a friendly guardian for any playroom or craft corner.
Step-by-Step
Materials
- Light blue cardstock (160-200 gsm)
- White cardstock (160-200 gsm)
- Yellow cardstock scraps
- Template/pattern (digital PDF or pre-printed kit)
- Craft knife and cutting mat
- Metal ruler
- Scoring tool (or dried-out ballpoint pen)
- White PVA glue or tacky glue
- Fine-tip glue applicator or toothpick
- Black fine-liner or marker
- Double-sided foam tape
- Googly eyes (optional)
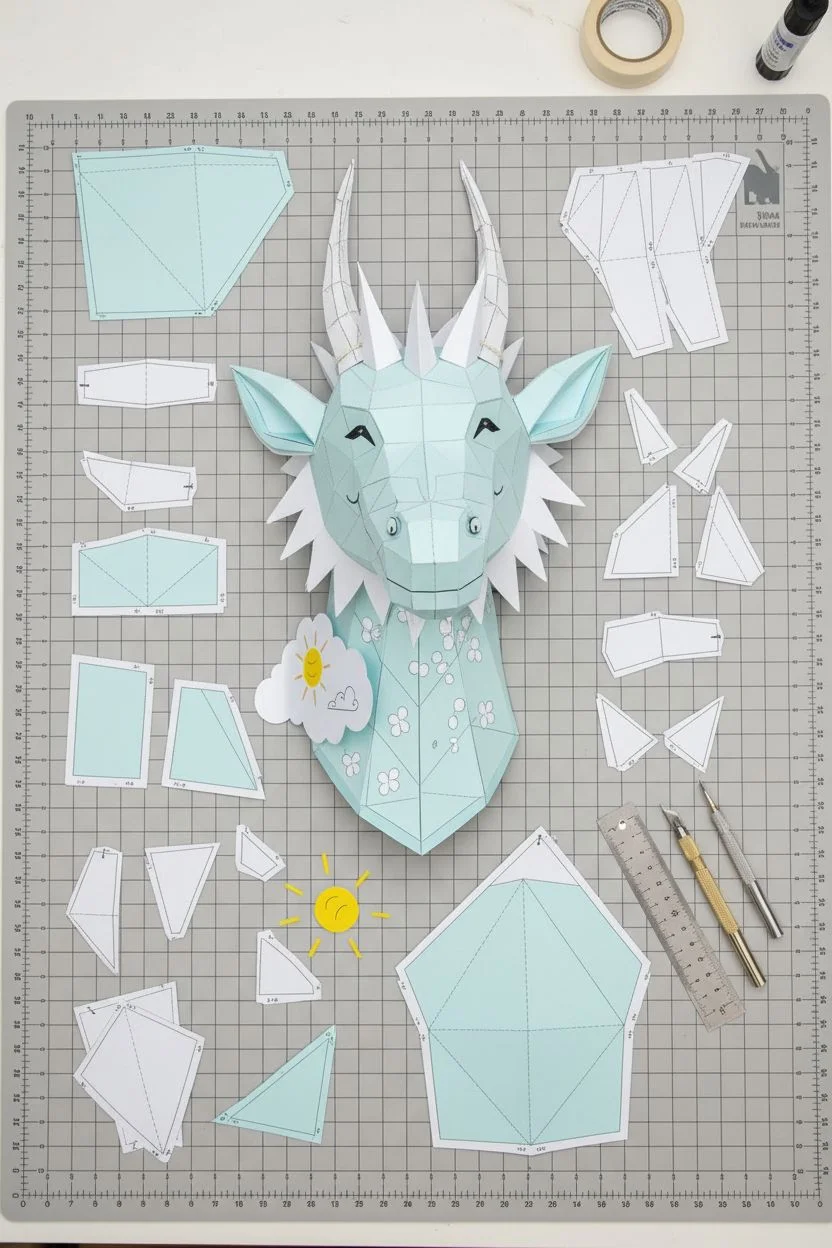
Step 1: Preparation & Cutting
-
Print or trace your template:
Begin by printing your low-poly dragon pattern directly onto the colored cardstock. You’ll need the main head and neck pieces on blue, and the horns, spikes, and ear details on white. If you don’t have a specific pattern, you can search for ‘low poly dragon head PDF’ online to find similar base models. -
Score all fold lines:
Before cutting anything out, use your ruler and scoring tool to trace over every internal line. This step is crucial for crisp geometric edges. Usually, dashed lines indicate ‘valley’ folds and dot-dash lines indicate ‘mountain’ folds. -
Cut out the components:
Carefully cut along the solid outer lines of each shape using a craft knife and metal ruler for straight edges. Precision here ensures the facets will line up perfectly later. -
Pre-fold the creases:
Go through each piece and sharply crease the folds you just scored. Folding them back and forth helps break the paper fibers slightly, making the assembly much easier.
Clean Glue Tabs
Apply glue to the tab, not the visible surface. Use a toothpick to spread it thinly. Too much glue warps the paper; you want just enough to tack it down without oozing out the seams.
Step 2: Assembling the Head
-
Start with the snout:
Locate the pieces that form the nose and snout. Apply a thin layer of glue to the tabs and join the corresponding numbers or edges. Holding the joined tab for 10-15 seconds allows the glue to tack up securely. -
Build the main head shape:
Work your way backwards from the snout, adding the cheek and forehead panels. The geometric form will start to naturally take shape as you close the polygons. -
Attach the ears:
Construct the ears separately. They often consist of a blue outer shell and a white inner detail. I find it easiest to glue the white inner faceted piece inside the blue shell before attaching the whole ear to the main head. -
Construct the white horns:
Assemble the long, spiraling horns and the shorter central spikes from white cardstock. These are usually long cones or pyramids. Ensure the tips are sharp and neat. -
Mount the horns:
Glue the finished horns onto the designated spots on the dragon’s forehead. Apply gentle pressure until they are firmly set to avoid them drooping.
Step 3: The Neck & Ruff
-
Form the neck base:
Assemble the large neck piece that will eventually mount to the wall. This piece needs to be sturdy, so ensure all glue tabs are well-adhered. -
Create the neck ruff:
Cut out multiple triangles or diamond shapes from white cardstock to create the jagged ruff (or mane) on the back of the neck. Layer these slightly to create volume. -
Attach the ruff:
Glue the white spikes in a row along the back spine of the blue neck piece, continuing the line where the head meets the neck. -
Join head and neck:
Connect the fully assembled head to the neck base. This is often the trickiest join, so take your time and align the edges carefully.
Gap Troubleshooting
If you find small gaps between facets where light shines through, cut a tiny strip of matching blue cardstock and glue it on the *inside* of the model to patch the hole invisibly.
Step 4: Decoration & Details
-
Draw the facial features:
Using a black marker, carefully draw a sweeping curved line for the mouth regarding the jawline facet. Fill in a small triangular nostril shape on the snout. -
Add the eye:
You can either draw an eye or stick on a googly eye for a fun, animated look. Place it on the flat facet just above the cheekbone. -
Create weather elements:
Cut out small white flower shapes or cloud puffs and a larger cloud shape. Cut a yellow circle and add rays with a marker to make a sun. -
Decorate the neck:
Glue the small white flowers randomly onto the blue neck. Assemble the large sun-and-cloud motif and attach it to the side of the neck using a small piece of foam tape to give it a 3D pop.
Hang your mythical creature on the wall and enjoy the dreamy atmosphere it adds to the room
BRUSH GUIDE
The Right Brush for Every Stroke
From clean lines to bold texture — master brush choice, stroke control, and essential techniques.
Explore the Full Guide
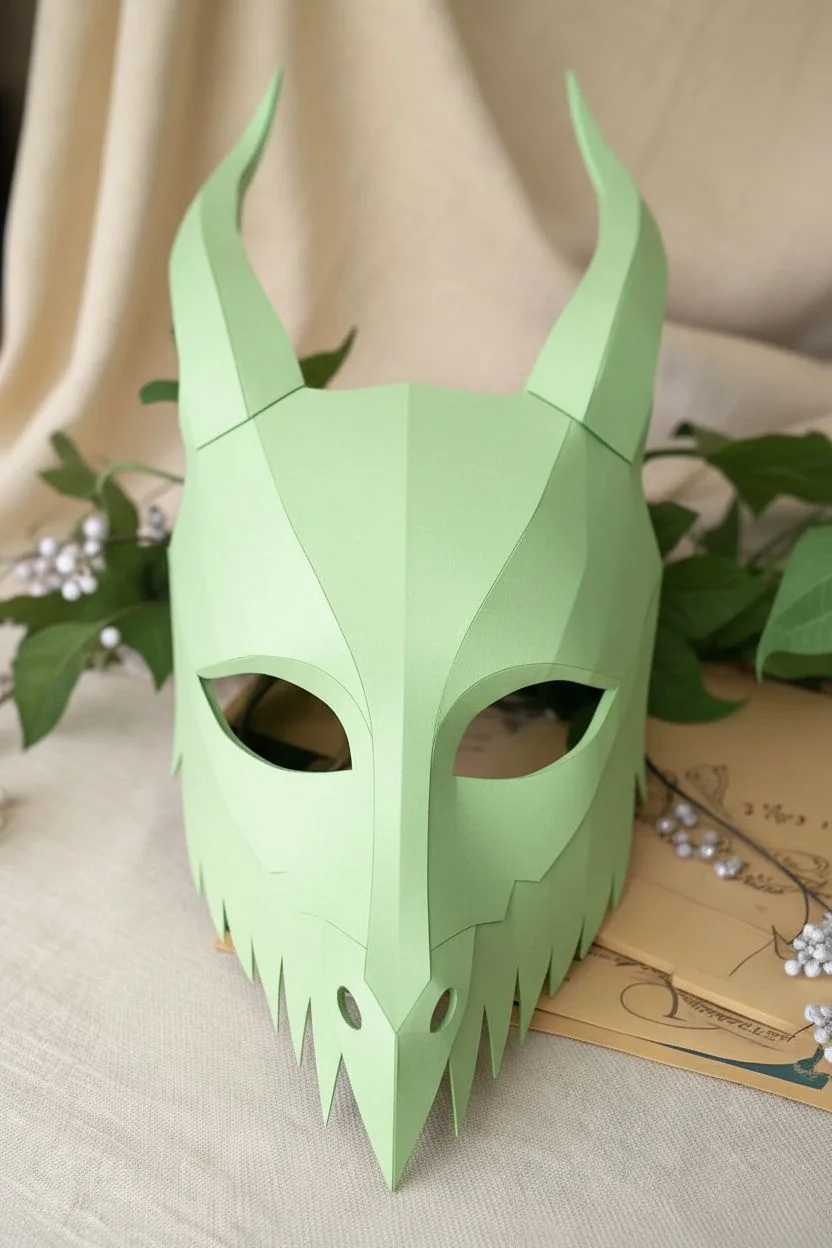
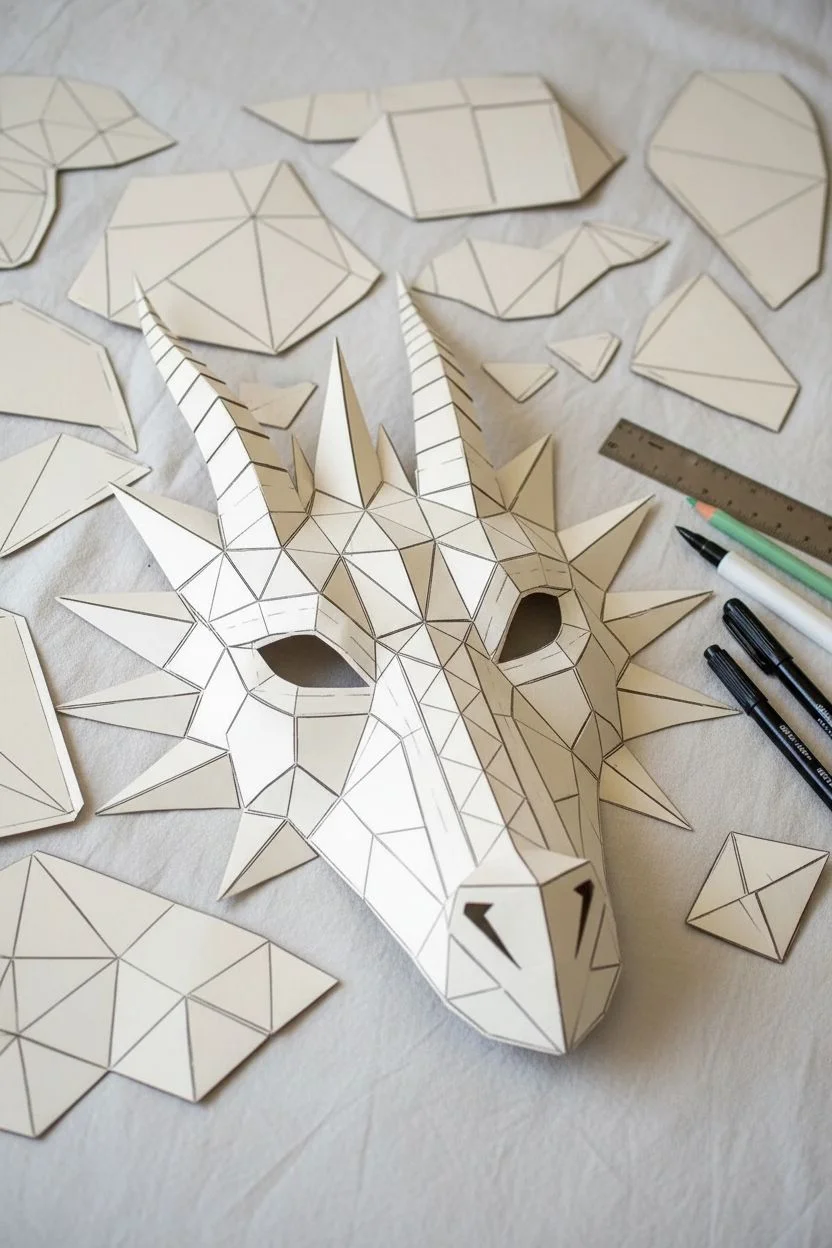
Simple Cute Dragon With Big Eyes and Rounded Snout
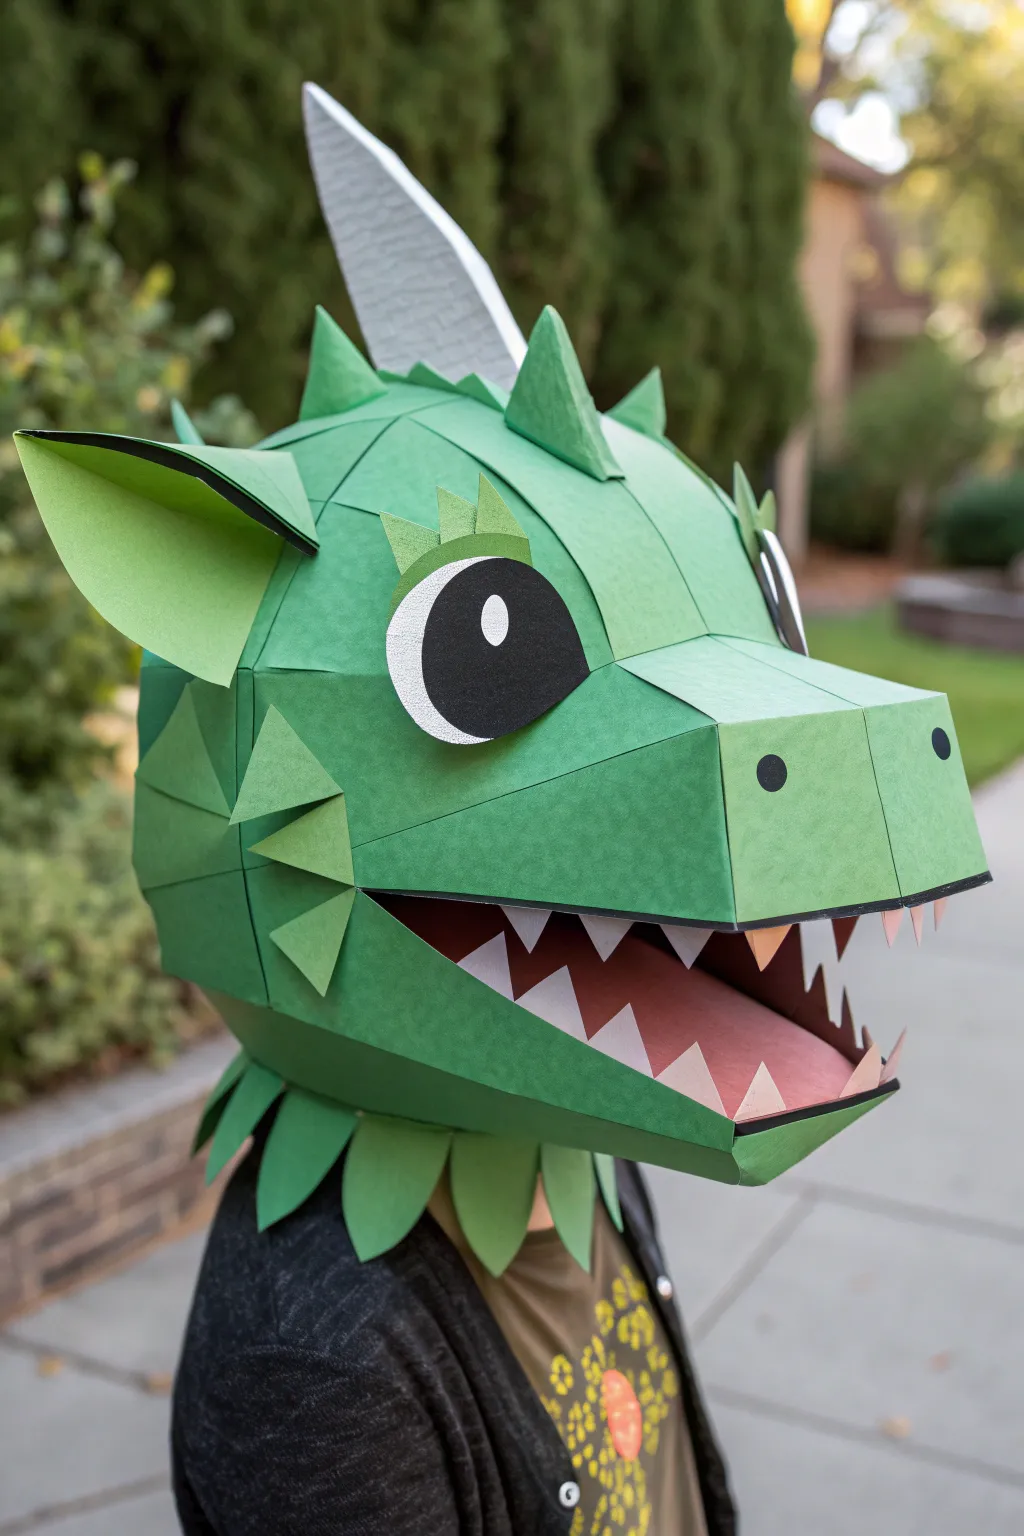
Transform simple cardstock into a magical creature with this low-poly mask featuring wide, friendly eyes and a charmingly rounded snout. The geometric paneled construction gives it a modern 3D look that is surprisingly sturdy once assembled.
Step-by-Step Tutorial
Materials
- Green cardstock (heavyweight, approx 250-300 GSM for structure)
- White or light grey cardstock (for horns and eyes)
- Black cardstock (for pupils and nostrils)
- Pink or red cardstock (for the interior mouth)
- Craft knife or scalpel (X-Acto style)
- Cutting mat
- Metal ruler
- Bone folder (or an empty ballpoint pen)
- Quick-drying tacky glue or strong double-sided tape
- Detailed digital dragon mask template (PDF)
- Printer (or access to a print shop)
- Scissors
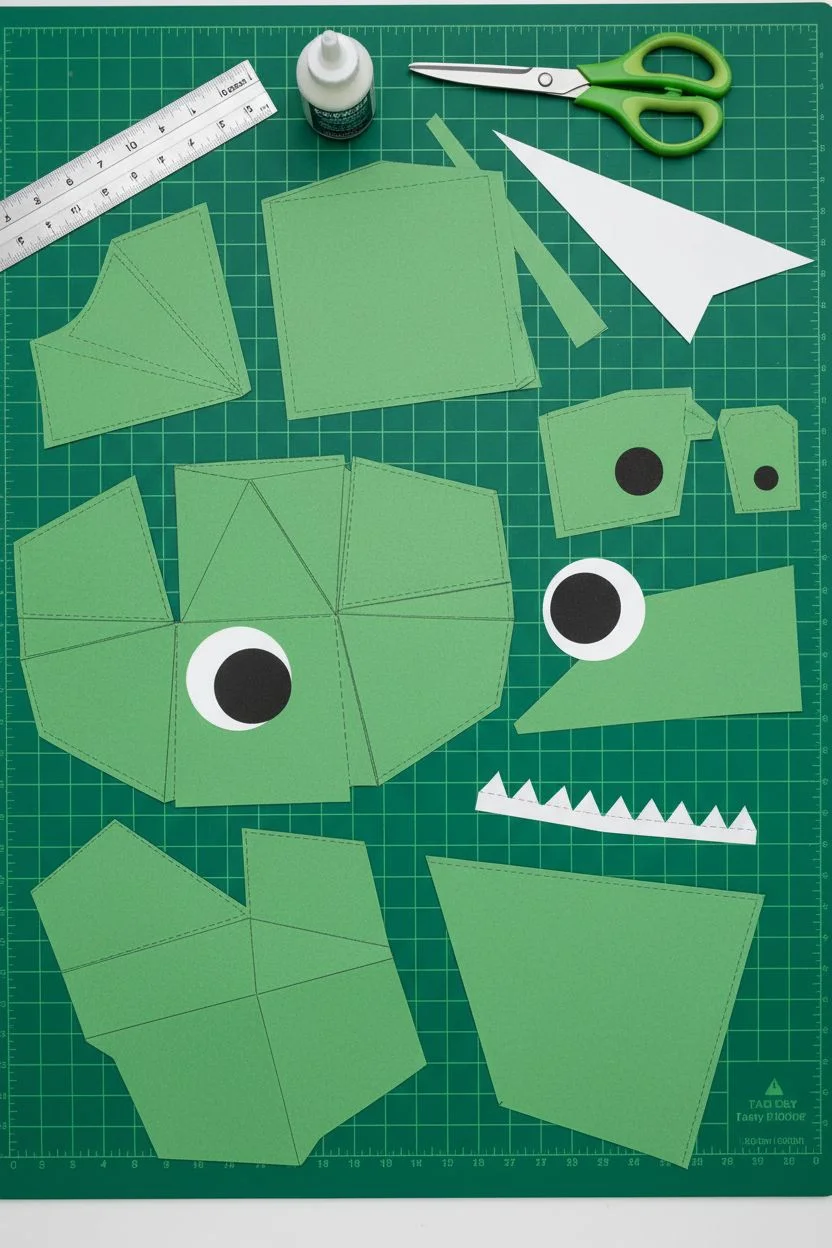
Step 1: Preparation and Cutting
-
Print the Templates:
Begin by printing your low-poly mask pattern directly onto your cardstock. If your printer can’t handle heavy weight paper, print on standard office paper first and spray-mount it lightly to your cardstock. -
Score the Fold Lines:
Before cutting anything out, use your metal ruler and the back of a craft knife (or a bone folder) to score every dashed and dotted line on the template. This is the secret to crisp, clean geometric angles. -
Identify Mountain vs. Valley:
Pay close attention to your template’s key: usually, dashed lines indicate ‘mountain’ folds (pointing up) and dotted lines indicate ‘valley’ folds (pointing down). -
Cut Out the Pieces:
Carefully cut out each numbered component using your craft knife for straight edges and scissors for more organic shapes like the neck frill. Keep the tab numbers visible.
Sticky Situation?
If tabs pop open, switch to a faster-drying solvent-based glue or use clips/clothespins to hold pieces tight for 5 minutes while they set.
Step 2: Assembling the Head Structure
-
Start with the Snout:
Locate the pieces for the nose and upper jaw. Apply a thin layer of tacky glue to the tabs and hold them together until set. Starting here gives you a central anchor point. -
Form the Nostrils:
Assemble the boxy snout shape, attaching the small black circles for nostrils over the marked areas before the structure gets too enclosed to reach. -
Build the Eye Sockets:
Connect the panels that form the forehead and eye ridges. The mask will start to curve dramatically here; ensure your mountain folds are sharp to maintain that polygon look. -
Construct the Eyes:
Layer the black pupil circle onto the white eye piece, then attach the small ‘shine’ cutout. Glue this entire eye assembly onto the flat panel provided on the face structure. -
Add the Decorative Brow:
Attach the small, fringed green piece just above the eye to create a cute, expressive eyebrow ridge. -
Close the Skull:
Work your way backward from the eyes, gluing the matching numbered tabs to form the top and sides of the head. It should now comfortably fit over a head.
Step 3: Jaws and Details
-
Assemble the Lower Jaw:
Construct the lower jaw separately, ensuring the pink or red cardstock tongue piece is glued inside the bottom curve before closing up the shape. -
Attach the Teeth:
Before connecting the jaw to the head, glue the strips of triangular white teeth along the upper and lower gum lines. I prefer to do this now while I have easy access to the inside edges. -
Join the Jaw:
Connect the lower jaw assembly to the main head piece at the designated hinge points near the ‘cheeks’ of the mask. -
Create the Horns:
Fold and glue the white cardstock pieces into elongated pyramid shapes for the horns. Attach these firmly to the top of the head. -
Add the Spikes:
Assemble the smaller green triangular pyramids and run them down the center back of the head as a spine ridge. -
Attach the Neck Frill:
Glue the leaf-shaped frill pieces around the bottom opening of the mask. These help hide the wearer’s neck and add a nice finished texture. -
Final Adjustments:
Try the mask on carefully. If it wobbles, you can glue a simple headband or foam strips inside the crown for a snugger, more comfortable fit.
Pro Tip: Sharp Edges
For the cleanest polygonal look, run a ruler along every fold after gluing to sharpen the crease. Crisp lines make the 3D effect pop.
Now recreate this charming beast in any color combination you can imagine for your next costume event
Geometric Scale Pattern Dragon for Clean, Modern Style
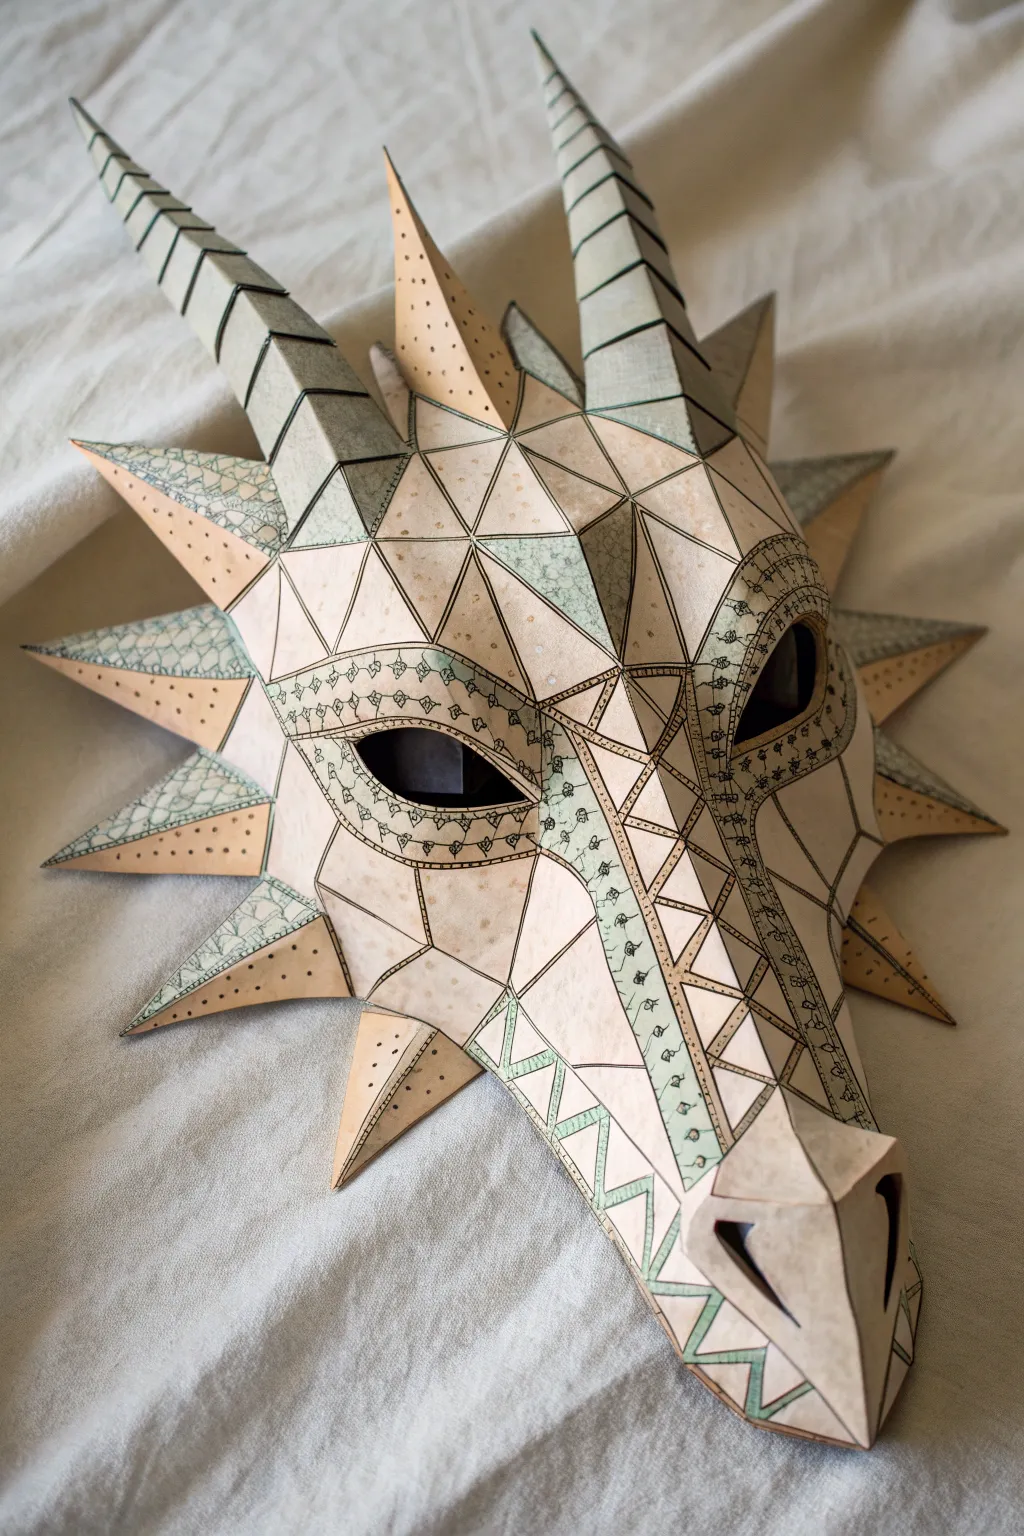
This stunning mask combines the sharp, angular aesthetic of low-poly 3D design with the organic warmth of hand-drawn illustration. By folding cardstock into faceted planes and adding intricate ink detailing, you’ll build a wearable piece of art that looks like a modern fantasy relic.
Step-by-Step Guide
Materials
- Heavyweight cardstock (110lb or 300gsm) in cream or off-white
- Digital cutting machine (Cricut/Silhouette) or X-Acto knife and cutting mat
- Metal ruler
- Bone folder or scoring tool
- Quick-setting tacky glue or double-sided craft tape
- Fine-point drawing pens (0.3mm and 0.5mm, black)
- Pastel green or sage colored pencil or marker
- Gold or bronze metallic gel pen (optional for accents)
- Elastic cord for wearing
- PDF or SVG template for a low-poly dragon mask
Step 1: Preparation and Cutting
-
Source your template:
Find a low-poly dragon mask template online (often called Pepakura or papercraft patterns). Look for one with prominent horns and a jagged ruff. -
Transfer and cut:
If using a cutting machine, upload your SVG and set the score lines. If cutting by hand, print the template onto cardstock and carefully cut out the perimeter of each piece using a sharp X-Acto knife. -
Score the fold lines:
This step is critical for crisp geometry. Use a bone folder and ruler to score every internal line. Check your template key: dashed lines usually mean a ‘valley’ fold, while dash-dot lines mean a ‘mountain’ fold.
Sticky Situation?
If glue isn’t holding the tension of a fold, use binder clips or clothespins to clamp the tabs together while they dry completely.
Step 2: Inking the Details
-
Map out the design:
Before assembly, while the pieces are flat, lightly sketch your patterns in pencil. Focus on the snout bridge, the area around the eyes, and the horns. -
Draw the scale borders:
Using a 0.5mm black pen, draw double lines along the major seams of the snout and eye sockets to mimic heavy leather stitching or armor plates. -
Fill the accent panels:
Select specific facets—like the triangles on the horns or the cheek panels—to be your ‘green zones.’ Lightly shade these with a sage green pencil or marker, keeping the color somewhat textured rather than solid. -
Add texture patterns:
Over the green areas, draw small, repetitive scale patterns or ‘crackle’ textures using a finer 0.3mm pen. This contrast between the geometric shape and organic drawing is what defines the style. -
Detail the ruff spikes:
On the spikes that flare out from the head, add small dots and dashed lines near the bases to suggest depth and shadow. -
Refine the horns:
Draw horizontal bands up the length of the horns to simulate growth rings. Vary the line weight slightly for a natural look.
Clean Lines Only
Use a fresh blade for every 3-4 sheets of cardstock. A dull blade drags and tears the paper fibers, ruining the crisp geometric look.
Step 3: Assembly
-
Pre-fold all creases:
Go through every piece and sharply fold along your scored lines. I find it helpful to pinch the fold nice and tight to ensure the final shape holds its volume. -
Connect the snout:
Start construction at the nose. Apply a thin layer of tacky glue to the tabs and hold them together until set. Working from the nose outward helps maintain symmetry. -
Build the eye sockets:
Attach the eye panels to the snout. This central structure is the anchor for the rest of the mask, so ensure these seams are perfectly flush. -
Attach the horns:
Assemble the horns separately first. Once they are solid cones, glue them onto the forehead section. Use plenty of pressure here as the horns can be heavy. -
Add the ruff spikes:
Assemble the individual spikes that frame the face. Glue them one by one to the main mask body, ensuring they radiate outward evenly. -
Reinforce the interior:
Once assembled, check the inside. If any seams look weak or light shines through gaps, add unparalleled strips of cardstock or tape on the inside for reinforcement. -
Punch holes for wearing:
Locate a sturdy point near the temples on the side flaps. Punch a small hole and reinforce it with a paper washer or metal eyelet before tying your elastic cord.
Once the glue is fully cured, your geometric dragon is ready to guard your wall or complete a unique costume

PENCIL GUIDE
Understanding Pencil Grades from H to B
From first sketch to finished drawing — learn pencil grades, line control, and shading techniques.
Explore the Full Guide
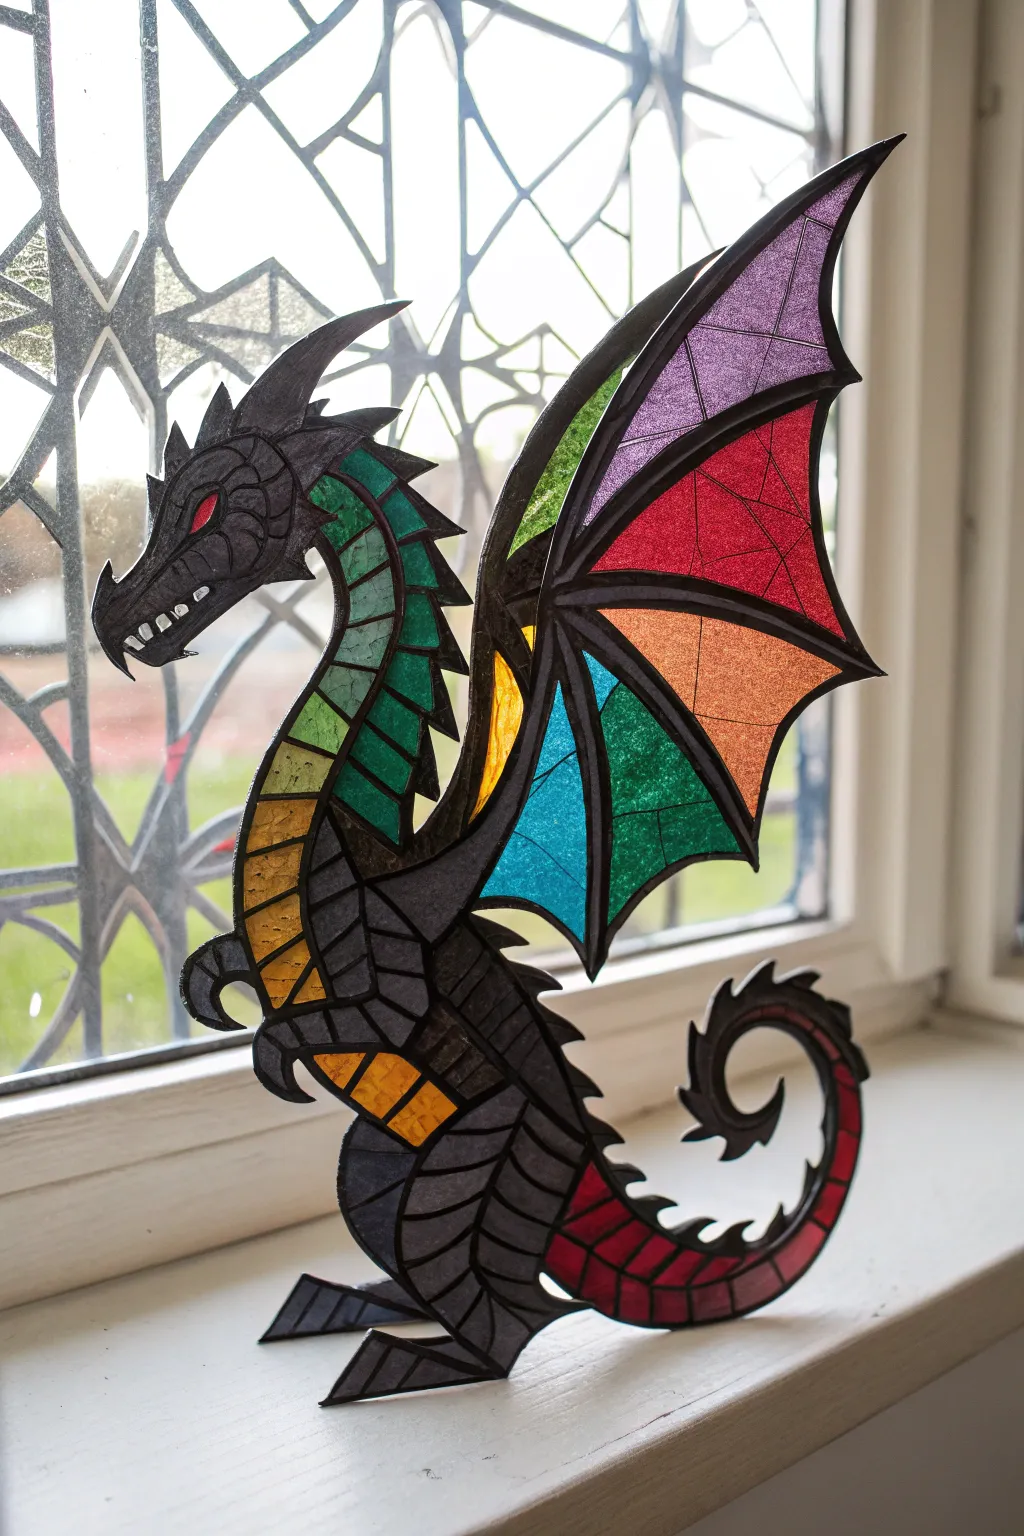
Stained-Glass Dragon With Black Leading and Bright Panels

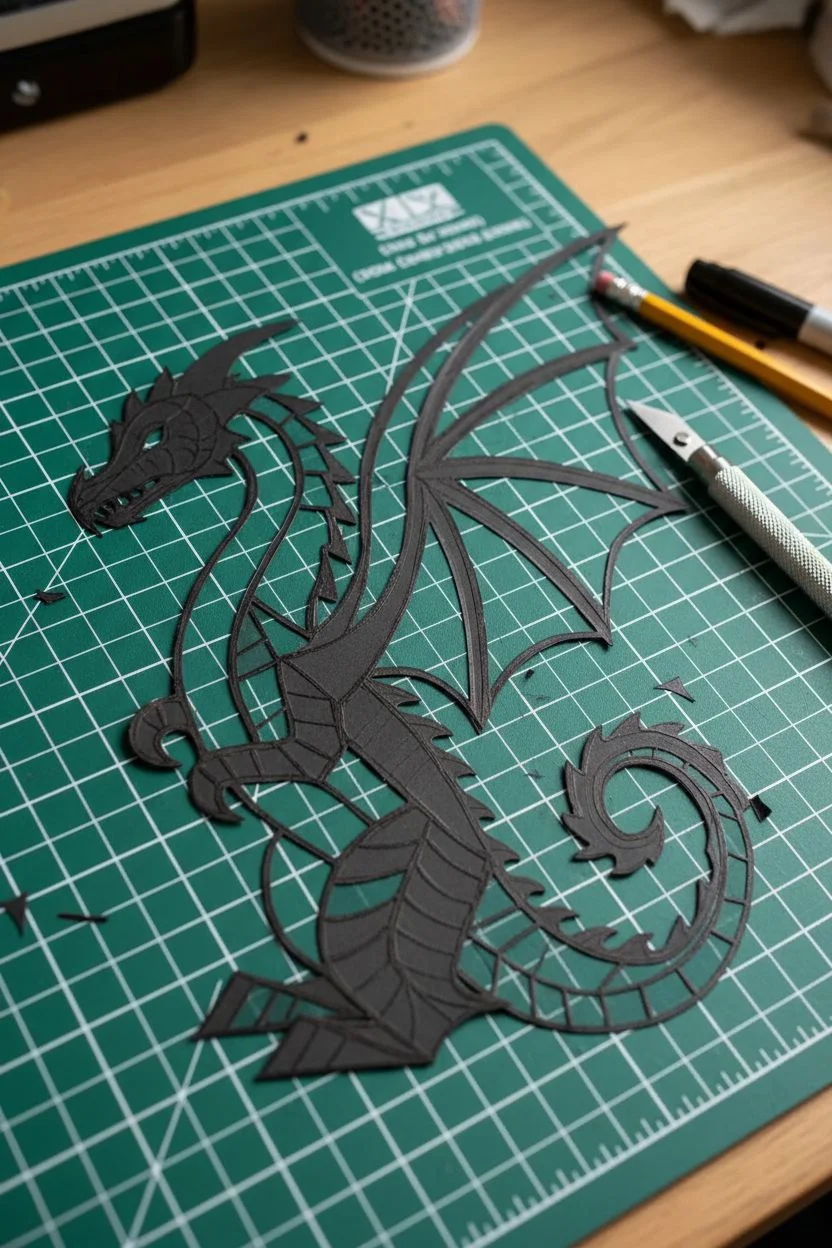
Bring a touch of medieval magic to your windowsill with this striking faux stained-glass dragon. By combining sturdy black cardstock cutouts with vibrant translucent paper, you’ll create a standalone figure that glows beautifully when backlit by the sun.
Step-by-Step Tutorial
Materials
- Heavy black cardstock or poster board (for the ‘lead’ framework)
- Translucent colored paper (tissue paper, cellophane, or kite paper in rainbow colors)
- Craft knife (X-Acto style) with fresh blades
- Self-healing cutting mat
- Pencil and eraser
- Clear-drying craft glue or a glue stick
- Black permanent marker or black paint pen
- Small scissors
- Toothpick (for applying glue to thin lines)
Step 1: Designing the Framework
-
Draft the Silhouette:
Sketch the dragon’s outline onto your black cardstock. Focus on a strong, jagged profile for the head and wings. You can either draw this freehand or print a template and trace it. Make sure to include a flat base at the feet and tail so it can stand upright later. -
Map the ‘Lead’ Lines:
Draw the internal lines that will separate the colors. These lines need to act like lead in a real stained glass window—they must be continuous and thick enough (at least 3-4mm) to hold the structure together. -
Segment the Body:
Divide the dragon’s belly and tail into small, scale-like segments. Keep the shapes simple—rectangles and triangles work best for creating that segmented armor look. -
Create the Wing Pattern:
For the wings, draw long, sweeping lines radiating from the ‘arm’ of the wing, then subdivide those sections into smaller geometric shards. This mimics the fractured look of traditional glass art.
Step 2: Cutting the Lead Lines
-
Cut the Interior Spaces:
Using your craft knife and a cutting mat, carefully cut out the negative spaces where the color will go. Leave the black borders intact. I find it helpful to start with the smallest, most difficult sections in the center of the body first. -
Clean Up Edges:
If any corners look fuzzy or torn, trim them clean with the tip of your knife. The cleaner the cut, the more convincing the ‘glass’ effect will be. -
Cut the Outer Perimeter:
Once all internal holes are removed, cut along the exterior outline of the dragon to release it from the cardstock sheet. -
Create a Duplicate (Optional but Recommended):
For the neatest finish, trace your cut-out frame onto another piece of black cardstock and cut a second identical frame. This allows you to sandwich the colored paper between two black layers, hiding all messy glue edges.
Sharper Blades Matter
Change your X-Acto blade frequently! Dull blades drag and tear the cardstock rather than slicing cleanly, ruining delicate lines.
Step 3: Adding the Color Panels
-
Prepare Color Swatches:
Select your translucent papers. For the wings, use a rainbow gradient (purple, red, orange, yellow, blue, green). For the body scales, choose alternating greens and yellows for the chest, and darker greys or textures for the main body if available. -
Trace the Openings:
Place your black frame (face down) over a piece of colored paper. Roughly trace the shape of a specific opening, adding a small margin around the edge for gluing. -
Apply Adhesive:
Use a toothpick to dab a tiny amount of glue onto the black cardstock ‘lead’ lines surrounding a specific opening. You don’t need much; too much glue will warp the tissue paper. -
Place the Paper:
Press your cut piece of colored paper onto the glued frame. Smooth it out gently to ensure there are no wrinkles. -
Repeat for Each Section:
Continue filling in the sections one by one. Change colors frequently to recreate the mosaic look of the dragon’s wings and scales. -
Layering for Depth:
If your tissue paper is very thin, you might layer two pieces of the same color to make the hue more vibrant and less transparent.
Wrinkled Tissue?
If the tissue paper buckles from wet glue, try using a glue stick or double-sided tape instead for a drier application method.
Step 4: Assembly and Finishing
-
Seal the Back:
If you cut a second black frame earlier, glue it carefully onto the back of your project now. Line it up perfectly to sandwich the colored paper inside. If you didn’t make a second frame, simply trim any excess colored paper that hangs over the black lines. -
Add Surface Details:
For the dragon’s eye, glue a tiny piece of bright red paper behind the eye socket. You can add extra definition to the face using a black paint pen to touch up any white paper edges. -
Construct the Base Stand:
To make it stand, cut two small triangular wedges from spare black cardstock. Glue one behind the feet and one behind the tail to act as hidden easel supports. -
Final Polish:
Check for any glue strings or loose edges. Place your dragon on a windowsill where the light can shine through the panels to reveal the vibrant colors.
Enjoy the colorful glow of your dragon as it guards your window from the sun


Have a question or want to share your own experience? I'd love to hear from you in the comments below!