A plain paper lantern is basically a 3D canvas, and the ribbed texture makes even simple paint strokes look extra special. Here are my favorite paper lantern painting ideas—starting with the classics and sliding into some really fun, unexpected looks.
Classic Horizontal Stripes on Ribs
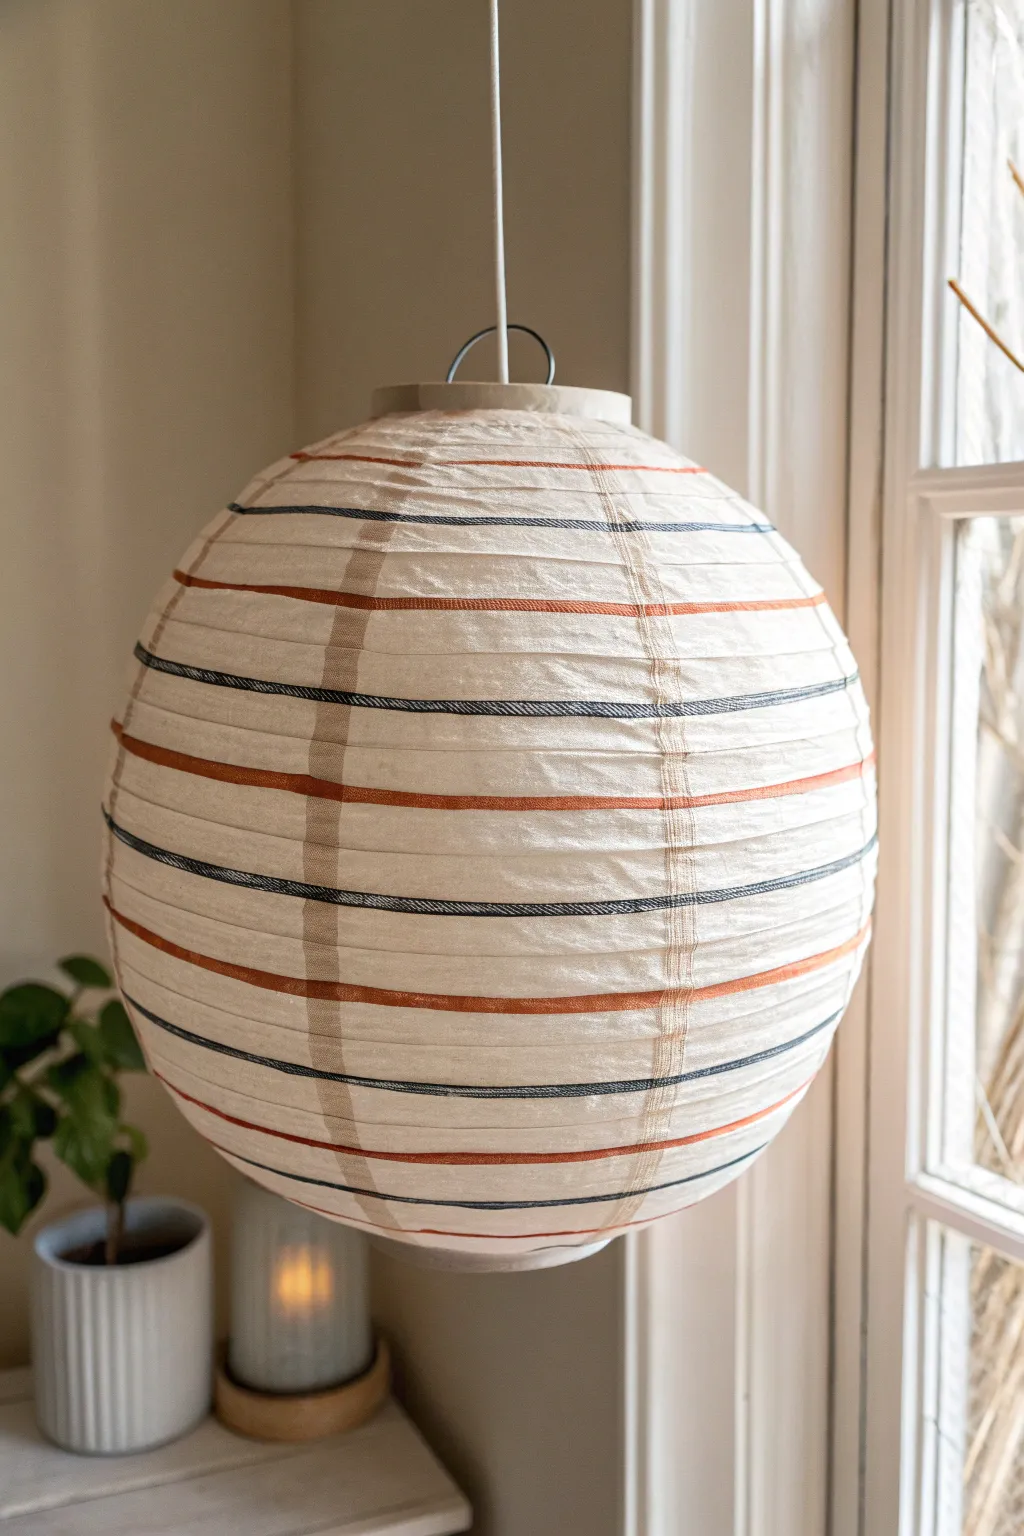
Transform a plain, inexpensive paper lantern into a chic coastal accent with just a few stripes. This project emphasizes the lantern’s natural structure by highlighting the horizontal ribs with alternating navy and burnt orange lines for a sophisticated yet handmade look.
Step-by-Step Guide
Materials
- White or cream paper lantern (round, 12-16 inch diameter)
- Acrylic craft paint (Navy Blue)
- Acrylic craft paint (Burnt Orange or Terracotta)
- Small flat shader brush (size 4 or 6)
- Cup of water
- Paper towels
- Hanging string or wire (for drying)
Step 1: Preparation
-
Expand the lantern:
Carefully insert the wire expander into the center of your paper lantern according to the package instructions. Ensure the paper is taut and the globe shape is fully formed. -
Set up a work station:
Find a way to hang the lantern at eye level while you work. Tying it to a shower curtain rod or a hook in a doorway works perfectly, allowing you to spin it freely without touching wet paint. -
Prepare your palette:
Squeeze a small amount of Navy Blue and Burnt Orange paint onto a palette or paper plate. Add a tiny drop of water to each color to improve flow, mixing until it has the consistency of heavy cream.
Step 2: Drafting the Design
-
Identify the rib guides:
Look closely at the lantern’s structure. You will see a spiral of bamboo or wire ribbing running horizontally from the top to the bottom. These ribs will serve as your exact painting guides. -
Plan the pattern:
Decide on your pattern sequence. This project uses an alternating rhythm: one Navy stripe, followed by two unpainted ribs, then one Orange stripe, then two unpainted ribs. I like to mentally mark the starting point to avoid confusion.
Uneven Lines?
If your hand is shaky, try resting your pinky finger on a dry part of the lantern as an anchor while you paint the stripe.
Step 3: Painting the Stripes
-
Start with the top navy line:
Select a rib near the top opening. Load your flat brush with Navy paint. Hold the brush horizontally, parallel to the rib. -
Apply the first stroke:
Gently press the brush against the raised rib. You don’t need to paint the valleys between ribs; stick to the high point. Drag the brush steadily while rotating the lantern with your other hand. -
Complete the circle:
Continue tracing that single rib all the way around until your line meets its beginning. Don’t worry if the line wavers slightly; that adds to the charm. -
Skip and switch colors:
Count two ribs down from your navy line. Leave these completely unpainted. Load a clean brush (or wash your current one thoroughly) with Burnt Orange paint. -
Paint the orange stripe:
Apply the orange paint to the third rib down, using the same rotating technique. Ensure the paint coverage is solid, but not so thick that it drips. -
Establish the rhythm:
Skip the next two ribs again. Switch back to your Navy paint and coat the following rib. You are now locked into the pattern: Paint, Skip Two, Paint, Skip Two.
Level Up
Mix a fabric medium into your acrylic paint; it helps the pigment flex with the paper lantern if you plan to collapse and store it later.
Step 4: Finishing Up
-
Continue downwards:
Work your way down the globe, maintaining the alternating colors and the two-rib spacing. It helps to step back occasionally to ensure you haven’t accidentally skipped the wrong number of ribs. -
Handle the bottom curve:
As you reach the bottom, painting becomes slightly trickier. You may need to tilt the lantern slightly to get a good angle on the lower ribs. -
Check for gaps:
Spin the lantern slowly and look for faint spots. Dab a little extra paint on any areas where the paper shows through too much on the colored lines. -
Clean up edges:
If any paint slipped into the ‘valleys’ between ribs, you can quickly wipe it with a slightly damp Q-tip before it dries, though small imperfections are generally invisible from a distance. -
Allow to dry:
Leave the lantern hanging in its safe spot for at least one hour. Acrylics dry fast on paper, but you want it fully set before handling.
Now you have a custom lighting piece that looks perfectly at home in a cozy reading nook or sunroom

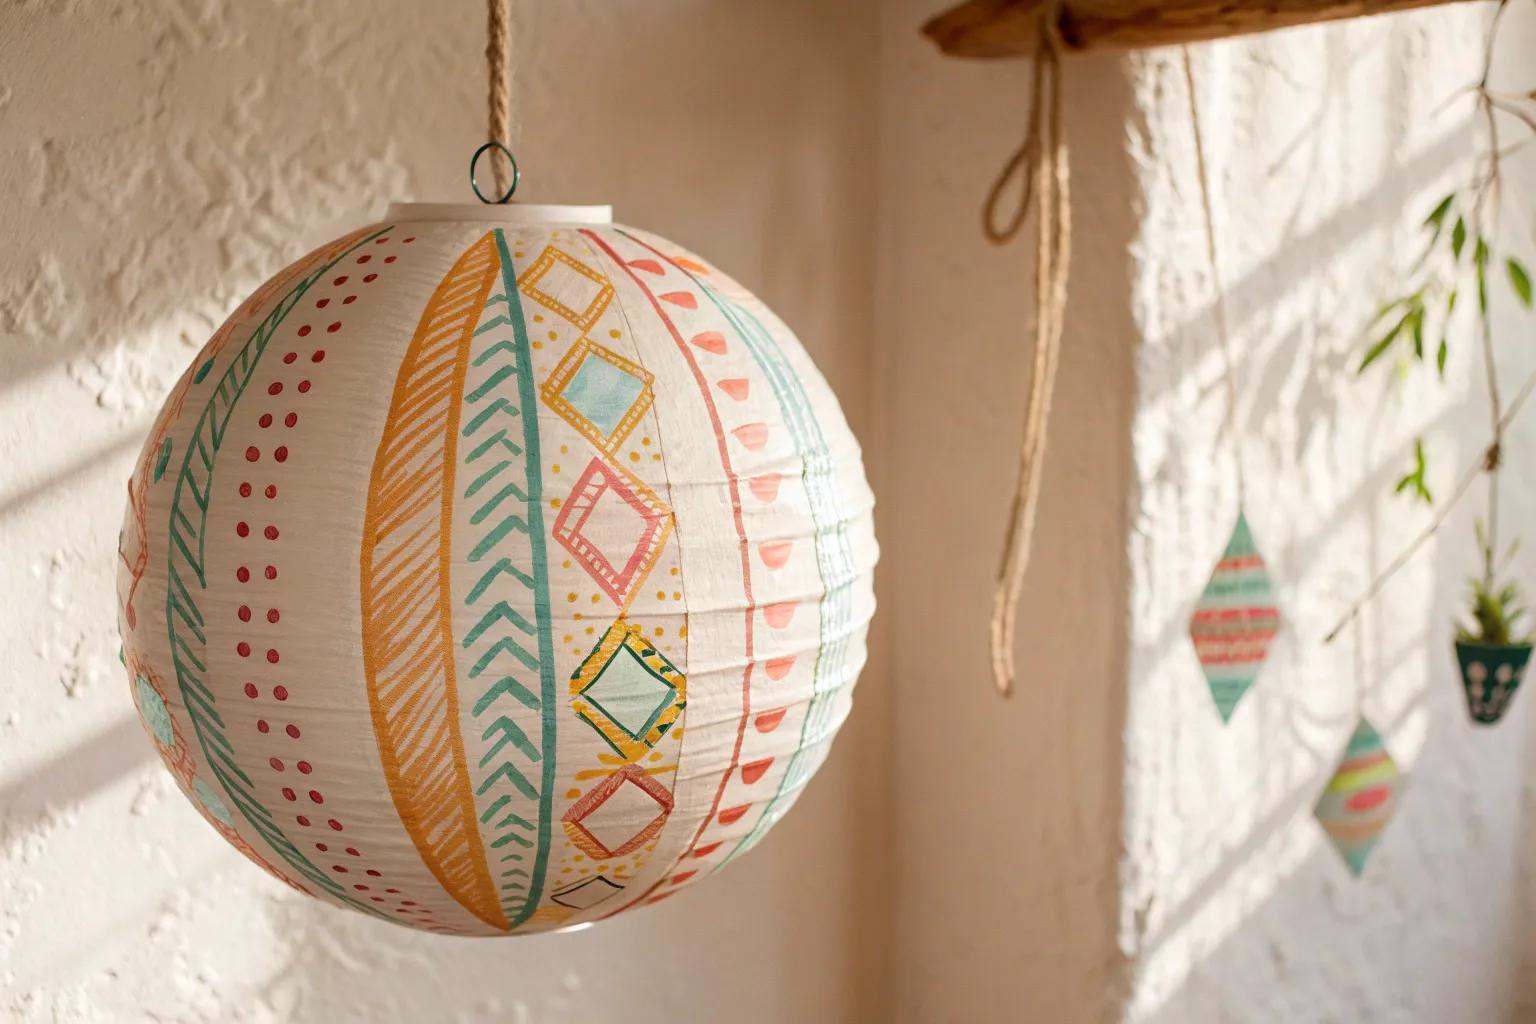
Loose Wildflower Sprigs All Around
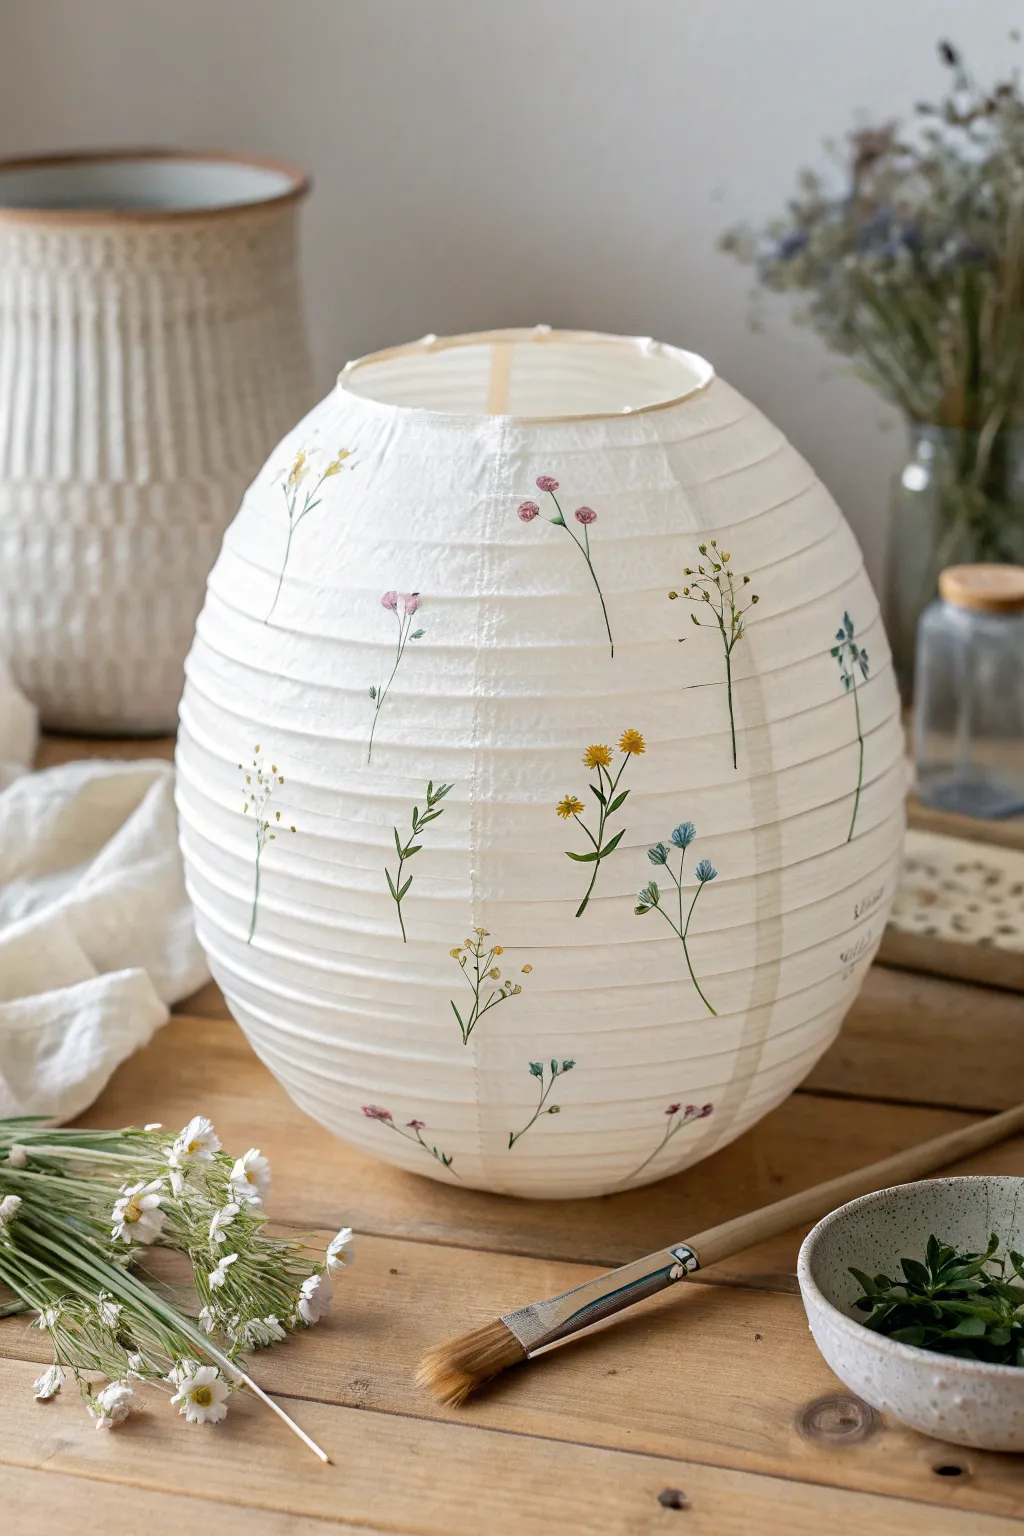
Transform a plain paper lantern into a delicate garden feature with scattered sprigs of hand-painted wildflowers. This project embraces a loose, botanical style that feels organic and airy, perfect for adding a soft, natural touch to any room or patio.
Detailed Instructions
Materials
- White paper lantern (sphere shape)
- Acrylic paints (olive green, sap green, mustard yellow, gentle pink, cornflower blue, white)
- Fine liner brushes (sizes 0 and 00)
- Small round brush (size 2)
- Jar of water
- Paper palette or mixing plate
- Paper towel
- Pencil (optional, light H grade)
Step 1: Preparation & Practice
-
Set up your workspace:
Expand the paper lantern fully and insert the wire expander to hold its shape taut. Place it on a bowl or cup to stop it from rolling around while you paint. -
Test your consistency:
Acrylic paint straight from the tube can be too thick for delicate paper. Mix a small amount of green paint with a drop of water until it flows like ink but holds its color opacity. I find testing this on a scrap piece of paper beforehand saves a lot of stress.
Step 2: Painting the Stems
-
Start with the main stems:
Using your thinnest liner brush (size 00) and the thinned olive green paint, create slender, slightly curved vertical lines scattered around the lantern. -
Keep it random:
Vary the heights and the angles of your stems. Some should lean left, some right, and others can stand taller or shorter to mimic a natural meadow. -
Add side branches:
From the main stems, paint tiny, hair-thin lines branching outwards. These will hold your buds and leaves later. Use a very light touch, barely grazing the paper surface. -
Rotate frequently:
Turn the lantern often to ensure the distribution of stems feels balanced but not perfectly symmetrical. Leave plenty of white space between them.
Brush Control Tip
Rest your pinky finger on a dry part of the lantern while painting. This stabilizes your hand for those ultra-fine stems and prevents shaky lines.
Step 3: Adding Foliage
-
Paint slender leaves:
Refill your brush with green. Press the belly of the brush down gently and lift up quickly to create tapered, needle-like leaves attached to the lower parts of your stems. -
Vary your greens:
Mix a little sap green or even a touch of yellow into your olive base for some leaves. This subtle variation adds depth without needing complex shading.
Layering Idea
Once dry, glue tiny pressed dried flowers over some painted ones. The mix of 2D paint and 3D real petals creates incredible texture.
Step 4: Blooming the Flowers
-
Create yellow wildflower clusters:
Mix mustard yellow. Using the tip of the size 0 brush, dab small clusters of dots at the tops of several stems. These mimic plants like tansy or goldenrod. -
Paint delicate pink buds:
Switch to a gentle pink. Paint tiny oval shapes at the ends of the finest branches on different stems, creating the look of closed or opening buds. -
Add blue accents:
With cornflower blue, paint small five-petal flowers or simple bell shapes on the remaining stems. Keep these loose; they don’t need to be botanically perfect. -
Highlight the blooms:
Once the flower heads are semi-dry, take a tiny dot of white paint and add a speck to the center of the blue flowers or the tops of the pink buds for a ‘sun-kissed’ highlight.
Step 5: Finishing Touches
-
Review and refine:
Spin the lantern slowly. Look for any large empty patches that might need a tiny, lonely sprig to balance the composition. -
Anchor floating stems:
Check that all your flowers connect to a stem. If you see a floating bloom, use your liner brush to draw a whisper-thin connection back to the green stalk. -
Let it cure:
Allow the lantern to dry completely for at least an hour before hanging it up or adding a light cord. The paper can be fragile while damp.
Enjoy the gentle glow of your personal indoor garden as the light shines through your artwork

Big Bloom Clusters as Focal Points
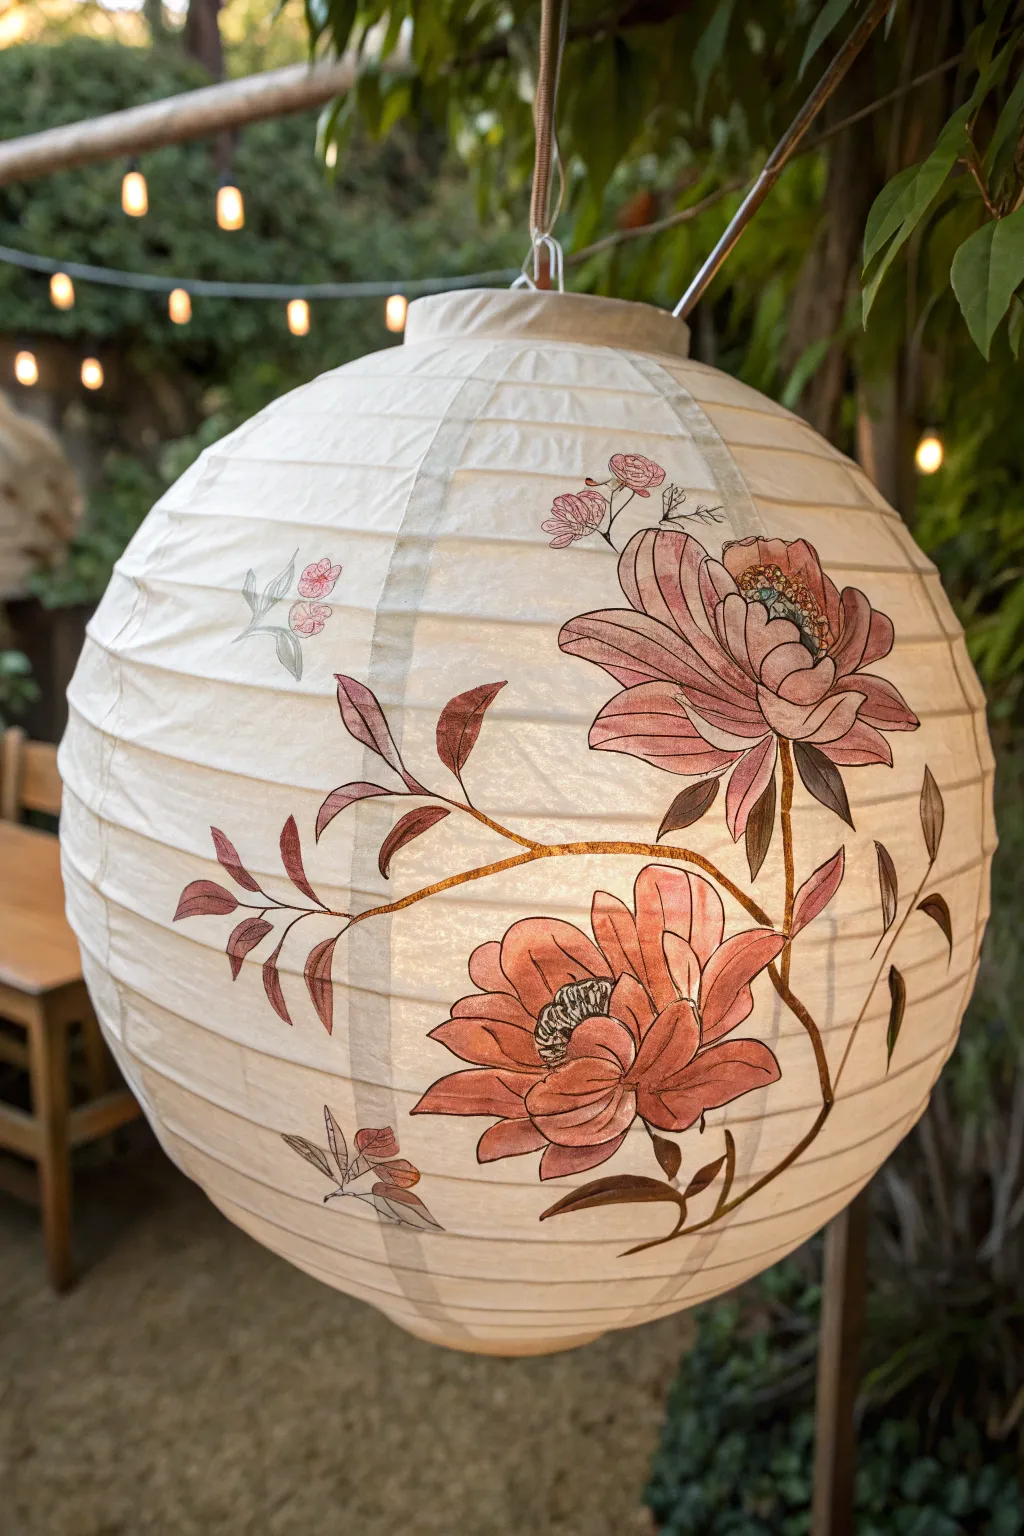
Transform a plain white paper lantern into a glowing garden accent with these bold, stylized peony clusters. The translucent petals and sweeping dark branches create an elegant contrast that looks stunning whether lit from within or swaying in the daylight.
Step-by-Step
Materials
- White paper lantern (12-16 inch diameter)
- Watercolor paints or thinned acrylics (Deep pink, Peach, Brown, Sage Green)
- Fine liner brush (size 0 or 1)
- Round watercolor brush (size 6 or 8)
- Pencil (very light graphite needed)
- Cup of water and paper towels
- String or hook for hanging while painting
Step 1: Planning and Sketching
-
Set up your station:
Before you begin, fully expand your paper lantern and insert the wire expander. It helps immensely to hang the lantern at eye level so you can paint all sides without resting it on a table, which might smear wet paint. -
Determine focal points:
Visualize two main focal areas for your large blooms. The example project places one large flower cluster on the upper right quadrant and a second cluster on the lower middle area. -
Sketch the main stems:
Using a very light touch with your pencil, draw a sweeping curved line connecting your focal points. This will be the main branch. Add a few branching offshoots that reach upward and outward. -
Outline the blooms:
Lightly sketch the general circular shapes of your large flowers directly over the branch lines. Don’t worry about petal details yet; just place the ‘footprint’ of where the flowers will sit.
Paper Control
Paper lanterns are thirsty! Work with a slightly ‘dry’ brush rather than a soaking wet one. Too much water can cause the thin paper to buckle, tear, or create large, uncontrollable blotches.
Step 2: Painting the Petals
-
Mix your base color:
Create a watery wash of peach or pale pink. You want the paint to be translucent so the light can shine through the petals later. -
Paint the first layer:
Using your round brush, fill in large petal shapes within your sketched flower circles. Start from the center and brush outward. Keep the edges soft and organic rather than perfectly round. -
Add depth with darker tones:
While the first layer is still slightly damp, drop a deeper pink color near the center of the flower. This wet-on-wet technique creates a natural gradient as the color bleeds outward. -
Define individual petals:
Once the base layer is dry to the touch, mix a slightly more saturated pink. Paint defined C-shaped curves and lines to separate individual petals, layering them like a blooming rose or peony. -
Paint the buds:
Identify spots further out on the branches for smaller buds. Use the same pink wash to paint small oval shapes, adding a tiny darker pink dot or line at the tip of each bud.
Metallic Magic
Add a touch of gold leaf or metallic gold paint to the very edges of a few central petals. When the lantern is lit at night, these metallic accents will catch the light and glisten beautifully.
Step 3: Adding Branches and Details
-
Mix the branch color:
Combine brown with a touch of deep purple or black to get a rich, dark woody tone. This needs to be slightly thicker than your flower wash for better control. -
Paint the main stems:
Using the liner brush, trace over your pencil lines for the main branch. Let your hand wobble slightly to create a natural, woody texture rather than a straight, manufactured line. -
Connect the flowers:
Carefully paint stems that lead right up to the base of your flower heads. Ensure the visual connection is strong so the heavy blooms don’t look like they are floating. -
Add the leaves:
Mix a muted sage green with a bit of brown. Paint flexible, elongated leaves coming off the main branches. Some can overlap the pink petals slightly for a realistic layered look. -
Darken the leaf tips:
Dip the very tip of your brush into the dark brown mixture and touch the ends and bases of your green leaves while they are wet to add dimension.
Step 4: Fine Lining & Finishing
-
Outline the petals:
This is the crucial step for this style. Use your finest liner brush and a diluted black or dark brown paint. Outline the major petals with very thin, delicate lines. -
Add center details:
In the very center of your open blooms, add tiny stippled dots or small loops in black or dark yellow to represent the stamens. -
Refine the composition:
Step back and look at the lantern from a distance. If an area feels too empty, add a small floating petal or a tiny extra twig to balance the visual weight. -
Erase guidelines:
Check for any visible pencil lines. If the paint is completely 100% dry, you can very gently erase them, but be careful not to tear the delicate paper.
Hang your finished lantern in a covered area and watch how the painted blooms come alive when the internal light is switched on


Delicate Cherry Blossom Branches
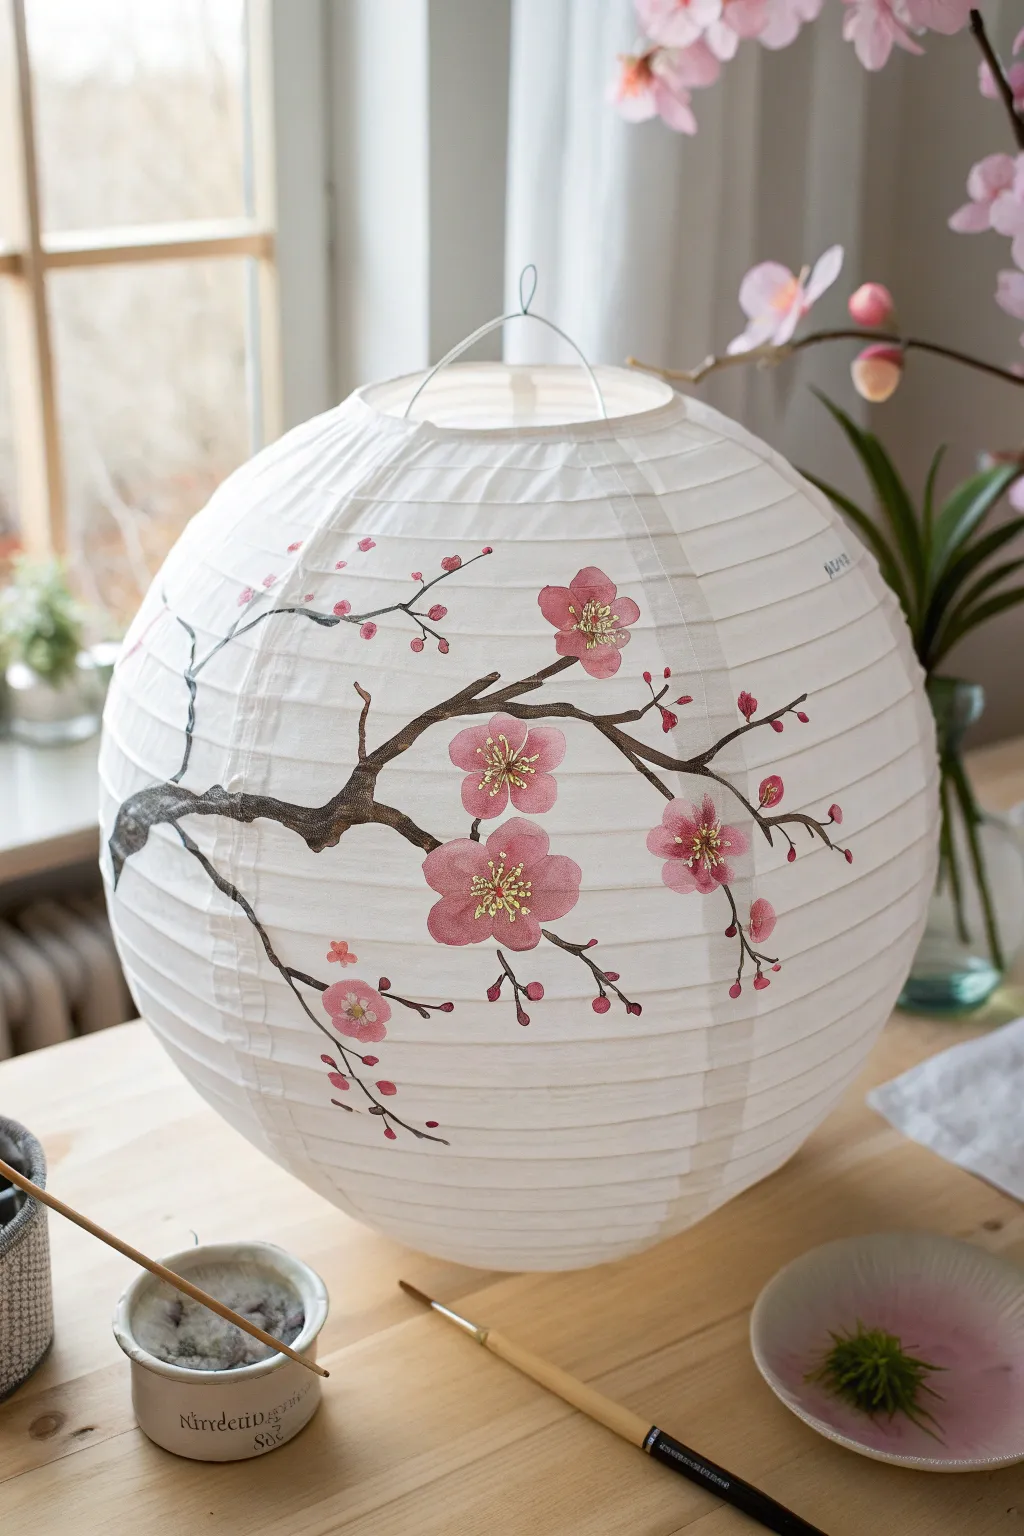
Transform a plain white paper lantern into a delicate piece of decor with this cherry blossom painting project. Using soft watercolors or thinned acrylics, you’ll create elegant branches and translucent petals that glow beautifully when the lantern is lit.
Step-by-Step Guide
Materials
- White spherical paper lantern (12-16 inches)
- Watercolor paints or acrylics (dark brown, black, deep pink, light pink, white, yellow)
- Round pointed paintbrushes (sizes 2, 4, and 6)
- Fine liner brush (size 0 or 00)
- Cup of water
- Paper plate or palette
- Pencil (optional)
Step 1: Planning and Branch Structure
-
Prepare the lantern:
Fully expand your paper lantern and insert the wire expander to hold its shape taut. Set it on a stable surface like a bowl or hang it at eye level so you can paint comfortably without it rolling away. -
Mix the branch color:
Create a dark, woody hue by mixing brown with a touch of black. If using acrylics, water the paint down significantly until it has an inky, watercolor-like consistency that will flow easily over the textured paper lines. -
Draft the main branch:
Using your size 6 brush, start the main branch from the left side of the lantern, about halfway down. Paint a thick, slightly jagged line that extends towards the center and curves slightly upward. Let the brush skip naturally over the lantern’s ribs to create organic texture. -
Add secondary branches:
Switch to a size 4 brush. Branching off from your main limb, paint thinner offshoots reaching upwards and downwards. Remember that cherry blossom branches often have sharp angles and knobby joints. -
Paint delicate twigs:
Use the fine liner brush to add the smallest twigs at the ends of your branches. These should be very fine lines where the buds will eventually sit. vary the pressure to make the lines taper off naturally. -
Let the structure dry:
Allow the branch work to dry completely before moving on to flowers. This prevents the dark paint from bleeding into your delicate pinks.
Step 2: Painting the Cherry Blossoms
-
Mix your petal shades:
Prepare two shades of pink on your palette: a watery, pale blush pink and a slightly more saturated medium pink. Having variation will give your flowers depth. -
Start with the main blooms:
Identify 3-5 spots on the branches for your largest, fully open flowers. Use the size 4 brush and the pale pink to paint five rounded petals for each flower. Leave a tiny empty space in the center of each arrangement. -
Layering color:
While the first layer is still slightly damp (but not soaking), dab a tiny amount of the darker pink near the center of the petals. Let it bleed outward naturally for a soft gradient effect. -
Add floating petals:
Paint a few single petals drifting near the branches or seemingly falling, which adds movement to the composition. -
Paint buds:
Along the tips of the thinner twigs, paint small, tight tear-drop shapes in the darker pink shade to represent unbloomed buds. I find grouped pairs of buds look particularly realistic.
Bleeding Lines?
Paper lantern paper is very absorbent. Use a “dry brush” technique—dip in paint, then dab most off on a paper towel before touching the lantern—to control spread.
Step 3: Detaling and Finishing
-
Create the flower centers:
Once the pink petals are fully dry, take your fine liner brush and mix a opaque yellow or gold paint. Paint tiny dots in the center of each open flower. -
Add the stamen:
Using white or very pale yellow and the liner brush, draw extremely fine lines radiating from the yellow center dots outwards onto the petals. -
Connect the flowers:
Use your brown branch mixture and the liner brush to paint tiny stems connecting the backs of the flowers and buds to the main wooden branches. This anchors them so they don’t look like they are floating. -
Final sepals:
Add tiny dark brown or reddish dots at the base of the buds to represent the sepals (the green/brown protective leaves at the base of a flower). -
Review and refine:
Step back and look at the lantern as a whole. If any areas look too sparse, add a small falling petal or a tiny extra twig to balance the visual weight.
Go Metallic
For a luxurious touch, paint the stamen details with metallic gold ink or paint. When the lantern is lit, these details will catch the light and shimmy.
Hang your lantern in a cozy corner or by a window to enjoy the soft, blooming glow.
BRUSH GUIDE
The Right Brush for Every Stroke
From clean lines to bold texture — master brush choice, stroke control, and essential techniques.
Explore the Full Guide
Simple Leafy Vine Border
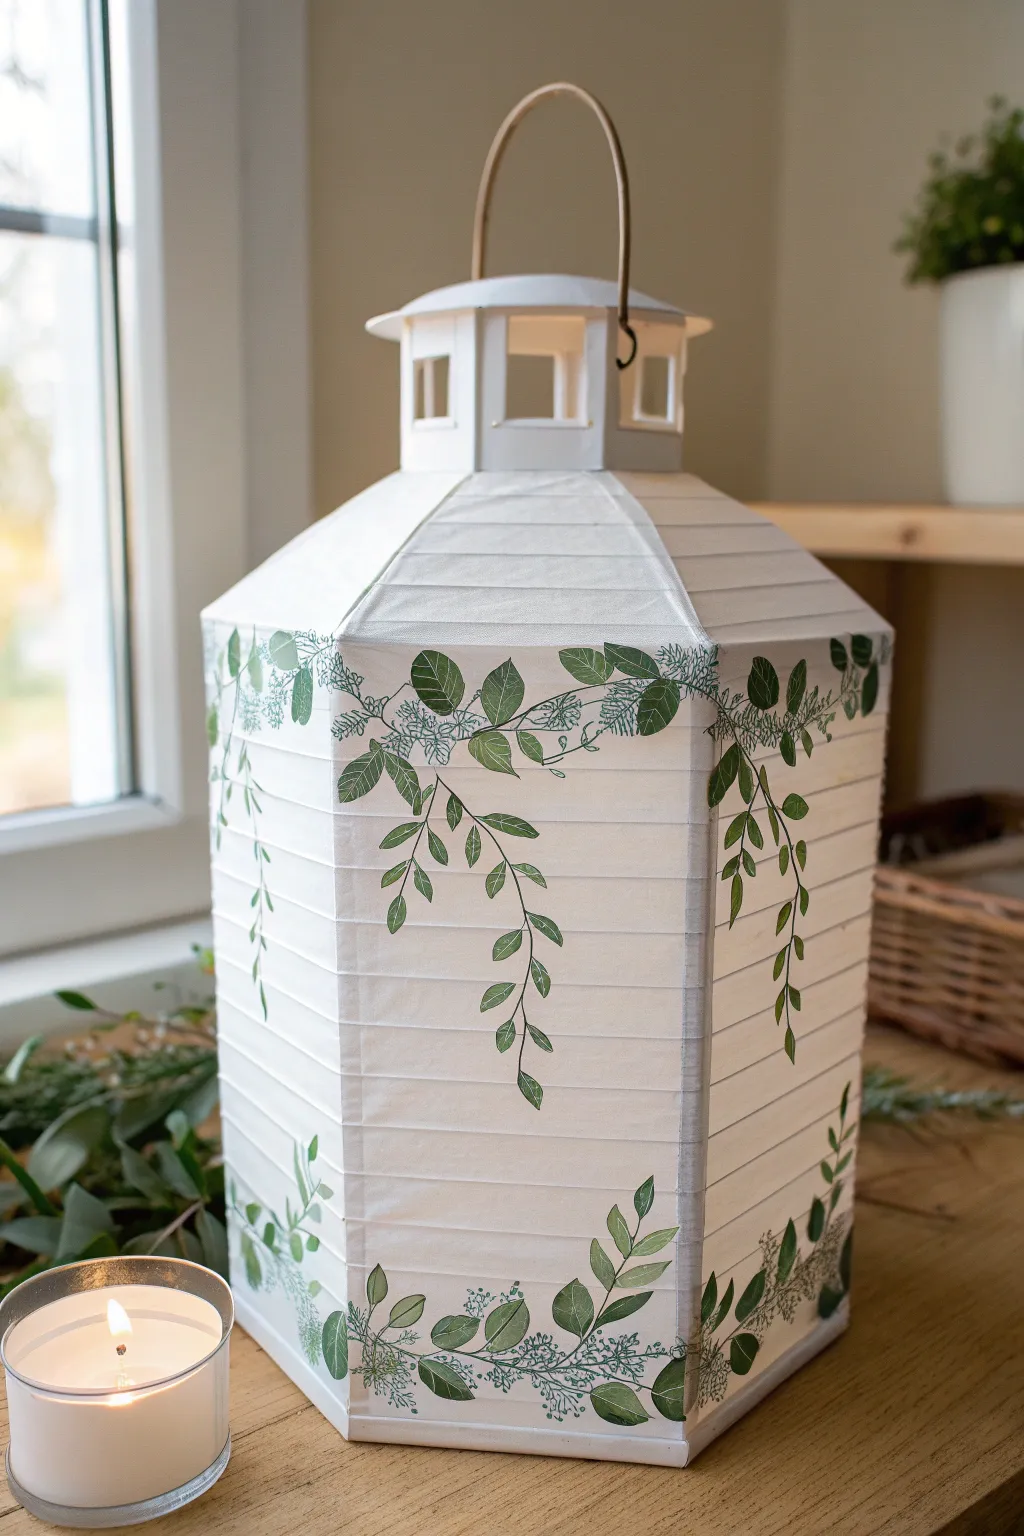
Transform a plain white paper lantern into a botanical beauty with this delicate trailing vine design. The soft greenery crawling along the edges creates an enchanting, garden-inspired glow perfect for cozy evenings.
Detailed Instructions
Materials
- White hexagonal paper lantern (with wire frame)
- Acrylic paints (Forest Green, Olive Green, White)
- Small round paintbrush (size 2 or 4)
- Fine liner brush (size 0 or 00)
- Fine-tip dark green or black permanent marker (optional)
- Palette for mixing
- Jar of water
- Paper towels
- Pencil (light H or HB)
Step 1: Preparation & Planning
-
Assemble the Lantern:
Begin by gently expanding the paper lantern and inserting the wire frame to hold its shape. Working on an expanded lantern is crucial so your painted design doesn’t warp later. -
Sketch the Vine Path:
Using a very light touch with your pencil, sketch a wavy, organic line around the upper perimeter of the lantern’s vertical panels. Let the line dip and rise naturally across the corners. -
Mark the Bottom Border:
Repeat the process for the bottom edge, creating a secondary vine path that mirrors the organic flow of the top line but stays lower to the ground. -
Establish Drooping Tendrils:
Lightly mark where you want your main drooping vines to fall. In the reference, these tendrils drape down from the top corners, reaching toward the center of the panels. Stagger their lengths for a natural look.
Paint Bleeding?
Paper lanterns are porous! If paint spreads, use less water and dab your brush on a paper towel before touching the surface. Dry-brushing works best.
Step 2: Painting the Foliage
-
Mix Your Base Green:
On your palette, mix a primary leaf color using Forest Green with a tiny touch of Olive Green to warm it up. Access to water is key here; you want the paint fluid enough to glide over the paper ridges but not so wet that it soaks through. -
Paint the Main Stems:
Using your fine liner brush, trace over your pencil guidelines to create the thin main stems. Keep your hand loose to avoid stiff, unnatural lines. -
Block in Larger Leaves:
Switch to the small round brush. Paint almond-shaped leaves attached to your main stems. Press down at the base of the leaf and lift as you pull away to create a tapered point. -
Add Drooping Vine Leaves:
Paint the leaves on the vertical drooping vines. These should be angled downwards, mimicking gravity’s pull on the foliage. -
Create Upward Growth:
For the bottom border, paint the leaves angling upwards. I like to make the bottom foliage slightly denser to visually ‘ground’ the lantern. -
Vary Leaf Sizes:
Ensure variety by painting some leaves large and others quite small. This size variation adds visual interest and realism to the botanical pattern.
Step 3: Adding Details & Depth
-
Add Lighter Accents:
Mix a lighter green by adding a drop of White to your original mixture. Paint thin veins on the larger dry leaves or add highlights to one side of the leaves to suggest a light source. -
Draw Delicate Sprigs:
Using the fine liner brush or a fine-tip marker, draw tiny, intricate branch structures between the solid painted leaves. These should be very fine, almost like sketches. -
Stipple Berry Clusters:
Dip the tip of a brush or a toothpick into the dark green paint. Add clusters of tiny dots at the ends of your fine sketching lines to resemble clusters of berries or buds. -
Connect the Gaps:
Step back and look for empty spaces. Add small curly tendrils or single floating leaves where the design feels too sparse, particularly around the corners of the hexagon. -
Refine Edges:
If any paint bled slightly into the paper ridges, use a barely-damp clean brush to gently feather the edge, turning the mistake into a soft shadow. -
Final Drying:
Allow the lantern to dry completely for at least an hour before moving it or adding a light source. The paper becomes fragile when wet, so patience is important.
Add Depth
For a 3D effect, paint a very thin line of dark green down the center of dry leaves, then add a tiny dot of white near the tip for a dewy look.
Place a battery-operated candle inside and watch your leafy garden glow warmly.
Breezy Ocean Waves and Seafoam
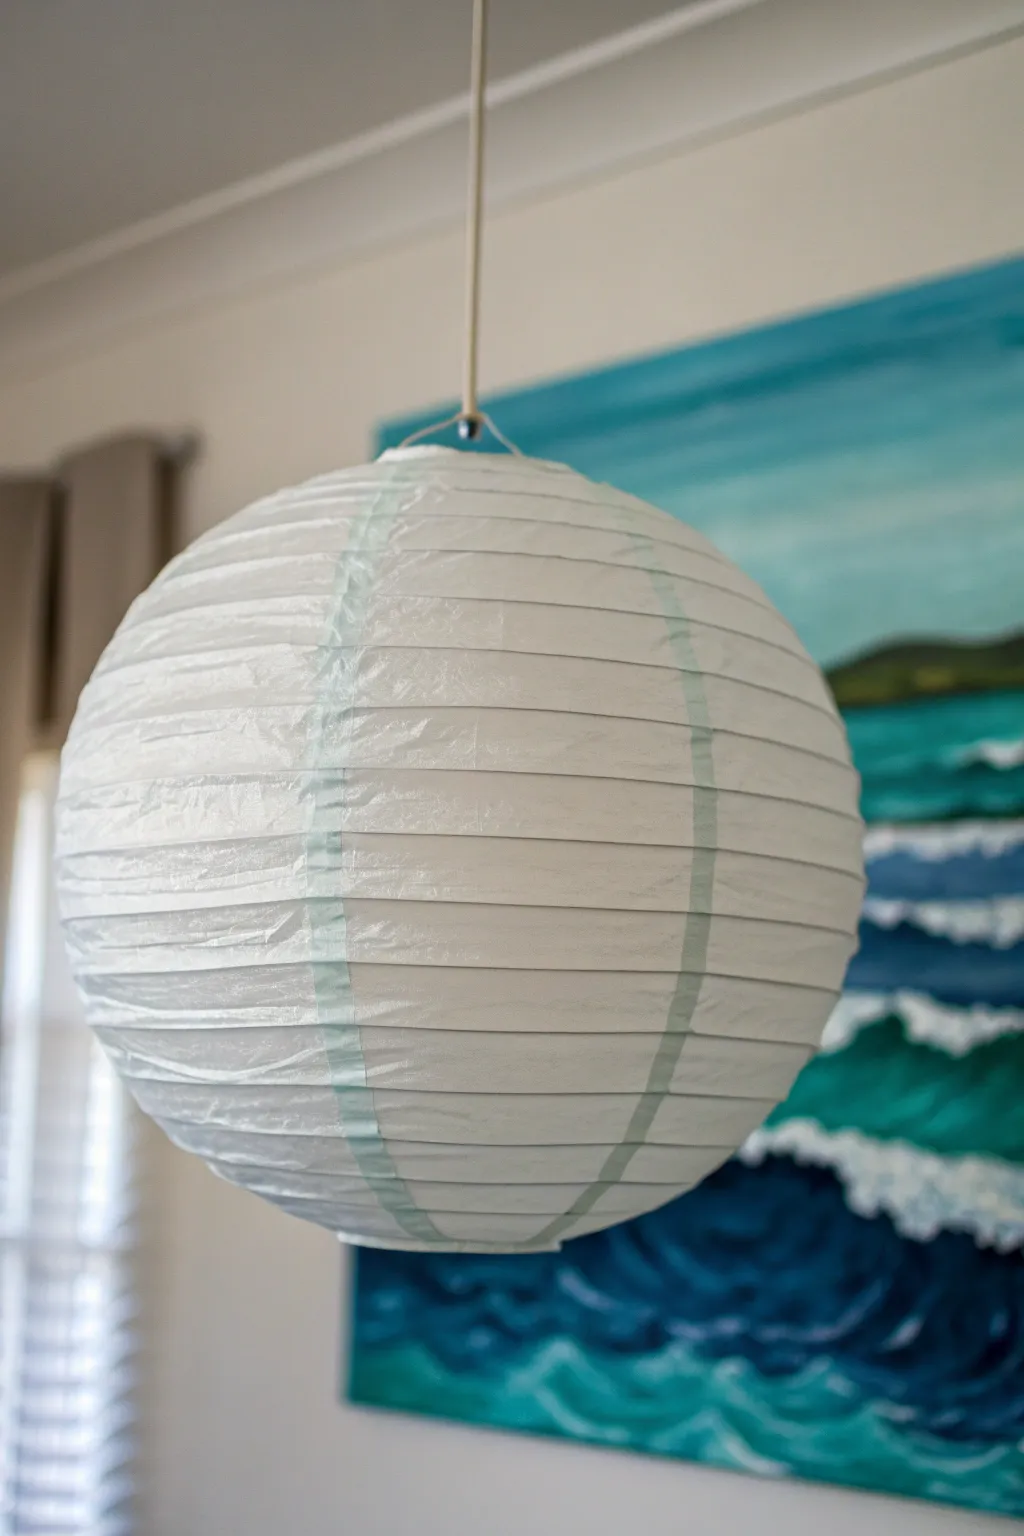
Bring the calming rhythm of the sea into your home with this subtly painted paper lantern. By using diluted watercolors or acrylics, you can create soft, translucent stripes that mimic sunlight filtering through shallow ocean water.
Step-by-Step Guide
Materials
- White paper lantern (12-inch or 16-inch diameter)
- Hanging cord kit or string
- Watercolor paints or fluid acrylics
- Colors: Pale teal, seafoam green, and soft blue
- Medium-sized soft round brush (size 6 or 8)
- Cup of water for rinsing and diluting
- Paper towels
- Palette or small mixing cups
- Newspaper or drop cloth to protect your workspace
Step 1: Preparation and Setup
-
Assemble the Lantern:
Begin by carefully expanding your paper lantern according to the package instructions. Insert the wire expander gently to hold its spherical shape, being careful not to tear the delicate tissue paper. -
Prepare Your Workspace:
These lanterns can roll easily, so I find it helpful to place the lantern in a large bowl or hang it from a low hook while I work. Lay down newspaper underneath to catch any potential drips. -
Mix Your Sea Palette:
In your palette or mixing cups, prepare your paint. You want a very watery consistency to maintain the lantern’s translucency. Mix a pale teal and a soft blue with a generous amount of water—think 80% water to 20% paint.
Water Control
Paper lanterns are delicate. Keep your brush damp, not dripping wet. If the paper starts to buckle or look grey, stop and let it dry before continuing.
Step 2: Painting the Vertical Bands
-
Test the Opacity:
Before touching the lantern, test your paint mixture on a scrap piece of paper or tissue. The color should be a whisper, not a shout. Add more water if the pigment looks too heavy. -
Determine Stripe Placement:
Locate the vertical structural wires inside the lantern. These natural ribs will serve as your guides. You will be painting along these vertical lines rather than horizontal ones. -
Start the First Stripe:
Load your brush with the pale teal mixture. Starting from the very top opening, gently drag your brush down along one of the vertical sections. Let the brush follow the curve of the lantern. -
Control the Flow:
Paper lanterns are absorbent. Use a light touch and don’t overload your brush, or the paper might become too soggy and tear. One smooth, continuous stroke is ideal. -
Alternate Sections:
Skip the next vertical section to keep the design airy. Move to the third section and paint another stripe. Painting every other section creates a balanced, striped look without overwhelming the white space. -
Switch Colors (Optional):
If you want depth, switch to your seafoam green or soft blue mixture for alternating stripes, or stick to a monochrome teal for a uniform look. The variation adds a lovely shimmering water effect. -
Complete the Globe:
Rotate the lantern carefully and continue painting the vertical stripes until you have circled the entire sphere. Ensure the lines meet neatly at the bottom opening.
Step 3: Adding Details and Finishing
-
Add Seafoam Highlights:
Once the base stripes are damp (but not soaking), you can add tiny touches of slightly darker pigment near the horizontal ribs of the lantern. This mimics the shadow of ripples on water. -
Dry Completely:
Allow the lantern to dry completely in a hanging position. Because the paper is thin, this usually only takes about 20-30 minutes. Do not collapse the lantern while it is wet. -
Inspect for Evenness:
Check your stripes. If any look too faint once dry, you can go over them with a second wash of color, but remember that the charm lies in the uneven, watercolor texture. -
Secure the Hardware:
Once fully dry, ensure the wire expander is seated correctly in the top loops. Attach your lighting cord or simply tie a string to the top wire if using it purely for decoration. -
Assess the Transparency:
Hold the lantern up to a light source. The painted areas should tint the light softly, casting a cool, aquatic glow rather than blocking the light entirely. -
Final Adjustments:
If you spot any major drips or mistakes, you can sometimes gently dab them with a clean, damp paper towel, though tissue paper is unforgiving, so embrace the imperfections. -
Hang and Enjoy:
Install the lantern in your chosen spot. Grouping these in odd numbers at varying heights creates a stunning coastal installation.
Ocean Ombré Upgrade
Create a gradient by making the mix darker at the bottom of the lantern and adding more water as you paint upward for a fading horizon effect.
Now your space will feel fresh and airy with this simple touch of coastal elegance

PENCIL GUIDE
Understanding Pencil Grades from H to B
From first sketch to finished drawing — learn pencil grades, line control, and shading techniques.
Explore the Full Guide
Cute Citrus Slice Lantern
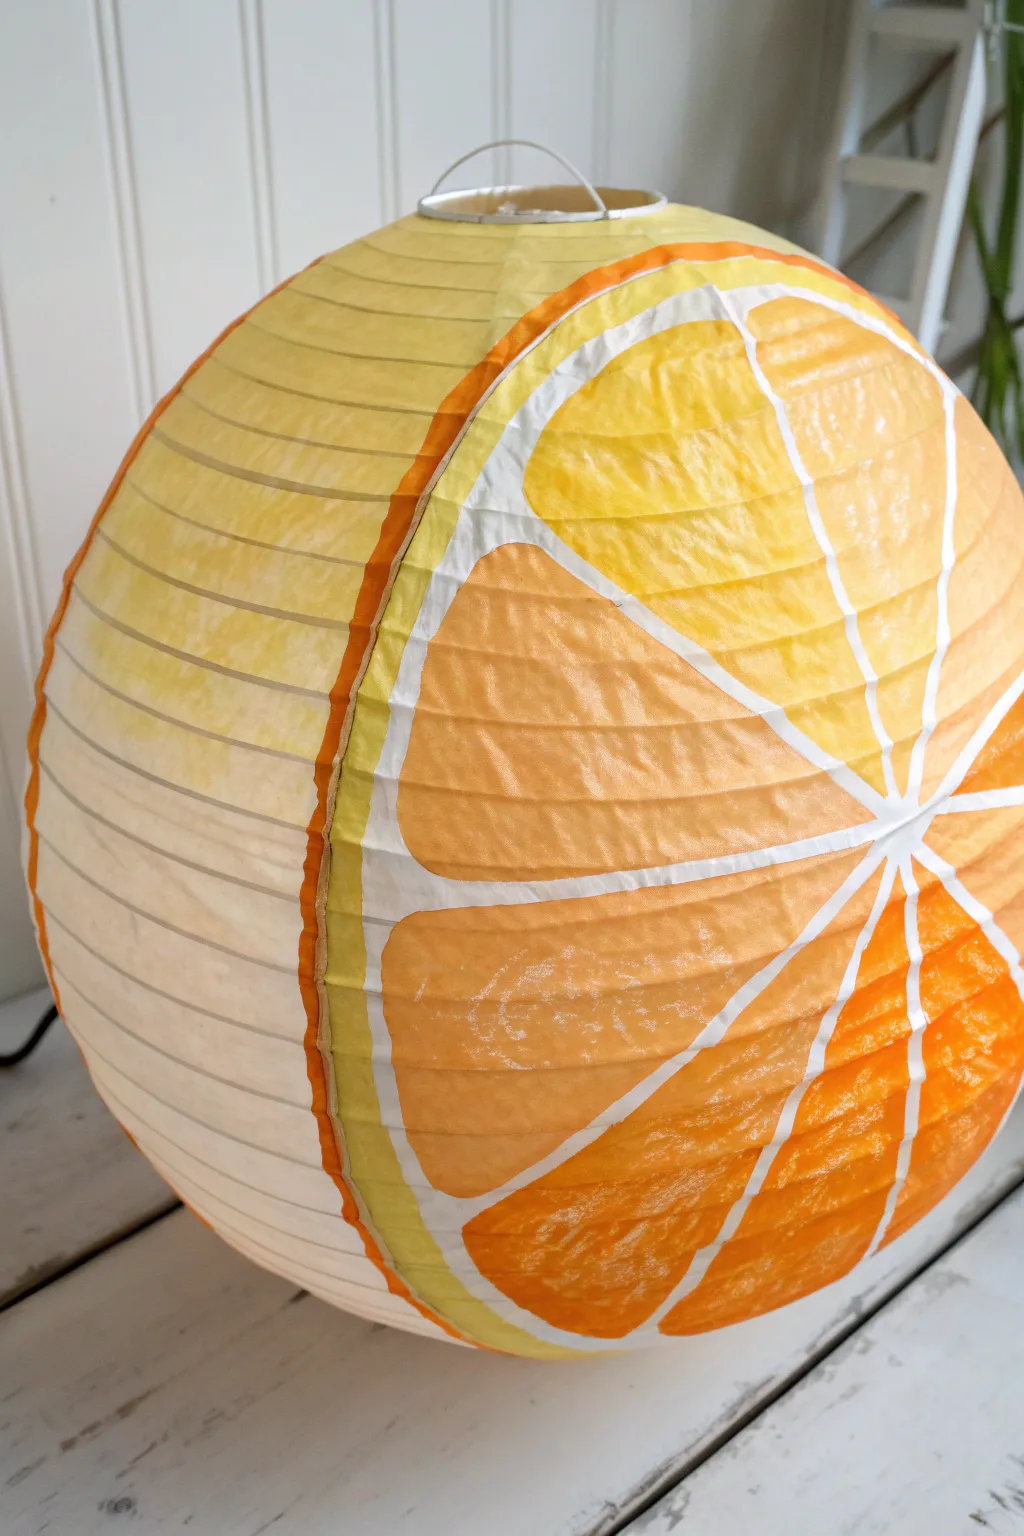
Brighten up any room or patio with this fresh and juicy paper lantern design that mimics a sliced orange. The clever use of negative white space creates the pith and segments, turning a simple white lantern into a vibrant summer decoration.
Detailed Instructions
Materials
- White paper lantern (round)
- Acrylic paints (bright orange, yellow, dark orange/red-orange)
- Medium flat paintbrush
- Small round detail brush
- Pencil
- Cup of water and paper towels
- String or hook for hanging while drying
Step 1: Setting the Composition
-
Expand the lantern:
Carefully insert the wire expander into your white paper lantern to give it its full round shape. Handle it gently, as the paper can be fragile. -
Mark the dividing line:
Using a pencil, draw a continuous line around the circumference of the lantern. This doesn’t have to be perfectly straight; a slightly organic curve makes it look more natural. -
Sketch the pith:
On one side of your dividing line, draw a second line parallel to the first, about half an inch away. This band will become the white pith between the skin and the fruit. -
Draw the center point:
Locate the approximate center of the ‘fruit’ side of the lantern and mark a small circle or star shape. This is where your segments will radiate from. -
Outline the segments:
Lightly sketch lines radiating from the center point out to the pith line, dividing the circle into 8-10 triangular wedges. Round the corners of each triangle slightly so they look like distinct juicy segments rather than sharp geometric shapes.
Step 2: Painting the Fruit Flesh
-
Mix your base orange:
Prepare a bright orange acrylic paint. If your orange is too dark, mix in a little yellow to keep it vibrant and translucent-looking. -
Fill the first segments:
Using your flat brush, paint the interior of one segment. Leave a clean strip of white paper between the paint and your pencil lines to represent the membrane. -
Create color variation:
While the paint is still wet, dip just the corner of your brush into yellow paint. Blend this into the inner part of the segment (near the center) to create a glowing gradient. -
Paint remaining segments:
Continue painting each wedge, alternating between pure orange and orange-yellow blends. I find that purposefully making some segments slightly darker adds realistic depth. -
Refine the edges:
Switch to your small round brush to tidy up the edges of the segments. The white gaps between them should remain crisp and unpainted.
Keep it transparent
Water down your acrylics slightly. Heavy paint blocks the light, but a wash lets the lantern glow beautifully when lit from within.
Step 3: Adding the Rind and Finish
-
Paint the dividing skin:
On the other side of your initial dividing line (the ‘skin’ side of the lantern), paint a solid band of dark orange right up to the pencil mark. -
Fill the skin side:
Paint the remainder of the lantern’s back half with a mix of orange and faint yellow streaks. The texture of the paper lantern naturally helps this look like citrus skin so avoid making it too opaque. -
Add the rind detail:
Mix a pale yellow-green or very light yellow. Carefully paint a thin line along the outer edge of your fruit segments, right next to the white pith area, to add a hint of refreshing tartness. -
Highlight the texture:
Once the segment paint is tacky but almost dry, dry-brush a tiny bit of white or pale yellow over the center of the largest segments to mimic the glistening juice sacs. -
Let it cure:
Hang the lantern in a safe place where it won’t touch anything. Let it dry completely for several hours before installing a light bulb.
Mix it up
Make a whole fruit bowl! Use bright yellow for lemons, electric green for limes, and ruby red for a pink grapefruit version.
Hang your new fruity creation near a window or patio light to enjoy its warm, citrusy glow all evening
Sunny Rainbow Bands With Soft Edges
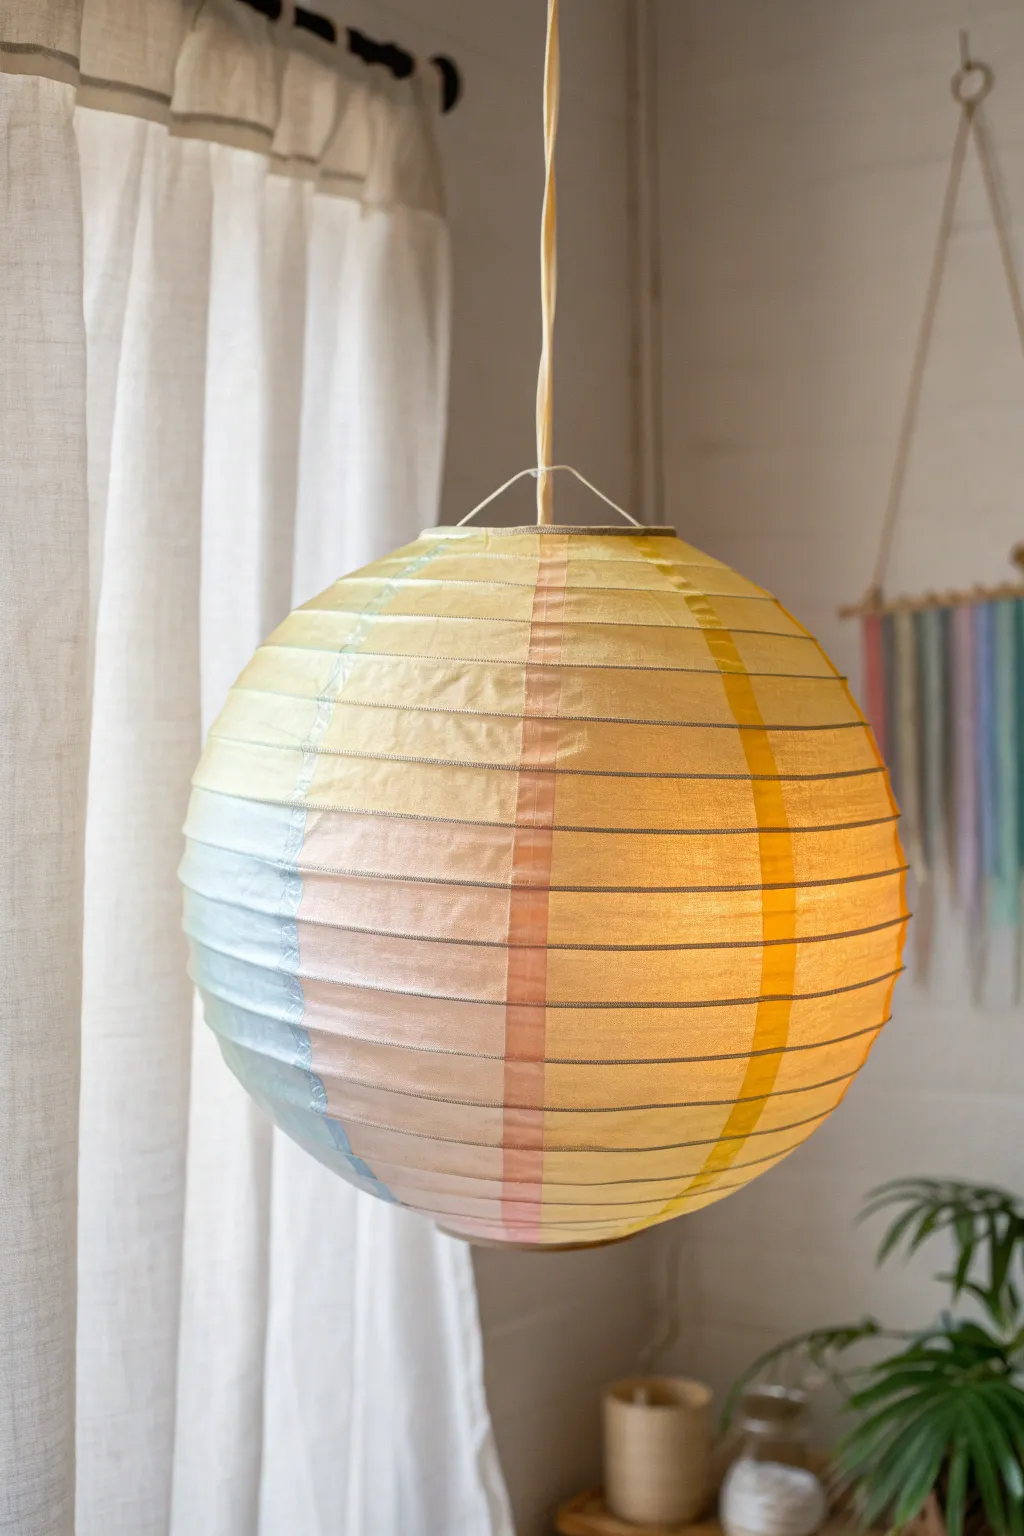
Bring a soft, cheerful glow to any room with this pastel-striped lantern project. By using watered-down acrylics or watercolors, you’ll create dreamy, translucent bands of color that gently overlap and blend for a seamless, sun-drenched effect.
Step-by-Step Guide
Materials
- White round paper lantern (approx. 12-16 inches)
- Watercolor paints or acrylic paint thinned with water
- Medium soft round brush
- Jar of clean water
- Paper towels
- Fishing line or string for hanging
- Drop cloth or newspapers
Step 1: Preparation
-
Assemble the lantern:
Carefully insert the wire expander into your paper lantern, ensuring it sits securely and the paper is touted but not ripping. -
Set up your workspace:
Hang the lantern at eye level using a string or fishing line in an area where you can walk around it freely. If that’s not possible, prop it securely on a bowl, but hanging is best for even painting. -
Mix your palette:
Prepare your paint colors. You will need a soft sky blue, a warm peach or blush pink, and a sunny yellow. If using acrylics, dilute them heavily with water until they have the consistency of watercolor ink.
Step 2: Painting the Bands
-
Test the consistency:
Before touching the lantern, test your paint on a scrap piece of paper. You want a wash that is transparent enough to let light through but pigmented enough to show color. -
Start with blue:
Load your brush with the blue wash. Choose a starting point near the top opening and paint a vertical stripe down to the bottom opening. -
Widen the stripe:
Make this blue band a few inches wide. Don’t worry about perfect straight lines; the charm lies in the slightly organic, soft edges. The paint will naturally wick into the paper fibers slightly. -
Feather the edges:
Dip your brush in clean water and lightly run it along the vertical edges of your blue stripe to soften the transition line so it isn’t stark. -
Apply the peach tone:
Clean your brush thoroughly. Pick up the peach or pink wash and paint a vertical stripe directly next to the blue one. -
Create the blend:
Allow the peach stripe to slightly overlap the wet edge of the blue stripe. The paper will help the colors bleed into each other, creating a subtle, mixed transition hue. -
Continue downward:
Ensure the peach stripe goes all the way from the top rim to the bottom rim, maintaining a relatively consistent width similar to the blue band. -
Add the yellow band:
Clean your brush again and load up the yellow wash. Apply this band next to the peach one, again allowing for a slight overlap to create a warm orange glow where they meet. -
Repeat the pattern:
Continue painting vertical stripes around the circumference of the lantern. You can repeat the blue-peach-yellow pattern, or introduce variations in width for a more playful look. -
Watch for drips:
Because the paint is watery, keep an eye out for drips running down the lantern. I like to keep a paper towel in my non-painting hand to quickly dab away excess moisture before it streaks.
Sagging Paper?
If the paper sags or wrinkles excessively while wet, stop painting. Let that section dry completely; the paper usually tightens back up as the water evaporates.
Step 3: Finishing Touches
-
Check for gaps:
Rotate the lantern slowly. If you see any stark white gaps between colors that look unintentional, use a slightly damp clean brush to pull color from the adjacent stripes into the white space. -
Let it dry completely:
Paper lanterns become fragile when wet. Leave the lantern hanging undisturbed for at least 2-3 hours until the paper is crisp to the touch again. -
Install the light:
Once fully dry, you can install your light kit or hang it as a purely decorative object. The transparency of the watercolor style looks particularly beautiful when illuminated from within.
Add Texture
Mix a tiny amount of iridescent medium into your paint washes. It adds a subtle shimmer that catches the light beautifully when the lantern is turned on.
Hang your new colorful creation near a window or light source to enjoy the warm, translucent colors all day long


Night-Sky Starfield and Dots
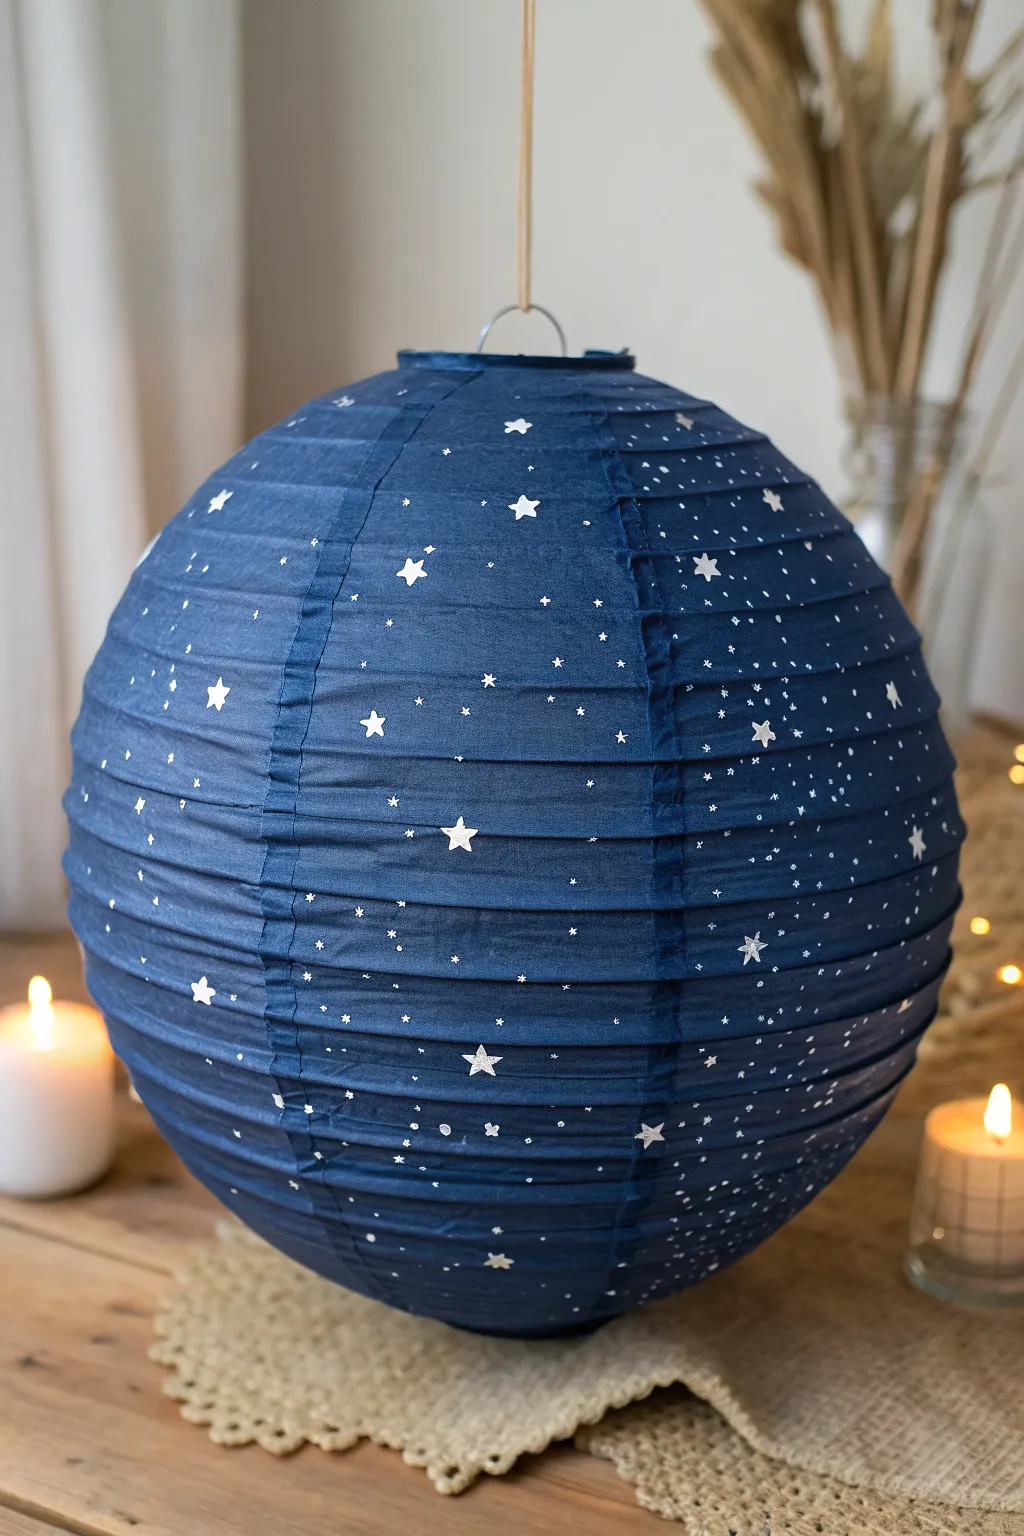
Transform a plain paper lantern into a stunning piece of the cosmos with this simple yet impactful painting project. The deep blue background contrasted with shimmering silver stars creates a magical atmosphere perfect for bedrooms or cozy gatherings.
Step-by-Step
Materials
- Dark blue spherical paper lantern (roughly 12-16 inches)
- Acrylic paint: Navy or Midnight Blue (if the lantern isn’t pre-colored)
- Metallic silver acrylic paint or paint pen
- Fine detail paintbrush (size 0 or 00)
- Small flat paintbrush (size 4 or 6)
- Star stencil (optional)
- Toothpick or dotting tool
- Fishing line for hanging
- LED lantern light (battery operated)
Step 1: Preparation and Base Coat
-
Assemble the structure:
Begin by gently expanding the paper lantern and inserting the metal wire frame. This keeps the surface taut, which is crucial for painting clean lines without collapsing the paper. -
Protect your workspace:
Lay down newspaper or a drop cloth. Suspended painting is easiest, so try hanging the lantern from a hook or clothesline at eye level if possible. This prevents smudging wet paint. -
Inspect the color:
If you bought a pre-colored dark blue lantern, you can skip to the decorations. If you have a white lantern, mix a deep midnight blue acrylic paint. -
Paint the background (if needed):
Apply the dark blue paint with a flat brush. Use horizontal strokes that follow the grain of the paper ribs. Work in thin layers to avoid saturating and tearing the delicate paper. -
Let it dry completely:
Wait at least one hour for the base coat to dry. The paper will feel cool to the touch if it is still damp. Do not rush this, or the silver stars will bleed into the blue.
Star Shape Struggles?
If painting 5-pointed stars is tricky, try ‘north star’ shapes: paint a simple cross, then add smaller diagonal lines in the center. It’s easier and looks very celestial.
Step 2: Painting the Constellations
-
Plan your major stars:
Visualize where your largest stars will go. You want them scattered randomly, not in a grid. Aim for about 10-15 large focal stars across the entire surface. -
Paint the big stars:
Dip your fine detail brush into metallic silver paint. Paint five-pointed stars freehand for a charming, organic look. If you aren’t confident, lightly trace a small stencil with a pencil first. -
Fill in the stars:
Use the silver paint to fill the star shapes. You may need a second coat of silver once the first dries to ensure they pop against the dark background. -
Add medium stars:
Between the large stars, paint slightly smaller four or five-pointed stars. These add depth to your galaxy and shouldn’t be as detailed as the focal ones. -
Create distant stars:
Dip the very tip of your brush or a toothpick into the silver paint. Gently touch the lantern surface to create distinct dots. -
Vary dot sizes:
Cluster some tiny dots together to mimic the Milky Way, while leaving other areas sparser. I find that varying the pressure on the dotting tool creates a nice variety of ‘distances’ for these stars.
Step 3: Finishing Touches
-
Check for balance:
Step back and spin the lantern slowly. Look for any large empty patches of blue that look unnatural and fill them with a few extra tiny specks. -
Dry the details:
Allow the metallic paint to fully cure. This usually takes about 30 minutes, but check your bottle’s instructions. -
Seal the deal (Optional):
If this will be hung outside or near a window, you can lightly mist it with a matte clear acrylic sealer spray to protect the paper from fading. -
Add illumination:
Insert the battery-operated LED light onto the hook of the wire frame inside. Avoid real candles as they are a fire hazard with paper. -
Hang it up:
Tie fishing line to the top metal bracket for an ‘invisible’ floating look and suspend your personal galaxy.
Make It Sparkle
While the silver paint is still wet on the largest stars, sprinkle a tiny pinch of fine silver glitter over them. Shake off the excess once dry for a true twinkle effect.
Now you have a mesmerizing piece of sky to light up your evening
Moody Galaxy Gradient With Splatter
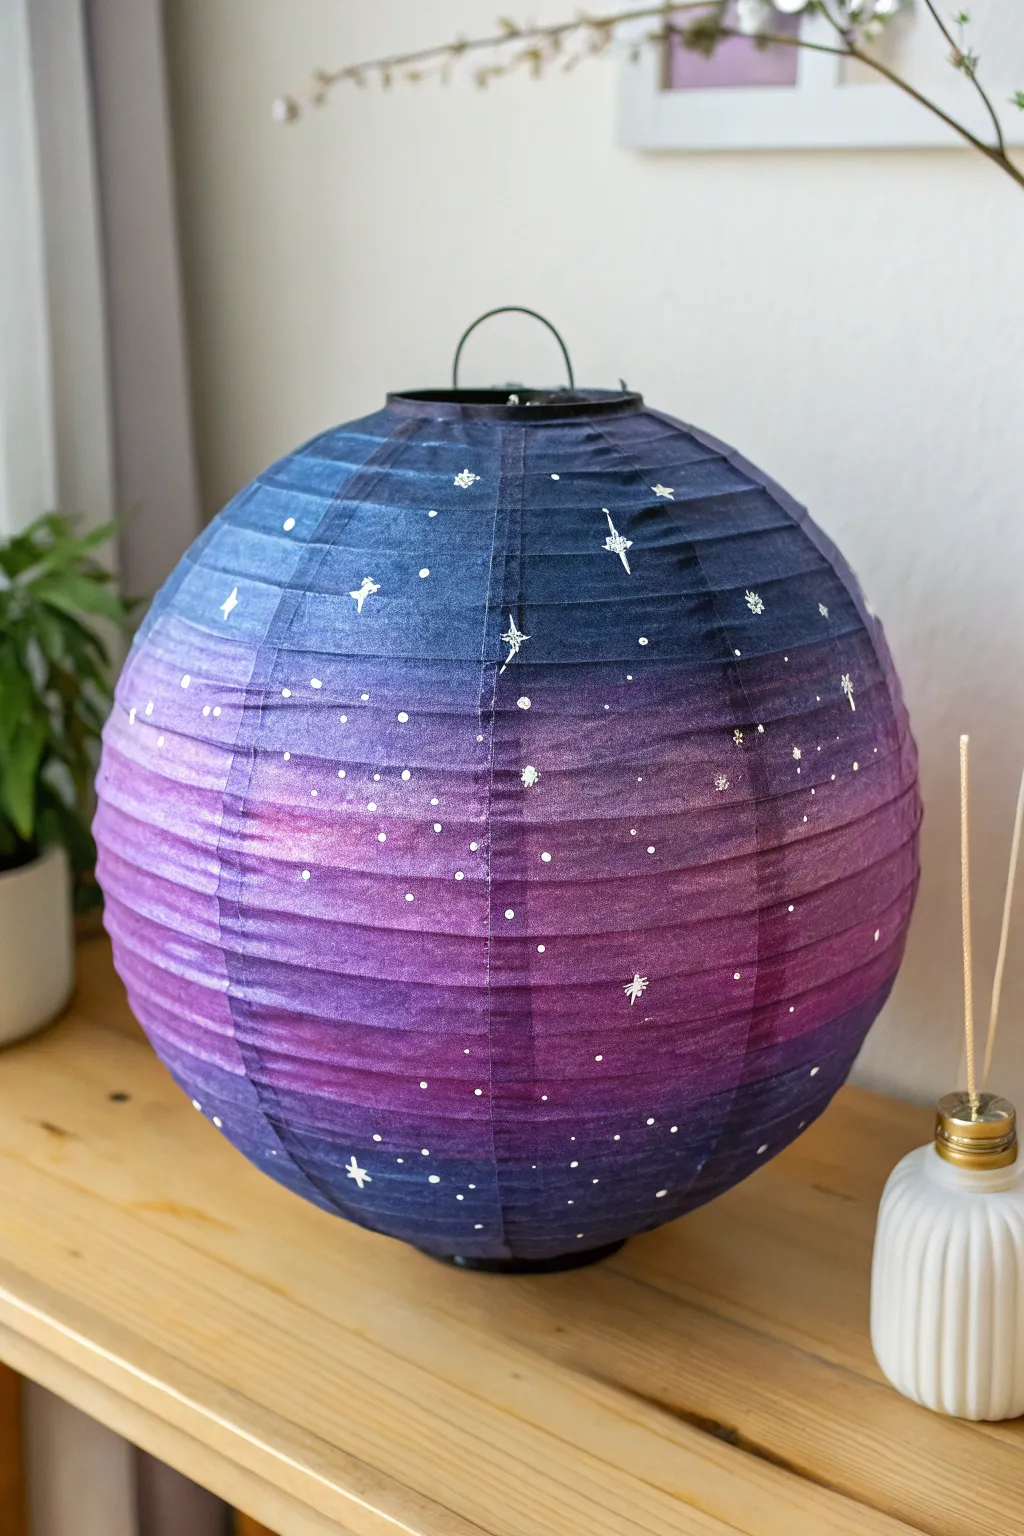
Transform a plain paper lantern into a dreamy piece of the cosmos with this moody galaxy gradient. The deep indigo and violet hues blend seamlessly to create a backdrop for hand-painted twinkling stars.
How-To Guide
Materials
- White round paper lantern (approx. 12-16 inches)
- Watercolor paints or diluted acrylics (Deep Navy, Violet, Magenta, Black)
- White acrylic paint or gouache
- Large soft wash brush or sponge brush
- Fine detail brush (size 0 or 1)
- Small round brush (size 4)
- Water cups
- Paper towels
- Spray bottle with water (optional)
Step 1: Setting the Atmosphere
-
Prepare your workspace:
Since you will be working with watery paints, cover your table with a drop cloth or old newspapers. Fully expand the lantern and insert the wire expander frame inside so it holds its round shape taut while painting. -
Mix your base colors:
Prepare three distinct puddles of paint on your palette: a deep navy blue (add a touch of black if needed), a rich violet, and a brighter magenta-pink. Dilute these with water until they have an ink-like consistency that will soak into the paper but still hold vibrant color. -
Paint the poles:
Starting at the very top opening of the lantern, apply the darkest navy blue using your large wash brush. Paint a ring roughly 3-4 inches wide. Repeat this same dark ring at the very bottom opening of the lantern. -
Add the mid-tones:
Clean your brush and switch to the violet shade. Paint a band below the top navy section and above the bottom navy section. While the paint is still wet, gently overlap it with the navy edge to encourage a soft bleed between the colors. -
Create the glowing center:
Fill in the remaining central band of the lantern with your magenta or lighter purple mix. This lighter strip creates the ‘glow’ effect of the galaxy. -
Blend the gradient:
With a clean, slightly damp brush, lightly stroke over the areas where the colors meet. The paper is porous, so the colors should naturally wick together. If you see hard lines, a tiny mist of water from a spray bottle can help soften transitions. -
Deepen the shadows:
Once the first layer is touch-dry, go back in with your darkest navy (mixed with a little black) and darken just the very top and bottom rims again to add more dimension and contrast. -
Dry completely:
It is crucial to let the lantern dry fully before moving to the stars. The paper will be fragile while wet. Hang it up if possible to speed up the process.
Uneven Blending?
If the paper dries too fast creating hard lines, re-wet the edge slightly with a clean damp brush and add a fresh drop of wet paint to reactivate the bleed.
Step 2: Painting the Constellations
-
Prepare the stars:
Squeeze out a small amount of opaque white acrylic paint. Do not dilute this too much; you want it to sit on top of the dark colors without becoming transparent. -
Paint larger stars:
Using your fine detail brush, paint 5-7 four-pointed star shapes scattered randomly around the upper and lower dark sections. These are your ‘hero’ stars. -
Add medium dots:
Switch to a slightly larger round brush or the back end of your paintbrush handle. Dip it in white paint and dot it firmly onto the surface to create distinct, round planets or larger distant stars. -
Create the Milky Way dust:
Dip an old toothbrush or a stiff bristle brush into watered-down white acrylic. Run your thumb over the bristles to flick tiny speckles onto the lantern. Focus these speckles heavily in the transition zones between purple and blue. -
Refine the details:
Look for empty patches that feel unbalanced. Add tiny hand-painted dots with your detail brush to fill gaps without overcrowding the design. -
Illuminate the center:
Add just a few very small white dots to the lighter magenta center band. Keeping the stars sparse here helps maintain the illusion that this area is a glowing gas cloud. -
Final dry:
Allow the white paint to dry completely. Once dry, you can remove the wire frame if you need to store it flat, or hang it immediately to enjoy your work.
Lighting Tip
Use a cool-toned LED bulb inside. The bluish light will enhance the galaxy colors better than a warm yellow bulb, which might make the purples look muddy.
Now you have a stunning piece of night sky to hang in your room
Modern Geometric Color Blocks
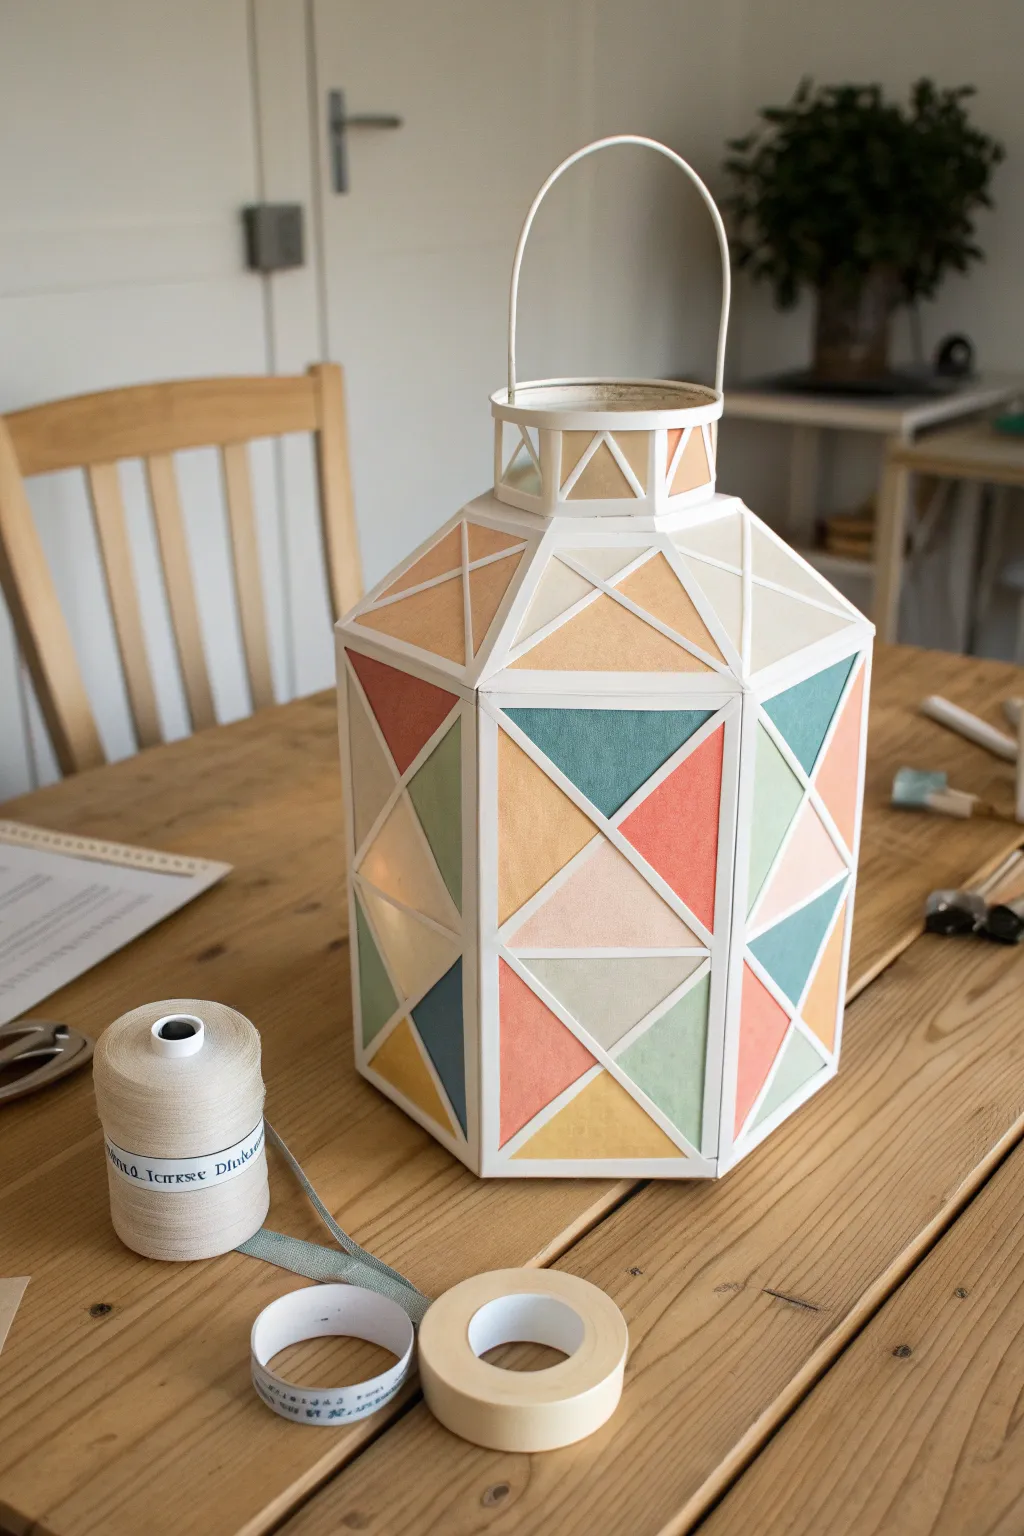
Transform plain cardstock and vellum into a sophisticated light feature with this tiered geometric design. The soft, dusty palette of peach, teal, and sage creates a modern yet cozy glow suitable for any room.
Step-by-Step Guide
Materials
- White heavyweight cardstock (approx. 300gsm)
- Vellum paper or translucent tracing paper
- Self-healing cutting mat
- Craft knife (X-Acto)
- Metal ruler
- Bone folder
- Tacky glue or strong double-sided tape
- Acrylic paints (peach, teal, sage green, dusty yellow, white)
- Flat shader paintbrush
- Palette
- Needle and strong thread (for handle mechanism)
- Pencil
Step 1: Planning and Cutting the Frame
-
Design the template:
Begin by sketching your template on paper first. You need a hexagonal base structure. The main body consists of six rectangular panels that taper slightly at the top, and six matching triangular roof panels. -
Add the frame details:
Draw an ‘X’ shape inside each rectangular panel to create four triangular openings per side. Add a 5mm border around all edges to create the structural frame. -
Transfer to cardstock:
Once your template is finalized, transfer the design onto your heavyweight white cardstock. You will need six main body panels, six roof triangles, and a smaller hexagonal collar for the very top. -
Cut the openings:
Using a sharp craft knife and a metal ruler, carefully cut out the triangular ‘window’ negative spaces. Leave the white framework intact. -
Cut the exterior shape:
Cut around the outside perimeter of your panels. Don’t forget to include glue tabs on the vertical edges of your panels so they can be assembled later. -
Score the folds:
Use a bone folder and ruler to score all fold lines—specifically where panels join (if cut as one piece) or where the glue tabs bend. This ensures crisp, professional corners.
Wrinkled Vellum?
If acrylic paint buckles the paper too much, switch to alcohol markers or high-flow fluid acrylics for a smoother, flatter color application on delicate vellum.
Step 2: Preparing the Color Panels
-
Trace vellum inserts:
Lay your cardstock frame over the vellum paper. Trace the triangular openings, adding a small margin (about 3-4mm) around each triangle so you have space to glue it behind the frame. -
Cut the vellum:
Cut out all the individual vellum triangles. You will need enough to fill every opening in your lantern frame. -
Mix your palette:
Prepare your acrylic paints. I prefer mixing a little white into standard colors to achieve that matte, chalky pastel look seen in the photo. Aim for a palette of dusty peach, muted teal, soft yellow, and sage. -
Paint the vellum:
Paint the vellum triangles. Applying paint to vellum can cause curling, so use thin, even coats. Allow the first layer to dry completely before deciding if a second coat is needed for opacity. -
Flatten the pieces:
If the painted vellum pieces have curled, place them under a heavy book between sheets of baking paper for an hour to flatten them back out.
Pro Tip: Clean Lines
Paint the vellum on the ‘back’ side only. When viewing from the front, the unpainted glossy vellum texture will show, giving a cleaner, glass-like finish.
Step 3: Assembly
-
Attach the panes:
Apply a thin line of tacky glue to the *back* of the cardstock frame around a window opening. Press the corresponding colored vellum piece in place. -
Vary the pattern:
As you glue, alternate your colors intentionally to create the geometric block effect. Try not to have two identical colors touching directly. -
Construct the hexagonal tube:
Once all windows are filled and dry, fold the main body panels along the scored lines. Apply strong adhesive to the vertical tabs and connect the six sides to form the hexagonal cylinder. -
Assemble the roof:
Repeat the gluing process for the angled roof section and the top collar. Attach the roof section to the top of the main body cylinder. -
Add the collar:
Secure the smaller hexagonal collar to the top opening of the roof. This adds a finished, architectural look. -
Create the handle:
Cut a strip of cardstock for the handle loops. Use a needle to burnish a curve into it so it arches gracefully. -
Final attachment:
Attach the handle to the inside of the top collar using strong glue or small brads. Ensure it stays upright and centered.
Place a battery-operated LED candle inside to see your colors illuminate the room softly
Sweet Scallop Pattern Around the Globe
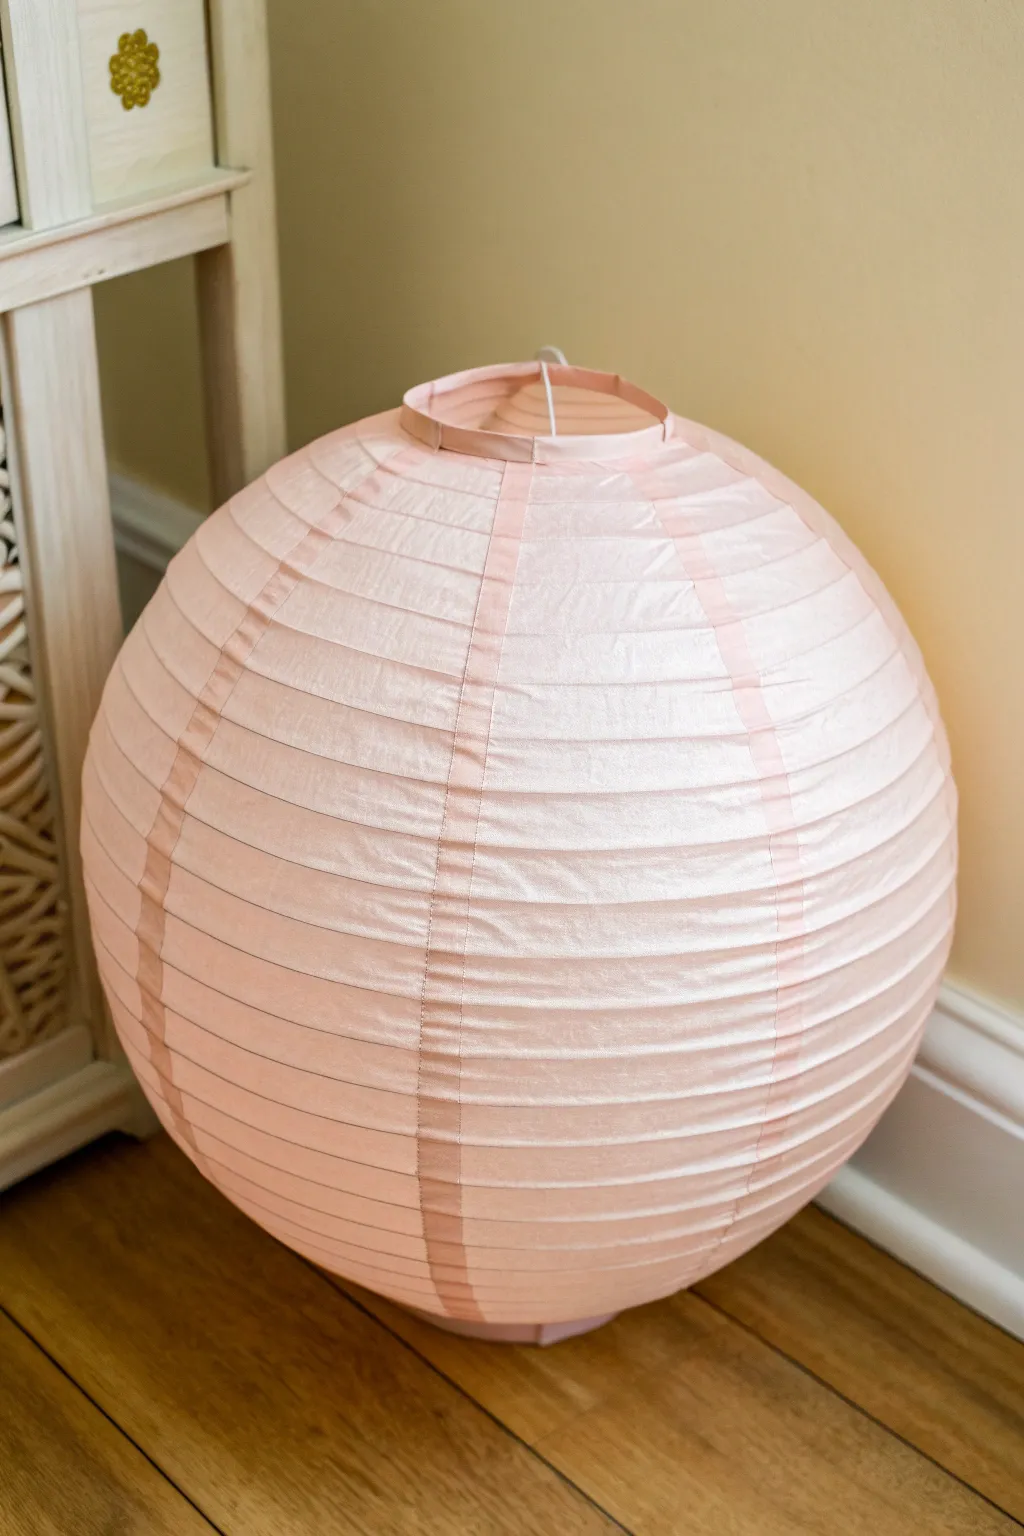
Transform a plain paper lantern into a sophisticated decor piece with bands of shimmering pearl paint. This project uses the lantern’s natural structure to create a gentle, segmented look that glows beautifully when lit.
Detailed Instructions
Materials
- Large round paper lantern (light pink or peach)
- Pearlized or metallic acrylic paint (champagne or soft pink)
- Wide flat paintbrush (1-inch width)
- Pencil (H or HB)
- Flexible measuring tape
- String or fishing line for hanging
- Paper plate or palette
- Damp cloth for clean-up
Step 1: Preparation and Planning
-
Expand the lantern:
Carefully insert the metal expander into your paper lantern according to the package instructions. Ensure the paper is taut and the shape is fully round before you begin working. -
Identify the segments:
Look closely at the top and bottom openings of the lantern. You will see the wire ribs spiraling horizontally, but for this design, we are focusing on creating vertical divisions. Decide how many vertical bands you want; usually, six or eight evenly spaced bands work best for a standard globe. -
Mark your guide points:
Using a flexible measuring tape, measure the circumference of the top opening. Mark even intervals with a pencil where your vertical stripes will begin. -
Repeat on the bottom:
Flip the lantern over and repeat the measuring and marking process on the bottom opening, ensuring these marks align vertically with the top marks as best as possible.
Uneven Stripes?
If your hand shakes, use two strips of painter’s tape to mark out the vertical channels before painting. Peel the tape off while the paint is still wet to avoid tearing the delicate paper.
Step 2: Painting the Vertical Bands
-
Load your brush:
Squeeze a generous amount of pearlized paint onto your palette. Dip your wide flat brush in, ensuring the bristles are coated but not dripping. -
Start the first stripe:
Begin at one of your top pencil marks. Place the brush flat against the paper surface and pull a straight line downward. I like to paint about 3-4 inches at a time to maintain control. -
Follow the curve:
Continue the line down the curve of the lantern. Don’t worry if the line isn’t perfectly straight; the goal is to follow the spherical shape naturally. -
Connect to the bottom:
Paint all the way to the corresponding mark on the bottom opening. The stripe should look like a segment of an orange. -
Refine the edges:
Go back over the stripe you just painted. Use the edge of the brush to tidy up the sides, ensuring the width is consistent all the way down—roughly the width of your brush. -
Paint opposite sides:
To keep the design balanced, rotate the lantern and paint the stripe directly opposite the one you just finished. This helps you gauge symmetry better than working strictly clockwise. -
Fill in remaining stripes:
Continue painting the remaining vertical bands based on your initial pencil marks. You should end up with a cage-like effect of shimmering stripes over the matte paper.
Pro Tip: Sheer Glaze
Mix your acrylic paint with a textile medium or water (1:1 ratio) to create a semi-transparent glaze. This lets more light filter through the painted strips for a softer glow.
Step 3: Adding the Scallop Detail
-
Understand the texture:
The paper lantern has natural horizontal wire ridges. The paint you applied will saturate the paper slightly, highlighting these ridges. -
Enhance the segments:
For a deeper effect, apply a second, slightly thinner coat of paint over the vertical stripes. As you paint, press just a tiny bit harder over the horizontal wire ribs. -
Check for opacity:
Hold the lantern up to a light source. Ideally, the painted stripes should be slightly more opaque than the unpainted sections, creating a lovely contrast when illuminated. -
Clean the distinct lines:
If any paint has strayed into the unpainted sections, quickly wipe it with a barely damp cloth or use a clean brush with a tiny bit of water to feather it out so it disappears. -
Let it cure:
Allow the lantern to hang freely to dry completely. This usually takes about an hour, depending on humidity.
Hang your new lantern and enjoy the soft, segmented glow it adds to your room
Bold Tropical Leaf Silhouettes
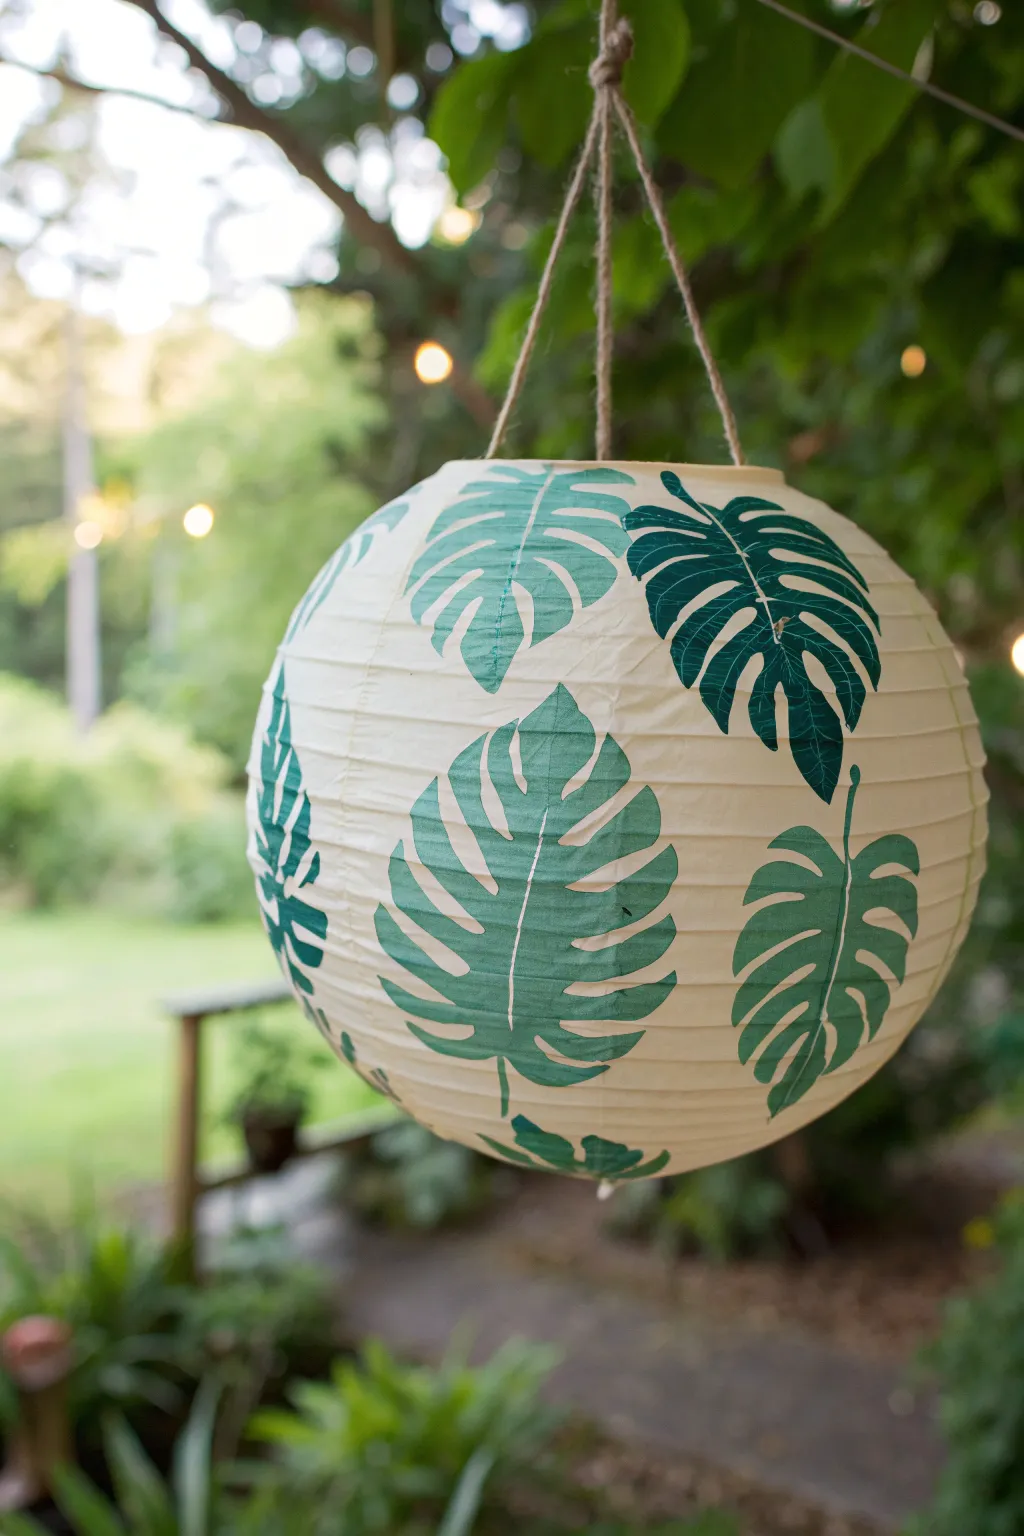
Transform a plain paper lantern into a tropical canopy with these striking Monstera leaf patterns. This project uses bold green acrylics to create a fresh, botanical look that floats effortlessly in your outdoor space.
How-To Guide
Materials
- White or cream paper lantern (medium to large size)
- Acrylic craft paint (Dark Hunter Green)
- Acrylic craft paint (Medium Leaf Green)
- Pencil
- Cardstock or heavy paper
- Scissors
- Medium round paintbrush
- Small liner paintbrush for details
- Twine or string for hanging
- Palette or paper plate
- Protective work surface
Step 1: Preparation & Template
-
Prepare your workspace:
Begin by expanding your paper lantern fully and inserting the wire frame expander essential for holding its round shape. Tie a piece of string to the top hook and hang it at eye level in a well-lit area, so you can paint all sides easily without smearing wet paint. -
Draft the leaf shape:
Sketch a simple Monstera leaf shape on a piece of cardstock. Focus on the iconic heart shape with a few deep notches or splits cut into the sides. Aim for a size that will fit about 3-4 times vertically on the lantern. -
Cut the template:
Cut out your leaf sketch carefully to create a reusable stencil. If you want variety, I find it helpful to create two templates: one slightly larger and one smaller to create a natural, organic distribution. -
Plan the layout:
Lightly hold the template against the lantern to visualize spacing. You want the leaves to be scattered randomly, rotating their orientation so they don’t look like a uniform grid.
Paint Consistency
Don’t thin your acrylics with water, as the thin lantern paper can warp or tear when too wet. Keep the paint creamy and fairly dry.
Step 2: Tracing & Outlining
-
Trace the leaves:
Using a soft pencil, lightly trace around your cardstock template directly onto the paper lantern. Be very gentle, as the lantern paper is delicate and can tear if you press too hard. -
Add detail lines:
Once the outline is traced, freehand a curved line down the center of each leaf to represent the main vein. This will act as a guide when painting. -
Continue tracing:
Move around the sphere, tracing leaves at different angles. Leave some white space between them to let the lantern’s glow shine through later. -
Mix your colors:
Pour your dark hunter green and leaf green paints onto the palette. You can use them straight from the tube or mix a little white into the lighter green to increase the contrast between the two shades.
Step 3: Painting the Foliage
-
Outline in dark green:
Load your small liner brush with the darker green paint. Carefully paint over your pencil outlines on the first leaf to define the crisp edges. -
Fill the dark leaves:
Switch to the medium round brush and fill in the interior of the leaf. Use long, smooth strokes that follow the curve of the leaf shape. Paint right over the horizontal wire ribs of the lantern, ensuring the paint gets into the crevices near the wire. -
Create color variation:
For the next leaf, use your lighter leaf green shade. Alternating between dark and light leaves creates depth and prevents the design from looking flat. -
Paint the stems:
Using the liner brush again, paint thin, curving stems extending from the base of each leaf. Let the stems trail off naturally or connect to an imaginary vine. -
Add vein details:
If you want extra detail, paint a very thin line in a contrasting green (light on dark leaves, dark on light leaves) down the center vein line you sketched earlier. -
Refine the edges:
Check your edges for any unevenness. The paper ribs can sometimes cause the brush to jump, so use the small brush to neatening up the points and notches of the leaves. -
Rotate and dry:
Rotate the hanging lantern as you work to reach blank spots. Be mindful of your hand placement so you don’t touch wet leaves. -
Final touches:
Step back and look for any large gaps. You can fill small empty spaces with tiny freehand leaves or simple vine tendrils to balance the composition.
Jungle Glow
Paint the inside of the lantern with a very sheer wash of yellow paint. When lit, it gives a warm, sunny glow to your tropical leaves.
Step 4: Finishing Up
-
Let it cure:
Allow the lantern to hang undisturbed for at least 2-3 hours until the paint is completely dry to the touch. -
Secure the hanger:
Attach a piece of rustic twine to the top wire support for hanging. A sturdy knot here ensures your artwork stays safe.
Hang your new botanical masterpiece on a porch or near a window and enjoy the tropical atmosphere
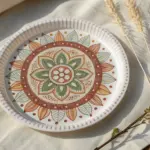
Detailed Mandala Rings on the Equator
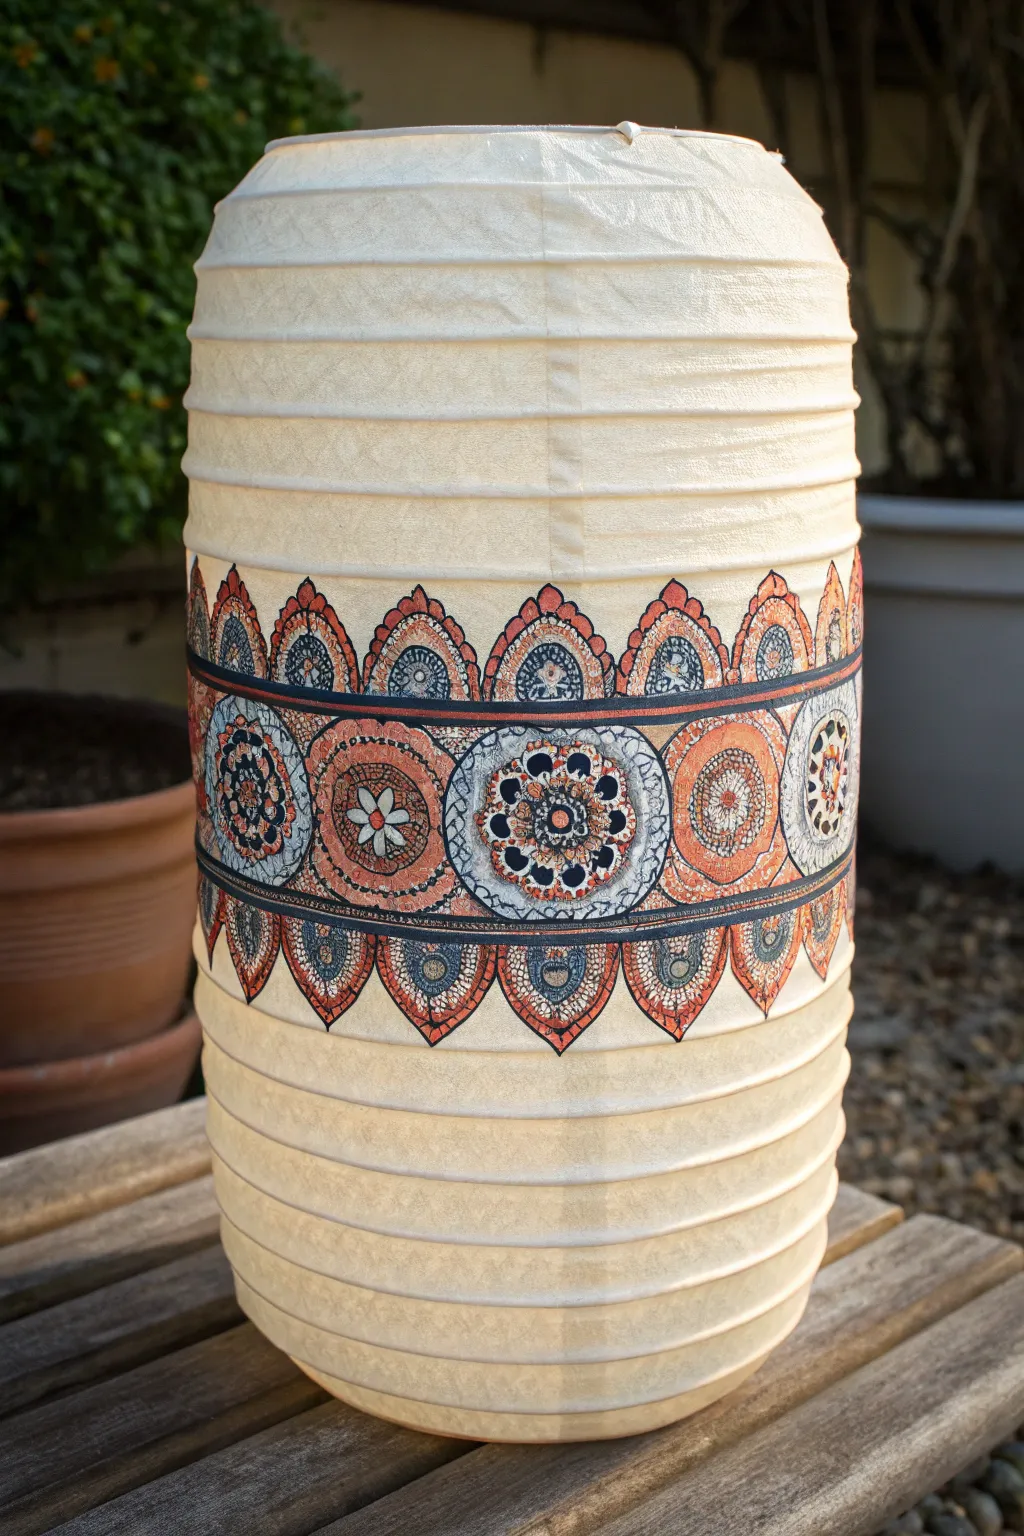
Transform a plain cylindrical paper lantern into a striking decor piece by focusing all your artistic energy on a single, detailed band around the middle. This project mimics the look of block-printed fabric or intricate henna designs, using earthy tones and repeating circular motifs to create a warm, inviting glow.
Step-by-Step
Materials
- Cylindrical white paper lantern (ribbed)
- Acrylic paints (terracotta orange, deep indigo/navy blue, creamy white, slate grey)
- Fine liner brushes (sizes 0 and 1)
- Flat shader brush (size 4 or 6)
- Black permanent marker or fine-tip paint pen
- Pencil and flexible ruler/measuring tape
- Compass or circular stencils (bottle caps work nicely)
- Cup of water and palette
Step 1: Preparation & Grid
-
Prepare the lantern:
Gently expand your paper lantern and insert the wire expander frame to hold it taut. This gives you a stable surface to paint on. -
Define the equator:
Identify the central section of the lantern. You’ll want to work across a span of about 3 to 4 prominent ribs right in the middle. -
Mark the boundaries:
Using a pencil very lightly, mark the top and bottom ribs that will frame your design. These ribs act as natural guidelines for your horizontal borders. -
Establish the central circles:
Measure the circumference and divide it by the number of large circles you want (usually 4-6). Mark the center point for each main mandala circle along the absolute middle line.
Paint Consistency
Paper lanterns are delicate. Don’t water down your acrylics; use them straight from the tube (creamy consistency) to prevent the paper from getting soggy and tearing.
Step 2: Painting the Main Band
-
Draft the circles:
Use a compass or trace a circular object centered on your marks to draw the main circles. They should almost touch each other side-by-side. -
Block in base colors:
Paint alternating circles with your terracotta orange and slate grey/white mix. Use the flat shader brush but keep the paint consistent—not too watery, or the paper might sag. -
Add the inner rings:
Once the base shapes are dry, paint smaller concentric circles inside the large ones. I like to switch colors here—putting grey rings inside the orange circles and vice versa. -
Detail the centers:
In the very center of each mandala, paint a small flower or starburst design. Use the fine liner brush and the deep indigo paint for high contrast. -
Fill the negative space:
The spaces between the large circles can look empty, so paint curved triangular shapes or simple scallops in the gaps using the dark blue tone.
Step 3: Creating the Borders
-
Thicken the border lines:
Paint a thick, solid band of dark indigo along the top and bottom guide ribs you chose earlier. This frames the artwork immediately. -
Draft the petal arches:
Above the top blue band and below the bottom blue band, lightly pencil in a row of repeating arches or ‘petals’ pointing outward. -
Fill the petals:
Paint the inside of these arches with terracotta orange, leaving a small gap between the paint and your pencil line. -
Add teardrop details:
inside each orange arch, paint a smaller teardrop shape in grey or white to mimic the complexity of the central band. -
Outline in ink:
This is the crucial step for sharpness. Take your black marker or paint pen and outline every shape. Outline the circles, the petals, and the internal flower details. -
Add texture with dots:
Use the very tip of your smallest brush or a toothpick to add tiny white or black dots inside the mandala rings and petal borders.
Metallic Accent
Swap the slate grey paint for a metallic copper or bronze. When the lantern is lit, the metallic specks will catch the light and add a beautiful shimmer.
Step 4: Finishing Touches
-
Review consistency:
Spin the lantern slowly to check for any uneven lines or missed spots in the paint coverage. -
Cleanup lines:
If any paint bled slightly, go over the edges with your black marker to crisp them up again. -
Seal the design:
For longevity, create a mix of 50% water and 50% white glue (or matte medium) and very gently brush it over the painted areas only. -
Final dry:
Let the lantern sit undisturbed in a dry area for at least a few hours before hanging it up or adding a light bulb.
Hang your finished lantern in a corner that needs a touch of pattern and enjoy the warm atmosphere it creates
Faux Stained Glass With Dark Lines
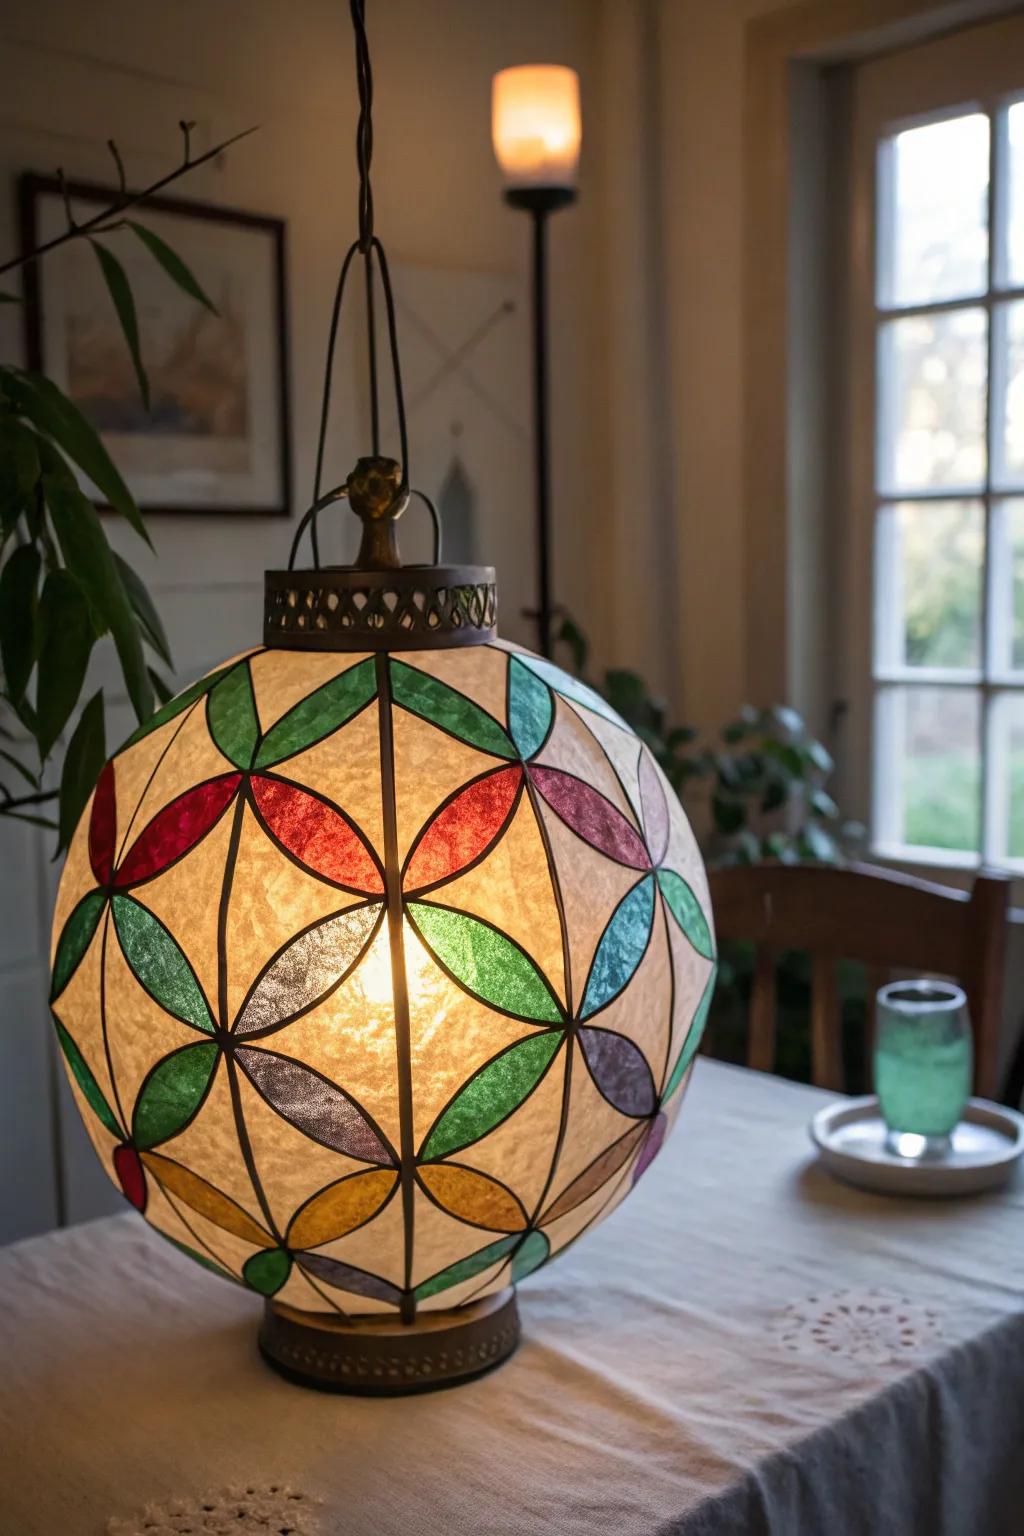
Transform a plain paper lantern into a glowing masterpiece that mimics the elegance of Tiffany-style glass. Using thick dimensional paint and translucent washes, you can recreate this intricate flower-of-life pattern for a fraction of the cost.
Step-by-Step Guide
Materials
- Round white paper lantern (approx. 12-16 inches)
- Pencil and eraser
- Compass or round stencil (jar lid/cup)
- Black dimensional fabric paint (puffy paint) or lead outline paint
- Tissue paper in assorted jewel tones (red, green, blue, purple, yellow)
- Decoupage medium (Mod Podge Gloss)
- Foam brushes and fine craft brushes
- Scissors
- Cardboard or scrap paper
- Lamp kit or battery-operated LED light puck
Step 1: Drafting the Design
-
Prepare the lantern:
Assemble your paper lantern carefully, inserting the wire expander to make the sphere taut. It’s much easier to draw on a surface that has some tension. -
Establish the poles:
Locate the top and bottom openings of the lantern. Lightly mark vertical lines connecting the top rim to the bottom rim to act as guides for your pattern segments. -
Sketch the primary circles:
Using a compass gently, or tracing a round object like a jar lid, draw a row of circles around the ‘equator’ of the lantern. Ensure they touch side-by-side but don’t overlap yet. -
Create the overlapping pattern:
Draw a second row of circles above the first, positioning the center of each new circle directly above the point where two lower circles touch. This creates the classic overlapping petal shape. -
Fill the grid:
Continue this staggered circle pattern until the entire lantern is covered. Don’t worry if the pattern distorts slightly near the very top and bottom; the dimensional paint will hide minor pencil imperfections.
Uneven Lines?
If your black puffy paint lines are shaky, wait for them to dry fully. You can then carefully slice off the mistake with an X-Acto knife and re-draw that section.
Step 2: Creating the Lead Lines
-
Test your flow:
Before touching the lantern, practice creating steady lines with your black dimensional paint on a piece of scrap cardboard. You want a thick, raised bead that simulates lead caming. -
Trace the verticals:
Begin by tracing over the long vertical segment lines first. Hold the bottle nozzle slightly above the paper surface rather than dragging it directly against the delicate material. -
Outline the pattern:
Carefully trace over your pencil circles. Work in sections—I usually do the top hemisphere first—and let the paint dry completely before rotating the lantern to avoid smearing your wet lines. -
Connect the joints:
Where lines intersect, add a tiny extra dot of paint to create a soldered look. Ensure all shapes are fully enclosed by the black lines so your colors will look distinct later. -
Allow to cure:
Let the black outline dry for at least 6–8 hours. The lines must be hard and non-tacky before you begin the coloring phase.
Level Up: Texture
For a textured glass look, waiting until the Mod Podge is tacky and dabbing it with a stiff brush creates a rippled ‘cathedral glass’ surface effect.
Step 3: Adding the Faux Glass Color
-
Cut tissue templates:
Cut your colored tissue paper into rough ‘petal’ or ‘almond’ shapes that are slightly larger than the spaces inside your black lines. -
Apply the decoupage medium:
Using a small brush, apply a thin layer of gloss decoupage medium inside of one specific enclosed shape on the lantern. -
Place the tissue:
Gently press a piece of colored tissue paper onto the wet medium. Use your brush to carefully smooth it out, pushing the edges right up against the raised black border. -
Seal the color:
Apply a second coat of decoupage medium directly over the top of the tissue paper. The wet medium will make the tissue look translucent and glass-like once dry. -
Follow the color pattern:
Work your way around the lantern. In the example, notice how the colors alternate (red petals, green petals, etc.) to create geometric flowers. Keep a consistent pattern for the most professional look. -
Trim excess:
If tissue paper overlaps the black ‘lead’ lines too much, carefully trim it away with a craft knife once it is fully dry, or use a fine black marker to touch up the lines.
Step 4: Finishing Touches
-
Final gloss coat:
Once all tissue sections are dry, brush a final layer of gloss medium over the entire lantern, including the black lines. This unifies the sheen and makes the ‘glass’ look polished. -
Add hardware:
If you wish to mimic the top fixture shown, you can glue a decorative metal cap or painted plastic cup to the top opening before inserting your light source. -
Light it up:
Insert a cool-burning LED bulb or a battery puck light. The light will shine through the tissue paper, revealing the stained glass effect clearly.
Hang your new lantern in a cozy corner and enjoy the warm, colorful glow it casts over the room
Cozy Autumn Leaves in Warm Tones
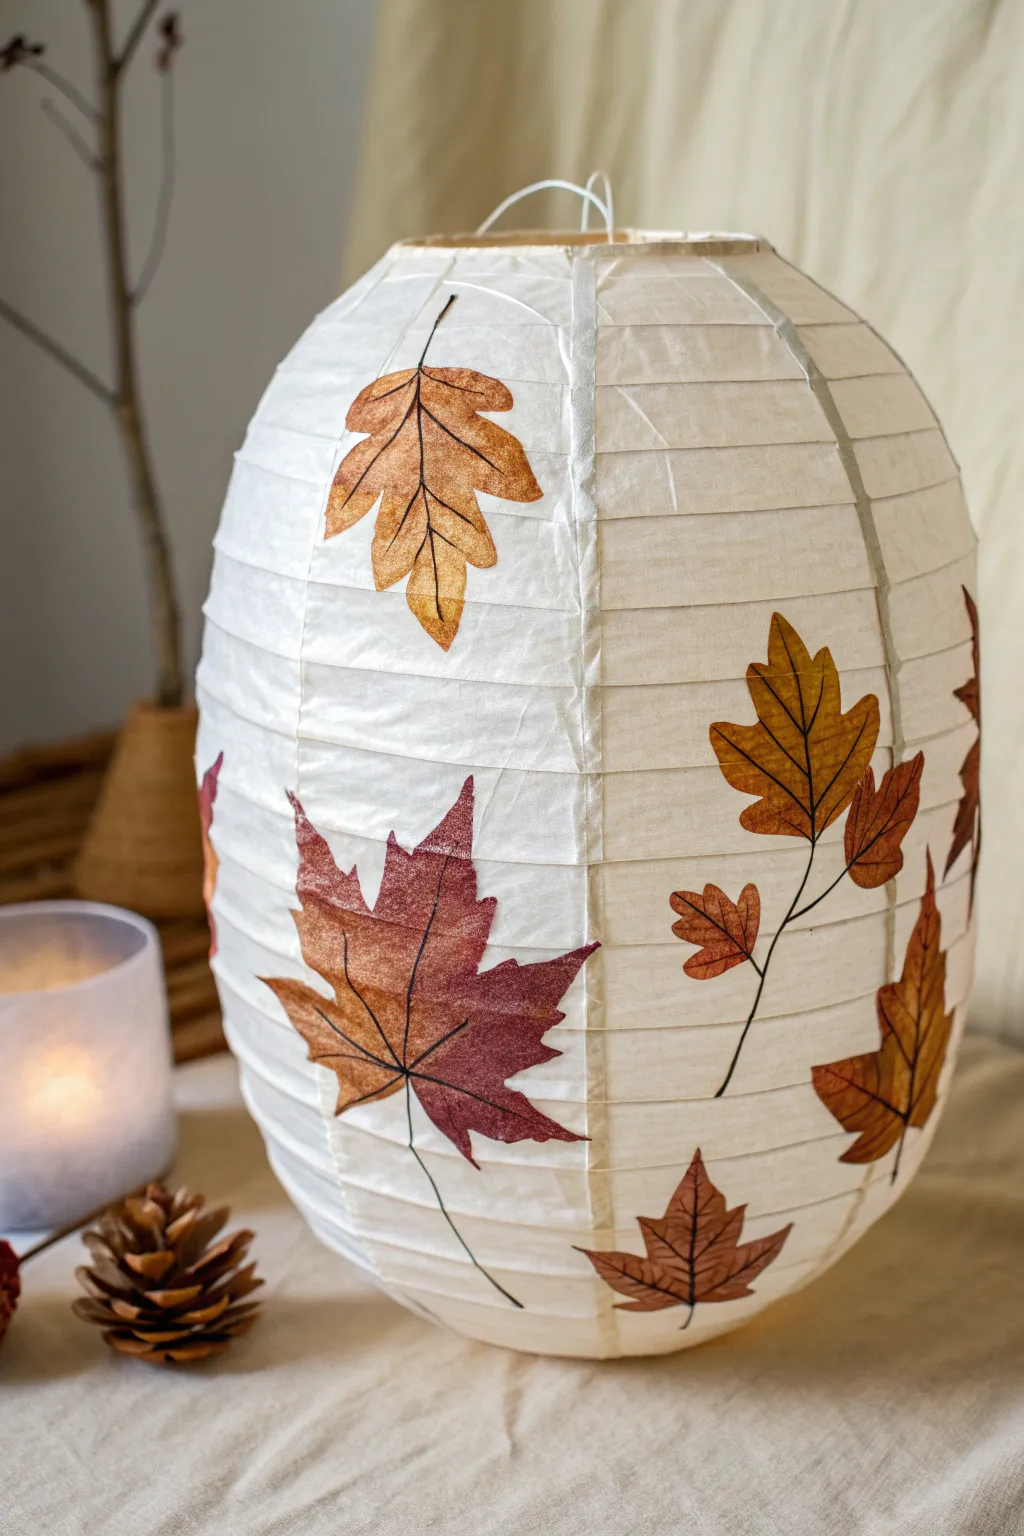
Transform a simple paper lantern into a celebration of harvest season with these realistic, hand-painted leaves. The warm russet and golden tones create a cozy, dappled light effect that perfectly captures the feeling of a crisp fall evening.
Step-by-Step Guide
Materials
- White paper lantern (round or oval shape)
- Acrylic paints (burnt sienna, yellow ochre, raw umber, deep red)
- Fabric medium (optional, for smoother flow)
- Fine liner brush (size 0 or 1)
- Small round brush (size 2 or 4)
- Pencil
- Real or printed leaves for reference
- Water cup and palette
- Clear fishing line or string for hanging
Step 1: Planning and Sketching
-
Prepare the lantern:
Assemble your paper lantern according to the package instructions, inserting the wire expander carefully so the paper is taut and ready for painting. -
Sketch the layout:
Using a very light touch with your pencil, sketch the outline of falling leaves randomly around the lantern. Vary the sizes, with some large maple leaves and some smaller oak-like clusters. -
Map the stems:
Draw faint lines connecting some of the leaves to suggest falling branches or long stems, ensuring they follow the curvature of the lantern naturally.
Step 2: Painting the Base Colors
-
Mix your palette:
Prepare your warm autumn palette. Mix burnt sienna with a touch of yellow ochre for a golden brown, and have deep red ready for accents. -
Add fabric medium:
I like to mix a drop of fabric medium or water into the acrylics; this helps the paint glide over the textured paper ribbing without getting stuck. -
Paint the golden leaves:
For the lighter leaves, use the round brush to fill in your shapes with the yellow-ochre mix. Don’t worry about perfect coverage; a little translucency looks lovely when the light is on. -
Paint the russet leaves:
Fill in the darker, reddish-brown leaves using the deep red and burnt sienna mixture. Keep the edges relatively crisp. -
Create gradients:
While the paint is still slightly wet on some leaves, blend a dot of raw umber near the base or tips to create a natural, dried-leaf gradient effect. -
Let the base dry:
Allow the base coats to dry completely for about 20-30 minutes. The paper is delicate when wet, so patience is key here to avoid tearing.
Use Nature’s Template
If freehand sketching feels daunting, find real fallen leaves, lightly trace them onto the lantern, or use them as a direct visual reference for shape and vein patterns.
Step 3: Adding Details and Definition
-
Mix the vein color:
Create a dark, almost black-brown by mixing raw umber with a tiny touch of black or deep blue. The paint should be inky and fluid. -
Paint the central veins:
Using your fine liner brush, paint a thin, confident line down the center of each leaf, extending it out to become the stem. -
Add branching veins:
From the center line, paint delicate V-shaped veins extending toward the leaf points. Keep your hand light to ensure the lines remain thin. -
Detail the edges:
If you want extra definition, use the very tip of your liner brush to add tiny serrated details or outlines to parts of the leaf edges, though it’s okay to leave some soft. -
Connect the foliage:
Draw longer, thin stems connecting groups of smaller leaves, mimicking the way they would attach to a twig. -
Final check:
Rotate the lantern and look for any empty spots that might need a small stray leaf or an extra bit of stem to balance the composition.
Fixing Drips
Paper lanterns are absorbent. If you accidentally drip paint, don’t scrub. Dab it gently with a dry paper towel immediately, or turn the drip into a new, small leaf.
Hang your finished lantern near a window or corner to bring a permanent golden hour glow to your room
Crisp Snowflake Scatter on Icy Blue
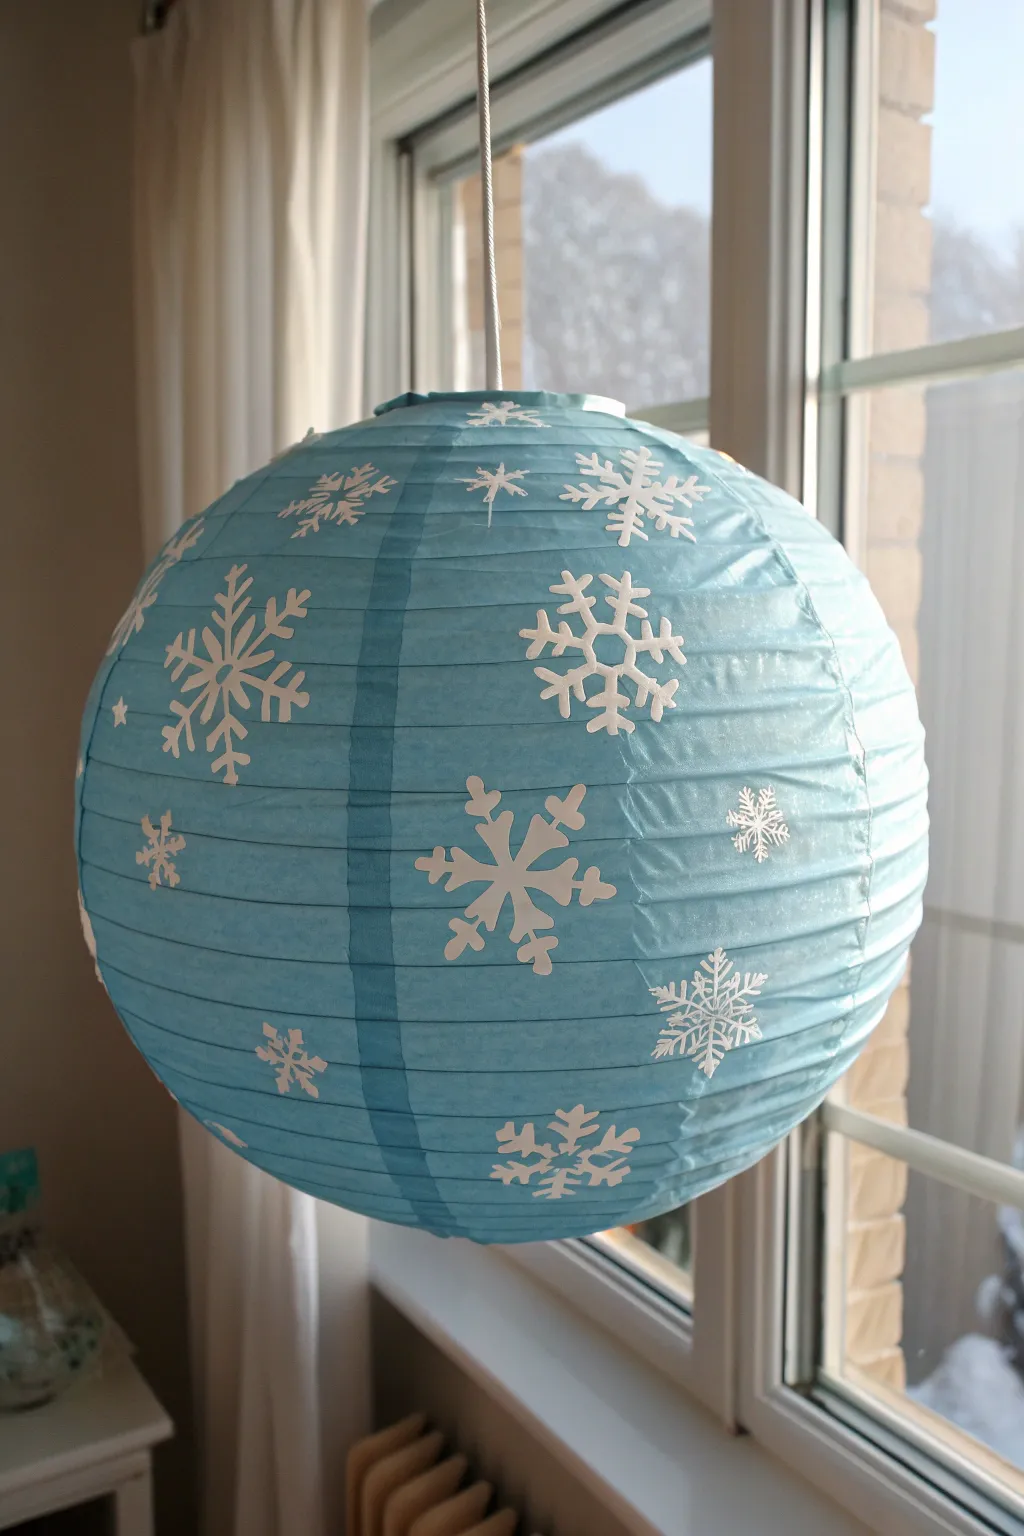
Transform a plain paper lantern into a winter wonderland centerpiece with this simple yet striking project. The icy blue background provides the perfect chilly canvas for a scatter of crisp, white snowflakes that seem to drift through the air.
Detailed Instructions
Materials
- White paper lantern (12-inch or 14-inch diameter)
- Light blue acrylic paint (specifically an ‘Ice Blue’ or similar cool tone)
- Wide, soft paintbrush (flat wash brush)
- White cardstock or heavy paper
- Snowflake paper punches (various sizes/shapes) or a cutting machine
- White craft glue or decoupage medium
- Small paintbrush (for glue)
- String or fishing line for hanging
- Protective work surface coverings
Step 1: Setting the Scene
-
Preparation:
Begin by expanding your paper lantern carefully using the wire insert provided with it. This tension is necessary to keep the surface taut for painting. Cover your workspace with newspaper or plastic, as painting round objects can get messy. -
Diluting the paint:
Squeeze a generous amount of light blue acrylic paint onto a palette or disposable plate. Mix in a very small amount of water—just enough to make the paint glide smoothly over the paper ridges without soaking through them immediately. -
Base coat application:
Holding the lantern by the top wire or bottom opening, begin applying the blue paint. Use long, horizontal strokes that follow the natural ribbing of the lantern. -
Consistent coverage:
Work your way around the sphere, ensuring you get paint into the creases near the wire ribs. Don’t worry if the color looks slightly uneven; a little variation adds a lovely textural depth. -
Drying time:
Hang the lantern in a safe spot to dry completely. This usually takes about 1-2 hours depending on humidity. The paper will feel tighter once the paint has fully cured.
Step 2: Creating the Snow
-
Punching shapes:
While the lantern dries, create your snowflakes. Use snowflake-shaped paper punches on white cardstock to create a blizzard of shapes. If you don’t have punches, you can cut freehand or use an electronic cutting machine. -
Variety is key:
Aim for at least three different sizes or styles of snowflakes. Having a mix of large, intricate flakes and smaller, simpler stars creates a more dynamic composition. -
Planning the layout:
Layout your dry lantern and loosely arrange your paper snowflakes next to it to visualize the spacing. You want them scattered randomly, not in a perfect grid.
Sticky Situation?
If the paper lantern tears while expanding or painting, patch it from the inside with a small piece of tissue paper soaked in diluted white glue. Let dry before painting over.
Step 3: Assembly
-
Gluing the first flake:
Apply a thin layer of white craft glue to the back of a large snowflake. I prefer to use a small brush for this to ensure the delicate arms of the snowflake get coated without globs of glue squeezing out. -
Placement method:
Gently press the snowflake onto the lantern surface. Because the lantern is ribbed, you will need to tap the paper flake down into the grooves so it conforms to the round shape. -
Securing the edges:
Hold the snowflake in place for a few seconds. If a tip pops up, apply a tiny dot of glue under it and hold again. -
Building the pattern:
Continue adding snowflakes, rotating the lantern as you go. Start with the largest flakes to establish the balance, then fill in the gaps with medium and small ones. -
Filling the gaps:
Look for empty ‘sky’ areas and add the tiniest punched stars or dots there. This makes the design look full and finished. -
Final drying:
Allow the glue to dry completely clear. If you notice any flakes lifting after an hour, simply press them back down with a tiny bit more adhesive. -
Hanging:
Attach a string or fishing line to the top wire hook and suspend your frosty creation near a window or light source.
Sparkle finish
Before the glue on the snowflakes dries completely, lightly dust them with iridescent white glitter. This mimics the way fresh snow catches the sunlight.
Enjoy the cool, serene atmosphere your new snowflake lantern brings to the room
Wax Resist Secrets Under a Wash
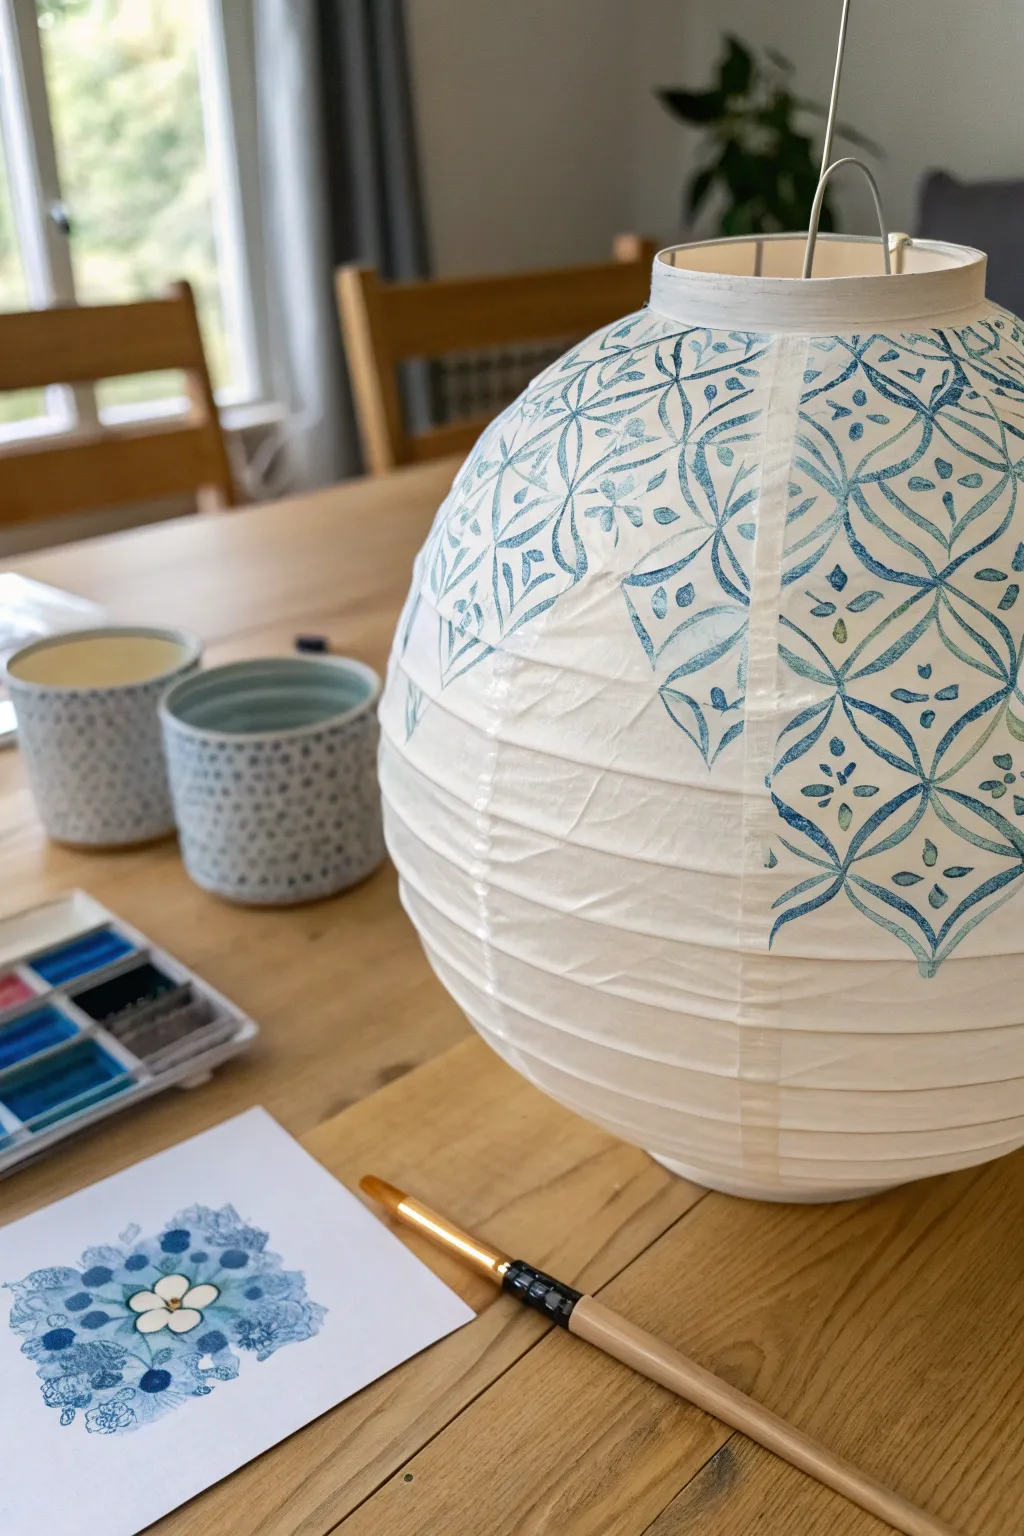
Transform a plain white paper lantern into a piece of illuminated art using the magic of wax resist. This technique creates crisp, negative-space lines within a wash of ocean-blue watercolor, resulting in a delicate, almost batik-like finish.
Step-by-Step
Materials
- Round white paper lantern
- Watercolor paints (shades of Prussian Blue and Indigo)
- Clear wax crayon or paraffin wax stick
- Medium round watercolor brush (size 6 or 8)
- Pencil
- Ruler or tape measure
- Cup of water and paper towels
- String for hanging during drying
Step 1: Preparation and Planning
-
Expand the lantern:
Carefully insert the wire expander into your paper lantern to give it its full shape. Ensure the paper is taut but not overstretched, as wrinkles can disrupt your wax lines. -
Sketch your motif:
Before touching the lantern, practice your geometric pattern on a scrap piece of paper. The design in the image uses intersecting petal shapes within a grid, so get comfortable drawing those curves first. -
Mark the grid:
Using a pencil very lightly, mark equidistant points around the top circumference of the lantern. This will serve as the anchor for your vertical pattern columns, keeping the geometric design symmetrical. -
Draft the guidelines:
Still using a light touch with your pencil, sketch the basic intersecting arcs of your pattern directly onto the lantern surface. Don’t press hard; you just need a faint guide for the wax.
Uneven Wax Lines?
If your wax crayon tip is too blunt, sharpen it with a knife for finer lines. If the wax is crumbling, warm it slightly in your hands before drawing to make it glide smoother.
Step 2: Applying the Wax Resist
-
Trace with wax:
Take your clear wax crayon or paraffin stick and firmly trace over your pencil lines. You need to apply enough pressure to leave a solid barrier of wax, but be gentle enough not to puncture the delicate paper. -
Add decorative details:
In the spaces between your main geometric lines, press small dots or petals with the wax crayon tips. These tiny details will remain stark white once painted. -
Check your coverage:
Tilt the lantern against the light. The waxed areas should have a slight sheen. If any lines look broken or faint, go over them again to ensure a crisp resist effect. -
Clean connection points:
Pay special attention to where lines intersect. Apply a little extra wax at these junctions to prevent the watercolor from bleeding through the corners of your design.
Pro Tip: Masking Fluid
For incredibly sharp, fine white lines, swap the wax crayon for liquid masking fluid. Apply it with a fine applicator bottle, let it dry, paint over it, and gently rub it off once finished.
Step 3: Painting the Wash
-
Mix the color:
In your palette, mix a generous amount of Prussian Blue watercolor with water. You want a fluid, watery consistency that will flow easily over the paper surface. -
Start the wash:
Load your round brush with the blue paint. Gently sweep it over one section of the wax pattern. You’ll immediately see the wax repel the water, keeping those lines white. -
Work in sections:
I prefer to paint one ‘diamond’ or petal section at a time. This allows you to control the wet edge and prevent unwanted drying lines in the middle of a shape. -
Vary the saturation:
For visual interest, drop a slightly more concentrated dot of Indigo paint into the wet centers of the shapes. Let it bloom naturally for a soft, gradient look. -
Create the fade:
As you move downwards towards the center of the lantern, dilute your paint with more water. This creates an ombré effect where the pattern gently fades out rather than stopping abruptly. -
Review and touch up:
Scan the lantern for any spots where the paint pooled too heavily. Use a clean, slightly damp brush to lift away excess pigment if necessary.
Step 4: Finishing Touches
-
Hang to dry:
Suspend the lantern by its wire hook in a safe place. Air flow is key here; let it hang freely so the wet paper dries evenly without touching any surfaces. -
Inspect once dry:
Once the paper is bone dry, the colors will likely lighten slightly. If the blue feels too pale, you can carefully glaze a second layer of paint over the existing design, but be quick to avoid disturbing the first layer. -
Add bottom weight:
If the lantern hangs strictly from the top wire, it might tile. Ensure your pattern is visually balanced, or add a small tassel to the bottom hook for stability and flair.
Hang your new lantern near a window or light source to see the beautiful texture of the paper glow through the paint


Have a question or want to share your own experience? I'd love to hear from you in the comments below!