A plain paper plate is basically a ready-made circular canvas, and once you start painting on it, ideas multiply fast. Here are my favorite paper plate painting ideas—from classic, kid-friendly go-tos to a few artsy twists that feel surprisingly “frame-worthy.”
Smiley Sun Face Plate
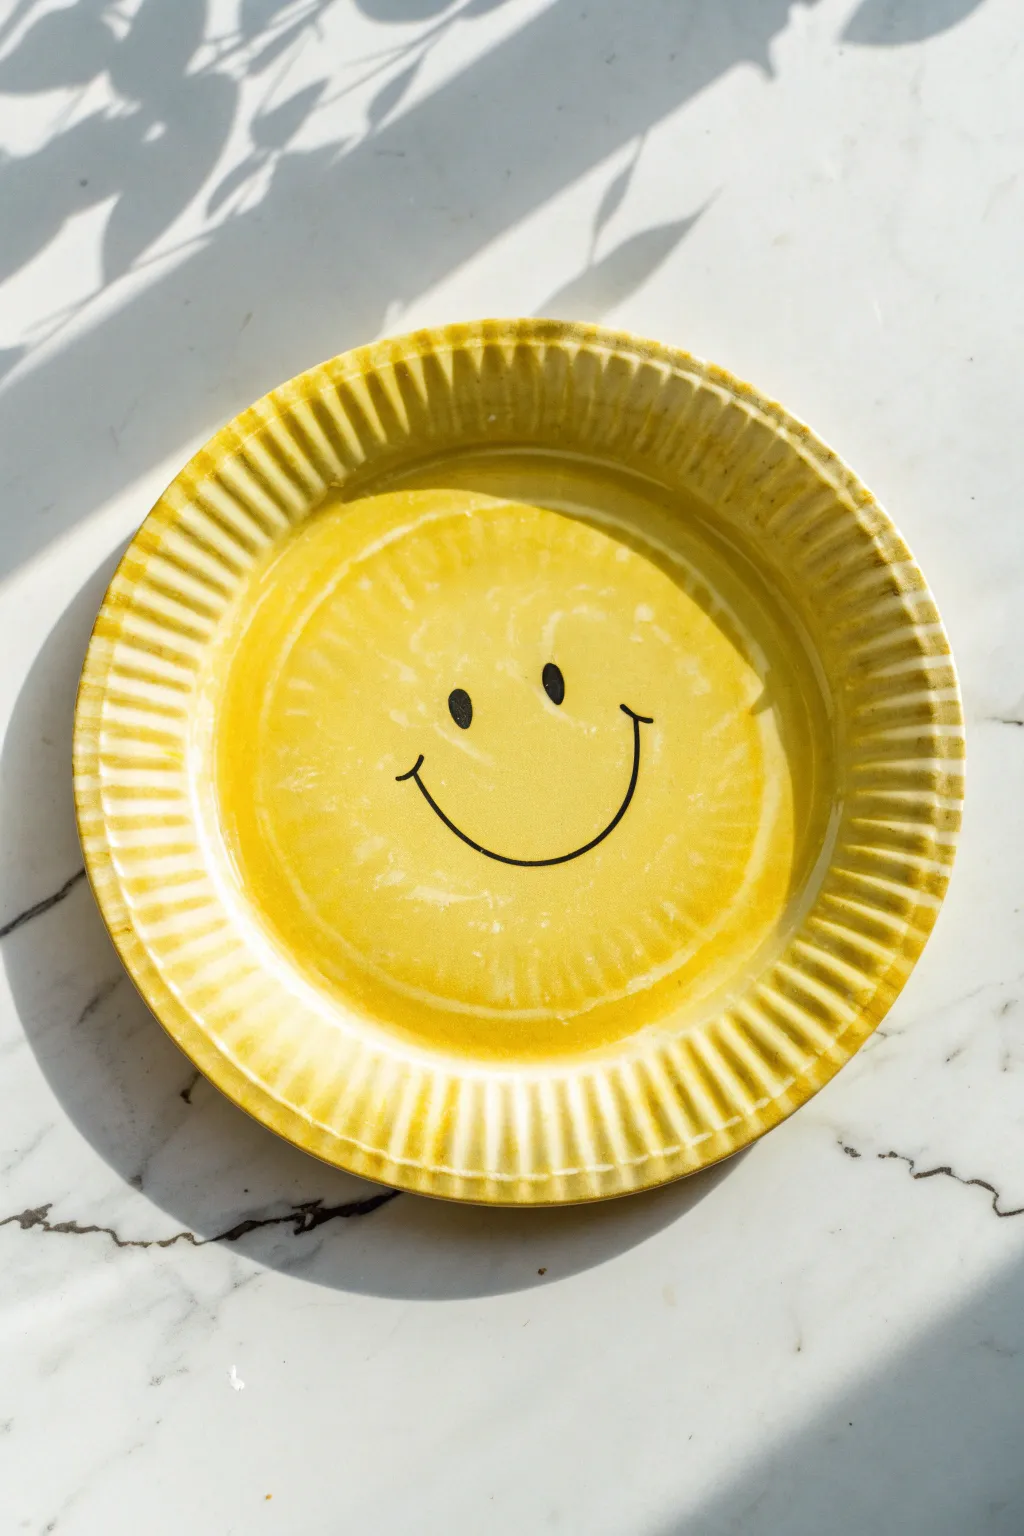
Brighten up your day with this cheerful, minimalist paper plate project that captures the warmth of a sunny afternoon. The translucent yellow wash gives the plate a lovely, hand-painted ceramic feel rather than a flat, crafty look.
How-To Guide
Materials
- White paper plate (uncoated is best for absorption)
- Yellow watercolor paint or watered-down acrylic paint
- Wide flat paintbrush
- Small round paintbrush or black permanent marker
- Black acrylic paint (if using brush)
- Cup of water
- Paper towels
Step 1: Creating the Base
-
Prepare your workspace:
Lay down some protective paper or a craft mat on your table, as watercolor washes can sometimes seep through or drip over the edges. -
Mix your yellow wash:
The key to this look is transparency. If you are using acrylics, mix a pea-sized amount of sunshine yellow with a generous amount of water. If you’re using watercolors, activate your pan with plenty of liquid. -
Test the consistency:
Dab a little paint on a scrap of paper or the back of the plate. You want a watery consistency that stains the paper rather than sitting on top of it like a thick layer. -
Paint the center circle:
Using your wide flat brush, load it up with the yellow wash and paint the flat inner circle of the plate. Use circular strokes that follow the shape of the plate. -
Soften the edges:
While the center is still wet, gently pull some of the paint outward toward the rim, but don’t paint the ridges just yet. -
Paint the rim:
add more wash to your brush and paint the fluted rim of the plate. I like to let the brush skip lightly over the ridges. -
Enhance the texture:
The ridges naturally collect more pigment in the valleys and stay lighter on the peaks. Encourage this by running your wet brush horizontally along the rim once. -
Create the sun shape:
Load your brush with a slightly more concentrated yellow (less water) and paint a second coat just around the inner circle’s edge, creating a ring. -
Add detail lines:
Quickly add faint radial lines coming from the center circle outward onto the rim, mimicking sun rays. Since the paper is wet, these will blur softly. -
Let it dry completely:
This is crucial. The paper plate needs to be bone dry before you add the face, otherwise the black ink or paint will bleed into the yellow, creating fuzzy lines.
Step 2: Adding the Face
-
Sketch lightly:
If you’re nervous about freehanding, use a pencil to very faintly mark where the eyes and mouth will go. Keep the face centered. -
Select your tool:
For the crispest lines, a black permanent marker is easiest. For a more painterly look like the original photo, use a small round brush and black acrylic paint. -
Paint the left eye:
Paint a small, vertical oval shape for the left eye. It should be solid black and relatively small. -
Paint the right eye:
Paint a matching oval for the right eye. Try to keep them evenly spaced apart. -
Plan the smile:
Visualize a wide ‘U’ shape. The smile on this plate is quite wide, extending past the width of the eyes on both sides. -
Draw the smile curve:
Start from the left side and draw a smooth, continuous curve downward and back up to the right. Use a confident, steady motion. -
Add the smile ends:
accent the smile by adding tiny, subtle perpendicular ticks at the very ends of the smile line, giving it a classic happy face look. -
Final touches:
If your yellow background looks too pale after drying, you can carefully add a second wash of yellow around the outer rim for extra contrast, avoiding the black face.
Plate Folding Warning
Paper plates warp when wet. To flatten it back out, place a heavy book on the plate once it is 100% dry (not damp!) overnight.
Uncoated Genius
Avoid glossy or wax-coated plates for this project. Cheap, rough paper plates absorb the watery paint best for that textured watercolor effect.
Hang your finished sun face on the wall or fridge for an instant dose of happiness every time you walk by


Watermelon Slice Paper Plate
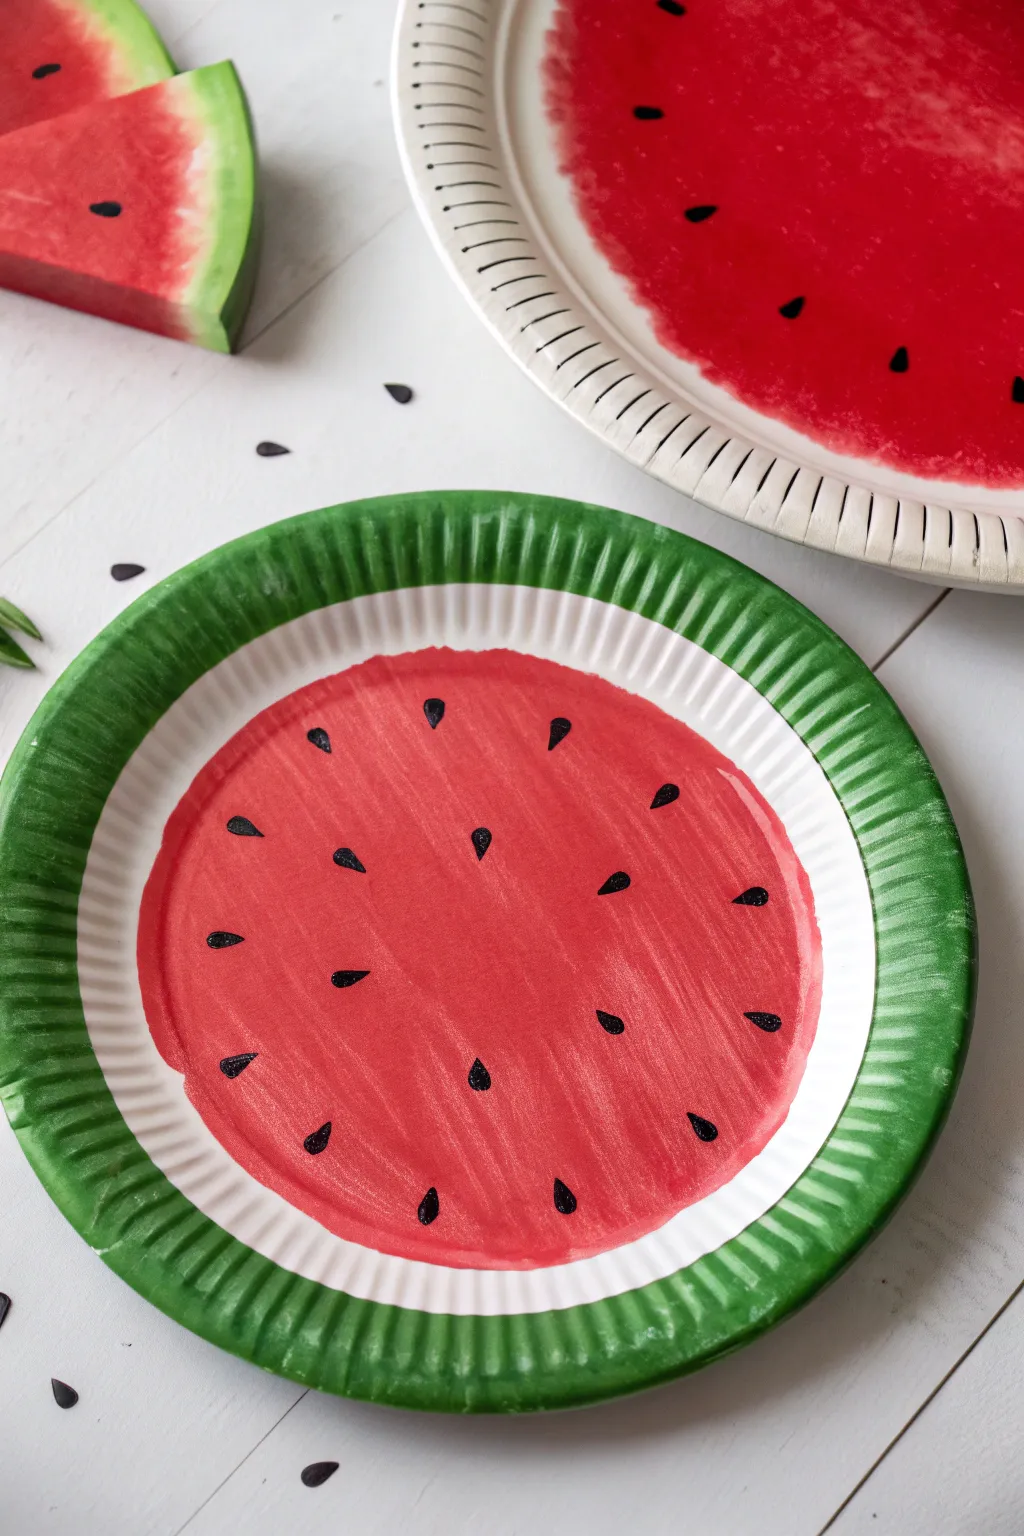
Transform a plain white paper plate into a juicy slice of summer with this incredibly simple yet vibrant painting project. The rough texture of the plate’s rim adds a fantastic rind-like quality that makes the final piece pop.
Detailed Instructions
Materials
- Standard white paper plate (uncoated is best for paint absorbtion)
- Red acrylic or tempera paint (bright crimson or watermelon red)
- Green acrylic or tempera paint (grass green or slightly darker)
- Black acrylic paint
- Medium flat paintbrush (about 1/2 inch)
- Small round detail brush
- Water cup for rinsing
- Paper towels
- Newspaper or placemat to protect your surface
Step 1: Painting the Fruit Center
-
Prepare your workspace:
Lay down your protective newspaper or placemat and set out your white paper plate right in the center. Make sure your paints are accessible. -
Load the red paint:
Squeeze a generous dollop of your bright red paint onto a palette or a scrap piece of paper. Dip your medium flat paintbrush in, ensuring it’s well-coated but not dripping. -
Define the center circle:
Start painting in the middle of the plate’s flat center area. Don’t go all the way to the textured rim yet; focus on creating a solid base of color in the very middle. -
Expand the red zone:
Work your way outward in a circular motion. The goal is to paint the entire flat, recessed eating surface of the plate red. -
Create the inner edge:
Carefully paint up to where the flat center meets the textured incline of the rim. Stop right at that transition line so you have a crisp circle. -
Refine the edges:
Go back around the perimeter of your red circle to smooth out any brushstrokes. The outline doesn’t have to be geometrically perfect—watermelons are organic shapes, after all. -
Let the center dry:
Give the red paint a few minutes to set. It doesn’t need to be bone dry, but it shouldn’t be wet enough to smear if your hand accidentally brushes it.
Seed Spacing Tip
Imagine a clock face when placing your outer seeds first: paint 12, 3, 6, and 9, then fill in the gaps between them. This helps keep spacing even without measuring.
Step 2: Creating the Rind
-
Clean your brush:
Rinse your medium flat brush thoroughly in water and dry it on a paper towel. You don’t want any red mixing into your green. -
Apply the green paint:
Load your clean brush with green paint. Paint the very outer edge of the paper plate’s rim. -
Work the texture:
Use the ridges of the paper plate as a guide. Paint inwards from the edge about half an inch to an inch, following the circle around. -
Leave a white gap:
This is crucial for the look: stop painting the green before you reach the red center. Leave a distinct ring of white paper plate exposed between the green rind and the red fruit. -
Thicken the rind color:
If the green looks a bit streaky due to the plate’s coating, I usually dab a second layer on while the first is tacky to enrich the color. -
Dry the rind:
Allow the green outer rim to dry completely. This prevents accidental smudging when you add the final details.
Uneven White Ring?
If your white gap between the red and green looks messy or uneven, use an opaque white paint pen or white acrylic to touch up the ring after the colors dry.
Step 3: Adding the Seeds
-
Switch brushes:
Pick up your small, round detail brush. This tool gives you the control needed for the tiny seed shapes. -
Dip into black:
Load just the tip of the brush with black paint. You don’t need much. -
Paint the first seed:
Press the brush tip down gently onto the red area near the outer edge of the circle, then lift up quickly while dragging slightly inwards. This creates a teardrop shape. -
Create a pattern:
Continue painting seeds around the perimeter of the red circle, spacing them out evenly like the numbers on a clock face. -
Fill the inner circle:
Add a second, smaller ring of seeds closer to the center of the plate, placing them in the gaps between the outer seeds. -
Point to the center:
Make sure the pointy end of your teardrop shapes (the seeds) are all pointing toward the center of the plate for a uniform look.
Once the seeds are dry, display your colorful watermelon slice on the wall or string several together for a festive garland


Lion Mane Rim Painting
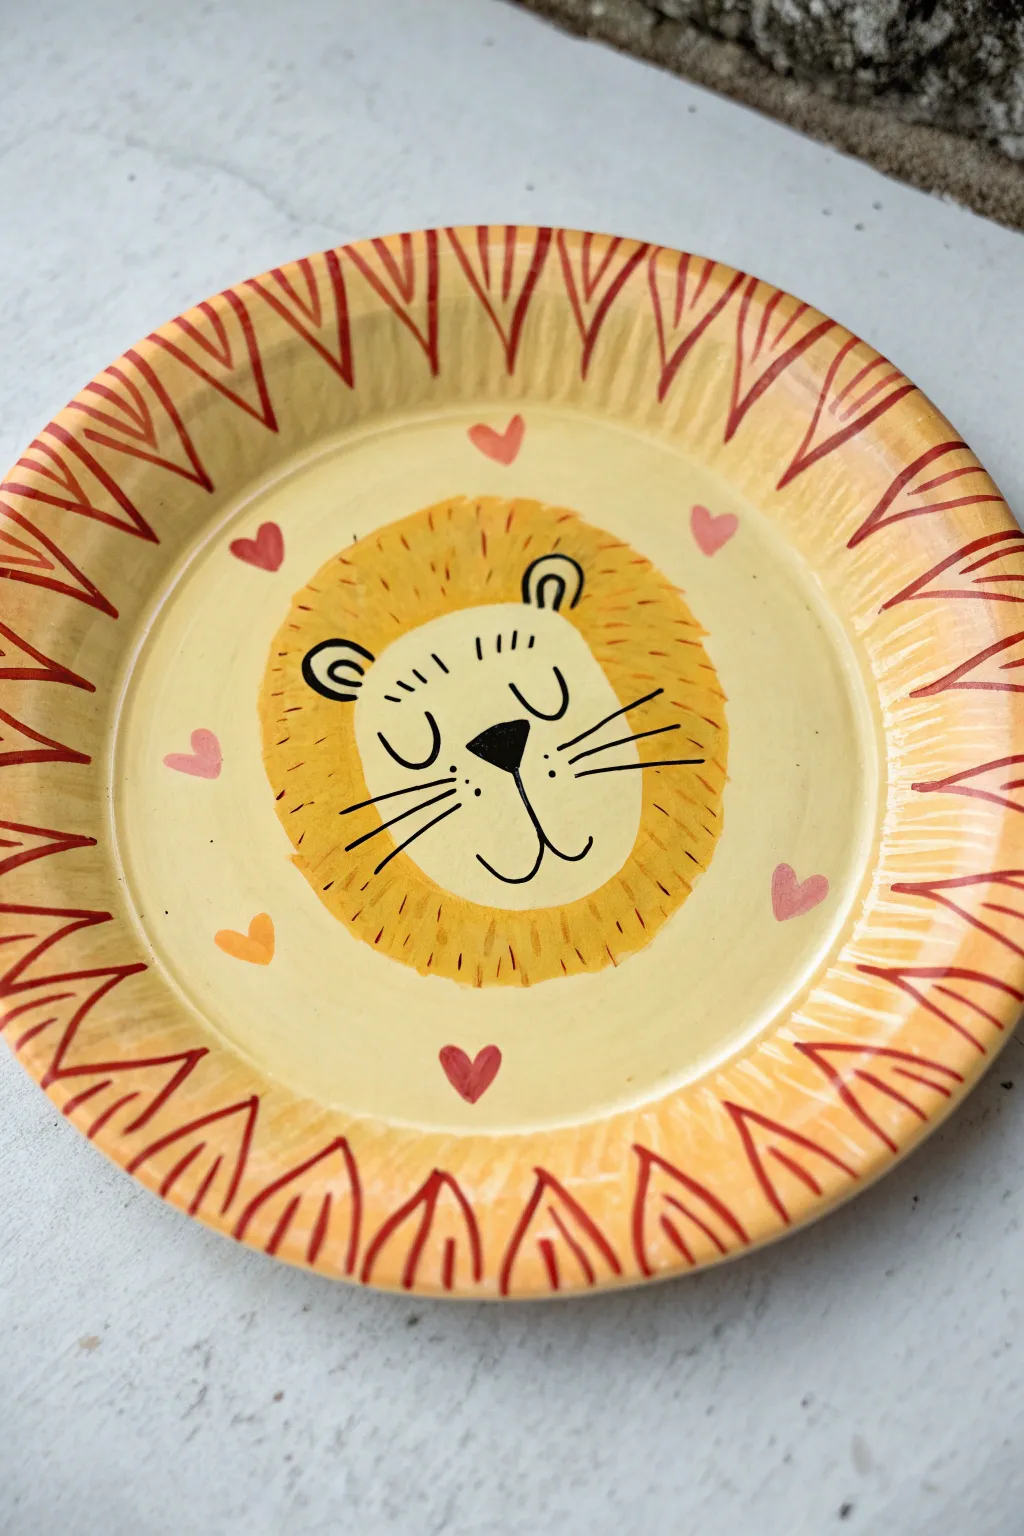
Transform a plain paper plate into a roaringly cute masterpiece with this lion-themed painting project. The clever design uses the plate’s natural rim to create a textured, radiating mane around a sweet, sleepy lion face.
Step-by-Step Tutorial
Materials
- Uncoated paper plate (white)
- Acrylic paints (pale yellow, golden yellow/orange, rust red, black, pink)
- Medium flat paintbrush
- Fine detail paintbrush or black paint marker
- Pencil (optional for sketching)
- Palette or extra paper plate for mixing
Step 1: Base Coat and Mane
-
Prepare the Base:
Start by painting the entire front surface of the paper plate with a pale yellow acrylic paint. This creates a smooth, uniform background for your lion. -
Dry the Base:
Allow this base layer to dry completely. If the paper plate pattern shows through, apply a second coat for better opacity. -
Define the Face:
Using a slightly darker golden-yellow or orange-yellow paint, paint a large circle in the center of the plate. This will be the lion’s main head shape. The edges don’t need to be perfect as we’ll add texture later. -
Paint the Rim Base:
Mix a warm orange hue and paint the fluted rim of the plate. Use outward strokes that follow the natural ridges of the plate to enhance the texture. -
Add Rim Details:
With a rust-red or deep orange paint and a thin brush, paint V-shapes or triangular outlines all around the rim. The point of the ‘V’ should aim toward the center of the plate, mimicking tufts of hair. -
Texture the Rim:
Inside each rim triangle, you can add a vertical line or two to give the mane more depth and detail.
Smoother Surfaces
Use uncoated paper plates rather than shiny ones. The waxy coating on glossy plates repels wet acrylic paint, causing it to bead up and smear.
Step 2: Face Details
-
Create the Furry Edge:
Go back to the central yellow circle. Use a small brush with the golden-yellow paint to add small, short strokes radiating outward from the circle’s edge to create a fluffy fur texture. -
Define the Snout Area:
Paint a lighter, creamy yellow shape in the middle of the face. It should be somewhat heart-shaped or like a rounded cloud to define the snout and eye area. -
Outline the Ears:
At the top of the head circle, paint two small semi-circles for ears using the golden yellow. Add a smaller black curve inside each one later for inner ear detail. -
Let the Paint Set:
Before doing the fine line work, ensure all your background colors are fully dry to prevent the black paint from bleeding. -
Draw the Eyes:
Using a very fine brush with black paint or a black paint marker, draw two U-shapes for sleepy, closed eyes. Add three tiny lashes to each eye. -
Add the Nose:
Paint a small, inverted triangle for the nose in black. It should sit near the bottom center of the light snout area. -
Add the Mouth:
Draw a straight vertical line down from the nose, then curve it outward to the left and right to make a smiling mouth anchor. -
Whiskers and Dots:
Add three distinct whiskers on each cheek area using quick flicking motions. Add a few tiny dots near the whisker base for extra cuteness. -
Decorate with Hearts:
Dip a small brush into pink and orange paints to add floating hearts in the negative space between the lion’s head and the rim.
3D Mane Effect
Cut small snips along the outer rim of the plate every half-inch. Gently ruffle them to make the outer mane actually stand up and look fluffy.
Once dry, display your cheerful lion on a shelf or wall to brighten up the room


Underwater Aquarium Scene Plate

Transform a simple paper plate into a stunning underwater view with layered shades of blue and charming black silhouettes. This easy painting project creates a sense of depth using simple color blocking and crisp details.
Detailed Instructions
Materials
- Uncoated white paper plate
- Acrylic paints (light blue, medium blue, dark blue, tan/beige, black, white, brown)
- Flat paintbrush (medium width)
- Small round detail brush
- Water cup
- Paper towels
Step 1: Paint the Background Layers
-
Start with the sky:
Begin by painting the top left third of the inner plate circle with your lightest shade of blue. Use smooth, curved strokes to create a gentle wave-like edge at the bottom of this section. -
Add the middle ocean layer:
Mix a medium blue shade and apply it below the light blue sky. Paint a thick, wavy band that curves downwards across the middle of the plate, overlapping the first layer slightly to blend the transition just a bit. -
Paint the deep sea:
Using a dark, rich blue, fill in the remaining left side of the plate, following the curve of the previous layer. This creates the deepest part of your ocean. -
Create the sandy shore:
Fill the bottom right section of the plate with tan or beige paint. Make sure the edge where the sand meets the water is curved, mimicking a coastline. -
Add texture to the sand:
While the beige paint is still slightly wet or just after drying, lightly tap your brush to add tiny speckles using a slightly darker shade of tan or diluted brown for a grainy sand effect. -
Let it dry completely:
Set the plate aside for 10-15 minutes. The background layers must be totally dry before you try painting detailed silhouettes on top, or the colors will muddy.
Step 2: Add Sea Life Silhouettes
-
Outline the fish:
Switch to your small round detail brush and black paint. Paint four small, almond-shaped fish bodies swimming in different directions. -
Add the tails:
Carefully paint a small triangle or ‘V’ shape at the back of each fish body to create the tail fins. -
Give the fish fins:
Add tiny triangular distinct fins on the top and bottom of each fish silhouette to bring them to life. -
Paint the seaweed:
Using the same black paint or a very dark blue, paint long, wavy lines rising from the bottom left corner. Add small leaf shapes coming off the stems. -
Add distant plants:
On the far right side, where the water meets the sand, paint a few smaller, fern-like plant fronds curving inward. -
Create rocks:
Dip your finger or a round brush into brown paint and stamp irregular circles along the sandy bottom edge and near the plant life to represent underwater stones.
Smooth Sailing
Work from the top of the plate down to the bottom. This prevents your hand from accidentally smudging wet paint as you move to the next section.
Step 3: Finishing Details
-
Paint the bubbles:
Clean your detail brush thoroughly and dip it into white paint. Dot various sizes of bubbles rising from the fish and plants toward the surface. -
Add fish eyes:
Place a single, tiny dot of white paint near the front of each black fish silhouette to create an eye. -
Highlight the rocks:
I like to add a tiny touch of lighter brown or white to the tops of the rocks to make them look dimensional and wet. -
Enhance the plants:
If you want extra depth, mix a dark teal and add a few strokes over the black seaweed to suggest light hitting the leaves. -
Final check:
Look over your composition. If any blue areas look streaky, apply a second thin coat carefully around your fish, though usually, one good coat suffices.
Make It 3D
Glue real sand or tiny crushed seashells onto the beige paint while it’s wet for authentic texture. You can also glue a googly eye on the fish.
Hang your finished plate on the wall for a lovely window into the deep blue sea
BRUSH GUIDE
The Right Brush for Every Stroke
From clean lines to bold texture — master brush choice, stroke control, and essential techniques.
Explore the Full Guide
Jellyfish Drip Paint Plate
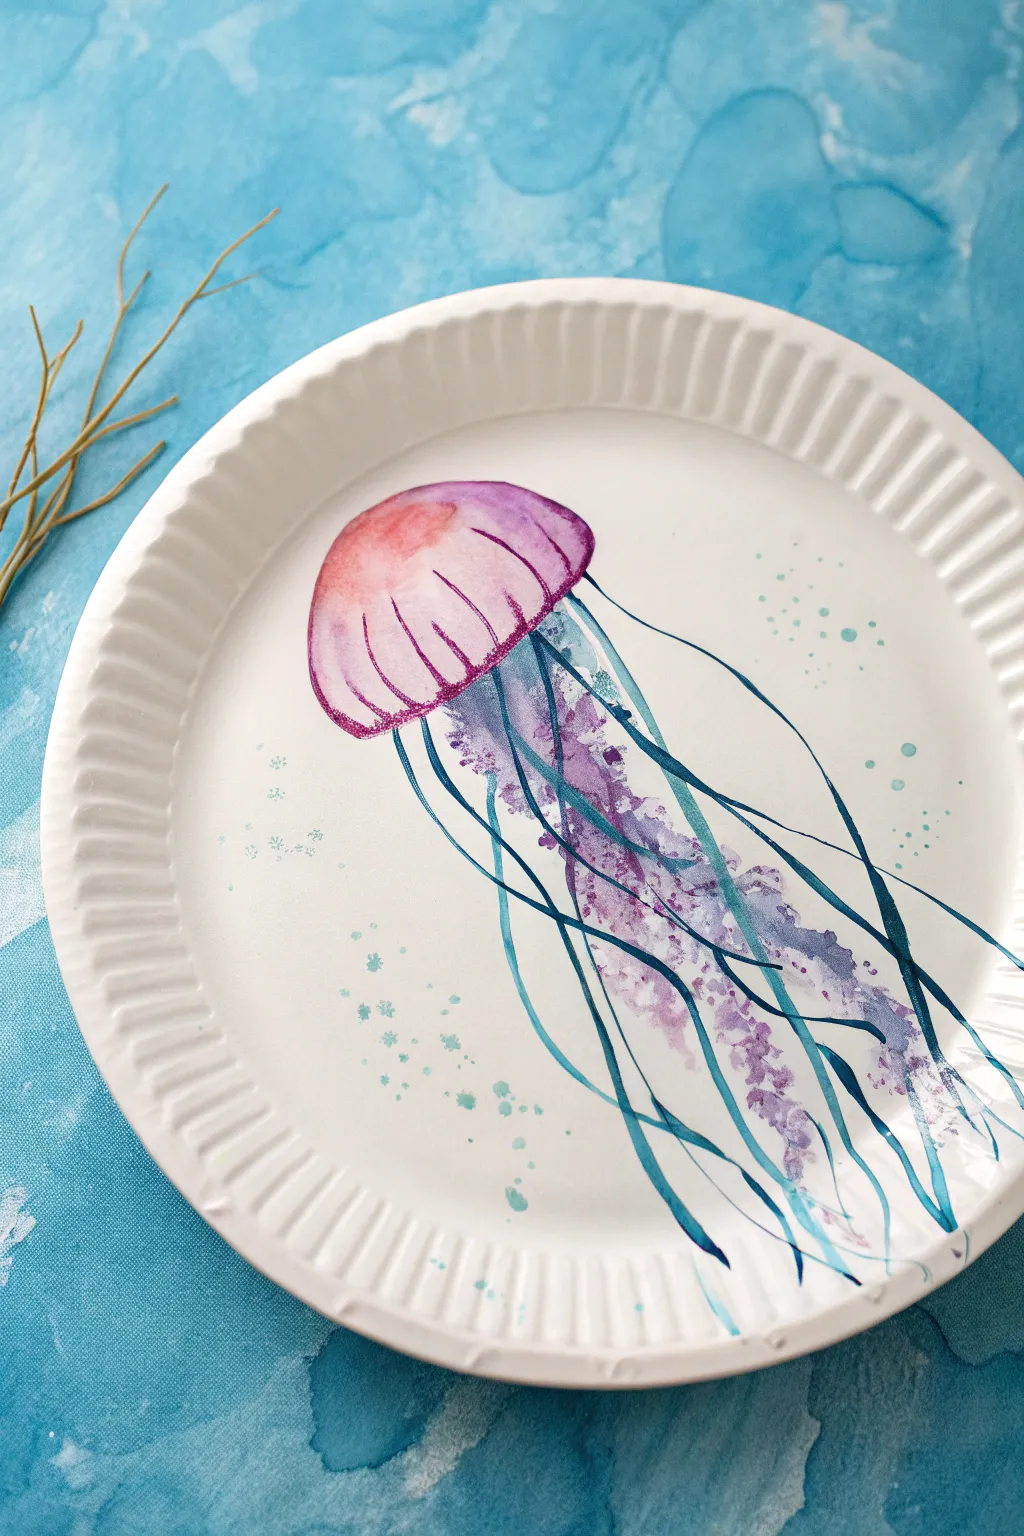
Transform a simple paper plate into an underwater masterpiece with this delicate jellyfish painting. Using loose brushstrokes and a splatter technique, you’ll capture the ethereal movement of sea life right on your tabletop.
Step-by-Step Tutorial
Materials
- Uncoated white paper plate (sturdy quality)
- Watercolor paints (tube or pan)
- Small round brush (size 2 or 4)
- Medium round brush (size 6 or 8)
- Water cup
- Paper towel
- Palette or mixing tray
- Pencil (optional)
Step 1: Planning and The Bell
-
Light Sketching:
Begin by lightly sketching the outline of the jellyfish bell (the head) on the upper third of the plate. Keep the shape organic—like a soft mushroom cap—and draw very faintly so the pencil doesn’t show through the paint later. -
Mixing the Bell Color:
On your palette, mix a watery wash of pink and purple. You want a gradient effect, so prepare a small puddle of pale pink and a separate puddle of violet. -
Painting the Base Shape:
Dip your medium brush into clean water and dampen the area inside your pencil sketch. Pick up the pale pink watercolor and touch it to the left side of the bell, letting it bleed into the damp paper. -
Adding Dimension:
While the pink is still wet, drop the violet color onto the right side and bottom edge of the bell. Let the colors merge naturally in the middle to create a soft, rounded look. -
Defining the Rim:
Using the smaller brush and a more concentrated purple pigment, carefully outline the bottom rim of the bell. Create small, vertical lines tracing upward from the rim into the body of the jellyfish to suggest texture and volume.
Step 2: Tentacles and Details
-
Creating the Inner Oral Arms:
Mix a diluted purple-blue shade. Using the medium brush, paint loose, ruffled shapes hanging directly from the center of the bell. These should look like bunched fabric or flowing lace. -
Adding Texture:
While these inner arms are semi-wet, dab in spots of darker purple to create a mottled, textured appearance. This mimics the transparency and complexity of real jellyfish anatomy. -
Painting the Long Tentacles:
Switch to your smallest brush. Load it with a dark teal or blue paint mixed to an unparalleled, inky consistency. Paint long, sweeping lines that originate from the bell’s rim and flow all the way to the bottom of the plate. -
Varying Line Weight:
As you paint these long tentacles, vary the pressure on your brush. Press down for thicker sections and lift up for whisper-thin trails. Allow some lines to cross over each other for a natural, tangled look. -
Adding Secondary Tentacles:
Mix a lighter blue shade and add a few more wispy tentacles in the background. These should appear fainter to give the artwork depth. -
The Drip Effect:
To achieve a fluid look, you can dampen the lower part of a few tentacles with clean water, encouraging the pigment to spread slightly and look like it’s drifting in water.
Paint Beading Up?
If your plate has a glossy coating, watercolor won’t stick. Lightly sand the painting area with fine sandpaper or add a tiny drop of dish soap to your paint water to break the surface tension.
Step 3: Atmosphere and Finishing
-
Bubbles and Splatters:
Load a medium brush with watery teal paint. Hold it over the empty spaces around the jellyfish and gently tap the handle with another brush to splatter small droplets onto the plate. -
Controlling the Splatter:
Aim for a cluster of droplets on the right side to balance the composition. Use a paper towel to immediately blot any larger accidental drops you don’t like. -
Defining Bubbles:
For a few larger droplets, use your small brush to paint tiny open circles or ‘C’ shapes in pale blue, suggesting larger air bubbles rising to the surface. -
Final Contrast Check:
Once the main painting is dry, look for areas that need more definition. I often go back with the darkest purple to deepen the shadow just under the rim of the bell. -
Drying Time:
Let the plate dry completely flat. If the paper plate warps slightly from the water, you can gently flatten it under a heavy book once it is 100% bone dry.
Pro Tip: Salt Texture
While the paint on the jellyfish head is still wet, sprinkle a few grains of table salt on it. As it dries, the salt pushes the pigment away, creating a stunning, starry texture.
Display your beautiful sea creature on a stand or mount it in a shadow box for a splash of ocean decor
Butterfly Symmetry Fold Painting
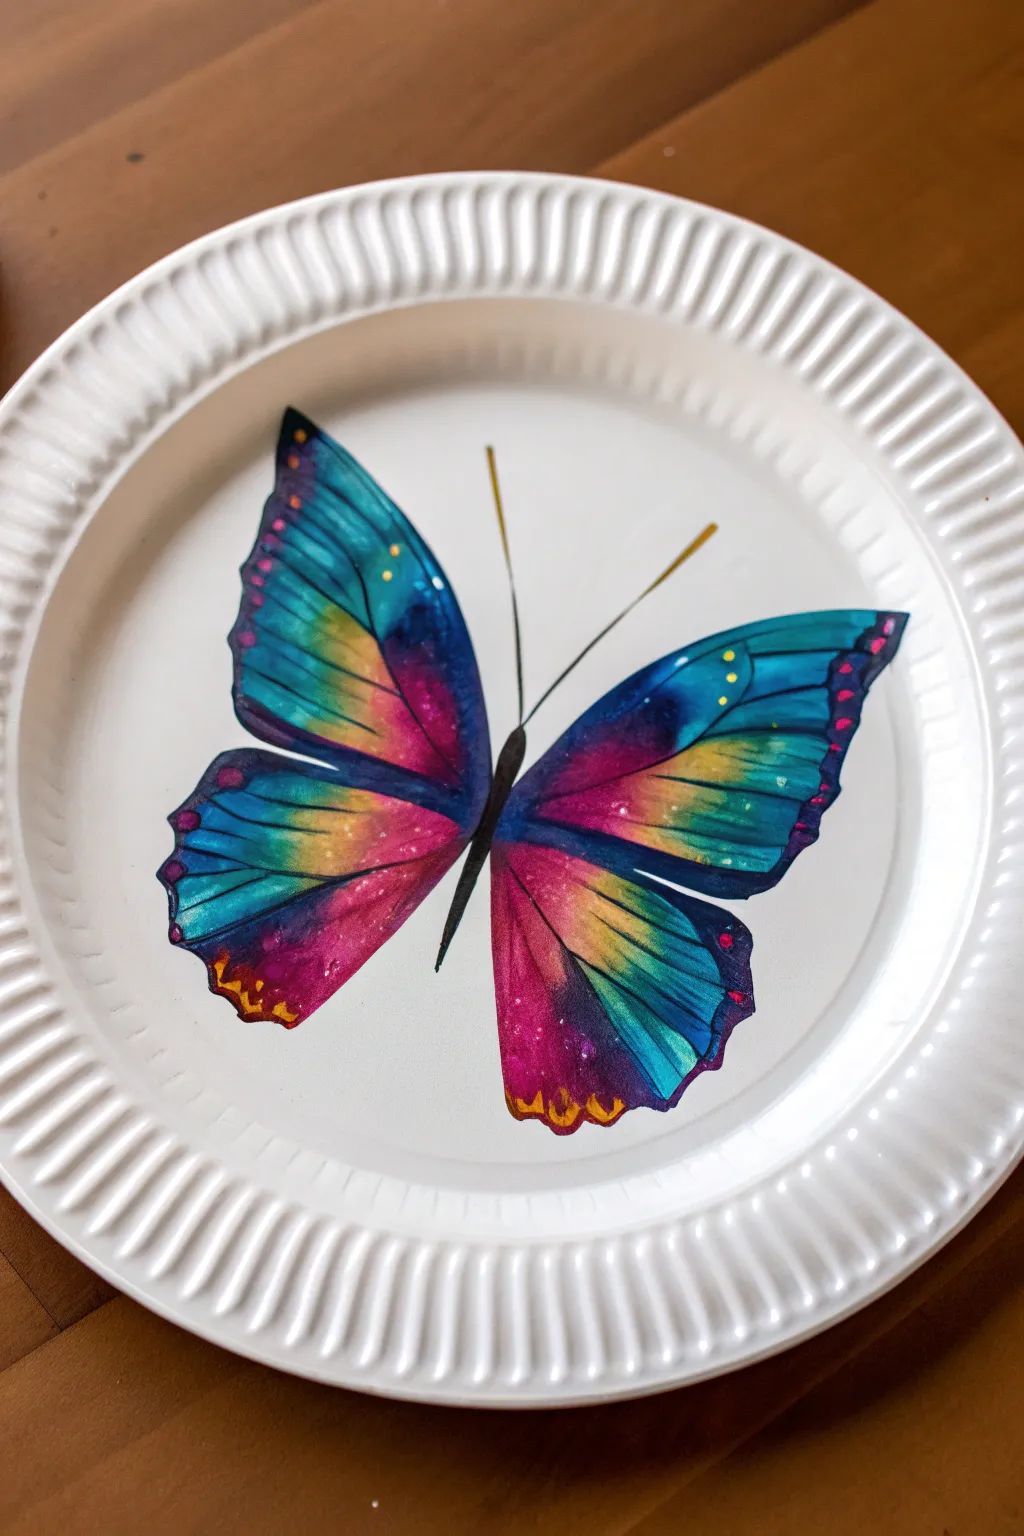
Transform a simple paper plate into a stunning piece of art that looks like it flew right out of a fairytale forest. While this uses the classic symmetry fold technique, careful blending creates a sophisticated watercolor effect with vibrant teals, pinks, and golds.
Detailed Instructions
Materials
- Uncoated white paper plate (standard size)
- Liquid watercolor paints (teal, magenta, yellow, violet) or watered-down acrylics
- Fine-point black permanent marker or liner
- Small round paintbrush
- Fine detail brush
- White gel pen or white acrylic paint
- Gold paint or metallic marker
- Pencil
- Scissors (optional, if you want to cut it out later)
Step 1: Preparation and Base Shape
-
Fold the canvas:
Begin by folding your paper plate perfectly in half. Crease it firmly, then open it back up. This crease will be the central axis for your butterfly’s body. -
Sketch one side:
Using a pencil very lightly, draw the outline of just the left wing on one side of the crease. Sketch a large upper wing that swoops up and a smaller, rounded lower wing. -
Create the mirror image:
Refold the plate along your crease. Rub the back of the plate firmly with a spoon or your fingernail over the pencil lines to transfer a faint graphite guide to the other side, or simply draw the right wing to match the left as closely as possible. -
Outline the wings:
Once you are happy with the symmetry, go over your pencil lines with your black fine-point marker to create a definite border for your coloring.
Uncoated Plates Work Best
Glossy plates repel watercolor. If you only have shiny plates, sand the surface lightly with fine-grit sandpaper to give the paint something to grip.
Step 2: Applying the Colors
-
Pre-wet the wings:
Using a clean brush and just water, lightly dampen the inside of the wing shapes. You want the paper moist so colors bleed slightly, but not soaking wet. -
Add the yellow centers:
Starting near the center crease (the body), drop in some yellow paint. Let it diffuse naturally outward. -
Introduce the magenta:
While the yellow is still damp, paint a band of magenta or hot pink around it. Allow the colors to touch and blend, creating a lovely orange transition. -
paint the teal edges:
Apply your teal or deep blue paint to the outer edges of the wings. Drag this color inward slightly to meet the pink, creating a purple-ish transition zone. -
Symmetry check:
I find it helpful to fold the plate briefly while the paint is wet to press the sides together. This ensures the color distribution is perfectly mirrored, which is the hallmark of this project. -
Deepen the contrast:
Once the base wash is semi-dry, go back in with more concentrated teal and violet paint on the very outer tips and near the wing veins to add depth. -
Let it dry completely:
This is crucial. The paper plate needs to be bone dry before you add the final markings, or the ink will bleed.
Preventing Warping
If the plate curls from the moisture, weigh down the outer rim with small heavy objects (like pebbles or coins) while it dries to keep it flat.
Step 3: Defining Details
-
Draw the veins:
Using your fine black marker or a very thin brush with black paint, draw the delicate veins radiating from the body outward to the wing edges. -
Paint the body:
Fill in the central body shape along the crease in solid black. Add two long, thin antennae extending from the top of the head. -
Add the stars:
With a white gel pen or a tiny dot of white acrylic, add small speckles across the dark teal sections of the wings to look like distant stars or dust. -
Highlight the edges:
Add a row of small pink or purple dots along the very outer rim of the wings for a decorative border effect. -
Gold accents:
For that magical finish seen in the image, use gold paint to touch up the bottom tips of the wings and add faint highlights along the antennae.
Display your shimmering butterfly on a wall or window to catch the light

PENCIL GUIDE
Understanding Pencil Grades from H to B
From first sketch to finished drawing — learn pencil grades, line control, and shading techniques.
Explore the Full Guide
Owl Face Paper Plate Portrait
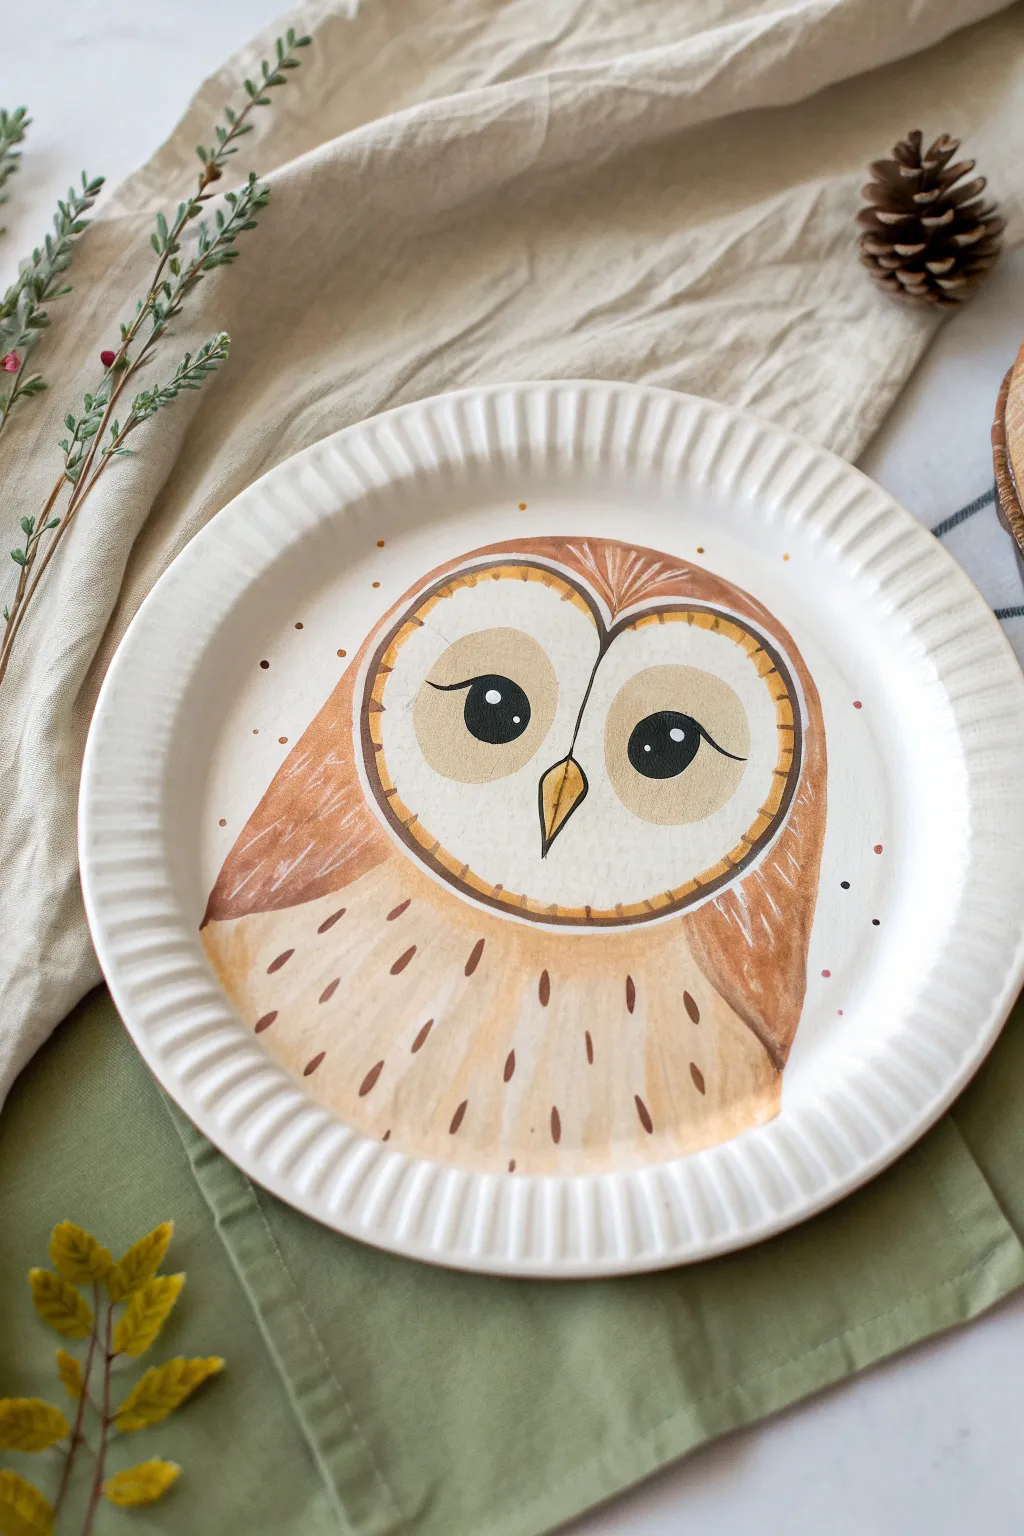
Transform a simple paper plate into a stunning woodland creature with this gentle barn owl design. The fluted edge of the plate acts as a natural frame for this painterly project, featuring soft earthy tones and expressive eyes.
Step-by-Step
Materials
- Sturdy white paper plate (uncoated works best)
- Acrylic paints (burnt sienna, raw umber, cream, white, ochre/yellow, black)
- Flat paintbrush (medium size)
- Detail paintbrush (small round)
- Pencil for sketching
- Palette or extra plate for mixing
- Cup of water and paper towels
Step 1: Planning the Face
-
Sketch the heart shape:
Use a pencil to lightly draw a large heart shape in the center of the plate. This will form the iconic facial disc of the barn owl. The top curves of the heart should dip down towards the center point where the beak will go. -
Outline the body:
Draw curved lines extending down from the sides of the heart shape to the bottom rim of the plate to create the owl’s shoulders and chest area. -
Mark the features:
Lightly sketch two large oval shapes inside the heart for the eye patches, keeping them symmetrical. Add a small diamond or tear-drop shape right in the center dip of the heart for the beak.
Step 2: Base Colors
-
Paint the face disc:
Mix white with a tiny dot of cream or ochre to get a very pale off-white. Fill in the entire heart shape, working carefully around the eye patches and beak sketches. -
Fill the body shape:
Using a light tan color (mix brown with plenty of white), fill in the chest area below the face. Brush strokes should follow the curve of the body downwards to suggest feathers. -
Paint the wings:
Mix a medium brown (burnt sienna) and fill in the wing shapes on the left and right sides of the face. Let the paint curve naturally with the plate’s circular shape.
Paint Consistency Pro-Tip
If your acrylics are too thick, water them down slightly. Thinner paint allows you to create smoother, wispier lines that look more like soft feathers.
Step 3: Adding Details
-
Define the face border:
Mix a darker brown and use your small detail brush to create a thin outline around the heart-shaped face. I like to make this line slightly uneven or broken in places to mimic feather texture rather than a solid hard line. -
Paint the eye patches:
Take a beige or light brown tone and fill in the oval eye patch areas you sketched earlier. This creates depth behind the eyes. -
Add the beak:
Paint the small diamond beak shape with a mustard yellow or ochre paint. Outline it thinly with black or dark brown to make it pop. -
Create the eyes:
Using black paint, fill in two large circles within the beige eye patches. Add a tiny curved line above each black circle for eyelids. -
Add the sparkle:
Once the black paint is tacky or dry, use the handle end of a paintbrush dipped in white paint to dot a highlight in each eye. This brings the owl to life immediately.
Level Up: 3D Elements
Glue actual small craft feathers onto the wings or cut a second paper plate to layer 3D wings on top for a pop-out effect.
Step 4: Feather Texture
-
Chest speckles:
Using dark brown paint and your smallest brush, paint small, teardrop-shaped dashes across the chest area. Radiate them outwards from the center like a fan. -
Wing texture:
Mix a lighter tint of your wing color (add white to the burnt sienna) and paint wispy strokes on the darker wing sections to suggest layered feathers. -
Facial disc rim:
Go back to the dark brown rim of the heart shape. Add tiny, short hash marks perpendicular to the line, pointing inward, to create that classic barn owl ruffled edge. -
Background whimsy:
Dip the back of your brush into different paint colors (like muted pink or orange) and stamp random dots around the owl on the white background for a decorative finish. -
Final touches:
Check your outlines and darken the ‘V’ shape on the forehead where the feathers meet. Let the entire plate dry completely before displaying.
Hang your finished owl on a wall or prop it on a shelf to add a touch of forest charm to your room
Bold Flower Burst Plate
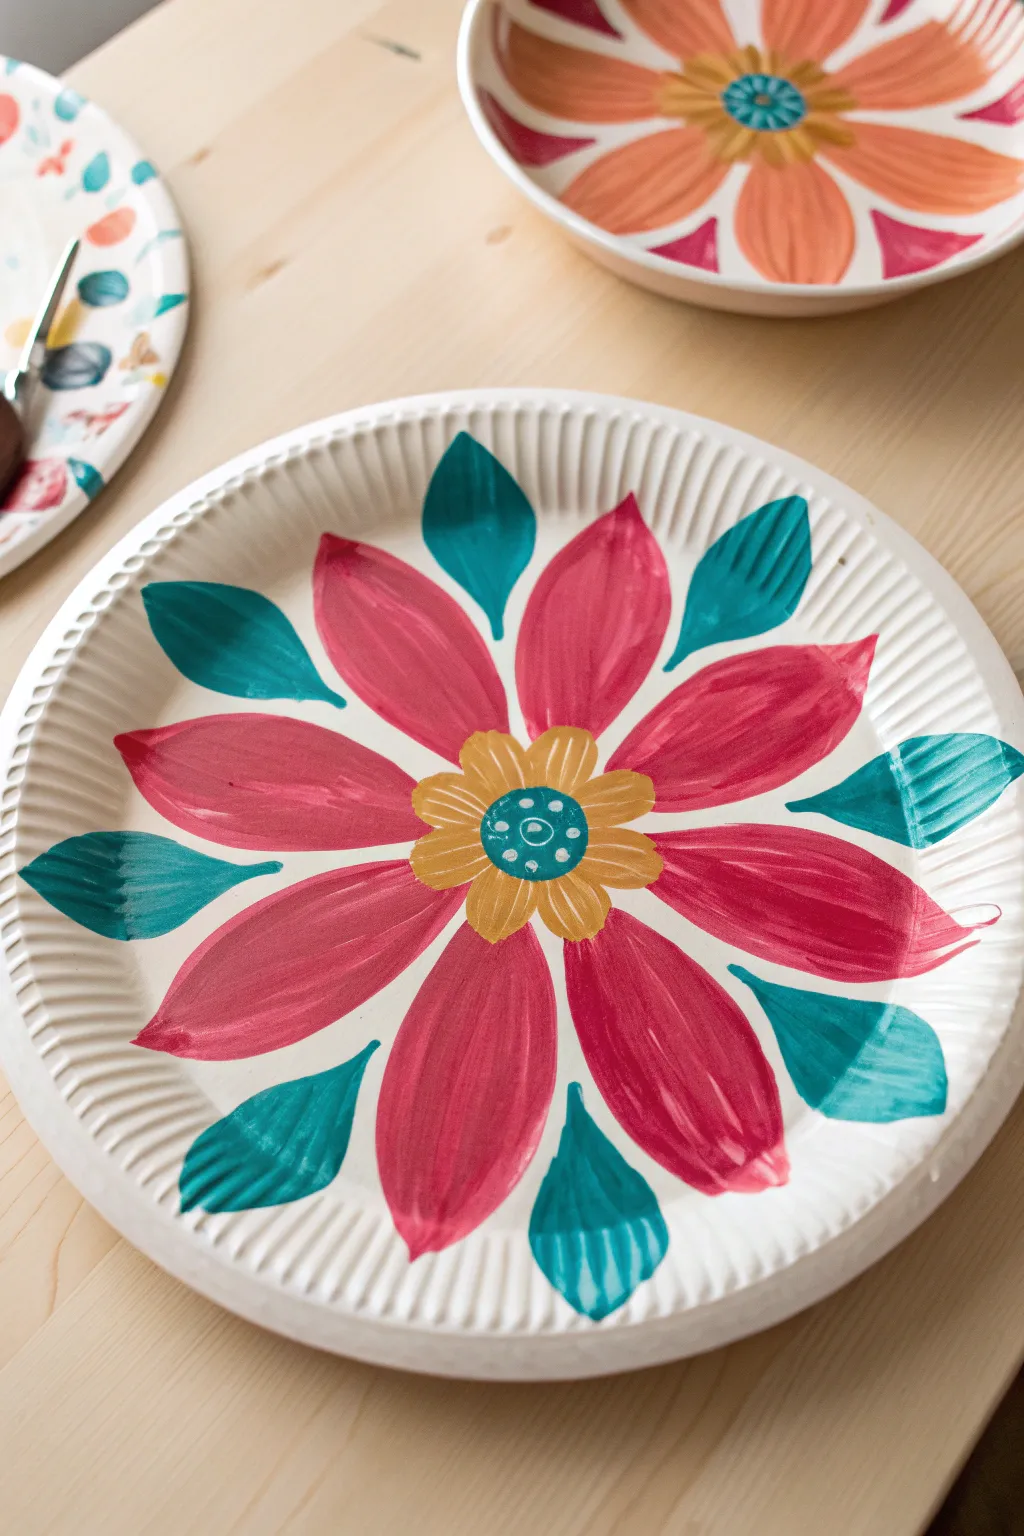
Transform a plain white paper plate into a vibrant piece of folk-art-inspired decor using just a few bold paint colors. This project features a large, symmetrical flower motif with striking pink petals and teal accents that makes for a cheerful afternoon craft.
Step-by-Step Guide
Materials
- Standard white paper plate (uncoated or matte finish works best)
- Acrylic craft paints: Deep pink (magenta), Teal (blue-green), Golden yellow
- Medium round paintbrush
- Small detail paintbrush
- Pencil for sketching (optional)
- Water cup and paper towels
Step 1: Planning and Center
-
Find the center:
Place your paper plate on a flat surface. Visually locate the absolute center of the plate’s eating area. If you feel more comfortable, make a tiny dot with a pencil to mark this spot. -
Base of the center:
Using your medium round brush and the teal paint, create a small, solid circle right on your center mark. This should be about the size of a dime. -
Add detail dots:
While the teal paint is still wet, you can carefully lift some pigment with a dry brush handle to make small dots, or wait for it to dry and use white paint to add the tiny ring of white dots inside the teal circle. -
Scalloped edge:
Rinse your brush thoroughly. Switch to the golden yellow paint. Paint small, scalloped humps around the teal center circle to create the flower’s core. Aim for about 6-8 scallops total.
Plate Texture Tip
Use the ridges of the paper plate as a guide! They naturally separate the rim from the center, helping you know exactly where to stop your petals.
Step 2: Painting the Petals
-
Petal placement:
Visualize the plate like a clock face. You want to paint large, elongated tear-drop shapes for the main pink petals. I find it easiest to paint the 12, 3, 6, and 9 o’clock petals first to keep things symmetrical. -
First layer of pink:
Load your medium brush with deep pink paint. Start near the yellow center and pull the brush outward toward the rim, lifting pressure as you reach the end to create a pointed tip. -
Fill in the gaps:
Paint the remaining pink petals in the spaces between your cardinal points. You should end up with roughly 8 large pink petals evenly spaced around the center. -
Refining shape:
Go back over the petals to widen them slightly if needed. The widest part of the petal should be in the middle, tapering near the center and the tip. -
Texture strokes:
Don’t worry about making the pink perfectly solid. Visible brushstrokes running lengthwise down the petals add to the hand-painted, folk-art aesthetic.
Warping Woes?
If the plate starts curling from the wet paint, tape the edges down to your table with masking tape until the paint is 100% dry to keep it flat.
Step 3: Leaves and Accents
-
Leaf placement:
Look for the V-shaped gaps between the outer tips of your pink petals. This is where the teal leaves will nestle. -
Painting leaves:
Using the teal paint and a clean medium brush, paint shorter, wider leaf shapes in these gaps. They should float near the rim of the plate, not touching the yellow center. -
Leaf orientation:
Angle the tips of these teal leaves outward, following the curve of the plate’s rim. They act as a frame for the central flower. -
Checking balance:
Step back and look at your pattern. If any gaps look too wide, you can slightly broaden the adjacent leaves to fill the visual space. -
Detail work:
Once the yellow center is dry, use a very fine brush or a toothpick to add thin white lines or small dots to the yellow scallops for extra dimension. -
Final drying:
Let the entire plate sit undisturbed for at least 20 minutes to ensure the thickest parts of the acrylic paint are completely dry.
Now you have a striking floral decoration ready to brighten up a wall or party table


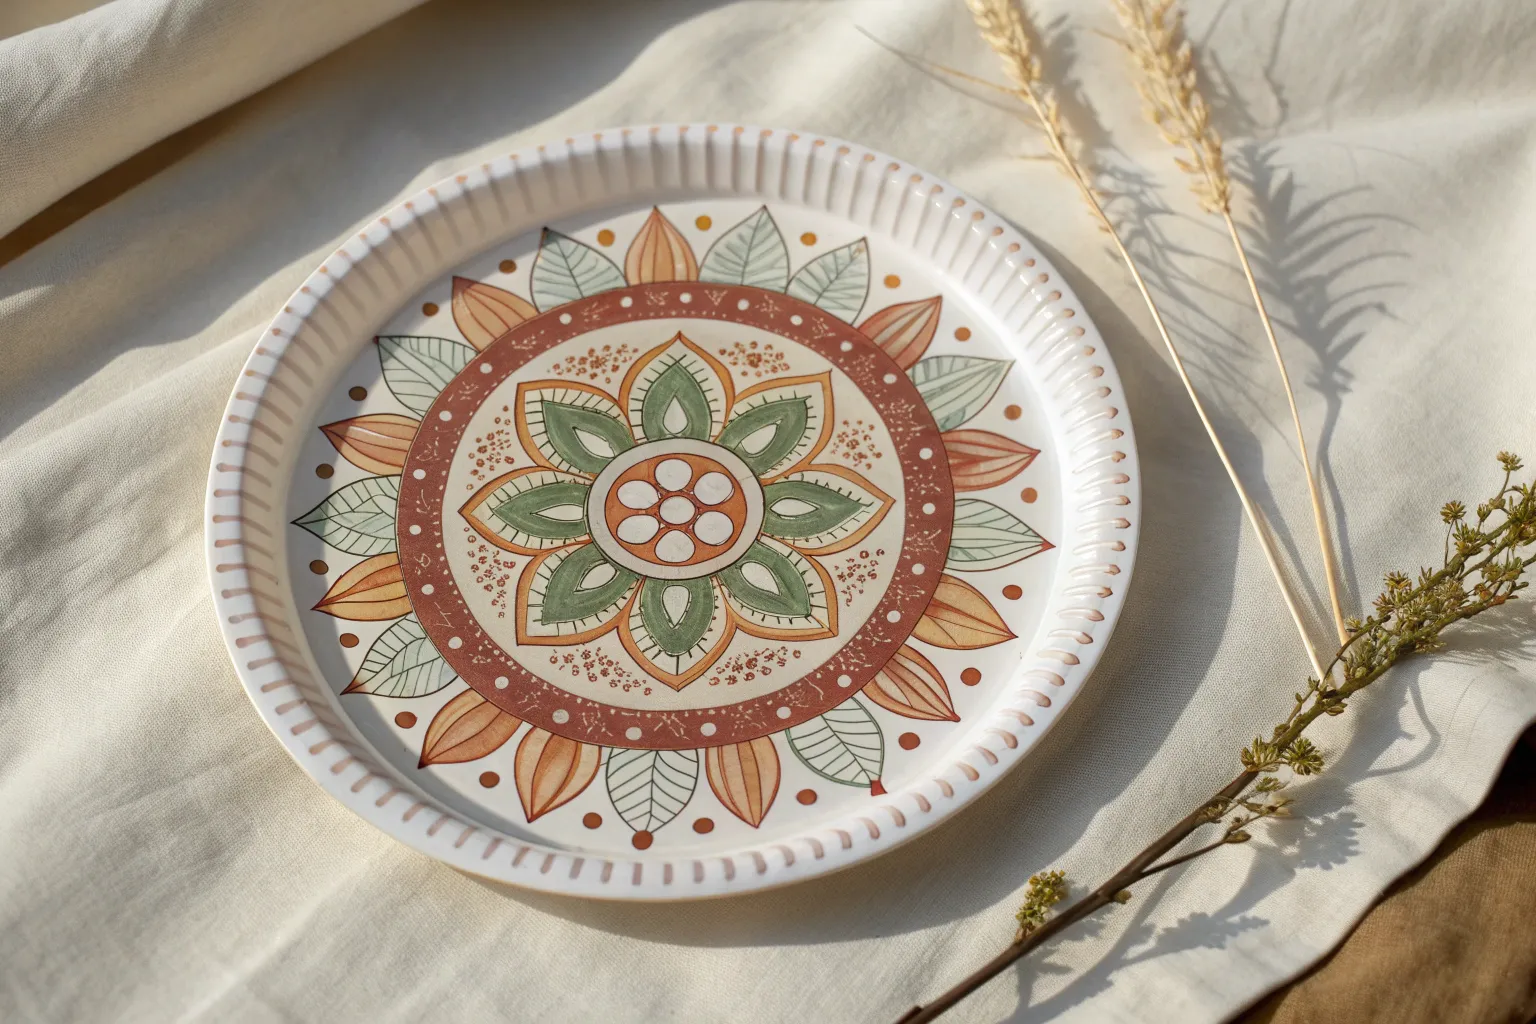
Dot Mandala Plate Painting

Transform a simple white plate into a stunning piece of bohemian decor using calming earth tones and precise dotting techniques. This design features radiating circles of terra cotta, sage green, and cream that mimic intricate ceramic glazing.
Detailed Instructions
Materials
- Sturdy white paper plate (uncoated or matte finish works best)
- Acrylic paints: Terra cotta (rust), sage green, cream/off-white, dark brown
- Dotting tools (various sizes) or household alternatives (Q-tips, pencil erasers, toothpick ends)
- Fine liner brush
- Compass and pencil (optional for guidelines)
- Paper towel
- Palette or small lid
Step 1: Setting the Foundation
-
Find the Center:
Begin by finding the exact center of your plate. You can mark this lightly with a pencil. If you want extra precision, use a compass to draw faint concentric circles outward from the center to act as guides for your pattern. -
Create the Central Flower:
Using a small brush or medium dotting tool, paint a central terra cotta circle about the size of a coin. Let it dry slightly. -
Add Inner Petal Details:
Paint a ring of small white dots inside the terra cotta circle. Then, using a fine liner brush, surround the central circle with small, U-shaped scallop petals in the same rust color to create a flower shape. -
Highlight the Center:
Place a single, distinct white dot in the very middle of your flower, and add tiny white dots to the peak of each scalloped petal for contrast.
Paint Consistency
For perfectly round dots, your paint should be the consistency of heavy cream. Use a fluid medium or a drop of water to thin heavy body acrylics.
Step 2: Building the Middle Rings
-
Paint the Sage Ring:
Mix a soft sage green. Paint a solid band around your central flower, leaving a small gap of white space between the flower and this new ring. -
Outline the Green:
Use a fine brush with terra cotta paint to outline the inner and outer edges of the sage green band. This creates a crisp, defined look. -
Add Green Dots:
Inside the sage green band, use a small tool to place a ring of cream-colored dots. This adds texture and lightness to the solid color. -
Create the Lattice Layer:
Moving outward, paint a wider band using a very diluted terra cotta or cream base. I like to use a liner brush here to paint a cross-hatch or grid pattern in cream over this band, giving it a woven basket texture. -
Frame the Lattice:
Enclose this textured section with two thin rings of solid terra cotta—one on the inside edge and one on the outside.
Oops! Smudged a dot?
Don’t wipe it! Let the mistake dry completely, then paint over it with the base white color. Re-dot the area once the correction layer is dry.
Step 3: The Outer Expansion
-
Large Dot Ring:
Dip a medium-large dotting tool into your terra cotta paint. Create a ring of evenly spaced dots outside your last line. Try to keep the spacing consistent. -
Sage Green Halo:
Paint a wide, transparent wash or thin ring of sage green outside the terra cotta dots. On top of this green layer, apply a ring of medium-sized open circles or large dots using a lighter green shade. -
Micro-Dot details:
Between the large terra cotta dots and the sage ring, use a toothpick to place tiny accent dots in dark brown or deep rust to fill the negative space. -
The Rim Border:
Near the rim of the plate, paint a series of large terra cotta dots. Leave about half an inch of space between each dot. -
Connecting the Rim:
Using your fine liner brush and diluted terra cotta paint, draw arched lines connecting the large rim dots, creating a scalloped border effect right at the edge. -
Inner Rim Details:
Just inside the large rim dots, add a final ring of very small, dark brown dots. These act as a visual container for the whole design. -
Final Touches:
Review your mandala specifically looking for empty spaces that feel unbalanced. Add tiny micro-dots of cream or white to act as highlights or fillers where needed.
Allow your beautiful mandala plate to dry completely before displaying it on a wall or shelf
Night-and-Day Split Sky Plate
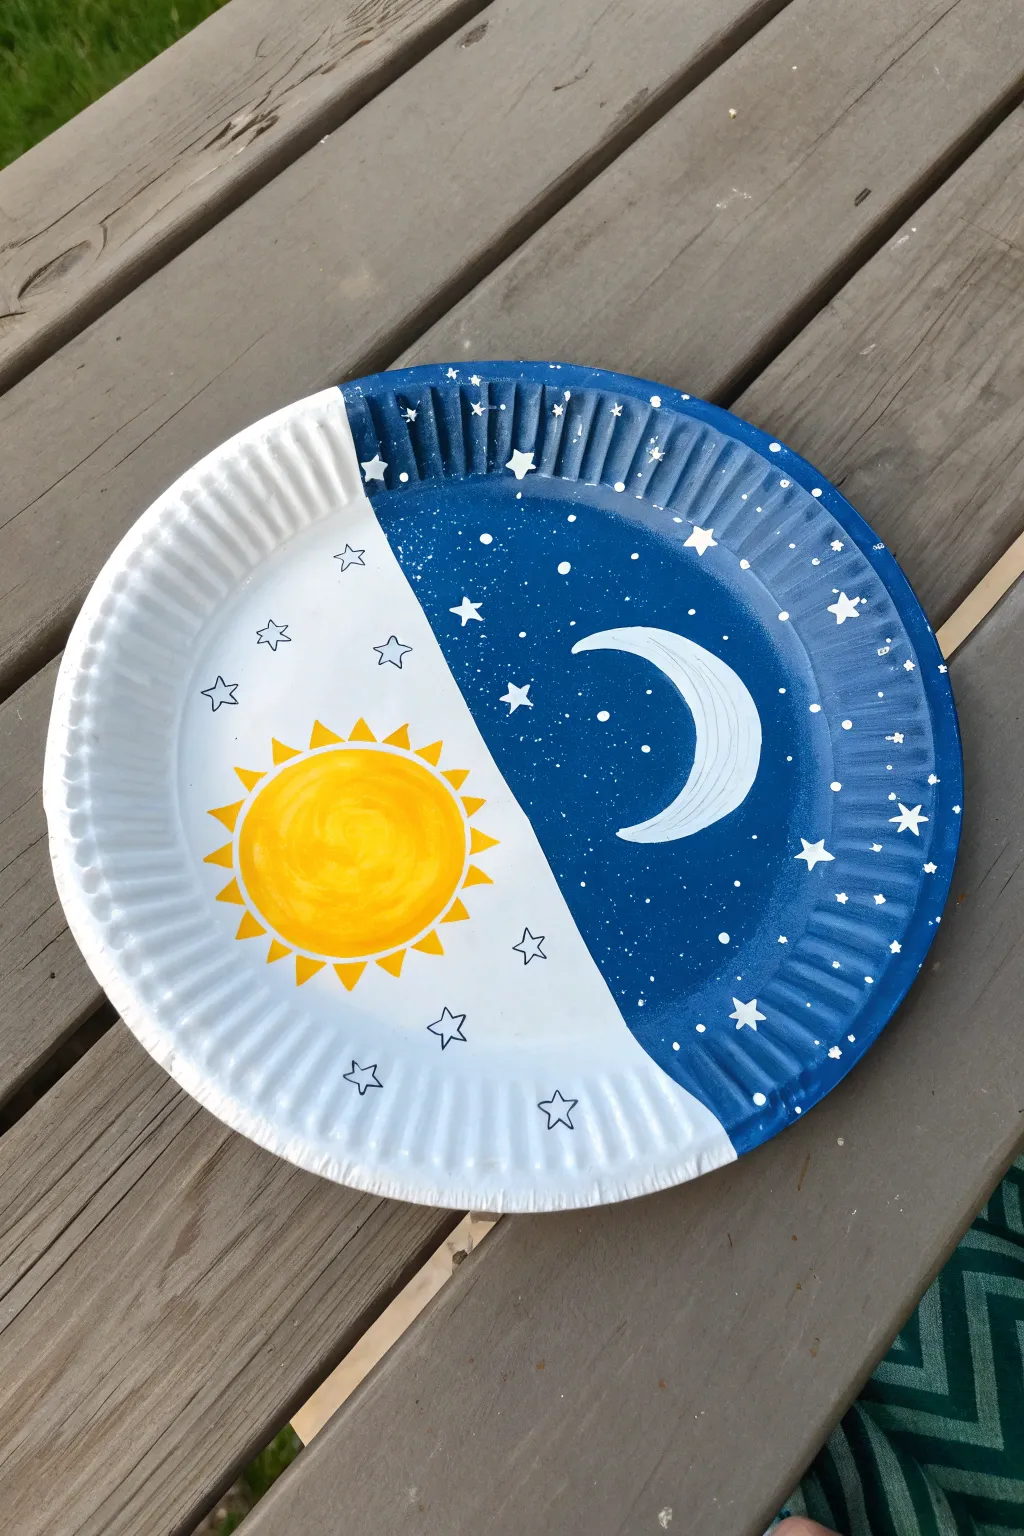
Teach contrasting art concepts with this vibrant paper plate project that captures the duality of light and dark. This simple yet striking design splits a single sky into a sunny day and a starry night, perfect for visual learners.
How-To Guide
Materials
- White paper plate (standard uncoated works best)
- Acrylic paint (Dark Blue, Bright Yellow, White)
- Paintbrushes (flat brush for coverage, fine detail brush)
- Black fine-tip marker or Sharpie
- Pencil for sketching
- Cup of water and paper towels
Step 1: Planning the Horizon
-
Draw the dividing line:
Start by lightly sketching a curved line down the center of your paper plate with a pencil. Aim for an S-curve or a gentle wave that separates the plate into two roughly equal halves. -
Define the celestial bodies:
On the left side (the day side), lightly sketch a circle for the sun. On the right side (the night side), sketch a crescent moon shape facing inward.
Step 2: Painting the Elements
-
Paint the night sky:
Using a flat brush, carefully fill in the right side of the plate with dark blue acrylic paint. Paint right up to your pencil line, being careful to paint around the crescent moon shape you sketched. -
Fill the ridges:
Make sure to dab plenty of blue paint into the fluted edges of the plate rim so no white shows through in the deep grooves. -
Paint the moon:
Once you’ve navigated around the moon shape, wash your brush thoroughly. Use white paint to fill in the crescent moon so it stands out brightly against the unpainted border you left. -
Add the sun:
Switch to bright yellow paint for the day side. Fill in the circular sun shape you sketched earlier. You might need two layers of yellow to make it opaque and vibrant. -
Create the sun’s rays:
Paint triangular rays extending outward from the sun’s circle. Alternate between slightly larger and smaller triangles to give it a dynamic, radiating look. -
Dry completely:
Pause here and let the base layers dry completely. Wet paint will cause your markers to bleed later, so patience is key.
Clean Lines Hack
Use a piece of masking tape or painter’s tape to block off the ‘day’ side while painting the blue ‘night’ side. Peel it off while wet for a perfect edge.
Step 3: Detailing the Sky
-
Add texture to the moon:
If you want a little extra detail, you can use a very dry brush with a tiny amount of grey or light blue to add faint streaks to the moon, though solid white looks great too. -
Paint the stars:
Using your smallest detail brush or the handle end of a paintbrush dipped in white paint, dot the blue night sky to create stars. Paint a few classic five-point star shapes for variety. -
Create a galaxy effect:
For the tinier, distant stars, I like to splatter a little watered-down white paint by flicking the bristles with my thumb over the blue section. -
Draw daytime stars:
On the white ‘day’ side of the plate, use a black fine-tip marker to draw simple five-point star outlines. This creates a cool graphic contrast against the painted side. -
Outline the sun (optional):
If you want the sun to match the graphic style of the day stars, you can outline the yellow sun and rays with the black marker once the yellow paint is fully dry. -
Check the edges:
Do a final check of the dividing line between blue and white. If the line looks messy, you can carefully touch it up with blue paint or outline the boundary with the black marker for a bold finish.
Bleeding Marker?
If your black marker tip gets clogged or stops writing while drawing on the plate, the paint likely wasn’t 100% dry. Let it sit longer or switch to a Sharpie.
Display your celestial masterpiece on a wall or bulletin board to brighten up the room
Galaxy Splatter Paper Plate
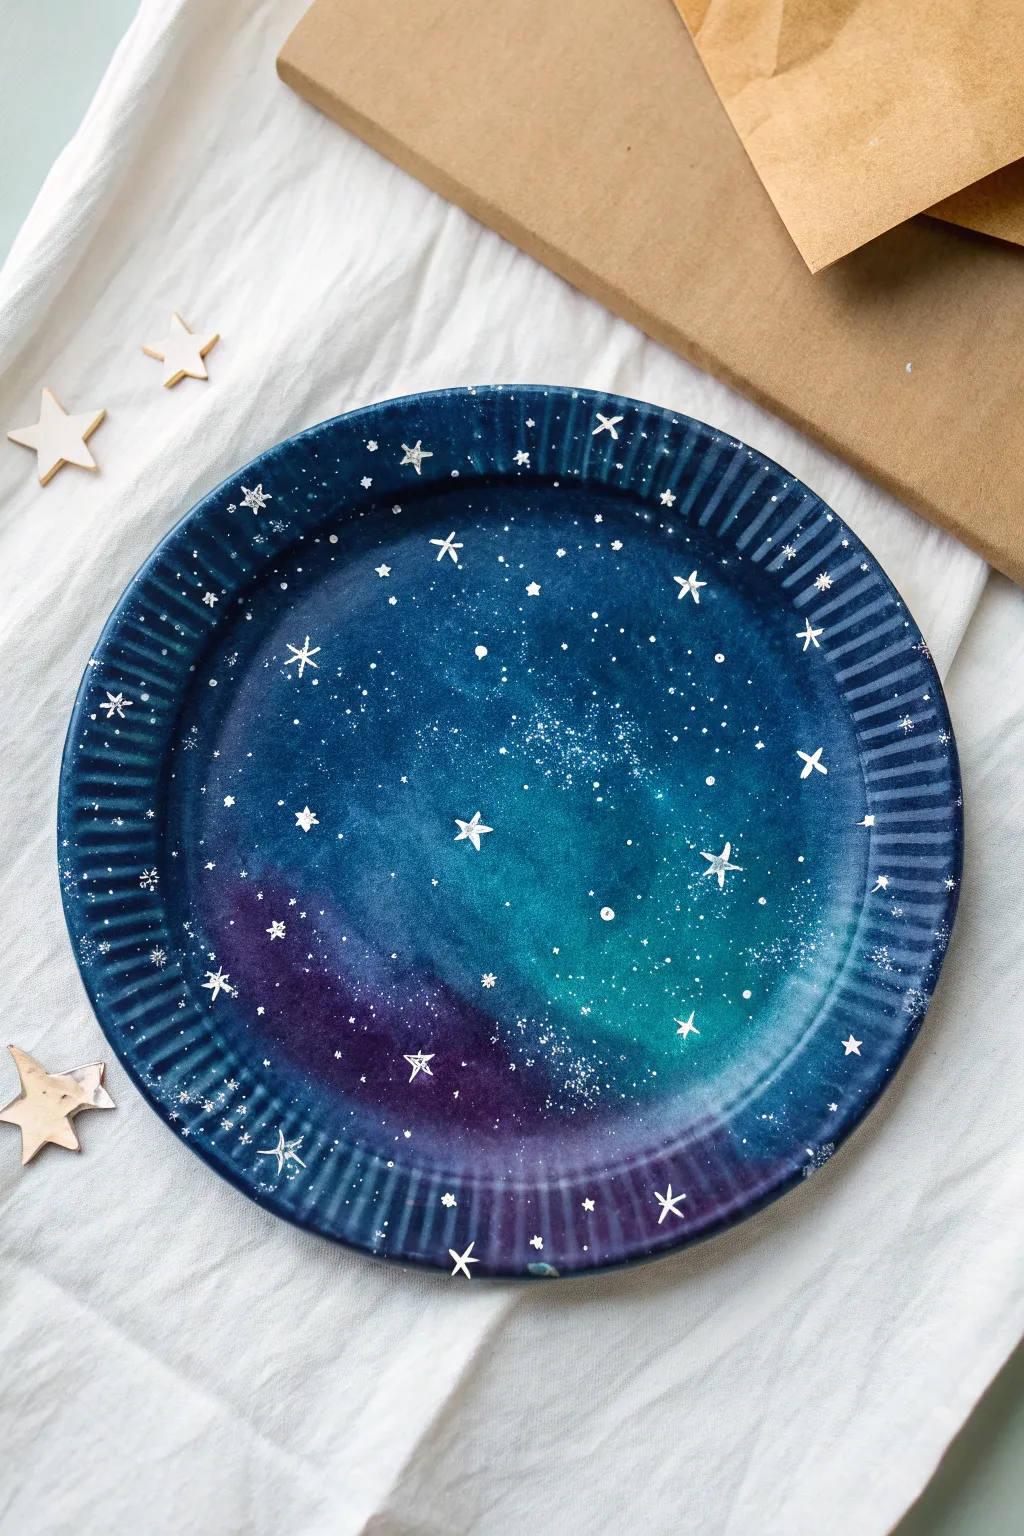
Transform a humble paper plate into a stunning window to the universe using deep, blending acrylics. This project captures the magic of a starry night with swirling nebulae and a sparkling dusting of distant stars.
Detailed Instructions
Materials
- Sturdy white paper plate (uncoated works best)
- Acrylic paints (Dark blue, purple, teal/turquoise, black, white)
- Sponge dabbers or makeup sponges
- Small round paintbrush
- Old toothbrush
- Water cup
- Paper towels
- Palette or extra paper plate for mixing
Step 1: Setting the Background
-
Base Color:
Start by squeezing a generous amount of dark blue acrylic paint onto your palette. Using a sponge dabber, cover the entire surface of the paper plate, including the ridged rim. Don’t worry about it being perfectly opaque yet; thin layers dry faster. -
Adding Depth:
While the blue is still slightly tacky, dab a small amount of black paint around the very outer edges of the plate’s center circle. Blend this inward just a touch to create a vignette effect, making the ‘sky’ feel deeper. -
Creating the Nebula:
Load a clean sponge with purple paint. Choose a specific area—perhaps the bottom left quadrant—and sponge the color on in a cloudy, irregular shape. Soften the edges by blotting gently so it fades into the blue background. -
Teal Highlight:
To make the galaxy pop, add a splash of teal or bright turquoise paint. Sponge this near the purple area or across the center, blending the edges carefully. I like to let these colors overlap slightly to create new, interesting hues. -
Rim Texture:
The rim of the plate has natural ridges. Enhance the depth here by taking a brush with a mix of dark blue and black and painting into the deep grooves of the rim, leaving the raised parts slightly lighter.
Muddy Colors?
If your purple and teal are turning gray when blending, let the dark blue base layer dry completely first. Layering dry-on-wet keeps colors distinct and vibrant.
Step 2: Painting the Stars
-
Splatter Mix:
Create a watery mixture of white acrylic paint. It should be the consistency of heavy cream or milk—thin enough to fly off bristles, but thick enough to show up opaque. -
Testing the Spray:
Dip an old toothbrush into your watered-down white paint. Before aiming at your masterpiece, test the splatter on a scrap piece of paper by running your thumb across the bristles. -
Star Dusting:
Hold the toothbrush over the plate and flick the bristles to create a fine mist of white dots. Focus the densest clusters over your purple and teal nebula clouds to mimic the ‘Milky Way’ look seen in the photo. -
Detailing Larger Stars:
Once the splatter is dry, switch to your smallest round brush and pure (undiluted) white paint. Dot a few larger stars randomly around the sky to create variation in size. -
Painting Star Bursts:
Identify a few of your larger white dots to turn into twinkling stars. Carefully paint a small cross or ‘X’ shape through the center of the dot. -
Adding Shine:
For the brightest stars, add a secondary, smaller ‘X’ rotated 45 degrees over the first one to create an eight-pointed glimmer. Keep your hand steady and use just the very tip of the brush. -
Rim Accents:
Don’t forget the rim! Paint a few tiny ‘X’ stars or simple dots along the fluted edge of the plate to carry the theme all the way to the border. -
Final White Dots:
Inspect the composition. If there are any large empty dark spaces, fill them with a single, deliberate white dot to balance the galaxy. -
Drying Time:
Allow the plate to dry completely before moving it. Because of the multiple layers of sponge painting, this might take a bit longer than standard painting.
Glow Up
Mix a tiny pinch of silver glitter into your white paint before splattering. This adds a subtle, real sparkle to the galaxy as the light hits the texture.
Display your celestial creation on a wall or use it as a decorative charger for a space-themed party
Desert Cactus Scene Plate
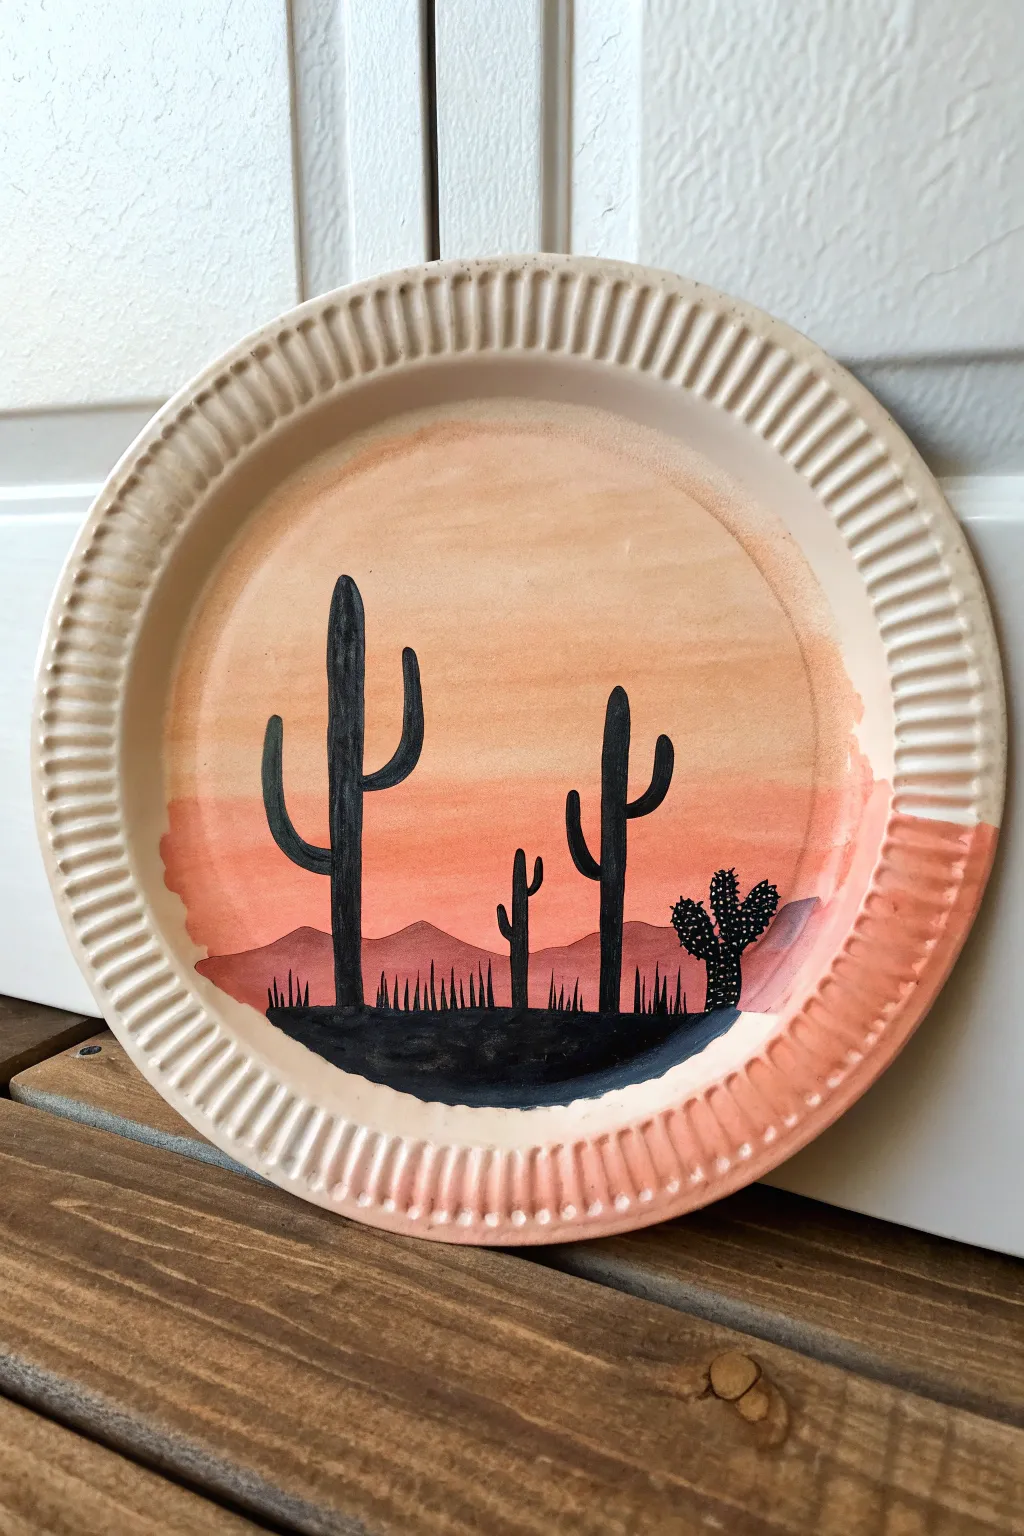
Capture the warmth of the desert with this striking silhouette painting. By blending warm tones directly on the plate, you’ll create a glowing backdrop for stark black cacti.
Step-by-Step
Materials
- Uncoated white paper plate (standard cheap variety works best)
- Acrylic paint (black, burnt orange, light peach/cream, dark red or brown)
- Flat paintbrush (medium size)
- Small round detail brush
- Water cup and paper towels
- Pencil (optional)
Step 1: Painting the Sunset Sky
-
Start with the lightest tone:
Begin at the top of the plate’s inner circle. Use your flat brush to paint a horizontal band of light peach or cream paint. Don’t worry about perfect edges near the rim just yet. -
Add the middle gradient:
While the top layer is still slightly wet, pick up some burnt orange paint. Apply this below the peach section, brushing back and forth where they meet to blend them softy. -
Deepen the horizon:
Mix a tiny bit of red or brown into your orange to create a deeper, duskier color. Paint the bottom third of the plate’s center with this shade. -
Paint the rim:
Extend the paint onto the textured rim of the plate. Keep the gradient consistent: peach at the top rim, transitioning to orange, and then the dark reddish-orange at the bottom rim. -
Let it dry beautifully:
Allow the background to dry completely. If the paper plate is absorbing too much paint, you might need a second coat to make the colors vibrant.
Plate Warping?
If the plate starts to bend from the moisture of the paint, let it dry, then place a heavy book on it (use wax paper in between!) to flatten it back out.
Step 2: Adding the Landscape
-
Create the distant mountains:
Mix a reddish-brown shade using your orange and a touch of black or brown. Using the flat brush, paint low, rolling mountain shapes across the lower third of the plate, right over your sunset background. -
Fill in the mountains:
Fill in the mountain shapes completely so they look solid against the sky. Let this layer dry to the touch before moving on. -
Paint the foreground ground:
Switch to pure black acrylic paint. Paint a solid black, uneven mound at the very bottom of the inner circle to serve as the ground where your cacti will stand.
Step 3: Designing the Cacti
-
Outline the main cactus:
I prefer using a pencil to vary lightly sketch the cactus placement first. Using your small round brush and black paint, draw a tall, thick vertical line on the left side for the main Saguaro cactus. -
Add Saguaro arms:
Paint two curved arms coming off the main trunk. Make them curve upward in a classic ‘U’ shape. Vary the heights to make it look natural. -
Paint the smaller cactus:
To the right of the center, paint a smaller Saguaro cactus. Give this one a single arm, or make it slightly different from the first one for variety. -
Create the Prickly Pear:
On the far right, paint a small, rounded cactus shape. It should look like a stack of black ovals connected to each other. -
Add Prickly Pear details:
Once the black paint on the Prickly Pear is dry, use a toothpick or a super fine brush to dot tiny white or light gray spots on it for needles. This adds great texture.
Add a Sun
Before painting the black silhouettes, use a circular foam pouncer or a coin to trace a yellow or white circle in the sky for a setting sun.
Step 4: Final Details
-
Add grass texture:
Using the very tip of your small round brush, flick tiny black lines upward from the black ground. Keep these short and random to look like desert grass. -
Refine the edges:
Check the rim of the plate. If the gradient paint didn’t cover the fluted edges well, dab a little extra paint into the grooves to finish the look. -
Final drying time:
Set the plate aside in a safe spot to dry completely, as the thick black paint may take a little longer than the background.
Display your desert scene on a shelf or wall to add a warm, artistic touch to your room
Koi Pond Ripple Plate
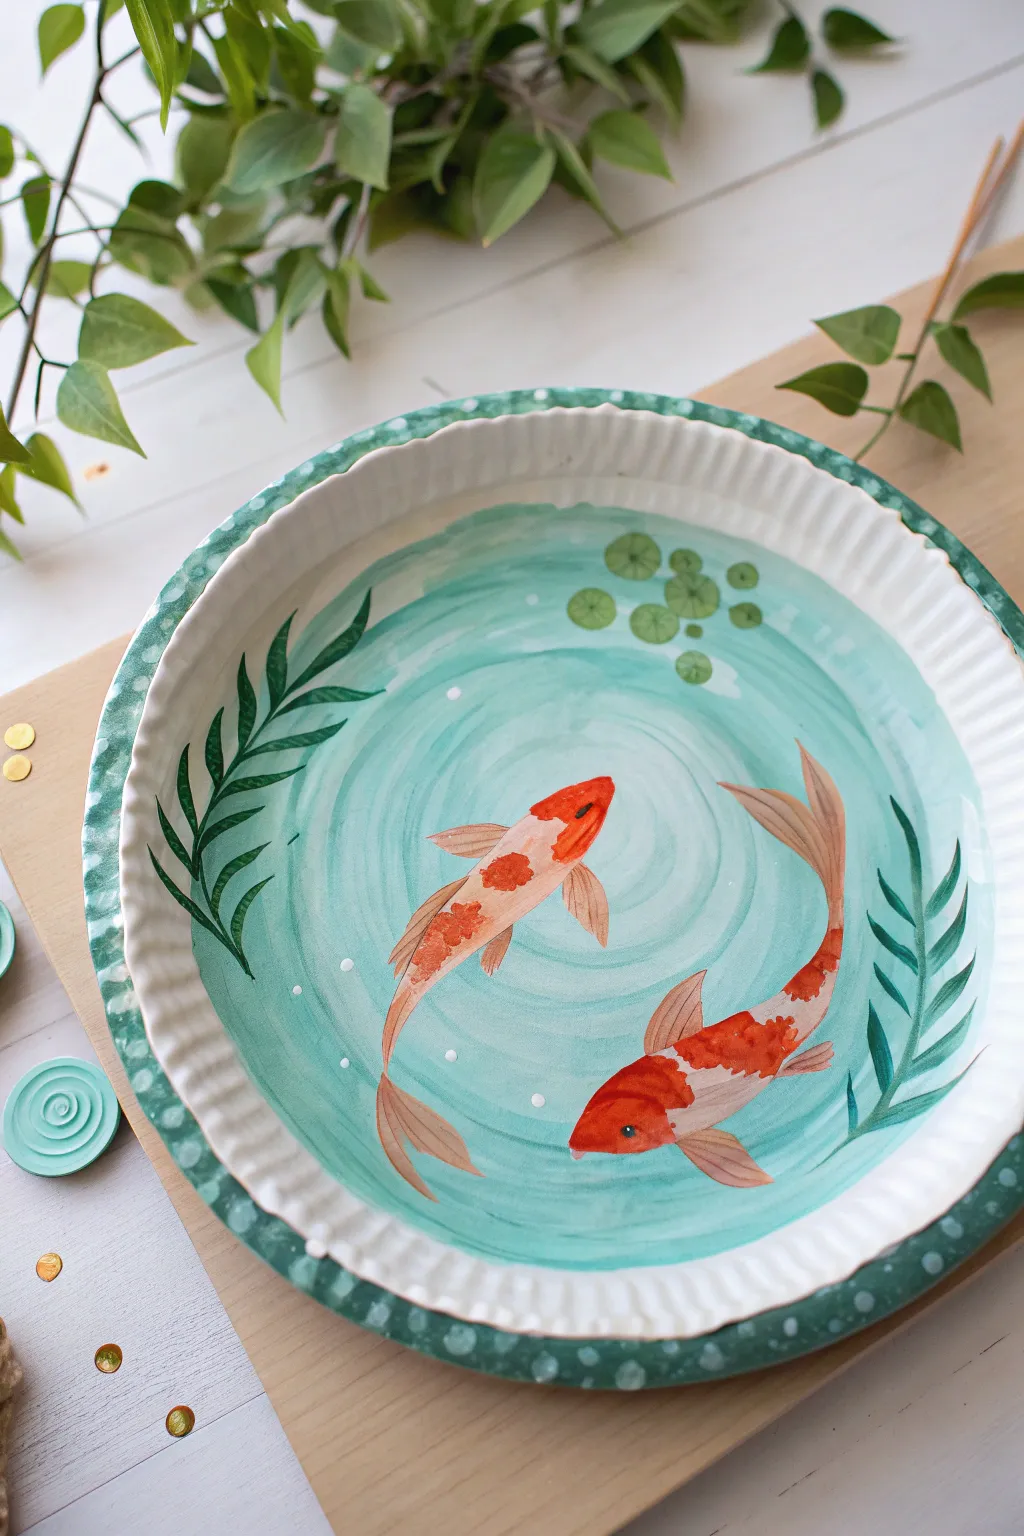
Transform a simple fluted paper plate into a tranquil water garden scene with swirling ripples and graceful koi fish. The natural ridges of the plate add a wonderful sense of movement to the painted water.
How-To Guide
Materials
- Sturdy fluted paper plate (uncoated works best)
- Acrylic paints (teal, turquoise, white, bright orange, red-orange, deep green, light green)
- Flat shader brush (size 6 or 8)
- Round detail brush (size 1 or 2)
- Fine liner brush
- Palette for mixing
- Cup of water and paper towels
Step 1: Preparing the Watery Base
-
Mix the base color:
Start by mixing a watery teal shade. Combine turquoise with a generous amount of white and a tiny drop of green to get that soft, aquatic look. -
Apply the initial wash:
Paint the entire center circle of the plate with this light teal mix. Don’t worry about being perfectly smooth; subtle brushstrokes actually help mimic water texture. -
Paint the rim:
For the fluted rim, use a slightly darker, more saturated green-teal. I like to dab the paint on here to give it a speckled, organic texture rather than a solid block of color. -
Create the ripples:
Using a clean brush and watered-down white paint, create concentric circular strokes in the center. These should look like soft swirls rather than perfect circles. -
Deepen the water:
Mix a slightly darker version of your base teal. Add curved strokes between your white ripples to create depth and shadow in the water’s movement. -
Add highlights:
Add tiny, crisp dots of pure white scattered randomly across the water surface to represent sparkling light reflections.
Step 2: Painting the Koi Fish
-
Outline the bodies:
With a diluted orange paint and your round brush, sketch two curved fish shapes swimming in a circle—one moving up, one moving down. They should look like elongated teardrops that curve at the tail. -
Fill the base color:
Fill in the fish bodies with a creamy, pale peach or very light orange. This acts as the base skin tone for the koi. -
Add orange markings:
Now, take your bright orange paint. Add distinctive patches and spots along the back of each fish. Koi are unique, so vary the sizes of these blotches. -
Deepen the patterns:
Mix a red-orange shade and paint smaller accents inside the orange patches. This layering gives the fish a realistic, three-dimensional scale effect. -
Define the fins:
Using a very pale translucent orange, paint the pectoral fins (on the sides) and the tail fin. Keep these wispy and delicate. -
Detail the fins:
Switch to your fine liner brush. Use a reddish-brown dilute mix to draw very thin lines along the fins and tail to show their ribbed structure. -
Add the eyes:
Place a tiny black dot for the eye on each fish, followed by a microscopic spec of white on the black dot to bring them to life.
Muddy Water?
If your ripple colors are blending too much and turning gray, make sure the base layer is 100% dry before adding the white swirls or shadows.
Step 3: Vegetation and Final Touches
-
Paint fern stalks:
Using deep green paint and a fine brush, draw a long, curved line on the left and right edges of the inner circle to serve as stems. -
Add fern leaves:
Paint small, pointed almond shapes radiating from the stems. Make the leaves slightly translucent by adding a touch of water to your green paint. -
Create lily pads:
Near the top right, paint a small cluster of circles in light olive green. These are your floating lily pads. -
Texture the pads:
Once the pads are dry, use a darker green to paint a tiny cross or vein pattern in the center of each one. -
Rim detailing:
Return to the outer fluted rim. Use a cotton swab or the end of a brush handle to dot white spots over the dark green rim, tying the frame into the watery theme. -
Final ripples:
Paint extremely thin white lines contouring around the fish bodies and the plants to show how they are disturbing the water surface.
3D Lily Pads
Cut small circles from green construction paper and glue them onto the painted surface for a mixed-media 3D pop effect.
Allow your beautiful pond plate to dry completely before displaying it on a stand or hanging it on the wall
Tape-Resist Geometric Plate
Transform a humble paper plate into a striking piece of modern art using simple geometric shapes and warm, earthy tones. This tape-resist technique creates crisp lines and bold triangles for a sophisticated finish that looks far more expensive than it is.
Step-by-Step Tutorial
Materials
- Standard white paper plate (uncoated works best)
- Painter’s tape or washi tape (1/4 inch width is ideal)
- Acrylic craft paints (navy blue, terracotta/rust, metallic gold/ochre, brow/bronze)
- Flat paintbrush (medium size)
- Fine detail paintbrush
- Palette or small dish for mixing
- Scissors
Step 1: Creating the Geometric Framework
-
Prepare the surface:
Start with a clean, dry paper plate. If your plate has a glossy coating, lightly sand it with fine-grit sandpaper to help the paint adhere better, though uncoated plates are preferred. -
Plan your central lines:
Cut long strips of painter’s tape. Place your first strip diagonally across the entire plate. Add a second and third strip to intersect the first one, creating large, random triangular sections. -
Subdivide the unexpected spaces:
Look for the larger empty triangles you’ve created. Use shorter pieces of tape to bisect these spaces, creating a complex web of varying triangle sizes. Aim for a balanced look where no single shape dominates. -
Seal the edges:
Firmly run your fingernail or the back of a spoon along the edges of every piece of tape. This is crucial for preventing paint bleed and achieving those crisp, professional lines later.
Bleeding Lines?
If paint bleeds under the tape, it’s usually because the tape wasn’t pressed down firmly enough. Try painting a layer of clear medium over the tape edges first to seal them before adding color.
Step 2: Blocking in Color
-
Start with navy blue:
Select 3-4 non-adjacent triangles and paint them with your navy blue acrylic paint. Use your flat brush and stroke away from the tape edges toward the center of the shape to minimize bleeding. -
Add the metallic accents:
Dip your brush into the gold or ochre paint. Fill in another set of 3-4 scattered triangles. I find that placing these next to the dark blue sections creates the most striking contrast. -
Apply the rust tone:
Fill a few remaining triangles with the terracotta or rust-colored paint. Keep the color distribution balanced around the plate so the eye travels easily across the design. -
Leave negative space:
Leave several triangular sections completely unpainted. The bright white of the plate is an essential ‘color’ in this design and will provide breathing room for the darker tones. -
Let the base dry:
Allow the paint to dry completely. Acrylics dry fast, but give it at least 15-20 minutes to be safe. The paint should finish matte and not feel tacky to the touch.
Step 3: Adding Details & The Reveal
-
Hand-paint the stripes:
Identify a few of the white, unpainted triangles. Using your fine detail brush and a bronze or dark brown paint, carefully hand-paint thin, parallel diagonal stripes inside these shapes. -
Vary line direction:
Change the angle of your stripes for each section you detail. If one set goes left-to-right, make the next set go right-to-left to keep the visual rhythm dynamic. -
The crucial peel:
Once your striped details are totally dry, begin removing the tape. Peel it slowly at a 45-degree angle away from the painted area. This helps cut the paint film cleanly. -
Touch up edges:
If a little paint seeped under the tape, use a tiny brush with white paint (or the color of your plate) to tidy up the lines. A white gel pen also works wonders for crisping up edges. -
Optional clear coat:
To protect your design and give it a slight sheen, you can brush on a layer of clear acrylic sealer or Mod Podge, though the raw matte finish has a lovely organic feel.
Metallic Pop
For extra luxury, swap the gold paint for gold leaf foil on a few triangles. Apply sizing glue, wait for it to get tacky, and press the foil sheet down for a brilliant, reflective finish.
Hang your stunning geometric masterpiece on the wall or use it as a decorative catch-all tray for lightweight items
Sponge-Stamped Texture Plate
Transform a simple ribbed paper plate into a piece of dreamy décor with soft sponge stamping and delicate brushwork. This project combines muted pastels with organic leaf motifs for a sophisticated, nature-inspired look.
Detailed Instructions
Materials
- White paper plate with ribbed rim
- Kitchen sponge or makeup wedge sponges
- Acrylic paints (Soft pink, muted gold/ochre, sage green, dark forest green)
- Fine liner paintbrush
- Small round paintbrush
- Toothpick or dotting tool
- Palette or wax paper
- Scissors
Step 1: Preparing the Stamps
-
Shape the Clouds:
Cut your sponge into small, irregular cloud shapes about 1 to 1.5 inches wide. Round off the corners to create fluffy edges rather than sharp angles. -
Create Leaf Stamps (Optional):
If you prefer stamping leaves over painting them, cut a tiny teardrop shape from a leftover piece of sponge. This works great for the larger, solid leaves. -
Test the Texture:
Dab a bit of paint onto your cloud sponge and press it onto a scrap piece of paper first. You want a soft, porous texture, not a solid glob of paint.
Too Much Paint?
If your sponge stamps look like solid blobs, dab the sponge on a paper towel 3-4 times before touching the plate. You need very little paint for that airy look.
Step 2: Stamping the Base
-
Stamp Pink Clouds:
Load your sponge with soft pink paint, dab off the excess, and press 3-4 clouds randomly around the plate’s flat center. -
Add Golden Clouds:
Using a clean sponge section, stamp a few ochre or gold-colored clouds in the empty spaces. Let them overlap the pink slightly for interest if you like. -
Add Green Accents:
Stamp one or two sage green clouds or simple blobs to balance the color palette. Keep the arrangement loose and airy. -
Rim Details:
Lightly drag a sponge with very little paint (pink or green) along the ribbed rim of the plate to highlight the texture without painting it solid.
Step 3: Painting the Foliage
-
Paint Dark Green Stems:
Using your fine liner brush and dark forest green paint, draw thin, curved lines weaving between the clouds. These will be your main stems. -
Add Leaves:
Paint small, alternating almond-shaped leaves along the dark stems. Press the brush down and lift up quickly to create a tapered leaf shape. -
Layer Lighter Foliage:
Switch to sage green paint and add a few lighter sprigs or ferns. These create visual depth against the darker leaves. -
Paint Berries:
Dip the handle of your brush or a dotting tool into pink or orange paint and add tiny round berries to the ends of a few thin stems. -
Extend to the Rim:
Allow some of your vines and leaves to creep up onto the ribbed rim of the plate for a continuous, seamless design.
Makeup Sponge Magic
Use triangular makeup wedges instead of kitchen sponges. The foam is much denser, giving you a smoother, more velvet-like print perfect for clouds.
Step 4: Adding Texture & Dots
-
Cluster Dots:
Dip a toothpick into dark green or black paint. Create small clusters of tiny dots in the empty white spaces to mimic pollen or seeds. -
Add Color Speckles:
Repeat the dotting process with pink or gold paint, clustering them near the clouds of the matching color. -
Finishing Touch:
Check for any large empty gaps and fill them with a single stray leaf or a tiny group of three dots.
Now let your beautiful botanical plate dry completely before displaying it on a wall or shelf


Have a question or want to share your own experience? I'd love to hear from you in the comments below!