
Pebble rock painting is one of my favorite ways to turn a tiny, ordinary stone into something that feels like a little pocket-sized artwork. If you’re craving approachable ideas that look great fast, these designs will keep your brush moving and your creativity happy.
Classic Ladybug Pebble Rocks
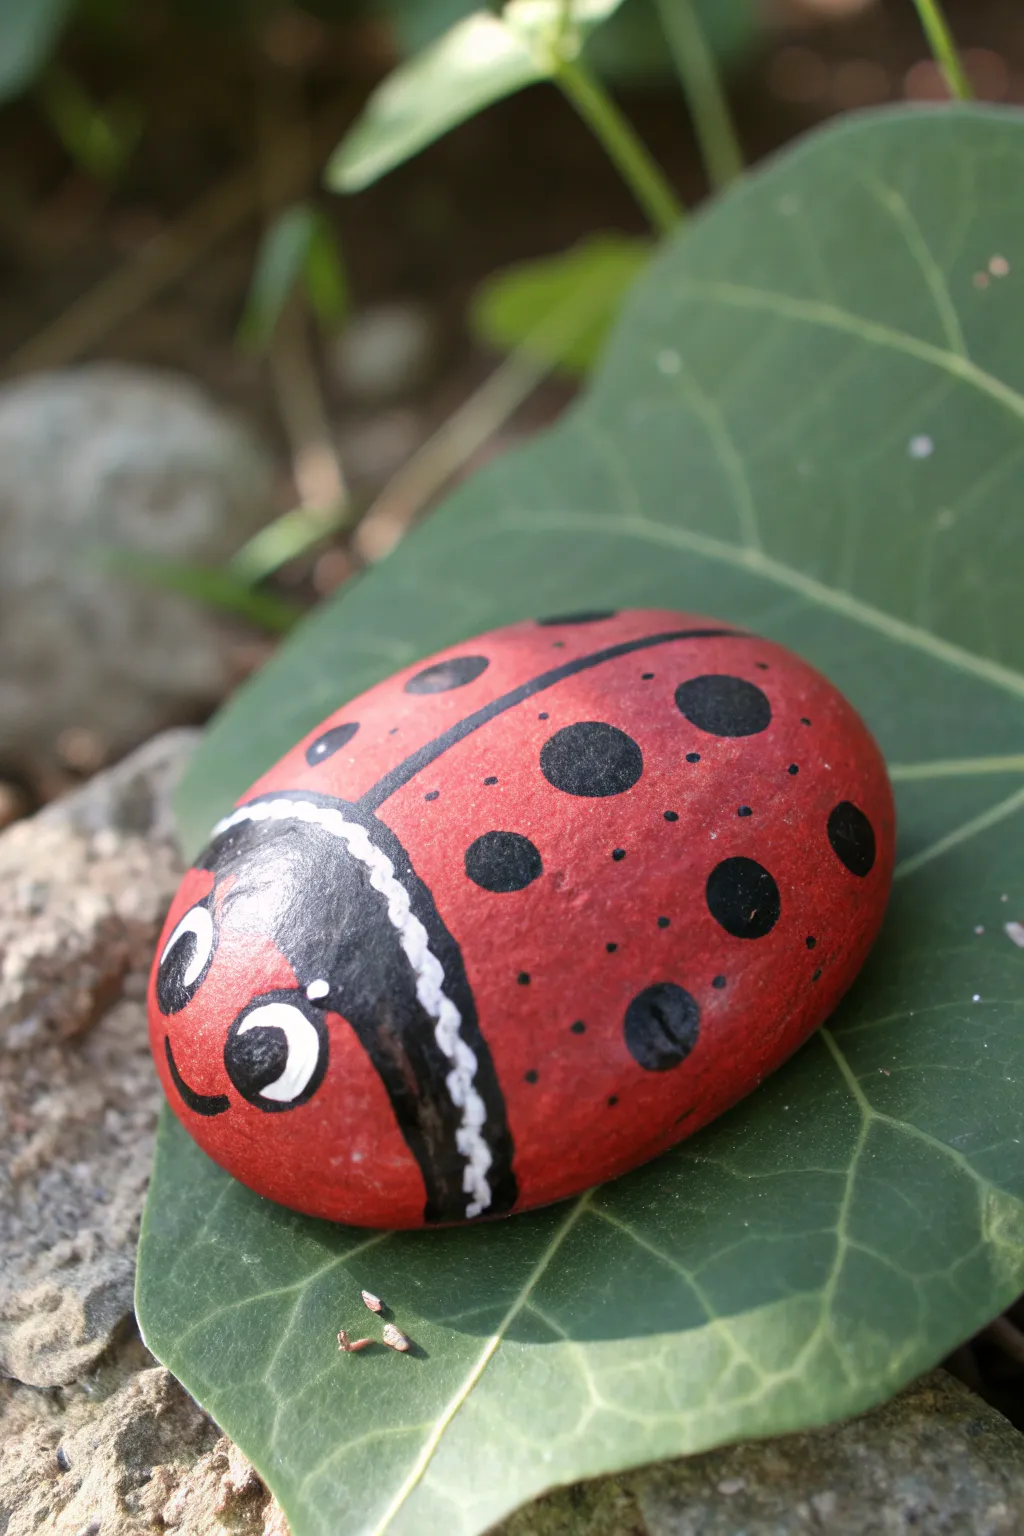
Transform a simple garden stone into a cheerful spotted friend with this classic ladybug design. The bright red body and playful face make this pebble painting project perfect for hiding in planters or brightening up a walkway.
Step-by-Step
Materials
- Smooth, oval-shaped river rock
- Acrylic paint (Red, Black, White)
- Flat paintbrush (medium size)
- Detail paintbrush (fine point)
- Dotting tool or toothpick
- Pencil
- Clear acrylic sealer (spray or brush-on)
- Palette or paper plate
- Water cup and paper towels
Step 1: Base Coating
-
Clean and Prep:
Begin by thoroughly washing your rock with warm soapy water to remove any dirt or grease. Dry it completely before starting, as moisture can prevent the paint from adhering properly. -
Base Color Application:
Using your medium flat brush, paint the entire top surface of the rock with bright red acrylic paint. Depending on your paint’s opacity, you may need a second coat for full coverage. Let the red layer dry completely. -
Drafting the Shapes:
Once the red base is dry to the touch, lightly sketch the outline of the head section at the front (narrower end) of the rock using a pencil. -
Painting the Head:
Fill in the sketched head area with black acrylic paint. Use the edge of your brush to create a smooth, curved line where the black meets the red body.
Uneven Circles?
If your black dots look lumpy or uneven, let them dry fully, then lightly sand the high spots. Repaint carefully with a dotting tool for a perfect circle.
Step 2: Adding Details
-
The Dividing Line:
Using a fine detail brush and black paint, draw a continuous line from the center of the black head section all the way down the middle of the red body to the tail. This separates the wings. -
Large Spots:
Dip a large dotting tool or the handle end of a paintbrush into black paint. Press firmly to create three or four large, distinct spots on either side of the dividing line. -
Tiny Speckles:
Switch to a toothpick or a very fine dotting tool for texture. Add tiny black micro-dots scattered randomly between the larger spots to give the shell a more organic, textured look. -
The Decorative Collar:
This is the signature detail for this design. Using a fine brush and white paint, create a scalloped or wavy line right over the border where the black head meets the red body. -
Refining the Collar:
Go back over your white wavy line to ensure it is solid and opaque. The white contrast really makes the red and black pop.
Step 3: Bringing it to Life
-
Eye Base:
On the black head area, paint two white ovals for the eyes. Position them slightly angled toward each other for a cute expression. -
Adding Pupils:
Once the white ovals are dry, add a black circle inside each one. Place the black circles toward the bottom-right of the white oval to make the ladybug look like it’s gazing sideways. -
Eye Highlights:
For that crucial sparkle, use a toothpick to place a tiny white dot inside the black pupil. This small reflection brings the character to life. -
The Smile:
With your finest liner brush and black paint, extend a small, curved line acting as a smile on the red area, just under the head on the left side (or paint a faint white smile on the black head if preferred). -
Adding Legs (Optional):
If you want extra detail, paint tiny black lines extending from the bottom edge of the rock to suggest tucked-under legs, though this simple unseen style works great too. -
Sealing:
Allow the entire rock to dry for at least 24 hours. Finish by applying a clear acrylic sealer to protect your artwork from weather and UV fading.
Glow in the Dark
Swap the white paint used for the eyes and the scalloped collar detail with glow-in-the-dark acrylics for a fun surprise in your garden at night.
Place your finished ladybug on a wide green leaf or a sunny rock to enjoy your handiwork


Busy Bee Pebble Designs
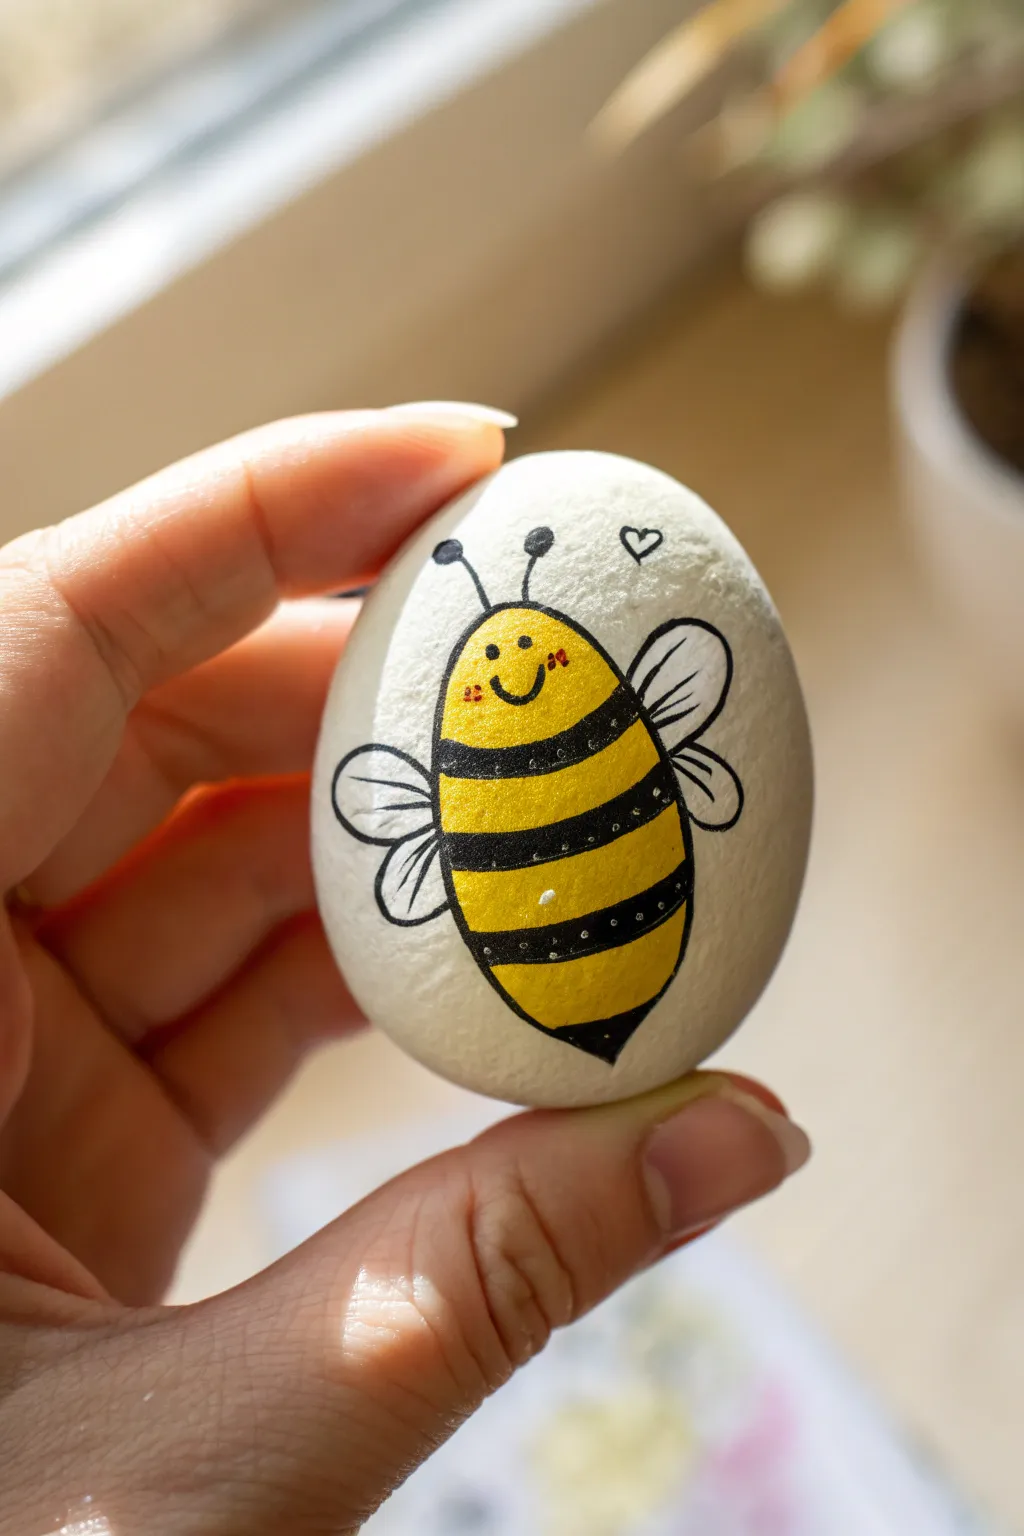
Brighten someone’s day with this cheerful yellow bumblebee painted on a smooth white stone. The simple, rounded shapes and cute expression make it an approachable project for beginners and kids alike.
Step-by-Step Tutorial
Materials
- Smooth, oval-shaped river rock or pebble
- White acrylic paint or white Posca pen (broad tip)
- Yellow acrylic paint or yellow paint marker
- Black fine-liner pen (waterproof) or extra-fine black paint pen
- Small round paintbrush (if using bottled paint)
- Red or pink fine-liner or paint for cheeks
- Clear matte or glossy sealant spray or varnish
Step 1: Preparing the Base
-
Clean the stone:
Start by washing your chosen pebble with warm soapy water to remove any dirt or oils. Let it dry completely in the sun or with a towel. -
Apply the white base:
Even if your stone is light-colored, painting a solid white oval in the center creates a bright canvas for the yellow bee. Use white acrylic paint or a broad paint marker to create a large, smooth oval shape. -
Let it dry:
Allow the white base layer to dry fully. If the stone’s color shows through, add a second coat for opacity.
Step 2: Painting the Body
-
Outline the bee body:
Using your yellow paint or marker, draw a large, vertical oval shape in the center of your white background. This will be the main body of the bee. -
Fill with yellow:
Fill in the entire oval with bright yellow paint. Ensure the coverage is solid and vibrant. -
Dry thoroughly:
Wait for the yellow paint to be completely dry to the touch so the black lines won’t bleed into it later.
Fixing Smudges
If your black outline bleeds into the yellow, wait for it to dry completely, then dab a tiny bit of opaque yellow paint over the mistake to cover it up.
Step 3: Adding Details
-
Outline in black:
Use a fine black paint pen or liner to carefully trace the outer edge of the yellow oval, giving the bee a crisp outline. -
Draw the stripes:
Paint three or four slightly curved horizontal bands across the yellow body. I like to make the bottom stripe slightly pointy to suggest the stinger area. -
Fill the stripes:
Color in the black bands completely. Leave the very bottom tip of the oval black as well for the stinger. -
Add wing outlines:
On the left side of the bee, draw two teardrop shapes stacked vertically—a larger top wing and a smaller bottom wing. Repeat this on the right side. -
Detail the wings:
Inside each wing, draw a few delicate curved lines radiating from the body to mimic wing veins. -
Create the face:
In the top yellow section, draw two small black dots for eyes and a wide U-shape for a happy smile. -
Add rosy cheeks:
Using a tiny dotting tool or a fine pink marker, place three tiny dots on each end of the smile for blushing cheeks. -
Draw antennae:
From the very top of the head, draw two thin black lines angled outward, finishing each with a solid black dot. -
Add the love:
Draw a tiny, simple heart outline floating just above the right antenna to give the bee a loving personality. -
Highlight the stripes:
Once the black ink is dry, use a white gel pen or a very fine brush with white paint to add tiny dots or dashed lines inside the black stripes for texture.
Make it Sparkle
Mix a tiny pinch of fine iridescent glitter into your final clear sealant coat to give the bee’s wings a magical, shimmering effect in the sunlight.
Step 4: Finishing Touches
-
Seal the artwork:
To protect your bee from chipping, apply a thin coat of clear varnish or mod podge over the entire painted area. -
Final dry:
Let the sealant cure according to the bottle instructions before handling or placing your stone outside.
Now you have a sweet honeybee friend to keep on your desk or hide in the garden for someone to find


Easy Flower Garden Pebbles
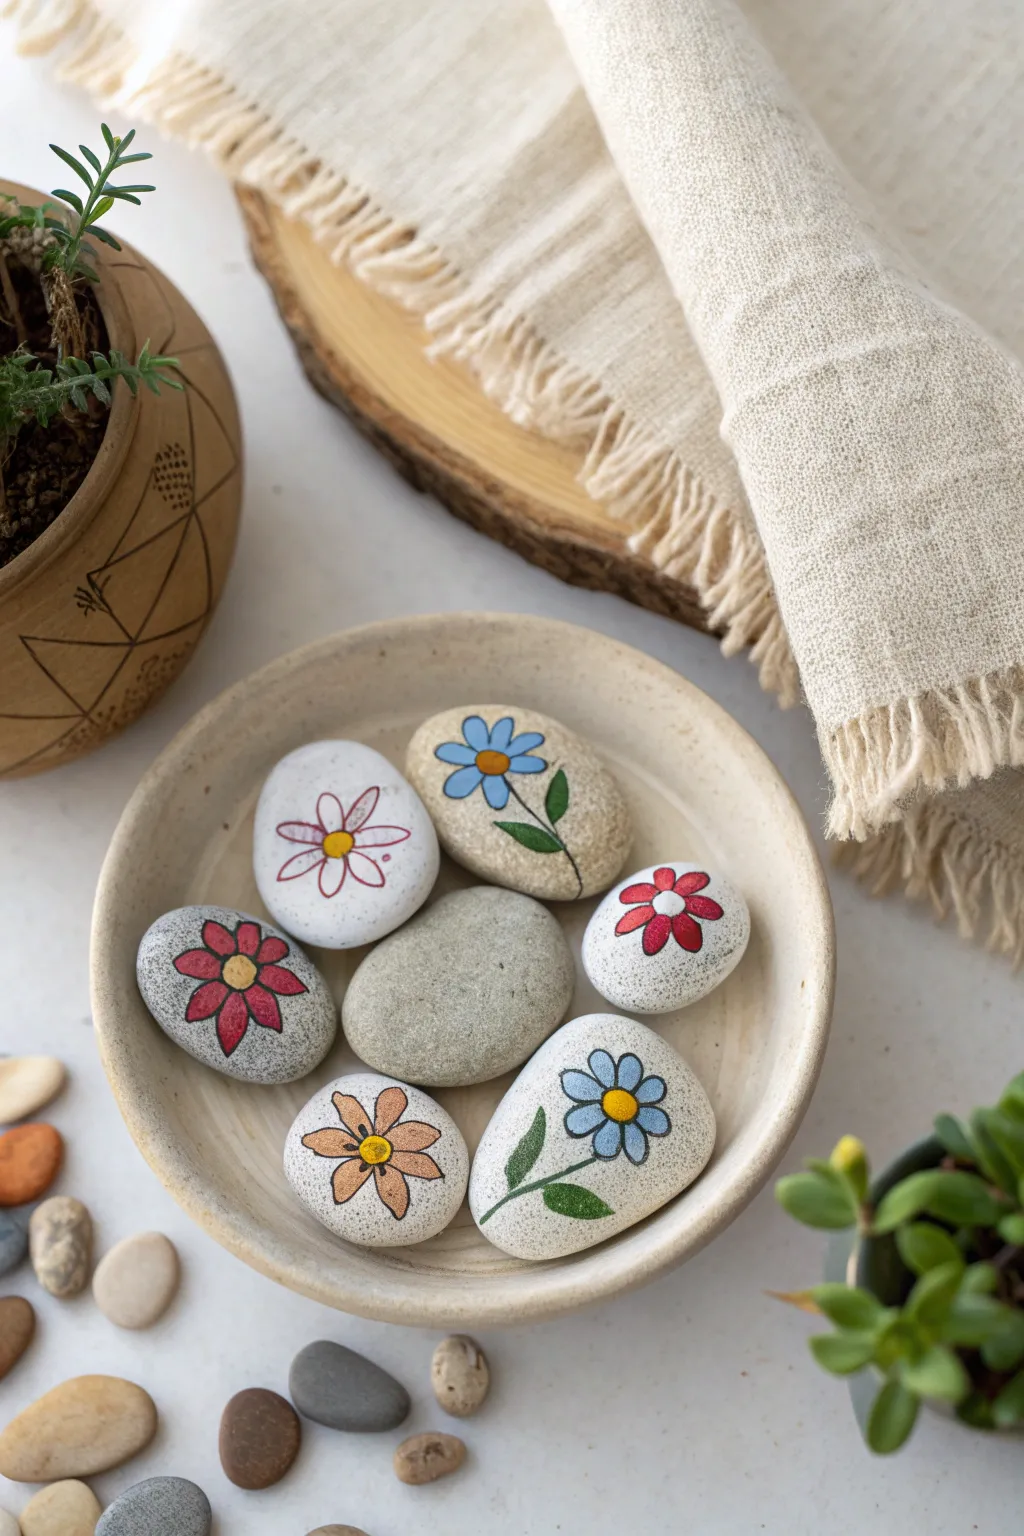
Transform ordinary smooth stones into a lovely indoor garden with these cheerful flower designs. The combination of clean black outlines and vibrant centers creates a charming, illustrative style that looks beautiful displayed in a simple ceramic bowl.
Step-by-Step
Materials
- Smooth, flat river rocks (light grey or white)
- Acrylic paints (white, red, blue, orange, yellow, green)
- Fine point black paint pen or permanent marker
- Small round paintbrushes (sizes 0 and 2)
- Pencil for sketching
- Clear matte or satin sealant spray or varnish
- Water cup and paper towels
Step 1: Preparation and Sketching
-
Clean Your Canvas:
Begin by washing your rocks thoroughly with warm soapy water to remove any dirt or oils. Let them dry completely before you start, as moisture will prevent the paint from adhering properly. -
Select Your Designs:
Plan out a variety of flower shapes. Some rocks will feature just a flower head, while slightly larger, oval rocks are perfect for a full stemmed flower. -
Lightly Sketch:
Using a pencil, very lightly draw your flower designs onto the rocks. Draw a central circle for the stigma and arrange 5-6 tear-drop shaped petals around it. For stemmed versions, add a simple curved line and a leaf or two.
Step 2: Painting the Base Colors
-
Paint the Centers:
Start by painting the center circle of each flower yellow. You don’t need to be perfectly neat at the edges since you will outline later. -
Fill the Petals:
Choose your petal colors. For the white daisy, paint the petals with opaque white acrylic. You may need two coats here to cover the grey stone completely. -
Add Color Variety:
Paint the other flowers with different hues like bright blue, deep red, or soft orange. Ensure the paint is applied smoothly without leaving thick ridges. -
Paint the Greenery:
If your design includes a stem, use a nice medium green for the stem line and the leaves. Keep the layers thin so they dry evenly. -
Let It Dry:
Wait for the base colors to dry completely. If the stone feels cool to the touch, the paint is still wet. Patience is key here to prevent smudging.
Choosing Rocks
Look for stones with a very fine grain. The smoother the surface, the easier your pen will glide, resulting in crisp, non-jittery black lines.
Step 3: Outlining and Details
-
Outline the Center:
Take your fine point black paint pen. Carefully trace around the yellow center circle first. -
Define the Petals:
Trace each individual petal. I find it helpful to rotate the rock as I draw the curves to keep my hand steady and comfortable. -
Add Petal Details:
Draw a small line down the center of each petal, starting from the center and stopping about halfway up. This adds dimension and that classic illustrative look. -
Outline Stems and Leaves:
Go over the green painted areas with the black pen. Add a central vein line to any green leaves for extra detail. -
Check for Gaps:
Look closely at your design. If any color looks patchy against the outline, you can carefully touch it up with a tiny brush, but usually, the outline hides minor imperfections.
Sparkle Accents
Mix a tiny amount of glitter into your varnish or use a metallic gold paint pen for the flower centers to make them catch the light.
Step 4: Finishing Touches
-
Cure the Ink:
Allow the black ink to dry fully. If you used a paint pen, give it at least 15 minutes to set so it won’t bleed when varnished. -
Apply Sealer:
Spray or brush on a clear matte or satin varnish. This protects the paint from chipping and gives the stones a finished, professional look without being too glossy. -
Arrange Display:
Once dry, arrange your painted stones in a shallow bowl. Consider adding one or two alluring unpainted stones to the mix for a natural contrast.
Enjoy arranging your new everlasting bouquet in a sunny spot on your table


Sunset Silhouette Pebble Scenes

This serene pebble art captures the quiet moment of a sunset with warm gradient hues and a striking black silhouette. It’s a perfect project for beginners looking to practice blending colors and painting fine details on a small canvas.
Step-by-Step Guide
Materials
- Smooth, round river rock (light-colored works best)
- Acrylic paints: White, Yellow, Orange, Pink, Purple, Black
- Makeup sponge or small crafting sponge
- Fine liner brush (size 0 or 00)
- Small flat brush
- Cup of water and paper towels
- Matte or satin varnish spray
Step 1: Base Coat & Gradient
-
Prepare the Surface:
Start by cleaning your rock thoroughly with soapy water and letting it dry completely. If your rock is dark, paint a base coat of white acrylic over the top surface to ensure your sunset colors pop. -
Apply the Horizon:
Squeeze a small amount of yellow and orange paint onto your palette. Using your sponge, dab the yellow paint horizontally across the lower-middle section of the rock where the horizon will be. -
Build the Sunset:
While the yellow is still slightly wet, dab orange paint just above it. Use the sponge to gently tap the border between the colors to create a seamless blend. -
Transition to Pink:
Move upwards by adding pink paint above the orange section. I like to keep my sponge slightly damp here to help pull the orange up into the pink for a softer transition. -
Finish the Sky:
Apply purple paint to the very top of the rock, blending it down into the pink. Continue tapping until you have a smooth gradient from yellow to purple. -
Let it Dry:
Allow the gradient background to dry completely. This is crucial because painting black over wet paint will result in muddy gray colors.
Step 2: Painting the Foreground
-
Paint the Ground:
Using black acrylic paint and a flat brush, paint the bottom portion of the rock to create the solid ground. This should cover the area below your yellow horizon line. -
Shape the Hill:
Give the ground a slight curve or uneven texture at the top edge so it looks like natural terrain rather than a straight line. -
Start the Tree Trunk:
Switch to your fine liner brush. On the right side of the rock, paint a thick black line curving upwards and inwards to form the main trunk of the tree. -
Add Main Branches:
Extend the trunk into 2-3 main branches that stretch across the upper part of the pink and purple sky. -
Create Fine Twigs:
Using the very tip of your brush with thinned black paint, add smaller, delicate twigs branching off from the main limbs.
Sponge Technique
When blending the sky, use a ‘pouncing’ motion (up and down tapping) rather than dragging. This prevents streaks and creates that soft, airbrushed look.
Step 3: Details & Seal
-
Stipple the Leaves:
Load a slightly dry, rough brush or a tiny piece of sponge with black paint. Gently dab or stipple texture onto the branches to create the illusion of clusters of leaves. -
Add Grass Texture:
At the base of the tree trunk, use quick, upward flicking motions with your fine liner brush to paint small blades of grass. -
Paint the Birds:
In the open sky area to the left, paint three or four small ‘V’ shapes with extended wings to represent birds flying in the distance. -
Add the Figures:
carefuly paint two tiny, rounded distinct shapes sitting on the silhouette hill on the left side. Simple blobs usually convey the shape perfectly without needing detail. -
Final Inspection:
Check for any patchy areas in the black silhouette and add a second coat if needed for full opacity. -
Varnish:
Once the paint is fully cured (give it a few hours), spray the rock with a matte or satin sealer to protect your artwork from chipping.
Starry Night Twist
Let the sky dry, then flick a toothbrush with thinned white paint over the purple section to add tiny stars before painting the black tree silhouette.
Place your finished sunset stone on a shelf or in a garden pot to enjoy a peaceful view anywhere you go
BRUSH GUIDE
The Right Brush for Every Stroke
From clean lines to bold texture — master brush choice, stroke control, and essential techniques.
Explore the Full Guide
Mini Galaxy Night-Sky Pebbles
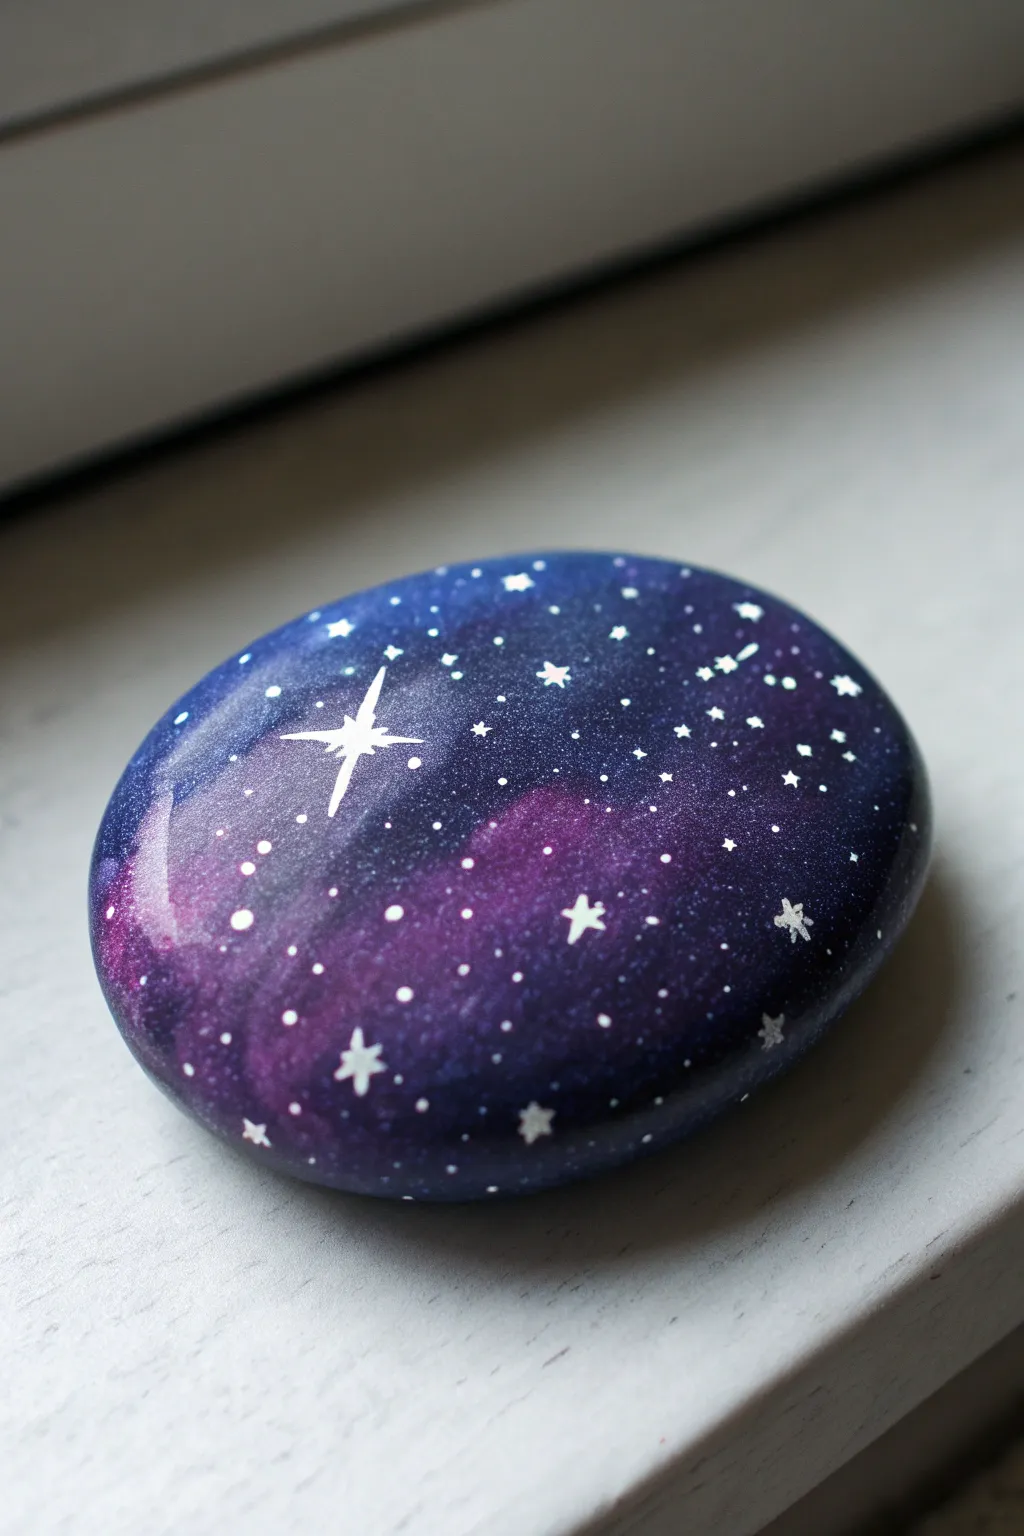
Capture the vastness of the cosmos in the palm of your hand with this mesmerizing galaxy rock. Using simple blending techniques and splattering methods, you’ll transform a plain stone into a deep, starry night sky featuring nebula clouds and a brilliant guiding star.
Step-by-Step Tutorial
Materials
- Smooth, rounded river rock or pebble
- Gesso or white acrylic primer
- Acrylic paints: Black, Navy Blue, Purple (Violet), Magenta (optional), and Titanium White
- Small kitchen sponge or cosmetic wedge
- Fine liner brush (size 0 or 00)
- Old toothbrush or stiff fan brush (for splattering)
- Palette or paper plate
- Water cup and paper towels
- High-gloss varnish or sealant (spray or brush-on)
Step 1: Base Preparation
-
Clean the stone:
Begin by washing your rock thoroughly with soap and water to remove any dirt or oils. Let it dry completely before starting. -
Prime the surface:
Paint a solid coat of white gesso or white acrylic paint over the top surface of the rock. This creates a bright base that will make your galaxy colors pop later. -
Apply the dark background:
Once the primer is dry, paint the entire rock with a deep black acrylic. You may need two coats for full opacity. Ensure the edges are covered neatly.
Muddy Galaxy?
If your nebula colors look brown or muddy, you likely blended them while too wet. Let the blue layer dry completely before sponging on the purple to keep the colors distinct.
Step 2: Creating the Nebula
-
Prepare your sponge:
Cut a small piece off a kitchen sponge or use the corner of a cosmetic wedge. Dampen it slightly, then squeeze out almost all the water. -
First layer: Navy Blue:
Dip the sponge into Navy Blue paint and dab off the excess on your palette. Lightly sponge this color onto the black rock in random cloud-like patches, leaving some black visible. -
Second layer: Purple:
While the blue is still slightly tacky or just dry, load a clean part of the sponge with Purple. Sponge this over parts of the blue and black, creating overlapping transparent layers. -
Adding depth with Magenta:
For a vibrant glow, mix a tiny bit of Magenta with white to make a soft pink-purple. Sponge this very sparingly into the center of your darkest purple areas to create a ‘glowing’ core effect. -
Blending the edges:
If your sponge marks look too harsh, take a clean, slightly damp sponge and gently tab over the edges of the colors to soften them into the black background.
Add Some sparkle
For a magical touch, mix a pinch of fine holographic glitter into your final varnish coat, or use a metallic silver paint for the larger stars.
Step 3: Painting the Stars
-
Prepare splatter paint:
Mix a small amount of Titanium White paint with a few drops of water. The consistency should be like thin cream or milk so it splatters easily. -
The splatter technique:
Dip an old toothbrush or a stiff brush into the thinned white paint. Hold it over the rock and flick the bristles with your thumb to spray tiny ‘distant stars’ across the surface. -
Review the splatter:
Check your distribution. If you got any large, unwanted blobs, quickly dab them up with a wet paper towel before they dry. -
Adding medium stars:
Using your fine liner brush and un-thinned white paint, gently dot a few specific stars onto the rock. Vary the size slightly to create depth, placing some over the purple nebula clouds. -
Paint the main starburst:
Locate a spot for your ‘hero’ star. Paint a small white cross first. Then, elongate the vertical line (making the bottom tail longest) and the horizontal line. -
Refine the starburst shape:
Using the very tip of your brush, pull the paint outward from the center of the cross to make the points sharp and tapered. Add tiny diagonal rays between the main arms if you like extra sparkle. -
Highlighting larger stars:
Pick 2 or 3 of your medium dots and turn them into tiny 5-point stars or smaller crosses to mimic the variety seen in the reference photo.
Step 4: Finishing Touches
-
Allow to cure:
Let the rock sit undisturbed until the thickest white paint dots are completely dry to the touch. -
Apply varnish:
Finish with a coat of high-gloss varnish. This is crucial for galaxy rocks as it deepens the black, makes the colors vivid, and gives that wet, glass-like appearance.
Place your finished galaxy pebble on your desk or windowsill to enjoy a little piece of the universe every day
Rainbow Stripe Pebble Rocks
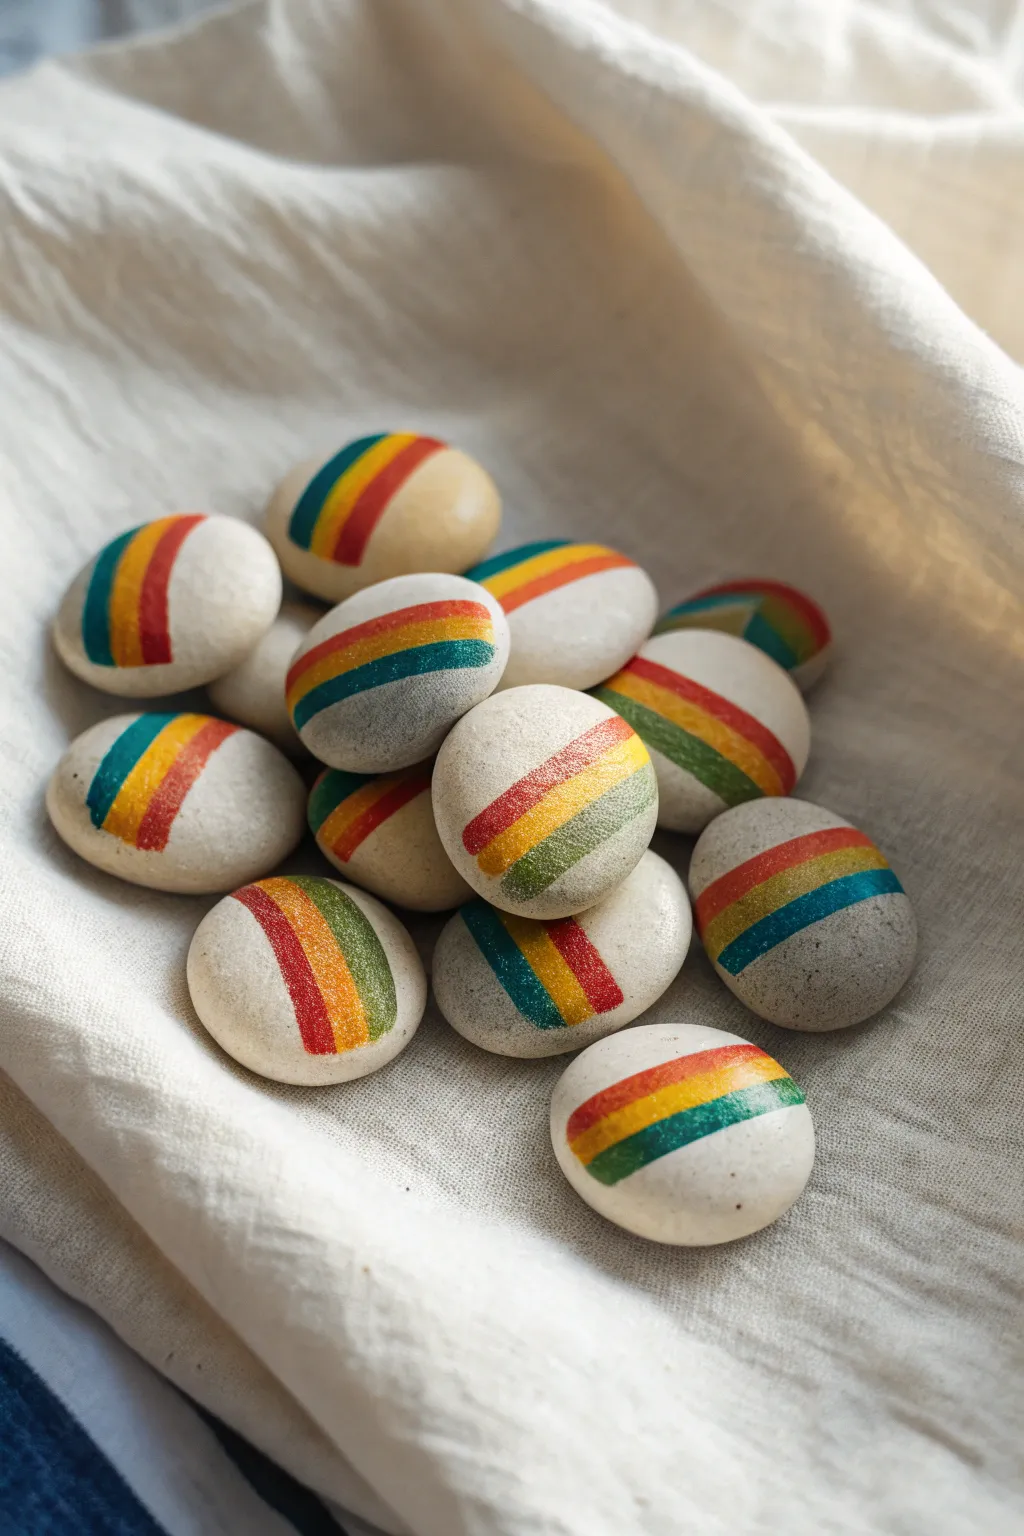
Embrace a minimalist yet vibrant aesthetic with these simple striped pebbles. The clean lines of red, yellow, and deep teal against natural white stone create a striking, retro-inspired look perfect for game pieces or modern decor.
How-To Guide
Materials
- Smooth white or light beige river rocks (roughly uniform size)
- Acrylic paint pens (red, yellow/ochre, deep teal/green)
- Pencil (optional)
- Painter’s tape or masking tape (thin strips)
- Matte spray sealant or brush-on varnish
- Soft cloth for cleaning
- Soap and water
Step 1: Preparation
-
Select your stones:
Choose a collection of stones that are similar in size and shape. Smooth, rounded river rocks with a light, creamy base color work best to make the colors pop without a white base coat. -
Clean the surface:
Wash your stones thoroughly with soap and water to remove any dirt or oily residue. Scrubbing them gently ensures the paint adheres properly. -
Dry completely:
Lay the stones out on a towel and let them air dry completely. Trapped moisture is the enemy of a long-lasting paint job. -
Inspect for flaws:
Check your stones for deep cracks or rough patches. Pick the smoothest side to be the top face where your design will live.
Clean Lines Hack
If you don’t have tape thin enough, use a rubber band stretched around the rock as a flexible guide to paint against.
Step 2: Drafting the Design
-
Visualize the band:
Decide on the angle of your stripe. A diagonal slant across the center of the oval shape tends to look the most dynamic. -
Mark the boundaries (optional):
If you are less confident in freehanding, lightly pencil two parallel lines to mark the outer edges of where your three-color band will go. -
Apply tape guide:
For razor-sharp edges, place a strip of painter’s tape across the stone to mask off the area outside your design. Press the edges down firmly.
Bleeding Paint?
If paint bleeds under tape cracks, wait for it to dry, then gently scrape the excess away with a craft knife for a sharp edge.
Step 3: Painting the Stripes
-
Start with the center color:
Take your yellow or ochre paint pen. Draw a single, bold line right down the middle of your designated band area. -
Fill the center stripe:
Thicken the yellow line until it is about 3-4mm wide. I find that doing the center color first helps keep the outer colors evenly spaced. -
Let it set:
Wait a minute or two for the middle stripe to dry to the touch to prevent accidental smearing. -
Add the red stripe:
Using the red paint pen, draw a stripe directly adjacent to one side of the yellow line. Try to keep it the same width as the yellow one. -
Add the teal stripe:
On the remaining side of the yellow line, apply your deep teal or green stripe. The colors should touch but not overlap significantly. -
Touch up edges:
Go back over any patchy areas to ensure the colors are opaque and vibrant. A second coat might be needed depending on your brand of paint pens. -
Dry thoroughly:
Allow the paint to cure fully. If you used tape, wait until the paint is 100% dry before slowly peeling it away.
Step 4: Finishing
-
Check for smudges:
Inspect the unpainted parts of the stone. If you have any stray marks, you can usually scratch them off gently with a fingernail or a damp toothpick. -
Prepare for sealing:
Move your dried stones to a well-ventilated area in preparation for the topcoat. -
Apply sealant:
Spray a light, even coat of matte varnish over the stones. A matte finish maintains the natural ‘stone’ look better than a high gloss. -
Final cure:
Let the sealant dry according to the manufacturer’s instructions before handling or stacking them.
Group these beauties together in a bowl or scatter them on a shelf for an instant pop of color

PENCIL GUIDE
Understanding Pencil Grades from H to B
From first sketch to finished drawing — learn pencil grades, line control, and shading techniques.
Explore the Full Guide
Hearts and Love Pebble Rocks
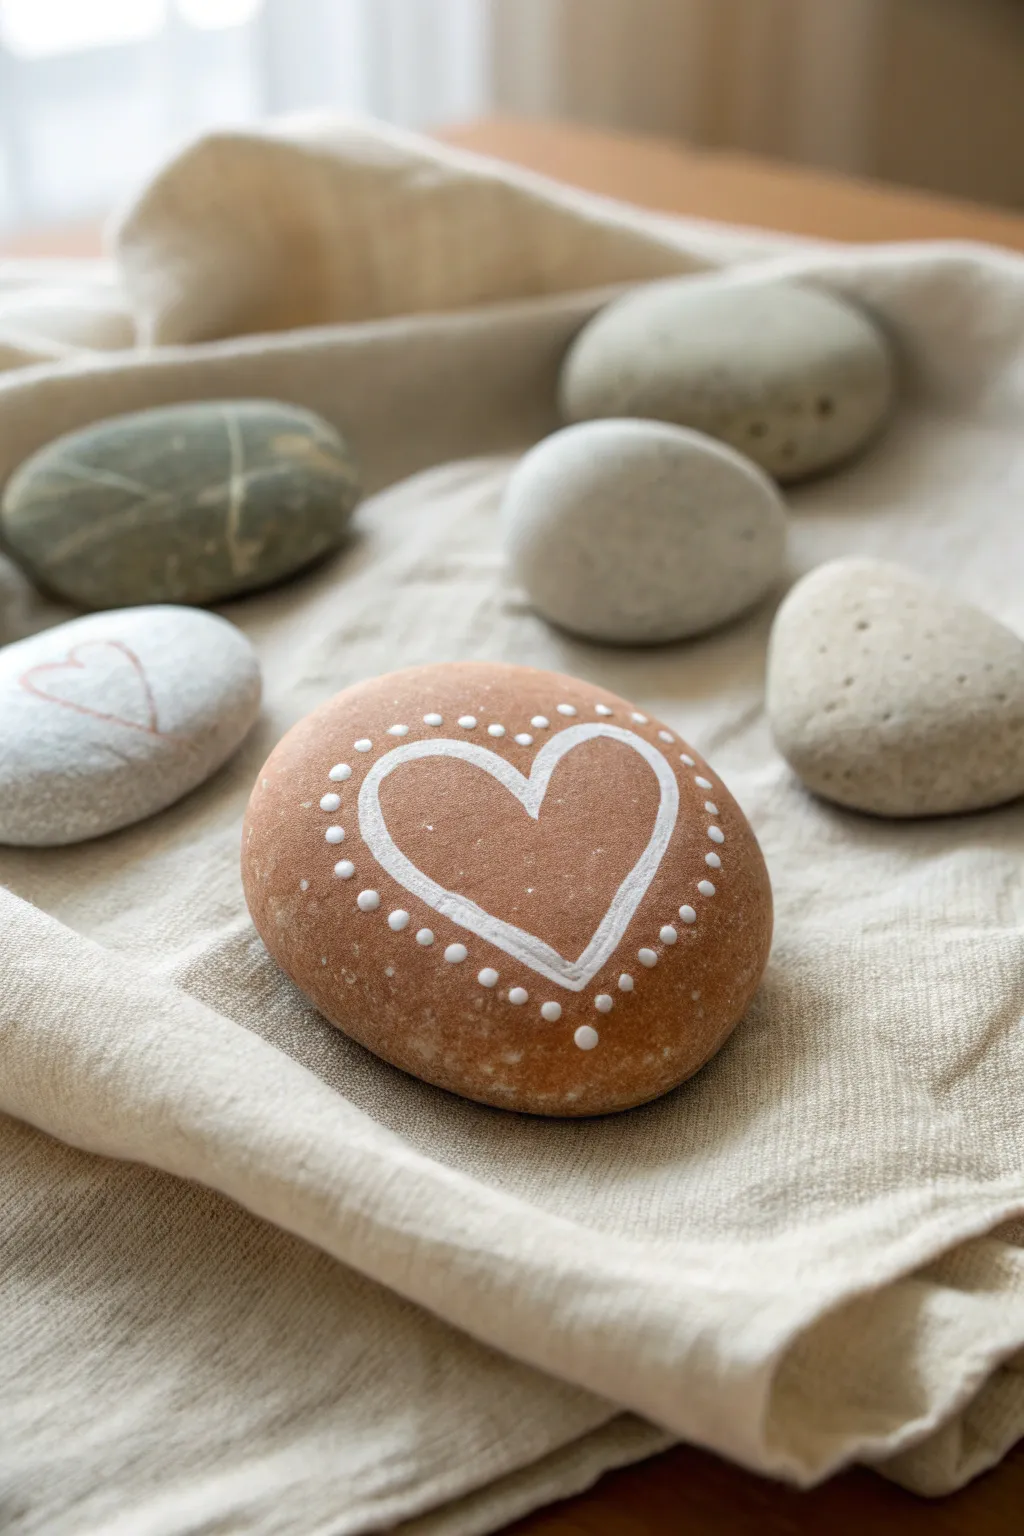
This rustic and charming project transforms a simple reddish-brown river stone into a token of affection using just white paint and steady hands. The design features a stylized heart outline framed by a delicate border of dots, creating a look that is both organic and elegant.
Detailed Instructions
Materials
- Smooth, flat river rock (preferably reddish-brown or terracotta colored)
- White acrylic paint or a white acrylic paint pen (fine tip)
- Small round paintbrush (size 0 or 1) if using bottled paint
- Dotting tool or a toothpick
- Pencil (optional for sketching)
- Damp cloth or paper towel
- Matte spray varnish (optional)
Step 1: Preparation
-
Clean the surface:
Begin by thoroughly washing your stone with warm soapy water to remove any dirt or oils. -
Dry completely:
Allow the stone to dry fully before you begin painting; moisture trapped inside can affect paint adhesion. -
Inspect the canvas:
Choose which side of the rock is smoothest and has the most even color for your painting surface.
Natural Stone Look
Don’t paint a background color. Letting the natural reddish tone of the rock show through provides beautiful contrast against the white.
Step 2: Painting the Heart
-
Sketch lightly (optional):
If you are nervous about freehanding, use a pencil to very lightly sketch the heart shape in the center of the stone. -
Prime your tool:
If using a paint pen, shake it well and press the tip on scrap paper to get the flow started. If using a brush, load it with a small amount of white acrylic paint. -
Paint the left curve:
Start at the top center indentation of the heart and draw a smooth curve down to the bottom point on the left side. -
Paint the right curve:
Return to the top center and draw the mirroring curve down to meet the point at the bottom. -
Thicken the line:
Go over your outline a second time to thicken it slightly, giving it a bold, hand-painted look rather than a precise geometric feeling. -
Refine the shape:
Smooth out any wobbles in your line work, ensuring the top curves are rounded and the bottom point is fairly sharp. -
Let the heart set:
Allow this main outline to dry for a few minutes so you don’t accidentally smudge it while adding details.
Step 3: Adding the Dotted Border
-
Prepare for dotting:
Dip your dotting tool, the handle end of a paintbrush, or a toothpick into a fresh puddle of white paint. -
Start the top center dot:
Place your first dot directly above the ‘V’ indentation of the heart, leaving a few millimeters of space between the heart and the dot. -
Place the bottom dot:
Place a second anchor dot directly below the bottom point of the heart. -
Continue the pattern:
Working entirely around the heart shape, add dots spaced evenly apart, roughly 3-4mm from the heart outline. -
Maintain spacing:
Try to keep the spacing between each dot consistent, but remember that minor irregularities add to the handmade charm. -
Review dot consistency:
If any dots look too faint or transparent, carefully dab a second layer of paint on top of them once the first layer is tacky. -
Clean up edges:
Use a damp cotton swab or toothpick to gently scrape away any stray paint splatters or misshapen dots while they are still wet.
Fixing Wonky Dots
If a dot smears, don’t wipe it! Let it dry completely, scrape it off gently with a craft knife, and then re-dot that specific spot.
Step 4: Finishing Touches
-
Allow specifically long drying time:
Let the rock sit undisturbed for at least an hour to ensure the thicker dots are completely dry all the way through. -
Seal the artwork:
To protect your design from chipping, spray a light coat of matte varnish over the stone, holding the can about 10 inches away.
Place this lovely creation on a desk or shelf as a sweet reminder of love
Sea-Life Pebble Rock Painting
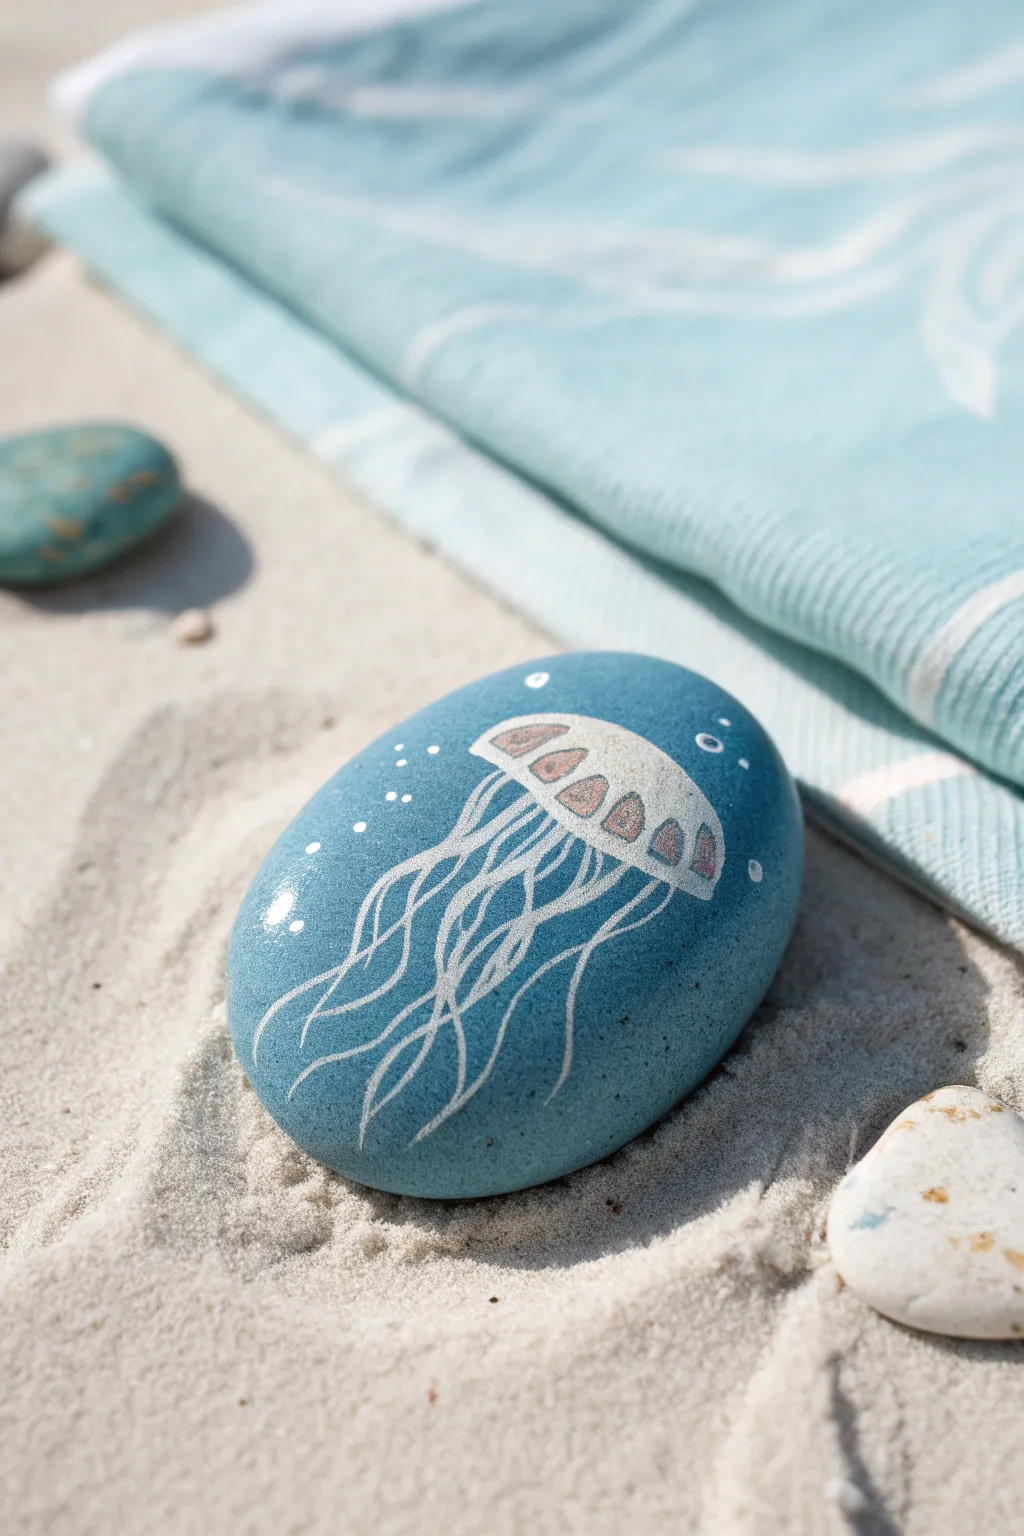
Capture the graceful movement of the deep sea with this serene jellyfish rock painting. The project features a smooth, gradient blue background that contrasts beautifully with delicate white line work to create a translucent, floating effect.
How-To Guide
Materials
- Smooth oval river rock
- Blue acrylic paint (Teal or turquoise shade)
- White paint pen (Fine tip)
- White paint pen (Extra-fine tip)
- Light pink or peach acrylic paint (or paint pen)
- Flat paintbrush
- Pencil (optional)
- Spray sealer or varnish
Step 1: Preparing the Base
-
Clean the stone:
Start by thoroughly washing your rock with warm soapy water to remove any dirt or oils. Use an old toothbrush to get into any crevices if needed. -
Dry completely:
Set the rock aside to dry fully. Painting on a damp rock can cause the acrylics to lift or bubble later on. -
Apply the base coat:
Using a flat brush, paint the entire top surface of the rock with a rich teal or turquoise acrylic paint. Aim for a smooth, opaque finish. -
Let it cure:
Allow the first coat to dry completely. If the rock’s natural color shows through, apply a second coat for full saturation. -
Blend the edges (optional):
For a softer look, I sometimes sponge a slightly lighter blue near the top edge while the paint is still wet to create a subtle underwater gradient.
Paint Pen Flow
If your white ink stops flowing, scribble on a scrap piece of paper or press the nib down gently on cardboard to re-saturate the tip before returning to the rock.
Step 2: Designing the Jellyfish Body
-
Sketch the outline:
Using a pencil very lightly, draw a mushroom-cap shape (an umbrella top) near the upper-middle section of the rock. -
Outline the cap:
Define the top curve of the jellyfish using your fine-tip white paint pen. Make this line solid and confident. -
Create the scalloped edge:
Draw the bottom edge of the cap as a scalloped or wavy line, connecting the two ends of your top curve. -
Add internal details:
Draw four or five small, curved shapes inside the cap, following the contour of the top. These will become the glowing internal organs of the jellyfish. -
Fill with color:
Use the light pink or peach paint to gently fill in these internal shapes. The color should be subtle against the blue background. -
Stipple technique:
Once the pink is dry, use the white pen to add tiny dots or stippling over the pink areas to give them texture and a translucent appearance.
Shaky Lines?
Rest the heel of your hand on the table or even on a dry part of the rock to stabilize your drawing hand when making the long tentacle strokes.
Step 3: Creating the Tentacles
-
Start the main tendrils:
Switch to your extra-fine white paint pen. Draw several long, wavy lines extending from the center of the cap downward. -
Vary the line weight:
Make the lines slightly thicker near the body and let them taper off to invisibility near the bottom of the rock. -
Add secondary tendrils:
Draw thinner, more erratic wavy lines in between the main tentacles. Cross them over each other slightly to show movement and depth. -
Keep it flowing:
Ensure the tentacles curve in a similar direction, as if the jellyfish is being pushed by a gentle ocean current.
Step 4: Final Touches
-
Add floating bubbles:
draw tiny circles of varying sizes around the jellyfish body to represent air bubbles rising to the surface. -
Highlight the cap:
Add a small, curved white line or a cluster of dots on the very top left or right of the cap to suggest a light reflection. -
Enhance the background:
Dot tiny specks of white in the blue space around the tentacles to mimic plankton or catching light particles. -
Seal the rock:
Once the artwork is completely dry (give it at least an hour), spray it with a clear varnish to protect the paint and make the colors pop.
Place your finished piece near a window or in the garden to evoke a sense of coastal calm


Owl Faces on Round Pebbles
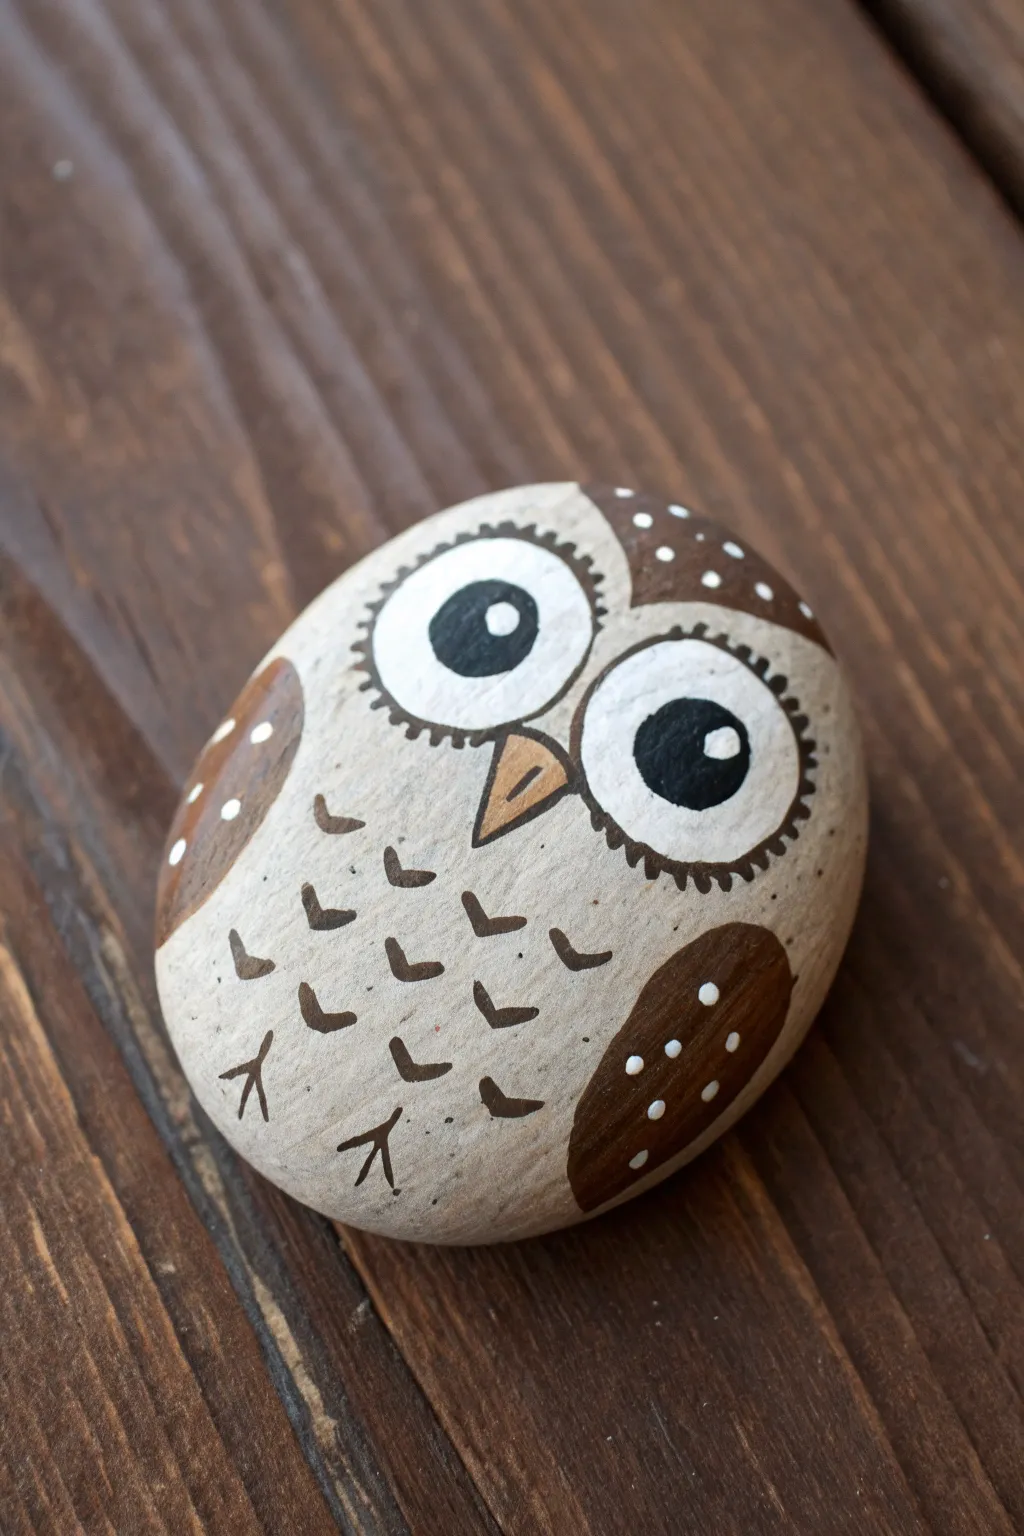
Transform a smooth garden stone into a charming, wide-eyed owl with just a few colors and simple geometric shapes. This stylized design uses the natural curve of the rock to give the bird a delightfully round and fluffy appearance.
Step-by-Step
Materials
- Smooth, oval-shaped river rock
- Acrylic paints (White, Dark Brown, Tan/Beige, Mustard Yellow)
- Fine point detail brush (size 0 or 00)
- Small flat brush (size 2-4)
- Dotting tool or toothpick
- Pencil for sketching
- Matte or satin sealant spray
Step 1: Preparation & Base shapes
-
Clean the canvas:
Begin by scrubbing your chosen rock with soap and warm water to remove any dirt or grit. Let it dry completely before applying any paint, as moisture will prevent adhesion. -
Paint the background:
Cover the entire front surface of the rock with a coat of tan or beige acrylic paint. Depending on your paint’s opacity, you might need a second coat to get a solid, even finish. -
Sketch the owl:
Once the base is dry, lightly use a pencil to map out the owl’s features. Draw two large circles for eyes near the top, a small triangle beak between them, and curved lines on the sides for wings.
Smooth Operator
If your rock has a bumpy texture, apply a layer of white gesso or primer first. This fills in tiny pits and creates a smoother surface for detailed painting.
Step 2: Painting facial features
-
Create the eyes:
Fill in the large pencil circles with bright white paint. I like to do two thin layers here to make sure the white pops against the tan background. -
Outline the eyes:
Using your fine detail brush and dark brown paint, carefully trace around the white circles. Add short, radiating dashes around the outer rim of these circles to simulate feathers or eyelashes. -
Add pupils:
Paint large black or very dark brown circles inside the white eye areas, looking slightly off-center or straight ahead. Leave a little white space around them. -
Catchlights:
Dip the non-brush end of your paintbrush or a dotting tool into white paint. Place a single white dot in the upper right corner of each pupil to bring the eyes to life. -
Form the beak:
Fill the triangle nose shape with a mustard yellow or light orange paint. Once dry, outline it thinly with dark brown and add a small vertical line inside for detail.
Step 3: Feathers & Details
-
Outline the head:
Paint a curved brown shape at the very top of the rock, creating a ‘widow’s peak’ style forehead. Add tiny white dots along the top edge of this brown area using a toothpick. -
Paint the wings:
Fill in the curved wing shapes on the left and right sides of the body with dark brown paint. Try to keep the edges smooth. -
Add wing details:
Once the brown wings are dry, use a dotting tool with white paint to add a row of small dots along the bottom curve of the right wing. -
Decorate the left wing:
For variety, paint larger white spots or dashes on the left wing to suggest folded feathers. -
Create chest feathers:
Using the fine detail brush and dark brown paint, paint small ‘V’ shapes scattered across the owl’s belly area to mimic textured plumage. -
Draw the feet:
Near the bottom of the rock, paint two simple twig-like feet using dark brown lines. Three toes pointing down is all you need.
Owl Family Upgrade
Make a whole family by finding rocks of different sizes. Paint some with eyes open and others with curved lines for sleeping eyelids.
Step 4: Finishing Touches
-
Clean up lines:
Check your work for any smudges or uneven lines. You can use the tan base color to ‘erase’ mistakes by painting over them carefully. -
Let it cure:
Allow the rock to dry fully for several hours. This is crucial before sealing to prevent the paint from running. -
Seal the artwork:
Apply a spray sealant in a well-ventilated area. A matte finish looks natural, while gloss will make the colors appear wet and vibrant.
Place your finished owl on a bookshelf or in a potted plant for a wise little companion
Pet Paw Print Pebble Tokens
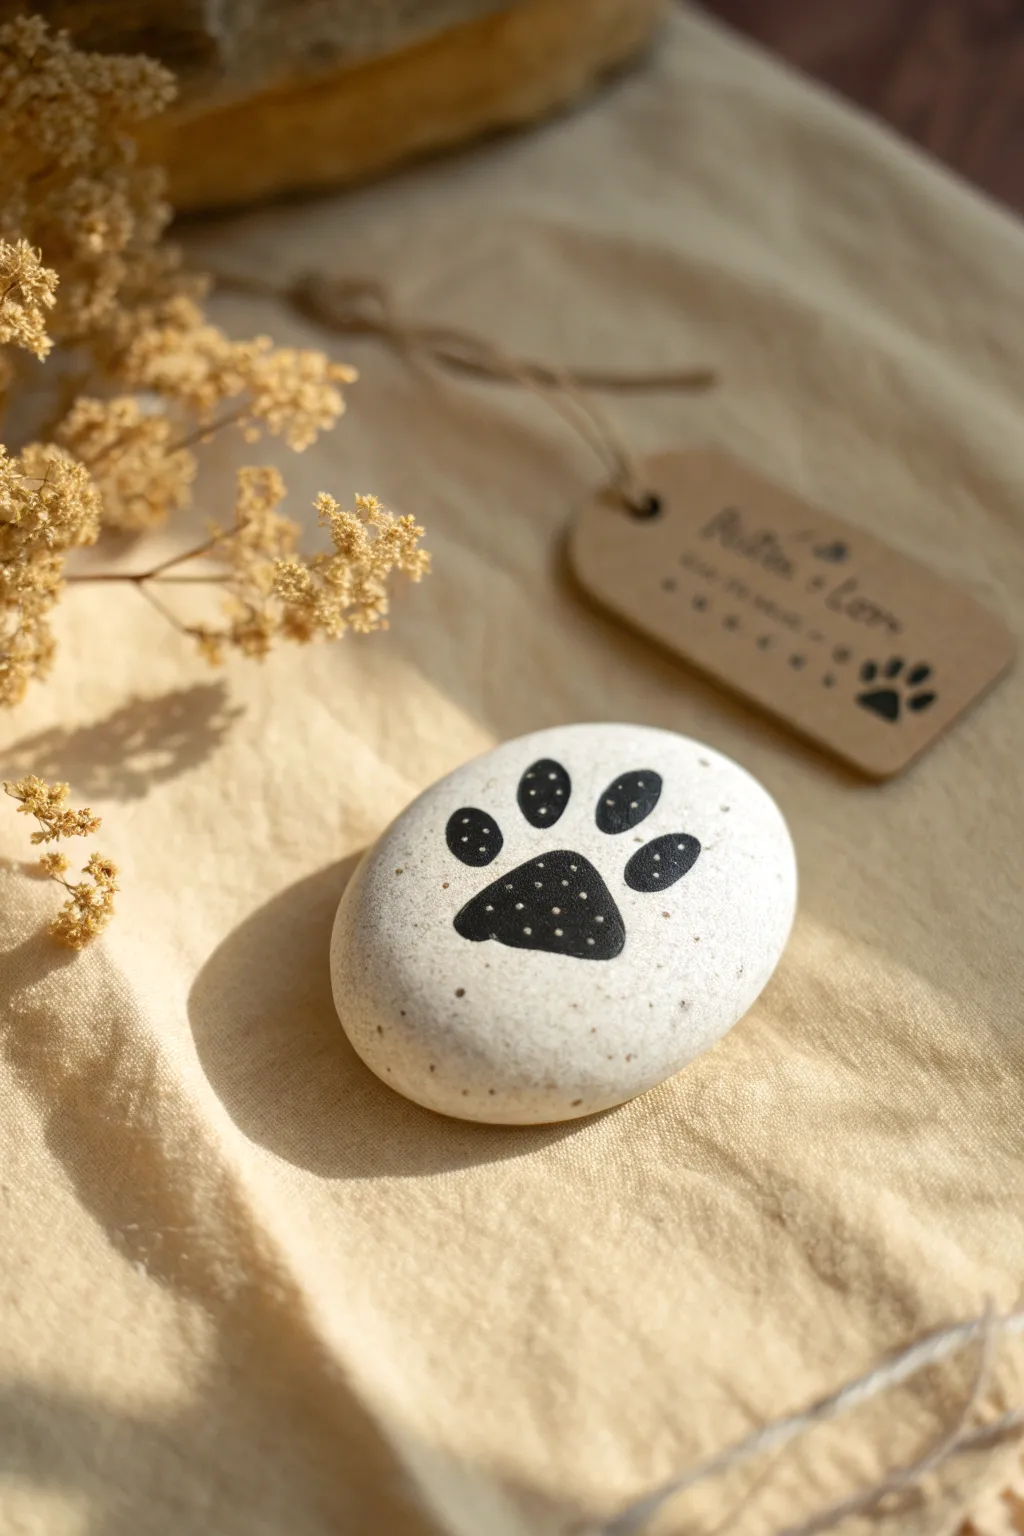
Create a sweet, tangible keepsake to honor a furry friend with just a simple stone and some paint. These minimalist pebble tokens feature a bold black paw print accented with delicate stippling, perfect for carrying in your pocket or gifting to a pet lover.
How-To Guide
Materials
- Smooth, oval river rock (white or cream color)
- Black acrylic paint or a fine-tip black paint pen (e.g., Posca)
- White acrylic paint or a white gel pen
- Small round paintbrush (size 0 or 1)
- Dotting tool or a toothpick
- Pencil for sketching
- Matte spray varnish or Mod Podge (optional for sealing)
- Soap and water for cleaning the stone
Step 1: Preparation
-
Clean the canvas:
Begin by thoroughly washing your selected stone with warm soapy water to remove any dirt or oils. Use an old toothbrush if there is stubborn grit. -
Dry completely:
Let the stone air dry completely or speed up the process with a hairdryer. Paint adheres much better to a bone-dry surface. -
Positioning:
Hold the stone in your hand to find the flattest, smoothest side. This will be your painting surface.
Clean Lines Pro Tip
If you struggle with shaky hands, rest your wrist on a heavy book or a block of wood that is the same height as your pebble while painting the outlines.
Step 2: Painting the Base Shape
-
Sketch the outline:
Lightly sketch the paw print shape with a pencil. Draw a large, roughly triangular pad at the bottom with rounded corners. -
Add the toes:
Sketch four smaller oval shapes above the main pad, arching them slightly to mimic the natural curve of a paw. -
Outline in black:
Using your small round brush or a fine-tip black paint pen, carefully trace over your pencil lines. Keep your hand steady and rested on a surface for stability. -
Fill the main pad:
Fill in the large bottom pad with solid black paint. Apply thin, even strokes to avoid ridges of paint building up. -
Fill the toes:
Fill in each of the four toe pads. I prefer to start in the center of the oval and work outward to the edges to keep the shape neat. -
Verify opacity:
Check your coverage. If the black looks streaky or gray, let the first coat dry completely and apply a second coat for a rich, solid black. -
Let it cure:
Allow the black paint to dry fully. This is crucial before moving to the next step to prevent the colors from smudging together.
Level Up: Name Tag
On the reverse side of the pebble, paint the pet’s name in a matching font. Adding a date creates a commemorative memorial stone.
Step 3: Adding Details & Finishing
-
Prepare the dots:
Dip a fine dotting tool, the tip of a stylus, or a toothpick into a small amount of white acrylic paint. -
Test spacing:
Practice your dotting technique on a scrap piece of paper first to ensure the dots remain small and delicate. -
Stipple the main pad:
Gently tap tiny white dots onto the large black pad. Keep the spacing random but relatively uniform, ensuring the black background remains dominant. -
Stipple the toes:
Add smaller clusters of white dots to the four toe pads. You might only need 3-5 tiny dots per toe depending on the size of your rock. -
Clean up edges:
If any white dots strayed outside the black area, wait for them to dry and carefully touch them up with a tiny bit of black paint. -
Final drying time:
Allow the entire design to dry for at least an hour. -
Seal the stone:
To protect your artwork from chipping, especially if it will be carried in a pocket, spray it with a matte clear varnish or brush on a thin layer of Mod Podge.
Once the sealer is dry, your beautiful little paw print token is ready to be cherished or gifted
Fruit Slice Pebble Rocks
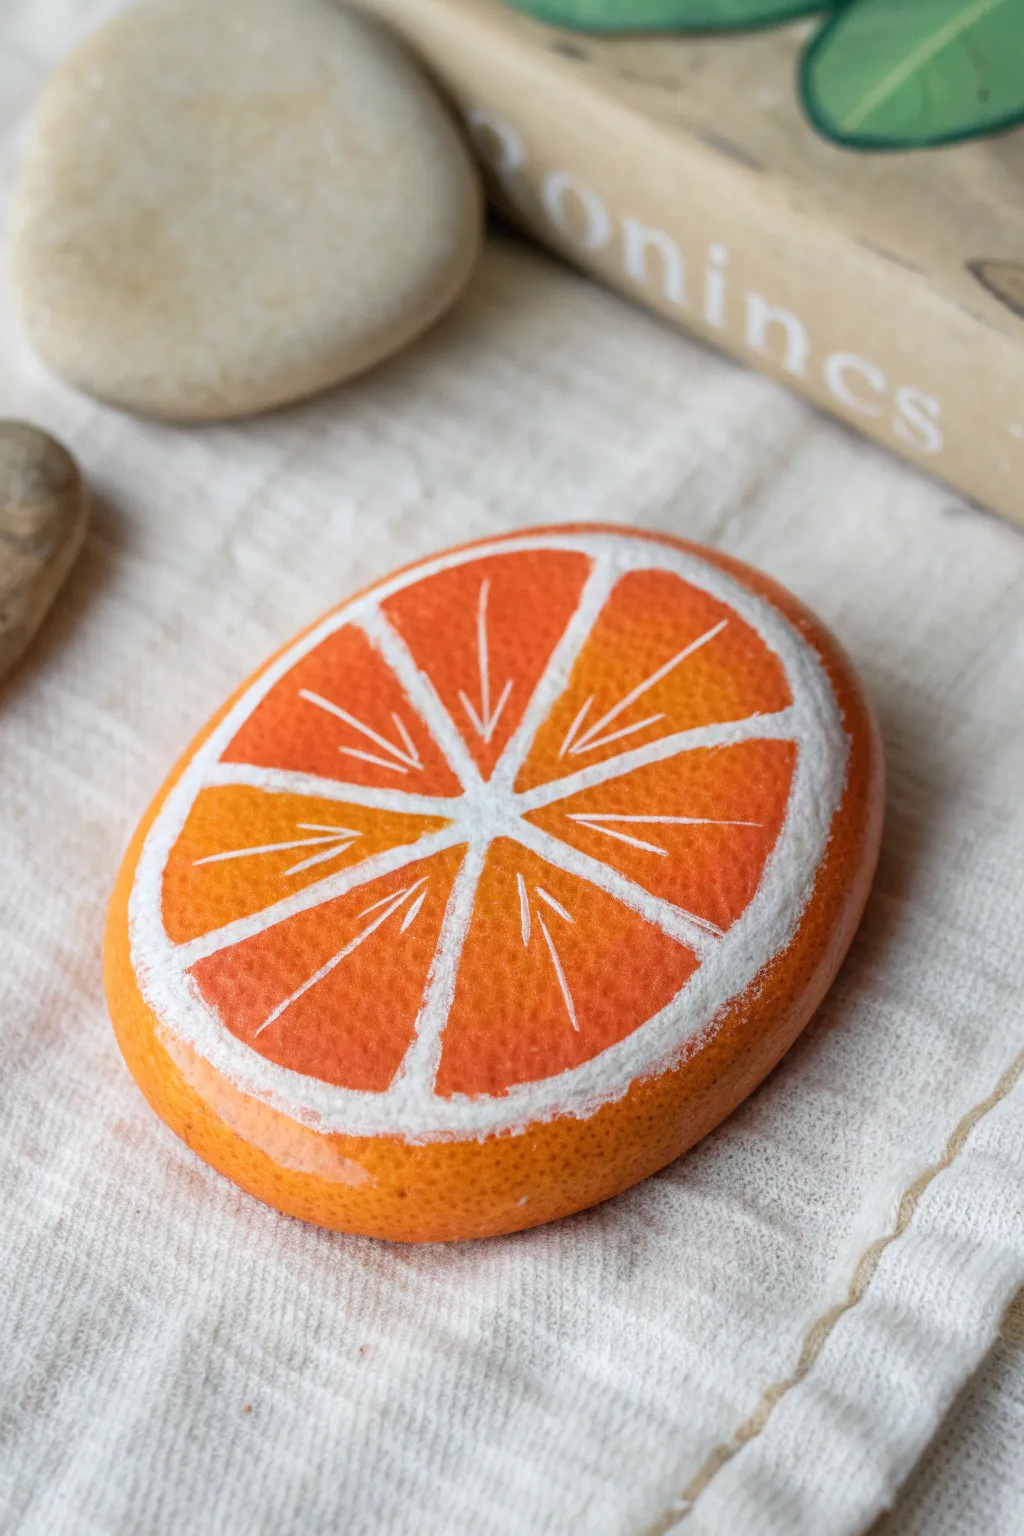
Transform a simple smooth stone into a vibrant citrus slice that looks good enough to squeeze. This project uses bold colors and careful highlighting to create a realistic, dimensional fruit texture on a rounded surface.
Step-by-Step
Materials
- Smooth, oval-shaped river rock
- Orange acrylic paint (bright tangerine shade)
- White acrylic paint
- Light yellow or cream acrylic paint (optional for highlights)
- Flat paintbrush (medium size)
- Fine detail paintbrush (liner brush)
- Clear gloss varnish or sealant
- cup of water
- Paper towels
Step 1: Base Coating
-
Clean surface:
Begin by washing your stone thoroughly with soap and water to remove any dirt or oils, then let it dry completely. -
Base coat application:
Paint the entire top surface of the rock with your bright orange acrylic paint. -
Full coverage:
Extend the orange paint down the sides of the rock so it covers the curved edges, mimicking the peel. -
Layering:
Allow the first coat to dry; if the rock color shows through, apply a second coat for solid opacity.
Uneven Lines?
If your white lines look shaky, wait for them to dry, then use the orange base color to tidy up the edges from the inside out.
Step 2: Creating the Pith
-
Outline the rim:
Using a smaller brush and white paint, draw a thick ring just inside the outer edge of your orange circle. -
Refine the border:
This white ring represents the pith; make sure it’s fairly uniform in thickness but natural-looking. -
Center point:
Place a small dot of white paint in the exact center of the rock to act as your hub. -
Painting dividers:
Connect the center dot to the outer white ring with straight lines, dividing the circle into segments like a pizza. -
Creating segments:
Aim for about 8 even triangular segments for a classic citrus look. -
Thicken the lines:
Go over your divider lines again to make them solid and clearly visible against the bright orange background.
Step 3: Juicy Details
-
Inner highlights:
Switch to your finest detail brush. Inside each orange triangle, paint very thin, wispy white lines. -
Directional strokes:
These lines should fan out slightly from the center point toward the outer rind, mimicking the juice vesicles. -
Varying texture:
I find that making some lines shorter and some longer creates a more organic, realistic texture. -
Softening (optional):
If the white lines look too harsh, you can mix a tiny bit of white with orange for a softer, creamy highlight color. -
Corner rounding:
Slightly round off the interior corners of your orange segments with orange paint so they look plump rather than geometrically sharp.
Make a Fruit Salad
Use this same technique with yellow paint for lemons, green for limes, or pink for ruby red grapefruit slices.
Step 4: Finishing Touches
-
Final drying:
Let the paint dry completely, preferably for a few hours, to ensure no moisture is trapped. -
Sealing:
Apply a coat of clear gloss varnish over the entire painted surface. -
High gloss:
The gloss finish is crucial here as it gives the ‘fruit’ a wet, freshly cut appearance.
Place your fresh citrus slice in a garden pot or on a desk for a permanent splash of summer color
Four Seasons Tree Pebble Set
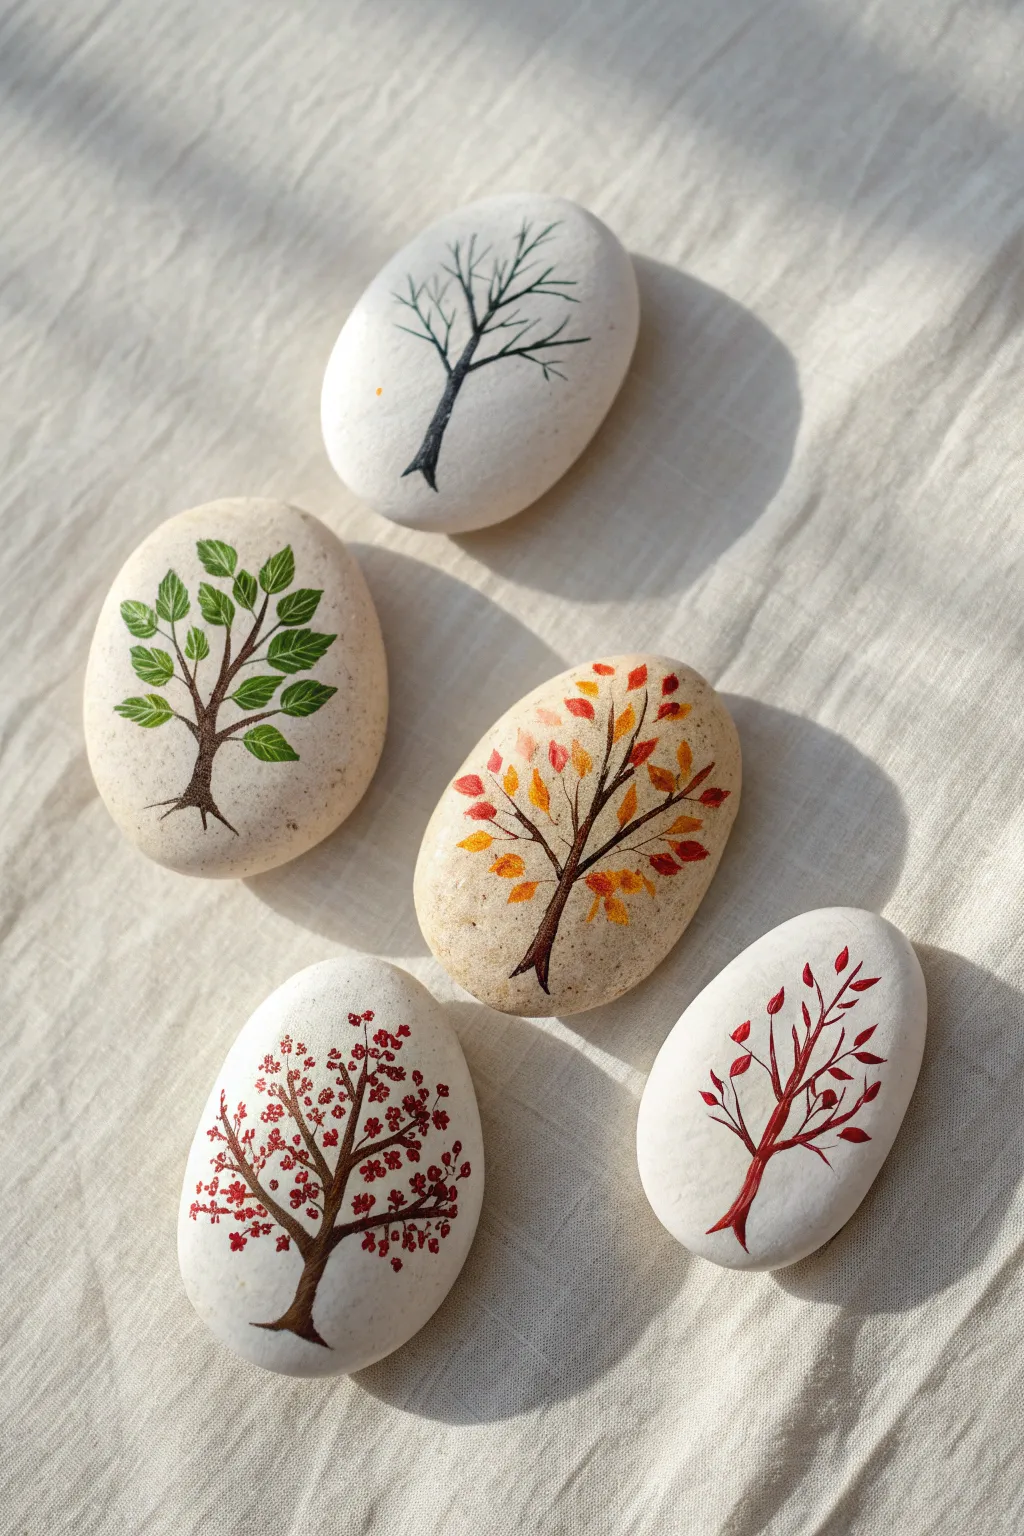
Capture the changing beauty of nature with this elegant set of five hand-painted river rocks. Each stone features a delicate tree illustration representing a different seasonal phase, from winter’s bare branches to the lush greens of summer.
How-To Guide
Materials
- 5 Smooth, light-colored river stones (flat and oval-shaped works best)
- Fine liner brushes (size 000 and 00)
- Acrylic paints (Dark Brown, Deep Green, Light Green, Cherry Red, Pink, Orange, Yellow)
- Pencil for sketching
- Matte or Satin varnish/sealer
- Palette or small plate
- Cup of water and paper towels
Step 1: Preparation & Sketching
-
Clean the canvas:
Begin by washing your stones with warm soapy water to remove any dirt or oils. Let them dry completely, or speed up the process with a hairdryer if you’re eager to start. -
Sketch the trunks:
Using a pencil, lightly sketch the central tree trunk and main branches on each stone. Aim for a natural, slightly curvy line for the trunk rather than a ruler-straight stick. -
Plan the branches:
Extend smaller branch lines outward from your main trunk sketch. Remember that the winter tree will need more visible branch detail than the others, as its structure is the main focus.
Brush Control Pro Tip
For the thinnest branches, add a tiny drop of water to your brown paint. Making it inky helps it flow off the brush tip for razor-sharp lines without dragging.
Step 2: Painting the Structure
-
Paint the trunks:
Load a size 00 brush with dark brown acrylic paint. Carefully trace over your pencil lines for the main trunks. -
Add the roots:
At the base of the trunk, flick your brush downward slightly to create small roots that anchor the tree to the bottom of the stone. -
Detail the branches:
Switch to your finest 000 brush. With a very light hand, paint the thinner branches extending outward. The paint should be thin enough to flow easily but opaque enough to cover the stone. -
Create the Winter Tree:
For one stone, leave it as just the brown skeleton. Add extra tiny twig details to the ends of the branches to make it look intricate and complete without leaves.
Level Up: Falling Leaves
Paint a few loose leaves at the very bottom of the Autumn and Red tree stones, as if they have just fallen to the ground, to add storytelling to your set.
Step 3: Adding Seasonal Foliage
-
Summer Greenery:
On the second stone, paint small, oval-shaped leaves using Deep Green. Start near the branches and work outward. -
Highlighting Summer:
Once the dark green is dry, add smaller strokes of Light Green on top of some leaves to create depth and dimension. -
Spring Blossoms:
For the third stone, use a dotting technique. Dip the tip of your brush (or a toothpick) into pink paint and dab clusters of dots along the branches to mimic cherry blossoms. -
Deepen the Spring color:
I like to add a tiny dot of red or darker pink in the center of a few blossom clusters for a realistic pop of contrast. -
Autumn Gold:
On the fourth stone, mix orange and yellow paints slightly on your palette without blending them fully. Paint jagged, oval leaf shapes so the colors swirl together. -
Late Autumn Red:
For the final stone, paint slender, pointed leaves using pure red. Arrange them pointing upwards to give the tree a windswept, dramatic look. -
Drying time:
Allow all the stones to sit undisturbed until the paint is dry to the touch, usually about 20 minutes.
Step 4: Finishing Touches
-
Erase pencil marks:
Check for any visible pencil lines that weren’t covered by paint. Gently erase them, being careful not to scrub the paint. -
Seal the artwork:
Apply a thin layer of matte or satin varnish over the painted surface. This protects the delicate branch lines from chipping and enhances the stone’s natural color.
Arrange your finished stones in a line or circle to display the beautiful cycle of the seasons
Tiny House Pebble Rock Paintings
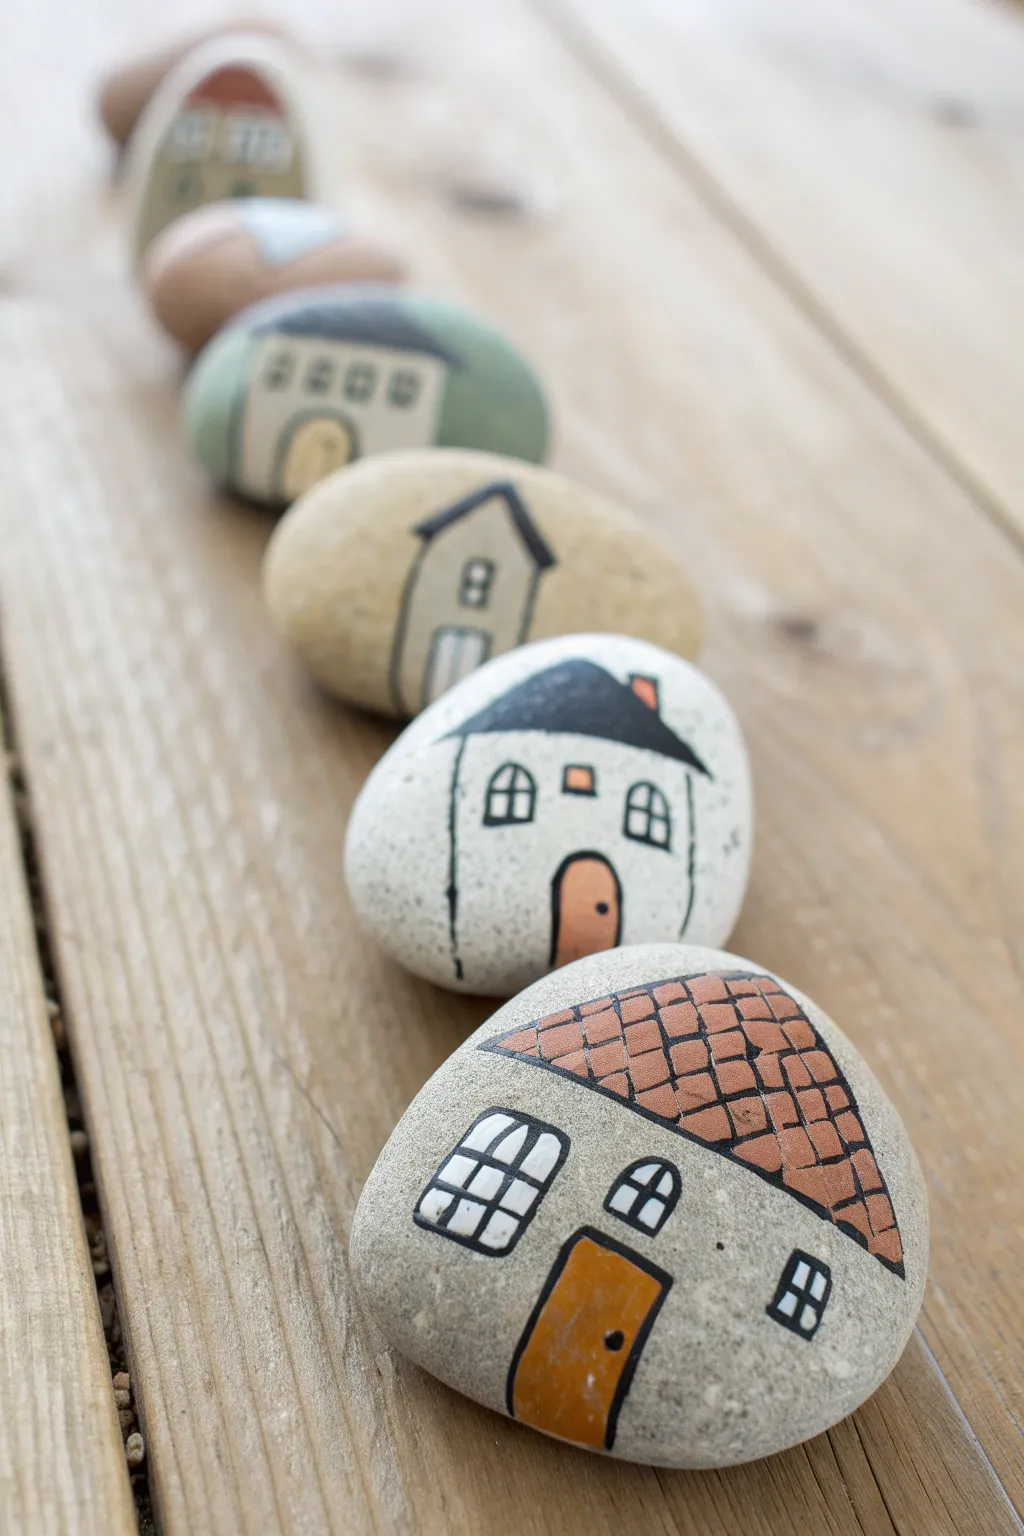
Transform smooth river rocks into a charming miniature village with these simple hand-painted designs. This rustic project uses the natural shape of each stone to dictate the architecture, resulting in a cozy collection of tiny homes perfect for garden decor or paperweights.
Step-by-Step
Materials
- Smooth river rocks (various sizes and shapes)
- Acrylic craft paints (light grey, white, terracotta/brick red, black, warm yellow)
- Fine point detail brushes (sizes 0 and 00)
- Medium flat brush
- Posca paint pens or fine tip black permanent marker (optional for outlining)
- HB Pencil
- Clear acrylic sealer (matte or satin finish)
- Water cup and paper towels
Step 1: Preparing the Foundation
-
Select your stones:
Choose smooth, rounded rocks that have a somewhat flat surface. Look for shapes that naturally suggest a house—some might be tall and narrow like a townhouse, while flatter ones work well for cottages. -
Clean the surface:
Scrub your rocks with warm soapy water and a stiff brush to remove any dirt or grit. Let them dry completely, as moisture trapped inside can ruin the paint later. -
Base coat application:
For lighter houses—like the white cottage in the middle—paint the entire face of the rock with acrylic white or a creamy off-white. For the grey stone cottage in the foreground, you can leave the natural rock color exposed as the base.
Running Paint?
If your black outlines bleed into the colors, the base paint wasn’t fully dry. Wait longer or use a hair dryer on low heat between layers.
Step 2: Sketching the Architecture
-
Draft the roofline:
Using a pencil, lightly sketch a triangle or curved line near the top of the stone to define where the roof sits. Let the natural curve of the rock guide the roof’s slope. -
Outline windows and doors:
Sketch simple rectangles or arches for doors and windows. Don’t worry about perfect symmetry; a wobbly line adds to the rustic, storybook charm. -
Add roof details:
For the foreground cottage, sketch a grid pattern on the roof area to represent shingles or tiles. Keep the lines somewhat loose.
Village Expansion
Try glueing smaller pebbles onto the sides to create chimneys, or paint tiny floral vines creeping up the side of the house for a garden look.
Step 3: Painting the Details
-
Block in the roof color:
Paint the roof area. For the tiled roof, dilute some terracotta or brick red paint slightly and wash it over the grid area, letting it be a bit transparent so the stone texture shows through. -
Paint a solid roof:
For the other houses in your village with solid roofs, use dark grey or black paint to fill in the roof shape completely, creating a strong contrast against the lighter walls. -
Fill the doors:
Mix a warm yellow-ochre or muted orange tone and carefully fill in the door shapes. I find that two thin coats look better than one thick, gloppy one. -
Whiten the windows:
Using your smallest brush or a white paint pen, color in the glass panes of the windows with bright white. This makes them pop against the grey stone.
Step 4: Defining and sealing
-
Outline the structures:
Once the base colors are bone dry, use a fine black paint pen or a liner brush with black paint to trace over your original pencil lines. -
Detail the shingles:
On the tiled roof, carefully draw the grid lines over the terracotta paint. Add a few random extra lines inside individual tiles to suggest texture. -
Window panes:
Draw a cross or grid inside the white window rectangles to create panes. Frame the windows with a slightly thicker black line. -
Door hardware:
Add a tiny black dot for the doorknob. You can also add a small line under the door to ground the house. -
Add character marks:
Feel free to add a few small dots or dashes on the stone walls to mimic texture or pebbledashing. -
Protect your work:
Allow the stones to cure for at least 24 hours. Once dry, apply a coat of matte or satin clear acrylic sealer to protect the paint from chipping and weather.
Arranging your finished stone cottages in a line creates a delightful little streetscape on any windowsill or shelf
Monster Face Pebble Rocks
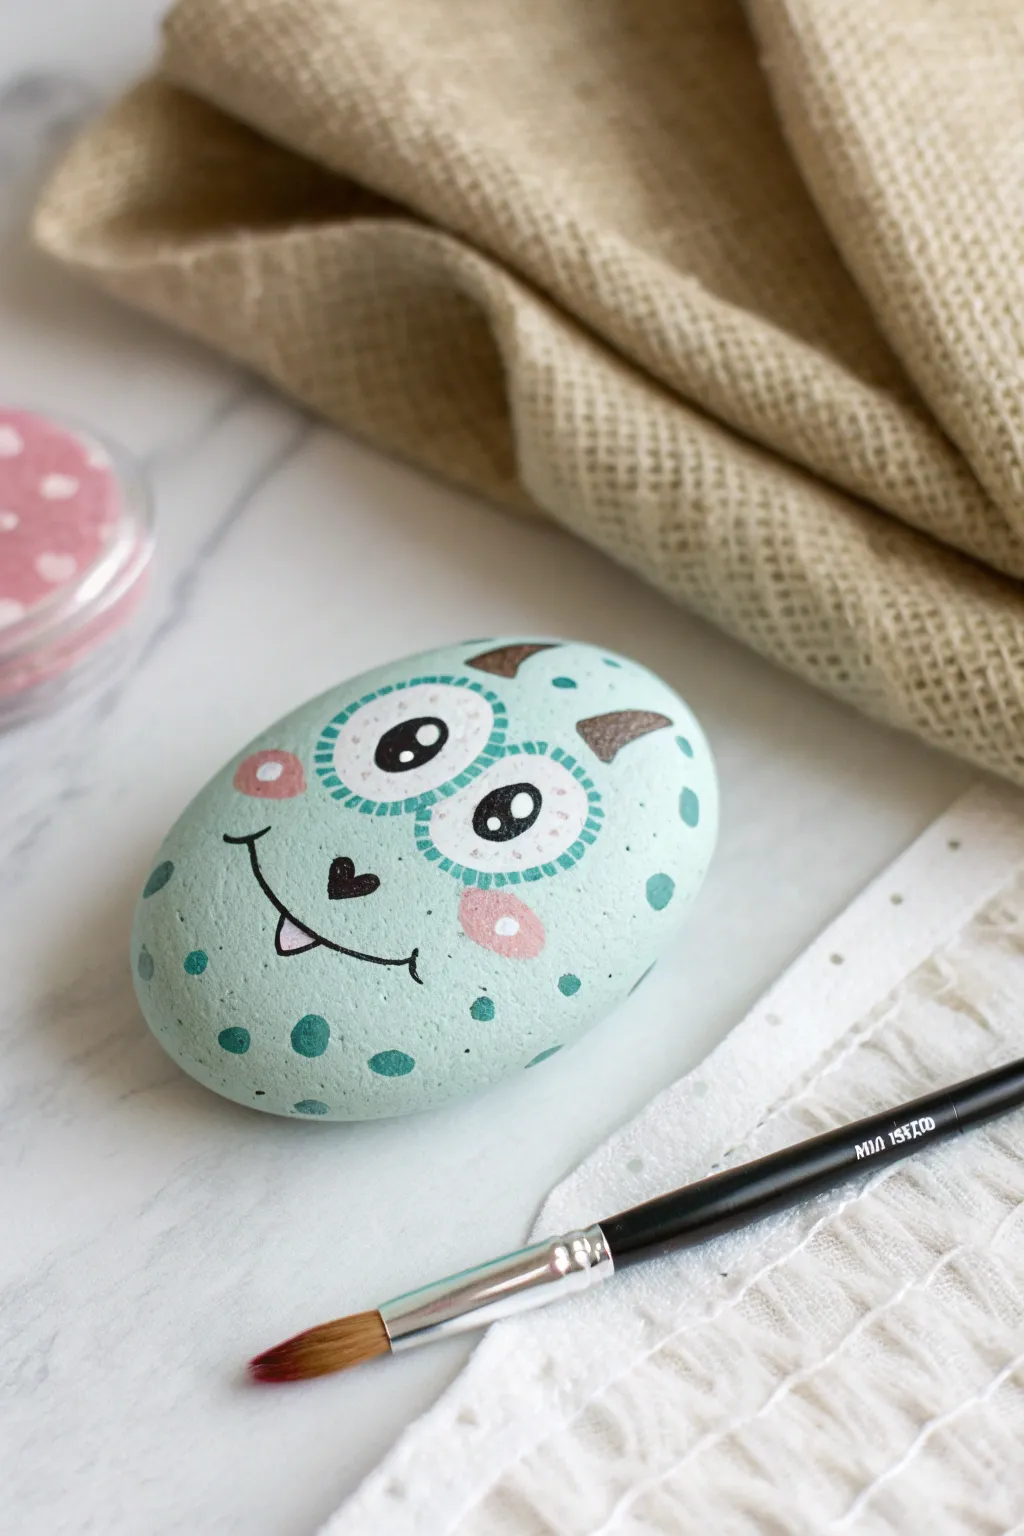
Transform a simple garden stone into an adorable creature with this easy painting project. This mint-green monster features big, expressive eyes and cute spotted skin, making it a perfect friendly desk companion.
Step-by-Step Guide
Materials
- Smooth, oval-shaped river rock
- Mint green acrylic paint
- White acrylic paint
- Black acrylic paint
- Dark teal or forest green acrylic paint
- Light brown acrylic paint
- Pink acrylic paint
- Fine tip paintbrush
- Medium flat paintbrush
- Dotting tool or toothpick
- Matte sealant spray or Mod Podge
Step 1: Base Coat Application
-
Clean the surface:
Before starting, ensure your rock is clean and dry. Wash it with mild soapy water to remove any dirt or grit, as this helps the paint adhere much better. -
Apply the first layer:
Using a medium flat brush, coat the entire top surface of the rock with mint green acrylic paint. Paint in smooth strokes to minimize texture. -
Let it dry:
Allow the first coat to dry completely. If the natural rock color is still showing through, I find a second coat is usually necessary for that solid, opaque look.
Uneven dots?
If your painted dots look messy or gloopy, try using the flat end of a drill bit or a specialized ball stylus tool instead of a brush for perfect circles every time.
Step 2: Creating the Face Features
-
Paint the eye circles:
Dip a rounded brush into white paint. Paint two large circles side-by-side near the top center of the rock. They don’t have to be perfectly round—a little quirkiness adds character. -
Add the horns:
While the eyes dry, use a small detail brush and light brown paint to add two small triangular shapes at the very top of the rock for horns. -
Detail the eyes:
Once the white circles are dry, paint two smaller black circles inside them for the pupils. Place them slightly toward the center to give the monster a sweet expression. -
Add eye highlights:
Using the tip of a toothpick or a very fine dotting tool, place two tiny white dots inside the black pupils. One slightly larger dot at the top and a smaller one below adds life to the eyes. -
Create the nose:
Paint a small, upside-down heart shape or triangle between and slightly below the eyes using black paint. This serves as the monster’s cute little nose. -
Paint the mouth:
Carefully draw a thin, curved black smile line beneath the nose. Add small tick marks at the ends of the smile for dimples. -
Add a goofy tooth:
Paint a tiny white or light pink triangle pointing downward from the smile line to create a single snaggletooth peeking out.
Go wild with color
Don’t stop at mint green. Try making a whole family of monsters in different pastel shades like lavender, baby blue, or soft lemon yellow for a colorful collection.
Step 3: Adding Texture and Details
-
Draw eye outlines:
Dilute your dark teal paint slightly or use a specialized acrylic paint marker. Paint short, dashed lines in a circle around the white of the eyes. This creates a stitched or furry texture effect. -
Add rosy cheeks:
Dip a fingertip or a round sponge dabber lightly into pink paint. Gently press it onto the rock below the eyes to create soft, flushed cheeks. -
Paint the spots:
Using the dark teal paint and a small brush or the back of a paintbrush handle, add various sized polka dots around the sides and bottom of the face. -
Outline the horns:
For extra definition, you can use a very fine brush to outline the brown horns with a thin line of darker brown or black. -
Seal your work:
Once your monster is fully dry—give it at least an hour—apply a coat of matte sealant or Mod Podge to protect the paint from chipping and scratching.
Place your finished monster rock in a potted plant or on a shelf where it can keep an eye on things
Tic-Tac-Toe Pebble Rock Game Set
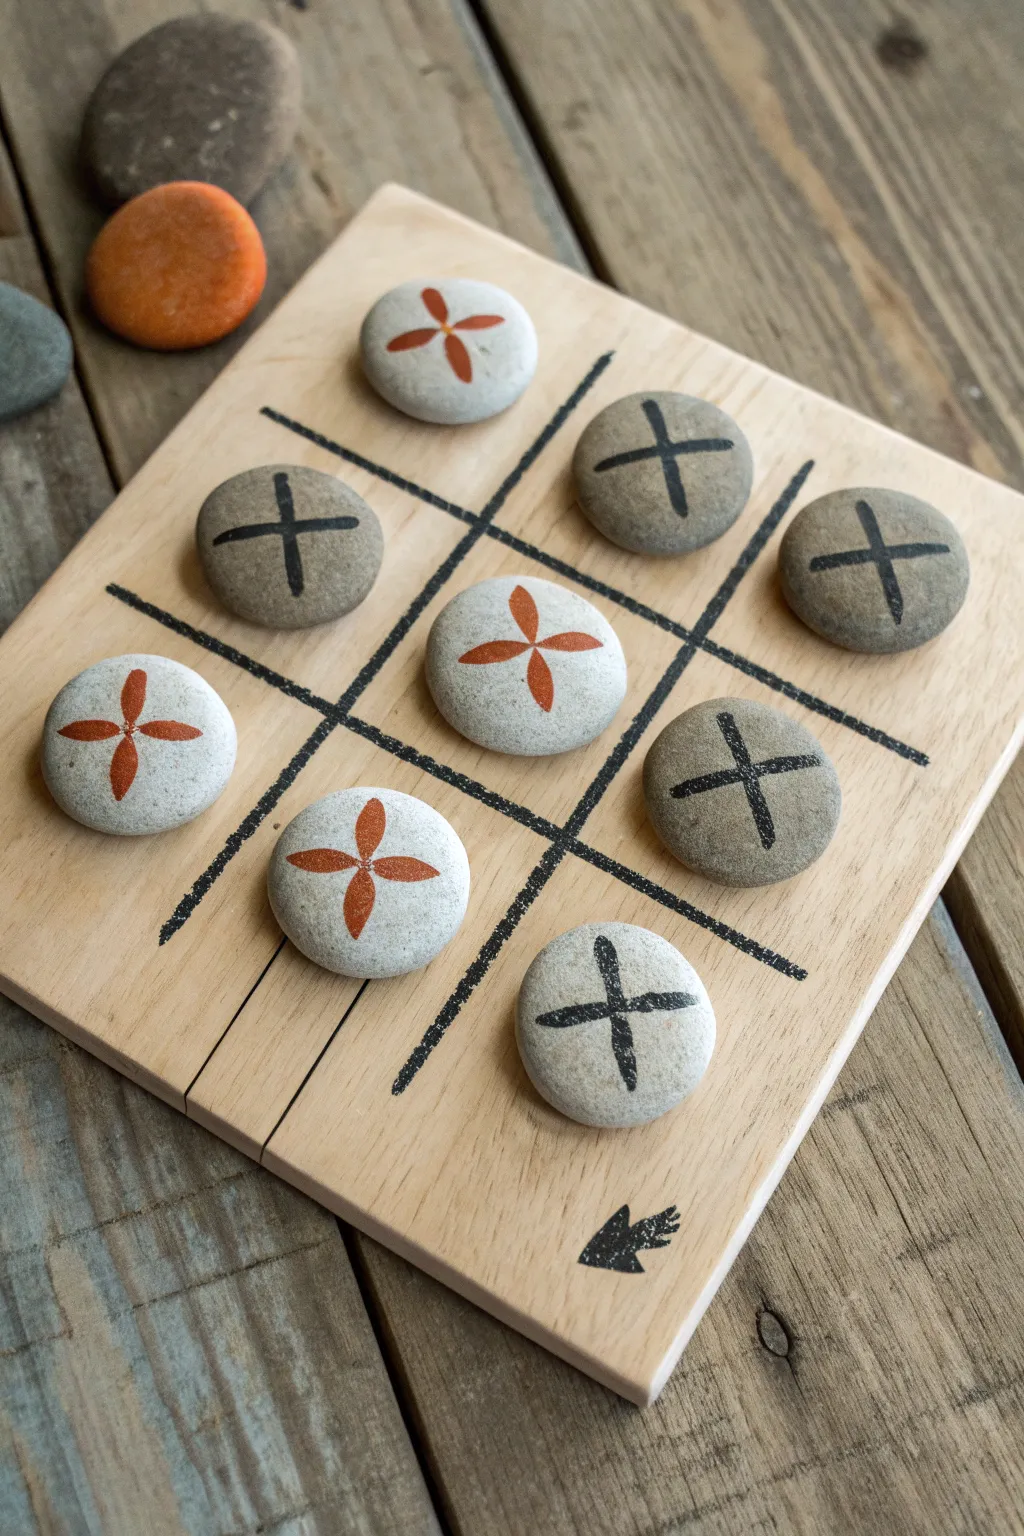
Transform simple garden stones and a scrap of wood into a charming, rustic game set that’s perfect for coffee table decor or outdoor play. This project combines natural textures with bold, graphic painted symbols for a timeless look that is surprisingly easy to achieve.
Step-by-Step
Materials
- Small square wooden board (approx. 6×6 to 8×8 inches)
- 10 smooth, flat river stones (roughly 1.5 inches diameter)
- Black acrylic paint or a broad tip permanent marker
- Terracotta or burnt orange acrylic paint
- Small flat paintbrush
- Fine detail paintbrush
- Ruler
- Pencil
- Fine-grit sandpaper
- Clear matte varnish (spray or brush-on)
- Black ink stamp pad (optional, for decorative corner)
Step 1: Preparing the Game Board
-
Select the base:
Choose a square piece of light-toned wood, like pine or plywood. A size around 7 or 8 inches square works beautifully for standard river rocks. -
Sand the surface:
Using fine-grit sandpaper, gently sand the face and edges of the wooden board until it feels smooth to the touch and free of splinters. -
Wipe it clean:
Remove all sanding dust with a slightly damp cloth or tack cloth to ensure your lines will be crisp and the ink won’t bleed. -
Measure the grid:
Use a ruler to divide the board into a 3×3 grid. Mark the four intersection points lightly with a pencil rather than drawing full lines immediately. -
Draw the grid lines:
Using black acrylic paint and a flat brush—or a thick permanent marker for easier control—draw the hashtag (#) shape. I like to keep the lines slightly imperfect and textured to enhance the rustic feel. -
Add a decorative touch:
In one corner of the board, add a small rustic detail like the arrow or leaf stamp shown in the example, using black paint or an ink stamp.
Uneven Lines?
If painting straight lines on wood is difficult, use masking tape to block off the grid. Peel the tape away while the paint is still wet for a crisp edge.
Step 2: Creating the Game Pieces
-
Sort your stones:
Select 10 flat, circular stones that are roughly the same size. Wash them with soapy water and let them dry completely. -
Divide the teams:
Separate the stones into two groups of five. One group will be the ‘X’ team, and the other will be the ‘Flower’ (or O) team. -
Paint the X pieces:
Take the darker stones if you have a mix of colors. Using black paint and a small brush, paint a large, bold ‘X’ across the entire surface of five stones. -
Refine the X lines:
Go over the black lines a second time if the stone is porous, ensuring the cross is solid and dark. -
Start the Flower pieces:
For the opposing team, choose lighter-colored stones. Dip your detail brush into the terracotta or burnt orange paint. -
Paint the petals:
Paint four teardrop shapes meeting in the center to form a simple flower. Think of it as painting a ‘plus’ sign that is thick at the ends and thin in the middle. -
Refine the petals:
Once the first coat is tacky, add a second layer of orange paint to make the color pop against the grey stone. -
Clean up edges:
If any paint smudged, use a damp Q-tip or a tiny bit of grey paint to tidy up the outlines of your symbols.
Grid Sizing
Lay your stones out in a 3×3 formation on the bare wood *before* drawing lines. Mark the gaps between them to ensure your grid fits your specific rocks perfectly.
Step 3: Finishing Touches
-
Check for gaps:
Place your stones on the board to ensure the grid lines are visible around them. Extend the grid lines on the board slightly if the rocks hide them too much. -
Seal the stones:
Apply a coat of clear matte varnish to the top of each stone. This protects the paint from chipping during intense gaming sessions. -
Seal the board:
Give the wooden board a quick spray or coat of the same matte varnish to protect the wood grain and the black grid lines. -
Let it cure:
Allow everything to dry overnight in a dust-free area before playing your first game.
Now you have a timeless, handcrafted game set ready for hours of unplugged fun
Glow-Style Star Constellation Pebbles
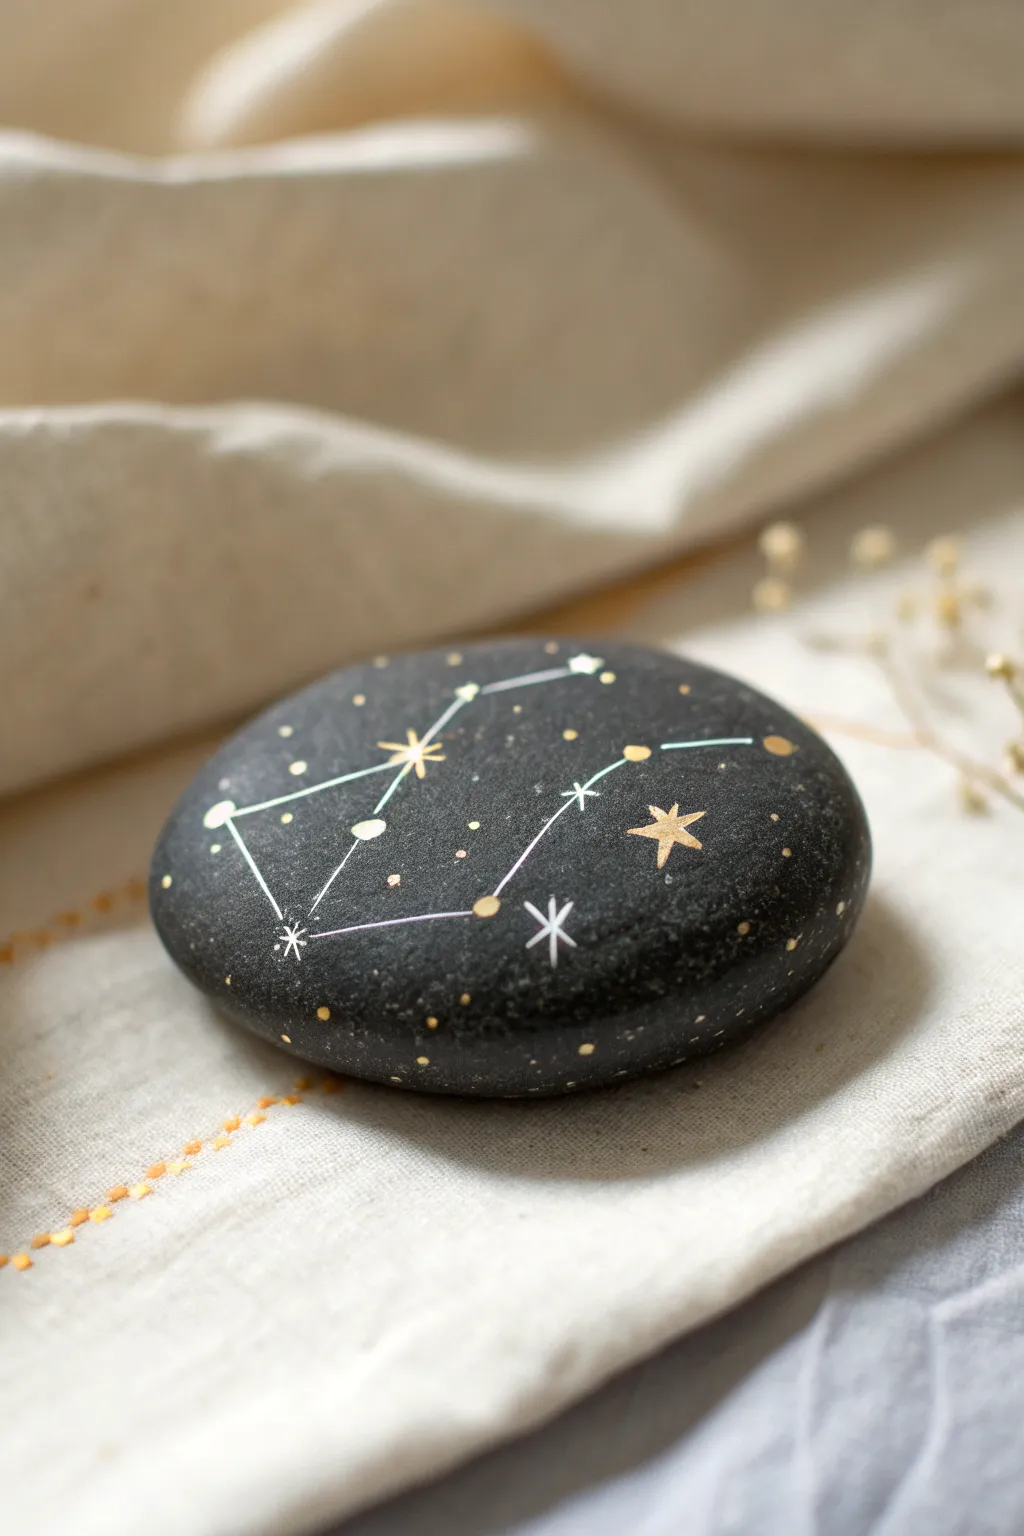
Capture the magic of the night sky by transforming a simple smooth stone into a glowing piece of galaxy art. This project uses fine lines and metallic accents to create a sophisticated, dreamy aesthetic perfect for decor or gifts.
Step-by-Step Tutorial
Materials
- Smooth, dark river stone (black or dark grey)
- White acrylic paint or a white Posca paint pen (extra fine tip)
- Gold metallic paint pen (fine tip)
- Light blue or teal acrylic paint (optional, for glowing effect)
- Fine detail paintbrush (size 00 or 000)
- Pencil or white charcoal pencil
- Matte or satin spray varnish
- Clean water and paper towels
Step 1: Preparation and Planning
-
Clean the Surface:
Begin by thoroughly washing your stone with warm soapy water to remove any dirt or oils. Let it dry completely before starting. -
Optional Base Coat:
If your stone isn’t naturally dark enough, apply a coat of black acrylic paint to create a deep, midnight background. I usually skip this if the natural stone has a nice dark charcoal tone. -
Sketch the Constellation:
Lightly plan your constellation design using a white charcoal pencil or a standard graphite pencil. You can look up star charts for accuracy or create your own whimsical pattern. -
Mark the Main Stars:
Identify where the major stars of your constellation will sit. Mark these spots with tiny dots so you know exactly where your lines need to connect.
Starry Precision
Use a toothpick dipped in paint for the tiniest ‘distant’ stars. It gives you more control than a brush and creates perfect micro-dots.
Step 2: Creating the Stars
-
Paint Major Stars:
Using your white paint pen or fine brush, dab larger dots of white on your marked spots to represent the brightest stars in the formation. -
Add Metallic Accents:
Switch to your gold metallic pen. Select a few key stars or standalone points and draw small five-pointed stars or simple gold dots to add warmth and variety. -
Create Distant Stars:
Fill in the empty negative space around the main design with tiny, random specks of white and gold. Vary the pressure to create different sizes, mimicking the depth of space. -
Detailing Specific Stars:
Choose one or two focal stars and draw an eight-point starburst shape (a large cross with a smaller ‘x’ over it) to make them twinkle.
Step 3: Connecting the Lines
-
Draft the Connections:
Carefully draw the lines connecting your main star dots. Use a very light touch with your white paint pen. -
Add the Glow Effect:
To achieve the subtle ‘glow’ seen in the image, mix a tiny amount of light blue or teal paint with water to make a glaze. Carefully trace over just the connecting lines. -
Reinforce the White:
Once the blue glaze is dry, go back over the very center of the lines with crisp white paint. This makes the lines look like beams of light. -
Clean Up Edges:
If any lines became too thick, use a wet toothpick or a damp brush to gently push the paint back or wipe away excess before it fully cures.
Uneven Lines?
If your connecting lines look shaky, use a ruler or the edge of a piece of cardstock as a guide for your paint pen to trace against.
Step 4: Finishing Touches
-
Enhance the Gold:
Go back over your gold stars to ensure they are opaque and shiny against the dark stone background. -
Add Tiny Clusters:
Group 2-3 tiny dots closely together in a few open areas. This creates the look of distant star clusters. -
Final Inspection:
Look at the composition from a distance. If it feels unbalanced, add a few more gold stray dots to fill the void. -
Seal the Artwork:
Once the paint is completely dry (wait at least an hour), spray the stone with a clear matte or satin varnish. This protects the delicate lines from scratching.
Place your finished constellation stone on a desk or shelf to add a little celestial wonder to your daily space


Have a question or want to share your own experience? I'd love to hear from you in the comments below!