Whenever I need a quick boost of joy in my studio, I paint a penguin—they’re naturally graphic, ridiculously cute, and perfect for winter painting practice. Here are my favorite penguin painting ideas, starting with simple classics and building up to more playful, unexpected twists.
Simple Oval Penguin on Snow
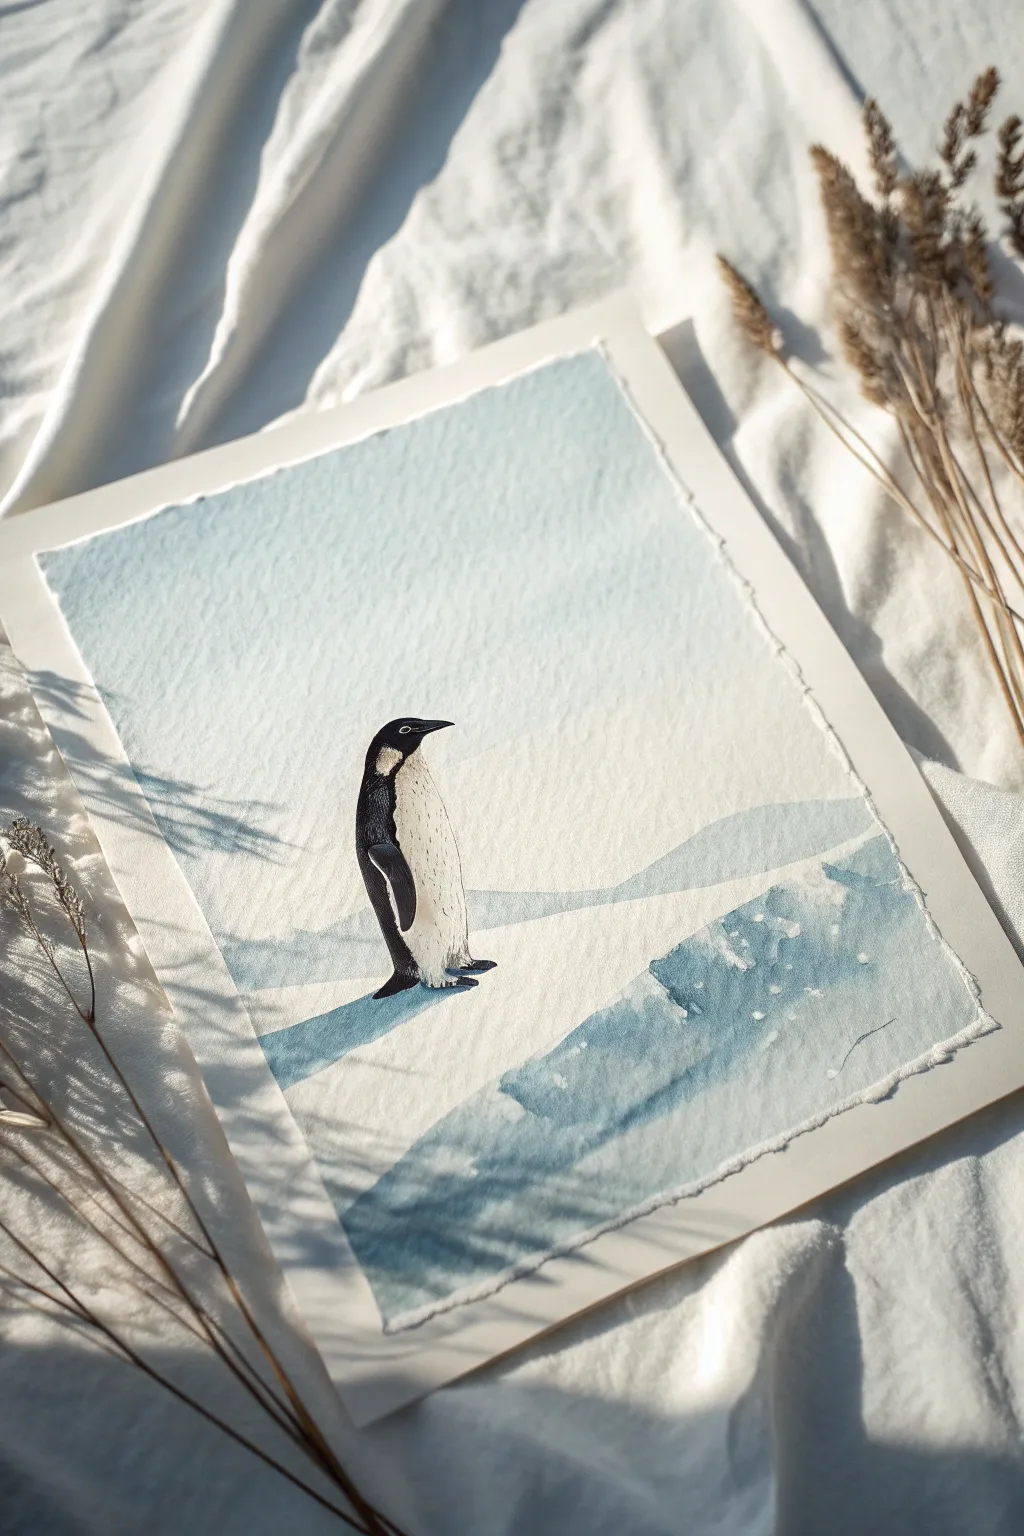
Capture the serene isolation of the Antarctic with this delicate watercolor painting featuring a lonely Adélie penguin. The soft, diffuse background contrasts beautifully with the crisp, dark details of the bird, all framed by naturally deckled paper edges.
Step-by-Step Tutorial
Materials
- Cold press watercolor paper (300 gsm)
- Watercolor paints (Indigo, Payne’s Grey, Cerulean Blue, Burnt Umber)
- Round brushes (flats for washes, size 0 or 1 for details)
- Masking fluid (optional)
- Clean water jars
- Paper towels
- Pencil (HB or H)
- Kneaded eraser
Step 1: Sketch and Background
-
Prepare the paper:
Start by tearing your watercolor paper to size rather than cutting it. This creates the soft, deckled edge seen in the reference, adding an organic feel to the finished piece. -
Lightly sketch the penguin:
In the lower-left third of the paper, sketch a simple oval shape for the penguin’s body. Add a small curve for the head and beak, keeping your pencil lines extremely faint so they don’t show through the pale paint. -
Mark the horizon:
Sketch a very subtle, sloping line behind the penguin to indicate the snowy hill, and a few jagged shapes in the foreground right corner for the icy ledge. -
Wet the sky:
Using a large, clean brush, wet the entire upper portion of the paper with clean water, stopping carefully around the penguin’s outline. -
Apply the first wash:
While the paper is glistening, drop in a very watery mix of Cerulean Blue. The color should be barely there, fading to almost white as it moves down toward your horizon line. -
Define the snowy hills:
While the sky is drying, mix a slightly stronger, cooler blue. Paint the distant hill shapes behind the penguin using the wet-on-dry technique to create a soft but defined edge.
Bleeding Troubles?
If your black paint bleeds into the white belly, don’t wipe it! Blot it vertically with a clean tissue immediately, then wait for it to dry before reapplying white gouache to fix the mistake.
Step 2: The Icy Foreground
-
Base layer for ice:
For the foreground ice ledge on the right, apply a wash of cool blue mixed with a tiny touch of grey. Keep the edges ragged to mimic fractured ice. -
Create texture:
While the ice wash is still damp, drop in concentrated Indigo or Payne’s Grey into the lower cracks and shadows. You can sprinkle a few drops of clean water onto the drying paint to create ‘blooms’ that look like frost texture. -
Cast shadow:
Paint a long, diagonal shadow stretching from the penguin’s feet toward the left. Use a transparent mix of Cobalt Blue and purple to make the shadow look cold but airy. -
Let it dry completely:
Wait until the paper is bone dry before touching the penguin to prevent the black paint from bleeding into your pristine snow.
Level Up: Salt Texture
bSprinkle table salt onto the wet blue wash of the foreground ice. Let it dry completely and brush it off to create amazing crystalline, icy textures automatically.
Step 3: Painting the Penguin
-
The dark coat:
Mix a dense, dark color using Indigo and Burnt Umber (avoid using straight black for a richer look). Carefully paint the penguin’s head and back, leaving the chest white. -
The flipper:
Define the flipper shape against the white belly. It should be dark at the top, perhaps fading slightly at the tip where the light hits it. -
Facial details:
Switch to your smallest brush (size 0 or 1). Paint the beak, leaving a tiny sliver of white paper for a highlight, and add the distinct white ring around the eye characteristic of Adélie penguins. -
Texture the belly:
The white belly shouldn’t be completely flat. Mix a very watery grey and add tiny, stippled dots or short strokes along the bottom and side to suggest roundness and dirty feathers. -
Feet placement:
Paint simple, dark triangular shapes for the feet. Ensure they connect firmly with the cast shadow you painted earlier so the bird feels grounded.
Step 4: Final Touches
-
Deepen contrasts:
Once the first layer of the penguin is dry, go back with your darkest mix to deepen the shadows under the flipper and around the neck. -
Soft highlights:
If you lost any highlights on the ice, you can use a touch of white gouache or a white gel pen to bring back the sparkles on the foreground ledge.
Now you have a tranquil winter scene that brings a quiet chill to any room it hangs in


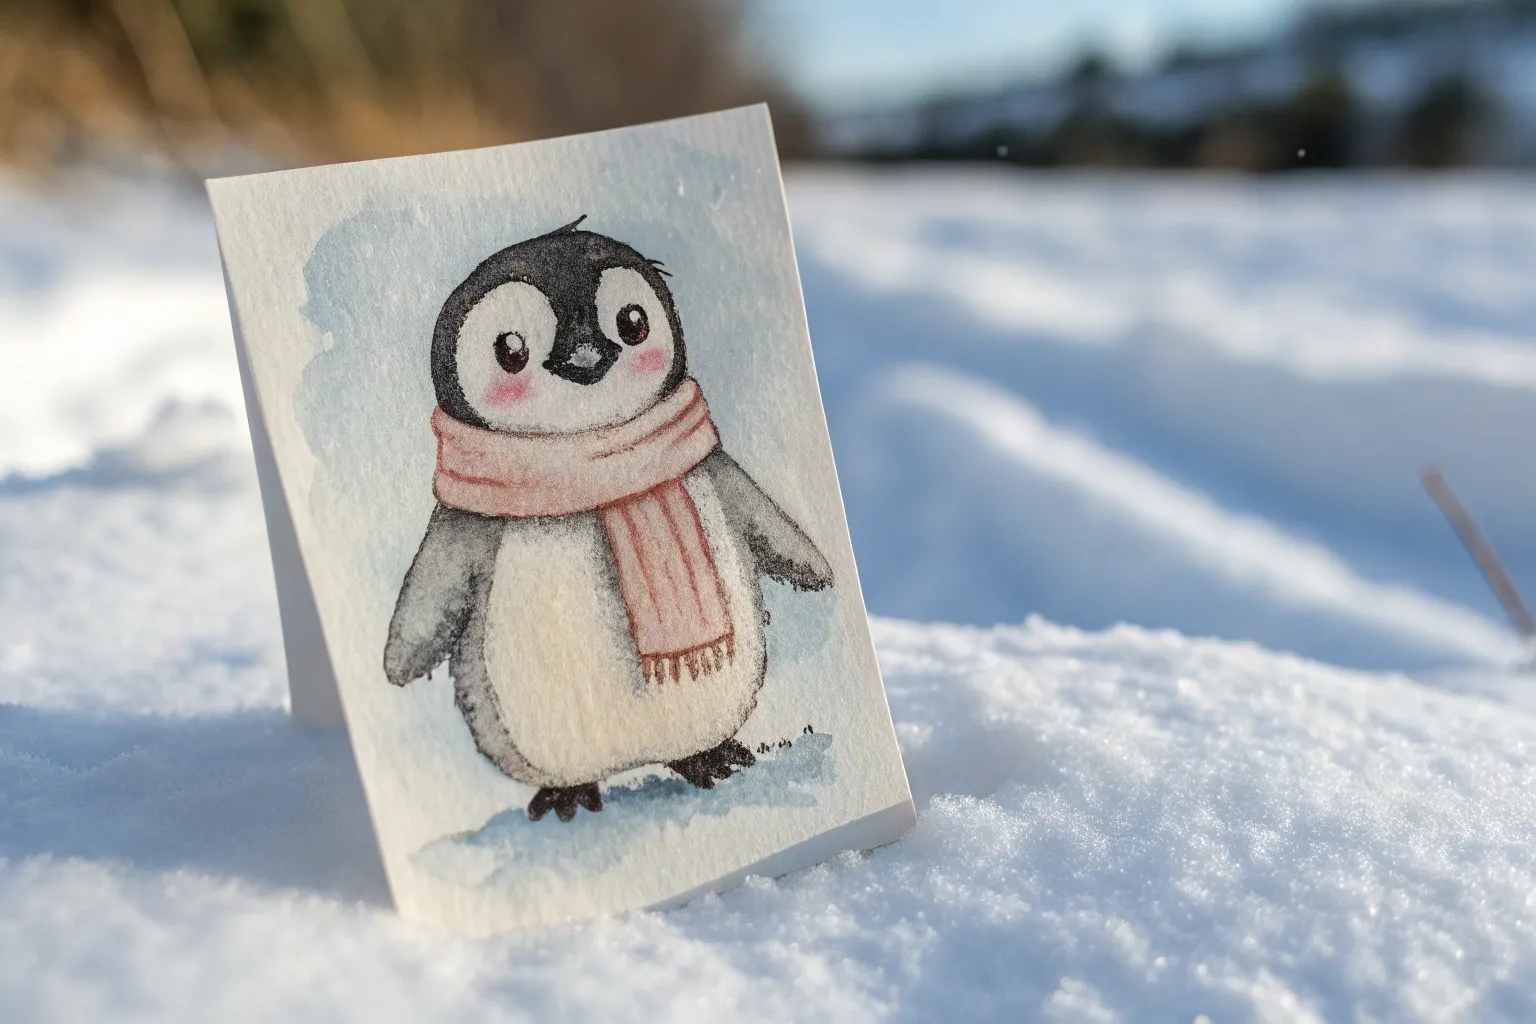
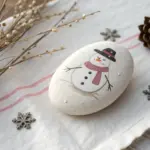
Cozy Scarf-and-Hat Penguin
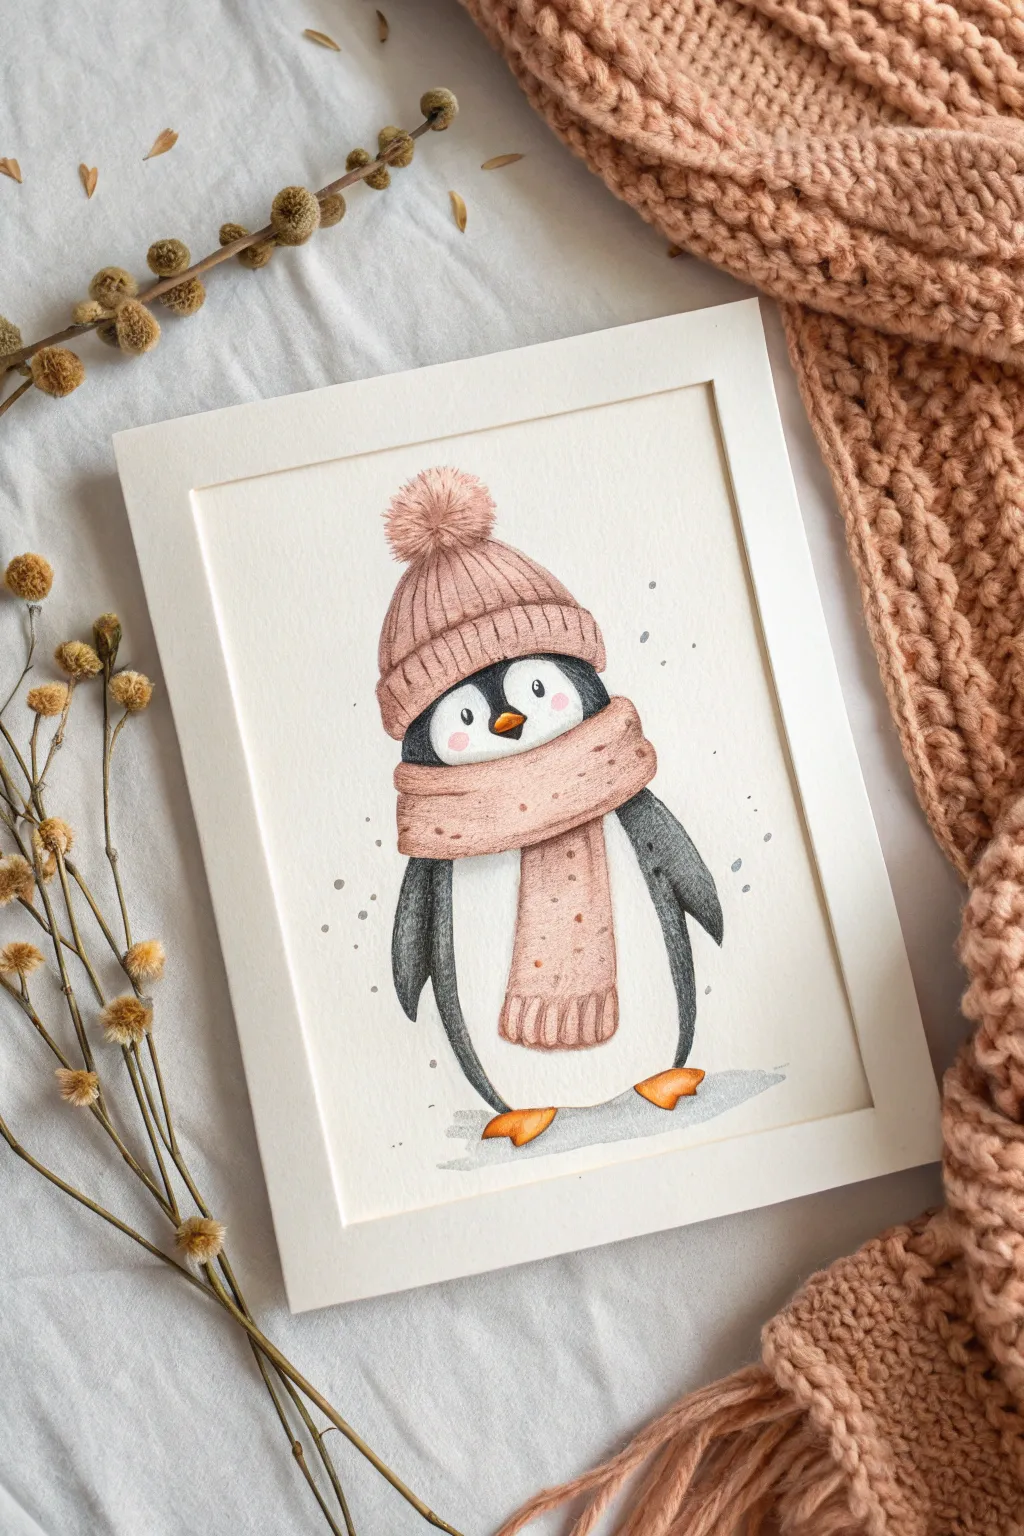
Capture the essence of winter warmth with this charming illustration of a penguin bundled up in cozy pink knits. The soft textures of the hat and scarf contrast beautifully with the crisp black and white of our chilly friend, creating a heartwarming piece perfect for holiday cards.
Step-by-Step Guide
Materials
- Hot press watercolor paper (smooth texture)
- Pencil (HB or H) and kneadable eraser
- Watercolor paints (Payne’s Grey, Blush/Rose Pink, Burnt Sienna, Lamp Black)
- Fine liner pens (0.1mm and 0.3mm, black and sepia)
- White gouache or white gel pen
- Small round brushes (sizes 0, 2, and 4)
- Salt (optional for texture)
Step 1: Sketching the Foundations
-
Basic Shapes:
Begin by lightly sketching a large oval for the penguin’s body in the center of your paper. Don’t press too hard; you want these lines to disappear later. -
Mapping the Accessories:
Draw the beanie sitting snugly on top of the oval. Add a large, fluffy pom-pom circle at the very peak. Sketch the thick, rolled brim of the hat slightly overlapping the top of the penguin’s head. -
Adding the Scarf:
Wrap a chunky scarf around the neck area. Draw the loop first, then add the hanging tail of the scarf draping down the front of the body. Keep the lines soft and rounded to suggest wool. -
Facial Features & flippers:
Define the face mask area within the oval, leaving space for the white belly. Add two small flippers sticking out from the sides and little triangular feet at the base.
Step 2: Painting the Cozy Knits
-
First Wash:
Mix a diluted dusty pink or warm rose color. Apply a light wash over the entire hat and scarf area. Let the water carry the pigment for a soft look. -
Building Texture:
Once the first layer is barely damp, deepen the pink mix slightly. Add vertical lines to the hat’s brim and the main body of the hat to mimic a ribbed knit pattern. -
Scarf Details:
Repeat the ribbing technique on the scarf tail. I like to add tiny, irregular dots of a darker rusty pink across the scarf and hat to simulate speckles in the yarn. -
Pom-Pom Fluff:
For the pom-pom, use short, flicking brushstrokes radiating outward from the center using your dusty pink. Leave some white gaps to keep it looking airy and fluffy.
Muddy Colors?
If the black feathers bleed into the pink scarf, stop immediately. Let the pink area dry completely before painting the adjacent black sections. Patience prevents bleeding!
Step 3: Bringing the Penguin to Life
-
The Dark Feathers:
Using Payne’s Grey or a soft black, carefully paint the penguin’s head (outside the face mask), back, and flippers. Use a ‘dry brush’ technique near the edges to suggest feather texture. -
Feather Variation:
While the grey is wet, drop in a slightly darker black tone near the bottom edges of the flippers and the side of the body for shadow. -
Beak and Feet:
Paint the small triangular beak and the feet with a bright pumpkin orange. Add a tiny shadow underneath the beak with a touch of brown. -
Shadowing the White:
The belly shouldn’t be stark white. Mix a very watery grey and paint a shadow along the left side of the belly and under the scarf to give the body volume.
Textured Wool Tip
For a fuzzy wool look, lightly blot the wet paint on the hat with a crumpled tissue. This lifts pigment unevenly, instantly creating a soft, fabric-like texture.
Step 4: Final Details & Ink
-
Inking the Scarf:
Once the paint is bone dry, use a sepia or brown fine liner to outline the knitwear. Use broken, shaky lines—not straight ones—to emphasize the wool texture. -
Defining the Face:
Use a black fine liner to draw two small oval eyes. Leave a tiny white spec in each for the catchlight, or add it later with white gel pen. -
Rosy Cheeks:
Dilute a tiny drop of pink paint or use a colored pencil to add soft, circular blush marks right under the eyes. -
Atmospheric Snow:
Splatter tiny droplets of grey or blue watercolor around the background to create falling snow. Add a few grounding shadows under the feet using a horizontal wash of light grey. -
Highlights:
Finally, use white gouache or a gel pen to add sharp highlights to the beak, the top of the feet, and a few stray ‘snowflakes’ on the hat and scarf.
Frame your chilly little friend in a simple mount to show off those adorable winter textures.


Waddling Penguin in Falling Snow
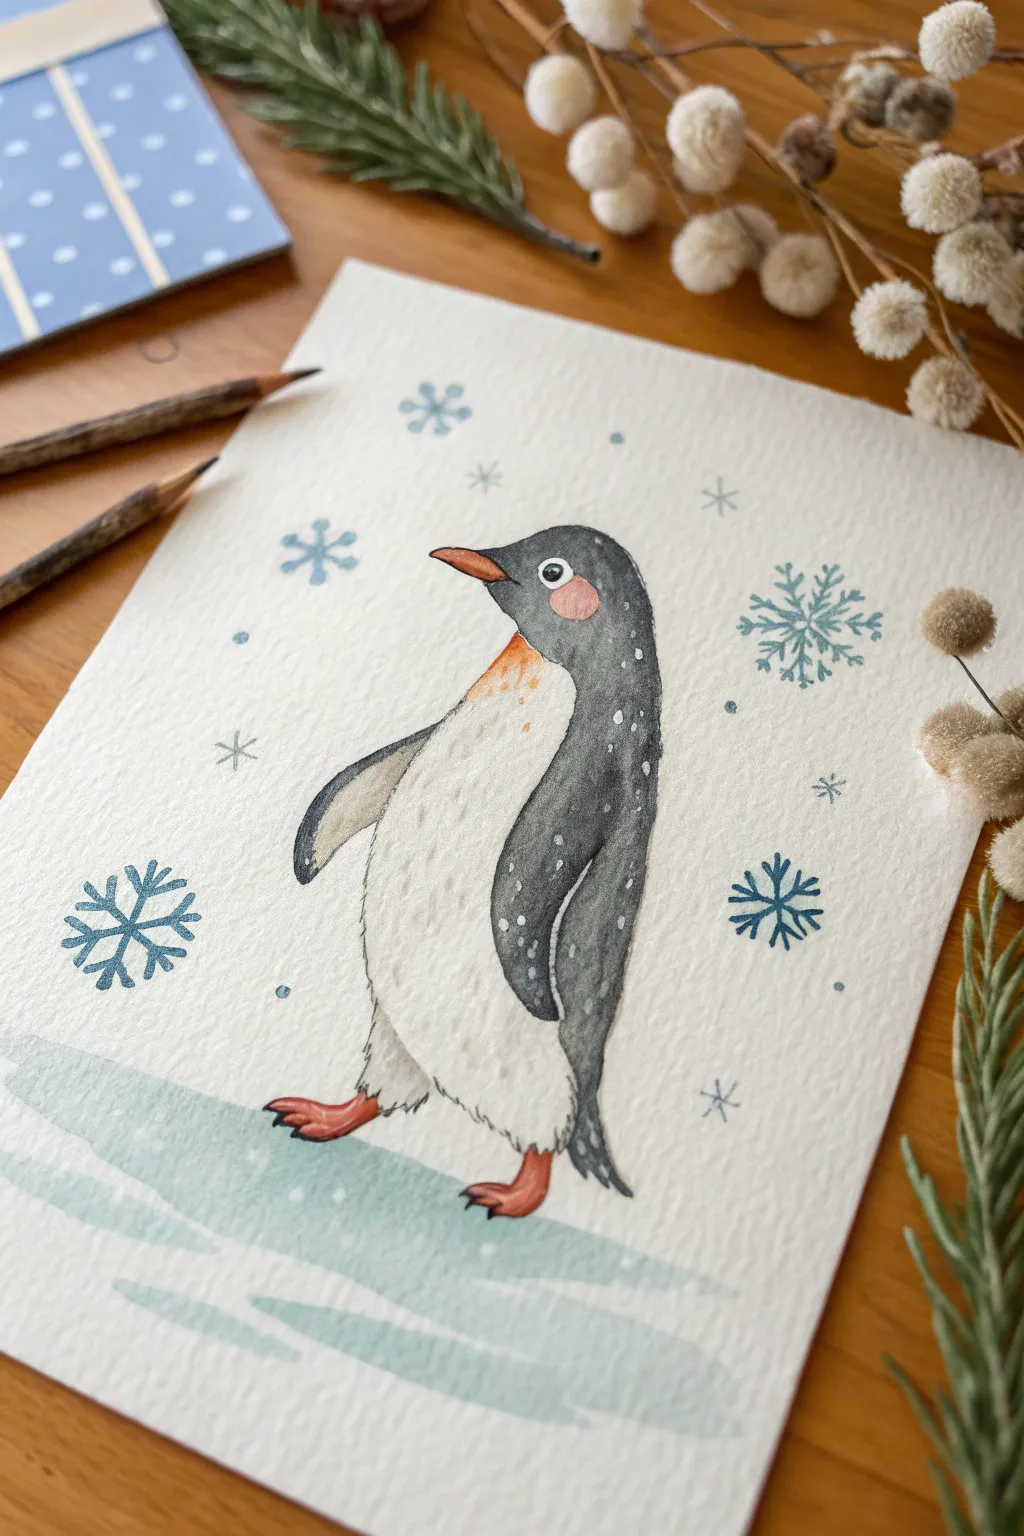
Capture the charm of a chilly stroll with this watercolor illustration of a penguin waddling through a gentle snowfall. The finished piece features soft textures and crisp snowflakes, perfect for a handmade holiday card or winter art print.
Detailed Instructions
Materials
- Cold press watercolor paper (A5 or 5×7 inches)
- Watercolor paints (Payne’s Grey, Indigo, Burnt Sienna, Cadmium Orange, Cerulean Blue)
- Round watercolor brushes (Size 4 for body, Size 0 or 1 for details)
- Masking fluid (optional)
- White gouache or white gel pen
- Pencil (HB or H)
- Kneaded eraser
- Two jars of water
- Paper towels
Step 1: Sketching & Preparation
-
Outline the body:
Begin by lightly sketching the penguin’s main shape. Draw a long, slightly curved oval for the body, leaning slightly forward to suggest movement. -
Add features:
Refine the head shape, adding a pointed beak and a small circle for the eye. Sketch the two flippers—one tucked against the side and one slightly extended back. -
Define the ground:
Sketch a ragged, horizontal shape beneath the penguin’s feet to represent an ice floe or snowy path. Keep the lines loose and irregular. -
Place snowflakes:
Lightly mark positions for the snowflakes around the penguin. Include a mix of simple six-pointed stars and smaller flake dots, but keep these pencil lines very faint so they don’t show through later. -
Lighten lines:
Roll your kneaded eraser gently over the entire sketch. You want the graphite to be barely visible, just enough to guide your brush without dirtying the paint.
Step 2: Painting the Penguin
-
First wash on the back:
Mix a watery wash of Payne’s Grey. Paint the penguin’s back, head, and flippers, carefully avoiding the white belly area and the circular eye patch. -
Deepen the darks:
While the first layer is still slightly damp, drop in a more concentrated Indigo or dark grey along the spine and under the flipper to create shadow and volume. -
Add warmth to the neck:
Dilute a tiny bit of Burnt Sienna or Ochre. Gently glaze this warmth onto the upper chest area where the black feathers meet the white, blending it downward so it fades into the belly. -
A subtle blush:
With a very clean brush and watered-down pink or diluted red, add a soft, circular blush patch on the penguin’s cheek, just behind the eye. -
Beak and feet base:
Paint the beak and feet with a mix of Cadmium Orange and a touch of red. Keep the color solid but not too dark yet. -
Belly texture:
Using extremely diluted grey paint and a mostly dry brush, scumble some texture onto the lower belly and near the legs to suggest fluffy feathers rather than flat white paper.
Fixing Muddy Whites
If dark paint bleeds into the white belly, blot immediately with a clean tissue. Once dry, paint over the mistake with opaque white gouache to restore the bright white feathers.
Step 3: Background & Details
-
Ice patch wash:
Mix a pale, watery Cerulean Blue or turquoise. Paint the icy ground using horizontal strokes, letting the brush skip slightly over the paper’s texture to create white ‘sparkles’ of dry paper. -
Deepen ice shadows:
Add a second, slightly darker strip of blue along the bottom edge of the ice patch to give the ground some dimension and weight. -
Painting snowflakes:
Using a fine detail brush and a blue-grey mix, carefully paint the snowflake designs. I like to start with a simple cross and add ‘V’ shapes to the ends for a classic crystal look. -
Final penguin details:
Once the body is fully dry, use your smallest brush with concentrated black to paint the pupil of the eye, leaving a tiny speck of white paper for the highlight. -
Refining the beak:
Add a thin line of dark brown or black along the bottom edge of the upper beak to separate it from the lower beak. -
Snowy speckles:
Load a brush with opaque white gouache (or use a white gel pen). Add tiny white dots directly onto the penguin’s dark back to make it look like snow is landing on his feathers.
Add Sparkle
Sprinkle a pinch of fine edible glitter or iridescent medium over the wet blue ice wash. It adds a magical, frosty shimmer that catches the light beautifully.
Let your painting dry completely before framing your frosty little friend


Parent and Chick Penguin Duo
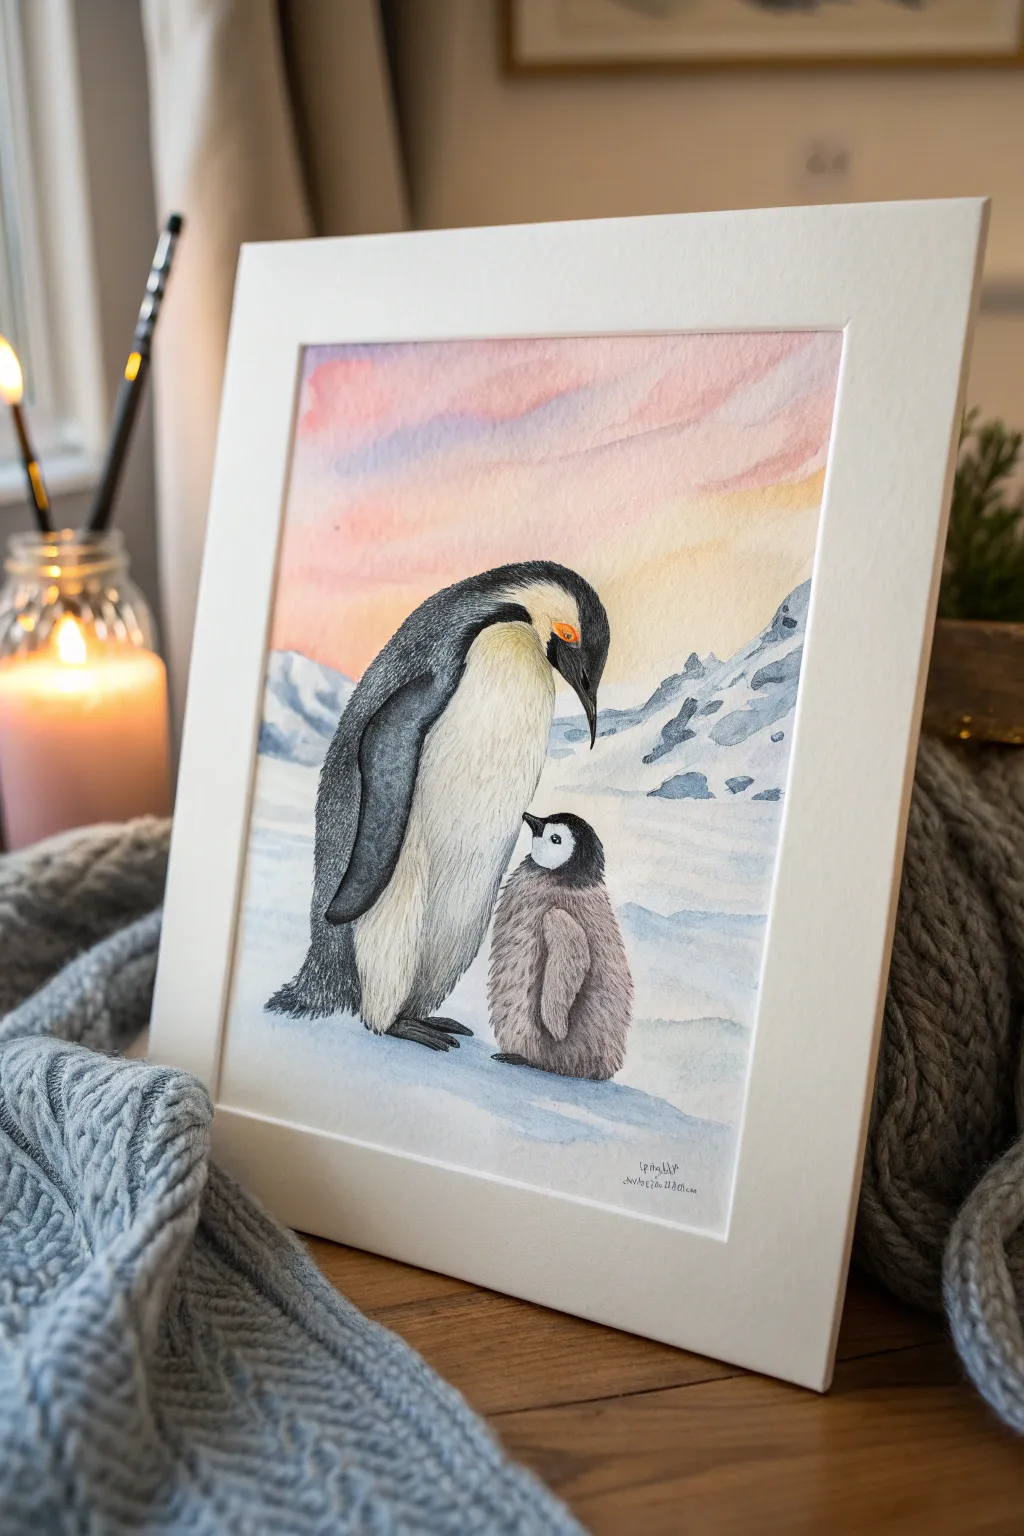
Capture the tender moment between parent and chick with this soft watercolor illustration. Using delicate washes for the sky and precise layering for the feathers, you’ll create a piece full of warmth and personality.
How-To Guide
Materials
- Cold press watercolor paper (300 gsm)
- Watercolor paints (Payne’s Grey, Lamp Black, Burnt Sienna, Cadmium Orange, Alizarin Crimson, Cobalt Blue)
- White gouache (optional highlights)
- Round watercolor brushes (sizes 2, 6, and 10)
- Fine liner pen or detail brush
- Pencil (HB) and kneaded eraser
- Masking fluid (optional)
- Clean water and palette
Step 1: Sketch and Sky
-
Draft the shapes:
Begin by lightly sketching the outline of the large parent penguin and the small, rounded chick. Keep the pencil lines faint so they don’t show through the final paint layers. -
Define the landscape:
Sketch a sloping horizon line behind the penguins to represent snowy hills. Add jagged shapes for distant mountains on the right side. -
Prepare the sky wash:
Wet the sky area of the paper with clean water using your size 10 brush. You want the surface to be glistening but not pooling with water. -
Paint the sunset gradient:
While the paper is wet, drop in horizontal strokes of diluted Alizarin Crimson and Cadmium Orange near the horizon. Let these bleed upwards. -
Add the upper sky:
At the very top, blend in a soft mix of diluted Cobalt Blue or a touch of purple, allowing it to fade seamlessly into the pinks and oranges below. Let this layer dry completely.
Wet-on-Wet Magic
For the softest feathers on the chick, slightly dampen the paper before applying the grey paint. The pigment will spread naturally, creating a fuzzy, down-like texture automatically.
Step 2: Ice and Underpainting
-
Form the icy clusters:
Using a dilute mix of Cobalt Blue and a tiny touch of Payne’s Grey, paint the distant mountains. Keep the edges sharp against the sky but soften the bottoms where they meet the ground. -
Create snowy shadows:
Add horizontal streaks of this pale blue mix across the foreground ice to suggest uneven terrain and wind-swept snow. -
Base layer for the parent:
Apply a very pale wash of yellow ochre or cream to the chest area of the adult penguin to give the white feathers warmth. -
Base layer for the chick:
Wash a light grey (black heavily diluted with water) over the chick’s body, leaving the face mask white for now.
Sparkle Effect
Sprinkle coarse salt onto the wet blue paint of the snowy foreground. As it dries, the salt pushes the pigment away, creating beautiful crystalline ice textures.
Step 3: Feathers and Details
-
Darken the parent’s back:
Mix a dense Payne’s Grey or Lamp Black. Paint the adult’s back, wing, and head, carefully avoiding the orange ear patch area. -
Add the signature glow:
Drop bright Cadmium Orange into the ear patch area while the surrounding dark paint is slightly damp for a soft edge, or paint it on dry paper for a crisp look. -
Texture the chick:
Switch to your size 2 brush. Using short, flicking strokes with a medium-grey mix, build up the texture of the chick’s fluffy down feathers. -
Define the chick’s face:
Paint the black cap and throat of the chick, ensuring the white eye-patch shape remains distinct and clean. -
Refine the adult’s chest:
Using a nearly dry brush with faint grey paint, add subtle vertical strokes to the adult’s white chest to suggest the direction of the feathers. -
Deepen the shadows:
Add a second, darker layer of black to the darkest parts of the adult’s flipper and tail to create volume and contrast.
Step 4: Final Touches
-
Paint the beaks and eyes:
Use a detail brush to carefully paint the sharp beaks. Add a tiny dot of white gouache to the eyes as a catchlight to bring them to life. -
Ground the subjects:
Paint a bluish-grey cast shadow underneath both penguins, stretching slightly to the right to match the lighting direction. -
Enhance texturing:
I find that adding a few very fine ink lines or sharp pencil marks over the dried watercolor adds wonderful definition to the chick’s fluff. -
Mount and display:
Once fully dry, erase any visible pencil marks and place your artwork behind a clean white mount to make the colors pop.
Step back and admire the heartwarming family portrait on the ice you have painted
BRUSH GUIDE
The Right Brush for Every Stroke
From clean lines to bold texture — master brush choice, stroke control, and essential techniques.
Explore the Full Guide
Cute Penguin Face Close-Up
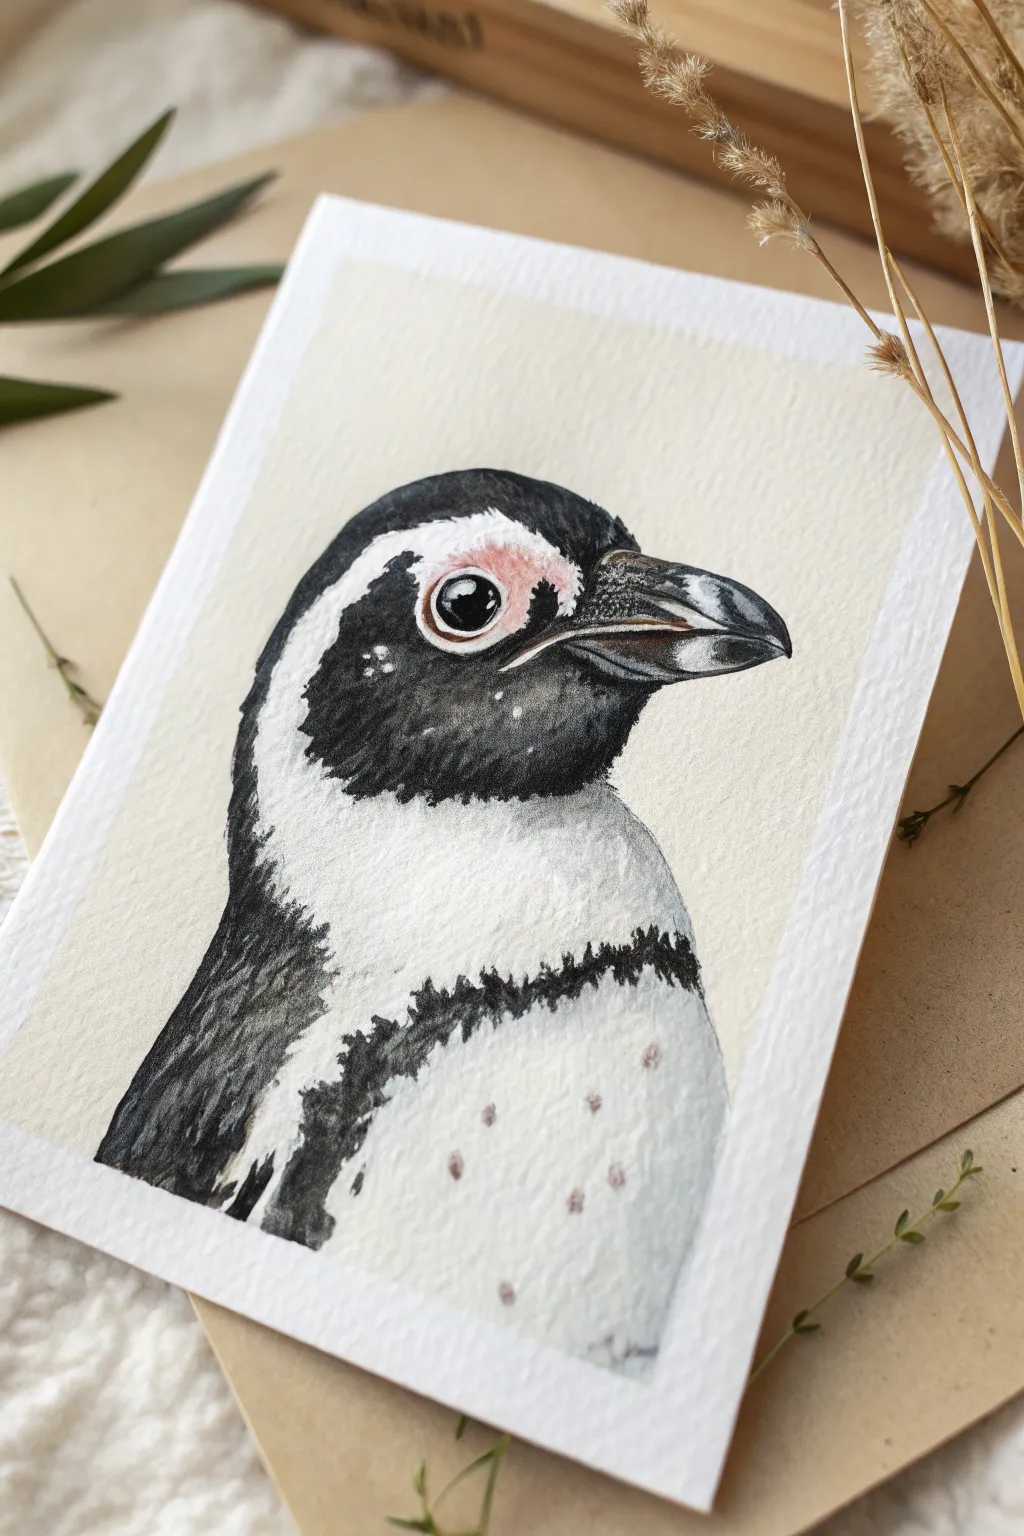
Capture the dignified charm of an African Penguin with this detailed watercolor study. By focusing on a close-up profile, you’ll learn to balance stark black-and-white contrasts with delicate pink accents and subtle feather textures.
Step-by-Step Tutorial
Materials
- Cold press watercolor paper (300 gsm)
- Watercolor paints (Lamp Black, Paynes Gray, Alizarin Crimson, Burnt Sienna)
- White gouache or white gel pen
- Round brushes (sizes 2, 4, and 00 for details)
- HB pencil and kneaded eraser
- Masking tape
- Two jars of water
- Paper towels
Step 1: Sketching and Preparation
-
Map the silhouette:
Begin by lightly sketching the outline of the penguin’s head and neck on your watercolor paper. Focus on the smooth curve of the skull transitioning into the beak. -
Define the markings:
Draw the distinctive C-shaped white band that wraps around the face. Be precise here, as this line separates your deepest blacks from the clean white paper. -
Sketch the eye and beak:
Place the eye within the black facial mask, leaving a small circle for the highlight. Sketch the beak segments, noting the slight hook at the tip. -
Refine and erase:
Use your kneaded eraser to lift almost all the graphite, leaving only faint ‘ghost lines’ to guide your painting. Dirty graphite can muddy yellow or white areas.
Feather Texture Trick
For realistic feather edges on the black neckband, use a ‘dry brush’ technique. Wipe most paint off your brush and drag it swiftly over the paper’s tooth.
Step 2: Applying the Base Layers
-
Paint the pink eye patch:
Mix a very dilute wash of Alizarin Crimson with a touch of Burnt Sienna. Carefully paint the skin area surrounding the eye, keeping the edges soft where it meets the feathers. -
First black wash:
Using a size 4 brush and watered-down Lamp Black, map out the dark areas of the head. Don’t go full dark yet; this layer establishes the shape of the feathers. -
Beak base tones:
Paint the beak with a mix of Paynes Gray and a tiny bit of brown. Leave a thin strip of unpainted paper along the center line to represent a shine. -
Chest shading:
I find it helpful to wet the white chest area slightly with clean water first, then drop in a very faint grey shadow along the bottom curve to create roundness.
Level Up: Cold Scenery
Instead of a plain background, paint a soft, out-of-focus wash of icy blues and teals behind the head to place your penguin in an Antarctic environment.
Step 3: Building Depth and Texture
-
Deepen the blacks:
Once the first layer is bone dry, go in with a concentrated, creamy mix of Lamp Black. Apply this to the darkest parts of the head, leaving some of the lighter under-layer visible to suggest feather sheen. -
Feather direction:
As you paint the black neck band, use short, flicking brushstrokes at the edges. This jagged edge simulates the texture of wet, sleek feathers overlapping the white chest. -
Eye details:
Switch to your size 00 brush. Paint the pupil jet black, leaving a crisp white highlight. Outline the eye ring carefully to make it pop against the pink skin. -
Beak texture:
Add darker striations and lines to the beak using Paynes Gray. Darken the very tip and the separation line between the upper and lower mandibles.
Step 4: Final Details and Highlights
-
Spot the chest:
African penguins have unique spots. Mix a mid-tone grey-brown and dab small, random dots onto the white chest area. Keep them soft-edged so they look like part of the plumage. -
Refine the pink skin:
Add a tiny bit more saturation to the pink area near the top of the eye to show dimension. Ensure the transition into the black feathers is seamless. -
Add white accents:
Using white gouache or a gel pen, add tiny dots or ‘sparkles’ to the black head feathers to simulate water droplets or catching light. -
Enhance beak highlight:
If your reserved white line on the beak got lost, reclaim it with a thin line of white gouache to restore the glossy, wet look. -
Final assessment:
Step back and check your values. If the black looks too flat, glaze a little Paynes Gray over the darkest shadows to cool them down and add depth.
Once the final highlights are dry, your penguin portrait is ready to display or gift to a bird lover
Marching Penguin Lineup
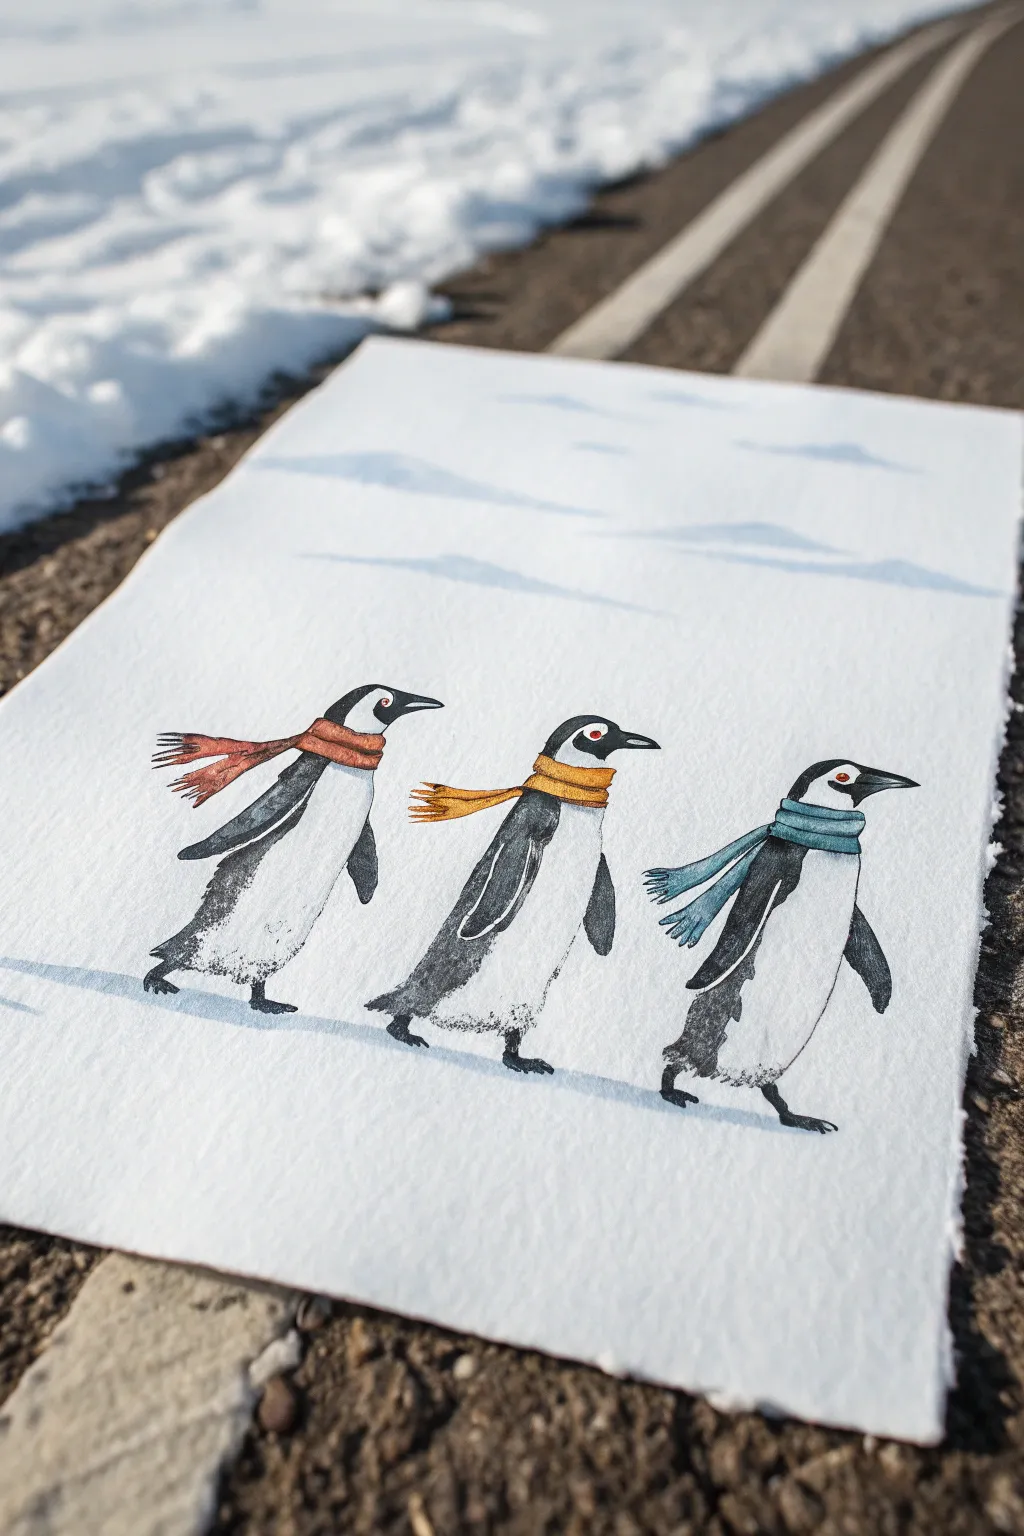
Capture the whimsical charm of three penguins on a winter stroll with this delightful watercolor project. You’ll learn to layer translucent washes to create icy textures and brave little birds bundled in colorful scarves.
Step-by-Step
Materials
- Cold press watercolor paper (300 gsm)
- Watercolor paints (Payne’s Grey, Lamp Black, Burnt Sienna, Yellow Ochre, Cerulean Blue)
- Round watercolor brushes (size 4 and 8)
- Fine liner brush or rigger brush
- Pencil (HB) and kneaded eraser
- Masking fluid (optional)
- Palette for mixing
- Jar of clean water
- Paper towels
Step 1: Sketching the Scene
-
Map the horizon:
Begin by lightly drawing a faint, uneven horizon line about two-thirds up the page to represent the snowbank. Add a few soft, wavy lines in the distance to suggest rolling snow drifts. -
Outline the figures:
Sketch three oval shapes for the penguin bodies, leaning them slightly forward to imply walking motion. Ensure they are spaced evenly apart across the lower third of the paper. -
Detail the features:
Refine the sketches by adding beaks pointing right, small feet in a walking stance, and flippers tucked back. Sketch the scarves wrapping comfortably around their necks, letting the ends trail behind them as if caught in a breeze.
Muddy Scarves?
If scarf colors bleed into the penguin’s white belly, stop immediately! Dab the mistake with a clean paper towel. Let it dry completely, then paint over the error with white gouache.
Step 2: Painting the Penguins
-
First wash of grey:
Mix a watery wash of Payne’s Grey. Apply this loosely to the back and head of the first penguin, intentionally leaving the belly area white. -
Texturing the feathers:
While the grey is still damp, drop in slightly more concentrated pigment near the flipper and tail to create a shadowed, feathery texture. -
Repeat for the group:
Continue this process for the second and third penguins. Vary the water-to-paint ratio slightly for each bird so they don’t look like carbon copies. -
Darkening the blacks:
Once the first layer is dry, mix a strong Lamp Black. Carefully paint the heads and backs again, leaving some of that first grey wash visible at the edges for a highlight effect. Use a dry brush technique on the tails to make them look scratchy. -
The eyes and beaks:
Using your smallest brush, paint the beaks black with a tiny sliver of white paper left for shine. Add a red or orange dot for the eye if you want a pop of color, or keep it black for realism.
Level Up: Knit Texture
Wait for the scarf paint to dry 100%. Use a white gel pen or very fine brush with white gouache to draw tiny ‘V’ shapes or cross-hatching to simulate a knitted wool pattern.
Step 3: Adding the Accessories
-
The red scarf:
For the first penguin, mix Burnt Sienna with a touch of red. Paint the scarf in sections, leaving tiny gaps between the wraps to show the folds. -
The yellow scarf:
Mix Yellow Ochre for the middle penguin. Paint the scarf boldly, letting the paint pool slightly at the bottom of the knot for natural shading. -
The blue scarf:
Use a diluted Cerulean Blue for the final penguin. Add a second layer of blue to the shadowed underside of the scarf once the first layer dries. -
Fringe details:
With a rigger or fine liner brush, flick tiny lines at the ends of the scarves to create the look of fringed wool.
Step 4: Snow and Shadows
-
Suggesting snow:
Dilute a tiny amount of Cobalt or Cerulean Blue until it is barely visible. Paint broad, horizontal strokes in the background to indicate the slope of the snow, softening the edges with clean water. -
Grounding shadows:
Mix a cool grey-blue. Paint horizontal shadows directly under the penguins’ feet, stretching to the left to match the light source. -
Splatter texture:
I like to load a toothbrush or stiff brush with white gouache or masking fluid and lightly splatter the bottom area to mimic kicked-up snow.
Now your trio is ready to march right off the page into a winter wonderland

PENCIL GUIDE
Understanding Pencil Grades from H to B
From first sketch to finished drawing — learn pencil grades, line control, and shading techniques.
Explore the Full Guide
Penguin Under an Aurora Sky
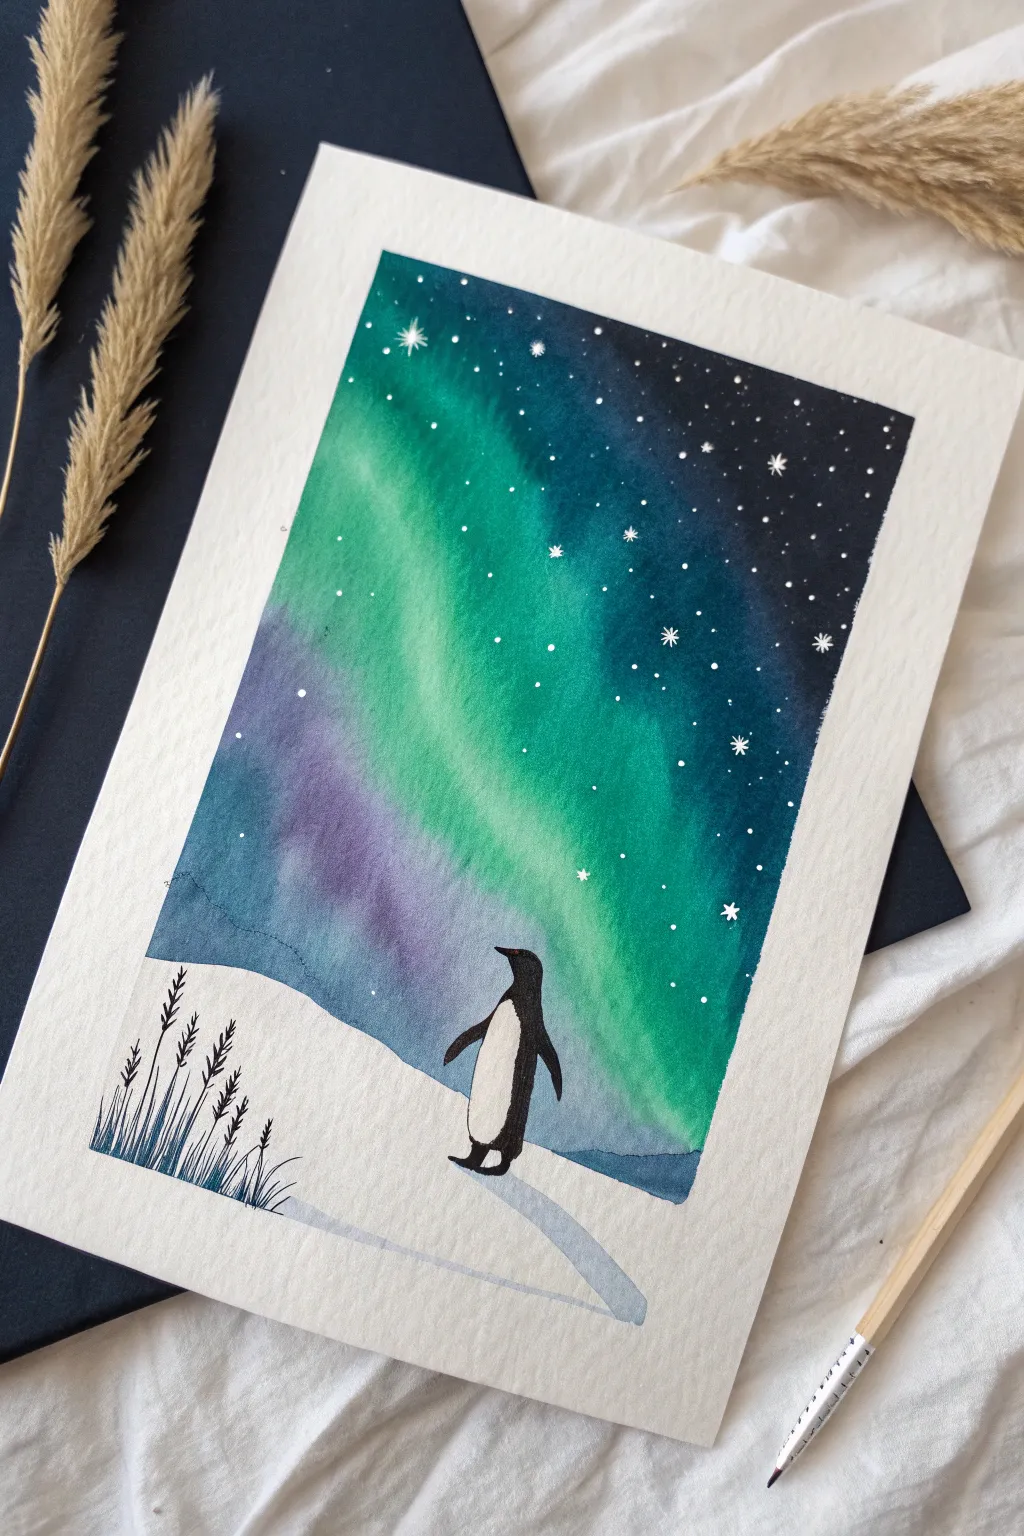
Capture the ethereal beauty of the polar night with this watercolor painting, featuring a lone penguin gazing up at a vibrant aurora borealis. The contrast between the crisp, white snow and the deep, galaxy-filled sky creates a stunning vertical composition.
Step-by-Step Guide
Materials
- Cold press watercolor paper (A5 or similar postcard size)
- Painter’s tape or masking tape
- Watercolor paints (Emerald Green, Phthalo Blue, Indigo, Purple/Violet, Payne’s Gray)
- Black ink pen or fine liner (waterproof)
- White gel pen or white gouache
- Flat wash brush (approx. 1/2 inch)
- Round brush (size 4 or 6)
- Fine detail brush (size 0 or 00)
- Jar of clean water
- Paper towels
- Pencil and eraser
Step 1: Preparation and Sketching
-
Secure the Paper:
Begin by taping down all four edges of your watercolor paper to a drawing board or hard surface. This creates a clean white border and prevents the paper from buckling when wet. -
Sketch the Horizon:
Lightly sketch a sloping line near the bottom third of the paper to designate the snowy hill. Keep the line organic and slightly uneven. -
Outline the Penguin:
Draw the small outline of a penguin standing on the hill, looking upward. Focus on the simple teardrop shape of the body and the small head; details aren’t necessary yet.
Starry Splatter
Instead of drawing every star, load a stiff brush with white gouache and tap it over the dry sky for a natural, random galaxy effect.
Step 2: Painting the Sky (Aurora)
-
Wet the Sky Area:
Using your flat brush and clean water, apply a wash to the entire sky area above your pencil line. The paper should be glistering but not swimming in puddles. -
Apply the Aurora Green:
While the paper is still wet, drop in streaks of Emerald Green diagonally across the center of the sky. Let the paint bloom naturally into the wet paper. -
Add Purple Accents:
Introduce touches of Purple or Violet along the lower edge of the green streaks. The wet-on-wet technique will allow these colors to blend softly where they meet. -
Deepen the Night Sky:
Switch to Phthalo Blue and Indigo. Paint the corners and the top section of the sky, carefully working around your green and purple aurora band. Keep the edges soft. -
Darken the Edges:
For maximum contrast, drop concentrated Indigo or a mix of Blue and Payne’s Gray into the very top corners and right side. This darkness makes the aurora appear to glow. -
Let it Dry Completely:
This is crucial. Allow the sky layer to dry fully before moving on. I usually wait until the paper feels room temperature to the touch rather than cool.
Step 3: Painting the Snowy Landscape
-
Shadow the Snow:
Steps for the snow should be minimal to keep it bright. Use a very watery wash of Indigo or Payne’s Gray to paint a soft shadow on the right side of the hill, creating a gentle slope. -
Add the Cast Shadow:
Paint a defined, elongated shadow stretching from the penguin’s feet towards the right side using a slightly darker grey wash, anchoring the figure to the ground.
Level Up: Salt Texture
While the sky paint is still wet, sprinkle a pinch of table salt into the dark blue areas. As it dries, it creates beautiful, icy crystal textures.
Step 4: Details and Final Touches
-
Paint the Penguin:
Using a fine brush and black watercolor (or a waterproof ink pen), fill in the penguin’s body. Leave the belly white and ensure the flippers are defined. -
Draw the Grasses:
On the bottom left corner, use your black pen or fine brush to draw delicate, tall grasses or wheat stalks rising from the snow. Vary their heights for a natural look. -
Create the Stars:
Using a white gel pen or a fine brush with white gouache, dot small stars throughout the dark blue sections of the sky. Avoid putting too many over the lightest green areas. -
Add Shining Stars:
Select a few stars to be ‘hero’ stars by drawing small crosses or sparkle shapes to make them twinkle. -
Remove the Tape:
Once you are absolutely certain the paper is bone dry, slowly peel away the painter’s tape at a 45-degree angle to reveal your crisp, clean borders.
Step back and admire the peaceful solitude of your arctic scene
Moonlit Night Penguin Scene
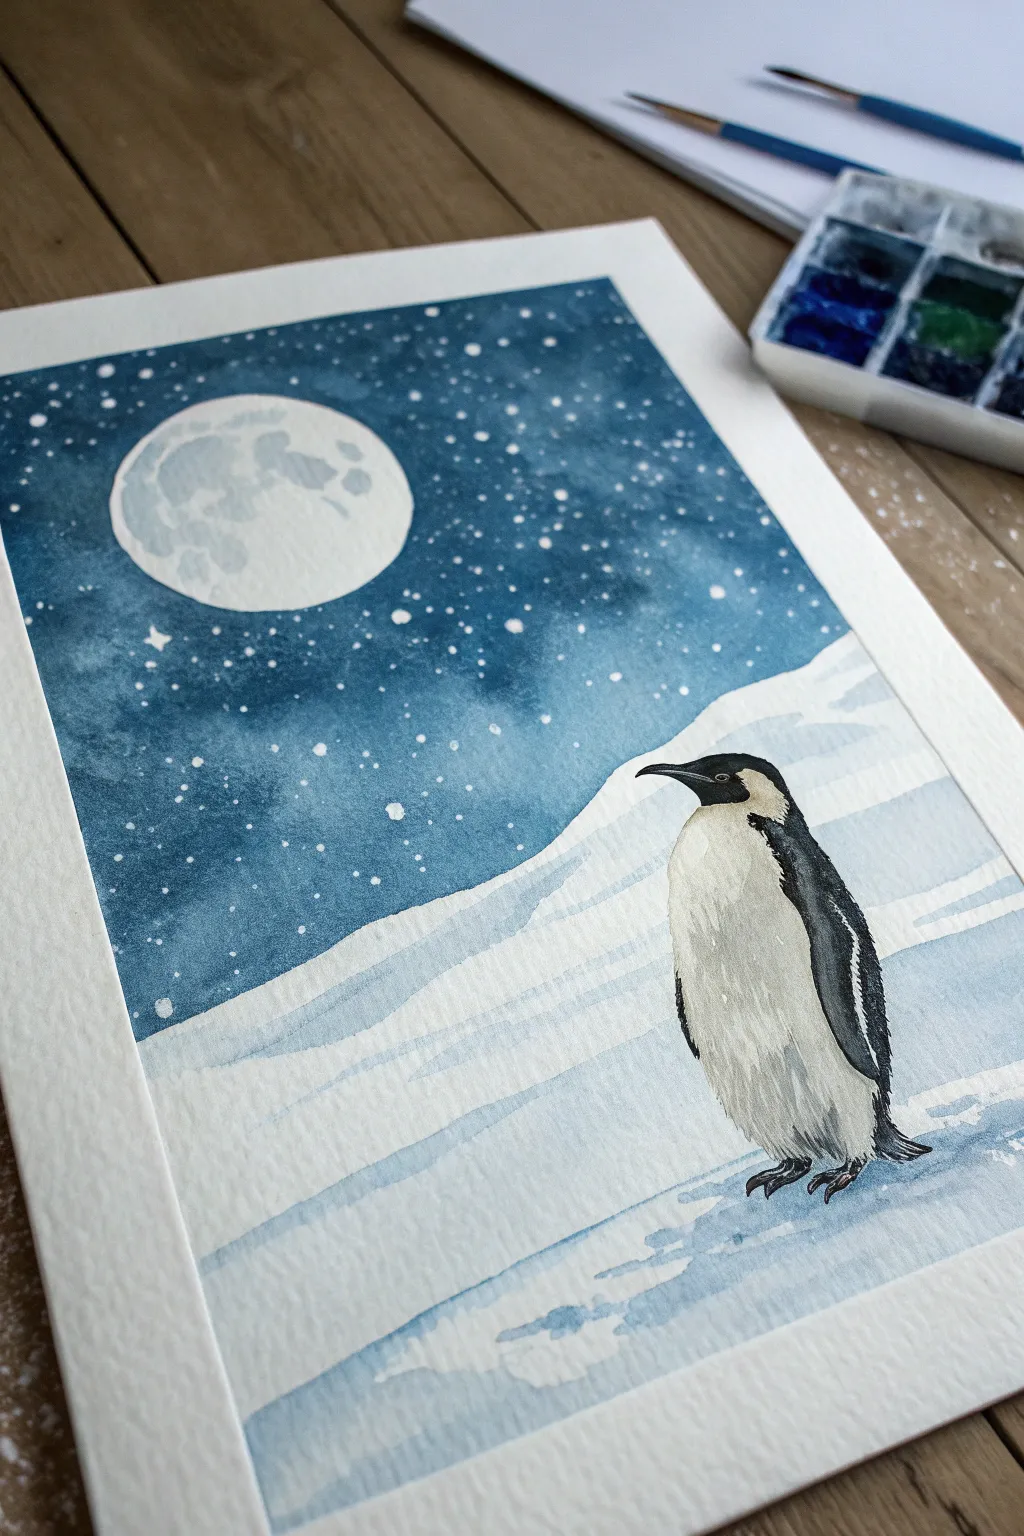
Capture the serene beauty of the Antarctic with this moody watercolor piece featuring a solitary Emperor penguin beneath a glowing moon. The contrast between the deep indigo sky and the crisp white snow makes for a striking composition that looks more complex than it actually is.
How-To Guide
Materials
- Cold press watercolor paper (300 gsm)
- Masking tape
- Pencil (HB) and eraser
- Watercolor paints: Indigo, Prussian Blue, Paynes Gray, Lamp Black
- White opacity medium (white gouache or opaque watercolor)
- Round brushes (large size 10-12 for washes, small size 2-4 for details)
- Old toothbrush (for splatter effects)
- Jar of clean water
- Paper towels
Step 1: Preparation and Sketching
-
Tape the edges:
Begin by taping down all four sides of your paper to a hard board using masking tape. This creates that clean, professional white border shown in the photo and prevents the paper from buckling under heavy washes. -
Outline the basics:
Use your HB pencil to lightly sketch the composition. Draw a large circle in the upper left for the moon. Then, map out the horizon line, making it curve gently downwards from right to left to create a snowy hill. -
Sketch the penguin:
Draw the penguin in the lower right foreground. Start with an oval for the body and a smaller circle for the head, connecting them with smooth lines. Don’t worry about feathers yet; just get the silhouette and posture right.
Bleeding Edges?
If paint bled under your tape, use a slightly damp, clean brush to gently scrub the pigment away, then dab with a paper towel. For stubborn spots, white gouache can cover errors.
Step 2: The Night Sky
-
Wet-on-wet technique:
Wet the entire sky area with clean water, being very careful to paint around the moon circle—keep the moon perfectly dry for now. -
Lay the base color:
While the paper is wet, drop in a rich mix of Prussian Blue and Indigo. Start lighter near the moon and snowy horizon, and build up darker values as you move toward the top corners. -
Deepen the contrast:
While the first wash is still damp, add concentrated Indigo or a bit of Paynes Gray to the very top edges to create a vignetted look that makes the moon glow. -
Create the stars:
Wait for the sky to dry completely. Dilute some white gouache with a tiny bit of water. Dip an old toothbrush into it and flick the bristles with your thumb to spray fine white specks across the dark sky. -
Enhance starry details:
Use a small detail brush dipped in the white gouache to add a few larger, distinct stars or a couple of cross-shaped twinkles for variety.
Level Up: Icy Glow
Mix a tiny drop of iridescent or silver watercolor medium into your blue sky wash. It will give the night scene a magical, frosty shimmer when it catches the light.
Step 3: The Moon and Snow
-
Paint the moon:
Dilute a tiny amount of Paynes Gray so it is very watery and pale. Gently dab in subtle crater shapes on the moon’s surface, leaving plenty of white paper showing for brightness. -
Define the snow drifts:
For the snowy foreground, mix a very diluted wash of Prussian Blue. Paint horizontal, slightly wavy bands across the white foreground to suggest undulating snow drifts and shadows. -
Add snow texture:
While these snowy bands are wet, you can drop in slightly darker blue values at the bottom of the waves to give the landscape dimension.
Step 4: The Penguin
-
Paint the penguin’s back:
Once the background is dry, use a mix of Lamp Black and Indigo to paint the penguin’s head, back, and wings. Leave a small white gap for the yellow/orange neck patch area if you want to add color later, though this monochrome style works well too. -
Detail the beak and head:
Using your smallest brush and concentrated black, carefully define the beak and eye area. Ensure the beak has a sharp, slightly curved tip. -
Shadow the white belly:
The penguin’s stomach isn’t pure white; it needs form. Use a very watery grey wash (dirty water often works perfectly here) to shade the right side and bottom of the belly, giving the bird a rounded appearance. -
Refine the texture:
I like to use a nearly dry brush with the grey mix to drag tiny lines downwards on the belly, suggesting soft feathers rather than a smooth plastic surface. -
Ground the subject:
Paint a small, dark shadow directly under the penguin’s feet using diluted Paynes Gray. This anchors the bird so it doesn’t look like it’s floating. -
Final reveal:
Allow the entire painting to dry completely—patience is key here to avoid tearing. Then, slowly peel off the masking tape at a 45-degree angle to reveal your crisp borders.
Step back and admire the peaceful winter scene you have brought to life


Ice-Skating Penguins (Two-Canvas Idea)
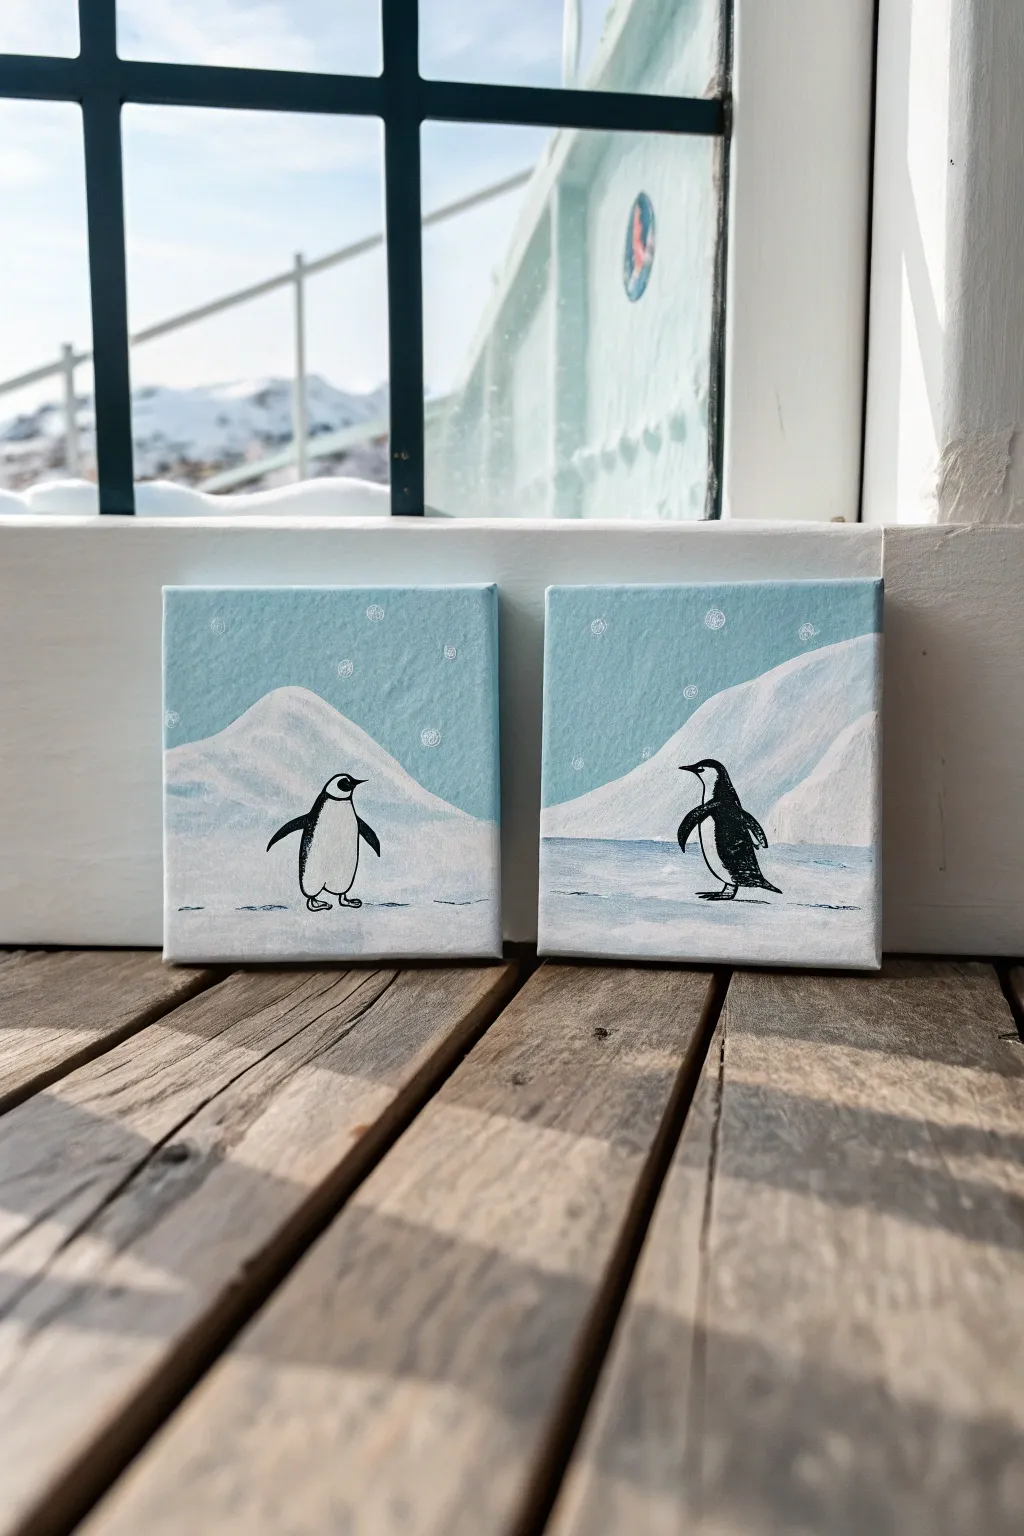
Create a charming diptych featuring two penguins enjoying a snowy day on separate ice floes. This beginner-friendly acrylic painting project uses soft blues and stark whites to capture a serene, chilly atmosphere perfect for winter decor.
Step-by-Step
Materials
- Two small square canvases (e.g., 4×4 or 6×6 inches)
- Acrylic paint (Titanium White, Phthalo Blue or Sky Blue, Mars Black)
- Flat brush (1/2 inch)
- Small round detail brush (size 0 or 1)
- Palette for mixing paint
- Cup of water
- Paper towels
- Pencil for sketching (optional)
Step 1: Setting the Scene
-
Prepare the sky:
Begin by squeezing out some blue and a generous amount of white paint onto your palette. Mix a very light, icy blue shade to serve as your sky color. -
Paint the background:
apply this light blue mix to the upper two-thirds of both canvases. Use your flat brush with horizontal strokes for a smooth finish, ensuring the color is consistent across both panels. -
Establish the ground:
Mix a slightly paler version of your blue—almost white—for the icy ground. Paint the bottom third of each canvas with this color to distinctively separate the sky from the frozen earth. -
Add snowy hills:
Using pure white paint, create the snowy mountains or hills. On the left canvas, paint a soft, rounded slope rising from the left side. On the right canvas, mirror this with a slope rising from the right side, creating a sense of continuity between the two pieces. -
Create depth:
While the white paint is still wet, you can blend the bottom edge of the hills slightly into the ground color to soften the transition. Let this background layer dry completely before moving on.
Step 2: Painting the Penguins
-
Outline the bodies:
Once the background is dry, use a pencil to lightly sketch the oval shape of a penguin on each canvas. Place the left penguin facing left and the right penguin facing right, so they look away from each other or towards the edges of the diptych. -
Fill the white bellies:
Using your small round brush and pure white paint, fill in the central oval shape for the penguins’ bellies. You might need two coats to ensure it’s opaque against the background. -
Paint the black coats:
Switch to black paint and outline the white belly, filling in the rest of the body shape. Create the head, the back, and the flippers extended outwards for balance. -
Add facial details:
Carefully paint a small black beak on each penguin. The left penguin’s beak should point left, and the right one’s to the right. Add a tiny dot for the eye on each. -
Paint the feet:
Using black paint (or a dark grey if you prefer contrast), paint small webbed feet at the bottom of each penguin. Position them to suggest movement, as if they are waddling or skating.
Snowy Texture Trick
For fluffier-looking snow on the hills, dab the wet white paint with a crumpled piece of paper towel or a sponge instead of brushing it on smooth.
Step 3: Finishing Touches
-
Ground the figures:
Mix a diluted grey-blue using a tiny drop of black in your sky color. Paint a thin, transparent shadow directly under the feet of the penguins to ground them on the ice. -
Sketch the markings:
To give the penguins a more illustrative look, you can use a fine liner brush or even a black paint pen to outline the separation between the white belly and black coat more crisply. -
Add snowflakes:
Dip the handle end of a small brush into white paint. Gently dot the sky area on both canvases to create falling snow. Vary the pressure to make snowflakes of different sizes. -
Create detailed flakes:
For a few larger snowflakes, use your detail brush to paint tiny ‘X’ shapes or asterisks over some of the dots, adding variety to the snowfall. -
Final check:
Step back and look at the two canvases side-by-side. Ensure the horizon lines of the ice match up visually if you plan to hang them close together.
Make It Sparkle
Once the painting is fully dry, brush a thin layer of glitter glaze over the snowy hills and white bellies to catch the light like real ice.
Enjoy displaying your adorable pair of penguins on a mantel or shelf for a touch of winter joy
Soft Watercolor Baby Penguin
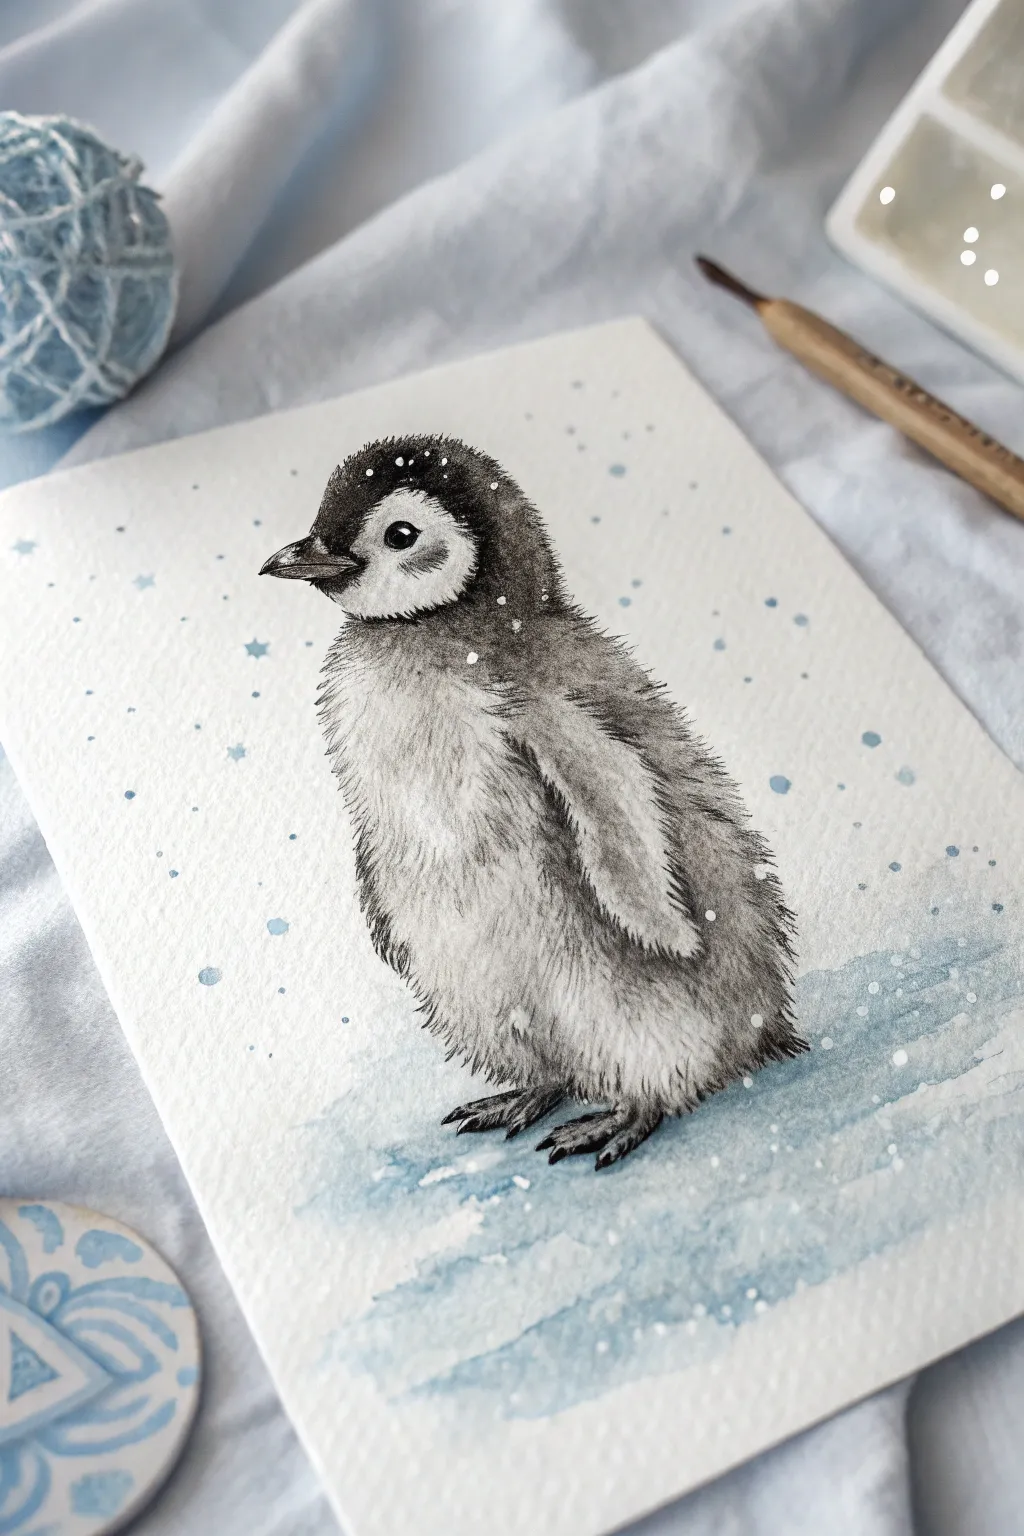
Capture the irresistible charm of a baby penguin with this soft mixed-media watercolor tutorial. The combination of delicate grey washes and precise ink stippling creates a fluffy, touchable texture that brings this little arctic friend to life on the page.
Detailed Instructions
Materials
- Cold-pressed watercolor paper (300gsm for texture)
- Watercolor paints (Payne’s Grey, Indigo, Cerulean Blue)
- Fine liner pens (Black, sizes 01 and 03)
- White gel pen or white gouache
- Round watercolor brushes (Size 2 and 6)
- Pencil (HB) and kneadable eraser
- Jar of clean water
- Paper towels
Step 1: Sketching and Foundation
-
Outline the shape:
Begin by lightly sketching an oval for the body and a smaller, slightly flattened circle for the head on top. Connect them with a gentle slope for the neck to form a bean-like shape. -
Refine the features:
Sketch the small triangular beak pointing left and a small almond-shaped eye. Indicate the flipper on the side, keeping it tucked close to the body. -
Map the patterns:
Lightly draw the boundary line on the face that separates the dark cap from the white cheek. Mark where the darker back feathers meet the lighter belly fluff. -
Lighten the lines:
Gently roll your kneadable eraser over the entire sketch. You want the graphite to be barely visible so it doesn’t show through the final paint.
Too dark too fast?
If your grey wash gets too dark, quickly dab it with a clean paper towel to lift the pigment. Watercolors always dry lighter, but lifting helps fix mistakes instantly.
Step 2: Watercolor Washes
-
Initial grey wash:
Mix a very watery, pale wash of Payne’s Grey. Apply this loosely to the back, flipper, and top of the head using your size 6 brush, leaving the belly and cheek area mostly white. -
Define the shadows:
While the first layer is still slightly damp, drop in a slightly more concentrated grey under the flipper and at the base of the belly to suggest roundness. -
Create the icy ground:
Mix Cerulean Blue with plenty of water. Paint horizontal, irregular strokes beneath the penguin’s feet to simulate an icy shelf. Let the edges be rough and organic. -
Add background dreamy spots:
Using the same diluted blue, dab small, random circles around the penguin to create a celestial or snowy atmosphere. Vary the sizes for interest.
Make it shimmer
For a magical frozen look, sprinkle a tiny pinch of salt onto the wet blue ice paint at the bottom. Brush it off when dry for a crystal-like texture.
Step 3: Building Texture
-
Deepen the darks:
Once the paper is bone dry, mix a darker Payne’s Grey. Paint the beak and the eye, leaving a tiny speck of white paper in the eye for a highlight. -
Start the fur texture:
Switch to your size 2 brush. Using a ‘dry brush’ technique with minimal water, flick tiny, upward strokes along the back and head to simulate messy baby feathers. -
Outline feathering:
Use your 01 fineliner to draw short, broken lines along the outer edge of the penguin. Don’t make a solid outline; keep it jagged to look like fluff. -
Detailing the face:
Use the 03 fineliner to heavily darken the top of the head and the area around the eye. Use stippling (tiny dots) to transition from the dark head to the white cheek. -
Texture the belly:
With the 01 pen, make very faint, sparse tick marks on the white belly area. Focus these near the shadows to suggest volume without making the bird look grey. -
Draw the feet:
Use the black pen to draw the claws and feet. Fill them in with dark ink but leave tiny slivers of white on the tops of the toes to show dimension.
Step 4: Magical Winter Details
-
Add snow to the body:
Using a white gel pen or thick gouache, dot tiny snowflakes directly onto the penguin’s dark head and back. This integrates the subject with the environment. -
Enhance the background:
Add smaller white dots over the blue background washes. You can even draw tiny 4-point stars for a whimsical touch. -
Ground the figure:
I like to add a final, very thin wash of blue shadow directly under the feet and tail to make sure the penguin feels firmly planted on the ice.
Now you have a cozy winter companion ready to waddle off the page
Geometric Tape-Resist Penguin
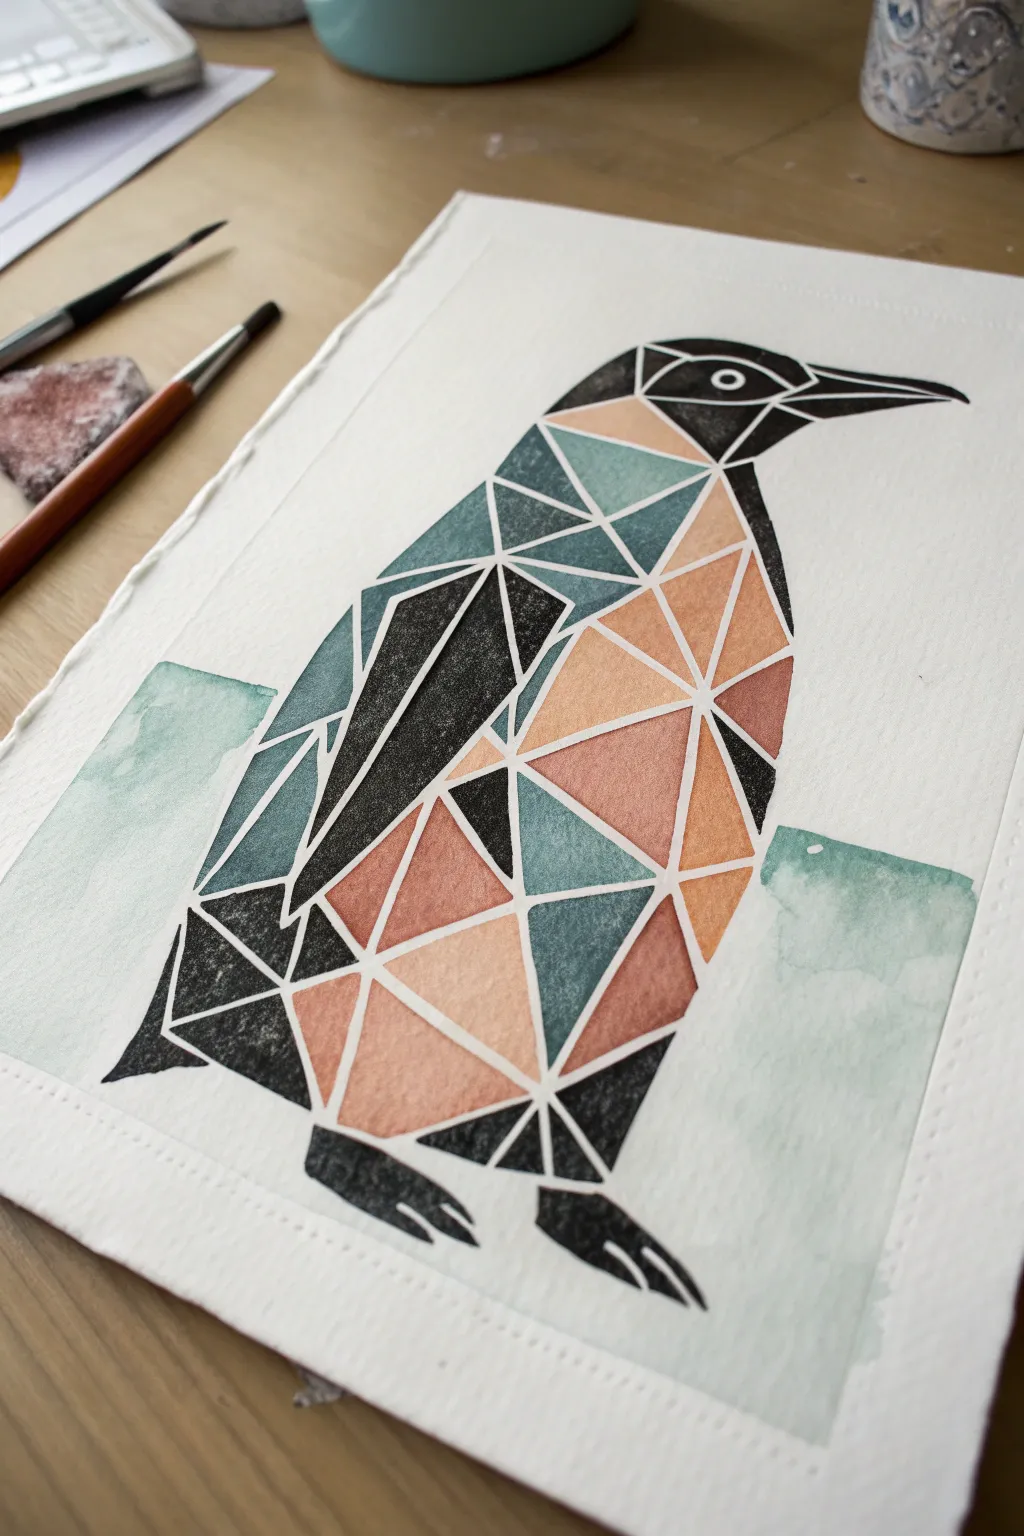
This striking project combines modern, low-poly geometry with the softness of watercolors to create a stylized penguin portrait. By using art masking tape or fluid, you’ll preserve crisp white lines that define the fragmented shapes, resulting in a clean and professional-looking illustration.
Detailed Instructions
Materials
- Cold press watercolor paper (300 gsm recommended)
- Fine-line masking fluid pen or very thin art tape (1/8 inch)
- Watercolor paints (Payne’s Grey, Lamp Black, Teal/Turquoise, Salmon/Peach)
- Round watercolor brushes (sizes 4 and 6)
- Pencil and eraser
- Ruler
- Paper towel
- Palette for mixing
Step 1: Planning and Masking
-
Sketch the outline:
Begin by lightly sketching the outline of a standing penguin on your watercolor paper. Don’t worry about the internal shapes yet; just focus on getting the curve of the back, the head, and the beak proportions correct. -
Map the geometry:
Using a ruler and pencil, lightly draw intersecting lines within the penguin’s body to create triangles and quadrilaterals. Aim for smaller shapes around the face and feet for detail, and larger shapes on the belly and back. -
Observe the anatomy:
While drawing your geometric mesh, try to follow the natural flow of the penguin’s body. For instance, angle the triangles on the wing to suggest downward feathers. -
Define the eye:
Sketch a small circle for the eye within the head area. Draw a tiny ring around it to create the distinct penguin eye patch. -
Apply masking fluid:
Carefully trace over all your internal pencil lines with a fine-line masking fluid pen. This is the secret to those crisp white separations. If using thin tape, cut it into small strips and lay them down precisely. -
Mask the eye detail:
Drop a tiny dot of masking fluid in the center of the eye for a highlight, and trace the ring around the eye carefully. -
Wait for drying:
I always ensure the masking fluid is 100% dry before touching it with a brush. It should feel rubbery and hard, not tacky.
Step 2: Painting the Facets
-
Mix your palette:
Prepare three main color puddles: a deep charcoal or black for the back/head, a muted teal for the shadows, and a soft salmon or peach for the highlights on the belly. -
Start with the darks:
Begin filling in the geometric shapes on the head, back, and wing with your black or dark grey mixture. Vary the intensity of the pigment in adjacent shapes to create depth. -
Paint the beak:
Use a concentrated black for the beak shapes, leaving the very tip slightly lighter if you wish to show a shine. -
Transition to color:
As you move toward the chest, switch to your teal tones. Paint a few triangles in pure teal, and maybe mix a little grey into others to create a transition zone. -
Add warmth:
Fill the central belly shapes with your salmon or peach color. This warm tone contrasts beautifully with the cool teals and greys. -
Create texture:
For some of the darker shapes, use a ‘dry brush’ technique or dab with a paper towel while wet to give a slightly mottled, stone-like texture. -
Paint the feet:
Fill in the feet shapes with solid black, ensuring the claws look sharp and defined. -
Add the background wash:
Mix a very watery, pale teal wash. Paint two loose rectangular blocks on either side of the penguin to suggest ice, letting the paint fade out at the edges.
Clean Lines Secret
To prevent masking fluid from ruining your brush, coat the bristles in bar soap before dipping it into the fluid. Or better yet, use a silicone applicator tool.
Step 3: The Reveal
-
Let it dry completely:
Allow the entire painting to dry bone-dry. If the paper is cool to the touch, it is still wet. -
Remove the masking:
Gently rub the masking fluid away with your finger or a rubber cement pickup tool. Start from a clean area and rub toward the paint to avoid lifting edges. -
Erase guidelines:
Once the mask is gone, use a soft eraser to gently remove any visible pencil lines from the white gaps. -
Final touches:
If any lines need sharpening or if a corner was missed, use a very fine brush to make tiny corrections, but try to keep the white lines pristine.
Make It Shimmer
Mix a tiny amount of iridescent medium or metallic silver watercolor into your dark grey paint for the back feathers to give the penguin an icy, frost-bitten sheen.
Now step back and admire how simple geometry transforms into a lively character
Ink Wash Penguin With Splatter Snow
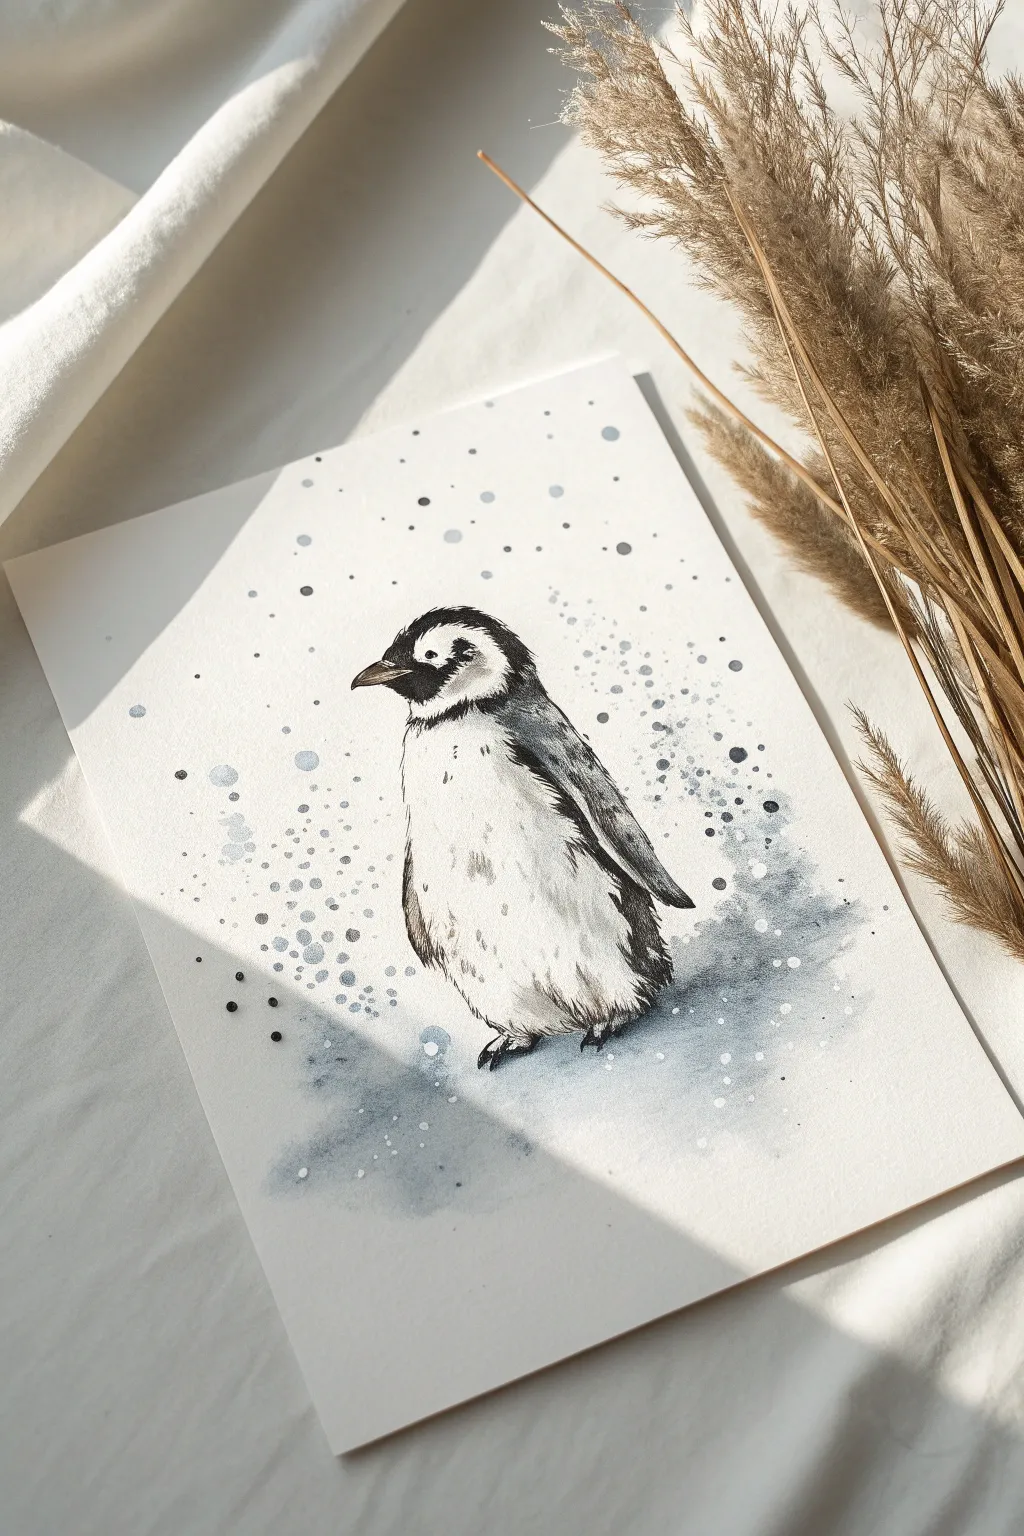
Capture the stark beauty of the Antarctic with this elegant ink wash and pen creation. By combining precise line work with loose, watery washes and a playful splatter technique, you’ll create a penguin that looks right at home in a gentle snowstorm.
How-To Guide
Materials
- Heavyweight watercolor paper (300gsm cold press recommended)
- Waterproof fine liner pens (0.1, 0.3, and 0.5 sizes)
- Black India ink or liquid watercolor
- Diluted grey ink or watercolor wash
- White gouache or white ink
- Round watercolor brushes (Size 4 and 8)
- Pencil (HB) and kneaded eraser
- Two jars of water
- Old toothbrush (for texture)
Step 1: Sketching the Form
-
Basic Shapes:
Begin by lightly sketching an elongated oval for the penguin’s body. Add a smaller circle for the head, overlapping slightly with the top of the body oval. -
Refining the Silhouette:
Connect the head and body with a curved neck line. Sketch the flipper extending backward from the shoulder area, ensuring it tapers to a point. -
Facial Features:
Draw the beak profile, keeping the top curve gentle and the bottom straight. Mark out the distinctive black cap area on the head and the white patch around the eye. -
Grounding:
Lightly sketch the feet at the base of the oval. Add a subtle horizon line around the feet to indicate the snowy surface.
Ink Bleeding?
If your ink washes are blurring your lines, your pen isn’t truly waterproof. Test pens on scrap paper first, or do the ink wash layer BEFORE the pen lines.
Step 2: Inking the Details
-
Outline Work:
Using your 0.3 waterproof pen, carefully trace over your pencil lines. Don’t make the line continuous; break it up slightly around the belly to suggest fluffy feathers. -
Darkest Darks:
Switch to the 0.5 pen or a brush with pure black ink to fill in the head markings, the beak (leaving a tiny highlight), and the dark stripe along the flipper. -
Feather Texture:
With the 0.1 pen, add small, flicking strokes on the chest and under the belly. These tiny marks mimic the texture of dense down feathers without outlining every single one. -
Erase Sketches:
Once the ink is completely dry—give it a few minutes to be safe—gently erase all underlying pencil marks with your kneaded eraser.
Step 3: Washes and Shadows
-
First Wash:
Dilute your black ink significantly with water to create a pale grey. Using the size 8 brush, apply a loose wash to the back of the penguin and the underside of the flipper. -
Building Depth:
While the first layer is still damp, drop slightly more concentrated grey ink into the shadow areas: under the chin, beneath the flipper, and at the very bottom of the belly. -
Ground Shadow:
Paint a watery, irregular grey wash around the penguin’s feet to simulate a shadow on the snow. Let the edges of this puddle fade out naturally into the white paper. -
Softening Edges:
I like to use a clean, damp brush to soften any harsh lines in the grey wash, especially on the penguin’s white belly, making the transition look round and soft.
Make It Shimmer
Mix a tiny amount of iridescent medium or pearlescent watercolor into your white gouache splatter. The ‘snow’ will catch the light beautifully.
Step 4: Creating the Snowstorm
-
Dark Splatter Prep:
Load a stiff brush or an old toothbrush with diluted grey ink. Test the spray on a scrap piece of paper first to gauge the density. -
Grey Atmosphere:
Flick the bristles to send a fine mist of grey speckles across the background and lower shadow area. Keep the splatter heavier near the bottom and lighter at the top. -
Confetti Dots:
Dip the handle end of a paintbrush into dark grey ink. Press it randomly onto text paper to create perfectly round, larger dots. These act as out-of-focus background elements. -
White Snowflakes:
Mix white gouache with a tiny drop of water until it has a heavy cream consistency. Load your brush and tap the handle against a finger to splatter bright white snow over the entire painting. -
Foreground Snow:
For the largest snowflakes, dip a clean brush handle into the thick white gouache and dot it directly onto the darker grey shadow areas for maximum contrast. -
Final Touches:
Check the eye; if it got covered by splatter, carefully re-define the pupil with your finest pen once the paint is totally dry.
Let your snowy scene dry completely before framing this serene winter moment.

Have a question or want to share your own experience? I'd love to hear from you in the comments below!