
When I want to mix art with a little brainy magic, physics drawing ideas are my favorite place to play. You can keep it simple with doodles and symbols, or go big with diagrams that feel like tiny works of visual storytelling.
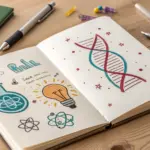
Scattered Physics Notebook Doodles

Transform a simple page of graph paper into a charming collection of scientific symbols and sketches. This assortment of physics-themed doodles—from atoms to lightbulbs—is perfect for decorating notebooks, bullet journals, or adding a touch of academic flair to your sketchpad.
How-To Guide
Materials
- Spiral-bound notebook with graph paper (squared)
- Fine-liner pen (black, 0.3mm or 0.5mm)
- Pencil (HB or H for sketching)
- Eraser
- Ruler (optional, for the graphs)
Step 1: Setting the Composition
-
Page Selection:
Open your notebook to a fresh, left-hand page. The graph paper grid is your best friend here; use the lines to keep your drawings aligned and proportionate, helping create that tidy, organized scientific aesthetic. -
Spatial Planning:
Visualize the page as being divided into rough columns. You won’t be drawing grid lines, but plan to space your doodles relatively evenly, leaving 2-3 grid squares of whitespace between each element so they don’t look cluttered.
Ink Confidence
Don’t stress over perfect straight lines. The slight wobble of a freehand line adds authentic ‘sketchbook’ character. If a circle isn’t perfect, just go over it again loosely.
Step 2: Drawing the Key Icons
-
The Classic Atom:
Start with a central circle for the nucleus. Draw three intersecting ovals around it to represent electron paths. I find it easiest to draw one vertical oval, then two diagonal ones forming an ‘X’ shape through the center. -
Geometric Prisms:
Near the top, sketch a simple triangle. To turn it into a 3D pyramid or prism, add depth lines extending back from the corners, following the diagonal constraints of the grid paper for accuracy. -
The Lightbulb:
Draw an upside-down ‘U’ shape that tapers inwards at the bottom for the glass bulb. Add a zig-zag filament inside. For the base, draw a small rectangle with horizontal lines to simulate the screw threads, shading the bottom solid black. -
Little Sun:
In the top left, create a circle. Add rays extending outward using short, straight lines. Alternating the length of the rays adds a nice bit of visual interest. -
Planetary Motion:
Sketch a circle (planet) with a smaller circle orbiting it on an elliptical path. You can add tiny dots or dashed lines to indicate the trajectory or gravitational pull.
Fixing Smudges
If you accidentally smudge wet ink, turn it into a feature. Draw a small cloud or explosion shape around the smudge and label it ‘reaction’ or ‘error’ to blend it in.
Step 3: Adding Charts and Graphs
-
Line Graph:
Using the grid lines as axes, draw a horizontal x-axis and vertical y-axis. Sketch a jagged line trending upwards or oscillating like a wave. Mark points at the peaks and troughs. -
Sine Wave:
Draw a long horizontal line. Carefully sketch a smooth curve that goes above and below the line in a rhythmic pattern, mimicking a sine wave or sound frequency. -
Timeline Axis:
Create a straight horizontal line about 2-3 inches long. Add small vertical tick marks at regular intervals (every 2 grid squares) to create a scale or number line.
Step 4: Equations and Text
-
Faux Equations:
Scatter some text between images. You don’t need real formulas; simply write Greek letters like ‘Alpha’ or ‘Beta’, or scribble energetic, illegible cursive that mimics a professor’s hasty notes. -
Labeling:
Add small labels like ‘Flux’ or ‘Area’ near the graphs. Keep the handwriting small and messy but deliberate, using the grid lines as a baseline for your text.
Step 5: Final Details
-
Boxed Elements:
Select one or two smaller doodles and draw a loose box around them. This highlights specific ideas, just like highlighting a key concept in lecture notes. -
Connecting Arrows:
Draw small, thin arrows connecting related concepts—perhaps from the sun to the lightbulb, or from an equation to a graph. Keep the arrowheads small and filled in. -
Micro-Details:
Fill empty negative space with tiny clusters of three dots, small plus signs, or tiny circles. These serve as ‘spacers’ and make the page look densely populated with ideas. -
Clean Up:
Once the ink is completely dry, gently erase any pencil guidelines you might have made for the initial positioning. Be careful not to smudge the fresh ink.
Now you have a page that looks like the brainstorming session of a genius scientist

Physics Title Page With Icon Cloud
Transform a blank notebook page into an inspiring entry point for your physics studies with this clean, icon-filled layout. This design combines classic hand-lettering with scattered scientific doodles to create a structured yet whimsical aesthetic that’s perfect for bullet journals or class headers.
Detailed Instructions
Materials
- Dotted or lined notebook
- Pencil (HB or H)
- Eraser
- Fine liner pen (0.3mm or 0.5mm, black)
- Fine liner pen (0.1mm, black)
- Ruler
Step 1: Planning the Layout
-
Find the center:
Begin by lightly marking the horizontal and vertical center of your page with a pencil. This specific design relies on the word ‘PHYSICS’ being the central anchor, so getting the positioning right is crucial. -
Sketch guidelines:
Draw two horizontal guidelines about 1.5 inches apart in the center of the page. This space will house your main lettering. -
Draft the lettering:
Sketch the word ‘PHYSICS’ in capital letters between your guidelines. Aim for a tall, narrow serif style. Widen the stance of the ‘Y’ and ‘S’ slightly to give the word a balanced, stable look. -
Refine the typeface:
Go back over your letters and add small ticks at the ends of the strokes to create the serifs. Keep the lines relatively thin and consistent, rather than doing thick-and-thin calligraphy.
Step 2: Adding the Icon Cloud
-
Sketch the top icons:
Above the text, lightly sketch a conical flask in the center. To its left, draw a small meteorite or comet. To the right, add a triangular prism with light rays and a magnifying glass or lightbulb doodle. -
Map out the bottom icons:
Below the text, plan for two large atom symbols—one centered and one slightly to the right. On the far left, sketch a planetary ring or orbit circle. -
Fill the gaps:
Look for empty spaces around your main icons. Sketch smaller fillers like stars (both five-pointed and simple asterisks), dots, small plus signs, and little circuit-like squiggles. -
Draw the flask details:
Inside the flask sketch, draw a horizontal line for the liquid level. I like to shade this area lightly with diagonal lines to suggest volume without needing color. -
Detail the atoms:
For the atom symbols, draw three intersecting ovals. Place a small dot in the very center to represent the nucleus.
Use Dotted Paper
A dotted grid notebook is a lifesaver for this layout. Use the dots to ensure your atom ovals are symmetrical and your main title stays perfectly level without heavy measuring.
Step 3: Inking and Finishing
-
Outline the text:
Switch to your thicker fine liner (0.3mm or 0.5mm). Carefully trace your pencil lettering for ‘PHYSICS’, ensuring the vertical strokes remain straight. Let the ink settle for a moment. -
Thicken the strokes:
Go over the main word one more time to give it a bold weight that stands out against the finer doodles. -
Ink the main icons:
Use the same pen to trace the larger icons: the flask, the atoms, and the prism. Use smooth, continuous motions for the ovals of the atoms. -
Ink the small details:
Switch to your thinner visual liner (0.1mm) for the delicate stars, dots, and the shading lines inside the flask. This contrast in line weight prevents the page from looking cluttered. -
Erase guidelines:
Wait until the ink is completely dry to the touch transparent. Gently erase all pencil marks, sweeping the eraser crumbs away carefully to avoid smearing. -
Add final sparkle:
Take a step back and see if any areas look too empty. Add a few tiny dots or simple ‘x’ marks with the 0.1mm pen to balance the composition perfectly.
Wobbly Circles?
If drawing perfect atom rings is difficult, lightly trace a coin or a small button with pencil first. Don’t worry about perfection; slightly organic lines add character.
Now you have a structured, intellectual cover page ready to be filled with formulas and theories


Newton’s Apple And Motion Sketch
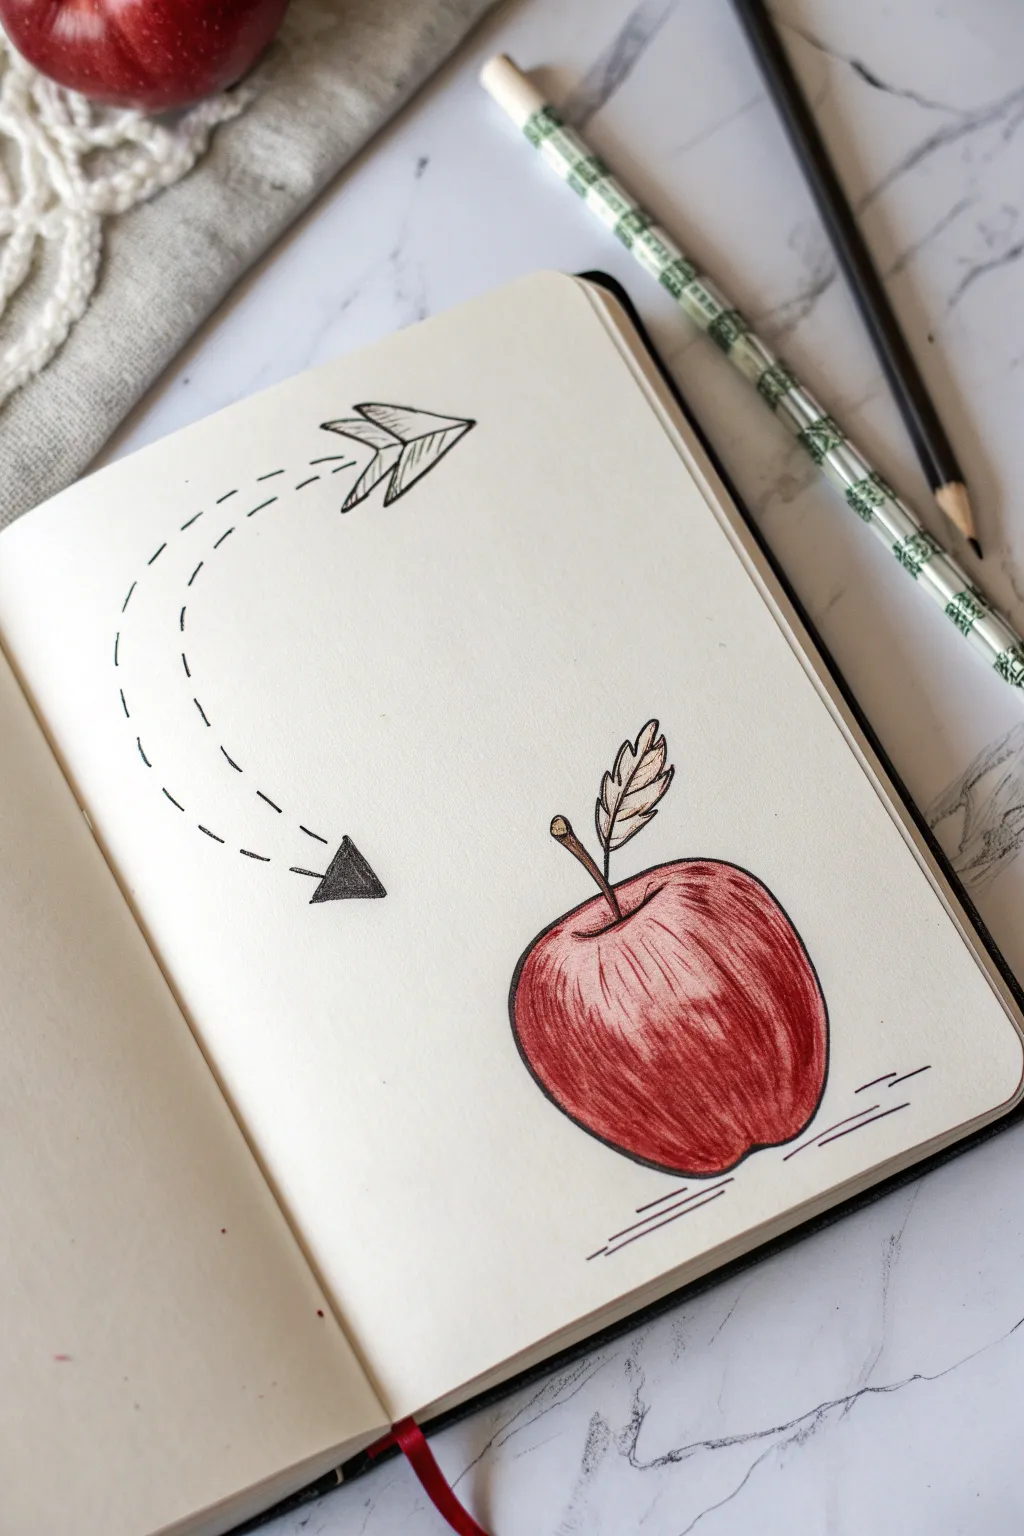
Capture the essence of gravity and motion with this clean, conceptual illustration suitable for any journal or sketchbook. This drawing combines a classic red apple with a dynamic dotted flight path, symbolizing the moment inspiration strikes.
Step-by-Step
Materials
- Sketchbook or drawing paper (cream or white)
- Pencil (HB or 2B for sketching)
- Fine liner pen (black, roughly 0.3mm to 0.5mm)
- Colored pencils (various shades of red, dark brown, light brown/tan)
- Eraser
- Ruler (optional, for spacing)
Step 1: Sketching the Apple
-
Outline the shape:
Begin near the bottom right of your page by lightly sketching the basic round shape of an apple. It shouldn’t be a perfect circle; aim for slightly wider shoulders and a tapered bottom. -
Add the stem dip:
At the top center of your fruit shape, draw a small, shallow ‘u’ or ‘v’ shape to create the indentation where the stem emerges. -
Draw the stem and leaf:
Sketch a thin, curved stick coming out of the indentation for the stem. Attach a small, jagged leaf shape to the side of the stem, keeping the lines loose and natural. -
Define the base:
Refine the bottom curve of the apple, adding slight bumps to give it a realistic, organic weight where it sits on the surface.
Step 2: Defining the Flight Path
-
Plan the arc:
Visualize a large, C-shaped curve starting from the top left of the page and swooping down towards the apple. Lightly trace this path with your pencil. -
Sketch the paper airplane:
At the very top of your arc (upper left), sketch a simple paper airplane. Draw a triangle for the body and two smaller triangles on the sides for wings, pointing it along the direction of the curve. -
Create the dashed line:
Turning your solid arc line into a trail, draw small dashes following the curve you sketched. Keep the spacing relatively consistent, but don’t worry about mathematical perfection. -
Add the directional arrow:
At the bottom end of the dashed arc (to the left of the apple), draw a solid black triangle pointing generally downward. This indicates the final direction of the motion.
Stroke Direction
When coloring the apple, always curve your pencil strokes to match the round shape of the fruit. Vertical, straight lines will make the apple look flat rather than round.
Step 3: Inking and Coloring
-
Ink the outlines:
Using your black fine liner, carefully trace over your pencil sketches. For the movement lines (the dashes), use quick, confident strokes to keep them looking fluid. -
Detail the leaf:
When inking the leaf, add a central vein line and small V-shapes branching off it to create texture. You might want to make the leaf outline slightly jagged. -
Erase pencil marks:
Wait a moment for the ink to dry completely, then gently erase all visible graphite lines to clean up the drawing. -
Base coat the apple:
Take a medium red colored pencil and fill in the apple shape with light pressure. Leave a small, uncolored patch on the upper left side of the fruit to represent a highlight. -
Build depth with shading:
Using a darker red or burgundy pencil, layer color predominantly on the bottom and right side of the apple. Use curved strokes that follow the round contour of the fruit to enhance its 3D form. -
Color the stem:
Fill the stem with a dark brown pencil. I like to add a tiny touch of the brown to the bottom of the apple indentation to show deep shadow. -
Tint the leaf:
Gently shade the leaf with a light brown or tan pencil. Keep this very light so the ink details remain visible. -
Add movement lines:
Finally, use your black pen/marker to draw three small, horizontal lines underneath the right side of the apple and two small lines behind the dashed arrow to emphasize speed and grounding.
Science Twist
Instead of a paper airplane, draw a small formula like ‘F=ma’ or an iconic falling feather at the start of the dashed line to lean into the physics theme.
Now you have a clever visual metaphor for scientific discovery ready to inspire your next idea


Free-Body Diagram Characters
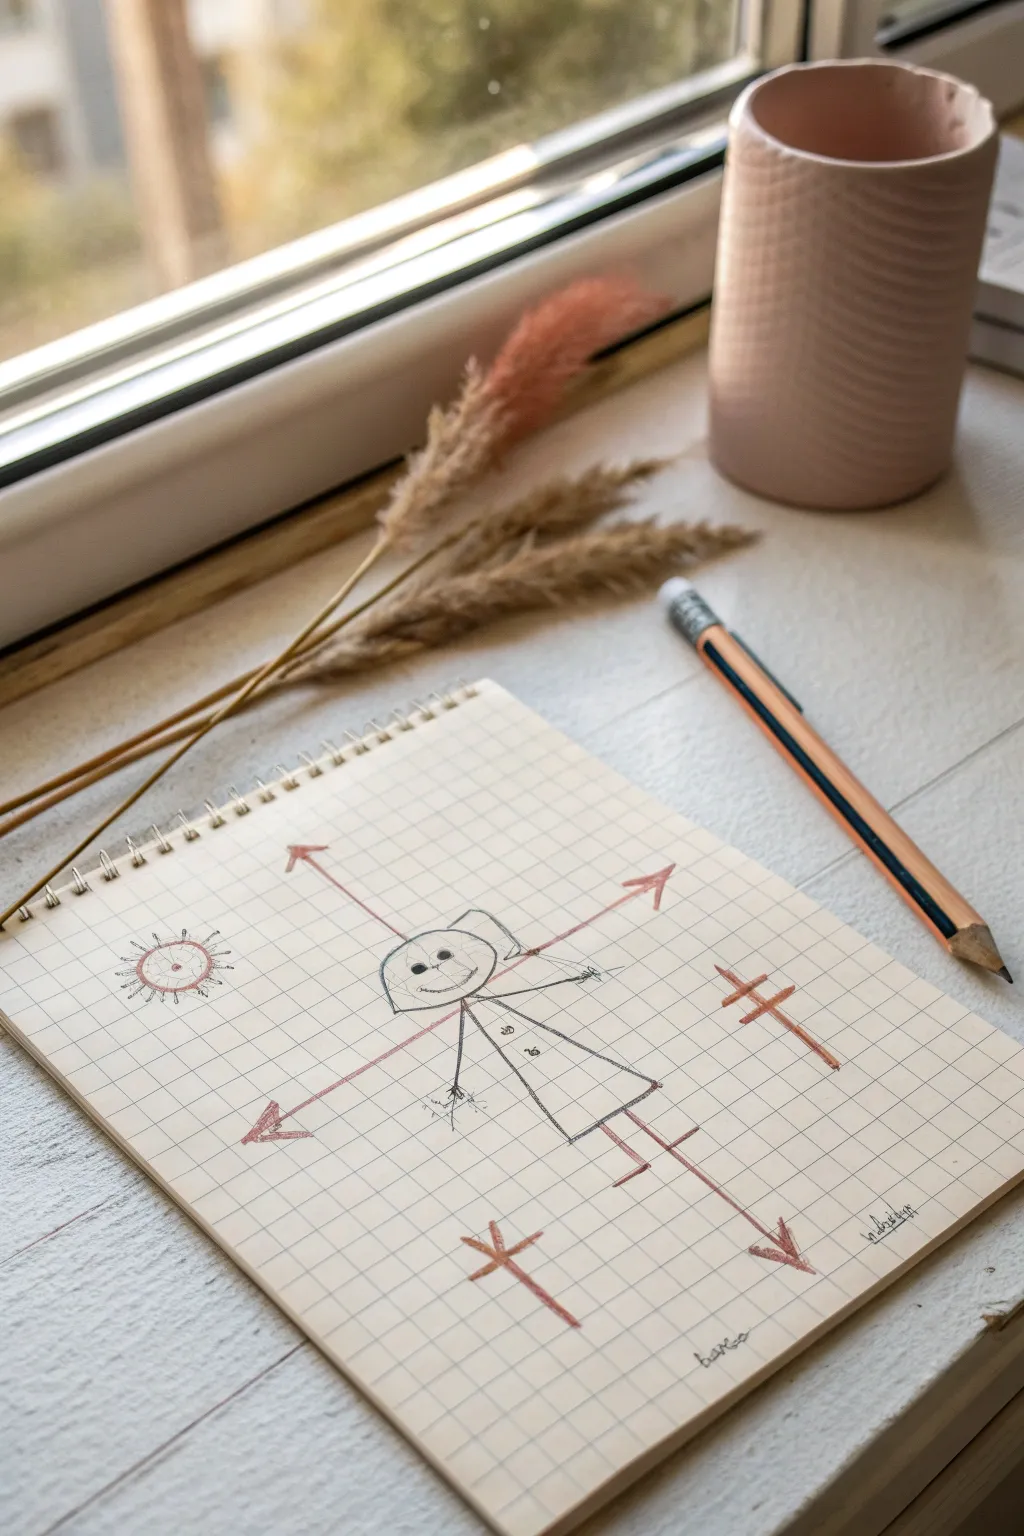
Transform a dry physics concept into a piece of art by turning a standard free-body diagram into a playful character sketch. This project combines simple line drawing with coordinate geometry to create a charming study aid that looks great on a desk flatlay.
How-To Guide
Materials
- Spiral-bound grid notebook (graph paper)
- Standard HB graphic pencil
- Orange-red colored pencil or fine felt-tip pen
- Ruler (optional, but helpful for axes)
- Eraser
Step 1: Setting the Stage
-
Prepare your page:
Open your spiral-bound grid notebook to a fresh page. Position it at a slight angle on your workspace to verify you have comfortable hand movement for drawing diagonal and straight lines. -
Draw the sun:
In the upper left quadrant of your page, lightly sketch a small circle using your graphite pencil. Add small, radiating tick marks around the circumference to represent a sun, giving the scene a whimsical outdoor feel. -
Add detail to the sun:
If you wish, re-trace the sun’s circle with a slightly firmer hand to make it pop against the grid lines, or leave it faint for a sketchier aesthetic.
Step 2: Drawing the Character
-
Sketch the head:
Locate the center of your page. Draw a medium-sized oval for the character’s head. Keep your pencil pressure light so you can adjust the shape if needed. -
Add facial features:
Draw two solid dots for eyes and a wide, curved line for a smile. The expression should be simple and cheerful. -
Outline the hair:
Frame the face with a simple bob haircut. Draw a curved line over the forehead for bangs and trace around the sides of the head to form the hair shape. -
Draw the dress body:
Extend two lines downward from the head to form a triangular ‘A-line’ dress shape. Connect them at the bottom with a straight horizontal line. -
Add clothing details:
Draw a central vertical line down the dress to represent a coat or button-up style. Add two or three small circles along this line for buttons. -
Draw the limbs:
Sketch simple stick-figure arms extending outward. Add stick legs at the bottom with small horizontal feet turn-outs. -
Detail the hands:
At the end of the arms, add tiny fingers. I usually just draw three or four small lines to suggest hands without getting too detailed.
Smudge Alert
Colored pencil can smear on smooth graph paper. Place a scrap piece of paper under your drawing hand while adding the colored axes to keep the graphite character clean.
Step 3: Physics Overlay
-
Mark the center point:
Switch to your orange-red colored pencil. Identify the ‘center of mass’ for your character, typically right in the middle of the chest area. -
Draw the vertical axis (Y-axis):
Using the colored pencil, draw a long vertical line passing directly through the center of the character. Top and bottom ends should extend well beyond the figure. -
Add vertical arrowheads:
Draw distinct arrowheads at both the top and bottom of this vertical line. Make them open and sketch-like rather than perfect triangles. -
Draw the horizontal axis (X-axis):
Draw a horizontal line crossing the vertical one at the center point. Extend this line equally to the left and right, passing through the character’s arms. -
Add horizontal arrowheads:
Add matching arrowheads to the left and right ends of the horizontal line. -
Sketch force markers:
In the lower right empty space of the grid, draw two small, unrelated cross-marks or tick marks with the colored pencil to balance the composition, mimicking calculation notes.
Level Up
Assign physics variables! Label the downward arrow ‘mg’ (gravity) and the upward arrow ‘N’ (normal force) to make it a scientifically accurate diagram.
Step 4: Final Touches
-
Sign your work:
In the bottom right corner, use your regular pencil to add a small, illegible scribble or signature to authentically mimic an engineer’s notebook. -
Clean up:
Gently erase any errant graphite smudges, being careful not to smear the colored pencil lines.
You have successfully turned a boring diagram into a character-driven doodle

PENCIL GUIDE
Understanding Pencil Grades from H to B
From first sketch to finished drawing — learn pencil grades, line control, and shading techniques.
Explore the Full Guide
Pulley, Lever, And Gear Mini-Set

Capture the essence of vintage engineering diagrams with this clean, gridded layout of mechanical components. This project combines precise line work with freehand sketching to create an appealing study of gears, wheels, and physics concepts on dotted paper.
Detailed Instructions
Materials
- Dotted grid notebook (A5 or similar size)
- Mechanical pencil (0.5mm HB)
- Fine liner pen (0.1mm or 0.2mm, black pigment ink)
- Ruler or straight edge
- Compass (optional, but helpful for gears)
- Eraser
Step 1: Layout & Framework
-
Define the quadrants:
Start by identifying a center point on your page. Using your ruler and pencil, lightly draw a large vertical line and a horizontal line to divide the page into four equal quadrants. These will house your separate drawings. -
Add inner borders:
Inside each of the four quadrants, lightly pencil a rectangle that leaves a comfortable margin (about 2-3 grid dots) from the main dividing lines. These inner boxes are where the actual drawings will live. -
Mark the corners:
At the corners of these inner rectangles, draw small ‘X’ marks or decorative corner bracket flourishes. This gives the drawing that classic blueprint aesthetic.
Straight Lines Secret
Don’t use a ruler for the final ink lines. A slightly wobbly freehand line looks more authentic and lively than a perfectly straight mechanical line.
Step 2: Sketching the Components
-
Outline the top-left wheel:
In the top-left quadrant, use your compass or freehand a large circle. Draw a smaller concentric circle inside for the rim. Sketch an axle in the center and draw spokes radiating outward. -
Add the lever arm:
Attached to the center axle of the wheel, sketch a diagonal arm extending downward to the left. At the end of this arm, draw a small, rectangular counterweight or pedal shape. -
Draft the top-right book:
In the top-right box, draw a slanted rectangle to represent a closed book. Add a second rectangle slightly offset to show thickness. Sketch curved lines on the spine to indicate binding and faint lines on the side for pages. -
Draft the bottom-left gear:
Draw a large circle in the bottom-left quadrant. Lightly mark evenly spaced teeth around the perimeter. Draw a smaller circle in the absolute center for the gear’s bore hole. -
Draft the bottom-right gear train:
This quadrant needs three smaller gears. Draw three circles of varying sizes arranged in a loose triangle or arc. Sketch the gear teeth interlocking where the circles meet.
Step 3: Inking & Detailing
-
Ink the frames:
Switch to your fine liner pen. Trace over your quadrant border lines. Instead of perfectly straight rigid lines, use a slightly broken or ‘sketched’ stroke to make it look hand-drawn and organic. -
Ink the wheel:
Go over the wheel sketch. Add small hatch marks (short parallel lines) on the side of the rim to suggest shadow and depth. Ink the spokes, making them thicker near the hub. -
Ink the book details:
Outline the book cover. Use very light, thin strokes for the page edges. Add some scribbled text or a title on the front cover to simulate writing. -
Detail the large gear:
Carefully outline the gear teeth. Add a second inner ring circle. Inside this ring, draw tiny dashed lines or small dots to create a texture that looks like machined metal. -
Ink the small gears:
Outline the three small gears. Add small center holes to each. I like to add tiny ‘tick’ marks on the flat surfaces of the gears to suggest metallic shine or wear. -
Add labels and notes:
Next to each diagram, scribble small, illegible cursive text to mimic engineer’s notes. Use short, wavy lines to represent sentences. -
Erase and clean up:
Let the ink dry completely for at least five minutes. Gently erase all your graphite guidelines, being careful not to buckle the paper. -
Final touches:
Add tiny decorative dots or small crosses at the intersections of your border lines to anchor the drawing to the grid paper background.
Sepia Style
Instead of black ink, try a dark brown or sepia fine liner. This instantly gives the drawing an antique, Da Vinci sketchbook vibe.
Now you have a charming technical study that turns simple shapes into a complex-looking engineering spread
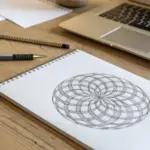
Planetary Orbits And Gravity Lines
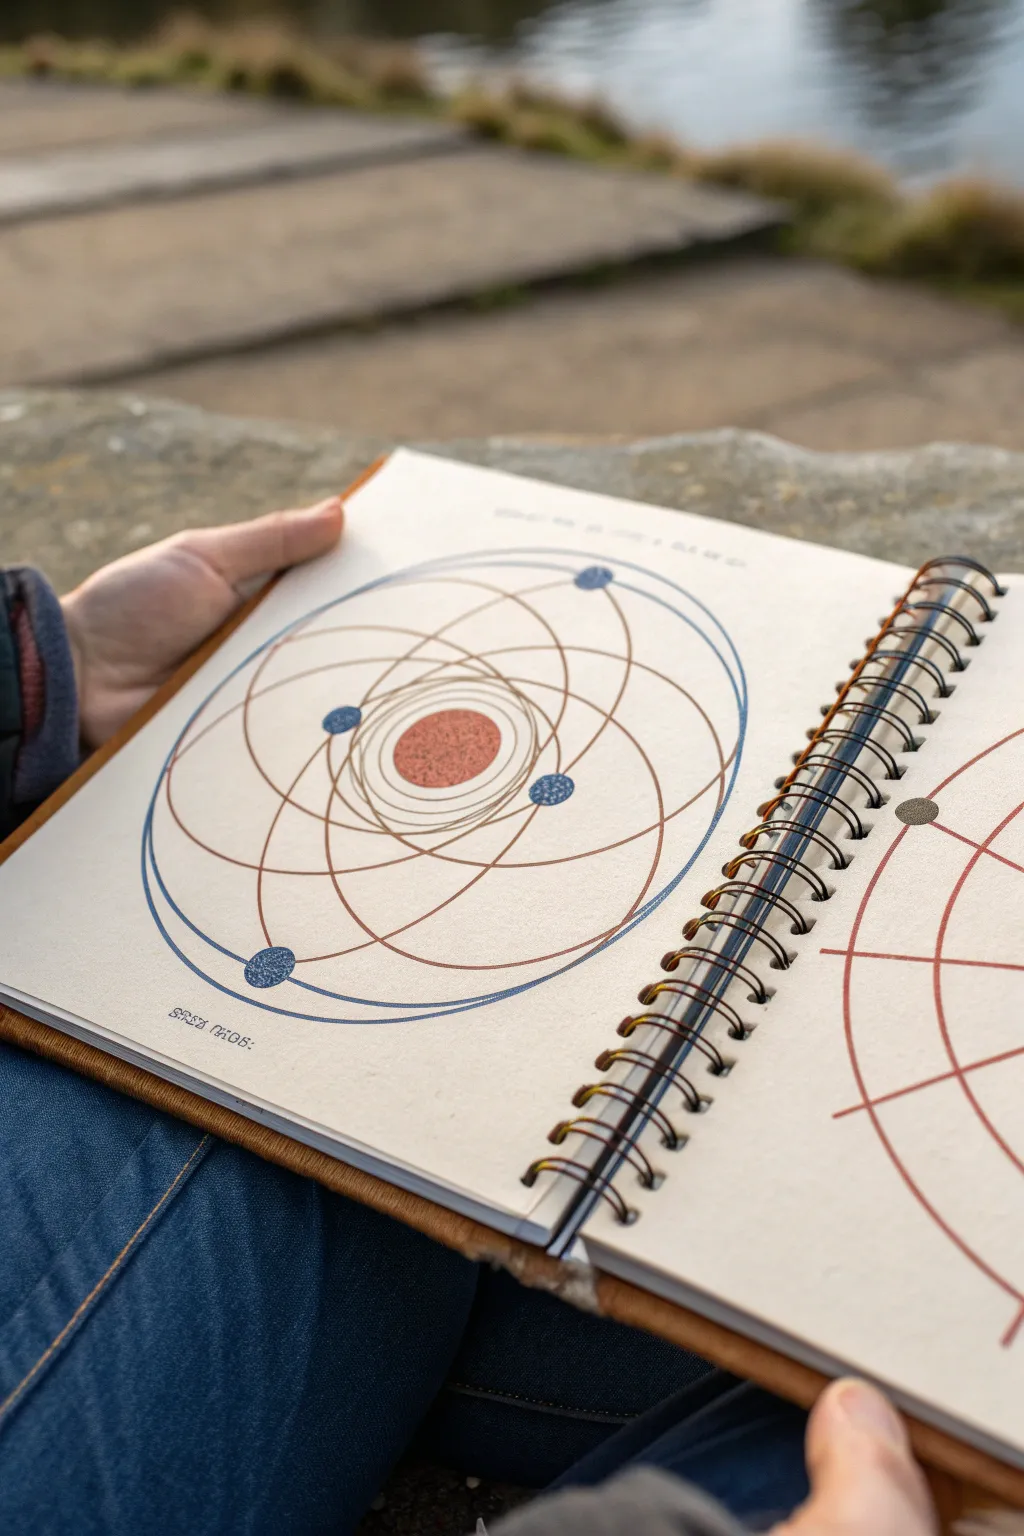
This project blends the precision of geometry with the wonder of astronomy, creating a stylized diagram of planetary orbits. Using fine liners and circle templates, you’ll draft a clean, scientific-looking illustration that captures the mesmerizing dance of celestial bodies.
Step-by-Step Guide
Materials
- A4 Spiral-bound sketchbook (cream or off-white paper preferred)
- Fine liner pens (0.1mm, 0.3mm, 0.5mm) in black or dark blue
- Brown/bronze fine liner or gel pen (0.3mm)
- Red/terracotta colored pencil or marker
- Blue/teal colored pencils or markers
- Compass with a pencil holder attachment
- Protractor and ruler
- Pencil (HB) and quality eraser
- Circle template ruler (optional but helpful)
Step 1: Setting the Center Stage
-
Locate the center:
Begin by finding the visual center of your sketchbook page. Mark this spot lightly with a pencil; this will be the anchor for your central star. -
Draft the star:
Using your compass, draw a small circle about 3-4cm in diameter around your center point. This will become the sun or central star. -
Texture the star:
Fill the central circle with a red or terracotta color. To get that grainy, celestial texture seen in the photo, I like to use a colored pencil and stipple small dots over the base color rather than shading solidly. -
Outline the star:
Once the color is down, outline the red circle with a thin (0.1mm) brown or bronze pen to give it a defined edge.
Step 2: Drafting the Orbital Paths
-
Primary orbital ring:
Set your compass to a radius that fills most of the page’s width. Draw a large, perfect circle in pencil first to define the outer boundary of your system. -
Ink the boundary:
Trace over this large outer circle using a blue or dark teal fine liner. This acts as the visual container for your planetary dance. -
Creating the elliptical paths:
This is the ‘spirograph’ effect. Place your compass point slightly off-center from the main star—about 2cm to the right. Adjust the radius so the pencil touches the outer blue boundary. -
Draw the first ellipse:
Swing an arc. Since you are off-center, this won’t be a perfect circle relative to the page, creating an elliptical look relative to the star. Do this lightly in pencil first. -
Rotate and repeat:
Move your compass point to a new spot, maintaining the same distance from the central star (imagine a small invisible circle around the star that you are placing your needle on). Draw another arc. -
Complete the rosette:
Continue moving the compass point around the center and drawing arcs until you have a symmetrical pattern of intersecting orbital lines. Aim for 4 to 6 distinct intersecting ovals. -
Inking the orbits:
Carefully trace these pencil ellipses with your brown or bronze fine liner. Keep your hand steady to maintain smooth, continuous curves.
Ink Smudge Prevention
Place a scrap piece of paper under your drawing hand while you work. This shields the paper from oils and prevents your hand from smearing fresh orbital lines.
Step 3: Adding Planets and Details
-
Positioning the planets:
Choose intersection points or apexes on your elliptical paths to place your planets. Symmetry looks nice, but random placement feels more natural. -
Drawing the planets:
Use a small circle template or freehand to draw small circles (about 0.5cm to 1cm) at your chosen spots. Vary the sizes slightly for visual interest. -
Coloring the planets:
Fill these circles with a blue, textured coloring. Similar to the sun, stippling with a pen or using a rough pencil shading creates a nice ‘planet surface’ effect. -
Connecting lines:
Draw straight radial lines from the center of the sun out to the edge of the system, passing through some planets if aligned. This gives the drawing a navigational chart aesthetic. -
Add cryptic text:
At the bottom left or top right, add some small, stylized lettering. Use a blocky, serif font or invent your own ‘alien’ symbols to label the system. -
Clean up:
Wait at least 15 minutes for all ink to fully dry. Then, gently erase all underlying pencil marks to reveal a crisp, clean diagram.
Metallic Accents
Use a gold or silver gel pen to add tiny dots or dashed lines along the primary orbits. It adds a subtle shimmer that mimics starlight.
Now you have a stunning piece of geometric art that looks like it came straight from an astronomer’s field journal
BRUSH GUIDE
The Right Brush for Every Stroke
From clean lines to bold texture — master brush choice, stroke control, and essential techniques.
Explore the Full Guide
Rocket Launch With Force Vectors
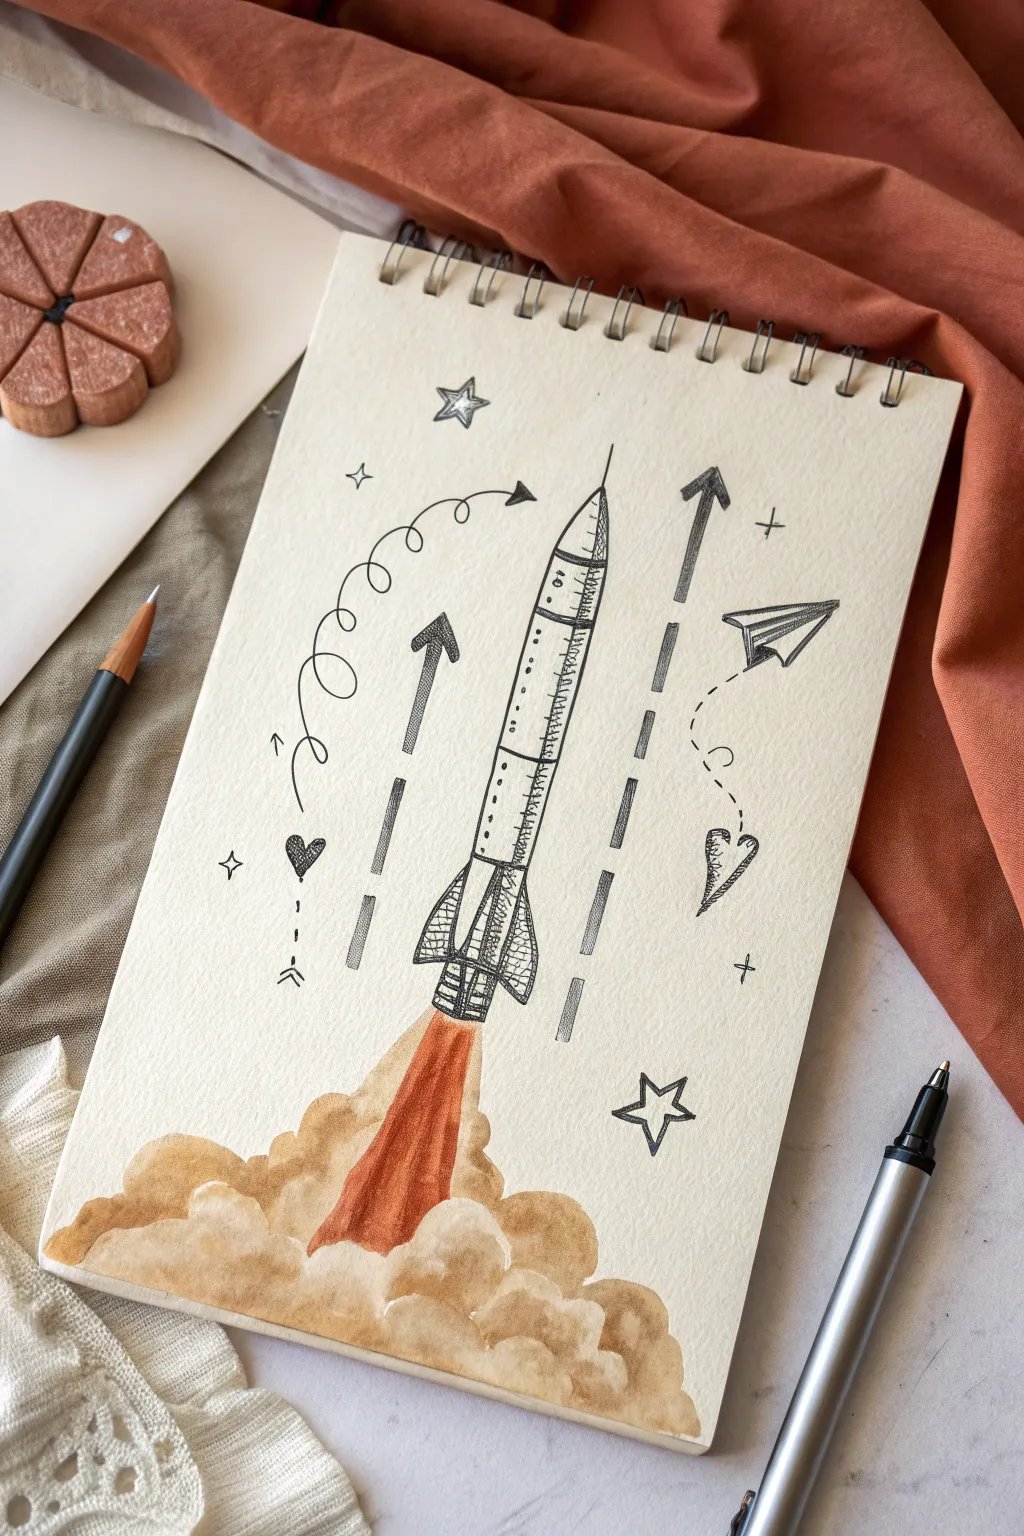
This charming sketchbook project combines precise line art with soft watercolor effects to create a dynamic rocket launch scene. The mix of pen doodle elements like stars and paper airplanes adds a playful touch to the physics-inspired layout.
Step-by-Step Tutorial
Materials
- Spiral-bound sketchbook (heavyweight paper)
- Black fineliner pens (0.3mm and 0.5mm)
- Pencil and eraser
- Watercolors (brown, ochre, rust/orange)
- Small round paintbrush
- Ruler (optional)
Step 1: Planning and Sketching
-
Center the rocket:
Start by lightly sketching a long, slender cylinder in the center of your page with a pencil. Add a pointed cone on top for the nose and slightly curve the bottom edge. -
Add the fins:
Draw three fins at the base of the rocket. Two should be on the sides, curving outward, and one central fin should face forward, creating a sense of dimension. -
Sketch trajectory lines:
Lightly pencil in two vertical lines on either side of the rocket to guide your future arrows. To the left, sketch a loopy, spiraling line that ends near the top. -
Add playful details:
Pencil in small floating elements like a paper airplane on the right, hearts, and scattered stars to fill the negative space.
Step 2: Inking the Structure
-
Outline the fuselage:
Using a 0.5mm fineliner, trace over your rocket pencil lines. Keep the lines clean but slightly organic—they don’t need to be ruler-perfect. -
Add panels and rivets:
Switch to a finer 0.3mm pen. Draw horizontal bands across the rocket body and add tiny dots along the vertical seams to mimic rivets relative to the rocket’s curve. -
Detail the fins:
Use cross-hatching shading on the fins to make them look metallic. Draw small grids or mesh patterns inside the fin shapes for texture. -
Draw the force arrows:
Ink the vertical directional lines using thick, dashed strokes. Top them with bold arrowheads pointing upward to emphasize the lift. -
Ink the spiral path:
Go over your loopy spiral line on the left. I like to add a tiny arrowhead at the very end to suggest a flight path. -
Add the paper plane:
Outline the paper airplane with sharp, angular strokes. Add a dotted trail behind it that loops into a heart shape before connecting to the plane.
Ink Bleed Prevention
Make sure your ink is waterproof (like Micron pens) before painting. If not, do the watercolor step first, let it dry completely, and then ink over it.
Step 3: Watercolor Clouds
-
Paint the exhaust plume:
Load your brush with a rusty orange or reddish-brown watercolor. Paint a cone shape directly under the rocket engine, keeping the edges slightly rough. -
Create the smoke base:
While the orange is still slightly damp, mix a light ochre or tan color. Dab this color in fluffy, rounded cloud shapes horizontally across the bottom of the page. -
Add volume and shadow:
Drop darker brown paint into the bottom curves of your smoke clouds while they are wet. This creates a natural shadow and makes the smoke look billowy and thick. -
Blend the transition:
Ensure the orange exhaust blends seamlessly into the tan smoke clouds. If a hard edge forms, soften it with a clean, damp brush.
Add Sparkle
Once the watercolor is dry, use a white gel pen to add tiny dots or highlights inside the dark smoke clouds or on the rocket’s metal body.
Step 4: Final Touches
-
Inking background elements:
Once the paint is totally dry, ink the surrounding stars. Give some of them double outlines for a glowing effect. -
Add heavy shadows:
Use your thicker pen to fill in small details, like the heart icon or specific stripes on the rocket, to add contrast. -
Erase pencil marks:
Gently erase any underlying pencil sketches, being very careful not to rub over the watercolor areas if they aren’t fully cured.
Your rocket is now ready to blast off from the page with plenty of artistic flair
Atom Model And Particle Paths
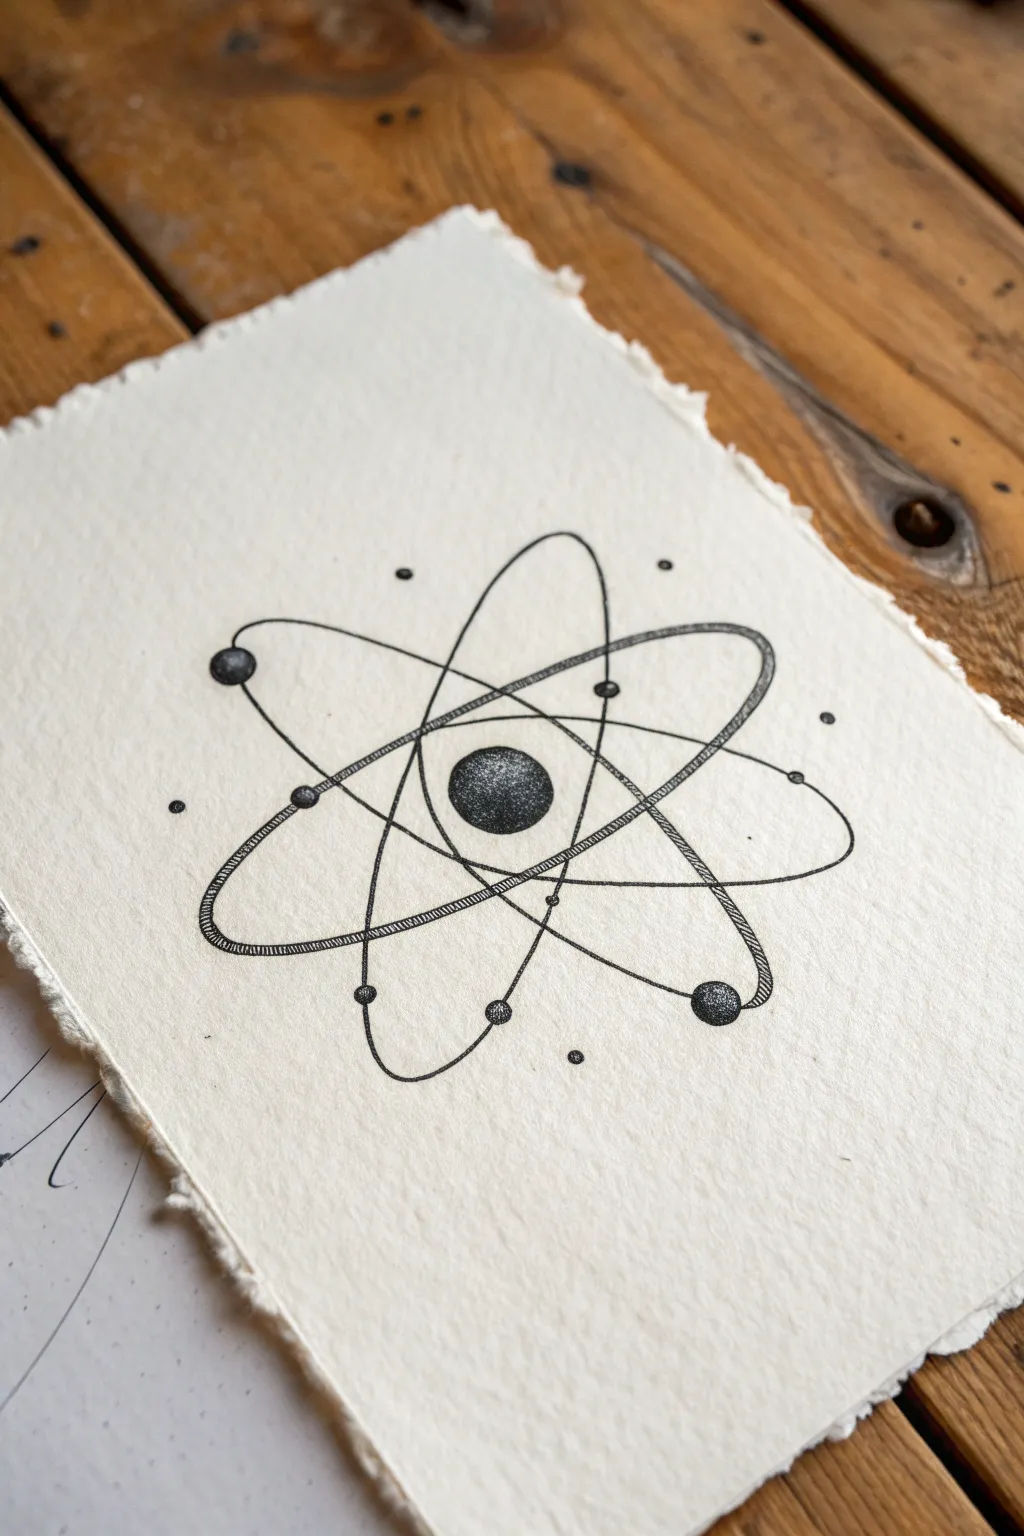
This elegant black-and-white illustration captures the classic beauty of atomic structure using fine stippling techniques. The result is a sophisticated scientific diagram that looks stunning on handmade textured paper.
Step-by-Step
Materials
- Heavyweight textured paper (deckle edge cardstock recommended)
- Pencil (HB or 2H)
- Eraser
- Compass (optional but helpful)
- Fine liner pens (sizes 0.05, 0.1, and 0.5)
- Ruler
Step 1: Planning the Structure
-
Center the Nucleus:
Begin by lightly sketching a small circle in the absolute center of your paper using a pencil. This will be your nucleus. Keep the pencil pressure extremely light so it can be erased later without damaging the paper’s texture. -
Draft the First Orbit:
Sketch a long, narrow oval that passes behind and in front of the nucleus. Angle it diagonally from the top-left to the bottom-right. Visualize this as a flat ring viewed from an angle. -
Draft the Second Orbit:
Draw a second oval of similar size, but angle this one from the top-right to the bottom-left, creating an ‘X’ shape with the first oval. Ensure the center of the ‘X’ aligns with your nucleus. -
Draft the Vertical Orbit:
Add the third and final oval. This one should stand almost vertically, intersecting the other two. It doesn’t need to be perfectly straight up and down; a slight tilt adds dynamism. -
Position the Electrons:
Sketch small circles along the orbital paths. Place at least one on each ring, varying their positions so they aren’t symmetrical. Add a few tiny dots floating outside the rings for artistic flair.
Uneven Ink Lines?
Textured paper can make pens snag. If lines look shaky, embrace it! Go over them once more to thicken them slightly, turning the ‘shake’ into an intentional organic style.
Step 2: Inking the Nucleus
-
Outline the Core:
Switch to your 0.5 fine liner pen. Carefully trace the outline of the central nucleus circle. -
Apply Stippling:
Instead of coloring it in solid black, use a stippling technique. Dot the pen repeatedly inside the circle. Cluster the dots densely on the bottom-right side to create a shadow, and space them out towards the top-left to create a highlight. -
Build Contrast:
Go back over the shadowed area with more dots until it looks nearly black, ensuring a smooth gradient into the lighter area. This gives the nucleus a spherical 3D form.
Step 3: Inking the Orbitals
-
Trace the Paths:
Use a 0.1 fine liner for the orbital rings. Draw over your pencil lines carefully. You want a consistent, clean line weight here. -
Create Depth:
To make the rings look like ribbons rather than wires, draw a second line parallel to the first, but only on the front-facing curves of the ovals. This subtle thickening suggests perspective. -
Texturing the Rings:
On the ‘front’ sections of the rings (where you added the double line), fill the space with tiny, closely spaced hatched lines perpendicular to the flow of the ring. This mimics the texture seen in the reference. -
Overlapping Logic:
Be mindful of where rings cross each other. Decide which ring is in front and stop the line of the back ring slightly before it touches the front one, creating a tiny white gap to show depth.
Level Up: Gold Accents
Use a metallic gold gel pen or fine paintbrush with gold watercolor to trace one of the orbital rings or fill in the electron spheres for a luxurious, alchemical look.
Step 4: Detailing and Finishing
-
Ink the Electrons:
Outline the small electron circles on the paths using the 0.1 pen. Like the nucleus, use stippling to shade them, keeping the light source consistent (highlight top-left, shadow bottom-right). -
Add Orbital Nodes:
Add tiny solid dots where the electron paths intersect the ‘wires’ of the orbits, or small beads along the path to suggest movement. -
Review and Erase:
Wait at least 15 minutes for the ink to fully cure. This is crucial on textured paper which holds ink longer. I prefer to wait closer to 30 minutes just to be safe. Then, gently erase the pencil guides. -
Final Atmosphere:
Using your smallest 0.05 pen, add a few stray dots scattered around the outer edges of the atom to suggest subatomic particles or energy fields.
Now you have a striking piece of scientific art that balances precision with hand-drawn charm


Spacetime Grid And Gravity Well
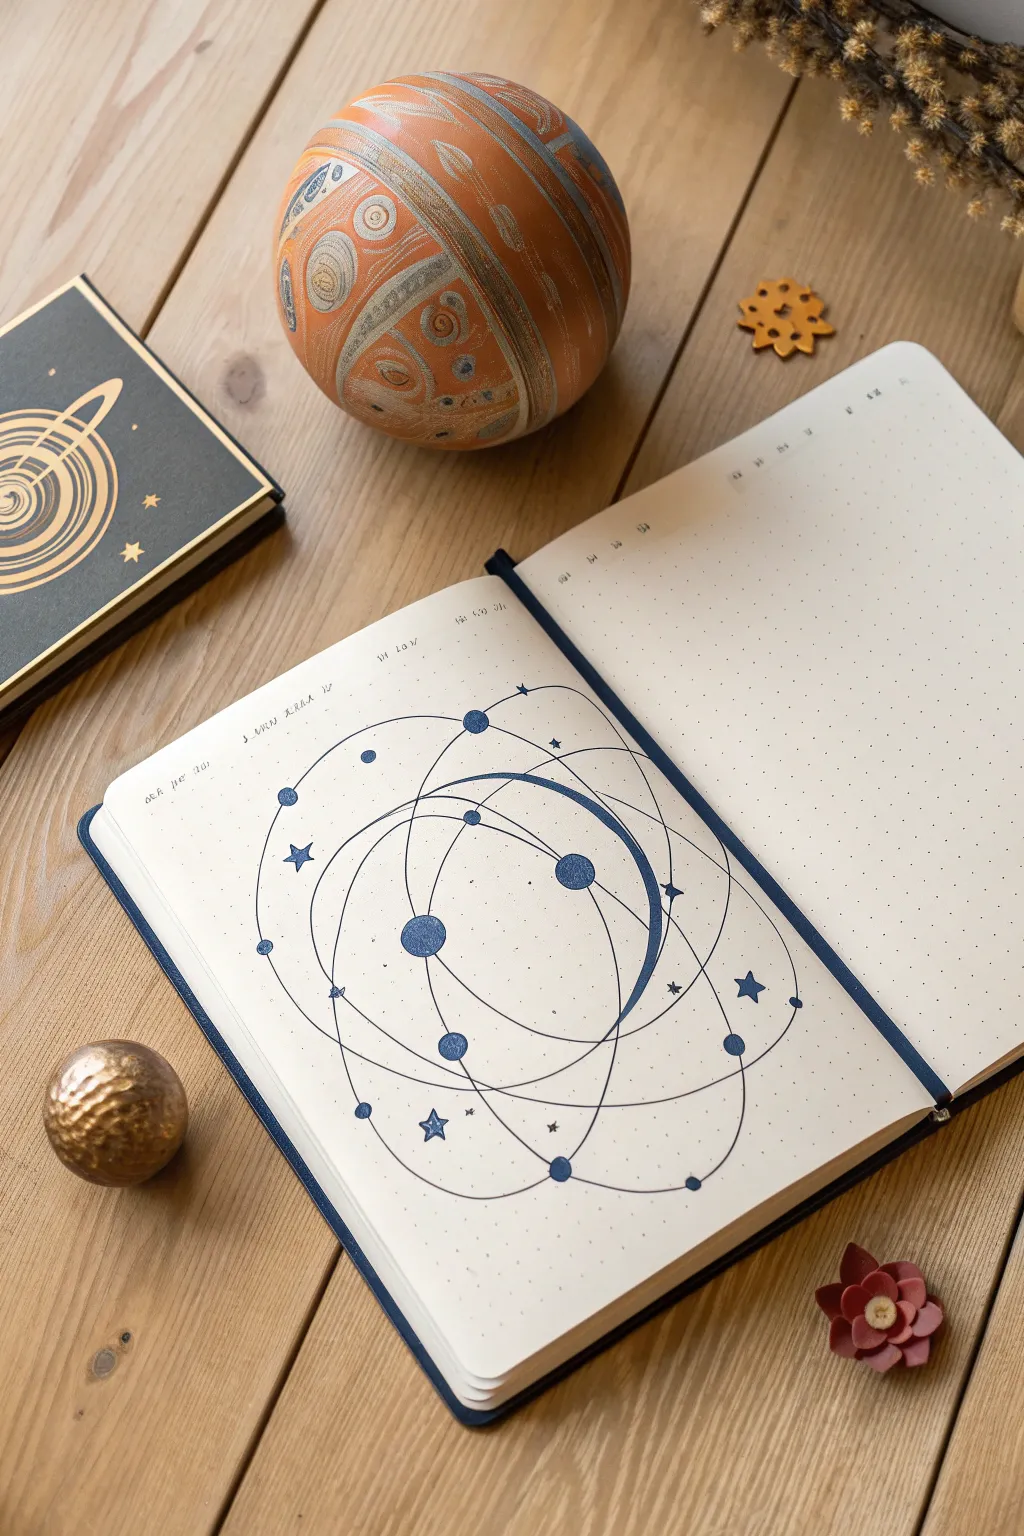
Capture the elegant dance of planetary motion with this stylized orbital diagram. Using simple geometric lines and a limited color palette on dot grid paper creates a clean, scientific aesthetic that visually represents gravity’s invisible pull.
Detailed Instructions
Materials
- A5 Dot grid notebook (high GSM paper recommended)
- Fine liner pen (0.3mm or 0.5mm, dark navy or black)
- Felt tip marker or brush pen (matching navy blue)
- Circle template or compass
- Pencil (HB or 2H)
- Eraser (kneaded preferred)
- Ruler
Step 1: Planning the Layout
-
Find the Center:
Begin by opening your notebook to a fresh spread. Locate the approximate visual center of the left-hand page. It doesn’t need to be mathematically perfect, but using the dots to count rows can help you find the middle. -
Draft the Primary Limits:
Using a pencil and a compass (or a large circular object), lightly sketch a large outer boundary circle. This won’t be inked later, but it defines the maximum space your orbits will occupy. -
Sketch the Core Ellipses:
Lightly pencil in 3-4 intersecting ellipses. Imagine them as hula hoops spinning around a central point, but tilted at different angles. Keep the lines loose and flowing.
Step 2: Drawing the Orbital Paths
-
Inking the First Curve:
Switch to your 0.3mm fine liner. Choose one of your penciled ellipses and trace it carefully. Instead of closing the loop perfectly, let the line drift slightly inward or outward to suggest a spiraling motion. -
Create the Gravity Well:
Draw the central, tightest loop. Make this line slightly bolder or go over it twice to emphasize the ‘well’ where gravity is strongest. -
Add Intersecting Orbits:
Trace the remaining pencil ellipses. Allow them to overlap and cross each other. The beauty of this design lies in the clean intersections of the sweeping curves. -
Draw the Crescent Form:
On the right side of the cluster, identify a section between two orbital lines. Fill this space to create a thin, crescent moon shape. This anchors the drawing and adds visual weight.
Wobbly Lines?
Don’t stress over perfect curves. If a line goes astray, thicken it slightly to look intentional, or add a small planet over the mistake to hide it completely.
Step 3: Adding Celestial Bodies
-
Position the Planets:
Scatter 5-6 small circles along the orbital paths you just drew. I like to place them at the apex of curves or near intersections for better visual balance. -
Fill the Planets:
Using your thicker felt tip marker or brush pen, fill in these small circles completely. Use a matching navy blue to keep the monochromatic look. -
Vary the Sizes:
Ensure your circles aren’t all identical. Make one or two slightly larger (like gas giants) and others tiny (like rocky planets) to add depth to the system. -
Draw the Central Mass:
Place a prominent circle near the center of the swirl, but slightly offset. This represents the star or mass anchoring the gravity well.
Cosmic Shimmer
Use a metallic silver or gold gel pen for the stars and the central gravity well lines to make the drawing pop against the cream paper.
Step 4: Finishing Touches
-
Add Distant Stars:
Draw small five-pointed stars scattered near the outer edges of the design. Keep them simple and unfilled for contrast against the solid planets. -
Incorporate Micro-Details:
Place tiny dots or ‘dust’ specks along a few of the orbital lines to suggest asteroid belts or debris fields. -
Erase Guidelines:
Wait until the ink is completely dry—give it a few extra minutes to be safe. Then, gently erase all visible pencil marks. -
Lettering:
If desired, add small, cryptic handwriting or scientific notations in the top left corner using your finest pen tip to mimic a physicist’s field notes.
Your stylized map of spacetime is now ready to inspire your next scientific adventure
Mixed-Media Physics Symbol Collage
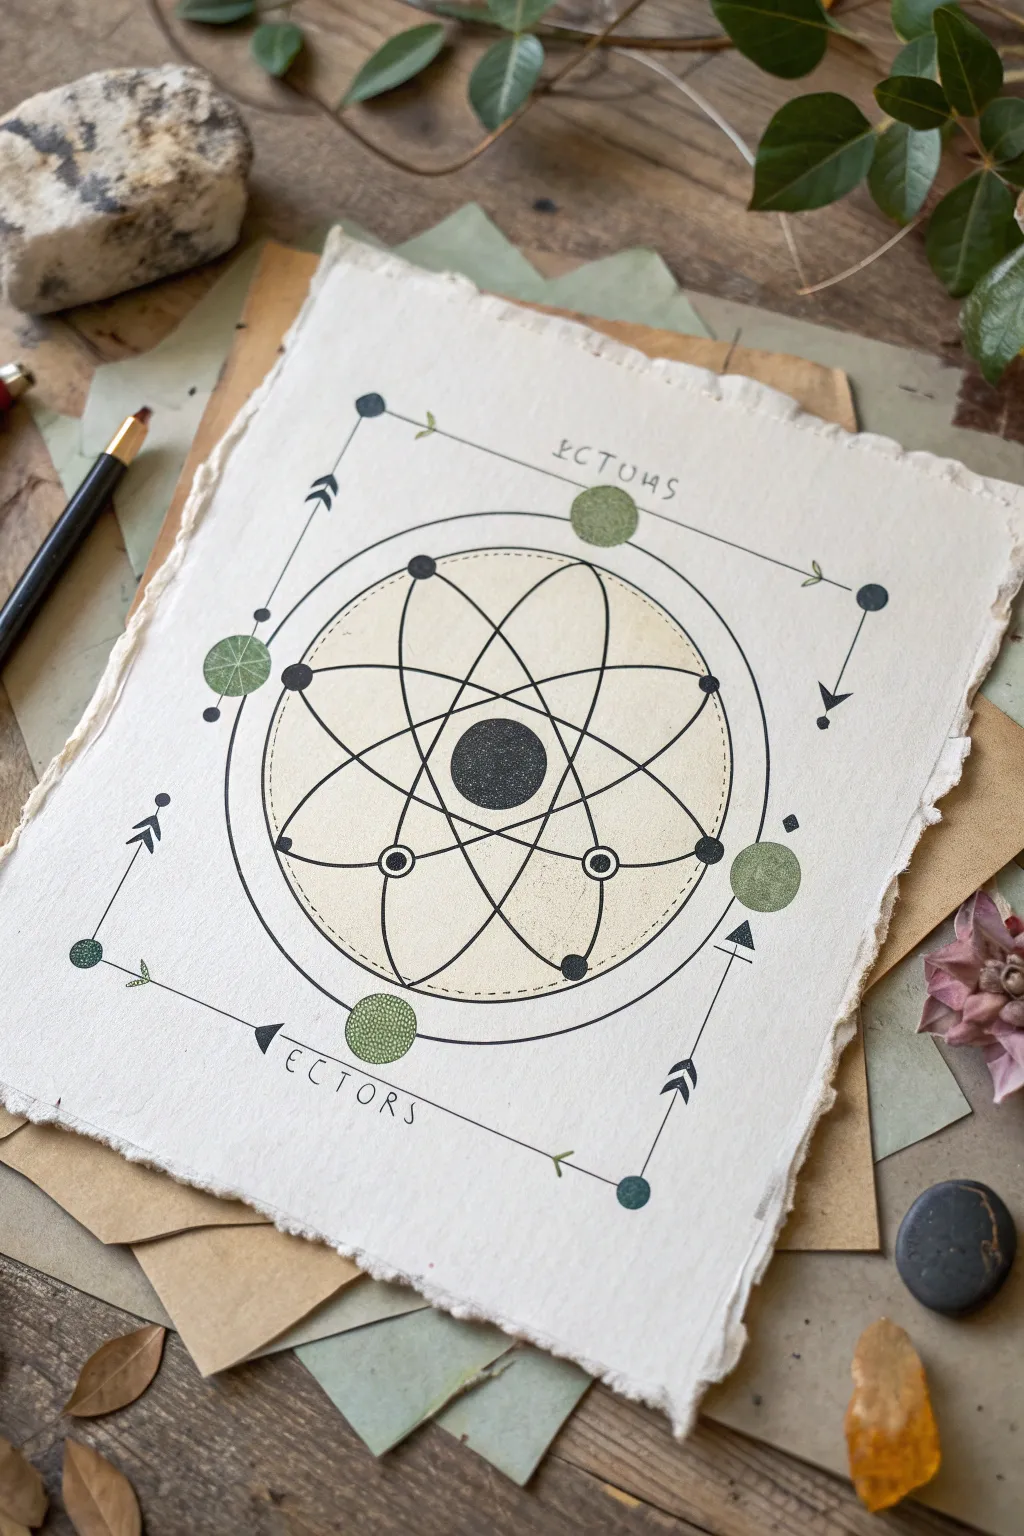
This elegant project combines the precision of scientific diagrams with the organic texture of handmade paper. It features a stylized atom surrounded by geometric borders and muted, earthy tones, perfect for a study or classroom.
Step-by-Step Tutorial
Materials
- Handmade cotton rag paper (deckle edge, approx. A4 or A5)
- Black various archival ink pens (0.1mm, 0.3mm, 0.5mm)
- Pencil (HB or 2H)
- Compass tool
- Ruler
- Watercolor paints (Olive Green, Sage, Sap Green, Ivory Black)
- Small round brush (size 2 or 4)
- Circle template (optional but helpful)
- Cream or light beige cardstock (for the central circle inlay)
- Glue stick or craft glue
Step 1: Planning the Structure
-
Center layout:
Begin by finding the exact center of your handmade paper. Lightly mark this spot with a pencil as your anchor point. -
Draw the main orbits:
Using your compass, draw a large circle (approx. 4-5 inches diameter) in the center. Inside this, draw three intersecting ellipses to represent electron orbits. -
Draft the frame:
Lightly sketch a rectangular frame around the central atom design. The lines should stop short of the corners, leaving space for decorative elements. -
Add geometric guides:
Mark the positions for the smaller planetary circles along the outer ring and the corners of the rectangular frame.
Uneven Circles?
If your hand-drawn circles look wobbly, use a circle template or coins to trace perfectly round shapes. For ellipses, create a simple cardboard stencil first.
Step 2: The Central Collage
-
Cut the background:
Cut a circle from the cream cardstock that is slightly smaller than your main outer ring. This adds a subtle layer of depth and texture. -
Adhere the center:
Glue this cream circle carefully into the center of your sketched design. Smooth it down gently to avoid wrinkles. -
Inking the Nucleus:
With a 0.5mm pen, draw the central nucleus circle directly onto the cream paper. Fill it in with a stippling technique (dots) or solid black for visual weight.
Step 3: Line Work and Details
-
Trace the ellipses:
Switch to a 0.3mm pen. Carefully trace over your pencil ellipses. Keep your hand steady, but don’t worry if the lines have a slight hand-drawn character. -
Add electrons:
Draw small circles at various intersection points on the ellipses. Fill some solid black and leave others as open rings with a center dot. -
Outer ring inking:
Ink the large outer circle that encases the atom. Use a slightly thicker line weight here if desired to frame the central motif. -
Connect the frame:
Draw the straight lines for the outer rectangular frame. Add the small arrowheads and directional markers as seen in the reference.
Age the Paper
For a truly vintage scientific look, lightly stain the edges of the handmade paper with brewed tea or diluted brown ink before you start drawing.
Step 4: Painting and Finishing
-
Mix your greens:
Prepare a watery mix of Sage and Olive Green watercolor. You want the paint to be translucent so the paper texture shows through. -
Paint the accents:
Carefully paint the four large circles located at the cardinal points of the outer ring. Use a ‘dry brush’ technique for a textured, vintage look. -
Detail geometric nodes:
Paint the smaller circles at the corners of the rectangular frame with a darker, more saturated green or a dark petroleum blue. -
Add text:
Using your finest 0.1mm pen, letter the words ‘VECTONS’ or similar scientific text along the top and bottom borders in a simple sans-serif style. -
Erase guidelines:
Wait until the ink is completely dry—I usually give it at least 20 minutes—before gently erasing any remaining pencil marks. -
Final inspection:
Check for any lines that need reinforcing or disconnected segments. Add tiny decorative leaves or arrows to the frame lines for a botanical touch.
Now you have a sophisticated piece of scientific art ready to be framed


Have a question or want to share your own experience? I'd love to hear from you in the comments below!