If you’ve been craving that calm, fresh “indoor garden” feeling, a plant mural can do it faster than any other wall treatment. I love how one big sweep of leaves can anchor a whole room and make your space feel instantly more alive.
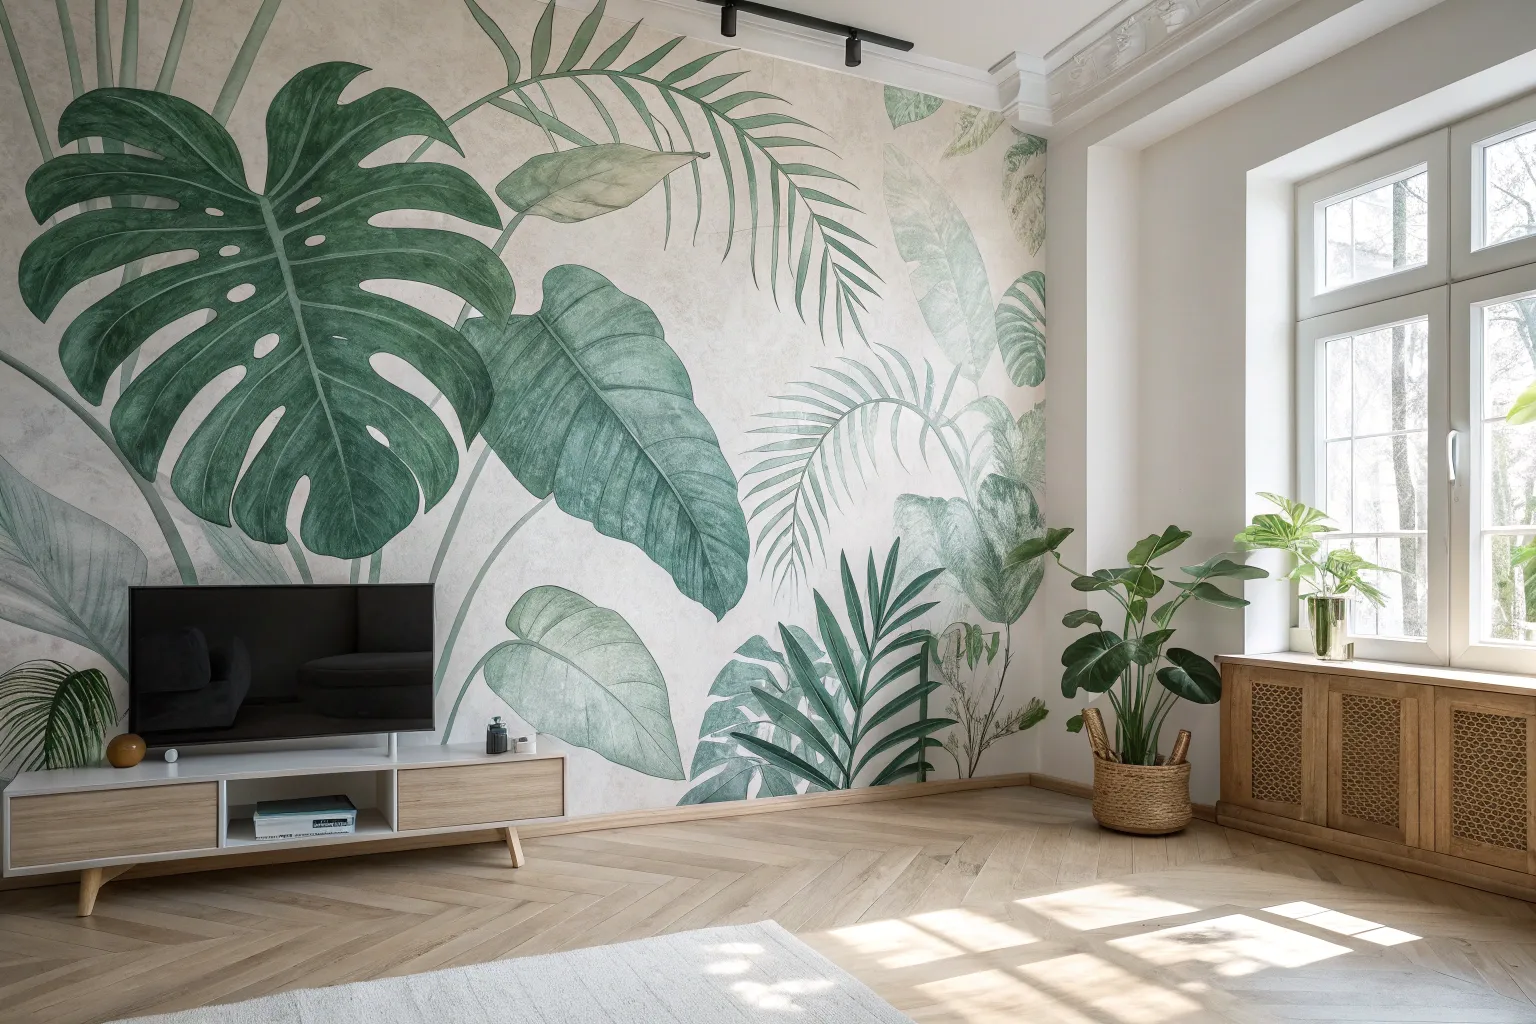
Oversized Tropical Leaf Feature Wall
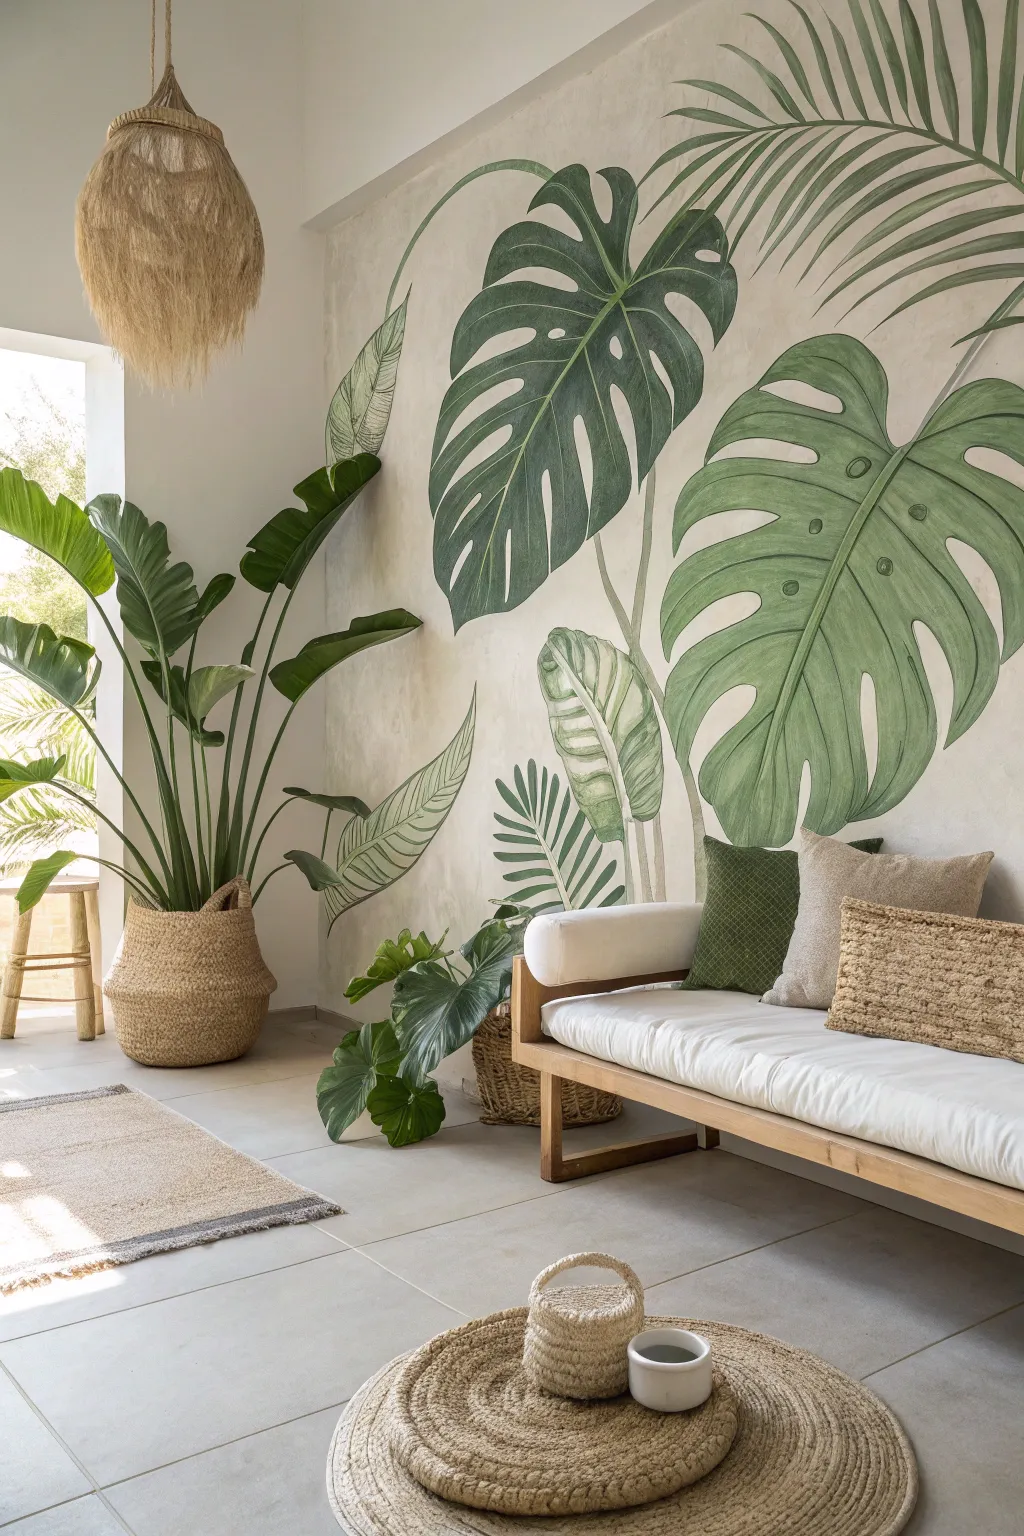
Transform a plain wall into a lush botanical sanctuary with this stunning large-scale leaf mural. Featuring giant Monstera and palm fronds in soothing greens, this project brings the biophilic beauty of the tropics indoors without the need for watering.
Step-by-Step
Materials
- Interior latex paint (matte or eggshell base color: beige/cream)
- Acrylic paints (various shades of forest green, olive, sage, and white)
- Glazing medium
- Pencil and large eraser
- Projector (optional but recommended)
- Assorted synthetic brushes (1-inch flat, #6 round, #2 liner)
- Painter’s tape and drop cloths
- Ladder or step stool
- Mixing cups or palette
- Sea sponge or rag (for texture)
Step 1: Preparation & Sketching
-
Prepare the canvas:
Clear the wall completely and mask off the baseboards and ceiling edges with painter’s tape. Lay down drop cloths to protect your flooring. -
Create the textured base:
Mix your beige base paint with a small amount of glazing medium to increase transparency. Apply this to the wall using a criss-cross motion with a wide brush or a sea sponge to create a subtle, plaster-like texture that mimics the reference image. -
Draft the layout:
I highly recommend using a projector to cast your leaf outlines onto the wall for accurate scaling. If sketching freehand, lightly draw the main veins of the largest leaves first to establish composition, ensuring they arc gracefully from the ceiling or corners. -
Refine the outlines:
Using a light pencil, detail the edges of the Monstera leaves, adding the characteristic holes (fenestrations) and splits. Draw the long, feathery shapes for the palm fronds, keeping lines faint so they don’t show through the paint later.
Uneven Coverage?
If your leaf paint looks blotchy, don’t panic. This style embraces a watercolor feel. Simply water down your paint slightly and apply a second sheer wash to unify the color without losing texture.
Step 2: Painting the Base Layers
-
Mix your greens:
Create three distinct green puddles on your palette: a dark forest green for shadows, a mid-tone olive for the main body, and a pale sage for highlights. Adding a touch of the beige wall color to your greens will help harmonize the mural with the room. -
Block in the darks:
Start with the darkest Monstera leaf. Using a 1-inch flat brush, fill in the silhouette with your mid-tone olive green. Don’t worry about perfect coverage; a slightly streaky look adds to the botanical illustration vibe. -
Paint the background leaves:
For the leaves that appear ‘behind’ others, like the large palm frond tops, use a slightly lighter, more watered-down green wash. This value change pushes them into the background visually. -
Add variance:
While the base coat is still tacky, blend in a little dark forest green near the center veins and stems to suggest depth.
Step 3: Detailing and Dimension
-
Define the veins:
Switch to a #6 round brush. Mix a light sage green (green + white) and carefully paint the central veins and the lateral ribs of the Monstera leaves. Keep your hand loose to avoid stiff, mechanical lines. -
Add linear texture:
On the large Monstera leaves, use a #2 liner brush to paint very fine, closely spaced lines running from the center vein outward toward the edges. This mimics the natural texture of the leaf surface. -
Highlight the edges:
Run a thin highlight of your lightest green along the upper edges of the leaves and the rims of the fenestrations (holes) to make them look like they are catching light. -
Deepen shadows:
Mix a small amount of black or deep blue into your forest green. Use this to paint the undersides of any folded leaves and the areas where one leaf overlaps another to create separation. -
Detail the palms:
For the palm fronds, use long, sweeping strokes with the liner brush to create individual leaflets. Ensure the tips taper off into thin points. -
Stem work:
Paint the stems connecting the leaves to the floor or wall edge. Treat these like cylinders, painting one side darker than the other to give them roundness.
Go 3D
For a mixed-media twist, attach a few high-quality faux silk leaves or dried palm fronds to the wall using adhesive hooks in clustered areas to blur the line between the mural and reality.
Step 4: Final Touches
-
Dry styling:
Step back and assess the mural from a distance. If any area looks too flat, use a dry brush with a tiny bit of white paint to scumble over the high points for a textured, vintage look. -
Clean up:
Use a small brush with your original beige wall color to ‘cut in’ and tidy up any ragged edges or pencil marks that are still visible around the leaves. -
Seal (Optional):
If this is in a high-traffic area, apply a clear matte water-based varnish over the painted leaves once they have cured for 24 hours.
Enjoy the calming atmosphere of your new hand-painted indoor garden


Soft Watercolor Cactus Garden
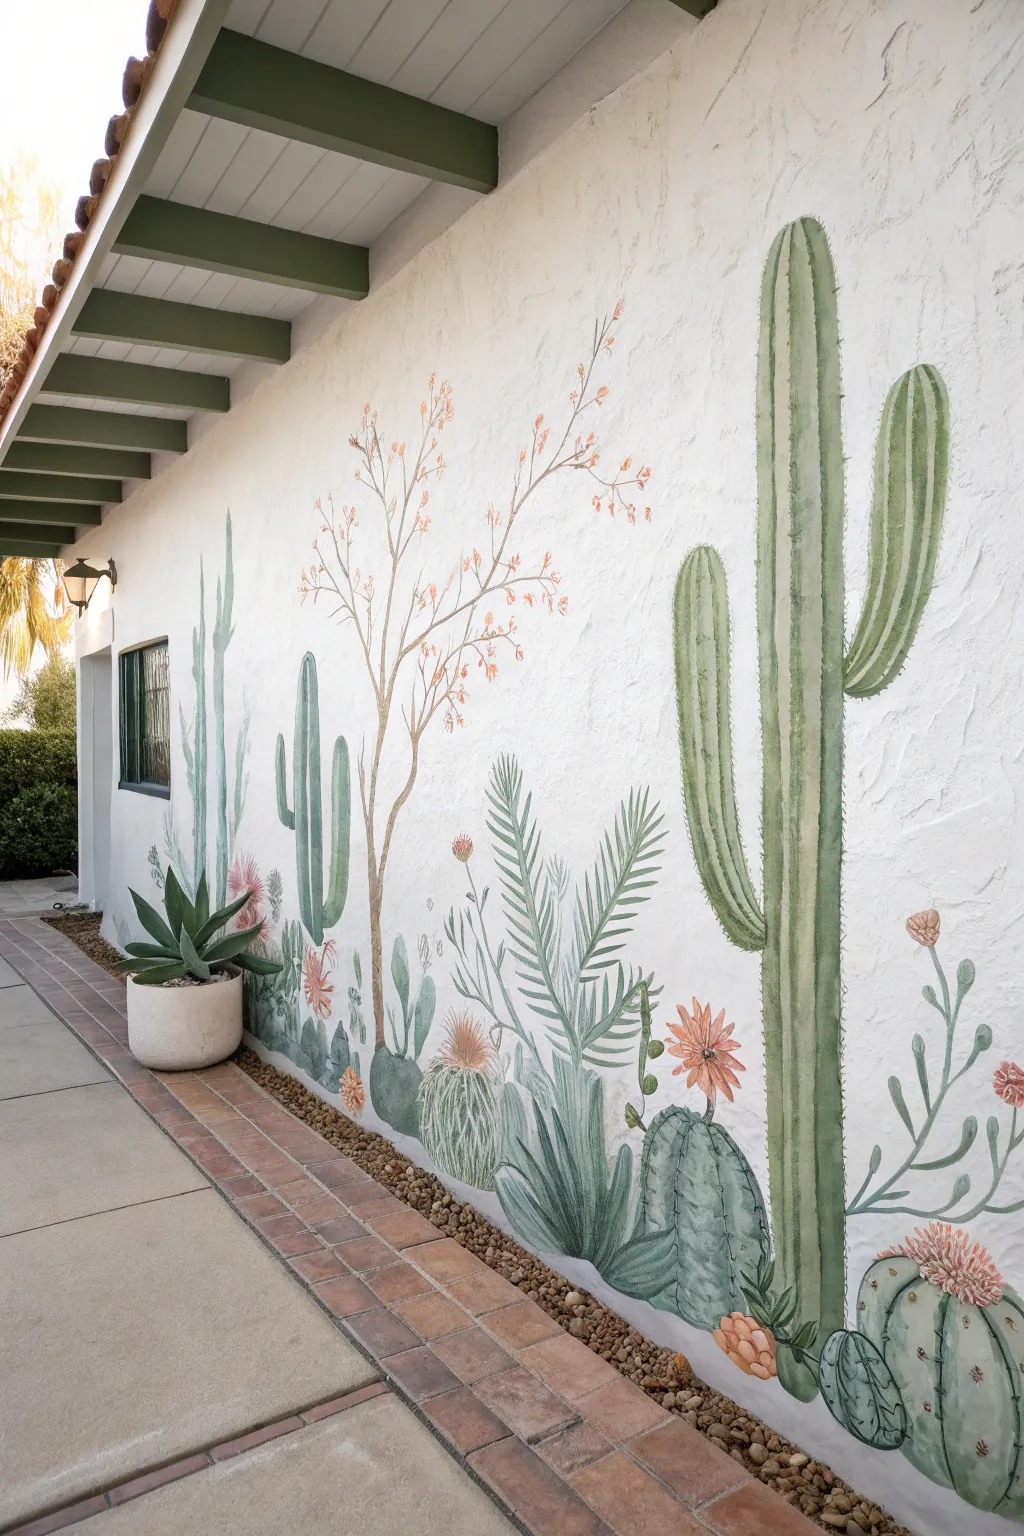
Transform a plain exterior wall into a serene desert oasis with this soft, watercolor-inspired mural. Using diluted acrylics and loose brushwork, you’ll create a layered garden of towering saguaros and delicate succulents that feels both organic and artistic.
Step-by-Step Guide
Materials
- Exterior acrylic latex paint (white base)
- Exterior acrylic paint (various greens: olive, sage, hunter)
- Exterior acrylic paint (accent colors: dusty pink, terracotta, ochre)
- Glazing medium or water for thinning
- Assorted synthetic brushes (2-inch sash, filbert, round)
- Chalk or watercolor pencils for sketching
- Painter’s tape and drop cloths
- Mixing buckets or containers
- Spray bottle with water
- Ladder or step stool
Step 1: Preparation & Sketching
-
Prep the Surface:
Begin by thoroughly cleaning the exterior wall to remove dust and debris. If the stucco has significant texture, use a stiff brush to get into the crevices. Tape off the roof eaves, window frames, and the ground line with painter’s tape and lay down drop cloths to protect the pavers. -
Lightly Sketch composition:
Using a light-colored watercolor pencil or chalk, sketch the basic outlines of your cacti. Start with the largest saguaro on the right to anchor the composition, then add the prickly pear clusters at the bottom and the taller, thinner cacti to the left. Keep lines faint; the paint will be translucent. -
Plan Your Layers:
Visualize the depth of your garden. Mark areas where plants will overlap. The watercolor style relies on transparency, so you’ll want to paint background elements first and let them dry before adding foreground details.
Step 2: Painting the Cacti
-
Mix Your Washes:
In separate containers, mix your green paints with water or a glazing medium. You want a consistency similar to heavy cream or milk—thin enough to drip slightly and show the wall texture, but thick enough to hold pigment. Create three distinct green shades: a pale sage, a medium olive, and a deep hunter green. -
Establish the Base Shapes:
Starting with the large saguaro, use a 2-inch brush to apply the lightest green wash. Fill in the main vertical column and arms. Don’t worry about perfect coverage; the variation in opacity creates that lovely watercolor effect. -
Add Vertical Ribbing:
While the base layer is still slightly damp, take a smaller brush with the medium olive tone. Paint vertical stripes down the length of the cactus to simulate ribs. Let these lines bleed slightly into the base coat for a soft look. -
Create Depth with Shadows:
Once the previous layer is dry to the touch, use your darkest green to deepen the shadows on the right side of the cactus ribs and under the arms. This gives the flat shapes volume. -
Paint Secondary Cacti:
Move to the thinner, columnar cacti on the left. Use a cooler, blue-green mix for these to differentiate them from the saguaro. Use long, continuous strokes from bottom to top to emphasize their height.
Drip Control Strategy
Keep a clean, damp sponge handy. Because the paint is thin, drips happen. Dab—don’t wipe—unwanted runs immediately to lift the pigment without smearing.
Step 3: Details & Flora
-
Add Succulents and Agave:
At the base of the wall, paint the rounded shapes of barrel cacti and the spiky leaves of agave. Use a ‘wet-on-wet’ technique here: spray the wall lightly with water before applying paint to encourage the pigments to bloom and soften. -
Paint Flowering Branches:
Using a thin round brush and a brown-ochre wash, paint the delicate, spindly branches of the ocotillo or desert wildflowers rising between the cacti. Keep your wrist loose and shaky to mimic organic growth. -
Bloom the Flowers:
Dip a small filbert brush into your dusty pink and terracotta paints. Dab these colors onto the tips of the cacti and the ends of branches. Do not overblend; let the brushstrokes represent the petals. -
Detail the Spines:
Wait until green areas are completely dry. Using a fine liner brush and a creamy off-white or pale yellow paint (undiluted for opacity), flick tiny dashes along the ridges of the cacti to represent spines and needles. -
Refine Edges:
Step back to view the mural from a distance. If any edges feel too hard, use a damp clean brush to feather them out. I find this softness is key to achieving the watercolor illusion on rough stucco. -
Seal the Work:
Because this art relies on thin washes, it’s crucial to seal it against the elements. Apply a clear, matte exterior masonry sealer over the entire mural once the paint has cured for at least 24 hours.
Add 3D Texture
For the flowering buds, mix a little sand or thickening gel into your pink paint. This adds actual physical texture to the blooms, making them pop off the stucco.
Step back and enjoy the calming, artistic atmosphere your new desert garden brings to your outdoor space


Vintage Botanical Print Wall Look
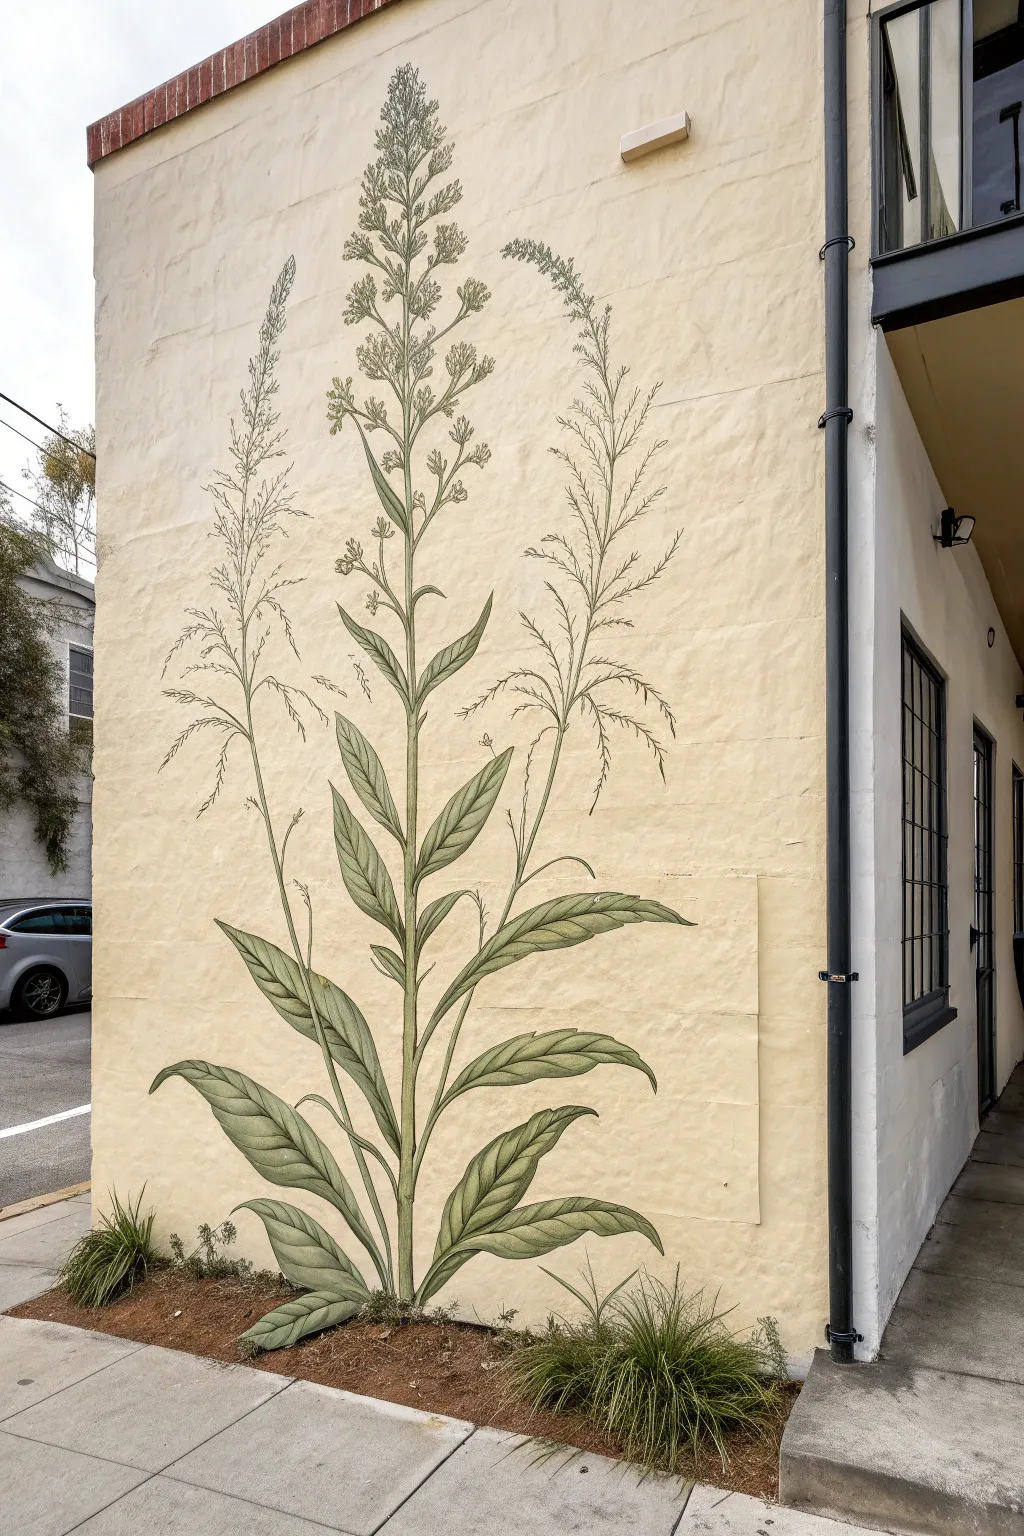
Transform a plain exterior or interior wall into a page from a vintage scientific textbook with this towering botanical mural. By combining precise line work with soft, muted washes of green, you’ll achieve an elegant, timeless piece that mimics the delicate style of antique lithographs.
Step-by-Step Tutorial
Materials
- Exterior masonry primer (if wall is unpainted)
- Exterior latex house paint (warm cream/off-white base)
- Exterior acrylic paints (Deep Olive, Sage Green, Yellow Oxide, Black, Burnt Umber)
- Synthetic sable brushes (Sizes 0 and 1 liner brushes)
- Flat brushes (1-inch and 2-inch for large leaves)
- Overhead projector or digital projector
- Digital botanical illustration file
- Pencil or white chalk
- Mixing buckets/palettes
- Glazing medium (exterior grade)
- Ladder or scaffolding
- Clear matte exterior sealant
Step 1: Preparation & Base Coat
-
Clean the Surface:
Begin by thoroughly cleaning the wall surface to remove dust, dirt, or loose stucco. A mild pressure wash or a stiff scrub brush with TSP substitute works best here to ensure good adhesion. -
Apply Primer:
If working on raw masonry, roll on a coat of high-quality masonry primer. Allow this to cure fully according to the manufacturer’s instructions, usually about 4 hours. -
Paint the Background:
Roll on your base color. To match the photo, choose a warm, buttery cream or aged parchment tone rather than a stark white. Apply two coats for solid, opaque coverage. -
Set Up Projection:
Wait until evening or set up a tarp tent to darken the area. Position your projector so the botanical image fills the vertical space, ensuring the stem originates naturally from the ground level. -
Trace the Outline:
Using a pencil or white chalk, carefully trace the projected image. Focus on getting the main central stalk, the sweep of the large lower leaves, and the delicate branching of the upper flowers.
Step 2: Painting the Foliage
-
Mix Leaf Colors:
Create three shades of green: a dark shadow tone (Olive + touch of Black), a mid-tone Sage, and a highlight mix (Sage + Yellow Oxide). I find adding a bit of glazing medium helps the paint flow better on textured walls. -
Block in Large Leaves:
Start with the large leaves at the bottom. Use your 2-inch flat brush to fill in the leaf shapes with the mid-tone Sage green. Don’t worry about perfect coverage; a little transparency looks like watercolor. -
Add Leaf Veins:
While the base layer is dry to the touch, use a smaller brush to paint the central vein of each leaf using a mix of the cream background color and a tiny drop of green. This mimics the pale spine seen in real leaves. -
Apply Shadows:
Using your dark shadow mix, paint along the sides of the central veins and the undersides of the leaves where they curl. Blend the edges slightly with a damp brush for a soft transition. -
Highlight the Edges:
Take your lightest yellow-green mix and carefully brush the outer edges and the top ridges of the leaves to give them dimension and form. -
Paint the Main Stalk:
Using a 1-inch brush, paint the thick central stalk. Use long, vertical strokes, keeping one side slightly darker to suggest a cylindrical shape.
Pro Tip: The Engraving Look
Don’t blend your colors perfectly! Leaving distinct, unblended hash marks and lines mimics the cross-hatching technique used in antique metal plate lithography.
Step 3: Detailed Line Work
-
Mix the Ink Tone:
To simulate the look of an engraving, mix a very dark grey-green or brownish-black. It should be fluid, almost like ink, so test the consistency on cardboard first. -
Outline Lower Leaves:
With a Size 1 liner brush, outline the large bottom leaves. Vary your pressure—press harder for thick lines on the shadowed side and lighter for thin lines on the lit side. -
Hash and Stipple:
Add texture to the leaves by painting tiny, parallel hatch lines in the shadowed areas. This is the key ‘vintage print’ technique that mimics engraving. -
Draft the Upper Stems:
Move to the upper section. Switch to your smallest Size 0 liner brush. Paint the thin, spindly stems that branch out from the top, keeping your hand steady but fluid. -
Create Flower Clusters:
For the granular look of the flower heads (the inflorescences), use a stippling motion. Dot your brush repeatedly to create clusters of seeds or tiny blooms at the tips of the branches. -
Refine the Silhouette:
Step back to view the whole composition. If any branches look too thin or faint against the cream wall, go back over them to embolden the line weight.
Troubleshooting: Textured Walls
If the stucco texture makes fine lines difficult, dilute your paint slightly with water or flow improver. This helps the paint get into the crevices without skipping.
Step 4: Finishing Touches
-
Clean Up Edges:
Use a small brush with your background cream color to tidy up any stray drips or lines that became too thick. -
Ground the Plant:
Ensure the bottom of the stem disappears naturally into the ground or landscaping. If needed, paint a few small ’emerging’ leaves right at the soil line. -
Seal the Mural:
Wait at least 48 hours for the paint to cure completely. Then, apply a clear, matte exterior sealer to protect your artwork from UV rays and weather damage.
Step back and admire how this elegant scientific illustration brings a sophisticated, historical atmosphere to your space


Sage Fern Fronds for a Calm Corner
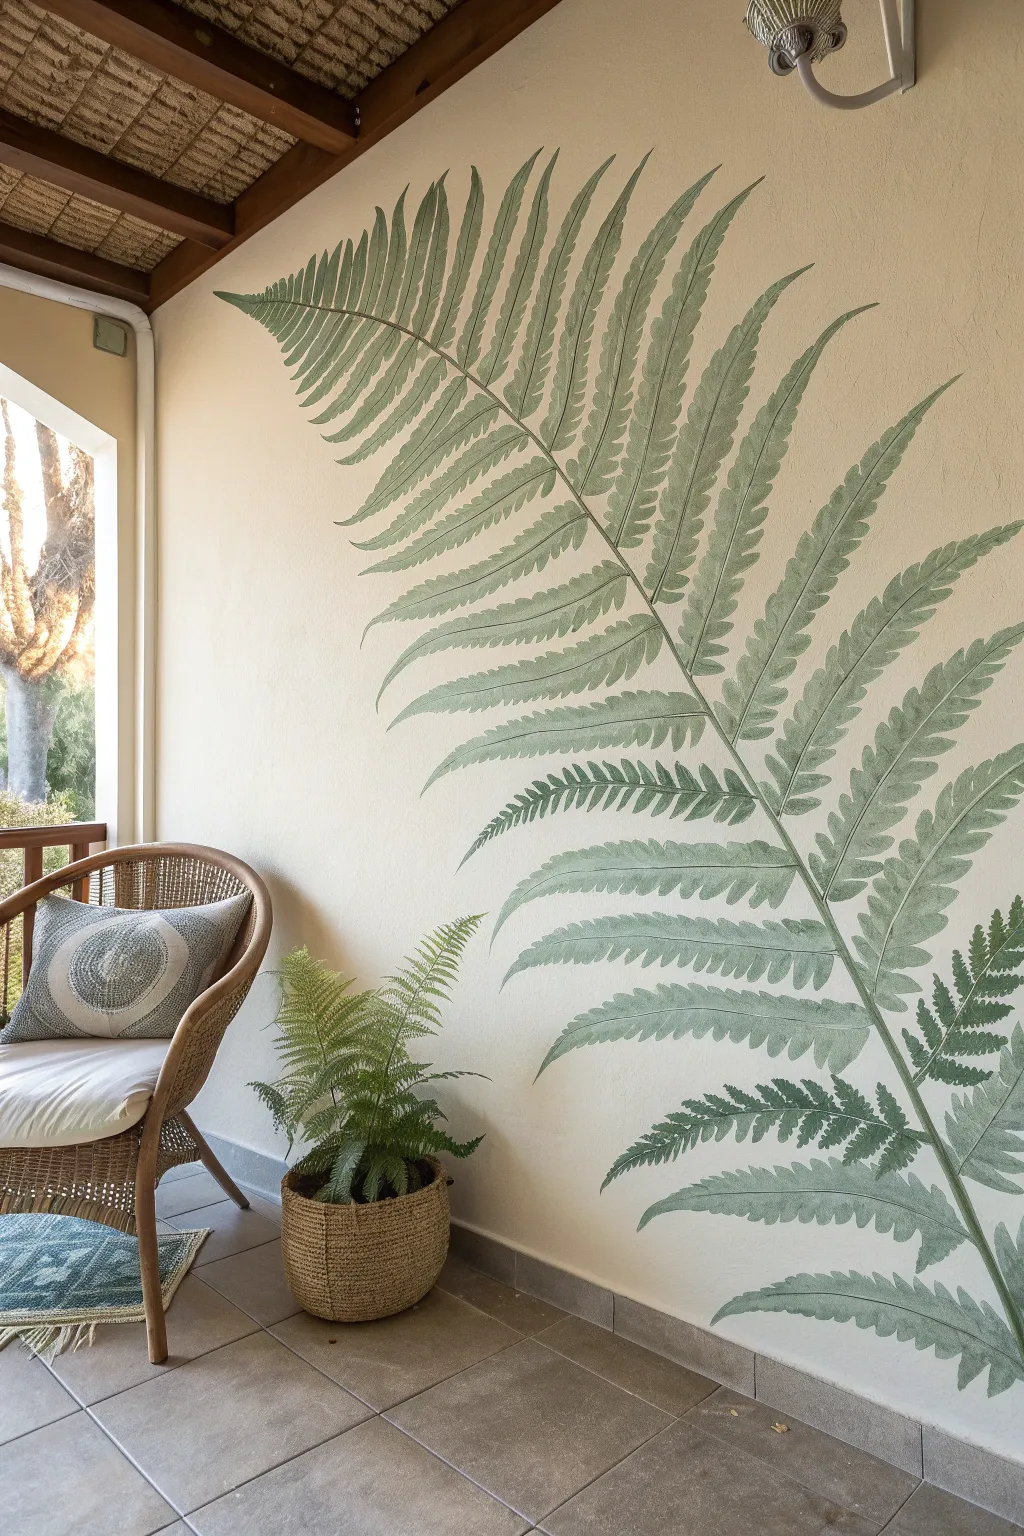
Transform a blank corner into a tranquil retreat with this oversized fern mural, inspired by vintage botanical illustrations. Using a soft sage palette and dry-brush techniques, you’ll create a textural, organic statement piece that feels both modern and timeless.
Step-by-Step Guide
Materials
- Latex wall paint (base color, cream or warm white)
- Acrylic paint or latex sample pot (sage green)
- Acrylic paint (darker forest green for shading)
- Acrylic paint (white for tinting)
- Pencil & eraser
- Measuring tape
- Painter’s tape
- Projector (optional but recommended for scale)
- Chalk or pastel pencil (light color)
- Small roller & artist brushes (filbert, round, and liner sizes)
- Mixing tray or palette
- Clean rags
- Step ladder
Step 1: Planning & Outline
-
Assess the Space:
Begin by observing your wall’s dimensions. For this sweeping design, you want the stem to originate from a bottom corner or low point, arching upwards across the majority of the wall space to create movement. -
Prepare the Surface:
Ensure the wall is clean and dust-free. If you are changing the background color, apply your base coat of cream or warm white latex paint now and let it cure for at least 24 hours. -
Draft the Spine:
Using a light pencil or chalk, sketch the main central vein (rachis) of the fern first. Start low and draw a long, gentle curve that extends diagonally upwards. It doesn’t need to be perfectly straight; a slight wobble adds organic realism. -
Mark Frond Placement:
Along the main spine, lightly mark ticks where the individual leaflets (pinnae) will attach. These should be larger at the bottom and gradually get smaller and closer together as you reach the tip. -
Sketch the Leaflets:
Draw the basic shapes of the leaflets attached to your tick marks. I find it helpful to think of them as elongated triangles with wavy edges. Don’t worry about the tiny internal details yet; just get the silhouette right.
Step 2: Painting the Base Layer
-
Mix the Sage Tone:
In your mixing tray, prepare your primary sage green. If your green is too bright, tone it down with a tiny drop of red or brown to earthy it up, then add white until it matches the soft, desaturated look of the photo. -
Line the Stem:
Load a medium round brush with your sage mix. Carefully paint the central spine of the fern, thickening the line slightly near the base and tapering it to a fine point at the top. -
Fill the Leaflets:
Using a filbert brush, which has a nice rounded tip, paint the leaflets one by one. Use sweeping strokes that follow the direction of the leaf growth—outward from the center spine. -
Create Texture:
Don’t aim for a perfectly solid, opaque coat. Allow the brush to run slightly dry towards the tips of the leaves. This dry-brush effect mimics the delicate texture of a fern and lets a bit of the wall texture show through. -
Let it Dry:
Allow this base layer to dry completely to the touch, usually about 30-60 minutes depending on humidity and paint thickness.
Wobbly Lines?
Don’t panic! Nature is imperfect. Instead of trying to straighten a wobble, thicken the line slightly in that area to turn the mistake into a natural bump or knot in the fern stem.
Step 3: Adding Dimension & Detail
-
Mix a Shadow Shade:
Take your original sage mix and add a small amount of forest green to darken it just a step or two. You want a subtle contrast, not a harsh outline. -
Define the Veins:
With a fine liner brush, paint a thin line down the center of each individual leaflet. Connect this back to the main spine. -
Add Subtle Serration:
Use the liner brush and the darker mix to add tiny, rapid tick marks along the edges of the larger leaflets. This suggests the serrated edge of a fern without needing to paint every single tooth perfectly. -
Highlighting:
Clean your brush and mix a lighter version of the sage by adding more white. Apply this sparingly to the top edges of the upper fronds where ‘light’ would naturally hit. -
Refine the Connection Points:
Go back to where the leaflets meet the main stem. Use the darker green to deepen the ‘V’ shape where they connect, adding structural depth to the painting. -
Final Step Check:
Step back about five feet to view the mural as a whole. Look for any areas that feel too heavy or too patchy and adjust with small dabs of paint as needed. -
Clean Up:
Gently erase any visible pencil or chalk lines once the paint is fully cured (give it a few hours just to be safe).
Use a Projector
If you aren’t confident freehanding the scale, find a clip-art image of a fern, project it onto the wall using a cheap mini-projector, and trace the outline lightly with pencil before painting.
Enjoy the peaceful atmosphere your new botanical feature brings to the room
BRUSH GUIDE
The Right Brush for Every Stroke
From clean lines to bold texture — master brush choice, stroke control, and essential techniques.
Explore the Full Guide
Moody Night-Garden Plant Mural
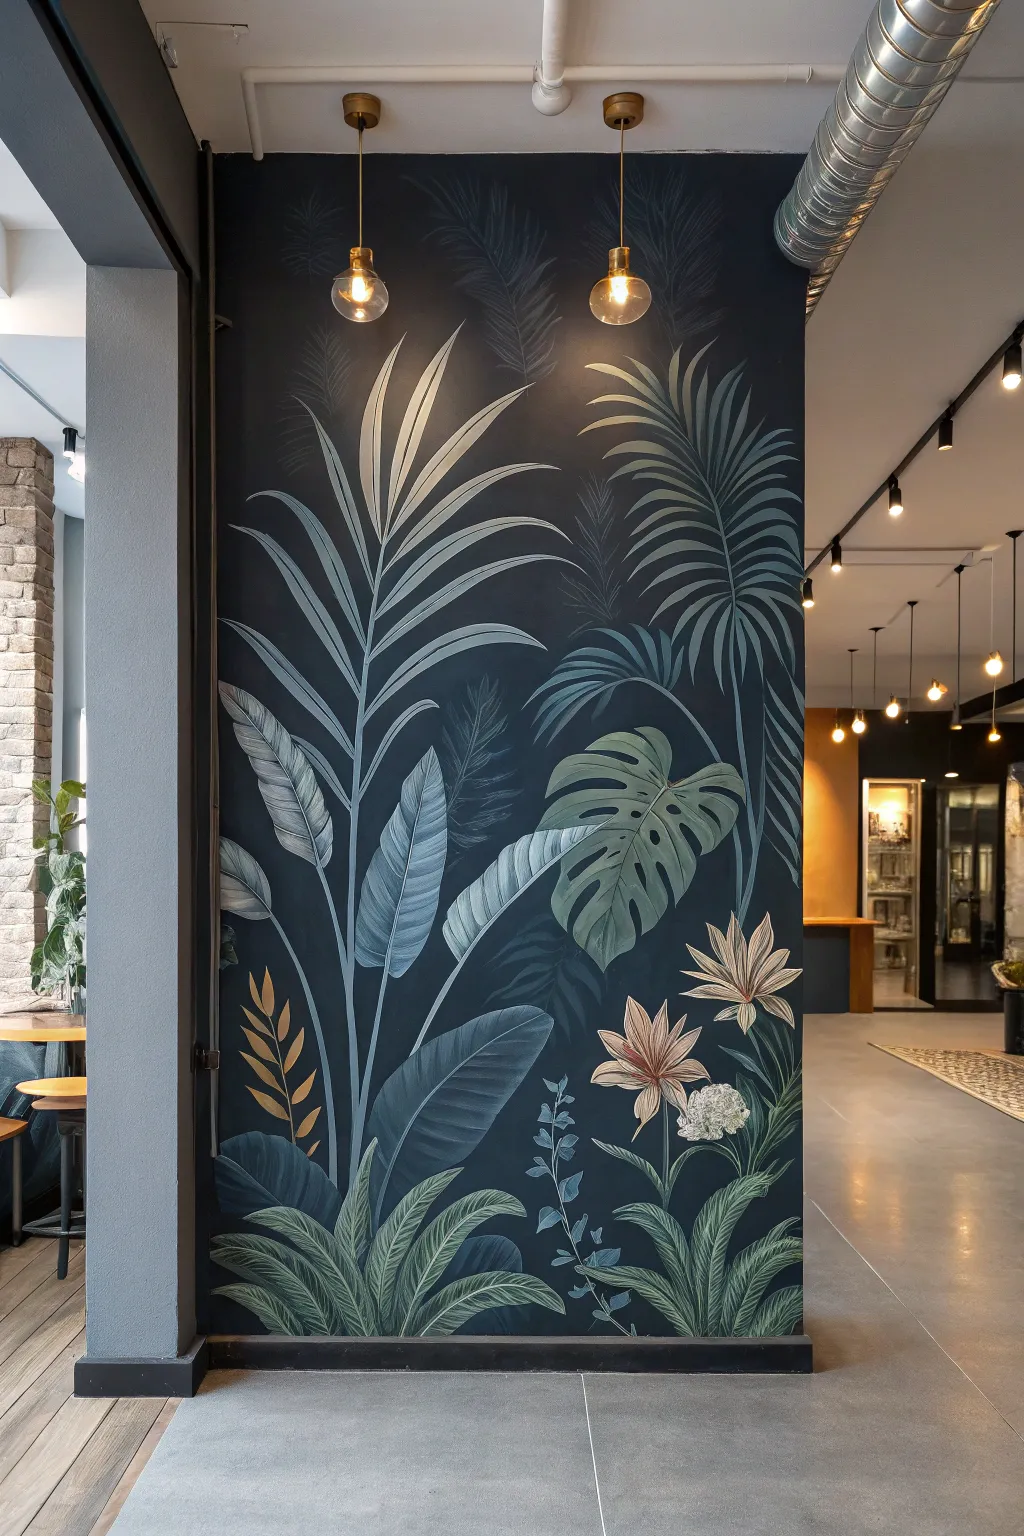
Transform a plain wall into a lush, nocturnal jungle with this moody plant mural. Featuring stylized palms, monstera leaves, and delicate blooms against a deep navy backdrop, this project combines bold silhouettes with soft shading for a sophisticated, illustrative look.
Step-by-Step Guide
Materials
- Interior latex paint (Deep Navy/Midnight Blue) for base coat
- Acrylic paints (various greens: sage, emerald, forest, mint)
- Acrylic paints (accents: pale pink, cream, ochre/gold)
- Chalk or watercolor pencil (white/light grey)
- Large foam roller and tray
- Assorted brushes: 2-inch angled sash brush, filbert brushes (sizes 8-12), fine liner brush
- Painter’s tape and drop cloth
- Step ladder
- Matte clear varnish (water-based)
Step 1: Setting the Mood
-
Prepare the surface:
Begin by cleaning your wall thoroughly with sugar soap or mild detergent to remove grease and dust. Once dry, tape off the skirting boards, ceiling edges, and any adjacent walls with painter’s tape to ensure crisp lines. -
Apply the dark base:
Pour your deep navy or midnight blue latex paint into a tray. Using a roller, apply the first coat to the entire wall. This dark background is crucial for making the greens pop later. Let it dry completely according to the can’s instructions, then apply a second coat for a rich, opaque finish.
Chalk It Up
Make a mistake while sketching? A damp microfiber cloth wipes chalk right off the latex base coat without leaving a trace, unlike pencil which can smudge or dent the wall.
Step 2: Drafting the Jungle
-
Sketch the composition:
Once the base coat is fully cured (give it at least 24 hours if possible), use white chalk or a light grey watercolor pencil to lightly sketch your design. Start with the largest elements: the tall, sweeping palm fronds rising from the bottom and the large monstera leaf on the right. -
Add secondary elements:
Sketch in the medium-sized leaves, such as the broad banana-leaf shapes and the fern-like clusters at the base. Don’t worry about perfect details yet; just focus on placement and flow. Keep the lines faint so they are easy to cover. -
Place the floral accents:
Mark the positions for the two large star-shaped flowers and the small white hydrangea-like cluster near the bottom right. These will act as focal points to break up the greenery.
Metallic Magic
Mix a tiny drop of gold metallic acrylic into your highlight color. It won’t look sparkly, but it catch the light beautifully when viewed from different angles in the room.
Step 3: Painting the Foliage
-
Block in base colors:
Mix a mid-tone sage green acrylic. Using a 2-inch angled brush or large filbert, fill in the main shapes of the large palm fronds and the monstera leaf. The paint doesn’t need to be perfectly opaque yet; a slightly streaky texture can actually add organic depth. -
Create gradients:
For the tall, vertical leaves, I like to mix a lighter mint green and blend it into the sage while the paint is still wet. Apply the lighter color towards the tips and the darker tones near the base of the stems to suggest light hitting from above. -
Paint the darker undergrowth:
Switch to a forest or emerald green for the leaves that are ‘behind’ the main subjects, particularly the fern clusters at the bottom corners. This recession in color value helps push them into the background visually. -
Detail the fern fronds:
Use a smaller filbert brush (size 8 or 10) to paint the individual leaflets on the palm fronds. Use a long, sweeping motion from the central vein outwards, lifting your brush at the end to create a tapered point. -
Add the blue-grey leaves:
Mix a blue-grey shade by adding a touch of the wall color and white to your green. Paint the large, oval-shaped leaves on the left side with this cool tone strictly to distinguish them from the warner palms. Add central veins in a lighter version of this mix.
Step 4: Illustrative Details
-
Define the veins:
Using a fine liner brush and a pale mint or cream paint, carefully draw the central spines and side veins on the monstera and banana leaves. Keep these lines thin and steady. -
Paint the flowers:
Fill in the star-shaped flowers with a pale pink or cream base. Once dry, add streaks of darker rose or ochre radiating from the center to define the individual petals. -
Add gold accents:
For the fern-like plant on the bottom left, use an ochre or gold-toned paint. This introduces a warm contrast against the cool blues and greens, mimicking the look of dried or autumnal foliage. -
Refine the hydrangea:
Create the white flower cluster by dabbing a small round brush repeatedly with white and light grey paint. Create a stippled texture rather than painting individual petals to give it a fluffy appearance. -
Highlighting edges:
Mix a very light green or off-white. Using a ‘dry brush’ technique (wipe most paint off the brush), lightly sweep over the very edges of the prominent leaves to catch the ‘light’ and separate them from the dark background. -
Clean up:
Step back and look for any chalk lines still visible. Wipe them away with a barely damp cloth. If you made any mistakes, simply use your leftover wall paint to ‘erase’ them. -
Protect the work:
Once the mural has cured for at least 48 hours, apply a clearer water-based matte varnish over the painted areas (or the whole wall) to protect it from scuffs and fading.
Enjoy the mysterious atmosphere your new night garden brings to the space.
Botanical Arch Behind a Bed or Sofa
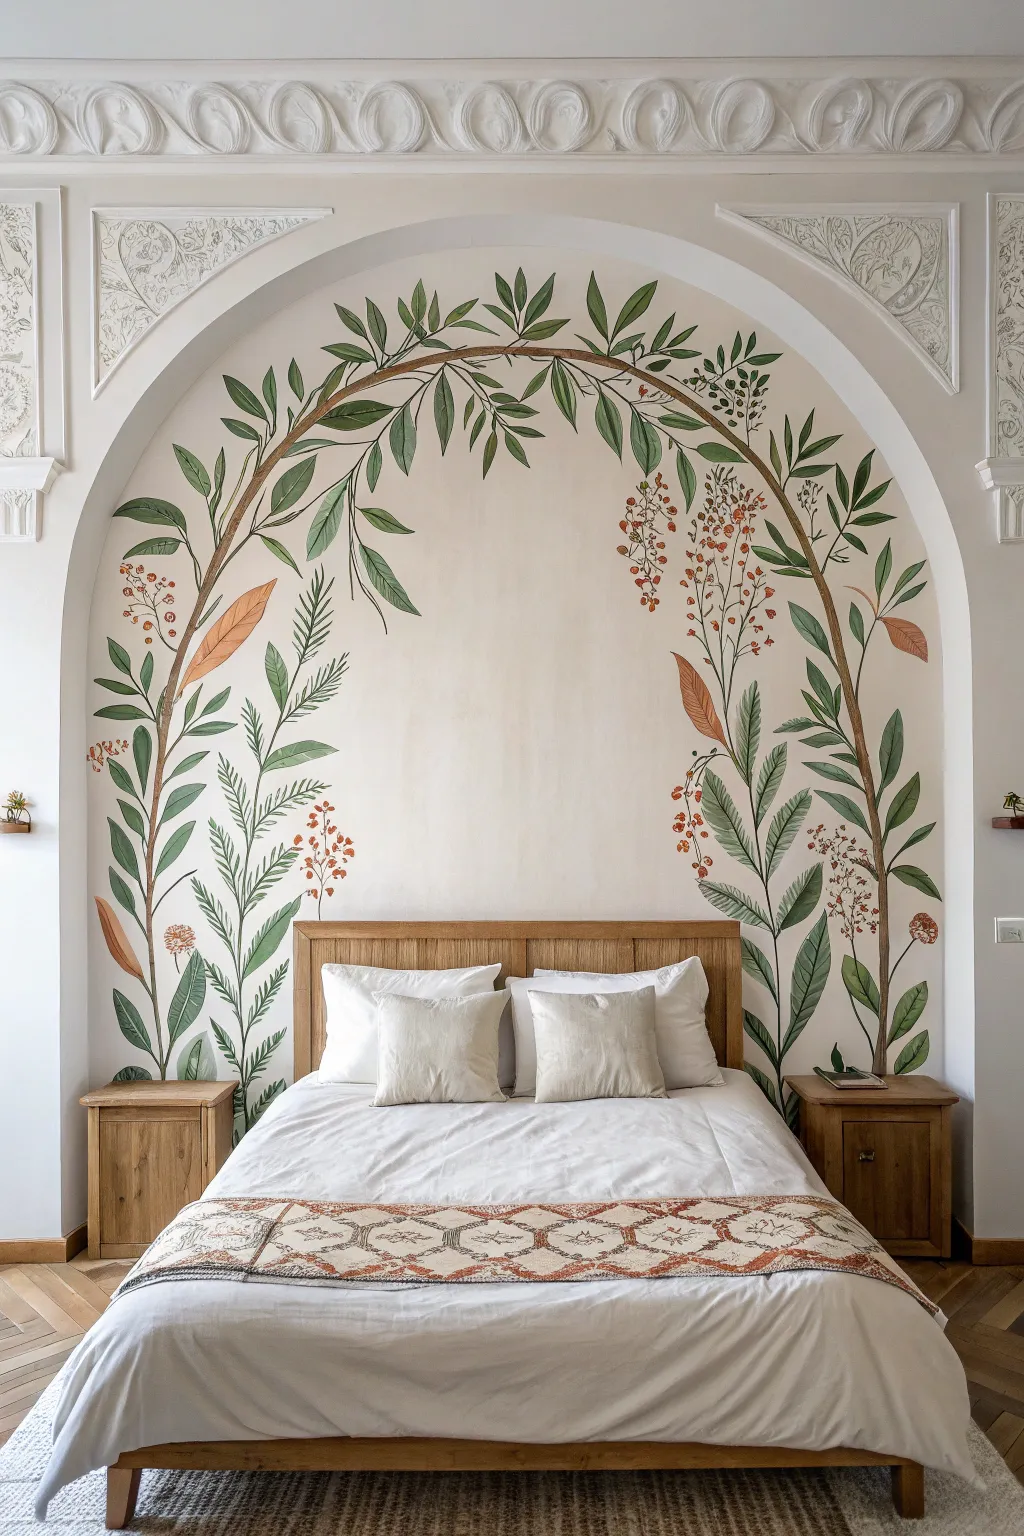
Transform a simple architectural arch or create a faux one behind your bed with this delicate, nature-inspired mural. The design features sweeping olive-green branches and clusters of russet berries that frame the space, bringing an organic, peaceful energy to your bedroom sanctuary.
Step-by-Step
Materials
- Interior latex paint (soft cream/off-white for base)
- Acrylic mural paints or sample pots (olive green, forest green, sage, russet orange, brown)
- Pencil and large eraser
- Angled sash brush (2-inch)
- Round artist brushes (sizes 4, 8, and 12)
- Small liner brush (size 0 or 1)
- Step ladder
- Painter’s tape and drop cloth
- A long piece of string and a tack (optional, for tracing the arch)
- Water cup and paper towels
Step 1: Preparing the Canvas
-
Clear and clean:
Move the bed away from the wall to give yourself plenty of working room. Wipe down the archway surface with a damp cloth to remove dust, ensuring your paint adheres perfectly. -
Base coat application:
If your arch isn’t already a warm, neutral tone, apply a fresh coat of soft cream or off-white latex paint. Let this cure for at least 4-6 hours so your mural lines stay crisp. -
Define the boundary:
If you are painting inside a physical recess like the photo, tape off the decorative molding edges to protect them. If you are painting on a flat wall to *fake* an arch, use the string-and-tack method to pencil in a perfect semi-circle to guide your composition.
Step 2: Sketching the Structure
-
Mapping the main stems:
Using a light pencil grip, sketch two main structural branches rising from behind where the headboard will sit. Curve them gently to follow the shape of the arch, leaving a gap of open space at the very top center. -
Adding secondary branches:
Draw thinner offshoot branches extending inward and upward from the main stems. Keep the lines fluid and slightly irregular; nature rarely produces perfect straight lines. -
Roughing in leaf placement:
Lightly mark the direction and size of the larger leaves. Don’t draw every single detail, just give yourself a roadmap of where the dense foliage clusters will go versus the airy spaces.
Fixing “Heavy” Leaves
If a leaf looks too dark or blob-like, wait for it to dry, then paint a thin line of the wall color down the center or along one edge to visually slim it down and add a highlight.
Step 3: Painting the Foliage
-
Painting the stems:
Mix a medium brown with a touch of olive green for the woody stems. Using the size 8 round brush, paint the main branches, pressing harder at the base for thickness and lifting pressure as you reach the delicate tips. -
Base layer of leaves:
Start with your darkest forest green. Use the size 12 brush to paint the largest leaves near the bottom and middle. Use a singular stroke motion—press down to widen the belly of the leaf, then pull up to create a sharp point. -
Mid-tone greenery:
Switch to your olive green shade. Paint the majority of the leaves, overlapping some of the darker ones once they are dry to visual depth. Vary the angles so they look like they are swaying. -
Adding lighter accents:
Using a sage or pale green, add the smallest, youngest leaves at the tips of the branches. I find that grouping these in sets of three often creates a pleasing natural rhythm. -
Fern-like details:
With a thinner brush (size 4), add the feathery, fern-like sprigs near the bottom. use quick, short flicks of the brush to mimic the texture of pine or fern needles.
Add Dimension
Mix a tiny drop of white into your green paint and add a quick highlight stroke to the top edge of the larger leaves. This makes them look like they are catching the sunlight.
Step 4: Details & Finishing Touches
-
Introducing color:
Mix a muted russet or terracotta orange. Paint the singular, larger accent leaves scattered throughout the design. These provide a lovely autumnal contrast to the heavy greenery. -
Berry clusters:
Dilute your russet paint slightly or use a reddish-brown. With the tip of your size 4 brush, dot clusters of small berries hanging from the thinner, drooping branches. Vary the size of the dots slightly for realism. -
Fine line work:
Take your liner brush and the dark brown paint to add central veins to the largest leaves and connect any floating berries back to their stems. -
Review and refine:
Step back to the other side of the room. Look for any bald spots that break the flow of the arch. Fill these in with small sprigs or single leaves, but remember that negative space is important for this airy look. -
Erase and clean:
Once the paint is completely bone-dry (wait overnight if possible), gently erase any visible pencil marks. Remove your painter’s tape carefully and move the bed back into place.
Enjoy waking up under your serene canopy of hand-painted nature every morning

PENCIL GUIDE
Understanding Pencil Grades from H to B
From first sketch to finished drawing — learn pencil grades, line control, and shading techniques.
Explore the Full Guide
Stencil-Style Leaf Silhouettes for Quick Impact
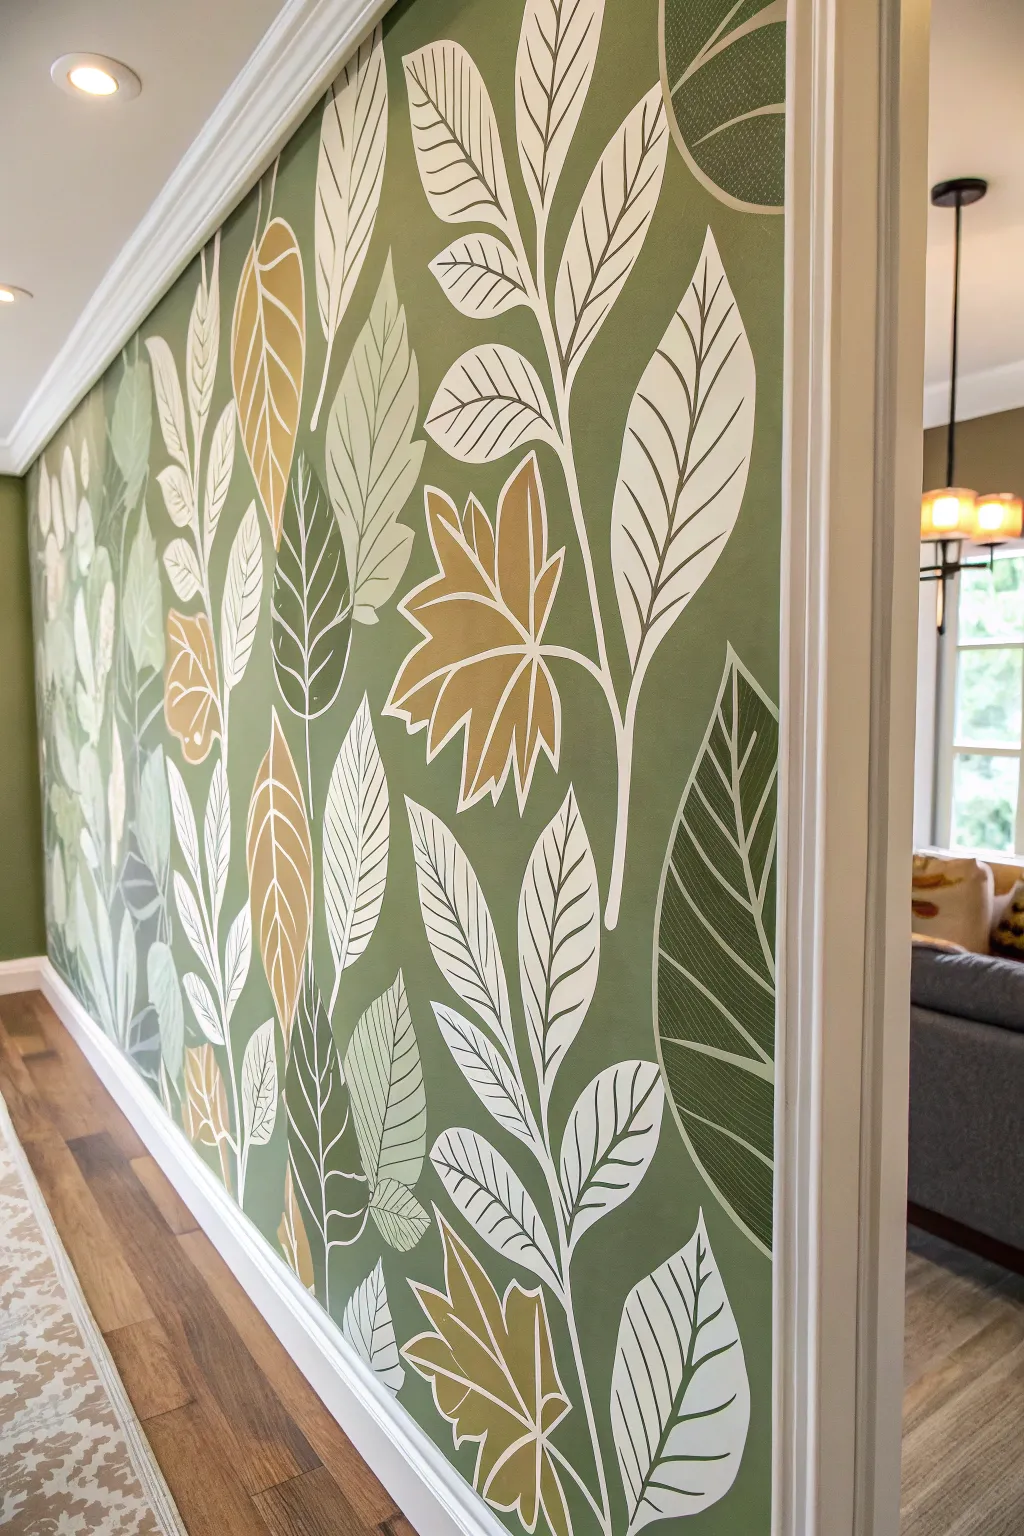
Transform a plain hallway into a lush, illustrated canopy with this large-scale leaf mural. By using a limited color palette of earthy greens and golds against a mossy background, you create a sophisticated, wallpaper-like effect without the hassle of hanging paper.
How-To Guide
Materials
- Latex interior wall paint (Base color: Medium Moss Green)
- Latex paints for leaves (Sage Green, Dark Forest Green, Ochre/Gold, Off-White)
- White or Cream paint pen (medium and thick tips)
- Pencil and eraser
- Cardstock or stencil acetate
- Craft knife and cutting mat
- Small foam roller
- Assorted angled sash brushes (1-inch and 2-inch)
- Painter’s tape
- Drop cloth
- Damp rag for mistakes
Step 1: Preparation and Base Coat
-
Prep the space:
Clear the area and lay down a drop cloth to protect your flooring. Tape off the ceiling line, baseboards, and any adjacent walls or door frames with painter’s tape to ensure crisp edges. -
Apply base color:
Roll on two coats of your medium moss green base color. Allow the first coat to dry completely before applying the second to ensure solid, opaque coverage. -
Create leaf templates:
While the wall dries, draw three to four distinct leaf shapes on cardstock or acetate. Include a standard oval leaf, a serrated maple-like leaf, and a long, slender willow leaf. Vary the sizes from 6 inches to 18 inches for visual interest. -
Cut the templates:
Carefully cut out your leaf shapes using a craft knife. You can choose to use the negative space as a traditional stencil or keep the cutout shape to trace around depending on your comfort level; for this project, tracing the cutout shape is often easier.
Step 2: Planning the Composition
-
Map out the flow:
Lightly sketch a few curved, vertical lines on the wall with a pencil to represent the main stems. These should reach from the bottom of the wall almost to the top, creating a sense of upward growth. -
Trace leaf placements:
Hold your cardboard leaf cutouts against the wall along your sketched stems and trace them lightly with a pencil. I find it helpful to rotate the shapes and flip them over occasionally so they don’t look like carbon copies of each other. -
Review the balance:
Step back to the other side of the room to check the density. You want a mix of overlapping clusters and open green space. Add more traced leaves if the wall feels too sparse.
Keep it Organic
Don’t aim for perfect symmetry. In nature, leaves twist and turn. Allow some traced leaves to run off the edge of the wall or corners to make the mural feel expansive.
Step 3: Painting the Foliage
-
Color blocking strategy:
Assign colors to your specific leaf shapes or clusters. Plan to paint about 60% in sage or lighter green, 20% in dark forest green, and 20% in the accent ochre/gold color. -
Paint the first leaves:
Using a 1-inch angled sash brush, carefully fill in the pencil outlines of your first color group. Don’t worry about perfect edges right now, as the outline step later will clean them up. -
Fill the accent leaves:
Switch to your ochre/gold paint for the maple-style leaves and scattered clusters. This warm tone brings the mural to life and breaks up the monochromatic green palette. -
Add dark depth:
Technical note: Paint the darker forest green leaves last. Place these seemingly ‘behind’ lighter leaves to create a sense of depth and shadow within the foliage. -
Connect the stems:
Use a thin liner brush and off-white paint to draw the main stems connecting your leaves. Keep the lines fluid and varying in thickness—thicker at the bottom, tapering off as they reach the top.
Add Metallic Sheen
Mix a clear glaze with gold mica powder and paint it over just the ochre leaves. They will catch the light beautifully when the hallway sconces are turned on.
Step 4: Detailing and Outlining
-
Prepare the paint pen:
Shake your white or cream paint pen thoroughly and test the flow on a scrap piece of cardboard to ensure it isn’t dripping or dry. -
Outline the shapes:
Trace the outer edge of every painted leaf with the paint pen. This white halo gives the mural its distinctive ‘print’ or stencil look and hides any wobbly brushstrokes from the previous phase. -
Add central veins:
Draw a single, long line down the center of each leaf, following its curvature. Don’t use a ruler; a slightly organic, hand-drawn curve looks more natural. -
Draw secondary veins:
Add angled lines branching off the center vein. Vary the spacing based on the leaf type—maple leaves get radiating veins, while oval leaves get parallel ribs. -
Create ‘ghost’ leaves:
For added artistic flair, draw a few leaf outlines directly onto the moss green background without filling them with paint. These open line-drawings add lightness and airiness to the dense pattern. -
Final touches:
Erase any visible pencil marks once the paint is fully dry. Step back and inspect line weights; you may want to go over the main stems a second time to make them stand out boldly.
Now you have a stunning, nature-inspired feature wall that brings the serenity of the outdoors right into your home
Painted Plants Plus Real Plants Layering Trick
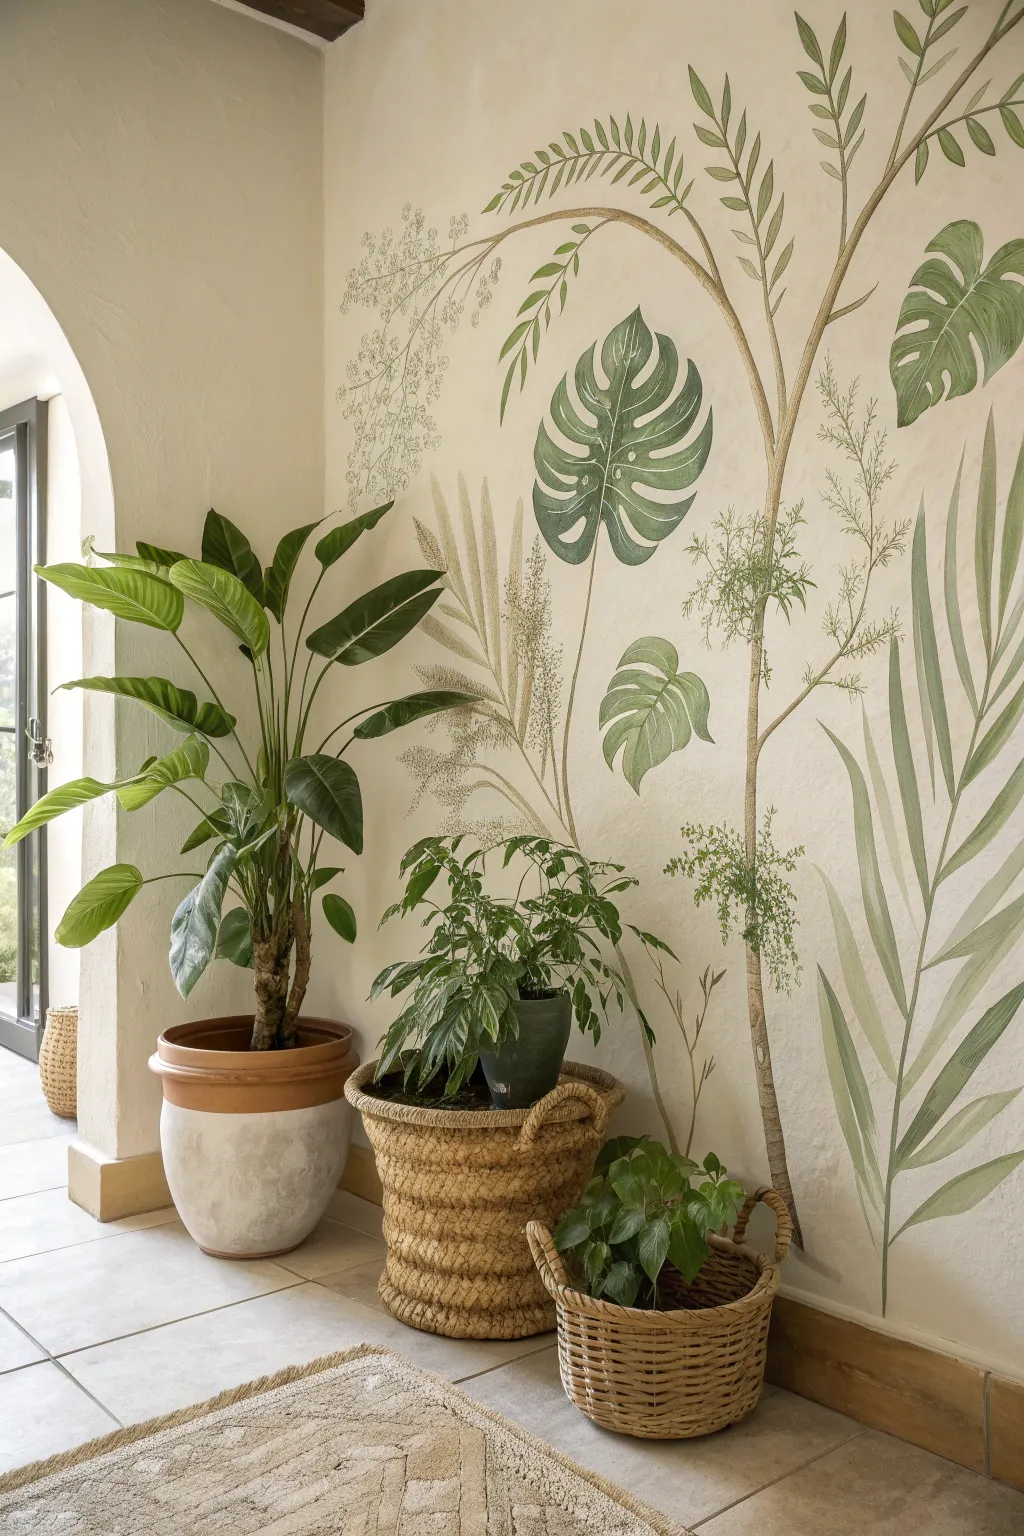
Transform a plain corner into a lush indoor garden by blending hand-painted botanical elements with real potted greenery. This project uses a soft, illustrative style on a textured wall to create depth without overwhelming the space, confusing the eye beautifully between art and reality.
Step-by-Step Tutorial
Materials
- Interior latex paint (soft cream/off-white base)
- Acrylic paints (various greens: olive, sage, emerald, hunter green)
- Acrylic paints (browns: raw umber, burnt sienna)
- Texture medium or joint compound (optional for wall texture)
- Pencil and eraser
- Assorted paintbrushes (flat 1-inch, round #6 and #12, script liner)
- Palette or paper plate
- Water cup and paper towels
- Real potted plants (tall leafy plant, medium bushy plant, small trailing plant)
- Wicker or terracotta planters
Step 1: Preparation & Layout
-
Prepare the wall surface:
Begin with a clean, dry wall. If your wall is smooth, you might want to sponge on a layer of slightly darkened cream paint or add a texture medium to mimic the plaster-like, old-world finish seen in the inspiration photo. Let this base fully cure. -
Position your real plants:
Before drawing anything, place your actual potted plants in the corner exactly where they will live. This is the crucial ‘layering trick’—you need to see where the real leaves sit to plan your painted ones around them. -
Sketch the main structure:
Lightly sketch the primary tree trunk and larger branches using a pencil. Draw the trunk rising tall and slightly curving, essentially filling the ‘negative space’ left by your real plants. -
Mark leaf placements:
Sketch outlines for the large Monstera leaves and elongated palm fronds. Aim for variety in height and angle. I like to draw some leaves ‘behind’ where the real plants sit to enhance the depth effect.
Step 2: Painting the Structure
-
Paint the trunk and stems:
Mix raw umber with a touch of cream to create a soft, woody brown. Using a round brush, paint the main trunk and connecting branches. Keep the edges slightly organic and not too rigid. -
Add branch details:
While the brown is still damp, streak in a little white or darker brown to suggest bark texture, following the curve of the wood. -
Block in large leaves:
For the Monstera leaves, mix a mid-tone sage green. Block in the shapes with a flat brush, leaving the characteristic holes and splits (fenestrations) unpainted so the wall color shows through. -
Create the palm fronds:
Switch to a lighter, more transparent olive green for the tall, feathery palm leaves. Use long, sweeping strokes starting from the stem and lifting the brush as you flick outward to create tapering leaf tips.
Uneven Paint Coverage?
Don’t panic if the wall texture makes lines shaky. Embrace it! The ‘stamped’ look adds vintage charm. Dilute paint slightly to help flow into crevices.
Step 3: Adding Details & Depth
-
Define the veins:
Once the base green is dry, mix a slightly lighter shade of green. Use a liner brush to paint the central veins and ribbing on the Monstera leaves for a graphic, botanical illustration look. -
Add delicate filler foliage:
Using a very diluted, watery grayish-green, paint delicate, fern-like sprigs and seeded stems in the background. These should look faint, as if they are further away or fading into the mist. -
Layering darker tones:
Mix a deep hunter green and carefully paint the undersides or shadowed areas of the large leaves. This high contrast helps the painted leaves stand up against the darkness of the real plant shadows. -
Refine the edges:
Step back and look at the composition. If any painted edges look too sharp, gently dry-brush a little of your wall color over the edges to soften them into the plaster texture.
Go 3D
Install a small wooden shelf directly onto the mural wall (perhaps on a painted branch) and place a trailing ivy plant on it for an extra layer of illusion.
Step 4: Final Styling
-
Erase guidelines:
Once the paint is completely dry (give it a few hours), gently erase any visible pencil marks. Be careful not to rub smoothly painted areas too vigorously. -
Re-place the planters:
Move your real plants back into position. Adjust the rotation of the pots so the real leaves overlap the painted stem bottoms, hiding the transition point where art meets floor. -
Coordinate the pots:
For a cohesive look, use natural textures for your containers. Wicker baskets and terracotta pots with a white-washed finish complement the earthy tones of the mural perfectly.
Step back and admire how difficult it is to tell where your garden ends and your art begins


One Giant Stem in Minimalist Style
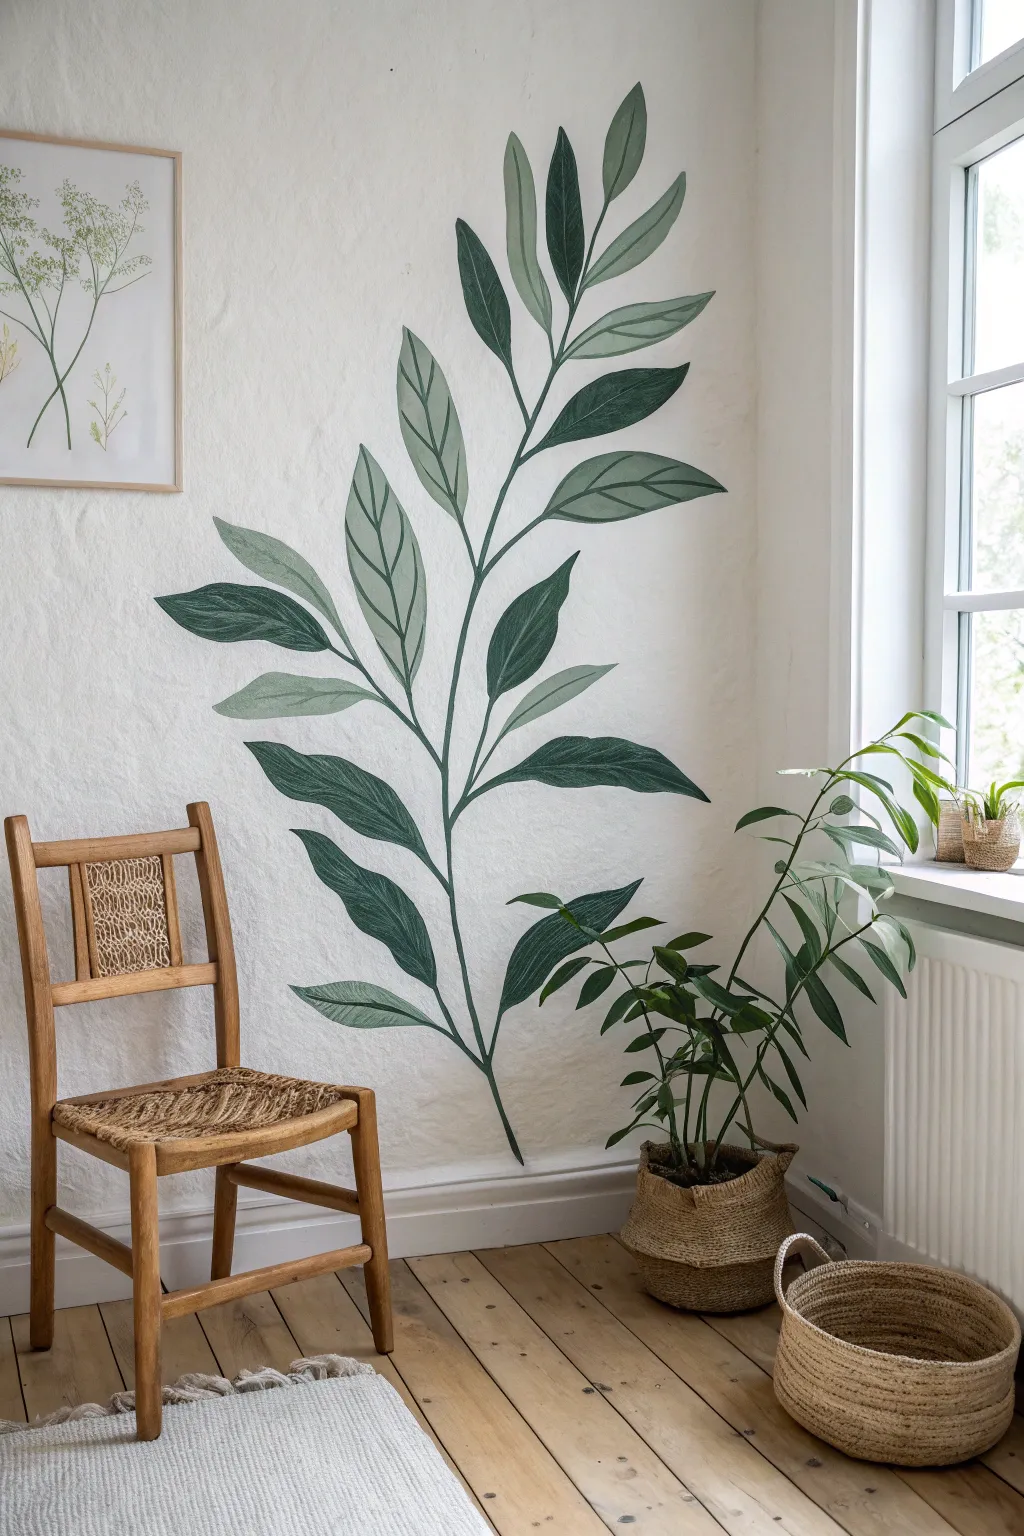
Transform a plain white wall into a serene focal point with this oversized botanical mural. Featuring a single, elegantly curved stem with two-tone leaves, this project uses simple shapes and clean lines to achieve a sophisticated, nature-inspired look without requiring advanced painting skills.
How-To Guide
Materials
- Interior wall paint (matte or eggshell finish)
- Dark forest green acrylic or latex paint
- Soft sage green acrylic or latex paint
- Pencil for sketching
- Large eraser
- Medium-sized flat paintbrush (1-inch width)
- Small round paintbrush (size 4 or 6) for details
- Painter’s tape (optional, for baseboards)
- Drop cloth
- Step stool or ladder
Step 1: Planning and Sketching
-
Prepare the space:
Clear the area of furniture and lay down your drop cloth to protect the floor. If you are painting near the baseboards, apply a strip of painter’s tape to keep the trim clean. -
Visualize the flow:
Stand back and look at your wall to decide on the curve of the main stem. It should start near the floor and reach upwards, leaning slightly to the right to mimic natural growth towards a light source. -
Lightly sketch the spine:
Using a pencil, draw a single, long line for the main stem. Keep your pressure extremely light so it’s easy to erase later. Don’t worry about thickness yet; just get the gesture and curve right. -
Mark leaf positions:
Along the main stem, mark small ticks where the petioles (leaf stems) will attach. Alternate them on the left and right sides rather than having them directly opposite each other, as this looks more organic. -
Outline the leaves:
Sketch the leaf shapes attached to your tick marks. Aim for an elongated almond or lanceolate shape. Vary the sizes slightly, with larger leaves at the bottom and smaller, younger leaves near the top tip.
Keep it Loose
Don’t aim for perfect opacity. Allowing brushstrokes to show through creates a hand-painted, illustrated look that adds charm and texture to the flat wall.
Step 2: Painting the Structure
-
Mix your main stem color:
Pour out your dark forest green paint. If it feels too stark, I like to mix in a tiny drop of the sage green to harmonize the palette. -
Paint the central stem:
Using the small round brush, paint over your pencil line for the main stem. Start thicker at the base (near the floor) and let the line taper to a fine point at the top. -
Add the leaf stems:
Connect your sketched leaf outlines to the main stalk with thin, painted lines. Ensure these connections feel fluid, curving gently upwards rather than sticking out at stiff angles.
Add Depth
Paint half of a single leaf in a slightly different shade (lighter or darker) to mimic how light hits a folded leaf surface for a 3D effect.
Step 3: Filling the Leaves
-
Plan your color distribution:
Decide which leaves will be dark and which will be light. In the reference, they are mixed fairly evenly. Mark the ‘light’ leaves with a tiny piece of tape or a faint pencil ‘L’ so you don’t get confused while painting. -
Paint the dark leaves first:
Using the flat distinct brush, fill in the dark green leaves. Use long, confident strokes that follow the direction of the leaf growth; visible brush texture adds character to this style. -
Define the edges:
Go back with your smaller round brush to crisp up the edges and point the tips of the dark leaves, ensuring the almond shape is sharp and elegant. -
Apply the sage green:
Switch to a clean brush and fill in the remaining leaves with the soft sage green paint. These lighter leaves create a sense of depth, suggesting some foliage is catching more light or is translucent. -
Add the vein details:
Once the base layers are dry to the touch, mix a slightly darker version of your sage green (or dilute the dark forest green heavily with water to make a glaze). -
Paint the central veins:
Draw a thin line down the center of each lighter leaf. This splits the leaf visually and adds to the botanical illustration feel. -
Create secondary veins:
Add faint, angled lines branching off the center vein on the lighter leaves. Keep these very subtle and swift. -
Detail the dark leaves:
For the dark leaves, mix a lighter tint (add a little white or sage to the dark green) and paint the central vein line so it stands out against the dark background.
Step 4: Finishing Touches
-
Check for gaps:
Step back and look for any white spots where the paint didn’t fully cover the wall texture. Touch these up with the appropriate color. -
Erase guidelines:
Once the paint is completely 100% dry (give it a few hours), gently erase any visible pencil marks that weren’t covered by paint.
Now you have a stunning, permanent piece of botanical art that brings life to your room without taking up any floor space
Color-Blocked Leaves Matched to Your Room Palette
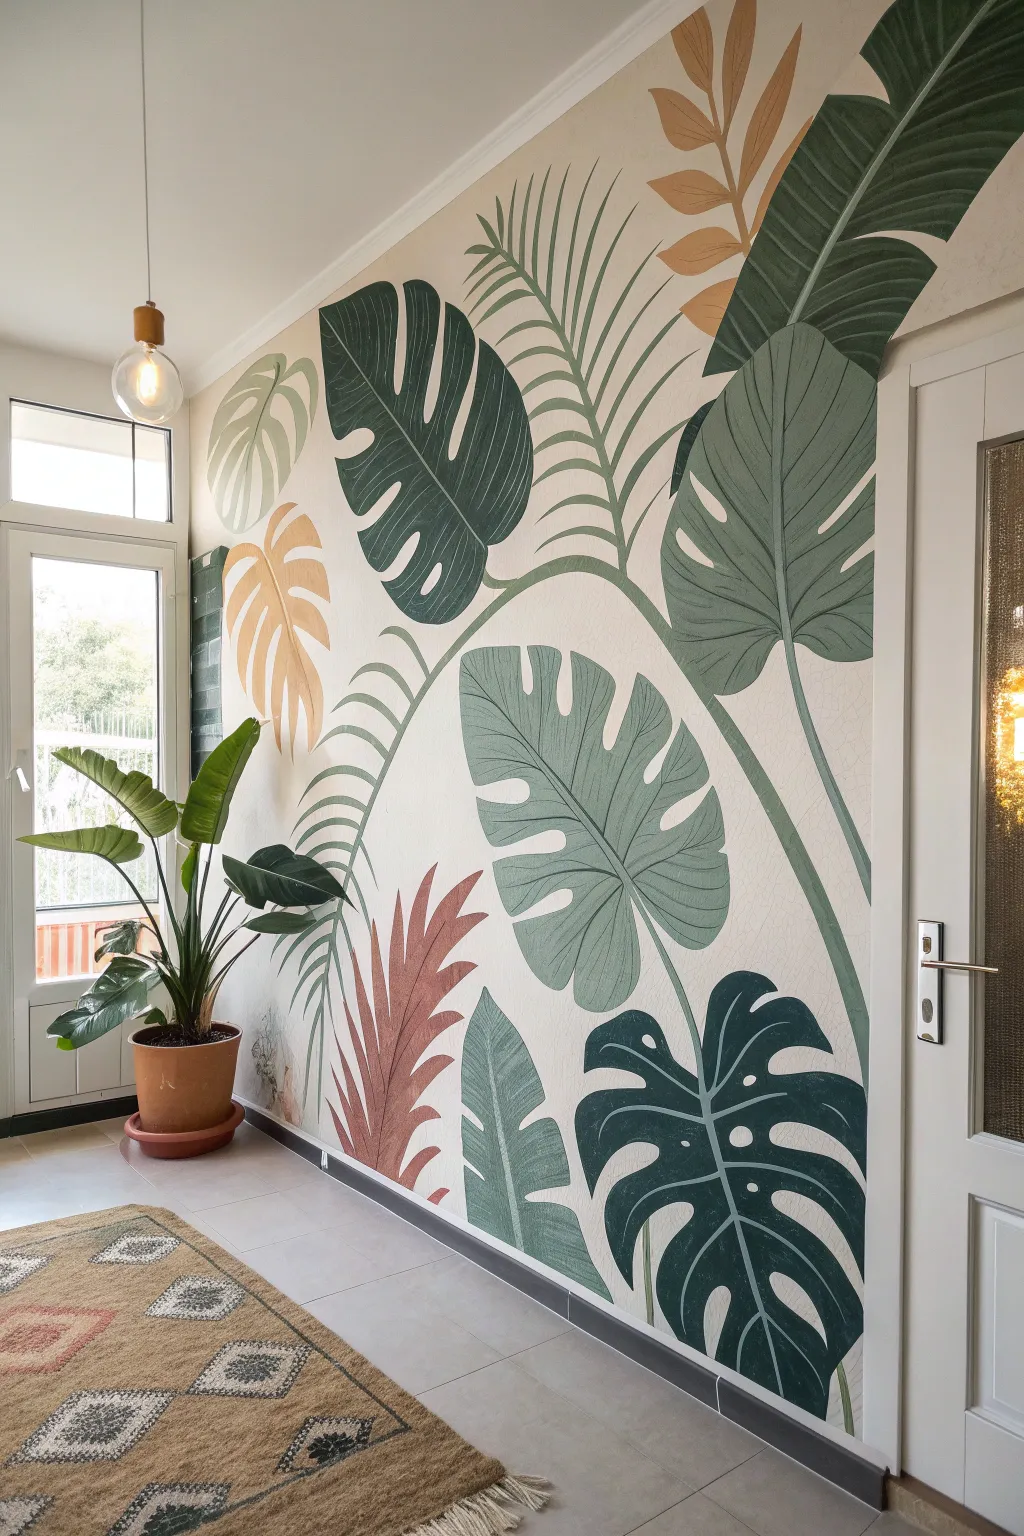
Transform a plain hallway into a lush, tranquil conservatory with this large-scale mural featuring oversized tropical foliage. Using a palette of sage, forest green, terracotta, and soft ochre, you’ll create a stylized botanical statement that warms up stark white walls without overwhelming the space.
Detailed Instructions
Materials
- Interior latex paint (Eggshell finish)
- Colors: Cream (base), Deep Forest Green, Sage Green, Terracotta, Mustard Yellow
- Pencils and eraser
- Reference images of monstera and palm leaves
- Assorted angled sash brushes (1.5 inch and 2 inch)
- Small round detail brush (size 4 or 6)
- Painter’s tape
- Drop cloth
- Ladder or sturdy step stool
- Chalk (optional, for sketching)
Step 1: Preparation and Layout
-
Prep the surface:
Clear the area and wipe down the wall with a damp cloth to remove dust and grease. Tape off the baseboards, door frames, and adjacent walls with painter’s tape, then lay down your drop cloth. -
Establish the background:
Roll on two coats of your cream or off-white base color. Let this dry completely—usually at least 4 hours—before attempting to sketch, to prevent the pencil from digging into soft paint. -
Map out the composition:
Using light pencil strokes or white chalk, sketch the main stems first. Start from the bottom corners and sweep them upwards and inwards to create a natural flow. -
Sketch the leaf outlines:
Draw the large leaf shapes attached to your stems. Don’t worry about perfect botanical accuracy; simple, bold shapes work best. Alternate between huge monstera-style leaves and slender, feathered palm fronds to create variety.
Natural Flow Tip
Use a projector to cast real leaf silhouettes onto the wall if you aren’t confident sketching freehand. It guarantees proportional shapes.
Step 2: Blocking in Color
-
Start with the darkest tones:
Mix your Deep Forest Green. Using an angled sash brush, fill in the largest, lowest leaves. I find it easiest to outline the shape carefully with the brush tip first, then fill in the center. -
Apply the mid-tones:
Move on to the Sage Green for the medium-sized leaves. These lighter greens effectively push the darker leaves into the foreground, creating depth. -
Add warmth:
Paint the accent leaves in Terracotta and Mustard Yellow. Place these sporadically to balance the heavy greens; think of them as the visual highlights of the mural. -
Create texture:
For a painterly look, don’t make the coverage perfectly solid. Allow faint brushstrokes to remain visible, mimicking the natural fibrous texture of plant life.
Step 3: Detailing and Refining
-
Add leaf veins:
Once the base colors are dry to the touch, mix a lighter version of each color (add a drop of white or cream). Use your small round brush to paint thin veins down the center of each leaf. -
Define the edges:
Check your outlines. If any edges are shaky, use the original wall color on a small brush to ‘cut in’ and tidy up the silhouette from the outside. -
Layering check:
Where leaves overlap, ensure the leaf in ‘front’ has a crisp edge against the one behind it. You may need a second coat on the top leaf to ensure it looks solid. -
Final inspection:
Stand back at the far end of the room to view the mural as a whole. Look for any bald spots or uneven textures and touch them up with the appropriate color. -
Cleanup:
Carefully peel away the painter’s tape while the touch-ups are still slightly tacky to ensure a clean line, then remove the drop cloth.
Uneven Coverage?
If the paint looks streaky, don’t panic. Apply a second thin coat in the opposite direction (cross-hatching) to build a rich, uniform finish.
Enjoy the calming atmosphere your new botanical feature wall brings to your home
Corner-Wrap Jungle That Turns the Wall
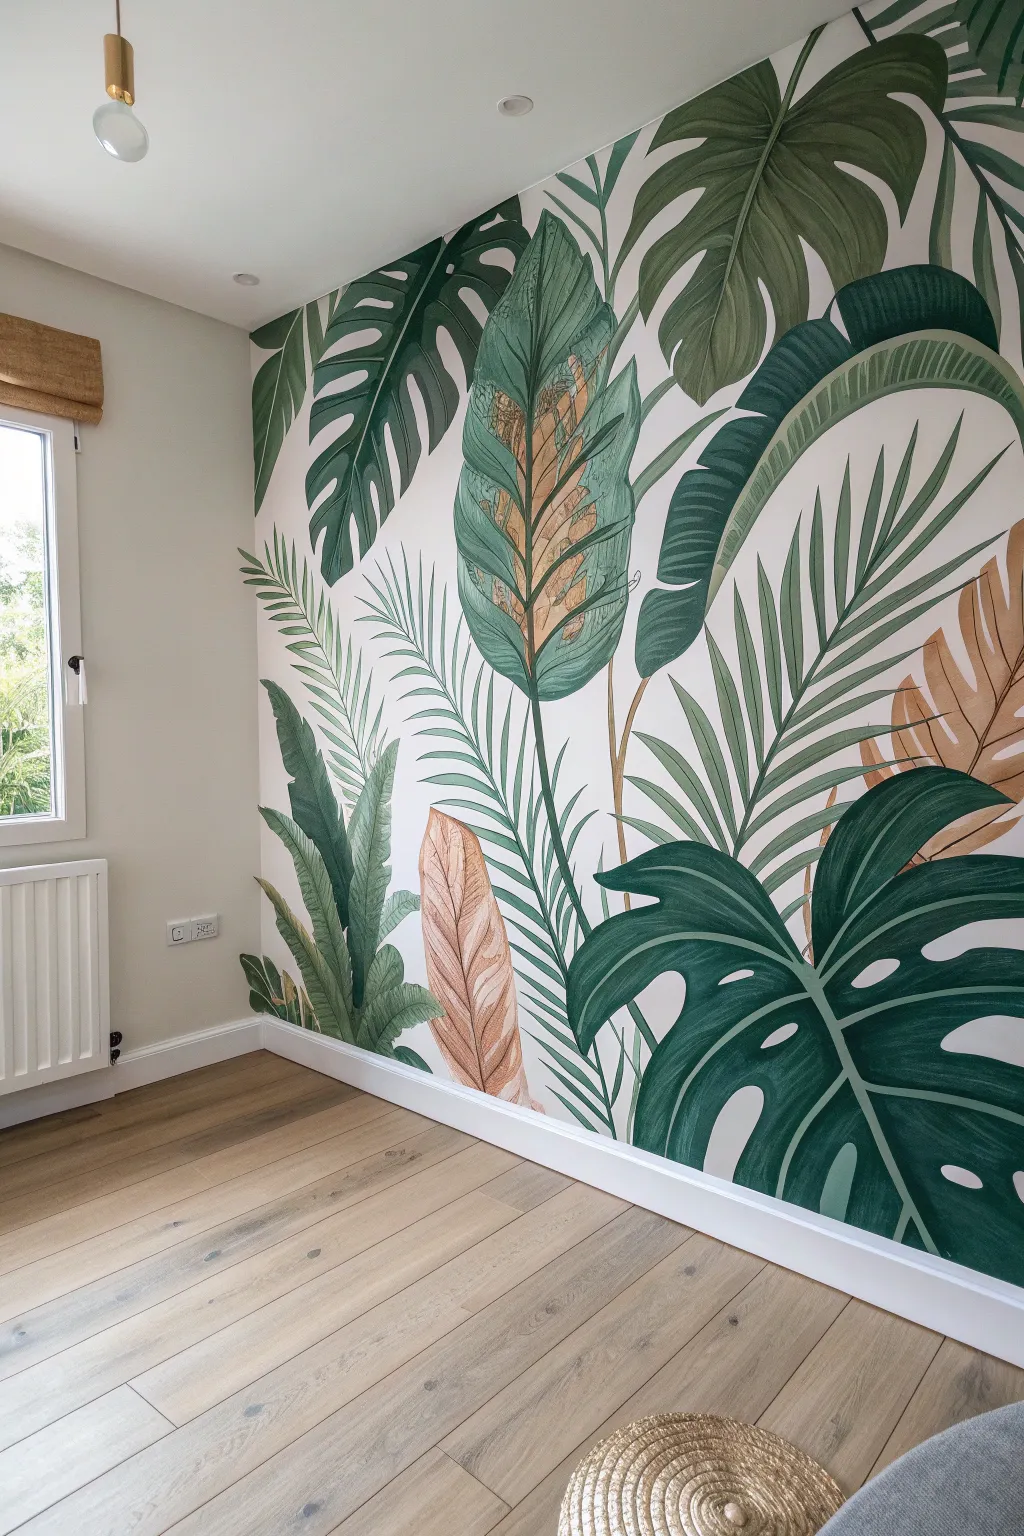
Transform a blank corner into a lush botanical sanctuary with this large-scale tropical leaf mural. Featuring oversized monstera and palm fronds in deep greens and subtle gold accents, this project brings the vibrancy of the jungle indoors without overheating the space.
Step-by-Step Tutorial
Materials
- Latex interior wall paint (White for base coat)
- Acrylic mural paints or latex sample pots (Forest Green, Emerald, Sage, Olive, Deep Teal)
- Metallic gold acrylic paint
- Pencil (HB or lighter)
- Eraser
- Digital projector (optional but recommended)
- Assorted synthetic brushes (2-inch flat, 1-inch angled sash, various round detail brushes)
- Painter’s tape
- Drop cloths
- Mixing trays or disposable plates
- Ladder or step stool
Step 1: Preparation & Mapping
-
Prime the Surface:
Begin by cleaning your wall thoroughly to remove dust and grease. Apply a fresh coat of stark white interior latex paint to create a high-contrast canvas; this brightness ensures your deep greens will really pop later. -
Protect the Trim:
Use high-quality painter’s tape to mask off your baseboards, ceiling line, and the adjacent window wall. Lay down drop cloths to protect that lovely wood flooring from accidental splatters. -
Rough Composition:
Stand back and visualize where your largest leaves will go. The goal is to anchor the design with a massive Monstera leaf in the bottom right and fan out taller palm fronds upward. Lightly sketch big oval shapes just to mark the general placement. -
Detailed Sketching:
Refine your leaf outlines. If you aren’t confident freehanding, this is where I like to hook up a digital projector to cast leaf silhouettes onto the wall. Trace the complex split-leaf philodendron shapes and the jagged edges of the palm fronds lightly with a pencil.
Step 2: Painting the Foliage
-
Block in Darkest Greens:
Start with your deepest Forest Green and Deep Teal mix. Paint the large bottom-right Monstera leaf and the shadowed undersides of the upper leaves. Don’t worry about perfect edges yet; just get the color solid on the wall. -
Apply Mid-Tones:
Mix an Emerald green with a touch of Olive. Use your 1-inch angled brush to fill in the large banana-style leaves near the top. Paint with the direction of the veins—from the center stem outward—to build texture naturally. -
Add Lighter Sage Accents:
For the feathery palm leaves extending toward the center, use a Sage green. These leaves should feel lighter and airier, so use a round brush to flick the paint at the tips of the fronds for a tapered look. -
Refining Edges:
Go back over the outlines of your blocked-in shapes with a smaller flat brush. Crisp, clean edges are crucial for this graphic style, so take your time smoothing out any wobbly lines.
Uneven Coverage?
If your greens look streaky, don’t panic. Acrylics often need two coats for full opacity. Wait for the first layer to dry completely before applying a second to avoid lifting the paint.
Step 3: Adding Depth & Detail
-
Veining Work:
Switch to a thin liner brush. Mix a lighter version of your base green (add a little white or yellow) and paint the central veins and ribs of the leaves. For the dark Monstera, use a slightly lighter teal for subtle contrast. -
Integrated Gold Tones:
Identify the leaves that will be your accent pieces—specifically the large central vertical leaf and the smaller fern-like leaf on the far right. Base coat these in a warm beige or tan color first. -
Metallic Texturing:
Once the beige base is dry, dry-brush metallic gold paint over these specific leaves. I find that applying the gold somewhat unevenly creates a beautiful shimmering texture that catches the light differently throughout the day. -
Gradient Blending:
Look for areas where leaves overlap. Darken the leaf that is ‘behind’ the other by glazing a thin layer of watery black or dark green right at the intersection. This separates the layers visually.
Use a Steady Hand
For long stems and sharp leaf tips, use a ‘mahl stick’ (or a clean yardstick) to rest your hand against the wall. This stabilizes your brush strokes for professional lines.
Step 4: Final Touches
-
Erase Guide Lines:
Check the wall closely for any visible pencil marks that weren’t covered by paint. Gently erase them, being careful not to rub the fresh paint if it isn’t fully cured. -
Touch Up Background:
It is almost inevitable that some green paint strayed outside the lines. Take a small brush and your original white wall paint to ‘cut in’ and tidy up the negative space between the leaves. -
Remove Tape:
Slowly peel back your painter’s tape at a 45-degree angle while the paint is dry to the touch but not rock hard, ensuring a crisp line at the baseboards and ceiling. -
Seal (Optional):
If this mural is in a high-traffic area, apply a clear matte acrylic varnish over the painted areas to protect against scuffs and fading.
Step back and enjoy the calming, nature-inspired view you have created right in your own home
Hidden Details Plant Mural With Subtle Shimmer
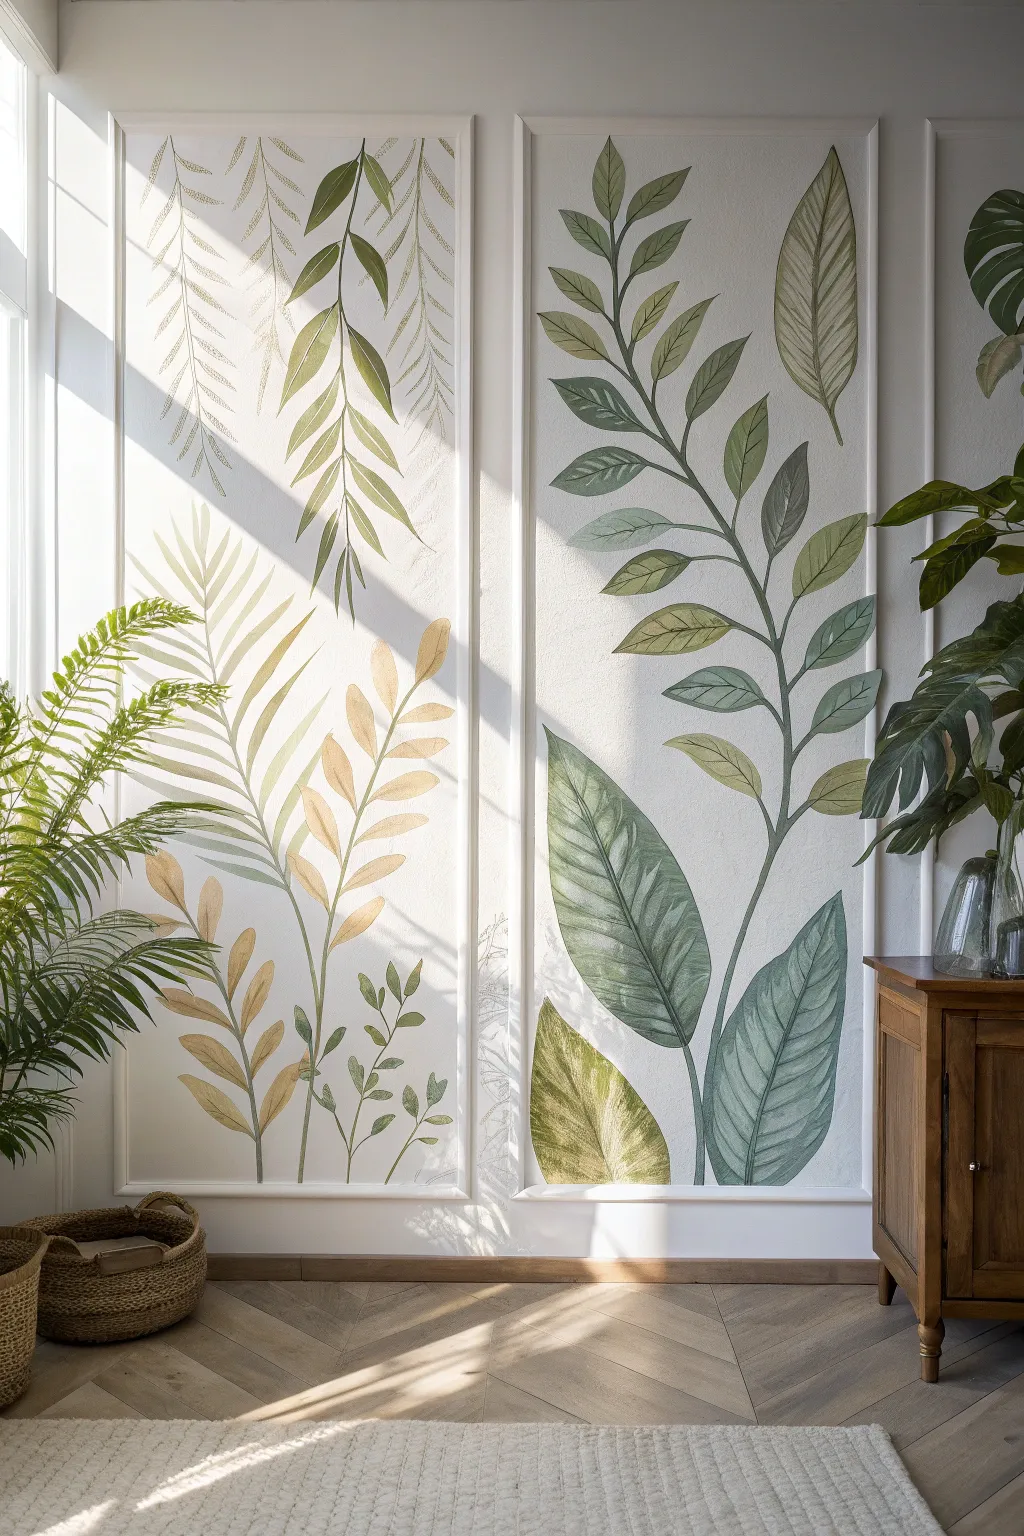
Transform a plain wall into an elegant conservatory with these twin framed botanical panels. The soft, watercolor-style leaves are elevated by hidden metallic details that catch the sunlight, creating a dynamic feature that changes throughout the day.
Step-by-Step Tutorial
Materials
- Semi-gloss white interior latex paint (base)
- Decorative molding trim (batten framing)
- Construction adhesive and finishing nails
- Watercolor glazing medium
- Acrylic paints (Olive Green, Sage, Burnt Umber, Raw Sienna, Cream)
- Metallic acrylic paint or shimmer medium (Gold and Champagne)
- Painters tape and drop cloth
- Sash brush and various round watercolor brushes (sizes 6, 10, 12)
- Chalk or light pencil
- Sea sponge (optional)
Step 1: Preparing the Canvas
-
Define the Panel Space:
Measure two identical vertical rectangles on your wall, leaving about 4-6 inches of space between them. Use a level and a pencil to mark the outline where your molding will eventually go. -
Prime the Surface:
Paint the area inside your pencil marks with a fresh coat of semi-gloss white paint. This sheen helps the subsequent glazes glide better than flat paint would. -
Install the Trim:
Cut your decorative molding to size with 45-degree miter cuts at the corners. Attach the frame to the wall using construction adhesive and a few finishing nails to secure it while the glue cures. -
Caulk and Finish Frame:
Fill any nail holes and corner gaps with wood filler or caulk. Once dry, paint the frame to match the wall color or a soft off-white to create a cohesive ‘canvas’ look.
Wet-on-Wet Blending
Keep a spray bottle of water handy. Lightly mist the wall before applying glaze to extend drying time and correct mistakes easily.
Step 2: Sketching and Blocking
-
Sketch the Composition:
Using white chalk or a very light pencil, sketch your main stems. For the left panel, draw sweeping curves moving upward and left; for the right panel, create a dominant central stem reaching upward. Keep lines loose and flowing. -
Outline Leaf Shapes:
Add large, broad leaves at the bottom of the right panel and varying fern-like or palm-like fronds on the left. Don’t worry about details yet; just focus on the overall balance of positive and negative space. -
Mix Your Glazes:
Mix your acrylic colors with the watercolor glazing medium in a 1:4 ratio. You want the paint to be translucent, not opaque. Prepare a palette of sage green, olive, deep brownish-green, and a warm golden tan.
Step 3: Painting the Botanicals
-
Paint the Stems:
Using a size 10 round brush loaded with the deep brownish-green glaze, trace your stem lines. Vary the pressure on the brush to make the lines naturally thicken and thin. -
Lay the Base Leaf Color:
Fill in the large lower leaves on the right panel with the sage green glaze. Work quickly to keep a ‘wet edge,’ preventing harsh drying lines in the middle of a leaf. -
Add Variation to Foliage:
For the upper leaves, switch between the olive and golden tan mixtures. I find it helpful to slightly overlap some leaves while the paint is still damp to create natural, soft blends. -
Create Depth with Layering:
Once the first layer is dry to the touch (usually 20 minutes), go back over the shadowed areas—where leaves overlap or attach to the stem—with a second coat of the darker green glaze. -
Detail the Veins:
Switch to a size 6 liner brush. Using a more opaque mixture of the Burnt Umber, paint delicate central veins and side veins on the larger leaves. -
paint the Palm Fronds:
On the left panel, use long, sweeping strokes with the golden tan glaze to create the feathery palm leaves. Start at the stem and flick the brush outward to get a tapered point.
Shadow Play
Paint a faint, grey-blue silhouette of a fern behind the main leaves to create a sense of deep 3D distance within the frame.
Step 4: Adding the Shimmer
-
Mix the Metallic Glaze:
Combine your gold and champagne metallic paints with a small amount of glazing medium. It should be subtle, like a whisper of shine rather than solid gold leaf. -
Highlight the Tips:
Brush this metallic glaze gently onto the very tips of the palm fronds and the upper edges of the broad leaves where sunlight would naturally hit. -
Add Hidden Shimmer Lines:
Run a very thin line of metallic gold alongside the main veins of the largest leaves. This detail will be almost invisible until the light hits it from the side. -
Soften Harsh Edges:
If any metallic highlights look too stark, take a damp clean brush and gently blur the edges into the surrounding green paint. -
Final Assessment:
Step back and view the mural from different angles to ensure the shimmer is balanced between the two panels. Add small touches of metallic to any empty-looking spaces for continuity.
Enjoy the calming atmosphere of your new botanical sanctuary as the sunlight dances across the hidden metallic details


Have a question or want to share your own experience? I'd love to hear from you in the comments below!