A plain plate is one of my favorite little canvases because it instantly turns everyday moments into something more personal. If you’re craving fresh plate painting ideas—from super simple patterns to “how did you do that?” designs—here are 21 you can totally make your own.
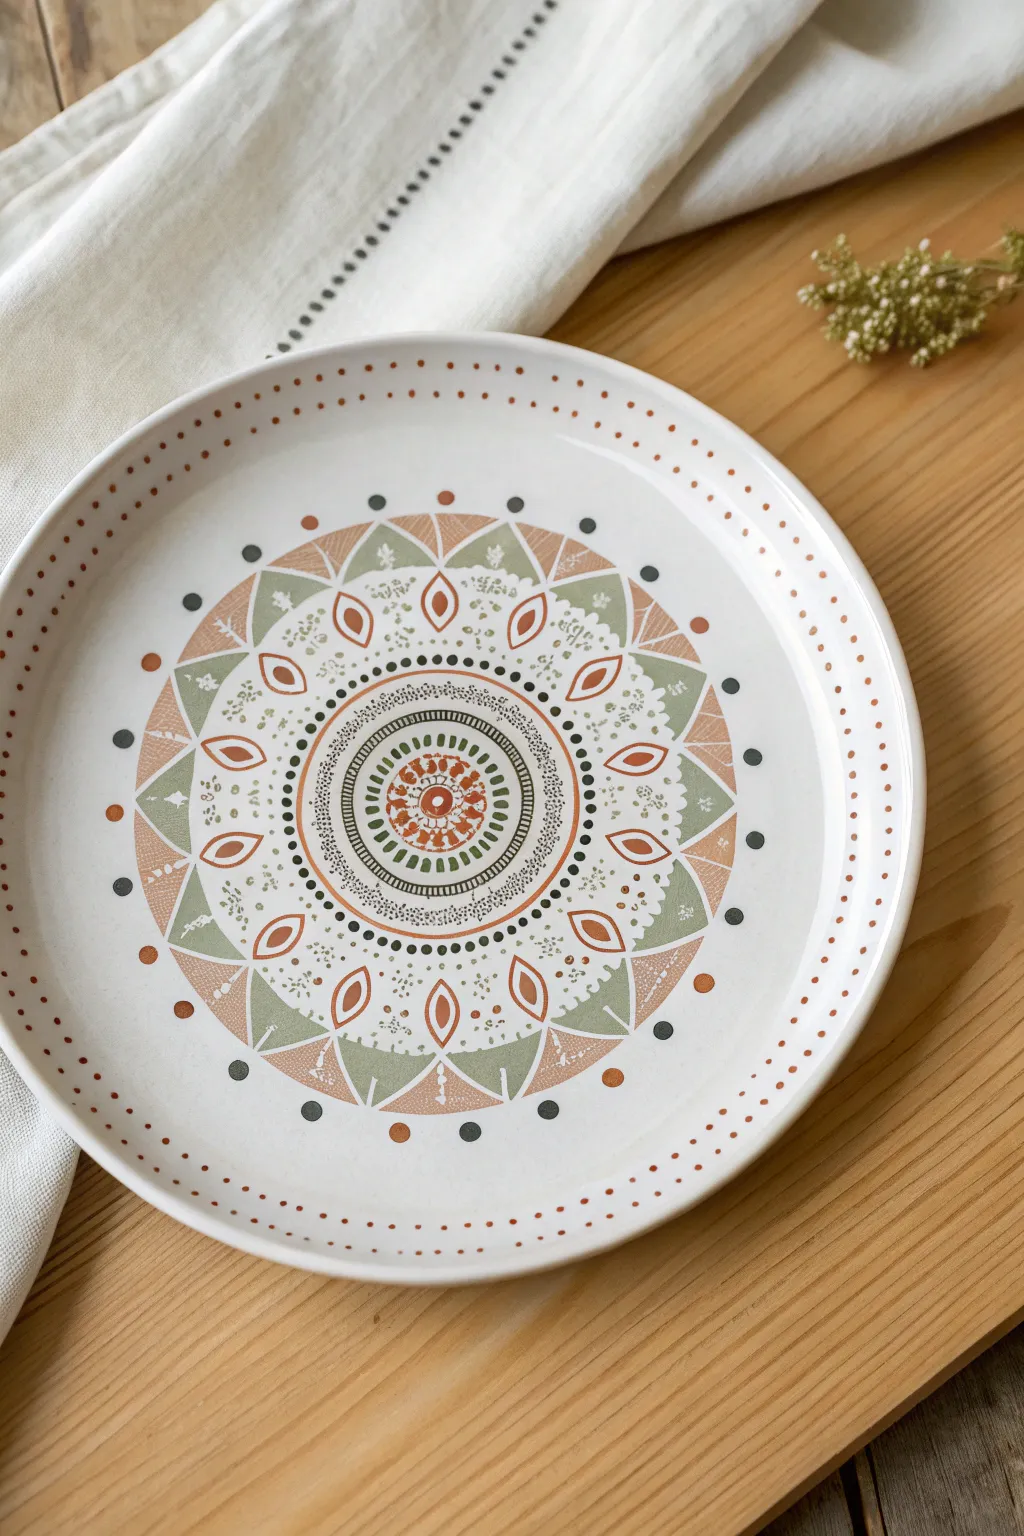
Classic Polka Dot Party
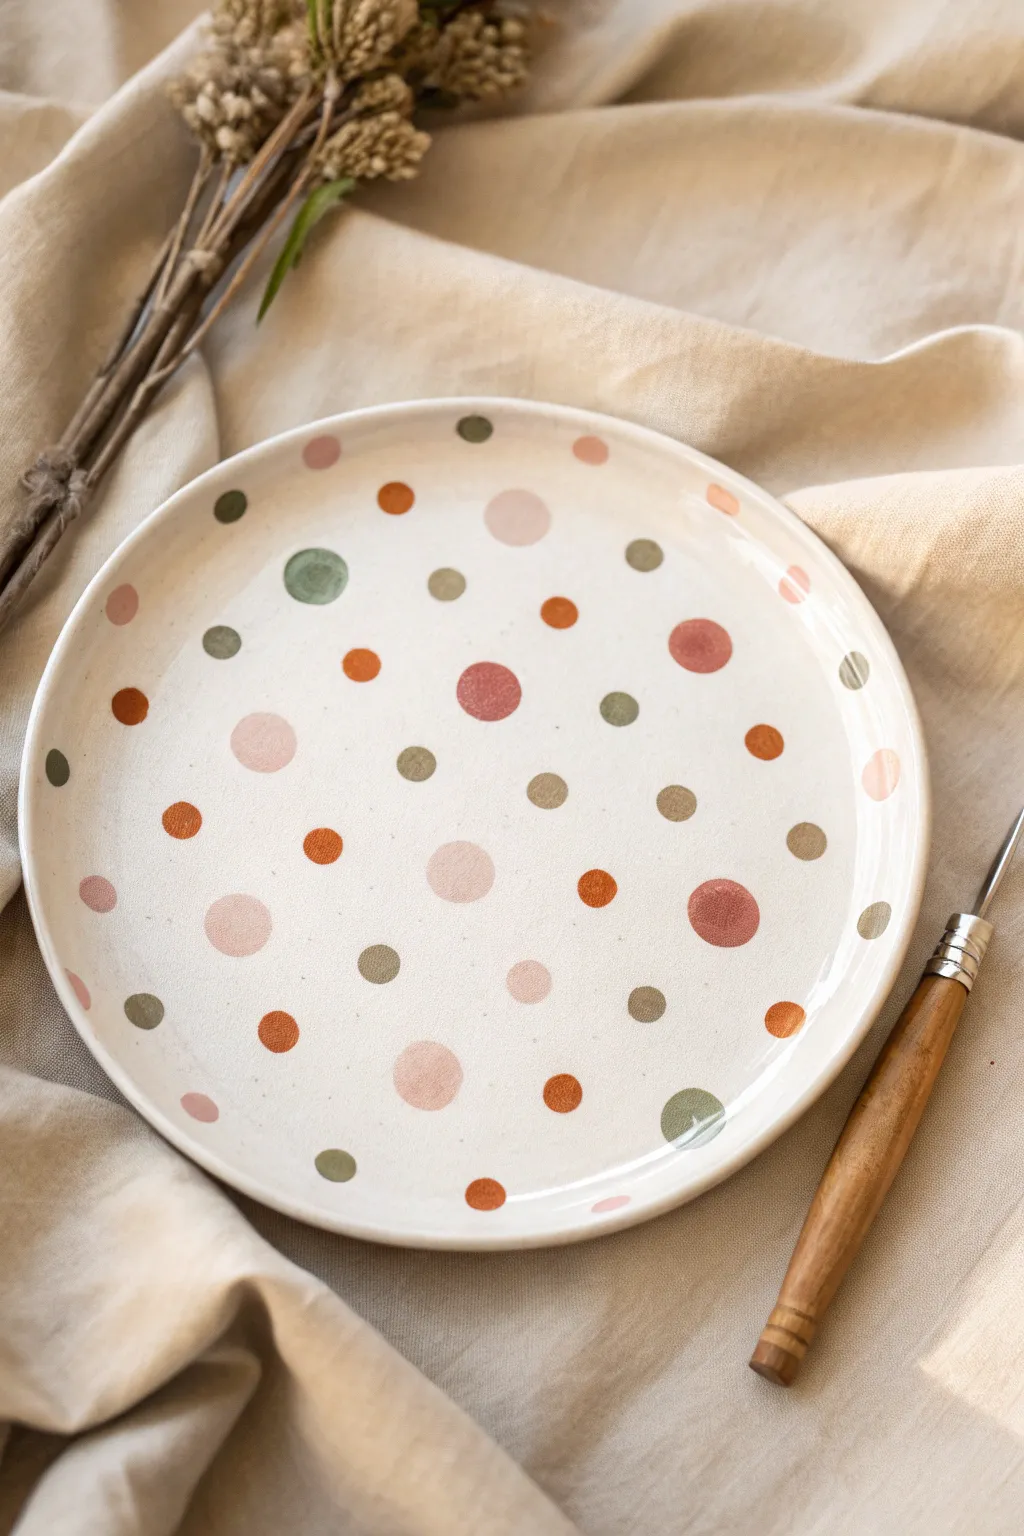
Bring a touch of organic whimsy to your table setting with this delightful speckled plate project. Featuring a harmonious palette of rust, sage, olive, and blush pink dots, the design feels simultaneously modern and timeless.
Step-by-Step
Materials
- White or cream ceramic plate (bisque or glazed, depending on paint choice)
- Ceramic paints or porcelain markers (Rust, Sage Green, Olive, Blush Pink, Burnt Orange)
- Round foam pouncers (sizes: small, medium, large)
- Small round paintbrush (size 2 or 4)
- Rubbing alcohol and cotton pads
- Paper plate or palette
- Oven (for curing)
Step 1: Preparation and Planning
-
Clean surface:
Begin by thoroughly cleaning your ceramic plate. Even invisible oils from your fingers can repel paint, so wipe the entire surface down with rubbing alcohol and a cotton pad. -
Dry completely:
Allow the alcohol to evaporate completely before you start painting; this usually takes just a few seconds but ensures a perfect bond. -
Prepare palette:
Dispense a small amount of each paint color onto your paper plate palette. Keep the colors separated to prevent muddying the hues.
Step 2: Painting the Large Dots
-
Load the large pouncer:
Dip your largest foam pouncer into the blush pink paint. Dab it a few times on a clean part of the palette to ensure the paint is evenly distributed on the foam, not goopy. -
Apply anchor dots:
Press the large pouncer firmly onto the plate to create your first few dots. Place these randomly but sparsely—aim for about 3-5 large pink dots across the surface to anchor the design. -
Switch colors:
Wipe off your pouncer or grab a fresh one of the same size. Load it with the rust or burnt orange color. -
Add contrast:
Stamp a few large rust-colored dots. Try to place these away from the pink ones so the colors are balanced across the white space. -
Create variation:
For a more organic look, I like to press some dots slightly lighter than others, giving them a slightly translucent, watercolor effect.
Uneven Circles?
If pouncers are leaving bubbles or ridges, lightly tap the wet paint with your fingertip to flatten the texture for a smooth finish.
Step 3: Adding Medium and Small Details
-
Medium sage dots:
Switch to a medium-sized pouncer or the handle end of a large paintbrush. Dip it into the sage green paint. -
Fill the gaps:
Place medium green dots in the larger empty spaces between your initial pink and rust circles. Don’t be afraid to put a dot closer to the rim. -
Olive accents:
Using a medium pouncer again, add the darker olive green tone. These darker hues add depth and ground the lighter pastel colors. -
Small brush work:
Pick up your small round paintbrush or a very small dotting tool. Dip it into the burnt orange paint. -
Scatter tiny dots:
Apply the smallest dots sporadically. These should act like confetti, filling in small voids without making the design look cluttered. -
Check the rim:
Don’t forget the edges! Add a few half-dots creating the illusion that the pattern continues off the plate.
Natural Variety
Don’t stress about perfect opacity. Allowing some brushstrokes or transparency makes the plate look hand-thrown and artisanal.
Step 4: Final Touches and Curing
-
Review balance:
Step back and look at the plate from a distance. If you see a large empty white space, add a small dot in a contrasting color to balance it out. -
Clean mistakes:
If any dots smudged or look misshapen, use a damp cotton swab or toothpick to gently scrape away the wet paint before it sets. -
Air dry:
Let the plate sit undisturbed for at least 24 hours. This initial drying phase is crucial before heat setting. -
Bake to cure:
Place the plate in a cold oven. Set the temperature to 300°F (150°C) or according to your specific paint’s instructions. Once the oven reaches temp, bake for 30-35 minutes. -
Cool down:
Turn the oven off and leave the plate inside until it is completely cool. Removing it while hot can cause the ceramic to crack.
Once cooled, your custom speckled plate is ready to add a splash of artistic charm to your next meal


Simple Floral Rim Border
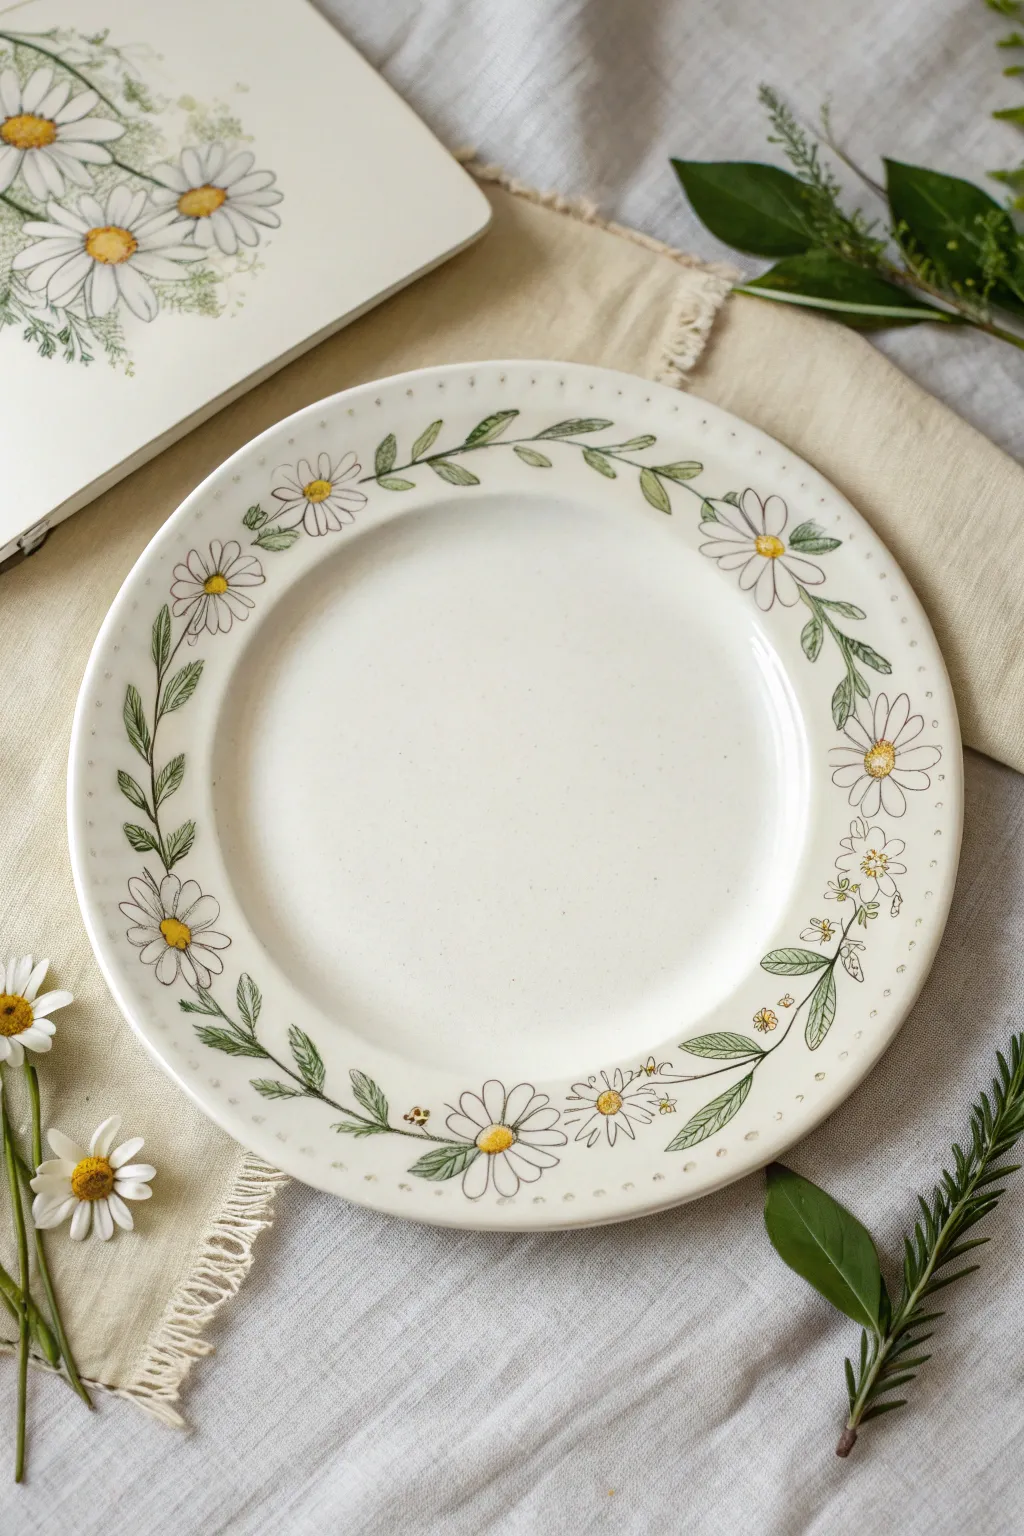
Transform a plain white ceramic plate into a charming cottagecore piece with this delicate daisy chain design. The airy vine motif and sweet florals create a light, cheerful border perfect for spring display or serving sweet treats.
Step-by-Step Tutorial
Materials
- Plain white ceramic plate (smooth rim preferred)
- Ceramic or porcelain paints (emerald green, olive green, bright yellow, white, black/dark grey)
- Fine liner brush (size 0 or 00)
- Small round brush (size 1)
- Rubbing alcohol and cotton pads
- Paper palette or small dish
- Pencil (optional, for light sketching)
- Oven (for curing, if required by paint brand)
Step 1: Preparation & Planning
-
Clean the Surface:
Before painting, precision is key. Wipe the entire rim of your plate thoroughly with rubbing alcohol and a cotton pad. This removes invisible oils and fingerprints that could prevent the paint from adhering properly. -
Mark Flower Placements:
Imagine a clock face on your plate. Lightly mark four small dots at 12, 3, 6, and 9 o’clock using a pencil or a very faint touch of paint. This provides the primary anchors for your daisy chain so the spacing remains balanced. -
Add In-Between Markers:
Place one additional mark between each of your anchor points. You should now have roughly eight equally spaced spots where your main daisy heads will live.
Oops! Smudged paint?
Keep Q-tips and a little rubbing alcohol nearby. If you slip, quickly dampen a Q-tip and wipe away the mistake before it sets. Dry the spot instantly before repainting.
Step 2: Painting the Vines
-
Mix Your Greens:
On your palette, place a drop of emerald green and a drop of olive green. Keep them slightly separate but allow them to mix in the middle for color variation. -
Paint the Connecting Stems:
Using your fine liner brush loaded with the mixed green, paint thin, curving lines connecting your marked flower spots. These don’t need to be perfect lines; a slight wiggle looks more natural and vine-like. -
Add Major Leaves:
Along the stem lines, paint slender, pointed leaves. Use a ‘press and lift’ motion: touch the tip of the brush to the plate, press down slightly to widen the leaf body, and lift up as you drag to create a sharp point. -
Vary Leaf Direction:
Ensure leaves face different directions for organic flow. Some should tuck behind where the flowers will go, and others should branch outward toward the plate’s edge. -
Dry the Vinery:
Check the manufacturer instructions for drying time between layers. I usually let the green layer sit for 10-15 minutes so the flower petals don’t get muddy when painted over them.
Step 3: Designing the Daisies
-
Paint the Centers:
Load your round brush with bright yellow paint. At each of your initial marker spots, dab a small, slightly imperfect circle. These are the hearts of your daisies. -
Add the Petals:
Clean your brush thoroughly and switch to white paint. Using the same ‘press and lift’ technique as the leaves but smaller, paint petals radiating outward from the yellow centers. -
Handle Overlap:
Don’t be afraid to let a few white petals overlap the green vines you painted earlier. This layering creates depth and makes the illustration look cohesive. -
Create Smaller Blossoms:
In the spaces between the large daisies, add a few tiny, three-petal buds or smaller flowers using the tip of your liner brush. This fills empty negative space without overcrowding the design.
Level Up: Bee Friends
Add tiny bumblebees near the petals! Paint a small yellow oval, add two black stripes with your finest liner, and create wings with diluted translucent white paint.
Step 4: Detailing & Finishing
-
Outline the Petals:
Once the white paint is dry to the touch, use your ultra-fine liner brush and diluted black or dark grey paint to loosely outline the petals. Keep the lines very broken and thin for a sketched, illustrative look. -
Texture the Centers:
Add tiny stippled dots of orange or brown to the bottom edge of the yellow centers to give them a 3D, fuzzy appearance. -
Add Flower Buds:
Draw tiny, unsprouted buds on the vines using a small oval of white with green sepals underneath, connecting them to the main vine with short strokes. -
Paint the Rim Dots:
Dip the non-brush end (the handle tip) of your paintbrush into a muted grey or light green paint. Gently dot it along the very outer edge of the plate rim for a decorative frame. -
Cure the Piece:
Follow your paint brand’s curing instructions. This usually involves air drying for 24 hours and then baking in a cool oven that heats up gradually to set the design permanently.
Now you have a lovely custom piece to brighten up your table setting


Easy Stripes and Bands
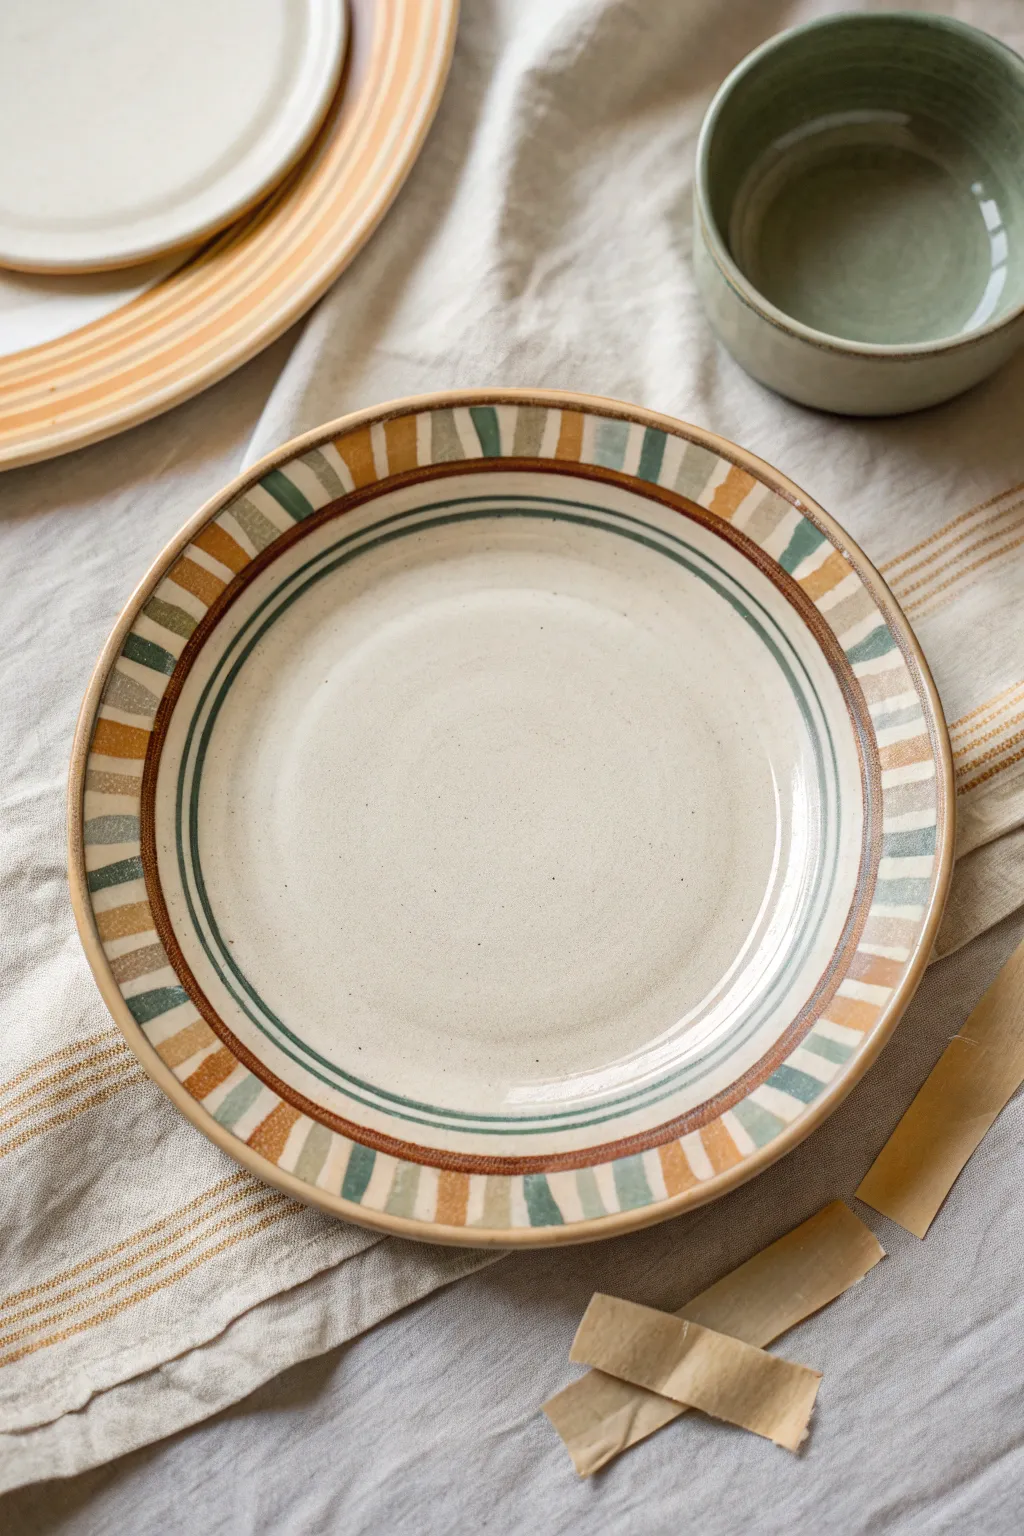
Bring an earthy, artisanal vibe to your table setting with this striped ceramic project. By combining simple concentric bands with a playful radial pattern on the rim, you create a piece that feels both structured and beautifully hand-crafted.
Step-by-Step
Materials
- Plain bisque or ceramic plate (cream or off-white base)
- Ceramic paints (Terracotta/Rust, Sage Green/Teal, Cream/Off-White)
- Round synthetic brushes (sizes 2 and 4)
- Flat shader brush (size 6 or 8)
- Pottery wheel or banding wheel (lazy Susan works in a pinch)
- Pencil
- Ruler or measuring tape
- Palette for mixing
- Water cup and paper towels
- Clear glazing medium (optional, if using air-dry paints)
Step 1: Preparation and Base Lines
-
Clean surface:
Begin by wiping down your plate with a damp cloth or alcohol wipe to remove any dust or grease oils, ensuring the paint adheres perfectly to the surface. -
Find the center:
Place your plate on your banding wheel or turntable. Use a ruler to lightly mark the exact center of the plate with a pencil as a guide reference. -
Mark ring spacing:
Measure about 1.5 inches inward from the rim edge and make a small tick mark. This will be the boundary for your central design versus the decorative rim. -
Paint the inner band:
Load a size 4 round brush with the Sage Green paint. Spin the wheel slowly and hold your brush steady on the tick mark to create a continuous thin ring. -
Add the outer definition:
Switch to the Terracotta paint. Create a slightly thicker ring (about 3-4mm) just outside the green ring you just painted, leaving a tiny gap of negative space between them if possible. -
Define the rim edge:
Paint another Terracotta ring right at the break where the flat eating surface meets the rising rim. This creates a solid border for your stripe pattern. -
Double check consistency:
While the paint is wet, inspect your circles. If the line heavily wobbles, use a damp Q-tip to gently gently wipe away the mistake and re-spin the line.
Wobbly Lines?
Rest your painting hand on a heavy can or stack of books while the wheel spins. This anchors your hand, turning it into a stable tool while the plate moves underneath.
Step 2: Painting the Radial Rim
-
Planning segments:
Visualize the rim divided into small equal sections. You don’t need to draw every line, but marking 12 ‘clock’ points with a pencil can keep your spacing even. -
Start the Terracotta stripes:
Using the flat shader brush loaded with Terracotta, paint short, radial strokes from the outer edge of the plate inward to the brown ring. Space them out significantly, imagining two other colors will fit between them. -
Add Sage Green stripes:
Clean your brush thoroughly. Load it with Sage Green and paint a stripe next to every Terracotta stripe. Try to keep the width of the stroke consistent with the first set. -
Fill with Cream accents:
I find mixing a little white into a beige tone gives the best ‘raw pottery’ look here. Paint a stripe in the remaining gaps between the rust and green lines. -
Touch up the edges:
The outer edge of the plate might look a bit ragged where the brush lifted off. Run a damp sponge or finger along the very rim to clean up the paint endings for a smooth finish. -
Variation check:
Step back and look at the pattern. It’s okay if the stripes vary slightly in width or opacity; this mimics the look of high-end hand-thrown pottery.
Step 3: Finishing Touches
-
Strengthen the inner rings:
If your concentric circles in the center look transparent after drying, carefully apply a second coat by spinning the wheel again. -
Curing preparation:
Allow the plate to dry completely for at least 24 hours before attempting any sealing or baking process. -
Bake or seal:
Follow the specific instructions on your paint bottle. Most ceramic paints require baking in a home oven (usually around 300°F/150°C for 30 minutes) to become dishwasher safe.
Add Texture
Before the paint entirely dries, gently scratch through the coloured stripes with a toothpick to reveal the base plate color, adding a rustic ‘sgraffito’ texture.
Enjoy your beautiful new custom homeware piece, perfect for warm salads or morning toast


Modern Color-Block Wedges
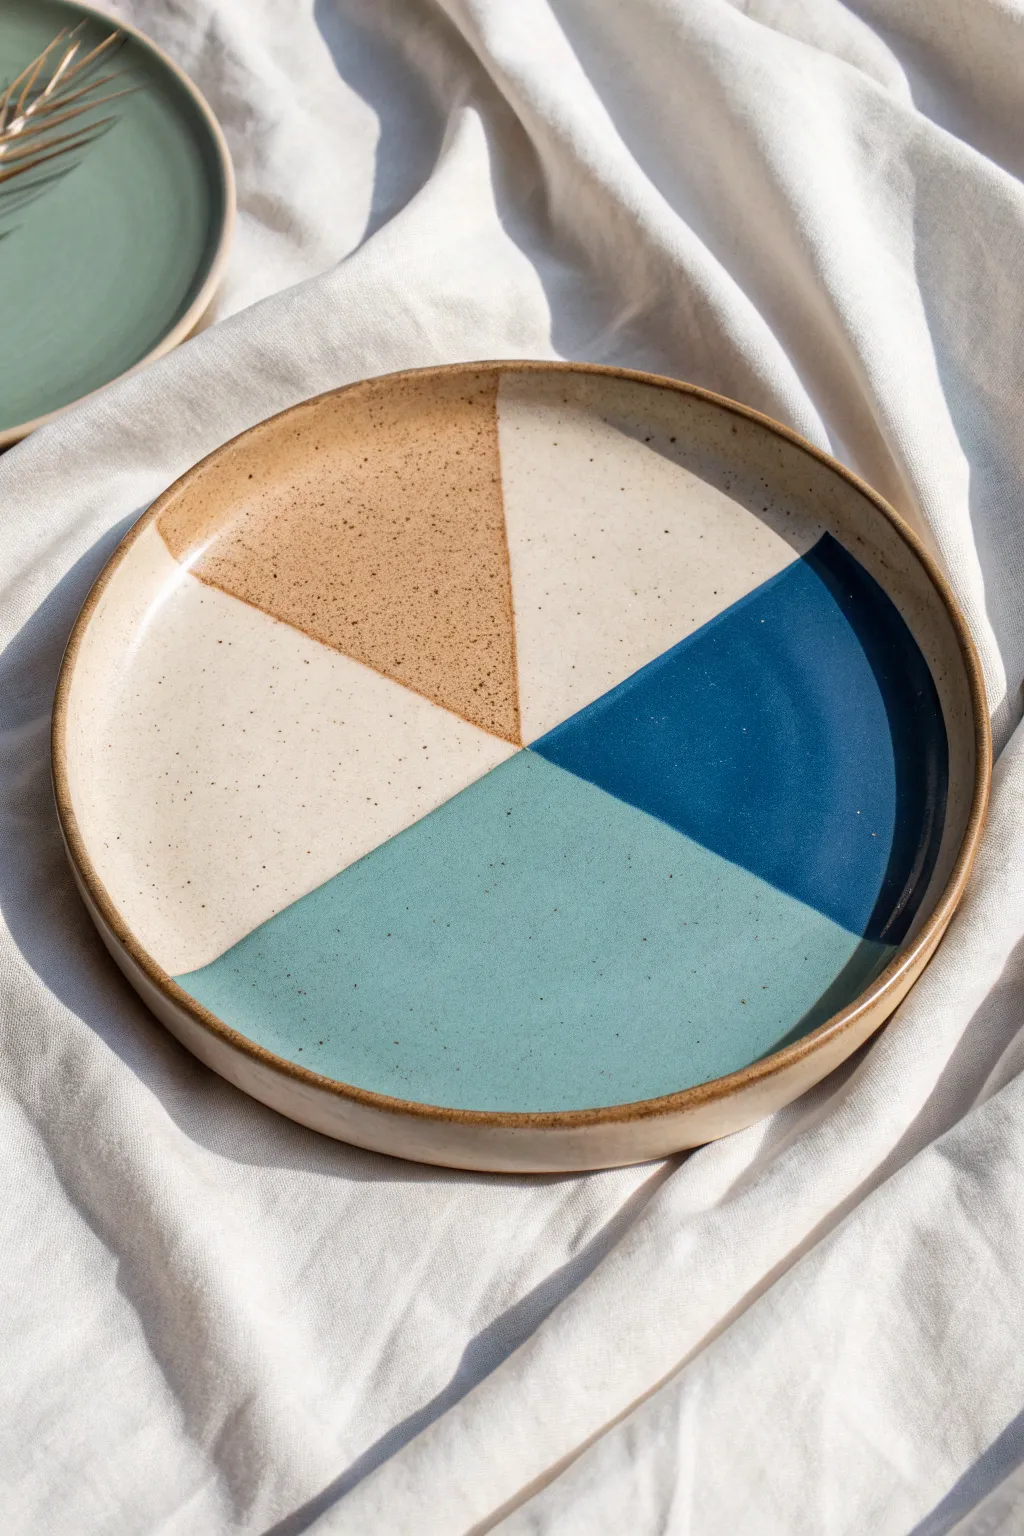
Transform a plain ceramic plate into a piece of modern art with this color-blocked wedge design. Using a palette of earth tones like tan, cream, teal, and navy, you’ll create a sophisticated geometric pattern with charming speckled details.
Step-by-Step Guide
Materials
- Bisque ceramic plate (platter or dinner plate size)
- Underglazes: Cream/White, Tan/Ochre, Teal/Sage Green, Navy Blue
- Pencil
- Ruler or straight edge
- Glazing brushes: Medium flat brush and fine detail brush
- Old toothbrush (for speckling)
- Small container of water
- Clear dipping glaze (or brush-on clear glaze)
- Masking tape (optional for straighter lines)
Step 1: Planning and Preparation
-
Clean the surface:
Before you begin, wipe down your bisque plate with a clean, slightly damp sponge to remove any dust or debris that might interfere with glaze adhesion. -
Find the center:
Place your plate on a flat workspace. Use a ruler to lightly visualize the center point of the plate. Mark a very faint dot with your pencil in the absolute middle. -
Sketch the wedges:
Draw lines radiating from your center dot to the rim to create four distinct sections. To match the photo, draw one vertical line downwards, then create the other segments at varying angles—a wide slice for the teal, thinner slices for the cream and tan.
Uneven Lines?
If your lines are wobbling, use painter’s tape or thin masking tape to define the wedges. Peel the tape away immediately after painting while the glaze is still wet to avoid chipping.
Step 2: Painting the Color Blocks
-
Start with cream:
Load your medium flat brush with the cream or off-white underglaze. Fill in the top-right and bottom-left sections (if matching the reference exactly, note the alternating pattern). Apply smooth, even strokes. -
Layer the cream:
Let the first coat dry until it’s chalky and no longer shiny. Apply a second coat to ensure opacity, and a third if the glaze directions recommend it for solid coverage. -
Apply the tan section:
Next, fill the top-left wedge with your tan or ochre underglaze. Be careful near the drawn lines; use the fine detail brush to get a crisp edge where the colors meet. -
Layer the tan:
Just like the cream section, apply two to three coats of the tan underglaze, allowing proper drying time between each layer. -
Paint the teal wedge:
Use your teal or sage green underglaze for the large bottom section. This is a prominent color, so ensure your brushstrokes are long and confident to minimize visible textures. -
Build teal opacity:
Repeat the layering process for the teal section. I find it helpful to rotate the plate as I work to keep my hand steady and avoid smudging wet areas. -
Add the navy accent:
Finally, paint the remaining wedge on the right side with the navy blue underglaze. The dark color is unforgiving, so take extra care to keep the lines crisp against the cream and teal neighbors. -
Finish navy layers:
Apply the necessary second and third coats of navy. Check all your boundary lines now; if any section looks uneven, carefully touch it up with a detail brush.
Carved Texture
Before glazing, use a sgraffito tool to carve shallow lines along the borders of your color blocks. This adds physical texture and separates the colors neatly.
Step 3: Detailing and Finishing
-
Prepare the speckles:
Dilute a very small amount of dark brown or black underglaze with a few drops of water. You want a thin, inky consistency that splatters easily. -
Test the splatter:
Dip an old toothbrush into the diluted mixture. Point the bristles away from you and run your thumb across them to test the spray on a piece of paper first. -
Apply speckles:
Hold the toothbrush over the plate and gently flick the bristles to create a fine mist of speckles across the entire surface. This unifies the color blocks and adds that organic, stoneware look. -
Clean the rim:
If you want the raw clay rim shown in the photo, take a damp sponge and carefully wipe away any glaze or speckles from the very top edge of the rim. -
Final drying:
Allow the plate to dry completely overnight or for several hours until bone dry. -
Clear glaze application:
Apply a clear coat over the entire design. If you have access to dipping glaze, dip the plate once. If using brush-on clear glaze, apply two thin coats quickly and evenly. -
Fire the piece:
Load the plate into the kiln and fire it according to the specific cone temperature required by your clay and glaze bodies.
Enjoy serving your first meal on this piece of functional modern art
BRUSH GUIDE
The Right Brush for Every Stroke
From clean lines to bold texture — master brush choice, stroke control, and essential techniques.
Explore the Full Guide
Minimal Line Art Face
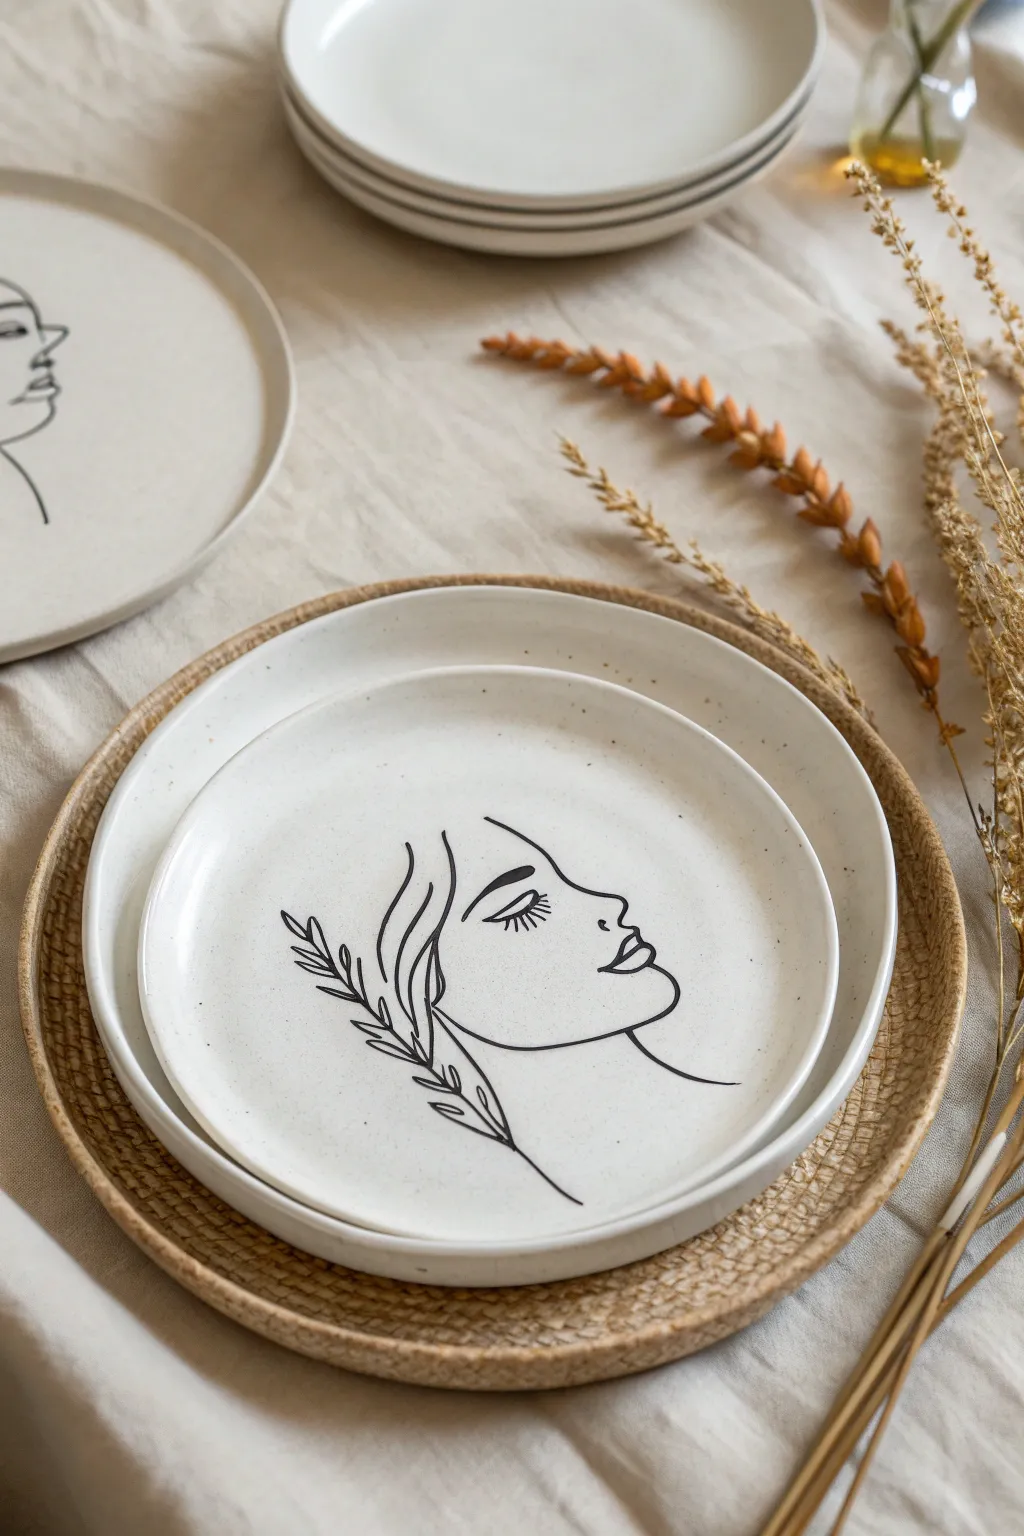
Transform plain ceramic plates into trendy art pieces with this elegant line art design. The sleek, continuous-style drawing of a serene face and botanical sprig creates a sophisticated, modern aesthetic perfect for display.
Step-by-Step Tutorial
Materials
- White or cream ceramic plates (salad or dessert size)
- Black porcelain paint marker (fine tip)
- Black porcelain paint marker (extra fine tip)
- Pencil (HB or lighter)
- Tracing paper (optional)
- Carbon paper (optional)
- Masking tape
- Rubbing alcohol
- Cotton pads
- Cotton swabs
- Domestic oven (for baking the paint)
Step 1: Preparation & Planning
-
Clean the Surface:
Before you start, wipe down the entire surface of your plate with rubbing alcohol on a cotton pad. This removes invisible oils or fingerprints that could prevent the paint from adhering properly. -
Draft Your Sketch:
On a plain piece of paper, practice drawing the face design. Focus on a simple profile: a curved forehead, a gentle nose, lips, and a graceful jawline that extends into a botanical stem. -
Refine the Line Work:
The beauty of this style is in the flowing line. Simplify your sketch until you have a design that looks like one or two continuous strokes. -
Size the Design:
Hold your paper sketch over the plate to ensure the scale is correct. The face should sit centrally but slightly off-center for an artistic look, leaving plenty of negative space.
Wobbly Lines?
Steady your hand by resting your pinky finger on a dry part of the plate as a pivot point while drawing curves.
Step 2: Transferring the Design
-
Position the Template:
Once you are happy with the sketch, transfer it to tracing paper if you haven’t already. Tape the tracing paper and a sheet of carbon paper underneath it onto the plate. -
Trace the Lines:
Using a pencil, firmly trace over your design. Press hard enough to transfer the carbon, but be gentle enough not to scratch the ceramic glaze. -
Check the Transfer:
Lift one corner of the paper to peek underneath. You should see a faint, guide line on the plate. If it’s visible, remove the papers completely. -
Freehand Method Option:
If you are confident, you can skip the transfer and lightly sketch directly onto the plate with a pencil. Pencil marks will burn off in the oven later.
Step 3: Painting the Artwork
-
Prime the Marker:
Shake your black porcelain paint marker well. Press the tip down on a scrap piece of paper until the ink flows smoothly and consistently. -
Begin the Profile:
Start with the main profile line. Using the fine tip marker, draw the forehead curve, moving down to the nose and lips in a fluid motion. -
Define the Chin and Jaw:
Continue the line from the chin, extending it backward to form the jawline. Let this line seamlessly transition into the stem of the plant. -
Draw the Eye:
Switch to your extra-fine tip marker for delicate details. Draw the closed eyelid as a simple crescent shape, then carefully add vertical lashes. -
Add the Eyebrow:
Above the eye, draw a bold, arched eyebrow. You can thicken this line slightly to add weight and contrast to the delicate eye area. -
Create the Hair Outline:
Back with the fine tip marker, add a few sweeping curves above and beside the face to suggest flowing hair without drawing every strand. -
Detail the Floral Sprig:
Along the stem line near the jaw, draw small, simple leaves. Keep them somewhat geometric or simplified to match the modern vibe of the face. -
Fix Mistakes:
If the line wobbles, don’t panic. Quickly use a damp cotton swab to wipe away the wet ink, dry the spot, and redraw the line.
Dishwasher Safe
To ensure longevity, hand wash gently. If using a dishwasher, keep it on the top rack and avoid high-heat cycles.
Step 4: Curing the Piece
-
Let it Air Dry:
Allow the plate to sit undisturbed for at least 24 hours. This drying time is crucial for the paint to settle before baking. -
Bake the Plate:
Place the plate in a *cold* oven. Turn the temperature to 300°F (150°C) and bake for 35 minutes. Putting it in cold prevents the ceramic from cracking. -
Cool Down:
Turn the oven off and leave the plate inside until the oven is completely cool. Removing it while hot can cause thermal shock.
Your custom-designed plates are now ready to be styled on a table setting or hung as wall art
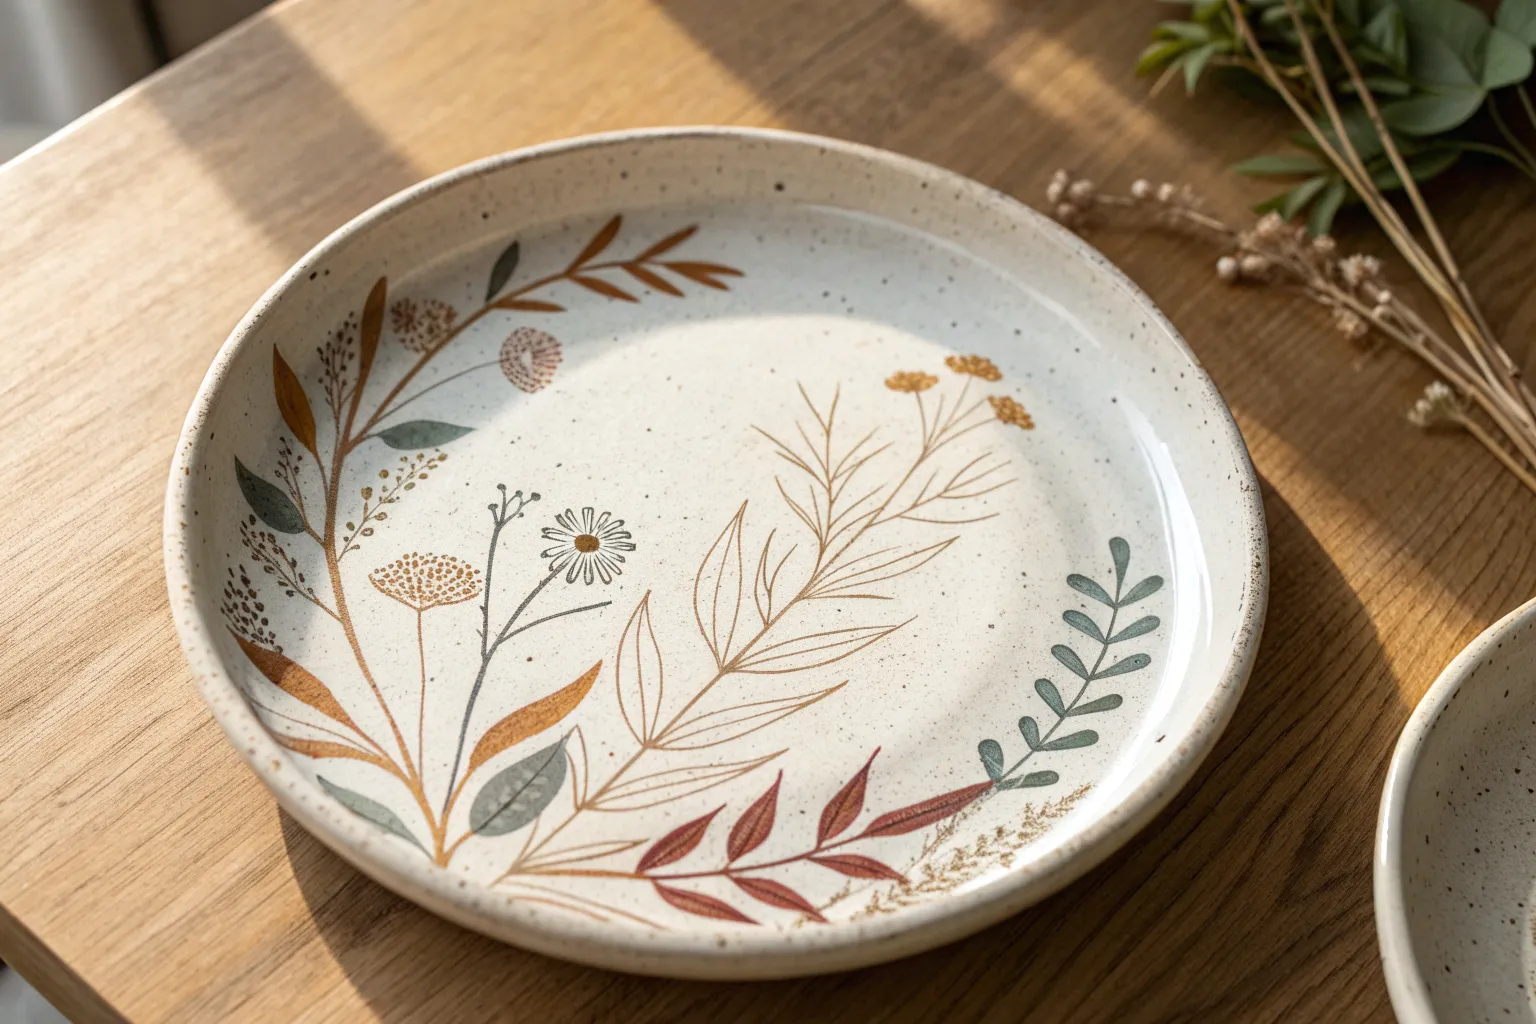
Hand-Drawn Leaf Sprigs
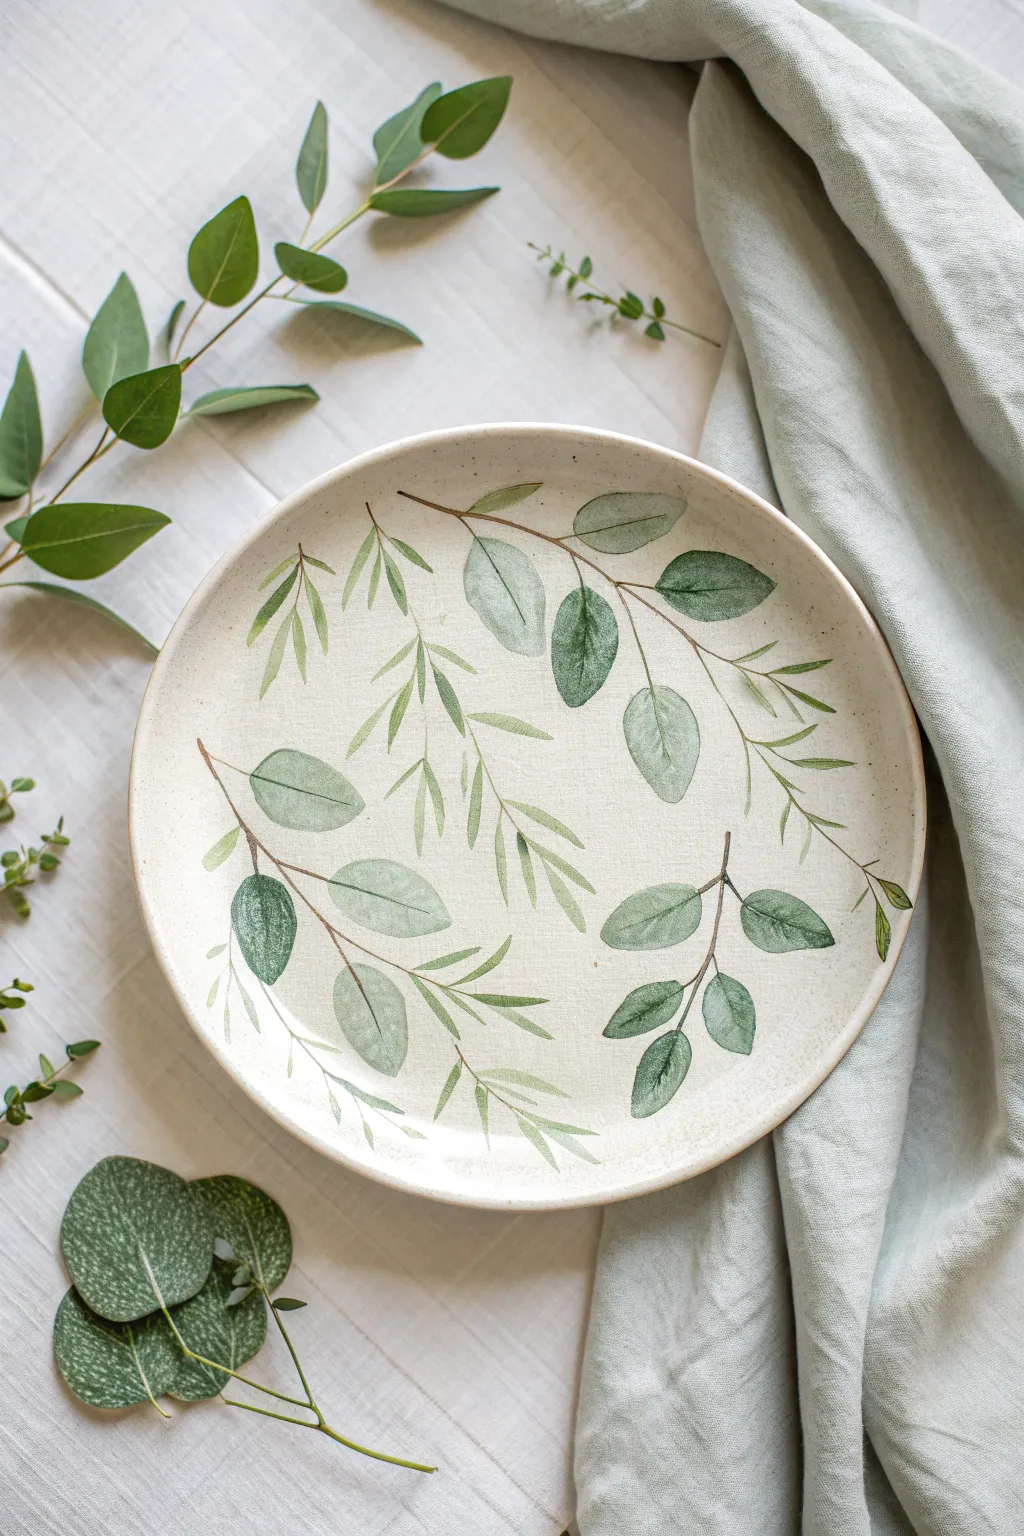
Capture the serene beauty of nature on your dinnerware with these airy, hand-drawn leaf designs. The combination of translucent, watercolor-style layering and speckled ceramic creates an organic, earthy finish that feels both modern and timeless.
How-To Guide
Materials
- Matte, speckled ceramic plate (bisque or glazed, depending on paint choice)
- Ceramic paints or porcelain markers (shades: sage green, forest green, olive, charcoal brown)
- Small round brushes (sizes 0, 2, and 4)
- Fine liner brush (size 00 or 000)
- Pencil (HB or lighter)
- Paper, water cup, and palette
- Rubbing alcohol and cotton pads
- Glaze and kiln (if using underglazes) or oven (if using bake-on paints)
Step 1: Preparation & Layout
-
Clean surface:
Wipe the entire surface of your plate with rubbing alcohol on a cotton pad to remove any oils or dust. This ensures the paint adheres perfectly. -
Sketch the flow:
Using a pencil, very lightly map out the main stems. Focus on creating a sweeping, circular rhythm. The stems should curve gently around the center of the plate rather than pointing straight in.
Uneven Coverage?
If your paint looks streaky, loading your brush too heavily might be the cause. Try two thin, semi-transparent layers rather than one thick gloop.
Step 2: Painting Main Stems
-
Mix stem color:
Mix a small amount of charcoal brown with a touch of olive green to create a natural, woody stem color. -
Paint main lines:
Using a fine liner brush, trace your pencil lines. Keep your hand loose to create organic, slightly wavering lines rather than perfect geometric curves. -
Add heavy branches:
From the main stems, paint smaller offshoot branches where you plan to place larger leaves.
Layered Look
Paint the background ‘willow’ sprigs first in a very pale wash. Let dry, then paint the detailed eucalyptus on top for a 3D shadow effect.
Step 3: Creating the Eucalyptus Leaves
-
Mix base greens:
Prepare two shades of green on your palette: a cooler, blue-leaning sage and a warmer olive green. Dilute them slightly with medium or water to achieve translucency. -
Paint round leaves:
With a size 4 round brush, paint the broad, oval-shaped eucalyptus leaves. Press the belly of the brush down to create the width, then lift to create the connection to the stem. -
Vary the tones:
Alternate between your warm and cool green mixtures for different leaves. I find that letting colors bleed slightly into each other on a wet leaf adds beautiful depth. -
Create texture:
While the paint is still slightly damp, use a dry brush to lift a tiny bit of pigment from the center of some leaves, creating a highlight that mimics light reflection.
Step 4: Adding Willow-Style Sprigs
-
Switch leaf shapes:
To add variety, we will add thinner, willow-like leaves. Switch to a size 2 brush. -
Paint willow clusters:
Fill the empty spaces between the heavy eucalyptus branches with lighter, feathery sprigs. Use quick, flicking motions to create tapered, needle-like leaves. -
Keep it light:
Use a very pale, diluted yellow-green for these thin leaves so they recede into the background, creating visual depth.
Step 5: Detailing & Finishing
-
Add leaf veins:
Once the large eucalyptus leaves are dry, use your finest liner brush and a darker green to paint a subtle central vein on a few focusing leaves. -
Refine connections:
Check where the leaves meet the stems. Add tiny dabs of brown paint to anchor any floating leaves. -
Clean up:
If you see any pencil marks still visible, gently erase them, or use a damp cotton swab to clean up edges if the paint hasn’t set. -
Cure the plate:
Follow the instructions for your specific paint type. This typically involves baking the plate in a home oven or firing it in a kiln to make the design permanent.
Now your custom botanical plate is ready to bring a fresh, natural touch to your table setting

PENCIL GUIDE
Understanding Pencil Grades from H to B
From first sketch to finished drawing — learn pencil grades, line control, and shading techniques.
Explore the Full Guide
Citrus Slices Around the Edge
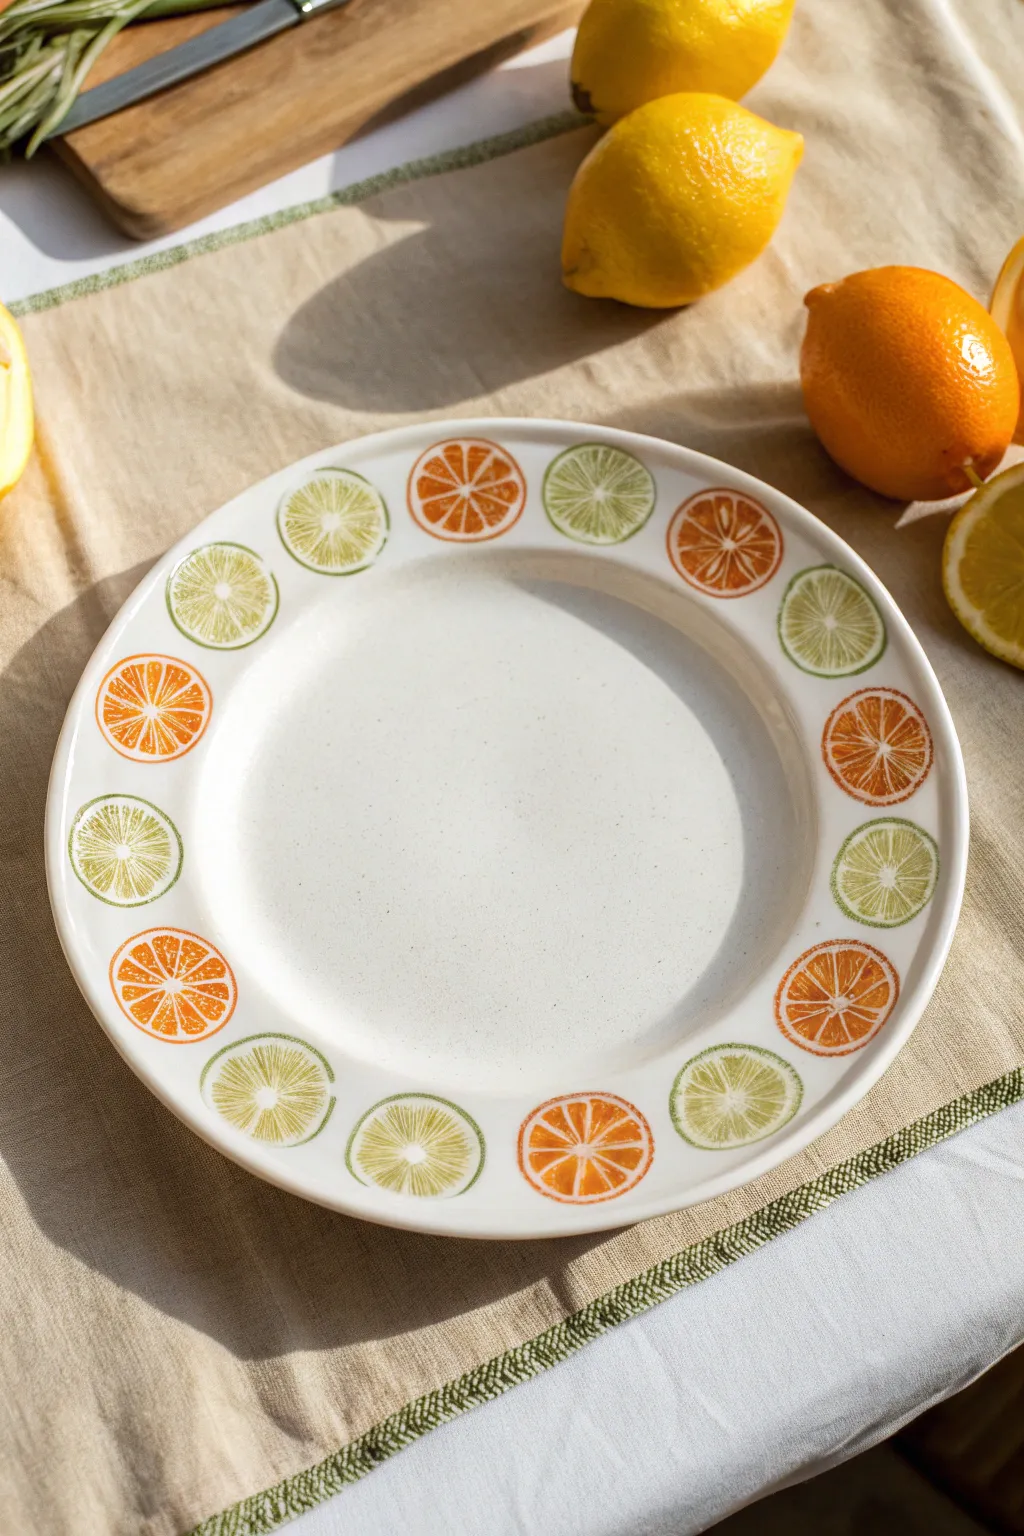
Brighten up your table setting with this zest-inspired plate painting project that captures the fresh geometry of sliced lemons, limes, and oranges. The alternating pattern creates a cheerful rhythm around the rim, making even a simple snack feel like a summer picnic.
Step-by-Step Guide
Materials
- White ceramic dinner plate (oven-safe)
- Pebeo Porcelaine 150 paints (or similar ceramic paint)
- Colors: Citrine Yellow, Orange, Olivine Green, Ivory or White
- Fine detail liner brush (size 0 or 00)
- Small round brush (size 2)
- Rubbing alcohol
- Cotton pads
- Pencil (optional)
- Palette or small dish for mixing
- Paper towels
- Oven (for curing)
Step 1: Preparation & Planning
-
Clean the Surface:
Before any paint touches the ceramic, wipe the entire rim of the plate thoroughly with rubbing alcohol on a cotton pad to remove oils and fingerprints. -
Plan the Spacing:
Visualize the pattern around the rim. You will be alternating between orange and green citrus slices. If you are nervous about spacing, lightly mark the center point of each fruit with a pencil; the graphite will burn off in the oven later.
Uneven Circles?
If freehand circles are tricky, trace the rim of a small glass or pill bottle with a pencil directly onto the plate first to guide your painting.
Step 2: Painting the Fruit Bases
-
Mix the Lime Green:
On your palette, mix a small amount of Olivine Green with a tiny touch of Yellow to create a fresh, lime-juice color. Keep the consistency fluid but opaque. -
Paint Green Circles:
Using the size 2 round brush, paint a circle for your first lime slice. It doesn’t need to be geometrically perfect; a slightly organic shape looks more natural. Leave gaps for the orange slices in between. -
Mix the Orange Tone:
Clean your brush well. Pour out some pure Orange paint. If it feels too dark, lighten it slightly with a drop of Yellow. -
Paint Orange Circles:
Fill in the alternating spaces with orange circles, matching the size of your green ones as closely as possible. -
Dry the Base:
Allow these base circles to dry for about 10-15 minutes. They should be dry to the touch so the next layers don’t smudge the outline.
Zest it Up
Add tiny yellow ‘lemon’ slices or pink ‘grapefruit’ slices in different sizes between the main fruits for a more varied, tutti-frutti confetti look.
Step 3: Adding the Pith & Segments
-
Create the Pith Color:
Mix Ivory or White paint with a very tiny amount of your yellow. You want a creamy, off-white color that resembles the pith of a fruit. -
Outline the Rind:
Switch to your fine detail liner brush. Carefully paint a thin ring just inside the outer edge of each green and orange circle. This defines the peel. -
Mark the Center:
Place a tiny dot of the pith color in the exact center of each fruit slice. -
Draw the Spokes:
Paint thin, radiating lines from the center dot to the inner rind ring, dividing the circle like a bicycle wheel. Aim for 8 to 10 sections per slice. -
Round the Corners:
Where the spokes meet the outer rind, gently curve the paint lines to soften the corners, creating distinct triangular fruit segments.
Step 4: Texturing & Final Details
-
Add Texture to Segments:
Rinse your liner brush. Dip it lightly into the original fruit base colors (green or orange). I like to add tiny stippling dots or faint lines inside the segments to mimic juicy pulp texture. -
Highlight the Peel:
Mix a slightly darker shade of green and orange. Paint a very thin, broken line on the absolute outer edge of the contrasting circles to give the peel some dimension. -
Clean Up Edges:
If any paint went astray, use a damp cotton swab or a toothpick to gently scrape away mistakes while the paint is still tacky. -
Wait for Full Dry:
Let the plate dry for at least 24 hours. This is crucial for the paint to settle properly before baking. -
Bake to Set:
Place the plate in a cool oven. Set the temperature to 300°F (150°C) or the manufacturer’s specific instruction. Once the temp is reached, bake for 35 minutes. -
Cool Down:
Turn the oven off and leave the plate inside to cool down completely with the door closed. This prevents the ceramic from cracking due to thermal shock.
Now you have a refreshing, custom piece of dinnerware ready for your next brunch
Cherries and Tiny Blossoms
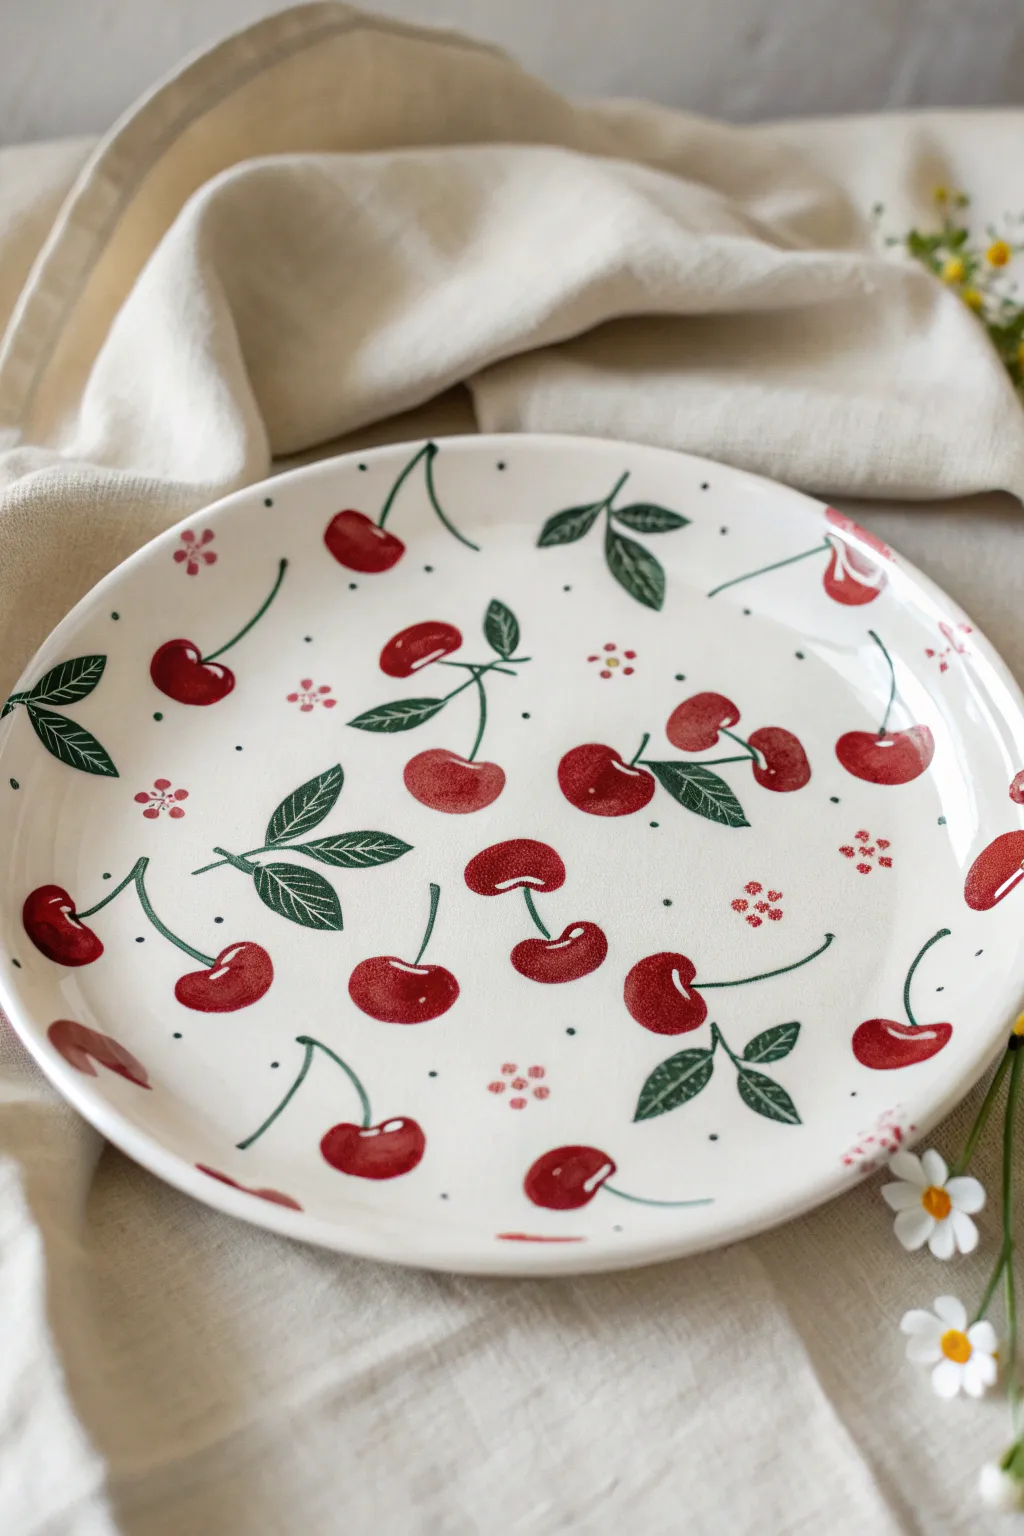
Capture the essence of spring picnics with this charming hand-painted plate design, featuring scattered bright red cherries and delicate blossoms. The finish is glossy and food-safe, making it a perfect functional piece that brings a vintage cottagecore vibe to your table setting.
Step-by-Step
Materials
- Plain white ceramic plate (dinner or salad size)
- Ceramic paint or porcelain paint markers (bright red, deep red, forest green, dark green, pink)
- Small round paintbrush (size 2 or 3)
- Fine liner paintbrush (size 00 or 0)
- Rubbing alcohol and cotton pads
- Paper palette or small mixing dish
- Oven (for curing, if required by your paint brand)
Step 1: Preparation & Planning
-
Clean the surface:
Before laying down a single drop of paint, wipe the entire plate surface thoroughly with rubbing alcohol on a cotton pad. This removes invisible oils or fingerprints that prevent ceramic paint from adhering properly. -
Map out the spacing:
Visualize the placement of your main cherry clusters. You want a random, scattered look rather than a grid. Imagine triangles connecting the main fruit groups to keep the composition balanced without becoming too rigid.
Step 2: Painting the Cherries
-
Mix your reds:
Squeeze out your bright red paint. If it feels too flat, mix in a tiny touch of deep red to giving it richness. You want a color that pops against the white ceramic. -
Paint the fruit bodies:
Using your small round brush, paint pairs of cherries. These should be roughly kidney-bean or round shapes. Don’t worry about making them perfect circles; the hand-painted charm comes from slight irregularities. -
Vary the groupings:
While most should be pairs, paint a few single cherries and perhaps one trio to keep the eye moving naturally across the plate surface. -
Add highlights:
While the red paint is still wet, you can lift a tiny speck of paint with a dry brush, or wait until it’s tacky and add a faint curve of lighter red or white to create a shine effect on the fruit skin. -
Let the fruit dry:
Allow the red shapes to dry to the touch so you don’t accidentally smudge them while working on the stems.
Paint Peeling Off?
Assuming you cleaned the plate properly, peeling often happens if the paint was applied too thickly. Use thin, even layers. Thick globs won’t cure properly in the oven.
Step 3: Stems & Leaves
-
Draw the stems:
Switch to your fine liner brush and dark green paint. Draw thin, sweeping lines connecting your cherry pairs. I allow these lines to be slightly shaky or curved to mimic organic growth. -
Anchor the stems:
Ensure the stems meet at a distinctive point at the top, sometimes with a little nub where they would attach to the branch. -
Paint the leaf outlines:
Using the forest green paint, paint simple almond-shaped leaves attached to some, but not all, of the cherry pairs. Vary the direction they point—some up, some sideways. -
Fill the leaves:
Fill in the leaf shapes. For a textured look like the example, use mostly forest green but streak in a little dark green while it’s wet to suggest veins. -
Add leaf veins:
Once the green base is tacky or dry, use your finest liner brush or a white paint pen to scratch or paint delicate vein lines onto the leaves.
Pro Tip: Vintage Texture
Don’t over-mix your paint on the palette. Let streaks of lighter and darker red exist on the brush; this gives the cherries a dimensional, hand-thrown pottery look.
Step 4: Blossoms & Details
-
Create blossom clusters:
Dip the handle end of a paintbrush into pink paint to act as a dotting tool. Press 5 small dots in a circle to form tiny flowers in the empty white spaces between cherries. -
Add scattered dots:
Use a darker green or black paint and the very tip of your liner brush (or a toothpick) to add tiny, dispersed micro-dots around the plate. This fills the negative space and adds texture. -
Clean up edges:
If you smudged any paint, use a damp cotton swab or a toothpick to gently scrape away the error before curing.
Step 5: Finishing
-
Air dry completely:
Let the plate sit undisturbed for at least 24 hours. The paint needs to fully dehydrate before any heat is applied. -
Bake to cure:
Place the plate in a cool oven, then set the temperature to 300°F (150°C) or whatever your specific paint brand instructs. Bake for 30-35 minutes. -
Cool down slowly:
Turn the oven off and leave the plate inside until it is completely cold. Removing it while hot can cause the ceramic to crack due to thermal shock.
Enjoy serving your favorite desserts on this delightful, durable piece of custom art


Sweet Heart Scatter
Capture the whimsy of love with this sweet, scattered heart design that embraces imperfection. Using a warm palette of terracotta, blush, and deep reds, you will create a ceramic piece that feels both modern and hand-crafted.
Detailed Instructions
Materials
- Bisque ceramic salad or dinner plate (smooth surface)
- Ceramic underglazes (colors: deep rust, terracotta, ballet pink, cream/white, maroon)
- Assorted soft bristled brushes (round #4, round #2, fine liner #0)
- Small palette or ceramic tile for mixing
- Pencil for sketching
- Cup of water and paper towels
- Clear dipping glaze (for post-painting firing)
Step 1: Preparation & Sketching
-
Clean the surface:
Begin by wiping down your bisque plate with a slightly damp sponge. This removes any ceramic dust that might resist the glaze and ensures a clean canvas for your hearts. -
Plan the layout:
Lightly sketch heart shapes directly onto the plate using a pencil. Aim for a random, organic scatter pattern. Don’t worry about graphite marks, as they will burn off in the kiln. -
Vary the sizes:
As you sketch, consciously vary the size of the hearts. Include some larger focal hearts and fill gaps with tiny ones to create visual rhythm. -
Tilt the angles:
Avoid placing all hearts upright. Tilt them left, right, and slightly upside down to mimic a falling or floating effect, just like confetti.
Uneven Coverage?
If your solid hearts look streaky, it likely needs another coat. Apply each layer in perpendicular directions (cross-hatching) to ensure full opacity.
Step 2: Painting the Solid Hearts
-
Mix your palette:
Pour out small puddles of your underglaze colors. I like to mix a tiny bit of the white into the terracotta to create a custom mid-tone for variety. -
Paint the dark solids:
Using the #4 round brush, fill in several scattered hearts with your deepest maroon or rust color. Apply 2-3 coats, letting each coat dry until matte before adding the next. -
Add lighter solids:
Switch to your ballet pink and fill in another group of hearts. These lighter colors often need 3 solid coats to ensure they don’t look streaky after firing. -
Create texture:
For a few select hearts, apply the paint slightly unevenly or use visible brushstrokes. This mimics the watercolor-style look seen in the inspiration piece.
Step 3: Outlining & Details
-
Outline technique:
Load your fine liner brush (#0) with a contrasting color, like the deep rust. Carefully outline some of the empty heart sketches to create open heart shapes. -
Vary line weight:
When outlining, apply slightly more pressure on the curves and lift up on the points. This creates a beautiful thick-and-thin line quality that looks more clear than a uniform stroke. -
Fill with transparency:
Dilute a bit of pink underglaze with a drop of water. Fill inside a few outlined hearts with this wash to create a semi-transparent, breezy look. -
Add stripe details:
Select two or three hearts and paint horizontal stripes across them using cream or light pink. Let the base color dry completely before adding a second color on top if layering.
Add Gold Luster
After the main firing, outline 3 random hearts with real gold luster and re-fire at a lower temp for a luxurious, shimmering highlight.
Step 4: Finishing Touches
-
Review the balance:
Step back and look at the plate from a distance. If there are large empty gaps, sketch and paint tiny filler hearts using your smallest brush. -
Clean up edges:
If any glaze smudged outside the lines or onto the rim where you don’t want it, scratch it away gently with a toothpick or a clean, damp brush. -
Final drying:
Allow the underglaze to dry completely, preferably overnight. The colors will look chalky and pale now, but the clear glaze will make them vibrant. -
Glazing and firing:
Dip the plate into clear glaze (or hand-brush perfectly smooth coats). Fire the piece according to the clay and glaze specifications, typically to Cone 06 or 05.
Once fired, you will have a lovely, durable piece perfect for serving sweet treats
Geometric Tile-Inspired Pattern
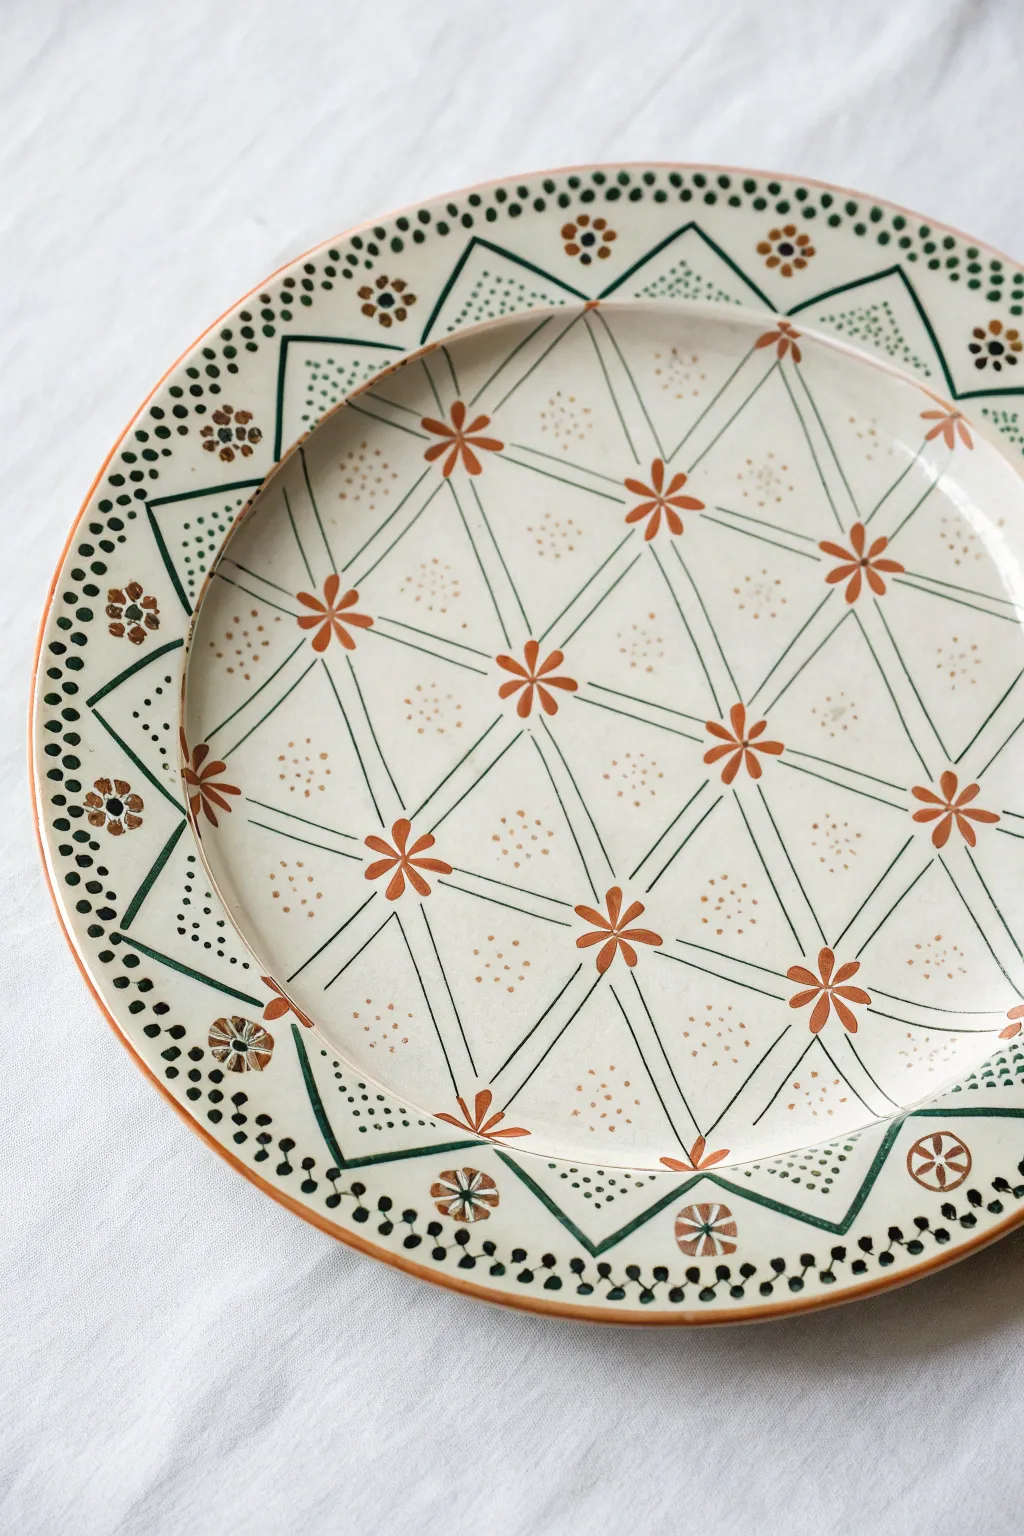
This project transforms a plain ceramic plate into a stunning piece of faux-pottery art reminiscent of traditional Mediterranean tile work. By combining structured geometric lines with delicate floral accents, you’ll create a sophisticated, handcrafted look that feels both timeless and fresh.
Step-by-Step Guide
Materials
- Plain white ceramic plate (dinner or salad size)
- Porcelain paint pens or ceramic paints (hunter green, rust-orange/terracotta)
- Fine-tipped detail brush (0 or 00 size)
- Flexible ruler or measuring tape
- Pencil (HB or lighter) or disappearing ink marker
- Cotton swabs and rubbing alcohol (for cleanup)
- Paper towels
- Oven (for curing, if required by paint type)
Step 1: Planning the Grid
-
Clean surface:
Begin by thoroughly wiping down your plate with rubbing alcohol and a paper towel to remove any oils or dust, ensuring a clean canvas for your paint. -
Mark the center:
Find the exact center of your plate and mark it lightly with a small dot using your pencil or disappearing ink marker. -
Create the diamond grid:
Using your flexible ruler, sketch a grid of intersecting diagonal lines across the central well of the plate to form a diamond lattice pattern. Aim for diamonds that are roughly 2 inches tall. -
Define the rim sections:
Draw a distinct circle separating the flat center from the raised rim. On the rim, sketch large triangles that point outward, aligning their tips with the grid lines from the center where possible.
Wobbly Lines?
If your hand shakes while painting long lines, rest your pinky finger on the dry part of the plate for stability. You can also use masking tape for straighter edges.
Step 2: Painting the Linework
-
Trace green lines:
Load your fine liner brush with hunter green ceramic paint (or use a fine-tip paint pen). Carefully trace over your pencil grid in the center of the plate. -
Double the lines:
To mimic the look of traditional glazing, add a second, parallel green line next to each grid line you just painted. Keep the gap between them very narrow and consistent. -
Outline the rim geometry:
Move to the rim and paint the large triangle outlines in green. Unlike the center grid, these can remain as single, bold lines. -
Add rim details:
Inside the negative space between the rim triangles, paint smaller inverted triangles or simple geometric dividers to balance the design.
Step 3: Adding Floral Accents
-
Paint central flowers:
Switch to your rust-orange or terracotta paint. At every intersection point of the green diamond grid, paint a simple six-petaled flower shape. -
Add dot clusters:
Dip the non-brush end of a small paintbrush or a dedicated dotting tool into the orange paint. Place a cluster of tiny dots in the center of each diamond shape to fill the negative space. -
Decorate the rim:
Inside the large green triangles on the rim, paint smaller flower motifs. These can be slightly more complex, perhaps with a darker center dot if you have a third color, or just solid orange. -
Create the border:
Paint a solid orange line along the very outer edge of the plate rim to frame the entire piece.
Vintage Patina
For an aged look, mix a tiny drop of brown paint into your orange to dull it down. Lightly sponge a transparent glaze over the finished dry piece for an antique finish.
Step 4: Refining and Finishing
-
Stipple the edge:
Using the green paint again, add a row of small, consistent dots along the outer curve of the rim pattern, following the shape of your triangles. -
Clean up smudges:
Check your work for any stray marks or wobbly lines. While the paint is still tacky, use a damp cotton swab to gently tidy up edges. -
Remove guide lines:
Once the paint is thoroughly dry to the touch, gently wipe away any visible pencil marks with a damp cloth or eraser. -
Cure the paint:
Follow the manufacturer’s instructions for your specific paint to cure the piece. This usually involves baking the plate in a home oven for 30-40 minutes to make the design permanent and dishwasher safe.
Allow the plate to cool completely in the oven before removing it to prevent cracking
Blue-and-White Fine-Line Scrollwork
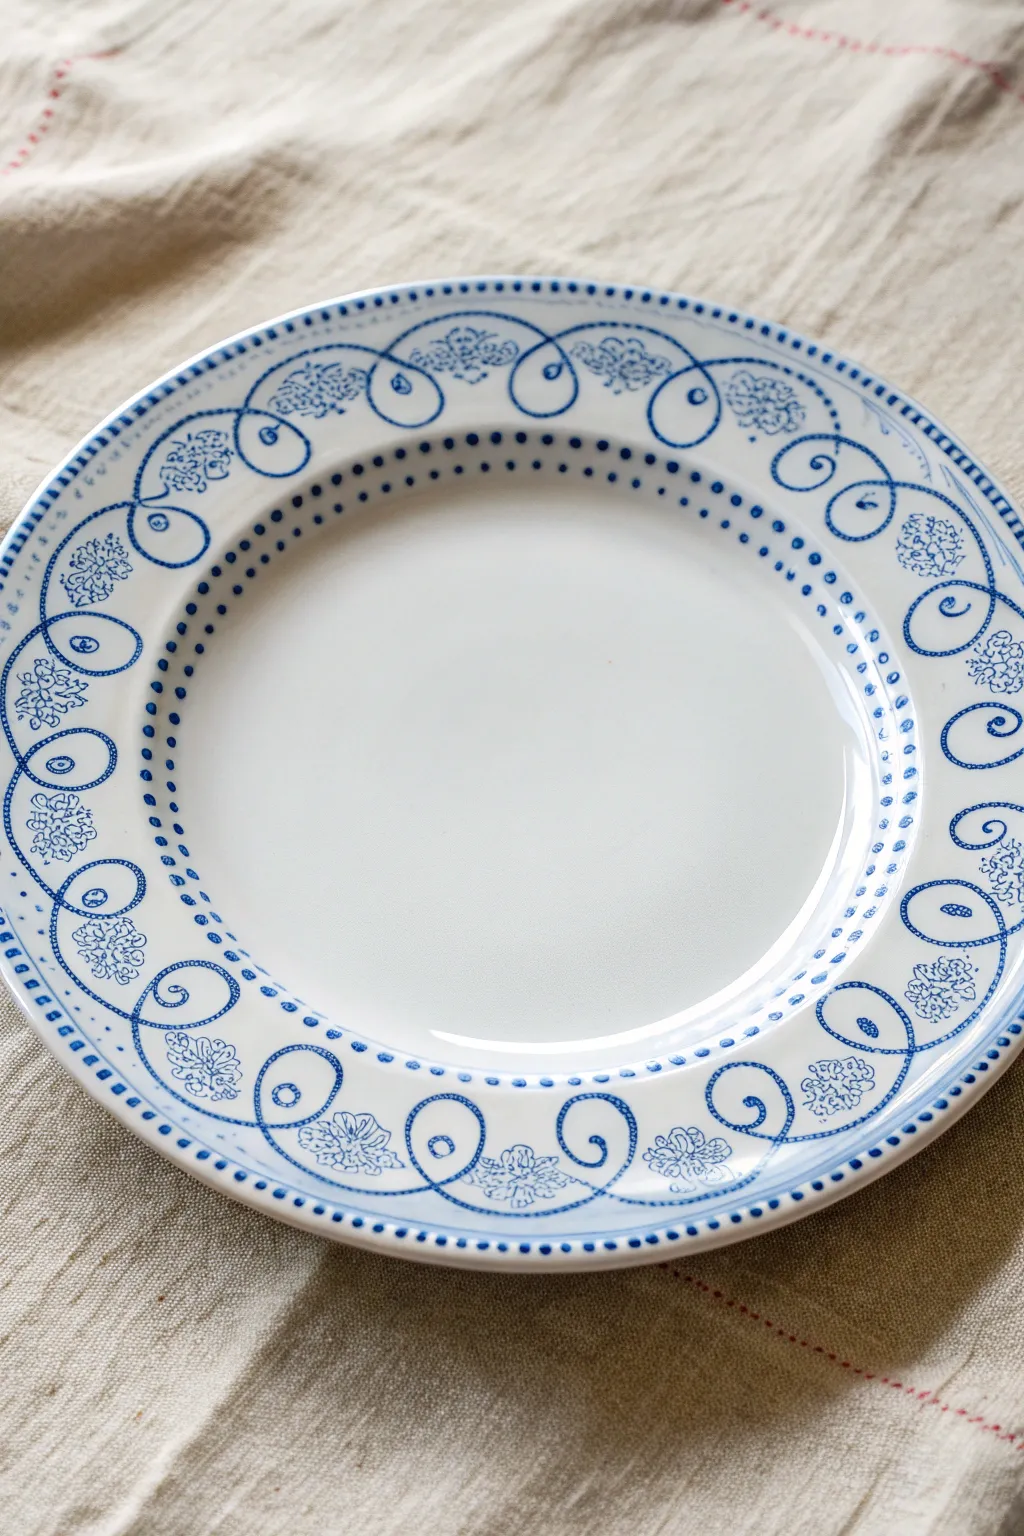
Capture the timeless elegance of classic porcelain with this intricate blue-and-white plate design. By combining sweeping fine-line scrolls with delicate stippling, you’ll transform a plain white dish into an heirloom-quality piece.
How-To Guide
Materials
- White ceramic plate (glazed, clean, and dry)
- Pebeo Porcelaine 150 paint (or similar ceramic paint) in Lapis Blue or cobalt shade
- Fine liner brush (size 00 or 000)
- Small round brush (size 0 or 1)
- Toothpick or dotting tool (very small tip)
- Graphite transfer paper (optional)
- Pencil
- Compass or round template
- Paper towels and water cup
- Rubbing alcohol
- Oven (for curing)
Step 1: Preparation and Mapping
-
Surface Cleaning:
Before you begin, wipe the entire surface of the plate with rubbing alcohol on a paper towel. This removes invisible oils or fingerprints that could prevent the paint from adhering properly. -
Define the Canvas:
Using a compass or a circular template, lightly trace two circles with a pencil: one outlining the inner well of the plate and another just inside the outer rim. These guidelines will help keep your borders perfectly uniform. -
Draft the Scrollwork:
Lightly sketch the looping scroll pattern onto the rim using a pencil. Aim for a continuous ‘S’ curve motion that loops back on itself, creating evenly spaced ovals around the entire circumference.
Step 2: Painting the Scrollwork
-
Line Consistency:
Load your fine liner brush (size 000) with thinned blue ceramic paint. You want an ink-like consistency that flows smoothy but isn’t watery. -
Trace the Loops:
Carefully paint over your pencil scroll lines. Keep your hand steady and apply even pressure to maintain a thin, consistent line weight throughout the sweeping curves. -
Add Inner Spirals:
At the tightness of each loop, paint a tiny, inward-curving spiral tick. This adds that classic calligraphic flair seen in vintage pottery. -
Paint the Flowers:
Inside every other loop (or every loop, depending on your spacing), paint a small, stylized floral motif. I like to use three tiny dabs for petals and slight hatching lines for detail. -
Fill the Gaps:
In the negative space between the top of the scrolls, paint small, fan-shaped floral clusters to balance the visual weight of the design.
Uneven Lines?
If your brush drags or skips, mix a tiny drop of painting medium or water into your paint. It should flow like smooth ink, not sticky acrylic.
Step 3: Adding the Dotted Borders
-
Inner Rim Stippling:
Switch to your dotting tool or the tip of a toothpick. Dip it into the blue paint and create a row of closely spaced dots along the pencil line you drew around the inner well. -
Second Inner Row:
Add a second row of dots slightly further in towards the center, staggering them between the dots of the first row for a zipper-like effect. -
Outer Rim Dots:
Repeat this stippling process on the very outer edge of the plate rim. These dots act as a frame, containing the scrolling energy of your main pattern. -
Scroll Accents:
For extra texture, place a single, tiny dot inside the small curls of your main scroll line.
Add a Gold Rim
Once the blue design is baked and cooled, add a third curing cycle to apply a rim of metallic gold ceramic paint for a regal finish.
Step 4: Finishing Touches
-
Clean Up:
Inspect your work for any smudges. If the paint is still wet, wipe them away with a damp Q-tip. If dry, you can carefully scratch them off with a craft knife. -
Dry Time:
Allow the plate to dry for at least 24 hours. The paint needs to be completely moisture-free before baking. -
Curing:
Place the plate in a cool oven, then set the temperature to 300°F (150°C). Bake for 35 minutes once it reaches temperature. -
Cool Down:
Turn the oven off and leave the plate inside to cool down gradually with the oven. Removing it too fast can cause thermal shock and cracking.
Now you have a stunning piece of faux-traditional pottery ready for display or gentle use
Dot Mandala Meditation
Embrace the calming rhythm of dot art with this intricate mandala design featuring a grounded palette of sage green, rust orange, and deep charcoal. The pattern radiates outward in concentric circles, combining geometric precision with organic petal shapes for a harmonious centerpiece.
Detailed Instructions
Materials
- White ceramic plate (round, flat rim)
- Pebeo Porcelaine 150 paints (or similar ceramic acrylics): Sage Green, Terracotta/Rust, Anthracite Grey/Black, White
- Rubbing alcohol
- Cotton pads
- Dotting tools (various sizes)
- Fine liner brush (size 0 or 00)
- Compass and pencil
- Paper plate or palette
- Q-tips (for cleanup)
- Oven (for baking/curing)
Step 1: Preparation & Center Design
-
Clean the Surface:
Before dipping your brush, wipe the entire plate surface with rubbing alcohol and a cotton pad to remove any oils or fingerprints, ensuring the paint adheres perfectly. -
Map the Structure:
Find the exact center of the plate. Using a compass and a very light pencil touch, draw concentric guide circles: one small center circle, a slightly larger one for the band, a medium ring for the first petal layer, and a large ring for the outer edge. -
Paint the Central Seed:
Start with a medium-sized Terracotta dot in the very center. Once dry, surround it with a ring of tiny white dots, then a ring of slightly larger Terracotta dots. -
Create the Checkered Band:
Around the central cluster, paint two thin concentric circles using Anthracite Grey. Between these lines, paint tiny, evenly spaced dashes to create a ‘zipper’ or track effect. -
Inner Petal Ring:
Using your fine liner brush, paint small Sage Green curved shapes pointing inward towards the center band. Fill the space between them with tiny grey stippling dots for texture.
Paint Consistency
If your ceramic paint feels too thick or leaves peaks on the dots, mix in a tiny drop of painting medium or thinner to help it self-level flat.
Step 2: Building the Pattern
-
Outline the Main Medallion:
Draw a bold circle with the Anthracite Grey paint using a steady hand or a template to define the central medallion’s boundary. Surround this with a ring of medium-sized grey dots. -
Form the Leaf Layer:
Paint a ring of alternating shapes: a Sage Green triangle followed by a Terracotta triangle outline. The green triangles should be solid, while the orange ones are just the v-shape outline. -
Fill the Petals:
Inside the Terracotta v-shapes, paint a small, hollow almond or ‘eye’ shape in Terracotta. Add a tiny white dot in the center of the green triangles to brighten them. -
Textural Details:
Using the smallest dotting tool (or a toothpick), add very fine clusters of white stippling dots inside the remaining white space of the leaf layer to mimic pollen or seeds. -
Outer Scale Border:
Around the leaf layer, paint alternating arches (scallops) in Sage Green and Terracotta outlines. Make these broad and sweeping. -
Detailing the Outer Layer:
Inside the green scallops, add a small white diamond shape. Inside the Terracotta scallops, I like to create a textured effect by stippling white paint lightly to create a faded, distressed look.
Level Up: Metallic Pop
Swap the Anthracite Grey for a metallic copper or bronze paint. The shimmer will catch the light and add a luxurious finish to the earthy palette.
Step 3: Finishing Touches
-
The Final Dot Ring:
Just past the scalloped edge, place a series of evenly spaced, solid Anthracite dots. Between each grey dot, paint a smaller Terracotta dot to connect the design. -
Rim Decoration:
Move to the raised rim of the plate. Create a simple, repetitive border using small Terracotta dots spaced widely apart. -
Double Border:
Add a second, denser row of tinier Terracotta dots just inside the first rim row, creating a delicate framing effect. -
Clean Up:
Check for any pencil marks still visible. If the paint is fully dry (wait at least an hour), use a Q-tip dipped in water or an eraser to gently remove the guidelines. -
Curate and Bake:
Allow the plate to air dry for 24 hours. Then, place it in a cold oven, set the temperature to 300°F (150°C), and bake for 35 minutes. Turn the oven off and let the plate cool inside completely to set the paint.
Once baked, your plate serves as both a functional dish and a meditative piece of art for your home
Coastal Waves and Seafoam
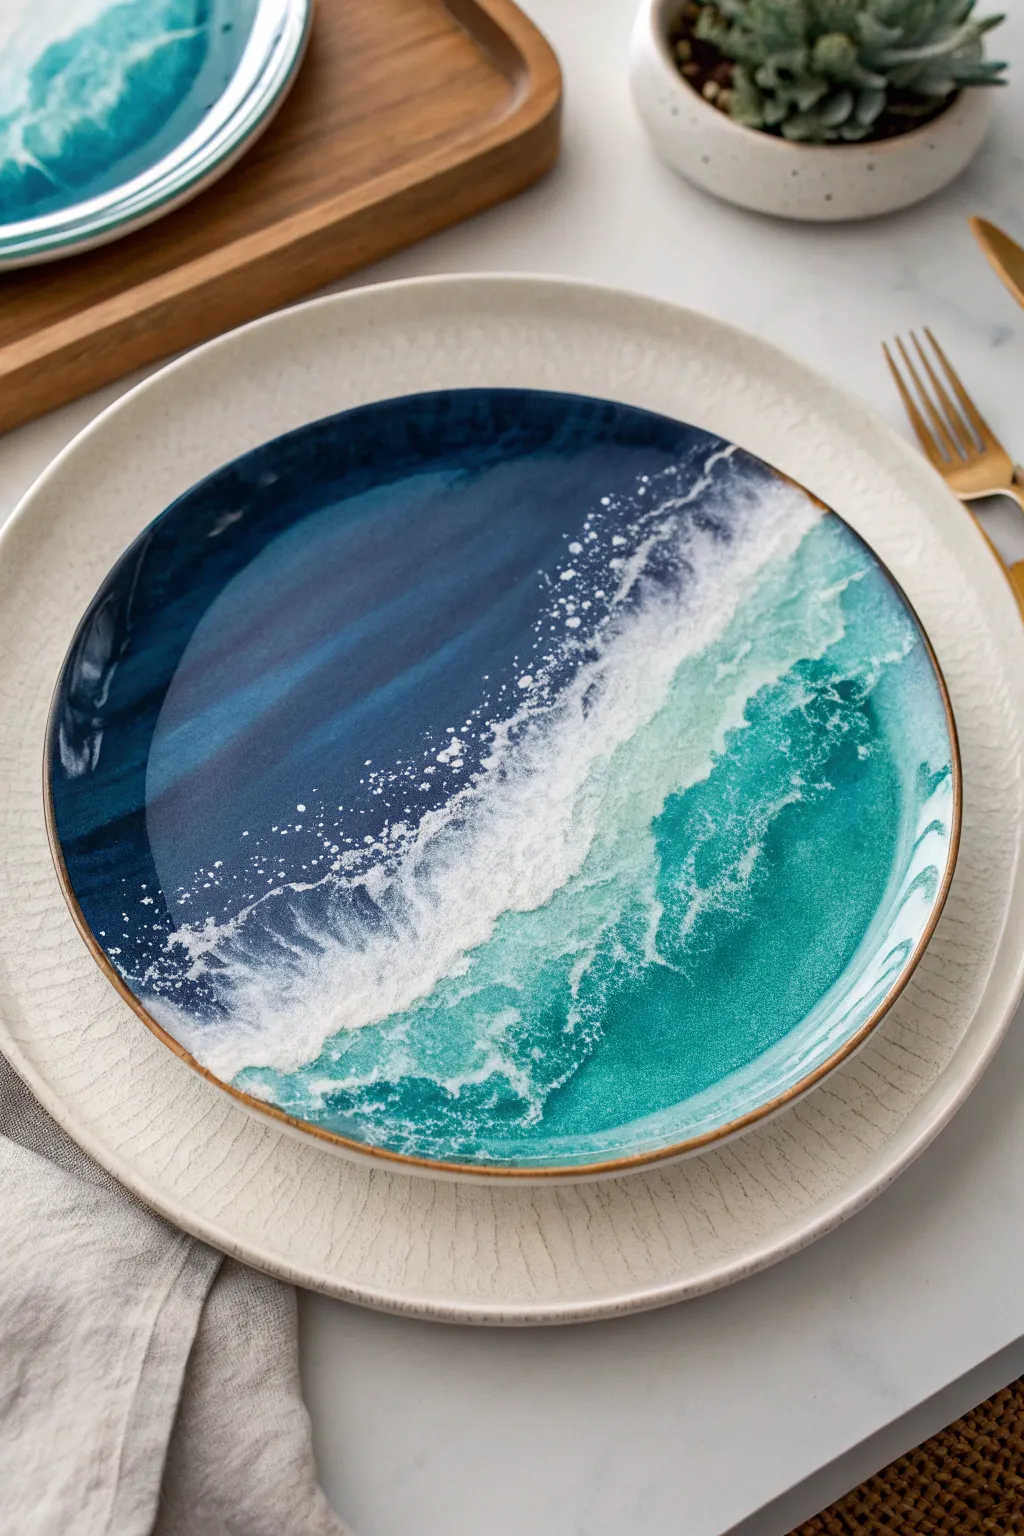
Bring the calming energy of the seaside to your table with this mesmerizing ocean wave design. Using a combination of alcohol inks and resin, you will create depth and realistic seafoam textures that look like a frozen moment of crashing water.
Step-by-Step
Materials
- White ceramic plate (must be glazed)
- Alcohol inks (Navy Blue, Teal, Turquoise, White)
- Clear epoxy resin (food safe if intended for eating, otherwise art resin)
- Isopropyl alcohol (91% or higher)
- Heat gun or hair dryer
- Straw (plastic or paper)
- Small mixing cups and stirring sticks
- Gloves and protective mat
- painter’s tape
Step 1: Preparation and Base Layer
-
Clean surface:
Wipe down your ceramic plate thoroughly with isopropyl alcohol to remove any oils or dust. This ensures the inks adhere properly to the glazed surface. -
Protect edges:
If you want a clean rim like the photo, carefully apply painter’s tape around the very edge of the plate, or decide to let the design flow naturally to the rim. -
Apply the deep ocean:
Start by dropping Navy Blue alcohol ink onto the left side of the plate (about one-third of the surface).
Step 2: Creating the Gradient
-
Add lighter tones:
Pour a line of Teal ink next to the Navy Blue, moving towards the center. Follow this immediately with the Turquoise ink on the remaining third of the plate. -
Blend with alcohol:
Drizzle a generous amount of isopropyl alcohol over the inks. Tilt the plate gently to help the colors merge and flow into one another, creating a seamless ombre effect from deep sea to shallow water. -
Air manipulation:
Use a heat gun on a low setting or a straw to blow the inks around gently. Aim to create organic streaks that mimic the movement of water currents.
Troubleshooting: No Cells?
If your white wave isn’t creating cells, your resin might be too thick. Warm the resin bottle in warm water before mixing, or use a higher heat setting briefly.
Step 3: The Seafoam Technique
-
Mix resin:
In a small cup, mix a small batch of clear epoxy resin according to the package instructions. Stir slowly to minimize bubbles. -
Create white resin:
Pour a small amount of the mixed resin into a separate cup and add a few drops of White alcohol ink or white pigment paste. Mix until opaque. -
Apply the wave line:
Drizzle a thin line of the white resin mixture where the deep blue meets the lighter teal sections. This will become your crashing wave. -
Blow the waves:
Using your heat gun or a straw, blow the white resin rapidly over the dried blue ink layer. The heat will cause the resin to lace up and create cells. -
Adding texture:
Repeat the white line process in smaller sections closer to the ‘shore’ (the lighter turquoise side) to create wispy foam trails. -
Detailing the foam:
For the specific splashes seen in the image, dip a toothpick into white ink and flick tiny droplets over the wave crest area.
Level Up: Sandy Shores
Add real grandeur by mixing fine sand with a bit of resin and applying it to the lightest edge of the water for a tactile 3D beach effect.
Step 4: Finishing Touches
-
Pop bubbles:
Pass a heat gun quickly over the surface to pop any micro-bubbles trapped in the resin layers. -
Curing phase:
Cover the plate with a clean box to protect it from dust and let it cure for 24 hours (or as per your resin’s instructions). -
Remove tape:
If you used tape on the rim, carefully peel it away once the resin is tacky but not fully hard to avoid jagged edges. -
Final cure:
Allow the plate to fully harden for another 24-48 hours before handling.
Now you have a stunning piece of coastal art that captures the eternal motion of the sea
Night Sky Galaxy Swirl
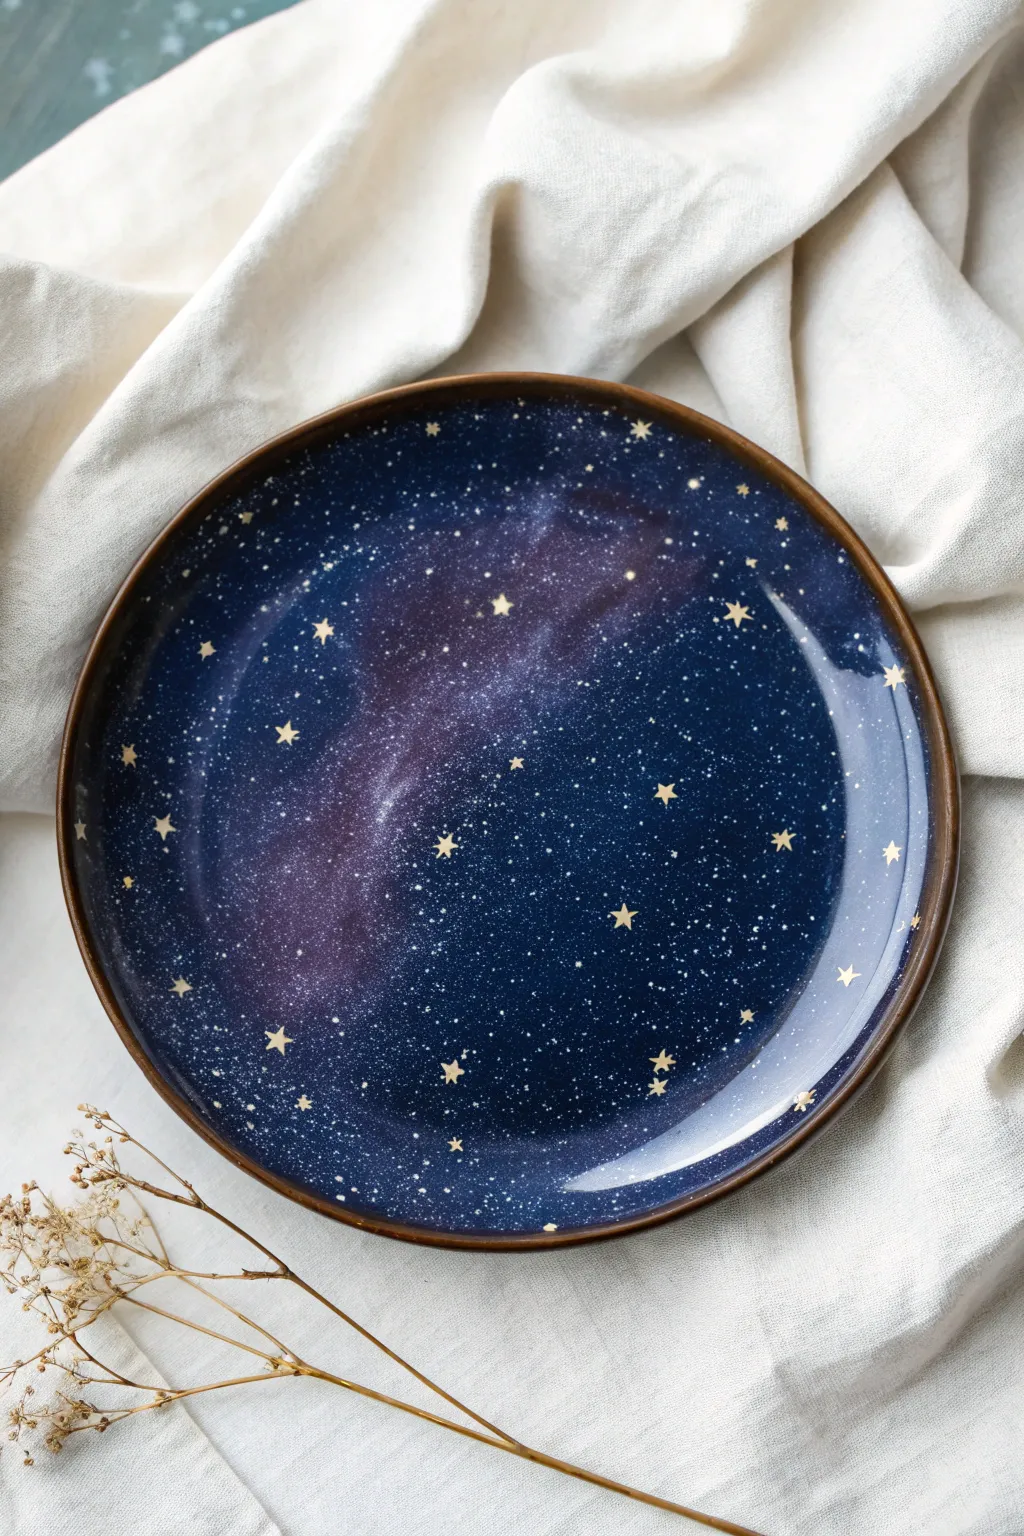
Capture the magic of a clear night sky with this stunning galaxy-themed plate. Using deep blues, subtle purples, and shimmering gold accents, you will transform plain ceramic into a doorway to the cosmos.
Step-by-Step Tutorial
Materials
- Plain white or light-colored ceramic plate
- Ceramic or porcelain paints (Midnight Blue, Violet/Purple, Black, White, Metallic Gold)
- Medium soft flat brush
- Small round detail brush
- Sponge dabber or small sea sponge
- Old toothbrush
- Rubbing alcohol
- Paper towels
- Oven (for curing, if required by paint type)
Step 1: Preparation and Base Layer
-
Clean surface:
Before you begin painting, wipe the entire surface of your plate with rubbing alcohol and a paper towel to remove any oils or dust that might prevent the paint from adhering properly. -
Apply base blue:
Using your flat brush, coat the entire eating surface of the plate with a deep midnight blue ceramic paint. Apply long, smooth strokes to get an even coverage. -
Darken the edges:
While the blue is still slightly wet, mix a tiny drop of black into your blue paint. Carefully blend this darker shade around the outer perimeter of the plate interior to create depth and a vignette effect. -
Initial drying:
Let this base layer dry completely according to the manufacturer’s instructions. This is crucial so your next layers sit on top rather than mixing into a muddy color.
Paint Lifting?
If sponging the nebula lifts the blue base paint, let the base layer cure longer (24 hrs) or bake it briefly to set it before adding sponge layers.
Step 2: Creating the Nebula
-
Mix the nebula shade:
On your palette, mix a vibrant purple with a small amount of white to create a soft, milky violet color. -
Sponge the swirl:
Load your sponge dabber or sea sponge with the violet mix. Gently dab a diagonal swath across the center of the plate. Keep the pressure light to create a clouded, wispy texture. -
Softening edges:
Before the purple paint dries, take a clean, slightly damp sponge and lightly tap the edges of your purple swirl to blend it seamlessly into the dark blue background. You want a soft transition, not a hard line. -
Adding highlights:
Dip just the corner of your sponge into pure white paint. Dab very sparingly into the center of the purple nebula cloud to create the brightest point of the galaxy.
Step 3: Stars and Details
-
Prepare the splatter:
Squeeze a pea-sized amount of white paint onto your palette and thin it slightly with a drop of water until it has an ink-like consistency. -
Create distant stars:
Dip an old toothbrush into the thinned white paint. Hold it over the plate and run your thumb across the bristles to flick tiny speckles onto the surface. I like to concentrate more speckles over the nebula lighter areas. -
Paint larger stars:
Using your smallest detail brush and metallic gold paint, verify the surface is dry, then hand-paint small five-pointed stars scattered randomly across the ‘sky’. -
Vary the star sizes:
Paint a few tiny gold dots in between the five-pointed stars to add variety and sparkle to the composition. -
Rim the plate:
With a steady hand, use the metallic gold or a metallic bronze paint to carefully line the very top rim of the plate, framing your artwork.
Make it Shimmer
Mix a tiny amount of iridescent meduim or fine glitter glaze into your purple nebula paint for a galaxy swirl that sparkles in the light.
Step 4: Finishing Up
-
Clean up errors:
If any paint smudged onto the back or bottom rim of the plate where you didn’t want it, wipe it away with a damp Q-tip before curing. -
Final cure:
Follow the specific instructions on your ceramic paint bottle to cure the piece. This usually involves baking the plate in a home oven for 30-40 minutes to set the design permanently. -
Cool down:
Allow the plate to cool completely inside the oven before removing it to prevent the ceramic from cracking due to temperature shock.
Now you have a piece of current decor that brings the beauty of deep space right to your table
Loose Watercolor-Style Blooms
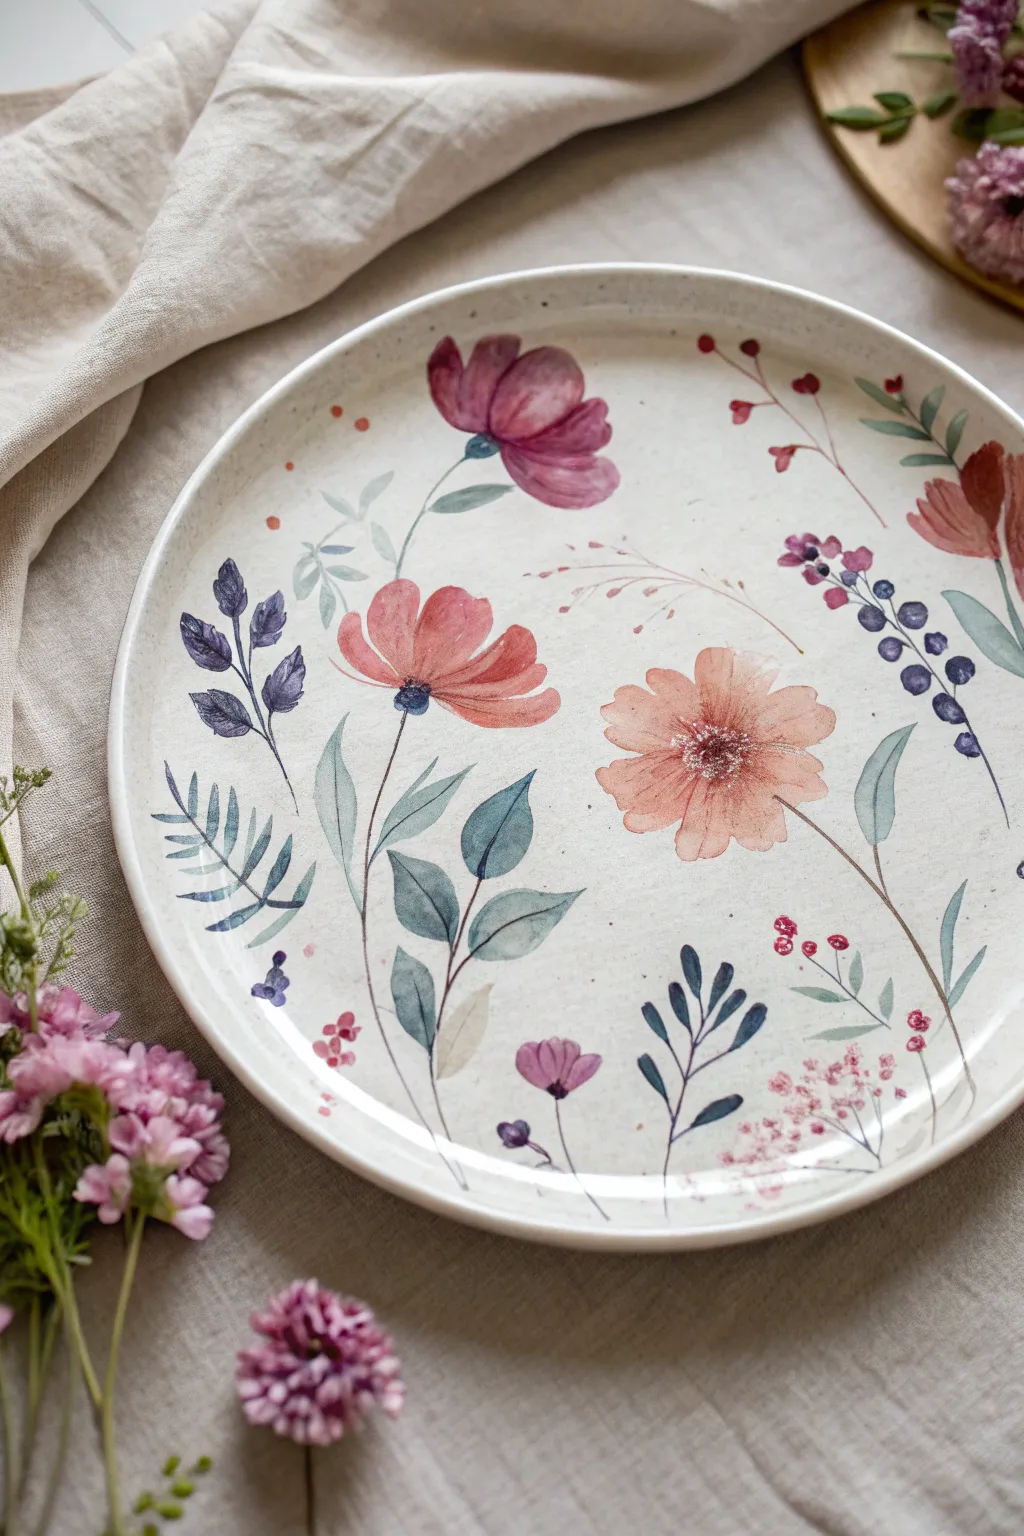
Transform a plain ceramic dish into a botanical masterpiece with this delicate, airy design. By mimicking the translucent properties of watercolor using ceramic paints, you’ll create a scatter of wildflowers that feels organic and effortlessly graceful.
Detailed Instructions
Materials
- White or cream-colored ceramic plate (glazed or unglazed bisque)
- Ceramic paints or underglazes (pinks, peach, purple, sage green, dark blue)
- Soft synthetic watercolor brushes (sizes 2, 4, and 6)
- Glazing medium or water (for thinning paint)
- Palette for mixing
- Paper towels
- Clear dipping glaze (if using bisque)
Step 1: Planning and Surface Prep
-
Clean the surface:
Before you begin, wipe down your ceramic plate thoroughly with alcohol or soapy water to remove any oils or fingerprints that could repel the paint. A clean surface is crucial for delicate work. -
Map the flow:
Visualize the layout without drawing hard lines. This design relies on negative space, so imagine a loose spiral or scattered placement where flowers drift across the surface rather than sitting in a rigid pattern. -
Prepare your washes:
On your palette, mix small amounts of your pink, peach, and purple paints with a glazing medium or water. You want a ‘tea stain’ consistency—thin enough to be transparent but pigmented enough to show color.
Step 2: Painting the Main Blooms
-
Start with the large pink bloom:
Using a size 6 brush loaded with thinned magenta or deep pink, press the belly of the brush down to create wide, organic petal shapes near the top center. Let the color pool naturally at the edges. -
paint the peach flower:
Create the lower-right peach flower using the same press-and-lift technique. Create open, distinct petals that radiate from a small imaginary center point. -
Add the smaller coral flower:
Paint the smaller red-coral flower on the left side. For variety, paint this one slightly sideways, showing a profile view rather than a full face, using shorter brushstrokes. -
Layering transparency:
If your first layer looks too pale, wait for it to dry slightly and add a second, smaller stroke of the same color near the base of the petals to create depth without losing that watercolor feel.
Paint Beading Up?
If the paint retreats into droplets on the glazed surface, the plate might be too slick. Wipe it again with rubbing alcohol or lightly sand the surface with fine-grit sandpaper to give it ‘tooth’.
Step 3: Stems and Foliage
-
Mix your greens:
Prepare two shades of green: a muted sage and a deeper forest green. Keep the sage very watery and transparent. -
Paint flowing stems:
Using your size 2 liner brush, connect your main blooms to imaginary ground lines with thin, wavering stems. Don’t make them straight; let them curve naturally like wild stems. -
Add broad leaves:
Below the coral flower, paint large, substantial leaves using the sage green. Use a single stroke for each side of the leaf, leaving a tiny gap of white space in the middle for the vein. -
Create fern-like foliage:
On the far left, paint a stem with small, symmetrical leaves using a darker blue-purple tone. This contrast in shape adds visual interest and breaks up the softness of the flowers. -
Add floating leaves:
Scatter loose, single leaves around the open white spaces. Vary the pressure on your brush to make some leaves look twisted or folded.
Pro Tip: Watering Down
To get that translucent watercolor look on ceramics, mix a drop of water or glazing medium into your paint. Test opacity on a paper towel first—it should look like stained glass, not solid cream.
Step 4: Fine Details and Accents
-
Detail the flower centers:
Once the base petals are dry, use the tip of a size 2 brush to dot the centers. Use dark blue or brown for the peach flower, and a tight cluster of dark stems for the pink bloom. -
Paint berry clusters:
On the right side, create a vertical stem of berries. Start with purple at the bottom and transition to blue at the top, painting small circles that decrease in size as you go up. -
Add wispy grasses:
Mix a very pale pink-brown. Use your thinnest brush to flick in ultra-fine lines mimicking dried grass or wheat stalks near the center of the plate. -
Scatter tiny filler flowers:
Using the tip of your brush, stipple tiny clusters of pink dots near the bottom right to resemble baby’s breath or wildflowers. -
Sprinkle decorative dots:
Dip the back end of your brush handle into paint and add random tiny dots in red and purple around the empty spaces to fill the composition without cluttering it. -
Final check:
Step back and look at the plate. If any area feels too empty, add a small floating petal or a faint ghost leaf using very watered-down grey-green paint.
Step 5: Finishing
-
Dry completely:
Let the paint dry for at least 24 hours to ensure all moisture has evaporated from the ceramic medium. -
Bake or seal:
Follow your specific paint manufacturer’s instructions to set the design. This usually involves baking in a home oven for 30-40 minutes or applying a clear varnish if the piece is decorative only.
Enjoy using your new floral plate for trinkets or display, letting the soft blooms brighten your space
Playful Animal Silhouette Scene
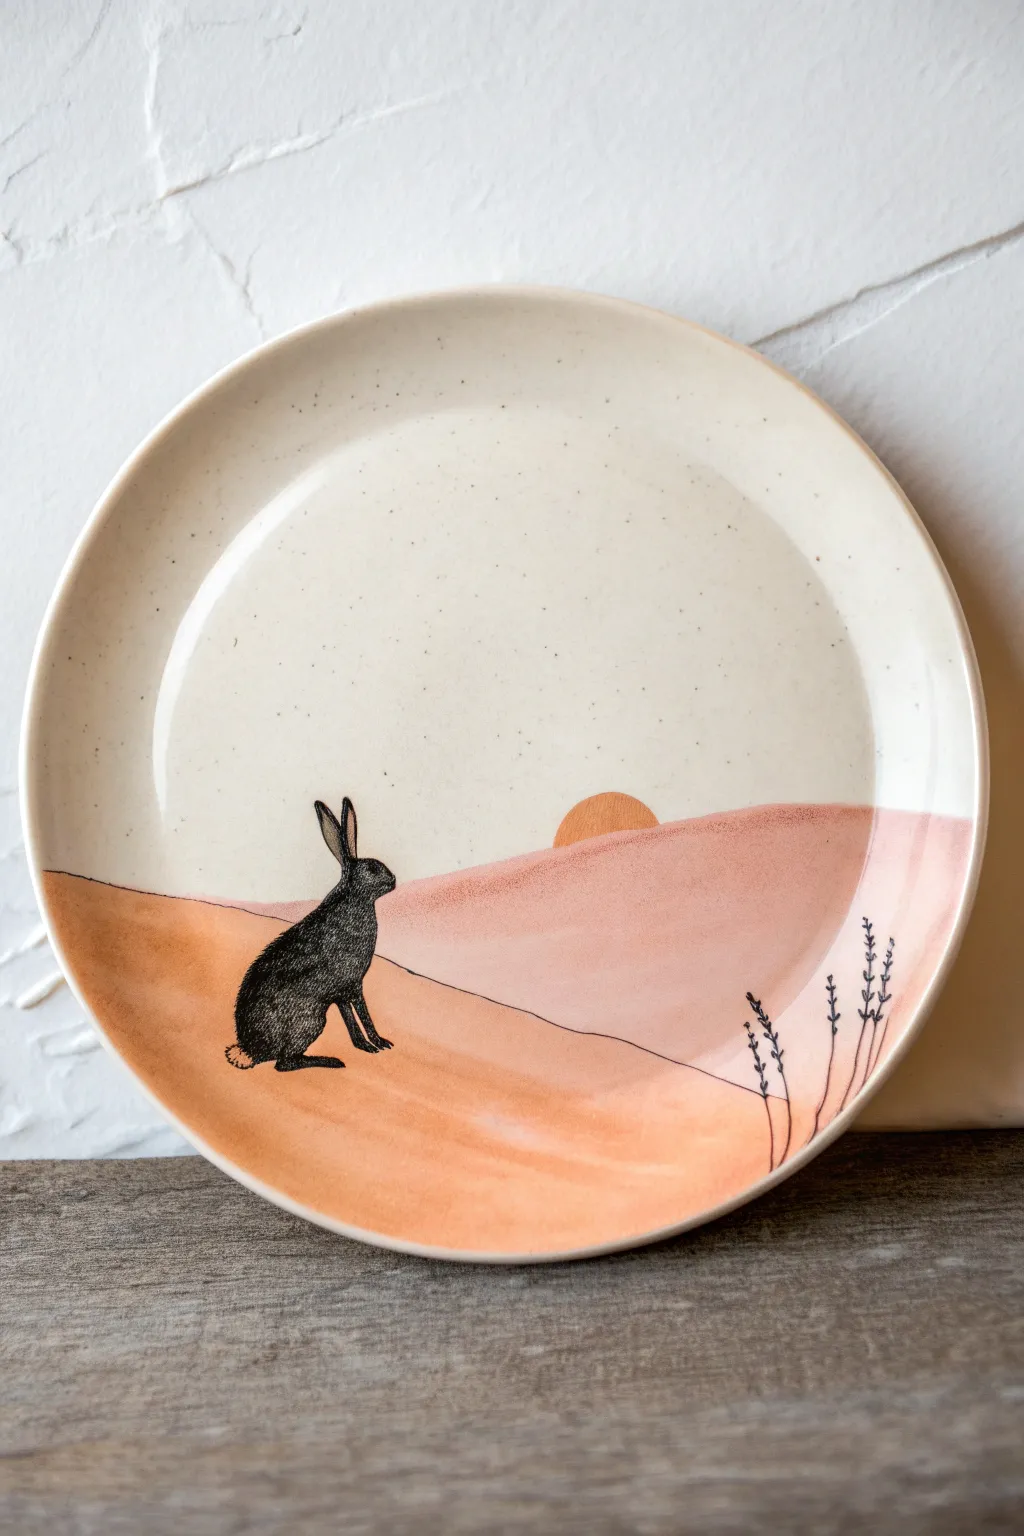
Capture a moment of quiet contemplation with this serene desert landscape featuring a detailed rabbit silhouette. The dusty pinks and warm oranges create a soft backdrop for the crisp, ink-black focal point, making for a sophisticated yet playful piece of tableware.
Step-by-Step
Materials
- Ceramic bisque plate (8-10 inch)
- Underglaze paints (Sand/Cream, Dusty Rose, Burnt Orange, Jet Black)
- Paintbrushes: Large flat wash brush, medium round brush, fine liner brush (size 0 or 00)
- Pencil for sketching
- Clear dipping glaze
- Water cup and palette
- Sponge
Step 1: Planning and Background
-
Prepare the surface:
Begin by wiping down your ceramic bisque plate with a damp sponge to remove any dust or oils that might repel the glaze. -
Sketch the horizon:
Lightly sketch the rolling landscape lines with a pencil. Draw a gentle curve roughly one-third of the way up the plate for the foreground, and a second, softer billow behind it for the distant dunes. -
Outline the subject:
Carefully draw the silhouette of the rabbit sitting on the left side of the foreground dune. Add the small semi-circle of the setting sun peeking over the background hill. -
Establish the sky:
Using a large flat brush, apply a very diluted wash of a Sand or Cream color to the entire top portion of the plate (the sky). You want this layer to be speckled and slightly translucent to mimic the pottery’s natural texture, so don’t overwork it.
Step 2: Painting the Landscape
-
Paint the distant dunes:
Mix your Dusty Rose underglaze with a touch of water. Paint the background hill section, ensuring a crisp edge where it meets the sky. I like to keep the paint slightly uneven here to suggest the texture of sand. -
Add the sun:
Fill in the semi-circle sun with Burnt Orange. Apply two to three coats to ensure it stands out against the pale sky. -
Paint the foreground:
For the closest hill, use a slightly lighter orange or a mix of Burnt Orange and Cream. Paint this section with horizontal strokes to emphasize the lay of the land. -
Blend the transition:
While the foreground paint is still slightly damp, use a clean, moist brush to soften the bottom edge where the orange fades into the rim of the plate.
Fur Texture Hack
Instead of brush strokes, use a scratching tool (sgraffito) to gently scratch through the top layer of black paint to reveal the clay underneath for instant fur texture.
Step 3: Detailing the Silhouette
-
Base coat the rabbit:
Switch to a medium round brush and fill in the rabbit sketch with solid Jet Black underglaze. Apply three coats, letting each dry completely, for full opacity. -
Add texture:
Once dry, use your finest liner brush or a specialized underglaze pencil to add tiny, scratchy marks within the black shape to suggest fur texture, especially around the ears and back. -
Define the legs:
Use the liner brush to carefully define the separation of the front legs and the curve of the haunches. -
Draw the horizon lines:
Take your fine liner brush with black underglaze and trace the pencil lines of the hills. Keep the line thin and slightly wavering to maintain an organic, sketched feel.
Golden Hour Glow
Dilute a tiny drop of gold luster (applied after the final firing) to the edge of the sun or the rabbit’s ears for a metallic shimmer.
Step 4: Final Flourishes
-
Plant minimal flora:
On the bottom right side, paint three simple vertical stems. Add tiny V-shapes or dashes near the tops to represent sparse desert lavender or dried grass. -
Clean up:
Check the rim and the unpainted sky area for any stray smudges. Underglaze mistakes can often be gently scratched off with a toothpick once dry. -
Glaze and fire:
Once the artwork is bone dry, dip the entire plate into clear glaze. Fire in the kiln according to your clay and glaze specifications (usually Cone 06 or Cone 6).
Display your finished plate on a stand or use it to serve treats at your next gathering
Expressive Splatter Rim Accent
This project captures the organic warmth of hand-thrown pottery using simple painting techniques on standard ceramic or bisque ware. By combining a controlled splatter effect with a textured edge, you can transform a plain white plate into a rustic, artisanal masterpiece perfect for a cozy table setting.
Step-by-Step Tutorial
Materials
- White ceramic plate (bisque or glazed, depending on paint choice)
- Ceramic paints or underglazes (warm white, dark brown, rust orange, grey)
- Small flat shader brush
- Old toothbrush or stiff bristle brush
- Palette or small mixing dishes
- Paper towels
- Lazy Susan or banding wheel (optional)
- Clear food-safe glaze (if using bisque)
Step 1: Base Preparation
-
Clean surface:
Begin by thoroughly wiping down your plate with rubbing alcohol or a damp sponge to remove any dust, oils, or residue that might prevent paint adhesion. -
Mix the base color:
Mix a small amount of warm white ceramic paint with a tiny drop of grey to create an off-white, creamy ‘oatmeal’ background color if your plate is stark bright white. -
Apply background (optional):
If painting on bisque or changing the base color, apply two smooth, even coats of your off-white mixture to the entire top surface, letting the first coat dry completely before adding the second.
Step 2: Creating the Speckle
-
Prepare splatter colors:
On your palette, prepare three small puddles of paint: a dark espresso brown, a slate grey, and a muted rust orange. Thin each slightly with water until they have an inky consistency. -
Test your technique:
Dip an old toothbrush into the dark grey paint first. Point the bristles away from you onto a scrap piece of paper and run your thumb across the bristles to test the spray pattern. -
First splatter layer:
Hold the toothbrush about 6-8 inches above the plate and flick the grey paint onto the surface. Focus on creating a random, uneven dispersion rather than perfect coverage. -
Second color application:
Clean the brush or switch tools, then load it with the dark brown paint. Repeat the splatter process, concentrating slightly more heavily near the outer edges. -
Adding warmth:
Finally, load the brush with the rust orange paint. Apply this layer very sparingly—you want just a few scattered orange ‘freckles’ to add warmth without overpowering the neutral tones. -
Clean up large drips:
If any large, unwanted blobs land on the plate, I like to use a barely damp cotton swab to gently lift them off or smudge them out before they dry.
Blob Control
If a splatter lands too heavy, let it dry partially, then use a sewing needle to scrape the center out, turning a blob into two smaller, natural-looking specks.
Step 3: The Rustic Rim
-
Mix rim color:
Create a rich, variegated brown for the rim. Don’t mix it perfectly uniform; leave some streaks of lighter rust and darker espresso within the puddle. -
Load the shader brush:
Dip a small flat shader brush into the brown mix. Wipe off excess paint so the bristles are coated but not dripping wet (dry-brush style). -
Initial rim definition:
Hold the brush perpendicular to the plate’s edge. Gently drag the brush around the very lip of the plate. If you have a banding wheel, spin it slowly while holding the brush steady. -
Add texture:
Instead of a solid line, create short, vertical hash marks along the rim. Press the brush down slightly to mimic the look of exposed clay peeking through glaze. -
Layering the edge:
Go back over the rim with a slightly darker brown tone, dabbing just the very top edge to create depth and a ‘burnt’ pottery look. -
Feathering inward:
With a mostly dry brush, very lightly feather the rim color inward toward the center of the plate about 1-2mm to soften the transition.
Level Up: Texture
Before painting the rim, gently sand the edge of the bisque ware with coarse sandpaper to create physical texture that the paint can grip onto.
Step 4: Finishing
-
Dry completely:
Allow the painted design to dry for at least 24 hours to ensure all layers are set. -
Glaze application:
If using underglazes on bisque, apply two to three coats of clear food-safe glaze over the entire piece. -
Fire or bake:
Follow the manufacturer’s instructions for your specific paint or glaze type to cure the piece—whether that involves kiln firing or baking in a home oven.
Once fired or cured, this beautiful plate is ready to bring a touch of earthy elegance to your dining table
Optical Illusion Checker Warp
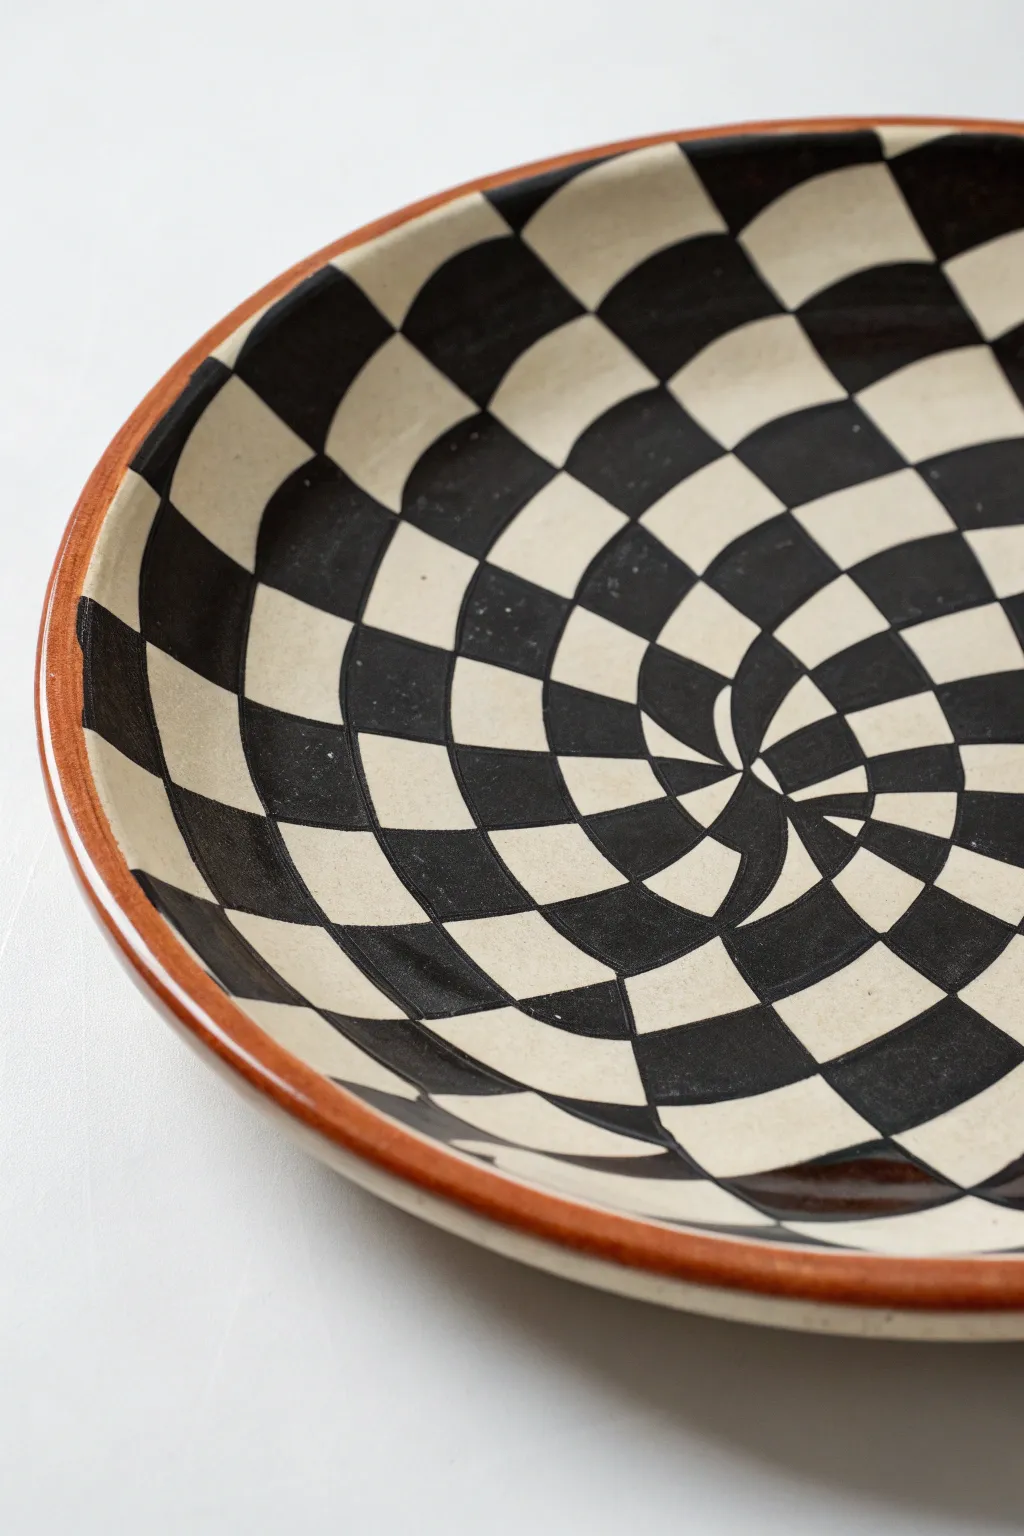
Transform a plain ceramic dish into a mesmerizing piece of optical art using simple geometric distortion. This black and white checkerboard pattern twists towards the center, creating a stunning sense of depth and movement that looks complicated but is built on a straightforward grid.
Step-by-Step
Materials
- Bisque-fired ceramic plate or ready-to-paint pottery blank
- Underglaze or ceramic paint (Black)
- Underglaze or ceramic paint (Red-brown or Terracotta)
- Clear dipping or brush-on glaze
- Pencil (HB or lighter)
- Flexible ruler or measuring tape
- Detail liner brush (size 0 or 00)
- Round brush (size 2 or 4)
- Damp sponge
- Potter’s wheel or banding wheel (optional but helpful)
Step 1: Drafting the Grid
-
Find the center:
Begin by finding the exact center of your plate. Mark this spot lightly with your pencil, as all your lines will converge or spiral around this point. -
Draw radial lines:
Sketch curved radial lines emanating from the center to the rim. Instead of straight spokes, curve them slightly like a pinwheel to create the spiral effect. Aim for about 12-16 sections evenly spaced around the rim. -
Add concentric circles:
Starting from the center, draw a series of circles expanding outward. These don’t need to be perfect circles; letting them wobble slightly follows the warped aesthetic. Space them closer together near the center and wider as they reach the rim. -
Define the checks:
You should now have a spiderweb-like grid. The intersection of your curved radial lines and the concentric circles creates the individual tiles for your checkerboard. -
Mark the black tiles:
To avoid confusion while painting, lightly place a small ‘x’ or dot inside every other tile. This ensures you maintain the alternating pattern correctly before you commit with paint.
Wobbly Lines?
Don’t stress about perfection! The optical illusion actually works better if the lines aren’t mechanically straight. The organic warping enhances the trippy 3D effect.
Step 2: Painting the Pattern
-
Outline the rim:
Apply the reddish-brown underglaze to the very edge of the plate rim. I generally use a steady banding wheel for this if available, but a steady hand and a round brush work perfectly fine too. -
Outline the black tiles:
Using your fine detail liner brush and black underglaze, carefully trace the outline of just the tiles you marked with an ‘x’. Keep the paint consistency fluid but not watery to get crisp edges. -
Fill the outer tiles:
Switch to your slightly larger round brush. Begin filling in the marked tiles near the outer rim. These are larger and easier to paint, helping you get into a rhythm. -
Work inward:
As you move toward the center spiral, switch back to the smaller brush. The tiles here get very narrow and angular, so take your time to stay within the lines. -
Refine the center point:
Paint the very center point carefully. The tiles here might merge into a single swirling focal point, which enhances the optical illusion. -
Review edges:
Check the corners of all your black squares. If any white clay is showing through where corners touch, carefully touch it up with the tip of your liner brush. -
Clean up smudges:
If you accidentally got black paint on a white tile, gently scratch it off with a toothpick or wipe it with a barely damp brush once it’s dry.
Color Swap
Swap the classic black for a deep navy blue or forest green for a softer look, or paint the ‘white’ squares a pale pastel (like cream or mint) for a retro vibe.
Step 3: Finishing and Glazing
-
Erase pencil lines:
Depending on your underglaze, the pencil marks might burn off in the kiln. If you are using acrylics on a decorative-only plate, gently erase visible lines on the white squares. -
Apply clear glaze:
Once the underglaze is bone dry, apply a clear glaze over the entire piece. Two to three coats are usually standard for brushing glazes to ensure a glossy, food-safe finish. -
First firing:
Follow the manufacturer instructions for your bisque firing if you painted on greenware, or proceed straight to the glaze firing if you used bisque.
Enjoy using your dizzying new creation at your next dinner party
Faux Kintsugi Crack Lines
Embrace the beauty of imperfection with this stunning faux Kintsugi project, where gold paint transforms simple lines into artful repairs. The result is a sophisticated, minimalist piece that mimics the ancient Japanese art of golden joinery without actually breaking any dishes.
Detailed Instructions
Materials
- White or cream ceramic plate (matte finish preferred)
- Pebeo Porcelaine 150 paint (Gold or Outliner in Gold)
- Fine liner brush (size 0 or 00)
- Pencil (HB or lighter)
- Rubbing alcohol
- Cotton pads
- Paper towel
- Oven (for curing)
Step 1: Preparation and Planning
-
Clean the surface:
Begin by thoroughly cleaning your ceramic plate. Wipe the entire surface with a cotton pad soaked in rubbing alcohol to remove any oils, fingerprints, or dust that might interfere with the paint adhesion. -
Dry completely:
Allow the alcohol to evaporate completely. Avoid touching the surface with your bare hands after this cleaning step to keep the canvas pristine. -
Sketch the main fissure:
Using a light pencil, gently sketch your primary crack line. Start from one edge of the plate and let your hand wobble slightly as you draw across to the other side to create a natural, organic fracture. -
Add branching cracks:
Draw secondary lines branching off the main fissure. Imagine how a plate creates shards when dropped; add smaller, intersecting lines that create distinct ‘broken’ shapes within the design. -
Refine the composition:
Step back and look at your pencil marks. Ensure the lines vary in direction and aren’t too symmetrical. You want the chaos to look accidental, not patterned.
Step 2: Painting the Gold Seams
-
Prepare the paint:
Shake your gold ceramic paint bottle well. If using a tube outliner, squeeze a small amount onto a palette or scrap paper to ensure the flow is smooth and free of air bubbles. -
Load the brush:
Dip your fine liner brush into the gold paint. You want the brush fully loaded but not dripping. If using an outliner tube directly, wipe the nozzle tip clean. -
Trace the main line:
Starting at the edge, carefully trace over your pencil marks with the gold paint. Press slightly harder in some areas and lift off in others to vary the line thickness, mimicking how resin fills a real crack. -
Creating texture:
Don’t try to make the line perfectly smooth. A slightly shaky hand is actually beneficial here. I like to occasionally wiggle the brush to create little pools of gold, simulating where the ‘glue’ would be thicker. -
Connect the branches:
Move on to the branching lines. Ensure the intersections where lines meet are fully connected with paint, creating a seamless web of gold. -
Add detail to plate edges:
Where the lines run off the rim of the plate, paint a tiny bit over the edge and slightly underneath. This gives the illusion that the crack goes all the way through the ceramic. -
Review and touch up:
Inspect your work for any skipped spots or lines that look too faint. Add a second layer of paint to the wider sections of the cracks to increase the opacity and metallic shine.
Fixing Smudges
If you make a mistake while painting, don’t panic. While the paint is wet, use a cotton swab dipped in rubbing alcohol to gently lift the error without ruining the rest of your design.
Step 3: Curing and Finishing
-
Initial Surface Dry:
Let the plate sit undisturbed for at least 24 hours. The paint needs to be fully dry to the touch before baking; rushing this can cause bubbling. -
Load the oven:
Place the plate into a cold oven. Do not preheat the oven, as the sudden temperature change could crack the actual ceramic or shock the paint. -
Bake the design:
Set the oven temperature to 300°F (150°C) or the specific temperature recommended on your paint bottle. Bake for 35 minutes once the temperature is reached. -
Cool down slowly:
Turn the oven off and open the door slightly, but leave the plate inside until the oven is completely cool. This gradual cooling prevents thermal shock. -
Final wipe:
Once fully cool, use a damp cloth to wipe away any visible pencil marks that weren’t covered by the gold paint.
Layering for Depth
To make the cracks look deeper, paint a very fine line of dark grey first. Let it dry, then paint the gold over it, leaving a tiny bit of grey visible at the edges for a shadow effect.
Now you have a striking piece of decor that celebrates the elegance of broken things


Have a question or want to share your own experience? I'd love to hear from you in the comments below!