Painting pottery mugs is one of my favorite ways to turn an everyday object into something that feels totally you. I pulled together a mix of classic, beginner-friendly pottery mug painting ideas and a few artsy curveballs for when you’re ready to play.
Classic Floral Wraparound Vines
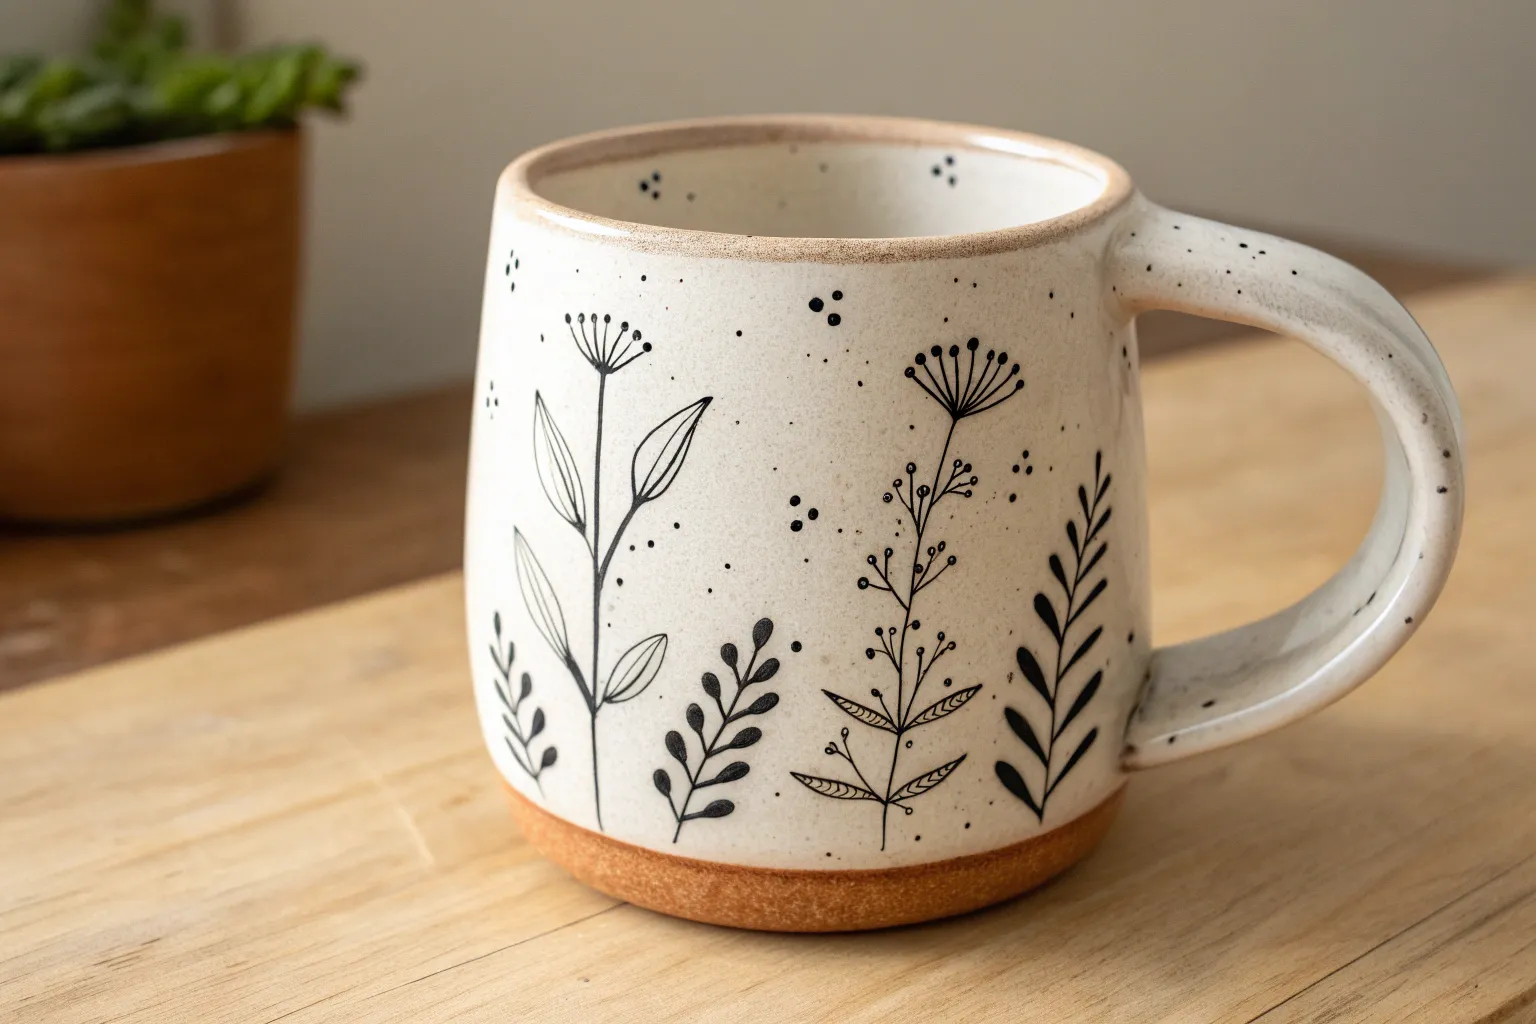
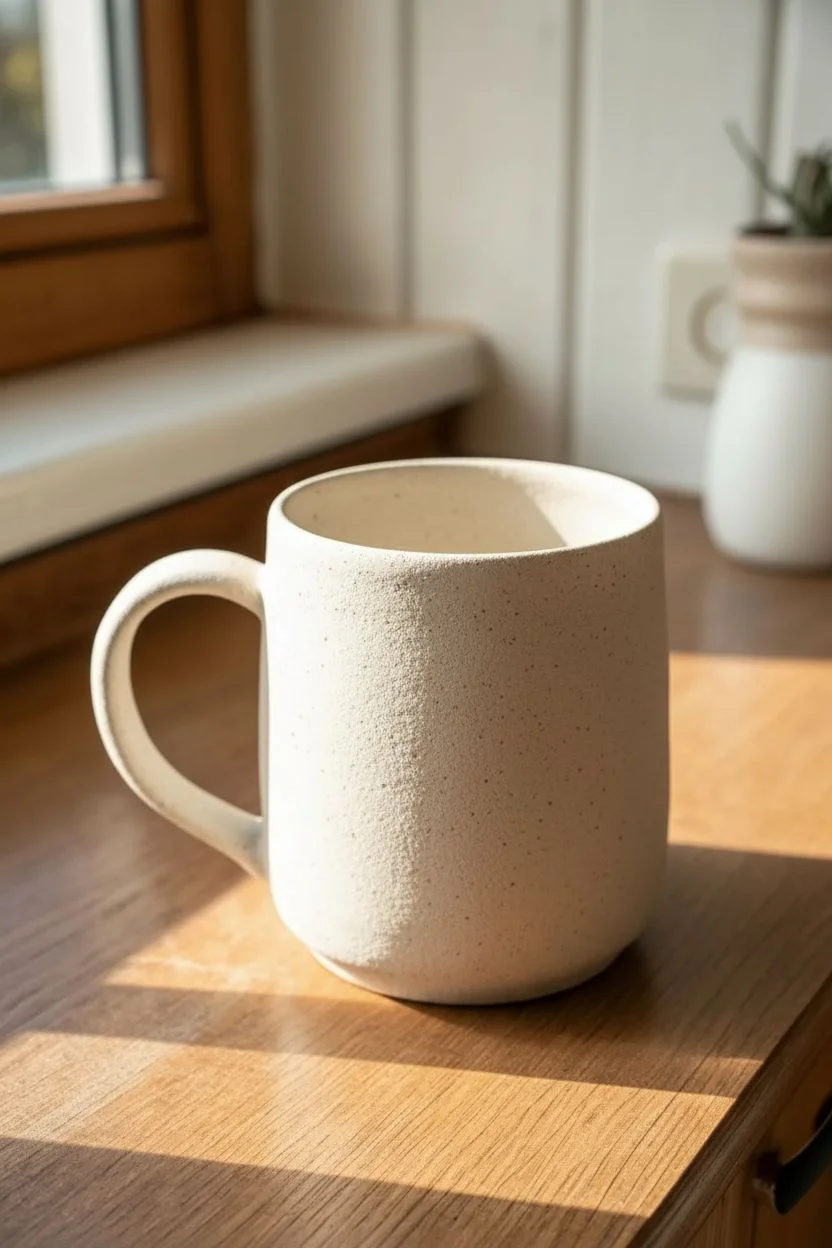
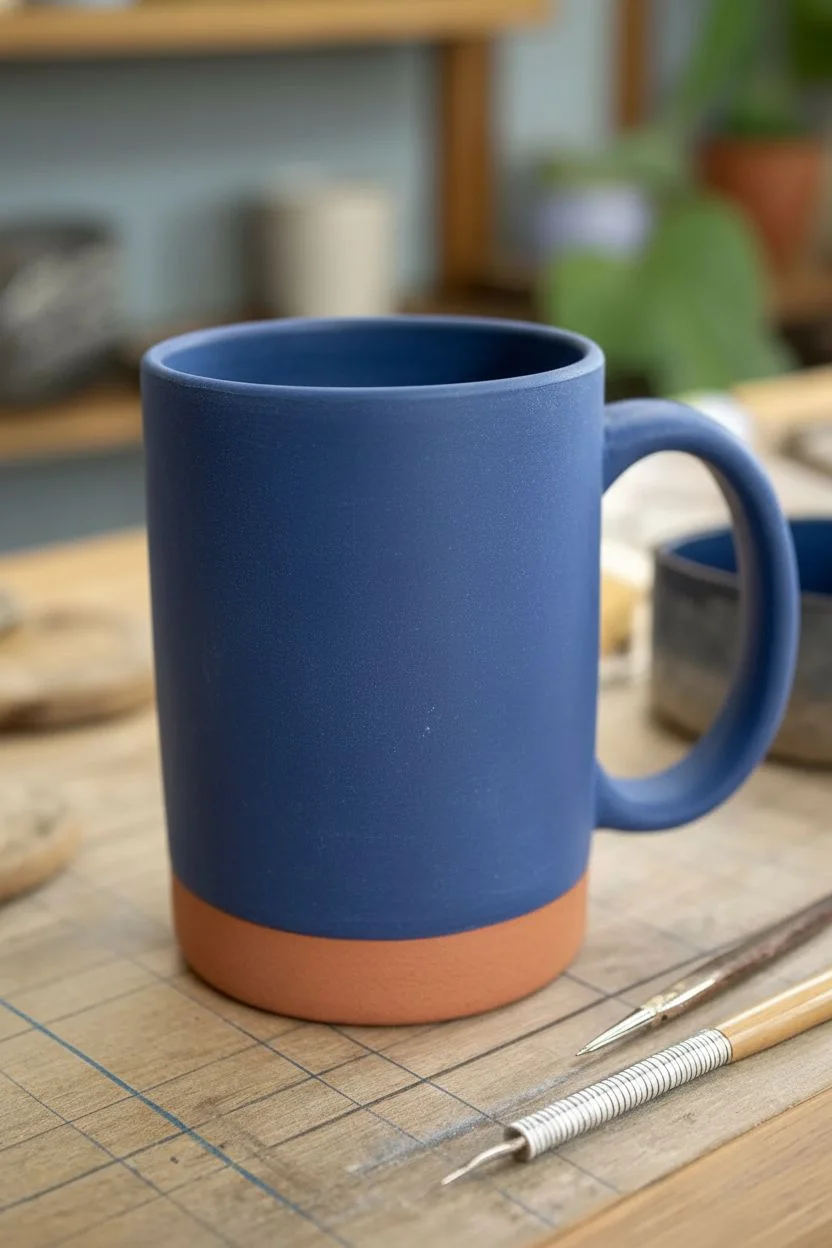
Embrace the rustic charm of speckled pottery with this elegant yet simple vine design that climbs organically around your mug. The contrast between the creamy white glaze and the exposed raw clay bottom creates a grounded, earthy aesthetic perfect for your morning brew.
Detailed Instructions
Materials
- Bisque-fired speckled stoneware mug
- Wax resist (liquid wax)
- Small foam brush or sponge
- Underglaze pencil (dark green or olive)
- Fine liner brush (size 0 or 00)
- Dark green underglaze (liquid)
- Clear or semi-transparent satin white glaze
- Soft fan brush
- Damp sponge
- Clean water
Step 1: Preparation & Waxing
-
Clean the bisque:
Start by wiping down your bisque-fired mug with a barely damp sponge. This removes any kiln dust or oils from your hands that might repel the glaze later. -
Define the unglazed base:
Decide how much raw clay you want exposed at the bottom. A band of about 1/2 to 3/4 inch looks balanced. Dip your foam brush in wax resist. -
Apply the wax barrier:
Carefully paint layer of wax resist around the bottom edge and the foot of the mug. Be precise with this line, as distinct separation is key to this look. Let the wax dry completely until it’s no longer tacky.
Step 2: Drafting the Vines
-
Sketch main stems:
Using a dark green underglaze pencil, lightly sketch your vertical vine stems. Start from just above the wax line and stretch them upward toward the rim. -
Vary the heights:
To keep the design looking organic, ensure the stems end at slightly different heights. Avoid making them perfectly straight; gentle S-curves look more natural. -
Add leaf placement:
Lightly mark where your leaves will go. Alternate them on either side of the stem rather than placing them directly opposite each other for a realistic growth pattern.
Smudged Lines?
If underglaze smears when applying the top clear glaze, dab the glaze on gently with a sponge over the drawing first to set it, rather than dragging a brush across.
Step 3: Painting the Detail
-
Prepare your underglaze:
Pour a small amount of dark green liquid underglaze onto a palette. If it feels too thick, thin it slightly with a drop of water until it has an ink-like consistency. -
Line the stems:
Load your fine liner brush. Trace over your pencil sketch for the stems, using light pressure to keep the lines thin and delicate. -
Paint the leaves:
For the leaves, press the belly of the brush down slightly and then lift up quickly to create a tapered point. This one-stroke method creates perfect teardrop shapes. -
Outline vs. Fill:
Notice how the leaves in the example are mostly outlines with a sketchy fill. Recreate this by outlining the leaf shape first, then adding a quick, loose stroke inside, leaving some negative space. -
Add connecting branches:
Connect your leaves to the main stem with tiny, thin curved lines. A breakage in the line here and there adds to the sketched, vintage botanical feel. -
Check the rim:
Allow some of the vines or leaves to just barely graze the rim area, but keep the inside of the mug clean. -
Final dry:
Let the underglaze design dry completely. It should look chalky and matte before you proceed to glazing.
Pro Tip: The Speckle Effect
Don’t have speckled clay? Mix ‘speckles’ (granular manganese or iron) into regular white clay slip and spatter it on the mug before the painting step.
Step 4: Glazing & Finishing
-
Prepare the overglaze:
Stir your semi-transparent satin white glaze thoroughly. You want a glaze that will show the speckles of the clay body underneath. -
First dip or coat:
For the smoothest application, pour the glaze into the mug, swirl to coat the interior, and pour out. Wipe the rim immediately. -
Exterior glazing:
Hold the mug by the foot (where the wax is) and lip-dip it into the white glaze, or apply with a soft fan brush if dipping isn’t an option. The wax at the bottom inevitably resists the glaze. -
Wipe back:
The wax will repel the glaze, but droplets stick. Use a damp sponge to firmly wipe any glaze spots off the waxed bottom section. -
Rim detail:
I like to gently wipe the very edge of the rim with a sponge to thin the glaze there, allowing the dark clay body to peek through as a subtle brown outline. -
Final Polish:
Check your design. If the white glaze is too thick over the leaves, it might obscure them. The glaze should be translucent enough that the green shows through clearly. -
Fire:
Load into the kiln and fire to the maturation temperature of your specific clay and glaze combination (typically Cone 5 or 6 for stoneware).
Enjoy the soothing process of painting these vines and look forward to that first sip of tea from your handcrafted creation


Simple Polka Dots in a Cozy Color Palette
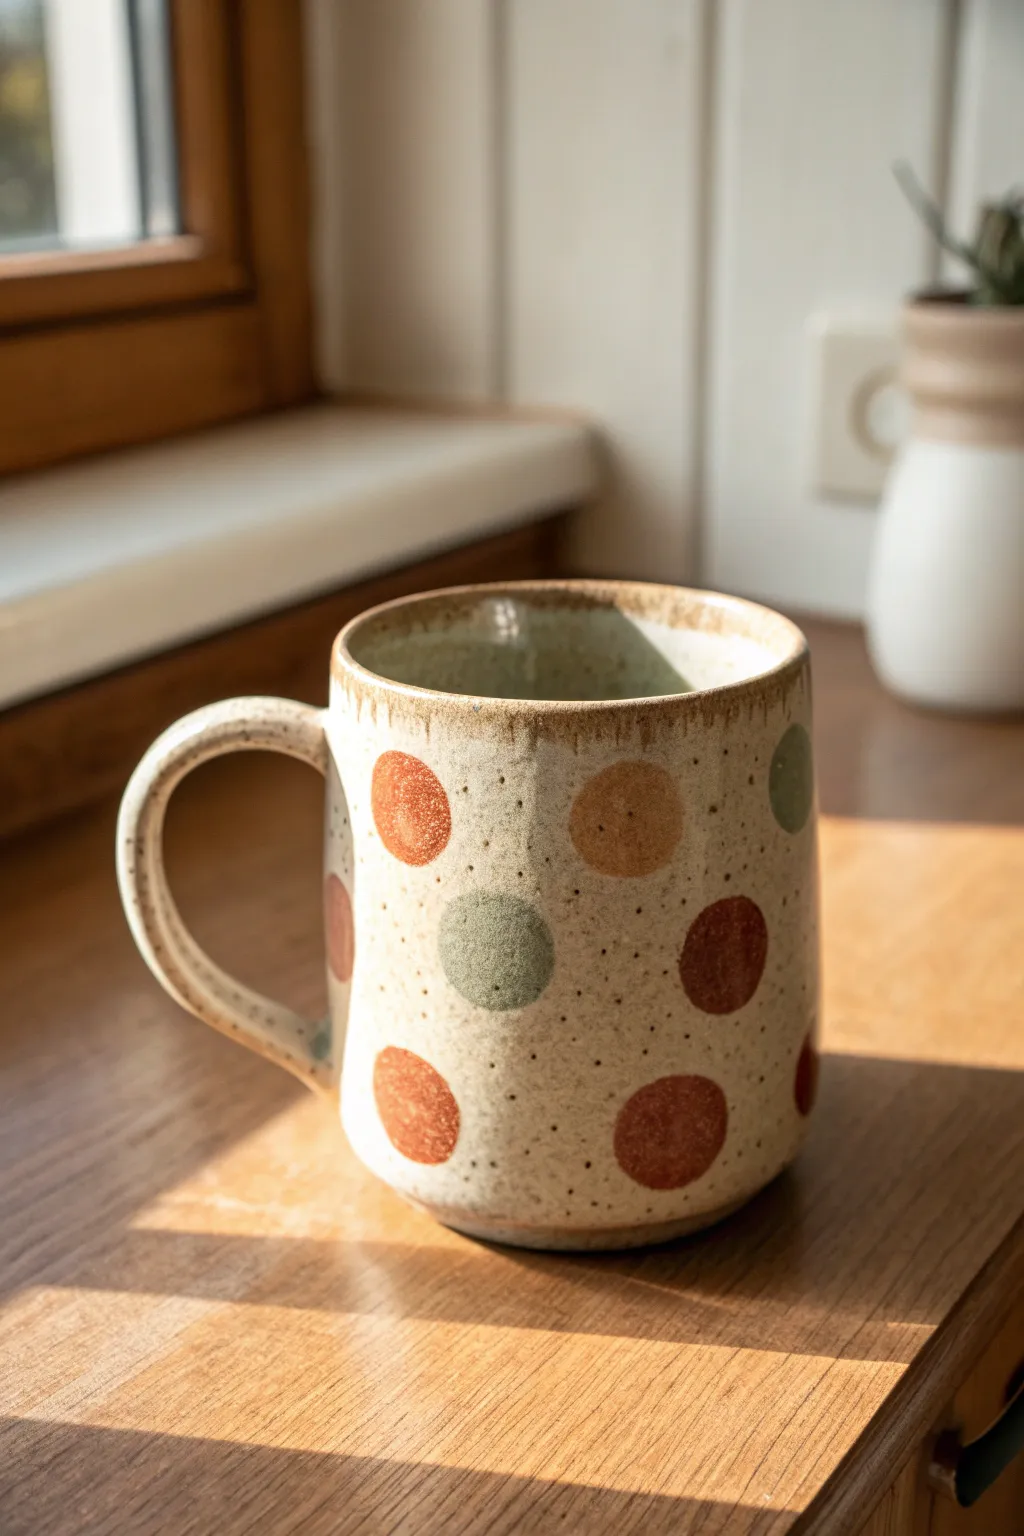
Capture the warmth of a cozy morning with this rustic design, featuring varied polka dots in a comforting palette of sage, terracotta, mustard, and rust. The beauty of this pattern lies in its loose, hand-painted feel against a soft, speckled cream background.
Step-by-Step Tutorial
Materials
- Bisque-fired ceramic mug
- Underglazes (colors: sage green, terracotta orange, mustard yellow, deep rust red, chocolate brown)
- Speckled cream or oatmeal glaze (translucent)
- Small round paintbrush (size 4 or 6)
- Stiff bristle brush (e.g., old toothbrush)
- Wax resist (optional)
- Clean sponge
- Water container
- Clear dipping glaze (if not using a speckled glaze)
Step 1: Preparation & Base
-
Clean the bisque:
Start by wiping down your bisque mug with a damp sponge. This removes any kiln dust or oils from your hands that might prevent the glaze from adhering properly. -
Map out spacing (optional):
If you are nervous about placement, lightly sketch the circle positions with a regular pencil. The graphite will burn off completely in the kiln, so don’t worry about messy lines.
Fixing Smudges
Accidentally brushed a wet dot? Wait for it to dry completely, then gently scratch the mistake off with a needle tool or stiff brush before reapplying the correct color.
Step 2: Painting the Dots
-
Mix your palette:
Pour small amounts of your underglaze colors—sage, terracotta, mustard, and rust—onto a palette. You want a creamy consistency. -
paint the first color:
Load your round brush with the terracotta color. Paint a few random circles around the mug. Keep the edges slightly soft rather than perfectly geometric for that handmade look. -
Add the second tone:
Rinse your brush thoroughly and switch to the mustard yellow. Place these dots in the gaps between the first set, varying the height so they don’t form straight horizontal lines. -
Introduce cool tones:
Using the sage green, paint circles in the remaining large spaces. The contrast of the cool green against the warm oranges creates a balanced, organic palette. -
Deepen the palette:
Finally, add the deep rust red dots. Aim for a balanced distribution where no two identical colors are directly right next to each other. -
Apply second coats:
Let the first layer dry until it’s chalky and matte. Go back over each dot with a second coat of its respective color to ensure solid, opaque coverage after firing. -
Third coat for vibrancy:
For the lighter colors like the yellow and sage, I find a third coat is often necessary to prevent the background clay from showing through too much.
Rim Aesthetic
For the look in the photo, wipe the glaze slightly thinner near the rim with a damp sponge. This allows the clay body color to show through, framing the mug beautifully.
Step 3: The Speckled Effect
-
Prepare the speckle mix:
Dilute a small amount of chocolate brown underglaze with water until it is quite thin and watery. -
Splatter texture:
Dip a stiff bristle brush or toothbrush into the diluted brown. Hold the brush near the mug and flick the bristles with your thumb to spray fine speckles over the entire surface, including the painted dots. -
Clean the bottom:
Wipe away any unwanted speckles or underglaze marks from the very bottom foot of the mug with a damp sponge to keep it clean for the kiln shelf.
Step 4: Glazing & Finishing
-
Dry thoroughly:
Allow all the underglaze work to dry completely. It should feel dry to the touch and room temperature. -
Apply wax resist:
Paint a careful layer of wax resist on the bottom foot of the mug. This prevents glaze from sticking where the mug touches the kiln shelf. -
Dip the mug:
Using dipping tongs or your hand, dip the entire mug into a clear or semi-transparent oatmeal glaze. A speckled glaze works best to enhance the rustic vibe if you skipped the manual splattering step. -
Shake off excess:
Give the mug a gentle shake while it’s upside down to remove excess drips, then turn it upright immediately. -
Final wipe:
Once the glaze is dry to the touch, run a sponge over the waxed bottom to bead up and remove any rogue glaze droplets. -
Fire the piece:
Place the mug in the kiln for a glaze firing according to the temperature requirements of your chosen clay and glaze (usually Cone 5 or 6).
Enjoy sipping your morning coffee from a mug that feels as warm and grounded as the earth itself


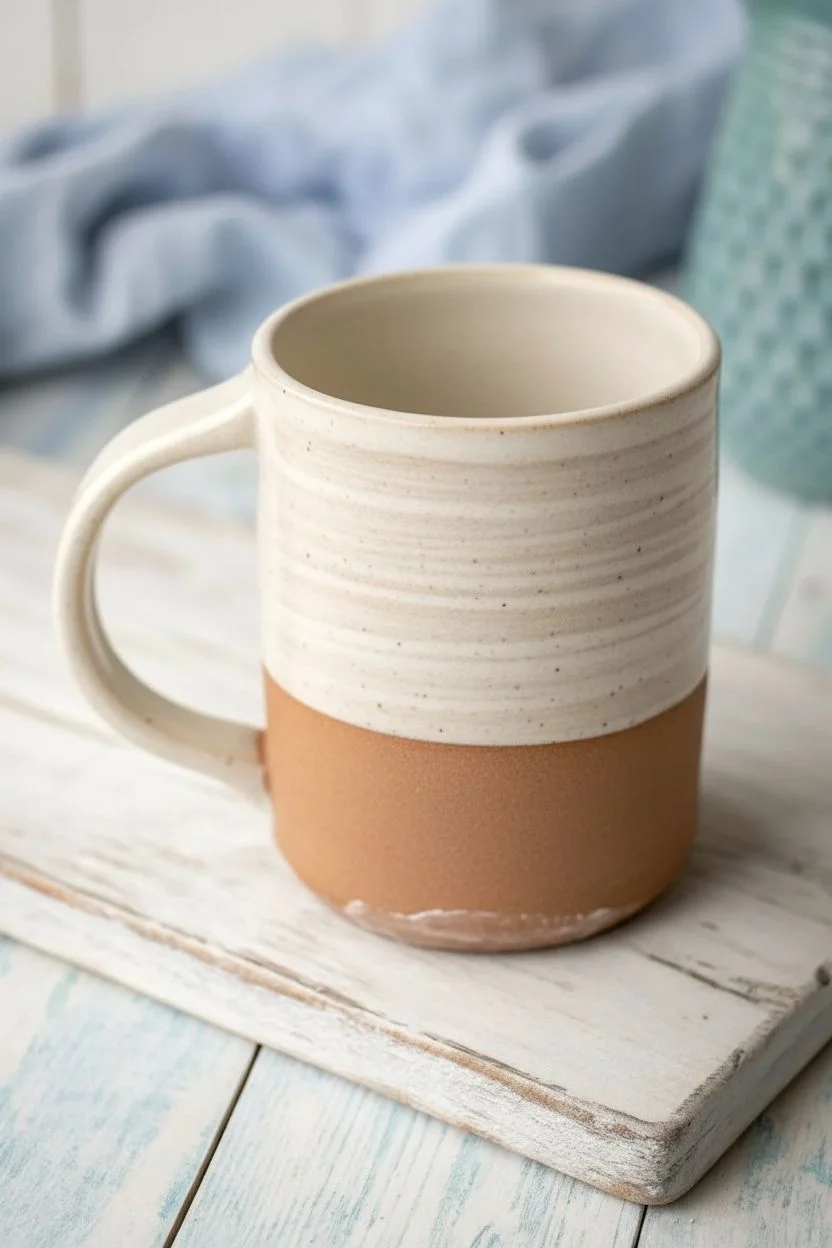
Clean Stripes With Painter’s Tape Edges

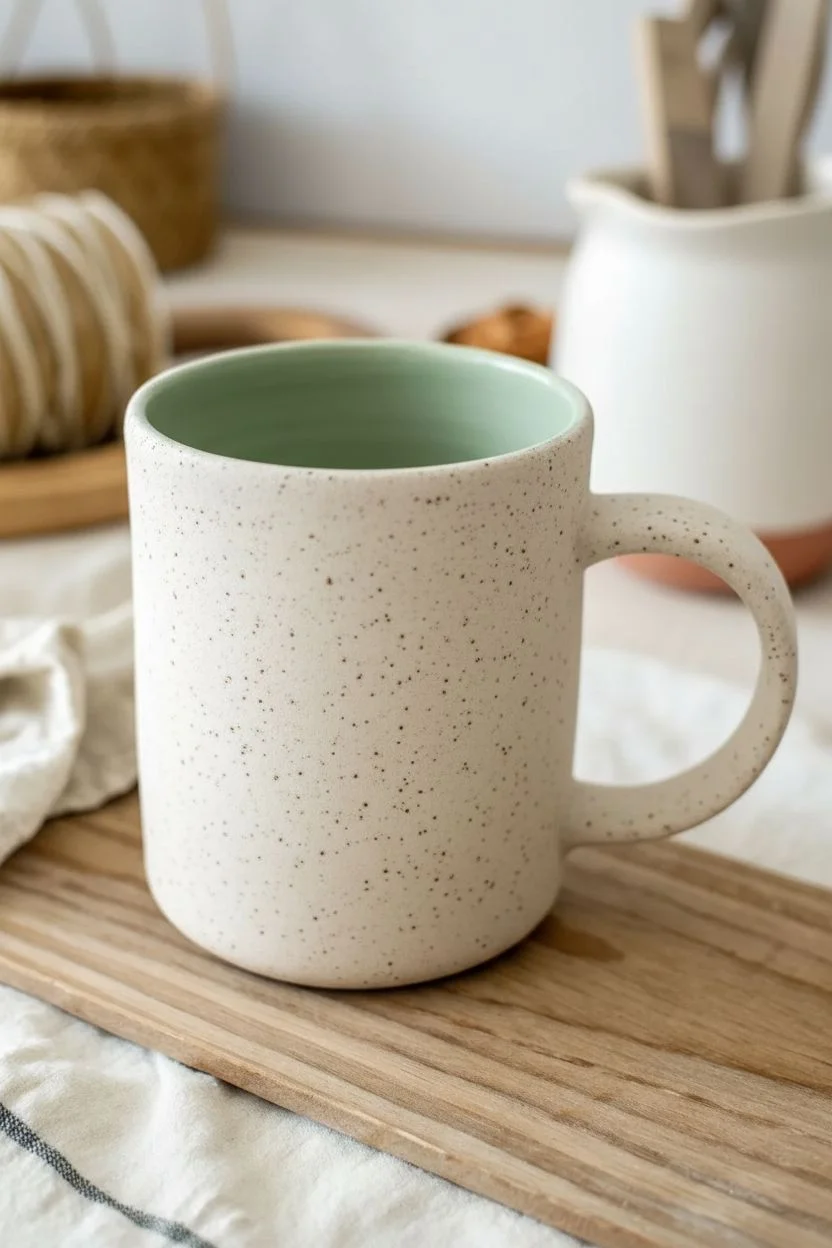
This project combines the rustic charm of speckled clay with modern, geometric precision using a soft palette of sage green and terracotta. The result is a cozy, artisanal mug that feels grounded and perfectly imperfect.
Step-by-Step Guide
Materials
- Bisque-fired ceramic mug (preferably speckle clay body)
- Painter’s tape (1/4 inch and 1/2 inch widths)
- Underglaze (Sage Green)
- Underglaze (Terracotta/Burnt Orange)
- Underglaze (Cream/White – optional if clay is dark)
- Soft fan brush
- Small flat shader brush
- Sponge
- Bowl of water
- Clear dipping glaze
Step 1: Preparation and Base
-
Clean the bisque:
Begin by wiping down your bisque mug with a damp sponge. This removes any dust that might prevent the glaze from adhering properly. -
Glaze the interior:
Pour a small amount of Sage Green underglaze into the mug. Rotate the mug slowly to coat the entire interior surface evenly, then pour out the excess back into your container. -
Clean the rim:
Use a damp sponge to immediately wipe away any green drips that may have gathered on the top rim or run down the outside. Let the interior dry until it is no longer cool to the touch. -
Apply base coat (optional):
If your clay body isn’t naturally cream-colored or speckled white, apply three even coats of a Cream underglaze to the exterior now, letting each coat dry before the next.
Bleeding Lines?
If paint seeps under the tape, wait for it to dry completely. Then, gently scratch the excess off with a wooden skewer or needle tool.
Step 2: Taping the Design
-
Plan the spacing:
Visualize your stripes. This design uses a wide green band at top and bottom, with two thinner terracotta bands in the middle. -
Tape the top edge:
Apply a strip of painter’s tape horizontally around the mug, leaving about an inch of exposed clay at the top for your first green stripe. Ensure the tape is level as you wrap it around. -
Create the middle gaps:
Place another strip of tape below the first one, leaving a gap of about 1/4 inch for the first terracotta stripe. Press the edges of the tape down firmly with your fingernail to prevent bleeding. -
Secure the bottom section:
Leave a wide section of exposed clay (about 1.5 inches) in the center, then apply tape to mask off the area above the bottom stripe. Leave the bottom inch exposed for the final green band.
Step 3: Painting the Stripes
-
Paint the green bands:
Using your soft fan brush, apply the Sage Green underglaze to the top and bottom exposed sections. Don’t worry if you paint over the tape slightly. -
Layer the green:
Apply a second and third coat of green to these areas once the previous layers are dry to the touch to ensure solid opacity. -
Paint the terracotta bands:
Switch to your flat shader brush. Carefully fill in the thin exposed strips in the middle section with the Terracotta underglaze. -
Build opacity:
Just like the green sections, apply two to three coats of the terracotta color. I find that three coats usually result in the richest color after firing. -
Handle detail:
Paint the handle with the Sage Green underglaze. You can carefully freehand where the handle meets the mug body, or tape it off if you prefer a sharp line.
Tape Removal Tip
Don’t let the underglaze dry 100% before peeling tape. removing it while slightly damp prevents the paint from chipping at the edges.
Step 4: Finishing Touches
-
Remove the tape:
Wait until the underglaze is slightly dry but not bone dry. Slowly and gently peel back the painter’s tape at a 45-degree angle to reveal your crisp lines. -
Clean up edges:
If any glaze bled under the tape, use a damp, stiff brush or a scratching tool to gently scrape away the excess paint and tidy up the lines. -
Bisque fire (optional):
If your studio practice allows, you might do a second bisque firing to set the underglaze. Otherwise, move straight to glazing. -
Apply clear glaze:
Dip the entire mug into a clear brushing or dipping glaze. This will seal the clay and make the colors pop. -
Final wipe:
Wipe the foot of the mug clean with a sponge to prevent it from sticking to the kiln shelf. -
Final firing:
Fire the mug to the temperature specified by your clay and glaze manufacturer (usually Cone 5 or 6 for stoneware).
Now you have a beautifully striped mug ready for your morning coffee or tea


Hearts and Mini Doodles for Instant Charm

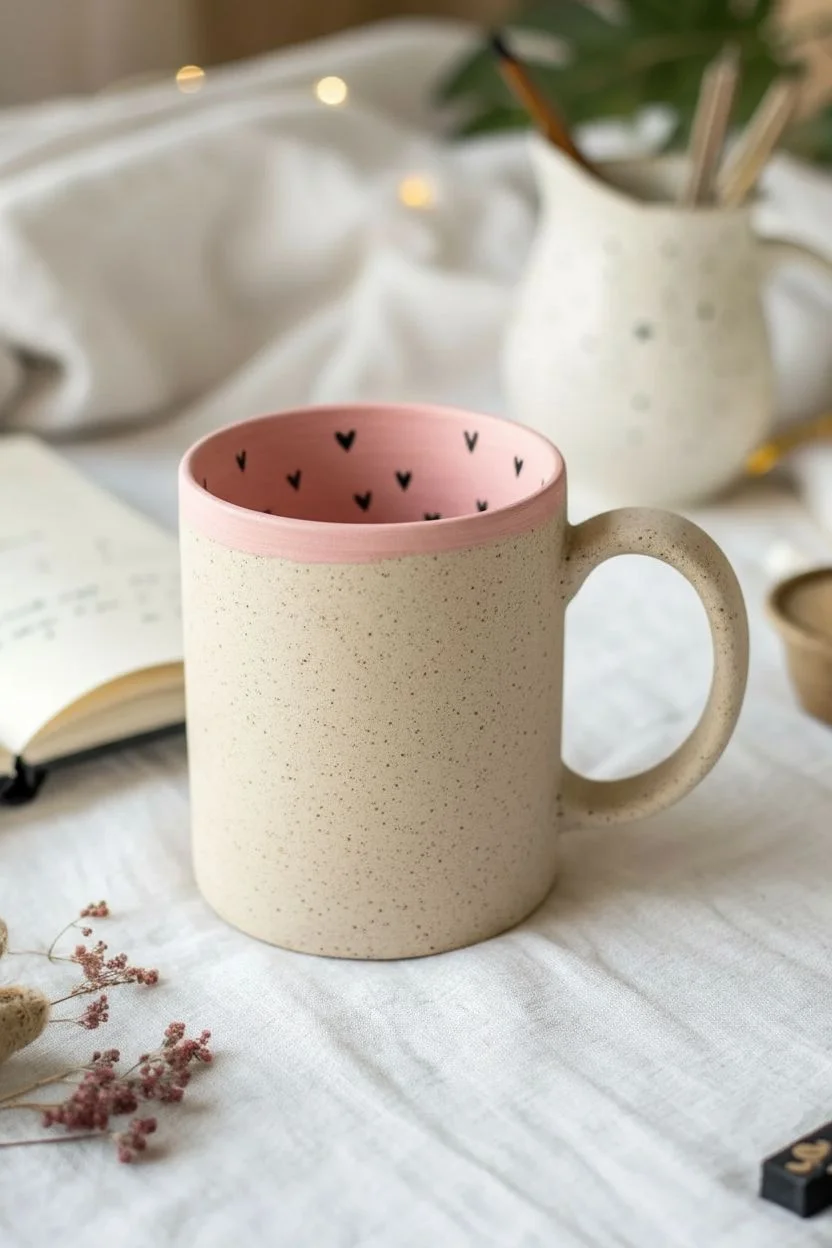
Embrace the imperfect charm of hand-doodled art with this speckled pottery mug project. Featuring a scattering of loose, sketchy hearts in muted earthy tones, this design combines the warmth of pink glaze with whimsical line work for a cozy, rustic finish.
Step-by-Step Guide
Materials
- Bisque-fired ceramic mug (preferably speckle clay body)
- Underglaze pencil or fine liner brush (black)
- Underglaze paints: warm pink, terracotta/rust, muted brown
- Clear dipping glaze (transparent)
- Small round brush (size 2 or 4)
- Sponge and water bucket
- Tiny detailing brush (size 00 or 0)
- Masking fluid (optional)
Step 1: Preparation & Base Color
-
Clean the bisque:
Begin by wiping down your bisque mug with a damp sponge. This removes any dust that might resist the glaze and ensures a smooth application surface. -
Paint the interior:
Using a soft round brush, apply three even coats of warm pink underglaze to the entire interior of the mug. Allow each coat to dry until it’s no longer shiny before applying the next. -
Rim detailing:
Extend the pink color over the rim and just barely onto the very top edge of the handle to create a cohesive border. I like to feather this edge slightly for a softer look. -
Interior doodles:
Once the pink interior is dry to the touch, use a fine liner brush and black underglaze to paint tiny, random hearts and dots near the top inner rim. Keep them sparse and playful.
Step 2: Painting the Exterior Hearts
-
Plan the layout:
You don’t need to sketch first, but mentally map out where your main hearts will go. Aim for a random scattering rather than strict rows. -
Paint solid hearts:
Mix a muted brown and your terracotta color. Paint several solid, medium-sized hearts on the mug exterior. Keep the shapes loose and hand-drawn rather than perfect. Leave plenty of space between them. -
Add pink accents:
Wash your brush well and switch to the warm pink underglaze. Add a few solid pink hearts interspersed among the darker ones, varying the angles slightly. -
Let the solids dry:
Wait until these solid color hearts are fully dry. They should look chalky and matte before you attempt to outline them.
Smudged Lines?
If your black outlines bleed into the damp pink paint, wait longer between layers. Alternatively, use a wax resist over the colored hearts before outlining.
Step 3: Line Work & Doodles
-
Outline the painted hearts:
Using your finest detail brush or a black underglaze pencil, loosely outline the colored hearts you just painted. The lines don’t need to match the color block perfectly; offset lines add character. -
Start the open hearts:
Now, draw several ‘open’ hearts (outlines only) in the empty spaces. Make some slightly larger and some smaller to create visual interest. -
Create variation:
Draw some hearts that are tall and skinny, and others that are short and wide. This variety mimics the look of a sketchbook page. -
Add tiny fillers:
Look for large gaps in your design. Fill these areas with very tiny open hearts—think approximately half the size of a fingernail. -
Review the balance:
Spin the mug slowly. Check that the hearts feel evenly distributed around the curve and under the handle area.
Gold Luster Accent
For extra shine, apply real gold luster to just one or two hearts after the final glaze firing, then re-fire at a lower temp (cone 018) for a metallic pop.
Step 4: Finishing Touches & Glazing
-
The speckle effect:
If your clay body isn’t naturally speckled, create faux speckles now. Dip a stiff toothbrush into thinned black underglaze and flick same tiny spray around the exterior. -
Add colored dots:
Using the handle end of a paintbrush, dip into your pink and terracotta paints. Dot small circles of color randomly in the negative negative spaces between hearts. -
Final dry:
Let the mug sit overnight or for several hours to ensure all moisture has evaporated from the underglaze layers. -
Clear glaze dipping:
Using tongs or a gloved hand, dip the entire mug into a clear, transparent glaze. Shake gently to remove excess drips. -
Touch up the foot:
Once the glaze is dry, wipe the bottom foot ring of the mug completely clean with a sponge to prevent it from sticking to the kiln shelf. -
Fire:
Load the mug into the kiln and fire to the temperature appropriate for your specific clay body and clear glaze (typically cone 5 or 6).
Pull your finished mug from the kiln and enjoy your morning coffee with a little extra love
BRUSH GUIDE
The Right Brush for Every Stroke
From clean lines to bold texture — master brush choice, stroke control, and essential techniques.
Explore the Full Guide
Gingham or Checkerboard Cottage Look

Embrace the cozy charm of farmhouse aesthetics with this simple yet striking grid pattern mug. The organic, hand-painted lines give it an authentic handmade feel that pairs perfectly with a speckled cream glaze.
Step-by-Step Tutorial
Materials
- Bisque-fired ceramic mug
- Speckled cream or oatmeal underglaze
- Navy blue or charcoal underglaze
- High-gloss clear dipping glaze
- Fan brush (for base coat)
- Fine liner brush (size 0 or 00)
- Pencil (optional)
- Sponge
- Water container
Step 1: Base Preparation
-
Clean surface:
Before picking up a brush, wipe down your bisque mug with a slightly damp sponge. This removes any kiln dust or oils from your hands that could repel the glaze. -
First base coat:
Using a soft fan brush, apply an even coat of the speckled cream underglaze. Ensure you cover the entire surface, including the handle and the rim. -
Dry and repeat:
Let the first layer dry until it’s chalky and matte—usually about 5-10 minutes. Apply a second coat to ensure opacity, and a third if the glaze manufacturer recommends it for full coverage. -
Speckle check:
If your base glaze contains suspended speckles (like Stoneware speckle), make sure they are distributed evenly. If using a plain cream glaze, you can flick a toothbrush dipped in brown underglaze to create faux speckles now.
Smudgy Lines?
If your clear glaze smears the grid lines during dipping, your underglaze wasn’t dry enough. Wait longer or lightly mist the design with water before dipping to set it.
Step 2: Drafting the Grid
-
Find the center:
Visualize where your vertical lines will go. For this wide windowpane look, you want large squares, not tight mesh. -
Light sketching:
Using a regular pencil, very lightly sketch your vertical lines from the rim to the base. The pencil lead will burn off in the kiln, so don’t worry about marks remaining. -
Horizontal spacing:
Mark out your horizontal lines. Aim to create roughly square shapes. Don’t stress about perfect geometry; the charm lies in the slight hand-drawn wobble.
Cozy Variation
Swap the dark grid lines for a soft sage green or a diluted terracotta orange. This instantly changes the vibe from modern farmhouse to soft, spring cottage core.
Step 3: Painting the Lines
-
Load the liner:
Dip your fine liner brush into the navy or charcoal underglaze. You want the consistency to be like ink—thin it with a drop of water if it feels too thick to flow smoothly. -
Vertical strokes:
Start with the vertical lines. Rest your pinky finger on the mug for stability and pull the brush downward. Let the line break or vary in thickness slightly to mimic the reference image. -
Handle connection:
When you reach the handle area, stop the line cleanly before the attachment point or let it wrap naturally depending on the handle shape. -
Horizontal strokes:
Paint the horizontal lines, crossing over the dry vertical ones. Reload your brush frequently to keep the pigment density consistent, or let it fade for a rustic look. -
Rim detail:
I like to run a very thin, slightly shaky line right along the lip of the mug to frame the grid pattern. This finishes the top edge nicely. -
Clean up:
If a line went wildly astray, use a clean, stiff brush dipped in water to gently scrub away the mistake before it dries.
Step 4: Finishing Touches
-
Handle detail:
Decide if you want the grid to continue onto the handle. For the look in the photo, leave the handle plain cream to let the speckled texture shine. -
Final drying:
Allow the dark grid lines to dry completely. They should look powdery and not reflective before you move to glazing. -
Clear glaze application:
Dip the entire mug into a clear, gloss glaze. Do this quickly—in and out in about 3 seconds—to avoid soaking the bisque. -
Base wiping:
Use a sponge to wipe the bottom foot ring of the mug completely clean of glaze. This prevents it from fusing to the kiln shelf during firing. -
Glaze smoothing:
Check for any drips in the clear glaze and gently rub them flat with your finger. The powder will move, smoothing the surface.
Once fired, fill your beautiful new mug with coffee and enjoy the handmade warmth of your creation
Minimalist Line Art Face on One Side
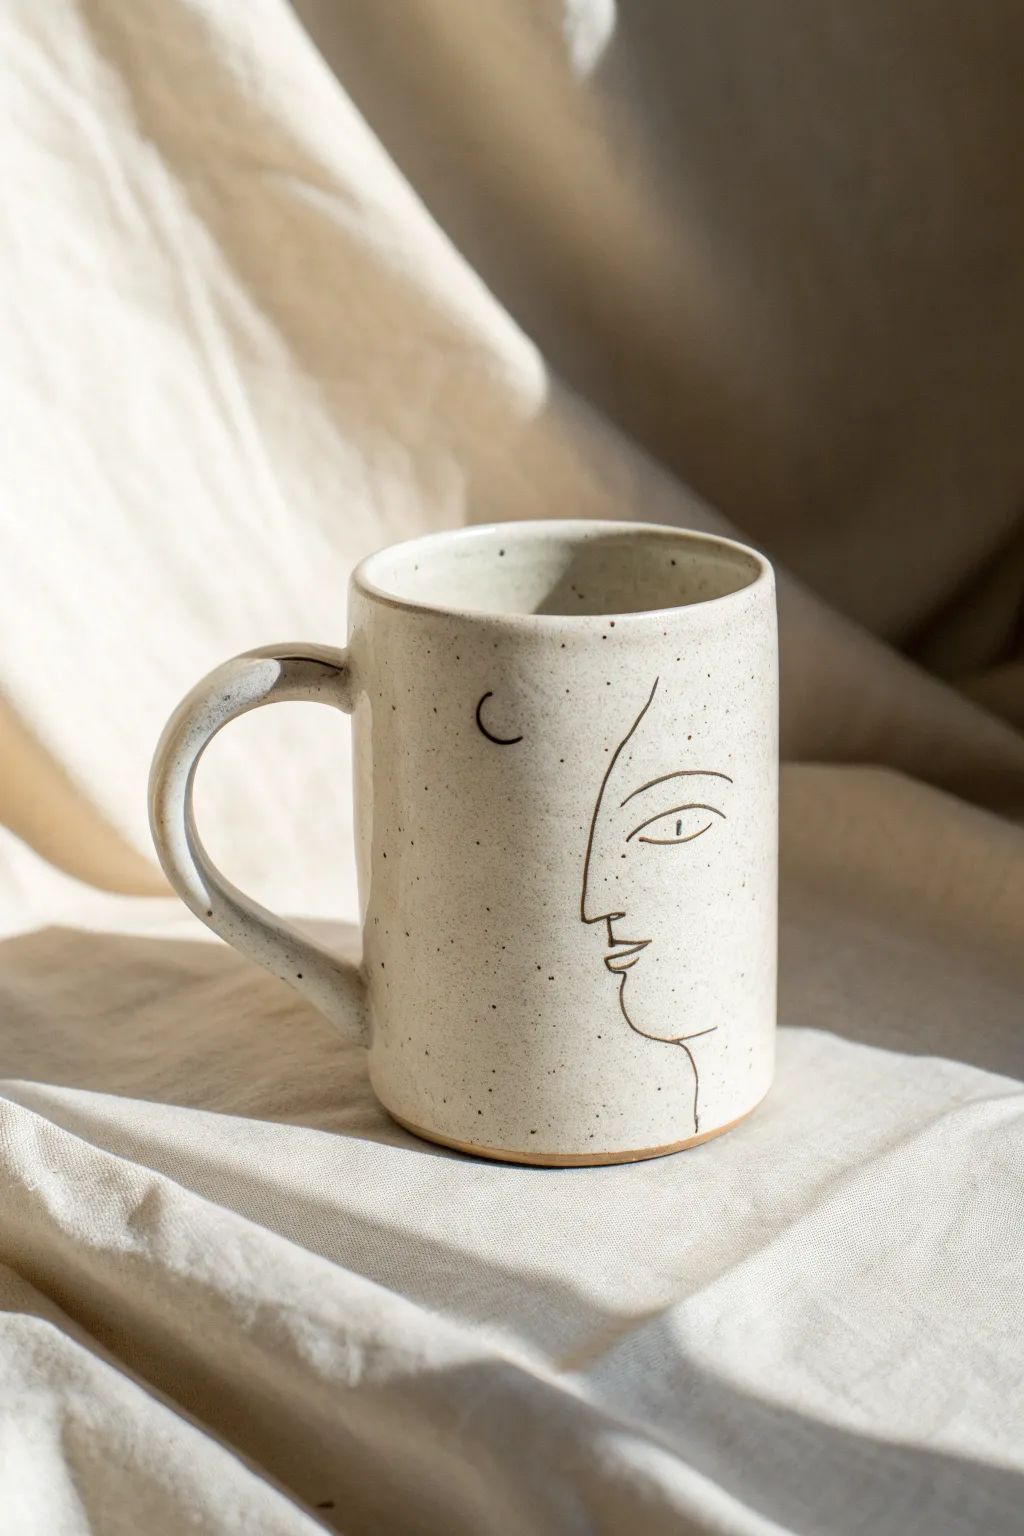
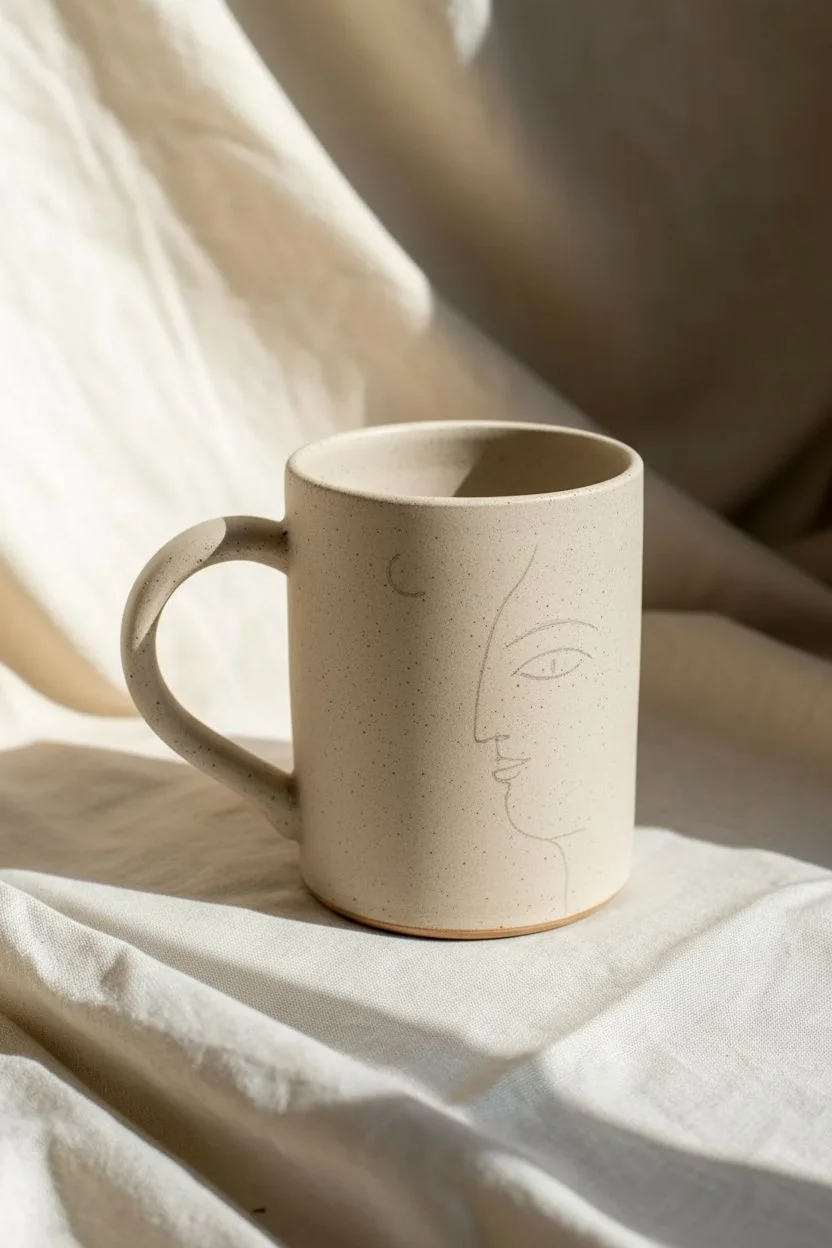
Capture a serene, celestial vibe with this speckled minimalist mug featuring delicate line art. This project combines simple contour drawing with a natural, organic finish perfect for your morning coffee rituals.
Step-by-Step Guide
Materials
- Bisque-fired ceramic mug (straight-sided)
- Speckled cream or oatmeal glaze (stoneware)
- Underglaze pencil (black or dark brown) OR oxides mixed with water
- Fine liner brush (size 0 or 1)
- Wide glazing brush
- Pencil and paper (for sketching)
- Damp sponge
- Clear transparent glaze (optional, depending on finish desired)
Step 1: Planning and Sketching
-
Study the form:
Begin by observing your bisqueware mug. The straight sides of a cylindrical mug work best for this profile design. -
Draft on paper:
Sketch the face profile on paper first to get the proportions right. Focus on a continuous line style—one sweeping curve for the forehead and nose, and simple strokes for the eye and lips. -
Transfer lightly:
Lightly sketch your design onto the bisque mug using a standard graphite pencil. Don’t worry about mistakes; graphite burns off in the kiln, so only your final underglaze lines will remain. -
Position the elements:
Place the face profile on the right side of the mug’s face, ensuring the nose points towards the handle or away depending on your preference. Add a small crescent moon shape near the upper left, slightly above eye level.
Smudged Lines?
If your glaze brush smears the black lines, try dabbing the glaze on over the drawing first, letting it set, and then brushing the rest of the mug.
Step 2: Applying the Line Art
-
Prepare your liner:
Use a black underglaze pencil for a crayon-like texture, or mix black oxide/underglaze to an inky consistency for a brush application. The image shows a very thin, distinct line. -
Draw the forehead and nose:
Start at the top of the forehead. Draw a single line curving down and outward to form the nose tip. Keep your hand steady but allow for slight organic wobbles. -
Add the lips and chin:
From the base of the nose, draw the upper lip, a small indent, the lower lip, and finally curve down and back to create the chin and jawline. The jawline should trail off, not connecting back to the ear. -
Detail the eye:
Draw an almond shape for the eye. Add a simple circle for the iris/pupil and a curved line above it for the eyelid. Keep it abstract rather than realistic. -
Inking the moon:
Carefully trace over your crescent moon sketch. Ensure the lines are solid enough to show through the speckled glaze later. -
Clean up:
If you smudge any underglaze, gently wipe it away with a barely damp sponge or scrape it off with an X-Acto knife if it’s stubborn.
Add Gold Luster
After the final firing, apply a gold luster overglaze to just the crescent moon for a touch of luxury, then refire at a lower cone (usually cone 018).
Step 3: Glazing and Finishing
-
Wax resist (optional):
If you are worried about the lines smearing, you can apply a tiny amount of wax resist over the black lines. However, for this rustic look, applying glaze directly over dry underglaze is usually fine. -
Prepare the speckled glaze:
Stir your speckled cream glaze thoroughly. The heavy particles that create the speckles tend to sink to the bottom. I always make sure to stir between every few dips or brushstrokes. -
Apply the first coat:
Dip the mug or use a wide brush to apply an even coat of the speckled glaze. If brushing, use long, smooth strokes to avoid ridges. -
Check opacity:
Let the first coat dry until chalky. The line art should still correspond visibly through the glaze. If using a dipping glaze, one dip is likely enough. -
Rim and handle:
Pay special attention to the rim and handle attachments. Dab a little extra glaze here if needed to ensure full coverage, but avoid drips. -
Wipe the foot:
Use a damp sponge to clean the bottom foot of the mug completely. Any glaze left here will fuse the mug to the kiln shelf. -
Final drying:
Allow the mug to dry completely, usually for 24 hours, before firing. -
Firing:
Fire the mug to the temperature recommended by your clay and glaze manufacturer (typically Cone 5 or 6 for stoneware). The heat will bring out the lovely iron speckles.
Enjoy sipping your warm drink from this beautifully personalized piece of art

PENCIL GUIDE
Understanding Pencil Grades from H to B
From first sketch to finished drawing — learn pencil grades, line control, and shading techniques.
Explore the Full Guide
Wildflower Meadow Band Around the Base
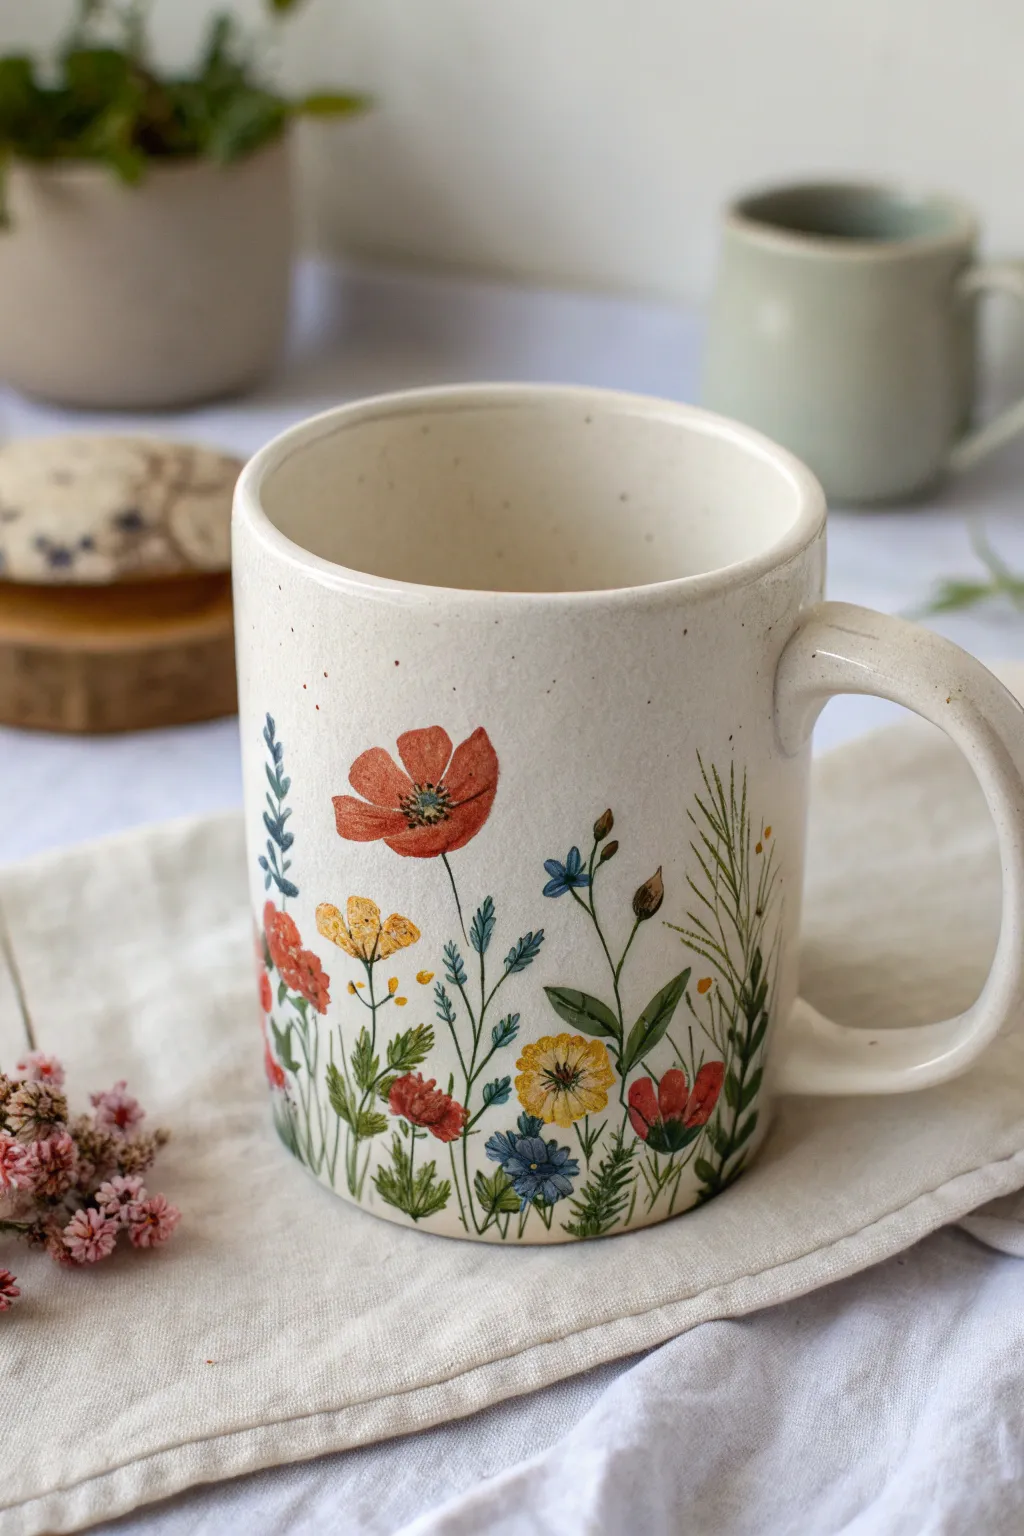
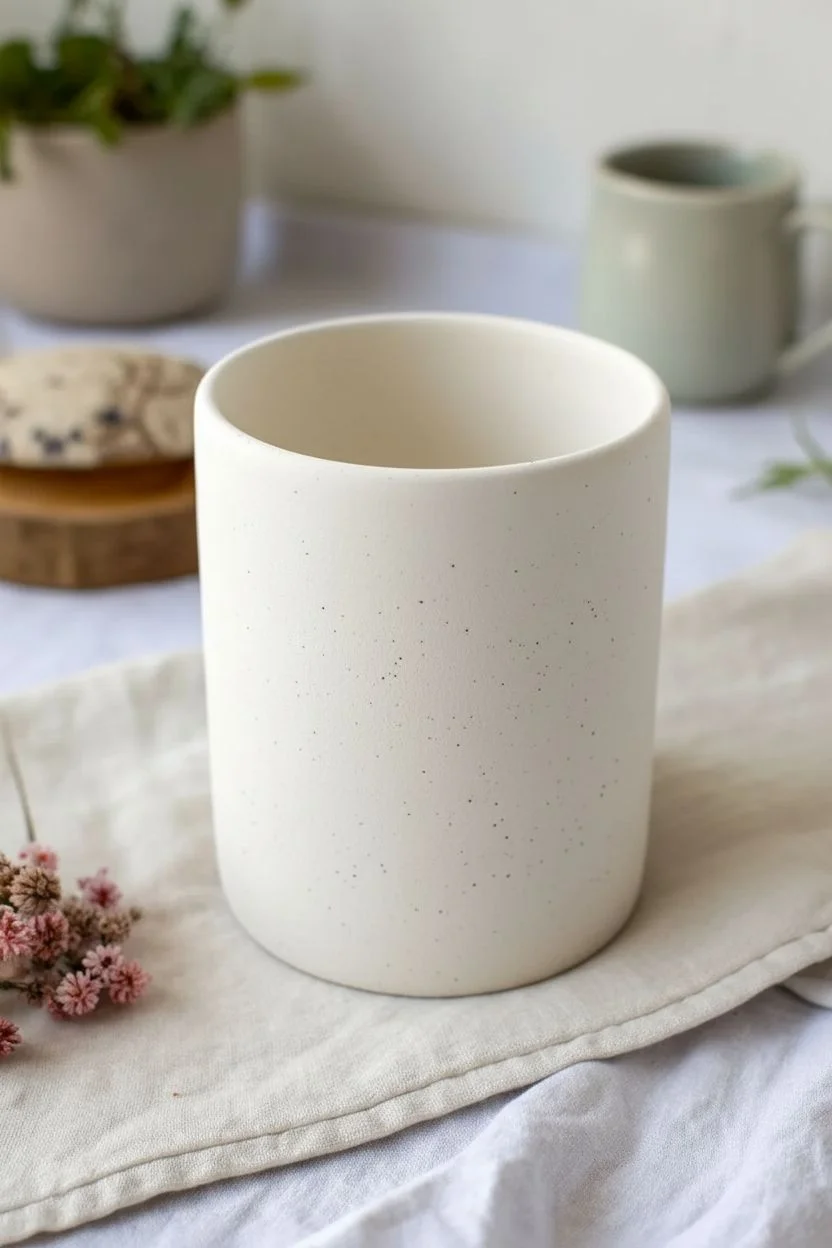
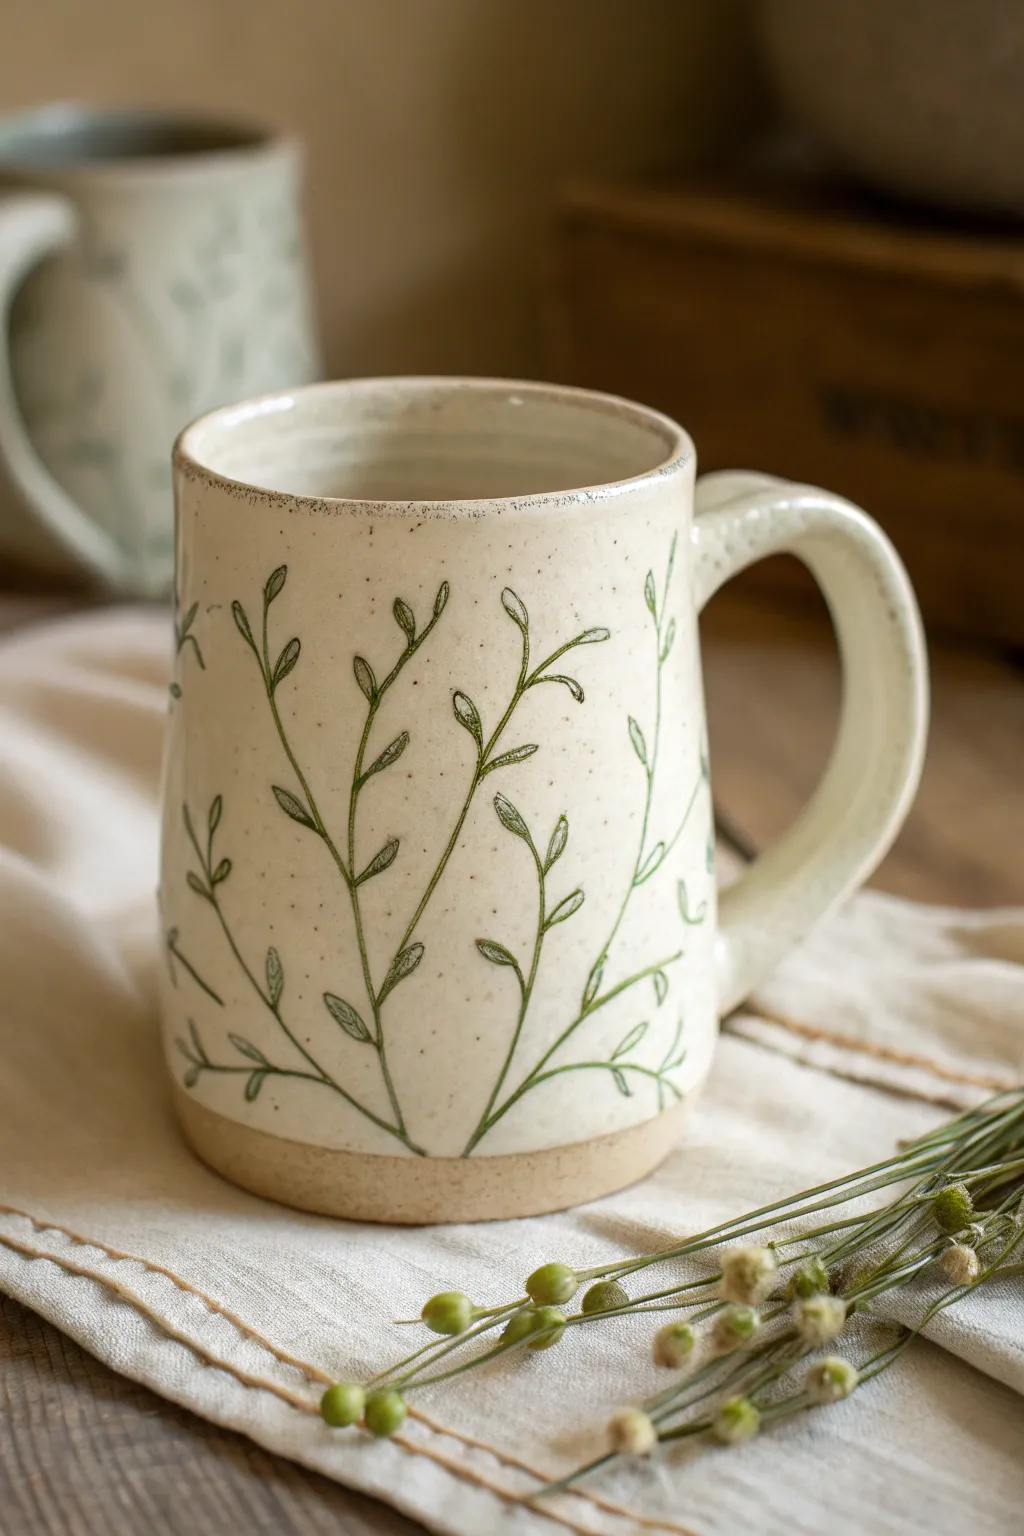
Transform a plain bisqueware mug into a blooming garden with this delicate wildflower meadow design. The design focuses on organic, rising stems that wrap around the base, creating a sense of growth and movement against a speckled cream background.
Step-by-Step Tutorial
Materials
- Cone 04 bisque mug (smooth surface preferred)
- Underglazes: Bright Red, Burnt Orange, Mustard Yellow, Cornflower Blue, Deep Navy, Sage Green, Forest Green, Chocolate Brown
- Clear dipping glaze (gloss finish)
- Speckled glaze additive (optional, for the background effect)
- Round watercolor brushes (sizes 0, 2, and 4)
- Detail liner brush (size 00)
- Pencil (HB)
- Sponge
- Palette or small cups for mixing
Step 1: Preparation & Background
-
Surface Prep:
Wipe down your bisque mug with a damp sponge to remove any kiln dust. This ensures the underglaze adheres properly without crawling. -
Base Color:
Apply three even coats of a cream or off-white underglaze to the entire exterior. Allow each coat to dry until it’s chalky to the touch before applying the next. -
Adding Texture:
To mimic the speckled stoneware look in the photo, you can lightly flick a toothbrush loaded with watered-down brown underglaze over the cream base. Alternatively, rely on a speckled clay body or a specialty speckled clear glaze later.
Step 2: Drafting the Design
-
Sketching Stems:
Using a pencil, lightly sketch vertical, wavy lines rising from the bottom edge of the mug. Vary the heights—some short, some reaching halfway up the mug. These are your anchors. -
Placement Planning:
Mark small circles or ovals where your main blooms will go. I like to stagger them so no two identical flowers are right next to each other.
Smudged Lines?
If you accidentally smudge a wet stem, don’t wipe! Let it dry completely, then gently scratch the mistake away with a wooden toothpick or craft knife.
Step 3: Painting the Blooms
-
Poppy Petals:
Mix a little Bright Red with Burnt Orange. Using a size 4 brush, paint loose, open tear-drop shapes for the poppy petals. Leave the center empty for now. -
Yellow Posies:
For the yellow flowers, dab small clusters of Mustard Yellow. Keep the edges ragged to simulate petals. -
Blue Accents:
Use Cornflower Blue to paint small bell shapes or tiny five-petal flowers on the tallest stems. These add a cool-tone contrast to the warm poppies. -
Layering Color:
Once the first layer of the red poppies is dry, add a second, slightly thinner layer of pure Bright Red to the outer edges to create depth and translucency.
Watercolor Effect
Thin your underglazes with a drop of water. This creates semi-transparent, watercolor-like washes that look beautiful when layered on ceramics.
Step 4: Greenery & Details
-
Stem Work:
Switch to your size 0 liner brush and Sage Green. Trace over your pencil stem lines, starting from the bottom and lifting the brush as you go up to create a tapered point. -
Leaf Variation:
Mix Forest Green with a tiny drop of Brown for darker foliage. Paint long, grass-like blades in between the flower stems to fill the gaps and create a ‘meadow’ density. -
Broad Leaves:
Add a few wider, oval leaves near the base using the Sage Green. I often press the belly of the brush down and lift sharply to get that organic leaf shape. -
Flower Centers:
Use the liner brush and Dark Navy or Black to dot the centers of the poppies. Add tiny yellow dots to the centers of the blue flowers. -
Fine Details:
Add tiny pollen dots in white or yellow floating around the main blooms for a whimsical touch. -
Rim Check:
Ensure the design doesn’t creep too close to the sipping rim; keep the top inch of the mug relatively negative space to balance the busy bottom.
Step 5: Finishing
-
Bisque Fire (Optional):
If your studio allows, do a bisque fire now to set the design. This prevents smearing during glazing. If not, proceed carefully to glazing. -
Clear Glaze:
Dip the entire mug into a clear gloss glaze. Hold it upside down for a few seconds to let excess drip off, then turn upright and sponge the foot ring clean. -
Final Fire:
Fire the mug to the temperature specified for your clay and glaze (likely Cone 5 or 6 for stoneware durability).
Enjoy your morning coffee surrounded by a permanent garden that blooms in every season
Citrus Slice Repeat Pattern for Bright Energy
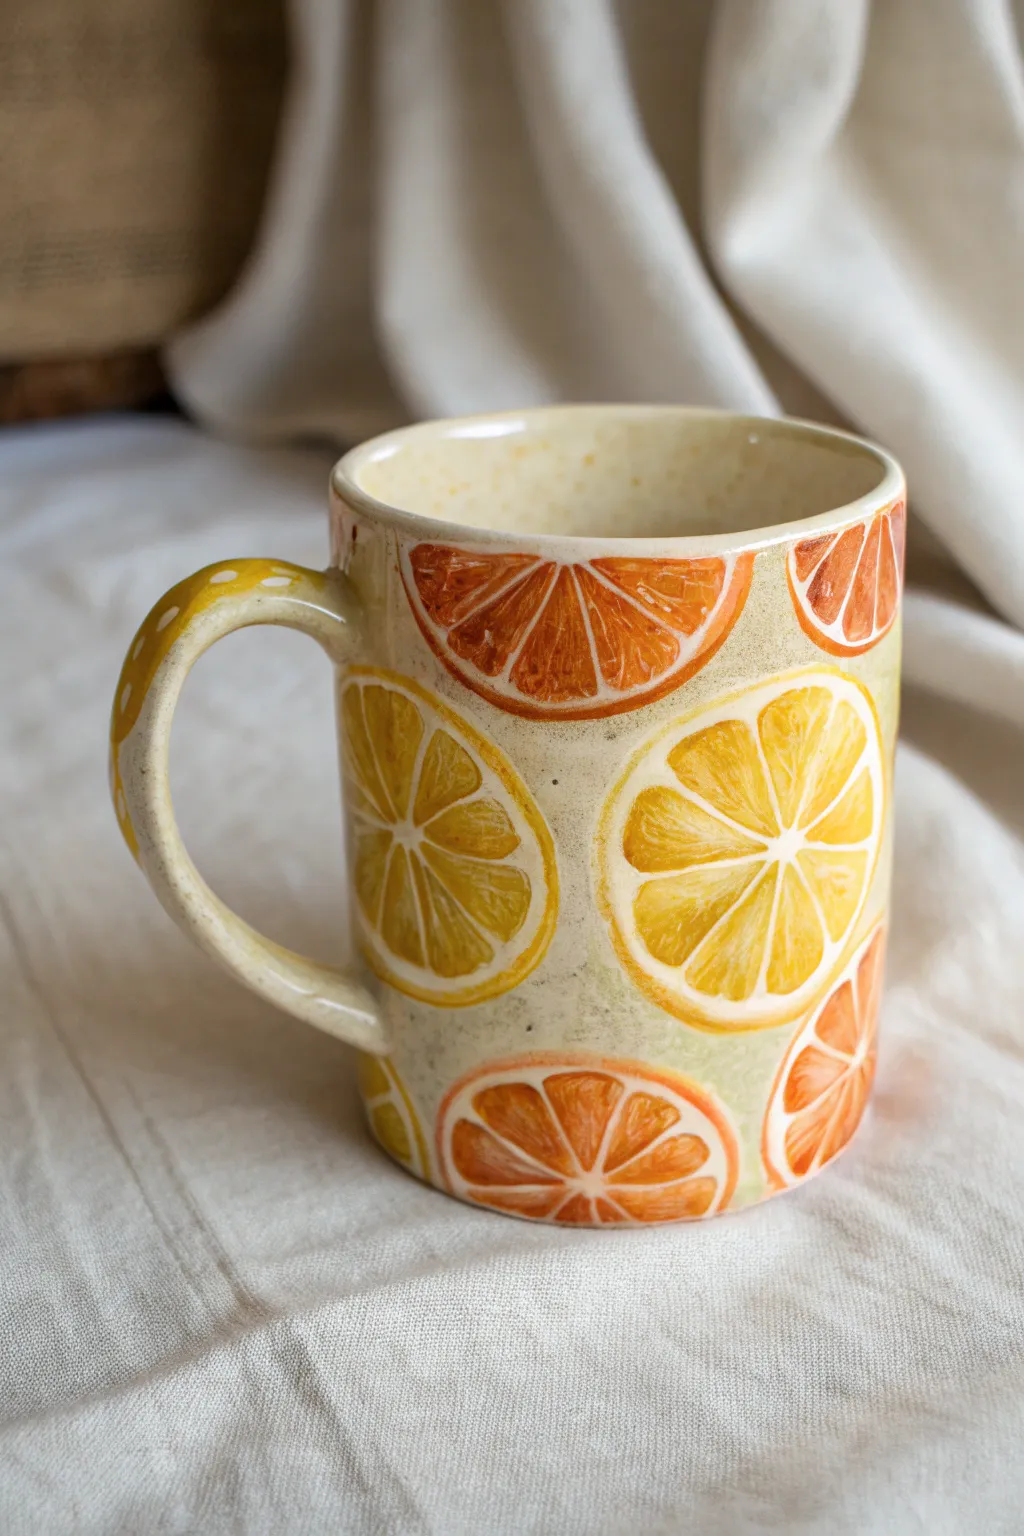
Brighten up your morning coffee routine with this vibrant, hand-painted pattern featuring juicy orange and lemon slices. The repetition of circular citrus shapes against a speckled cream background creates a lively, fresh aesthetic that perfectly mimics a summer picnic.
Step-by-Step Guide
Materials
- Bisque-fired ceramic mug (handmade or store-bought)
- Underglaze (Lemon Yellow, Golden Yellow, Orange, Deep Orange/Red-Orange)
- Underglaze pencil (light brown or grey) – optional
- Clear transparent glaze
- Speckled clay body or speckled buff underglaze (for background)
- Small round paintbrushes (sizes 0, 2, and 4)
- Small flat shader brush (size 4)
- Water cup and sponge
- Paper towels
- Pencil for sketching
- Clear wax resist (optional)
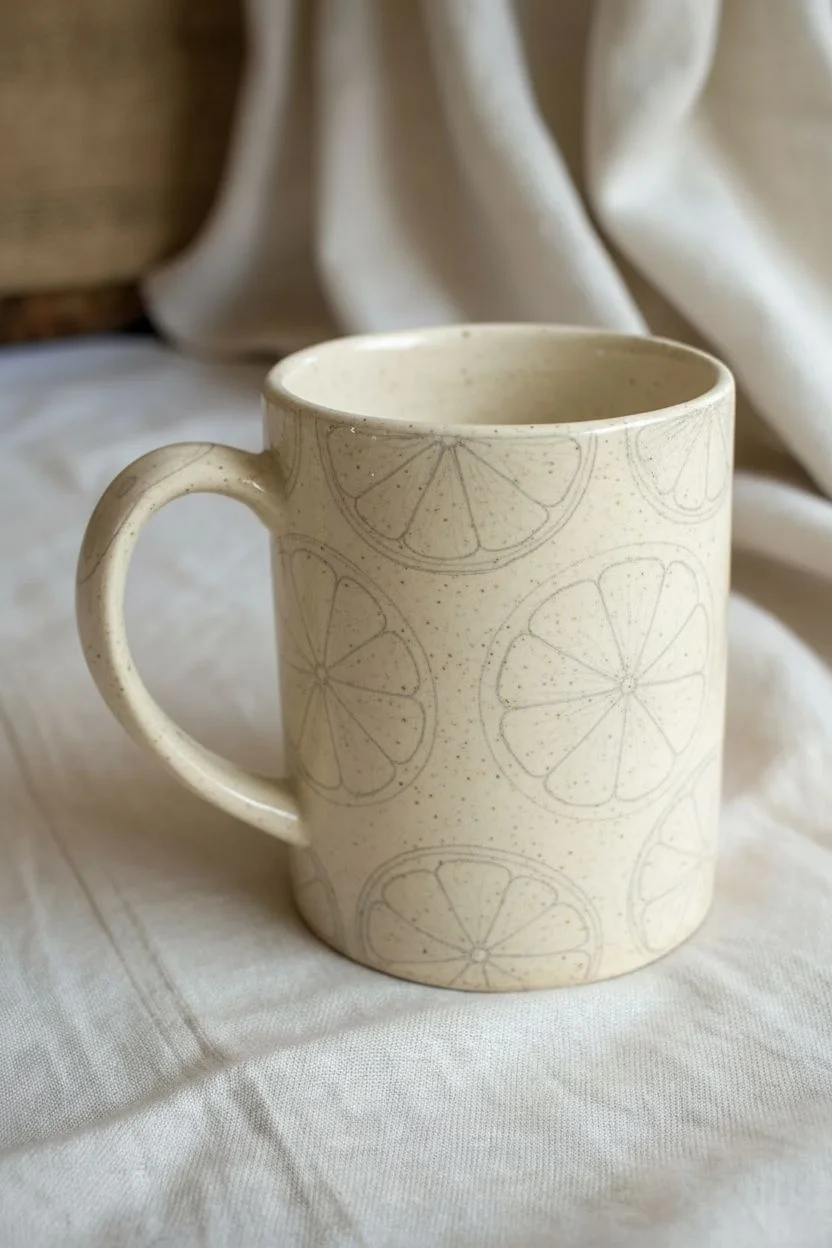
Step 1: Planning and Sketching
-
Clean surface:
Begin by wiping down your bisque mug with a damp sponge to remove any kiln dust or oils from your hands, ensuring a clean surface for the underglaze. -
Establish the background:
If your mug isn’t made of speckled clay, apply two coats of a speckled cream or buff underglaze to the entire exterior. If it is already a lovely speckled clay, you can leave the background raw for a natural texture. -
Map the layout:
Using a regular pencil (the graphite will burn off later), lightly sketch circles of varying sizes around the mug. Aim for a mix of full circles and half-circles at the rim and base to create the illusion of a continuous pattern. -
Segment the slices:
Inside each circle, draw the pinwheel structure of the citrus segments. Sketch a small center point and radiate 6-8 lines outward to the rind, creating the triangular segment shapes.
Citrus Shine Tip
Don’t over-blend your gradients inside the fruit segments. Leaving visible brushstrokes mimics the fibrous texture of real citrus pulp.
Step 2: Painting the Fruit Flesh
-
Base layer for lemons:
Load your size 4 brush with Lemon Yellow underglaze. Paint the triangular segments of your lemon slices, being careful to leave small gaps between them (the pith lines) unpainted so the background color shows through. -
Base layer for oranges:
Switch to your Orange underglaze and fill in the segments for the orange slices, again preserving those thin lines of negative space for the pith. -
Add depth to lemons:
While the yellow is still slightly damp or just dry, take a size 2 brush with Golden Yellow. Add small strokes near the outer edge of each segment, blending inward to create a juicy, 3D gradient effect. -
Add depth to oranges:
Repeat the shading process on the orange slices using a Deep Orange or Red-Orange. Focus the darker pigment near the rind edge of each segment to give the fruit volume. -
Handle details:
I like to extend the motif to the handle. Paint small, partial citrus shapes or simple dots along the spine of the handle to tie it into the main design.
Step 3: Rinds and Refining
-
Paint the outer rinds:
Using a size 2 brush, paint a thick ring around the outside of every fruit slice. Use Golden Yellow for the lemons and Orange for the oranges. -
Highlight the pith:
If your background color is too dark, use a size 0 fine liner brush with White underglaze to carefully re-state the pith lines between segments and the thin ring between the flesh and the outer rind. -
Texture details:
For extra realism, use your finest brush to add tiny, nearly invisible white or pale yellow ‘seeds’ or glimmer lines near the center of a few segments. -
Rim cleanup:
Check the rim of the mug. If any fruit slices were cut off at the top, ensure the painting stops cleanly at the lip. -
Interior glazing:
Pour clear bucket glaze inside the mug, swirl to coat, and pour out the excess. Wipe any drips off the exterior immediately. -
Exterior glazing:
Once the underglaze is completely bone dry, dip the entire mug into a clear transparent glaze. This will make the colors pop and become food safe. -
Final wipe:
Use a sponge to wipe the foot of the mug completely clean of glaze to prevent it from sticking to the kiln shelf.
Level Up: Sgraffito
Paint solid circles first, let them dry to leather hard, then carve out the pith lines with a needle tool for a crisp, tactile texture.
Fire your piece according to the clay and glaze specifications and enjoy your dose of vitamin C with every sip


Cute Mushroom Cluster for Cottagecore Vibes
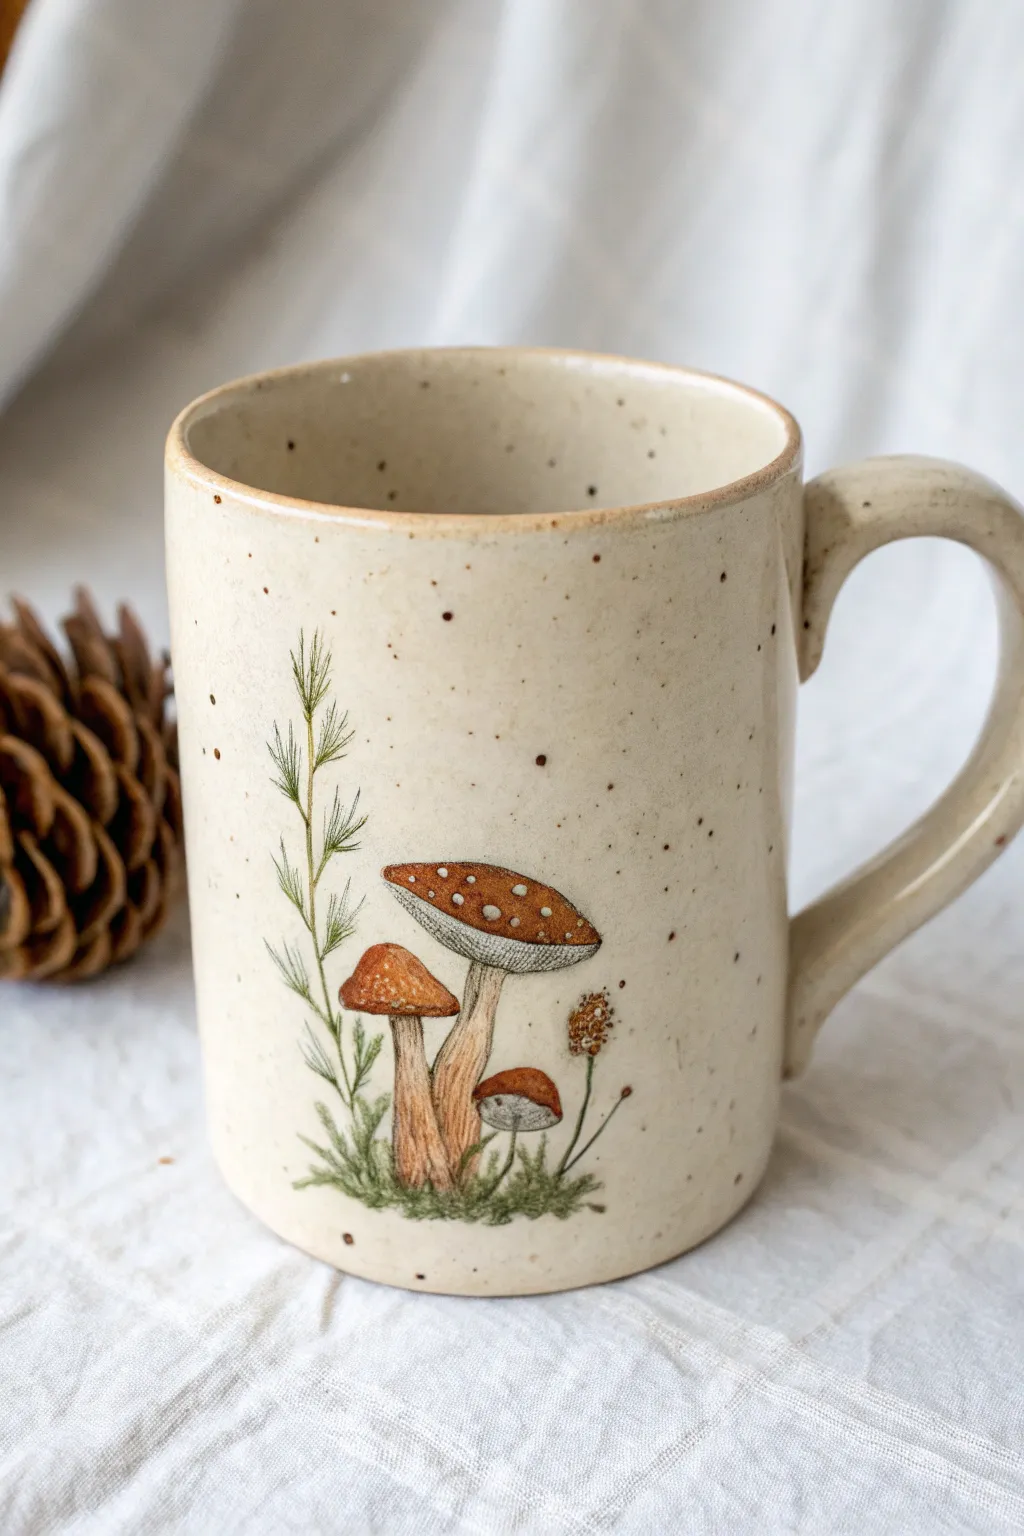
Embrace the cozy cottagecore aesthetic by painting this charming trio of mushrooms. Using fine lines and earthy glazes on speckled stoneware, you’ll create a scene that feels like a tiny forest floor right on your coffee cup.
How-To Guide
Materials
- Bisque-fired speckled stoneware mug
- Underglaze pencil (dark brown or black)
- Underglazes: Terra cotta, deep brown, cream/white, forest green, sage green
- Fine liner brush (size 00 or 000)
- Small round brush (size 2)
- Clear transparent glaze (cone 5/6 recommended)
- Clean water & sponge
- Pencil for initial sketching
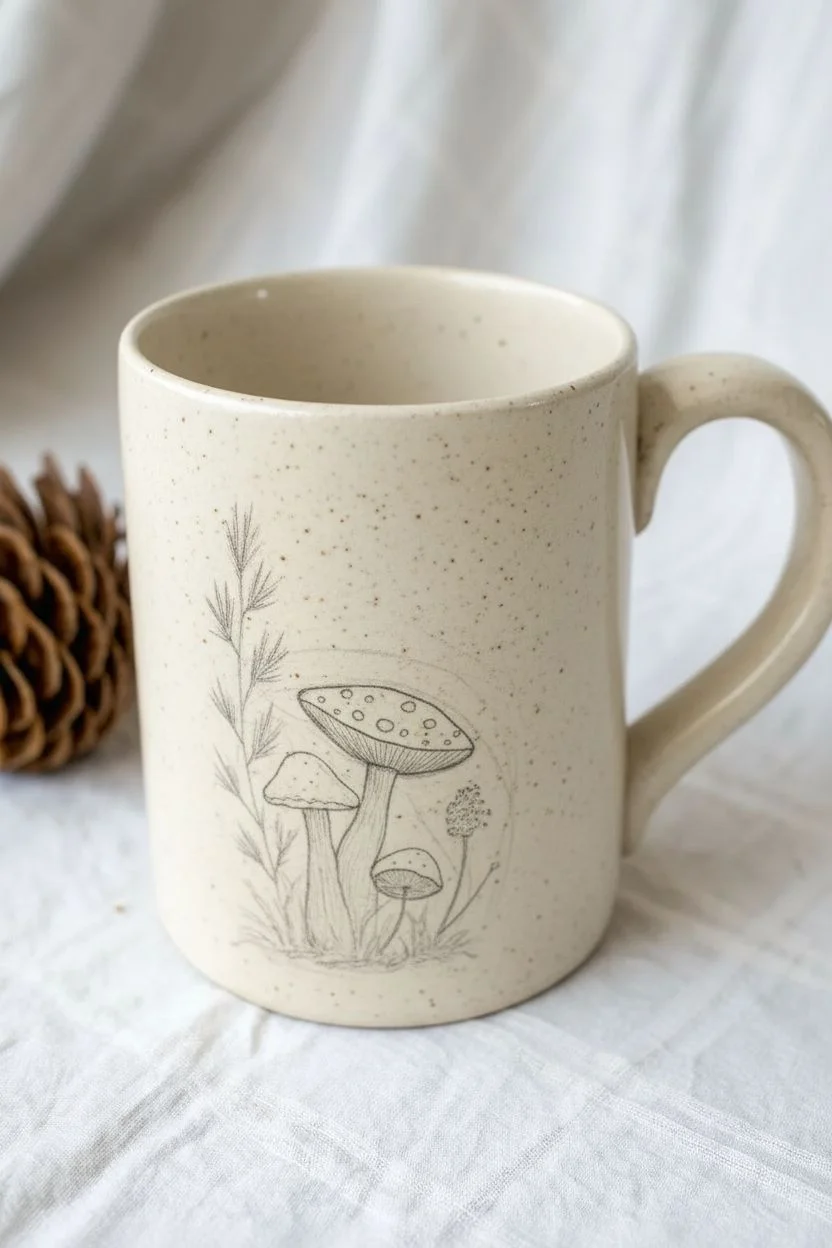
Step 1: Planning and Sketching
-
Surface Prep:
Begin by wiping down your bisque mug with a slightly damp sponge. This removes any dust that might resist the glaze and ensures a clean canvas for your delicate work. -
Rough Sketching:
Using a regular graphite pencil, lightly outline the placement of your three mushrooms. Draw a large central mushroom, a medium one tucked slightly behind to the left, and a tiny button mushroom on the right. -
Adding Flora:
Sketch a tall, slender fern stem rising to the left of the mushroom cluster. Add the small grassy tufts at the base to ground your composition. -
Defining the Outline:
Switch to your dark brown or black underglaze pencil (or a very fine liner brush with thinned dark underglaze). Carefully trace over your pencil lines to create the permanent illustrative outline. -
Detailing the Gills:
Under the caps of the two larger mushrooms, draw very fine vertical lines close together to represent the gills. Keep a steady hand here—I like to brace my pinky against the mug for stability.
Steadiness Hack
Work with the mug upside down or resting on a sandbag while painting the base details. This allows you to rest your wrist comfortably for better control.
Step 2: Painting the Mushrooms
-
Cap Base Coat:
Load your small round brush with terra cotta underglaze. Paint the caps of the large and medium mushrooms. Depending on the opacity of your brand, you may need two thin coats for vibrant color. -
The Tiny Mushroom:
Paint the cap of the smallest mushroom on the right with a slightly deeper brown tone to verify variety in the cluster. -
Stem Work:
Use a diluted wash of a creamy beige or very light brown for the mushroom stems. You want this to look translucent so the texture of the speckled clay and your outline show through. -
Adding the Spots:
Once the red caps are dry to the touch, use the tip of your liner brush or a dotting tool to add small white dots. Group them naturally, varying their sizes slightly. -
Shading:
Take a tiny amount of watered-down dark brown underglaze and gently shade the bottom of the stems and right under the caps to add dimension.
Make it Shine
Try a tiny dab of specialized gold luster on the mushroom spots after the final firing. It requires a third low-temp kiln firing but adds magical sparkle.
Step 3: Greenery and Finishing
-
Tall Fern Stems:
Mix a sage green underglaze. Using your finest liner brush, paint the tall fern stem on the left side. Use quick, flicking motions to create the wispy leaves branching off the main stalk. -
Base Foliage:
Switch to a darker forest green for the mossy bed at the bottom. Use a stippling motion (tapping the brush tip) to create a texture that looks like moss and grass surrounding the mushroom bases. -
Accent Botanical:
Paint the small seed pod stem on the right side using a mix of brown and ochre, adding tiny dots to the head of the pod for texture. -
Cleanup:
Check your work for any stray underglaze smudges. You can gently scrape these away with a needle tool or a clean, stiff brush once dry. -
Bisque Fire (Optional):
If your studio practices it, do a second bisque firing to set the underglaze. Otherwise, move straight to glazing if your underglaze is formulated for single-fire application. -
Glazing:
Dip the entire mug into a clear transparent glaze. Ensure the coat is even but not too thick, as you don’t want to cloud the fine illustrative lines. -
Final Fire:
Fire the mug to the temperature recommended for your specific clay body and glaze (typically cone 5 or 6 for stoneware) to bring out the speckles and seal the design.
Once fired, fill your new mug with tea and enjoy the woodland charm you created with your own hands
Ocean Wave Rim Border With Layered Blues
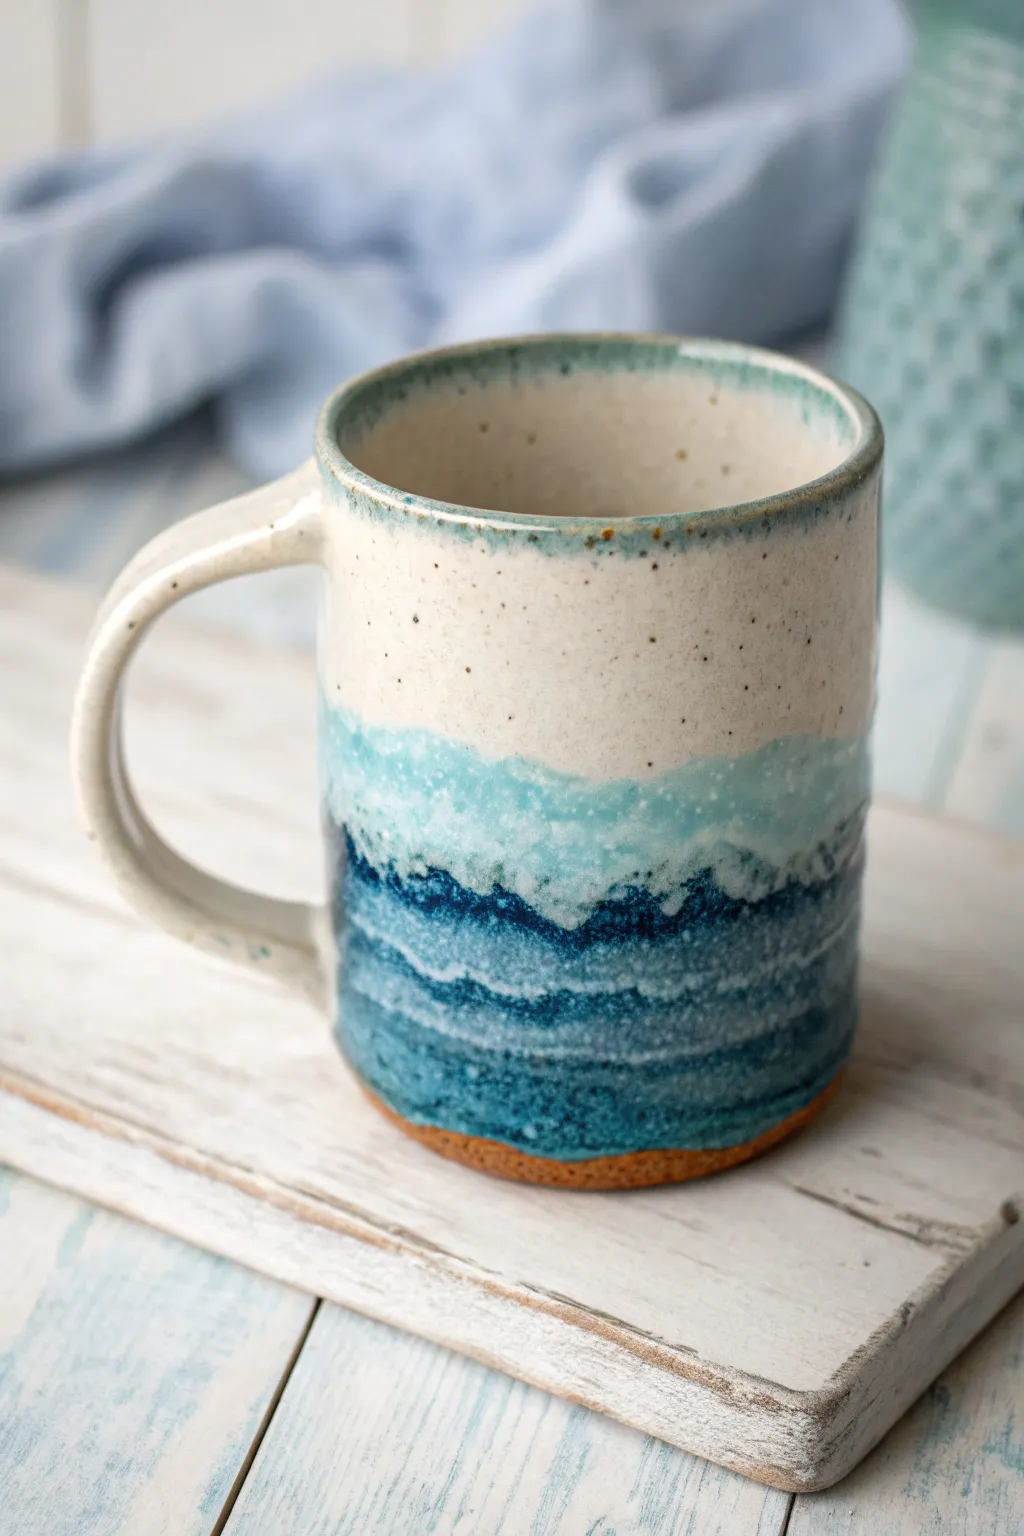
Capture the serene beauty of the ocean with this stunning layered glaze technique that mimics rolling waves on a sandy beach. By layering specific glaze combinations, you can create a beautiful chemical reaction that results in a foamy, organic texture where the colors meet.
Step-by-Step Guide
Materials
- Bisque-fired ceramic mug (stoneware clay recommended)
- Cream or textural white matte glaze (e.g., Mayco Winter Wood or Amaco Oatmeal)
- Light turquoise translucent glaze
- Dark denim blue or navy reactive glaze
- Teal or sea-green glaze for the rim
- Fan brush
- Small synthetic detail brush
- Sponge
- Wax resist (optional)
- Kiln access (Cone 5/6)
Step 1: Preparation & Base Coat
-
Clean the bisque:
Begin by wiping down your bisque-fired mug with a slightly damp sponge. This removes any dust that could prevent the glaze from adhering properly to the clay body. -
Wax the foot:
Flip the mug over and carefully apply a coat of wax resist to the bottom foot ring. This saves you from having to wipe off excess glaze later and protects your kiln shelves. -
Apply the interior glaze:
Pour your cream or textural white glaze inside the mug, roll it around to coat every surface, and pour the excess back into the bottle. Wipe any drips off the rim immediately. -
Glaze the exterior top half:
Using a fan brush, apply three coats of the creamy white glaze to the exterior. Start from the rim and work your way down, stopping just below the middle of the mug. Allow each coat to dry until it loses its sheen before applying the next.
Step 2: Creating the Wave Layers
-
Establish the water line:
Dip your fan brush into the light turquoise glaze. Apply a horizontal band that overlaps slightly with the bottom edge of your white glaze. -
Blend the transition:
While the glaze is still slightly damp, gently dab the meeting point of the white and turquoise with the tip of your brush to encourage blending, which creates that soft, foamy shore look. -
Add the deep ocean layer:
Switch to your dark denim blue reactive glaze. Apply this to the bottom third of the mug, bringing it up to meet—and slightly overlap—the light turquoise band. -
Intensify the depth:
Apply a second heavy coat of the dark denim blue to the bottom section. I find that dabbing the glaze on thickest near the bottom edge gives a lovely visual weight to the piece. -
Create the wave crests:
Dip a smaller brush into the creamy white glaze you used for the top. Dab irregular, organic spots over the transition line where the blue meets the turquoise glazes. This extra flux will create movement in the kiln.
Glaze Run Troubleshooting
If your glazes run too much, create a ‘catcher’ by making a small clay disk to place under the mug in the kiln to protect the shelf.
Step 3: Finishing Touches & Firing
-
Add the rim detail:
Load a detail brush with your teal or sea-green glaze. Hold the brush steady and spin the banding wheel (or turn the mug) to apply a consistent line of color right on the rim. -
Let the rim drip slightly:
Allow a little bit of the rim glaze to overlap onto the interior and exterior surfaces. This frames the ‘sky’ portion of the mug nicely. -
Expose the clay body:
Leave a small strip of unglazed raw clay near the very bottom. This ‘sandy’ bottom provides a nice textural contrast and prevents the running blue glaze from sticking to the shelf. -
Clean up edges:
Use a damp sponge to meticulously wipe back any glaze that may have crept onto the waxing ring or the unglazed bottom strip. -
Dry thoroughly:
Let the mug dry completely for at least 24 hours. Damp ware can explode in the kiln, so patience is key here. -
Fire the mug:
Load the mug into the kiln and fire to Cone 5 or 6 (approximately 2167°F – 2232°F / 1186°C – 1222°C), depending on your specific clay and glaze instructions.
Level Up: Texture
Add carved texture to the ‘water’ area before the first firing. The glaze will pool in the grooves, creating distinct light and dark ripples.
Unload your kiln to reveal a beautiful seascape mug that feels perfect for morning coffee
Starry Night Sky With Splatter Stars

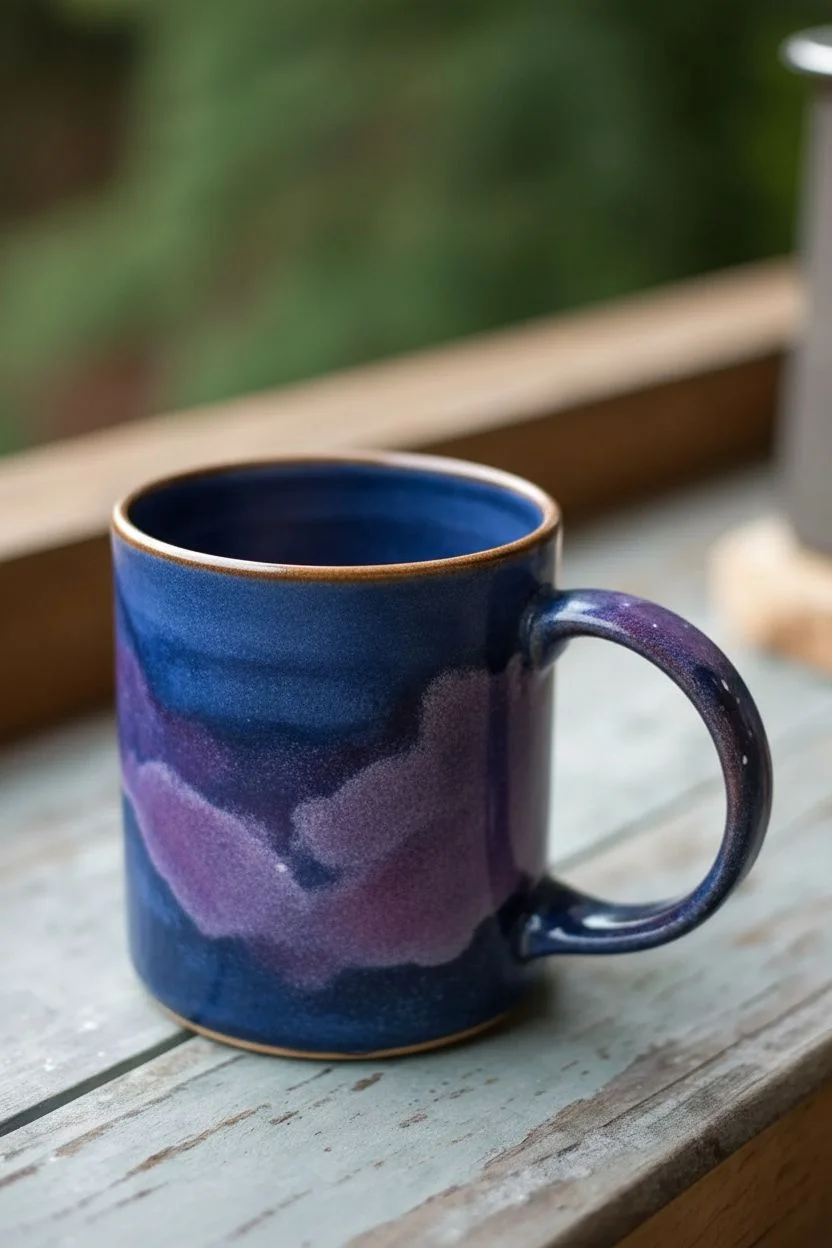
Capture the magic of deep space on your morning coffee cup with this celestial starry night design. By layering moody blues and purples with a flick of white splatter, you can create a galaxy effect that looks far more complex than it actually is.
Detailed Instructions
Materials
- Bisque ceramic mug (straight-sided works well)
- Underglazes: Deep Midnight Blue, Royal Blue, Violet/Purple, bright White, Chocolate Brown
- Fan brush or stiff-bristled toothbrush
- Medium soft round brush (size 6 or 8)
- Fine liner brush (size 0 or 00)
- Sponge
- Palette or ceramic tile
- Clear dipping glaze
Step 1: Setting the Base Atmosphere
-
Prep the surface:
Wipe down your bisque mug with a slightly damp sponge to remove any shelf dust or oils from your hands. This ensures the underglaze adheres perfectly without crawling later. -
Apply the first deep blue layer:
Using your medium round brush, apply a solid coat of Deep Midnight Blue to the entire exterior of the mug, excluding the very top rim. Use long, smooth horizontal strokes to minimize brush marks. -
Create depth with lighter blue:
While the first layer is touch-dry but not fully set, sponge or brush a patchy layer of Royal Blue over the upper two-thirds of the mug. Don’t cover everything; let that darkness peek through. -
Add the nebula effect:
Dip your sponge into the Violet underglaze. Dab it gently around the lower third and middle sections of the mug to create cloudy, nebula-like patches. Soften the edges by dabbing with a clean part of the sponge so the purple blends into the blue. -
Repeat for opacity:
Once the first pass is dry, repeat the blue and purple layering process. You want a rich, opaque coverage so none of the white bisque shows through. Three coats total is usually the magic number for solid color.
Step 2: Creating the Stars
-
Prepare splatter paint:
Mix a small amount of bright White underglaze with a drop or two of water. It should be the consistency of heavy cream—runny enough to fly off bristles, but thick enough to stay opaque. -
Test the splatter:
Dip your stiff fan brush or toothbrush into the watered-down white. Run your thumb across the bristles over a piece of scrap paper first to test the splatter size. I always do a test run to avoid dropping giant unplanned blobs on my work. -
Splatter the galaxy:
Hold the brush near the mug and flick the bristles to spray a fine mist of white stars across the surface. Vary your distance slightly to create a mix of tiny distant stars and slightly larger ones. -
Paint varying star sizes:
Switch to your fine liner brush with full-strength white underglaze. Dot a few specific stars by hand that are slightly larger than the splatter to create focal points. -
Add the twinkling cross-stars:
Select 3-5 spots for your largest ‘hero’ stars. Paint a simple cross shape with long, thin tapered lines. Add a small ‘x’ in the center of the cross to make it an eight-pointed glimmer. -
Detail the larger stars:
For the five-pointed stars seen in the design, draw a simple star shape and fill it in carefully. Keep these sparse; too many will clutter the cosmic effect.
Blob Control
Get a giant white blob instead of a mist? Don’t wipe it! Let it dry, then scratch it off gently with a toothpick or pin tool before glazing to remove the mistake without smearing the blue.
Step 3: Finishing Touches
-
Rim the mug:
Dip your medium brush into Chocolate Brown underglaze. Carefully paint the rim of the mug, letting the brush naturally deposit color just over the edge onto the blue sky. -
Clean the interior:
If any splatter or rogue blue paint landed inside the mug, wipe it away cleanly with a damp sponge. Keeping the interior white (or a solid contrasting color) makes the outside pop. -
Check density:
Step back and look at your galaxy. If a spot looks too empty, add a tiny dot or two with your liner brush. If a splattered star looks too faint, carefully dab a fresh dot of white over it. -
Glaze and fire:
Allow the mug to dry completely, preferably overnight. Dip into a clear transparent glaze and fire according to your clay body’s instructions (usually Cone 06 or Cone 6).
Shimmer Boost
For a truly magical finish, mix a tiny pinch of mica powder or use a specialty ‘stardust’ clear glaze over the top coat. This adds a subtle glitter that catches the light like real stars.
Once fired, fill your new cosmic mug with a hot drink and enjoy holding the universe in your hands
Mountain Silhouette With a Sunset Gradient
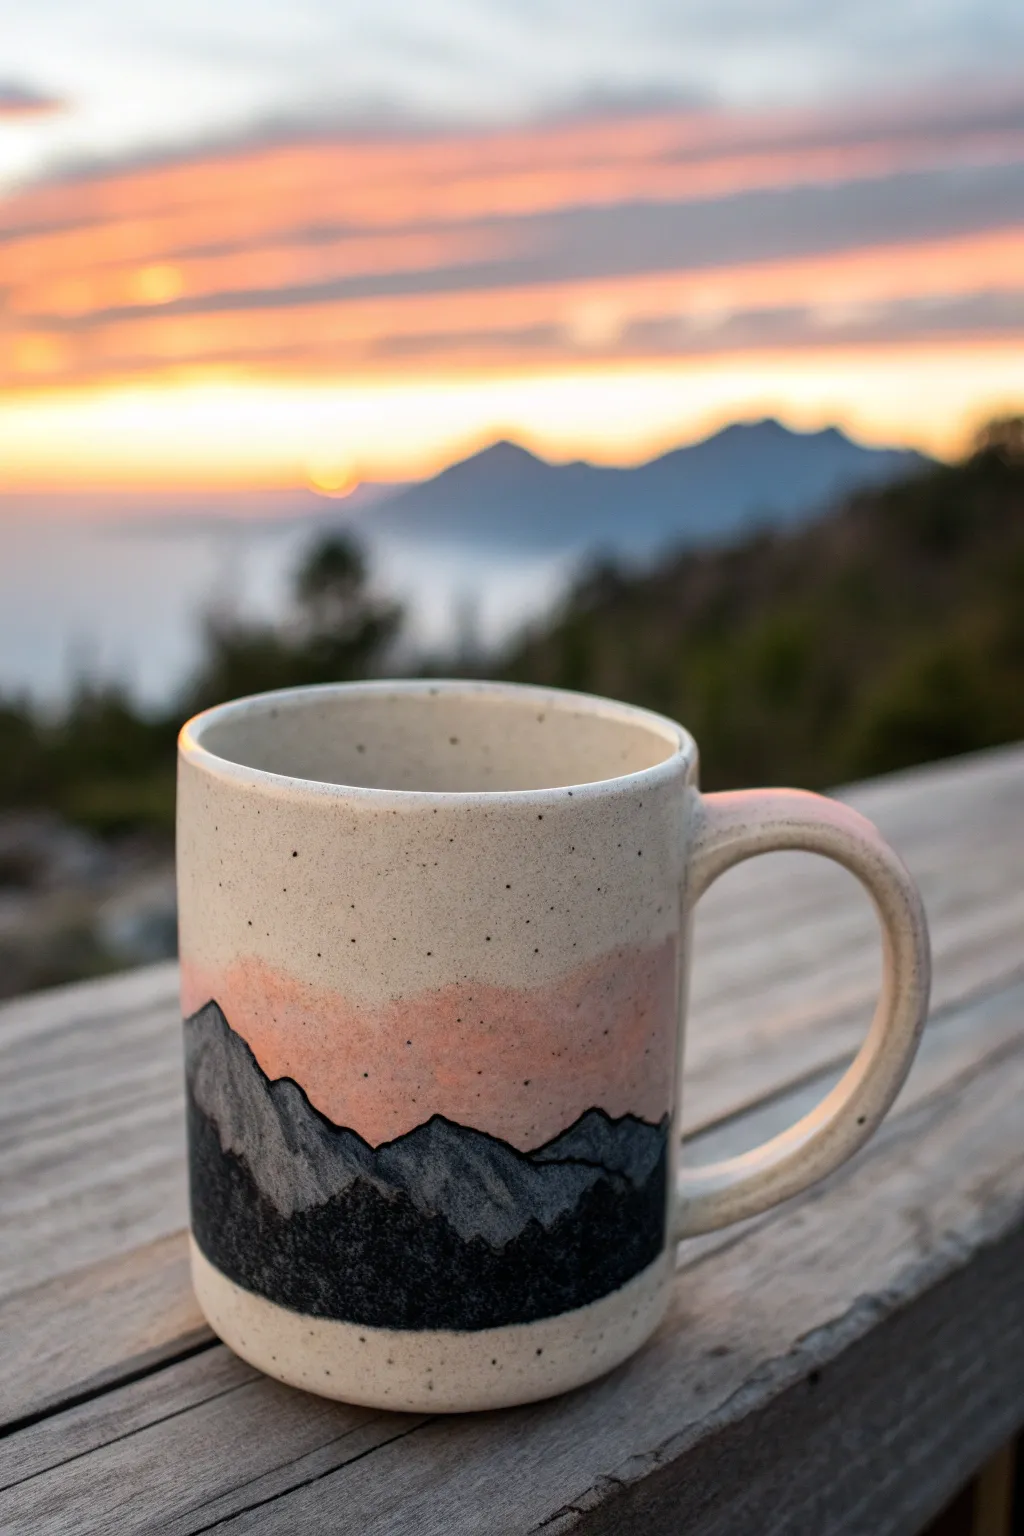
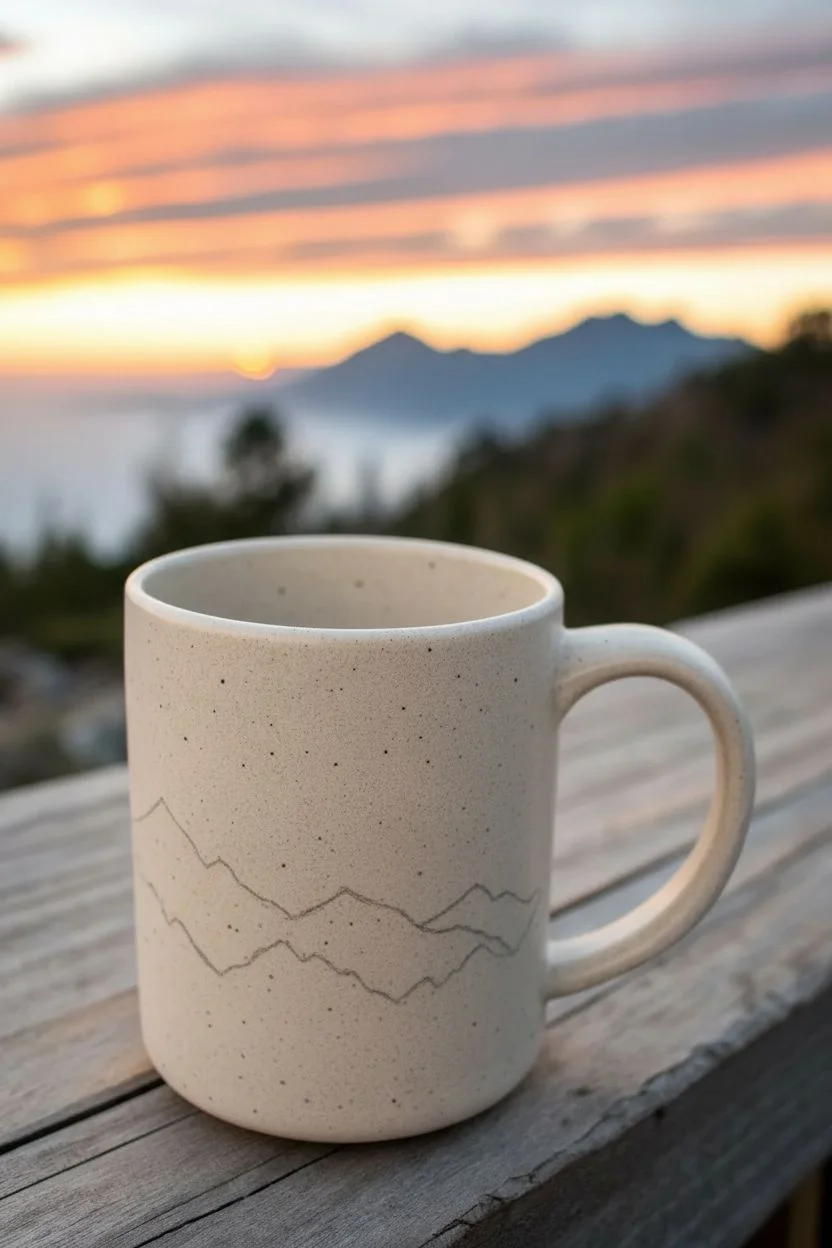
Capture the magic of twilight with this serene mountain landscape mug, featuring a soft peach gradient that fades into a speckled cream sky. The design uses layered underglazes to create depth, mirroring the peaceful transition from rugged peaks to a warm, glowing horizon.
Step-by-Step Guide
Materials
- Bisque-fired speckled stoneware mug
- Underglaze (Black or very dark charcoal)
- Underglaze (Dark Grey)
- Underglaze (Peach or Salmon Pink)
- Clear dipping glaze (transparent)
- Small flat brush (size 4 or 6)
- Fine liner brush (size 0 or 00)
- Fan brush (optional for glazing)
- Pencil
- Sponge and water bowl
Step 1: Preparation and Planning
-
Clean surface:
Wipe down your bisque mug with a damp sponge. This removes any dust from the kiln and opens up the pores of the clay to accept the underglaze better. -
Sketch the horizon:
Using a regular pencil, lightly sketch your mountain range about one-third of the way up the mug. Don’t worry about being messy; the graphite will burn off completely in the kiln. -
Define the layers:
Draw two distinct jagged lines. The bottom line will be the foreground mountains (darkest), and the line above it will be the mid-ground range (grey). Keep the peaks angular and varied for a natural look.
Clean Lines
If you struggle with steady hands, use thin masking tape or painter’s tape to block out the sky area while you paint the mountain peaks for a sharp edge.
Step 2: Painting the Sky Gradient
-
Mix your wash:
Dilute your peach or salmon pink underglaze slightly with water. You want a consistency that is thinner than heavy cream but thicker than watercolor. -
Apply the band:
With a flat brush, paint a horizontal band of peach just above your pencil sketched mountains. Let the bottom edge be crisp against the mountain line. -
Fade upward:
While the paint is still damp, rinse your brush and use just water to feather the top edge of the peach band upward. This creates that soft, fading sunset effect into the raw clay color. -
Second coat:
Once the first layer is dry to the touch, apply a second coat of peach near the horizon line to intensify the color, leaving the faded top edge alone.
Step 3: Creating the Mountains
-
Paint the mid-ground:
Using your dark grey underglaze and a steady hand, fill in the mountain range that sits furthest back. Carefully follow the pencil line where it meets the peach sky. -
Let it set:
Allow the grey layer to dry completely. If you paint the next layer too soon, the colors might muddy together. -
Paint the foreground:
Switch to your black underglaze. Paint the bottom-most mountain range, overlapping the bottom portion of your grey mountains. -
Fill the base:
Extend the black paint all the way down to create a solid visual anchor at the bottom of the design. I prefer to stop just before the curve of the base so the speckled clay shows at the very bottom. -
Refine edges:
Use your fine liner brush to sharpen up the peaks. Add tiny, jagged details to the tops of the mountains to mimic rocky terrain.
Metallic Magic
After the final firing, add a touch of gold luster overglaze to the very tips of the mountains or the sun area for a shimmering effect.
Step 4: Finishing Touches
-
Inspect the specks:
Since we used speckled clay, check if you want to enhance the sky. If your clay body isn’t naturally speckled, you can flick a toothbrush with thinned brown underglaze to add faux texture. -
Check density:
Ensure your black and grey sections are opaque. If the clay shows through too much, apply a second thin coat, specifically to the dark mountains. -
Clear glaze application:
Once all underglaze is bone dry, dip the entire mug into a clear, transparent glaze. Shake gently to remove excess drips. -
Rim check:
Wipe the foot of the mug clean with a sponge so it doesn’t stick to the kiln shelf. -
Final Fire:
Fire the mug to the appropriate cone temperature for your specific clay and glaze combination (usually Cone 5 or 6 for stoneware).
Enjoy sipping your morning coffee while gazing at a view that never fades
Mandala Medallion Centered on the Front
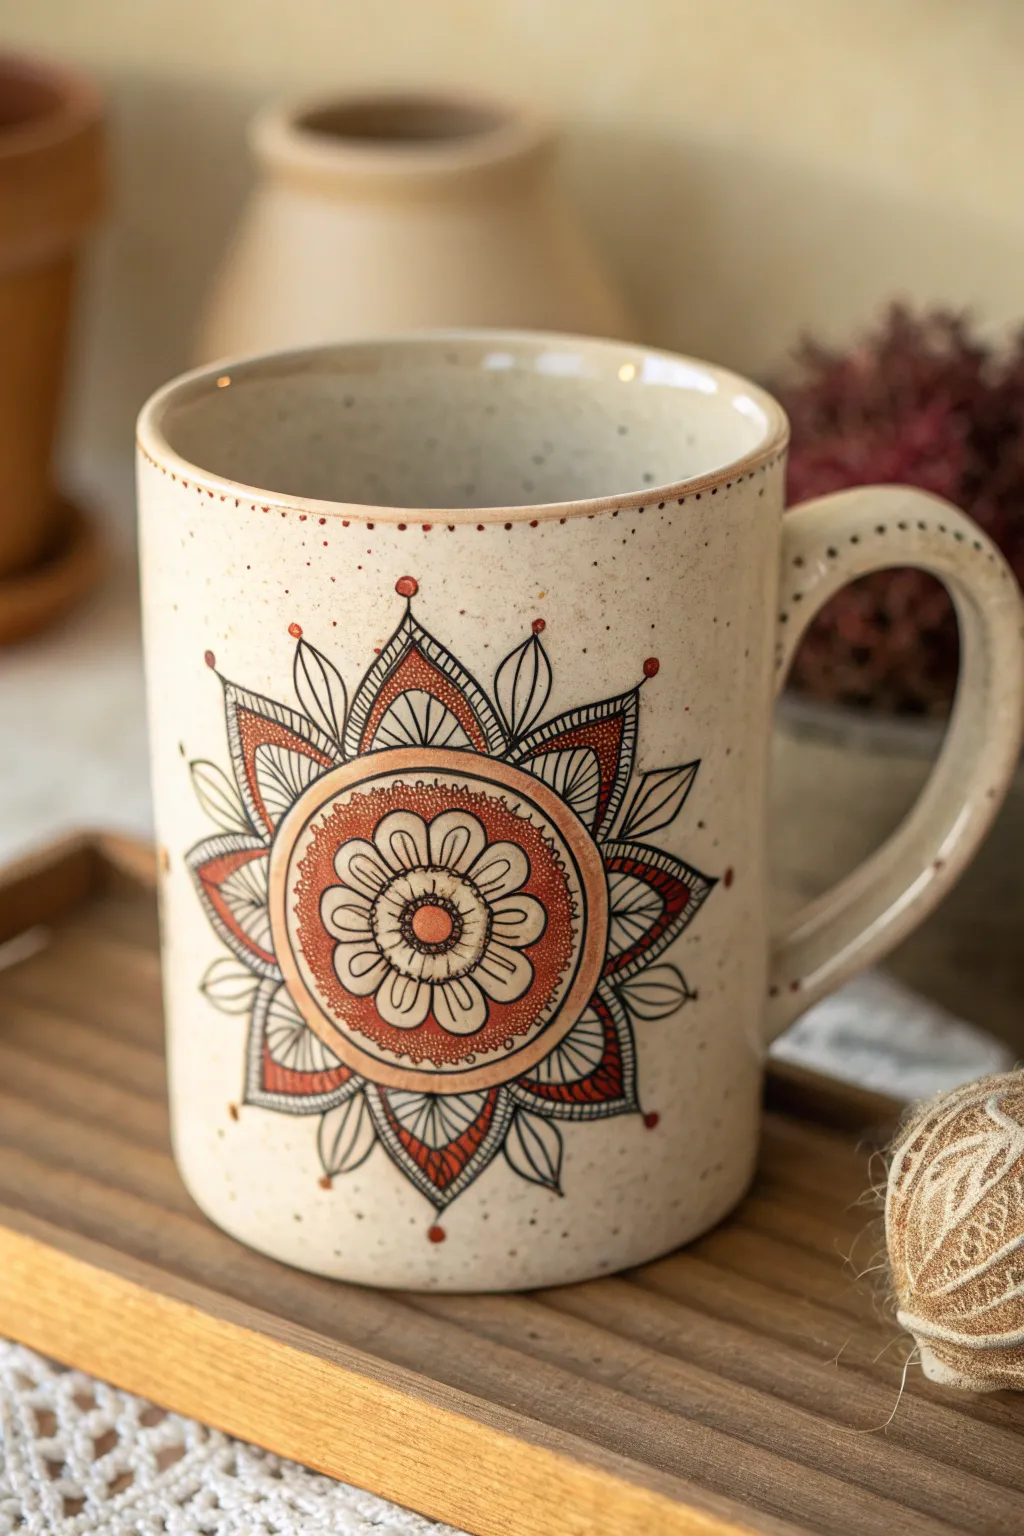
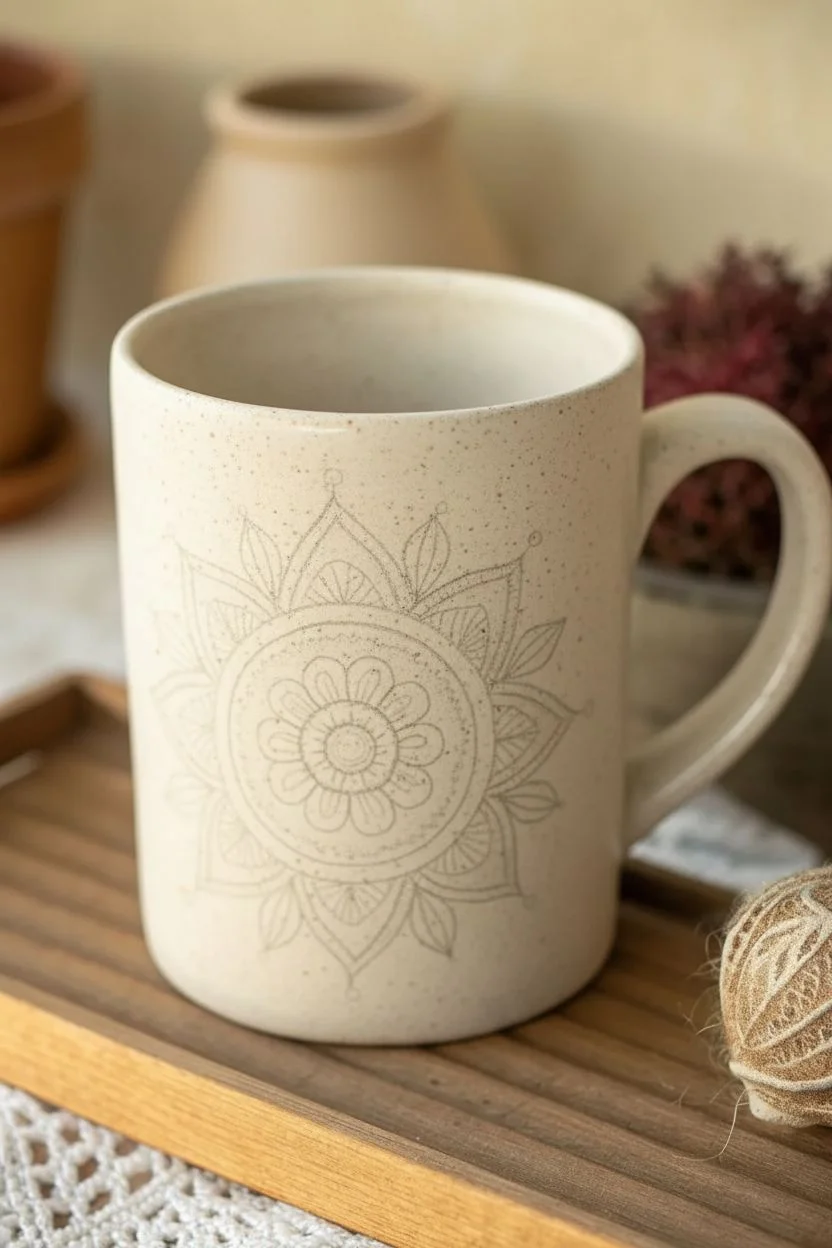
Bring a touch of bohemian elegance to your coffee routine with this intricately designed mandala mug. The warm terracotta hues and crisp black linework create a stunning medallion that looks both earthy and sophisticated against speckled clay.
Detailed Instructions
Materials
- Bisque-fired ceramic mug (speckled cream or beige clay body preferred)
- Underglaze pencil (black)
- Liquid underglaze (Jet Black)
- Liquid underglaze (Terracotta or Burnt Orange)
- Fine liner brush (size 00 or 000)
- Small round brush (size 2)
- Needle tool or toothpick (for dotting)
- Pencil (standard HB for sketching)
- Clear dipping glaze
- Damp sponge
Step 1: Planning and Sketching
-
Prep the surface:
Begin by wiping the entire bisque mug with a damp sponge. This removes any kiln dust and ensures your underglaze adheres properly to the surface. -
Find the center:
Hold the mug comfortably and identify the visual center on the face of the mug opposite the handle. Lightly mark this center point with your HB pencil. -
Sketch the inner rings:
Using your pencil, lightly draw a small circle about an inch in diameter around your center point. Draw a second, slightly smaller concentric circle inside it to create a band. -
Outline the petals:
Sketch a flower shape with eight rounded petals inside the very center circle. Ensure they radiate evenly from the center point. -
Draft the outer layers:
Sketch a larger ring around the central medallion. From there, draw triangular points extending outward to create the starburst effect, adding leaf-like shapes between the larger points.
Step 2: Applying Color
-
Fill the center band:
Dip your small round brush into the Terracotta underglaze. carefully fill in the negative space around the central flower petals, leaving the petals themselves unpainted to show the clay body. -
Fill the secondary ring:
Move to the outer ring enclosing the center design. Paint this band solid Terracotta, ensuring an opaque, even coat. I find two thin coats work better than one thick one here. -
Accent the outer petals:
Identify the larger triangular petals in the outer layer. Paint the inner section of these shapes with the Terracotta underglaze, leaving a border for the linework later. -
Add rim detail:
Using the side of a brush or a steady hand, apply a very thin line of Terracotta underglaze along the very top rim of the mug for a subtle frame.
Steady Hands Pro-Tip
Rest your painting hand’s pinky finger against the mug surface while drawing lines. This acts as an anchor, stabilizing your hand for crisper, straighter linework.
Step 3: Detailed Linework
-
Outline the center flower:
Switch to your fine liner brush and Jet Black underglaze. Outline the eight central petals and add a small circle in the very center. -
Detail the main ring:
Outline the Terracotta ring. Inside this colored band, use the needle tool or a very fine brush tip to add tiny stippling dots for texture. -
Define the outer petals:
Outline the large triangular petals with black. Inside these petals, draw horizontal hatching lines to create shading and depth. -
Draw the leaf motifs:
In the gaps between the triangular petals, outline the leaf shapes you sketched earlier. Add a simple central vein line to each leaf. -
Add accent dots:
Dip the blunt end of your needle tool or a toothpick into the Terracotta glaze. Place a single dot at the very tip of each large triangular petal. -
Create the border dots:
Using the same dotting technique with Terracotta, add small dots around the perimeter of the entire design and a few scattered near the rim and handle for balance.
Level Up: Handle Detail
Don’t leave the handle bare. Extend the dot pattern down the spine of the handle to visually connect it to the main mandala design.
Step 4: Finishing
-
Clean up stray marks:
Once the underglaze is dry to the touch, use a slightly damp brush to gently wipe away any visible pencil sketch lines that weren’t covered by paint. -
Glaze application:
Dip the entire mug into a clear dipping glaze. Ensure the glaze coat is even and shake off excess drips carefully. -
Final Fire:
Fire the mug in the kiln according to the clay and glaze manufacturer’s temperature guidelines (usually Cone 5 or 6 for stoneware).
Now you have a beautifully hand-painted mug perfect for cozy mornings or as a thoughtful handmade gift
Sgraffito Scratch-Through Design on Painted Underglaze
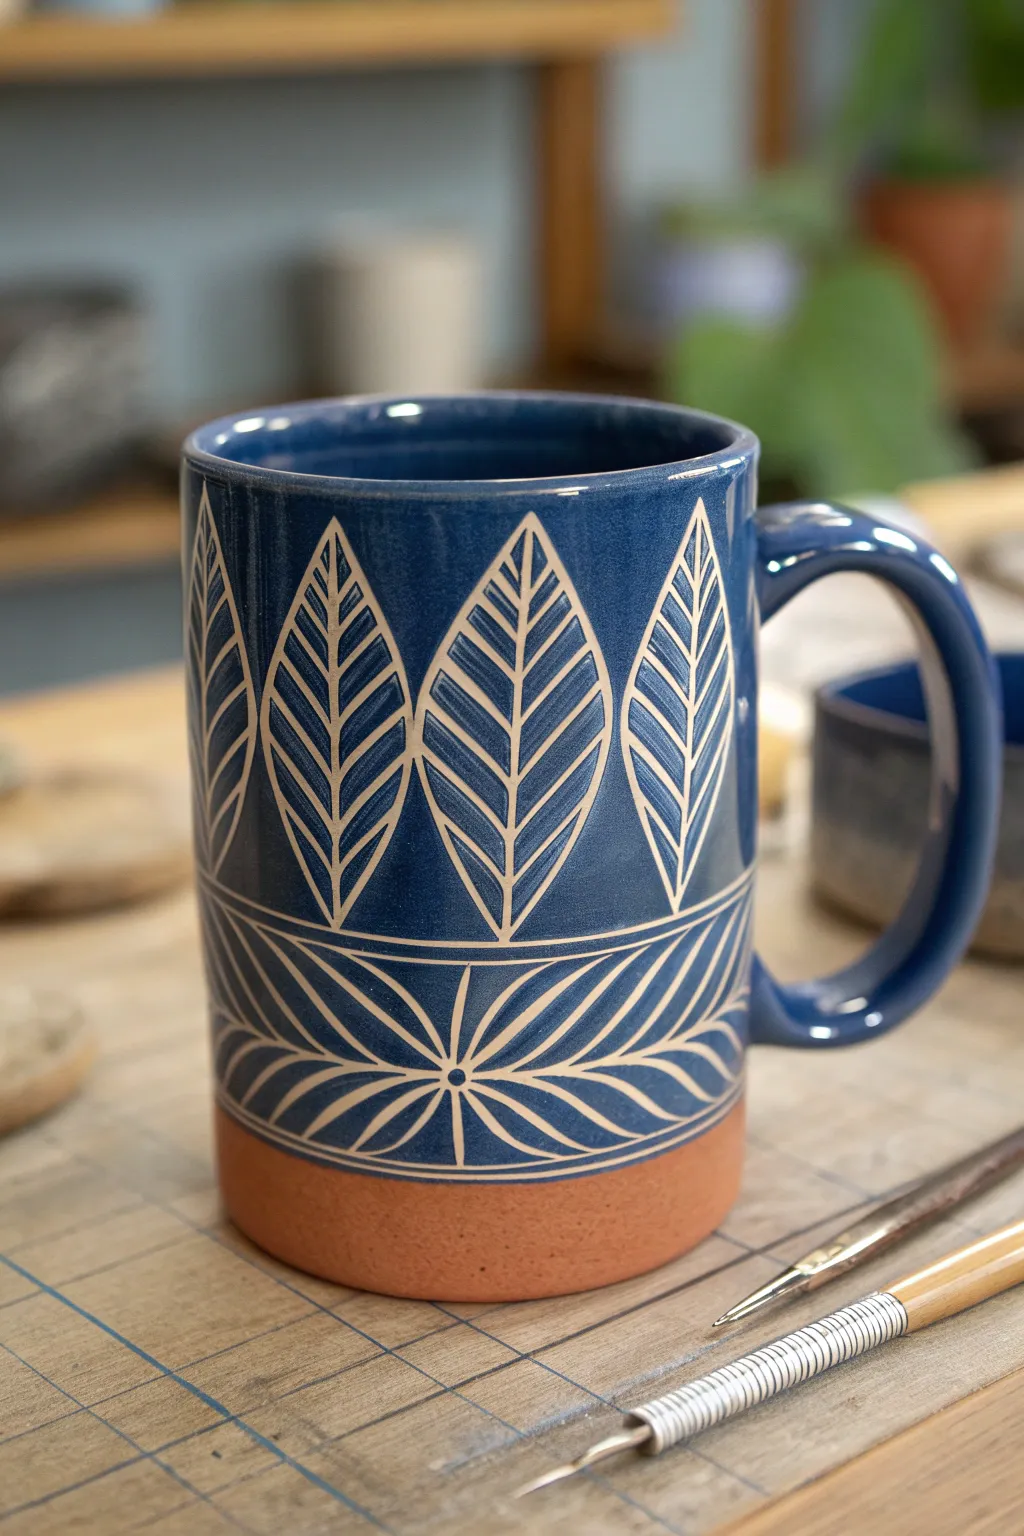
Showcase the stunning contrast of white clay against deep blue using the sgraffito technique on this tall, hand-built style mug. The crisp white lines of the leaf and petal motifs pop beautifully against the rich cobalt background, revealing the intricate carving work.
Step-by-Step Guide
Materials
- Leather-hard clay mug (terracotta or red clay)
- Deep cobalt blue underglaze
- Soft fan brush
- Sgraffito tool (loop tool or needle tool)
- Damp sponge
- Pencil (optional)
- Clear transparent glaze
- Carving dust brush
Step 1: Preparation & Underglazing
-
Prepare the mug:
Ensure your clay mug is at the perfect leather-hard stage. It should be firm enough to handle without warping but soft enough to carve into effortlessly. Wipe the surface gently with a damp sponge to remove any dust. -
Apply the first coat:
Using a soft fan brush, apply an even layer of deep cobalt blue underglaze to the exterior of the mug. Leave the bottom half-inch unglazed to show off the raw clay body later. -
Check density:
Let the underglaze dry until it loses its sheen. Apply a second—and possibly third—coat. You want a solid, opaque blue so the clay color doesn’t peek through unintentionally. -
Dry to perfection:
Allow the underglaze to dry to the touch. It shouldn’t come off on your finger, but the clay underneath should still retain some moisture for smooth carving.
Clean Lines Only
Keep a small bowl of water nearby to rinse your carving tool frequently. A clogged tool drags through the clay rather than cutting, leaving ragged edges.
Step 2: Drafting the Design
-
Mark the sections:
Lightly scratch a horizontal guideline around the mug, about a third of the way up from the bottom. This separates the top leaf section from the bottom floral band. -
Sketch the leaves:
I prefer to lightly sketch the outline of the tall, pointed leaves in the top section using a pencil. The graphite will burn off in the kiln, so don’t worry about messy lines. -
Plan the bottom band:
In the lower section, mark out semicircles or arches that will become the stylized flower petals radiating outward.
Step 3: Carving the Sgraffito
-
Outline the leaves:
Use a sharp sgraffito tool or small loop tool to carve the outline of each large leaf. Apply consistent pressure to cut through the blue layer and reveal the white/light clay body beneath. -
Add the central vein:
Draw a straight vertical line down the center of each leaf, stopping just before the tip. -
Carve the texture:
Create the diagonal veins inside the leaves. Make parallel, angled cuts from the central vein out to the edge. Keep the spacing tight and rhythmic. -
Carve the divider:
Go back to your horizontal guideline and carve two parallel lines to create a distinct border between the upper and lower designs. -
Outline the bottom petals:
Carve the swooping outlines of the flower petals in the bottom band. These should look like long, curved teardrops lying on their sides. -
Detail the petals:
Add a single central line to each petal in the bottom grouping to mimic the style of the veins in the upper leaves. -
Clean up details:
If there are large negative spaces between leaves, you can carve thin vertical lines or small geometric fillers to balance the design.
Chipped Edges?
If the underglaze chips off while carving, your clay is likely too dry. Mist the piece lightly with water, wrap it in plastic for an hour to rehydrate, and try again.
Step 4: Finishing Touches
-
Remove crumbs:
Use a soft, dry brush to gently sweep away all the little clay crumbs (burrs) created by carving. Do not use your hand, or you might smudge the blue pigment. -
Clean the distinct rim:
Use a damp sponge to clean up the bottom edge where the glaze ends, creating a sharp, crisp line between the blue body and the exposed reddish clay foot. -
Bisque fire:
Fire the mug to bisque temperature (usually Cone 04 or 06) to set the shape and the underglaze. -
Glaze and final fire:
Dip the entire mug into a clear transparent glaze. Wipe the foot clean again, then fire to your clay’s maturity temperature (e.g., Cone 5 or 6).
Now you have a stunning, high-contrast mug ready for your morning coffee
Faux Mosaic Tiles Using Painted “Shard” Shapes
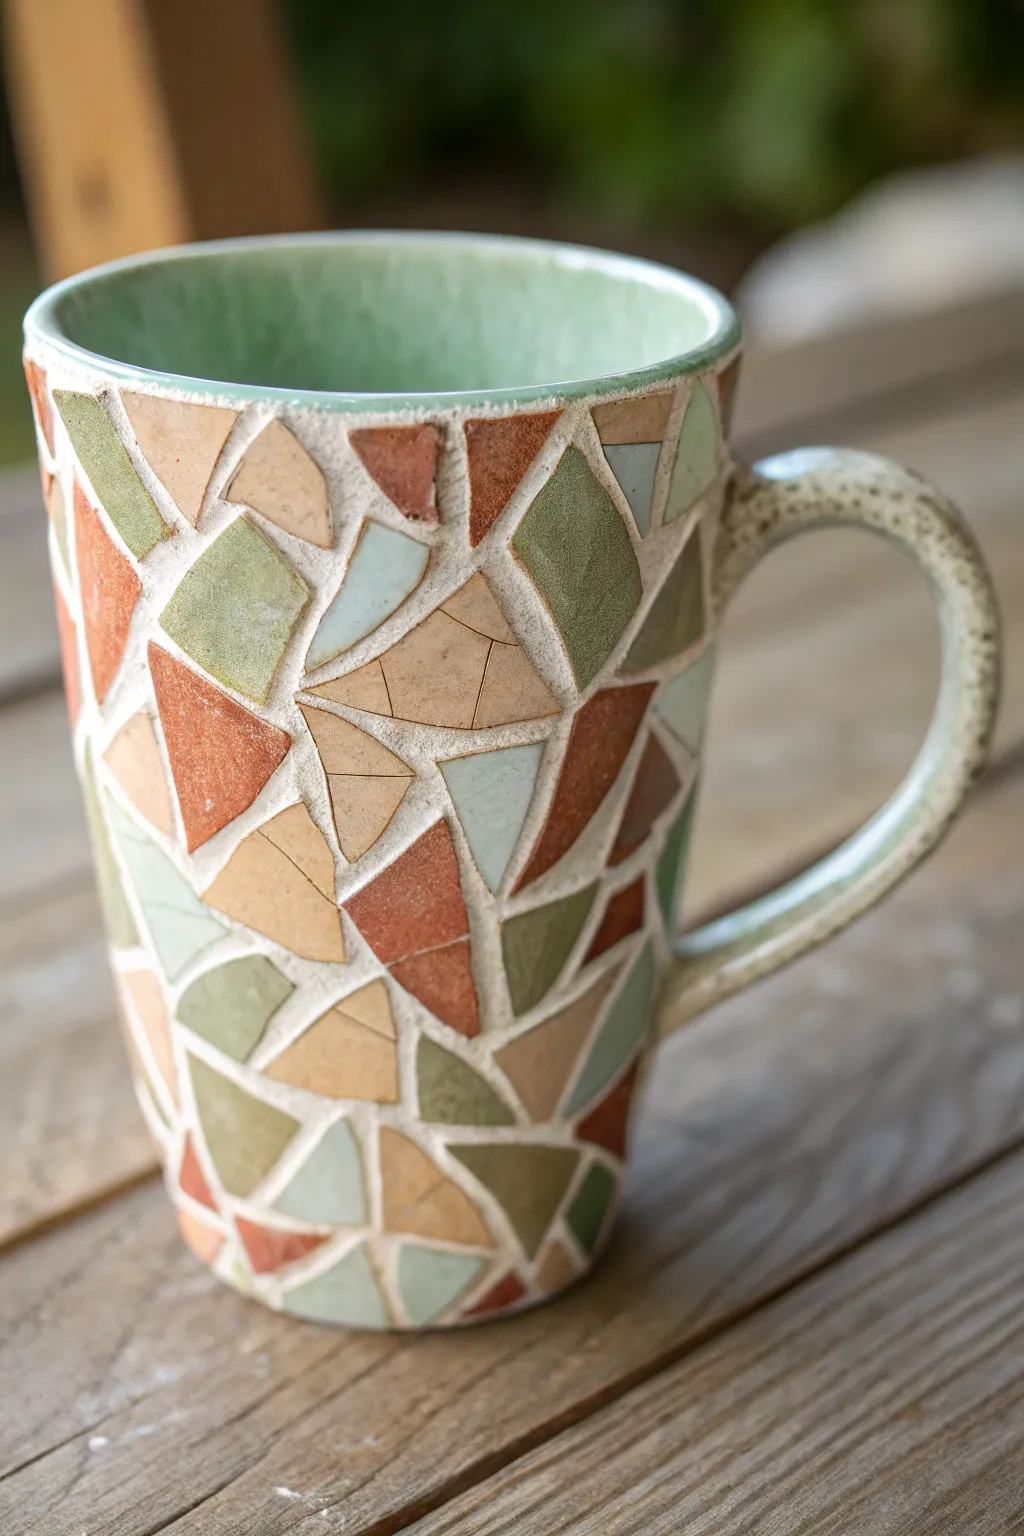
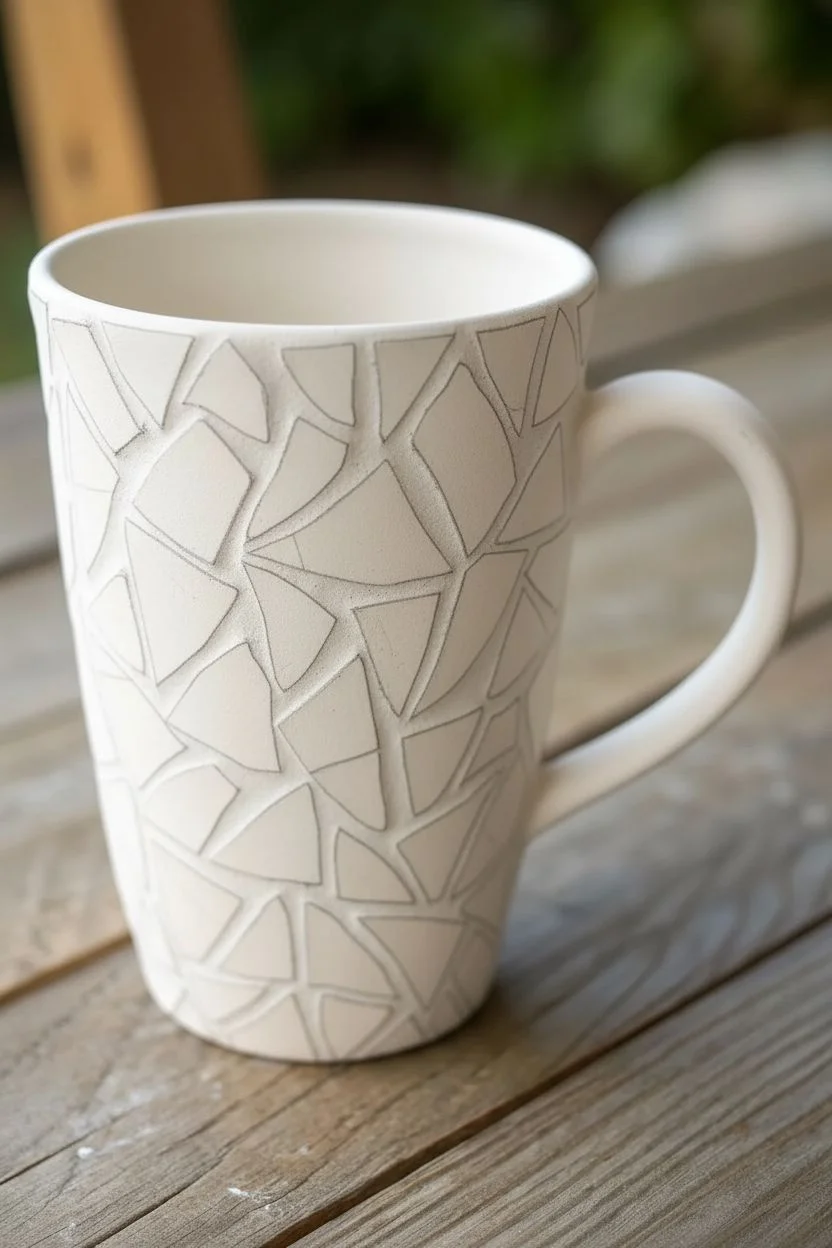
Achieve the rustic, textured look of a classic mosaic without gluing a single tile. By carefully painting geometric ‘shard’ shapes and leaving negative space for a faux grout line, you can transform a plain bisque mug into a piece that feels ancient and artistic.
Step-by-Step
Materials
- Bisque fired ceramic mug
- Underglazes in earthy tones (terracotta, sage green, beige, dusty blue, cream)
- Small flat shader brush (size 2 or 4)
- Fine liner brush (size 0 or 00)
- Wax resist (liquid wax emulsion)
- Sponge
- Clear dipping glaze
- Pencil (optional)
Step 1: Planning and Prepping
-
Clean surface:
Begin by wiping down your bisque mug with a slightly damp sponge to remove any kiln dust or oils from your hands, ensuring a clean canvas for your underglaze. -
Sketch the pattern:
Lightly sketch your mosaic pattern directly onto the bisque using a pencil. Focus on creating irregular triangles, trapezoids, and polygon shapes that fit together like a puzzle but don’t touch. -
Mind the gap:
As you sketch, ensure you leave a consistent gap of about 1/8th of an inch between every shape. This empty space will later become your ‘grout’ lines.
Step 2: Painting the Shards
-
Load the palette:
Pour out small amounts of your earth-toned underglazes. I like to keep my palette varied but cohesive, sticking to muted natural colors like sage, rust, and sand. -
Apply the first color:
Using a small flat shader brush, fill in scattered shapes with your first color (e.g., terracotta). Try not to place two of the same color right next to each other. -
Build opaque layers:
Underglazes often need 2-3 coats for full opacity. Apply your first coat to the shapes, let it dry until matte (chalky looking), and then apply the second coat. -
Add the greens:
Switch to your sage green color. Paint various sizes of triangles and shards, filling in roughly a quarter of the available shapes. -
Incorporate neutrals:
Fill the remaining shapes with your beige, cream, and dusty blue tones. Be careful to stay inside your pencil lines to keep those edges crisp. -
Simulate texture:
To make the shards look like real stone or pottery, dip a damp sponge into a slightly darker shade of the base color and lightly dab it onto a few dried shapes for a speckled effect. -
Detail fine cracks:
For extra realism, use your fine liner brush and a dark brown underglaze to paint tiny, hairline cracks across a few of the larger ‘shards.’
Bleeding Lines?
If underglaze bleeds into the grout gaps, your brush was likely too wet. Let the area dry, scrape the excess paint away gently with a crafting knife, and retry with a drier brush.
Step 3: Creating the Grout
-
Wax the shapes:
Once all your painted shapes are bone dry, carefully apply a coat of wax resist over *only* the colored areas. This protects your design. -
Prepare the grout wash:
Dilute a cream or light grey underglaze with a little water to create a thin wash. This will serve as the grout color between your tiles. -
Apply the wash:
Brush this wash over the entire mug surface. The wax will repel the wash from the colored shapes, but the liquid will settle into the unpainted gaps between them. -
Clean up:
Gently wipe the surface with a damp sponge. The wash should stay in the recessed raw bisque areas (the ‘grout lines’) while wiping cleanly off the waxed, painted shapes.
Make It 3D
For actual texture, apply 3-4 heavy coats of slip or thick underglaze to the shard shapes only. This raises them physically higher than the grout lines for a tactile feel.
Step 4: Finishing Touches
-
Dry thoroughly:
Allow the mug to dry completely. Any moisture trapped under the glaze can cause defects during firing. -
Glaze application:
Dip the entire mug into a clear glaze. This will seal the bisque and make the colors pop, giving the ’tiles’ a glossy finish while the grout lines remain visible underneath. -
Fire the piece:
Fire the mug in the kiln according to the specifications of your clay and glaze (usually Cone 06 or Cone 6).
Once fired, you’ll have a durable mug that carries the charm of an ancient archaeological find


Have a question or want to share your own experience? I'd love to hear from you in the comments below!