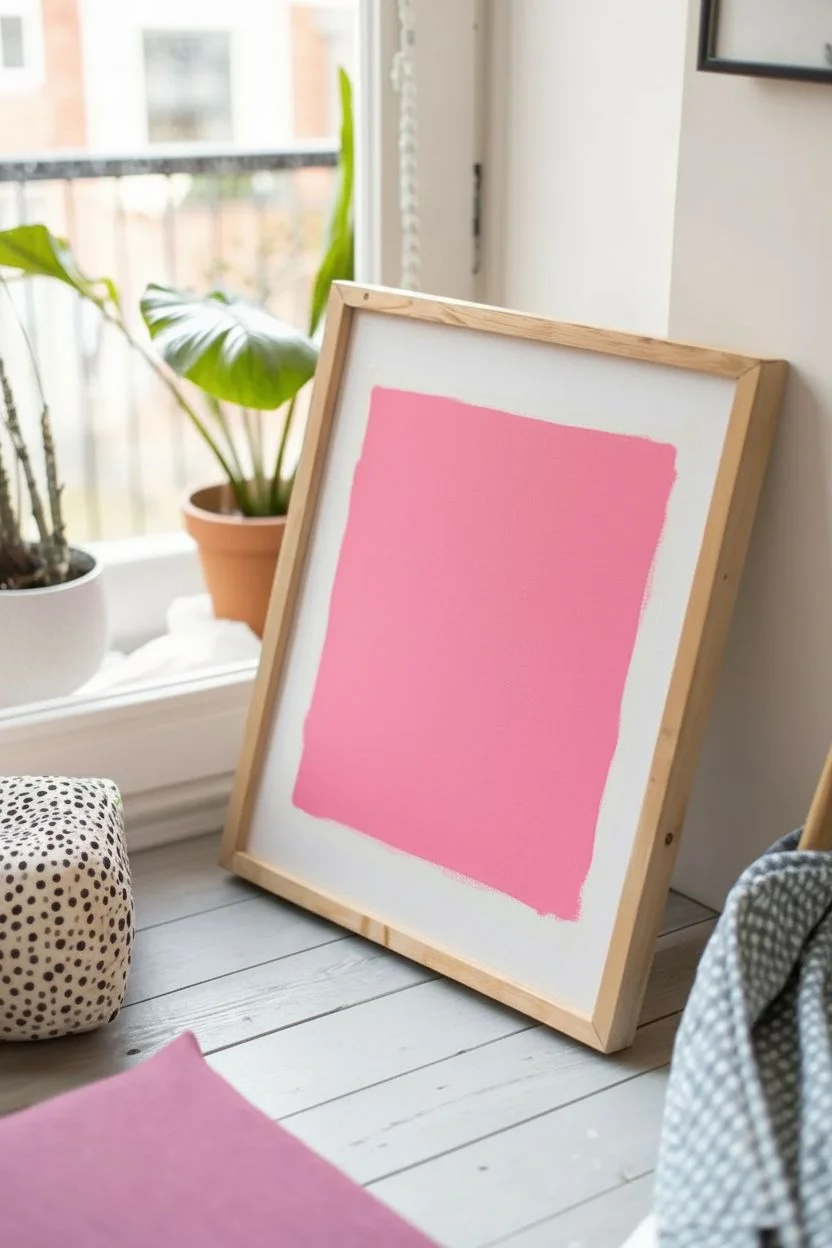
If you’re craving that preppy aesthetic—bold color, cute icons, and a little Y2K sparkle—painting is such a fun way to make it totally your own. Here are my favorite preppy painting ideas that look amazing on a wall, a desk shelf, or as a mini gallery set.
Pink Smiley Face with Starry Eyes
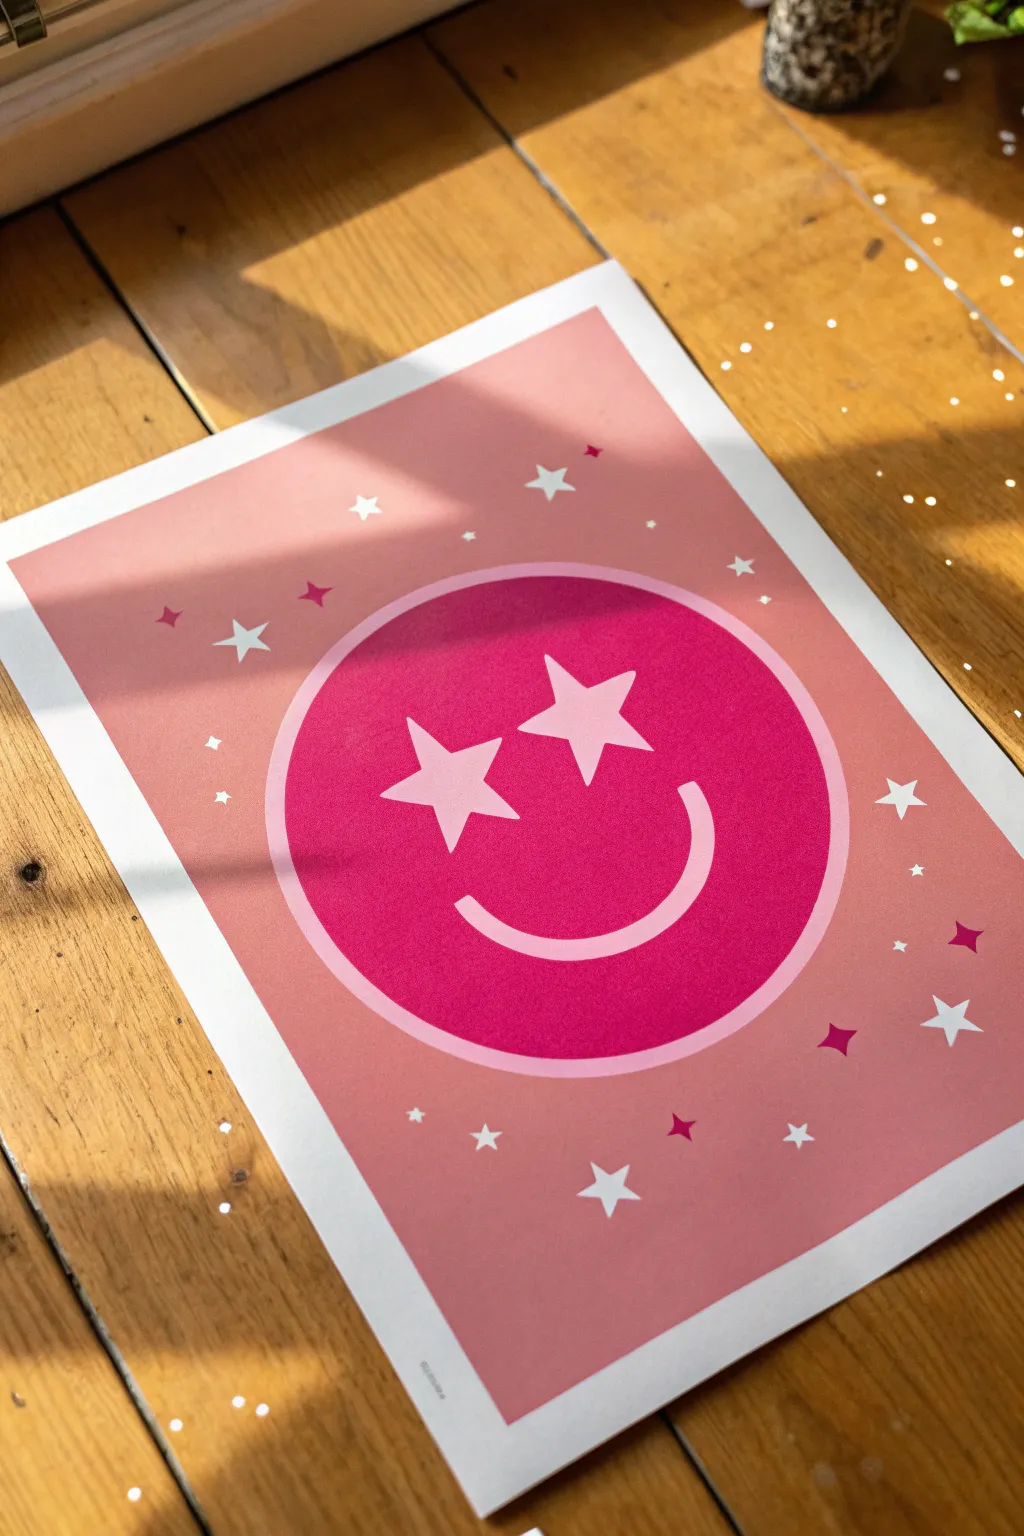
Capture the trendy, Y2K-inspired preppy aesthetic with this vibrant pink smiley face painting. Featuring starry eyes and a scattering of sparkles, this design uses a monochromatic pink palette to create a fun, youthful piece of wall art.
Step-by-Step Tutorial
Materials
- Heavyweight watercolor paper or cardstock (rectangular)
- Acrylic paints: Dusty rose/salmon pink, hot pink/magenta, white
- Paintbrushes: 1-inch flat wash brush, medium round brush (size 6 or 8), fine liner brush (size 0 or 1)
- Compass or a large circular object (like a bowl) for tracing
- Pencil and eraser
- Ruler
- Palette for mixing
Step 1: Setting the Background
-
Prepare the base color:
Mix your dusty rose or salmon pink acrylic paint. You want enough to cover the entire sheet of paper, so be generous. If you only have standard pink, mix in a tiny touch of orange and plenty of white to get that warm, muted tone. -
Paint the background:
Using your 1-inch flat wash brush, paint the entire paper with an even coat of the dusty rose mixture. Use long, horizontal strokes to ensure a smooth finish without obvious brush marks. -
Let it dry completely:
Allow the background to dry fully. If the color looks streaky or translucent, apply a second coat and let it dry again. The surface must be bone-dry before you start penciling, or the graphite will dig into the paint.
Clean Lines Hack
For perfectly crisp star points, use small strips of washi tape to mask off the edges of the stars before painting the white. Peel away while wet.
Step 2: Designing the Smiley
-
Draw the main circle:
Find the center of your paper. Using a compass or by tracing around a large bowl, lightly draw a large circle in the middle of the page. This will be the face. -
Sketch the star eyes:
Lightly sketch two five-pointed stars where the eyes should go. To make them look dynamic, tilt them slightly away from each other so the top points angle outward. -
Draw the smile:
Sketch a simple, wide U-shape for the smile. Keep the line consistent in thickness to match the clean vector style of the reference image. -
Plan the sparkles:
In the negative space around the large circle, lightly sketch small stars. Vary the sizes and switch between five-pointed stars and four-pointed ‘sparkle’ diamond shapes.
Opaque Whites
If your white paint looks streaky over the pink, paint a layer of light gray first, let it dry, and then apply the white on top for better coverage.
Step 3: Painting the Face
-
Outline the face:
Switch to your medium round brush and the hot pink (magenta) paint. Carefully paint along the inside edge of your large pencil circle to create a crisp border. -
Fill the silhouette:
Fill in the rest of the large circle with this hot pink color. Be very careful to paint *around* the star eyes and the smile line you sketched; you want to leave those areas blank or the background color for now. -
Second coat:
Acrylics often dry darker or slightly transparent. Apply a second coat of hot pink to the face circle to make the color pop and look solid.
Step 4: Adding Details
-
Paint the eyes:
Using a smaller brush, fill in the star shapes of the eyes with pure white paint. You might need 2-3 layers to get a bright, opaque white over the background. -
Define the smile:
Using your fine liner brush or a small round brush, paint the smile line in white. Try to do this in one or two confident strokes to keep the curve smooth. -
Clean up edges:
If your white paint went outside the lines, use a tiny bit of the hot pink to touch up the edges of the eyes or mouth once the white is dry. -
Paint a border:
Mix a very light pink (mostly white with a dot of your hot pink). Paint a thin, even ring around the outside of the hot pink face circle to act as a highlight border.
Step 5: Finishing Touches
-
Paint white sparkles:
Use your fine liner brush and white paint to fill in about half of the small background stars you sketched earlier. -
Paint pink sparkles:
Use the hot pink paint to fill in the remaining background stars. This variety adds depth to the simple composition. -
Erase guidelines:
Once the painting is 100% dry (give it a few hours to be safe), gently erase any visible pencil marks, being careful not to rub off the paint.
Now you have a cheerful piece of art ready to brighten up any desk or gallery wall


Wavy Checkerboard in Hot Pink and White

Bring a burst of playful energy to your room with this distorted checkerboard painting. The groovy, melted grid design combines classic preppy pink with a modern, psychedelic twist that is surprisingly simple to draft and paint.
Step-by-Step Guide
Materials
- Square stretched canvas (e.g., 12×12 or 16×16 inches)
- Acrylic paint: Hot pink (or magenta) and Titanium White
- Flat shader brushes (medium and small)
- Pencil
- Eraser
- Ruler or straight edge
- Painter’s tape (optional)
- Jar of water
- Paper towels
Step 1: Drafting the Wavy Grid
-
Prime the canvas:
Start by applying a solid base coat of Titanium White acrylic paint to the entire canvas. Even if the canvas came pre-primed, this fresh layer ensures a bright, even background for your pattern. -
Let it dry completely:
Wait for the white base coat to be fully dry to the touch before moving on to pencil work, preventing any smudging or graying of the paint. -
Mark vertical guides:
Using your ruler, lightly mark even intervals along the top and bottom edges of the canvas. For a standard size, spacing them about 2-3 inches apart works well to establish your columns. -
Sketch the vertical waves:
Connect your top and bottom marks by drawing wavy lines down the canvas. Try to keep the ‘amplitude’ (the width of the curves) consistent, so the columns look like they are swaying in unison. -
Mark horizontal guides:
Now mark intervals along the left and right sides of the canvas. These should roughly match the spacing of your vertical marks to keep the checkerboard effect balanced. -
Sketch the horizontal waves:
Connect the side marks with wavy lines going across. To get that ‘melted’ look, curve these horizontal lines so they flow with the vertical waves, creating a distorted grid rather than perfect squares. -
Identify the pattern:
Lightly mark a small ‘x’ or dot inside every other shape on your grid. This is crucial for tracking which squares will be pink and which stay white, preventing mistakes once you start painting.
Step 2: Painting the Checkers
-
Prepare your pink:
Squeeze out a generous amount of hot pink acrylic paint. If you want a more opaque finish, you can mix in a tiny touch of white, though bright magenta looks best straight from the tube. -
Outline the first square:
Using a smaller flat brush, carefully paint the outline of your first marked square. Use the chisel edge of the brush to get crisp lines against the pencil marks. -
Fill in the shape:
Switch to a medium brush if the square is large enough, and fill in the center of the shape with smooth, even strokes. -
Work in clusters:
I find it easier to paint all the pink squares in one specific area or column before moving across the canvas, rather than jumping around randomly. -
Paint the edges:
Don’t forget to wrap the pattern around the sides of the canvas. Extend the pink squares over the edge to give the artwork a professional, finished look from all angles. -
Allow the first coat to dry:
Acrylics can sometimes look streaky on the first pass. Let the pink paint dry completely before assessing the coverage. -
Apply a second coat:
Go over the pink squares with a second layer of paint. This increases color saturation and hides any brushstrokes or canvas texture showing through. -
Touch up the white:
Once the pink is totally dry, use a clean small brush and white paint to tidy up any edges where the pink might have wobbled outside the lines.
Steady Hand Trick
Rest your pinky finger on a dry part of the canvas while painting outlines. This acts as an anchor, giving you much more control for crisp, wavy edges.
Liquefy Effect
For a trippier look, taper the size of the squares so they get progressively smaller toward the center, creating a fun optical illusion of depth.
Hang your funky masterpiece on the wall or lean it on a shelf for an instant pop of color


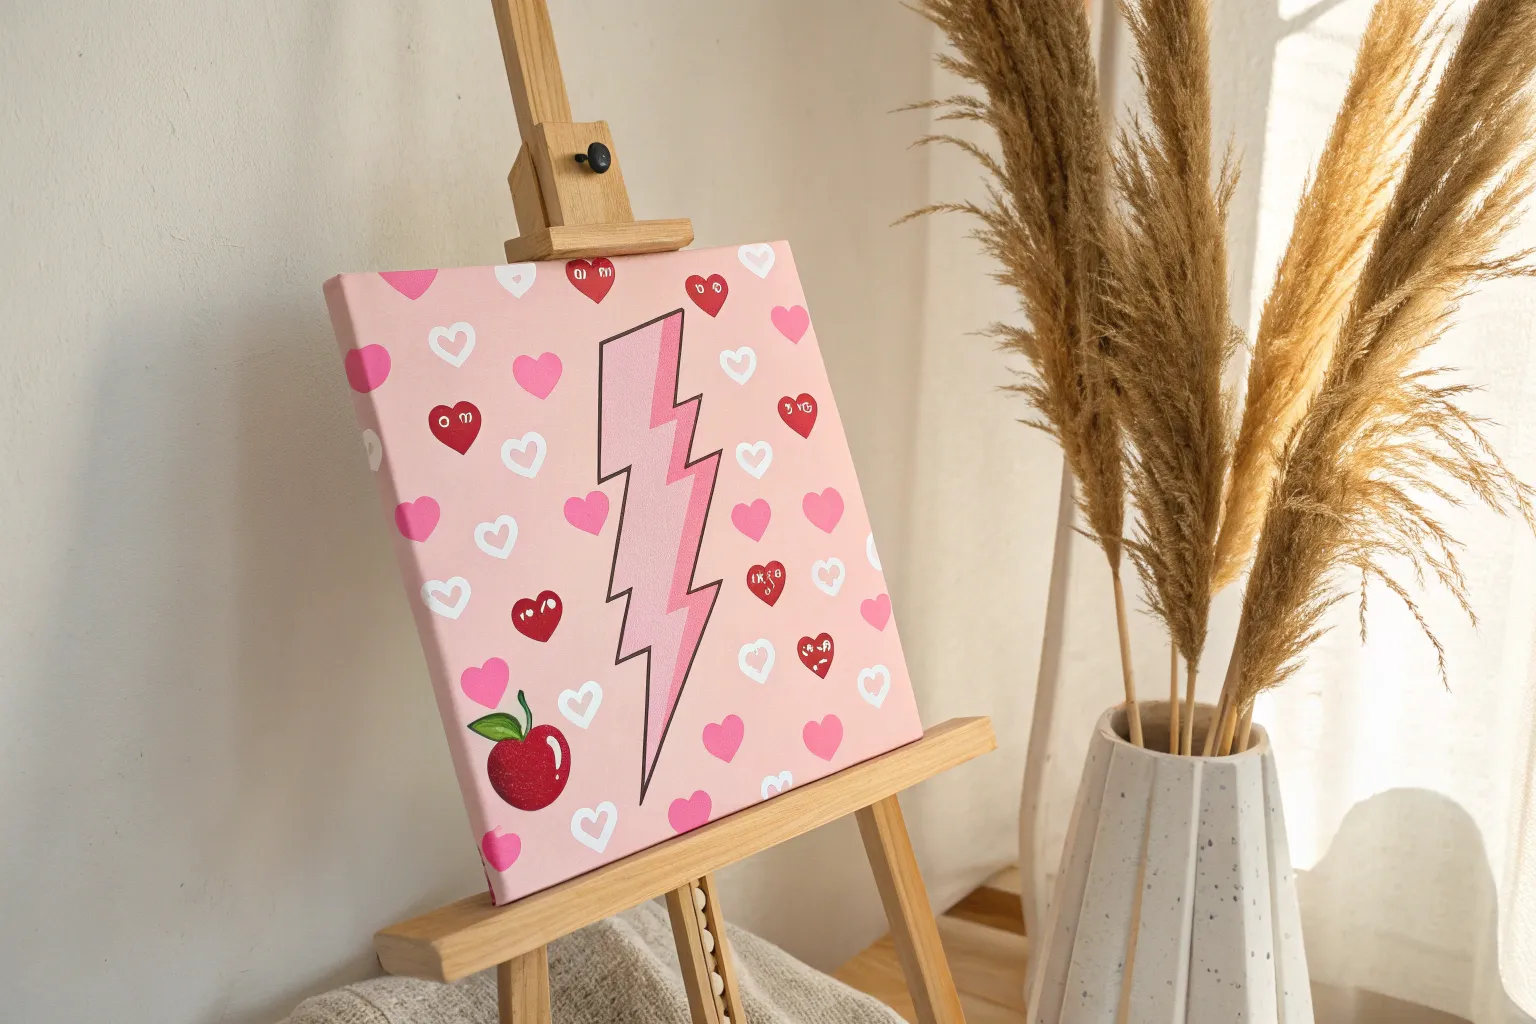
Lightning Bolts and Star Sprinkles
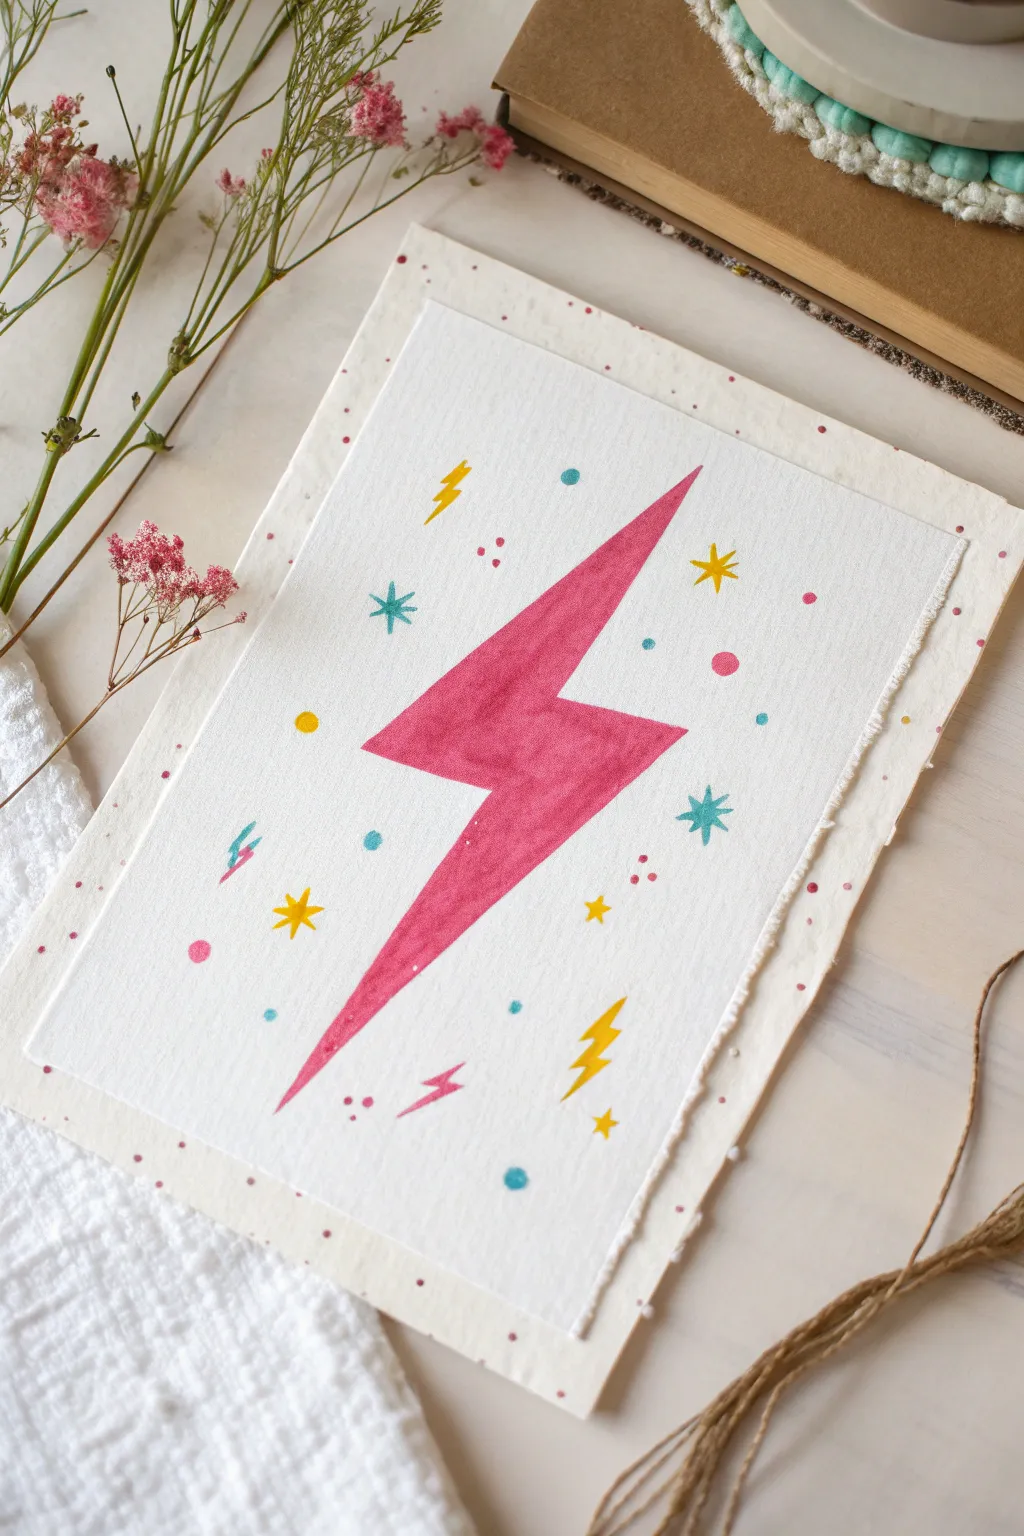
Channel some high energy into your art journal with this preppy lightning bolt painting. The centerpiece is a bold magenta streak surrounded by a playful confetti of tiny stars, dots, and sparks in contrasting teal and yellow.
Step-by-Step Tutorial
Materials
- Textured watercolor paper (cold press)
- Secondary paper for backing (optional)
- Watercolor paints (magenta/hot pink, bright yellow, teal/turquoise)
- Round paintbrushes (size 4 or 6 for the bolt, size 0 or 1 for details)
- Pencil and eraser
- Ruler
- Paper towel
- Jar of water
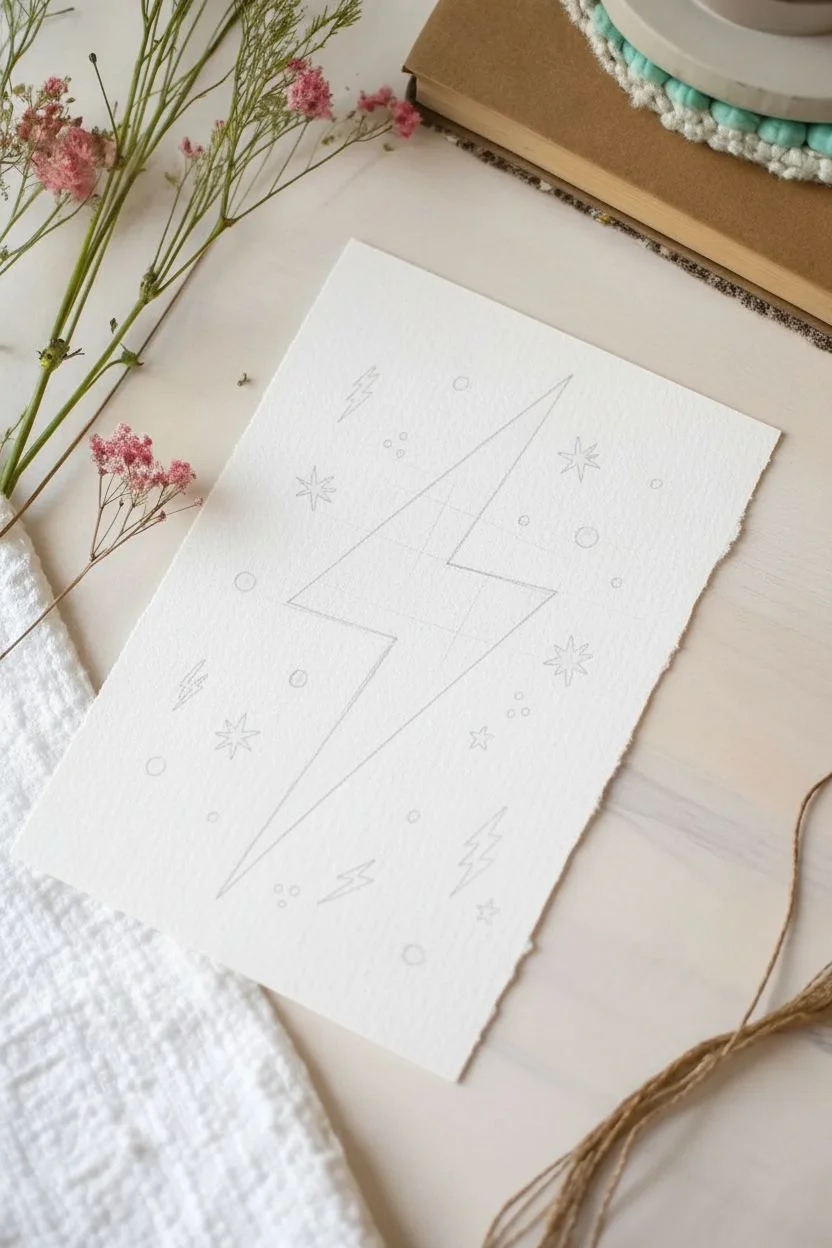
Step 1: Planning and Sketching
-
Prepare your paper:
Start by cutting your watercolor paper to your desired size. A 5×7 inch rectangle works perfectly for this design. If you want the torn-edge look shown in the photo, fold the paper back and forth along a ruler edge and carefully tear it rather than cutting with scissors. -
Map out the center:
Use a pencil to very lightly mark the center point of your page. This helps ensure your main subject doesn’t end up drifting too far to one side. -
Sketch the main bolt:
Drawing a lightning bolt can be tricky freehand. Start by drawing a diagonal line for the top section, then a sharp horizontal zig-zag in the middle, and finally a long diagonal tail. -
Refine the shape:
Thicken your pencil sketch to create the classic bold shape. Use a ruler if you want perfectly straight edges, or hand-draw it for a more organic feel. Erase any extra sketch lines until you have a clean outline.
Step 2: Painting the Bolt
-
Mix your main color:
Load your medium-sized brush with a vibrant magenta or hot pink watercolor. You want a good pigment-to-water ratio so the color is bold and opaque, not too washed out. -
Outline first:
Carefully trace the inside edge of your pencil outline with the tip of your brush. This creates a barrier so you can fill in the center more quickly without worrying about going over the lines. -
Fill the shape:
Fill in the rest of the lightning bolt with the same magenta paint. Try to work while the outline is still wet to avoid creating hard ridges where the paint dried. -
Smooth the texture:
If you see puddles forming, dry your brush on a paper towel and lift the excess water. Aim for a relatively flat, even wash of color. -
Let it dry completely:
This is crucial. Before adding any surrounding elements, let the pink bolt dry fully so you don’t smudge it with your hand.
Clean Edges Trick
If you struggle with shaky hands, use washi tape or masking tape to block out the lightning bolt shape before painting. Peel it off when the paint is dry for crisp lines.
Step 3: Adding the Confetti Details
-
Switch brushes:
Move to your smallest detail brush (size 0 or 1). This will give you the control needed for the tiny decorative elements. -
Add floating stars:
Using a bright yellow paint, create several 5 or 6-pointed starburst shapes. I like to scatter three or four of these at random distances from the main bolt. -
Paint secondary stars:
Rinse your brush and switch to a teal or turquoise color. Paint simple 8-pointed asterisks (a plus sign with an X over it) to add variety to your star shapes. -
Insert mini bolts:
Add tiny lightning bolts in the negative space. Use both yellow and pink for these, keeping them very small—about the size of a fingernail. -
Scatter the dots:
Using all three colors (pink, yellow, teal), dot the empty spaces. Vary the sizes slightly; some can be pinpricks, others distinct circles. -
Cluster the smallest details:
For a dynamic look, group tiny clusters of 2-3 microscopic dots near the tips of the main lightning bolt, as if sparks are flying off.
Make It 3D
Add a touch of glitter glue or metallic gold paint to the center of the yellow stars to make the artwork catch the light and truly sparkle.
Step 4: Finishing Touches
-
Erase pencil marks:
Once you are 100% sure the paint is bone dry, take a clean eraser and gently remove any visible pencil lines around the main bolt. -
Create the speckled background layer:
Take a slightly larger sheet of paper for the backing. Dip a toothbrush or stiff brush into watery pink paint and flick the bristles to spray fine speckles across the surface. -
Assemble the layers:
Once both papers are dry, center your lightning bolt painting over the speckled backing sheet and adhere it with glue or double-sided tape.
Now you have a striking, electric art piece ready to brighten up your desk or wall


Bubble-Letter Quote in Preppy Colors
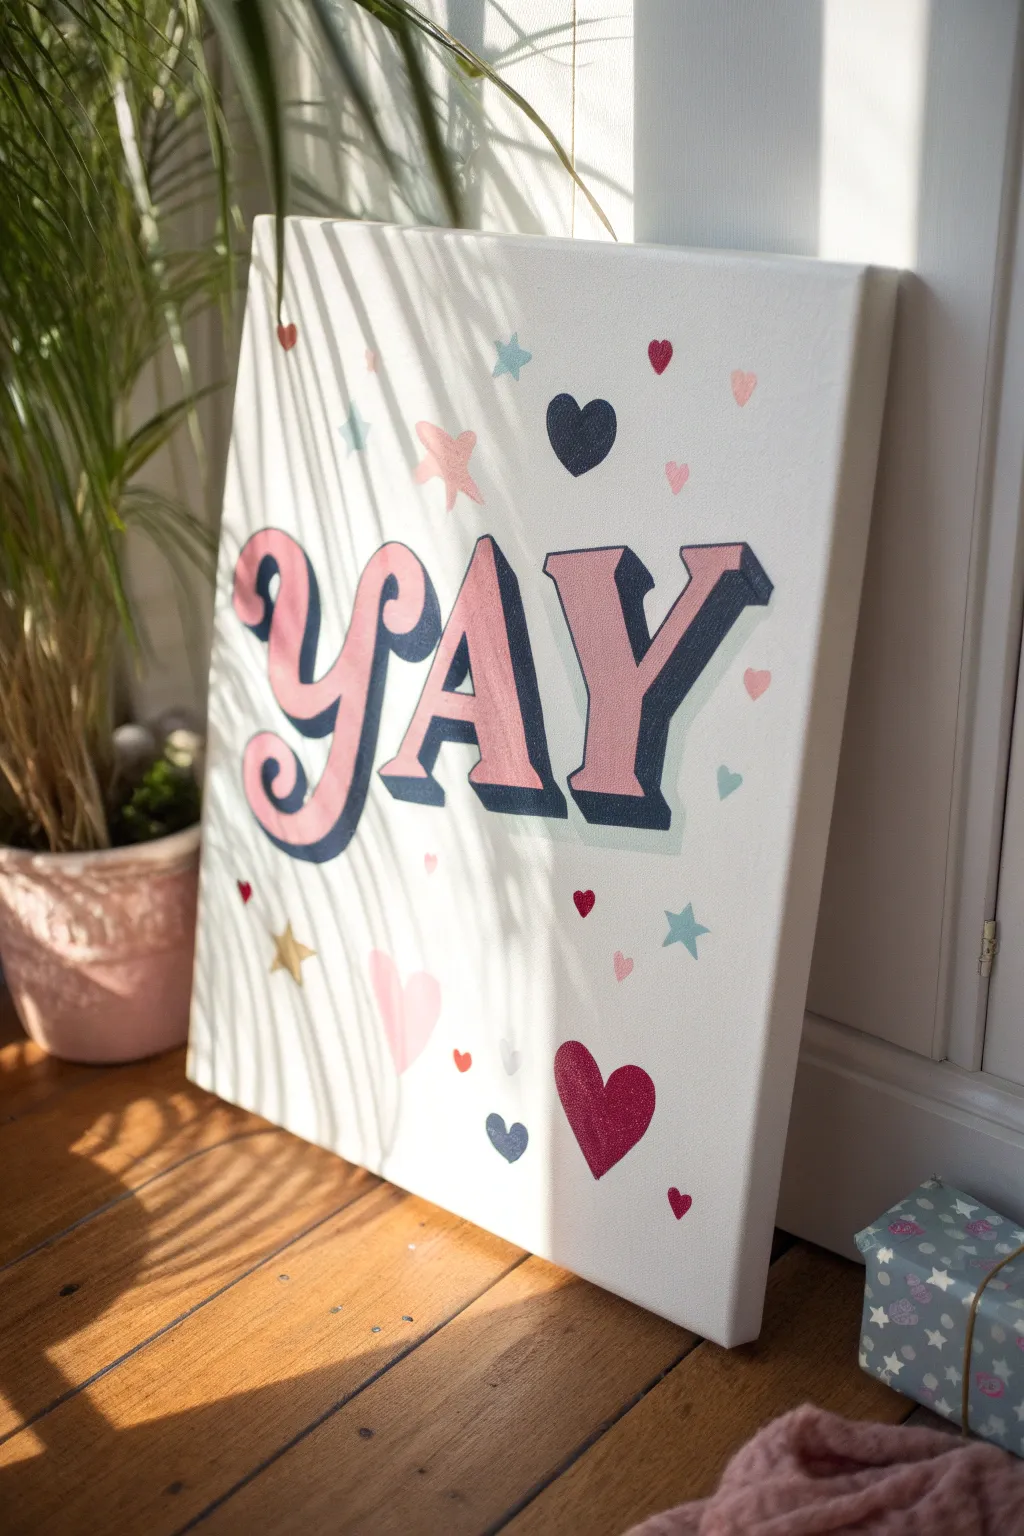
Bring a burst of cheerful energy into your room with this preppy-inspired quote canvas. Featuring bold bubble letters and a confetti-like sprinkle of hearts and stars, this project uses a classic pink and navy palette that feels both playful and polished.
Step-by-Step Guide
Materials
- Rectangular stretched canvas (e.g., 16×20 inches)
- Acrylic paints: Baby pink, dark navy blue, bright red, metallic gold, light blue, and white
- Gesso (optional, for priming)
- Pencil and eraser
- Ruler
- Flat shader brushes (medium and small)
- Fine detail liner brush
- Palette for mixing
- Cup of water and paper towels
Step 1: Planning and Sketching
-
Prime the Surface:
If your canvas isn’t pre-primed, apply a coat of white gesso to create a smooth, bright base. Let this dry completely before sketching. -
Map Out the Letters:
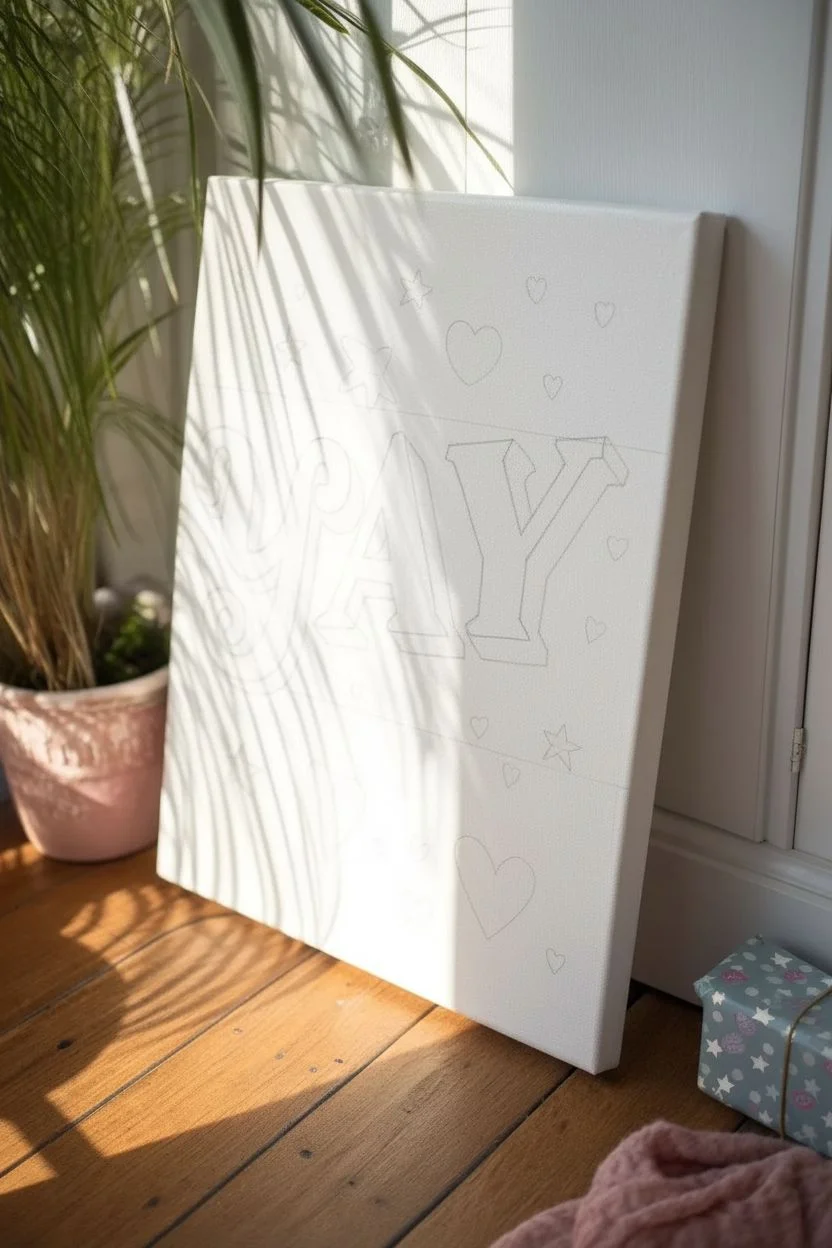
Using a ruler, lightly draw horizontal guidelines across the center of the canvas to ensure your letters stay straight. Make sure to leave ample white space above and below for the decorative elements. -
Sketch the ‘YAY’:
Draft the word ‘YAY’ in large, blocky serif letters. Focus on the main shape of the letters first. The ‘Y’s should have a slight swirl at the bottom tail for a decorative touch. -
Add Dimension:
To create the 3D block effect, draw diagonal lines extending from the bottom and right corners of each letter. Connect these lines to form the shadow shape, giving the text depth. -
Sketch the Motifs:
Randomly sketch small hearts and five-pointed stars around the text. Vary their sizes and orientations to make it look like falling confetti.
Clean Lines Hack
Struggle with straight lines? Use low-tack painter’s tape to mask off the edges of your block letters. Peel it away while paint is slightly wet for razor-sharp edges.
Step 2: Painting the Text
-
Fill the Main Letters:
Dip a medium flat brush into your baby pink acrylic paint. Carefully fill in the front faces of the letters ‘Y’, ‘A’, and ‘Y’. You may need two coats for a solid, opaque finish. -
Clean Up Edges:
Use a slightly damp detail brush to clean up any pink smudges while the paint is still wet, ensuring crisp, sharp lines. -
Paint the Shadows:
Switch to your dark navy blue paint. Using a smaller flat brush, fill in the 3D shadow areas you sketched earlier. This high contrast against the pink is key to the preppy look. -
Refine the Corners:
I find that using a liner brush for the sharp interior corners of the shadows helps keep the geometric look precise.
Step 3: Adding Details
-
Paint the Red Hearts:
Select a few heart outlines to fill with bright red paint. Use a small round brush and work from the center of the heart outward. -
Add Navy Accents:
Paint a few of the larger hearts using the same navy blue from the text shadow to tie the color scheme together. -
Paint Light Pink Fillers:
Mix a tiny amount of white into your baby pink to create a lighter shade. Use this for several small hearts and stars to add variety. -
Create Blue Stars:
Use light blue paint for several of the star shapes. A fine tip brush works best here to keep the star points sharp. -
Apply Gold Highlights:
Shake your metallic gold paint well. Paint the remaining stars with gold to catch the light. -
Final Touch-Ups:
Check the white background for any accidental paint splatters. If found, cover them with a dab of white acrylic once they are dry. -
Erase Guidelines:
Once the painting is 100% dry (give it a few hours), gently erase any visible pencil guidelines around the text.
Make It Sparkle
For extra preppy flair, brush a coat of clear glitter glaze over just the pink letters or the red hearts once the main paint is fully dry.
Hang your new artwork near a window to let the metallic gold stars shimmer in the natural light
BRUSH GUIDE
The Right Brush for Every Stroke
From clean lines to bold texture — master brush choice, stroke control, and essential techniques.
Explore the Full Guide
Collegiate Initial with Varsity Shadow

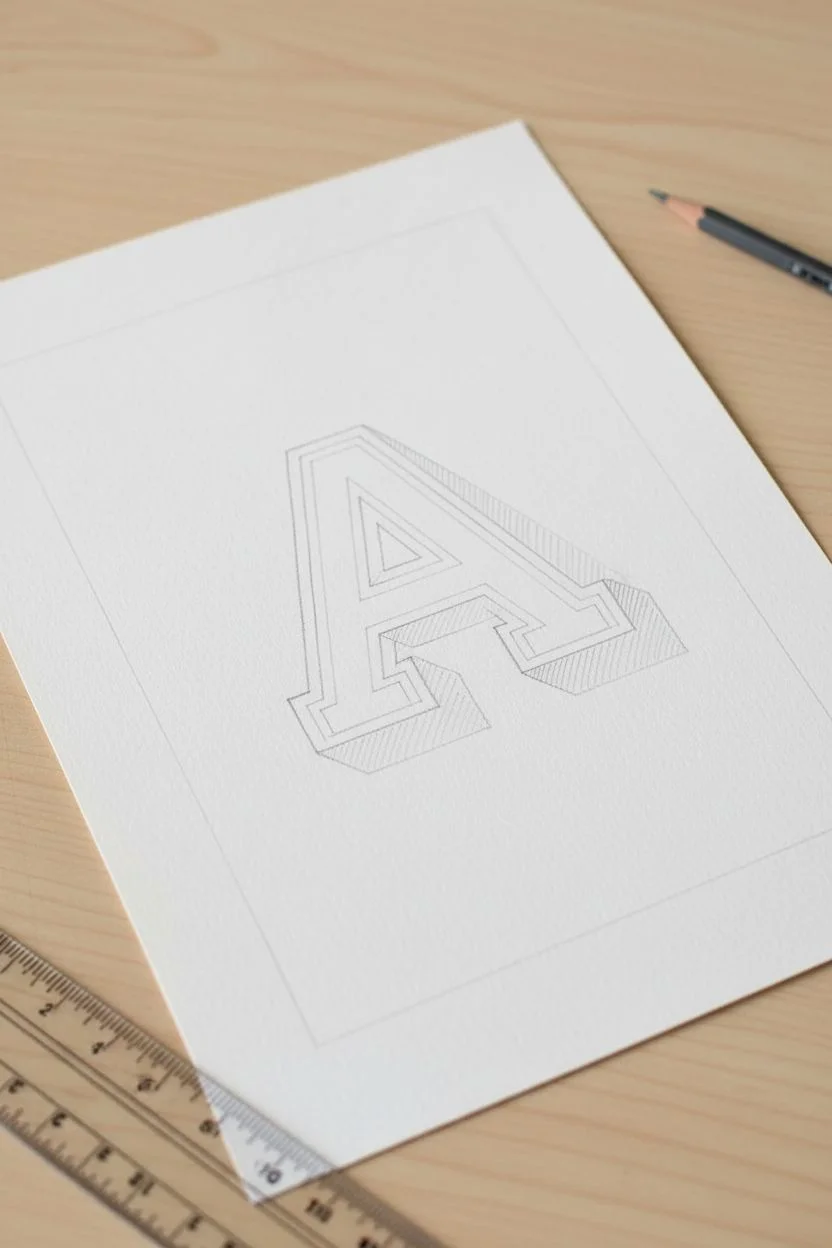
Capture the classic spirit of campus life with this crisp, varsity-style initial art piece. Featuring a bold block letter with a distinct drop shadow, the design pops against a clean white background, framed perfectly by a double mat for a polished finish.
Step-by-Step
Materials
- High-quality watercolor paper or heavy cardstock (8×10 or 11×14 inches)
- Acrylic paints (Soft Pink, Navy Blue, Grey)
- Fine liner brush (size 0 or 00)
- Flat shader brush (small, approx. 1/4 inch)
- Ruler
- Pencil (HB or lighter)
- Eraser
- Painter’s tape or masking tape (low tack)
- Pre-cut mat board with window opening
- Picture frame (white)
- Computer and printer (optional for template)
Step 1: Preparation and Layout
-
Choose your typeface:
Begin by selecting a font that mimics classic varsity jackets—look for blocky serifs and bold lines. I like to type my chosen letter on a computer and print it out at the desired size to use as a direct reference. -
Transfer or sketch the letter:
Lightly sketch the outline of your letter in the center of your paper. If using a printed template, you can use the graphite transfer method to trace the shape precisely onto your art surface. -
Draft the inner outline:
Draw a secondary line slightly inside your main letter shape. This creates the ‘inline’ effect where the pink fill will go, leaving a white gap between the color and the outer border. -
Add the drop shadow:
To create the dimensional look, sketch a block shadow extending down and to the right of every vertical and horizontal line. Keep your ruler handy to ensure these angles are consistent. -
Mark the border structure:
Using your ruler, lightly draw a rectangular border around the letter. This will become the grey painted frame that mimics a mat line within the artwork itself.
Step 2: Painting the Design
-
Fill the primary color:
Load your flat brush with soft pink acrylic paint. Carefully fill in the innermost section of the letter, keeping your edges as sharp as possible. -
Touch up edges:
If the corners are tricky, switch to your fine liner brush to pull the pink paint into the sharp points of the serifs. -
Let the base dry:
Allow the pink layer to dry completely to the touch. This prevents smudging when you work on the surrounding details. -
Outline in navy:
Using the fine liner brush and navy blue paint, carefully trace the outer edge of the letter. This line should be consistent in thickness. -
Fill the shadow:
Continue using the navy blue to fill in the block shadow areas you sketched earlier. The dark contrast against the pink is what gives it that collegiate punch. -
Paint the decorative border:
Tape off the outside edges of your penciled rectangle border with low-tack tape to ensure straight lines. Paint the strip with a steady grey tone. -
Remove tape carefully:
Peel back the tape while the grey paint is still slightly tacky to avoid pulling up any paper.
Clean Lines Hack
Use a white gel pen to clean up the gap between the pink fill and navy outline. It acts like an eraser for wobbly paint edges.
Step 3: Finishing Touches
-
Erase guidelines:
Once all paint is absolutely dry—I usually give it an hour to be safe—gently erase any visible pencil marks, being careful not to rub over the painted areas. -
inspect closer details:
Look closely at your navy lines. If any pink shows through where it shouldn’t, or if the white gap needs cleaning up, use a tiny amount of white paint or white gouache to correct mistakes. -
Prepare the matting:
Clean the glass of your frame thoroughly. Position your artwork behind the mat board, centering the painted grey border within the mat opening. -
Secure the art:
Use artist tape to secure the paper to the back of the mat board. This keeps the letter perfectly centered over time. -
Assemble the frame:
Place the matted artwork into the frame, close up the back, and display your personalized varsity art.
Level Up: Texture
Mix a pinch of baking soda into the pink paint before applying. It creates a fuzzy, raised texture that mimics a real chenille varsity patch.
This sophisticated yet simple project renders a timeless piece of decor perfect for a dorm room or study
Retro 8-Ball in Pink Pop Art Style
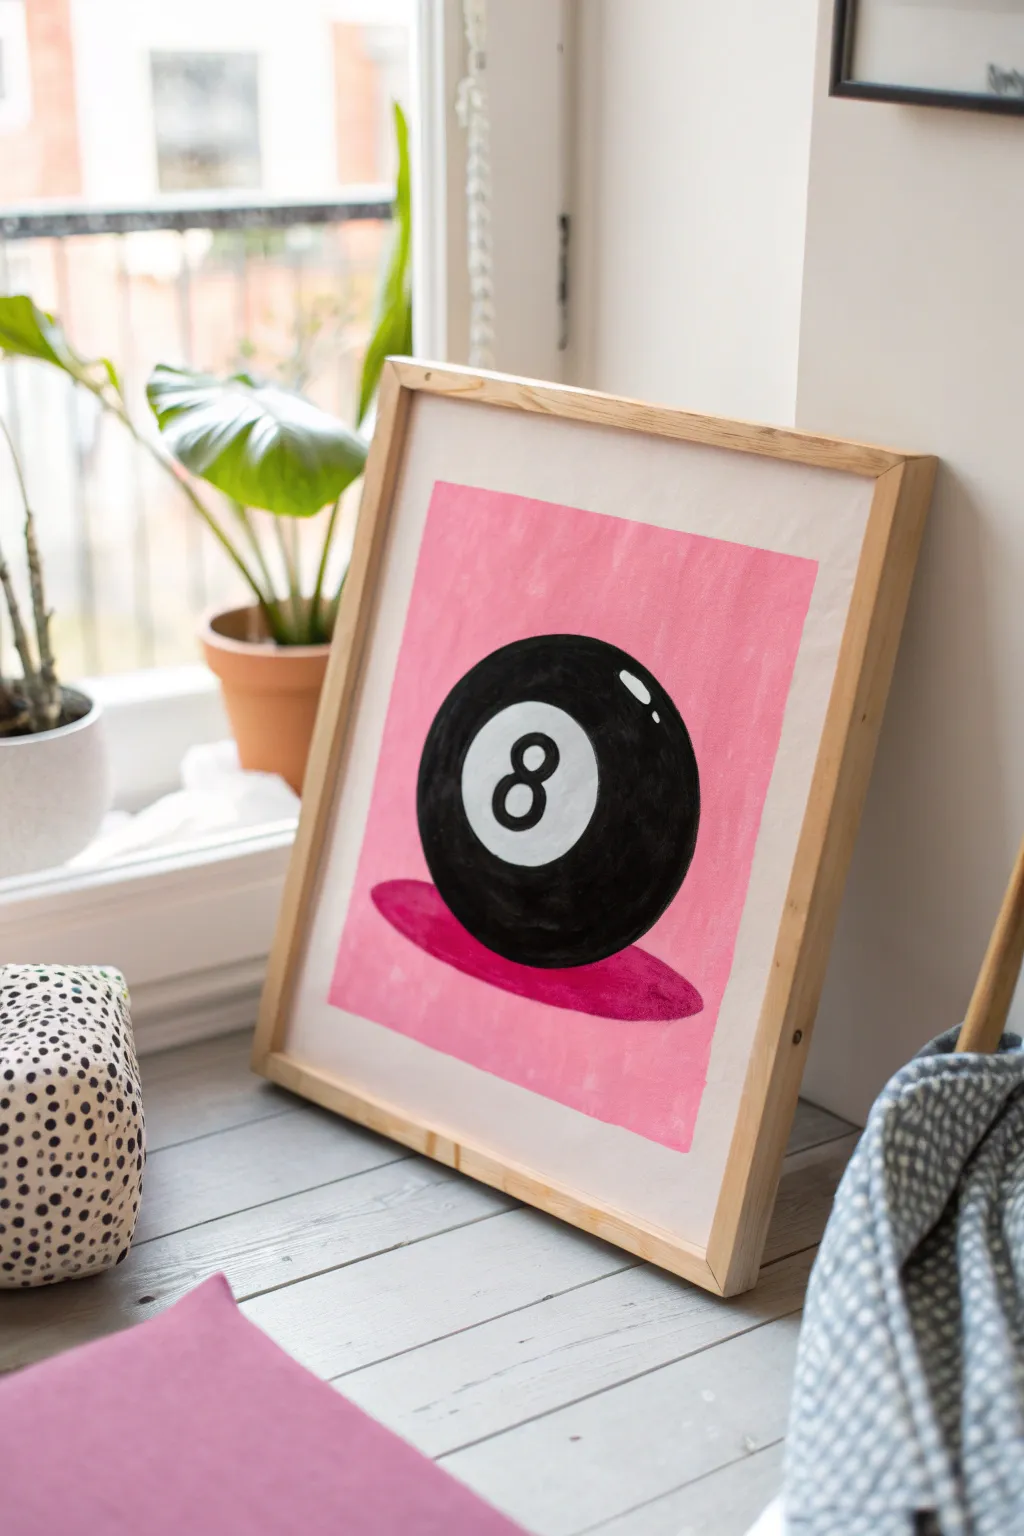
Channel some playful nostalgia with this vibrant pop art piece that combines a classic 8-ball motif with a fresh, preppy pink palette. The bold contrast between the glossy black sphere and the matte bubblegum background makes for an eye-catching statement on any gallery wall.
Step-by-Step
Materials
- Heavyweight mixed media paper or canvas panel (11×14 or similar)
- Acrylic paints: Carbon Black, Titanium White, Bubblegum Pink, Magenta
- Wide flat brush (for background)
- Medium round brush
- Small detail brush
- Pencil for sketching
- Compass or large circular object (like a bowl) for tracing
- Small circular object (like a bottle cap) for the inner circle
- Painter’s tape or masking tape
- Palette for mixing
- Water cup and paper towels
Step 1: Setting the Scene
-
Prepare the canvas:
Begin by taping the edges of your paper or canvas to your work surface. This prevents buckling and, more importantly, creates that crisp white border seen in the original artwork. -
Create the pink field:
Squeeze a generous pile of Bubblegum Pink onto your palette. Using your wide flat brush, paint a large rectangle in the center of the paper. -
Refine the edges:
Don’t worry about measuring a perfect rectangle; part of the charm comes from the freehand painted edges. Just ensure the coverage is opaque and even. -
Let it dry completely:
Allow the pink background to dry fully. If the paper still shows through, apply a second coat for a more solid pop-art look.
Crisp Circles Tip
Make your brush strokes mimic the shape of the object. Paint in curves following the rim of the ball rather than straight horizontal lines.
Step 2: Drafting the Sphere
-
Trace the main shape:
Once dry, place your large circular object or compass in the center of the pink rectangle. Lightly trace the circle with a pencil. -
Add the inner circle:
Locate the optical center of your 8-ball. Place your smaller circular object slightly above and to the left of the true center to imply perspective, and trace it. -
Sketch the shadow:
Lightly draw a flattened oval (ellipse) underneath the main circle. This cast shadow should extend slightly to the left and right, grounding the object. -
Draft the number:
Inside the small white circle, sketch a classic figure ‘8’. Make the top loop slightly smaller than the bottom loop for a traditional font look. -
Mark the highlights:
Sketch a small, curved rectangular shape on the upper right side of the large circle. This will be the glossy reflection.
Style Swap
Switch the number ‘8’ for your own lucky number, or try a different background color like lime green or electric blue for a different vibe.
Step 3: Painting the Values
-
Paint the cast shadow:
Mix a small amount of Magenta with your Bubblegum Pink to create a darker, deeper rose color. Fill in the cast shadow oval under the ball with this shade. -
Block in the black:
Using Carbon Black and a medium round brush, carefully paint the large sphere, working around the inner circle and the reflection highlight area you marked. -
Fill the inner circle:
Use Titanium White to fill in the small inner circle. You may need two thin coats to cover the pink background completely without it looking streaky. -
Paint the number:
Switch to your smallest detail brush. Load it with Carbon Black and carefully paint the ‘8’ inside the white circle. Keep your wrist loose to get smooth curves. -
Add the main highlight:
Rinse your brush thoroughly. Paint the curved reflection area on the upper right with pure Titanium White. -
Create secondary reflections:
Add a few smaller, fainter white dots or dashes near the main highlight to enhance the glossy, billiard-ball texture.
Step 4: Finishing Touches
-
Clean the edges:
Check the perimeter of your black sphere. If the edges look shaky, use a steady hand to smooth out the curve with fresh black paint. -
Final smooth coat:
If the black looks patchy after drying, I generally like to add a second coat of black to ensure it looks deep and velvety. -
Remove tape:
Wait until the painting is 100% dry to the touch. Gently peel away the masking tape at a 45-degree angle to reveal your clean white borders. -
Frame it:
Place the artwork in a light wood frame to match the airy, modern aesthetic shown in the example.
Hang your new pop art masterpiece in a bright spot where the colors can really shine

PENCIL GUIDE
Understanding Pencil Grades from H to B
From first sketch to finished drawing — learn pencil grades, line control, and shading techniques.
Explore the Full Guide
Y2K Glam Icons: Lip Gloss, Rings, and Sparkles
Channel the early 2000s energy with this cheeky, vibrant watercolor illustration featuring glossy lips, playful stars, and chunky rings. The rough-edged paper adds a beautiful, handmade texture to these pristine pop-culture icons.
Step-by-Step Guide
Materials
- Cold-press watercolor paper (300gsm with deckle edge)
- Watercolor paints (Magenta, Crimson, Indigo/Navy, Turquoise, Cobalt Blue)
- Round watercolor brushes (sizes 2 and 4)
- Fine liner brush (size 0 or 00)
- Pencil (HB) and eraser
- Clean water and paper towel
- White gel pen (optional for highlights)
Step 1: Drafting the Layout
-
Paper preparation:
Start by gently tearing the edges of your watercolor paper against a Ruler if it doesn’t already have a deckled edge. This creates that lovely organic border. -
Sketch the lipstick:
In the lower left quadrant, lightly sketch a cylindrical lipstick tube at a diagonal angle. Draw the base cap, the middle mechanism, and the slanted lipstick bullet emerging from the top. -
Position the main icons:
Sketch two lip prints near the top—one slightly larger on the left. Outline a few five-pointed stars scattered across the page, varying their sizes. -
Fill the gaps:
Add smaller details to balance the composition. Sketch a circular flower icon, delicate leafy sprigs, and small floating hearts or sparkles in the empty negative spaces.
Step 2: Painting the Feature Elements
-
Lipstick base layer:
Using your size 4 brush, paint the lipstick bullet with a watery wash of magenta. While wet, drop in concentrated crimson near the bottom edge to create a gradient. -
Kiss prints:
For the lip prints, mix a textured pink. Instead of painting a solid shape, use the tip of your brush to dab small, broken lines that mimic the texture of skin on a kiss mark. -
Developing the tube:
Paint the lipstick case with a dark indigo or navy blue. Leave a tiny sliver of white paper unpainted along the long edge to represent a glossy reflection, giving the tube volume. -
Star power:
Fill in the stars. For the larger pink stars, use a lighter wash first, then dap a darker pink into the center for a glittery, dimensional effect. -
Blue accents:
Switch to your blue palette. Paint the circular flower icon with alternating navy and white segments, and fill in any blue stars with a soft cobalt wash.
Bleeding edges?
If your crisp star shapes are bleeding into the paper, your brush is likely too wet. Blot it on a paper towel before painting, or wait longer for adjacent wet areas to dry completely.
Step 3: Finer Details & Texture
-
Adding rings:
Paint the circular ring shapes using a fine liner brush. I like to use tiny stippling dots or small circles within the ring to suggest paved diamonds or texture. -
Leafy sprigs:
Using the tip of a size 2 brush, paint delicate red stems with small, teardrop-shaped leaves branching off. Keep these loose and fluid. -
Micro-details:
Scatter tiny hearts, dots, and four-pointed sparkles (diamonds) around the larger elements using a saturated red or pink to tie the color scheme together. -
Lipstick definition:
Once the lipstick tube is dry, carefully outline the separate segments of the case with a very fine dark blue line to sharpen the mechanical parts. -
Final highlights:
If your white paper highlights got lost, use a white gel pen to add sharp reflection lines on the lipstick bullet and the ‘wet’ parts of the lip prints.
Go 3D
Once the paint is fully dry, cover the lipstick bullet and the center of the rings with a focused layer of clear glossy varnish or clear nail polish for a true wet-look shine.
Let your artwork dry completely before displaying it to preserve that crisp, clean aesthetic
Monogram-Style Repeat Pattern with Hearts and Stars
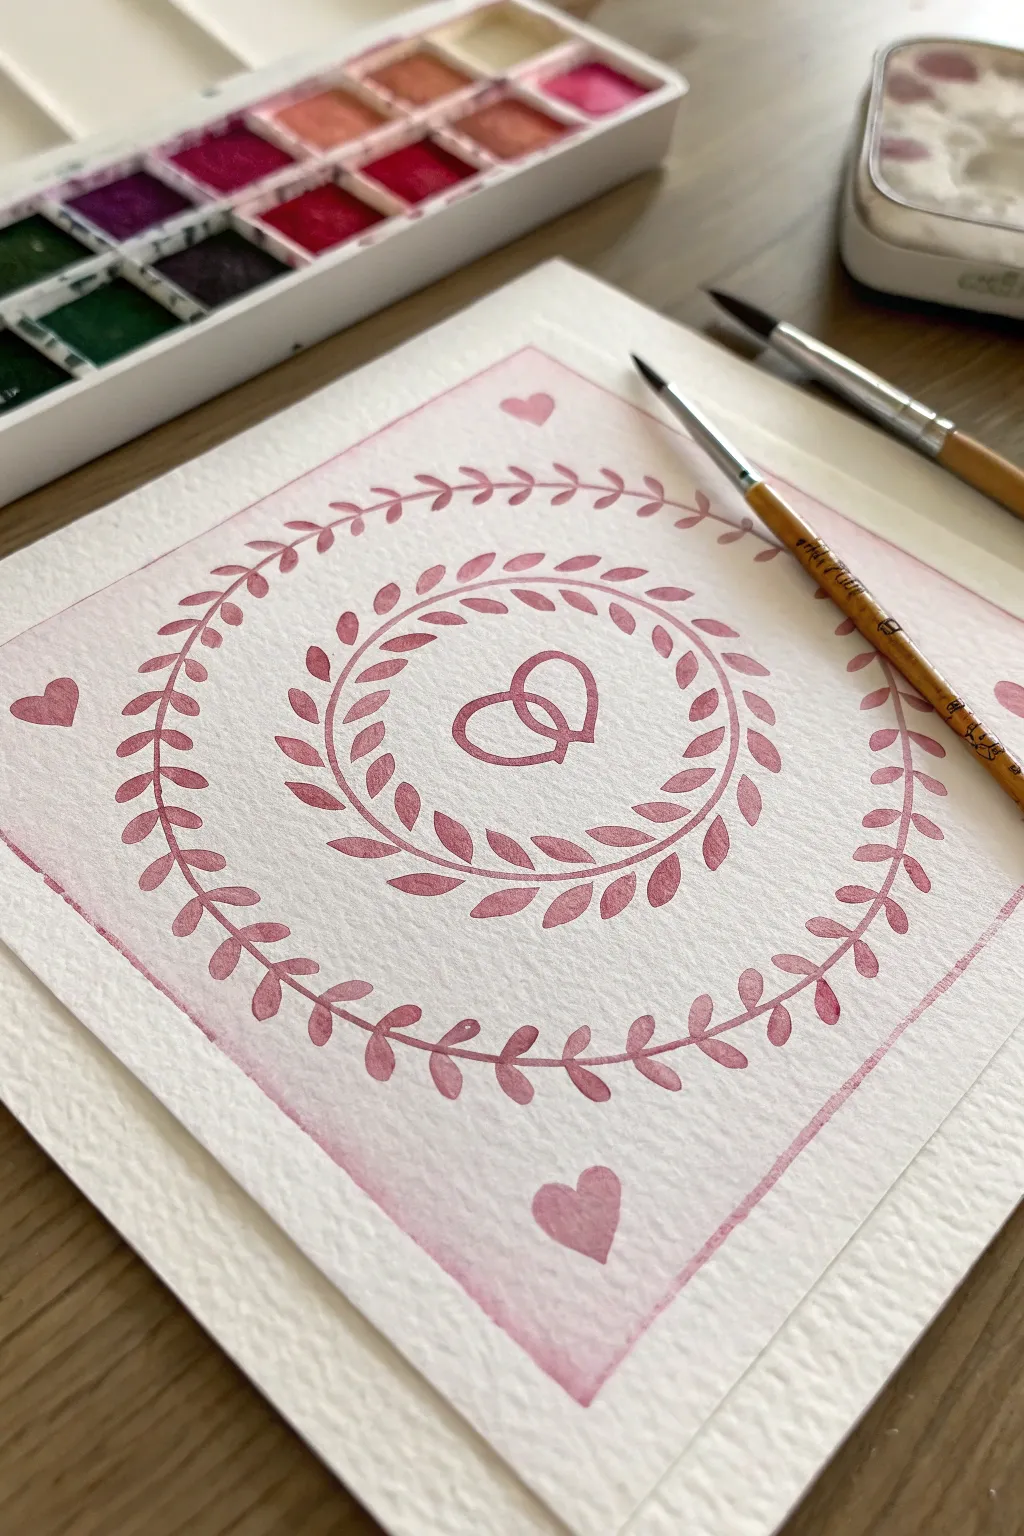
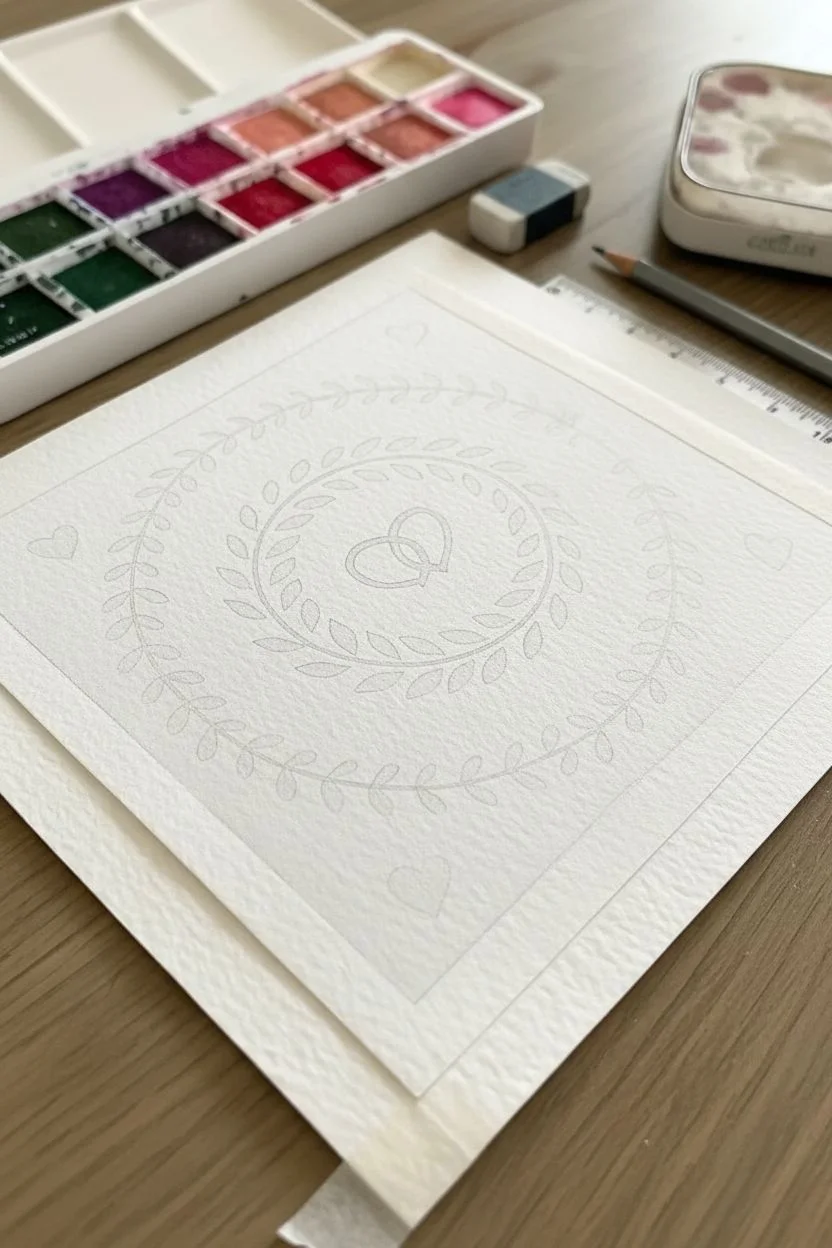
Create a delicate and romantic monogram-style art piece featuring soft pink hues and elegant laurel wreaths. This beginner-friendly watercolor project uses simple brush strokes to build a sophisticated design perfect for wall art or handmade cards.
Step-by-Step
Materials
- Cold press watercolor paper (square format recommended)
- Watercolor paints (shades of dusty pink, rose, and maroon)
- Round pointed paintbrush (size 2 or 4)
- Smaller detail brush (size 0 or 1)
- Pencil (HB or H)
- Compass or two round objects of different sizes to trace
- Ruler
- Eraser
- Masking tape (optional for holding paper flat)
Step 1: Planning and Sketching
-
Define the boundaries:
Start by lightly drawing a square frame on your watercolor paper using a ruler. Leave a generous margin of white space around the outside to let the design breathe. -
Draft the concentric circles:
Using a compass or by lightly tracing round objects, draw two circles inside your square. There should be a smaller inner circle and a larger outer circle, with enough space between them for your leaf designs. -
Sketch the center motif:
In the very center of the inner circle, lightly pencil two interlocking hearts. They should look like two chain links that are heart-shaped, slightly overlapping. -
Add corner accents:
Draw four small, simple heart shapes in the corners between your outer circle and the square frame to balance the composition.
Step 2: Painting the Wreaths
-
Prepare your palette:
Mix a dusty rose color on your palette. You want a medium consistency—not too watery, but fluid enough to glide easily. I like to keep a darker maroon handy to add depth if needed. -
Start the inner wreath stem:
Using your size 2 or 4 brush, paint a very thin, continuous line over your inner pencil circle. This acts as the vine for your leaves. -
Practice the leaf stroke:
The leaves are made using a simple ‘press and lift’ motion. Touch the tip to the paper near the stem, press down to widen the belly of the brush, and lift up as you pull away to create a point. -
Paint the inner leaves:
Working your way around the inner circle, paint small leaves branching off the stem. Try to angle them all in the same direction, creating a rhythmic flow. -
Paint the outer wreath stem:
Reload your brush and paint the thin circular line for the larger, outer circle. -
Detail the outer leaves:
Repeat the leaf painting process on the outer circle. Since this circle is larger, you can make these leaves slightly larger or spaced further apart than the inner ones.
Brush Control Tip
For uniform leaves, keep your wrist still and move your whole arm. Rotate the paper as you work around the circle so your hand is always in a comfortable painting position.
Step 3: Adding Details and Refining
-
Outline the center hearts:
Switch to your smaller detail brush for precision. Carefully paint the outline of the interlocking hearts in the center using the same pink tone. -
Fill the corner hearts:
Paint the four corner hearts solid pink. You can make these slightly more saturated than the leaves to help anchor the corners. -
Create the soft border:
For the square frame, mix a very watery, pale wash of your pink paint. Paint a wide, transparent strip along your initial square pencil lines. -
Soften the edges:
While the border paint is still wet, you can dab the edges with a clean, damp brush to give it that dreamy, soft-focus look rather than a harsh line. -
Erase guidelines:
Allow the entire painting to dry completely—wait until the paper is cool to the touch. Then, gently erase any visible pencil marks, being careful not to scrub the paint.
Make It Yours
Instead of interlocking hearts, paint your initials in the center for a custom monogram, or switch the color palette to sage green for a botanical vibe.
Once the paint is dry, you have a lovely piece of personalized art ready to frame or gift


Dripping Pink Daisies for a Maximalist Twist
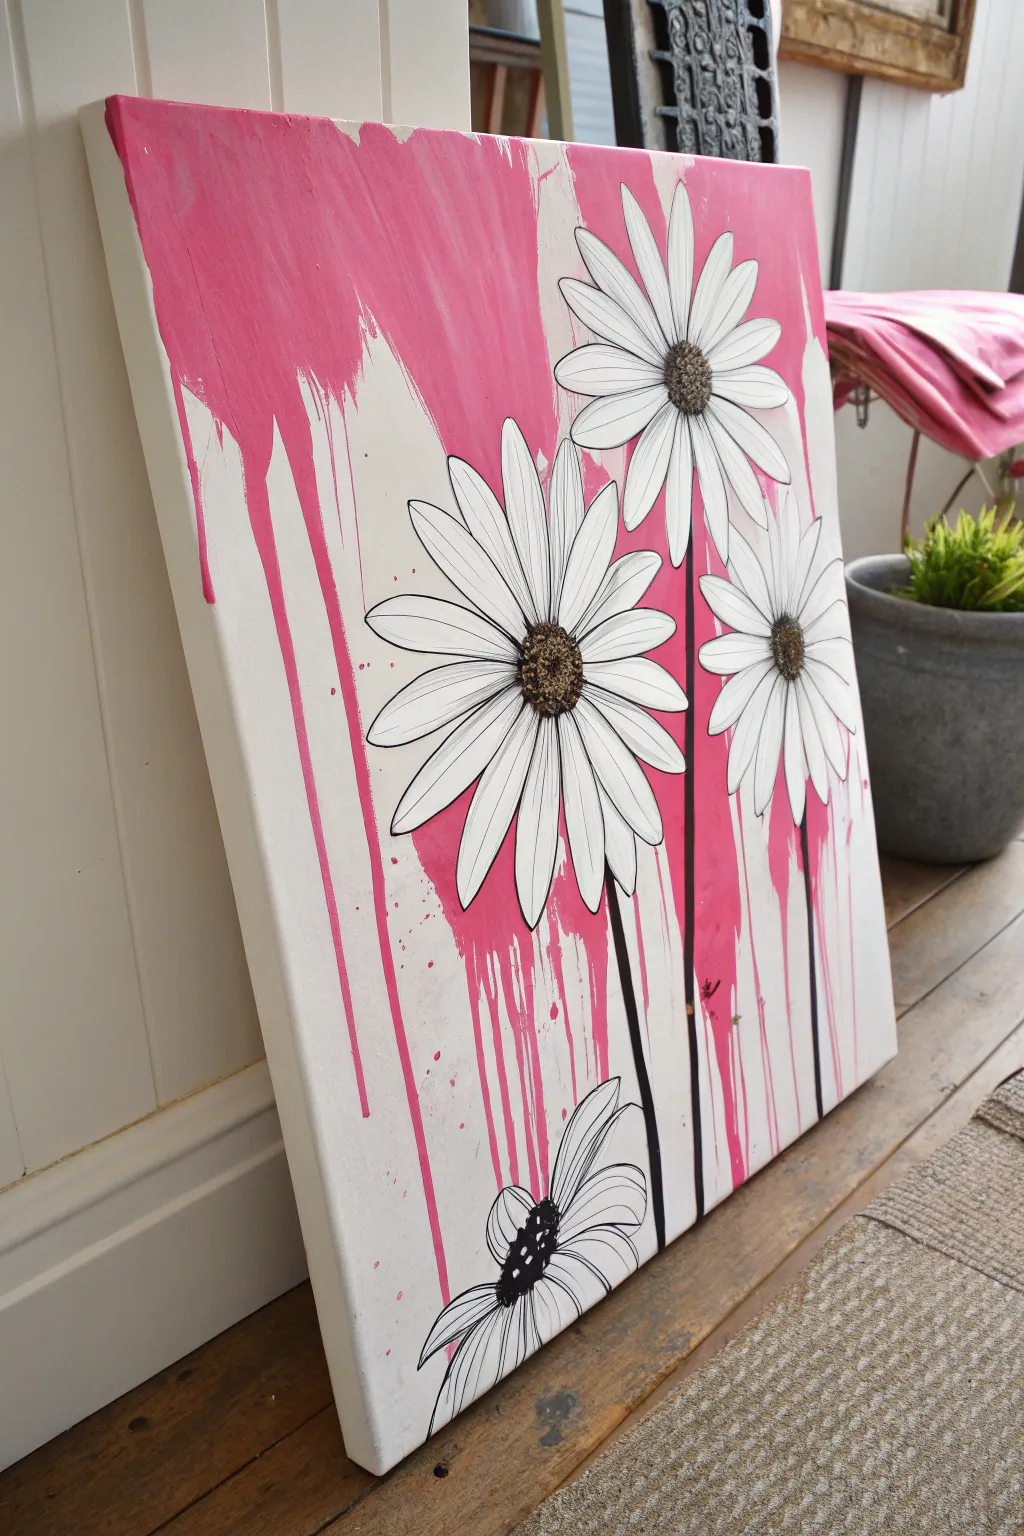
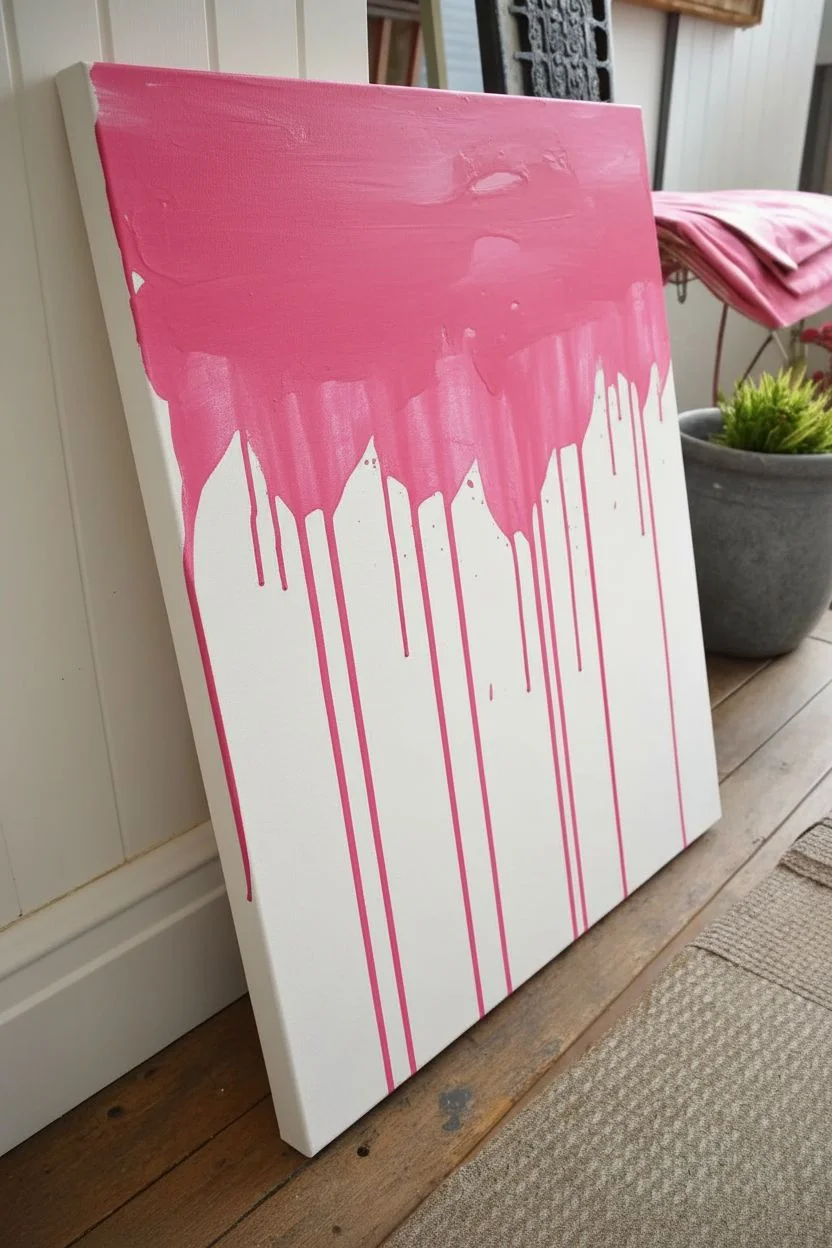
Embrace a bold, preppy aesthetic with this vibrant canvas featuring stylized daisies against a backdrop of rebellious pink drips. The contrast between the clean, illustrative floral lines and the messy, energetic background creates a striking maximalist statement piece.
Step-by-Step Tutorial
Materials
- Stretched canvas (rectangular, e.g., 18×24 inches or similar)
- White acrylic paint (heavy body is best)
- Hot pink acrylic paint (fluid or high-flow works best for drips)
- Black acrylic paint or Posca paint markers
- Wide flat brush for the background
- Fine liner brush or small round brush
- Small gold or brown beads (seed beads or micro beads)
- Tacky glue or heavy gel medium
- Cup of water and spray bottle
- Pencil for sketching
- Drop cloth or newspapers
Step 1: Setting the Scene
-
Prime the Surface:
Begin by coating your entire canvas with a fresh layer of white acrylic paint. Even if the canvas came primed, this ensures a bright, consistent surface. Let it dry completely. -
Prepare the Pink Paint:
Mix your hot pink acrylic paint with a small amount of water to thin it down. You want a consistency similar to heavy cream or melted ice cream—fluid enough to run but thick enough to hold its color. -
Apply the Pink Top Block:
Using your wide flat brush, paint a solid, uneven band of pink across the top 1/3 to 1/2 of the canvas. Don’t worry about a neat bottom edge. -
Create the Drips:
While the pink paint is still wet, load your brush with watered-down paint or plain water and press it against the bottom edge of your pink section. Tilt the canvas upright to let gravity pull the paint down in streaks. -
Encourage the Flow:
If the drips are moving too slowly, mist them lightly with your spray bottle. Vary the length of the drips so some reach the bottom while others stop midway. Let this layer dry fully, preferably overnight.
Drip Control
If a drip runs somewhere you don’t want it, quickly wipe it away with a damp paper towel while wet. If it dries, just paint over it with opaque white.
Step 2: Sketching the Florals
-
Plan the Composition:
Lightly sketch three large daisies using a pencil. Place the highest one on the right, a middle one on the left, and a lower one back on the right to create a balanced triangular composition. -
Draw the Petals:
Sketch long, slender petals radiating from the centers. Don’t worry about perfect symmetry; a slightly illustrative, imperfect look adds charm. Add a partial fourth flower peeking up from the bottom left corner. -
Block in White Petals:
Paint the petals with opaque white acrylic. You may need two coats to cover the pink drips where the flowers overlap the background context.
Step 3: Adding Definition
-
Outline the Petals:
Once the white petals are dry, use a black paint pen or a fine liner brush with black paint to outline every petal. Keep your hand loose to achieve that sketchy, artistic quality. -
Add Petal Details:
Draw single lines down the center of several petals to give them dimension and texture, mimicking the veining found in real daisies. -
Draw the Stems:
Paint thick, straight black lines extending from the bottom of the flower heads down to the bottom edge of the canvas. These should look like bold graphic strokes.
Make it Sparkle
For a glam twist, mix fine holographic glitter into your hot pink paint before creating the drips, or use metallic gold paint for the flower centers instead of beads.
Step 4: Texturing the Centers
-
Base Coat the Centers:
Paint the circular centers of the daisies with a dark brown or black acrylic base. -
Apply Adhesive:
Apply a generous dollop of tacky glue or heavy gel medium directly onto the painted centers. -
Add Bead Texture:
Sprinkle your gold or brown beads into the glue while it is wet. Gently press them down to ensure they adhere. This gives the painting that tactile, 3D embellished look seen in the inspiration piece. -
Seal the Beads:
I like to carefully drip a little watered-down glue or matte medium over the top of the beads once they are set to lock them in place permanently. -
Final Cleanup:
Check for any stray pencil marks and erase them, or touch up the white background if any pink splatters landed where they shouldn’t be.
Now hang your vibrant creation and enjoy the pop of color it brings to your space
Mini Preppy Icon Series for a Gallery Wall
Bring a burst of youthful energy to your room with this grid of mini canvases featuring classic preppy motifs. The clean, graphic icons in a cohesive pink, red, and yellow palette create a trendy aesthetic that looks polished yet playful.
Step-by-Step Guide
Materials
- 9 mini square canvases (4×4 or 6×6 inches)
- Acrylic paint (bright red, soft pink, pale yellow, white, black)
- Small flat paintbrushes
- Fine liner brush
- Graphite transfer paper or pencil
- Ruler
- Painter’s tape or stencil film (optional but recommended for crisp lines)
- Removable mounting strips
Step 1: Preparation & Base Coat
-
Prime the Surface:
Start by giving all nine canvases a fresh coat of white acrylic paint. Even if they came pre-primed, this ensures a uniform, bright background that makes the red and pink pop. -
Plan Your Grid:
Sketch out your nine designs on a piece of paper first to balance the colors. Notice how the yellow smiley face is in the top corner to anchor the grid, while the reds and pinks are distributed evenly.
Step 2: Drafting the Designs
-
Draw the Smiley Face:
On the first canvas, trace a perfect circle using a large cup or compass. lightly sketch the oval eyes and the wide, U-shaped smile. -
Sketch the Heart Variations:
For the center top, draw a heart shape and divide it with a grid pattern, then add a bow in the center. For the top right, draw a standard heart with a heartbeat ‘EKG’ line jagged through the middle. -
Outline the Cherries:
Create two cherry canvases. Draw two round fruits connected by curved stems to a leaf. Vary them slightly—one set can have solid stems, while the other might have a highlight glint. -
Map the Geometric Icons:
For the disco ball (center), draw an oval and add a grid of curved vertical and horizontal lines. For the bottom right radiant circle, draw a circle and use a ruler to mark segments like pizza slices. -
Trace the Stars:
Draw two five-pointed stars on separate canvases. One will feature a dotted pattern, and the other can be simple or have a double outline.
Clean Lines Hack
Use a paint marker instead of a brush for tiny details like the cherry stems or the disco ball grid. It gives you way more control and cleaner edges.
Step 3: Painting the Icons
-
Paint the Smiley:
Fill the circle with pale yellow paint. You may need two coats for opacity. Once dry, use a fine liner brush and black paint to carefully fill in the eyes and the smile line. -
Fill the Solid Reds:
Using your bright red paint and a small flat brush, fill in the cherry fruits, the main heart shape, and the heartbeat line. Keep your edges sharp. -
Detail the Disco Ball:
Paint the disco ball shape with alternating red and white grid squares. I find it easiest to paint the whole shape red first, let it dry, and then carefully add the white grid lines over the top. -
Layer the Star Patterns:
Paint the base of the stars in soft pink. Once dry, add darker pink or red dots to one star, and perhaps a smaller internal star or outline to the other. -
Execute the Radial Burst:
For the bottom right circle, paint alternating segments in pink and red to create a spinning effect. Use a ruler to steady your hand if needed. -
Add Cherry Stems:
Use a deep red or maroon for the cherry stems and outline the leaves. Fill the leaves with a lighter red or leave white detailing for veins. -
Final Touches:
Go back over any white background areas that got smudged with a clean brush and white paint. Add tiny white highlight dots to the cherries for a glossy look.
Level Up: Gloss Finish
After the paint is fully cured, apply a coat of high-gloss varnish or Mod Podge. It makes the icons look like enamel pins or professional stickers.
Step 4: Assembly
-
Dry Completely:
Allow all canvases to cure overnight so the paint is hard and durable. -
Mount the Grid:
Use a level and ruler to mark a 3×3 grid on your wall. Use removable mounting strips to adhere the canvases, keeping about 1-2 inches of space between each one for a gallery feel.
Step back and admire how these simple individual paintings come together to make a major statement piece


Have a question or want to share your own experience? I'd love to hear from you in the comments below!