Princess face paint is one of those designs that instantly makes a kid stand taller, like they just stepped into their own fairytale. I love how a simple painted tiara plus a little sparkle can look fancy without needing a full-face makeover.
Purple-to-Pink Ombre Princess Mask
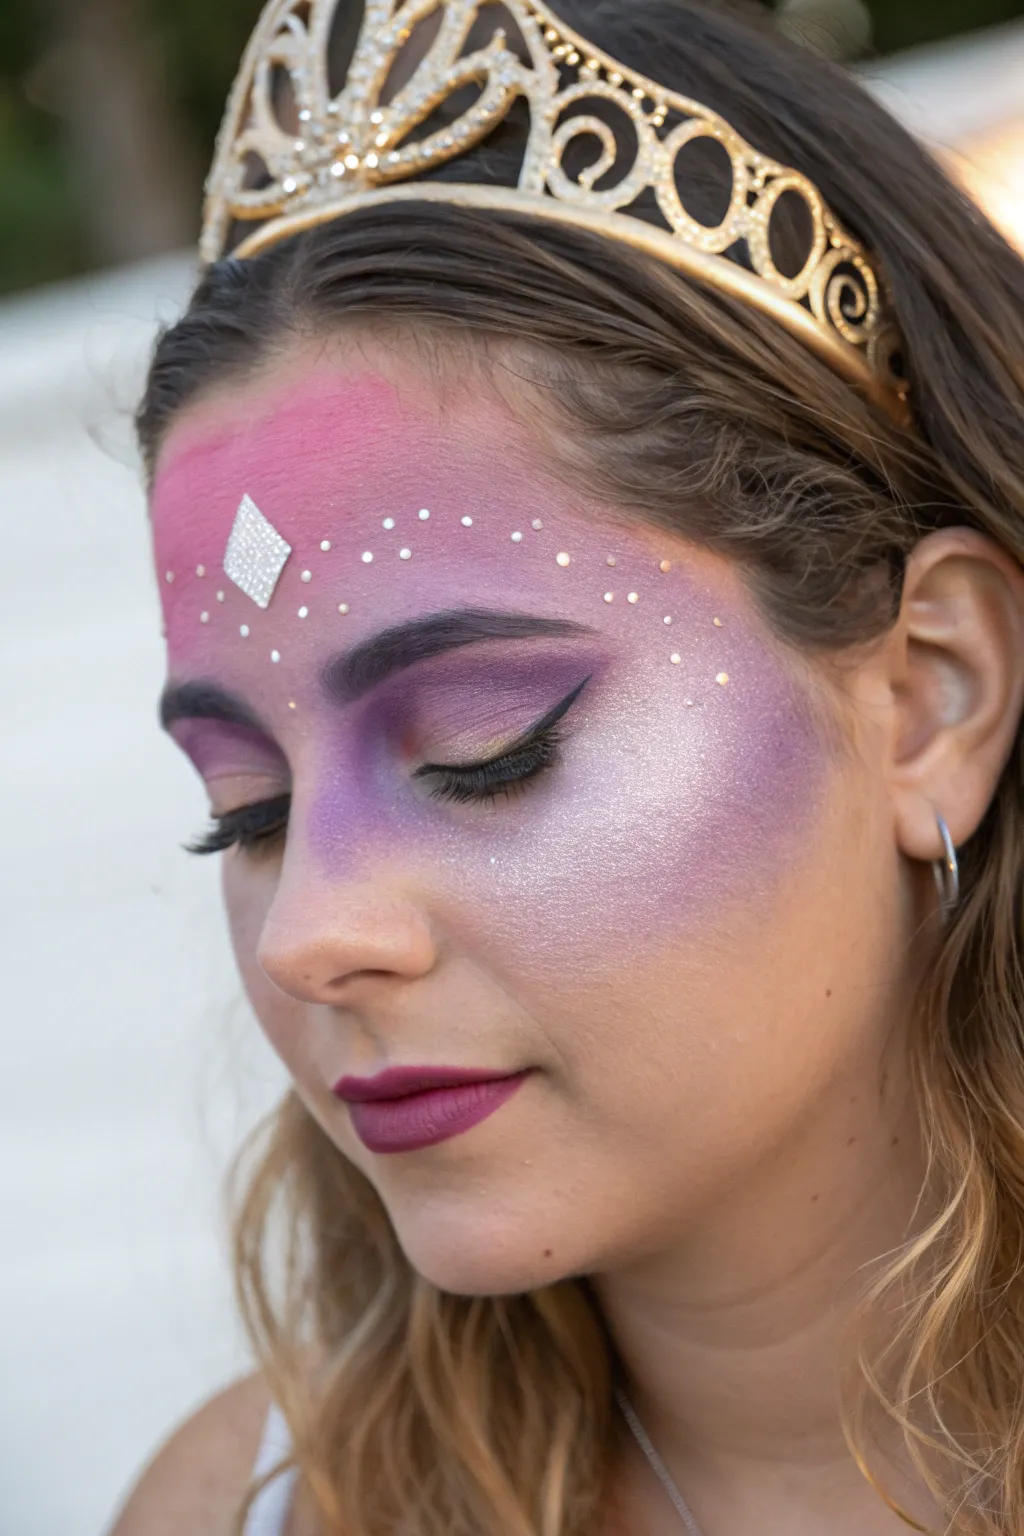
Transform into royalty with this ethereal princess design that features a seamless gradient of berry hues across the eyes and forehead. The look is elevated with delicate rhinestone detailing and a diamond centerpiece, creating a magical mask effect perfect for any fairytale occasion.
Detailed Instructions
Materials
- Face paint or highly pigmented eyeshadow (Pink, Deep Purple, Lavender)
- White or iridescent liquid highlighter/shimmer powder
- Flat foundation brush or sponge applicator
- Fluffy blending brush
- Black liquid eyeliner
- Black mascara
- Face-safe adhesive (or lash glue)
- One large diamond-shaped rhinestone
- Small round rhinestones (silver or holographic)
- Berry or mauve lipstick
- Setting spray (optional)
Step 1: The Ombré Base
-
Prime and prep:
Start with a clean, moisturized face. If you plan to use powder eyeshadows for the color, applying an eyeshadow primer across the forehead and eyelids will help the pigment stick and stay vibrant all day. -
Apply the pink base:
Using a flat brush or a sponge, apply a bold pink pigment to the center of the forehead. Creating a rounded shape that extends slightly downward towards the bridge of the nose works best as your starting point. -
Introduce the purple:
Pick up your deep purple shade. Apply this color starting from the temples and blending inward towards the pink center. Also, sweep this color over the eyelids, extending it past the outer corners to create a mask-like shape. -
Blend the gradient:
Using a clean fluffy blending brush, gently buff the area where the pink and purple meet. You want a soft transition, not a harsh line, so take your time swirling the brush in small circles until the colors melt together. -
Brighten the eyes:
Take a lighter lavender shade or mix a bit of white into your purple. Pat this onto the center of the eyelid and the inner corner of the eye to create dimension and make the eyes pop.
Patchy Pigment?
If the purple looks uneven, don’t keep adding dry powder. Mist your brush slightly with water or setting spray before picking up pigment to create a smoother, creamy paste.
Step 2: Shimmer and Definition
-
Add the ethereal glow:
Dip a brush into your iridescent highlighter or shimmer powder. Generously stipple this over the cheekbones, extending up towards the temples and over the purple face paint. This gives that dreamy, magical skin texture. -
Create the wing:
With a steady hand, use black liquid eyeliner to draw a sharp winged line along the upper lash line. I find it easiest to follow the natural curve of the lower lash line upwards to get the perfect angle. -
Define the lashes:
Apply two coats of black mascara to both the upper and lower lashes. Ensure you wiggle the wand at the root to build volume that stands out against the colorful background.
Step 3: Jewels and Finishing Touches
-
Place the centerpiece:
Using a tiny dot of skin-safe adhesive, place the large diamond-shaped rhinestone directly in the center of the forehead, right in the middle of the pink section. -
Map out the constellation:
Plan where your smaller gems will go before gluing. The design looks best with a scattered ‘starry night’ effect radiating outward from the center diamond. -
Apply the accents:
Dip the back of a brush or a cotton swab into the glue, tap a small dot onto the skin, and press a small round rhinestone onto it. Repeat this pattern, creating two curved rows of gems extending across the forehead. -
Paint the lips:
Finish the look with a berry or mauve lipstick that complements the purple tones in the mask. Define the cupid’s bow sharply for a regal appearance. -
Set the look:
Mist the face lightly with a setting spray to lock the pigments in place and prevent the face paint from smudging during royal duties.
Extra Magic
For a fairy-dust effect, mix loose cosmetic glitter with clear aloe vera gel and tap it gently over the cheekbones and temples on top of the highlighter layer.
Now crown yourself with a tiara and step out into your kingdom


Gold Regal Crown With Jewel Center
Transform yourself into royalty with this intricate crown design that captures the sheen of beaten gold and the depth of precious gems. This look combines advanced metallic line work with realistic jewel rendering for a dimensional, high-drama effect perfect for any princess.
Step-by-Step Guide
Materials
- Gold face paint (metallic liquid or cake)
- Teal or turquoise face paint
- Dark blue face paint (shading)
- White face paint
- Fine round brush (size 1 or 2)
- Medium round brush (size 4)
- Filbert or flat brush (small)
- Setting spray (optional)
- Cosmetic glitter gel (gold)
Step 1: The Centerpiece
-
Map the center jewel:
Begin in the center of the forehead. Using your teal paint and a filbert brush, paint a large teardrop shape pointing upward. This will be the main gemstone. -
Create smaller jewels:
On either side of the main teardrop, paint smaller teal teardrops, slightly angled outward. Paint a few additional small oval shapes further out near the temples to act as accent stones. -
Shadow the gems:
Load a small round brush with dark blue paint. Carefully outline one side of each teal shape (usually the bottom or right side) to create a shadow effect within the gem. -
Add high shine:
Using white paint and a fine liner brush, add a crisp ‘C’ shape or a dot on the opposite side of the shadow (top left) on each gem. This reflection creates the illusion of polished glass.
Clean Lines
If your gold lines look streak, your paint might be too watery. Mix the metallic cake until it has a creamy, melted chocolate consistency before loading the brush.
Step 2: Golden Framework
-
Frame the central jewel:
Load your medium round brush with metallic gold. Paint a thick, ornate border around the central teal teardrop. Extend the top point slightly to give it an elegant peak. -
Paint the main arches:
From the top of the central setting, sweep two long, curved lines outwards toward the hairline, creating the upper silhouette of the crown. -
Create the structural lattice:
Draw intersecting gold lines creating diamond or petal shapes that connect the central piece to the side jewels. Imagine creating a wireframe that holds the gems in place. -
Add the base band:
Paint a solid, continuous gold line across the forehead, just above the eyebrows, connecting the bottom of all your designs. This acts as the rim of the crown. -
Thicken the metal:
Go back over your main structural lines with a second coat of gold. I find this extra layer really helps the metallic pigment pop against the skin.
Step 3: Intricate Detailing
-
Add beadwork details:
Using a fine brush loaded with gold, dab rows of tiny dots along the arches and the main band. These represent tiny gold pearls or textural beading. -
Create hanging charms:
Paint small circles or teardrops hanging from the bottom band of the crown, resting on the upper forehead. Space them evenly for a balanced look. -
Fill the gaps:
Inside the larger gold loop shapes (the ‘petals’ of the crown), gently dry-brush a very sheer layer of gold to simulate a textured metal background, distinguishable from the bright solid lines. -
Highlight the metal:
With a very fine brush and white paint, add tiny starbursts or straight highlight lines on the highest points of the gold structure to make it look like gleaming metal.
Royal Variation
Swap the teal paint for deep ruby red or sapphire blue to match a specific princess costume while keeping the gold structure exactly the same.
Step 4: Finishing Touches
-
Enrich the jewel settings:
Outline the gold frames surrounding the teal gems with a very thin line of dark brown or black to separate the ‘metal’ from the ‘stone’ and add 3D contrast. -
Add glitter accents:
Tap a small amount of cosmetic gold glitter gel onto the center of the ‘beads’ and the thickest parts of the crown frame for real sparkle that catches the light. -
Refine the edges:
Clean up any smudged edges with a damp cotton bud or concealer brush to keep the metalwork looking sharp and precise.
Now you are ready to rule the kingdom with a crown that won’t slip off


Silver Ice Princess Tiara
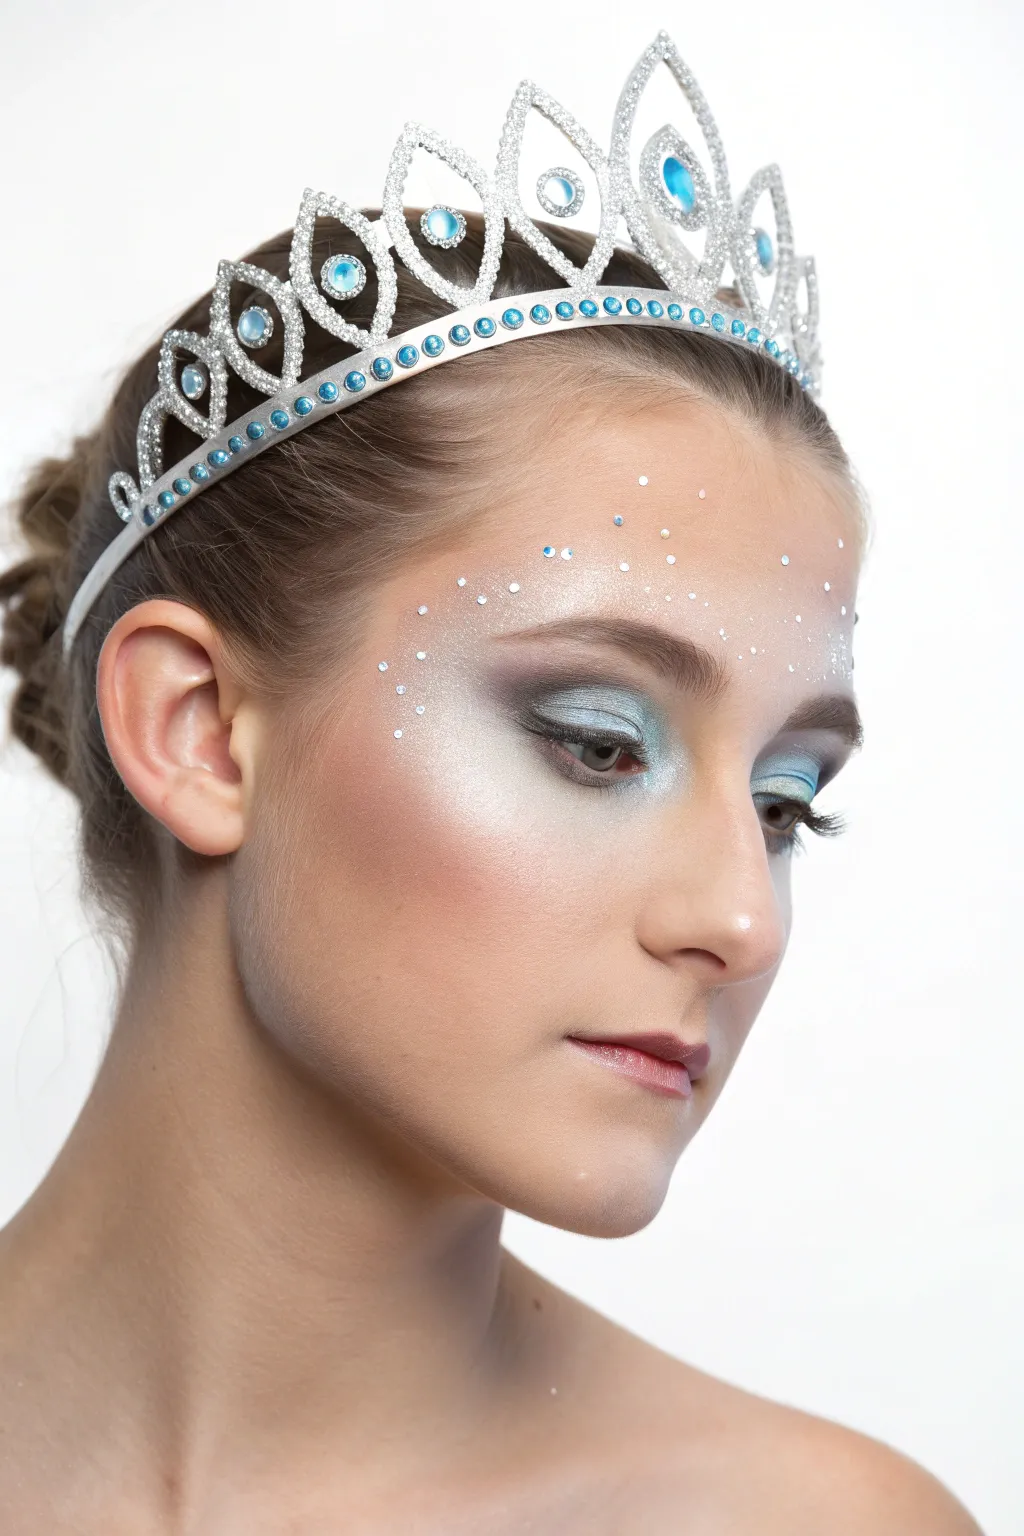
Transform into royalty with this elegant ice princess look that balances shimmering makeup with glittering accessories. This design focuses on ethereal highlighters and precisely placed gems to create a regal, wintry glow perfect for parties or costumes.
How-To Guide
Materials
- Moisturizing primer
- Pale, luminous foundation or face paint base
- Silver cream eyeshadow
- Metallic baby blue eyeshadow
- Soft charcoal or grey eyeshadow
- Holographic or ice-blue powder highlighter
- Clear eyelash glue or skin-safe adhesive
- Small rhinestones (clear and iridescent blue)
- Small flat shader brush
- Fluffy blending brush
- Detail brush or dotting tool
- Silver glitter tiara with blue accents
Step 1: Base and Contour
-
Prep the canvas:
Begin with a clean, moisturized face. Apply a hydrating primer to ensure the metallic textures grip well without looking dry. -
Apply foundation:
Use a foundation or very light wash of face paint that is one shade lighter than the natural skin tone to create a pale, wintry complexion. Blend well down the neck. -
Soft contouring:
Instead of warm bronzer, use a cool-toned taupe or very soft grey powder to contour gently under the cheekbones and along the jawline for a structured, icy look. -
Highlighter base:
Sweep a generous amount of holographic or icy-white highlighter across the tops of the cheekbones, the bridge of the nose, and the center of the forehead. This is the key to that ‘frosted’ skin effect.
Glue Not Tacky?
If gems slip immediately, let the adhesive dot sit on the skin for 15-20 seconds to get tacky before pressing the rhinestone into it. This prevents sliding.
Step 2: The Frozen Eye Look
-
Silver base:
Apply a silver cream eyeshadow across the entire mobile eyelid as a tacky base. This will augment the color payoff of the powders on top. -
Blue shimmer:
Pack a metallic baby blue eyeshadow onto the inner two-thirds of the lid using a flat shader brush. Press the pigment on rather than sweeping to minimize fallout. -
Deepen the crease:
Using a fluffy blending brush, work a soft charcoal or cool grey matte shadow into the outer corner and crease. Blend outwards towards the tail of the eyebrow to elongate the eye shape. -
Highlight the brow bone:
Take your white or silver highlighter and apply it directly under the arch of the eyebrow to lift the eyes. -
Lower lash line:
Smudge a little of the baby blue shadow along the lower lash line, stopping halfway. I like to keep the inner corner bright silver to open up the gaze. -
Lashes:
Apply two coats of lengthening mascara. You can also add natural-looking false lashes if you want extra drama, but keep them wispy rather than heavy.
Step 3: Gemstone Details
-
Map out the design:
Visualize a swooping curve starting from the temple and arching over the eyebrow. It helps to tap a tiny bit of powder where you want the main gems to sit before gluing. -
Apply adhesive points:
Using the back of a small brush or a dotting tool, dab tiny points of clear eyelash glue or skin-safe adhesive in a scattered pattern above the right eyebrow and onto the forehead. -
Place the gems:
Using tweezers or a wax pencil picker, place small rhinestones onto the glue dots. Mix clear gems with iridescent blue ones for variety. -
Create the fade:
Concentrate more gems near the temple and outer brow, spacing them further apart as you move toward the center of the forehead to create a gradient, ‘falling snow’ effect. -
Cheek accents:
Add just two or three tiny gems high on the opposite cheekbone to balance the asymmetry of the forehead design.
Snowy Texture
Mix a tiny bit of loose cosmetic glitter with clear aloe gel and tap it lightly over the temples for a textured, 3D frost effect surrounding the gems.
Step 4: Finishing Touches
-
Lips:
Keep the lips soft. Apply a sheer, rosy pink gloss or a lipstick with a cool undertone. Avoid heavy liners. -
Setting spray:
Mist the face with a setting spray to lock the powders in place and melt the highlighter into the skin. -
Crown the princess:
Place the silver tiara on the head. Ensure the blue stones in the crown compliment the eyeshadow shade; adjust hair pins to secure it firmly behind the ears.
Now you are ready to rule your winter kingdom with grace and sparkle


Rose Garden Princess Tiara
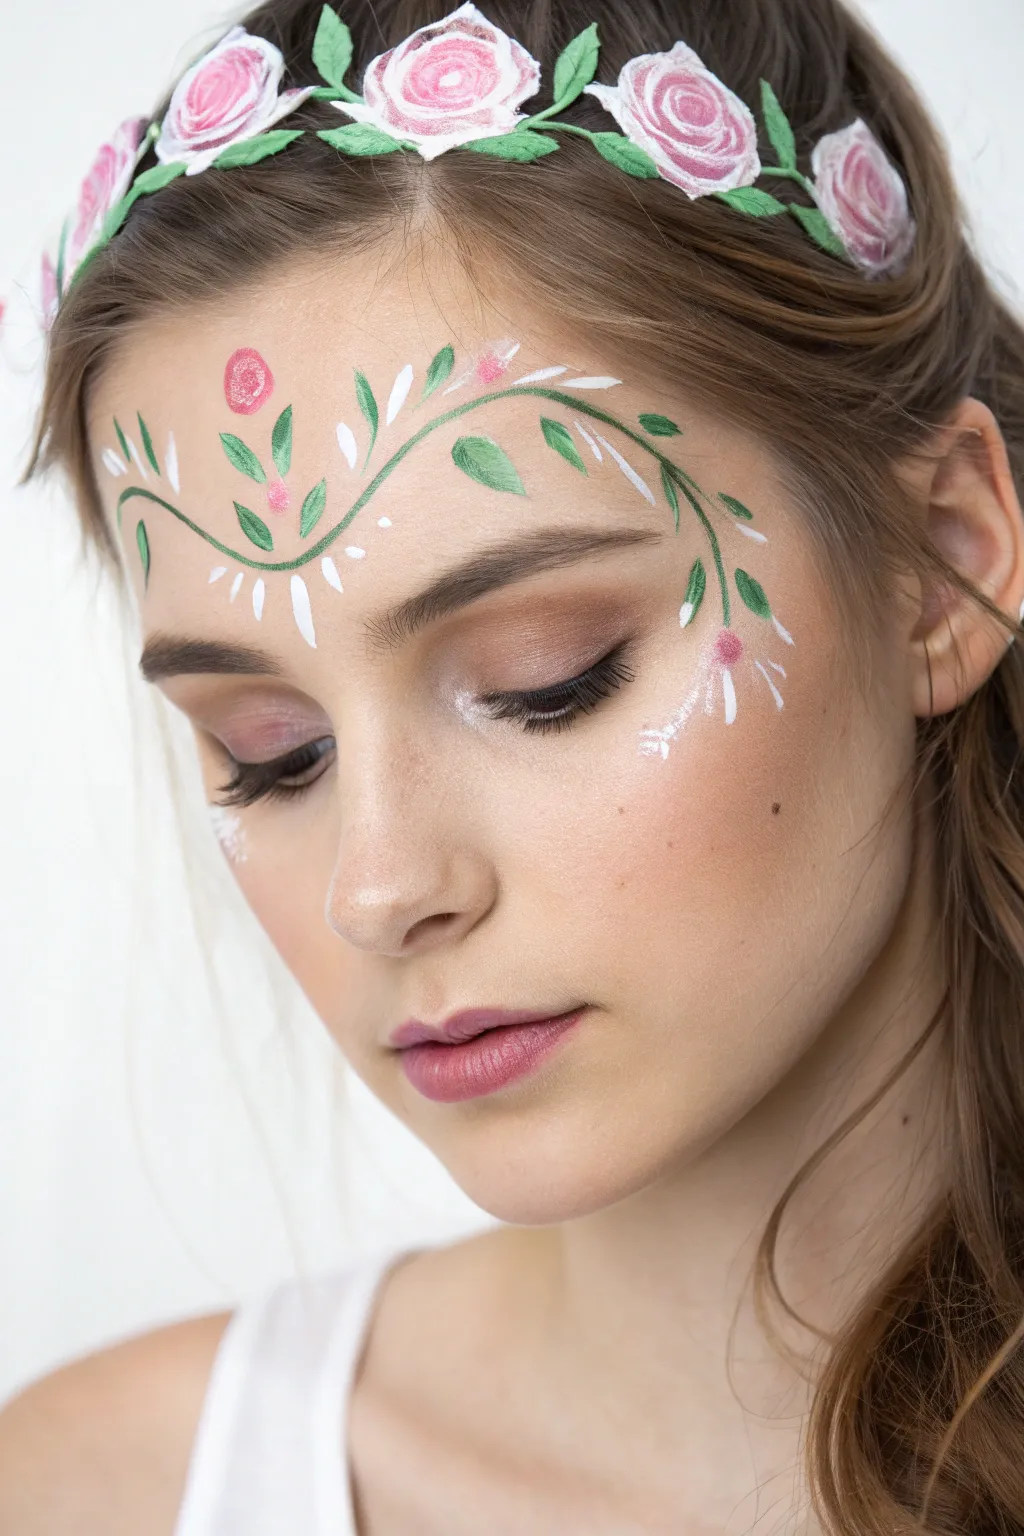
Transform into royalty with this delicate, nature-inspired face paint design that mimics a floral crown. Combining soft pink roses with trailing green vines, this look frames the face beautifully without overwhelming natural features.
Step-by-Step Guide
Materials
- White face paint (water-activated)
- Pink face paint (medium and dark shades)
- Green face paint (medium leaf green)
- Round brush (size 2 or 3)
- Fine liner brush (size 0 or 1)
- Small flat brush (optional, for flower petals)
- Cup of water
- Paper towels or sponge
Step 1: Painting the Floral Crown
-
Outline the Rose Circles:
Start at the very top of the forehead, right along the hairline. Using a brush loaded with white paint, create four or five rough, circular bases where your roses will sit. These don’t need to be perfect; they just map out the spacing. -
Define the Petals:
Switch to a medium pink paint on a round brush. Inside your white circles, paint concentric, C-shaped strokes that hug each other. Start from the center and spiral outward to create the look of unfolding rose petals. -
Add Depth with Darker Pink:
While the pink is still slightly damp, take a fine liner brush with a darker pink or berry color. Carefully outline the edges of the C-shapes to give the roses definition and separation between the petals. -
Create the Headband Leaves:
Using green paint and a round brush, paint small, pointed leaves connecting the roses. Place them in the gaps between flowers to link them together into a continuous band along the hairline. -
Highlight the Crown:
Add tiny touches of white to the top edges of the roses and leaves. This simulates light hitting the crown and adds a bit of dimension to the flowers.
Step 2: Creating the Forehead Vines
-
Map the Main Vine:
Load a round brush with green paint. Starting from the center of the forehead just below the hairline, paint two swooping lines that curve outward and down toward the temples. These lines should be thin and graceful. -
Paint the Central Leaves:
Along the center of these green vines, press down with your round brush to create teardrop-shaped leaves. Angle them upward and outward, following the flow of the vine. -
Extend the Side Vines:
Continue the green vine down the left side of the face, sweeping past the temple and slightly onto the cheekbone area. Allow the line to trail off delicately. -
Add White Accents:
Clean your brush thoroughly and load it with opaque white paint. Paint small, white teardrop shapes interspersed among the green leaves on the forehead vine. I find this creates a nice lightness and contrast against the green. -
Center Ornamentation:
In the very center of the forehead, beneath the main vine curve, paint a small pink bud or dot. Flank it with tiny green strokes to anchor the design. -
Add Droplets:
Using your fine liner brush and white paint, create a series of tiny teardrop shapes or ‘droplets’ hanging from the center of the vine, pointing downward toward the nose bridge.
Brush Pressure is Key
For pointed leaves, press the brush belly down fully, then lift while dragging to create a sharp, tapered tip.
Step 3: Finishing Details
-
Cheek Blossom Base:
At the end of the vine on the left cheek, paint a small pink circle to represent a budding flower. -
Cheek Blossom Details:
Add white strokes emerging from this pink bud, fanning downwards like a hanging flower or fuchsia. -
Highlighting Vines:
Take your fine liner with a mix of light green or white. Carefully add thin highlights to the top edge of your main green vines to make them look rounded and 3D. -
Adding Texture to Leaves:
If you have space on your larger leaves, paint very thin, dark green veins down the center of each leaf for extra realism. -
Final Sparkle (Optional):
For extra magic, add a few tiny white dots scattered around the cheek flower and the ends of the vines to mimic pollen or magical dust.
Add Some Shimmer
While the paint is wet, dab cosmetic-grade glitter on the center of the roses or the white teardrops for instant sparkle.
You now have a wonderfully ethereal floral design ready for any royal garden party
BRUSH GUIDE
The Right Brush for Every Stroke
From clean lines to bold texture — master brush choice, stroke control, and essential techniques.
Explore the Full Guide
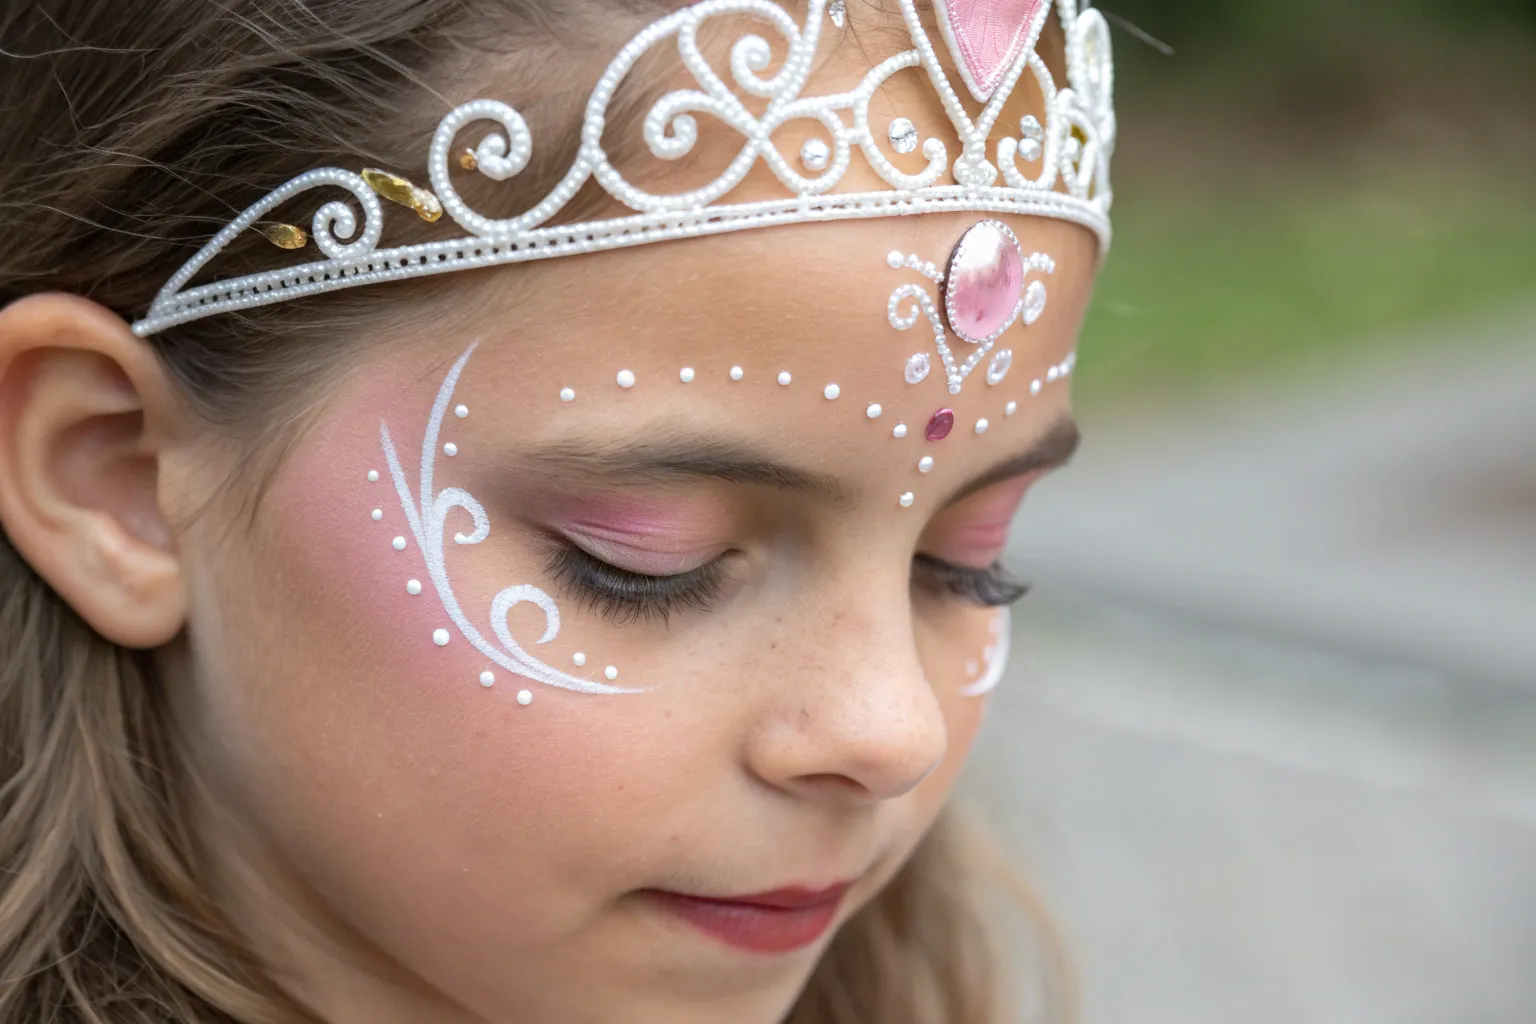
Filigree Swirls and Teardrop Jewels

Transform little ones into royalty with this delicate, frosty tiara design featuring elegant filigree swirls and sparkling gem accents. The combination of crisp white linework and jewel-toned gems creates a sophisticated yet magical look perfect for parties or snowy days.
Step-by-Step
Materials
- White face paint (high pigment, water-activated)
- Round brush (size 2 or 3 for main swirls)
- Fine liner brush (size 0 or 1 for details)
- Adhesive face Gems (teardrop shape, light blue/teal)
- Skin-safe cosmetic glitter (optional)
- Water cup
- Paper towels
- Sponge (optional for base)
Step 1: The Centerpiece
-
Establish the center point:
Begin by finding the exact center of the forehead, just above the eyebrows. Place your largest teal teardrop gem here, pointing downward. -
Create the central arch:
Load a size 2 or 3 round brush with creamy white paint. Start from the top of the central gem and paint two mirrored ‘S’ curves that sweep up and out, creating a heart-like open shape. -
Add secondary swirls:
Inside the curves you just painted, add two smaller, tight spirals that curl inward towards each other, filling the negative space above the gem. -
Paint the side flourishes:
From the bottom of your initial curves, paint long, flowing lines that extend out toward the temples. Curve them slightly upward at the ends like the wings of the tiara.
Fixing Shaky Lines
If your swirls look jagged, your paint might be too dry. Add a drop of water to your brush and practice the ‘press and lift’ motion on your arm first
Step 2: Filigree Details
-
Frame the eyes:
Switch to your finer brush if preferred. Paint a swirl that starts near the outer corner of the eye and curls up towards the hairline, connecting visually with your upper design. -
Add the temple curls:
Create a distinct spiral shape on each temple. Press down firmly at the start of the stroke and lift gently as you curl inward to get that beautiful thick-to-thin taper. -
Connect the design:
Use teardrop strokes (press down, pull, lift) to add connecting elements between the main swirls, making the design look like continuous lace. -
Apply accent gems:
Place a smaller teardrop gem (pointing up) above your central swirl design. Add another gem between the eyebrows, just below the first one you placed.
Make it Wintery
Swap standard white matte paint for a pearlescent white or metallic silver to give the design an icy, frozen finish that catches the light beautifully
Step 3: Delicate Accents
-
Paint the nose details:
Using the very tip of your fine brush, paint a series of tiny dots running down the bridge of the nose, stopping halfway. -
Create the cheek cascades:
On the cheekbones, paint three to four long, sweeping teardrop strokes that curve downward towards the jawline, mimicking a delicate veil. -
Add dotted embellishments:
Dip the back of your brush handle into the white paint to stamp perfect circles along the curves of your cheek designs. -
Highlight the brow:
Place three graduated dots following the arch of the eyebrow on both sides to tie the upper and lower sections together. -
Dot the filigree:
Add tiny micro-dots inside the spirals on the forehead for extra texture and detail.
Step 4: Finishing Touches
-
Apply outer sparkle:
Place small adhesive crystals at the outer corners of the eyes near your temple swirls. -
Lip color:
Apply a soft berry or pink lip stain to complement the cool tones of the white paint. -
Review finish:
Check for any uneven lines and touch them up carefully with a damp liner brush to keep edges crisp. -
Final glitter dust:
While the paint is slightly tacky, tap a tiny amount of cosmetic glitter over the wettest parts of the white swirls.
Now your regal design is ready to enchant everyone at the ball
Butterfly-Style Crown Wings
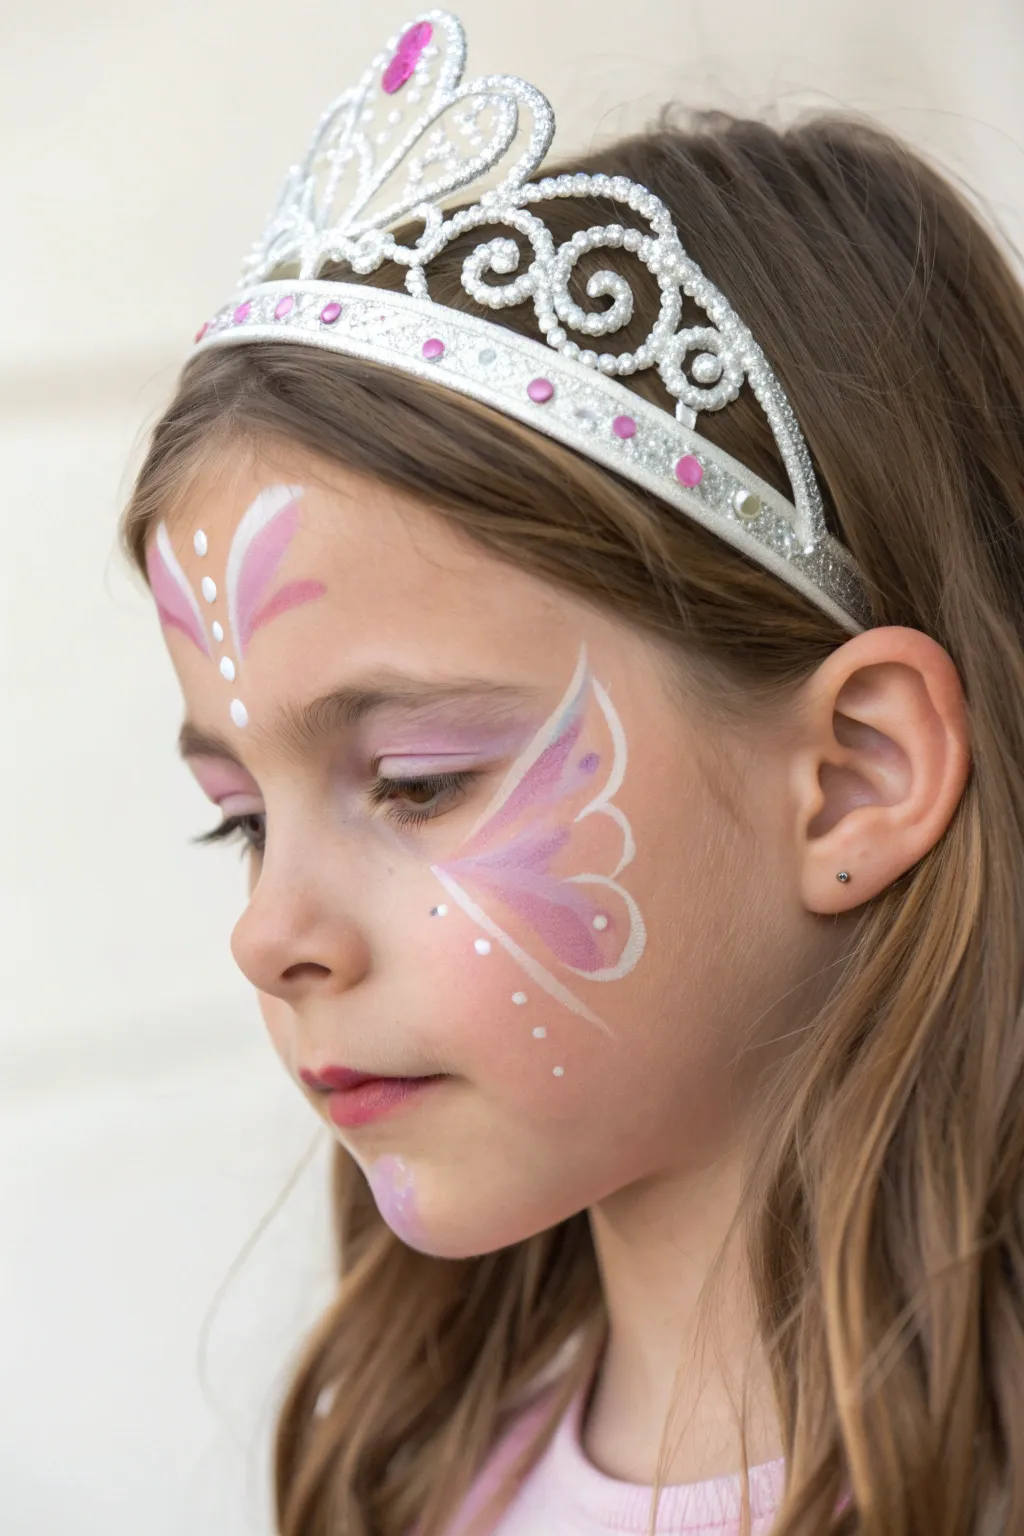
Transform a simple look into royalty with this delicate, butterfly-inspired face paint design that complements a sparkling tiara perfectly. This soft, ethereal style uses gentle pinks, lilacs, and crisp white linework to create sweeping wings and a central forehead crown motif.
Detailed Instructions
Materials
- Face paint: Metallic or pearl white
- Face paint: Soft pink (matte or shimmer)
- Face paint: Lilac or light purple
- Round brush (size 2 or 3 for details)
- Filbert brush or small sponge (for filling shapes)
- Cup of water
- Paper towels
- Cosmetic glitter gel (optional)
- Silver tiara with pink accents (to complete the look)
Step 1: Forehead Centerpiece
-
Create the central petals:
Begin in the very center of the forehead, just above the eyebrows. Using a filbert brush loaded with soft pink paint, create two tear-drop shapes that curve outwards, leaning away from each other like opening flower petals. -
Add the outer petals:
Load your brush with a slightly darker shade of pink or mix a little lilac in. Paint two smaller, curved strokes on the outside of your first petals, creating a fan-like shape. -
Outline in white:
Switch to a fine round brush (size 2) loaded with creamy white paint. Carefully outline the pink shapes you just created. Use a light hand to keep the lines thin and elegant. -
Add central dots:
Using the handle end of your brush or the tip of a round brush, place a vertical line of graduating white dots down the center of the forehead, starting large at the top and getting smaller between the eyebrows. -
Detail the forehead design:
Add three small white dots ascending from the top of the central pink petals to draw the eye upward.
Stay Symmetrical
For the forehead design, paint the central dot first as an anchor point. This makes it much easier to mirror the petals on the left and right sides.
Step 2: Butterfly Eye Wings
-
Base the eye color:
Use a sponge or wide brush to gently pat a sheer layer of lilac paint over the eyelid, blending it up towards the brow bone for a soft, eyeshadow effect. -
Draft the wing shape:
With your round brush and white paint, start at the outer corner of the eye. Draw a large, sweeping curve that goes up towards the temple and curls slightly inward at the top. -
Complete the lower wing:
From the same starting point at the eye corner, draw a second curved line swooping down onto the cheekbone, curling upward at the end to meet the bottom of the first curve, forming a distinct butterfly wing silhouette. -
Fill the wing tip:
Load your brush with a blend of pink and lilac. Fill in the outer tip of the wing shape you just outlined, fading the color out as you move closer to the eye to keep it airy. -
Define the inner wing:
Paint a second, smaller teardrop shape inside the main wing using a deeper lilac tone to add dimension and mimic the patterns found on real butterfly wings. -
Add wing details:
Using your fine liner brush and white paint, add delicate interior lines within the wing sections to separate the pink and lilac segments. -
Embellish with dots:
Place three tiny white dots along the bottom curve of the wing on the cheekbone, spacing them evenly to create a trailing effect. -
Highlight the wing tip:
Add a single, bright white dot near the tip of the upper wing section and another near the lower section to act as highlights.
Shaky Lines?
If your white outlines look wobbly, your paint might be too thick. Add a single drop of water to your white cake to get an ink-like consistency that flows smoothly.
Step 3: Finishing Touches
-
Cheek accent:
Paint a very faint, small pink swirl or petal shape on the lower cheek near the jawline to balance the design. -
Lip color:
Apply a wash of soft pink face paint or a tinted lip balm to the lips. I prefer blending this with a finger for a natural, stained look. -
Set the tiara:
Carefully place the silver tiara on the head so it frames the forehead design without covering your painted centerpiece.
Now your little princess is ready for a royal ball with her custom butterfly crown wings

PENCIL GUIDE
Understanding Pencil Grades from H to B
From first sketch to finished drawing — learn pencil grades, line control, and shading techniques.
Explore the Full Guide
Pearl Strand Forehead Band
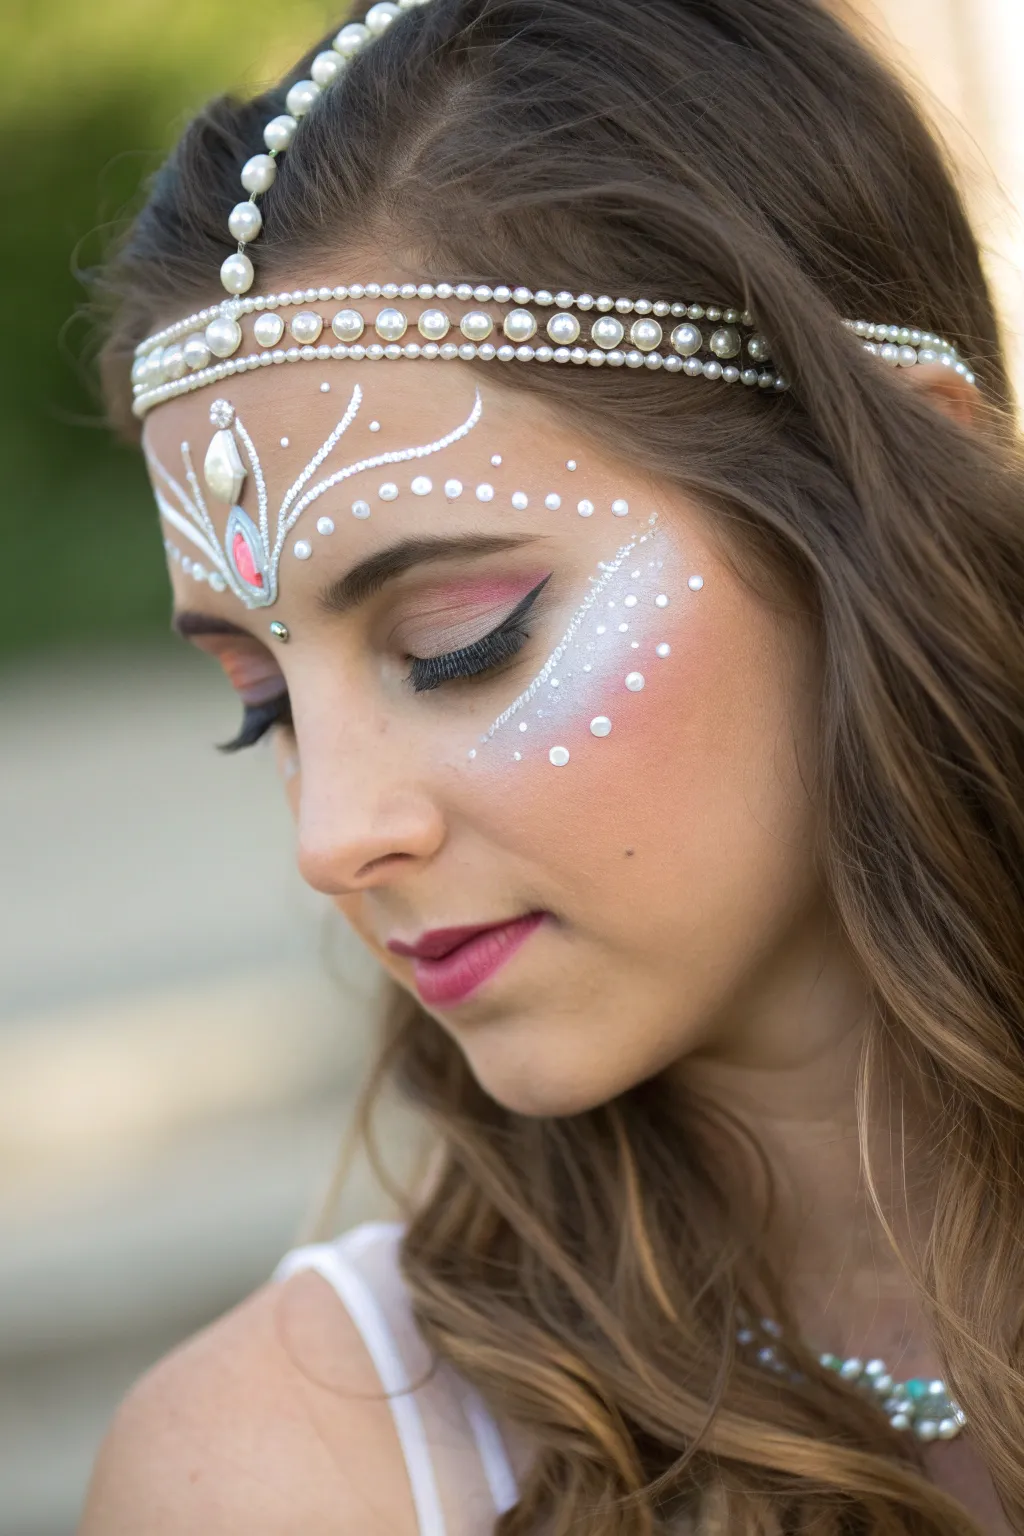
Transform yourself into royalty with this delicate, jewel-encrusted design that combines stick-on pearls with soft, shimmering face paint. The look centers around a stunning forehead band made of actual pearl strands, accented by painted white flourishes and a touch of sparkling glitter.
How-To Guide
Materials
- Stick-on craft pearl strands (small and medium sizes)
- Individual stick-on gems (large teardrop pearl, pink teardrop, clear round)
- White face paint
- Silver liquid glitter or glitter gel
- Fine round brush (size 1 or 2)
- Body glue or spirit gum (optional but recommended for longevity)
- Small pink or clear rhinestone for the nose bridge
- Pink eyeshadow or blush
- Black eyeliner
- Makeup sponge
Step 1: Creating the Pearl Crown
-
Position the main forehead strand:
Begin with a long strand of self-adhesive pearls. Place it horizontally across the middle of the forehead, curving slightly downward towards the temples to mimic the shape of a tiara band. If the adhesive isn’t strong enough, I like to dot a tiny bit of spirit gum along the line first. -
Add the upper strand:
Running directly above your main band, place a second, thinner strand of pearls. Ensure they sit snug against the first row for a solid, jewelry-like appearance. -
Create the central drop:
From the center of your forehead band, drape a short vertical line of pearls downwards towards the bridge of the nose. This acts as the anchor for your central jewel piece.
Sticky Situation
If pearls lift at the edges due to skin oils or sweat, secure them with a tiny dot of eyelash glue. It’s safe for skin and holds firmly all day.
Step 2: Painting the Centerpiece
-
Outline the central teardrop:
Using a fine round brush loaded with white face paint, draw a teardrop shape around the endpoint of your vertical pearl drop. Make the top point sharp and elegant. -
Apply the central gems:
Stick a large pearlescent gem inside the top of your painted teardrop shape. Directly beneath it, place a pink teardrop gem to add a pop of color to the centerpiece. -
Draw the side flourishes:
Starting from the base of your central design, paint three delicate curved lines fanning out towards the temples on each side. Use thin, confident strokes that taper off at the ends. -
Add dot accents:
Along the top curve of your painted flourishes, ply your brush gently to create a series of graduating white dots. Start with slightly larger dots near the center and make them smaller as you move outward. -
Place the bindis:
Stick a tiny round gem or bindi right between the eyebrows at the very bottom of your painted design to finish the vertical line.
Add Royal Shimmer
Dust a fine iridescent highlighting powder over the high points of the cheeks and brow bone to make the skin glow ethereally around the painted designs.
Step 3: Cheek & Eye Details
-
Apply blush base:
Using a makeup sponge or soft blush brush, apply a generous amount of pink blush or light red face paint to the apples of the cheeks, sweeping upwards towards the hairline. -
Paint the eye flourish:
With your thin brush and white paint, create a curved line starting from the outer corner of the eye, swooping down and out across the cheekbone. -
Texture the cheek design:
Along the top edge of this cheek curve, paint short, diagonal hatch marks to give a feathery or fringed effect. -
Add glittering dots:
Scatter white dots of varying sizes below the cheek curve. While the paint is still slightly damp, tap silver liquid glitter over these dots to make them sparkle. -
Define the eyes:
Apply a sweeping wing of black eyeliner to the upper eyelid. Keep the line precise and sharp to contrast with the soft face paint. -
Highlight the shadow:
Brush a soft pink eyeshadow onto the eyelids, blending it into the crease to harmonize with the cheek color. -
Final pearl touches:
For extra luxury, stick a few individual small pearls along the painted cheek flourishes or interspersed within the white dots on the forehead.
Step back and admire your regal, pearl-adorned reflection
Starry Princess Diadem
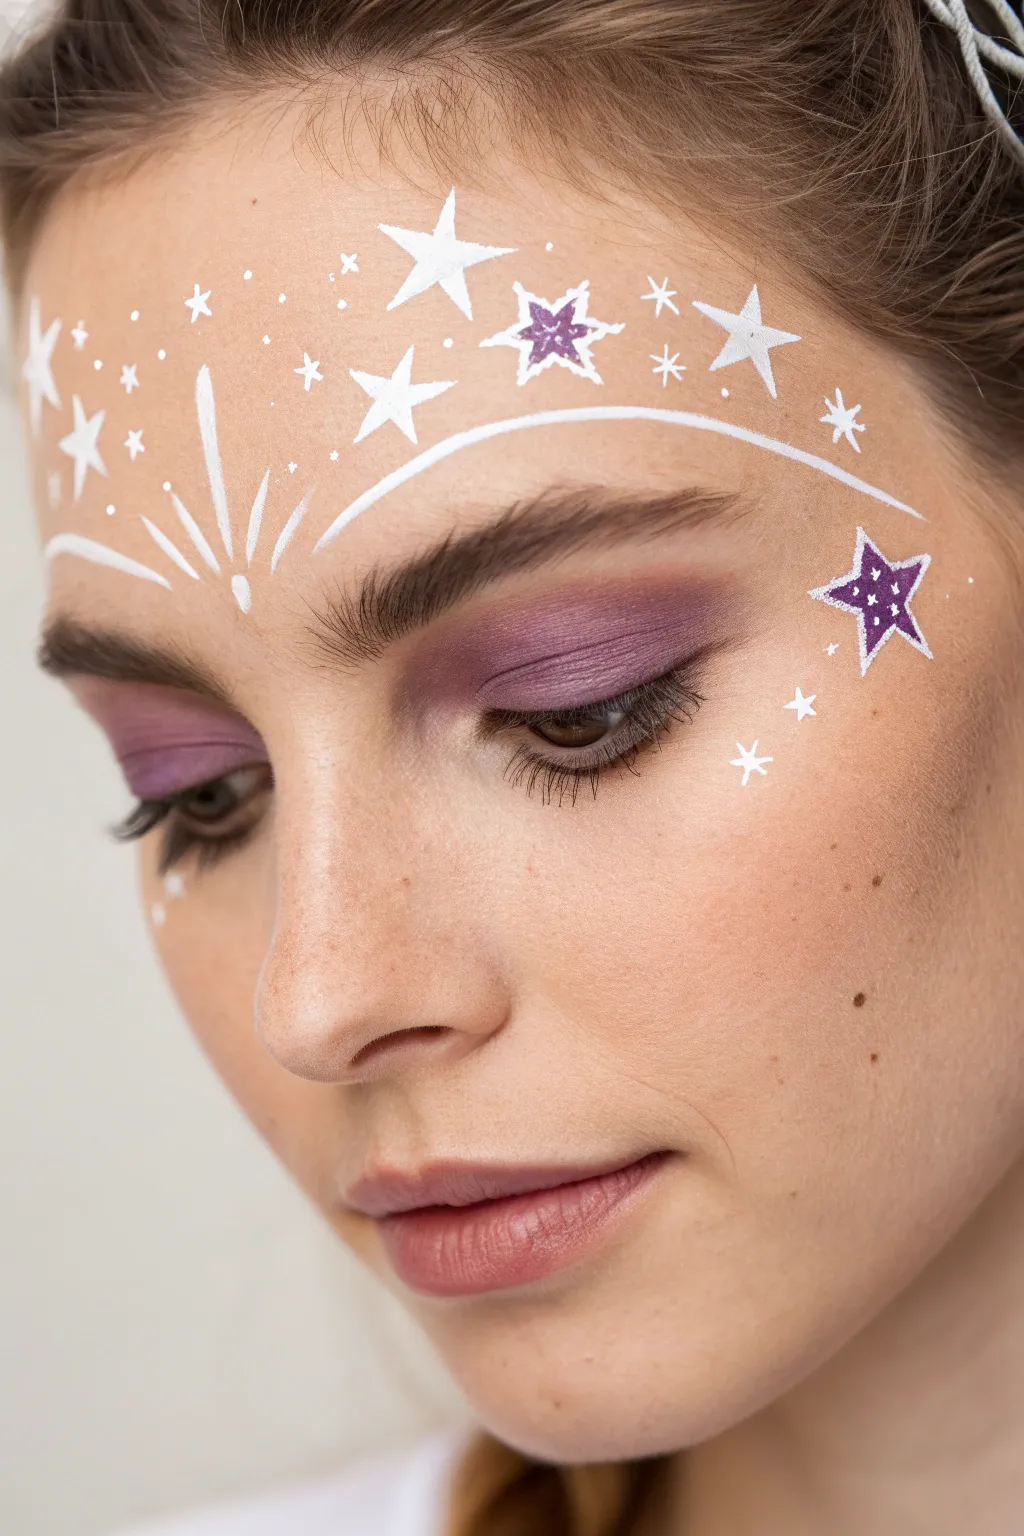
Transform into royalty of the night sky with this elegant starry diadem design. Combining soft lilac eyeshadow with crisp white linework creates a magical, ethereal look perfect for princesses of all ages.
Detailed Instructions
Materials
- High-density face paint sponge
- Purple matte eyeshadow
- Fluffy eyeshadow blending brush
- Soft detail eyeshadow brush
- Round brush (size 1)
- Round brush (size 3)
- White face paint (wax-based works best for crisp lines)
- Purple face paint
- Cup of water
- Paper towels
Step 1: Setting the Base
-
Prep the canvas:
Begin with a clean, dry face. If the skin is oily, a quick wipe with a toner can help the paint adhere better. -
Apply initial eyeshadow:
Load your fluffy blending brush with a soft matte purple eyeshadow. Sweep this generously across the entire eyelid, bringing the color up slightly past the crease towards the brow bone. -
Deepen the crease:
Switch to a slightly smaller, denser brush and pick up more of the same purple shadow. Focus this pigment on the outer corner of the eye and the crease to create depth and dimension. -
Define the lash line:
Using a small detail brush or angled liner brush, apply the purple shadow along the lower lash line, softening it out so there are no harsh edges.
Step 2: Painting the Diadem
-
Create the center focal point:
Load a size 3 round brush with creamy white face paint. Starting right between the eyebrows, paint a teardrop shape pointing downwards. -
Draft the main arches:
From just above your center teardrop, paint a long, sweeping curved line that arches over the eyebrow and extends out towards the temple. Repeat this on the other side to frame the forehead. -
Add radial bursts:
In the center forehead space between the two eyebrows, add three to five short, straight lines fanning upward from the center point, creating a sparkling burst effect. -
Paint large white stars:
Using your size 3 brush, paint a large five-pointed star shape near the hairline on the upper forehead. I find it easiest to paint a ‘V’ shape first, then cross the arms. -
Add medium stars:
Paint a few slightly smaller white stars scattered around the main arches, ensuring you place some lower down near the temple area. -
Create twinkling details:
Switch to your size 1 round brush for fine details. Paint tiny four-pointed stars (cross shapes) and small dots in the empty spaces to build density without cluttering the design.
Crisp Lines Secret
For sharp star points, ensure your paint consistency is like heavy cream—not too watery. Press firmly at the center and lift pressure as you flick outward.
Step 3: The Purple Accents
-
Outline the purple stars:
Clean your size 3 brush thoroughly and load it with purple face paint. Paint a large five-pointed star on the upper cheekbone area. -
Add a forehead accent:
Paint a second purple star on the forehead, perhaps slightly off-center or nestled among the white stars for asymmetry. -
Fill the color:
Fill in these purple stars completely with the face paint, ensuring an opaque, solid coverage. -
Highlight the purple stars:
Once the purple paint is completely dry, use your size 1 brush with white paint to outline the purple stars thinly. This makes them pop against the skin. -
Add inner sparkle:
inside the purple stars, add tiny white dots using the very tip of your fine brush to give them a textured, cosmic appearance. -
Final check:
Step back and check for symmetry. Add a few extra white dots trailing down the cheekbone to soften the transition from the painted design to bare skin.
Add Cosmic Shimmer
While the white paint is still slightly damp, gently puff cosmetic-grade iridescent white glitter over the forehead area for a true starry night sparkle.
You are now ready to sparkle under the lights with your celestial crown


Side-Swept Princess Tiara
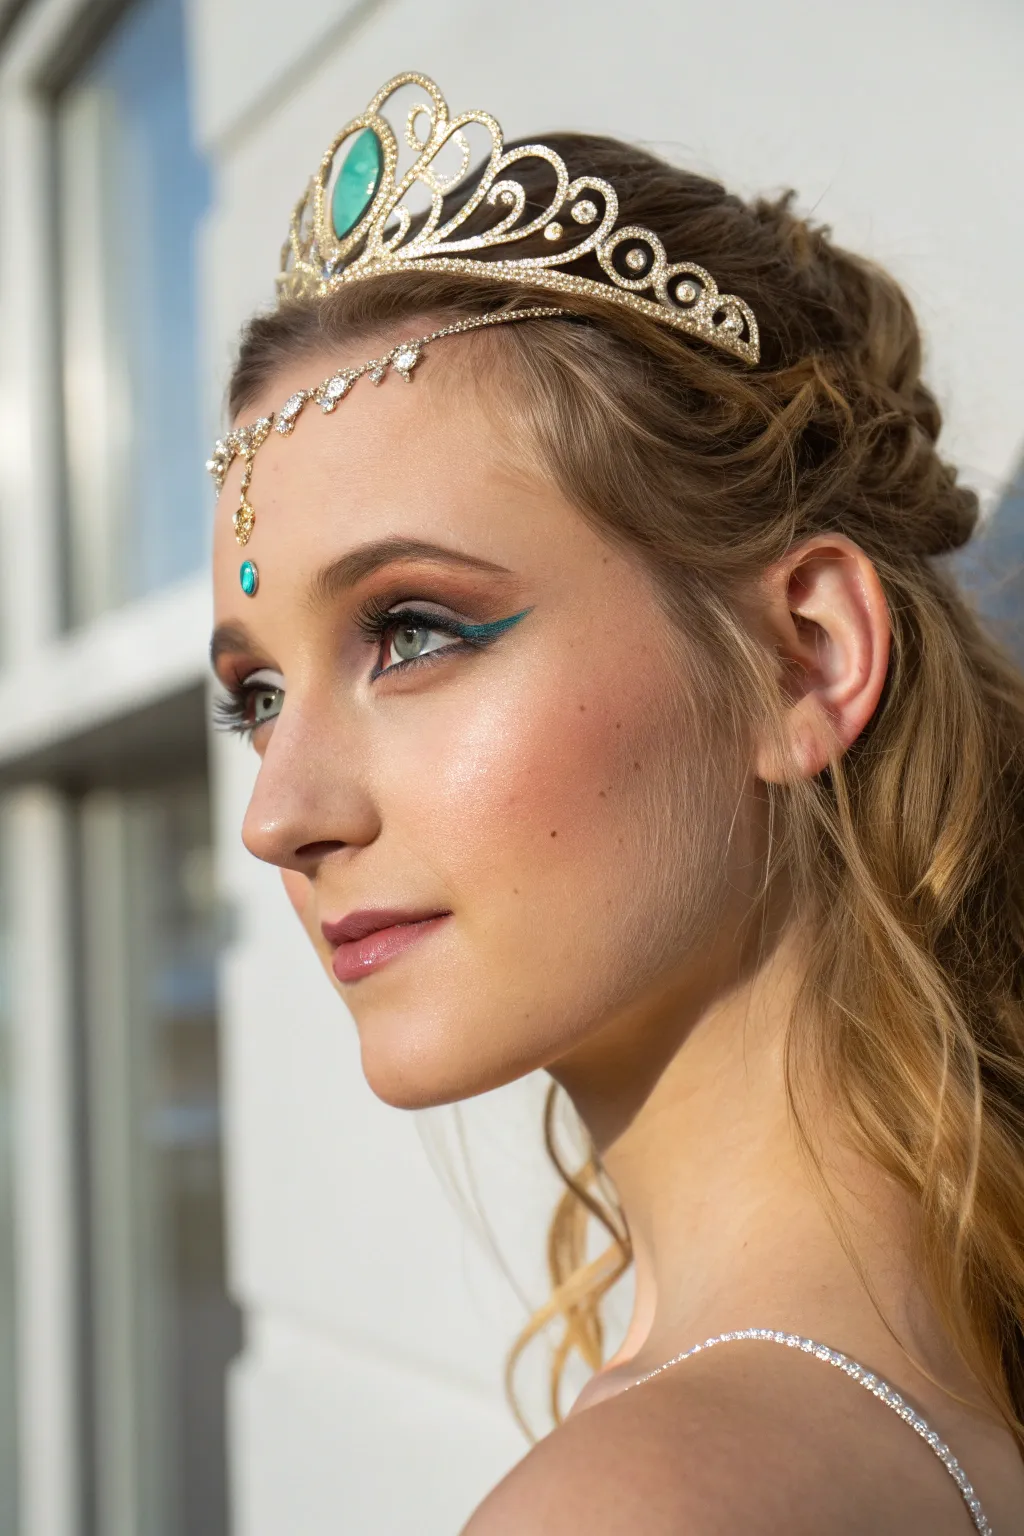
Achieve a regal and sophisticated princess transformation using a combination of warm bronze tones and striking teal accents. This look balances dramatic eye makeup with delicate face jewels for an elegant finish perfect for older children or teens.
Step-by-Step
Materials
- Warm matte brown eyeshadow palette
- Shimmering gold or bronze eyeshadow
- Teal gel eyeliner or water-activated face paint
- Fine liner brush
- Fluffy blending brush
- Black mascara
- Rose-pink lip gloss or lipstick
- Self-adhesive face gems (teal teardrop and small clears)
- Gold tiara with teal stone accents
- Gold chain headpiece
- Setting spray
Step 1: Base & Contour
-
Prep the canvas:
Begin with a clean, moisturized face. Apply a light foundation or tinted moisturizer to even out the skin tone, creating a flawless base for the colors to pop. -
Warm the cheeks:
Using a large fluffy brush, sweep a warm peach or soft bronze blush across the apples of the cheeks, blending upwards towards the temples to create a natural, sun-kissed flush. -
Add subtle highlight:
Dust a champagne-colored highlighter on the high points of the cheekbones and the tip of the nose for that ethereal princess glow.
Step 2: The Royal Eye Design
-
Create the crease definition:
Take a matte medium-brown eyeshadow on a blending brush and work it into the crease of the eyelid. Use windshield-wiper motions to diffuse the edges for a soft, smoky effect. -
Deepen the outer corner:
Pack a darker chocolate brown shade onto the outer ‘V’ of the eye to add dimension and depth, blending it seamlessly into the transition shade. -
Apply the lid shimmer:
Press a metallic gold or bronze eyeshadow onto the center of the eyelid. I find using a fingertip applies shimmer more intensely than a brush. -
Draw the signature teal wing:
Dip a fine liner brush into teal gel liner or wet teal face paint. Starting from the middle of the upper lash line, draw a line extending outward. -
Sharpen the flick:
Flick the line upward at the outer corner toward the end of the eyebrow to create a sharp, distinct wing that mimics the teal in the tiara. -
Lower lash definition:
Smudge a small amount of the dark brown shadow along the lower lash line, stopping halfway to keep the eye looking open and bright. -
Finish with lashes:
Apply two generous coats of black mascara to the upper lashes, focusing on the outer corners to enhance the cat-eye shape created by the liner.
Placement Pro Tip
Before sticking down your forehead gem, put the head chain on first. This lets you see exactly where the metal pendant lands so you don’t place the gem too high or too low.
Step 3: Jewels & Finishing Touches
-
Select the face gems:
Choose a small teal gem (round or teardrop) and ensure the adhesive backing is sticky, or apply a dot of eyelash glue for extra hold. -
Place the bindi accent:
Adhere the teal gem precisely in the center of the forehead, slightly above the eyebrows, acting as a focal point. -
Paint the lips:
Apply a creamy rose-pink lipstick or gloss. The color should be polished but not so bold that it competes with the dramatic eye makeup. -
Position the head chain:
Carefully place the gold head chain so the central drop hangs vertically down the forehead. Adjust it so the bottom pendant sits just above your painted teal gem. -
Align the tiara:
Place the tiara on the crown of the head. Position it so the large teal stone in the tiara aligns vertically with the forehead jewelry for purely symmetrical royalty. -
Secure the hair:
Pin the side sections of hair back loosely, allowing the curls to cascade over the shoulder, ensuring the jewelry stays visible. -
Lock the look:
Close the eyes and mist the entire face with a setting spray to ensure the makeup holds up through any royal decree or dance.
Level It Up
Enhance the teal eyeliner wing by adding a thin line of gold liquid glitter directly above it. This double-liner effect adds instant sparkle and matches the gold hardware.
You are now ready to rule the kingdom with this stunning, jewel-toned style
Moonlit Princess Crown With Celestial Details
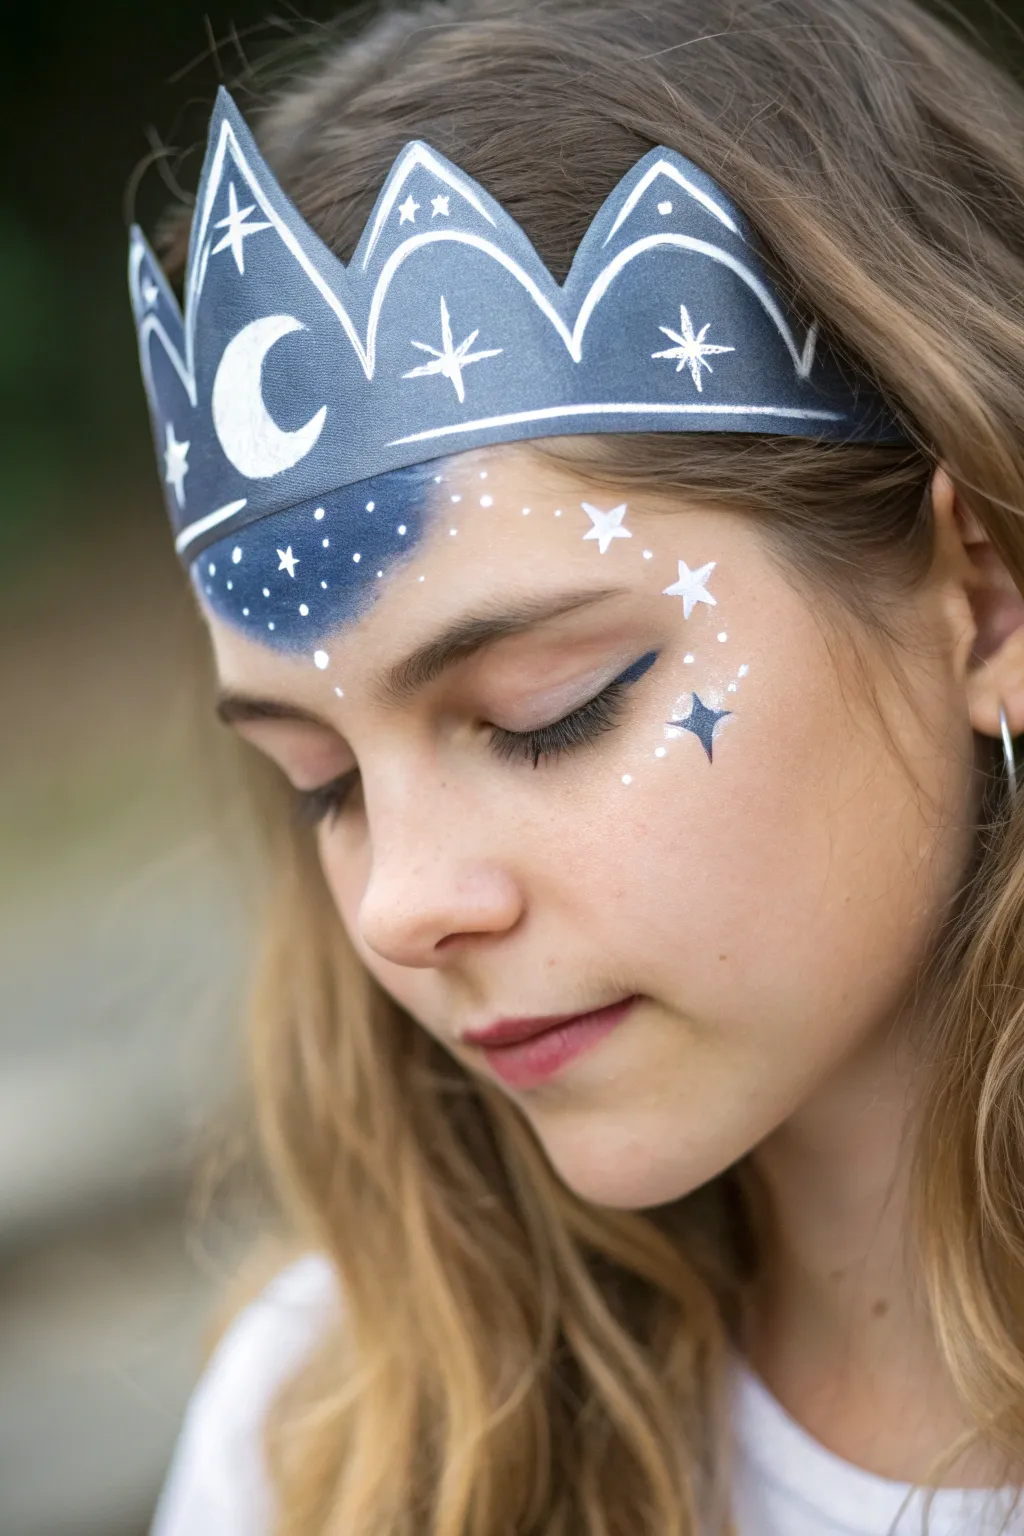
Transform into a ruler of the night sky with this ethereal look that pairs a handmade paper crown with delicate, starry face paint. The deep indigo tones and crisp white accents create a serene moonlight effect perfect for a magical costume.
Detailed Instructions
Materials
- Dark blue or indigo cardstock paper
- White gel pen, paint pen, or chalk marker (fine and broad tips)
- Scissors
- Measuring tape
- Clear tape or stapler
- Face paint: Dark blue / Navy
- Face paint: White
- Makeup sponge (wedge)
- Small round brush (size 1 or 2)
- Setting spray (optional)
Step 1: Crafting the Lunar Crown
-
Measure the circumference:
Begin by measuring the head of the princess-to-be with a soft tape measure to determine the length needed for the crown band. -
Draft the crown shape:
Cut a strip of dark blue cardstock to the measured length plus two inches for overlap. Along the top edge, draw a series of peaks—make the center peak slightly taller and wider, with smaller peaks tapering off to the sides. -
Cut out the peaks:
Using sharp scissors, carefully follow your drafted lines to cut out the jagged top edge of the crown. -
Outline the details:
Grab your white paint pen or gel pen. Start by tracing a consistent border along the very edge of the cut peaks to define the shape. -
Draw the crescent moon:
In the center of the largest peak, draw a bold crescent moon shape and fill it in solidly with white ink. -
Add celestial accents:
Decorate the remaining peaks with various star shapes. I like to mix simple four-point crosses with tiny five-point stars and small dots. -
Secure the band:
Wrap the paper strip into a circle, ensuring a snug fit, and secure the overlapping ends at the back with clear tape or staples (cover staples with tape for safety).
Clean Lines
For the crispest stars on the face, ensure your brush is damp but not dripping wet. A creamier paint consistency gives sharp points without spreading.
Step 2: Applying the Starry Makeup
-
Sponge on the base:
Load a makeup sponge slightly with dark blue face paint. Tap it gently onto the upper forehead, just below the hairline where the crown will sit. -
Create a fade:
As you move down the forehead, use less pressure and less paint to fade the blue out into the natural skin tone, creating a soft, misty nebula effect. -
Paint tiny constellations:
Dip a fine round brush into white face paint. Over the blue patch on the forehead, dot tiny specks to represent distant stars. -
Highlight the cheek:
Moving down to the cheekbone on one side, paint a few larger white stars. Vary the sizes—some large five-point stars and some tiny clusters. -
Add a feature star:
For a bit of contrast, paint one sharp four-point star in dark blue on the upper cheek, creating a silhouette effect amongst the white shimmer. -
Detail the eyes:
If desired, apply a simple sweep of dark eyeliner on the upper lid to define the eyes without overpowering the delicate face paint. -
Final touches:
Place the paper crown on the head so it partially overlaps the blue painted area, seamlessly blending the craft with the makeup.
Add Some Shimmer
Before the blue forehead paint dries completely, tap a small amount of cosmetic silver glitter over the area for a true galaxy twinkle.
Now you are ready to illuminate the night with your celestial style


Have a question or want to share your own experience? I'd love to hear from you in the comments below!