
When I’m decorating gourds, nothing beats turning them into a pumpkin face with a few bold lines and a little attitude. Here are my favorite pumpkin face drawing ideas—from classic grins to unexpected personalities—so you can sketch one that feels totally you.
Classic Jack-o’-Lantern Face
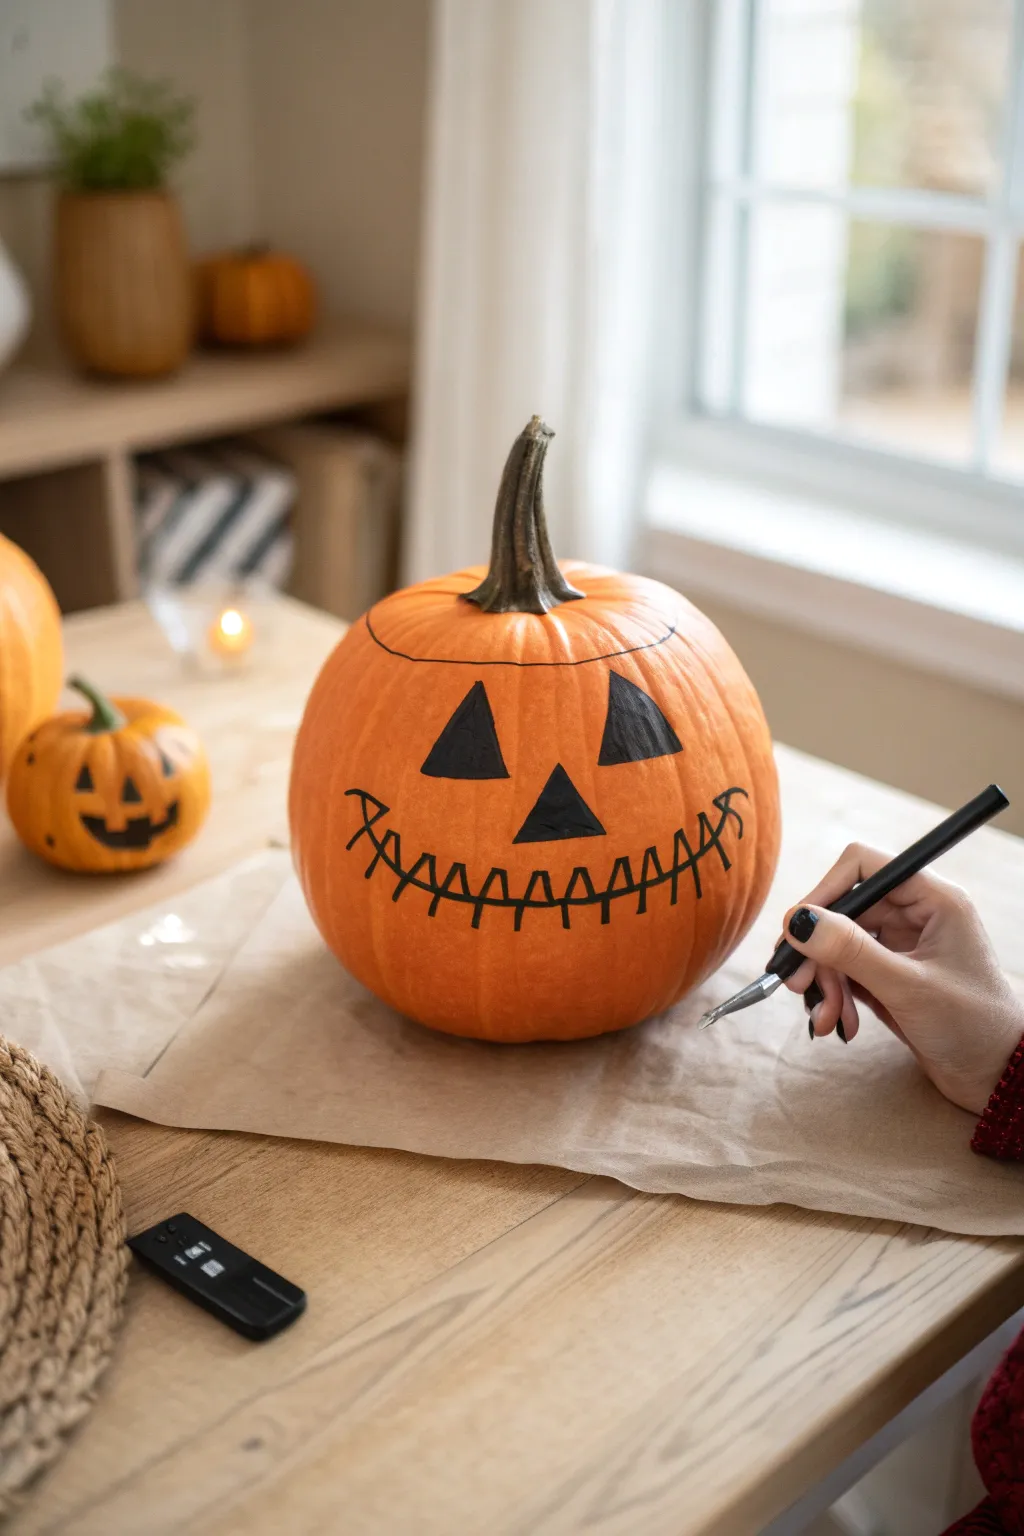
Go back to basics with this quintessential Halloween design that embodies simplicity and charm. By using bold, black lines against the bright orange skin, you’ll create a sharp, recognizable face that captures the nostalgic spirit of the holiday without needing a single carving tool.
Step-by-Step
Materials
- Medium-sized orange pumpkin (clean and dry)
- Black permanent marker (chisel tip suggested)
- Black fine-point marker or pen (for outlining)
- Pencil (optional, for sketching)
- Damp cloth or paper towel
- Kraft paper or newspaper (to protect the table)
Step 1: Preparation & Mapping
-
Surface Prep:
Before you uncap any markers, wipe down your pumpkin with a damp cloth to remove any dirt or field dust. The surface needs to be completely dry and room temperature so the ink adheres properly. -
Protect Your Workspace:
Lay down a sheet of kraft paper or newspaper on your table. Pumpkins can sometimes have unseen soft spots, and permanent markers can stray, so it’s best to have a protective barrier. -
Drafting the Design:
If you’re feeling tentative, lightly sketch your design using a dull pencil first. The graphite won’t show up well, but it leaves a slight indentation or sheen you can follow. Alternatively, just visualize the face placement: eyes about a third of the way down, nose centered, and mouth sweeping across the bottom third.
Step 2: Drawing the Base Features
-
Left Eye Outline:
Using your black marker, draw a simple equilateral triangle for the left eye. Keep the bottom edge flat and the point facing up toward the stem. -
Right Eye Outline:
Draw the second triangle for the right eye, trying to match the size and angle of the first. It’s okay if they aren’t mathematically perfect; slight asymmetry adds character. -
The Nose:
Place a slightly smaller triangle right in the center of the ‘face’, slightly below the eyes. I like to make this triangle slightly wider at the base than the eyes for a cute button-nose look. -
The Smile Line:
Draw a wide, sweeping curved line for the mouth. Start low on the left, swoop down comfortably, and curve back up to the right side. -
Adding the Smile Ends:
At each end of your smile curve, draw a small perpendicular line (like a serif) or a tiny crease line to define the corners of the mouth.
Stay Steady
Rest your drawing hand’s pinky finger on a dry part of the pumpkin while working. This acts as an anchor for stability and prevents smudging wet ink.
Step 3: Adding the ‘Stitched’ Detail
-
Vertical Stitches:
Along the heavy smile line you just drew, add vertical tick marks. Space them relatively evenly, about an inch apart, crossing directly over the main mouth line. -
Connecting the Stitches:
This is the signature step for this specific look: connect the tops of your vertical tick marks with small, slightly curved lines that dip down, creating a jagged ‘upper lip’ effect. -
Completing the Teeth:
Repeat this process on the bottom, connecting the lower ends of the tick marks. This creates the illusion of negative space teeth without actually coloring anything in.
Oops! Ink Eraser
Made a mistake? A dab of rubbing alcohol on a cotton swab or a dry-erase marker drawn over the permanent ink can often lift errors off the waxy skin.
Step 4: Applying Color & Finishing
-
Filling the Eyes:
Go back to your eye triangles. Use the broader side of your marker tip to fill them in completely black. Work in consistent strokes to avoid streaky lines. -
Filling the Nose:
Color in the nose triangle just like the eyes, ensuring solid coverage. -
Thickening the Smile:
Carefully re-trace your mouth lines. You want the main horizontal smile line to be slightly thicker than the vertical tooth lines to give the face structure. -
Adding the Lid Line:
Draw a thin, horizontal curved line going across the very top section of the pumpkin, creating a ‘lid’ illusion, even though you aren’t cutting it. -
Final Cleanup:
Check the edges of your filled shapes. Use the fine point of the marker to sharpen any dull corners or smooth out jagged edges on the triangles. -
Drying Time:
Let the pumpkin sit untouched for at least 15 minutes. Pumpkin skin is waxy and non-porous, so permanent marker takes longer to fully cure than it does on paper.
Place your drawn pumpkin on the porch or a mantle to enjoy a mess-free burst of Halloween spirit


Simple Happy Pumpkin Smile

For a cheerful autumn accent that doesn’t require carving tools, this project transforms a small pumpkin into a smiling friend using just a bit of paint or marker. The result is a clean, graphic look featuring bright eyes and a wide grin that captures the cozy essence of the season.
Step-by-Step Tutorial
Materials
- Small to medium orange pumpkin (clean and dry)
- Black acrylic paint marker (broad tip) or permanent marker
- Pencil (optional for sketching)
- Damp cloth or paper towel
- Clear matte sealer spray (optional)
Step 1: Preparation and Planning
-
Surface Prep:
Begin by wiping down your pumpkin with a damp cloth to remove any dirt or field dust. Dry it completely; markers and paint won’t adhere well to a waxy or damp skin. -
Find the Face:
Rotate your pumpkin to find the best side. Look for a relatively smooth patch without deep blemishes or extreme ribbing that might distort your drawing lines. -
Level Check:
Set the pumpkin on a flat surface to see how it naturally sits. You want to draw the face slightly higher than the exact middle so it looks up at you pleasantly rather than staring at the table.
Step 2: Drawing the Eyes
-
Sketching the Outline:
Using a pencil very lightly, sketch two tall, vertical ovals for the eyes. Space them about an inch apart, depending on your pumpkin’s size. -
Adding the Pupil Detail:
Before filling anything in, draw a tiny circle inside each oval near the top right or top left edge. These will remain unpainted to create the ‘sparkle’ or highlight in the eye. -
Inking the First Eye:
Take your black paint marker and carefully trace the outer edge of the left eye oval. -
Filling In:
Fill in the rest of the oval with solid black ink, being extremely careful to work around that tiny highlight circle you sketched earlier. Leaving the pumpkin’s orange skin showing through is the trick here. -
Repeat for Second Eye:
Do the same for the right eye. Trace the perimeter, then fill the center, protecting that little highlight dot. I like to step back for a second to ensure they look relatively symmetrical before the ink dries. -
Thickening the Lines:
Go over your fill one more time if the orange colour is showing through too much. You want a deep, solid black for high contrast.
Oops! Smudged Ink?
If you smudge the wet ink, act fast! Use a Q-tip dipped in rubbing alcohol to gently lift the mistake. If it dries, paint over the error with a dab of orange acrylic paint.
Step 3: Creating the Smile
-
Planning the Curve:
Visualize a wide U-shape starting below the center of the left eye and ending below the center of the right eye. -
Drawing the Center:
Start your stroke at the very bottom center of the smile and draw upward to the right. Then return to the center and draw upward to the left. This helps keep the smile even. -
Extending the Grin:
Extend the curved lines up slightly higher than you might think, reaching almost to the level of the bottom of the eyes for a extra happy look. -
Cheek Marks:
At the very tip of each smile end, draw a small perpendicular line—a tiny hash mark. This creates the illusion of a cheek crease or dimple. -
Bold Line Weight:
Go back over the mouth line to make it slightly thicker. A thin line can get lost on a textured pumpkin, so a bold stroke reads better from a distance.
Level Up: Rosy Cheeks
For extra cuteness, dip your finger or a dry brush into a tiny amount of pale pink acrylic paint and dab soft circles at the ends of the smile line for blushing cheeks.
Step 4: Finishing Touches
-
Clean Up:
If you see any visible pencil marks from your initial sketch, gently erase them once the black marker is 100% dry. -
Sealing (Optional):
If this pumpkin will live on a porch outside, give the painted face a light coat of clear matte sealer spray to prevent the marker from running in the morning dew.
Place your happy pumpkin on a windowsill or table to enjoy its cheerful expression all season long


Sleepy Closed-Eye Face
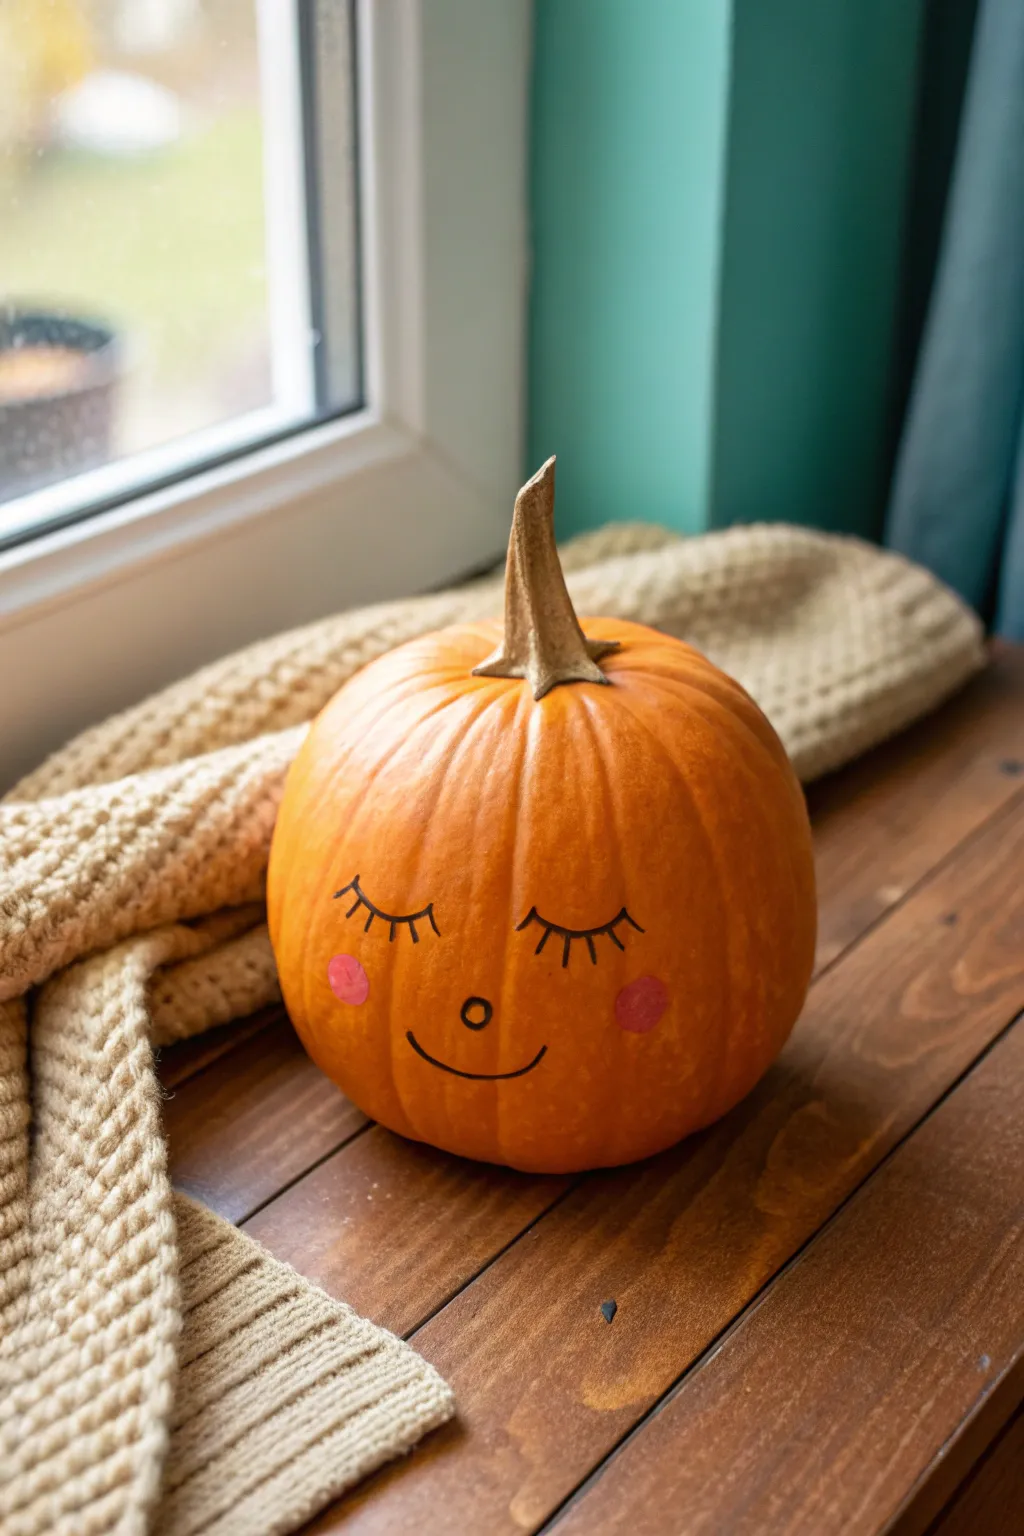
Transform a simple orange pumpkin into a calm, sleepy companion for your autumn decor. This minimalist design uses clean lines and soft rosy cheeks to create a gentle expression that looks lovely nestled near a window.
Detailed Instructions
Materials
- Small to medium orange pumpkin (real or faux)
- Black permanent marker or paint pen (fine to medium tip)
- Pink acrylic paint or pink paint pen
- Small round paintbrush (if using acrylic paint)
- Pencil
- Eraser
- Damp cloth
- Matte sealant spray (optional)
Step 1: Preparation & Planning
-
Clean surface:
Begin by wiping down your pumpkin with a damp cloth to remove any dirt or waxy residue. This ensures your marker and paint will adhere smoothly. -
Dry completely:
Allow the pumpkin surface to dry fully before starting any sketching. If it’s damp, the pencil lines won’t show and marker ink might bleed. -
Sketch the eyes:
Using a pencil, lightly sketch two downward-curving arcs for the closed eyes. Place them symmetrically on the smoothest side of the pumpkin, roughly halfway down the height. -
Plan the lashes:
Add three to four small, radiating lines extending downward from each eye arc to represent eyelashes. -
Mark the nose:
Draw a very small circle in the center, just below the level of the eyes, to create a subtle button nose. -
Draft the smile:
Sketch a simple, gentle upward curve for the mouth below the nose. Keep it modest to maintain the peaceful, sleepy vibe. -
Outline cheeks:
Lightly trace two circles on either side of the smile for the rosy cheeks. They should be slightly larger than the nose but smaller than the eyes.
Wobbly Lines?
If your marker slips over a bump, thicken the line slightly to hide the jitter. You can also wipe fresh marker off a real pumpkin quickly with rubbing alcohol.
Step 2: Drawing the Features
-
Trace the eyes:
Take your black permanent marker or paint pen and carefully trace over the pencil lines for the closed eyelids. -
Add detail:
Draw the eyelashes with quick, confident strokes so they taper naturally at the ends. -
Define the nose:
Outline the small circle for the nose. I prefer to leave the inside of the nose the natural pumpkin color rather than filling it in, just as shown in the inspiration. -
Ink the smile:
Go over the mouth line with a steady hand. If you want a softer look, you can make the line slightly thinner at the ends. -
Let ink set:
Wait about five minutes for the black marker to dry completely to avoid smudging it while you work on the cheeks.
Step 3: Adding Color & Finishing
-
Paint the cheeks:
Dip a small round brush into pink acrylic paint (or use a pink paint pen). Fill in the two cheek circles you sketched earlier. -
Apply second coat:
The orange skin of the pumpkin can show through light pink paint. Once the first layer is dry to the touch, add a second thin layer for better opacity. -
Clean up:
After all paint and ink are fully dry, gently erase any visible pencil sketch lines that weren’t covered. -
Seal:
If you plan to keep this pumpkin outside or for a long time, give it a light coat of matte sealant spray to protect the face from moisture.
Natural Texture
Work with the pumpkin’s ribs. Place the nose directly on a rib and the eyes in the grooves for a contoured look, or span across them for a flatter face.
Place your warm and cheerful creation on a windowsill for a cozy autumn greeting


Vampire Fangs and Drips

This striking no-carve design combines sharp, geometric lines with spooky, oozing details for a look that really pops. The high contrast of black and white paint against the bright orange skin creates a classic Halloween vibe without any of the mess of gutting a pumpkin.
Step-by-Step Guide
Materials
- Medium-sized orange pumpkin
- Black acrylic paint
- White acrylic paint
- Fine-point paintbrush
- Medium flat paintbrush
- Pencil for sketching
- Paper towel or rag
- Cup of water
- Clear acrylic sealer spray (optional)
Step 1: Planning and Sketching
-
Clean surface:
Begin by wiping down your pumpkin with a damp cloth to remove any dirt or oils that might prevent the paint from sticking. -
Dry thoroughly:
Ensure the surface is completely dry before you start sketching; paint won’t adhere well to a damp rind. -
Sketch the eyes:
Using a pencil, lightly draw two large, curved triangles for the eyes. Position them fairly high up on the pumpkin’s face. -
Outline the mouth:
Sketch a very wide crescent shape for the mouth. The top line should be slightly curved down, and the bottom, wider curve creates the grand smile. -
Add the teeth:
Inside the mouth outline, draw a series of sharp zigzags to create the teeth. Make the triangles tall and jagged for a menacing look. -
Sketch the drips:
At the bottom corners and center of the mouth, draw teardrop shapes extending downward to mimic oozing liquid.
Smooth Moves
If your pencil isn’t showing up well on the waxy skin, try using a dry-erase marker. It sketches easily and wipes off clean if you make a mistake.
Step 2: Painting the Face
-
Outline in black:
Take your fine-point brush and black acrylic paint to carefully trace over your pencil lines for the eyes and the main outline of the mouth. -
Fill the eyes:
Switch to a slightly larger brush if needed and fill in the triangular eye shapes completely with solid black paint. -
Create the reflection:
While the black paint is drying, clean your small brush thoroughly. Dip it in white paint and add a small, vertical oval near the inner corner of each eye. This ‘gleam’ brings the character to life. -
Fill the teeth:
Using the white paint and a steady hand, fill in the triangular teeth shapes inside the mouth. You may need two coats here to ensure the orange doesn’t show through. -
Dry the white:
Let the white teeth dry completely. If you paint the black outlines too soon over wet white paint, you’ll end up with gray smudges.
Step 3: Details and Finishing
-
Outline the teeth:
Once the white is dry, use your finest brush and black paint to outline each individual tooth, separating them from the white background. -
Fill the gaps:
Paint the small triangular spaces between the white teeth (the gums area) with black paint to create depth. -
Paint the drips:
Fill in the drip shapes hanging from the mouth with sold black paint. Round out the bottom of each drip so it looks like a heavy drop of liquid. -
Thicken the lines:
Go back over the main outline of the smile, making the line slightly bolder to frame the teeth and drips nicely. -
Touch up edges:
Look for any spot where the pencil marks are still visible or lines are shaky, and perform tiny touch-ups with your fine brush. -
Seal it up:
If you plan to keep this pumpkin outside, give the painted face a light coat of clear acrylic sealer spray once everything is bone dry.
Glow Up
Use glow-in-the-dark acrylic paint for the white sections of the teeth and the eye reflections. It looks normal in daylight but spooky at night.
Now you have a menacing, drippy grin that will last all season long without rotting
BRUSH GUIDE
The Right Brush for Every Stroke
From clean lines to bold texture — master brush choice, stroke control, and essential techniques.
Explore the Full Guide
Sugar-Skull Inspired Pumpkin Face
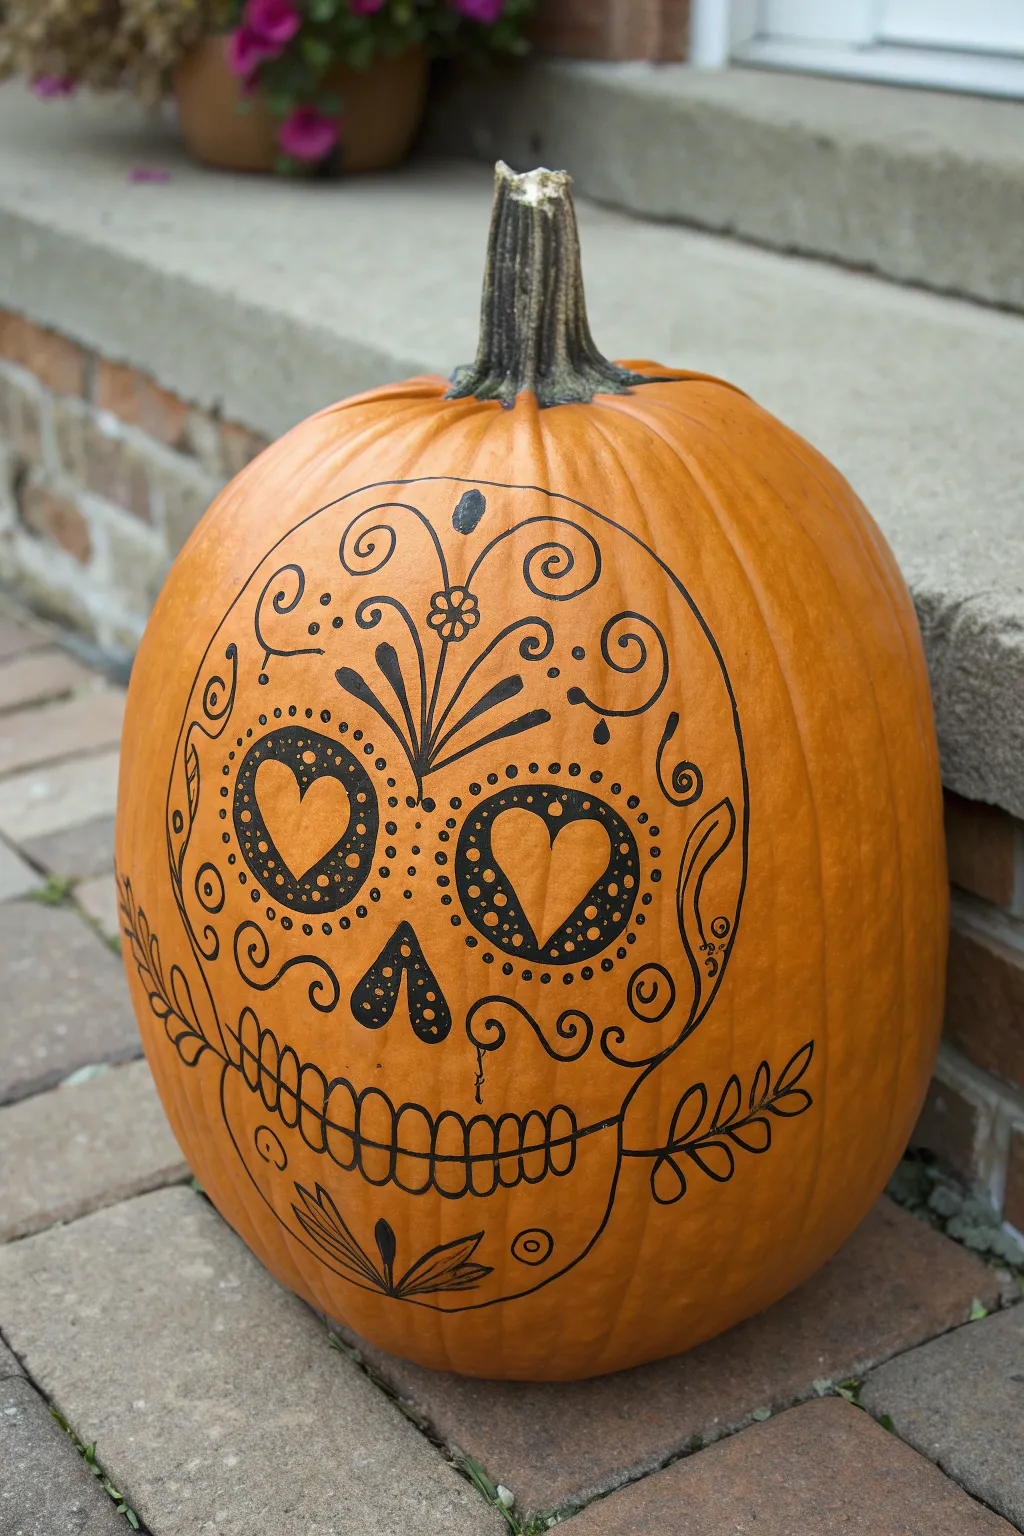
Embrace the spirit of Día de los Muertos with this elegant sugar skull design that skips the messy carving entirely. Using just a few simple drawing tools, you’ll transform a standard pumpkin into a festive work of art featuring heart-shaped eyes, floral flourishes, and intricate line work.
How-To Guide
Materials
- Medium to large orange pumpkin (smooth surface is best)
- Black permanent marker (fine tip)
- Black permanent marker (medium or broad tip)
- Pencil (HB or #2)
- Eraser
- Damp cloth
- Dry towel
Step 1: Preparation & Sketching
-
Clean and Dry:
Before you begin, wipe down the surface of your pumpkin with a damp cloth to remove any dirt or field dust. Dry it completely with a towel; even a little moisture can stop markers from adhering properly. -
Map the Face Shape:
Using a pencil, lightly sketch a very large, rounded upside-down teardrop shape or a simple oval on the flattest side of the pumpkin. This outline defines the skull’s boundary. -
Locate the Eyes:
Inside your skull outline, roughly halfway down, pencil in two large circles for the eye sockets. Don’t worry about the hearts yet; just get the placement balanced. -
Sketch the Nose:
Functioning as the center anchor point, draw an upside-down heart shape or a triangular spade shape just below the eye circles. -
Draft the Jaw and Mouth:
Draw a long horizontal line curving upward at the ends (like a gentle smile) across the lower third of the skull. Add vertical hash marks along this line to represent teeth. -
Add the Cheekbones:
Refine the outer skull shape by indenting the line slightly near the cheek area to give the skull true anatomical definition.
Smudge Control
Work from the top of the pumpkin downward to avoid dragging your hand through wet ink. If you’re left-handed, work from right to left as you fill in details.
Step 2: Inking the Core Features
-
Outline the Eyes:
Switch to your medium/broad tip permanent marker. Inside the pencil circles you drew earlier, outline distinct heart shapes. These are the actual eye sockets. -
Fill the Nose:
Using the broad marker again, trace the nose shape. I prefer to split the nose into two teardrop shapes joined at the top, leaving a tiny sliver of orange between them, then fill them in completely black. -
Detail the Eye Sockets:
Draw a larger circle around each black heart outline. Fill the space between the heart and the circle with solid black ink, but leave small dots or circles uncolored to create a decorative pattern within the shadow. -
Define the Mouth:
Go over your mouth line with the fine-tip marker. Draw the individual teeth as rounded rectangles rather than just sticks, giving them a skeletal look.
Step 3: Decorative Flourishes
-
Create the Forehead Swirls:
Starting from the center top of the forehead, draw a vertical stem with leaves branching out. At the top of the stem, draw two large spirals curling outward like ram’s horns. -
Add Floral Accents:
Between the large spirals, add a small four-petal flower and a few solid teardrop shapes fanning out to fill the gap. -
Embellish the Cheeks:
On the outer cheeks, draw large C-curve scrolls that hug the side of the face. Add smaller dots and circles alongside these curves for texture. -
Extended Leaf Details:
Draw a long vine extending horizontally from the corners of the mouth, adding simple leaf shapes along the stem. -
Chin Decoration:
At the very bottom of the skull (the chin area), draw a small fan of three leaves or petals pointing upward toward the mouth. -
Final Cleanup:
Wait about 10 minutes to ensure the ink is bone dry. Gently erase any visible pencil sketch lines, being careful not to smear the ink.
Add Dimension
Use a white paint pen to add small highlights inside the black areas (like the eye hearts) or to trace alongside the black lines to make the design pop.
Place your decorated pumpkin on the porch for a sophisticated and spooky greeting
Zombie Slack-Jaw Face
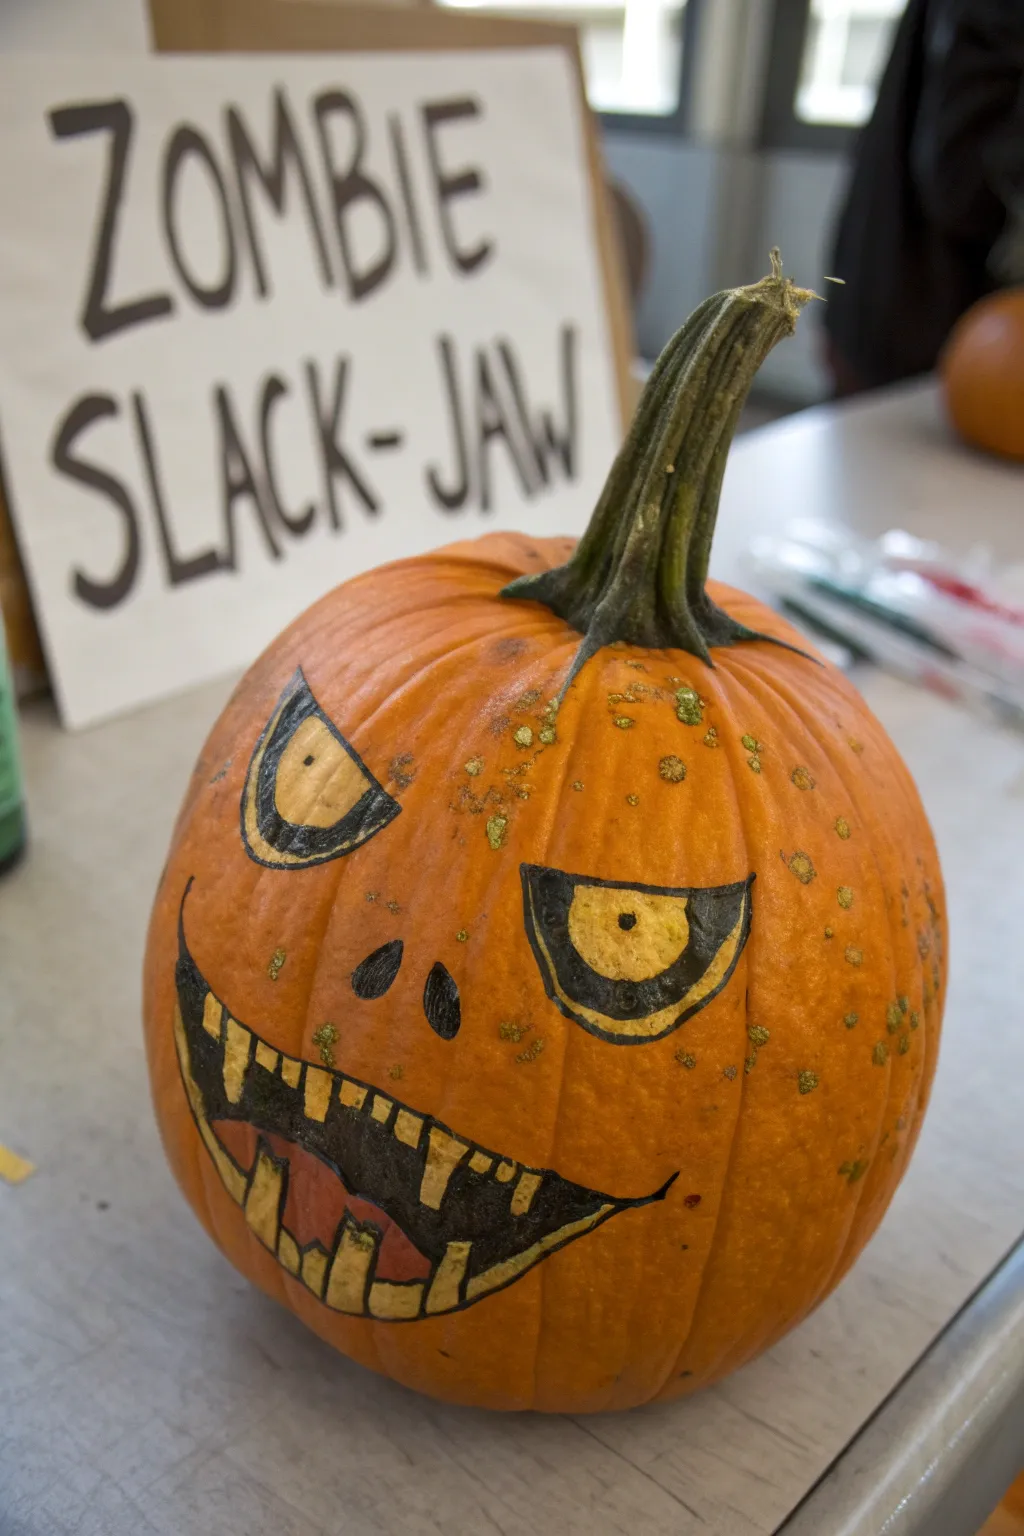
Bring your Halloween décor back from the dead with this comical zombie pumpkin design. Instead of carving, this project uses bold marker work to create sunken eyes and a gaping, toothy mouth that defines the “slack-jaw” look.
Step-by-Step Guide
Materials
- Medium-sized orange pumpkin
- Thick black permanent marker (e.g., Sharpie Magnum or Chisel Tip)
- Fine point black permanent marker
- Yellow or off-white paint pen (or acrylic paint)
- Pencil/Eraser (optional for sketching)
- Damp cloth
Step 1: Preparation & Outline
-
Clean the surface:
Before engaging in any artwork, wipe down your pumpkin with a damp cloth to remove any dirt or field dust. Dry it completely so your markers will adhere properly without skipping. -
Plan the slack-jaw:
Visualize the face placement. The most defining feature is the mouth, which should sit low and curve dramatically upward on the sides to create that unhinged jaw effect. You can lightly sketch the basic shapes with a pencil first if you want a guide. -
Outline the left eye:
Start with the left eye (looking at the pumpkin). Draw a slanted, half-moon shape or a tilted ‘D’ shape. The flat side should angle downward toward the nose area to create an angry or intense brow line. -
Outline the right eye:
For the right eye, create a slightly different shape to emphasize the zombie’s erratic nature. Draw a larger, squarish U-shape with a heavy upper lid line. Making the eyes asymmetrical is key to the undead character. -
Draw the nose:
Place two small, teardrop-shaped nostrils just below the eyes. Keep them relatively small compared to the eyes and mouth. -
Create the mouth outline:
Draw the large, open mouth shape. Start with a wide U-shape for the bottom lip, stretching almost to the sides of the pumpkin. Add the top lip line, keeping the mouth open wide to show off the teeth later.
Step 2: Adding Details & Filling In
-
Draw the pupils:
Inside each eye outline, draw a small circle for the pupil. Place them slightly off-center or mismatched—one looking up, one looking straight—to enhance the vacant zombie stare. -
Fill the pupils:
Use your fine point black marker to color in the pupil dots fully black. -
Thicken the outlines:
Go over your initial eye and nose outlines with the thick chisel-tip marker. I like to make the upper eyelids especially heavy to mimic dark, sunken circles. -
Sketch the teeth:
Inside the mouth opening, draw rectangular shapes for teeth along both the top and bottom ridges. Make them irregular sizes—some wide, some narrow—and leave gaps between a few to look like missing teeth. -
Add tooth definition:
Draw a smaller inner square inside each tooth shape. This creates a border around the tooth that separates the ‘enamel’ from the gum line or lip. -
Fill the mouth void:
Using your thickest black marker, color in all the negative space inside the mouth, working carefully around your drawn teeth. This dark background makes the teeth pop forward visually. -
Color the teeth and eyes:
Use your yellow or off-white paint pen to color inside the teeth and the whites of the eyes. This gives them an aged, rotting bone appearance that works perfectly against the orange rind. -
Add detail lines:
Take the fine point marker and add jagged, squiggly lines horizontally across the colored part of the teeth. These look like cracks or decay. -
Define the eye sockets:
Draw thick, sweeping curves underneath the eyes using the black marker to emphasize baggy, tired sockets. -
Add skin texture:
Dot the forehead and cheek areas with clusters of small black stippling or freckles. Use a green or yellow highlighter or paint pen to dab small spots of ‘rot’ randomly around the face for extra texture.
Marker Drying Out?
Pumpkins can be waxy. If your marker stops flowing, scribble on a scrap piece of paper to clear the wax buildup from the tip, then resume drawing.
Make it Glow
Use glow-in-the-dark paint for the teeth and eye whites. When the lights go out, your floating zombie face will look even spookier.
Your slack-jawed zombie is now ready to greet trick-or-treaters with a vacant stare

PENCIL GUIDE
Understanding Pencil Grades from H to B
From first sketch to finished drawing — learn pencil grades, line control, and shading techniques.
Explore the Full Guide
Freckled Pumpkin Portrait Face
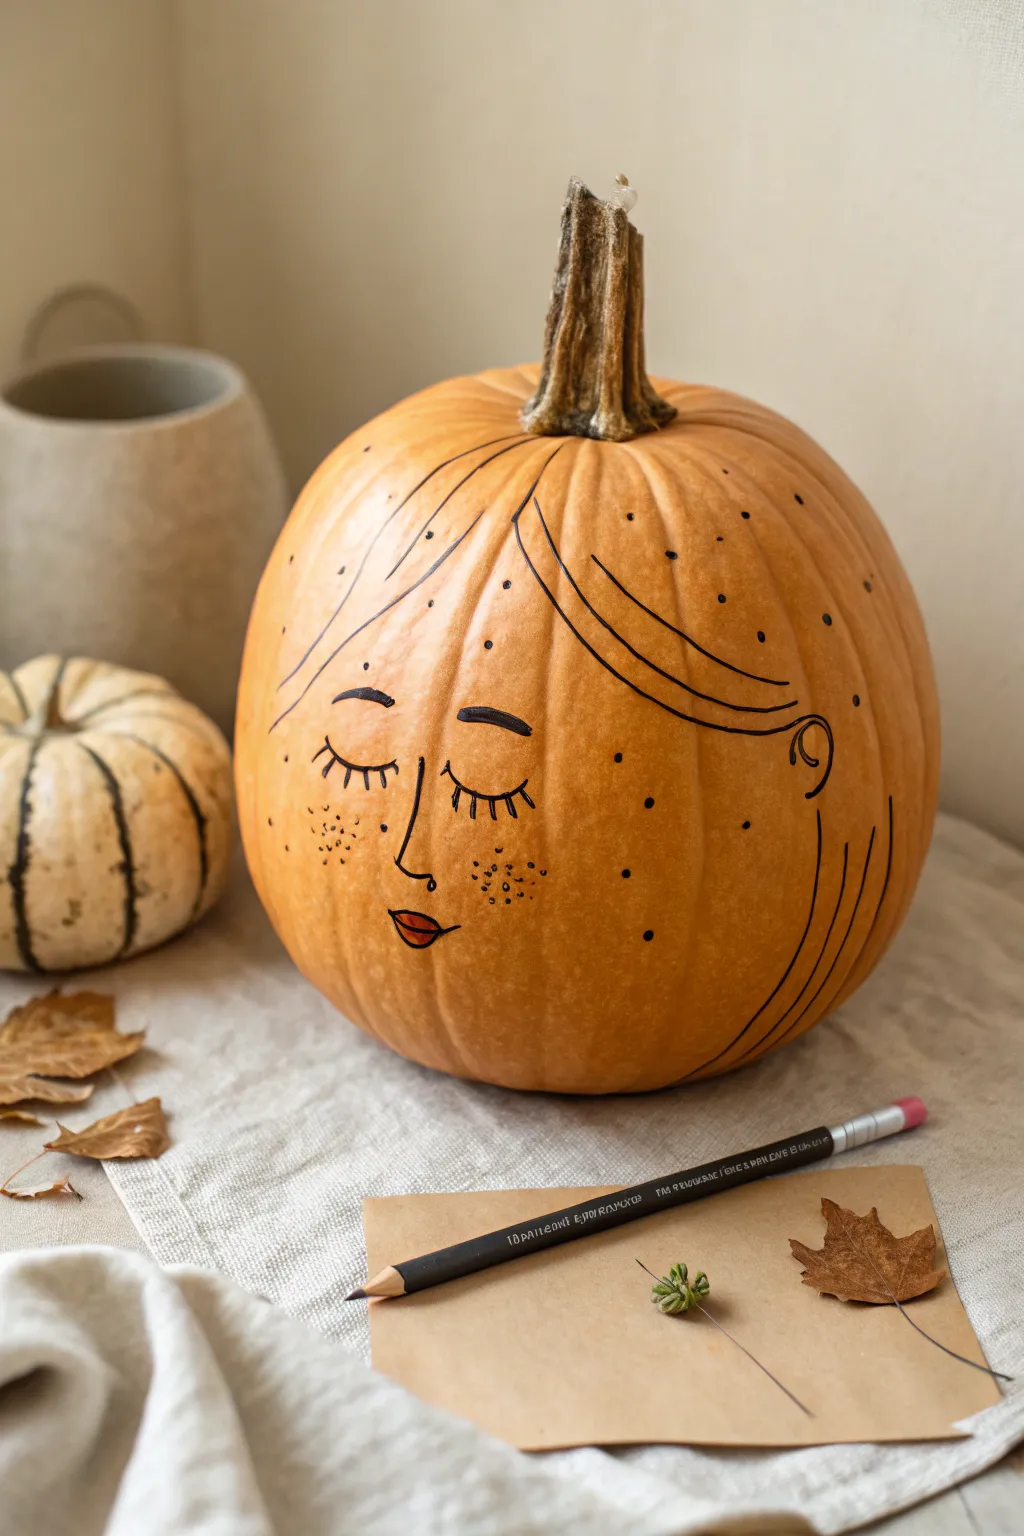
Capture the serene beauty of autumn with this minimalist pumpkin portrait art. Featuring gentle, sleeping eyes and a dusting of playful freckles, this no-carve project uses simple line work to transform an orange gourd into a peaceful character.
Detailed Instructions
Materials
- Medium-sized orange pumpkin (smooth surface preferred)
- Black permanent marker (fine and medium tip)
- Pencil (for light sketching)
- Red or coral paint pen (or fine brush and acrylic paint)
- Damp cloth
- Dry paper towel
Step 1: Preparation & Layout
-
Clean the surface:
Before starting any drawing, take a damp cloth and wipe down the entire surface of your pumpkin to remove dirt and oils. Dry it thoroughly with a paper towel to ensure your marker ink adheres properly. -
Orient the pumpkin:
Situate your pumpkin so the smoothest, most blemish-free side is facing you. This will serve as the canvas for the face. -
Sketch the hair outline:
Using a pencil very lightly, sketch the sweeping curves of the hair. Start from the top near the stem and draw long, swooping lines down the sides to frame the face area. -
Block in facial features:
Still using your pencil, mark the placement for the eyes, nose, lips, and the small ear curve on the right side. Keep these lines faint so they are easy to adjust.
Smudge Fixer
If permanent marker smears, quickly dab a Q-tip in rubbing alcohol and gently wipe the error. It works like an eraser on the pumpkin skin.
Step 2: Drawing the Base Lines
-
Trace the hair strands:
Switch to your medium-tip black permanent marker. Carefully trace over your pencil lines for the hair, using confident, fluid strokes. Allow the lines to taper off naturally towards the bottom of the pumpkin. -
Add hair volume:
Draw connection lines across the ‘forehead’ area to suggest bangs or parted hair. These lines should curve slightly downward to hug the round form of the pumpkin. -
Draw the ear:
On the right side of the face, draw a simple ‘C’ shape for the ear just under the hair line, adding a tiny swirl inside for detail. -
Create the eyebrows:
Draw two thick, slightly curved rectangles for eyebrows. Fill them in solid black to give the face a bold, modern look.
Floral Crown
Glue dried autumn leaves or small faux flowers around the stem to give your portrait character a seasonal floral crown.
Step 3: Adding Facial Details
-
Draw the sleeping eyes:
Create two large downward curves for the closed eyelids. I find it helps to draw these quickly to keep the arc smooth rather than shaky. -
Add delicate lashes:
Using the fine-tip marker, draw short, straight lines radiating downward from the eyelid curves to create eyelashes. -
Define the nose:
Draw a minimalist, angular ‘L’ shape for the nose. Keep it simple and positioned centrally between the eyes. -
Ink the lips:
Draw the outline of the lips below the nose. Create a small upper lip and a slightly fuller bottom lip. -
Color the lips:
Use your red or coral paint pen (or a fine brush with acrylic paint) to gently fill in the lips. Keep the color inside the black outlines for a crisp finish.
Step 4: Finishing Touches
-
Add the signature freckles:
Take your fine-tip black marker and dot the cheeks generously. Cluster them around the nose area and spread them out toward the ears. Vary their spacing to make them look natural. -
Add background dots:
Place scattered black dots around the hair and the outer edges of the face. These decorative spots add texture and whimsy to the overall design. -
Let the ink set:
Allow the pumpkin to sit untouched for at least 15 minutes to let the marker and paint dry completely. -
Clean up sketch lines:
Once clearly dry, take a soft eraser and gently remove any visible pencil marks that weren’t covered by the marker ink.
Place your lovely new art piece on a mantel or porch step to welcome the season with a peaceful smile


Have a question or want to share your own experience? I'd love to hear from you in the comments below!