If you want pumpkin decor that feels bold, clean, and a little tougher—painting is where it’s at. I’m talking high-contrast, moody tones, and designs that look at home on a shadowy porch, a workbench, or a minimalist shelf.
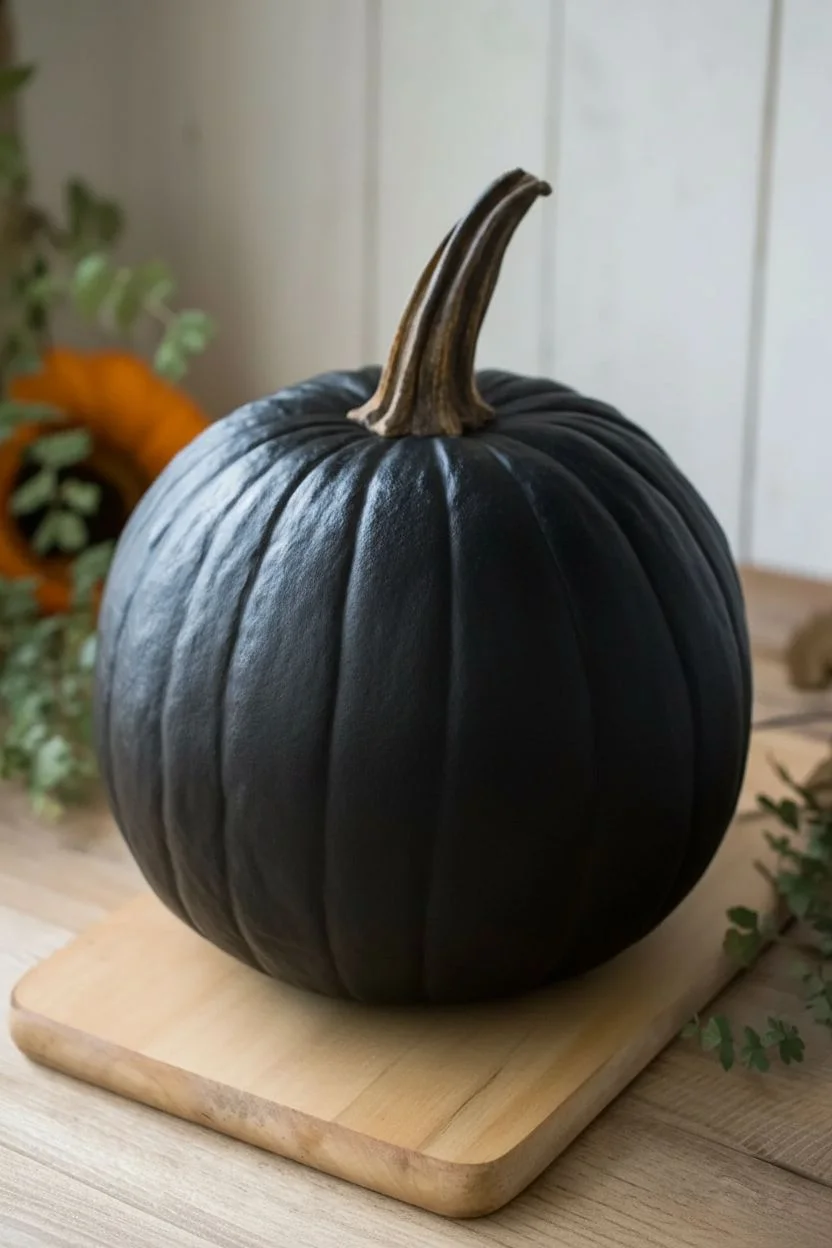
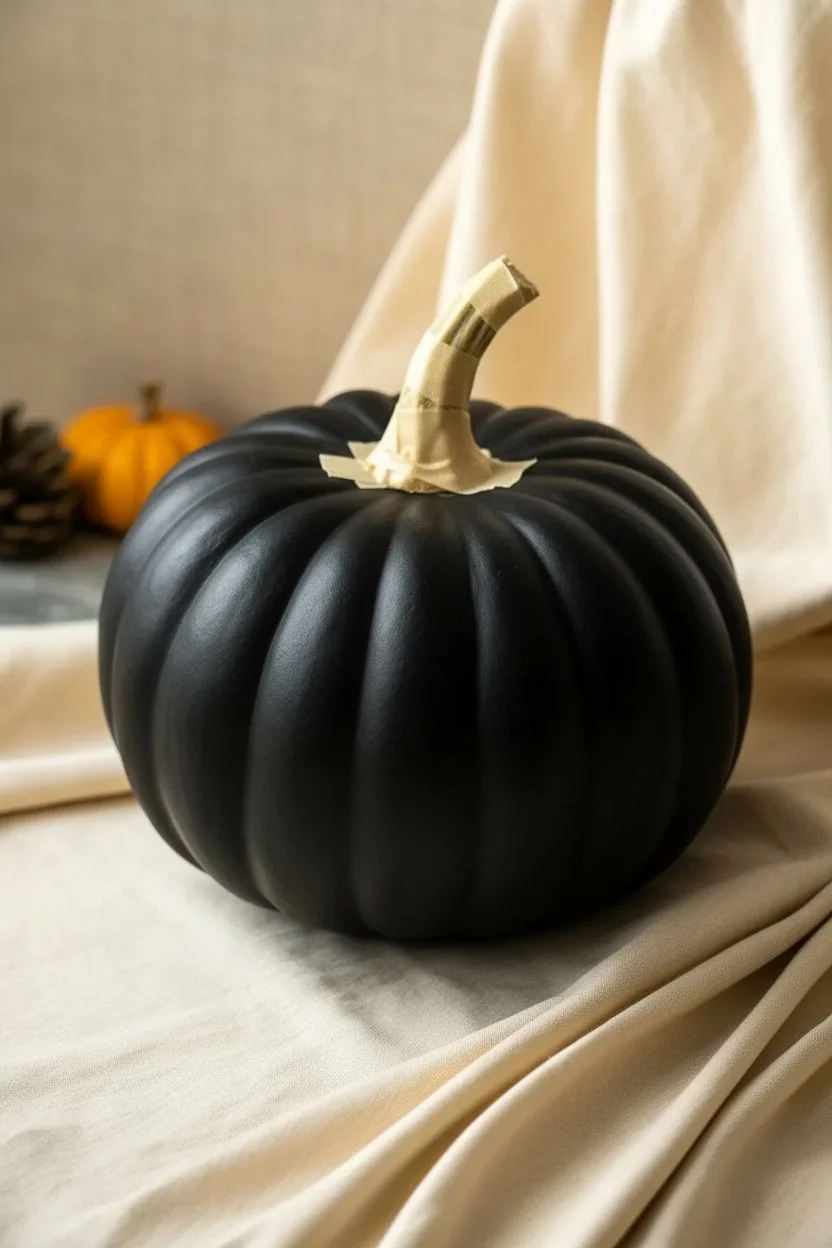
Classic Matte Black Pumpkin With Sharp White Highlights
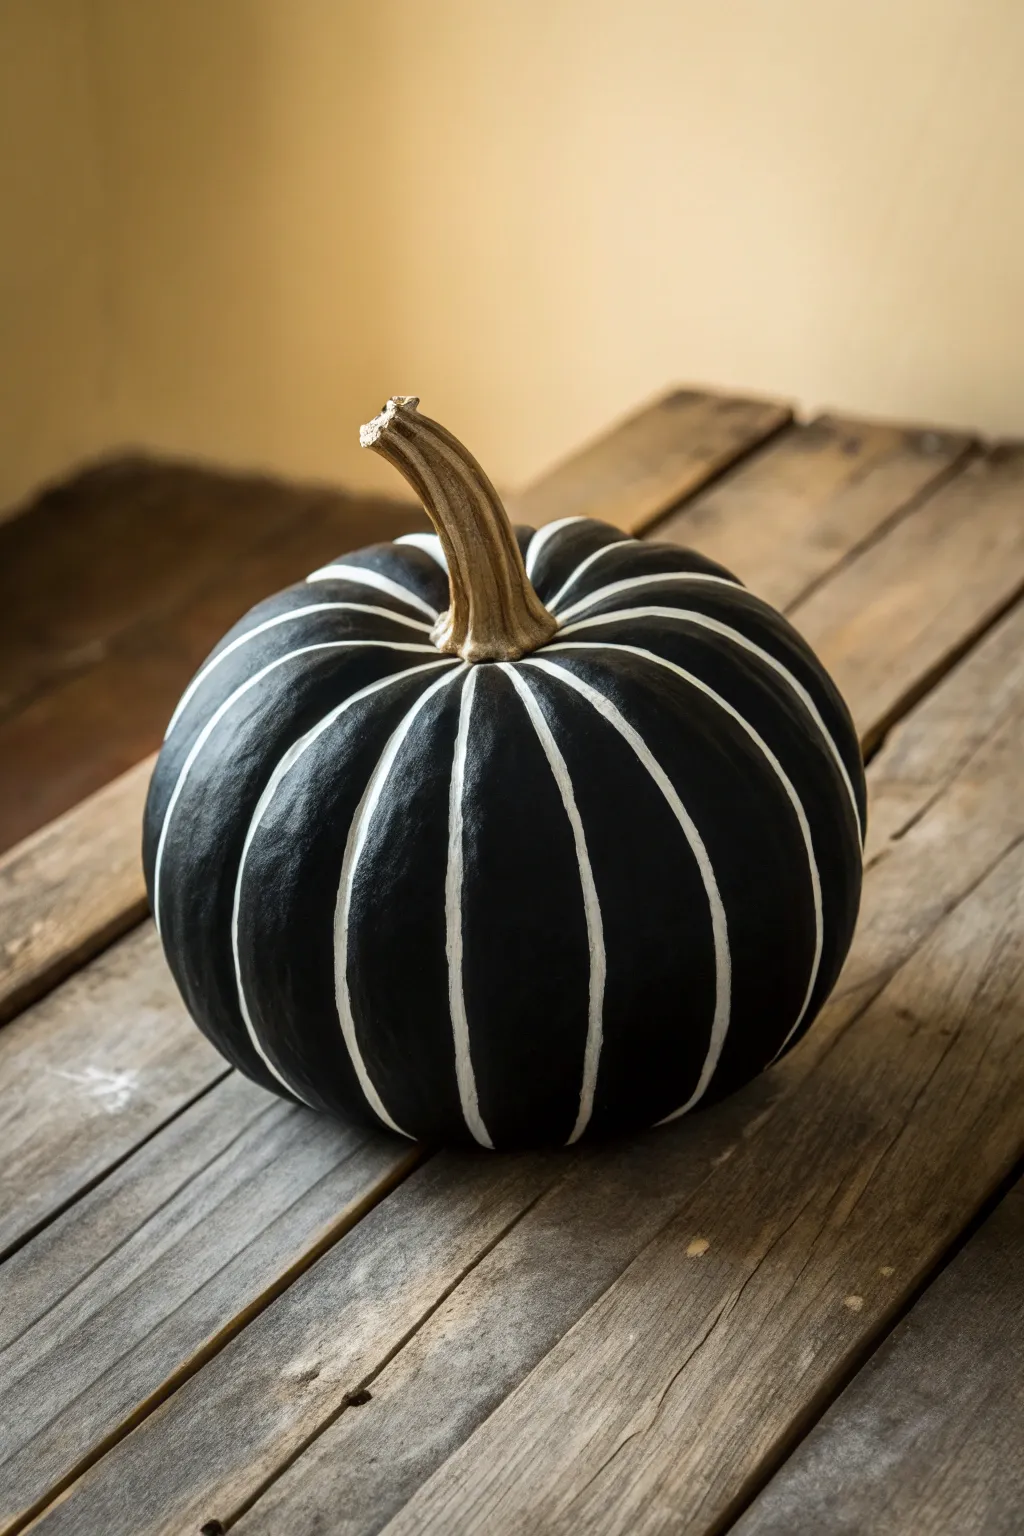
This sleek design transforms an ordinary gourd into a piece of modern, masculine décor with deep matte black paint and striking white pinstripes. By following the pumpkin’s natural ribs, you achieve a tailored look that feels sophisticated rather than spooky.
Step-by-Step
Materials
- Medium-sized pumpkin with deep, defined ribs
- Matte black acrylic craft paint
- White acrylic craft paint or opaque white paint pen
- Painter’s tape (optional)
- Medium flat paintbrush (approx. 1 inch)
- Fine detail paintbrush (size 1 or 2)
- Damp cloth or paper towel
- Clear matte sealer spray (optional)
- Palette or paper plate
Step 1: Preparation & Base Coat
-
Clean the surface:
Begin by wiping down your pumpkin thoroughly with a damp cloth to remove any dirt or field dust. Dry it completely to ensure the paint adheres properly. -
Protect the stem:
Carefully wrap the stem with painter’s tape to keep it natural and unpainted. If you trust your brush control, you can skip the tape, but it adds a nice safety net. -
First coat of black:
Using your medium flat brush, apply a layer of matte black acrylic paint over the entire pumpkin body. Brush vertically from top to bottom to minimize texture. -
Let it dry:
Allow the first coat to dry completely for about 20-30 minutes. The matte finish can be unforgiving if you drag a brush through wet paint. -
Check for coverage:
Inspect the pumpkin for any orange showing through. I often find a second coat is necessary for that deep, void-like black intensity. -
Apply second coat:
Apply the second layer of black paint if needed, ensuring full opacity. Let this layer dry completely—patience here prevents smudging later. -
Touch up the top:
Use a smaller brush to carefully paint the black right up to the base of the stem, ensuring a crisp line where the paint meets the natural stem texture.
Step 2: Adding the Highlights
-
Identify the valleys:
Locate the deepest part of the vertical grooves (ribs) running down the pumpkin. These natural indentations will serve as the guide for your white stripes. -
Prepare the white paint:
Load your fine detail brush with a creamy consistency of white acrylic paint. Alternatively, shake and prime a white paint pen if you prefer that tool. -
Start the stroke:
Starting near the stem (but not touching it), place your brush in the center of a groove. Pull the brush downward in a confident, steady motion. -
Complete the line:
Continue the line all the way to the bottom center of the pumpkin. Don’t worry if the width varies slightly; it adds organic character. -
Repeat around the pumpkin:
Rotate the pumpkin and continue painting a single white line down the center of every major groove. -
Refine the edges:
Go back over your white lines to sharpen edges or fill in thin spots. The white needs to be bright and opaque to pop against the black. -
Detailing the top and bottom:
Ensure the white lines taper off naturally near the stem and the base. They don’t need to connect at a single point; just letting them fade out looks professional. -
Clean up mistakes:
If any white paint strays outside the groove, wait for it to dry, then touch it up with a tiny bit of black paint on your smallest brush.
Pro Choice: Paint Pens
Struggling with brush control in the grooves? Swap the small brush for a medium-point white acrylic paint pen. It offers superior stability for long lines.
Step 3: Finishing Touches
-
Remove the tape:
If you used painter’s tape on the stem, carefully peel it away now to reveal the contrast between the natural wood tone and the painted skin. -
Seal the work:
For longevity, especially if displaying outdoors, spray the entire pumpkin with a light coat of clear matte sealer.
Fixing Wobbly Lines
If your white lines look shaky, don’t wipe them wet. Let them dry fully, then use the black base paint to carve back into the line and straighten the edge.
Place your sleek new pumpkin on a porch or mantle for an instantly upgraded, graphic look


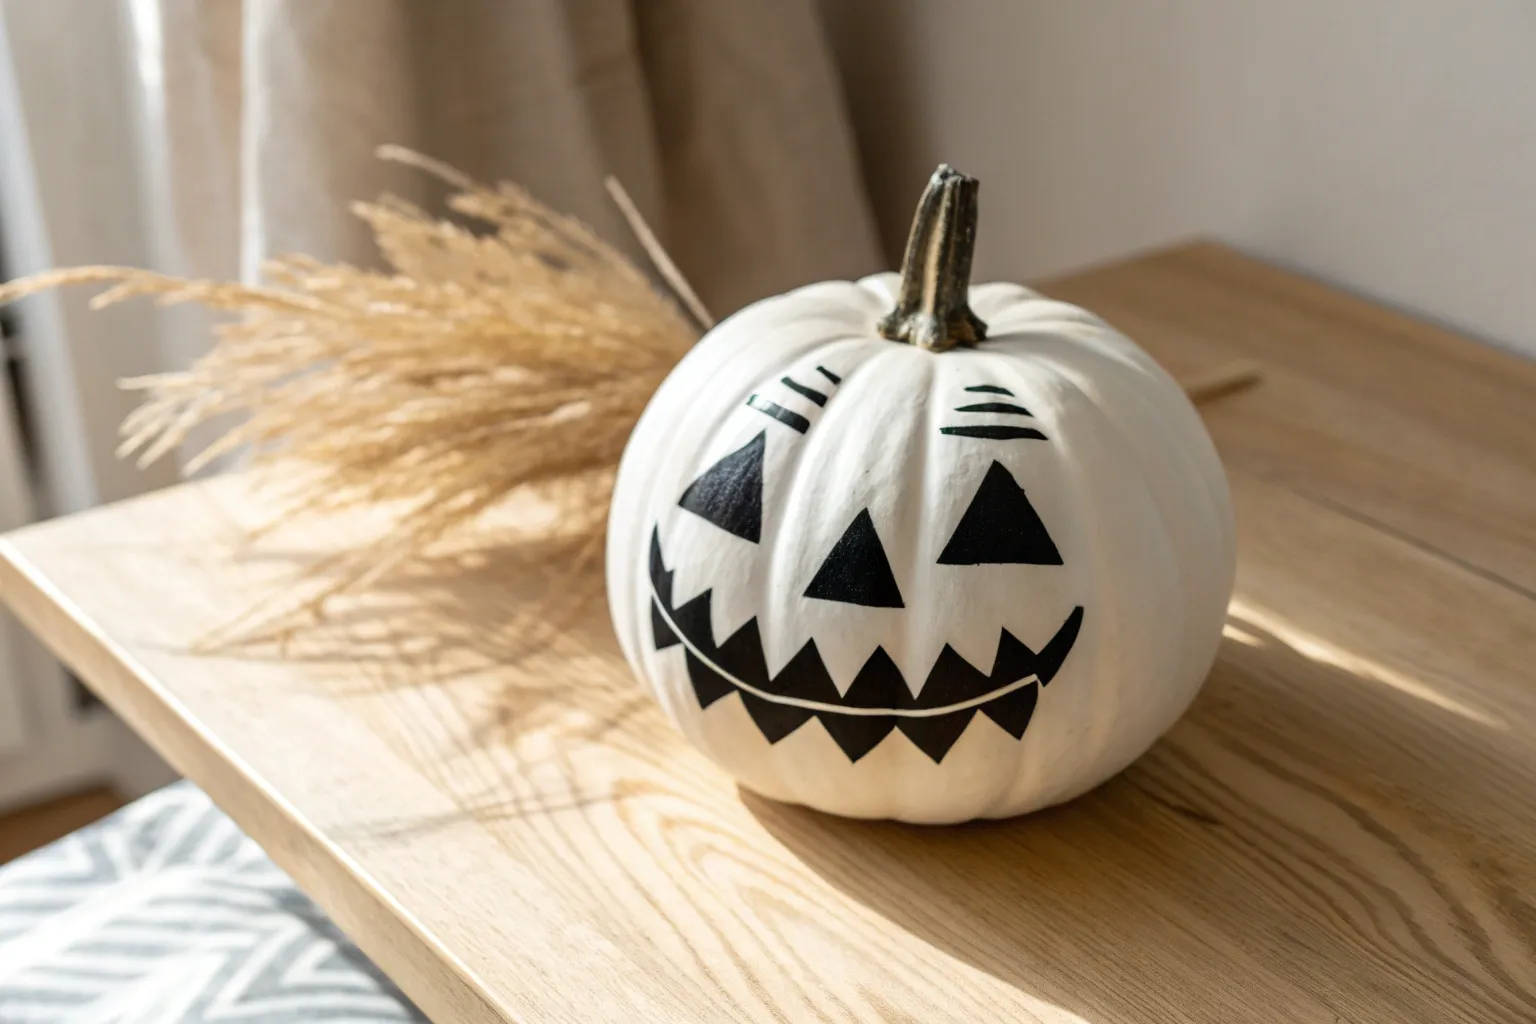
Skull Front-and-Center Pumpkin Portrait
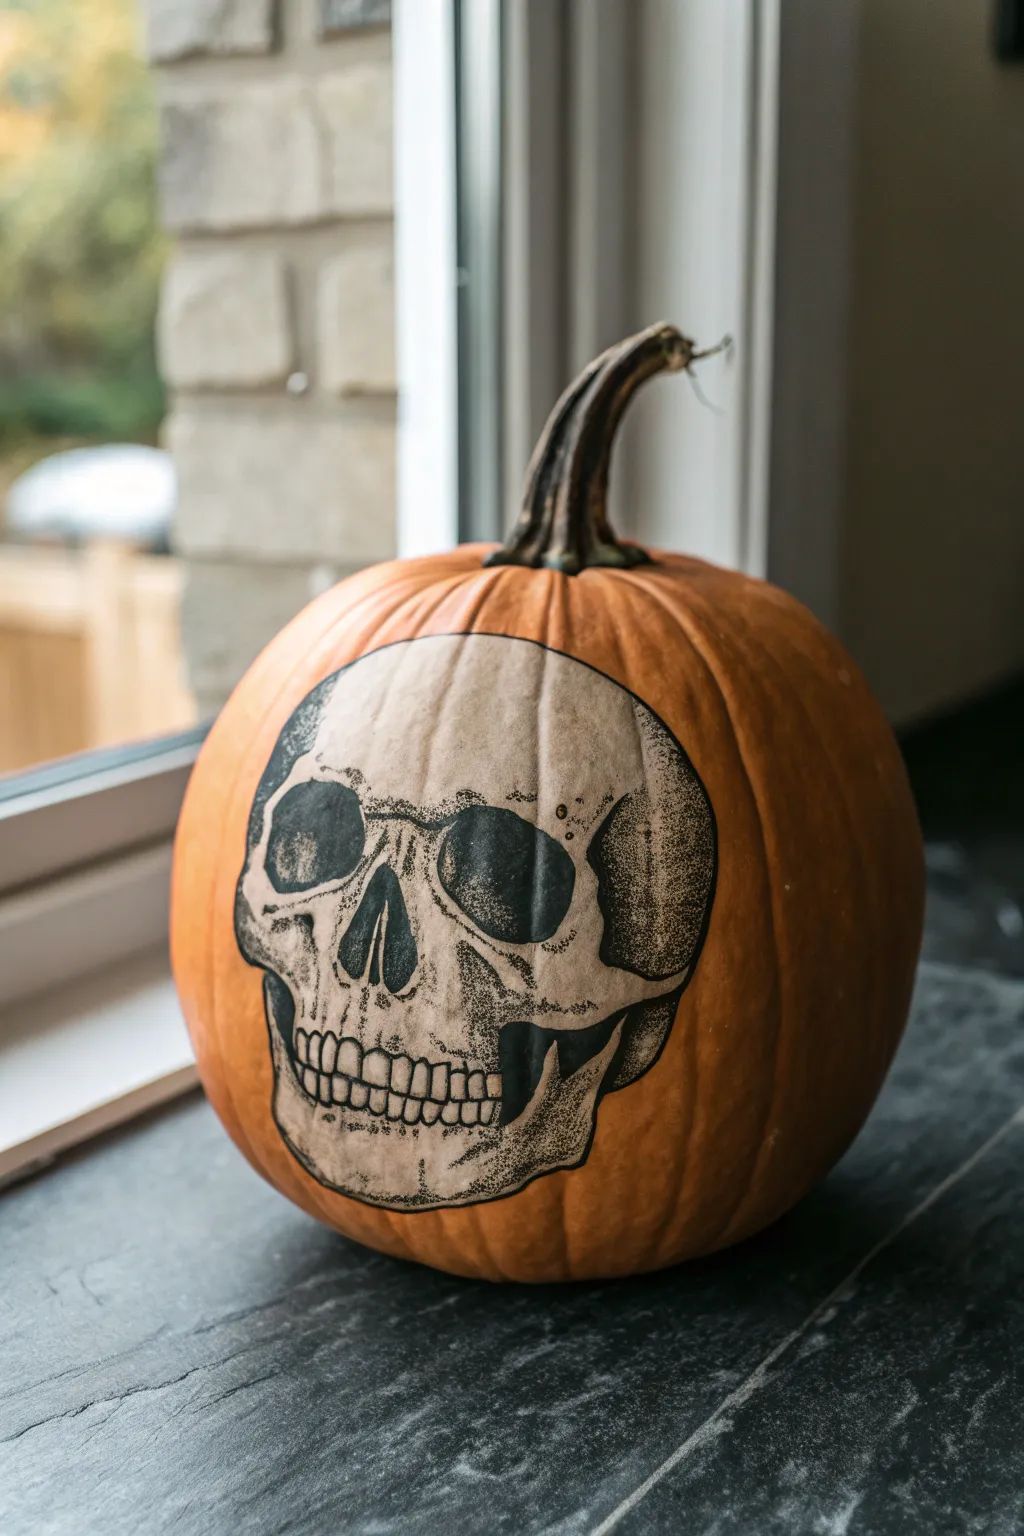
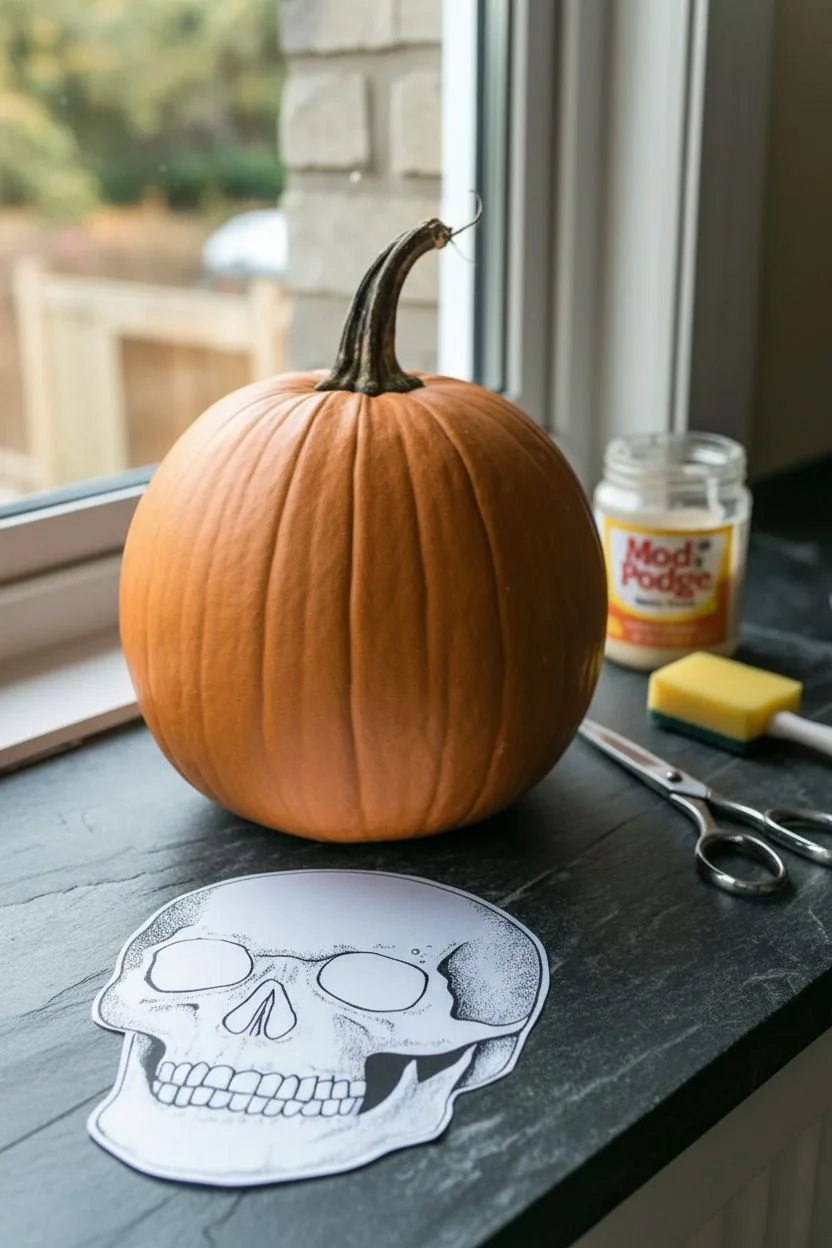
Skip the mess of carving and opt for high-impact artistry with this realistic skull transfer technique. This project uses decoupage or careful illustration transfer to place a medically accurate, vintage-style skull right on the face of your pumpkin.
Step-by-Step Guide
Materials
- Medium-sized orange pumpkin (smooth surface preferred)
- Laser-printed skull illustration (vintage anatomy style)
- Mod Podge (Matte finish)
- Scissors or precision craft knife
- Sponge brush or soft bristle brush
- Damp cloth or bowl of water
- Fine-grit sandpaper (optional)
- Black fine-point permanent marker or liner pen (for touch-ups)
- Acrylic matte sealer spray
Step 1: Preparation & Image Selection
-
Choose your image:
Find a high-contrast vintage anatomy illustration of a skull. The image should be black ink on a white background with clear stippling or hatching details for that classic look. -
Resize and print:
Measure the face of your pumpkin to determine the optimal size for the skull. Resize your image digitally and print it on standard printer paper using a laser printer—inkjet ink may bleed when wet. -
Clean the canvas:
Wipe down your pumpkin thoroughly with a damp cloth to remove any dirt or field dust. Dry it completely. -
Surface smoothing:
I like to run a fine-grit sandpaper lightly over the painting area if the pumpkin has stiff bumps or warty textures. This helps the paper adhere much flatter. -
Cut out the design:
Use scissors to cut out the skull shape. You don’t need to be surgically precise right at the black lines yet; leave a very small white margin around the edge for easier handling.
Wrinkle Release
Make small relief cuts (tiny slits) along the curved edges of the paper before gluing. This allows the flat paper to overlap slightly and conform to the round pumpkin without big creases.
Step 2: Applying the Transfer
-
Apply the medium:
Using a sponge brush, apply a generous, even layer of Mod Podge directly onto the area of the pumpkin where the skull will sit. -
Coast the back:
Quickly apply a thin layer of Mod Podge to the back of your paper cutout as well to ensure a strong bond. -
Position the skull:
Place the paper onto the wet, sticky area of the pumpkin. Center it carefully, as you won’t have much time to slide it around once it touches the surface. -
Smooth it out:
Starting from the center of the nose cavity, use your fingers or a clean dry sponge to press the paper down. Work outward toward the edges to push out air bubbles. -
Handle the curves:
Because pumpkins are round and paper is flat, you will encounter wrinkles. Gently pleat or fold the paper at the edges where necessary, smoothing them down so they lie flat. -
Seal the top:
Immediately brush another layer of Mod Podge over the top of the adhered image. This seals the paper and helps merge the edges with the pumpkin skin.
Ink Bleeding?
If you only have an inkjet printer, spray the printed paper with a clear acrylic fixative and let it dry completely before starting. This locks the ink so the glue won’t smear it.
Step 3: Finishing Touches
-
Let it cure:
Allow the project to dry completely. This usually takes about 1-2 hours, depending on humidity. The glue will turn from white to clear. -
Check the edges:
Inspect the perimeter of the skull. If any white paper edges are lifting, dab a tiny bit more glue under them and press firmly until stuck. -
Enhance the blacks:
Once fully dry, the black ink might look slightly faded from the glue. Use a fine-point permanent marker to darken the deepest shadows, like the eye sockets and nasal cavity, to restore contrast. -
Blend the seams:
If the white paper edge is too visible against the orange skin, use a stippling motion with your marker to create small dots around the perimeter, blending the paper line into the pumpkin’s texture. -
Final seal:
Take the pumpkin outside and give the artwork a light misting of acrylic matte sealer spray. This protects the paper from moisture and gives the entire piece a uniform finish.
Now you have a striking, highly detailed centerpiece that looks far more complex than it actually is


Haunted House Silhouette Pumpkin in Black and Orange
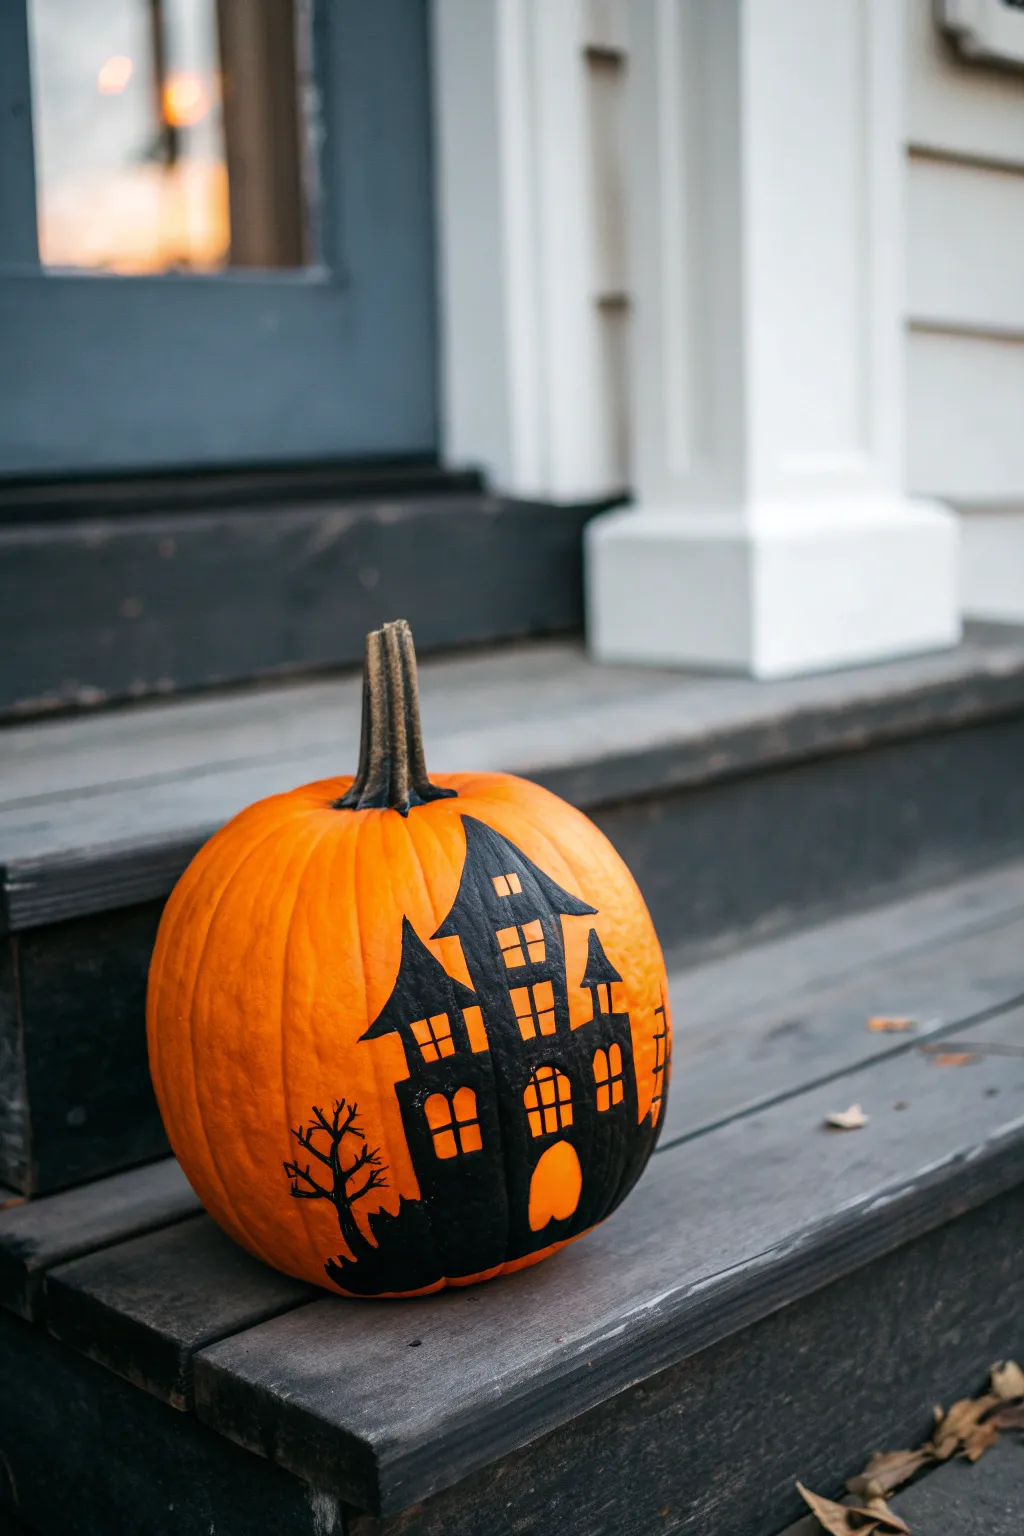
Transform a classic orange gourd into a spooky scene with this high-contrast silhouette design. The sharp black lines of the haunted house against the bright pumpkin skin create a striking, eerie effect that’s perfect for porch displays without the mess of carving.
Step-by-Step
Materials
- Medium-sized orange pumpkin (wiped clean)
- Black matte acrylic paint
- Painter’s tape or masking tape
- Fine-point permanent marker or pencil
- Small flat paintbrush
- Fine detail paintbrush (liner brush)
- Haunted house stencil (optional)
- Exacto knife or craft knife (for tape)
- Damp cloth
- Clear acrylic sealer spray (optional)
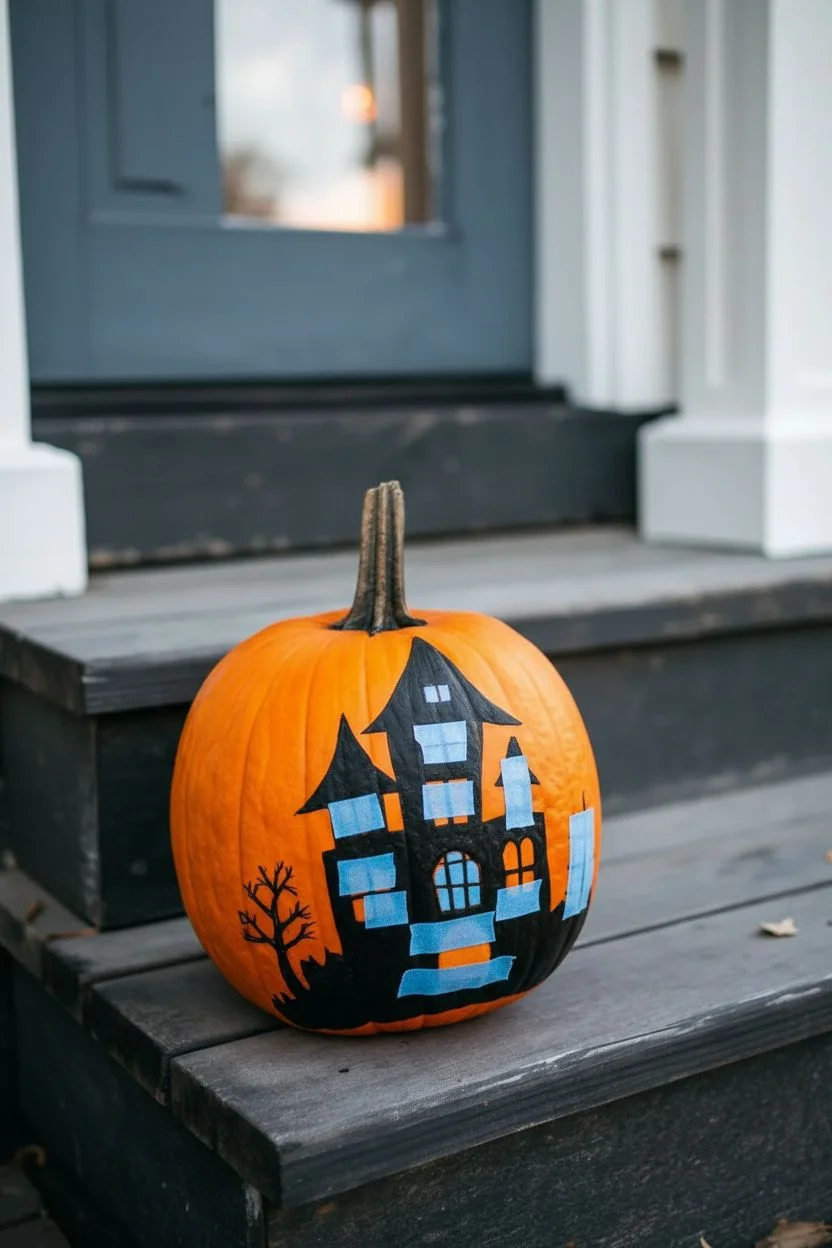
Step 1: Planning the Architecture
-
Clean surface:
Begin by wiping down your pumpkin with a damp cloth to remove any dirt or field dust. Let it dry completely so the adhesive and paint will stick properly. -
Map the windows:
Decide where your glowing windows will be. Cut small squares and rectangles from painter’s tape to represent the window panes. You can create arched windows by curving the top of a rectangular piece with scissors beforehand. -
Apply window masks:
Press these tape pieces firmly onto the pumpkin face in the arrangement of your house. Group them to form distinct floors and towers. Ensure edges are sealed tight so paint won’t bleed underneath. -
Sketch the outline:
For the house structure, use a pencil or a light touch with a fine-point permanent marker to draw the outline of the roof, walls, and towers around your taped windows. Don’t worry about being perfect; spooky houses look better when they are a bit crooked. -
Add landscape details:
Extend your sketch to the bottom, drawing uneven ground or hills. Sketch a simple skeletal tree shape on one side, keeping the branches distinct enough to paint around later.
Bleeding Lines?
If paint seeps under your tape, let it dry completely. Then, use a toothpick or a dull knife to gently scrape the excess paint off the orange skin. It usually flakes right off.
Step 2: Painting the Silhouette
-
Outline in paint:
Using your fine detail brush and black matte acrylic paint, carefully trace over your sketched outline. Keep your hand steady to create sharp, crisp edges for the roof peaks and eaves. -
Paint the bulk:
Switch to a small flat brush to fill in the larger areas of the house walls. Apply the paint somewhat thickly to ensure full opacity, covering the orange skin completely within the silhouette. -
Paint over tape:
Paint directly over your taped window masks. Don’t be afraid to cover them entirely; this ensures the ‘mullions’ (the dividers between window panes) are painted crisply when the tape is removed. -
Tackle the tree:
Return to your fine detail liner brush for the tree. Paint the trunk first, then gently pull the paint outward to create thin, spindly branches. I find it easier to pull the brush away from the trunk rather than pushing into it. -
Ground the scene:
Fill in the bottom area to create the ground silhouette, connecting the house and the tree into one cohesive black mass. This anchors the design visually. -
Second coat:
Let the first layer dry for about 15-20 minutes. If you see any orange peeking through the black, apply a second coat to get that deep, solid shadow look.
Make It Glow
For a ‘level_up’ effect, use yellow fluorescent or glow-in-the-dark paint inside the window spaces instead of leaving them bare orange. It makes the house look inhabited at night.
Step 3: Revealing the Light
-
Dry time:
Allow the paint to dry fully to the touch. This usually takes about an hour, depending on humidity. -
Remove tape:
Very carefully peel off the painter’s tape squares using the tip of a craft knife or your fingernail. Pull slowly at a 45-degree angle to reveal the bright orange pumpkin skin beneath. -
Clean up edges:
If any paint bled under the tape, use the tip of a craft knife to gently scrape it away. You can also touch up the black lines between window panes with your fine brush if they look ragged. -
Add window bars:
For larger windows, use the very tip of your detail brush to paint thin vertical or horizontal lines across the exposed orange space, creating the look of window bars. -
Seal it (optional):
If this pumpkin will live outside, give the painted area a light misting of clear acrylic sealer to protect it from moisture.
Place your haunted masterpiece on the porch stairs for a sophisticated scare that lasts all season


Creepy Eyeball and Teeth Pumpkin Face
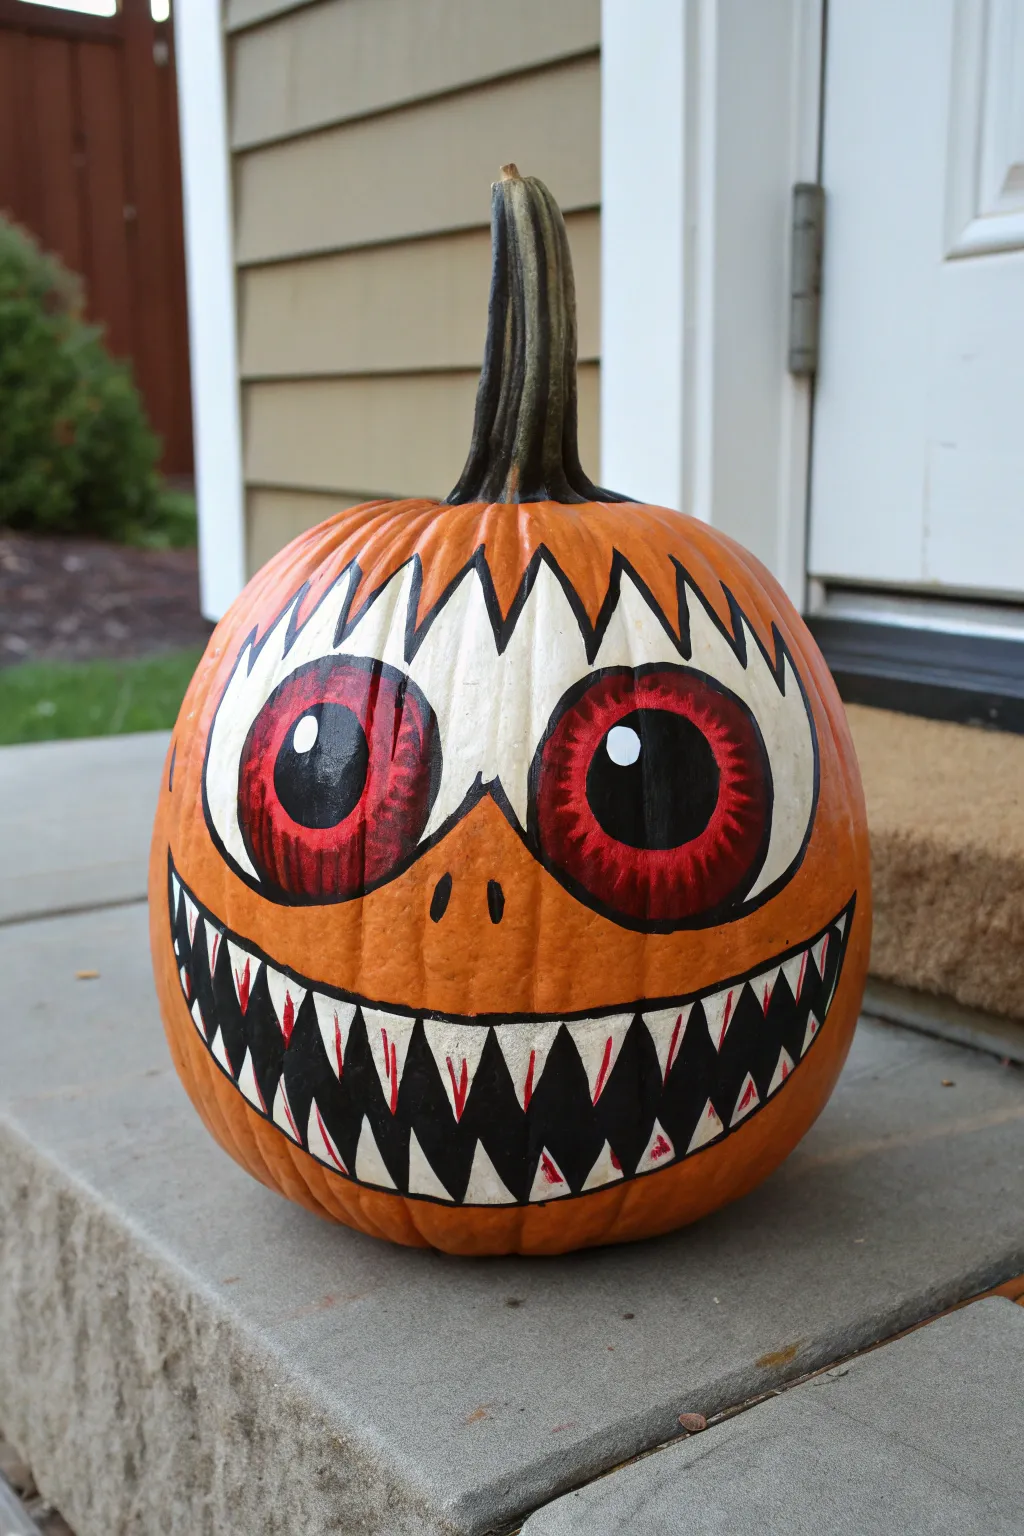
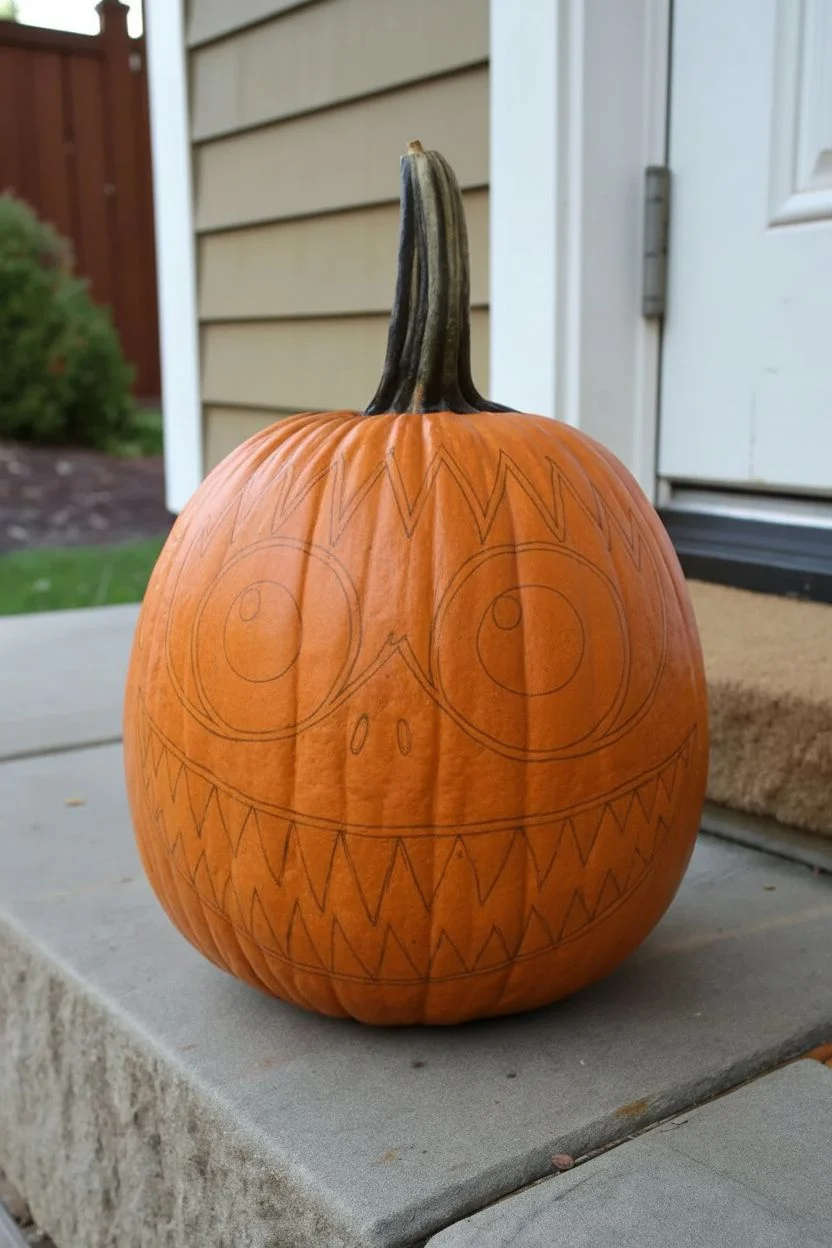
Transform a standard orange pumpkin into a menacing monster with this striking painted design. Featuring oversized bloodshot eyes and a jagged, toothy maw, this project relies on bold acrylic paints rather than carving tools to create a frightful front-porch guardian.
Step-by-Step Guide
Materials
- Medium-sized orange pumpkin (cleaned and dried)
- White acrylic paint
- Black acrylic paint
- Red acrylic paint
- Medium flat paintbrush
- Small round detail brush
- Pencil or light marker for sketching
- Cup of water
- Paper towels
- Sealer spray (optional gloss or matte)
Step 1: Planning the Face
-
Clean surface:
Begin by wiping down your pumpkin with a damp cloth to remove any dirt or oils. Let it dry completely so the paint adheres properly. -
Sketch the eyes:
Using a pencil, lightly outline two very large circles for the eyes. Position them high on the pumpkin, leaving a small gap between them. -
Add the jagged brows:
Above the eye circles, sketch a series of sharp, jagged triangles pointing upward. Connect these jagged lines to form a mask-like shape around the top of the eyes. -
Outline the mouth:
Draw a wide, curved smile that stretches across the lower half of the pumpkin. Inside this shape, sketch sharp, triangular teeth on both the top and bottom, interlocking them like a zipper.
Pro Tip: Brighter Whites
Painting white over orange can be tough. Paint a base layer of light gray or yellow first to neutralize the orange, then add your white topcoat for brightness.
Step 2: Blocking in the Base Colors
-
Paint the white areas:
Using a medium flat brush, fill in the jagged brow area and the outer whites of the eyes with white acrylic paint. You will likely need two coats for opaque coverage. -
Fill the teeth:
Switch to a smaller brush if needed and carefully paint each tooth white. Take your time to keep the points sharp. -
Dry time:
Allow the white paint to dry completely. If you proceed too quickly, the red and black layers will turn pink or grey.
Troubleshooting: Shaky Lines
If your black outlines look wobble-y, switch to a black permeant marker or paint pen. It gives you much more control than a brush for fine details.
Step 3: Adding the Ghoulish Details
-
Paint the irises:
Paint large red circles inside the white eye areas. Leave a ring of white visible around the outside of the red circles. -
Add texture to the eyes:
While the red is still slightly tacky or after it dries, use a small brush with a tiny bit of black or darker red to add small streaks radiating from the center, giving the iris a fibrous look. -
Create the pupils:
Paint a large, solid black circle in the center of each red iris. Make these quite large to give the character an intense stare. -
Add the eye sparkle:
Dip the handle end of a paintbrush into white paint and dot a small highlight in the upper right or left corner of each black pupil. This brings the character to life instantly. -
Paint the nostrils:
Between the eyes and the mouth, paint two small, vertical teardrop shapes in black for the nostrils.
Step 4: Defining the Grin
-
Black out the mouth:
Using a small round brush and black paint, carefully fill in the negative space between the white teeth. This creates the dark void of the mouth. -
Outline the features:
Outline the entire white eye mask area and the outer edge of the mouth with a thin black line. This cartoon-style outlining makes the design pop from a distance. -
Outline the teeth:
Very carefully outline each individual tooth with a fine black line to separate them from the gums and the background. -
Bloody details:
For a creepy touch, use a very dry brush with a tiny amount of red paint to add faint scratches or blood stains on the tips of the teeth. -
Final touches:
Check for any uneven edges. I personally like to smooth out the black outline around the eyes one last time to ensure it looks crisp. -
Seal (Optional):
Once fully dry, you can spray the painted area with a clear acrylic sealer to protect it from moisture if the pumpkin will be displayed outdoors.
Place your menacing masterpiece on the porch to stare down trick-or-treaters all night long
BRUSH GUIDE
The Right Brush for Every Stroke
From clean lines to bold texture — master brush choice, stroke control, and essential techniques.
Explore the Full Guide
Barbed Wire Wrap Illusion in High Contrast
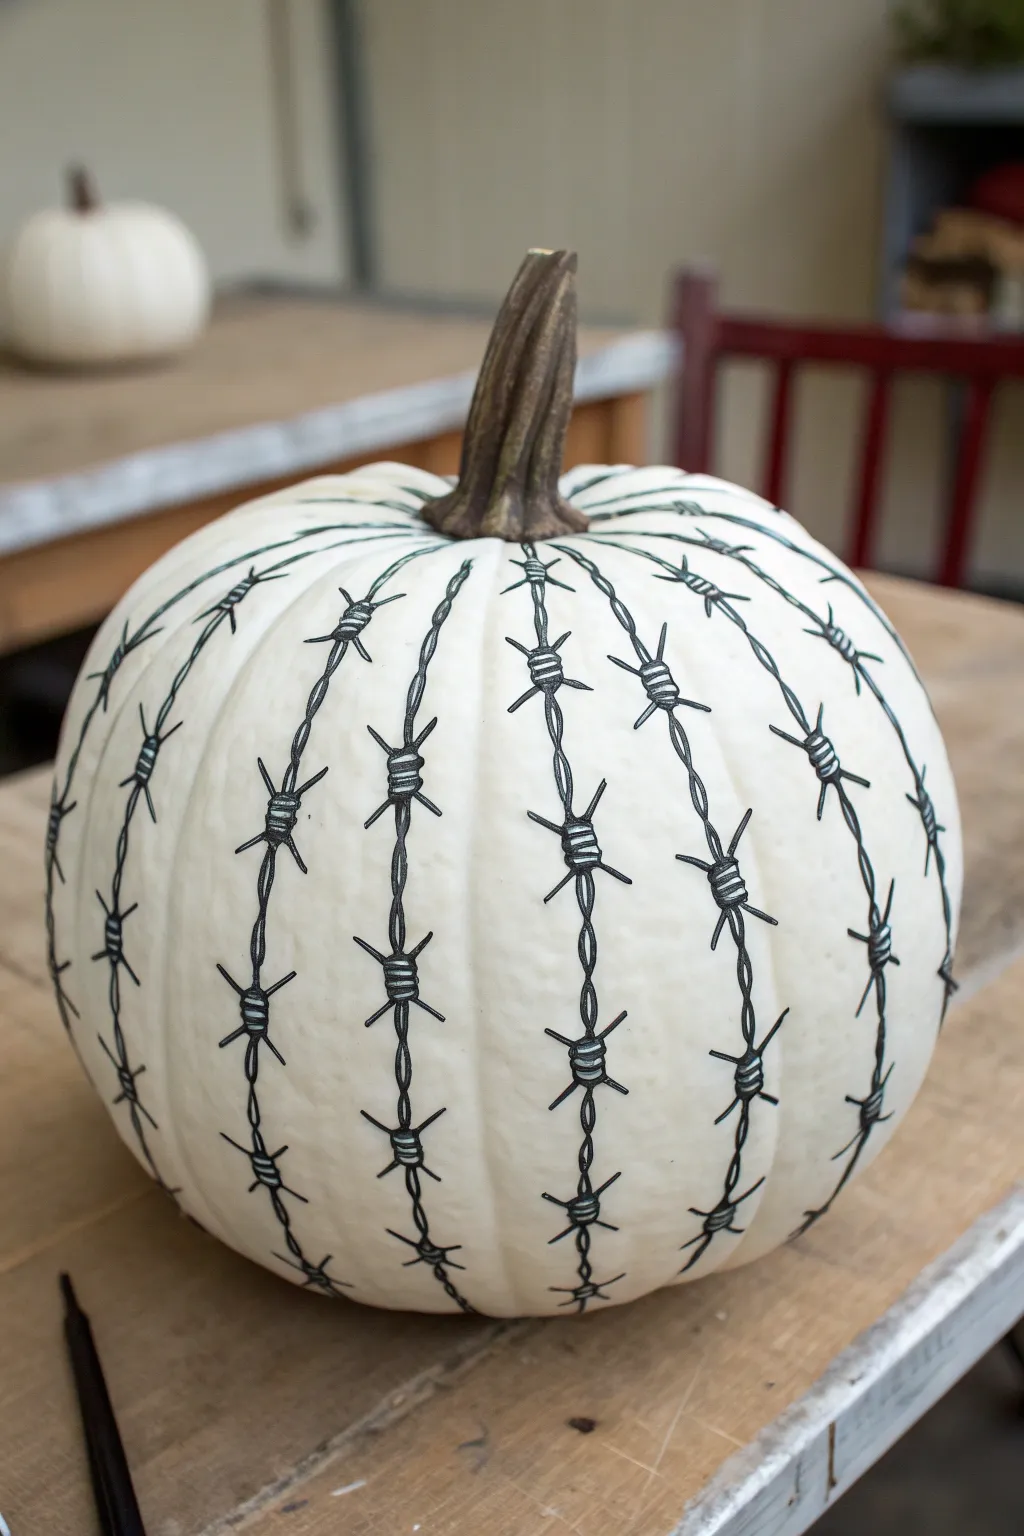
Achieve a rugged, edgy look with this high-contrast design that turns a simple pumpkin into a statement piece. By carefully illustration sharp lines on a pale background, you can create a convincing optical illusion of wrapped barbed wire.
Detailed Instructions
Materials
- Medium to large pumpkin (white or off-white varieties like Lumina or Casper worked best)
- Black paint marker (fine point)
- Black paint marker (medium point)
- Pencil (HB or 2B)
- Eraser
- Silver or metallic grey paint marker (fine point)
- Damp cloth
- Clear matte sealant spray (optional)
Step 1: Preparation and Planning
-
Clean surface:
Begin by wiping down your white pumpkin with a damp cloth to remove any dirt or field dust. The surface needs to be completely dry and smooth for the markers to adhere properly. -
Identify ridges:
Study the natural vertical ridges of your pumpkin. This design works best when it follows the pumpkin’s existing contours, so mentally map out which valleys you want the ‘wire’ to follow. -
Sketch guides:
Using a pencil, lightly trace single vertical lines down the center of each groove where you plan to place the barbed wire. Keep these sketching lines faint so they are easy to cover or erase later.
Smudge Control
Work from the top down and rotate the pumpkin frequently. If you’re right-handed, work from left to right to keep your palm off fresh ink.
Step 2: Drawing the Main Wire
-
Draw the main strand:
Take your medium-point black paint marker and trace over your pencil lines. Draw a twisted effect by creating slightly wavy, overlapping segments rather than a perfect straight line. -
Add twist details:
To make the wire look like two strands twisted together, add small diagonal hash marks inside the line you just drew. This subtle texture mimics the braided steel look of real fencing wire. -
Correct spacing:
Pause to check your spacing. You won’t drawing barbs on every inch of wire; mark small dots with your pencil about 2-3 inches apart along each vertical strand to indicate where the knot clusters will go. -
Stagger the clusters:
Try to stagger the placement of the barbs on adjacent vertical lines so they aren’t all perfectly aligned horizontally. This creates a more organic, realistic appearance.
Step 3: Creating the Barbs
-
Draw the central knot:
At your first marked spot, draw a small, tight horizontal coil or cylinder shape right over the main wire line. It should look like a small spring wrapped around the strand. -
Detail the coil:
Use the fine-point black marker to add definition to the coil, drawing 3-4 distinct rings to show the wrapping. -
Add the first barb:
From the top side of the coil, draw a sharp, angular spike pointing diagonally upward and outward. Make the tip sharp and triangular. -
Add the opposing barb:
From the bottom side of the coil, draw a second spike pointing diagonally downward and outward in the opposite direction. -
Create the cross-spike:
Draw two more shorter spikes emerging from the sides of the coil, creating an ‘X’ shape when viewed head-on. This creates the dimension needed for the 3D effect. -
Repeat the process:
Move down the line and repeat this barb construction at every marked interval. I like to rotate the pumpkin as I work to prevent smudging wet ink with my hand.
Realism Pro-Tip
Vary the length of your spikes slightly. Perfect symmetry looks fake; slight imperfections make the ‘wire’ look genuinely manufactured and worn.
Step 4: Adding Highlights and Finish
-
Wait for drying:
Allow the black ink to dry completely for at least 15 minutes before moving on to highlights. -
Apply metallic accents:
Take your silver or metallic grey paint marker and add tiny highlights to the center of the coil rings and along the top edge of the wire strands. -
Highlight the tips:
Add a tiny dot of silver to the very tip of each barb spike. This small detail makes the ‘metal’ look like it catches the light. -
Clean up sketch lines:
Once you are certain all paint is dry, gently use your eraser to remove any visible pencil guidelines that weren’t covered by the ink. -
Seal the art:
If you plan to display this outdoors, give the pumpkin a light coat of clear matte sealant spray to protect the marker from moisture.
Place your finished pumpkin on a rustic wooden crate or step to complete the industrial farmhouse vibe
Gothic Bat Swarm Pumpkin With a Full Moon
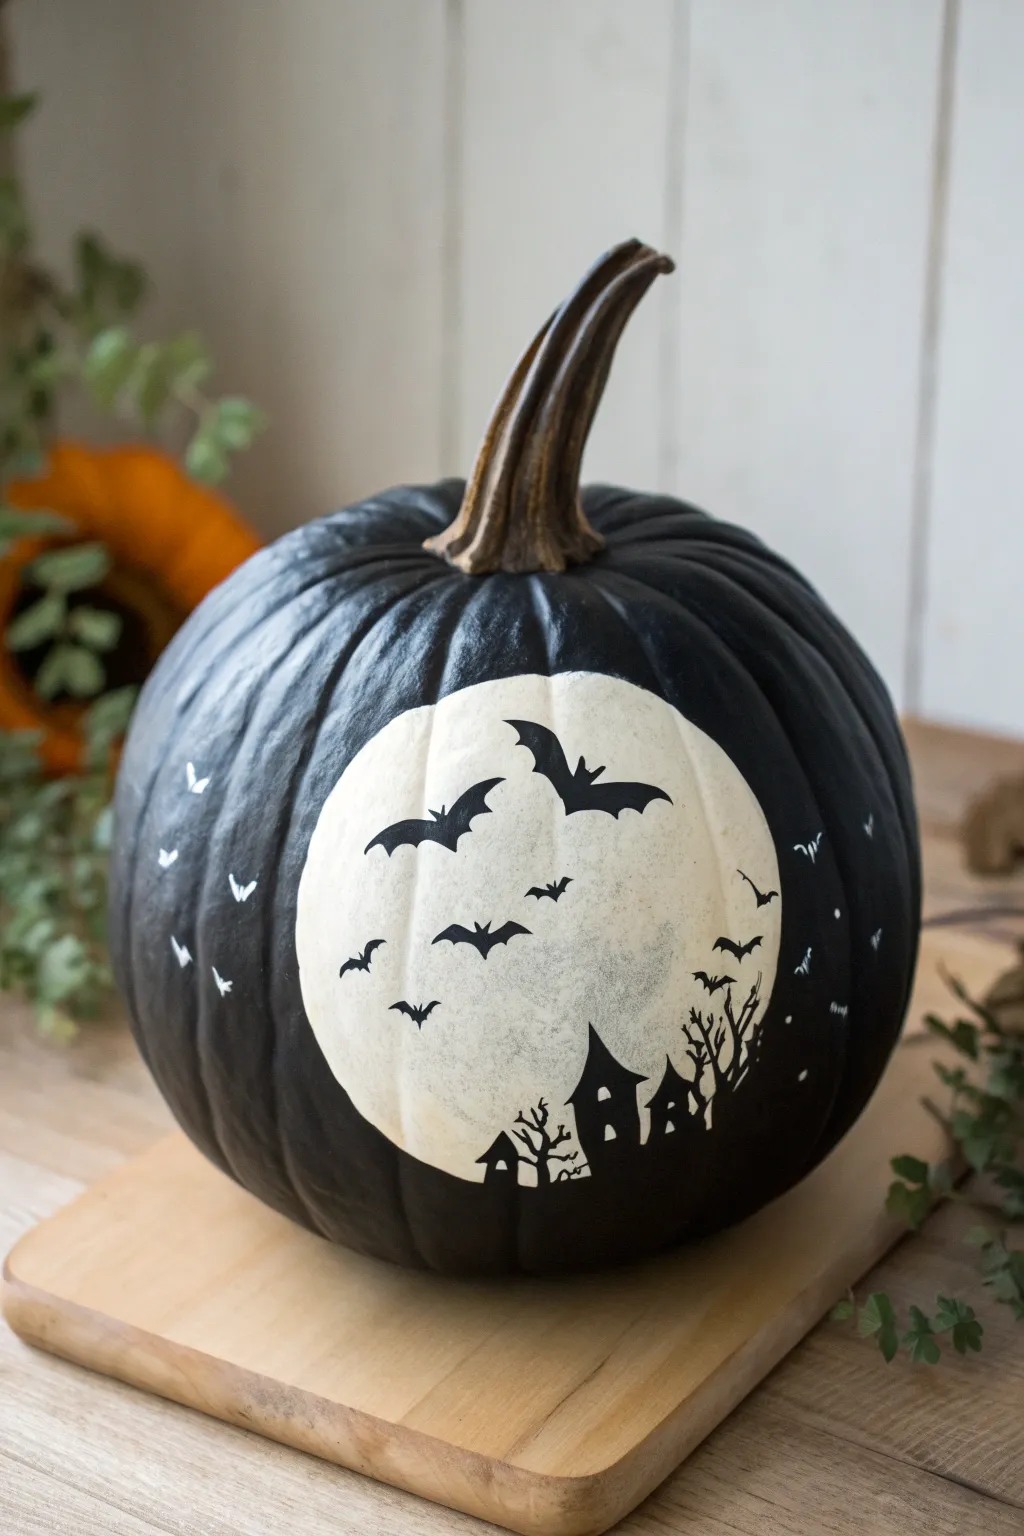
Embrace a darker aesthetic with this sophisticated painted pumpkin featuring a stark white moon set against a matte black background. Silhouetted bats and spooky architecture create a dramatic, high-contrast scene that is perfect for a gothic-inspired Halloween display.
How-To Guide
Materials
- Medium-sized pumpkin (real or faux)
- Matte black acrylic paint
- Titanium white acrylic paint
- Large flat paintbrush
- Medium round paintbrush
- Fine detail liner brush
- Pencil or chalk
- Round object for tracing (like a bowl or plate)
- Palette or paper plate
- Water cup and paper towels
- Black fine-point paint marker (optional)
- Spray sealant (matte finish)
Step 1: Setting the Dark Stage
-
Clean the surface:
Begin by thoroughly wiping down your pumpkin with a damp cloth to remove any dirt or oils. If you are using a real pumpkin, ensure it is completely dry before you start painting. -
Apply base coat:
Using your large flat brush, apply a generous coat of matte black acrylic paint over the entire pumpkin, excluding the stem. Work the paint into the vertical grooves for full coverage. -
Dry and repeat:
Allow the first layer to dry completely. Add a second or even third coat until the orange skin is entirely hidden and the finish is opaque and velvety. -
Highlight the stem:
Leave the stem natural for contrast, or if it got messy, carefully clean up the base where the stem meets the pumpkin skin with a small wet brush.
Moon Shape Trick
If you struggle to paint a perfect circle on a bumpy pumpkin, use a round sponge stipple brush or a stencil to stamp the initial white shape.
Step 2: Creating the Moon
-
Trace the moon:
Once the black base is bone dry, position your round object (like a small bowl) on the front of the pumpkin. Lightly trace around it with a pencil or a piece of white chalk to mark your moon’s boundary. -
Fill in the circle:
Load a medium round brush with titanium white paint. Carefully fill in the circle you just traced. I find it easiest to outline the edge first and then fill the center. -
Layer the white:
White paint over black often looks streaky at first. Let each layer dry fully before adding another. You will likely need 3-4 thin coats to achieve that bright, solid lunar glow. -
Create texture:
For the final white layer, dab the brush slightly rather than smoothly stroking it. This creates a subtle texture that mimics the cratered surface of a real moon.
Level Up: Glow Effect
Mix a tiny drop of glow-in-the-dark medium into your final coat of white paint. The moon will faintly glow green when the lights go out.
Step 3: Painting the Silhouettes
-
Outline the focal bats:
Switch to your fine detail liner brush or a black paint marker. Sketch the outlines of three or four large bats directly onto the upper half of the white moon. -
Fill the large bats:
Fill in these bat shapes with black paint, ensuring their wings have jagged, sharp edges for a spooky effect. Vary their sizes to create a sense of depth and perspective. -
Add distant flock:
Paint smaller, simpler ‘V’ shapes or tiny bat silhouettes lower down in the moon and off to the sides to represent bats flying further away. -
Anchor the design:
At the very bottom of the white circle, paint the silhouette of a haunted house or castle. Use simple geometric shapes—triangles for roofs and rectangles for buildings. -
Detail the landscape:
Add gnarled, leafless trees emerging from the sides of the house silhouette. Use the very tip of your liner brush to drag out thin, wiggly branches that reach upward. -
White accent bats:
To integrate the design with the rest of the pumpkin, use your fine brush and white paint to add tiny bat silhouettes ‘flying’ outside the moon area, directly onto the black background. -
Refine edges:
Check the edges of your moon. If the black silhouettes look messy, touch them up. If the white circle edge is uneven, carefully correct it with black paint from the outside.
Step 4: Finishing Touches
-
Check for opacity:
Look closely at your silhouettes. If the white moon shows through the black bats, add another quick layer of black to make them solid and bold. -
Seal the work:
Once all paint is completely cured (give it a few hours), spray the entire pumpkin with a matte clear sealant. This protects the paint from scratching and moisture.
Place your masterpiece on a porch or mantle to let the bats take flight into the night

PENCIL GUIDE
Understanding Pencil Grades from H to B
From first sketch to finished drawing — learn pencil grades, line control, and shading techniques.
Explore the Full Guide
Minimalist Geometric Pumpkin in Black, White, and Gray
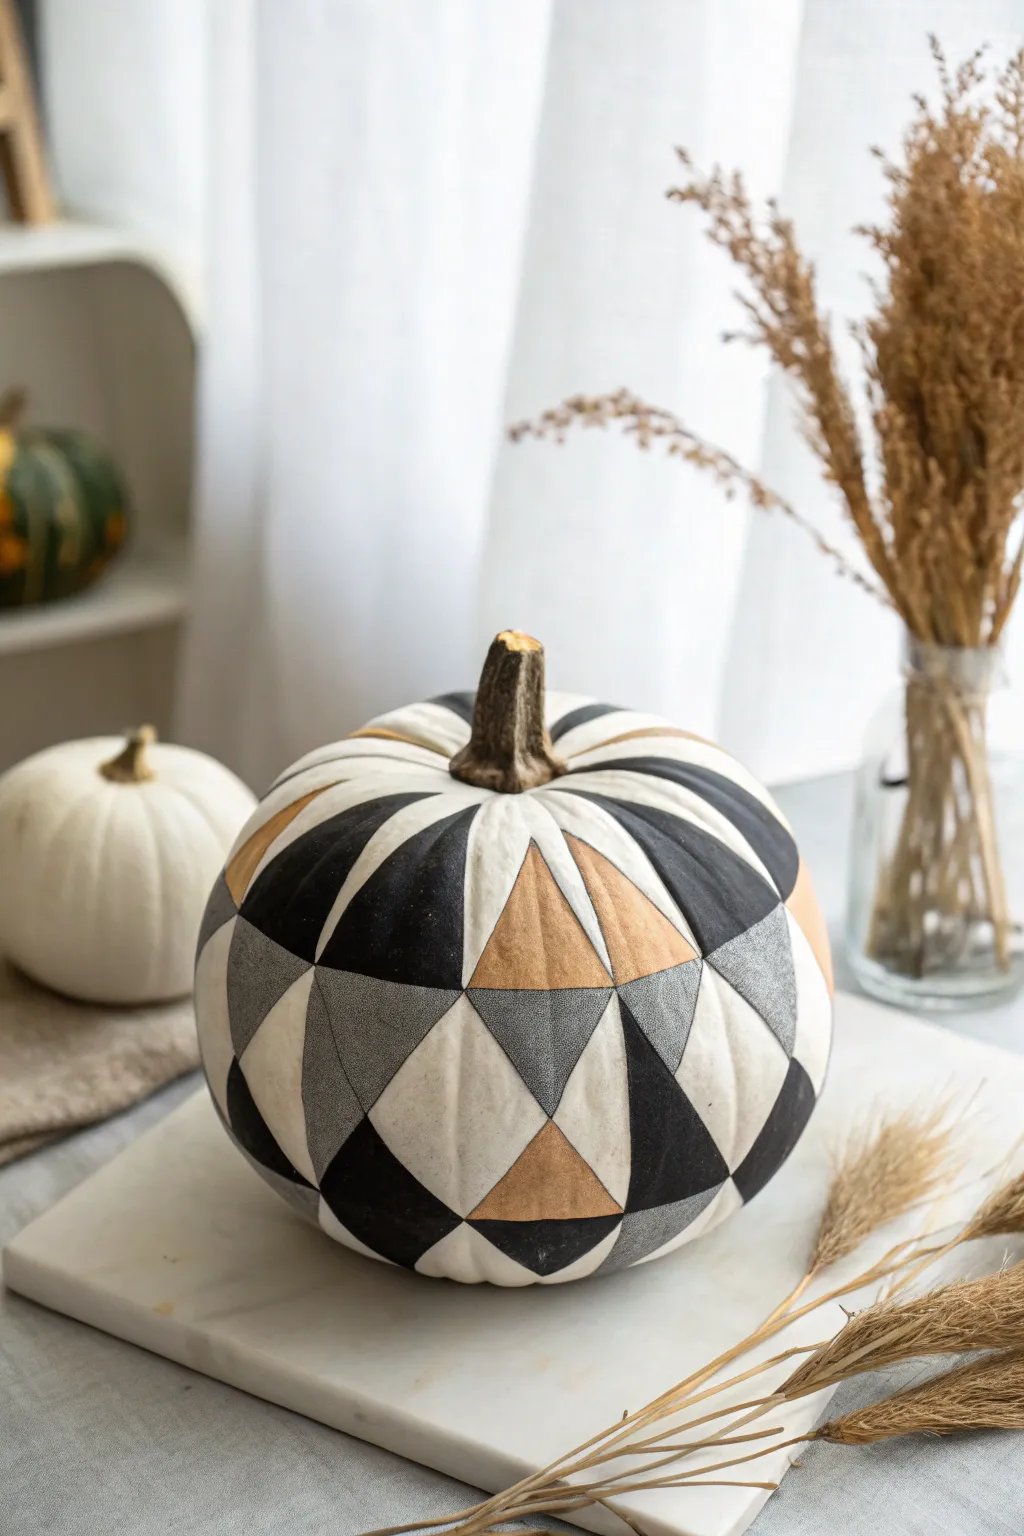
Bring a sharp, architectural edge to your autumn decor with this striking geometric pumpkin design. Featuring a bold palette of black, charcoal, gold, and white arranged in a kaleidoscopic triangle pattern, this project transforms a simple gourd into a sophisticated modern art piece.
Detailed Instructions
Materials
- White faux pumpkin (or real white pumpkin, cleaned)
- Acrylic craft paints: Matte Black, Dark Graphite Gray, Metallic Gold or Bronze
- Painter’s tape (various widths, preferably narrow)
- Pencil (HB or lighter)
- Ruler or flexible measuring tape
- Flat shader brushes (small and medium sizes)
- Fine liner brush (for touch-ups)
- Palette or paper plate
- Paper towels
- Clear matte acrylic sealer spray (optional)
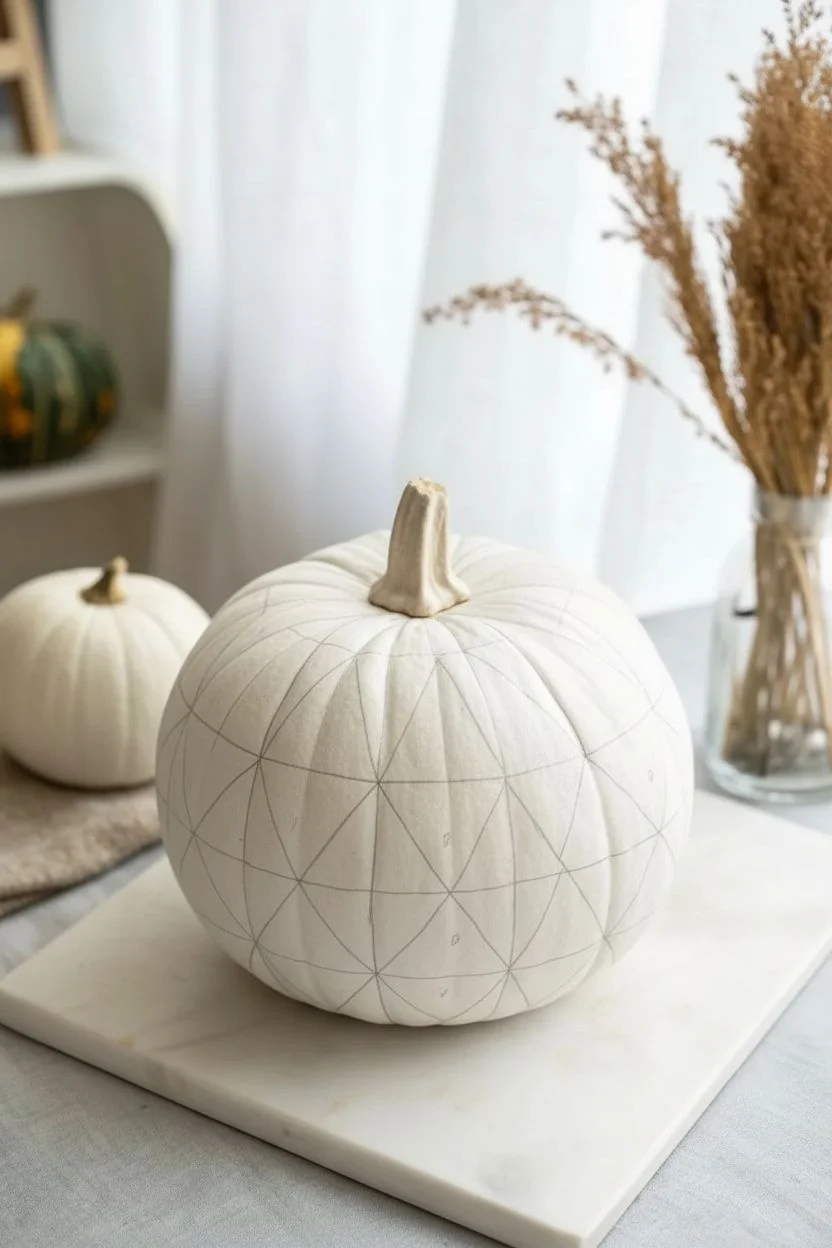
Step 1: Planning the Grid
-
Clean and Prep:
Begin by wiping down your pumpkin surface with a damp cloth to remove any dust or oils. If you are using a real pumpkin, ensure it is completely dry before starting; for faux pumpkins, a quick wipe with rubbing alcohol helps paint adhere better. -
Establish Vertical Lines:
Using the pumpkin’s natural ribs as a guide is the easiest way to start. With your pencil, lightly mark vertical lines following the deepest indented grooves from the stem down to the base. If your pumpkin is smooth, use a flexible measuring tape to mark 8 to 10 evenly spaced vertical sections. -
Mark Horizontal Divisions:
Measure the height of your pumpkin. Lightly mark horizontal rings around the pumpkin to divide it into three or four stacked rows. Doesn’t have to be perfect, but keeping them roughly equidistant helps the symmetry. -
Sketch the Diagonals:
Now, connect your grid points to form triangles. In each rectangular section created by your vertical and horizontal lines, draw a diagonal line from one corner to the opposite corner. Alternate the direction of the diagonal in adjacent sections to create a diamond or zigzag effect.
Step 2: Painting the Pattern
-
Map Your Colors:
Before opening any paint, take a moment to plan which triangles will be which color. I find it helpful to put a tiny dot of ‘B’ (black), ‘G’ (gray), or ‘M’ (metallic) inside the triangles with a pencil so I don’t get lost while painting. -
Outline the Black Triangles:
Start with your matte black paint and a small flat brush. Carefully outline the edges of the first triangle designated for black. Using a flat brush allows you to get a crisp straight edge without needing to tape everything off. -
Fill the Black Sections:
Fill in the rest of the black triangles. Apply the paint in thin, even layers. You will likely need two coats to get that solid, opaque look where no pumpkin skin shows through. -
Paint the Gray Sections:
Switch to your dark graphite gray paint. Locate the triangles adjacent to the black ones according to your plan. Using a clean brush, carefully paint these sections. The gray adds a nice visual bridge between the stark black and white. -
Add Metallic Accents:
Now for the focal points. Use your metallic gold or bronze paint for the remaining selected triangles. Metallic paints are often more translucent, so be prepared to let the first coat dry completely before adding a second or third layer for maximum shine. -
Leave White Space:
Remember to leave specific triangles unpainted to let the white pumpkin show through. This negative space is crucial for the high-contrast geometric look.
Wobbly Lines?
If you don’t have a steady hand, try using narrow automotive detailing tape (pinstriping tape) to mask off triangles. It contours to the round pumpkin shape better than standard blue painter’s tape.
Step 3: Refining and Finish
-
Clean Up Edges:
Once all the main blocks of color are dry, inspect your lines. Use a fine liner brush with the appropriate color to sharpen any wobbly edges or corners where the points of the triangles meet. -
Erase Guide Lines:
If any pencil marks are still visible in the unpainted white sections, very gently erase them with a clean, white eraser. Be careful not to rub the fresh paint. -
Paint the Stem:
Give the stem a realistic or contrasting look. You can leave it natural, or dry-brush it with a mix of dark brown and the metallic gold you used on the body. -
Seal the Design:
To protect your hard work, especially if the pumpkin will be outside, mist the entire pumpkin with a clear matte acrylic sealer. This unifies the sheen of the different paints.
Level Up: Texture
Mix a small amount of baking soda into your gray or black paint before applying. This creates a concrete-like, gritty texture that adds a tactile, industrial element to the geometric design.
Place your masterpiece on a mantle or table and enjoy the modern sophistication it brings to the room
Wood Grain Pumpkin That Looks Like Carved Timber
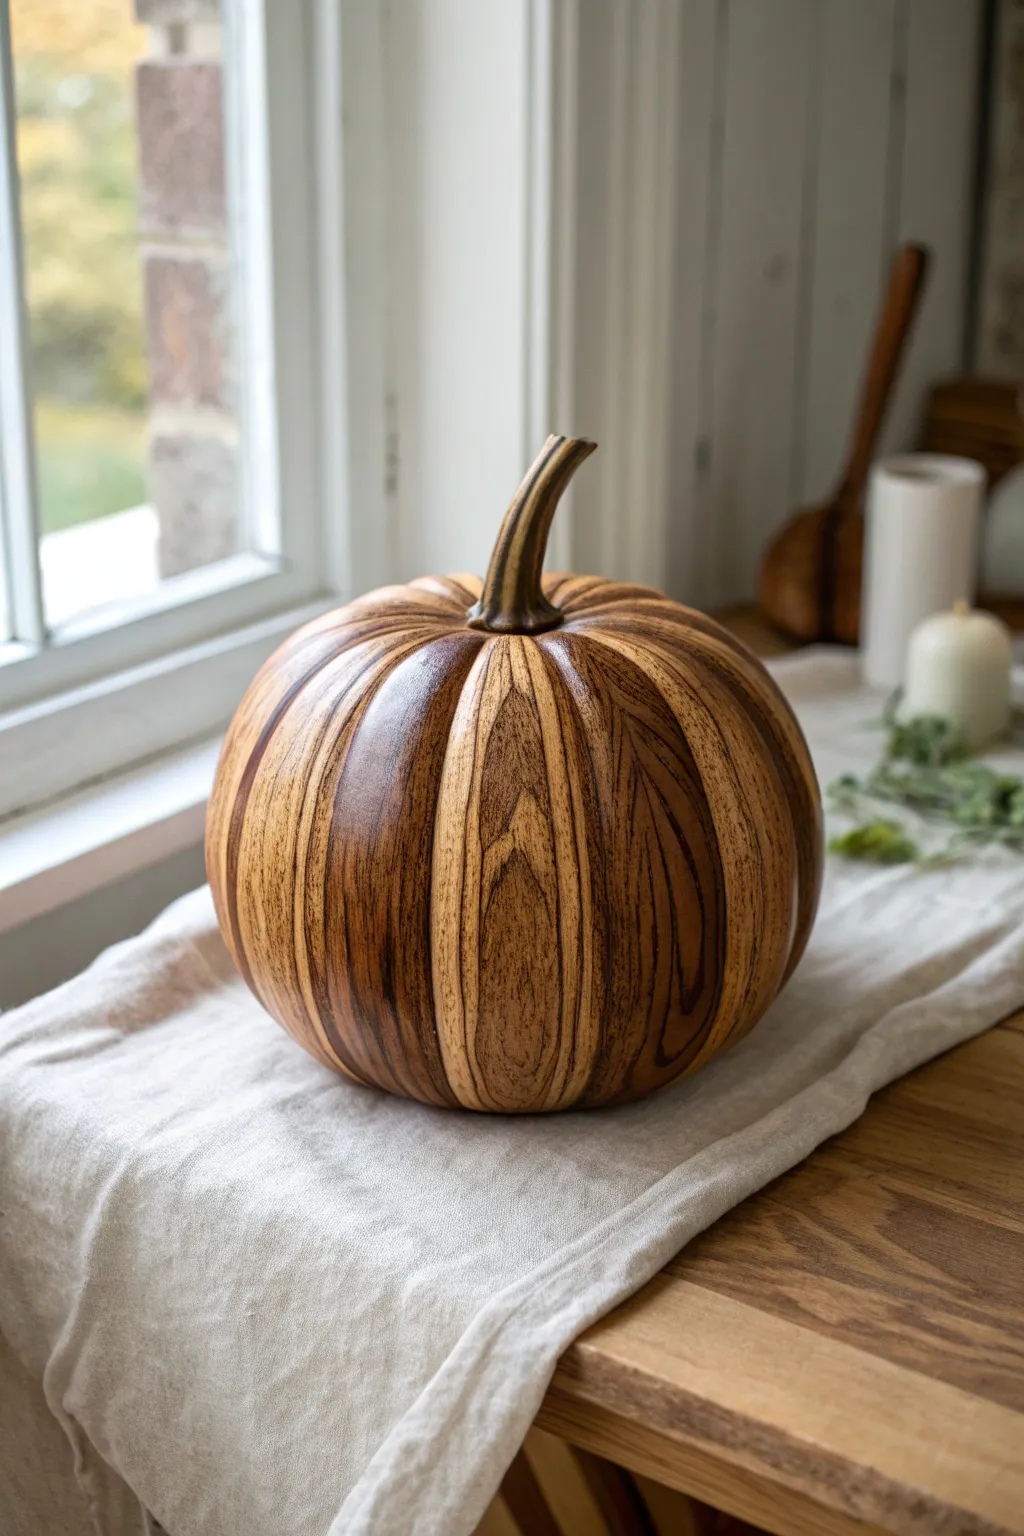
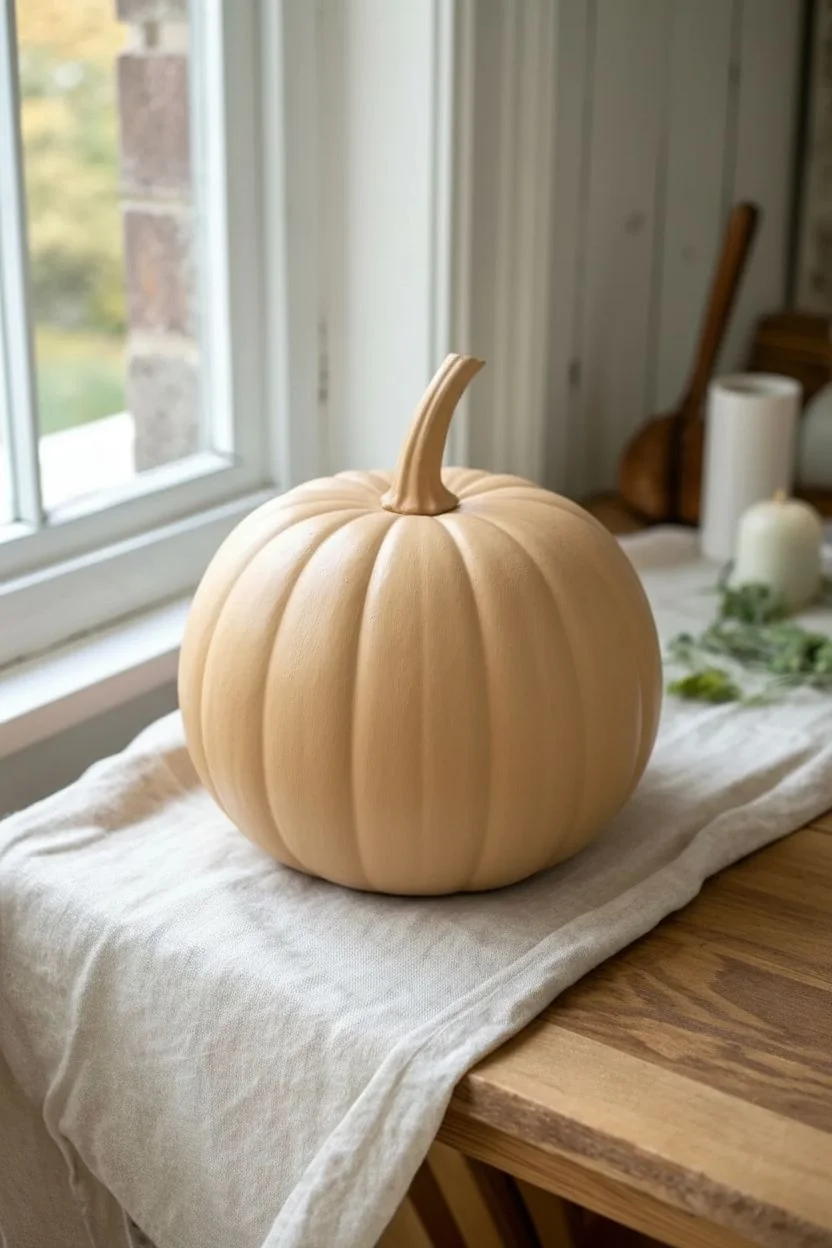
Transform a standard craft pumpkin into a sophisticated piece of decor that mimics the warmth and texture of hand-carved timber. This project uses layers of paint and glaze to create a convincing wood grain effect that feels rustic yet refined.
Step-by-Step
Materials
- Faux pumpkin (smooth surface works best)
- Sandpaper (fine grit)
- Base coat acrylic paint (warm beige or light tan)
- Wood stain or dark brown glazing medium
- Gel stain (walnut or mahogany specifically)
- Soft bristle brushes (various sizes)
- Grain rocker tool (optional but helpful)
- Detail liner brush
- Matte or satin clear sealant spray
- Paper towels or lint-free rags
Step 1: Preparation and Base Coat
-
Prep the surface:
Begin by lightly sanding your faux pumpkin to remove any seams or manufacturing bumps. This slight roughing of the surface also helps the paint adhere better, creating a more durable finish. -
Apply the primer:
Paint the entire pumpkin with a neutral primer if it’s a bright orange plastic pumpkin. Let this dry completely before moving on to your color base. -
Paint the wood base:
Apply your base coat of warm beige or light tan acrylic paint. This color represents the lightest part of the wood, or the ‘sapwood,’ that will peek through the grain lines. -
Add depth:
While I usually aim for flat coverage, for this step, slight streakiness is actually okay as it adds to the organic feel. Let this base layer dry fully, preferably overnight.
Too Many Brushstrokes?
If your grain lines look too uniform or stripy, lightly drag a clean, soft cloth vertically over the wet glaze to blur the lines and create a softer, more blended wood look.
Step 2: Creating the Grain
-
Mix your glaze:
Mix a dark brown acrylic paint with a glazing medium. Alternatively, creating a faux finish with actual gel stain works beautifully on top of dried acrylics for a rich, deep tone. -
Apply the glaze section by section:
Working on one vertical rib of the pumpkin at a time, brush on a generous layer of your dark mixture. Use long, vertical strokes from the stem down to the base. -
Draw the grain:
While the glaze is wet, use a dry, coarse brush to drag through the paint, revealing the lighter base coat underneath. Keep your hand somewhat shaky to mimic natural wood imperfections. -
Add knots and texture:
To create the look of knots or cathedral grain, use a small detail brush or a rubber grain rocker tool. Twist your wrist slightly as you drag the tool down a section to create oval shapes in the wet glaze. -
Highlight the curves:
Pay close attention to the crevices between the pumpkin ribs. Allow slightly more dark glaze to pool here to simulate shadow and depth, reinforcing the carved timber appearance. -
Vary the patterns:
Don’t make every rib look identical. Alternate between straight grain lines and curvier, knotty sections to keep the visual interest high and the look authentic.
Pro Tip: Direction Matters
Always pull your grain lines vertically from stem to base. Horizontal strokes will ruin the illusion, as real wood pumpkins are turned on a lathe or carved with the grain.
Step 3: Details and Protection
-
Refine the stem:
Paint the stem with a darker, almost blackened brown to contrast with the body. Use a dry brush with a touch of tan paint to highlight the ridges of the stem for a weathered look. -
Feather the edges:
Use a clean, dry brush to gently feather out any harsh lines where the grain patterns meet. This softens the transition and makes the painted ‘carving’ look more integrated. -
Let it cure:
Allow the faux wood layers to dry completely. Since gel stains or heavy glazes take longer to set, give this at least 24 hours in a well-ventilated area. -
Check for gaps:
Touch up any spots near the bottom or around the stem where the original pumpkin color might still be showing through. -
Seal the finish:
Spray the entire pumpkin with a matte or satin clear sealant. Avoid high-gloss sprays, as they can make the piece look like plastic rather than polished wood.
Now you have a timeless, rustic centerpiece that brings the warmth of the woods indoors


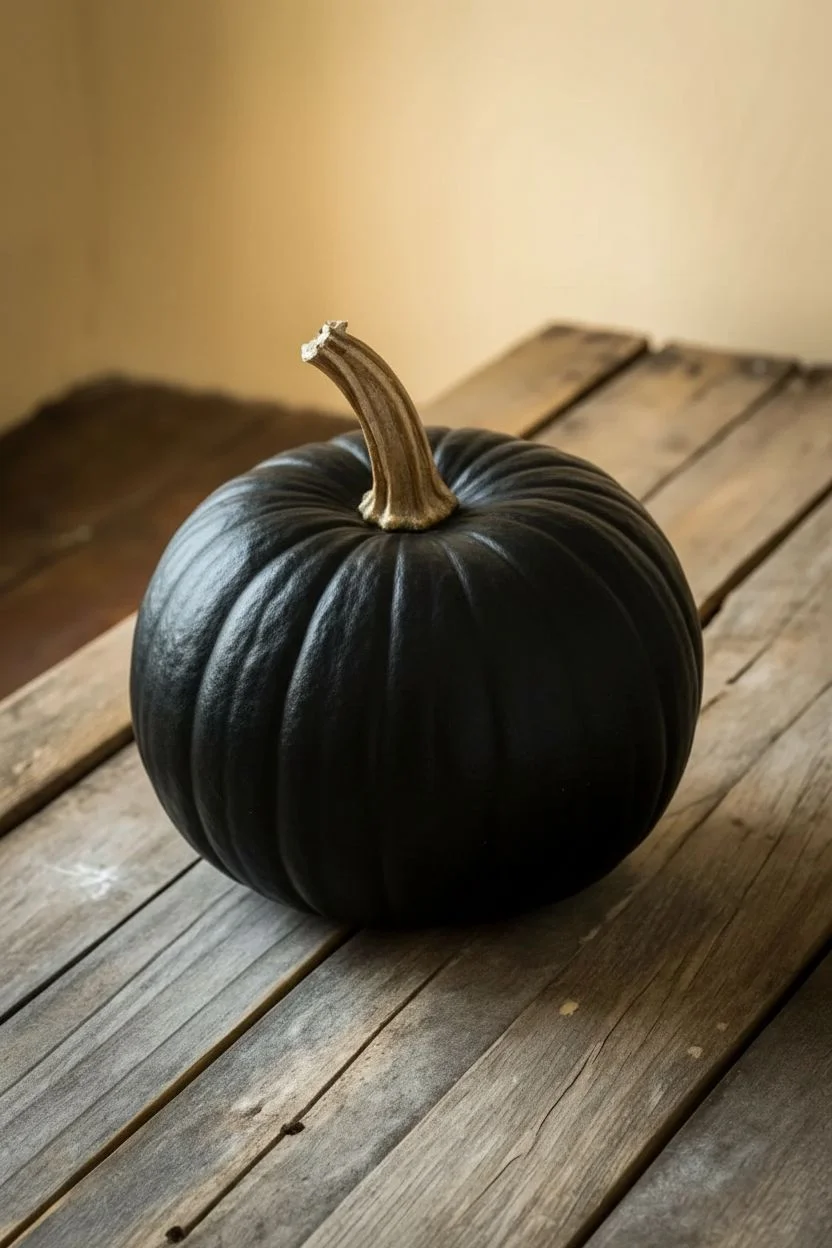
Weathered Metal Pumpkin With Faux Rivets and Rust
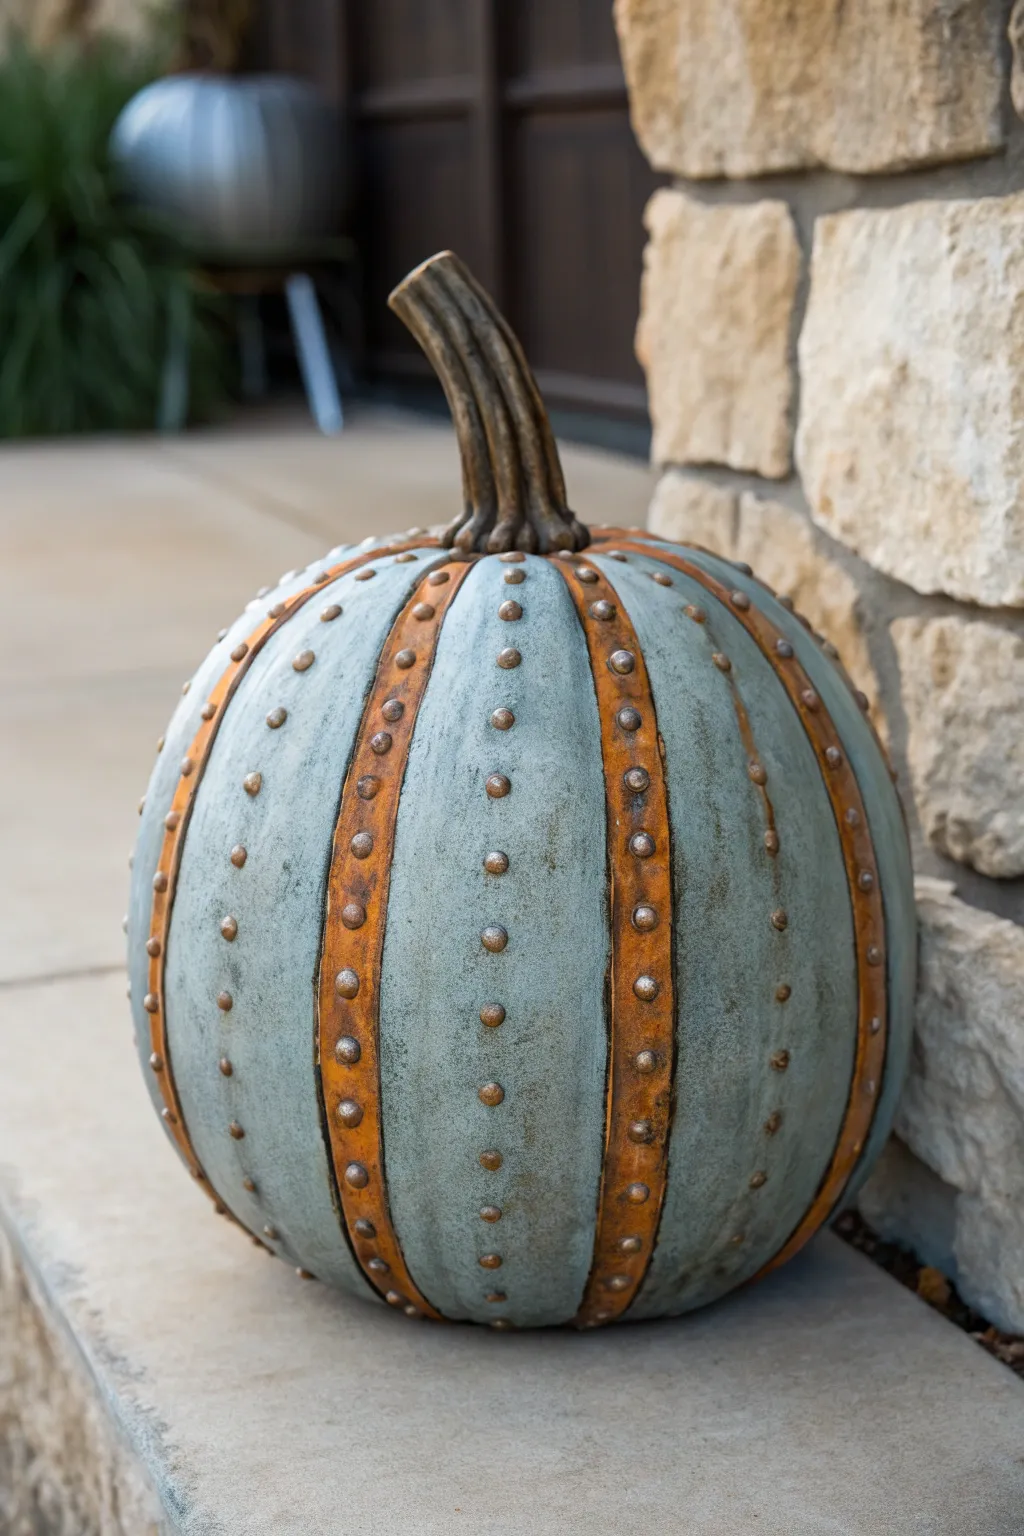
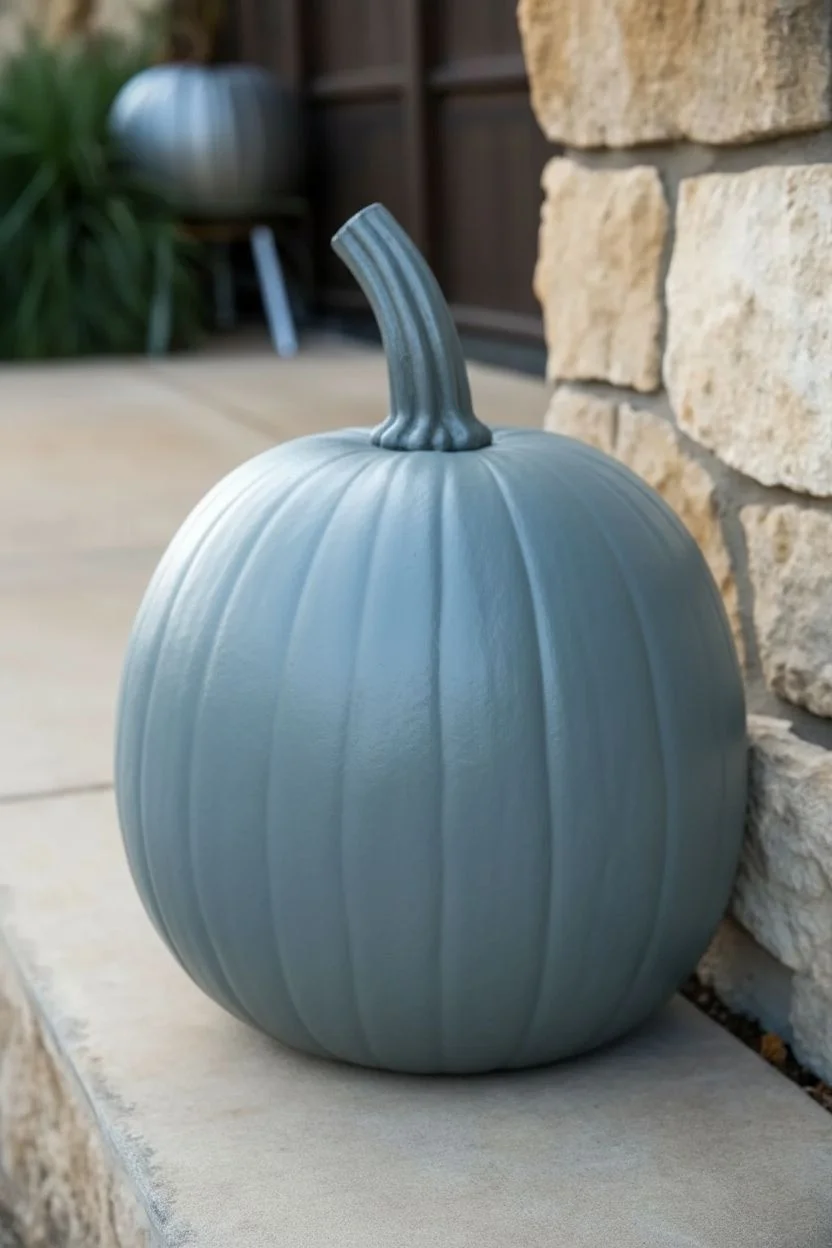
Transform a standard craft pumpkin into a heavy-duty industrial relic with this rugged metal-effect finish. The combination of weathered blue-grey steel, faux rust oxidation, and rivet detailing creates a masculine, workshop-ready centerpiece.
Step-by-Step Guide
Materials
- Faux pumpkin (smooth surface works best)
- Grey spray primer
- Metallic gunmetal or blue-grey acrylic paint
- Rust-colored texture paint or iron paint with activator
- Copper or bronze metallic acrylic paint
- Self-adhesive furniture pads or halved wooden beads (for rivets)
- Matte black acrylic paint (for weathering)
- Sea sponge
- Small flat brush
- Painter’s tape
- Hot glue gun (optional, if using beads)
Step 1: Preparation and Base Coat
-
Clean the Surface:
Wipe down your pumpkin with a damp cloth to remove any dust or oils that might prevent paint adhesion. If it’s a shiny plastic pumpkin, a quick scuff with fine-grit sandpaper will help the primer stick. -
Prime the Surface:
Apply a coat of grey spray primer over the entire pumpkin, including the stem. This provides a neutral base and ensures your metallic colors show up true. -
Apply the Base Metal Color:
Once the primer is dry, paint the entire body of the pumpkin with the metallic gunmetal or blue-grey acrylic paint. You may need two coats for full opacity.
Adhesion Issues?
If rivets keep popping off the curved surface, skip the self-adhesive backing. Use a dot of super glue or hot glue for a permanent, weather-resistant bond.
Step 2: Creating the Straps and Rivets
-
Mark the Vertical Bands:
Identify the natural vertical ridges on your pumpkin. These will serve as the ‘metal straps.’ You can lightly mask the areas between these ridges with painter’s tape to keep lines crisp, though a steady hand works too. -
Paint the Straps:
Paint these vertical bands using your rust-colored texture paint or a flat copper/bronze color. I find that dabbing the paint on rather than stroking it creates a more realistic pitted metal texture. -
Add the Rivets:
Take your self-adhesive furniture pads (or glue on halved wooden beads) and stick them down the center of each painted vertical strap. Space them evenly, about 1.5 to 2 inches apart. -
Add In-Between Rivets:
For extra detail, place additional rivets in the center of the blue-grey panels between the straps, as seen in the inspiration image. Spacing these wider apart creates a sturdy, bolted look. -
Paint the Rivets:
Carefully paint over the newly attached rivets. Paint the strap rivets to match the rusty strap color, and the body rivets to match the blue-grey metal body.
Level Up: Real Rust
Instead of orange paint, use ‘Iron Paint’ base and an oxidizing spray activator. This creates chemical oxidation for genuine, crusty rust texture.
Step 3: Weathering and Rust Effects
-
Create Depth with a Wash:
Mix a small amount of matte black paint with water until it’s very thin. Brush this into the deep creases where the straps meet the body and around the base of the stem. -
Wipe Back the Wash:
Immediately use a rag or paper towel to wipe away the excess black wash. The dark pigment will stay in the crevices, mimicking years of grime buildup. -
Adding Rust to the Straps:
Using a sea sponge, lightly dab bright copper or orange-brown paint randomly over the vertical ‘straps.’ Focus on the edges and the tops of the rivets where oxidation would naturally occur. -
Highlight the Body Rivets:
Dry brush a tiny amount of metallic silver or lighter grey on the very tops of the body rivets to make them pop against the darker background. -
Detail the Stem:
Paint the stem a dark, flat brown or bronze. Once dry, dry brush a lighter tan color over the raised ridges of the stem to accentuate its twisted texture.
Step 4: Final Touches
-
Spatter Effect:
Dip an old toothbrush into thinned black or dark brown paint. Run your thumb over the bristles to flick tiny speckles across the pumpkin’s surface for a pitted, industrial finish. -
Seal the Work:
Finish with a clear matte spray sealer. This unifies the different sheens and protects your faux metal finish from chipping.
Enjoy your durable-looking decor piece that brings a tough, industrial edge to the season
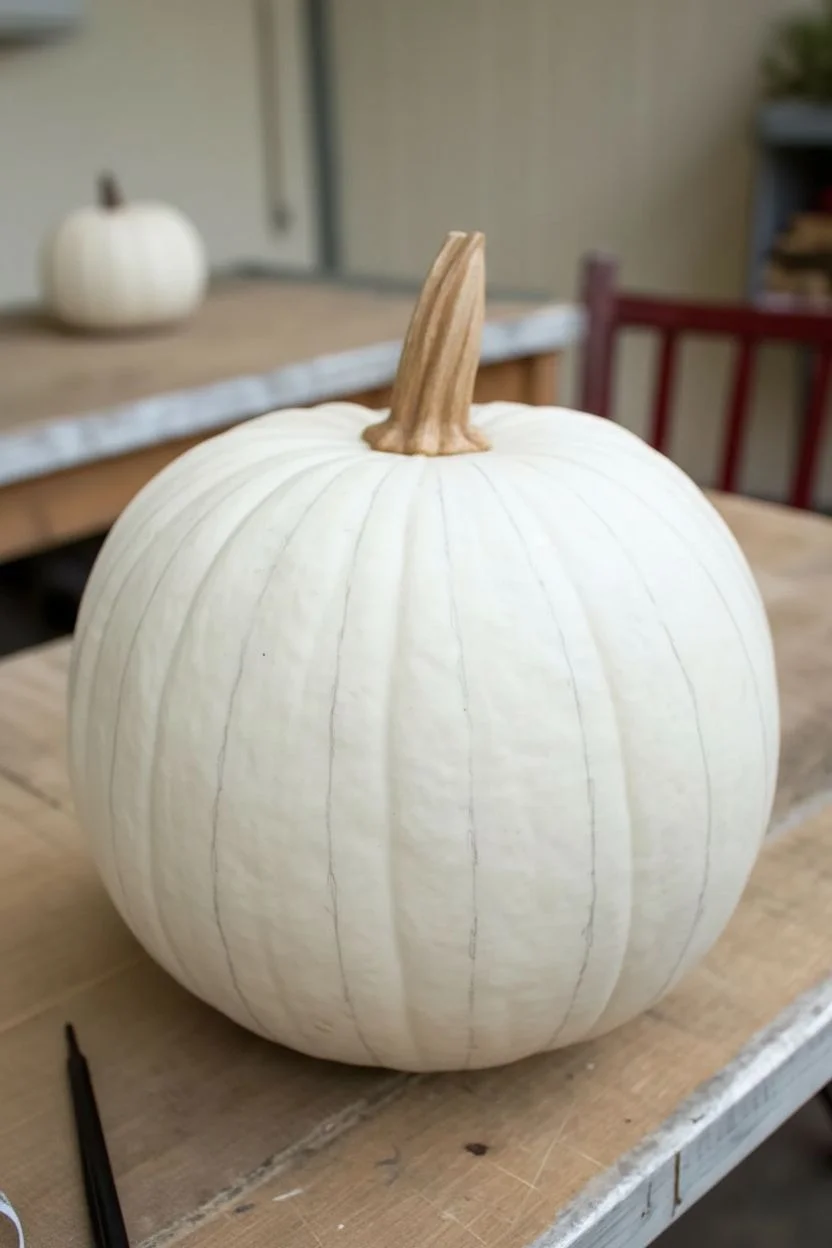
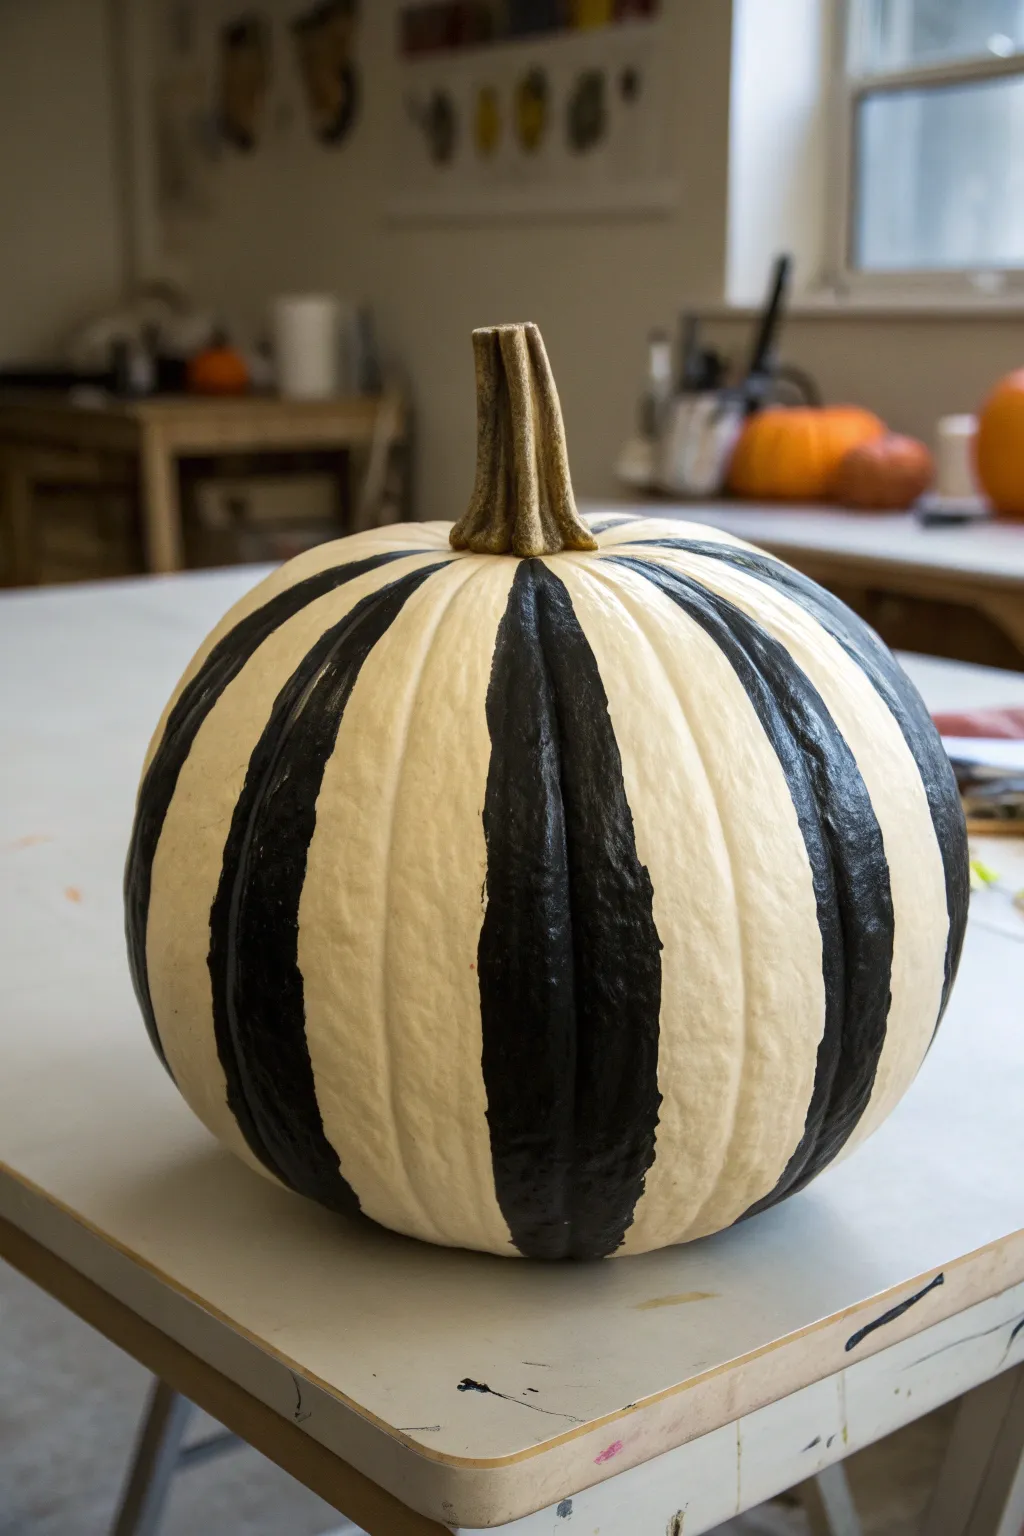
Classic Plaid or Buffalo Check Pumpkin in Deep Neutrals

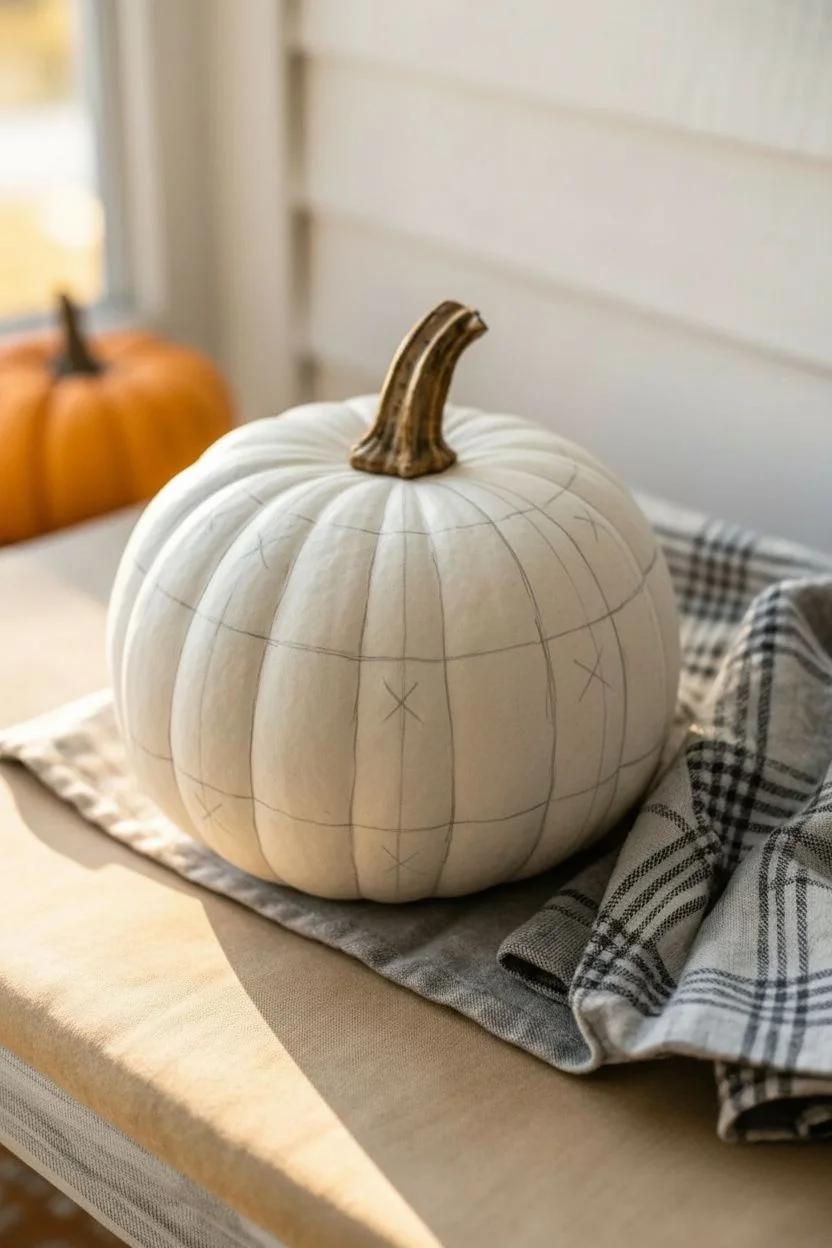
Transform a simple white pumpkin into a bold statement piece with this oversized, rustic checkerboard design. The deep charcoal squares follow the pumpkin’s natural curves, creating a sophisticated and masculine look perfect for a modern autumn display.
Step-by-Step Tutorial
Materials
- Medium-sized white faux pumpkin (or real white pumpkin)
- Black acrylic paint or chalk paint (matte finish)
- White acrylic paint or chalk paint (for touch-ups)
- Medium flat paintbrush (approx. 1/2 inch to 1 inch wide)
- Fine detail paintbrush
- Pencil
- Painter’s tape or flexible masking tape (optional)
- Clear matte sealer spray (optional)
- Paper towels and water cup
Step 1: Planning the Grid
-
Clean and prep:
Start by wiping down your pumpkin with a damp paper towel to remove any dust or oils. If you are using a real pumpkin, ensure it is completely dry before starting. If using a faux pumpkin, remove any price stickers. -
Map vertical lines:
Look at your pumpkin from the top down. Identify the natural ribs or grooves. Use a pencil to lightly sketch vertical lines following these indentations from the stem down to the base. These natural ribs will serve as the vertical guides for your checkerboard. -
Mark horizontal rings:
Decide how many rows of checks you want. For the look in the photo, aim for about 3 to 4 horizontal rings. Lightly sketch horizontal lines around the circumference of the pumpkin to create a grid. -
Visualize the distortion:
Remember that checks on a round object will naturally tapered at the top and bottom. Don’t fight this; let your horizontal lines curve slightly downward as they go around to mimic the pumpkin’s roundness. I find it helpful to sketch ‘X’ marks in the squares that will be painted black to avoid confusion later.
Tape Trick
For sharper lines, use thin washi tape or painter’s tape to mask off your grid. Press edges firmly so paint doesn’t bleed underneath.
Step 2: Painting the Checks
-
Outline the first black square:
Load your medium flat brush with black paint. Start with a square in the middle row (the ‘equator’ of the pumpkin) where the surface is flattest. Carefully paint the outline of the square first. -
Fill in the block:
Fill in the outlined square with confident strokes. For that rustic look seen in the photo, don’t worry about complete opaque coverage; a little bit of streakiness adds texture. -
Create the checkerboard pattern:
Move horizontally to the next section. Skip one square (leaving it white) and paint the next one black. Continue this alternating pattern all the way around the middle ring. -
Paint the upper row:
Move to the row above your middle ring. This time, alternate the pattern so you are painting black squares directly above the white spaces of the row below. These squares will naturally be slightly narrower as they approach the stem. -
Paint the lower row:
Repeat the process for the row below the middle ring. Again, ensure you are alternating colors—painting black below the white squares of the middle row. -
Tackle the tricky stem area:
For the very top row near the stem, switch to your fine detail brush. The squares here will turn into triangles or thin wedges. Carefully fill these in without painting the stem itself. -
Finish the base:
Turn the pumpkin upside down (or on its side) to paint the bottom-most row of checks. Use the detail brush again if the ridges get tight at the bottom.
Step 3: Refining and Finish
-
Touch up edges:
Once the black checks are dry to the touch, examine your lines. Use the fine brush with a little white paint to clean up any messy edges where the black might have slipped into the white zones. -
Add distressed texture:
To mimic the specific texture in the photo, take a mostly dry brush with a tiny amount of white paint. Lightly ‘dry brush’ over the center of a few black squares to give them a worn, chalky appearance. -
Soften the contrast:
If the black looks too stark and glossy, gently sand the painted areas with a fine-grit sandpaper block. This scuffs the paint just enough to look aged and matte. -
Seal the work:
If you plan to display this pumpkin outdoors or want to protect the finish, give the entire pumpkin a light coat of clear matte sealer spray. Let it dry completely in a well-ventilated area.
Stem Style
Enhance the realism by painting the stem with a mix of brown and gold metallic paint for an elegant, dried-gourd look.
Place your bold new pumpkin near a window or fireplace to enjoy its striking geometric contrast throughout the season
Snake Skin Texture Pumpkin in Dark Greens
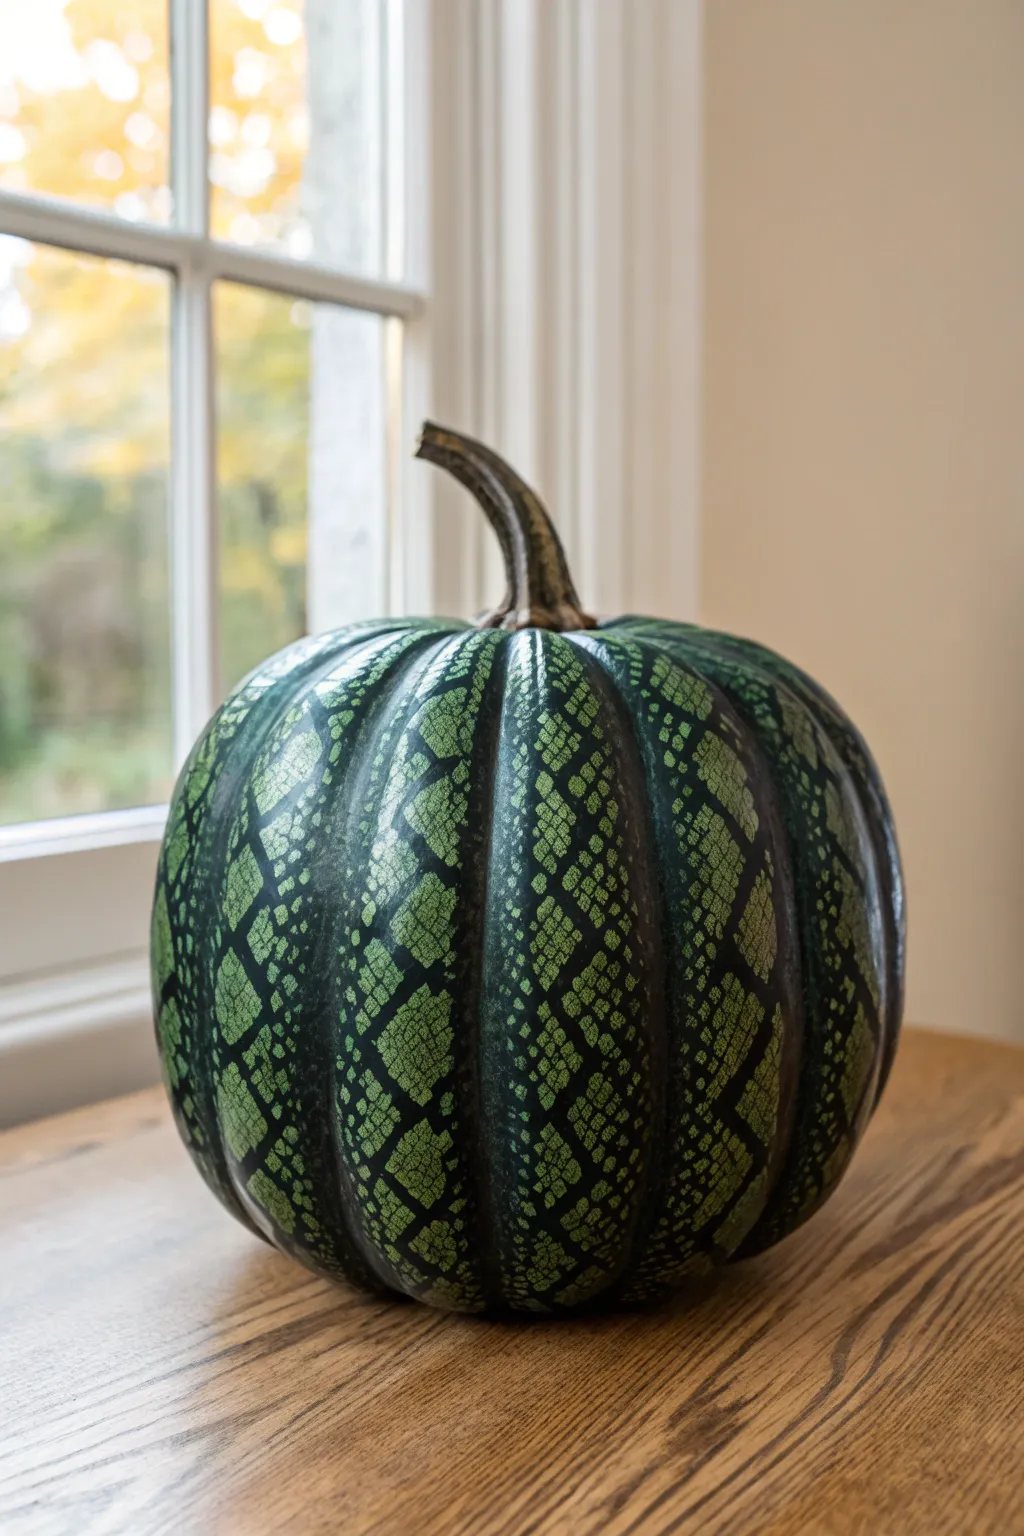
For a masculine, rugged edge to your fall decor, this project transforms a simple pumpkin into a menacing, reptilian work of art. Using dark emerald tones and a clever stenciling technique, you’ll create a hyper-realistic snakeskin texture that looks like it just slithered out of the garden.
Detailed Instructions
Materials
- Medium-sized pumpkin (real or faux)
- Black matte spray paint or acrylic paint
- Dark emerald green metallic acrylic paint
- Lime green or chartreuse acrylic paint
- Fishnet stockings or mesh laundry bag (for the stencil)
- Makeup sponges or dabber brushes
- Fine-grit sandpaper
- Matte clear sealant spray
- Rubber bands or painter’s tape
- Small detail brush
Step 1: Base Coat and Prep
-
Clean the surface:
Wipe down your pumpkin with a damp cloth to remove any dirt or oils. If you’re using a real pumpkin, make sure it’s completely dry before starting; for a faux pumpkin, a quick sanding helps the paint stick. -
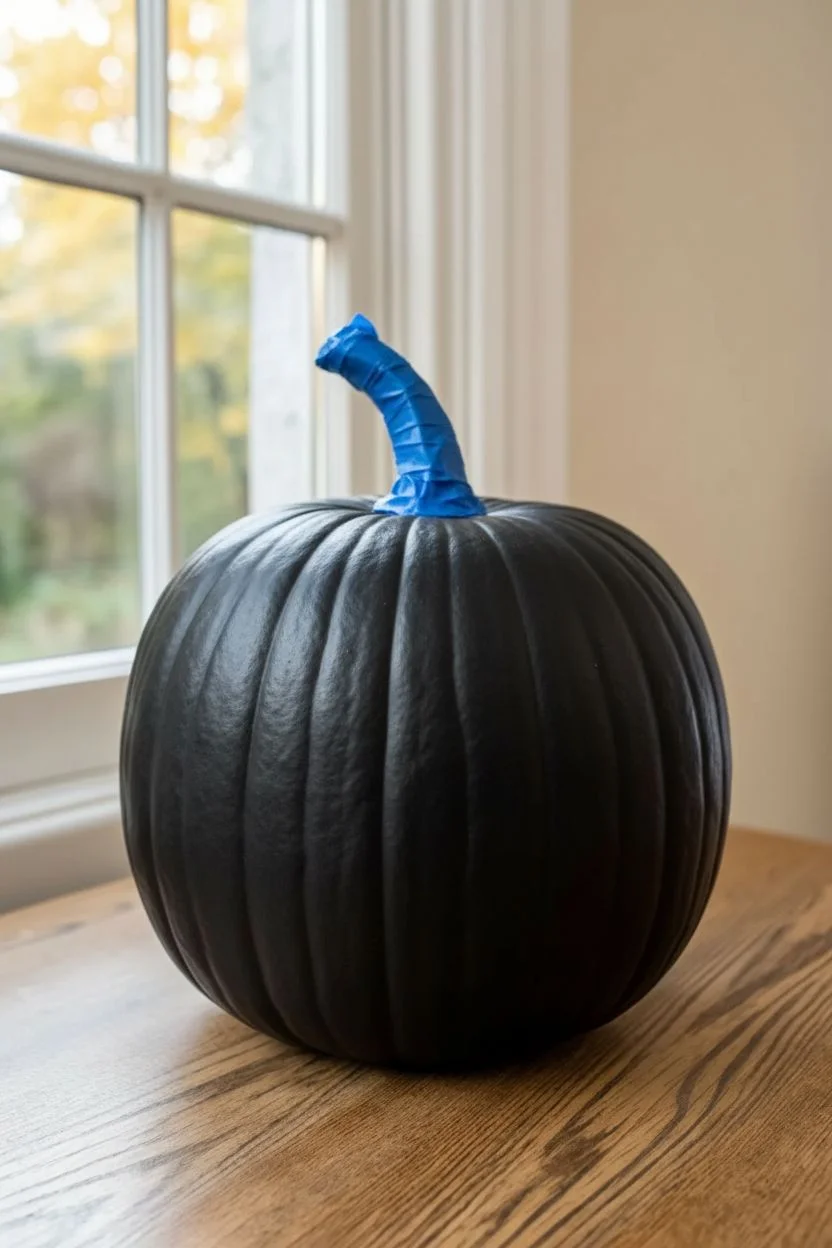
Protect the stem:
Wrap the stem carefully with painter’s tape. You want to keep its natural color to provide a realistic contrast against the dark skin pattern we are about to create. -
Apply the dark base:
Cover the entire pumpkin with black matte paint. I prefer spray paint for an even, quick coating, but brushing on black acrylic works too. This black layer will become the lines between the scales. -
Let it cure:
Allow the base coat to dry completely. It needs to be rock hard so the stencil doesn’t peel it off later.
Pro Tip: Mesh Matters
Use fishnets with a diamond pattern rather than squares. The diamond shape mimics biologic scales much better and contours to the round pumpkin shape naturally.
Step 2: Creating the Scale Mesh
-
Fit the stencil:
Take your fishnet stocking (or mesh bag) and stretch it over the pumpkin. Pull it from the bottom up toward the stem. -
Adjust the tension:
Pull the mesh tight. The more you stretch the fabric, the larger and more distorted the ‘scales’ will be. Aim for a mix of tight areas near the ribs and slightly looser areas in the valleys. -
Secure the mesh:
Tie the stocking off tightly at the top near the stem using a rubber band or zip tie. Ensure the mesh is flush against the pumpkin’s skin everywhere to prevent paint bleed.
Troubleshooting: Bleeding Paint
If paint bled under the mesh, your sponge was too wet. Wait for it to dry, paint that specific spot black again with a small brush, and hand-paint green scales on top.
Step 3: Applying the Reptilian Texture
-
Load the sponge:
Pour a small amount of dark emerald metallic paint onto a palette. Dip your makeup sponge in, then dab most of it off on a paper towel. You want a very dry sponge. -
Sponge the first layer:
Gently dab the metallic green over the mesh. Do not drag or brush; just press straight down and lift. This creates the primary color of the scales. -
Add dimension:
While the emerald is still tacky, mix a tiny drop of lime green into your emerald paint to lighten it. Use a fresh sponge to dab this lighter shade selectively on the high points or ‘ribs’ of the pumpkin. -
Highlighting scales:
Take a tiny amount of pure lime green on a detail brush or sponge edge. Very lightly hit random clusters of scales to mimic the way light catches reptile skin. -
Dry partially:
Let the paint set for about 10–15 minutes. It should be dry to the touch but not fully cured.
Step 4: The Reveal and Finish
-
Remove the mesh:
Carefully cut the rubber band and slowly peel the fishnet away. Lift it straight up rather than dragging it across the surface to keep the scale edges crisp. -
Assess the pattern:
Check for any areas where the black lines are too thick. You can use a small brush with the green mixture to touch up specific scales if needed. -
Darken the grooves:
To enhance the depth, I sometimes mix a watery black wash and carefully run it down the deepest vertical grooves of the pumpkin, reinforcing the shadows. -
Detail the ribs:
If you really want that high-contrast look from the photo, dry-brush a tiny bit of the lightest green on the very crest of the pumpkin’s ribs, right over the texture. -
Seal the work:
Once fully dry, spray the pumpkin with a matte or low-satin clear sealant. This protects the finish and unifies the sheen of the different paints. -
Unmask the stem:
Remove the tape from the stem. If the stem looks too pristine, dirty it up with a little brown or black paint wash to match the rugged vibe.
Place this dark, textured masterpiece on your porch or table to add a touch of mysterious danger to the season
Fire Pit Ember Glow Pumpkin With Ashy Edges
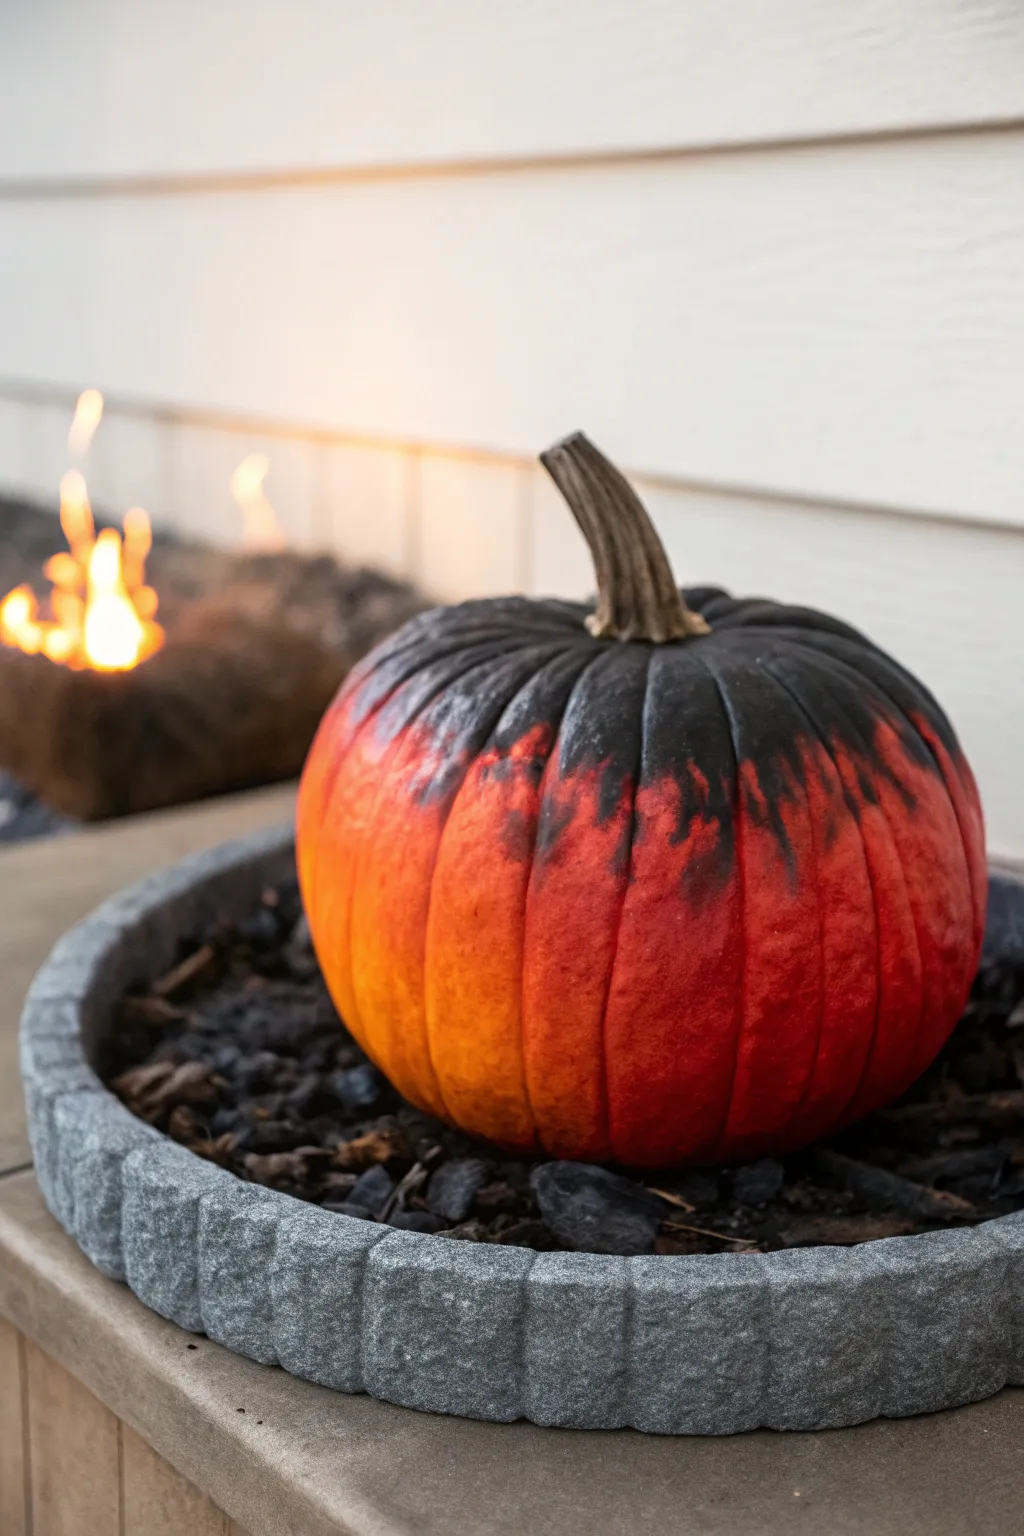
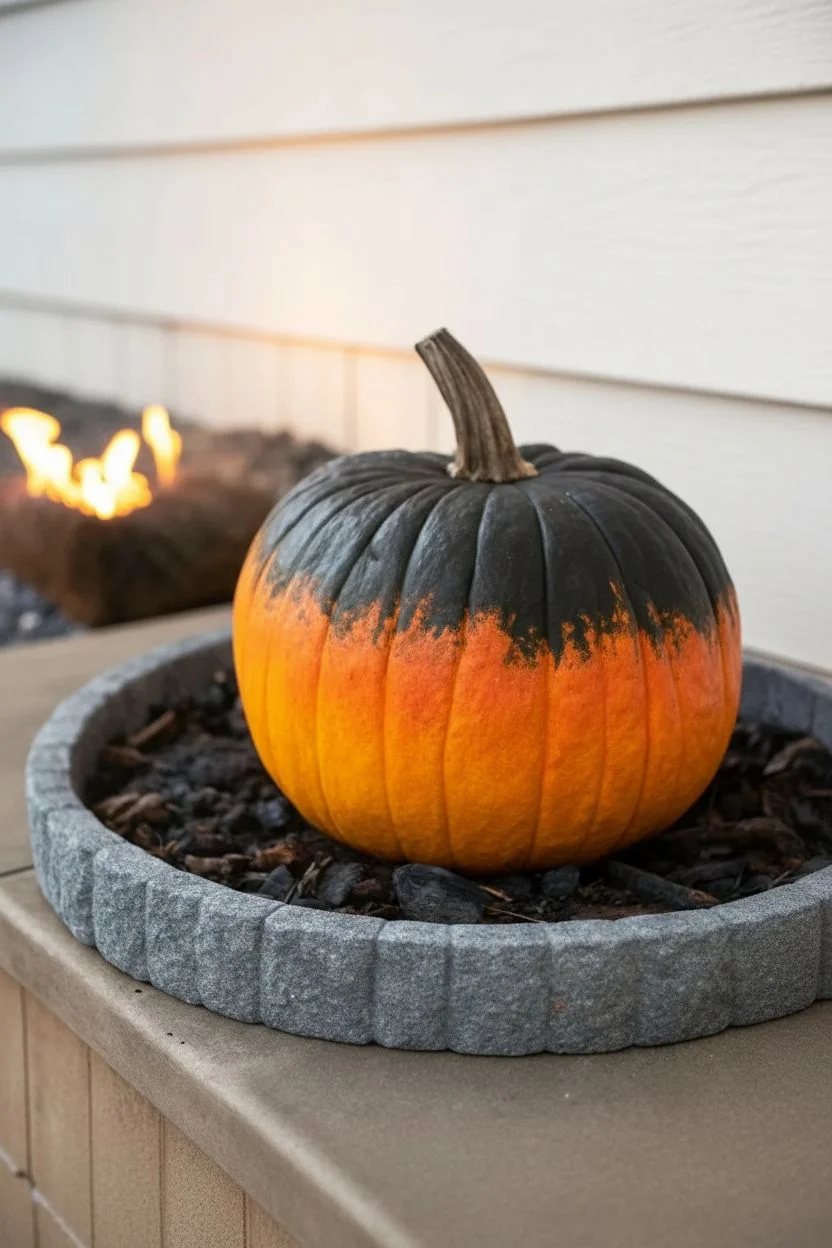
Capture the intense heat of a dying fire with this striking ember-glow pumpkin design. By blending vibrant yellows into deep reds and capping it with a charred black top, you’ll create a realistic illusion of a pumpkin transformed into a glowing coal.
Step-by-Step Guide
Materials
- Pumpkin (real or faux)
- White spray paint or primer (optional but recommended for dark pumpkins)
- Acrylic paints: Bright yellow, warm orange, deep red, flat black
- Makeup sponges or sea sponges
- Paintbrushes (stiff bristle brush and soft blending brush)
- Matte clear sealer spray
- Paper plate or palette
- Water and paper towels
Step 1: Preparation and Base Coat
-
Clean and Dry:
Start by wiping down your pumpkin with a damp cloth to remove any dirt or oils. If you are using a real pumpkin, make sure it is completely dry before moving on. -
Prime the Surface:
If your pumpkin is naturally dark green or orange, applying a coat of white primer or spray paint will help the yellow and orange hues pop vividly. Let this base coat dry fully. -
Apply the Base Yellow:
Squeeze a generous amount of bright yellow acrylic paint onto your palette. Using a sponge or large brush, cover the bottom two-thirds of the pumpkin. Don’t worry about a perfect upper edge; a rough line helps with blending later. -
Layer the Orange:
While the yellow is still slightly tacky or just dry, sponge warm orange paint over the middle section, overlapping the yellow significantly. Use a rapid dabbing motion to blend the two colors where they meet, creating a seamless gradient.
Muddy Colors?
If blending creates brown instead of orange, dry your brush completely between colors. Wait for the bottom layer to dry slightly before adding the next.
Step 2: Building the Heat Gradient
-
Introduce Deep Red:
Load a sponge with deep red paint. Begin applying this color to the upper middle section of the pumpkin, dabbling downwards into the orange area. -
Enhance the Transition:
Go back and forth between your orange and red sponges to soften the transition line. You want a fiery glow, so avoid harsh horizontal stripes. -
Intensify the Bottom Glow:
If the yellow at the base looks too dull after handling, dab a fresh layer of bright yellow near the very bottom to re-establish that ‘hot center’ look. -
Let the Colors Set:
Allow the gradient layers to dry completely (about 20-30 minutes). This prevents the black top coat from turning your vibrant fire colors into muddy brown.
Level Up: Real Texture
Mix a teaspoon of baking soda or fine sand into your black paint before applying. This adds a gritty, physical crust that feels like real charcoal ash.
Step 3: Creating the Charred Effect
-
Start the Soot Layer:
Mix flat black acrylic paint with a tiny drop of water to improve flow without making it runny. Apply this to the very top of the pumpkin, surrounding the stem. -
Paint the Stem:
Thoroughly coat the stem in the flat black or a dark brownish-grey paint to make it look singed and burnt. -
Create Ashy Streaks:
Using a stiff bristle brush with very little paint on it (dry brushing technique), pull the black paint downwards from the top. Follow the natural vertical ribs of the pumpkin. -
Feather the Edges:
Where the black meets the red, use quick, flicking brushstrokes to create uneven ‘fingers’ of char. I find that varying the length of these streaks makes the burning effect look much more organic. -
Add Depth to Recesses:
Take a smaller brush and gently guide the black paint further down into the deep creases between the pumpkin ribs. This accentuates the pumpkin’s shape and mimics how shadows fall on cooling embers. -
Texture the Top:
For a distinct ashy texture, lightly dab a dry sponge with grey or off-black paint over the solid black top section. This subtle mottling makes it look like powdery ash sitting on top of the coal. -
Final Char Details:
Inspect your gradient. If the black looks too stark, you can lightly stipple a tiny bit of dark red over the black edges to suggest heat still simmering beneath the soot.
Step 4: Finishing Touches
-
Protect the Paint:
Once everything is completely dry—give it an hour to be safe—take the pumpkin to a well-ventilated area. -
Apply Matte Sealer:
Spray the entire pumpkin with a clear matte sealer. A glossy finish would ruin the ‘ashy’ illusion, so ensure you use matte. This locks in the colors and protects it from moisture if placed outdoors.
Set your finished ember pumpkin near a fire pit or warm light to fully ignite the smoldering effect you just created
No-Carve Stitched-Up Pumpkin With Faux Seams
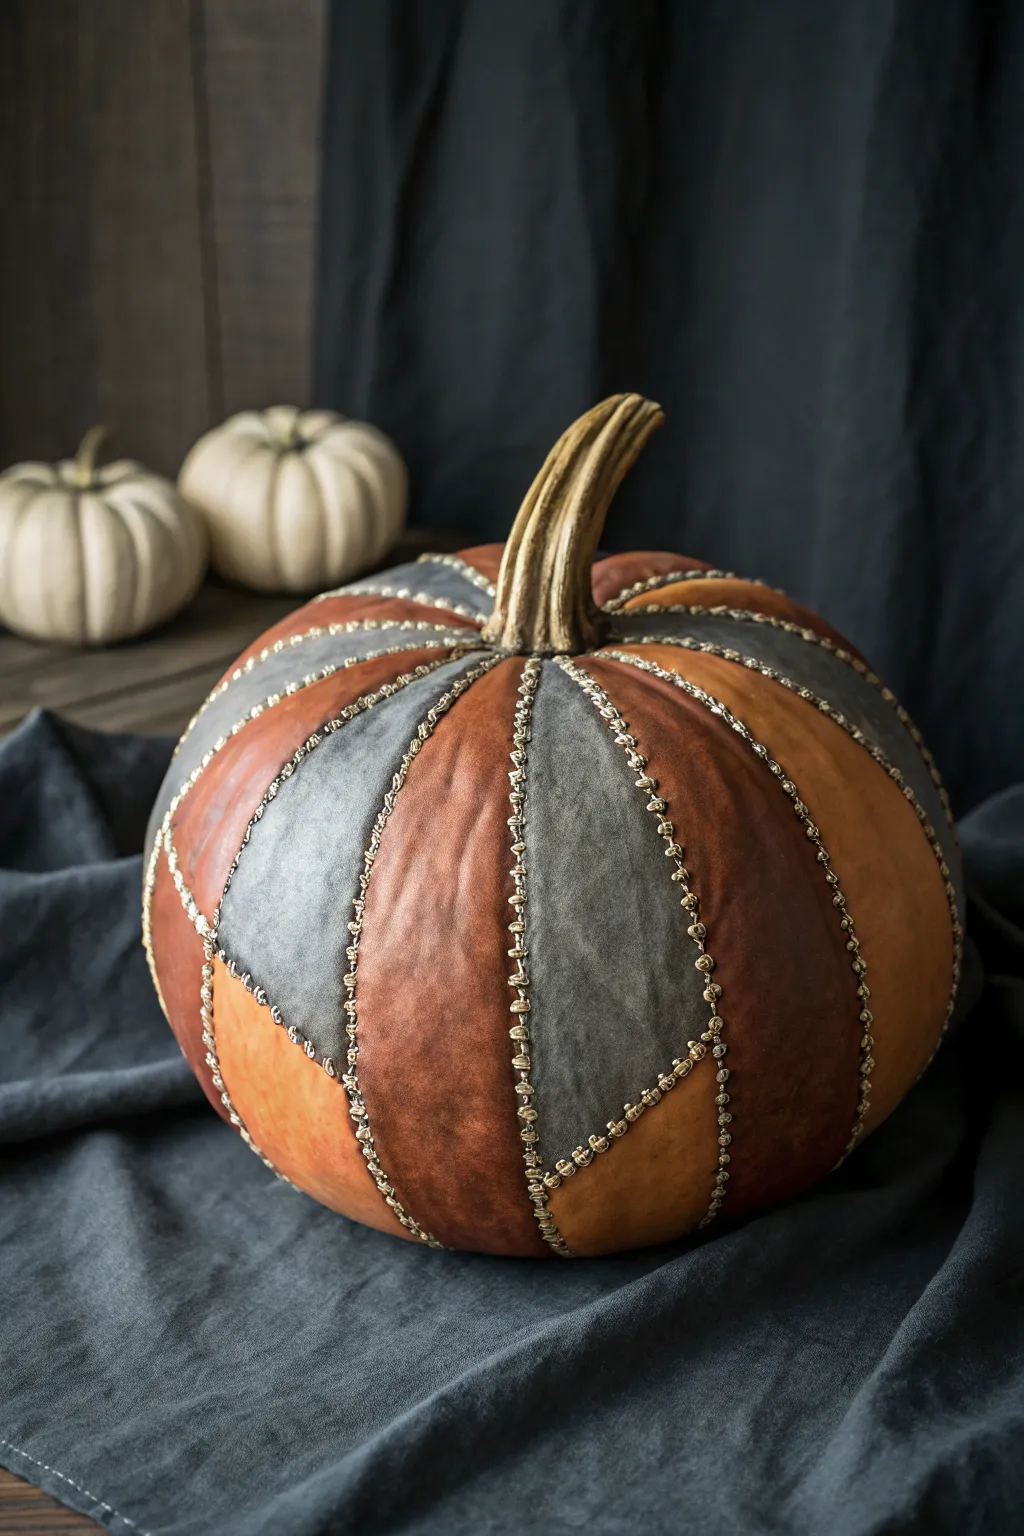
For a rugged, industrial twist on Halloween décor, this no-carve project mimics the look of heavy leather patches stitched together with metal. By using paint and simple metallic embellishments, you can transform a standard pumpkin into a sophisticated, moody centerpiece perfect for any masculine-styled den.
Step-by-Step Tutorial
Materials
- Large, smooth synthetic or real pumpkin (white or orange base)
- Acrylic craft paint: Burnt Sienna (leather orange)
- Acrylic craft paint: Charcoal Grey or Slate Blue
- Paintbrushes: 1-inch flat brush and a small round detail brush
- Gold or bronze dimensional fabric paint (puffy paint)
- Matte finish clear sealer spray
- Pencil or chalk
- Paper towels or soft rag
- Dark brown antiquing wax or slightly watered-down brown paint
Step 1: Preparation & Mapping
-
Clean the surface:
Begin by thoroughly wiping down your pumpkin with a damp cloth to remove any dirt or waxy residue. If you are using a real pumpkin, ensure it is completely dry before proceeding. -
Plan your segments:
Using the pumpkin’s natural vertical ribs as a guide, lightly sketch lines with a pencil or chalk. You want to designate alternating sections that will be painted different colors. -
Create horizontal divisions:
To enhance the ‘patched’ look seen in the inspiration photo, sketch a few horizontal or diagonal lines across some of the vertical panels. This breaks up the long strips and makes it look like smaller scraps of leather were used.
Step 2: Painting the Faux Leather
-
Apply the first color:
Start painting alternating sections with your Burnt Sienna acrylic paint. For a realistic leather effect, don’t make the coat perfectly opaque; let some brushstrokes show texture. -
Apply the second color:
Fill in the remaining sections with your Charcoal Grey or Slate Blue paint. Be careful near the edges to keep the lines relatively clean, though the ‘stitching’ step will hide minor mistakes later. -
Add depth and texture:
Once the base coats are dry to the touch, use a dry brush technique or a rag to dab a tiny amount of darker brown paint or antiquing wax onto the center of the orange panels. This mimics the worn, burnished look of old leather. -
Weather the grey sections:
Similarly, lightly dab a bit of lighter grey or white onto the center of the charcoal sections to create a highlighted, worn effect. I prefer to use a crumpled paper towel here for random, organic texture. -
Seal the paint:
Spray the entire pumpkin with a matte clear sealer. This not only protects the paint but creates a uniform, non-glossy surface that looks more like fabric or leather skin.
Paint Slipping?
If acrylic paint beads up on a plastic pumpkin, lightly sand the surface with fine-grit sandpaper first to give the paint something to grip.
Step 3: Stitching & Details
-
Trace the seams:
Using your gold or bronze dimensional fabric paint (puffy paint), carefully draw a thin line directly over all your pencil lines where the colors meet. -
Create the stitch base:
Along these metallic lines, squeeze small, evenly spaced dots. These will serve as the heavy ‘rivets’ or knots in the stitching. -
Connect the stitches:
Draw tiny, diagonal or X-shaped lines connecting the dots or bridging the gap between two color panels. This simulates the thread pulling the ‘fabric’ together. -
Detail the intersections:
Where vertical and horizontal lines meet, add a slightly larger dollop of dimensional paint to simulate a reinforced junction point. -
Let it cure completely:
Allow the dimensional paint to dry fully, which usually takes at least 4 hours depending on the brand. Do not touch the stitches until they are hard. -
Paint the stem:
While the stitches dry, paint the pumpkin stem. A mix of beige and light brown works well to keep it looking natural and rustic against the dark ‘leather’ body. -
Final dry brushing:
If the metallic stitches look too shiny and new, lightly graze them with a brush carrying a tiny bit of black paint to tarnish the metal look.
Make it Industrial
Glue actual small metal nuts or washers along the seams before painting them gold for a heavier, 3D steampunk aesthetic.
Place your stitched creation on a dark cloth or wooden surface to emphasize its rugged, textural appeal
Topographic Map Lines Pumpkin for an Outdoorsy Vibe
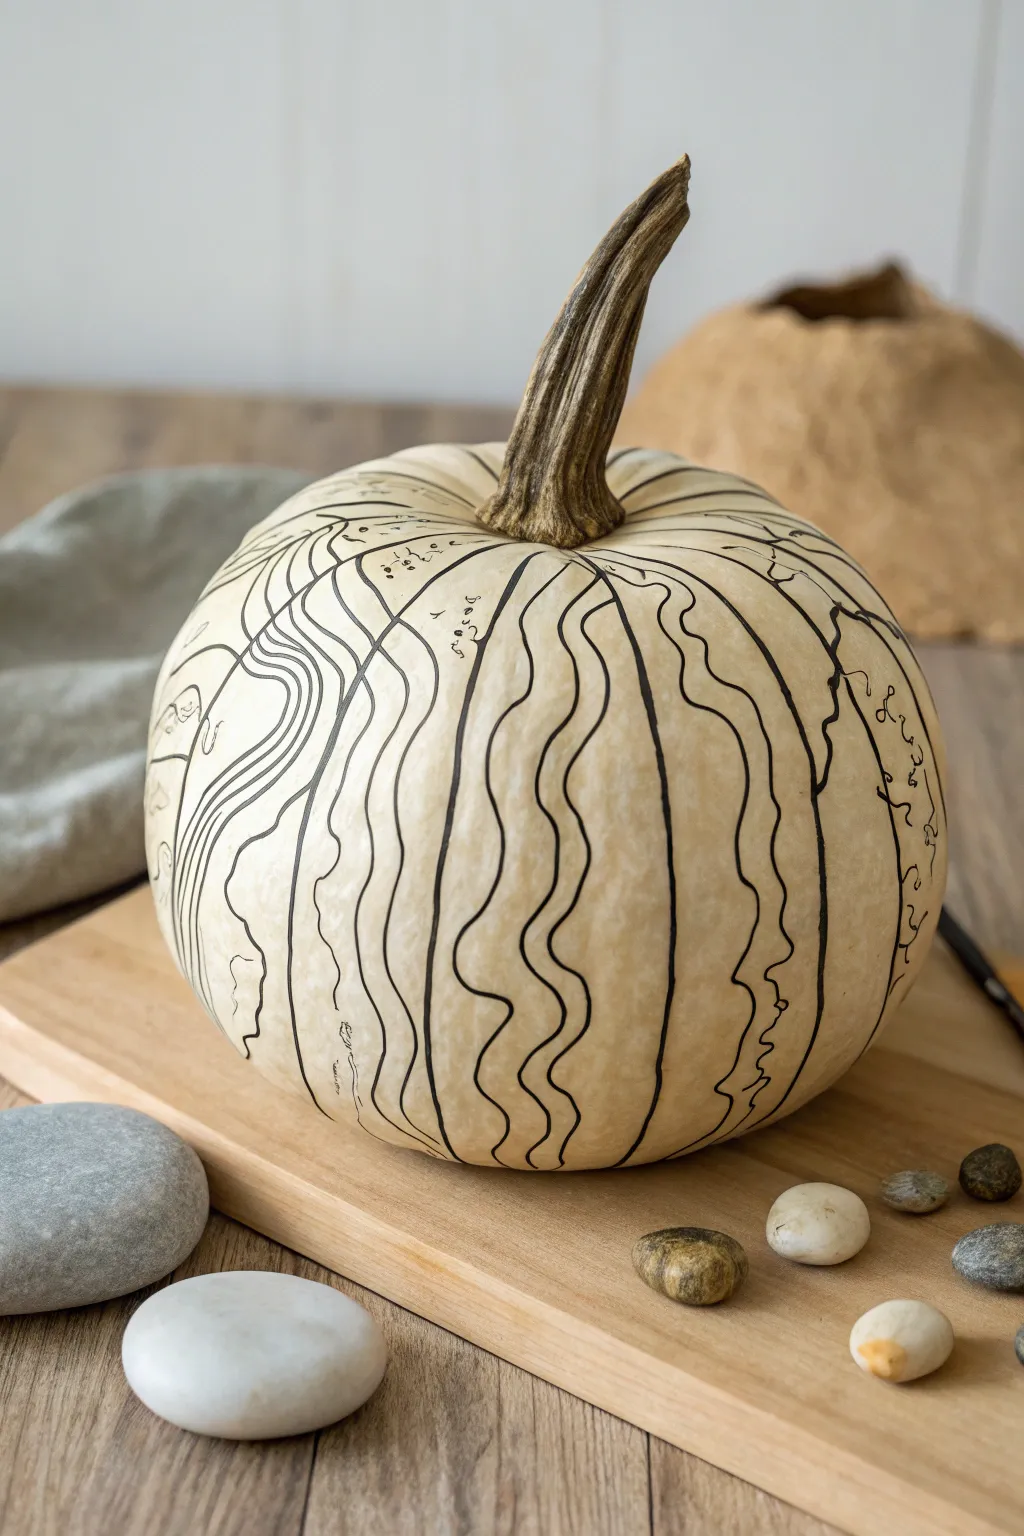
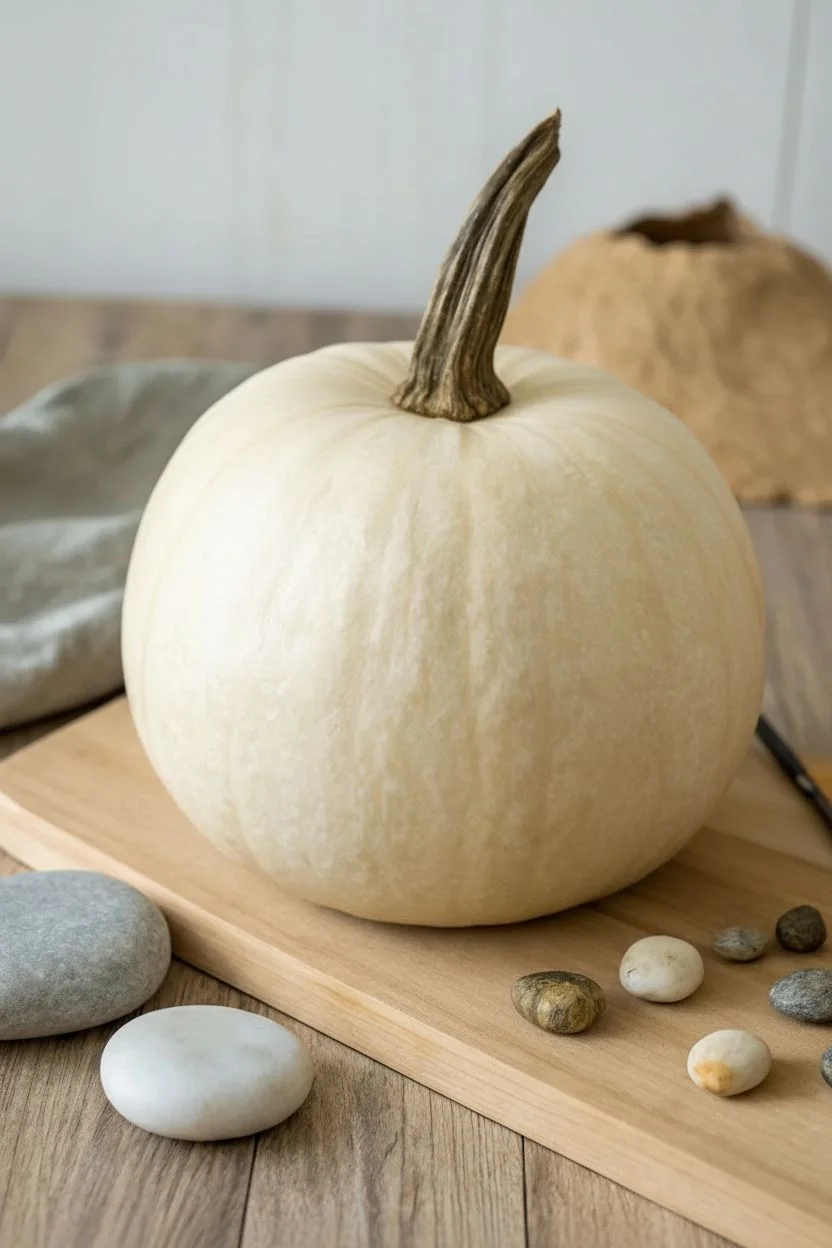
Bring a touch of the wilderness indoors with this minimalist design that mimics the winding elevation lines of a topographic map. This project turns a simple white pumpkin into an intricate piece of modern decor perfect for the outdoorsman.
Detailed Instructions
Materials
- Medium-sized white or cream pumpkin (real or faux)
- Black ultra-fine point permanent marker (0.5mm)
- Black fine point permanent marker (1.0mm)
- Pencil with eraser
- Damp cloth
- Rubbing alcohol
- Cotton rounded pads
- Reference photo of a topographic map (optional)
Step 1: Preparation
-
Clean surface:
Begin by thoroughly wiping down your pumpkin with a damp cloth to remove any surface dirt or dust. If you are using a real pumpkin, wash it gently with mild soap and water. -
Degrease skin:
Take a cotton pad soaked in rubbing alcohol and wipe the entire surface of the pumpkin. This removes natural oils that can prevent the ink from adhering properly or smearing later. -
Dry completely:
Allow the pumpkin to air dry completely for at least 15 minutes. The surface must be bone dry before you apply any ink.
Mapping Precision
Work in sections from top to bottom. This prevents your hand from resting in wet ink and smearing your previous work as you rotate the pumpkin.
Step 2: Drafting the Topography
-
Sketch the primary lines:
Using a light pencil, start drawing organic, wavy lines vertically from the top near the stem down toward the base. Don’t try to be perfect; natural terrain is irregular. -
Create distinct zones:
I like to break the pumpkin surface into three or four large ‘zones’ with these main vertical lines first, leaving wide spaces between them to fill in later. -
Add contours:
Inside the spaces between your main lines, lightly sketch parallel wavy lines. These should mimic the main lines but don’t need to follow them exactly. -
Introduce converging points:
Occasionally, make lines get closer together to represent ‘steep terrain’ and wider apart for ‘flat terrain.’ This variance is key to the topographic look. -
Group lines:
Create concentric irregular circles or ovals in some areas to look like hilltops or depressions, just like on a real map.
Navigate New Terrain
Pick a specific real-world location, like a favorite hiking trail or mountain peak, and print a topo map of it to trace directly onto the pumpkin.
Step 3: Inking the Design
-
Trace main arteries:
Switch to your thicker fine-point (1.0mm) marker. Carefully trace over the primary vertical lines you drew first. These will serve as the bold focal points of the design. -
Vary line weight:
As you draw these thicker lines, ease up on the pressure occasionally to create slight variations in thickness, which adds hand-drawn character. -
Fill with fine details:
Switch to the ultra-fine point (0.5mm) marker. Begin filling in the contour lines between the bold sections, tracing your pencil sketches. -
Steady hand technique:
Rest your pinky finger against the pumpkin surface to stabilize your hand as you draw the long, winding curves. This prevents shakiness on the uneven surface. -
Add ‘elevation’ markers:
Along the thinner lines, occasionally add tiny tick marks or small numbers (like ‘200’ or ‘400’) very small to truly mimic a map’s elevation indicators. -
Detail tight curves:
Focus on the areas where lines converge tightly. Use the ultra-fine tip to ensure these lines don’t bleed into each other, keeping distinct white space between them. -
Incorporate breaks:
Don’t connect every single line. Allow some lines to trail off or break, which adds visual interest and prevents the design from looking too crucial. -
Dry and set:
Let the ink sit for at least 30 minutes to ensure it is completely set. Be careful not to touch the inked areas during this time.
Step 4: Finishing Touches
-
Erase guidelines:
Once the ink is fully cured, gently use a soft eraser to remove any visible pencil marks that weren’t covered by ink. -
Check for gaps:
Inspect the pumpkin from all angles. If there are large empty spaces that look unbalanced, add a few stray contour lines with the fine-point pen. -
Clean up smudges:
If you accidentally smudged any ink, use a cotton swab dipped in a tiny amount of rubbing alcohol to carefully clean up the edges.
Place your finished map pumpkin on a wooden board or near some river stones to complete the rugged aesthetic
Classic Monster-Inspired Pumpkin: Clean Frankenstein-Style Face
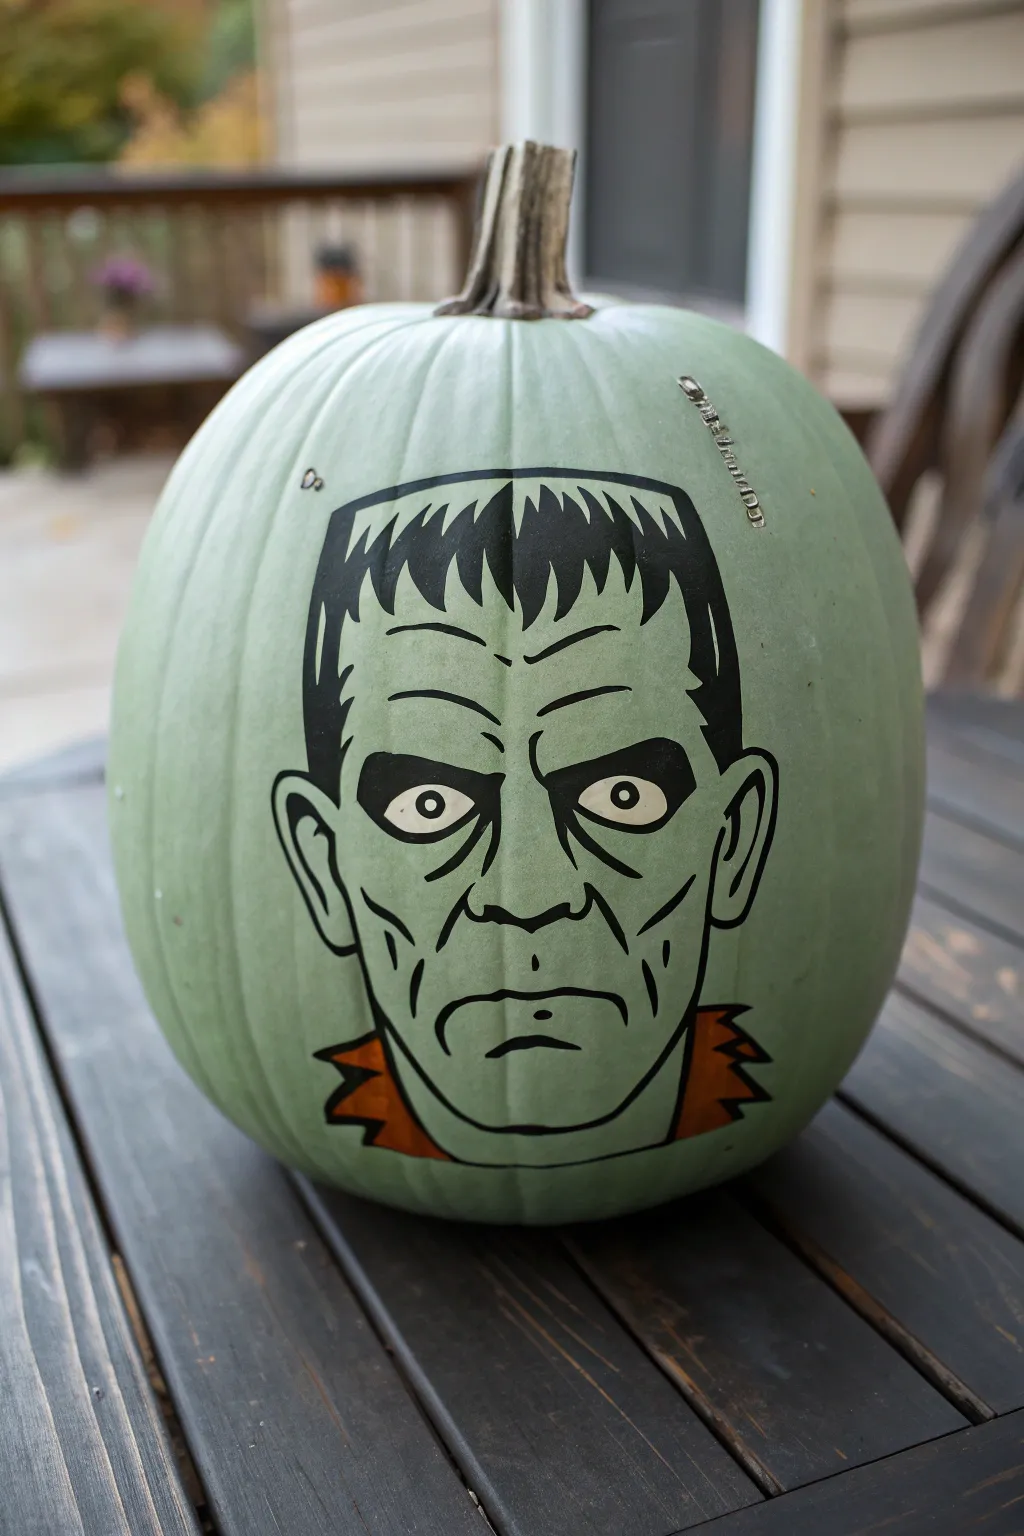

Embrace the classic horror aesthetic with this crisp, graphic interpretation of Frankenstein’s monster painted directly onto a naturally green pumpkin. This design relies on bold black lines and simple shapes to create a striking, cartoon-like visage that stands out without needing a single carve.
Step-by-Step Tutorial
Materials
- Large pumpkin (ideally a green variety like Jarrahdale, or painted sage green)
- Black acrylic paint
- Orange or rust-colored acrylic paint
- White acrylic paint
- Graphite transfer paper or soft pencil for tracing
- Fine liner brush (size 0 or 1)
- Small flat brush (size 4 or 6)
- Black permanent marker (medium tip, optional for outlining)
- Printed template of Frankenstein’s face
- Painter’s tape
- Damp cloth or baby wipes
- Clear matte sealer spray (optional)
Step 1: Preparation and Transfer
-
Clean the Surface:
Begin by thoroughly wiping down your pumpkin with a damp cloth to remove any dirt or oils. The paint needs a clean, dry surface to adhere properly, so dry it completely before moving on. -
Optional Base Coat:
If you couldn’t find a naturally green pumpkin, mix a muted sage green acrylic paint and apply two coats to a regular orange pumpkin, allowing it to dry fully between coats. If you have a Jarrahdale variety, you can skip this step. -
Prepare the Template:
Print out a line drawing of a Frankenstein monster face that fits the scale of your pumpkin. Cut away the excess paper around the edges of the design to make it easier to mold slightly to the pumpkin’s curve. -
Position the Face:
Tape the template onto the flattest side of the pumpkin. Since pumpkins are round, you may need to make small snips in the paper’s edge to get it to lay relatively flat against the surface. -
Transfer the Design:
Slide a sheet of graphite paper behind your template. Using a ballpoint pen or dull pencil, trace firmly over every line of the face—hair, eyes, wrinkles, and bolts. If you don’t have transfer paper, you can heavily rub the back of your printout with a soft pencil and then trace over the front to transfer the graphite.
Step 2: Painting the Features
-
Outline the Hair:
Remove the paper and tape. Using your fine liner brush and black acrylic paint, carefully paint the outline of the blocky hair shape. I find it helpful to anchor my pinky finger on the pumpkin for stability while pulling these lines. -
Fill the Hair:
Switch to your small flat brush to fill in the large hair area with solid black paint. Apply a second coat if the coverage looks streaky after the first one dries. -
Paint the Eyes:
Paint the pupils black, leaving the rest of the eye area unpainted so the green skin shows through (or paint it white if you prefer a higher contrast look). In this design, the ‘whites’ of the eyes are actually just empty space. -
Adding the Highlights:
Once the black pupils are dry, use a detail brush or the handle end of a paintbrush dipped in white paint to place a small dot in each pupil. This ‘catchlight’ brings the character to life. -
Define the Brows and Wrinkles:
Return to your fine liner brush. Carefully trace the heavy brow ridges, forehead wrinkles, and the lines under the eyes. Keep your paint consistency fluid but opaque; add a tiny drop of water if it drags too much. -
Nose and Mouth Details:
Paint the nose shape and the grim, straight mouth line. Don’t forget the small frown lines at the corners of the mouth and the chin dimple to give him that signature grumpy expression. -
Add the Ears:
Outline the ears on either side of the head. Keep the lines clean and consistent in thickness with the rest of the face features. -
The Neck Bolts:
Paint the simple outline of the bolts or scars if your design includes them. For the collar area, outline the jagged edges of his shirt collar near the bottom. -
Color the Collar:
Using the orange or rust-colored paint, fill in the small triangles of the collar. This pop of color adds a nice contrast to the green skin and black lines. -
Clean Up Edges:
Inspect your lines. If any edges look fuzzy, you can sharpen them with a black permanent marker once the paint is 100% dry, or use a damp Q-tip to wipe away wet mistakes immediately. -
Side Details:
Optionally, add small details like a stray fly or a jagged scar stitch line on the upper forehead area using your fine liner brush for extra character. -
Seal the Work:
To protect your artwork from moisture and prevent the paint from flaking, give the painted area a light coat of clear matte sealer spray once everything has cured for a few hours.
Uneven Lines?
If your brushstrokes are shaky, let the paint dry completely, then go over the edges with a medium-tip black paint pen (like Posca) for a razor-sharp, comic-book clean finish.
Dimensional Bolts
Hot glue two real wine corks or bolts painted silver to the sides of the pumpkin where the neck would be for an awesome 3D mixed-media effect.
Place your finished monster on the porch to greet trick-or-treaters with a stoic stare
Blackout Pumpkin With Subtle Gloss-on-Matte Pattern
This sophisticated project transforms a standard pumpkin into a sleek, modern centerpiece using a striking combination of matte black and metallic patterning. The geometric grid design adds architectural depth, making it a perfect choice for those who want Halloween decor that feels more like an art object than a craft.
Step-by-Step Guide
Materials
- Faux pumpkin (medium size)
- Matte black spray paint (flat finish)
- Silver or metallic champagne paint marker (fine tip)
- Painter’s tape or flexible masking tape (1/4 inch width)
- Pencil or white charcoal pencil
- Ruler or measuring tape
- Soft cloth or tack cloth
- Matte clear coat sealer (optional)
- Dark walnut or antique faux glazing medium (for the stem)
- Small stiff brush
Step 1: Preparation & Base Coat
-
Clean surface:
Begin by wiping down your pumpkin with a damp cloth to remove any dust or manufacturing residue. If it’s a real pumpkin, ensure it is completely dry; for faux pumpkins, a quick wipe with isopropyl alcohol helps the paint adhere better. -
Mask the stem:
Carefully wrap the stem in painter’s tape to protect it from the black spray paint. I prefer to tear small strips of tape to get right into the crevices where the stem meets the fruit. -
First coat:
In a well-ventilated area, apply the first coat of matte black spray paint. Hold the can about 8-10 inches away and use sweeping motions to avoid drips. -
Dry and rotate:
Let this layer dry for about 20 minutes until it’s tacky but solid. Rotate the pumpkin to check for missed spots, especially near the bottom curves. -
Final dense coat:
Apply a second, heavier coat to ensure complete, opaque coverage. The goal is a velvety, light-absorbing black finish. Allow this to cure completely, ideally overnight, as the paint pens can scratch soft paint.
Uneven Lines?
If your hand shakes, try resting your pinky finger on the dried surface of the pumpkin for stability. You ran also use flexible masking tape as a guide for perfectly straight lines.
Step 2: Mapping the Geometry
-
Define vertical ribs:
Identify the natural vertical grooves (ribs) of the pumpkin. If your pumpkin is smooth, you’ll need to use a measuring tape to mark 8-10 evenly spaced vertical intervals around the circumference. -
Mark horizontal rings:
Using a white charcoal pencil or a regular pencil (if visible), lightly mark three or four horizontal ‘rings’ around the pumpkin. These don’t need to be perfect circles, but should be roughly evenly spaced from top to bottom. -
Sketch the diamonds:
Lightly sketch diagonal lines connecting your grid points. You want to create a diamond lattice pattern. Connect a point on the top ring to the two nearest points on the ring below it. -
Review spacing:
Step back and look at your sketch. The lines should naturally curve with the pumpkin’s shape, getting slightly closer together near the top and bottom.
Pro Tip
Use varying line thicknesses. Make the vertical lines along the ribs slightly thicker than the diagonal cross-hatching to emphasize the pumpkin’s natural shape.
Step 3: Applying the Design
-
Prime the pen:
Shake your silver or metallic paint marker vigorously. Press the tip down on a scrap piece of paper until the ink flows smoothly and consistently. -
Trace verticals first:
Start by tracing the vertical lines following the pumpkin’s natural ribs. Use a steady hand and pull the pen towards you rather than pushing it away for cleaner lines. -
Draw the diagonals:
Begin adding the diagonal lines to form the triangular and diamond shapes. Work from the top of the pumpkin downward to avoid smudging your fresh ink with your hand. -
Manage the curve:
When drawing over the curved surface, don’t try to draw a long line in one go. I find it easier to connect intersection to intersection, treating each segment as a single short line. -
Double-pass lines:
For a bolder look similar to the photo, go over your lines a second time once the first pass is dry. This enhances the metallic sheen against the matte background. -
Clean intersections:
Check where your lines meet. If the corners look messy, carefully dab a tiny dot of paint at the intersection to square it off.
Step 4: Stem & Finish
-
Unmask stem:
Remove the tape from the stem. If the original color is too distinct, brush on a little dark walnut glazing medium to give it a darker, weathered look that complements the black body. -
Dry brush highlights:
Take a very small amount of your metallic paint on a stiff brush and lightly dry-brush the ridges of the stem. This ties the organic element to the geometric design. -
Clean up sketches:
If any pencil marks are still visible, use a damp Q-tip to gently wipe them away without disturbing the paint lines. -
Optional seal:
To make the finish durable for outdoor use, spray a light coat of matte clear sealer over the entire project. Be careful not to dull the metallic lines too much.
Now you have a striking, architectural pumpkin that brings a touch of modern elegance to your seasonal display
Bold Brushstroke Pumpkin in Two-Color Street-Style Blocks
Bring a sleek, graphic edge to your autumn decor with this high-contrast black and white pumpkin. By following the natural ridges of the gourd, you create a bold pattern that feels both organic and modern, reminiscent of street art blocking.
Detailed Instructions
Materials
- Medium to large pumpkin (real or faux)
- White acrylic paint (matte or satin finish)
- Black acrylic paint (heavy body preferred)
- Wide flat paintbrush (approx. 1 inch)
- Medium round paintbrush
- Painter’s tape (optional)
- Clean rag or paper towels
- Palette or paper plate
- Spray sealant (matte or gloss, optional)
Step 1: Preparation & Base Coat
-
Clean surface:
Begin by wiping down your pumpkin with a damp rag to remove any dirt or oils. If you are using a real pumpkin, ensure it is completely dry before moving on to painting. -
Protect the stem:
Carefully wrap the stem with painter’s tape if you want to keep it completely paint-free. I generally prefer just being careful with my brush, as the natural stem provides a nice textural contrast. -
First white layer:
Squeeze a generous amount of white acrylic paint onto your palette. Using the wide flat brush, apply a base coat over the entire pumpkin. -
Smooth coverage:
Work the white paint into the crevices and ridges. Don’t worry if the orange subtly shows through the first coat; this helps you see where you’ve been. -
Dry and repeat:
Allow the first coat to dry for about 20-30 minutes. Apply a second coat of white to ensure a solid, opaque background. Let this dry completely—ideally for an hour—so the black paint won’t mix with it later.
Step 2: Painting the Stripes
-
Identify ridges:
Look at the natural vertical ribs of your pumpkin. These indentations will serve as the guides for your black stripes. -
Load the brush:
Switch to your medium round brush or stick with the flat brush turned on its edge. Load it generously with heavy body black acrylic paint. -
Start from the top:
Choose a deep ridge valley to start. Place your brush right at the base of the stem (without painting the stem itself) and drag the paint downward. -
Follow the curve:
Pull the stroke all the way down toward the bottom of the pumpkin, letting the brush naturally follow the indentation of the rib. -
Build the width:
Go back over the initial black line to widen it. The goal is a thick, confident stripe that fills the ‘valley’ of the rib but leaves the ‘peaks’ white. -
Rough edges:
Don’t stress about perfect straight lines. A slightly jagged or organic edge adds to the ‘brushstroke’ aesthetic seen in the photo. -
Skip sections:
To prevent smudging wet paint with your hand, paint every other ridge first. Rotate the pumpkin carefully as you work. -
Fill the gaps:
Once the first set of stripes is touch-dry (about 15 minutes), go back and paint the remaining ridges in black. -
Touch ups:
Inspect your stripes. If the black looks patchy, add a second layer to make the color deep and saturated.
Use Heavy Body Paint
Thin paint will streak. Use ‘heavy body’ acrylics for opaque, one-coat coverage on the black stripes.
Step 3: Finishing Touches
-
Clean the bottom:
Check the underside of the pumpkin. Extend the black stripes slightly underneath so the lines don’t abruptly stop when viewed from the side. -
Stem cleanup:
If any paint accidentally got on the stem, wipe it off quickly with a damp cloth or paint over it with a distinct brown shade to match the natural look. -
Seal the work:
Once the entire pumpkin is fully dry (overnight is best), spray a light coat of clear sealant over it to protect the paint from chipping, especially if it will be displayed outdoors.
Add Metallic Flair
Once the black is dry, outline one side of each black stripe with a thin gold line for a luxury streetwear vibe.
Place your bold creation on the porch or a table to immediately modernize your fall setup
Night Forest Scene Pumpkin With Cabin Silhouette
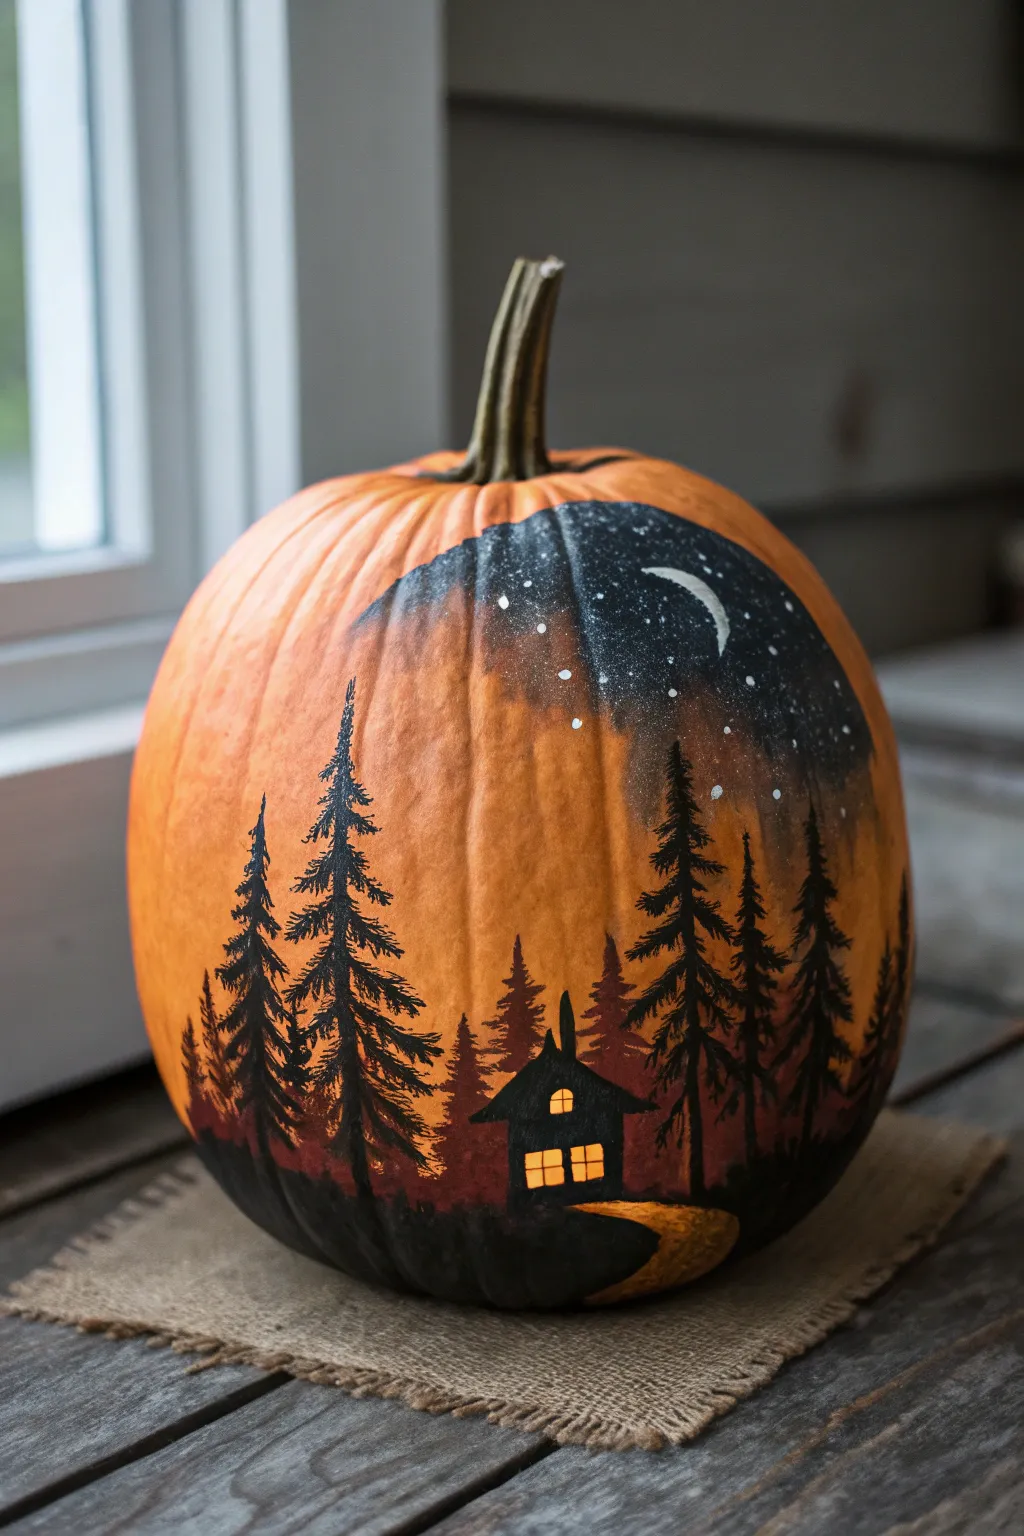
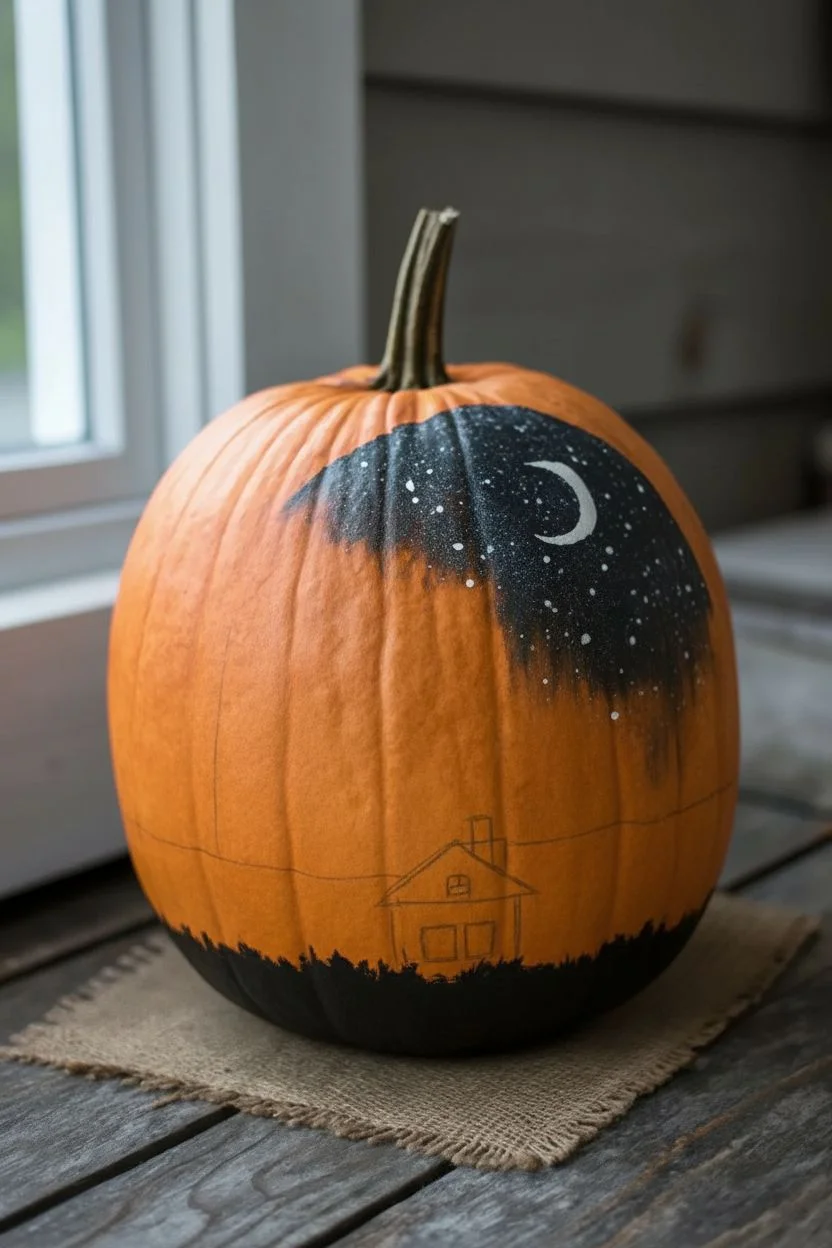
Transform a plain pumpkin into a moody, atmospheric masterpiece by painting a serene night forest scene directly onto the orange rind. This project uses the pumpkin’s natural color as the sunset sky, creating a stunning contrast with the stark black silhouettes of towering pines and a cozy cabin.
Step-by-Step
Materials
- Large, clean pumpkin
- Black acrylic paint
- White acrylic paint
- Dark blue acrylic paint (optional, for sky blend)
- Yellow or gold acrylic paint
- Medium flat brush
- Small fine-liner brush
- Old toothbrush (for stars)
- Pale yellow or beige paint (for path)
- Pencil or chalk
- Paper plate or palette
- Water cup and paper towels
- Matte spray sealer (optional)
Step 1: Planning and Sky
-
Prep the Surface:
Wipe down your pumpkin with a damp cloth to remove any dirt or oils. Let it dry completely so the acrylic paint adheres properly to the skin. -
Map Your Design:
Lightly sketch the main elements using a pencil or chalk. Mark a curved line near the top right for the night sky area, a rough horizon line for the ground, and a small box shape where the cabin will sit. -
Paint the Night Sky:
Using your medium flat brush, fill in the top right curved area with black paint. You can mix a tiny drop of dark blue into the black near the edges to soften the transition, but keep it very dark. -
Create the Texture:
While masking the orange part of the pumpkin with a paper towel, dip an old toothbrush into watered-down white paint. Use your thumb to flick the bristles, spraying tiny ‘stars’ onto the black sky area. -
Add the Moon:
Switch to a small brush and paint a crescent moon shape in white within the black sky. Let the paint drag slightly to create a mystical, textured look rather than a solid block.
Step 2: Painting the Landscape
-
Establish the Ground:
Use black paint to fill in the bottom section of the pumpkin, creating an uneven, hilly terrain. Paint right up to where you marked the cabin’s foundation. -
Paint the Path:
While the ground dries, use pale yellow or beige paint to create a winding path leading from the foreground toward the cabin spot. Use short, horizontal strokes to give the path some texture. -
Define the Path Edges:
Once the path color is applied, carefully refine the edges with black paint so it looks like the path is cutting through the dark grass. -
Paint the Cabin Silhouette:
Using a small brush and black paint, fill in the cabin shape. Make sure to paint the roof with a distinct peak and add a small chimney rectangle on top. -
Add the Windows:
Wait for the black cabin paint to dry completely. This is crucial. Then, paint two small squares in bright yellow or gold to represent lit windows. Add a tiny cross in the center of them with a very fine black line later if you have a steady hand.
Paint Slipping?
If acrylic paint beads up on the waxy pumpkin skin, dab the area gently with a dry paper towel or very lightly sand the surface with fine-grit sandpaper to give it ‘tooth’ before trying again.
Step 3: Adding the Forest
-
Start the Trees:
Beginning on the left side, paint a vertical black line for the trunk of your first large pine tree. Make it tall, extending up into the orange ‘sunset’ area. -
Build the Branches:
Starting at the top of the trunk, use the tip of your small brush to tap on horizontal branches. As you move down the trunk, make the branches wider and slightly fuller. -
Vary the Sizes:
Continue adding trees across the horizon. I always try to vary the heights—some should tower high, while others remain shorter to create depth in your forest. -
Layering the Background:
For added depth, you can mix a little water or grey into your black paint and create fainter, smaller trees in the background behind the cabin. -
Connect the Forest:
Ensure the bottom of all your trees blends seamlessly into the black ground layer you painted earlier. -
Final Touches:
Check your paint coverage. If the orange shows through the black too much, add a second coat to the silhouettes to make them opaque and crisp. -
Seal (Optional):
Once everything is bone dry, lighter spray with a matte clear sealer will protect your artwork from moisture.
Add Real Light
Instead of painting the yellow windows, carefully carve them out using a small clay tool or x-acto knife. Place a battery votive inside for a warm, real glow that matches your painted scene.
Now you have a striking landscape that captures the quiet mystery of a forest night on your porch
Galaxy Pumpkin in Deep Blues With Star Splatter
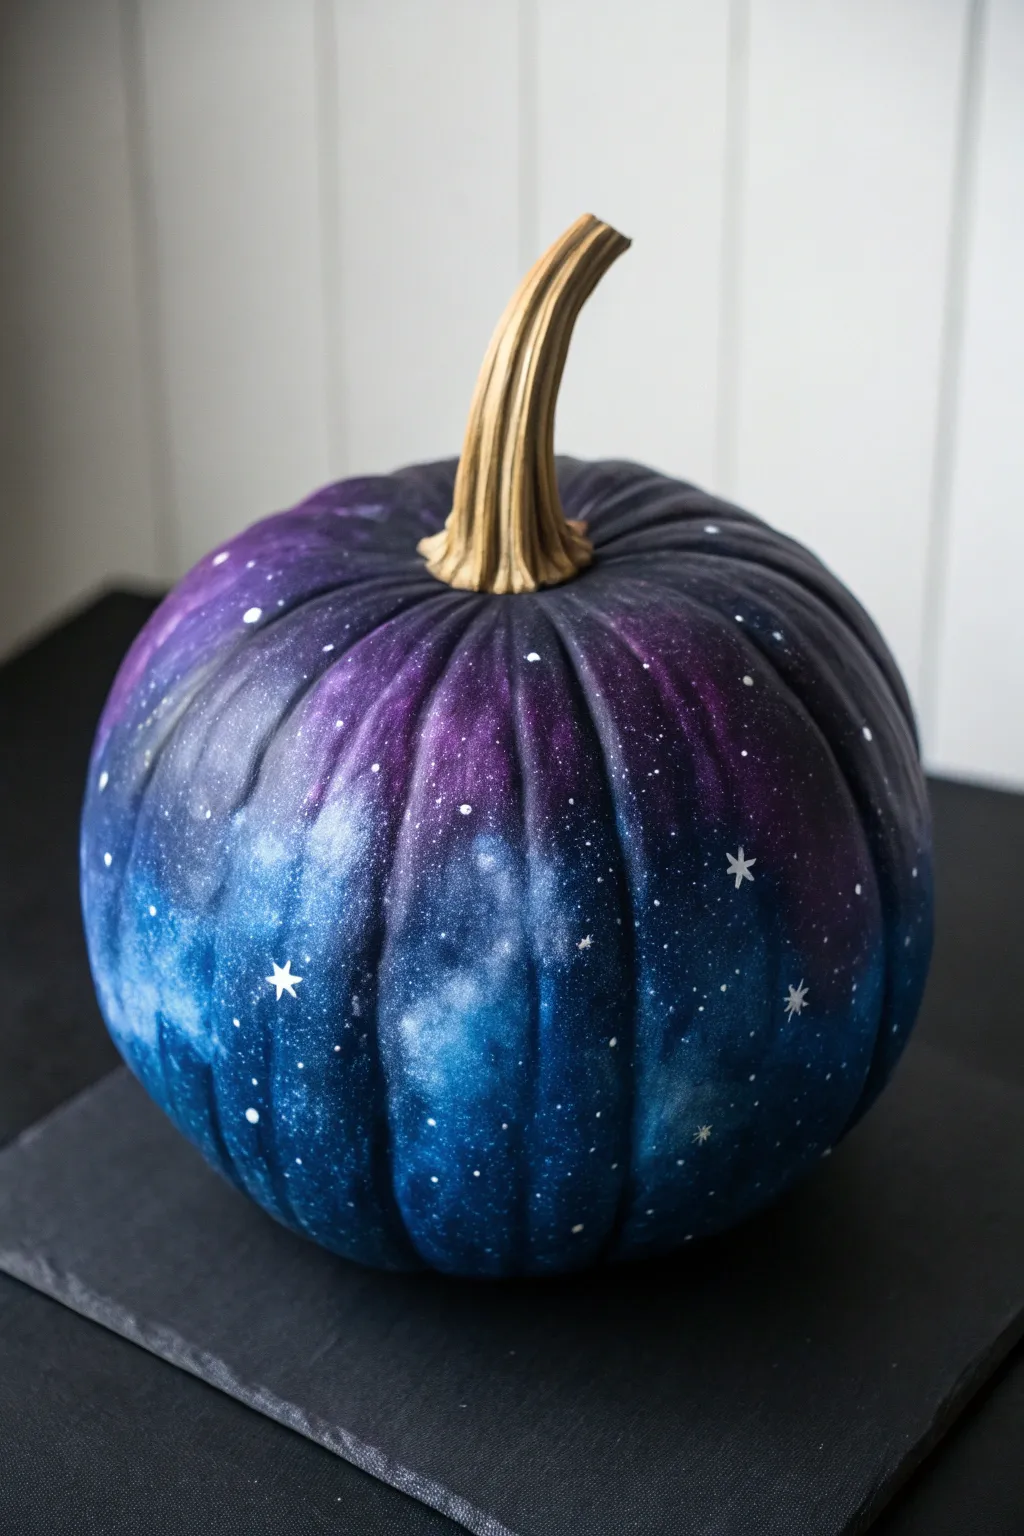
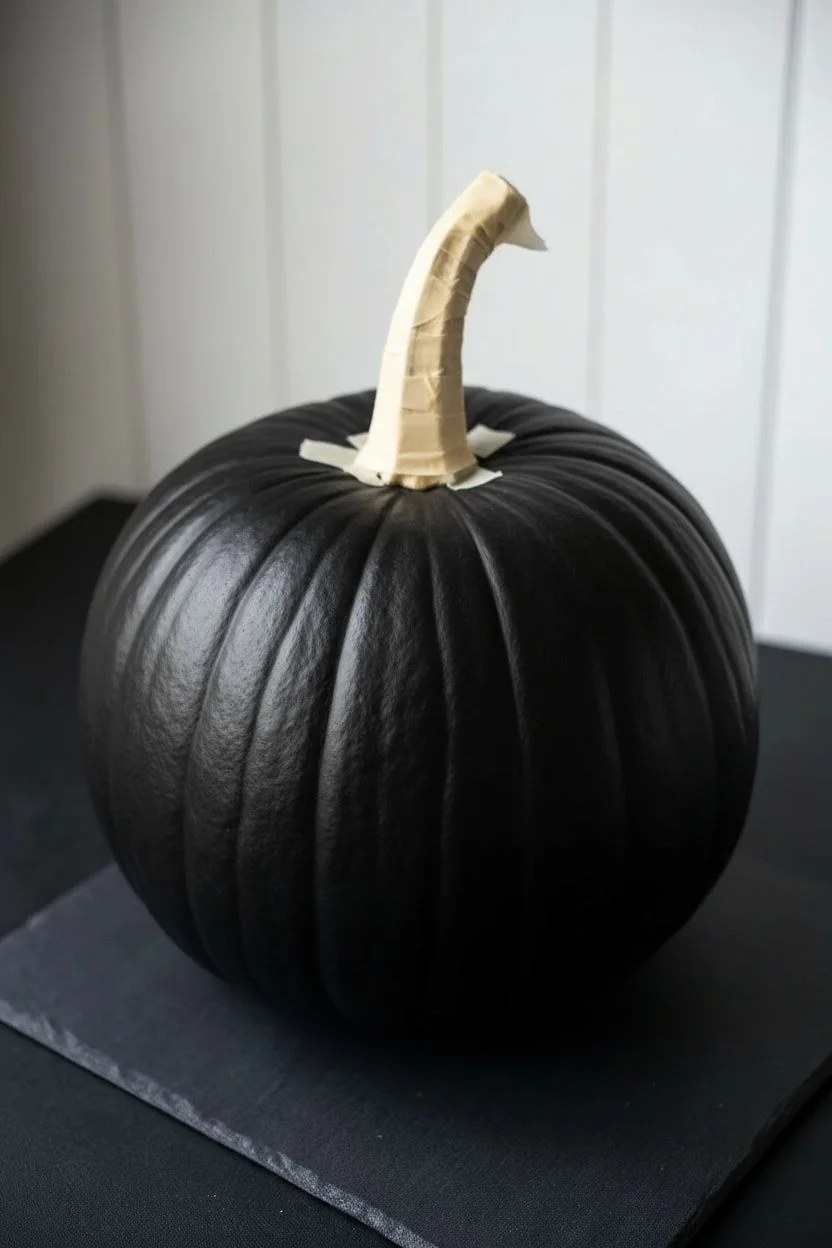
Transform a simple gourd into a piece of the cosmos with this stunning galaxy-themed painted pumpkin. Featuring deep nebulous clouds of indigo and violet punctuated by bright starlight, this no-carve project adds an elegant, mysterious atmosphere to your seasonal decor.
Step-by-Step Tutorial
Materials
- Medium-sized craft pumpkin or real pumpkin
- Gesso or white primer (optional, but helpful for coverage)
- Black acrylic paint (matte)
- Dark blue acrylic paint (navy or indigo)
- Purple acrylic paint (violet or plum)
- Teal or light blue acrylic paint
- White acrylic paint
- Assorted cosmetic sponges or kitchen sponge pieces
- Medium flat paintbrush
- Small fine-tipped detail brush
- Old toothbrush
- Paper plate or palette
- Matte or satin spray sealant
- Masking tape
Step 1: Preparation and Base Coat
-
Clean the surface:
Wipe down your pumpkin with a damp cloth to remove any dust, dirt, or wax. If using a real pumpkin, ensure it is completely dry before beginning. -
Protect the stem:
Carefully wrap the entire stem with masking tape. We want to keep that beautiful natural color free of dark paint splatters. -
Prime the pumpkin:
Apply a thin layer of primer or black paint as your base. I prefer starting with a solid matte black coat to give the galaxy depth right from the start. -
Let it cure:
Allow the base coat to dry completely. This creates a solid foundation so the subsequent colors won’t mix into a muddy grey.
Muddy Colors?
If your sponge blending turns grey or muddy, you’re likely using too much wet paint. Let layers dry for 5-10 minutes between colors, or use a hair dryer for speed
Step 2: Creating the Galaxy Clouds
-
Prepare your palette:
Squeeze out quarter-sized amounts of black, dark blue, purple, and teal paint onto your paper plate. -
Start with dark blue:
Dampen a cosmetic sponge slightly and dip it into the dark blue paint. Dab off excess paint onto the plate so the sponge is relatively dry. -
Sponge on the first layer:
Gently pounce the sponge onto the pumpkin in diagonal, patchy clouds. Don’t cover the whole black base; leave negative space for contrast. -
Layer in purple:
Using a fresh piece of sponge, pick up the purple paint. Dab this over the edges where the blue meets the black, and create some standalone purple clusters. -
Blend the transitions:
Softly tap over the areas where colors meet to blur harsh lines. The goal is an organic, smoky effect. -
Add highlights:
Take a tiny amount of teal or light blue on a clean sponge. Lightly dab this into the center of your blue sections to create a glowing ‘heart’ within the nebula clouds. -
Re-intensify contrast:
If your galaxy looks too bright or washed out, sponge a little black back in around the edges of the colorful patches to deepen the shadows.
Step 3: Adding the Stars
-
Mix the star paint:
Mix a small amount of white paint with a few drops of water until it reaches an ink-like consistency. -
Create distant stars:
Dip an old toothbrush into the watered-down white paint. Hold it near the pumpkin and run your thumb across the bristles to flick a fine mist of specks onto the surface. -
Paint larger stars:
Using the tip of a toothpick or the back end of a small paintbrush, dot individual white stars in random spots. Vary the sizes for a realistic look. -
Detail the main stars:
With your fine detail brush, select a few brighter dots and carefully paint simple four-pointed crosses or diamond shapes to create twinkling hero stars.
Level Up: Metallic Glow
Mix a tiny drop of metallic pearl or iridescent medium into your teal and purple highlight layers for a subtle shimmer that catches the light beautifully
Step 4: Finishing Touches
-
Remove the tape:
Once the paint is dry to the touch, gently peel the masking tape off the stem. -
Check for gaps:
Inspect the area around the base of the stem. If any orange shows through, use a small brush to touch it up with black or dark blue paint. -
Seal the artwork:
Take the pumpkin to a well-ventilated area and apply a light coat of matte or satin spray sealant. This protects the paint from scratching and moisture. -
Final drying time:
Le the sealant cure fully according to the can’s instructions before displaying your cosmic masterpiece.
Place your galaxy pumpkin on a dark slate board or wooden table to let its vibrant colors truly pop
Optical Illusion Pumpkin With 3D Cube Shading
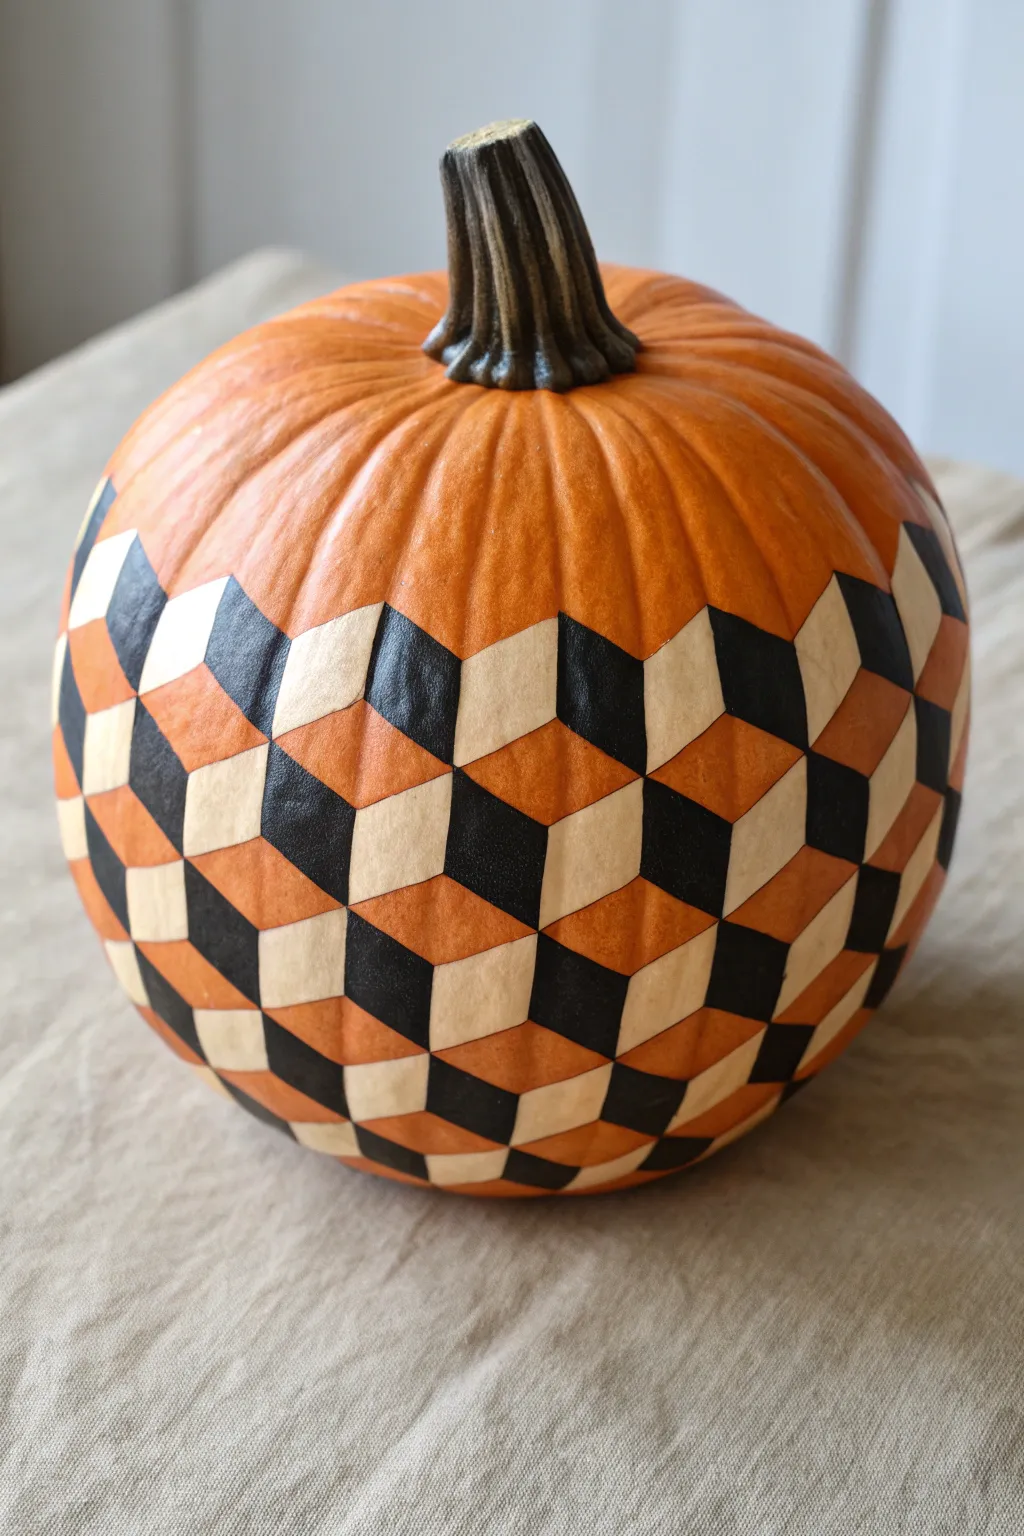
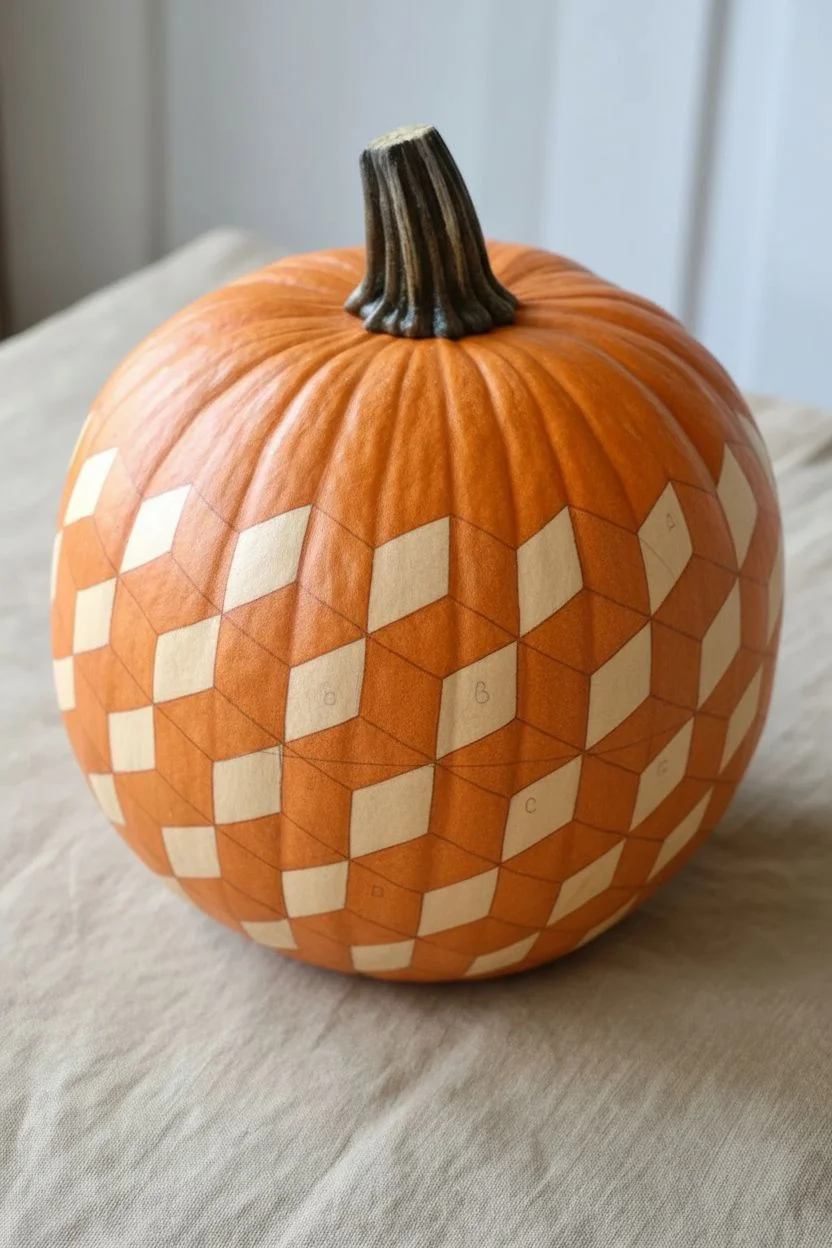
Challenge your perception with this striking optical illusion design that transforms a standard pumpkin into a dimensional masterpiece. Using a classic tumbling block pattern, you’ll create a mesmerizing 3D effect that looks complicated but is built on simple repeating shapes.
How-To Guide
Materials
- Large, smooth-skinned orange pumpkin
- Painter’s tape or masking tape (thin width creates cleaner corners)
- Graphite transfer paper or extensive stencil template
- Pencil and eraser
- Ruler or flexible measuring tape
- Black acrylic paint (matte finish)
- Cream or off-white acrylic paint
- Small flat-edged paint brushes (size 2 or 4)
- Very fine liner brush for touch-ups
- Clear matte sealant spray (optional)
Step 1: Planning and Grid Layout
-
Clean the surface:
Before you begin, wipe down your pumpkin with a damp cloth to remove any dirt or oils that might prevent the paint from glowing. Dry it thoroughly. -
Choose your horizon line:
Decide how high up the pumpkin you want the pattern to go. The example shows the pattern stopping about two-thirds of the way up. Mark this irregular horizon line lightly with a pencil. -
Create a rhombus template:
Cut a distinct diamond (rhombus) shape out of cardstock. This shape entails two acute angles (approx 60 degrees) and two obtuse angles (approx 120 degrees). All four sides must be equal in length. -
Trace the diamonds:
Begin tracing your cardstock template onto the pumpkin surface. The pattern relies on groups of three diamonds meeting at a central point to form a hexagon. These hexagons then nest together. -
The tumbling block rule:
Ensure your orientation is correct: one diamond should be vertical (the ‘side’ of a cube), one should be angled to the other side, and the space left by the pumpkin’s natural orange skin will form the ‘top’ of the cube. -
Navigate the curves:
As you trace around the pumpkin, the spherical shape will distort your grid slightly. I find it helpful to cheat the lines a tiny bit at the bottom to maintain the visual flow rather than forcing mathematical perfection.
Step 2: Painting the Pattern
-
Identify your color zones:
To create the 3D effect, you need distinct light sources. Designate three types of diamonds: ‘Shadow’ (Black), ‘Highlight’ (Cream), and ‘Mid-tone’ (the unpainted Orange pumpkin skin). -
Mark the zones:
Before dipping your brush, put a tiny ‘B’ for black and ‘C’ for cream inside the respective diamonds lightly in pencil so you don’t get lost in the pattern while painting. -
Paint the black facets:
Using your flat-edged brush, fill in the black diamonds first. These usually represent the shadowed side of the cube. Use the flat edge of the brush to get crisp, straight lines along your pencil marks. -
Apply the cream facets:
Once the black paint is touch-dry, paint the cream diamonds. These typically act as the side of the cube facing the light. You may need two coats of cream to fully cover the orange skin underneath. -
Leave the tops orange:
Do not paint the third set of diamonds. The natural orange of the pumpkin acts as the top face of your cubes, tying the design back to the medium itself. -
Refine the edges:
After your main blocks are filled, use a very fine liner brush to tidy up any intersections where the black and cream paint meet. Crisp corners are crucial for the optical illusion to work.
Grid Distortion Fix
If the pattern starts drifting apart due to the pumpkin’s curve, simply stop the pattern lower on the pumpkin. The distortion is less noticeable near the ‘equator’ of the gourd.
Step 3: Finishing and Sealing
-
Clean up sketch lines:
Once the paint is completely bone dry, gently erase any visible pencil marks on the unpainted orange sections. -
Seal the work:
To prevent flaking, especially if the pumpkin will be outside, apply a light coat of clear matte sealant spray. This protects the acrylic without adding a distracting gloss.
Pro Tip: Tape Trick
For ultra-crisp lines without a steady hand, use thin automotive detailing tape (1/8 inch) to mask off the diamond borders. Press edges firmly to prevent paint bleed.
Step back and admire how a simple repeated pattern turns your gourd into a stunning geometric sculpture


Have a question or want to share your own experience? I'd love to hear from you in the comments below!