When I’m craving fall vibes, I love sketching a pumpkin patch—it’s basically a playground of round shapes, twisty vines, and cozy farm textures. Here are my favorite pumpkin patch drawing ideas, starting with the classics and easing into more creative, studio-style experiments.
One-Point Perspective Pumpkin Rows
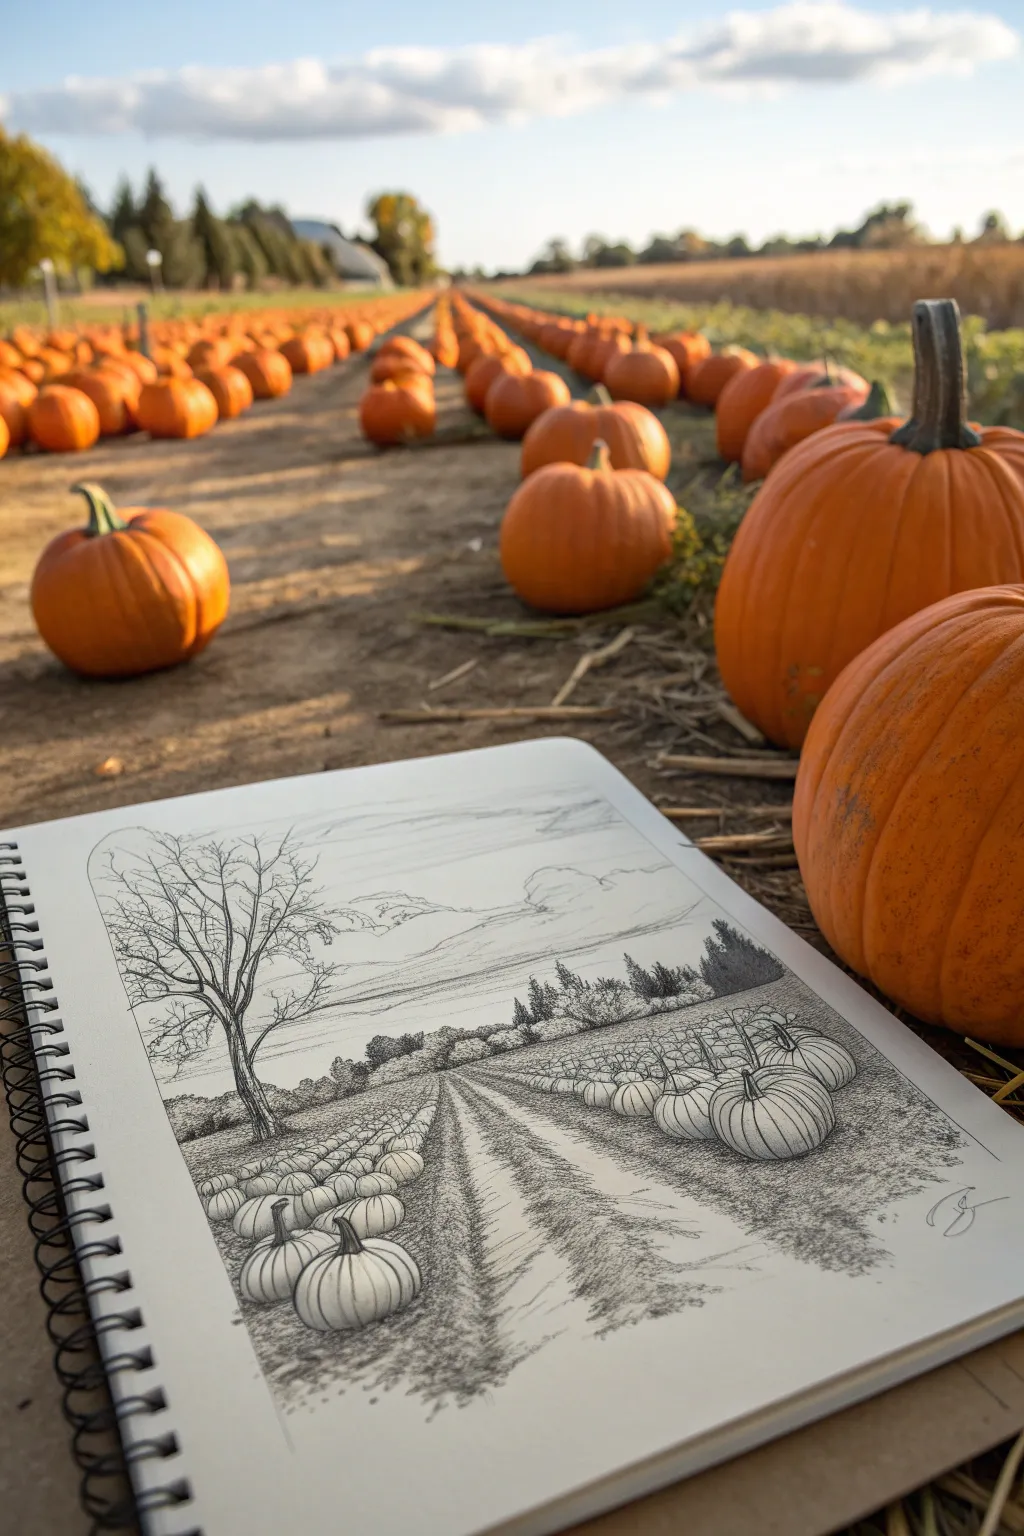
Capture the rustic charm of a sprawling pumpkin field using classic one-point perspective and intricate ink textures. This sketch creates a sense of depth that draws the viewer right down the dirt path.
Step-by-Step Guide
Materials
- Spiral-bound sketchbook (heavyweight paper)
- HB graphite pencil
- Kneaded eraser
- Ruler
- Fine liner pens (sizes 0.1, 0.3, and 0.5)
- Brush pen or broader marker (for shadows)
Step 1: Setting the Scene
-
Establish the horizon:
Begin by lightly drawing a horizontal line across your page with your pencil, placing it slightly below the center. This will represent eye level and separate the sky from the field. -
Define the vanishing point:
Mark a small dot near the center of your horizon line. This single vanishing point will anchor the entire composition. -
Map the path:
Use your ruler to draw two lines extending from the vanishing point downward to the bottom corners of the page. This creates the main dirt road cutting through the field. -
Sketch the pumpkin rows:
Determine where the pumpkin rows will sit by drawing additional guide lines radiating from the vanishing point on either side of the path.
Step 2: Penciling the Elements
-
Draw the foreground pumpkins:
Start sketching large, rounded pumpkin shapes in the immediate foreground on both sides of the path. Remember to vary their sizes and tilts for naturalism. -
Recede into the distance:
Continue sketching pumpkins along your guide lines, making them progressively smaller and closer together as they approach the horizon. By the time they reach the vanishing point, they should be mere specks. -
Add the lone tree:
On the left side of the composition, sketch the skeleton of a leafless tree. Let the branches reach delicately into the sky, creating a stark silhouette against the open space. -
Suggest background foliage:
Draw faint outlines of a tree line or bushes sitting right on the horizon line to give the field a boundary.
Variation in Line Weight
Use your thickest pen only for objects in the very front. As objects get further away, switch to increasingly thinner pens to simulate atmospheric perspective.
Step 3: Inking & Texturing
-
Outline the pumpkins:
Switch to a 0.3 fine liner to ink the pumpkin outlines. Don’t close every line perfectly; broken lines can suggest light hitting the rounded forms. -
Detail the ribs:
With a thinner 0.1 pen, draw the vertical ribs on the pumpkins. Curve these lines to follow the form, reinforcing their roundness. -
Texture the ground:
Use short, horizontal hatching strokes and stippling along the dirt path to create a gritty, earthen texture. Concentrate these marks near the bottom of the page for more detail in the foreground. -
Render the tree:
Ink the tree trunk and branches with the 0.3 pen. Add texture to the bark using vertical, squiggly lines. Allow the smaller branches to taper into very fine lines. -
Create depth with shadows:
Use a 0.5 pen or brush pen to add dark cast shadows underneath each pumpkin. Consistently placing shadows on the same side (e.g., the right) implies a light source like the setting sun. -
Hatch the fields:
Between the pumpkins and in the distance, use cross-hatching to simulate grass and uneven soil. I find that keeping the hatching looser in the foreground and tighter in the background enhances the depth. -
Define the distant trees:
For the distant tree line, use tight vertical strokes or scribbling to create dense, dark masses that contrast with the lighter sky.
Add a Pop of Color
After the ink dries, use a watercolor wash or orange marker just on the pumpkins. Leaving the rest monochrome makes the orange vividly stand out.
Step 4: Examples of Texture
-
Draw the clouds:
Lightly sketch cloud shapes in the sky using very broken, wavering lines with your 0.1 pen. Keep these extremely minimal so they don’t compete with the detailed ground. -
Refine the contrasts:
Step back and look for areas that need more contrast. Deepen the darkest shadows beneath the foreground pumpkins and at the base of the tree to make the drawing pop. -
Clean up:
Once the ink is completely dry, gently erase all your graphite guidelines and the horizon line for a crisp, professional finish.
Now you have a timeless autumn landscape that leads the eye straight into the harvest season


Classic Barn Backdrop Patch
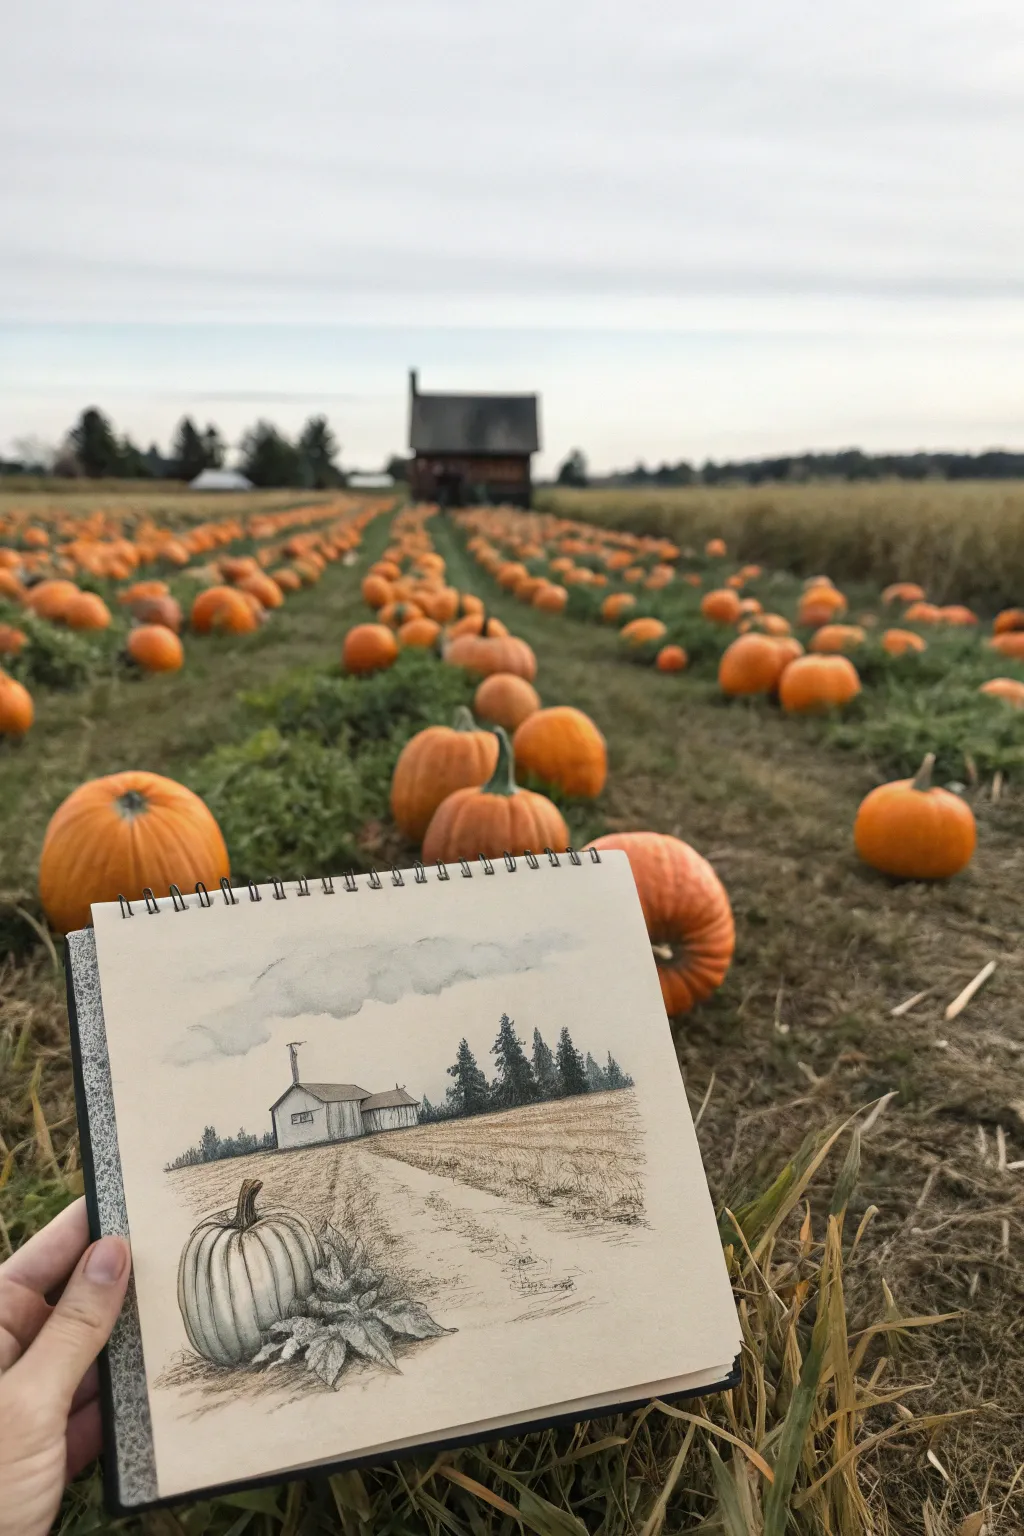
Capture the serene solitude of a pumpkin farm with this mixed-media sketch. Combining precise ink lines with soft washes creates a nostalgic, atmospheric piece that feels ripped straight from a farm journal.
How-To Guide
Materials
- Spiral-bound sketchbook with mixed media paper
- Fine liner pens (sizes 0.1, 0.3, and 0.5)
- Graphite pencil (HB) for sketching
- Kneaded eraser
- Set of watercolor pencils or light wash watercolors
- Small round paintbrush (size 4 or 6)
- White gel pen (optional)
Step 1: Setting the Scene
-
Horizon line:
Begin by lightly sketching a horizon line about one-third of the way up from the bottom of your page. This low horizon emphasizes the sky and the open field. -
Building block-in:
Place the main barn structure just to the left of the center on your horizon line. Use simple geometric shapes: a rectangle for the main body and a triangle for the roof pitch. Add a smaller lean-to structure on the right side. -
Foreground hero:
On the bottom left corner, sketch a large, round pumpkin. Draw it slightly flattened at the top and bottom to give it weight. Add a few jagged leaves at its base to anchor it to the ground. -
Tree line placement:
behind the barn, lightly indicate a row of trees. Vary the heights, making the ones directly behind the barn tallest to frame the structure. -
Path perspective:
Draw faint diagonal lines leading from the bottom right corner toward the barn. These lines shouldn’t be straight ruler lines; let them wobble slightly to suggest a dirt track or rows of crops.
Loose Lines
Don’t connect every single line. Leaving small gaps in your ink lines allows the eye to fill in the rest, making the sketch feel more lively and less like a technical diagram.
Step 2: Inking the Details
-
Barn structure:
Using a 0.3 pen, trace over your barn sketch. Use vertical hatching lines for the siding, keeping them close together on the shadowed side of the building to create depth. -
Tiny windows:
Switch to a 0.1 pen to add small details like the windows on the barn and the chimney pipe. Keep these lines very delicate. -
Tree textures:
For the pine trees in the background, use a 0.5 pen. Use a scribbling, stippled motion to create the dense texture of evergreen needles. Darken the bottoms of the trees more heavily to ground them. -
Foreground pumpkin:
Outline the foreground pumpkin with the 0.3 pen. Draw the vertical ribs using curved lines that follow the pumpkin’s form, but don’t connect them all the way from top to bottom—broken lines look more natural. -
Leafy textures:
Ink the leaves around the pumpkin with jagged, organic outlines. Add veining inside the leaves with your finest 0.1 pen. -
Field stubble:
Suggest the texture of the field using short, horizontal dashes and small tufts of grass. Concentrate these marks in the middle ground and let them fade out as they get closer to the horizon.
Soggy Paper?
If your sketchbook paper buckles under the wash, place a heavy book on the closed sketchbook overnight after the drawing is fully dry to flatten the pages back out.
Step 3: Adding Tone and Wash
-
Barn shadows:
Use a light grey watercolor pencil or wash to shade the side of the barn and the roof. If using pencil, scribe lightly and then blend with a damp brush. -
Pumpkin coloring:
Apply a very pale wash of sage green or desaturated orange to the pumpkin. Keep the color subtle; this style relies on the drawing, not heavy paint. Leave a highlight on the upper curve for volume. -
Field warmth:
Brush a wash of yellow ochre or pale wheat color across the field area. allow the brushstrokes to be loose and streaky to mimic the direction of the field rows. -
Sky atmosphere:
Wet the sky area with clean water first. Drop in a tiny amount of diluted grey-blue paint near the top and let it bleed downwards to create hazy clouds. -
Tree depth:
Once the trees are dry, add a wash of dark green-grey over the inked trees. This pushes them into the distance and unifies the scribbled ink lines. -
Final touches:
Use a white gel pen to add tiny highlights on the pumpkin ribs or the edge of the barn roof if they got lost during painting. Erase any remaining visible pencil lines once the paper is bone dry.
Close your sketchbook and capture the essence of autumn in a single glance


Close-Up Pumpkin Cluster Study
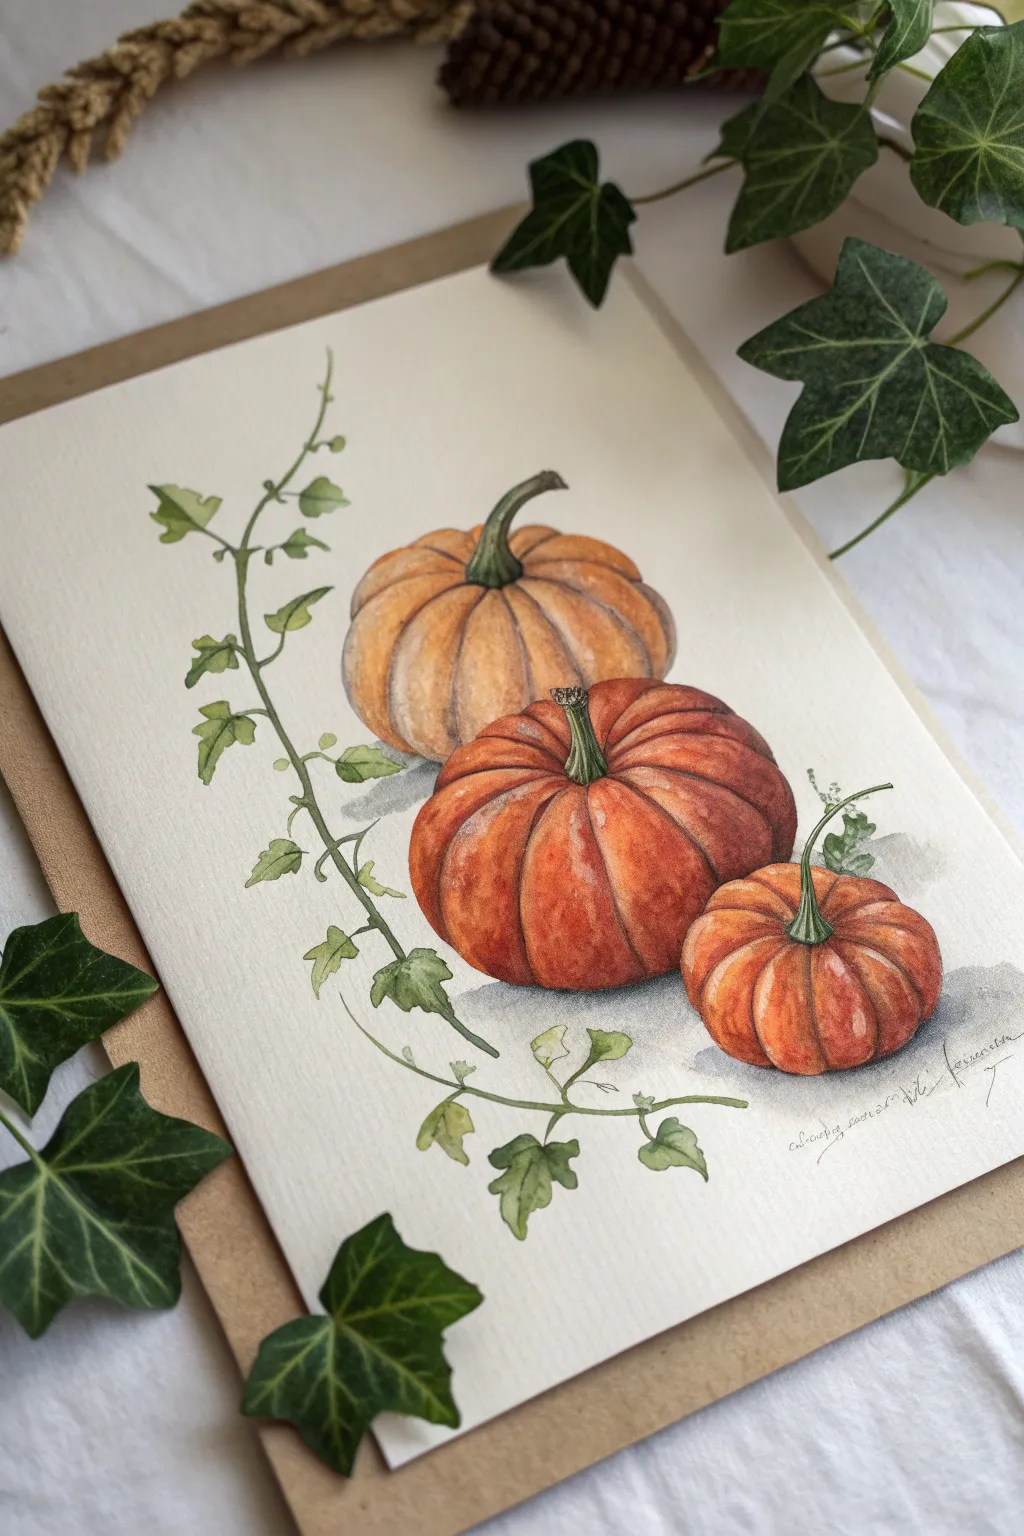
Capture the essence of autumn with this delicate watercolor study featuring a trio of pumpkins nestled among trailing ivy. This project focuses on layering translucent washes to build rich orange tones and creating realistic botanical details with fine brushwork.
Step-by-Step
Materials
- Cold press watercolor paper (300 gsm)
- Watercolor paints (Burnt Sienna, Cadmium Orange, Yellow Ochre, Sap Green, Olive Green, Burnt Umber)
- Round watercolor brushes (sizes 2, 4, and 6)
- Pencil (HB or H for light sketching)
- Kneaded eraser
- Clean water and paper towels
- Kraft paper or cardstock (for mounting)
Step 1: Sketching the Composition
-
Outline the Pumpkins:
Begin by lightly sketching three ovals for your pumpkins. Place the largest one in the center, slightly overlapping the pumpkin behind it, and position the smallest pumpkin in the front right foreground. Keep your pencil lines very faint so they won’t show through the paint later. -
Define the Ribs:
Draw the vertical ribs on each pumpkin. Start from the center indentation where the stem will be and curve your lines outward toward the bottom. Remember that the ribs determine the volume, so make the curves accentuate the roundness. -
Add the Trailing Ivy:
Sketch a delicate, winding vine starting from the upper left, weaving down behind the pumpkins, and trailing off to the bottom center. Add small, geometric ivy leaves along the vine, varying their angles to make the movement feel natural.
Step 2: Building Pumpkin Color
-
First Wash – Background Pumpkin:
For the pumpkin in the back, mix a pale wash of Yellow Ochre with a tiny touch of Burnt Sienna. Apply this wash to the entire shape, leaving tiny slivers of white paper for highlights on the tops of the ribs. -
Layering the Main Pumpkin:
While the first pumpkin dries, mix a vibrant blend of Cadmium Orange and Burnt Sienna for the central pumpkin. Paint each rib individually, using a wet-on-dry technique. Start with more concentrated color at the top and bottom indentations and pull the color toward the center with a damp brush to create a highlight. -
Painting the Small Pumpkin:
Use a similar orange mix for the smallest foreground pumpkin but add a touch more Cadmium Orange to make it pop. Paint the ribs carefully, ensuring you leave those essential highlight strips down the center of each curve. -
Deepening Shadows:
Once the initial layers are bone dry, mix a darker version of your orange using Burnt Sienna and a dot of Burnt Umber. Glaze this into the crevices between the ribs to create depth and separation. -
Adding Texture:
For the back pumpkin, I like to add thin, vertical striations using a very diluted Burnt Sienna to suggest texture without overwhelming the pale color.
Highlight Pro-Tip
Don’t use white paint for highlights. Instead, leave the white of the paper unpainted. If you miss a spot, gently lift the wet paint with a clean, damp brush or paper towel.
Step 3: Details and Greenery
-
Stems and Tops:
Use a mix of Olive Green and Burnt Umber for the pumpkin stems. Paint them with vertical strokes, twisting the brush slightly at the top to show the cut end. Allow the green to bleed slightly into the top of the orange pumpkin flesh for a natural transition. -
Painting the Ivy Vine:
With your size 2 brush and a mix of Sap Green and Olive Green, carefully trace the thin vine line. Vary your pressure to make the line thick and thin in places. -
Leaf Variation:
Fill in the ivy leaves. Use a pale green wash for some leaves and a deeper Olive Green for others to create visual interest. Leave tiny white veins or lift color out with a thirsty brush while the paint is still damp. -
Grounding Shadows:
Mix a cool gray using Burnt Umber and a touch of blue. Paint soft, diffuse cast shadows underneath the pumpkins to anchor them to the surface. -
Final Touches:
Add very fine details with your smallest brush, such as tiny spots on the pumpkin skin or sharp tips on the ivy leaves. Sign your work lightly in pencil near the bottom right.
Troubleshooting Muddy Colors
If your shadows look muddy, you’re likely working the paint too much while it’s damp. Let each layer dry completely before adding a glaze or shadow on top.
Mount your finished piece on the kraft paper to complete that rustic, autumnal aesthetic


Scarecrow in the Pumpkin Patch
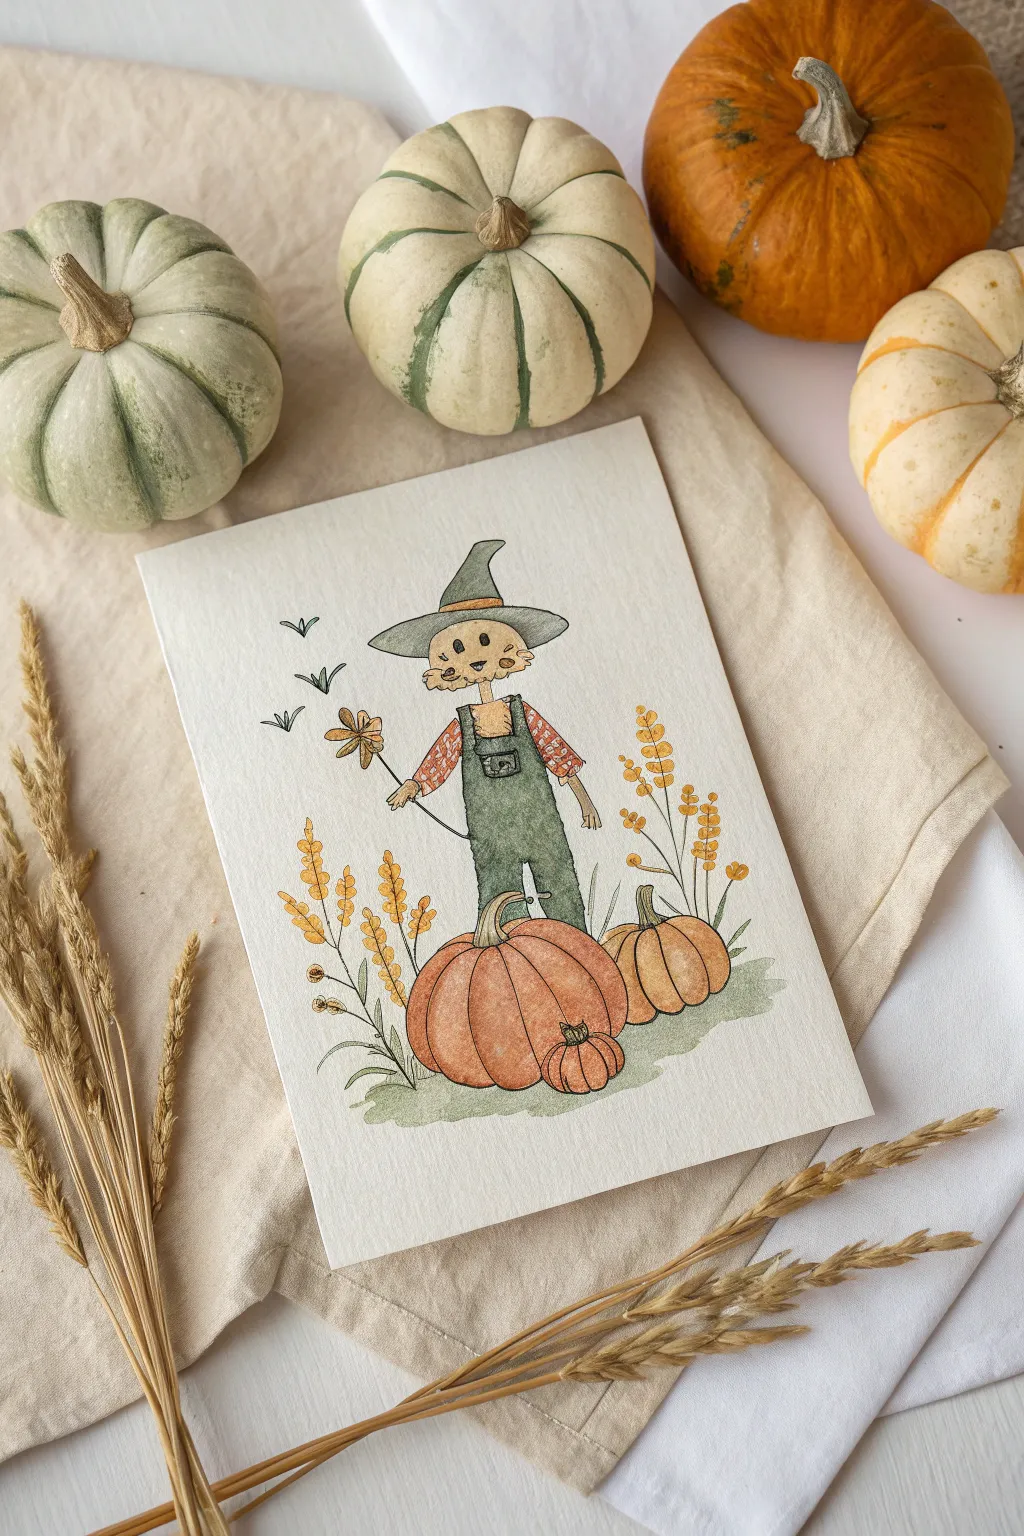
Capture the charm of autumn with this delightful illustration featuring a friendly scarecrow tending to his pumpkin harvest. Using watercolor and fine liners, you’ll create a soft, rustic scene full of character and seasonal warmth.
Step-by-Step Tutorial
Materials
- Cold-pressed watercolor paper (A5 size or greeting card blank)
- Pencil (HB or H)
- Kneadable eraser
- Waterproof fine liner pens (0.1mm and 0.3mm, black)
- Watercolor paints (pan or tube set)
- Round watercolor brushes (sizes 2, 4, and 6)
- Two jars of water
- Paper towels or a clean rag
- White gel pen (optional for highlights)
Step 1: Planning the Sketch
-
Establish the horizon:
Begin by lightly sketching a faint, uneven line near the bottom third of your paper to indicate the ground level where your pumpkins will sit. Keep your pencil pressure very light so it’s easy to erase later. -
Block in the scarecrow:
In the center of the page, draw a simple vertical rectangle for the torso and two lines for legs. Add a circle for the head, making sure it’s proportioned slightly larger for that cute, illustrative style. -
Add costume details:
Refine the scarecrow’s outfit by drawing dungarees over the torso shape, adding a front pocket and crisscross straps. Sketch a wide-brimmed, pointy witch-style hat sitting jauntily on his head. -
Draw the pumpkins:
Sketch three pumpkins at the scarecrow’s feet. Draw one large, slightly flattened central pumpkin, a smaller one tucked to the right, and a tiny baby pumpkin in the foreground. -
Incorporate nature elements:
Add tall stalks of wheat or grass rising on the left and right sides to frame the character. Pencil in three simple ‘V’ shapes in the upper left sky for flying birds. -
Refine the face:
Give your scarecrow personality by drawing button eyes, a triangular stitched nose, and a simple stitched mouth. Don’t forget to sketch straw poking out from the sleeves and hat brim.
Bleeding Lines?
If you notice your black ink bleeding when you apply paint, your pen likely isn’t waterproof. Stop, let it dry deeply, and try sealing lines with a very light layer of clear wax crayon before painting.
Step 2: Inking the Outlines
-
Outline the main shapes:
Using a 0.3mm waterproof fine liner, carefully trace over your pencil lines. Use a slightly broken or ‘shaky’ line for the clothing and straw to emphasize the rustic texture. -
Add fine details:
Switch to a 0.1mm pen for delicate areas like the facial features, the birds in the distance, and the fine grains on the wheat stalks. Add small stitching lines on the overalls. -
Clean up the sketch:
Wait at least 5-10 minutes to ensure the ink is bone dry. Then, gently rub your kneadable eraser over the entire drawing to lift away graphite lines without damaging the paper surface.
Make it Pop
Add a faint blue wash to the background sky, leaving a cloud-like white halo around the scarecrow. This separates the character from the background and adds depth.
Step 3: Painting with Watercolor
-
Paint the pumpkins:
Mix a warm orange using Gamboge or Cadmium Orange. Paint the pumpkins, leaving slivers of white paper along the top curves for natural highlights. Drop in a touch of Burnt Sienna near the bottom for shadow. -
Color the outfit:
For the shirt, paint a checkered pattern using a diluted chaotic red or terracotta. Once dry, paint the overalls in a muted olive green. Allow the color to pool slightly at the bottom of the pant legs for depth. -
Detail the scarecrow:
Use a pale wash of Yellow Ochre for the straw hands, neck, and face. Paint the hat a soft grey-blue or slate color, keeping the wash fairly transparent. -
Add warmth to foliage:
Paint the wheat stalks and grass seeds with Golden Yellow or Raw Sienna. Use a very fine brush to dab color onto individual grain kernels. -
Ground the scene:
Mix a watery Sap Green. Paint the ground area loosely around the pumpkins’ base, avoiding the orange shapes. Let the edges of this green patch fade out softly into the white paper.
Step 4: Final Touches
-
Deepen shadows:
Once the first layers are completely dry, mix slightly darker versions of your green and orange. Paint thin shadow lines under the hat brim, under the armpits, and between the pumpkin ridges. -
Add texture:
I like to take a fairly dry brush with dark brown paint and add tiny specks or stippling on the scarecrow’s face to mimic burlap fabric texture. -
Final highlights:
This step is optional, but you can use a white gel pen to add tiny dots to the eyes or to clean up any edges where paint might have bled slightly.
Now you have a charming autumnal character ready to be framed or sent as a seasonal greeting card
BRUSH GUIDE
The Right Brush for Every Stroke
From clean lines to bold texture — master brush choice, stroke control, and essential techniques.
Explore the Full Guide
Moonlit Pumpkin Patch Night Scene

Capture the eerie beauty of an autumn night with this atmospheric mixed-media sketch. This project combines the deep, moody tones of gouache or acrylics with the precision of colored pencils to create a stunning moonlit landscape.
Detailed Instructions
Materials
- Heavyweight mixed-media sketchbook or watercolor paper
- Gouache or matte acrylic paints (Dark Blue/Indigo, Black, White, Teal)
- Colored pencils (Orange, Terra Cotta, Dark Brown, Cream, White)
- Small flat brush and fine detail brush
- Masking tape (for clean borders)
- White gel pen (optional for stars)
Step 1: Setting the Scene
-
Tape the Edges:
Start by applying masking tape around the perimeter of your page to create a crisp, rectangular frame for your painting. Press the edges down firmly to prevent paint from seeping underneath. -
Sketch the Composition:
Lightly sketch a large circle for the moon in the upper center. Draw a low horizon line about one-third up from the bottom, and position two main pumpkins in the foreground. -
Underpainting the Moon:
Mix a very pale teal-white shade using gouache. Fill in the moon circle completely. It doesn’t need to be perfectly smooth, as some texture adds to the crater effect.
Step 2: Painting the Night Sky
-
Deep Blue Background:
Mix a deep indigo or midnight blue. Paint the entire sky area around the moon, getting darker as you move toward the edges of the paper. -
Creating the Glow:
While the blue paint is still slightly damp, mix a lighter teal-blue. Carefully blend this around the immediate edge of the moon to create a soft, glowing halo effect. -
Cloud Formations:
Using a dry brush technique with lighter blue-grey paint, scumble in some horizontal cloud wisps cutting across the lower part of the moon and the horizon line. Keep these strokes loose and organic. -
Adding Stars:
Once the sky is dry, use a fine tip brush vertically to dot tiny specks of white or yellow paint for stars. I like to vary the sizes slightly to create depth.
Glow Factor
To make the moon really pop, paint a very thin ring of pure white right on the edge of the moon circle before blending into the blue halo.
Step 3: The Earthy Foreground
-
Base Ground Tone:
Paint the ground area below the horizon with a dark, desaturated brown-grey. This serves as a shadow base for the field. -
Detailed Pumpkins:
Switch to colored pencils for the pumpkins. Start with a base layer of bright orange for the two main pumpkins. -
Shading the Pumpkins:
Layer terra cotta and dark brown pencil strokes along the ribbed lines of the pumpkins to give them volume. Ensure the light source (the moon) is considered, leaving the tops lighter. -
Highlights:
Use a white pencil or a touch of white paint to add a sharp highlight on the top curve of the pumpkins where the moonlight hits them. -
Distant Pumpkins:
With the orange pencil, add tiny, less detailed orange shapes in the distance to suggest a full patch, fading them out as they get closer to the horizon.
Tape Tearing Paper?
If your tape is sticking too much, stick it to your clothes (pants or shirt) a few times before applying it to the paper to reduce its tackiness.
Step 4: Final Details
-
Silhouetted Trees:
Using black paint and a fine detail brush, paint the silhouette of distant pine trees along the horizon line. Use jagged, vertical strokes to mimic pine branches. -
Ground Texture:
Use black and dark grey colored pencils to scribble grassy textures and shadows around the base of the pumpkins to ground them in the scene. -
Moon Surface Details:
Return to the moon with a slightly darker teal-grey wash. Dab small blotches onto the moon’s surface to create craters and maria features. -
Remove Tape:
Wait until the painting is completely bone dry. Slowly peel the masking tape away at a 45-degree angle to reveal your crisp, professional borders.
Now you have a moody autumn night scene captured right in your sketchbook
Bird’s-Eye View Patch Layout Sketch

Map out your perfect autumn day with this charming bird’s-eye view spread. This journal layout features a whimsical winding path through a field of pumpkins, creating a minimal yet festive scene perfect for tracking tasks or simply celebrating the season.
Step-by-Step Guide
Materials
- A5 dot grid journal or notebook
- Pencil (HB or H for light sketching)
- Fine liner pen (0.3mm or 0.5mm, black)
- Clean eraser
- Ruler (optional, freehand is preferred for organic shapes)
Step 1: Setting the Scene
-
Define the borders:
Begin by drawing a singular, neat rectangular border around your page. Leave about a half-inch margin from the edge of the paper to frame your drawing space nicely. -
Draft the winding path:
Using a pencil, lightly sketch a meandering path that starts near the bottom left and winds its way up toward the top center. Keep the curves gentle and organic rather than sharp. -
Place anchor pumpkins:
Sketch large, rough ovals to represent your main pumpkins. Place one large one in the bottom center foreground, two on the right side along the curve, and one near the top center to balance the composition.
Step 2: Detailed Drawing
-
Refine pumpkin shapes:
Go back over your pumpkin ovals with your pencil to add the segments. Draw curved lines radiating from the top center to the bottom to give them volume and dimension. -
Add stems:
Top each pumpkin with a stout, slightly curved stem. Vary the angles—some tipping left, some right—to make them look natural and less uniform. -
Sketch the trees:
In the open spaces on the left side of the path, draw simple tree outlines. Use a ‘cloud-like’ fluffy shape for one and a more intricate branch structure for another to add variety to the foliage. -
Add smaller details:
Sprinkle in a few tiny details like a small mushroom near the top path or scattered leaves on the ground. These little additions make the map feel lived-in. -
Draw the horizon line:
Lightly pencil in a horizon line behind the top elements to give the map a sense of depth, separating the foreground patch from the background.
Clean Lines Pro-Tip
When drawing segments on pumpkins, don’t let the lines touch the very bottom outline. Stopping just short creates a highlighted look that enhances the roundness.
Step 3: Inking and Finalizing
-
Ink the main pumpkins:
Switch to your fine liner pen. Trace over your pumpkin lines with confident strokes. I find it helpful to ink the central segment first and work outward to keep the shape symmetrical. -
Ink the stems:
Carefully outline the stems, adding a tiny oval at the cut end to show perspective. -
Create the dotted path:
Instead of a solid line, use small, evenly spaced dots to ink the winding path you sketched earlier. This dashed line style mimics a treasure map or a walking trail guide. -
Ink floral elements:
Go over your trees and leaves. For the bare tree, use slightly jagged lines for branches. For the fluffy tree, keep your hand loose for soft curves. Add small circles or stippling on the trees for texture. -
Outline the frame:
Use your pen (and a ruler if you want it crisp, though hand-drawn adds charm) to ink the rectangular border box you created in step one. -
Erase pencil marks:
Wait until the ink is completely dry to the touch to avoid smearing. Once safe, gently erase all underlying pencil sketches to reveal the clean design. -
Add movement:
Draw tiny, short dash marks or dots around the pumpkins and trees to suggest ground texture or movement in the air. -
Final touches:
Review the composition. If a certain area feels too empty, add a tiny extra leaf or a few stippled dots to balance the white space.
Level Up: Seasonal Color
Use watercolor pencils or mild highlighters to tint the pumpkins orange and the trees sage green. Keep the colors desaturated for a vintage map aesthetic.
Now you have a cozy, navigational guide to autumn right inside your journal to enjoy all season long

PENCIL GUIDE
Understanding Pencil Grades from H to B
From first sketch to finished drawing — learn pencil grades, line control, and shading techniques.
Explore the Full Guide
Simple Line Art Pumpkin Patch Doodle

Capture the essence of a crisp autumn day with this charming line art doodle for your bullet journal. This beginner-friendly spread features a rustic wooden fence and plump pumpkins, perfect for setting a cozy seasonal mood.
How-To Guide
Materials
- Dotted or blank notebook
- Fine liner pen (black, 0.3mm or 0.5mm)
- Pencil
- Eraser
- Ruler (optional)
Step 1: Setting the Scene
-
Establish the horizon:
Begin by lightly sketching a horizontal line about one-third of the way up from the bottom of your page. This doesn’t need to be perfectly straight, as it will serve as the ground behind your fence. -
Sketch the fence posts:
Using your pencil, draw a series of vertical posts. Make them slightly uneven in height and spacing to give the fence a rustic, handmade look. Each post should have a triangular pointed top. -
Add the rails:
Connect your vertical posts by sketching two horizontal rails running behind them. One should be near the top just below the pointed tips, and one near the middle-bottom.
Wobbly Lines?
Don’t stress if your fence posts aren’t perfectly straight. Wobbly lines actually enhance the rustic, old-farm charm of this particular doodle.
Step 2: Drawing the Pumpkins
-
Place the main pumpkin:
On the right side of the page, in front of the fence, sketch a large oval shape. This will be your primary pumpkin. Make sure it partially obscures the fence line behind it. -
Add a companion:
Sketch a slightly smaller, secondary pumpkin tucked just to the left of the first one. Overlap them slightly to create depth. -
Define the segments:
Draw curved vertical lines on your pumpkin ovals, starting from the center top and sweeping down to the bottom. These lines define the classic ribbed pumpkin shape. -
Top them off:
Add a sturdy, slightly twisted stem to the top of each pumpkin. You can make the cut top of the stem slightly jagged for realism.
Level Up: Depth
Use a slightly thicker pen (0.5mm) for the pumpkins in the foreground and a thinner pen (0.1mm) for the fence and clouds to instantly create visual depth.
Step 3: Inking and Details
-
Outline the fence:
Switch to your fine liner pen. Carefully trace over your fence posts. I like to double up some of the vertical lines on the posts to suggest the thickness of the wood planks. -
Ink the horizontal rails:
Draw the horizontal rails behind the posts. Remember to skip the lines where the vertical posts are in front so the rails appear to be in the background. -
Detail the wood:
Add tiny visual details to the wood, like small circles for nail heads where the rails meet the posts, and short, thin vertical scratches to mimic wood grain. -
Ink the pumpkins:
Trace your pumpkin sketches with confident, smooth curves. Ensure the lines closest to the viewer (the front pumpkin) are solid, while lines hidden behind other objects are omitted. -
Add ground foliage:
At the base of the fence and pumpkins, draw small, jagged tufts of grass and a few simple leaves. This grounds your drawing so the items aren’t floating. -
Include some taller weeds:
Sketch a few taller, thin stems with tiny leaves poking up between the fence posts to enhance the overgrown patch feel.
Step 4: Sky and Finishing Touches
-
Draw the clouds:
In the upper portion of the page, add a few stylized, fluffy clouds. Use simple, scalloped lines for the tops and flat, straight lines for the bottoms. -
Add distant birds:
Draw a couple of tiny V-shapes in the distance to represent birds flying high in the sky. -
Erase pencil lines:
Once the ink is completely dry—give it a good minute just to be safe—gently erase all your original pencil sketches to reveal the clean line art.
Enjoy your lovely autumn scene as a minimalist decoration or fill it in with watercolors for extra warmth
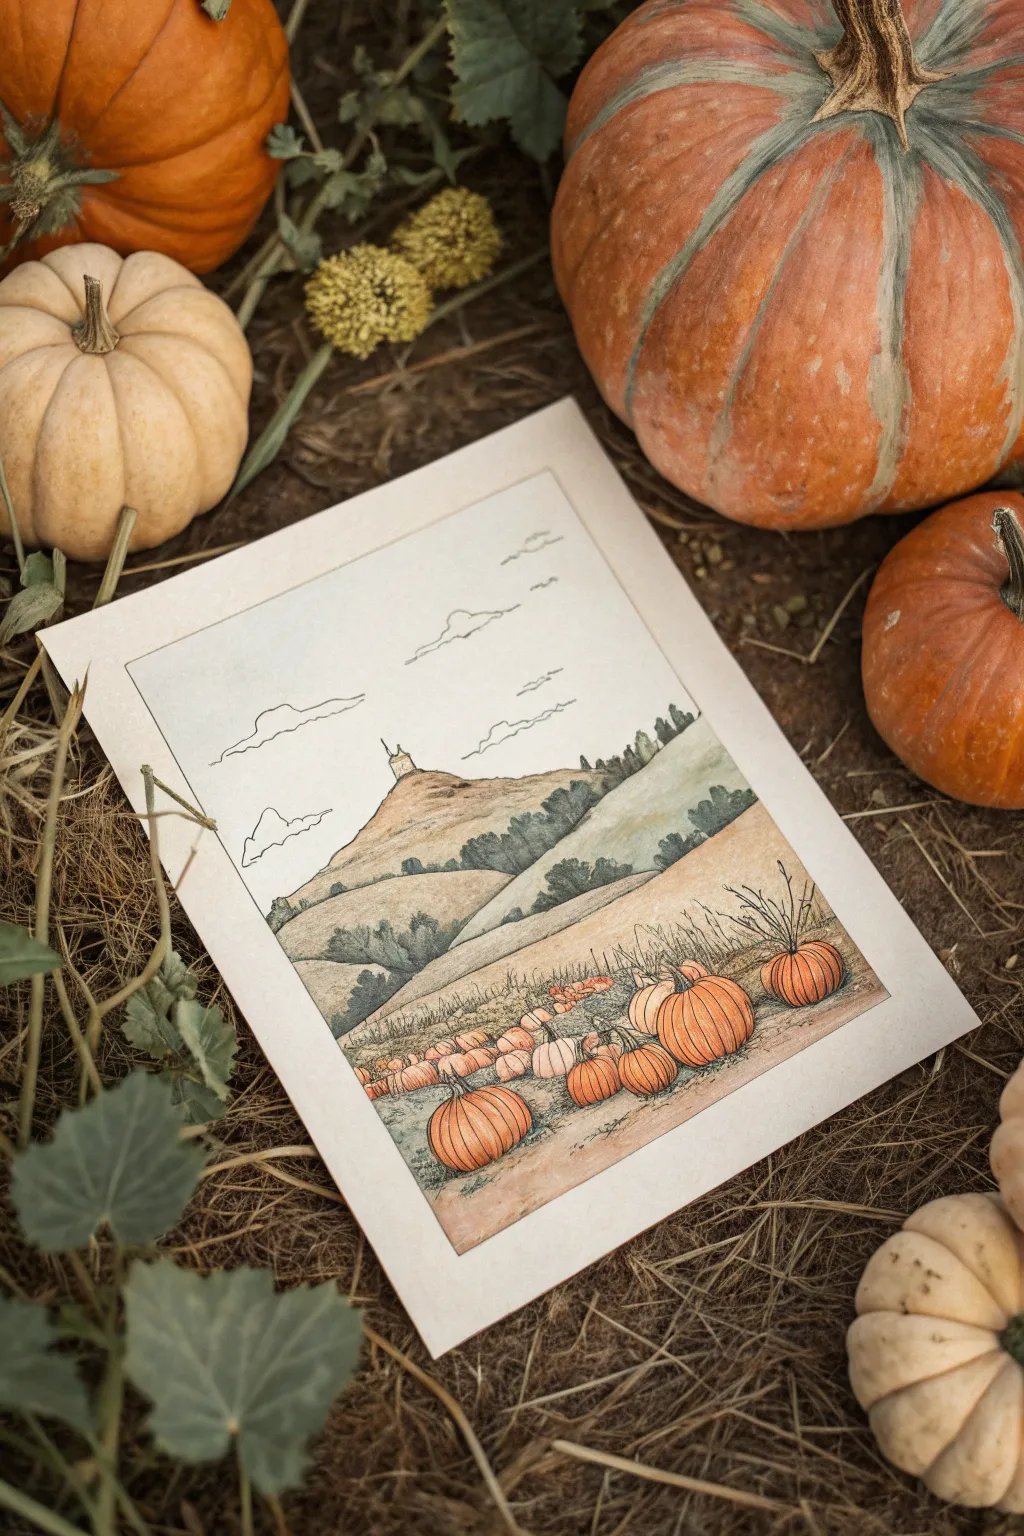
Surreal Pumpkin Patch With Giant Pumpkin Hill

This whimsical project captures a dreamlike autumn landscape where rolling hills meet a bountiful pumpkin harvest under a vast sky. Using ink line work and soft watercolor washes creates that perfect vintage storybook aesthetic.
Detailed Instructions
Materials
- Cold press watercolor paper (approx. 8×10 inches)
- Fine liner pens (black, waterproof, sizes 0.1 and 0.3)
- Watercolor paints (Key colors: Burnt Sienna, Yellow Ochre, Sap Green, Payne’s Grey, Indigo)
- Round watercolor brushes (Size 4 and 8)
- HB Pencil and kneaded eraser
- Masking tape
- Jar of water and paper towels
Step 1: Sketching the Layout
-
Establish the horizon:
Begin by lightly sketching a horizontal line about one-third of the way up from the bottom of your paper to separate the foreground field from the hills. -
Draft the central hill:
Draw a large, sloping hill shape in the center. Give it a slight asymmetrical peak, mimicking the organic curve of a giant squash or gourd. -
Add the tiny structure:
At the very peak of the central hill, sketch a tiny, distant tower or chapel. Keep the details minimal since it is far away. -
Outline the foreground pumpkins:
Sketch a scattering of pumpkins in the bottom foreground. Vary their sizes, placing larger ones closer to the viewer and smaller dots suggesting pumpkins further back in the field. -
Ink the drawing:
Using your 0.1 waterproof pen, trace over your pencil lines. Use broken, shaky lines for the grass and hills to create texture, but keep the structure’s lines straight. -
Erase pencil marks:
Wait for the ink to dry completely, then gently erase all visible graphite lines with your kneaded eraser.
Ink Smearing?
If your black lines bleed when painting, your pen isn’t fully waterproof or dry. Test your pen on scrap paper first, and wait at least 15 minutes before painting.
Step 2: Applying Watercolor Washes
-
Paint the sky:
Mix a very dilute wash of Indigo or a pale blue-grey. Apply this to the sky area, leaving random white spaces to represent the fluffy, linear clouds shown in the reference. -
Base layer for the hills:
Mix Yellow Ochre with a touch of Burnt Sienna. Paint the hills with a sheer wash, letting the color pool slightly in the valleys to show shadow. -
Adding greenery:
While the hill layer is still slightly damp, drop in diluted Sap Green along the ridges and the base of the hills to create soft, diffused vegetation. -
Defining the dark trees:
Mix Sap Green with Payne’s Grey to get a dark, moody green. Paint small, clustered shapes along the slopes to represent distant tree lines and bushes.
Vintage Vibe
To age the paper, apply a very light wash of tea or coffee over the entire dried painting. This knocks back the bright white paper for an antique look.
Step 3: Bringing the Pumpkins to Life
-
First pumpkin layer:
Dilute a bright orange or mix Vermilion and Yellow. Paint the bodies of the foreground pumpkins, avoiding the stems. -
Adding depth to pumpkins:
Once the orange is dry, mix a slightly darker Burnt Sienna wash. Paint thin curved lines on the pumpkins to follow their ribs, giving them roundness. -
Painting the stems:
Use a mix of brown and green to carefully paint the stems on the larger foreground pumpkins. -
Field texture:
Using a dry-brush technique with pale brown, lightly sweep horizontal strokes across the foreground dirt to simulate dry harvest earth. -
Final ink details:
Switch to your 0.3 pen. Add stronger outlines to the closest pumpkins and scribble jagged little grass tufts in the foreground to anchor the scene. -
Cloud definition:
Use the 0.1 pen to add very delicate, broken outlines to the bottom edges of your clouds, reinforcing the illustrative style.
Now you have a charming, surreal landscape ready to frame or gift to a fall-loving friend


Have a question or want to share your own experience? I'd love to hear from you in the comments below!