Painting pumpkins purple is my favorite little art rebellion against the usual orange-and-black routine. If you’re craving anything from witchy vibes to chic modern patterns, these purple pumpkin ideas will give you a ton of directions to play.
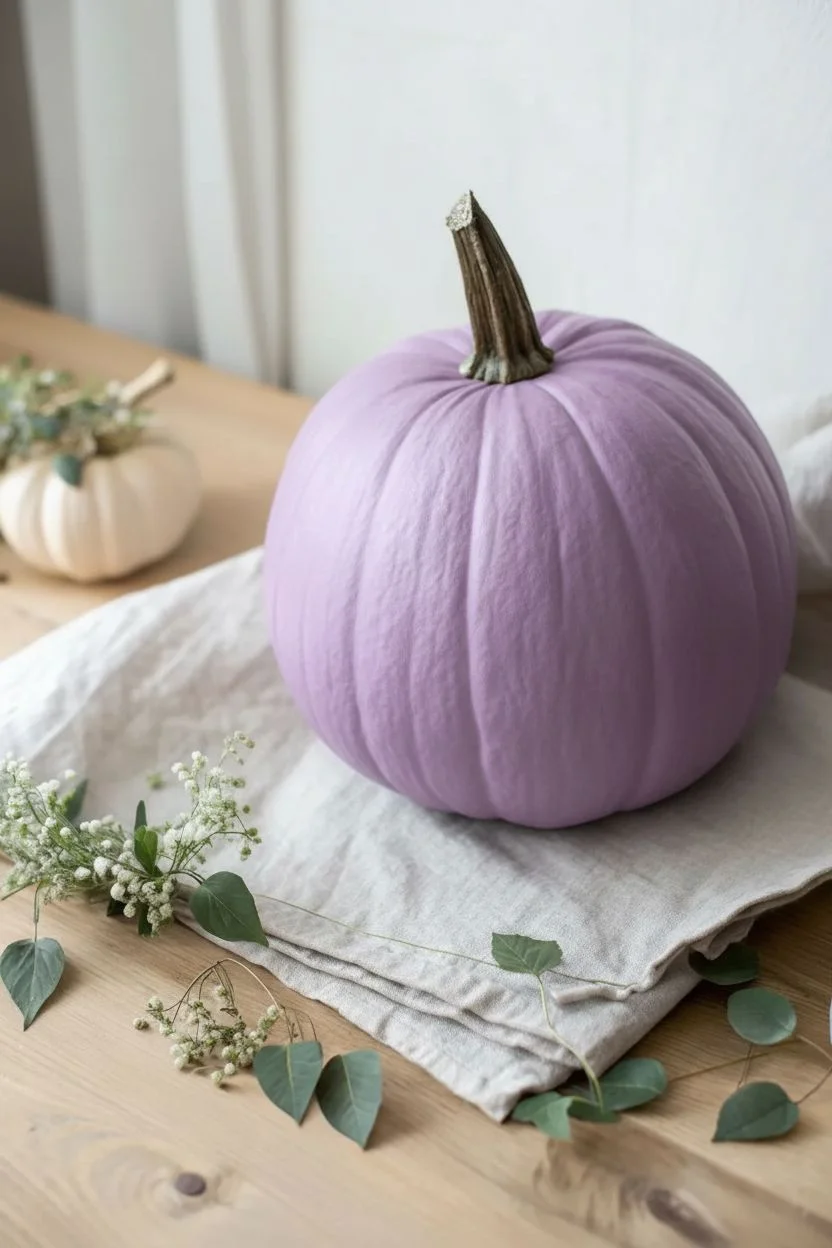
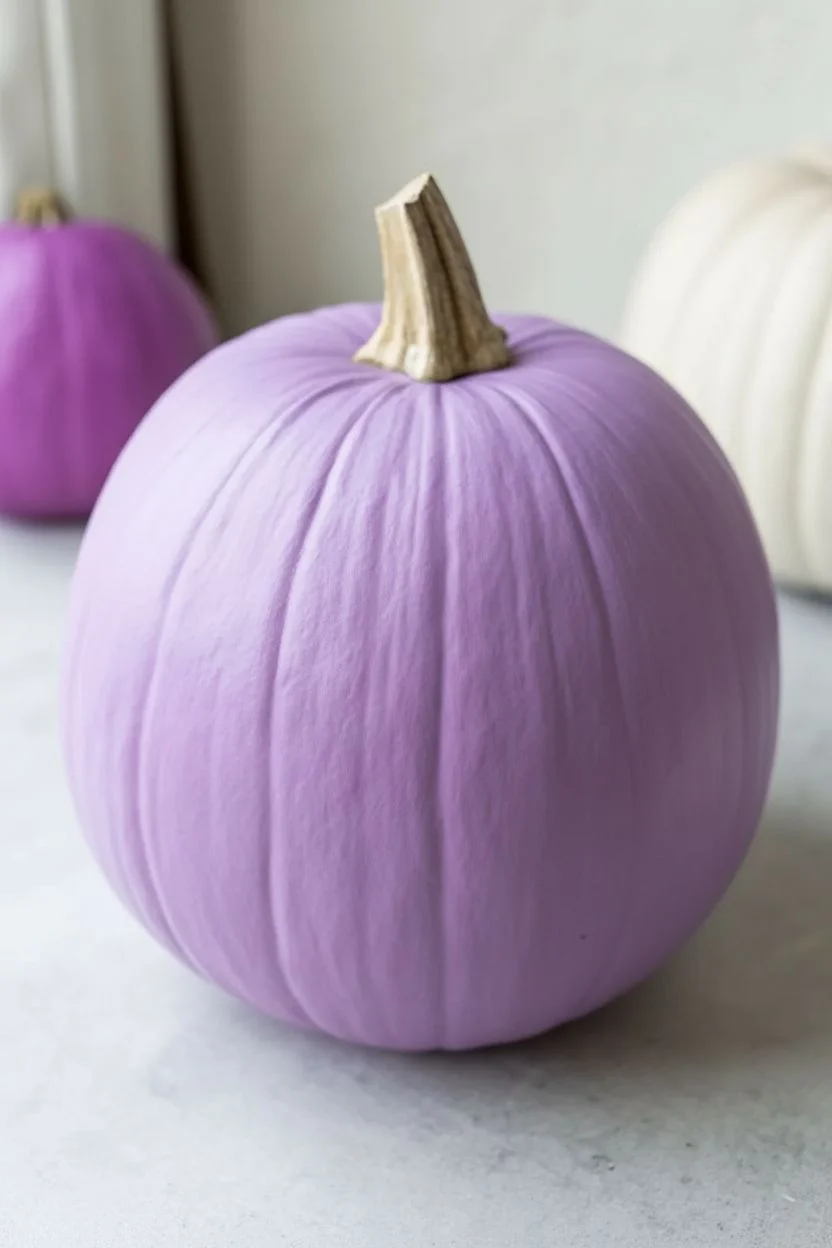
Classic Purple Ombré Fade
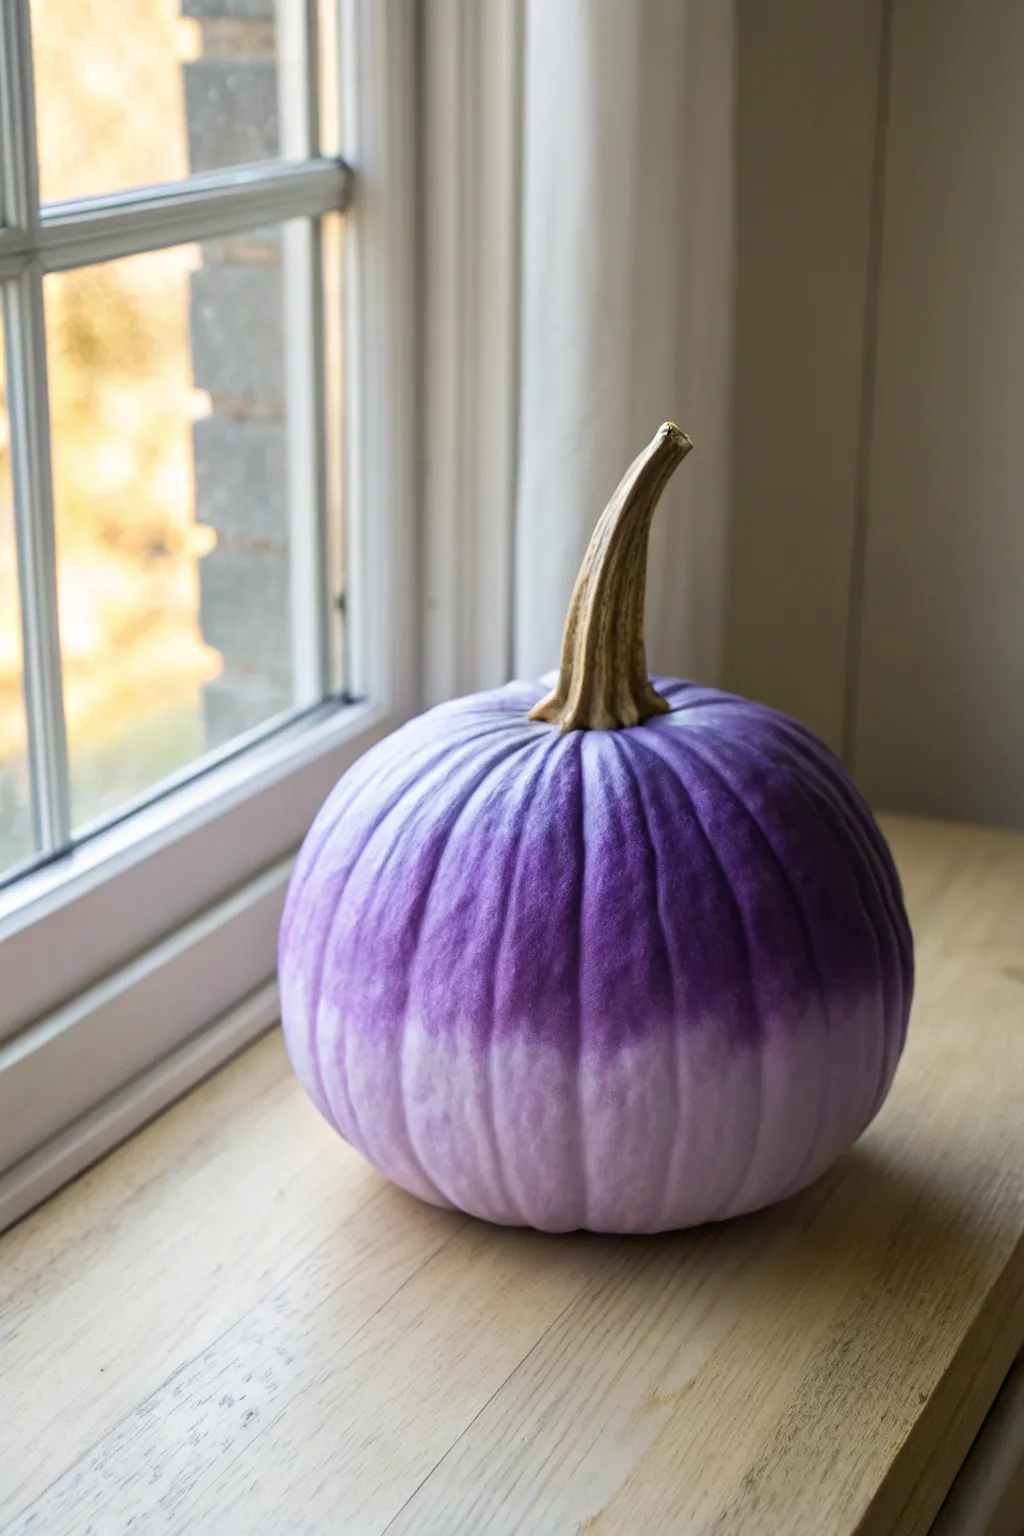
Achieve a sophisticated, seamless gradient with this two-tone purple ombré design that transitions from deep royal violent to a whisper-soft lilac. This technique creates a modern, velvety look that elevates standard Halloween decor into something elegant enough for a centerpiece.
Detailed Instructions
Materials
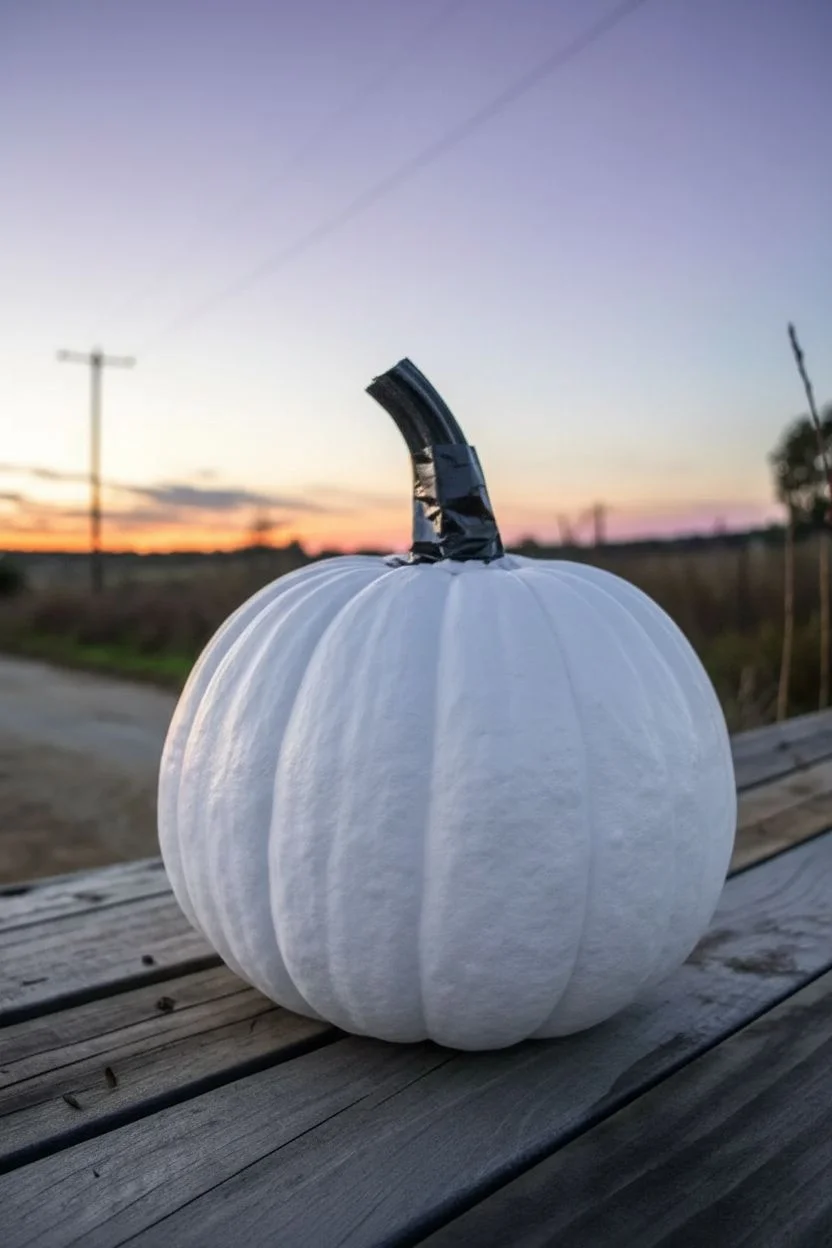
- Medium-sized faux or real white pumpkin
- Deep violet acrylic craft paint
- White or pale lavender acrylic craft paint
- Large flat paintbrush (1-2 inch)
- Medium blending brush or makeup sponge
- Paper palette or paper plate
- Painter’s tape
- Water cup and paper towels
- Matte clear sealant spray (optional)
Step 1: Preparation & Base Coat
-
Clean surface:
Begin by wiping down your pumpkin with a damp cloth to remove any dust or waxy residue, ensuring the paint adheres properly. -
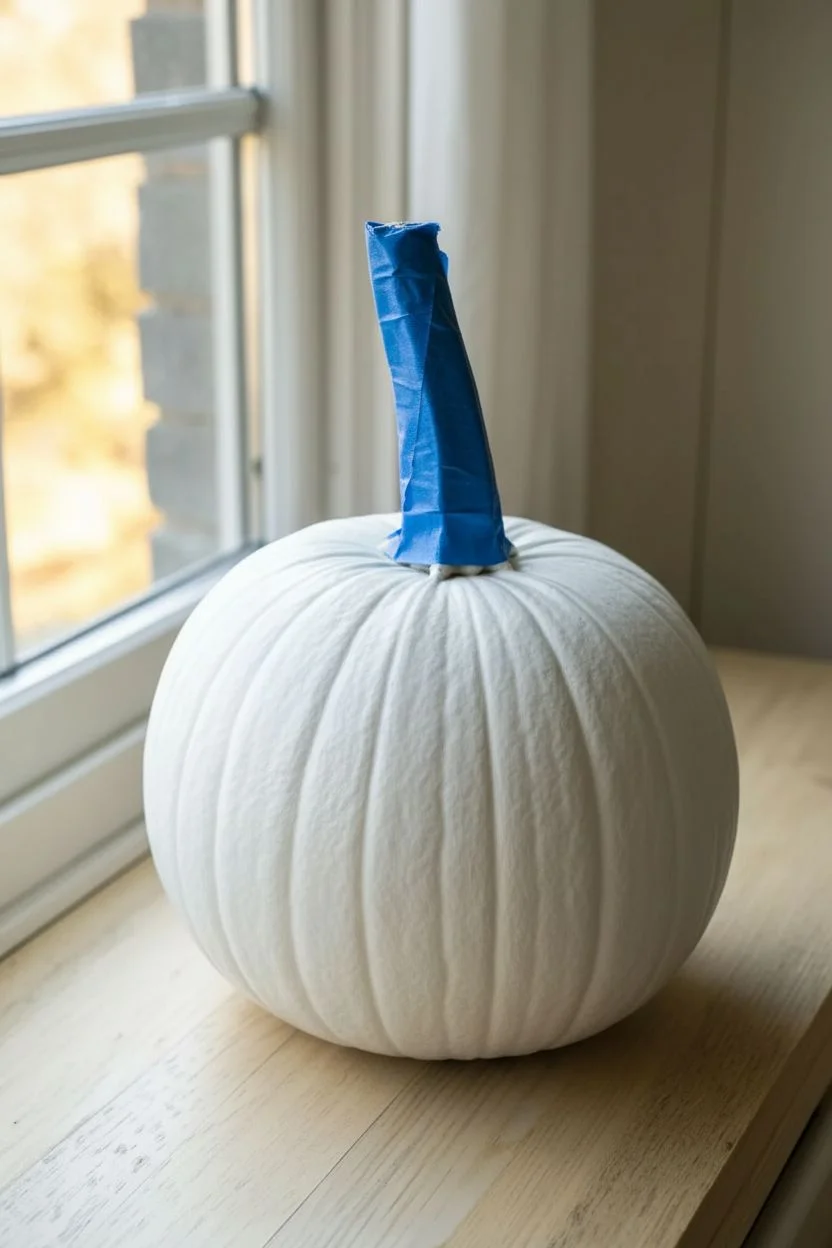
Protect the stem:
Wrap the stem carefully with painter’s tape to keep it natural and clean, pressing down firmly around the base where the stem meets the pumpkin skin. -
Establish the base:
If you are using an orange pumpkin, paint the entire surface with a coat of white acrylic paint first to prime it; if your pumpkin is already white, you can skip straight to the color steps.
Patchy Paint?
If the blending looks streakier than you’d like, wait for the first layer to dry completely, then repeat the blending process with a second, thinner coat.
Step 2: Applying the Dark Tone
-
Paint the top third:
Using your large flat brush, apply the deep violet paint to the top third of the pumpkin, painting right up to the taped stem. -
Work into crevices:
Make sure to push the bristles into the deep vertical grooves of the pumpkin so no white shows through in the upper section. -
Drag downward:
While the paint is still wet, lightly drag your brush downward past the one-third mark to create an uneven, jagged bottom edge for the purple section.
Step 3: Creating the Mid-Tone Fade
-
Mix a transitional shade:
On your palette, mix equal parts of the deep violet and the white (or pale lavender) paint to create a medium purple mid-tone. -
Apply the middle band:
Paint this medium mixture around the middle section of the pumpkin, slightly overlapping the jagged wet edge of the deep violet paint you just applied. -
Blend the upper seam:
Using a clean, slightly damp blending brush or sponge, gently tap or brush horizontally where the dark violet meets the medium purple to soften the line. -
Extend the color down:
Continue painting the medium purple downward until you are about two-thirds of the way down the pumpkin.
Level Up
Once the paint is dry, paint the stem metallic gold or copper for a luxurious contrast against the soft purple gradient.
Step 4: Finishing the Ombré
-
Apply the lightest shade:
Load your brush with pure white (or the very palest lilac) paint and cover the bottom third of the pumpkin, including the underside. -
Blend the lower seam:
While the paint is wet, work the white paint upward into the medium purple section using rapid vertical strokes to merge the colors. -
Refine the gradient:
I find a makeup sponge works wonders here; dab lightly along the gradient lines to remove harsh brushstrokes and create that mist-like fade. -
Check for gaps:
Rotate the pumpkin to ensure the gradient looks consistent from all angles and fill in any ridges you might have missed. -
Dry completely:
Allow the pumpkin to sit undisturbed for at least 1-2 hours until the paint is fully dry to the touch. -
Remove tape:
Gently peel off the painter’s tape from the stem. -
Seal (Optional):
For a lasting finish, take the pumpkin to a well-ventilated area and apply a light coat of matte clear sealant spray to protect the fade.
Place your creation near a window to let the natural light highlight the seamless transition of colors


Matte Purple Pumpkin With Crisp White Polka Dots
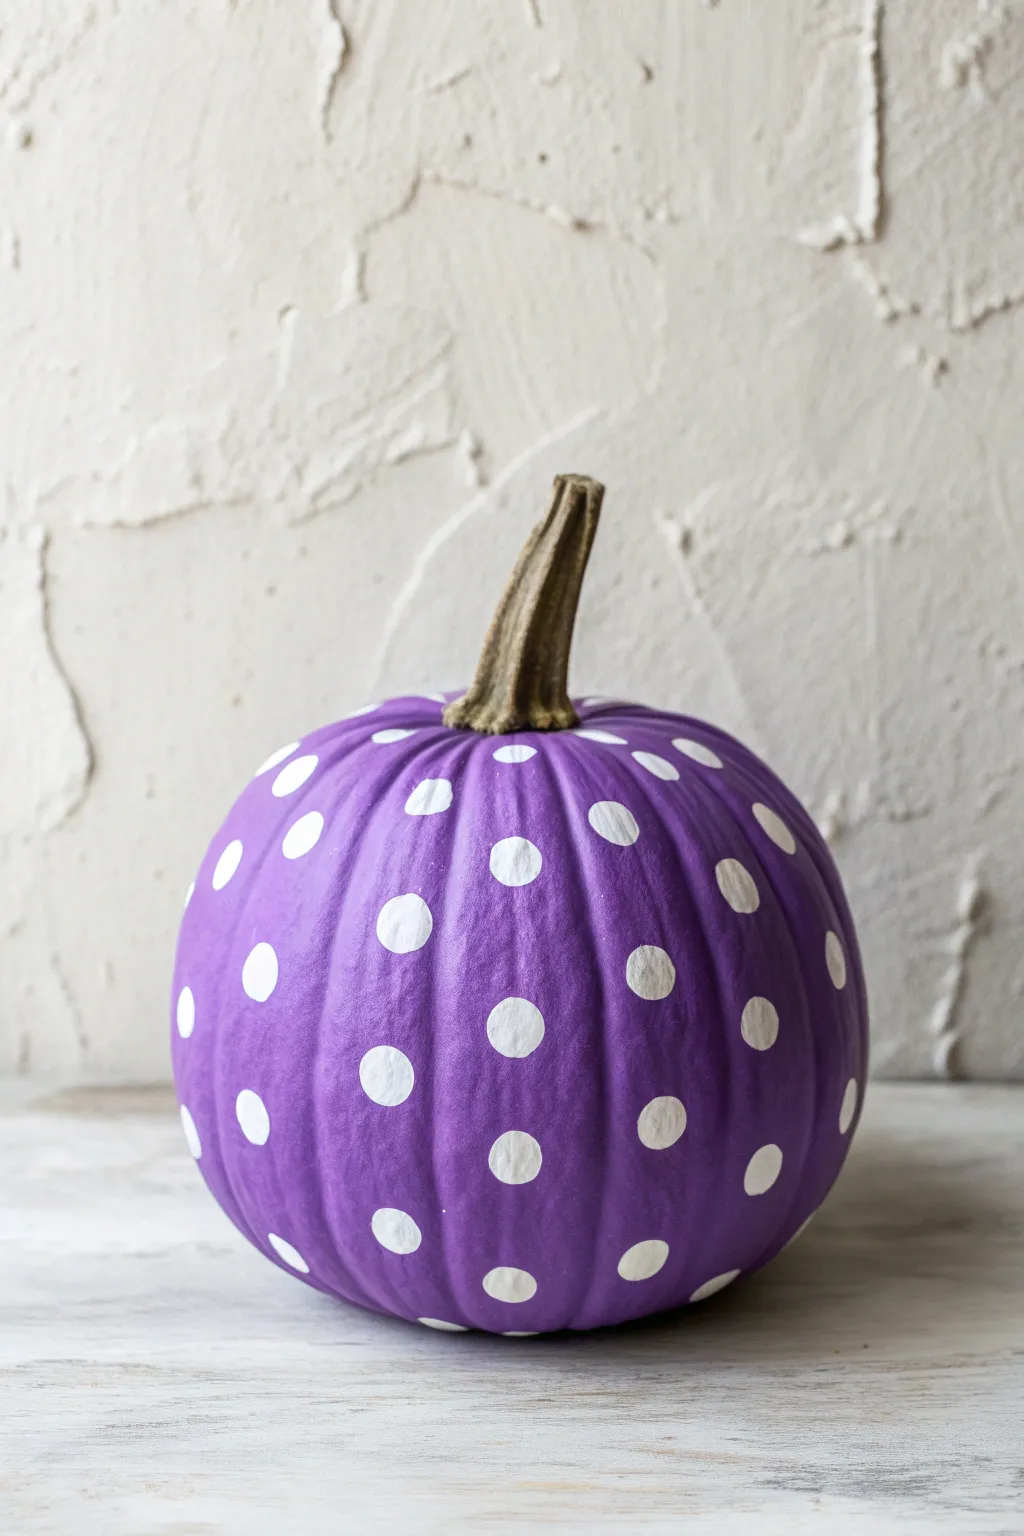
Transform an ordinary pumpkin into a modern fall statement piece with a coat of dreamy matte purple paint and playful white dots. This no-carve project strikes the perfect balance between spooky and sweet, making it an ideal centerpiece for your Halloween or Thanksgiving decor.
Step-by-Step
Materials
- Real or faux pumpkin (medium size)
- Matte acrylic craft paint (lilac or violet)
- Matte acrylic craft paint (white)
- Medium flat paintbrush
- Round sponge pouncers (approx. 1/2 inch diameter)
- Small round detail brush
- Painter’s tape
- Paper plate or palette
- Damp cloth
- Clear matte sealant spray (optional)
Step 1: Preparation & Base Coat
-
Clean surface:
Begin by thoroughly wiping down your pumpkin with a damp cloth to remove any dirt or oils. If using a real pumpkin, dry it completely to ensure the paint adheres well. -
Protect the stem:
Wrap the pumpkin stem carefully with painter’s tape. We want to preserve that natural brown texture, so take your time to ensure the tape tucks right down to where the stem meets the skin. -
First coat of purple:
Squeeze a generous amount of your matte lilac paint onto the palette. Using your medium flat brush, apply the first coat of paint in long, vertical strokes following the pumpkin’s ribs. -
Dry time:
Let this first layer dry completely. It usually takes about 20-30 minutes, but you can speed this up with a hair dryer on a cool setting if you’re impatient. -
Second coat:
Apply a second coat of purple paint. This ensures full opacity and that rich, solid color we’re aiming for. Look for any streaks and smooth them out gently. -
Detail check:
Flip the pumpkin carefully to paint the bottom curves, ensuring no orange skin is peeking through near the base. Let the pumpkin dry fully for at least an hour before moving to the dots.
Uneven Circles?
If sponge pouncers are slipping on the slick surface, try using the eraser end of a new pencil as a stamp. It’s firmer and offers more control for perfect small circles.
Step 2: Dotting the Design
-
Load the pouncer:
Pour a small amount of white matte paint onto your palette. Dip your round sponge pouncer into the paint, then dab it off slightly on a clean part of the plate to prevent globs. -
Start at the top:
Begin placing your dots near the top of the pumpkin, around the stem area. Press the sponge pouncer straight down and lift straight up to get a crisp circle. -
Create a pattern:
Work your way down the pumpkin’s ribs. I find it helpful to stagger the dots—placing one dot in a groove, and the next on a ridge—to create a random but balanced confetti look. -
Spacing and variation:
Keep the spacing relatively consistent, leaving about 1 to 2 inches between dots depending on the size of your pumpkin. Don’t worry about perfect symmetry. -
Handling curves:
As you move around the curves, you might notice the sponge misses the center of the circle on deep ridges. We will fix this in the next step. -
Clean up edges:
Once the stamped dots are dry to the touch, take your small round detail brush and dip it in the white paint. Carefully fill in any centers that look patchy or refine edges that aren’t perfectly round. -
Painting partial dots:
For a natural look, add a few ‘half dots’ near the very bottom or top where the pumpkin surface disappears from view. This makes the pattern feel continuous. -
Remove tape:
Gently peel away the painter’s tape from the stem. If any purple paint seeped under, you can carefully scratch it off with a fingernail or touch it up with a damp Q-tip.
Level Up: Metallic Pop
Swap the matte white paint for metallic gold or copper acrylic for the dots. The shimmer against the matte purple creates a luxurious, high-end boutique look.
Step 3: Final Touches
-
Final inspection:
Rotate the pumpkin and check for any purple spots that need a touch-up or white dots that need brightening with a second layer of white. -
Seal (Optional):
If this pumpkin will live on a porch, spray it lightly with a clear matte sealant to protect your work from moisture and chipping.
Place your finished masterpiece on a mantle next to some crisp fall leaves for a cozy seasonal display


Lilac-to-Plum Gradient Stripes
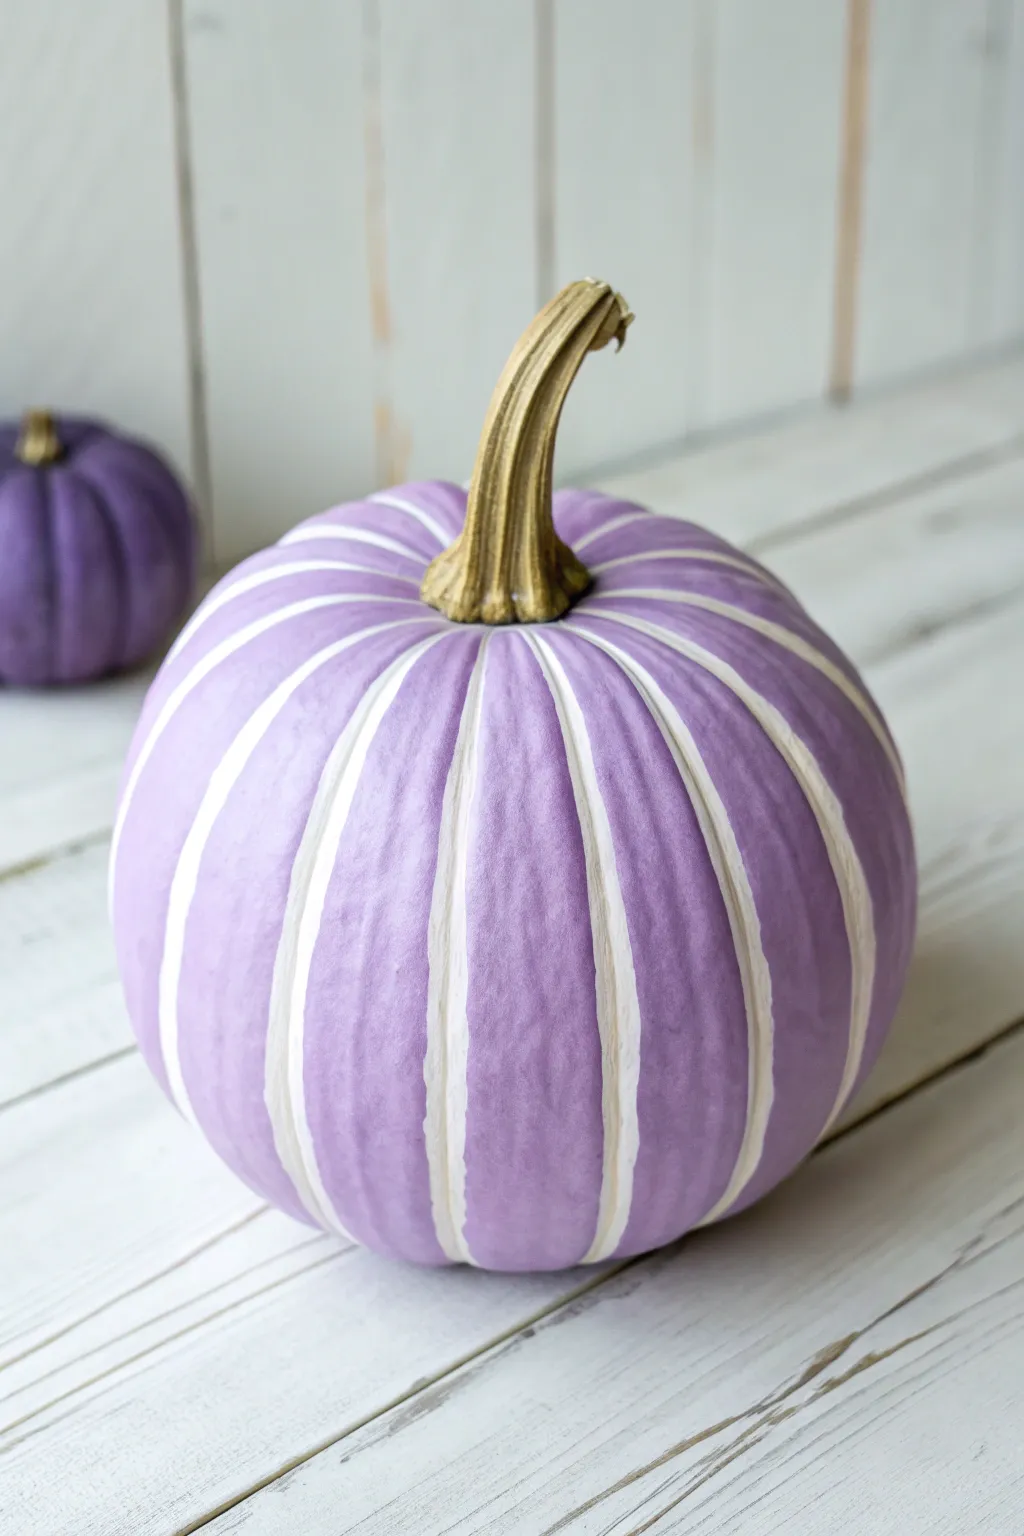

Transform a standard faux pumpkin into a sophisticated piece of fall decor with this lilac and cream striped design. The soft purple hue paired with crisp white detailing created a modern, polished look perfect for an upscale autumn display.
Step-by-Step Tutorial
Materials
- Faux pumpkin (medium size with distinct ribs/grooves)
- Lilac or lavender chalk-finish acrylic paint
- Cream or off-white acrylic paint
- Metallic antique gold acrylic paint
- Flat paintbrush (approx. 1 inch width)
- Small round detail brush (size 2 or 4)
- Small flat shader brush or filbert brush
- Paper towels
- Palette or paper plate
- Clear matte sealer spray (optional)
Step 1: Base Coat Application
-
Clean surface:
Begin by wiping down your faux pumpkin with a slightly damp paper towel to remove any dust or manufacturing residue. Let it dry completely. -
First lilac layer:
Load your large flat paintbrush with the lilac paint. Apply a smooth, even coat over the entire body of the pumpkin, avoiding the stem. -
Working into grooves:
Make sure to push the paintbrush bristles gently into the deep grooves of the pumpkin to ensure full coverage, even though we will be painting over these areas later. -
Drying time:
Allow the first coat to dry for about 20-30 minutes. Chalk-finish paint dries quickly, but ensure it is dry to the touch before proceeding. -
Second coat:
Apply a second coat of lilac paint to achieve an opaque, solid color. Brush in vertical strokes from top to bottom to minimize texture marks. -
Final dry:
Let the purple base coat cure fully for at least an hour to prevent lifting when you add details.
Step 2: Detailing the Stripes
-
Prepare the cream paint:
Pour a small amount of cream or off-white paint onto your palette. You want a consistency that flows well but isn’t too watery. -
Selecting the brush:
Switch to your small flat shader brush or a filbert brush. The width of this brush will determine the width of your stripe, so choose one that fits comfortably inside the pumpkin’s natural grooves. -
Starting the stripe:
Start at the very top of the pumpkin, right near the base of the stem. Place your brush in the center of a groove. -
Painting downwards:
With a steady hand, drag the brush down the length of the groove in a single, confident stroke if possible. If you need to stop, lift the brush gently to avoid a hard edge. -
Defining the edges:
I like to go back over the stripe edges with a small round detail brush if the line looks too ragged. The goal is a clean, creamy line nestled deep in the groove. -
Repeat the process:
Continue painting cream stripes in every vertical groove around the entire circumference of the pumpkin. -
Touch ups:
Once all stripes are painted, inspect your work. If any purple shows through the cream, carefully apply a second layer to the stripes for bright, solid coverage.
Wobbly Lines?
If your hand shakes while painting the grooves, stabilize your pinky finger against the dry part of the pumpkin to anchor your hand for smoother strokes.
Step 3: Stem and Finishing
-
Gilding the stem:
Load a clean small brush with metallic antique gold paint. Carefully paint the stem, covering it completely from the base to the twisted top. -
Refining the connection:
Pay close attention where the stem meets the pumpkin body. Create a clean line where the gold meets the lilac, being careful not to drip onto your stripes. -
Adding dimension:
While the gold is still slightly wet, dab a tiny bit of brown or darker bronze paint into the crevices of the stem to accentuate its texture. -
Seal (optional):
If you plan to display this outdoors or want extra durability, mist the entire pumpkin with a matte clear sealer spray. -
Final cure:
Allow the finished project to dry undisturbed overnight before handling or arranging in your display.
Clean Color Pop
Use a white primer or base coat on the grooves first. This makes the cream topcoat pop against the purple without needing five layers of paint.
Now you have a stunning custom pumpkin ready to grace your mantel or table centerpiece


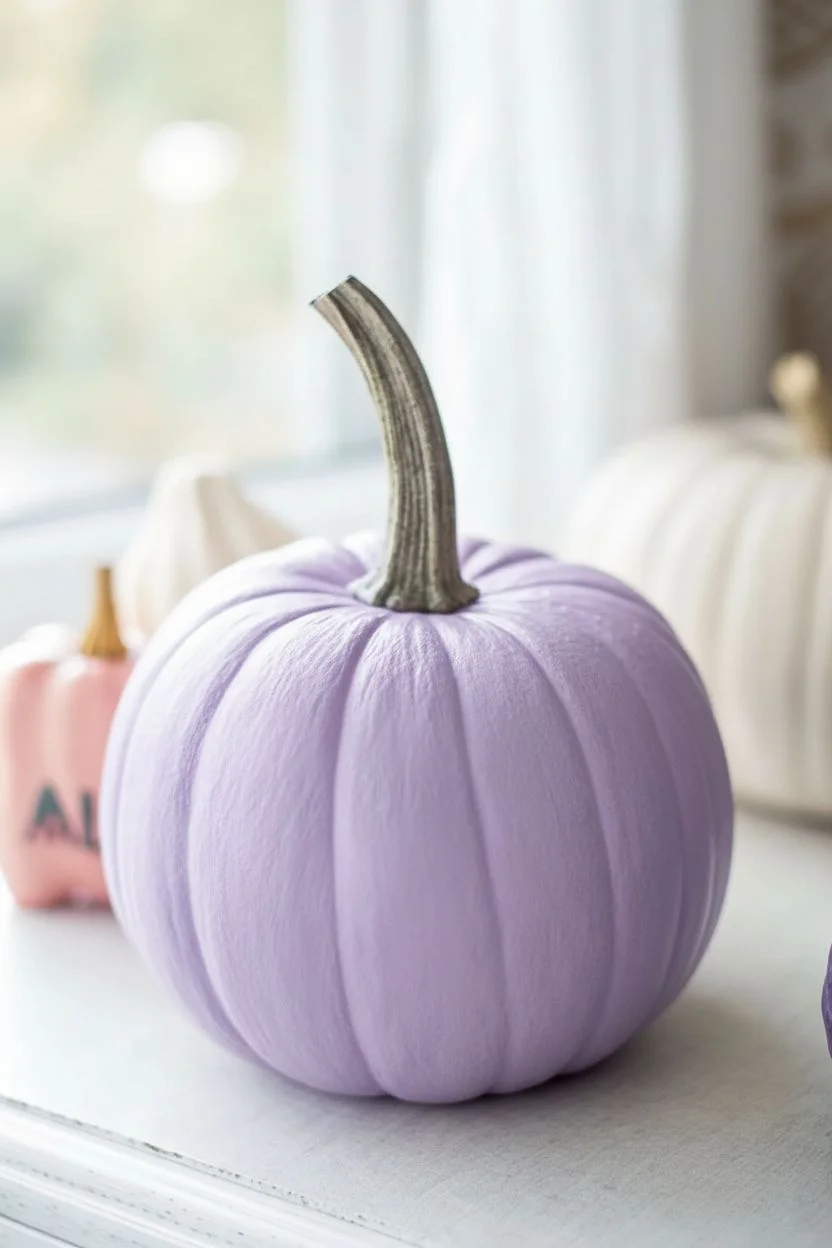
Flowing White Swirls on Lavender
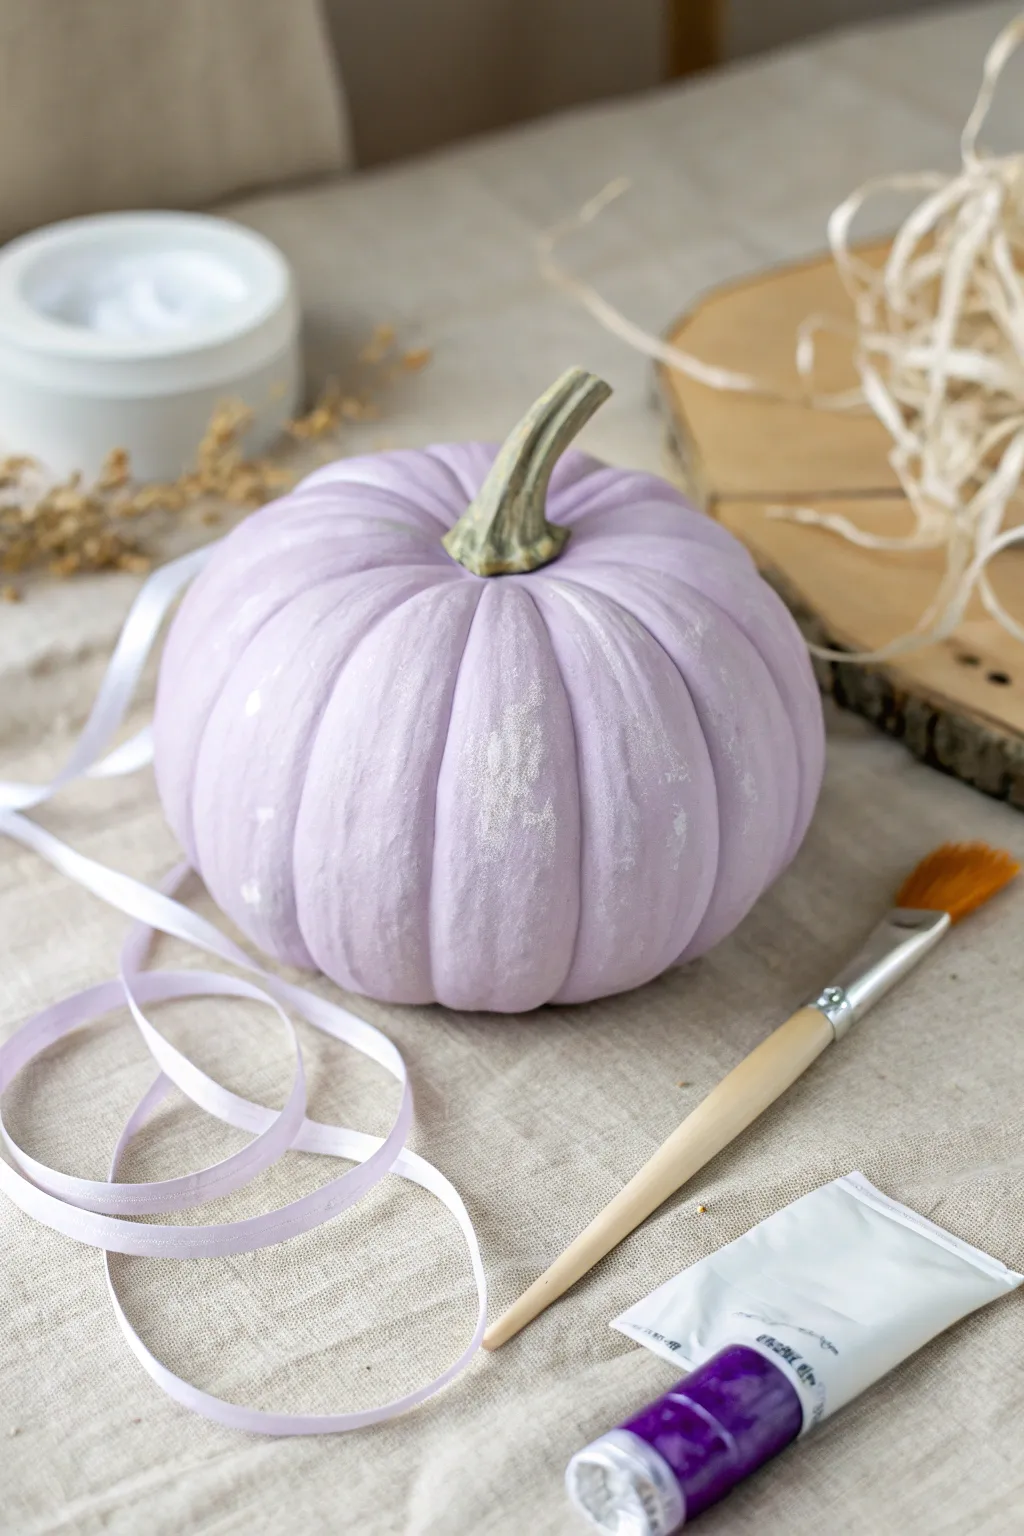

Transform a standard pumpkin into a soft, dreamlike decoration with this lavender painting technique. The dusty purple base accented by subtle, snowy highlights creates a sophisticated look perfect for elegant autumn displays.
Step-by-Step
Materials
- Faux or real pumpkin (medium size)
- White acrylic paint
- Purple acrylic paint (violet or deep purple)
- Medium flat paintbrush
- Small round paintbrush (for details)
- Paper plate or palette
- Water cup
- Paper towels
- Clear matte sealer spray (optional)
Step 1: Base Coat Preparation
-
Clean surface:
Begin by wiping down your pumpkin with a slightly damp cloth to remove any dust or dirt. If using a real pumpkin, ensure it is completely dry before proceeding. -
Mix the lavender hue:
Squeeze a generous amount of white acrylic paint onto your palette. Add a very small drop of purple paint—about the size of a pea to start. -
Adjust the shade:
Mix the colors thoroughly. I like to aim for a very pale, milky lavender, so add more white if the color looks too saturated. You want a pastel tone. -
Apply first coat:
Using the flat paintbrush, apply the lavender mixture over the entire surface of the pumpkin, working from top to bottom. -
Navigate the ridges:
Be sure to push the bristles into the deep grooves of the pumpkin so no orange (or original color) peeks through. -
Protect the stem:
Carefully paint around the base of the stem. You can use painter’s tape to mask it off, or just use a steady hand with the smaller brush to cut in near the stem. -
Let dry fully:
Allow the first coat to dry completely for about 20-30 minutes. Acrylics dry darker, so don’t worry if it looks light when wet. -
Second coat:
Apply a second coat of the lavender mix to ensure opaque coverage. This smooths out any brushstrokes from the first layer.
Natural Stem Trick
Keep the stem unpainted for a rustic contrast. If it looks dull, rub a tiny bit of olive oil on it to deepen the natural green-brown color.
Step 2: Adding Texture and Highlights
-
Prepare highlighting paint:
Place a fresh dollop of pure white paint on your palette. Do not add water; you want a thicker consistency for dry brushing. -
Load the brush:
Dip just the tip of your dry flat brush into the white paint. -
Unload excess:
Dab the brush repeatedly on a paper towel until almost no paint comes off. This is crucial for the ‘misty’ effect shown in the image. -
Highlight the ridges:
Gently drag the dry brush vertically down the raised ribs of the pumpkin. Keep your hand light to deposit only a faint dusting of white. -
Focus on curvature:
Concentrate slightly more white texture on the roundest parts of the pumpkin’s belly to emphasize its shape. -
Soften edges:
If a streak looks too harsh, quickly smudge it with your finger or a clean, dry brush to blend it back into the lavender base. -
Seal the work:
Once the highlights are bone dry, you can lightly mist the pumpkin with a clear matte sealer to protect the finish, though this is optional for indoor display.
Paint Stripping?
If the second coat pulls up the first one, you are re-working the paint too much while wet. Let the base layer cure longer before adding more.
Place your finished lavender pumpkin on a linen cloth or wooden tray to complete the soft, cottage-style aesthetic
BRUSH GUIDE
The Right Brush for Every Stroke
From clean lines to bold texture — master brush choice, stroke control, and essential techniques.
Explore the Full Guide
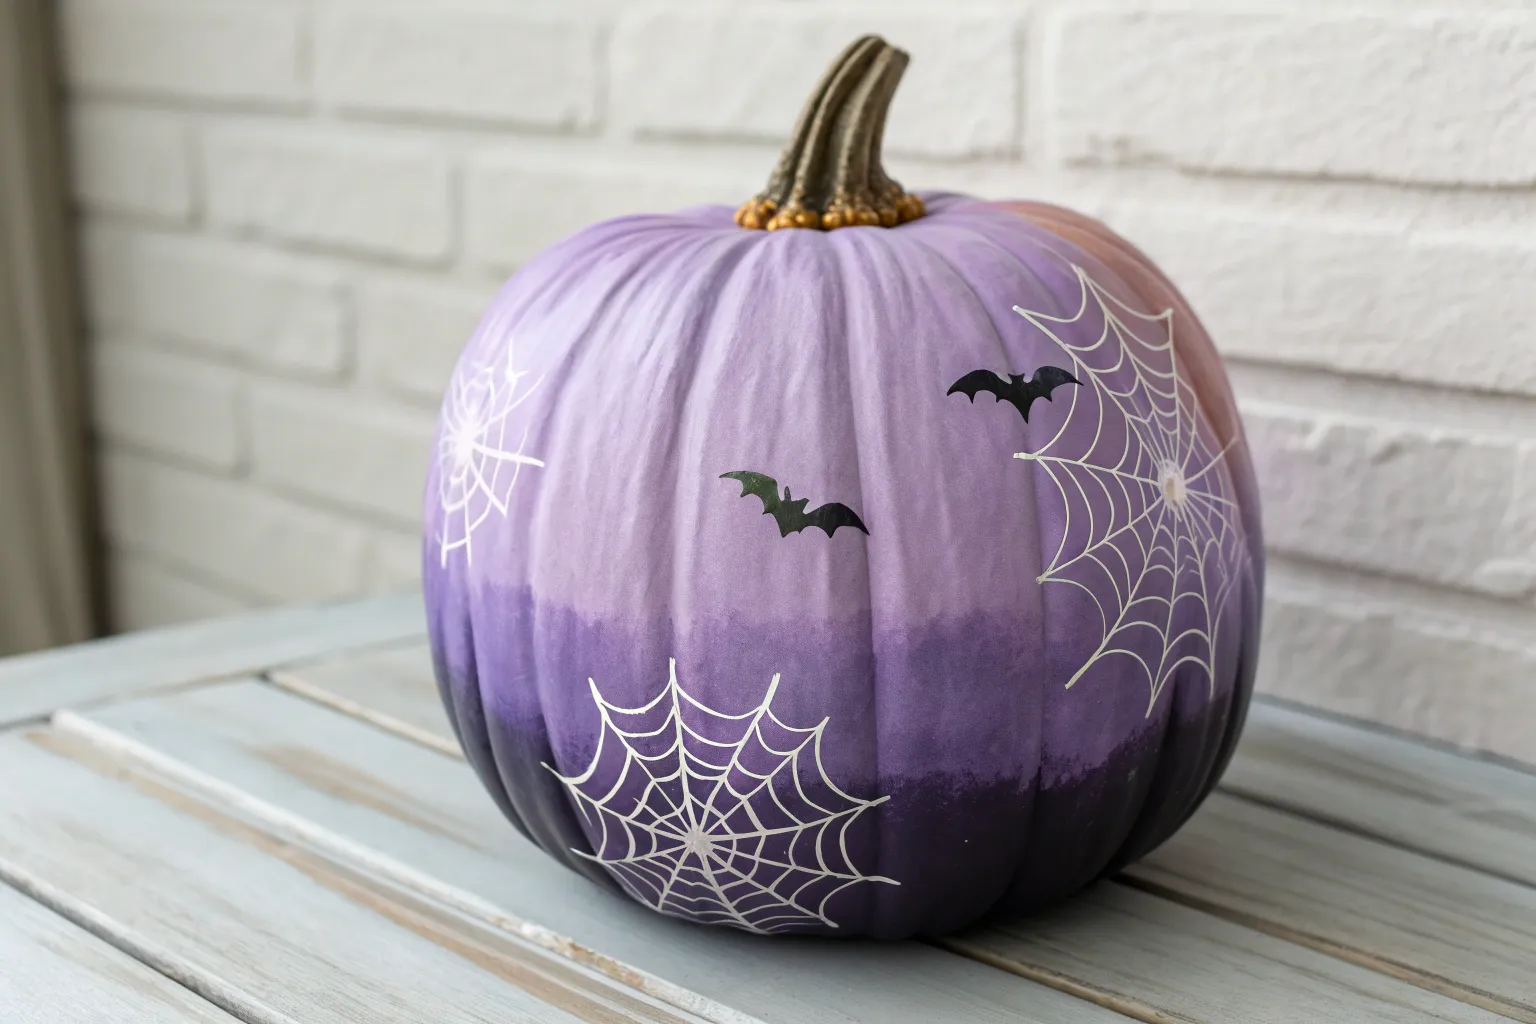
Purple Pumpkin With White Spiderweb Lines
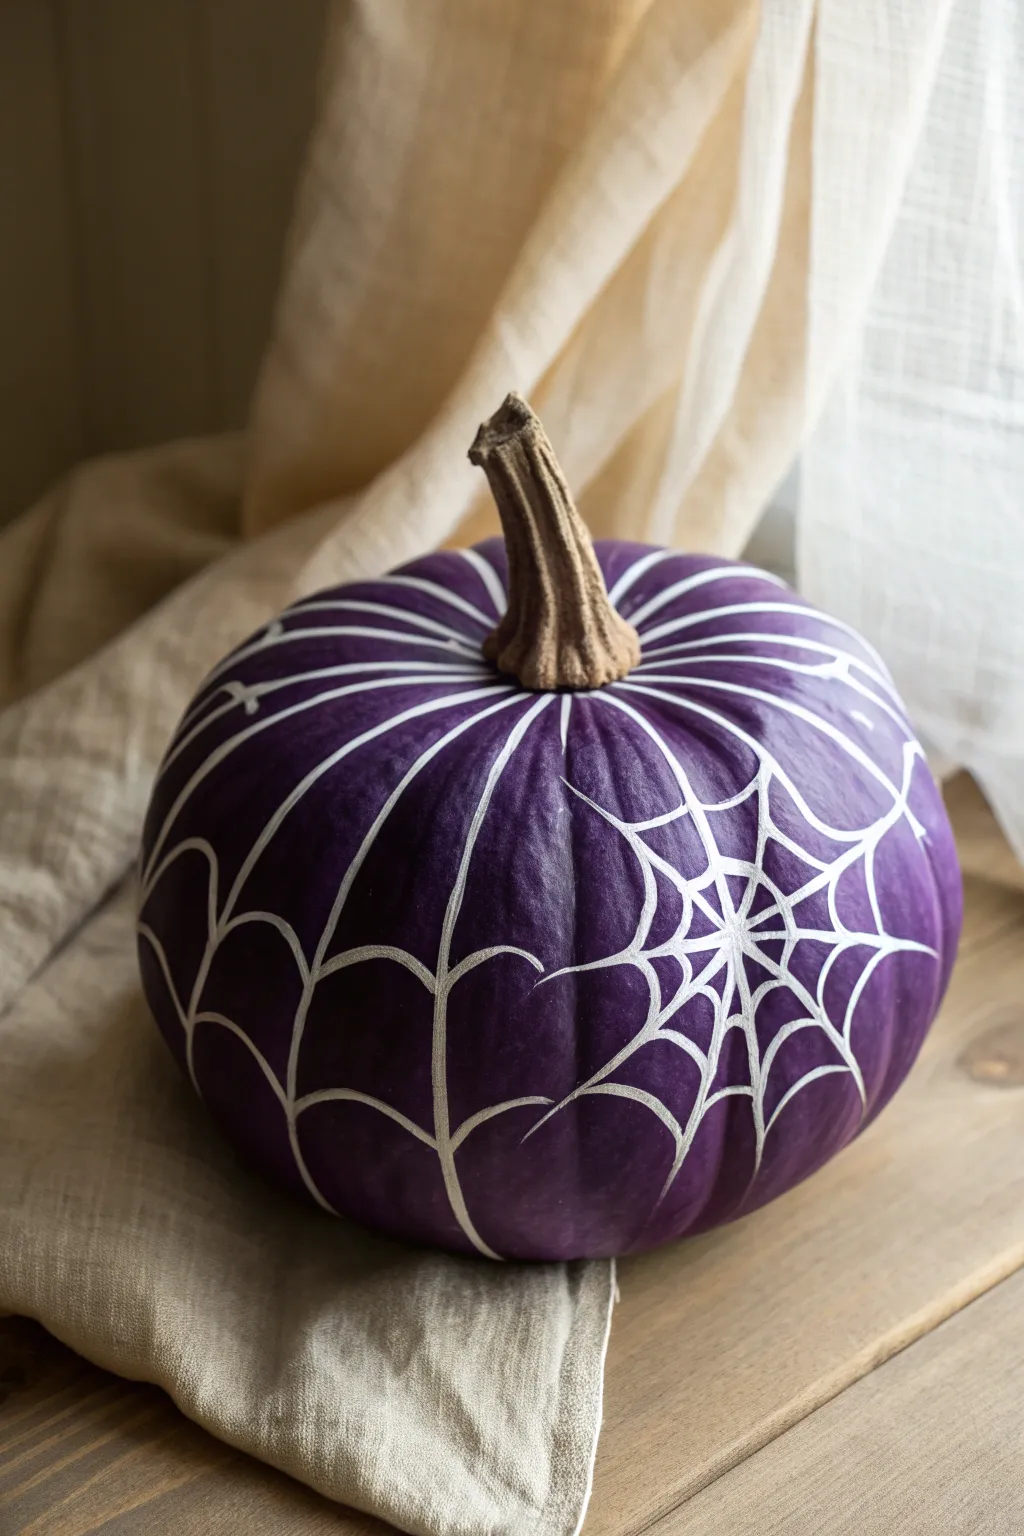
Transform a simple pumpkin into a spooky-chic masterpiece with deep amethyst hues and striking, high-contrast web details. This project balances elegant simplicity with classic Halloween imagery for a decoration that looks sophisticated rather than scary.
Step-by-Step Guide
Materials
- Medium-sized pumpkin (real or faux)
- Deep purple acrylic craft paint (matte or satin finish)
- White acrylic paint or a white oil-based paint pen (medium tip)
- Large flat paintbrush or foam sponge brush
- Small round detail brush (size 1 or 2, synthetic bristles)
- Pencil or white chalk pencil (optional)
- Clear matte acrylic sealer spray
- Painter’s tape or masking tape (for stem protection)
Step 1: Base Coat Preparation
-
Clean the surface:
Before painting, wipe your pumpkin down with a damp cloth to remove any dirt or oils. If you are using a real pumpkin, dry it thoroughly with a paper towel. -
Protect the stem:
Wrap the stem carefully with painter’s tape or masking tape. This ensures you can paint quickly without worrying about getting purple splatters on the natural wood tone. -
Apply the first coat:
Using your large flat brush or foam sponge, apply a generous coat of the deep purple acrylic paint. Brush from the top near the stem down toward the base to follow the natural ribs of the pumpkin. -
Let it dry completely:
Allow this first layer to dry for at least 30 to 60 minutes. Acrylics dry darker, so don’t worry if it looks slightly uneven while wet. -
Add a second coat:
Apply a second layer of purple paint to achieve that rich, opaque violet color seen in the photo. If your paint is thin, a third coat might be necessary for full coverage. -
Clean up the base:
Once the final purple coat is dry to the touch, flip the pumpkin over carefully to ensure the very bottom is also painted, creating a seamless look from all angles. -
Remove the tape:
Gently peel away the painter’s tape from the stem. If any purple paint seeped through, you can scrape it off gently with a fingernail or craft knife while the paint is still relatively fresh.
Smooth Operator
For the crispest lines, use a white oil-based paint pen (like a Sharpie marker) instead of a brush. It glides over the bumpy pumpkin surface much easier.
Step 2: Weaving the Web
-
Plan the center point:
Determine where the center of your spiderweb will be. In the inspiration image, the web radiates from a point on the upper shoulder of the pumpkin, rather than the stem itself, creating an asymmetrical interest. -
Sketch the spokes (optional):
If you are nervous about freehanding, lightly sketch your main radial lines using a white chalk pencil. Draw 6 to 8 straight lines extending outward from your chosen center point. -
Paint the main radial lines:
Using a white paint pen or a small round brush loaded with thinned white acrylic, trace over your spoke lines. Keep your pressure steady so the lines remain a consistent thickness. -
Start the webbing loops:
Begin near the center point and paint small, curved scalloped lines connecting the spokes. These first loops should be quite small and tight. -
Expand the pattern:
Work your way outward, creating concentric rings of scalloped lines. Imagine you are drawing little bridges between each straight spoke line. -
Adjust the spacing:
As the web gets larger and wraps around the curve of the pumpkin, space your scalloped lines further apart. I find this creates a nice sense of perspective and dimensionality. -
Refine the lines:
Go back over any lines that look transparent. A second pass with the white paint will make the web pop crisply against the dark purple background. -
Add secondary webs:
If desired, you can start a partial second web on the opposite side or leave it as a single focal point design depending on your preference. -
Clean up edges:
Use a damp Q-tip to tidy up any smudges or wobbly lines while the white paint is still wet. -
Seal the project:
Once all paint is fully cured (usually after 24 hours), spray the entire pumpkin with a clear matte acrylic sealer. This protects the finish and prevents the paint from scratching off during storage or display.
Glow Up
Mix a tiny amount of glow-in-the-dark powder into your white paint before drawing the web. Your design will look elegant by day and eerie by night.
Place your striking purple pumpkin near a window or on a mantle to show off its intricate web work
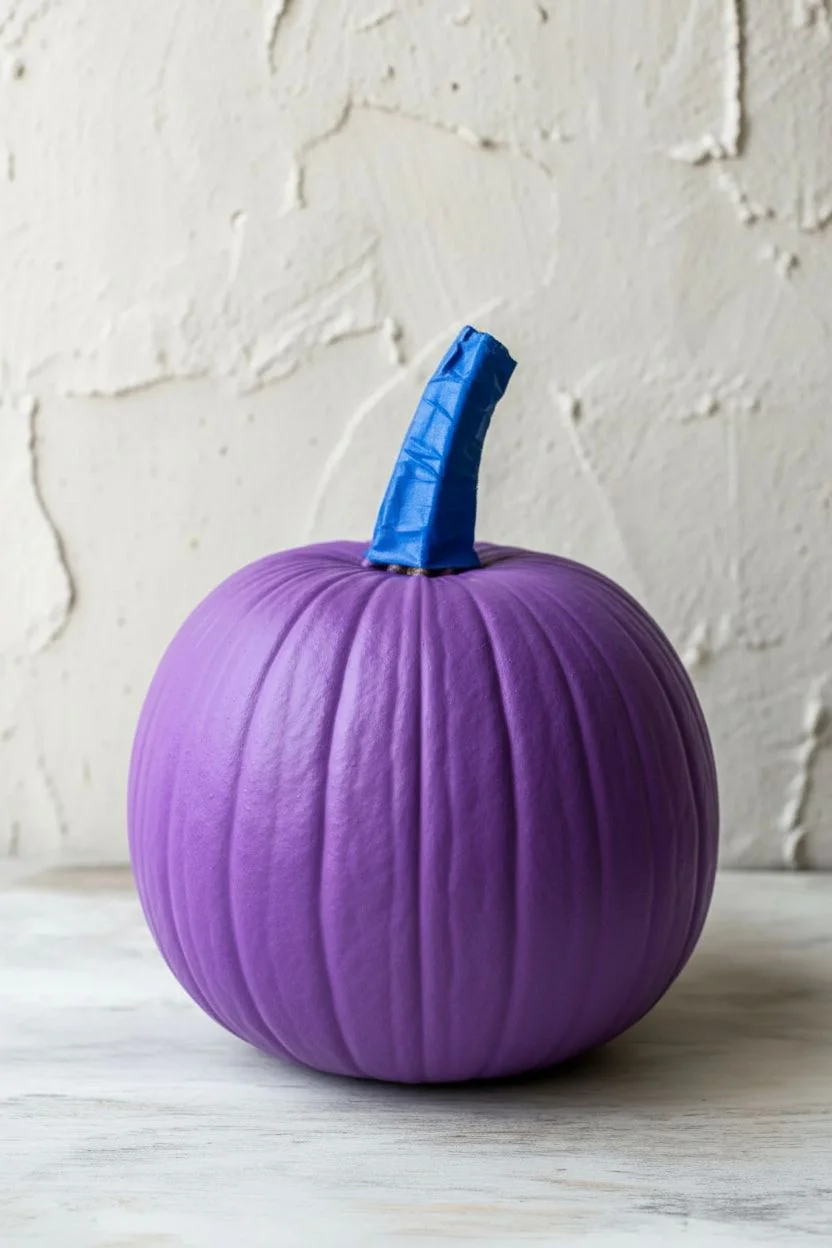
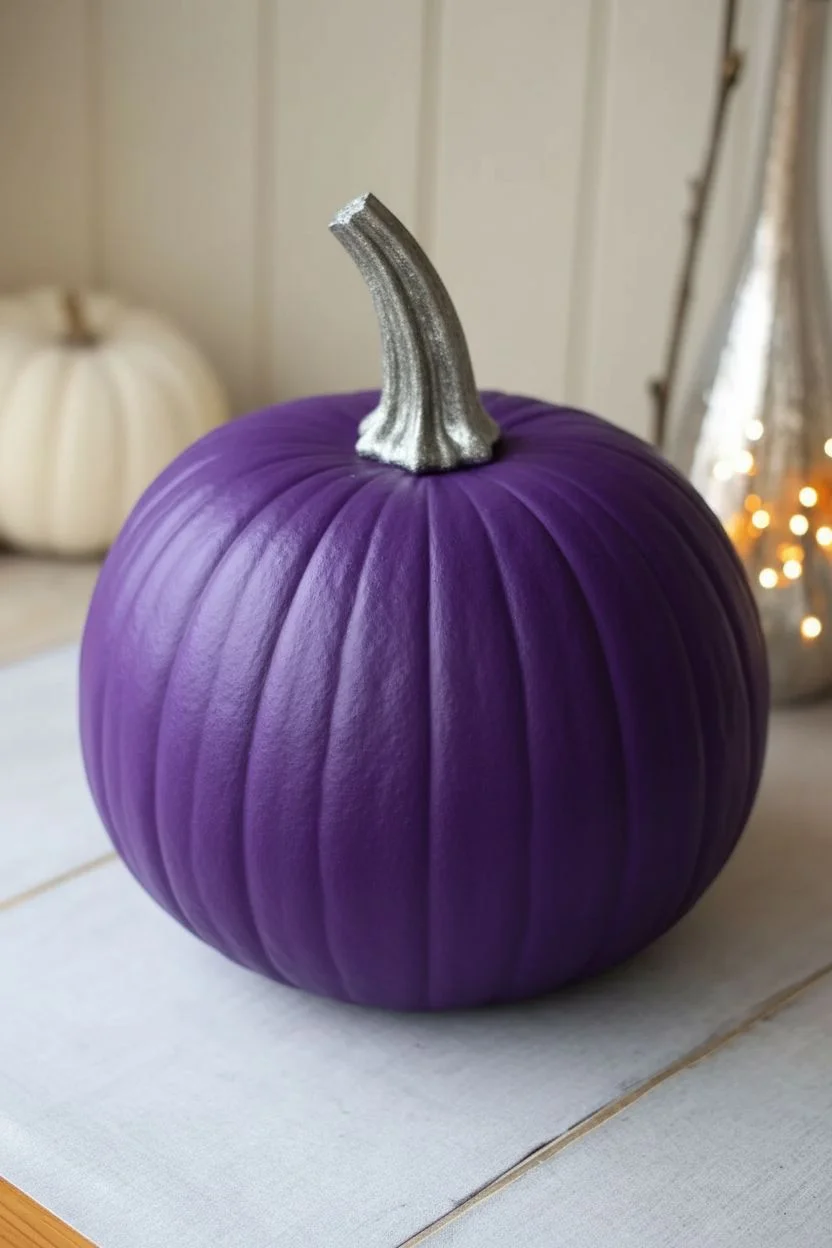
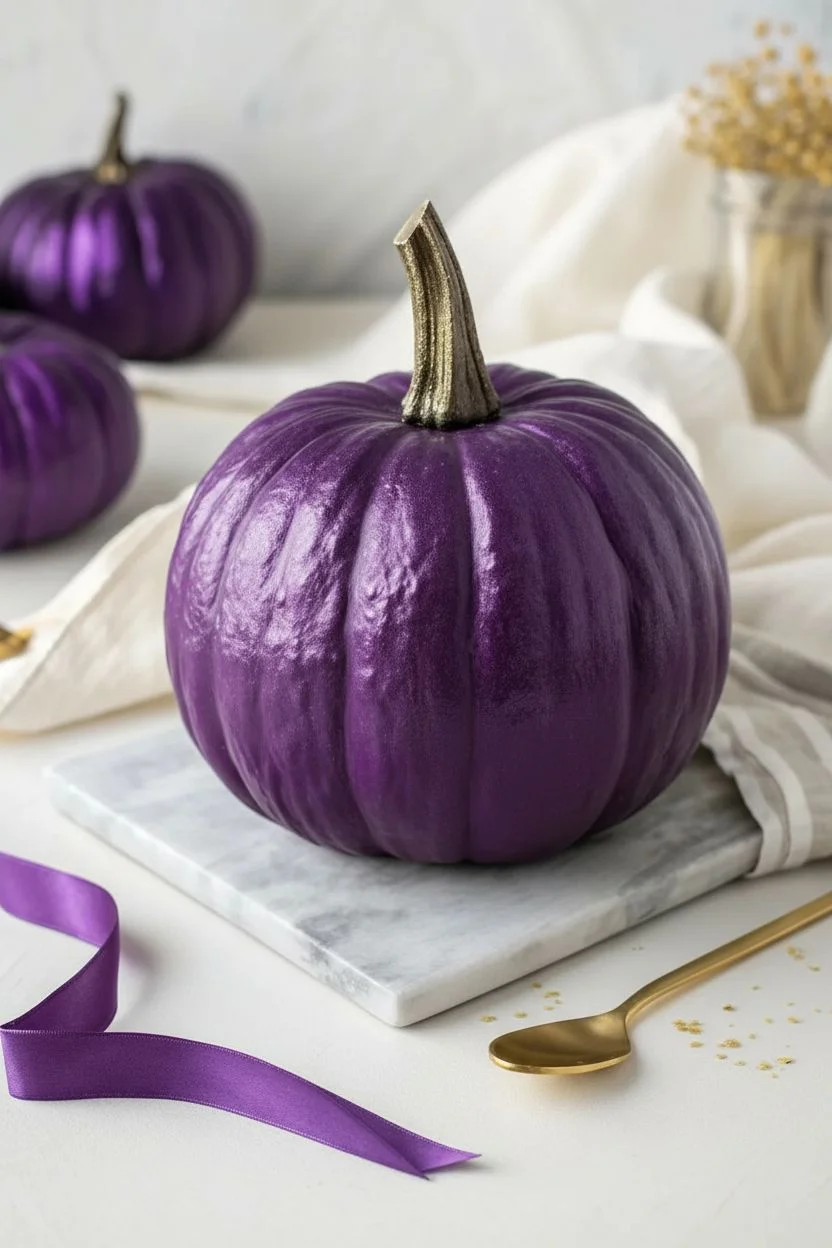
Glossy Purple Pumpkin With Metallic Gold Stem
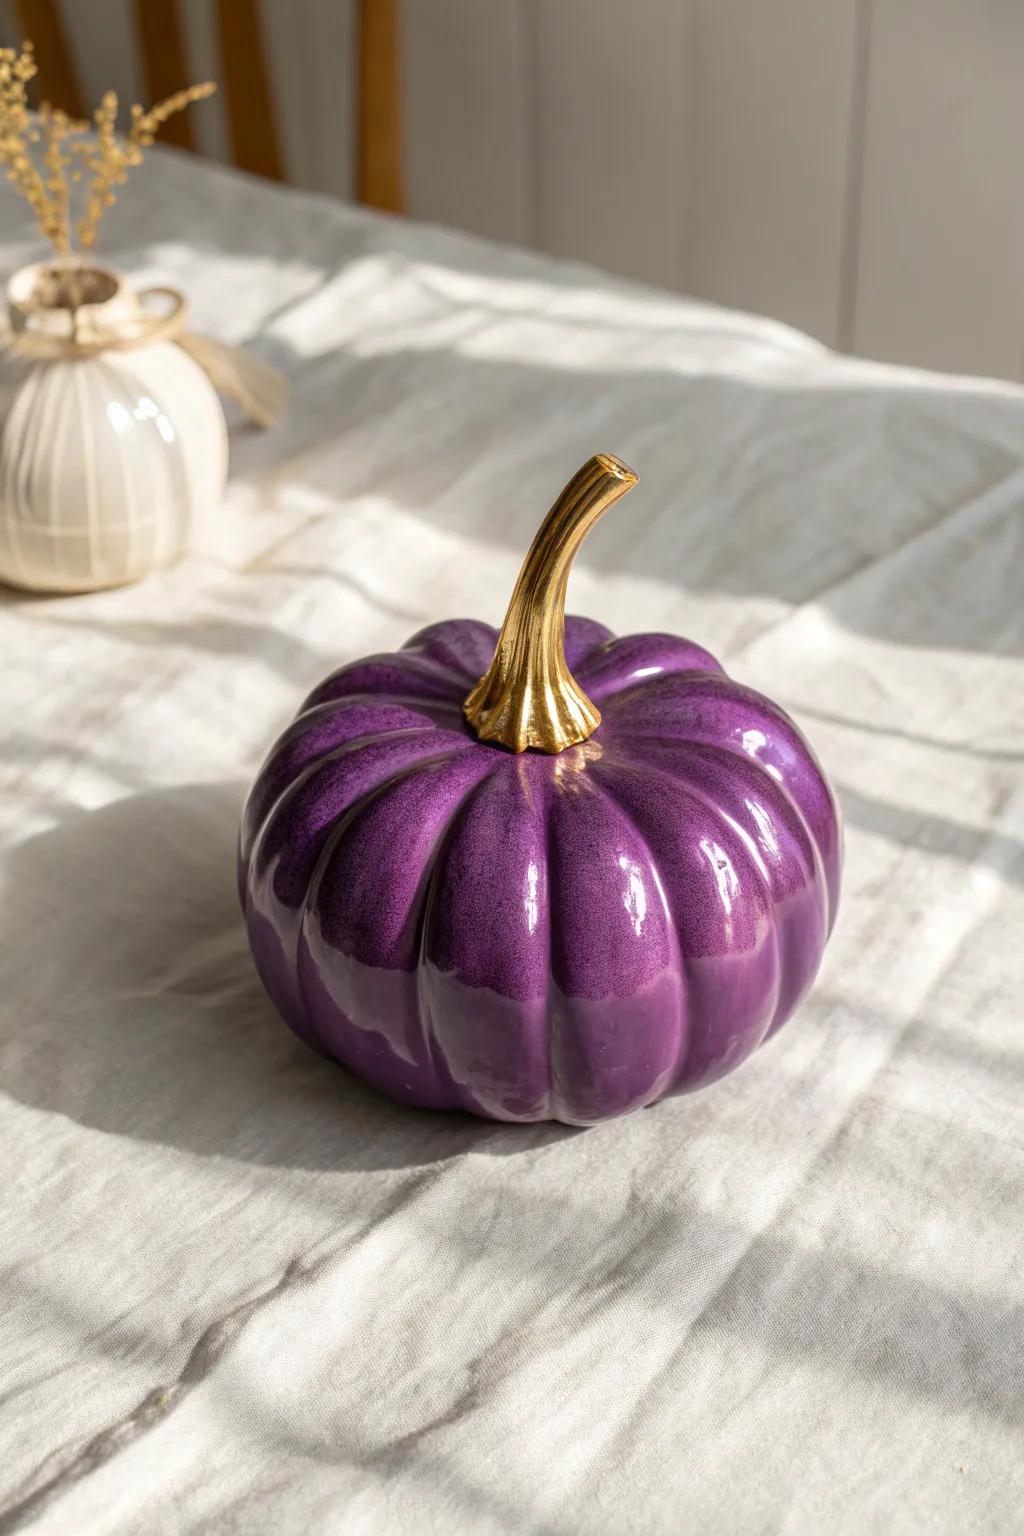

Transform an ordinary craft pumpkin into a luxurious centerpiece with a deep, glossy purple finish and a striking gold stem. This project mimics the high-end look of glazed ceramic, perfect for an elegant autumn display.
Detailed Instructions
Materials
- Faux pumpkin (smooth surface preferred)
- Deep purple acrylic gloss enamel paint
- Liquid gold gilding paint or metallic gold acrylic paint
- Glossy clear coat sealant (spray or brush-on)
- Fine-grit sandpaper (220 grit)
- Soft flat paintbrushes (medium and small)
- Painter’s tape
- Primer spray paint (white or grey)
- Disposable cup or palette
- Drop cloth or cardboard to protect workspace
Step 1: Preparation and Priming
-
Clean and Sand:
Begin by wiping down your faux pumpkin with a damp cloth to remove dust or oils. If the pumpkin has prominent seams or rough texture, lightly sand the entire surface with fine-grit sandpaper until smooth. -
Mask the Stem:
Wrap the stem carefully with painter’s tape. We want to keep the stem clean while we prime the body of the pumpkin for the best paint adhesion. -
Apply Primer:
Set the pumpkin on your drop cloth. Apply a thin, even coat of primer spray paint. This ensures the purple color pops vividly and adheres well to the synthetic surface. -
Let Dry:
Allow the primer to dry completely according to the can’s instructions. Usually, this takes about an hour, but check for tackiness before proceeding. -
Remove Tape:
Once dry, gently peel off the painter’s tape from the stem. We will paint the stem last to avoid smudging.
Brush Stroke Blues?
If brush strokes are visible after drying, lightly sand the purple paint with 400-grit sandpaper and apply a final ‘wet’ coat thinned slightly with water.
Step 2: Painting the Body
-
First Coat of Purple:
Using a soft flat brush, apply your deep purple gloss enamel. Use long, vertical strokes following the natural ridges of the pumpkin to minimize brush marks. -
Underside Details:
Don’t forget to flip the pumpkin carefully or hold it by the stem to paint the bottom curves, ensuring no original color shows through near the base. -
Dry Time:
Let this first coat dry fully. Gloss paints often take longer to cure than matte ones, so patience is key here to avoid dragging sticky paint. -
Second Coat:
Apply a second layer of purple. This deepens the color and creates that rich, saturated look seen in the photo. If needed, a third coat can be added for absolute opacity. -
Smoothing Check:
Inspect the surface for any drips or pooled paint in the crevices. Quickly smooth these out with your brush before they harden.
Ultra-Glossy Finish
For a glass-like finish that resembles true ceramic, use a ‘pour-on’ high gloss resin or a Triple Thick glaze instead of standard spray sealant.
Step 3: Adding the Gold Stem
-
Initial Gold Layer:
Switch to a smaller brush and dip it into your liquid gold gilding or metallic paint. Carefully paint the stem, starting from the top and working downward. -
Refining the Edge:
I like to use a very fine detail brush where the stem meets the purple body to get a crisp, clean line without accidentally getting gold on the purple. -
Texture Coverage:
Ensure the gold paint gets into all the twists and textured grooves of the stem. Dap the brush tip into deep recesses to fill them completely. -
Second Gold Coat:
Metallic paints can sometimes be semi-transparent. Apply a second coat once the first is dry to achieve a solid, molten metal appearance.
Step 4: Sealing and Finishing
-
Apply Glaze:
To get that ultra-high-shine ceramic look, apply a clear high-gloss sealant over the entire purple section. Avoid the stem if you want the metals to have a different sheen, or seal it all for uniformity. -
Curing:
Set the pumpkin in a dust-free area to cure overnight. This hardens the finish and protects it from scratches. -
Final Buff:
If there are tiny dust specks after drying, you can very gently buff them with a soft cloth, but usually, the gloss coat self-levels beautifully.
Now you have a stunning, sophisticated pumpkin that looks ready for a high-end catalogue shoot

PENCIL GUIDE
Understanding Pencil Grades from H to B
From first sketch to finished drawing — learn pencil grades, line control, and shading techniques.
Explore the Full Guide
Gold Glitter Dots Over Deep Purple
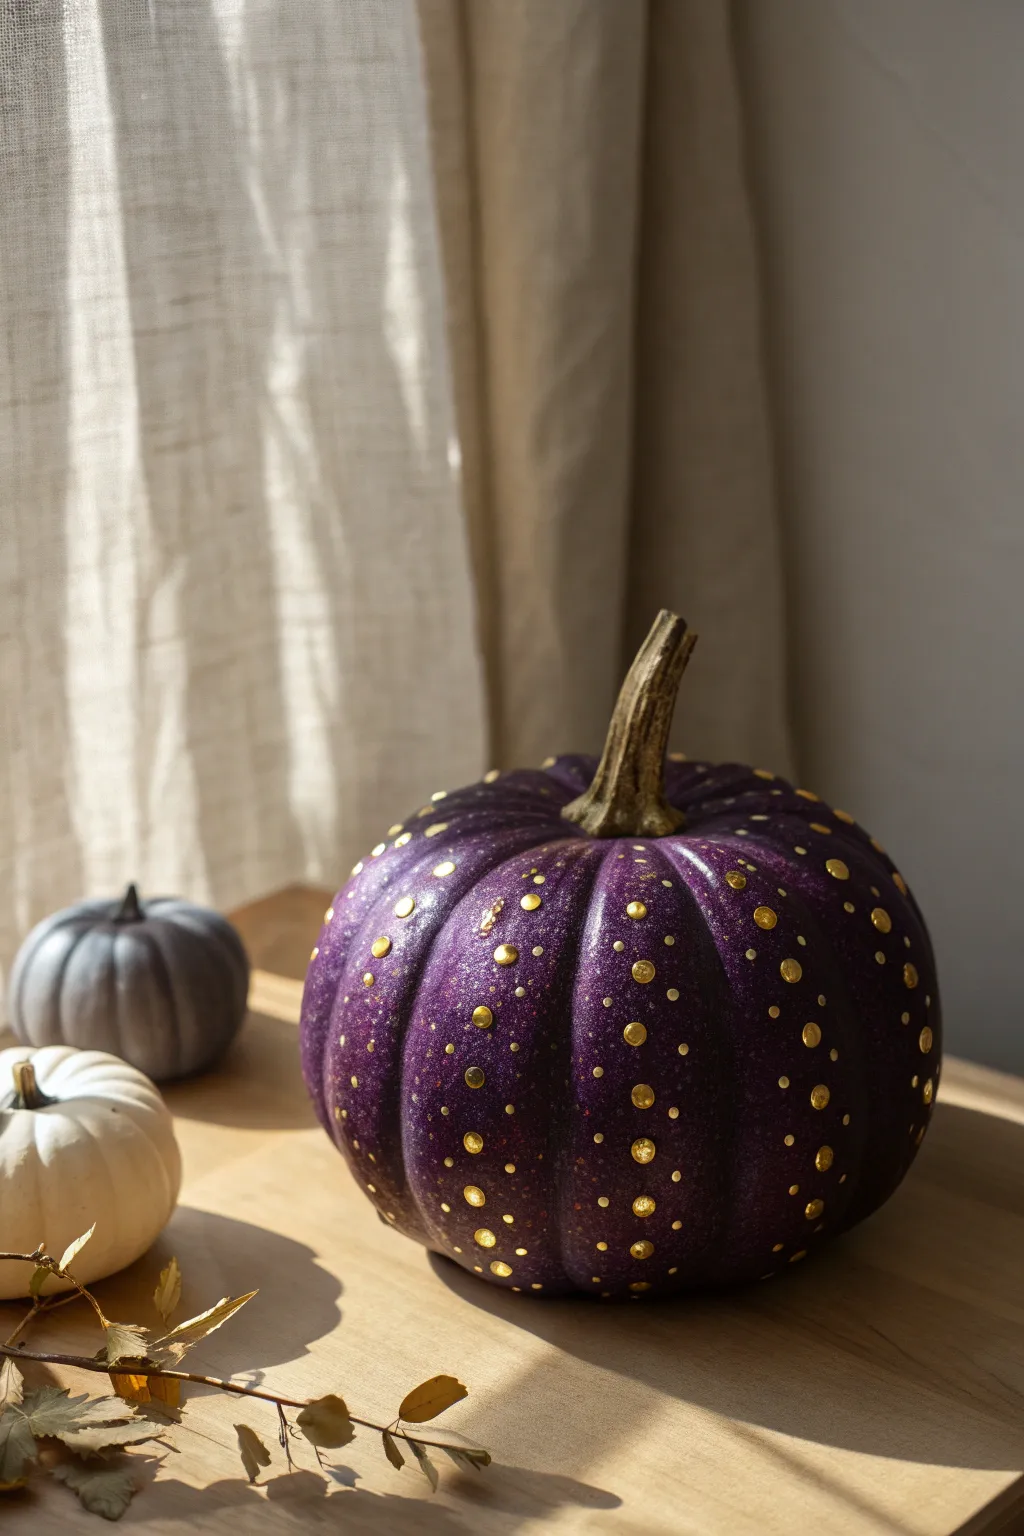
Transform a simple gourd into a galaxy-inspired centerpiece with this rich, dimensional design. The combination of deep violet and shimmering gold dots creates a sophisticated look that catches the autumn light beautifully.
How-To Guide
Materials
- Medium-sized pumpkin
- Deep purple acrylic craft paint
- Gold dimensional fabric paint (puffy paint)
- Fine purple glitter spray or loose extra-fine purple glitter
- Glossy clear acrylic sealer spray
- Wide foam brush
- Small round paintbrush
- Paint palette or paper plate
- Damp cloth (for clean up)
- Scrap paper or drop cloth
Step 1: Base Coat Application
-
Clean surface:
Begin by wiping down your pumpkin with a damp cloth to remove any dirt or oils. Let it dry completely to ensure the paint adheres smoothly. -
Protect the stem:
Carefully wrap the pumpkin’s stem with masking tape or painter’s tape to keep it natural and free of purple paint. -
Apply first coat:
Load your foam brush with deep purple acrylic paint. Apply a thin, even layer over the entire surface of the pumpkin, following the natural vertical curves. -
Dry thoroughly:
Allow the first coat to dry for at least 30 minutes. Don’t rush this; wet paint will drag if you add a second layer too soon. -
Apply second coat:
Add a second coat of purple paint to achieve full opacity. If your paint is thin, you might even need a third coat for that rich, dark eggplant color. -
Add subtle sparkle:
While the final coat of purple is still slightly tacky but not wet, mist it lightly with purple glitter spray. Alternatively, sprinkle a pinch of extra-fine purple glitter from a height to create a subtle galaxy dust effect. -
Seal the base:
Once the paint and glitter are completely dry (give it an hour or two), spray the entire pumpkin with a glossy clear acrylic sealer. This locks in the base color and provides a smooth surface for the dots.
Step 2: Gold Detail Work
-
Test the flow:
Take your bottle of gold dimensional paint and test it on a piece of scrap paper. Squeeze gently to ensure you can make consistent, round dots without air bubbles. -
Create large anchors:
Start by placing the largest dots. Choose random spots along the vertical ribs of the pumpkin and squeeze the bottle gently to create raised gold pearls about the size of a peppercorn. -
Add medium dots:
Fill in the spaces between the large dots with medium-sized ones. Try not to create a recognizable pattern; random dispersion looks more organic and elegant. -
Fill with micro-dots:
Now, fill the remaining empty spaces with tiny specks. Barely tap the tip of the bottle to the surface to leave the smallest possible dot of gold. -
Check density:
Step back and look at the overall distribution. The dots should feel balanced but not perfectly uniform, concentrating slightly more in the valleys between the ribs. -
Dry flat:
Let the dimensional paint dry undisturbed for at least 4 hours, or overnight. Puffy paint takes much longer to cure than acrylics, and you don’t want to smudge your hard work. -
Remove tape:
Once everything is fully cured and hard to the touch, carefully peel the tape off the stem. -
Enhance stem (optional):
If the natural stem looks dull compared to the glam pumpkin, dry brush a tiny amount of gold metallic paint onto the ridges of the stem for a cohesive finish.
Fixing drips
If a paint dot runs or loses its round shape, wait for it to dry slightly, then use a toothpick to gently reshape the edges or lift the excess paint away.
Jeweled upgrade
Press tiny flat-backed Swarovski crystals or rhinestones into the center of the largest wet gold dots for extra dimensional sparkle.
Enjoy the luxurious glow of your new autumn decoration as it catches the light.
Delicate White Flowers on a Purple Base
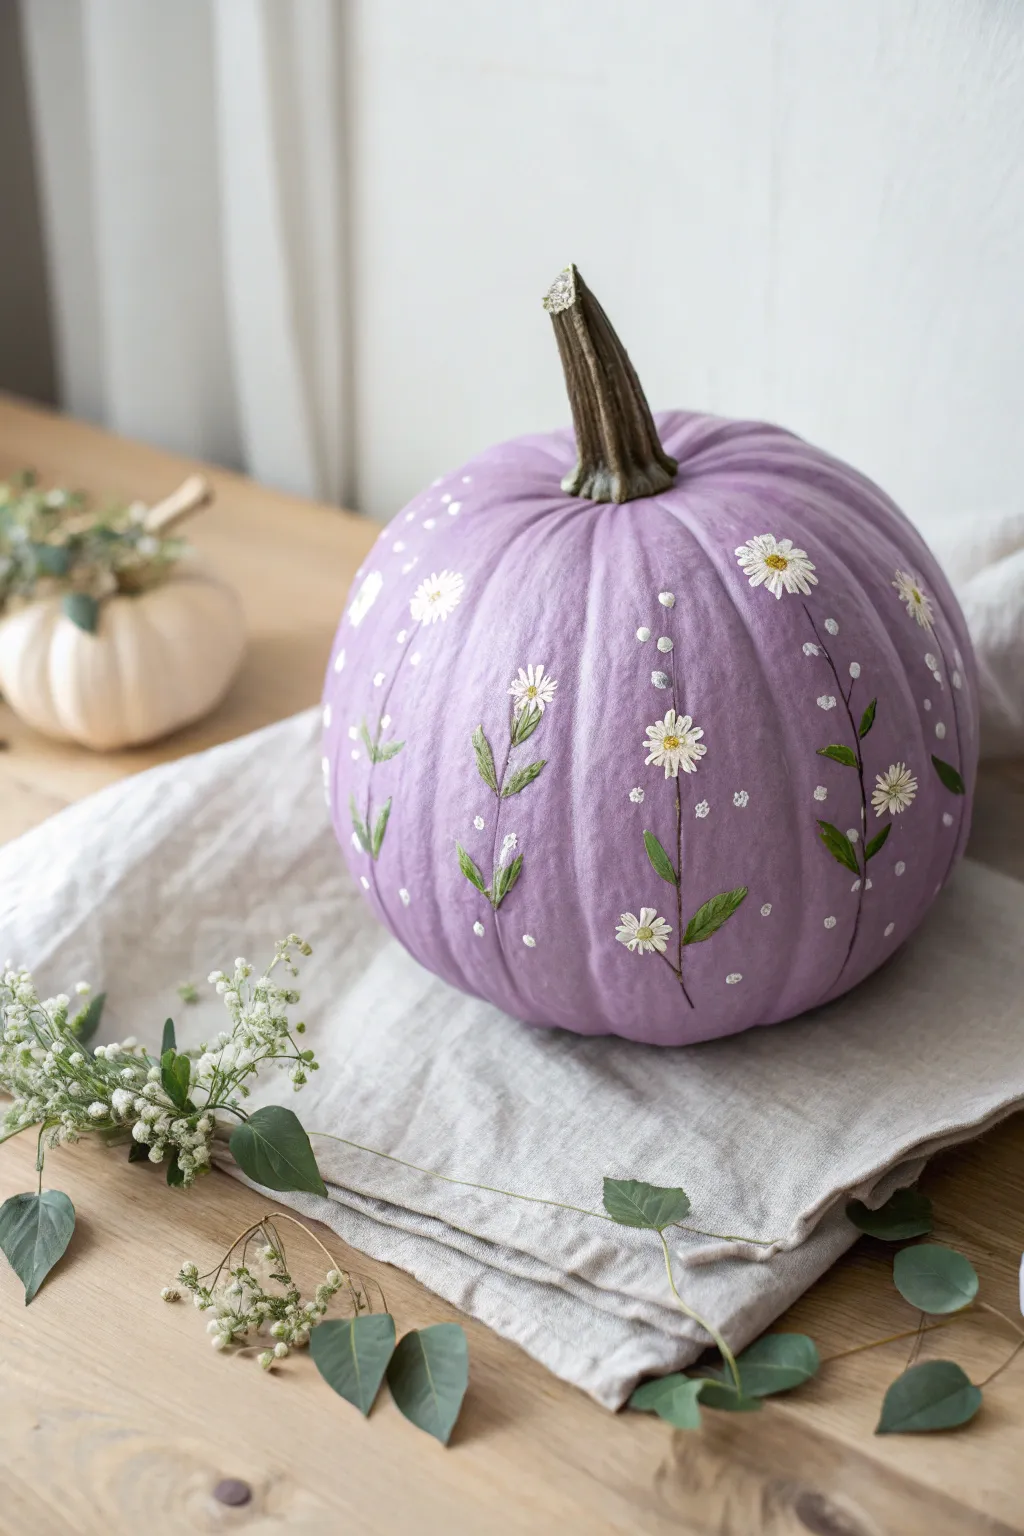
Transform a standard pumpkin into a soft, romantic centerpiece featuring delicate white daisies and trailing greenery against a dreamy lavender backdrop. This painted design mimics the look of fine embroidery or pressed flowers for a surprisingly sophisticated finish.
Step-by-Step Guide
Materials
- Medium-sized pumpkin (real or faux)
- White primer spray paint
- Lavender/lilac matte acrylic paint
- Titanium white acrylic paint
- Sap Green and Olive Green acrylic paint
- Yellow ochre acrylic paint
- Large flat paintbrush or foam brush
- Fine liner brush (size 0 or 00)
- Small round brush (size 2)
- Dotting tool or toothpick
- Matte clear sealant spray
Step 1: Preparing the Canvas
-
Clean surface:
Begin by wiping down your pumpkin with a damp cloth to remove any dirt or oils. If using a real pumpkin, ensure the stem involves no rot. -
Apply primer:
To ensure that lovely purple pops, spray the entire pumpkin with a coat of white primer. Let this dry completely according to the can’s instructions. -
Base coat application:
Using your large flat brush or foam brush, apply the lavender acrylic paint over the entire pumpkin. -
Second coat:
Once the first purple layer is dry to the touch, apply a second coat to ensure an opaque, streak-free finish. Don’t paint the stem yet. -
Stem detailing:
While the purple base cures, use a mix of olive green and brown to paint the stem, keeping it natural-looking.
Step 2: Painting the Flowers
-
Plan placement:
Visualize where your main flower stems will go. It helps to stagger them at different heights around the pumpkin’s curve. -
Paint main stems:
Load your liner brush with a mix of Sap Green and a touch of brown. Paint thin, slightly curved vertical lines acting as the main stems. -
Add leaves:
Along the stems, paint small, elongated almond shapes for leaves. Vary the greens by mixing Olive and Sap green for depth. -
Flower centers:
At the top of your stems, dab a small circle of yellow ochre to mark the center of your daisies. -
Petal formation:
Using the small round brush and titanium white paint, press down near the yellow center and pull outward to create teardrop-shaped petals. -
Layering petals:
Paint closely packed petals around the entire yellow center. I like to let the white paint be slightly thick here to give it a bit of texture. -
Adding texture:
Once the white petals are dry, use your finest brush to add tiny grey or light brown lines near the center of the petals for realistic detail.
Fixing Wobbly Lines
If your stems look shaky, don’t wipe them off. Wait for the green to dry, then create a ‘leaf’ over the mistake, or paint over the error with your purple base color to ‘erase’ it
Step 3: Delicate Accents
-
Floating petals:
Paint a few single petals drifting away from the main flowers or smaller buds that haven’t opened yet. -
Baby’s breath dots:
Dip a dotting tool or the back of a paintbrush into white paint. Create clusters of tiny dots around the main flowers to mimic baby’s breath. -
Stem highlights:
Run a very thin line of lighter green along the sunny side of your stems to give them dimension. -
Center details:
Add tiny brown stippling dots inside the yellow flower centers for a textured, realistic look. -
Stray dots:
Scatter a few tiny white dots randomly across the purple background to fill negative space and add whimsy. -
Final seal:
Once the artwork is thoroughly dry (give it a few hours), spray the entire pumpkin with a matte clear sealant to protect your work.
Pro Tip: Texture
For petals that look like real embroidery or thick oil painting, mix a little baking soda into your white acrylic paint. It creates a fluffy paste that holds brushstrokes beautifully
Place your floral masterpiece on a linen runner and enjoy the soft cottagecore vibes it brings to your space


White Vines and Leaves for an Elegant Botanical Look
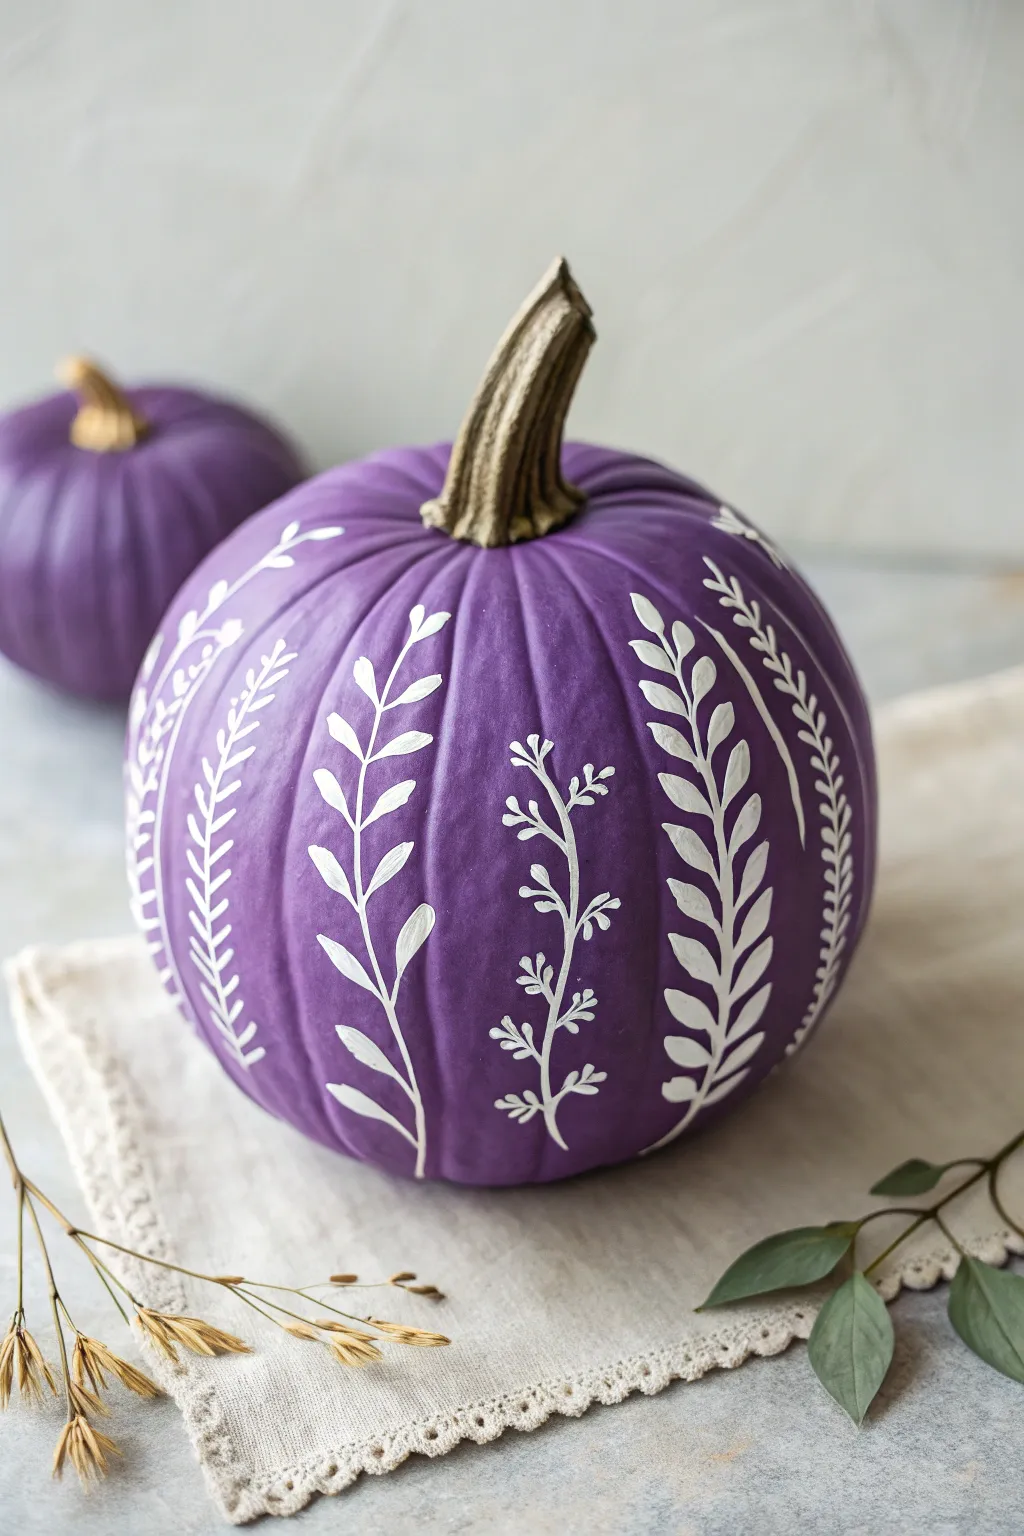
Transform a simple gourd into a sophisticated centerpiece with this botanical-inspired design. The contrast between the matte purple base and the delicate white vines creates an elegant look perfect for a modern autumn display.
Step-by-Step Tutorial
Materials
- Medium-sized pumpkin (real or faux)
- Matte acrylic paint (medium purple/lavender)
- White acrylic paint or paint pen (fine tip)
- Medium flat paintbrush (for base coat)
- Round detail brushes (sizes 0 and 2)
- Pencil (optional)
- Sealer spray (matte finish)
- Paper towel
- Water cup
Step 1: Setting the Canvas
-
Clean the surface:
Begin by wiping down your pumpkin with a damp cloth to remove any dirt or oils. If using a real pumpkin, make sure it is completely dry before applying any paint, as moisture will cause peeling. -
Apply the first base coat:
Using your medium flat brush, apply a smooth, even layer of purple acrylic paint over the entire surface of the pumpkin. Don’t worry about full opacity yet; just aim for coverage. -
Paint the bottom:
Turn the pumpkin upside down once the top is touch-dry to ensure the bottom is fully coated. This prevents orange glimpses if the pumpkin is placed on a mirror or glass table. -
Add a second coat:
Apply a second layer of purple paint. I find that brushing in vertical strokes that follow the natural ribs of the pumpkin helps hide brush textures and creates a cleaner finish. -
Dry thoroughly:
Allow the base coat to dry completely for at least an hour. The surface must be non-tacky before you start the detailed work.
Brushwork Secret
Mix a tiny drop of water into your white paint. Ink-like consistency flows better for long vines than thick paint does.
Step 2: Planning the Foliage
-
Identify the ribs:
Study the natural vertical indentations (ribs) of your pumpkin. These will serve as your guides for where to place the vines. -
Sketch guides (optional):
If you are nervous about free-handing, lightly sketch a vertical line down the center of each rib section using a pencil.
Gilded Edge
After the white dries, add tiny dots of metallic gold paint to the tips of the leaves for a bit of subtle glamour.
Step 3: Painting the Vines
-
Paint the central stems:
Using a size 2 round brush or a white paint pen, draw a long, slightly curved vertical line from the top of the pumpkin down to the bottom. Vary the curve slightly on different sections to keep it organic. -
Create the leafy vine style:
On alternating sections, paint pairs of small, almond-shaped leaves extending from the stem. Start at the bottom and angle the leaves upward. -
Refine the leaf shape:
Press down with the belly of the brush to create the wide part of the leaf, then lift as you pull away to create a sharp point. -
Paint the fern style:
On the remaining sections, paint a different botanical style closer to a fern or wheat stack. These should feature smaller, thinner dashes rather than full leaves. -
Add branch details:
For the fern-style stems, add tiny ‘Y’ shaped branches coming off the main stem. Keep these delicate and airy. -
Mix design elements:
Feel free to mix the patterns. Notice how the image shows a variation where small circular buds or simpler grass-like strokes are used on narrower sections of the pumpkin. -
Taper the tops:
As your vines reach the stem area, make the leaves or branches progressively smaller to fit the narrowing space.
Step 4: Finishing Touches
-
Correct mistakes:
If painting freehand goes awry, use a damp Q-tip to quickly wipe away wet acrylic, or let it dry and touch it up with a bit of the purple base paint. -
Highlight the stem:
Leave the pumpkin stem natural for a rustic contrast, or lightly dry-brush it with a touch of gold or brown if it looks too dull. -
Seal the work:
Once the white paint is bone dry, spray the entire pumpkin with a matte sealer. This protects the design from chipping and evens out the sheen.
Place your lovely lavender creation next to dried wheat stems or eucalyptus for a soft, curated vignette
Purple Marble Swirl Effect

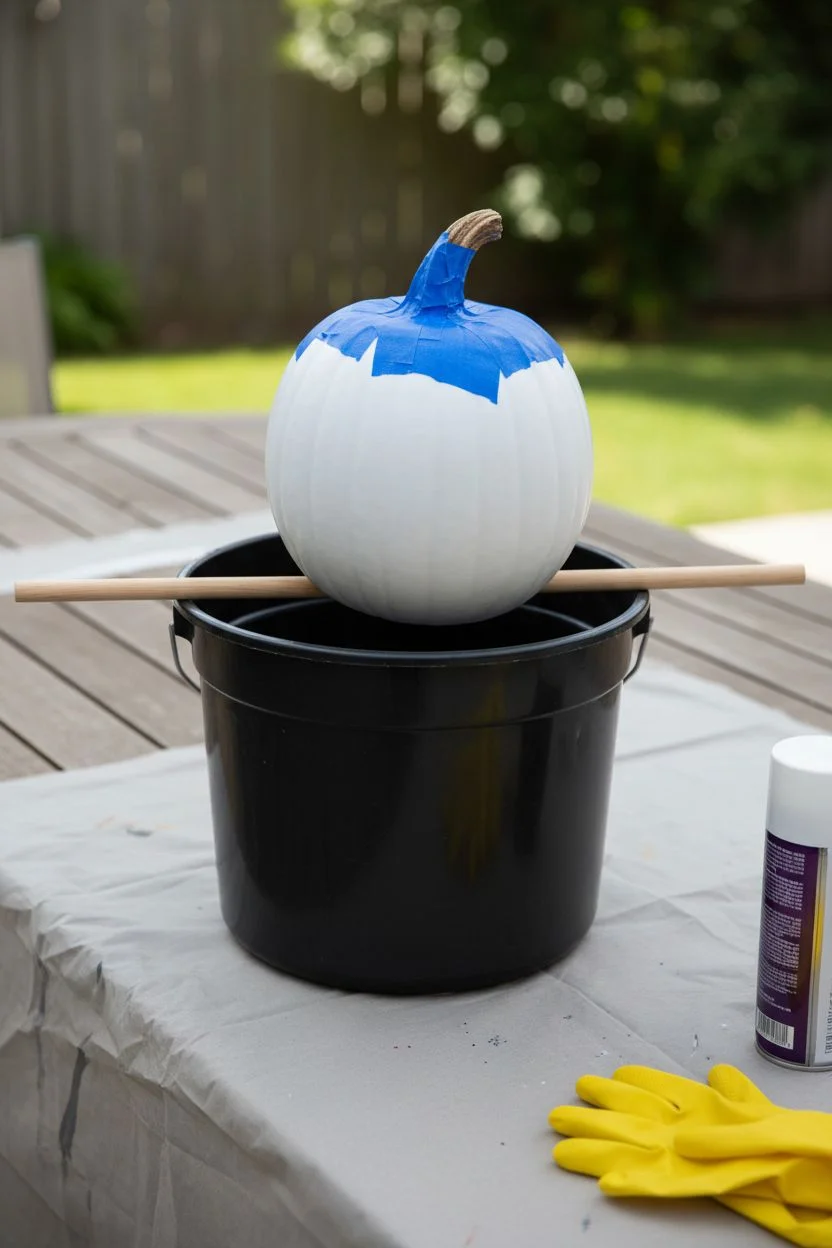
Transform a plain pumpkin into a mesmerizing piece of decor with this stunning purple and white marble effect. Using the simple science of water and paint, you will create organic, swirling patterns that look impossibly intricate but are surprisingly easy to achieve.
Step-by-Step
Materials
- Faux white crafting pumpkin (medium size)
- Deep purple spray paint (satin finish)
- White spray paint (satin finish)
- Large plastic bucket or bin (deep enough to submerge the pumpkin)
- Water (room temperature)
- Painter’s tape
- Sturdy stick or dowel for stirring
- Dust sheet or cardboard to protect your workspace
- Rubber gloves
- Sealant spray (clear matte or gloss)
Step 1: Preparation
-
Clean the surface:
Wipe down your faux pumpkin with a damp cloth to remove any dust or oils that might repel the paint, then dry it completely. -
Protect the stem:
Carefully wrap the pumpkin’s stem with painter’s tape, ensuring the edges are sealed tight so no paint sneaks underneath. -
Prepare the workspace:
Set up your dipping station outdoors or in a very well-ventilated area, placing your large bucket on top of a drop cloth. -
Fill the vessel:
Fill the plastic bin with room temperature water slightly deeper than the height of the pumpkin.
Step 2: Creating the Marble Effect
-
Spray the purple base:
Shake your purple spray paint can vigorously for a minute and hold it about 8-10 inches from the water surface. -
Add the first layer:
Spray a generous amount of purple paint directly onto the center of the water; it should float on top. -
Add the white accent:
Immediately spray the white paint into the center of the purple circle you just created; alternating colors is key here. -
Repeat the pattern:
Continuing working quickly, alternate spraying bursts of purple and white into the center until you have a ‘bullseye’ of floating paint rings. -
Swirl the design:
Take your stick or skewer and gently drag it through the paint rings to break the circles and create the marbled swirls seen in the photo.
Temperature Matters
Use lukewarm, room-temp water. If the water is too cold, the spray paint will seize up into a hard film instead of staying fluid.
Step 3: The Dip
-
Position the pumpkin:
Put on your rubber gloves and hold the pumpkin by the stem (or base if heavy), positioning it over the best part of the swirl pattern. -
Submerge slowly:
Slowly and steadily push the pumpkin straight down into the water, allowing the paint film to wrap around the pumpkin’s curves. -
Clear the surface:
Be careful here: while the pumpkin is firmly held underwater, use your free hand (or a helper) to sweep away the remaining paint on the water surface with a piece of cardboard so it doesn’t double-coat the pumpkin on the way out. -
Remove and drain:
Lift the pumpkin out of the water quickly, giving it a gentle shake to remove excess water droplets.
Paint Clumping?
If the paint sinks or clumps, you are spraying too close. Hold the can 10-12 inches away to mist the surface gently.
Step 4: Finishing Up
-
Initial dry:
Set the pumpkin on a covered surface or drying rack to let the water evaporate and the paint set for at least an hour. -
Check for bubbles:
If you see any large water droplets trapped under the paint, I gently dab them with a paper towel corner before they dry fully. -
Remove tape:
Once the paint is dry to the touch but not fully cured, carefully peel away the painter’s tape from the stem. -
Seal result:
Spray a light coat of clear sealant over the entire pumpkin to protect the delicate marble finish from chipping.
Enjoy displaying your unique hydro-dipped masterpiece as a centerpiece or porch decoration
Purple and Pink Leopard Print Spots
Transform a plain pumpkin into a chic statement piece with this trendy leopard print design. The soft lilac base paired with bold purple and pink spots creates a modern, playful look that stands out from traditional fall decor.
Step-by-Step Tutorial
Materials
- Faux craft pumpkin (white or cream preferred)
- Lavender craft paint (matte finish)
- Dark purple craft paint
- Bubblegum pink craft paint
- Metallic champagne or antique gold craft paint
- Medium flat paintbrush
- Small round paintbrush
- Detail liner paintbrush
- Paper plate or palette
- Cup of water and paper towels
Step 1: Base Coat Application
-
Clean the surface:
Before you begin, wipe down your faux pumpkin with a slightly damp cloth to remove any dust or oils that might prevent the paint from sticking. -
Apply lavender base:
Using your medium flat brush, apply a generous coat of lavender paint over the entire surface of the pumpkin, avoiding the stem. -
Smooth the strokes:
Work in long, vertical strokes following the natural ribs of the pumpkin to minimize visible brush marks. -
Let it dry:
Allow the first coat to dry completely. This usually takes about 20-30 minutes depending on the thickness of your paint. -
Second coat:
Apply a second coat of lavender paint to ensure full, opaque coverage. If you can still see the original pumpkin color, a third thin coat might be necessary after drying.
Oops! Runny Paint?
If your spot outlines are dripping or spreading, your brush is too wet. Blot it on a paper towel before dipping into paint, or switch to a heavier body acrylic paint
Step 2: Painting the Spots
-
Prepare spot colors:
Pour a small amount of bubblegum pink and dark purple paint onto your palette. -
Create pink centers:
Dip your small round brush into the pink paint. Dab irregular, organic shapes onto the pumpkin surface. I like to keep these random—some can be oval, some bean-shaped, and some just small dots. -
Space them out:
Leave varying amounts of space between your pink shapes. Remember that leopard print isn’t a perfect grid, so scatter them naturally around the pumpkin’s curves. -
Dry the pink:
Let the pink spots dry to the touch so the colors don’t smear when you add the outlines.
Pro Tip: Natural Flow
Don’t overthink the spots. The faster and more loosely you paint the dark purple brackets, the more natural and organic the leopard print will look
Step 3: Adding Leopard Details
-
Start the outlines:
Switch to your detail liner brush and load it with dark purple paint. You want nice control for this step. -
Frame the spots:
Paint partial brackets around the pink spots. Do not circle them completely. Instead, paint two or three disconnected C-shapes or U-shapes around the edges of each pink blob. -
Vary the line weight:
As you paint the dark purple brackets, press down slightly harder in the middle of the stroke and lift up at the ends to create a realistic, tapered animal print effect. -
Fill the gaps:
Look for large empty spaces of lavender background between your main spots. Use the dark purple paint to add small, solid irregular dots or tiny C-shapes in these gaps to balance the pattern. -
Rotate and review:
Turn the pumpkin slowly to ensure the pattern flows seamlessly all the way around, checking for any large bald spots that need an extra detail.
Step 4: Finishing Touches
-
Paint the stem:
Using a clean small brush, carefully paint the stem with metallic champagne or antique gold paint. -
Touch up edges:
Ensure the metallic paint meets the lavender base neatly at the base of the stem without overlapping messily. -
Final dry:
Allow the entire pumpkin to sit undisturbed for at least an hour to ensure the thickest parts of the leopard spots are utterly dry.
Enjoy displaying your stylish and sassy creation alongside your other seasonal decor
Galaxy Night-Sky Purple Pumpkin
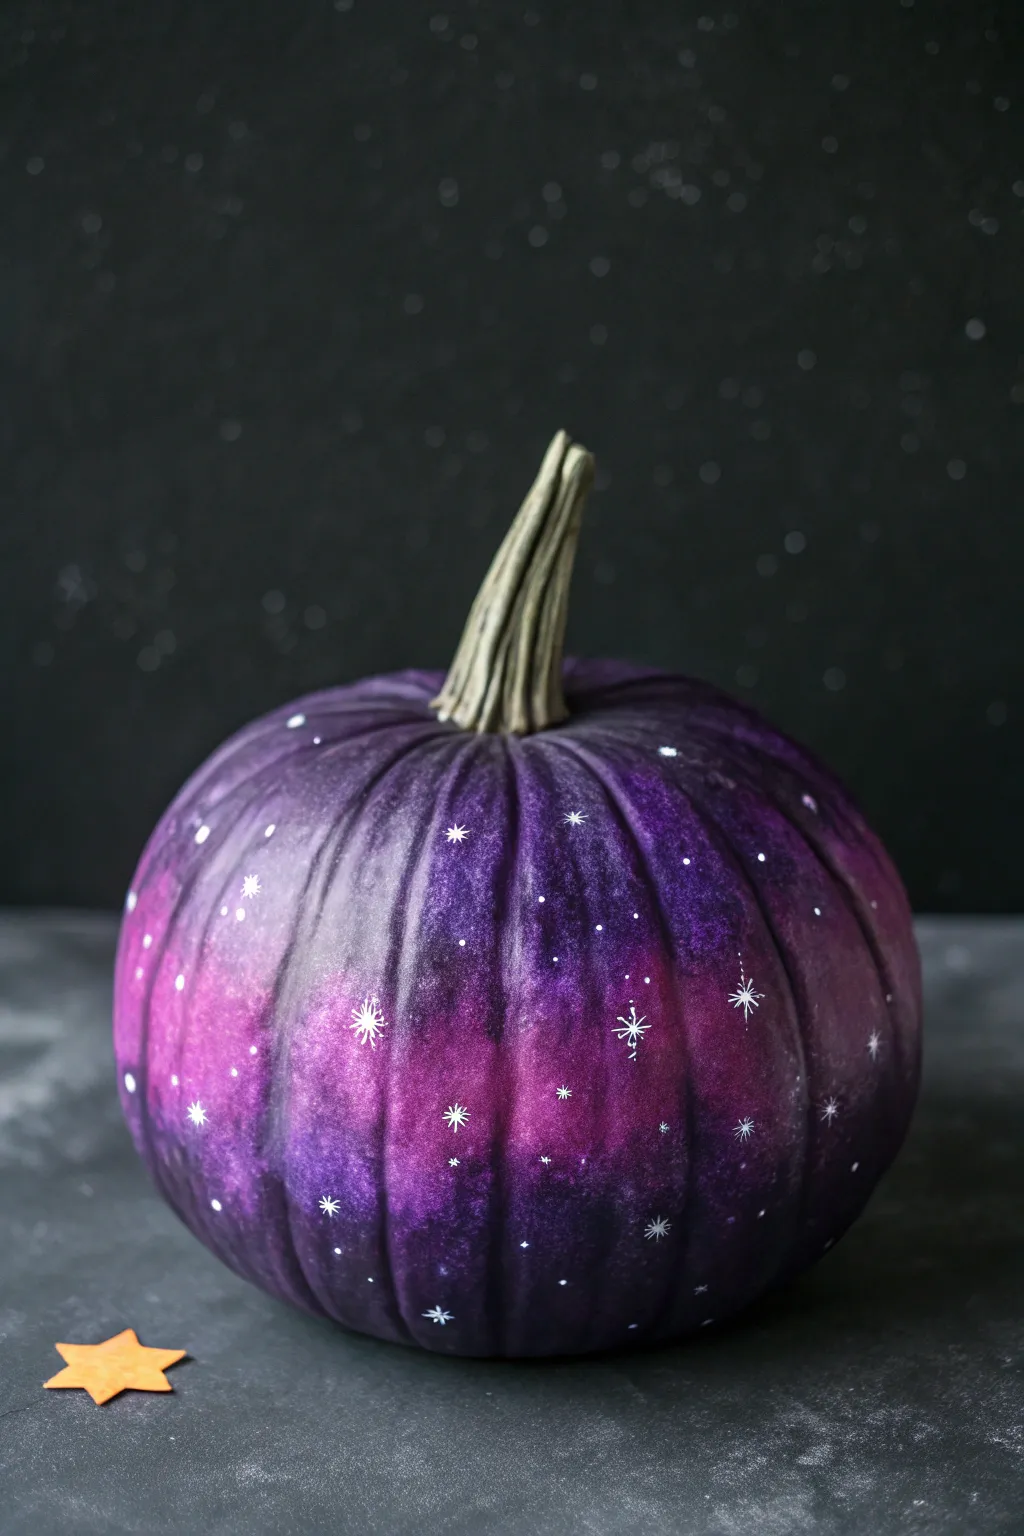
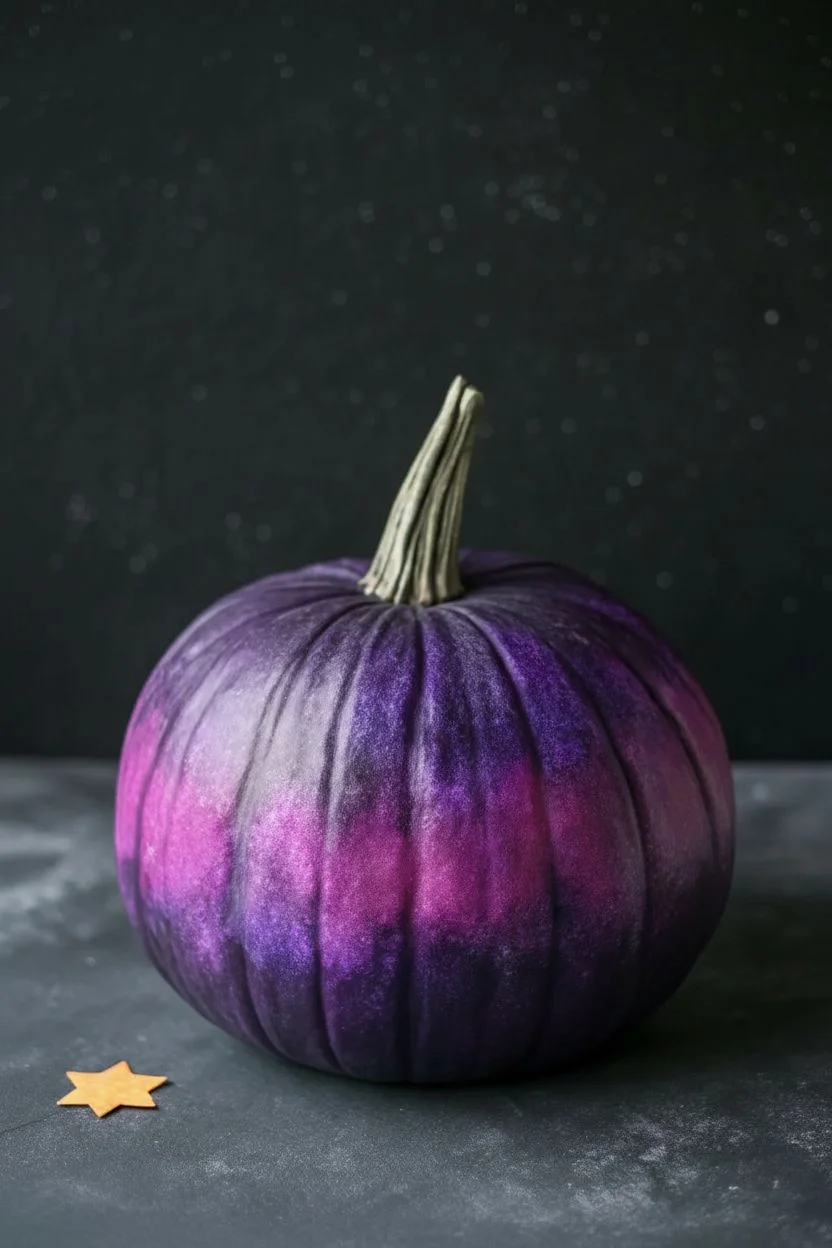
Transform a simple pumpkin into a mesmerizing slice of the cosmos using layers of deep purple and violet paints. This sophisticated no-carve project features delicate hand-painted stars twinkling against a nebulous, blended background.
Detailed Instructions
Materials
- Faux or real pumpkin (medium size)
- Acrylic craft paints (black, deep violet, bright purple, magenta, white)
- Sponge applicators or cosmetic wedges
- Fine detail paintbrush (size 0 or 00)
- Old toothbrush (optional for splattering)
- Paper plate or palette
- Water cup and paper towels
- Clear matte sealant spray
Step 1: Creating the Cosmic Base
-
Prime the surface:
If your pumpkin is orange or patterned, apply a base coat of dark primer or matte black acrylic paint to create a neutral canvas. Let this dry completely before moving on. -
Establish the darkest tones:
Squeeze a generous amount of black and deep violet paint onto your palette. Using a sponge applicator, dab the black paint into the deepest crevices and the top and bottom sections of the pumpkin where shadows would naturally fall. -
Blend in the violet:
While the black is still slightly tacky, sponge the deep violet paint onto the main body of the pumpkin. Dab over the transition lines where the black meets the violet to create a seamless, smoky gradient. -
Add mid-tone brightness:
Pick up your bright purple paint with a clean side of the sponge. Lightly dab this color in uneven, cloud-like patches around the center circumference of the pumpkin, blending the edges softly into the darker violet. -
Create the nebula effect:
Mix a tiny drop of white into your magenta or bright purple to make a lighter lavender shade. Sparingly dab this highlight color into the center of your brightest purple patches to create the glowing core of a nebula. -
Soften the texture:
Take a clean, dry sponge and gently tap over any harsh lines or thick globs of paint. The goal is an airy, atmospheric look, so the colors should drift into one another rather than sit in stripes. -
Dry thoroughly:
Allow the entire pumpkin to dry completely. Since we layered the paint thickly with sponges, give it at least an hour to ensure the surface is hard and ready for detail work.
Starry Precision
If you struggle with painting fine lines for the starbursts, try using a white gel pen or a fine-tip paint marker instead of a brush for easier control.
Step 2: Painting the Stars
-
Prepare fine details:
Load your finest detail brush with pure white acrylic paint. You may need to thin the paint slightly with a drop of water so it flows smoothly off the bristles without clumping. -
Paint the major stars:
Select 5-7 focal points on the pumpkin for your largest stars. Paint a simple cross shape first, then add a smaller ‘X’ over the center to create an eight-pointed starburst effect. -
Add secondary stars:
Create medium-sized stars by painting simple four-pointed crosses. Vary the length of the arms slightly to make them look distinct and hand-drawn. -
Scatter the distant stars:
Using the very tip of your brush, place single white dots randomly around the pumpkin. Group some clustered together and leave some areas sparse to mimic the randomness of the night sky. -
Create a star field (optional):
For a dense cluster of tiny stars, dip an old toothbrush in watered-down white paint. Hold it near the pumpkin and run your thumb across the bristles to flick a fine mist of specks onto the surface. -
Refine the brightest points:
Go back to your largest stars and add a tiny extra dot of thick white paint right in the very center. This builds dimension and makes the stars appear to be glowing intensely. -
Preserve the finish:
Once all paint is bone dry, take the pumpkin to a well-ventilated area and apply a light coat of clear matte sealant to protect your artwork from scratches and moisture.
Constellation Connection
Look up real star maps and paint actual constellations like the Big Dipper or Cassiopeia onto the surface for a hidden astronomical detail.
Place your galactic masterpiece on a mantle or porch to bring a touch of cosmic wonder to your seasonal decor
Constellations and Moons on a Purple Pumpkin
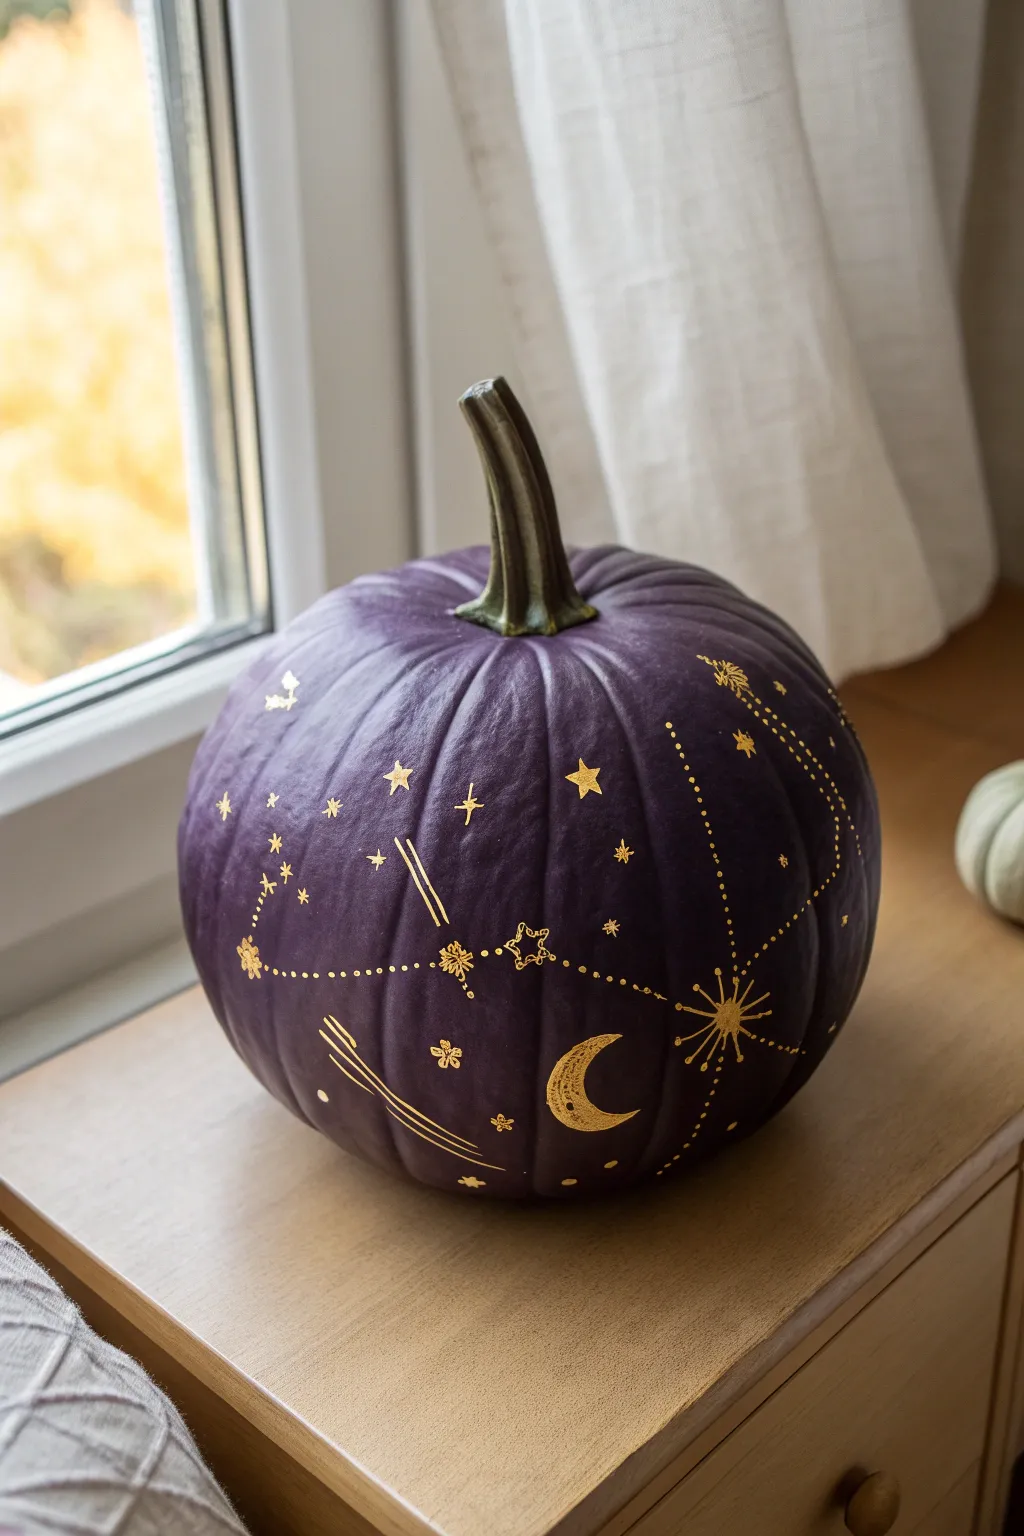
Transform a plain pumpkin into a mystical piece of decor with this celestial-themed project. The deep, matte purple base provides the perfect evening sky backdrop for shimmering gold constellations and moons.
Step-by-Step Guide
Materials
- Medium-sized pumpkin (real or faux)
- Deep purple acrylic paint (matte or satin finish)
- Wide foam brush or soft bristle brush
- Gold metallic paint pen (fine tip)
- Gold metallic paint pen (medium tip)
- Pencil (optional)
- Paper towel or rag
- Clear matte sealer spray (optional)
Step 1: Preparation & Base Coat
-
Clean surface:
Begin by wiping down your pumpkin with a damp cloth to remove any dirt or oils. If using a real pumpkin, ensure it is completely dry before proceeding. -
Protect the stem:
If you want to keep the natural green stem color as shown in the photo, wrap a piece of painter’s tape around the base of the stem or simply paint carefully around it. -
First coat:
Apply a generous layer of deep purple acrylic paint using a wide foam brush. Work in vertical strokes from top to bottom, following the natural ribs of the pumpkin. -
Dry and repeat:
Let the first coat dry completely, which usually takes about 20-30 minutes. Apply a second or third coat until the orange skin is fully covered and the color is opaque and rich. -
Check the finish:
Inspect the pumpkin for any streaks. To get that smooth, velvet-like look from the photo, ensure your final strokes are long and even. Allow the pumpkin to cure for at least an hour.
Clean Lines Tip
Shake your paint pen vigorously before starting and test the flow on a scrap paper. This prevents sudden blobs of gold ink from ruining your smooth purple base.
Step 2: Drafting the Design
-
Plan placement:
visualize where your main elements will go. The design relies on balance, so plan for a large crescent moon on the lower half and a major starburst cluster on the opposite side. -
Sketch lightly:
Use a pencil to very faintly mark small dots where your major stars will be. Don’t press hard, or you might scratch the purple paint. I find just a tiny indentation is enough to guide me.
Step 3: Painting the celestial Details
-
Draw the crescent moon:
Using the medium-tip gold paint pen, draw the outline of a crescent moon on the lower front section. Fill it in completely with gold ink. -
Add texture to the moon:
While the ink is still wet on the moon, you can dab it slightly to give it a cratered texture, or let it dry and add tiny scratch marks for detail. -
Create starbursts:
Switch to the fine-tip pen. Draw several eight-pointed stars (a cross with an ‘X’ over it) scattered around the upper sections. Make the center lines longer than the diagonal ones. -
Five-pointed stars:
Interperse standard five-pointed stars in the empty spaces. Rotate them slightly so they aren’t all facing the same direction, making the ‘sky’ look more natural. -
Gold dust accents:
Dot the pumpkin with tiny specs of gold using the very tip of the fine pen. These represent distant stars and add depth to the background.
Make It 3D
Glue tiny flat-backed rhinestones or crystals onto the centers of the largest stars for a design that truly sparkles in the candlelight.
Step 4: Connecting Constellations
-
Draw primary constellation lines:
Identify a group of your starbursts or dots. Connect them drawing dashed or dotted lines. Vary the patterns—some lines can be tiny dots, others can be small dashes. -
Create the main arc:
Recreate the large, sweeping dotted line seen on the right side of the pumpkin. Start from a high star and curve gently downward toward the bottom right, creating a sense of movement. -
Add shooting stars:
Near the bottom left, draw two or three long, straight lines originating from a single point to mimic a comet or shooting star tail. -
Feature icons:
Draw a few specific astronomical symbols, like the small planet with a ring or the clustered geometric shapes shown near the center, to break up the pattern. -
Review contrast:
Step back and look at the pumpkin. If any gold lines look faint against the dark purple, go over them a second time to ensure they pop. -
Seal (Optional):
If this pumpkin will be outside, spray it lightly with a clear matte sealer to protect the paint from moisture.
Place your finished celestial pumpkin near a window or light source to catch the metallic shimmer
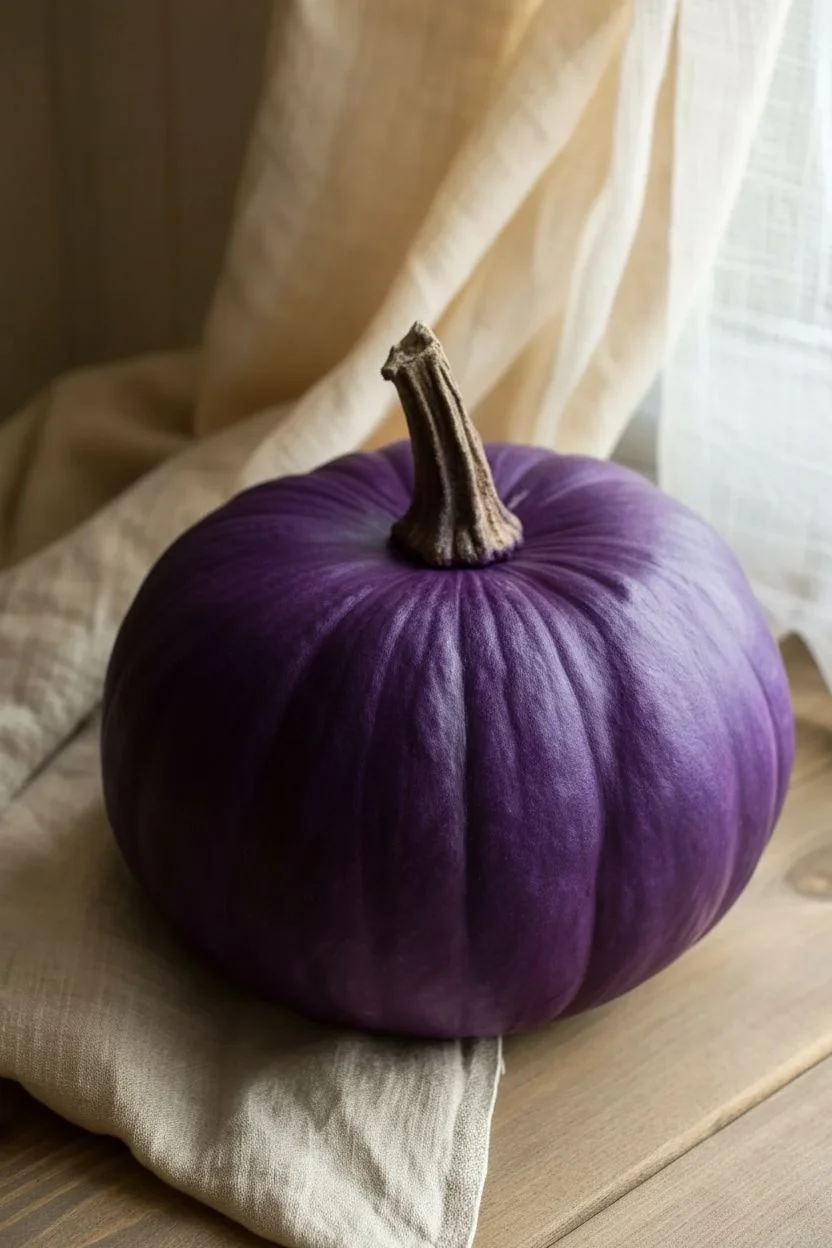
Witching-Hour Silhouettes Against a Purple Twilight Gradient
Before adding witchy silhouettes, mastering the perfect twilight background is essential. This step creates a smooth, matte purple foundation that captures the mystical feeling of the evening sky right before darkness falls.
Step-by-Step Tutorial
Materials
- Real or faux pumpkin (medium to large)
- White acrylic gesso or primer
- Light lilac acrylic paint
- Deep violet acrylic paint
- Soft synthetic flat brush (1-inch width)
- Makeup sponge or blending sponge
- Matte spray sealer
- Painter’s tape
- Damp cloth
Step 1: Preparation & Priming
-
Clean the surface:
Wipe down your pumpkin thoroughly with a damp cloth to remove any dirt or oils. If using a real pumpkin, ensure it is completely dry before proceeding. -
Protect the stem:
Carefully wrap the entire stem with painter’s tape. This keeps the natural wood look intact and creates a crisp line where the paint meets the stem. -
Apply primer:
Brush on a coat of white acrylic gesso or primer. This step is crucial for purple pigments, which can sometimes be translucent, ensuring the final color pops vibrantly. -
Let it cure:
Allow the primer to dry completely. It should feel chalky and dry to the touch, usually taking about 15-20 minutes.
Step 2: Creating the Base Color
-
Mix your mid-tone:
On your palette, mix a small amount of the deep violet with the light lilac to create a medium lavender shade. This will bridge the gap between your light and dark areas. -
Apply the first coat:
Using your flat brush, paint the entire pumpkin with this medium lavender mix. Don’t worry about streaks yet; just get the surface covered. -
Dry and repeat:
Let the first coat dry. Apply a second coat to ensure opacity, so no orange or white peeks through.
Uneven Blending?
If your gradient looks patchy, your paint might be drying too fast. Mix a drop of acrylic retarder into your paints to keep them wet longer for smoother blending.
Step 3: Building the Twilight Gradient
-
Apply the highlight:
While the base is dry, dab a makeup sponge into the light lilac paint. Lightly sponge the top third of the pumpkin, concentrating the lightest color near the stem. -
Blend downward:
While the lilac is still wet, use a clean side of the sponge to soften the bottom edge, fading it into the base lavender color. -
Apply the shadow:
Load a sponge with the deep violet paint. Dab this onto the bottom third of the pumpkin to create the ‘night’ portion of the sky. -
Blend upward:
Work the violet paint upward, gently blending it into the middle section. Use a rapid dabbing motion to create a seamless transition without harsh brushstrokes. -
Refine the transition:
If the line between colors looks too sharp, I grab a barely damp clean sponge and lightly tap over the border to blur the edges together.
Pro Tip: Texture
For that ultra-matte look seen in the photo, avoid glossy sealers entirely. Use a ‘chalk finish’ spray topcoat which mimics the soft haze of twilight.
Step 4: Finishing Touches
-
Remove the tape:
Once the paint is fully dry, slowly peel off the painter’s tape from the stem. Do this carefully to avoid lifting any paint at the seam. -
Seal the work:
Take the pumpkin outside or to a well-ventilated area. Spray it with a thorough coat of matte sealer to protect the gradient and give it a velvet-like finish. -
Dry overnight:
Allow the sealer to cure overnight before moving on to painting silhouettes or displaying your twilight masterpiece.
With your perfect purple canvas complete, you are ready to paint your silhouette scene or simply enjoy the moody color palette
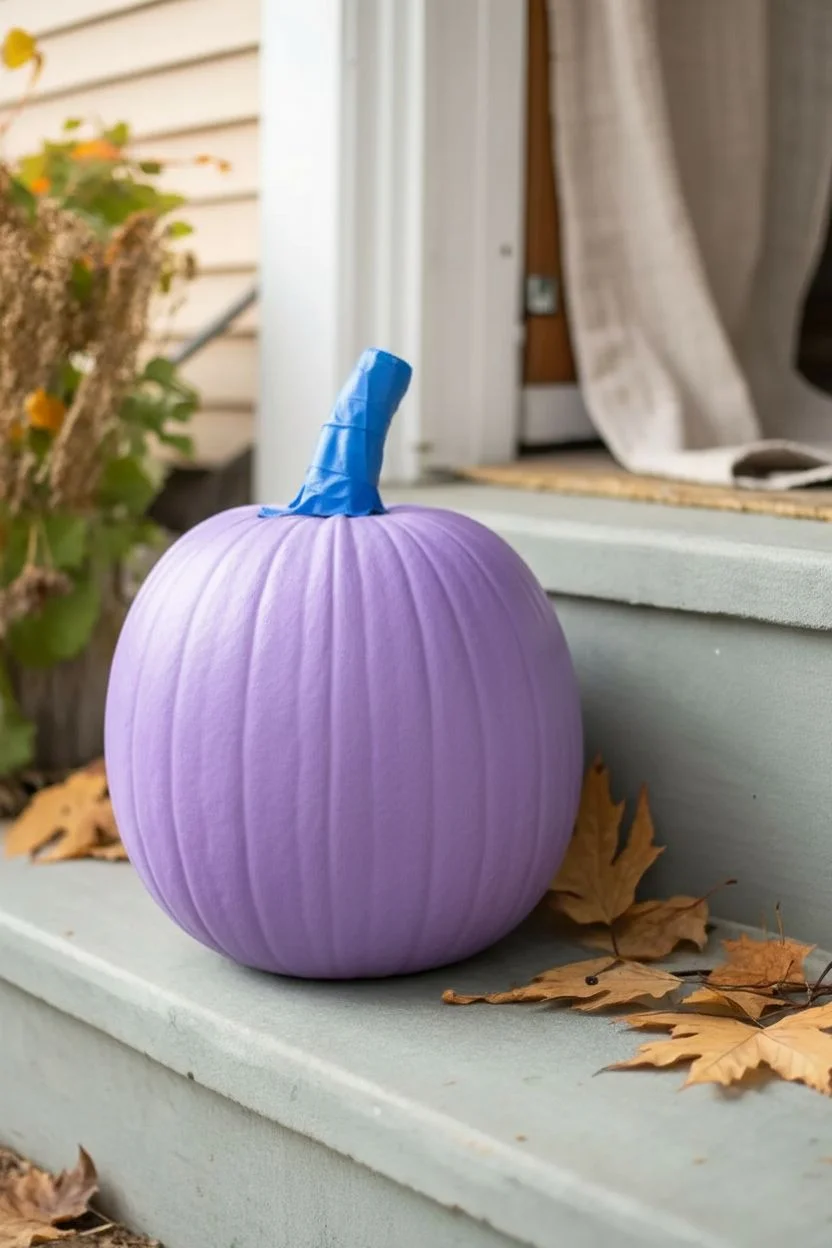
Black Cat Silhouette on a Purple Pumpkin
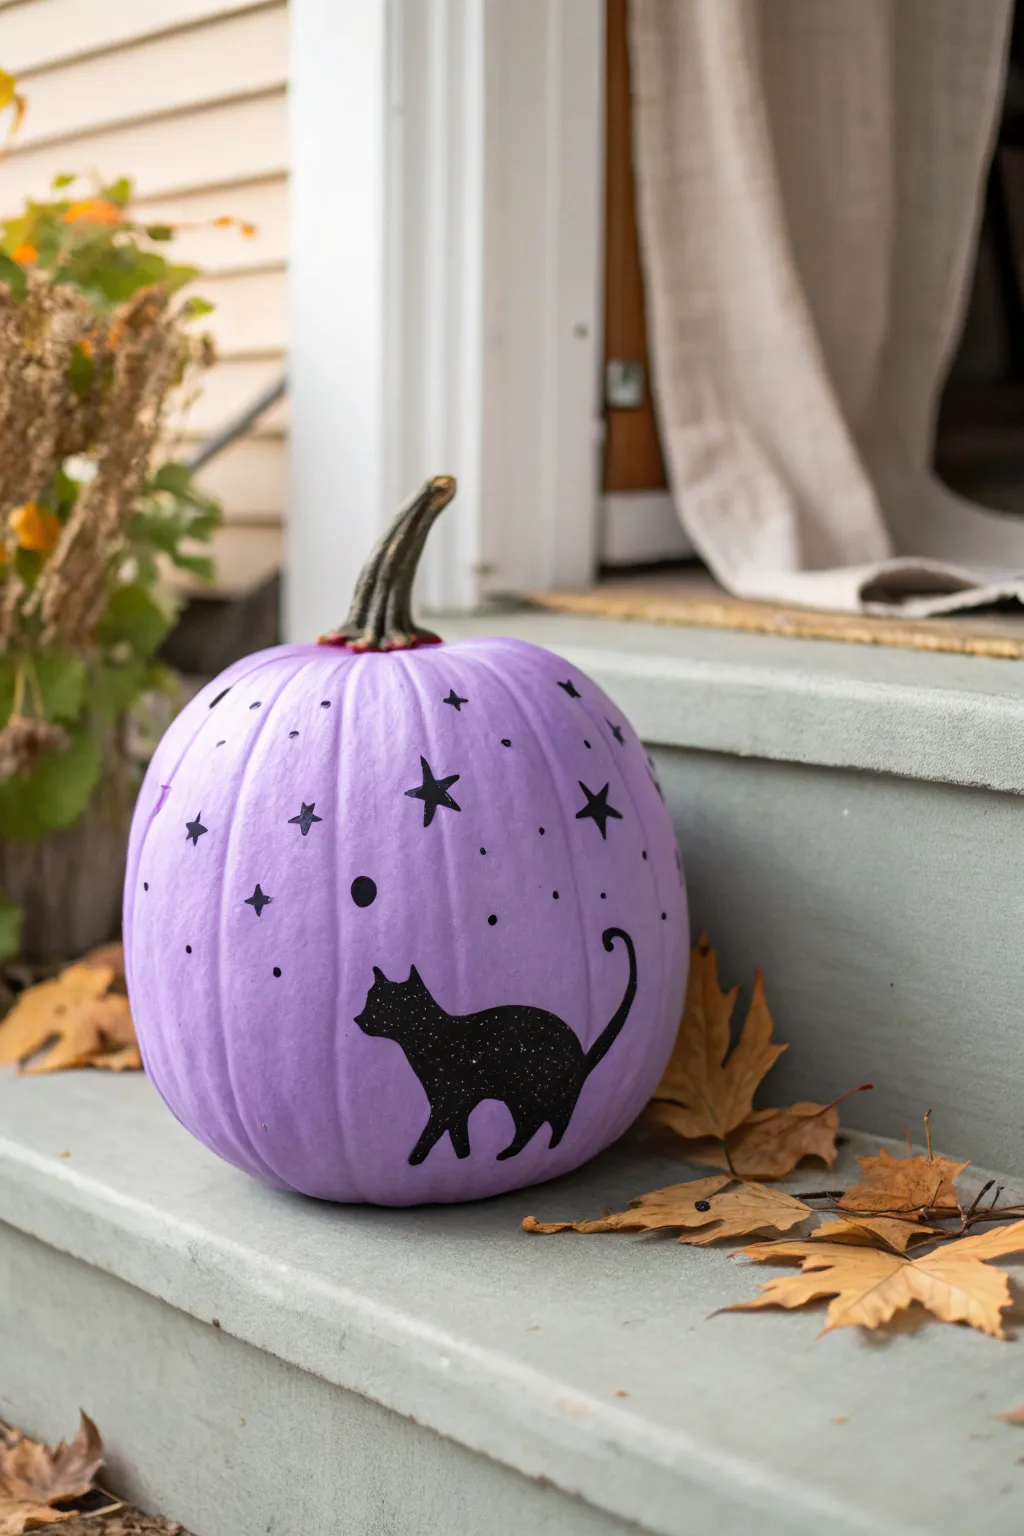
Embrace a softer side of Halloween with this charming pastel purple pumpkin featuring a classic black cat silhouette. The contrast between the gentle lilac base and the crisp black design creates a sophisticated yet spooky decoration perfect for your front porch.
Detailed Instructions
Materials
- Medium-sized pumpkin (real or faux)
- Pastel purple acrylic craft paint (matte finish)
- Black acrylic craft paint
- Pencil
- Wide flat paintbrush (approx. 1 inch)
- Medium round paintbrush
- Fine detail paintbrush (size 0 or 1)
- Cat silhouette template (printed) or cardstock
- Scissors
- Painter’s tape (optional)
- Clear acrylic sealer spray (matte or satin)
Step 1: Prepping the Base
-
Clean the surface:
Before you begin, wipe down your pumpkin with a damp cloth to remove any dirt or oils. If using a real pumpkin, ensure it is completely dry before painting. -
Mask the stem:
Carefully wrap the pumpkin’s stem with painter’s tape to protect it from stray brushstrokes. Keeping the natural stem color adds a nice rustic contrast to the pastel paint. -
Apply the first coat:
Using your wide flat brush, apply a layer of pastel purple paint over the entire surface of the pumpkin. Paint in vertical strokes following the natural ribs of the pumpkin for a smooth look. -
Let it dry completely:
Allow the first coat to dry for at least 30 minutes. Acrylics can be tricky on slick pumpkin skins, so patience is key here. -
Add a second coat:
Apply a second coat of purple paint to ensure opaque, solid coverage. If the orange is still peeking through, a third coat might be necessary once the second is dry.
Paint Consistency Tip
If your black paint feels too thick to drag smoothly for the tail or star points, mix in a singular drop of water. Ink-like consistency helps create sharp lines.
Step 2: Designing the Cat
-
Create your template:
Print out a simple cat profile silhouette on paper, or sketch one onto cardstock and cut it out. The cat should be walking with its tail curved upward in a gentle ‘S’ shape. -
Position the design:
Place your paper template on the most prominent side of the pumpkin. You want it centered vertically but slightly lower than the middle so it feels grounded. -
Trace the outline:
Holding the template firmly, lightly trace the outline of the cat using a pencil. Press gently so you don’t dent the paint or leave heavy graphite marks. -
Fill in the body:
Use your medium round brush and black acrylic paint to fill in the main body of the cat. Work from the center outward toward the lines. -
Refine the edges:
Switch to your fine detail brush to carefully paint up to your pencil lines. Crisp, clean edges are what make a silhouette look professional. -
Paint the tail:
With the detail brush, paint the tail using a single smooth stroke if possible. It should curve elegantly upwards, ending in a slight spiral or hook.
Make It Sparkle
While the black paint is still wet, sprinkle ultra-fine black or iridescent glitter onto the cat silhouette for a magical texture.
Step 3: Adding the Stars
-
Plan the star placement:
Visualize where your celestial elements will go. You want them scattered casually around the cat, concentrating them slightly more near the top of the pumpkin. -
Paint the larger stars:
Using the detail brush, paint a few five-point stars. I like to start by painting a small ‘A’ shape and crossing the arms to get the basic form, then filling it in. -
Add four-point stars:
Mix in some four-point stars (diamond shapes or simple crosses with tapered ends) for variety. These look great placed slightly higher up than the cat. -
Disperse small dots:
Dip the non-brush end (the handle) of your detail brush into the black paint. Dot it onto the pumpkin surface to create perfect circles representing distant stars. -
Fill empty spaces:
Step back and look at the composition. If a certain area looks too purple and empty, add a tiny dot or a very small cross-star to balance it out. -
Seal the artwork:
Once all paint is thoroughly dry (give it a few hours), take the pumpkin outside and spray it with a clear acrylic sealer. This protects your hard work from moisture and scratches.
Place your starry feline pumpkin on your porch steps to greet trick-or-treaters
Cute Ghosts Floating on a Purple Pumpkin
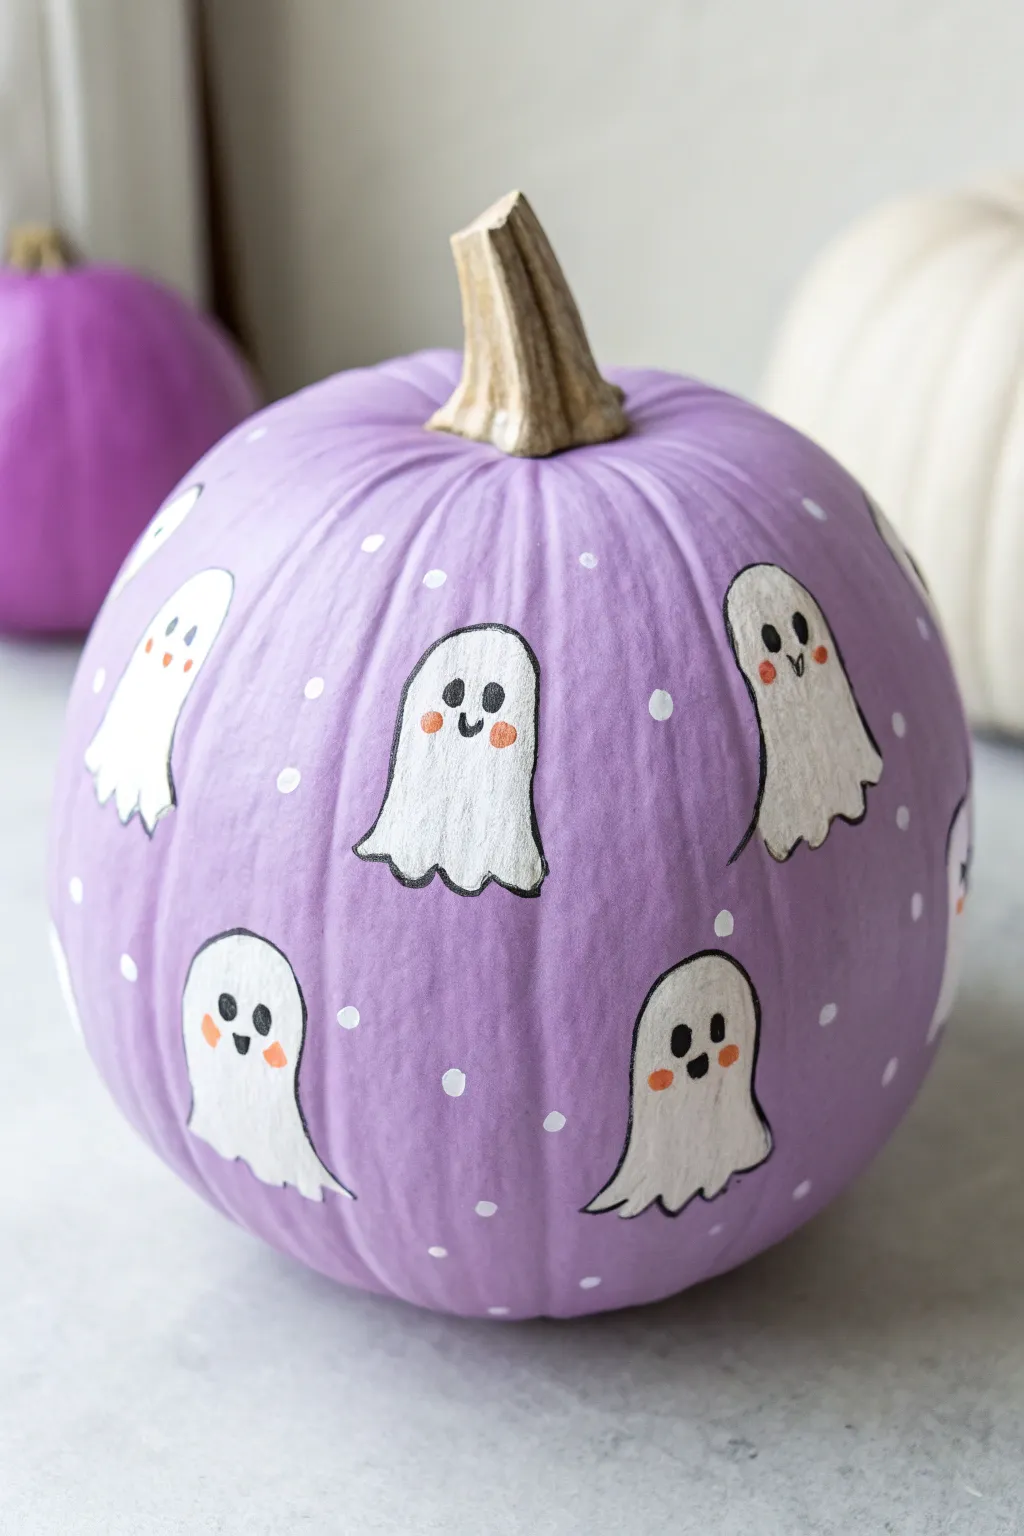
Move away from traditional orange and embrace a softer Halloween palette with this adorable lavender pumpkin. Featuring hand-painted floating ghosts with rosy cheeks and delicate polka dots, this design is more sweet than scary.
Step-by-Step
Materials
- Faux pumpkin (white or cream base works best)
- Lavender acrylic craft paint
- White acrylic craft paint
- Black acrylic paint or fine-tip paint pen
- Coral or light orange acrylic paint
- Medium flat paintbrush (for base coat)
- Small round paintbrush (size 2 or 4)
- Fine detail brush or dotting tool
- Pencil
- Matte sealer spray (optional)
Step 1: Setting the Scene
-
Clean surface:
Before beginning, wipe down your pumpkin with a slightly damp cloth to remove any manufacturing dust or oils. Let it dry completely to ensure the paint adheres smoothly. -
Apply base color:
Using a medium flat brush, paint the entire pumpkin with your chosen lavender acrylic paint. You want a consistent, opaque finish. -
Second coat:
Allow the first layer to dry for about 20-30 minutes. Apply a second coat of lavender paint to cover any streaks or translucent spots, ensuring the original pumpkin color is fully hidden. -
Dry completely:
Let the purple base coat cure fully. It should be dry to the touch before you start sketching, otherwise your pencil might scratch the paint off.
Ghost Opacity Trick
If your white paint looks translucent over the purple, paint the ghost shapes with a light grey first. Once dry, top with white for a solid, bright finish.
Step 2: Drafting the Ghosts
-
Sketch outlines:
Lightly sketch simple ghost shapes scattered around the pumpkin using a pencil. Aim for classic sheet-ghost silhouettes with wavy bottoms and rounded heads. -
Vary sizes:
Make the ghosts slightly different sizes and orientations to create a sense of movement. I like to tilt some of them slightly as if they are floating upwards. -
Fill in bodies:
Using a small round brush and white acrylic paint, fill in the sketched ghost shapes. Be careful to stay inside your pencil lines. -
Layering white:
White paint over dark purple can be tricky. Let the first layer dry, then apply a second coat of white to make the ghosts bright and opaque.
Glow in the Dark
Mix a little phosphorescent medium into your final layer of white paint on the ghosts. When the lights go out, your spooky friends will actually glow.
Step 3: Bringing Them to Life
-
Outline details:
Once the white paint is completely crisp and dry, outline each ghost. You can use a very fine liner brush dipped in black paint, or for easier control, use a black fine-tip paint pen. -
Add expressions:
Paint small black ovals for eyes and a tiny ‘U’ or oval shape for the mouth. Keep the features centered on the upper third of the ghost shape for maximum cuteness. -
Rosy cheeks:
Dip the back end of a small paintbrush or a dotting tool into coral or light orange paint. Gently stamp two small dots beneath the eyes to create blushing cheeks. -
Background dots:
Using the handle end of a paintbrush or a dotting tool, dip it into white paint and stamp random polka dots in the purple spaces between the ghosts. -
Vary dot sizes:
Create visual interest by using two different tools to make dots of varying sizes, scattering them like gentle snowfall or stars. -
Stem detail:
If your pumpkin stem looks messy from the purple base coat, touch it up with a natural beige or gold paint to keep the finish clean. -
Final seal:
To protect your work from scratches, spray the entire pumpkin with a clear matte sealer once everything is absolutely dry.
This charming pastel pumpkin is ready to add a whimsical touch to your fall decor
Silver Glitter Stripes for a Glam Finish
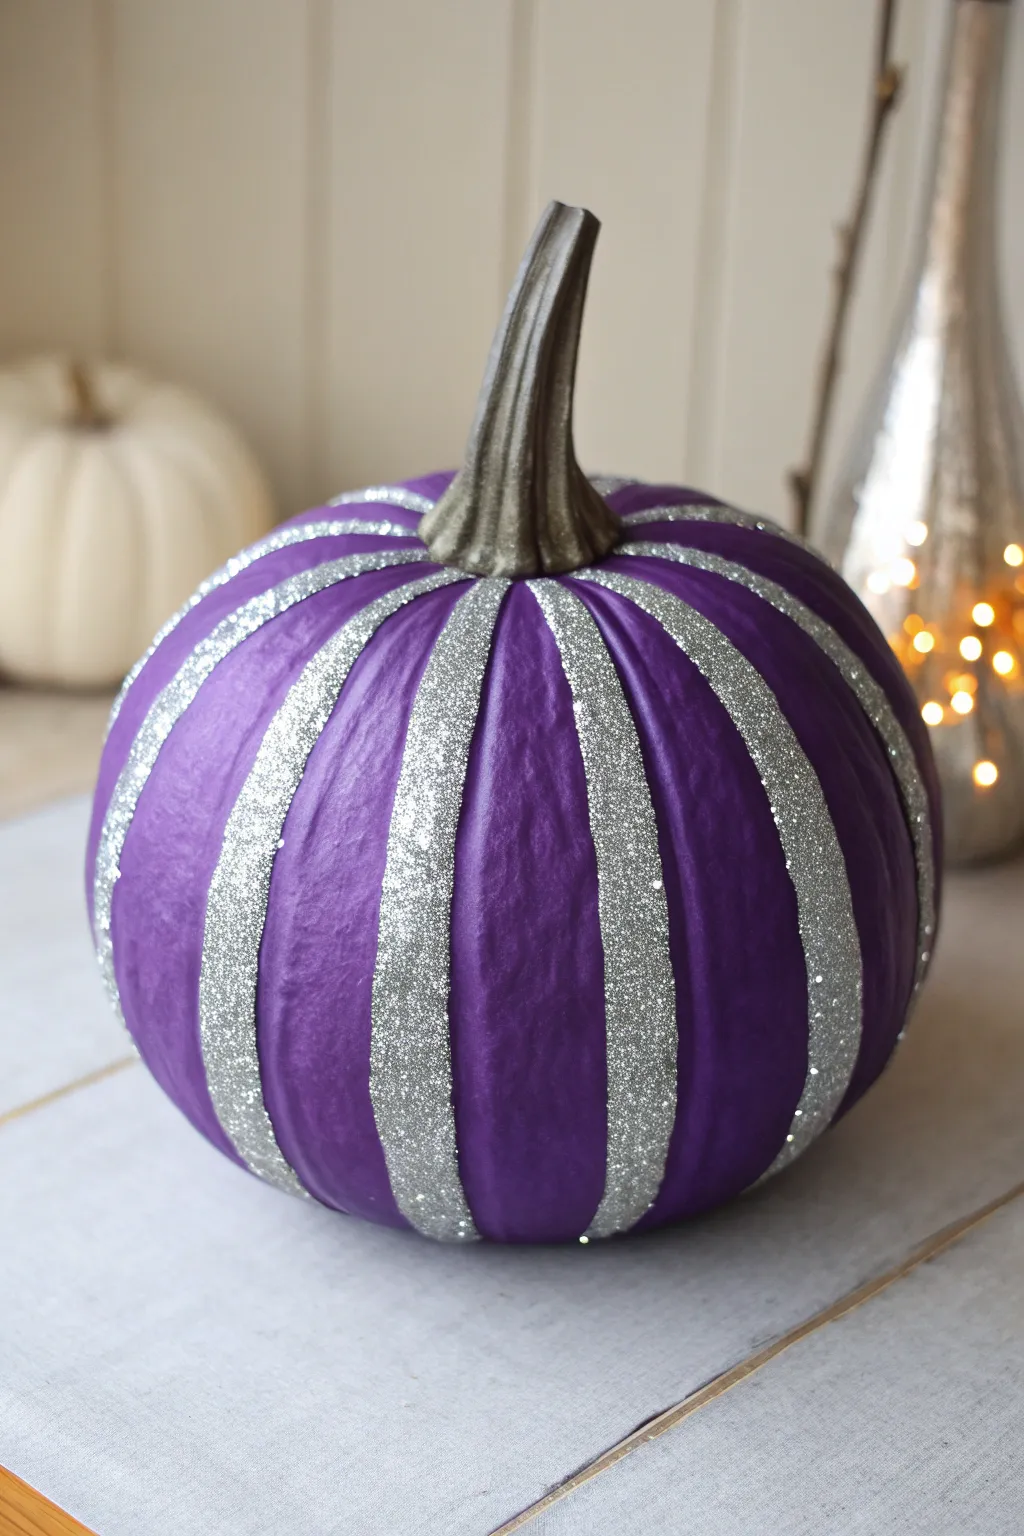
Transform a standard pumpkin into a regal centerpiece by combining deep, matte purple with shimmering silver accents. This high-contrast design highlights the pumpkin’s natural shape while adding a touch of sophisticated glamour to your fall decor.
Step-by-Step Tutorial
Materials
- Medium-sized faux or real pumpkin (white or orange)
- Deep purple acrylic craft paint (matte finish)
- Metallic silver craft paint
- Silver extra-fine glitter
- Mod Podge or craft glue
- Medium flat paintbrush
- Small round paintbrush
- Painter’s tape or skinny masking tape
- Paper plate or palette
- Newspaper or drop cloth
Step 1: Base Coat Preparation
-
Clean surface:
Begin by wiping down your pumpkin with a damp cloth to remove any dirt or oils. If using a real pumpkin, ensure it is completely dry before proceeding. -
Initial purple layer:
Squeeze a generous amount of deep purple acrylic paint onto your palette. Using the medium flat brush, apply a smooth coat over the entire body of the pumpkin, avoiding the stem. -
Let it dry completely:
Allow this first coat to dry for at least 30 to 45 minutes. Acrylics tend to streak if you layer them while wet. -
Apply second coat:
Paint a second layer of purple to ensure full opacity. The goal is a rich, solid color where the original pumpkin skin doesn’t show through. -
Stem painting:
While the body dries, switch to the small round brush. Paint the entire stem with metallic silver paint. I find that a metallic base works better here than glitter, as it keeps the shape defined. -
Final drying time:
Let the fully painted pumpkin sit for an hour or until it is bone dry to the touch so the tape won’t lift the paint later.
Step 2: Creating Glitter Stripes
-
Identify ribs:
Look at the natural vertical indentations (ribs) of your pumpkin. You will be placing stripes in the valleys between these ribs. -
Apply tape guides:
Place painter’s tape vertically along the ridges of the pumpkin, leaving the indented valleys exposed. Press the edges of the tape down firmly to prevent leaks. -
Mix adhesive:
Pour a small amount of Mod Podge or craft glue onto your palette. If it’s very thick, you can thin it slightly with a drop of water for smoother application. -
Paint the glue:
Using a clean brush, paint the glue into the exposed purple valleys between your tape strips. Work on one or two stripes at a time so the glue doesn’t dry too fast. -
Apply glitter:
Generously sprinkle the silver extra-fine glitter over the wet glue stripes. Don’t worry about excess; you’ll tap it off later. -
Continue around:
Repeat the glue and glitter process for all exposed stripes around the pumpkin. -
Tap off excess:
Once you’ve covered all stripes, gently tilt the pumpkin over your newspaper and tap it to dislodge loose glitter. -
Remove tape:
Carefully peel away the painter’s tape while the glue is still slightly tacky. Pulling slowly at a 45-degree angle helps keep the lines crisp. -
Touch ups:
If any purple paint lifted with the tape, use a tiny brush to dab a bit of purple back in place. If glitter heavily strayed onto the purple, use a dry, soft brush to sweep it away. -
Seal the glitter (Optional):
To prevent shedding, you can gently dab a top coat of Mod Podge over the glitter stripes once they are fully dry, though this may slightly dull the sparkle.
Uneven Stripes?
If the pumpkin’s ribs are irregular, skip the tape. Freehand the glue lines with a small flat artist’s brush, following the natural grooves for a more organic look.
Level Up
Ombre the glitter by mixing a darker charcoal glitter near the bottom and transitioning to bright silver at the top for a dramatic fade effect.
Now you have a stunning, glamorous pumpkin ready to shine on your mantel or dining table
Purple Pumpkin With a Dramatic Gold Drip
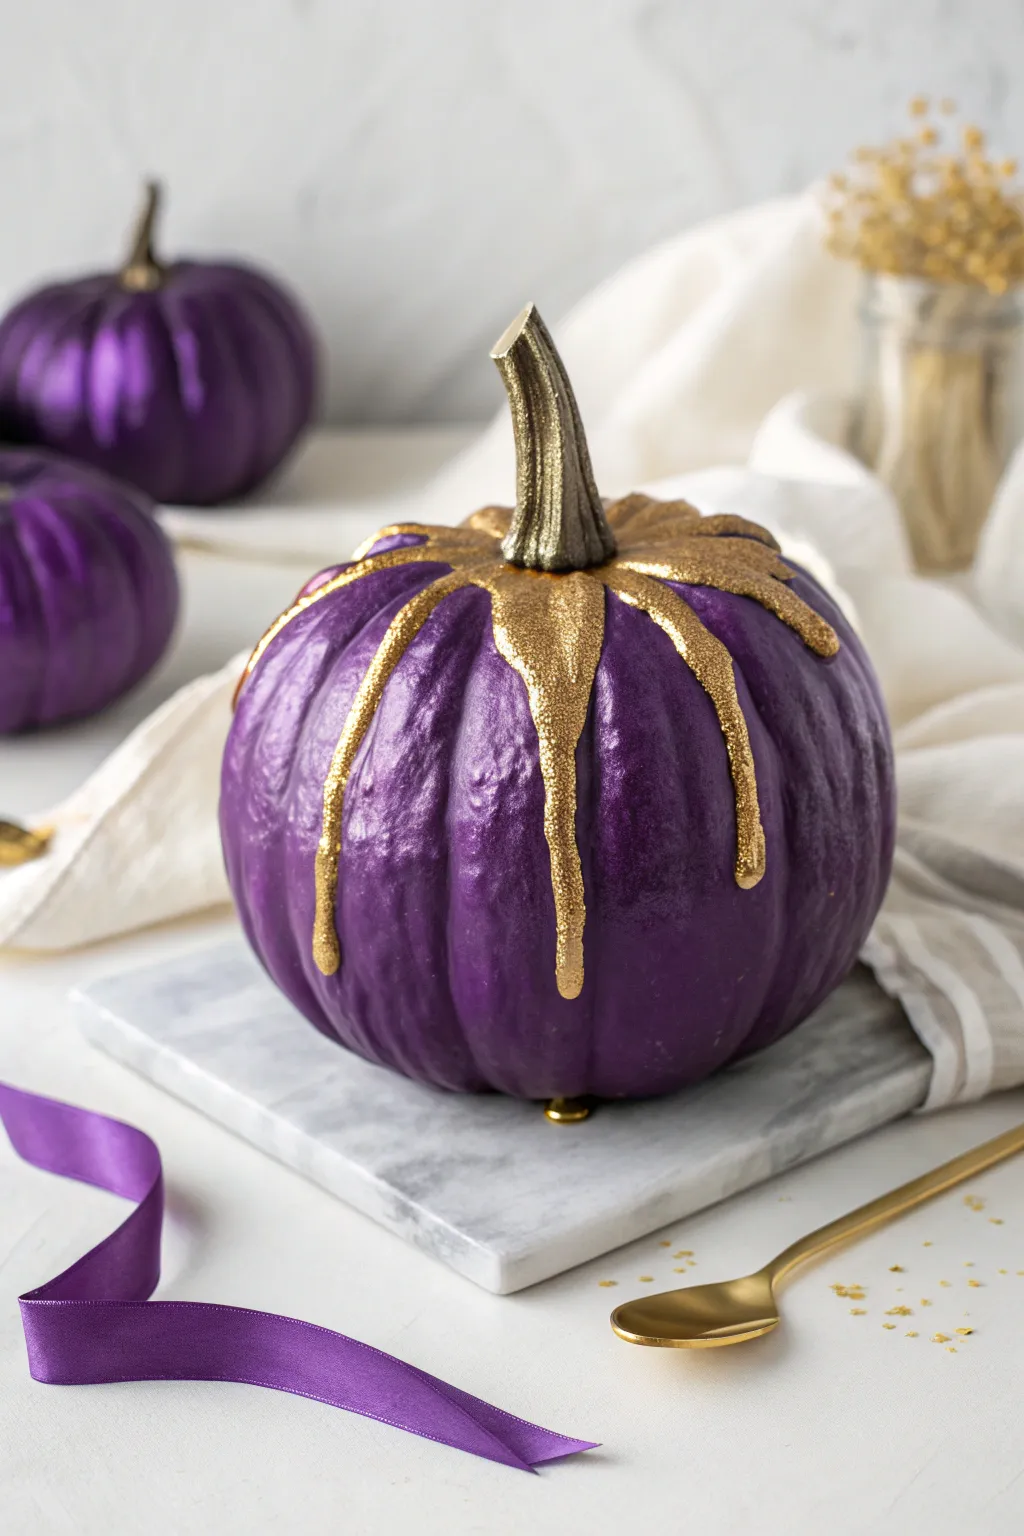
Transform an ordinary pumpkin into a regal centerpiece with this striking combination of deep, metallic purple and textured gold. The dramatic gold drip effect adds an opulent touch that looks complicated but is surprisingly achievable with the right technique.
Step-by-Step Guide
Materials
- Faux pumpkin (white or cream base works best)
- Deep purple acrylic craft paint (satin or metallic finish)
- Metallic gold acrylic paint
- Fine gold glitter
- Medium flat synthetic paintbrush
- Small round detail brush
- Mod Podge or white craft glue
- Squeeze bottle or plastic pipette (optional)
- Small mixing bowl
- Paper plate or palette
- Drop cloth or newspaper
Step 1: Base Coat Application
-
Prep surface:
Begin by wiping down your faux pumpkin with a slightly damp cloth to remove any manufacturing dust or oils. Let it dry completely before starting to ensure the paint adheres smoothly. -
Apply first purple layer:
Using your medium flat brush, apply a coat of deep purple paint to the entire body of the pumpkin. Don’t worry about the stem just yet. Use long, vertical strokes that follow the natural grooves of the pumpkin. -
Dry and assess:
Allow the first coat to dry for about 20-30 minutes. If the underlying color is still showing through, which is common with dark pigments, prepare for a second coat. -
Apply second coat:
Apply a second layer of purple paint to achieve that rich, opaque finish seen in the photo. If you want an extra sheen, mix a tiny drop of metallic medium or silver paint into your purple for this layer. -
Paint the stem:
While the body dries, carefully paint the stem. For this look, paint the stem a dark, metallic bronze or mix your gold paint with a little black to create an antique brass color.
Thickening the Drip
If your gold paint is too runny, mix in a pinch of baking soda. This thickens the paint instantly, allowing you to create raised, 3D drips that won’t run all the way to the bottom.
Step 2: Creating the Textured Gold Drip
-
Mix the drip medium:
In a small mixing bowl, combine your metallic gold paint with a generous amount of white craft glue (about a 1:1 ratio). This mixture creates a thicker consistency that will drip slowly and hold its shape better than paint alone. -
Add texture:
Fold in a teaspoon of gold glitter into your glue and paint mixture. This gives the drip that textured, encrusted look rather than a flat, shiny finish. -
Position the pumpkin:
Ensure your purple base coat is 100% dry. Place the pumpkin on a flat, protected surface. I find it helpful to elevate it slightly on a small cup so I can see all sides easily. -
Start the drip:
Using a spoon or filling a plastic squeeze bottle, deposit a generous pool of the gold mixture right at the base of the stem, letting it puddle on the top of the pumpkin shoulders. -
Guide the flow:
Gently push the gold mixture over the edge of the pumpkin’s shoulders using your round brush. Encourage it to flow down into the natural vertical grooves of the pumpkin. -
Vary the lengths:
Control the visual interest by adding more mixture to certain drips to make them travel further down the side, while keeping others short. The goal is an organic, uneven pattern. -
Refine the edges:
If a drip looks too thin, carefully trace over it with your brush loaded with more of the glitter-gold mix to plump it up. -
Detail the stem base:
Use your small brush to ensure the gold mixture cleanly hugs the very bottom of the stem, creating a seamless transition where the drip ‘erupts’ from.
Step 3: Finishing Touches
-
Add surface sparkle:
While the gold drip is still wet, you can lightly sprinkle a pinch of dry gold glitter directly onto the thickest parts of the drip for extra dimension and sparkle. -
Clean up errant drops:
Check the bottom of the pumpkin. If any fast-moving drips have pooled at the base, wipe them away quickly with a damp paper towel before they set. -
Extended drying time:
Because the glue and paint mixture is applied thickly, let the pumpkin sit undisturbed for at least 12-24 hours. The outside may feel dry while the inside of the thick drips is still wet. -
Optional sealing:
Once fully cured, you can spray a clear gloss sealant over the purple areas (masking off the gold) if you want a high-shine ceramic look.
Drip Moving Too Fast?
If the paint runs too quickly down the sides, flip the pumpkin upside down immediately. Gravity will pull the drip back toward the stem, slowing it down until it creates the perfect length.
Place your opulent pumpkin on a marble tray or nestled in white fabric to really make those royal colors pop
Peacock-Feather Inspired Details on Purple
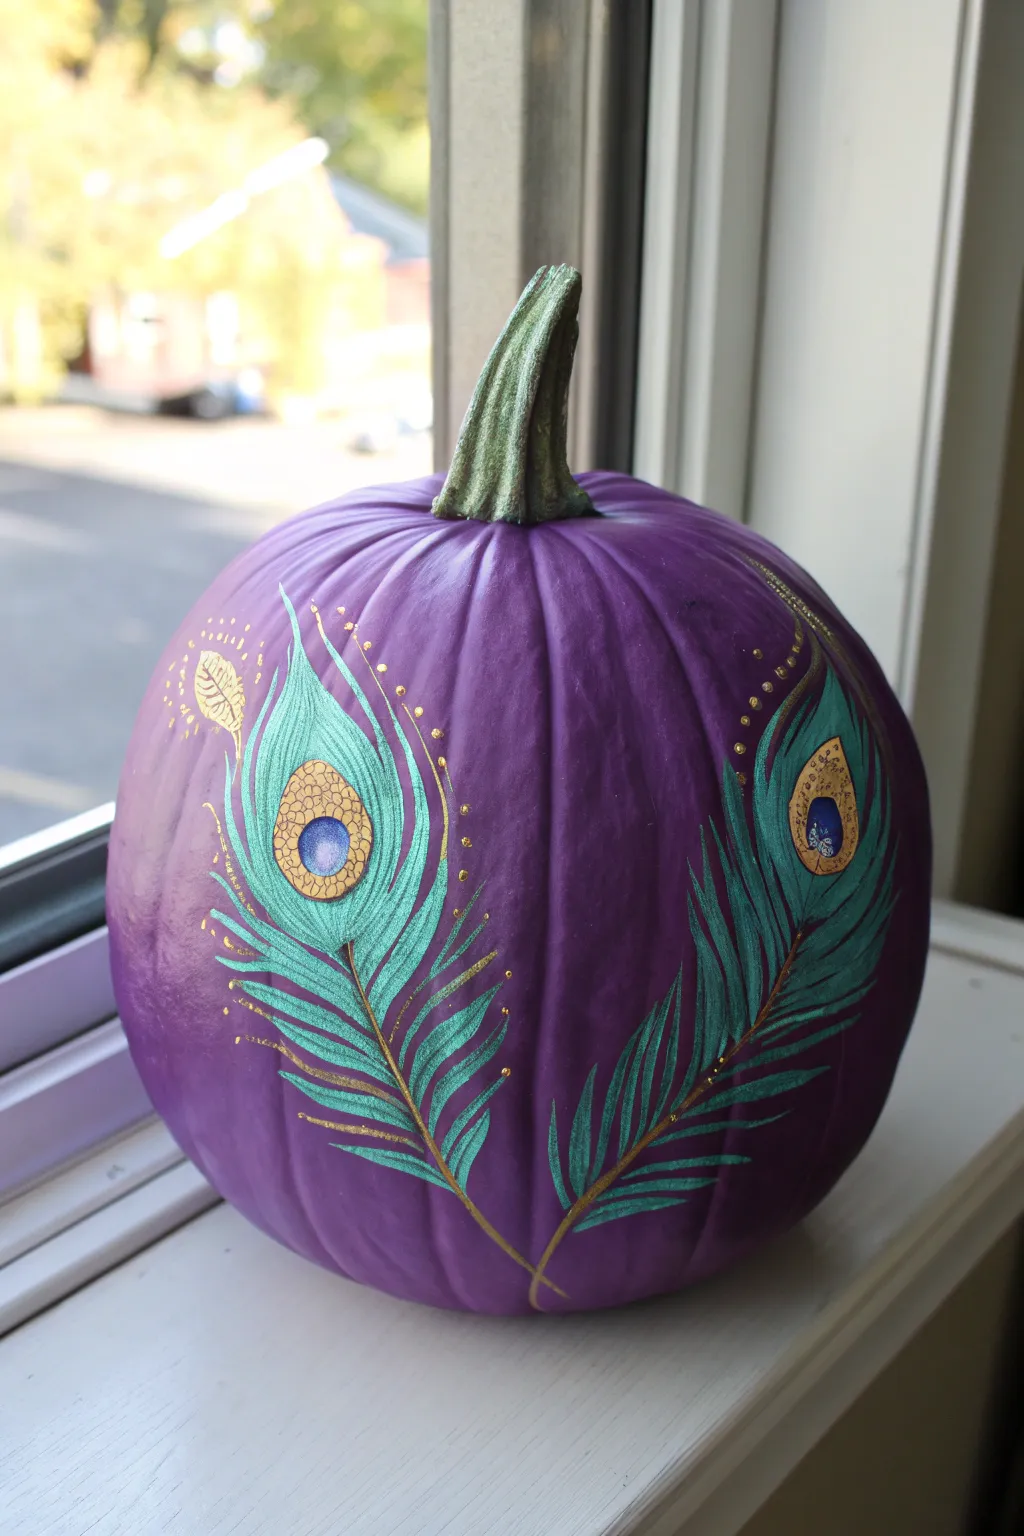
Transform a simple gourd into a sophisticated showpiece with this stunning peacock feather design. The deep purple base provides a luxurious backdrop for the shimmering teal and metallic gold details that make this pumpkin truly stand out.
Detailed Instructions
Materials
- Faux or real pumpkin
- Purple matte acrylic paint
- Metallic green acrylic paint
- Teal acrylic paint (light and medium shades)
- Gold metallic paint or paint pen
- Royal blue acrylic paint
- Fine detail paintbrush (size 0 or 00)
- Medium flat brush
- Pencil or white chalk for sketching
- Sealer spray (optional)
Step 1: Base Coat & Stem
-
Clean surface:
Begin by wiping down your pumpkin with a damp cloth to remove any dust or oils, ensuring a smooth painting surface. -
Apply purple base:
Using the medium flat brush, apply a coat of matte purple acrylic paint over the entire pumpkin body. -
Second coat:
Let the first layer dry completely for about 20 minutes, then apply a second coat for rich, opaque coverage. -
Paint the stem:
While the body dries, carefully paint the stem with metallic green acrylic paint to mimic the natural shimmer of a peacock’s neck.
Stroke Direction Matters
Always paint your feather strokes starting from the center spine and flicking outward. This naturally tapers the paint at the end, looking like real hair.
Step 2: Drafting the Feathers
-
Sketch the spines:
Using a pencil or a piece of white chalk, lightly draw two long, curved lines starting from the bottom center and sweeping upward to form the spines of the feathers. -
Outline the eye:
At the top of each spine, sketch the teardrop or oval shape that will become the ‘eye’ of the peacock feather. -
Draw the barbs:
Lightly sketch the outline of the feathery barbs extending outward from the spine, keeping the shape wide near the top and tapering thin near the stem.
Step 3: Painting the Details
-
Fill the feather body:
Load your brush with teal paint and fill in the feathery barb area you just sketched. Use outward sweeping strokes to mimic hair-like texture. -
Add dimension:
Once the base teal is tacky but not fully dry, streak in a lighter teal or mint green to add highlights and separate the individual barbs visually. -
Paint the eye base:
Fill the large teardrop shape at the top of the feather with metallic gold paint. -
Create the center graphic:
Paint a smaller circle inside the gold teardrop using royal blue paint. -
Add the inner pupil:
Place a tiny dot or oval of lighter blue or purple inside the royal blue circle to give the eye depth.
Gemstone Glamour
Glue a flat-backed rhinestone or gem into the center of the feather’s eye. A sapphire or emerald colored stone adds instant 3D luxury.
Step 4: Gilded Accents
-
Gold spine:
Using a fine detail brush or a gold paint pen, trace over the central spine line, extending it all the way down to where the feathers cross. -
Outline the eye:
Ideally, use the gold pen to crisp up the edges of the teardrop shape and the inner blue circle. -
Add delicate details:
Draw very fine gold lines extending from the spine out into the teal painted areas to represent the shiny rachis of the feather. -
Paint decorative dots:
Add a series of small gold dots floating above the feathers and curving around the shape to add a magical, dusting effect. -
Final leaf detail:
Paint a small, stylized gold leaf or feather shape floating near the top left for an extra decorative touch. -
Seal the work:
Allow everything to cure overnight, then lightly spray with a clear sealer if you plan to display this outdoors.
Place your finished masterpiece near a window or lamp to catch the metallic shimmer


Have a question or want to share your own experience? I'd love to hear from you in the comments below!