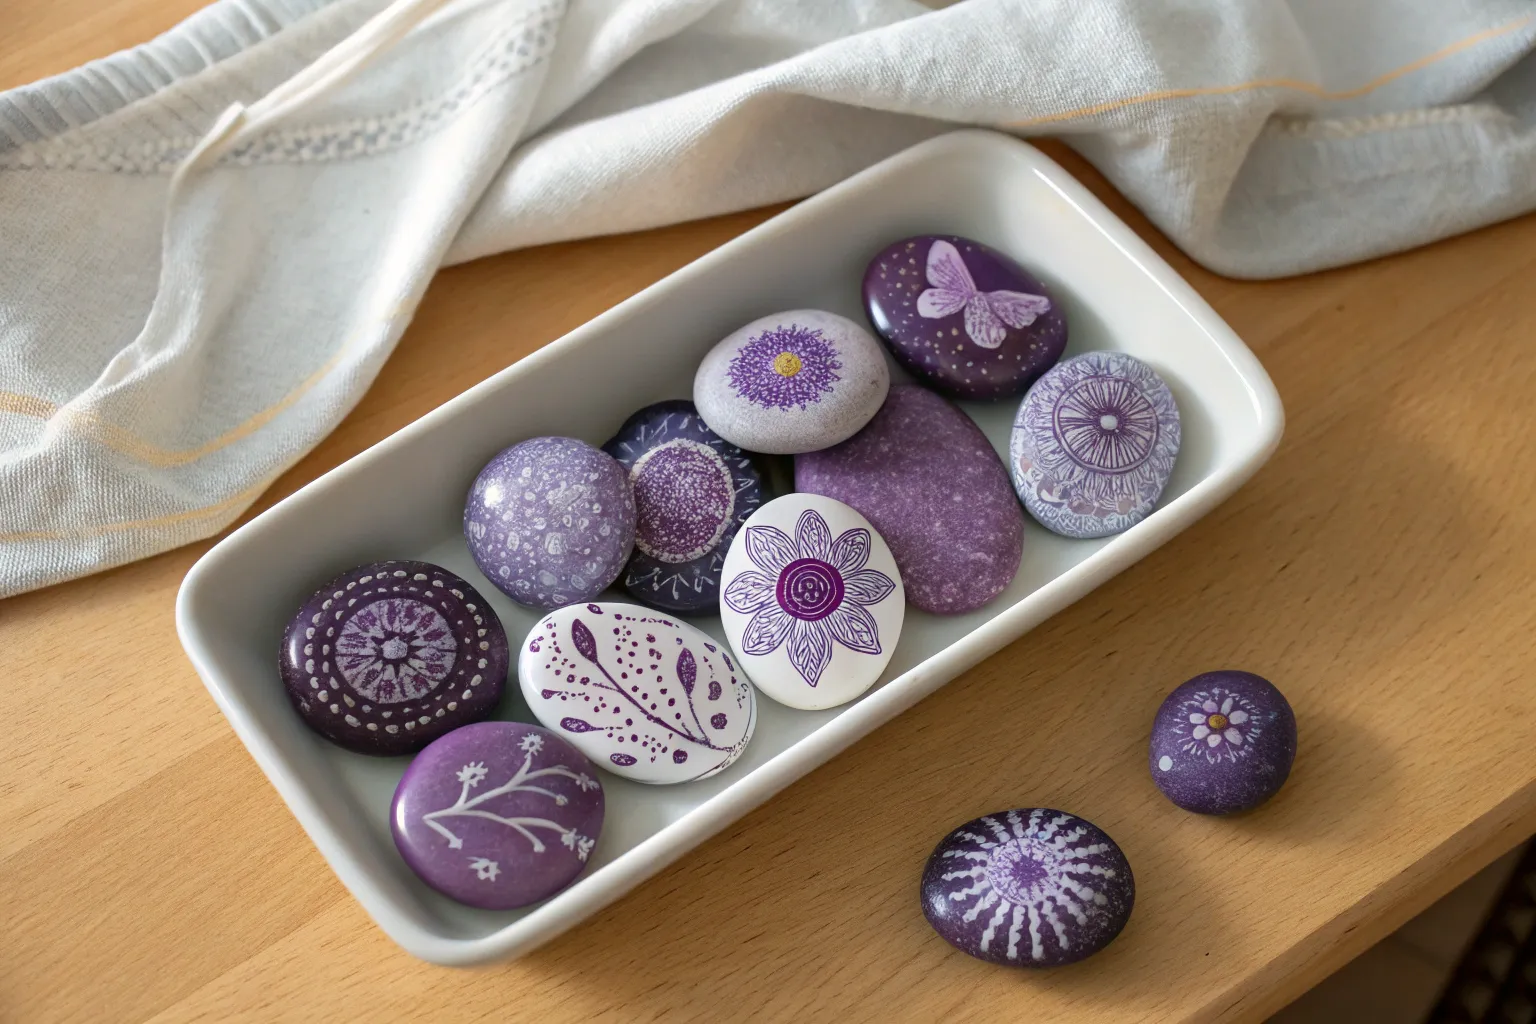
Purple is one of my favorite colors to paint on rocks because it can feel dreamy, bold, spooky, or sweet depending on the shade. Here are my go-to purple rock painting ideas—starting with the classics everyone loves and moving into a few artsy curveballs for when you’re ready to play.
Lavender Sprigs on a White-Washed Rock
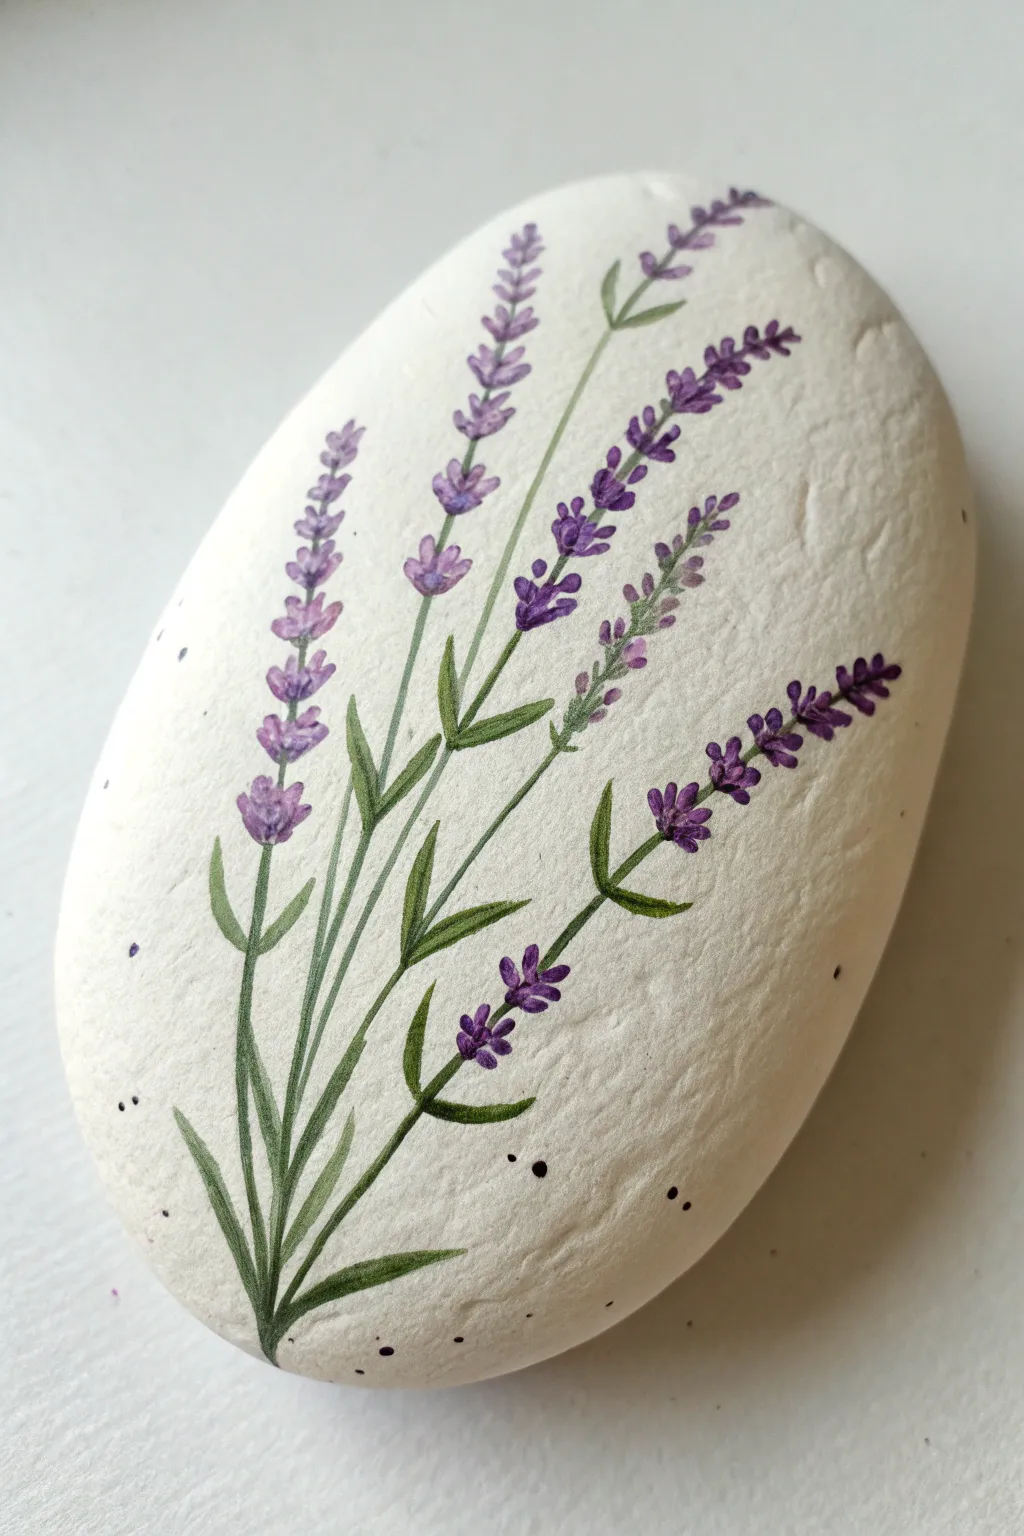
Transform a simple smooth stone into a piece of botanical art with this lavender sprig design. The contrast of the vivid purples and sage greens against a soft white background creates a clean, calming aesthetic perfect for garden decor or paperweights.
Step-by-Step Guide
Materials
- Smooth, oval river rock (approximately palm-sized)
- White acrylic paint (matte finish preferred)
- Acrylic paints: Dark Green, Sage/Olive Green, Deep Violet, Lilac/Lavender, White
- Fine detail brushes (sizes 0/0 and 000 liner)
- Small flat brush (for base coat)
- Matte spray sealer or varnish
- Toothbrush (optional, for speckling)
- Palette or paper plate
- Water cup and paper towels
Step 1: Preparation & Base Coat
-
Clean the surface:
Begin by washing your stone thoroughly with soap and water to remove any dirt or oils. Let it dry completely before starting. -
Apply the white base:
Using a flat brush, stroke on a layer of white acrylic paint. You want a solid, opaque background, so apply 2-3 thin coats rather than one thick one, allowing each to dry fully in between. -
Smooth the texture:
If your paint leaves brushstrokes, you can lightly sand between dry coats with very fine sandpaper, or simply stipple the final wet coat with a sponge for a stone-like texture.
Wobbly Lines?
If your stems look shaky, allow the paint to dry fully. Then, take the white base color and carefully ‘cut back’ into the stem line to straighten the edge.
Step 2: Drafting the Stems
-
Mix your greens:
Prepare two shades of green on your palette: a darker forest green for shadows and stems, and a lighter sage green for highlights. Mixing a touch of yellow or white into your dark green creates a lovely sage tone. -
Map out the stems:
Using your finest liner brush and the darker green mixed with a drop of water (for flow), paint 4-5 long, slender lines starting from a single point at the bottom center. Curve them gently outward as they rise, varying their heights. -
Add first leaves:
Towards the bottom third of the stems, paint thin, lance-shaped leaves. Press the brush down gently and lift up quickly to create a tapered point. Keep these sparse; we don’t want to overcrowd the design. -
Stem variations:
Paint small off-shoot stems on the upper halves of your main vertical lines. These short stems will hold the flower clusters later.
Step 3: Painting the Blooms
-
Create the bud shape:
Switch to your purple shades. Starting at the top of a stem, paint tiny, teardrop-shaped dabs using the Deep Violet hue. These form the individual flower buds. -
Build the clusters:
Work your way down the stem in sections. Lavender grows in whorls, so paint small clusters of 3-4 jagged purple dots, leaving a tiny gap of green stem visible between each cluster. -
Layer lighter tones:
Once the dark violet is dry, take your Lighter Lilac color. Add smaller dabs on top of the dark base buds, focusing on the tips and upper left sides to suggest a light source. -
Add highlights:
Mix a tiny amount of white into your lilac paint. Carefully place microscopic dots on the very tips of a few flowers to make them pop against the white background.
Level Up: Scented Stone
Once the varnish is fully cured, place a drop of essential lavender oil on the unpainted back of the rock for a multisensory decoration.
Step 4: Refining & Finishing
-
Deepen the greenery:
Return to your dark green paint. Add a thin line of darkness along one side of the lower stems and at the base of the leaves to create depth and dimension. -
Connect the blooms:
If any flower clusters look like they are floating, use the 000 brush to paint a hair-thin green connection back to the main stem. -
Add texture speckles:
To mimic the natural stone look in the photo, dilute a tiny bit of black or dark grey paint with water. Flick the bristles of an old toothbrush (or tap your paintbrush against another handle) to lightly splatter tiny specks over the white background. Practice on paper first to control the spray. -
Final drying time:
Let the entire rock sit undisturbed for at least an hour to ensure the thickest parts of the paint are cured. -
Seal the work:
Finish with a spray of matte varnish. This protects your delicate brushwork without adding an unnatural glossy shine.
Place your finished lavender stone on your desk for a permanent touch of spring that requires no watering


Purple Ombre Sunset With Black Silhouettes
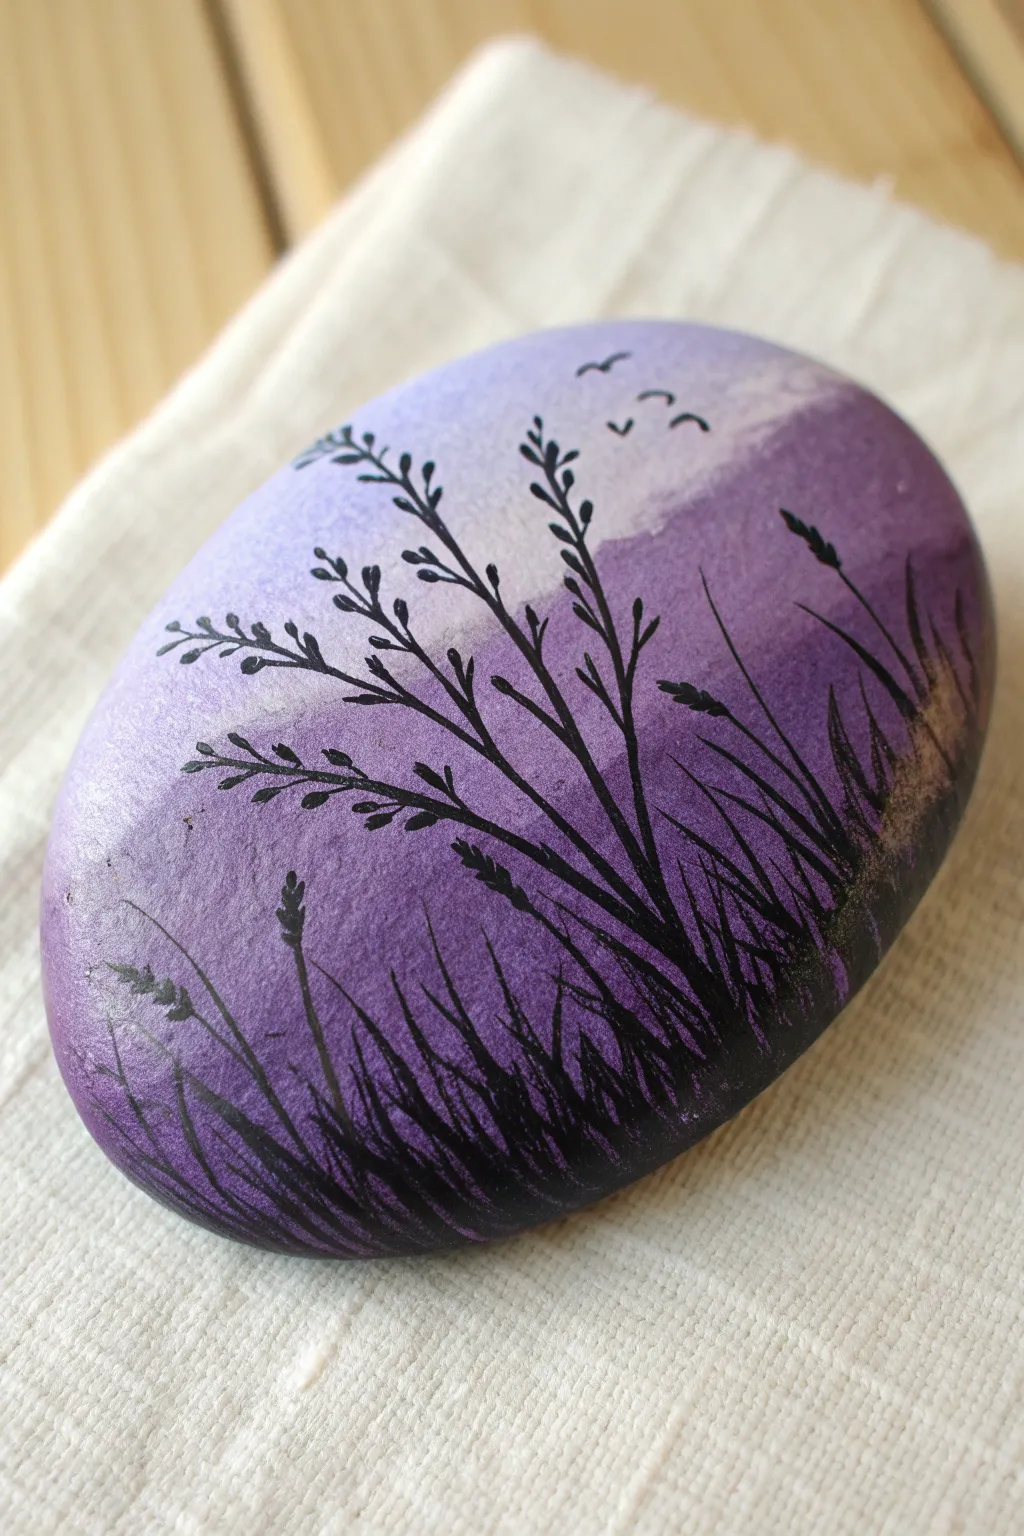
Capture the serenity of a fading day with this elegant painted rock project. By blending soft lavender hues into a deep violet background, you’ll create the perfect canvas for delicate black silhouette grasses that seem to sway in a gentle evening breeze.
Step-by-Step
Materials
- Smooth, oval river rock (approx. 3-4 inches wide)
- Acrylic paints: White, Light Lavender, Medium Purple, Deep Violet/Plum, Black
- Flat shader brush (medium size)
- Fine liner brush (size 0 or 00)
- Make-up sponge or foam dabber (optional but helpful for blending)
- Acrylic satin or matte sealer spray
- Palette or paper plate
- Water cup and paper towels
Step 1: Creating the Ombre Sky
-
Clean the surface:
Begin by washing your stone with warm soapy water to remove any dirt or oils. Let it dry completely before applying any paint. -
Base coat:
Apply a layer of white acrylic paint over the entire top surface of the rock. This acts as a primer and ensures your purple colors will pop vividly rather than sinking into the stone’s natural gray tone. -
Prepare your palette:
Squeeze out your white, light lavender, medium purple, and deep violet paints onto your palette. You want them ready to go so you can blend while they are still wet. -
Apply the lightest band:
Start at the top third of the rock. Use your flat brush to apply a mix of white and light lavender in a curved shape, following the rounded edge of the stone. -
Add the mid-tone:
Immediately below the light section, paint a band of medium purple. Don’t worry about a hard line just yet; simply get the color onto the stone. -
Paint the darkest base:
Fill the bottom third of the rock with your deepest violet or plum color. This will be the ground level where the silhouettes will eventually sit. -
Blend the transition:
While the paint is still tacky, use a damp brush or a small piece of makeup sponge to gently tap along the lines where the colors meet. This softens the transition from light to dark for that misty, sunset effect. -
Let it cure:
Allow the background gradient to dry completely. If the colors look translucent, repeat the gradient steps for a second coat to get full opacity.
Step 2: Painting the Silhouettes
-
Anchor the ground:
Switch to your black paint. Using the flat brush turned on its chisel edge, create a solid black area at the very bottom curve of the rock to represent the earth. -
Start the grass canvas:
Using a fine liner brush, flick short, quick strokes upward from the black base. These should be varied in length and direction to look like wild, uneven ground cover. -
Add tall stalks:
Choose 3 or 4 points to extend long, sweeping lines upward. These will be your main focal plants. Curve them slightly as if they are bending in the wind. -
Detail the seed heads:
Along the upper parts of your tall stalks, dab tiny, teardrop-shaped spots of black paint. Cluster them loosely to mimic seed heads or grains like wheat or lavender. -
Flesh out the foliage:
Add smaller branches coming off the main stalks. Keep your paint thin (add a drop of water if needed) to ensure the lines remain crisp and sharp. -
Fill the background grass:
Go back to the bottom layer and add more medium-height grass blades. Cross them over each other slightly to build density and realism. -
Paint distant birds:
In the lightest part of the sky—near the top right often looks nice—paint two or three tiny ‘v’ or ‘m’ shapes with your finest brush to represent birds flying in the distance. -
Final drying time:
Let the black paint dry fully. Since black is pigment-heavy, give it a little extra time to ensure it won’t smear during sealing. -
Seal the artwork:
Take the rock to a well-ventilated area and spray it with a clear acrylic sealer. I usually prefer a matte or satin finish for natural landscapes to avoid harsh glare.
Uneven Blending?
If your gradient looks streaky, use a barely damp sponge to dab the transition lines gently. Do this while paint is wet to blur edges instantly.
Better Brush Control
For ultra-fine grass blades, thin your black paint with a tiny drop of water. Ink-like consistency flows smoother off the liner brush than thick paint.
Now you have a peaceful piece of painted nature that fits right in the palm of your hand


Monochrome Purple Dot Mandala
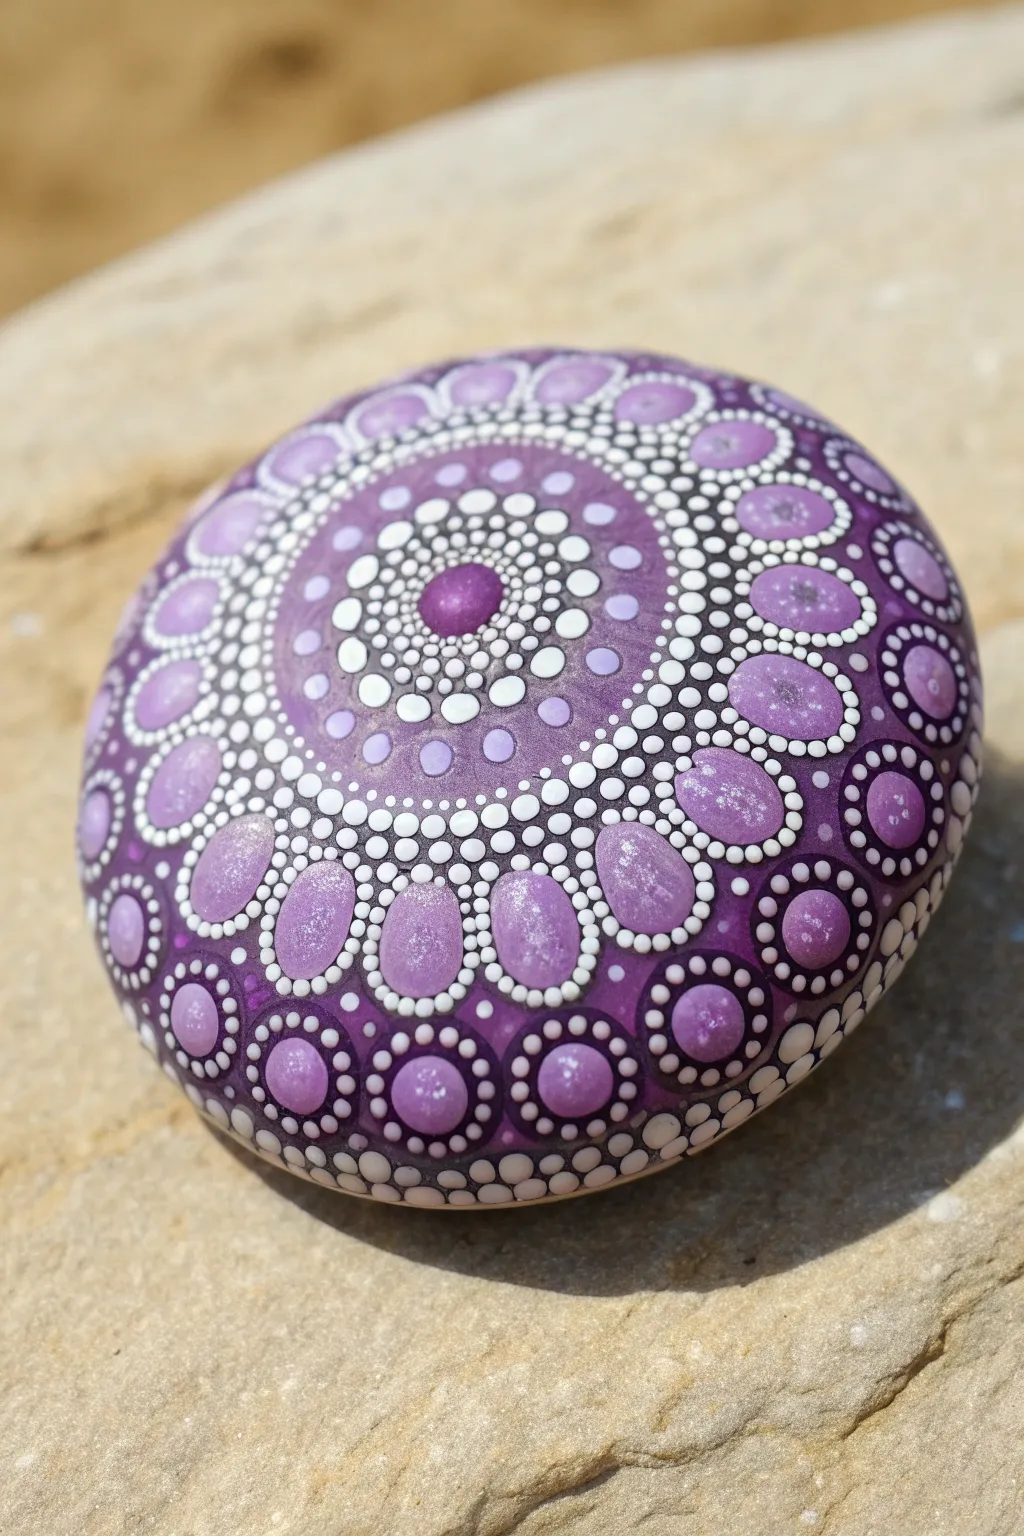
This project transforms a simple stone into a mesmerizing monochrome masterpiece using various shades of purple. The gradient effect, achieved by carefully selected tints, creates a radiating energy that feels both calming and sophisticated.
Step-by-Step Tutorial
Materials
- Smooth, round river rock (approx. 3-4 inches diameter)
- Acrylic paints: Dark violet, medium purple, lavender, lilac, and titanium white
- Dotting tools set (various sizes, from large ball stylus to fine needle point)
- Black acrylic paint or gesso (for base)
- Gloss varnish or clear resin
- Palette for mixing paint
- Damp cloth or paper towel
- Pencil and chalk (optional for guidelines)
Step 1: Preparation & Center
-
Base Coat:
Begin by washing and thoroughly drying your rock. Apply one or two coats of black acrylic paint or black gesso to the entire surface. Let this dry completely to create a high-contrast background for your colors. -
Finding the Center:
Locate the visual center of your stone. Using your largest dotting tool, place a single, prominent dot of medium-dark purple right in the middle. This will anchor your entire design. -
First Ring:
Dip a small dotting tool into white paint. Create a tight ring of small white dots immediately surrounding the central purple dot. Try to keep the spacing consistent, as if they are hugging the center. -
Expanding the Core – Row 2:
Switch to a slightly larger tool and use a light lavender shade. Place a ring of dots around the white circle. Use the ‘walking the dots’ technique if you want them smaller, or simply place individual dots in the gaps between the previous row’s dots. -
Expanding the Core – Row 3:
Using a medium-sized tool and pure white paint again, add another concentric circle of dots. These should be slightly larger than the previous row to begin the expansion effect.
Paint Consistency is Key
If your paint forms peaks instead of smooth domes, mix in a drop or two of pouring medium or water. You want a texture like heavy cream for perfect dots.
Step 2: The Lavender Gradient Band
-
Defining the Gradient Zone:
This next section creates the smooth purple field. Mix a medium purple shade. Using a medium-large tool, place a ring of dots. Don’t worry about gaps yet; we are building a solid-looking band. -
Filling the Gradient:
Continue adding concentric rings, gradually lightening your purple mix by adding tiny amounts of white for each subsequent row. I like to overlap these dots slightly or pack them very densely to create that wash of color seen in the reference. -
Adding Texture:
Once you have a wide band of gradient purple (about 3-4 rows deep), take a very fine tool and white paint. Dot tiny white specks on top of the larger purple dots near the outer edge of this band to create depth. -
Outer Ring Definition:
Border this entire central gradient section with a distinct ring of crisp, medium-sized white dots. This acts as a frame for the intricate petal work to come.
Add Some sparkle
Mix a tiny amount of iridescent medium into your lighter purple shades. This gives the petals a subtle, pearlescent shimmer when the rock catches the sunlight.
Step 3: Outer Petals & Details
-
Large Oval Base:
For the prominent outer ovals, use a large tool or the back of a paintbrush. dipping into a light shimmering lilac or pale purple. Press and drag slightly to create an oval shape rather than a perfect circle. Space these evenly around the white border ring. -
Framing the Ovals:
Using your smallest tool and white paint, carefully ‘walk the dots’ around each large oval. Start from the base of the oval and work your way to the tip, decreasing the dot size as you go. -
Gap Fillers:
In the diamond-shaped negative spaces between the large ovals, place a medium-sized dark purple dot. -
Walking the Dark Dots:
Using a lighter lavender shade, walk small dots around the top half of those dark purple gap fillers, similar to how you framed the large ovals. -
The Final dark Ring:
Around the outer perimeter of your design, create a final ring of large, dark violet circles. These should align with the tips of your large pale ovals. -
Top Dots:
To add dimension, place a smaller, lighter purple dot on top of each large dark violet circle from the previous step. Wait until the bottom layer is dry to prevent smearing. -
Tiny Accents:
Finish by adding micro-dots of white on the very top of each layered dot stack for a highlight effect. -
Sealing:
Allow the rock to dry for at least 24 hours. Coat with a high-gloss varnish or resin to make the colors pop and protect your artwork.
Display your finished mandala stone in a sunny spot where the layers of purple can truly shine


White Stars on a Deep Purple Night Sky
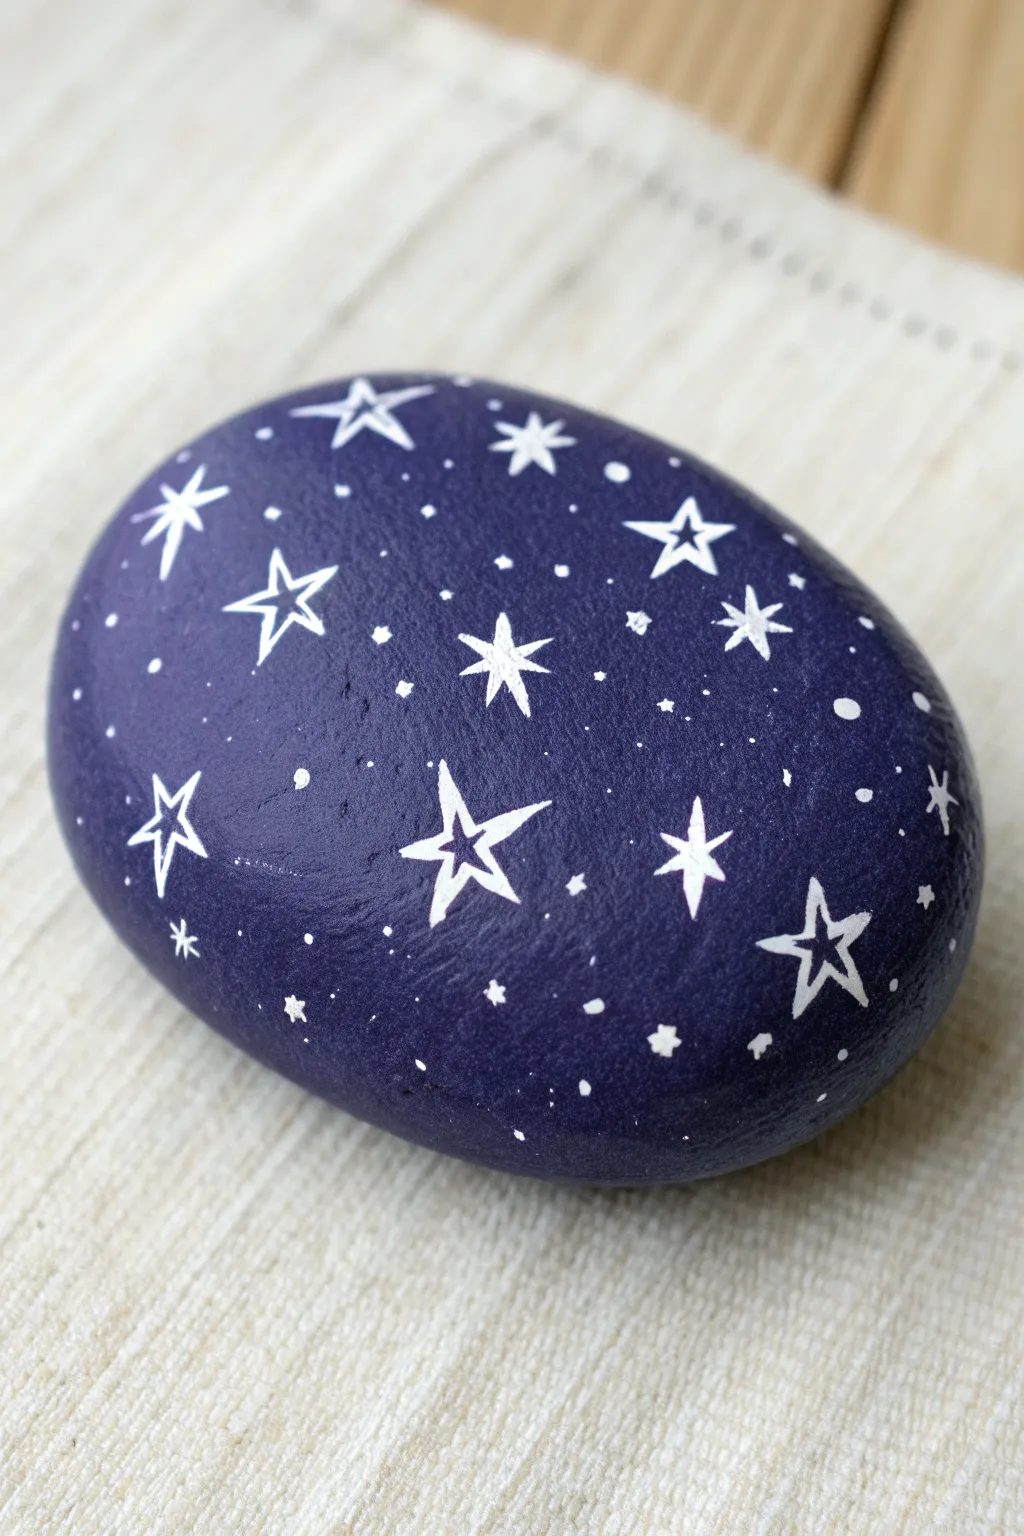
Transform a simple smooth stone into a pocket-sized galaxy with this striking design. The deep, matte violet background provides the perfect high-contrast canvas for delicate white celestial doodles.
Step-by-Step Guide
Materials
- Smooth, oval-shaped river rock
- Deep purple acrylic paint (matte finish preferred)
- White acrylic paint or a fine-tip white paint pen
- Flat paintbrush (medium size)
- Small detail paintbrush (size 0 or 1)
- Dotting tool or toothpick
- Clear matte varnish or sealant
Step 1: Preparing the Canvas
-
Clean the stone:
Before putting any paint on your rock, wash it thoroughly with warm soapy water to remove any dirt or oils. Let it dry completely in the sun or with a towel. -
Base coat application:
Using your flat paintbrush, apply a layer of deep purple acrylic paint. Brush smoothly in one direction to minimize texture. -
Let it dry:
Allow the first coat to dry fully. This usually takes about 15-20 minutes, depending on the thickness of the paint. -
Second coat:
Apply a second layer of purple to ensure full opacity. You shouldn’t see any of the original stone color showing through. Let this layer dry completely before moving on.
Wobbly Lines?
If your hand shakes while painting lines, rest your wrist on the table and rotate the rock itself while keeping the brush steady.
Step 2: Painting the Constellations
-
Practice your stars:
If you’re nervous about free-handing, practice drawing five-pointed stars on a scrap piece of paper first to get the motion down. -
Create the large stars:
Using a fine-tip white paint pen or a very small detail brush, paint the outline of your largest five-pointed stars. I like to scatter three or four of these across the rock’s surface first as anchors. -
Add medium stars:
In the spaces between the large stars, paint smaller, solid white stars. These can be simple crossed lines or tiny filled-in five-point shapes. -
Draw simple sparkle stars:
Create ‘sparkle’ stars by painting a simple cross, then adding a smaller ‘X’ through the center to create an eight-pointed burst. -
Refine the outlines:
Go back to your large outline stars. If the lines look faint, carefully trace over them again to make the white pop against the dark purple. -
Add tiny fillers:
Look for larger empty gaps and add very small, simple four-pointed stars or tiny asterisks.
Step 3: The Milky Way details
-
Dotting the sky:
Dip a dotting tool or a toothpick into white paint. Gently press dots of varying sizes throughout the empty purple space. -
Varying the density:
Cluster some tiny dots near the larger stars to simulate the density of a galaxy, keeping other areas a bit more sparse. -
Creating distance:
For the tiniest, most distant-looking stars, barely touch the tip of the toothpick to the surface, leaving just a speck of white. -
Final inspection:
Check the whole rock for balance. If a spot looks too dark, add a small dot or a tiny cross-star to fill it in. -
Seal the artwork:
Once the white paint is bone dry (give it at least an hour), apply a clear matte varnish to protect your night sky from chipping.
Glow Up
Swap standard white paint for glow-in-the-dark acrylic to make your constellations actually shine when the lights go out.
Now you have a piece of the night sky you can hold in the palm of your hand
BRUSH GUIDE
The Right Brush for Every Stroke
From clean lines to bold texture — master brush choice, stroke control, and essential techniques.
Explore the Full Guide
Purple Galaxy Swirl With Layered Speckles
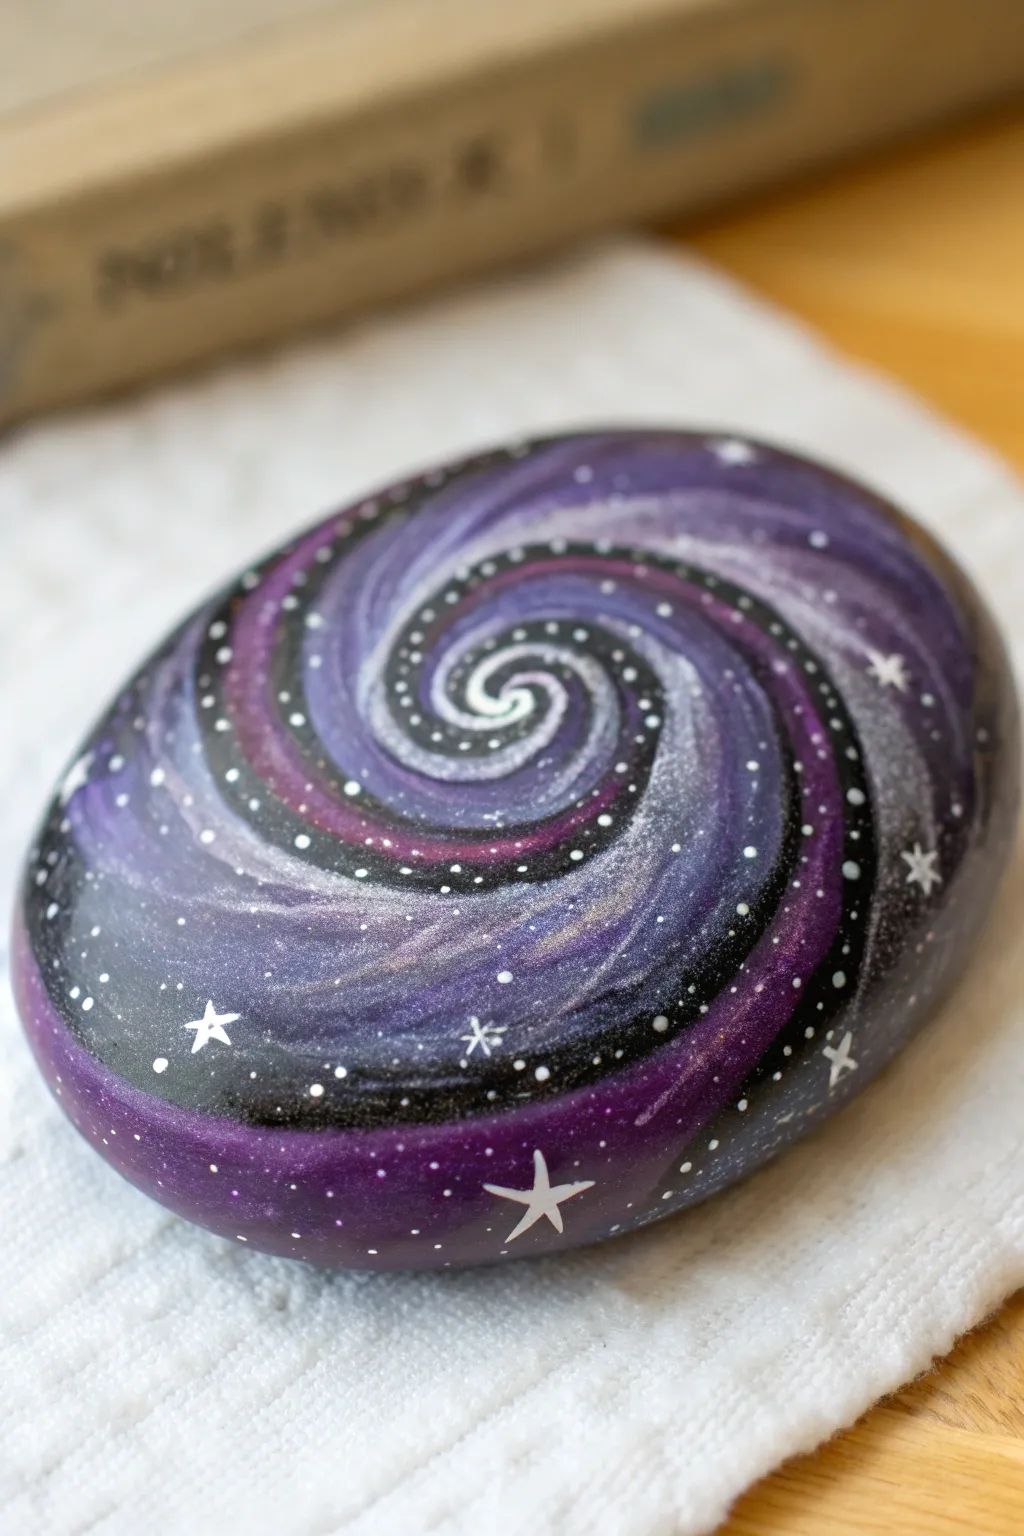
This mesmerizing rock painting captures the deep mystery of space with a swirling violet galaxy design. The layered speckles and bright white stars create a stunning depth that seems to pull you right into the center of the vortex.
How-To Guide
Materials
- Smooth, oval river rock
- Acrylic paints (Black, Deep Violet, Lilac/Lavender, White)
- Metallic silver or pearl acrylic paint (optional)
- Wide flat brush for base coating
- Fine liner brush (size 0 or 00)
- Dotting tools (small and medium sizes)
- Cup of water and paper towels
- Glossy sealant spray or resin
Step 1: Setting the Stage
-
Clean and prep:
Wash your stone thoroughly with soap and water to remove any dirt or oils. Let it dry completely before starting. -
Base coat application:
Using a wide flat brush, paint the entire top surface of the rock with a solid layer of black acrylic paint. You may need two coats for full opacity. -
Initial swirl mapping:
Once the black is dry, take a pencil and very lightly sketch a spiral starting from the center and winding outwards to the edges. This doesn’t need to be perfect; it’s just a guide.
Starry Splatter Tip
When flicking paint for stars, test on a paper towel first. If the paint is too watery, you’ll get blobs instead of mist. Cover surrounding areas to avoid mess.
Step 2: Creating the Galaxy Swirl
-
Deep purple layer:
Load a medium brush with deep violet paint. Follow your pencil lines, creating thick, sweeping bands that spiral outward. -
Blending the edges:
While the violet is still slightly wet, feather the edges into the black background so the transition isn’t too harsh. A dry brush technique works well here. -
Adding dimension:
Mix a little lilac or lavender with your deep violet. Painting wet-on-wet, add streaks of this lighter purple through the center of your dark purple bands. -
Highlighting the spiral:
Using pure lilac or a very light purple, paint thinner, sharper lines within the swirls to define the flow of the galaxy. -
Metallic accents:
If you have metallic silver or pearl paint, add very faint, translucent wisps over the purple sections. This adds a shimmering ‘stardust’ effect. -
Central focus:
Brighten the very center of the spiral with a dab of white mixed with lilac to make it look like a glowing galactic core.
Step 3: Stars and Details
-
The dotting technique:
Dip a small dotting tool or the end of a paintbrush handle into white paint. Place dots along the spiral arms, concentrating them in the lighter purple areas. -
Varying sizes:
Create depth by using different tools to make tiny specks and slightly larger ‘planet’ dots throughout the swirl. -
Micro-stars:
For the tiniest stars, I like to dilute white paint slightly with water and flick it off an old toothbrush or stiff brush onto the rock for a natural scattered look. -
Painting large stars:
Using your finest liner brush and pure white paint, carefully draw a few four-pointed or five-pointed stars. Place these sparingly—maybe 3 to 5 total—on the outer edges or darker sections for contrast. -
Defining the black void:
If your painting got messy, go back with black paint and a liner brush to clean up the negative space between the spiral arms. This high contrast makes the colors pop. -
Adding dotted trails:
Using your smallest dotting tool, creating a trail of tiny white dots that follows the curve of the black negative space. This emphasizes the spinning motion.
Add a Constellation
Personalize your galaxy by painting your zodiac constellation in the black negative space using tiny connected dots and fine lines.
Step 4: Finishing Touches
-
Final drying:
Allow the rock to sit undisturbed safely until all paint layers, especially the thick dots, are completely dry. -
Sealing:
Apply a glossy spray sealant or a layer of art resin. The gloss finish mimics the look of polished glass and intensifies the depth of the galaxy colors.
Place your finished galaxy rock on a desk or shelf to add a little piece of the universe to your room
Purple Poppy Bloom With Bold Brushstrokes
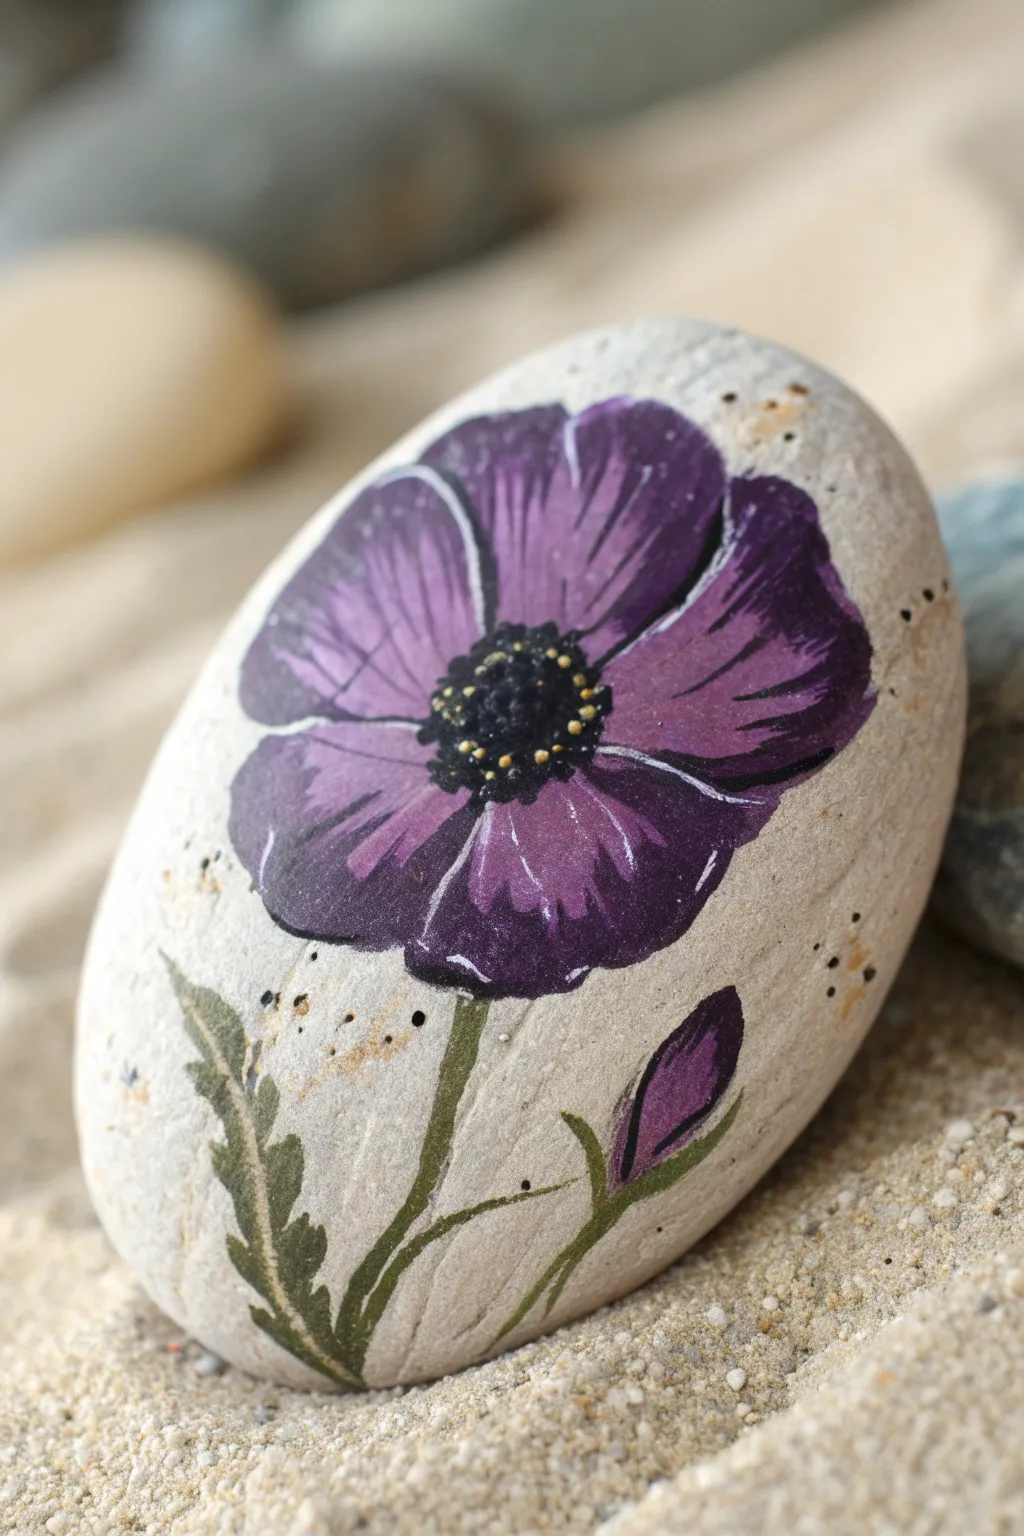
Transform a simple garden stone into a striking piece of art featuring a bold purple anemone or poppy bloom. This design uses layered shading and crisp white highlights to make the petals pop against the natural stone background.
Detailed Instructions
Materials
- Smooth, oval river rock (light beige or grey)
- Acrylic paints: Deep Violet, Lavender, Titanium White, Black, Olive Green, Forest Green
- Paintbrushes: Small flat brush (size 2-4), fine liner brush (size 00 or 000)
- Pencil for sketching
- Palette or small plate
- Cup of water and paper towels
- Spray sealer or varnish (matte or satin finish)
Step 1: Sketching and Base Layers
-
Clean Your Canvas:
Begin by washing your rock with soapy water and scrubbing away any dirt. Let it dry completely so the paint adheres properly. -
Outline the Flower:
Use a pencil to lightly sketch the main flower shape. Draw a large oval or circle positioned slightly off-center. Inside, sketch 5-6 large overlapping petal shapes radiating from a central point. -
Add Stem and Bud:
From the bottom of the flower, draw a thin, curving line downwards for the stem. To the right, sketch a smaller teardrop shape for a flower bud and its own connecting stem. Add a few jagged leaves near the base. -
Base Color for Petals:
Load your small flat brush with Deep Violet. Fill in the petal shapes completely. Don’t worry about shading yet; just get a solid, opaque coat of color down. You may need two coats for full coverage. -
Paint the Bud:
Using the same Deep Violet, fill in the teardrop shape of the bud on the right side.
Step 2: Building Depth and Detail
-
Create Inner Shadows:
Mix a tiny dot of Black into your Deep Violet to create a darker purple. Paint this darker shade at the very base of each petal where they meet the center, blending it outward slightly. -
Add Highlights:
Clean your brush and pick up some Lavender paint. Apply this to the outer edges and tips of the petals. I like to use quick, sweeping strokes inward to mimic the texture of flower petals. -
Enhance Contrast:
For even more dimension, mix a little Titanium White with Lavender. Add thin streaks of this lightest purple near the very edges of the petals and on the top curve of the bud. -
Define Petal Separation:
Use your fine liner brush and the dark purple mixture (or straight black thinned with water) to paint very thin lines between the petals, separating them visually. -
Bright White Accents:
Take your fine liner brush with pure Titanium White. Paint very thin, crisp lines along the outer rim of some petals. This ‘rim lighting’ effect gives the flower a sharp, pop-art style.
Pro Tip: Stroke Technique
When painting the petals, curve your brushstrokes to follow the shape of the petal. This directional painting makes the flower look cupped and realistic rather than flat.
Step 3: The Center and Greenery
-
Paint the Center:
Using Black paint and a small round brush, dab a textured circle in the middle of the flower. Use a stippling motion (tapping the brush tip) to create a fuzzy texture. -
Add Pollen Specs:
Once the black center is dry, dip the very tip of your liner brush (or a toothpick) into yellow or cream paint. place tiny dots around the outer edge of the black center to represent pollen anthers. -
Green Stems:
Mix Olive Green with a touch of Forest Green. Using the liner brush, carefully paint over your pencil lines for the main stem and the bud’s stem. -
Leaf details:
Paint the jagged leaves at the bottom using the same green mix. Use short, flicking strokes to replicate the serrated edges of poppy leaves. -
Sepals on the Bud:
Add two small green strokes at the base of the purple bud to form the sepals holding it. -
Final Touches:
Add a few tiny black dots scattered purely for artistic effect on the bare rock surface around the flower, if desired, to balance the composition. -
Seal the Artwork:
Allow the rock to dry overnight. Finish by applying a spray varnish to protect the paint from chipping and fading.
Troubleshooting: Sheer Paint
If your purple looks streaky or the rock color shows through, let the first coat dry completely. Apply a second thin coat rather than globbing on one thick layer.
Place your finished stone in a garden pot or on a sunny windowsill to enjoy bloom all year round

PENCIL GUIDE
Understanding Pencil Grades from H to B
From first sketch to finished drawing — learn pencil grades, line control, and shading techniques.
Explore the Full Guide
Purple and White Polka Dot Pop
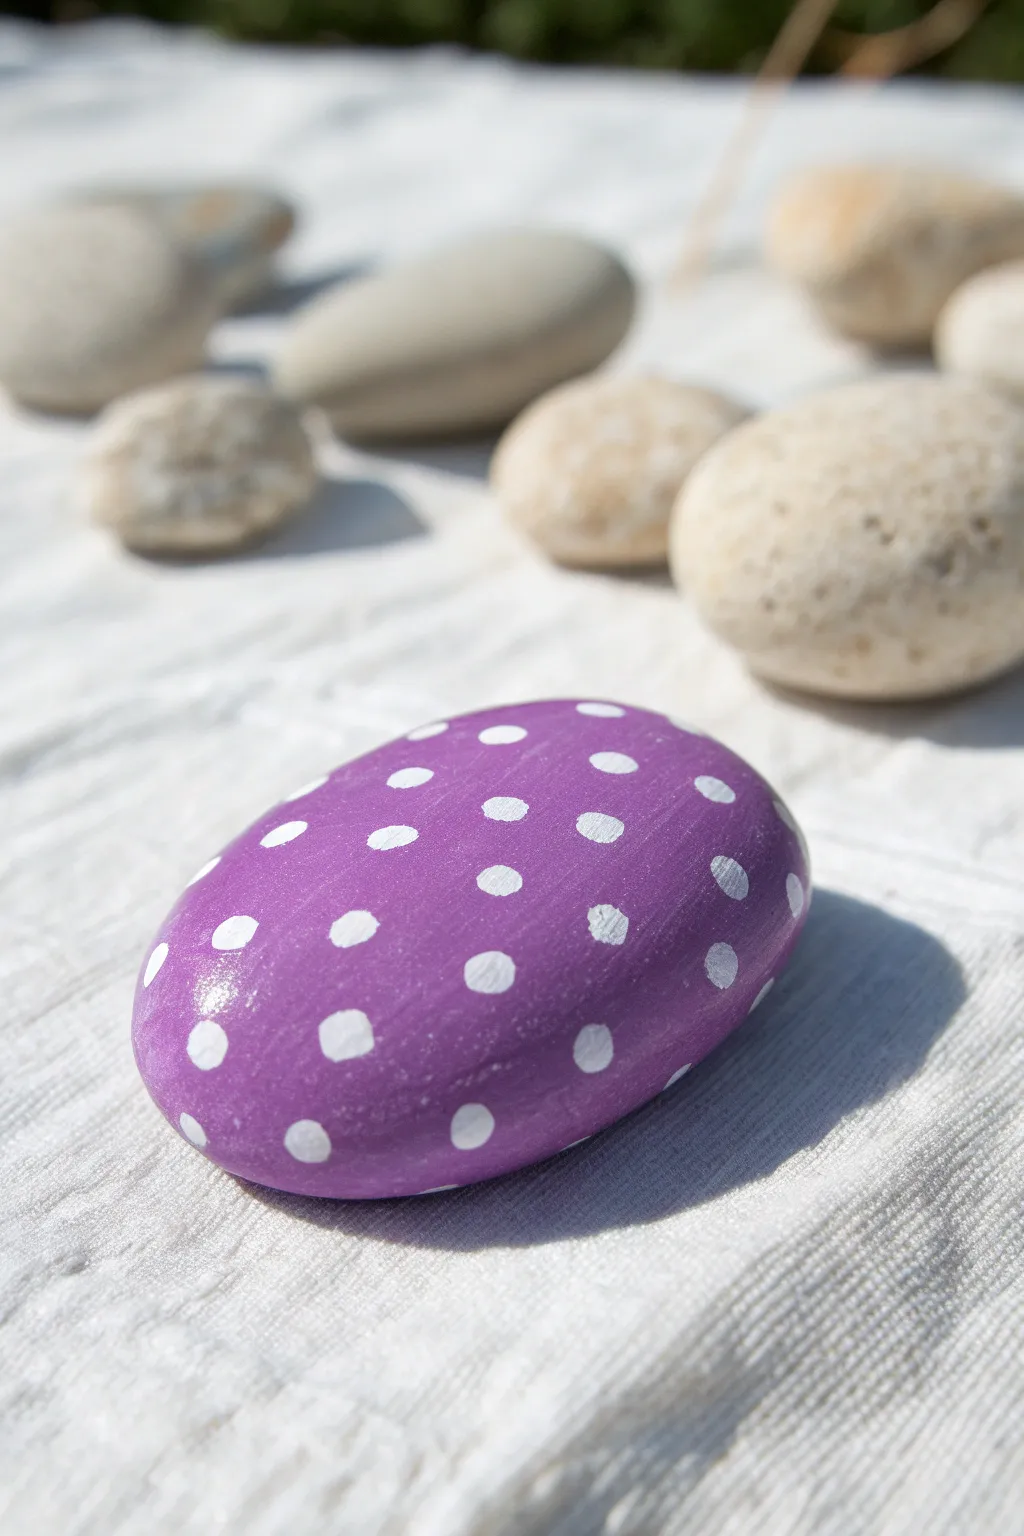
Transform a simple stone into a playful accessory or garden decoration with this vibrant purple and white polka dot design. The contrast between the bold violet background and crisp white dots creates a cheerful, retro-inspired look that is surprisingly easy to achieve.
Step-by-Step
Materials
- Smooth, flat oval river rock
- Purple acrylic paint (medium shade)
- White acrylic paint
- Flat paintbrush (medium size)
- Dotting tools (various sizes) or the handle end of paintbrushes
- Clear acrylic sealer (spray or brush-on)
- Soap and water for cleaning
- Paper towel
- Palette or paper plate
Step 1: Preparation & Base Coat
-
Clean the canvas:
Begin by washing your chosen rock thoroughly with soap and warm water to remove any dirt, oil, or grit. Dry it completely with a paper towel or let it air dry in the sun. -
Prepare the violet:
Squeeze a generous amount of purple acrylic paint onto your palette. If your paint feels too thick, add a tiny drop of water to improve flow, but keep it opaque. -
Apply the first layer:
Using a flat paintbrush, cover the entire top surface of the rock with purple paint. Smooth out your brushstrokes to minimize texture. -
Let it dry:
allow the first coat to dry completely. This usually takes about 15-20 minutes depending on humidity. Don’t rush this step, or the next layer might lift the paint. -
Add a second coat:
For a truly solid and vibrant purple like the one in the photo, apply a second coat of purple paint. Ensure full coverage over any darker spots of the underlying stone. -
Inspect the edges:
Check the sides of the rock. Bring the purple paint down the sides to create a finished look, fading it out or covering the bottom depending on your preference. -
Final drying time:
Let this purple base coat dry thoroughly before attempting to add any dots. The surface must be hard to the touch.
Perfect Circles Pro-Tip
If you don’t have dotting tools, use household items like Q-tips, pencil erasers, or nail heads. Test on paper first to see the size.
Step 2: Dot Design
-
Load the dotting tool:
Dip a medium-sized dotting tool or the back end of a paintbrush into your white acrylic paint. You want enough paint to form a slight bead on the tool. -
Start within the center:
Place your first few dots near the center of the rock to anchor the pattern. I like to press gently and lift straight up to keep the circles round. -
Create a pattern:
Work outwards from the center, spacing the white dots somewhat irregularly but evenly apart. Avoid creating perfect grid lines for a more organic, playful feel. -
Vary the sizes:
To match the image exactly, use slightly different pressure or tools to create minor variations in dot size. Some can be bold and large, others slightly smaller. -
Address the edges:
Place some dots partially falling off the edge of the curvature. This technique gives the design dimension and makes it look like a printed fabric wrapped around the stone. -
Check density:
Step back and look at the overall balance. If there are large purple gaps, add a small dot to fill the space without crowding. -
Dry the details:
Allow the white dots to dry completely. Because dots are thicker applications of paint, they may take longer than the base coat—give them at least 30 minutes.
Fixing Wonky Dots
If a dot smears or isn’t round, don’t wipe it! Let it dry fully, paint over it with the purple base color, dry again, and re-dot.
Step 3: Finishing
-
Clean up stray marks:
If you accidentally smudged a dot, you can carefully touch up the purple background with a tiny detail brush once the white is dry. -
Apply sealer:
Once everything is bone dry, apply a clear acrylic sealer. A glossy finish works best to replicate the shine seen in the reference photo. -
Cure completely:
Let the rock sit undisturbed for the recommended curing time of your sealer
Now you have a cheerful pocket stone to brighten your desk or give to a friend
Lacy White Floral Filigree on Lavender
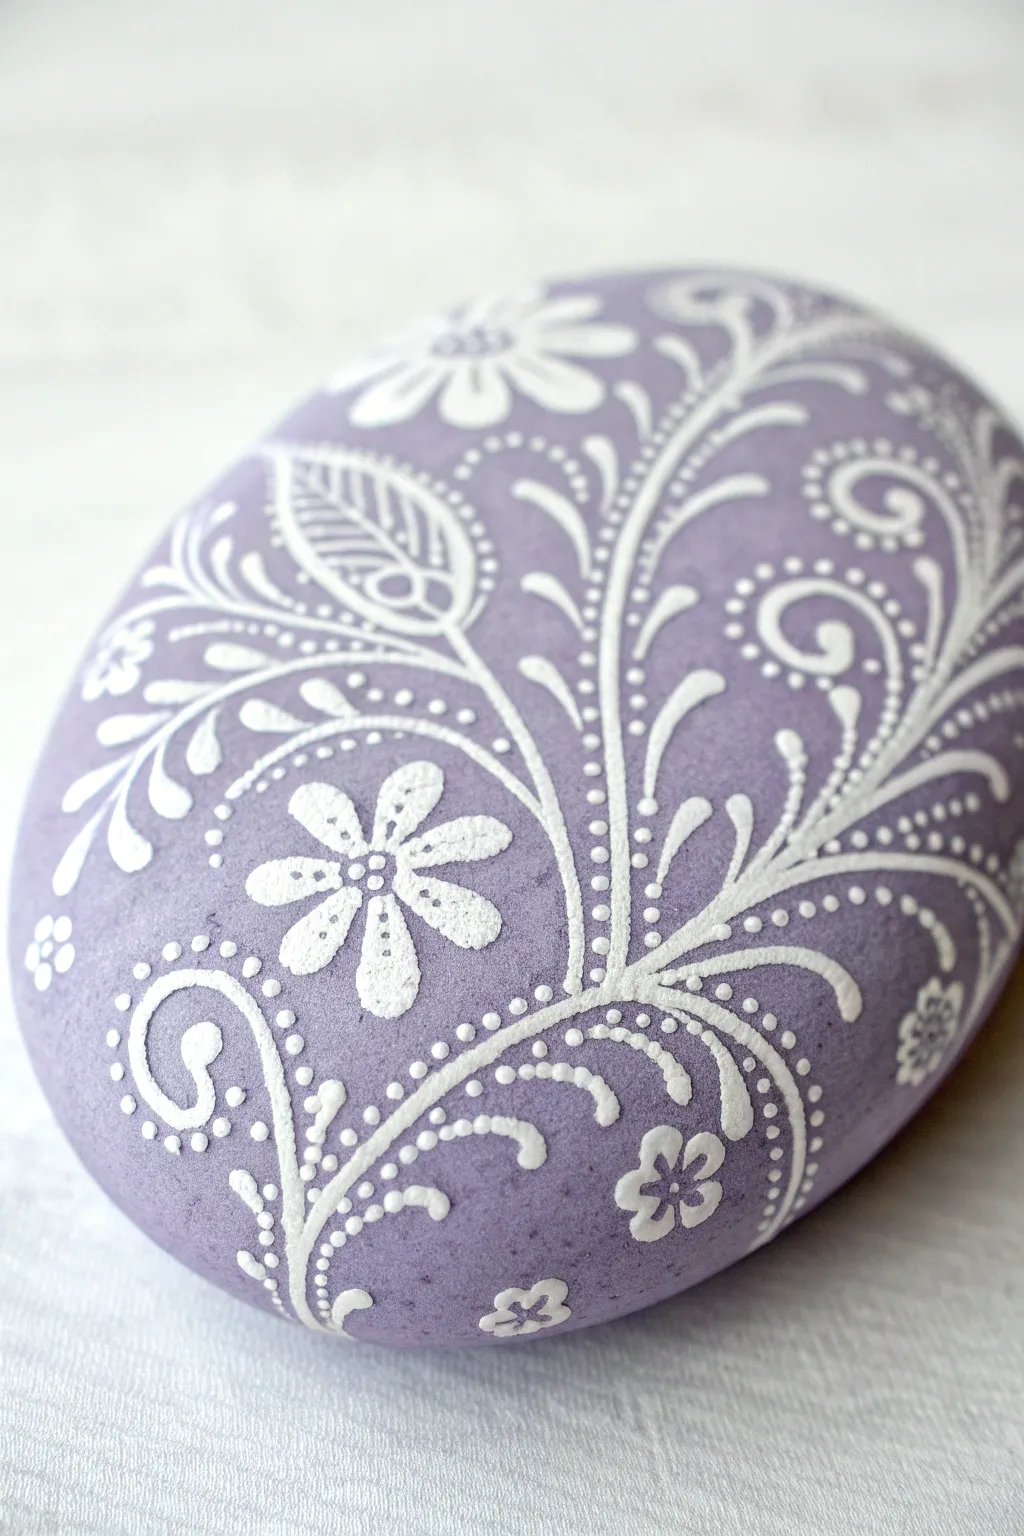
Transform a simple stone into an elegant keepsake with this delicate filigree design. The contrast between the matte lavender background and the raised, lacy white details creates a sophisticated look reminiscent of fine embroidery or lace.
Step-by-Step Guide
Materials
- Smooth, oval river rock
- Acrylic paint: Lavender (or purple mixed with white)
- Titanium White heavy body acrylic paint or POSCA paint pen (extra fine tip)
- Small flat paintbrush
- Fine detail liner brush (size 00 or 000)
- Dotting tools (various small sizes) or toothpicks
- Matte spray varnish or sealant
- Cup of water and paper towels
Step 1: Preparing the Canvas
-
Clean and Dry:
Begin by scrubbing your rock with warm, soapy water to remove any dirt or oils that might repel the paint. Dry it completely with a towel or let it sit in the sun for an hour. -
Base Coat:
Using the flat paintbrush, apply a coat of lavender acrylic paint to the entire top surface of the stone. Depending on the opacity of your paint, you may need two or three thin layers to get a solid, even color. Allow each layer to dry fully before adding the next. -
Smooth the Surface:
If your base coat feels rough, you can lightly sand it with very fine-grit sandpaper (like 1000 grit) once the paint is bone dry to ensure your intricate lines will glide on smoothly.
Clean Lines Hack
Mix a tiny drop of water or flow medium into your white paint. Ink-like consistency flows better from liner brushes than thick paint.
Step 2: Designing the Main Stems
-
Central Curve:
With your fine liner brush and thinned white paint (or a white paint pen), draw a long, sweeping curve starting from the bottom right and reaching toward the top left. This is the ‘spine’ of your design. -
Secondary Stems:
Add two or three smaller curved lines branching off the main spine. Keep the movement fluid and organic; think of how vines grow naturally. -
Anchor Scroll:
At the very base of the design, create a distinct scroll or spiral shape to anchor the composition visually.
Step 3: Adding Floral Elements
-
Main Flower Placement:
Locate an open space on the left side of the main stem. Paint a simple five-petal flower shape here. The petals should be teardrop-shaped and radiate from a small center point. -
Top Blossom:
Add a slightly larger, half-flower shape peeking over the top curve of the rock, giving the impression that the design wraps around the stone. -
Leaf Outlines:
Draw large, open leaf shapes attached to your secondary stems. Instead of filling them in solid, leave them as outlined shapes to maintain the airy, lacy feel. -
Interior Details:
Inside the larger leaves and flower petals, paint tiny lines or grids. This cross-hatching or veining is key to achieving that intricate lace texture.
Oops! A Wobbly Line?
Don’t panic about mistakes. Use a clean, damp Q-tip to instantly wipe away acrylic paint while it’s wet, or paint over dried errors with lavender.
Step 4: Filigree and Dotwork
-
Tendrils:
Using the very tip of your liner brush, pull tiny, whisper-thin tendrils and swirls coming off the main stems and leaves. I find holding my breath for a second helps keep my hand steady for these hairline strokes. -
Primary Dotting:
Dip a small dotting tool into white paint. Add a row of dots following the curve of the main stem. Start with larger dots at the base and use less pressure as you move up to create smaller dots. -
Accenting the Flowers:
Place a cluster of tiny dots in the center of your flowers. You can also add a single dot at the tip of each petal for extra decoration. -
Filling the Negative Space:
Look for empty purple spaces. Add small floating elements like tiny three-petal flowers or isolated spirals to balance the composition without overcrowding it. -
Micro-dots:
Use a toothpick to place incredibly small ‘micro-dots’ along the edges of your scrolls and leaves. This adds depth and mimics the picot edging found on lace.
Step 5: Finishing Touches
-
Final Dried Check:
Let the white paint dry completely. If the purple background looks dull in any spots, do not retouch it now, as you risk ruining the white lines. -
Sealing:
Spray the rock with a matte varnish. A matte finish looks best for this design as it keeps the focus on the pattern rather than a glossy reflection. Do two light coats rather than one heavy one.
Now you have a stunning piece of stone art that looks delicate enough to have been woven by hand


Purple Hearts With Tiny White Highlights
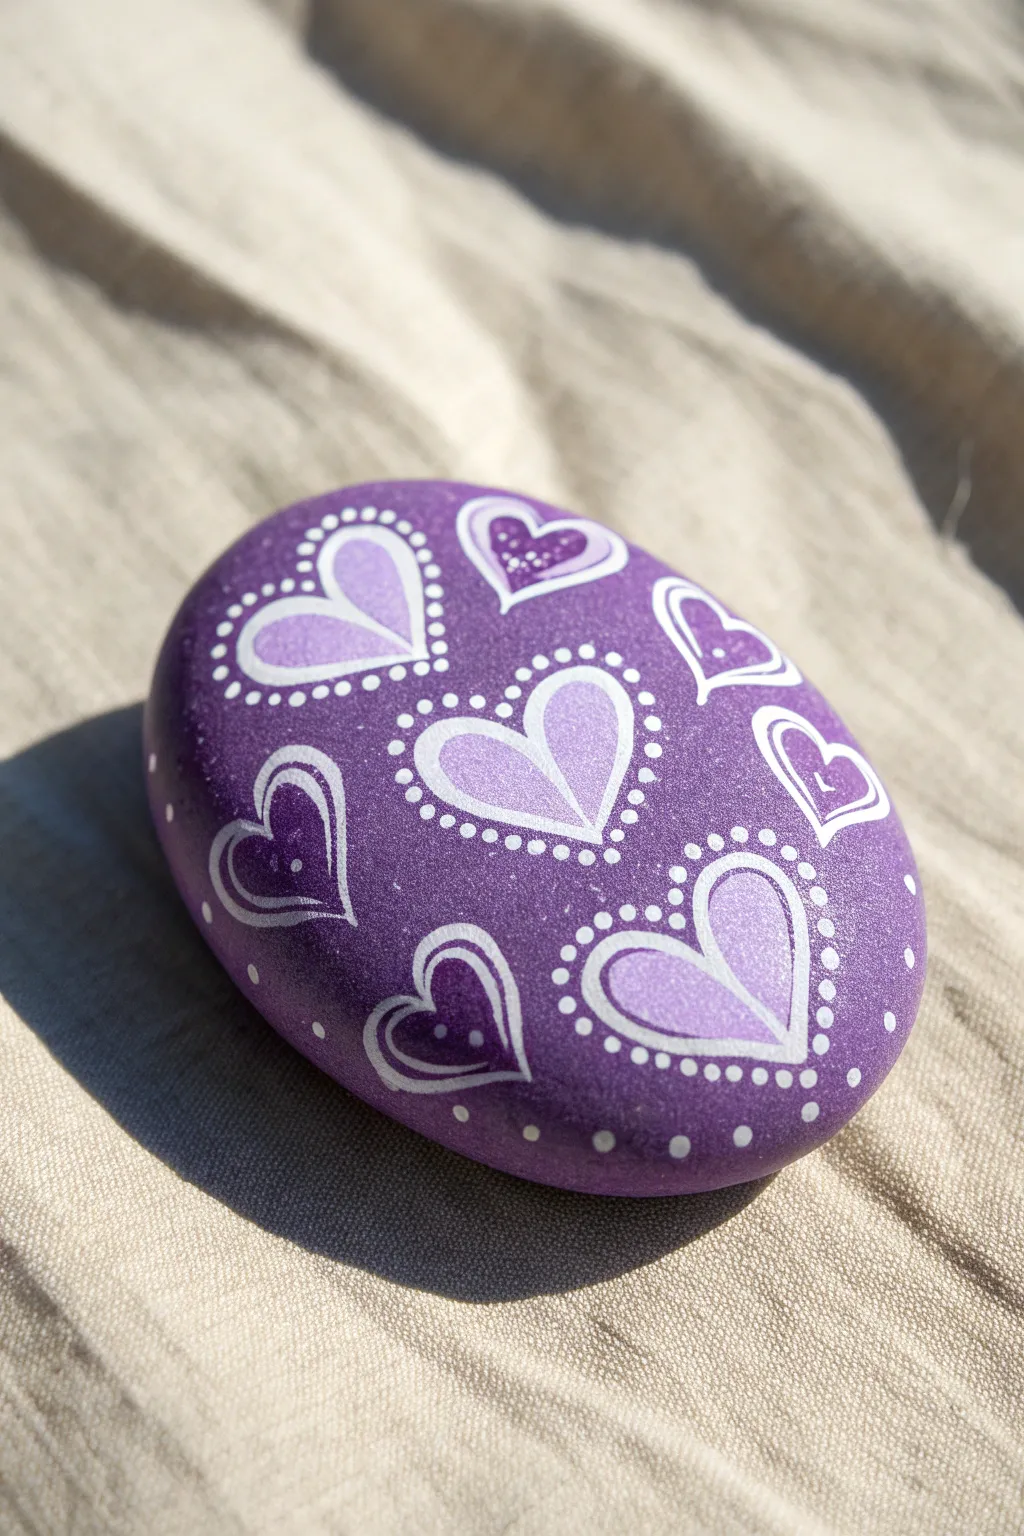
Transform a smooth river stone into a stunning token of affection with this layered purple heart design. By combining stark white outlines with soft lavender fills and delicate dotwork, you’ll create a piece that feels dimensional and sweetly romantic.
Step-by-Step
Materials
- Smooth, oval river rock (approx. palm-sized)
- Deep violet acrylic paint (base coat)
- Titanium white acrylic paint
- Lavender or light purple acrylic paint
- Wide flat brush (for base coating)
- Fine liner brush (size 0 or 00)
- Dotting tools (various small sizes) or toothpicks
- Gloss acrylic sealer or varnish
Step 1: Preparation & Base Coat
-
Clean the canvas:
Begin by washing your stone thoroughly with warm soapy water to remove any dirt or oils. Let it dry completely before starting. -
Apply the purple base:
Using your flat brush, coat the entire top surface of the rock with the deep violet paint. You want a rich, dark background for the white to pop against. -
Add a second coat:
Once the first layer is dry to the touch, apply a second coat of deep violet to ensure full opacity and a smooth finish. Allow this to dry fully, perhaps for 20-30 minutes.
Paint Consistency
If your white paint feels too thick or drags, mix in a singular drop of water. It should flow like smooth ink for the best fine lines.
Step 2: Main Heart Illustrations
-
Draft the layout (optional):
If you are nervous about freehanding, use a white watercolor pencil to very lightly sketch the placement of your hearts. Aim for a mix of sizes and angles. -
Paint the central heart outline:
Start with the largest heart in the center. Use your fine liner brush and white paint to draw a clean, medium-thickness heart outline. -
Create the surrounding hearts:
Paint 3-4 slightly smaller heart outlines scattered around the central one. Vary their tilt to give the design a playful, floating feeling. -
Fill the hearts:
Inside the white outlines of your main hearts, paint a smaller heart shape using the lavender paint. Leave a small gap of the dark purple background showing between the white outline and the lavender fill. -
Add the crease detail:
Using the white liner brush again, draw a thin line down the center of the lavender hearts, starting at the top dip and ending at the bottom point, to mimic a folded paper look.
Glitter Upgrade
Use a metallic or pearlescent purple paint for the filled hearts instead of matte lavender to make the stone shimmer in the sunlight.
Step 3: Decorative Accents
-
Different heart styles:
For variety, paint a few smaller hearts that are just double outlines (a white heart inside another white heart) without the lavender fill. -
Outline details:
On the non-filled hearts, use a very fine brush to add tiny dashes or curves inside the shapes to give them texture. -
Dot the borders:
Dip a small dotting tool into white paint. Carefully place a series of dots around the exterior of the filled lavender hearts, spacing them evenly to create a pearl-like border. -
Add tiny filler hearts:
Look for empty spaces on the rock and paint very small, simple white heart outlines to balance the composition. -
Micro-dots for texture:
Where you have large filled hearts, add incredibly tiny white dots inside the lavender area near the rim for a sparkly effect. -
Base scattered dots:
Using your smallest dotting tool, add random single dots in the dark purple negative space between hearts to make the design feel cohesive.
Step 4: Finishing Touches
-
Clean up edges:
Check your white lines. If any look transparent, carefully go over them with a second thin layer of white to brighten them up. -
Let it cure:
Allow the design to dry completely, preferably overnight, to ensure the thick dots are solid all the way through. -
Seal the stone:
Apply a coat of gloss varnish or sealer. This not only protects the paint from chipping but makes the colors appear more vibrant and deeper.
Now you have a beautifully intricate keepsake that looks lovely in a garden or on a desk
Purple Butterfly With Black Outline
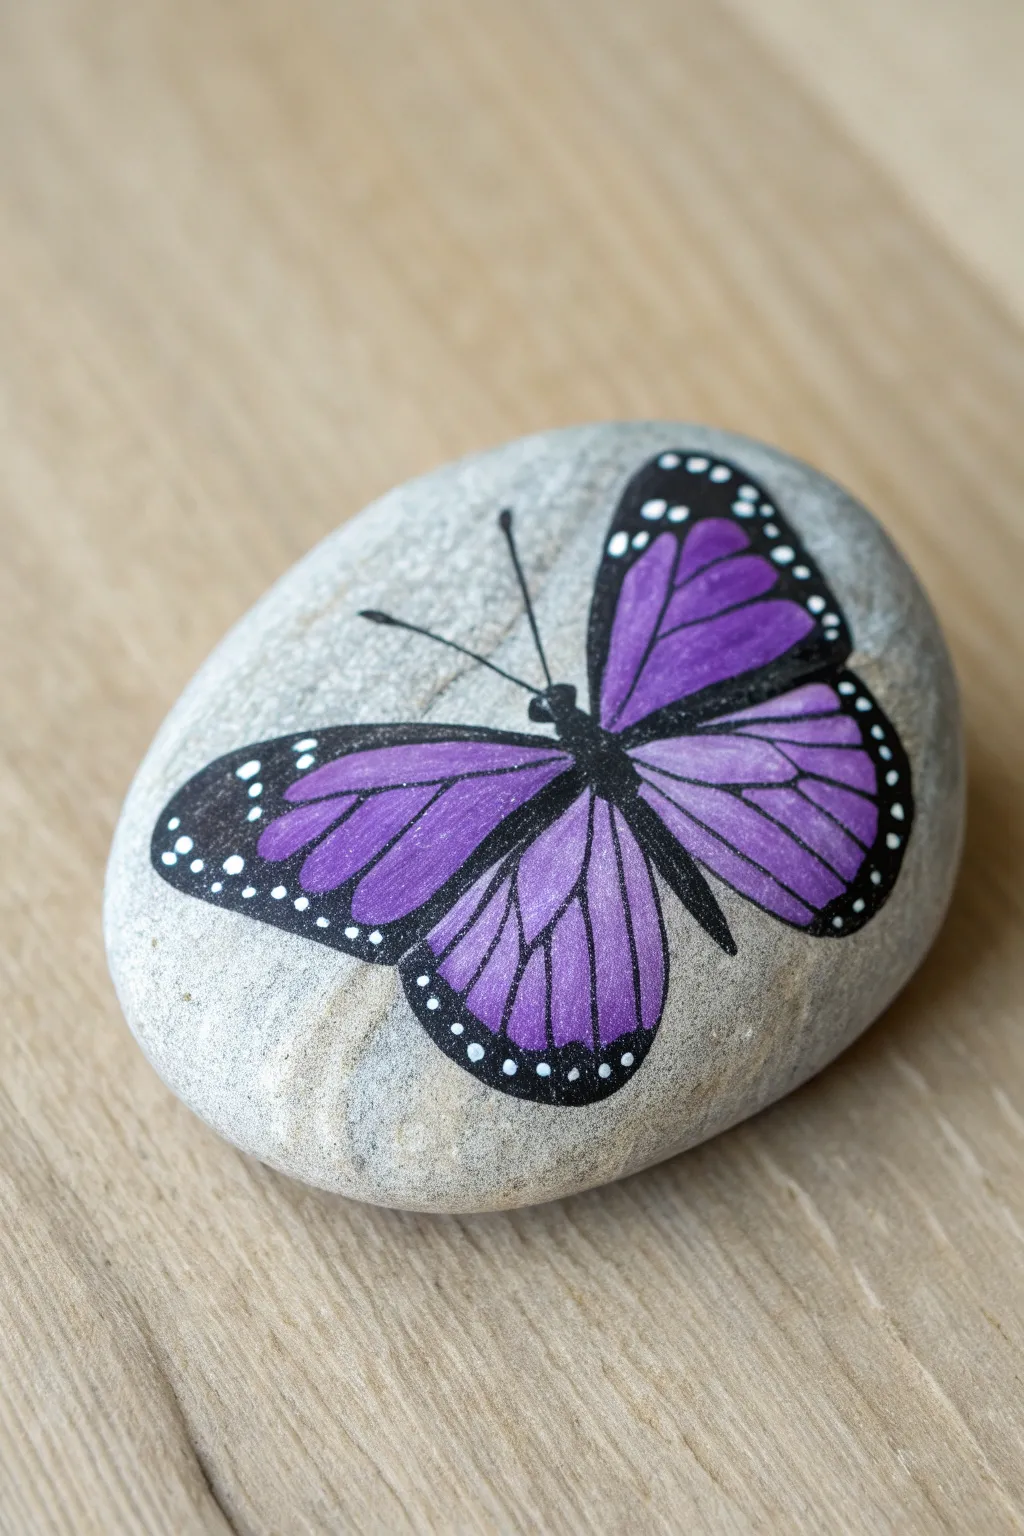
Transform a simple smooth rock into a stunning piece of nature-inspired art with this vibrant butterfly design. By swapping the traditional orange for deep violet hues, you create a magical, whimsical creature that stands out beautifully against the natural grey stone.
Detailed Instructions
Materials
- Smooth, oval-shaped river rock (clean and dry)
- Acrylic paints: Titanium White, Carbon Black, Deep Violet, Lilac (or light purple)
- Pencil (HB or lighter) and eraser
- Fine detail brush (size 0 or 00)
- Small round brush (size 1 or 2)
- Dotting tool or toothpick
- Clear acrylic sealer (glossy or matte)
Step 1: Sketching the Outline
-
Prepare your canvas:
Ensure your rock is thoroughly washed and dried. The natural grey background is part of the charm, so we won’t be applying a base coat. -
Draw the main axis:
Using a pencil, very lightly draw a central line down the middle of the rock where the butterfly’s body will sit. This helps keep the wings symmetrical. -
Sketch the upper wings:
Draw two large, rounded triangle shapes extending from the top half of your center line. These should angle upwards slightly. -
Sketch the lower wings:
Add two smaller, rounded shapes below the upper wings. These should tuck in slightly underneath the top wings.
Paint Consistency Tip
For the thin black veins, water down your black paint slightly until it has an ink-like consistency. This helps the paint flow smoothly off your liner brush without skipping.
Step 2: Blocking in Color
-
Paint the purple base:
Load your small round brush with the lighter Lilac shade. Fill in the four wing sections, leaving a small gap between them for the body. -
Add depth:
While the lilac is still slightly wet, I like to blend a bit of Deep Violet near the outer edges of the wings to create a subtle gradient. -
Dry completely:
Let this purple layer dry fully. Acrylics darken slightly as they dry, so you’ll get a better sense of the color then. -
Start the black center:
Using your black paint, fill in the gap between the wings to paint the butterfly’s thorax and abdomen. Make the top part slightly thicker than the tail.
Step 3: Veins and Details
-
Identify main veins:
Switch to your finest detail brush or a black paint pen. Paint heavy black lines separating the upper and lower wings. -
Outline the wings:
Paint a thick black border around the entire outer edge of all four wings. This border will house the white dots later, so make it bold. -
Draw internal veins:
Paint thin, delicate lines radiating from the body outward to the thick black border. Imagine these like the spokes of a bicycle wheel. -
Connect the webbing:
Add small, curved cross-lines between the radiant veins to create that stained-glass effect typical of monarch wings. -
Add antennae:
Paint two thin, curved lines extending from the head. finish them with tiny dots at the very tips.
Shaky Hands?
If you struggle with fine brush details, swap the detail brush for an ultra-fine tip acrylic paint marker (0.7mm) for the black veins and outlines.
Step 4: Finishing Touches
-
Prepare the dots:
Dip a dotting tool or the very tip of a toothpick into Titanium White paint. -
Dot the borders:
Carefully place small white dots along the thick black border of the wings. Vary the spacing slightly for a natural look. -
Double check double dots:
On the upper wings’ outer corners, you can add pairs of dots to mimic the specific pattern seen in the reference image. -
Clean up edges:
If any paint went outside the lines onto the raw stone, use a damp Q-tip to wipe it away quickly before it sets. -
Seal the artwork:
Once the paint is bone dry (give it at least an hour), apply a coat of clear acrylic sealer to protect your butterfly from chipping.
Now you have a permanent piece of springtime to decorate your garden or desk
Cute Purple Owl With Big Eyes

Transform a simple smooth stone into an adorable nocturnal friend with this easy-to-follow painting guide. Featuring oversized eyes and soft purple plumage details, this owl character makes for a charming desk ornament or garden decoration.
Step-by-Step
Materials
- Smooth, egg-shaped rock (river stone works best)
- Acrylic paints (light lavender, dark purple, white, black, orange/gold)
- Fine detail brushes (size 0 or 00)
- Medium flat brush
- Pencil for sketching
- Paint sealant or varnish (optional)
Step 1: Base and Sketch
-
Prepare the Surface:
Begin by cleaning your rock thoroughly with soapy water and letting it dry completely to ensure the paint adheres smoothly. -
Apply the Base Coat:
Paint the entire front surface of the rock with a light lavender or lilac acrylic paint. You might need two layers to get a solid, opaque finish; let the first coat dry before applying the second. -
Define the Owl’s Shape:
Once the base is fully dry, lightly sketch the outlines with a pencil. Draw a large oval for the belly area, two smaller semi-circles on the sides for wings, and a curved ‘V’ shape at the top for the head feathers. -
Sketch the Face:
Draw two large circles touching each other for the eyes in the upper half of the rock. Add a small triangular beak just below where the eyes meet.
Step 2: Adding Color Blocks
-
Paint the Wings:
Using a darker purple shade, fill in the wing shapes on the left and right sides of the body. -
Darken the Head:
Use that same dark purple to fill in the ‘V’ shape at the very top of the head, creating a feather tuft effect. -
Underbody Shading:
I like to paint a crescent moon shape of dark purple at the very bottom of the rock to ground the figure and create a border for the feet. -
Fill the Eyes:
Paint the two large eye circles with bright white paint. Take your time here to keep the edges crisp. -
Color the Beak and Feet:
Paint the small triangular beak and draw two small three-toed feet at the bottom using an orange or golden-yellow paint.
Uneven Eyes?
If painting perfect circles is tricky, trace a bottle cap or a large coin lightly with pencil first to get uniform shapes.
Step 3: Details and Definition
-
Add Purple Details:
On the dark purple wings and head tuft, add small, thin dashes of the light lavender color using your finest brush to suggest feather texture. -
Paint the Pupils:
Inside the white eye circles, paint large black circles looking slightly upward to the right. -
Add Eye Sparkles:
Place a tiny white dot in the upper right area of each black pupil. This reflection makes the owl look alive and cute. -
Outline the Eyes:
Using a very fine liner brush and black paint (or a paint pen), carefully outline the white circles of the eyes. -
Draw Eyelashes:
Add three small, curved lashes to the top outer corner of each eye for extra character. -
Outline Body Parts:
Outline the beak, the wings, the head tuft, and the bottom dark purple section with a thin black line to separate the sections clearly. -
Create Chest Feathers:
On the light lavender belly area, paint rows of small ‘v’ or ‘u’ shapes using the dark purple paint. Stagger them like fish scales for a natural look. -
Final Touches:
Outline the orange feet at the bottom. Once everything is completely dry, seal your rock with a clear varnish to protect the paint.
Pro Tip: Texture
Use a toothpick instead of a brush for the tiny white eye sparkles and the smallest feather details to get ultra-precise dots.
Set your new little friend on a windowsill or hide it in the garden for someone to find
Purple Geode Slice Illusion
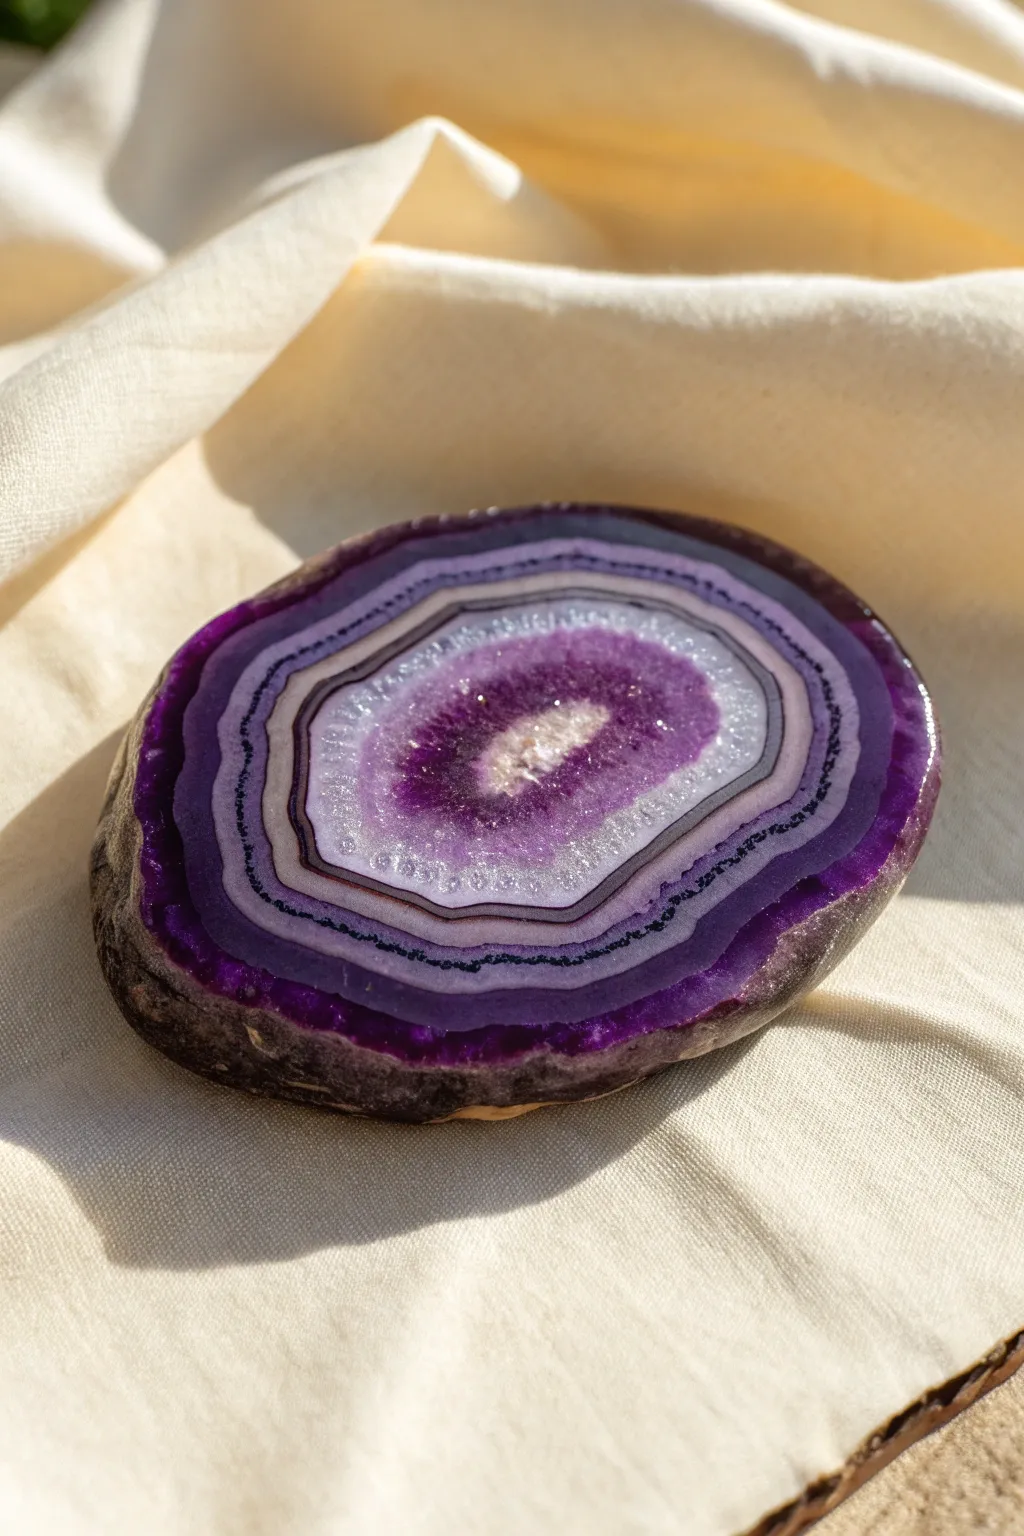
Transform a simple flat stone into a stunning, glimmering geode slice with just a few shades of acrylic paint and some clever layering. This project uses concentric rings and metallic accents to mimic the natural banding found in real amethyst crystals.
Step-by-Step Tutorial
Materials
- Flat, round or oval river rock (smooth surface)
- Acrylic paints (dark violet, lavender, white, black, metallic silver)
- Iridescent or fine crystal glitter medium
- Fine detail brushes (size 0 and 00)
- Small flat brush (size 2-4)
- High-gloss varnish or resin
- Palette for mixing
Step 1: Base Preparation
-
Clean the canvas:
Wash your rock thoroughly with soap and water to remove any dirt or oils. Let it dry completely before starting. -
Establish the outer rim:
Using a flat brush, paint the very edge and the outer rim of the rock face with a mix of black and dark violet. This creates the ‘rock crust’ look typical of geodes. -
Lay the foundation:
Paint the entire center face of the rock with a solid coat of dark violet. This ensures no bare stone shows through your translucent layers later.
Step 2: Creating the Crystal Bands
-
Paint the first inner ring:
Mix a small amount of white into your dark violet to create a deep plum shade. Paint a thick, slightly wavy ring just inside your dark outer rim. -
Add the lavender layer:
Lighten your mix further to a true lavender. Paint another ring inside the plum one, keeping the edges slightly organic rather than perfectly circular. -
Create the white quartz band:
Using a clean detail brush, paint a thin, stark white ring next to the lavender. This represents the quartz separation often found in agate slices. -
Blend the transition:
While the paint is still slightly tacky, use a damp brush to gently feather the edge between the lavender and white rings so they aren’t too harsh. -
Detail the separation lines:
Load your finest liner brush with black paint thinned slightly with water. paint very shaky, thin lines between some of the color bands to mimic natural mineral fractures. -
Add metallic sheen:
Trace the edge of the white quartz ring with a very thin line of metallic silver paint to catch the light.
Layering Pro Tip
Work wet-on-wet for the purple bands to get a cloudy, natural gemstone look, but let the black separation lines dry completely so they stay sharp.
Step 3: The Crystalline Center
-
Define the core:
For the very center, mix a vibrant, semi-transparent purple. Paint an oval shape in the middle, leaving a small untouched spot in the dead center. -
Create the druzy effect:
Stipple (dot repeatedly) pure white paint into the very center of your purple core. This texture mimics the rough, sparkly crystals found in the hollow of a geode. -
Apply glitter texture:
Once the center paint is dry, apply a layer of iridescent glitter medium or sprinkle fine crystal glitter over the central white and purple area. -
Intensify the depth:
I like to add tiny dots of pure dark violet around the immediate edge of the glittery center to make the ‘hole’ look deeper.
Fixing Wobbly Lines
If your concentric rings look too shaky, re-outline them with the thin black “fracture” line. It hides uneven edges and adds to the natural realism.
Step 4: Finishing Touches
-
Refine the crust:
Dry brush a little grey or brown texture onto the very outer black rim of the rock to make the ‘crust’ look more like rough stone. -
Varnish layout:
This step is crucial for the illusion. Coat only the painted face (the ‘slice’) with a thick layer of high-gloss varnish or resin. -
Matte finish adjustment:
Leave the outer rim (the crust) unvarnished or use a matte varnish there. The contrast between the glossy center and matte edge sells the realistic stone effect.
Now you have a mesmerizing faux geode that looks like a treasure straight from the earth
Marbled Purple and White Swirls
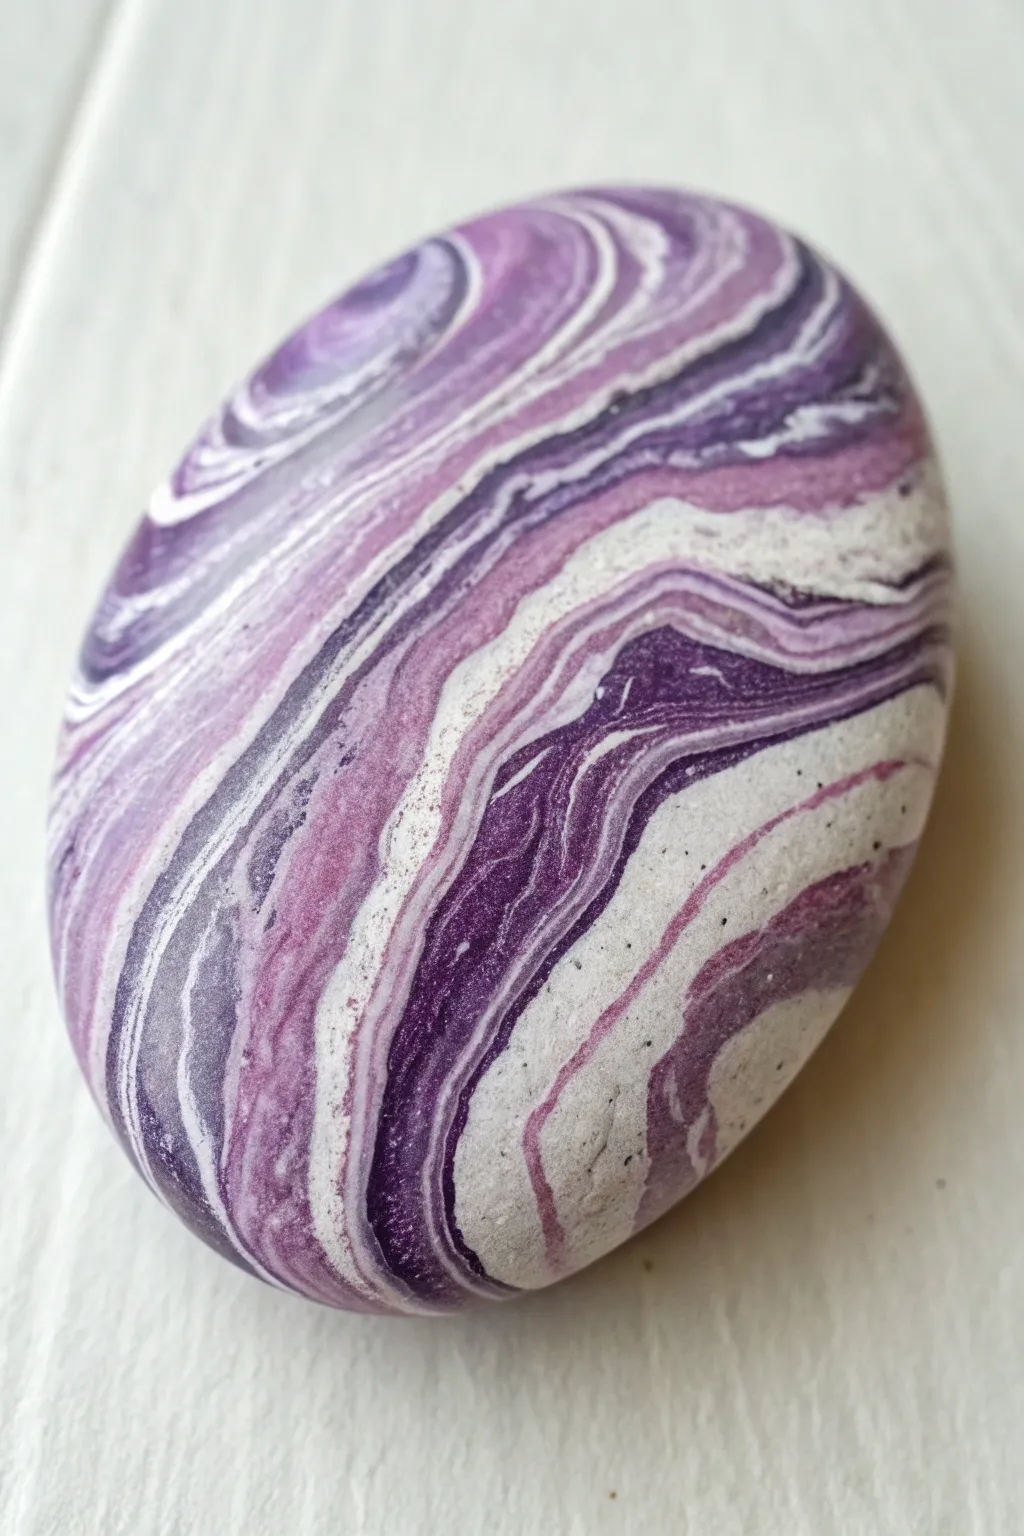
Transform a simple river rock into a mesmerizing piece of art with this elegant purple marbling technique. The finished stone features organic, fluid layers of deep violet, soft lilac, and crisp white that look like natural agate.
Step-by-Step
Materials
- Smooth oval river rock (clean and dry)
- White acrylic paint (fluid or flow variety)
- Deep violet acrylic paint
- Lilac or lavender acrylic paint
- Pouring medium (or Floetrol)
- Small plastic cups (shot glass size)
- Craft sticks for stirring
- Cardboard box or tray (to catch drips)
- Gloves (optional)
- High-gloss varnish or resin (for finishing)
Step 1: Preparation and Mixing
-
Clean your canvas:
Scrub your rock thoroughly with soap and water to remove any dirt or oils. Let it dry completely before starting to ensure the paint adheres properly. -
Prepare the workspace:
Set up your cardboard tray or a plastic-covered surface. Place your rock on a raised platform inside the tray—an upside-down plastic cup works perfectly—so the paint can flow freely off the edges. -
Mix the pouring medium:
In separate small cups, mix each acrylic paint color with your pouring medium. A standard ratio is often 1:1, but check your specific medium’s instructions. You want a consistency similar to warm honey. -
Check consistency:
Lift your stirring stick from the mixture. The paint should flow off in a smooth, continuous stream without breaking. If it’s too thick, add a tiny drop of water; if too thin, add more paint. -
Layer the dirty cup:
Take a fresh empty cup. Pour a small amount of white into the bottom. Gently pour a layer of deep violet on top, followed by the lilac. Don’t stir them! Repeat this layering process until the cup is about half full.
Pro Tip: Dirty Cup Magic
Pour your paint down the side of the cup rather than straight into the middle. This preserves distinct layers and creates cleaner lines when poured onto the rock.
Step 2: Creating the Pour
-
The initial pour:
Slowly pour the paint from your layered cup onto the center of the rock. Use a gentle circular motion as you pour to encourage the rings and swirls to form naturally. -
Cover the surface:
Continue pouring until the entire top surface is covered with a pool of paint. The excess will start dripping down the sides, which is exactly what we want. -
Tilt to manipulate:
If the paint hasn’t covered certain edges, carefully pick up the rock (wearing gloves helps here) and gently tilt it. Let gravity guide the swirls toward the bare spots. -
Refine the pattern:
I sometimes gently blow on specific areas of the wet paint to push the colors around and create more intricate, wispy lines between the purple and white layers. -
Touch up edges:
Check the underside edge of the rock. Use a craft stick to scoop up dripped paint from the tray and dab it onto any bare spots near the bottom rim.
Troubleshooting: Muddy Colors?
If your purples are turning grey/brown, you likely over-stirred or tilted too much. Stop manipulating the paint sooner to keep the color separation crisp.
Step 3: Drying and Sealing
-
Let it settle:
Place the rock back on its drying pedestal. The paint will continue to move slightly as it settles, so ensure the surface is perfectly level to prevent the design from sliding off. -
Pop bubbles:
Inspect the surface closely for tiny air bubbles. If you see any, gently prick them with a pin or pass a culinary torch quickly over the surface to pop them. -
Extended drying time:
Allow the rock to dry undisturbed for at least 24 to 48 hours. Pour painting takes significantly longer to dry than standard brushing because the paint is much thicker. -
Inspect the finish:
Once fully dry, check that the surface is hard and smooth. The colors usually darken slightly as they dry, making the purples richer. -
Apply the gloss:
To achieve that wet, polished look seen in the image, apply two coats of high-gloss varnish or a layer of art resin. This step makes the marbling truly pop and protects the stone.
Now you have a stunning, gem-like stone that captures the beauty of liquid motion forever
Purple Paisley and Swirl Doodle Mix
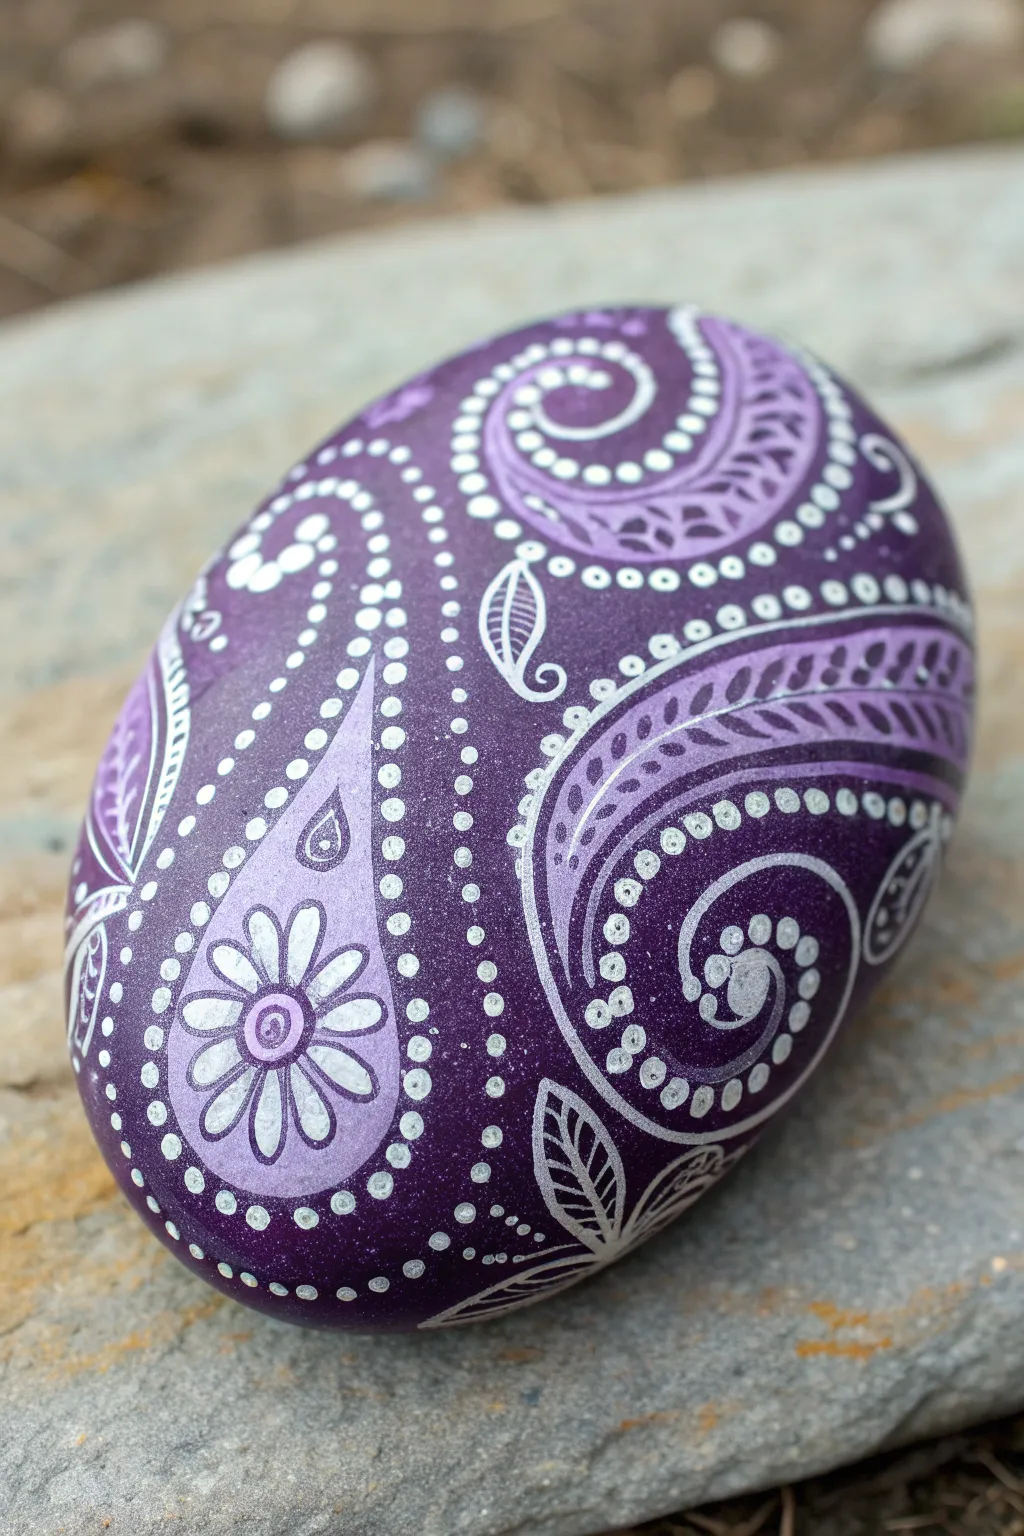
Transform a smooth river rock into an intricate piece of art featuring elegant paisley swirls and delicate dotwork. The deep purple background provides striking contrast for fine white and lavender details, creating a sophisticated look perfect for home decor or garden accents.
Step-by-Step Tutorial
Materials
- Smooth oval river rock (approx. palm-sized)
- Acrylic paint: Deep Purple/Violet
- Acrylic paint: White (Titanium White)
- Acrylic paint: Light Lavender or Lilac
- Fine detail brushes (sizes 0, 00, or liner brush)
- Dotting tools (various sizes, or toothpicks/brush handles)
- White gel pen (optional, for ultra-fine lines)
- Gloss acrylic varnish/sealer
- Water cup and paper towels
- Pencil for sketching (optional)
Step 1: Base Preparation
-
Clean the stone:
Wash your stone thoroughly with soap and water to remove any dirt or oils. Let it dry completely before starting. -
Apply base coat:
Paint the entire surface of the rock with the deep purple acrylic paint. I usually apply two or three thin coats rather than one thick one to ensure smooth, opaque coverage without brushstrokes. -
Dry thoroughly:
Allow the base coat to dry completely. If the paint feels tacky, give it more time or use a hairdryer on a cool setting to speed up the process.
Step 2: Main Paisley Shapes
-
Outline the large teardrops:
Using a fine liner brush and light lavender paint mixed with a tiny bit of white, lightly sketch the large teardrop (paisley) shapes. Place one prominent shape slightly off-center and curve the tail elegantly. -
Fill the primary shapes:
Fill the inside of your main paisley teardrop with the light lavender paint. Step back to ensure the color stands out against the dark purple background; add a second layer if it looks streaky. -
Add secondary swirls:
Create large, sweeping swirl shapes around the main teardrop using the deep purple base color mixed with just a hint of white to create a subtle, lighter purple outline, or use your white paint for high contrast immediately. -
Draft the flower center:
Inside the bottom bulb of the main lavender paisley, paint a small circle for a flower center using the dark purple base color.
Shaky Hands?
Rest your painting hand on the table or against your other hand for stability. Bracing your pinky finger against the rock itself works wonders for control.
Step 3: Intricate Line Work
-
Paint flower petals:
Using white paint and a very fine brush (or a white gel pen), draw elongated oval petals radiating from the flower center you created inside the lavender teardrop. -
Add internal details:
Inside the large purple swirls, paint finer lines such as hatched lines, small triangles, or smaller inner spirals using the light lavender shade. -
Draw leaf accents:
In the negative space between the main swirls, paint small, simple leaf shapes with a white outline. Add a central vein and diagonal veins to each leaf for texture. -
Refine the outlines:
Go over the outer edges of your main paisley and swirl shapes with a crisp white line to define them clearly against the dark background.
Pro Tip: Consistency
Mix your white paint with a drop of water or flow medium until it has an ink-like consistency. This creates smoother, longer lines without brush drag.
Step 4: Dotting and Texturing
-
Outline with dots:
Dip a small dotting tool or a toothpick into white paint. Carefully place a row of evenly spaced dots along the outer curve of the main lavender paisley shape. -
Create dotted swirls:
Follow the curves of your background swirls with a line of graduating dots—start with larger dots at the wide end of the swirl and decrease pressure to make smaller dots as the swirl tightens. -
Fill gaps with micro-dots:
Look for empty purple spaces between your main elements. Use a needle-point tool or the very tip of a size 000 brush to add tiny stippling dots in white to create a ‘dusty’ texture. -
Enhance the flower:
Place a single distinct white dot in the very center of the flower inside the paisley to make it pop.
Step 5: Finishing Touches
-
Check for consistency:
Review your lines. If any white lines look translucent, carefully retrace them to ensure they are bright and opaque. -
Final dry:
Let the detail work dry completely. This step is crucial because smudging the fine white lines is heartbreakingly easy at this stage. -
Seal the artwork:
Apply a coat of gloss varnish. The gloss finish will deepen the purple background and make the white details appear even brighter.
Place your finished paisley rock on a desk or shelf where the intricate details can be admired up close
Metallic-Look Purple Shimmer Strokes
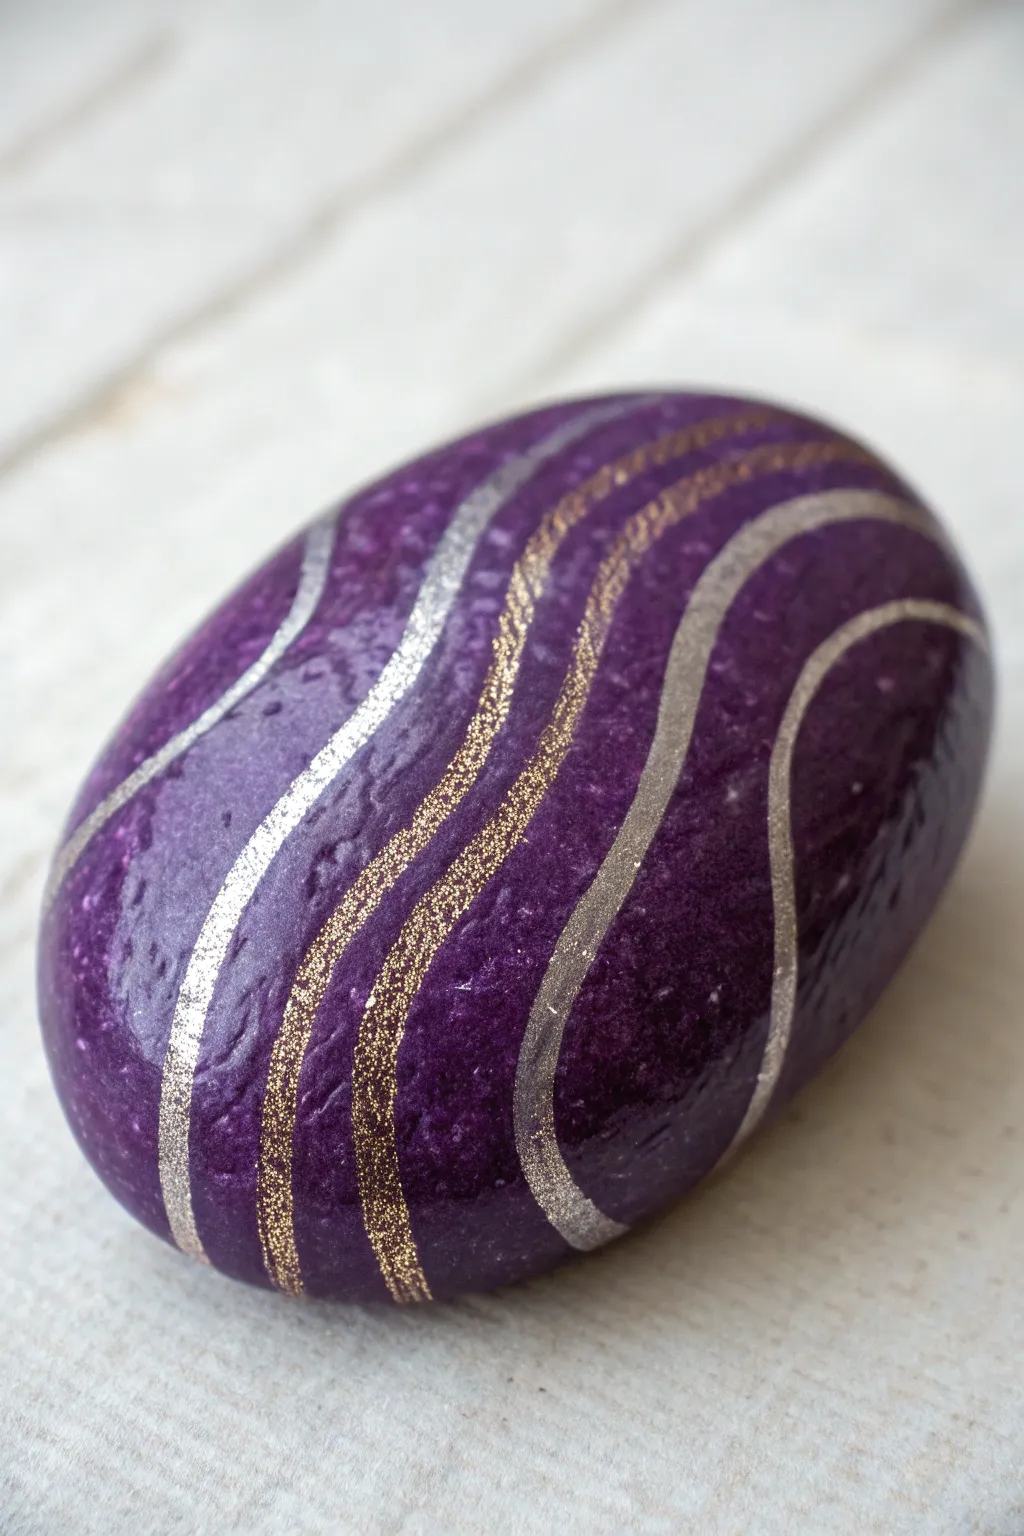
Transform an ordinary smooth stone into a luxurious decorative piece featuring deep, textured purple hues intersected by elegant metallic waves. This project combines rich acrylic layers with shimmering gold and silver accents for a sophisticated, modern look that catches the light beautifully.
Step-by-Step
Materials
- Smooth, oval river rock (cleaned and dried)
- Deep purple acrylic paint (gloss or satin finish)
- Metallic silver paint pen (medium tip)
- Metallic gold paint pen (fine tip) or gold glitter glue
- Wide flat paintbrush
- High-gloss varnish or sealant (spray or brush-on)
- Piece of sponge (optional for texture)
- Water cup and paper towels
Step 1: Base Coat Application
-
Prepare the stone:
Begin by washing your stone thoroughly with soapy water to remove any dirt or oils. Let it dry completely before starting, as moisture can trap under the paint and cause peeling later. -
Apply the first purple layer:
Using a wide flat brush, coat the entire top surface of the rock with your deep purple acrylic paint. Don’t worry about complete opacity yet; just get good coverage. -
Create texture (optional):
While the first coat is still tacky, you can lightly dab it with a small piece of sponge. This creates that slightly uneven, organic texture seen in the reference, rather than a perfectly flat plastic look. -
Layer specifically for depth:
Apply a second coat of purple once the first is dry to touch. I like to use a slightly darker shade or mix a tiny bit of black into the purple for this layer to add richness and dimension. -
Final drying time:
Allow the purple base to cure completely. It needs to be bone dry so the metallic pens glide smoothly without digging into the base paint.
Uneven Lines?
If your hand shakes while drawing waves, try moving your whole arm instead of just your wrist. Faster strokes often result in smoother curves than slow ones.
Step 2: Adding Metallic Accents
-
Plan the flow:
Visualize three to five wavy lines moving diagonally across the stone. They should follow the natural curve of the rock’s shape for a harmonious composition. -
Draw the main silver waves:
Take your silver metallic paint pen and draw the first thick, wavy line. Press down firmly to deposit a generous amount of ink. -
Thicken the silver lines:
Go back over your silver lines to thicken them slightly. The goal is a bold, solid metallic stripe that contrasts sharply with the dark background. -
Add secondary silver curves:
Add one or two more silver lines parallel to the first, keeping the spacing somewhat irregular to look more natural. -
Introduce the gold glitter:
Using a gold glitter pen or fine gold paint pen, draw lines in between the silver ones. These should be slightly thinner than the silver strokes. -
Texturize the gold:
If using a paint pen, tap the tip repeatedly while moving along the line to create a stippled, glittery effect rather than a solid line. -
Check spacing:
Step back and look at the balance. You want alternating cool (silver) and warm (gold) tones against the purple. -
Touch up edges:
Clean up any shaky edges on the silver lines. A sharp, crisp edge makes the metallic effect look much more professional.
Step 3: Sealing and Finishing
-
Dry the metallics:
Metallic pens can sometimes smear easily. Let the rock sit undisturbed for at least 30 minutes to ensure the ink is totally set. -
Apply varnish:
Coat the entire stone with a high-gloss varnish. The gloss finish is crucial as it creates that ‘wet look’ and enhances the shimmer of the metallic pigments. -
Check for bubbles:
Inspect the varnish immediately after application for any air bubbles and brush them out gently if found. -
Final cure:
Let the varnish cure according to the manufacturer’s instructions, usually leaving it overnight for a rock-hard finish.
Galaxy Twist
Before adding stripes, sponge a tiny bit of vibrant pink or light blue onto the purple base for a subtle galaxy nebula effect under the metallic lines.
Place your shimmering stone on a desk or shelf where it can catch the sunlight and display its elegant textures
Purple Full Moon Over Spindly Trees
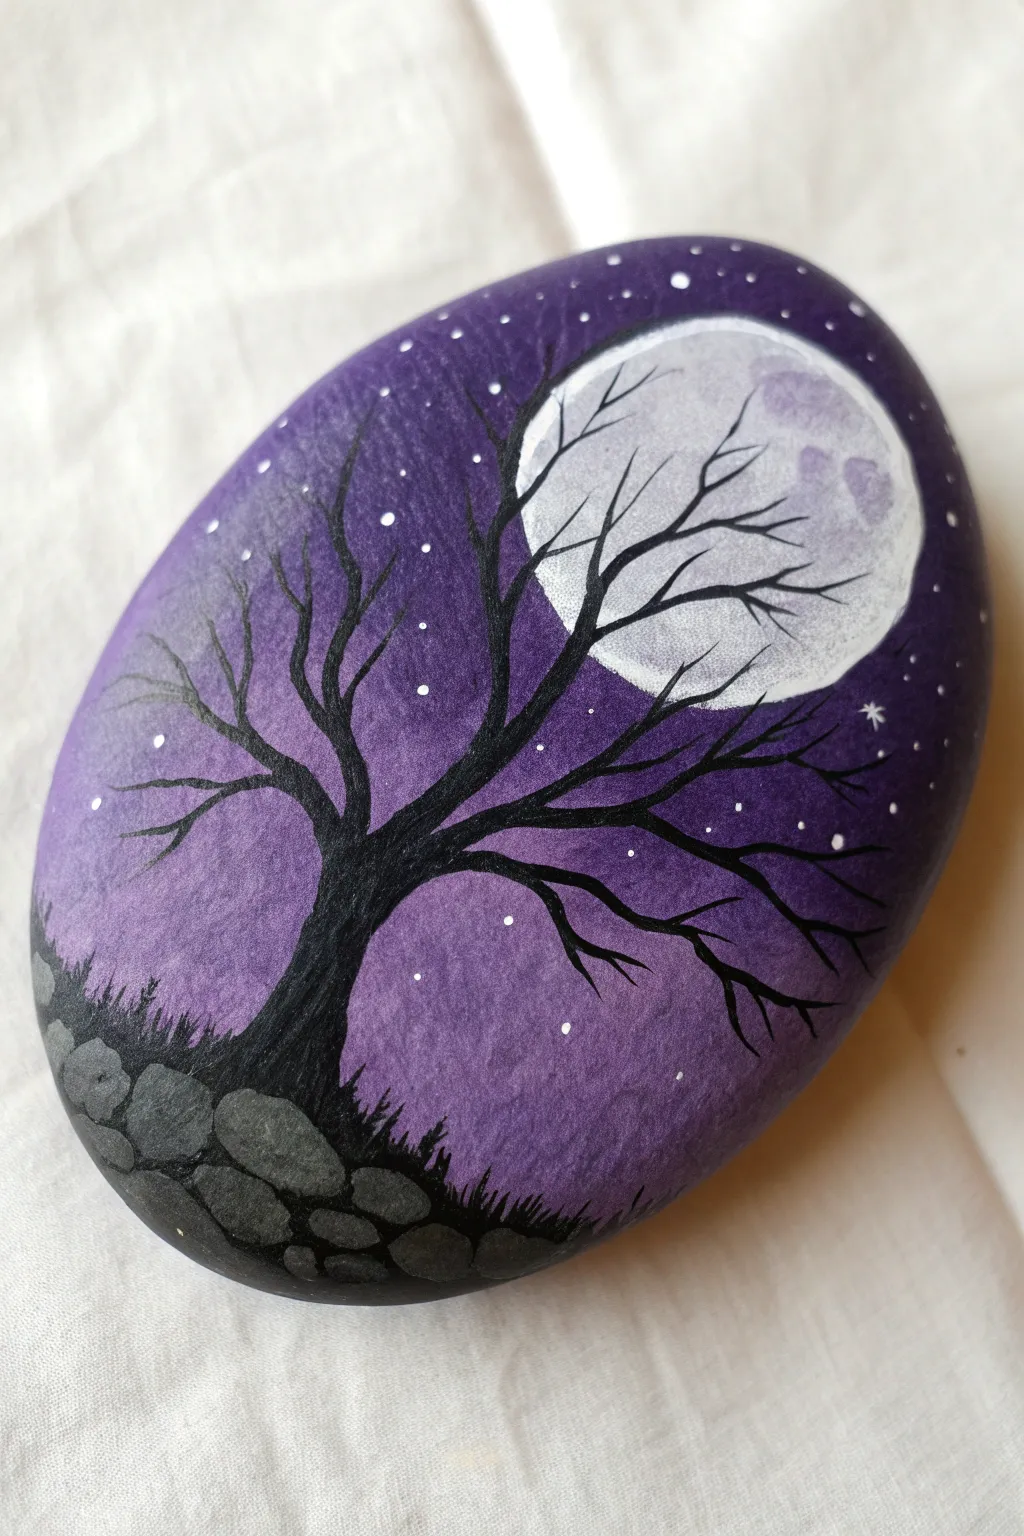
Capture the mystic beauty of a moonlit night on a smooth stone canvas. This project blends a moody purple gradient background with the stark silhouette of a spooky tree, creating a striking contrast that fits perfectly in any rock garden or desk display.
How-To Guide
Materials
- Smooth, oval river rock (about 3-4 inches wide)
- Acrylic paints: Dark violet, lavender, white, black, grey
- Flat paintbrush (medium size)
- Round paintbrush (small size)
- Detail liner brush (very fine, size 0 or 00)
- Sponge dabber or small piece of cosmetic sponge
- Water cup and paper towels
- Clear acrylic sealer (spray or brush-on, matte or glossy)
Step 1: Setting the Scene
-
Clean Your Canvas:
Begin by washing your rock with soap and water to remove any dirt or oils. Let it dry completely so the paint adheres properly. -
Base Coat:
Paint the entire top surface of the rock with a medium purple or lavender shade. This acts as a primer and ensures your colors pop. Let this layer dry fully. -
Creating the Gradient:
Load a sponge or flat brush with dark violet paint. Dab the outer edges of the rock, gradually working inward but leaving the center lighter. -
Blending Inward:
While the dark violet is still slightly wet, pick up some lighter lavender paint. Blend the dark edges into the lighter center using soft, tapping motions to create a seamless transition. -
Moon Placement:
Identify the spot for your moon in the upper right quadrant. Gently dab white paint in a circular shape here, blending the edges very slightly into the surrounding purple to create a glowing halo effect. -
Drying Time:
Allow the gradient background to dry completely. I like to wait at least 15-20 minutes here so the next layers don’t smudge.
Moon Glow Trick
Before painting the white moon, dry-brush a very faint ring of white around where the moon will go. It creates a hazy atmospheric glow.
Step 2: Painting the Moon
-
Solid White Circle:
Using your small round brush and white paint, fill in the moon shape properly. Make it opaque and bright. -
Adding Craters:
Mix a tiny amount of grey with white to get a very pale grey. Dab small, uneven blotches onto the white moon to mimic craters and texture. Keep this subtle.
Add Sparkle
Mix a tiny pinch of fine iridescent glitter into your final clear sealant coat to make the starry sky actually twinkle in the sunlight.
Step 3: Stonework and Silhouette
-
Sketch the Wall:
At the bottom left curve of the rock, use a small brush and grey paint to outline a stack of rounded stones forming a low wall. -
Fill the Stones:
Fill in the stone shapes with dark grey. Add highlights to the top edges with a lighter grey mix to give them dimension. -
Stone Shadows:
Use black paint to fill in the gaps between the wall stones, defining their individual shapes. -
Ground Line:
Paint a solid black wavy line across the bottom of the rock, covering the base of the stone wall and extending to the right edge to represent the ground. -
Main Trunk:
Using black paint and a liner brush, paint the thick trunk of the tree starting from the stone wall. Curve it slightly towards the center of the rock. -
Primary Branches:
Extend 3 to 4 main branches out from the trunk. Make them thicker at the base and taper them off as they reach outward. -
Spindly Details:
With your finest liner brush, add many small, twisting twigs coming off the main branches. Let some overlap the bright white moon for dramatic contrast. -
Grassy Texture:
Use the very tip of your brush to flick tiny black strokes upward along the ground line, creating the look of wild grass. -
Starry Night:
Dip the tip of a toothpick or a fine styling tool into white paint. Dot tiny stars scattered across the purple sky, varying their spacing. -
Final Seal:
Once the artwork is completely bone dry (give it a few hours), apply a clear acrylic sealer to protect your painting from chipping and UV light.
Place this mystical stone in a potted plant or give it as a magical gift to a friend
Purple Ladybug With Classic Black Spots
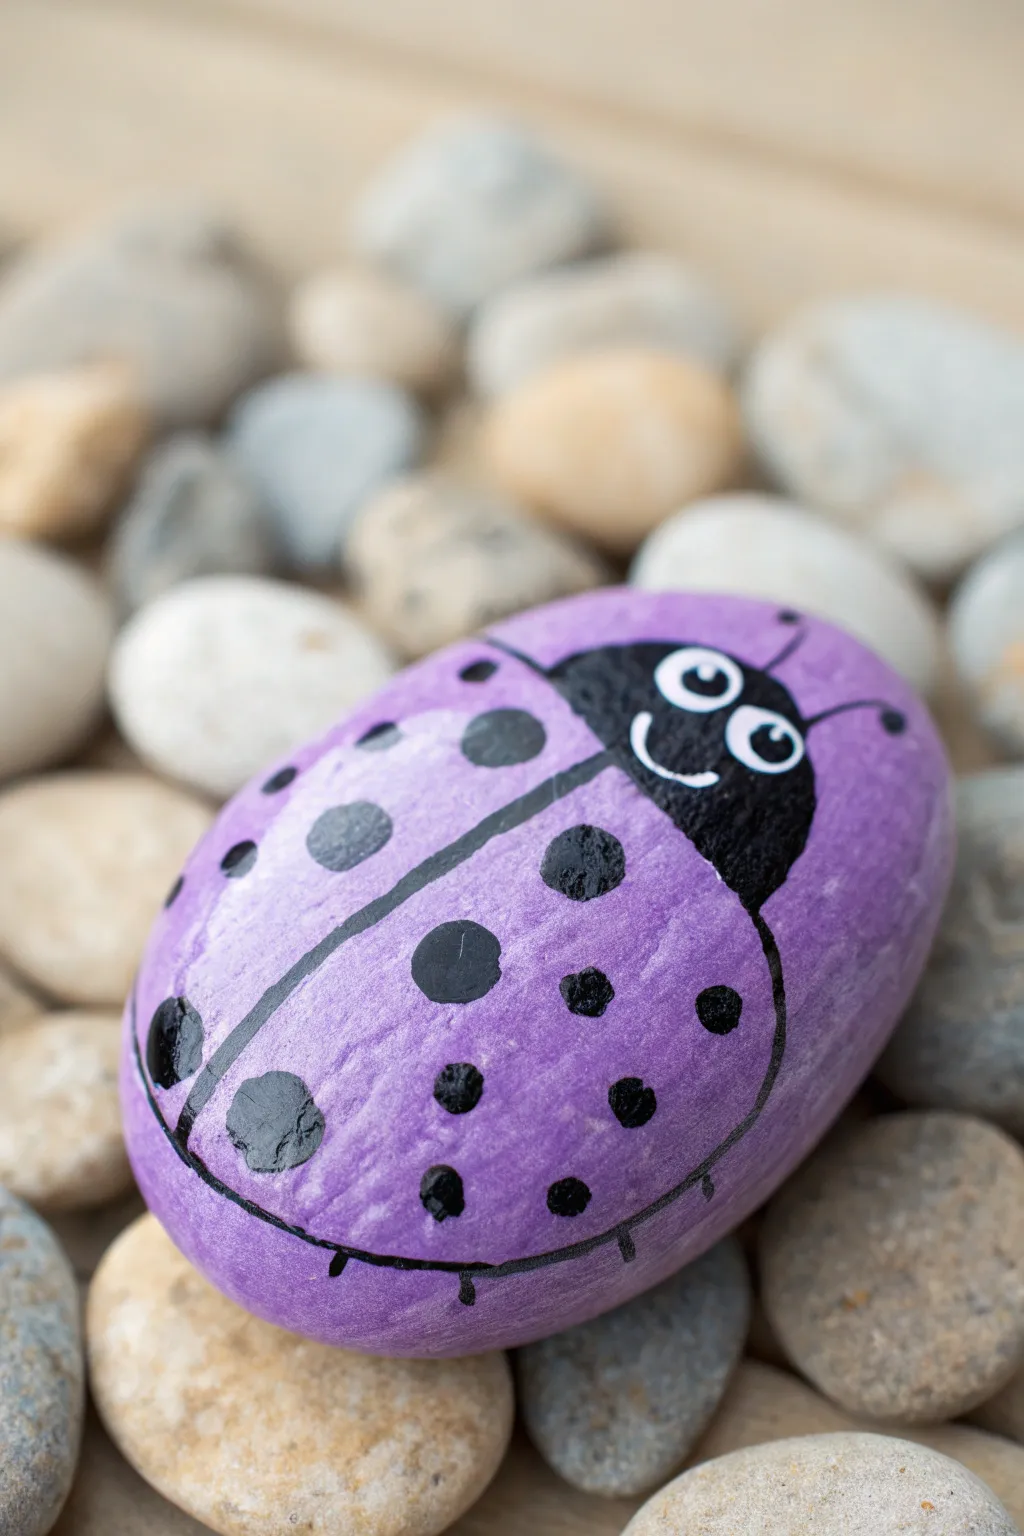
Switch up the traditional red and black for something a little more magical with this lovely purple ladybug design. The simple black spots and friendly eyes make this a perfect beginner project that adds a pop of lilac charm to any garden or desk.
Step-by-Step Guide
Materials
- Smooth, oval-shaped river rock
- Purple acrylic paint (a nice lilac or lavender shade)
- Black acrylic paint
- White acrylic paint
- Medium flat paintbrush
- Small round detail brush
- Very fine liner brush (optional)
- Dotting tool or toothpick
- Sealant (spray or brush-on varnish)
Step 1: Base Coating
-
Clean your canvas:
Before you unscrew any paint caps, give your rock a good wash with soap and water to remove any dirt or oils. Let it dry completely so the paint adheres properly. -
Apply the purple base:
Using your medium flat brush, coat the entire top surface of the rock with your chosen purple acrylic. Start from the center and brush outwards. -
Add a second coat:
Acrylic purples can sometimes be slightly translucent. Once the first layer is dry to the touch, apply a second coat to get that solid, opaque lavender color shown in the photo. -
Dry thoroughly:
Patience is key here—let the purple base dry completely before moving on to the black details to prevent any muddy smearing.
Uneven Coverage?
If your purple paint looks streaky, don’t just pile on more wet paint. Let the streak layer dry completely, then add another thin layer. Several thin coats are smoother than one thick, gloopy one.
Step 2: Mapping the Body
-
Paint the head:
Dip a small round brush into black paint. At the narrower end of the rock (if there is one), paint a semi-circle shape to create the ladybug’s head. -
Draw the center line:
Switch to a fine liner brush or just the tip of your round brush. Starting from the bottom center of the black head, draw a thin black line straight down the middle of the rock to the opposite end. This divides the wings. -
Add the neck detail:
Where the head meets the purple body, re-trace the curved edge slightly to ensure a clean, crisp boundary between the black and purple sections. -
Create the bottom curve:
At the very bottom of the rock (opposite the head), paint a thin curved line that mimics the curve of the rock’s edge, connecting the bottom of your center line to the sides. -
Add subtle leg markings:
Along the bottom curved line you just painted, add tiny little tick marks spaced out evenly. These serve as stylized little feet or leg indicators.
Antennae Trick
For super fine antennae lines without a liner brush, try drawing them with a black permanent marker or paint pen after the base paint is 100% dry. It offers way more control.
Step 3: Adding Details
-
Paint the main spots:
Using your small round brush and black paint, add several large circular spots on both sides of the center line. I find random placement looks more natural than a perfect grid. -
Add varied smaller spots:
Fill in the gaps with smaller black dots. You can use the handle end of a paintbrush or a dotting tool to stamp these smaller circles perfectly. -
Outline the wings (optional):
If you want extra definition, very lightly outline the outer curve of the purple ‘wings’ with a thin black line, though leaving it soft is also fine. -
Start the eyes:
Once the black head section is fully dry, dip a clean brush handle or large dotting tool into white paint. Stamp two large white circles onto the black head area. -
Add pupils:
Wait for the white circles to dry. Then, using a smaller tool or fine brush tip, place a black dot inside each white circle. Position them slightly toward the top or center for a looking-up expression. -
Paint the smile:
Use your finest brush or a toothpick with white paint to draw a tiny, thin curved line just below the eyes for a happy little smile. -
Give it antennae:
Using black paint and a liner brush, paint two short, curved lines extending from the top of the head area. Add a tiny dot at the end of each line for the antennae tips.
Step 4: Finishing Up
-
Let it cure:
Give the rock several hours (or overnight) to ensure every layer of paint is rock-hard and dry. -
Seal the deal:
Apply a clear varnish or sealant over the entire painted surface. This protects your purple ladybug from the elements if she decides to live in the garden.
Now you have a charming little garden friend ready to brighten up a potted plant or windowsill
Dragon Scale Texture in Purple Tones
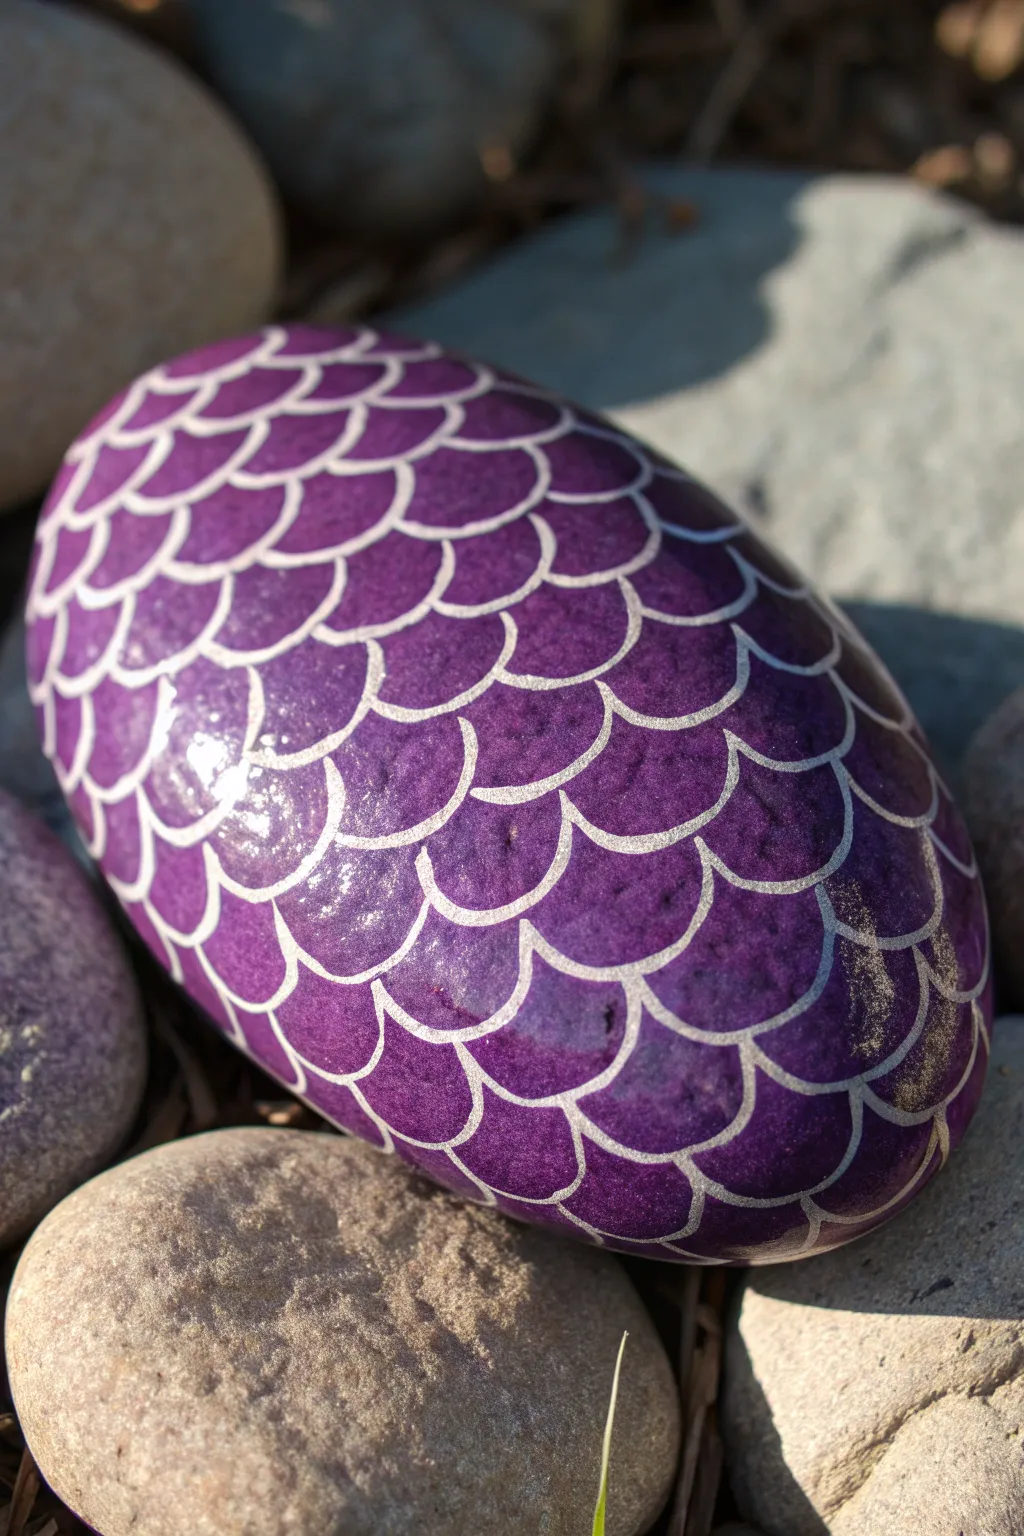
Transform an ordinary garden stone into a mythical artifact with this mesmerizing dragon scale design. The rich purple hues combine with delicate metallic linework to create depth and magic that fits right in the palm of your hand.
Detailed Instructions
Materials
- Smooth, oval river rock (medium size)
- Purple acrylic paint (deep violet shade)
- Metallic silver or white paint pen (fine tip/extra fine tip)
- Glossy acrylic varnish or sealer
- Soft flat paintbrush
- Pencil (optional for sketching)
- Damp cloth for clean up
Step 1: Base Coat Preparation
-
Clean Your Canvas:
Begin by scrubbing your rock thoroughly with soap and water to remove any dirt or oils. Let it dry completely before starting to ensure the paint adheres properly. -
First Purple Layer:
Using a soft flat brush, apply a coat of deep violet acrylic paint over the entire top surface of the rock. Don’t worry about the bottom just yet; focusing on the visible area makes handling easier. -
Build Opacity:
Allow the first coat to dry until it’s matte to the touch. Apply a second coat of purple to ensure full, opaque coverage, hiding the original stone color completely. -
Check for Smoothness:
Inspect the surface for any brushstrokes or lumps. If the rock texture is rough, a third thin layer can help self-level the surface, providing a smoother base for your fine lines.
Step 2: Drawing the Scales
-
Start at the Top:
Take your fine-tip metallic silver or white paint pen. Shake it well to activate the ink flow. Start near the very top center of the rock with a single, small U-shape. -
Second Row Formation:
Create the second row by drawing two U-shapes directly beneath the first one. Each new scale should start from the middle of the curve above it, creating an overlapping brick pattern. -
Expanding the Pattern:
Continue to the third row, adding more scales. The key is to keep your wrist loose and try to maintain a consistent size for each ‘U’ curve as you work your way down. -
Handling the Curves:
As you move down the rock where it becomes wider, add extra scales on the sides. You naturally have to stretch the outer scales slightly to wrap around the curved three-dimensional surface. -
Mid-Rock Rhythm:
When you reach the widest part of the rock, finding a rhythm is helpful. I like to work from left to right for each row to keep the spacing even. -
Closing gaps:
Make sure the connection points of your scales touch the line of the row above. Gaps can break the illusion of overlapping armor.
Wobbly Lines?
If your hand is shaking, rest your pinky finger on a dry part of the rock for stability. If you mess up a curve, quickly wipe it away with a damp Q-tip before it dries.
Step 3: Finishing Touches
-
Tapering the Bottom:
As the rock narrows toward the bottom, reduce the number of scales in each row. Let the curves flow naturally off the edge of the painted area. -
Touch Ups:
Inspect your linework. If the paint pen skipped or the line looks faint in areas, carefully retrace those specific segments to brighten the silver. -
Drying Time:
Let the paint pen ink cure for at least an hour. Metallic pens can sometimes smear if you seal them too quickly. -
Sealing the Magic:
Apply a coat of glossy varnish or sealer. This is crucial as it brings out the richness of the purple and gives the ‘egg’ a wet, freshly laid appearance. -
Final Cure:
Set the rock in a dust-free area to dry overnight. Once hardened, it is ready to be displayed in a garden or on a shelf.
Level Up: Ombré Effect
Before drawing scales, sponge a lighter shade of purple or pink onto the center of the rock over the dark base. This creates a glowing highlight beneath the scales.
Now you have a stunning dragon egg creating a magical focal point in your rock collection
Negative-Space Purple Botanicals
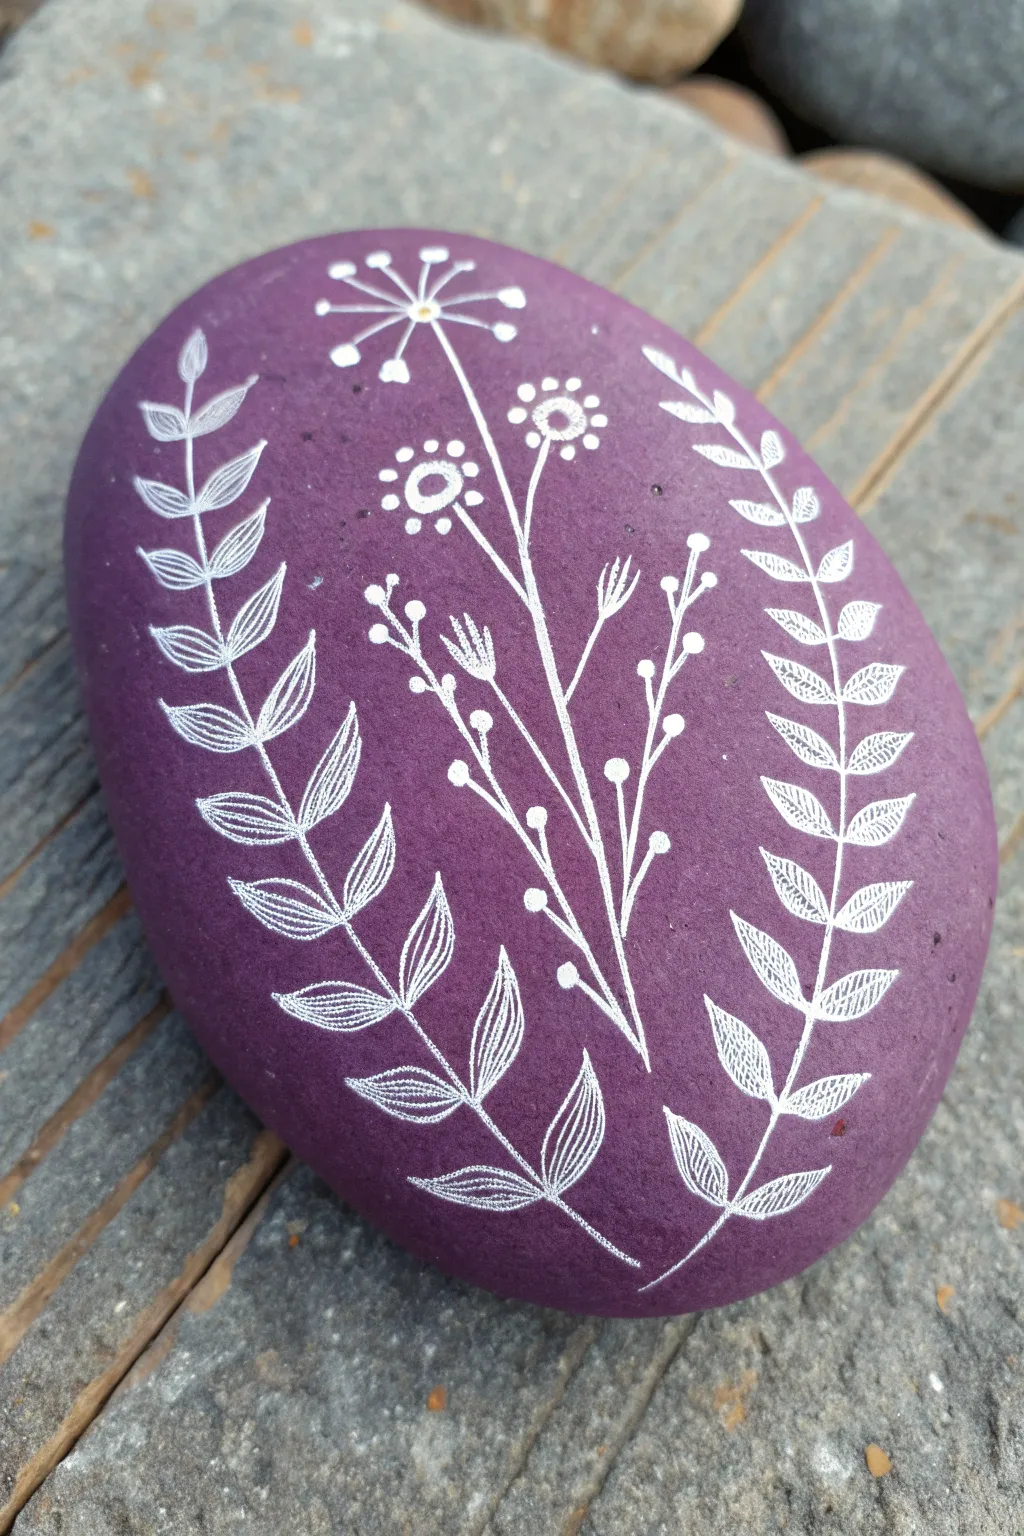
Transform a smooth river rock into a piece of botanical art with this elegant high-contrast design. The deep plum purple background makes the delicate, fine-line white florals pop beautifully, evoking the style of a vintage botanical print.
Step-by-Step
Materials
- Smooth oval river rock (medium size)
- Deep purple acrylic paint (matte or satin finish)
- White extra-fine tip paint pen (0.7mm or 0.5mm)
- Wide flat paintbrush
- Pencil (optional)
- Eraser
- Spray varnish or clear sealer (matte recommended)
Step 1: Preparing the Canvas
-
Clean the stone:
Before you begin, scrub your rock thoroughly with soap and water to remove any dirt or oils that might repel the paint. Let it dry completely. -
Base coat application:
Using your wide flat brush, apply a generous coat of deep purple acrylic paint to the entire top surface of the stone. Smooth out your brushstrokes so the finish is even. -
Drying and second coat:
Allow the first coat to dry for about 15-20 minutes. If the stone’s natural color is peeking through, apply a second coat for a solid, opaque background. -
Final drying check:
Wait until the purple surface is completely dry to the touch. If the paint is even slightly tacky, the paint pen nib might clog or scrape up the base layer in the next steps.
Pen Primer
Before touching the rock, press the paint pen nib on a scrap piece of paper a few times to get the ink flowing smoothly. This prevents sudden blobs of white ink on your purple base.
Step 2: Drawing the Floral Centerpiece
-
Planning the layout:
Visualize the center of the rock. The design consists of three main elements: a central floral cluster flanked by two curving leafy ferns. You can lightly sketch the main stems with a pencil, but keep the lines very faint. -
Central stem:
Start with the white paint pen in the lower center. Draw a thin, slightly curved line reaching upward to about the top third of the stone. -
Top flower burst:
At the very top of your center stem, draw a burst shape like a dandelion seed head. Create 5-6 small straight lines radiating from a central point, then add small dots at the end of each line. -
Secondary flower stems:
Branching off the main central stem, draw two slightly shorter stems curving outward. On the ends of these, draw small circle flowers with dots in the centers, resembling simplified daisies. -
Adding filler sprigs:
Fill the lower gap between the main stems by adding delicate, thin sprigs with tiny dots on the tips. These mimic baby’s breath or seed pods and add texture to the middle section.
Step 3: Adding the Framing Ferns
-
First fern spine:
On the left side of the rock, draw a long, curving line that follows the contour of the stone’s edge. This is the spine of your first fern. -
Drawing the leaves:
Along this spine, draw pairs of pointed, almond-shaped leaves. Instead of filling them in solid white, trace the outline of each leaf and draw a single line down the center of each for a detailed, veined look. -
Mirroring the design:
Repeat this process on the right side. Draw a curving spine mirroring the left one, following the right curve of the stone. -
completing the right fern:
Add the almond-shaped leaves to the right spine, keeping the spacing consistent with the left side to maintain symmetry. -
Refining the details:
Go back over your white lines to see if any areas need brightening. I like to add a second pass to the main stems to make them slightly bolder than the delicate veins of the leaves. -
Clean up:
If you used any pencil guidelines that are still visible, wait for the white ink to cure completely (at least an hour) before gently erasing them. -
Sealing:
Spray the finished rock with a matte clear sealer to protect the paint without adding too much shine, preserving that natural stone fee.
Golden Touch
Make the design luxurious by adding tiny dots of metallic gold paint to the centers of the circular flowers or the tips of the ‘seed’ sprigs.
Now you have a stunning, sophisticated garden stone ready for display or gifting
Abstract Purple Color-Block Geometry

Transform a simple smooth stone into a mesmerizing geometric jewel using shades of violet and crisp white lines. This project combines the relaxing repetition of coloring with bold, architectural shapes for a modern art piece.
Detailed Instructions
Materials
- Smooth, oval river rock
- Painter’s tape or thin masking tape (1/8 inch or 3mm width)
- Acrylic paints (dark purple, violet, magenta, white)
- Fine detail paintbrush (size 0 or 1)
- Posca paint pen (white, fine tip 0.7mm)
- Palette for mixing
- Matte spray varnish
Step 1: Preparation and Mapping
-
Clean the Surface:
Begin by washing your rock thoroughly with soap and water to remove any dirt or oils. Let it dry completely before starting. -
Plan the Geometry:
Visualize a star or intersecting triangle pattern. Instead of drawing complex grids, you will create the structure using tape to ensure perfectly straight lines. -
Apply the First Tape Lines:
Take your thin painter’s tape and lay down two long strips that crisscross the rock from end to end, creating a large X shape. -
Create Intersections:
Add 2-3 more strips of tape horizontally or diagonally across the X. The goal is to create various enclosed triangular and polygonal shapes of different sizes. -
Seal the Edges:
Run your fingernail or a burnishing tool firmly along the edges of every piece of tape. This is crucial to prevent paint from bleeding underneath and ruining your crisp lines.
Clean Lines Secret
Paint a layer of the *base* rock color or white over the tape edges first. This seals the gap so any bleed is invisible, keeping your purple lines sharp.
Step 2: Color Blocking
-
Mix Your Palette:
Squeeze out your dark purple, violet, and magenta paints. Create 2-3 custom shades by mixing white into the purple for a lavender tone, and mixing magenta with violet for a warmer plum hue. -
Paint the Deepest Tones:
Select 3-4 scattered sections on the rock and fill them in with your darkest purple paint. I like to keep these sections apart so similar colors don’t touch. -
Add Medium Shades:
Move on to your standard violet and magenta shades. Fill in the sections adjacent to the dark purple, ensuring good coverage. Two thin coats are better than one thick glob. -
Apply Light Accents:
Use your custom-mixed lavender or pale lilac for the remaining empty shapes. This high contrast against the dark purple adds depth to the design. -
Dry Completely:
Allow the paint to dry fully. Since we are using tape, the paint needs to be 100% dry to the touch before moving to the next step, or it might peel up.
Step 3: Refining and Finishing
-
The Reveal:
Carefully peel away the tape one strip at a time to reveal the raw stone color beneath. Do this slowly to avoid chipping the paint edges. -
Define the Grid:
Use a fine-tip white paint pen to draw over the empty lines where the tape used to be. The tape created the gap; the pen creates the crisp white skeleton. -
Correct Overspray:
If any purple paint bled under the tape earlier, simply color over it with the opaque white paint pen to hide the mistake. -
Enhance Texture:
For a stone-like texture as seen in the photo, you can lightly stipple a tiny bit of a slightly lighter purple shade into the center of the larger dark shapes using a nearly dry brush. -
Seal the Work:
Once the white ink is completely dry, take the rock outside and apply a coat of matte spray varnish to protect the paint without making it unnaturally glossy.
Bleeding Tape?
If paint seeps under the tape, wait for it to dry. Scrape the excess gently with a toothpick, then re-draw the line with your white paint pen.
Display your geometric stone as a modern paperweight or hide it in a garden for someone to find


Have a question or want to share your own experience? I'd love to hear from you in the comments below!