When I want a wall to feel layered and lived-in, rag painting is the first technique I reach for because it creates depth without needing perfect brushwork. Here are my favorite rag rolling and ragging off ideas—starting with the classics and ending with a few playful twists you can totally make your own.
Classic Neutral Rag-Rolled Accent Wall
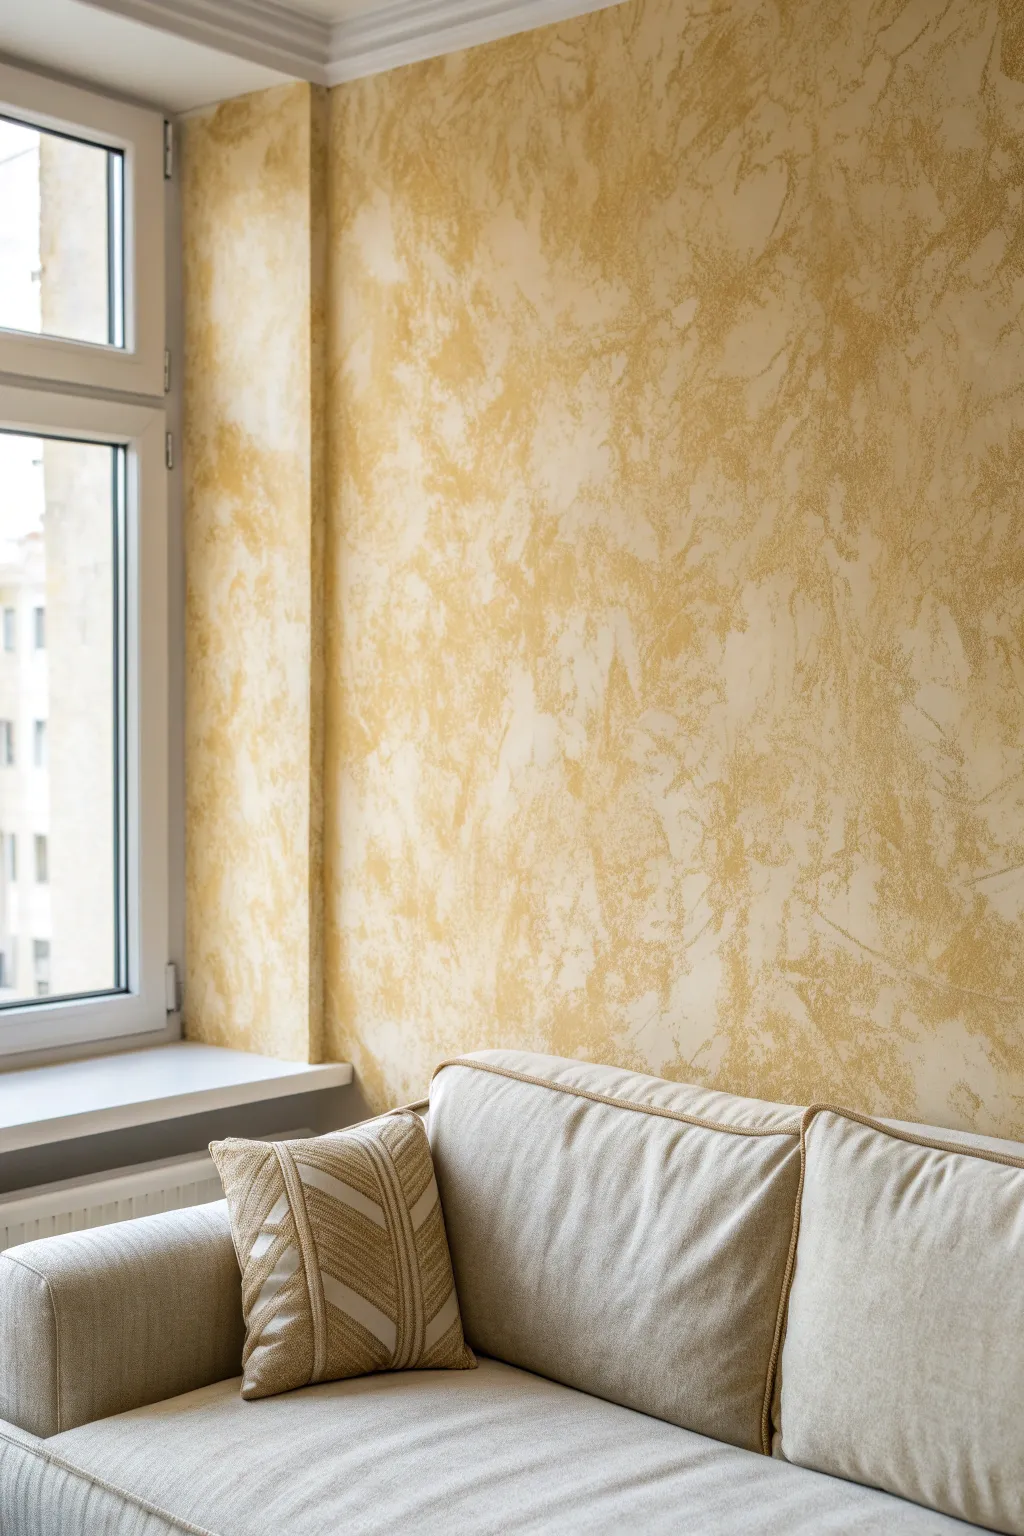
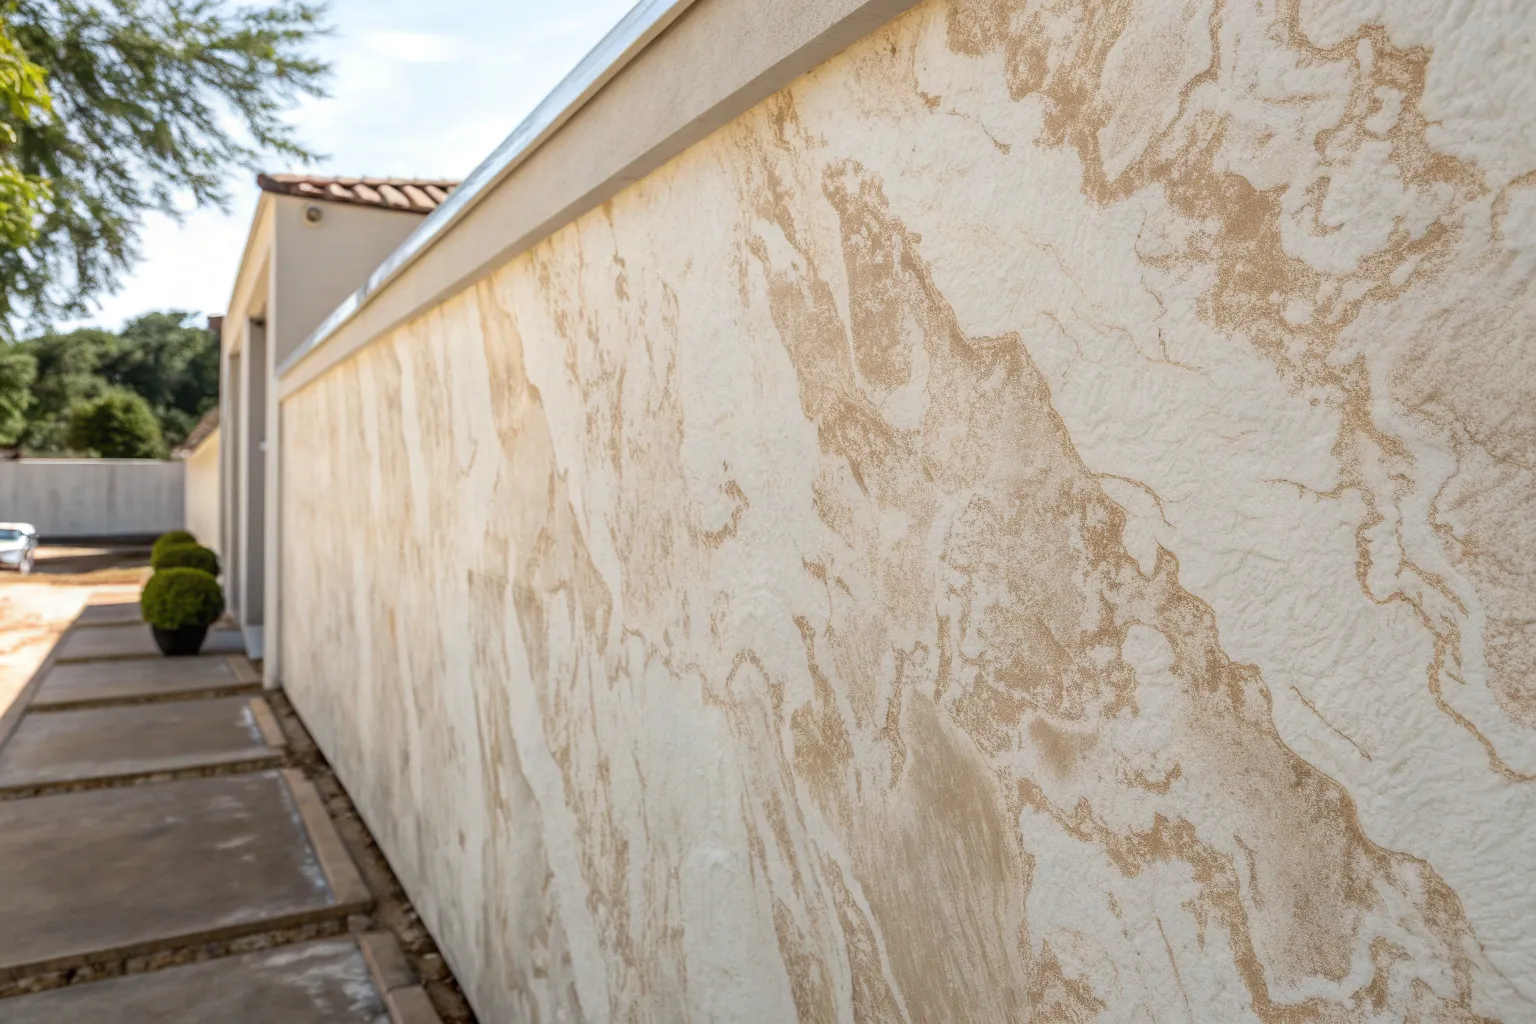
Transform a plain white wall into a warm, textured masterpiece with this classic rag-rolling technique. The effect mimics expensive Venetian plaster or aged parchment, brining a luxurious and soft depth to your living space using simple tools.
Step-by-Step
Materials
- Satin finish base paint (Cream or Off-White)
- Semi-gloss or eggshell glaze coat paint (Golden Ochre)
- Clear acrylic glaze medium
- Painter’s tape
- Drop cloths
- Paint roller and tray
- Lint-free cotton rags (old t-shirts work best)
- Bucket of water
- Latex gloves
- Mixing bucket
Step 1: Preparation and Base Coat
-
Protect the area:
Clear furniture away from the wall and lay down drop cloths to protect your flooring. Tape off the ceiling line, baseboards, and window trim securely. -
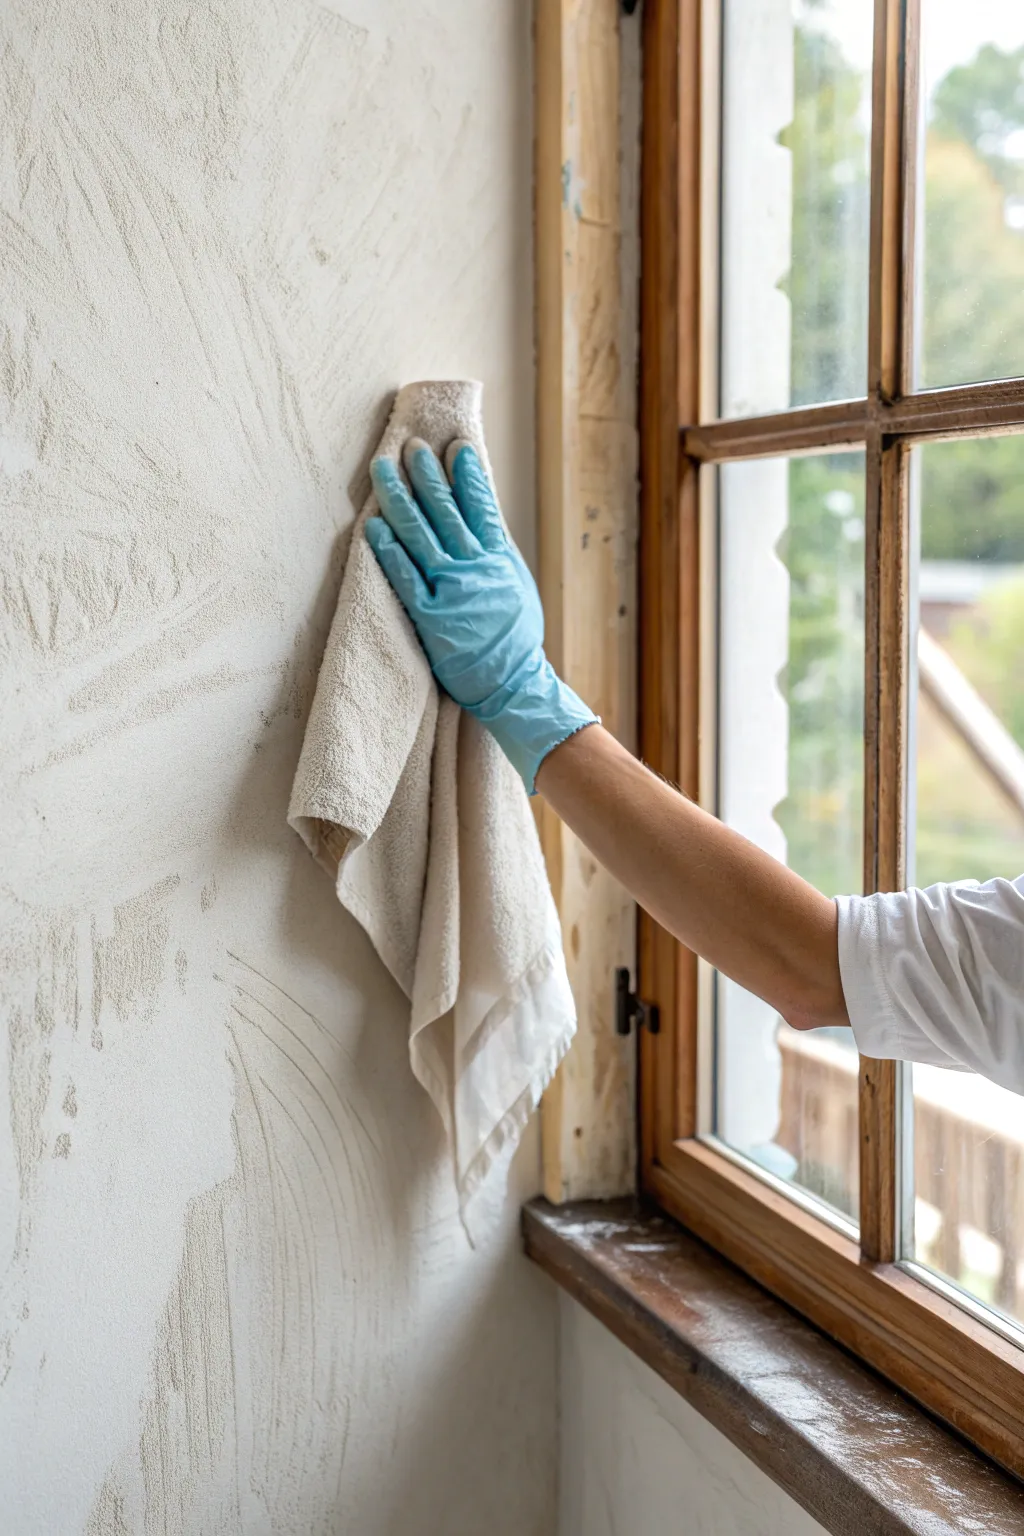
Clean the surface:
Wipe down the wall with a damp cloth to remove dust or grease, ensuring the paint adheres properly. -
Apply the base color:
Roll on your base coat of cream or off-white satin paint. Use a standard ‘W’ motion to get even coverage. -
Check coverage:
Once the first coat is dry to the touch, assess if a second coat is needed for a solid, opaque background. -
Let it cure:
Allow the base coat to dry completely, preferably overnight. A fully cured base is crucial so the ragging process doesn’t lift the bottom layer.
Uneven Texture?
If you see a distinct line where sections dried too fast, rehydrate the edge slightly with a misty spray bottle of water and dab with a clean rag to blend.
Step 2: Mixing the Glaze
-
Prepare the glaze mixture:
In your mixing bucket, combine one part of your golden ochre paint with four parts of the clear acrylic glaze medium. -
Test transparency:
Dip a stir stick into the mix. The glaze should be translucent, not opaque. Add more glaze medium if the color is too dense, or a touch more paint if it’s too weak. -
Prepare your rags:
Cut your clean, lint-free cotton cloth into manageable squares, roughly 18 inches by 18 inches. -
Dampen the first rag:
Soak one rag in clean water and wring it out thoroughly until it is just slightly damp, not dripping. -
Bunch the rag:
Crumple the damp rag in your hand like a loose ball of paper. Avoid folding it neatly; random creases create the best texture.
Step 3: Ragging Technique
-
Apply glaze to wall:
Working in a small section (about 3×3 feet), use a brush or roller to apply a thin layer of your gold glaze mixture onto the wall. -
Start ragging:
Immediately take your crumpled rag and press it into the wet glaze, lifting it straight back off. This removes some glaze and reveals the cream base underneath. -
Rotate frequently:
As you dab the wall, rotate your wrist and change the grip on the rag constantly to avoid a repetitive ‘stamp’ pattern. -
Keep the edge wet:
Leave the outer edges of your working section slightly untouched or ‘feathered’ so you can blend the next patch seamlessly without hard lines. -
Rinse or switch rags:
Once the rag becomes saturated with glaze, surface texture will be lost. Rinse it out in your water bucket and wring firmly, or switch to a fresh rag. -
Continue the process:
Move to the adjacent section, overlapping the wet edges slightly to blend the texture. I prefer to step back every few feet to check for visual balance. -
Detail work:
Use a smaller piece of rag to get tight into corners and along the ceiling line where the large bunched rag won’t fit. -
Final inspection:
Scan the wall for any areas that look too heavy with glaze. If the glaze is still tacky, you can blot these spots lightly with a clean, dry rag to lift excess color. -
Remove tape:
Carefully peel away the painter’s tape while the glaze is still slightly tacky to prevent peeling the dried finish. -
Dry time:
Allow the finish to dry completely according to the glaze manufacturer’s instructions before moving furniture back.
Wrinkle It Up
The tighter you bunch the rag, the sharper and more intricate the veins will be. For a softer, cloud-like look, hold the rag more loosely.
Enjoy the elegant atmosphere your new golden textured wall brings to the room


Soft Two-Tone Ragging Off Texture
Achieve a dreamy, cloud-like atmosphere with this subtle ragging-off technique that blends soft color with tactile depth. By removing wet glaze with a bunched cloth, you reveal the base coat underneath while creating organic, flowing movement across your walls.
Step-by-Step Guide
Materials
- Satin or eggshell base paint (white or off-white)
- Latex glaze (clear mixing glaze)
- Top coat paint (soft beige or taupe)
- Clean, lint-free cotton rags (t-shirt material works best)
- Blue painter’s tape
- Paint roller and tray
- 2-inch angled trim brush
- Disposable gloves
- Bucket of water (for rinsing rags)
Step 1: Preparation & Base Coat
-
Protect boundaries:
Begin by taping off all trim, including window casings, baseboards, and ceiling lines, with high-quality painter’s tape to ensure crisp edges. -
Apply the base:
Roll on your base coat of white or very light off-white paint. Use a satin or eggshell finish, as these sheens allow the glaze to slide better than flat paint. -
Ensure coverage:
If the original wall color shows through, apply a second coat of the base paint. -
Let it cure:
Allow the base coat to dry completely, preferably overnight, so the tape doesn’t pull it up and the glaze doesn’t soften it.
Clean Rag = Sharp Texture
Change your water bucket often. If you rinse your rag in cloudy, paint-filled water, you’ll start depositing mud back onto the wall instead of lifting the glaze cleanly.
Step 2: Mixing & Application
-
Create the glaze mixture:
Mix one part of your top coat paint (the beige/taupe color) with four parts clear acrylic glaze. Stir thoroughly to ensure a uniform translucency. -
Work in sections:
Don’t try to paint the whole wall at once. Plan to work in manageable sections of about 3 feet by 3 feet to keep a wet edge. -
Brush the edges:
Use your angled sash brush to cut in the glaze mixture along the taped edges of your first 3×3 section. -
Roll the glaze:
Immediately roll the glaze mixture onto the rest of the section. The coverage doesn’t need to be perfect, but ensure the area is fully wet.
Add Metallic Shimmer
For a luxurious twist, mix a pearl or metallic bronze paint into your glaze instead of flat color. This catches the light on the texture ridges.
Step 3: The Ragging Techinque
-
Prepare the rag:
Take a clean, lint-free cotton cloth and run it under water, wringing it out until it is just damp, not dripping. -
Form a textural tool:
Bunch the damp rag loosely in your hand. Avoid making a tight ball; you want folds and diverse surfaces to create the pattern. -
Begin removing glaze:
Press the bunched rag into the wet glaze on the wall and lift it straight off without dragging. This is the ‘ragging off’ motion. -
Vary your grip:
Rotate your wrist and change the grip on the rag frequently. Repetitive motions create recognizable tile patterns, which you want to avoid. -
Clean the rag:
As the rag becomes saturated with paint, rinse it out in your water bucket and wring it essentially dry again, or switch to a fresh rag. -
Check your progress:
Step back occasionally to ensure the texture looks consistent. I like to squint my eyes to check if any areas look too heavy or too light.
Step 4: Blending & Finishing
-
Handle the seams:
When moving to the next 3×3 section, overlap the wet edge slightly with your ragging motion to blend the two areas seamlessly. -
Corner detailing:
Use a smaller piece of rag to gently dab into corners and specifically around window frames where a large rag might smudge. -
Final softening:
If you spot harsh lines while the glaze is still tacky, lightly dab them with a clean, dry rag to soften the transition. -
Remove tape:
Carefully remove the painter’s tape while the glaze is still slightly damp to prevent peeling dried paint.
Step back and enjoy the soft, sophisticated movement you’ve brought to your space


Tonal Ragging On for Subtle Movement
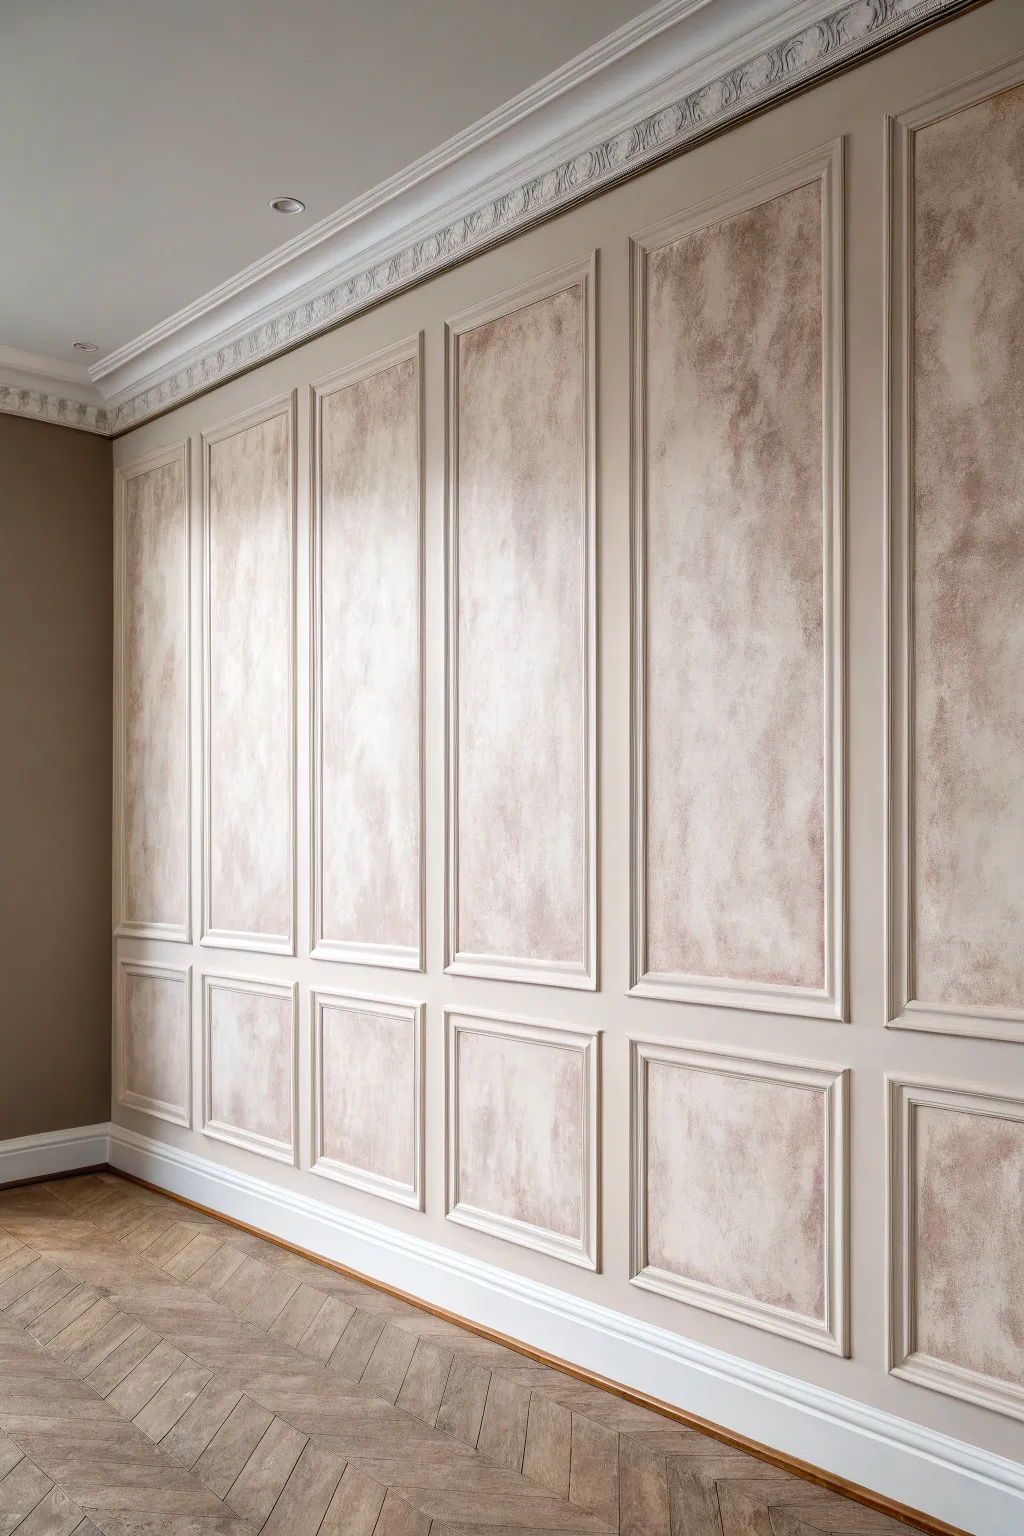
Transform plain wall panels into sophisticated architectural features using a subtle rag-rolling technique. This method creates a soft, cloud-like texture that adds depth and movement without overwhelming the space, perfectly mimicking the look of aged plaster or limestone.
How-To Guide
Materials
- Satin latex base paint (soft beige/cream)
- Semi-gloss latex paint (one shade darker than base)
- Acrylic glazing liquid
- Painter’s tape (low-tack)
- Lint-free cotton rags (old t-shirts work best)
- Paint tray and liners
- 2-inch angled sash brush
- 4-inch foam roller
- Drop cloths
- Plastic mixing buckets
- Stir sticks
Step 1: Preparation and Base Coat
-
Protect the surrounding area:
Before starting, lay down drop cloths to protect your flooring, especially if you have intricate herringbone floors like the ones shown here. -
Clean the surface:
Wipe down the wall panels and trim molding with a damp cloth to remove dust and grease, ensuring a clean bond for the paint. -
Tape the edges:
Apply low-tack painter’s tape around the outside of the molding if you plan to keep the surrounding wall a different color, or simply to protect the trim while painting the inner panels. -
Cut in the base color:
Using your 2-inch angled brush, paint the interior edges of the molding and the corners of the panels with your satin base color. -
Roll the panels:
Use the foam roller to apply the base coat to the flat center of each panel, smoothing out any brush marks from the cutting-in phase. -
Paint the molding:
While the panels dry, paint the raised molding frames with the same base coat color to create a unified foundation. -
Apply a second coat:
Once the first coat is completely dry to the touch, apply a second coat of the base color to ensure solid, opaque coverage. -
Dry thoroughly:
Allow the base coats to cure for at least 24 hours. This is crucial because ragging involves friction that can lift uncured paint.
Step 2: Mixing and Ragging On
-
Prepare the glaze mixture:
In a mixing bucket, combine one part of your darker semi-gloss paint with four parts acrylic glazing liquid. Stir thoroughly until consistent. -
Prepare the rag:
Take a lint-free cotton rag, dampen it slightly with water, and wring it out completely. Then, crumple it into a loose ball in your hand. -
Load the rag:
Dip the surface of your crumpled rag into the glaze mixture. Blot the excess onto a clean part of the paint tray or a piece of cardboard; you want the rag damp with glaze, not dripping. -
Start pouncing:
Starting in a corner of one panel, gently press the crumpled rag against the wall. Use a ‘pouncing’ motion—straight on and straight off. -
Vary the wrist angle:
Rotate your wrist slightly with every few dabs to avoid creating a repetitive stamp pattern. The goal is random, organic texture. -
Reload and blend:
When the rag starts running dry, reload it with glaze, blot, and continue. Overlap your previous work slightly to blend the wet edges. -
Address the corners:
I like to push a small corner of the rag into the edges where the panel meets the molding to ensure the texture doesn’t stop abruptly, creating a natural shadow effect. -
Check for heavy spots:
Step back frequently to look for areas that are too heavy with glaze. If you spot one, dab it with a clean, dry rag to lift some pigment while it’s still wet. -
Soften the look:
Once a panel is covered but still wet, standard practice is to take a clean, dry rag and very lightly tumble it over the surface to soften any harsh edges within the texture. -
Repeat for all panels:
Continue this process panel by panel. Do not stop in the middle of a panel, as the glaze will dry and leave a visible seam. -
Remove tape:
Carefully peel away the painter’s tape while the glaze is still slightly tacky to prevent peeling the dried film.
Rag Management
Change your rag often. Once it becomes saturated with glaze, it stops creating distinct texture and starts smearing like a wash.
Metallic Touch
For a luxurious twist, mix a pearlized or metallic gold paint into your glaze instead of a standard color to catch the light.
Step back and admire how this subtle texture brings instant history and warmth to your room


Ragged Panels Inside Trim or Molding
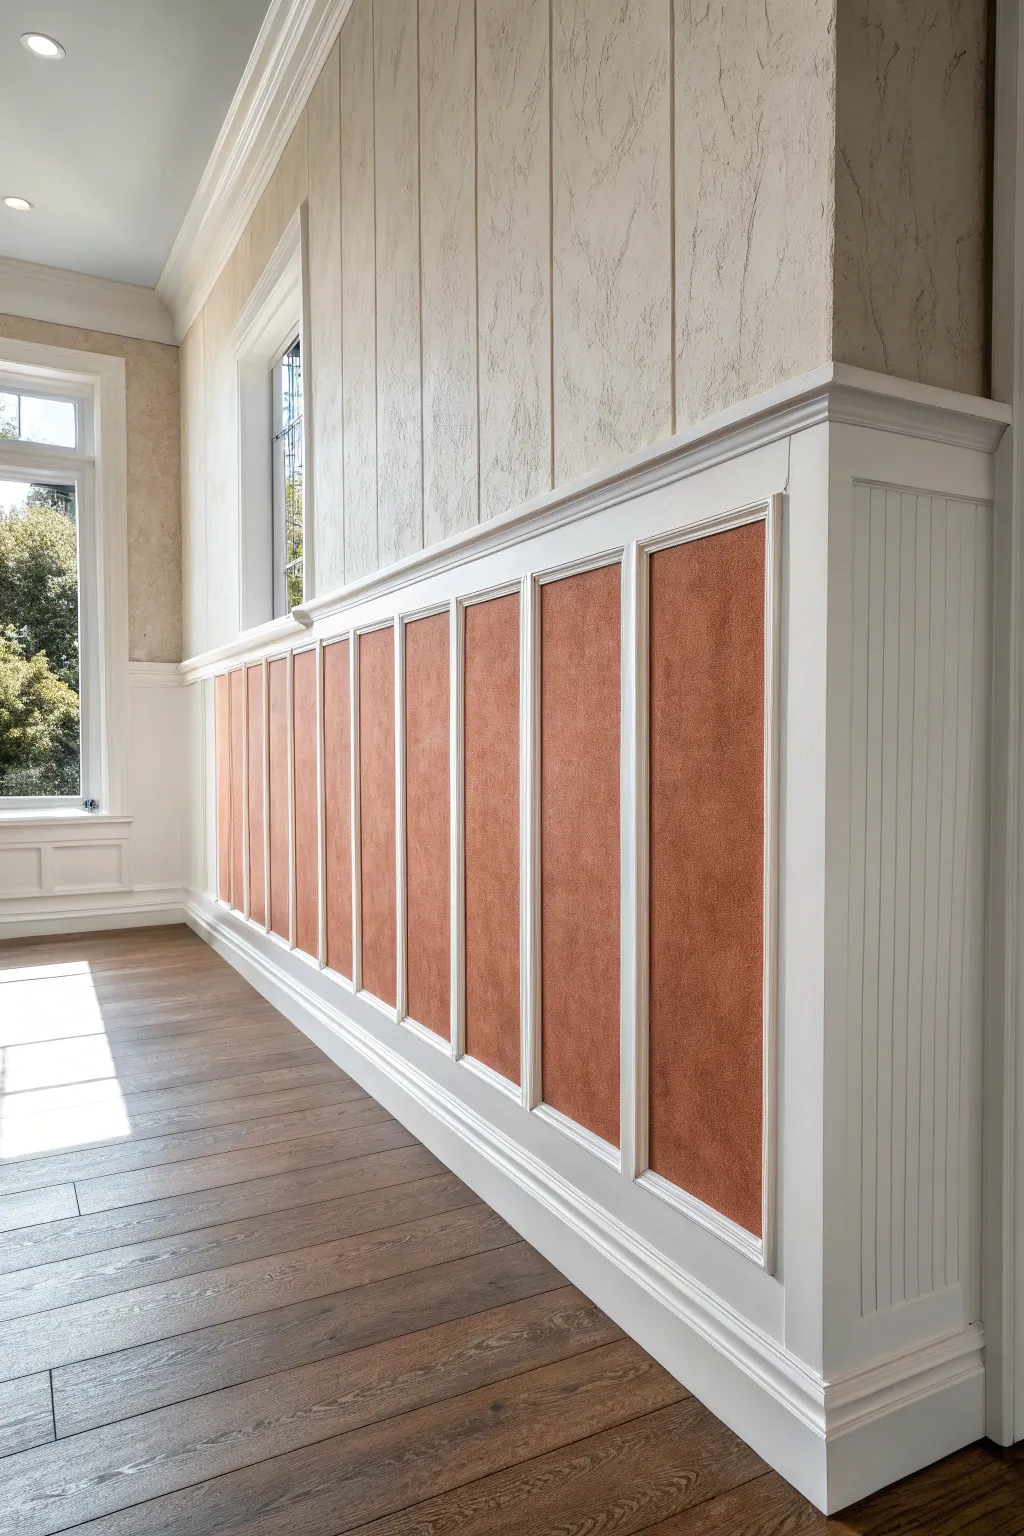
Transform standard wainscoting into a striking architectural feature by applying a warm, textured rag finish inside the recessed panels. This technique mimics the look of aged leather or soft suede, adding depth and sophistication to your hallway or dining room.
How-To Guide
Materials
- Interior latex satin base coat paint (warm terracotta or reddish-brown)
- Faux glaze medium
- Dark brown latex paint (for the glaze mixture)
- White semi-gloss trim paint
- Painter’s tape (high quality)
- Clean, lint-free cotton rags (t-shirt material works best)
- Small paint tray and liners
- 2-inch angled sash brush
- Paper towels
- Drop cloths
- Sanding sponge (fine grit)
- Tack cloth
Step 1: Preparation and Base Coat
-
Prepare the surface:
Ensure your wainscoting panels are clean and free of dust. If the surface is glossy, lightly scuff it with a fine-grit sanding sponge to help the new paint adhere, then wipe it down with a tack cloth. -
Protect the trim:
Carefully apply painter’s tape along the inside edges of the white molding surrounding each panel. Press the tape edges down firmly to prevent any paint bleed, as sharp lines are crucial for this framed effect. -
Cut in the base color:
Using your angled sash brush, paint the perimeter of the panel with your terracotta or reddish-brown base color, getting tight into the corners where the tape meets the wall. -
Key the main surface:
Fill in the rest of the panel with the base color. You can use a small roller for speed, but brushing ensures a smooth, non-stippled surface for the glaze later. -
Apply a second coat:
Once the first coat is fully dry (check the can’s instructions), apply a second coat to ensure rich, opaque coverage. Let this dry completely—preferably overnight—before starting the glazing process.
Too Blotchy?
If your texture looks too heavy or blotchy, your rag is too wet. Blot it on a paper towel more frequently, or re-bunch the rag to expose a cleaner side for softer blending.
Step 2: Mixing and Ragging
-
Mix your glaze:
In a mixing bucket, combine one part dark brown latex paint with four parts faux glaze medium. Stir thoroughly until the mixture is consistent. If you prefer a more translucent look, you can add a splash of water. -
Prepare the rag:
Take a clean cotton rag and dampen it slightly with water, wringing it out until it’s just barely moist. Bunch the rag up into a irregular ball in your hand, folding edges inward so there are no loose tails flapping. -
Apply the glaze:
Dip your bunched rag lightly into the glaze mixture. Dab off the excess on a paper towel or the dry part of the paint tray; you want the rag coated but not dripping wet. -
Start the texture:
Begin dabbing the rag onto the panel surface using a pouncing motion. Working in small, manageable sections (about 2×2 feet) keeps the glaze wet while you manipulate it. -
Vary your hand position:
As you pounce the rag against the wall, constantly rotate your wrist and change the angle of the rag. This prevents a repetitive ‘stamp’ pattern and creates a natural, organic texture. -
Refine the edges:
Use a smaller piece of rag or just your fingertip inside the cloth to gently press the glaze into the corners and edges taped off earlier. You want the texture to go all the way to the trim. -
Check for heavy spots:
Step back occasionally to look for areas where the glaze is too heavy or pooled. If you spot one, dab it with a clean, dry rag to lift some of the pigment off before it dries.
Step 3: Finishing Details
-
Repeat for all panels:
Continue this process for each panel. I find it helpful to complete one full panel before moving to the next to ensure consistency in the drying time and pattern. -
Remove tape carefully:
Wait until the glaze is tacky but not fully hardened (usually about an hour) to peel off the painter’s tape. Pull the tape away from the painted edge at a 45-degree angle to get a crisp line. -
Touch up the trim:
If any glaze seeped under the tape onto the white molding, use a small artist’s brush and your white trim paint to cover the imperfections once the panels are completely dry. -
Seal the surface (Optional):
For high-traffic hallways, you might consider applying a clear matte or satin water-based polyurethane over the dried panels to protect the finish from scuffs and fingerprints.
Glaze Open Time
Glaze dries fast! Work in one panel at a time. If you must stop mid-panel, mist the area lightly with water or keep edges irregular and “wet” to blend later.
The result is a warm, dimensional finish that brings an upscale, custom feel to your home’s woodwork


Have a question or want to share your own experience? I'd love to hear from you in the comments below!