Whenever I’m painting faces, rainbow face paint is the design that instantly gets everyone smiling—fast, cheerful, and endlessly remixable. Here are my favorite rainbow face paint ideas, starting with the classic crowd-pleasers and drifting into the more unexpected, artsy twists.
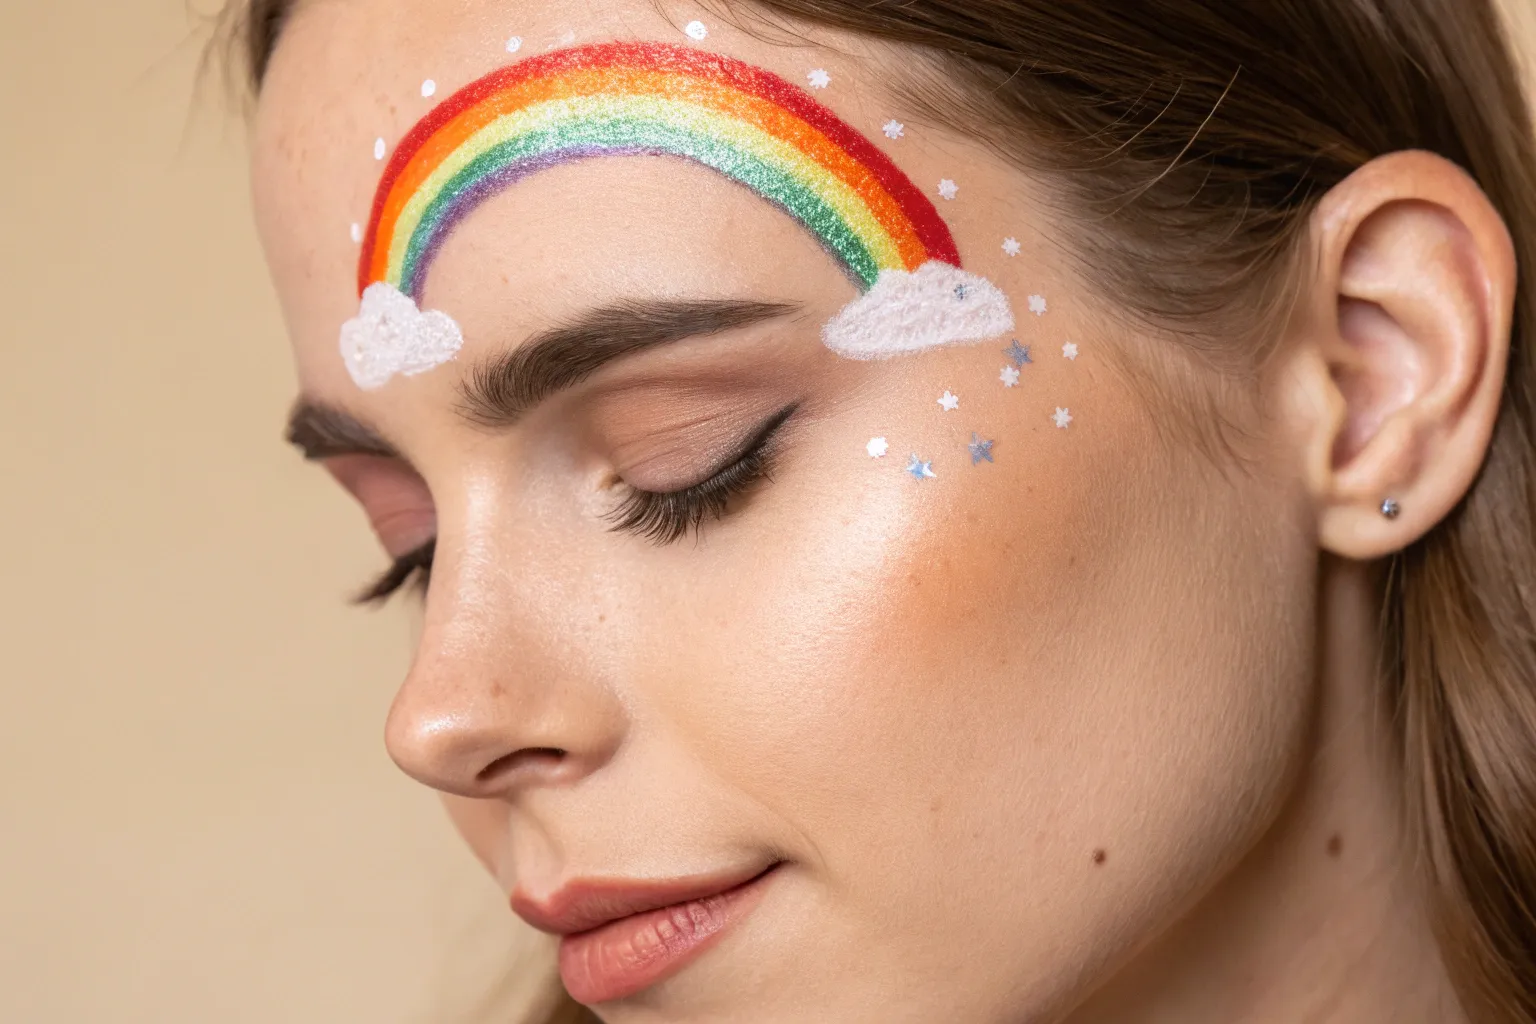
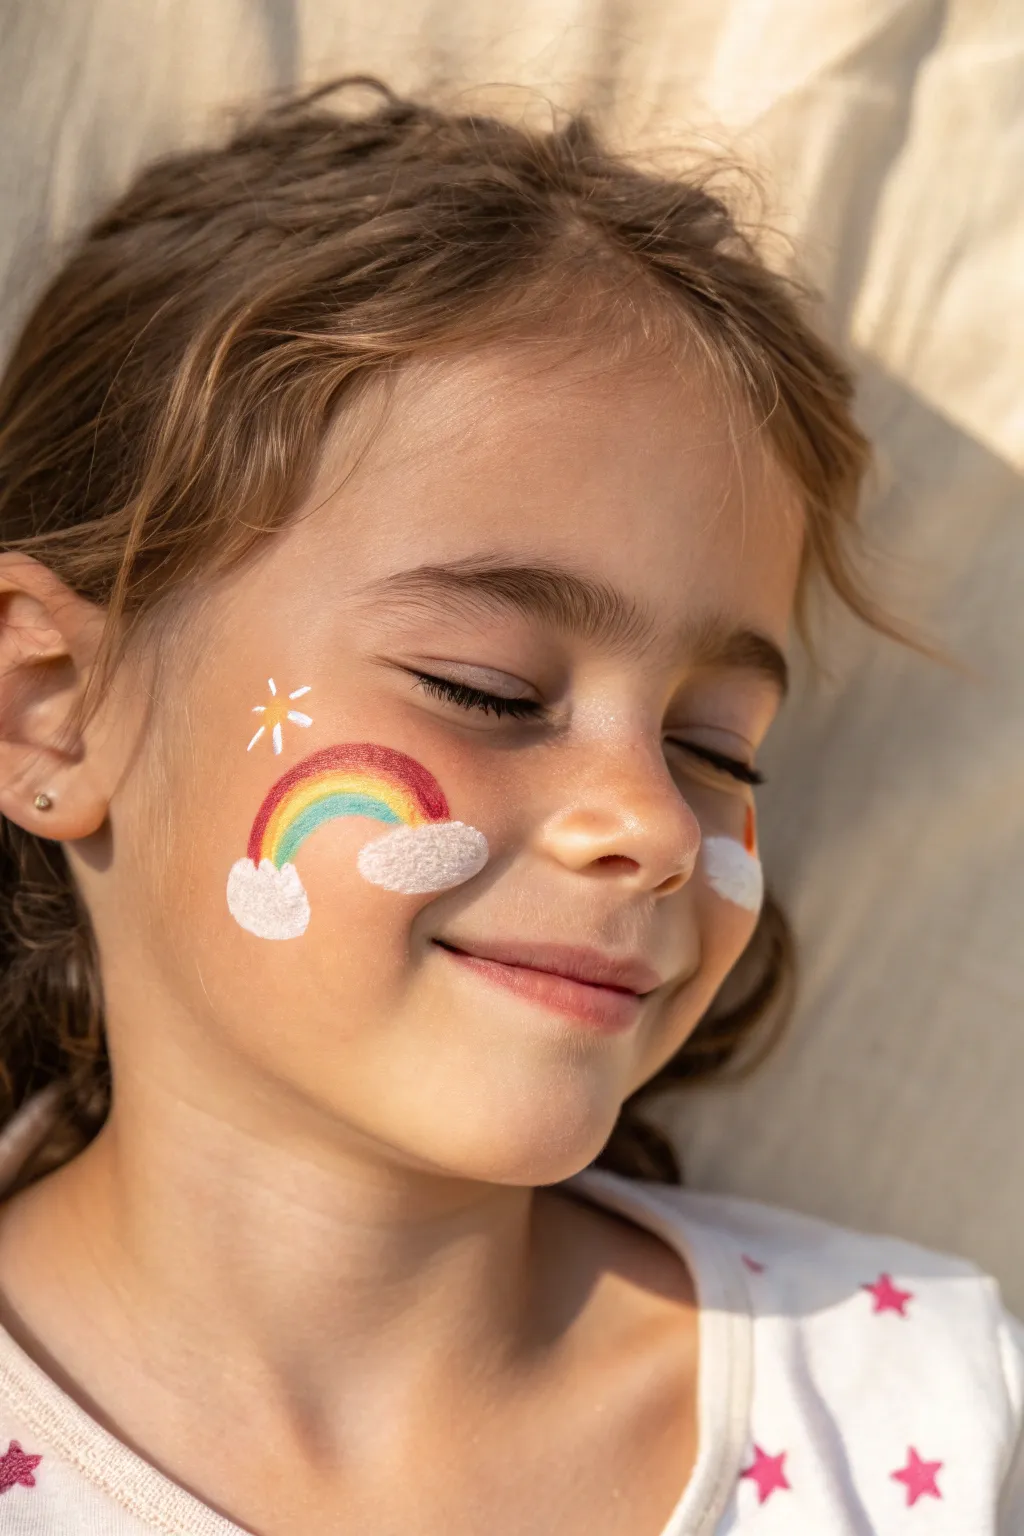
Classic Forehead Rainbow With Clouds
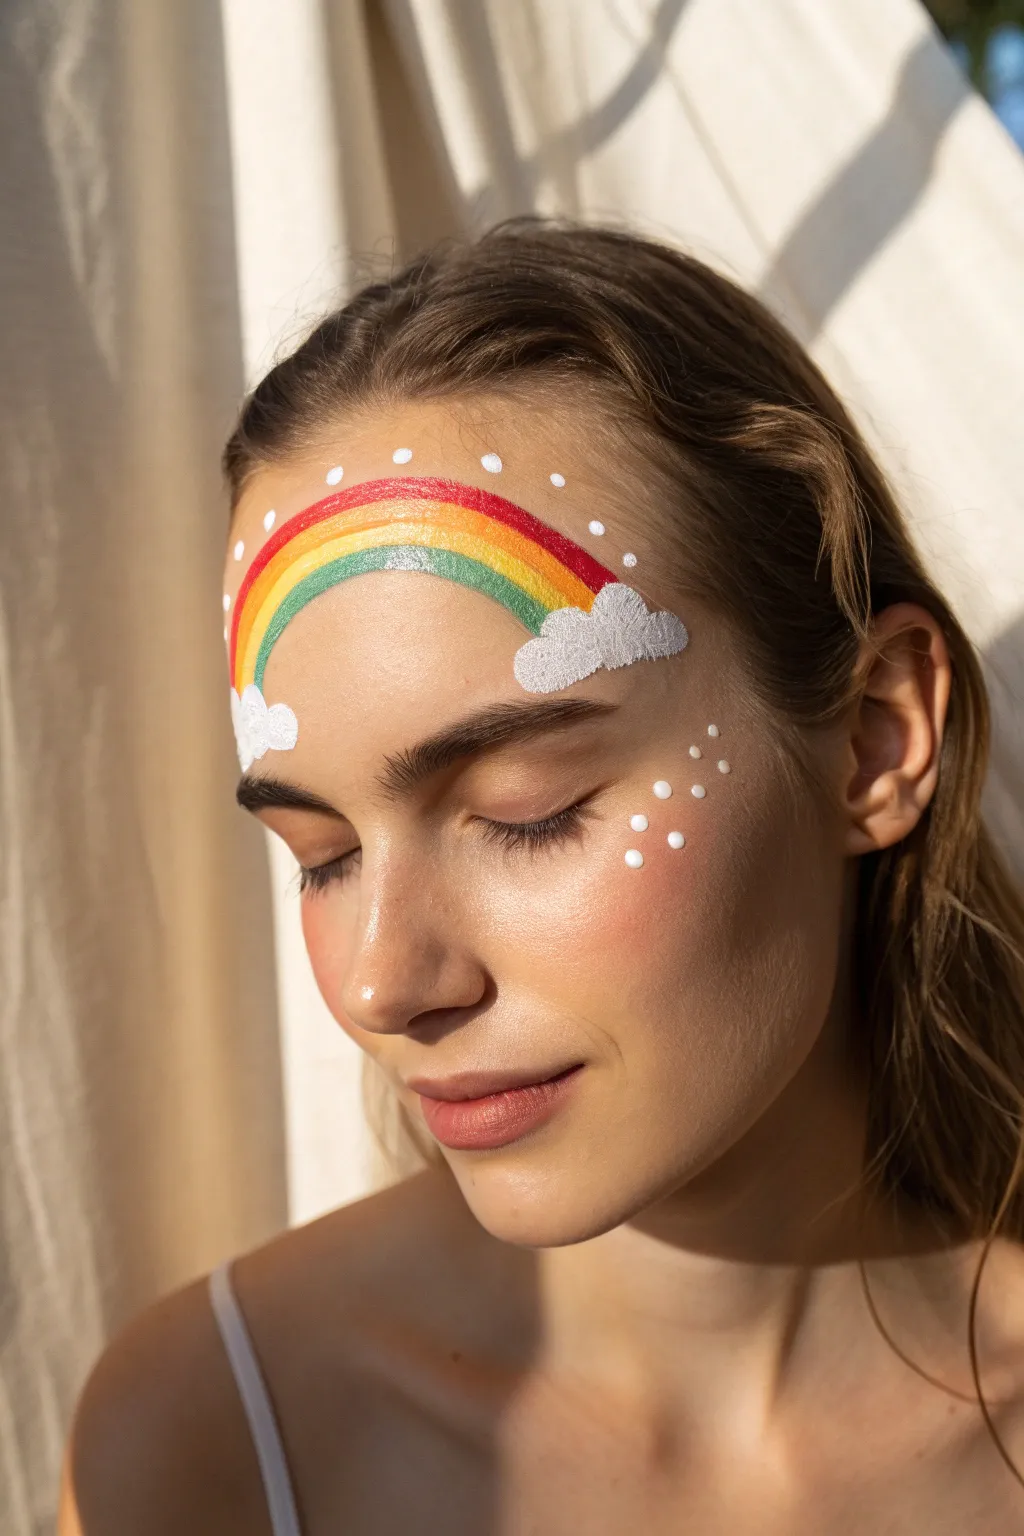
Brighten up any festival or summer gathering with this sweet, symmetrical forehead design. It features a classic four-color rainbow arching across the brow, anchored by fluffy clouds and playful white dots for a dreamy finish.
Step-by-Step Guide
Materials
- Face paint cake or palette (Red, bright yellow, bright green, turquoise/blue, white)
- Flat brush (roughly 3/4 inch or wide enough for 4 stripes)
- Small round brush (size 2 or 3)
- Medium round brush (size 4 or 5)
- Cup of water
- Spray bottle (optional, for activating paints)
- Small sponge (optional)
Step 1: Planning and Base
-
Clean and prep:
Start with a clean, dry face free of moisturizers or oils, as these can make the water-based paint slide around. -
Visualize the arch:
Visualize the placement before painting. You want the arch to start just above the inner corner of one eyebrow, go high onto the forehead, and end above the inner corner of the other eyebrow.
Step 2: Painting the Rainbow
-
Load the flat brush:
Activate your rainbow split-cake or load a flat brush individually with red, yellow, green, and blue. Make sure the paint consistency is creamy but opaque. -
Position the brush:
Place the flat brush perpendicular to the skin just above the right eyebrow’s start point. Ensure the red paint is on the top edge (furthest from the eye) and the blue is on the bottom. -
Create the first curve:
In one smooth, confident stroke, glide the brush upward towards the center of the forehead. -
Complete the arch:
Continue the stroke down the other side, mirroring the first curve until you reach the space just above the left eyebrow. -
Check symmetry:
Step back and look at the arch. If the ends are uneven, you can gently wipe one wet edge or extend the other slightly to match.
Clean Lines Pro-Tip
Keep your elbow tucked or rest your pinky finger gently on the model’s forehead (use a dry sponge as a barrier) to stabilize your hand while painting the main arch stroke.
Step 3: Adding the Clouds
-
Load white paint:
Thoroughly rinse your brush or switch to a medium round brush. Load it well with bright white face paint. -
Start the left cloud base:
At the bottom of the rainbow arch on the left side, paint a straight horizontal line to form the flat bottom of the cloud. -
Fluff up the cloud:
Dab the brush in small, rounded motions on top of that line, overlapping slightly with the ends of the rainbow stripes to cover them cleanly. -
Create the right cloud:
Repeat this process on the right side. I find making the clouds slightly different shapes looks more organic and fun. -
Double-check opacity:
If the rainbow colors are showing through the white, let the first layer dry for a minute and dab a second layer of white on top.
Glitter Upgrade
While the paint is still slightly tacky, dab cosmetic-grade chunky glitter onto the white clouds or along the cheekbone dots for extra sparkle.
Step 4: Delicate Details
-
Switch to fine brush:
Grab your smallest round brush and make sure your white paint is a little more fluid, like ink consistency. -
Dot the arch:
Place small, evenly spaced dots following the curve of the red stripe, leaving about a centimeter of space above the rainbow. -
Add cheek accents:
Move down to the cheekbones. On one side, place a cluster of 3-5 dots in varying sizes. -
Finish the other side:
Repeat the dot cluster on the opposite cheekbone to balance the look. -
Refine edges:
Look closely at the rainbow edges. If the paint feathering is uneven, you can use a damp cotton swab to clean up the lines for a crisp finish. -
Final set:
Allow everything to dry completely before the model moves too much to prevent smudging.
Now you have a cheerful design that captures the magic of the sky


One-Eye Rainbow Sweep
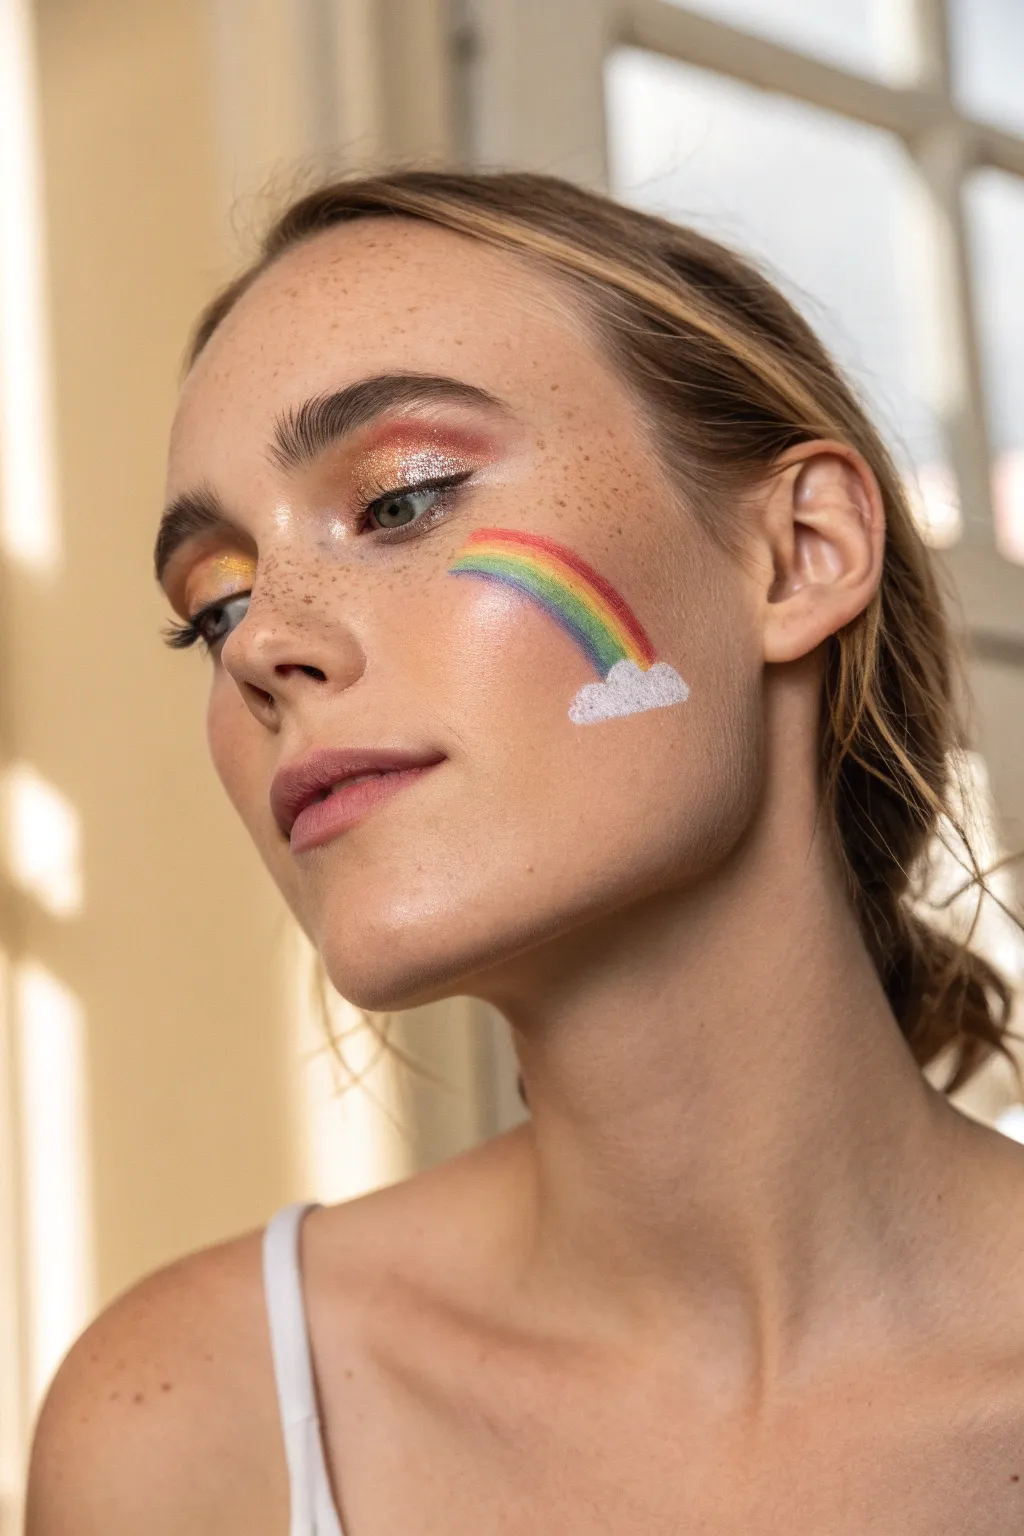
This elegant take on rainbow face paint moves beyond the standard full-face designs, focusing on a delicate sweep beneath one eye anchored by a fluffy cloud. Paired with warm, shimmering eyeshadow, it creates a dreamy, festival-ready look that highlights your natural features.
Step-by-Step
Materials
- White face paint (water-activated)
- Red face paint
- Orange face paint
- Yellow face paint
- Green face paint
- Blue face paint
- Purple/Indigo face paint
- Fine detail brush (round size 0 or 1)
- Small flat brush (size 2)
- Small blending sponge
- Gold shimmer eyeshadow
- Copper/rust eyeshadow
- Setting spray
- Mascara
Step 1: Prepping the Canvas
-
Cleanse and moisturize:
Start with a clean, moisturized face. If you plan to wear foundation or concealer, apply that now and let it set completely so the paint doesn’t slide around. -
Apply eye primer:
Dab a small amount of eyeshadow primer onto your eyelids to ensure the metallic shades pop and stay vibrant throughout the day.
Fixing Smudges
If colors bleed together, wait for them to dry completely. Then, use a damp cotton swab to erase the mistake before repainting the line. Don’t wipe wet paint.
Step 2: Creating the Sunset Eye Look
-
Base shadow layer:
Using a fluffy blending brush, sweep a matte warm brown or soft orange shade into the crease of your eyelid to create depth. -
Add inner corner gold:
Pack a bright, metallic gold eyeshadow onto the inner third of your eyelid, pressing it in rather than sweeping to minimize fallout. -
Blend the rust tones:
Apply a shimmering copper or rust-colored shadow to the center and outer corner of the lid, blending it seamlessly into the gold so there are no harsh lines. -
Highlight the brow bone:
Dust a tiny amount of pale champagne highlighter just under the arch of your eyebrow to lift the eye. -
Define lashes:
Finish the eye makeup with a coat or two of black mascara on both top and bottom lashes to frame the look.
Make It Sparkle
Apply a touch of clear eyelash glue over the rainbow arc once dry, then tap loose biodegradable glitter over it for a dazzling 3D effect.
Step 3: Painting the Rainbow Sweep
-
Position the cloud:
Using a small round brush loaded with white face paint, outline a small, fluffy cloud shape on the high point of your cheekbone, slightly away from the center of your face. -
Fill the cloud:
Fill in the cloud shape with the white paint. I like to use a stippling motion here to give it a bit of texture so it looks fluffy rather than flat. -
Start the red arch:
Load a fine detail brush with red paint. Starting from the top edge of the cloud, draw a thin, curved line sweeping upward toward the outer corner of your eye. -
Add orange and yellow:
Clean your brush and pick up orange paint. Paint a line directly underneath/adjacent to the red one, following the same curve. Repeat this process immediately with yellow. -
Paint the cool tones:
Continue the sequence with green, then blue, and finally purple. Ensure the lines stay tight against each other so the rainbow looks cohesive. -
Taper the end:
As you reach the end of the rainbow arc (near the eye), lift pressure on the brush slightly so the lines taper off softly rather than ending abruptly. -
Refine the cloud edges:
Go back to your white paint and carefully touch up the top edge of the cloud where it meets the rainbow colors to ensure a clean overlap. -
Add cloud highlights:
For extra dimension, you can dab a tiny bit of sheer cosmetic glitter onto the wet white paint of the cloud.
Step 4: Finishing Touches
-
Set the paint:
Once the paint is fully dry (it should look matte), lightly mist your face with setting spray, holding the bottle at arm’s length to avoid creating droplets. -
Clean up edges:
If any lines look wobbly, use a cotton swab dipped in a tiny bit of micellar water to sharpen the edges, then re-dab foundation if needed.
Now you are ready to brighten up any event with this cheerful and artistic accent.


Rainbow Across Both Brows
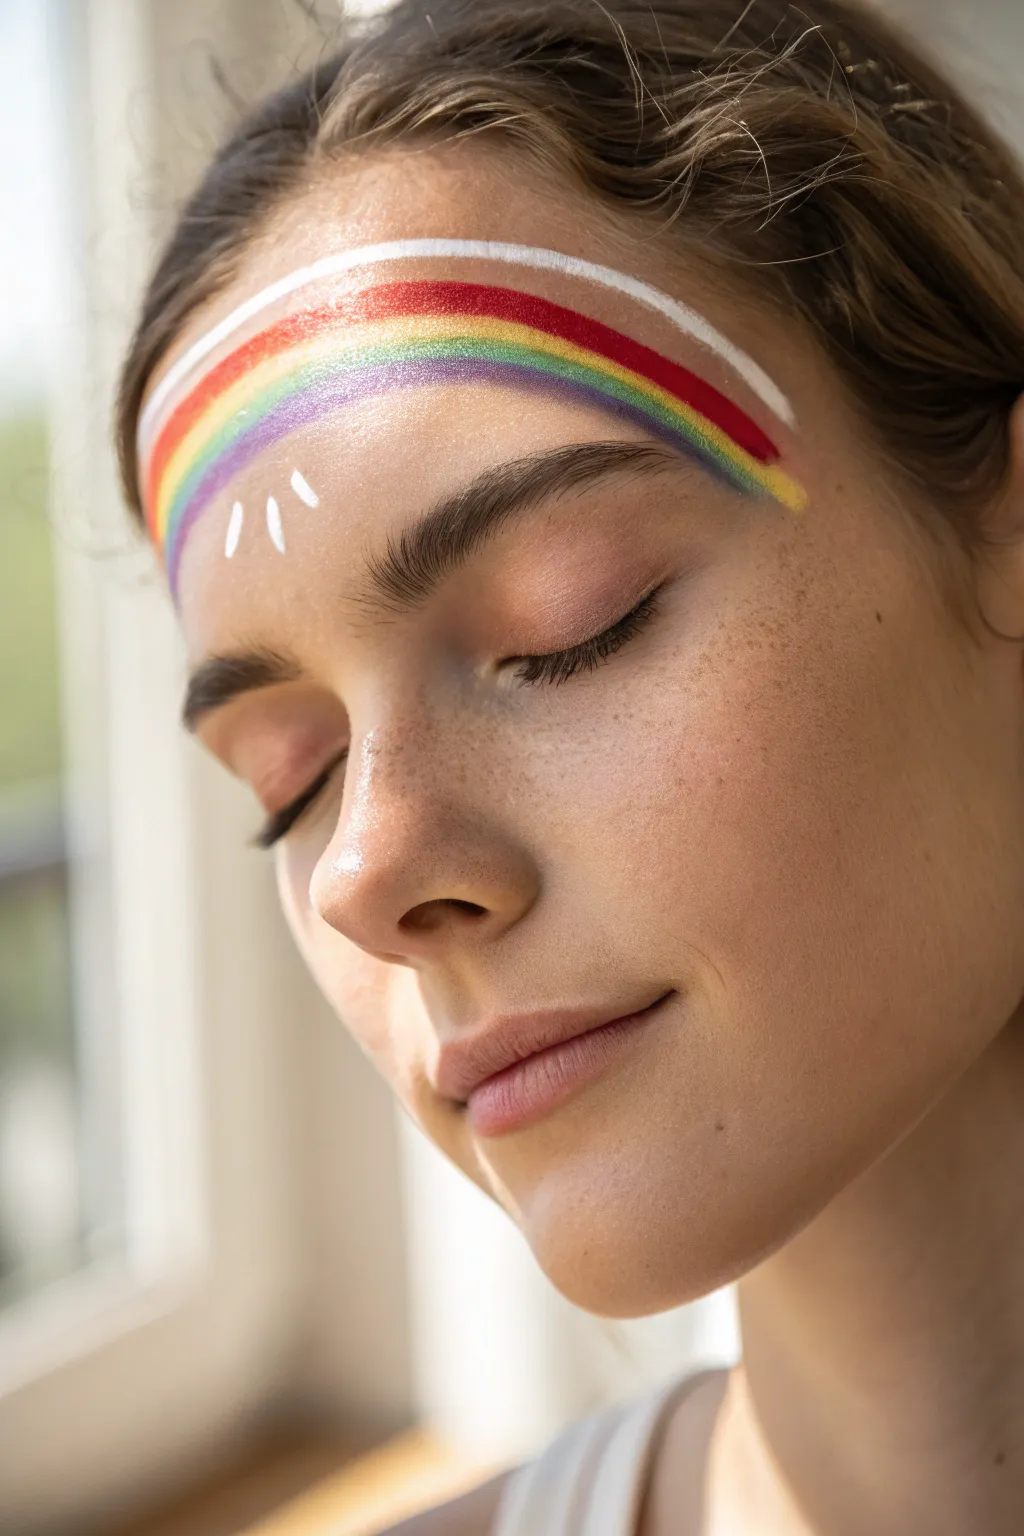
This minimalist yet striking design frames the face with a clean arc of vibrant color sweeping across the forehead. It pairs a classic six-stripe rainbow with delicate white accents for a look that feels both whimsical and polished.
Detailed Instructions
Materials
- Water-activated face paints (red, orange, yellow, green, blue, purple, white)
- Flat shader brush (medium width)
- Small round detail brush (size 1 or 2)
- Cup of clean water
- Paper towels
- Spray bottle with water (optional)
- Makeup sponge (optional for skin prep)
Step 1: Preparation & Mapping
-
Clean canvas:
Start with a clean, dry forehead free of heavy oils or moisturizers, as these can cause water-activated paints to separate. If the skin is very oily, a light dusting of translucent powder can help adhesion. -
Determine the arc:
Visualize the curve before you paint. You want a smooth crescent shape that starts near the temple, rises above the eyebrows, and curves down to the opposite temple. -
Load the white paint:
Wet your medium flat brush and work it into the white face paint until you have a creamy, opaque consistency. -
Establish the top guide:
Create the uppermost white line of the rainbow first. Using the edge of your flat brush, paint a smooth, consistent white arc stretching across the forehead. -
Assess symmetry:
Check your white line in a mirror. It doesn’t need to be mathematically perfect, but ensure the high point is roughly centered.
Creamy is Key
Water-activated paint needs the right texture. Too much water and it drips; too little and it streaks. Aim for the consistency of melted ice cream or light cream.
Step 2: Building the Rainbow
-
Begin with red:
Clean your flat brush thoroughly. Load it with red paint. Place this stripe immediately underneath your initial white guideline, following the exact same curve. -
Add the orange band:
Rinse and load orange. Apply this stripe directly beneath the red one. Keep your brush pressure steady to maintain a consistent line width. -
Yellow stripe:
Continue with the yellow band. I find that yellow can sometimes be sheer, so ensure your paint consistency is creamy enough to show up against the skin tone. -
Green stripe:
Apply the green stripe next. Try to keep the gap between colors minimal so they touch but don’t bleed into each other. -
Blue stripe:
Paint the blue band below the green. As you move lower on the forehead, be mindful of the eyebrow hairs; paint carefully over them if the arc crosses that area. -
Purple finish:
Complete the rainbow spectrum with the purple stripe at the very bottom of the stack. -
Clean edges:
If any ends of the rainbow look ragged, use a slightly damp cotton swab or the edge of a clean makeup sponge to sharpen them up.
Glitter It Up
Before the paint dries completely, tap cosmetic-grade biodegradable glitter over the colors. A fine iridescent glitter mimics the shimmery texture seen in the photo perfectly.
Step 3: Final Details
-
Prepare the detail brush:
Switch to your small round detail brush and load it with fresh white paint. -
Inspect the center:
Locate the center point under the arch of the rainbow, right in the middle of the forehead. -
First teardrop:
Paint a small, vertical teardrop shape or simple dash right in the center, a centimeter or two below the purple line. -
Side accents:
Add two more slightly angled teardrops or dashes on either side of the center one, fanning them out slightly. -
Shimmer touch:
If you want the look exactly like the photo, gently pat a tiny amount of translucent shimmer powder over the dried rainbow for a subtle glow. -
Set the look:
Allow everything to dry completely. Avoid scrunching your forehead for a minute or two to prevent cracking while it sets.
You have created a beautiful, joyful expression of color to brighten your day


Rainbow Cheek Swipe With Cloud Puff
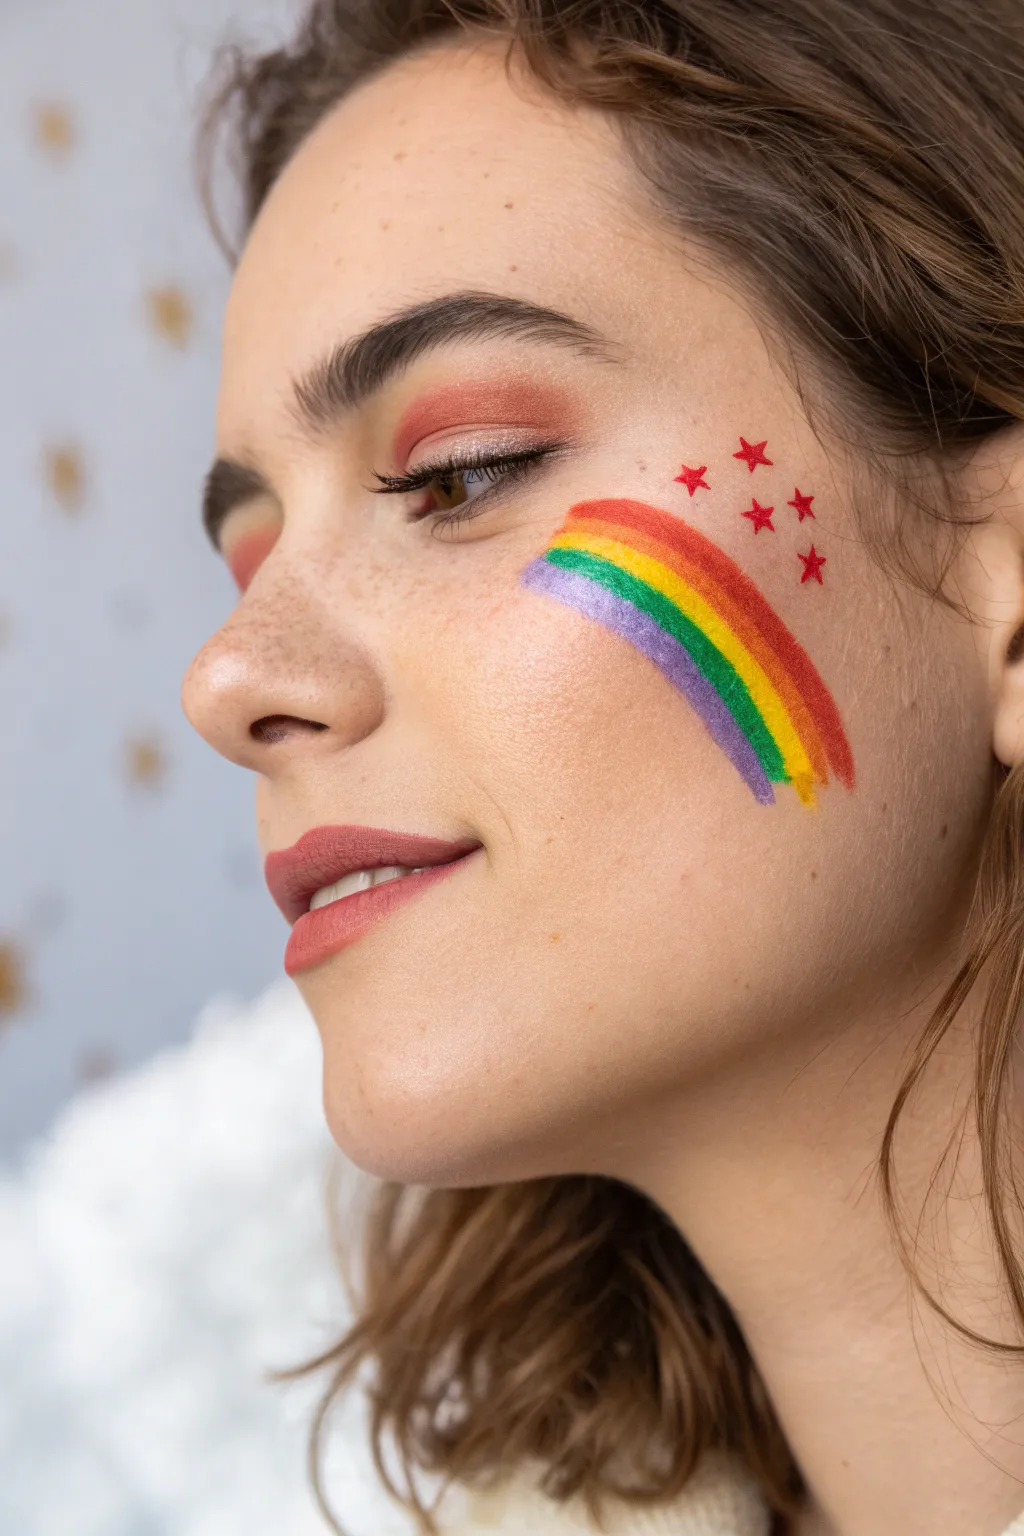
This effortless look combines a sweeping arc of rainbow hues with delicate star accents to create a dreamy, festival-ready vibe. The design highlights the natural cheekbone structure while adding a pop of celebratory color and sparkle.
Step-by-Step Tutorial
Materials
- Water-activated face paint palette (red, orange, yellow, green, blue, purple)
- Flat shader brush (medium width)
- Small round detail brush (size 1 or 2)
- Setting spray or water in a spritzer bottle
- Warm-toned eyeshadow palette (terracotta/rust shades)
- Fluffy eyeshadow blending brush
- Soft pink-nude lipstick
- Mascara
Step 1: Base Preparation
-
Prep the skin:
Start with clean, moisturized skin. Apply a sheer foundation or tinted moisturizer to even out your skin tone while letting your natural freckles show through if you have them. -
Warm the lids:
Using a fluffy blending brush, sweep a warm terracotta or rust-colored eyeshadow across the entire eyelid. Blend it slightly upward into the crease for a soft, diffused look. -
Add definition:
Apply a coat of mascara to your upper lashes to define the eyes without overpowering the colorful cheek art. -
Apply lip color:
Swipe on a soft, matte rose or nude-pink lipstick to balance the vibrant colors on the cheek.
Step 2: Creating the Rainbow Swipe
-
Load the brush:
Dampen your flat shader brush slightly with water or setting spray. You want the bristles moist but not dripping. -
Pick up the purple:
Dip the edge of the brush into the purple face paint. Create a creamy consistency on the brush tip. -
Start the arc:
Position the brush on the high point of the cheekbone. Paint a sweeping curved line downwards toward the jawline, roughly 2 inches long. This is the bottom layer of your rainbow. -
Apply the blue layer:
Rinse your brush thoroughly. Load it with blue paint and draw a parallel line immediately above the purple one, following the same curve. -
Add the green stripe:
Clean and reload the brush with green paint. Paint the next stripe directly above the blue, keeping the width consistent. -
Paint the yellow band:
Continue the pattern with yellow paint. Position this stripe right on the prominence of the cheekbone. -
Layer with orange:
Follow up with an orange stripe above the yellow. If the edges blend slightly, that adds to the soft, watercolor effect. -
Finish with red:
Complete the rainbow by painting the top red arc. Ensure the top edge tapers off gently near the temple area. -
Soften the edges:
If the ends of the rainbow look too blunt, use a barely-damp clean finger to lightly tap and soften the start and finish points for a more organic feel.
Uneven Stripes?
If your stripes overlap messily, wait for them to fully dry. Then, use a slightly damp Q-tip to erase the mistake before reapplying the correct color.
Step 3: Starry Details
-
Switch brushes:
Pick up your small round detail brush (size 1 or 2) for the precision work. -
Load red paint:
Create a slightly fluid mixture with the red face paint so it flows easily off the brush tip. -
Map the stars:
Visualize a cluster of five stars above the rainbow arc, near the outer corner of the eye. -
Paint the first star:
Choosing the spot closest to the eye, paint a tiny five-point star. I find it easiest to paint a small ‘V’ shape first, then cross it to form the star. -
Create the cluster:
Continue painting four more small red stars, scattering them upwards toward the temple. Vary their sizes slightly for a natural constellation effect. -
Final check:
Allow the paint to dry completely for a minute before touching your face to prevent smudging.
One-Stroke Wonder
For a faster application, use a wide flat brush and a ‘split cake’ palette that has all rainbow colors side-by-side to paint the whole arc in one motion.
Now you have a vibrant, cheerful look that brightens up any occasion
BRUSH GUIDE
The Right Brush for Every Stroke
From clean lines to bold texture — master brush choice, stroke control, and essential techniques.
Explore the Full Guide
Matching Double Cheek Rainbows
Brighten up any smile with this cheerful design that spans both cheeks like a bridge over the nose. This classic rainbow features fluffy cloud ends and a tiny sun accent for an extra touch of warmth.
Step-by-Step Guide
Materials
- Face paint palette (Red, Orange, Yellow, Green, Light Blue, White)
- Small flat brush (size 4 or 6)
- Round detail brush (size 1 or 2)
- Spray bottle with water
- Small cup of clean water
- Paper towel or sponge for blotting
Step 1: Painting the Rainbow Arches
-
Prepare your red paint:
Start by activating your red face paint with a little water until it reaches a creamy consistency. Load up your small flat brush. -
Create the first red arch:
Starting on the left cheek apple, paint a curved red line that arches slightly upward towards the nose bridge. Keep this line relatively thick as it’s the top band. -
Start the second cheek:
Move to the right cheek and mirror the red arch you just made, ensuring it starts at roughly the same height so the rainbow looks connected. -
Add the orange band:
Rinse your brush thoroughly. Load it with orange paint and carefully stroke it directly underneath the red line on both cheeks, blending slightly where they meet if you like softer edges. -
Follow with yellow:
Repeat the process with bright yellow paint. Tuck this stripe snugly under the orange band, keeping the curve consistent. -
Apply the green stripe:
Switch to green. Paint this band under the yellow. You can start tapering the width of your brush strokes slightly as you get closer to the bottom of the rainbow stack. -
Finish with blue:
Using light blue paint, add the final interior arch. This completes the main structure of your rainbow bridge.
Fixing Smudges
If lines bleed, wait for the paint to dry completely. Then, use a damp Q-tip to erase the mistake before re-painting the line.
Step 2: Adding Clouds and Details
-
Load white for clouds:
Clean your flat brush well and load it with opaque white face paint. Make it a bit thicker than the colored paints so it stands out. -
Stamp the cloud base:
At the bottom of the rainbow on the left cheek, press the flat brush down to create the flat bottom edge of a cloud. -
Fluff up the cloud tops:
Using the tip of the brush, dab small, rounded semi-circles on top of your white base to make the cloud look fluffy and soft. Repeat this for the cloud end on the nose bridge. -
Repeat clouds on the other side:
Create the matching cloud endpoints on the right cheek rainbow, ensuring they cover any uneven ends of your colored stripes. -
Detail the sun center:
Switch to your fine round detail brush (size 1 or 2). Load it with yellow paint and place a small dot or circle just above the top of the rainbow arch on the left cheek. -
Paint sun rays:
Paint 4-5 small, straight lines radiating outward from the yellow center dot. -
Highlight the sun:
Clean your fine brush and pick up a tiny amount of white. Add very thin white lines in between the yellow sun rays for a sparkling effect. -
Add cloud texture:
If dry enough, use the detailed brush to add tiny, faint grey or light blue swirls inside the white clouds for dimension, though plain white works beautifully too.
Pro Tip: One-Stroke
Use a rainbow ‘split cake’ and a wide flat brush to paint all the colored bands in a single swipe for perfect speed and symmetry.
Now you have a colorful, joyous design that’s perfect for warm weather fun
Rainbow Mask Around Both Eyes
This dreamy face paint design creates a soft, arching rainbow that spans from the forehead down across the cheekbone. It features delicate clouds, starry details, and a touch of inner-corner sparkle for an ethereal, sky-gazing look.
Step-by-Step
Materials
- Face paint palette (Red, Orange, Yellow, Green, Blue, Violet)
- White face paint
- Flat brush (medium width, approx ½ inch)
- Small round detail brush (size 1 or 2)
- Makeup sponge
- Cup of water
- Cosmetic glitter gel or loose glitter (silver/white)
- Setting spray (optional)
Step 1: Painting the Rainbow Arch
-
Prep the skin:
Begin with clean, dry skin. If the model has oily skin, a quick wipe with a mild toner can help the paint adhere better. -
Load the red paint:
Dampen your flat brush slightly and load it generously with red face paint. You want a creamy consistency, not too watery, to ensure opacity. -
Paint the top band:
Starting high on the forehead above the eyebrow, paint a smooth, curved stripe that arches down towards the temple. Use the flat edge of the brush for a clean line. -
Add the orange band:
Clean your brush thoroughly. Load it with orange paint and carefully paint a second stripe directly underneath the red one, blending the edges slightly while the paint is still damp for a softer transition. -
Create the yellow stripe:
Repeat the process with yellow paint. This stripe should sit just above the eyebrow and the temple area. I find overlapping the wet edges just a tiny bit creates that lovely seamless gradient seen in the photo. -
Transition to cool colors:
Below the yellow, switch to green. Apply this stripe starting from the outer corner of the eye, following the cheekbone downward. -
Finish the rainbow wash:
Continue the pattern with blue and then a soft violet stripe at the very bottom. Allow the stripes to fade out naturally on the cheek rather than ending in a hard line.
Fixing Smudges
If colors blend too much and turn muddy, let the paint dry completely. Then, use a damp Q-tip to wipe away the mistake before reapplying fresh color.
Step 2: Appying Clouds and Stars
-
Paint fluffy clouds:
Load a small round brush with white face paint. Along the border between the yellow and orange stripes on the forehead, dab small, connected semi-circles to create a fluffy cloud formation. -
Fill the clouds:
Gently fill in the cloud shapes with white, stippling the paint slightly to give it a textured, puffy appearance rather than a flat block of color. -
Draw the main star:
Using the fine tip of your round brush and white paint, draw a five-pointed star within the red band on the forehead. Keep the lines crisp. -
Add starry dots:
Dip the very tip of the brush in white. Dot tiny ‘stars’ randomly across the red and orange bands, and scatter a few grouping of dots on the green and blue sections on the cheek. -
Paint tiny accent clusters:
Create a few clusters of four small dots arranged in a diamond shape on the lower cheek for extra magical detail.
Make It Pop
Outline the white clouds with a very thin, diluted line of pale blue paint. This subtle shadow adds dimension and makes the white pop against the skin.
Step 3: Highlights and Sparkle
-
Highlight the inner corner:
Using a clean finger or a small sponge, press white shimmery face paint or a pearlescent highlighter into the inner corner of the eye, blending it slightly onto the nose bridge. -
Apply glitter:
Dab a small amount of silver glitter gel over the inner corner highlight to catch the light. -
Check symmetry (optional):
If you are mirroring this on the other eye, check that the heights of the arches match, though this design also looks beautiful as an asymmetrical single-side mask.
Now you have a vibrant, sky-inspired look perfect for festivals or parties

PENCIL GUIDE
Understanding Pencil Grades from H to B
From first sketch to finished drawing — learn pencil grades, line control, and shading techniques.
Explore the Full Guide
Rainbow Heart Cheek Accent
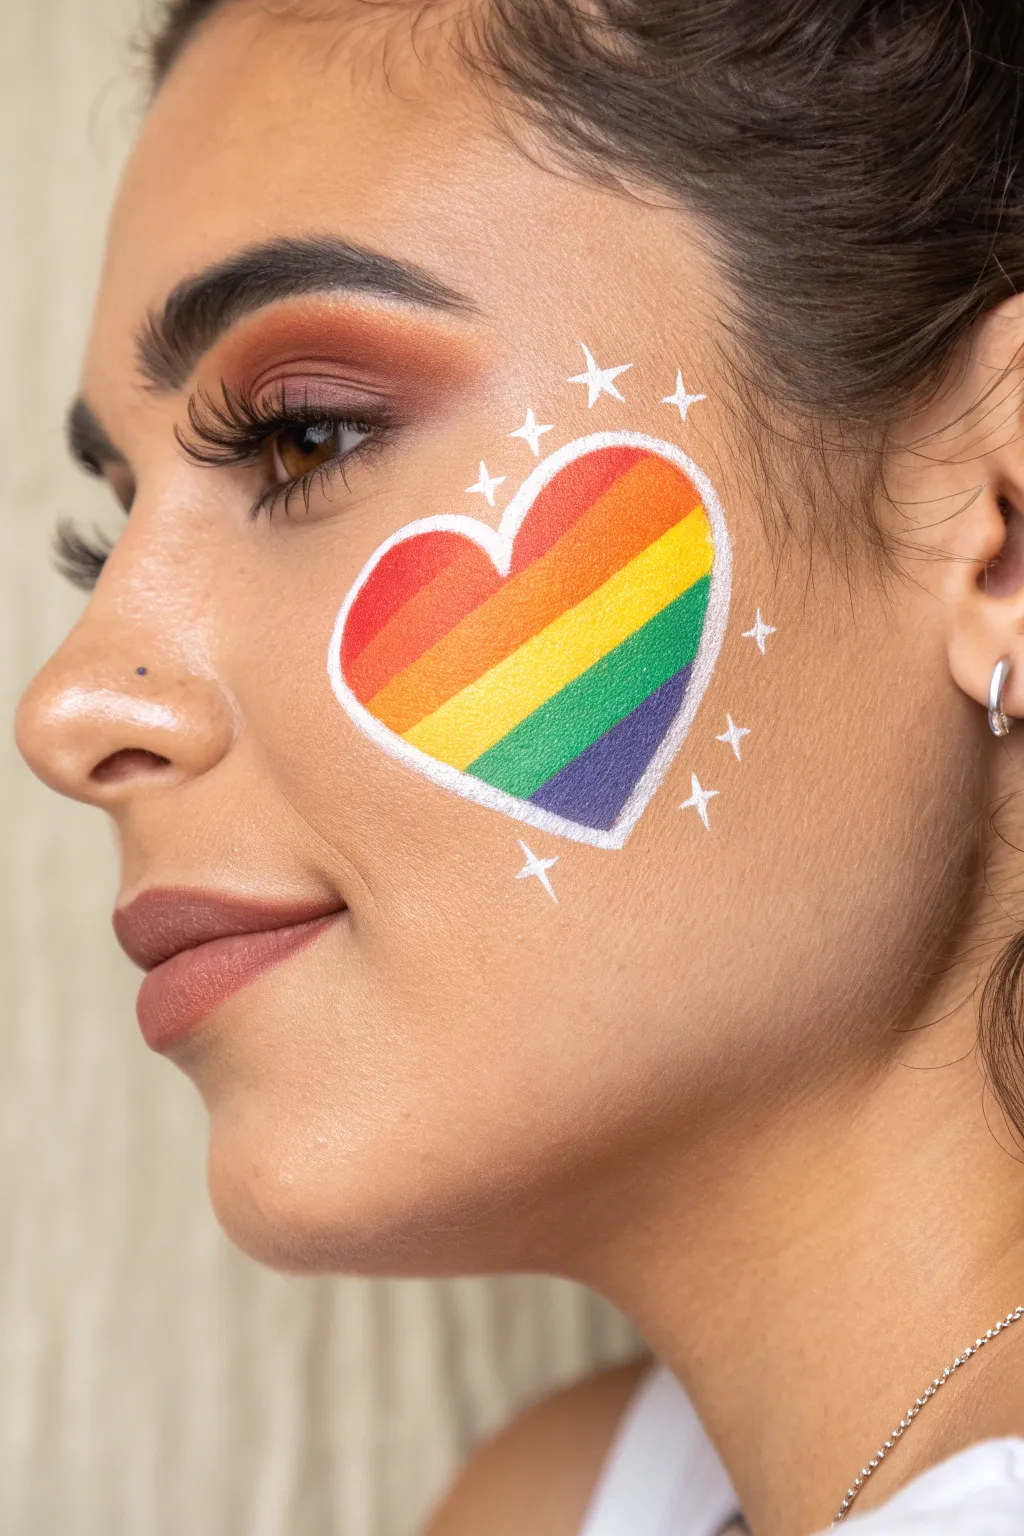
Celebrate pride or just add a splash of color to your day with this vibrant rainbow heart face paint design. The clean white outline makes the colors pop, while delicate starbursts add a magical, finishing touch.
Step-by-Step
Materials
- Water-activated face paints (Red, Orange, Yellow, Green, Blue, Purple)
- Water-activated face paint (White)
- Flat brush (approx. 1/2 inch or 1 cm)
- Fine liner brush (size 0 or 1)
- Small round brush (optional)
- Cup of clean water
- Paper towels or cloth
- Setting spray (optional)
Step 1: Preparation and Base Shape
-
Prepare the skin:
Start with clean, dry skin. If the model is wearing foundation or moisturizer, ensure it has set completely so the water-based paint adheres properly without sliding. -
Visualize the placement:
Identify the high point of the cheekbone. You want the heart to sit nicely on the apple of the cheek, slightly angled upwards towards the temple for a lifting effect. -
Draft the outline (optional):
If you are nervous about symmetry, you can use a very pale eyeliner pencil or a watered-down white paint on a thin brush to faintly sketch the heart shape before committing to the heavy colors.
Step 2: Painting the Rainbow Stripes
-
Load the red paint:
Wet your flat brush or small round brush and load it with bright red face paint. Aim for a creamy consistency that isn’t too drippy. -
Paint the red stripe:
Start at the top left ‘hump’ of the heart. Paint a diagonal stripe downwards. This will form the very top left corner of your heart shape. -
Clean and switch to orange:
Rinse your brush thoroughly and load it with orange. Paint a diagonal stripe directly next to and below the red one, following the same angle. -
Add the yellow stripe:
Continue the pattern with yellow paint. I find it helpful to slightly overlap the previous color while it’s still damp to create a seamless transition, though distinct stripes look great too. -
Apply the green stripe:
Load up a vibrant grass green. Paint the next diagonal band. By now, you should be crossing the widest part of the heart’s center. -
Paint the blue stripe:
Add the blue stripe next. As you move lower, the stripes will become shorter as the heart shape tapers toward the point. -
Finish with purple:
Complete the bottom tip of the heart with purple paint. Check your overall shape now; don’t worry about rough edges, as the outline will cover them.
Smudged Outline?
If the white outline mixes with the colored paint, your rainbow base wasn’t dry enough. Wait 60 seconds between coloring and outlining, or clean your brush more often.
Step 3: Outlining and Details
-
Load the white liner:
Switch to your fine liner brush (size 0 or 1). Create a very creamy, ink-like mixture with white face paint and water. -
Outline the top arches:
Start at the dip (cleft) of the heart and pull the line up and around one arch. Repeat on the other side. Keep a steady hand and apply even pressure. -
Connect the point:
Continue the white line down the sides of the heart, meeting at the bottom sharp point. Make this line bold enough to cover any uneven ends of your colored stripes. -
Create the center starbursts:
Using the same fine brush, paint a four-point star (a cross shape) directly above the dip of the heart. -
Add side sparkles:
Paint two or three more stars of varying sizes spaced out along the outer curve of the heart. To make them sharp, flick the brush outward from the center of the star. -
Paint final accents:
Add a few tiny white dots or smaller crosses near the bottom point of the heart to balance the design. -
Let it dry:
Allow the paint to dry completely for a minute. Avoid touching the face during this time to prevent smudging. -
Set the look:
If you need the design to last all day, lightly mist a makeup setting spray over the area from a distance.
Sharper Lines
For the crispest stars and outlines, roll your fine liner brush into a sharp needle-point on the edge of your paint cake before bringing it to the skin.
You have created a beautiful, joyful design that is ready to be shown off
Mini Rainbow On the Nose Bridge
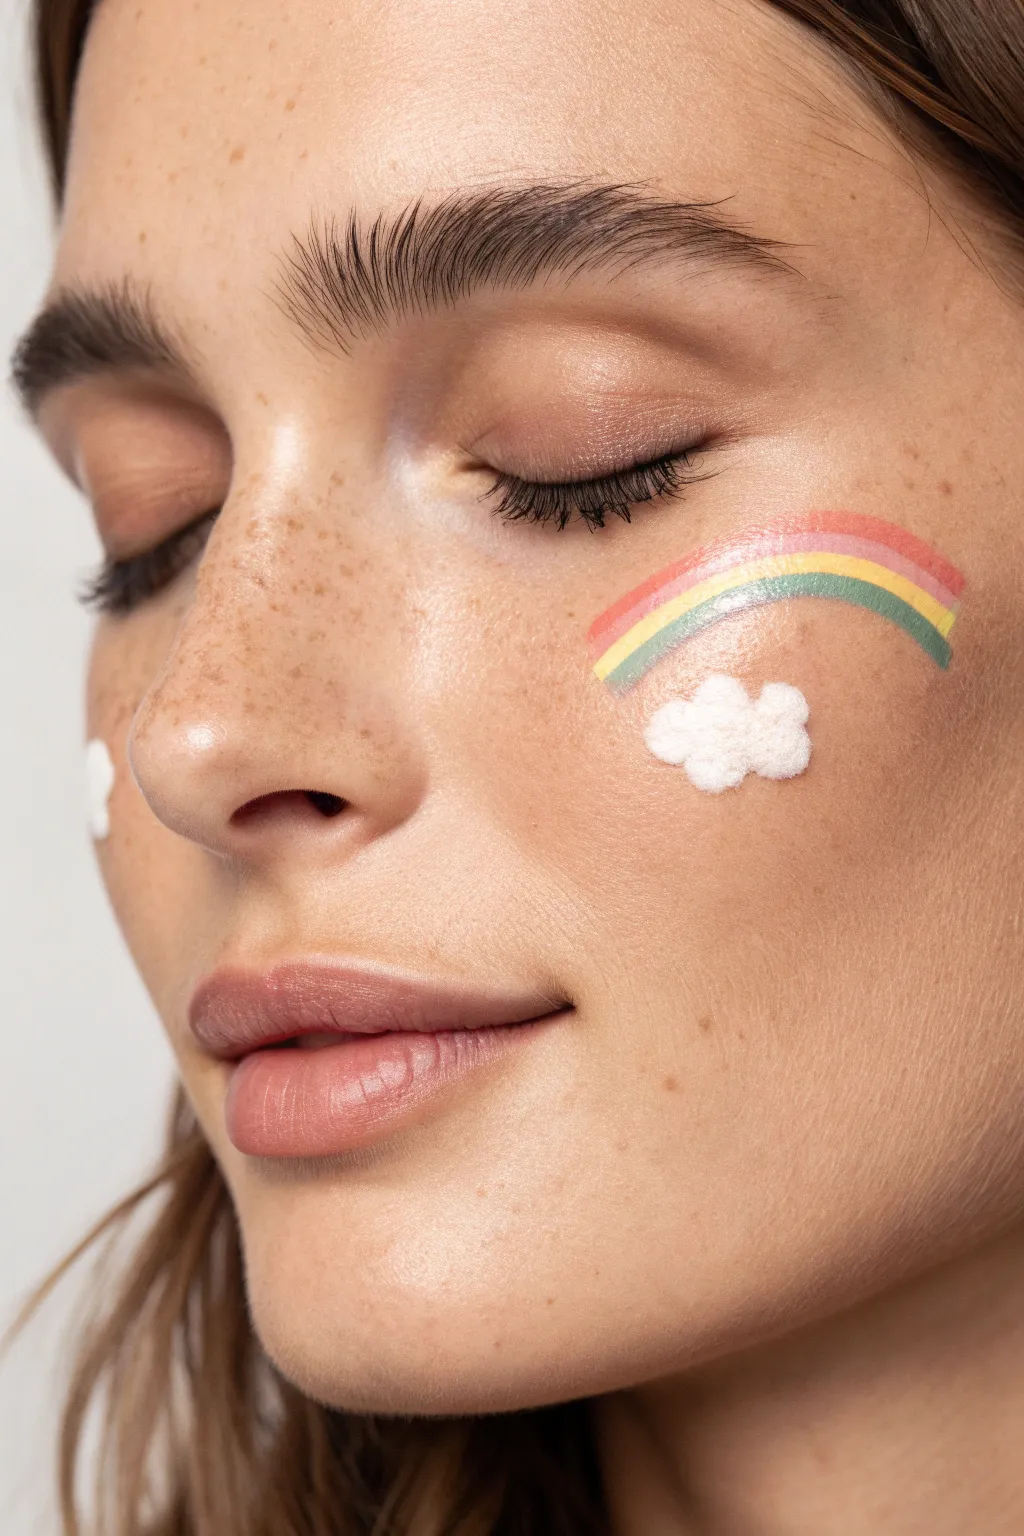
Add a touch of magic to your makeup look with this delicate rainbow arc that curves perfectly along the cheekbone. The soft, textured cloud adds a dreamy 3D effect that transforms simple face paint into wearable art.
How-To Guide
Materials
- Water-activated face paints (coral pink, pastel yellow, seafoam green, soft teal)
- White face paint (high opacity)
- Small flat brush (size 2-4)
- Small round detail brush (size 1)
- Cotton swab or small stipple sponge (for texture)
- Cup of water
- Paper towels
- Setting spray (optional)
Step 1: Painting the Rainbow Arc
-
Prep the palette:
Begin by activating your paints with a small amount of water. You want a creamy, opaque consistency rather than a watery wash to ensure the colors pop against the skin tone. -
Start with pink:
Load your small flat brush with the coral pink shade. Find the high point of your cheekbone and paint the top curve of the rainbow, starting closer to the nose and sweeping outward toward the temple. -
Clean the lines:
If the edge looks a bit shaky, wipe your brush clean and run it slightly damp along the upper edge to smooth out the curve creating a crisp top line. -
Add the yellow stripe:
Rinse your brush thoroughly. Load it with pastel yellow. Paint a line directly underneath the pink, slightly overlapping the wet edge to blend them softly, or keep them distinct for a graphic look. -
Apply the green layer:
Clean the brush again and pick up your seafoam green. Follow the curve created by the yellow line, maintaining a consistent width for each stripe. -
Finish with teal:
For the final inner arch, use the soft teal shade. Paint this line carefully along the bottom of the green curve. Taper the end slightly near the nose where the cloud will eventually sit. -
Assess symmetry:
Take a step back and look in the mirror. Check if the arc follows the natural countour of your cheekbone nicely.
Uneven Stripes?
If stripes overlap too much, wait for them to dry completely. Then, re-paint the dominant color on top. Wet paint on wet paint just creates mud.
Step 2: Creating the Fluffy Cloud
-
Load the white paint:
Activate your white face paint. You want this mixture to be quite thick, almost dry, to build texture rather than just flat color. -
Base shape:
Using the round detail brush, outline a bumpy cloud shape at the bottom inner end of your rainbow arc. Make three or four distinct rounded humps. -
Fill the cloud:
Fill in the outline with solid white. Don’t worry about being smooth here; a little unevenness adds character. -
Stipple for texture:
This is where I like to switch tools. Take a cotton swab or a very small sponge, dip it into the thick white paint, and dab it repeatedly over the cloud shape. -
Build dimension:
Focus the dabbing on the top curves of the cloud to make them look fluffier and more three-dimensional. -
Clean up edges:
If any white paint migrated too far, use a clean, slightly damp angled brush to tidy up the perimeter of the cloud. -
Second cheek accent:
To balance the look, paint a single small white cloud on the opposite cheek without the rainbow, using the same stippling technique. -
Wait to dry:
Let the paint dry completely for a minute or two. Try not to smile too widely while it sets to prevent cracking. -
Set the look:
Lightly mist the painted areas with a setting spray to keep the colors vibrant and prevent smudging throughout the day.
Add Some Sparkle
While the cloud paint is still slightly tacky, press loose cosmetic glitter onto the cloud’s center, or stick tiny adhesive rhinestones at the rainbow’s end.
You are now ready to brighten everyone’s day with your cheerful, cloud-capped masterpiece


Rainbow Cloud Clusters On the Cheeks
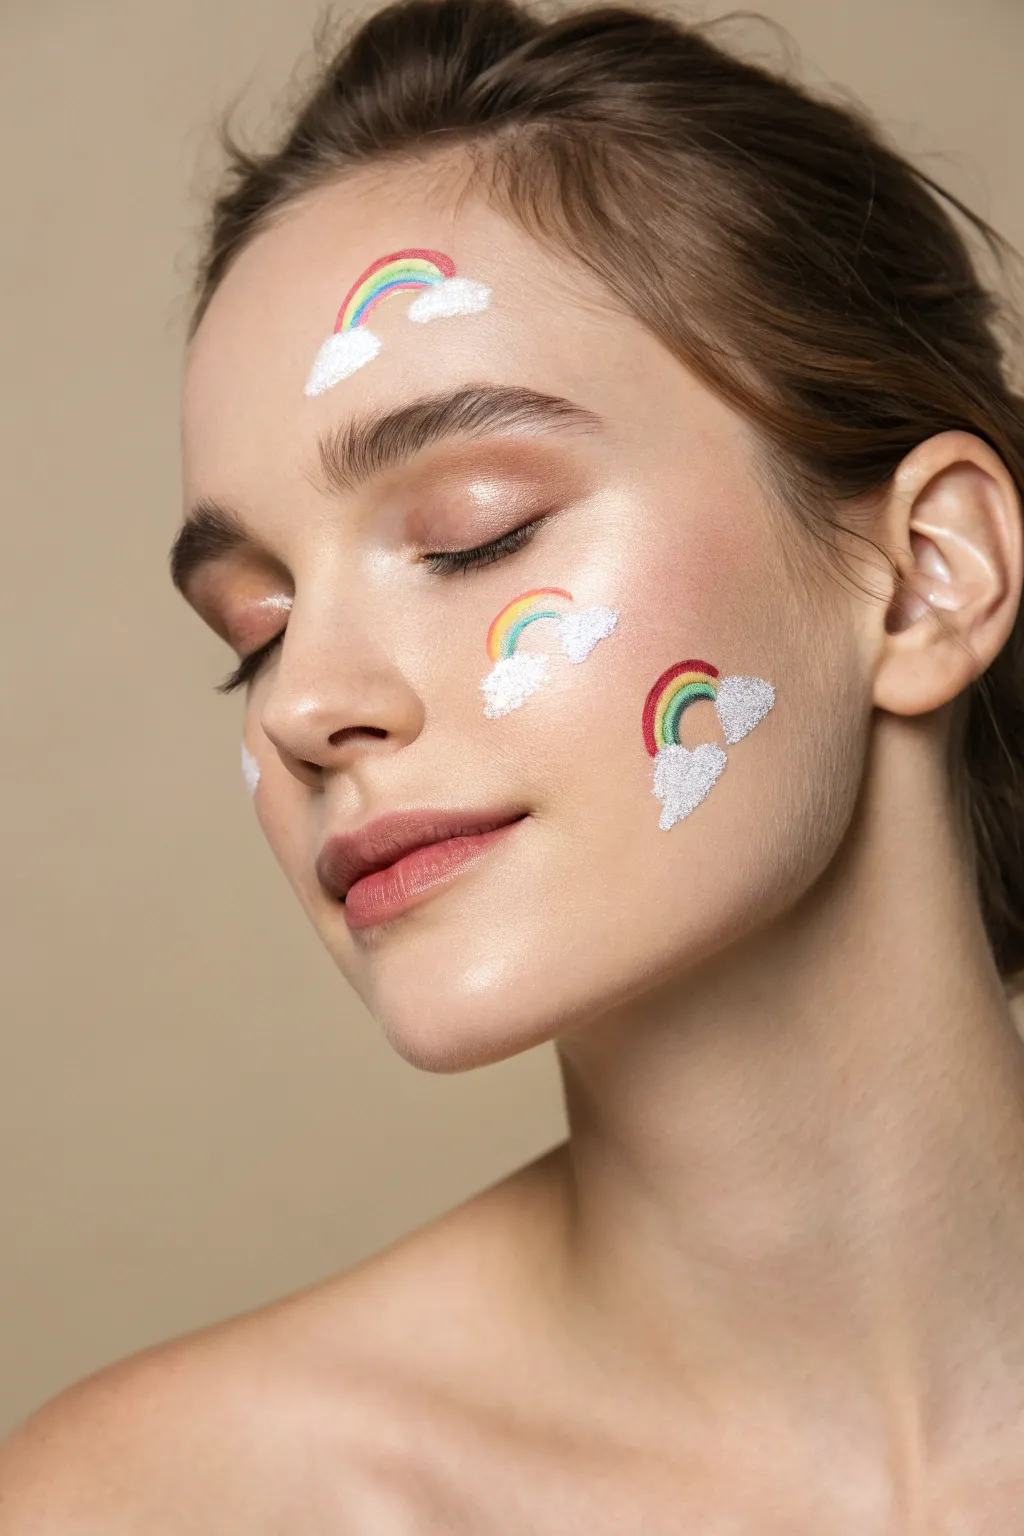
Capture the magic of a sunny day with this delicate and dreamy face paint design featuring petite rainbows emerging from fluffy, glitter-dusted clouds. This look balances clean, glowing skin with playful pops of color, perfect for festivals or a fun photoshoot.
Step-by-Step Tutorial
Materials
- Water-activated face paints (red, yellow, green, blue)
- White face paint (high opacity)
- Fine detail brush (size 0 or 1)
- Small round brush (size 2 or 3)
- Cosmetic grade iridescent white glitter
- Setting spray (optional)
- Cup of water
- Paper towels
Step 1: Base Preparation
-
Cleanse and prep:
Start with a clean, moisturized canvas. Ensure all oils are removed from the areas where you’ll be painting—specifically the forehead and left cheek—to help the paint adhere smoothly. -
Apply minimal base:
If you plan to wear foundation or concealer, keep it light and dewy. Heavy powders can make the face paint crack, so stick to creams or tinted moisturizers for that fresh skin look.
Steady Hand Trick
Rest your pinky finger on the cheek or chin to stabilize your hand while painting the thin rainbow arches. This acts as an anchor for cleaner lines.
Step 2: Painting the Rainbow Arcs
-
Load your red:
Wet your fine detail brush and load it with bright red face paint. You want a creamy, ink-like consistency that flows easily but isn’t drippy. -
Draft the first arc:
Starting on the upper forehead above the left eyebrow, paint a small, curved red line. This will be the top band of your first rainbow. -
Add cheek rainbows:
Move down to the cheek area. Paint two more red arcs: one positioned higher on the cheekbone under the eye, and a second one slightly lower and further back on the cheek. -
Layer the yellow:
Clean your brush thoroughly. Load it with yellow paint and carefully draw a second arc directly underneath each red line. Keep the lines hugging each other tightly to avoiding gaps. -
Curve the green:
Rinse and load green paint. Nest this color right under the yellow bands on all three rainbows. I find that steadying my pinky finger against the face helps keep these tiny lines precise. -
Finish with blue:
Complete the rainbow spectrum by adding a final blue line under the green. Keep this line just as thin as the others for a uniform look.
Step 3: Creating Fluffy Clouds
-
Prep the white:
Switch to your small round brush and load it heavily with high-opacity white face paint. The texture should be slightly thicker than the colored paint to create opacity. -
Stamp the forehead clouds:
At both ends of the forehead rainbow, create a cloud shape by using a stippling motion. Press the brush tip down gently to make small, rounded ‘fluff’ shapes rather than painting solid circles. -
Form the cheek clouds:
Repeat this stippling technique for the four ends of the rainbows on your cheek. Vary the size slightly—making the clouds a bit wider at the base makes them look fluffier. -
Build texture:
Go back over the clouds with a second layer of white if needed. Dab the paint on to build a little texture, which gives the clouds dimension.
Sky High Style
Add tiny white starbursts or dots around the rainbows to expand the scene, or use a pearlescent highlighter on the cheekbones for an ethereal glow.
Step 4: Adding the Sparkle
-
Glitter application:
While the white paint on the clouds is still slightly tacky (damp but not wet), pick up cosmetic iridescent glitter with a dry finger or a clean brush. -
Press and pat:
Gently press the glitter onto each white cloud cluster. Don’t swipe, or you might smear the white paint into the rainbow colors. Just press straight down. -
Dust off excess:
Once the paint is fully dry, very lightly brush away any loose glitter that fell onto the cheeks using a clean, fluffy fan brush. -
Clean up edges:
If any white paint strayed too far, use a Q-tip dipped in a tiny bit of water or makeup remover to sharpen the edges of your clouds. -
Set the look:
Close your eyes and mist the face lightly with a setting spray to lock the design in place and prevent the colors from bleeding if you get warm.
Now you are ready to brighten everyone’s day with these adorable, weather-inspired accents
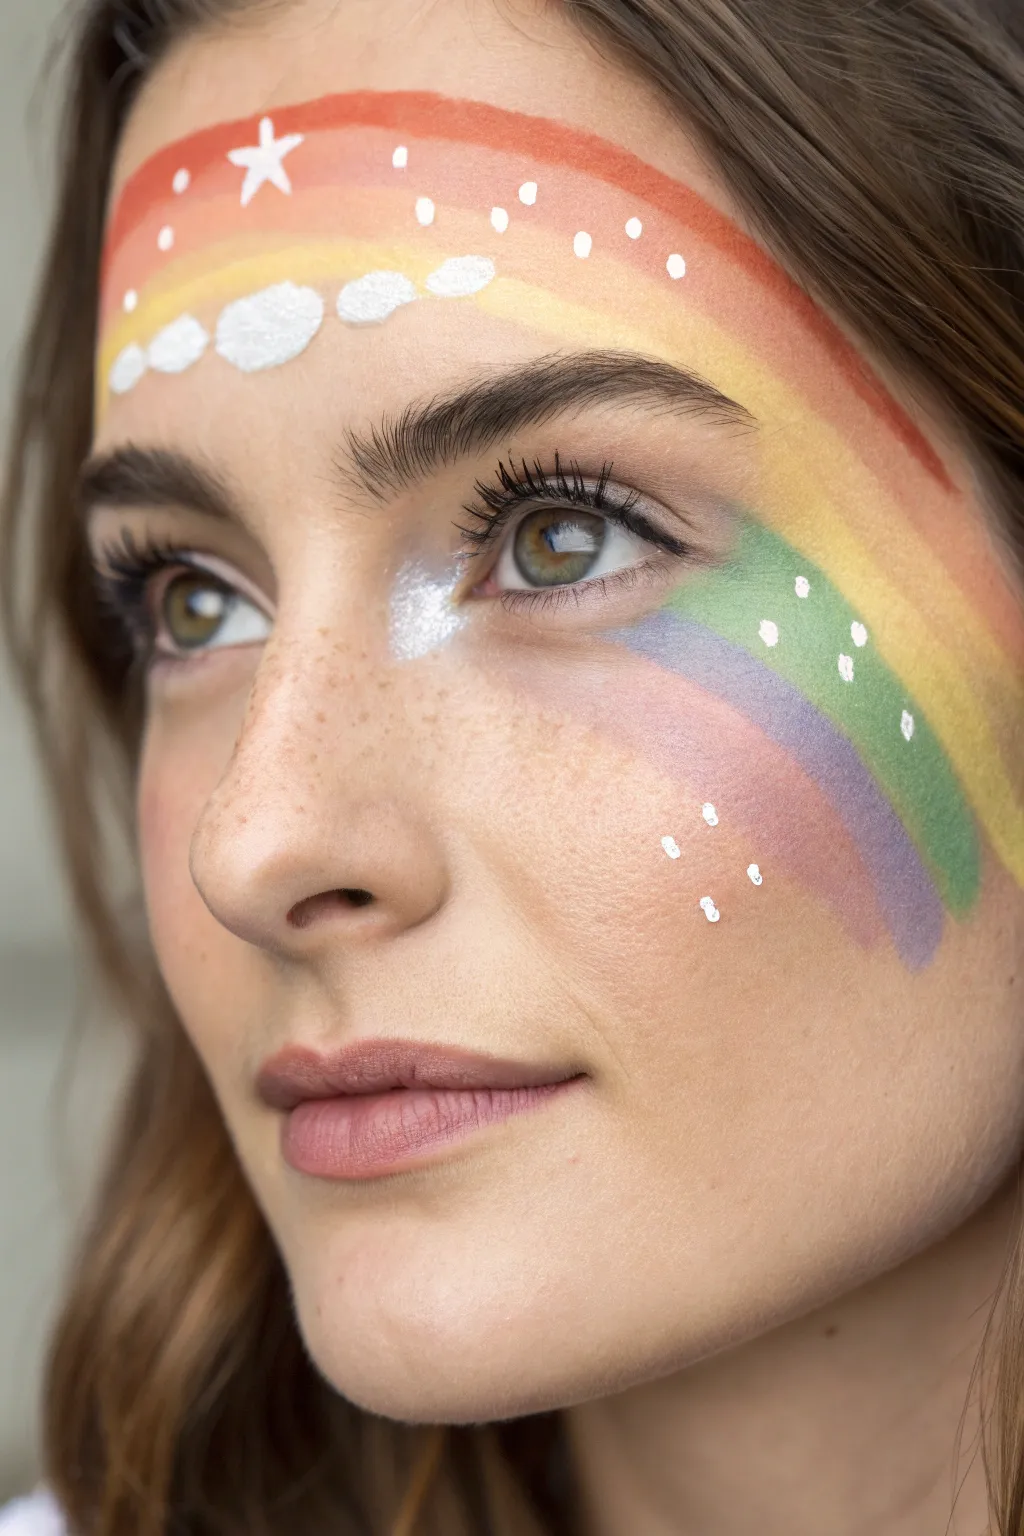
Rainbow With White Starburst Highlights
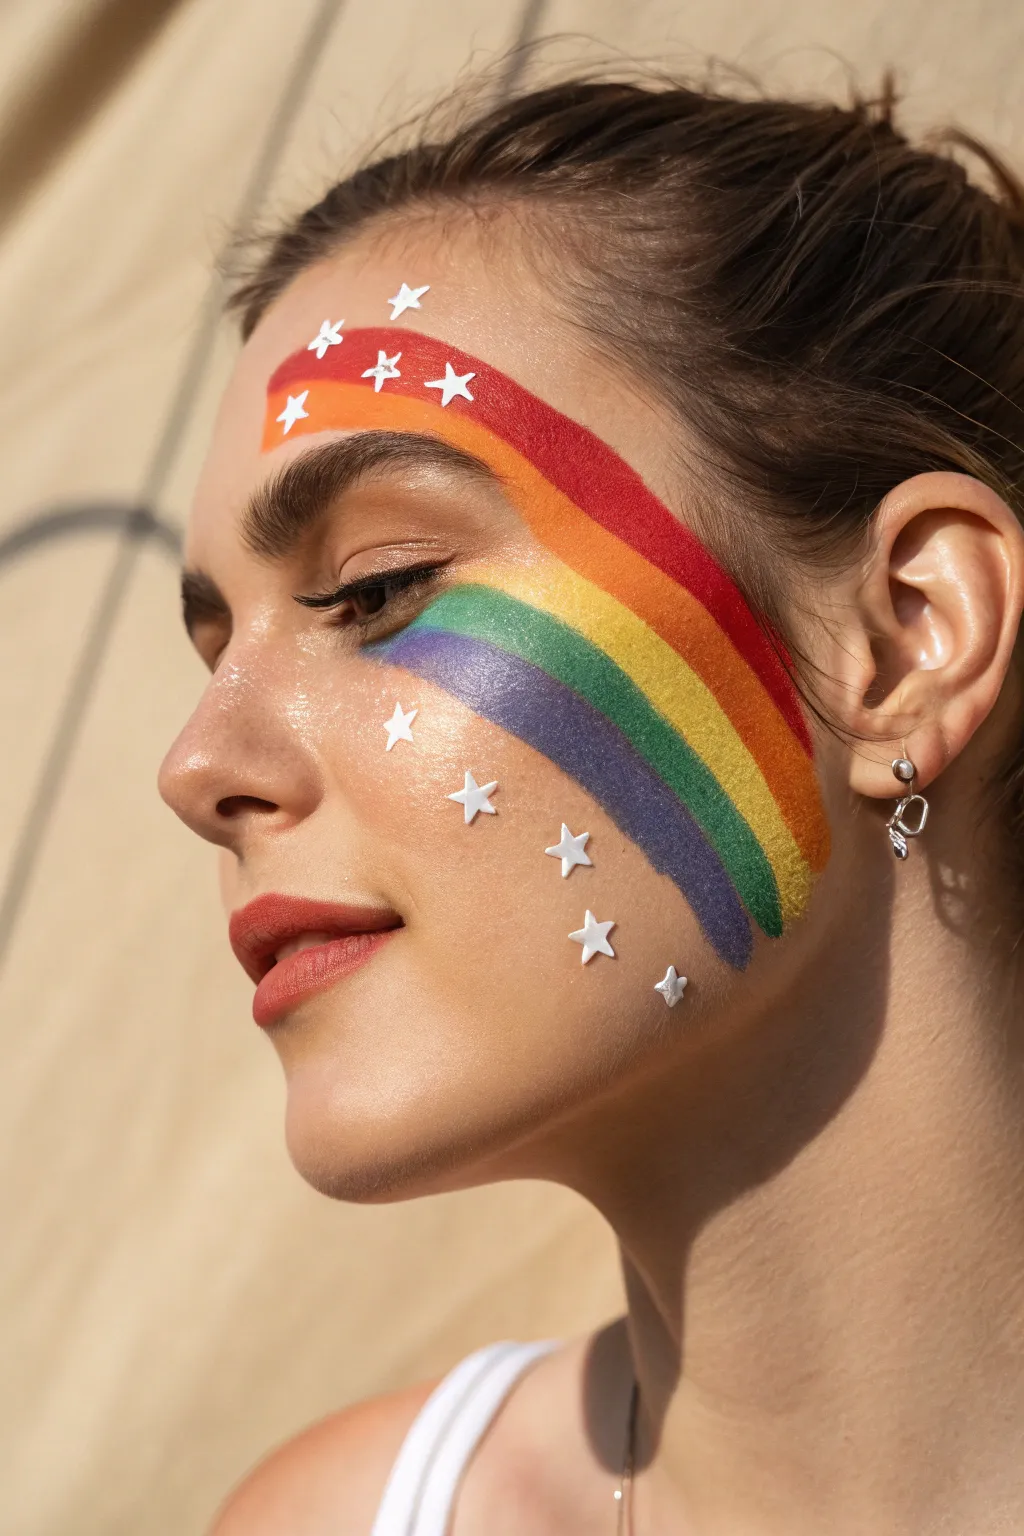
This radiant face paint design features a bold, classic rainbow swoosh that curves from the forehead down to the cheekbone, creating a vibrant frame for the face. The look is softened and whimsicalized with scattered white stars that mimic a magical, celestial burst.
Detailed Instructions
Materials
- High-quality face paint palette (red, orange, yellow, green, blue, purple)
- White face paint (highly pigmented)
- Medium flat brush (approx. 1/2 inch to 3/4 inch)
- Small flat or filbert brush
- Fine detail brush (round, size 1 or 2)
- Small cup of water
- Paper towels
- Optional: Setting spray
- Optional: Cosmetic glitter
Step 1: Planning and First Colors
-
Clean and prep:
Start with a clean, dry face free of oils or heavy moisturizers. If the skin is oily, a quick wipe with a mild toner can help the paint adhere better. -
Visualize the curve:
Imagine a smooth ‘C’ shape starting high on the forehead above the eyebrow, curving around the temple, and ending low on the cheek. This is your guide. -
Applying the red band:
Load your medium flat brush with red face paint. Starting on the forehead, paint a smooth, curved stripe that follows your imaginary guide down past the temple. -
Adding orange:
Clean your brush thoroughly. Load it with orange paint and apply a second stripe directly beneath the red one, slightly overlapping the edge to ensure no skin shows through.
Step 2: Completing the Rainbow
-
Painting the yellow stripe:
With a clean brush and yellow paint, follow the curve of the orange line. Keep your hand steady to maintain a consistent width for each color band. -
Transitioning to cool tones:
Switch to green. Paint this stripe below the yellow, being careful as you curve around the eye area. I find it easiest to have the model look slightly away from the brush. -
Adding the blue band:
Apply the blue stripe beneath the green. This line will likely pass over the upper cheekbone, so follow the bone structure for a natural flow. -
Finishing with purple:
Load a slightly smaller flat brush with purple paint if you are running out of space, and paint the final bottom stripe. Let the end of the rainbow fade out softly on the cheek. -
Softening edges:
If any lines look too harsh or separated, you can lightly dampen a clean brush and gently run it between the colors to blend them slightly.
Fixing Opacity
If the white stars look gray or transparent against the bright colors, let the first layer dry completely, then dab a second layer of white directly on top.
Step 3: Starry Details
-
Prepping white paint:
Get your white paint to a creamy, ink-like consistency. It needs to be opaque enough to cover the colors underneath without being goopy. -
Forehead stars:
Using a fine detail brush, paint small five-pointed stars on the upper red and orange sections of the rainbow on the forehead. -
Mid-section stars:
Move down to the cheek area. Paint a few larger, distinct stars over the yellow, green, and blue sections. -
Trailing stars:
Paint a trail of stars drifting off the bottom of the rainbow onto the bare skin of the jawline. -
Varying the sizes:
Ensure you paint stars of different sizes—some tiny specks and some larger dominant stars—to create depth and interest. -
Sharpening the points:
Go back over your stars with the very tip of your detail brush to sharpen the points, making them look crisp and neat. -
Final touches:
Allow the design to dry completely. If you want extra sparkle, you can gently tap a little cosmetic glitter over the wet paint before it sets.
Sparkle Upgrade
Add tiny self-adhesive rhinestones to the center of the largest stars for a 3D effect that catches the light beautifully when you move.
You now have a dazzling, colorful look perfect for festivals or parties
Rainbow Tear Drops Under the Eye

This ethereal look combines a softly defined natural makeup base with a vibrant, playful rainbow arching across the cheekbone. The addition of delicate white dots creates a dreamy, cloud-like effect that perfectly frames the eye.
Step-by-Step Tutorial
Materials
- Lightweight foundation or tinted moisturizer
- Concealer
- Soft brown brow pencil or powder
- Mascara (black or dark brown)
- Rosy pink lip stain or tinted balm
- Matte face painting palette (water-activated) or high-pigment eyeshadows
- Fine detail brush (size 0 or 00)
- Small flat angled brush
- White liquid eyeliner or white face paint
- Dotting tool or toothpick
- Makeup setting spray
Step 1: The Natural Base
-
Prep the canvas:
Begin with clean, moisturized skin. Apply a sheer layer of foundation or tinted moisturizer to even out the skin tone while letting natural freckles or texture peek through. -
Conceal lightly:
Dab a tiny amount of concealer under the eyes to brighten the area where the rainbow will sit, ensuring the skin looks fresh and awake. -
Define the brows:
Brush eyebrow hairs upward for a fluffy look. Fill in sparse areas gently with a soft brown pencil or powder, keeping the strokes light and feather-like rather than blocky. -
Add warmth:
Sweep a very subtle wash of warm brown or peach eyeshadow over the eyelid to create depth without overpowering the upcoming face paint. -
Lashes and lips:
Apply one coat of mascara to the upper lashes. Finish the base with a rosy pink lip stain or tinted balm, blotted with a finger for a soft, lived-in finish.
Clean Lines Tip
If your hand shakes, rest your pinky finger on your chin to stabilize your hand while painting the curved lines.
Step 2: Painting the Rainbow
-
Draft the curve:
Visualize the arc starting from the outer corner of the eye, curving over the cheekbone, and ending mid-cheek. You can lightly dot the path with a nude pencil if needed. -
Start with red:
Load a fine detail brush or a small angled brush with water-activated red face paint. Paint the outermost curve of the rainbow first to establish the shape. -
Layer the orange:
Clean your brush thoroughly. Pick up orange paint and draw a line immediately beneath the red. I find slightly overlapping the wet edges helps blend them naturally. -
Add the yellow:
Continue with a stripe of bright yellow. Ensure your brush isn’t too wet, or the yellow might become muddy when touching the orange. -
Paint the green:
Apply the green stripe next. Keep the line width consistent with the previous colors for a uniform look. -
Finish the spectrum:
Complete the rainbow with a line of blue followed by a final line of purple on the innermost curve. -
Soften the texture:
If the lines look too harsh, you can gently tap the dry paint with a clean, dry eyeshadow brush to give it a slightly powdery, soft-focus texture.
Step 3: The Starry details
-
Prepare the white:
Shake your white liquid eyeliner well, or create a creamy consistency with white face paint and a detail brush. -
Outer framing dots:
Place a series of small white dots following the outer curve of the red stripe. Space them evenly, leaving about half a centimeter between each dot. -
Inner framing dots:
Repeat the dotting process along the inner curve of the purple stripe. These can be slightly smaller to fit the tighter curve. -
Scattered highlights:
Add a few random, tiny dots near the ends of the rainbow to mimic sparkling dust or distant stars. -
Set the look:
Close your eyes and mist the face with a setting spray to lock the pigments in place and prevent the rainbow from smudging throughout the day.
Level Up: Cloud Nine
Instead of simple dots at the ends of the rainbow, paint tiny fluffy white clouds to make the rainbow look like it’s emerging from the sky.
Now you have a vibrant pop of color that brightens your smile
Rainbow Freckle Scatter
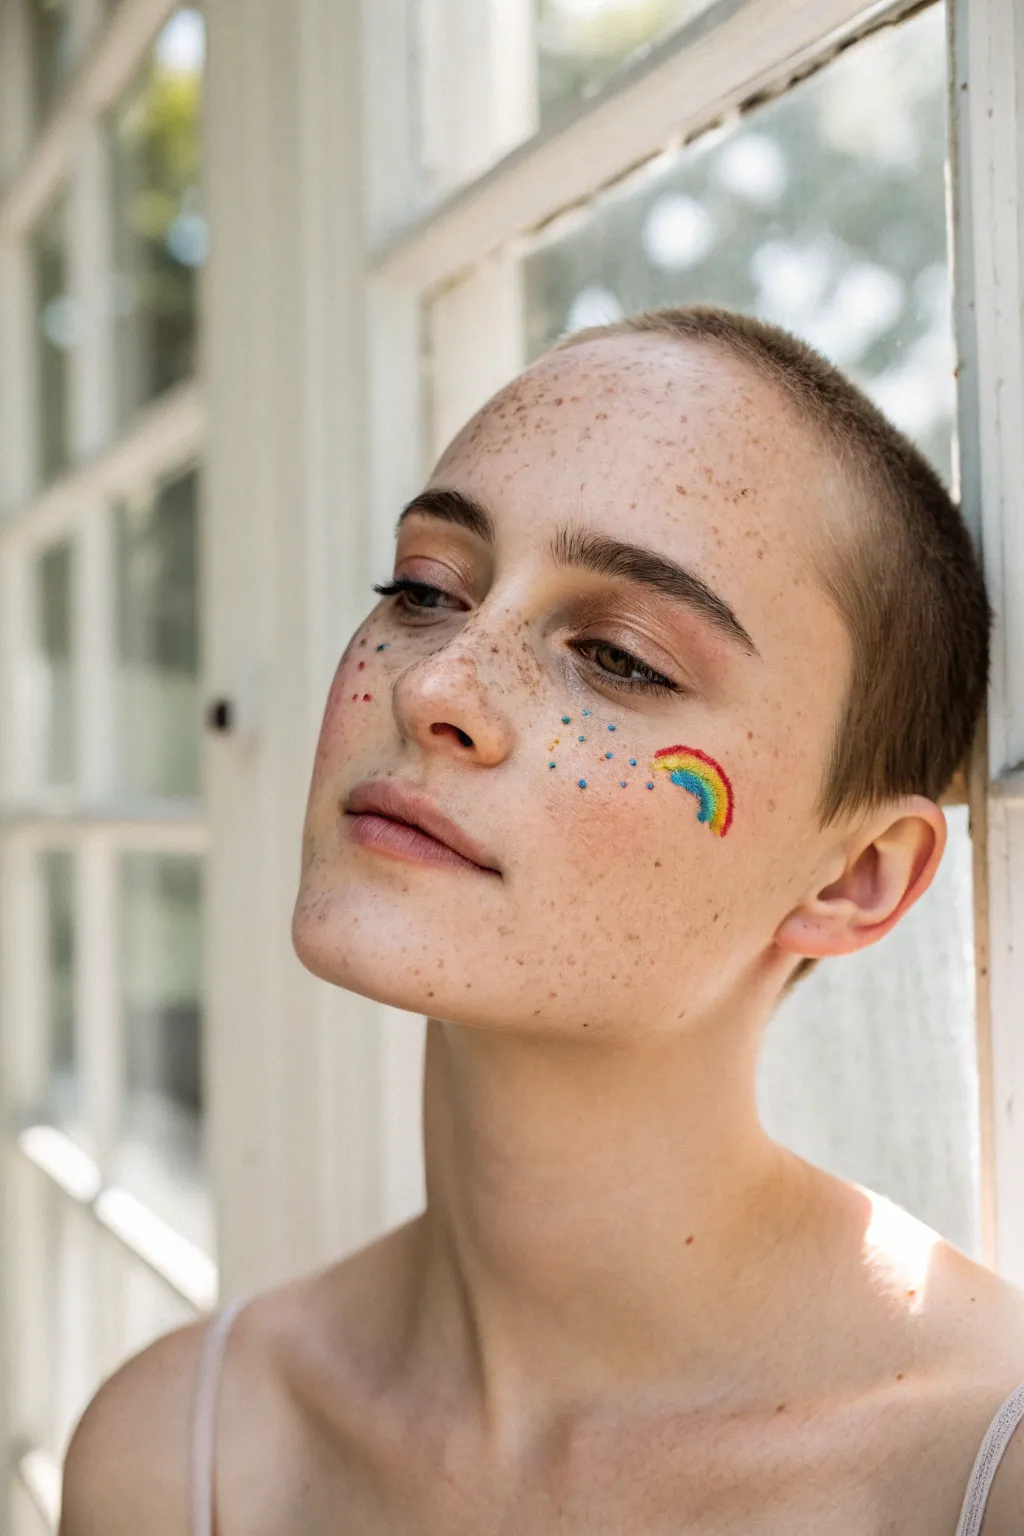
For a minimalist yet magical take on rainbow face paint, this look combines a singular, delicate rainbow arch with a scattering of colorful ‘freckles’ across the nose and cheeks. It’s subtle enough for a festival or just a sunny day out, blending playfulness with natural beauty.
Step-by-Step Guide
Materials
- Water-activated face paints (red, orange, yellow, green, blue)
- Fine detail brush (size 0 or 00)
- Small cup of water
- Pointed cotton swabs (optional)
- Setting spray
- Moisturizer or primer (for base prep)
Step 1: Base Preparation
-
Cleanse and prep:
Start with a clean, moisturized face. Since this look relies on skin showing through, avoid heavy foundation or keep it very sheer to let natural texture shine. -
Determine placement:
Decide which cheek you want the rainbow on. In our inspiration, it sits high on the cheekbone, just under the outer corner of the eye.
Smudged Lines?
If your rainbow stripes bleed into each other, your brush is likely too wet. Wait for it to dry completely, gently scratch off the mistake with a dry spoolie, and re-paint.
Step 2: Painting the Rainbow Arch
-
Load the brush with blue:
Dip your fine detail brush into water and swirl it into your blue face paint until you have a creamy, ink-like consistency. -
Paint the inner arch:
Draw a small, curved line about half an inch long to form the innermost ring of the rainbow. Keep your hand steady and light. -
Add the green stripe:
Rinse your brush thoroughly. Load it with green paint and carefully draw a second arch right next to the blue one, mirroring its curve perfectly. -
Continue with yellow:
Clean the brush again. Apply the yellow stripe next to the green. I find that yellow can sometimes look transparent, so load the brush heavily here for opacity. -
Apply the orange band:
Next, apply the orange stripe. Ensure it hugs the yellow line closely without blending into it. -
Finish with red:
Paint the final, outermost arch with red paint. This completes the classic rainbow shape. -
Clean up edges:
If any lines are uneven, use a pointed cotton swab dipped in a tiny bit of water or makeup remover to gently neaten the ends of the rainbow.
Step 3: Creating the Color Scatter
-
Start with blue dots:
Reload your small brush with blue paint. Gently tap the tip onto the skin to create tiny dots. Place a few near the rainbow and scatter some across the nose bridge. -
Vary the dot sizes:
Try to make some dots slightly larger and others microscopic by varying the pressure you put on the brush tip. -
Add yellow speckles:
Switch to yellow paint. Place yellow dots randomly among the blue ones, concentrating a cluster near the tail of the rainbow. -
Incorporate red accents:
Finish by adding tiny red dots to the mix. Place some on the opposite cheek as well to balance the look without mirroring it completely. -
Check density:
Step back and look in the mirror. You want a ‘scattered’ effect, not a solid block of dots, so leave plenty of open skin space.
Freckle Pro-Tip
For the most natural-looking scatters, group dots in odd numbers (clusters of 3 or 5) and vary the spacing. Avoid perfect grids to keep it organic.
Step 4: Finishing Touches
-
Let it dry:
Keep your face relatively still for a minute or two to allow the water-activated paints to fully set and dry matte. -
Set the look:
Close your eyes and mist a makeup setting spray over your face. This helps prevent the water-based paint from smudging if you sweat.
Now you have a cheerful, artistic accent that brightens your expression without overwhelming it
Watercolor Rainbow Splashes
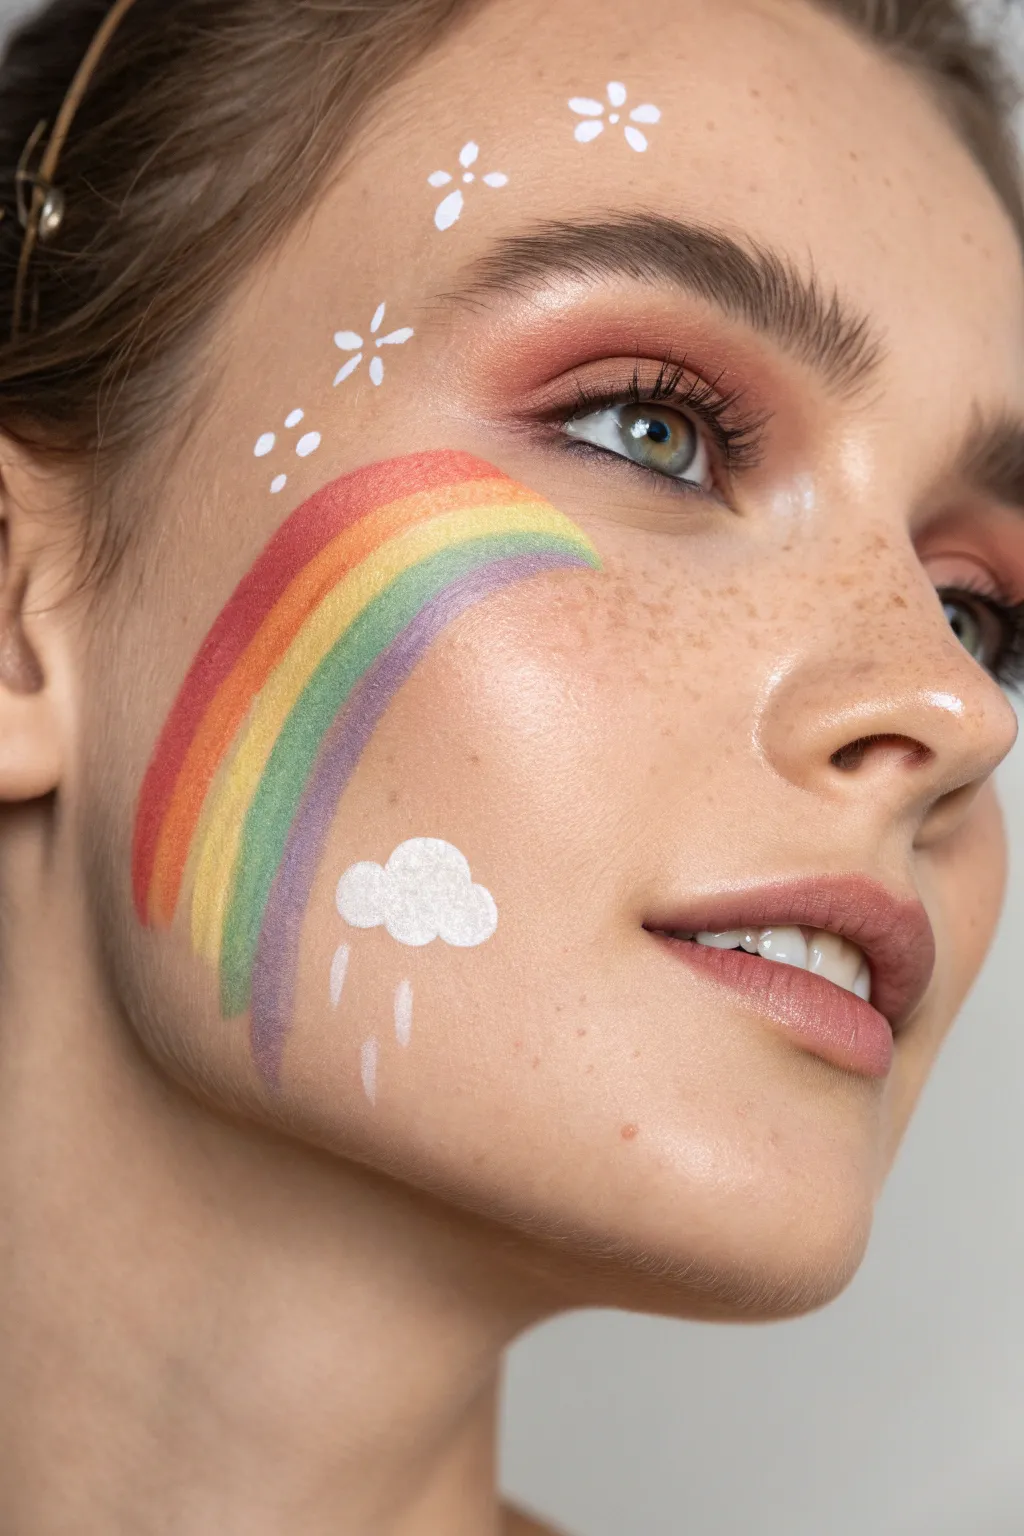
Embrace a soft, dreamy aesthetic with this gentle rainbow design that sweeps across the cheekbone like a watercolor painting. Paired with white cloud accents and delicate floral motifs, it creates a magical, ethereal look perfect for festivals or cheerful photoshoots.
Detailed Instructions
Materials
- Water-activated face paints (red, orange, yellow, green, blue, purple)
- White face paint (high opacity)
- Flat angled brush (3/4 inch or similar)
- Small round detail brush (size 1 or 2)
- Dotting tool or the back of a small brush
- Warm terracotta or peach eyeshadow
- Fluffy blending brush
- Makeup sponge (optional)
- Setting spray
Step 1: Setting the Canvas
-
Prep the Skin:
Start with a clean, moisturized face. For this look, a natural base works best, so apply a light tinted moisturizer or keep the skin bare to let natural texture show through. -
Warm the Eyes:
Using a fluffy blending brush, sweep a warm terracotta or peach eyeshadow into the crease of the eyelids and diffuse it outwards slightly. This complements the warm tones of the rainbow without overpowering it. -
Groom Brows:
Brush eyebrows upward with a clear brow gel to keep the look fresh and lifted, matching the whimsical vibe of the face paint.
Pro Tip: Consistency is Key
Keep your white paint creamy, like melted chocolate. If it’s too watery, it will be translucent on the skin. If too thick, it will crack. Test on your hand first.
Step 2: The Rainbow Arc
-
Load the Brush:
This is the most crucial step. I like to use a flat, angled brush or a specifically designed rainbow cake split cake. If loading individual colors, dampen a flat brush and pick up stripes of red, orange, yellow, green, blue, and purple side-by-side until the bristles are fully saturated. -
Position the Arc:
Place the top edge of your brush (the red side) just under the outer corner of the eye, high on the cheekbone. -
Paint the Sweep:
In one smooth, confident motion, drag the brush downwards and curve it inwards towards the jawline. Visualize a ‘C’ shape that hugs the contour of the cheek. -
Feather the End:
As you reach the bottom of the stroke (near the jaw), lift the brush gently off the skin to create a naturally faded, feathered end rather than a blunt stop. -
Soften Edges:
If the edges look too harsh, you can lightly tap them with a clean, slightly damp finger before the paint dries completely to create that watercolor effect.
Level Up: Glitter Rain
Apply cosmetic glitter gel over the white cloud or replace the white raindrops with small rhinestones using eyelash glue for a sparkling 3D effect.
Step 3: Cloud and Rain Details
-
Create the Cloud Base:
Dip a small round brush into opaque white face paint. Near the bottom curve of the rainbow, paint three connected rounded bumps to form the top of a fluffy cloud. -
Fill the Cloud:
Fill in the shape solidly with white. To give it texture, I prefer stippling the paint slightly rather than smoothing it out perfectly. -
Add Raindrops:
Using the very tip of your round brush, paint three small teardrop shapes falling from the bottom of the cloud. Vary their lengths slightly for a playful look. -
Highlighting:
Once the rainbow creates a background, you need to let it dry for a moment so your white details don’t smear into the colors.
Step 4: Floral Accents
-
Upper Flowers:
Above the eyebrow and temple area, use the small round brush loaded with white to create simple five-petal flowers. -
Petal Technique:
Press the belly of the brush down and lift quickly towards the center point to create teardrop-shaped petals. -
Add Center Dots:
Leave the very center of the flowers empty or add a tiny dot of skin-toned negative space for dimension. -
Floating Petals:
Paint a few stray petals or dots scattering down from the forehead towards the rainbow to connect the design elements together visually. -
Tiny Dots:
Use a dotting tool or the back of a thin brush handle dipped in white paint to add clusters of three tiny dots near the rainbow’s start for extra magic.
Step 5: Finishing Touches
-
Enhance Freckles:
If the face paint covered natural freckles, use a fine brown eyebrow pencil or a splatter technique with diluted brown paint to add faux freckles across the nose and cheeks. -
Lip Gloss:
Finish with a clear or slightly pink-tinted lip gloss to keep the focus on the cheek art. -
Set the Look:
Close your eyes and mist the face lightly with a setting spray to prevent the water-based paint from cracking or flaking during wear.
Now you are ready to share your vibrant, sky-inspired masterpiece with the world
Geometric Rainbow Blocks
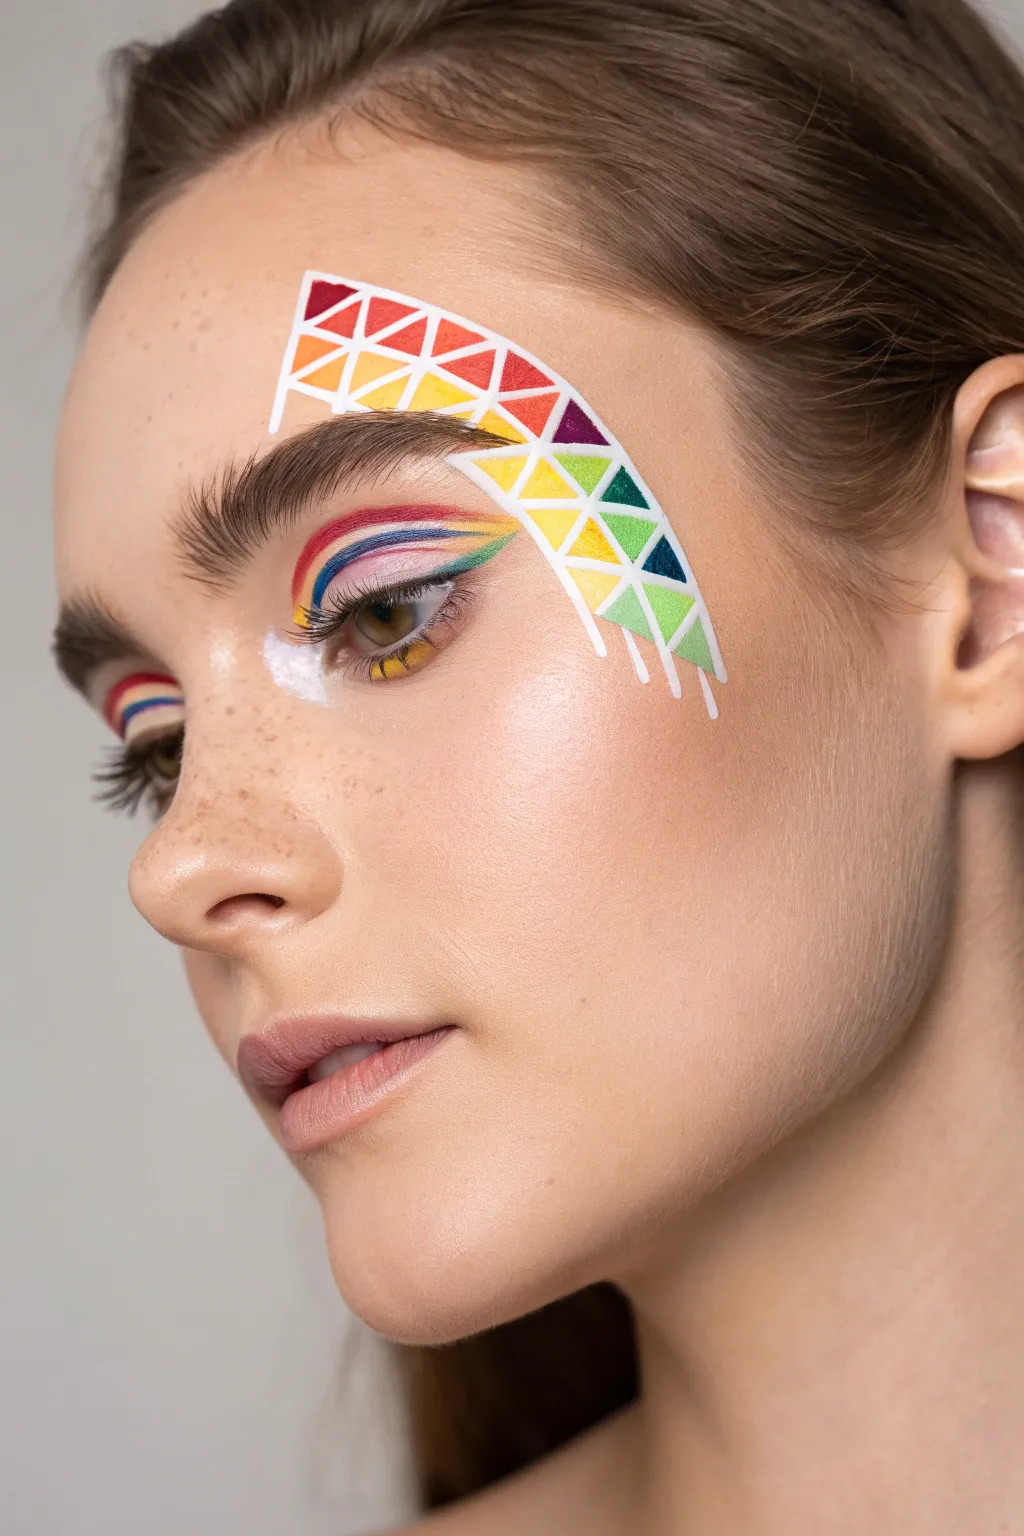
This striking makeup look combines precise linework with vibrant color blocking to create a wearable piece of modern art. The design features a mosaic of rainbow triangles arcing over the brow, complemented by a multi-layered graphic liner that makes the eyes pop.
Step-by-Step Guide
Materials
- Face primer and foundation (to match skin tone)
- White liquid eyeliner or water-activated face paint (fine liner brush)
- Rainbow eyeshadow palette (matte finish)
- Small flat angled brush
- Fine detail liner brush (size 0 or 00)
- Micellar water and cotton swabs (for cleanup)
- Setting spray
- White cream base or concealer
Step 1: Base and Preparation
-
Prep the Canvas:
Start with a clean, moisturized face. Apply your usual primer and foundation to create an even, flawless base. Since this look relies on negative space, ensure the skin around the eye area is well-blended and set with a light dusting of translucent powder. -
Groom the Brows:
Brush your eyebrows upward using a clear brow gel. You want them neat and defined but natural, as they will serve as the anchor for the geometric design above them.
Clean Lines Hack
Make a mistake? Wait for the paint or liner to dry completely, then use a angled brush dipped in a tiny bit of concealer to ‘erase’ and sharpen the edges.
Step 2: The Geometric Arch
-
Outline the Grid:
Using a white liquid liner or white water-activated paint on a fine liner brush, carefully draw a curved grid above your eyebrow. Start with the top and bottom parallel curved lines, following the natural arch of your brow bone. -
Create the Triangles:
Within those parallel lines, draw diagonal intersecting lines to create a tessellated triangle pattern. Extend the design slightly down towards the temple, letting the white lines drip or fade out at the very end for an artistic touch. -
Fill Red and Orange:
Select a small angled brush or a tiny detail brush. Start filling in specific triangles with matte red shadow or paint. I like to focus the warm tones (reds, oranges) near the inner part of the arch. -
Add Yellow and Green:
Moving outwards towards the arch’s peak, fill adjacent triangles with yellow and bright green. Be careful to stay strictly within the white grid lines to maintain that crisp, mosaic effect. -
Complete with Cool Tones:
Fill the remaining triangles on the outer tail of the design with blues, indigos, and teals. Leave some triangles empty (just skin showing) or fill them with white to create breathing room in the design.
Level Up: Glossy Finish
For an editorial wet-look, adhere clear eye-safe gloss over the geometric shapes. Just barely tap it on so you don’t smear the water-based paints underneath.
Step 3: The Rainbow Liner
-
Base Graphic Line:
On your upper eyelid, draw a sharp, winged shape using a blue or indigo liner. This doesn’t need to be a solid fill; just outline the shape of a classic cat-eye wing that extends outward. -
Layering Colors:
Above your blue crease line, carefully trace a thin line of red, followed immediately by a thin line of orange or yellow underneath it. Follow the curve of your natural crease. -
Inner Corner Detail:
On the inner corner of the eye, use a bright white cream base or liner to create a small, abstract cloud or highlight shape. This brightens the eye and balances the heavy color above. -
Lower Lash Line:
For the lower lash line, mimic the rainbow order. Apply a tiny dash of yellow near the center, blending into a small flick of orange or red towards the outer corner. -
Mascara Application:
Apply a coat of defining mascara to the top and bottom lashes. Keep the lashes separated and natural rather than clumpy, so they don’t obscure the intricate liner work.
Step 4: Finishing Touches
-
Freckle Enhancement:
If you have natural freckles, let them shine through. If not, use a light brown brow pencil to dot a few faux freckles across the nose and cheeks for a youthful, fresh appearance. -
Set the Look:
Close your eyes and mist a setting spray over your face. This is crucial to prevent the fine lines of the geometric grid from smudging throughout the day.
Now you have a vibrant, architectural look that turns your face into a canvas of color
Split Rainbow Wings Around the Eyes
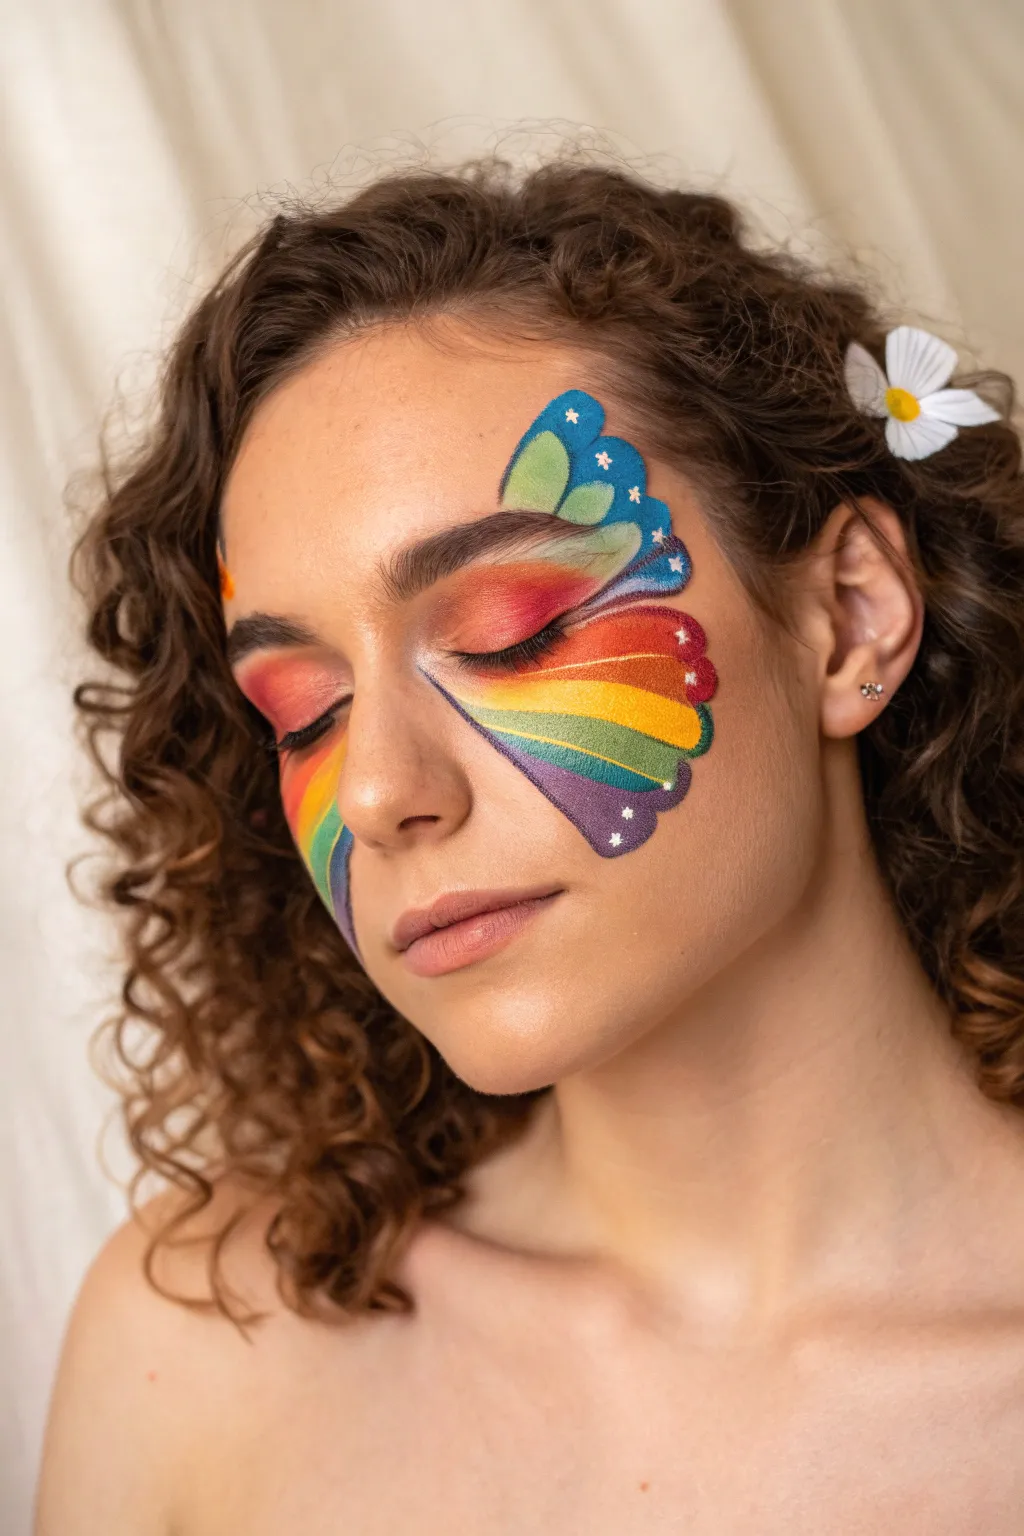
Transform your face into a canvas with this stunning split butterfly wing design that uses negative space and vibrant rainbow gradients to frame the eyes. This artistic look combines soft blending with crisp graphic lines for a magical, ethereal finish.
Step-by-Step Tutorial
Materials
- Water-activated face paints (red, orange, yellow, green, teal, blue, purple, white)
- Flat shader brush (medium)
- Small tapered detail brush
- Medium round brush
- Makeup sponge (optional for base)
- Cup of water
- Soft towel or paper towel
Step 1: Base Gradient
-
Prime the Eyelid:
Start with a clean, dry face. Load your flat shader brush with a bright red face paint, ensuring the consistency is creamy but not dripping. -
Apply Red Base:
Paint a curved shape starting from the inner corner of your eyelid, sweeping up over the crease. This will form the top section of the ‘wing’ closest to the nose. -
Transition to Orange:
Clean your brush and pick up orange paint. Blend this into the edge of the red on the eyelid, pulling the color downwards towards the outer corner of the eye. -
Add Yellow Lower Wing:
Using a fresh yellow paint, create the middle section of the wing right under the lower lash line. This should be the brightest part of the design. -
Cool Tones Underneath:
Switch to green and then teal or purple for the lowest sweeping curves on the cheekbone. Ensure each color stripe follows a fan-like pattern radiating from the outer corner of the eye. -
Upper Wing Detail:
For the top ‘antennae’ section above the eyebrow, paint a small, rounded triangular shape using teal and blue paint. I like to angle this slightly outward to lift the face visually.
Smudged Lines?
If a line gets messy, wait for it to dry completely. Then, use a damp Q-tip to gently erase the mistake before repainting. Wet paint smudges worse
Step 2: Defining the Shape
-
Create the Wing Outline:
This is the most crucial step. Using a small tapered detail brush loaded with dark violet or indigo paint, carefully outline the outer scalloped edges of your rainbow gradient. -
Inner Separation Lines:
Draw thin, precise lines between each color section (between red and orange, orange and yellow, etc.) radiating from the inner eye corner outwards. These lines should mimic the veins of a butterfly wing. -
Refine the Edges:
Thicken the outer border line slightly to give the wing more definition and weight, especially at the tips of the ‘feathers’ or scallops. -
Symmetry Check:
Repeat the gradients and outlining on the other eye. Don’t worry if they aren’t perfect mirror images; organic variation looks natural.
Step 3: Celestial Highlights
-
Load White Paint:
Clean your detail brush thoroughly and load it with opaque white face paint. Make sure the paint encourages a sharp point. -
Dot the Border:
Place tiny white dots along the dark outer purple border of the wing. Group them in threes or vary the spacing for a whimsical feel. -
Add Star Details:
Paint tiny four-pointed stars on the upper blue section and the lower purple section. Use the very tip of your brush to keep them delicate. -
Inner Corner Highlight:
Add a small dash of white or bright yellow to the inner corner of the eye to open up the look. -
Set the Look:
Allow the paint to dry fully for a minute before opening your eyes wide to prevent creasing in the eyelid area.
Glitter Upgrade
Before the paint fully dries, tap a clear cosmetic glitter over the yellow and orange sections to make the wings sparkle in the sunlight
Now you are ready to flutter away with a look that is both colorful and elegant
Rainbow Galaxy With Cloud Edges
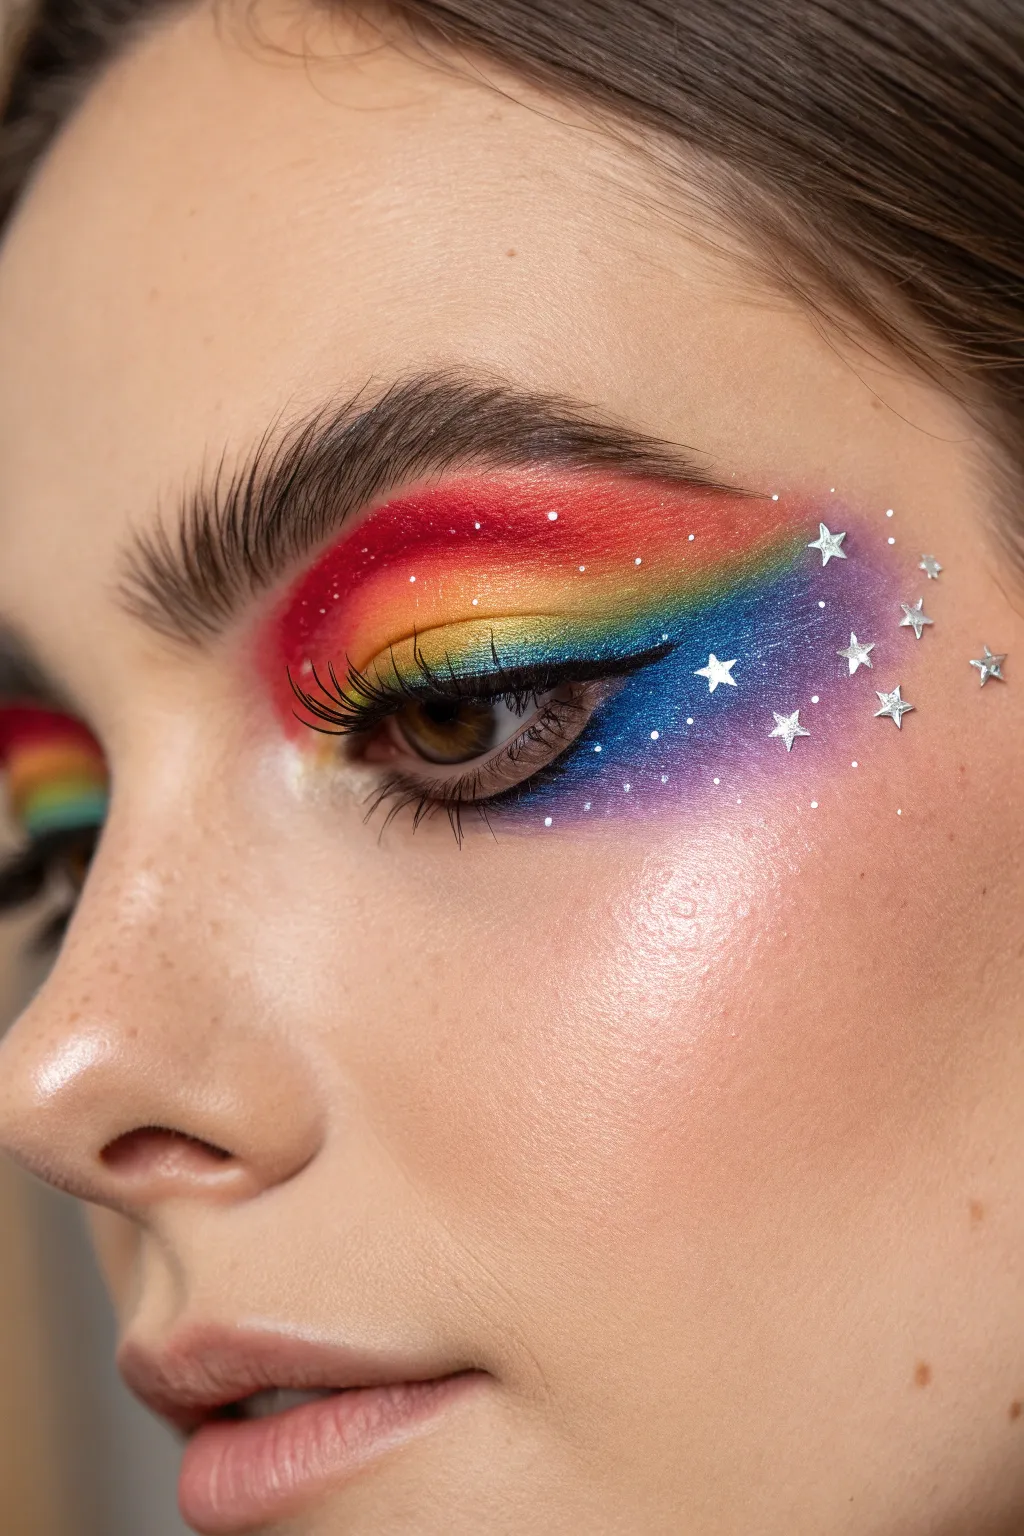
Transform your eyes into a miniature cosmos with this striking rainbow galaxy design. This look combines the vivid energy of a classic rainbow with dreamy, star-speckled blended edges for a truly celestial effect.
How-To Guide
Materials
- Matte eyeshadow palette (red, orange, yellow, green, blue, purple)
- White liquid eyeliner or water-activated face paint
- Flat shader brush
- Small blending brush
- Fluffy blending brush
- Black liquid eyeliner
- Mascara
- Highlighter
- Setting spray (optional)
Step 1: Base and Rainbow Gradient
-
Prime the canvas:
Start with a clean eyelid. Apply an eyeshadow primer or a light concealer over the entire lid space up to the brow bone. This ensures the bright colors pop and stick without creasing. -
Start with red:
Dip a small flat shader brush into a vibrant matte red eyeshadow. Pack this color onto the inner corner of your eyelid, closest to the nose, keeping the edges soft. -
Blend into orange:
Clean your brush or pick up a new one. Apply orange shadow right next to the red, overlapping slightly. Gently buff the seam where they meet so the transition is seamless. -
Apply yellow:
Pack a bright yellow into the center of the lid. Blend it backward into the orange. The yellow acts as the brightest point of the rainbow arch. -
Transition to green:
Next, apply a lime or grass green shade. Ensure you are following the natural curve of your crease, arching the color placement slightly upwards. -
Deepen with blue:
Apply a rich blue shade to the outer third of the lid. Start angling the shape outwards towards the temple, lifting the eye shape. -
Create the galaxy wing:
Using a purple shadow, blend out from the blue, extending well past the eyebrow tail. Use a fluffy brush here to diffuse the purple into the skin for that soft, misty galaxy effect.
Step 2: Interstellar Details
-
Define the lash line:
Take a black liquid eyeliner and draw a thin, crisp line along your upper lashes. Keep the wing subtle so you don’t cover up too much of the blue and purple gradient. -
Draw the main stars:
Dip a fine liner brush into white liquid liner or face paint. Carefully paint a few five-pointed stars over the purple and blue sections on your temple. -
Add constellatory dots:
Using the very tip of your brush or a dotting tool, scatter tiny white dots around the larger stars. Vary the pressure to create different sizes representing distant stars. -
Highlight the brow bone:
Apply a shimmering champagne or pearlescent highlighter just under the arch of your eyebrow to lift the brow and clean up the upper edge of the rainbow. -
Inner corner glow:
Pop a tiny bit of that same highlighter or a shimmery yellow into the tear duct area to open up the eye. -
Finish with mascara:
curl your lashes and apply two coats of black mascara to top and bottom lashes. Fluff up your eyebrows with a brow gel to frame the artwork. -
Clean up edges:
Check under your eye for any fallout. Use a clean fluffy brush to sweep away loose powder, or a cotton bud with a dab of concealer to sharpen the lower edge of the galaxy wing.
Muddy Colors?
If your rainbow stripes look muddy, wipe your brush completely clean on a paper towel between every single color switch. Color purity is key for a real rainbow.
Add 3D Sparkle
For extra dimension, gently press a tiny amount of cosmetic glitter or glue small rhinestones onto the eyelid over the matching color sections.
Enjoy wearing your vibrant, cosmic creation that is sure to turn heads


Have a question or want to share your own experience? I'd love to hear from you in the comments below!