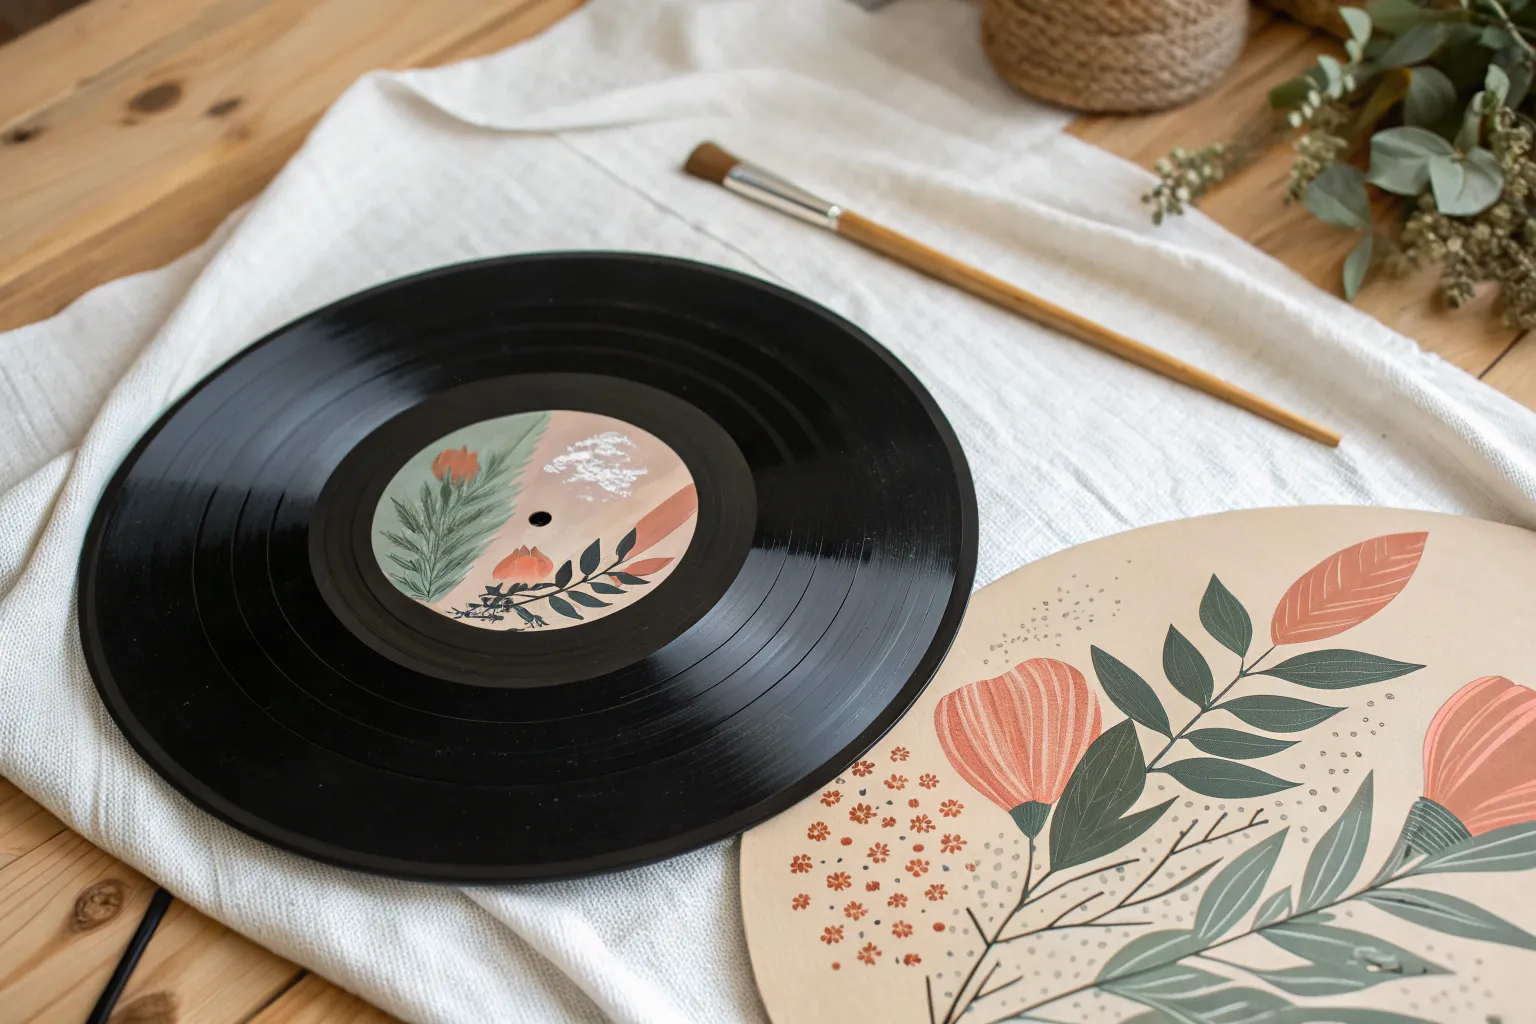
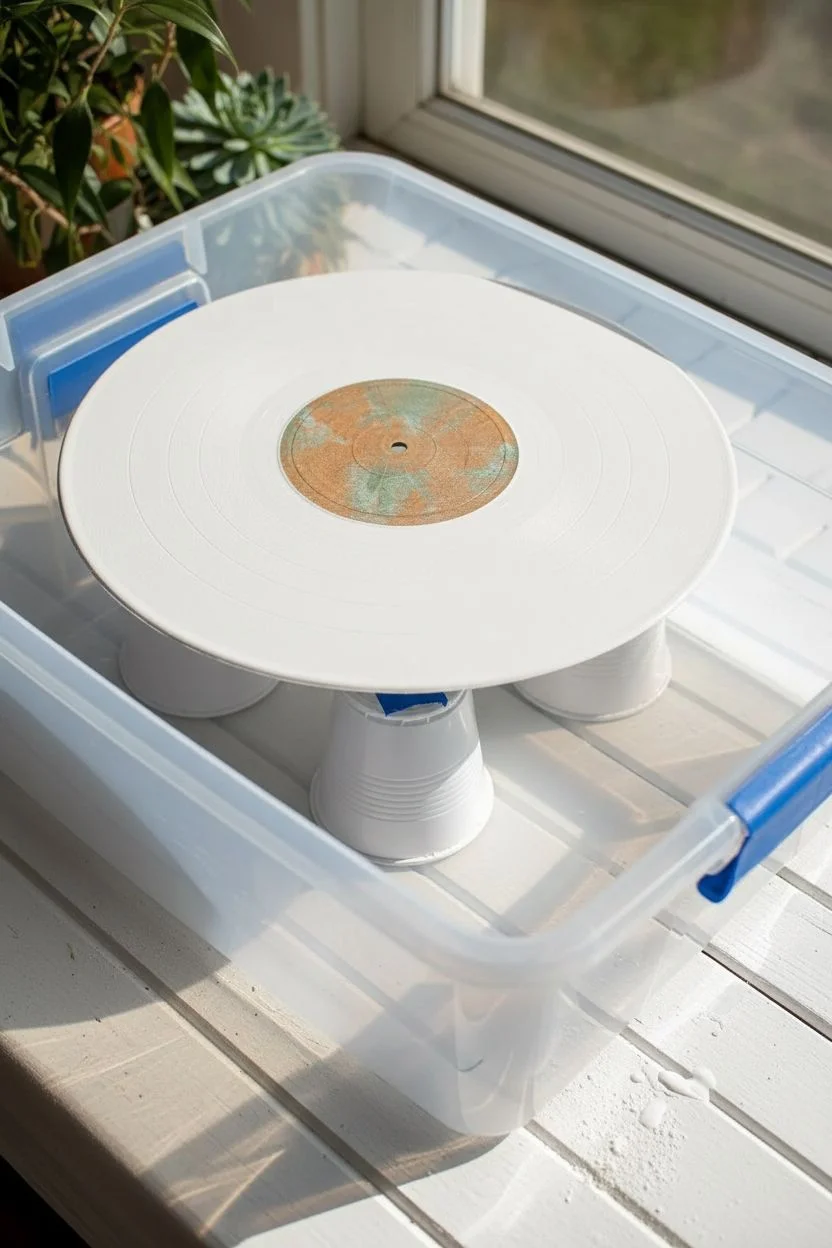
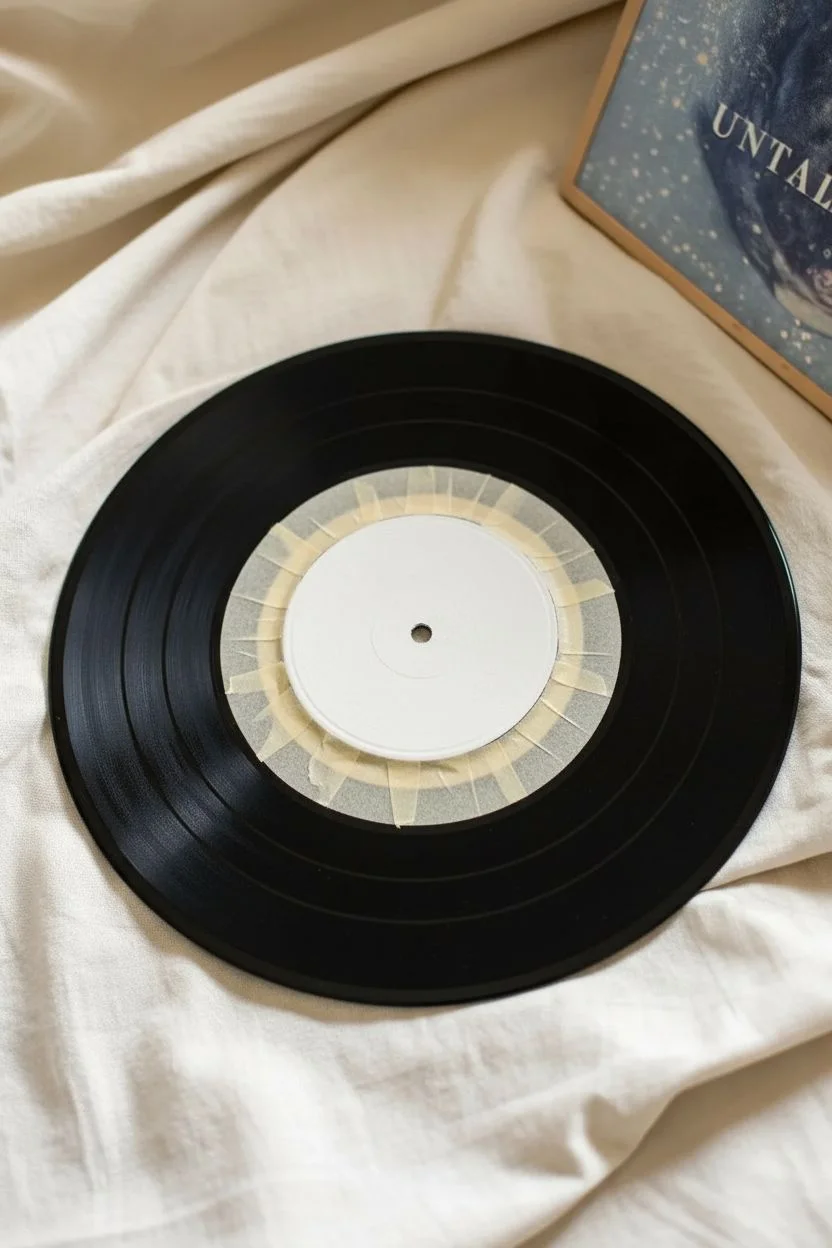
Breathing new life into scratched vinyl albums transforms them from forgotten basement clutter into striking pieces of upcycled wall art. This unique circular canvas offers a refreshing creative challenge that encourages us to rethink composition beyond the traditional square frame.
Radiating Dot Mandalas
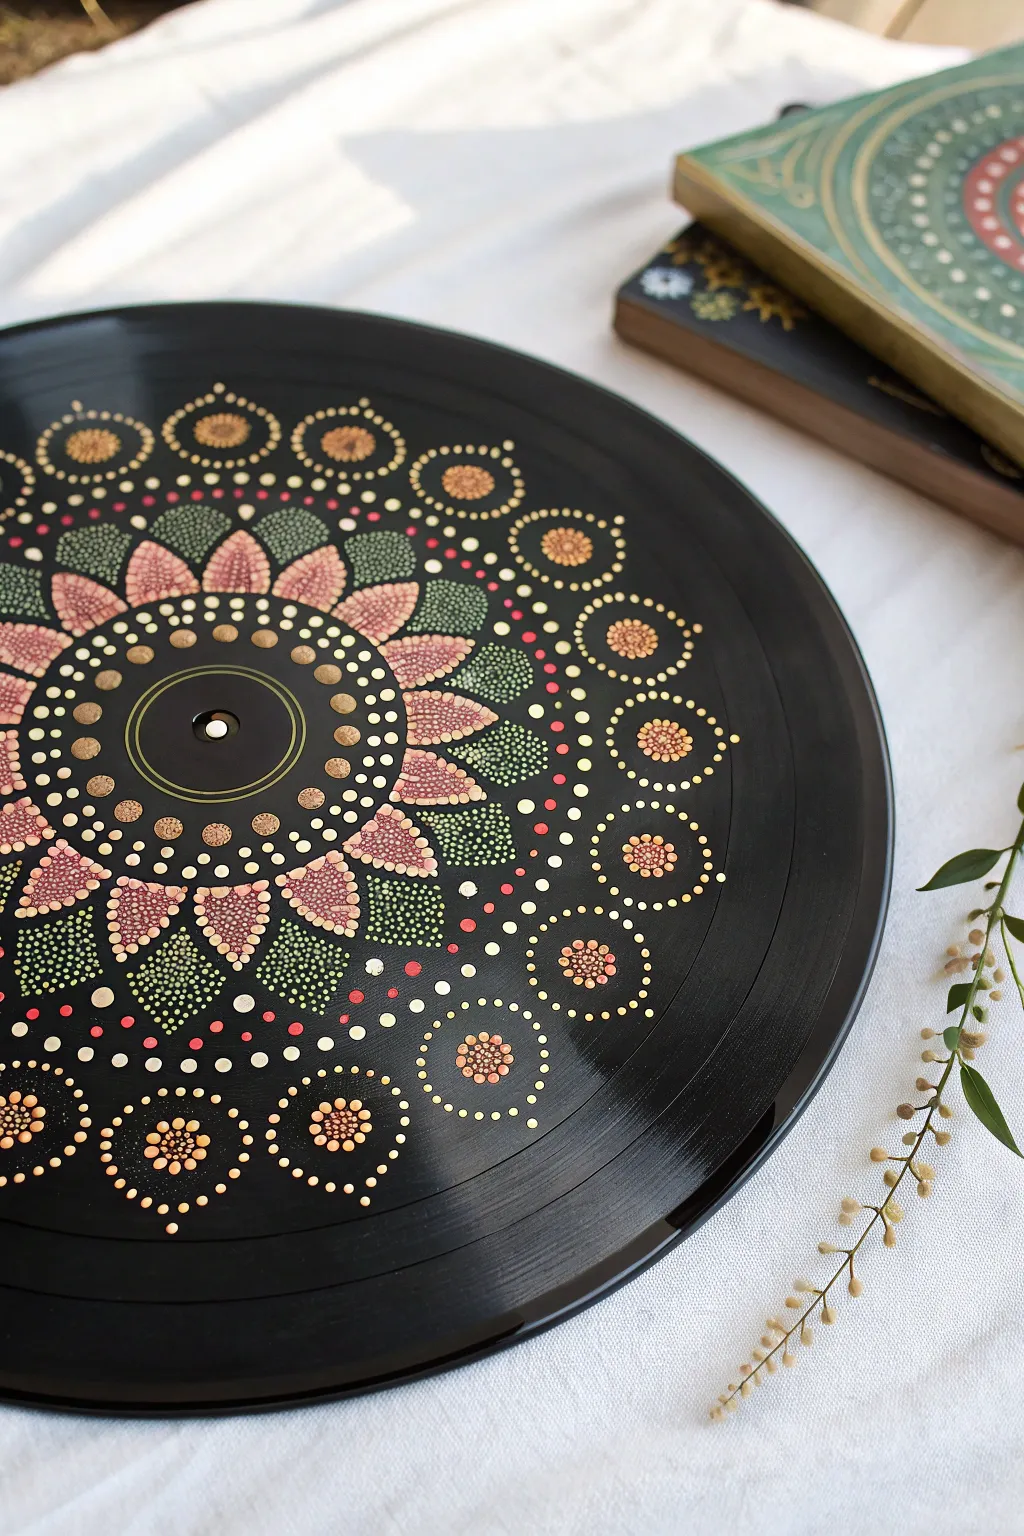
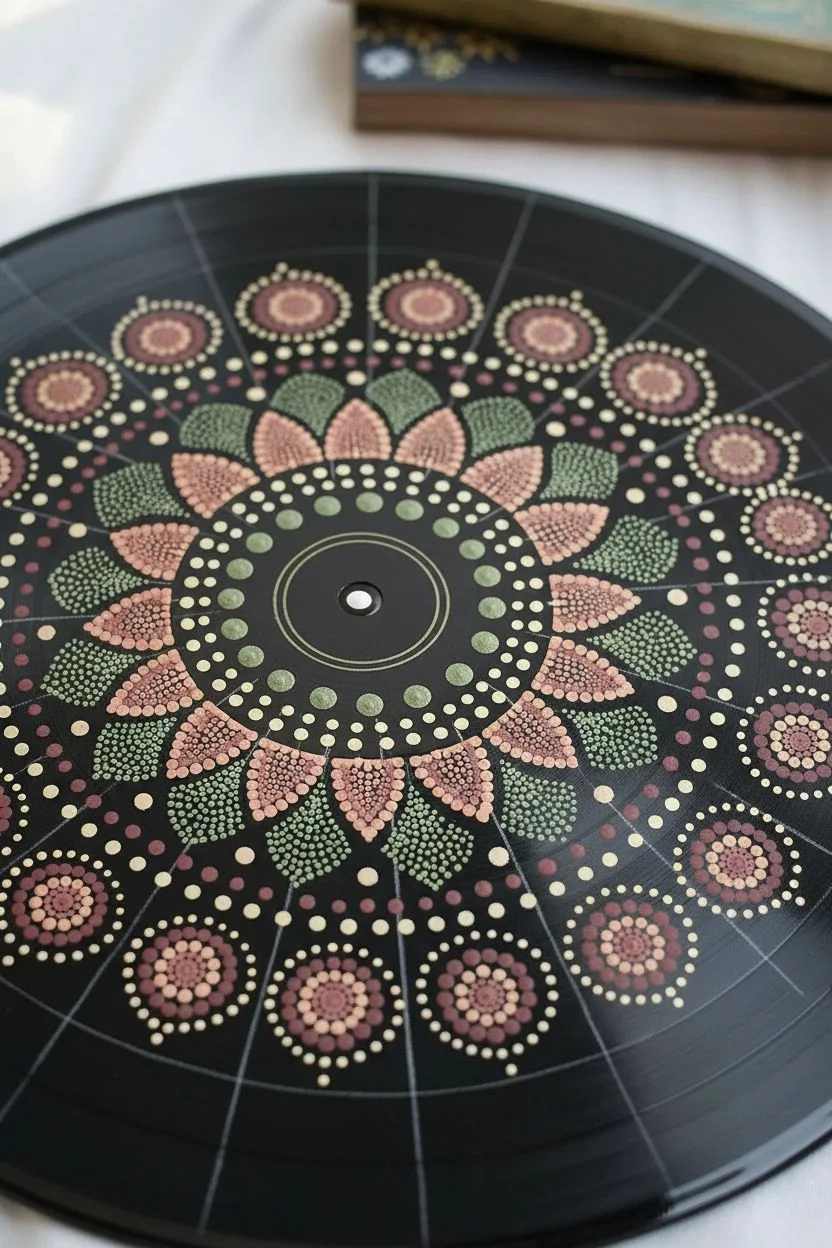
Transform a scratched record into a mesmerizing piece of wall decor using the meditative art of dot painting. This design radiates with earthy metallics, sage greens, and dusty pinks for a sophisticated bohemian look.
How-To Guide
Materials
- Old vinyl record (12-inch)
- Acrylic craft paints (Gold, Sage Green, Mauve, Cream, Burgundy)
- Dotting tools (various sizes, from fine stylus to 6mm rod)
- White charcoal pencil or chalk pencil
- Compass and ruler
- Damp painter’s rag and rubbing alcohol
Step 1: Preparation and Grid
-
Clean surface:
Wipe the record down with rubbing alcohol to remove dust and oils, ensuring the paint adheres properly. -
Cover the label:
If you want a seamless look, paint the center paper label with black acrylic paint or gesso to match the vinyl. -
Draw guidelines:
Use a white charcoal pencil and compass to draw concentric circles moving outward from the center. I prefer charcoal here because it wipes away easily later. -
Mark segments:
Use a ruler to draw straight lines across the record like slicing a pizza, dividing it into 16 equal sections to keep your symmetry exact.
Placement Pro Tip
To keep your circle spacing even, don’t go strictly clockwise. Place ‘anchor dots’ at 12, 3, 6, and 9 o’clock first, then fill in the gaps between them.
Step 2: The Central Bloom
-
Center point:
Place a single, crisp white dot in the absolute center of the record. -
Inner rings:
Using a fine brush or stylus, paint a thin sage green ring around the white dot. Surround this with a tight ring of tiny gold dots. -
Expansion rings:
Move outward and place a ring of medium-sized gold dots, followed by a ring of larger gold dots spaced slightly further apart. -
Petal outlines:
Using your chalk guidelines, lightly sketch 16 large petal shapes. Dot along these lines using cream paint and a small tool. -
Filling the petals:
Fill the interior of the cream petals with mauve dots. Make the dots larger at the base of the petal and smaller near the tip.
Oops! Managing Mistakes
If you smudge a dot, wipe it immediately with a damp Q-tip. If it smears, let it dry completely, paint over the mistake with black acrylic, and re-dot.
Step 3: Texture and Outer Details
-
Leaf texture:
In the triangular spaces between the mauve petals, create a ‘leaf’ effect. Fill this area with tightly packed, tiny green dots (stippling) rather than solid paint. -
Outer medallions centers:
Near the outer edge of the record, aligned with the petal points, place a cluster of 7 small gold dots to form a flower center. -
Medallion rings:
Surround each gold cluster with a ring of medium cream dots. -
Outer framing:
Add a final ring of larger gold dots around the cream ones to complete the medallions. -
Connecting accents:
Place a small burgundy dot floating between each large outer medallion to add contrast and bridge the design. -
Micro-details:
Use your smallest stylus to add tiny ‘stardust’ dots in cream or gold in any large black negative spaces for extra sparkle.
Step 4: Finishing
-
Dry and clean:
Allow the paint to cure for at least 24 hours. Gently wipe away the white charcoal grid lines with a damp cloth. -
Seal:
Apply a spray varnish (gloss or matte) to protect the dots and give the vinyl a finished sheen.
Hang your new mandala masterpiece and enjoy the rhythmic beauty you’ve created.


Starry Night Galaxies
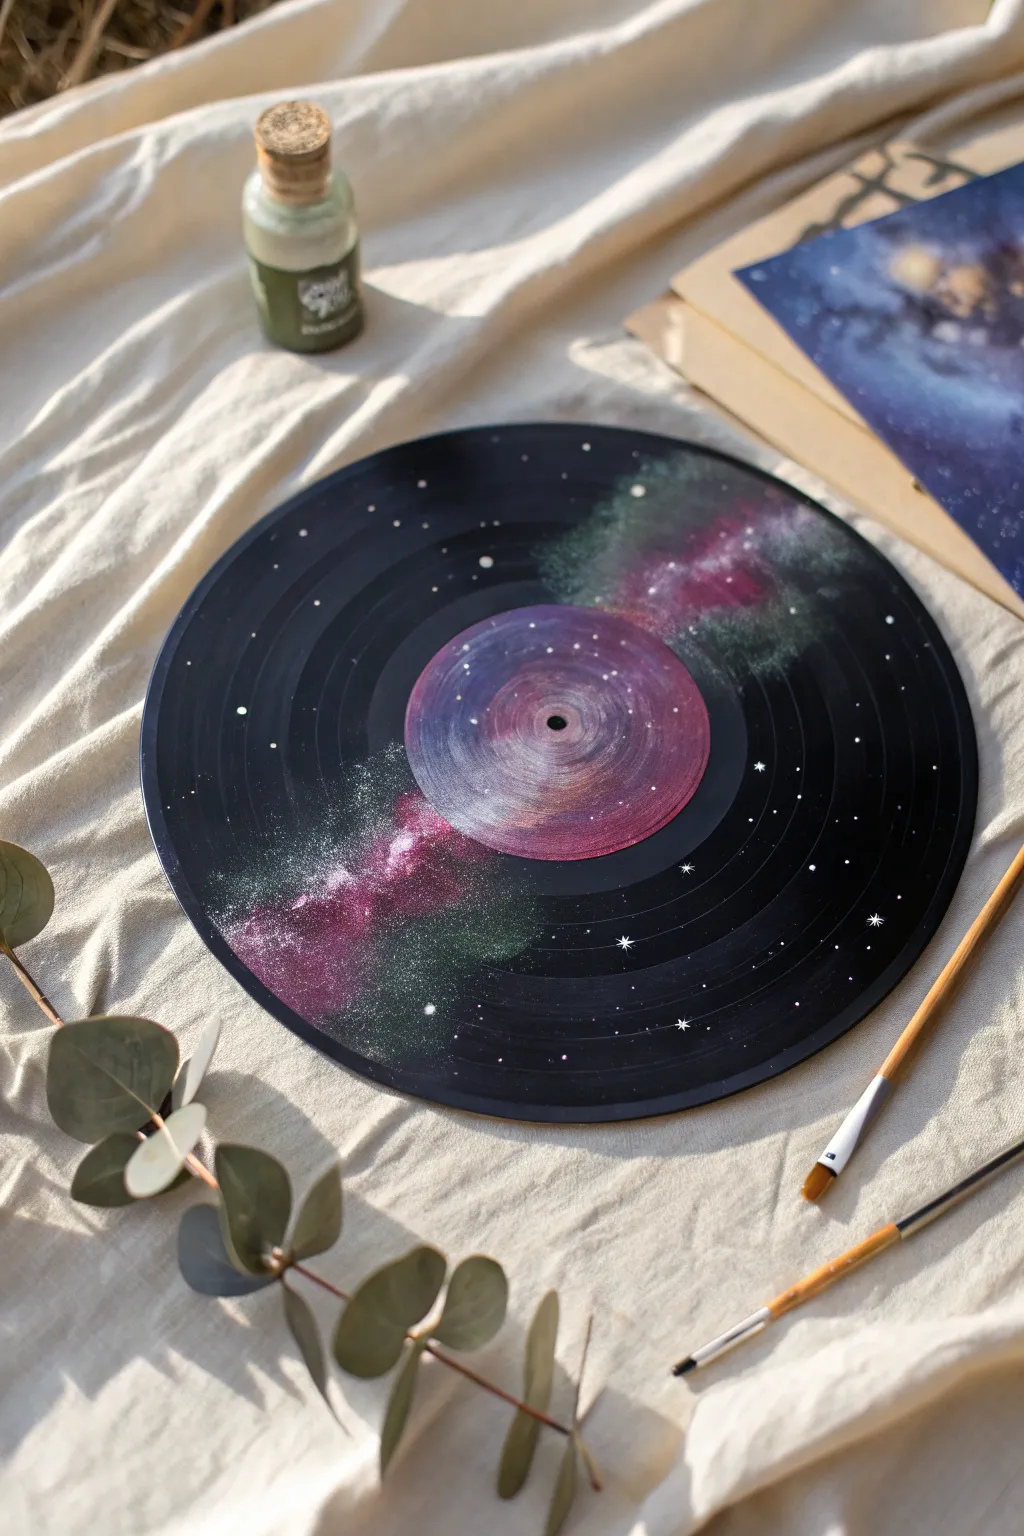
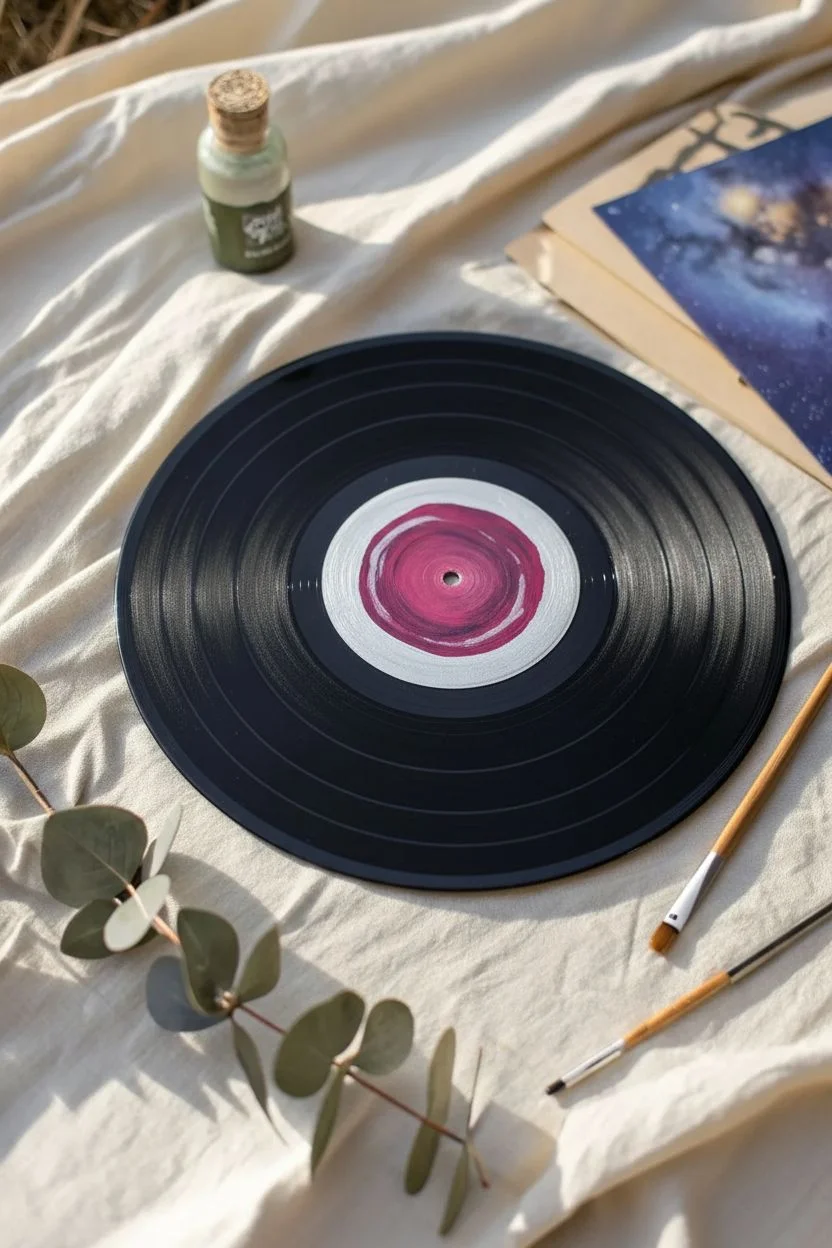
Transform an unplayable record into a stunning piece of wall art that captures the depth of deep space. By utilizing the vinyl’s natural black surface as your void, you will paint shimmering nebulas and glowing stars that seem to float across the grooves.
Step-by-Step
Materials
- Old vinyl record (7 or 12 inch)
- Rubbing alcohol & cotton cloth
- Acrylic paints (Magenta, Emerald Green, Deep Purple, White, Metallic Silver)
- Makeup sponges or small kitchen sponge pieces
- Fine liner brush (size 00 or 0)
- Small flat brush
- White Gesso or primer
- Spray varnish (glossy)
Step 1: Preparing the Galactic Core
-
Clean the Surface:
Wipe the entire record down with rubbing alcohol and a soft cloth to remove dust and oily fingerprints, ensuring the paint adheres properly. -
Prime the Label:
Using a flat brush, apply a thin coat of white gesso or primer over the center paper label. This blocks out the old text and creates a bright base for your colors. -
Base Color for Center:
Once the primer is dry, mix a metallic silver with a drop of purple. Paint the outer edge of the center label area, following the circular shape. -
Create the Gradient:
While the outer ring is wet, paint the inner circle with a mix of metallic pink or magenta. Use your brush to swirl the wet colors together where they meet, creating a seamless cosmic vortex. -
Center Highlight:
Add a tiny dab of pure silver or white right around the center hole to simulate a glowing core, then allow the center area to dry completely.
Slippery Surface?
Vinyl is slick. If your paint beads up, lightly scuff the painting areas with fine-grit sandpaper (400-600 grit) before painting to give the surface some ‘tooth’.
Step 2: Painting the Nebulas
-
Prepare the Sponges:
Cut your sponge into small wedges. You will need a separate fresh side for each main color to differentiate the gas clouds. -
First Nebula – Magenta:
Dip a sponge lightly into deep purple, then magenta. Offload most of the paint on a paper towel until it stamps a soft, misty texture. -
Stippling Motion:
Gently dab—do not drag—the sponge across the black vinyl in a diagonal cloud shape on the left side. Let the black vinyl show through the edges for a fading effect. -
Second Nebula – Green:
Using a clean sponge wedge, pick up emerald green paint. Dab a second gas cloud on the upper right side of the record, opposite your magenta nebula. -
Brightening the Clouds:
Mix a tiny amount of white into your magenta and green paints respectively. Sponge this lighter shade sparingly into the center of each nebula to create volume and a ‘glow’ effect. -
Blending Out:
If the edges look too harsh, take a clean, slightly damp sponge and gently tap the perimeter of your painted areas to soften the transition into the black vinyl.
Glow Up
Mix glow-in-the-dark medium with your white paint for the stars. During the day it looks normal, but at night your record will transform into a glowing celestial map.
Step 3: Stars and Details
-
Star Constellations:
Load your fine liner brush with watered-down white paint. Gently touch the tip to the record to create tiny dots representing distant stars scattered around the nebulas. -
Creating Clusters:
Cluster more dots near the brighter parts of your painted nebulas, as stars are denser within galaxies. -
Painting Major Stars:
Select 3 or 4 spots for large ‘hero’ stars. Paint a small white cross shape at these locations using the very tip of your liner brush. -
Adding Star Flares:
Elongate the vertical and horizontal lines of your crosses slightly, tapering them so they are thin at the ends. -
Central Brilliance:
I like to add a tiny dot of pure, thick white paint right in the center of the cross-stars to make them look like they are shining intensely. -
Final Sealing:
Once the artwork is fully cured (at least 24 hours), take the record to a well-ventilated area and apply a clear glossy spray varnish to protect the paint and restore the vinyl’s shine.
Hang your cosmic creation on the wall and enjoy the view of deep space right in your room


Floral Wreath Borders
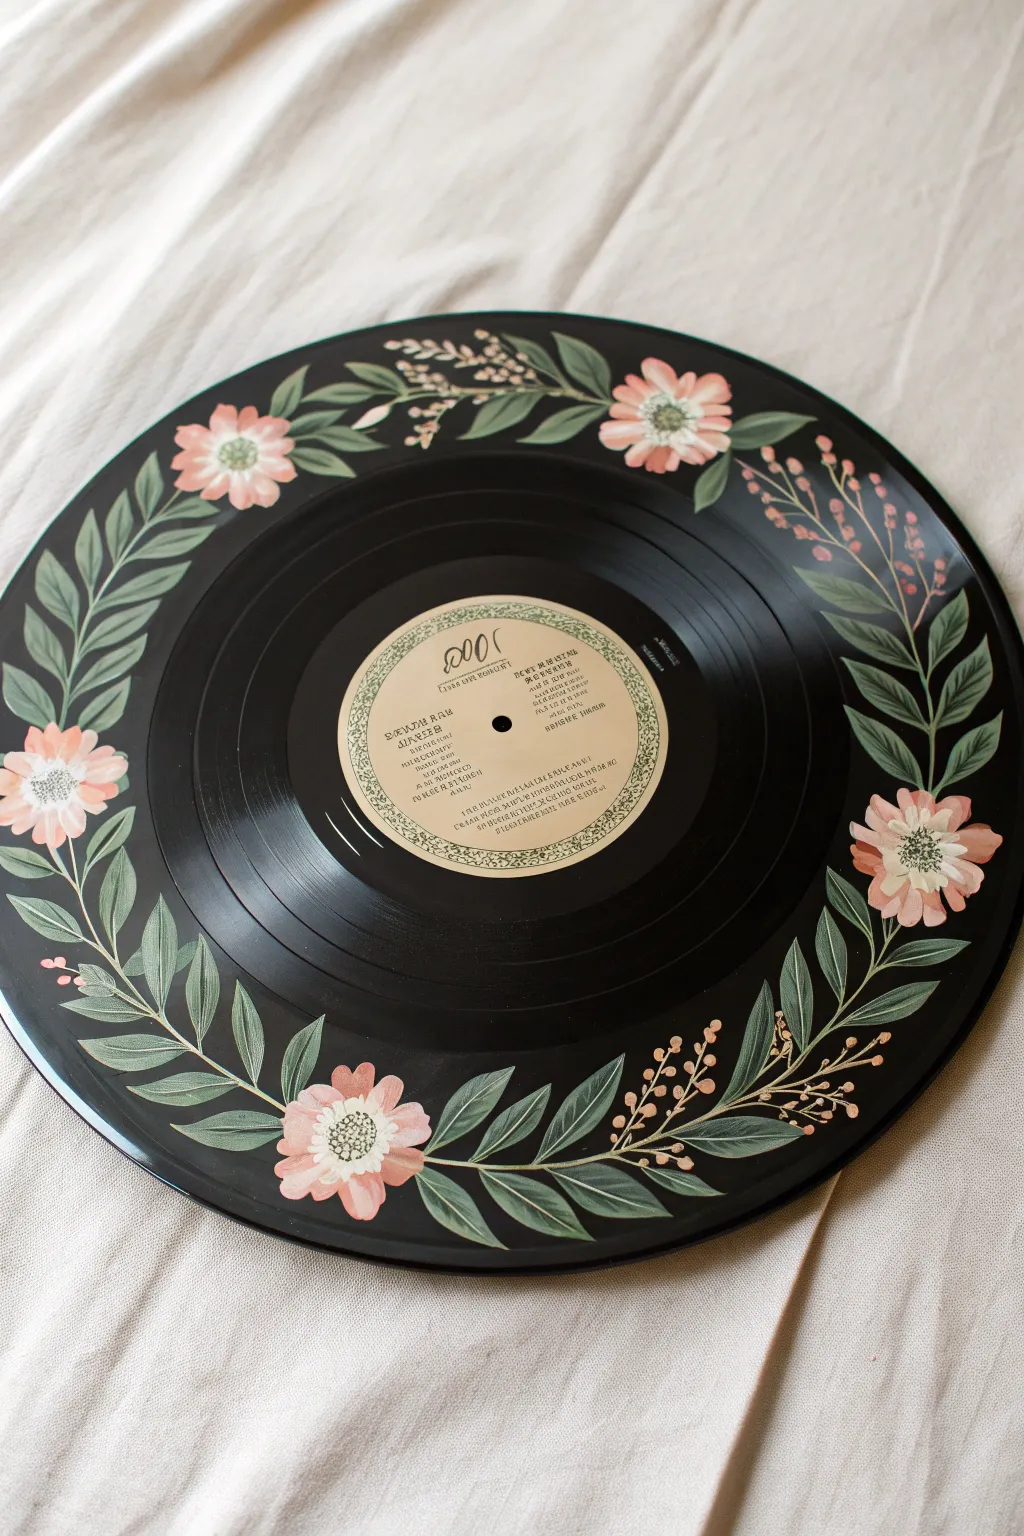
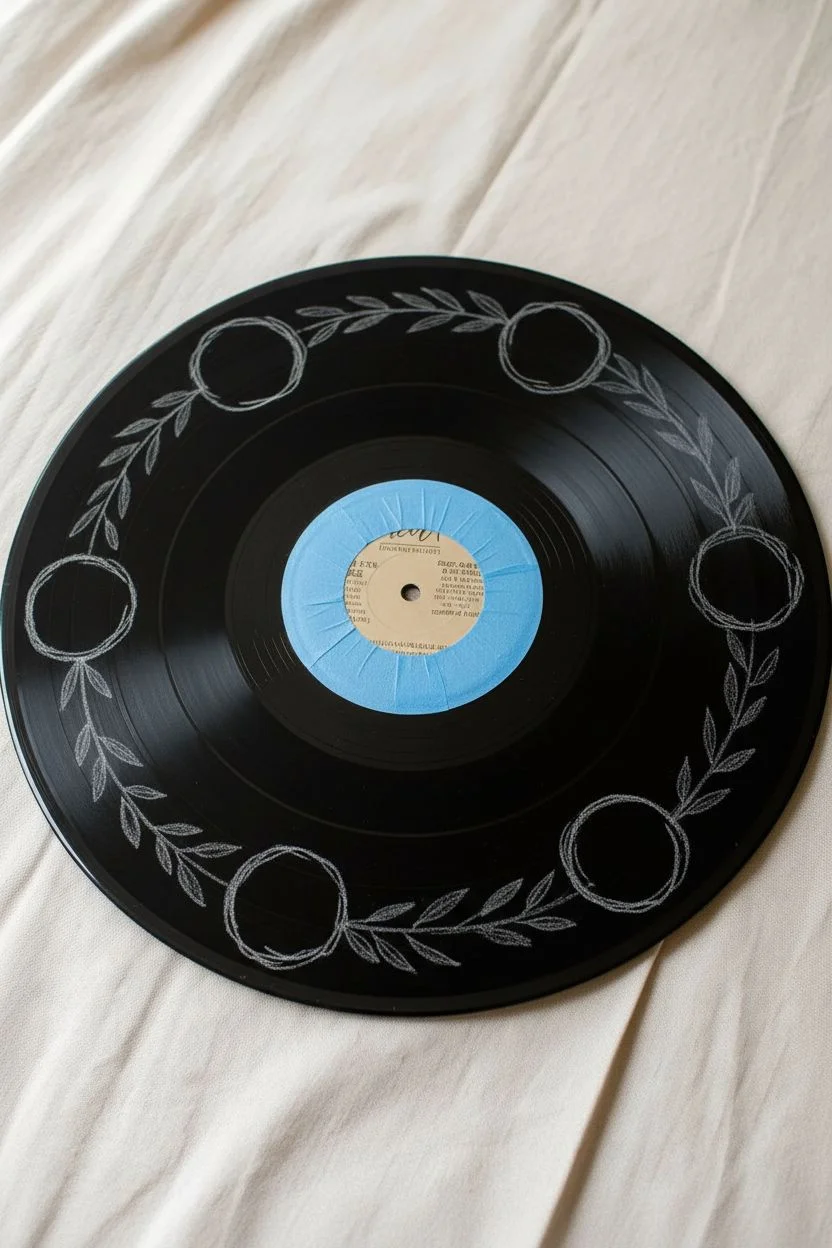
Transform a scratched or unplayable record into a charming piece of folk art with this botanical painting tutorial. The stark black background of the vinyl makes the soft pink bloals and sage green leaves pop, creating a wreath design perfect for wall decor.
How-To Guide
Materials
- Old 12-inch vinyl record
- Isopropyl alcohol and soft cloth
- White charcoal pencil or chalk
- Acrylic paints (Sage Green, Olive Green, Pale Pink, Coral, Cream, Yellow Ochre)
- Round synthetic brushes (sizes 4 and 6)
- Fine liner brush (size 0 or 00)
- Palette or paper plate
- Clear acrylic spray sealer (matte or satin)
Step 1: Preparation and Layout
-
Clean the surface:
Before you begin, wipe the entire surface of the vinyl record with isopropyl alcohol to remove dust, oils, and fingerprints, ensuring the paint adheres properly. -
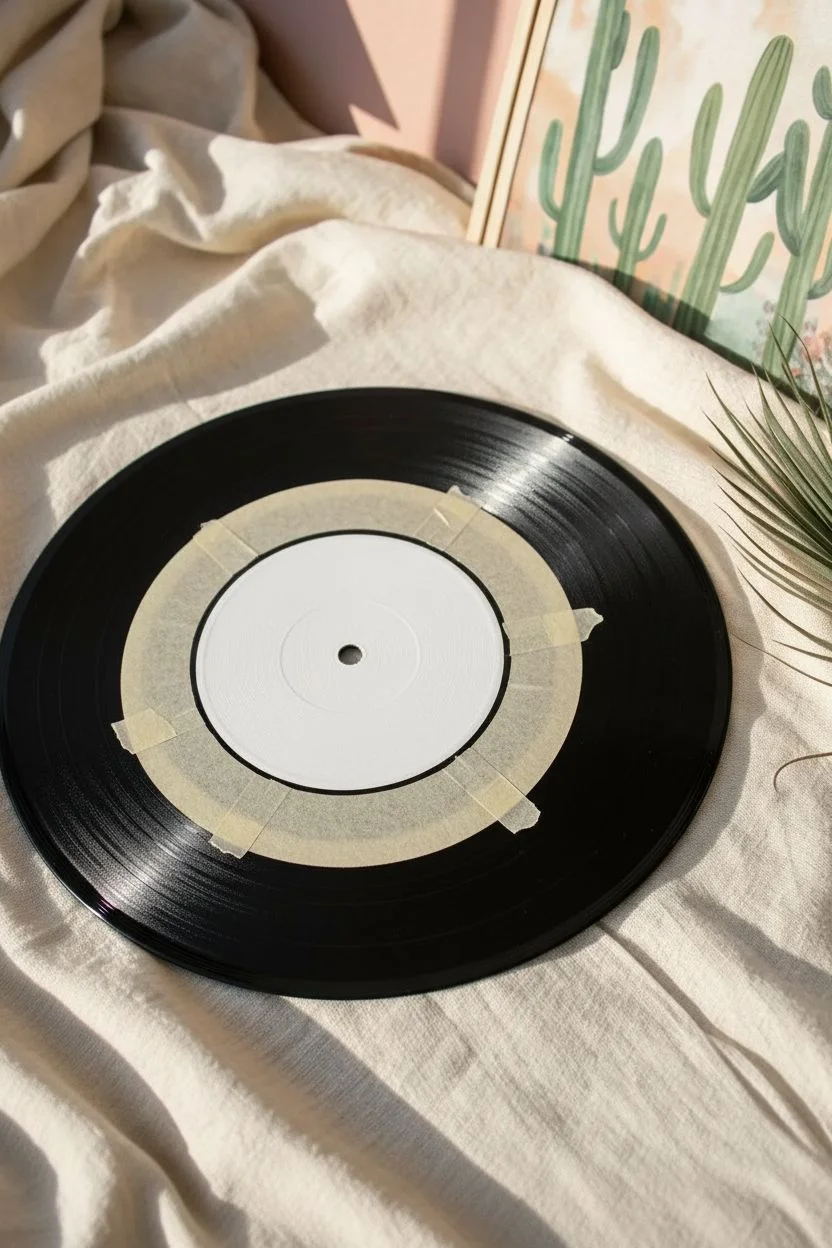
Protect the label:
If you want to keep the original center label pristine, carefully cover it with a circle of painter’s tape or a small bowl while you work. -
Draft the stems:
Using a white charcoal pencil, lightly sketch a sweeping, continuous vine roughly 2 inches from the outer edge to act as your guide. -
Mark flower placement:
Sketch five or six rough circles along your vine path to designate where your large pink blooms will sit, ensuring they are somewhat evenly spaced.
Step 2: Painting the Foliage
-
Base coat the leaves:
Load a size 6 round brush with sage green. Press down and lift up as you paint to create varied, tapered leaf shapes extending from your main vine. -
Create opacity:
Vinyl is slick and dark, so you may need a second coat of green once the first layer is dry to get a solid, opaque finish. -
Add leaf variance:
While I have the green out, I like to mix a little cream into the sage to paint a few lighter leaves for variety. -
Paint vein details:
Once the base green is dry, use your liner brush and a mix of olive green and water to paint thin central veins on the larger leaves. -
Highlight the edges:
Using a very small amount of cream paint on a dry brush, gently highlight one side of each leaf to create dimension.
Paint Slipping?
If your acrylic paint slides around on the glossy vinyl surface without sticking, lightly scuff the painting area with fine-grit sandpaper to give the record some ‘tooth’ before starting.
Step 3: Creating the Blooms
-
Block in petals:
Using the size 4 brush and pale pink paint, fill in the five-petal flower shapes you marked earlier, starting from the outside and pulling toward the center. -
Layer the pink:
Apply a second coat of pink to the petals to ensure the black vinyl doesn’t show through. -
Add depth:
Mix a small amount of coral into your pink and paint the center third of each petal to give the flower a cupped appearance. -
Define the edges:
With a thin brush and cream paint, add delicate outlines or tips to the petals to separate them visually from the background. -
Paint the centers:
Dab a messy circle of yellow ochre in the middle of each flower. -
Stipple details:
Using the very tip of your liner brush, stipple tiny dots of brown and white over the yellow centers to mimic textured pollen.
Spin It Right
Place your record on an actual turntable (turned off) or a kitchen lazy Susan while you paint. This allows you to rotate the canvas to you rather than contorting your hand.
Step 4: Accents and Finishing
-
Add wispy stems:
Use your liner brush with thinned olive paint to add wispy, branching stems shooting off from the main vine into the empty black spaces. -
Dot the berries:
Dip the back end of your paintbrush handle into coral paint and dot clusters of ‘berries’ onto the ends of your wispy stems. -
Clean up sketches:
Once the paint is completely dry to the touch, use a damp cotton swab to gently wipe away any visible white charcoal guidelines. -
Seal the art:
Take the record to a well-ventilated area and apply a light coat of clear acrylic spray sealer to protect the paint from chipping.
Hang your floral masterpiece on the wall using damage-free strips or display it on a shelf for a retro-chic vibe


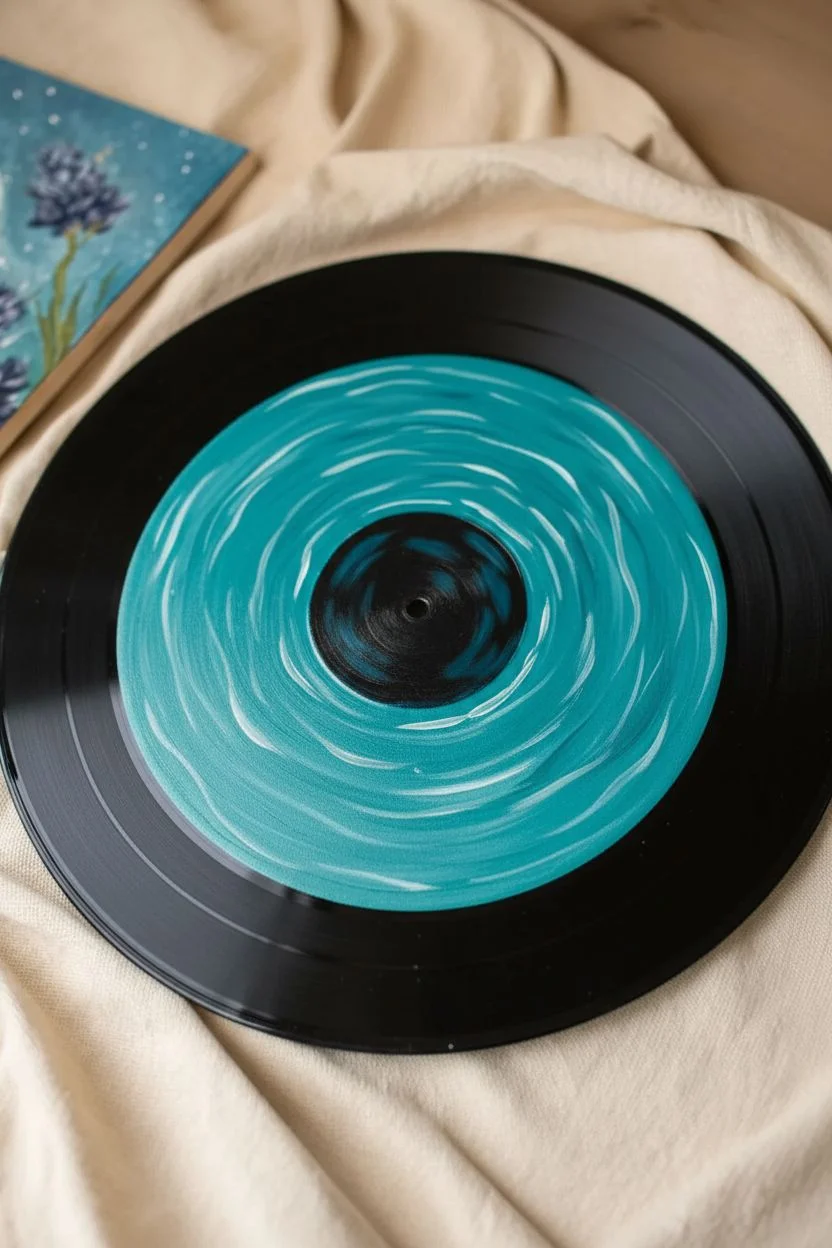
Curved Ocean Waves
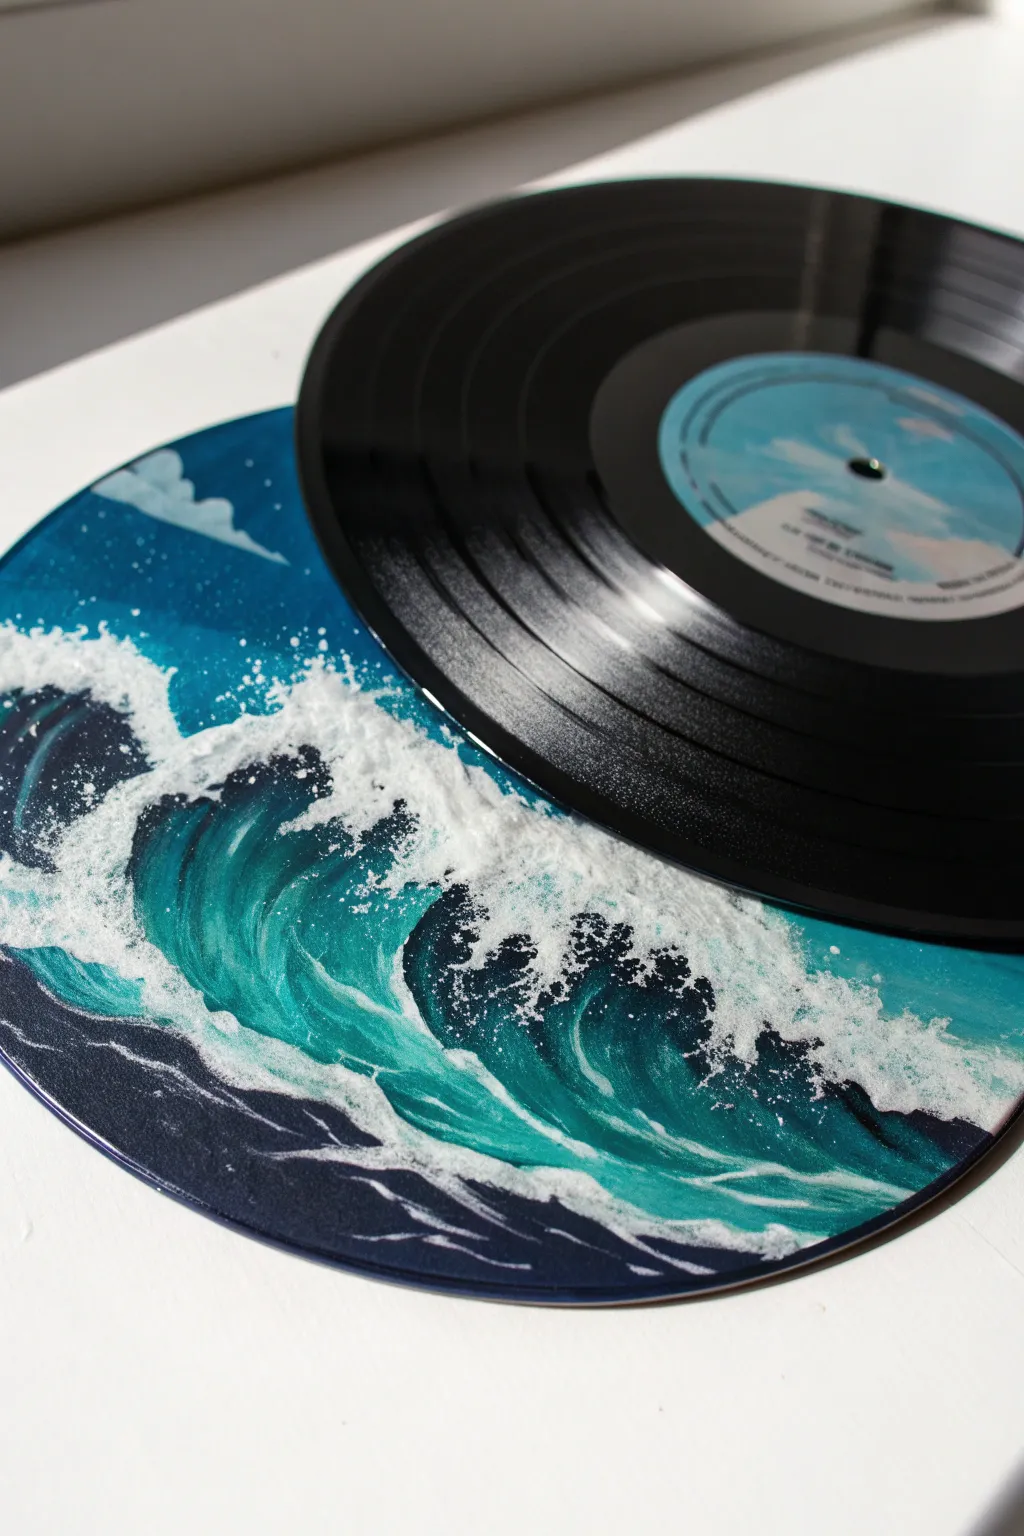
Transform a scratched, unplayable record into a dynamic seascape where the circular shape enhances the feeling of motion. This project uses acrylic blending techniques to capture the energy of a crashing turquoise wave against a deep indigo sea.
Detailed Instructions
Materials
- Old vinyl record
- White Gesso or acrylic primer
- Fine-grit sandpaper
- Painter’s tape or masking tape
- Acrylic paints (Titanium White, Phthalo Blue, Turquoise/Teal, Prussian Blue)
- Flat synthetic brushes (large and small)
- Fan brush (optional)
- Old toothbrush (for splatter)
- Gloss varnish
Step 1: Preparation & Base Coat
-
Clean and protect:
Wipe the vinyl record down with a damp cloth to remove any dust or oils. Place a circle of painter’s tape over the center label to protect it from stray paint strokes. -
Scuff the surface:
Lightly sand the glossy surface of the record using fine-grit sandpaper. This creates a ‘tooth’ that helps the paint adhere much better than on slick vinyl. -
Prime the surface:
Apply a coat of white tintable Gesso or primer over the entire playable area of the record. Creating a white background helps the translucent blue paint colors appear more vibrant later. -
Map the horizon:
Once the primer is dry, mix Prussian Blue with a tiny drop of black. Paint the upper third of the record and the bottom sliver with this deep, dark shade to represent the deep ocean water.
Pro Tip: The Fan Brush
For the wispy foam trails on the wave’s face, try using a dry fan brush. Lightly dragging it creates multiple thin, parallel lines that look exactly like stretching water.
Step 2: Forming the Wave
-
Block in the wave body:
Using a bright Turquoise or Teal, paint a large, curved shape through the center-left and middle of the record. Let the brushstrokes follow the curve of the record to simulate the water’s movement. -
Create the gradient:
While the paint is still slightly wet, blend Phthalo Blue into the bottom edge of your teal wave, merging it into the dark background to create a shadowed effect where the wave begins to rise. -
Add highlights:
Mix a little Titanium White into your Turquoise. Paint sweeping strokes along the upper curve of the wave face to show where the light hits the translucent water just before it breaks. -
Establish the crest shape:
Use pure Titanium White on a smaller flat brush to outline the jagged, uneven top edge of the wave. Don’t make this a straight line; let it be erratic and bumpy.
Troubleshooting: Peeling Paint?
If paint lifts off the vinyl as you work, you likely didn’t sand enough or skipped the primer. If this happens, let it dry completely, lightly sand the trouble spot, and re-apply gesso.
Step 3: Foam & Texture
-
Pulling the foam:
From your white crest, drag the brush downward into the teal water using quick, light strokes. This simulates gravity pulling the foam down the face of the wave. -
Create seafoam texture:
Load a brush with heavy white paint and use a stippling motion (dabbing up and down) where the wave meets the dark water at the bottom. This creates the churning, bubbly ‘mesh’ of foam. -
Connect the layers:
Paint thin, white vein-like lines connecting the crashing top crest to the turbulent foam at the bottom. I like to twist the brush slightly while dragging to keep these lines organic and unpredictable. -
Enhance the depth:
Mix a very watery, dark blue glaze. Lightly paint under the thickest parts of the white foam to create a shadow, making the white pop forward three-dimensionally. -
Add the spray:
Dip an old toothbrush or stiff bristle brush into watered-down white paint. Run your thumb across the bristles to flick tiny droplets over the crest of the wave for a realistic mist effect. -
Final highlights:
Add a few sharp, pure white strokes to the very top edge of the wave and the brightest parts of the churning water for maximum contrast. -
Seal and reveal:
Once the painting is fully dry (give it at least 24 hours), peel off the center tape and apply a coat of gloss varnish to restore the shine and protect your artwork.
Hang your finished record on the wall and enjoy the eternal movement of your captured ocean wave.
BRUSH GUIDE
The Right Brush for Every Stroke
From clean lines to bold texture — master brush choice, stroke control, and essential techniques.
Explore the Full Guide
Vibrant Sunset Gradients
Transform a scratched or unplayable vinyl record into a breathtaking canvas that captures the warmth of a setting sun. This project utilizes the circular shape to create a panoramic sky effect, featuring a smooth color gradient and a striking solitary silhouette.
Step-by-Step
Materials
- Old vinyl record (LP size)
- White acrylic gesso or primer
- Acrylic paints (Deep Violet, Magenta, Cadmium Orange, Primary Yellow, Black, White)
- Fine-grit sandpaper
- Large flat paintbrush
- Medium flat paintbrush
- Fine liner or detail brush
- Palette and water cup
- Paper towels
Step 1: Preparation
-
Clean surface:
Wipe down the vinyl record with a damp cloth to remove any dust or oils. -
Sand lightly:
Gently scuff the surface of the record, including the paper center label, using fine-grit sandpaper so the paint adheres better. -
Prime the base:
Apply a coat of white gesso or primer over the entire face of the record. This ensures the bright sunset colors will pop rather than looking muddy against the black vinyl. -
Dry completely:
Allow the primer to dry fully before moving to color; the surface should be opaque white.
Groove Control
Paint usually settles into the record grooves. Don’t fight it! Apply paint in the direction of the grooves (circular motions) when blending to minimize streaks.
Step 2: Painting the Sky
-
Layout colors:
Squeeze out your violet, magenta, orange, and yellow paints onto your palette along with a separate blob of white. -
Start dark:
Using a large flat brush, apply the deep violet generally in the top-left section of the record, following the curvature of the grooves slightly. -
Transition to pink:
While the violet is still wet, apply magenta below it. Brush back and forth where the colors meet to create a blurry, seamless transition. -
Add warmth:
Clean your brush, then introduce the orange paint, blending it into the magenta moving diagonally across the center label area. -
Finish with light:
Fill the remaining bottom-right section with yellow, blending it backward into the orange for a glowing horizon effect. -
Smooth the gradient:
I like to take a clean, slightly damp brush and run it lightly over the transition lines one last time to soften any harsh streaks. -
Dry and assess:
Let the gradient dry. If the record grooves are still showing through too much, apply a second thin coat following the same color pattern.
Functional Art
Turn this into a working wall clock! Purchase a clock mechanism kit, insert the spindle through the record’s center hole, and attach hands that contrast with the sky.
Step 3: Adding the Silhouette
-
Outline the hill:
Using black paint and a medium brush, paint a sloping hill shape at the bottom right, covering the yellow area solidly. -
Fill the ground:
Fill in the entire area below your slope line with solid black paint. Make sure it is opaque. -
Create texture:
Switch to a liner brush or the edge of a small flat brush. Use quick, short upward flicking motions along the top of the black hill to create the look of wild grass. -
Position the figure:
Visualize where your figure will stand; placing them slightly off-center usually looks best compositionally. -
Paint the body:
With your fine liner brush, paint the outline of the person’s torso and legs, keeping the shape simple and elongated. -
Add details:
Carefully fill in the head and arms. The figure is a shadow, so no internal details are needed—just a clean outline. -
Ground the figure:
Paint a very subtle, slightly angled darkness at the feet to show where the figure connects with the swaying grass. -
Sign your work:
Use a tiny amount of white paint on your finest brush to sign your name in the bottom dark area. -
Seal:
Once fully dry, apply a spray varnish to protect the paint from scratching and seal the finish.
Now you have a stunning piece of retro-style art that captures the serene feeling of a perfect sunset.
Moon Phases Cycle
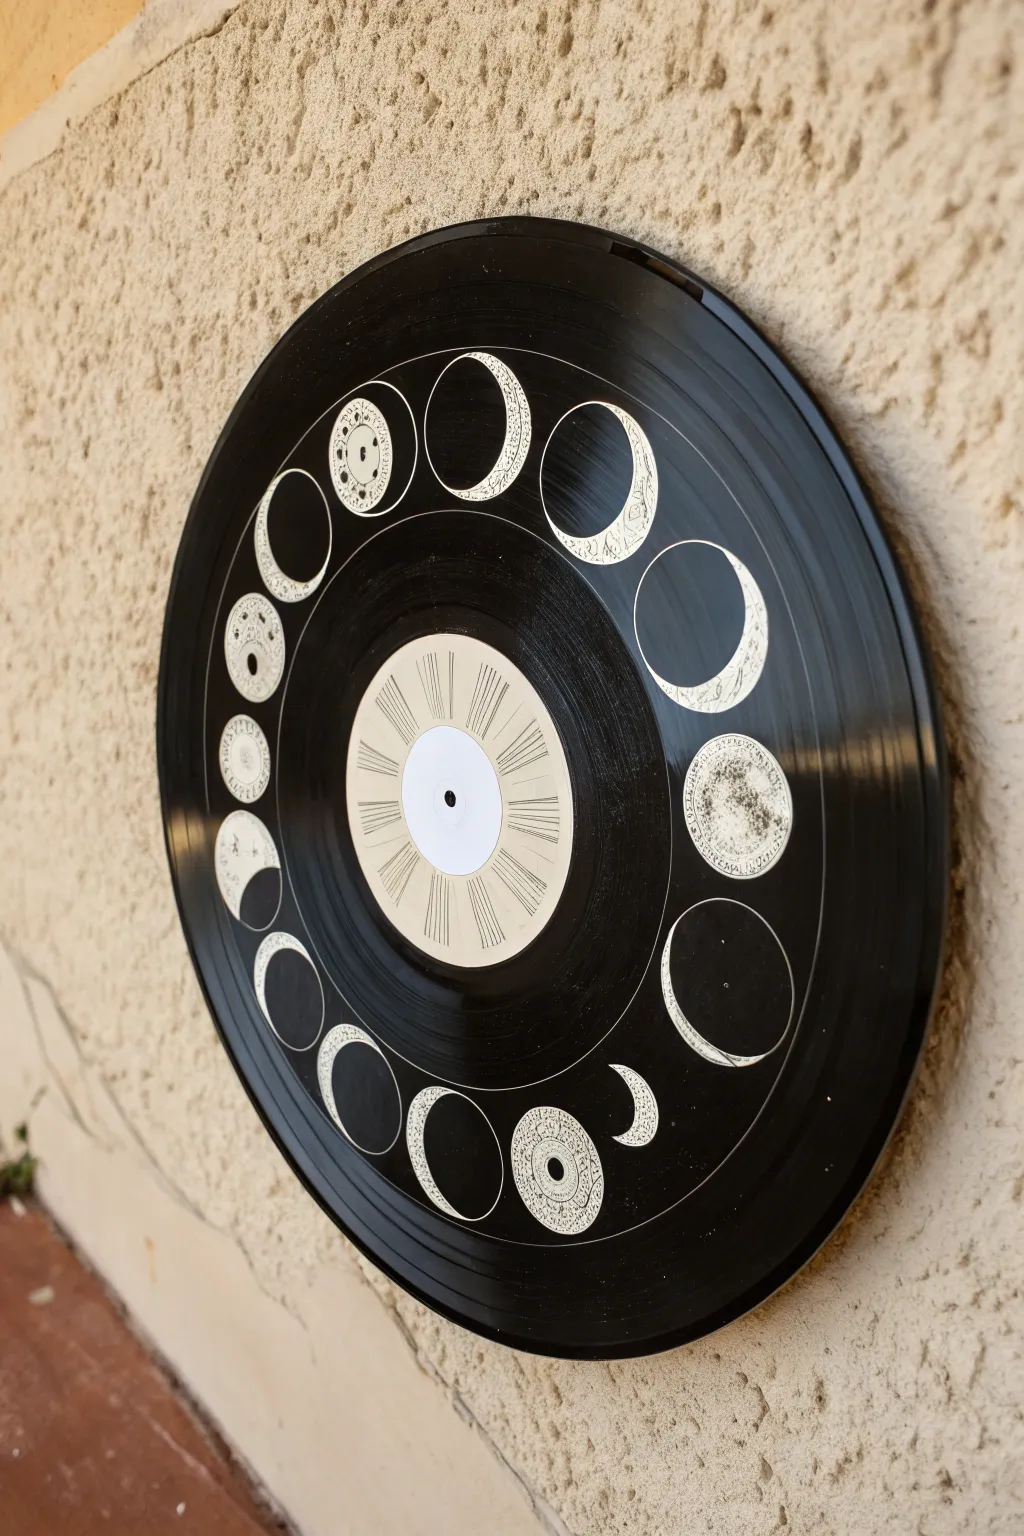
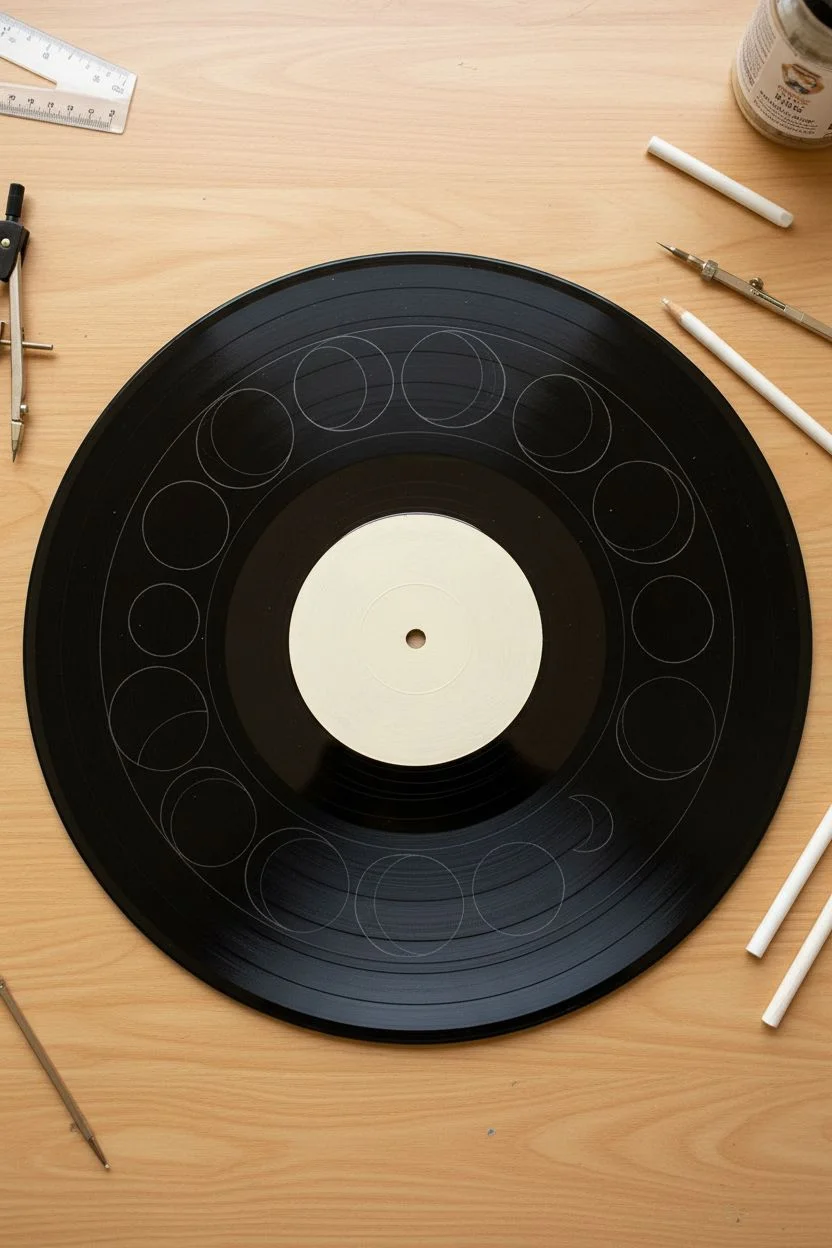
Transform a forgotten record into a stunning piece of astronomical art featuring a detailed lunar cycle. This project combines high-contrast white linework on black vinyl with a vintage-style center dial for a look that is both mystic and scientific.
Detailed Instructions
Materials
- 12-inch vinyl record
- Isopropyl alcohol and soft cloth
- White chalk pencil
- Compass and ruler
- Acrylic paint (Antique Cream or Beige)
- White acrylic paint markers (0.7mm and 1-2mm tips)
- Black fine-liner pen (0.5mm)
- Circle stencil (approx. 1.5 inch diameter)
- Matte clear spray varnish
Step 1: Preparation & Layout
-
Clean the surface:
Wipe the vinyl record down thoroughly with isopropyl alcohol and a soft cloth to remove dust and oils, ensuring the paint adheres properly. -
Prime the center:
Paint the record’s original paper label with two coats of Antique Cream acrylic paint to create a blank canvas for the sun dial. Allow this to dry completely. -
Draw guide circles:
Using a compass and white chalk pencil, lightly draw a large circle about 2 inches inward from the record’s edge to serve as the centerline for your moon placements. -
Mark positions:
Visualize a clock face. Mark 16 evenly spaced points along your chalk guide circle to represent where each moon phase will sit. -
Draft the moons:
Place your circle stencil over each mark and lightly trace the outline with the chalk pencil. I find that using a stencil ensures uniformity that a freehand compass can’t quite match on the slippery vinyl grooves.
Step 2: The Center Dial
-
Define the hub:
Use your compass to draw a small circle in the direct center of the cream-painted label, leaving a small white dot in the very middle. -
Add radial lines:
With a ruler and the black fine-liner, draw straight lines radiating from the inner circle to the edge of the label, mimicking an antique compass or sun dial. -
Create segments:
Double up some of the lines or thicken them to create distinct segments, alternating between thin and thick strokes for a vintage printed look.
Orbit Correction
Slip up on the ridges? Don’t wipe wet paint, as it will smear into the grooves. let it dry completely, then gently scratch the mistake off with a wooden toothpick to clean up the edge.
Step 3: Painting the Phases
-
Outline the bases:
Using the fine-tip white paint marker, carefully trace over your 16 chalk circles. Keep your hand steady as the pen tip rides over the vinyl grooves. -
Define the crescents:
Starting at the top and working clockwise, draw the curve of the shadows inside the circles to differentiate the phases from waxing to waning. -
Fill the solids:
For the bright parts of the crescents, use the thicker white paint marker to fill them in solid. You may need a second layer for total opacity. -
Detail the full moons:
For the fuller phases (located around the 3 o’clock and 9 o’clock positions), stipple small dots inside the circle to replicate crater textures rather than filling them solid.
Cosmic Glow Up
Mix a small amount of phosphorescent medium into your white paint. The design will look classic cream by day, but will glow green in the dark, turning your wall art into a nightlight.
Step 4: Intricate Details
-
Add the mandala moon:
Locate the moon at the bottom (6 o’clock position). Instead of a standard shadow, fill the dark crescent area with tiny, intricate swirls or paisley patterns using the extra-fine white marker. -
Draw the celestial face:
On the left-side crescent (roughly 8 o’clock), draw a classic ‘man in the moon’ profile inside the crescent curve, giving it a nose and lips looking inward. -
Add script details:
If desired, mimic the look of the reference image by adding tiny, illegible script or faux-Latin text around the edges of the textured moons using your finest tip marker. -
Final cleanup:
Once all paint is perfectly dry to the touch, use a damp cotton swab to gently wipe away any visible chalk guidelines. -
Seal the work:
Take the record to a ventilated area and apply a light coat of matte clear spray varnish to protect the paint from scratching off the plastic surface.
Hang your lunar cycle with pride and enjoy the celestial rhythm it brings to your space.

PENCIL GUIDE
Understanding Pencil Grades from H to B
From first sketch to finished drawing — learn pencil grades, line control, and shading techniques.
Explore the Full Guide
Cottagecore Mushroom Scenes
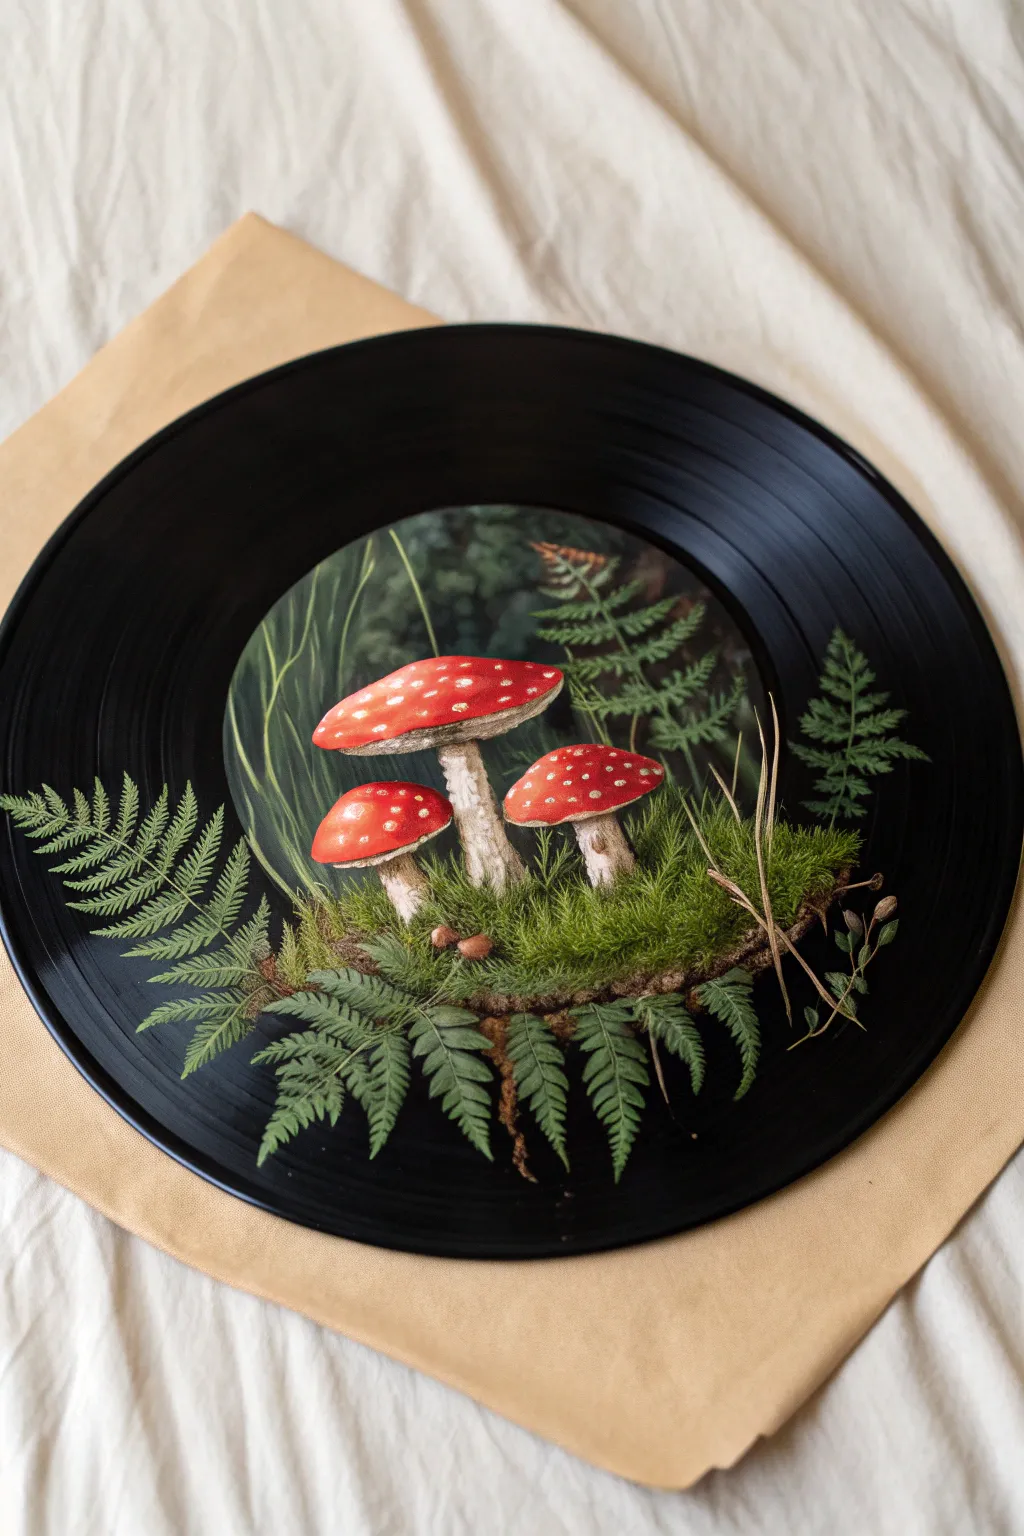
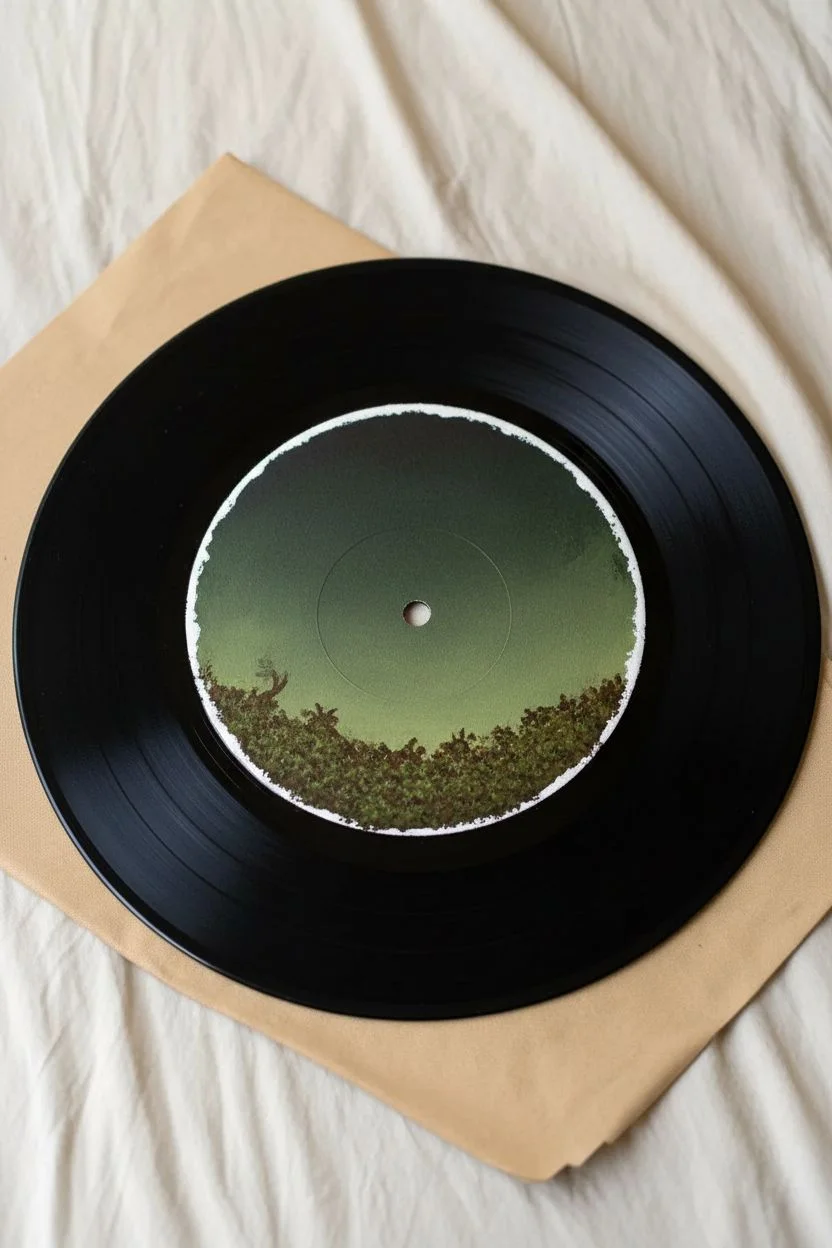
Transform a scratched vintage record into a whimsical cottagecore window by painting directly over the center label. This project features stylized fly agaric mushrooms nestled in moss, with lush ferns spilling out onto the vinyl grooves for a stunning dimensional effect.
How-To Guide
Materials
- Old vinyl record
- Sandpaper (fine grit)
- White gesso primer
- Acrylic paints (Titanium White, Mars Black, Cadmium Red, Hooker’s Green, Sap Green, Burnt Umber, Yellow Ochre)
- Set of synthetic brushes (sizes 0/1 liner, 2 round, small flat)
- Sealant or varnish (matte and gloss)
Step 1: Preparation & Background
-
Clean the surface:
Wipe the record down with a damp cloth or rubbing alcohol to remove grease and dust, ensuring the paint adheres properly. -
Prime the center:
Apply a coat of white gesso over the record label, extending slightly past the paper edge. If you want the background painting to be perfectly round, use a compass to sketch a circle first. -
Create the dark backdrop:
Mix black with a deep forest green. Paint the upper two-thirds of the white circle, blending it into a lighter, murky green towards the center to create the illusion of a deep forest background. -
Lay the mossy foundation:
Using a scruffy old brush, stipple a mix of sap green and burnt umber along the bottom third of the circle to create a textured base for the soil and moss.
Step 2: Painting the Mushrooms
-
Block in stems:
Mix titanium white with a tiny dot of brown to get an off-white cream color. Paint three thick mushroom stems rising from the mossy base. -
Add the caps:
Paint the distinct cap shapes on top of the stems using bright red acrylic. Make the central cap large and flat, while the side caps can be rounder buttons. -
Shadow the red caps:
While the red is still slightly wet, blend a bit of crimson or purple-brown at the bottom edges of the caps to give them volume and roundness. -
Highlight the tops:
Mix a little orange or yellow into your red and gently brush the very tops of the caps where the light would hit. -
Detail the stems:
I like to use a watered-down grey-brown wash to paint the skirts (annulus) on the stems and add rough texture lines vertically down the stalks. -
Paint the spots:
Using your smallest detail brush or a toothpick, dot pure white paint onto the red caps. Vary the sizes and spacing for a natural look.
Slippery Surface?
Vinyl is slick! If your acrylic paint beads up or streaks, lightly sand the area with fine-grit sandpaper before priming to give the surface ‘tooth’.
Step 3: Foliage & Details
-
Texture the moss:
Go back to the mound at the base. Stipple bright lime green over the dark base layer to create fluffy moss highlights. -
Map the ferns:
Using a thin liner brush and dark green paint, draw curved lines stemming from the moss mound outwards. Allow these lines to extend past the painted circle onto the black vinyl grooves. -
Leaf out the ferns:
Paint small, individual leaflets along your fern stems. Start with a dark green for the bottom leaves. -
Highlight the ferns:
Mix a yellow-green shade and paint a second layer of smaller leaflets on top of the dark ones to make the ferns pop against the black vinyl. -
Add tall grasses:
Use a liner brush with pale green and tan paint to flick thin, vertical lines upwards around the mushrooms, simulating tall grass blades. -
Insert dried twigs:
On the right side, paint delicate, spindly brown lines extending outward to represent dried twigs or dead grass for textural contrast. -
Paint tiny forest floor details:
Add two tiny brown mushroom caps at the very base of the moss mound to fill in empty space. -
Varnish and seal:
Once fully dry, seal the painting. Use matte varnish for the moss and ferns, but dab gloss varnish on the mushroom caps to make them look wet.
Level Up: 3D Depth
Make the ferns more dynamic by not painting a background behind the tips that extend onto the vinyl. The contrast of green on the black grooves creates visual depth.
Display your botanical vinyl on a shelf or wall to bring a touch of forest magic indoors.
Black Silhouette Landscapes
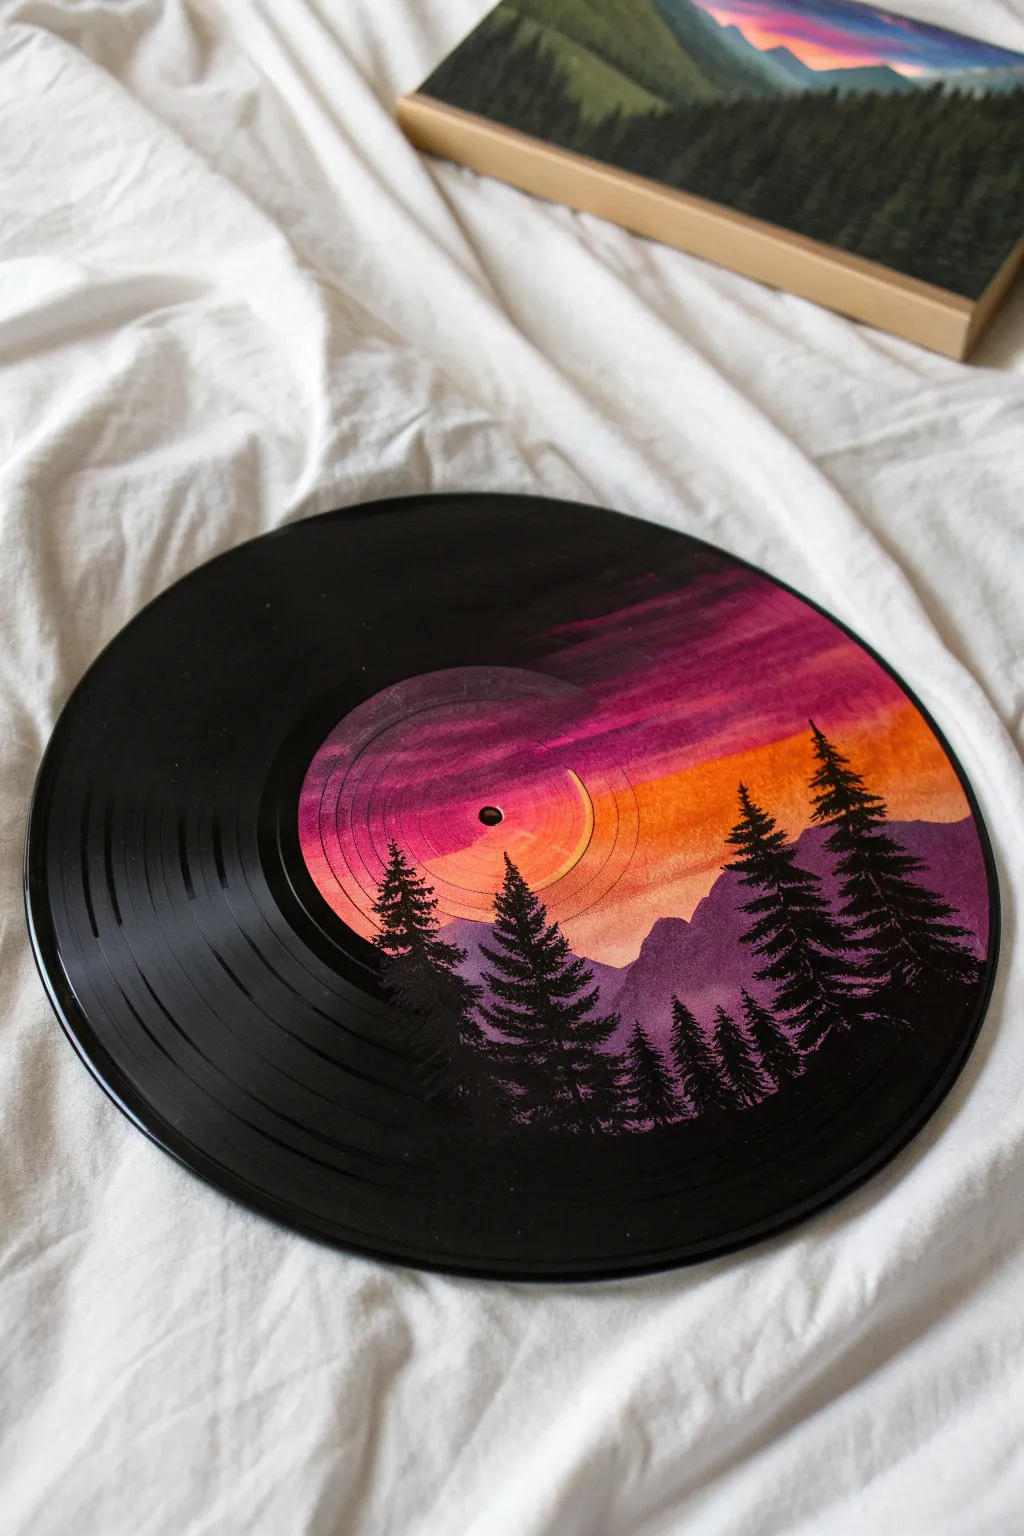
Transform an old, scratched record into a stunning canvas where vibrant sunset hues meet the deep, glossy black of the vinyl itself. This project uses the record’s natural darkness to enhance the silhouette of a pine forest.
Step-by-Step
Materials
- Old vinyl record
- Isopropyl alcohol and soft cloth
- Fine-grit sandpaper
- White gesso or acrylic primer
- Acrylic paints (Cadmium Orange, Magenta, Dioxazine Purple, Carbon Black, Titanium White)
- Flat shader brush (approx. 1/2 inch)
- Small round brush or liner brush
- Palette and water cup
Step 1: Surface Preparation
-
Clean surface:
Wipe the entire record down with isopropyl alcohol to remove any dust, grease, or fingerprints that could prevent paint adhesion. -
Scuff the vinyl:
Lightly sand the right half of the record and the center label area where you intend to paint. This creates a ‘tooth’ for the paint to grab onto. -
Prime the sky:
Apply a coat of white gesso roughly in the shape of your sunset, covering the right side and sweeping over the center label. Keep the edges ragged and organic. -
Dry thoroughly:
Allow the primer to dry completely. A white base is crucial here so the sunset colors appear bright rather than muddy against the black plastic.
Label Adhesion Tip
Paper labels absorb paint differently than plastic vinyl. If your label wrinkles when wet, seal it with a coat of matte medium before applying gesso to lock it down.
Step 2: Painting the Sunset Gradient
-
Apply the horizon color:
Load your flat brush with orange paint. Paint a curved band across the lower middle section of your primed area to serve as the horizon glow. -
Add the middle tones:
While the orange is still wet, introduce magenta just above it. Brush back and forth where the colors meet to create a soft, blended transition. -
Paint the upper sky:
Apply purple paint to the top portion of the sky area. Blend it down into the magenta. I like to keep my brush strokes horizontal to mimic atmospheric clouds. -
add subtle clouds:
Mix a tiny amount of purple into white to create a lavender shade. Use the corner of your brush to streak thin, wispy clouds across the upper purple section. -
Extend the gradient:
Ensure your painted sky covers the center label completely, leaving only the spindle hole visible. Let this layer dry fully before moving on.
Step 3: Creating the Landscape
-
Mix mountain color:
Combine purple with a little white and a dot of black to create a muted, shadowy mountain color. -
Paint mountain peaks:
Using a small round brush, paint jagged mountain outlines overlapping the lower part of your orange horizon line. -
Fill the range:
Fill in the body of the mountains with the purple mix. As you move lower down the record, you can darken this color slightly. -
Draft tree trunks:
Switch to pure black acrylic. With a fine liner brush, paint vertical lines of varying heights to establish where your pine trees will stand. -
Start tree foliage:
Using the very tip of a small round brush, tap gently at the top of a trunk line to create the narrow peak of a pine tree. -
Build the branches:
Work your way down the trunk using a stippling or zigzag motion, making the branches wider as you get closer to the bottom. -
Create depth:
Paint the largest trees in the foreground first, extending them from the unpainted black vinyl area up into the colorful sky. -
Blend into the void:
Allow the solid black paint at the base of the trees to fade seamlessly into the glossy unpainted black of the record on the bottom and left sides. -
Final details:
Add a few tiny, distant trees on the mountain slopes using the finest tip of your brush for scale.
Level Up: Starry Night
Once the sky is dry, use an old toothbrush dipped in watered-down white paint to flick tiny stars over the purple section for a magical twilight effect.
Display your new vinyl art on a shelf or mount it on the wall for a retro-modern vibe


Fluid Art Pours
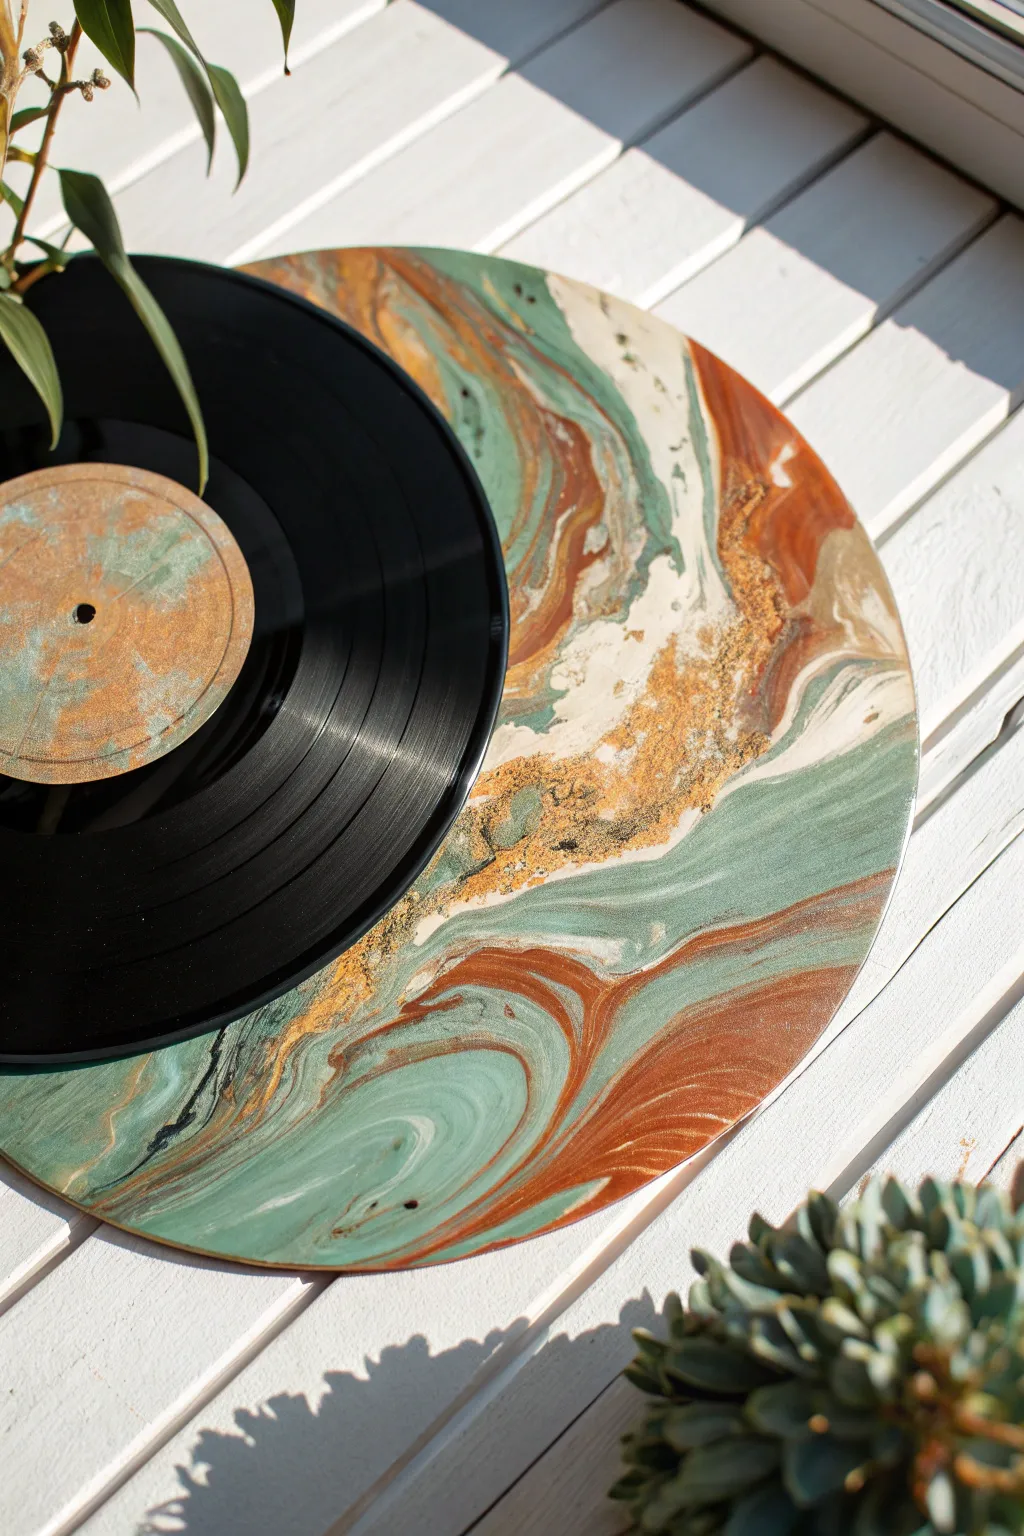
Transform an old, scratched record into a stunning piece of fluid art featuring swirling currents of sage green, terracotta, and metallic gold. This project uses acrylic pouring techniques to create an organic, stone-like finish that completely revitalizes the vinyl surface.
Step-by-Step Tutorial
Materials
- Old 12-inch vinyl record
- White Gesso primer
- Fine-grit sandpaper (220 grit)
- Acrylic paints (Sage Green, Burnt Sienna/Rust, Cream, Gold)
- Acrylic pouring medium (like Floetrol or Liquitex)
- 4 plastic mixing cups & stir sticks
- Large plastic bin or drop cloth (for mess)
- Disposable cups (to prop up the record)
- High-gloss varnish or spray sealer
Step 1: Preparation
-
Clean the surface:
Wipe down your vinyl record with a damp cloth to remove any dust or grease fingerprints, then dry it completely. -
Scuff sanding:
Lightly sand the surface of the record using fine-grit sandpaper. You don’t need to remove the grooves, just create a subtle texture for the paint to grip. -
Mask the hole:
Place a piece of painter’s tape over the center hole on the *back* side of the record to prevent paint from flowing straight through initially. -
Prime with Gesso:
Apply a coat of white surface primer (Gesso) over the entire front of the record, including the paper label. This bright base ensures your sage and gold colors will pop rather than looking dark against the black vinyl. -
Create a workstation:
Set up four overturned disposable cups inside a plastic bin or on a covered table. Place your primed record on top of these cups so the edges are floating, allowing paint to drip off freely.
Muddy Colors?
If your colors are turning into a brown sludge, you might be over-tilting. Stop moving the record as soon as the surface is covered to preserve the distinct bands of color.
Step 2: Mixing & Pouring
-
Mix your medium:
In separate cups, mix your acrylic paints with the pouring medium. A standard ratio is 1 part paint to 1 part medium, but check your bottle’s instructions. -
Check consistency:
Stir each color until the consistency resembles warm honey. If the paint flows off the stick in a jagged way, add a few drops of water until it creates a smooth, continuous stream. -
Layer the dirty cup:
Take a fresh empty cup. Pour a small amount of Cream into the bottom, followed by the Sage Green, then the Rust, and finally a drizzle of Gold. Repeat these layers until the cup is about half full. -
The pour method:
Start pouring the contents of your layered cup directly onto the center of the record. Use a slow circular motion to help the colors swirl as they hit the surface. -
Enhance the pattern:
I prefer to pour until the puddle covers the center label area completely, ensuring the old label text won’t show through the final design.
Make It Functional
Turn your art into a timepiece! Once the paint is cured, poke back through the taped hole and install a simple battery-operated clock mechanism to make a unique wall clock.
Step 3: Tilting & Finishing
-
Tilt to spread:
Gently lift the record and tilt it slowly. Guide the running paint toward the edges. The goal is to stretch the paint, creating those long, marble-like veins seen in the photo. -
Cover the edges:
Continue tilting until the paint spills over the rim on all sides. Use a gloved finger to touch up any dry spots on the very edge of the vinyl. -
Remove air bubbles:
Once you are happy with the composition, quickly run a culinary torch or heat gun briefly over the surface to pop any trapped air bubbles. -
The long dry:
Leave the record on its cup stand to dry. Do not touch it! Acrylic pours can take 24 to 48 hours to dry completely depending on humidity. -
Seal the art:
Once fully cured (wait at least 72 hours to be safe), apply two thin coats of high-gloss varnish to protect the paint and give it that wet, polished look.
Now you have a sophisticated piece of upcycled art that brings an organic, earthy vibe to your space.
Retro Geometric Patterns
Transform an old scratchy LP into a stunning piece of 70s-inspired decor using warm earth tones and satisfying geometry. This project balances concentric circles with a striking diagonal color split, creating a modern twist on retro aesthetics.
How-To Guide
Materials
- Old vinyl record (LP)
- White Gesso or bonding primer
- Acrylic paints: Terracotta, Sage Green, Mustard Yellow, Beige, Off-White
- Lazy Susan or manual turntable
- Painter’s tape or masking tape (1/2 inch width)
- Flat paintbrushes (various sizes)
- Compass or pencil
- Ruler
- Matte varnish (optional)
Step 1: Prime and Prep
-
Clean surface:
Wipe the record down thoroughly with rubbing alcohol or soapy water to remove dust and finger oils. -
Prime the vinyl:
Apply a layer of Gesso or primer over the entire face of the record. Record grooves are slippery, and this step ensures your design won’t peel off later. -
Base coat:
Once primed, paint the entire record with your Off-White color. This will act as the separating lines between your colored bands later on. -
Dry completely:
Allow the base coat into dry fully, preferably overnight, so the tape steps don’t lift the paint.
Clean Lines Troubleshooting
To prevent paint bleeding under the tape, brush a tiny amount of your Off-White base color over the tape edges first. This seals the gap, ensuring your colored lines stay razor-sharp.
Step 2: Map the Geometry
-
Create the split:
Place two strips of masking tape diagonally across the bottom third of the record to create the ‘break’ in the pattern. The space between the tape strips will remain Off-White. -
Setup the spin:
Center your record on a Lazy Susan or turntable. Secure it with a loop of tape underneath so it doesn’t slide while spinning. -
Mark the rings:
While gently spinning the turntable, hold a pencil steady at different distances from the center to lightly mark where your colored rings will sit.
Level Up: Functional Art
Turn this art piece into a working clock! Buy a simple quartz clock mechanism kit online. The shaft fits perfectly through the standard spindle hole of the LP.
Step 3: Paint the Warm Section
-
Outer Terracotta ring:
Identify the large upper section above your tape line. Load a medium flat brush with Terracotta paint. -
Spin and paint:
Spin the turntable slowly. Apply the Terracotta to the outer rim, lifting your brush smoothly when you reach the masking tape border. Creating a clean edge takes patience. -
Middle layers:
Moving inward, paint the next ring Mustard Yellow, followed by a thick band of Beige. Remember to leave thin gaps of the Off-White base showing between colors. -
Inner definitions:
Add a thin Terracotta ring closer to the center label area, maintaining the concentric spacing.
Step 4: Paint the Cool Section
-
The color shift:
Now focus on the smaller section below the tape. Here, we swap the palette to create that cool visual glitch. -
Green takeover:
Paint the outer rim of this bottom section in Sage Green (replacing the Terracotta used top-side). -
Matching the bands:
Continue filling in the ring segments in this lower section with Sage Green, aligning them with the rings above but changing the hue.
Step 5: Center and Finish
-
The bullseye:
Paint the center label area. Use Sage Green for the very center circle and surround it with a bright Mustard Yellow ring. -
The reveal:
Wait until the paint is dry to the touch, then slowly and carefully peel back the masking tape at a 45-degree angle to reveal the crisp diagonal lines. -
Touch ups:
If any paint bled under the tape, I like to use a tiny detail brush and the Off-White paint to clean up the edges. -
Seal it:
Finish with a coat of matte varnish to protect the paint and unify the texture of the grooves.
Now you have a groovy geometric masterpiece ready to display on a shelf or wall.
Mystical Crystal Ball Illusion
Transform the center label of an old record into a gateway to another galaxy. This project focuses on blending electric blues and purples to create a glowing, mystical nebula effect right in the middle of the vinyl.
Detailed Instructions
Materials
- Old vinyl record
- Rubbing alcohol and cotton cloth
- Wide painter’s tape
- Gesso or white acrylic primer
- Acrylic paints: Carbon Black, Titanium White, Dioxazine Purple, Phthalo Blue, Turquoise
- Brushes: Flat shader, small filbert, fine liner
- Palette and water cup
- Toothpick (for cleanup)
Step 1: Prep and Prime
-
Clean surface:
Wipe the center label of the record with rubbing alcohol to remove grease and dust, ensuring the paint adheres properly. -
Mask the grooves:
Apply painter’s tape over the vinyl grooves surrounding the label. I find tracing a bowl the same size as the label onto the tape and cutting it out creates the cleanest circular mask. -
Apply primer:
Paint a layer of gesso or white primer directly over the paper label to block out the original text and create a smooth painting surface. -
Sand the base:
Once the primer is fully dry, inspect for rough patches and lightly sand if necessary for a sleek finish.
Fuzzy Edges?
If paint bled under your mask, don’t wipe it while wet. Wait for it to dry completely, then use a toothpick to gently scrape the excess paint off the vinyl grooves—acrylic peels off plastic easily.
Step 2: The Deep Space Base
-
Create the void:
Paint the entire primed circle with specific Carbon Black acrylic mixed with a tiny drop of Phthalo Blue for a rich, deep space background. -
Position the light source:
Identify the light source area in the upper right quadrant and paint a soft, diffused circle using Phthalo Blue mixed with a little black. -
block in the nebula:
Paint a diagonal swoosh of Dioxazine Purple starting from the bottom left, curving upward toward the blue orb area. -
Soft blending:
While the paint is still damp, use a dry soft filbert brush to blur the edges of the purple and blue shapes into the black background to create a smoky look.
Holographic Finish
Once your painting is dry, brush a clear glitter glaze or color-shift medium over just the purple and blue sections to make the nebula shimmer as the record spins.
Step 3: Building the Nebula
-
Mix the glow color:
On your palette, mix Turquoise with a small amount of Titanium White to create a bright, glowing cyan. -
Ignite the orb:
Paint a smaller circle inside the dark blue zone you created earlier, blending the edges outward so it looks like a glowing ball of gas. -
Highlight the gas clouds:
Add streaks of purple mixed with white to the lower purple swoosh to give the gas cloud dimension and form. -
Patting technique:
Gently blend these lighter highlights into the darker purple base using a patting motion with your brush to simulate cloud texture.
Step 4: Electrifying Details
-
Prepare the ink:
Thin down Titanium White paint with water until it has an inky, fluid consistency. -
Paint energy veins:
Using your finest liner brush, paint the electric veins starting from the glowing orb and pulling the brush quickly outward into the purple area. -
Branch out:
Add a few wispy, branching lines in the purple nebula section, following the curve of the swoosh to mimic lightning or plasma. -
The core star:
Place a concentrated dot of pure, thick Titanium White in the very center of the turquoise orb to act as the primary star. -
Glazing depth:
Dilute a tiny bit of purple paint with water to create a glaze and lightly wash it over parts of the white lightning lines to push them back into the cloud. -
Final highlights:
Go back with the white liner brush and re-highlight just the thickest central segments of the lightning for maximum brightness.
Step 5: Clean Up
-
Reveal the edge:
Carefully peel away the painter’s tape while the paint is dry to the touch but not fully cured to avoid ripping the paint skin. -
Final touch-ups:
If any paint bled onto the vinyl grooves, gently scratch it off with a damp toothpick to perfect the circle.
Take a moment to admire your mini-universe before displaying it on a wall or shelf
Yin Yang Koi Fish

Transform a scratched record into a serene pond scene where two koi fish swim in an eternal loop. This project utilizes the circular nature of the vinyl to create a balanced, flowing composition with deep oceanic tones.
How-To Guide
Materials
- Old vinyl record
- Rubbing alcohol and cloth
- White acrylic gesso or primer
- Acrylic paints (Teal, Phthalo Blue, Black, Titanium White, Cadmium Orange, Red)
- Flat shader brush (medium)
- Detail liner brush (size 00 or 0)
- Palette and water cup
- White charcoal pencil or chalk
- Gloss varnish
Step 1: Preparing the Waters
-
Clean surface:
Wipe the record down thoroughly with rubbing alcohol to remove any oils or dust that might prevent the paint from sticking. -
Define the area:
Decide on the size of your painting. You want a large circle in the center, leaving about 2-3 inches of the black vinyl tracks visible on the outer edge. -
Prime the circle:
Paint your defined circle with white gesso. This provides a ‘tooth’ for the paint and ensures your colors extend brightly rather than sinking into the black vinyl. -
Base coat the water:
Mix teal with a little phthalo blue. Cover the primed white area completely with this rich turquoise color. -
Create the abyss:
Paint a smaller circle in the absolute center (covering the label area) using black mixed with a touch of blue. Blend the edges slightly into the teal for a gradient effect. -
Add currents:
Using a lighter mix of teal and white, paint swirling, curved strokes throughout the water area. I find that following the curve of the record helps maintain visual flow.
Step 2: Drafting and Painting Koi
-
Sketch the shapes:
Use a white charcoal pencil to lightly outline two fish swimming opposite each other. Curving their bodies creates that classic Yin Yang movement. -
Base the orange fish:
Fill in the first fish with a solid coat of cadmium orange. You may need two thin layers to get full opacity. -
Base the white fish:
Paint the second fish using titanium white mixed with a tiny drop of grey to give it some weight. -
Scale texture:
For the orange koi, mix a darker red-orange and use your finest liner brush to paint small ‘U’ shapes to imitate scales across the body. -
Spotted details:
On the white koi, paint organic blotches using the orange paint to create the ‘Kohaku’ pattern shown in the image. -
Fins and tails:
Paint the flowing tails and side fins. Keep the paint slightly translucent here to make the fins look delicate and water-swept.
Paint Adhesion Help
If the gesso beads up or doesn’t stick to the glossy vinyl, lightly scuff the painting area with fine-grit sandpaper (400 grit) and wipe clean before re-priming.
Step 3: Depth and Highlights
-
Add shadows:
Mix a dark blue-black glaze (paint thinned with water) and paint gently along one side of each fish to make them look rounded and dimensional. -
Facial features:
With your smallest brush, dot the eyes with black and add tiny white reflections. Carefully drag the brush out from the mouth area to create thin whiskers. -
Surface ripples:
Using diluted white paint, add thin, crisp curved lines over parts of the fish and the background to create the illusion of ripples on the water’s surface. -
Final dry:
Allow the acrylics to dry completely, preferably overnight to ensure all layers are set. -
Varnish:
Apply a coat of gloss varnish over the painted area. This enhances the ‘wet’ look of the water and protects your artwork.
Level Up: Resin Textures
Instead of standard varnish, pour a thin layer of clear epoxy resin over just the painted circle. This creates a realistic, glass-like depth that mimics real pond water.
Hang your balanced masterpiece on the wall and enjoy the tranquility it brings to the room
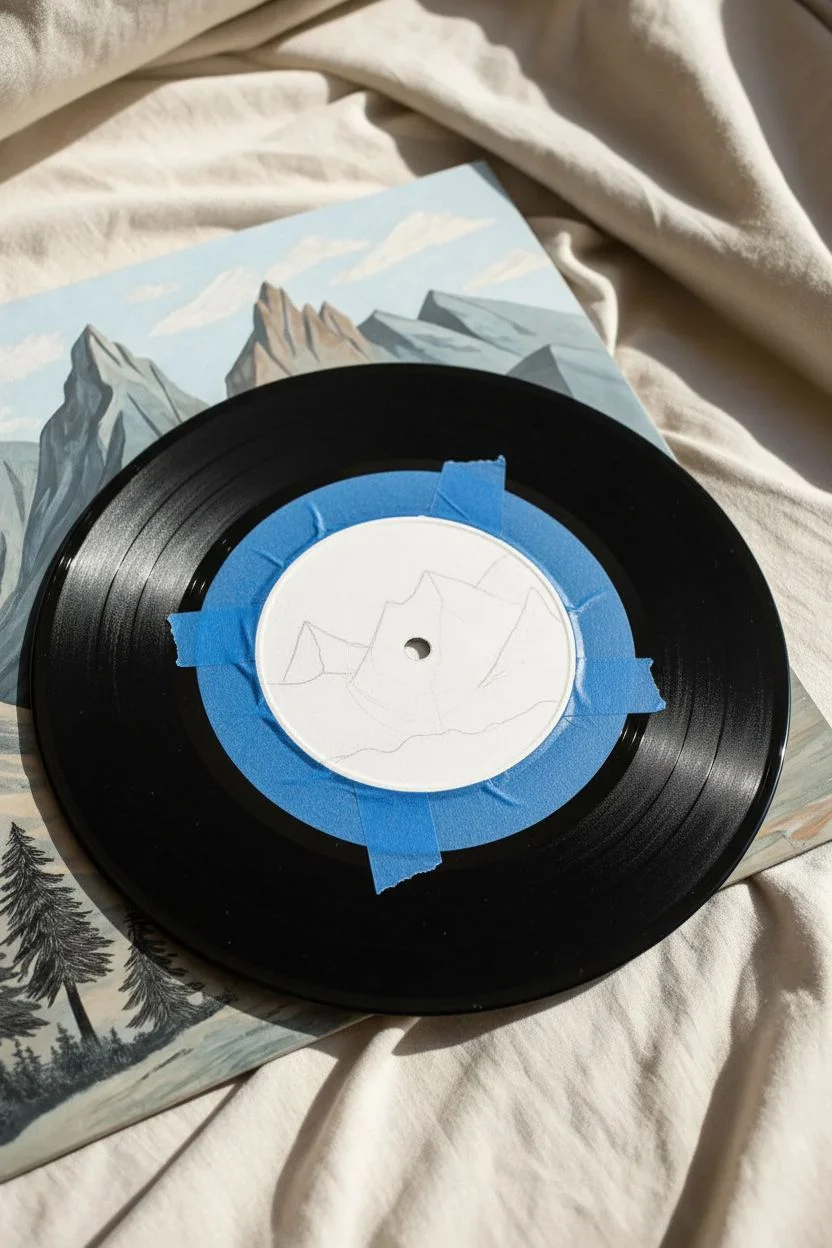
Mountain Range Horizons
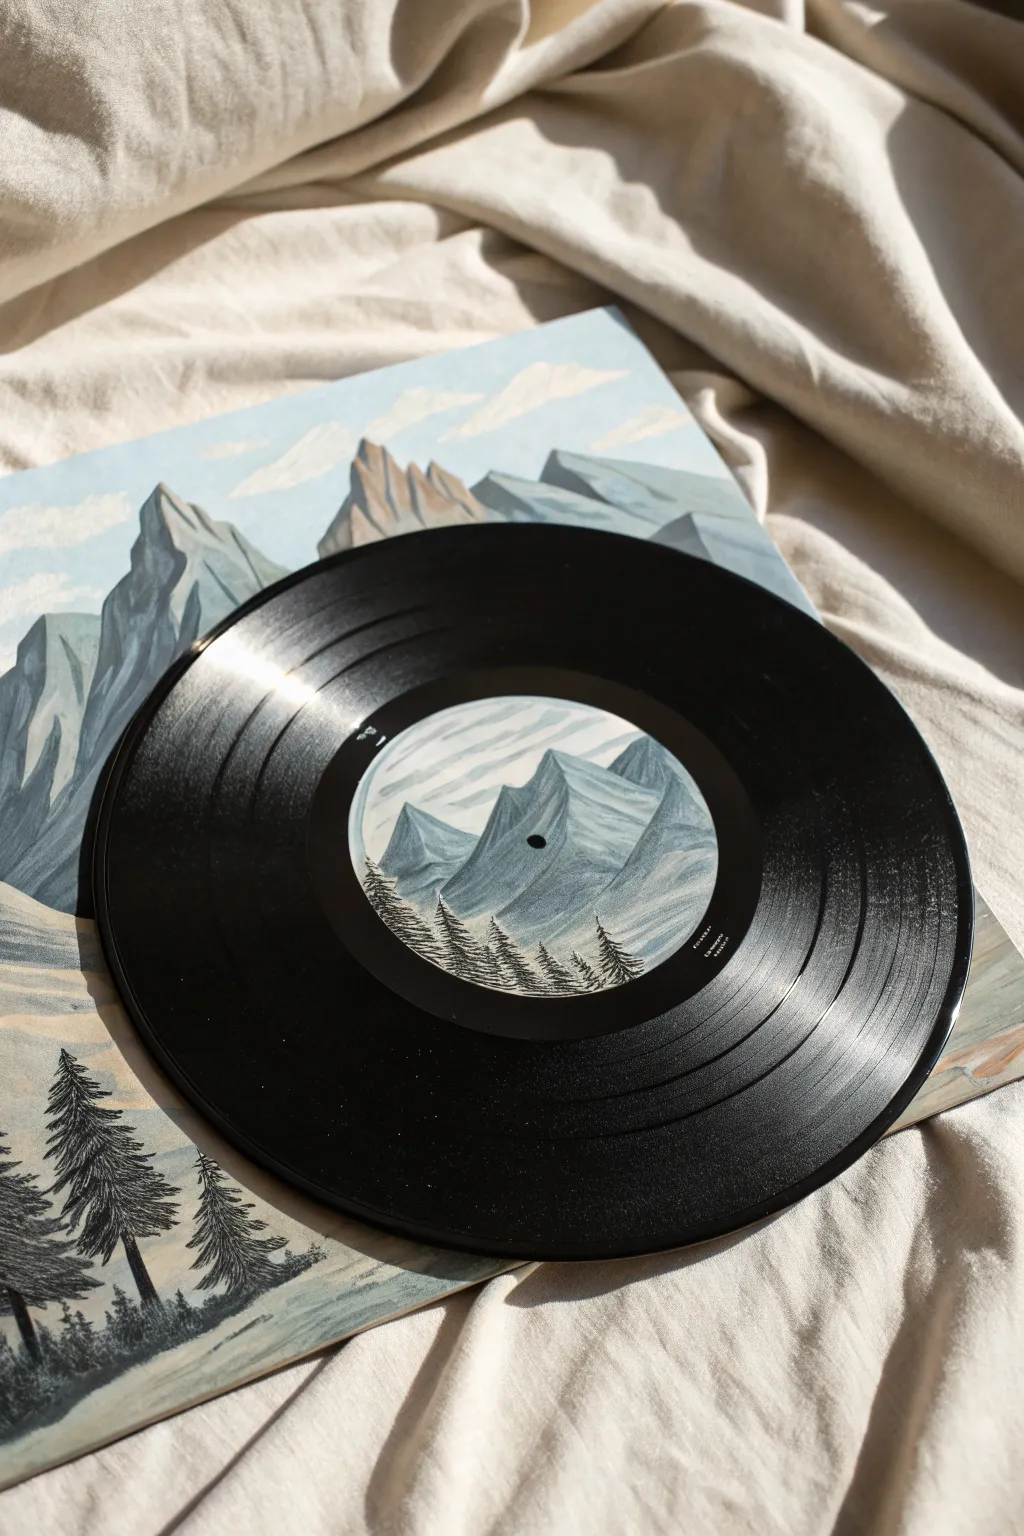
Transform the center of an old vinyl record into a serene, cool-toned mountain escape. This project focuses on painting a miniature landscape directly onto the record label, creating a stunning piece of circular art that sharply contrasts with the black vinyl grooves.
Step-by-Step Guide
Materials
- Old vinyl record
- White gesso primer
- Acrylic paints (Titanium White, Phthalo Blue, Mars Black, Payne’s Grey)
- Small flat synthetic brush (size 4)
- Fine liner detail brush (size 00 or 0)
- Painter’s tape
- Palette and water cup
- Compass or circle stencil
Step 1: Preparation & Base
-
Clean the surface:
Wipe down the center label of your record with a slightly damp microfiber cloth to remove any dust or oils. -
Mask the grooves:
Carefully apply painter’s tape around the edge of the label where it meets the vinyl grooves to protect the playable area. -
Prime the label:
Apply a coat of white gesso to the label area using a flat brush; this blocks out the old text and gives the acrylics tooth to adhere to. -
Let it dry:
Allow the gesso layer to dry completely; if the original label is still visible, add a second thin coat and let it cure. -
Sketch the composition:
Lightly sketch the outlines of two or three large mountain peaks and a horizon line using a pencil directly on the white primer.
Step 2: Sky & Mountains
-
Mix the sky color:
Create a very pale blue by mixing a large amount of Titanium White with a tiny dot of Phthalo Blue. -
Paint the sky:
Fill the upper section of the label behind your mountain outlines with the pale blue mixture. -
Add cloud streaks:
While the sky is still slightly tacky, use a dry brush with pure white to drag horizontal streaks across the sky for stylized clouds. -
Mix the mountain base:
Mix a slate grey-blue shade using White, Payne’s Grey, and a touch of Blue for the mountain bodies. -
Paint mountain shapes:
Fill in your mountain outlines with the slate mixture, ensuring you cover the line where the mountains meet the sky. -
Define the peaks:
I like to mix a slightly darker version of your grey-blue and paint the right side of each mountain peak to create a shadow effect. -
Add snowy highlights:
Using a clean small brush and pure Titanium White, paint the left slopes of the peaks to simulate sunlight hitting the snow. -
Soften the base:
Blend the bottom of the mountains into a lighter, hazier grey towards the bottom of the label to create atmospheric perspective.
Circle Perfection
If you struggle with masking tape, cut a hole in a piece of paper the exact size of the label and tape that paper down as a shield.
Step 3: Foreground Details
-
Mix the tree color:
Combine Mars Black with a small amount of Payne’s Grey to create a deep, cool charcoal color for the silhouette trees. -
Paint tree trunks:
Using your finest liner brush, paint thin vertical lines along the bottom edge of the mountains where they meet the foreground. -
Add pine branches:
Start at the top of a trunk line and use tiny, quick dabbing motions to create branches that get wider towards the bottom. -
Layer the forest:
Paint a few larger, more detailed trees in the very front, overlapping the smaller background trees to build depth. -
Add ground cover:
Stipple some of the dark mixture at the very base of the trees to ground them and hide the trunk bottoms. -
Reveal the edge:
Carefully peel away the painter’s tape while the paint is dry to reveal a crisp, perfect circle. -
Seal the work:
Apply a thin layer of matte varnish over the painted label to protect it from scratches and dust.
Level Up
Paint the surrounding paper sleeve with a matching larger landscape so the record ‘completes’ the scene when placed on top.
Now you have a custom piece of vinyl art that brings the majesty of the mountains to your music collection
Abstract Sunbursts
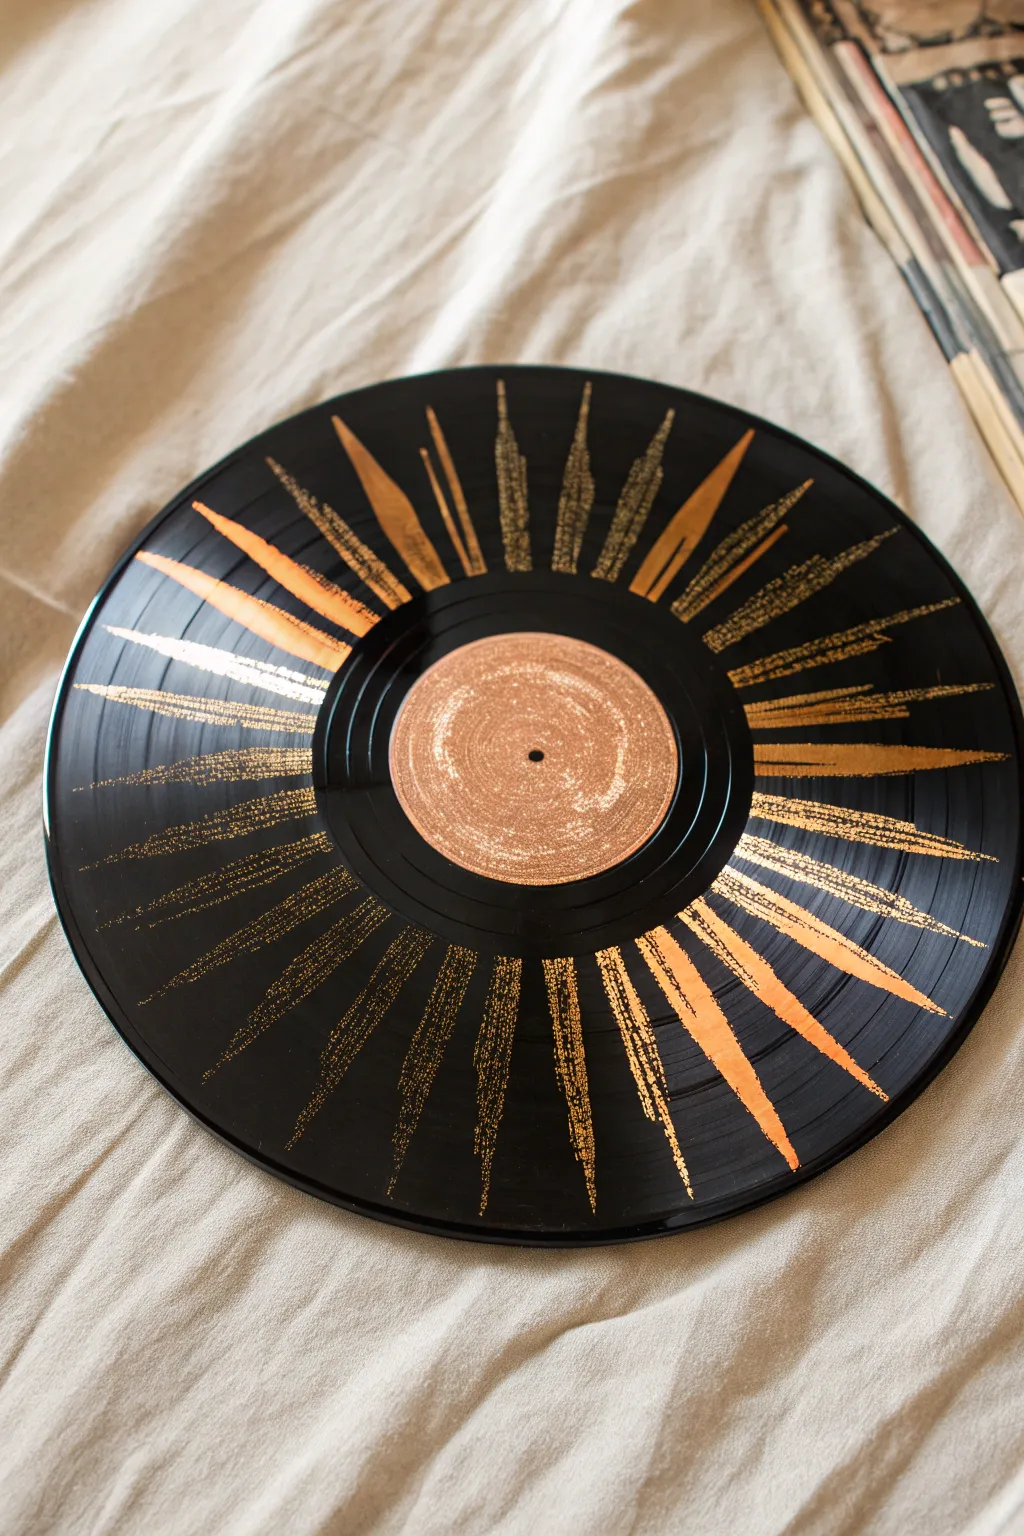
Transform a scratched or unplayable record into a striking piece of modern art using metallics and negative space. This project relies on the contrast between the deep glossy black of the vinyl and the light-catching texture of gold or copper paint to create a celestial effect.
Step-by-Step
Materials
- Old 12-inch vinyl record
- Isopropyl alcohol and soft cloth
- High-pigment metallic acrylic paint (Gold and Copper)
- Wide flat shader brush (1 inch)
- Medium flat brush (1/2 inch)
- Old, stiff bristle brush (for texture)
- Paper plate or palette
- Gloss spray sealant (optional)
Step 1: Surface Preparation
-
Clean the surface:
Wipe down the entire vinyl record with a soft cloth dampened with isopropyl alcohol to remove dust and finger oils. -
Dry completely:
Allow the alcohol to evaporate fully so the surface is bone-dry before you begin painting. -
Protect the spindle:
If you plan to keep the spindle hole clear for a clock mechanism later, place a small piece of painter’s tape over the hole on the backside.
Paint sliding off?
vinyl is slick. If your paint isn’t sticking or looks streaky, apply a thin coat of clear gesso or primer over the painting area first to give the surface some ‘tooth’ for the metallics to grab.
Step 2: The Center Core
-
Mix the core color:
On your palette, squeeze out a generous amount of copper acrylic paint. You want this center section to be slightly warmer than the rays. -
Cover the label:
Using the wide flat brush, paint directly over the original paper label in a circular motion. -
Add texture:
While the paint is wet, switch to a stiff bristle brush and use a stippling (up-and-down dabbing) motion. -
Build the texture:
Continue stippling until the paper label is completely obscured and the paint has a rough, hammered metal appearance. -
Extend the edge:
Paint slightly past the edge of the paper label onto the vinyl itself to ensure a clean, perfect circle.
Step 3: Painting the Rays
-
Switch to gold:
Clean your brush or switch to a fresh medium flat brush and load it with bright gold metallic paint. -
Create anchor rays:
Paint four long, solid triangle shapes at the 12, 3, 6, and 9 o’clock positions to establish symmetry. -
Taper the strokes:
When painting these solid rays, start with firm pressure near the center and lift the brush gradually as you pull outward to create a sharp point. -
Prepare for dry brushing:
For the textured rays, dip your stiff brush into the paint, then wipe most of it off onto a paper towel until the brush is almost dry. -
Apply textured strokes:
Drag the dry brush rapidly from the center outward in between your solid rays. The bristles should skip over the vinyl grooves. -
Vary the lengths:
I like to intentionally make the dry-brushed rays varied in length and width to prevent the design from looking too uniform. -
Layer the density:
Go back over some of the textured areas with a second pass of dry brushing to increase brightness without losing the scratchy effect. -
Fill the gaps:
Add smaller, shorter solid strokes between the larger rays to create a dense, exploding starburst effect near the center circle.
Make it functional
Turn this art into a working clock by purchasing a simple high-torque quartz clock movement kit. Insert the mechanism through the center hole after your paint has fully cured.
Step 4: Finishing Touches
-
Review the composition:
Stand back and look for any large black gaps that feel unbalanced, filling them with thin, quick flicks of gold. -
Let it cure:
Allow the paint to dry undisturbed for at least 24 hours to ensure the metallic pigments harden fully. -
Seal the work:
Spray the entire record with a light coat of clear gloss sealant to protect the paint from scratching and enhance the shine.
Hang your new metallic artwork in a spot with plenty of natural light to watch the sunburst shimmer throughout the day
Minimalist Zodiac Constellations
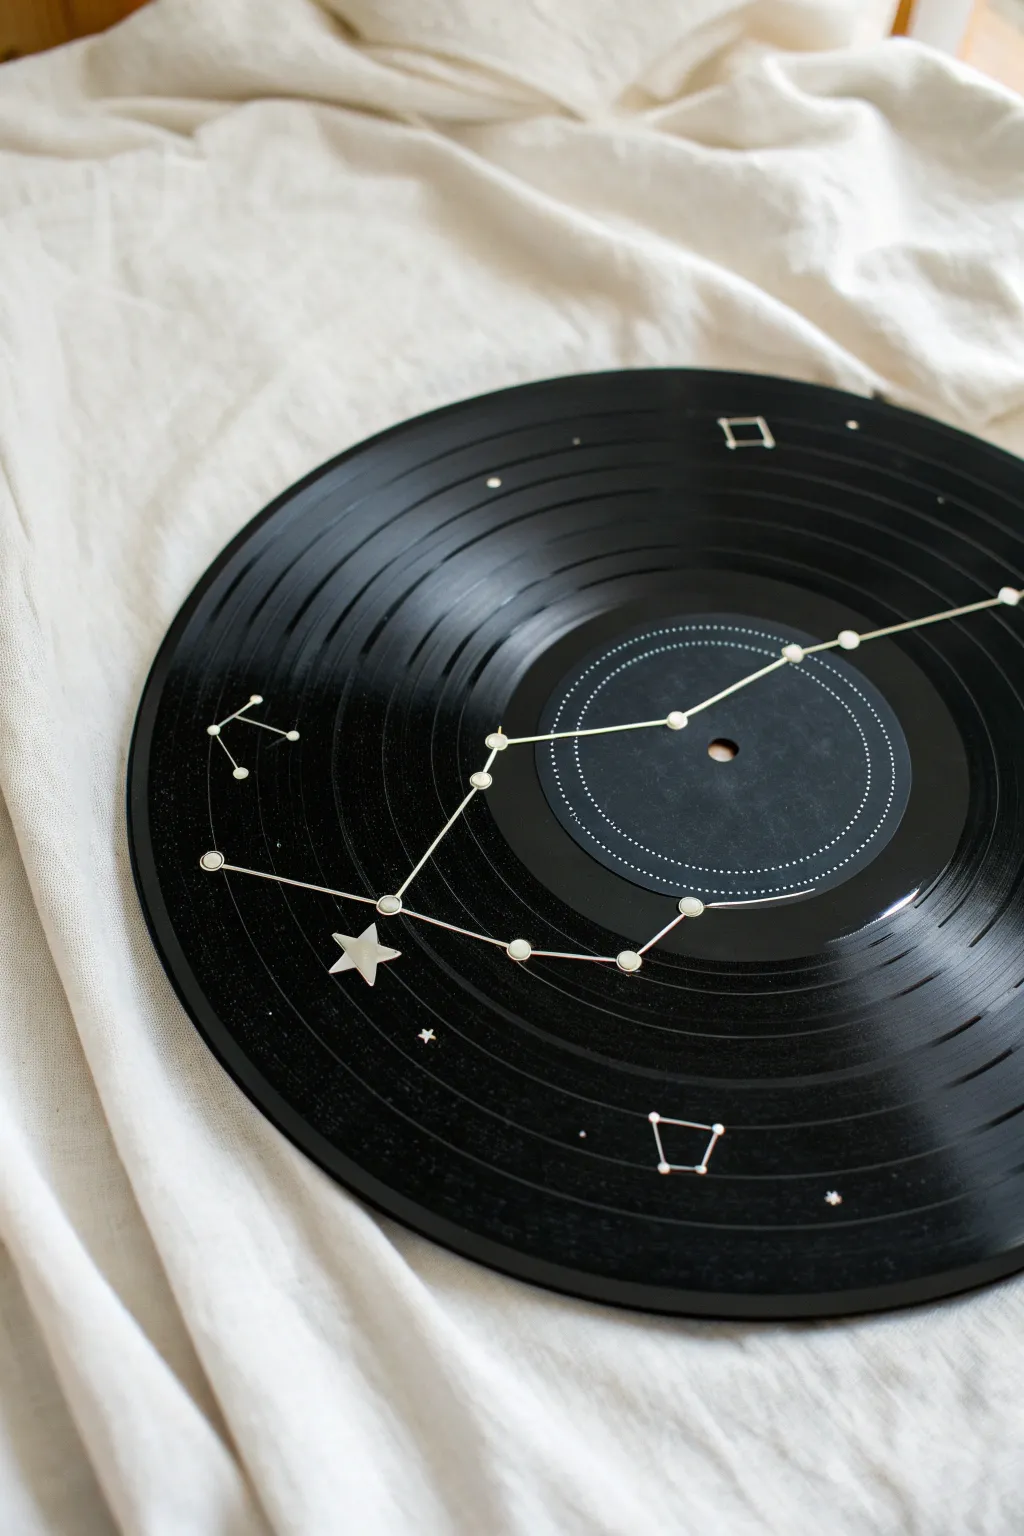
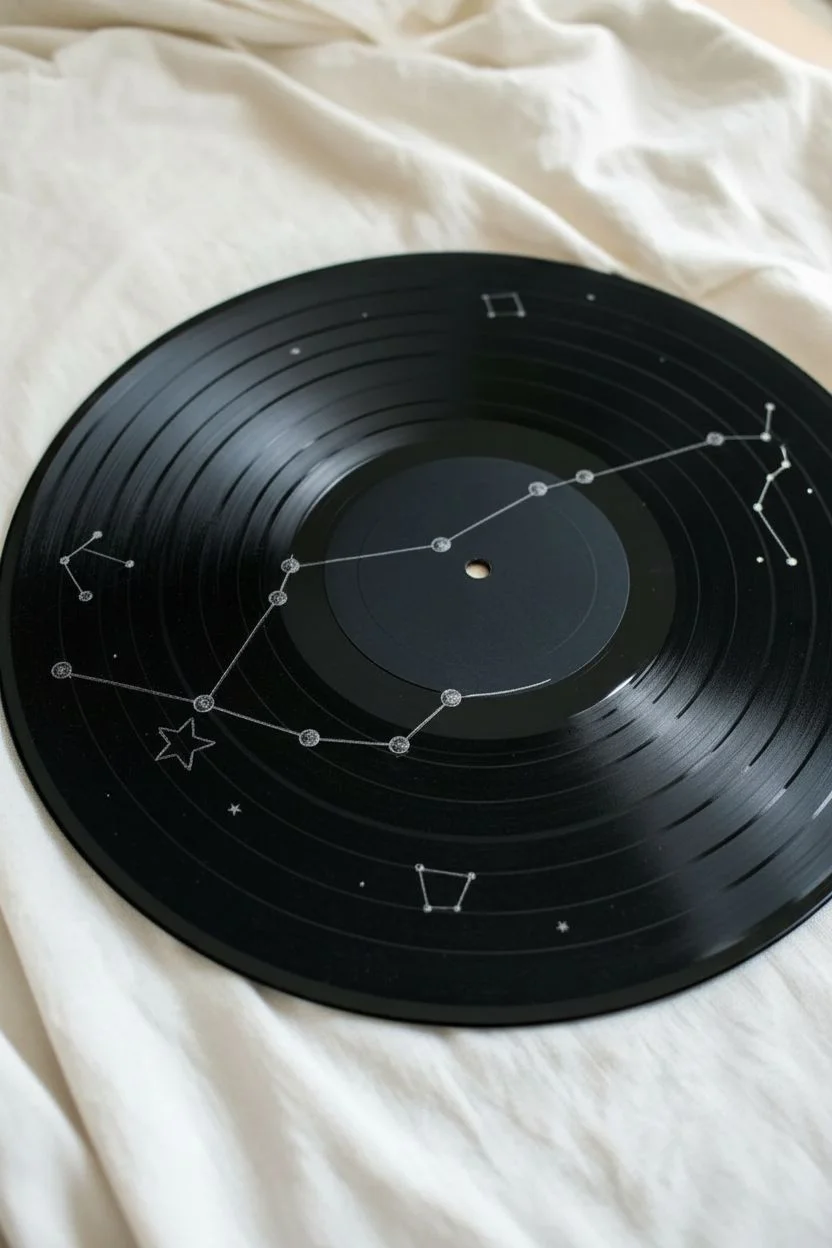
Transform a scratched or thrifted record into a sophisticated piece of wall decor using a minimalist celestial theme. This project contrasts the matte black texture of the vinyl with crisp white lines and stars to create a stunning star chart effect.
Step-by-Step Tutorial
Materials
- Old 12-inch vinyl record
- Matte black acrylic paint
- Flat paintbrush
- White extra-fine tip paint pen (0.7mm)
- White charcoal pencil or chalk
- Ruler
- Compass (optional)
- Silver paint or silver star sticker
- Cotton swabs
- Rubbing alcohol
- Spray sealer (matte or satin)
Step 1: Preparing the Canvas
-
Clean the surface:
Wipe the entire record down with rubbing alcohol and a soft cloth to remove grease, dust, and fingerprints. -
Prime the label:
Paint the center paper label of the record with matte black acrylic paint. -
Apply a second coat:
Once the first layer is dry to the touch, add a second coat of black paint to the center to ensure the original label design is completely covered. -
Dry completely:
Allow the center paint to cure fully; if it’s still tacky, your sketching tools might drag the paint.
Bleeding Lines?
Vinyl grooves naturally wick liquid paint. To fix messy lines, wait for the mistake to dry, scratch it off gently with a toothpick, and redraw using a drier marker tip.
Step 2: Mapping the Constellations
-
Plan your sky:
Choose 2-3 constellations you love; iconic shapes like Ursa Major (the Big Dipper) or Cassiopeia work best for this layout. -
Draft the layout:
Using a white charcoal pencil, lightly mark the positions of your main stars. I prefer charcoal here because it wipes away cleaner than standard chalk. -
Sketch the center rings:
Use a compass or trace around a circular object to lightly sketch two concentric guide rings inside the painted center label area. -
Position the main constellation:
Sketch your primary constellation (like the Dipper) so that it spans across both the vinyl grooves and into the painted center label for a unified look.
Step 3: Painting the Design
-
Dot the center rings:
With your fine-tip white paint pen, carefully place small, evenly spaced dots along the circular guides you drew on the center label. -
Create primary stars:
Paint the main stars of your constellations as solid white dots. Make these slightly larger than the dots in the center rings. -
Add connecting lines:
Use a ruler and the paint pen to draw straight, thin lines connecting your star dots to form the constellation shapes. -
Navigate the grooves:
When drawing lines across the vinyl grooves, use light pressure and move somewhat quickly to prevent the ink from bleeding into the tracks. -
Identify joints:
Add a small, hollow circle around specific ‘joint’ stars in your constellation to mimic the look of a technical star map.
Level Up: Glow Effect
Trace over your white stars with glow-in-the-dark paint, or use small adhesive rhinestones on the major stars to catch the light during the day.
Step 4: Finishing Touches
-
Add the North Star:
Paint a larger, five-pointed star near the bottom left, or attach a small silver star sticker for an extra pop of dimension. -
Fill the void:
Sprinkle the empty black space with tiny pinpoint dots to represent distant stars and space dust. -
Add geometric artifacts:
Paint a few tiny detached geometric shapes, like a small trapezoid or square, near the edge to enhance the ‘astronomical chart’ aesthetic. -
Clean up:
Once the paint is 100% dry, gently wipe away any visible charcoal guidelines with a damp cotton swab. -
Seal the work:
Spray the entire record with a light coat of clear matte sealer to protect the paint from chipping off the slick vinyl.
Now you have a piece of the cosmos captured on vintage vinyl, ready to display on a shelf or hang on your wall.
Desert Cacti aesthetics
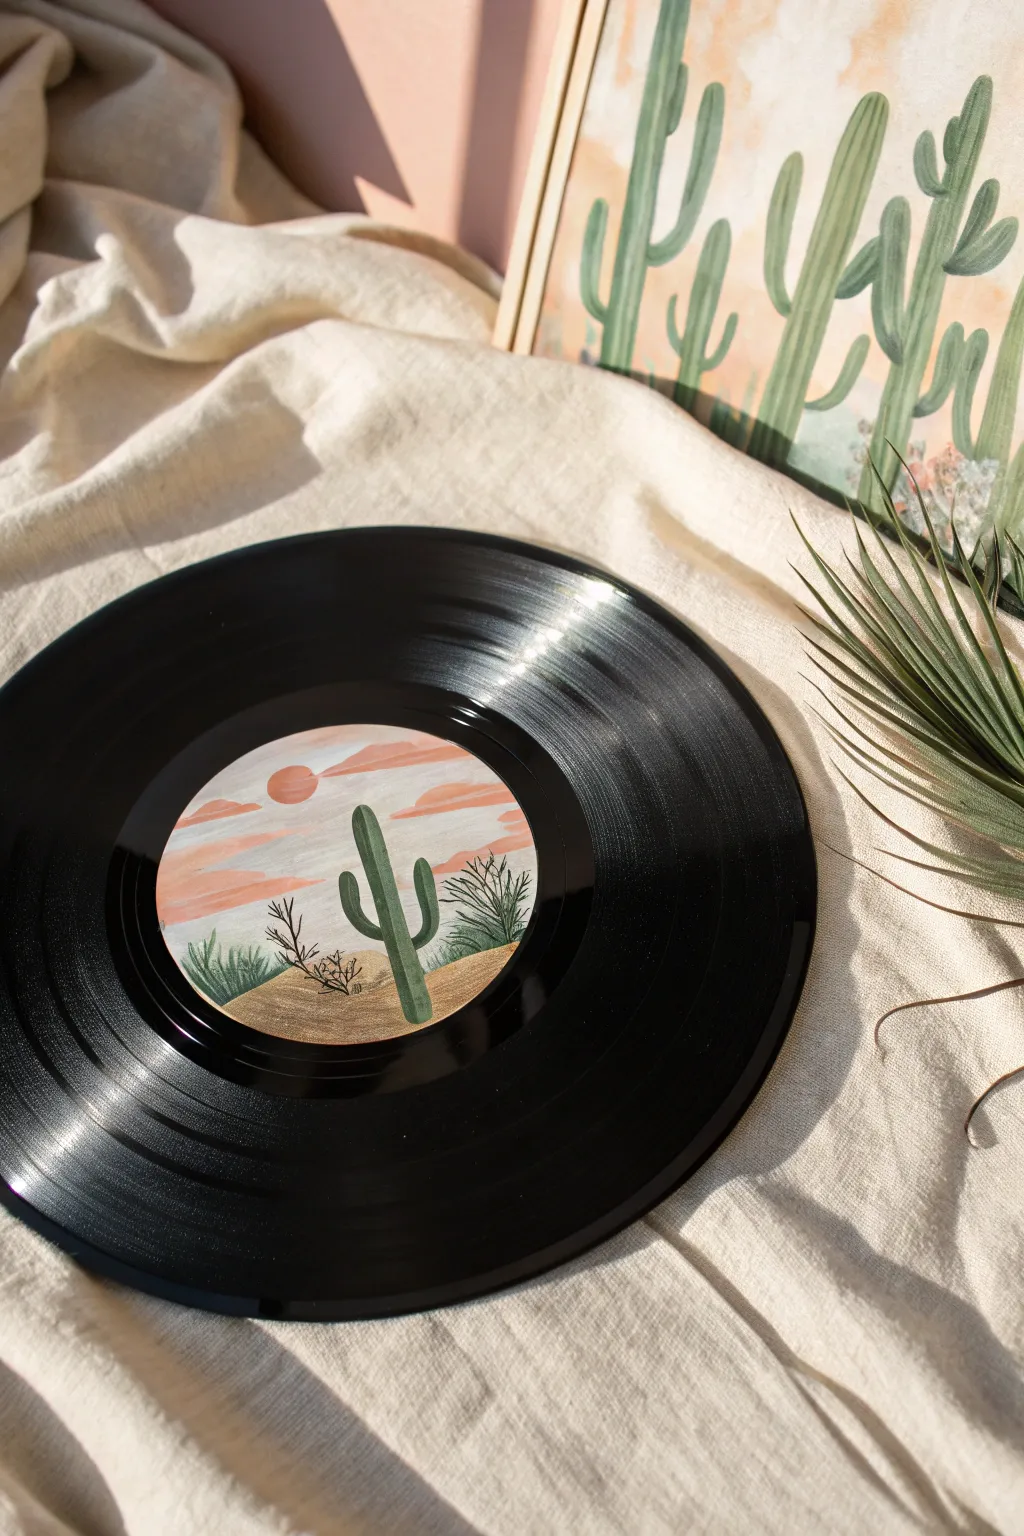
Transform an unplayable record into a stunning piece of boho wall art by reimagining the center label as a miniature canvas. This tutorial guides you through painting a warm, pastel desert scene featuring a saguaro cactus against a sunset sky.
Step-by-Step Guide
Materials
- Vinyl record (check thrift stores)
- White acrylic gesso or primer
- Acrylic paints (pale blue, coral pink, terracotta, sage green, forest green, beige, dark brown)
- Small flat shader brush
- Fine detail liner brush
- Painter’s tape or a circular paper mask
- Matte spray varnish
Step 1: Preparation
-
Clean surface:
Wipe the center label of the record with a slightly damp cloth to remove any dust or oils that might repel the paint. -
Mask the grooves:
Place painter’s tape carefully around the edge of the label to protect the black vinyl grooves. I prefer to cut a hole in a piece of paper the size of the label and tape that down for easier coverage. -
Prime the canvas:
Apply a coat of white gesso or acrylic primer over the entire label. This hides the original text and ensures your pastel colors pop. -
Second coat:
Once the first layer is dry, apply a second coat of white if the original label design is still visible, creating a solid blank canvas.
Paint sliding around?
If the original record label is very glossy, the primer might bead up. Lightly scuff the label with fine-grit sandpaper before priming to give the paint some ‘tooth’ to grip onto.
Step 2: Painting the Sky
-
Sky gradient:
Mix a very pale blue with white. Using your flat brush, paint horizontal strokes across the top third of the circle. -
Horizon fade:
While the blue is still wet, blend in white paint as you move downward, creating a fade that stops just below the center line. -
The sun:
Dip your brush in terracotta orange. Paint a small, solid circle near the upper left quadrant to represent the setting sun. -
Cloud shapes:
Mix a soft coral pink. Using the flat edge of your brush, swipe gentle, horizontal streaks across the sky to form wispy clouds. -
Cloud shadows:
Add a tiny touch of darker pink or orange to the bottom edge of the largest cloud for volume.
Level Up
Mix a tiny pinch of baking soda into your beige paint for the dunes. This creates a gritty, realistic texture that mimics actual sand when it dries!
Step 3: Dunes and Flora
-
Sand dunes:
Mix beige with a drop of warm yellow. Paint two rolling hill shapes at the bottom of the circle, overlapping slightly to show depth. -
Sand texture:
Use a slightly darker shade of beige to add sweeping strokes at the bottom of the dunes, mimicking the shadows of rippled sand. -
Cactus silhouette:
Using a sage green, paint the main vertical column of the cactus, positioning it slightly off-center to the right. -
Cactus arms:
Add the iconic saguaro arms: one reach upward on the left, and a slightly higher one on the right. Keep the edges smooth. -
Dimension:
Switch to your fine liner brush and forest green paint to add thin vertical stripes down the length of the cactus for a ribbed texture. -
Dry brush:
With dark brown paint thinned slightly with water, paint a spindly, leafless shrub to the left of the cactus. -
Review vegetation:
Add tiny upward strokes of green and brown at the base of the cactus and shrub to create the look of desert grass.
Step 4: Finishing Touches
-
Drying time:
Allow the paint to fully cure for at least one hour. Acrylics on paper labels dry quickly, but you don’t want to smudge your hard work. -
Reveal:
Carefully peel away the painter’s tape or paper mask to reveal the crisp edge between your artwork and the black vinyl. -
Seal it:
Spray the artwork with a matte varnish to protect the paint from chipping and to unify the sheen of the different colors.
Now you have a unique piece of retro-modern art ready to display on a shelf or hang on the wall.
Seasonal Gallery Series
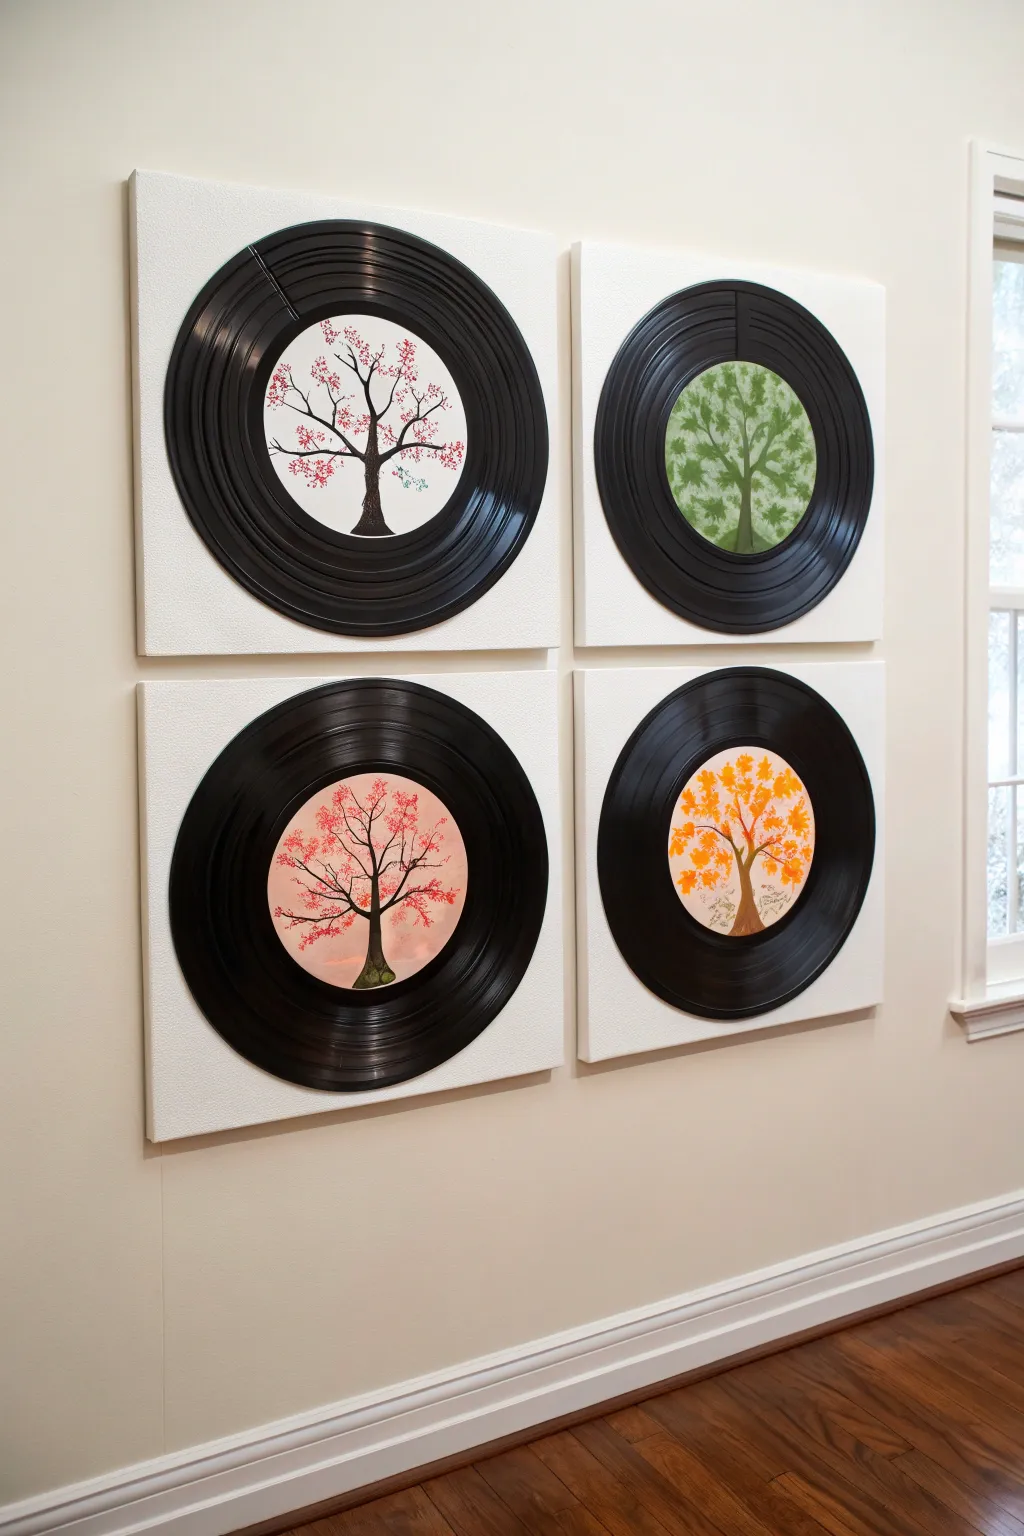
Transform a set of old LPs into a stunning four-seasons gallery wall. This project combines upcycled retro vinyl with acrylic painting techniques to create a meaningful quartet of nature-inspired art.
How-To Guide
Materials
- 4 Vinyl records (12-inch LPs)
- 4 Square canvases (16×16 inches recommended)
- Heavyweight watercolor paper or cardstock
- Acrylic paints (Brown, White, Pink, Green, Orange, Yellow, Red)
- Heavy-duty craft glue (e.g., E6000)
- Scissors and compass (or 4-inch circular object)
- Fine liner brush
- Small sea sponge or stipple brush
- Palette and water cup
Step 1: Preparing the Base
-
Measure and cut:
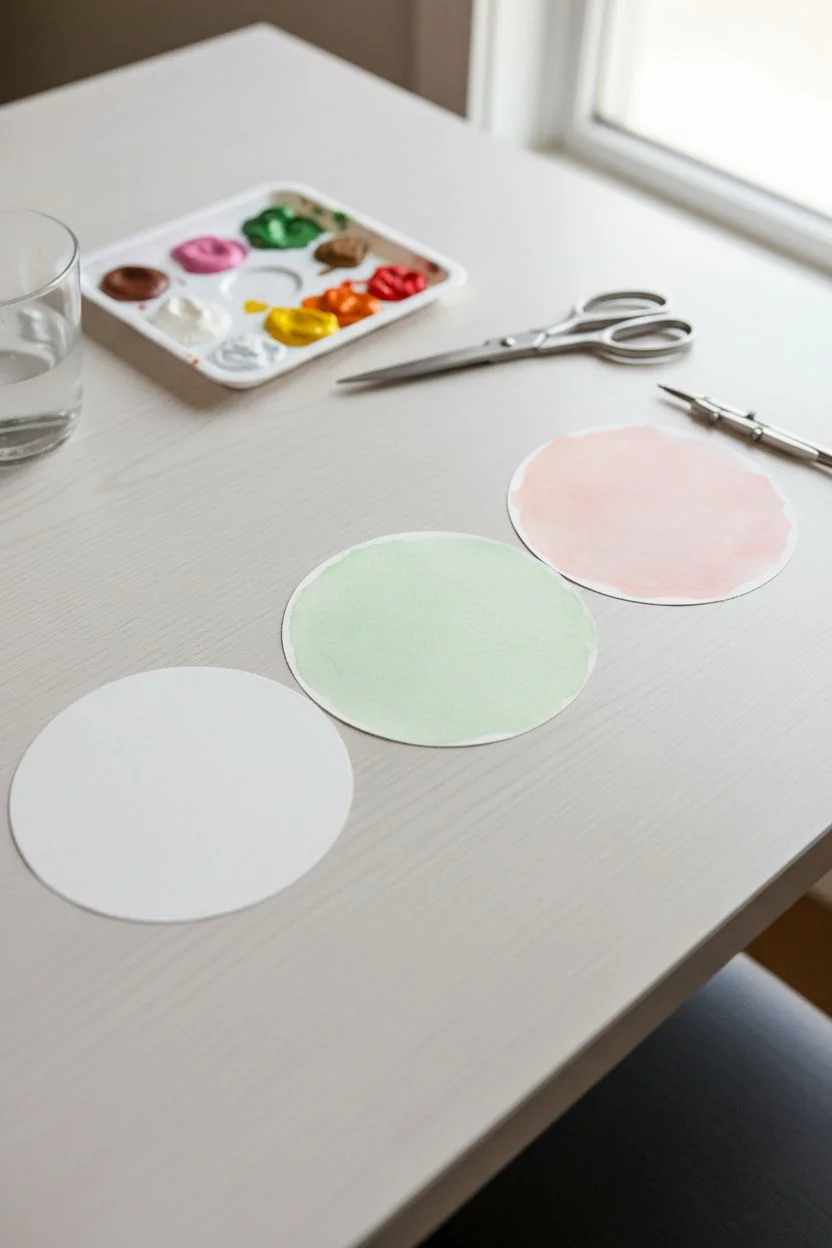
Using a compass or a circular object slightly larger than the record label (usually about 4 inches), trace four circles onto your watercolor paper and cut them out neatly. -
Test fit:
Place the paper circles over the center of your records to ensure they fully cover the label and the spindle hole. Trim any rough edges if necessary. -
Create background washes:
Leave two circles plain white. For the ‘Summer’ circle, paint a diluted wash of light green. For the ‘Sunset’ circle, apply a soft wash of warm pink. Let these dry completely before moving on.
Step 2: Painting the Seasons
-
Outline the trunks:
Mix a dark brown shade using brown and a touch of black. Lightly sketch or freehand a central tree trunk on each paper circle, starting wider at the bottom. -
Paint the structure:
Fill in the trunks with your brown mixture. I like to add a tiny bit of white to one side of the trunk while the paint is wet to create a subtle highlight. -
Branch out:
Switch to your fine liner brush. Extend thin, delicate branches outward and upward from the main trunk, ensuring they taper off at the ends. -
Spring foliage (Top Left):
On one of the white-background circles, use a small brush or cotton swab to dab clusters of bright pink paint onto the branch tips to mimic cherry blossoms. -
Summer foliage (Top Right):
On the green-washed circle, use a sea sponge or stipple brush with a darker leafy green to stamp full, lush foliage around the branches. -
Autumn foliage (Bottom Right):
On the second white-background circle, dab a mix of orange, yellow, and red paints to create a vibrant fall canopy. -
Sunset foliage (Bottom Left):
On the pink-washed circle, use deep red or magenta paint to stipple leaves that contrast against the soft background, creating a moody evening look. -
Allow to cure:
Set all four painted circles aside to dry completely.
Troubleshooting: Warped Paper
If your watercolor circles curl after painting, place them under a heavy book for an hour once they are dry but before gluing. This ensures they sit perfectly flat on the record.
Step 3: Assembly & Mounting
-
Attach the art:
Apply a thin, even layer of glue to the back of each painted paper circle and press them firmly over the center labels of the vinyl records. -
Clean the vinyl:
While the centers dry, wipe down the black vinyl surface with a slightly damp microfiber cloth to remove dust and fingerprints. -
Apply mounting adhesive:
Flip the records over. Apply a strong adhesive like E6000 in a spiral pattern on the back of the record, keeping away from the very edge to prevent oozing. -
Mount to canvas:
Carefully place each record into the center of a square canvas. Measure the distance from the edges to ensure it is perfectly centered. -
Press and set:
Place heavy books on top of the records (using a protective sheet of paper in between) and let them dry overnight to ensure a permanent bond.
Pro Tip: Cotton Swab Texture
For perfectly round blossoms or leaves, bundle 3-4 cotton swabs together with a rubber band. Dip them in paint and stamp on the paper for instant, uniform clusters of foliage.
Now hang your seasonal quartet in a square grid and enjoy the year-round beauty of nature in your home


Have a question or want to share your own experience? I'd love to hear from you in the comments below!