If you’re craving a room that feels bold, dramatic, and a little bit cinematic, red and black paint is such a delicious combo to play with. I’m sharing my favorite red and black room painting ideas—starting with the classics and building into artsy, unexpected twists you can totally make your own.
Classic Red Accent Wall Behind the Bed With Black Trim
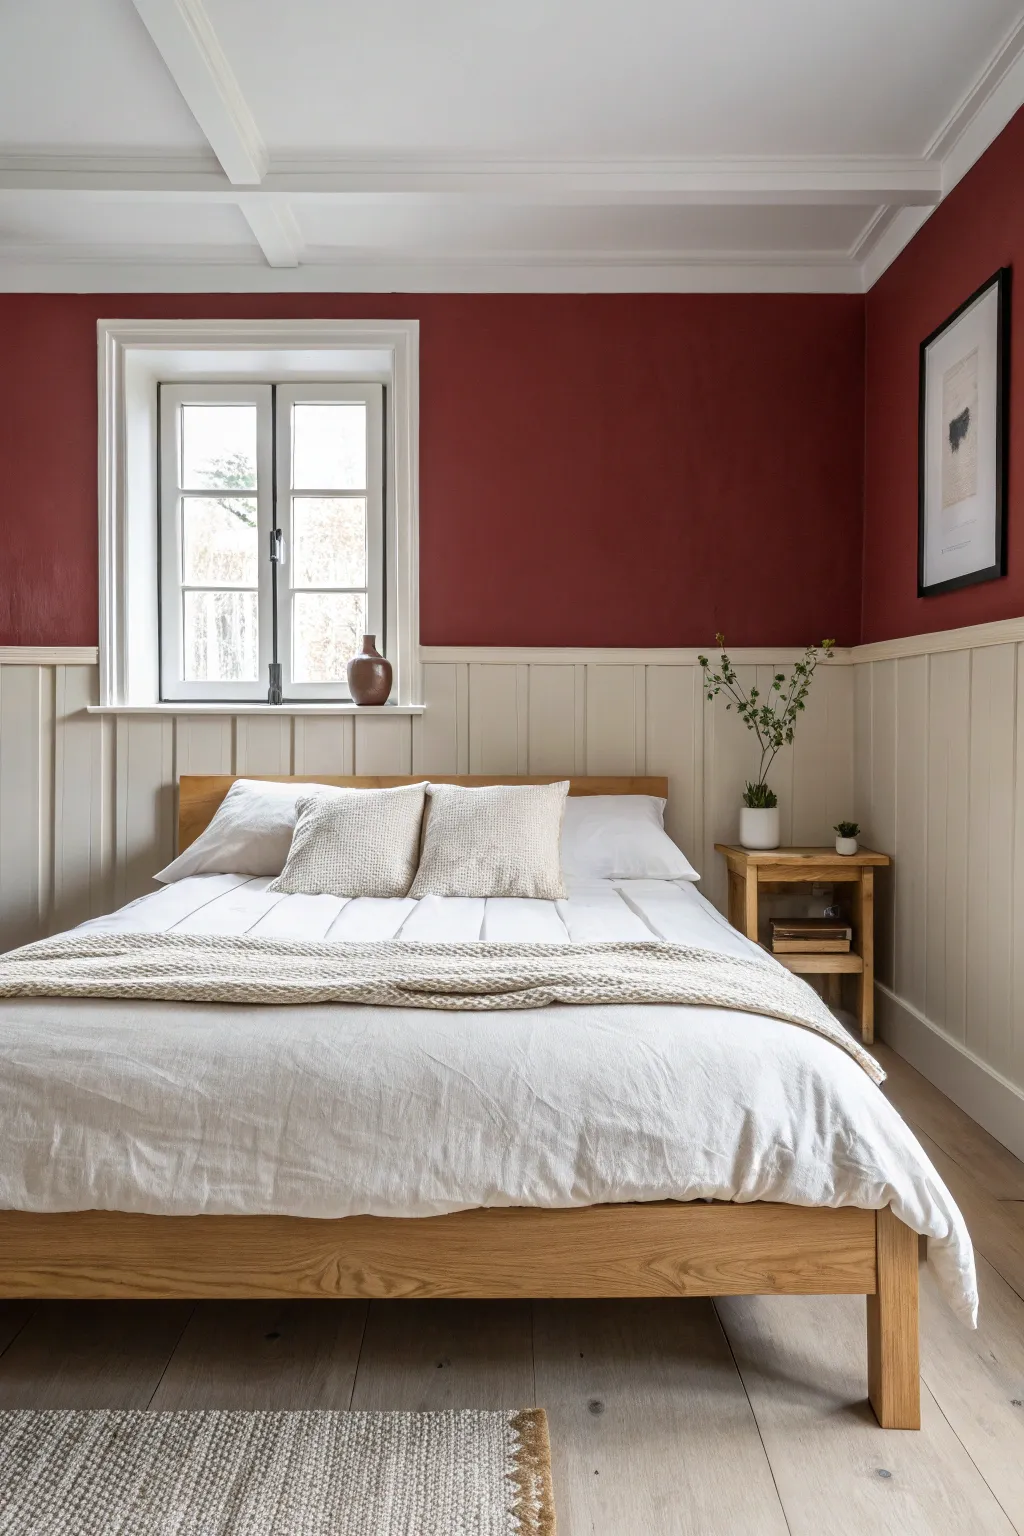
This project transforms a plain bedroom into a cozy retreat by combining deep red upper walls with classic cream tongue-and-groove paneling. The contrast between the rich paint and the light wood tones creates a timeless, grounded atmosphere perfect for relaxation.
How-To Guide
Materials
- Deep red interior wall paint (matte finish)
- Cream or off-white interior wood paint (satin finish)
- Tongue-and-groove wall paneling (wainscoting) boards
- Dado rail molding
- Construction adhesive
- Pin nails and nail gun (or hammer)
- Wood filler
- Sandpaper (120 and 220 grit)
- Painter’s tape
- Paint rollers (medium nap for walls, foam for wood)
- Angled sash brush
- Drop cloths
- Spirit level
- Caulk and caulk gun
Step 1: Preparation & Wall Paneling
-
Clear and Prep:
Clear the room of furniture or move everything to the center and cover with drop cloths. Remove any existing baseboards carefully if you plan to reuse them or replace them with the paneling system. -
Measure and Mark:
Determine the height for your wainscoting. A standard height is about one-third of the wall, or chair-rail height (around 32-36 inches). Use a spirit level and pencil to mark a level line around the room at this height. -
Install Paneling:
Cut your tongue-and-groove boards to the determined height. Apply construction adhesive to the back of the first board and place it in the corner, checking for plumb. Secure it with pin nails through the tongue. -
Continue Installation:
Slot the next board into the groove of the first, apply adhesive, and nail it in place. Continue this process along the wall. I find it helpful to check level every 4-5 boards to ensure I haven’t drifted. -
Add the Top Rail:
Once the vertical boards are installed, measure and cut your dado rail molding. Install it along the top edge of the paneling to create a finished look, securing it with adhesive and nails. -
Fill and Sand:
Fill all nail holes and any gaps in the wood with wood filler. Once dry, sand the filled areas and the entire wood surface with 220-grit sandpaper for a smooth finish. Wipe away dust with a tack cloth.
Step 2: Painting & Finishing
-
Tape Off Areas:
Apply painter’s tape along the top edge of the dado rail to protect it from the red wall paint. Ensure the tape is pressed down firmly to prevent bleed-through. -
Cut In the Red Paint:
Stir your deep red paint thoroughly. Using an angled sash brush, ‘cut in’ around the edges of the upper wall—corners, ceiling line, and along the taped dado rail. -
Roll the Upper Walls:
Use a medium nap roller to apply the red paint to the rest of the upper wall. Work in W-shaped sections for even coverage. Let the first coat dry completely before applying a second coat for full depth of color. -
Prime the Woodwork:
If your paneling is raw wood, apply a high-quality wood primer. Let it dry according to the manufacturer’s instructions. -
Paint the Paneling:
Once the red paint is dry, move your tape to protect the red wall right above the rail (or paint carefully). Apply your cream satin paint to the paneling and baseboards using a foam roller for a smooth, brush-mark-free finish. -
Detail Work:
Use a small brush to get cream paint into the grooves of the paneling if the roller missed spots. Two coats are usually necessary for a durable and opaque finish on the woodwork. -
Caulk for Perfection:
Run a thin bead of finish caulk where the paneling meets the wall (if you haven’t already painted over it) and in corners to seamless seal any gaps. -
Final Reveal:
Remove the painter’s tape slowly while the paint is still slightly tacky to ensure a crisp line. Let the room cure for 24 hours before moving furniture back against the walls.
Uneven Walls?
If your walls are bowed, panels might not sit flush. Use liquid nails generously and temporary bracing to hold panels tight while the glue sets, or scribe the corner pieces.
Add a Picture Rail
For extra classic flair, install a picture rail molding 12 inches below the ceiling. Paint the space above it white to match the ceiling, making the room feel taller.
Enjoy the warmth and architectural character your new bedroom walls bring to your home


Black Feature Wall Behind the Sofa With Red Artwork Zones
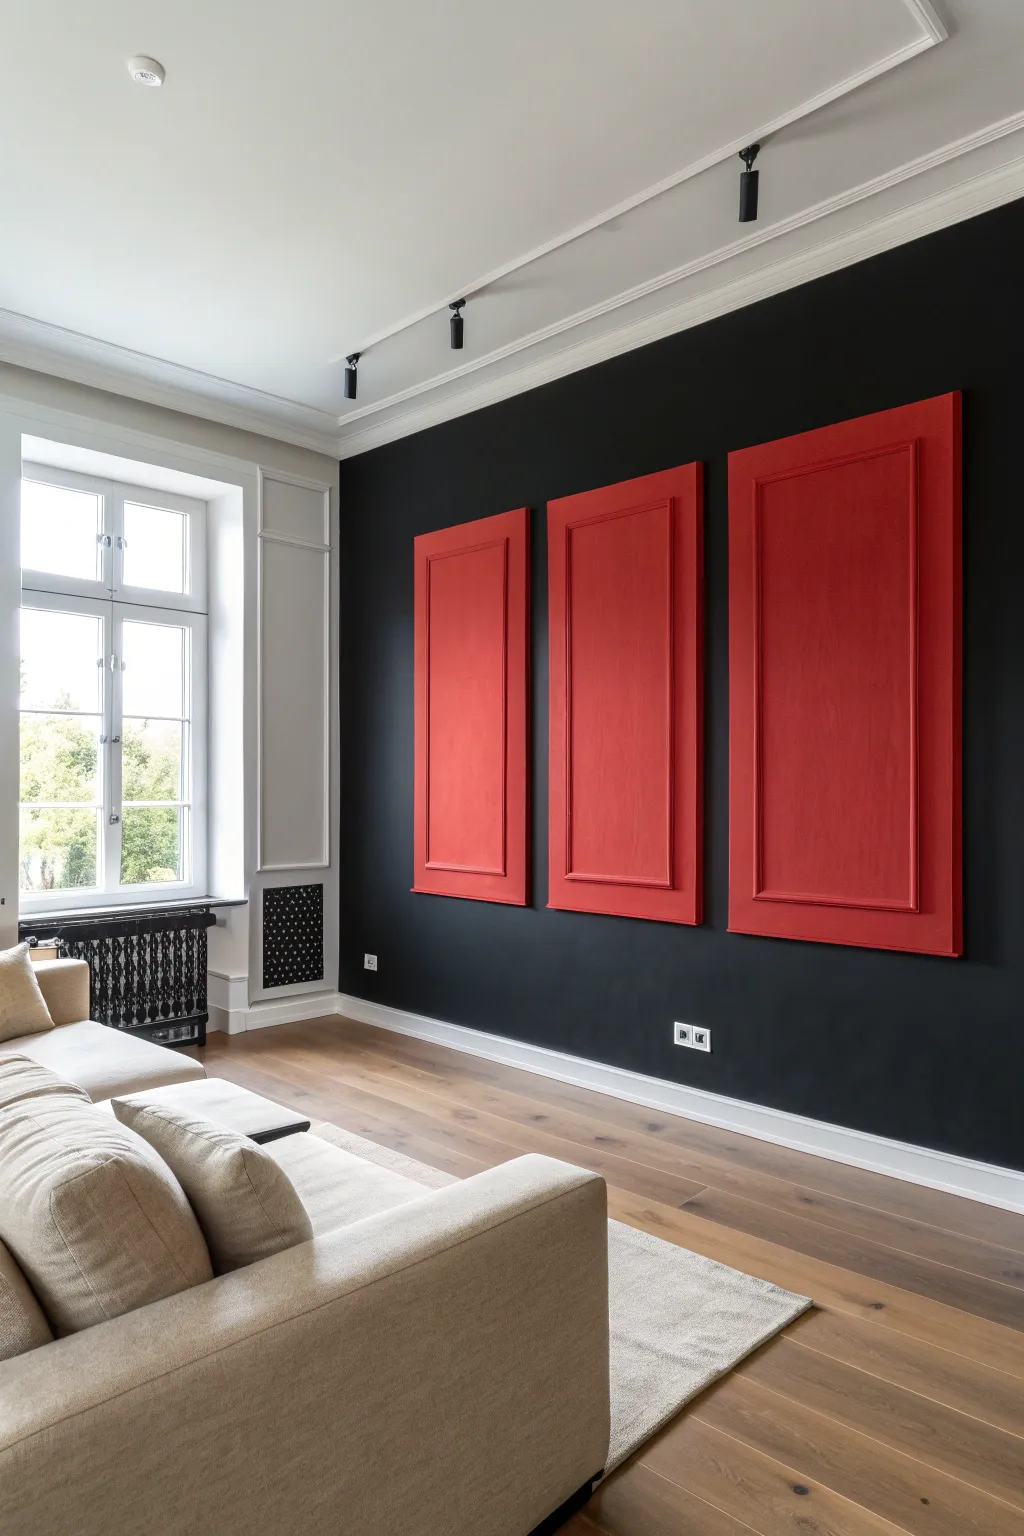
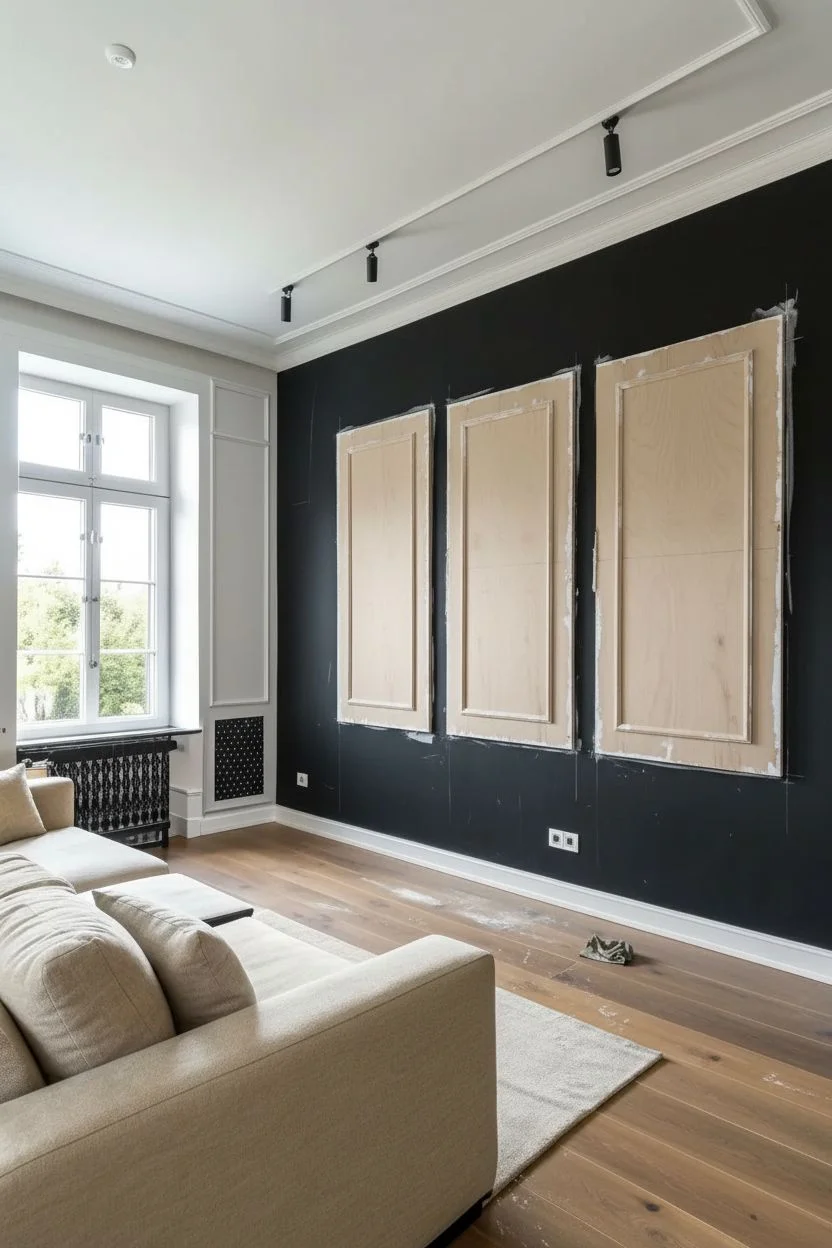
Transform a plain black feature wall into a dramatic modern gallery by crafting these three imposing red relief panels. This project combines simple trim work with bold monochromatic painting to create a high-contrast architectural statement that adds texture and depth to your living space.
Step-by-Step Guide
Materials
- 3 large sheets of 1/2-inch MDF or plywood (size customized to your wall)
- Decorative molding/trim (approx. 2-inch width)
- Wood glue
- Pin nailer or finishing nails
- Sandpaper (medium and fine grit)
- High-adhesion primer (specifically for MDF)
- Matte or eggshell interior paint (Vivid Red)
- Foam paint roller and tray
- Angled sash brush
- Heavy-duty French cleat hanging system (3 sets)
- Level
- Drill and wall anchors
Step 1: Building the Structures
-
Determine dimensions:
Measure your wall space carefully. You want three identical rectangles that fill about 60-70% of the wall’s height. Ensure there is equal spacing between each panel and significantly more space at the top and bottom. -
Cut the base panels:
Using a table saw or circular saw with a guide, cut your three MDF or plywood sheets to the exact dimensions determined in the previous step. Sand the cut edges until they are perfectly smooth. -
Measure the border:
Decide on the margin width for your raised frame. In the reference image, the frame sits about 4 inches inside the outer edge of the panel. Mark this line lightly with a pencil all the way around each board. -
Cut the molding:
Using a miter saw, cut your decorative molding at 45-degree angles to create the picture frame shape. The lengths should correspond to the pencil lines you just drew. -
Attach the molding:
Apply a bead of wood glue to the back of the molding pieces. Position them carefully on your pencil marks. Secure them in place using a pin nailer or small finishing nails to ensure a tight bond while the glue sets. -
Fill the gaps:
Wood filler implies professionalism here. Apply a small amount to the mitered corners of the frame and over any nail holes. Once dry, sand these spots flush so the frame looks like one continuous piece. -
Clean surface:
Wipe down the entire assembly with a tack cloth or slightly damp rag to remove all sawdust before moving on to finishing.
Step 2: Painting and Finishing
-
Prime the MDF:
MDF is very thirsty and soaks up paint quickly. Roll on a coat of high-quality primer, paying special attention to the cut edges of the board. I typically like to let this dry for a full 2-3 hours to ensure a sealed surface. -
Sand the primer:
Once the primer is fully dry, lightly scuff the surface with fine-grit sandpaper. This knocks down any raised grain and ensures the smoothest possible topcoat. -
Cut in the details:
Using an angled sash brush and your vivid red paint, carefully paint the intricate areas first. This includes the sides of the molding and the interior corners where the molding meets the flat panel. -
Roll the flat surfaces:
Use a foam roller for the large flat areas—both inside the frame and the outer border. A foam roller eliminates brush strokes and provides that manufactured, flawless matte finish seen in the photo. -
Apply second coat:
Red pigment is notoriously translucent. You will likely need a second, and possibly a third, coat to achieve that deep, opaque saturation. Allow ample drying time between layers. -
Install hanging hardware:
Flip the dried panels over. Attach the upper half of a heavy-duty French cleat system to the back of each panel, ensuring it is centered and level. -
Mount wall cleats:
Measure and mark the wall locations for the corresponding wall-side cleats. Use a long level to ensure all three are perfectly aligned horizontally. -
Hang the art:
Lift the panels onto the wall cleats. The French cleat system allows you to slide them left or right slightly to get the spacing between them exactly even.
Pro Tip: Edge Sealing
For ultra-smooth MDF edges that don’t look fuzzy when painted, apply a thin layer of drywall compound or wood glue to the cut edges and sand it off before priming.
Level Up: Texture
Before painting, wrap the center rectangle (inside the frame) with acoustical fabric or linen. This adds softness and sound-dampening qualities to the room.
Step back and admire how the fierce red geometry pops against the black background to create a sophisticated focal point


Balanced Red and Black Two-Tone Wall With a Chair-Rail Split
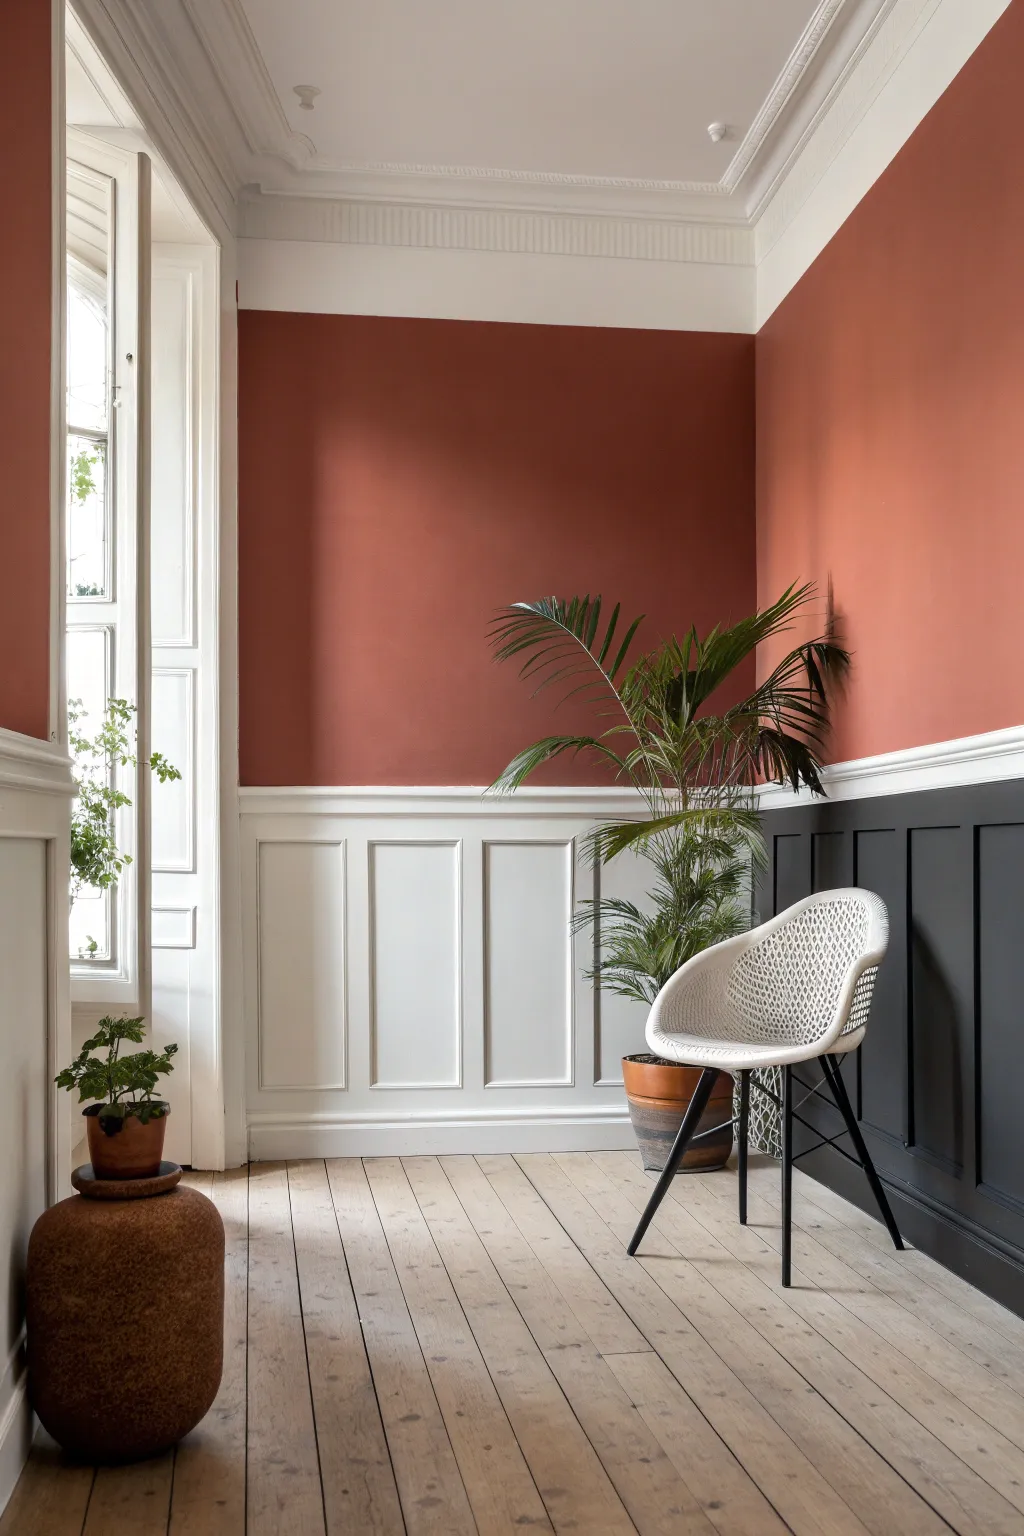

Transform a plain room into a sophisticated space by combining warm, earthy terra cotta tones above with grounding charcoal black paneling below. This tutorial guides you through installing classic wainscoting and achieving a crisp, two-tone paint finish that balances modern drama with traditional elegance.
How-To Guide
Materials
- Interior latex paint (Terra Cotta/Burnt Orange matte finish)
- Interior latex paint (Charcoal/Soft Black satin finish)
- Interior latex paint (Crisp White semi-gloss finish)
- Pre-primed wainscoting panels or trim molding kit
- Chair rail molding
- Baseboard molding (if not reusing existing)
- Painter’s tape (high quality)
- Drop cloths
- Spackle or wood filler
- Caulk and chaulk gun
- Sandpaper (120 and 220 grit)
- Paint rollers (microfiber) and tray
- Angled sash brush (2-inch)
- Level (laser or spirit)
- Measuring tape
- Hammer and finish nails or nail gun
Step 1: Preparation & Wall Division
-
Clear and clean:
Begin by removing all furniture, outlet covers, and existing baseboards from the room. Wipe down the walls with a damp cloth and mild detergent to remove dust and oils, ensuring a clean surface for adhesion. -
Measure the split:
Decide on the height of your chair rail. A classic rule of thumb is one-third of the wall’s total height, usually between 32 and 36 inches from the floor. Use your measuring tape to mark this height at several points around the room. -
Draw the line:
Using a laser level or a long spirit level, connect your marks to draw a continuous horizontal pencil line around the entire room. This line will act as the guide for the top of your wainscoting and the bottom of your bold upper color.
Step 2: Installing the Wainscoting
-
Plan the layout:
Before nailing anything, determine the spacing of your vertical stiles and boxes. I find it helpful to sketch the wall on paper first so you don’t end up with awkward, skinny boxes in the corners. -
Install the framework:
Attach the horizontal rails first, aligning the top rail with your pencil line. Secure them to the studs using a nail gun or hammer and finish nails. -
Add vertical stiles:
Cut your vertical trim pieces to fit snugly between the top rail and the floor (or bottom rail). Install them according to your layout plan, using a level to ensure each piece is perfectly plumb. -
Mount the chair rail:
Place the decorative chair rail molding on top of the upper horizontal board. This cap piece provides a finished look and covers the transition between the paneling and the drywall above. -
Fill and seamless:
Use wood filler to cover all nail holes and joints. Once dry, sand these spots smooth. Run a bead of paintable caulk along every seam where wood meets wall or wood meets wood to create a seamless, built-in appearance.
Clean Lines Pro Tip
To prevent paint bleed under tape, seal the tape edge with a thin layer of the *base* color first (e.g., white primer) before applying your bold top coat.
Step 3: Painting the Upper Wall
-
Tape the transition:
Apply painter’s tape along the top edge of your newly installed chair rail to protect it from the upper wall color. Press the tape edge down firmly. -
Cut in the edges:
Using your angled sash brush and the terra cotta paint, carefully cut in along the ceiling line, corners, and just above the taped chair rail. -
Roll on the color:
Load your roller with the terra cotta paint. Apply it to the upper wall sections using a ‘W’ pattern to distribute the paint evenly, then smooth it out with vertical strokes. Two coats are usually best for this rich depth of color. -
Remove tape:
While the second coat is still slightly tacky, gently peel off the painter’s tape from the chair rail to ensure a sharp, clean line without peeling any dried paint.
Level Up: Texture
For a richer look, consider using a lime wash or chalk-finish paint for the upper terra cotta section. The subtle texture adds an old-world plaster effect.
Step 4: Painting the Lower Section
-
Protect the floor:
Ensure your drop cloths are pushed right up to the baseboards. If you’re nervous about the floor, tape paper or plastic sheeting directly to the floor edge. -
Choose your finish:
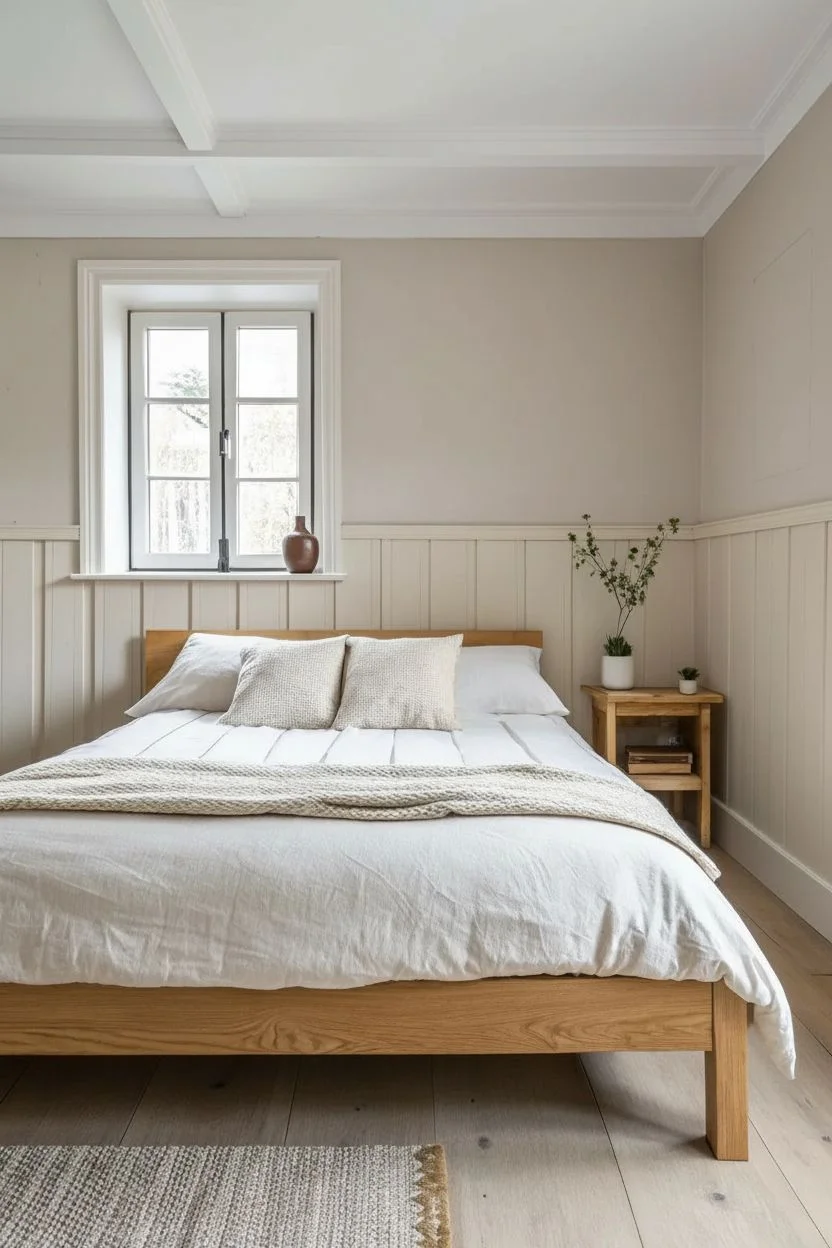
For the lower section, decide on your contrast. As seen in the inspiration, one wall features the dark charcoal paneling while the adjacent wall keeps the woodwork crisp white. -
Paint the white woodwork:
On the walls destined for white wainscoting, use a high-quality semi-gloss trim paint. Brush inside the recessed panels first, then the stiles and rails. Watch for drips in the corners of the molding. -
Apply the charcoal:
For the accent wall section, switch to your charcoal or soft black paint. Use a brush for the detailed molding areas and a small foam roller for the flat panels to get a smooth, factory-like finish. -
Final touches:
Check for any uneven spots or missed crevices in the molding. A final light touch-up with a small artist’s brush can fix tiny imperfections.
Step back and enjoy how the rich colors and architectural details instantly elevate the character of your room


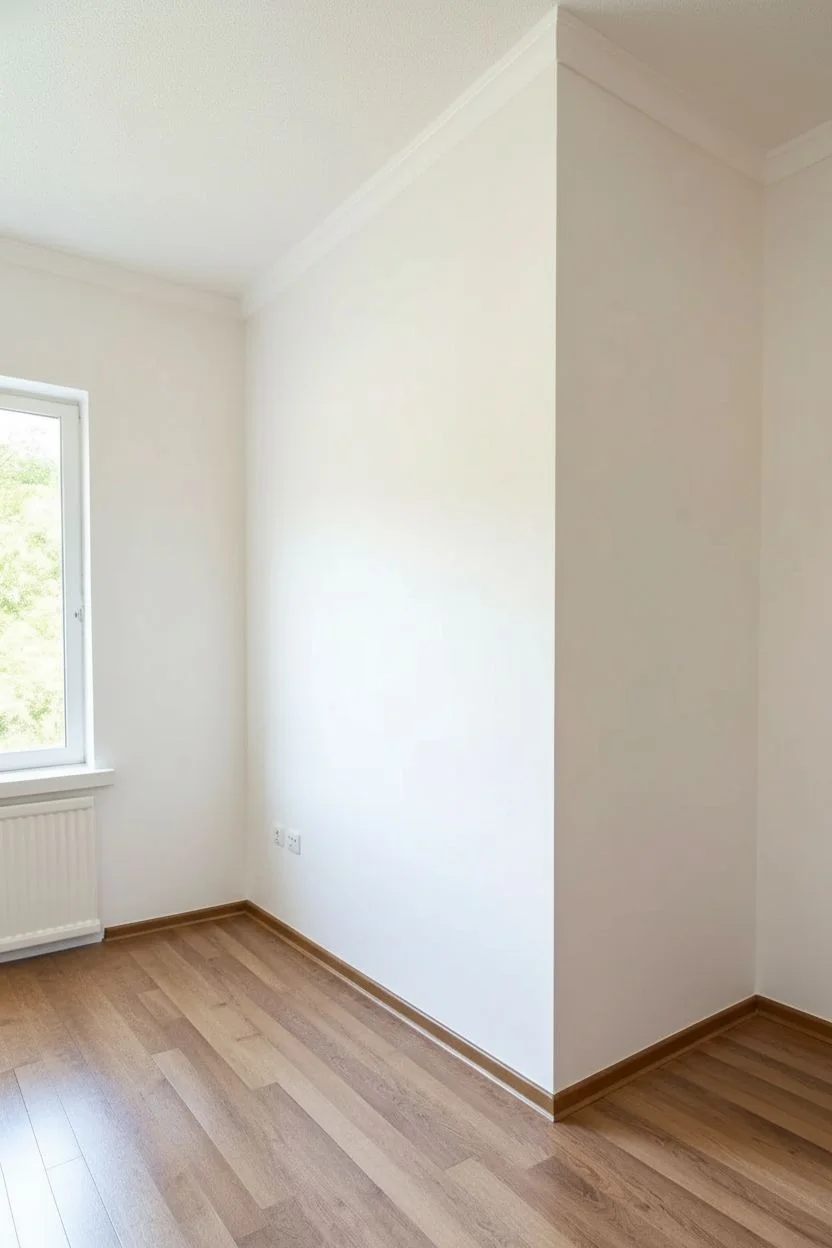
Modern Red and Black Color Blocking to Zone a Corner
Transform a plain corner into a dynamic workspace or dressing area using bold color blocking. By combining a vibrant fire-engine red with stark black horizontal stripes, you create an instant focal point that visually alters the room’s architecture.
Step-by-Step Tutorial
Materials
- High-quality painter’s tape (multi-surface)
- Laser level or carpenter’s level
- Pencil
- Sanding block (fine grit)
- Primer (tinted gray recommended)
- Interior latex paint: Matte bright red
- Interior latex paint: Matte or satin black
- Angled sash brush (2-inch)
- Microfiber paint roller covers (3/8 inch nap)
- Paint tray and liners
- Drop cloths
- Step ladder
Step 1: Preparation & Base Coat
-
Clear and Clean:
Remove all furniture, switch plates, and outlet covers from the wall area. Wipe the wall down with a damp cloth to remove dust and let it dry completely. -
Inspect and Repair:
Check the surface for any holes or bumps. Fill holes with spackle and lightly sand any rough patches to ensure a flawless finish for the bold colors. -
Protect Surfaces:
Lay down drop cloths to cover the flooring. Since red and black are highly pigmented, drips are harder to clean, so be thorough with your floor protection. -
Tape Edges:
Apply painter’s tape along the ceiling line, the adjacent white wall, and the baseboards. Press the tape edges down firmly with a putty knife or credit card to prevent bleed-through. -
Prime the Surface:
Roll on a coat of primer. I highly recommend using a gray-tinted primer rather than white, as it helps the deep red topcoat achieve true opacity much faster.
Bleeding Lines?
If paint bled under the tape despite sealing, wait for it to fully cure. Retape the stripe line precisely, then use a tiny artist’s brush to touch up the error with the background color.
Step 2: The Red Foundation
-
Cut In the Red:
Using the angled sash brush, carefully paint the red color along the taped edges of the ceiling, corners, and baseboards. -
Roll the First Coat:
Use a roller to fill in the main wall area with the red paint. Work in ‘W’ shapes to distribute paint evenly, then smooth it out with vertical strokes. -
Dry and Repeat:
Allow the first coat to dry according to the manufacturer’s instructions (usually 4 hours). Red often requires two or even three coats for full saturation, so apply additional coats until the color is rich and solid. -
Full Cure:
Let the final red coat cure for at least 24-48 hours. This is crucial—if you apply tape for stripes too soon, you risk peeling off the fresh red paint.
Step 3: Adding the Black Stripes
-
Measure the Stripes:
Decide on the placement of your two horizontal stripes. Measure from the floor up to mark the bottom and top of each stripe with a pencil. -
Level Lines:
Use a laser level or a long carpenter’s level to lightly draw horizontal pencil lines across the entire red wall connecting your marks. -
Tape the Stripes:
Apply painter’s tape along the *outside* of your pencil lines (so the stripe area remains exposed). Press the edges down firmly. -
Seal the Tape:
Brush a very thin layer of the *red* paint over the edge of the tape that touches the future stripe. This seals the tape and ensures that if any paint bleeds under, it matches the background, keeping your line crisp. -
Paint the Stripes Black:
Once the seal is dry, paint the exposed stripe areas with black paint. Use a small roller for smoother texture or a brush for precision. -
Second Black Coat:
Apply a second coat of black once the first is dry to the touch to ensure solid coverage without streaks. -
Reveal the Design:
While the final black coat is still slightly tacky (not fully dry), carefully peel away the painter’s tape at a 45-degree angle. This prevents the dried paint film from ripping.
Pro Tip: Sheen Choice
Consider using a satin finish for the black stripes against a matte red wall. The slight difference in light reflection adds a subtle, high-end texture to the graphic look.
Step back and admire how this bold geometric accent instantly defines the space and adds architectural interest to your room
BRUSH GUIDE
The Right Brush for Every Stroke
From clean lines to bold texture — master brush choice, stroke control, and essential techniques.
Explore the Full Guide
Sharp Red and Black Diagonal Stripe Statement Wall
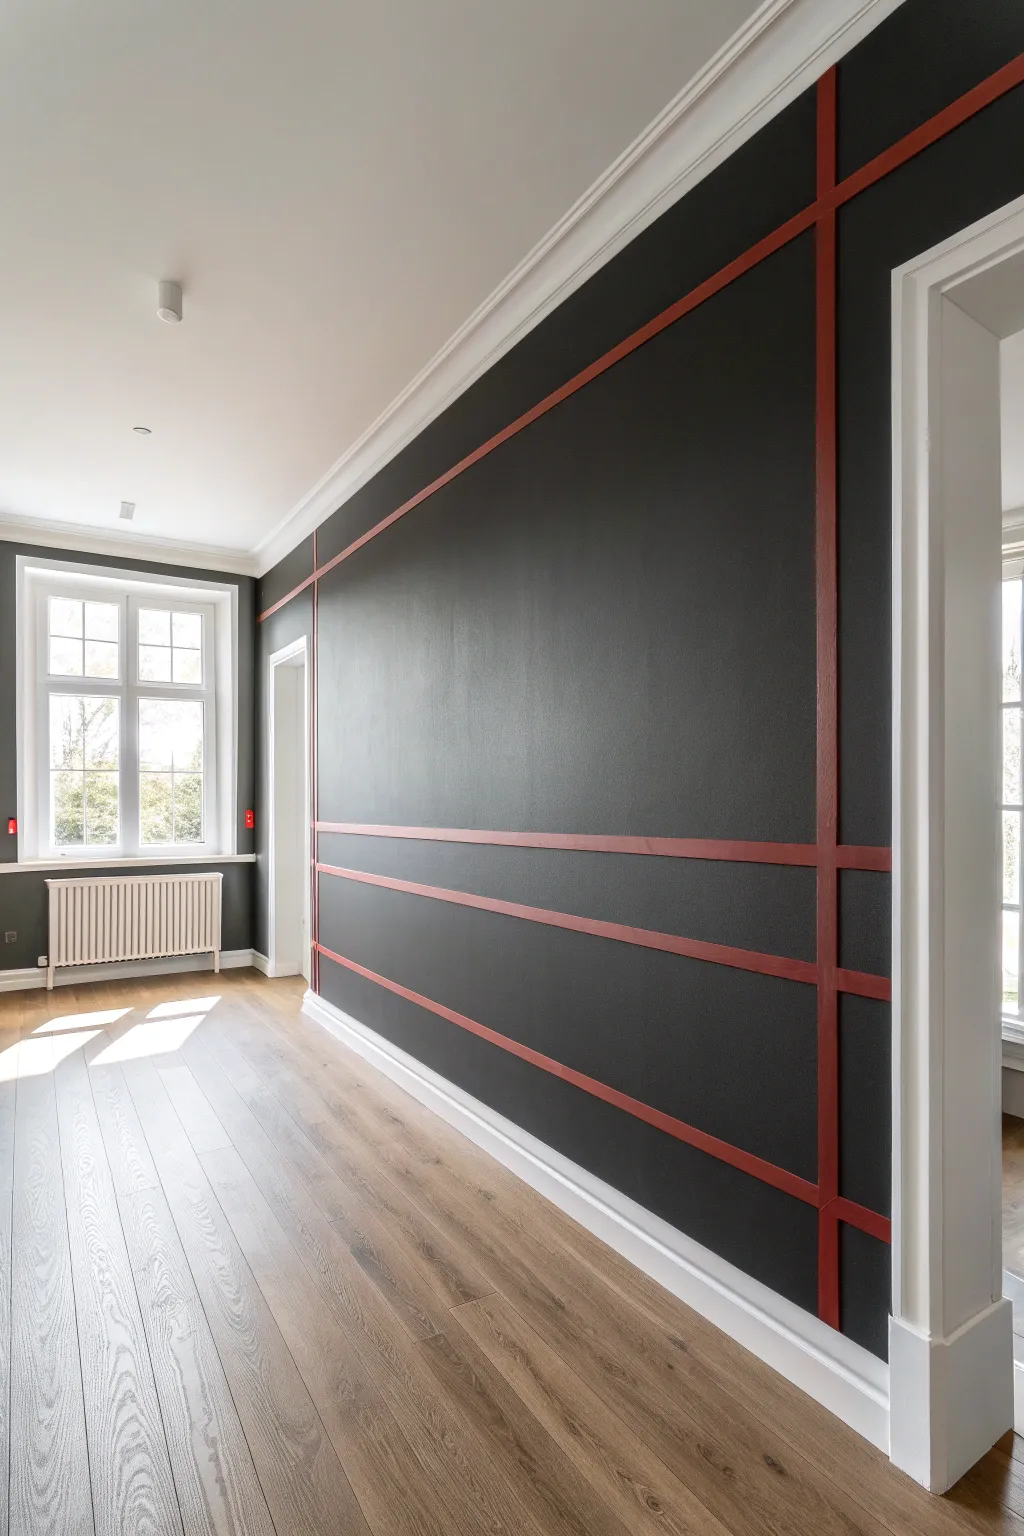
Transform a plain hallway or feature wall into a modern architectural masterpiece with this bold contrast design. By combining deep charcoal paint with vibrant red accent lines, you create a sophisticated grid structure that adds instant depth and character.
Step-by-Step
Materials
- Matte or eggshell black/charcoal interior paint
- High-quality red painter’s tape or red washi tape (approx 1-inch width)
- White or light gray primer (optional, for dark coverage)
- Painter’s tape (standard blue or green)
- Paint roller and tray
- Roller extension pole
- Angled sash brush (2.5 inch)
- Level (laser level highly recommended)
- Measuring tape
- Pencil
- Drop cloths
- Red semi-gloss paint (optional, if painting the stripes instead of using tape)
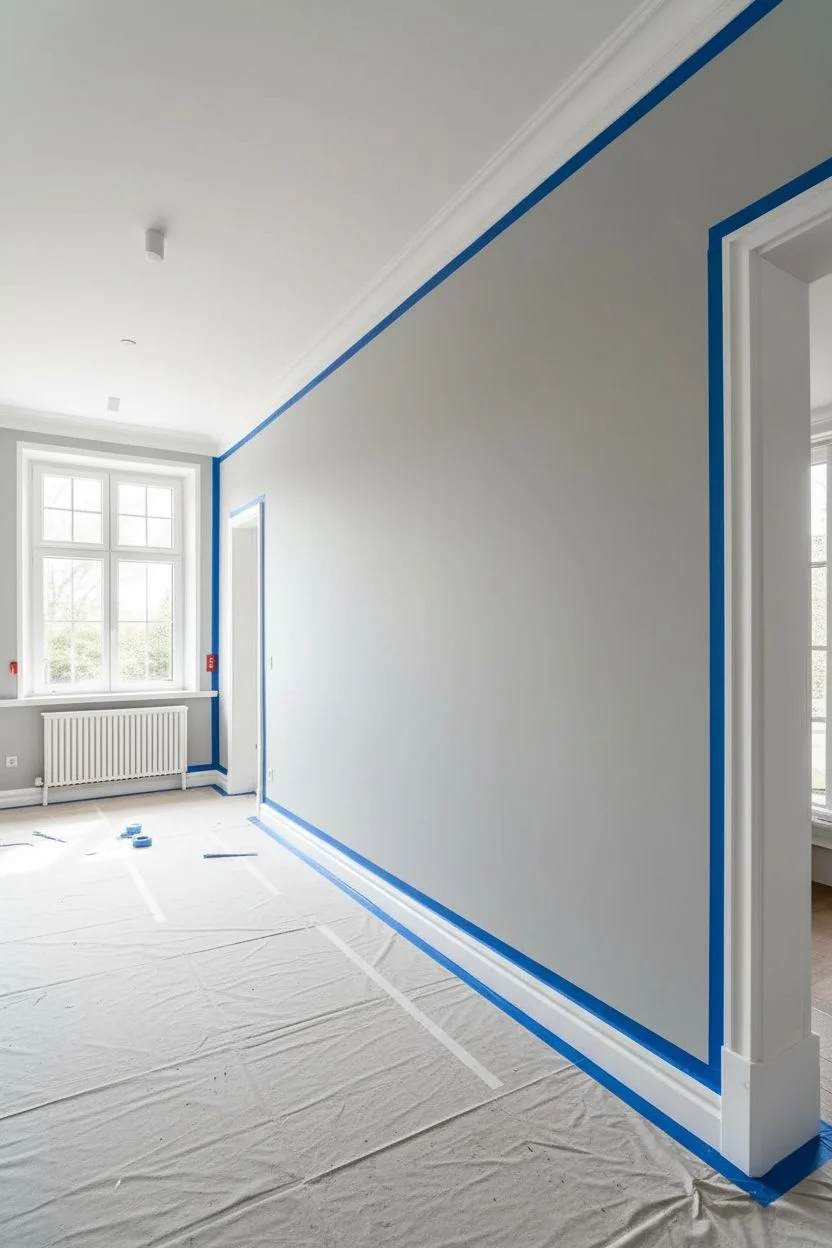
Step 1: Preparation & Base Coat
-
Clear the Area:
Begin by removing any wall art, outlet covers, or switch plates from the wall. Lay down drop cloths to protect that beautiful light wood flooring from dark paint splatters. -
Tape Off Boundaries:
Apply your standard blue painter’s tape along the ceiling molding, baseboards, and any door frames. Press down firmly on the edges to ensure a crisp line where the white trim meets your future black wall. -
Prime the Surface:
Since you are applying a very dark color, a tinted gray primer works best to reduce the number of coats needed. Roll on a layer of primer and let it dry completely according to the can’s instructions.
Seal the Deal
To prevent paint bleed under the tape, brush a tiny amount of your base color (or clear matte medium) over the tape edge before applying the black paint.
Step 2: Creating the Grid
-
Measure Your Layout:
Decide on the placement of your red lines. In the reference, there is a large central rectangular area defined by vertical and horizontal lines. Use a measuring tape to mark small pencil dots where your lines will intersect. -
Set Up the Laser Level:
Set up a laser level on a tripod. This is the secret to getting those long lines perfectly straight across a wide wall. Align the laser with your pencil marks. -
Apply the Red Tape:
Carefully unroll your red tape along the laser line. If you are using red architectural tape or washi tape as the final finish (the easiest method), apply it directly to the primed wall. Smooth it down firmly. -
Alternative: Paint the Stripes:
If you prefer painted stripes over tape, first paint the stripe areas red. Let them dry, then place painter’s tape *over* the red lines where you want the final stripes to be. This masks the red so it remains after you paint the black.
Go 3D
For a more tactile, high-end look, use thin wood molding strips painted red instead of tape. Nail them up after the black wall is fully dry.
Step 3: Applying the Charcoal
-
Cut In the Edges:
Dip your angled sash brush into the black paint. Carefully cut in around the ceiling, baseboards, and door frames properly. I like to do this first so the roller can blend the brush marks later. -
Paint Around the Tape:
Using the brush again, gently paint around your red tape lines (or masking tape). Don’t soak the tape; just ensure the area right next to it is covered. -
Roll the First Coat:
Load your roller with black paint. Apply the first coat using a ‘W’ motion to distribute the paint evenly. Cover the large open spaces between your grid lines. -
Dry and Assess:
Let the first coat dry for at least 4 hours. Dark colors often look patchy after one coat, so don’t worry if it’s not solid yet. -
Apply Second Coat:
Roll on a second coat of black paint. This should provide that rich, opaque finish seen in the photo. Watch for drips near the tape lines.
Step 4: The Reveal
-
Remove Boundary Tape:
While the paint is still slightly tacky (not fully cured), carefully peel away the tape from the ceiling and baseboards at a 45-degree angle. -
Reveal the Stripes (If Painted):
If you used the masking method with red paint underneath, peel away the tape now to reveal the sharp red lines beneath the black field. -
Clean Up Edges:
Inspect your red lines. If any black paint bled onto your red tape (or into the red painted line), use a tiny artist’s brush for touch-ups. A steady hand is key here. -
Final Inspection:
Check the wall from different angles to ensure the sheen is consistent. Once fully dry, replace your outlet covers.
Step back and admire how the sharp red geometry cuts through the darkness to create a truly modern atmosphere
Red and Black Geometric Grid for a Clean, Graphic Vibe
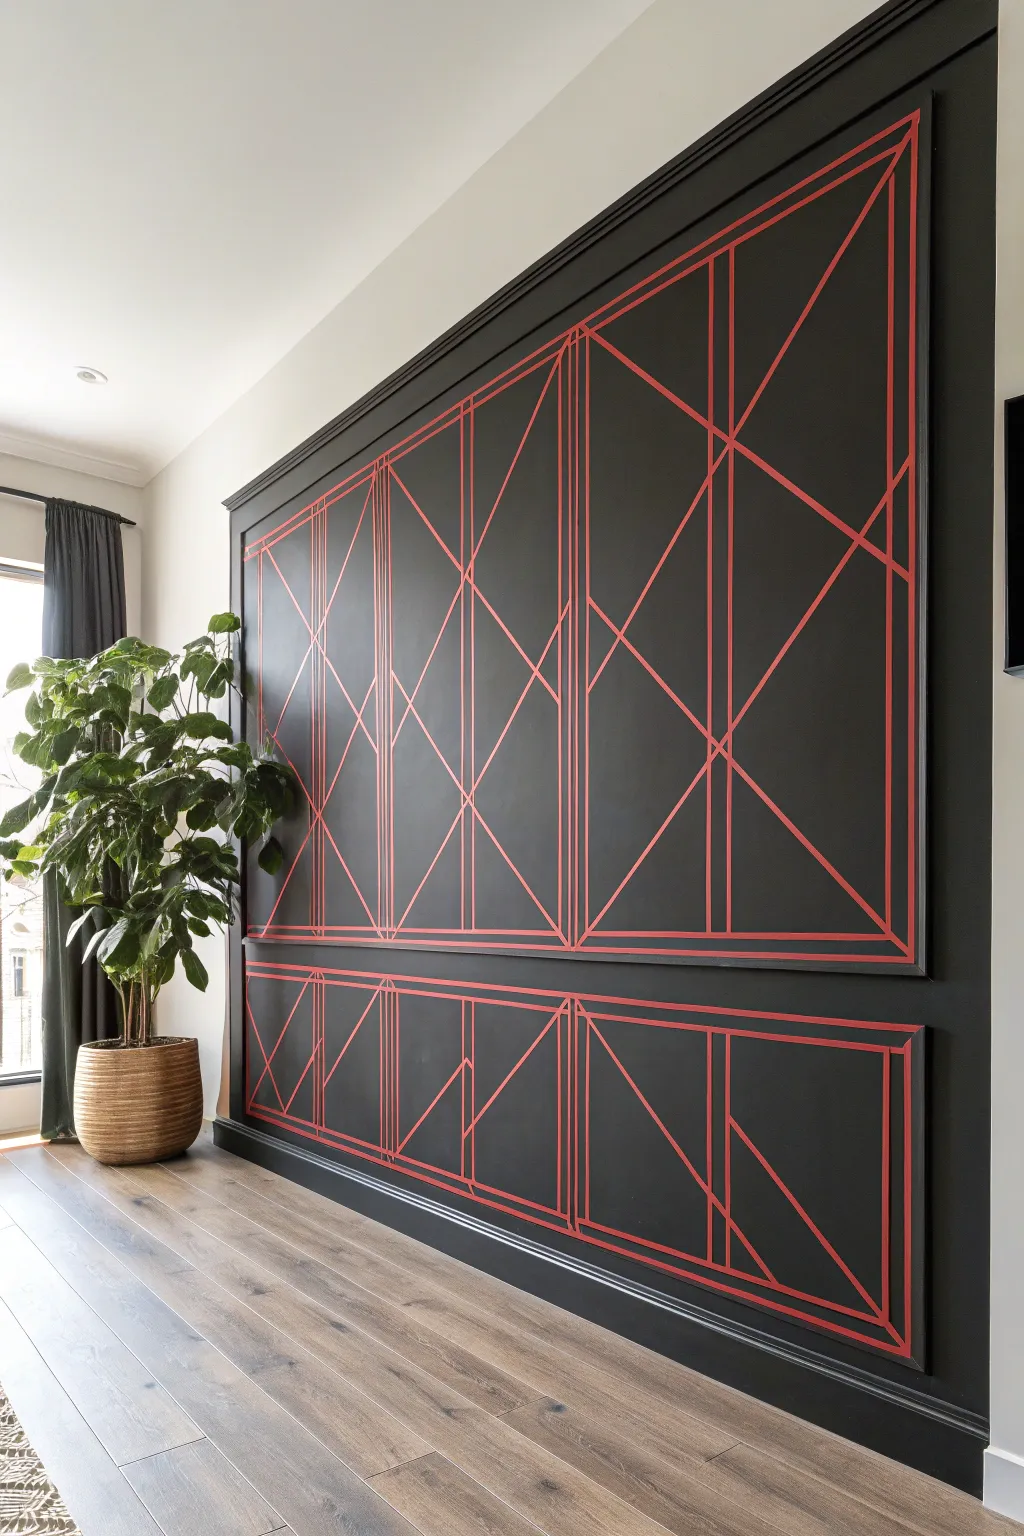
Transform a plain wall into a modern artwork using high-contrast colors and crisp geometric lines. This project combines traditional wainscoting techniques with a bold, graphic tape or paint design to create a sophisticated focal point.
Step-by-Step Tutorial
Materials
- Dark charcoal or matte black interior paint
- Bright red painter’s tape (0.25 inch width) OR red semi-gloss paint and red masking tape
- Wood molding trim (for outer frames)
- Miter saw
- Nail gun and finishing nails
- Wood filler and sandpaper
- Laser level
- Measuring tape and pencil
- Paint rollers and angled brushes
- Primer (if covering a light wall)
Step 1: Base Preparation
-
Assess and clean:
Begin by cleaning your wall surface thoroughly with a damp cloth to remove dust and oils. If your wall has shiny paint, give it a light sanding to help the new dark paint adhere better. -
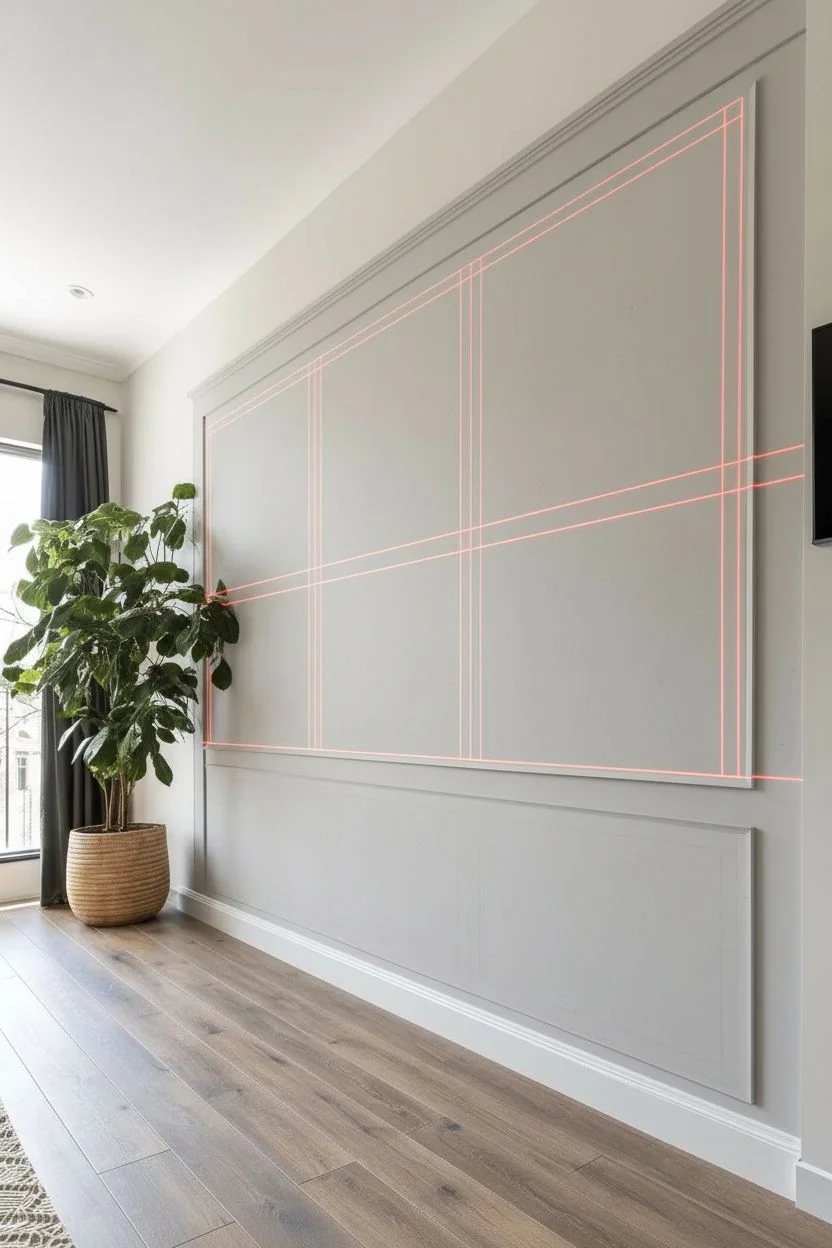
Measure the layout:
Using a tape measure, determine the dimensions of your large upper panel and the smaller lower wainscoting panel. Mark the corners lightly with a pencil. -
Establish level lines:
Set up a laser level to project horizontal and vertical guides. This step is crucial because black paint hides imperfections poorly, but it highlights crooked lines.
Bleed-Through Blues?
If using paint for lines: Always ‘seal’ your masking tape by painting over the edge with your BASE wall color first. This blocks gaps so the red line comes out razor sharp.
Step 2: Creating the Framework
-
Cut the molding:
Using a miter saw, cut your wood molding strips at 45-degree angles to create the frames for your upper and lower boxes. Measure twice to ensure the opposite sides are perfectly equal. -
Install the trim:
Attach the molding to the wall using a nail gun, following your laser level lines. I verify the level one last time before sinking the nails to avoid any slanting. -
Fill and sand:
Fill the nail holes and any gaps in the mitered corners with wood filler. Once dry, sand these spots smooth so the frame looks seamless. -
Caulk the edges:
Run a thin bead of paintable caulk along the inside and outside edges where the wood meets the wall to eliminate gaps.
Step 3: Painting the Canvas
-
Prime the surface:
Apply a coat of tinted primer to the wall and the wood molding. A grey-tinted primer works best here to help the black topcoat achieve full opacity. -
Apply the dark coat:
Roll on your charcoal or matte black paint. Use an angled brush to get into the crevices of the molding first, then roll the flat surfaces. Two coats are usually necessary for a rich, deep finish. -
Allow ample drying time:
Let the black paint cure for at least 48 hours. This is vital; if the paint is even slightly soft, the tape used in the next step might peel it off.
Gloss It Up
For a subtle, high-end look, use matte black for the wall and high-gloss black for the molding trim. The texture difference adds depth before you even add the red lines.
Step 4: Applying the Geometric Design
-
Plan the grid:
Sketch your geometric pattern on paper first. The design relies on vertical ‘pillars’ intersected by diagonal X-shapes and angled lines. -
Mark anchor points:
Using a chalk line or very light pencil marks, indicate where the main vertical lines and the diagonal intersections should land within the black frames. -
Apply vertical lines:
Apply your bright red graphical tape (or masking tape if painting stripes) vertically first. Ensure these are perfectly plumb. -
Add diagonals:
Apply the diagonal tape strips, cutting the ends with a craft knife where they intersect with vertical lines to keep the joints sharp and clean. -
Seal or Paint (Option A: Tape):
If using decorative vinyl tape as the final finish, press down firmly on all edges with a credit card to ensure adhesion. -
Seal or Paint (Option B: Paint):
If painting the lines, apply a thin layer of the black base paint over the tape edges first to seal them. Once dry, brush on your bright red paint, let dry, and peel the tape for crisp lines.
Step back and admire how the vibrant red lines visually pop against the deep, moody background

PENCIL GUIDE
Understanding Pencil Grades from H to B
From first sketch to finished drawing — learn pencil grades, line control, and shading techniques.
Explore the Full Guide
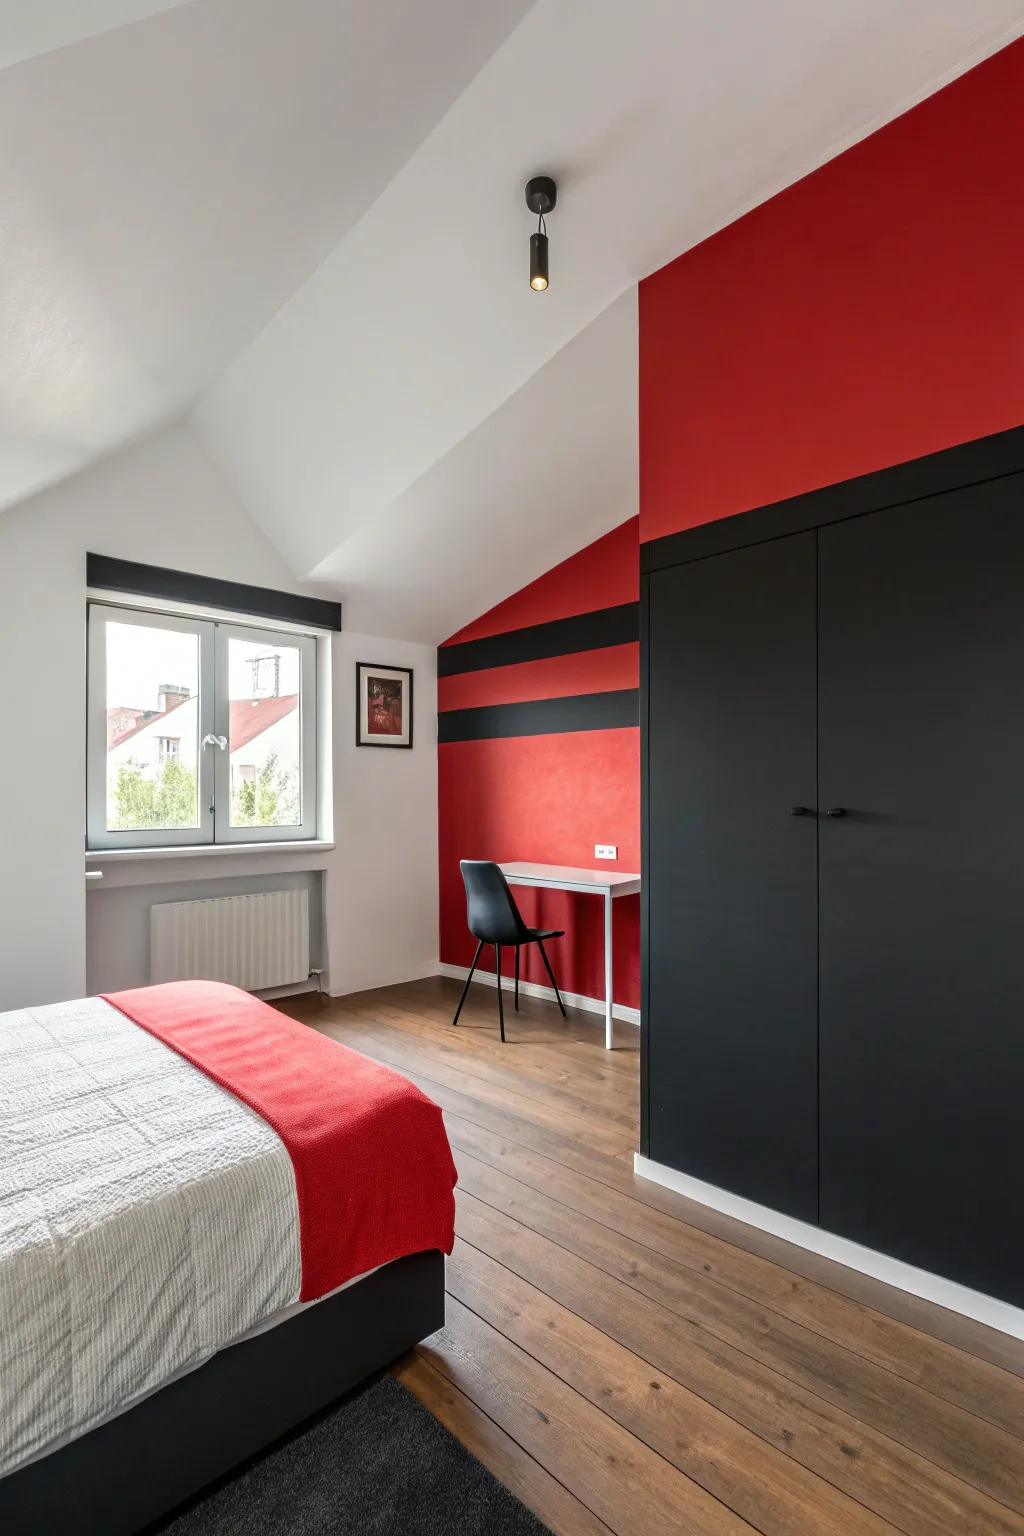
Unexpected Pop: Red Ceiling With Black Walls on One Side
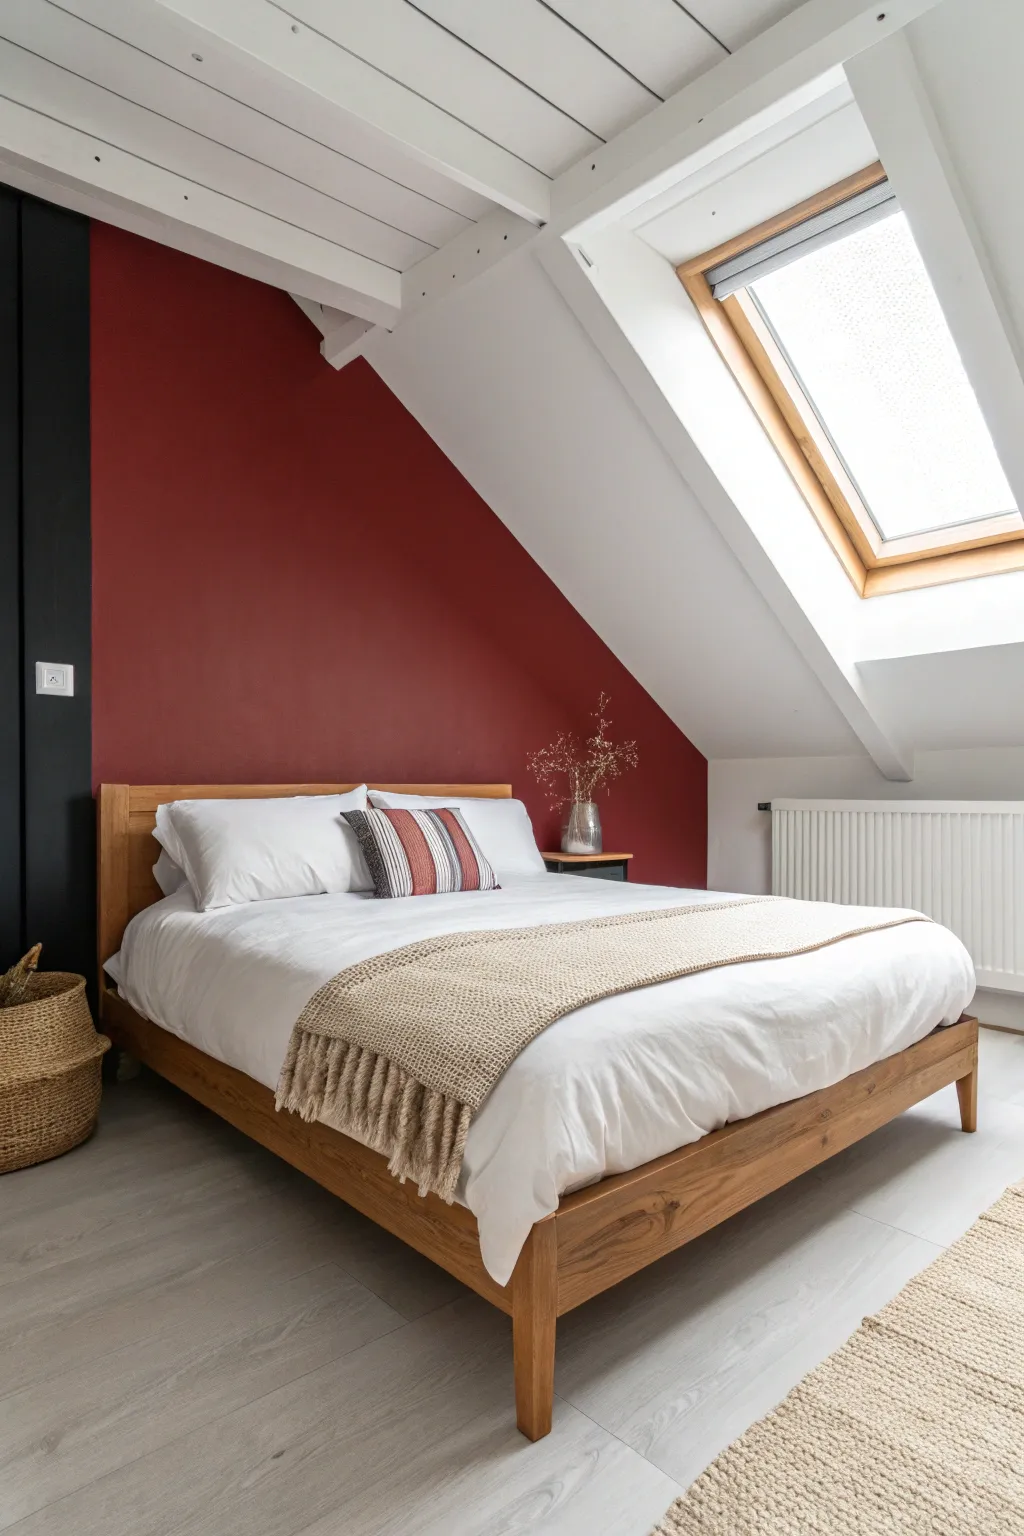
Transform an awkward attic space into a cozy, dramatic retreat by using deep, saturated colors to embrace the room’s unique geometry. This project focuses on painting a bold berry-red accent on the slanted wall section while grounding it with a sleek, matte black vertical panel.
Detailed Instructions
Materials
- Interior latex paint (deep berry red, matte or eggshell finish)
- Interior latex paint (true black, matte finish)
- Painter’s tape (high quality for crisp lines)
- Drop cloths
- Spackling paste and putty knife
- Sandpaper (120 and 220 grit)
- Angled sash brush (2.5 inch)
- Small roller (4-inch) for tight corners
- Standard roller (9-inch) with medium nap
- Extension pole
- Paint tray and liners
- Ladder
- Damp rag for cleanup
Step 1: Preparation & Planning
-
Clear the area:
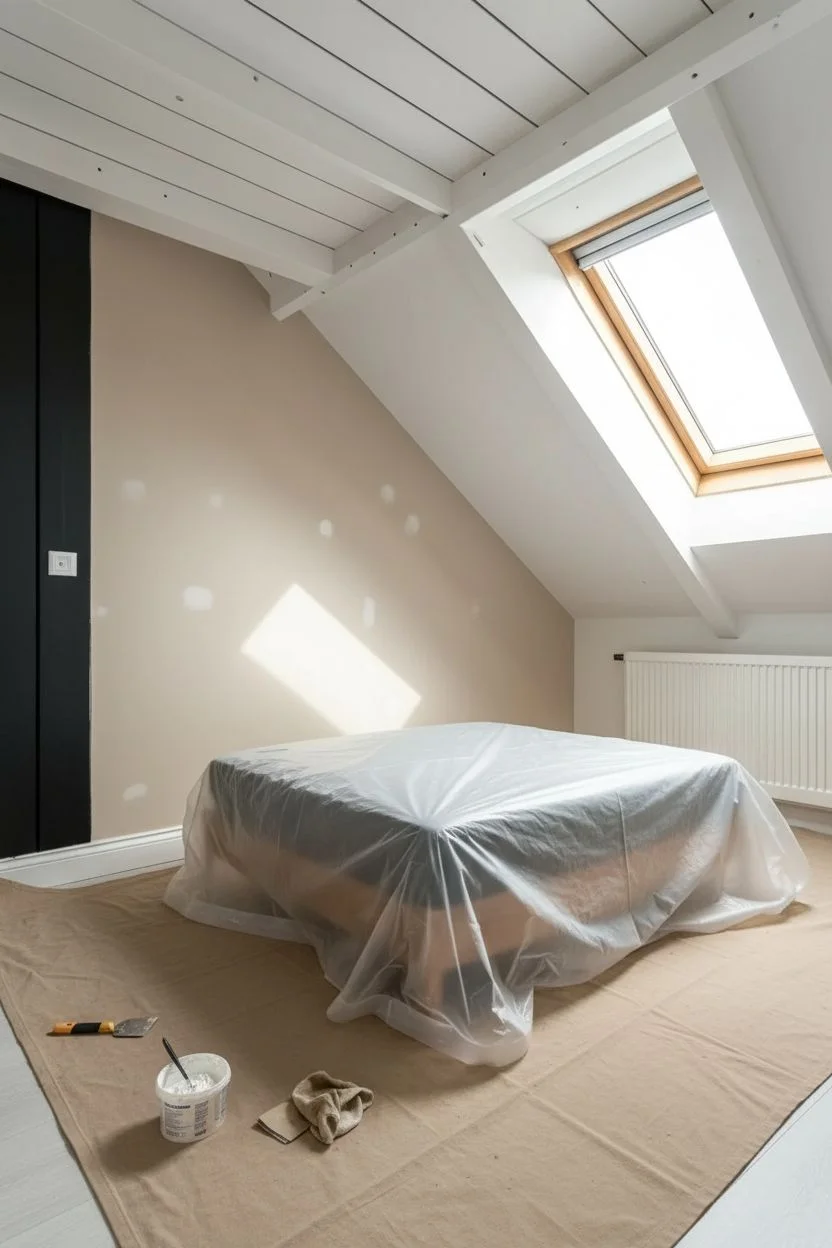
Remove all furniture, including the bed and nightstand, from the wall area. If the bed is too heavy, move it to the center of the room and cover it completely with a plastic sheet. -
Protect the floor:
Lay down your drop cloths, ensuring they are flush against the baseboards to catch any potential drips from overhead painting. -
Inspect surfaces:
Check the slanted wall and the black vertical section for nail holes or imperfections. Given the raking light from the skylight, bumps will be very visible, so fill any holes with spackling paste. -
Sand smooth:
Once the spackle is dry, sand the patches flat. I like to give the entire wall a quick scuff sand to help the new bold colors adhere properly. -
Clean the dust:
Wipe down the walls with a damp rag or tack cloth to remove all sanding dust.
Uneven Coverage?
Deep reds are notorious for poor coverage. If it looks sheer after two coats, apply a thrid thin coat rather than one thick, heavy one to avoid drips.
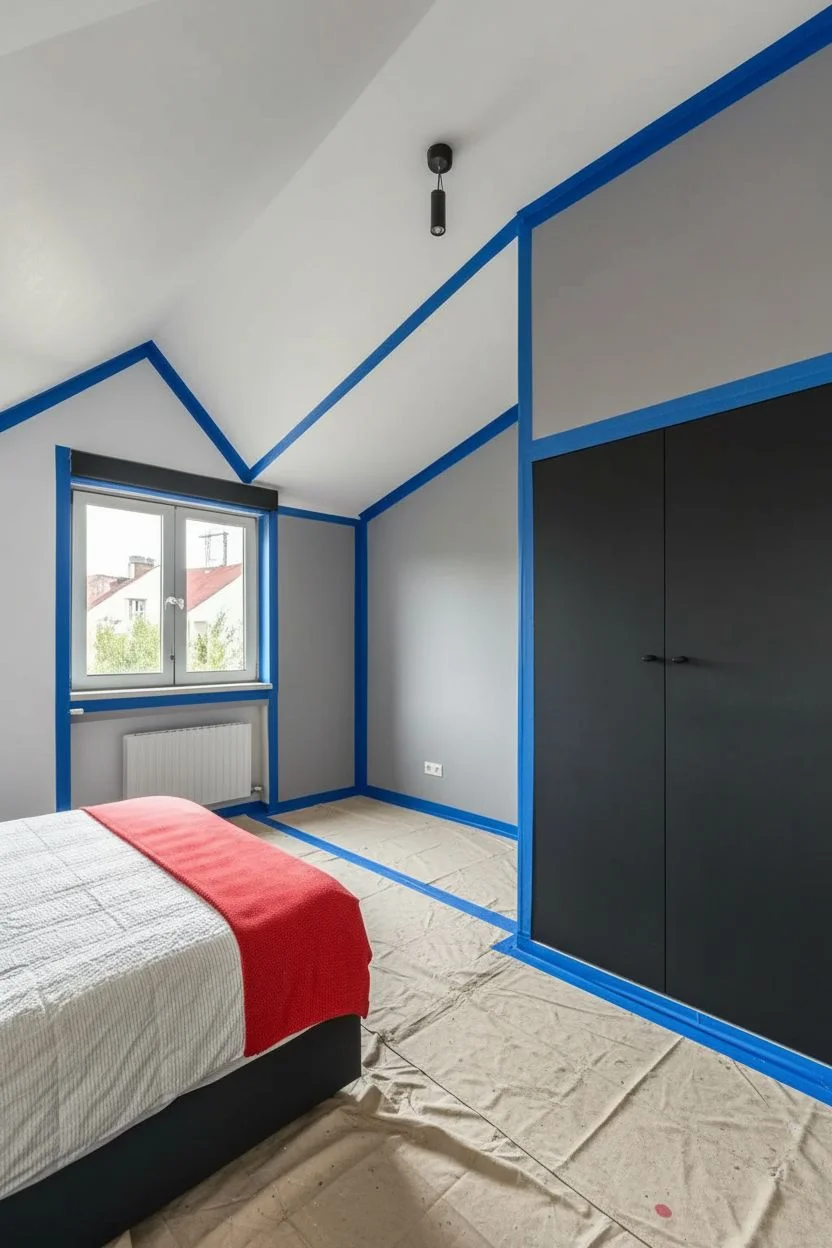
Step 2: Taping for Crisp Lines
-
Tape the ceiling line:
Apply painter’s tape along the upper edge where the red wall meets the white slanted ceiling beams and paneling. Press the edge of the tape down firmly with a putty knife or your fingernail to prevent bleed-through. -
Tape the baseboards:
Run a line of tape along the top of the baseboards. -
Define the color split:
If your black section is distinct (like a closet door or separate panel), tape the hardware or edges. If you are painting a flat wall two colors, use a laser level to tape a perfect vertical line where the red will meet the black.
Level Up: Texture
For a luxe feel, use a lime wash paint for the red wall instead of standard latex. This adds subtle velvet-like movement to the large block of color.
Step 3: Painting the Deep Red Accent
-
Cut in the edges:
Dip your angled brush into the berry red paint. Carefully paint a 3-inch border along the tape lines at the ceiling, floor, and corners. -
Roll the main section:
Load your roller with red paint. Start from the top of the slanted wall and roll downwards in overlapping ‘W’ patterns. Work in sections to keep a ‘wet edge’ so the paint blends seamlessly. -
Assess coverage:
Let the first coat dry for at least 4 hours. Deep reds often require multiple coats to look rich rather than streaky. -
Apply second coat:
Apply the second coat of red in the same manner. Check visually to ensure the white underlayer isn’t showing through the deep pigment.
Step 4: Adding the Black Contrast
-
Prepare the black section:
Once the red wall is completely dry (wait 24 hours if taping over fresh red paint), mask off the adjacent red area if the surfaces touch directly. -
Cut in the black:
Using a clean brush, carefully cut in the edges of the vertical black section. -
Roll out the black:
Use a small 4-inch roller for narrow vertical sections to get a smooth finish without brush strokes. Two coats are usually sufficient for matte black.
Step 5: Finishing Touches
-
Remove tape:
Pull the tape off slowly at a 45-degree angle while the final coat of paint is still slightly tacky to avoid peeling dry paint chips. -
Touch up:
Inspect the edges. If any red bled onto the white ceiling beams, use a small artist’s brush and white paint to correct it. -
Reassemble:
Move the furniture back into place, styling with neutral bedding to let the new wall colors take center stage.
Now you have a striking, architectural focal point that completely redefines the feeling of the room
Painted Red and Black Arch Behind the Bed or Dresser
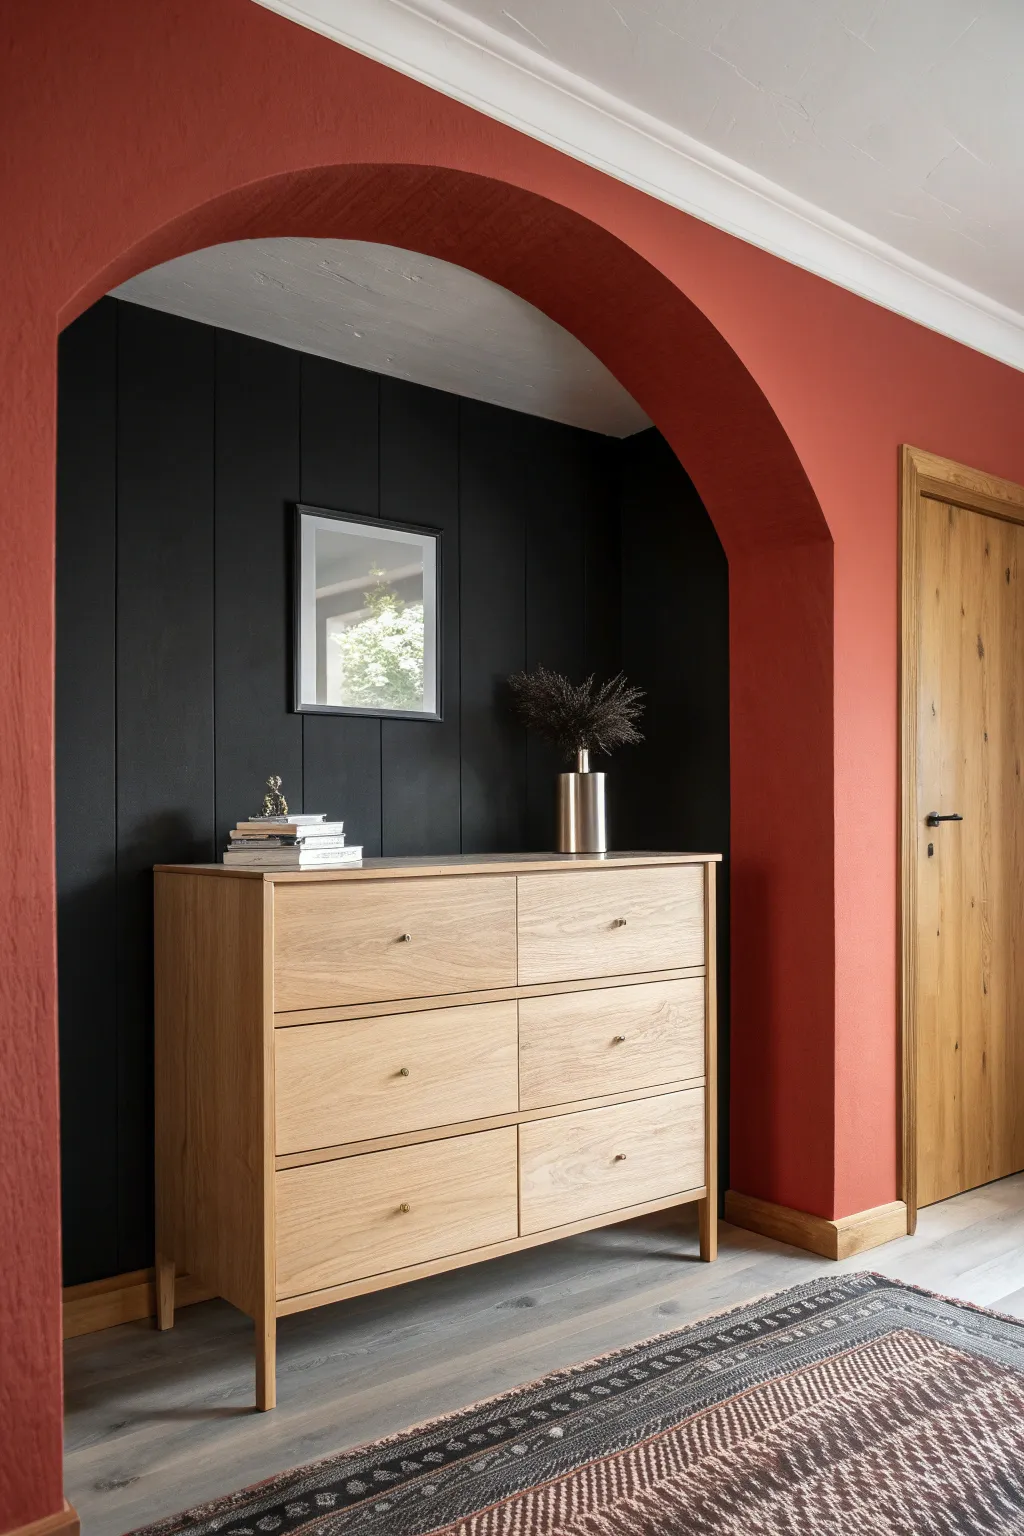
Transform a standard alcove or niche into a stunning focal point by combining a bold terracotta red arch with a moody, matte black interior. This high-contrast design creates instant depth and sophistication, perfectly framing a dresser or headboard.
Step-by-Step
Materials
- Terracotta red interior latex paint (matte or eggshell)
- Black interior latex paint (matte finish)
- Painter’s tape (high quality)
- Paint rollers (smooth surface)
- Angled sash brush (2 inch)
- Drop cloths
- Fine-grit sandpaper
- Spackling paste (if needed)
- Primer (tinted gray recommended)
- Step ladder
Step 1: Preparation and Priming
-
Clear and clean:
Remove all furniture, including the dresser, from the alcove area. Wipe down the walls and the surrounding archway with a damp cloth to remove dust and oils, ensuring a clean surface for paint adhesion. -
Patch imperfections:
Inspect the vertical shiplap or drywall for any nail holes or dents. Fill these with spackling paste, let it dry completely, and sand lightly until smooth. -
Protect the floors:
Lay down drop cloths to cover the flooring completely, taping the edges to the baseboards to prevent the cloth from sliding around while you work. -
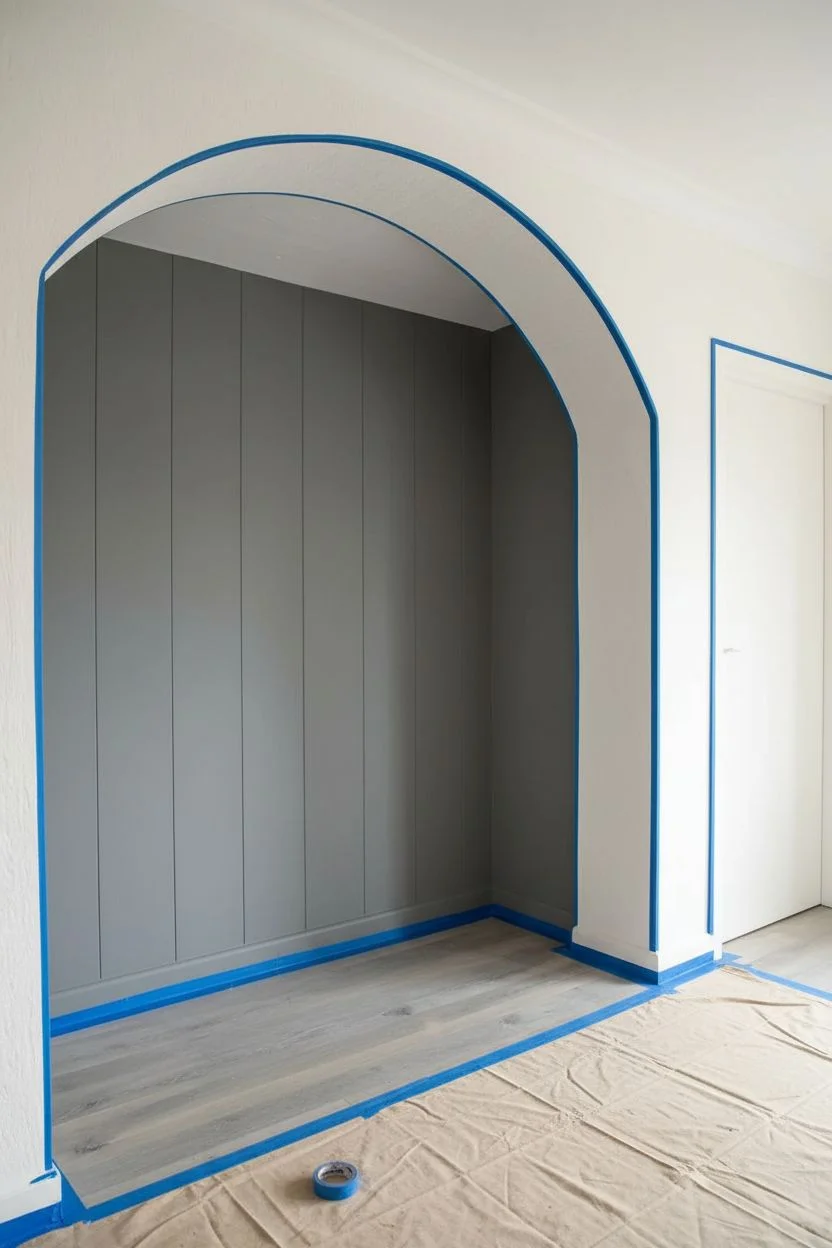
Tape the boundaries:
Apply painter’s tape carefully along the baseboards, the ceiling line inside the niche, and any adjacent walls you don’t intend to paint. Press the tape edges firmly to prevent bleed-through. -
Prime the dark surface:
Since we are going for a deep black, apply a coat of tinted gray primer to the back wall and side walls of the niche. This helps the black paint cover better later.
Bleed-Through Blues?
If paint bleeds under the tape, wait for it to fully dry. Then, re-tape slightly over the line and use a tiny artist’s brush to touch up the error with the original base color.
Step 2: Painting the Black Niche
-
Cut in the corners:
Open your matte black paint. Using the angled sash brush, carefully ‘cut in’ along the edges, corners, and ceiling line of the inner niche. Don’t worry about the outer arch face yet. -
Paint the shiplap grooves:
If your niche has vertical paneling like the example, use the brush to get paint deep into the vertical grooves first. Avoid letting paint pool in these gaps. -
Roll the flat surfaces:
Switch to a roller to cover the main flat areas of the back wall. Work in ‘W’ shapes to distribute the paint evenly, blending it into the brushed edges while wet. -
Apply a second coat:
Allow the first black coat to dry according to the can’s instructions (usually 2-4 hours). Apply a second coat to ensure a rich, opaque finish without streakiness.
Level Up: Texture
For a more rustic, old-world feel on the red arch, consider using a lime wash paint or mixing a texture additive into your latex paint to simulate plaster.
Step 3: Creating the Red Arch
-
Define the separation:
Once the black paint is fully cured (I like to wait overnight to be safe), apply delicate-surface painter’s tape exactly where the inner black wall meets the outer face of the arch. -
Cut in the red:
Using a clean angled brush, cut in the terracotta red paint along the ceiling line and the taped edge where the red meets the black interior. Take your time here for a crisp line. -
Roll the arch face:
Use a small roller to paint the face of the arch wall. If the wall has texture, make sure to apply enough pressure to get paint into the crevices. -
Paint the underside:
Don’t forget the underside of the arch (the soffit). Paint this the same red as the face to create a cohesive, tunnel-like effect leading into the black void. -
Second coat of red:
Let the first coat dry, then apply a second coat of terracotta red for full color saturation and depth. -
Remove tape:
While the final coat is still slightly tacky, slowly peel off the painter’s tape at a 45-degree angle. This prevents the dry paint from chilling off with the tape. -
Touch ups:
Inspect the transition line between red and black. If there are any tiny bleeds, use a small artist’s brush and the appropriate color to correct them manually. -
Final styling:
Once walls are fully dry, replace your baseboards if you removed them, slide your wooden dresser back into place, and style with metallic accents like the silver vase shown.
Step back and admire how the bold color contrast completely redefines the architecture of your room


Soft Edge: Red-to-Black Ombre Fade Feature Wall
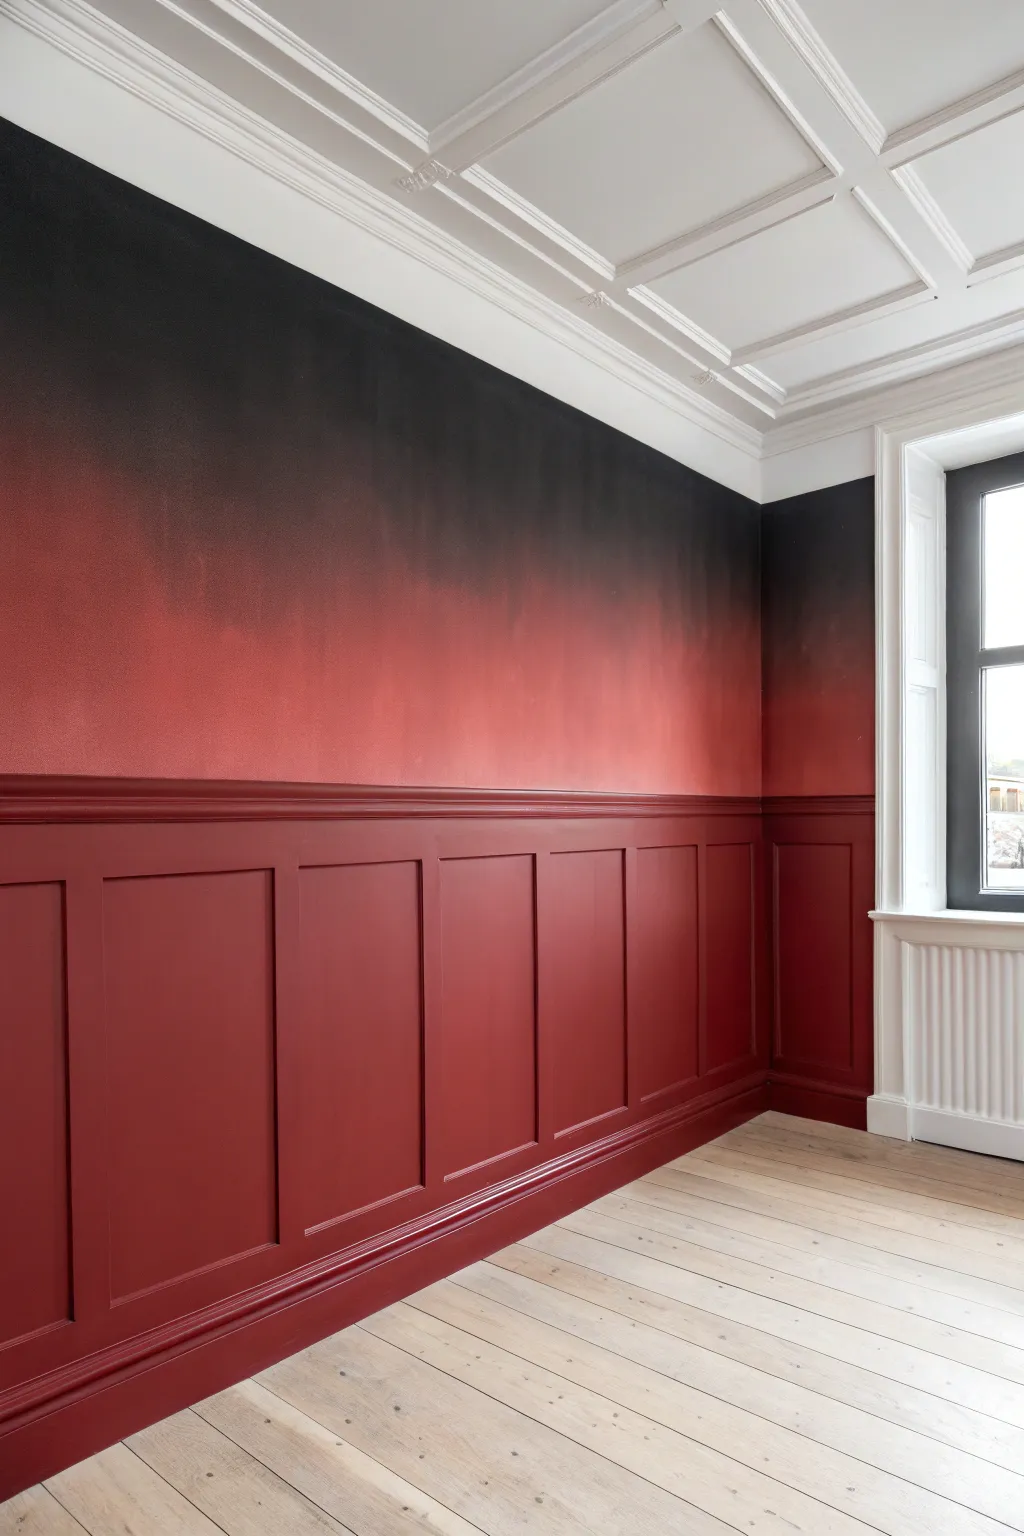
Transform a traditional space into a modern statement piece with this bold gradient wall treatment. This project combines classic wainscoting with a striking ombre fade, transitioning seamlessly from a deep crimson base into a midnight black ceiling line.
Step-by-Step
Materials
- Deep red interior wall paint (satin or eggshell finish)
- Black interior wall paint (matte or flat finish recommended)
- High-quality painter’s tape
- Drop cloths
- Medium-nap roller covers (3/8 inch)
- Roller frames and trays
- 2-inch angled sash brush
- 4-inch mini roller for blending
- Large dry blending brush (soft bristle)
- Spray bottle with water (optional)
- Glaze medium (acrylic/latex compatible)
- Sandpaper (220 grit) if wainscoting needs prep
Step 1: Preparation & Wainscoting
-
Clear and cover:
Begin by removing all furniture from the wall area and laying down heavy-duty drop cloths to protect your flooring, especially since the ombre technique can create splatter. -
Prep the surface:
Clean the wainscoting and the upper wall thoroughly. If the wood paneling has been previously painted with a high gloss, give it a light scuff sand with 220-grit sandpaper to ensure adhesion. -
Tape the edges:
Apply painter’s tape around the window frames, ceiling molding, and baseboards. Press the edges down firmly with a putty knife to prevent bleed-through. -
Paint the wainscoting:
Using your deep red paint, cut in the corners and detailed molding of the wainscoting with the angled sash brush. Follow immediately with a roller on the flat panels for a smooth finish. -
Apply second coat:
Allow the first coat on the wainscoting to dry completely according to manufacturer instructions, then apply a second coat for rich, opaque coverage.
Glaze is Key
Add 20% clear acrylic glazing liquid to your paints for the gradient section. It slows drying time significantly, preventing hard lines while blending.
Step 2: Creating the Ombre Fade
-
Set the red base:
Paint the bottom section of the upper wall (just above the wainscoting rail) with the red paint, extending up about 12-18 inches. Feather the top edge of this red band lightly. -
Apply the black top:
Using a fresh roller and tray, paint the top section of the wall black, cutting in carefully against the ceiling molding. Bring the black paint down, stopping about 12 inches above your red line. -
Mix the blend color:
In a separate container, mix equal parts of your red and black paint. I find adding a splash of glaze medium here extends the drying time, giving you more freedom to work the blend. -
Apply the middle band:
Paint the empty gap between the pure red and pure black with your custom mixed dark red/burgundy color. -
Start the wet blend:
While all three sections (red, blend, black) are still wet, use a clean 4-inch mini roller to gently roll over the transition lines vertically. -
Soften with a dry brush:
Take your large dry blending brush and work the transition areas using an ‘X’ motion. This cross-hatching technique breaks up hard lines and creates that misty, spray-paint look. -
Troubleshoot drying paint:
If the paint starts to tack up before you are happy with the blend, mist it very lightly with water or add a tiny bit more glaze to your brush to re-activate the surface. -
Check from a distance:
Step back frequently to look at the wall as a whole. Up close, it may look messy, but stepping back reveals whether the gradient is smooth or if one color block is too dominant. -
Refine the edges:
Once the main blend is dry, touch up the ceiling line with a small brush and black paint to ensure a crisp, sharp edge against the white molding. -
Remove tape:
Carefully peel away the painter’s tape while the final touch-ups are still slightly damp to pull a clean line without chipping.
Add Metallic Sheen
Once the black section is dry, dry-brush a tiny amount of charcoal or dark silver metallic glaze near the top for a subtle, moody shimmer.
Enjoy the dramatic atmosphere your new feature wall brings to the room
Painted Headboard Illusion in Red and Black
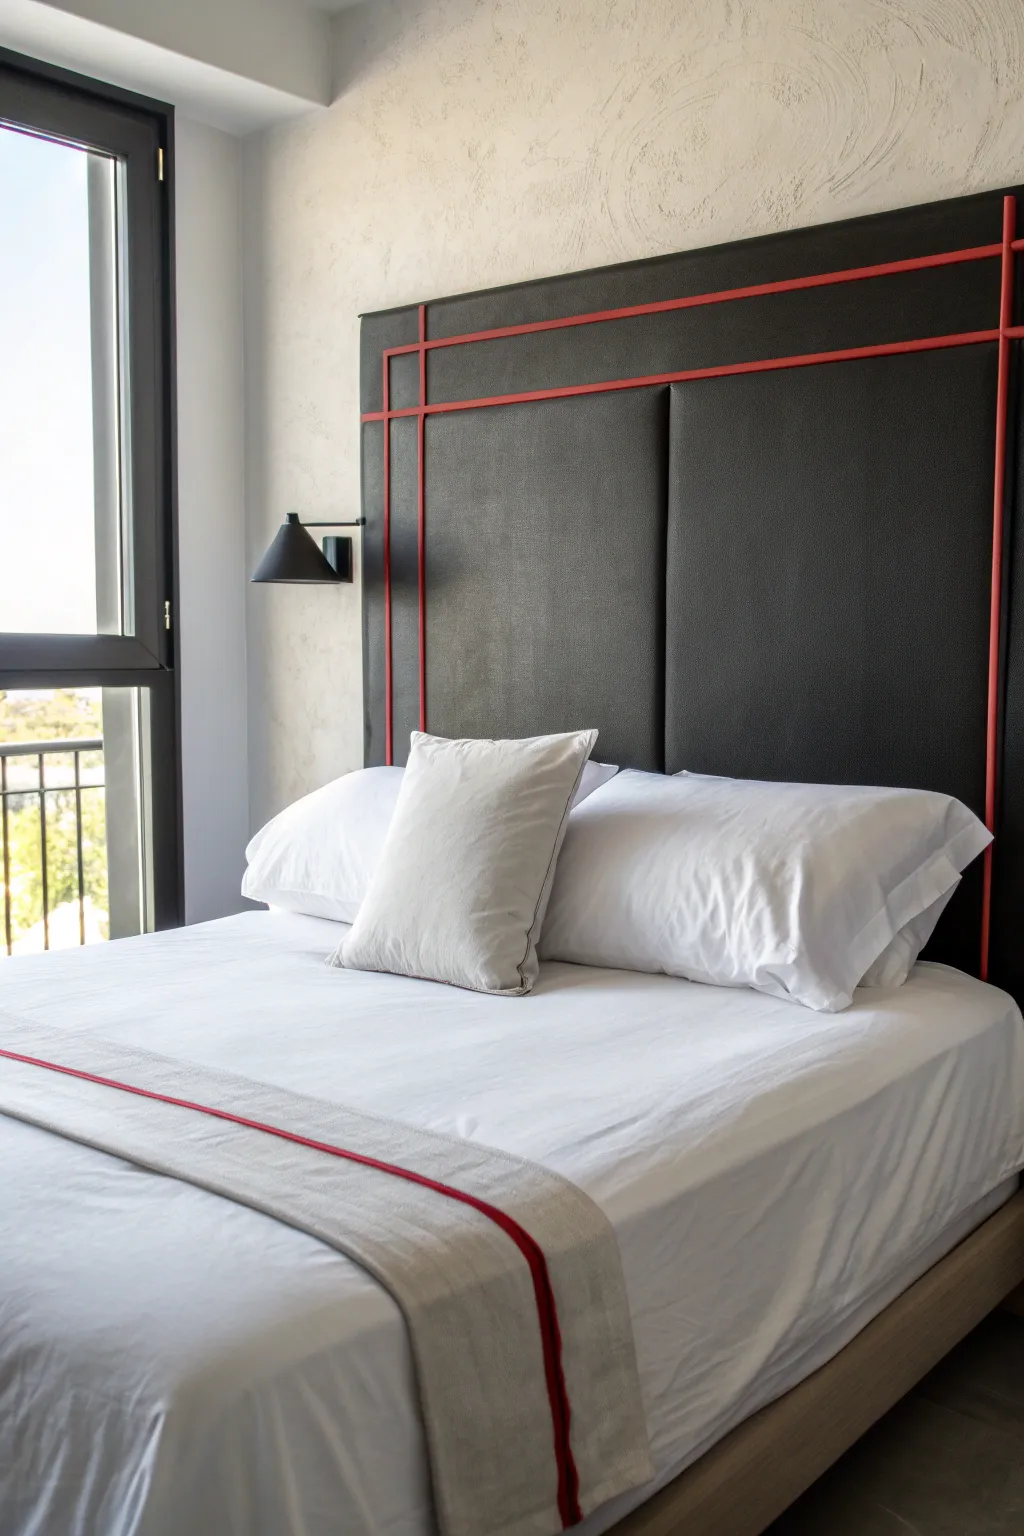
Elevate your bedroom with a striking headboard that mimics the look of high-end upholstered leather using nothing but MDF, paint, and trim. This project creates a bold graphic statement with deep charcoal faux-leather panels accented by vivid red grid lines.
Detailed Instructions
Materials
- Large MDF panel (4×8 feet or cut to bed width)
- Wooden lattice trim or narrow molding strips
- Semi-gloss black paint (charcoal tone)
- Bright red high-gloss enamel paint
- Paint roller with foam cover (for smooth finish)
- Fine-grit sandpaper (220 grit)
- Wood glue
- Pin nails or finishing nails
- Hammer or nail gun
- Artist’s liner brush
- Painter’s tape
- Drop cloth
- Measuring tape
- Level
- Construction adhesive (for wall mounting)
- French cleat hanging system (optional for removable mounting)
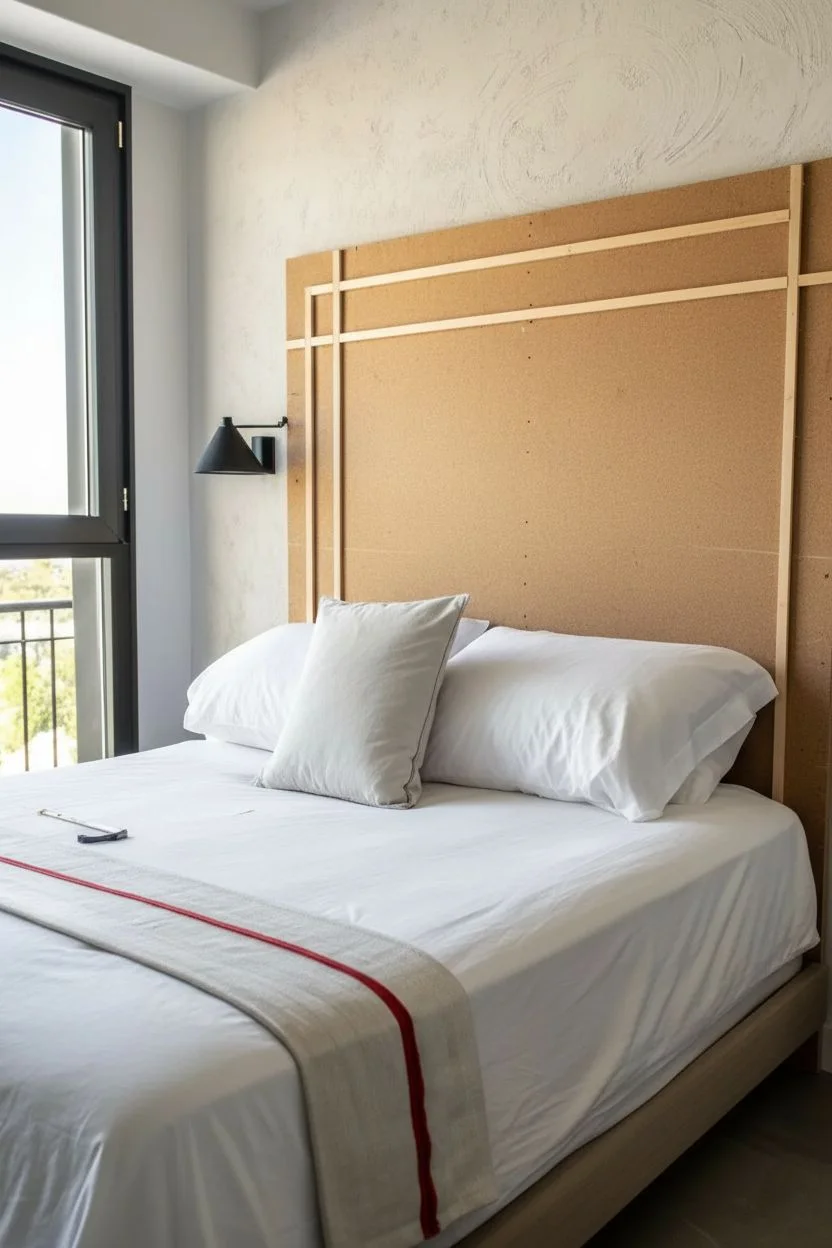
Step 1: Base Construction
-
Measure and Cut:
Measure the width of your bed frame to determine the main panel size. For a dramatic floor-to-ceiling look like the inspiration, cut your MDF sheet tall, or use multiple panels stacked vertically. -
Sand the Surface:
Lightly sand the entire face of the MDF panel. This roughs up the surface just enough to help the paint adhere and mimics the very subtle texture of leather once painted. -
Cut Trim Pieces:
Cut your wooden lattice trim to create the grid pattern. You will need long vertical strips for the sides and a center divider, plus horizontal strips to span the top width. -
Dry Fit the Grid:
Lay your MDF panel flat on the floor and arrange the trim pieces to ensure your spacing is symmetrical. I like to double-check my measurements here before committing to glue. -
Attach the Trim:
Apply a thin bead of wood glue to the back of each trim piece. Press them firmly onto the MDF panel. -
Secure with Nails:
Use a pin nailer or small finishing nails to lock the trim in place while the glue dries. If using a hammer, be careful not to dent the soft wood.
Uneven red coverage?
Red paint often streaks. If the color looks uneven after two coats, switch to a grey primer on just the trim, then re-apply the red for better opacity.
Step 2: Faux Leather Finish
-
Prime the Assembly:
Apply a coat of quality primer over the entire piece, including the trim. This seals the absorbent MDF edges and face. -
Sand Again:
Once the primer is fully dry, do a quick pass with 220-grit sandpaper to knock down any raised grain or dust nibs. -
Paint the Black Base:
Using a foam roller, apply the semi-gloss black paint to the large rectangular recessed areas. The foam roller helps eliminate brush strokes, giving that smooth, leather-like appearance. -
Detail the Edges:
Use a small brush to carefully paint the inner edges of the trim black, ensuring no primer shows where the panel meets the molding. -
Apply Second Coat:
Let the first coat dry completely, then apply a second coat of black for a deep, opaque finish.
Pro Tip: Faux Stitching
For extra realism, run a classic tracing wheel tool along the black paint before it fully cures to create tiny indentations that look like leather stitching.
Step 3: The Red Accent
-
Tape Off Panels:
Once the black paint has cured for at least 24 hours, carefully apply painter’s tape to the black panels right up against the edge of the trim strips. -
Seal the Tape:
Run a credit card or putty knife firmly over the tape edges to prevent the red paint from bleeding onto your black faux-leather finish. -
Paint the Trim Red:
Brush the bright red high-gloss enamel onto the lattice trim. The high gloss contrast against the semi-gloss base enhances the architectural feel. -
Apply Second Red Coat:
Red pigment is notoriously translucent, so apply a second or even third coat to get that vibrant, lipstick-red saturation. -
Remove Tape:
Peel off the painter’s tape carefully while the final coat of red is still slightly tacky to ensure a crisp, clean line. -
Touch Up:
Use an artist’s liner brush to fix any tiny areas where paint might have bled or missed a spot.
Step 4: Mounting
-
Install French Cleat:
Attach the wall-side of a heavy-duty French cleat to your bedroom wall, ensuring it is perfectly level. -
Attach Cleat to Headboard:
Screw the corresponding cleat piece to the back of your finished headboard. -
Hang and Center:
Lift the headboard onto the wall cleat. Slide it left or right until it is perfectly centered behind your bed frame.
Step back and admire how this bold geometric focal point completely transforms the energy of your room
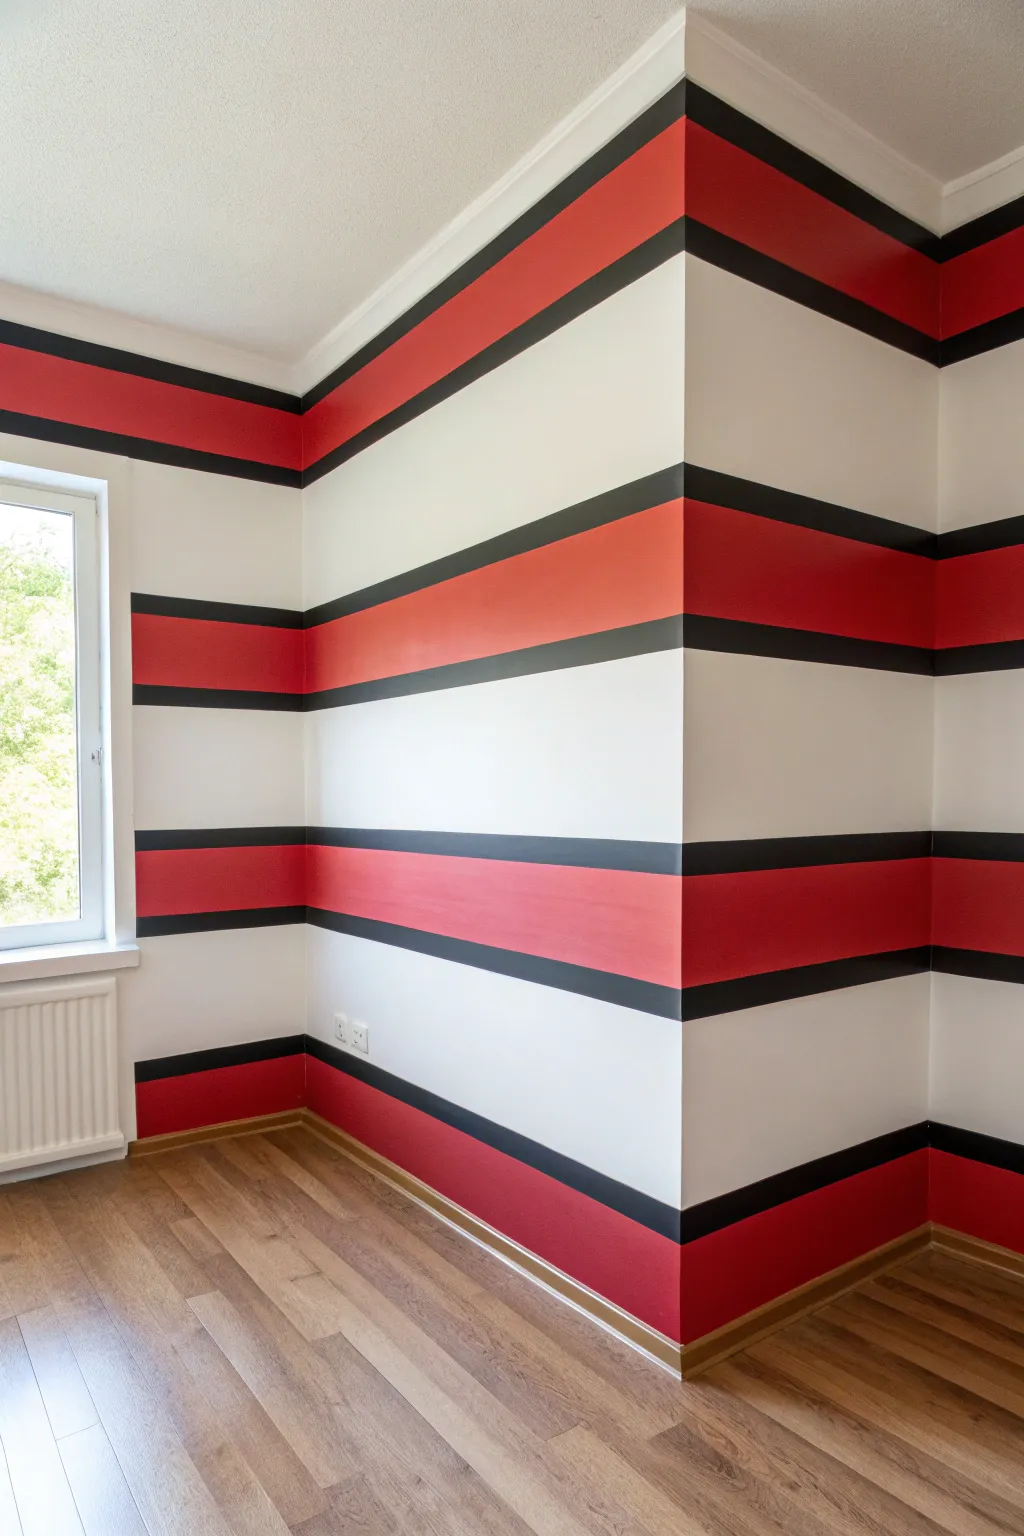
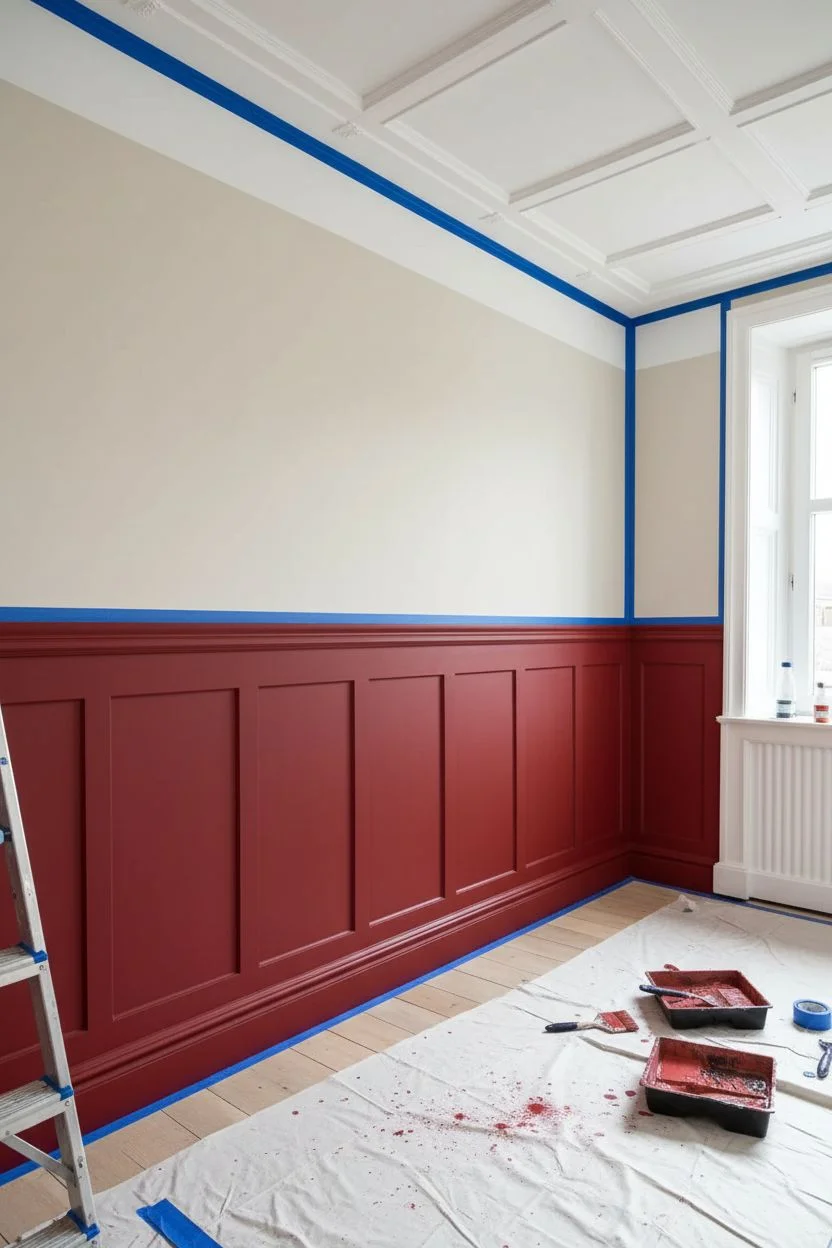
Wraparound Bands: Red and Black Stripes That Continue Around Corners

Transform an ordinary corner into a striking architectural feature with this precise geometric paint design. By wrapping high-contrast red and black bands continuously across adjacent walls, you create a modern, cohesive look that expands the visual space of the room.
Step-by-Step Guide
Materials
- White or off-white interior latex paint (eggshell or satin finish)
- Deep red interior latex paint (semi-gloss for durability)
- Black interior latex paint (semi-gloss)
- Painter’s tape (high-quality, preferably FrogTape for distinct lines)
- Laser level (for long, straight lines)
- Pencil
- Tape measure
- Paint rollers (medium nap)
- Small angled sash brush (1.5 to 2 inch)
- Trim brush or small foam roller
- Drop cloths
- Spackling paste and sandpaper (for wall prep)
Step 1: Preparation and Base Coat
-
Clear and Prep:
Begin by removing all furniture from the corner area and laying down drop cloths. Remove switch plates or outlet covers if they fall within your stripe zones. -
Patch Imperfections:
Inspect the walls for any nail holes or dings. Fill these with spackling paste and sand smooth once dry to ensure your stripes don’t highlight wall flaws. -
Apply Base Color:
Paint the entire wall area with your chosen white or off-white base color. Apply two coats if necessary for full coverage, allowing the manufacturer’s recommended drying time between coats. -
Full Cure:
This is crucial: allow the white base coat to cure for at least 24 to 48 hours. If the paint is even slightly tacky, the tape used in the next phase will peel it right off.
Step 2: Measuring and Taping
-
Set Visual Height:
Decide on the height of your main red stripe. In the reference image, the stripes are spaced evenly, with one near the ceiling, one at chest height, one just above the baseboard, and one near the floor. -
Mark Reference Points:
Using a tape measure, measure up from the floor and mark the top and bottom edges of where the *red* stripe will go with a pencil. Repeat this at several intervals along the wall. -
Project Laser Lines:
Set up your laser level to connect your pencil marks. A laser is vastly superior to a standard level here, as it projects the beam around the corner, ensuring the stripe height matches perfectly on both walls. -
Tape the Red Zone:
Apply painter’s tape along the laser line. Place the tape on the *outside* of the area intended for the red stripe. Run your finger firmly along the tape edge to seal it. -
Seal the Edge:
To prevent bleeding, I like to lightly paint over the tape edge with the *base wall color* (white). This seals any tiny gaps in the tape with white paint so the red line will be crisp.
Tape Bleed Disaster?
If paint bleeds under the tape, wait for it to dry completely. Re-apply tape along the correct line, seal it firmly, and touch up the smudge with the original base color using a small artist’s brush.
Step 3: Painting the Red Stripes
-
Roll the Red:
Once the edge seal is dry, apply the deep red paint within your taped-off area. Use a medium nap roller for the broad sections and a sash brush for the corners. -
Second Coat:
Red pigment often has poor coverage. Apply a second or even third coat as needed until the color is rich and solid. -
Remove Tape:
Ideally, peel off the tape while the final coat of red is still slightly wet. Pull the tape away from the fresh paint at a 45-degree angle. -
Dry Completely:
Let the red stripes cure fully (wait at least 24 hours again) before attempting to tape over or near them for the black borders.
Level Up: Gloss Contrast
For extra dimension, use matte paint for the white walls but high-gloss for the red and black stripes. The bands will catch the light and look more architectural, like installed molding.
Step 4: Adding the Black Borders
-
Mark the Borders:
Measure a consistent width (e.g., 2 inches) above and below your dried red stripe. Mark these lightly with a pencil. -
Tape the Black Lines:
This step requires precision. Apply new tape directly onto the edge of your dried red stripe (to protect it) and another strip of tape on the white wall at your measured mark. -
Re-Seal Edges:
Seal the tape edges again. Use red paint on the tape covering the red stripe, and white paint on the tape covering the white wall. -
Paint Black:
Using a small foam roller or a steady brush hand, fill in the narrow gap with black paint. Take care not to overload the brush to avoid drips. -
Double Check:
Check for opacity. Black usually covers well, but touch up any light spots immediately. -
Final Reveal:
Peel away all tape slowly. You should now have a thick red band perfectly sandwiched between two thin black lines.
Enjoy the dynamic energy your new geometric feature wall brings to the space.


Have a question or want to share your own experience? I'd love to hear from you in the comments below!