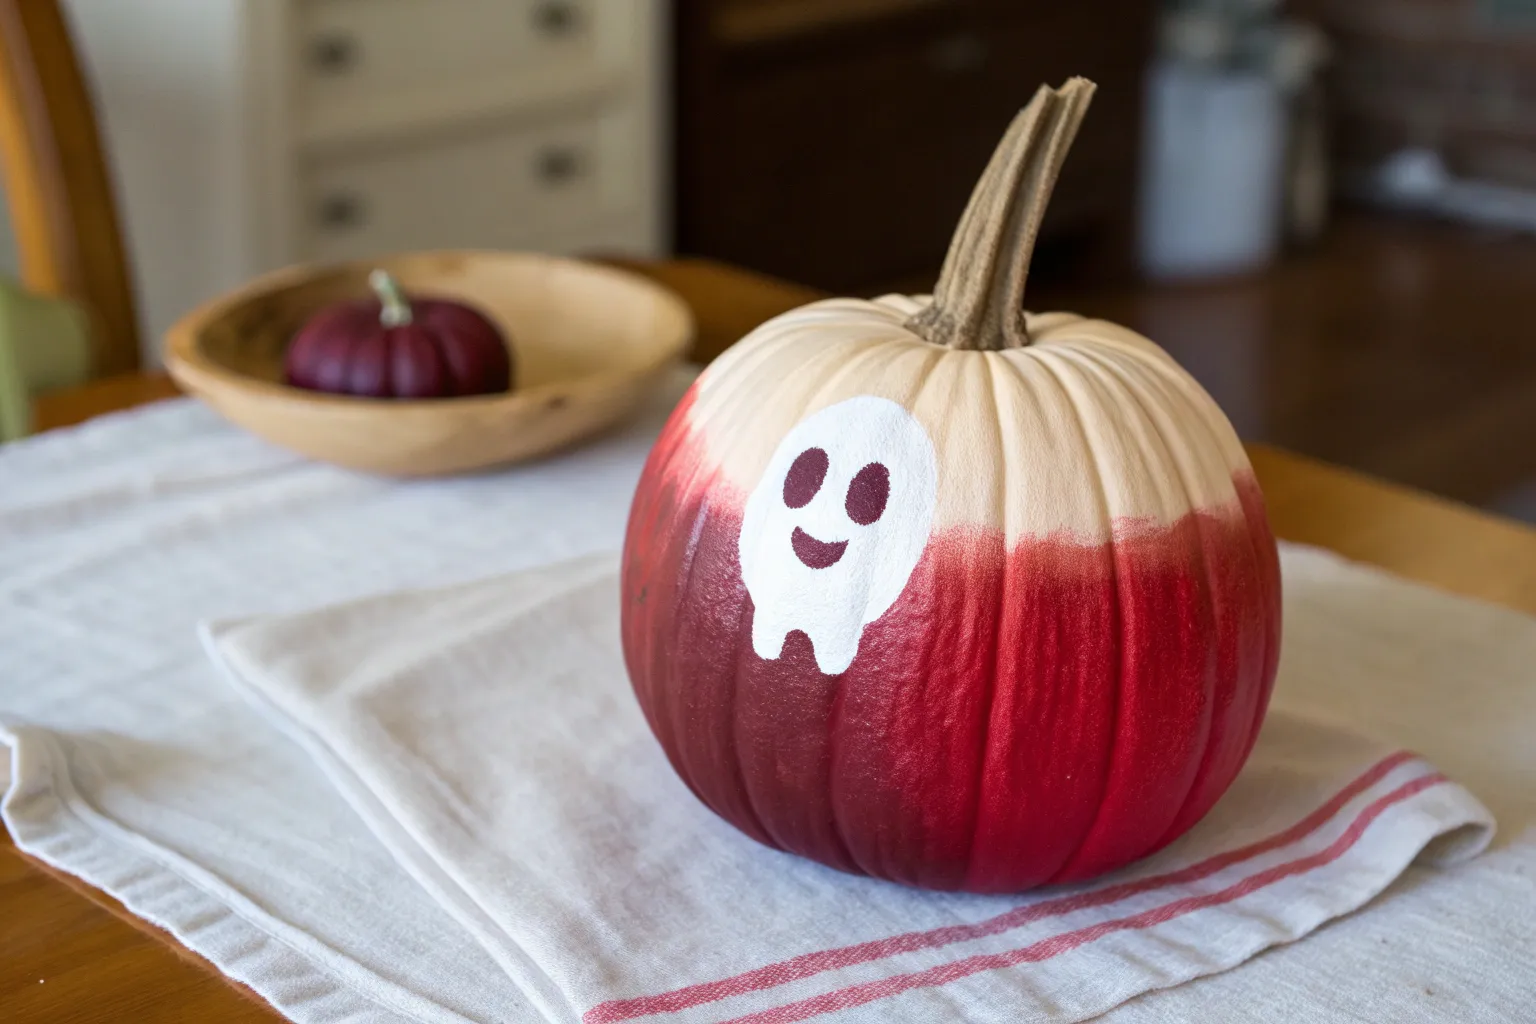
If you’re craving a pumpkin that feels bold, dramatic, and a little unexpected, red pumpkin painting is such a fun direction to go. I love how red can swing from sweet and cozy to moody and spooky, all with a few simple tweaks.
Red Pumpkin With Gold Stem Accent
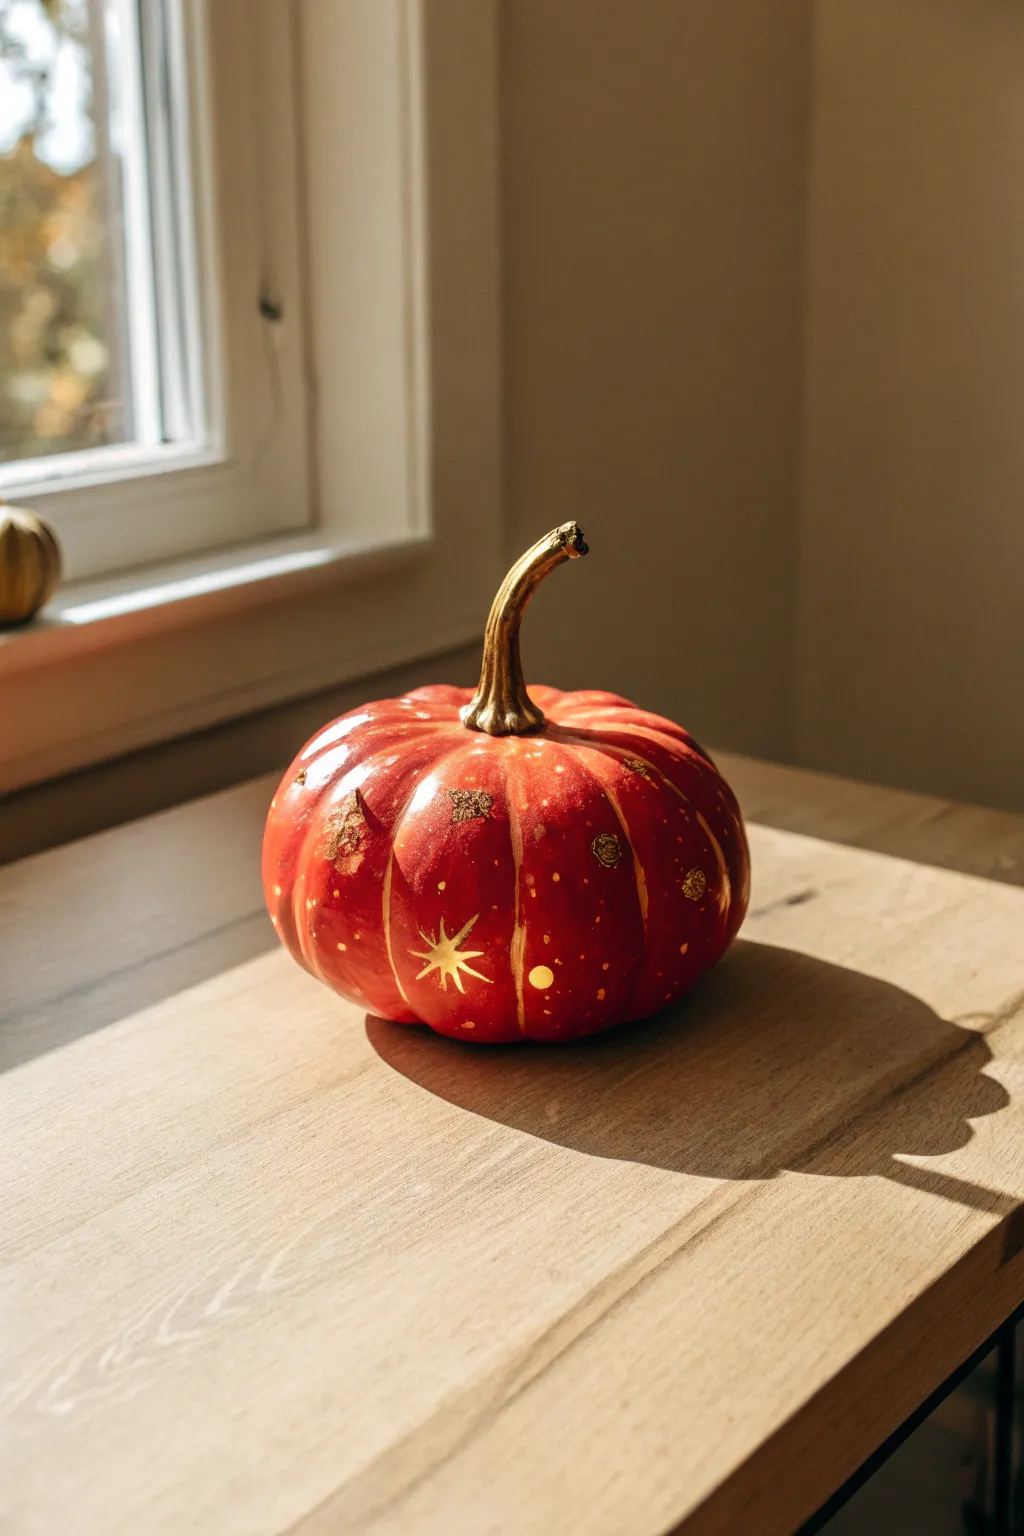
Transform a simple faux pumpkin into a striking piece of decor with this celestial-inspired design. The rich red base contrasted with shimmering golden stars and a fully gilded stem creates a warm, magical look perfect for autumn evenings.
Step-by-Step Guide
Materials
- Medium-sized faux pumpkin (cream, white, or orange)
- Crimson red acrylic paint (matte finish)
- Metallic gold acrylic paint (high gloss)
- Gold leaf adhesive (size)
- Gold leaf sheets or gold flakes
- Medium flat brush (approx. 1 inch)
- Small fine-liner brush (size 0 or 00)
- Sealer spray (satin or matte)
- Soft-bristle brush (for gold leaf application)
- Palette or paper plate
- Cup of water and paper towels
Step 1: Base Preparation & Painting
-
Clean surface:
Begin by wiping down your faux pumpkin with a damp cloth to remove any dust or oils. Let it dry completely to ensure the paint adheres smoothly. -
Prime the stem:
Using masking tape, carefully tape off the base of the pumpkin right where it meets the stem. This protects the skin while you work on the stem area first. -
Guild the stem:
Apply a coat of metallic gold paint to the entire stem. Depending on the opacity of your paint, you may need two coats. I like to let this dry for about 20 minutes between layers. -
Prepare the red base:
Remove the tape from the stem. Now, squeeze a generous amount of crimson red acrylic paint onto your palette. -
Apply first coat:
Using your medium flat brush, apply the red paint to the body of the pumpkin. Paint vertical strokes following the natural ribs of the pumpkin for a consistent texture. -
Refine the edges:
Around the base of the gold stem, switch to a smaller brush to carefully paint up to the gold line without overlapping. A steady hand is key here. -
Build opacity:
Allow the first red coat to dry completely (roughly 30-45 minutes). Apply a second coat to ensure a rich, solid color without streaks.
Step 2: Celestial Details
-
Plan placement:
Look at the pumpkin and mentally map out where your largest stars will go. Aim for random spacing rather than a grid pattern. -
Paint star centers:
Dip your fine-liner brush into the metallic gold paint. Paint a small central dot where a star will live. Drag four points outward from this center—top, bottom, left, right—tapering them into sharp points. -
Add diagonal rays:
Between the four main points of your star, paint four much shorter, thinner lines to create an eight-pointed celestial starburst. -
Create scattered dots:
Using the tip of your brush or a dotting tool, scatter small gold dots and tiny circles throughout the red space to mimic a starry night sky. -
Apply adhesive for texture:
For the textured gold splotches seen in the image, brush small, random patches of gold leaf adhesive onto the red surface. Let it sit until tacky (usually 10-15 minutes). -
Apply gold leaf:
Gently press gold leaf sheets or flakes onto the tacky adhesive spots. Don’t worry about being neat; the ragged edges add character. -
Burnish the leaf:
Use a dry, soft-bristle brush to gently rub the gold leaf. This removes the excess and polishes the remaining gold to a high shine. -
Highlight the ribs:
Load your brush with a very dry amount of gold paint. Very lightly dry-brush vertical lines along a few of the pumpkin’s ribs to accentuate its shape. -
Seal the work:
Once all paint and adhesive is totally dry, take the pumpkin to a well-ventilated area and apply a light coat of spray sealer to protect your design.
Sticky Situation?
If the gold leaf sticks to your fingers instead of the pumpkin, dust your fingertips with a tiny bit of cornstarch or baby powder before handling.
Cosmic Depth
Mix a tiny drop of purple or deep blue into your red paint for the second coat. This creates a deeper, wine-colored background that makes the gold pop even more.
Place your shimmering celestial pumpkin near a natural light source to watch the gold accents twinkle throughout the day


Red Buffalo Plaid Pumpkin
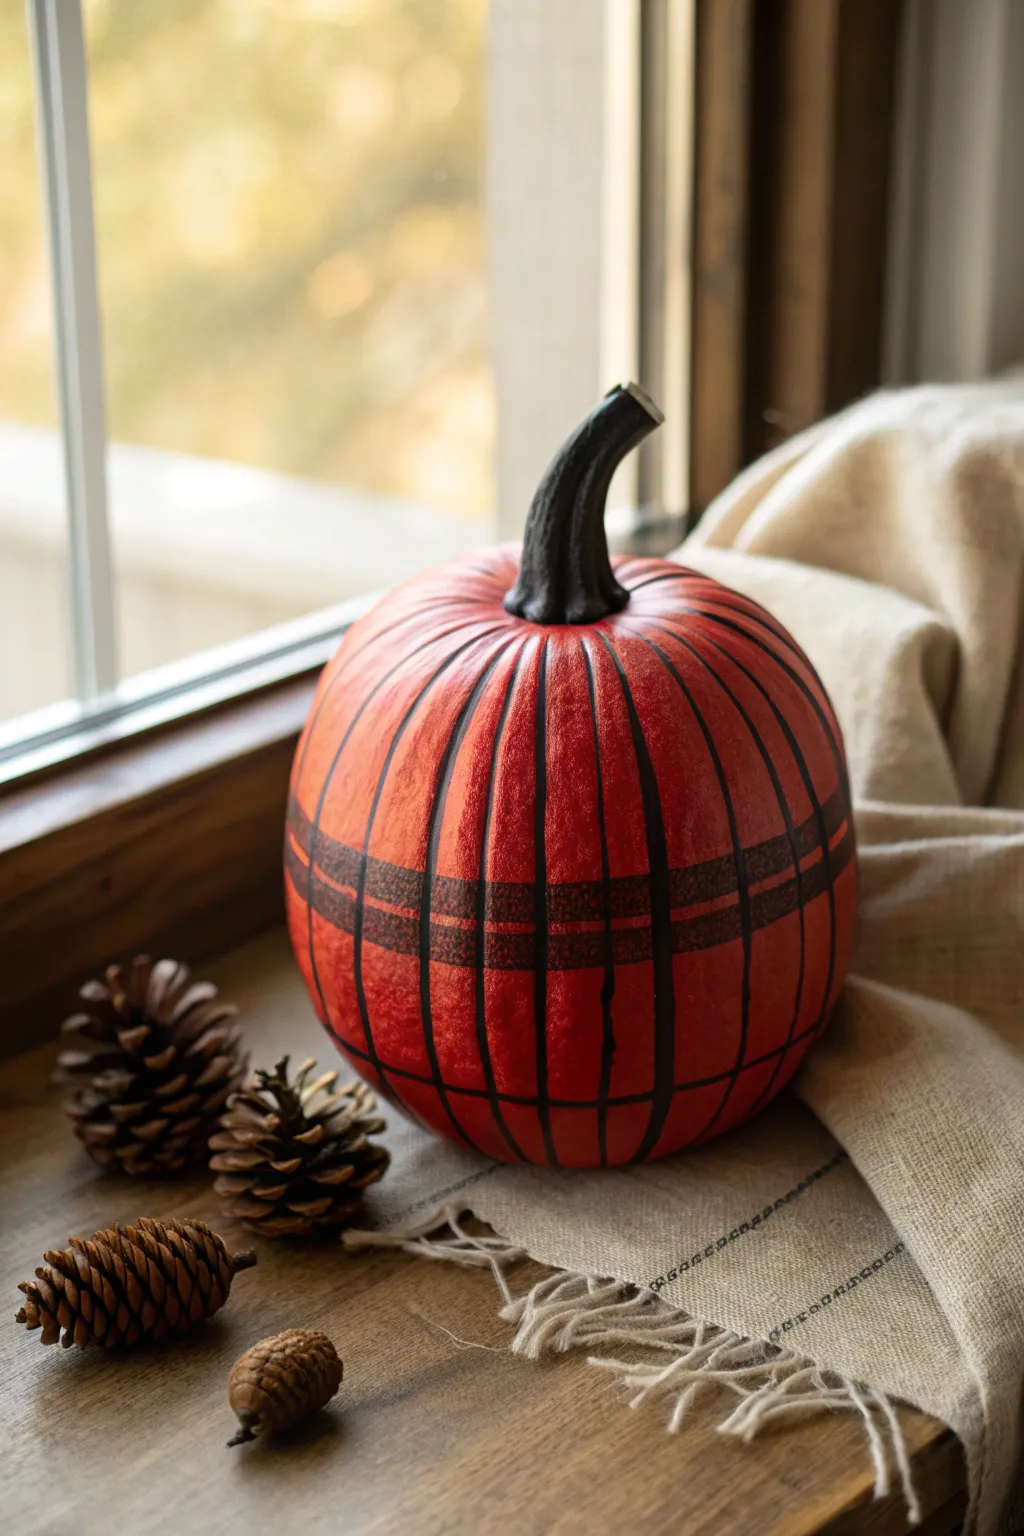
Transform a plain pumpkin into a rustic statement piece with this bold red and black plaid design. By working with the pumpkin’s natural shape, you create a captivating grid pattern that feels cozy and modern all at once.
Step-by-Step Tutorial
Materials
- Faux pumpkin (medium size) or real pumpkin with a smooth surface
- Red acrylic craft paint (bright cardinal or tomato red)
- Black acrylic craft paint
- Wide flat paintbrush (1-inch width)
- Medium round paintbrush (size 6 or 8)
- Fine liner brush (size 0 or 1)
- Sea sponge or stiff bristle brush for texturing
- Painter’s tape or flexible masking tape (1/4 inch width is ideal)
- Paper plate or palette
- Water cup and paper towels
- Matte sealer spray (optional)
Step 1: Base Coat Application
-
Clean surface:
Begin by wiping down your pumpkin with a damp cloth to remove any dust or oils. If you are using a real pumpkin, ensure it is completely dry before proceeding. -
Prime the stem:
Carefully tape off the base of the stem to protect it, or plan to paint around it carefully. If the stem needs a refresh, paint it a solid matte black now and let it dry. -
First red layer:
Using your wide flat brush, apply a generous coat of bright red acrylic paint to the entire body of the pumpkin. Don’t worry about complete opacity yet; just get the color on. -
Dry and repeat:
Let the first coat dry for about 20-30 minutes. Apply a second—and possibly third—coat until you have a rich, solid red base with no transparency showing through. -
Add subtle texture:
To mimic the slightly rustic look in the photo, dip a sea sponge or stiff dry brush into a tiny bit of darker red or orange paint. Lightly dab it over the dry red base to break up the flat color.
Step 2: Painting the Vertical Lines
-
Follow the ribs:
Identify the natural vertical grooves (ribs) of your pumpkin. These will serve as the guides for your main vertical stripes. -
Paint main verticals:
Using the medium round brush and black paint, carefully paint a distinct line down the deepest part of every other groove. I find it helpful to start from the stem and pull the brush smoothly down to the base. -
Create varying widths:
To match the plaid aesthetic, make these vertical lines slightly varying in thickness. Go back over a few lines with the flat brush to widen them, creating a mix of thick and thin vertical stripes. -
Refine edges:
Use your fine liner brush to touch up the edges of the black lines, ensuring they look intentional but not overly perfect or plastic.
Tape Trick
Work with the pumpkin’s curve, not against it. Use thin flexible tape (often sold for nail art or model cars) to mask straight lines over the bumpy surface.
Step 3: Creating the Horizontal Grid
-
Plan horizontal bands:
Visualize where your horizontal bands will go. You want two or three main horizontal stripes wrapping around the pumpkin’s equator to create the ‘plaid’ checks. -
Drafting the lines:
Lightly sketch the horizontal rings with a pencil if you feel unsteady, or use flexible painter’s tape to create a guide for the rings. -
Paint horizontal stripes:
Load your medium round brush with black paint. Paint the horizontal bands, crossing over the vertical lines you already created. -
Simulate fabric texture:
This is the crucial step for the ‘buffalo plaid’ look: take a mostly dry brush with a tiny amount of black paint and drag it horizontally inside the horizontal bands creating a scratchy, semi-transparent look. -
Darken intersections:
Where the vertical black lines and horizontal black bands cross, the color should be darkest. Dab a solid square of opaque black paint at every single intersection point. -
Add thin accents:
Using the fine liner brush, add very thin horizontal lines parallel to your thick bands. This mimics the weave of tartan fabric.
Wobbly Lines?
Don’t stress over perfectly straight edges. A slightly uneven, hand-painted look actually makes the ‘woven’ fabric effect more convincing and rustic.
Step 4: Finishing Touches
-
Inspect the checks:
Step back and look at your grid. If the red squares between the lines look too plain, create a ‘glimmer’ of texture by dry-brushing faint black hatching lines into the red areas. -
Clean up:
Use a small brush with red paint to tidy up any black smudges that went outside the desired grid lines. -
Seal the work:
Once the paint is completely cured (wait at least an hour), spray the pumpkin with a clear matte sealer to protect the design and unify the sheen.
Place your finished pumpkin near a window or fireplace to let that warm red pattern shine through the autumn gloom


Red Pumpkin With White Polka Dots
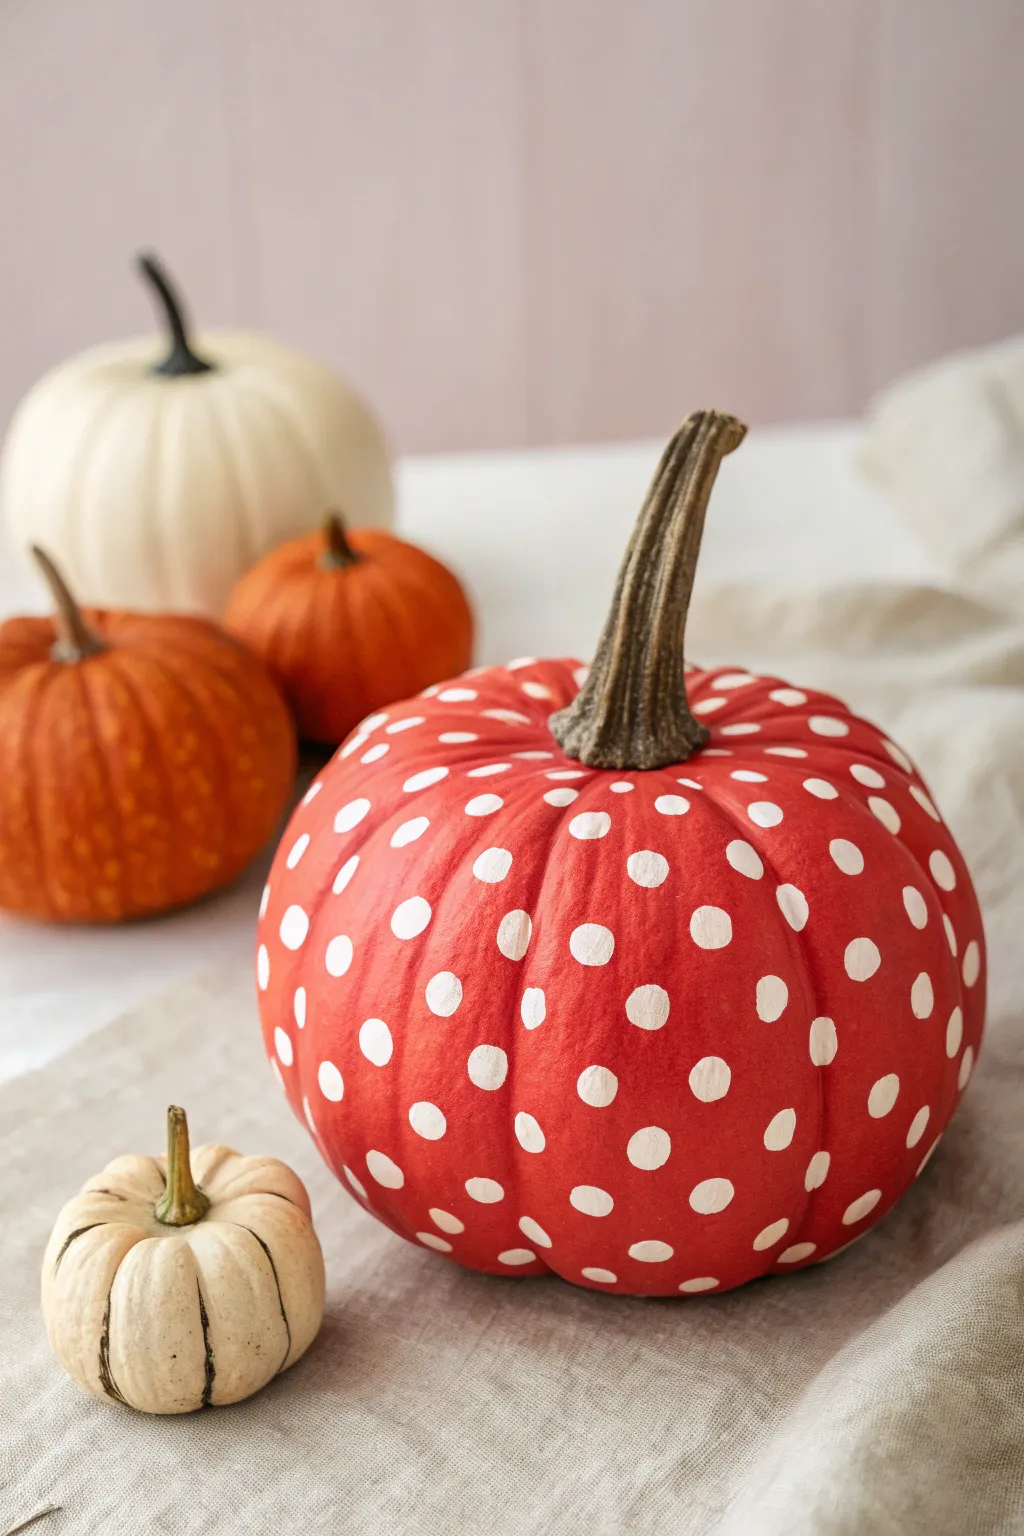
Transform a standard pumpkin into a vibrant, fashion-forward fall decoration with this striking red and white polka dot design. The bold crimson base pairs perfectly with crisp, clean dots for a look that feels both classic and surprisingly modern.
How-To Guide
Materials
- One medium-sized pumpkin (real or faux)
- Red acrylic craft paint (matte or satin finish)
- White acrylic craft paint
- Medium flat paintbrush
- Small round paintbrush (size 4 or 6)
- Round foam pouncer (approx 0.5 to 0.75 inch diameter)
- Painter’s tape or stencil tape (optional, for the stem)
- Clear matte sealer spray (optional)
- Paper palette or paper plate
- Water cup and paper towels
Step 1: Preparation and Base Coat
-
Clean the surface:
Begin by thoroughly wiping down your pumpkin with a damp cloth to remove any dirt, dust, or oils. If you are using a real pumpkin, make sure it is completely dry before moving on to painting. -
Protect the stem:
To keep that natural, rustic stem looking pristine, carefully wrap it with painter’s tape right where it meets the pumpkin’s skin. Since the stem on this pumpkin is quite textured, press the tape firmly into the crevices. -
Load your vibrant red:
Squeeze a generous amount of red acrylic paint onto your palette. I tend to choose a shade closer to a bright tomato red rather than a deep burgundy for maximum contrast. -
Apply the first coat:
Using your medium flat brush, apply the first layer of red paint. Use long, vertical strokes starting from the top near the stem and pulling down towards the base, following the natural ribs of the pumpkin. -
Let it dry completely:
Allow this first coat to dry for at least 30 to 45 minutes. Acrylics dry quickly, but painting over wet paint can lift the previous layer and create streaks. -
Add a second coat:
Once dry to the touch, apply a second coat of red. This ensures full opacity so the orange or white of the original pumpkin doesn’t peek through. A third coat might be necessary depending on your paint’s thickness. -
Paint the bottom:
Don’t forget the underside! Carefully tilt the pumpkin or flip it over once the top is dry to paint the bottom curves, ensuring the red color wraps seamlessly underneath.
Step 2: Creating the Polka Dots
-
Prepare the white paint:
Dispense a puddle of white acrylic paint onto your palette. You want a creamy consistency that isn’t too runny, so the dots hold their shape without dripping. -
Load the foam pouncer:
Dip your round foam pouncer straight down into the white paint. Dab it a few times on a clean part of the palette to ensure the sponge is evenly coated but not overloaded with excess paint. -
Start the central row:
Identify a central rib on the pumpkin that faces forward. Press the pouncer gently but firmly against the pumpkin surface to create your first dot. Lift straight up to avoid smudging. -
Establish spacing:
Working vertically down that same rib, add more dots. Aim for roughly 1 to 1.5 inches of space between each dot. Visualizing a grid helps keep things orderly. -
Offset the next row:
Move to the adjacent section (the valley between the ribs). Place these dots so they align horizontally with the empty spaces of your first row, creating a staggered brick-lay pattern. -
Rotate and repeat:
Continue this alternating pattern around the entire pumpkin. If you encounter a particularly deep groove, rock the pouncer slightly side-to-side to ensure the paint reaches the bottom of the curve. -
Fill in gaps:
Check near the stem and the base. You may need to add partial dots or smaller dots to fill awkward spaces where the ribs converge. -
Touch up with a brush:
Foam pouncers can sometimes leave small bubbles or uneven edges. Use your small round paintbrush to smooth out the white paint circles or sharpen the edges for a crisp finish. -
Remove the tape:
Carefully peel away the painter’s tape from the stem. If any red paint bled through, you can gently scrape it off with a damp toothpick or touch it up with a bit of brown paint. -
Seal the artwork:
Once all dots are fully dry (give them at least an hour), take the pumpkin outside and spray it with a light coat of clear matte sealer to protect the paint from chipping.
Clean Circle Tip
If your foam pouncer feels slippery, twist it slightly (just a tiny bit!) as you lift it off the pumpkin surface. This breaks the suction and often leaves a cleaner edge.
Pop of Gold
For a glamorous twist, paint the stem metallic gold after the red paint dries. The customized stem adds a chic, high-end finish that complements the red beautifully.
Place your bold spotted creation among softer neutral pumpkins for a display that truly pops.


Red Pumpkin With Painted Vine Swirls
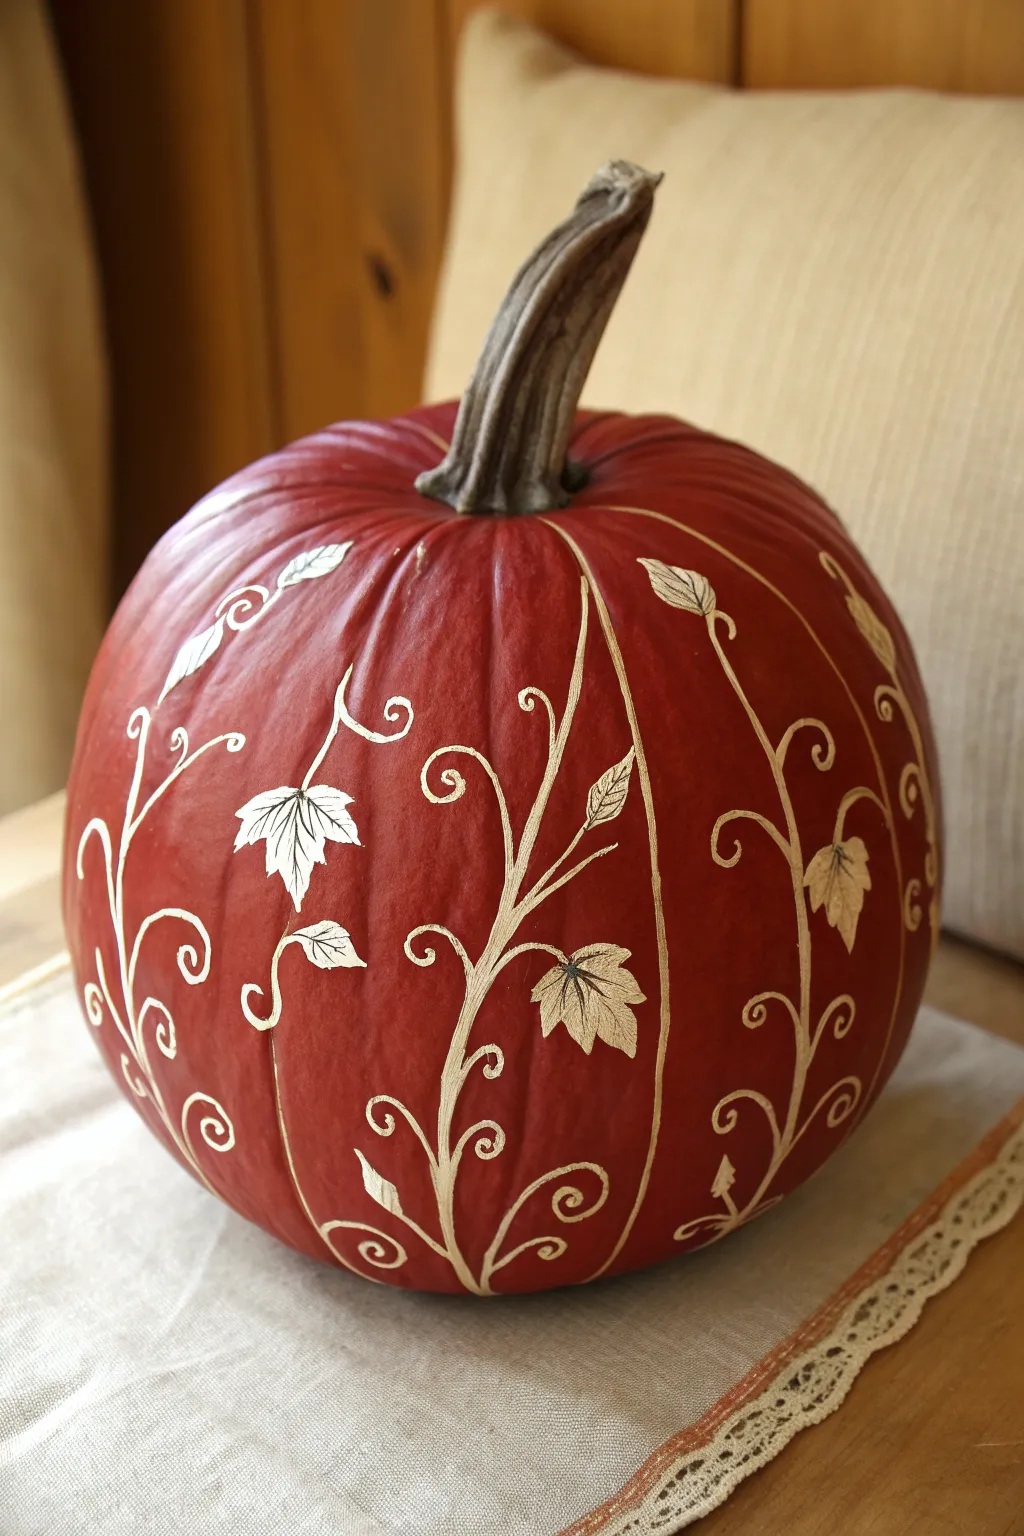
Transform a classic autumn gourd into a sophisticated centerpiece featuring delicate cream vines on a deep red backdrop. This project combines bold color blocking with intricate line work to create a piece that feels both rustic and refined.
Step-by-Step Tutorial
Materials
- Medium-sized pumpkin (real or faux)
- Deep red acrylic paint (matte finish suggested)
- Cream or off-white acrylic paint
- Medium flat paintbrush
- Fine liner brush (size 0 or 00)
- White colored pencil or chalk (for sketching)
- Paper towels
- Clear spray sealant (matte or satin)
- Palette or paper plate
Step 1: Base Preparation
-
Clean surface:
Begin by thoroughly wiping down your pumpkin with a damp cloth to remove any dirt or oils. If using a real pumpkin, ensure it is completely dry before proceeding. -
Apply base coat:
Using a medium flat brush, apply a layer of deep red acrylic paint over the entire surface of the pumpkin, avoiding the stem. Use long, vertical strokes that follow the natural ribs of the pumpkin. -
Dry and repeat:
Allow the first coat to dry completely for about 20-30 minutes. Apply a second coat to ensure full opacity and rich color saturation. Let this dry for at least an hour. -
Detail the stem:
Leave the stem natural for contrast, or lightly dry-brush it with a dark brown or grey paint to enhance its texture without fully covering it.
Clean Up Mistakes
Smudged a line? Dip a clean, damp Q-tip in water and gently erase the wet paint. If it’s already dry, paint over the error with your base red color.
Step 2: Drafting the Design
-
Plan the vines:
Using a white colored pencil or a piece of chalk, lightly sketch vertical guidelines following the natural indentations between the pumpkin’s ribs. These will be the main arteries for your vines. -
Sketch swirls:
Along these vertical lines, lightly draw large S-curves and spiral tendrils branching outward. Aim for an organic flow where the vines curve away from each other symmetrically or in alternating patterns. -
Place leaves:
Mark positions for the leaves at various points along the vines. Sketch a mix of small, simple leaf shapes and larger, maple-like leaves with visible veins.
Step 3: Painting the Vines
-
Load the liner brush:
Dip your fine liner brush into the cream paint. You want the paint to be fluid but not watery—add a tiny drop of water if the paint feels too thick to drag smoothly. -
Paint main stems:
Start at the bottom of the pumpkin and paint the main vertical stems, pulling the brush upward with steady, even pressure. I find it helpful to anchor my pinky finger on the pumpkin for stability. -
Add swirls:
Branch off from the main stem to create the swirling tendrils. Use less pressure at the very end of the stroke to create a tapered, elegant point. -
Paint outlines:
Outline the leaf shapes you sketched earlier with the fine liner brush. Keep the lines crisp and delicate. -
Fill leaves:
Carefully fill in the larger leaves with the cream paint. You might need two thin coats here to cover the dark red background completely. -
Add veins:
Once the filled leaves are dry, mix a tiny amount of the background red with a little brown or black to create a dark contrasting color. Paint very fine veins inside the cream leaves for a realistic botanical look.
Fluid Lines
To get super smooth swirls, mix a drop of water or acrylic flow medium into your cream paint. It helps the brush glide longer without stopping.
Step 4: Finishing Touches
-
Refine details:
Look over your design for any uneven lines. Use the liner brush to smooth out curves or add tiny extra curlicues to fill empty spaces. -
Clean markings:
If any chalk or pencil guidelines are still visible, gently wipe them away with a barely damp cloth or cotton swab once the paint is fully cured. -
Seal the work:
Take the pumpkin to a well-ventilated area and spray it lightly with a clear matte or satin sealant to protect your handiwork from scratches and moisture.
Place your elegant red pumpkin on a mantle or table runner to enjoy the polished vibe it adds to your seasonal decor
BRUSH GUIDE
The Right Brush for Every Stroke
From clean lines to bold texture — master brush choice, stroke control, and essential techniques.
Explore the Full Guide
Candy-Apple Red Pumpkin Shine

Transform a standard orange pumpkin into a sophisticated centerpiece with this deep, translucent red finish that mimics the shine of a candy apple. By layering translucent glazes over a base coat, you achieve a rich, dimensional color that glows beautifully against dark backgrounds.
Step-by-Step
Materials
- Medium-sized pumpkin (real or high-quality faux)
- Acrylic craft paint (Deep Red, Crimson, and Orange)
- High-gloss glazing medium or clear varnish
- Metallic copper or bronze acrylic paint (for stem)
- Dark grey or black acrylic wash (optional for shading)
- Wide, soft synthetic brittle brush (1-inch width)
- Fine detail brush
- Paper towels
- Warm water
- Disposable mixing palette or plate
Step 1: Preparation and Base Layer
-
Clean surface:
Begin by thoroughly wiping down your pumpkin with a damp cloth to remove any dirt or waxy residue. If you are using a real pumpkin, ensure it is completely dry before proceeding. -
Prime the stem:
Using painter’s tape, carefully mask off the base of the stem. Paint the stem with a thin layer of matte white or light tan to neutralize its natural color, providing a clean slate for later detailing. -
Mix the base color:
Combine a dollop of deep orange acrylic paint with a small amount of crimson. You want a warm, reddish-orange base tone that isn’t too dark yet. -
Apply base coat:
Using your wide soft brush, apply the orange-red mixture over the entire pumpkin body. Use vertical strokes that follow the natural ribs of the gourd to keep the texture looking organic. -
Dry completely:
Let this base layer dry fully. It needs to be dry to the touch so the subsequent glazing layers sit on top rather than mixing in.
Step 2: Building the Red Glaze
-
Create the glaze:
On your palette, mix your deep red acrylic paint with a generous amount of high-gloss glazing medium. The ratio should be roughly 1 part paint to 3 parts medium creates a semi-transparent, jelly-like consistency. -
First glaze application:
Brush this red glaze over the dry base coat. Because it is translucent, the orange underneath will shine through, creating an instant depth that flat paint can’t achieve. -
Enhance the grooves:
While the first glaze is still wet, dip the corner of your brush into straight crimson paint (unthinned) and run it specifically along the recessed vertical grooves of the pumpkin to deepen the shadows. -
Dry and repeat:
Allow the first glaze layer to dry completely. It will likely look a bit streaky; this is normal. Apply a second coat of the red glaze mixture to even out the color and build that candy-shell finish. -
Add final gloss:
Once the color creates that rich, saturated look you see in the photo, apply a final layer of clear high-gloss varnish to maximize the shine.
Glazing Pro Tip
Don’t overwork the glaze. Apply it in long, smooth vertical strokes and leave it alone. Excessive brushing while wet will cause the finish to become cloudy
Step 3: Stem and Finishing Details
-
Base coat the stem:
Remove the tape from the stem. Paint the entire stem with a dark, earthy green or brown base coat. -
Dry brush texture:
Take a dry brush with a tiny amount of metallic bronze or copper paint. Wipe most of it off on a paper towel, then lightly drag the brush over the raised ridges of the stem to highlight the texture. -
Add stem contrast:
I like to mix a very watery black or dark brown wash and dab it into the deep crevices where the stem attaches to the pumpkin body, adding realistic grime and shadow. -
Highlight the body:
If you want extra dramatic lighting effects, you can mix a tiny drop of white into your gloss medium and glaze just the high points of the pumpkin ribs to create artificial reflection spots. -
Final inspection:
Check for any drips that may have pooled at the bottom of the pumpkin and wipe them away before the final cure.
Level Up: Galaxy Shine
Mix extremely fine iridescent red or gold mica powder into your final clear gloss layer. This adds a subtle, shimmering metallic sparkle meant for close-up viewing
Place your finished pumpkin on a slate or dark wood surface to really let that glossy red finish pop
Dripping Poison Red Pumpkin
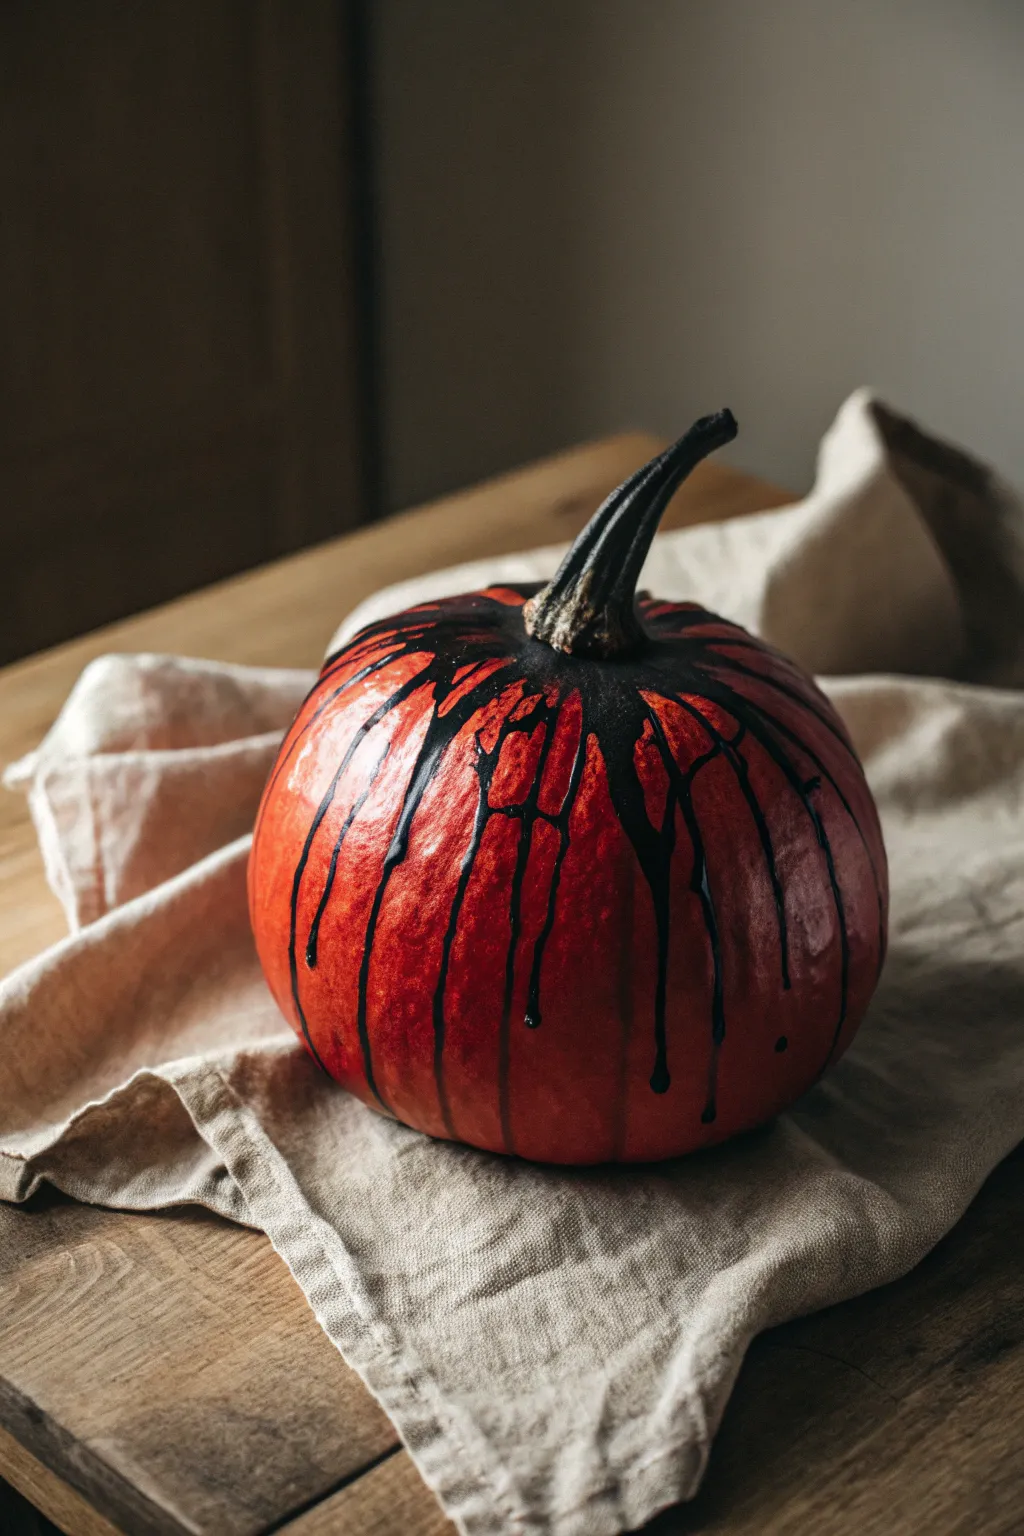
Transform a standard pumpkin into a strikingly eerie centerpiece with this high-contrast design. The vibrant red base combined with glossy black drips creates a look that is both sophisticated and suitably spooky for the season.
Step-by-Step Tutorial
Materials
- Medium-sized pumpkin (real or faux)
- Bright red acrylic paint (gloss or satin finish)
- Black acrylic paint (high gloss) or black pouring medium
- Wide flat paintbrush
- Small round paintbrush
- Medium squeeze bottle or piping bag (optional)
- Clean cloth or rag
- Rubbing alcohol
- Newspaper or drop cloth (for surface protection)
- Primer (white or gray, optional but recommended)
Step 1: Preparation and Base Coating
-
Clean the Surface:
Begin by thoroughly wiping down your pumpkin with a damp cloth to remove any dirt or field dust. -
Degrease:
Take a cloth with a small amount of rubbing alcohol and wipe the entire surface. This removes natural oils or manufacturing residues that might repel paint. -
Dry Completely:
Allow the pumpkin to air dry completely before applying any paint, ensuring a perfect bond. -
Apply Primer:
If your pumpkin is dark orange or green, coat it with a layer of white or gray primer first. This will make your red topcoat pop vividly. -
First Red Layer:
Using your wide flat brush, apply a generous coat of bright red acrylic paint. Move in vertical strokes following the pumpkin’s ribs. -
Dry and Assess:
Let the first coat dry for about an hour. If you can still see the underlying color, it needs another layer. -
Build Saturation:
Apply a second (and potentially third) coat of red paint until the color is deep, solid, and completely opaque. -
Final Cure:
Allow the red base coat to cure fully for at least 2-3 hours or overnight; the surface must be totally dry before starting the drip effect.
Dips Running Too Fast?
If paint runs too quickly to the bottom, it’s too thin. Let it sit on your palette for 10 minutes to thicken slightly, or mix in more heavy-body acrylic before trying again.
Step 2: Creating the Toxic Drip
-
Prepare Black Paint:
You need fluid consistency for the drips. If using standard tube acrylics, mix the black paint with a little pouring medium or water until it flows like heavy cream. -
Load Your Tool:
Pour your thinned black paint into a squeeze bottle or load up a medium round brush heavily with paint. -
Start at the Stem:
Begin painting the very top of the pumpkin right around the base of the stem, creating a solid black collar. -
Paint the Stem:
Extend the black paint all the way up the stem itself, ensuring every nook and cranny of the handle is coated. -
Initiate the First Drip:
I like to start the first major drip at the highest curve of the pumpkin. Squeeze a generous bead of paint or press your loaded brush down so gravity pulls a line of paint downward. -
Vary the lengths:
Continue adding drips around the circumference. Make some travel halfway down the pumpkin and others stop higher up for a natural, organic look. -
Control the Flow:
If a drip is moving too fast, quickly catch it with a clean brush or tilt the pumpkin backward slightly to slow it down. -
Connect the Top:
Ensure all your drip lines connect smoothly back to the solid black collar around the stem so it looks like one cohesive spill. -
Add Minor Drips:
Place smaller, thinner drips in between the larger ones to add variety and density to the design. -
Refine the Ends:
As the drips settle, use a small brush to round out the bottom of any drip that looks too sharp or streaky. -
Let it Set:
Set the pumpkin on a flat, protected surface and disturb it as little as possible while the thick paint dries.
Make It Sparkle
While the black drips are still wet, lightly dust extremely fine black or dark red glitter onto the paint for a subtle, shimmering ‘poison potion’ effect.
Once fully dry, place your beautifully dangerously designed pumpkin on display to intrigue your guests

PENCIL GUIDE
Understanding Pencil Grades from H to B
From first sketch to finished drawing — learn pencil grades, line control, and shading techniques.
Explore the Full Guide
Red-to-Black Ombre Pumpkin
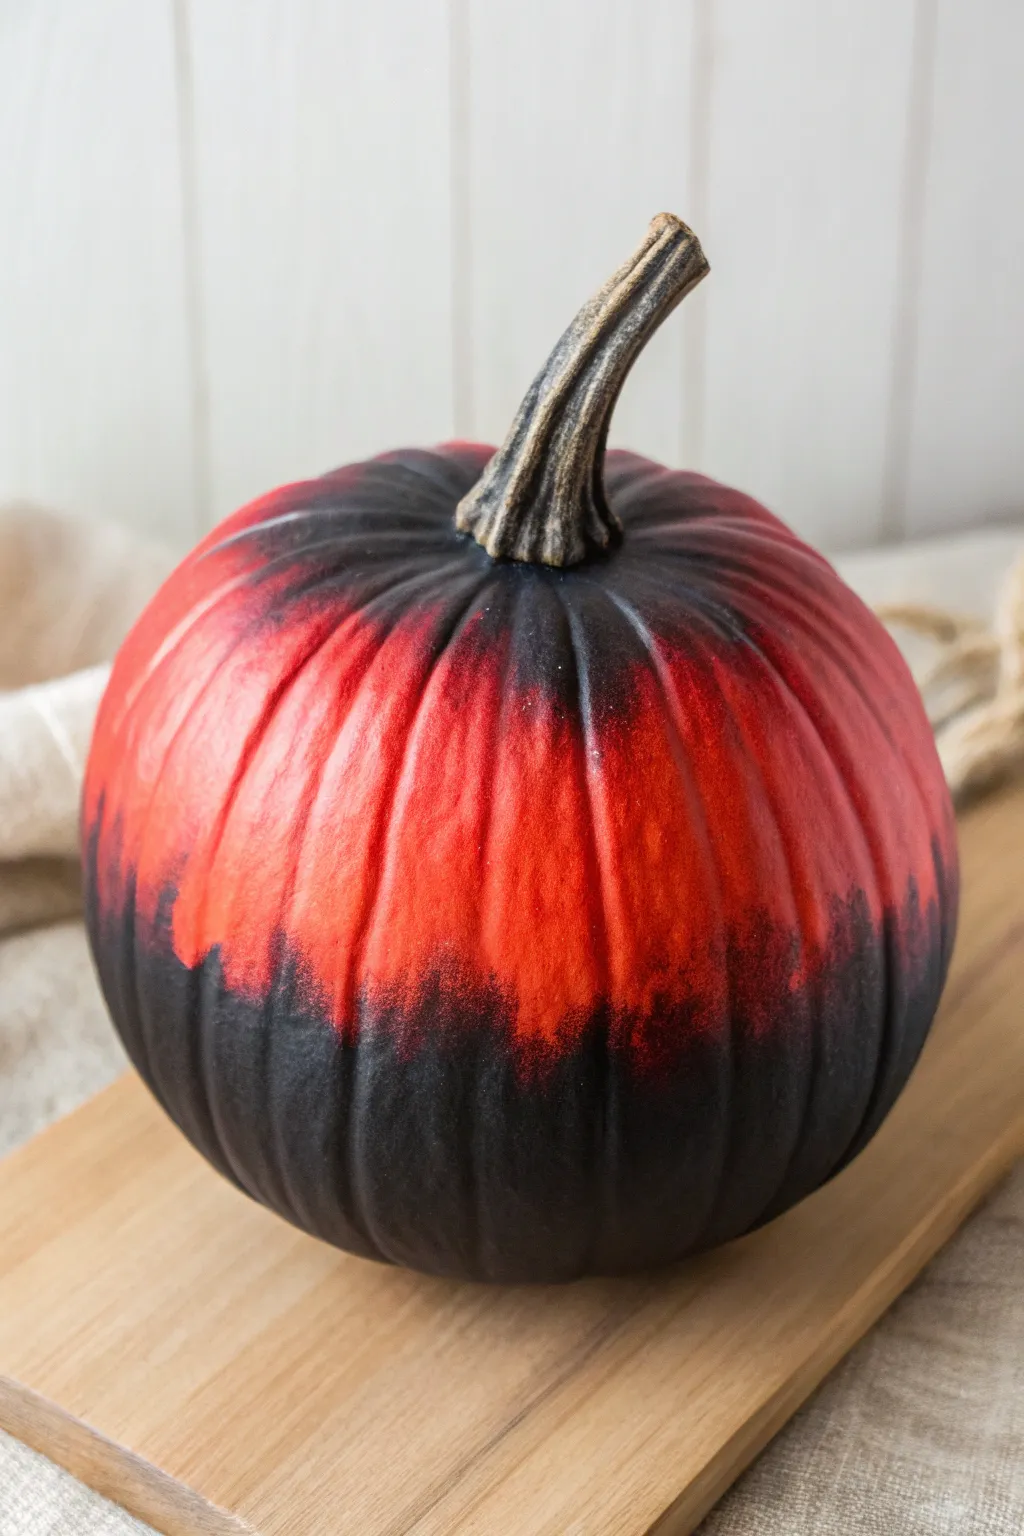
Transform a standard gourd into a gothic masterpiece with this striking red-to-black fade. The textured transition between deep charcoal and vibrant crimson gives this pumpkin a dramatic, moody look perfect for Halloween decor.
Step-by-Step Guide
Materials
- Medium-sized faux or real pumpkin (white or orange base)
- Black acrylic craft paint (matte finish)
- Bright red acrylic craft paint (satin or matte)
- Dark red or burgundy acrylic paint (optional, for blending)
- Large flat paintbrush
- Medium round paintbrush
- Natural sea sponge or kitchen sponge (cut into pieces)
- Painter’s tape
- Paper plate or palette
- Water cup
- Paper towels
- Matte clear sealant spray (optional)
Step 1: Preparation and Base Layer
-
Clean surface:
Begin by wiping down your pumpkin with a damp cloth to remove any dust, dirt, or wax. If using a real pumpkin, ensure it is completely dry before proceeding. -
Protect the stem:
Wrap the stem carefully with painter’s tape. This project looks best with a natural, unpainted stem contrasting against the dark paint, so take your time to seal the base of the stem well. -
Paint the red center:
Squeeze a generous amount of bright red paint onto your palette. Using a large flat brush, paint a wide band around the entire middle section of the pumpkin, leaving the very top and very bottom bare for now. -
Apply second coat:
Let the first red layer dry for about 15-20 minutes. Apply a second coat of bright red to ensure opacity, especially if you are covering an orange pumpkin skin.
Fixing Muddy Colors
If the red and black mix into a dull grey, stop blending immediately. Let the paint dry fully, then sponge fresh pure red or pure black over the muddy area to restore vibrancy.
Step 2: Creating the Ombré Effect
-
Paint the bottom black:
Using a clean brush, paint the bottom third of the pumpkin with black acrylic paint. Don’t worry about a straight line where it meets the red; an uneven edge is actually better for blending. -
Paint the top black:
Paint the top third of the pumpkin black, surrounding the taped stem. Bring the black paint down towards the red section, stopping just before the colors touch. -
Prepare the sponge:
Dampen your sea sponge slightly and wring it out completely so it is barely moist. Dip the sponge into a small amount of black paint on your palette. -
Blot excess paint:
Tap the sponge on a paper towel to remove the bulk of the pigment. You want a ‘dry brush’ effect rather than a gloopy stamp. -
Blend the bottom transition:
Gently dab the sponge along the line where the bottom black paint meets the red. Work the black paint upwards into the red zone lightly to create a textured, uneven fade. -
Blend the top transition:
Repeat the sponging process at the top. Dab black paint downwards from the dark top section into the red middle. I invariably find that less is more here; build the darkness slowly. -
Add depth color:
If the transition looks too harsh, mix a tiny drop of black into your red paint to create a burgundy shade. Sponge this intermediate color lightly between the pure black and bright red zones. -
Refine the gradient:
Continue stippling with the sponge until you are happy with the fade. You can go back in with a clean sponge and fresh red paint to push the red back into the black areas if things get too dark.
Velvet Texture
For a spooky, fabric-like finish, sprinkle ultra-fine black flocking powder or embossing powder onto the black painted sections while they are still wet.
Step 3: Finishing Touches
-
Paint the grooves:
Use a medium round brush to gently feather black paint into the deep vertical grooves of the pumpkin within the red section. This accentuates the pumpkin’s natural shape. -
Dry completely:
Allow the pumpkin to sit undisturbed for at least an hour to ensure the thick layers of sponged paint are fully dry. -
Remove tape:
Carefully peel away the painter’s tape from the stem. If any paint seeped through, you can scratch it off gently with a fingernail or craft knife. -
Seal the work:
Take the pumpkin to a well-ventilated area and apply a light coat of matte clear sealant spray. This protects the gradient from chipping and gives the finish a unified sheen.
Place your creation on a wooden board or mantle for a sophisticated seasonal display
Red Pumpkin With Gothic Lace Pattern
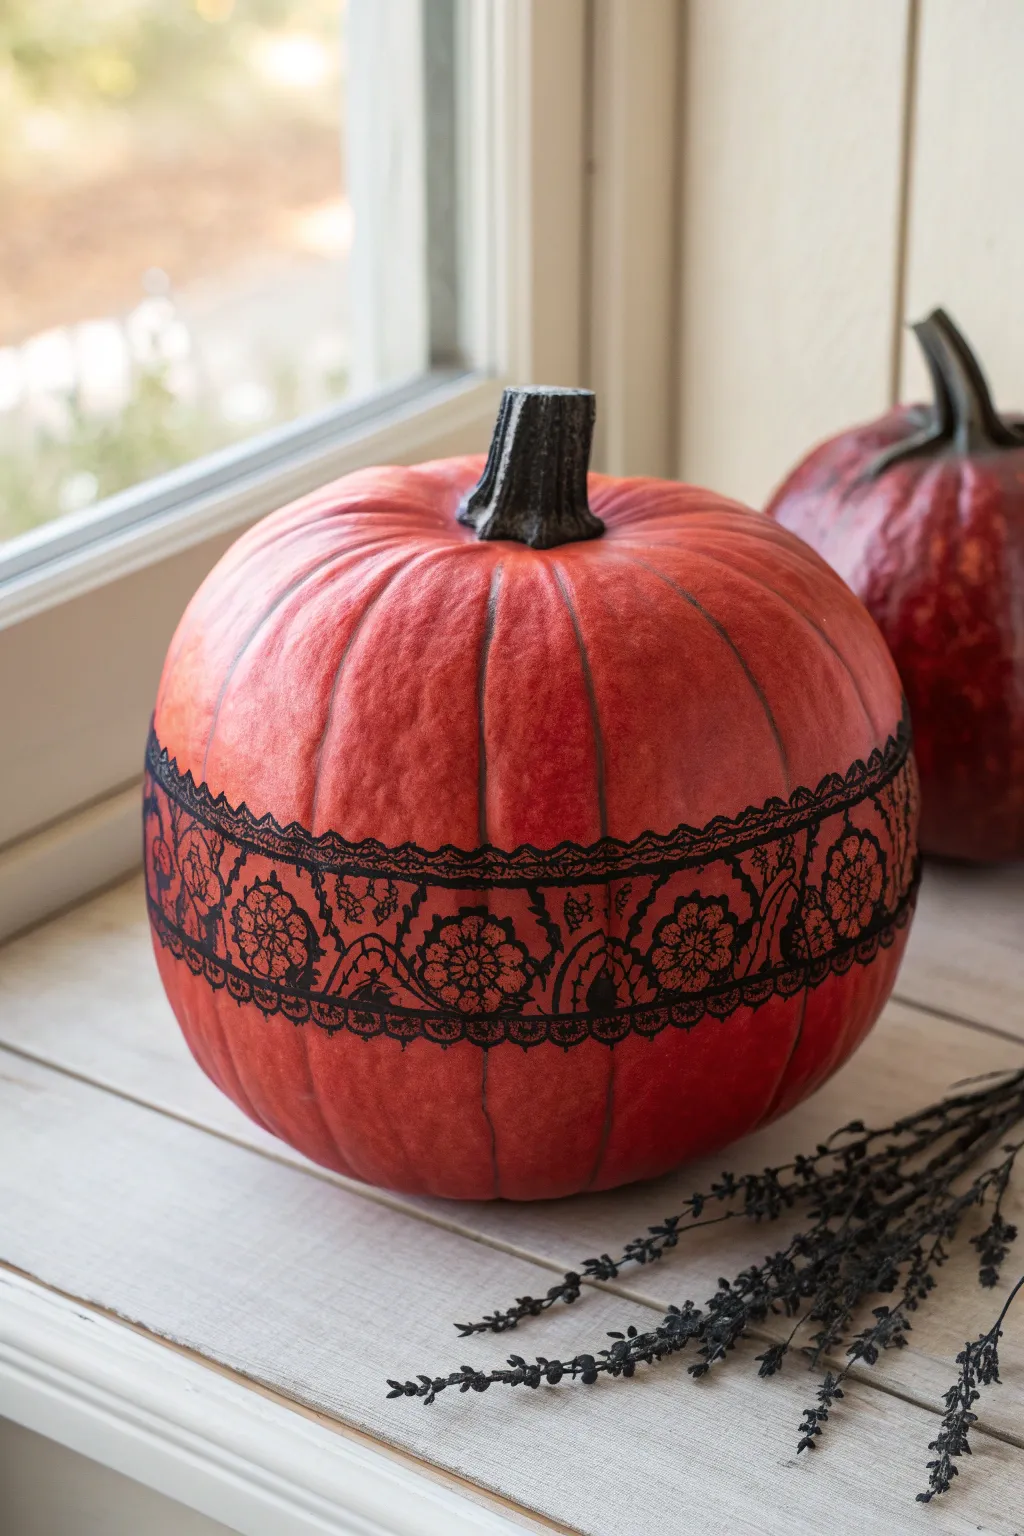
Transform a simple pumpkin into a sophisticated centerpiece with this striking red and black design. By combining deep crimson hues with a delicate, faux-lace band, you’ll create a decoration that balances autumn warmth with a touch of gothic mystery.
Step-by-Step Tutorial
Materials
- Faux pumpkin (medium size)
- Matte red acrylic paint (deep crimson or rusty red)
- Black fine-tip paint pen or permanent marker
- Wide black lace trim (about 2-3 inches wide)
- Mod Podge or decoupage glue
- Foam sponge brush
- Small flat paintbrush
- Scissors
- Matte clear sealer spray
- Pencil
- Paper towel
Step 1: Base Coat Preparation
-
Clean the surface:
Wipe down your faux pumpkin with a damp paper towel to remove any dust or oils. Let it dry completely before starting. -
Apply the first coat:
Using a foam sponge brush, apply a layer of matte red acrylic paint over the entire pumpkin. Brush vertically from the stem down to the base to follow the natural ribs. -
Deepen the color:
Allow the first coat to dry for about 20 minutes. Apply a second coat to ensure rich, opaque coverage, focusing on any light spots. -
Highlight the ribs:
If you want extra dimension, mix a tiny drop of black into your red paint. Use a small brush to lightly paint inside the vertical crevices of the pumpkin, then blend outward with a dry brush. -
Let it cure:
Set the pumpkin aside for at least an hour until the paint is fully dry to the touch and no longer tacky.
Lace Lifting?
If the lace keeps popping up in the pumpkin’s deep grooves, use sewing pins to hold the fabric in place while the glue dries, then remove them later.
Step 2: Applying the Lace Band
-
Measure the lace:
Wrap your black lace trim around the widest part or center of the pumpkin to determine length. Cut the lace, leaving about half an inch of overlap. -
Apply adhesive:
Using a clean brush, apply a generous band of Mod Podge or decoupage glue around the pumpkin’s equator, matching the width of your lace. -
Position the lace:
Carefully press the lace into the wet glue. Start at the back of the pumpkin (choose the side you like least) to hide the seam. -
Smooth it out:
Gently tap the lace with your fingers or a dry brush to ensure it adheres into the grooves of the pumpkin. Don’t pull too tight, or it will bridge over the gaps rather than sitting in them. -
Seal the lace:
Apply another layer of Mod Podge directly over the top of the lace. This seals it and ensures all the intricate edges stay flat against the surface. Let this dry clear.
Gothic Glam
Add small black adhesive gemstones or rhinestones to the center of the lace flowers. This adds a subtle sparkle that catches candlelight beautifully.
Step 3: Detailing and Finishing
-
Enhance the pattern:
Once the glue is dry, use a fine-tip black paint pen to trace the upper and lower edges of the lace band. This creates a crisp border that makes the lace look painted on. -
Fill in gaps:
I find that sometimes the lace pattern isn’t dark enough against the red. Use the marker to darken the centers of any flowers or thick parts of the lace pattern for higher contrast. -
Add faux stitching:
Draw tiny vertical lines or dots just above and below the lace band to mimic intricate stitching or embroidery detail. -
Paint the stem:
Use black acrylic paint to cover the stem completely. For a realistic look, dry brush a tiny bit of grey or brown over the black once dry. -
Final seal:
Take the pumpkin to a well-ventilated area and spray it lightly with a matte clear sealer. This unites the sheen of the paint and glue for a professional finish.
Place your finished pumpkin near a window or fireplace to let the intricate lace details shine


Red Pumpkin With Spiderweb Lines
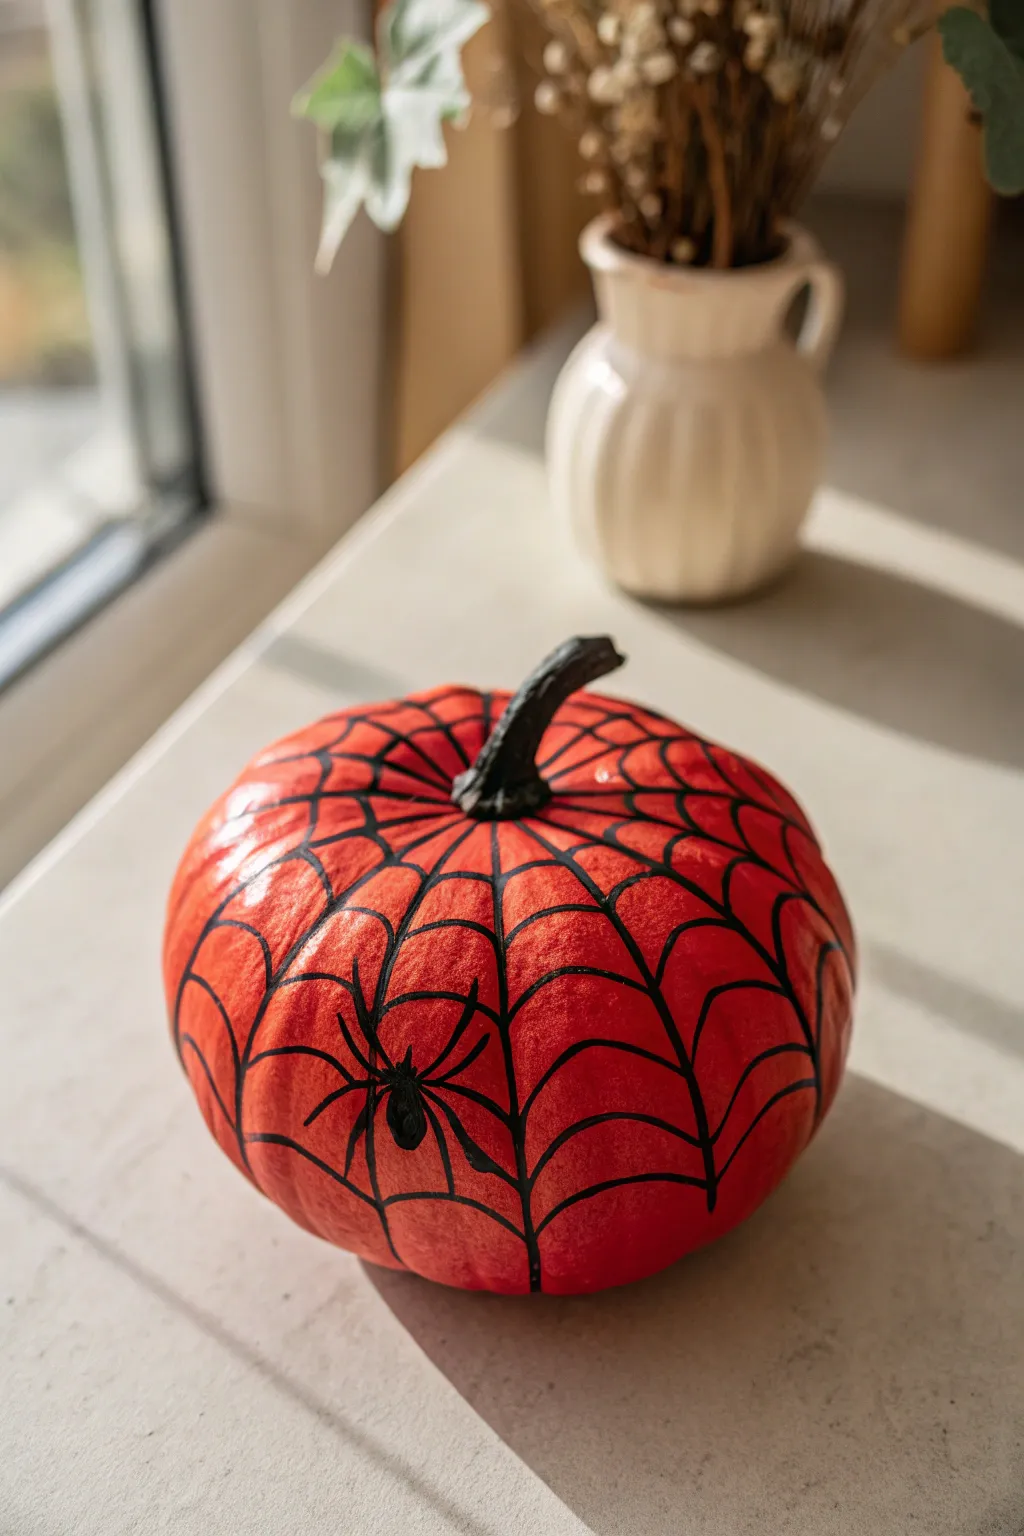
Transform a standard pumpkin into a superhero-inspired masterpiece with this vibrant red and black design. By layering bold color with precise web detailing, you’ll create a striking decoration that looks fantastic perched on a sunny windowsill.
Detailed Instructions
Materials
- Real or faux pumpkin (smooth surface works best)
- Bright red acrylic paint (matte or satin finish)
- Black acrylic paint or a broad black paint marker
- Medium flat paintbrush
- Fine liner brush (if not using a paint marker)
- Clear spray sealant (matte or glossy)
- Painter’s tape (optional, for stem protection)
- Paper plate or palette
- Water cup and paper towels
Step 1: Base Preparation
-
Clean the Surface:
Begin by wiping down your pumpkin with a damp cloth to remove any dirt or oils. If you are using a real pumpkin, ensure it is completely dry before moving on. -
Protect the Stem:
Wrap the stem carefully with painter’s tape if you want to keep its natural color. Alternatively, you can choose to paint around it carefully with your brush. -
First Coat of Red:
Load your medium flat brush with bright red acrylic paint. Apply a thin, even layer over the entire surface of the pumpkin, brushing from top to bottom. -
Let it Dry:
Allow the first coat to dry completely. This usually takes about 20-30 minutes depending on the thickness of the paint and humidity. -
Second Coat for Vibrancy:
Apply a second coat of red paint to ensure full, opaque coverage. The bright, saturated red shown in the photo relies on a solid base, so I like to be thorough here. -
Stem Detailing:
If you taped the stem, remove the tape now. If you want a darker contrast like the photo, paint the stem black or dark brown using a smaller brush.
Clean Lines Hack
Use a black acrylic paint pen instead of a brush for the webbing. It offers much better control over line thickness on the curved surface.
Step 2: Web Design
-
Start from the Stem:
Using your black paint marker or a fine liner brush tailored for detail work, start solely at the base of the stem. -
Draw Vertical Ribs:
Draw long, vertical lines extending from the stem down towards the base of the pumpkin. Follow the natural grooves of the pumpkin as guides to keep spacing organic. -
Space the Lines:
Aim for about 8 to 10 vertical lines around the pumpkin to create the main structure of the web. -
Begin the Scoops:
Starting near the top, draw curved, scallop-shaped lines connecting the vertical ribs. These are the horizontal threads of the web. -
Curve Direction:
Ensure the curve of each connecting line droops slightly downward in the middle, creating that classic ‘U’ shape indicative of a spiderweb. -
Work Downward:
Continue adding rows of these curved lines, moving down the pumpkin. Space them wider apart as the pumpkin gets wider near the middle. -
Thicken Intersections:
Go back over the points where lines cross if needed. Slightly thickening these intersections can make the web look more structural and bold.
Oops! Paint Smudge?
If you smudge a black line, let it dry completely, paint over the mistake with red, let that dry, and then redraw the black line.
Step 3: Adding the Spider
-
Choose a Spot:
Pick a spot in one of the open web sections for your spider. The example shows it positioned slightly off-center on the side. -
Paint the Body:
Draw a small oval for the abdomen and a smaller circle attached to it for the head using your black marker or liner brush. -
Add Legs:
Draw four legs extending from each side of the body/head area. Remember that spider legs have joints, so give them a little bend. -
Connect to Web:
Draw a tiny single line connecting the spider to the nearest web line so it doesn’t look like it’s floating in mid-air. -
Final Seal:
Once all paint is totally dry (give it an hour), spray a light coat of clear sealant over the pumpkin to protect the design and give it a finished sheen.
Place your striking red webbed pumpkin near a window or on a porch step to catch everyone’s eye this season
Red Pumpkin With Bold Pop-Art Lips
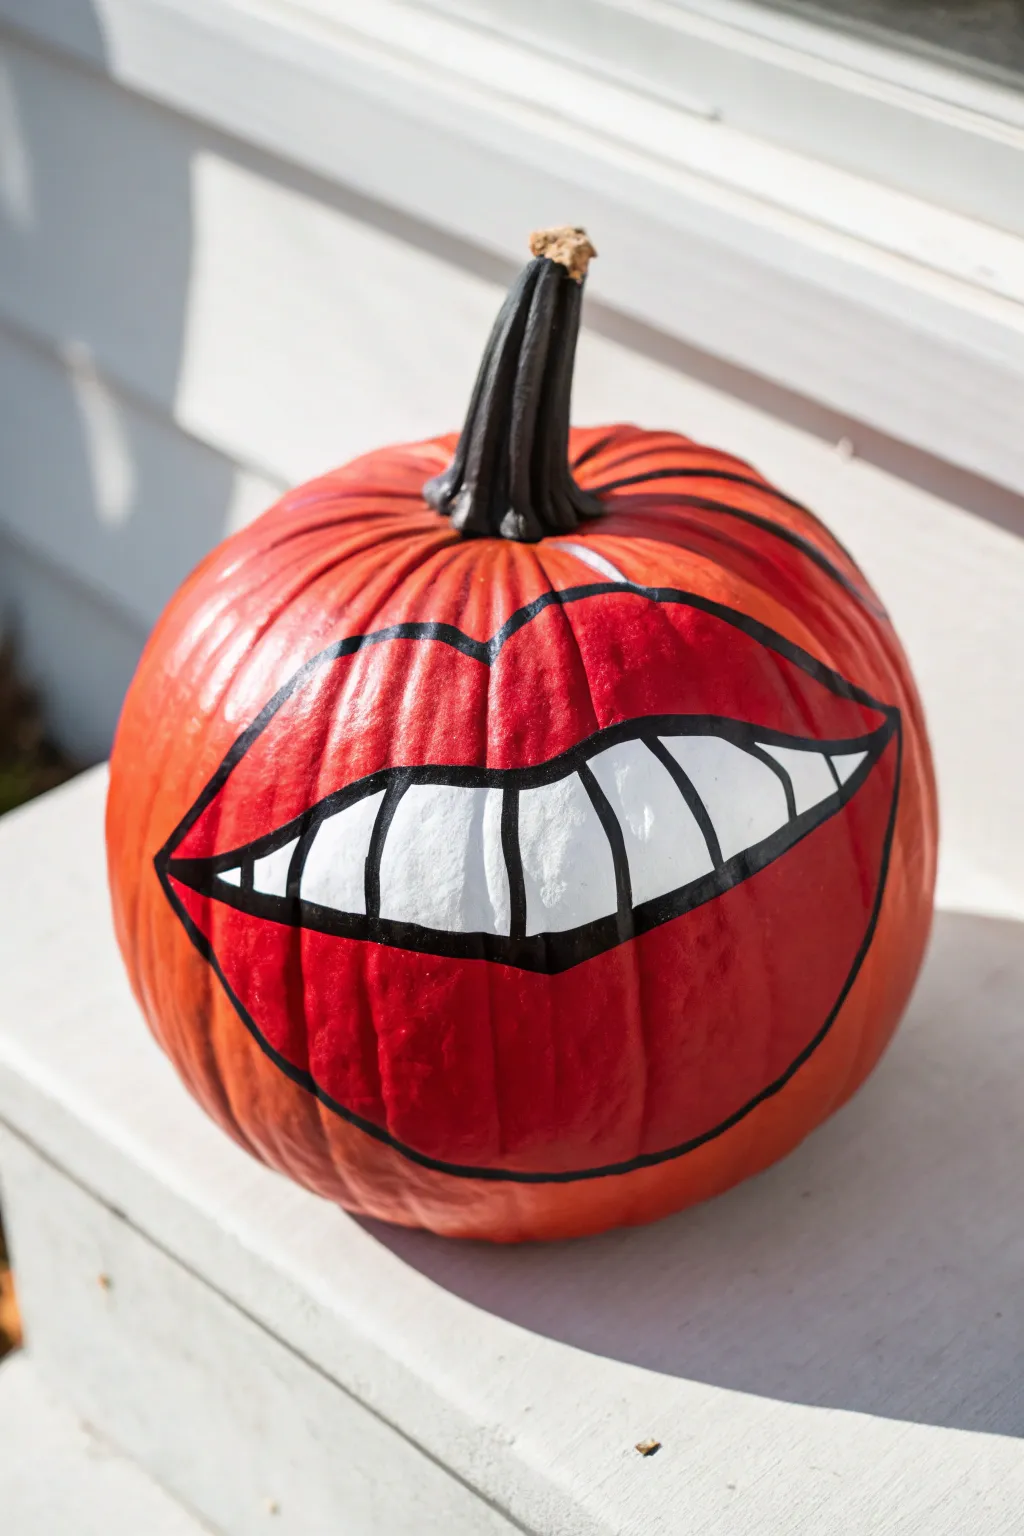
Transform a standard gourd into a striking piece of modern art with this bold lip design. The bright red base and graphic black outlining give this pumpkin a fun, comic book-inspired vibe that stands out on any porch.
Step-by-Step Tutorial
Materials
- Medium-sized pumpkin (cleaned and dried)
- Bright red acrylic craft paint
- White acrylic craft paint
- Black acrylic paint or paint pen
- Wide flat paintbrush (approx 1 inch)
- Medium round paintbrush
- Fine detail brush or small liner brush
- Pencil for sketching
- Clear spray sealant (optional, matte or gloss)
Step 1: Base Coat
-
Prep the surface:
Begin by wiping down your pumpkin with a damp cloth to remove any dirt or residue. Ensure it is completely dry before you start painting. -
Paint the stem:
Using black acrylic paint and a medium brush, coat the entire stem. Get into the crevices for solid coverage, but don’t worry about being too neat where the stem meets the pumpkin skin. -
Apply red base:
Using your wide flat brush, cover the entire pumpkin with bright red acrylic paint. Stroke in the direction of the pumpkin’s ribs for a smoother look. -
Let it dry:
Allow the first coat to dry completely to the touch. This usually takes about 20-30 minutes depending on humidity. -
Second coat:
Apply a second layer of red paint to ensure fully opaque, vibrant coverage. Let this layer dry thoroughly before moving on to the design.
Smooth Operator
Work with the pumpkin’s natural ribs rather than fighting them. Position the center of the teeth in a valley between ribs to keep the smile symmetrical.
Step 2: Sketching the Design
-
Outline the mouth shape:
Using a pencil, lightly sketch a large, wide almond shape across the front of the pumpkin. Position it centrally so it wraps slightly around the curve. -
Define the lips:
Draw the contours of the upper and lower lips around your almond shape. Create a distinct ‘cupid’s bow’ dip at the top center of the upper lip. -
Add the teeth line:
Sketch a horizontal curve through the middle of the mouth opening to separate the top and bottom teeth. -
Mark individual teeth:
Draw vertical lines to indicate the separation between teeth. Keep these lines slightly curved to match the volume of the pumpkin.
Step 3: Painting the Details
-
Fill the teeth:
Use a medium round brush and white acrylic paint to fill in the teeth area carefully. You might need two coats here to cover the red base completely. -
Fill the inner lip:
Identify the inner part of the lip shape you sketched earlier. Paint this area with the same red used for the base, or a slightly darker red if you want more contrast, but the base color works perfectly for a flat pop-art look. -
Outline lips in black:
Using a black paint pen or a fine liner brush with black paint, trace carefully over your pencil lines for the outer edge of the lips. Make this line thick and confident. -
Outline the mouth opening:
Draw a thick black line separating the red lips from the white teeth. Taper the line slightly at the corners of the mouth. -
Define the teeth:
Use your fine paint brush or pen to trace the horizontal line between the upper and lower teeth, then draw the vertical separating lines. Keep these lines slightly thinner than the main outline. -
Clean up edges:
Inspect your lines for any wobbles. You can use a small brush with red or white paint to tidy up edges where the black might have strayed. -
Seal the artwork:
Once all paint is bone dry (give it at least an hour), take the pumpkin outside and spray a light coat of clear sealant to protect your work from moisture.
Glam It Up
Before sealing, apply a layer of red glitter paint over the lips section only. This adds a sparkly, glamorous dimension to the pop-art style.
Place your finished masterpiece on a sunny ledge to show off that brilliant smile
Red Pumpkin Vampire Face
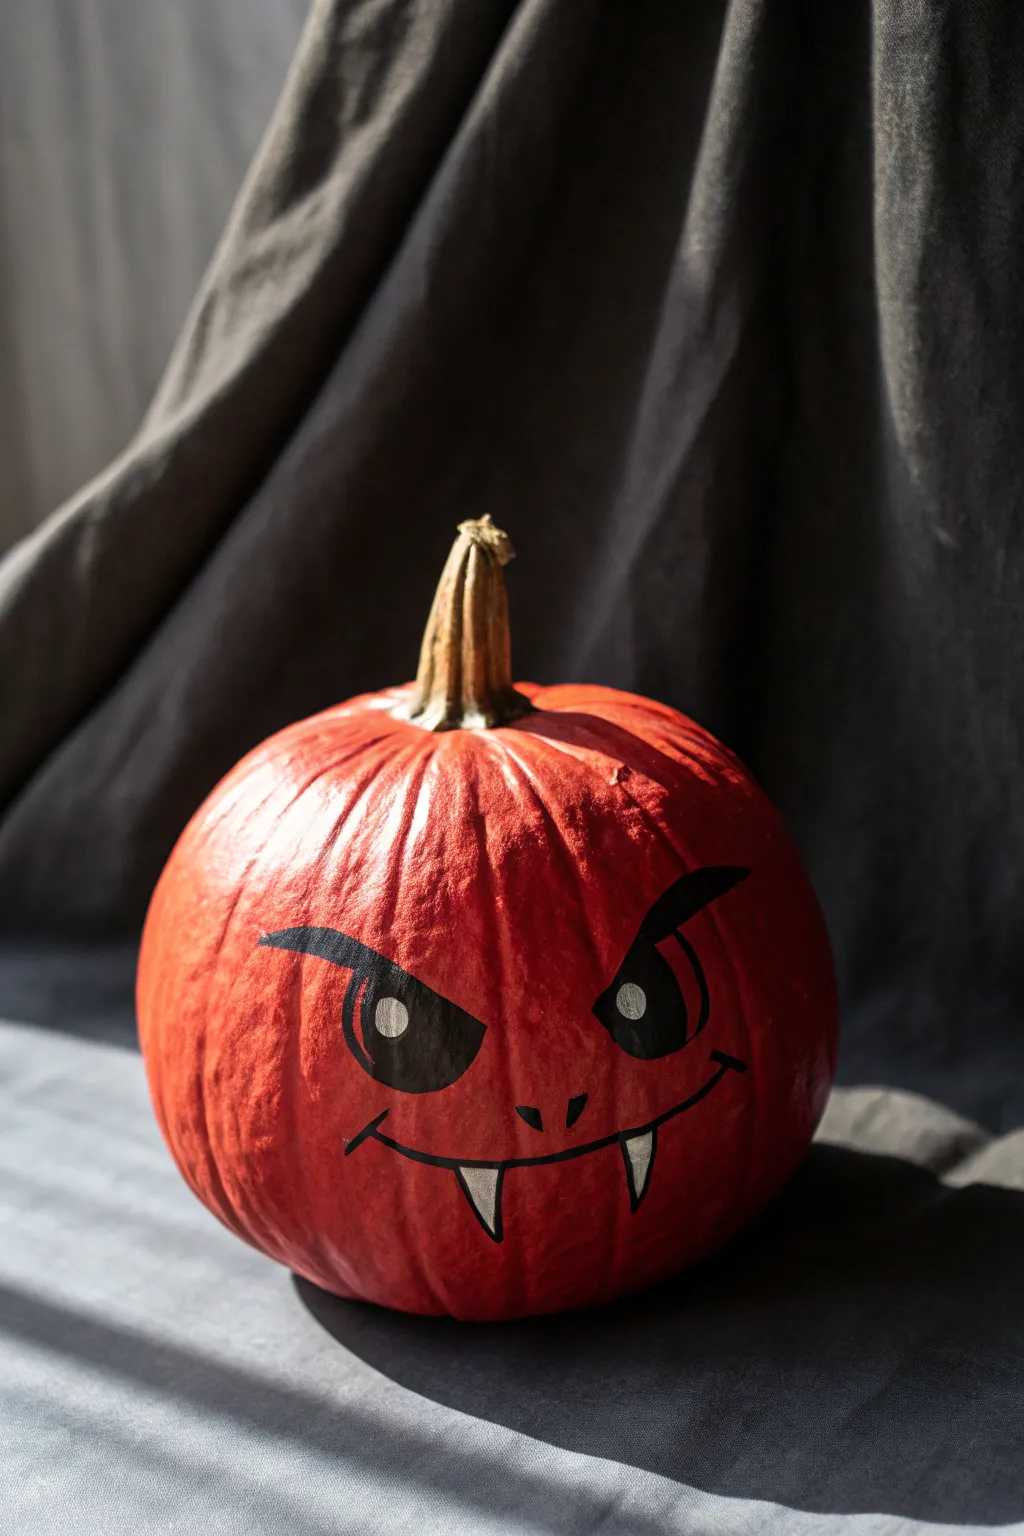
Transform a simple pumpkin into a mischievous vampire with this striking red and black design. The bold contrast of the solid red base against the sharp, comic-book style features creates a look that is both spooky and playful.
Step-by-Step Guide
Materials
- Medium-sized pumpkin (cleaned)
- Red acrylic craft paint (matte or satin finish)
- Black acrylic paint or Posca paint pen (broad tip)
- White acrylic paint or Posca paint pen (fine tip)
- Medium flat paintbrush
- Small round detail brush
- Pencil for sketching
- Sealer spray (optional)
Step 1: Base Coat Preparation
-
Clean surface:
Begin by wiping the pumpkin down with a damp cloth to remove any dirt or oils, ensuring the surface is completely dry before you start painting. -
Apply first red coat:
Using your medium flat brush, apply a generous layer of red acrylic paint over the entire pumpkin, leaving only the stem unpainted. -
Let it dry:
Allow the first coat to dry completely for about 20-30 minutes; it should not feel tacky to the touch. -
Add second coat:
Apply a second coat of red paint to ensure full opacity and vibrancy, covering any streaks from the first layer. -
Final drying:
Let this base layer cure fully for at least an hour to create a stable canvas for the facial features.
Paint Pen Precision
For the crispest lines on the sharp eyebrows and mouth, swap brushes for acrylic paint pens. They handle bumpy pumpkin skin much easier than soft bristles.
Step 2: Drafting the Design
-
Position the face:
Determine the best side of the pumpkin for the face, looking for a relatively smooth area without deep ridges. -
Sketch the eyes:
Lightly sketch two large, semi-circles for the eyes with a pencil, keeping the tops flat and angled downward toward the nose for a menacing look. -
Outline the eyebrows:
Draw sharp, arched eyebrows that connect directly to the top corners of the eyes, exaggerating the angle. -
Mark the nose:
Sketch two small, teardrop-shaped slits near the center specifically for the nostrils. -
Draw the mouth:
Pencil in a wide, curved smile line that extends almost as wide as the eyes. -
Add fangs:
Draw two sharp, triangular fangs drooping down from the top lip line.
Step 3: Painting the Features
-
Outline in black:
Using a small round brush or a black paint pen, carefully go over your pencil lines to define the shapes of the eyes, brows, nose, and mouth. -
Fill the eyebrows:
Fill in the thick, angled eyebrows with solid black paint, ensuring edges are crisp. -
Fill the eyes:
Fill the eye shapes completely with black, being careful to stay within your outlines. -
Define the mouth:
Thicken the smile line with black paint, adding small perpendicular tick marks at the corners for character. -
Paint the nostrils:
Fill in the two small nostril shapes with solid black.
Add a Spooky Glimmer
Mix a tiny pinch of fine silver glitter into the white paint for the eyes. It gives the vampire a mischievous twinkle when the light hits it.
Step 4: Highlighting and Details
-
Wait for black to dry:
Allow the black features to dry completely to prevent the white paint from turning gray. -
Fill the fangs:
Using a small brush or white paint pen, fill in the triangular fangs with bright white paint. -
Outline fangs:
I prefer to re-outline the white fangs very thinly with black once dry to make them pop against the red skin. -
Add eye highlights:
Place a medium-sized white circle in the upper corner of each eye to create a shiny, cartoon-like reflection. -
Final touch-ups:
Check for any uneven edges or smudges and correct them with a tiny bit of red or black paint as needed.
Place your crimson creation on the porch or a mantle to greet guests with a spooky smile
Red Pumpkin With Rose Motifs
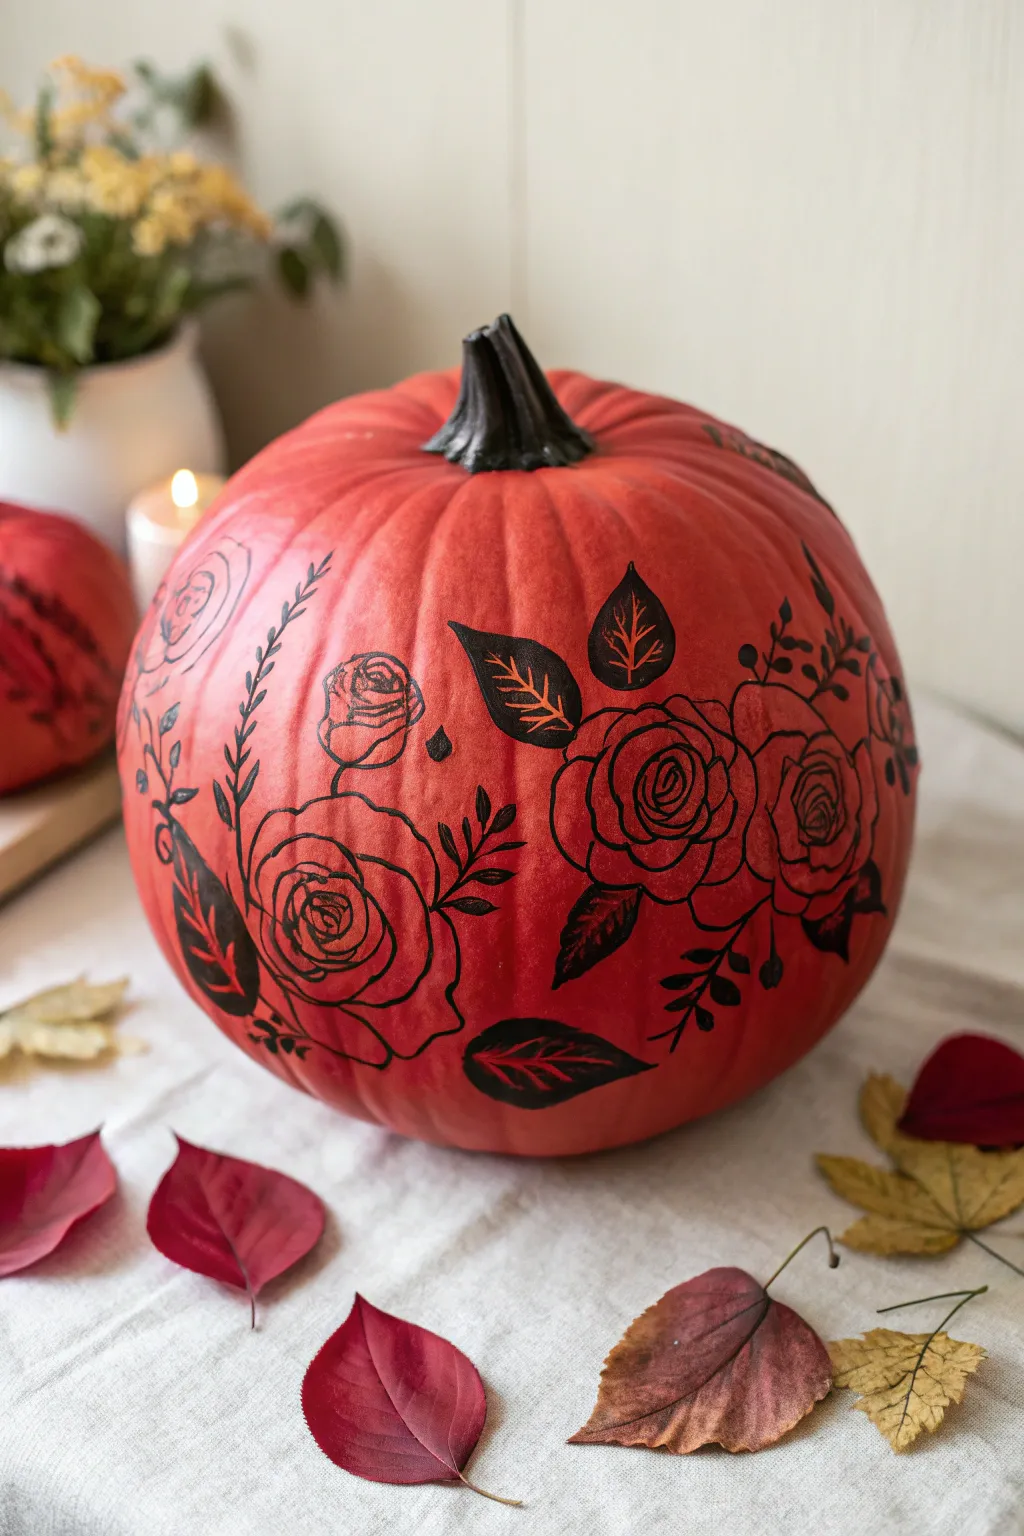
Transform a standard pumpkin into a romantic centerpiece with a bold coat of crimson paint and delicate rose illustrations. This project combines the simplicity of monochromatic drawing with the striking visual of a deep red backdrop for a truly unique autumn decoration.
Detailed Instructions
Materials
- Medium-sized pumpkin (real or faux)
- Matte red acrylic craft paint (crimson or brick red)
- Wide flat paintbrush or foam brush
- Pencil (HB or lighter)
- Black oil-based paint pen (medium tip)
- Black permanent marker or fine-tip paint pen
- Sealer spray (matte finish, optional)
- Damp cloth
- Newspaper or drop cloth
Step 1: Preparation & Base Coat
-
Clean surface:
Begin by wiping down your pumpkin with a damp cloth to remove any dirt or oils, ensuring the paint adheres properly. Dry it thoroughly. -
Protect stem:
If you want to keep the stem natural or paint it a contrasting color like black (as shown), carefully tape it off with painter’s tape. -
First coat:
Apply a base layer of red acrylic paint using a foam brush or wide flat brush. Brush in vertical strokes following the pumpkin’s ribs for a smooth look. -
Observe drying:
Allow this first coat to dry completely for about 30 to 45 minutes; it’s crucial the surface isn’t tacky before adding more paint. -
Second coat:
Apply a second coat of red paint to achieve full opacity, covering any orange streaks that might be showing through. -
Paint stem:
Once the body of the pumpkin is dry, carefully paint the stem black using a smaller brush to match the illustration style.
Ink Flow Tip
Store paint pens horizontally. Before drawing on the curve, test the ink flow on a scrap paper to prevent sudden blobs on your pumpkin.
Step 2: Sketching the Design
-
Rough sketch:
Lightly sketch the rose placements directly onto the dry red paint using a pencil. Focus on creating three main focal flowers in a slight diagonal arrangement. -
Outline shapes:
Draw loose circles for the roses and elongated football shapes for the larger leaves. Don’t worry about perfect details yet; just map out the composition. -
Add vines:
Sketch trailing lines curving away from the flower clusters to represent vines and sprigs.
Step 3: Inking the Motifs
-
Center spirals:
Using your medium-tip black paint pen, start in the center of your first rose outline. Draw a tight spiral or a ‘C’ shape to form the bud. -
Build petals:
Work outward from the center spiral, drawing crescent shapes that overlap slightly to create the look of opening petals. Go slowly to keep lines crisp. -
Connect petals:
Continue adding larger scalloped lines around the outer edges until the rose reaches your desired size. -
Draw leaves:
Outline the leaf shapes you sketched earlier. Draw a central vein down the middle of each leaf. -
Fill leaves:
For the solid black leaves, fill them in completely with the paint pen, leaving thin red lines for the veins to create a negative space effect. I find this really makes the design pop. -
Line drawings:
For the open line-art leaves, simply draw the outline and the internal vein structure without filling them in. -
Decorative sprigs:
Switch to a fine-tip marker for delicate vines. Draw a main stem and add tiny leaves or buds branching off symmetrically on either side. -
Final touches:
Add small black teardrop shapes or dots floating near the flowers to balance out empty red spaces. -
Seal:
Once the ink is fully dry (give it at least an hour), lightly mist with a matte sealer to prevent scratching.
Add Metallic Flair
Trace over the veins of the black leaves with a thin gold paint pen. The metallic shimmer against the matte red looks incredibly elegant.
Now you have a stunning, hand-illustrated piece of fall decor that looks lovely on a table or mantel
Red Pumpkin Marbled With White Veins
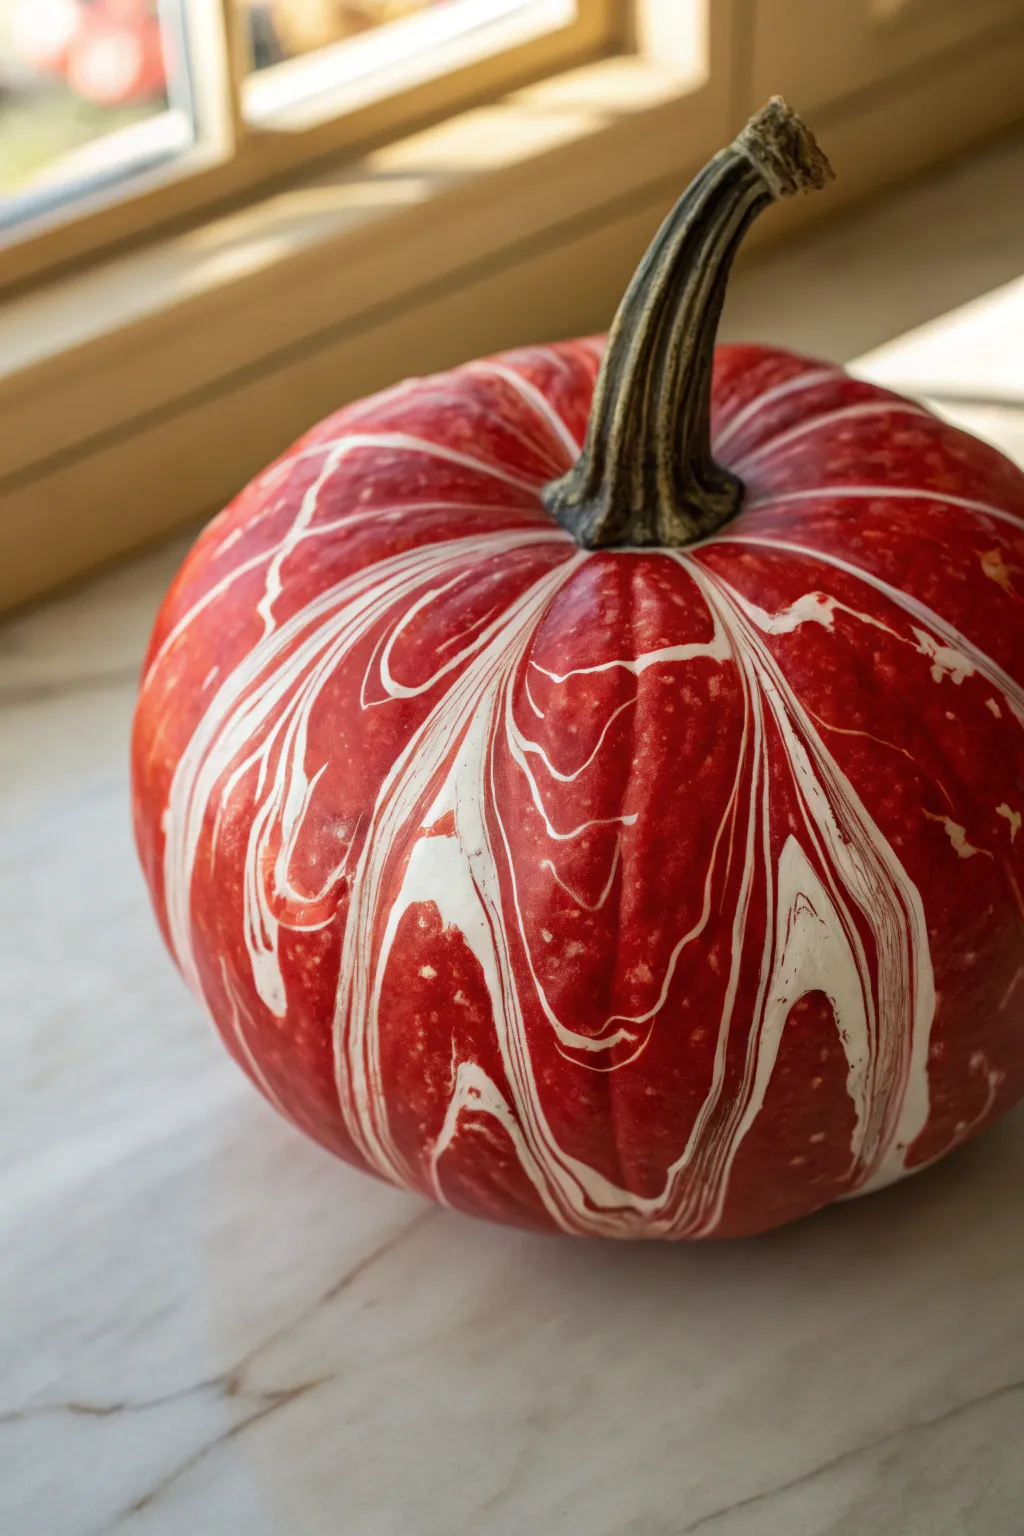
Transform a standard pumpkin into a striking piece of abstract art with this vibrant marbling technique. The high-contrast interplay between deep red and fluid white veins mimics the sophisticated look of polished stone or hand-dipped marbled paper.
Step-by-Step Tutorial
Materials
- Medium-sized faux or real pumpkin (white or orange)
- Glossy red acrylic craft paint
- White acrylic craft paint (fluid or pouring medium mixed)
- Pouring medium (optional but recommended for flow)
- Large plastic tub or bin (big enough to dip the pumpkin)
- Water (room temperature)
- Toothpicks or skewers
- Painters tape
- Plastic drop cloth or garbage bags
- Gesso or white primer (if starting with an orange pumpkin)
- Gloss varnish spray (optional)
Step 1: Preparation
-
Clean and Prime:
Wipe down your pumpkin surface to remove any dirt or oils. If you are using a standard orange pumpkin, apply a coat or two of white gesso or primer; this ensures the translucent red colors will pop rather than looking muddy. -
Protect the Stem:
Carefully wrap the entire stem in painter’s tape. You want to keep that natural or metallic stem look completely clean from the messy marbling process. -
Setup the Workspace:
Lay down your plastic drop cloth. This process involves hydro-dipping or pouring, so drips are inevitable.
Paint Sinking?
If your white paint sinks to the bottom instead of floating, it is too heavy. Try thinning it further with water or consider using enamel model paint, which floats naturally on water.
Step 2: Creating the Base
-
Apply the Base Red:
Paint the entire pumpkin with your glossy red acrylic. You want a solid, opaque coverage, so apply a second coat if the white primer peeks through. -
Dry Completely:
Let the red base coat dry fully. If the red is wet when you add the white veins, the colors will turn pink instead of maintaining distinct lines.
Step 3: The Marbling Process
-
Prepare the Dip Tank:
Fill your large plastic bin about 3/4 full with room-temperature water. The temperature matters—too cold and the paint seizes up; too hot and it breaks apart. -
Prepare the White Paint:
Mix your white acrylic paint with a bit of water or pouring medium until it has the consistency of whole milk. It needs to float on the water’s surface. -
Drop the Paint:
Gently drip the thinned white paint onto the surface of the water. Do this sporadically across the surface. It should spread out into thin films. -
Swirl the Pattern:
Take a toothpick or skewer and very gently drag it through the floating white paint. Create swirls and organic vein patterns, breaking up any large blobs. -
The Dip:
Holding the pumpkin by the taped stem (or a handle screw inserted into the bottom), slowly dip the pumpkin into the water at a 45-degree angle. -
Rotate and Submerge:
As you push the pumpkin down, rotate it slowly so the white paint film wraps around the red surface. I find twisting your wrist slightly helps catch the paint in natural-looking curves. -
Clear the Surface:
Once the pumpkin is fully submerged, blow on the water’s surface to push away remaining paint or have a helper sweep the surface with a piece of cardboard before you pull the pumpkin back up. This prevents double-dipping interference. -
Remove and Shake:
Lift the pumpkin out of the water. Give it a very gentle shake to remove excess water, but be careful not to smudge the wet paint.
Add Metallic Flair
Mix a small amount of liquid gold leaf or metallic gold paint into your white swirl mixture. The metallics will separate slightly, adding gilded edges to the marble veins.
Step 4: Finishing Touches
-
Initial Drying:
Set the pumpkin on a drying rack or a disposable cup (to elevate it). Let the water evaporate and the paint set completely. -
Remove Tape:
Once the pumpkin is dry to the touch, carefully peel away the painter’s tape from the stem. -
Seal (Optional):
For a high-gloss finish that looks like ceramic, spray the entire pumpkin with a clear gloss varnish. This protects the delicate white veins.
Enjoy the sophisticated, glossy finish of your new marbled masterpiece, perfect for an elegant autumn display
Red Pumpkin With Geometric Tape Shapes
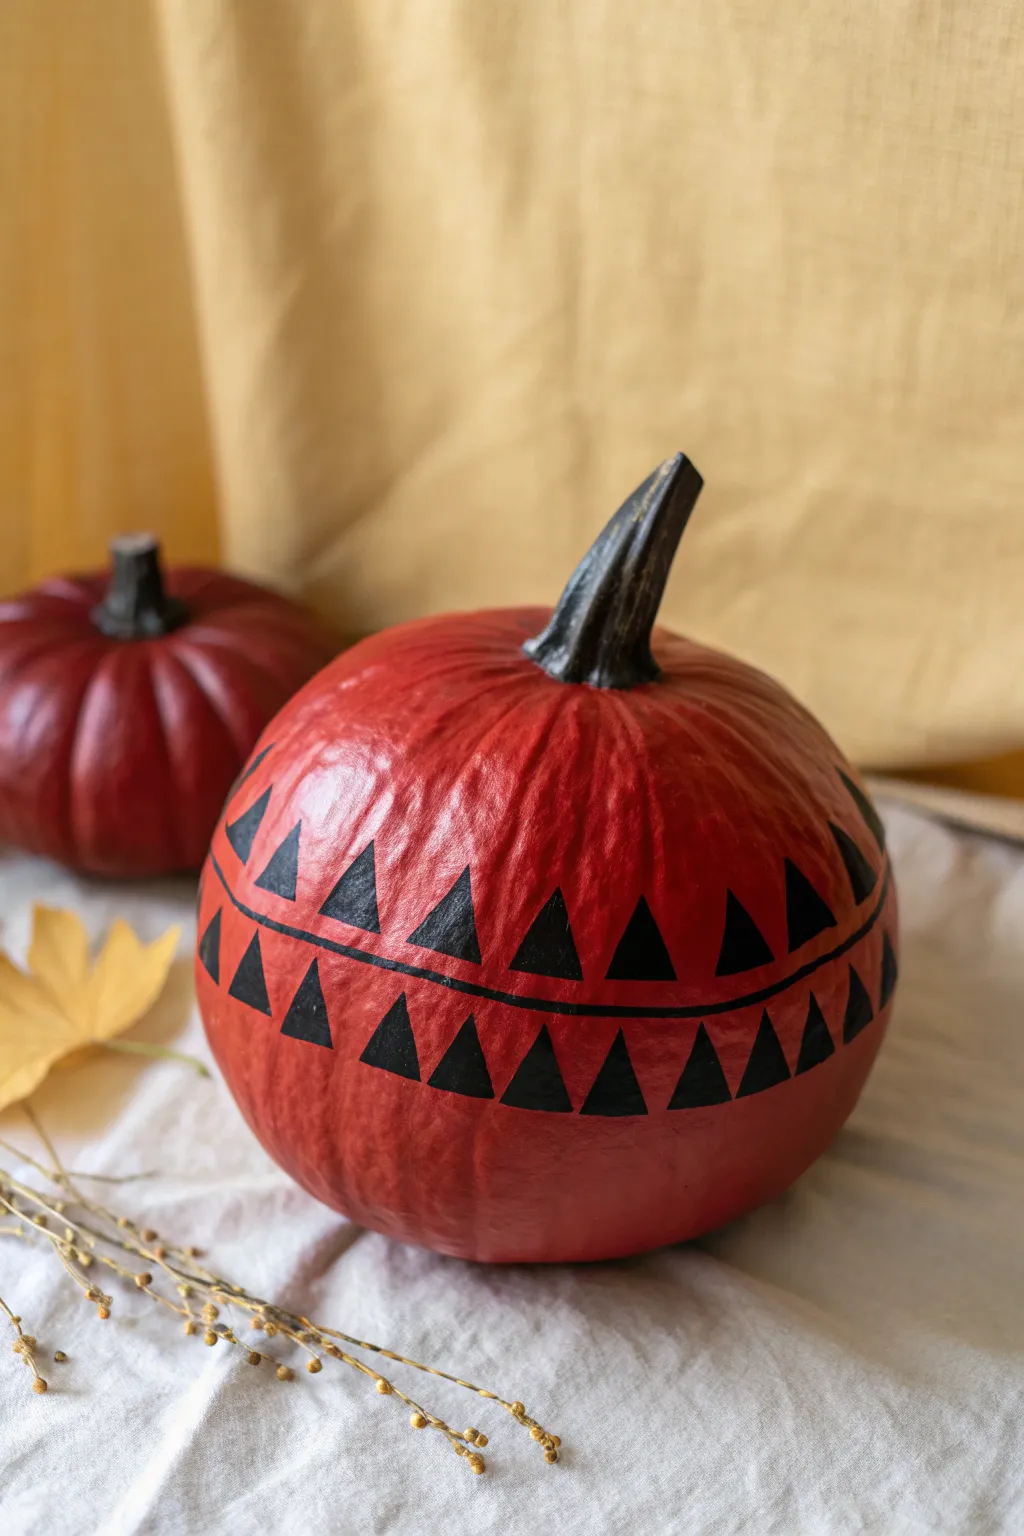
Transform a simple pumpkin into a modern art piece with this striking geometric design. By using a bold red base and sharp black triangles, you’ll create a sophisticated look that pairs perfectly with minimalist autumn decor.
How-To Guide
Materials
- Medium-sized faux or real pumpkin (cleaned)
- Deep red acrylic paint (matte finish recommended)
- Black acrylic paint
- Painter’s tape or masking tape (1 inch width)
- Thin crafting tape or washi tape (1/8 inch width)
- Wide flat paintbrush (for base coat)
- Small flat brush or detail brush
- Scissors
- Paper plate or palette
- Newspaper or drop cloth
Step 1: Preparing the Base
-
Prepare your workspace:
Lay down newspaper or a drop cloth to protect your table from spills. Set out your paints and brushes. -
Clean the pumpkin:
Wipe the surface of your pumpkin with a damp cloth to remove any dust or dirt. If using a real pumpkin, ensure it is completely dry before painting. -
Mix the red base color:
Squeeze a generous amount of deep red acrylic paint onto your palette. If your red is too bright, you can mix in a tiny drop of brown or black to achieve that rich, earthy tone shown in the image. -
Apply the first base coat:
Using the wide flat paintbrush, cover the entire pumpkin with the red paint. Paint in vertical strokes following the natural ribs of the pumpkin for a smooth finish. -
Let it dry completely:
Allow the first coat to dry for at least 30 minutes. It should be dry to the touch before moving on. -
Apply a second coat:
Apply a second layer of red paint to ensure full coverage and opacity. I find that two coats usually give the richest color return. -
Paint the stem:
Carefully paint the stem using black acrylic paint. You may need a smaller brush to get close to the base without smudging the red.
Bleeding Lines?
If paint bleeds under the tape, wait for it to dry fully, then gently scrape the excess away with a craft knife or toothpick.
Step 2: Creating the Geometric Pattern
-
Mark the center line:
Take your thin crafting tape (1/8 inch) and wrap it horizontally around the middle of the pumpkin. This creates the thin negative space line between the two rows of triangles. -
Create triangle stencils:
Cut small pieces of 1-inch painter’s tape into uniform triangle shapes. You can stick a strip of tape to parchment paper first to make cutting easier, then peel them off. -
Mask the top row:
Place the tape triangles pointing downward just above the thin horizontal tape line. The tips of the triangles should almost touch the line, leaving the triangular spaces in between exposed for painting. -
Mask the bottom row:
Repeat the process below the thin line, placing tape triangles pointing upward. The tips should again be near the center line. -
Seal the tape edges:
Press down firmly on all edges of your tape pieces. Run your fingernail along the edges to prevent paint from bleeding underneath. -
Paint the exposed triangles:
Using a small flat brush and black paint, carefully fill in the triangular spaces between your tape masks. Use a dabbing motion rather than brushing side-to-side to avoid pushing paint under the tape. -
Paint the center stripe:
Carefully paint a thin black line right over the thin crafting tape you placed first. Wait, actually—check the reference. The line is black! So, instead of masking the line, you will paint a thin black line using the tape as a guide, or freehand it after removing the tape. -
Let the black paint set:
Allow the black paint to dry slightly, but not completely. Waiting about 10-15 minutes is usually ideal. -
Remove the tape:
Gently peel off the tape triangles and the center strip while the paint is still slightly tacky. This helps create crisp, sharp lines. -
Touch up:
If any red paint peeled off or if lines are jagged, use a tiny detail brush to make corrections with the appropriate color.
Make It Glossy
Add a coat of high-gloss outdoor varnish after the paint dries to make the pumpkin shine and protect it from weather.
Enjoy displaying your sophisticated, geometric pumpkin centerpiece alongside your other seasonal decor
Red Pumpkin With Mixed-Media Glitter Drips
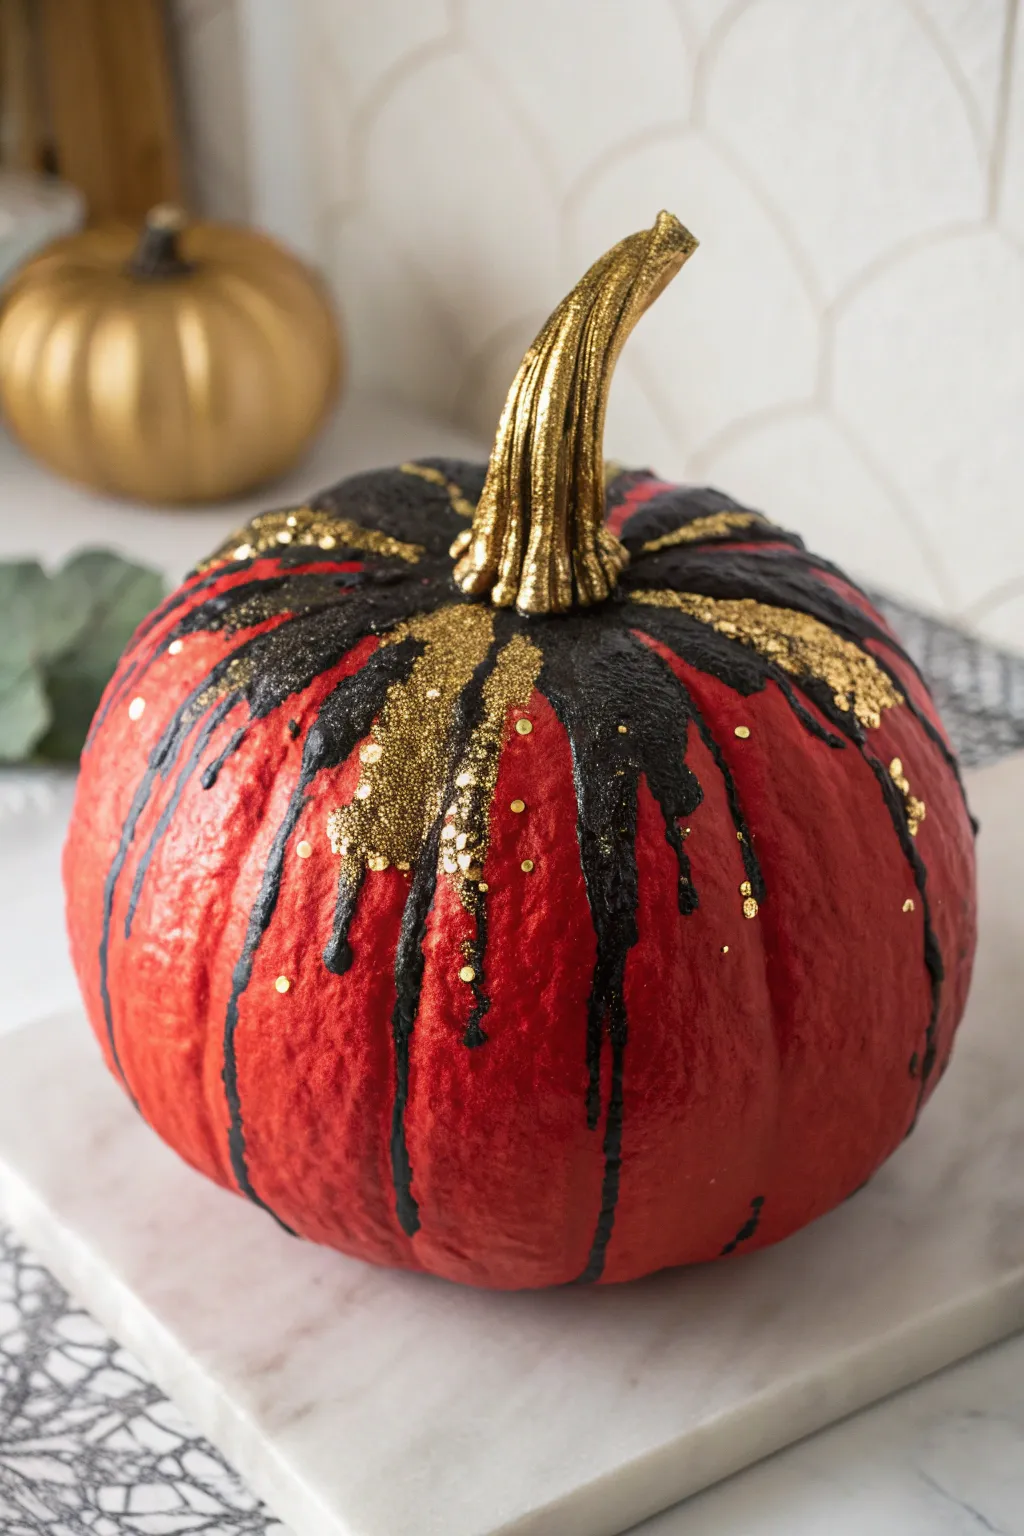
Transform a standard pumpkin into a glamorous centerpiece with this bold mixed-media design. Combining vibrant matte red paint with dramatic black drips and sparkling gold accents creates a luxe, slightly gothic aesthetic perfect for sophisticated autumn decor.
Step-by-Step Guide
Materials
- Faux craft pumpkin (or a clean, dry real pumpkin)
- Matte red acrylic craft paint
- Glossy black acrylic paint
- Gold metallic paint (liquid, not spray)
- Fine gold glitter
- Chunky gold glitter
- Medium flat paintbrush
- Small round detail brush
- Paper plate or palette
- Drop cloth or newspapers
- Mod Podge (gloss finish)
Step 1: Base Coating
-
Prepare the Surface:
Wipe down your pumpkin with a slightly damp cloth to remove any dust or oils. If you are using a real pumpkin, ensure it is completely dry before starting. -
Apply First Red Coat:
Using the medium flat brush, apply a layer of matte red acrylic paint over the entire body of the pumpkin. Don’t worry about the stem for now. -
Let it Dry:
Allow the first coat to dry completely. This usually takes about 20-30 minutes depending on the thickness of your paint. -
Add Second Red Coat:
Apply a second coat of red to ensure full, opaque coverage. Since red pigment is often translucent, a third coat might be necessary for a truly vibrant finish. -
Paint the Stem:
Once the red body is dry, clean your brush and paint the entire stem with the metallic gold paint. Use two coats if needed for a solid, shiny look.
Drip Control
If your paint is too thick to run, mix it 1:1 with fabric medium or PVA glue. This helps it flow smoothly over the curves without cracking when it dries.
Step 2: Creating the Drips
-
Mix the Drip Medium:
On your palette, pour a generous amount of glossy black acrylic paint. I like to mix in a tiny bit of water or pouring medium just to help it flow, but keep it thick enough to control. -
Start the Drips:
Load your brush heavily with black paint. Press the brush at the base of the stem and let the paint pool and run naturally down the ribs of the pumpkin. -
Guide the Paint:
Use the brush to gently guide the drips further down into the crevices. Vary the lengths—let some stop near the top and others run halfway down the pumpkin. -
Thicken the Top:
Paint the area immediately surrounding the gold stem with a solid ring of black to anchor the drips, creating a ‘cap’ of black paint. -
Let Drips Dry Partially:
Allow the black paint to sit for about 5-10 minutes. It should be tacky but not fully dry before you move to the glitter step.
Gothic Glam Twist
Swap the red base for a deep matte black, and use metallic copper drips instead for a moodier, darker aesthetic.
Step 3: Golden Accents
-
Apply Adhesive for Glitter:
Using a small detail brush, paint strokes of Mod Podge directly over select black drips or in the spaces between them where you want glitter. -
Add Fine Glitter:
While the Mod Podge is wet, gently sprinkle fine gold glitter over the adhesive areas. This creates a subtle shimmer base. -
Layer Chunky Glitter:
Immediately follow up by dropping pinchfuls of chunky gold glitter onto the wet adhesive for texture and dimension. -
Create Gold Streaks:
Dip your clean detail brush into the metallic gold paint. Paint thin, organic lines trailing down from the stem alongside the black drips to add contrast. -
Highlight the Drips:
Add tiny dots of gold paint or individual flecks of chunky glitter directly onto the dry tips of the black drips for extra sparkle. -
Touch Up the Stem:
If any black paint got on your gold stem, carefully touch it up with the metallic gold paint creating a crisp line where they meet. -
Final Drying Time:
Let the entire project sit undisturbed for several hours (or overnight) to ensure the thick drips and glue harden completely. -
Seal (Optional):
For longevity, you can gently spray the glittered areas with a clear acrylic sealer to prevent shedding.
Place your shimmering creation on a mantle or entryway table to set a dramatic tone for the season


Have a question or want to share your own experience? I'd love to hear from you in the comments below!