
If you’ve ever wanted a chess set that feels like functional sculpture, resin is where the magic happens. I love how you can control everything—color, depth, sparkle, and even what’s trapped inside—until the whole set feels like your personal art piece.
Marble-Swirl Board and Pieces
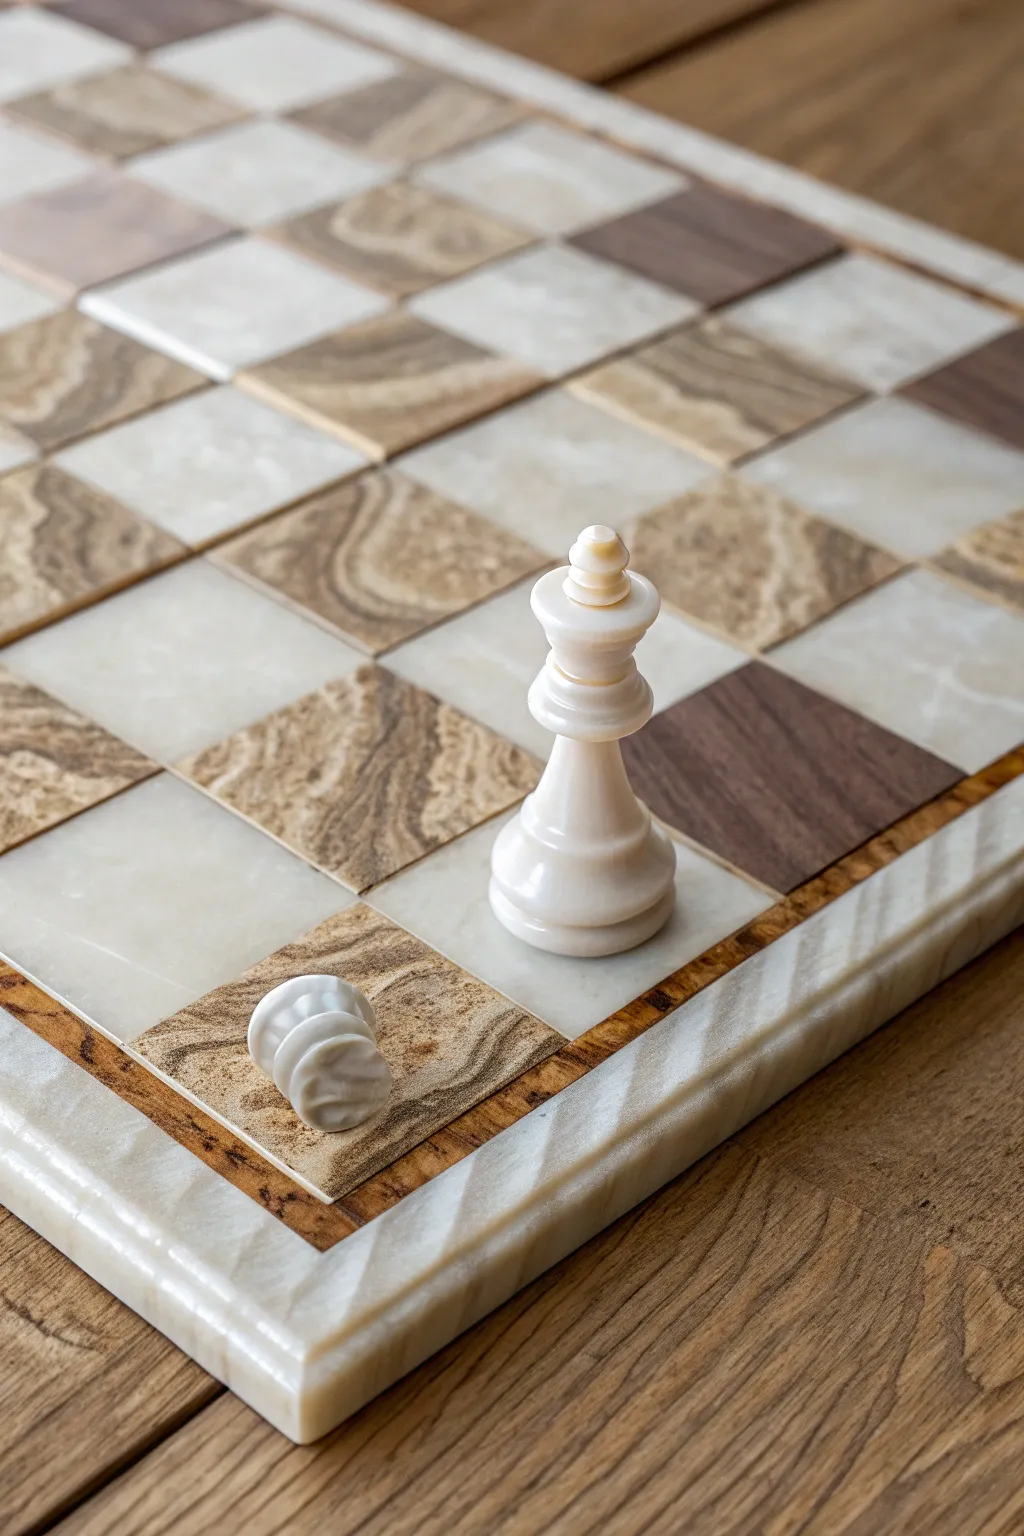
Achieve the classic elegance of high-end travertine and onyx sets using clever resin pouring techniques. This project mimics the organic veining and soft, matte finish of natural stone for a sophisticated display piece.
How-To Guide
Materials
- Epoxy resin (low viscosity for the board, casting resin for pieces)
- Chessboard mold (square)
- Standard chess piece silicone molds
- Opaque resin pigments (Warm White, Beige, Dark Brown, Mocha)
- Translucent resin dyes (Amber)
- White alcohol ink
- Mixing cups and sticks
- Heat gun or torch
- Fine grit sandpaper (up to 2000 grit)
- Polishing compound (optional)
- Matte finish spray sealant
Step 1: Creating the Stone-Look Resin Mixtures
-
Prepare the Base Colors:
Mix a large batch of clear resin according to the manufacturer’s instructions, then separate it into four cups. You will need a larger amount for the light squares and a slightly smaller amount for the dark squares. -
Tint the Light Stone:
For the ‘onyx’ look, tint the largest cup with warm white opaque pigment, adding a drop of amber translucent dye to kill the brightness and give it an aged, creamy tone. -
Tint the Dark Stone:
For the darker squares, mix beige and mocha pigments together. You want a varied palette, so create a third smaller cup with just dark brown for the veining effects.
Clean Lines
Can’t pour squares neatly? Pour one color (e.g., all white squares) first, let cure, remove from mold, trim flash, then place them back in to pour the second color around them.
Step 2: Pouring the Chessboard
-
Pour the Light Squares:
Carefully pour the warm white mixture into the alternating squares of your chessboard mold. Don’t fill them to the brim yet; leave a tiny bit of space. -
Create Light Veining:
Dip a toothpick or fine tool into the beige mixture and drag it gently through the setting white resin. I find that swirling in a random, organic motion creates the most realistic stone fissures. -
Pour the Dark Squares:
Fill the remaining empty squares with your beige/mocha mixture. Immediately drop tiny amounts of the dark brown resin into these squares. -
Marbling the Dark Squares:
Using a clean toothpick, swirl the dark brown drops into the beige base. Don’t overmix; you want distinct striations, not a muddy solid color. -
Pop Bubbles:
Pass a heat gun quickly over the surface to remove air bubbles. Let the board cure fully, usually 24-48 hours depending on your brand.
Step 3: Casting the Pieces
-
Prepare Piece Resin:
Mix a fresh batch of casting resin. Divide it into two batches: one for the white army (warm white + amber drop) and one for the dark army (mocha + beige). -
Drop In Contrast:
Before pouring the main color, drip a tiny amount of contrasting resin (brown for light pieces, white for dark pieces) into the bottom or sides of the mold to create surface variation. -
Fill the Molds:
Pour your main colors into the molds. Fill them slowly in a thin stream to prevent trapping large air pockets in detailed areas like the King’s cross or the Knight’s mane. -
Release Trapped Air:
Squeeze the bottom of the silicone molds gently to burp out air bubbles. You can also use a toothpick to probe inside the mold cavity. -
Cure and Demold:
Allow the pieces to cure completely before removing them. If they feel flexible, let them sit longer.
Stone Texture
Add a pinch of fine sand or calcium carbonate powder to your resin mix. This adds weight and makes the pieces feel cold and solid like real stone, not plastic.
Step 4: Finishing and Assembly
-
Sand the Bases:
Use fine-grit sandpaper to flatten the bottom of each chess piece so they stand perfectly straight. Wet sanding helps keep dust down. -
Sand the Board Edges:
Once demolded, sand any sharp edges of the board. To achieve the matte stone look seen in the photo, lightly sand the surface with very high grit (2000+) paper to remove the plastic-like gloss. -
Add Weight (Optional):
Drill a small hole in the base of the larger pieces, insert a small fishing weight or washer, and seal with a drop of uv resin for a premium, heavy feel. -
Seal the Texture:
Spray a thin coat of matte clear sealant over everything. This unifies the surface and eliminates the ‘sticky’ feel resin sometimes has, making it feel more like smooth rock. -
Apply Felt Pads:
Stick adhesive felt circles to the bottom of the chess pieces to protect the board surface during play.
Set up your sophisticated new board and enjoy the timeless feel of faux-stone gaming


Gold-Flecked Luxury Set
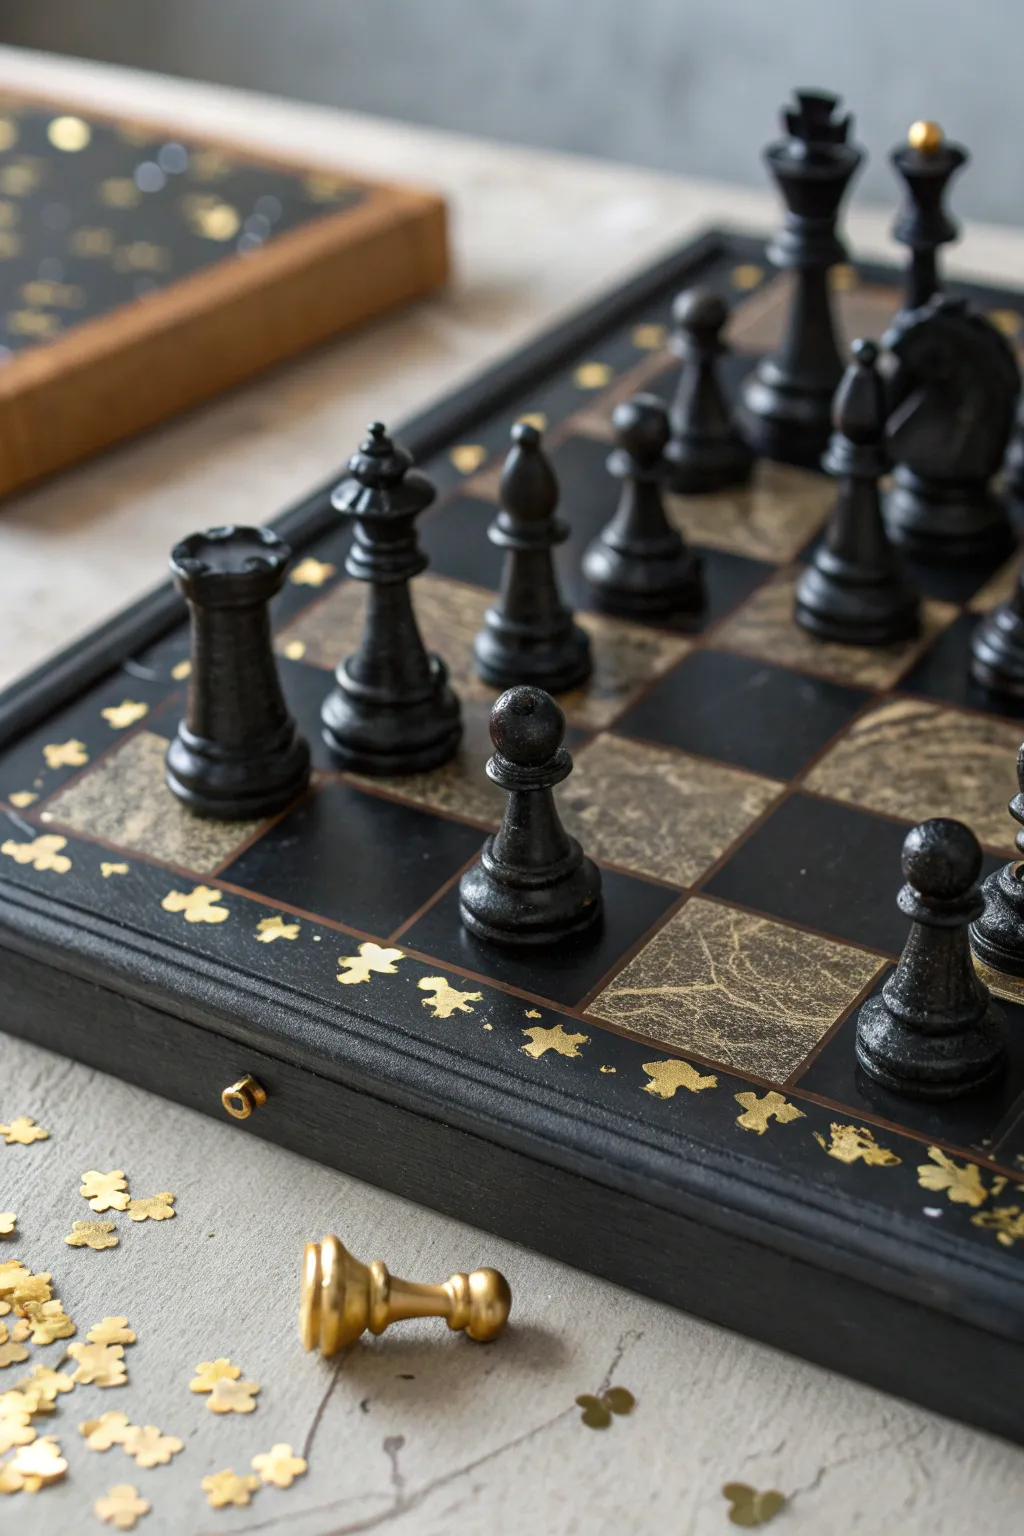
Elegance meets strategy in this sophisticated resin chess project, featuring deep black marbleized squares contrasting against a faux-stone beige infused with delicate gold veins. The set is finished with a striking matte black army and a board border detailed with embedded gold leaf motifs.
Step-by-Step Guide
Materials
- Deep silicone chess board mold (with border space)
- Standard chess piece silicone molds
- High-quality epoxy resin (casting formula)
- Black alcohol ink or resin pigment paste
- Metallic gold mica powder
- Gold leaf flakes or gold confetti shapes (specifically small cross/flower shapes if possible)
- Matte black spray paint or acrylic paint
- Gold spray paint (for accent piece)
- Mixing cups and stir sticks
- Heat gun or torch
- Toothpicks or precision tweezers
- Painter’s tape
- Sandpaper (fine grit)
Step 1: Planning and Border Prep
-
Clean Your Molds:
Before starting, ensure your silicone chess board mold is completely free of dust and lint. Use masking tape to lift away any debris, as these will show up in your high-gloss finish. -
Arrange the Border Accents:
For the decorative border, take your gold leaf confetti shapes. Carefully place them along the edge of the board mold using precision tweezers. Spacing them irregularly gives that organic, scattered look shown in the photo. -
Secure the Gold:
Mix a tiny amount of clear resin. Use a toothpick to dab a minuscule drop onto each gold flake to tack it down to the mold surface. This prevents them from floating away when you pour the main resin.
Placement Pro-Tip
When placing gold flakes, use a mirror layout! Arrange opposite sides of the board identically for symmetry, but let the top and bottom edges have a unique pattern.
Step 2: Pouring the Board
-
Mix the Black Resin:
Mix a batch of resin and tint it opaque black using pigment paste. This needs to be a solid, deep black for the dark squares and the main border structure. -
Mix the Bronze-Gold Resin:
In a separate cup, mix resin with a beige pigment and a healthy swirl of gold mica powder. Don’t overmix the mica—you want some swirls to remain to mimic stone veins. -
Pour the Squares:
Carefully pour your black resin into alternating square cavities of the mold. Immediately follow with the beige-gold mix for the remaining squares. Use a toothpick to guide the resin into corners to avoid air pockets. -
Fill the Border:
Pour the remaining black resin into the border area, gently flowing over your tacked-down gold confetti. The black background will make the gold pop brilliantly. -
Pop Bubbles:
Pass a heat gun quickly over the surface to pop any rising air bubbles. Let the board cure for at least 24-48 hours, covering it to prevent dust accumulation.
Level Up: Weighted Feel
Before the resin in your chess pieces fully hardens, drop small fishing weights or hex nuts into the molds. This adds heft and makes the pieces feel expensive.
Step 3: Casting the Army
-
Prepare Black Resin:
While the board cures, mix a new batch of resin plain black. You will need enough for 32 pieces if you are painting them all, or cast two sets if your mold only does half a set at a time. -
Pour the Pieces:
Slowly pour the black resin into the chess piece molds. Squeeze the bottom of the molds gently to release trapped air bubbles from intricate details like the King’s cross or the Knight’s mane. -
Demold and Trim:
Once fully cured, remove the pieces. Use fine-grit sandpaper or a craft knife to trim any flashing or sharp edges from the base of the pieces.
Step 4: finishing Touches
-
Matte Finish Application:
To achieve the sophisticated non-gloss look of the pieces in the image, take your cured resin pieces outside and spray them with a high-quality matte black spray paint. Apply two thin coats rather than one heavy one. -
The Golden Outlier:
For a unique twist, select one pawn or a special piece (like the one shown lying down) and spray paint it gold instead of black. This creates a stunning conversation piece. -
Demold the Board:
Carefully peel the silicone mold away from your cured board. If the edges feel sharp, wet-sand them lightly with high-grit sandpaper. -
Polish the Border:
If any resin clouded over your gold confetti inserts, use a plastic polish and a microfiber cloth to buff the border until the gold shines clearly through the black resin. -
Attach Felt Bottoms:
Cut small circles of black felt or self-adhesive velvet and attach them to the bottom of each chess piece for smooth movement during gameplay and to protect your new board.
Set up your pieces on their new marble-look battlefield and enjoy the admiring glances your craftsmanship receives


Geometric Pattern Squares Beyond the Grid
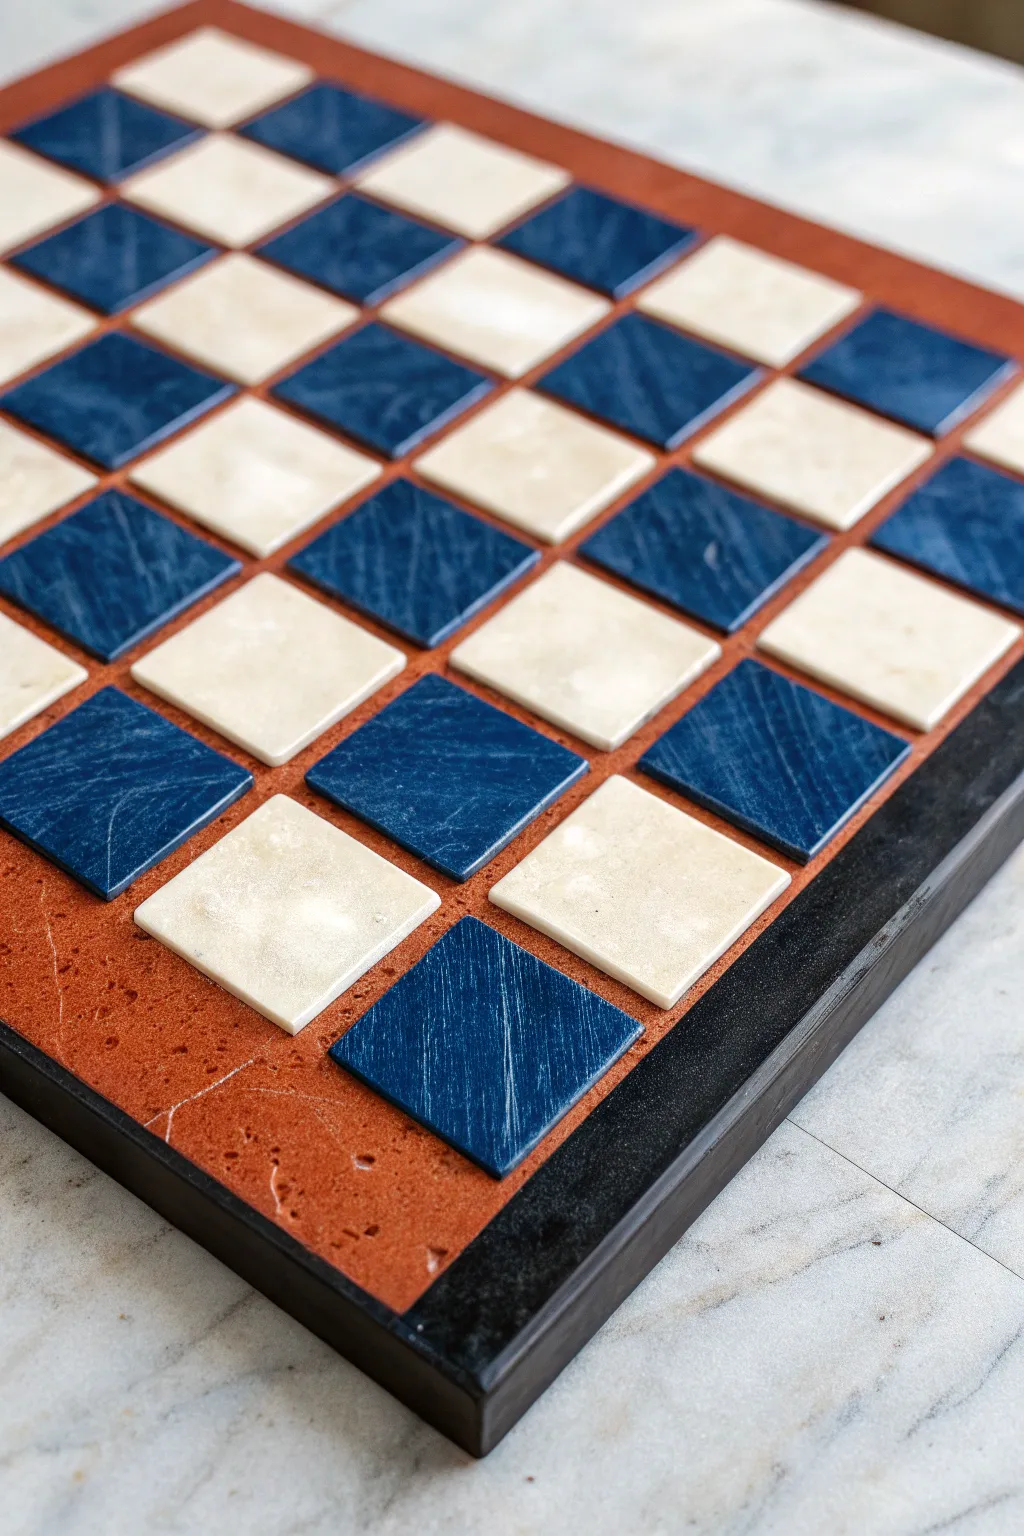
Recreate the sophisticated look of inlaid stone without the masonry tools using this resin casting technique. This project combines a textured, earthy base with high-gloss faux marble and lapis lazuli tiles for a stunning contrast.
Detailed Instructions
Materials
- Epoxy resin (casting resin for tiles, coating resin for base)
- Square silicone mold (approx. 1.5 – 2 inches)
- White alcohol ink
- Deep blue mica powder or alcohol ink
- Cream/Antique White mica powder
- Terracotta or reddish-brown acrylic paint (for the base)
- Coarse salt or sand (for base texture)
- Large rectangular wooden board or MDF panel
- Black wooden trim or molding (for the frame)
- Super glue or heavy-duty construction adhesive
- Wood glue
- Sandpaper (various grits)
- Mixing cups and stir sticks
- Ruler and pencil
Step 1: Crafting the Base
-
Prepare the board:
Cut your MDF or wood panel to your desired size, ensuring it accommodates an 8×8 grid of your chosen tile size plus a border. Sand the surface lightly to help the texture adhere. -
Texture mixture:
Mix a small batch of resin with terracotta acrylic paint. Fold in coarse salt or clean sand until you have a thick, gritty paste that mimics porous stone. -
Apply the base layer:
Spread this textured mixture over the entire top surface of the board. I like to use a spatula to keep it relatively flat but allow some natural pitting and unevenness to remain. -
Color enhancement:
Once the texture layer is tacky but not fully cured, dab a little extra thinned brown or rust-colored paint into low spots to exaggerate the stone effect. -
Fully cure:
Allow the base board to cure completely, usually for 24-48 hours, so it is hard enough to support the weight of the tiles.
Stone Effect Secret
To get realistic ‘scratches’ on the blue tiles, drag a coarse scouring pad across the surface just as the resin hardens but before it’s rock solid.
Step 2: Casting the Tiles
-
Mix cream resin:
Prepare a batch of resin mixed with antique white mica powder. You want an opaque, milky look. -
Create marble veins:
Pour the cream resin into your square molds. Immediately drop in white alcohol ink and gently swirl with a toothpick to create subtle veining. Let these cure. -
Mix blue resin:
For the dark squares, mix resin with deep blue mica powder. Add a tiny drop of black pigment if you want a deeper, midnight-blue tone. -
Add stone texture:
Pour the blue resin. To mimic the scratches seen in the reference, you can wait until the resin is in the ‘gel stage’ and lightly scratch the surface with a tool, or sand them later. -
Demold and prep:
Once all 32 light and 32 dark tiles are fully cured, remove them from the molds. Sand the edges if there is any flashing or sharp corners.
Uneven Tiles?
If your cast tiles have varying thicknesses, use extra adhesive on the thinner ones to level them out. A small level can help check flat alignment.
Step 3: Assembly and Framing
-
Attach the frame:
Cut your black wooden trim to fit the perimeter of the base board. Glue it securely in place to create a contained ‘tray’ look. -
Mark the grid:
Using a ruler, lightly mark the center of your textured base to guide your first tile placement. Accuracy here helps the whole board align. -
Dry fit first:
Lay out your tiles without glue to ensure the spacing looks even. The beauty of this design is the gap between tiles, revealing the terracotta base underneath. -
Glue the tiles:
Using strong construction adhesive or thick super glue, attach the tiles one by one. Use a spacer (like a small piece of wood) to keep the gaps consistent. -
Distress (Optional):
If your blue tiles look too perfect, lightly scuff the tops with high-grit sandpaper to give them that worn, antique stone matte finish shown in the photo. -
Clean up:
Wipe down the tiles with a damp cloth to remove any sanding dust or fingerprints.
Now you have a striking geometric centerpiece that invites strategic play

Pressed Flower Resin Chess Set
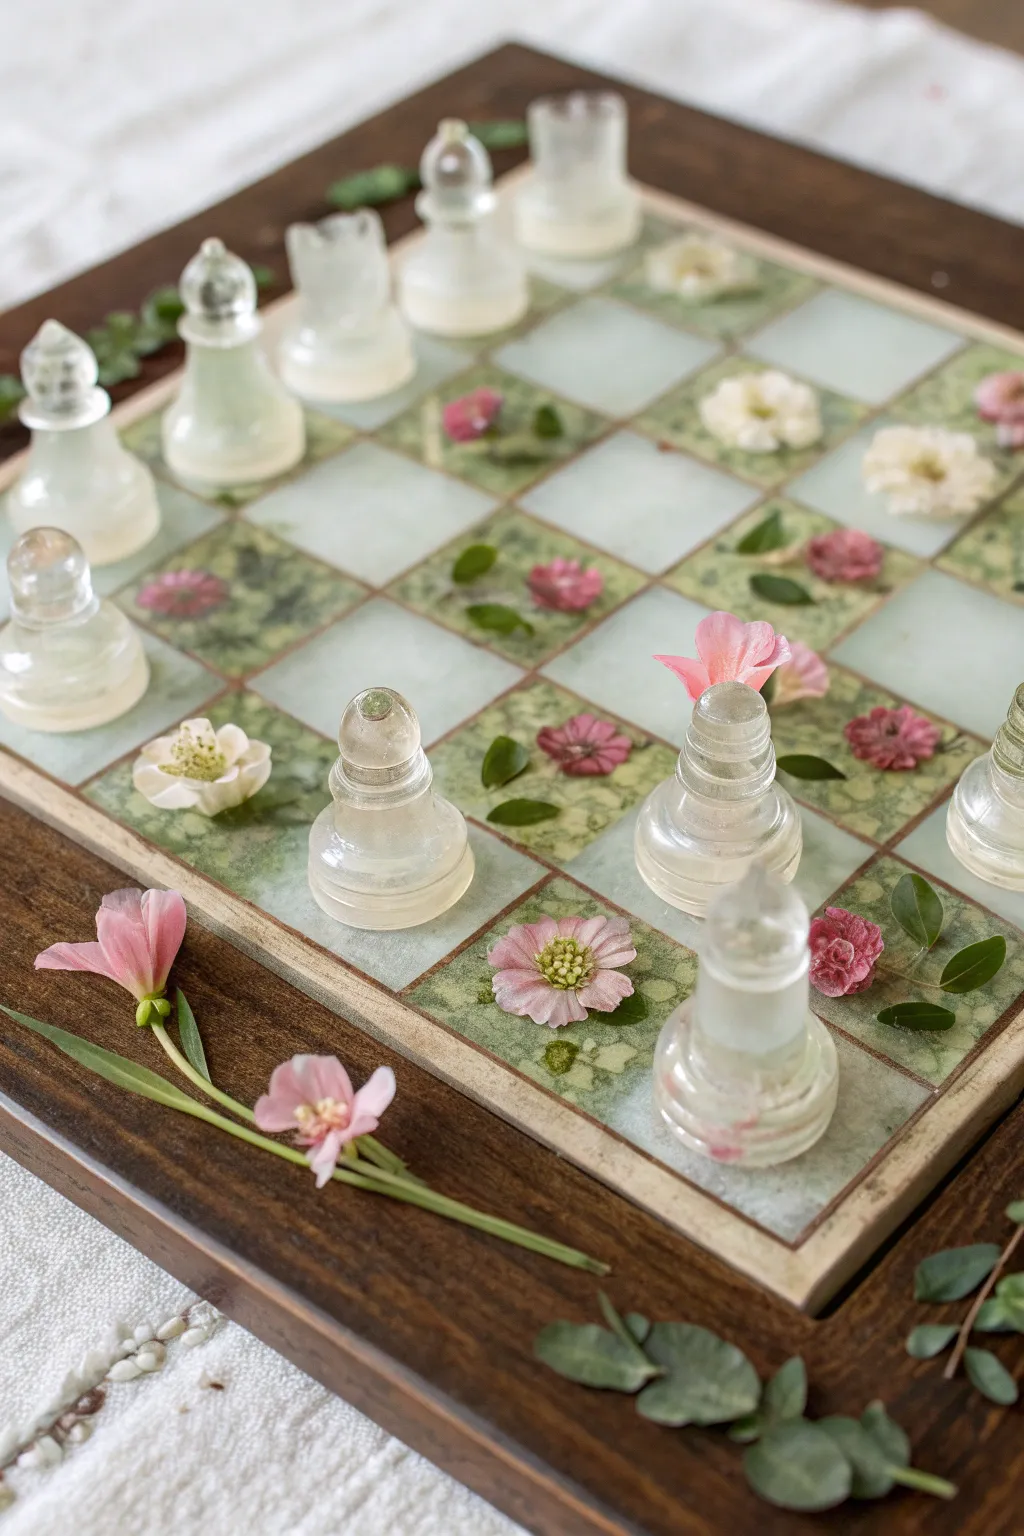
Bring the romance of an English garden to your game nights with this stunning botanical chess set. By embedding real pressed flowers and leaves into milky translucent resin, you create pieces that look like frozen moments of spring.
Step-by-Step Tutorial
Materials
- High-quality casting resin (epoxy)
- Silicone chess piece molds
- Wooden chess board frame (with recessed squares for inlay)
- Small dried pressed flowers (pink, white)
- Dried small green leaves or fern tips
- White alcohol ink or opaque resin pigment
- Tweezers
- Mixing cups and stir sticks
- Heat gun or torch
- Sandpaper (various grits up to 2000)
- Polishing compound
- Disposable gloves and respirator mask
Step 1: Preparing the Botanicals
-
Select your blooms:
Choose small, delicate flowers that will fit inside your chess piece molds. The image uses small pink blossoms and white petals, along with tiny green leaves. -
Dry check:
Ensure all organic material is 100% dry. Any moisture trapped in the resin will cause the flowers to rot or the resin to cure improperly. -
Trim to size:
Use small scissors to trim stems and excess leaves. You want individual elements that can float freely in the resin.
Cloudy Resin?
If your clear resin looks foggy near the flowers, it’s likely moisture. Ensure your botanicals are bone-dry using silica gel sand for a week before casting.
Step 2: Casting the Chess Pieces
-
Mix the resin:
Combine your resin and hardener according to the manufacturer’s instructions. Stir slowly to minimize bubbles, then let it sit for a few minutes to degas. -
Add the tint:
Add a very small drop of white alcohol ink or pigment. You want a ‘milky’ semi-translucent look, not solid opaque white, so go easy on the color. -
Initial pour:
Pour a small amount of resin into the head of the chess piece mold first. This helps prevent air pockets in the detailed intricate tops. -
Insert botanicals:
Using tweezers, carefully dip a flower or leaf into your mixed resin first to coat it, then slide it into the mold. This reduces bubble entrapment around the petals. -
Positioning:
Arrange the flowers so they are visible from the sides. For the larger pieces, you might stack a leaf and a flower. -
Fill the mold:
Top off the mold with the rest of the milky resin. Since flowers float, you may need to baby-sit the mold for the first hour and gently push them back down with a toothpick if they rise too much. -
Pop bubbles:
Pass a heat gun quickly over the opening of the mold to burst any surface bubbles.
Glow Up
Mix a tiny amount of phosphorescent (glow-in-the-dark) powder into the white squares for a magical garden that lights up at night.
Step 3: Creating the Garden Board
-
Prep the wooden base:
Start with a wooden board that has recessed squares. Seal the wood inside the recessed areas with a thin layer of clear glue or resin to prevent bubbles releasing from the wood grain. -
Lay out the design:
Plan your pattern. In the image, ‘white’ squares are plain milky resin, while ‘black’ squares feature the green botanical inlays. -
Place the greenery:
Arranging dried moss, small leaves, and flat pressed flowers into the squares designated for the botanical pattern. Use a tiny dab of glue to hold them flat against the bottom. -
Pouring the squares:
Mix a fresh batch of resin. For the botanical squares, keep the resin clear or very slightly tinted green. Pour carefully to fill the recess level with the wood borders. -
Pouring plain squares:
For the alternating squares, use the same milky white mix you used for the chess pieces to tie the set together visually. -
Curing:
Cover the entire project with a dust cover and allow it to cure fully for at least 24-48 hours.
Step 4: Finishing Touches
-
Demold pieces:
Gently remove your chess pieces from the silicone molds once fully hard. -
Sand the bottoms:
The bottom of the pieces might have a sharp edge or lip from the mold. Sand this flat using wet sandpaper on a flat surface. -
Polish the board:
If your resin levels sunk slightly while curing, you can sand the whole board flat and add a final top coat of clear resin, or simply polish the wood and resin with wax for a unified sheen.
Now you have an heirloom-quality game set perfect for display or play
BRUSH GUIDE
The Right Brush for Every Stroke
From clean lines to bold texture — master brush choice, stroke control, and essential techniques.
Explore the Full Guide
Inky Petri-Style Chess Pieces
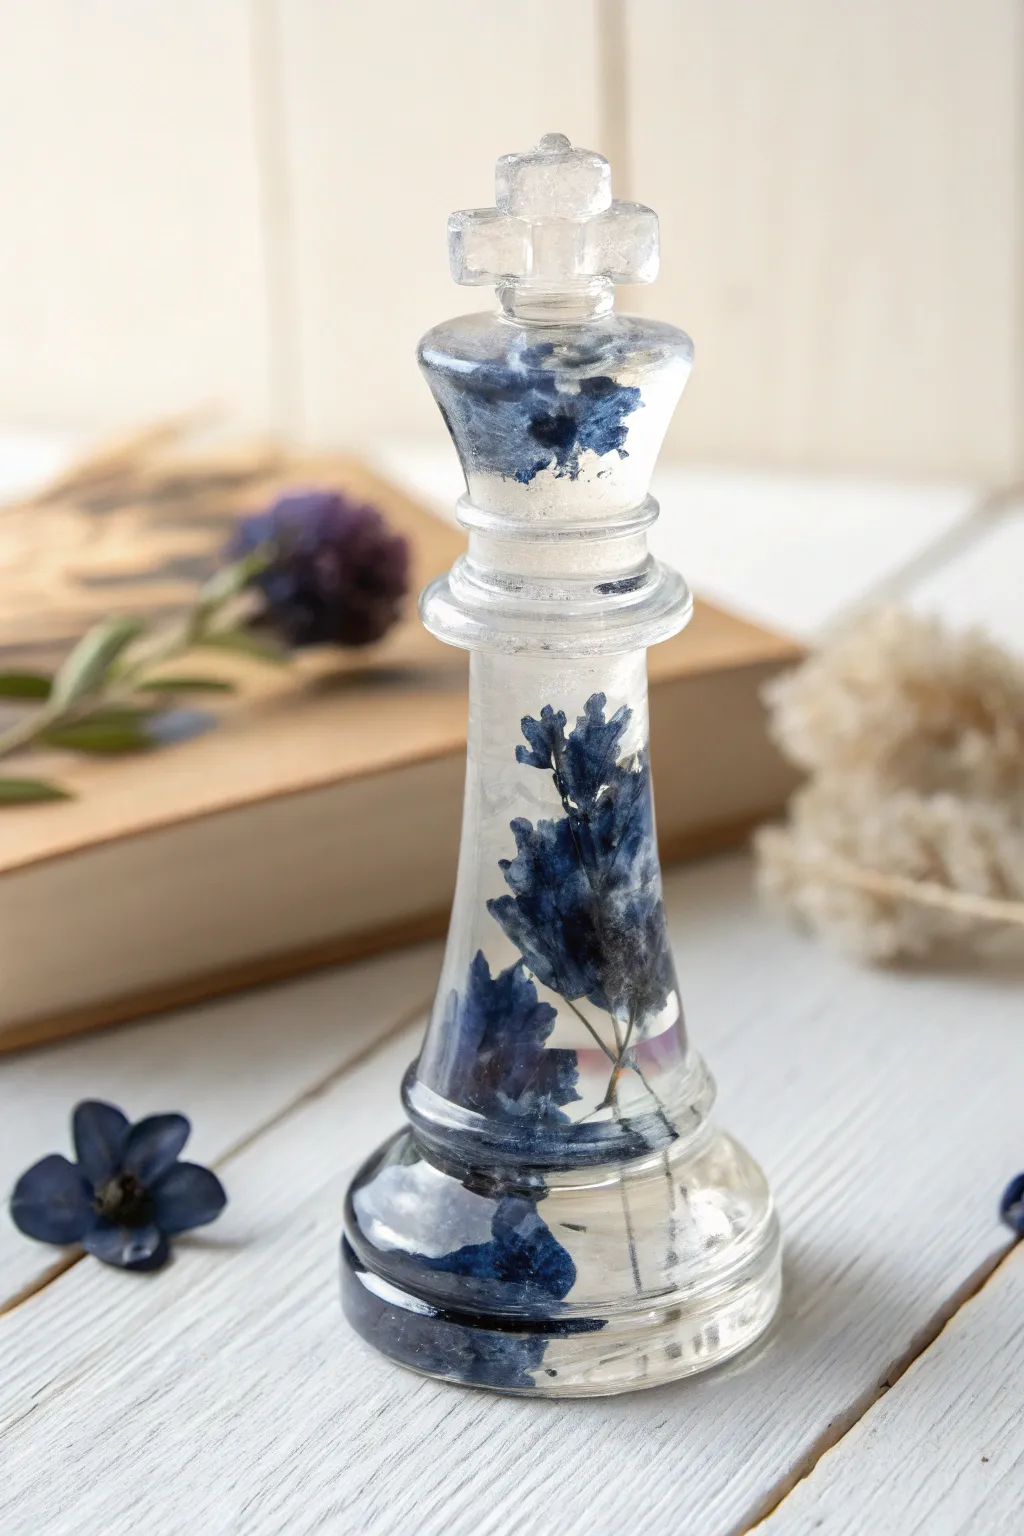
Bring a touch of nature to your game night with this stunning resin King piece. Featuring delicate blue pressed flowers suspended in crystal-clear epoxy, this project creates an elegant, frozen-in-time effect that turns a board game staple into art.
Detailed Instructions
Materials
- High-quality clear casting resin (epoxy)
- King chess piece silicone mold
- Small dried blue flowers (e.g., delphinium, hydrangea, or forget-me-nots)
- Dried blue foliage or skeleton leaves
- Tweezers (long-nosed are best)
- Mixing cups and stir sticks
- Isopropyl alcohol in a spray bottle
- Gloves and respirator mask
- Toothpicks
- Heat gun or lighter
Step 1: Preparation & First Pour
-
Prepare your workspace:
Ensure your mold is clean and dust-free. Work in a well-ventilated area with a level surface, as even a slight tilt can ruin the curing process. -
Sort the botanicals:
Select your dried blue flowers and leaves. Since the King piece has a narrow neck and cross top, you will need very small sprigs for the upper sections and slightly larger leaves for the base. Break them down to size now. -
Mix the first resin batch:
Mix a small amount of clear casting resin according to the manufacturer’s instructions, ensuring you scrape the sides and bottom of the cup thoroughly to avoid sticky spots later. -
Fill the detail work:
Pour a tiny amount of resin just into the cross at the very top of the mold. Use a toothpick to guide the resin into the corners of the cross to prevent air bubbles from getting trapped in that crucial detail. -
Insert the top flower:
Using tweezers, carefully place a tiny blue petal or flower fragment into the specific shape of the cross or the top crown area. I like to dip the flower in resin first to minimize trapped air. -
Base layer:
Pour resin until the mold is filled just past the neck of the chess piece. Let this layer sit for about 20-30 minutes until it gets tacky; this prevents heavier flowers from sinking to the bottom immediately.
Cloudy Resin?
If your piece looks milky, it’s likely due to moisture in the flowers. Ensure all botanicals are 100% bone dry or preserved in silica gel before putting them in resin.
Step 2: Building the Botanical Core
-
Strategic placement:
With the resin tacky, use your long tweezers to insert the larger blue leaves and flowers into the main body of the piece. Push them down gently. -
Create depth:
Don’t clump everything in the center. Push some leaves closer to the mold walls (the transparent outer edge) and keep some near the ‘core’ to create a multi-dimensional look. -
Orientation matters:
Remember that chess pieces are viewed from all angles. Rotate the mold (if possible) or check your placement to ensure the flowers look good from 360 degrees. -
Fill the remainder:
Mix a second batch of clear resin if needed, and slowly top off the mold until it is completely full. Pour in a thin stream to avoid introducing new bubbles.
Gold Flake Upgrade
Add tiny flecks of gold or silver foil alongside the blue flowers. The metallic glimmer catches the light and adds a regal touch perfect for a King piece.
Step 3: Finishing Touches
-
Bubble removal:
Let the piece sit for 10 minutes to allow bubbles to rise. Pass a heat gun or lighter quickly over the surface to pop any surface bubbles, but be careful not to scorch the mold. -
Check placement again:
Before the resin hardens completely, check one last time that your flowers haven’t floated up or sunk incorrectly. Use a toothpick to nudge them back into place if they have drifted. -
Curing:
Cover the mold with a box to prevent dust from settling on the sticky surface. Allow the piece to cure fully according to your resin’s guidelines, usually 24 to 48 hours for deep pours. -
Demolding:
Once hard, peel the silicone mold back gently. Start from the base and work your way up to the delicate cross at the top, wiggling it slowly to avoid snapping the resin. -
Polishing:
If there are any sharp edges or a lip at the base, sand them down with fine-grit sandpaper. If the surface looks cloudy, a quick coat of polishing compound or a thin layer of gloss spray will restore the crystal clarity.
Now you have a regal, nature-inspired King creating a striking focal point for your custom chess set


Have a question or want to share your own experience? I'd love to hear from you in the comments below!