There’s something downright magical about a resin cube—it’s like freezing a tiny moment in time inside a crystal-clear block. If you love miniature worlds, dreamy color layers, and satisfying glossy finishes, these ideas will keep your hands busy in the best way.
Dried Flower Keepsake Cube
Encapsulate the delicate beauty of a single strawflower in a crystal-clear resin cube. This modern, minimalist keepsake creates a stunning focal point that plays with light and preserves nature indefinitely.
Step-by-Step Tutorial
Materials
- Deep-pour clear epoxy resin (2:1 or 1:1 ratio, depending on brand)
- Square silicone cube mold (approx. 2-3 inches)
- Dried strawflower (Helichrysum) with short stem attached
- Mixing cups and stirring sticks
- Tweezers
- Wooden skewer or toothpick
- Sanding paper (varied grits from 400 to 2000)
- Polishing compound
- Microfiber cloth
- Heat gun or torch
- Gloves and respirator
Step 1: Preparation & First Pours
-
Dry the bloom:
Ensure your strawflower is completely dry before beginning; any moisture will cloud the resin or rot the flower. I prefer silica gel drying for 3-5 days to keep the petals perfectly shaped. -
Clean the mold:
Wipe the inside of your silicone mold with rubbing alcohol and a lint-free cloth. Even a speck of dust will show in a clear casting like this. -
Mix base layer:
Mix a small amount of resin according to the manufacturer’s instructions, stirring slowly to minimize bubbles. You only need enough to fill the bottom 1/4 inch of the mold. -
Pour the base:
Pour this thin layer into the mold and let it cure until it is tacky (usually 4-6 hours depending on your resin). This acts as an anchor for the flower.
Cloudy Resin?
If your resin looks milky, moisture was likely trapped in the flower. Ensure blooms are 100% physically dry, or use silica gel, before casting to keep it crystal clear.
Step 2: Positioning & Encapsulation
-
Dip the flower:
Before placing the flower, dip it entirely into a cup of mixed clear resin. This pre-wetting step releases trapped air from between the petals outside the mold, reducing bubbles later. -
Place the bloom:
Gently place the resin-coated flower onto the tacky base layer. Use tweezers to adjust it so the bloom faces upward and the stem angles slightly down. -
Secure the position:
If the flower tries to float or tip, use a small piece of tape across the top of the mold to hold the stem in place, or lean the stem against the corner if the aesthetic allows. -
Mix the main pour:
Mix a larger batch of resin, enough to fill the rest of the mold. Let the mixture sit for 5-10 minutes to allow air bubbles to rise to the surface before pouring. -
Pour slowly:
Pour the resin down the side of the mold, not directly onto the flower. This gentle flow fills the space without crushing delicate petals or introducing turbulence. -
Check for bubbles:
Wait 15 minutes, then inspect the flower closely. Use a toothpick to gently dislodge any stubborn bubbles caught under the petals or near the center of the bloom. -
Pop surface bubbles:
Quickly pass a heat gun or torch over the surface to pop any rising bubbles. Be careful not to overheat the silicone mold itself. -
Full cure:
Cover the mold with a box to prevent dust from settling and let it cure fully. For deep pours, this usually takes 24 to 48 hours.
Bubble-Free Petals
Paint a thin layer of catalyzed resin onto the textured center of the flower with a brush before submerging it. This seals the tiny gaps where air loves to hide.
Step 3: Finishing Touches
-
Demold:
Once rock hard, gently peel the silicone mold away from the resin cube. Do this slowly to avoid tearing the mold. -
Sand sharp edges:
The top edge where the resin settled is often sharp or slightly uneven. Wet sand this face starting with 400 grit sandpaper on a flat surface. -
Refine the surface:
Progress through higher grits (600, 1000, 2000), wet sanding until the surface is smooth but foggy. -
Polish to clarity:
Apply a plastic polishing compound to a microfiber cloth and buff the sanded side vigorously until it returns to a glass-like transparency.
Now you have a permanent botanical sculpture that captures a fleeting moment of nature perfectly


Glitter Galaxy Resin Cube
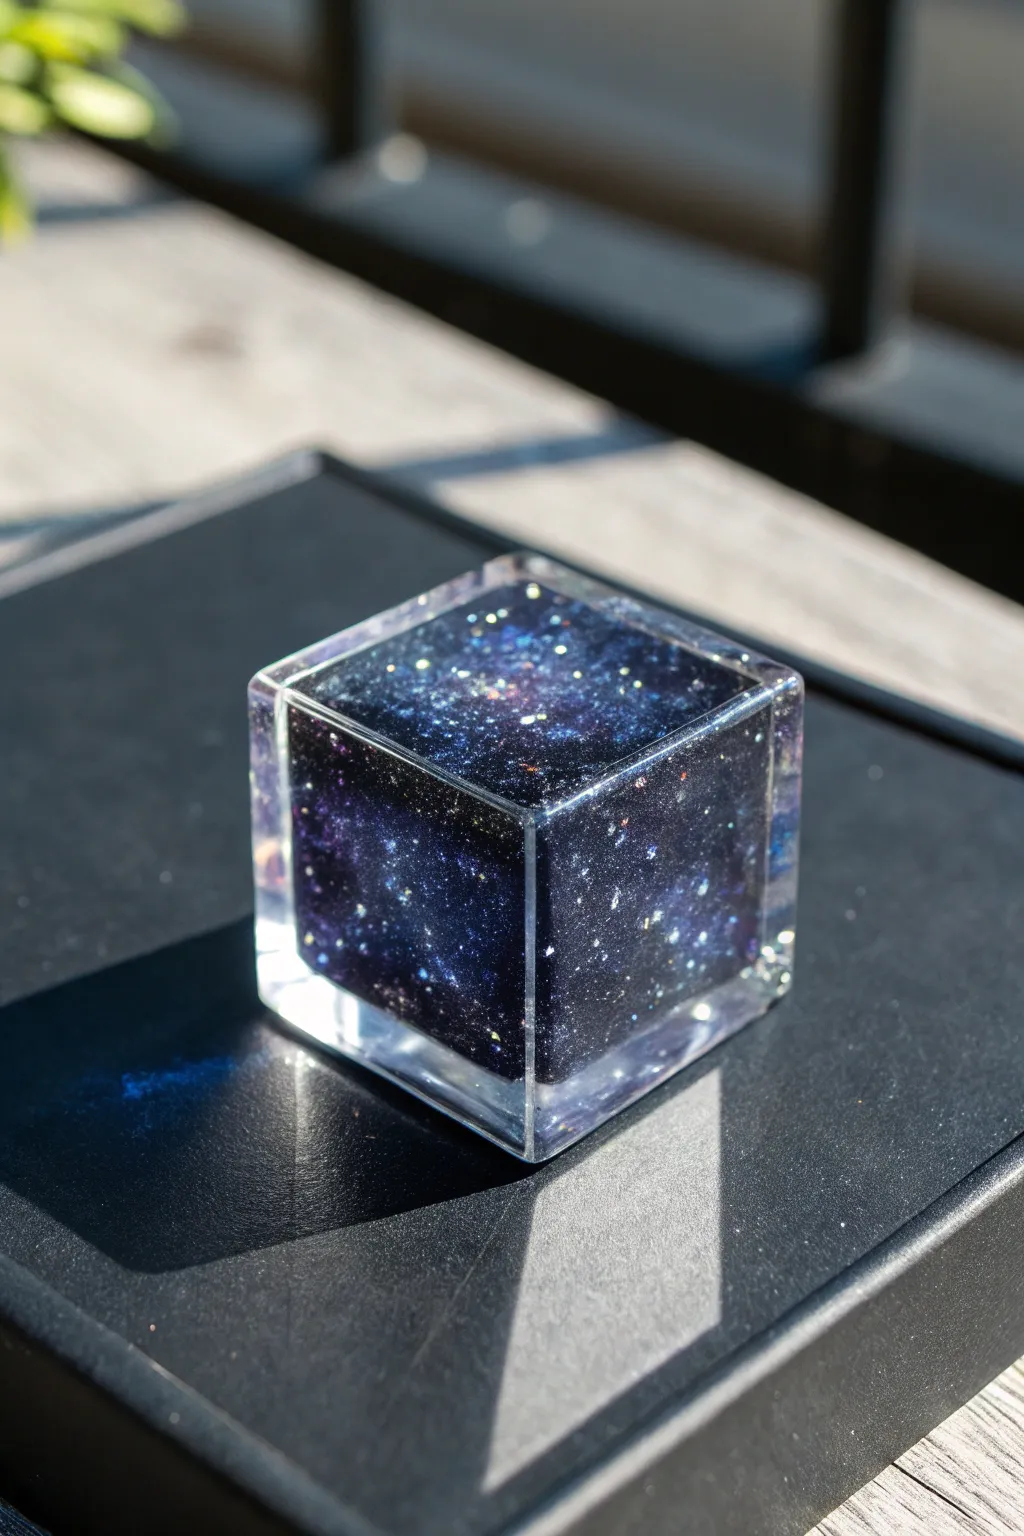
Capture the infinite depth of space in a compact, modern form with this stunning galaxy resin cube. By suspending swirls of deep violet and blue pigment amidst scattered glitter stars, you can create a miniature universe that sits right on your desk.
Detailed Instructions
Materials
- Square silicone cube mold (approx. 2-3 inches)
- Deep pour epoxy resin (low viscosity)
- Resin hardener
- Alcohol inks (Black, Navy Blue, Purple, Magenta)
- Holographic fine glitter (silver or iridescent)
- Chunky glitter flakes (holographic)
- Mixing cups and stir sticks
- Heat gun or torch
- Pressure pot (optional but recommended for crystal clarity)
- Toothpicks
- Polishing compound and microfiber cloth
Step 1: Preparation and Base Layer
-
Clean Your Mold:
Begin by inspecting your silicone cube mold for any dust or lint. Use a piece of masking tape to lift away any debris, as these imperfections will show clearly in the final piece. -
Measure and Mix Resin:
Measure out enough deep pour epoxy resin to fill your mold entirely. It’s crucial to follow the manufacturer’s exact ratio. Stir slowly for 3-5 minutes to minimize incorporating air bubbles. -
Degas the Mixture:
Let the mixed resin sit for about 10 minutes to allow larger bubbles to rise to the surface. If you have a pressure pot, this is the time to use it, but letting it rest works for basic clarity. -
Separate the Outer Shell:
Pour a small amount of clear resin into the mold—just enough to coat the bottom by about 3mm. This creates the clear ‘window’ at the base of your cube. -
Pop Surface Bubbles:
Quickly pass a heat gun or torch over the clear layer to pop any rising bubbles. Be careful not to overheat the silicone mold itself.
Step 2: Creating the Galaxy Core
-
Prepare Color Cups:
Divide the remaining resin into three small cups and one larger ‘main’ cup. Leave the main cup clear for now. -
Mix the Colors:
Tint the small cups: one dark navy blue, one deep purple, and one pitch black. I find that using alcohol ink keeps the resin translucent enough to see depth, whereas pigment paste can be too opaque. -
Add the Stars:
Mix a generous pinch of fine holographic glitter into the clear main cup. Add a tiny amount of chunky glitter for larger ‘planets’ or distant bright stars. -
Wait for Honey Consistency:
Let your colored cups sit until they reach a thick, honey-like consistency. This prevents the colors from blending into a muddy grey immediately. -
Pour the Clear Glitter:
Pour the clear, glittery resin into the center of the mold until it is mostly full, leaving just a little room at the top. -
Inject the Nebula:
Using a stick or pipette, drop swirls of the navy, purple, and black resin directly into the clear glitter mix. Don’t stir; just let the drops sink and spread naturally. -
Create Patterns:
Dip a clean toothpick into the mold and gently swirl the colors together. Use a lifting motion to pull deep colors up and push surface colors down, creating 3D tendrils.
Clear Walls Secret
To get the perfect transparent border shown in the photo, cast the galaxy core in a smaller mold first, cure it, then center it inside a larger mold and fill with clear resin.
Step 3: Curing and Finishing
-
Final Heat Treatment:
Do one last pass with your heat gun to remove bubbles introduced during the swirling process. -
Long Cure:
Cover the mold with a box to prevent dust from landing on the sticky surface. Allow the resin to cure fully, which usually takes 24-48 hours depending on your brand. -
Demold Gently:
Once fully rock-hard, carefully peel the silicone mold away from the cube. Take your time to avoid tearing the mold. -
Sand Sharp Edges:
If there is a raised lip or sharp edge on the top face (where you poured), wet sand it flat using high-grit sandpaper (start at 600, move to 2000). -
Polish to Shine:
Apply a resin polishing compound to a microfiber cloth and buff the sanded face until it matches the crystal clarity of the other sides.
Cosmic Depth
Add a tiny drop of white alcohol ink into the center during the swirling phase. As it sinks, it drags the other colors down, creating realistic ‘nebula’ tendrils.
Step 4: Adding the ‘Floating’ Effect (Optional)
-
The Double Cast Technique:
If you want the galaxy to look suspended inside a clear block (like the reference image), you actually need two molds. Follow the steps above with a slightly smaller mold first. -
Encasing the Galaxy:
Once the smaller galaxy cube is cured, place it into a larger square mold. Pour clear resin around it to create the thick, transparent walls shown in the photo.
Place your finished cube near a light source to watch the internal galaxy sparkle and shift throughout the day.


Ocean Wave Layer Cube
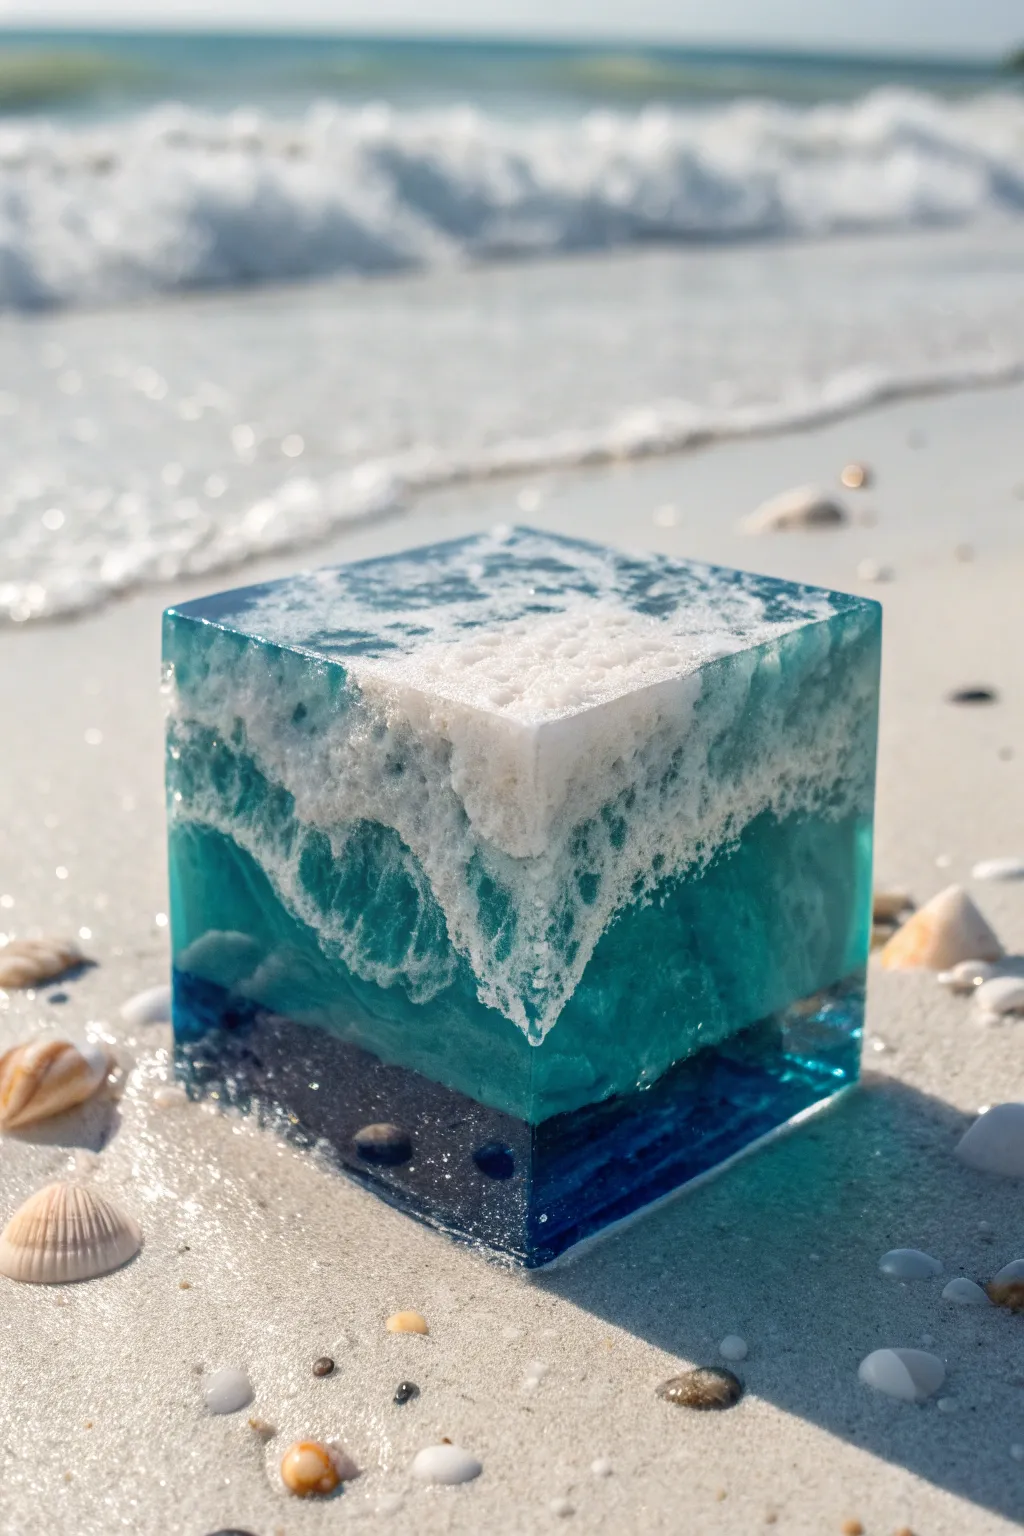
Freeze a moment of crashing surf in time with this stunning multi-layered resin cube. By carefully layering deep blues, transparent aquas, and textured whites, you can create a realistic cross-section of the ocean right on your desk.
Step-by-Step Tutorial
Materials
- Square silicone cube mold (approx. 3-4 inches)
- Deep pour epoxy resin (slow curing is best)
- Tabletop epoxy resin (for the white waves)
- Blue mica powder (dark navy)
- Alcohol inks (teal, sapphire blue, white)
- White pigment paste (opaque)
- Fine dark sand or black glitter sand
- Heat gun or torch
- Mixing cups and stir sticks
- Tweezers
- Small sea shells or pebbles (optional)
- Isopropyl alcohol in a spray bottle
Step 1: The Deep Ocean Floor
-
Prepare the mold:
Ensure your silicone mold is perfectly clean and dust-free. Lightly misting it with mold release can help later, but it isn’t strictly necessary if your silicone is high quality. -
Mix the base layer:
Mix a small batch of deep pour resin. Tint this batch with dark navy blue mica powder until it is opaque. You want this bottom layer to look like the deep, mysterious ocean floor. -
Add texture:
Stir in a generous amount of fine dark sand or black glitter sand. The mixture should be thick and slushy, not runny, to ensure it stays at the bottom. -
Pour the foundation:
Pour this sand-resin mixture into the bottom of the mold, filling it about 15-20% of the way up. Tap the mold gently on the table to release trapped air bubbles. -
Embed details:
If you have tiny shells or pebbles, use tweezers to place one or two on top of the sand layer while it’s still wet, pushing them slightly into the surface. -
Initial cure:
Allow this base layer to cure until it is tough and tacky (usually 12-24 hours depending on your resin brand) before proceeding to the water.
Wave Maker Tip
Wait until the clear resin is the consistency of warm honey before adding white. If you pour too early, the white will sink like a cloud rather than staying on top as foam.
Step 2: The Clear Water Body
-
Mix the water resin:
Prepare a larger batch of deep pour resin—enough to fill the mold to about 85% capacity. This needs to remain transparent. -
Tinting for transparency:
Add just one or two drops of teal alcohol ink. Go very easy here; you want a glass-like look, not an opaque color. Stir gently to avoid bubbles. -
Pour the mid-section:
Pour this tinted resin over your cured sand base. Use a heat gun to pop any bubbles that rise to the surface. -
Waiting game:
Let this layer thicken to a gel-like consistency. This is crucial—if the resin is too liquid, the white waves we add next will just sink to the bottom.
Step 3: Creating the Crashing Wave
-
Prep the white resin:
While the main layer is getting tacky, mix a small amount of heavier tabletop epoxy. This type cures faster and holds patterns better. -
Make it opaque:
Color this small batch with opaque white pigment paste. High opacity is key for realistic foam. -
Pour the wave shape:
Once the teal layer is thick like honey, pour the white resin in a wavy, uneven line across the top surface. -
Blow the waves:
Using a heat gun on a low setting, push the white resin around to feather it out and create movement. I like to push it slightly downward into the teal resin to simulate depth. -
Create cells:
Mist isopropyl alcohol or use a toothpick dipped in clear resin to interrupt the white areas, creating those little ‘cells’ that look like sea foam. -
Top off:
If the mold isn’t quite full after the wave settles, carefully add a final thin layer of clear resin to level the top once the wave layer has gelled slightly.
Level Up: Hidden Treasure
Before pouring the sand layer, place a tiny LED light at the bottom center. When finished, the light will shine up through the water, making the waves glow from below.
Step 4: Demolding and Finishing
-
Full cure:
Leave the project undisturbed for the full cure time recommended by your resin manufacturer, often 48-72 hours for deep blocks. -
Demold:
Gently pull the sides of the silicone away from the cube and push from the bottom to pop the artwork out. -
Sand edges:
Depending on the mold, you might have sharp edges. Wet sand them lightly with high-grit sandpaper (1000+) if needed. -
Polish:
Apply a polishing compound or a final thin coat of brush-on resin to restore crystal clarity to any sanded areas.
Place your finished cube near a window to let the sunlight illuminate the deep blue depths


Mini Mushroom Terrarium Cube
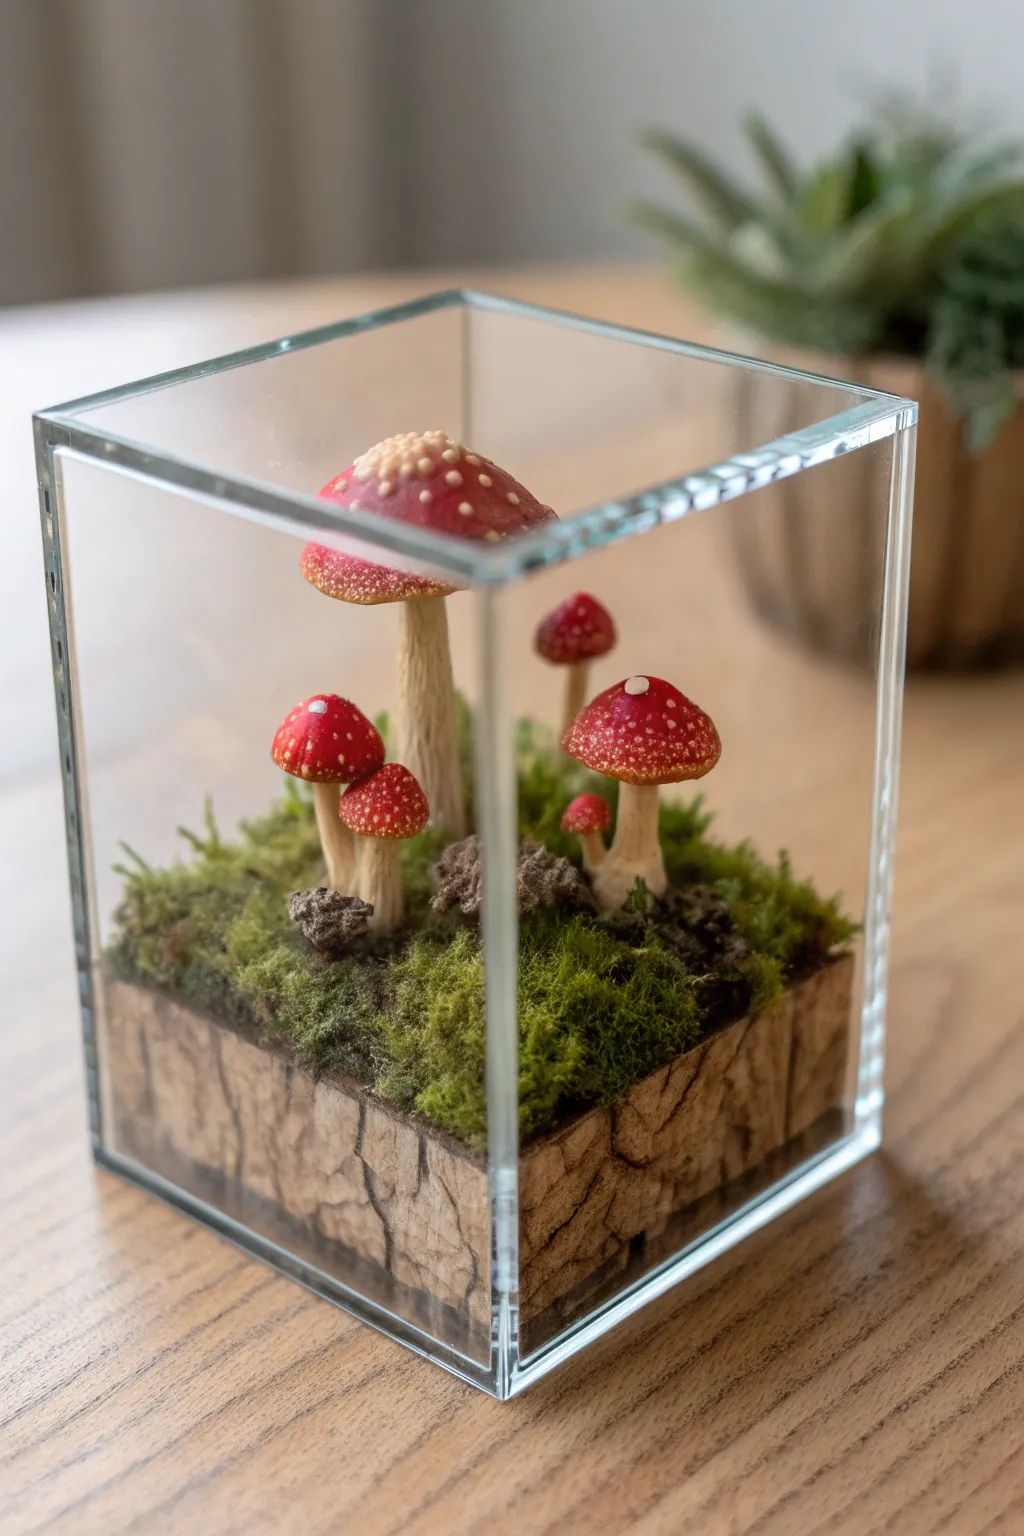
Capture a tiny slice of the woodland floor with this charming enclosed terrarium. Featuring realistic polymer clay mushrooms nestled in preserved moss, this low-maintenance display brings a touch of fairytale magic to your desk without needing any water.
Step-by-Step
Materials
- Clear acrylic or glass display cube (approx. 4×4 inches) with removable lid or open side
- Polymer clay (white, red, beige/tan)
- Acrylic paints (brown, white, yellow ochre)
- Fine-grit sandpaper
- Liquid Sculpey or clay adhesive
- Textured craft foam or cork sheet (for the base)
- Preserved reindeer moss or sheet moss (various greens)
- Small pebbles or coarse sand
- Dried tea leaves or coffee grounds (for soil texture)
- Craft glue or E6000
- Fine detail paintbrush
- Sculpting tools (needle tool, ball stylus)
- Matte varnish (optional)
Step 1: Sculpting the Fungi
-
Prepare the stems:
Condition your beige or tan polymer clay until soft. Roll out several snakes of varying thicknesses for the mushroom stems. You’ll want one large central stem and several tinier ones for the smaller mushrooms. -
Texture the stalks:
Using a needle tool, gently drag vertical lines down the length of the stems to mimic the fibrous texture of real mushroom stalks. Gently flare the bottoms slightly where they will meet the ground. -
Shape the caps:
Roll balls of red clay in varying sizes. Flatten the bottoms and gently dome the tops. For the largest mushroom, create a slightly wider, flatter dome, while the smaller ones should remain rounder buttons. -
Attach caps to stems:
Apply a tiny drop of liquid clay or adhesive to the top of each stem. Press the red caps firmly onto the stems. Use a ball stylus to blend the seam underneath the cap for a seamless transition. -
Add famous spots:
Take tiny pinches of white clay and roll them into microscopic balls. Press these randomly onto the red caps, flattening them slightly. Vary the sizes to look natural—nature isn’t perfectly uniform. -
Bake the batch:
Arrange your mushrooms on a baking sheet lined with parchment paper. Bake according to your polymer clay package instructions (usually 275°F for 15-30 minutes). Let them cool completely.
Natural Texture Hack
Before baking, lightly roll a piece of rough sandpaper or a toothbrush over the mushroom caps to remove fingerprints and give them a velvety, organic organic matte texture.
Step 2: Building the Terrain Base
-
Cut the foundation:
Measure the inside floor of your acrylic cube precisely. Cut a square of thick textured foam or cork sheet to fit snugly inside. It should be about 1/2 to 3/4 inch thick to create a visible ‘earth’ layer. -
Texture the earth:
If using foam, score the vertical sides with a craft knife to create cracks and strata lines intended to look like dried earth. Paint the sides with a wash of brown and yellow ochre acrylic paint. -
Prepare the surface:
Coat the top surface of your base block with a generous layer of craft glue. While wet, sprinkle dried coffee grounds or tea leaves over patches where you want ‘bare soil’ to show through.
Avoid The Fog
If you use superglue (cyanoacrylate), leave the lid off the cube for 24 hours. Superglue fumes can permanently fog up clear acrylic plastic if trapped inside!
Step 3: Assembly and Detail
-
Plant the moss:
Tear small tufts of preserved moss. Glue them onto the top of the base, creating an uneven, rolling landscape. I find mixing two shades of green adds depth that single-color moss lacks. -
Position the mushrooms:
Decide on your arrangement. Use a sharp tool to poke guide holes through the moss and into the foam base where the stems will go. -
Secure the fungi:
Dip the bottom of each mushroom stem in strong glue and insert them into your guide holes. Hold them straight for a few seconds until the glue tacks up. -
Add rocky details:
Glue a few small pebbles or chunks of cork near the base of the stems. This helps hide insertion points and adds realism to the forest floor. -
Final clean up:
Once the diorama insert is fully dry, inspect for any loose debris. Use a soft brush to sweep away stray heavy dust. -
Encasing the scene:
Carefully slide your finished terrain block into the acrylic cube. If it’s a tight fit, push gently from the center to avoid smearing glue on the clear walls. Seal the cube if desired.
Place your tiny world near a light source to see the shadows dance through the moss
BRUSH GUIDE
The Right Brush for Every Stroke
From clean lines to bold texture — master brush choice, stroke control, and essential techniques.
Explore the Full Guide
Pet Fur or Whisker Memory Cube
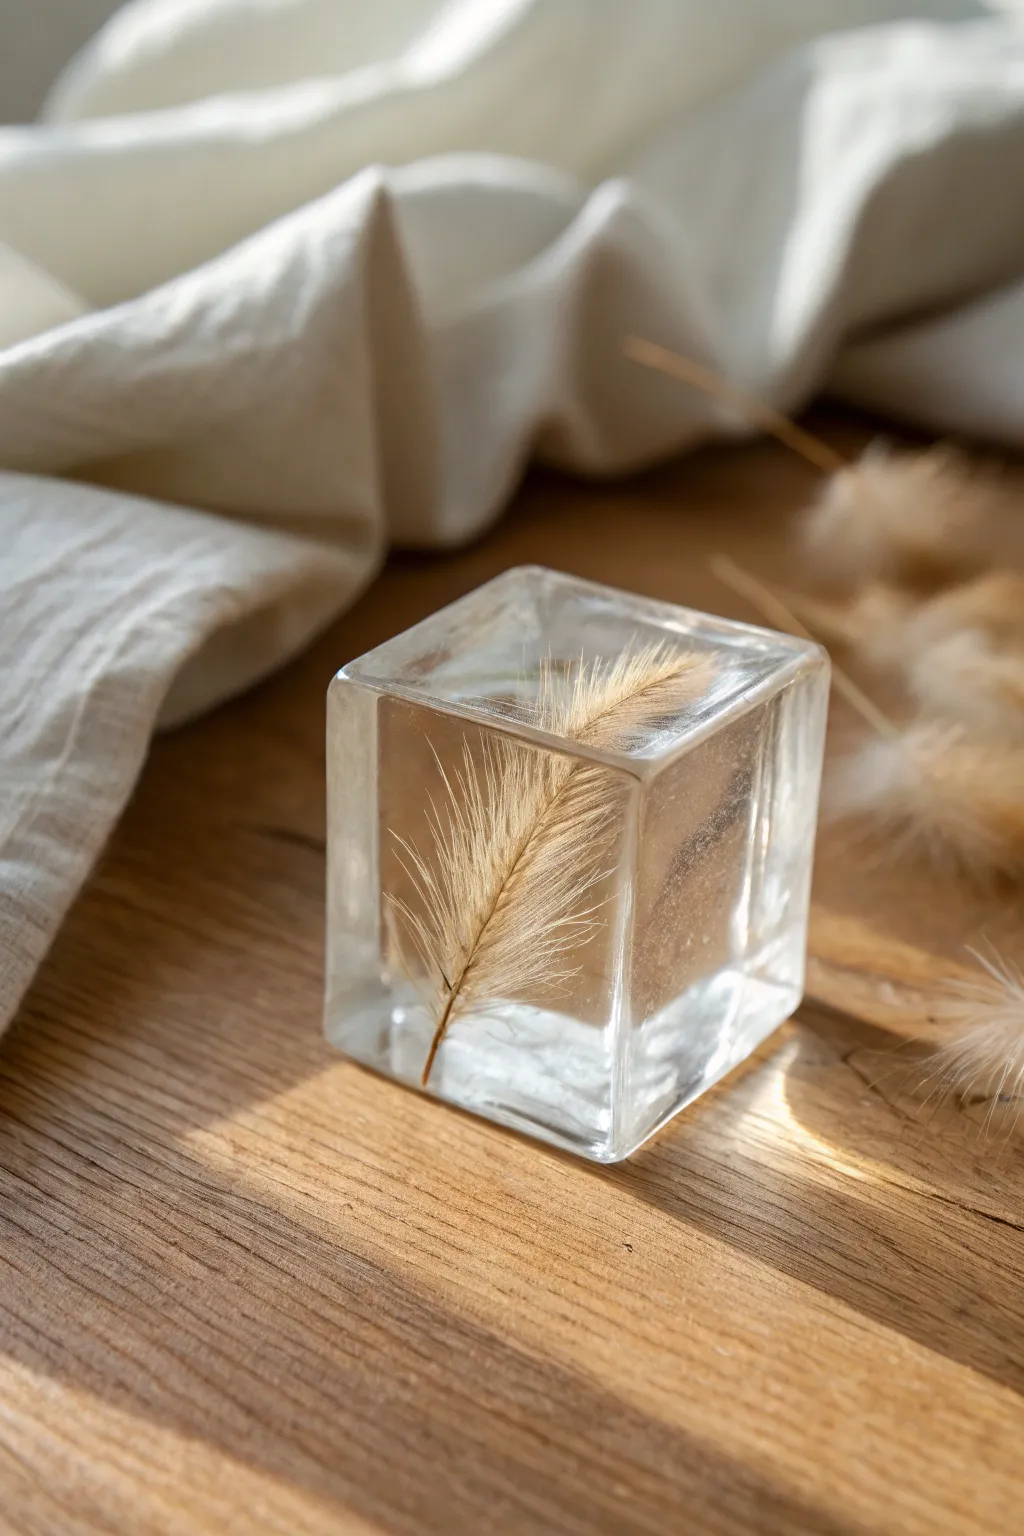
Capture a cherished memory of a beloved pet by encapsulating a whisker or delicate tuft of fur inside a crystal-clear resin cube. This project creates a minimalist, modern keepsake that beautifully highlights the natural texture and color of the hair against the glass-like resin.
Step-by-Step Tutorial
Materials
- High-quality clear casting epoxy resin (deep pour formula recommended)
- Square silicone cube mold (approx. 2-3 inches)
- Pet whisker, small feather, or fur tuft
- Mixing cups and stir sticks
- Tweezers
- Heat gun or torch for bubbles
- Disposable gloves
- Dust cover (a clean box works well)
- Fine grit sandpaper (optional for finishing)
- Resin polishing compound (optional)
Step 1: Preparation & First Pour
-
Clean and Prepare:
Before starting, ensure your silicone mold is perfectly clean and dry. Any dust or lint will be magnified in the final clear cube, so use masking tape to lift away stray particles from the mold’s interior. -
Select the Specimen:
Choose a clean, straight whisker or a small, neat tuft of fur. If using a feather-like tuft as seen in the photo, ensure it is completely dry and free of oils. -
Mix the Base Layer:
Mix a small amount of clear casting resin according to the manufacturer’s instructions. You want enough to fill the mold about one-third of the way up. -
Pour the Base:
Slowly pour the mixed resin into the bottom of the mold. Pouring down the side of the mold helps reduce air bubbles. -
Remove Bubbles:
Let the resin sit for 5-10 minutes to allow bubbles to rise. Pass a heat gun or torch quickly over the surface to pop them. -
Wait for Gel Stage:
Allow this bottom layer to cure until it reaches a ‘gel’ or tacky state. It should be firm enough to support the whisker but sticky enough to bond with the next layer. This usually takes 2-4 hours depending on your resin.
Clear is Key
Warm your resin battles in a warm water bath before mixing. Warm resin is thinner, which allows micro-bubbles to escape much faster, resulting in glass-like transparency.
Step 2: Placement & Encapsulation
-
Place the Whisker:
Using tweezers, carefully place your whisker or fur tuft onto the tacky resin layer. I like to position it diagonally to add some visual dynamism to the cube. -
Secure the Position:
If the object tends to float or move, you can use a tiny drop of UV resin or superglue to tack it down to the gelled layer, or simply press it gently into the tackiness. -
Mix Second Batch:
Mix a second batch of clear resin. Stir slowly but thoroughly to minimize introducing new bubbles, as this layer will surround the delicate hairs. -
Coat the Specimen:
dip a stir stick into the resin and gently drip a small amount directly over the whisker first. This helps wet the surface and prevents air pockets from getting trapped in the texture of the fur. -
Fill the Mold:
Slowly pour the rest of the resin into the mold until it reaches the brim. Create a slight dome effect (meniscus) at the top if possible, as resin sometimes shrinks slightly. -
Final Bubble Check:
Check closely for bubbles trapped around the whisker. Use a toothpick to gently guide stubborn bubbles away from the main subject and up to the surface. -
Cover and Cure:
Place a dust cover over the mold immediately. Let the cube cure undisturbed for at least 24-48 hours, or whatever full cure time your specific resin brand requires.
Add a Glow
Mix a tiny pinch of mica powder or phosphorescent powder into the very bottom layer for a subtle, ethereal glow that illuminates the whisker from below.
Step 3: Demolding & Finishing
-
Demold Gently:
Once fully cured and hard, gently pull the silicone sides away from the cube. Push from the bottom to pop the resin block out. -
Assess the Edges:
Check the edges of your cube. The top edge (which was the open face of the mold) might be slightly sharp or raised. -
Sand if Necessary:
If the top edge is rough, wet sand it lightly with find grit sandpaper (start at 600 and go up to 2000) on a flat surface to level it. -
Polish for Clarity:
If you sanded, use a polishing compound and a microfiber cloth to buff that side back to crystal clarity. If no sanding was needed, a quick wipe with a polishing cloth ensures it’s fingerprint-free.
Place your finished cube near a window where sunlight can catch the fine details of the preserved memory
Tiny Seashell and Sand Cube
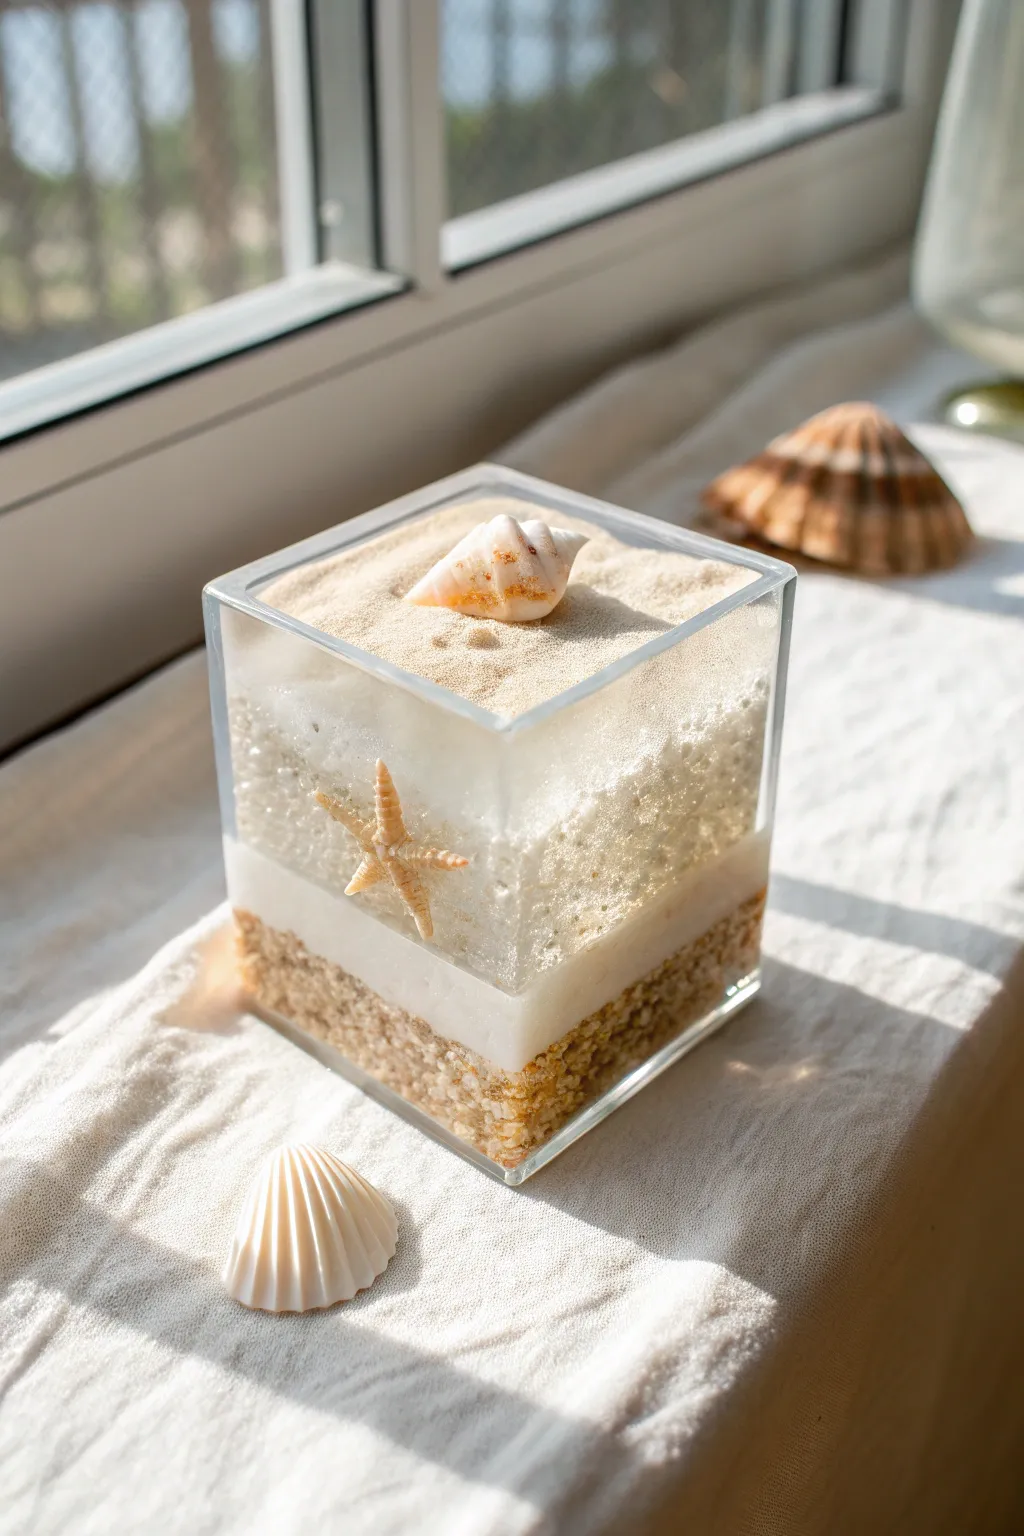
Capture the serenity of the shoreline in a compact, modern form with this multi-layered resin cube. Combining textured sand, frothy white resin, and clear bubbly sections creates a stunning cross-section of the beach that catches the light beautifully.
Step-by-Step
Materials
- Square silicone cube mold (approx. 3-4 inches)
- Epoxy resin (casting resin is best for depth)
- Sand (coarse grain for bottom, fine grain for top)
- White alcohol ink or opaque white resin pigment
- Small dried starfish
- Small seashell (spiral shape)
- Mixing cups and stir sticks
- Tweezers
- Heat gun or torch (optional, used sparingly here)
- UV resin (optional, for quick adhering)
Step 1: The Sandy Foundation
-
Prepare the Base Mixture:
Mix a small amount of epoxy resin according to the manufacturer’s instructions. In a separate cup, combine this resin with your coarse grain sand until you achieve a wet sand consistency that holds its shape but is fully coated. -
Layer the Bottom:
Pack the sand-resin mixture into the bottom of your silicone mold. Aim for a layer about 0.5 to 0.75 inches thick. Use a flat stick to tamp it down firmly so the edges are crisp and flat against the mold walls. -
Initial Cure:
Allow this bottom layer to cure completely. Since the next layer is a solid color, you don’t want the sand shifting or floating up into it.
Bubble Control
Wait for the resin to reach a ‘gel’ stage before inserting the starfish. This traps bubbles near the object, enhancing the underwater look.
Step 2: The Crashing Wave
-
Mix White Resin:
Prepare a new batch of clear resin. Add several drops of white alcohol ink or opaque white pigment. Stir thoroughly until the color is solid and milky; you don’t want transparency for this specific separating layer. -
Pour the White Layer:
Pour a thin layer (about 0.25 to 0.5 inches) of the white resin directly onto the cured sand base. I usually pour slowly down the side or over a stick to avoid creating air pockets at the sand interface. -
Partial Cure:
Let this white layer cure until it is tacky or hard. It needs to be solid enough to support weight but sticky enough to bond with the next layer.
Coastal Glow
Mix a tiny pinch of phosphorescent (glow-in-the-dark) powder into the white middle layer. Your shoreline will glow softly at night!
Step 3: The Deep Water
-
Prepare Clear Resin:
Mix a larger batch of clear deep-pour or casting resin. For this particular aesthetic, you actually *want* some micro-bubbles to mimic sea foam, so you don’t need to be overly aggressive with a heat gun. -
Pour and Place Starfish:
Pour the clear resin into the mold until it fills the majority of the remaining space, leaving about half an inch at the top. Wait about 30-40 minutes for the resin to thicken slightly to a honey-like consistency. -
Embed the Starfish:
Using tweezers, carefully lower the dried starfish into the thickening resin. Position it near the front face of the cube. If it sinks too fast, pull it out and wait another 15 minutes before trying again. -
Create Texture:
To mimic the effervescence of ocean water, vigorously stir the top inch of the resin right in the mold to induce bubbles, or inject a tiny bit of white alcohol ink and swirl it gently without blending it fully. -
Full Cure:
Let this thick clear layer cure completely. This may take 24-48 hours depending on your resin brand.
Step 4: The Sandy Shore Top
-
Top Layer Mix:
For the final surface, mix a small batch of resin with very fine, light-colored sand. This should be a slightly looser mixture than the base layer to ensure it self-levels. -
Fill to the Brim:
Pour this sand mixture to fill the remainder of the mold, creating a flat top surface. Ensure it reaches all four corners perfectly. -
Position the Shell:
While the top sand layer is wet, place your spiral seashell gently onto the surface. Don’t push it in; let surface tension hold it so it looks like it’s resting on the beach. -
Final Cure and Demold:
Allow the entire project to cure for the full recommended time, usually 24-72 hours for deep cubes. Once solid, carefully peel back the silicone mold to reveal your artwork. -
Finishing Touches:
If there are any sharp edges from the mold, sand them lightly with high-grit sandpaper and polish, or add a thin brush-coat of resin to seal them.
Place your finished cube on a sunny windowsill where the natural light can illuminate the layers of your miniature ocean world

PENCIL GUIDE
Understanding Pencil Grades from H to B
From first sketch to finished drawing — learn pencil grades, line control, and shading techniques.
Explore the Full Guide
Message-in-a-Bottle Cube
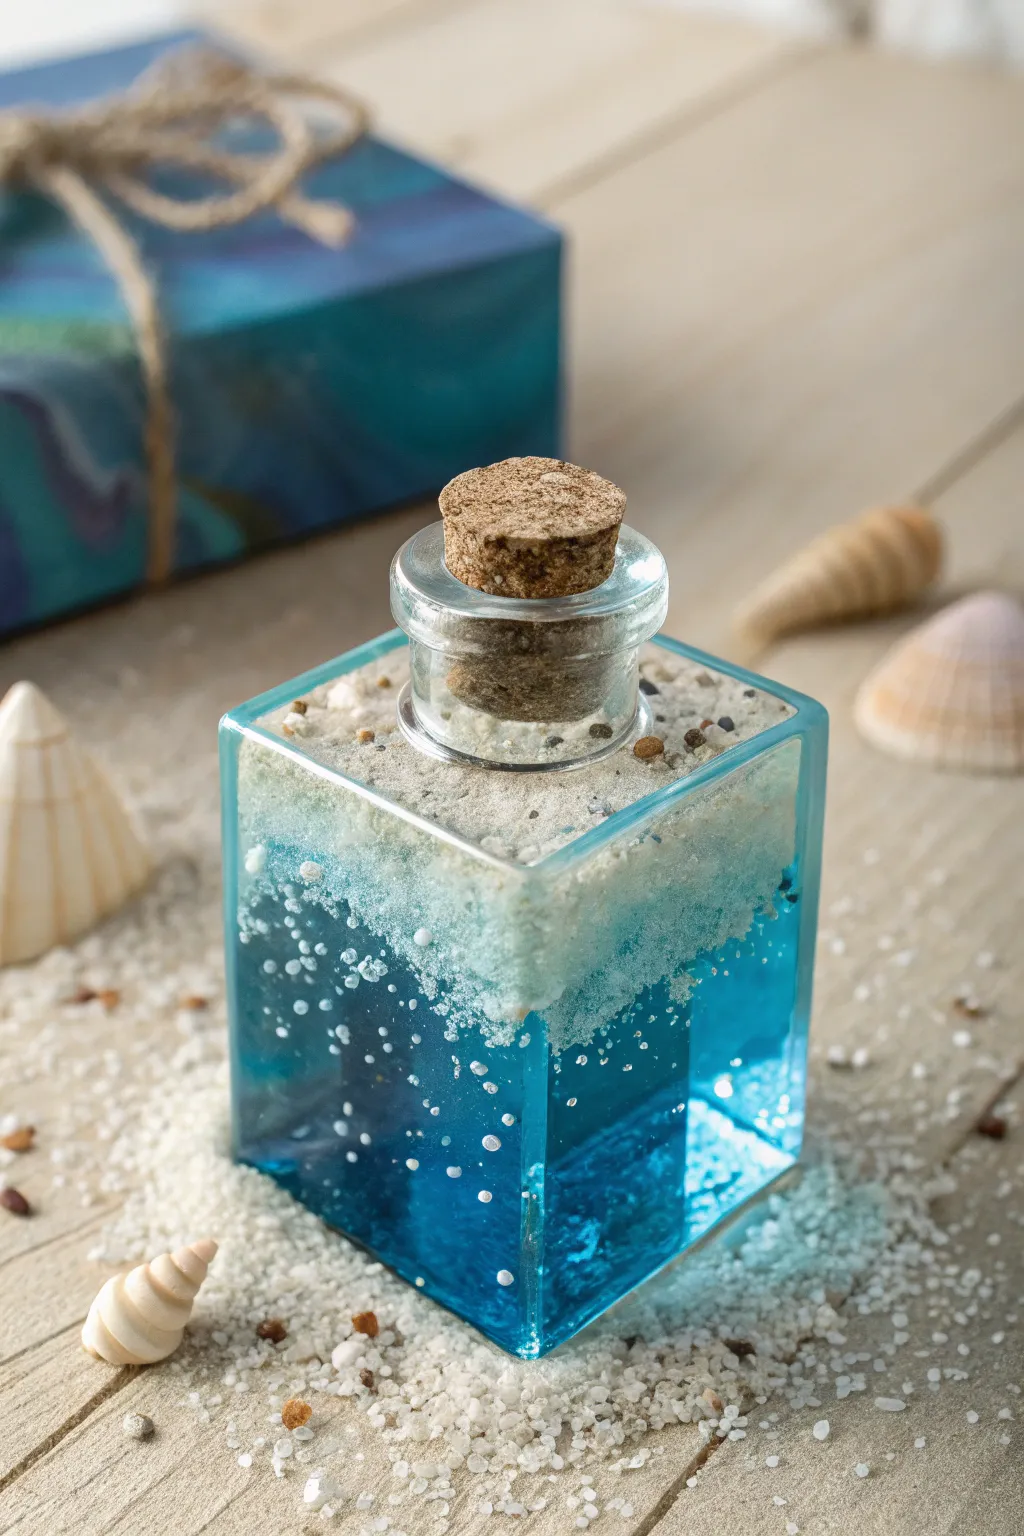
Capture the magic of the ocean in this stunning resin cube featuring a crystal-clear blue base and a realistic sandy shore top. The embedded glass bottle neck and rustic cork stopper give it the irresistible charm of a message in a bottle washed ashore.
How-To Guide
Materials
- High-quality epoxy resin (casting resin)
- Square silicone mold (cube)
- Small glass bottle (one with a neck that fits your mold scale)
- Cork stopper to fit the bottle
- Transparent blue resin tint or ink
- Fine white decorative sand
- Small pebbles or crushed shells (optional)
- Mixing cups and stir sticks
- Gloves and safety gear
- Sandpaper (various grits)
- Heat gun or lighter
Step 1: Preparation & First Pour
-
Prepare the bottle insert:
Since we only need the neck and cork for this illusion, you have two options. You can use a very small vial that fits entirely, or ideally, safely cut the neck off a small glass bottle. If cutting glass isn’t an option, find a small vial where the body is shorter than your mold’s height. -
Clean everything:
Wipe down your silicone mold with isopropyl alcohol to ensure no dust is present. Ensure your glass piece and cork are completely clean and dry. -
Mix the ocean layer:
Mix a batch of casting resin according to the manufacturer’s instructions. Stir slowly to minimize bubbles. -
Tint the resin:
Add a very small drop of transparent blue tint. You want an aquamarine look that is see-through, not opaque. Mix well. -
Pour the base:
Pour the blue resin into your cube mold, filling it about 3/4 of the way up. This leaves room for the sandy top layer. -
Pop bubbles:
Let the resin sit for 10 minutes to allow bubbles to rise, then gently pass a heat gun or lighter over the surface to pop them. -
Let it gel:
Allow this blue layer to cure until it reaches a ‘gel’ stage—sticky and thick but firm enough to hold weight. This usually takes 4-8 hours depending on your resin.
Cloudy Water Fix
If your resin looks milky, humidity is the likely culprit. Always cast in a low-humidity room (under 50%) and keep the temperature steady during the cure.
Step 2: Adding the Beach & Bottle
-
Prepare the sand mix:
In a small cup, mix a small amount of fresh resin with your fine white sand. You want a consistency like wet beach sand—crumbly but coated, not a runny liquid. -
Place the bottle neck:
Gently press your glass bottle neck (with the cork already inserted firmly) into the center of the blue gel layer. It should sink just slightly but sit mostly on top. Ensure it stands straight. -
Add the sand layer:
Carefully spoon the sand and resin mixture around the glass neck, filling the rest of the mold to the top. Pack it gently around the glass to create a seal. -
Detail the shore:
Sprinkle a little dry sand and a few tiny pebbles on the very top while the resin is wet for extra texture. I find this creates a more realistic, non-glossy surface. -
Final cure:
Allow the entire project to fully cure for at least 24-48 hours. Do not disturb the bottle neck during this time.
Hidden Treasure
Before pouring the sand layer, drop a tiny curled paper note or a miniature shell into the blue gel layer so it floats suspended beneath the ‘surface’
Step 3: Demolding & Finishing
-
Remove from mold:
Gently peel back the silicone mold to release your cube. Be careful around the top edge where the sand meets the silicone. -
Inspect edges:
The sharp corners of the mold might have left raised ridges. Use fine-grit sandpaper to smooth any sharp edges on the bottom or sides if necessary. -
Enhance clarity:
If the sides of the cube look cloudy from the mold texture, you can polish them with a resin polishing compound or apply a thin topcoat of clear resin to the sides only. -
Clean the glass:
If any resin smudge got onto the exposed glass neck, carefully scrape it off with a razor blade or wipe with acetone. -
Final touch:
Display your cube near a window where natural light can shine through the blue water layer.
This serene ocean keepsake brings a permanent piece of summer to your desk or shelf, reminding you of sunny days
Pressed Leaf Gradient Cube
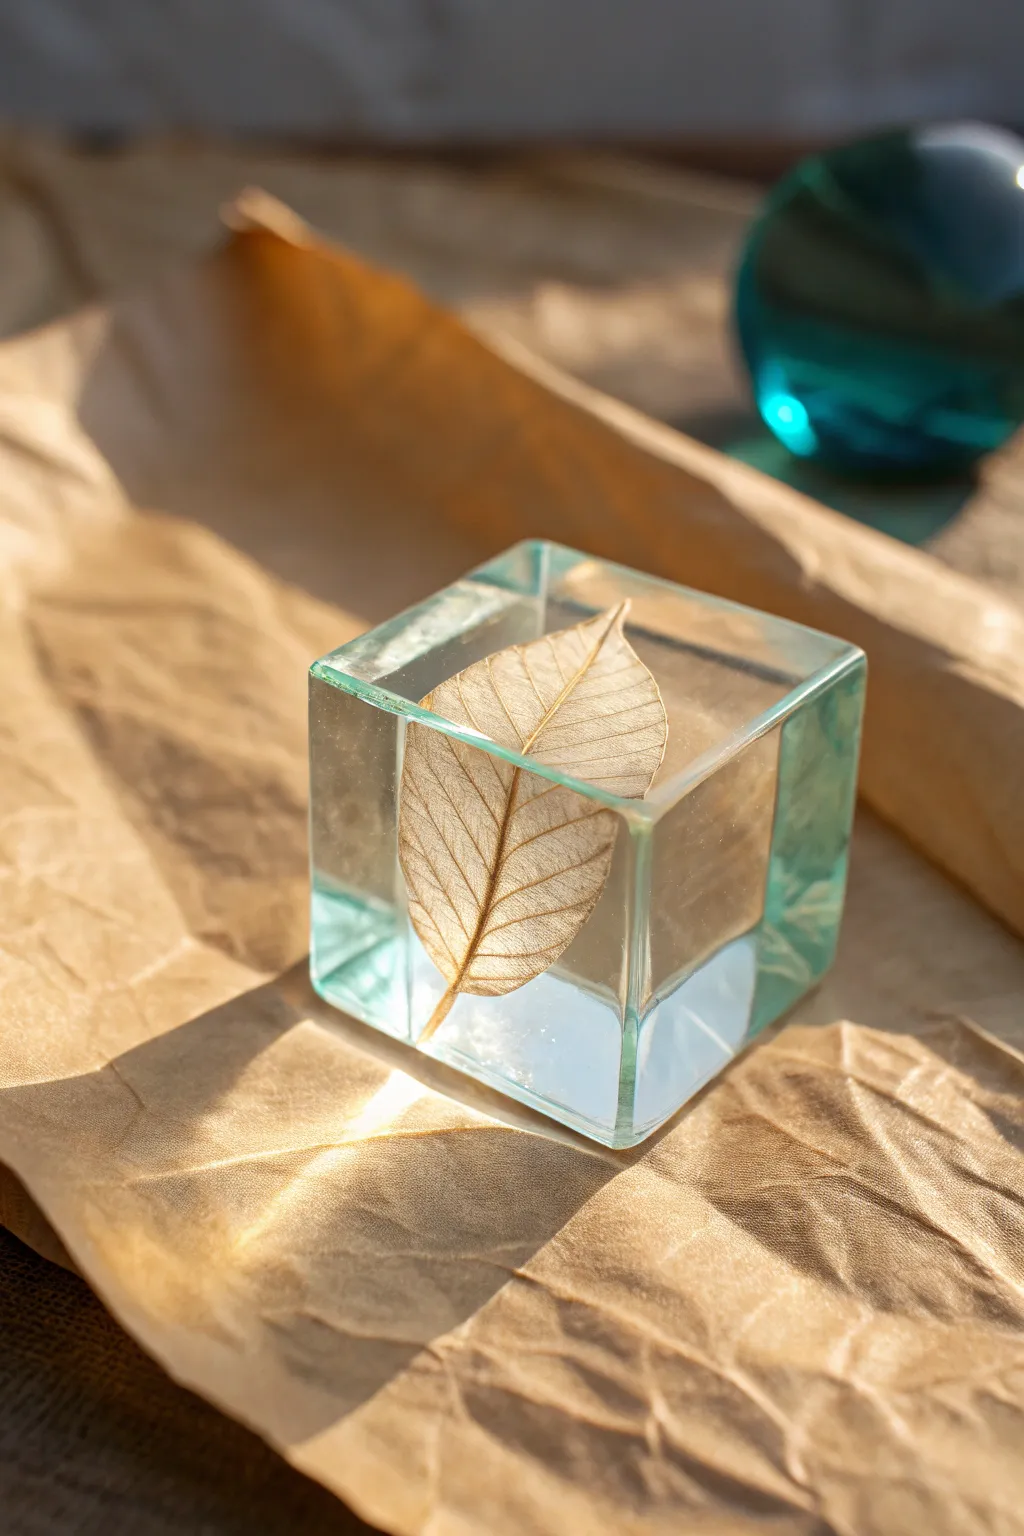
Capture the delicate beauty of nature suspended in time with this minimalist resin project. By embedding a single skeletonized leaf within a lightly tinted, glass-like cube, you’ll create a sophisticated display piece that plays with light and transparency.
Detailed Instructions
Materials
- Square silicone cube mold (approx. 2-3 inches)
- Epoxy resin (casting resin intended for deeper pours is ideal)
- Skeletonized leaf (dried and pressed)
- Blue-green or teal liquid resin dye (transparent)
- Mixing cups and stir sticks
- Tweezers
- Heat gun or lighter
- Gloves and respirator mask
- Sanding paper (various grits from 400 to 2000)
- Polishing compound and microfiber cloth
Step 1: Preparation & First Layer
-
Leaf selection:
Choose a skeletonized leaf that fits comfortably within your mold’s dimensions without touching the edges. Ensure it is completely flat and dry. -
Mold cleaning:
Inspect your silicone mold for any dust or debris. Use a piece of masking tape to lift away stray particles, as these will be very visible in the clear resin. -
Mixing first batch:
Mix a small amount of resin, enough to fill about one-third of the mold. Follow the manufacturer’s ratio instructions precisely and mix slowly to minimize bubbles. -
Tinting the base:
Dip the tip of a toothpick into your blue-green dye and swirl it into the resin. You want a barely-there tint, almost like sea glass, so use a very light hand—you can always add more, but you can’t take it away. -
Pouring the base:
Pour this first layer into the mold. Let it settle for a few minutes, then pass a heat gun or lighter quickly over the surface to pop any rising air bubbles. -
Initial cure:
Allow this layer to cure until it reaches a tacky, gel-like state. This usually takes 2-4 hours depending on your specific resin brand.
Floating Leaf Issue?
If your leaf drifts after pouring, the base layer wasn’t tacky enough. Use a toothpick to reposition it, continuing to check it every 15 minutes until the resin thickens enough to hold it.
Step 2: Embedding the Leaf
-
Placement:
Once the base layer is sticky but firm enough to support weight, carefully place the skeleton leaf into the mold using tweezers. -
Securing the leaf:
Gently press the leaf down so it adheres to the tacky resin surface. This prevents it from floating up during the next pour. -
Mixing part two:
Mix a second batch of resin. I prefer to keep this layer completely clear or use an even fainter tint than the bottom layer to create a subtle gradient effect. -
Sealing the leaf:
Pour a very small amount of fresh resin over the leaf first. Use your stir stick to gently coat the delicate veins, ensuring no air bubbles are trapped fast to the skeleton structure. -
Filling the mold:
Continue pouring the resin slowly down the side of the mold until it is filled to the top. Pouring down the side helps avoid introducing new bubbles. -
Final bubble check:
Let the mold sit for 10 minutes, checking periodically for bubbles trapped in the leaf’s mesh. Use a toothpick to gently guide them to the surface and pop them with heat.
Gilded Edges
Before placing the leaf in the mold, brush the very edges of the skeleton structure with a tiny amount of gold mica powder for a subtle metallic shimmer that catches the light.
Step 3: Demolding & Finishing
-
Full cure:
Cover the mold with a box to prevent dust from landing on the sticky surface and let it cure fully for 24-48 hours. -
Removing the cube:
Peel the silicone mold away from the resin block. It should release easily if fully cured. -
Sanding sharp edges:
If the top edge is sharp or uneven from the meniscus effect, wet sand the edges starting with 400 grit sandpaper on a flat surface. -
Refining surfaces:
Work your way up through higher grits (600, 1000, 2000) until the sanded areas start to regain clarity. Keep the paper wet throughout the process. -
Polishing:
Apply a small dab of plastic polishing compound to a microfiber cloth and buff the cube in circular motions until it is crystal clear and glossy.
Place your finished cube near a window to see how the light travels through the delicate leaf structure and tinted resin


Floating Gold Flake Minimal Cube
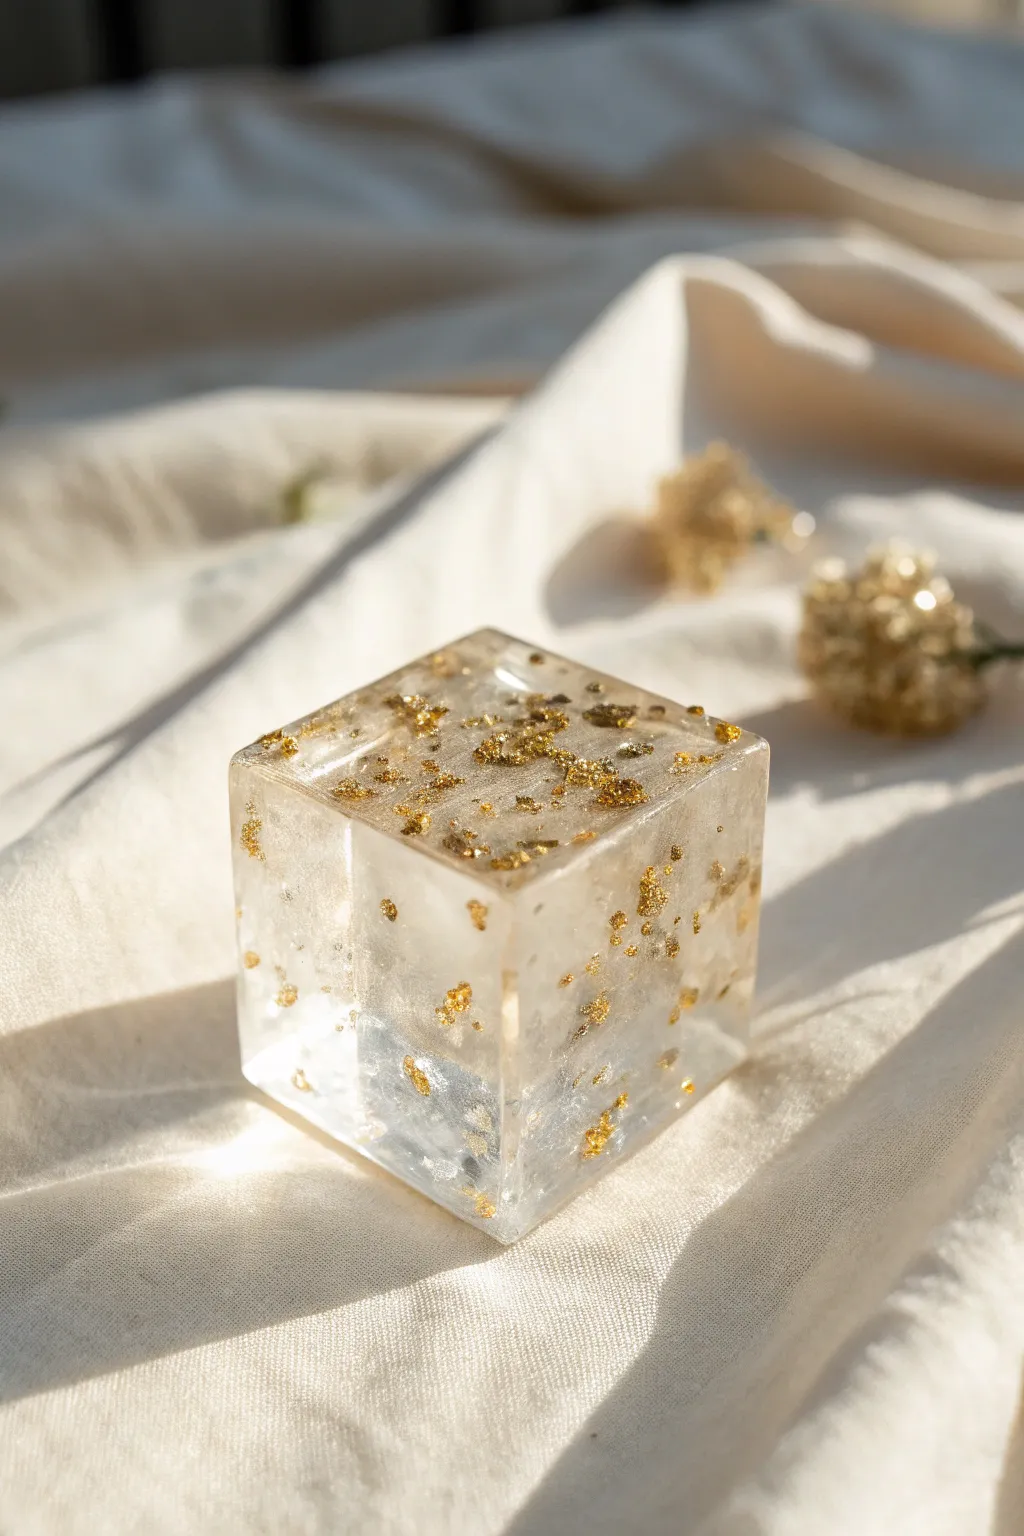
Capture the elegance of suspended light with this minimalist resin cube featuring floating gold accents. The crystal-clear finish combined with scattered metallic flecks creates a sophisticated, modern paperweight or decorative piece.
How-To Guide
Materials
- High-quality deep pour epoxy resin (Part A and Part B)
- Silicone cube mold (approx. 2-3 inches)
- Gold leaf sheets or loose gold flakes
- Tweezers or a toothpick
- Mixing cups and stir sticks
- Heat gun or torch
- Gloves and workspace protection
- Dust cover (cardboard box or container)
Step 1: Preparing the Gold Flakes
-
Set up your workspace:
Begin by covering your surface with a protective mat or plastic sheet. Ensure the room is well-ventilated and dust-free, as even tiny particles can mar the crystal-clear finish we are aiming for. -
Tear the gold leaf:
If you are using full sheets of gold leaf, gently tear them into small, irregular fragments using tweezers. You want a variety of sizes—some tiny specks and some slightly larger flakes—to create visual interest. -
Clean the mold:
Inspect your silicone cube mold for any dust or lint. Use a piece of masking tape to lift away any debris from the inside walls, ensuring a perfect surface for your cast.
Clear Cast Secret
Warm your resin battles in a warm water bath before mixing. Warm resin is thinner, which allows micro-bubbles to escape much faster for a flawless, glass-like cube.
Step 2: Mixing and First Layer
-
Measure the resin:
Accurately measure your epoxy resin and hardener according to the manufacturer’s ratio (often 1:1 or 2:1). Pour them into a clean mixing cup. -
Mix slowly:
Stir the mixture slowly and steadily for at least 3-5 minutes. Scraping the sides and bottom of the cup ensures no unmixed resin remains, which creates sticky spots later. -
Let it rest:
Allow the mixed resin to sit for about 5-10 minutes. This degassing period lets larger air bubbles rise to the surface and pop naturally before you pour. -
Pour the base layer:
Pour a small amount of resin into the bottom of the mold, filling it about one-quarter of the way up. I like to tilt the mold slightly to ensure the resin coats the bottom corners thoroughly. -
Add first gold flakes:
Using tweezers, gently place a few gold flakes into this base layer. Push some down slightly with a toothpick so they aren’t all resting flat on the bottom face.
Step 3: Building the Layers
-
Wait for gel phase:
Wait until the first layer reaches a ‘gel’ state—sticky and thick like taffy, but not fully hard. This prevents the next batch of gold flakes from sinking all the way to the bottom. -
Prepare next batch:
Mix a second small batch of resin following the same careful stirring process. -
Pour and suspend:
Pour the next layer of resin into the mold. Drop in more gold flakes, using a toothpick to gently push them into different depths within the liquid resin. -
Repeat if necessary:
Depending on the size of your mold, you may need to repeat this layering process one more time to fill the cube completely. Layering is the secret to making the flakes look suspended rather than sunk.
Level Up: Color Tint
Add a single, tiny drop of translucent alcohol ink (like pale pink or smoke grey) to the resin for a subtle, smoky tint that makes the gold pop even more.
Step 4: Finishing Touches
-
Top off the mold:
Pour the final layer of resin until it slightly domes over the top edge of the mold. Resin shrinks slightly as it cures, so this extra volume compensates. -
Final flake placement:
Add the last few flakes near the surface. These will catch the light beautifully on the top face of your finished cube. -
Remove bubbles:
Pass a heat gun or torch quickly over the surface to pop any remaining bubbles. Keep the heat source moving constantly to avoid scorching the mold. -
Cover and cure:
Place a dust cover over the mold to protect it. Let it cure undisturbed for the full time recommended by your resin brand, usually 24-72 hours. -
Demold:
Once fully hardened, gently peel the silicone mold away from the resin. Take your time to avoid tearing the mold or stressing the resin corners. -
Polish (Optional):
If there are any sharp edges or a slight lip from the meniscus, sand them down with fine-grit sandpaper and use a polishing compound to restore the glass-like clarity.
Now you have a stunning, crystal-clear keepsake that captures light from every angle
Tiny Animal Diorama Cube
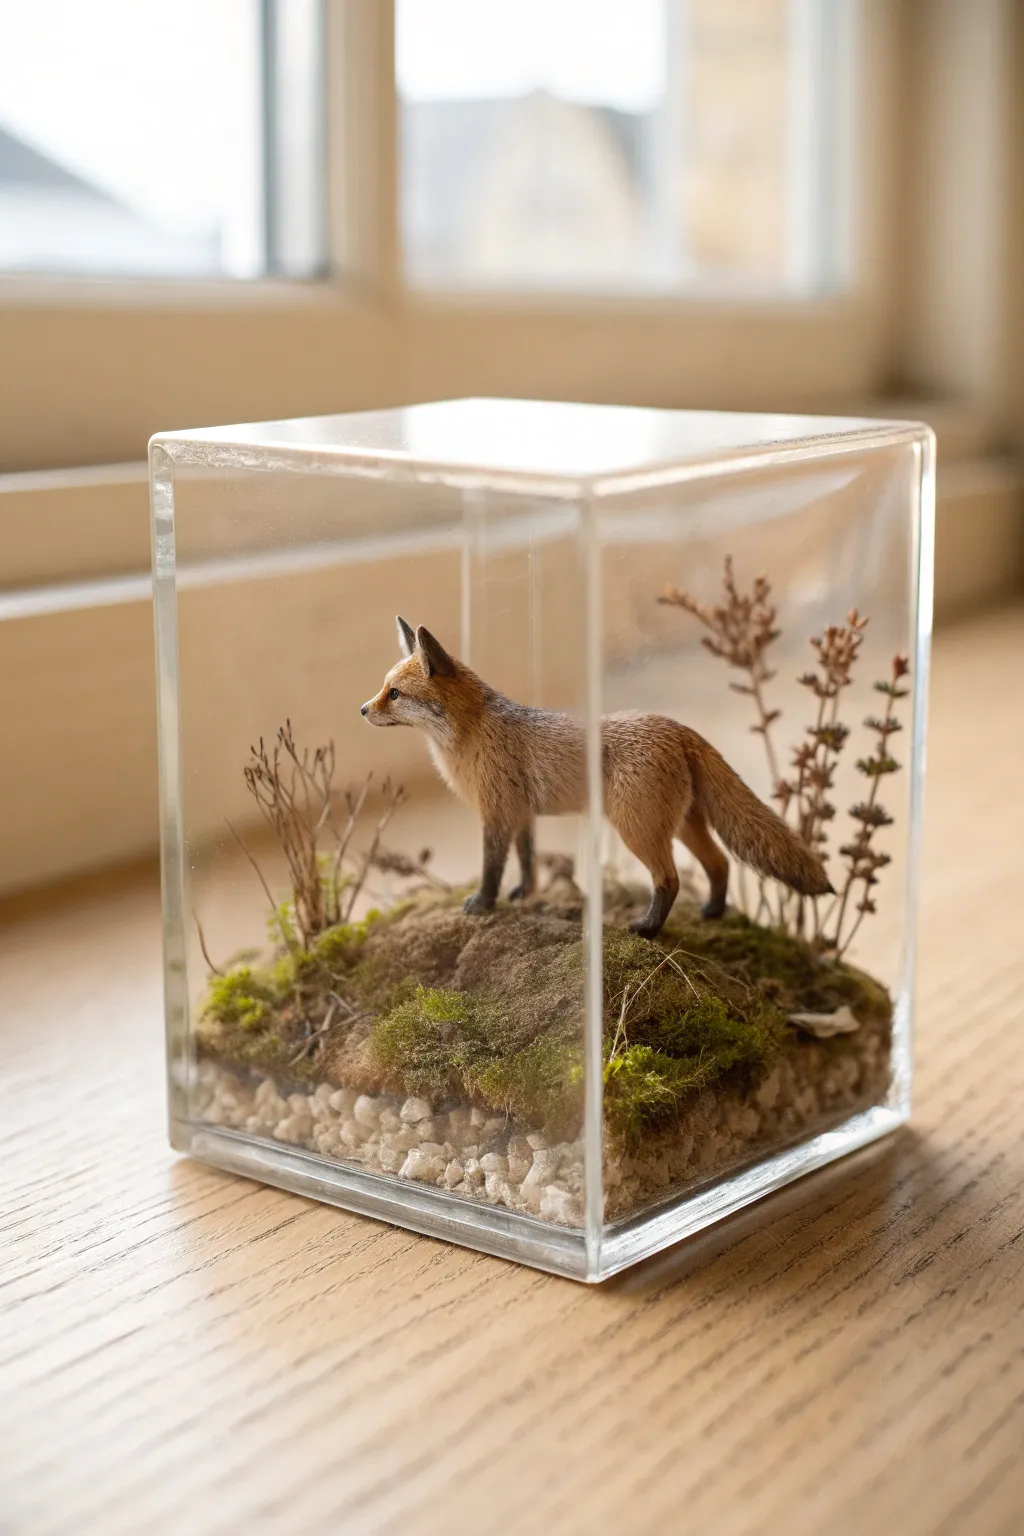
Capture a slice of the wild in a permanent, crystal-clear home with this charming fox diorama. By combining a realistic miniature figure with natural textures and a crisp resin pour, you create a tiny, suspended world that looks perfect on any sunny windowsill.
Detailed Instructions
Materials
- Clear epoxy casting resin (deep pour recommended)
- Square silicone cube mold (approx. 3-4 inches)
- Miniature fox figurine (plastic or resin)
- Fine white gravel or aquarium sand
- Dried moss (various shades of green)
- Small dried twigs or heather sprigs
- Mod Podge or clear craft glue
- Mixing cups and stir sticks
- Tweezers
- Heat gun or lighter
- Pressure pot (optional, for bubble removal)
Step 1: Base Preparation
-
Clean the mold:
Begin by thoroughly cleaning your silicone mold with warm soapy water and letting it air dry completely. Even a speck of dust can ruin the optical clarity of your final cube. -
Prepare the fox:
Inspect your miniature fox figurine. If it has any manufacturing seams, gently file them down. I like to seal the painting on the figurine with a thin coat of clear matte sealer to prevent the resin from reacting with the paint later. -
Mix the base layer:
Mix a small amount of epoxy resin according to the manufacturer’s instructions. You only need enough to cover the bottom of the mold by about 1/4 inch. -
Pour and settle:
Pour the mixed resin into the bottom of the mold. Let it sit for 5-10 minutes so bubbles can rise to the surface, then pop them with a heat gun. -
Add the gravel:
Gently sprinkle the fine white gravel into the wet resin. Ensure it’s an even layer but leave it slightly rough to simulate natural ground. Let this layer cure until it is tacky or ‘gel-like’ (usually 4-6 hours depending on your resin).
Step 2: Scene Construction
-
Create the mound:
To elevate the fox, create a small mound using a mix of sand and a bit of fresh resin. Shape this in the center of the tacky base layer. This adds dimension so the fox isn’t just standing on a flat floor. -
Apply mossy texture:
While the mound is wet, press small pieces of dried moss onto it. Use darker moss for the lower areas and brighter green moss for the highlights to create visual depth. -
Plant the flora:
Dip the ends of your dried heather sprigs or twigs into a drop of UV resin or superglue, then tuck them into the mossy mound behind where the fox will stand. Hold them in place for a moment until they stand upright on their own. -
Seal the organic material:
Brush a very thin layer of Mod Podge or clear glue over the moss and twigs. This is a crucial step to prevent the organic material from releasing trapped air bubbles into your final pour. -
Position the fox:
Once the terrain is secure, glue the fox figurine onto the highest point of your mossy mound. Ensure it is centered and facing a pleasing angle relative to the cube’s corners.
Pro Tip: Minimize Bubbles
Pre-seal your moss and dried plants by dipping them in a thin resin mixture before placing them. This forces air out early so it doesn’t escape later during the deep pour.
Step 3: Encapsulation
-
Mix the main pour:
Prepare a large batch of casting resin. Since this is a deep pour, ensure you are using a resin formulated for thick layers to avoid overheating and yellowing. -
Degas the resin:
Let the mixed resin sit for a few minutes to let air escape. If you have a vacuum chamber, use it now to pull out micro-bubbles. -
The initial fill:
Pour the resin down the side of the mold slowly—don’t pour directly on the fox. Fill firmly up to the fox’s legs. Stop here and user a toothpick to dislodge any air bubbles trapped in the moss or under the belly. -
Complete the pour:
Continue pouring slowly until the mold is filled to the brim. The resin may shrink slightly as it cures, so a slight overfill is helpful. -
Monitor for bubbles:
Check the project every 15 minutes for the first hour. New bubbles often emerge from the porous moss. Gently fish them out with a toothpick or pop them with a lighter. -
Curing:
Cover the mold with a box to prevent dust from settling and leave it to cure fully. This usually takes 24-72 hours depending on the volume and resin brand.
Troubleshooting: Silvering
If the fox looks ‘silver’ underwater, air is trapped on its surface. Before the final pour, paint the fox with a thin layer of uncured resin to break surface tension.
Step 4: Finishing Touches
-
Demold:
Once fully hard, gently peel the silicone mold away from the resin block. Take your time to avoid tearing the mold. -
Sand the edges:
If there are sharp edges or a meniscus lip at the top, wet sand the cube starting with 400 grit and working up to 3000 grit sandpaper for a smooth finish. -
Polish to clarity:
Apply a plastic polishing compound with a microfiber cloth to buffer the sanded sides back to crystal-clear transparency.
Place your finished cube near natural light to watch the shadows play through the moss and fur texture
Snow Globe Winter Scene Cube
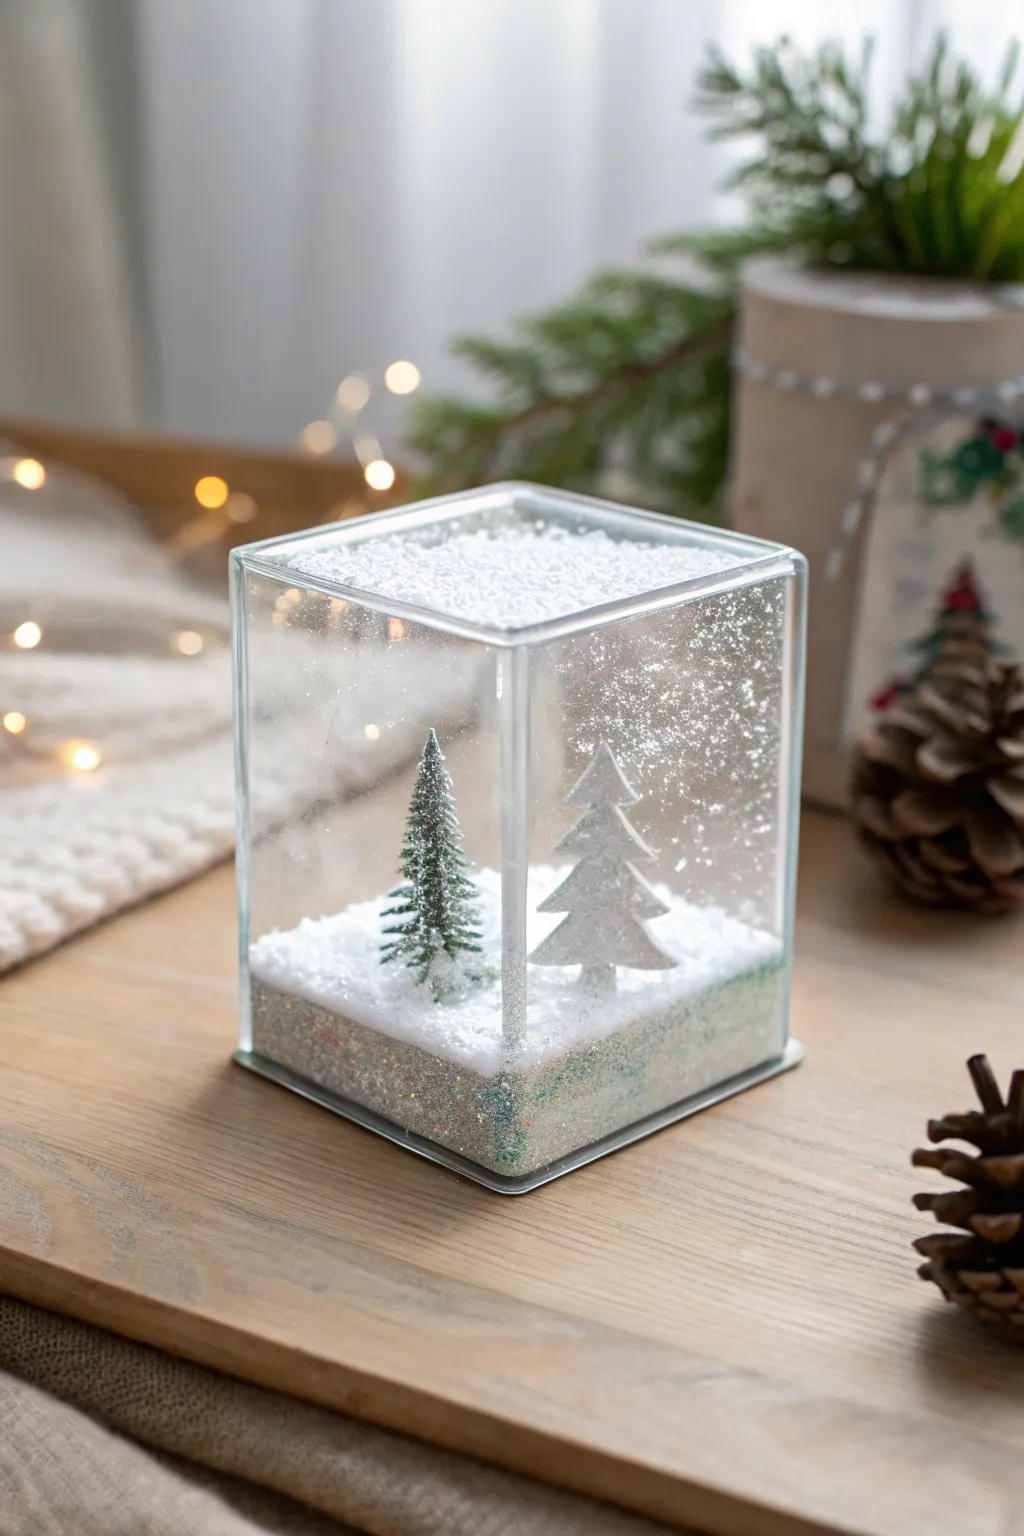
Capture the stillness of a snowy forest inside a crystal-clear resin cube. This project combines miniature modeling with resin casting to create a dreamy, suspended winter scene that catches the light beautifully.
Step-by-Step Tutorial
Materials
- Deep pour epoxy resin (slow curing)
- Square silicone cube mold (approx. 3-4 inches)
- Miniature bottle brush tree (green)
- Miniature wooden or plastic flat tree cutout (white)
- White casting sand or fine white glitter
- Fake snow powder or chunky iridescent glitter
- UV resin and UV light (for tacking)
- Mixing cups and stir sticks
- Tweezers
- Heat gun or torch
- Sandpaper and polishing compound (optional for finishing)
Step 1: Preparation and Base Layer
-
Prepare your workspace:
Ensure your work area is level, dust-free, and well-ventilated. Wipe down the inside of your silicone mold with alcohol to remove any debris that could mar the shiny surface. -
Mix the base resin:
Mix a small amount of ArtResin or epoxy according to the manufacturer’s directions. You only need enough to fill the bottom 0.5 inches of the mold. -
Create the snowy floor:
Stir white casting sand or heavy white glitter into this mixed resin until it has a slushy consistency. This needs to be opaque enough to look like ground. -
Pour the foundation:
Pour this white mixture into the bottom of the mold. Tap the mold gently against the table to release trapped bubbles and level the surface. -
Cure the base:
Allow this bottom layer to cure until it is tacky but firm enough to hold weight, usually about 4-6 hours depending on your resin brand.
Step 2: Arranging the Scene
-
Prepare the trees:
Check that your bottle brush tree and white cutout tree fit comfortably within the mold’s height with at least half an inch of clearance at the top. Trim the wire bases if needed. -
Anchor the trees:
Dip the bottom of each tree into a drop of UV resin. Place them onto the semi-cured snowy base—I find tweezers helpful here for precise positioning. -
Secure the placement:
Shine your UV light on the base of the trees for 30-60 seconds to instantly freeze them in place. This prevents them from floating during the big pour. -
Dust the branches:
Using a small brush, dab a tiny bit of resin onto the branches of the green tree and sprinkle extreme fine white glitter on it to simulate fresh powder.
Floating Snow?
If glitter sinks too fast, pour in layers. Let the first clear layer set for an hour until thick like honey, then mix glitter in. This suspension holds particles in place.
Step 3: The Main Pour
-
Mix the deep pour resin:
Mix a large batch of deep pour epoxy. This type of resin is crucial because it cures slower, reducing the heat that could melt plastic trees or cause yellowing. -
Degas the resin:
Let the mixed resin sit for 5-10 minutes to allow air bubbles from mixing to rise to the surface and pop. -
Add the snowfall effect:
Wait until the resin thickens slightly (the ‘gel phase’) before adding your floating snow. Stir in a pinch of iridescent chunky glitter or fake snow powder. -
Pour the first half:
Gently pour the resin down the side of the mold, not directly on the trees, to avoid trapping air pockets in the branches. Fill only halfway up the trees. -
Check for bubbles:
Use a toothpick to gently agitate the branches of the bottle brush tree to release stubborn air bubbles hiding in the needles. -
Finish the pour:
Continue pouring until the mold is filled to the brim. Make sure the tops of the trees are completely submerged. -
Final bubble removal:
Pass a heat gun quickly over the surface to pop surface bubbles. Don’t linger too long or you might overheat the mold. -
Full cure:
Cover the mold with a box to prevent dust from settling and let it cure for the full time recommended by your resin (usually 24-72 hours for deep pour).
Pro Tip: Surface Tension
Before pouring, dip the bottle brush tree completely in mixed resin. This ‘pre-wetting’ greatly reduces the amount of air bubbles trapped in the bristly texture.
Step 4: Demolding and Finishing
-
Remove from mold:
Once fully hard, gently peel the silicone mold away from the resin cube. Take your time to avoid tearing the mold. -
Sand the edges:
If there is a sharp lip or ridge on the top edge from the meniscus, wet sand it down carefully with fine-grit sandpaper. -
Polish for clarity:
If sanding clouded the surface, use a plastic polishing compound and a microfiber cloth to restore the crystal-clear shine.
Place your finished cube near a window or some fairy lights to see the winter scene sparkle from within
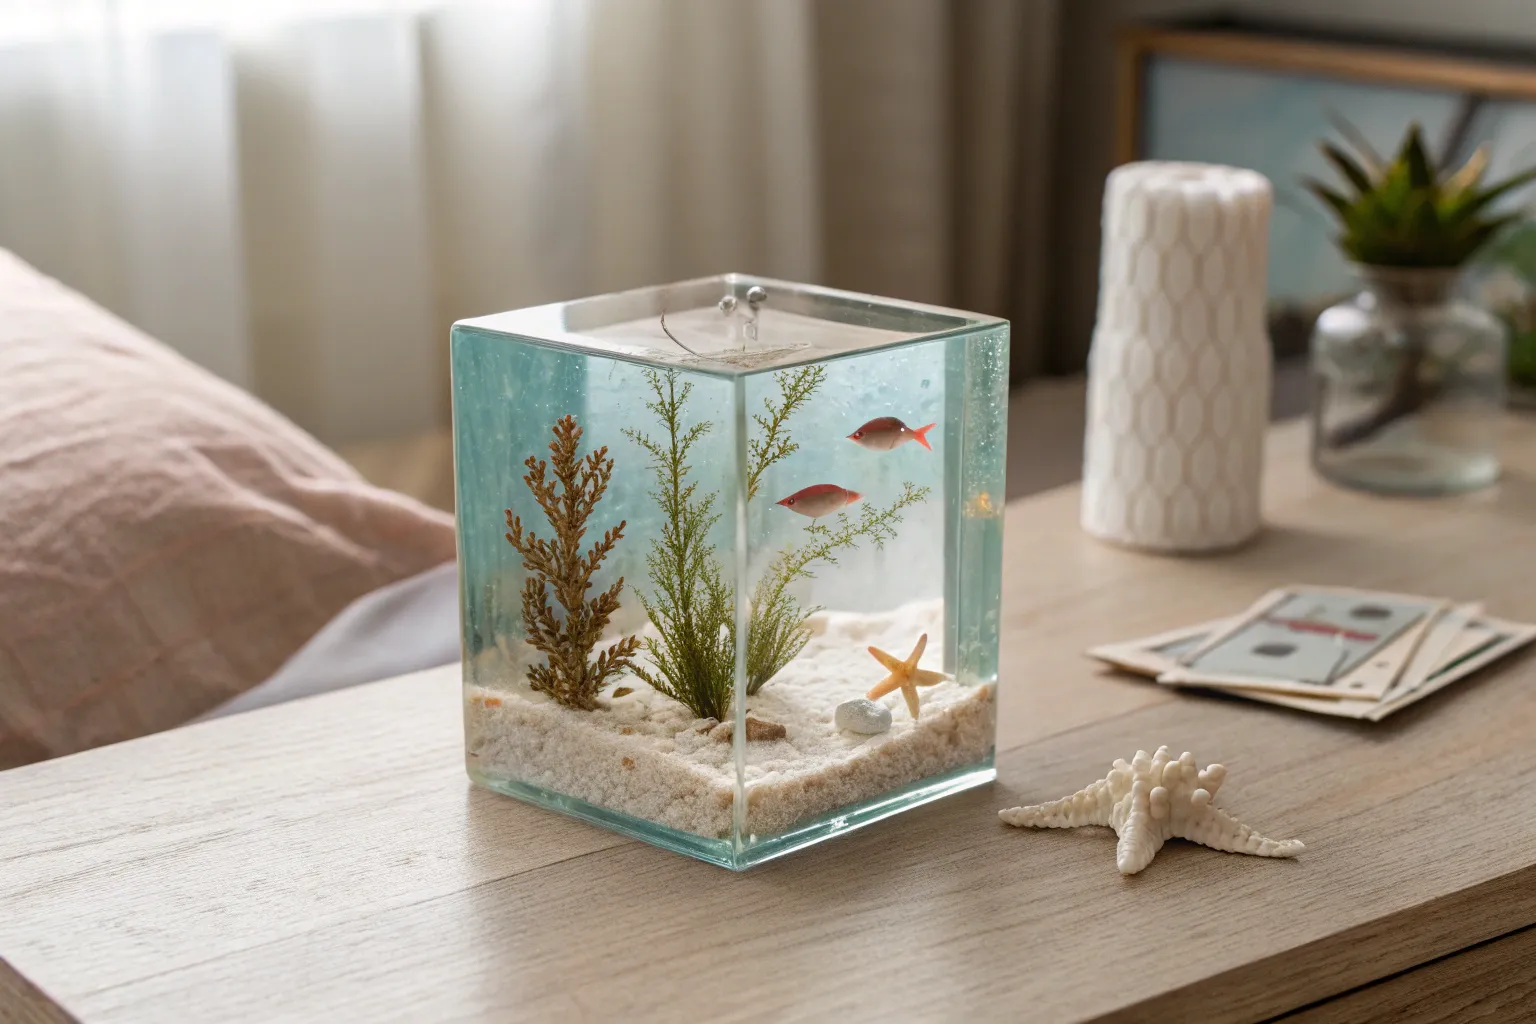
Underwater Aquarium-Style Cube
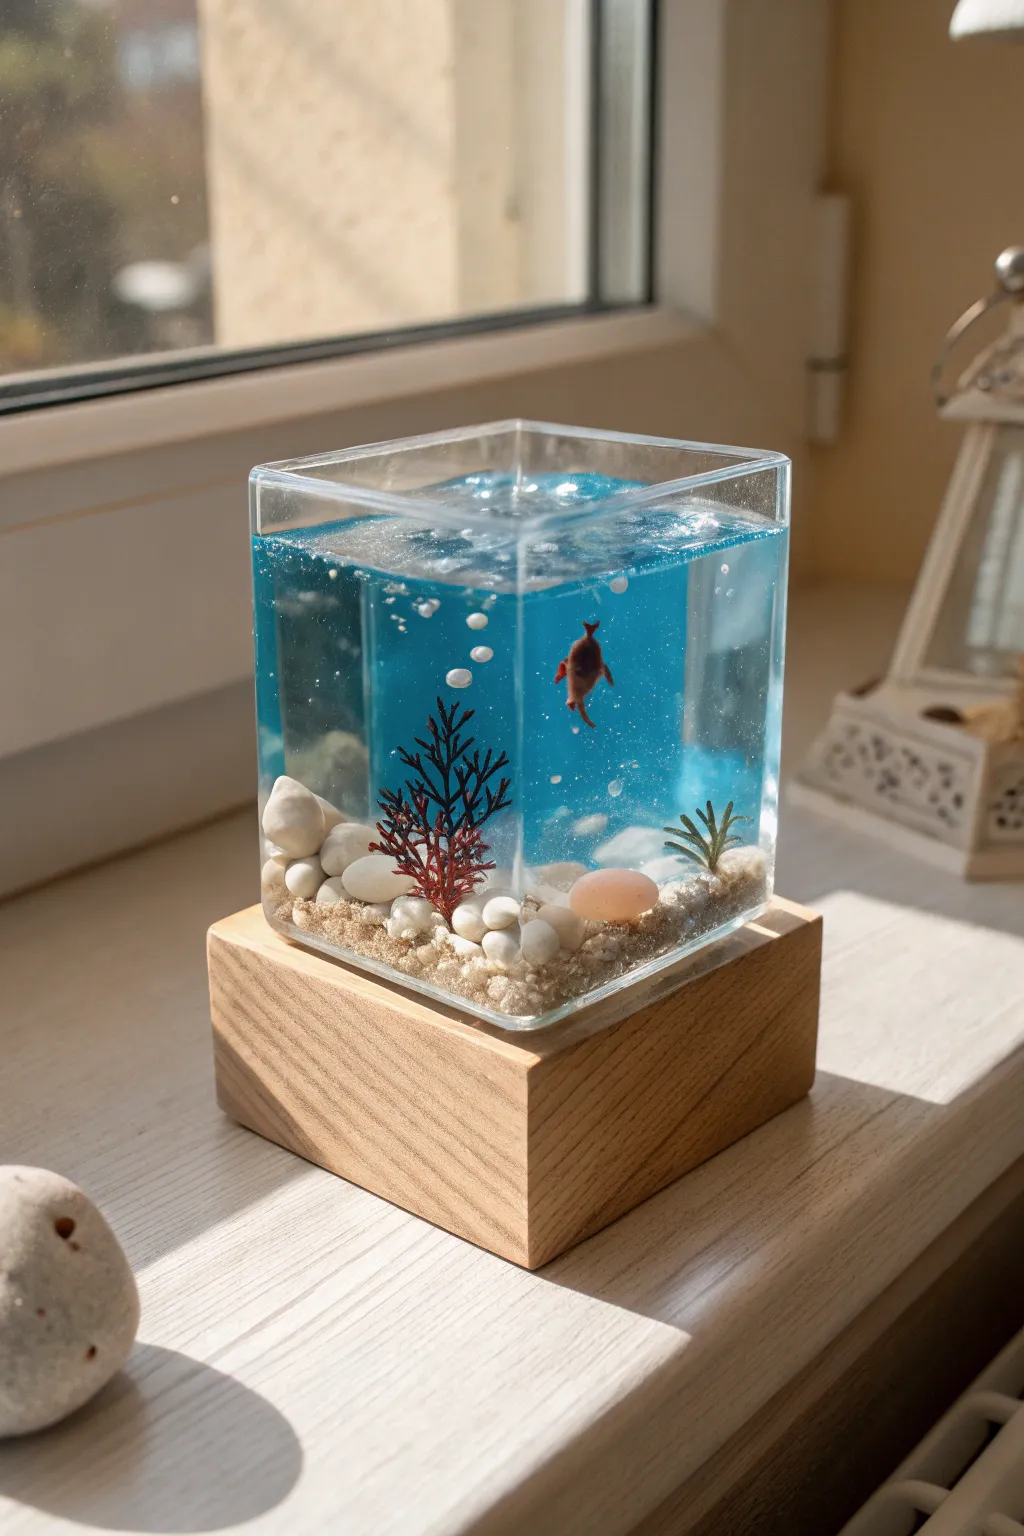
Capture the stillness of the deep sea with this stunning underwater diorama encased in crystal clear resin. The vibrant blue tint and suspended marine life create a mesmerizing 3D snapshot of the ocean floor that illuminates beautifully on a light base.
Detailed Instructions
Materials
- Square silicone cube mold (approx. 3-4 inches)
- Deep pour epoxy resin (slow curing)
- Transparent blue alcohol ink or resin dye
- White aquarium sand or fine decorative sand
- Small white pebbles and one larger smooth pebble
- Miniature plastic fish figurine
- Artificial aquarium plant tip (red/brown)
- Small air plant snippet or plastic greenery
- UV resin and UV torch (for securing items)
- Tweezers
- Mixing cups and stir sticks
- Wooden light display base (optional)
Step 1: Preparation and Base Layer
-
Clean the mold:
Begin by ensuring your silicone mold is perfectly clean and dry. Use masking tape to lift away any dust particles from the inside walls, as these will be permanently visible in the final cast. -
Mix the first layer:
Mix a small amount of epoxy resin, enough to cover the bottom of the mold by about half an inch. Keep this layer clear or add the tiniest drop of blue dye for a very subtle tint. -
Create the seabed:
Pour the resin into the mold and immediately sprinkle in your white sand. Let it sink to the bottom naturally to create an uneven, realistic texture. -
Add rocks and pebbles:
Using tweezers, carefully place the small white pebbles and the larger feature stone onto the sand layer. Arrange them near the corners or edges to frame the scene. -
Secure the layer:
Allow this base layer to cure until it reaches the ‘gel’ stage—sticky but solid enough to hold items in place. This prevents the sand from floating up during the main pour.
Step 2: Placing the Scene
-
Plant the vegetation:
Dip the base of your red coral piece and the small green plant into a drop of UV resin. Place them firmly onto the tacky sand layer or wedged between rocks. -
Lock in the plants:
Flash cure the base of the plants with your UV torch for 10-20 seconds. This ensures they won’t float away when you pour the heavy liquid resin later. -
Position the fish:
This is the tricky part. You can either glue the fish to a thin, clear piece of plastic acetate and glue that to the bottom, or suspend the fish using a thin fishing line taped to a bridge across the top of the mold. -
Alternative suspension:
I prefer to do this in two main pours. If you have the patience, pour clear resin up to the height where you want the fish, let it gel, place the fish, and then continue.
Cloudy Resin?
If your resin looks milky, moisture is the enemy. Ensure sand and plants are 100% dry. Even slight humidity in the sand can react with curing resin to cause cloudiness.
Step 3: The Ocean Pour
-
Mix the ocean blue:
Prepare a large batch of deep pour resin. Add transparent blue alcohol ink one drop at a time, mixing constantly until you achieve a rich cerulean tone that is still translucent. -
Remove bubbles:
Let the mixed resin sit for 10-15 minutes to allow air bubbles from stirring to rise to the surface and pop. A pressure pot is ideal here, but letting it rest helps significantly. -
Pour slowly:
Pour the blue resin down the side of the mold or over a stir stick so it flows gently around your plants and fish without displacing them. -
Inject bubbles:
To mimic the ‘breathing’ effect seen in the photo, use a syringe to inject a few small air bubbles back into the resin near the fish or plants, or swirl a toothpick rapidly in one spot. -
Final cure:
Cover the mold with a box to prevent dust from landing on the surface. Allow the deep pour resin to cure fully, which typically takes 24 to 72 hours depending on the brand.
Level Up: Bioluminescence
Mix glow-in-the-dark powder into the sand or paint small dots on the fish before casting. When the lights go out, your ocean floor will glow magically.
Step 4: Demolding and Finishing
-
Release the cube:
Once fully hard, gently pull the silicone sides away from the resin. Push from the bottom to pop the cube out. Take your time to avoid tearing the mold. -
Sand edges:
If there is a sharp rim or lip at the top of the cube (which was the open face of the mold), wet sand it smooth starting with 400 grit sandpaper and working up to 3000 grit. -
Polish for clarity:
Apply a polishing compound to the sanded face to restore its crystal-clear shine, making the water look wet and glass-like. -
Light it up:
Place your finished cube on the wooden LED base. The light will travel through the clear sand layer and illuminate the blue water from below.
Enjoy the peaceful atmosphere your new slice of the ocean brings to your desk or shelf
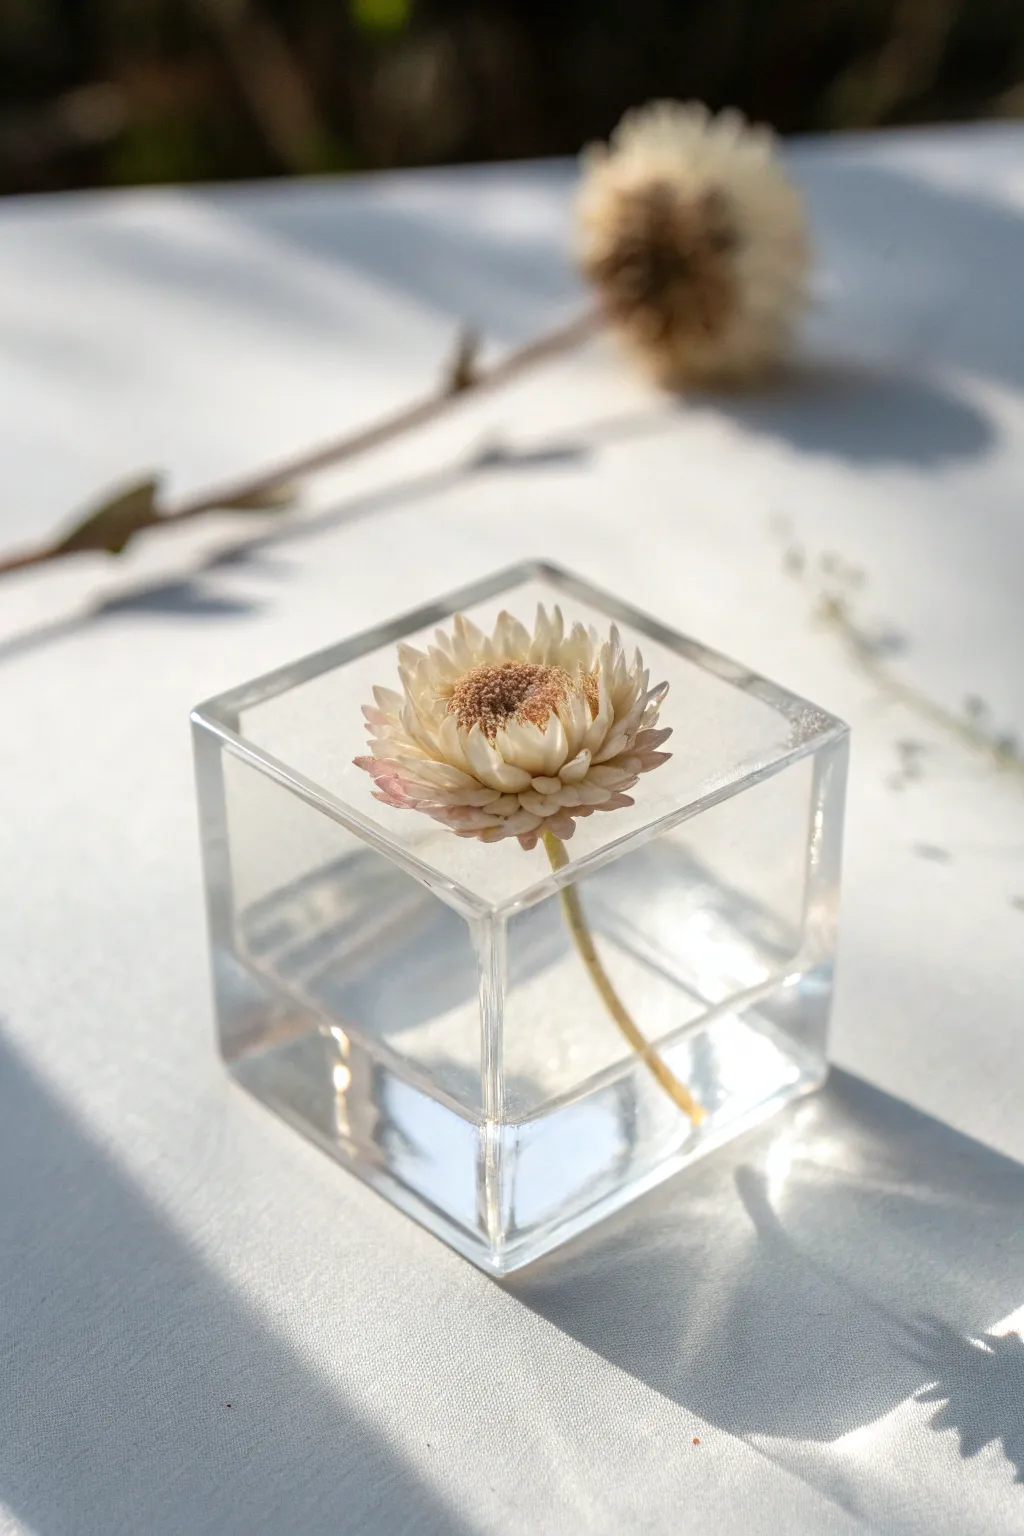
Botanical Seed Head Time-Capsule Cube
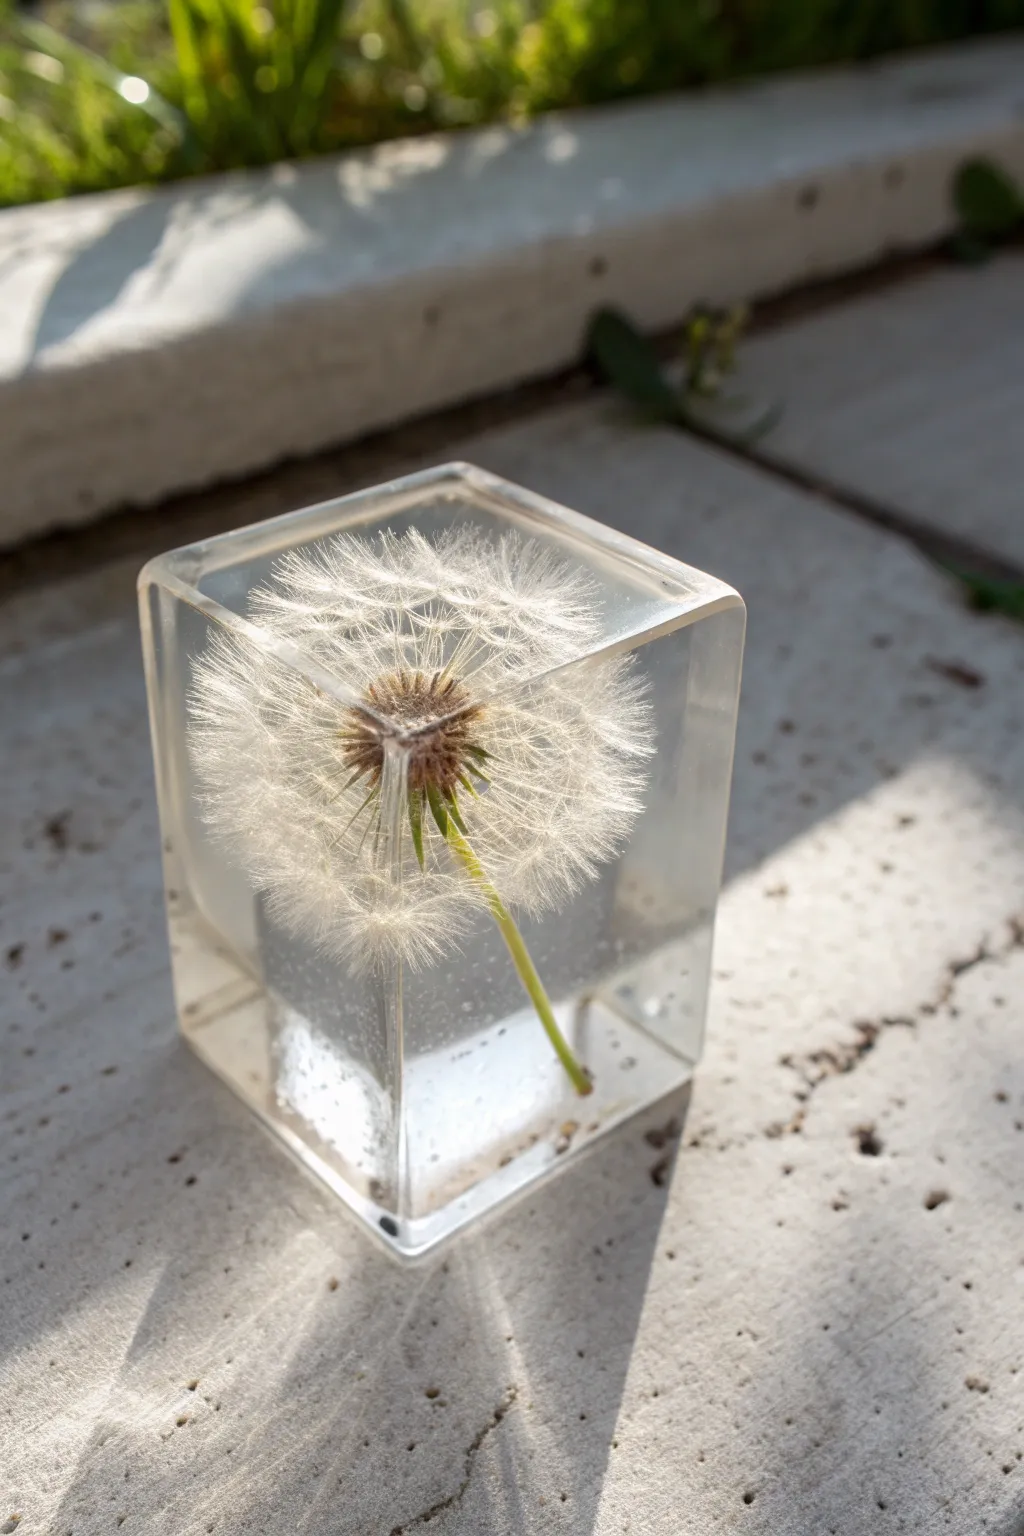
Capture the delicate, fleeting beauty of a dandelion seed head in crystal clear resin. This project creates a stunning, glass-like botanical specimen straight from nature that looks frozen in time.
Step-by-Step Tutorial
Materials
- Dandelion seed head (fully opened and intact)
- Hairspray (extra hold)
- Clear casting resin (epoxy is recommended for depth)
- Silicone cube mold (at least 2-3 inches)
- Mixing cups and stir sticks
- Tweezers or a small clip
- Toothpick or skewer
- Gloves and respirator mask
- Heat gun or lighter
Step 1: Preparation & Stabilization
-
Harvest carefully:
Find a dandelion clock that is perfectly spherical. Gently cut the stem, leaving about 2 inches attached. Transport it very carefully to avoid losing seeds. -
Stabilize the seeds:
Hold the stem and lightly mist the seed head with extra-hold hairspray from about 12 inches away. Do not soak it; you just want to lock the seeds in place. Let it dry completely for an hour. -
Clean the mold:
Ensure your silicone cube mold is free of dust and lint. Wipe it with a little rubbing alcohol and let it dry. -
Prepare your workspace:
Set up a level surface covered with a protective mat. Ensure the room is well-ventilated and roughly room temperature (70-75°F) for optimal curing.
Step 2: The First Pour
-
Mix the first layer:
Mix a small amount of resin according to the package instructions. Stir slowly to minimize bubbles. -
Pour the base:
Pour about 1/2 inch of resin into the bottom of the mold. This will anchor the stem later. -
Pop bubbles:
Pass a heat gun or lighter quickly over the surface to pop any rising air bubbles. -
Let it gel:
Wait until this layer becomes tacky or ‘gel-like’ (usually 1-3 hours depending on your resin). It shouldn’t be liquid, but sticky enough to hold an object.
Silvering Seeds?
If the seeds look silver inside the resin, air was trapped. Next time, dip the dandelion in liquid resin before placing it in the mold to pre-wet the fuzz.
Step 3: Placing the Botanical
-
Trim the stem:
Cut the dandelion stem to a length that fits comfortably within the mold without touching the top edge. -
Insert the dandelion:
Carefully lower the dandelion into the mold, pressing the tip of the stem gently into the tacky base layer. I find using long tweezers helps position it perfectly vertical. -
Check alignment:
Verify the flower is centered and standing straight up. The sticky base layer should hold it in place without support.
Illuminated Base
Before the final pour fully cures, embed a tiny battery-powered LED at the base of the cube to turn your specimen into a glowing nightlight.
Step 4: Encapsulation
-
Mix the main batch:
Mix enough resin to fill the rest of the mold. Remember to mix slowly and scrape the sides of the cup. -
Pour carefully:
This is the critical step. Pour the resin in a thin stream down the inner side of the mold wall—never directly onto the delicate dandelion. -
Let resin rise:
Allow the resin to slowly rise around the seed head. The liquid will naturally fill the spaces between the seeds with minimal disturbance. -
Fill to top:
Continue pouring until the resin slightly domes over the top of the mold, as resin can shrink slightly while curing. -
Remove trapped air:
Use a toothpick to gently fish out any bubbles trapped near the seed center or mold corners. Be extremely gentle near the seeds. -
Final cure:
Cover the mold with a box to prevent dust from settling and let it cure fully, usually 24-48 hours. -
Demold:
Once fully hard, gently peel the silicone mold away from the resin cube to reveal your preserved botanical.
Enjoy the magic of having a fleeting moment of nature captured permanently on your shelf
Tech Relic Circuit Cube
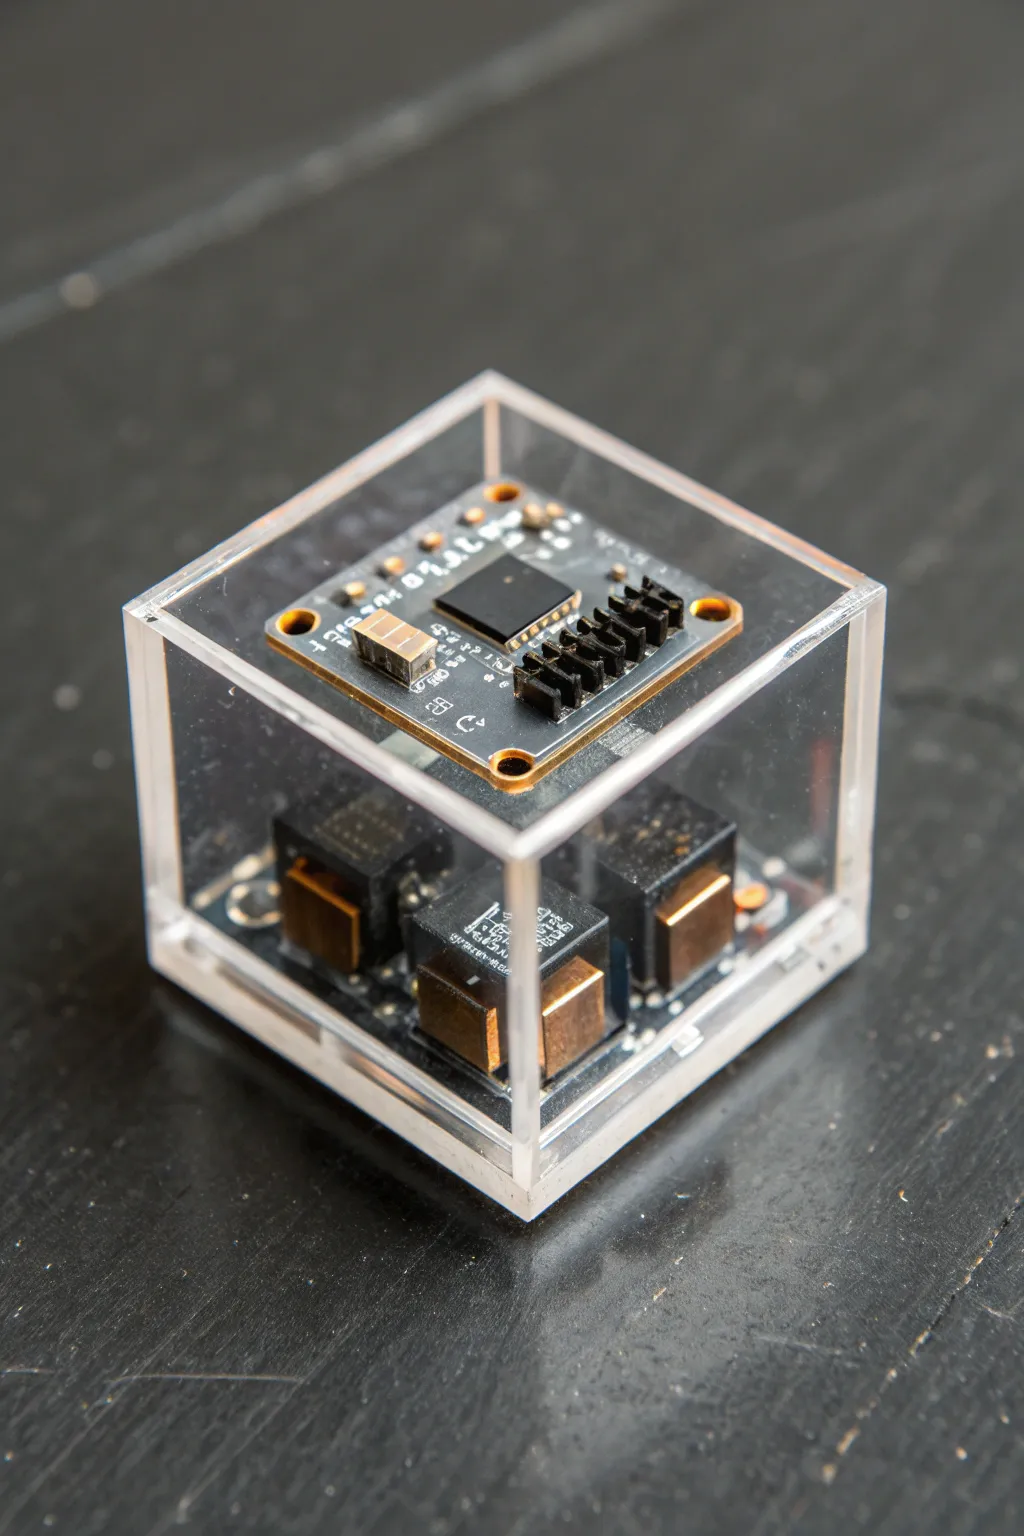
Encased in crystal-clear resin, this project transforms discarded electronic components into a suspended piece of sci-fi artifact art. The dual-layer suspension creates a fascinating floating effect, turning mundane circuit boards into a futuristic tech relic perfect for a desk display.
Step-by-Step
Materials
- Square silicone cube mold (approx. 2-3 inches)
- Epoxy resin (deep pour formula recommended)
- Small square circuit board (top layer, e.g., a breakout board or sensor module)
- Larger circuit board with chunky components (bottom layer, e.g., relays or capacitors)
- Isopropyl alcohol (99%)
- Soft toothbrush
- Mixing cups and stir sticks
- Sanding paper (grits 400 to 3000)
- Polishing compound
- Microfiber cloth
- Heat gun or torch
- Tweezers
- Clear monofilament or UV resin (for positioning)
Step 1: Component Prep
-
Cleaning the electronics:
Before casting anything, your electronics need to be pristine. Use a soft toothbrush and 99% isopropyl alcohol to scrub every inch of your chosen circuit boards. Dust trapped on a chip will look like a boulder once magnified by the resin. -
Drying thoroughly:
Allow the alcohol to evaporate completely. Any moisture left on the boards can cause the resin to cloud or inhibit curing. -
Sealing porous parts:
If your bottom board has paper labels or wrapped coils, brush a thin coat of UV resin or clear glue over them to prevent bubbles from seeping out later.
Silver Streak Issues
Seeing silver streaks inside? That’s trapped air. Next time, dip your circuit boards in a small cup of mixed resin before placing them in the mold to ‘wet’ the complex surfaces first.
Step 2: The Base Layer
-
Mixing the first batch:
Mix a small amount of epoxy resin, enough to fill just the bottom 5-10mm of your mold. Stir slowly to minimize bubbles. -
Pouring the base:
Pour this initial layer into the mold and let it sit for 10-15 minutes so micro-bubbles can rise. A quick pass with a heat gun will pop surface bubbles. -
Placing the bottom board:
Gently lower your larger, chunkier circuit board into this wet layer. Press it down slightly so resin wells up around the base, anchoring it securely. -
Initial cure:
Let this bottom layer cure until it reaches the ‘B-stage’—sticky like heavy tape but firm enough to support weight. Usually, this takes 4-6 hours depending on your resin.
Activate the Tech
Drill a small hole in the base before the resin fully cures and embed a tiny LED behind the bottom board. Lighting it up from below makes the circuitry glow like a working computer core.
Step 3: The Suspension Pour
-
Preparing the second batch:
Mix a larger batch of resin now, enough to cover the bottom components and reach the height where you want the top board to float. -
Submerging the bottom layer:
Pour slowly down the side of the mold to avoid trapping air in the complex shapes of the bottom components. Fill until just below where the top board will sit. -
Bubble patrol:
Wait 20 minutes and check for bubbles trapped under large capacitors or relays. Use a toothpick to dislodge distinct bubbles clinging to the solder points. -
Second cure:
Allow this layer to gel completely. This creates the invisible shelf that your top board will rest on.
Step 4: The Top Layer
-
Positioning the top board:
Mix a fresh batch of resin. Pour a thin layer onto the cured surface. Place your smaller top board (the one with the chip) directly onto this wet layer, centering it perfectly. -
Final encapsulation:
Pour the remaining resin over the top board until the mold is slightly overfilled to account for shrinkage. Ensure the resin surface domes slightly. -
Degassing:
Pass your heat gun over the surface one last time. Monitor the pins on the top board, as air likes to hide between them. -
Full cure:
Cover the mold with a box to prevent dust landing on the sticky surface and let it cure for the full 24-48 hours recommended by your manufacturer.
Step 5: Finishing
-
Demolding:
Once rock hard, gently flex the silicone mold to release the suction and pop the cube out. The sides might look slightly frosted. -
Sanding the faces:
Wet sand the faces of the cube, starting with 400 grit to flatten any uneven edges, and progressing through 600, 800, 1000, and up to 3000 grit. -
Polishing:
Use a polishing compound and a microfiber cloth (or a buffing wheel on a rotary tool) to buff the resin until it is crystal clear and glass-like. -
Cleaning:
Wipe away any residue with a clean cloth to reveal the suspended circuitry inside.
Now you have a perfectly preserved slice of technology frozen in time, ready to catch the light on your shelf.
Optical Illusion Layered Depth Cube
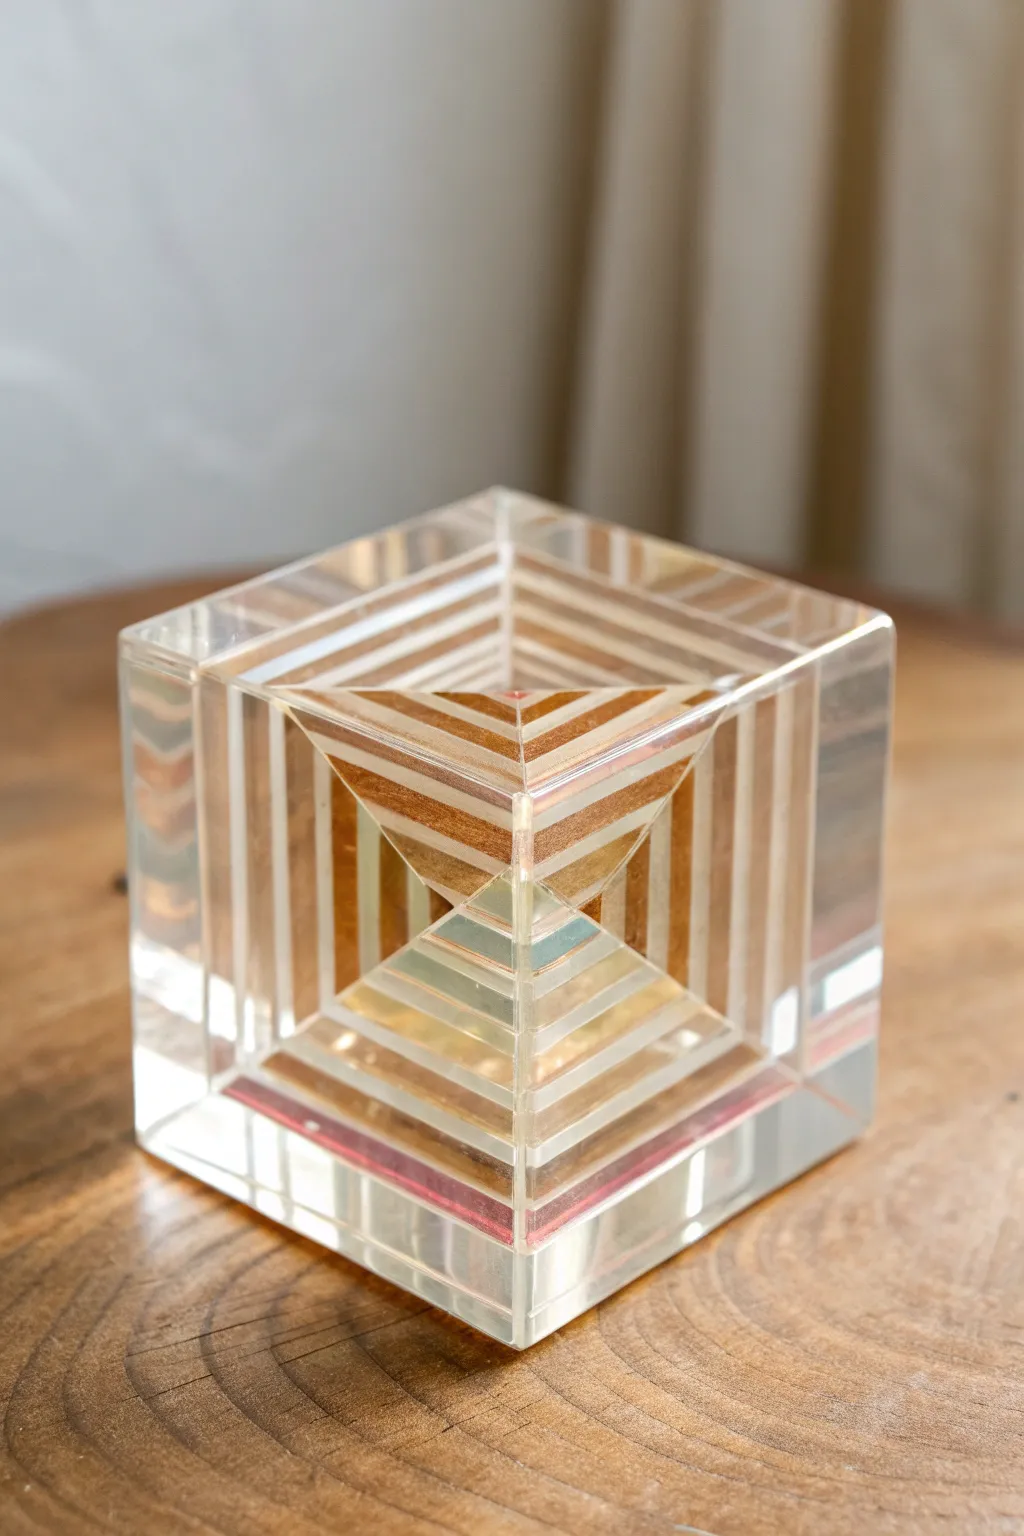
Create a mesmerizing optical illusion suspended in time with this layered resin project. By carefully casting a hollow negative space and filling it with distinct layers, you’ll build a geometric pyramid that appears to float inside a solid block of crystal-clear resin.
Detailed Instructions
Materials
- High-quality deep pour epoxy resin
- Pressure pot (highly recommended for bubble-free clarity)
- Square silicone cube mold (approx. 3-4 inch)
- Pyramid-shaped insert or object to create the negative space (can be 3D printed or a pre-made silicone pyramid)
- Mold release spray
- Opaque pigment pastes (white, gold, or copper)
- Small mixing cups and stir sticks
- Sandpaper assortment (400 to 2000 grit)
- Polishing compound
Step 1: Planning the Negative Space
-
Prepare the insert:
The secret to this effect is casting resin around a pyramid shape that you will later remove. Find a smooth, rigid pyramid object that fits inside your cube mold with at least half an inch of clearance on all sides. -
Apply mold release:
Coat your pyramid insert thoroughly with mold release. This is crucial because you need to pull it out later without damaging the surrounding resin. -
Position the insert:
If your mold allows, suspend the pyramid upside down so the point faces the bottom center of the cube mold. You can use a wooden skewer across the top of the mold to hold it steady.
Layer Timing Trick
To speed up the layering process, use a faster-setting UV resin for the thin opaque stripes and traditional epoxy for the thick clear sections.
Step 2: The Main Cast
-
Mix the clear resin:
Mix a sufficient amount of clear deep-pour resin. Stir slowly to minimize air entrapment, then let it sit for a few minutes so large bubbles can rise. -
Pour the base:
Pour the clear resin into the cube mold, surrounding your suspended pyramid insert. Fill it to the top rim of the mold. -
Cure under pressure:
Place the mold into a pressure pot at roughly 40-50 PSI. This step is key for that glass-like finish shown in the photo. -
Demold and remove insert:
Once fully cured (this may take 24-48 hours depending on your resin), remove the resin block from the silicone mold. Carefully wiggle and extract the pyramid insert to reveal a perfect, hollow geometric void inside the cube.
Step 3: Layering the Illusion
-
Prepare striping colors:
Mix small batches of resin with your chosen opaque pigments. The image uses an alternating pattern of white and a metallic copper or wood-tone color. -
Pour the first tip layer:
Pour a tiny amount of clear resin into the very tip of the hollow pyramid void. Let this gel slightly so it becomes tacky. -
Start the striping:
Pour a thin layer of your first opaque color (e.g., white) on top of the clear tip. You want thin, even horizontal layers. -
Wait for gel phase:
Allow this opaque layer to reach a gel state. If you pour the next layer too soon, the colors will bleed and ruin the crisp lines. -
Add the clear spacer:
Pour a thicker layer of clear resin. This creates the ‘floating’ effect between the colored bands seen in the photo. -
Add the second color:
Once the clear layer is tacky, pour a thin layer of your metallic or secondary color. -
Repeat the process:
Continue this pattern—clear spacer, thin opaque line, clear spacer, thin metallic line—working your way up until the hollow void is completely filled to the surface level of the block. -
Final cure:
Let the entire piece cure fully for another 24-48 hours to ensure all internal layers are hardened.
Uneven Lines?
If your stripes look wavy, the previous layer wasn’t cured enough before the next pour. Wait until the resin is firm/tacky like masking tape, not liquid.
Step 4: Finishing Touches
-
Sand the top face:
The surface where you filled the void will likely be uneven. Sand this face flat, starting with 400 grit sandpaper and working up to 2000 grit. -
Check the sides:
If the sides of your cube lost their shine during the first demolding, sand those as well. -
Polish to clarity:
Using a polishing compound and a microfiber cloth or buffing wheel, buff the sanded surfaces until they are perfectly transparent again.
Place your finished cube near a light source to fully appreciate the optical depth you have created


Have a question or want to share your own experience? I'd love to hear from you in the comments below!