There’s something kind of magical about freezing a delicate bloom in crystal-clear resin and knowing it’ll stay gorgeous for years. If you’ve been saving petals, tiny wildflowers, or a meaningful bouquet, these resin flower ideas will give you lots of directions to play.
Hexagon Resin Flower Blocks
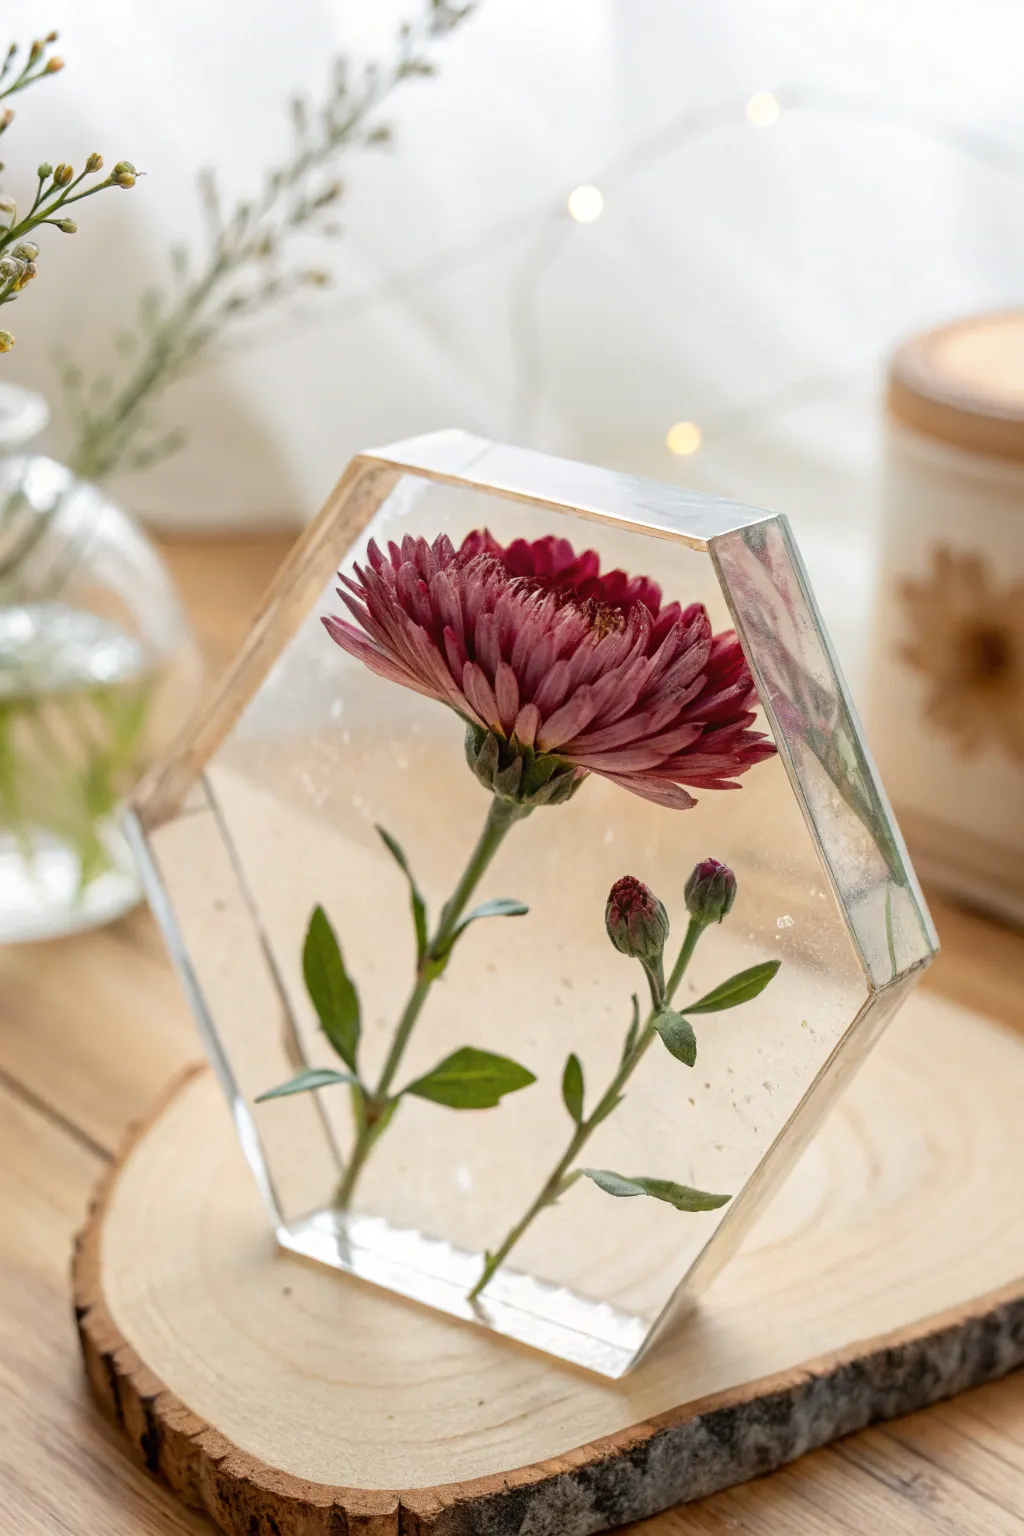
Capture the fleeting beauty of a late-summer garden with this striking hexagonal resin preservation. By suspending a rich maroon bloom alongside delicate buds, you create a floating botanical specimen that catches the light from every angle.
How-To Guide
Materials
- Deep pour epoxy resin (slow curing)
- Hardener (part B)
- Hexagon silicone mold (approx. 6 inches)
- Dried maroon chrysanthemum or similar hardy flower
- Two dried flower buds with stems attached
- Silica gel for drying flowers (if fresh)
- Mixing cups and stir sticks
- Tweezers or long skewers
- Heat gun or lighter
- Nitrile gloves
- Dust cover (large box)
Step 1: Flower Preparation
-
Dry the Botanicals:
Before touching any resin, ensure your flowers are bone dry. Bury the fresh chrysanthemum and accompanying buds in silica gel for 5-7 days. Using fresh flowers will rot inside the resin and turn brown. -
Clean and Inspect:
Gently shake off any excess silica beads using a soft brush. Inspect the petals for any loose debris or dark spots, as these will be magnified by the resin. -
Test the Fit:
Place your dried flower and buds into the dry mold to check sizing. Trim the stems if they are too long; you want the bloom to float in the center, not touch the edges.
Step 2: Base Layer and Anchoring
-
Mix the Base Layer:
Mix a small amount of resin (about 1-2 ounces) following the manufacturer’s ratio instructions. Stir slowly for at least 3-5 minutes to minimize bubbles. -
Pour the Anchor:
Pour this thin layer into the bottom of the hexagon mold. This layer will eventually be the very front face of your block. -
Pop Surface Bubbles:
Pass a heat gun or lighter quickly over the surface to pop any rising air bubbles. Don’t overheat the resin or the silicone mold. -
Initial Cure:
Let this thin layer cure until it is tacky—usually about 4-6 hours depending on your brand. It should feel like the sticky side of tape.
Silvering Petals?
If petals look shiny or silver, air is trapped. Dip flowers in resin before placing them, or use a slower-curing resin to allow air time to escape.
Step 3: Embedding the Composition
-
Mix the Main Pour:
Prepare a larger batch of deep pour resin. Since this is a thick block, standard coating resin might overheat and crack, so a deep pour formula is essential here. -
Dip and Place:
Dip the main flower head into your cup of mixed resin first. This helps trapped air escape from between the dense petals before it goes into the mold. -
Position the Bloom:
Place the main flower onto the tacky base layer. The stickiness will help hold it in place so it doesn’t float up immediately. -
Add the Buds:
Dip and arrange the two smaller buds with stems next to the main flower. I try to angle them slightly outward to create a natural, growing look. -
Pour the First Half:
Gently pour the mixed resin into the mold until the mold is about half full. Pour down the side of the mold, not directly on the fragile petals. -
Check Alignment:
The flowers might drift as the resin fills in. Use a skewer or tweezers to nudge them back into the perfect composition.
Pro Tip: Layering
Pour in two stages if your flower floats too much. Let the first half-inch cure to hold the stems, then pour the rest to cover the bloom.
Step 4: Final Pour and Finishing
-
Top It Off:
Continue pouring until the mold is filled to the brim. The resin will shrink slightly as it cures, so a slight overfill is okay. -
Bubble Release:
Let the mold sit for 10-15 minutes, then check for bubbles trapped under the flower head. Gently prod underneath with a toothpick to release them. -
The Long Cure:
Cover the mold with a box to prevent dust from landing in the sticky resin. Allow it to cure fully for 24-72 hours, strictly following your deep pour resin’s timeline. -
Demolding:
Once fully rock-hard, gently peel the silicone mold away from the block. Take your time to avoid tearing the mold. -
Edge Polishing:
If the edges are sharp or uneven, sand them gently with fine-grit sandpaper and apply a polishing compound or a thin topcoat of resin for crystal clarity.
Place your finished hexagon near a window where sunlight can illuminate the delicate veins of the petals


Floating Flower Paperweight
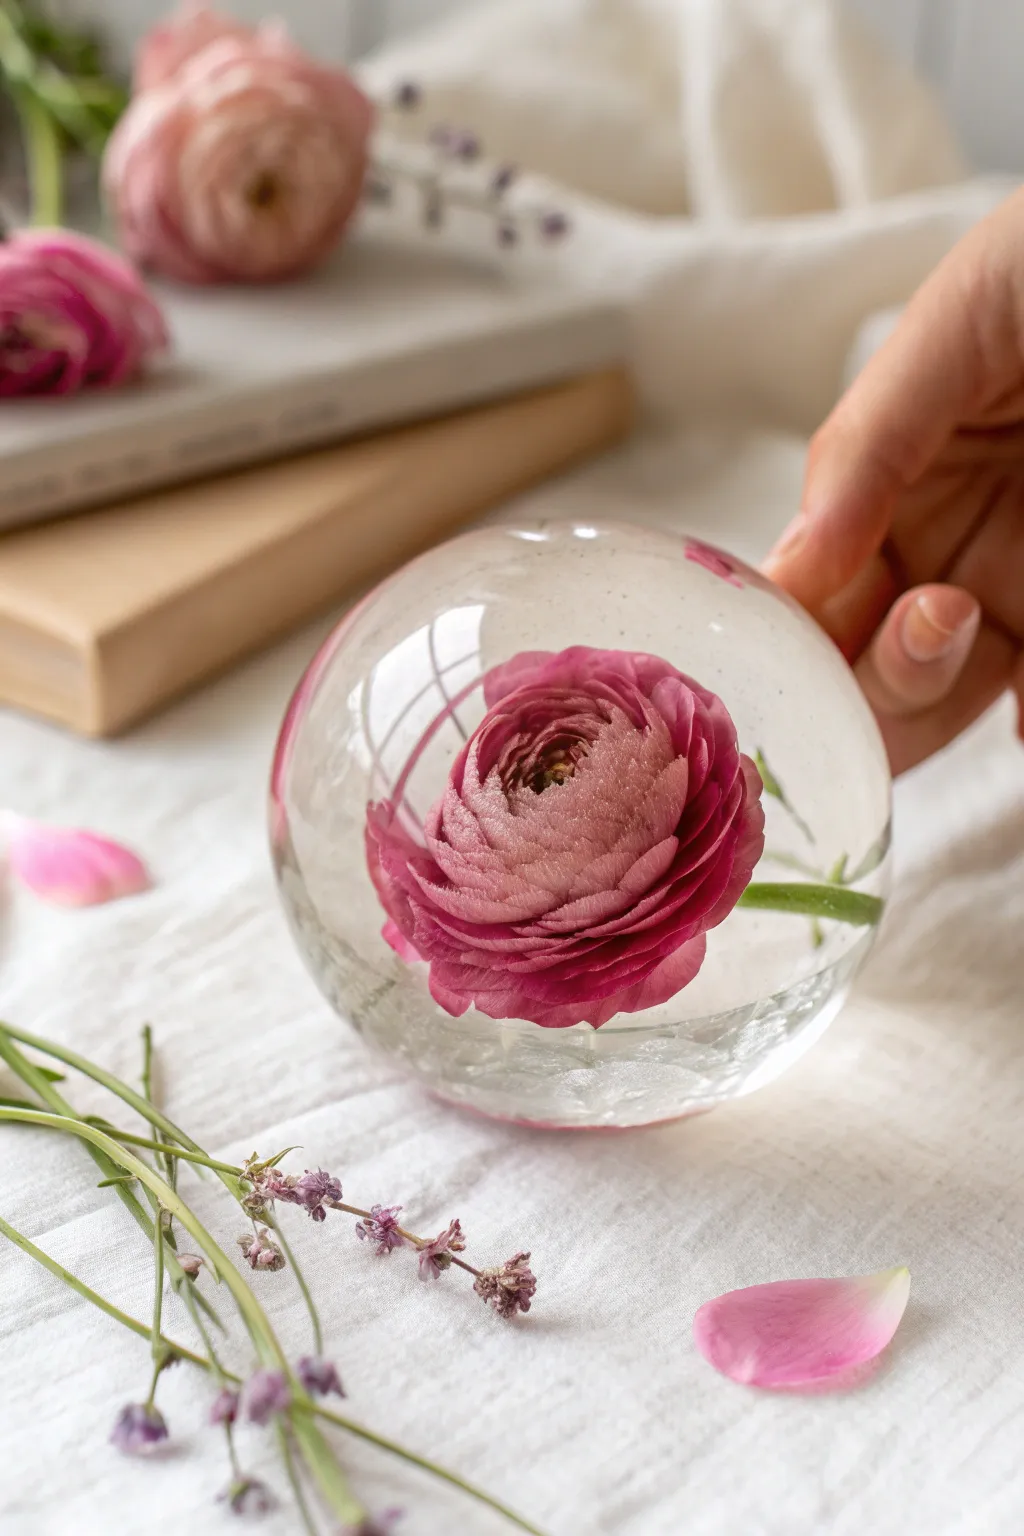
Create a breathtaking, crystal-clear resin sphere that captures the delicate beauty of a pink ranunculus forever. This floating flower paperweight creates a stunning magnifying effect, making every petal detail pop while serving as a functional piece of art.
Step-by-Step
Materials
- High-quality clear casting resin (epoxy)
- Spherical silicone mold (single piece or two-part)
- Dried pink ranunculus flower (must be fully silica-dried)
- Small dried purple filler flowers (optional)
- Silica gel for drying flowers
- Mixing cups and stir sticks
- Heat gun or torch
- Pressure pot (highly recommended for bubbles)
- Polishing compound and sandpaper (micro-mesh)
Step 1: Flower Preparation
-
Dry the flower:
Before touching any resin, you must preserve your ranunculus. Bury the fresh bloom gently in a container of silica gel, ensuring granules get between the petals without crushing them. Let it sit for at least 5-7 days until completely moisture-free. -
Check for moisture:
Remove the flower carefully. If the petals feel cool to the touch, they still have moisture. Resin hates water and will turn cloudy or rot the flower, so ensure it is bone dry. -
Seal the flower:
I like to spray the dried flower with a light coat of clear acrylic sealer or hairspray. This helps prevent the resin from saturating the petals too quickly and creating transparent spots.
Pro Tip: Petal Translucency
If petals turn too transparent (looking wet), dip the flower in a diluted mixture of white glue and water and let dry before casting. This seals the pores.
Step 2: First Pour & Placement
-
Mix the base layer:
Prepare a small amount of deep-pour casting epoxy according to the manufacturer’s ratio. Mix slowly to minimize air bubbles. -
Pour the anchor layer:
Pour just enough resin into the bottom of your spherical mold to create a base. This will eventually be the ‘top’ of the sphere if using a standard mold. -
Insert the bloom:
Gently lower your dried ranunculus into the mold, head down. You want the face of the flower to be centered in the widest part of the sphere. -
Remove trapped air:
Use a toothpick to gently wiggle the flower and release any air bubbles trapped between the dense petals. This is the most crucial step for clarity. -
Initial cure:
Let this first layer set until it reaches the ‘gel’ phase. This anchors the flower so it doesn’t float to the surface during the main pour.
Level Up: Dew Drops
Before drying the flower, carefully place tiny droplets of clear UV resin on a few petals and cure them. They will look like permanent morning dew inside the sphere.
Step 3: Encapsulation
-
Mix the main batch:
Mix a larger batch of casting resin. If you have a vacuum chamber, degas the mixed resin now to pull out micro-bubbles. -
Fill the mold:
Pour the resin slowly down the side of the mold, not directly onto the flower, to avoid damaging the delicate petals. -
Fill completely:
Fill the mold almost to the brim. If you are adding the small purple filler stems, tuck them in near the base of the ranunculus now. -
Pressure pot curing:
For the glass-like finish seen in the photo, place the filled mold into a pressure pot at 40-50 PSI. This crushes microscopic bubbles that are impossible to remove by hand. -
Full cure time:
Allow the resin to cure fully. Deep pour resins often take 24-72 hours. Do not rush this, or the sphere might distort when demolded.
Step 4: Finishing Touches
-
Demold:
Once rock hard, peel back the silicone mold. The surface might look slightly matte or have a seam line depending on your mold type. -
Sand the sprue:
Sand down the flat spot where the resin was poured (the sprue) using wet sandpaper, starting at 400 grit and working up to 2000 grit. -
Polish to shine:
Apply a plastic polishing compound with a microfiber cloth or a buffing wheel to restore absolute transparency to any sanded areas. -
Final wipe:
Clean the sphere with a soft cloth to remove fingerprints and dust, revealing your suspended garden.
This mesmerizing floral sphere brings a permanent touch of spring to your desk or bookshelf


Pressed Petal Serving Tray
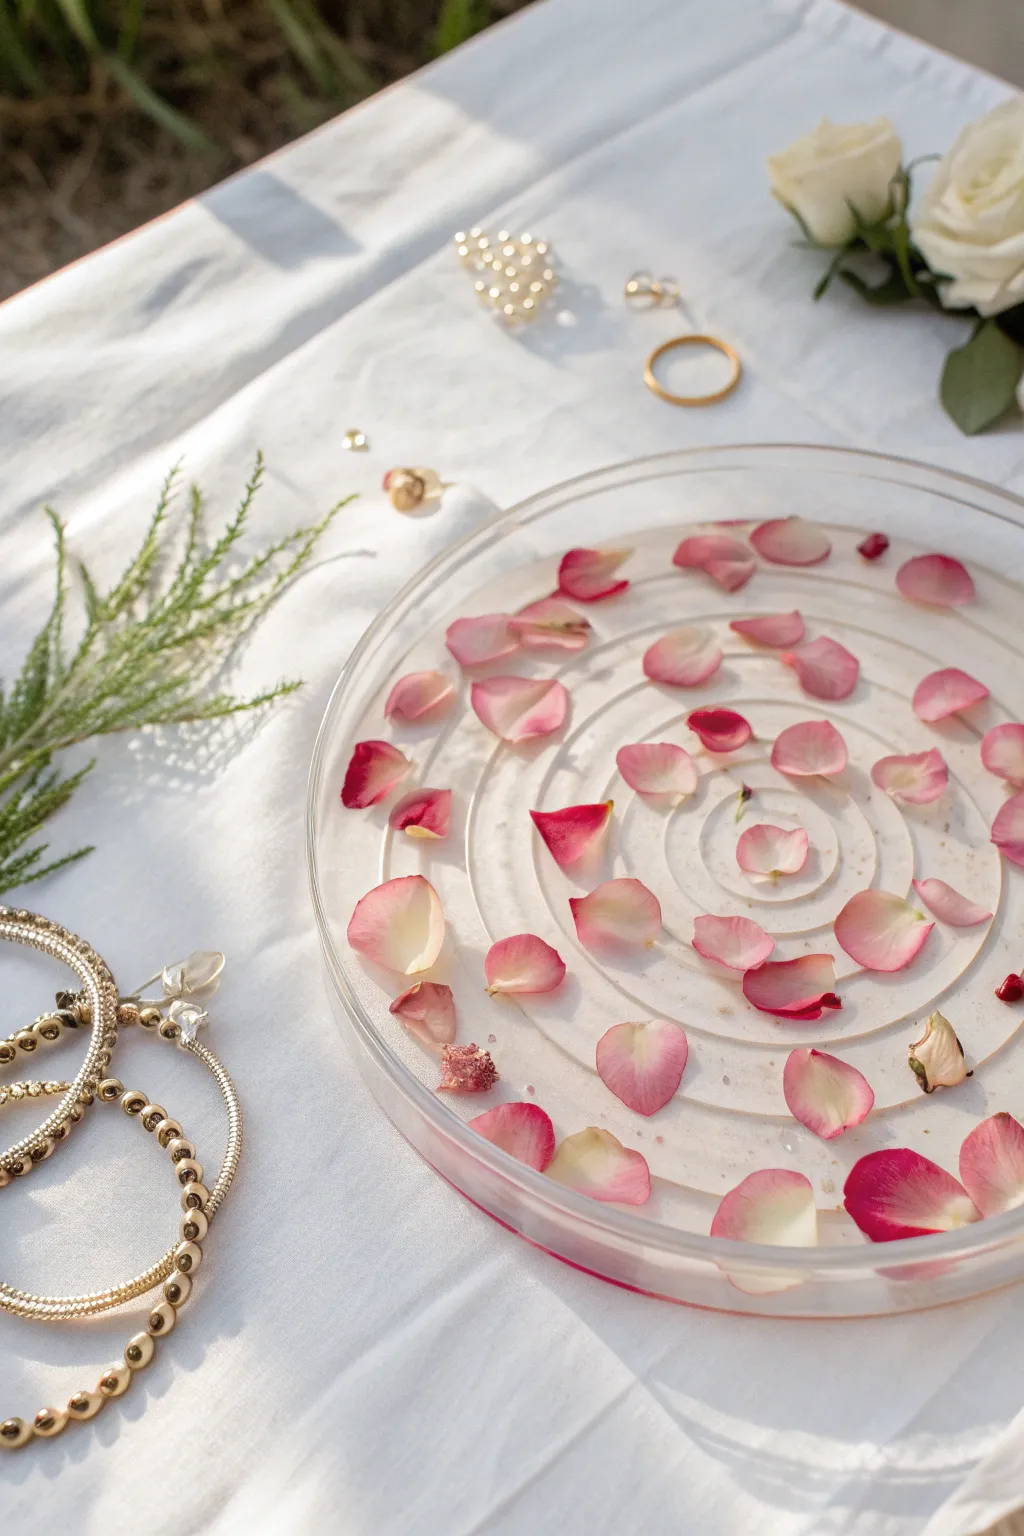
Capture the delicate beauty of fresh blooms forever with this elegant resin serving tray. The concentric ring design adds a sophisticated watermark effect while preserving the romantic gradients of pink rose petals.
Step-by-Step Tutorial
Materials
- High-quality clear casting epoxy resin (two-part)
- Circular silicone tray mold (approx. 10-12 inches diameter)
- Fresh or semi-dried pink rose petals
- Mixing cups and stir sticks
- Heat gun or culinary torch
- Tweezers
- Dust cover (cardboard box)
- Gloves and respirator mask
- Small amount of gold flakes (optional)
- Isopropyl alcohol
Step 1: Preparation
-
Prepare your petals:
Select fresh rose petals with a nice gradient of color. Gently press them between heavy books for 2-3 days beforehand if you want them perfectly flat, or use fresh petals for a more organic, slightly dimensional look, understanding that colors may shift slightly over time. -
Clean the workspace:
Ensure your work surface is perfectly level. Wipe down your silicone mold with isopropyl alcohol and a lint-free cloth to remove any dust or fingerprints, which will show in the final clear cast. -
Mix the first layer:
Don your safety gear. Measure equal parts of resin and hardener (or per your brand’s instructions) into a mixing cup. Stir slowly and consistently for 3-5 minutes, scraping the sides and bottom.
Petals Turning Brown?
Fresh flowers contain moisture that rots in resin. Always pre-dry petals in silica gel for 3-5 days first. They will retain shape and color perfectly without turning brown later.
Step 2: Layering the Base
-
Pour the base layer:
Pour a thin layer of clear resin into the mold, filling it just enough to cover the bottom surface (about 1/8 inch). This prevents the petals from sinking directly to the bottom face of the tray. -
Pop bubbles:
Let the resin sit for a few minutes to allow bubbles to rise. Using your heat gun or torch, quickly pass over the surface to pop any remaining air pockets. Don’t linger in one spot to avoid damaging the mold. -
Initial cure:
Cover the mold with a dust box and let this layer cure until it reaches a sticky, tacky gel phase. This usually takes 2-4 hours depending on your resin brand.
Level Up: Ripple Effect
To get the concentric rings shown in the photo, choose a mold that specifically has a ‘ridged’ or ‘LP record’ texture on the bottom, or scratch rings into a plain mold before pouring.
Step 3: Arrangement
-
Position the petals:
Once the base is tacky, it acts like glue. Using tweezers, carefully place your rose petals onto the sticky resin. I find that starting from the center and spiraling outward creates a balanced look. -
Create flow:
Scatter the petals so they face different directions, mimicking how they might fall naturally on water. Leave plenty of negative space between them to keep the design airy. -
Press down gently:
Gently tap the center of each petal with your gloved finger or a tool to ensure full contact with the sticky layer. This helps prevent large air bubbles from getting trapped underneath later. -
Add dried accents:
If you have tiny dried buds or gold flakes, tuck a few into gaps near the outer edge for added texture, but keep the focus on the flat petals.
Step 4: Encapsulation
-
Mix the top coat:
Prepare a second, larger batch of clear resin following the same mixing protocols as before. Let it rest for 5 minutes to degas slightly before pouring. -
Pour over petals:
Slowly pour the resin over the arranged petals. Start pouring from the center and let it spread outward to minimize shifting your carefully placed flowers. -
Submerge floaters:
Watch for petals that try to float to the surface. Use a toothpick to gently push them back down and release any air bubbles trapped under their curves. -
Final torching:
Do a final pass with the heat gun to eliminate surface bubbles. Be extra vigilant around the edges of the petals where bubbles love to hide. -
Final cure:
Cover with your dust box again. Allow the tray to cure fully for 24-48 hours. Do not touch it during this time to ensure a glass-like finish.
Step 5: Finishing
-
Demold:
Once fully hardened, gently peel the silicone mold away from the resin. Start at the edges and work your way around until the tray pops free. -
Sand edges:
Inspect the rim for any sharp edges or resin overhang. Use fine-grit sandpaper (400 to 1000 grit) to smooth any rough spots if necessary. -
Polish (optional):
If sanding clouded the edges, apply a tiny bit of polishing compound or a thin layer of resin painted on with a brush to restore clarity.
Now you have a stunning, crystal-clear centerpiece ready to hold your jewelry or serve light snacks


Mini Flower Pendant Charms
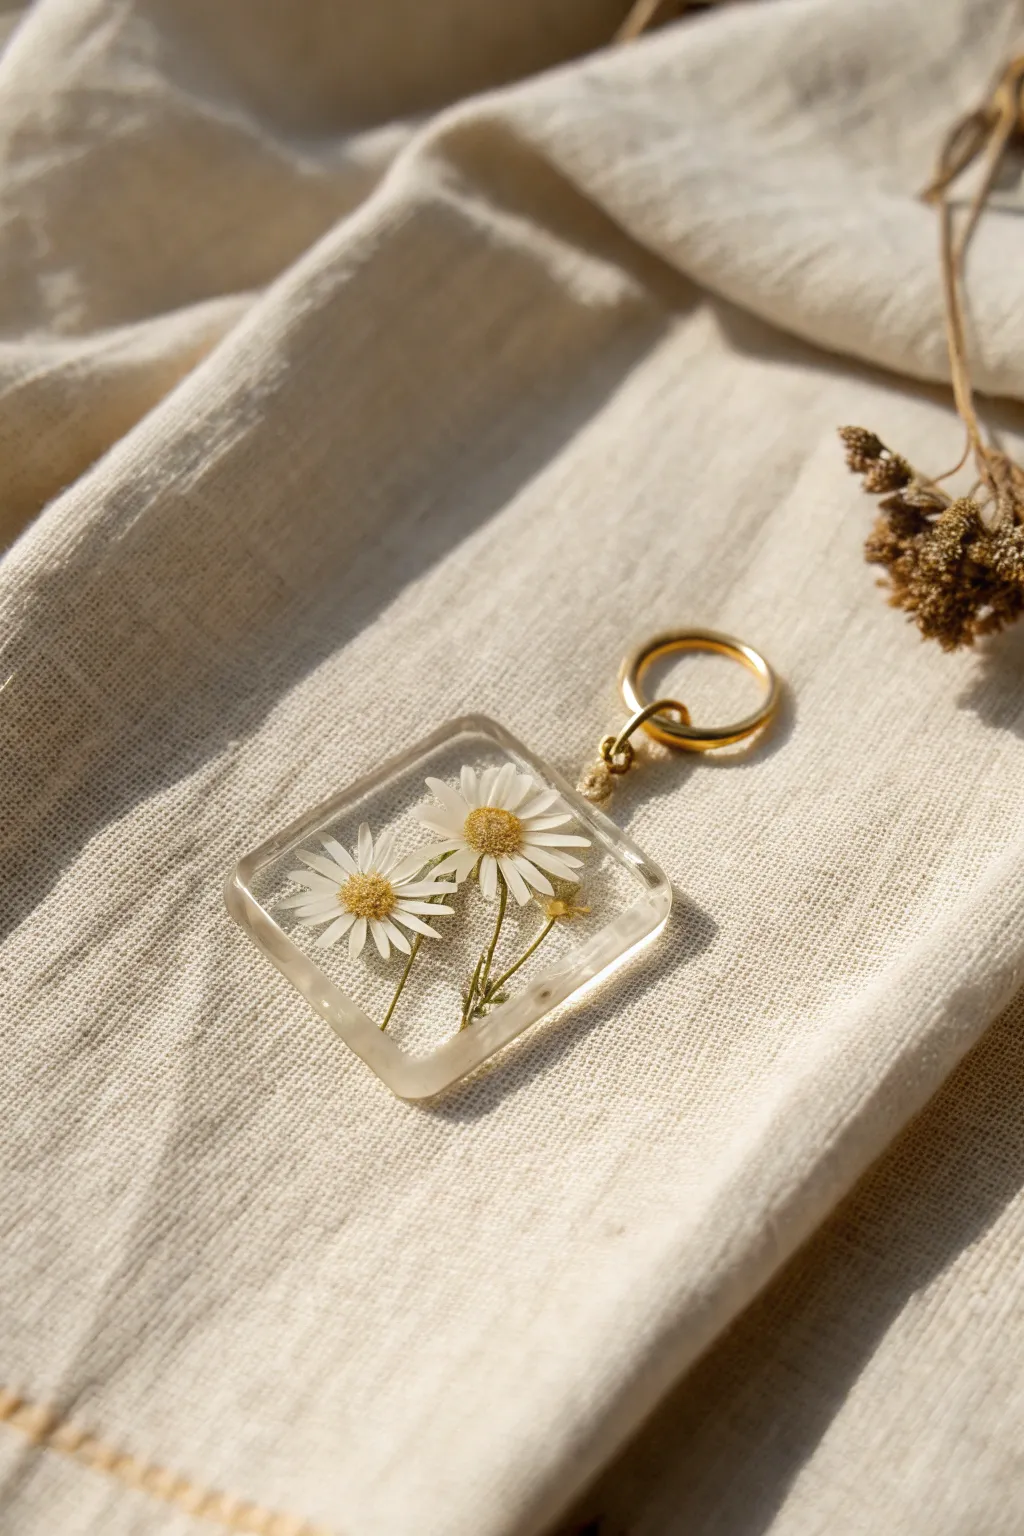
Capture the delicate beauty of a summer meadow with this minimalist square resin pendant. Featuring two perfectly preserved daisies suspended in crystal-clear resin, this charm makes for a timeless keychain or necklace focal point.
Detailed Instructions
Materials
- Square silicone epoxy mold (approx. 1.5 – 2 inches)
- Two-part crystal clear jewellery grade epoxy resin (Part A and Part B)
- Small dried and pressed white daisies (or chamomile flowers)
- Mixing cups and stir sticks
- Hand drill or pin vise with a small drill bit
- Gold screw eye pin
- Gold jump ring (large)
- Matches or prolonged butane lighter
- Tweezers
- Latex or nitrile gloves
- Respirator or Well-ventilated work area
Step 1: Preparation & First Pour
-
Prepare your workspace:
Ensure your working surface is completely level so the resin cures evenly. Lay down a silicone mat or wax paper to protect your table from any accidental drips. -
Select your flowers:
Choose two small dried pressed daisies that fit comfortably within your square mold without touching the edges. Their stems should be intact and straight. -
Mix the resin:
Combine your resin and hardener according to the manufacturer’s specific ratio instructions. Stir slowly for at least 3-4 minutes to avoid whipping bubbles into the mixture. -
Pour the base layer:
Pour a thin layer of mixed resin into the mold, filling it just about one-third of the way up. This acts as the ‘glue’ for your flowers. -
Pop surface bubbles:
Wait a few minutes for bubbles to rise, then quickly pass a lighter or heat gun over the surface to pop them. Be careful not to burn the mold.
Floating Flowers?
If your flowers drift after the first pour, your base layer was too fluid. Wait longer (until the resin is like thick honey) before placing botanicals to keep them stuck in place.
Step 2: Design & Encapsulation
-
Place the flowers:
Using tweezers, gently place your first daisy into the wet resin, face down. The side facing the bottom of the mold will be the front of your pendant. -
Arrange the second bloom:
Position the second daisy slightly lower than the first to create a natural, staggered look. I like to angle the stems slightly so they cross or run parallel. -
Check for trapped air:
Press the flowers down very gently with your stir stick to ensure resin saturates the petals. Look closely for trapped air pockets under the flower centers. -
Let it get tacky:
Allow this initial layer to cure until it reaches a gel-like state (usually 4-6 hours). This prevents the flowers from floating up when you pour the final layer. -
Mix final batch:
Mix a second small batch of clear resin, following the same careful stirring process to minimize bubbles. -
Fill the mold:
Slowly pour the resin over your set flowers until the mold is filled to the top edge. Pouring slowly helps avoid disturbing the delicate petals. -
Final bubble check:
Do one last pass with your lighter to remove any new surface bubbles and cover the mold with a dust cover. -
Full cure:
Let the piece cure undisturbed for 24 to 48 hours, or until fully hardened and no longer tacky to the touch.
Step 3: Finishing Touches
-
Demold the charm:
Gently flex the silicone mold to release the vacuum seal and pop your cured resin square out. -
Clean the edges:
If there are any sharp edges or a lip from over-pouring, gently sand them down with fine-grit wet sandpaper for a smooth finish. -
Drill the corner hole:
Using a hand drill or pin vise, carefully drill a small hole diagonally into one of the top corners of the square. -
Attach the hardware:
Screw the small gold eye pin into the drilled hole. Put a drop of superglue on the threads before inserting for extra security. -
Add the ring:
Open your large gold jump ring using pliers, slide it through the eye of the screw pin, and close it securely to finish your charm.
Crystal Clear Tip
Warm your resin bottle in a bowl of warm water for 10 minutes before mixing. Thin, warm resin releases bubbles much faster than cold, thick resin.
Now you have a stunning botanical keepsake ready to catch the light on your keys or bag
BRUSH GUIDE
The Right Brush for Every Stroke
From clean lines to bold texture — master brush choice, stroke control, and essential techniques.
Explore the Full Guide
Botanical Keychains With Tiny Blooms
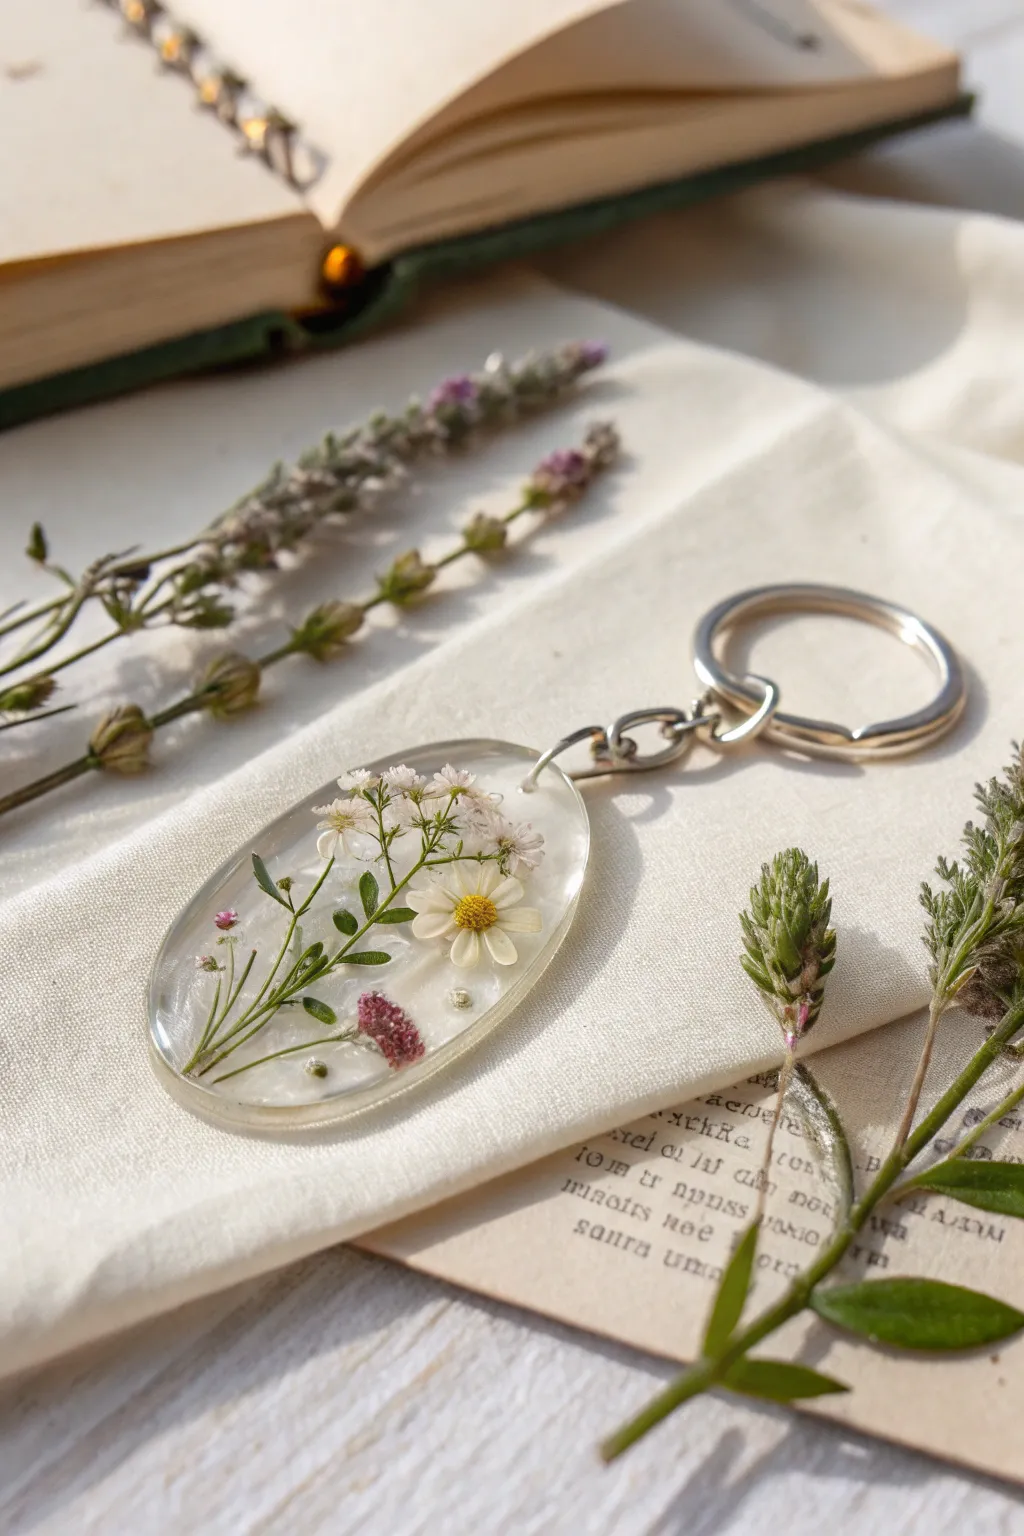
Capture the delicate beauty of a summer field in this elegant oval keychain. By encapsulating tiny blooms like daisies and baby’s breath in resin, you create a timeless botanical keepsake that feels light, airy, and full of natural charm.
Step-by-Step Guide
Materials
- UV resin or 2-part epoxy resin (UV is faster for small projects)
- Oval silicone mold for pendants/keychains
- Dried pressed flowers (one small daisy, baby’s breath sprigs, tiny purple heather/clover)
- White or pearl alcohol ink (optional, for background effect)
- Tweezers
- UV lamp (if using UV resin)
- Mixing cups and stir sticks
- Silver keychain hardware (split ring and jump rings)
- Small jewelry pliers
- Hand drill or pin vibe (if mold doesn’t have a pre-made hole)
Step 1: Preparation & First Layer
-
Select your blooms:
Before pouring anything, arrange your dried flowers on a white piece of paper. Choose a small white daisy as the focal point, flanked by delicate sprigs of baby’s breath and a touches of purple greenery. Ensure they fit within the oval shape of your mold. -
Prepare the resin base:
Pour a small amount of resin into the bottom of your oval silicone mold. You only need a thin layer here, about 2-3mm deep, to serve as the bed for your flowers. -
Remove bubbles:
Let the resin sit for a minute to allow air bubbles to rise. Use a lighter quickly passing over the surface or a toothpick to pop any stubborn bubbles clinging to the edges. -
Partial cure:
If using UV resin, cure this base layer under the lamp for about 30-60 seconds. It should be solid enough to hold flowers but slightly tacky. If using epoxy, wait until it reaches a gel-like consistency.
Seal Your Blooms
To prevent flowers from becoming translucent or rotting in resin, seal them with a thin coat of Mod Podge or clear spray sealer and let dry completely before embedding.
Step 2: Arranging the Botanicals
-
Place the greenery:
Dip the tips of your green stems into a stash of fresh resin before placing them. Using tweezers, lay down the longer green stalks first, extending from the bottom left upwards toward the right. -
Add the focal daisy:
Position your small white daisy slightly off-center to the right. Gently press it down so it lies flat against the tacky base layer, ensuring no air is trapped under the petals. -
Insert filler flowers:
Tuck tiny sprigs of baby’s breath and the small purple accents around the daisy and greenery. I like to overlap the stems slightly to make it look like a cohesive bouquet rather than floating parts. -
Secure the arrangement:
Once happy with the layout, cure briefly under the UV lamp (about 60 seconds) or let the epoxy set further. This locks the flowers in place so they won’t float away during the next pour.
Add Subtle Sparkle
Mix a tiny pinch of crushed iridescent flakes or fairy glitter into the clear top layer. It mimics dew drops hitting the sunlight without overpowering the flowers.
Step 3: Encapsulation & Finishing
-
Mix the background layer:
For that soft, milky look seen in the image, mix a tiny drop of white alcohol ink or pearl mica powder into clear resin. You want it translucent, not opaque. -
Pour the top layer:
Carefully pour this semi-transparent mixture over your secured flowers, filling the mold to the brim. Pour slowly to avoid creating new bubbles around the delicate flower heads. -
Dome the surface:
If the resin shrinks slightly away from the edges, add a tiny bit more to the center until surface tension creates a slight dome shape. This magnifies the flowers beautifully. -
Final cure:
Cure completely. For UV resin, give it 2-3 minutes on both the front and back side (flip the mold over) to ensure the light reaches through the flowers. For epoxy, let cure for 24-48 hours. -
Demold:
Gently flex the silicone mold and pop out your hardened resin oval. Check the edges for any sharp bits and sand them lightly with fine-grit sandpaper if necessary.
Step 4: Assembly
-
Drill the hole:
If your mold didn’t have a built-in post for a hole, use a small hand drill or pin vise to bore a hole near the top edge of the oval. -
Attach rings:
Open a jump ring with your jewelry pliers using a twisting motion (never pull apart). Slide it through the drilled hole. -
Connect hardware:
Attach the chain of the keyring to the jump ring before twisting the jump ring closed securely. -
Final polish:
Wipe the resin with a soft cloth to remove any fingerprints and make your botanical garden shine.
Enjoy carrying a tiny piece of nature with you wherever you go or gift it to a fellow flower lover
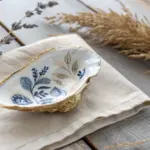
Resin Ring Dish With Pressed Florals
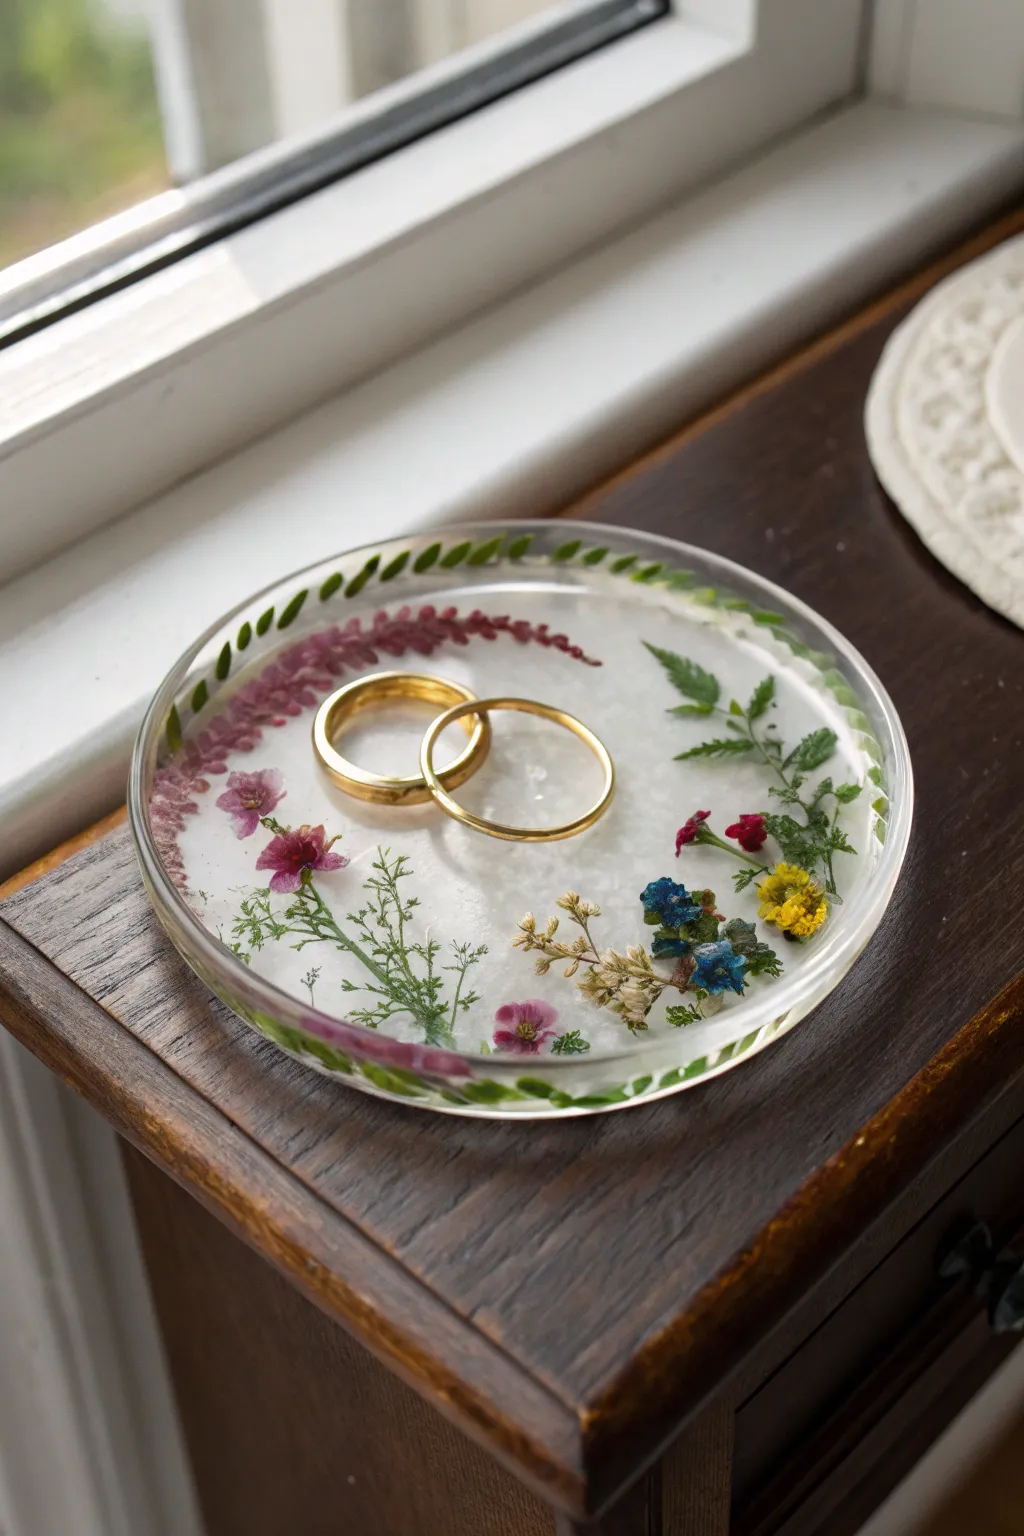
Preserve the delicate beauty of nature with this elegant resin ring dish, featuring an airy arrangement of ferns, heather, and tiny wildflowers suspended in clear epoxy. It’s the perfect sentimental resting place for wedding bands or everyday jewelry.
How-To Guide
Materials
- Circular silicone mold (approx. 4-5 inches diameter, shallow lip)
- Two-part casting resin (clear epoxy)
- Assorted dried and pressed flowers (ferns, heather, statice, baby’s breath)
- Mixing cups and wooden stir sticks
- Tweezers
- Heat gun or lighter
- Gloves and respirator mask
- Plastic drop cloth
Step 1: Preparation & First Pour
-
Safety First:
Before uncapping anything, set up your workspace in a well-ventilated area. Lay down a plastic drop cloth to protect your table, and ensure you are wearing your gloves and respirator. Choosing a dust-free environment is crucial for that crystal-clear finish. -
Plan the Design:
Take your silicone mold and lay it on your work surface. Before mixing any resin, practice your floral arrangement. Place your dried ferns along the edges to create a border, and scatter the colorful blooms (yellow, blue, and purple) in natural-looking clusters. Once you like the look, take a quick photo for reference. -
Mix the Resin:
Measure equal parts of resin and hardener (strictly following your brand’s 1:1 ratio instructions) into a mixing cup. Stir slowly but thoroughly for at least 3-5 minutes, scraping the sides and bottom. I always make sure there are no ribbons or cloudy streaks left in the mixture. -
Degas the Mixture:
Let the mixed resin sit for about 5 minutes to allow large bubbles to rise to the surface. Gently pass a heat gun over the top to pop them if necessary. -
Pour the Base Layer:
Pour a thin layer of clear resin into the mold—just enough to cover the bottom surface (about 1/8 to 1/4 inch deep). This acts as the glue for your flowers.
Floating Flowers?
If flowers drift during the cure, your base layer was too fluid. Wait until the resin is like thick honey before placing flowers next time.
Step 2: Arranging the Florals
-
Place the Fern Border:
Using your tweezers, carefully pick up the fern fronds. Dip them briefly into a small cup of leftover mixed resin to coat them (this helps prevent trapping air bubbles) and place them along the outer rim of the mold, curving them to fit the shape. -
Add the focal flowers:
Start placing your larger elements, like the purple heather sprigs and the green leafy stems. Refer back to your design photo. Since this will be the bottom of the dish, remember you are working in reverse if looking through the bottom, or standard if the mold is open-faced—usually, for a dish mold, you are placing them face-up. -
Fill in Details:
Tuck the smaller blue and yellow flowers into the gaps. Use the tweezers to gently push them down in the wet resin so they don’t float away. Ensure they remain flat. -
Check for Bubbles:
Look closely around the petals and leaves. If you see trapped air bubbles underneath them, gently nudge the flower with a toothpick to release the air. A quick pass with a lighter (held at a distance) can pop surface bubbles. -
Initial Cure:
Cover the mold with a box to prevent dust from settling on it. Allow this layer to cure until it is tacky or soft-set (usually 4-6 hours depending on your resin brand). This prevents the flowers from floating to the top during the final pour.
Pro Tip: Contrast
Use bright, opaque flowers like yellow statice or solidified blue hydrangeas. Translucent petals can disappear (
Step 3: Final Pour & Finishing
-
Mix the Top Coat:
Mix a second batch of clear resin, following the same careful stirring process as before. -
Fill the Mold:
Slowly pour the resin over your tacky floral layer. Fill the mold almost to the rim, creating a nice, flat surface which will become the bottom of the tray (or the top surface depending on your specific mold type). Pour slowly to avoid introducing new bubbles. -
Final Bubble Removal:
Wait 10 minutes, then do one last check for micro-bubbles rising to the surface. Zap them carefully with your heat gun. -
Full Cure:
Cover the project again and let it cure fully for 24-48 hours. Do not rush this step; the resin needs to be completely hard before demolding. -
Demold:
Gently pull the silicone sides away from the cured resin. Push from the bottom to pop the dish out. -
Edge Cleanup:
If the top edge (which was against the mold) feels sharp, use a fine-grit wet sandpaper to smooth it down gently. -
Optional Polishing:
If sanding clouded the edge, you can apply a tiny amount of polishing compound or paint a thin layer of resin on the rim to restore the shine.
Now you have a stunning, transparent keepsake ready to hold your most precious jewelry

PENCIL GUIDE
Understanding Pencil Grades from H to B
From first sketch to finished drawing — learn pencil grades, line control, and shading techniques.
Explore the Full Guide
Window Suncatcher Flower Discs
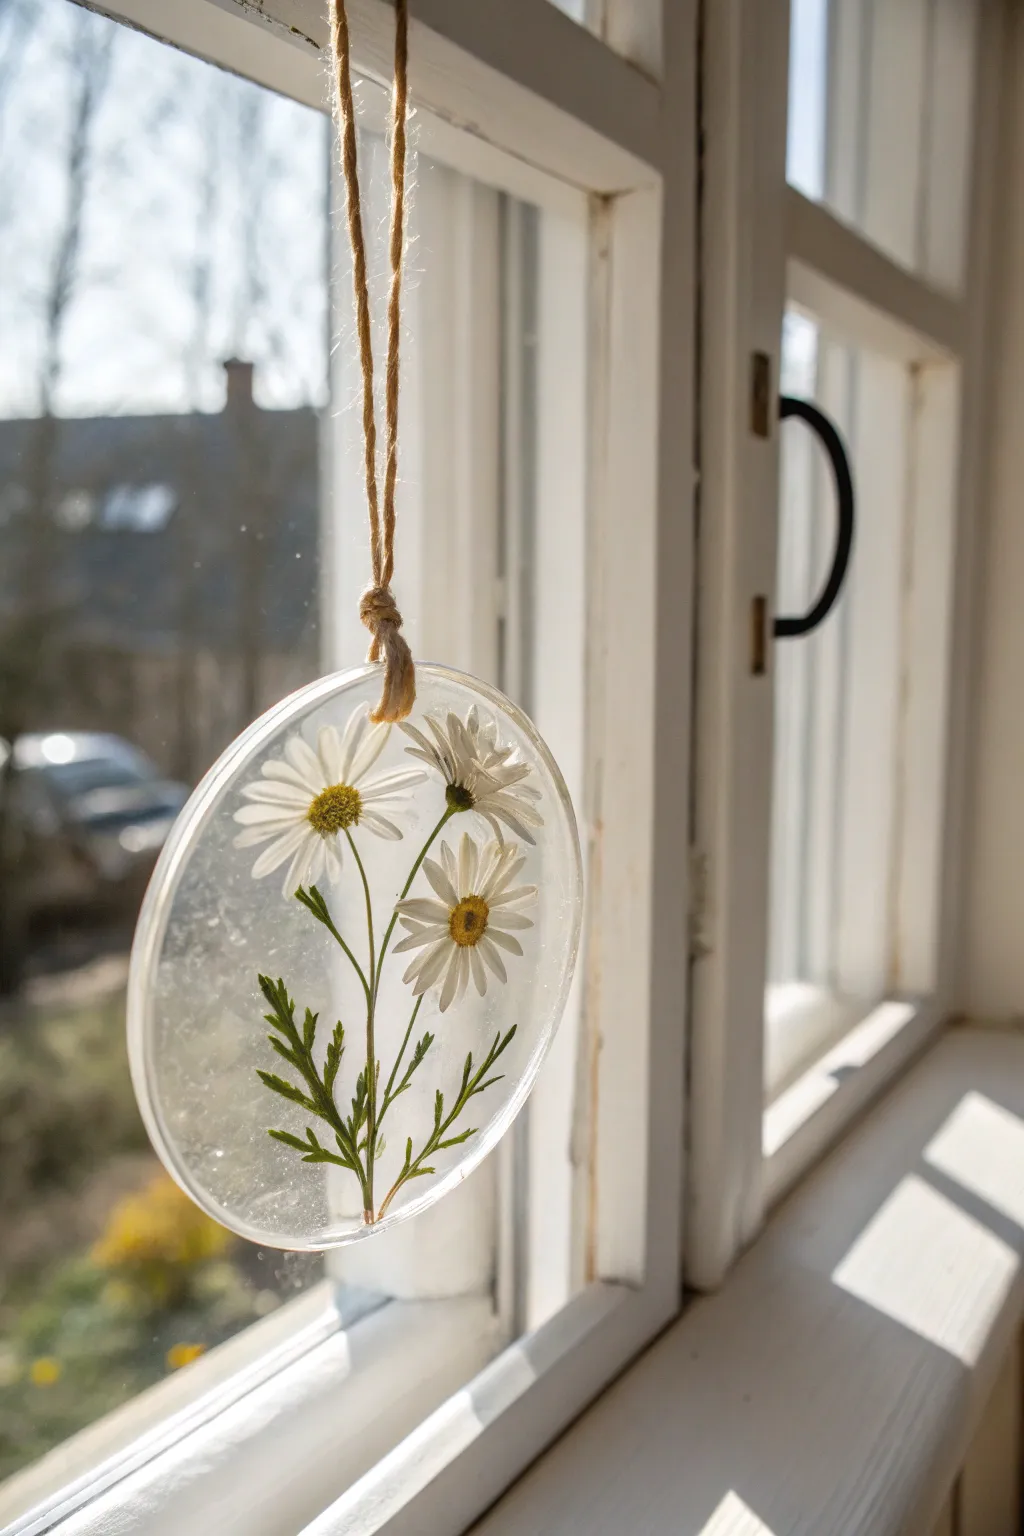
Capture the fleeting beauty of a sunny meadow with this crystal-clear resin suncatcher. Featuring delicate pressed daisies suspended in time, this simple hanging disc brings a touch of eternal spring to any window.
Step-by-Step Guide
Materials
- Epoxy resin (casting or coating resin)
- Hardener
- Silicone circle coaster mold (approx. 4-inch diameter)
- Dried and pressed daisies (3 stems)
- Mixing cups and stir sticks
- Tweezers
- Heat gun or lighter
- Hand drill with small bit
- Natural jute twine
- Gloves and respirator mask
- Flat, level working surface
Step 1: Preparation & First Layer
-
Prepare your workspace:
Ensure your work area is completely level, dust-free, and well-ventilated. A level surface is crucial for resin to settle evenly. Lay down silicone mats or parchment paper for easy cleanup. -
Arrange the composition:
Before mixing any resin, take your silicone mold and do a ‘dry run’ with your pressed flowers. Lay the daisies inside to find the most pleasing arrangement. The image shows a classic trio: two full blooms facing forward and one slightly turned or budding. -
Trim the stems:
Using small scissors, carefully trim the stems so they fit neatly within the circle without touching the very edge. You want them to look like they are floating. -
Remove the flowers:
Once you are happy with the layout, carefully remove the flowers with tweezers and set them aside next to the mold in the exact pattern you created so you don’t forget it. -
Mix the first batch:
Put on your gloves and respirator. Measure equal parts of resin and hardener (or according to your bottle’s specific ratio) into a cup. Mix slowly for 3-5 minutes, scraping the sides and bottom to ensure a thorough blend. -
Pour the base layer:
Pour a thin layer of clear resin into the mold, filling it about halfway. This layer acts as the ‘bed’ for your flowers. -
Remove bubbles:
Let the resin sit for a minute to allow air to rise, then quickly pass a heat gun or lighter over the surface to pop any bubbles. Don’t hold the heat in one spot too long to avoid damaging the silicone mold.
Step 2: Embedding the Botanicals
-
Place the flowers:
Using your tweezers, gently place the daisies face down into the wet resin. Since this is a transparent suncatcher, ‘face down’ provides the best view from the smooth bottom side, which often becomes the front. -
Adjust and submerge:
Gently press the stems and petals down so they are fully in contact with the resin. If they float up, I like to check back in 15 minutes and push them down again slightly. -
Let it cure partially:
Cover the mold with a box to prevent dust from settling on it. Allow this layer to cure until it reaches a soft, tacky gel state (usually 4-6 hours depending on your resin brand).
Clearer than Crystal
To avoid ‘silvering’ (air trapped under petals), dip your dried flowers in a tiny bit of mixed resin before placing them into the mold. This seals the pores.
Step 3: Finishing & Hanging
-
Mix the second batch:
Once the first layer is tacky, mix a second small batch of clear resin following the same instructions as before. -
Top off the mold:
Pour the fresh resin over the flowers until you reach the rim of the mold. This encapsulates the botanicals completely and creates a smooth back surface. -
Final bubble check:
Do one last pass with your heat gun to ensure crystal clarity. Cover again and let it cure fully for 24-48 hours until rock hard. -
Demold the disc:
Gently peel the silicone mold away from the cured resin. The edges might be sharp, so you can sand them lightly with fine-grit sandpaper if needed, or add a thin coat of resin to smooth them out. -
Drill the hole:
Mark a spot about half an inch from the top edge. Using a hand drill or a rotary tool, carefully drill a small hole through the resin. -
Add the hanger:
Cut a length of jute twine. Thread it through the drilled hole. -
Tie the knot:
Tie a secure knot at the base near the resin, or loop it through itself for a cleaner look. Tie the top ends together to create a loop for hanging. -
Hang and enjoy:
Find a bright window and hang your new suncatcher to see the light illuminate the delicate petals.
Adding Sparkle
Mix a tiny pinch of white mica powder or iridescent glitter into the background layer to give the effect of morning dew catching the sunlight.
Now you have a permanent piece of spring to brighten up your window view every day
Crystal Point With Embedded Wildflowers
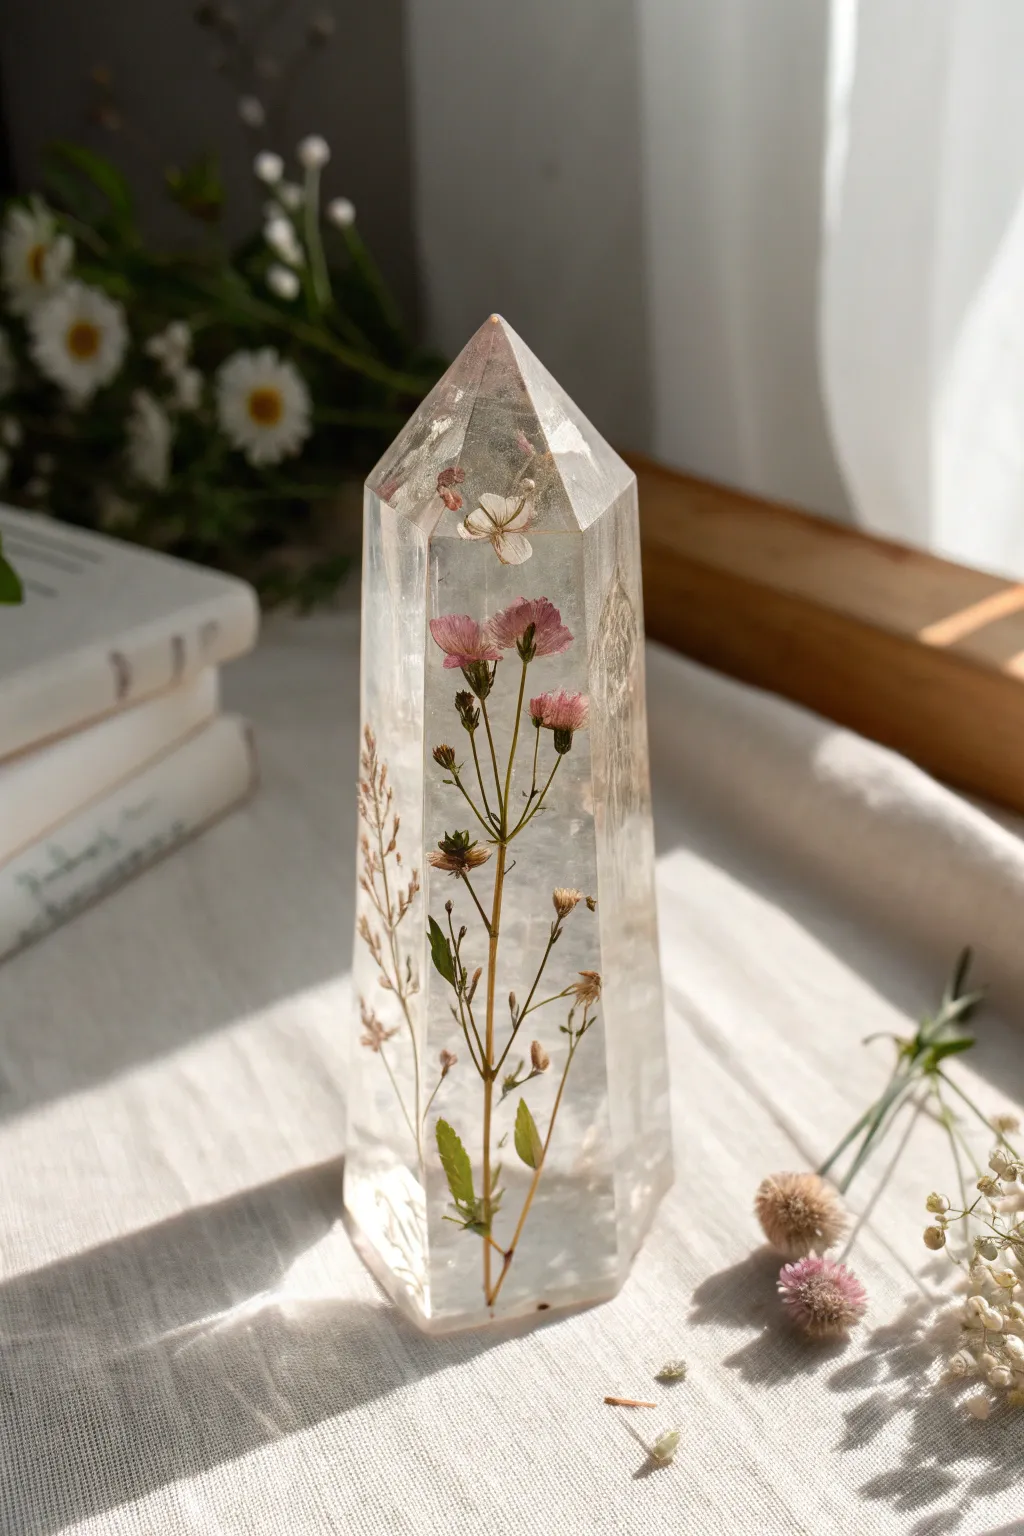
Capture the delicate beauty of a meadow eternally in this stunning resin obelisk. This project uses a crystal-shaped mold to encase tiny stems and petals in perfectly clear resin, creating a mesmerizing light-catching display piece.
Step-by-Step
Materials
- High-quality deep pour epoxy resin (low viscosity)
- Silicone crystal point/obelisk mold (approx. 4-6 inches tall)
- Dried wildflowers (pink clover, baby’s breath, varied grasses)
- Mixing cups and stir sticks
- Tweezers or long forceps
- Heat gun or lighter
- Nitrile gloves
- Respirator mask
- A box or dust cover
Step 1: Preparation and Design
-
Prepare your botanicals:
Ensure all your wildflowers are completely dried before starting. Moisture will cause the resin to cloud or the flowers to rot. If you picked them fresh, dry them in silica gel for a few days to preserve their 3D shape. -
Test the fit:
Hold your dried stems next to the silicone mold to gauge the height. Trim stems as needed so they fit comfortably within the crystal shape without touching the very bottom (which will become the tip). -
Clean the mold:
Inspect the inside of your silicone crystal mold. Use a piece of tape to lift away any stray dust or lint, as these will be permanent once resin is poured.
Step 2: First Layer and Positioning
-
Mix the first batch:
Mix a small amount of deep pour resin according to the manufacturer’s ratio. Stir slowly for 3-5 minutes to minimize bubbles, scraping the sides and bottom of the cup. -
Pour the tip:
Pour just enough resin into the mold to fill the pointed ti, probably about half an inch deep. This solid base protects the delicate flower tips. -
Insert the main flower:
Using long tweezers, carefully lower your main pink flower stem into the mold upside down. Dip the flower head in resin first to prevent trapped air bubbles. -
Secure the position:
You may need to balance the stem against the side or use a popsicle stick with a clip across the top of the mold to hold the flower stem centered while this initial layer gels. -
Let it tack:
Allow this first layer to cure until it is tacky but not fully hard. This acts as a glue to keep your flower floating in the center rather than sinking or floating away.
Cloudy Tip?
If the tip of your crystal looks dull after demolding, it’s the mold’s finish, not you! Coat the tip with a thin layer of glossy clear coat spray or a dab of UV resin to instantly make it transparent.
Step 3: Layering the Scene
-
Add secondary visuals:
Once the first layer is tacky, mix your next batch of resin. Before pouring, place smaller dried elements like the white florets or dried grasses around the main stem to create depth. -
The main pour:
Slowly pour more resin into the mold. Pour down the side of the silicone rather than directly on the flowers to avoid breaking fragile petals. -
Check for bubbles:
Pause halfway. Look closely at the flower heads; air often gets trapped under leaves. Use a toothpick to gently nudge bubbles out from tight crevices. -
Fill to the brim:
Continue pouring until the resin reaches the top edge of the mold. The resin often shrinks slightly as it cures, so a slight overfill (a convex dome) is helpful. -
Pop surface bubbles:
Pass a heat gun or lighter quickly over the surface to pop any rising bubbles. Be careful not to burn the delicate silicone mold edges.
Add Magic
Mix a tiny pinch of iridescent mica powder or fine glitter into the final resin layer (the base) for a sparkling backdrop that doesn’t obscure the flowers.
Step 4: Finishing
-
Wait for the cure:
Cover the mold with a box to prevent dust from settling on the sticky surface. Let it cure fully—usually 24 to 48 hours for deep pour resins. -
Demold carefully:
Gently peel the silicone away from the resin crystal. Break the vacuum seal by pulling the mold sides away, then push the crystal up from the bottom tip. -
Sand the base:
The open face of the mold (which is the bottom of your crystal) might have a sharp lip. Place sandpaper on a flat surface and rub the crystal base in circles to flatten and smooth it. -
Polish if necessary:
If the sanding made the base cloudy, you can paint a thin layer of fresh resin over the bottom or use a polishing compound to restore clarity.
Place your finished crystal on a sunny windowsill where the light can illuminate the preserved botanicals inside


Layered Floral Scene in a Square Block
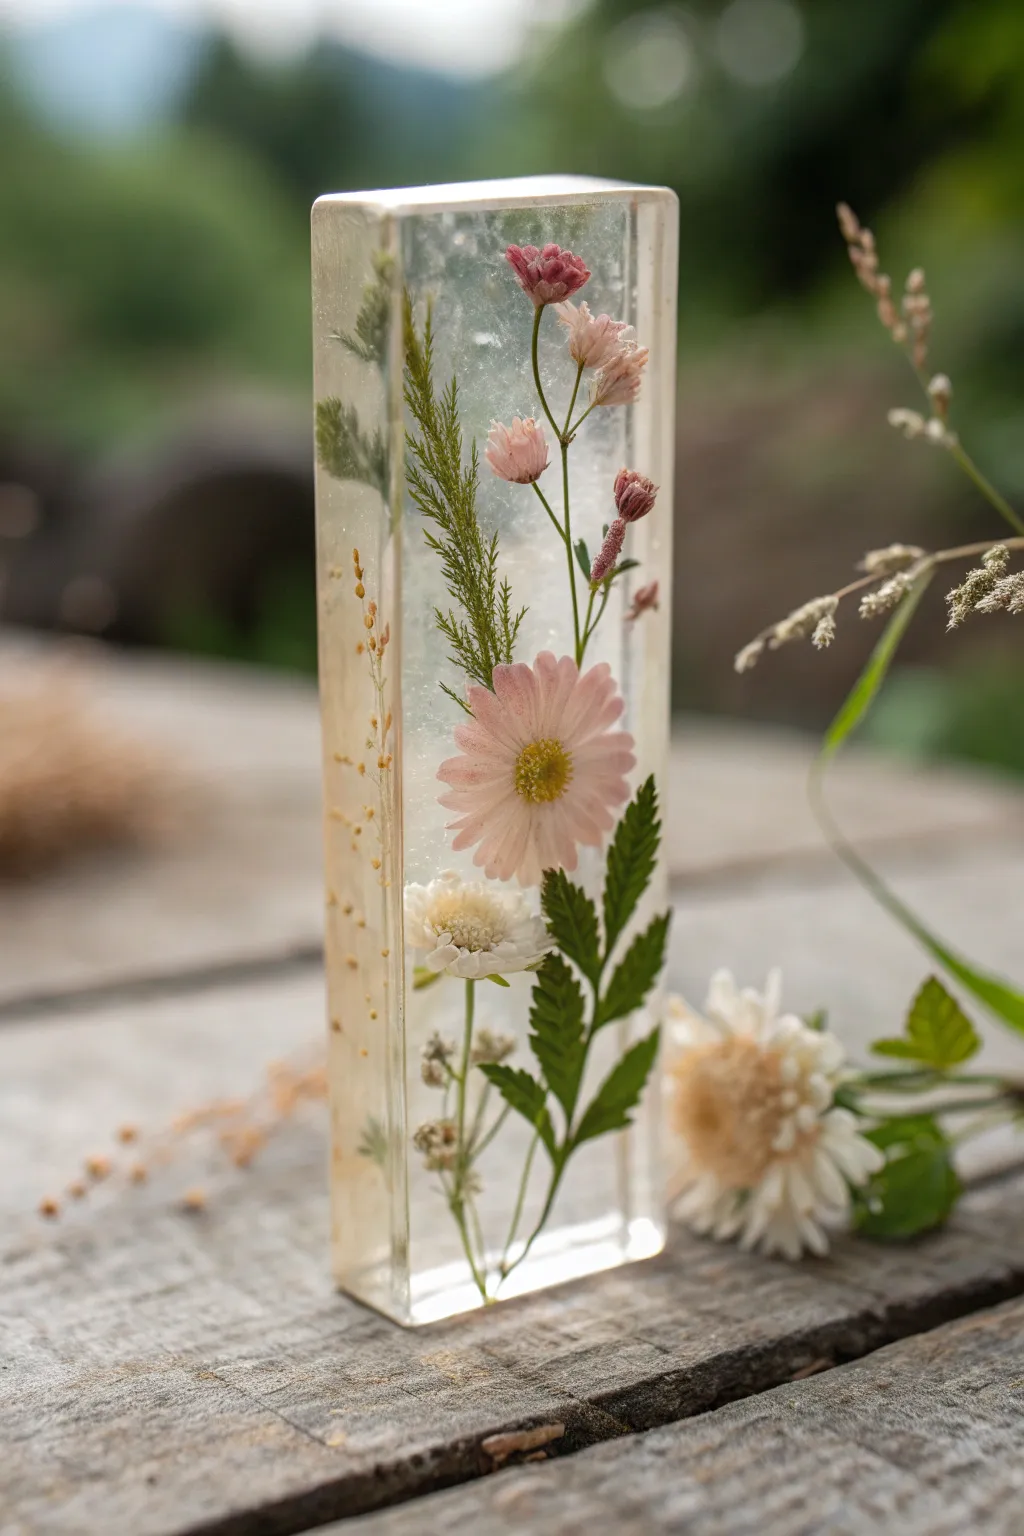
This stunning keepsake encapsulates the delicate beauty of a meadow in a tall, crystal-clear block. The vertical design allows for a graceful, upward-reaching arrangement of pink daisies, fern fronds, and tiny buds suspended in time.
Step-by-Step Guide
Materials
- High-quality, deep-pour epoxy resin
- Deep-pour resin hardener
- Tall rectangular silicone mold (approx. 6 inches tall)
- Dried pressed flowers (pink daisies, white mums, asters)
- Dried greenery (fern leaves, tall thin grass stems)
- Silicone mixing cups and stir sticks
- Tweezers
- Heat gun or lighter
- Gloves and respirator mask
- Transparency film or clear plastic sheet (optional for layering)
Step 1: Preparation & First Pours
-
Prepare your botanicals:
Before mixing any resin, ensure your flowers are completely dried and moisture-free to prevent rotting. Lay out your design on a piece of paper next to the mold to visualize how the stems will overlap and where the blooms will sit. -
Mix the first layer:
Measure and mix a small amount of deep-pour resin according to the manufacturer’s instructions. Stir slowly to minimize bubbles, as clarity is key for this thick block. -
Pour the base:
Pour about 1/2 inch of resin into the bottom of the mold. This acts as an anchor for your stems. Let this layer sit until it becomes tacky (usually 2-4 hours depending on your resin brand). -
Anchor the greenery:
Using tweezers, carefully place the stems of your tallest greenery (like the thin grass or fern) into the tacky resin. Lean them against the sides of the mold if needed to keep them upright.
Clear Layering Tip
To avoid visible join lines between layers, pour the next layer while the previous one is still tacky and gel-like, rather than fully hard.
Step 2: Building the Floral Scene
-
Mix the second layer:
Prepare a larger batch of resin. You want enough to fill the mold about halfway up. -
Pour and position:
Gently pour the resin into the mold. Once the resin is in, use tweezers to adjust the floating greenery. I find that checking the arrangement from the side view helps ensure it looks good from all angles. -
Add lower blooms:
Submerge the lower white flowers and the base of the fern fronds. If they try to float to the top, you can dip them in resin first to weigh them down or catch them under the existing greenery. -
Remove bubbles:
Use a heat gun or lighter to quickly pass over the surface and pop any rising air bubbles. Be careful not to overheat the silicone mold. -
Let it gel:
Allow this second layer to cure until it reaches a thick, gel-like consistency. This prevents the heavy main flower from sinking to the bottom.
Add a Glow
Mix a tiny amount of iridescent mica powder or fine glitter into just the back layer of resin to give the floral scene a shimmering background.
Step 3: The Focal Point & Finish
-
Place the main flower:
Insert the large pink daisy and the delicate pink buds into the gel-state resin. The thickness will hold them suspended exactly where you place them. -
Final pour preparation:
Mix the final batch of resin. Let it sit in the mixing cup for a few minutes to let macro bubbles rise and pop before pouring. -
Top it off:
Slowly fill the mold to the brim, covering the tips of the highest buds. Pour over the back of a spoon to avoid disturbing the flowers below. -
Check alignment:
Do a final check to ensure your flowers haven’t drifted. Use a toothpick to make minute adjustments to petals or leaves. -
Cover and cure:
Place a box or cover over the mold to prevent dust from landing in the wet resin. Let the block cure fully for at least 24-48 hours, or as directed for deep pours. -
Demold:
Gently peel the silicone mold away from the cured block. If the edges are sharp, you can sand them lightly with fine-grit wet sandpaper. -
Polish:
If sanding made the surface cloudy, use a polishing compound and a microfiber cloth to restore the crystal-clear shine.
Place your finished floral block near a window where the light can illuminate your preserved garden
Gold Flake Accents Around Petals
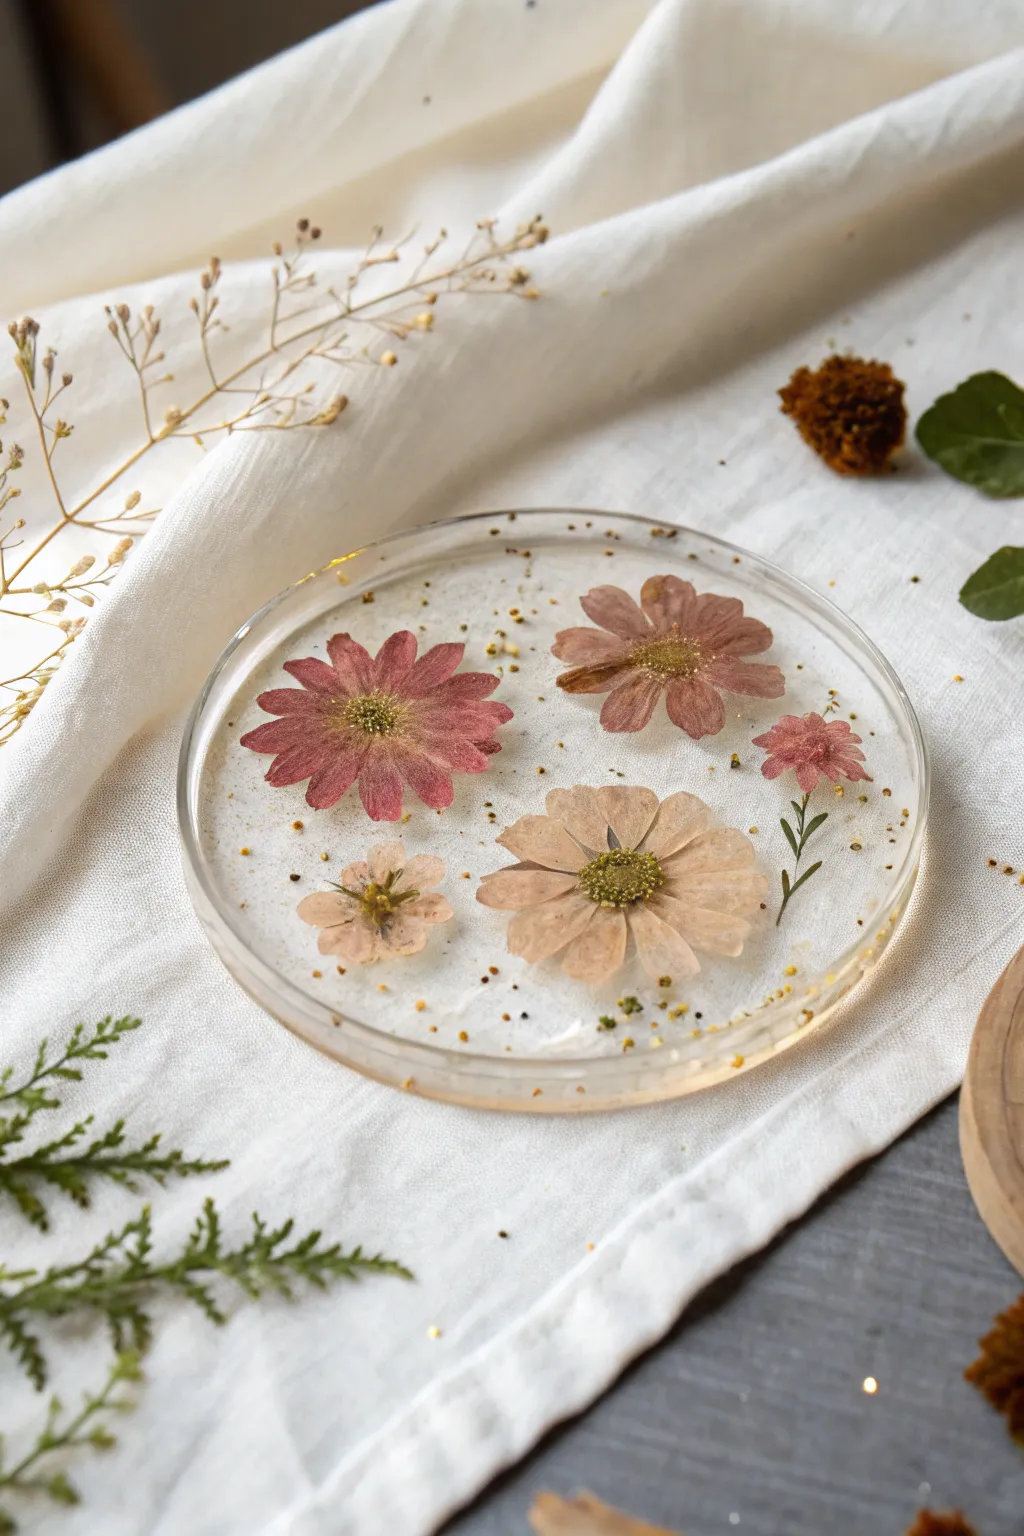
Capture the delicate beauty of dried botanicals forever in this crystal-clear resin coaster. The scattered gold flakes add a subtle, magical shimmer that perfectly highlights the vintage tones of the pink and beige petals.
Step-by-Step Tutorial
Materials
- Epoxy resin (casting resin)
- Resin hardener
- Silicone coaster mold (round)
- Dried pressed flowers (Cosmos, daisy, or similar flat varieties)
- Fine gold glitter or small gold flakes
- Tweezers
- Mixing cups
- Stir sticks
- Heat gun or torch
- Gloves and respirator mask
- Toothpick
Step 1: Preparation and Base Layer
-
Safety First:
Before beginning, ensure your workspace is well-ventilated. Put on your protective nitrile gloves and a respirator mask to work safely with epoxy resin. -
Mix the Resin:
Measure your resin and hardener exactly according to the manufacturer’s ratio (usually 1:1 or 2:1). Pour them into a mixing cup. -
Stir Slowly:
Stir the mixture slowly and consistently for at least 3-5 minutes. Scrape the sides and bottom of the cup to ensure a complete chemical blend, but try to minimize introducing air bubbles. -
Pour the Base:
Pour a thin layer of clear resin into the silicone mold—just enough to cover the bottom, about 1/8th of an inch deep. This acts as the ‘glue’ for your flowers. -
Pop Bubbles:
Let the resin sit for a minute to allow bubbles to rise. Pass a heat gun or torch quickly over the surface to pop any stubborn air pockets.
Floating Flowers?
If your flowers float to the surface during the first pour, your base layer was too thick. Use a toothpick to hold them down for a few minutes until the resin starts to gel and grip them.
Step 2: Arranging the Botanicals
-
Select Your Blooms:
Choose a variety of dried pressed flowers. For this look, I like to use one larger dark pink flower, a medium beige daisy, and a few smaller filler flowers to create visual balance. -
Place the Main Flowers:
Using tweezers, gently pick up your largest flower. Dip it face-down into your remaining mixed resin first to coat the front—this helps prevent trapped air bubbles—then place it face-up into the mold. -
Add Secondary Blooms:
Repeat the dipping and placing process with the secondary flowers. arrange them slightly off-center or in a natural grouping, ensuring they aren’t touching the very edge of the mold. -
Insert Greenery:
If you have small sprigs of dried leaves or stems, tuck them near the flower heads to create a ‘bouquet’ feel. Use a toothpick to nudge them into the perfect angle. -
Check for Trapped Air:
Look closely underneath the petals. If you see air bubbles trapped under the flowers, gently press down on the flower center with your toothpick to release them.
Gilded Edges
After demolding, use a gold leaf pen or liquid gilding paint to color the rim of the coaster. This frames the artwork beautifully and matches the internal gold flakes.
Step 3: Applying the Gold Accents
-
Prepare the Glitter:
Take a small pinch of fine gold glitter or crush up some gold leaf flakes into tiny particles. -
Sprinkle with Precision:
Carefully sprinkle the gold dust around the flowers. Focus on the negative space between the petals rather than covering the blooms themselves. -
Sink the Glitter:
Use your toothpick to gently push the gold specks down into the wet resin so they are suspended at the same level as the flowers. -
Initial Cure:
Cover the mold with a dust cover (like an upside-down box) and let this layer cure until it is tacky or hard, usually about 4 to 6 hours depending on your resin brand.
Step 4: Final Pour and Finish
-
Mix Second Batch:
Mix a second batch of clear resin, following the same mixing and stirring procedure as before. -
Fill the Mold:
Pour the fresh resin over your cured flower layer until the mold is filled to the brim. The resin should self-level. -
Final Bubble Removal:
Do one last pass with your heat gun to remove surface bubbles from this top layer. -
Full Cure:
Cover the project again and allow it to fully cure for 24 to 48 hours in a dust-free environment. -
Demold:
Once fully rock-hard, gently peel the silicone mold away from the resin coaster. If there are sharp edges, you can sand them lightly with fine-grit sandpaper.
Place your favorite mug on your new floral creation and enjoy the permanent blooms
Soft Tinted Resin Backgrounds for Flowers
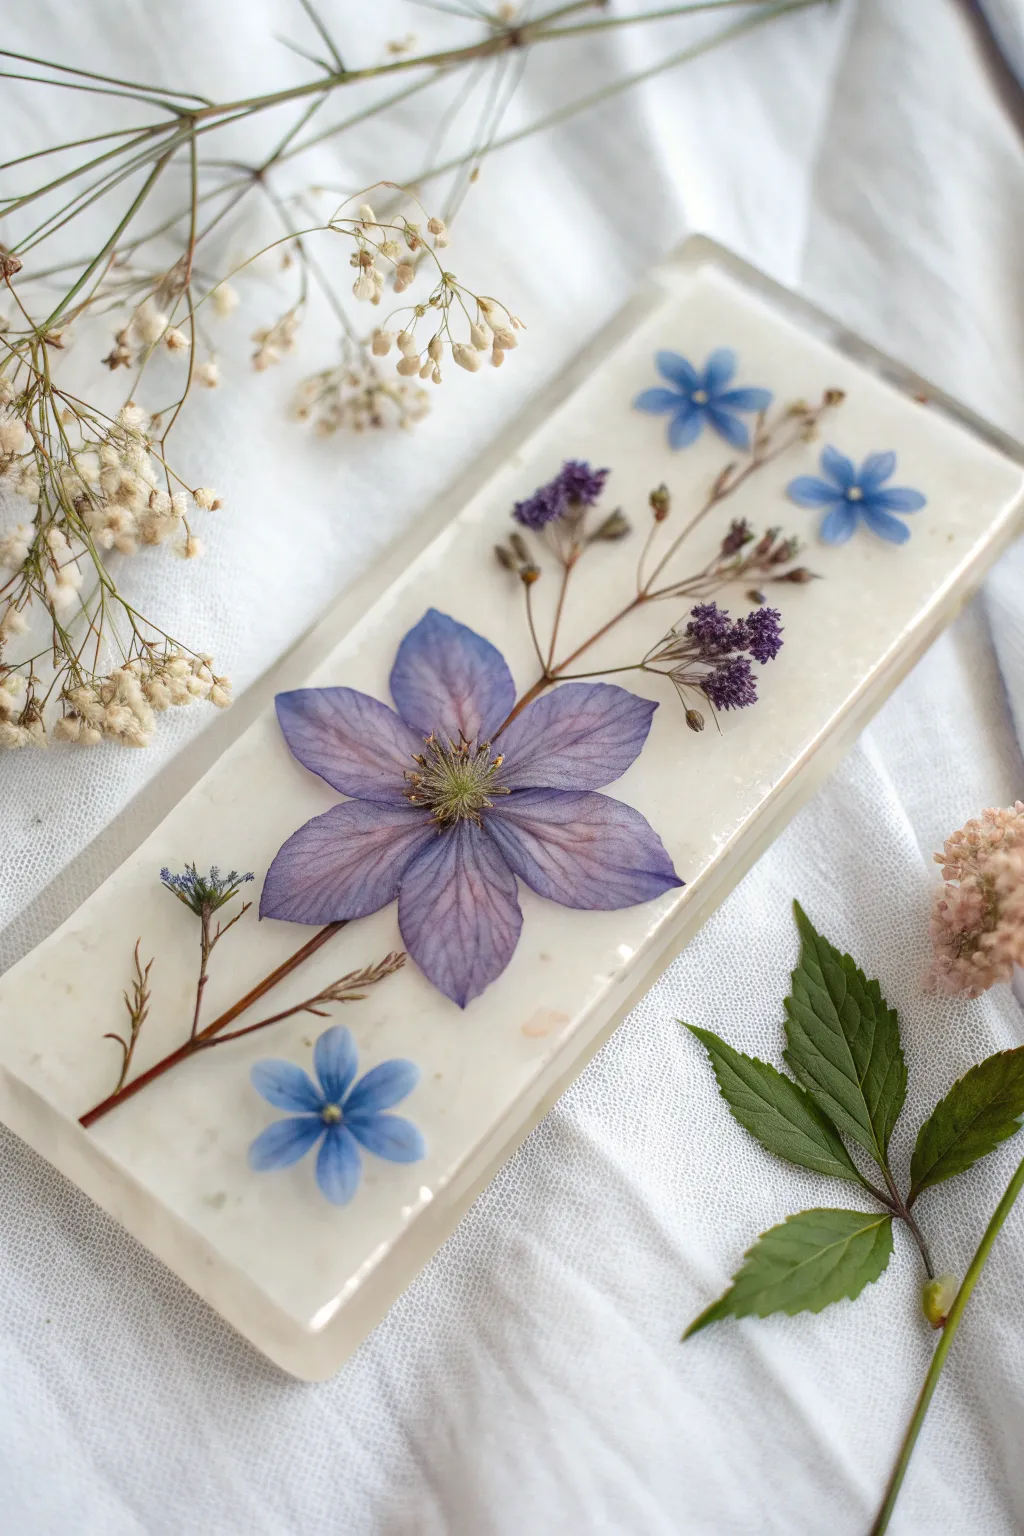
This project captures the delicate beauty of pressed flowers suspended within a soft, creamy backdrop that feels almost like porcelain. The milky semi-opaque base provides stunning contrast for purple and blue botanicals, creating a vintage-inspired piece perfect for display.
Step-by-Step
Materials
- Deep pour epoxy resin (or casting resin)
- Rectangular silicone mold (approx 4×8 inches)
- Pressed Clematis flower (purple)
- Pressed Forget-me-not flowers (blue)
- Dried Statice (purple) and delicate filler foliage
- White alcohol ink or white resin pigment paste
- Mixing cups and stir sticks
- Tweezers
- Heat gun or lighter
- Nitrile gloves
Step 1: Preparation & First Layer
-
Prepare your workspace:
Ensure your work area is level, dust-free, and well-ventilated. Lay down a protective mat and gather all your dried botanicals so they are within easy reach. -
Arrange the composition:
Before mixing any resin, test your layout. Place the large Clematis in the center, flanked by the Statice stems and Forget-me-nots on a piece of paper cut to the size of your mold. This rehearsal prevents panic once the resin is live. -
Mix the first clear layer:
Mix a small batch of clear potting resin according to the manufacturer’s ratio. You only need enough to cover the bottom of the mold by about 3-4mm. Stir slowly to minimize bubbles. -
Pour the clear base:
Pour the clear resin into the mold. Let it sit for a few minutes to allow bubbles to rise, then gently sweep a heat gun over the surface to pop them. -
Lay the flowers:
Using tweezers, gently place the botanicals onto the wet resin face-down. Start with the central Clematis, pressing it down lightly to ensure no air is trapped underneath the petals. -
Add the smaller details:
Position the smaller blue flowers and delicate stems around the main bloom. I find that dipping the flowers in a little mixed resin before placing them helps prevent stubborn air pockets. -
Secure the floating blooms:
Check for any flowers that might be drifting or floating up. If they move, gently nudge them back into place with a toothpick until the resin gets tacky enough to hold them. -
Let it cure:
Allow this initial clear layer to cure until it is hard to the touch (usually 12-24 hours depending on your resin brand). This locks the design in place.
Clear Petal Pro-Tip
To prevent ‘silvering’ (shiny air spots) on textured petals, seal flowers with a sealing spray or brush a thin coat of UV resin on them before embedding.
Step 2: The Creamy Background
-
Mix the background resin:
Mix a second, larger batch of resin. This will fill the rest of the mold and create the background color. -
Tint the resin:
Add a few drops of white alcohol ink or a tiny dab of white pigment paste. The goal is a soft, milky white—translucent enough to let light through but opaque enough to hide the back. Mix thoroughly. -
Pour the tinted layer:
Slowly pour the white-tinted resin over the cured clear layer containing the flowers. Pour until the mold is filled to the top rim. -
Remove final bubbles:
Wait 5-10 minutes for trapped air to rise, then do a final pass with your heat gun or lighter to pop surface bubbles. -
Full cure time:
Cover the mold with a dust cover (like a cardboard box) and let it cure fully for 24-48 hours. Do not disturb the mold during this time.
Level Up: Pearlescent Glow
Mix a tiny pinch of white pearl mica powder into your background layer alongside the white pigment. It adds a shimmering, high-end depth to the milky base.
Step 3: Finishing Touches
-
Demold the piece:
Once fully hardened, gently pull the sides of the silicone mold away from the resin block. Push from the bottom to pop the artwork out. -
Sand sharp edges:
If the back edges feel sharp from the meniscus of the pour, use fine-grit sandpaper (around 800-1000 grit) wet-sanding to smooth them down. -
Inspect and polish:
Wipe the piece clean with a microfiber cloth. If the top surface (the clear face) isn’t perfectly crystal clear, you can apply a thin topcoat of clear resin to restore the shine.
Now you have a timeless botanical keepsake that freezes the transient beauty of spring forever
Botanical Bookmark Strips With Pressed Flowers

Capture the delicate beauty of a summer garden between pages with these crystal-clear resin bookmarks. Floating pressed daisies and greenery create an elegant, timeless placeholder for your favorite reads.
Detailed Instructions
Materials
- Rectangular silicone bookmark mold (approx. 1.5 inch x 6 inch)
- Clear epoxy casting resin (Part A and Part B)
- Pressed dried flowers (white daisy, small chamomile or feverfew, fern fronds, small green stems)
- Tweezers
- Mixing cups and stir sticks
- Heat gun or lighter
- Disposable gloves
- Respirator mask (for safety)
- Protective work surface mat
- Fine grit sandpaper (wet/dry, optional for edges)
Step 1: Preparation and Layout
-
Select your botanicals:
Choose your dried flowers carefully. For this look, you need one medium-sized white daisy, a smaller white filler flower (like feverfew), a few delicate fern fronds, and some slender green stems. -
Dry run arrangement:
Before mixing any resin, lay your mold on a white piece of paper. Place your dried flowers inside the empty mold to test the composition. I like to arrange them linearly, mimicking a growing stem reaching upward. -
Check for height:
Look at the mold from the side. Ensure that none of your flowers, particularly the daisy center, rise above the top rim of the mold. If they do, they will protrude from the resin later. -
Set aside:
Once you are happy with the design, take a photo for reference, then carefully remove the flowers and set them aside on a clean surface in the exact order you plan to place them.
Seal Flowers First
To prevent flowers from becoming translucent or changing color in resin, seal them first with a quick coat of clear drying glue or hairspray.
Step 2: The First Pour
-
Mix the resin:
Measure equal parts of resin (Part A) and hardener (Part B) according to your brand’s specific instructions. Stir slowly for 3-5 minutes, scraping the sides and bottom to ensure a thorough mix without whipping in too many bubbles. -
Let it sit:
Allow the mixed resin to rest for about 5 minutes. This helps any air bubbles created during stirring to rise to the surface and pop. -
Pour the base layer:
Pour a thin layer of resin into the mold—fill it only about one-third of the way full. You don’t want to fill it completely yet. -
Pop bubbles:
Briefly pass a heat gun or lighter over the surface to pop any stubborn bubbles.
Add a Metallic Touch
Mix a tiny amount of gold foil flakes into your second resin pour for a subtle, shimmering effect that catches the light.
Step 3: Embedding the Botanicals
-
Place the greenery:
Using tweezers, gently dip your fern fronds and stems into your cup of remaining resin first (to coat them and prevent trapped air), then place them into the mold’s base layer. -
Add the flowers:
Dip the daisy and smaller fowers into the resin cup as well. Place the large daisy near the top and the smaller flower lower down, referring back to your photo or test layout. -
Adjust positions:
Use a toothpick to gently nudge the flowers into perfect alignment. If they float around too much, wait ten minutes for the resin to get tackier before maneuvering them. -
Check for trapped air:
Look closely under the flower petals and fern leaves. If you see air pockets, gentle press down with your toothpick to release the trapped bubble. -
Initial cure:
Cover the mold with a box to prevent dust from settling and let this layer cure for about 4-6 hours until it is gel-like or tacky, but not fully hard.
Step 4: The Top Coat
-
Mix fresh resin:
Mix a second, smaller batch of clear resin following the same careful stirring process. -
Fill the mold:
Slowly pour the clear resin over the tacky layer until the mold is filled to the brim. The resin should slightly dome over the flowers, completely encapsulating them. -
Final bubble check:
Do one last pass with your heat tool to ensure a crystal-clear finish. -
Full cure:
Cover again and allow the bookmark to cure fully for 24-48 hours, depending on your resin’s specifications and the room humidity.
Step 5: Finishing Touches
-
Demold:
Gently peel the silicone mold away from the hardened resin bookmark. -
Inspect edges:
Check the edges for any sharp bits of resin. If you find any jagged spots, use wet/dry fine-grit sandpaper to smooth them down carefully. -
Add a tassel (optional):
If your mold created a hole at the top, loop a piece of silk ribbon or a suede cord through it to finish the look.
Enjoy using your new botanical bookmark as a permanent reminder of sunny days in the garden
3D Flower Layers With a Floating Gradient
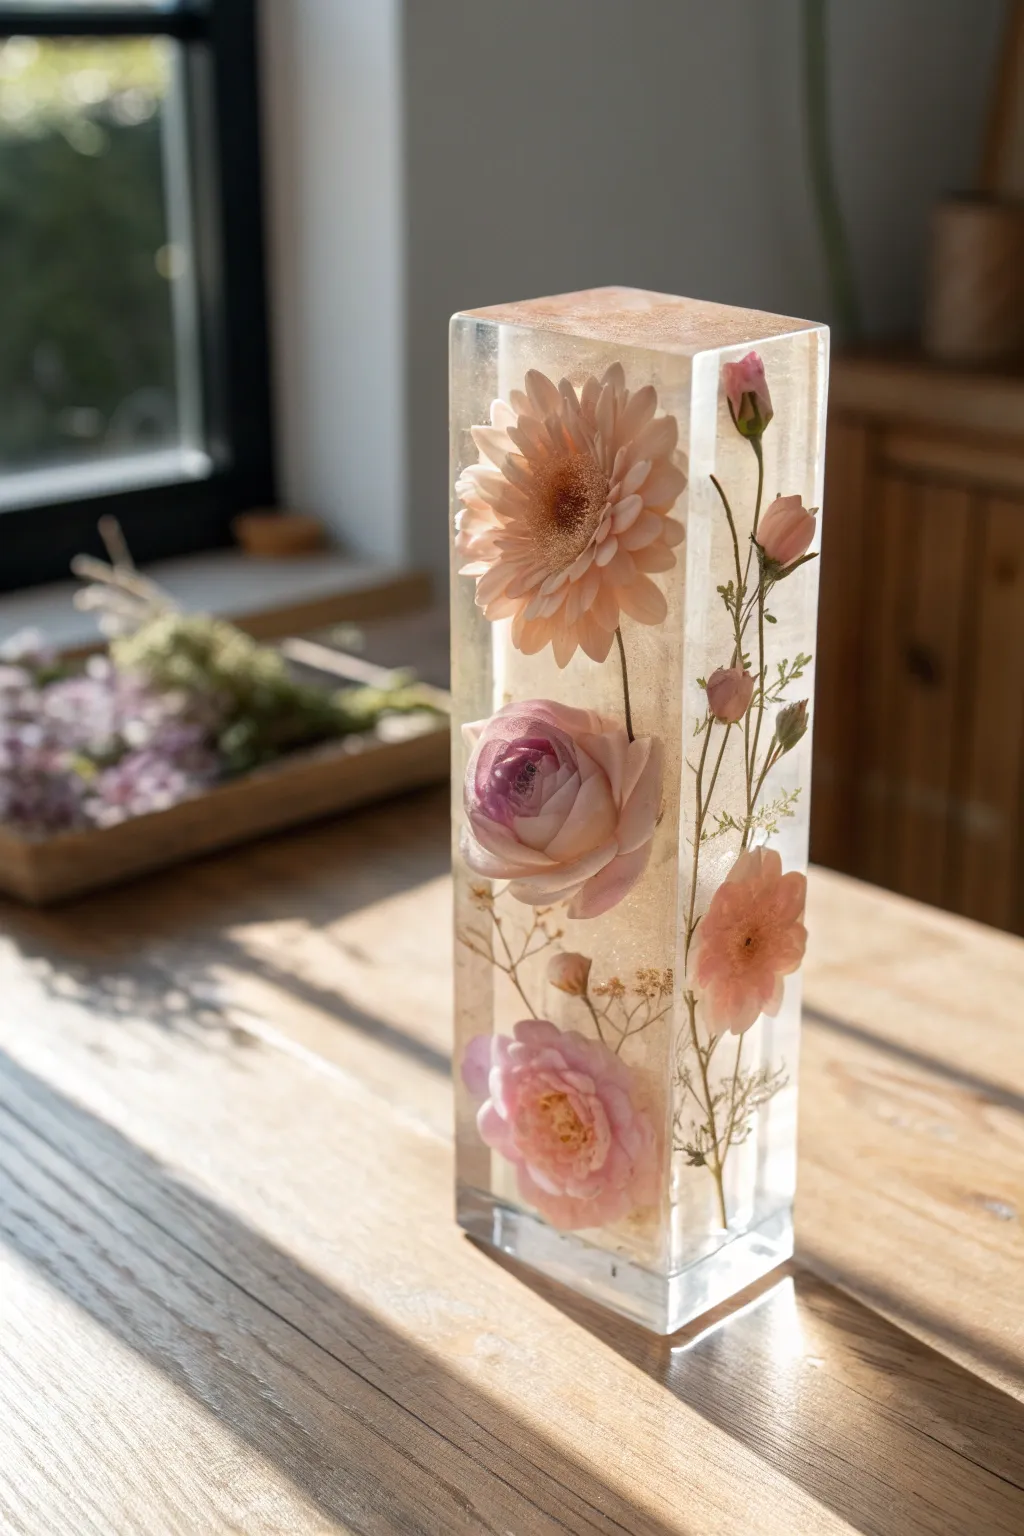
Capture the delicate beauty of fresh blooms forever frozen in time with this stunning vertical resin column. This project showcases a graceful, floating arrangement of peach and pink flowers encased in crystal-clear epoxy, perfect for catching the light on a windowsill.
How-To Guide
Materials
- Deep-pour epoxy resin (slow curing)
- Rectangular silicone mold (tall pillar style)
- Dried flowers (Gerbera daisy, ranunculus, rose buds, filler greens)
- Silica gel for drying flowers
- Mixing cups and stir sticks
- Tweezers or long forceps
- Heat gun or lighter
- Isopropyl alcohol
- Gloves and respirator mask
- Digital scale
Step 1: Flower Preparation
-
Select your blooms:
Choose fresh, unblemished flowers. For this look, you need one large focal flower (like a Gerbera daisy), two medium blooms (ranunculus or roses), and slender stems with buds for the sides. -
Buried drying method:
Pour a layer of silica gel into an airtight container. Place your flowers face-up on the bed, ensuring they don’t touch. -
Cover completely:
Gently pour more silica gel over the petals, making sure to get in between every crevice without crushing the shape. Seal the container and leave for 5-7 days until completely moisture-free. -
Dust off:
Once dry, gently remove the flowers and use a soft brush to sweep away any remaining silica dust particles.
Flower Float Fix
If flowers start floating up during a pour, tape a popsicle stick across the top of the mold and use a clipped wire or toothpick to gently pin the flower down until the resin gels.
Step 2: The Base Pour
-
Prepare the mold:
Clean your tall rectangular silicone mold with isopropyl alcohol and let it dry. Ensure it is sitting on a perfectly level surface. -
Mix the first layer:
Mix a small amount of deep-pour resin according to the manufacturer’s ratio. You only need enough to fill about 1 inch of the mold. -
Pour the anchor layer:
Pour the resin into the bottom of the mold. This will become the top of your piece (if you plan to demold and flip) or remain the bottom depending on your flower orientation preference. For this look, we create a clear base. -
Remove bubbles:
Briefly pass a heat gun or lighter over the surface to pop any air bubbles. let this layer cure until it is tacky (usually 4-6 hours depending on your resin brand).
Step 3: Building the Floral Arrangement
-
Dip the flowers:
Before placing them in the mold, dip your dried flowers into a cup of mixed resin. This seals the petals and drastically reduces the chance of trapped air bubbles ruining the final clarity. -
Position the bottom bloom:
Using long tweezers, lower the bottom-most pink flower into the mold, resting it on the tacky base layer. The tackiness will hold it in place so it doesn’t float. -
Add vertical interest:
Place the long, slender stems with buds along the side of the mold. Propping them against the corners helps keep them upright. -
The second pour:
Mix a larger batch of deep-pour resin. Slowly pour it down the side of the mold (not directly on the flowers) until the first flower is submerged. -
Monitor bubbles:
Check for trapped air pockets under petals. Use a toothpick to gently release them. I like to revisit the mold after 15 minutes to catch any late risers.
Pro Tip: Bubble Free
Warm your resin components in a warm water bath before mixing (keep lids on tight!). Warmer resin is thinner, allowing micro-bubbles to escape much faster during the pour.
Step 4: Completing the Column
-
Repeat for the middle:
Once the previous layer is gelled but not fully hard, add your middle flower (the second medium pink bloom). Repeat the dipping and placing process. -
Place the focal flower:
Finally, position the large peach Gerbera daisy near the top section. Ensure it faces the front viewing pane of the mold squarely. -
Final pour:
Mix your final batch of resin and fill the mold to the brim, ensuring all flower parts are completely covered. Let this sit undisturbed for the full cure time (often 24-72 hours for deep pour). -
Demolding:
Once fully cured and rock hard, carefully peel the silicone mold away from the resin block. Use a release spray if it feels stuck. -
Finishing touches:
If the top edge (where you poured) is sharp or slightly uneven, sand it with wet sandpaper (starting at 400 grit up to 2000) and polish with a plastic polishing compound for glass-like clarity.
Place your finished crystal column near a window to watch the sunlight illuminate the delicate petals within.
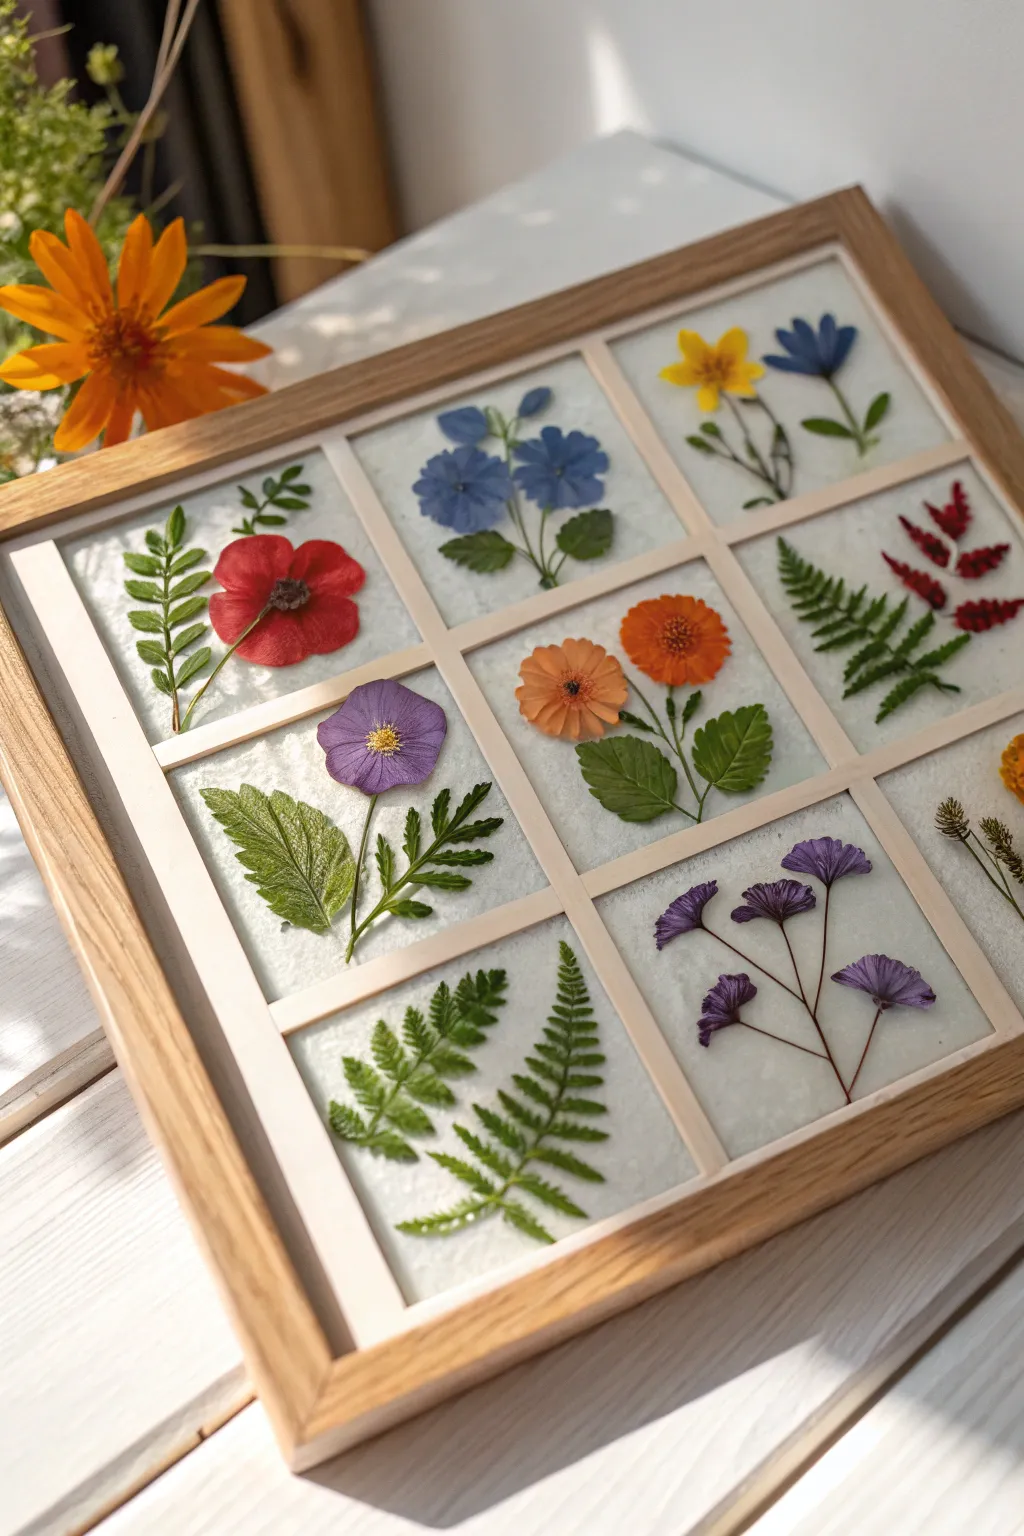
Resin Flower Mosaic Tiles for Wall Art

Create a stunning gallery of nature’s finest details with this grid-style resin art piece. By combining delicate pressed flowers with separate resin pours, you achieve a clean, modern botanical display perfect for brightening any wall.
Step-by-Step Guide
Materials
- Square wooden frame with deep rebate (shadow box style or similar)
- Thin balsa wood or basswood strips (for the grid)
- Epoxy resin and hardener (clear casting resin)
- Textured white cardstock or watercolor paper
- Assorted pressed flowers and leaves (ferns, cosmos, pansies, hydrangeas)
- Wood glue
- Craft knife and cutting mat
- Ruler and pencil
- Tweezers
- Mixing cups and stir sticks
- Heat gun or torch
- Silicone mat (optional)
Step 1: Preparing the Grid & Base
-
Measure the Frame Interior:
Begin by carefully measuring the exact interior dimensions of your wooden frame. You need the length and width to determine the size of your backing paper and the grid structure. -
Cut the Backing Paper:
Cut your textured white cardstock or watercolor paper to fit perfectly inside the frame. This will serve as the bright, clean background that makes the flowers pop. -
Calculate Grid Spacing:
Divide your total interior width by three to determine the size of your nine square sections. Mark these measurements lightly with a pencil on the frame’s edge or a scrap paper to visualize the layout. -
Cut Wood Strips:
Using a craft knife and ruler, cut two long strips of balsa wood that span the full height of the frame, and six shorter individual pieces that will fit horizontally between the vertical strips to form the cross-sections. -
Assemble the Lattice:
Construct the grid directly onto your backing paper to ensure fit, but don’t glue it to the paper yet. Glue the wood strips together at their intersections using wood glue, creating a 3×3 window pane structure. -
Secure the Grid:
Once the wood glue on the grid is dry and sturdy, place it inside the frame against the glass (if using a float frame style) or directly onto your backing board. I prefer to glue the grid to the backing paper first to create sealed ‘wells’ for the resin.
Floating Flowers?
If your flowers drift when pouring resin, wait for the resin to thicken slightly (become tackier) before pouring, or ensure your initial glue dots are fully dry.
Step 2: Arranging the Botanicals
-
Draft Your Layout:
Before committing with resin, lay out your nine ’tiles’ on a separate surface. Experiment with color balance—place a red poppy in one corner and perhaps a yellow cosmos in the opposite to distribute visual weight. -
Trim the Flora:
Use small scissors to snip stems and leaves so they fit comfortably within their designated square without touching the grid walls. Leave a little ‘breathing room’ around the edges. -
Adhere the Flowers:
Using tweezers, gently place your pressed flowers into the grid squares. Apply a tiny dot of white glue or Mod Podge to the back of each flower to tack them in place on the paper, preventing them from floating when resin is added.
Step 3: Pouring the Resin
-
Mix the Resin:
Mix your epoxy resin and hardener according to the manufacturer’s specific ratio. Stir slowly for several minutes to minimize bubbles, scraping the sides of the cup. -
Let it Rest:
After mixing, let the resin sit for about 5 minutes to allow air bubbles to rise to the surface before pouring. -
First Pours:
Slowly pour a small amount of resin into the center of each grid square. Depending on the depth of your wood strips, you only need enough to cover the flowers and create a unified glossy surface. -
Spread carefully:
Use a toothpick or a clean stir stick to gently guide the resin into the corners of each square, ensuring the paper base is fully saturated and coated. -
Pop Bubbles:
Wave a heat gun or torch quickly over the surface of the wet resin. Keep it moving to avoid scorching the flowers or the wood grid; this will pop any remaining surface bubbles. -
Seal from Dust:
Cover the entire frame with a large box or plastic tub to protect the wet resin from dust and pet hair while it cures. -
Wait for Cure:
Allow the project to cure undisturbed for 24 to 48 hours, or as directed by your resin brand, until it is rock hard and crystal clear.
Add Dimension
Pour resin in two thin layers. Place ferns in the first layer, let cure, then add a flower on top in the second layer for a beautiful 3D shadow box effect.
Hang your botanical mosaic in a sunny spot to let the light catch the glossy resin surface.


Have a question or want to share your own experience? I'd love to hear from you in the comments below!