If you’ve got a handful of smooth stones and a little curiosity, you’ve already got everything you need for rock painting. Here are my favorite easy rock painting ideas that look adorable fast, even if you’re brand-new and just want to relax and play with color.
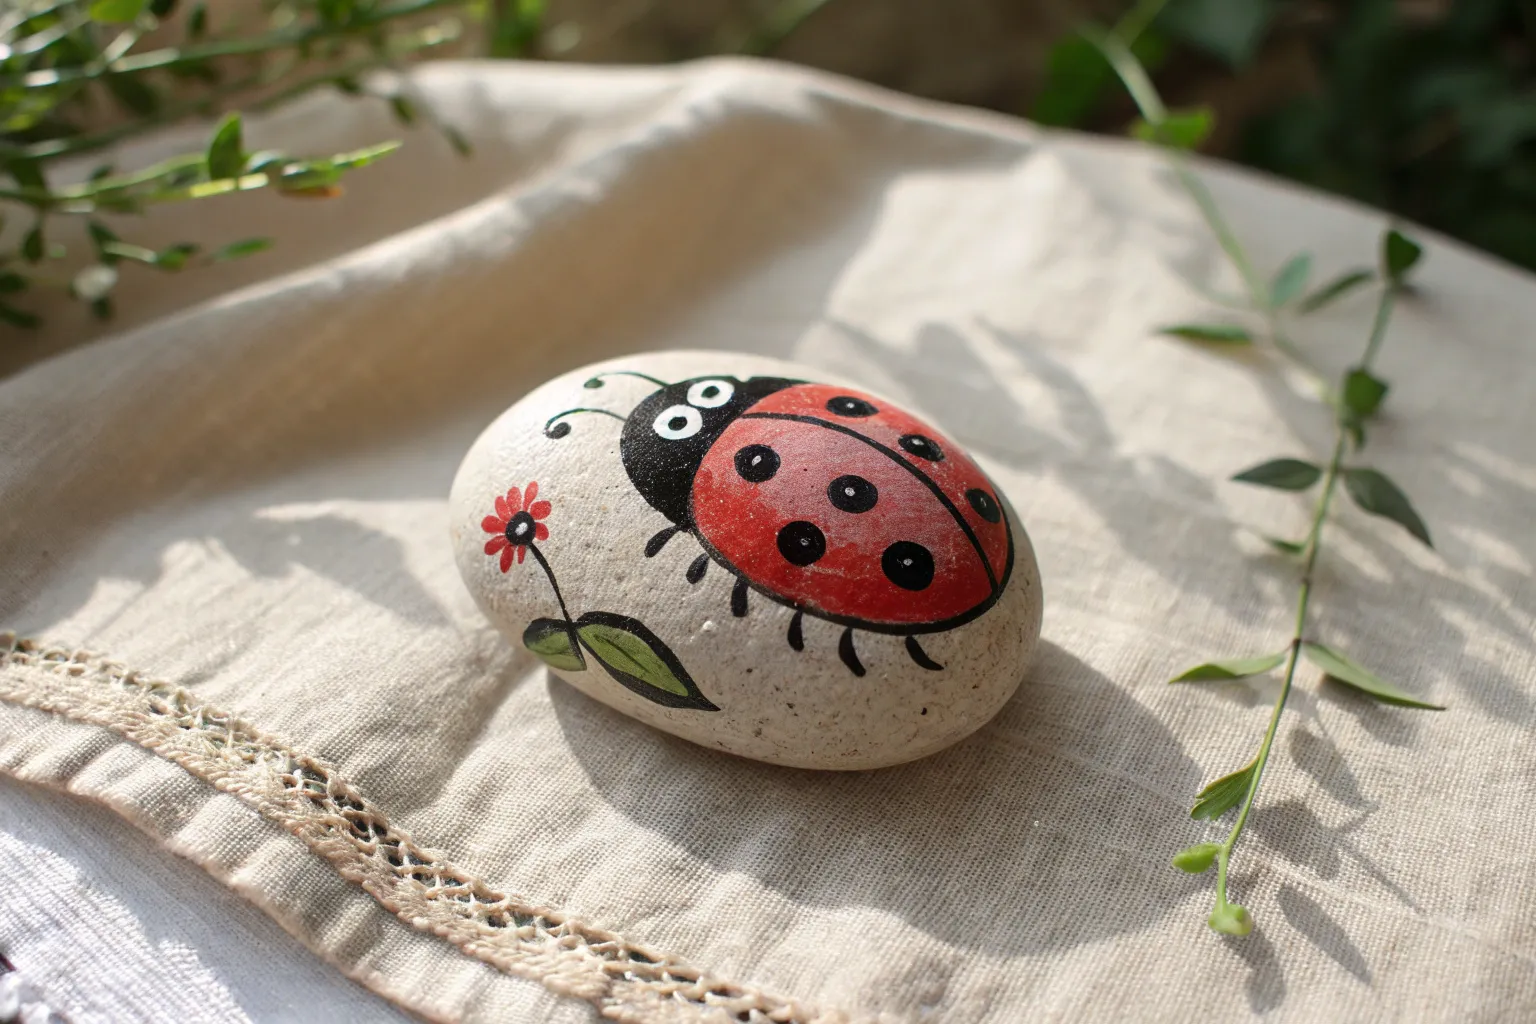
Classic Ladybug Rocks

Transform a smooth, rounded stone into a charming garden friend with this classic ladybug design. Using simple colors and bold shapes, you’ll create a cheerful beetle that looks ready to crawl right off your porch.
Step-by-Step
Materials
- Smooth, round river rock (approx. palm-sized)
- Red acrylic paint (bright scarlet or primary red)
- Black acrylic paint
- White acrylic paint
- Flat paintbrush (medium size)
- Fine detail paintbrush (round size 0 or 1)
- Dotting tool or the back end of a paintbrush handle
- Clear weather-resistant sealer (spray or brush-on)
- Water cup and paper towels
Step 1: Base Coat and Body Shape
-
Clean your canvas:
Begin by washing your stone thoroughly with soap and water to remove any dirt or oils. Let it dry completely before starting, as moisture trapped in the stone can cause paint to peel later. -
Paint the red base:
Coat the entire top surface of the rock with bright red acrylic paint. Use your flat brush for this, ensuring smooth, even strokes. -
Apply a second coat:
Once the first layer is dry to the touch, apply a second coat of red. This ensures the color is opaque and vibrant, covering the natural gray of the stone underneath. -
Define the head area:
Using black paint and a smaller brush, paint a curved semi-circle at the narrower end of the rock to create the ladybug’s face. Make the curve smooth and filled in completely with solid black. -
Draw the center line:
Starting from the center of the black head section, paint a continuous black line straight down the middle of the red body to the tail. This line divides the wings and should be moderately thick.
Perfect Circles
If you don’t have dotting tools, use the flat end of a pencil eraser for large spots and a Q-tip with the cotton removed for medium spots.
Step 2: Adding the Spots and Eyes
-
Plan your spots:
Visualize where you want the spots to go. For a balanced look, aim for roughly symmetrical placement on either side of the center line. -
Paint the large black spots:
Dip your medium-sized dotting tool or a small round brush into black paint. Press firmly to create large, circular spots scattered across the red wings. -
Create smaller spots:
Fill in any empty gaps with slightly smaller black dots to add variety. Keeping the spots irregular in size makes the ladybug look more organic and lively. -
Add highlights to the spots:
Once the black spots are completely dry, dip a tiny styling tool or toothpick into white paint. Place a singular, small white dot inside each black spot, slightly off-center, to create a reflection effect. -
Paint the eye base:
On the black head area, paint two medium white circles for the eyes. Space them evenly apart, leaving room for a mouth below. -
add the pupils:
When the white circles are dry, add a small black dot in the center of each. This gives the ladybug its focused, cute expression.
Step 3: Character Details and Finishing
-
Paint the smile:
Using your finest detail brush and white paint, carefully draw a thin, curved line below the eyes to create a happy smile. -
Add the antenna detail:
To suggest antennae without painting thin lines, paint two small black lines extending slightly from the head into the red body area, finishing each with a white highlight dot at the end. -
Check for coverage:
Look over your rock for any spots where the underlying stone shows through or where the black paint needs a touch-up. I like to do a quick second pass on the black head if it looks streaky. -
Let it cure:
Allow the finished painting to dry completely, preferably overnight. The thick layers of acrylic need time to harden fully before sealing. -
Seal for protection:
Apply a coat of clear, weather-resistant sealer over the entire rock. This will protect your ladybug from sun and rain if you choose to place it in the garden.
Garden Family
Paint rocks of different sizes to create a whole family. Use yellow or orange paint instead of red to create variety.
Place your adorable new friend in a flower pot or on a sunny ledge to brighten up your outdoor space


Simple Heart Kindness Rocks

Embrace the natural beauty of simplicity with this charming painted stone project. A single, bold rust-red heart stands out beautifully against the raw, unpolished texture of a smooth river rock, creating a perfect token of kindness.
Detailed Instructions
Materials
- Smooth, light-colored river stone (approx. palm-sized)
- Rust-red or terracotta acrylic paint
- Small flat paintbrush (size 4 or 6)
- Fine liner brush (optional, for edges)
- Pencil (HB or lighter)
- Matte finish sealer (spray or brush-on)
- Cup of water and paper towels
Step 1: Preparation
-
Clean surface:
Begin by thoroughly washing your river stone with warm, soapy water to remove any dirt or oils. -
Dry completely:
Let the stone dry completely in the sun or use a hairdryer to speed up the process; paint won’t adhere well to damp stone. -
Inspect textures:
Examine the surface of your rock to identify the flattest area, which will serve as your canvas for the heart. -
Sketch lightly:
Using a pencil, very lightly sketch a simple heart shape in the center of the stone. Don’t press too hard, as graphite can sometimes smear into light-colored paint.
Paint Slipping?
If the paint beads up or slides off, the stone might still be oily. Wipe the area with a cotton ball dipped in rubbing alcohol and let dry before repainting.
Step 2: Painting the Heart
-
Load the brush:
Dip your flat paintbrush into the rust-red paint, ensuring the bristles are coated but not dripping. -
First stroke:
Starting from the top left curve of the heart, pull the brush down towards the bottom point in a smooth motion. -
Second stroke:
Repeat this motion for the right side, starting at the top curve and meeting the first stroke at the bottom point. -
Fill the center:
Use the flat edge of your brush to fill in the middle of the heart, blending the strokes together. -
Check consistency:
If the stone’s texture is showing through heavily, you might need slightly more paint, but aim for a thin layer first to avoid globs. -
Refine the edges:
Switch to a fine liner brush or turn your flat brush on its side to carefully neaten the outline of the heart. -
Embrace imperfections:
Don’t worry if the edges aren’t razor-sharp; a slightly organic edge adds to the rustic feel seen in the example. -
Dry the first coat:
Allow this initial layer to dry for about 10 to 15 minutes.
Step 3: Finishing Touches
-
Add a second coat:
For a richer color like the one in the photo, apply a second coat of rust-red paint directly over the first. -
Texture match:
I like to dab the brush slightly on this second coat to create a subtle texture that mimics the stone underneath. -
Remove pencil marks:
Once the paint is 100% dry, gently erase any visible pencil sketch lines around the edges. -
Seal the art:
Apply a matte sealer over the painted area (or the whole rock) to protect the heart from chipping without adding too much unnatural shine. -
Final cure:
Let the sealer cure according to the bottle instructions before handling or gifting your kindness rock.
Add Dimension
Mix a tiny drop of white into your red paint and add a small highlight curve on the upper right side of the heart to give it a 3D puffy sticker look.
This simple yet heartfelt creation is ready to be placed on a desk or hidden in a park to brighten a stranger’s day


Easy Rainbow Stripes
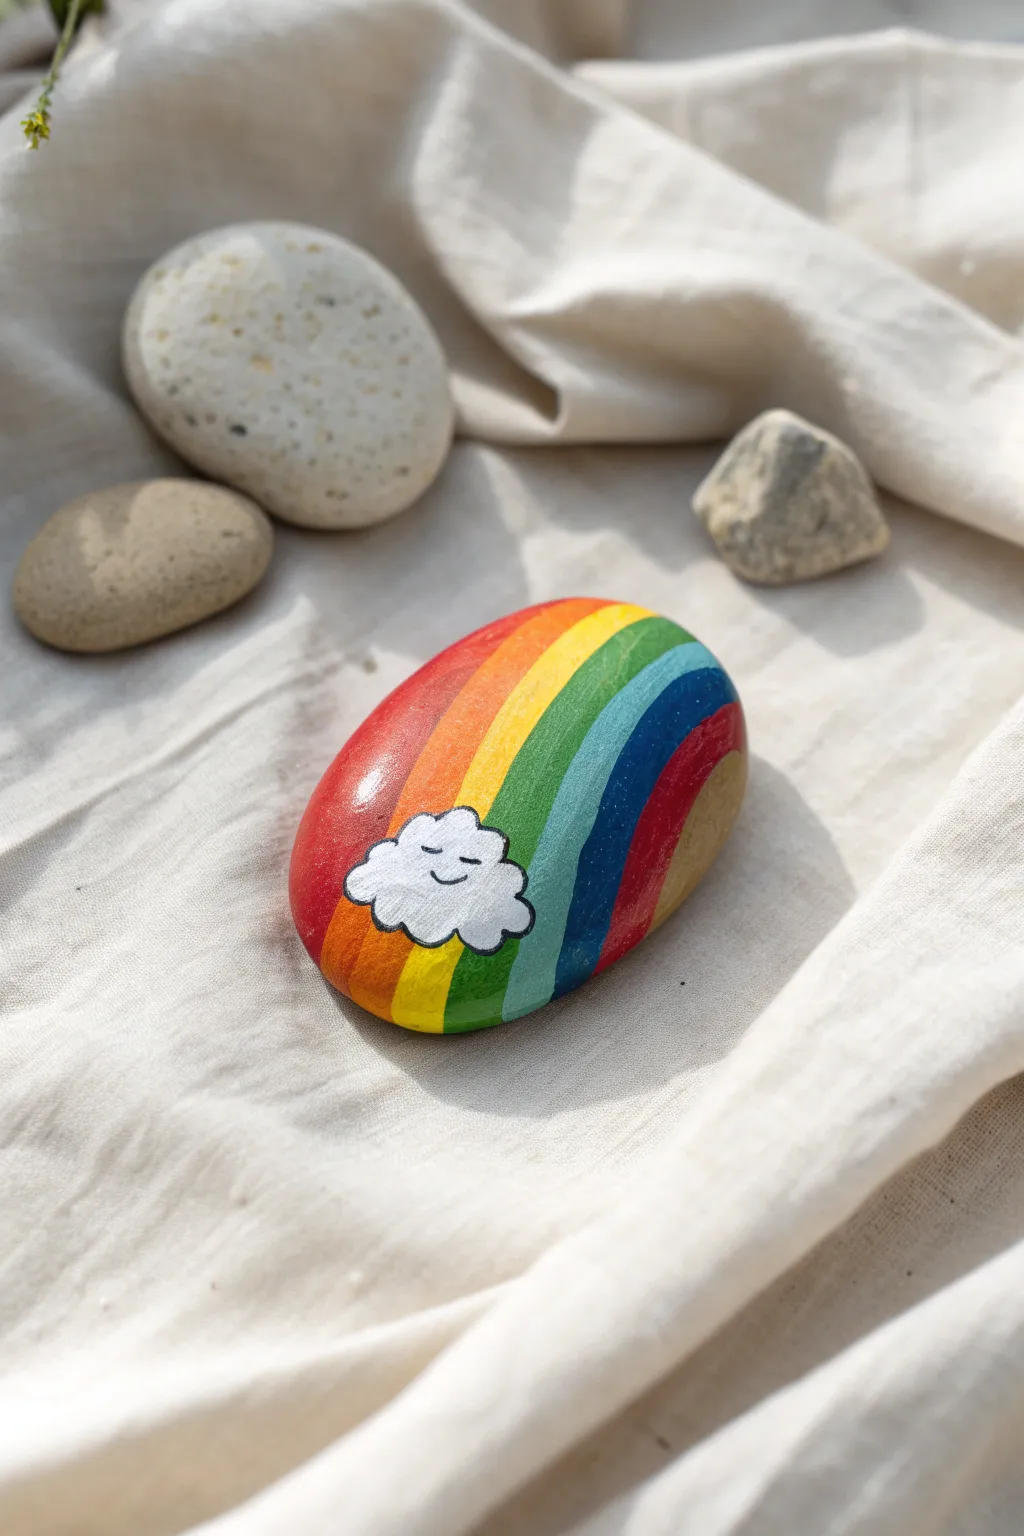
Brighten someone’s day with this cheerful painted stone featuring curved rainbow stripes and a sweet, sleeping cloud. The design flows naturally with the shape of the rock, making it a soothing and satisfying project to paint.
Step-by-Step
Materials
- Smooth, oval-shaped river rock
- Acrylic paints (Red, Orange, Yellow, Green, Light Blue, Dark Blue)
- White acrylic paint or paint pen
- Black fine-liner or detail brush
- Flat paintbrush (medium width)
- Small round detail brush
- Pencil for sketching
- Spray gloss varnish or sealer
Step 1: Preparation & Base
-
Clean:
Begin by washing your stone with warm soapy water to remove any dirt or grease. Let it dry completely in the sun or with a cloth. -
Surface check:
Run your fingers over the surface to ensure it’s smooth. If there are any rough patches, you can lightly sand them down, but painting directly on the natural stone texture usually works well. -
Sketch contours:
Using a pencil, lightly sketch curved lines across the width of the stone to map out your rainbow stripes. Follow the natural curve of the rock rather than drawing perfectly straight lines. -
Cloud placement:
Near one end of the rock (over where the red and orange stripes will be), sketch a fluffy cloud shape over your lines. This helps you know where to stop painting the stripes later.
Clean Lines Hack
Use thin strips of washi tape or painter’s tape to mask off each stripe area. Paint one, let it dry, peel, and re-tape for the next.
Step 2: Painting the Rainbow
-
First stripe: Red:
Load your flat brush with bright red acrylic paint. Fill in the first section on the far left, carefully painting around the top edge of your cloud sketch. -
Second stripe: Orange:
Clean your brush and switch to orange. Paint the stripe directly next to the red, making sure the colors touch without blending too much. -
Third stripe: Yellow:
Apply the yellow stripe next. Since yellow can be translucent, I find it sometimes needs a second coat to really pop against the grey stone. -
Fourth stripe: Green:
Continue with a grassy green shade. Follow the curve you established with the previous stripes, keeping the width consistent. -
Fifth stripe: Light Blue:
Paint a band of sky blue or cyan next to the green. -
Sixth stripe: Dark Blue:
Finish the main rainbow sequence with a stripe of deep blue or indigo on the far right. -
Touch-ups:
Inspect your stripes. If any stone shows through, apply a second coat to those specific colors once the first layer is touch-dry.
Step 3: Adding the Cloud Detail
-
White base:
Using white acrylic paint and a round brush, fill in the cloud shape you sketched earlier. You’ll likely need two to three coats to make it opaque over the stone. -
Correction:
If the white paint accidentally overlapped slightly onto the red or orange stripes, you can touch up the colored stripes carefully once the white is dry. -
Outlining:
Once the white cloud is completely dry, take a black fine-liner pen or a very fine brush with black paint. Outline the fluffy edges of the cloud. -
Face details:
Draw a simple, happy face in the center of the cloud. Two small U-shapes for sleeping eyes and a tiny smile give it a peaceful expression.
Paint Slipping?
If your acrylic paint is beading up or slipping on a very smooth river rock, try brushing on a thin layer of matte medium first as a primer.
Step 4: Finishing Touches
-
Clean edges:
Check the edges where your paint meets the bare stone. You can leave them soft or crisp them up with a steady hand for a cleaner look. -
Sealing:
To protect your artwork, spray the entire rock with a clear gloss varnish. This will make the colors vibrant and weather-proof the stone. -
Drying:
Allow the sealer to cure fully according to the manufacturer’s instructions before placing your rock outside.
Now you have a vibrant little pocket of happiness to decorate your garden or desk


Sunflower Face Rocks
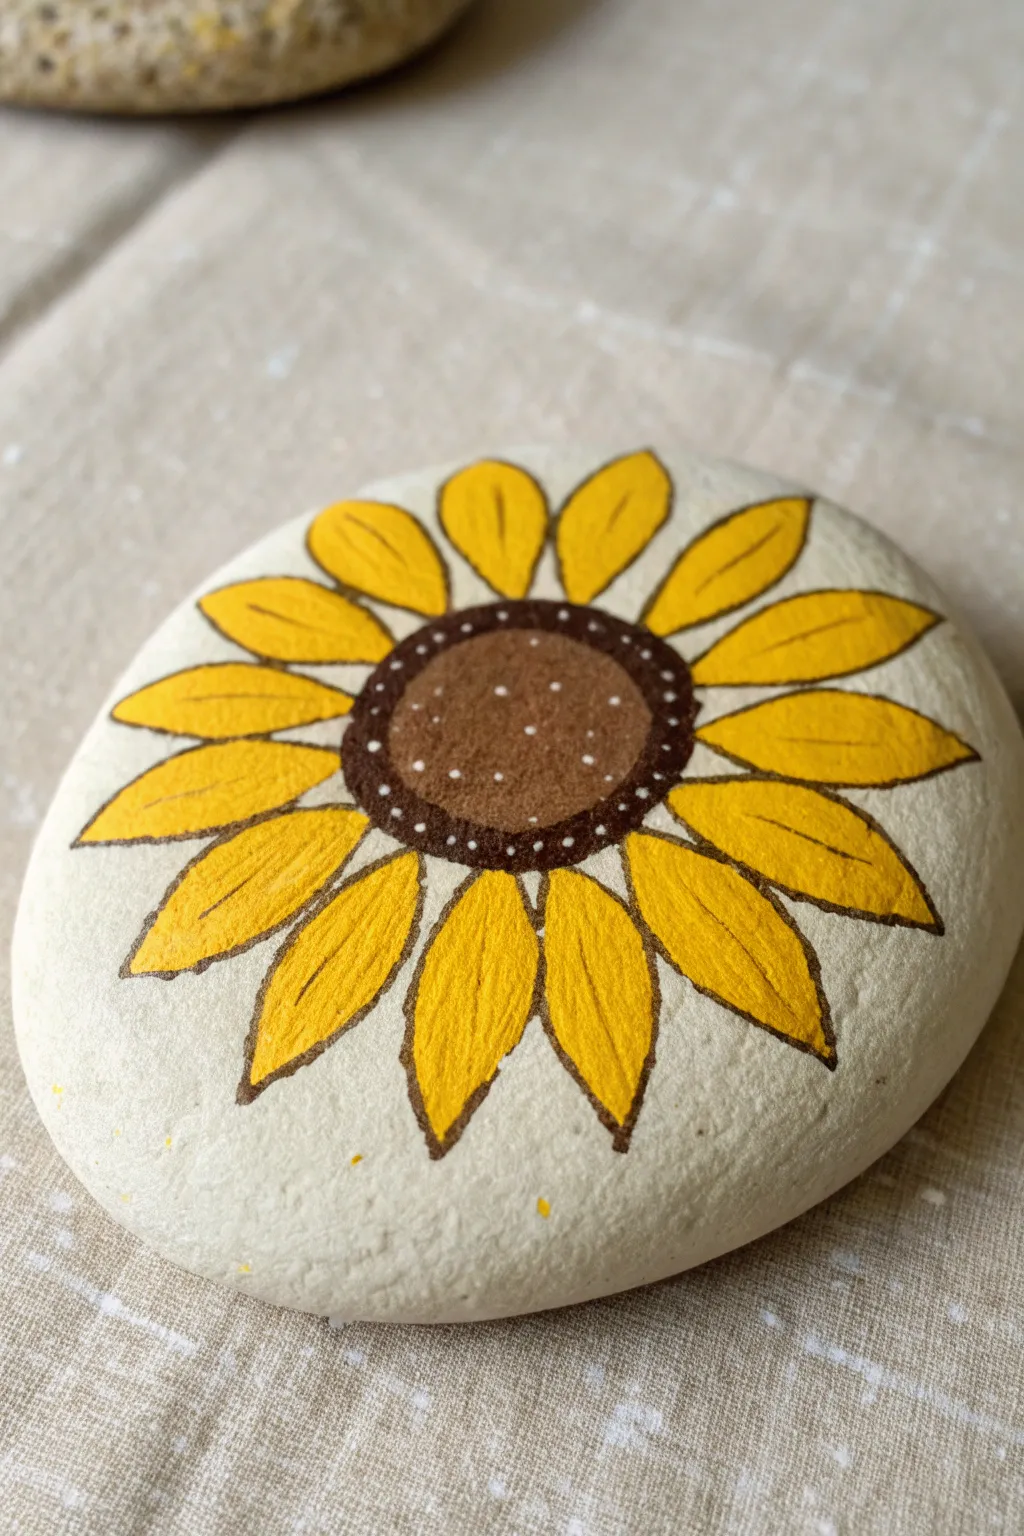
Brighten up your garden or windowsill with this cheerful sunflower rock painting. The design features bold, sunny yellow petals surrounding a textured brown center, all set against a clean, creamy background for a lovely rustic look.
Step-by-Step Guide
Materials
- Smooth, round river rock (medium size)
- Acrylic paint: Cream/Off-white, Bright Yellow, Dark Brown, White
- Flat paintbrush (medium)
- Round detail paintbrush (small/fine liner)
- Pencil (optional)
- Dotting tool or toothpick
- Sealer/Varnish (matte or glossy)
Step 1: Base Coating
-
Clean the surface:
Before starting, ensure your rock is clean and dry. Scrub away any dirt or grit with warm soapy water and let it dry completely to ensure the paint adheres properly. -
Apply the background:
Using your medium flat brush, coat the entire top surface of the rock with the cream or off-white acrylic paint. This provides a neutral canvas that makes the yellow pop. -
Building opacity:
Let the first coat dry fully. Apply a second coat of the cream paint to ensure solid coverage so the natural color of the rock doesn’t show through. Allow this to dry completely before sketching.
Step 2: Drawing the Outline
-
Sketch the center:
Lightly sketch a circle in the very middle of your rock with a pencil. This will be the seed head of the sunflower. -
Add petal guides:
Sketch the petals radiating outward from the center circle. Aim for a slightly pointed, leaf-like shape for each petal. Don’t worry if they aren’t perfectly symmetrical; nature is rarely perfect.
Paint too transparent?
Yellow paint is notoriously see-through. To make it pop, paint the petal shapes in white first, let dry, and then paint yellow on top.
Step 3: Painting the Sunflower
-
Base coat the petals:
Load your round brush with bright yellow paint. Fill in each petal shape carefully. Depending on the transparency of your yellow paint, you might see streaks initially. -
Intensify the yellow:
Once the first yellow layer is dry to the touch, add a second layer. This makes the color rich and opaque, eliminating those brush strokes. -
Paint the center:
Using the dark brown paint, carefully fill in the central circle. Be careful not to smudge the yellow petals where they meet the center. -
Outline the center:
Switch to your fine liner brush and ensure it’s loaded with smooth, slightly watered-down dark brown paint. Outline the brown center circle to clean up the edges. -
Outline the petals:
Continuing with the fine liner and brown paint, trace the outer edge of each yellow petal. Keep your hand steady and use light pressure for a thin, consistent line. -
Add petal details:
Draw a single, thin brown line down the center of each petal, starting from the center circle and stopping just before the tip. This adds dimension and a classic sunflower look.
Pro Tip: Steady Hand
For the thin brown outlines, rest your pinky finger on a dry part of the rock or the table to stabilize your hand while painting.
Step 4: Final Details
-
Create the inner ring:
Dip a very fine dotting tool or the tip of a toothpick into white paint. Place a ring of tiny white dots just inside the outer edge of the brown center circle. -
Add texture dots:
Add a few random, scattered white dots in the middle of the brown center to mimic seeds and light reflection. -
Clean up:
Check your cream background. If you accidentally got any yellow or brown outside the lines, use a small brush with cream paint to touch up the background. -
Seal the artwork:
Once the paint is thoroughly dry (I usually give it a few hours just to be safe), apply a coat of sealer. A spray sealer works well, or brush on a varnish to protect your sunny creation from elements.
Place your finished sunflower rock in a spot where you need a little extra sunshine
BRUSH GUIDE
The Right Brush for Every Stroke
From clean lines to bold texture — master brush choice, stroke control, and essential techniques.
Explore the Full Guide
Daisy Dot Flowers
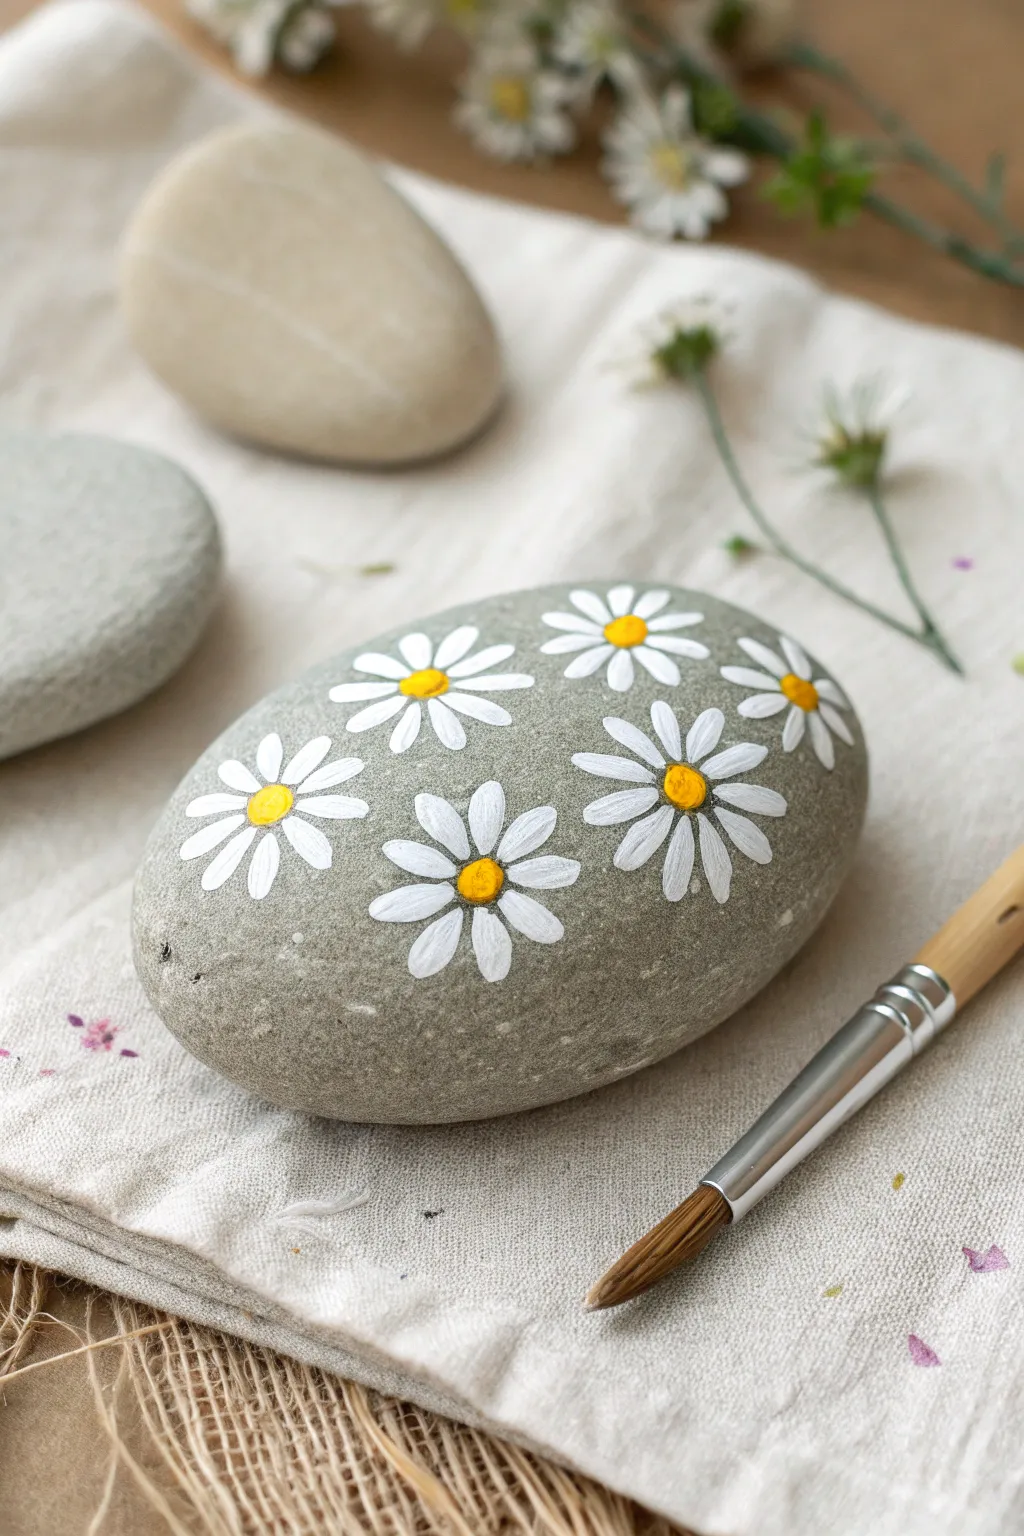
Transform an ordinary grey river rock into a blooming garden piece with this simple daisy design. The contrast of crisp white petals and bright yellow centers against the natural stone creates a lovely, rustic look that’s perfect for beginners.
Step-by-Step Tutorial
Materials
- Smooth, oval-shaped grey river rock
- White acrylic paint (high opacity)
- Yellow acrylic paint or paint marker
- Small round paintbrush (size 1 or 2)
- Dotting tool or back of a paintbrush
- Matte or satin sealant spray
- Water cup and paper towel
- Soap and water for cleaning rock
Step 1: Preparation
-
Clean surface:
Begin by thoroughly washing your rock with soap and warm water to remove any dirt or oily residue. Scrub gently with an old toothbrush if needed to get into the crevices. -
Air drying:
Allow the stone to dry completely before you start painting. The stone should be warm and dry to the touch so the paint adheres properly. -
Paint consistency:
Squeeze a small amount of white acrylic paint onto your palette. If the paint feels too thick, mix in a tiny drop of water to improve its flow without making it runny.
Petal Perfection
Use a filbert brush (flat with a rounded tip) instead of a round brush. The shape automatically creates a perfect rounded petal edge with just one simple press.
Step 2: Painting the Petals
-
Planning placement:
Visualize where your flowers will sit on the stone. Aim for an odd number, like five or seven flowers, scattered randomly across the surface for a natural, organic look. -
First petal stroke:
Load your small round brush with white paint. Start your first flower by painting a single, tear-drop shaped petal. Press the brush down gently and lift up as you pull inward toward what will be the center. -
Completing the first bloom:
Continue painting petals in a radial pattern around a small invisible center point. Most daisies look best with roughly 8 to 10 petals, but don’t worry about being perfectly symmetrical. -
Spacing out flowers:
Move to a different section of the rock and paint your second flower. Leave enough negative space between the blooms so the grey stone background shows through clearly. -
Varying sizes:
As you continue adding flowers, try making some slightly smaller or larger than others. I like to paint a few flowers appearing to go off the edge of the stone for visual interest. -
Adding texture:
If your white paint looks a bit streak, let the first layer dry for about five minutes and then apply a second coat to the petals to make them bright and opaque. -
Drying time:
Once all your white flower shapes are painted, set the rock aside. Ensure the white paint is completely dry to the touch before moving to the next color to prevent smudging.
Step 3: Adding the Centers
-
Preparing yellow:
Get your yellow acrylic paint ready. You want a sunny, warm yellow for the classic daisy look. -
Dotting the centers:
Dip the handle end of a paintbrush or a specialized dotting tool into the yellow paint. You want a decent amount of paint on the tip. -
Placing the dots:
Gently press the tool into the center of your dry white petals. Lift straight up to leave a clean, raised round dot of yellow paint. -
Repeat process:
Add a yellow center to every flower on the rock. If the center looks too small, you can lightly swirl the tool in a tiny circle to widen it. -
Optional highlighting:
For extra dimension, once the yellow is dry, you can add a microscopic dot of white or a darker orange crescent to the yellow center to suggest light and shadow.
Paint Too Sheer?
If your white paint looks transparent on the dark rock, don’t just pile it on thick. Paint a base layer, let it dry fully, then add a second thin layer for opacity.
Step 4: Finishing Touches
-
Final drying:
Let the entire rock sit undisturbed for at least an hour, or until the thickest parts of the paint are fully hardened. -
Sealing the art:
Take your rock to a well-ventilated area. Hold the sealant spray can about 10-12 inches away and apply a light, even coat over the surface. -
Second coat:
Allow the first coat of sealer to dry according to the can’s instructions, then apply a second thin coat to ensure your garden rock is weatherproof and durable.
Place your charming new daisy rock in a potted plant or on a windowsill to enjoy a touch of spring all year round
Butterfly Wing Symmetry
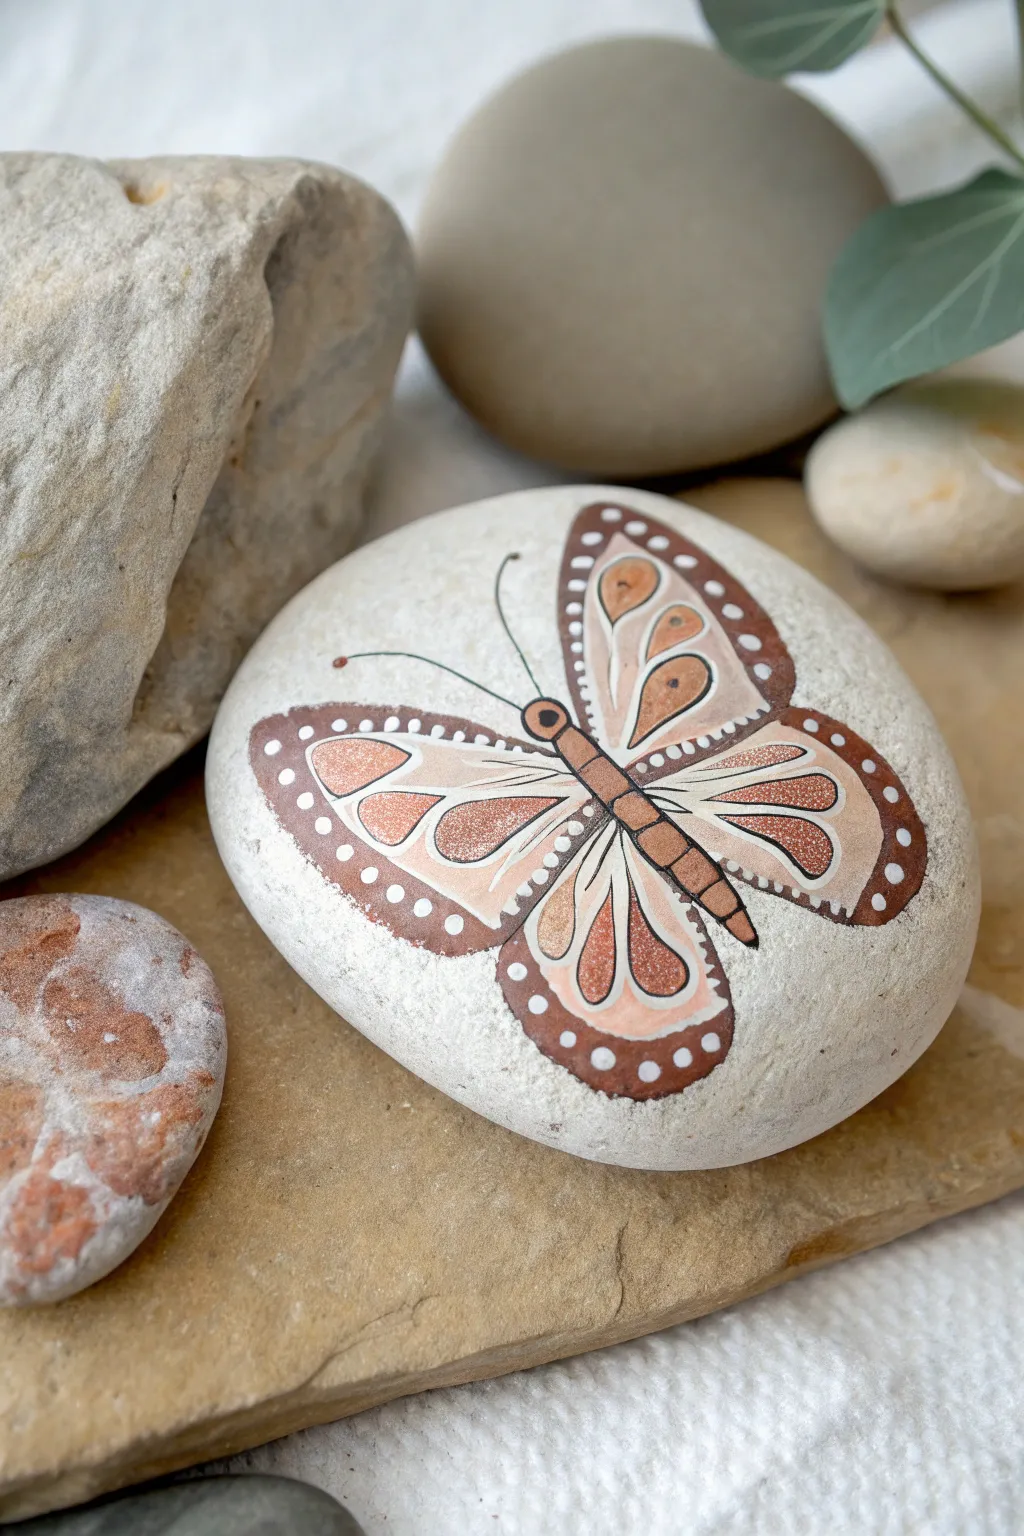
This elegant butterfly design uses a soothing palette of terracotta, beige, and white to create a natural, organic look. The soft curves and dotted details evoke a gentle, folk-art style that perfectly complements the smooth surface of a river rock.
Detailed Instructions
Materials
- Smooth, flat oval river rock (white or light grey preferred)
- Acrylic paints: Burnt Sienna (reddish-brown), Tan/Beige, Dark Brown, White, Black
- Fine liner brush (size 00 or 000)
- Small round brush (size 1 or 2)
- Pencil and eraser
- Dotting tool or toothpick
- Matte or satin sealant spray
Step 1: Sketching the Symmetry
-
Clean surface:
Begin by washing your stone with soapy water and letting it dry completely to ensure the paint adheres properly. -
Center line:
Using a pencil, lightly draw a slanted line down the middle of the rock to serve as the butterfly’s body axis. -
Body segments:
Sketch a small circle for the head near the top of your line, followed by an elongated oval for the thorax and a longer, tapered shape for the abdomen. -
Wing outlines:
Draw the large upper wings first, arching out from the thorax. Then, add the smaller lower wings emerging from below the upper ones, ensuring they are roughly symmetrical on both sides.
Step 2: Blocking in Color
-
Paint the body:
Fill in the head, thorax, and abdomen with a solid coat of burnt sienna or terracotta paint. -
Upper wing base:
Using your beige or tan paint mixed with a little white for opacity, fill in the inner sections of the upper wings, leaving a border around the edge for the darker outline later. -
Lower wing base:
Repeat the previous step for the lower wings, filling them with the soft beige tone. -
Wing borders:
Paint a thick border around all four wing sections using the burnt sienna color. This frame will house the white decorative dots later. -
Inner details:
Inside the beige wing sections, paint teardrop shapes using the burnt sienna color. I place two teardrops in each upper wing and two elongated teardrops in the lower wings.
Wobbly Lines?
If your hand shakes while outlining, steady your pinky finger against the rock surface for balance. Thinning the black paint slightly with a drop of water also helps the brush glide smoother
Step 3: Defining and Decorating
-
Line work:
Switch to your fine liner brush and black (or very dark brown) paint. carefully outline the entire butterfly body and all wing segments. -
Segmenting:
Draw horizontal lines across the body to create segments, making the insect look more realistic. -
Antennae:
Paint two thin, curving lines extending from the head for antennae, adding a tiny dot at the very tip of each using the burnt sienna color. -
Veins:
With the finest brush, add delicate white highlight lines inside the beige sections of the wings to simulate veins. -
Dotting the border:
Using a dotting tool or a toothpick dipped in white paint, gently press small, evenly spaced dots all along the burnt sienna border of the wings. -
Highlight dots:
Add a few tiny white dots inside the terracotta teardrops for extra sparkle. -
Final touches:
Clean up any smudged edges with the background stone color or by scraping gently with a toothpick once dry. -
Seal it:
Once the paint is fully cured (usually 24 hours), spray with a matte varnish to protect your art without making it too glossy.
Add Some Shimmer
For a magical touch, mix a tiny amount of gold metallic paint into your beige wing color, or add a single gold dot to the center of the butterfly’s head for a subtle focal point
Place your beautiful stone in a garden pot or on a windowsill to enjoy its calming symmetry

PENCIL GUIDE
Understanding Pencil Grades from H to B
From first sketch to finished drawing — learn pencil grades, line control, and shading techniques.
Explore the Full Guide
Bumblebee Stripe Rocks
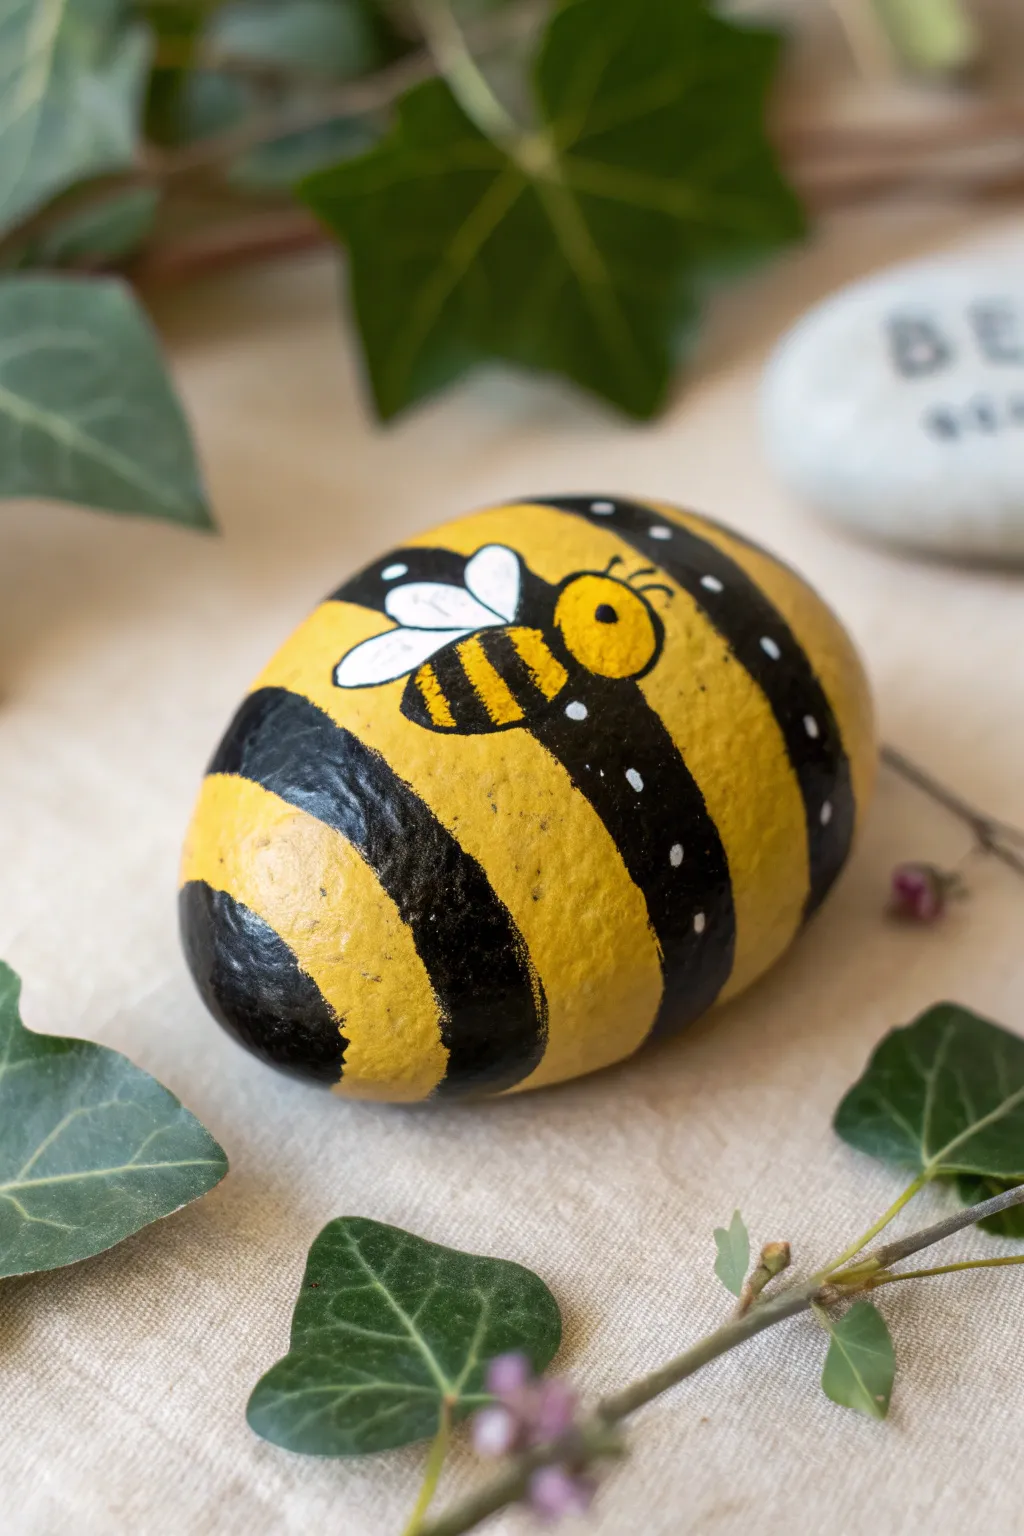
Transform a smooth garden stone into a cheerful bumblebee with this simple yet striking design. By painting broad stripes around the entire rock and adding a tiny bee detail on top, you create a fun, layered look perfect for hiding in flower pots.
Step-by-Step Tutorial
Materials
- Smooth, oval-shaped river rock
- Yellow acrylic paint (bright, sunny shade)
- Black acrylic paint
- White acrylic paint
- Wide flat paintbrush
- Small round paintbrush (size 1 or 2)
- Fine liner brush or posca pen (black)
- Dotting tool or toothpick
- Clear acrylic sealer (spray or brush-on)
- Water cup and paper towels
Step 1: Preparation and Base Coat
-
Clean the Stone:
Begin by scrubbing your rock with warm soapy water to remove any dirt or grit. Rinse it thoroughly and let it dry completely in the sun or with a towel. -
Apply First Yellow Layer:
Using your wide flat brush, coat the entire top surface of the rock with bright yellow paint. Don’t worry about full opacity yet; just get good coverage. -
Let Dry:
Allow the first coat to dry fully to the touch. This usually takes about 15-20 minutes depending on your paint thickness. -
Apply Second Yellow Layer:
Paint a second coat of yellow to ensure a solid, vibrant background with no stone showing through. Let this layer dry completely before moving on.
Step 2: Painting the Stripes
-
Plan the Stripes:
Visualize where your black stripes will go. They should curve slightly to follow the rounded shape of the rock, mimicking a bee’s body segments. -
Paint the Frist Black Stripe:
Load your brush with black paint. carefully paint a thick, curved stripe across one end of the rock. Keep your edges as neat as possible. -
Paint Remaining Stripes:
Add 2-3 more black stripes across the body of the rock, leaving bands of yellow in between. The stripes don’t need to be perfectly straight; a little wobble adds character. -
Touch Ups:
If your black paint looks streaky, wait for it to dry and add a second layer for a deep, opaque finish. -
Add White Dots:
Once the black stripes are dry, use a dotting tool or the tip of a toothpick dipped in white paint. Place tiny dots along the black stripes for a whimsical, decorative touch.
Fixing Wobbly Lines
If your black stripes have uneven edges, wait for them to dry completely. Then, use a fine brush with yellow paint to carefully tidy up and straighten the lines.
Step 3: Adding the Mini Bee Detail
-
Outline the Mini Bee Body:
Decide where your main little bee character will sit—usually on a yellow section looks best. Use a small round brush with yellow paint to create a small oval for the body and a circle for the head. -
Refine the Bee Shape:
You might need to paint over the underlining black stripe if your mini bee overlaps it. I usually dab a little white first as a primer, then apply the yellow on top so the black doesn’t show through. -
Paint Mini Stripes:
Using your finest liner brush or a black paint pen, draw tiny black stripes across the mini bee’s yellow body. -
Add Wings:
Clean your small brush and dip it in white paint. Paint two small tear-drop shaped wings emerging from the bee’s back. -
Outline the Bee:
carefully outline the entire mini bee, including the wings, with your fine black liner brush or pen to make it pop against the background. -
Add Facial Features:
Paint a tiny black dot for the eye on the bee’s head and add two thin, curved antennae sticking up. -
Wing Details:
Draw faint lines inside the white wings to suggest transparency and texture.
Pro Tip: Primer Base
Painting a coat of white acrylic or gesso on the bare rock before starting with yellow will make your colors pop much more vividly with fewer coats.
Step 4: Finishing Touches
-
Final Inspection:
Look over your rock for any smudges or areas that need a touch-up of yellow or black. -
Seal the Rock:
Once the paint is bone dry (wait at least an hour or overnight), apply a clear acrylic sealer. This protects your artwork from weather if you plan to keep it outdoors.
Place your buzzing creation in the garden to surprise visitors with a splash of handmade charm
Smiley Face Pebbles

These charming smiley face pebbles allow you to create a whole range of emotions using natural stone canvases. The minimalist design focuses on simple lines and clear expressions, making it a perfect project for beginners wanting quick, gratifying results.
Step-by-Step Guide
Materials
- Smooth, flat river rocks (assorted sizes and shades)
- Mild dish soap and water
- Old toothbrush or scrubbing brush
- Acrylic paint markers (fine tip, black)
- Acrylic paint markers (fine tip, blue/teal)
- Acrylic paint markers (fine tip, orange)
- Acrylic paint markers (fine tip, pink/magenta)
- Black acrylic paint (optional, for thicker lines)
- Fine detail paint brush (size 0 or 00)
- Clear matte or satin sealant spray
Step 1: Preparation
-
Rock hunting:
Select a variety of smooth, rounded stones. Look for lighter colors like beige, tan, and light gray, as these will show off the painted expressions best without needing a base coat. -
Clean the canvas:
Wash your stones thoroughly with warm water and mild dish soap. Use an old toothbrush to scrub away any dirt or grit from the crevices. -
Complete drying:
Allow the rocks to dry completely. Moisture trapped inside porous stone can ruin your paint job later, so setting them in the sun for an hour is a good idea.
Bleeding Lines?
If ink bleeds into the stone’s pores, switch to paint pens rather than ink markers. Paint sits on top of the surface better. If it still happens, seal the raw stone first.
Step 2: The Winking Face (Foreground)
-
Drafting the features:
Visualize the face placement on the largest, lightest stone. You want the features centered but spacious. -
Drawing the eyes:
Using a fine-tip black paint marker, draw two arched curves for the closed, smiling eyes. Add two small eyelashes to the outer corner of the right eye. -
Adding the blush:
Take an orange paint marker. On the left cheek, draw two short, horizontal dashes. Repeat on the right cheek, placing them slightly lower to follow the contour of the stone. -
The main smile:
With the black marker, draw a wide, simple ‘U’ shape connecting the cheek areas. Add short, vertical tick marks at the ends of the smile line for a cheerful, dimpled effect.
Step 3: The Laughing Face (Middle)
-
Selecting the color:
Choose a medium-gray stone for this expression. The darker background will make the teal paint pop nicely. -
Creating the squint:
Using a teal or dark blue paint marker, draw two angled brackets or ‘greater than/less than’ signs (< >) for the eyes, representing a hearty laugh. -
The laughing mouth:
Beneath the eyes, draw a wide, sweeping curve. Thickening the line slightly in the center gives it more weight and character.
Add Dimension
Use a white paint pen to add tiny reflection dots to the eyes or the tip of the tongue. It instantly makes the cartoon faces look wet and alive.
Step 4: The Cheeky Face (Background)
-
Base features:
On a tan or brownish stone, use the black marker to draw two simple oval eyes. I like to fill in the pupils but leave a tiny speck of unpainted stone for a highlight. -
The mouth outline:
Draw a smaller smile curve, but leave the bottom open for the tongue. -
Adding the tongue:
Draw a ‘U’ shape droping down from the mouth line. Use a pink or magenta marker to fill in this tongue shape. -
Refining the tongue:
Once the pink paint is dry, use the black fine tip marker to outline the tongue and draw a small line down the center for detail.
Step 5: Finishing Touches
-
Let it cure:
Allow all the paint markers to dry completely. This usually takes about 15-20 minutes depending on humidity. -
Sealing the deal:
Take the rocks outside or to a well-ventilated area. Apply a light coat of clear matte sealant spray. -
Second coat:
After the first coat dries, add a second light coat to ensure the painted faces are weather-resistant and durable.
Now you have a delightful group of expressive stones to brighten up your garden path or windowsill


Cute Cat Face Rocks
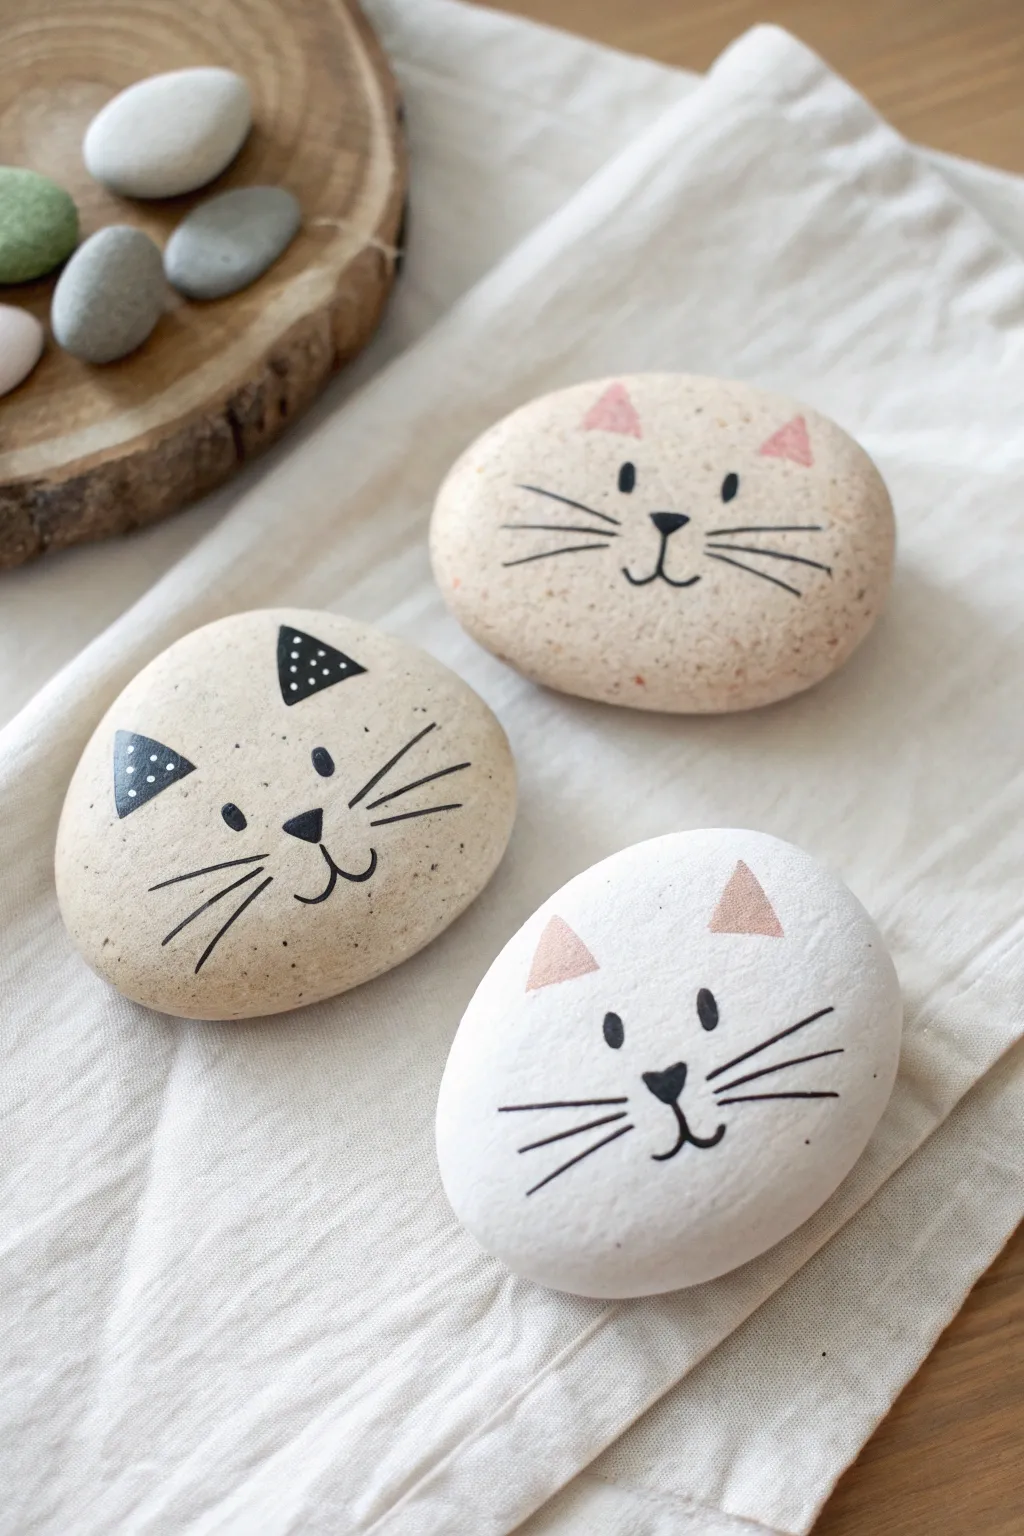
Transform smooth, round stones into a charming set of feline friends with minimal supplies and maximum cuteness. These three distinct designs—speckled beige, white, and tan—use simple geometric shapes and fine lines to create expressive faces perfect for garden décor or paperweights.
Detailed Instructions
Materials
- Three smooth, oval-shaped river rocks (roughly palm-sized)
- Acrylic paint in white, beige/cream, light pink, and metallic gold or tan
- Small flat paintbrush (size 4 or 6)
- Fine detail paintbrush (size 0 or 00) or a black paint pen/marker
- White gel pen or fine white paint marker
- Matte or sealant spray (optional)
- Paper plate or palette
- Cup of water and paper towels
Step 1: Base Coat Preparation
-
Clean the canvas:
Begin by washing your chosen stones with mild soap and water to remove any dirt or grit. Dry them thoroughly so the paint adheres properly. -
Mix the beige base:
For the two beige cats, mix a small amount of white acrylic paint with a drop of brown or beige to get a soft, creamy stone color. If your rocks are naturally this color, you can skip full coverage, but a painted base ensures vibrancy. -
Apply the first layer:
Paint the entire top surface of two rocks with your beige mix and the third rock with pure white paint. Let this initial coat dry for about 15 minutes. -
Add a second coat:
To ensure opacity, apply a second coat of the base colors. The finish should be smooth and even, covering the natural rock texture completely. -
Create the speckled effect:
For the beige rocks, create a speckled texture by flicking a toothbrush loaded with slightly watered-down brown paint, or use a stiff brush to stipple tiny dots randomly across the surface. Let everything dry completely before moving on.
Clean Lines Hack
If you struggle with painting fine lines for whiskers, use a permanent fine-point marker instead of a brush. It offers much better control for beginners.
Step 2: Painting the Ears
-
Design the first cat:
On one of the beige rocks, paint two small triangles near the top edge using light pink paint for the ears. The triangles should be soft-edged and slightly rounded at the tips. -
Design the second cat:
On the white rock, paint similar triangular ears, but use a metallic gold or tan paint for a subtle contrast. -
Design the third cat:
For the final beige rock, paint the ear triangles in solid black. These should be slightly larger and sharper to match the bold style of this particular design. -
Detail the black ears:
Once the black paint is fully dry on the third rock, use a white gel pen or the very tip of a fine brush to add tiny polka dots inside the black triangles.
Step 3: Drawing the Faces
-
Review paint dryness:
Before starting the fine linework, touch the surface gently to ensure the base coats are bone dry; wet paint will clog your markers or smear your lines. -
Position the noses:
Using a fine detail brush with black paint or a black paint pen, draw a small, inverted triangle in the center of each rock for the nose. I find starting with the nose helps anchor the rest of the facial features. -
Draw the mouth anchors:
From the bottom point of the nose triangle, draw a short vertical line straight down. -
Curve the mouths:
From the bottom of that vertical line, draw two curved lines outward—like a sideways ‘3’ or a rounded ‘w’—to create the smiling mouth. -
Add eyes:
Place two small black ovals above the nose for eyes. Space them widely for a cute, innocent look. Make the eyes on the white cat slightly taller ovals, and the beige cats slightly rounder. -
Whiskers step one:
Paint three whiskers on the left side of the face. Start the stroke near the cheek area and flick the brush outwards so the line tapers at the end. -
Whiskers step two:
Repeat the process on the right side, trying to keep the whiskers symmetrical in length and angle. -
Protect the art:
Once the ink or black paint is completely cured (give it an hour to be safe), mist the rocks with a matte spray varnish to protect them from chipping.
Make It 3D
Glue small pieces of felt or craft foam onto the rock for the ears instead of painting them to add a fun tactile element and dimension.
Group your new feline trio together on a shelf or scatter them through your garden for a delightful surprise
Owl Belly Pattern Rocks
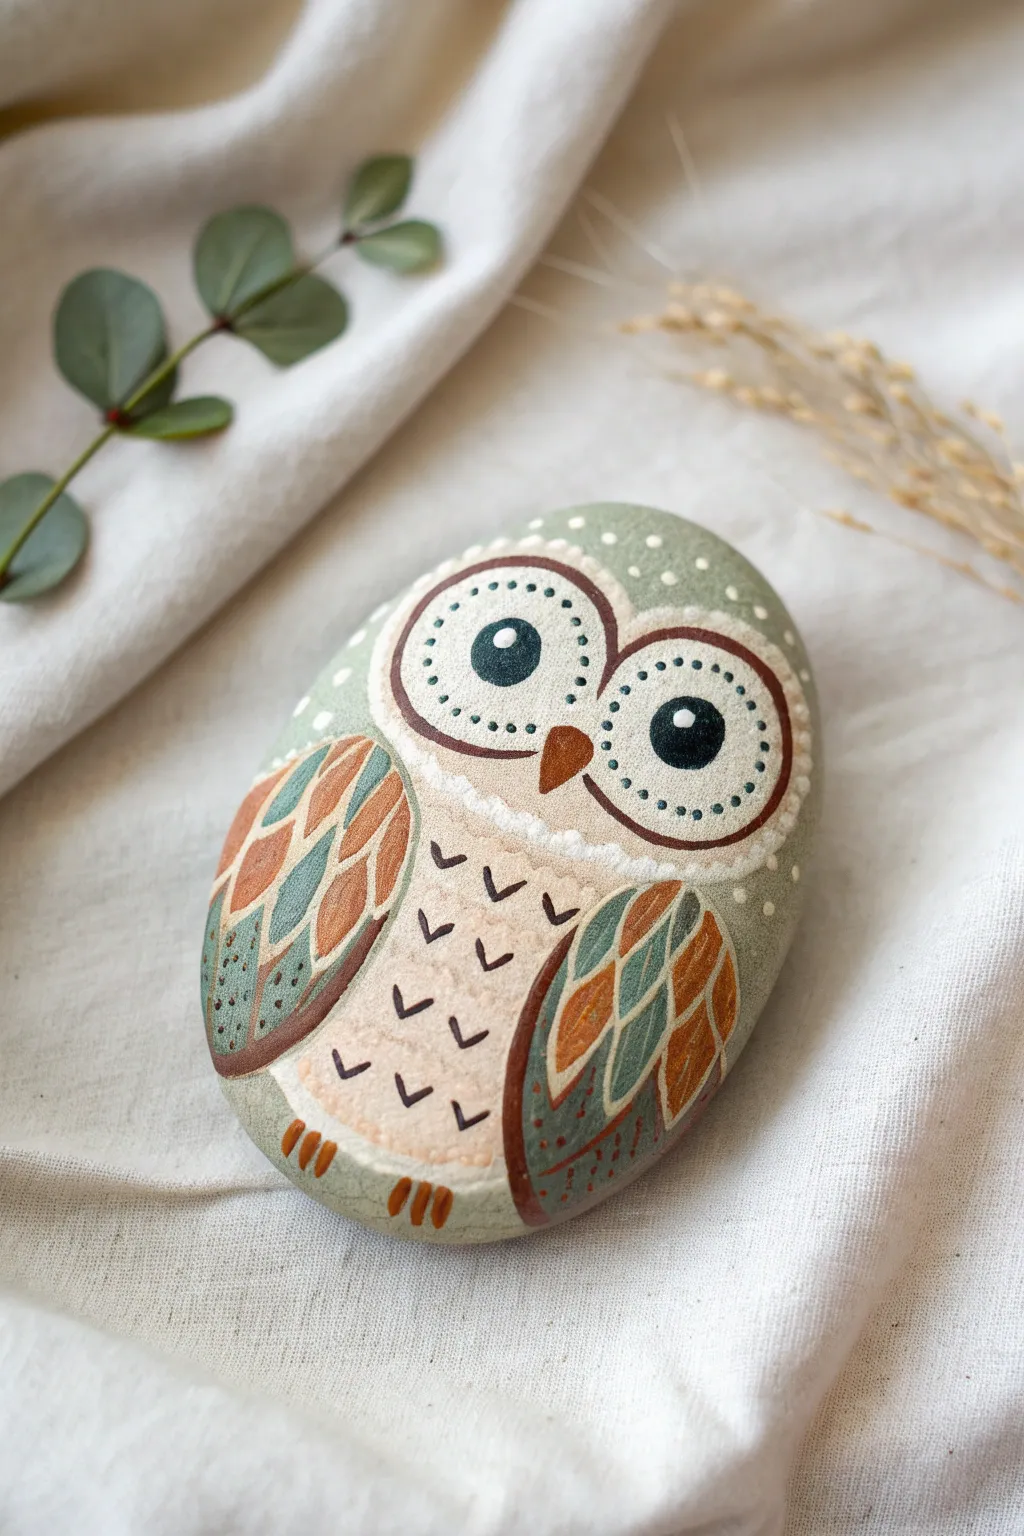
Transform an ordinary smooth stone into a charming woodland creature with this folk art-inspired owl design. The soft sage green background and earthy rust tones give this piece a warm, natural feel perfect for garden decor or a paperweight.
Step-by-Step Guide
Materials
- Smooth oval river rock (palm-sized)
- Acrylic craft paints: Sage Green, Cream/Beige, Rust/Terracotta, Teal/Slate Blue, Dark Brown, White, Black
- Flat brush (medium)
- Detail round brushes (sizes 0 and 1)
- Dotting tools or toothpicks
- Pencil for sketching
- Matte or satin sealant spray
Step 1: Base and Sketch
-
Clean your canvas:
Begin by washing your stone with warm soapy water and scrubbing away any dirt. Let it dry completely in the sun or with a hairdryer before starting. -
Paint the background:
Coat the entire top surface of the rock with a soft Sage Green paint. You may need two coats to get full opacity. I like to let the first coat dry for about 10 minutes before applying the second. -
Sketch the outline:
Once the green base is bone dry, lightly sketch the owl’s features with a pencil. Draw a large upside-down heart shape for the face mask, an oval for the belly below it, and two curved wing shapes on the sides.
Step 2: Blocking Colors
-
Fill the face mask:
Using a small flat brush, fill in the heart-shaped face area with Cream or Beige paint. Keep the edges smooth and rounded. -
Paint the belly:
Continue with the same Cream color to fill in the belly oval. It should connect seamlessly or sit just below the face mask depending on your sketch. -
Add the beak:
Paint a small, sharp triangular beak right in the center bottom of the face mask using the Rust/Terracotta color. The point should face downward. -
Outline the main shapes:
Load a size 1 liner brush with watered-down Dark Brown paint. Carefully outline the face mask, the belly, and define the wing shapes on either side. Keep a steady hand for crisp lines.
Owl Eyes Pro-Tip
To get perfectly round eyes, trace a small coin or bottle cap lightly with pencil before painting. Symmetrical eyes are key to the character’s cute expression.
Step 3: Detailed Features
-
Paint the eyes:
paint two large circles within the face mask using Cream (or leave them blank if you were careful). Then, inside those, paint two large circles of Dark Brown or Black for the pupils. -
Add eye highlights:
Dip the non-brush end of your paintbrush or a large dotting tool into White paint. Add a single crisp white dot to the upper right area of each dark pupil to bring the owl to life. -
Detail the eyes:
Using a very fine brush or dotting tool with Dark Brown paint, add a ring of tiny dots around the outer edge of the eye circles. Add a second ring of even tinier dots just inside that outer ring for texture. -
Create the feather pattern:
On the wings, paint elongated tear-drop shapes. Alternate colors between Rust and Teal. These should look like stylized feathers overlapping slightly. -
Outline the feathers:
Once the wing colors are dry, use your fine liner brush and Dark Brown paint to outline each feather tear-drop. Add a tiny central vein line inside each feather if you have space. -
Texture the belly:
Paint small ‘V’ shapes scattered across the cream belly area using the Dark Brown paint. These represent the fluffy tummy feathers.
Level Up: Metallic Texture
Mix a tiny bit of metallic gold paint into your Rust color for the feathers. It adds a subtle shimmer that catches the sunlight beautifully.
Step 4: Finishing Touches
-
Add white accents:
Use a detail brush with White paint to outline the top curve of the face mask and add a scalloped line under the neck for a ‘bib’ effect. -
Head and background dots:
Using a dotting tool and White or very light Green paint, add scattered dots on the green background area above the head and around the sides for a whimsical, snowy look. -
Paint the feet:
Paint two sets of three small oval distinct strokes at the very bottom of the rock using Rust paint to create the talons. -
Final outline check:
Go over any main outlines that may have gotten covered by other layers, ensuring the division between the wings and body is sharp and dark. -
Seal the rock:
Allow the paint to cure for at least 24 hours. Finish by spraying a clear matte or satin sealant over the rock to protect your artwork from chipping and weather.
Now you have a wise little companion to watch over your desk or garden plants
Cactus in a Pot Rocks
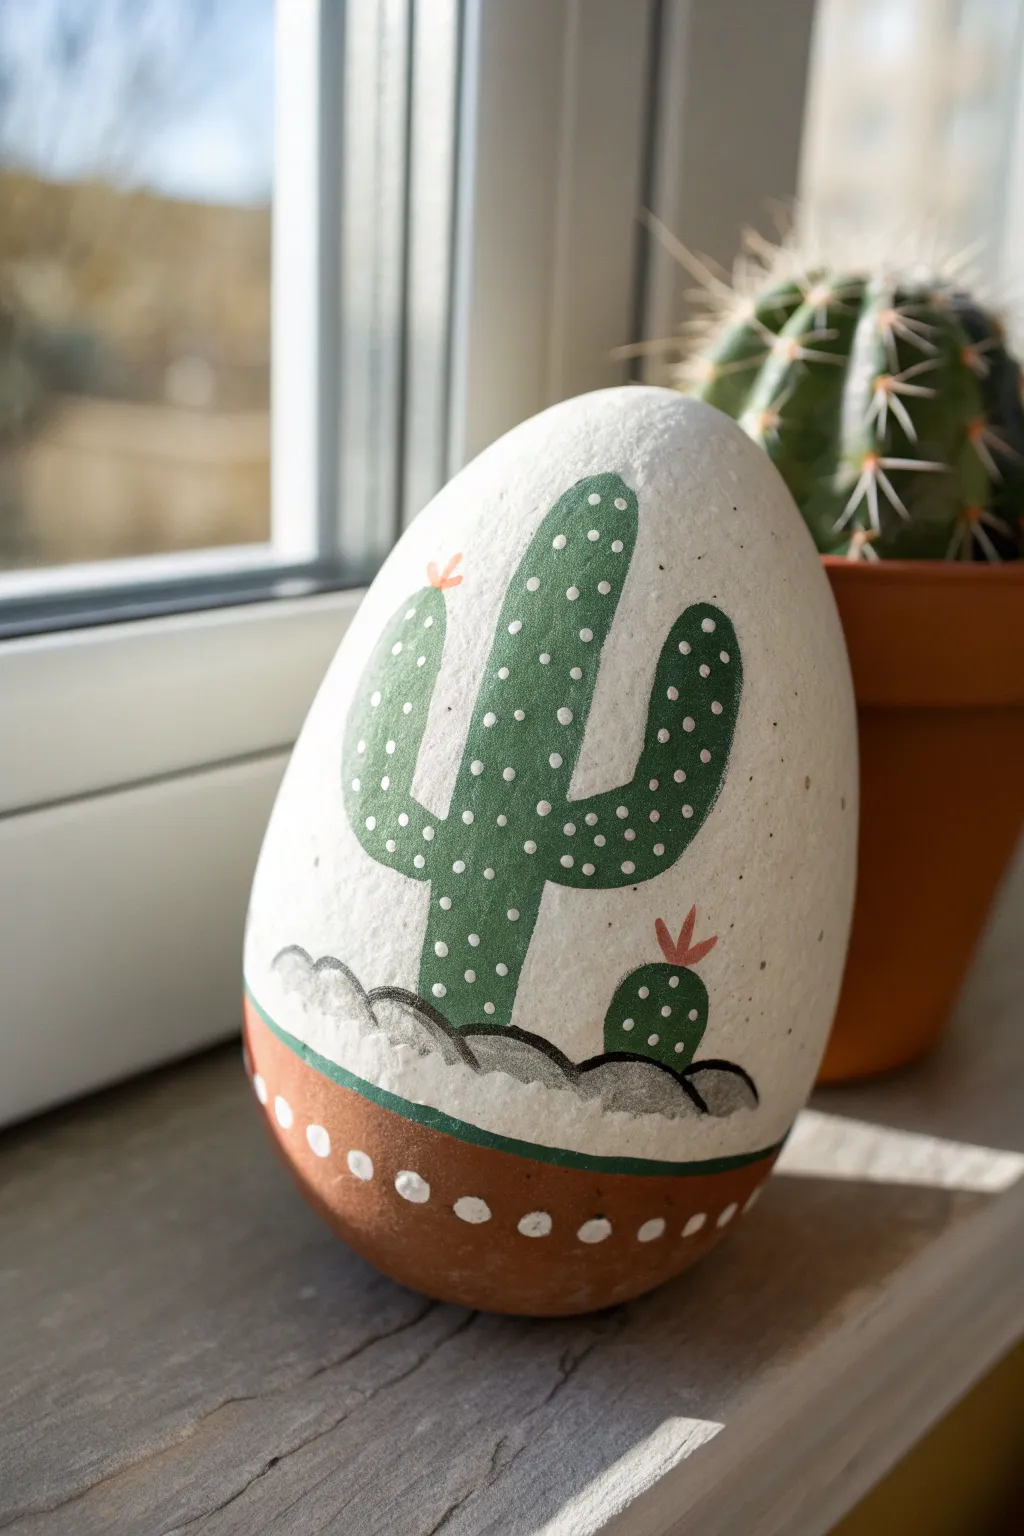
Transform a simple egg-shaped stone into an adorable piece of desert decor that requires zero watering. This project uses clever color blocking to turn the rock itself into a faux terracotta pot, complete with a prickly green cactus painted on top.
Step-by-Step Tutorial
Materials
- Smooth, egg-shaped rock
- White acrylic paint (gesso primer optional)
- Terra cotta/burnt sienna acrylic paint
- Medium green acrylic paint
- Dark grey or black acrylic paint
- Salmon pink or light orange acrylic paint
- Flat shader brush (size 6-8)
- Fine liner brush (size 0 or 00)
- Dotting tool or toothpick
- Matte spray varnish
Step 1: Preparation & Base Coat
-
Clean the surface:
Begin by washing your stone thoroughly with soap and water to remove any dirt or oils. Let it dry completely before starting, as paint won’t stick well to a damp surface. -
Prime the stone:
Apply a solid coat of white acrylic paint over the entire rock. This bright underlayer is crucial because it ensures the white background remains crisp and the other colors pop. -
Apply a second coat:
Once the first layer is dry, check for any streaks. Apply a second coat of white if needed to get an opaque, smooth finish. -
Mark the pot line:
Visualize the bottom third of your rock as the ‘pot’. You can lightly sketch a horizontal line around the rock with a pencil if you want a guide, but freehanding usually works well for a rustic look. -
Paint the terracotta base:
Using your flat brush and terracotta or burnt sienna paint, fill in the bottom section of the rock. Keep your brush strokes horizontal to mimic the texture of a clay pot. -
Refine the rim:
Carefully clean up the top edge of the terracotta section to create a designated rim for your pot. I like to use a slightly rounded stroke here to emphasize the 3D shape of the rock.
Step 2: Painting the Cactus
-
Outline the main cactus:
Switch to your medium green paint. In the center of the white area, paint the main vertical stem of the cactus, leaving about a half-inch of white space above the terracotta rim. -
Add the arms:
Extend two curved arms from the main stem—one reaching up on the left and another on the right. Try to make them rounded at the tips for a classic saguaro look. -
Paint a baby cactus:
To the right of the main cactus, near the pot rim, paint a small, singular rounded bump to represent a baby cactus growing alongside the big one. -
Add the soil mound:
Using grey paint, create wavy, mound-like shapes at the base of your cacti. This grounds your plants and connects them to the terracotta pot section below. -
Outline the soil:
Take your fine liner brush with dark grey or black paint and outline the top curves of the soil mounds to give them definition against the white background. -
Outline the pot rim:
While you have the liner brush, careful paint a thin line separating the soil area from the terracotta pot color. This crisp line acts as the lip of the planter.
Wobbly Lines?
If your hand shakes while painting the cactus outline, don’t stress. Let it dry, then paint over the mistake with the white background color to ‘erase’ it.
Step 3: Details & Finish
-
Dot the spines:
Dip a dotting tool or the very tip of a paintbrush into white paint. Add rows of tiny dots vertically along the green cactus bodies to simulate spines. -
Decorate the pot:
Clean your dotting tool and use it to tap a row of larger white dots across the terracotta section. This adds a charming decorative element to the planter. -
Add blooms:
Using a tiny amount of salmon pink or orange paint on your finest brush, add two or three tiny V-shapes or lines at the top of the cactus arms to look like blooming flowers. -
Final clean up check:
Look over the rock for any smudges. If you got green on the white background, you can carefully touch it up with white paint once the green is fully dry. -
Seal the artwork:
Once all paint is completely dry (give it at least an hour), take the rock outside and apply a coat of matte spray varnish to protect your miniature garden from chipping.
Pro Tip: Texture Trick
Mix a tiny pinch of baking soda into your terracotta paint before applying it. This gives the ‘pot’ section a gritty, realistic clay texture!
Set this little stone on your windowsill for a plant that stays perfectly green forever
Polka Dot Color-Block Rocks
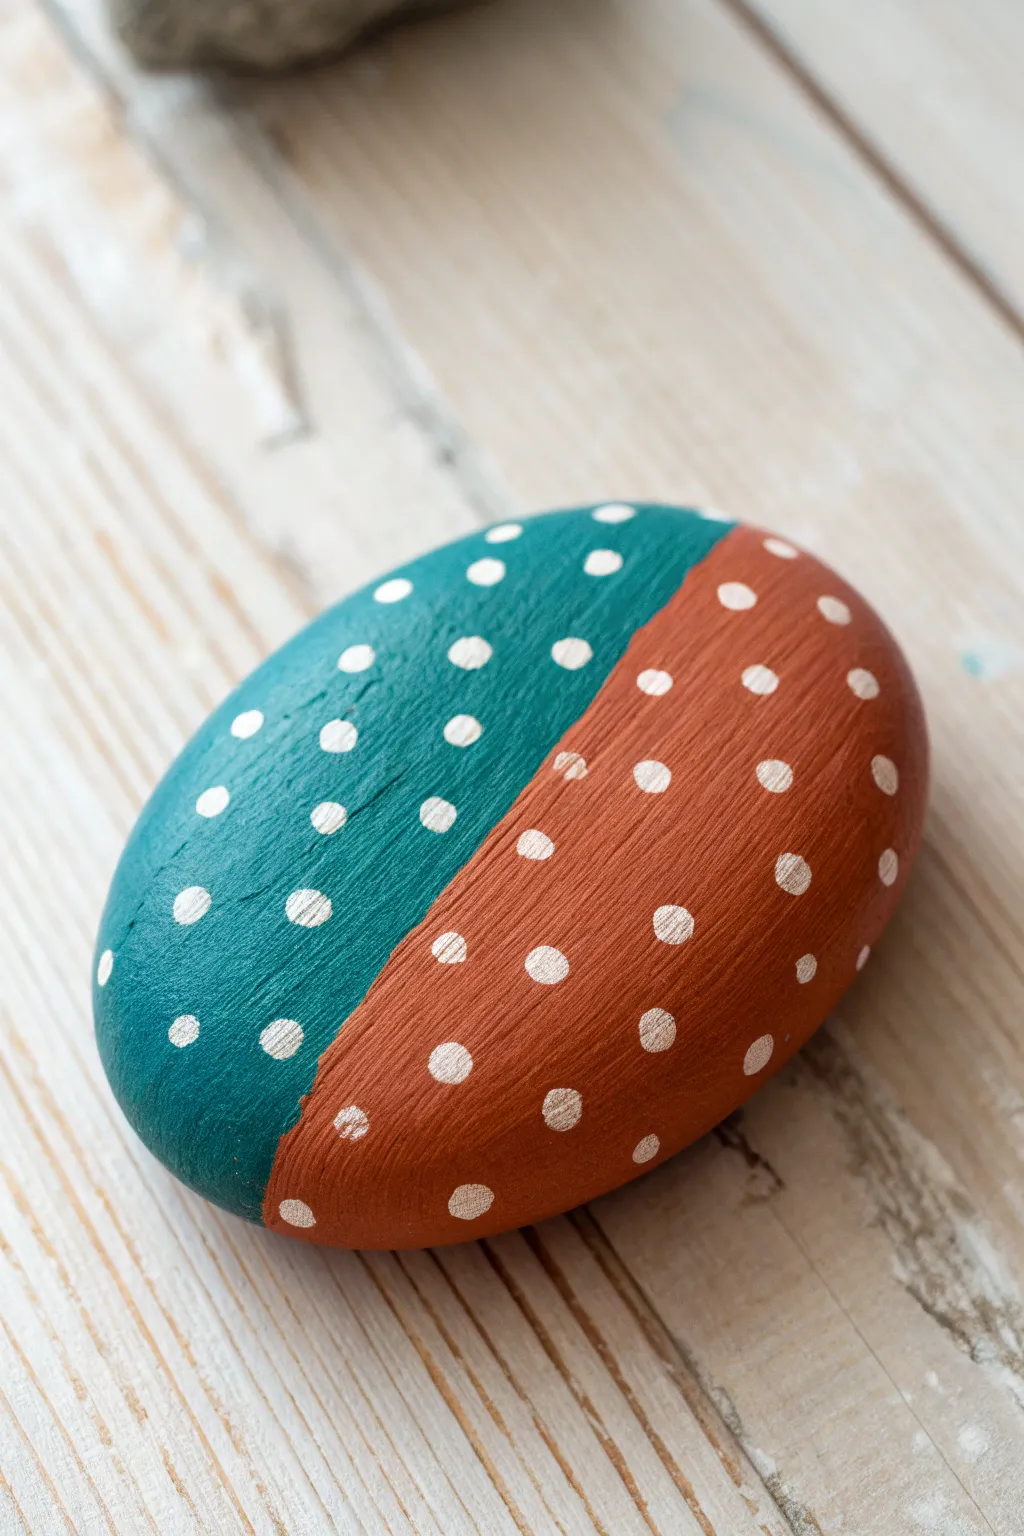
Embrace simplicity with this modern, color-blocked rock painting design that pairs a cool teal with a warm terrestrial rust tone. The playful grid of white polka dots ties the two contrasting colors together for a chic, finished look.
How-To Guide
Materials
- Smooth, oval river rock (about palm-sized)
- Acrylic paint (Teal/Turquoise)
- Acrylic paint (Rust/Burnt Siena)
- Acrylic paint (White)
- Flat paintbrush (medium size)
- Dotting tool or the handle end of a paintbrush
- Pencil (optional)
- Painter’s tape or masking tape
- Matte or glossy sealer (spray or brush-on)
- Palette or small dish for mixing
- Water cup and paper towels
Step 1: Base Coat & Color Blocking
-
Clean Your Canvas:
Begin by washing your stone with warm water and a little dish soap to remove any dirt or oils. Let it dry completely before starting, as moisture trapped inside can affect the paint. -
Define the Division:
Decide on the angle for your color block. A diagonal line across the middle usually looks dynamic. You can lightly sketch this line with a pencil to guide you. -
Tape It Off:
For a truly crisp edge, apply a piece of painter’s tape along your pencil line. Press down firmly along the edge where the paint will meet the tape to prevent seepage. -
Paint the Top Half:
Start with the teal color. Using your flat brush, paint the upper section of the rock, brushing away from the tape edge initially to avoid pushing paint under it. Cover the curve of the rock down to the tape line. -
Second Coat Consistency:
Allow the first layer of teal to dry for about 10–15 minutes. It likely needs a second coat to be fully opaque, so go ahead and apply that now for a solid, rich color. -
Reveal the Edge:
Once the teal paint is dry to the touch but not fully cured, carefully peel back the painter’s tape to reveal a sharp, straight line. -
Paint the Lower Half:
Now, switch to your rust or burnt sienna color. Using the flat brush, carefully paint the bottom section. I find steadying my hand on the table helps me cut in close to the existing teal edge without overlapping it. -
Refine the Seam:
Apply a second coat of the rust color if needed. If the meeting point between the two colors is a little shaky, don’t worry—you can touch it up with a very fine detail brush later, or let the texture of the rock enhance the organic feel.
Step 2: Adding the Polka Dot Pattern
-
Prepare for Dotting:
Pour a small amount of white acrylic paint onto your palette. It should be fluid enough to form a round drop but thick enough to hold its shape. -
Choose Your Tool:
Select a dotting tool that matches the medium-sized dots shown in the image. If you don’t have a specialized tool, the non-brush end of a paintbrush handle works wonderfully for dots this size. -
Start the Center Line:
Begin adding dots right along the diagonal seam where the colors meet. Place a dot on the teal side, then one on the rust side, spacing them out evenly. -
Establish the Grid:
Work outwards from that central seam. Try to place the next row of dots in the spaces between the dots of the previous row (like a brick pattern) or stack them directly in a grid, depending on your preference. The example uses a somewhat loose, organic spacing. -
Keep the Pressure Even:
Dip your tool into the white paint before every single dot. This ensures every circle is the same size and opacity. Press straight down and lift straight up. -
Fill the Edges:
Continue the pattern all the way to the edges of the stone. Don’t be afraid to put ‘half dots’ that slip off the curve of the rock; this makes the pattern look continuous. -
Check Consistency:
Look over your work. If any white dots look too translucent after drying, you can carefully re-dot the exact same spot with a fresh drop of white paint to brighten them up.
Clean Lines Hack
To prevent paint bleeding under the tape, paint a thin layer of the *base* rock color (or clear matte medium) along the tape edge first to seal it.
Step 3: Finishing Touches
-
Dry Completely:
Allow the polka dots to dry fully. Since the paint is thicker in the dots, this might take closer to an hour. Don’t rush this, or you might smear a perfect circle. -
Seal the Deal:
Apply a clear sealer over the entire rock to protect your work from scratches and weather. A matte spray keeps the natural stone look, while gloss will make the colors pop.
Metallic Accent
Swap the plain white dots for gold or silver metallic paint. The shimmer looks incredible against the matte rust and teal background.
Place your finished geometric masterpiece on a desk or in a garden planter for a splash of structured color
Watermelon Slice Rocks
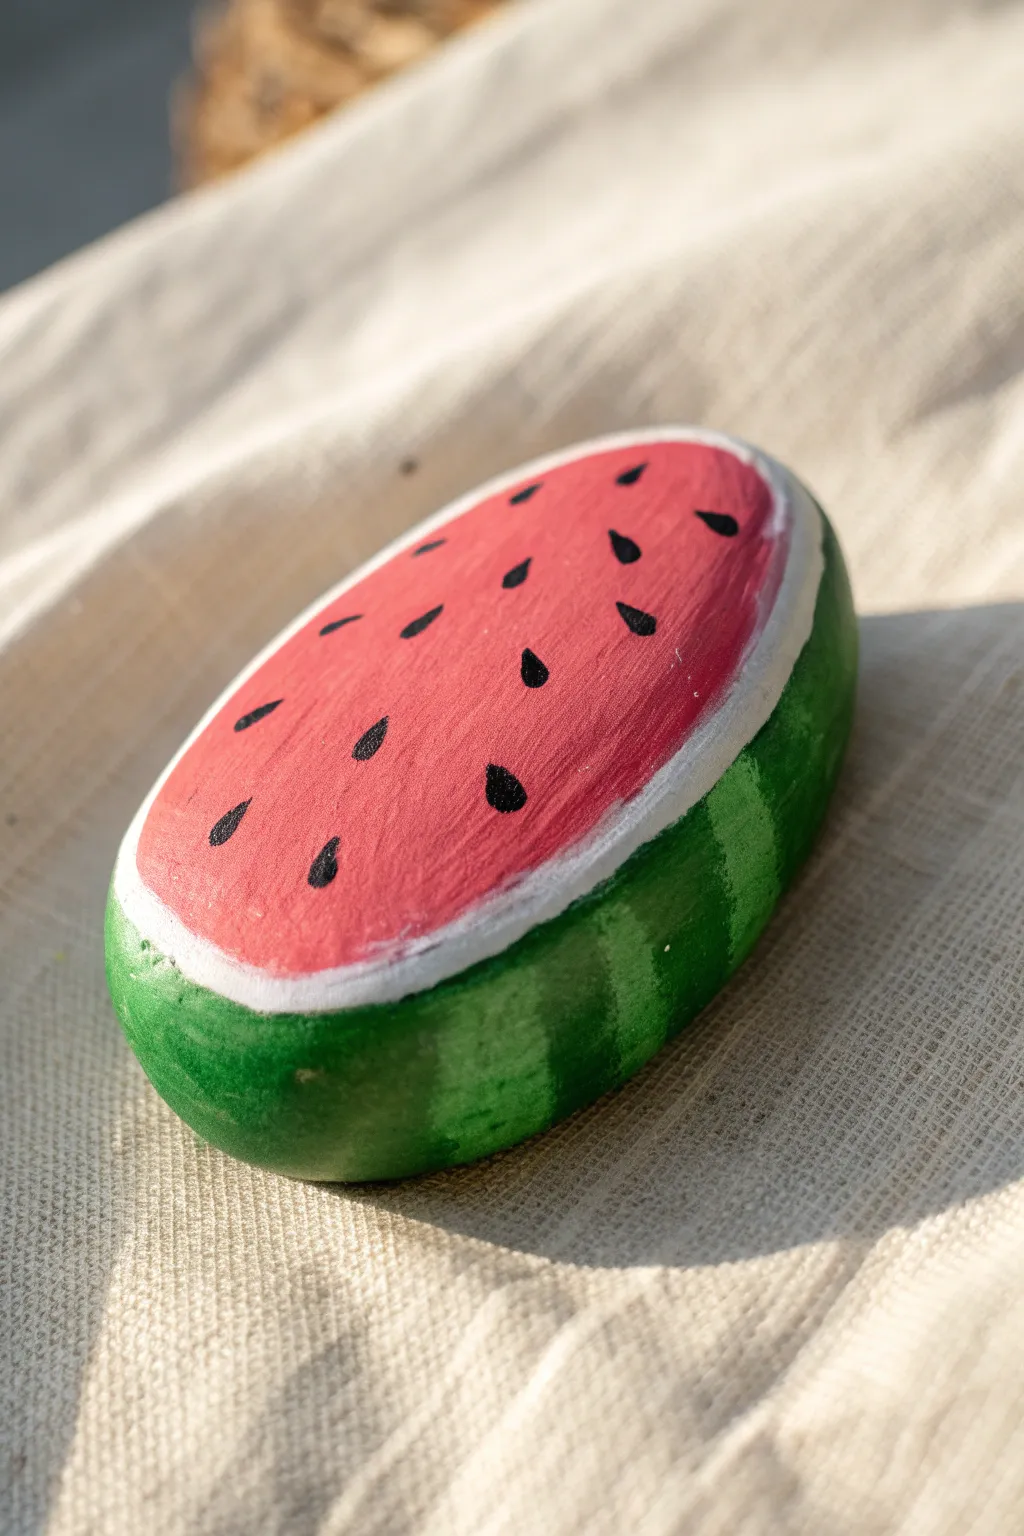
Transform a smooth, oval stone into a refreshing slice of summer with this easy watermelon design. This project uses bold colors and simple shapes to create a charming piece of décor that looks good enough to eat.
Step-by-Step Guide
Materials
- Smooth, oval-shaped river rock
- Acrylic paints (dark green, light green, white, watermelon red, black)
- Small flat paintbrush
- Fine liner or detail brush
- Pencil (optional)
- Matte or glossy sealant (spray or brush-on)
- Water cup and paper towels
Step 1: Preparing the Base
-
Clean your canvas:
Begin by thoroughly washing your rock with soap and water to remove any dirt or oils. Dry it completely with a towel or let it sit in the sun for a few minutes. -
Base coat (optional):
If your rock is very dark, you might want to paint the entire top surface white first to make the red and green pop. Let this layer dry completely before moving on.
Step 2: Painting the Fruit Flesh
-
Outline the shape:
Visualize a smaller oval shape on the top face of the rock. This will be the pink fruit area. You can lightly sketch this with a pencil to guide your brush. -
Fill the center:
Using your flat brush, fill in the center oval with watermelon red paint. Aim for a nice, opaque layer. -
Smooth coverage:
If the first coat looks streaky, let it dry for about 10 minutes and apply a second coat for a rich, vibrant color.
Uneven White Lines?
If your hand shakes while painting the white pith ring, use a white Posca paint pen instead of a brush for better control.
Step 3: creating the Rind
-
Paint the outer skin:
Load your flat brush with dark green paint. Paint the sides and bottom of the rock, bringing the color up to meet the edge of where the white line will eventually go. -
Define the edge:
Carefully paint up the sides, leaving a distinct gap of unpainted rock (or white base coat) between the red center and the green sides. -
Add the pith:
Using a clean brush and white paint, fill in that gap between the red and green. This white ring represents the pith of the watermelon. -
Refine the border:
Go over the white line carefully to ensure it’s a solid, even band surrounding the red center. -
Create texture:
Mix a little light green with your dark green, or use straight light green paint. Add vertical stripes along the green rind area to mimic the natural pattern of a watermelon skin. -
Blend the stripes:
While the green paint is still slightly tacky, I find it helpful to soften the stripe edges slightly so they look organic rather than geometric.
Juicy Highlights
Add tiny white dots or commas on top of the black seeds and the red flesh to make the watermelon look glistening and fresh.
Step 4: Adding Details and Finishing
-
Prepare for seeds:
Switch to your finest detail brush or a liner brush. Ensure the red paint is 100% dry to prevent bleeding. -
Paint the teardrops:
Dip into black paint and create small teardrop shapes scattered across the red area. The point of the teardrop should face inward toward the center of the fruit. -
Vary the arrangement:
Don’t make the pattern too perfect. Scatter the seeds somewhat randomly, angling them slightly differently to look natural. -
Check your work:
Look over the rock for any accidental smudges. You can touch up the white line or the red center if your hands were a bit shaky. -
Dry completely:
Let the rock sit undisturbed for at least an hour until all paint layers are fully cured. -
Seal the deal:
Apply a coat of clear sealant over the entire rock. A glossy finish works particularly well here to make the fruit look juicy.
Place your finished slice in the garden or on a desk for a permanent splash of summer color
Pizza Slice Rocks
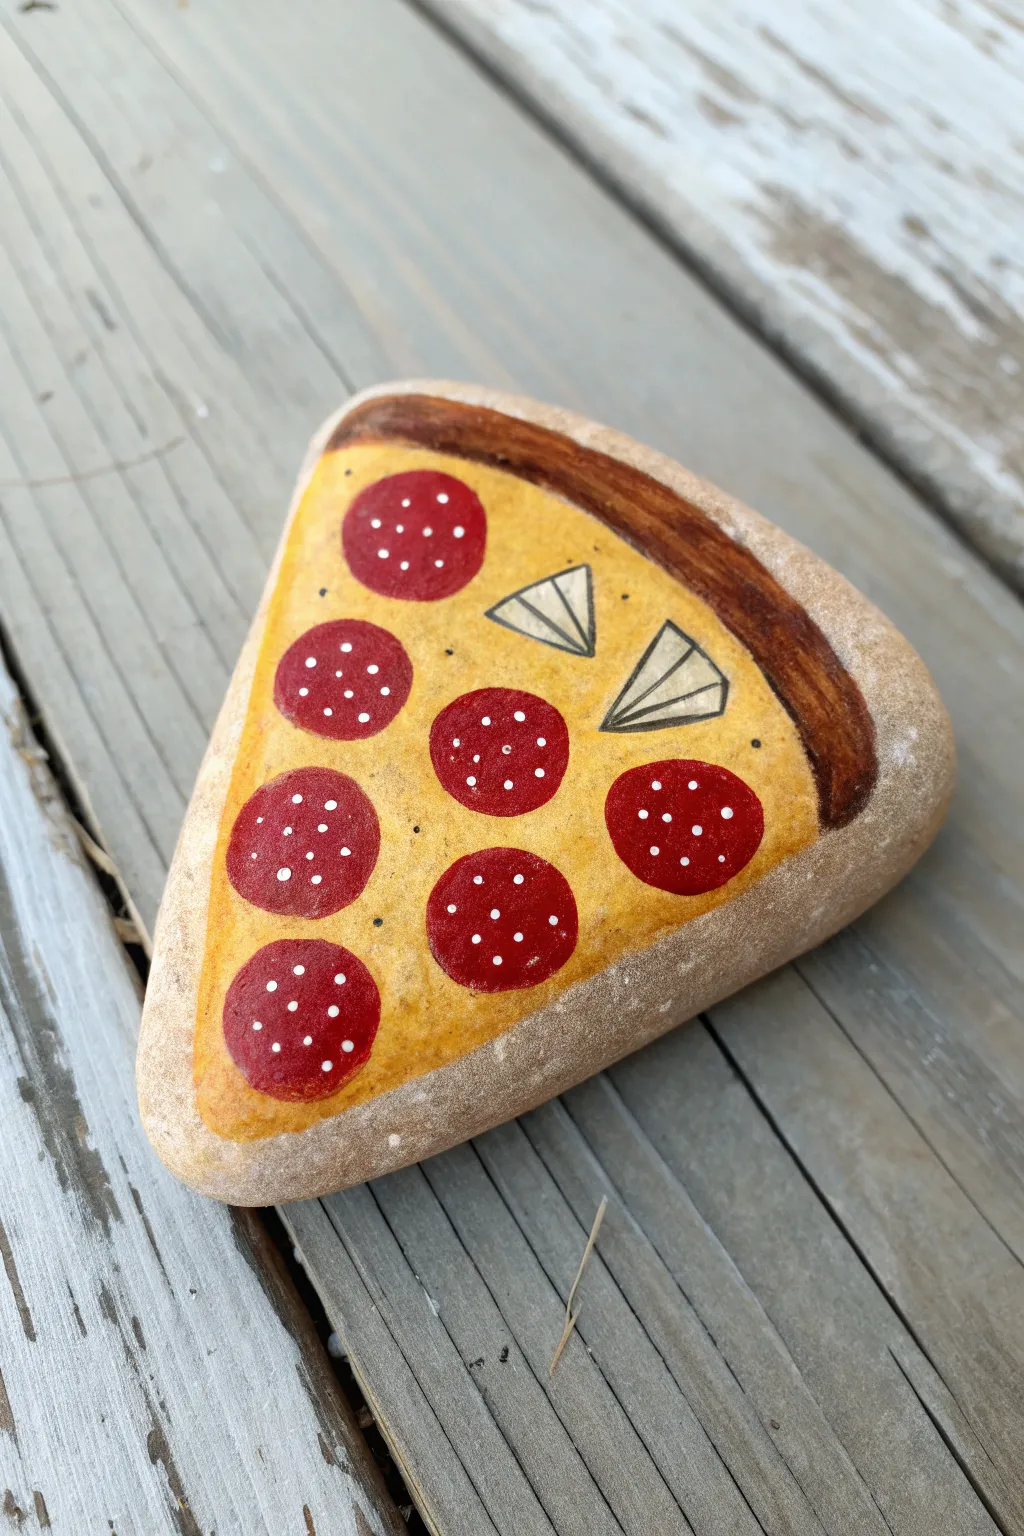
Transform a triangular stone into a mouth-watering slice of pepperoni pizza with this fun and simple rock painting project. The bright yellow cheese and classic toppings make for a playful piece of decor that looks good enough to eat.
How-To Guide
Materials
- Triangular smooth river rock
- Yellow acrylic paint (golden yellow or cheddar shade)
- Brown acrylic paint (light and dark shades)
- Red acrylic paint
- White acrylic paint (or a white paint pen)
- Black fine-liner pen (like a Pigma Micron or Posca extra fine)
- Flat paintbrush
- Etail paintbrush
- Sealer (Mod Podge or clear acrylic spray)
Step 1: Preparing the Base
-
Clean the Stone:
Begin by washing your triangular rock with warm, soapy water to remove any dirt or grit. Let it dry completely in the sun or with a towel before you start painting. -
Paint the Cheese Base:
Using a flat paintbrush, cover the top surface of the rock with a bright, golden yellow acrylic paint. Leave a bare strip at the wider end of the triangle where the crust will go. -
Add a Second Coat:
Yellow paint can sometimes be translucent on darker stones. Let the first coat dry for about 10 minutes, then apply a second layer to ensure the color is solid and vibrant. -
Paint the Crust:
Mix a light brown paint or use a ‘teddy bear’ brown shade to fill in the strip you left bare at the top. Curve the line slightly where it meets the yellow cheese to mimic the natural pull of melted cheese. -
Add Crust Detail:
While the brown crust paint is still slightly tacky but mostly dry, you can lightly brush a slightly darker brown along the very top edge to give it a baked, crispy look. -
Outline the Crust:
Once the base colors are fully dry to the touch, use a dark brown paint and a fine detail brush to paint a thick, definitive line separating the crust from the cheese. Make this line bold to define the edge.
Pizza Texture Trick
Mix a tiny bit of baking soda into your red paint before painting the pepperonis. It adds a slight grit that mimics the texture of real meat slices.
Step 2: Adding Toppings
-
Draft the Pepperoni:
Dip a small round brush or the end of a paintbrush handle into bright red paint. Stamp or paint circles randomly across the yellow cheese area. -
Draw Mushroom Shapes:
Using a very fine detail brush with black paint or a black fine-liner pen, sketch two small triangles for mushroom slices. I like to place these in open spots between the pepperoni to balance the design. -
Detail the Mushrooms:
Inside your mushroom triangles, draw a few straight lines radiating from the center point to the edge to represent the gills of the mushroom. -
Highlight the Pepperoni:
Dip a toothpick or a dotting tool into white paint. Add tiny clusters of white dots onto each red pepperoni circle to create texture and a shiny, greasy appearance. -
Add Spices:
Using a fine-tip black pen or the very tip of a brush with black paint, add tiny random dots over the yellow cheese area to look like oregano or pepper. -
Refine the Edges:
If your yellow paint looks a bit flat, mix a tiny drop of orange into your yellow and lightly sponge it near the crust line for a baked effect.
Customize Your Order
Don’t stop at mushrooms! Paint small green squares for green peppers, black rings for olives, or white irregular shapes for onions.
Step 3: Finishing Touches
-
Let it Dry:
Allow the entire rock to dry for at least 30 minutes. The thick dots on the pepperoni might take a little longer than the flat paint. -
Seal the Design:
Apply a coat of clear sealer or Mod Podge over the top. A glossy finish works best here to make the ‘cheese’ look melty and delicious.
Enjoy displaying your permanent slice of pizza in the garden or using it as a fun paperweight
Beach Horizon Rocks
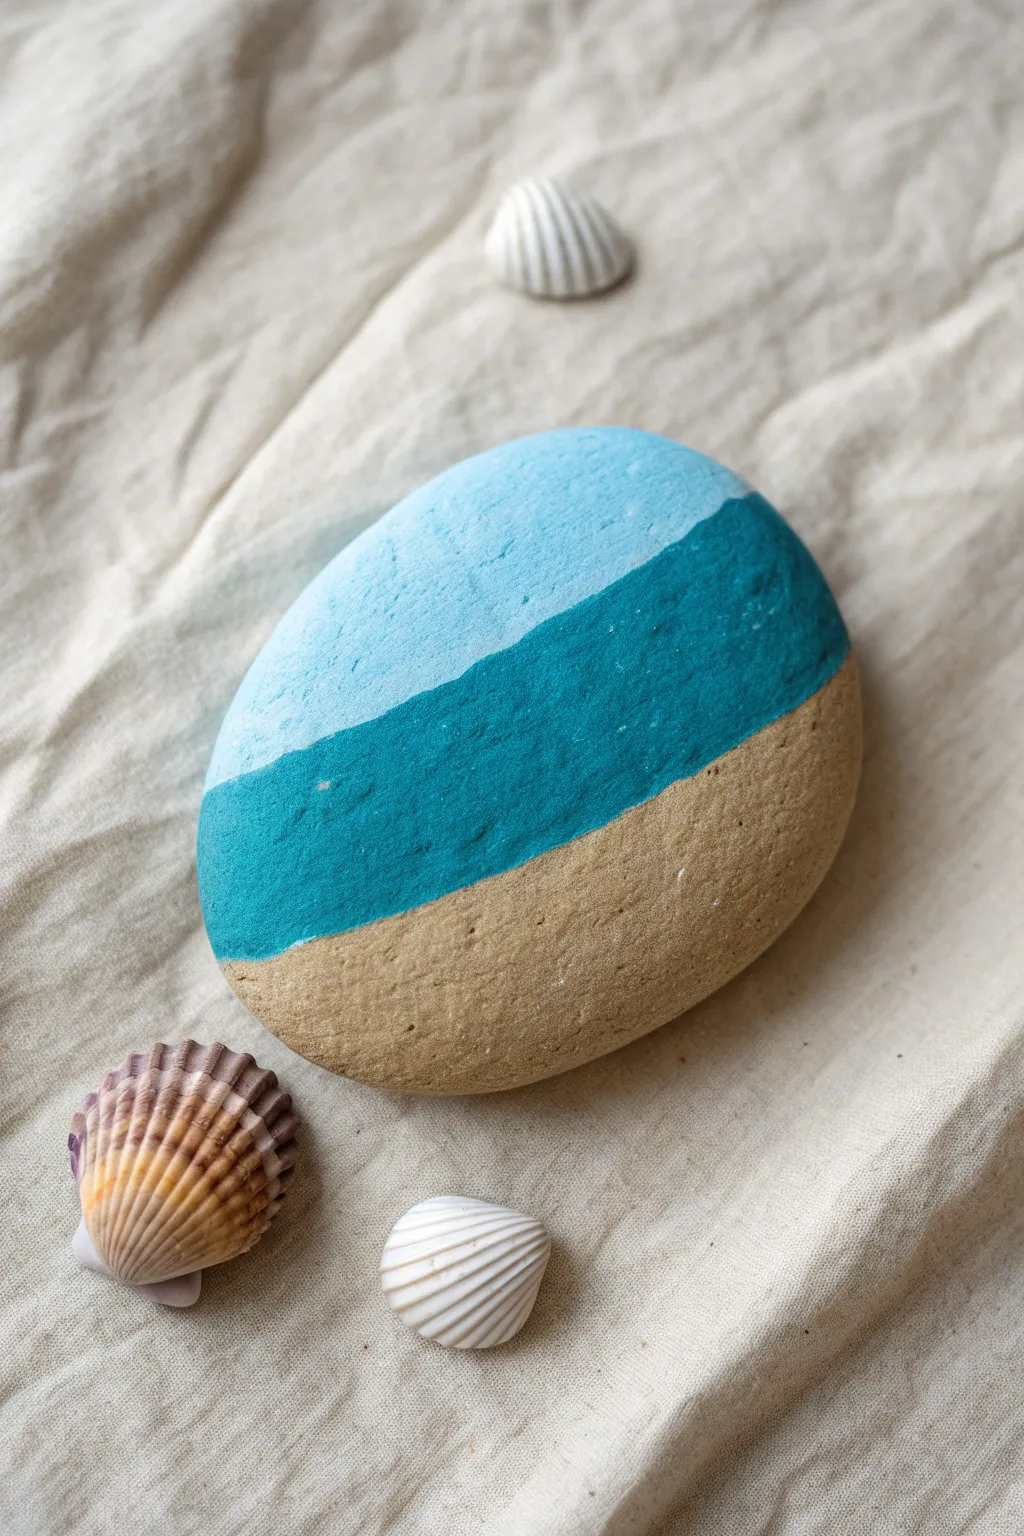
Capture the serenity of a day at the beach with this minimalist painted stone. By using just two colors and the natural beauty of the rock itself, you can create a calming abstract seascape that fits perfectly in any summer display.
Detailed Instructions
Materials
- Smooth, oval river rock (beige or tan)
- Acrylic paint: Light sky blue
- Acrylic paint: Teal or Turquoise
- Flat shader brush (medium size)
- Pencil (optional)
- Painter’s tape or masking tape (optional)
- Matte or satin varnish sealant
Step 1: Preparation
-
Clean surface:
Begin by washing your stone thoroughly with warm soapy water to remove any dirt or oils that might prevent the paint from sticking. -
Dry completely:
Let the rock dry completely under the sun or with a towel before you start painting. -
Plan the sections:
Visualize the rock divided into three horizontal bands. The bottom third will remain unpainted to represent the sand. -
Mark lines (optional):
If you struggle with freehand lines, lightly sketch two wavy horizontal lines across the rock with a pencil to mark the horizon and shoreline.
Wobbly Horizon?
If you can’t get a straight horizon line freehand, place a strip of painter’s tape across the dry teal section before painting the sky blue. Peel it off while wet for a crisp edge.
Step 2: Painting the Ocean
-
Load the brush:
Squeeze a small amount of teal or turquoise acrylic paint onto your palette and load your flat brush. -
Paint the middle band:
Carefully paint across the middle section of the rock. This darker blue represents the deep ocean water. -
Create the shoreline edge:
For the bottom edge of the teal band, I encourage a slightly wavy, organic line rather than a perfect straight edge, as this mimics waves on the sand. -
Check opacity:
Apply a second coat of teal if the rock’s color shows through too much, ensuring the color is rich and solid. -
Let it dry:
Allow the teal section to dry completely to the touch before moving on to the sky.
Step 3: Painting the Sky
-
Switch colors:
Clean your brush thoroughly or switch to a clean flat brush. Load it with light sky blue paint. -
Paint the top band:
Fill in the top third of the rock with the light blue paint. -
Meet the horizon:
Carefully bring the light blue paint down to meet the top edge of the teal band. A steady hand helps here to keep the horizon line crisp. -
Refine the line:
If the horizon line feels messy, you can carefully re-paint over the edge once the paint dries to straighten it out. -
Dry thoroughly:
Set the rock aside until both paint colors are completely dry.
Add Sea Foam
Dab a tiny amount of white paint along the transition line between the teal water and the unpainted stone to create the look of crashing foam.
Step 4: Finishing Touches
-
Clean up edges:
If any paint smudged onto the bottom ‘sand’ section, use a damp Q-tip or a little sandpaper to gently remove it. -
Seal the stone:
Apply a coat of matte or satin varnish over the entire top surface of the rock to protect the paint and bring out the natural color of the unpainted stone.
Place your finished stone alongside some seashells for a lovely reminder of the coast
Four-Season Tree Series
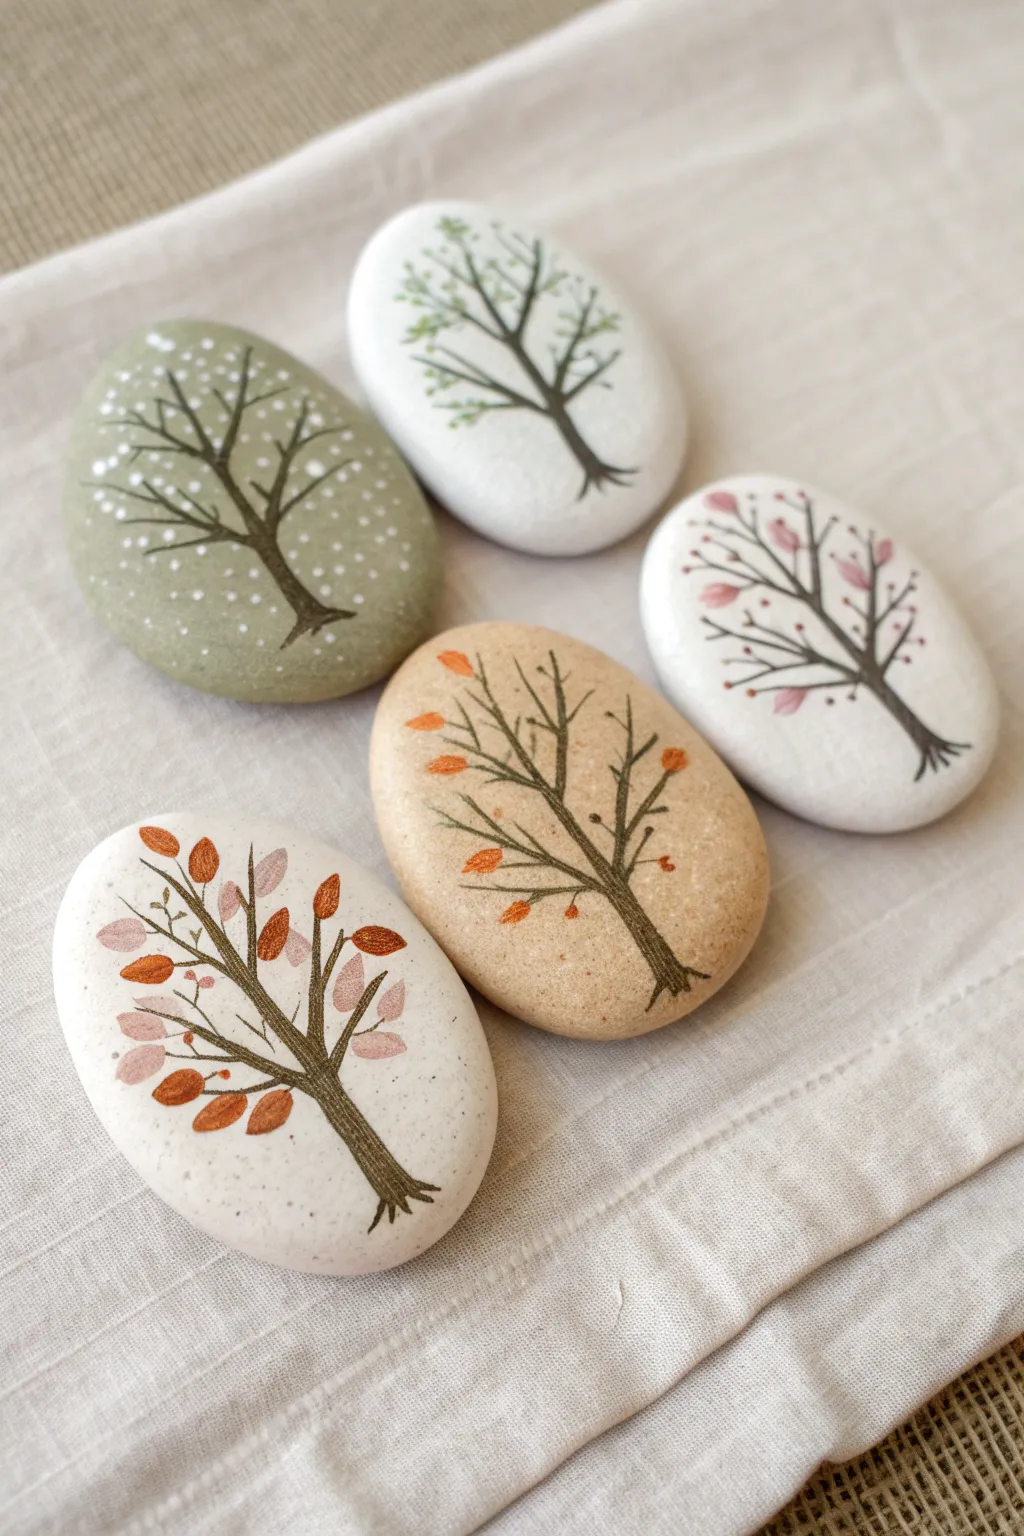
Capture the changing beauty of nature with this elegant set of five hand-painted stones, each depicting a tree in a different seasonal state. Using smooth river rocks as your canvas, you will create a cohesive series ranging from snowy winter branches to full autumn foliage.
Step-by-Step Guide
Materials
- 5 smooth, oval river rocks (approx. 2-3 inches long)
- Acrylic paints: Black (or dark brown), White, Sage Green, burnt Orange, soft Pink, light Green, and warm Beige
- Fine detail paintbrush (size 0 or 00)
- Small flat paintbrush (for base coats)
- Mod Podge or clear acrylic sealer (matte or satin finish)
- Palette or small dish for mixing
- Pencil (optional)
- Water cup and paper towels
Step 1: Base Preparation
-
Clean and Dry:
Begin by thoroughly washing your rocks with warm soapy water to remove any dirt or oils. Let them dry completely, as moisture will prevent the paint from adhering properly. -
Base Color Selection:
Select your base colors to match the seasons. For the winter and spring stones, you’ll need white or off-white. For the autumn stone, choose a warm beige or tan. For the snowy winter night stone, pick a sage or olive green. -
Painting the Backgrounds:
Using your flat brush, paint the entire top surface of each rock with its designated base color. You may need two thin coats for full coverage, especially on darker rocks. Allow the paint to dry fully between coats.
Step 2: The Tree Structure
-
Mixing the Trunk Color:
Mix a small amount of black with a tiny drop of brown to create a deep, natural charcoal shade for the tree silhouettes. Pure black can be a bit harsh, so softening it adds realism. -
Anchoring the Trunk:
On your first dried stone, use the fine detail brush to paint the main trunk line. Start near the bottom edge of the stone, pressing slightly harder for a wider base, and lift pressure as you move upward to taper the trunk. -
Adding Main Branches:
Paint three to four main branches extending from the trunk. Keep your wrist loose and allow the lines to be slightly squiggly or irregular; nature rarely makes perfect straight lines. -
Detailed Twigs:
From each main branch, extend smaller, finer twigs outward. I find it helpful to think of a ‘Y’ shape when splitting branches ensuring the tips act like delicate veins reaching toward the edge of the rock. -
Repeat for All Stones:
Repeat the trunk and branch process for all five stones. While the basic structure is similar, vary the curvature slightly so each tree has its own personality. Let the black paint dry completely before moving to leaves.
Brush Control Tip
For super fine branches, thin your black paint slightly with a drop of water. It should be the consistency of ink, allowing it to flow off the brush smoothly without dragging.
Step 3: Seasonal Details
-
Winter Snow (Green Stone):
For the green-based stone, dip the very tip of your detail brush or a toothpick into white paint. Dot tiny specks all around the branches and falling through the ‘air’ to mimic a gentle snowfall. -
Early Spring (White Stone):
On one of the white stones, mix a very watery, pale green. lightly dab this color onto the very tips of the finest branches to represent the first tiny buds of new growth. -
Spring Blossoms (White Stone):
On the second white stone, use soft pink paint. Create small, teardrop-shaped buds attached to the branches. Vary the pressure to make some look like closed buds and others like opening flowers. -
Autumn Breeze (Tan Stone):
For the beige stone, use safety orange or burnt sienna. paint small, sparse oval shapes on the branches, and paint a few ‘floating’ away from the tree to suggest leaves falling in the wind. -
Full Foliage (Large White Stone):
For the final, most detailed stone, layer multiple colors. Start with larger rust-colored leaves, then add lighter soft pink and orange leaves over top once the first layer dries to create depth and volume.
Magnetize It
Glue strong round magnets to the back of these flat stones. They make a sophisticated, seasonal set for your refrigerator or a magnetic whiteboard.
Step 4: Finishing Touches
-
Review and Refine:
Line up your stones and check for any gaps. If a tree looks too bare, add a few more tiny black twigs to fill the empty space. -
Sealing the Art:
Once the paint is bone dry (give it at least an hour), apply a thin layer of clear sealer or Mod Podge. This protects the paint from chipping and gives the stones a unified, professional finish.
Display these charming stones together in a shallow bowl or line them up on a windowsill to enjoy a miniature forest year-round
Rock Monsters With Texture

This friendly little monster rock combines bright teal, polka dots, and a toothy grin for a project that is bursting with character. The smooth stone surface makes it perfect for clean lines and fun details like the zig-zag stripe and little horns.
Detailed Instructions
Materials
- Smooth, oval river rock (approx. palm-sized)
- Acrylic paints: Teal/Turquoise, Deep Red/Burgundy, Orange, White, Black, Dark Teal (or mix teal with a tiny bit of black)
- Flat paintbrush (medium size)
- Fine detail paintbrush (liner brush)
- Dotting tool or toothpick
- Pencil (optional)
- Clear acrylic sealer (matte or glossy)
Step 1: Base Colors
-
Clean the rock:
Begin by washing your rock with soap and water to remove any dirt or oils. Let it dry completely before starting. -
Sketch the division:
Using a pencil, lightly draw a curved line across the lower third of the rock. This will separate the monster’s body from its pants. -
Paint the body:
Fill the top two-thirds of the rock with your teal or turquoise acrylic paint. Apply two coats if necessary for solid, opaque coverage, letting the first coat dry before adding the second. -
Paint the bottom:
Paint the lower third section with a deep red or burgundy color. Ensure this edge meets the teal section neatly.
Smooth Surface Trick
If your rock has pits or bumps, apply a layer of white Gesso or a thick base coat of white acrylic first. Sand it lightly when dry for a perfect canvas.
Step 2: Adding the Details
-
Create the belt:
Using orange paint and a fine brush, carefully paint a zig-zag line exactly where yellow and red meet. Thickening this line slightly makes the colors pop. -
Sketch the face:
Once the base is fully dry, lightly sketch two large circles for eyes and a wide U-shape for the mouth. -
Paint the eyes:
Fill in the eye circles with bright white paint. You might need a second coat here to ensure the teal doesn’t show through. -
Draw the mouth shape:
Using a very fine brush and black paint, outline the wide, curved mouth. Don’t fill it in yet. -
Add the teeth:
Inside the mouth outline, paint a row of small white triangles hanging down from the top edge, and another row pointing up from the bottom edge. -
Define the grin:
Once the white teeth are dry, draw a thin black line connecting the points of the teeth to define the bite. -
Add pupils:
Paint two small black circles inside the white eye areas. Placing them slightly cross-eyed or looking in different directions adds a goofy personality. -
Outline the eyes:
Use your finest brush (or a black paint pen if you have one) to outline the white eyes with a thin black line.
Glow in the Dark
Use glow-in-the-dark paint for the eyes and the white polka dots. Your monster will turn into a spooky glowing guardian at night.
Step 3: Texture and Finishing Touches
-
Paint the horns:
Paint two small, orange triangle horns on the very top of the monster’s head. Outline them in black and add a tiny horizontal stripe on each. -
Add nose holes:
Paint two small, dark tear-drop shapes between the eyes for nostrils. -
Create body texture:
I like to use a dark teal color (or mix black into your base teal) to add random spots and speckles all over the teal section for texture. -
Dot the pants:
Dip a dotting tool or the back end of a paintbrush into white paint. Add polka dots evenly across the red bottom section. -
Highlight the dots:
For extra dimension, add a tiny dot of light blue or teal inside a few of the white polka dots. -
Seal the rock:
Once absolutely everything is dry, apply a coat of clear acrylic sealer to protect your monster from the elements.
Enjoy finding the perfect spot in your garden to hide your new monster friend


Have a question or want to share your own experience? I'd love to hear from you in the comments below!