If you love those glowing end-of-day skies, sunset rock painting is the perfect tiny canvas to chase that feeling. I’m sharing a mix of classic silhouettes and more playful twists so you can find a sunset rock idea that fits your mood.
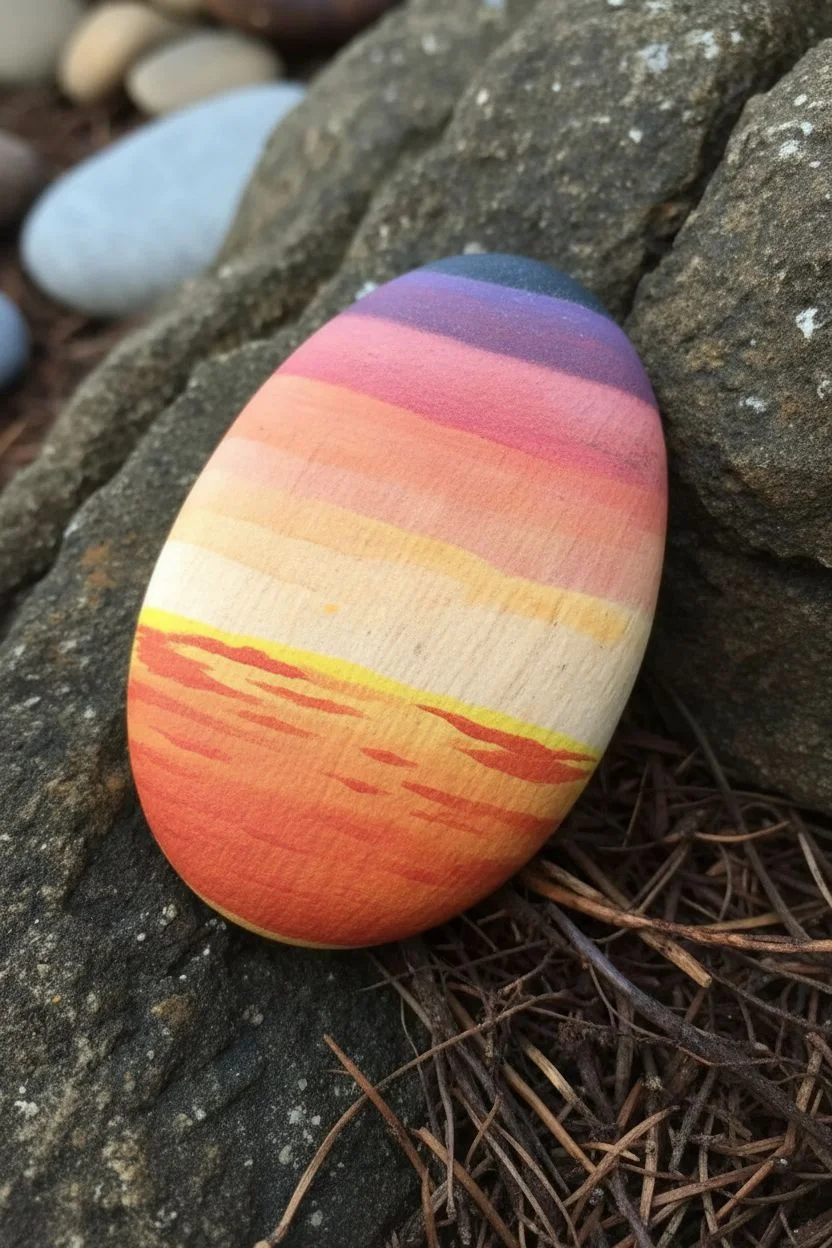
Classic Sunset Gradient With Horizon Line
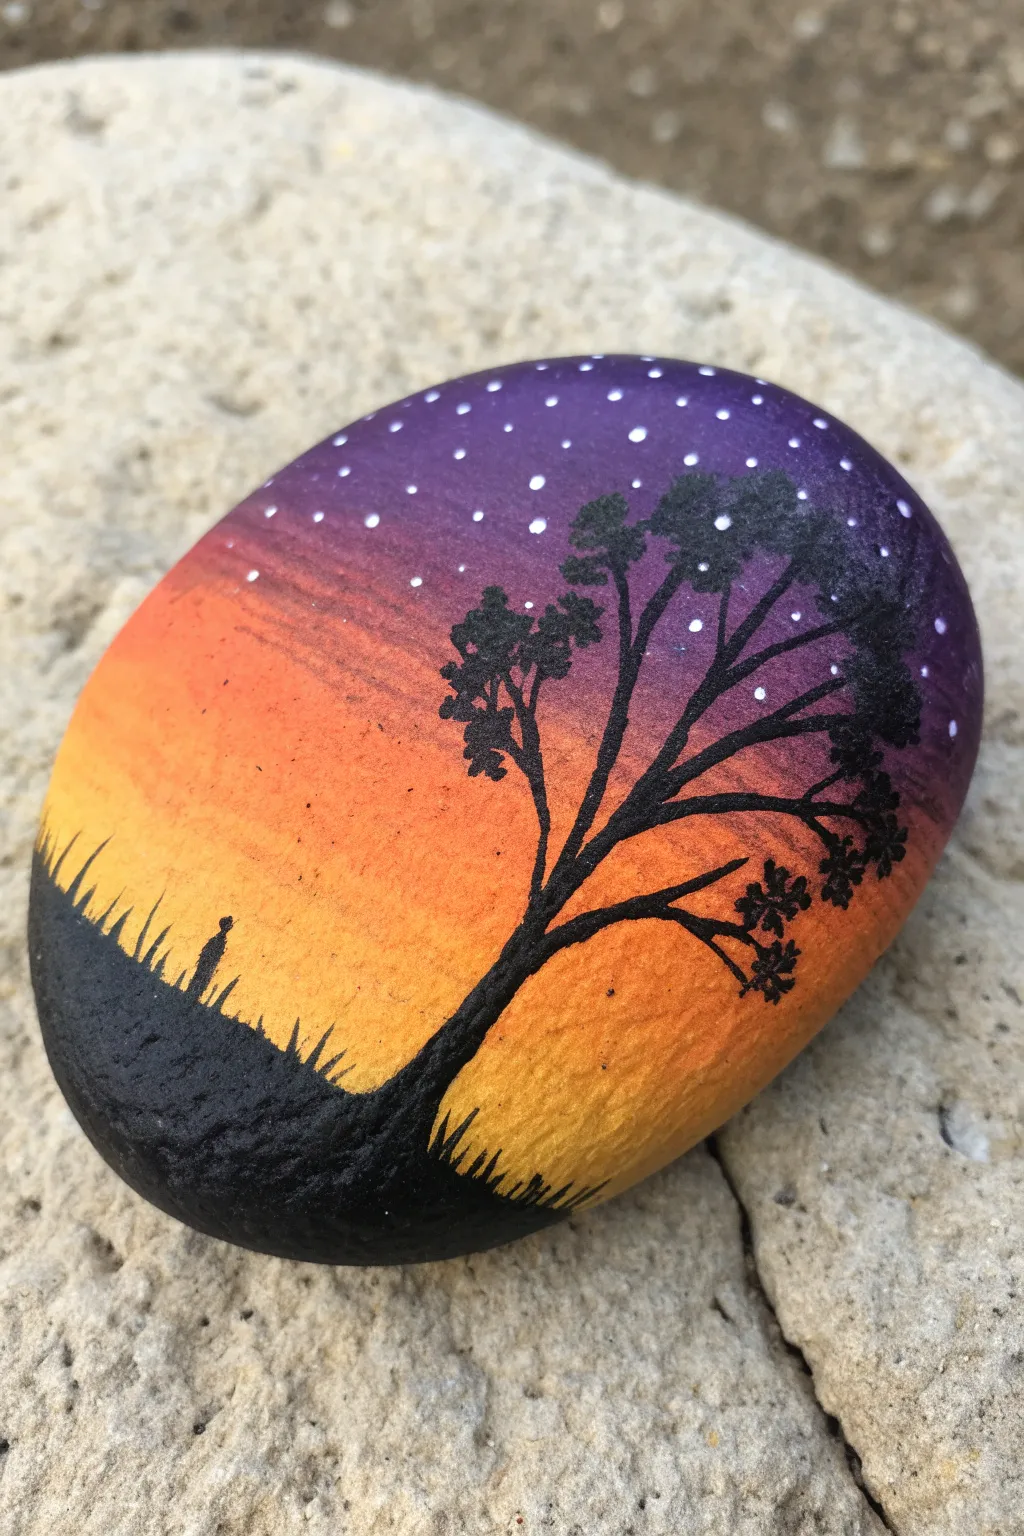
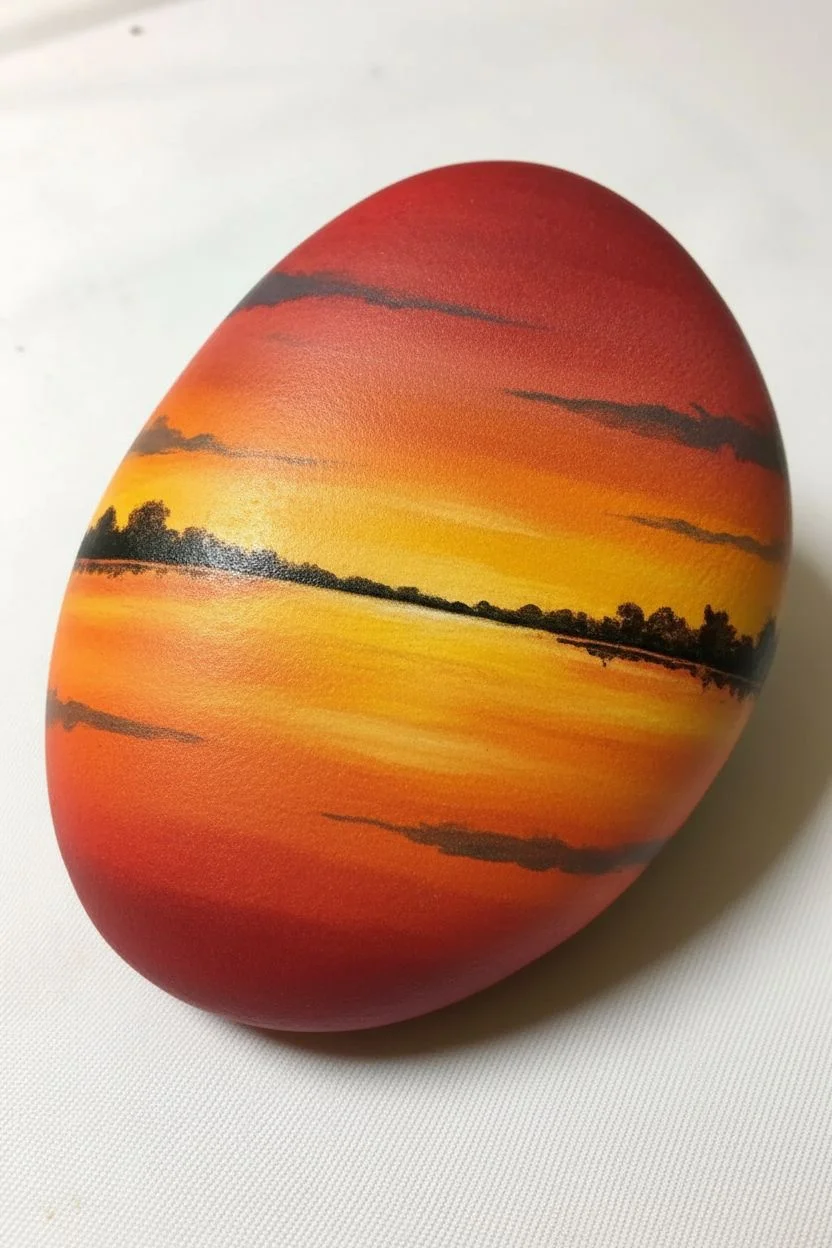
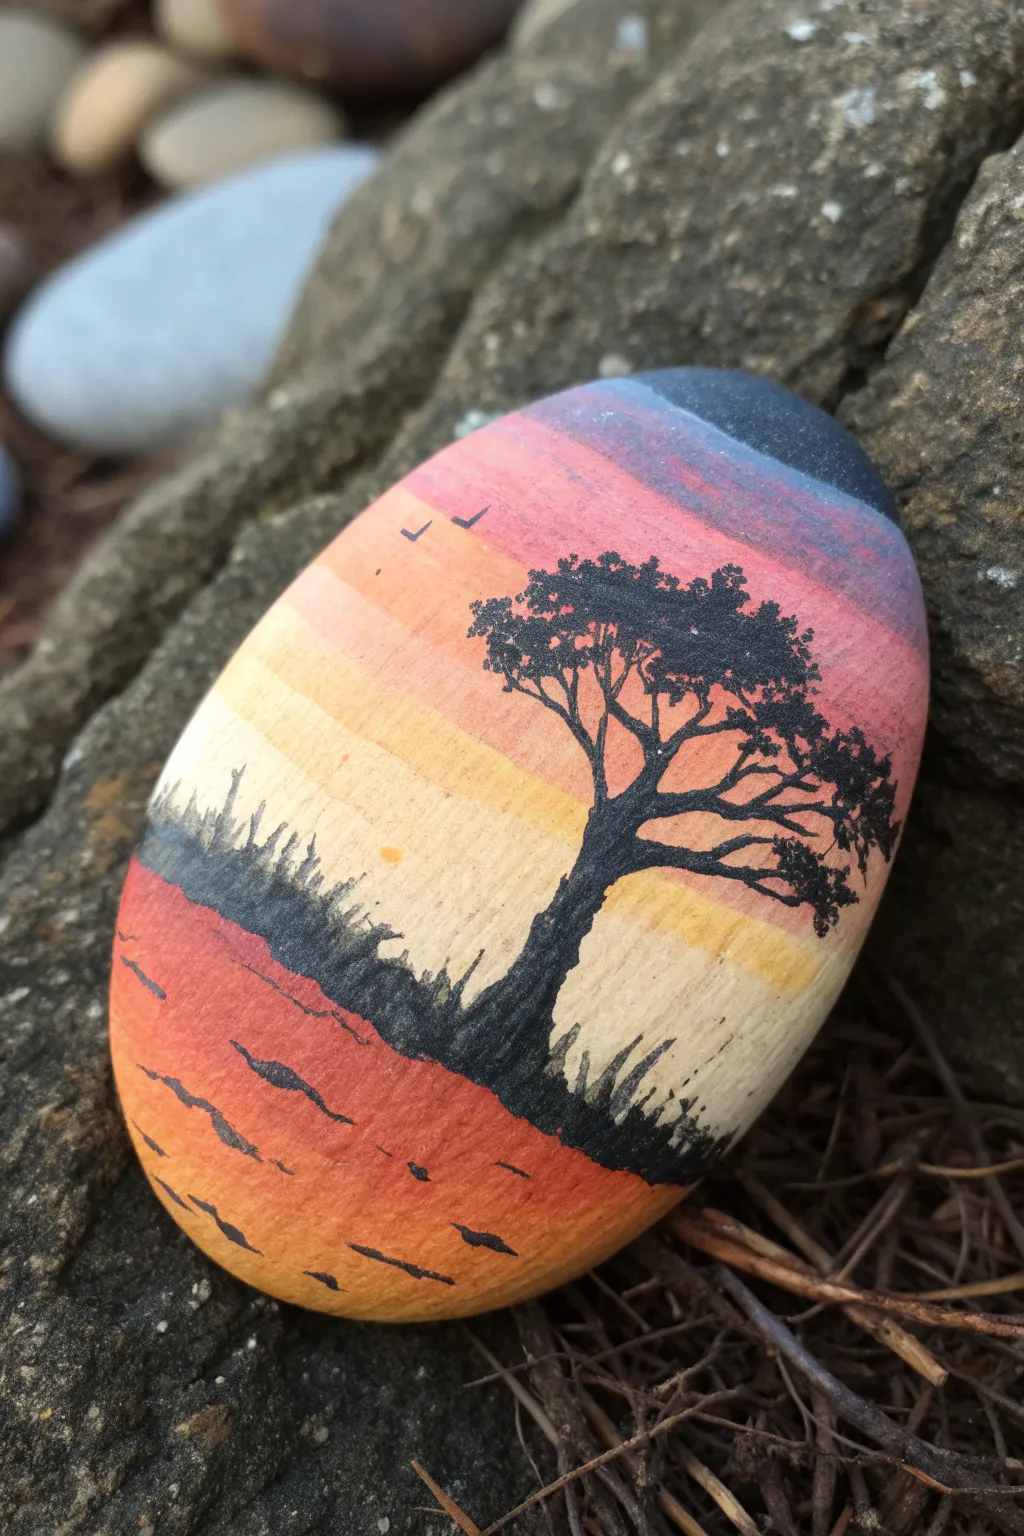
Capture the magic of twilight with this stunning painted rock project featuring a seamless sunset gradient and a peaceful silhouette. This design beautifully transitions from warm orange hues to a deep, starry purple sky, creating a perfect backdrop for the solitary figure and tree.
Detailed Instructions
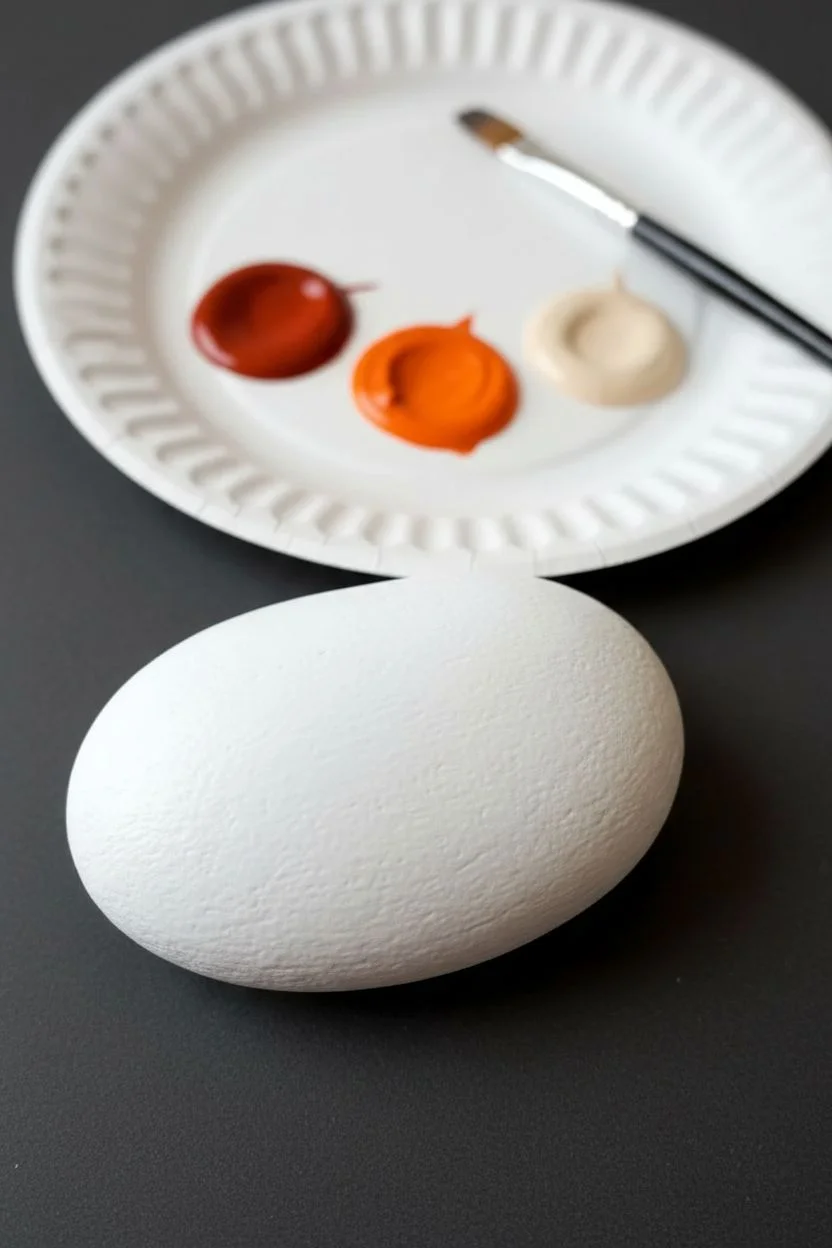
Materials
- Smooth, oval-shaped river rock (clean and dry)
- Acrylic paints: White, Yellow, Orange, Purple, Black
- Flat shader brush (medium size)
- Fine detail liner brush
- Makeup sponge or foam pouncer (for blending)
- Dotting tool or toothpick
- Cup of water and paper towels
- Spray sealant (gloss or matte)
Step 1: Prepping the Canvas
-
Clean the surface:
Ensure your rock is thoroughly washed with soap and water to remove any dirt or oils, then let it dry completely before starting. -
Apply a base coat:
Paint the entire top surface of the rock with a layer of white acrylic paint. This crucial step ensures the bright sunset colors will pop rather than looking dull against the grey stone. -
Let it cure:
Allow the white base coat to dry fully. If the rock texture is still showing through too much, apply a second thin coat of white.
Sponge Smoothing Secret
Make your sponge slightly damp, not wet. If it’s too wet, it will lift the paint off the rock instead of blending the colors together smoothly.
Step 2: Creating the Gradient Sky
-
Lay down the yellow:
Using your flat brush, paint a strip of bright yellow across the bottom third of the rock face. -
Add the orange band:
Paint a strip of orange directly above the yellow, covering the middle section of the rock. -
Apply the purple sky:
Paint the top third of the rock with a deep purple hue. While the paint is still wet, you need to work somewhat quickly for the next blending steps. -
Blend the transition zones:
Take a slightly damp makeup sponge and gently dab along the line where the yellow meets the orange to create a soft blur. Wipe the sponge, then do the same where the orange meets the purple. -
Refine the gradient:
If the transition looks too harsh, add a tiny bit of the lighter color onto the sponge and dab it into the darker area. The goal is a seamless fade from light to dark. -
Dry completely:
This background layer must be 100% dry before you add any black paint, or the colors will muddy.
Step 3: Painting the Silhouette
-
Outline the hill:
Using black acrylic paint and a medium brush, paint a curved, sloping hill at the bottom left of the rock, covering over the yellow section. -
Fill the foreground:
Fill in the entire hill area with solid black paint, ensuring it is opaque. -
Start the tree trunk:
Switch to a liner brush. Draw a thin, curving line extending from the bottom center-right of the hill upwards and towards the right side of the rock. -
Add main branches:
Paint 3-4 main branches splitting off from the trunk, reaching up into the purple section of the sky. -
Detail the foliage:
Use a small, stiff brush or a stippling motion with the liner brush to dab clusters of black leaves onto the ends of the branches. Keep them somewhat transparent at the edges to look like leaves. -
Paint the grass:
Using the very tip of your liner brush, flick short, quick strokes upward from the black hill to create the look of wild grass blades. -
Add the figure:
Carefully paint a tiny silhouette of a person standing on the hill, just to the left of the tree. A simple vertical dash with a small dot for a head works perfectly.
Muddy Colors?
If blending orange into purple turns grey/brown, let the orange dry first. Then glaze a very thin, watery layer of purple over the transition line.
Step 4: Final Details
-
Create the stars:
Dip a dotting tool or the tip of a toothpick into white paint. Gently place small dots scattered across the purple section of the sky. -
Vary the sizes:
I like to make some stars slightly larger than others to create depth, concentrating them mostly in the darkest purple area. -
Seal the artwork:
Once the paint is fully cured (give it a few hours), spray the rock with a clear sealant to protect it from weather and scratches.
Place your finished sunset stone in a garden or on a desk where it can offer a moment of calm


Palm Tree Silhouette at Sunset
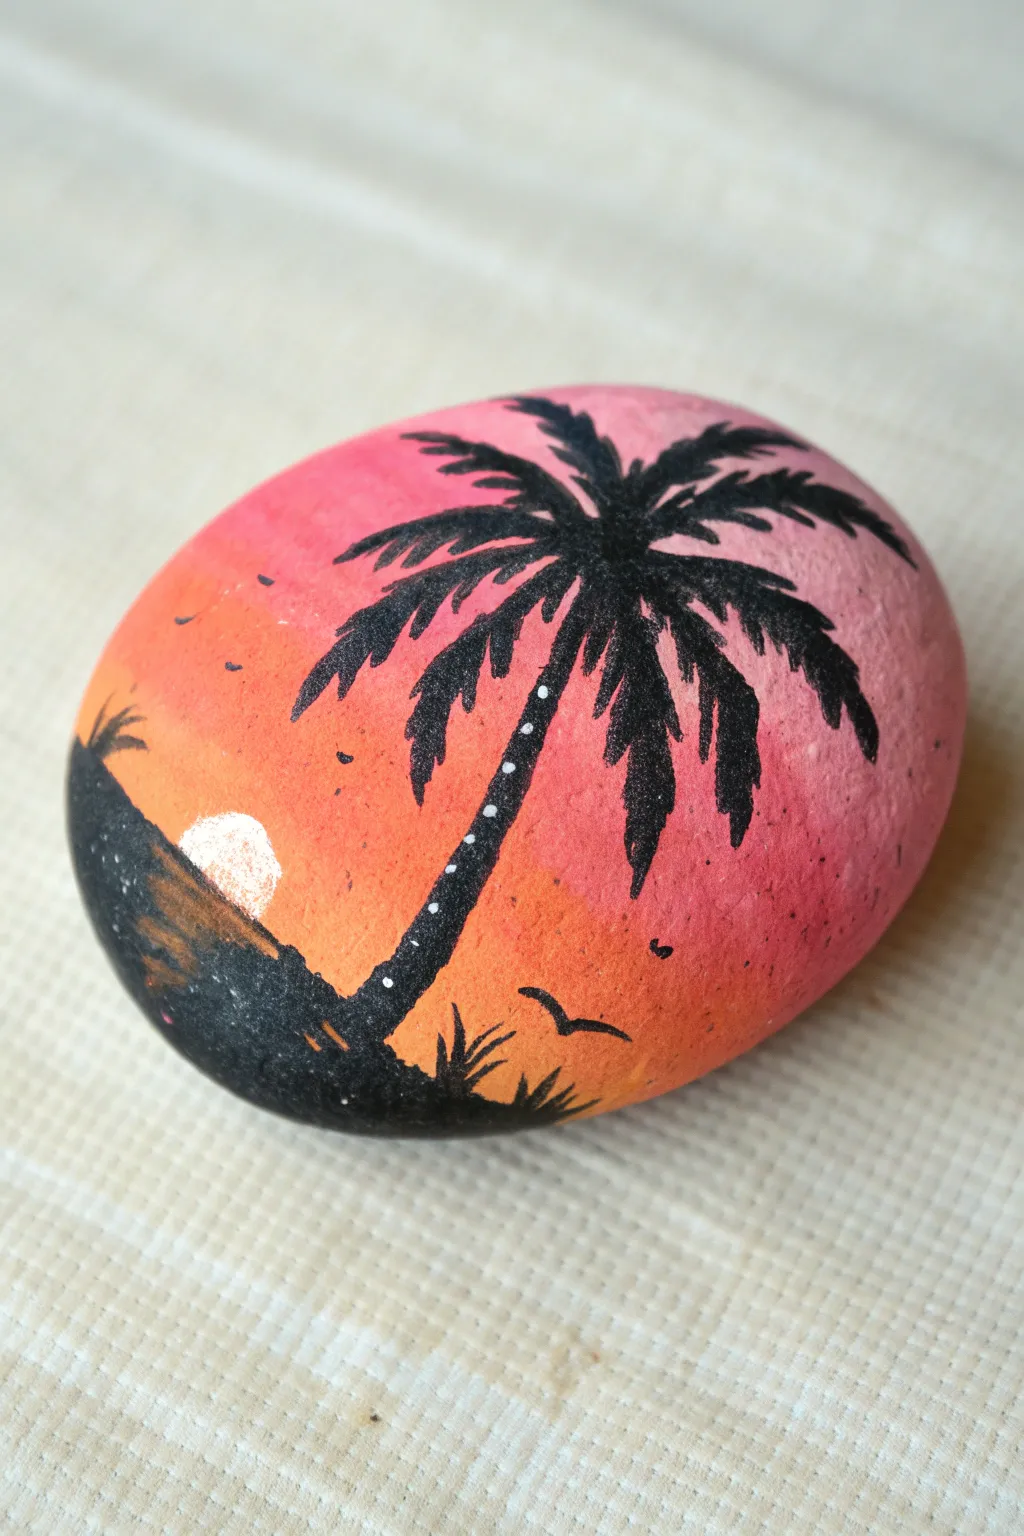
Capture the warmth of a tropical evening with this vibrant rock painting project, featuring a fiery gradient sky and a striking palm tree silhouette. The smooth stone surface is the perfect canvas for blending pinks and oranges into a serene sunset backdrop.
Step-by-Step Guide
Materials
- Smooth, round river rock (washed and dried)
- Acrylic paints: Bright Pink, Orange, Yellow, Titanium White, Black
- Flat paint brushes (medium and small)
- Fine liner brush or black paint pen (extra fine tip)
- Dotting tool or toothpick
- Clear acrylic sealer (spray or brush-on)
- Palette or paper plate
- Cup of water and paper towels
Step 1: Creating the Sunset Gradient
-
Base coat:
Start by painting the entire top surface of your clean rock with a coat of Titanium White. This crucial step ensures your sunset colors will pop brilliantly rather than soaking into the grey stone. -
Blocking in colors:
While the white is dry, squeeze out your pink, orange, and yellow paint. Apply a band of hot pink across the top third of the rock’s surface. -
Adding orange:
Paint a middle band of bright orange below the pink, letting the wet edges touch slightly. -
Adding yellow:
Fill the remaining bottom section with yellow, again allowing the border to meet the wet orange paint above it. -
Blending the sky:
Using a slightly damp clean brush, gently stroke back and forth horizontally where the pink meets the orange to create a seamless transition. Repeat for the orange-to-yellow transition until you have a smooth gradient. -
Drying time:
Let this background layer dry completely. If the colors look streaky, apply a second coat repeating the gradient process for full opacity.
Smooth Blending Trick
If acrylics dry too fast while blending the sky, mix a drop of water or ‘flow improver’ into your paint on the palette first to keep it workable longer.
Step 2: Painting the Silhouettes
-
Establishing the ground:
Using black paint and a small flat brush, paint a curved hill roughly across the bottom left quadrant of the rock. -
Adding texture:
Dab the brush slightly at the top edge of the black hill to simulate grass or uneven terrain, rather than painting a perfectly smooth line. -
Stem structure:
With a fine liner brush and black paint, draw a long, slightly curved line extending from the black hill up toward the top right. Thicken the base slightly where it meets the ground. -
Frond center lines:
At the top of your trunk, verify the paint is dry, then paint 5-7 distinct curved lines radiating outward like fireworks to establish the main veins of the palm fronds. -
Adding the leaves:
Switch to your finest liner brush. Along the bottom edge of each frond line, paint tiny, quick flicking strokes downward/outward to create the feathery palm leaves. -
Distant details:
On the far left horizon line of your black hill, paint a tiny version of a palm tree to create depth and perspective.
Glittery Shores
Mix a pinch of fine gold glitter into the sealer coat, or dab gold metallic paint onto the water reflection area for a magical shimmering effect.
Step 3: Final Details
-
Painting the sun:
Mix a tiny amount of yellow with white. Carefully paint a semi-circle or round shape seemingly setting into the black hill on the left side. -
Adding birds:
Use your finest brush or a black paint pen to make tiny ‘v’ or ‘m’ shapes in the orange section of the sky for distant seabirds. -
Trunk texture:
Dip a dotting tool or toothpick into white paint. Add a vertical row of tiny dots going up the center of the palm tree trunk for a decorative highlight. -
Sealer:
Once the entire rock is bone dry—I usually wait at least an hour—apply a coat of clear acrylic sealer to protect your painting from chipping and make the colors shine.
Place your finished tropical masterpiece on a desk or in the garden to keep those vacation vibes close by


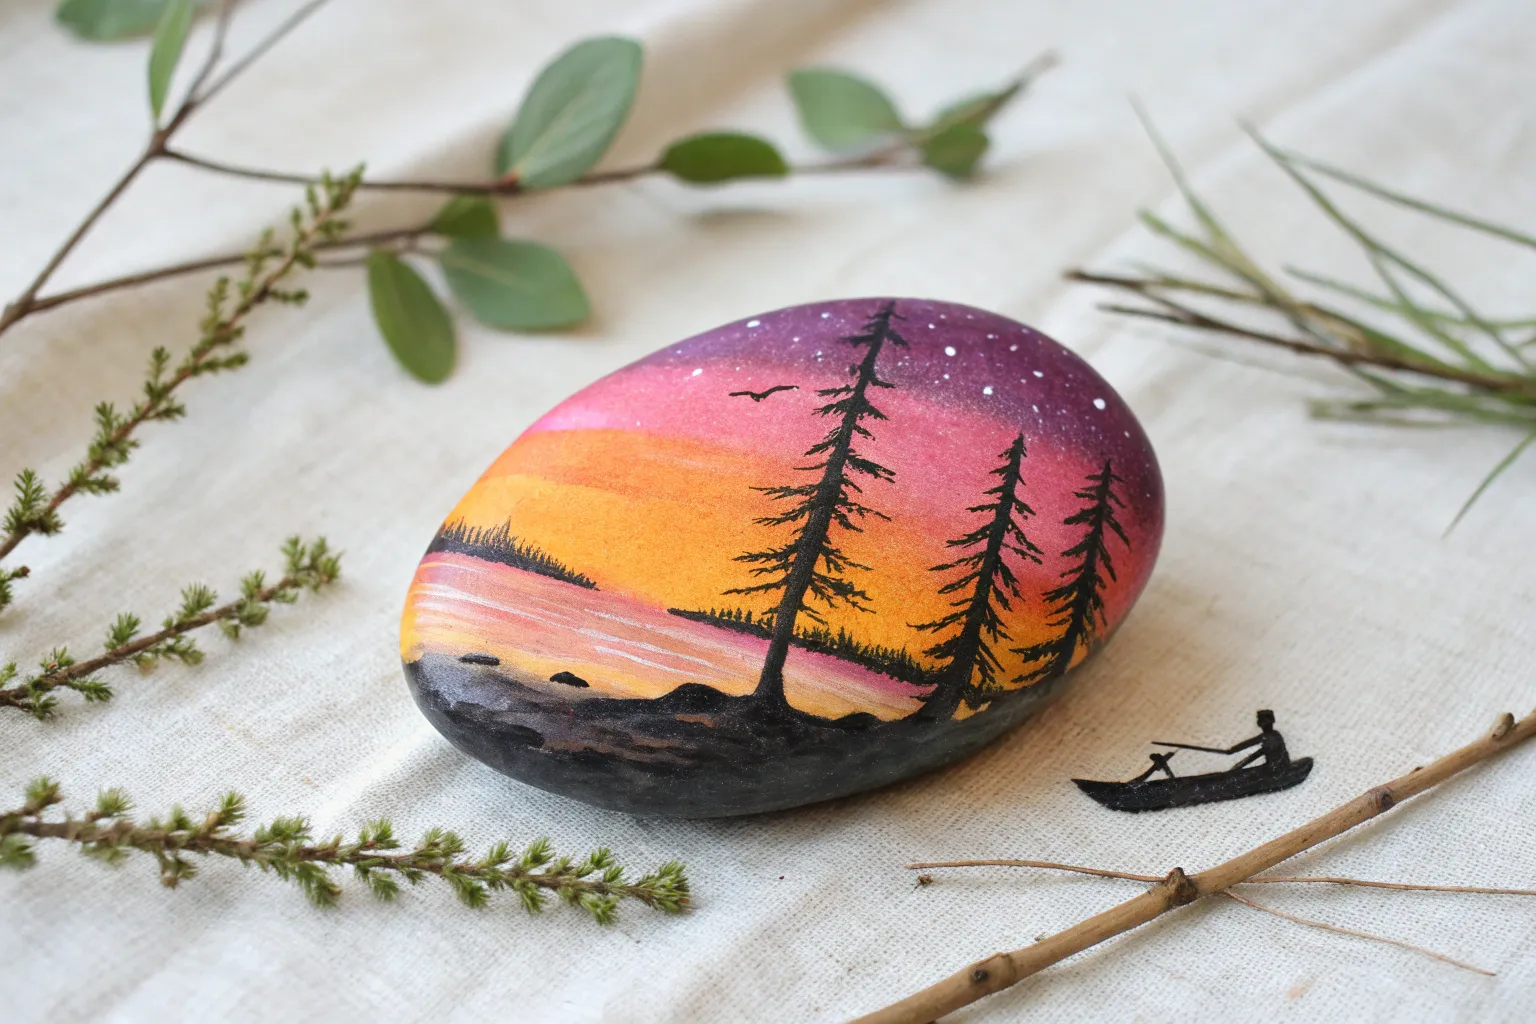
Pine Tree Line Against a Purple Sunset
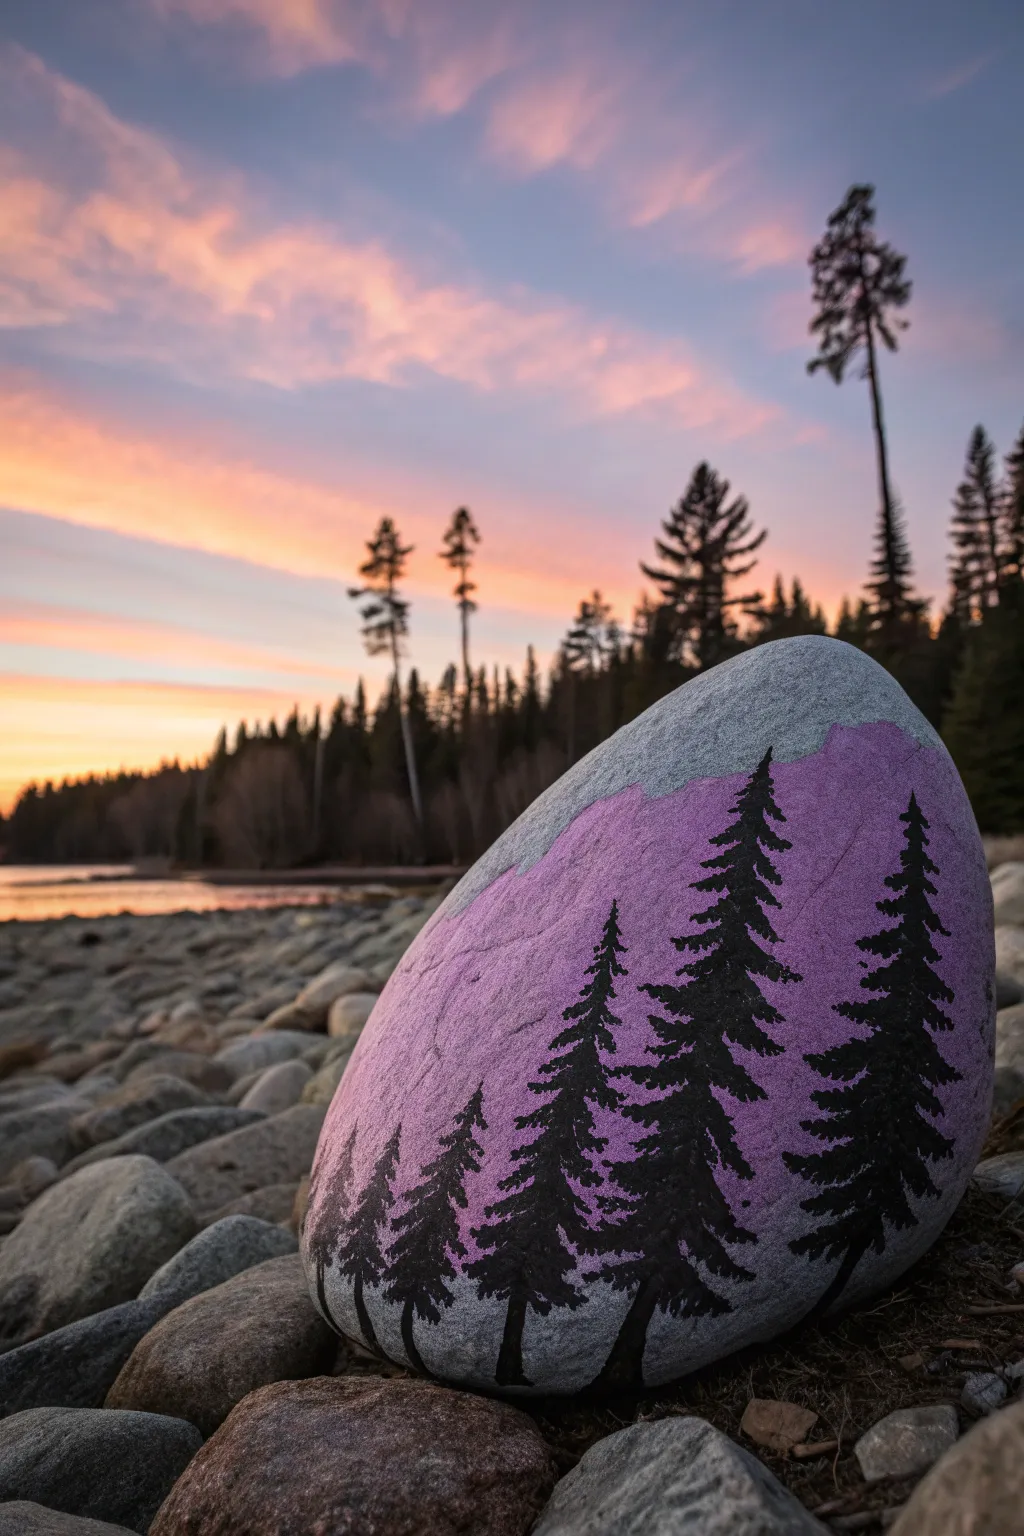
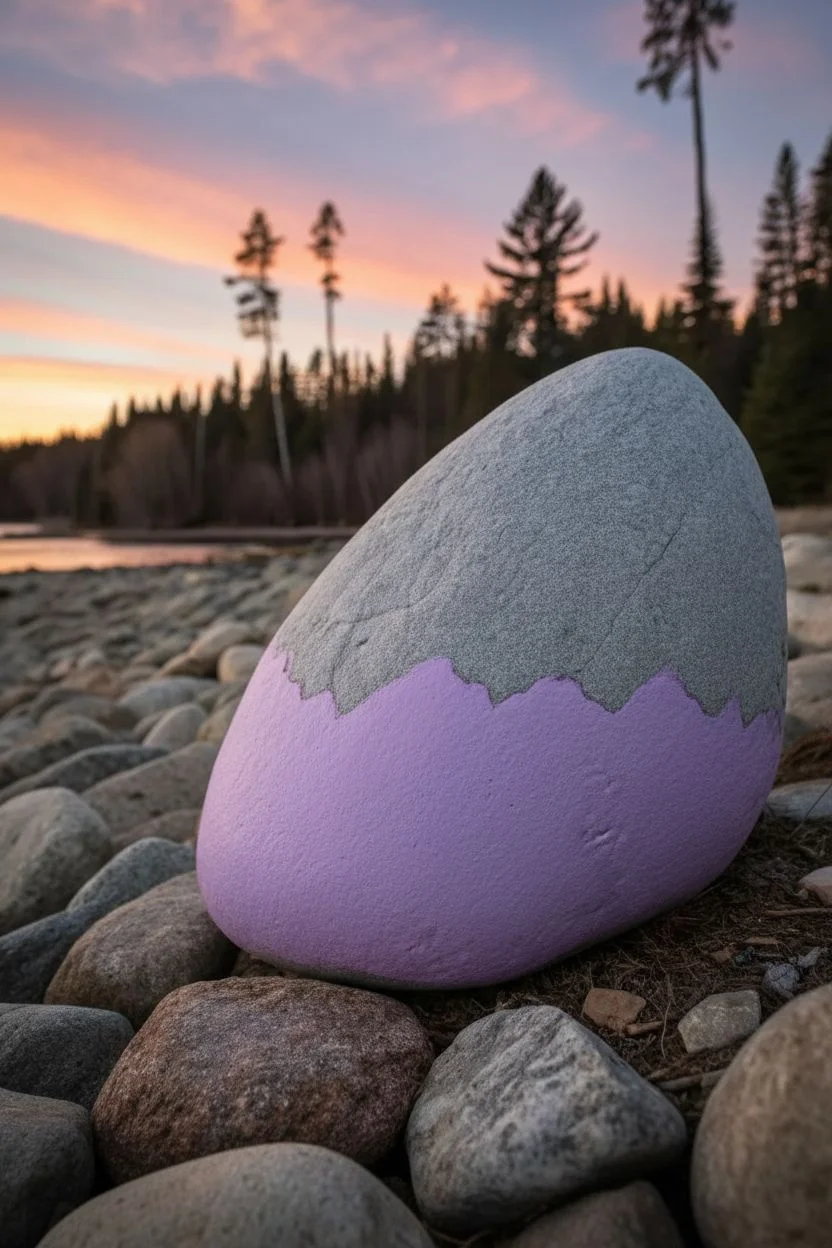
Capture the serene beauty of twilight with this evocative rock painting design that blends simplicity with striking contrast. By silhouetting delicate black pines against a soft purple mountain range, you create a peaceful scene that looks beautiful in any garden or on a desk.
How-To Guide
Materials
- Large, smooth oval river rock (grey or white base)
- Acrylic paints: Lavender/Light Purple, Black, White
- Flat brush (medium size)
- Fine detail liner brush (size 0 or 00)
- Small round brush
- Pencil (optional)
- Spray sealer (matte or satin finish)
- Water cup and paper towels
Step 1: Setting the Scene
-
Clean your canvas:
Begin by scrubbing your rock with warm soapy water and a stiff brush to remove any dirt or oils. Rinse thoroughly and let it dry completely in the sun or with a hairdryer. -
Base coat consideration:
Examine your rock’s natural color. If it is a nice, clean light grey like the one in the photo, you can leave the sky area unpainted. If your rock is dark or uneven, paint the top 2/3 of the rock with a mix of white and a tiny drop of grey acrylic to create a smooth, neutral sky. -
Sketching the mountains:
Using a pencil very lightly, draw a jagged, uneven line across the middle of the rock. This will be the ridge of your purple mountains. Make sure the line varies in height to look natural. -
Painting the mountain range:
Load your medium flat brush with lavender or light purple paint. Fill in the area below your pencil line, bringing the color down almost to the bottom edge of the rock, leaving just a sliver of raw stone at the base. -
Softening the edges:
While the purple paint is still slightly wet, I like to take a clean, damp brush and gently feather the bottom edge so it fades slightly rather than ending in a hard line. Let this purple layer dry completely before moving on.
Step 2: Adding the Forest
-
Planning the trees:
Visualize where your trees will stand. In this design, we have three distinct large trees on the right and smaller ones on the left. You can lightly mark vertical lines with a pencil to guide their placement. -
Painting the tree trunks:
Using your fine liner brush and black acrylic paint, draw thin vertical lines for the trunks. Start from the bottom of the purple area and extend them upwards. Make the tallest tree on the right extend well above the mountain line into the unpainted stone area. -
Starting the branches:
Switch to a very small round brush or keep using the liner. Start at the very top of your tallest tree. tap tiny horizontal dashes, getting slightly wider as you move down the trunk. -
Creating the iconic pine shape:
As you move lower on the tree, angle your strokes slightly downward. Use a stippling or dabbing motion rather than painting straight lines to mimic pine needles. -
Building density:
Make the branches denser and wider near the bottom of the tree. The black should be solid near the trunk and somewhat feathery at the tips. -
Repeating for the forest:
Repeat this process for the other two large trees on the right side. Vary their heights slightly to keep the composition interesting. -
Adding the distant trees:
For the smaller trees on the left side, use a lighter touch. Make these trees shorter and slightly less detailed to give the illusion that they are further away. -
Grounding the forest:
At the very bottom of the rock, use black paint to connect the base of all the trunks. Paint a narrow, uneven strip of black ground to anchor your trees so they aren’t floating.
Uneven Texture?
If the rock surface is too bumpy for fine lines, slightly water down your black paint to an inky consistency. It will flow into the crevices easier than thick paint.
Step 3: Finishing Touches
-
Touch-ups:
Check the silhouette against the ‘sky’. If any black branches look too thin, gently dab a little more paint to thicken them up. -
Cleaning edges:
If you accidentally smudged any purple into the sky area, use a small brush with a bit of grey-white paint (or water if the rock is unpainted) to tidy up the mountain ridge line. -
Sealing the art:
Once the black paint is bone dry (give it at least 20 minutes), take the rock outside and spray it with a clear matte or satin sealer. This protects the paint from chipping and weather.
Add Moonlight
Paint a tiny, crisp white crescent moon or a small white circle in the unpainted sky area above the tallest tree for a magical night-time effect.
Now you have a tranquil piece of nature captured in stone to enjoy forever


Sunset Over Water Reflection Bands
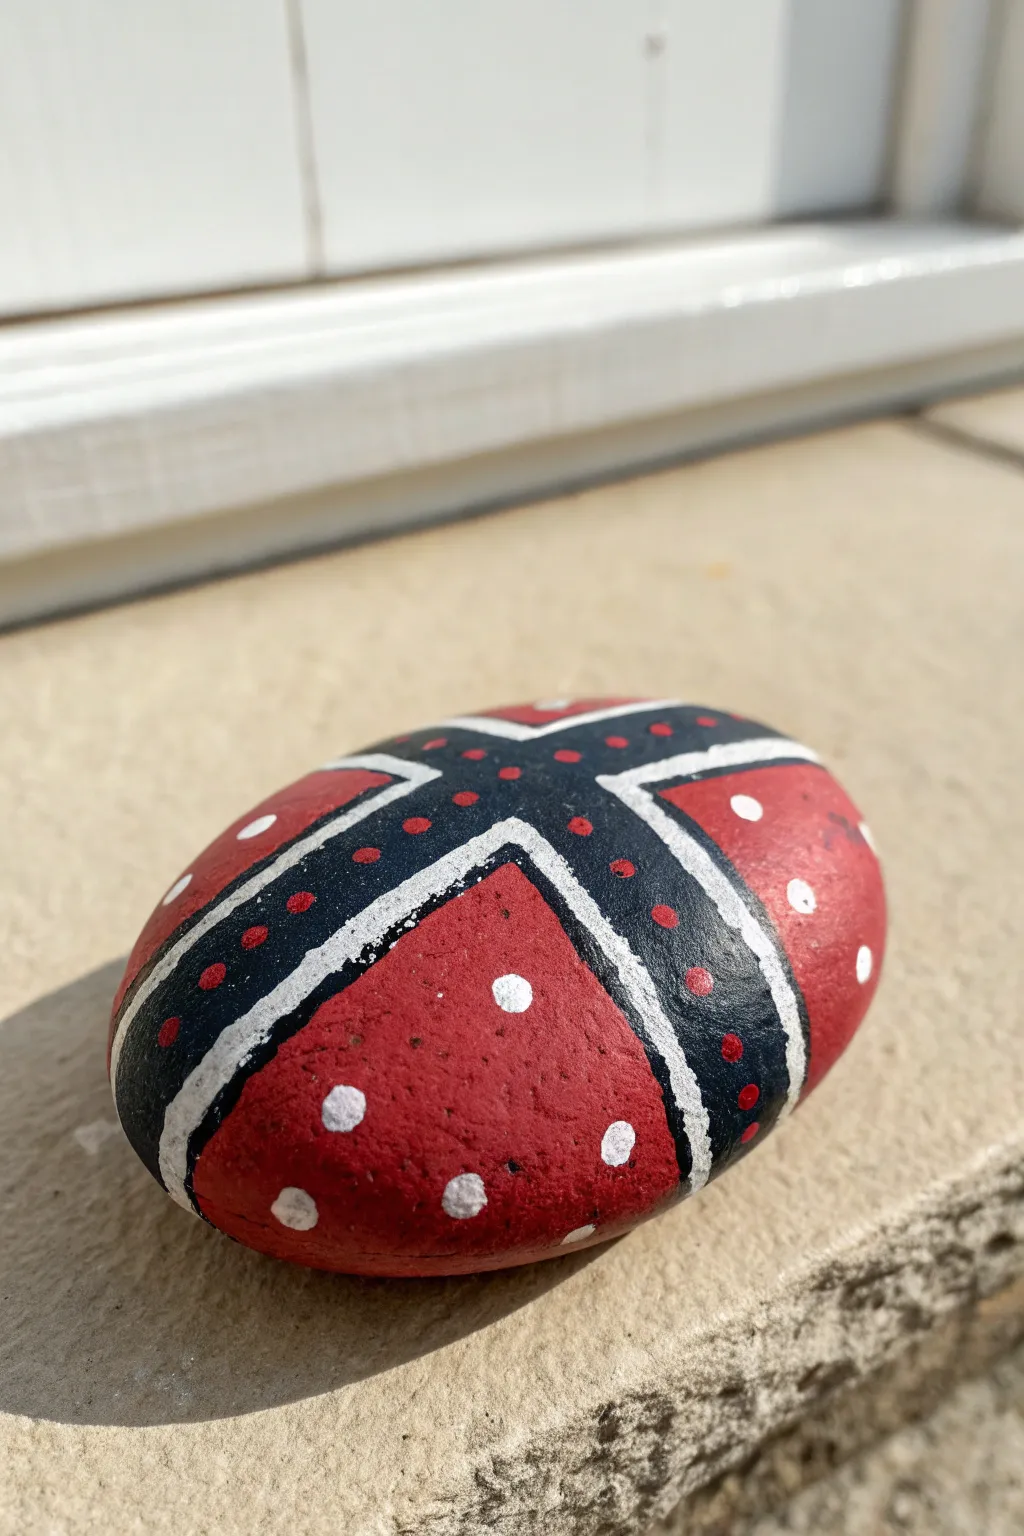
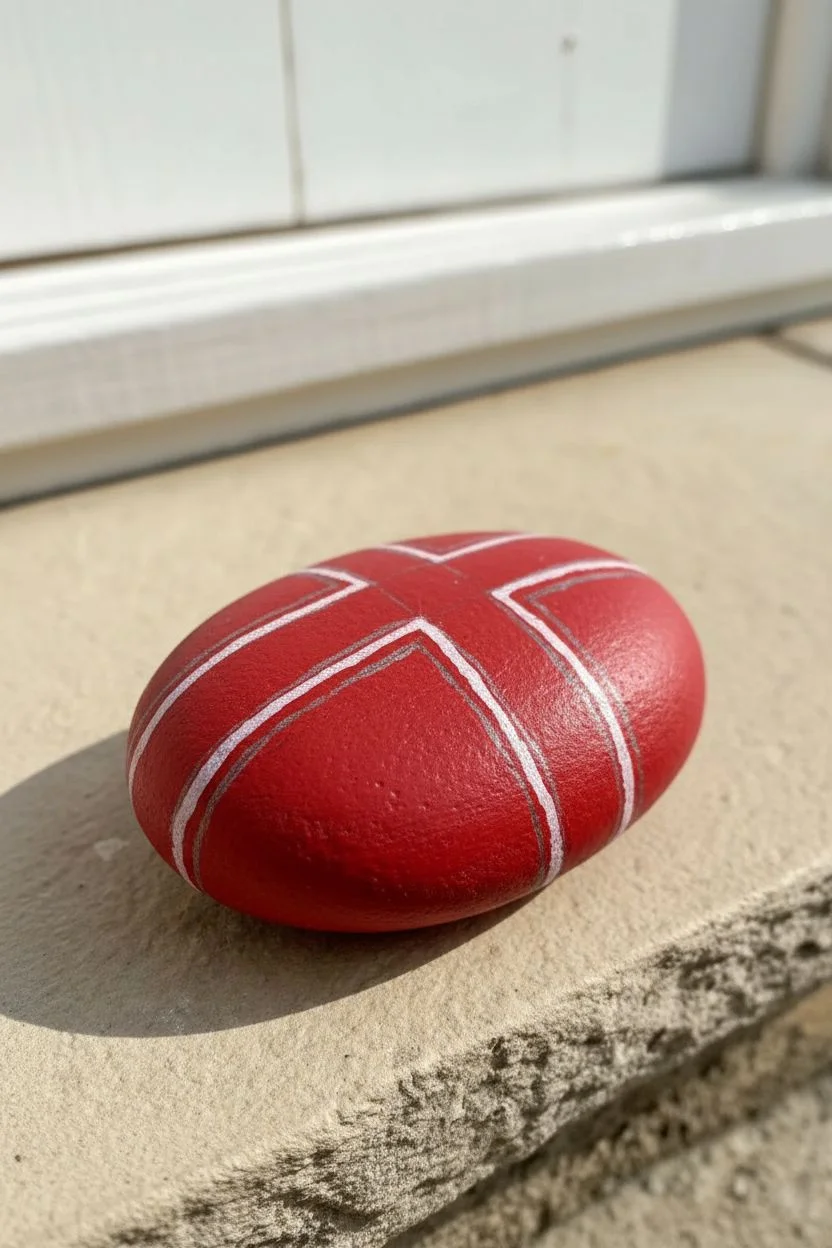
This striking painted rock features a bold geometric design reminiscent of a stylized flag or shield, combining clean lines with playful dot art. High-contrast sections of red and black are separated by crisp white bands, creating a visual pop that looks great in any rock garden.
Step-by-Step Guide
Materials
- Smooth, oval river rock (clean and dry)
- Acrylic paint (Red, Black, White)
- Flat paint brushes (small and medium)
- Fine liner detail brush
- Dotting tools (or toothpicks/ends of paintbrushes)
- Pencil for sketching
- Clear acrylic sealer (spray or brush-on)
- Palette or paper plate
Step 1: Base and Structure
-
Prime the Surface:
Before diving into the design, inspect your rock. If it’s very dark or porous, you might want to give it a quick base coat of white acrylic paint to help the red pop later. Let this dry completely. -
Sketch the Grid:
Using a light pencil, draw a large ‘X’ or cross shape across the entire surface of the rock. This should be wide enough to become the black band later. -
Define the Zones:
Sketch a smaller line inside each arm of your ‘X’. Essentially, you are drawing the boundaries for where the white stripes will separate the black cross from the red background sections. -
Paint the Red Sections:
Filling in the negative space first is often easier. Paint the four triangular sections between the arms of your cross with bright red acrylic paint. -
Apply Second Coat:
Red pigment can be transparent. Once the first layer is dry to the touch, apply a second coat of red to ensure a solid, opaque finish without streak marks.
Wobbly Lines?
To fix unsteady lines, wait for the paint to dry fully. Then, use a fine-tip paint pen (like a Posca pen) to re-trace the edges instead of a brush.
Step 2: Cross and Outlines
-
Paint the Center Black:
Using a steady hand and a small flat brush, fill in the central cross shape with black acrylic paint. Careful not to paint over the area you reserved for the white stripes. -
Refine the Edges:
If your black lines are a bit wobbly, don’t worry. You can clean them up in the next step, but try to keep the black paint smooth and flat. -
Create the White Bands:
With a fine liner brush or a very small flat brush, paint thick white stripes separating the red sections from the black cross. This high-contrast border is crucial for the design’s impact. -
Double Check Opacity:
White paint over dark rock often needs a second pass. I like to let the first white layer dry completely before adding a second to make it crisp and bright.
Level Up: Metallic Pop
Swap the white separating stripes for metallic silver or gold paint. It adds an elegant shimmer that catches sunlight beautifully outdoors.
Step 3: Dot Details
-
Prepare Dotting Tools:
Pour small puddles of red and white paint onto your palette. Select a medium-sized dotting tool for the main dots on the red sections. -
Add Large White Dots to Red:
Place about three to five large white dots randomly within each red triangular section. Keep them somewhat spaced out rather than clustered. -
Add Small White Dots to Red:
Switch to a smaller tool or a toothpick. Add tiny white dots near the edges of the red sections to fill in gaps and add texture. -
Dot the Black Cross:
Dip a small tool into the red paint. Carefully place a line of small red dots down the center of each black arm of the cross. -
Accent the Center:
Where the black arms meet in the middle, create a small cluster or cross pattern of red dots to unify the design. -
Final Cleanup:
Check for any stray paint marks. You can scrape dried mistakes off gently with a fingernail or paint over them with the background color. -
Seal the Rock:
Once absolutely everything is dry—give it extra time for the thick dots—finish with a clear acrylic sealer to protect your work from the elements.
Place your finished geometric rock in a sunny spot where the contrasting colors can really shine
BRUSH GUIDE
The Right Brush for Every Stroke
From clean lines to bold texture — master brush choice, stroke control, and essential techniques.
Explore the Full Guide
Setting Sun Orb With Soft Glow
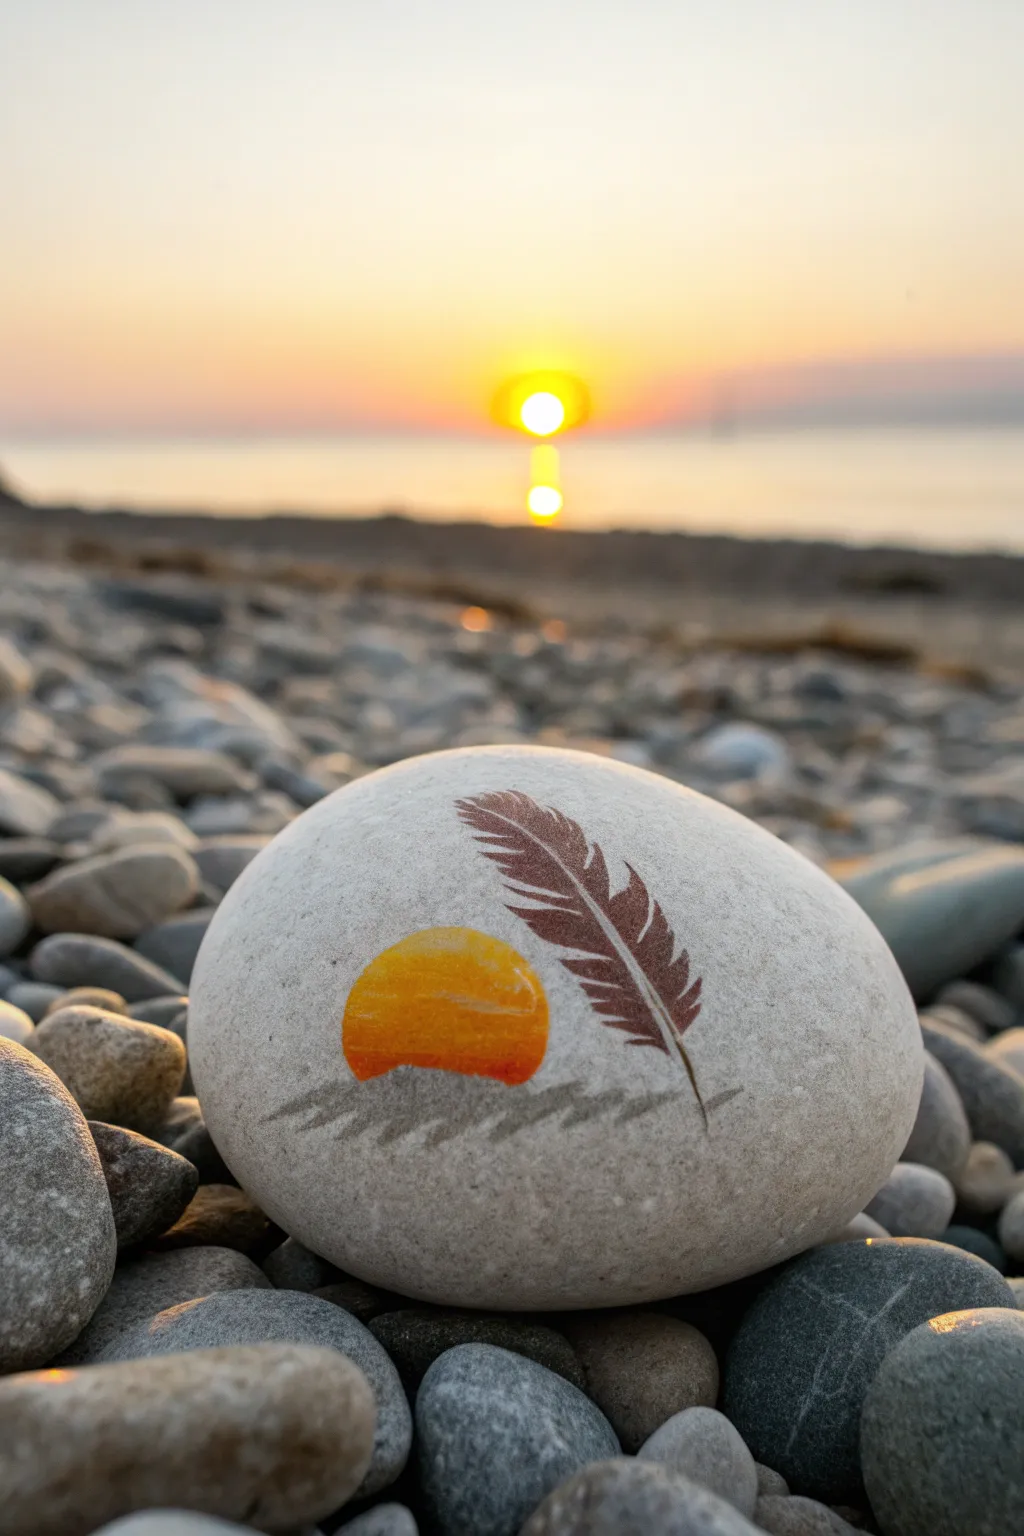
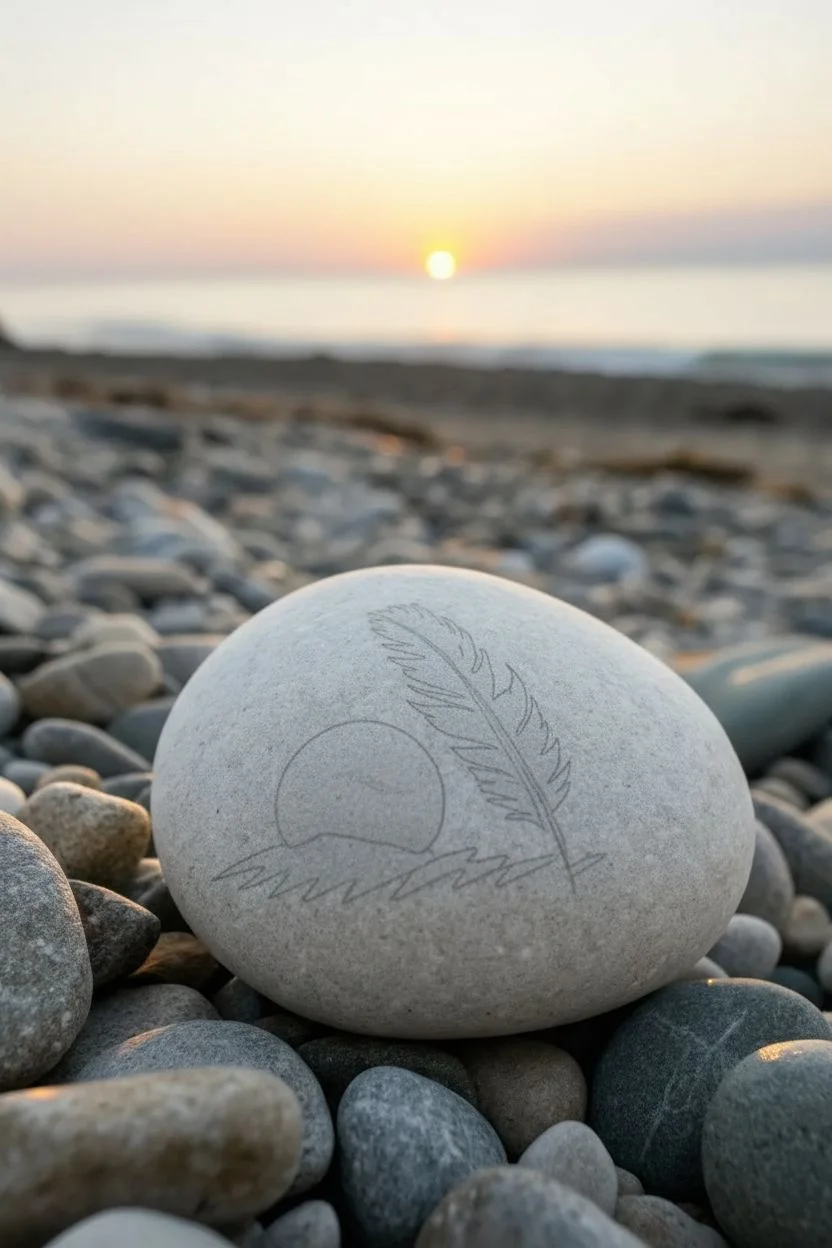
Capture the serene beauty of a setting sun with this minimalist rock painting design. Using just a few warm tones and a delicate feather motif against the natural stone, you’ll create a tranquil keepsake that glows with evening light.
Step-by-Step Tutorial
Materials
- Smooth, rounded pebble (light grey or white)
- Acrylic paints: Bright Yellow, Orange, Deep Red-Orange
- Brown fine-point acrylic paint pen or liner brush
- Grey pencil or diluted grey paint
- Small flat brush
- Detail brush
- Water cup and paper towels
- Clear matte varnish (optional)
Step 1: Preparation & Base
-
Clean your canvas:
Begin by washing your stone thoroughly with warm soapy water to remove any sand, salt, or oils. Let it dry completely in the sun or with a hair dryer until bone dry. -
Plan placement:
Ideally, choose the flattest face of your stone. Visualize where your sun and feather will sit; keeping them centered creates a balanced, harmonious look.
Natural Texture
Don’t paint a background color! Letting the raw stone texture show through mimics the sandy beach atmosphere perfectly.
Step 2: Painting the Sun
-
Paint the yellow top:
Load your small flat brush with bright yellow paint. Create the top arch of a semi-circle in the lower-left quadrant of your stone’s face. Leave the bottom edge rough for blending later. -
Add the orange middle:
While the yellow is still slightly tacky, pick up some orange paint. Apply it just below the yellow, gently overlapping the two colors to encourage a soft gradient where they meet. -
Deepen the base:
Finish the sun orb by painting a deep red-orange strip at the very bottom. Blend this upward into the orange mid-tone to create the effect of the sun sinking into the horizon. -
Refine the shape:
Use a clean, damp brush to smooth out the outer curve of your sun if needed, ensuring it looks like a glowing dome. -
Let it set:
Allow the sun element to dry completely before moving on to avoid smearing the bright colors.
Add Sparkle
Mix a tiny amount of gold metallic paint into your yellow sun layer. It will catch the light beautifully, just like a real sunset reflection.
Step 3: Drawing the Feather
-
Sketch the quill:
Using your brown paint pen or a very fine liner brush with brown paint, draw the central spine (rachis) of the feather. Start near the bottom right of the sun and curve it diagonally upward to the right. -
Start the barbs:
Begin adding the individual hair-like strokes (barbs) on one side of the quill. Keep your strokes short and sweeping, angling them upwards towards the tip of the feather. -
Complete the shape:
Repeat the process on the other side of the quill. I like to make the barbs slightly shorter near the top and bottom to give the feather a natural, tapered oval shape. -
Add variation:
Intentionally leave small gaps or ‘splits’ in the barbs here and there. This makes the feather look realistic and wind-blown rather than perfect and stiff. -
Darken the spine:
Go back over the central spine once more to ensure it stands out clearly against the lighter stone background.
Step 4: Grounding Details
-
Create the horizon:
Mix a very watery grey wash or use a soft pencil. Gently sketch a few horizontal, jagged lines beneath the sun and feather quill to suggest distant waves or ground. -
Soften the lines:
If using paint, use a damp brush to blur these grey lines slightly so they don’t overpower the main sunset image. They should look like a shadow. -
Final check:
Look over your design one last time. If the sun needs more vibrancy, carefully add a second coat of yellow to the top area. -
Seal the stone:
Once everything is fully dry (give it at least an hour), apply a coat of clear matte varnish to protect your artwork from the elements without making it too shiny.
Place your finished stone on a windowsill or back on the beach to share a moment of peace with someone else
Birds in Flight Across a Sunset Sky
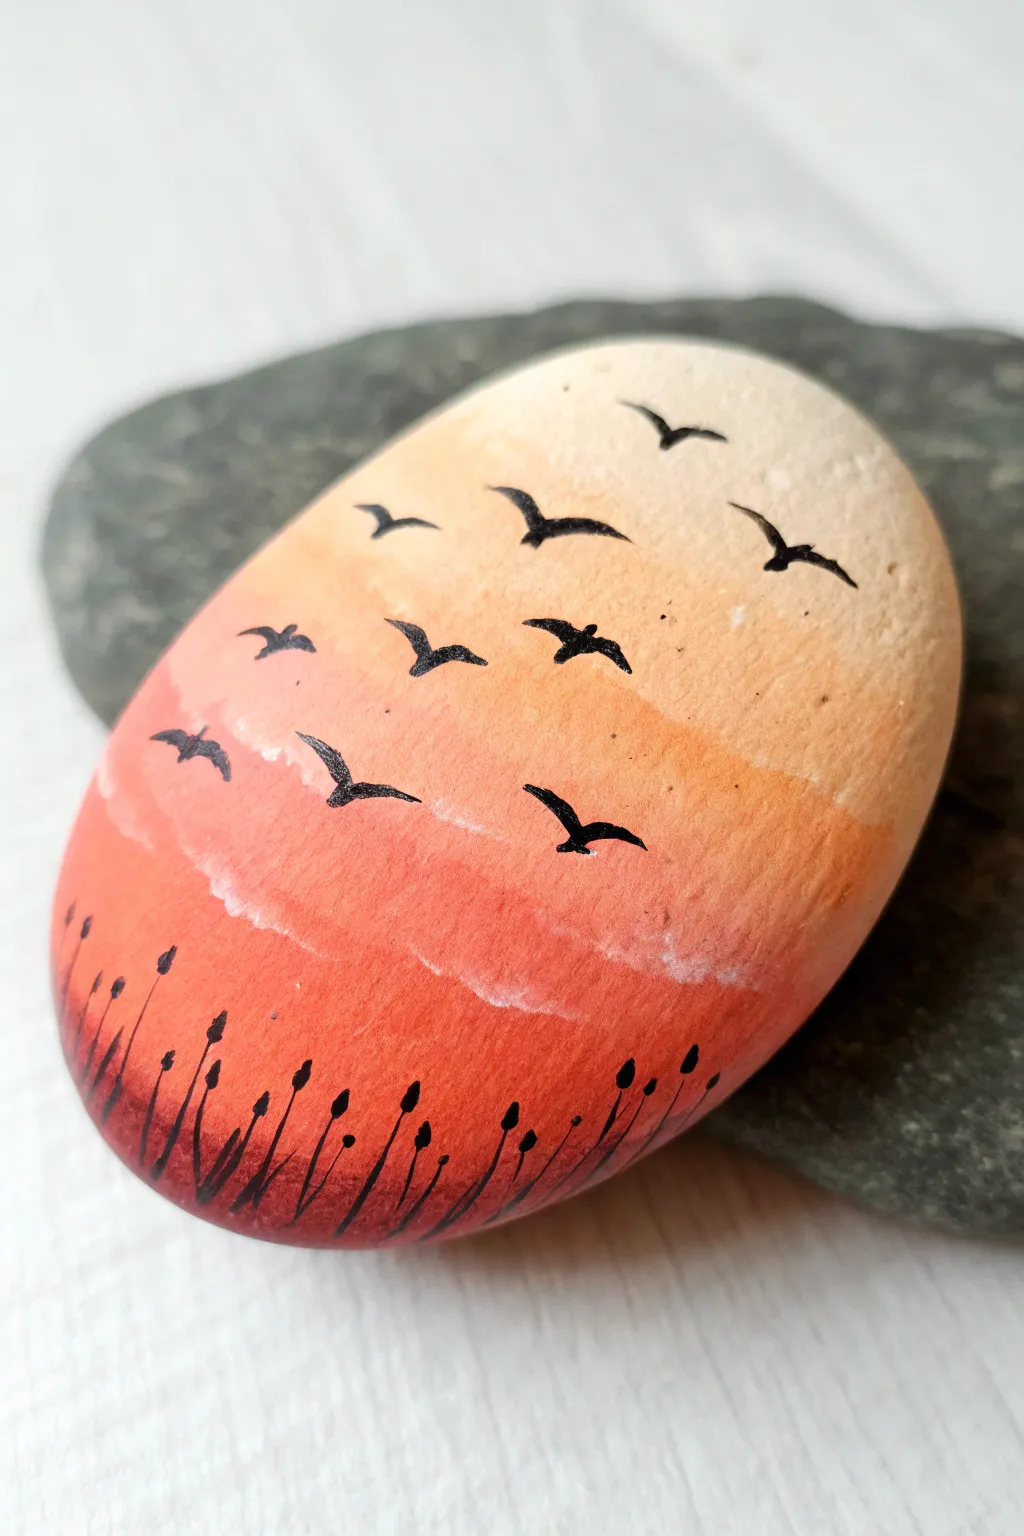
Capture the serenity of twilight with this beautiful gradient rock painting featuring a flock of silhouetted birds. The smooth blend of orange into cream creates the perfect glowing backdrop for the crisp, dark details of the foreground.
Step-by-Step
Materials
- Smooth, oval river rock (light-colored preferred)
- Acrylic paints (Titanium White, Orange, Red, Cream/Beige, Black)
- Flat shader brush (size 4 or 6)
- Fine liner brush (size 0 or 00) or extra-fine black paint pen
- Palette or paper plate
- Cup of water and paper towels
- Matte or glossy spray varnish
Step 1: Prepping the Base
-
Clean the Surface:
Begin by washing your stone with warm water and a little soap to remove any dirt or oils. Let it dry completely. If the stone is dark grey, apply a base coat of white acrylic paint to the entire surface to make the top colors pop. -
Mix Your Gradient Colors:
Prepare your palette with three distinct blobs of paint: a deep reddish-orange, a standard bright orange, and a creamy beige or off-white.
Step 2: Painting the Sunset Gradient
-
Apply the Bottom Color:
Using your flat brush, paint the bottom third of the rock with the deep reddish-orange. Don’t worry about a perfectly straight line at the top edge. -
Add the Middle Tone:
While the bottom layer is still slightly wet, paint the middle section with the bright orange. Where the two colors meet, gently brush back and forth horizontally to blend the seam. -
Finish the Sky:
Clean your brush and apply the cream or beige paint to the top third of the stone. -
Blend the Transition:
Use the damp brush to pull the cream paint slightly down into the orange, softening the line. I find that using a very light touch helps create that hazy, atmospheric look. -
Add Subtle Clouds:
Dip a corner of your brush into a tiny bit of white paint mixed with water. Gently tap or ‘scumble’ a few faint, horizontal cloud lines across the middle orange section to break up the gradient. -
Let It Dry:
Allow the background gradient to dry completely before starting the black details. This is crucial to prevent the black paint from bleeding into the sky.
Smooth Blending Trick
If your acrylics are drying too fast to blend properly, mix a drop of ‘slow drying medium’ or retarder into your paints before starting the gradient.
Step 3: Adding Silhouettes
-
Paint the Birds:
Using your fine liner brush or a black paint pen, carefully draw small ‘V’ shapes in the upper two-thirds of the rock. Vary the sizes and angles—some should look like they are banking or turning. -
Thicken the Wings:
Go back over the ‘V’ shapes to give the bird bodies a little more weight in the center and taper the wingtips to sharp points. -
Start the Grass:
At the very bottom curve of the rock, paint a solid black line to ground the scene. -
Add Grass Stems:
Flick your liner brush upward from the bottom black edge to create thin, curving stems. Vary the heights and let them cross over each other naturally. -
Detail the Seed Heads:
At the top of some grass stems, add small, oval-shaped blobs to represent seed heads or cattails. Keep these silhouettes simple and crisp. -
Final Touches:
Check your composition. If there’s an empty looking spot in the sky, add one tiny distant bird to balance it out. -
Seal the Artwork:
Once the black paint is bone dry (wait at least an hour), spray the rock with a clear varnish to protect the paint and give it a finished sheen.
Fixing Birds
If a bird shape goes wrong or looks too blobby, wait for the black paint to dry completely, then paint over it with the background color and try again.
Place your finished sunset stone on a shelf or in the garden to add a peaceful splash of color to your day

PENCIL GUIDE
Understanding Pencil Grades from H to B
From first sketch to finished drawing — learn pencil grades, line control, and shading techniques.
Explore the Full Guide
Sailboat Silhouette on a Sunset Sea
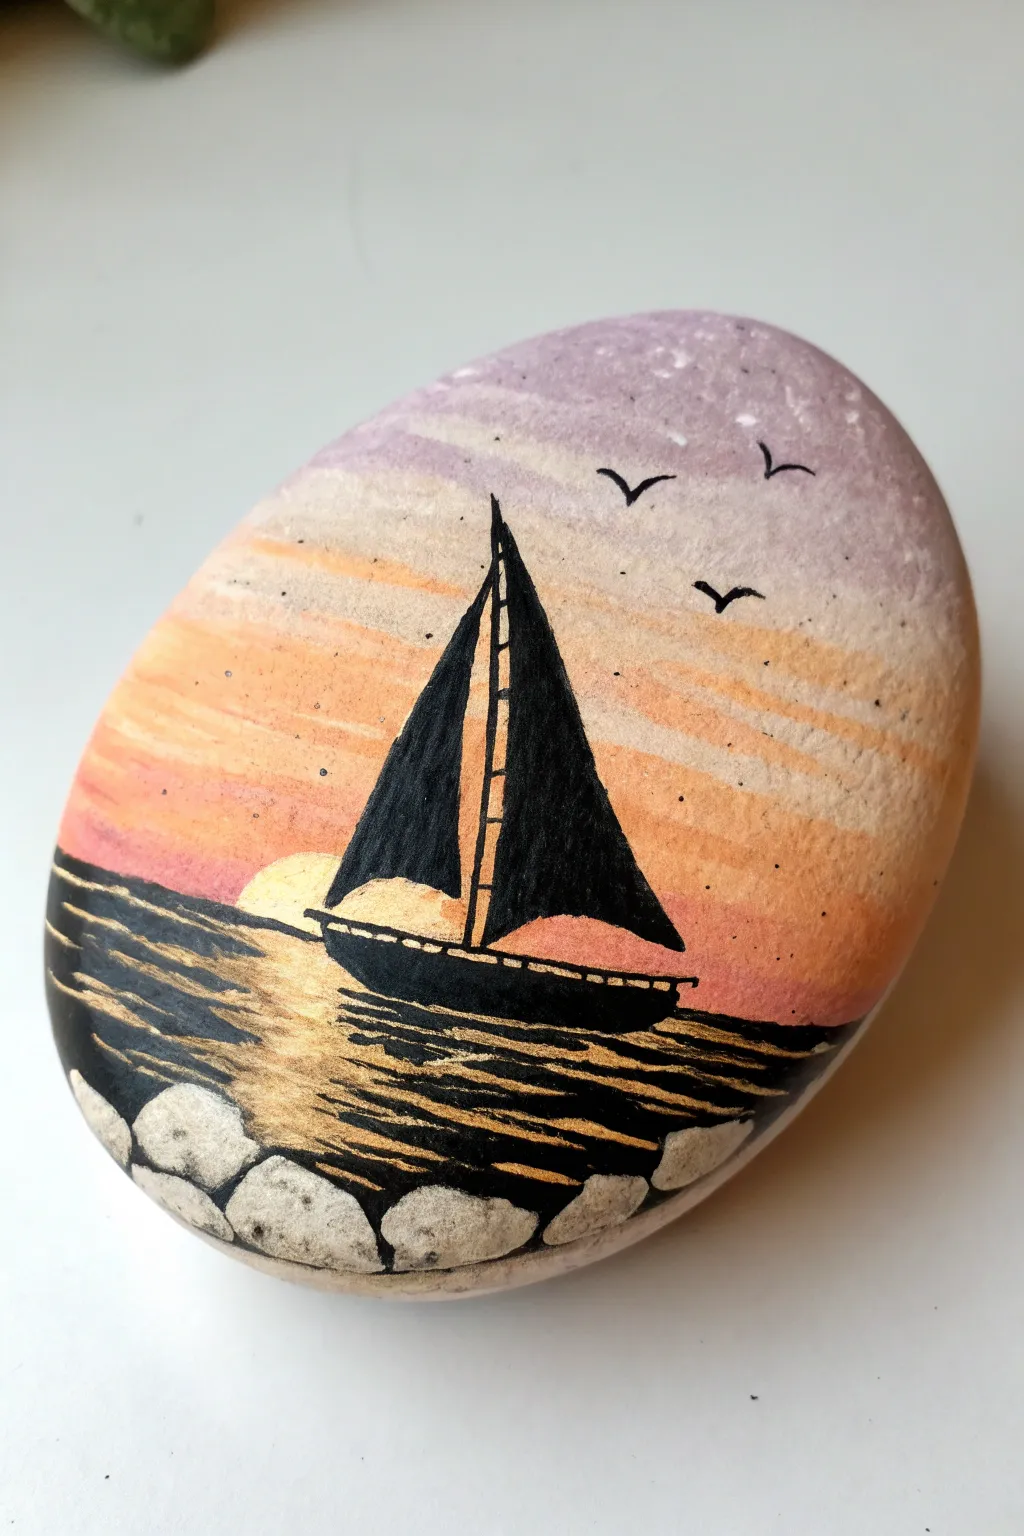
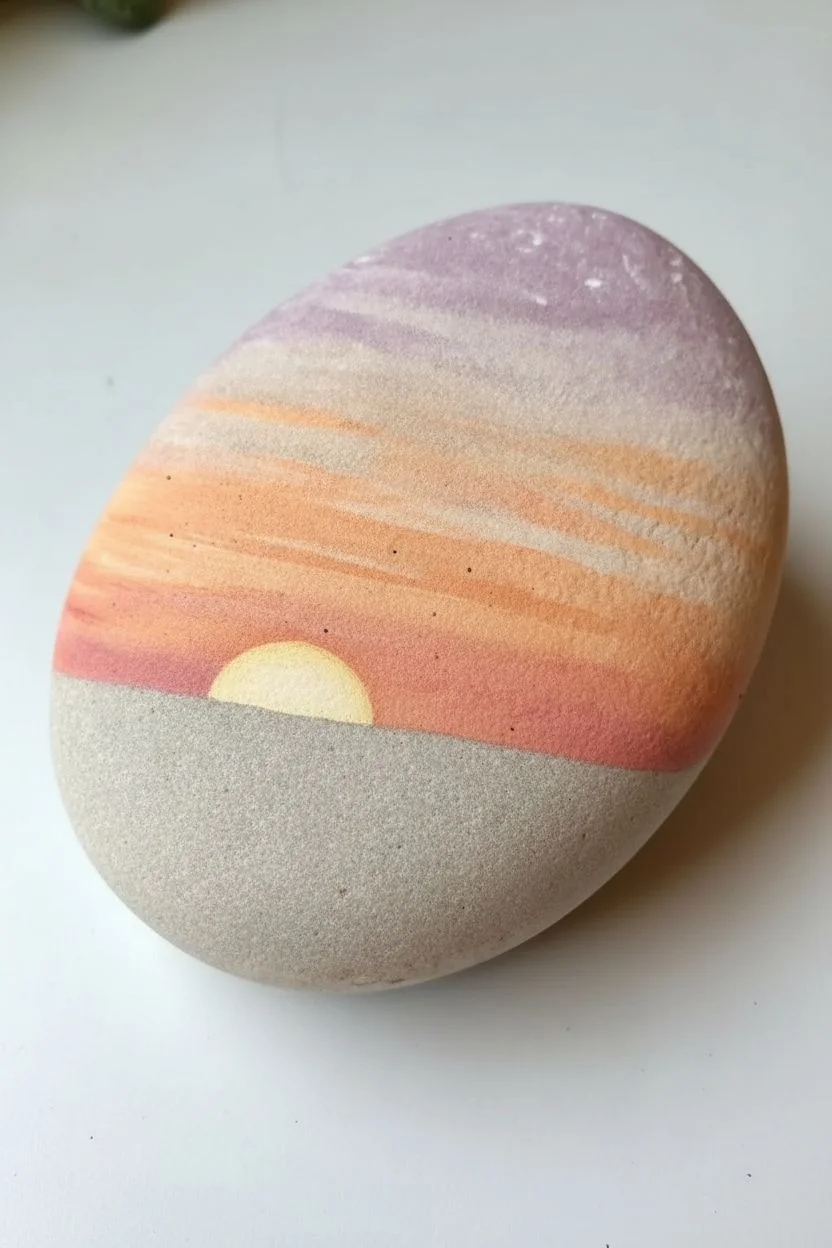
Capture the peaceful calm of a sunset at sea with this stunning painted rock project. Using soft gradients and bold silhouettes, you’ll create a miniature masterpiece where golden light dances on dark waves.
Step-by-Step Tutorial
Materials
- Smooth, oval river rock (cleaned and dried)
- Acrylic paints: purple, light pink, peach/orange, yellow, black, white, gold metallic
- Flat brush (medium)
- Fine detail brush (liner brush)
- Small round brush
- Paint palette or mixing plate
- Water cup and paper towels
- Spray sealer or varnish (glossy)
Step 1: Setting the Scene
-
Base prep:
Begin with a clean, dry stone. If your rock is very dark, you might want to paint a solid coat of white first to help the sunset colors pop, though it’s not strictly necessary for lighter stones. -
Sky gradient: Top:
Load your flat brush with light purple paint. Apply this to the top third of the rock, brushing horizontally to create a smooth band of color that curves with the stone’s shape. -
Sky gradient: Middle:
Without cleaning your brush thoroughly, pick up some light pink or peach paint. Blend this directly below the purple while the paint is still wet, creating a soft transition where they meet. -
Sky gradient: Horizon:
Finish the sky by blending yellow into the bottom of the peach section. Bring this yellow down to about the halfway point of the rock, establishing where your horizon line will be. -
Create the sun:
While the yellow sky is still slightly damp, use a small round brush with a mix of white and yellow to paint a semi-circle rising from the horizon line on the left side. This is your setting sun. -
Dry time:
Let this background layer dry completely. The blending needs to be set before we add the crisp black details on top.
Step 2: Ocean and Silhouette
-
The dark sea:
Using black acrylic paint and a medium brush, paint the bottom half of the rock completely black. Create a straight horizontal line where the black water meets the yellow sky. -
Sailboat hull:
Switch to your fine liner brush. Paint a shallow, curved boat hull in black silhouette, floating right on the horizon line in the center of the rock. -
The mast:
Draw a thin, straight vertical line rising from the center of the boat hull. This will serve as the mast for your sails. -
Painting the sails:
Paint two large triangles for sails. The left sail should curve slightly outward; the right sail is usually larger. Leave a tiny sliver of sky visible between the mast and the sails for realism. -
Deck details:
Add tiny vertical ticks along the hull of the boat to suggest the railing. Precision is key here, so use your finest brush tip. -
Birds in flight:
In the upper right of the purple sky, paint three small, simple ‘V’ shapes to represent silhouetted seagulls flying in the distance.
Uneven Horizon?
If your horizon line is wobbly, place a piece of painter’s tape across the dry sky background. Paint the black water up to the tape edge, then peel it off for a perfectly crisp line.
Step 3: Highlights and Foreground
-
Golden reflections:
Dip your fine brush into metallic gold paint. Paint restless, horizontal squiggles across the black water, concentrating them directly under the sun and the boat to mimic reflected light. -
Highlight intensity:
Make the gold lines thicker and brighter closer to the sun, and thinner as they move away. I like to let a few gold lines streak towards the right side for balance. -
Foreground rocks: Base:
At the very bottom edge of the painted stone, paint a row of irregular semi-circles using white or light grey paint to create a rocky shore. -
Foreground rocks: Shadow:
Once the white rocks are dry, use watered-down black paint to outline them and add subtle cracks or texture to their surface. -
Final seal:
Allow the entire painting to cure for 24 hours. Finish with a glossy spray sealer to protect the paint and make the water look wet and shimmering.
Add Some sparkle
Mix a tiny pinch of gold glitter into your sealing varnish before applying it. This will give the entire sunset sky a subtle, magical shimmer when it catches the light.
Place your finished stone on a desk or shelf to keep a little piece of summer sunset with you all year round
Cattails Framing a Lake Sunset
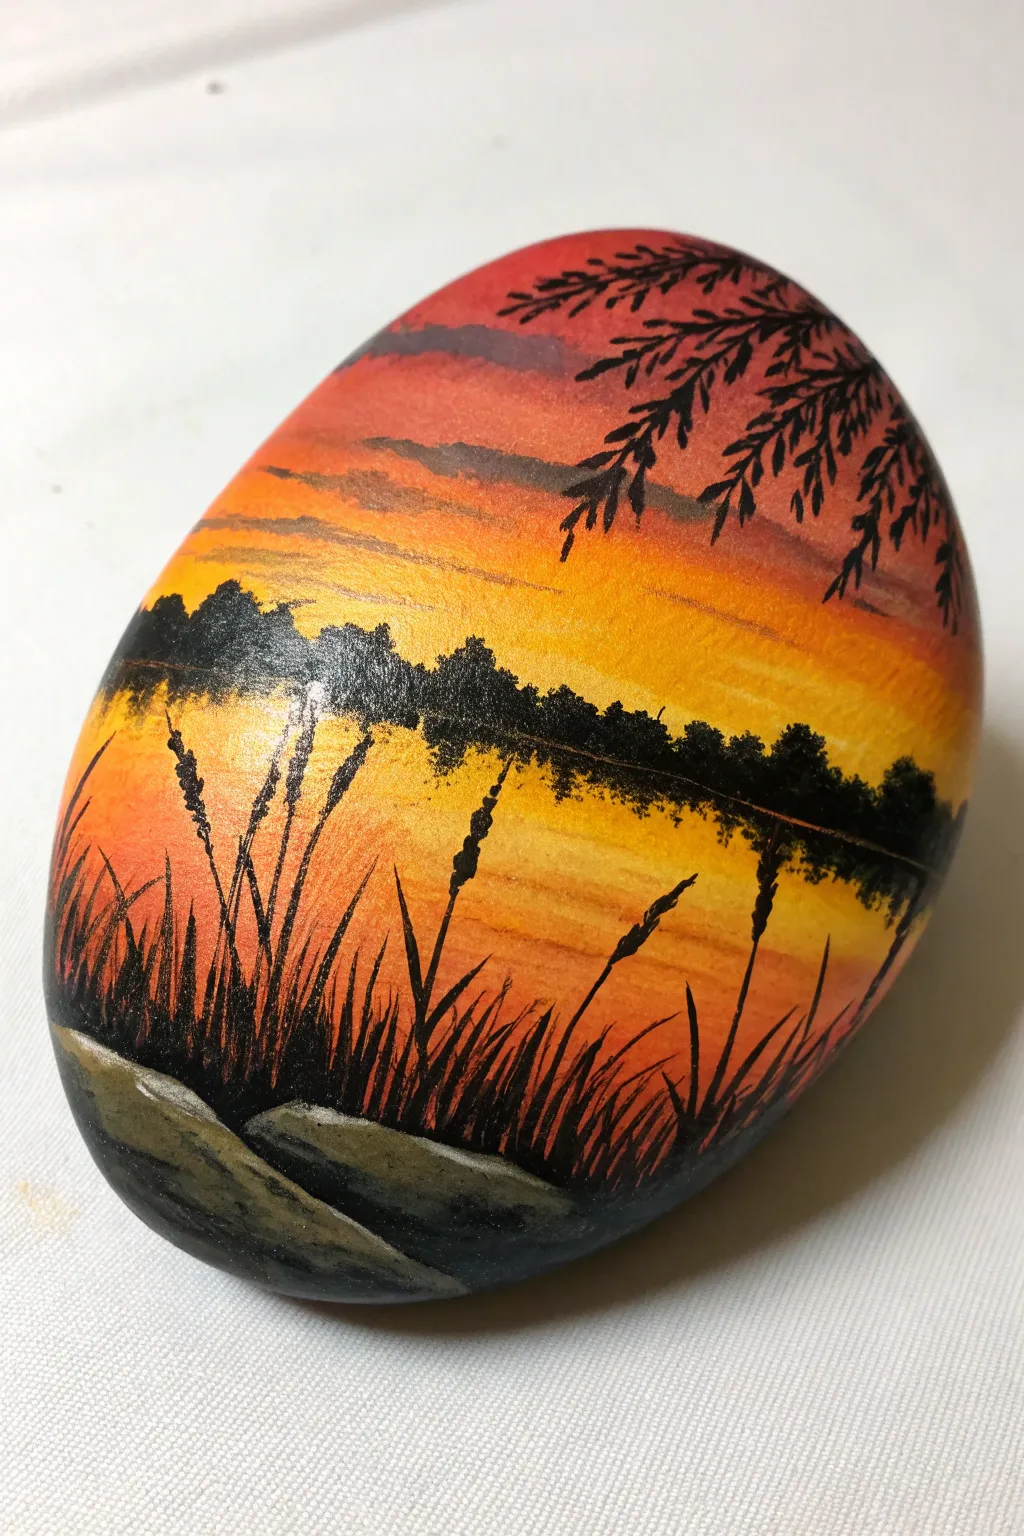
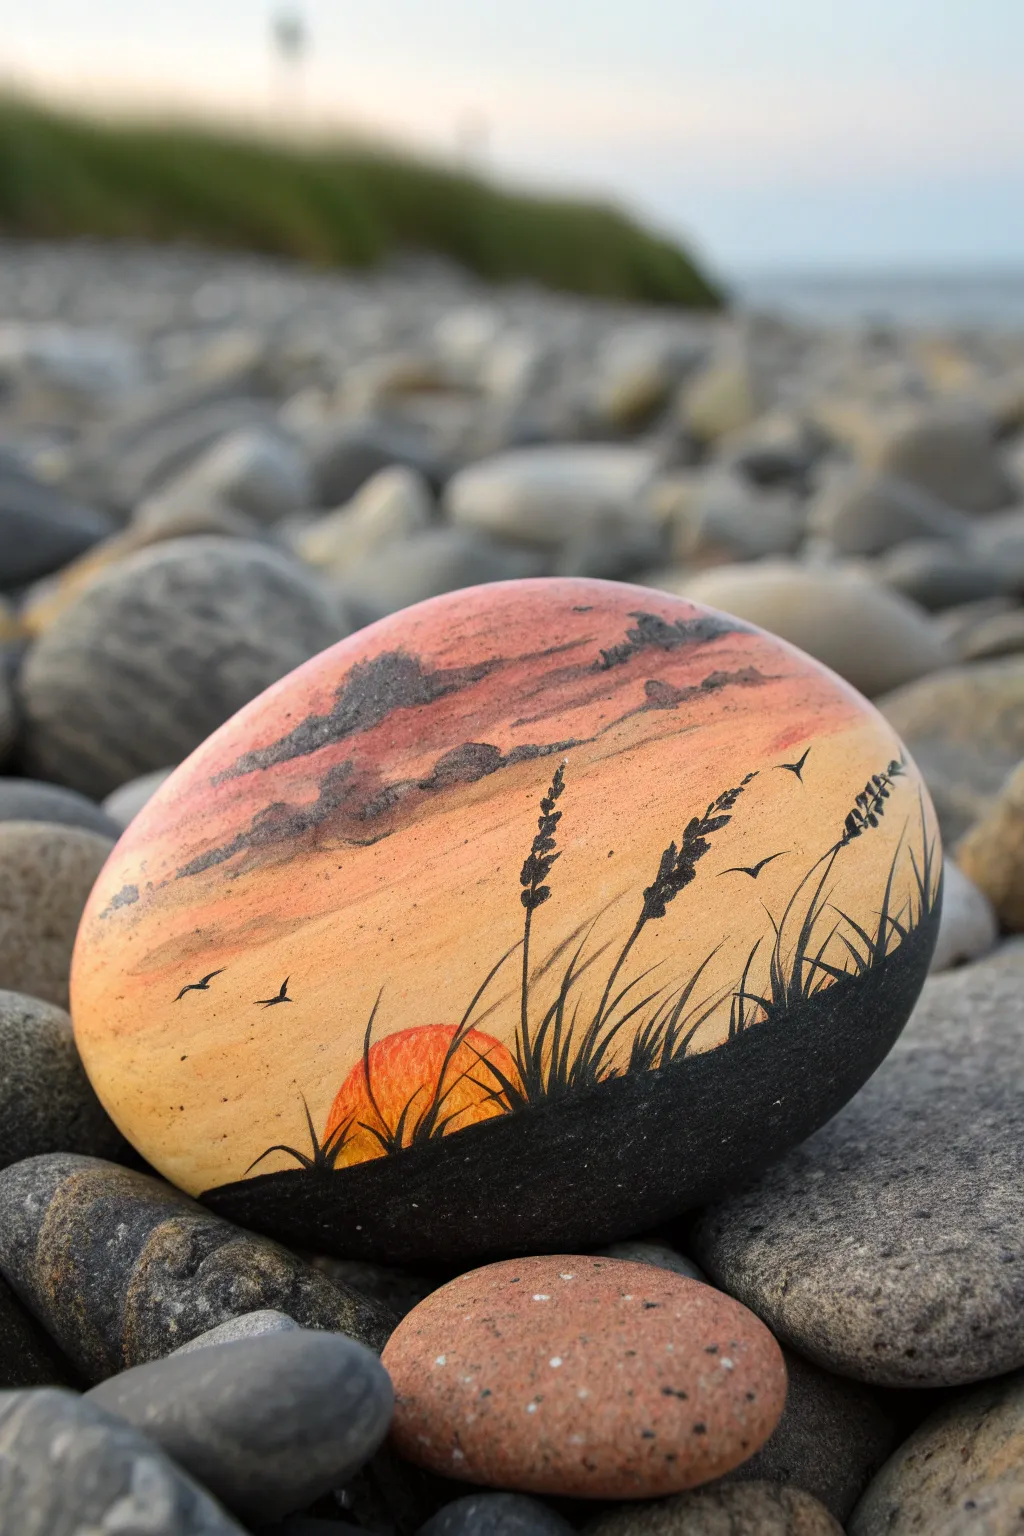
Capture the serenity of twilight with this stunning painted rock project featuring silhouetted cattails against a glowing horizon. The rich gradient of warm colors creates a peaceful lake reflection that fits perfectly in any garden or home display.
Step-by-Step Guide
Materials
- Smooth, oval river rock (clean and dry)
- Acrylic paints (Titanium White, Cadmium Yellow, Orange, Red, Black, hints of Grey/Brown)
- Wide flat brush for blending
- Fine liner brush (size 0 or 00)
- Medium round brush
- Cup of water
- Paper towels
- Spray gloss varnish or sealant
Step 1: Painting the Sky Gradient
-
Base coat preparation:
Start by cleaning your rock thoroughly to remove any dirt or oils. Apply a thin layer of Titanium White acrylic paint over the entire front surface. This helps the sunset colors pop and appear more vibrant later. -
Map out the horizon:
Visualize a line running horizontally across the middle of the rock. This will be your horizon line where the distant trees meet the water. -
Apply the brightest yellow:
Load your flat brush with bright yellow paint. Paint a wide horizontal band just above your imaginary horizon line, and another matching band just below it for the water’s reflection. -
Add the orange tones:
Clean your brush and pick up some orange paint. Apply this above the yellow sky band. While the paint is still wet, gently blend the bottom edge of the orange into the top edge of the yellow to create a soft transition. -
Paint the deep red sky:
At the very top of the rock, paint a curve of deep red. Drag this color down into the orange section, using horizontal strokes to blend them seamlessly. -
Mirror the water:
Repeat this process for the bottom half of the rock to create the reflection. Paint orange below the yellow water line, and red near the bottom, blending them downwards just like the sky. -
Create soft clouds:
Mix a tiny bit of red with grey or purple to get a muted tone. Using a dry brush technique, lightly streak a few thin, horizontal clouds across the upper sky and their fainter reflections in the water.
Muddy Gradient?
If your sunset colors are turning brown when blending, wash your brush thoroughly between colors. Wait for the yellow to dry slightly before adding red nearby.
Step 2: Adding Silhouettes and Details
-
Establish the horizon line:
Switch to your fine liner brush and black paint. Carefully paint an uneven, jagged line horizontally across the center of the rock where the sunset and water meet. -
Fill in the tree line:
Stipple or dab small clusters of black paint on top of that horizon line to represent distant trees. Vary the heights to make it look like a natural forest edge. -
Add the water reflection:
Immediately paint the reflection of the trees below the horizon line. Use slightly lighter, horizontal, and disjointed strokes here to mimic the movement of ripples on the water. -
Paint the foreground rocks:
At the very bottom left corner, paint two or three rounded rock shapes using grey and mossy green tones. Add a harsh black shadow underneath them to anchor them in the scene. -
Highlight the rocks:
Mix a light beige or white. Gently highlight the top edges of these foreground rocks, suggesting the setting sun is catching their surface. -
Draft the grass blades:
Using your finest liner brush and thin, inky black paint, pull long, sweeping strokes upward from the foreground rocks. Curve them slightly to look like wind-blown grass. -
Create the cattails:
Select a few of the taller grass stems. Near the top of these stems, paint a small, elongated oval shape to form the ‘cigar’ part of the cattail, adding a tiny thin line extending from the very top. -
Add hanging branches:
I like to frame the scene by adding some hanging foliage in the top right corner. Paint a few black branches curving downward, and add small, drooping leaves to suggest a willow tree. -
Seal the artwork:
Allow the rock to dry completely, preferably overnight. Finish by applying a spray gloss varnish to protect the paint and give the water a realistic, wet sheen.
Add Sparkle
Mix a tiny amount of gold metallic paint or very fine glitter into the yellow water reflection area for a magical, shimmering ‘golden hour’ effect.
Place your finished rock in a spot where it can catch the light and remind you of peaceful evenings by the water


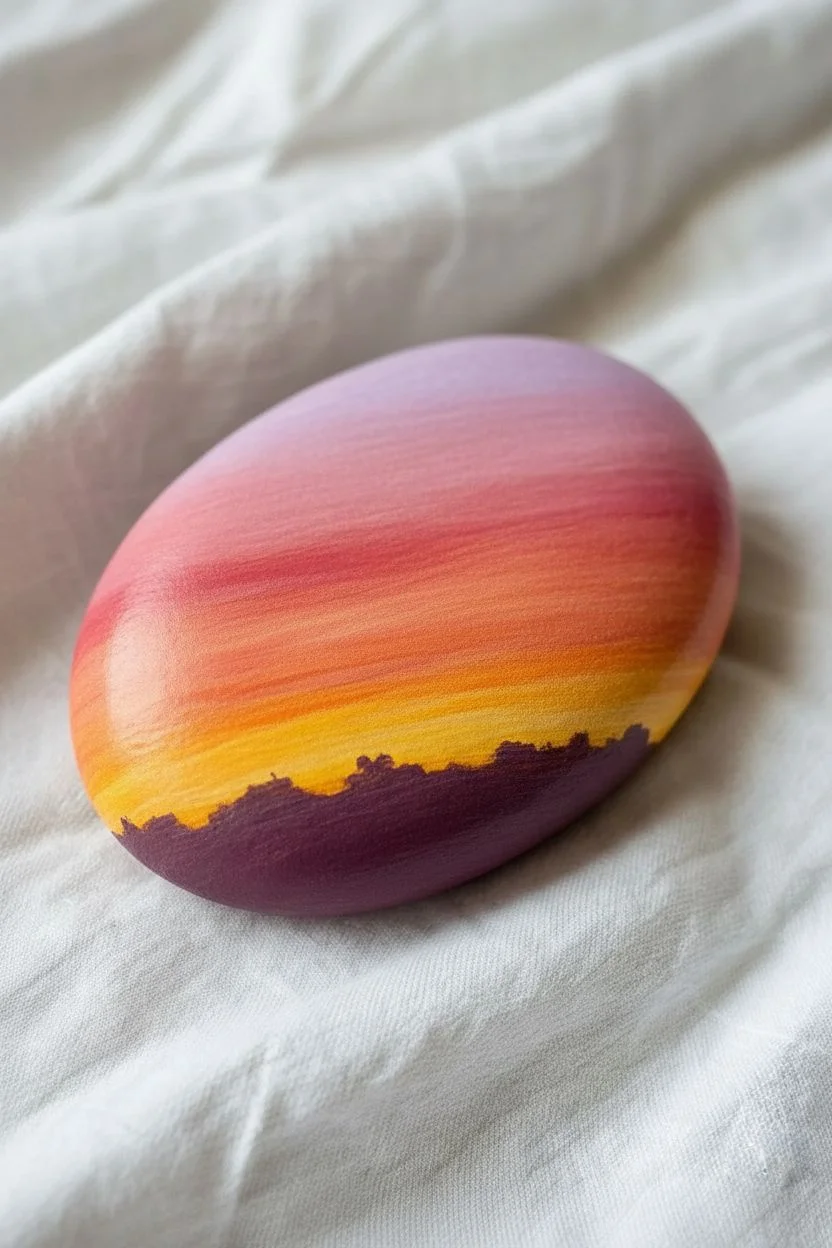
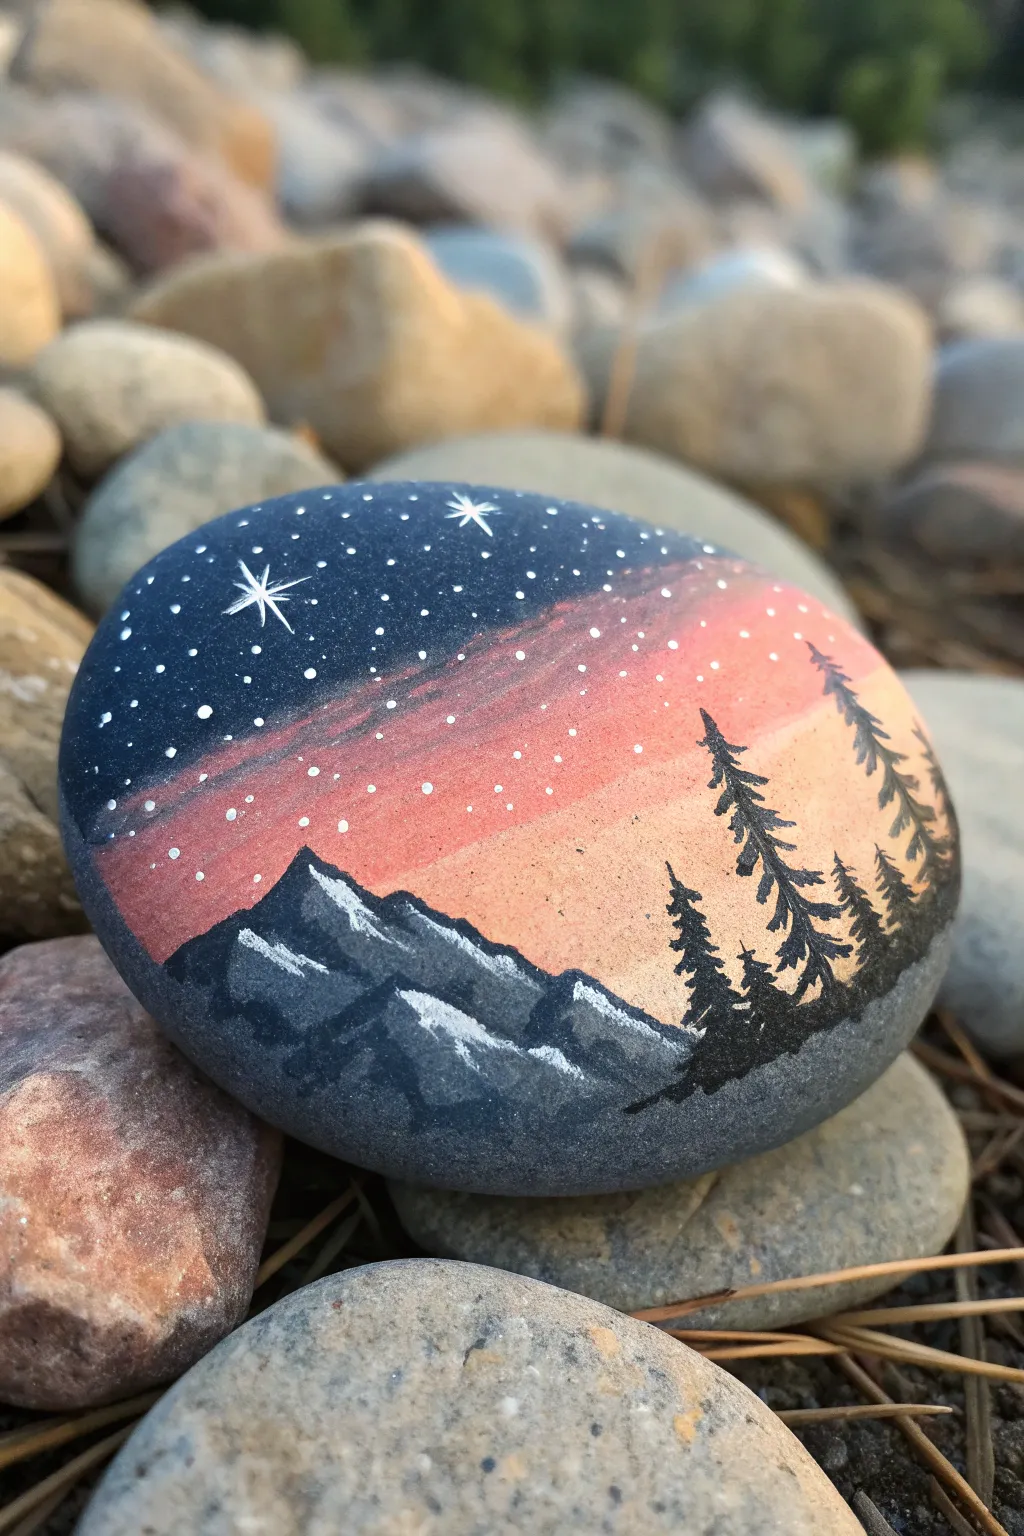
Mountain Ridge Silhouette at Dusk
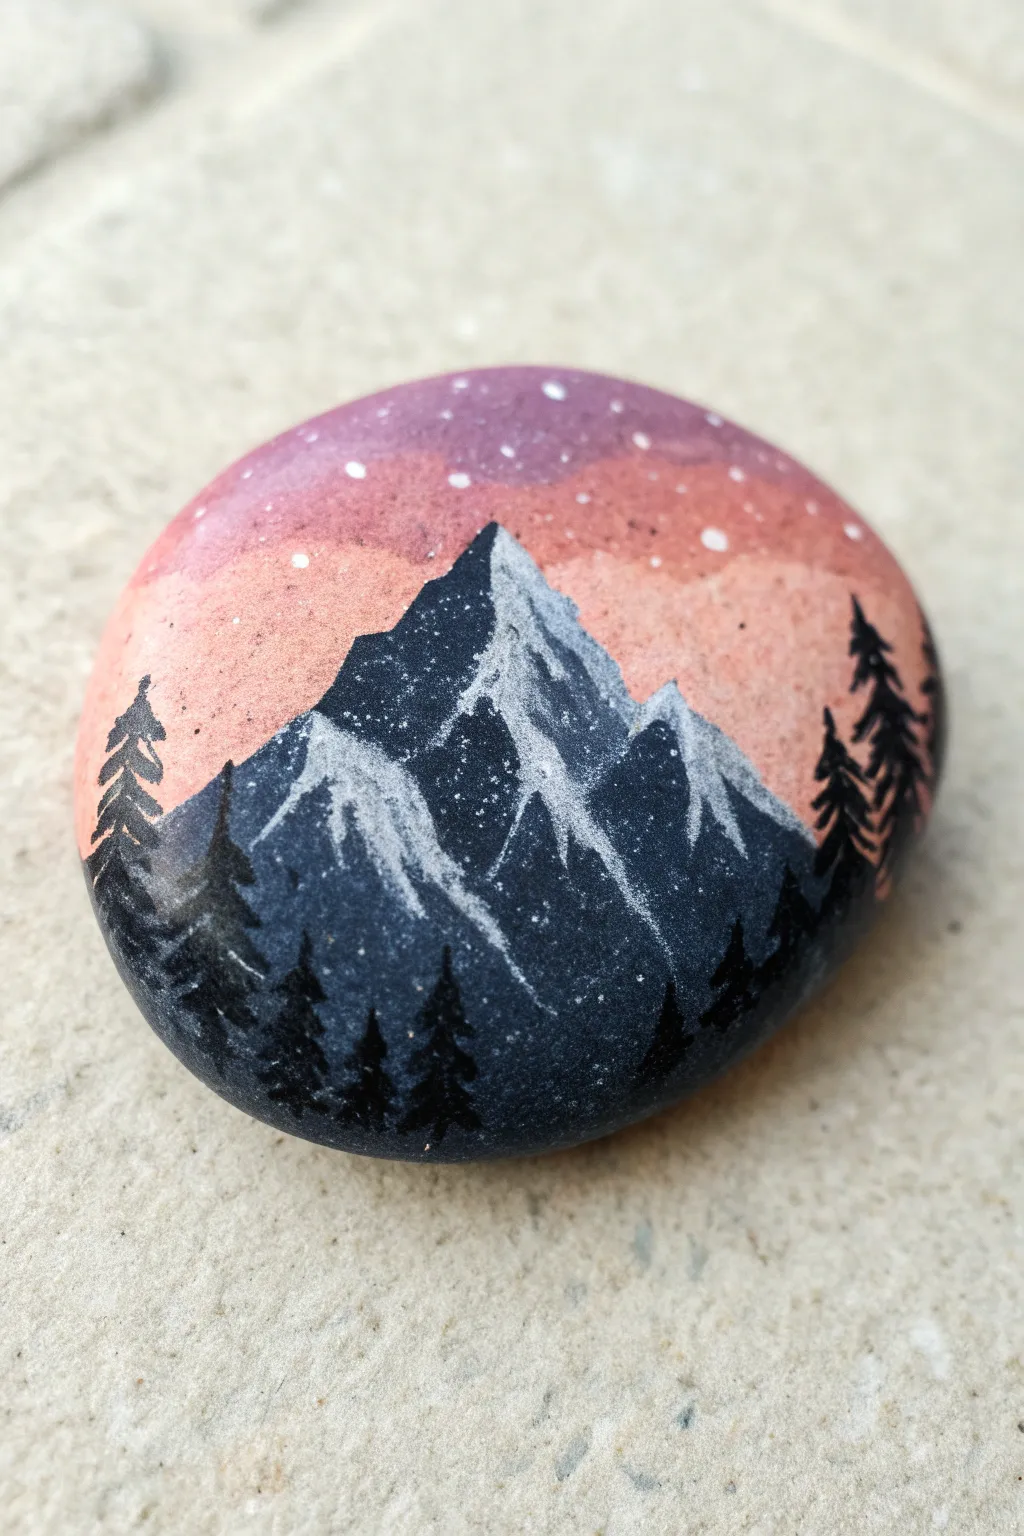
Capture the magic of twilight on a simple stone with this serene mountain landscape. The blend of a soft, purple-to-peach gradient sky against stark mountain silhouettes creates a striking contrast that fits in the palm of your hand.
Detailed Instructions
Materials
- Smooth, round river rock (clean and dry)
- Acrylic paints (purple, dark pink/salmon, peach, white, and black)
- Flat brush (medium)
- Small round detail brush (size 0 or 00)
- Fine liner brush (optional, for trees)
- Old toothbrush (for the starry splatter effect)
- Palette or paper plate
- Cup of water and paper towel
- Spray sealer or varnish (matte or glossy)
Step 1: Painting the Sky Gradient
-
Prepare your canvas:
Ensure your rock is scrubbed clean of any dirt or oils and fully dry. If the rock is very dark, you might want to paint a base coat of white first to make the colors pop, though this isn’t strictly necessary if your acrylics are opaque. -
Apply the top purple layer:
Using your flat brush, load up a medium-tone purple. Paint the top third of the rock’s surface, curving the line slightly to follow the rock’s natural shape. -
Blend in the pink:
While the purple is still slightly wet, pick up your dark pink or salmon color. Paint the middle section, overlapping the purple edge. Gently brush back and forth where they meet to create a soft, seamless transition. -
Finish with peach:
Clean your brush and pick up the light peach color. Paint the remaining bottom third of the rock, blending it upward into the pink layer. You want a gradient that goes from cool twilight at the top to warm sunset at the bottom. -
Let the sky set:
Allow the gradient to dry completely. Since we will be adding crisp black lines on top, any wetness in the background will ruin the silhouette effect.
Step 2: Creating the Mountain Range
-
Outline the peaks:
Switch to your small round brush and black paint. Draw a jagged outline across the rock, roughly dividing the painted surface in half. Create one large, dominant peak in the center and smaller foothills on the sides. -
Fill in the mountains:
Use the black paint to fill in everything below your jagged line. Ensure the coverage is solid and opaque; you may need a second coat of black once the first dries to avoid any patchy streaks. -
Mix a highlight grey:
On your palette, mix a tiny dot of black into your white paint to create a very light, cool grey. Alternatively, you can use pure white, but a slight grey tint adds realism. -
Add snow to the peaks:
Imagine a light source coming from the right. Using your finest brush, gently drag the white/grey paint down the right side of the mountain peaks. Use a ‘dry brush’ technique here—wipe most of the paint off first—to create a scratchy, textured look that resembles rock and snow. -
Add shadow contrast:
Add smaller, more jagged white highlights on the left sides of the peaks, but keep them thinner and more sparse than the right side.
Gradient Troubles?
If acrylics dry too strictly before blending, keep a mister bottle handy. A tiny spritz of water keeps the paint workable for smoother color transitions.
Step 3: Adding Trees and Stars
-
Start the pine trees:
Using a fine liner brush and black paint, draw vertical lines of varying heights along the bottom left and right edges of the rock. These are the trunks of your foreground trees. -
Flesh out the branches:
Starting from the top of each trunk, dab tiny horizontal strokes downward, getting wider as you go down. I like to use a quick, zig-zag motion to mimic the natural irregularity of pine boughs. -
Create a starry sky:
Cover the mountain section with a piece of paper to protect it. Dip an old toothbrush into watered-down white paint. Run your thumb across the bristles to flick tiny speckles onto the purple section of the sky. -
Add distinct stars:
Use the tip of a toothpick or the handle end of a paintbrush to dot a few larger, distinct stars in the upper sky area for variation. -
Seal the artwork:
Once the paint is thoroughly dry (give it at least an hour), apply a coat of spray sealer. This protects the paint from chipping and gives the rock a professional finish.
Make It Glow
Mix a tiny bit of glow-in-the-dark pigment into your white paint for the stars and snow highlights. The rock will reveal a hidden landscape at night.
Place this miniature masterpiece on your desk or in a planter for a daily dose of mountain calm
Desert Sunset With Cactus Silhouette
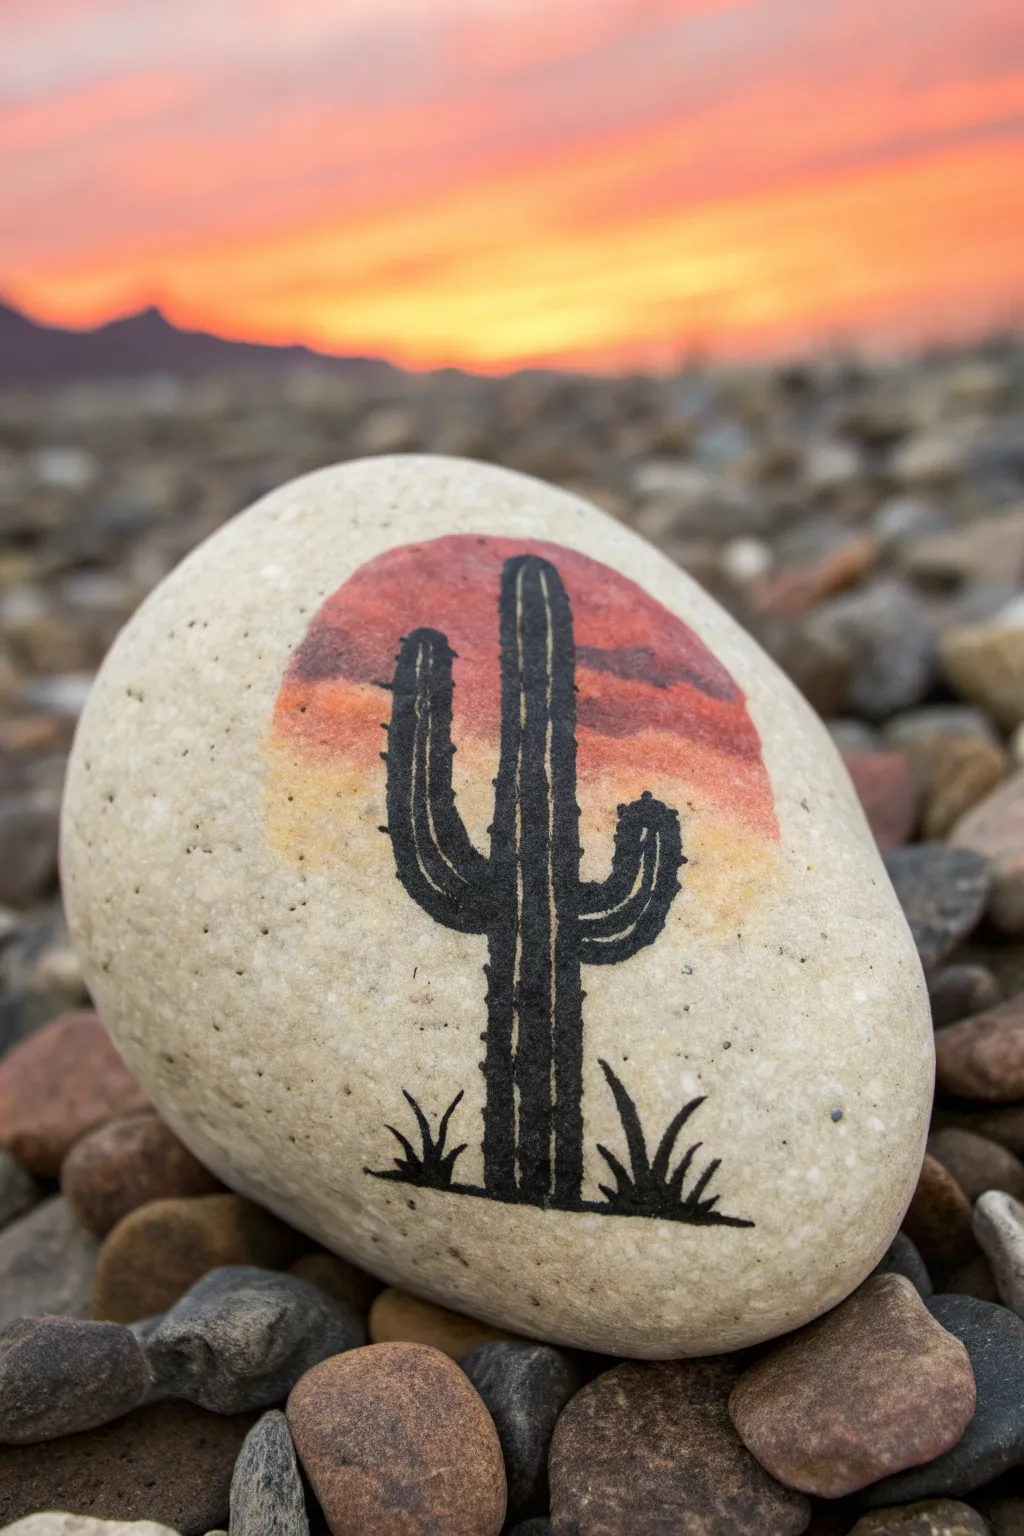
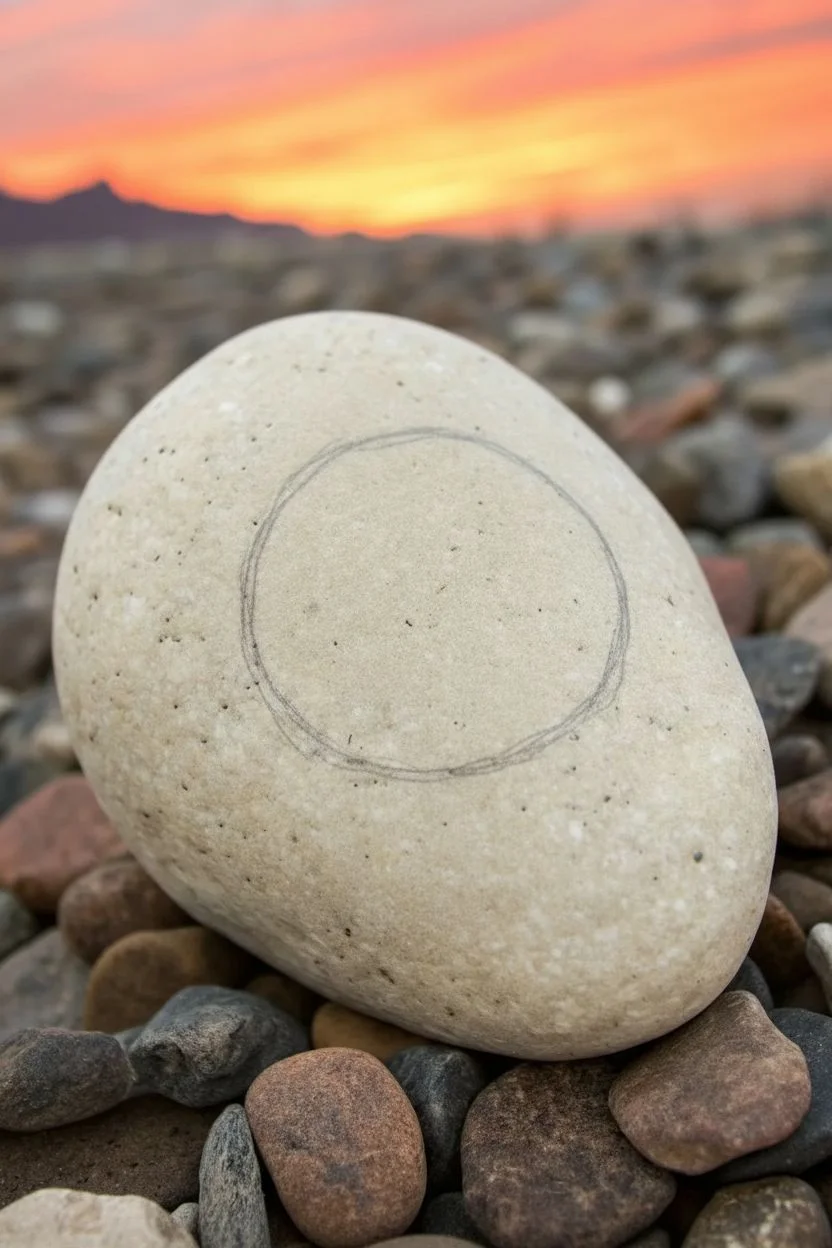
Capture the warmth of the desert evening on a simple stone with this elegant design. Using a smooth white canvas, you’ll blend soft sunset hues behind a bold, striking black cactus silhouette.
Step-by-Step Tutorial
Materials
- Smooth, oval-shaped white river rock
- Acrylic paints (Red, Orange, Yellow, Black)
- Small flat brush (size 2 or 4)
- Fine liner brush (size 00 or 0)
- Pencil for sketching
- Palette or small plate for mixing
- Water cup and paper towels
- Clear acrylic sealer (spray or brush-on)
Step 1: Preparing the Sun Canvas
-
Select the base:
Choose a rock that is naturally light-colored and smooth. A white or cream river rock works best so you don’t have to paint a base coat, allowing the natural stone texture to frame your art. -
Clean the surface:
Wash the rock thoroughly with soap and water to remove any dust or oils, then let it dry completely. -
Sketch the circle:
Lightly draw a circle in the center of the rock using a pencil. This doesn’t need to be perfectly round; a slight oval shape complements the cactus form well.
Paint Consistency
For the sunset background, dilute your acrylics with water (about 50/50). This creates a transparent ‘glaze’ that lets the stone’s texture show through.
Step 2: Painting the Sunset Gradient
-
Mix the top color:
On your palette, prepare a muted red or deep terracotta color. You want it slightly watered down so it acts almost like a watercolor wash on the porous stone. -
Apply the red layer:
Using your flat brush, paint the top third of your sketched circle with the red wash. Keep the edges ragged and uneven to mimic wispy clouds. -
Create the middle transition:
While the red is still slightly damp, pick up some orange paint. Blend this into the bottom of the red section, covering the middle third of the circle. -
Finish with yellow:
Clean your brush and apply a pale yellow wash to the bottom third of the circle. Blend it upward into the orange to create a seamless gradient from sky to horizon. -
Add cloud details:
Dip a dry brush into a tiny amount of the red paint. Gently dab a few horizontal streaks across the orange section to suggest clouds drifting across the setting sun. -
Let it dry:
Allow the background gradient to dry completely. Since we used thin layers, this should only take about 10-15 minutes.
Line Wobbles?
If your cactus edges look shaky, wait for the black paint to dry, then gently scrape away the excess with a wooden toothpick to sharpen the silhouette.
Step 3: Detailing the Silhouettes
-
Outline the cactus:
With your fine liner brush and black acrylic paint, paint a vertical line straight down the center of your sun circle. This is the main trunk of the saguaro. -
Add the right arm:
Paint a curved arm extending from the right side of the trunk. It should dip down slightly and then curve upward in a ‘U’ shape. -
Add the left arm:
Paint a similar arm on the left side, but position it slightly higher on the trunk than the right arm for a natural, asymmetrical look. -
Thicken the shape:
Go back over your black lines to thicken them slightly. The cactus should look sturdy, not spindly. -
Add texture lines:
Mix a tiny drop of white or yellow into your black paint to make a dark grey. Use the very tip of your liner brush to draw thin vertical lines inside the cactus body, representing the ribs. -
Paint the spines:
Using pure black again, add tiny, almost invisible dots or ticks along the outer edges of the cactus arms to suggest prickly spines. -
Ground the cactus:
Paint a thin horizontal black line at the base of the cactus to create the ground. -
Add desert grasses:
Paint small, spiky tufts of grass on either side of the cactus base. Use quick, flicking motions with your liner brush to make the blades sharp and tapered. -
Seal the artwork:
Once the black paint is bone dry, finish your piece with a coat of clear acrylic sealer to protect the design and make the colors pop.
Place your finished rock in a sunny spot to enjoy the warm desert vibes all day long
Simple Cloud Streaks in a Sunset Blend
Transform a smooth river rock into a miniature piece of the evening sky with this sunset painting tutorial. You will capture the romantic transition of colors from deep plum to soft lilac, accented by feathery white clouds.
Step-by-Step
Materials
- Smooth, oval river rock (clean and dry)
- Acrylic paints: Titanium White, Deep Violet, Magenta, Orange, Deep Yellow, Lavender
- Flat brush (size 6 or 8) for gradients
- Small round detail brush (size 1 or 2) for clouds
- Old scruffy brush or sponge (optional for texture)
- Palette for mixing paint
- Cup of water and paper towels
- Matte or Gloss Acrylic Sealer/Varnish
Step 1: Creating the Base Gradient
-
Prepare the surface:
Begin by ensuring your rock is completely clean of any dirt or oils. If the rock is very dark, you might want to paint a base coat of white gesso or white acrylic first and let it dry completely to make the sunset colors pop. -
Start with the sky:
Mix a soft lilac color using Lavender and a touch of Titanium White. Apply this to the top third of the rock, brushing horizontally to cover the curve without leaving harsh strokes. -
Introduce the pinks:
While the lilac is still slightly wet, pick up some Magenta mixed with a little White. Blend this directly below the lilac section, allowing the colors to merge softly where they meet. -
Add warmth with orange:
Clean your flat brush. Mix a vibrant sunset Orange (you can add a tiny dot of Magenta to harmonize it). Paint a stripe of this across the middle of the rock, blending it upwards into the pink layer carefully. -
Create the golden horizon:
Below the orange band, lay down a strip of Deep Yellow. This represents the brightest part of the sunset just before the sun dips down. Blend the edge where the yellow meets the orange to create a seamless glow. -
Paint the shadowy foreground:
For the bottom section of the rock, mix Deep Violet with a little Magenta to create a rich plum color. Paint the bottom curve of the rock heavily with this dark shade. -
Connect the gradient:
Use a slightly damp brush to blur the line between the golden yellow horizon and the deep plum bottom. The transition should look a bit jagged or textured, suggesting distant land or heavy low clouds.
Cloud Blending Trouble?
If your clouds look too stiff, dip your brush in water and blot it almost dry. Gently drag this damp brush over the paint edges to soften and blur them into the background.
Step 2: Adding the Cloud Details
-
Mix an off-white cloud color:
For the clouds, you don’t want pure stark white just yet. Mix Titanium White with the tiniest speck of your pink or orange mix to warm it up. This ensures the clouds look like they belong in the sunset. -
Paint the main cloud streaks:
Switch to your small round brush or an old scruffy brush. Load it with the cloud mixture and paint long, broken diagonal streaks across the upper middle section. -
Feather the edges:
Use a gentle dabbing motion on the top edges of these streaks to make them look fluffy. I find that keeping the bottom edge of the clouds straighter helps define the perspective. -
Layer lower clouds:
Add smaller, thinner wisps of clouds near the yellow horizon line. These should be less dense than the upper ones, appearing more like distant vapor. -
Highlight the fluff:
Once the cloud base is dry to the touch, load your detail brush with pure Titanium White. Tap this onto the very tops of the clouds to catch the imaginary ‘light’ and add volume. -
Add subtle stars (optional):
If you want a hint of night approaching, use the tip of a toothpick or a very fine brush to dot a few tiny white specks in the upper lilac area.
Step 3: Finishing and Sealing
-
Review contrast:
Take a step back and look at your rock. If the bottom dark plum area needs more depth, you can add a second coat or streak in some darker violet for texture. -
Dry completely:
Allow the painted rock to dry thoroughly. Acrylic paint skins over quickly but needs time to cure so it doesn’t smear during sealing. -
Apply varnish:
Coat the entire top surface with your chosen sealer. A gloss varnish mimics the wet look of the original photo, while matte gives a softer, velvety finish.
Add a Silhouette
Once dry, paint a solid black silhouette of a tree line, mountains, or birds over the bottom purple section to turn the sunset into a full landscape scene.
Place your finished sunset rock in a sunny window or garden pot to enjoy a permanent golden hour
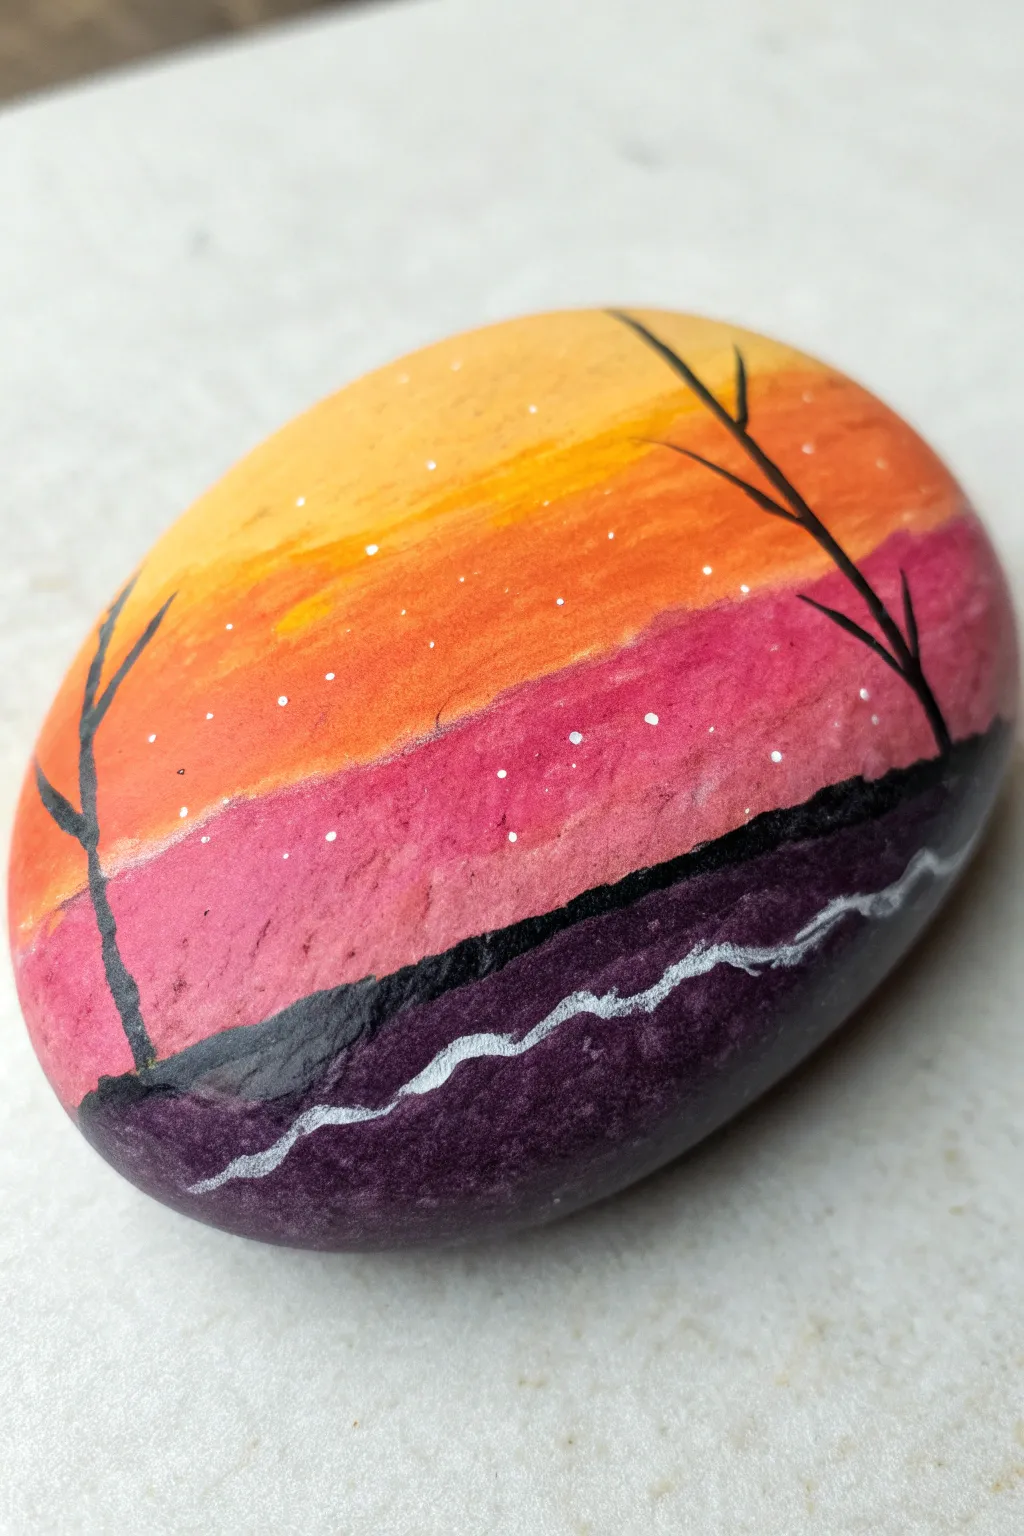
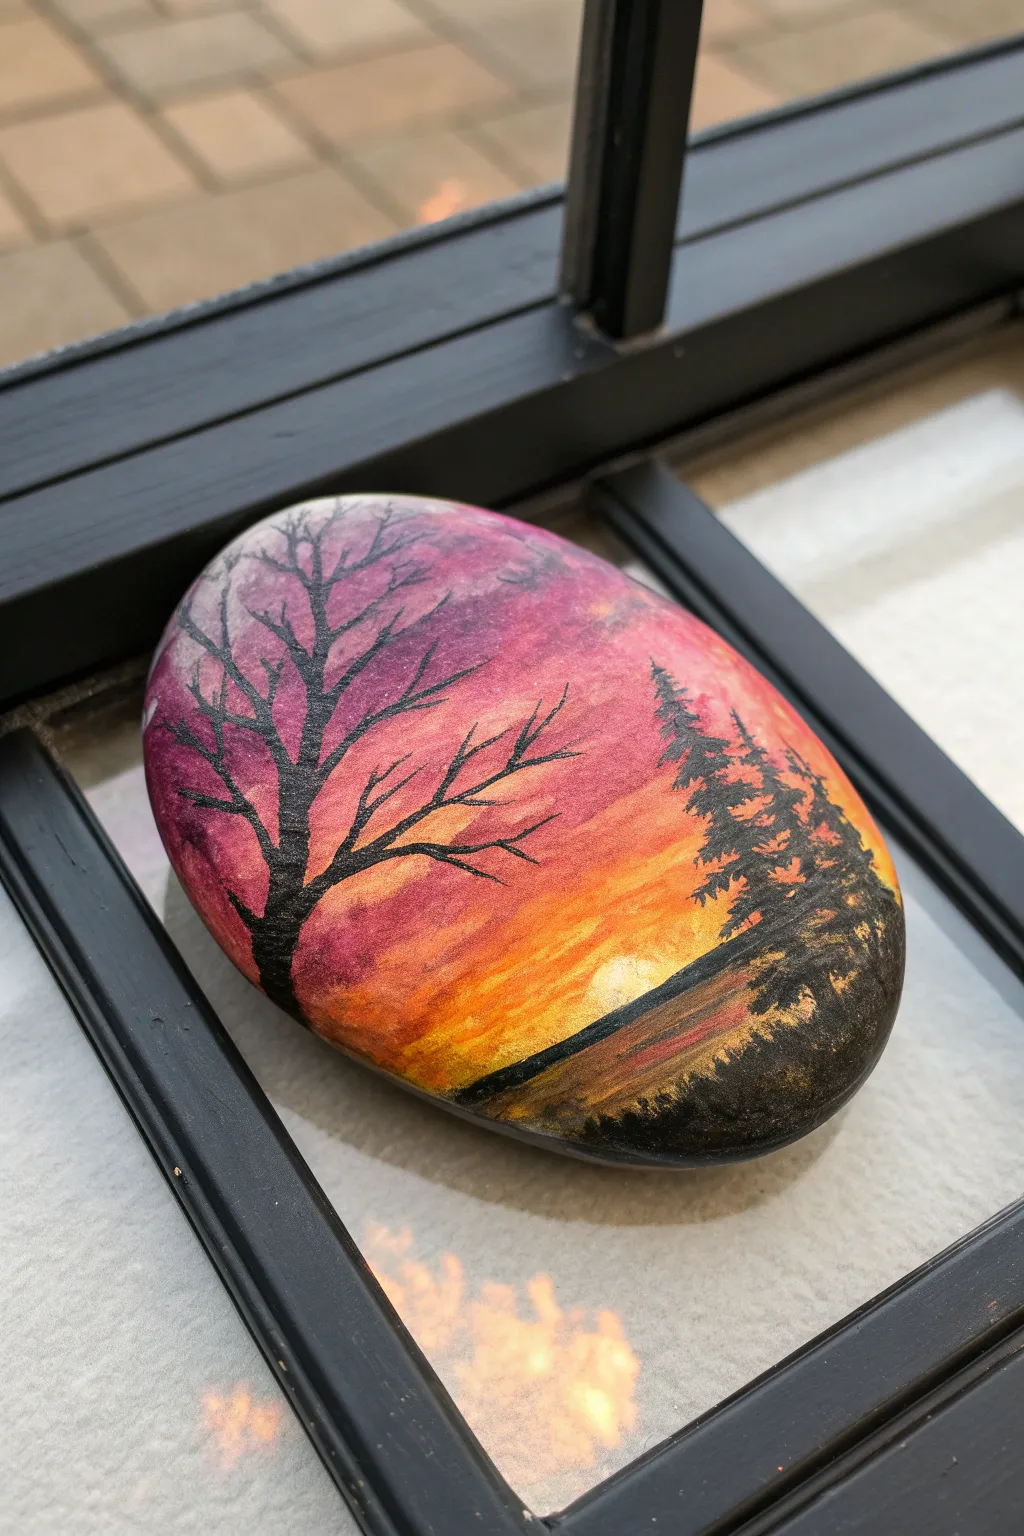
Bare Branches for a Moody Sunset
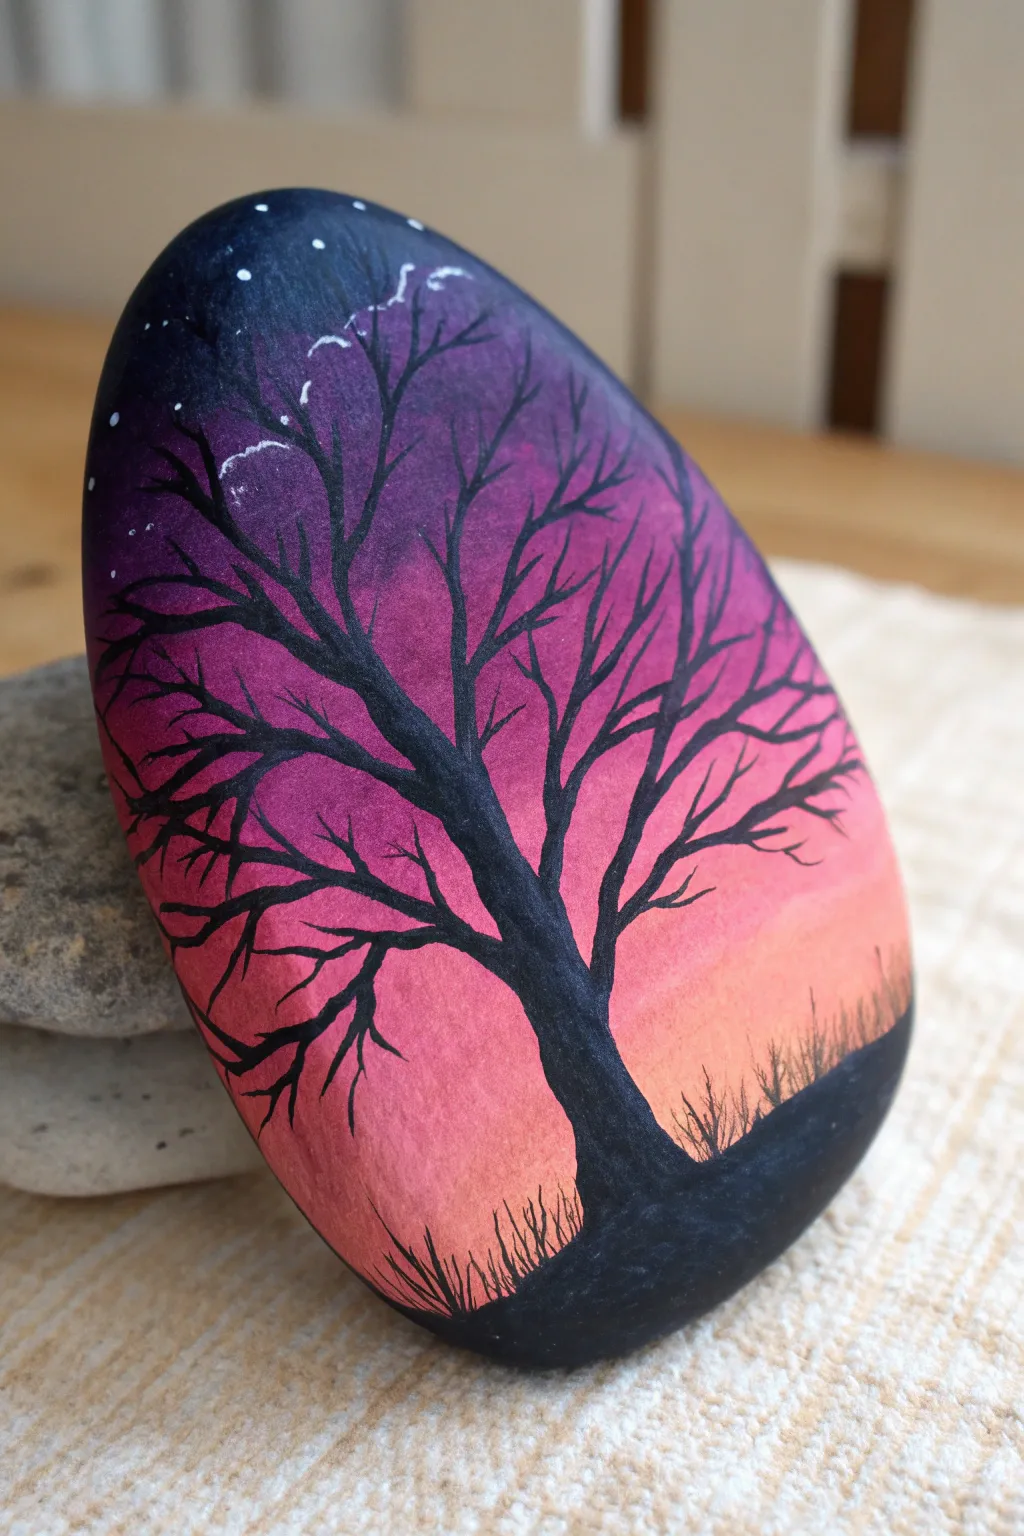
This striking rock painting captures a moody transition from day to night with a vibrant gradient sky and stark black silhouette. The bare branches add a touch of winter elegance, making it a perfect piece for displaying on a desk or bookshelf.
Step-by-Step Tutorial
Materials
- Smooth, flat oval rock (river rock is ideal)
- White gesso or primer
- Acrylic paints: black, dark navy blue, purple, magenta, orange, and pale peach
- Sponge applicators or makeup sponges
- Fine liner brush (size 0 or 00)
- Small flat brush
- White Posca pen or fine-tip brush for stars
- Clear acrylic sealer (spray or brush-on)
Step 1: Preparing the Canvas
-
Clean the surface:
Wash your rock thoroughly with soap and water to remove any dirt or oils that might prevent the paint from sticking. Let it dry completely. -
Prime the rock:
Apply a coat of white gesso or white acrylic paint to the entire surface. This crucial step ensures your sunset colors will pop and look vibrant rather than dull.
Step 2: Creating the Sunset Gradient
-
Lay out your palette:
Squeeze out small amounts of navy blue, purple, magenta, orange, and pale peach onto your palette. -
Start at the top:
Using a sponge applicator, dab the dark navy blue onto the very top rounded edge of the rock to start your night sky. -
Add the purple layer:
Immediately below the blue, sponge on the purple paint. While both colors are wet, dab over the line where they meet to blend them softly. -
Transition to pink:
Work your way down by sponging magenta below the purple. Use a light bouncing motion to merge the purple and pink together smoothly. -
Bring in the warmth:
Add the orange paint below the magenta, blending upwards slightly into the pink area. -
Finish the horizon:
Apply the pale peach color at the very bottom third of the rock. Blend it into the orange above it to complete the gradient. Let this background layer dry completely before moving on.
Fixing Blotchy Blends
If your gradient looks blocky instead of smooth, wait for it to dry completely. Then, re-sponge a thin, second layer of colors, focusing specifically on the transition lines.
Step 3: Painting the Silhouette
-
Paint the ground:
Using black acrylic paint and a small flat brush, paint a curved hill at the bottom right of the rock. Ensure the paint is opaque. -
Start the trunk:
Switch to your fine liner brush. Paint the main trunk of the tree growing out of the hill, leaning it slightly to the left for a natural look. Make the base wider and taper it as you go up. -
Add main branches:
Paint three or four thick main branches extending from the trunk. I find it helpful to look at a reference photo of a real winter tree to get the angles right. -
Create secondary branches:
From each main branch, paint smaller branches splitting off. Keep your touch light to keep these lines thinner than the trunk. -
Detail the twigs:
Add very fine, wispy twigs to the ends of the branches. Use the very tip of your liner brush and barely touch the rock surface. -
Add grass texture:
Using the same fine brush, flick small, upward strokes along the black hill at the bottom to create the look of tall wild grass.
Add a Moon
Before sealing, paint a tiny crescent moon in the upper purple section using white paint. It adds a magical focal point to the evening sky.
Step 4: Final Touches
-
Add the stars:
Dip the tip of a fine brush or a toothpick into white paint (or use a white paint pen) and dot a few tiny stars into the dark blue section at the top left. -
Dry and seal:
Allow the rock to dry for at least 24 hours to ensure all layers are set. Once dry, apply a clear acrylic sealer to protect your artwork from chipping and fading.
Now you have a serene sunset scene captured in stone to enjoy
Beach Dunes Silhouette at Sunset
Capture the serene beauty of a coastal evening with this stunning painted rock project. Using a blend of warm gradients and stark black silhouettes, you’ll create a peaceful sunset scene that looks beautiful in any garden or on a desk.
Step-by-Step Guide
Materials
- Smooth, round river rock (clean and dry)
- Acrylic paints: White, Light Yellow, Orange, Red or Magenta, Black
- Flat shader brush (medium size for blending)
- Fine liner brush (size 0 or 00)
- Pencil (optional)
- Cup of water and paper towels
- Clear acrylic sealer (spray or brush-on)
- Palette or paper plate
Step 1: Painting the Sky Gradient
-
Prime the surface:
Start by painting the entire upper two-thirds of the rock with a layer of titanium white. This ensures your sunset colors will be vibrant and opaque rather than dull. -
Lay down the yellow:
While the white is still slightly tacky or just dry, paint a horizontal band of light yellow across the middle section of the rock, where the sun will eventually be. -
Add the orange layer:
Paint a band of orange just above the yellow strip. While the paint is wet, gently brush back and forth where the colors meet to create a smooth, seamless transition. -
Blend in the pinks:
Mix a bit of red or magenta with white to create a soft dusty rose color. apply this to the very top of the rock, blending it downward into the orange band for a twilight effect. -
Create the clouds:
Mix a tiny drop of black into your red or purple paint to make a dark, dusty violet. Using the corner of your flat brush, dab irregular, horizontal cloud shapes across the upper pink and orange sections. Keep the edges soft.
Step 2: Adding the Sun and Horizon
-
Paint the sun:
Once the sky background is completely dry, use a brighter, deeper orange to paint a semi-circle rising from the bottom third of the rock. This will be your setting sun. -
Highlight the sun:
Add a touch of yellow to the center of your sun semi-circle while the orange is wet, blending outward to make it look glowing and radiant. -
Establish the ground line:
Using black paint and a steady hand, paint a solid horizon line that cuts slightly across the bottom of the sun. Fill in everything below this line completely with black paint to create the silhouette hill.
Stripes Not Blending?
If your gradient lines look too harsh, keep a slightly damp (clean) brush handy. Run it lightly over the border between two wet colors to soften the transition instantly.
Step 3: Detailing the Silhouettes
-
Switch to a liner brush:
For the delicate details, switch to your finest liner brush. Thin your black paint slightly with a drop of water so it flows like ink but remains opaque. -
Paint the tall grass stems:
Starting from the black ground, pull long, thin lines curving upward into the sky. Vary the heights and angles so they look natural and wind-blown. -
Add the seed heads:
On the tallest stalks, use tiny dabbing motions to create the textured seed heads of the wheat or reeds. They should be thicker at the bottom and taper to a point at the top. -
Fill in the undergrowth:
Paint shorter, sharper blades of grass near the ground level. I find that quick, flicking motions with the brush simulate the sharp tips of grass blades best. -
Check density:
Ensure the bottom area is solid black where the grass clumps together, fading into individual blades as they rise higher against the sunset.
Level Up: Reflections
Add a thin line of white or light yellow exclusively on the top edges of the black grass blades and seed heads to simulate the last rays of sunlight hitting them.
Step 4: Final Touches
-
Add distant birds:
Using the very tip of your fine brush, paint tiny ‘v’ or ‘m’ shapes in the sky to represent birds flying in the distance. Place them in the lighter yellow/orange areas for high contrast. -
Dry completely:
Let the rock sit undisturbed for several hours to ensure all paint layers, especially the thick black bottom, are fully cured. -
Seal the artwork:
Apply a coat of clear acrylic sealer. A glossy finish will make the sunset colors pop and look like wet glass, while a matte finish gives a more natural stone feel.
Place your finished sunset stone near a window where the natural light can enhance those warm gradient colors
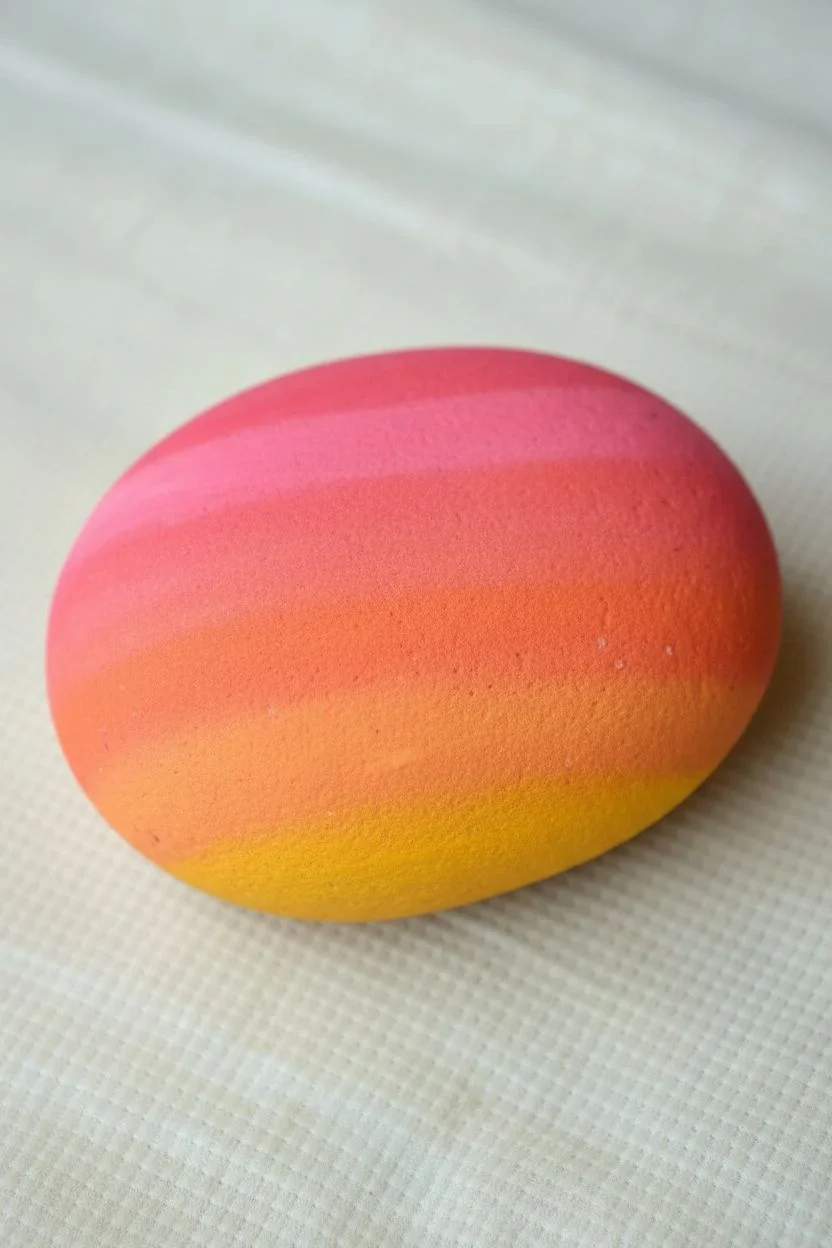
Sunset Ombre With Dot-Painted Texture
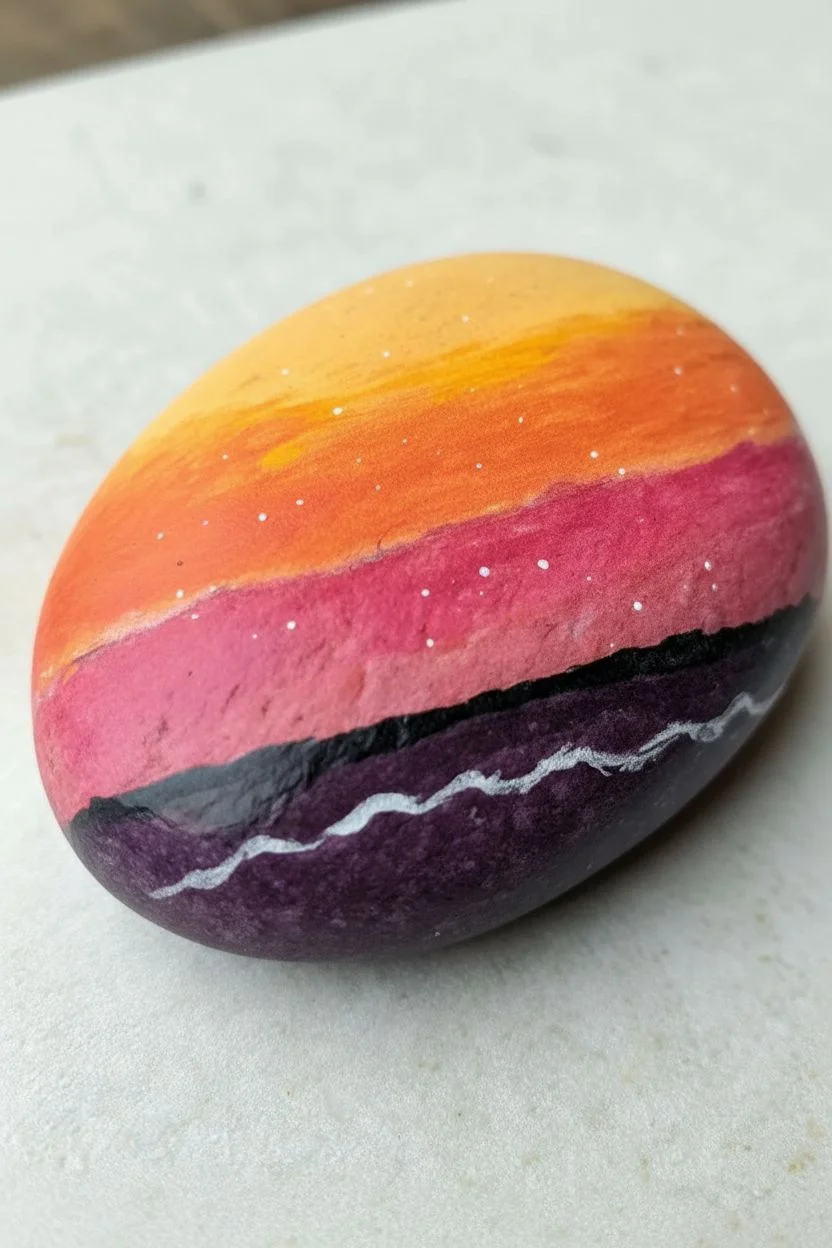
Transform a simple smooth stone into a vibrant evening landscape with this striking gradient sunset design. The bold black silhouettes contrast beautifully against the warm orange and cool purple tones, creating a tiny world you can hold in your hand.
Step-by-Step Tutorial
Materials
- Smooth, oval river rock (clean and dry)
- Acrylic paints: yellow, orange, hot pink/magenta, deep purple, black, white
- Flat paintbrushes (small and medium)
- Fine liner brush (size 0 or 00)
- Dotting tool or toothpick
- Palette or paper plate
- Cup of water and paper towels
- Spray sealant (gloss or matte)
Step 1: Creating the Sunset Gradient
-
Base the yellow:
Start at the very top of your clean rock. Using a medium flat brush, paint a curved section of bright yellow that covers about the top 20% of the surface. -
Add the orange layer:
While the yellow is still slightly wet, paint a band of orange directly underneath it. Gently stroke upward into the yellow where they meet to blend the colors together for a smooth transition. -
Transition to pink:
Rinse your brush and pick up your hot pink or magenta paint. Apply this as a wide band below the orange, taking up the middle portion of the rock. -
Blend the mid-tones:
Work the wet pink paint carefully into the bottom edge of the orange band. A slightly damp brush helps mesh these two strong colors without creating a muddy brown. -
Bottom purple layer:
Paint the final bottom section of the rock with deep purple. This will represent the dark ground or water reflecting the night sky before the silhouette is added. -
Final gradient blend:
Blend the top edge of the purple into the bottom edge of the pink. Ensure the entire front surface is covered and let this background layer dry completely, ideally for 15-20 minutes.
Muddy Gradient?
If colors produce brown when blending, let the first layer dry completely. Then, apply a thin wash of the second color over the edge rather than wet-blending.
Step 2: Adding Landscape Details
-
Paint the black horizon:
Using black paint and a smaller brush, create a jagged, uneven horizon line right where the purple meets the pink. -
Fill the silhouette ground:
Fill in the area below your new horizon line with black, but don’t cover the entire purple section. Leave the bottom-most purple area visible, creating a dark, shadowed landmass. -
Draw the main tree trunks:
Switch to your fine liner brush. Paint simple, thin lines extending upward from the black horizon on the left and right sides. Curve them slightly inward to frame the scene. -
Add delicate branches:
From your main trunks, pull out tiny, thin V-shaped lines to form bare branches. Keep your hand light and lift the brush at the end of each stroke for a tapered look. -
Add the white accent line:
Clean your fine liner brush thoroughly. Dip it in white paint and draw a wiggly, organic line through the purple section at the bottom, mimicking a frosty shoreline or a stream reflection. -
Dot the stars:
Pour a tiny drop of white paint onto your palette. Dip the tip of a toothpick or a very small dotting tool into the paint. -
Create the starry sky:
Gently tap small white dots across the orange and pink sections of the sky. Vary the spacing to make it look natural, clustering a few here and there. -
Add texture to the purple:
If you like, add a few very faint white dots or smudges near the white wiggly line on the purple section to suggest texture or reflections on the water. -
Wait for complete drying:
Let all surface details dry fully. The black paint can take a bit longer if it was applied thickly, so give it plenty of time. -
Seal the artwork:
Once bone dry, take the rock outside and apply a coat of spray sealant. This protects the gradient and makes the colors pop vividly.
Add Dimension
Mix a tiny bit of white into your purple and dry-brush faint highlights onto the black landmass to simulate moonlight hitting the hills.
Place your finished sunset stone on a shelf or in a garden pot to enjoy a peaceful evening view all day long
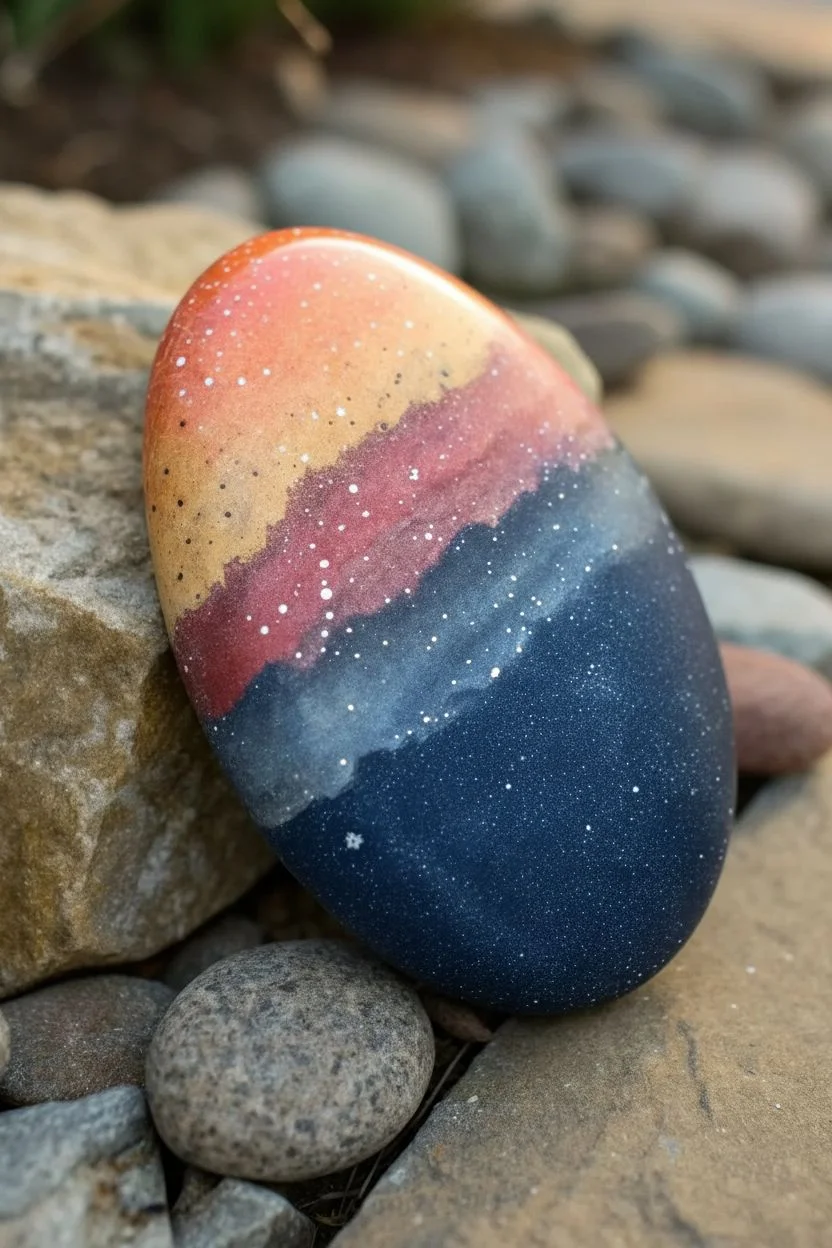
Half Sunset, Half Night With First Stars
Capture the magical moment where day meets night with this striking gradient design. This project blends a deep indigo starfield into a warm sunset, framed by rugged mountain silhouettes and majestic pines.
How-To Guide
Materials
- Smooth, oval river rock (clean and dry)
- Acrylic paints (black, white, navy blue, crimson red, orange, peach/light yellow)
- Flat paintbrushes (medium and small)
- Fine detail liner brush (size 00 or 000)
- Dotting tool or toothpick
- Palette for mixing
- Cup of water and paper towels
- Spray sealer (glossy or matte)
Step 1: Creating the Gradient Sky
-
Lay the base colors:
Squeeze out your sky colors on a palette: navy blue, crimson red, orange, and peach. Using a medium flat brush, paint a diagonal band of navy blue across the top left corner of the rock, covering about one-third of the surface. -
Blend the transition:
While the blue is still slightly wet, pick up some crimson red. Paint a band right next to the blue line. Gently brush back and forth where the two colors meet to create a blurry, purplish transition zone. -
Add the sunset hues:
Clean your brush, then apply the orange paint below the red band. Blend the edge between the red and orange just like before, using light, horizontal strokes to smooth the gradient. -
Finish the horizon:
Paint the remaining bottom right portion with your peach or light yellow color, blending it seamlessly into the orange. This creates the glowing horizon effect. -
Let it cure:
Allow the gradient background to dry completely. If the colors look translucent, apply a second coat following the same blending steps for vibrancy.
Smooth Blending
Work quickly while the paint is wet for the best gradients. If it dries too fast, mist your brush slightly with water to re-activate the blending edge.
Step 2: Painting the Foreground
-
Outline the mountains:
Switch to a small flat brush and black paint. Towards the bottom left, paint jagged triangular shapes to form a mountain range that sits in front of your sunset. -
Fill the silhouette:
Fill in the mountain shapes with solid black. Extend the black paint along the bottom edge of the rock to ground the scene, creating a base for your trees. -
Start the pine trees:
Using your fine detail liner brush and black paint, draw a few vertical lines of varying heights on the right side of the rock. These will be the trunks of your pine trees. -
Add tree branches:
Starting from the top of each trunk, use tiny tapping motions to paint branches angling downward. Make the branches wider as you move down the trunk to create that classic conical pine shape. -
Create snowy peaks:
Once the black mountains are dry, use the liner brush with a small amount of white paint. Add jagged highlights to the right side of the mountain peaks, suggesting snow catching the light. -
Soften the snow highlights:
I find that dry-brushing the white paint gently down the slope gives the snow a more realistic, textured look rather than a solid white line.
Step 3: Starry Night Details
-
Scatter the small stars:
Dip a dotting tool or the very tip of a toothpick into white paint. Gently tough the dark blue section of the sky to create tiny stars. Add a few dots trailing into the red area for continuity. -
Paint the major stars:
Using your finest liner brush and thinned white paint, draw two four-pointed stars in the navy section. Start with a tiny cross, then gently pull the tips outward to taper them. -
Add star centers:
Place a tiny white dot in the center of your four-pointed stars to make them pop against the dark background. -
Final dry:
Let all the details dry completely, usually for at least 30 minutes, to prevent smearing during the sealing process. -
Seal the artwork:
Take the rock to a well-ventilated area and spray it with a clear acrylic sealer. This protects your painting from chipping and makes the colors look richer.
Add Dimension
Mix a tiny drop of grey into the snow on the shadowed side of the mountain peaks to give them more 3D depth and realism.
Place this miniature landscape on your desk or in a garden planter for a daily reminder of nature’s beauty
Sunset Window Silhouette Effect

Capture the fleeting beauty of twilight with this serene rock painting project. Using smooth blending techniques, you’ll create a radiant sunset that transitions from deep plum to fiery orange, silhouetting stark pine trees against the fading light.
Step-by-Step
Materials
- Smooth, flat river rock (oval shape preferred)
- White gesso or primer
- Acrylic paints (Titanium White, Cadmium Yellow, Orange, Magenta/Deep Violet, Carbon Black)
- Flat brush (size 6 or 8) for blending
- Fine liner brush (size 00 or 000) for details
- Palette or paper plate
- Cup of water and paper towels
- Clear spray sealant (matte or gloss)
Step 1: Preparing the Canvas
-
Clean Your Stone:
Before you begin, scrub your rock with warm, soapy water to remove any dirt or oils. Let it dry completely in the sun or use a hairdryer to speed things up. -
Priming:
Apply a base coat of white gesso or white acrylic paint to the top surface of the rock. This creates a bright foundation that will make your sunset colors pop vividly. -
Second Coat:
Once the first layer creates a tacky surface but isn’t wet, apply a second coat of white if the gray of the stone is still showing through. Allow this to dry fully before moving on.
Muddy Colors?
Clean your brush thoroughly between color transitions. If yellow mixes directly with purple, it turns brown. Blend neighbor colors only (red/orange or yellow/orange).
Step 2: Painting the Sunset Gradient
-
Mixing the Violet:
On your palette, prepare a deep magenta or violet. Start at the top left curve of the rock, painting a sweeping arc of this dark color. It should cover about a third of the upper left area. -
Adding the Mid-Tones:
While the violet is still wet, pick up your orange paint. Apply it just below and to the right of the violet section. Use your brush to gently blend the boundary where the two colors meet, creating a soft transition. -
Brightening the Horizon:
Load a clean brush with bright yellow paint. Apply this to the center and lower-right portion of the rock, blending it backward into the orange. The goal is a seamless gradient from dark purple to bright yellow. -
Creating the Sun:
Mix a tiny bit of white into your yellow to create a pale, sun-bleached hue. Dap a small, blurry circle near the bottom right horizon line to represent the setting sun. -
Painting the Water:
Below where your horizon line will be, paint horizontal strokes of the same sunset colors—yellows, oranges, and faint purples—mirroring the sky above but slightly darker.
Fine Line Hack
For razor-thin tree branches, slightly water down your black paint until it has an ink-like consistency. It will flow much smoother off a liner brush.
Step 3: Adding the Silhouette Details
-
Establishing the Horizon Line:
Using black paint and a fine liner brush, carefully draw a straight (or slightly angled) line across the bottom third of the rock to separate the sky from the water. -
Drafting the Main Tree:
On the left side, paint a solitary, leafless deciduous tree. Start with the main trunk, making it thicker at the base and tapering as it reaches upward into the purple sky. -
Branching Out:
Use the very tip of your liner brush to pull thin, jagged branches extending from the main trunk. Let your hand shake slightly to give the branches a natural, organic look. -
Painting the Pines:
On the right side of the rock, paint the vertical lines for two or three pine trees. I find it easiest to start with just a straight line for the trunk. -
Adding Pine Needles:
Using a stippling motion with the tip of your brush, tap horizontal, irregular shapes on either side of the pine trunks. Make the branches wider at the bottom and narrower at the top to form a cone shape. -
Grounding the Scene:
Fill in the bottom area below the horizon line with black paint, but don’t make it solid black. Leave some of the underlying sunset reflection visible to look like water shimmering. -
Shoreline Texture:
Tab the brush gently along the very bottom edge to create the texture of a grassy bank or shoreline in silhouette.
Step 4: Final Touches
-
Checking Contrast:
Look over your silhouettes. If the black looks patchy, go over the main trunks once more to ensure they are opaque and stark against the bright background. -
Sealing:
Allow the paint to cure for at least 24 hours. Then, take the rock outside and spray it with a clear sealant to protect your artwork from chipping and fading.
Now you have a permanent sunset you can hold in the palm of your hand
Sunset Color Bands With Minimalist Tree
Transform a simple smooth stone into a peaceful evening landscape with this layered sunset tutorial. The distinct bands of color create a glowing backdrop for the stark, elegant silhouette of a lone tree.
Step-by-Step Guide
Materials
- Smooth, oval-shaped river rock (cleaned and dried)
- Acrylic paints: Black, Deep Purple, Magenta, Burnt Orange, Bright Yellow, Titanium White
- Flat paintbrushes (medium and small)
- Fine detail liner brush (size 0 or 00)
- Cup of water
- Paper towels
- Clear acrylic sealer (matte or glossy spray)
Step 1: Painting the Sunset Gradient
-
Prime the Surface:
Start by examining your rock and choosing the smoothest side for your canvas. Paint a base coat of Titanium White over the entire front surface to make your sunset colors pop later on. -
Create the Horizon Line:
Mix a soft yellow using Bright Yellow and a touch of Titanium White. Paint a horizontal band across the middle of the rock, slightly wider than you think you need, to represent the glowing horizon. -
Add the Orange Band:
Directly above the yellow strip, paint a band of Burnt Orange. While the paint is still wet, gently blend the bottom edge of the orange into the top edge of the yellow using a clean, damp brush for a seamless transition. -
Introduce Violet Hues:
Paint a stripe of Magenta above the orange band. Again, use a clean brush to feather the magenta down into the orange while both are tacky to avoid harsh lines. -
Darken the Sky:
At the very top of the rock, apply Deep Purple. Blend this downward into the magenta layer. Add a tiny dot of black to the purple at the absolute apex to suggest the night sky creeping in. -
Reflect the Colors:
The bottom half of the rock will mirror the sky but in disjointed water patterns. Paint the bottom section with Burnt Orange, darkening it slightly as you reach the bottom edge. -
Dry Completely:
Let the background layers dry fully before proceeding. If the paint feels cold to the touch, it’s still wet.
Paint Lifting?
If blending layers lifts the paint underneath, you are overworking it. Let the bottom layer dry completely, then use a glazing medium to blend the top colors smoothly.
Step 2: Adding the Silhouette
-
Draft the Ground:
Using black paint and a small flat brush, establish the uneven ground line on the left side of the rock. Make it jagged to resemble grass or distant scrub brush. -
Anchor the Tree:
With your fine liner brush and thinned black paint (ink consistency works best here), paint the main trunk of the tree. Let the trunk lean slightly to the right for a more natural, windswept look. -
Branch Out:
Extend main branches from the trunk, tapering them as they move outward. Remember that trees in nature are rarely perfectly symmetrical. -
Add Foliage Texture:
Instead of painting individual leaves, use a stippling motion. Load a small brush with black paint and gently dab at the ends of the branches to create clumps of leaves. -
Detail the Grass:
On the left-side ground bank, use quick, upward flicks with your liner brush to create tall, spindly grasses silhouetted against the yellow horizon. -
Paint Water Ripples:
In the orange water section at the bottom, paint thin, horizontal black squiggles. Keep these lines broken and irregular to mimic ripples on a lake surface. -
Balance the Composition:
Add a few smaller ripples near the bottom edge to give the water depth. Step back and look at your rock to ensure the tree feels visually balanced against the water lines. -
Birds in Flight:
Using the very tip of your finest brush, add two or three tiny ‘V’ shapes in the upper left sky. Keep them very small to emphasize the vastness of the sunset.
Add Sparkle
Mix a tiny pinch of metallic gold powder or glitter into your orange paint for the water section. It creates a shimmering reflection effect when the rock catches the light.
Step 3: Finishing Touches
-
Touch Up Highlights:
If the sun’s glow got muddy during painting, you can carefully re-apply diluted white or pale yellow between the tree branches to bring back the light source. -
Seal the Artwork:
Once the paint is cured (usually 24 hours to be safe), take the rock outside and spray it with a clear acrylic sealer to protect it from the elements and give it a professional finish.
Place your finished sunset stone in a garden nook or on a windowsill to catch the evening light
Sunset Galaxy Twist With Silhouette Foreground
Merge the warmth of a setting sun with the mystery of the cosmos in this stunning painted stone project. By blending earthy sunset tones into a deep, starry night sky, you create a seamless transition from day to night right in the palm of your hand.
Detailed Instructions
Materials
- Smooth, oval river rock (clean and dry)
- Acrylic paints (Titanium White, Orange, Yellow Ochre, Maroon/Burgundy, Navy Blue, Black)
- Flat paint brushes (small and medium)
- Detail liner brush (size 0 or 00)
- Make-up sponge or foam dabber
- Old toothbrush (optional for stars)
- Water cup and paper towels
- Clear sealant (spray or brush-on)
Step 1: Creating the Sunset Base
-
Prepare your canvas:
Start with a clean, dry rock. If the surface is rough, give it a quick sand. Apply a base coat of white acrylic paint to the top surface of the rock to make your colors pop. Let this dry completely before moving on. -
Apply the top sunset:
Using a medium flat brush or a sponge, apply a bright orange paint to the very top section of the rock, curving the lower edge slightly. -
Blend in the golden hour:
While the orange is still slightly wet, mix in some yellow ochre just below it. Use a clean sponge or dry brush to tap the boundary between the orange and yellow, creating a soft, hazy transition. -
Create the horizon haze:
Below the yellow band, paint a strip of maroon or deep burgundy. This reddish-brown tone acts as the transition zone between the bright sky and the coming night. Use a dappling motion with your sponge to blend it slightly upwards into the yellow. -
Establish the night sky:
Fill the bottom half of the rock with navy blue paint. Allow the top edge of the blue to overlap the maroon layer. I like to lightly dab this border to create a cloudy, atmospheric effect rather than a hard line. -
Deepen the cosmos:
To add depth to the night sky, mix a tiny bit of black into your navy blue. Apply this darker shade to the very bottom curve of the rock and blend it upward into the lighter navy, creating a gradient within the dark area.
Star Splatter Mess?
If you accidentally splatter big blobs of white paint instead of fine mist, quickly wipe them gently with a damp Q-tip. Or, turn the mistake into a planet by rounding it out!
Step 2: Adding Celestial Details
-
Paint the major stars:
Switch to your finest detail liner brush and thin down some white paint with a drop of water until it has an ink-like consistency. -
Create the North Star:
Near the top right, where the sunset meets the maroon band, paint a large four-pointed star. Draw a vertical line first, then a shorter horizontal crossbar, tapering the ends to sharp points. -
Add prominent constellations:
In the lower dark blue section, hand-paint several medium-sized stars. Instead of simple dots, try painting tiny asterisks or six-pointed stars to give them a twinkling appearance. -
Sprinkle the stardust:
Dip an old toothbrush or a stiff brush into your thinned white paint. Test it on a paper towel first, then gently flick the bristles with your thumb to spray a fine mist of tiny white dots across the entire rock, focusing more density on the dark blue section. -
Add the shooting stars:
Using your liner brush again, paint two or three long, thin curved lines sweeping from the right side towards the bottom center. Add a tiny star shape at the head of each line to create shooting stars.
Step 3: Finishing Touches
-
Detailed dot work:
Go back in with a toothpick or dotting tool and place specific bright white dots in the dark blue area to represent larger, distant planets or stars, varying their sizes for visual interest. -
Clean up edges:
Check the sides of your rock. You can choose to wrap the painting around the sides or leave a clean, natural stone border. If painting the sides, ensure your gradient colors extend smoothly. -
Dry thoroughly:
Let the rock sit for at least an hour or until the paint is bone dry. The thickest dots of white will take the longest to cure. -
Seal for protection:
Apply a coat of clear sealant. A glossy finish works particularly well here as it mimics the shine of a wet stone and makes the starry galaxy section look deep and vibrant.
Silhouette Style
Add a silhouette foreground! Once the background is dry, use black paint to add a simple treeline, a mountain range, or a tiny sitting cat at the very bottom edge.
Place your finished celestial stone in a garden or on a windowsill to catch the light
Tiny Sunset Scenes on Mini Pebbles Set
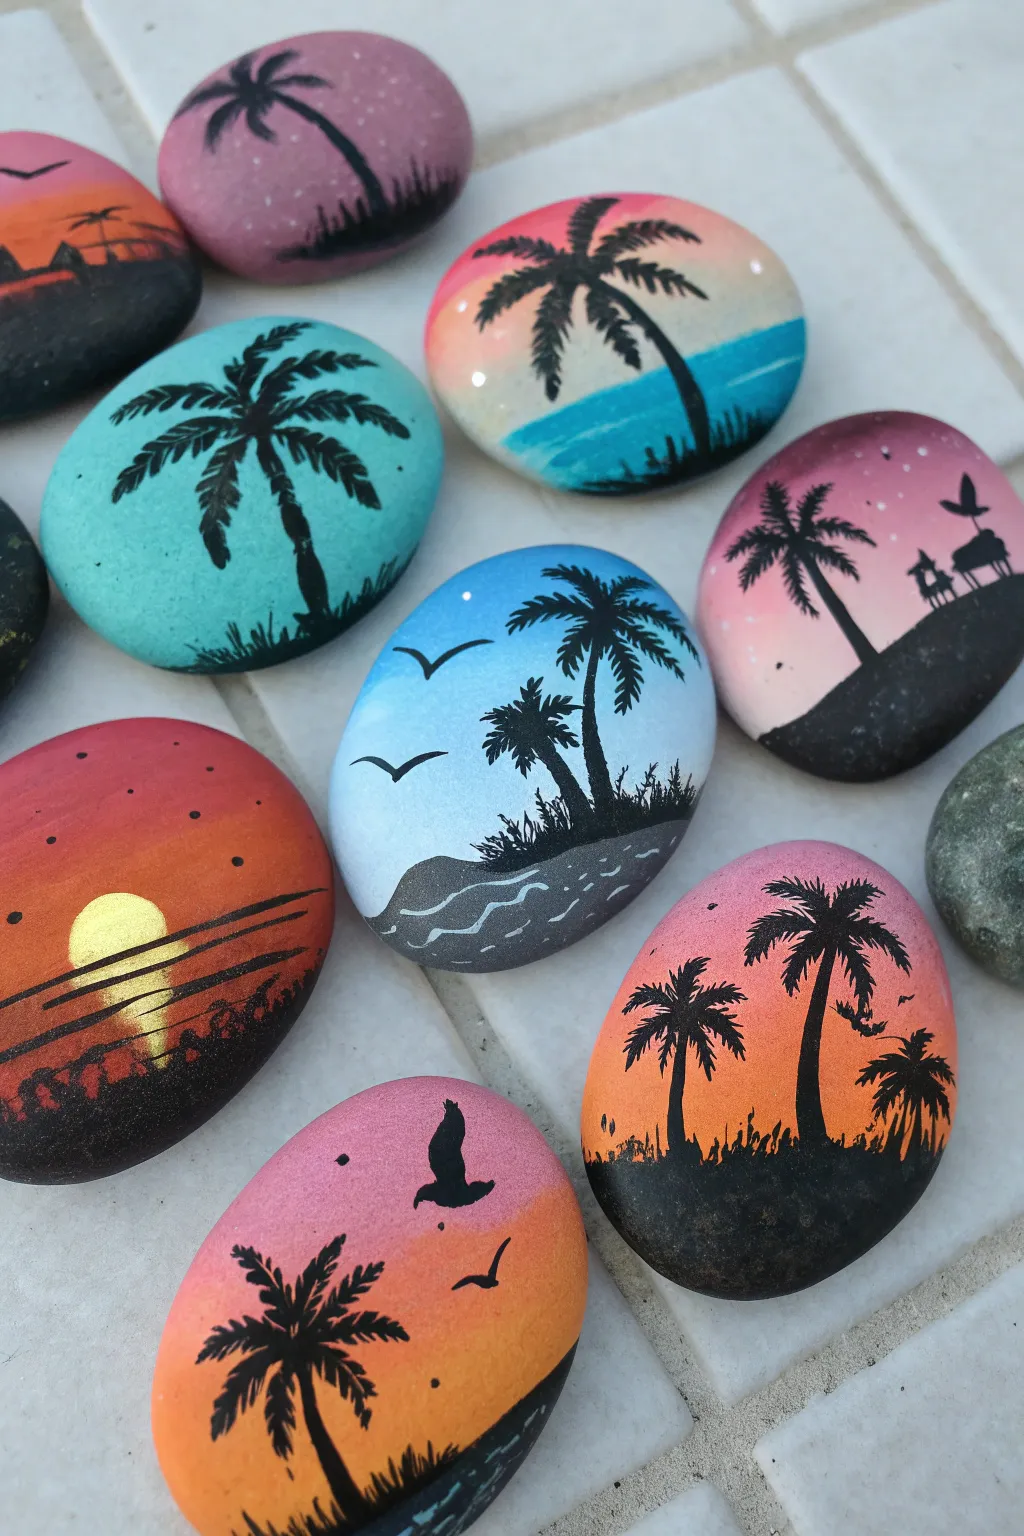
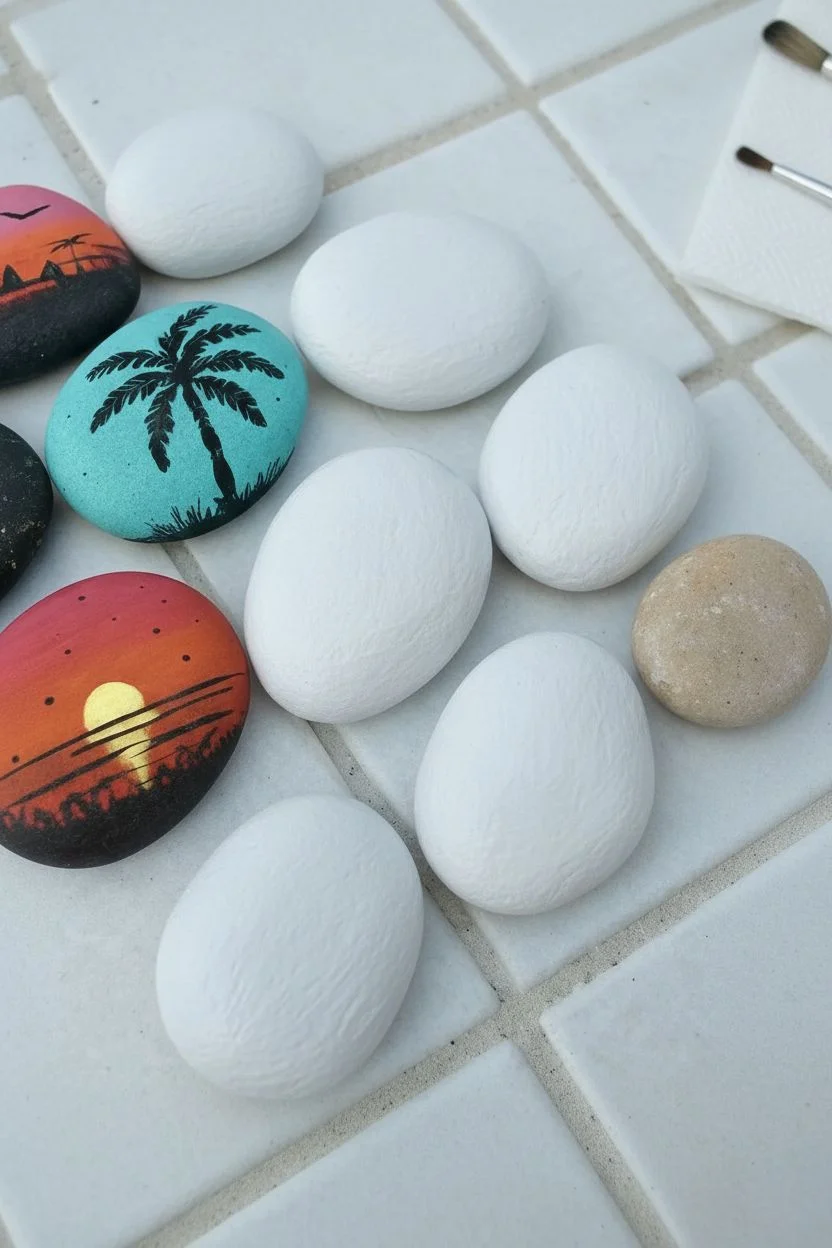
Transform ordinary garden pebbles into a vibrant tropical getaway with these charming miniature sunset scenes. Using smooth stones as your canvas, you’ll learn to blend acrylic gradients and paint fine silhouetted palm trees for a stunning collection of pocket-sized art.
Step-by-Step Guide
Materials
- Smooth, flat river rocks or pebbles (light colored is best)
- Acrylic paints (black, white, yellow, orange, pink, light blue, teal, purple)
- Fine detail paintbrushes (size 0 and 00)
- Small flat shader brush (size 4 or 6)
- Pencil
- Palette or paper plate for mixing
- Cup of water and paper towels
- Gloss varnish or clear sealer (spray or brush-on)
- Optional: Paint pens (black and white) for extra control
Step 1: Prepping and Planning
-
Select your canvas:
Choose stones that are relatively flat and smooth. Wash them thoroughly with soap and water to remove any dirt or oils, and let them dry completely before starting. -
Base coat (Optional):
If your rocks are dark grey or brown, paint a layer of white acrylic over the surface first. This acts as a primer and ensures your sunset colors will pop vividly.
Step 2: Creating the Sunset Gradient
-
Choose your palette:
Decide on a color scheme for your first rock. Classic combinations include yellow-to-orange-to-red, pink-to-purple, or a ‘daytime’ teal-to-white gradient. -
Apply the top color:
Using your flat brush, paint the top third of the rock with your darkest sky color (e.g., deep pink or teal). -
Apply the middle color:
While the top paint is still slightly wet, add your middle color (e.g., orange or light blue) below it. Use light, horizontal strokes to blend the boundary where the two colors meet. -
Finish the horizon:
Paint the bottom third with your lightest color near the horizon line (yellow or white). Continue blending upwards into the middle section for a seamless transition. -
Let it dry:
Allow the gradient background to dry completely. If the layer looks thin or streaky, apply a second coat using the same blending technique.
Smoother Blends
Keep your brush slightly damp (not dripping) when blending the sky gradient. The moisture helps the acrylics flow together without leaving harsh stripe marks.
Step 3: Painting Silhouettes
-
Draft the layout:
Once the sky is bone-dry, use a pencil to very lightly sketch where your horizon line and palm trees will go. -
Paint the ground:
Using black acrylic paint and a small brush, fill in the bottom area to create the ground or an island silhouette. For some designs, curve this line to look like a hill or sand dune. -
Draw the trunk:
Switch to your finest detail brush (size 00) or a black paint pen. Paint a thin, slightly curved line extending upward from the ground for the palm tree trunk. Make it slightly thicker at the base. -
Add palm fronds:
At the top of the trunk, paint 5-7 curved lines radiating outward like fireworks. These are the spines of the leaves. -
Detail the leaves:
Using the very tip of your brush, add tiny, feathery strokes hanging down from each curved spine to create the texture of palm leaves. -
Add birds:
Paint tiny ‘V’ or ‘M’ shapes in the empty sky areas to represent seagulls flying in the distance.
Add Sparkle
For a magical twilight effect, flick an old toothbrush dipped in diluted white paint over the darker parts of the sky to create tiny stars.
Step 4: Special Effects and Sealing
-
Create a sun:
For a sunset scene, paint a small white semi-circle or circle near the horizon. Once dry, glaze over it with bright yellow. -
Add water reflections:
If your scene includes water, mix a little white with your sky color and paint thin, wavy horizontal lines below the horizon to mimic light reflecting on the waves. -
Highlight the sun (Optional):
If you painted a large sun, use a very watered-down yellow or hold to paint horizontal lines across the sun to make it look like it’s setting behind clouds. -
Seal the artwork:
Once you are absolutely certain the paint is dry (I usually wait overnight to be safe), apply a coat of gloss varnish. This protects the stone and gives it a beautiful, polished ‘wet’ look.
Arranged together in a bowl or scattered in the garden, these colorful pebbles serve as a permanent reminder of warm summer evenings


Have a question or want to share your own experience? I'd love to hear from you in the comments below!