If you want your next piece to feel like a little love story, romance is honestly one of the easiest moods to paint. I lean on silhouettes, glowing skies, and sweet, recognizable symbols so you can focus on feeling—not fussy details.
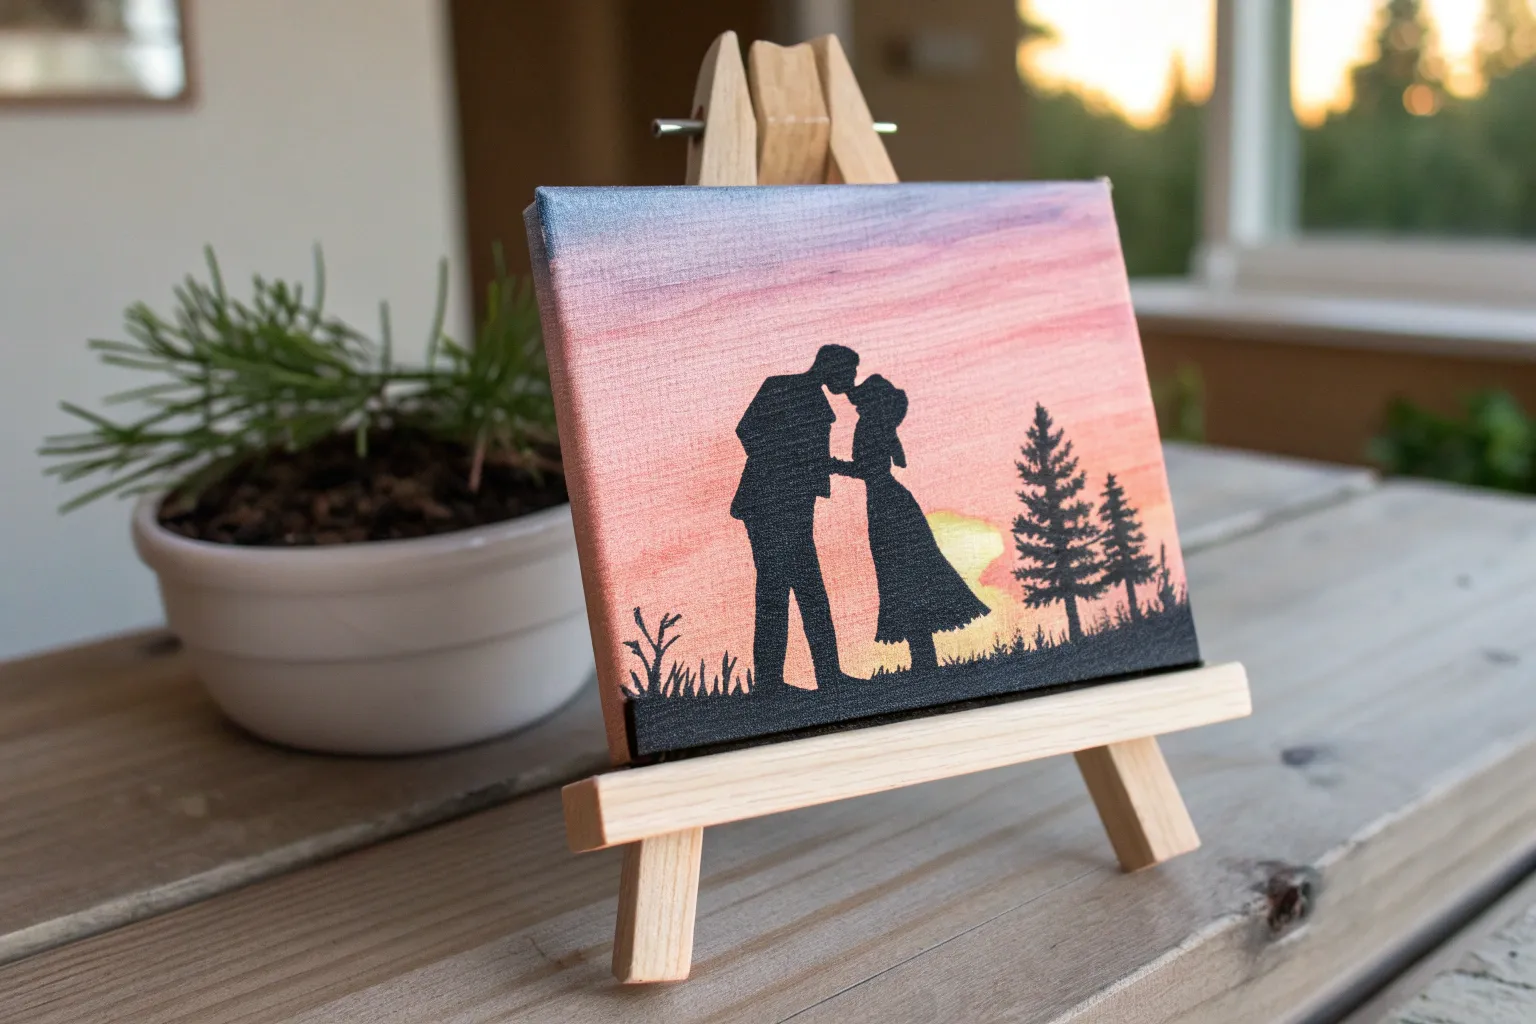
Sunset Couple Silhouettes
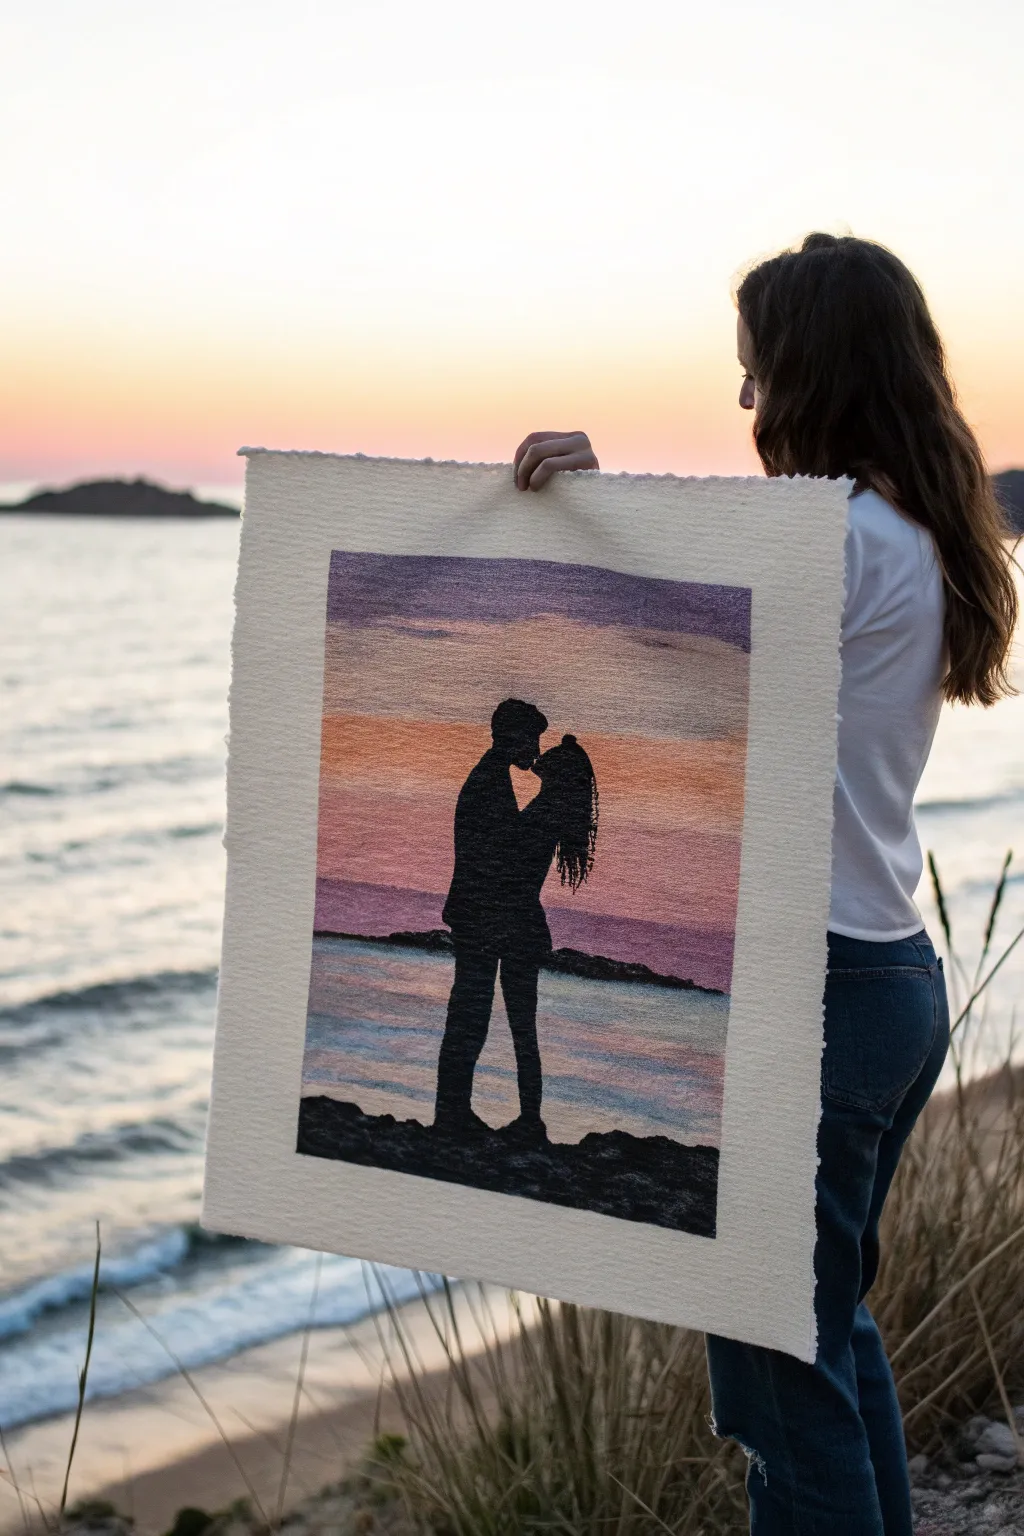
Capture the magic of a romantic evening with this striking silhouette painting on textured paper. The rough deckle edge of the paper adds a rustic, artisanal feel that perfectly complements the soft gradient of the painted sunset sky.
Step-by-Step Tutorial
Materials
- Large sheet of heavyweight watercolor paper or handmade cotton paper (deckle edge recommended, approx. 18×24 inches)
- Acrylic paints: Titanium White, Ultramarine Blue, Phthalo Blue, Dioxazine Purple, Magenta, Cadmium Orange, Mars Black
- Wide flat wash brush (1-2 inch)
- Medium filbert brush
- Small round detail brush (size 0 or 1)
- Painter’s tape
- Pencil and eraser
- Reference photo of a couple in profile
- Palette for mixing
- Cup of water and paper towels
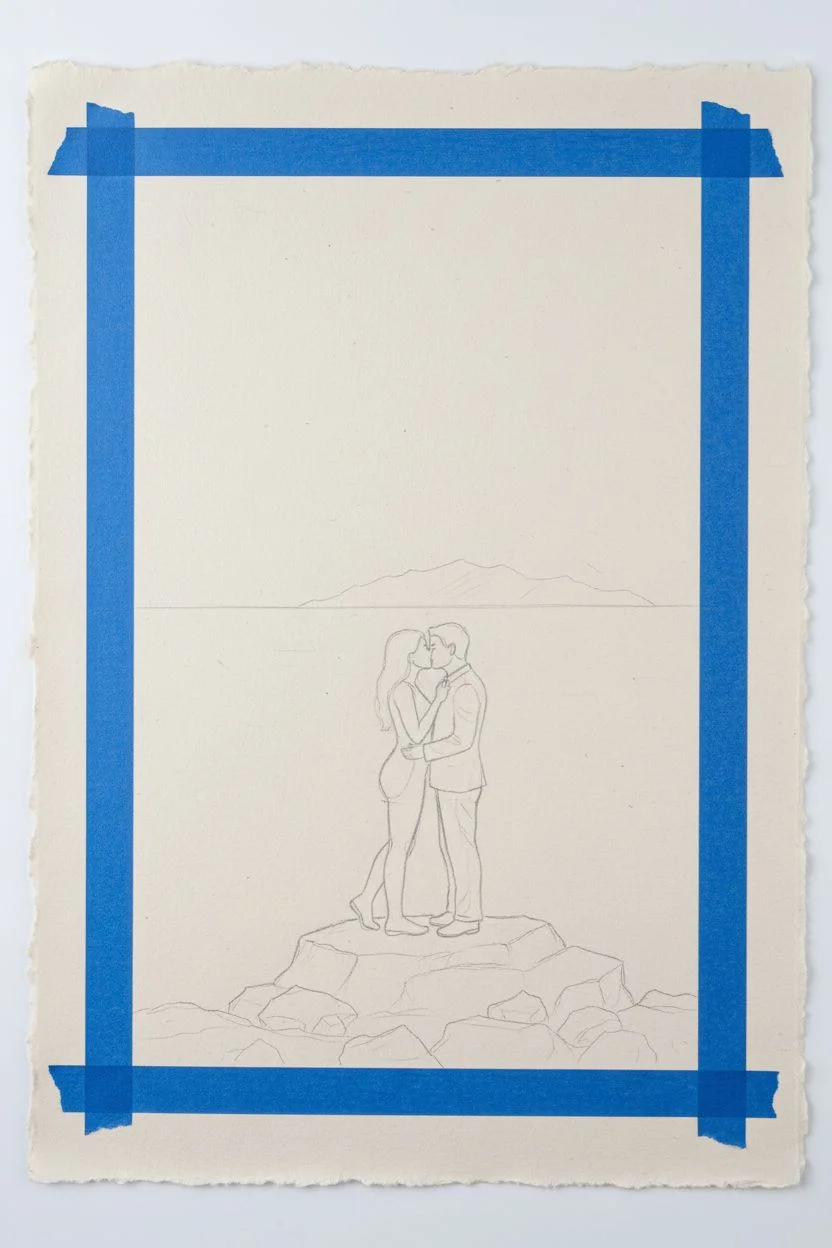
Step 1: Planning and Sketching
-
Paper selection:
Choose a high-quality, heavy paper for this project. The texture is key to the final look, so opt for cold-press watercolor paper or handmade cotton rag paper with rough, uneven edges. -
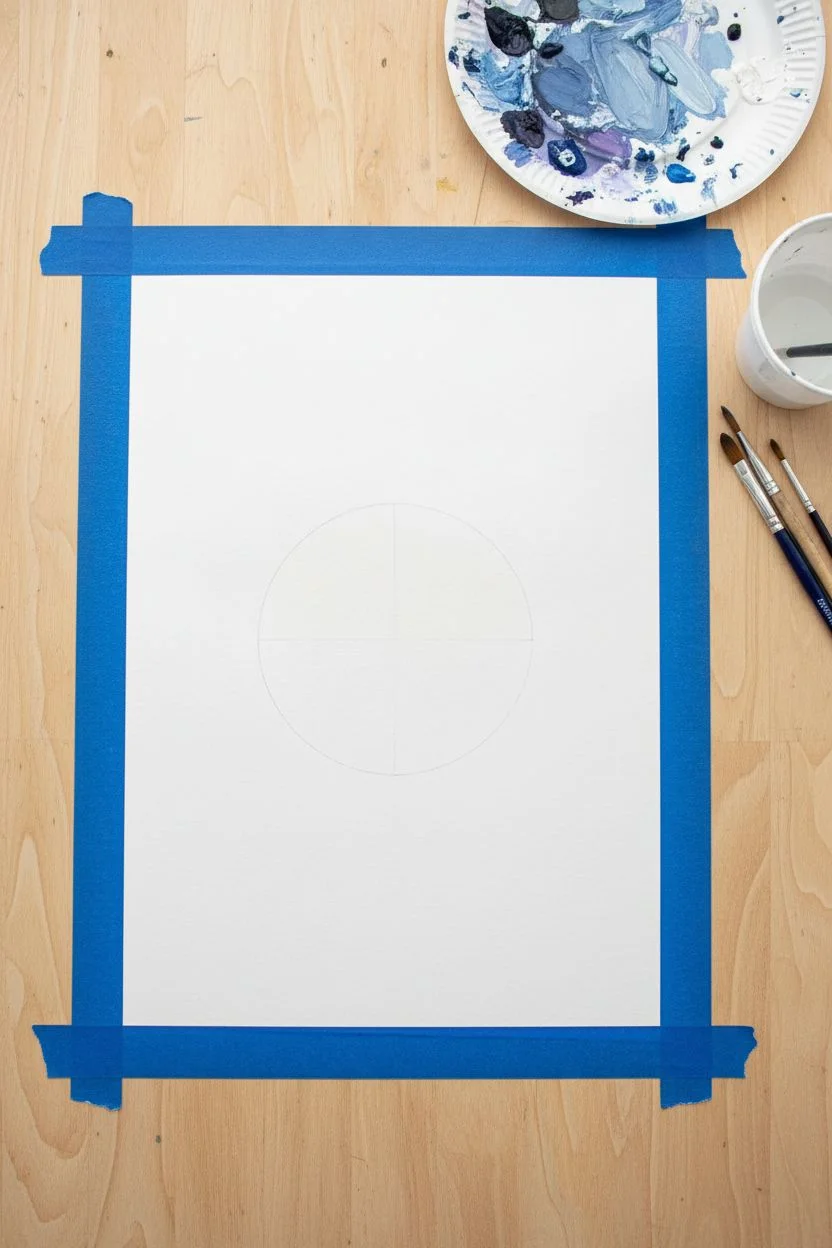
Masking the borders:
Measure a generous border (about 2-3 inches) around the perimeter of your paper. Apply painter’s tape to create a crisp rectangular boundary for your painting area. Press the edges of the tape down firmly to prevent paint seepage. -
Sketching the horizon:
Lightly draw a horizontal line about one-third of the way up from the bottom tape edge. This will be your water line. Add a distant, rugged landmass shape sitting on this horizon line. -
Drafting the couple:
Using your reference photo or imagination, sketch the outline of the kissing couple in the center of the composition. Focus only on the outer contours since the inside will be filled with solid black. Ensure their feet are grounded on a rocky foreground shape.
Paint bleeding under tape?
If paint seeped under the tape, wait for it to dry completely. Then, use a small flat brush with white acrylic paint (or gouache for better coverage) to carefully touch up and straighten the edges.
Step 2: Painting the Sky Gradient
-
Mixing sky colors:
Prepare your palette with purple, magenta, orange, and white. This sky relies on a soft transition from cool to warm tones. -
Top sky layer:
Start at the very top of the taped section. Use your wide flat brush to apply a mix of Dioxazine Purple and white. Use horizontal strokes that mimic the texture of the paper. -
transitioning down:
While the purple is still wet, quickly mix in some magenta and white. Blend this into the bottom edge of the purple section, moving downward. Working wet-on-wet helps create that seamless sunset fade. -
Adding warmth:
Switch to a pale orange mixture (Cadmium Orange plus plenty of white) for the horizon area just above the water line. I find it helpful to wipe my brush clean before switching from purple to orange to avoid making a muddy brown color. -
Atmospheric clouds:
With a slightly smaller brush, streak in thin, uneven lines of darker purple and pink across the sky to suggest wispy clouds. Don’t overthink these; let the brush skip over the paper’s texture.
Step 3: Painting the Water
-
Water base:
For the water, mix Ultramarine Blue with a touch of the purple from your sky and white. Paint horizontal strokes below the horizon line, leaving the silhouette area blank if possible, though painting over it is fine since the black will cover it. -
Reflecting the sky:
While the blue base is damp, lightly brush in streaks of the pale orange and pink you used in the sky. These reflections should be horizontal and slightly broken to look like gentle waves. -
Drying time:
Allow the entire background (sky and water) to dry completely. The paper should feel room temperature to the touch, not cool.
Add a personal touch
Make this a custom gift by adjusting the silhouette profiles to match specific people, or use a gold paint pen to write a significant date or initials in the white border below the painting.
Step 4: Creating the Silhouettes
-
Distant land:
Mix a very dark grey using Mars Black and a tiny bit of blue. Paint the distant island strip on the horizon line. Keep it relatively flat but slightly bumpy on top to suggest terrain. -
Foreground rocks:
Load your brush with pure Mars Black. Paint the rocky ground at the very bottom of the taped area where the couple is standing. Make the top edge of the rocks irregular and jagged. -
Outlining the couple:
Switch to your small round detail brush. Carefully paint the outline of the couple’s silhouette using pure Mars Black. Steady your hand against the table for the intricate details like facial profiles and hair textures. -
Filling the shapes:
Once the outline is crisp, use a larger brush to fill in the bodies with solid black paint. Apply two coats if necessary to ensure it is opaque and no background color shows through. -
Final details:
Add tiny details like individual curls in the hair or the fabric texture of clothes using the very tip of your smallest brush. -
The reveal:
Wait until the black paint is bone dry. Then, slowly and carefully peel away the painter’s tape at a 45-degree angle to reveal your crisp, clean borders.
Now you have a stunning, personalized piece of art that captures a tender moment forever.


Kiss Under a Full Moon
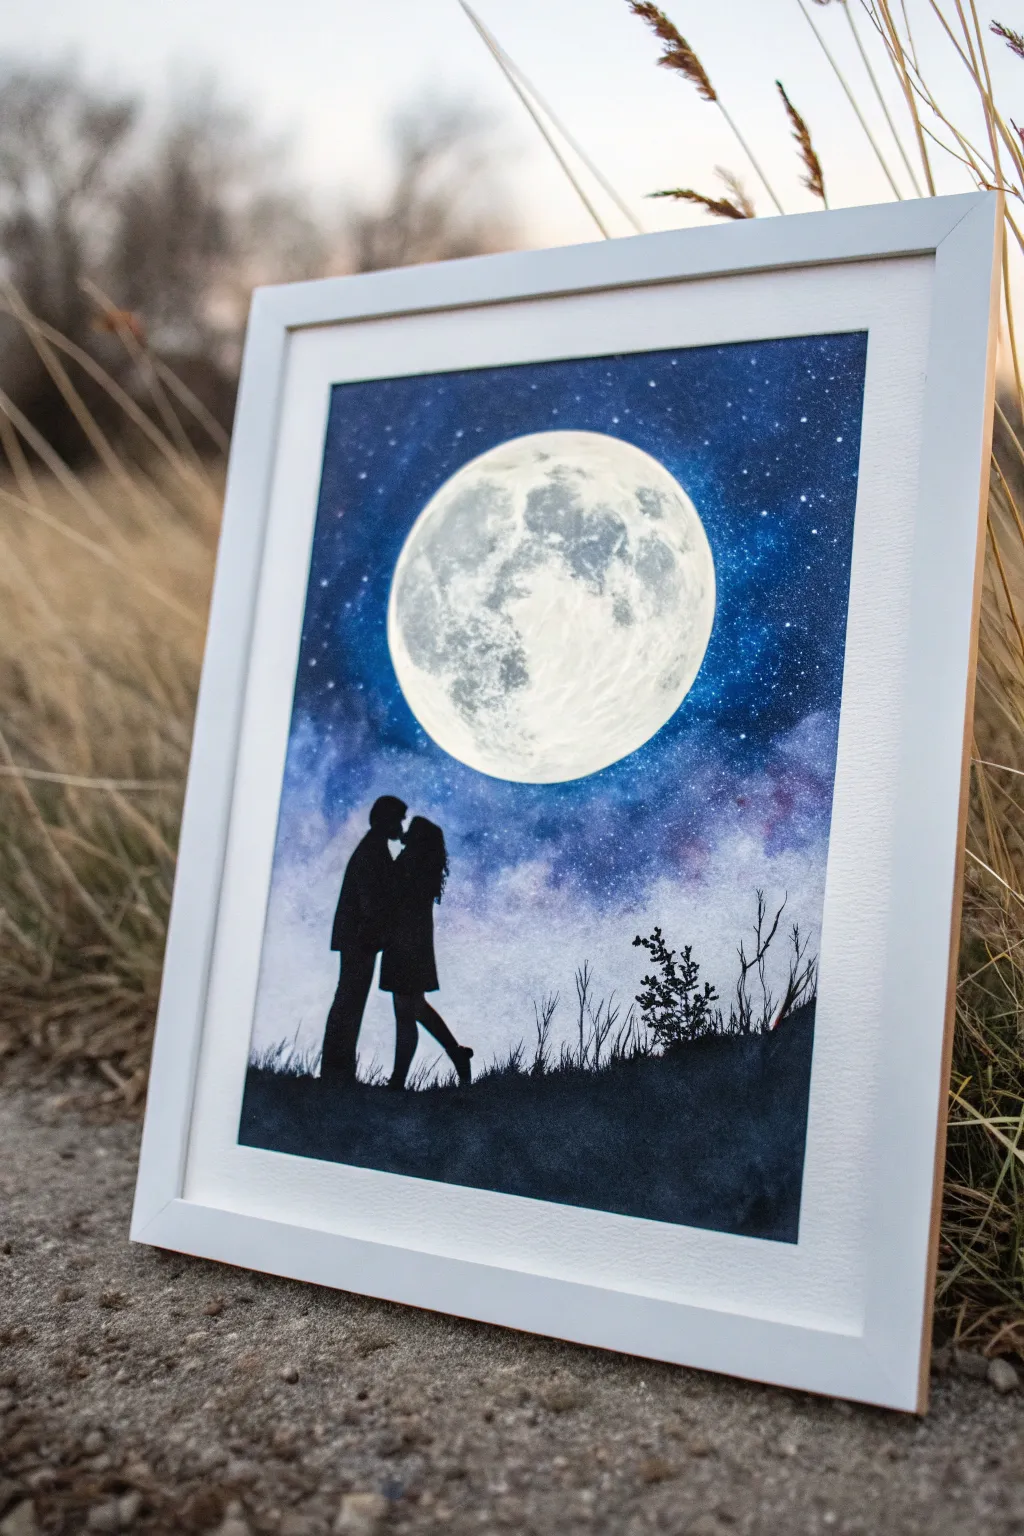
Capture the magic of a starry night with this striking acrylic painting featuring a detailed full moon and a romantic silhouette. The contrast between the bright, textured lunar surface and the deep, galaxy-inspired sky creates a truly captivating piece of art.
Step-by-Step Guide
Materials
- Acrylic paints (Titanium White, Mars Black, Prussian Blue, Dioxazine Purple, Ultramarine Blue)
- Heavyweight watercolor paper or canvas panel
- Paintbrushes (large flat wash brush, medium round brush, fine liner brush)
- Old toothbrush (for stars)
- Circular stencil or masking tape roll (approx. 4-5 inches diameter)
- Masking tape
- Pencil and eraser
- Palette or paper plate
- Paper towels and water cup
Step 1: Setting the Scene
-
Prepare your surface:
Begin by taping down the edges of your watercolor paper to a hard board using masking tape. This creates a clean white border and prevents the paper from buckling when wet. -
Mask the moon:
Decide where you want your moon to sit. Place your circular object (like a tape roll) in that spot and trace a light circle with a pencil. To keep this area pristine white, you can either paint carefully around it or cover it with a circular piece of masking tape or masking fluid.
Step 2: Painting the Galaxy Sky
-
Base layer:
Start by mixing Titanium White with a tiny touch of Ultramarine Blue. Paint a diffused, glowing ring immediately around your masked moon area, blending outwards into the white of the paper to create a soft halo effect. -
Deepen the blues:
Move further out from the moon using pure Ultramarine Blue. Blend this into the lighter halo while the paint is still slightly wet to ensure a smooth gradient. -
Add purple hues:
Introduce Dioxazine Purple into the sky, focusing on the mid-sections. Apply it somewhat unevenly to create cloudy, nebula-like textures rather than a flat wall of color. -
Darken the edges:
Mix Prussian Blue with a little Mars Black to get a deep midnight navy. Apply this to the top corners and outer edges of the canvas, blending inward to create a vignette effect that focuses attention on the center. -
Create stars:
Once the sky is completely dry, dilute a small amount of Titanium White paint with water until it’s inky. Load an old toothbrush, aim it at the canvas, and flick the bristles with your thumb to spray tiny stars across the sky. I like to let this dry briefly before adding a few larger stars with a fine liner brush.
Moon Texture Trick
Don’t overthink the moon craters! A scrunched-up piece of plastic wrap dipped in grey paint and stamped onto the white circle creates perfect, instant crater textures.
Step 3: Detailing the Moon
-
Base moon color:
Remove the mask or paint inside your pencil circle with a solid coat of Titanium White. Let it dry completely. -
Sponge texture:
Mix a very light grey using White and a tiny dot of Black. Using a small piece of sponge or a scrunched-up paper towel, dab this grey lightly onto the moon to create the look of craters and maria (the dark plains). -
Refining craters:
With a slightly darker grey and a small round brush, add specific details to the moon’s surface. Look at a reference photo of the moon to dab in darker patches, keeping the edges soft and organic.
Opaque Silhouettes
If your black paint looks streaky or translucent when dry, don’t just pile on thick paint. Instead, apply two thin, even coats, letting the first dry completely before the second.
Step 4: The Silhouette
-
Sketch the couple:
Lightly sketch the outline of the couple kissing in the lower left quadrant. If you aren’t confident drawing figures, you can print a silhouette, cut it out, and trace it. -
Paint the figures:
Using Mars Black and a fine liner brush, carefully fill in the couple’s silhouette. Ensure lines are crisp, especially around the faces, as this is the focal point of the story. -
Add the ground:
Paint a rolling hill at the bottom of the canvas in solid black to anchor the figures. Vary the height of the ground so it feels natural, rising slightly where the couple stands. -
Grassy details:
Using your liner brush and black paint, flick quick, upward strokes along the horizon line of the hill to interpret tall grass and weeds. -
Add vegetation:
On the right side of the hill, paint small, simple scruffy bushes or tree branches extending upwards to balance the composition against the couple on the left. -
Final touches:
Review your painting for any light spots in the black silhouette and apply a second coat if necessary for complete opacity. Once fully dry, carefully peel away the masking tape to reveal your crisp white border.
Frame your masterpiece in a simple white frame to really make the deep blues pop.


Slow Dance in Silhouette
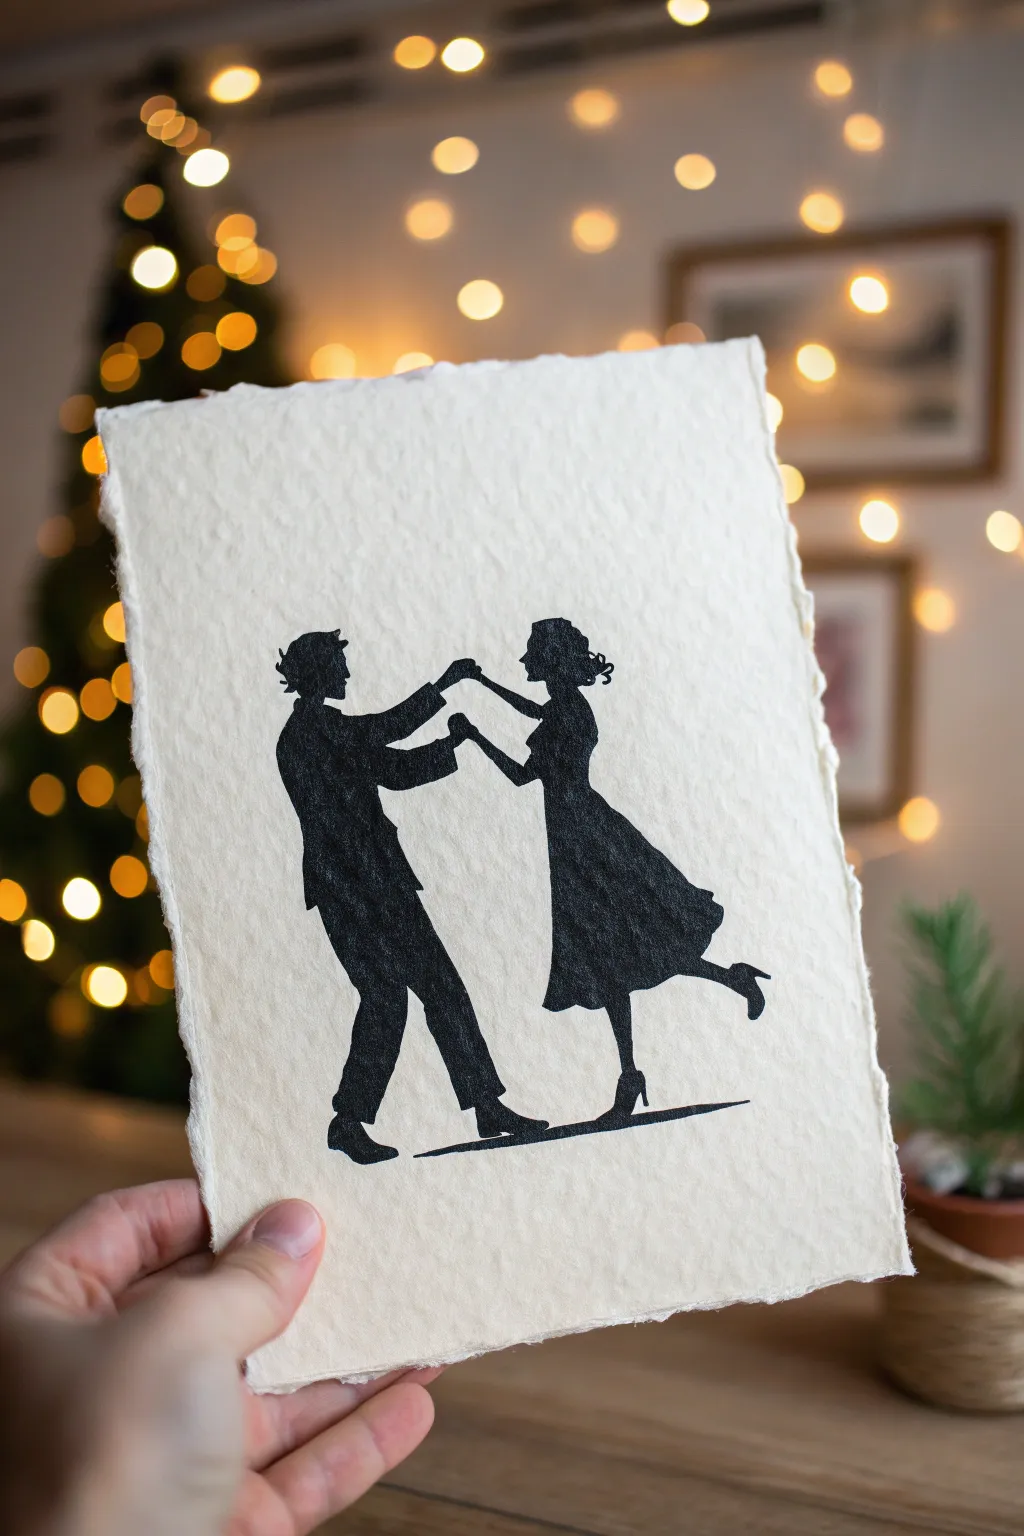
Capture the timeless elegance of love with this striking black-and-white silhouette artwork. The high contrast of the dancing couple against the soft, heavily textured handmade paper creates a classic and romantic piece perfect for gifting.
Detailed Instructions
Materials
- Heavyweight handmade cotton paper (deckle edge)
- Black India ink or high-flow black acrylic paint
- Fine liner pen (0.1mm or 0.3mm)
- Pencil (HB or 2H)
- Kneaded eraser
- Small round brush (size 0 or 1)
- Reference photo of a dancing couple
- Carbon transfer paper (optional)
- Masking tape
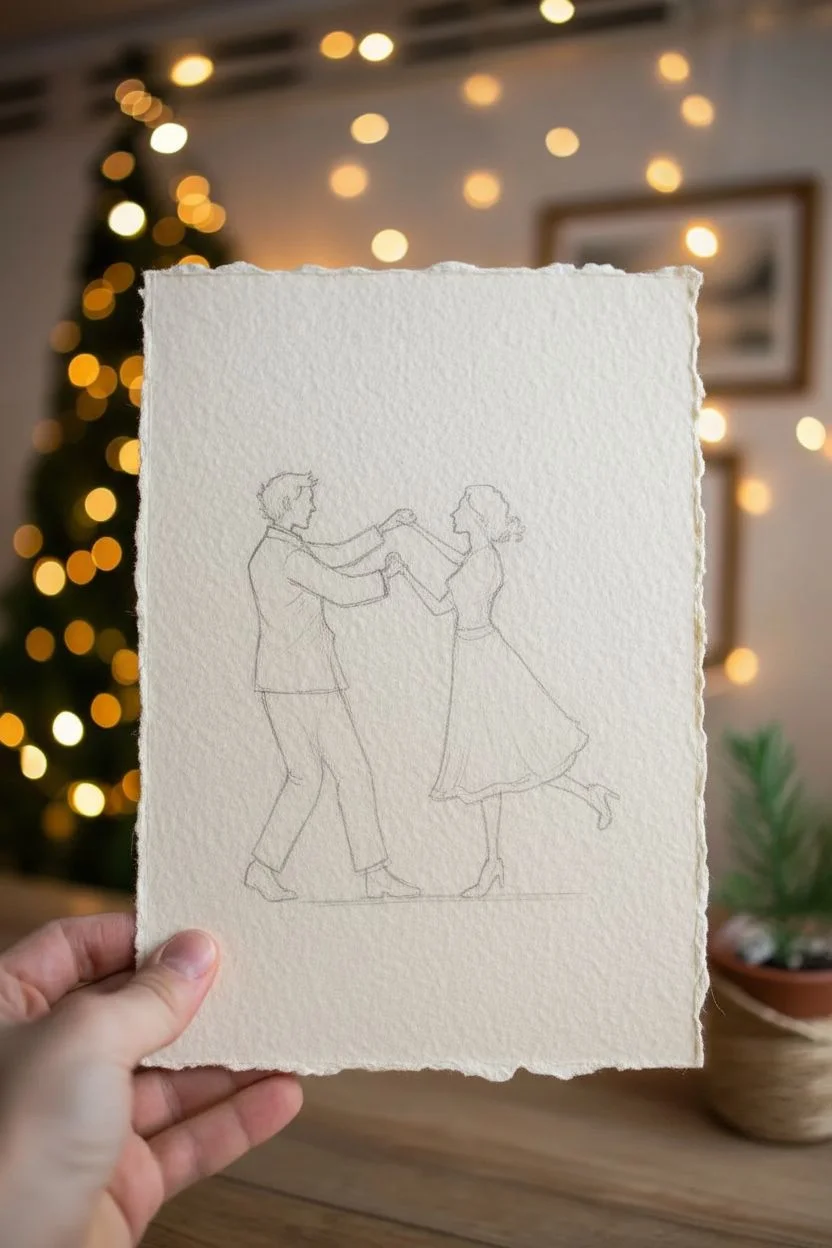
Step 1: Preparing the Sketch
-
Select your paper:
Choose a piece of thick, handmade paper with a visible deckle edge. The texture makes a huge difference here, so look for something with a bit of tooth and roughness. -
Observe the composition:
Visualize the couple in the center of the page. You want them grounded near the bottom third, but leave plenty of negative space around their heads to let the paper breathe. -
Lightly sketch or transfer:
If you are confident in drawing, sketch the outline of the couple lightly with your pencil. If not, print your reference image to size, place carbon paper underneath, and gently trace the silhouette onto your textured paper. -
Refine the outline:
Go over your sketch very lightly. Pay special attention to the small details like the nose profiles, the man’s hair tufts, and the woman’s bun, as these define the silhouette’s character. -
Check the hands:
Hands can be tricky in silhouette. Ensure the clasped hands generally look interlocked and the other hands are clearly defined against the negative space.
Step 2: Inking the Silhouette
-
Outline the edges:
Start with your fine liner pen. Carefully trace the entire perimeter of your pencil sketch. Being precise here is crucial because this line defines the final shape. -
Handle the texture:
Because the paper is bumpy, I find it helps to move the pen slowly to ensure the ink sinks into the little valleys of the paper grain without skipping. -
Define the ground:
Draw the thin, tapered shadow line beneath their feet. This anchors the figures so they don’t look like they are floating globally in space. -
Prepare your fill medium:
Shake your black India ink or high-flow acrylics well. You want an opaque, solid black color for the fill. -
Start filling the interior:
Using your small round paint brush, begin filling in the silhouette. Start from the center of the bodies and work your way outward toward your pen lines. -
Approach the edges carefully:
As you get close to your fine liner border, slow down. Use just the tip of the brush to meet the ink line perfectly without going over it. -
Saturate the black:
Handmade paper is thirsty. You may notice the black looks grey as it dries. Apply a second coat of ink if necessary to get that deep, void-like black. -
Dry the artwork:
Let the ink dry completely. India ink can smudge easily while wet, so keep your hands well away from the painted areas for at least 30 minutes.
Ink Bleeding?
Handmade paper is absorbent. If ink starts feathering, spray a light coat of matte workable fixative over the sketch before painting to seal the fibers.
Step 3: Final Touches
-
Erase guidelines:
Once you are 100% sure the ink is bone dry, gently dab visible pencil marks with a kneaded eraser. Dabbing prevents damaging the delicate paper surface. -
Inspect for gaps:
Hold the paper up to a light source. If you see tiny white pinholes where the paint missed a deep paper texture pore, use your fine liner to dot them in.
Use a Lightbox
Don’t press hard while tracing! Place your reference under the thick paper on a lightbox (or a bright window) to see the image without carbon paper mess.
Frame this delicate piece in a floating glass frame to show off those beautiful torn edges


Lovebirds on a Branch at Dusk
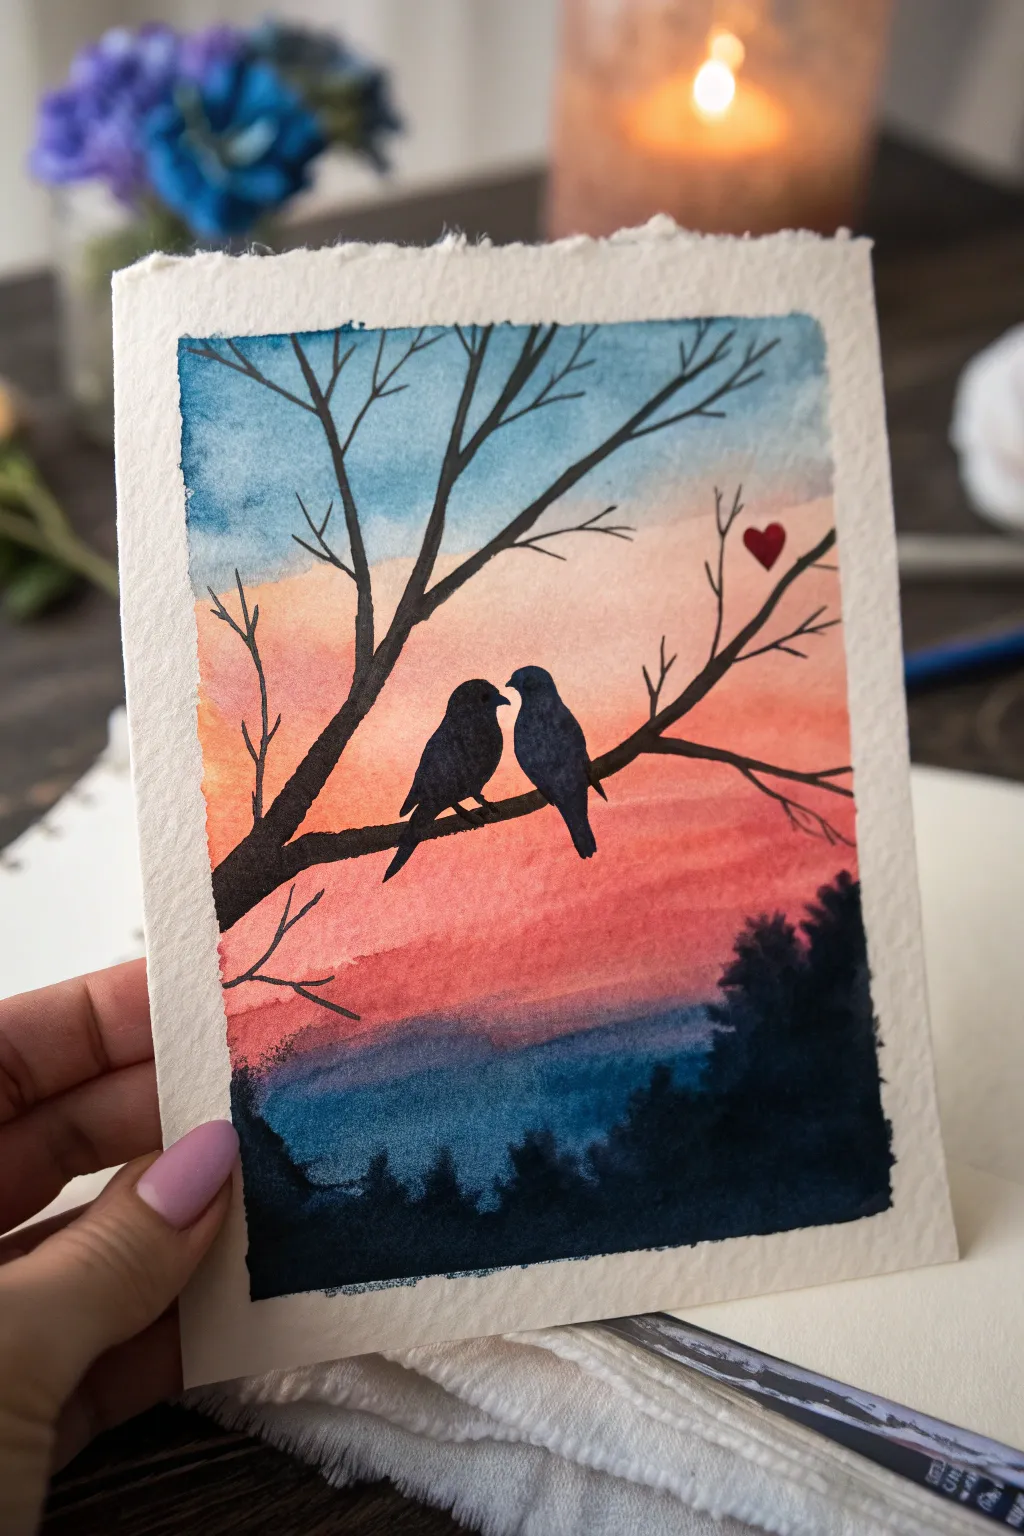

Capture the romance of two silhouetted birds sharing a quiet moment against a vibrant, fiery sunset. This watercolor project uses simple gradients and bold contrasts to create a striking piece of art perfect for gifting.
Step-by-Step Guide
Materials
- Cold press watercolor paper (300 gsm or heavier)
- Watercolor paints (Indigo, Prussian Blue, Alizarin Crimson, Cadmium Yellow, Lamp Black)
- Flat wash brush (3/4 inch)
- Round brushes (size 4 for birds, size 0 or 1 for details)
- Painters tape or masking tape
- Pencil and eraser
- Paper towels
- Jar of clean water
Step 1: Preparing the Sky
-
Tape and Prep:
Begin by taping down all four sides of your watercolor paper to a board. This prevents buckling and creates a clean, crisp white border. If your paper has deckled edges like the example, tape inside the edge or simply work carefully without tape for a more organic look. -
Wet the Surface:
Using your large flat brush, apply a clean coat of water across the entire top 2/3 of the paper where the sky will be. You want the paper glistening but not swimming in a puddle. -
Add the Blue:
Load your brush with diluted Prussian Blue or a similar cool blue. Paint a horizontal strip at the very top of the paper, letting the wet surface help diffuse the bottom edge of the blue downwards. -
Blend in the Orange:
Rinse your brush thoroughly. Mix a soft wash of Cadmium Yellow with a touch of Alizarin Crimson to make a peach or light orange. Apply this directly below the blue, being careful not to overmix them on the paper, which can turn green. Leave a tiny sliver of unpainted white or very pale wash between them if needed for a glowing effect. -
Intensify the Sunset:
As you move lower towards the horizon line, strengthen your mix with more Alizarin Crimson to create a vibrant reddish-pink band. I like to let these colors bleed naturally into the peach section above.
Muddy Sky Fix
If blue and orange mix to make brown/green, wait for the first color to dry completely before glazing the second over it, or leave a white gap between.
Step 2: Creating the Landscape
-
Darken the Horizon:
While the lower sky is still slightly damp, mix a darker purple using Alizarin Crimson and patches of Prussian Blue. Paint a horizontal band where the sky meets the land to suggest distant mountains or clouds. -
Form the Foreground:
Switch to your Indigo and mix it quite concentrated. Paint the bottom section of the paper, creating a dark, moody blue base. This represents the shadowed forest floor or distant hills in silhouette. -
Add Tree Textures:
While the bottom Indigo layer is wet, dab in concentrated Lamp Black or Indigo along the upper edge of this dark section. Use the tip of your brush to create uneven, bumpy shapes that look like the tops of pine trees or bushes. -
Let it Dry:
This is crucial: allow the entire background (sky and ground) to dry completely. If you touch the paper and it feels cool, it’s not ready. Use a hair dryer on a low setting if you are impatient.
Metallic Accent
Once dry, use a gold gel pen or metallic watercolor to outline the heart or add tiny stars in the blue section for extra magic.
Step 3: The Silhouettes
-
Sketch the Branch:
Lightly sketch the main branch shape with a pencil. Start from the left side, about halfway up, and curve it gently downwards and then up towards the right side. Add a few smaller twigs branching upward. -
Outline the Birds:
Draw the outline of two small birds perched close together in the center of the main branch. Their beaks should be almost touching. -
Paint the Branch:
Load your size 4 round brush with a creamy mixture of Lamp Black. Carefully paint the main branch, varying the pressure to make the line thicker at the base and thinner at the tips. -
Detail the Twigs:
Switch to your smallest brush (size 0 or 1) to paint the delicate, fine twigs reaching up into the blue sky. Ensure your hand is steady and use quick, confident strokes. -
Fill the Birds:
Using the size 4 brush and intense black, fill in the bird outlines. Be very precise with their beaks and tails to maintain the silhouette shape. -
Add the Heart:
Mix a vibrant, opaque red (add a tiny bit of white gouache if your watercolor isn’t covering well). Paint a small, floating heart on the right side, just above a twig, to symbolize their connection.
Step 4: Final Touches
-
Refine Edges:
Check the edges of your tree line and birds. If any edges look ragged, smooth them out with the fine tip of your brush and a bit more black paint. -
Remove Tape:
Once everything is bone dry, peel the tape away slowly at a 45-degree angle to reveal your clean edges (if you used tape).
Step back and admire your beautiful, high-contrast silhouette sunset!
BRUSH GUIDE
The Right Brush for Every Stroke
From clean lines to bold texture — master brush choice, stroke control, and essential techniques.
Explore the Full Guide
Heart-Shaped Trees in Negative Space
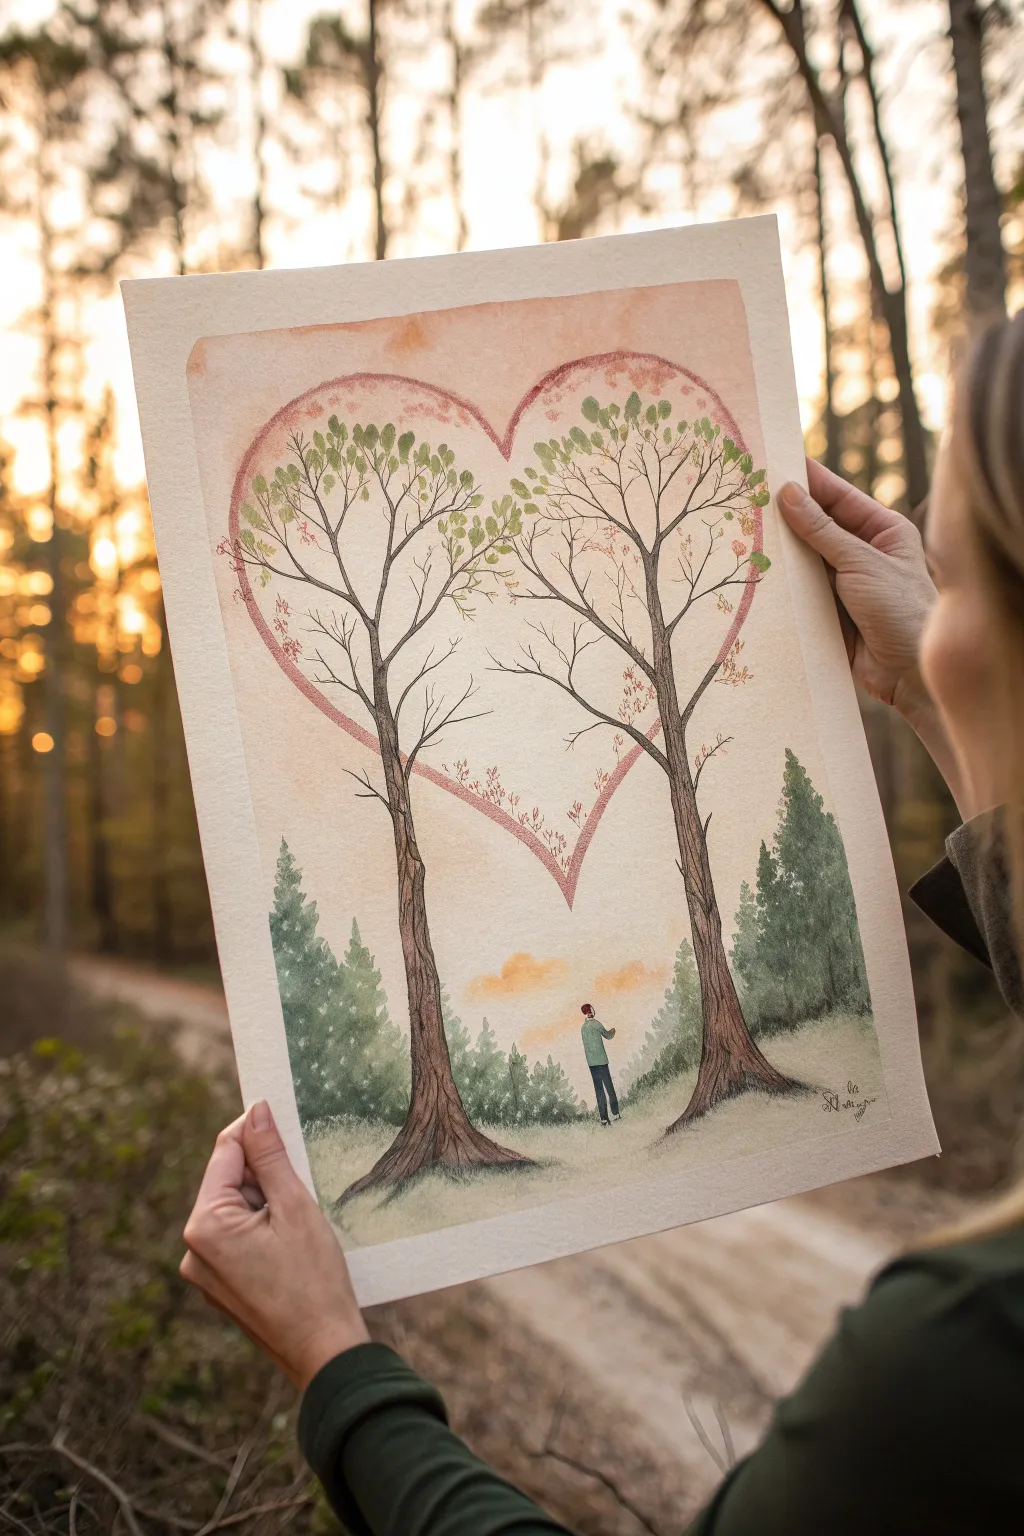
Capture the magic of nature and romance with this whimsical watercolor painting featuring two majestic trees forming a heart. This project combines gentle washes with fine pen details to create a serene forest scene perfect for a gift or home decor.
How-To Guide
Materials
- Cold-press watercolor paper (9×12 or similar)
- Watercolor paints (Sap Green, Burnt Umber, Yellow Ochre, Rose Madder/Pink)
- Painter’s tape
- Pencil (HB) and eraser
- Fine liner pens (Black and Sepia, waterproof)
- Round brushes (sizes 4 and 8)
- Detail brush (size 0 or 1)
- Clean water and paper towels
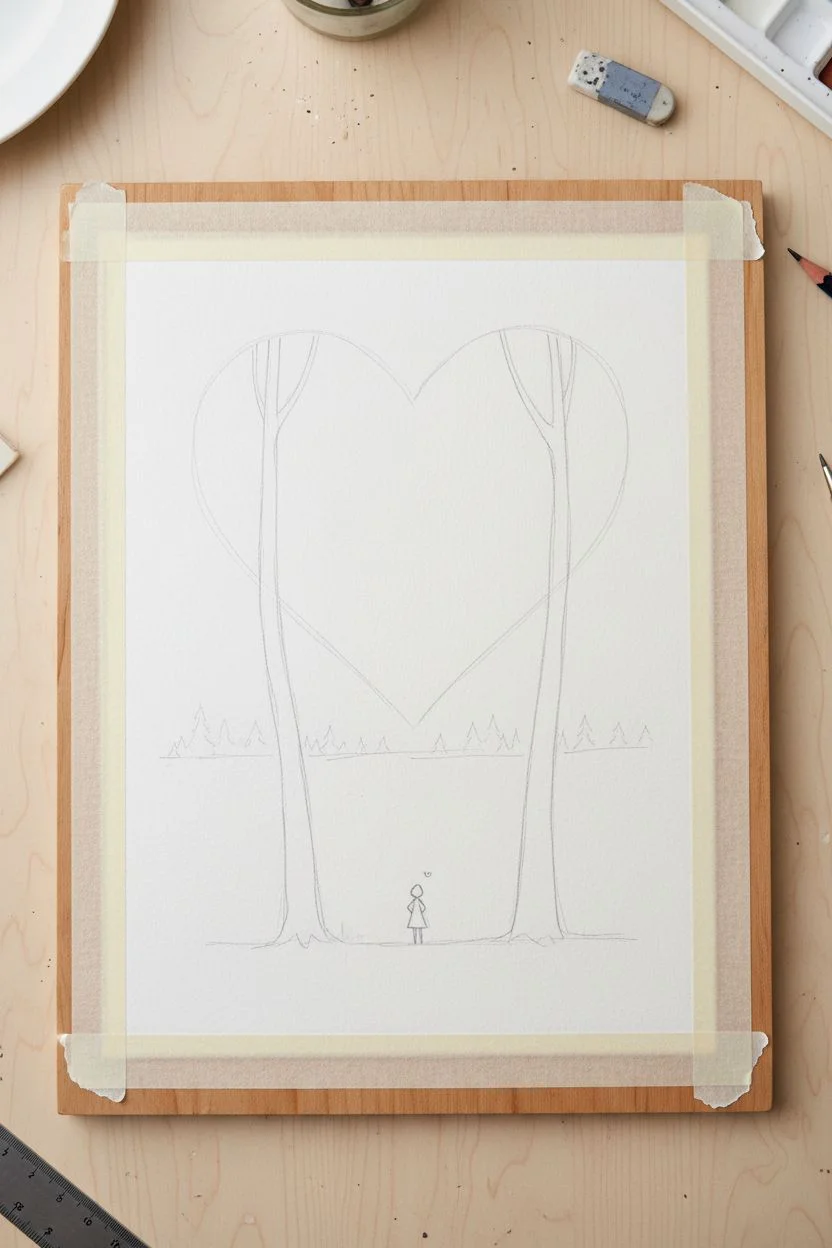
Step 1: Sketching the Layout
-
Tape down boundaries:
Begin by taping the edges of your paper to a hard board. This creates the crisp white border seen in the original and prevents the paper from buckling during the wash phases. -
Lightly draw the heart:
Using your pencil very lightly, draw a large heart shape in the upper two-thirds of the paper. This will act as your guide for the tree canopies and foliage. -
Position the trunks:
Sketch two tall, slender tree trunks rising from the bottom grassy area. They should curve slightly outward and upward, following the outer curve of your heart guide. -
Add the figure:
Draw a tiny silhouette of a person standing between the trees at the bottom, looking up. Keep it simple—just the basic shapes of legs, torso, and head. -
Sketch the horizon:
Add a soft horizon line behind the trees and figure where the distant forest will sit.
Use Negative Space
Don’t fill the center of the heart completely with branches. Leaving open ‘sky’ space inside highlights the heart shape better.
Step 2: Painting the Background
-
Initial wash:
Mix a very watery, pale wash of Rose Madder and Yellow Ochre. Apply this inside the heart shape and faintly around the sky area to give a warm, sunset glow. -
Define the heart edge:
While the paper is still slightly damp, take a more concentrated pink mix and carefully paint along the inner edge of your pencil heart line. Let the color bleed slightly inward for a soft, dreamy border. -
Paint the distant trees:
Using diluted Sap Green, paint the smaller pine tree shapes in the background. Keep the edges soft to suggest distance. Vary the height to make it look natural. -
Foreground grass:
Wash the bottom area with a mix of Yellow Ochre and a touch of Sap Green to create the grassy hill. Let this dry completely before moving forward.
Step 3: Adding the Main Trees
-
Tree bark texture:
Mix Burnt Umber with a tiny bit of black. Using your size 4 brush, paint the two main tree trunks. Use vertical strokes to mimic bark texture, leaving tiny slivers of white paper for highlights. -
Branch structure:
Switch to your detail brush. paint thinner branches extending from the main trunks upward, ensuring they stay confined mostly within your heart-shaped guide. -
Adding leaves:
Dab small spots of Sap Green and lighter yellow-green onto the branches. Focus the leaves near the top edge of the heart to reinforce that specific silhouette. -
Root details:
Darken the base of the trunks where they meet the grass, spreading the roots slightly outward to ground the trees firmly.
Adding Meaning
Carve ‘initials’ into the tree trunk with your fine liner pen to personalize this piece as an anniversary or wedding gift.
Step 4: Refining Details
-
Inking the trees:
Once the paint is bone dry, use your Sepia fine liner to outline the tree trunks and add wood grain texture. This adds the illustrative quality seen in the reference. -
Defining the branches:
Use the pen to extend tiny twigs off the main branches. Let these lines be a little shaky and organic rather than perfectly straight. -
Coloring the figure:
Paint the small person with solid colors—blue for jeans, a muted green for the jacket. I find a tiny dot of red for a beanie adds a nice focal point. -
Heart outline accent:
Go back to the heart’s perimeter. If the shape isn’t distinct enough, add very subtle, small pink leafy dabs along the pencil line to solidify the form without drawing a hard outline. -
Final touches:
Erase any visible pencil marks carefully. Sign your name near the bottom right corner, peel off the tape, and you are done.
Now you have a deeply romantic piece of art that celebrates connection and nature
Galaxy Sky With a Constellation Heart


Capture the magic of a shared moment under the cosmos with this breathtaking watercolor galaxy piece. The blend of deep indigo, violet, and soft pink creates a dreamy backdrop for a simple yet poignant couple silhouette.
Step-by-Step Guide
Materials
- High-quality watercolor paper (cold press, 300gsm)
- Watercolor paints (Indigo, Payne’s Gray, Violet, Magenta, White Gouache)
- Masking tape or painter’s tape
- Large flat wash brush
- Medium round brush (size 6-8)
- Small detail brush (size 0-1)
- White gel pen (optional)
- Black waterproof fine liner pen or black acrylic paint
- Two jars of water
- Paper towels
- Pencil and eraser
- Toothbrush (for splattering)
Step 1: Preparing the Sky
-
Secure the paper:
Tape your watercolor paper down firmly to a hard board using masking tape. This creates that crisp, clean white border seen in the final piece and prevents the paper from buckling under heavy washes. -
Sketch the horizon:
Lightly sketch a very low, uneven horizon line near the bottom inch of the paper. Keep it organic to represent grass or a hill. -
Wet-on-wet base:
Using your large wash brush, wet the entire sky area with clean water. You want the paper to be glistening but not forming puddles. -
Lay down the light colors:
While the paper is wet, drop in patches of magenta and violet near the middle and lower sections of the sky. Let them bloom naturally. -
Add depth:
Introduce indigo and deep blue into the upper corners and top edge of the paper. Allow these darker colors to bleed downwards into the purple and pink areas, but don’t overmix them or you’ll get mud. -
Intensify the darkness:
While still damp, dab concentrated Payne’s Gray or black into the very top corners to simulate the deepest part of space. -
Create the nebula texture:
If the paint is pooling too much, lift some pigment out with a thirsty (dry) brush or a crumpled paper towel to create cloud-like textures in the galaxy. -
Dry completely:
Let this first layer dry 100%. If the paper feels cold to the touch, it’s still wet. Paint will bloom uncontrollably if you rush this step.
Step 2: Stars and Details
-
Splatter the stars:
Dilute some white gouache or white acrylic paint with a tiny bit of water. Dip an old toothbrush into it and run your thumb across the bristles to flick fine mist over the dark parts of the sky. -
Add larger stars:
Use a small detail brush or a white gel pen to manually dot in a few larger, brighter stars. Group them slightly to avoid a uniform polka-dot look. -
Paint the major sparkles:
Identify 3-4 spots for major ‘twinkle’ stars. Use your fine brush and white gouache to paint a small plus sign with an elongated vertical line for the signature cross flare. -
Create the shooting star trail:
Dip a damp, stiff brush into white paint. Starting from the center and curving down toward the left, stipple or dry-brush a faint, textured trail that looks like stardust falling. -
Highlight the trail:
At the top of your stardust trail, paint a bright, sharp star flare to indicate the source of the light.
Starry Night Secret
For a magical glow, paint the shooting star trail with water first, wait 10 seconds, and dab it with a paper towel. This lifts the dark pigment before you add the white.
Step 3: The Silhouette
-
Outline the figures:
Once the sky is bone dry, lightly sketch the silhouette of the couple standing close together. Keep the shapes simple; distinct hair shapes and posture tell the story better than details. -
Fill in the couple:
Use black acrylic paint or a black waterproof marker to fill in the couple. Acrylic is often better here as it’s more opaque than watercolor and won’t reactivate the sky layer. -
Paint the ground:
Fill in the ground area below the horizon line with solid black. -
Add grass texture:
While the black ground paint is wet (or using a fine liner pen), flick tiny upward strokes along the horizon line to simulate grass blades silhouetted against the bright lower sky. -
The Reveal:
Wait for everything to dry completely, then slowly peel off the masking tape at a 45-degree angle to reveal your crisp white border.
Fixing Muddy Skies
If your galaxy colors turn brown or muddy, let the layer dry completely. Glaze over it with a thin layer of transparent blue or violet to unify the tones again.
Frame your finished masterpiece in a simple white frame to let those cosmic colors truly shine


Have a question or want to share your own experience? I'd love to hear from you in the comments below!